Embed Size (px)
Citation preview
Marking Menus for 3DDesktop Haptic Applications
Erik Forsstrom
February 13, 2006Master’s Thesis in Computing Science, 20 credits
Supervisor at CS-UmU: Anders BackmanExaminer: Per Lindstrom
Umea UniversityDepartment of Computing Science
SE-901 87 UMEASWEDEN


Abstract
This master thesis describes the development and evaluation of a menu sys-tem for efficient command selection in 3D haptic applications. A literaturestudy was conducted, and it was concluded that a haptic version of mark-ing menus was the most promising alternative for implementation. Lack ofoverview of sub-menus and menu items is a problem for marking menus anda solution called browse menus is proposed. The browse menus gives a pre-view of the next sub-menu or item before a selection is made and speeds upselection. Different ways of selecting sub-menus and commands were inves-tigated and a combination of release button and exceed border were foundto be the most efficient selection technique for both beginners and experts.The results conclude that marking menus with eight sectors, nested threelevels deep is a promising alternative for complex haptic applications.
Keywords
Haptic, marking menu, 3D interface, fish tank VR, interaction design, human-computer interaction

ii
Contents
1 Introduction 11.1 Haptics Terminology . . . . . . . . . . . . . . . . . . . . . . . . . . . . . 11.2 How Haptics Work . . . . . . . . . . . . . . . . . . . . . . . . . . . . . . 2
2 Goal and Method 32.1 Requirements . . . . . . . . . . . . . . . . . . . . . . . . . . . . . . . . . 32.2 Target Group . . . . . . . . . . . . . . . . . . . . . . . . . . . . . . . . . 32.3 Iterative Design Method . . . . . . . . . . . . . . . . . . . . . . . . . . . 3
2.3.1 Prototype Evaluation . . . . . . . . . . . . . . . . . . . . . . . . 4
3 3D Interfaces 53.1 Guidelines for 3D Interaction Design . . . . . . . . . . . . . . . . . . . . 53.2 Widgets . . . . . . . . . . . . . . . . . . . . . . . . . . . . . . . . . . . . 63.3 2D Menus in 3D Environments . . . . . . . . . . . . . . . . . . . . . . . 6
3.3.1 Placement of Menus and Occlusion . . . . . . . . . . . . . . . . . 73.3.2 Linear Menus . . . . . . . . . . . . . . . . . . . . . . . . . . . . . 73.3.3 Pie Menus . . . . . . . . . . . . . . . . . . . . . . . . . . . . . . . 83.3.4 2D Marking Menus . . . . . . . . . . . . . . . . . . . . . . . . . . 8
4 Haptic Interaction 134.1 Haptic Feedback . . . . . . . . . . . . . . . . . . . . . . . . . . . . . . . 13
4.1.1 Naive Haptic Feedback . . . . . . . . . . . . . . . . . . . . . . . . 134.1.2 Constructed Haptic Feedback . . . . . . . . . . . . . . . . . . . . 14
4.2 Menu Selection Techniques . . . . . . . . . . . . . . . . . . . . . . . . . 144.3 Assisting Forces in Menus . . . . . . . . . . . . . . . . . . . . . . . . . . 154.4 Summary and Conclusions of 3D interfaces and Haptic Interaction . . . 15
5 Ergonomics and Two Handed Interaction 17
6 Design of the Prototype 196.1 Early Design Decisions . . . . . . . . . . . . . . . . . . . . . . . . . . . . 196.2 The Haptic Building Blocks of the Reachin API . . . . . . . . . . . . . . 20
iii

iv CONTENTS
6.2.1 Surfaces . . . . . . . . . . . . . . . . . . . . . . . . . . . . . . . . 206.2.2 Localized Haptic Effects . . . . . . . . . . . . . . . . . . . . . . . 21
6.3 Prototype v1 . . . . . . . . . . . . . . . . . . . . . . . . . . . . . . . . . 216.4 Prototype v2 . . . . . . . . . . . . . . . . . . . . . . . . . . . . . . . . . 22
6.4.1 Haptic behavior . . . . . . . . . . . . . . . . . . . . . . . . . . . 226.4.2 Visual Design and Browse Menus . . . . . . . . . . . . . . . . . . 23
7 Evaluation 257.1 Subjects . . . . . . . . . . . . . . . . . . . . . . . . . . . . . . . . . . . . 257.2 Equipment . . . . . . . . . . . . . . . . . . . . . . . . . . . . . . . . . . 267.3 Task . . . . . . . . . . . . . . . . . . . . . . . . . . . . . . . . . . . . . . 267.4 Test Design . . . . . . . . . . . . . . . . . . . . . . . . . . . . . . . . . . 277.5 Conclusions of the Test . . . . . . . . . . . . . . . . . . . . . . . . . . . 287.6 Improvements to the Test Design . . . . . . . . . . . . . . . . . . . . . . 29
8 Final Version of the Prototype 318.1 Haptic behavior . . . . . . . . . . . . . . . . . . . . . . . . . . . . . . . . 31
8.1.1 Visual Design and Browse Menus . . . . . . . . . . . . . . . . . . 32
9 Discussion 359.1 Future work . . . . . . . . . . . . . . . . . . . . . . . . . . . . . . . . . . 36
10 Acknowledgements 37
References 39

Chapter 1
Introduction
Reachin Technologies develop software and hardware platforms for 3D haptic environ-ments for industries such as medical, manufacturing and R&D markets. One of theirproducts is the Reachin API which shortens application developing time by offering ahigh level programming interface to produce haptic applications.
Although many 3D interaction tasks can be made more intuitive and natural by usingthe sense of touch, it has been proven necessary to add elements from traditional WIMP(Windows, icons, mouse and pull-down menus) interfaces to create usable haptic systems[18]. This is especially important to provide access to a full range of functionality.
To enable customers to rapidly build commercial applications, a powerful menu sys-tem is needed. Today there exist no standards for how a menu system for complex3D haptic applications should look or feel. Because menu interaction is a crucial partof an application, small benefits in efficiency can make a large impact on the overallperformance of the application.
1.1 Haptics Terminology
– Stylus: The graphical representation of the pen that a user is holding in theirhand. See figure 6.1 on page 20.
– Proxy: The contact point that is used to calculate haptic forces in most hapticAPIs. It is often visually represented as a sphere. The stylus and the proxy is a3D equivalent to a mouse pointer.
– DOF: Degrees Of Freedom is a term used to describe how many dimensions aninput device can be moved and rotated. A mouse has two DOF, one for the x axisand one for the y axis. The Phantom and similar devices have six DOF. One forevery x, y and z axis and one for rotation around respective axis.
– Stereoscopic viewing: This is a technology which makes it possible to perceivethe visual depth dimension in 3D graphics. The illusion of depth is created bypresenting a slightly different image to each eye. It can either be accomplished byusing shutter glasses or a 3D monitor[6], [4].
– Fish tank VR: A term used for a workstation with a limited virtual workspaceoften with stereoscopic viewing. The position of the hand is often co-located withthe visual rendering of the stylus.
1

2 Chapter 1. Introduction
Figure 1.1: The Phantom Omni is a haptic input device with six DOF positional sensing.
– WIMP: Windows, icons, mouse and pull-down menus. A term used to describethe traditional graphical user interface.
– VRML: Virtual Reality Markup Language is a standard for defining 3D graphics.
1.2 How Haptics Work
Haptics is a technology that makes it possible to physically feel 3D computer graphics.It is based on a combination of force feedback algorithms collocated with 3D graphics.
3D haptic input devices such as Phantom Desktop made by Sensable Technologies,allows construction of small, but very realistic 3D haptic environments that can be bothseen and touched in a very intuitive way. This kind of environment can be used forapplications such as 3D modeling, surgical simulation, games, molecular modeling andexploration of geo-science data [24]. Another similar device made by the same companyis called the Phantom Omni (figure 1.1). This device is cheaper, but also less preciseand provides weaker haptic output than the Phantom Desktop.
The Phantom Desktop and Omni are stand-alone units that looks like a mechanicalrobot arm with a pen at the end. When holding the pen it is possible to touch and feel3D computer objects with six degrees of freedom (DOF). Haptic output is provided inthree DOF. The pen has one or two buttons which can have similar functions as mousebuttons.
The Reachin API uses point interaction which means that it is only possible to feelone point of a surface at a time. A similar feeling can be experienced by touching a realobject holding a normal pen.
To make a virtual object appear solid, a force is calculated that is perpendicular tothe surface. The force pushes the contact point (proxy) out of the object. The furtherinside the proxy is an object, the greater force is calculated to push it out. This hasthe effect that the surface feels solid. Since the human sense of touch is highly sensitive,haptic rendering needs to be calculated in at least 1000 Hz. This can be compared withvisual rendering which usually is updated in between 60 to 100Hz.

Chapter 2
Goal and Method
The goal of this project was to investigate how a menu system for desktop VR applica-tions should look and feel. To achieve this goal a prototype was developed and evaluated.As a sub goal suggestions of improvements to the Reachin API is desirable. It was alsodesirable that ergonomic improvements to the fish tank VR working environment wasinvestigated.
2.1 Requirements
The menu system should be designed for complex applications that have several hun-dreds of different commands. It should utilize the potential of six degrees of freedomhaptic input devices such as the Phantom. Another requirement was that the solutionshould offer fast and accurate selection for expert users, and provide control and intu-itiveness for beginners. The implementation of the solution will be implemented as aprototype using the Reachin API, VRML and Python script.
2.2 Target Group
The target group of the menu system is professional users of 3D haptic applications thaton a daily basis uses the applications. It is therefore important to facilitate speed ofselection and an easy way of accessing frequently used commands.
2.3 Iterative Design Method
Based on previous research in haptic interaction and guidelines from 2D and 3D inter-action, requirements were gathered and a prototype was designed and developed. Thepurpose of the prototype was to explore the most effective and intuitive way of selectinglarge sets of menu items.
The implementation of the menu system has been done in an iterative design process.The process starts with gathering of requirements and needs, and these are realized ina prototype of some kind. The prototype is evaluated with or without test subjects,and the analyzed results are used to improve the prototype or gather more requirementsand needs. The process is not structured in a linear fashion, and for example canrequirements be evaluated before a prototype is built [25].
3

4 Chapter 2. Goal and Method
Figure 2.1: Iterative design method. Reproduced from [25].
2.3.1 Prototype Evaluation
Initial usability testing was conducted as early in the design process as possible. Thepurpose was to determine if the main ideas of the menu system were feasible and togather more requirements to make improvements to the prototype.
The menu system needed to be evaluated from both an expert and a beginner per-spective. Since none of the subjects would have experience with haptic marking menus,it was needed to simulate expert behavior.
Data of selections and selection time were gathered to give statistical indication aboutthe performance of the menu system and if some selections were harder to perform thanothers.
During the test, the subjects were encouraged to criticize the prototype and suggestalternative solutions to parts they did not appreciate. They were also asked questionsabout their perception of the menu system.
The subjects were also observed during the test session, and their reactions werewritten down. The purpose was to investigate if the subjects perception of the func-tionality corresponded with the actual functionality of the menu. This was especiallyimportant since it could give indication if some parts of the design were inadequate.
Chapter 3
3D Interfaces
One major decision when designing 3D interfaces is whether to create a true 3D interface,or a combination of a 2D and a 3D interface. A true 3D interface could be explainedwith entering a virtual world where tools and widgets are situated directly in the world,and are being used to create and manipulate virtual objects. A combination of 2Dand 3D interfaces integrates traditional 2D WIMP elements such as menus, sliders andbuttons with 3D interface elements such as 3D widgets and haptic effects to control theenvironment.
A general challenge for interface design, whether it is 2D or 3D, is to create an in-terface metaphor that supports the feeling of immersion or directness with the currenttask, and does not force the user to switch frame of reference. A switch in frame of refer-ence can occur when the user is required to, instead of communicating directly with theinterface object, have to communicate about them [12]. In other words, when engage-ment with manipulating an object or data is being disrupted by selecting commands incomplicated ways, the users immersion and focus in the current task might be broken.
Conclusions and a summary of the chapters 3D Interfaces and Haptic Interactioncan be found on page 15.
3.1 Guidelines for 3D Interaction Design
The ideal interaction scenario is that the user manipulates virtual objects without theneed to pay attention to the interaction itself. When a human reaches adulthood it hasperfected many motorical and cognitive skills to a level where they can be performedwithout much conscious attention. This is the kind of naturalness and transparency tostrive for when designing human computer interfaces and applications. The center ofattention should be on interacting through the computer rather than interacting withthe computer [8].
Bowman[5] has concluded some basic principles that can be implemented in thecreation of 3D user interfaces:
– Consider ”magic” interfaces in place of ”natural” ones when tasks require produc-tivity and efficiency. Natural interaction should be used when a replication of thephysical world is important.
– Choose interaction techniques based on the requirements of the application, thesame set of techniques will not work in every situation.
5

6 Chapter 3. 3D Interfaces
– Limit the required degrees of freedom for input whenever possible, and providephysical or virtual constraints to help guide user input.
Zheng et al. have also identified three guidelines for successful 3D interface design;consistency, visual feedback and naturalness [15].
– Consistency. The basic principle is that the interface should be consistent in inputtechniques so that the user can make general assumptions and infer new knowledgeof how to interact with the system based on already known rules. This implies thatthe same rules should always be used for selection of tasks, canceling of commandsand that system messages always should appear at the same place where thisis possible. Examples include the placement of menu items, highlighting whereattention is needed and the output screen format.
– Visual feedback. It is important to give information to the user about what kindof operation that has been performed or selected. The command button could forexample be highlighted so that the user is certain that the correct command hasbeen chosen.
– Naturalness. Naturalness means that the system should not ask for informationfrom the user that does not have relevance to the task. The system should requirea minimum amount of input from the user to perform a task and the input toperform a task should be designed in an intuitive way. If gestures are used as aninteraction technique, these gestures should be displayed to the user as a reminderwhat gestures can be performed.
3.2 Widgets
”The basic approach of using widgets and handles is to put control directly inthe 3D scene with the objects that are being manipulated. When a virtualobject is selected a number of graphical objects (widgets) appear. Eachwidget is only responsible for a small set of manipulation DOF” [8].
Some researchers [16], [12] means that tools and widgets provides a more intuitiveand easily understood interaction metaphor than menu interaction in 3D worlds sinceit resembles the real world in a better way. One possible advantage of using tools andwidgets are that they can create an interaction approach that can augment the feeling ofimmersion and directness of the application where commands are selected by touchingand manipulating them in the virtual world. My opinion is that the virtual world wouldbecome cluttered with widgets if too many commands would be represented in this way.There is also a problem with placement of the widgets so that they do not obscure thevirtual objects created or are placed so that selecting the widgets becomes a tiresometask.
3.3 2D Menus in 3D Environments
Although many interaction tasks can be made more intuitive and natural by using thesense of touch, it has been proven necessary to add elements from traditional WIMPinterfaces to create usable systems [24]. This is especially important to provide accessto a full range of functionality.
3.3. 2D Menus in 3D Environments 7
When the numbers of available commands are large it is important to structurethese in an appropriate way. This could be achieved with context-sensitive menus or byarranging the commands in a clear hierarchy of sub menus and items.
A general guideline is that 2D interaction techniques are very effective for selectiontasks and creates a familiar and often intuitive environment for the user, while 3D inter-action tasks could be more effective for manipulation tasks [24]. This area have not beenthoroughly researched, and one reason is probably that it is possible to create a usablesystem by incorporating standard interaction techniques from 2D WIMP interfaces withbuttons and menus and placing these on top of, or floating inside the 3D world withoutusing any specific 3D interaction techniques [24].
3.3.1 Placement of Menus and Occlusion
One challenge with incorporating WIMP components in a 3D world, is that it convertsa 2D task to a 3D task. This can make interaction harder because the user has to locatea floating 2D menu in a 3D space. If stereoscopic viewing is not used it becomes verydifficult to judge the correct depth of the menu if no additional depth cues are given[12]. This transforms a 1 DOF task, choosing from a list, into a 6 DOF task, henceincreasing the likelihood for errors and user frustration [1].
Menu items can be positioned at the same depth as the screen or they can be placedat an arbitrary depth in the 3D space. Both these approaches can cause problems evenwhen stereoscopic viewing is used. The reason is that it can be problematic to includeopaque 2D interface components into the 3D world, since these might occlude objectsfurther back in the 3D space. One solution to the problem of occlusion by menus isto place the menus at a fixed location in space but make them semi-transparent whenthe virtual pointer of the input device is not within close distance of the menu. Thissolution makes it possible to place the menus anywhere within the virtual world, but itis recommended to place the menu items in the foreground rather than the background[20].
Instead of displaying the menus inside the virtual environment at all times it could bemore efficient and intuitive to display menu items only when the user wishes to interactwith them. De Boeck et al. [16] have in recent work investigated to have menus ata fixed location in the virtual environment where it minimally obstructed the virtualobjects. However, despite stereoscopic viewing, the users experienced difficulties withjudging the correct depth of the menu because of lack of visual depth feedback. Theirsolution to the problem was to make a menu appear directly under the current proxyposition when a user activated the menu. The menu was hidden again after a selectionwas made. This approach solves the depth and partially the occlusion problem.
3.3.2 Linear Menus
Most researchers have implemented and evaluated linear menus with different placement,haptic effects and transparency [14], [24], [9] and [16]. It might seem like a good idea touse well known interface components, and extend these with haptic properties to makeusers familiar with selection and navigation of commands. However, I find that otherways of selecting commands that utilizes more of the potential of six DOF haptic inputdevices will prevail in 3D haptic interfaces.

8 Chapter 3. 3D Interfaces
Figure 3.1: A classic pie menu with 4 sectors. The menu appears directly under the mousecursor when activated. Selection is made by pressing the mouse button and releasing it in oneof the sectors. Adapted from [11].
3.3.3 Pie Menus
A 2D pie menu has a circular design where menu options are arranged around thecenter in radial sectors, where each sector corresponds directly to a command. Themenu appears directly under the cursor which saves the distance needed to first movethe cursor to a menu bar before activating the menu. A selection is made by pressingand holding the mouse button, dragging the cursor in a direction into a radial sector andreleasing the mouse button. The philosophy behind pie menus are that directions andmenu layout will get coded into the muscle memory with practice and hence reduce visualattention needed to make a menu selection. This transition to rapid expert behavior isnot possible with linear menus where visual attention is needed even for experts. Piemenus have been shown to be measurably faster than traditional linear menus becausethe large selection regions and the short and consistent movements needed to make aselection. There exists different menu configurations, but it is common that pie menushave four, eight or twelve sectors / commands [32].
One version of a haptic pie menu with eight directions have been implemented andevaluated by [18]. The menu appear under the proxy when a user wishes to interactwith it. They conclude that pie menus are up to 25% faster than a linear equivalent,and that nested pie menus probably are very good alternative for selecting commandsin 3D haptic applications.
3.3.4 2D Marking Menus
Marking menus are a development of pie menus. They extend the functionality of piemenus by leaving an ink trail from the cursor similar to drawing a pen stroke on paperwhen a command is invoked. Marking menus are usually nested with one or more submenus to increase the amount of available commands. A novice activates the menuand waits a short time interval before the graphics of the menu are displayed (Usuallybetween 1/3 and 1/2 a second [3]), and then makes a selection. An expert that knowsthe location of a specific menu item or sub menu can draw a quick mark with differentdirections without waiting for the visual part of the menu to appear.
Menus are usually well suited for beginners since they provide good control anda way for the user to explore the interface and learn about the available commandsin the application [6]. Expert users on the other hand want quick and easy accessto frequently used commands, and traditional pull down menus are often perceived asbeing to slow and labor intense. Instead, accelerator keys are often used to by-pass themenus. One problem is that the user has to select commands in a radically different wayand hence has to learn two different protocols of selecting commands. The philosophy
3.3. 2D Menus in 3D Environments 9
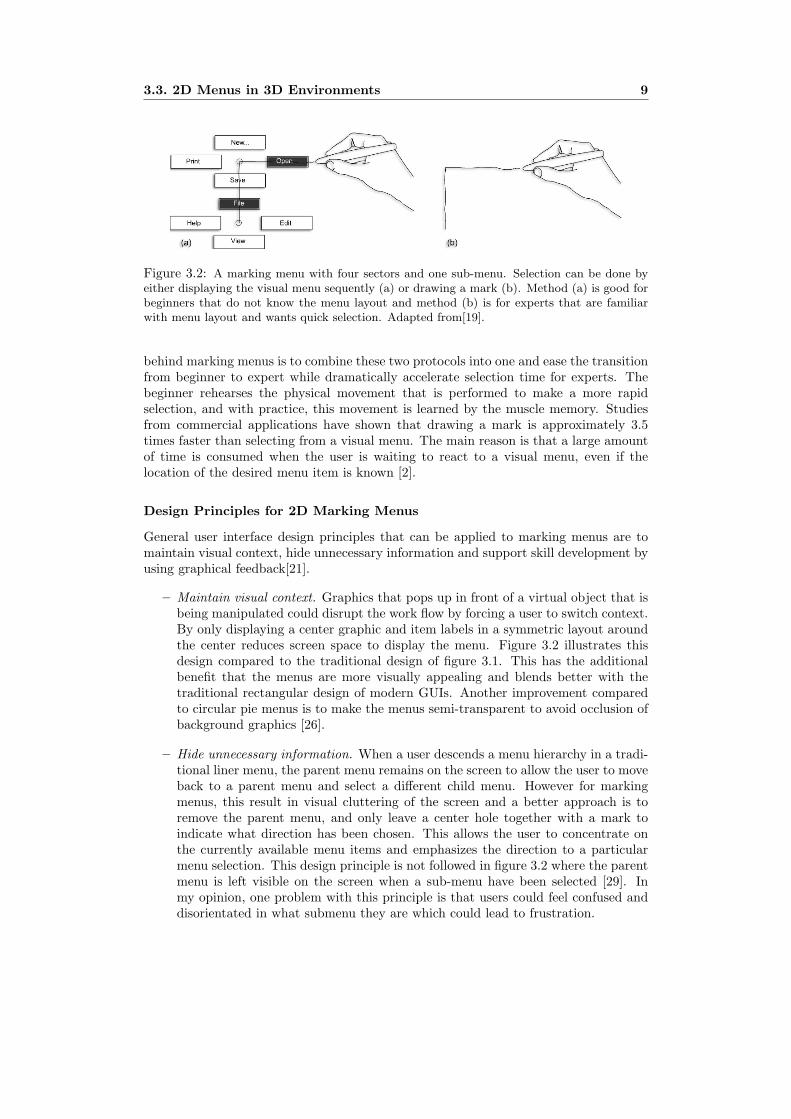
Figure 3.2: A marking menu with four sectors and one sub-menu. Selection can be done byeither displaying the visual menu sequently (a) or drawing a mark (b). Method (a) is good forbeginners that do not know the menu layout and method (b) is for experts that are familiarwith menu layout and wants quick selection. Adapted from[19].
behind marking menus is to combine these two protocols into one and ease the transitionfrom beginner to expert while dramatically accelerate selection time for experts. Thebeginner rehearses the physical movement that is performed to make a more rapidselection, and with practice, this movement is learned by the muscle memory. Studiesfrom commercial applications have shown that drawing a mark is approximately 3.5times faster than selecting from a visual menu. The main reason is that a large amountof time is consumed when the user is waiting to react to a visual menu, even if thelocation of the desired menu item is known [2].
Design Principles for 2D Marking Menus
General user interface design principles that can be applied to marking menus are tomaintain visual context, hide unnecessary information and support skill development byusing graphical feedback[21].
– Maintain visual context. Graphics that pops up in front of a virtual object that isbeing manipulated could disrupt the work flow by forcing a user to switch context.By only displaying a center graphic and item labels in a symmetric layout aroundthe center reduces screen space to display the menu. Figure 3.2 illustrates thisdesign compared to the traditional design of figure 3.1. This has the additionalbenefit that the menus are more visually appealing and blends better with thetraditional rectangular design of modern GUIs. Another improvement comparedto circular pie menus is to make the menus semi-transparent to avoid occlusion ofbackground graphics [26].
– Hide unnecessary information. When a user descends a menu hierarchy in a tradi-tional liner menu, the parent menu remains on the screen to allow the user to moveback to a parent menu and select a different child menu. However for markingmenus, this result in visual cluttering of the screen and a better approach is toremove the parent menu, and only leave a center hole together with a mark toindicate what direction has been chosen. This allows the user to concentrate onthe currently available menu items and emphasizes the direction to a particularmenu selection. This design principle is not followed in figure 3.2 where the parentmenu is left visible on the screen when a sub-menu have been selected [29]. Inmy opinion, one problem with this principle is that users could feel confused anddisorientated in what submenu they are which could lead to frustration.
10 Chapter 3. 3D Interfaces
– Support skill development by using graphical feedback. By displaying a straight,idealized mark, after a selection is made lets the user know how the system recog-nized the command and gives feedback on what command was selected. Thecontrast would be to display a mark exactly like it was drawn, often not straightand precise, which could cause an ambiguity of what command was invoked.
Breadth vs. Depth
Previous research [3] concludes that error rate is the limiting factor when deciding howmany levels of sub menus and sectors a marking menu can have. There are no strictrules for what an acceptable error rate is, because it depends on the consequence of theerror, the cost of undoing an error and the attitude of the user. However, below 10 %can be seen as a very rough guideline [32].
A 2D marking menu with four directions that are nested four levels deep results in256 menu options. Eight directions that are nested 2 levels deep results in 64 menuoptions. Both theses configurations have been shown through usability testing to befunctional menu layouts with error rates below 10 %. It was shown that the off-axisselections were the most error prone directions and the source of a higher error rate fordeep menus.
For complex applications such as 3D modeling applications these configurations donot provide a sufficient number of menu items. Maya made by AutoDesk have forexample over 1200 commands. A menu layout with eight directions that are nestedthree levels deep provides 512 different menu options. This configuration have beenshown to cause an error rate of roughly 15%, but it is possible that supportive hapticforces can reduce this error rate.
One approach for creating a sufficiently large menu system to house these largenumbers of menu items would be to stack two or three of the above described menuconfigurations on top of each other in levels. The levels could be visualized by stackingthree plates on top of each other in the depth dimension. They could be accessed bypushing or pulling the input device in the depth dimension when the proxy is in thecenter region of the menu.
Limitations of Marking Menus
One major drawback with pie and marking menus is that only a limited number ofmenu items can be displayed in one menu. The most common menu configurations forpie menus are eight or four items in one menu[10]. As a consequence, menus needsnesting with sub menus to be used in any reasonable complex application.
When a user knows what they want to do, but not how to do it and what tool to use,one common technique is to search through the menu system in systematical manner.In a traditional 2D menu bar, most menu alternatives can be made visible by draggingthe mouse to the left or right in the menu bar. This approach creates an overview ofavailable commands or actions.
The lack of overview in marking menus is a drawback that have not received muchattention in the literature. The user is forced to choose a sub menu before it is possibleto find out what that sub menu contains. If the grouping and general menu layoutdesign is done carefully this problem can be limited, but ambiguities and overlappingcategories are usually hard to avoid.
A general problem for menus that are made to appear directly under the proxy isthat if the menu is activated close to a 3D object, the menu could cut into the object

3.3. 2D Menus in 3D Environments 11
which probably have a haptic surface of some kind. This could cause both a haptic anda visual conflict.

12 Chapter 3. 3D Interfaces

Chapter 4
Haptic Interaction
3D interaction with a computer is difficult. One reason is that humans are dependent onhaptic stimuli when interacting with the real world. By introducing haptic force to thecomputer environment, 3D interaction has the potential of becoming easier and morestraightforward.
Haptic research is a relatively new discipline, and as a result many interpretationsof the word haptic can be found in the literature. A definition is proposed by Miller etal. [22];
”In brief, a haptic device provides position input like a mouse but also stim-ulates the sense of touch by applying output to the user in the form of forces.Tactile devices affect the skin surface by stretching it or pulling it, for ex-ample. Force feedback devices affect the finger, hand, or body position ormovement.”
4.1 Haptic Feedback
The naive approach when designing haptic enhanced interfaces is to simulate naturalforces from the real world into the interface. However, research conducted by [19]suggests that this approach does not utilize the full potential of haptic input devices.The reason is that it does not make use of supportive and resisting forces that does nothave an equivalent in the physical world.
4.1.1 Naive Haptic Feedback
Examples of different naive haptic effects that draw inspiration from the real world aretexture, friction, gravity and recess which is a hole in a haptic plane [22]. Texture canbe used to enhance surfaces in a workspace by providing detailed hight information.Friction dampens the user’s velocity when moving the haptic input device over specificsurfaces. A recess is a few mm deep hole in the haptic plane with sloping angles, whichforces the user to climb over the walls in order to leave the recess. It could be used forbuttons that are either pushed or clicked so the user does not accidentally slide off theedge of the button.
13
14 Chapter 4. Haptic Interaction
4.1.2 Constructed Haptic Feedback
Constructed haptic feedback is forces that do not have a direct counterpart in thephysical world. A taxonomy for different constructed haptic effects is proposed by Milleret al. [23]. They have concluded that anticipation, follow through, indication, guidanceand distinguishing directions are effective building blocks for haptic interaction.
– Anticipation can be illustrated by an example of turning a volume knob on a radio.A small resisting force can be felt when the knob is turned, but just before theradio is turned off there is usually an increasing amount of force to indicate that byturning the knob further, the behavior of the control will change qualitatively. Abreakable force, which means that the force can relatively easy be overcome, couldbe used to resist the users motion. This gives a hint that the current modality isabout to change before it has happened, and gives an opportunity to back off fromthe current action if it is not desirable, or to proceed if it is intended.
– Follow through can also be illustrated with the same example as above. When thevolume knob is turned past the increased resisting force and snaps into the ’offmode’, feedback is provided that the radio has changed mode. This effect couldbe used to let the user know that a desired action actually has been performed.
– Indication is the same kind of spring force that a joystick has when it returns tothe center position. This effect lets the user know that a continuing indicatingeffect is activated and possible also in what direction and by how far away fromthe center it is.
– Guidance can also be described with the help of the radio knob example. The usercould hypothetically feel predefined stations as small haptic forces when a diallingknob is turned. This feedback could prove to be very powerful for 3D modeling,and for example could this effect be used to guide motion along a predefined pathwith evenly spaced holes in the haptic plane.
– Distinguishing directions could be illustrated with a knob on a shaft that canbe both turned and pushed/pulled. The forces to push/pull the knob could beset to be greater than to turn the knob, which allows the user to turn the knobwithout accidentally pushing/pulling it at the same time. This haptic effect givesthe opportunity to assign different functionality to different dimensions/axis of thesame input mechanism.
– Guided output is my own term to describe a force that pushes or pulls the inputdevice to a specific location or along a predefined 2D or 3D path. This force couldprove very useful especially for simulation applications where a user can experiencea motion or a task before they start to practice it themselves.
4.2 Menu Selection Techniques
Three alternatives for choosing a command from a haptic pie menu have been inves-tigated by [18]. The first is release button where the physical button on the stylus isused in a similar way as a mouse button. The second method is push-through whichresembles how we interact with buttons in the physical world. The proxy is moved intoa menu option and a selection occurs when the force perpendicular to the plane exceeds

4.3. Assisting Forces in Menus 15
a given threshold value. The third alternative is exceed-border where a selection occurswhen the proxy is moved beyond the outer perimeter of the menu.
Their results conclude that exceed border technique is the fastest selection methodfor pie menus and probably best suited for marking menus. Release button is foundto be the slowest but is the least error prone technique. This result is in contrast withthe result of [24] which concluded that release button was superior compared to push-through technique in both selection time and error rate. They did however implementa linear menu that had a static placement in the depth dimension and not a pie menu.
4.3 Assisting Forces in Menus
Haptic input devices provide a number of possibilities to guide user input when selectingfrom a menu. Examples found in the literature are 2D planar constraint, edge boundaryconstraint, option selection snap force [18] and adjusted haptic condition [13].
– 2D planar constraint. It has been shown that a haptic plane to support movementin the planar surface of the menu is beneficial for both linear and pie menus.
– Edge boundary constraint. This force could be used to prevent the proxy fromsliding off the virtual haptic plane that the menu is situated on. The haptic wallsaround the menu create a recess.
– Option selection snap force. This force attracts the proxy to the center of theentered menu sector. The idea is that this helping force should guide the user to amenu item, help to differentiate between different menu options and decrease errorswhen making selections. It has been showed that this kind of force decreased errorrate considerably with the side effect that selection time increased with a smallamount.
– Adjusted haptic constraint. It is also possible to construct more advanced and re-fined haptic reinforcements as shown by Oakley et. al. They investigated a hapticenhanced menu similar in behavior and appearance as the Windows Start menu,and compared user performance with different haptic effects. Their contributionconsists of an adjusted haptic condition where the haptic forces are reduced to asmall but noticeable force when the user moves the virtual pointer slowly, below2cm/s. When the virtual pointer is moved with a speed that exceeds 2 cm/s thehaptic forces that are orthogonal to the current direction is reduced in proportionto the speed. This has the effect that forces are reduced in the direction of traveland increased in the orthogonal direction. The authors find strong statistical evi-dence that this adjusted condition is better than only a recess enhanced menu orno haptic forces at all. I believe that their main contribution is to open up theidea that very subtle and constructed, non intuitive haptic forces can improve userperformance.
4.4 Summary and Conclusions of 3D interfaces andHaptic Interaction
– Consider ”magic” interfaces in place of ”natural” ones when tasks require produc-tivity and efficiency.
16 Chapter 4. Haptic Interaction
– Limit the required degrees of freedom for input whenever possible, and providephysical or virtual constraints to help guide user input.
– The interface should be consistent in input techniques so that the user can makegeneral assumptions and infer new knowledge of how to interact with the systembased on already known rules.
– It is important to give visual feedback to the user about what kind of operationthat has been performed or selected.
– Combining 2D and 3D interfaces could provide an effective and intuitive way ofselecting commands. However, 2D menus in 3D space needs to be positioned indepth so they are easily accessible. One promising technique is to position themenu directly under the proxy when a user wishes to make a selection.
– Haptic pie menus have been shown to be measurably faster than linear menus, andhaptic marking menus have the potential of being a very effective and intuitiveway of selecting commands in 3D applications.
– A suitable menu layout for a haptic marking menu could be eight sectors withthree sub levels which totals 512 commands.
– Semi-transparent menus could be used to not obscure virtual objects that arefurther back.
– Haptic effects should be used to increase efficiency in menu selection.
– To select a menu item release button, push-through or exceed border could beused. Exceed border is the fastest technique and release button is the slowest butleast error prone technique.
Chapter 5
Ergonomics and Two HandedInteraction
For everyday tasks in normal life it is clear that people use both hands to interact withobjects. While the dominant hand usually manipulates the object, the non dominant isholding the object and/or changing its position and hence creates a frame of referencefor the dominant hand. Bendels et al. [9] and De Boeck et al. [16] have done researchwhere they investigate two handed interaction techniques. De Boeck states:
”Most virtual worlds suffer from a common set of problems such as difficul-ties to access tools and widgets floating somewhere in space. The same istrue for accessing and manipulating objects. In general the main reason forthese problems is a lack of good depth perception in the virtual world. Forcefeedback can partially solve the problem, since the user can feel when he ac-tually touches the object. In literature and from our own research, however,we still see the same problems. To improve the accessibility of both widgetsand 3D objects, we have drawn a solution based on proprioception and forcefeedback, by using both hands” [16].
Proprioception is a term used to describe the sensory receptors found in the musclesor joints which detects the motion or position of the body or the limb relative to otherlimbs. This means for example that the arm knows the position of the other arm withoutthe need of visual perception.
Both their systems consist of a workbench with a Phantom device that is held inthe dominant hand and a visual display that allows 3D viewing of the objects with thehelp of shutter glasses. Tracking of the left hand is implemented using a data glove withsensors that can track the position and gestures of the hand. They propose that thenon dominant hand could be used to select and rotate objects as well as making a menuappear. A closed fist means grabbing an object and an opened fist means releasing thatobject. When an object has been grabbed it can be rotated or moved as if the user whereholding a real object. The glove that records the motion of the non dominant hand ishowever not a user friendly solution and both research teams are striving to incorporatecamera tracking of the non dominant hand instead of using a glove to improve thenaturalness of the system. The camera could be used to extract motion and differentpostures from the hand. The difficulty is that the hand with all five fingers has 27 DOFand motion analysis becomes very complex and computational intensive. One solution
17
18 Chapter 5. Ergonomics and Two Handed Interaction
to the problem of camera based hand tracking is proposed by [28]. Their idea is to fill adatabase with pictures of possible hand gestures taken from various different angles withjoint angles included, and then compare this with the features from the cameras. Thisoperation is very computationally heavy but since there is a limit in the number of states,grab, no grab or flat hand, the authors claim that the complexity of the operation shouldbecome relatively manageable. They have however not yet implemented this solution.
One additional benefit with proprioception is that it could free visual cognitive re-sources that are used for judging depth to more relevant tasks, for example analyzingcomplex data [17].
Another important aspect is that six DOF input devices can cause pain and fatiguein the arms and shoulders, even after short working sessions [2]. The main reason isprobably the lack of wrist support which results in static muscle tension.
In a study were non-haptic six-DOF trackers were used, it was concluded that whenboth hands were used to interact with the virtual world, the pain and fatigue was equiv-alent with using a normal mouse [7]. However, when using only one tracker, statisticallysignificant fatigue could be shown.

Chapter 6
Design of the Prototype
Based on findings from the literature it was concluded that marking menus have thepotential of being a very promising menu selection technique for 3D haptic applications.At the beginning of the design process, other more creative alternatives were considered,but after an initial evaluation these early alternatives were discarded.
6.1 Early Design Decisions
Selection and Assisting Haptic Forces
– Use eight directions nested three levels deep. This configuration give access to atotal of 512 menu items.
– Use a break through force and border constraint to make a selection.
– Use a follow through haptic effect when a selection is made.
– Use the wrists working volume to minimize movements of the arm and to reduceselection time by drawing short marks. The marks should always be of the samelength to facilitate muscle memory learning.
Visual Design
– Use transparent menus to maintain visual context.
– Use an octagon to represent the haptic selection area to enforce eight directions[18].
– Separate menu labels from the haptic selection area to save screen space.
– Change the stylus representation to a pen to strengthen the metaphor of drawingmarks. Also make the stylus transparent to prevent occlusion of the menu items.
– Draw idealized marks to emphasize chosen directions.
– Add a preview mode to allow browsing of submenus before a selection is made.
– Fade the selected menu item after selection is made to provide feedback.
19
20 Chapter 6. Design of the Prototype
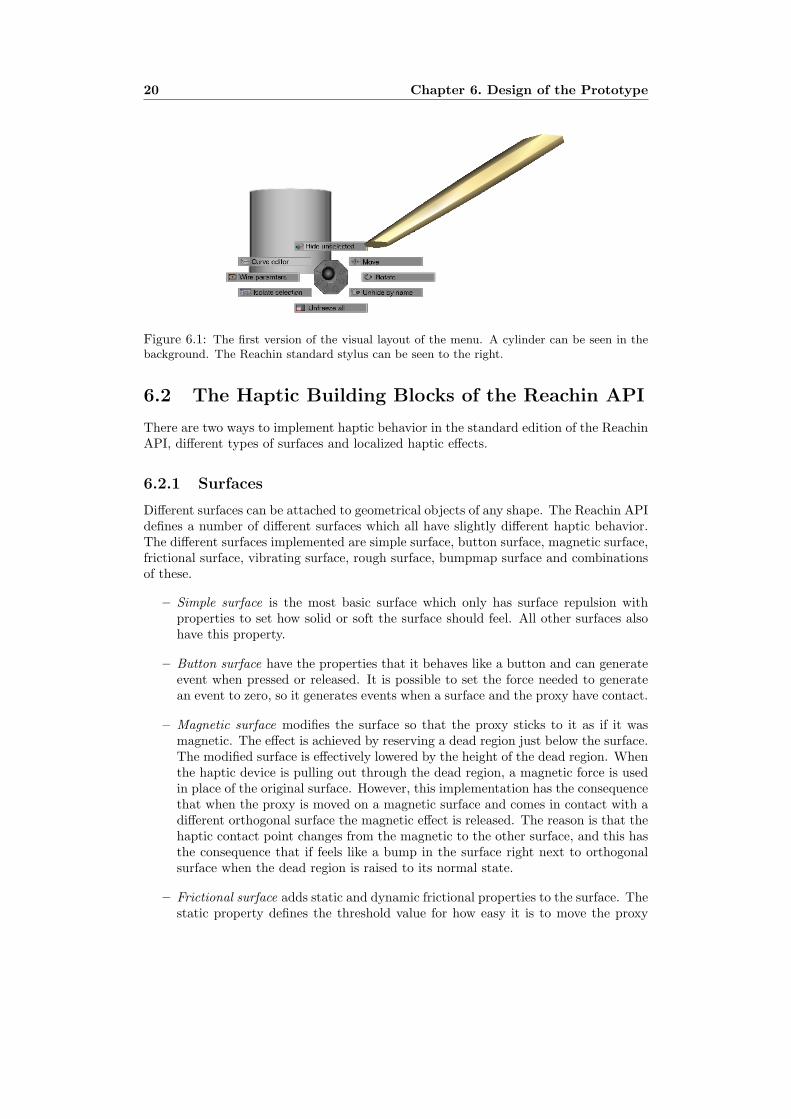
Figure 6.1: The first version of the visual layout of the menu. A cylinder can be seen in thebackground. The Reachin standard stylus can be seen to the right.
6.2 The Haptic Building Blocks of the Reachin API
There are two ways to implement haptic behavior in the standard edition of the ReachinAPI, different types of surfaces and localized haptic effects.
6.2.1 Surfaces
Different surfaces can be attached to geometrical objects of any shape. The Reachin APIdefines a number of different surfaces which all have slightly different haptic behavior.The different surfaces implemented are simple surface, button surface, magnetic surface,frictional surface, vibrating surface, rough surface, bumpmap surface and combinationsof these.
– Simple surface is the most basic surface which only has surface repulsion withproperties to set how solid or soft the surface should feel. All other surfaces alsohave this property.
– Button surface have the properties that it behaves like a button and can generateevent when pressed or released. It is possible to set the force needed to generatean event to zero, so it generates events when a surface and the proxy have contact.
– Magnetic surface modifies the surface so that the proxy sticks to it as if it wasmagnetic. The effect is achieved by reserving a dead region just below the surface.The modified surface is effectively lowered by the height of the dead region. Whenthe haptic device is pulling out through the dead region, a magnetic force is usedin place of the original surface. However, this implementation has the consequencethat when the proxy is moved on a magnetic surface and comes in contact with adifferent orthogonal surface the magnetic effect is released. The reason is that thehaptic contact point changes from the magnetic to the other surface, and this hasthe consequence that if feels like a bump in the surface right next to orthogonalsurface when the dead region is raised to its normal state.
– Frictional surface adds static and dynamic frictional properties to the surface. Thestatic property defines the threshold value for how easy it is to move the proxy

6.3. Prototype v1 21
Figure 6.2: The first version of the haptic part of the menu. The geometry combined withtexture were supposed to shape the haptic behavior.
from a resting position on a surface. The dynamic property defines how easy it isto move the proxy over the surface.
– Vibrating surface adds vibrating properties to the surface.
– Rough surface implements an algorithmically textured surface and feels like roughsand paper.
– Bumpmap surface can be used to create the illusion that a texture can be felt withvery high resolution. It uses a black and white image as a height-map over thesurface. White areas of the image are lowered into the surface and black areas areright on the surface.
6.2.2 Localized Haptic Effects
It is possible to define spherical force fields and magnets independent of surfaces. Aforce field pushes the proxy in one given vector and a magnet pulls the proxy to thecenter of the magnet. When force fields and magnets intersect a surface the behavior ofthe surface is altered to a dimple in the surface.
6.3 Prototype v1
Paper prototypes were used to decide a suitable radius for the haptic part of the menu.It was concluded that an outer radius of 12 mm were suitable to make three selectionsin the same direction and still be inside the wrists working volume.
The original implementation idea was to use 3D geometry combined with textureto create the haptic constraints and supporting forces of the haptic part of the menu.The center piece was flat with eight V-formed 3D tracks leading out to the differentdirections. The purpose was to restrict and guide movement to the eight directions.Selection was made when the proxy climbed over a slanted edge at the border of thecenter piece. To register which selection was made the haptic part of the menu was builtwith nine geometrical sections. One in the middle and eight sectors around it which allwere instances of button surface as described above. The click force was set to zero toregister which sector the proxy was located in.
22 Chapter 6. Design of the Prototype
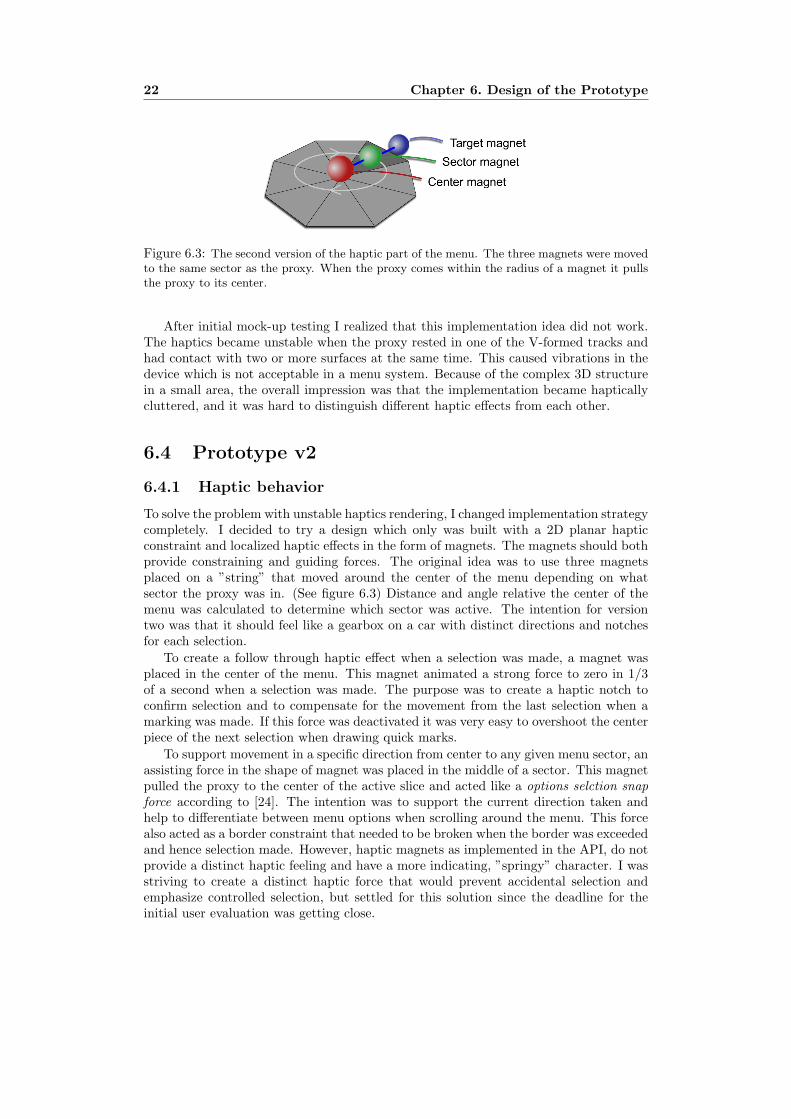
Figure 6.3: The second version of the haptic part of the menu. The three magnets were movedto the same sector as the proxy. When the proxy comes within the radius of a magnet it pullsthe proxy to its center.
After initial mock-up testing I realized that this implementation idea did not work.The haptics became unstable when the proxy rested in one of the V-formed tracks andhad contact with two or more surfaces at the same time. This caused vibrations in thedevice which is not acceptable in a menu system. Because of the complex 3D structurein a small area, the overall impression was that the implementation became hapticallycluttered, and it was hard to distinguish different haptic effects from each other.
6.4 Prototype v2
6.4.1 Haptic behavior
To solve the problem with unstable haptics rendering, I changed implementation strategycompletely. I decided to try a design which only was built with a 2D planar hapticconstraint and localized haptic effects in the form of magnets. The magnets should bothprovide constraining and guiding forces. The original idea was to use three magnetsplaced on a ”string” that moved around the center of the menu depending on whatsector the proxy was in. (See figure 6.3) Distance and angle relative the center of themenu was calculated to determine which sector was active. The intention for versiontwo was that it should feel like a gearbox on a car with distinct directions and notchesfor each selection.
To create a follow through haptic effect when a selection was made, a magnet wasplaced in the center of the menu. This magnet animated a strong force to zero in 1/3of a second when a selection was made. The purpose was to create a haptic notch toconfirm selection and to compensate for the movement from the last selection when amarking was made. If this force was deactivated it was very easy to overshoot the centerpiece of the next selection when drawing quick marks.
To support movement in a specific direction from center to any given menu sector, anassisting force in the shape of magnet was placed in the middle of a sector. This magnetpulled the proxy to the center of the active slice and acted like a options selction snapforce according to [24]. The intention was to support the current direction taken andhelp to differentiate between menu options when scrolling around the menu. This forcealso acted as a border constraint that needed to be broken when the border was exceededand hence selection made. However, haptic magnets as implemented in the API, do notprovide a distinct haptic feeling and have a more indicating, ”springy” character. I wasstriving to create a distinct haptic force that would prevent accidental selection andemphasize controlled selection, but settled for this solution since the deadline for theinitial user evaluation was getting close.

6.4. Prototype v2 23
Figure 6.4: An early version of the second version of the menu. The browse menu is visiblefor sector ”NorthWest”. When a sector is changed the browse menu moves to correspondingsector. A box can be seen in the background to show the transparency of the menu.
The target magnet was placed outside the border and was activated when the borderwas crossed and pulled the proxy to its center with a strong force. It seemed like a goodidea to strengthen the follow through effect and to further pull the proxy to a chosendirection. After informal testing this haptic effect was discarded because it causedaccidental selection and uncontrolled behavior in the menu.
To restrict movement in the depth dimension and prevent the proxy to leave theplanar constraint i used a downward force field that pushed the proxy toward the plane.
6.4.2 Visual Design and Browse Menus
One of the major drawbacks of marking menus compared to traditional linear menus arein my opinion the lack of overview of sub menus and items. My solution to this problemwas to add a function which I call browsing menus. When the proxy was resting in asector for a short predefined time the next sub menu or menu items became visible inthe same direction as the current sector. This provided a preview to the next sub menuor menu items and the design intention was that the next level or menu item could bechosen quicker because the location was already known, see figure 6.4. The idea wasthat the browse menus could be scrolled with a circular motion resembling Apples IPod.
To emphasize that selection is made by moving the proxy in different directions themenu items were given the character of arrows [27].

24 Chapter 6. Design of the Prototype
Chapter 7
Evaluation
To get adequate feedback as soon as possible in the design process the decision wasmade to conduct initial user testing as soon as a working prototype of the menu systemexisted. The questions that I wanted to answer with this test were:
Question 1: Is it a feasible idea to use haptic marking menus with eight directionsnested three levels deep? In other words, can a selection be made, and what is the errorrate. How long time does it take to make a selection?
Question 2: Are off axis selection harder to perform than on axis selection? Previousresearch for 2D marking menus [32] have shown that off-axis selection are the most errorprone. Can this be avoided with assisting forces? On-axis is defined as left, right, upand down. Off-axis is defined as the slanted directions between these.
Question 3: How long does it take for a subject to get used to the menu system?Is it intuitive to draw marks in three directions to make a selection, and do subjectsunderstand the metaphors in the implementation?
Question 4: What degree of control does the menu system offer? Does the subjectsexperience that they are in complete charge of the menu selection?
Question 5: Does the subjects learn categories after the short test period? Thissubjective judgement would indicate how quickly a subject learns menu layout.
Question 6: Is the browsing function a feasible idea? Will the subjects use them tomake quicker selections, and what are their opinions about them?
To answer the first two questions statistics needed to be collected for selection timeand if each selection and sub selection was made correctly. The other questions neededto be answered by asking the subjects for opinions and observing the behavior of thesubjects when they were using the menu.
7.1 Subjects
The target group had been identified as being computer literate, expert users of 3Dmodeling applications, in the age between 20 - 35, aesthetically skilled and very goodeye hand coordination. Instead of trying to recruit a suitable company which wouldcost a fair bit of money and resources, the decision was made to cooperate with UmeaInstitute of Design, Umea university in recruiting suitable test subjects. Seven male andtwo female subjects, all right handed, completed the test.
25
26 Chapter 7. Evaluation
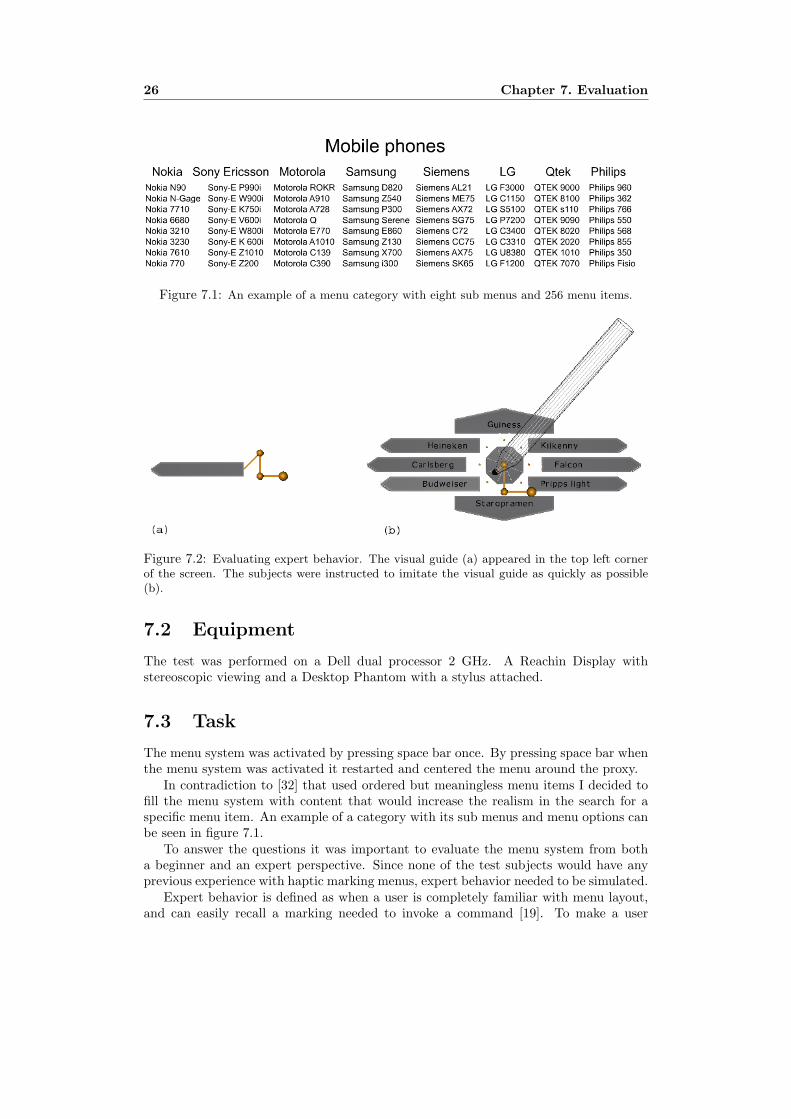
Figure 7.1: An example of a menu category with eight sub menus and 256 menu items.
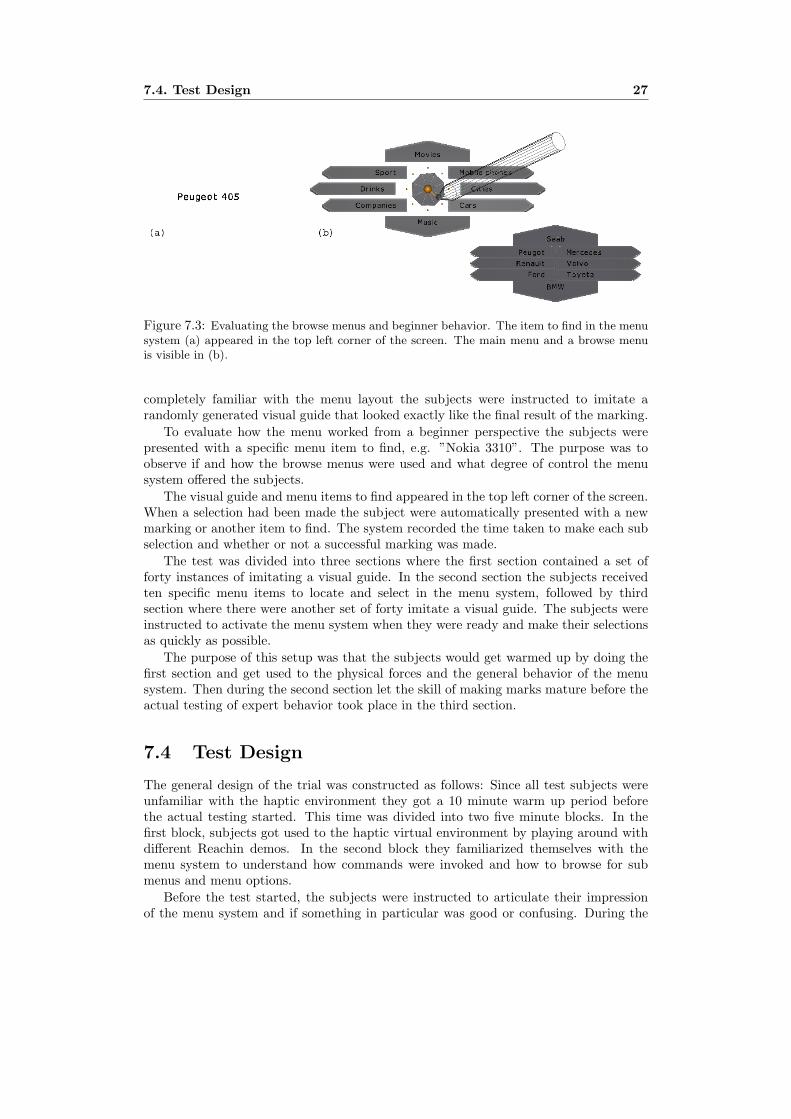
Figure 7.2: Evaluating expert behavior. The visual guide (a) appeared in the top left cornerof the screen. The subjects were instructed to imitate the visual guide as quickly as possible(b).
7.2 Equipment
The test was performed on a Dell dual processor 2 GHz. A Reachin Display withstereoscopic viewing and a Desktop Phantom with a stylus attached.
7.3 Task
The menu system was activated by pressing space bar once. By pressing space bar whenthe menu system was activated it restarted and centered the menu around the proxy.
In contradiction to [32] that used ordered but meaningless menu items I decided tofill the menu system with content that would increase the realism in the search for aspecific menu item. An example of a category with its sub menus and menu options canbe seen in figure 7.1.
To answer the questions it was important to evaluate the menu system from botha beginner and an expert perspective. Since none of the test subjects would have anyprevious experience with haptic marking menus, expert behavior needed to be simulated.
Expert behavior is defined as when a user is completely familiar with menu layout,and can easily recall a marking needed to invoke a command [19]. To make a user
7.4. Test Design 27
Figure 7.3: Evaluating the browse menus and beginner behavior. The item to find in the menusystem (a) appeared in the top left corner of the screen. The main menu and a browse menuis visible in (b).
completely familiar with the menu layout the subjects were instructed to imitate arandomly generated visual guide that looked exactly like the final result of the marking.
To evaluate how the menu worked from a beginner perspective the subjects werepresented with a specific menu item to find, e.g. ”Nokia 3310”. The purpose was toobserve if and how the browse menus were used and what degree of control the menusystem offered the subjects.
The visual guide and menu items to find appeared in the top left corner of the screen.When a selection had been made the subject were automatically presented with a newmarking or another item to find. The system recorded the time taken to make each subselection and whether or not a successful marking was made.
The test was divided into three sections where the first section contained a set offorty instances of imitating a visual guide. In the second section the subjects receivedten specific menu items to locate and select in the menu system, followed by thirdsection where there were another set of forty imitate a visual guide. The subjects wereinstructed to activate the menu system when they were ready and make their selectionsas quickly as possible.
The purpose of this setup was that the subjects would get warmed up by doing thefirst section and get used to the physical forces and the general behavior of the menusystem. Then during the second section let the skill of making marks mature before theactual testing of expert behavior took place in the third section.
7.4 Test Design
The general design of the trial was constructed as follows: Since all test subjects wereunfamiliar with the haptic environment they got a 10 minute warm up period beforethe actual testing started. This time was divided into two five minute blocks. In thefirst block, subjects got used to the haptic virtual environment by playing around withdifferent Reachin demos. In the second block they familiarized themselves with themenu system to understand how commands were invoked and how to browse for submenus and menu options.
Before the test started, the subjects were instructed to articulate their impressionof the menu system and if something in particular was good or confusing. During the

28 Chapter 7. Evaluation
Figure 7.4: Diagram (a) shows the average error rate for each level, and (b) the total selectiontime for each level. Each data point is the average of 360 trials.
whole test session I was observing and taking notes about the subjects reactions. If testsubjects stopped talking for a long period I started to ask them questions to remindthem to articulate what they were experiencing. One example of such a question couldbe: Do you feel that you are in control of the menu system?
7.5 Conclusions of the Test
From the collected data, the average error rate for on- and off- axis marks were calculatedseparately for every sub level. The total selection time for each sub level was calculatedseparately for each sub level, and then added together.
Since the data from the test were used for indicating purposes, no in-depth statisticalstudy was performed.
The conclusions that could be made from the test were: Question 1. Is it a feasibleidea to use haptic marking menus with eight directions, nested three levels deep? Thesubjects could perform the markings needed to make a selection. The statistical analysisof the collected data indicates that markings can be done with a reasonably low errorrate and an acceptable selection time. Selection time appears to be linear with menudepth, which corresponds with previous studies of 2D marking menus [19].
Question 2. Are off axis selection harder to perform than on axis selection? The datadoes not indicate that it should be harder (fig 7.4). However, most subjects perceivedthe off-axis selections as error prone and more difficult to execute.
Question 3. How long does it take for a subject to get used to the menu system? Idefined that a subject is used to the menu system when they can make a selection bothas a beginner and an expert. This judgement is of course very subjective and individualbut on average it took between two to four minutes to acquire the skills needed to operatethe menu system. This is in my opinion at least one to three minutes to long and theconclusion was that major improvements needed to be done to shorten this time.
Question 4. What degree of control does the menu system offer? The main conclusionwas that the menu system did not offer sufficient control to the users. This was especiallyevident when subjects were using the visual menu and searched for a specific menu item.It was perceived as unpredictable and unreliable that a selection could be made withoutintention. This intimidated some subjects from using the browse menus even thoughthey liked the idea of being able to get a preview of the next selection.
Some subject experienced problems with overshooting the center of the next sub
7.6. Improvements to the Test Design 29
menu after a selection had been made with a marking. This had the consequence thatthe marking did not end up the way a subject intended.
Question 5. Do the subjects learn categories after the short test period? The secondtest block contained only ten rounds of finding a specific item. Even after this very shorttraining period it was common to observe subjects select a category very fast and startedto search the sub menu for a more specific match. This does not provide substantialevidence that subjects learned categories, but it gives an indication that if categoriesare constructed wisely, the transition from beginner to expert can be rapid.
Question 6. Is the browsing function a feasible idea? The implementation of themenu made some subjects hesitate to use the browse menus. However most subjectsappreciated and praised this function as very useful and many subjects used them to findout the location of a specific menu item. An observation was that if subjects activatedthe menu too far off from the center of the working volume the browse menus would beclipped by the edge of the screen. This caused frustration for some subjects.
7.6 Improvements to the Test Design
Some of the subjects experienced problems when they activated the menu to deep intothe haptic working volume. This had the effect that the arm of the Phantom devicerestricted the movement that was necessary to do a selection. An improvement tothe test would be to use the same test design as [24], were a virtual object in theworking volume were moved around between trials to simulate a more realistic workingenvironment.

30 Chapter 7. Evaluation

Chapter 8
Final Version of the Prototype
Drawing three marks to make a selection, were shown to work better than expected.However, the menu did not provide sufficient control for exploring the visual menu.Many users complained that they felt intimidated to use the browse function becauseselections could be made without their intention if the proxy slipped over the border.
8.1 Haptic behavior
To solve the problem of insufficient control in the menu, the way selection was made hadto be changed. Also, the haptic feedback when exploring and searching for commandsneeded to be increased.
After a substantial amount of mind work it finally struck me that a solution was toput a haptic wall around the whole center piece to increase haptic feedback and eliminateuncontrolled selection. This solution had already been implemented and proven validby [18]. Unfortunately had I misinterpreted the description of their solution and hencereinvented the wheel.
A further improvement was to rotate the octagon 22.5 degrees to utilize the eightcorners that was formed by the haptic wall for selection. The decision was made to usetarget zones in each corner (see figure 8.1) to emphasize the connection between a cornerand a selection. This avoided that selection could occur when the proxy was betweentwo sectors and created a guiding effect to a corner when a quick stroke was made. Thecorners provide a very distinct feeling.
A consistent and in my opinion intuitive selection method would be to use the push-through technique when the proxy is in a corner. To draw a quick mark, the stylus couldbe constantly pushed against the plane when drawing marks and descending the menuhierarchy, and released in a corner of the last sub-menu to make a selection. To returnto a parent menu, or if in the first level, close the menu without selecting a command,the stylus could be pulled from the 2D plane with a force that exceeded a predefinedthreshold. After initial testing of these ideas, it was found that this selection methodcaused unnecessary muscle tension when drawing marks due to the force needed to pushthe stylus towards the plane. It was also found that when using the less precise PhantomOmni input device it was difficult to distinguish the follow through haptic feeling whenpushing towards the plane.
The selection of commands was instead changed to the button on the stylus penwhen the proxy is in a corner / target zone in a similar style as described above. The
31

32 Chapter 8. Final Version of the Prototype
Figure 8.1: The octagonal shaped box that defines the haptic behavior of the final version ofthe menu.
release button technique has been shown to provide the most controlled selection [24].To preserve the exceed border style when drawing quick marks, selection of the twofirst levels occurs when the button on the pen is pressed down, and the final selectionwhen the button is released. This has the effect that a marking can be done by pressingand holding the button while the marks are drawn, but a selection is not made untilthe user releases the button in the last sub-menu. If the proxy is not in a corner, noselection is made. It was decided to keep the same method as described in the previousparagraph to return to a parent-menu or exit the menu. Even if this selection techniqueis inconsistent and hence violates the guideline of consistency, it provides control andquick selection for both selecting from the visual menu and drawing quick marks.
To create a distinct push-through feeling when lifting the pen from the plane whenreturning to a parent menu or exiting the menu a button surface was used as a roof tothe haptic box created by the border and the planar constraint.
To create a haptic notch and to avoid overshooting the center of the next sub-menuwhen drawing quick marks, a center magnet was animated from a strong force to zeroin 1/3 of a second in the same way as described for version 2 of the implementation.
8.1.1 Visual Design and Browse Menus
To increase the visual esthetics of the menu system, the design from version 2 with arrowlike menu items were abandoned. The background color of the menu items was changedfrom grey to black, and the text was changed from black to white.
In order to emphasize that a selection only can be made when the proxy is in acorner / target zone, an orange frame lights up around the activated menu item. Whenthe proxy leaves the target zone, this lighted frame is switched off.
By displaying a graphical button on the stylus pen that corresponds to the physicalbutton on the Phantom, the intention is to give a hint about the way sub-menus andcommands are selected. When the physical button is pressed, the graphical representa-tion of the button is also pressed and changes color to orange.

8.1. Haptic behavior 33
Figure 8.2: The final version of the menu. The background graphics show the transparencyof the menu alternatives. The main level of the menu can be seen in (a). In (b) the pen isresting on the haptic border and the browse menu displays the options of the next sub menu.The activated menu alternative is highlighted and the others are faded to avoid visual clutter.Selection is made by pressing the button on the Phantom pen.
Figure 8.3: A selection has been made. The stylus is changed back to the standard version.The selected command with its mark is slowly faded away to give feedback and to reinforce themarking.
Browse Menus
Even though the browse menus had been appreciated by most subjects in the user test,improvements needed to be done. One problem was that the browse menus consumeda lot of screen space and could disappear outside the screen if the menu was activatednear the edge of the screen.
The improvement was to make them appear centered around the sub menu of interest(figure 8.2). The browse menus are only revealed when the proxy have contact with theborder, and are hidden when the proxy does not have contact with the border. At thesame time the browse menus are displayed, the transparency of all the other menu itemsof the current level is increased to reduce visual clutter.
It was investigated if it was possible to create a browse function for all 512 commandsfrom the main level of the menu, without making a selection. This could provide a veryfast search technique for a specific command in the menu system. The idea was to createa possibility to ”browse the browse menus”.
When this function had been activated, the rotation of the stylus was mapped tothe different sub-menus of the currently displayed browse menu. (The rotation of the

34 Chapter 8. Final Version of the Prototype
stylus was around its own axis, which is the same axis as the normal to the 2D planarconstraint.) Since the pen can be rotated roughly 360 degrees, each 45 degrees of rotationcorresponded to its own sub-menu.
This idea was implemented, but due to the limited time frame of the project, it wasdiscarded. The reason was that I did not succeed to find a clear visual metaphor to helpa user distinguish between the two different browse modes. When activated, the secondlayer of browse menus caused visual clutter, and the concern was that the function couldcreate more confusion than it would help a user.
Only basic informal mock up tests have been performed with these improvementsbut it can be concluded that they contribute to major enhancements in control anduser comfort of the menu system, and probably reduces the learning time to operate themenu system.
Chapter 9
Discussion
3D haptic interaction design is difficult. One reason is that the available design spacewith possible solutions is enormously large and complex for 3D interfaces, and evenlarger for haptic 3D interfaces. Another reason is that the human hand is a remarkabledevice with an extraordinary resolution. In our every day lives it performs thousandsoften subconscious actions and tasks. To create a computer interface that functionslogically, intuitively, is aesthetically pleasing but also ”feels right” is therefore a greatchallenge. A fun challenge.
One observation of human behavior is that when a person is learning a new taskor doing an unfamiliar action, the physical motion is usually cautious and slow. Whendoing an automated familiar action that has been coded into muscle memory, the motionis typically faster, more precise and distinct.
My vision have been to support these contradicting requirements in the menu systemwith appropriate haptic feedback.
Therefore, a critical part of the work with the thesis has been to define in wordshow the haptic forces should feel. The challenge has been to facilitate control andintuitiveness for both beginners that are exploring the menu and for experts that usequick marks to select commands. I believe that when a user is unfamiliar with a menulayout and is searching for a command, it is crucial to provide clear and distinct feedback.When a user knows the location of a menu item, subtle and guiding feedback to facilitatespeed, accuracy and responsiveness is the priority.
Only rigorous usability testing can conclude if these requirements have been realized.Unfortunately, due to the limited time span of this project this has not been possible.
In the initial stages of designing and developing 2D applications there exists a numberof established low fidelity techniques to shorten the development time and catch earlyflaws in the design. Examples of such techniques are paper prototypes and simpleinteractive prototypes which with low effort can be made to illustrate concepts. Anadvantage of using such techniques is that it is often easier to communicate with theend users and create a fruitful discussion about major design decisions.
One problem when developing haptic applications is that it does not yet exist anysuch low fidelity tools, and there are no valid alternatives to implementing an actualsolution before testing it. Therefore, a solution must be implemented in order to find outif the haptic behavior ”feels right”. Since implementation demands that the designerinvests a lot of time in the solution, this could lead to that other possible solutionsare discarded to early in the design process. It is therefore a high priority to find and
35
36 Chapter 9. Discussion
develop such low fidelity prototyping tools and techniques for haptic applications.
9.1 Future work
Rigorous usability testing with suitable test subjects is needed to establish if the pro-posed solution is efficient and intuitive enough to be accepted among professional usersof haptic applications.
The solution have been developed entirely in Python and VRML. To incorporateit into the Reachin API, a C++ implementation is needed with a suitable interface toother programmers.
To ease learning of the menu layout, color coding of the different directions could beimplemented. This was suggested by both Markus Nordstrom and David Werjefelt, andI believe it is a really good idea.
Chapter 10
Acknowledgements
I would like to thank all employees at Reachin Technologies and especially my supervisorMarkus Nordstrom for invaluable guidance, support and ideas. Ida Markstrom, yourtech support was really appreciated.
I would also like to thank Tomer Shalit for inspiration and David Werjefelt and JoelNystrom for creative discussions and insightful comments.
A big thank you to Anders Backman, my internal supervisor at Umea university.And finally, thank you Julia for understanding the importance of this thesis.
37

38 Chapter 10. Acknowledgements

References
[1] Roland Arsenault and Colin Ware. Eye-hand co-ordination with force feedback.CHI Letters, 2:408–415, 2000.
[2] Paul Wormald Bahar Sener and Ian Campbell. Evaluating a haptic modelling sys-tem with industrial designers. Proceedings of the EuroHaptics-2002 Int. Conference,Edinburgh Scotland, pages 165–169, 2002.
[3] Monica Bordegoni and Umberto Cogini. Issues in the combination of visual andhaptic interaction. 1st International Conferance on Universal Access in Human-Computer Interaction, New Orleans, August 5-10, pages –, 2001.
[4] James Boritz and Kellogg S. Booth. A study of interactive 3d point location in acomputer simulated virtual environment. ACM VRST ’97 Lausanne Switzerland,pages 181–187, 1997.
[5] Doug A. Bowman and Ernst Krujiff. An introducion to 3d user interface design.Presence: Teleoperators and Virtual Environments, 10:96–108, 2001.
[6] Dough A. Bowman and Ersnt KruijFF. 3D User Interfaces- Theory and Practice.Addison-Wesley, Boston, MA, 2005.
[7] Shaw Chris. Pain and fatigue in desktop vr: Initial results. PROC GRAPHICSINTERFACE., pages 185–192, 1998.
[8] Jean-Bernard Martens Dzmitry Alilakseyeu, Siriam Subramanian and MatthiasRauterberg. Interaction techniques for navigation through and manipulation of 2dand 3d data. Eigth Eurographics Workshop on virtual Environments, pages 179–188,2002.
[9] Ferenc Kahlesz Gerhard H Bendels and Rheihard Klein. Towards the next genera-tion of 3d content reation. AVI ’04, May 25 -28, ACM, pages 283–288, 2004.
[10] Russell N. Owen Gordon Kurtenbach, George W. Fitzmaurice and Thomas Baudel.The hotbox: Efficient access to a large number of menu-items. CHI, 99, pages 231–237, 1999.
[11] Abigail J. Sellen Gordon P. Kurtenbach and William A.S. Buxton. An empiricalevaluation of some articulatory and cognitive aspects of marking menus. Human-Computer Interaction, 1993, No. 1, 8:1–23, 1993.
[12] Chris Hand. A survey of 3d interaction tecniques. Eurographics, 16:269–281, 1997.
39

40 REFERENCES
[13] Stephen Brewsterand Ian Oakley and Philip Gray. Solving multi-target hapticproblems in menu interaction. Extended abstract of ACM CHI ’01, pages 357–358,2001.
[14] Stephen Brewsterand Ian Oakley, Marilyn rose Mc Gee and Philip Gray. Puttingthe feel in look and feel. CHI Letters, 2:415–422, 2000.
[15] K.W Chan J.M Zheng and I. Gibson. Desktop virtal reality interface for computeraided conceptual design using geometric techniques. J. ENG DESIGN, volume 4,12:309–329, 2001.
[16] Erwin Cuppens Joan De Boeck and Tom De Weyer. Multisensory interactionmetaphors with haptics and proprioception in virtual environments. NordiCHI´04,october23-27, pages 189–197, 2004.
[17] Dennis Proffitt Ken Hinckley, Randy Pausch and Neal F. Kassell. Two-handedvirtual manipulation. ACM Transactions on Computer-Human Interaction, Issue3, 5:260–302, 1998.
[18] Rick Komerska and Colin Ware. A study of haptic linear and pie menus in a3d fish tank vr environment. 12th International Symposium on Haptic Interfacesfor Virtual Environment and Teleoperator Systems (HAPTICS’04), pages 224–231,2004.
[19] Gordon Kurtenbach and William Buxton. The limits of expert performance usinghierarchic marking menus. Proceedings of the SIGCHI conference on Human factorsin computing systems, pages 482–487, 1993.
[20] Gordon Kurtenbach and William Buxton. User learning and performance withmarking menus. Conference on Human Factors in Computing Systems, Boston,Massachusetts, United States, pages 258 – 264, 1993.
[21] Gordon Kurtenbach and Mark A. Tapia. Some design refinements and principleson the appearance and behavior of marking menus. Proceedings of the 8th annualACM symposium on User interface and software technology, pages 189 – 195, 1995.
[22] H. Massie and J.K Salisbury. The phantom interface: A device probing virtualobjects. Symposium on Haptic Interfaces for Virtual Environment and TeleoperatorSystems, Chicago, pages 1–6, 1994.
[23] Timothy Miller and Robert Zeleznik. The design of 3d haptic widgets. Symposiumon Interactive 3D graphics Atlanta GA USA, ACM, pages 97–102, 1999.
[24] Chris Raymaekers and Karin Coninx. Menu interaction in a desktop haptic envi-ronment. Proceedings of Eurohaptics 2001, pages –, 2001.
[25] J. ROGERS and Y. SHARP H. Interaction Design, Beyond Human ComputerInteraction. John Wiley and Sons, USA., 2002.
[26] William Buxton Shumin Zhai and Paul Milgram. The partial-oclusion effect: Uti-lizing semitransparency in 3d human-computer interaction. ACM Transactions onComputer-Human Interaction, 3:254–284, 1996.

REFERENCES 41
[27] Eva Soliz and W. Bradford Paley. A re-interpretation of marking menus: Theusage of gestalt principles as cognitive tools. http://www1.cs.columbia.edu/ pa-ley/spring03/assignments/HWFINAL/es481/MarkingMenuGestalt.pdf (visited2005-12-29).
[28] Yanquing Wang and Christina L. MacKenzie. The role of conceptual haptic andvisual constraints on object manipulation in virtual environments. CHI Letters,2:532–539, 2000.
[29] Shengdong Zhao and Ravin Balakrishnan. Simple vs. compound mark hierarchicalmarking menus. Proceedings of the 17th annual ACM symposium on User interfacesoftware and technology, pages 33–42, 2004.