Embed Size (px)
Citation preview
Marten - StopwatchThis document will show you how to create a "desk accessory" application using the Marten development environment. This application will display a stopwatch that you can start and stop to measure elapsed time in seconds.
Overview
A desk accessory is a small application that usually just displays one window and provides some very specific functionality. The Calculator application is just such an example. In this project, you will create a stopwatch timer desk accessory that will have a single button that starts and stops timing. In order to focus on different aspects of the development, the project will have three phases.
The first phase is to just create the basic functionality of starting, stopping, and displaying the elapsed time. The stopwatch will consist of a window with a text control and a push button control. When the push button is clicked the first time, the stopwatch will start timing, and when the button is pushed again, the stopwatch will stop timing and display the elapsed time in seconds. This phase of the project describes how to use the various editors to edit the application, the window, and the controls.
It also illustrates a new development philosophy that Marten supports. This approach has two parts. First, it promotes instance editing over code writing. You should "edit" your application as much as you can and conversely write as little code as possible. Second, when it finally comes to writing code, you should let the Marten editor do as much of that as it can. This generally means that you run the application immediately and write code only when the running application requires it.
This initial application has an unsatisfactory user experience because nothing happens while the stopwatch is timing. The display doesn't change until the button is pushed again. It would be better if the display constantly changed in realtime, showing the current elapsed time. The second phase of the project implements this functionality. It illustrates how in a modern MacOS X application an application will often need to send events to itself to allow dynamic updating of GUI elements.
The third phase of the project goes further and constructs an actual "stopwatch face". An actual second hand will revolve clockwise around a circle as the stopwatch is timing. This phase shows how to use a custom control to do your own drawing in your window. The drawing will not be very fancy but will get you started using Quartz 2D.
This example makes use of MacOS X Carbon API concepts such as event handling and core graphics and you are encouraged to go to the Apple developer site at http://developer.apple.com to learn more about them.
Creating the Stopwatch project
To begin, launch the Marten IDE and create a new Marten project. Name the project application "Stopwatch.app", the project "Stopwatch Project", then add the MacOS Carbon, Standard, and AquaUI libraries to the project. Next create a section called "Stopwatch Section" where you will add all your code:
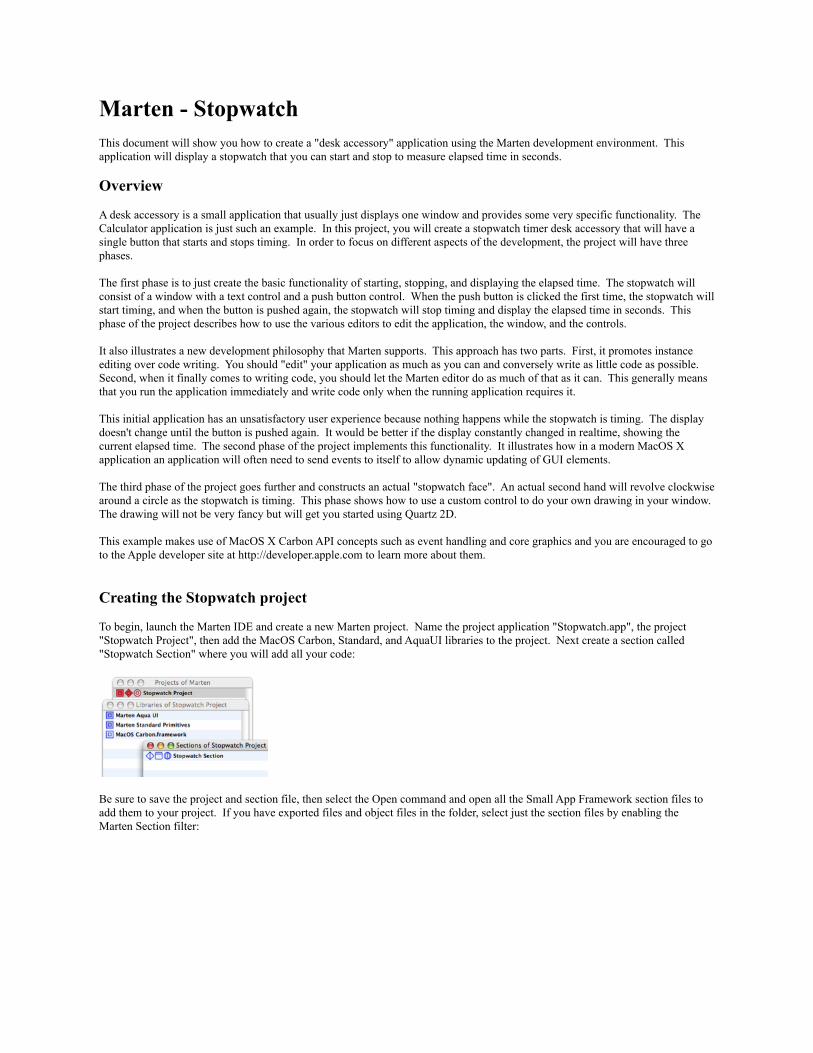
Be sure to save the project and section file, then select the Open command and open all the Small App Framework section files to add them to your project. If you have exported files and object files in the folder, select just the section files by enabling the Marten Section filter:
Rearrange the newly added section files to a more convenient ordering. One possible arrangement is:
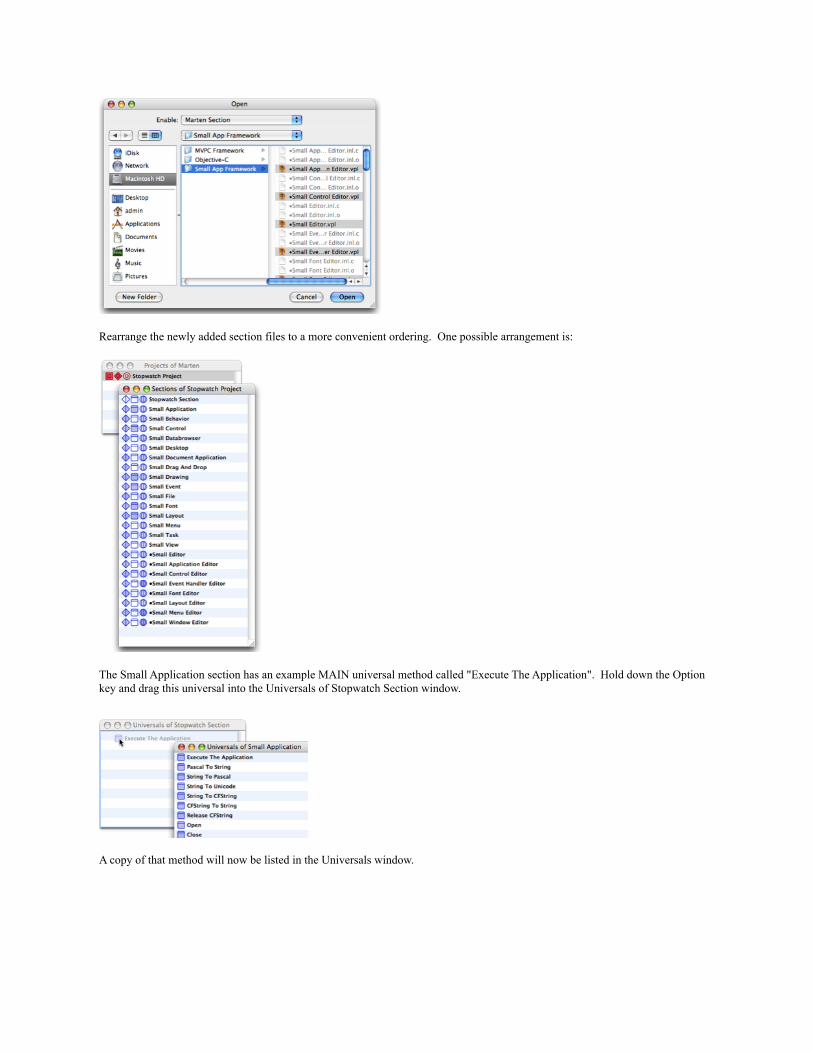
The Small Application section has an example MAIN universal method called "Execute The Application". Hold down the Option key and drag this universal into the Universals of Stopwatch Section window.
A copy of that method will now be listed in the Universals window.
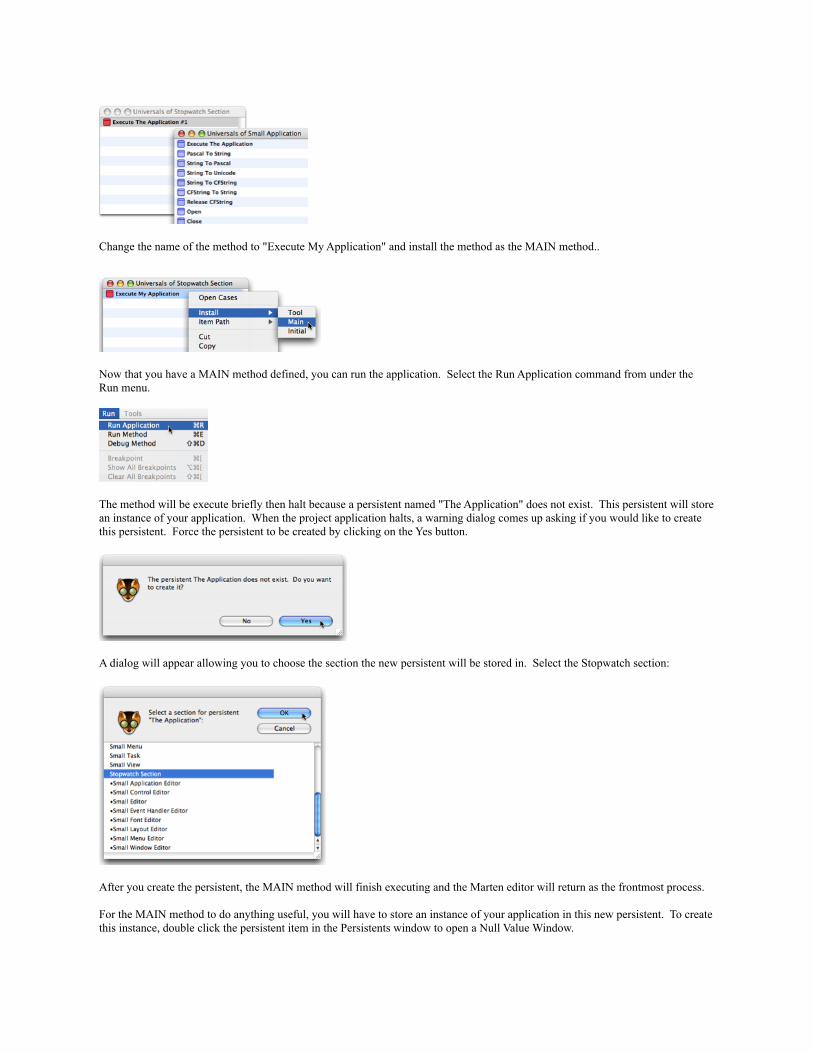
Change the name of the method to "Execute My Application" and install the method as the MAIN method..
Now that you have a MAIN method defined, you can run the application. Select the Run Application command from under the Run menu.
The method will be execute briefly then halt because a persistent named "The Application" does not exist. This persistent will store an instance of your application. When the project application halts, a warning dialog comes up asking if you would like to create this persistent. Force the persistent to be created by clicking on the Yes button.
A dialog will appear allowing you to choose the section the new persistent will be stored in. Select the Stopwatch section:
After you create the persistent, the MAIN method will finish executing and the Marten editor will return as the frontmost process.
For the MAIN method to do anything useful, you will have to store an instance of your application in this new persistent. To create this instance, double click the persistent item in the Persistents window to open a Null Value Window.
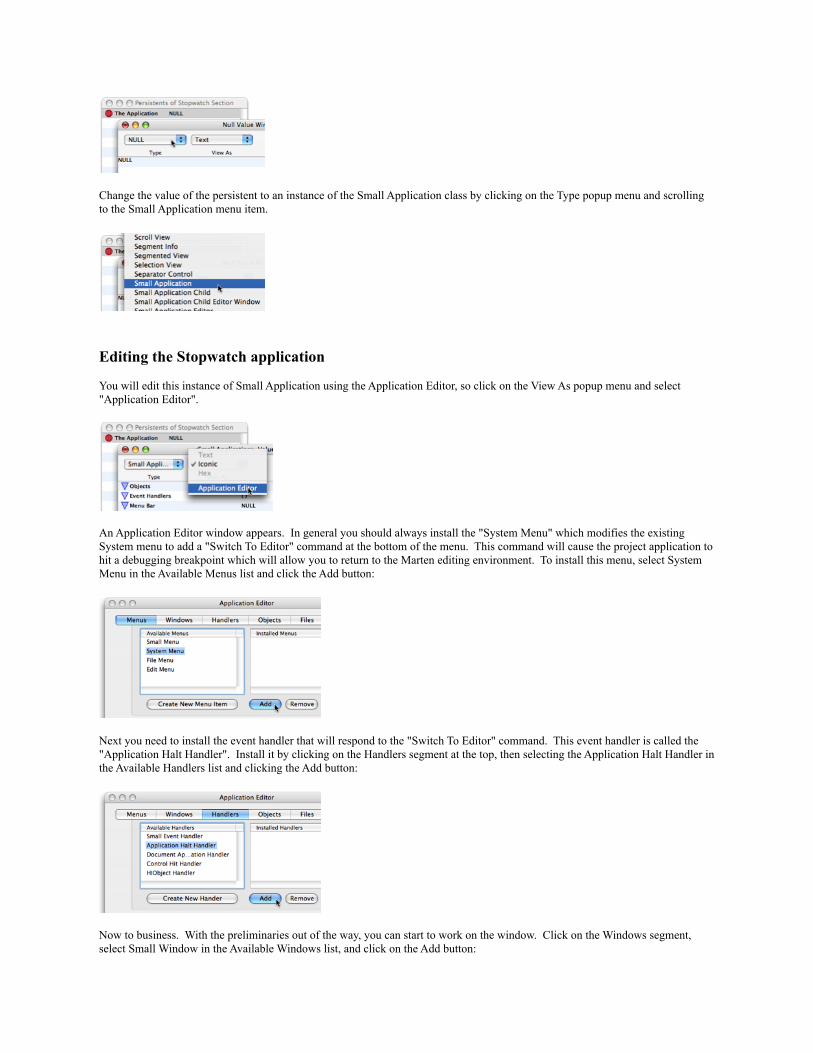
Change the value of the persistent to an instance of the Small Application class by clicking on the Type popup menu and scrolling to the Small Application menu item.
Editing the Stopwatch application
You will edit this instance of Small Application using the Application Editor, so click on the View As popup menu and select "Application Editor".
An Application Editor window appears. In general you should always install the "System Menu" which modifies the existing System menu to add a "Switch To Editor" command at the bottom of the menu. This command will cause the project application to hit a debugging breakpoint which will allow you to return to the Marten editing environment. To install this menu, select System Menu in the Available Menus list and click the Add button:
Next you need to install the event handler that will respond to the "Switch To Editor" command. This event handler is called the "Application Halt Handler". Install it by clicking on the Handlers segment at the top, then selecting the Application Halt Handler in the Available Handlers list and clicking the Add button:
Now to business. With the preliminaries out of the way, you can start to work on the window. Click on the Windows segment, select Small Window in the Available Windows list, and click on the Add button:

Editing the Stopwatch window
Open an editor for the window by clicking on the Edit button with Small Window selected in the Initial Windows list:
A Window Editor window opens showing the current content of your window. A Controls Palette window also opens. To begin with, you will set some of the properties of the window. These properties are accessed from a drawer that will open from the side of the Window Editor. Open this drawer by clicking on the Drawer button in the lower left hand corner:
The window properties drawer will open. Change the properties as follows. Set the title to "Stopwatch", the class to "kUtilityWindowClass", the background to "kThemeBrushUtilityWindowBackgroundActive", and uncheck the Document check box. The properties drawer should look like:
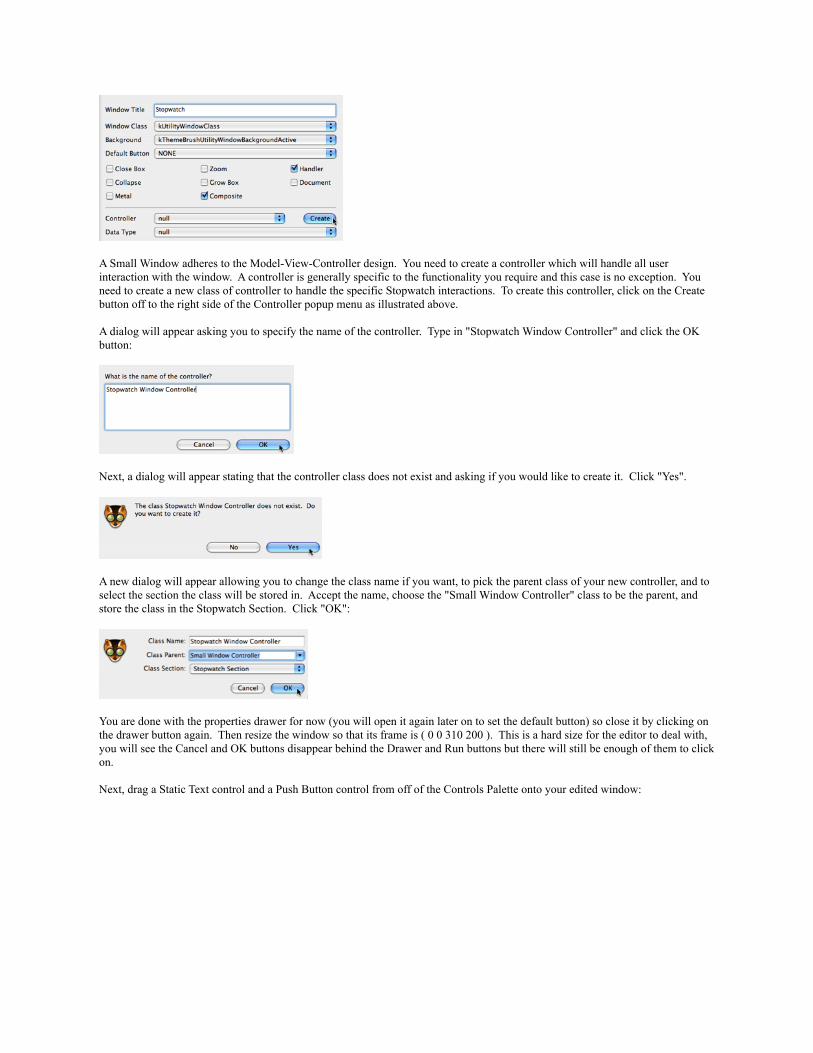
A Small Window adheres to the Model-View-Controller design. You need to create a controller which will handle all user interaction with the window. A controller is generally specific to the functionality you require and this case is no exception. You need to create a new class of controller to handle the specific Stopwatch interactions. To create this controller, click on the Create button off to the right side of the Controller popup menu as illustrated above.
A dialog will appear asking you to specify the name of the controller. Type in "Stopwatch Window Controller" and click the OK button:
Next, a dialog will appear stating that the controller class does not exist and asking if you would like to create it. Click "Yes".
A new dialog will appear allowing you to change the class name if you want, to pick the parent class of your new controller, and to select the section the class will be stored in. Accept the name, choose the "Small Window Controller" class to be the parent, and store the class in the Stopwatch Section. Click "OK":
You are done with the properties drawer for now (you will open it again later on to set the default button) so close it by clicking on the drawer button again. Then resize the window so that its frame is ( 0 0 310 200 ). This is a hard size for the editor to deal with, you will see the Cancel and OK buttons disappear behind the Drawer and Run buttons but there will still be enough of them to click on.
Next, drag a Static Text control and a Push Button control from off of the Controls Palette onto your edited window:
Editing the Static Text control
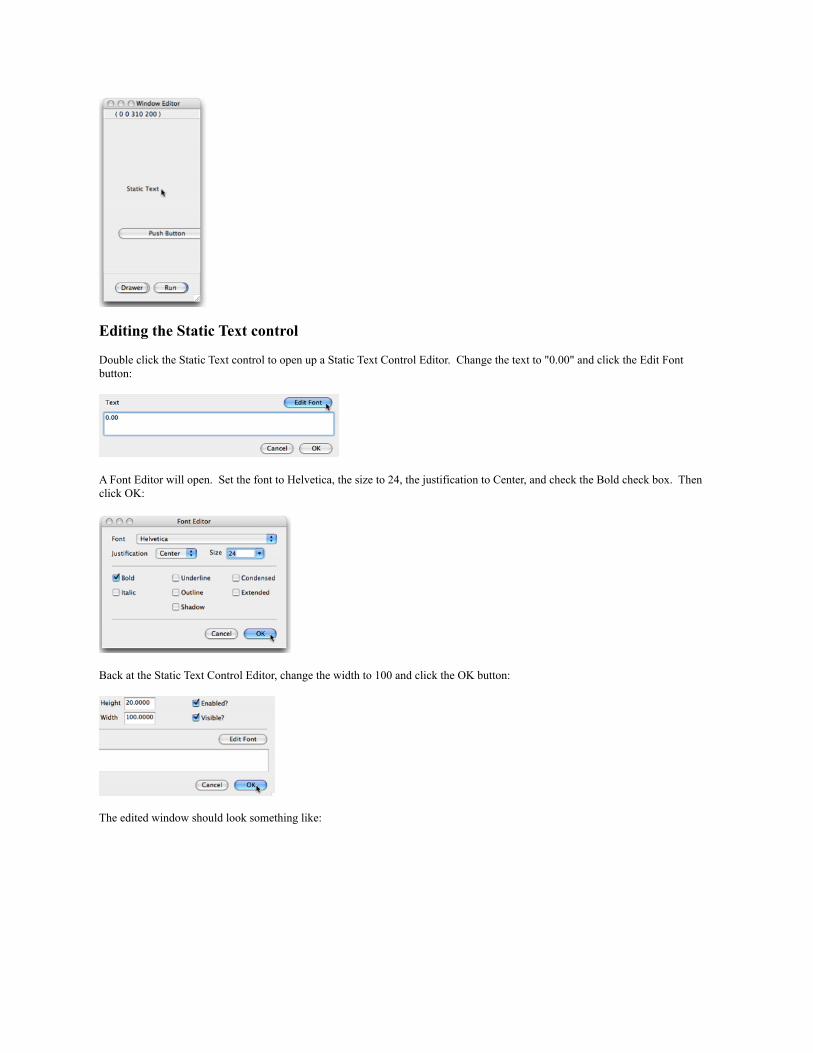
Double click the Static Text control to open up a Static Text Control Editor. Change the text to "0.00" and click the Edit Font button:
A Font Editor will open. Set the font to Helvetica, the size to 24, the justification to Center, and check the Bold check box. Then click OK:
Back at the Static Text Control Editor, change the width to 100 and click the OK button:
The edited window should look something like:
Editing the Push Button control
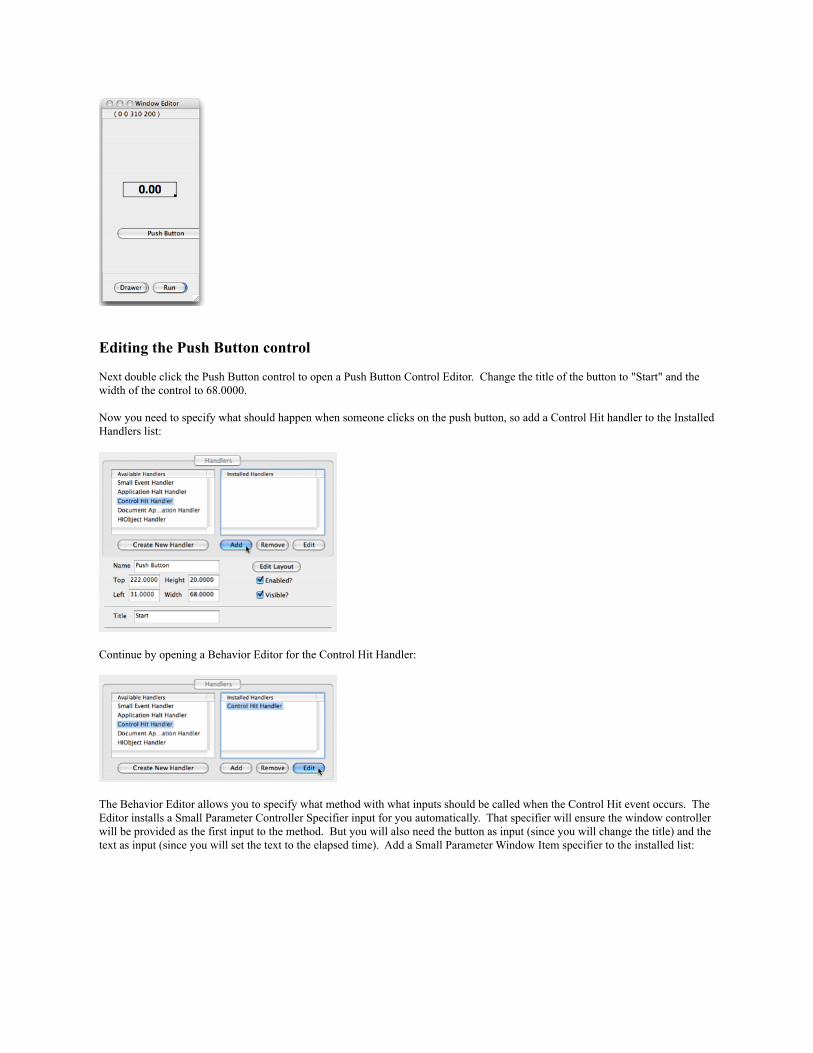
Next double click the Push Button control to open a Push Button Control Editor. Change the title of the button to "Start" and the width of the control to 68.0000.
Now you need to specify what should happen when someone clicks on the push button, so add a Control Hit handler to the Installed Handlers list:
Continue by opening a Behavior Editor for the Control Hit Handler:
The Behavior Editor allows you to specify what method with what inputs should be called when the Control Hit event occurs. The Editor installs a Small Parameter Controller Specifier input for you automatically. That specifier will ensure the window controller will be provided as the first input to the method. But you will also need the button as input (since you will change the title) and the text as input (since you will set the text to the elapsed time). Add a Small Parameter Window Item specifier to the installed list:
and open its editor:
Click on the combo box control and select "Push Button". Click on the combo box again to close the list (DO NOT hit the Return key, this will close the editor before accepting the selection!):
Now click the OK button:
Add the third input as a Small Parameter Window Item specifier and edit it to select the Static Text control as the parameter:
Click the OK button of the Push Button Control Editor window to set the values of the push button.
Positioning the controls
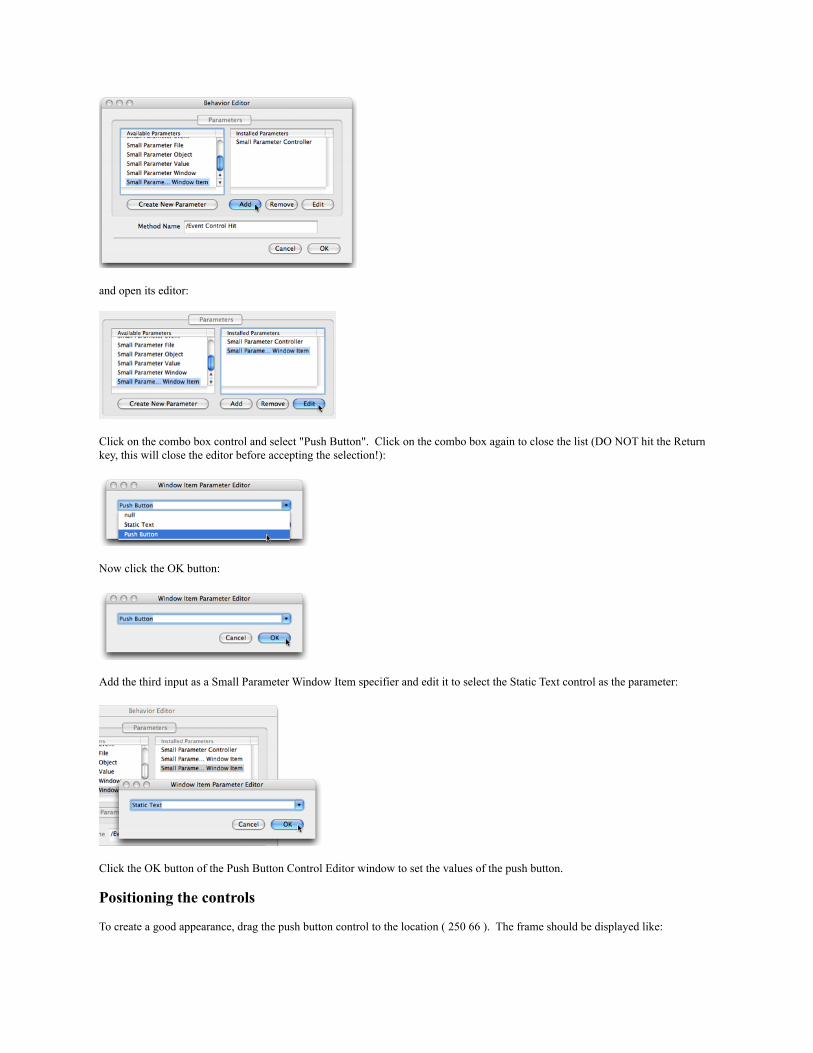
To create a good appearance, drag the push button control to the location ( 250 66 ). The frame should be displayed like:
Similarly, drag the static text control to the location ( 210 50 ). The frame should be displayed like:
Setting the default button
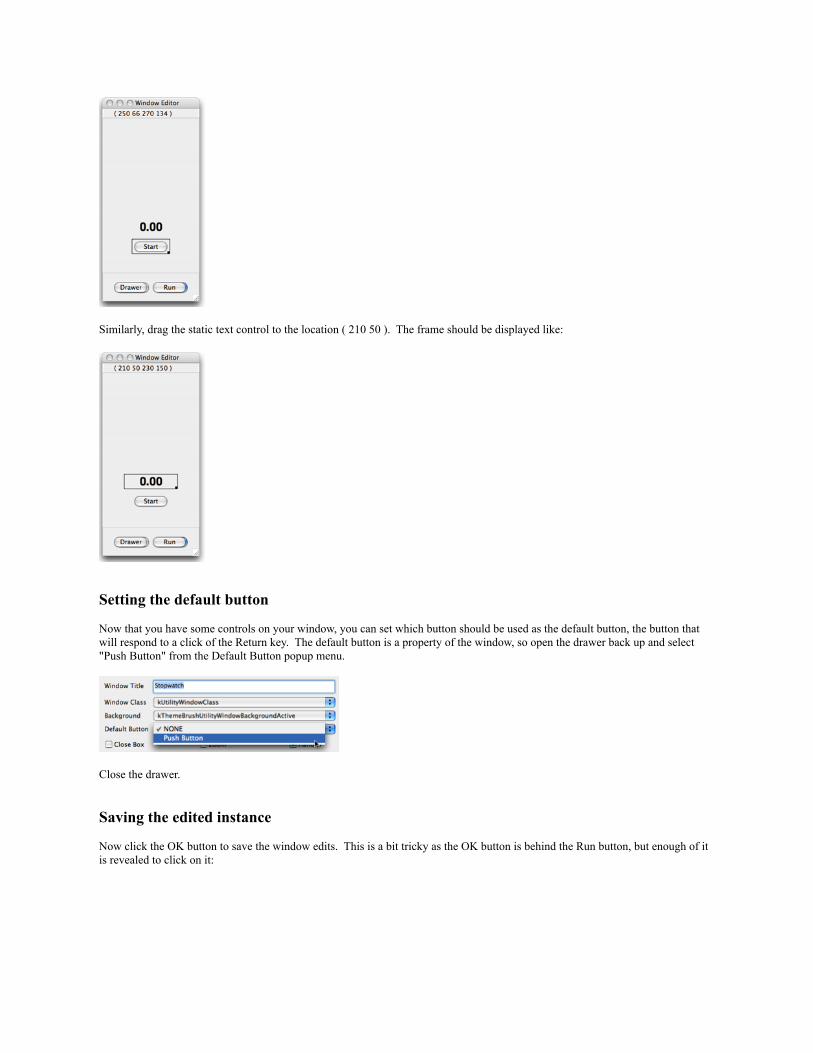
Now that you have some controls on your window, you can set which button should be used as the default button, the button that will respond to a click of the Return key. The default button is a property of the window, so open the drawer back up and select "Push Button" from the Default Button popup menu.
Close the drawer.
Saving the edited instance
Now click the OK button to save the window edits. This is a bit tricky as the OK button is behind the Run button, but enough of it is revealed to click on it:
Continue to save the application instance edits by clicking the Application Editor OK button:
Finally click the OK button of the value window for the Small Application instance:
Running the application again
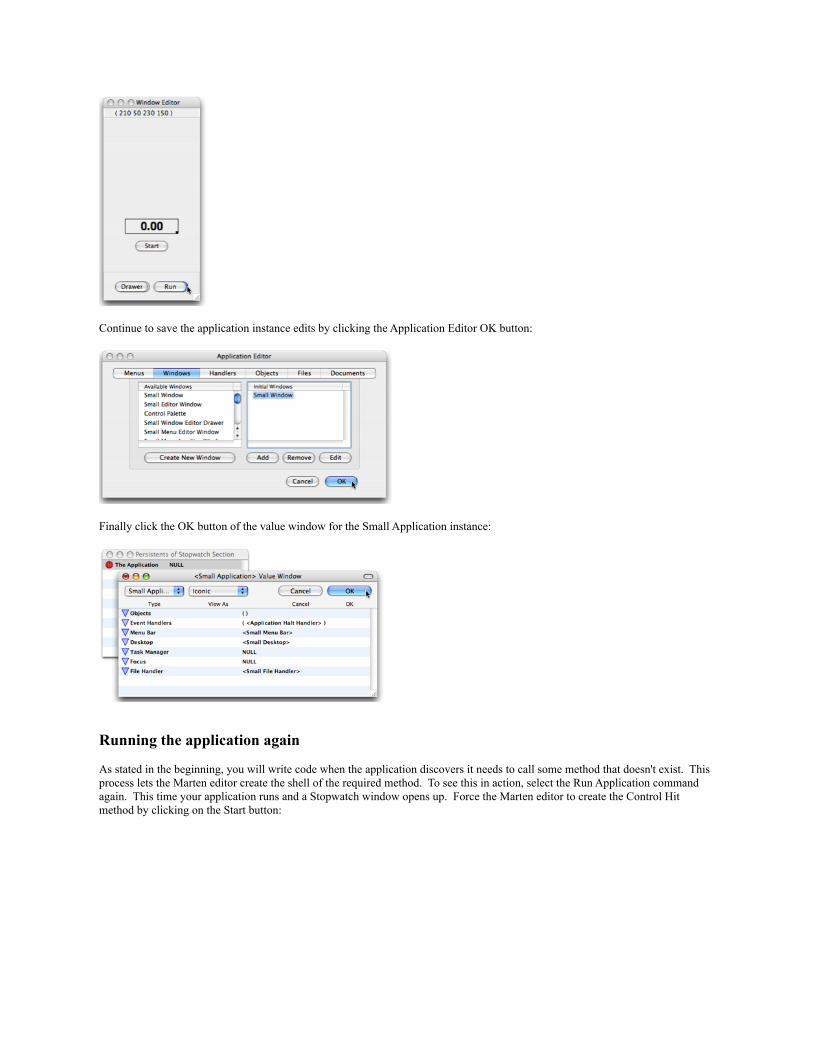
As stated in the beginning, you will write code when the application discovers it needs to call some method that doesn't exist. This process lets the Marten editor create the shell of the required method. To see this in action, select the Run Application command again. This time your application runs and a Stopwatch window opens up. Force the Marten editor to create the Control Hit method by clicking on the Start button:
The class method specified by the control hit behavior is called "Event Control Hit" for the Stopwatch Window Controller class and it doesn't exist. So the project application halts and a dialog opens asking if you want to create the method. Click "Yes":
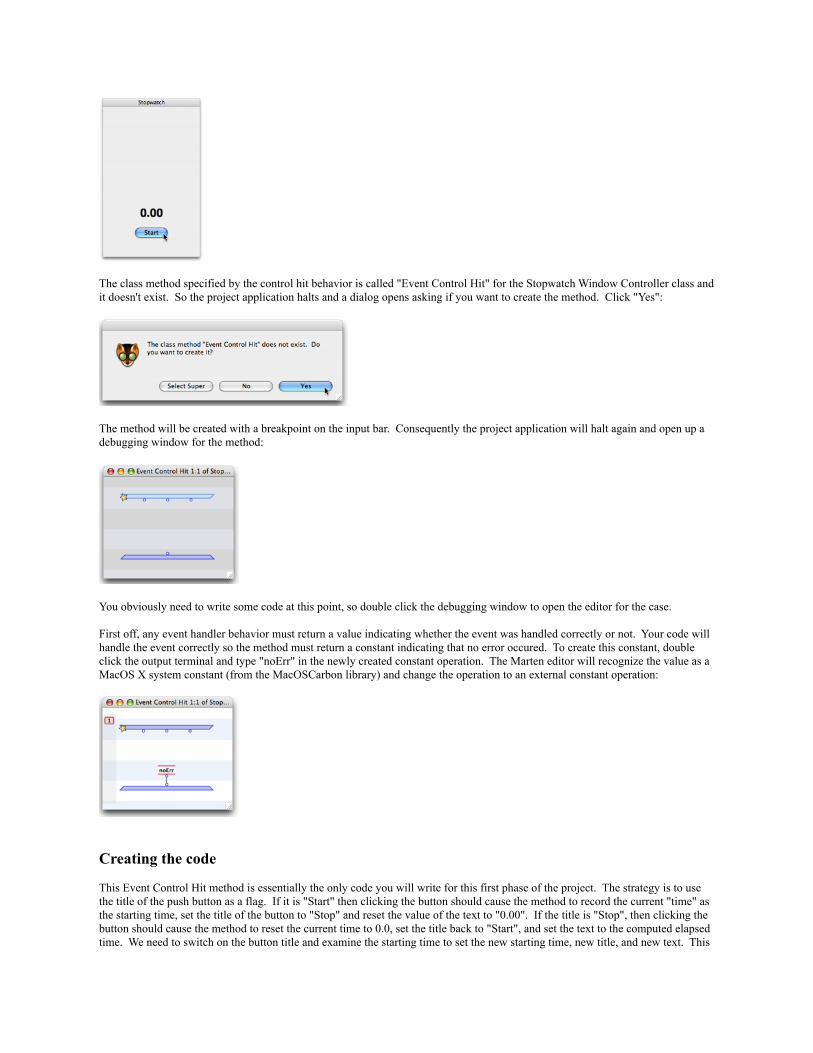
The method will be created with a breakpoint on the input bar. Consequently the project application will halt again and open up a debugging window for the method:
You obviously need to write some code at this point, so double click the debugging window to open the editor for the case.
First off, any event handler behavior must return a value indicating whether the event was handled correctly or not. Your code will handle the event correctly so the method must return a constant indicating that no error occured. To create this constant, double click the output terminal and type "noErr" in the newly created constant operation. The Marten editor will recognize the value as a MacOS X system constant (from the MacOSCarbon library) and change the operation to an external constant operation:
Creating the code
This Event Control Hit method is essentially the only code you will write for this first phase of the project. The strategy is to use the title of the push button as a flag. If it is "Start" then clicking the button should cause the method to record the current "time" as the starting time, set the title of the button to "Stop" and reset the value of the text to "0.00". If the title is "Stop", then clicking the button should cause the method to reset the current time to 0.0, set the title back to "Start", and set the text to the computed elapsed time. We need to switch on the button title and examine the starting time to set the new starting time, new title, and new text. This
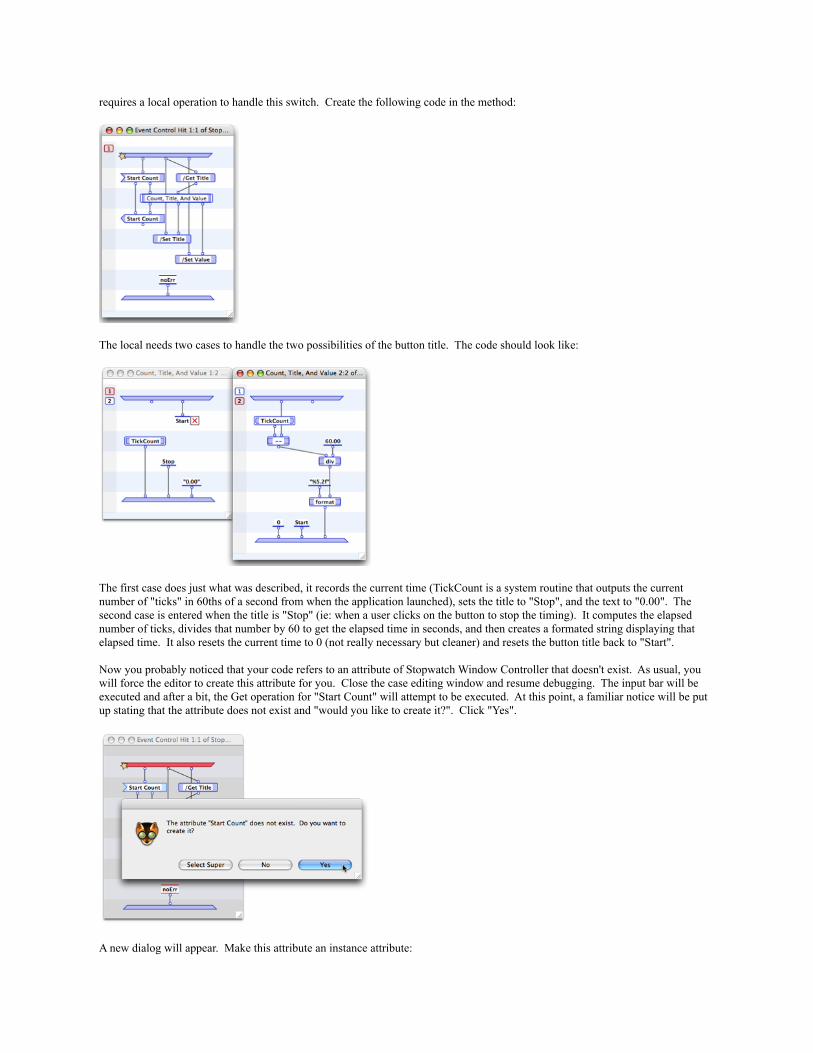
requires a local operation to handle this switch. Create the following code in the method:
The local needs two cases to handle the two possibilities of the button title. The code should look like:
The first case does just what was described, it records the current time (TickCount is a system routine that outputs the current number of "ticks" in 60ths of a second from when the application launched), sets the title to "Stop", and the text to "0.00". The second case is entered when the title is "Stop" (ie: when a user clicks on the button to stop the timing). It computes the elapsed number of ticks, divides that number by 60 to get the elapsed time in seconds, and then creates a formated string displaying that elapsed time. It also resets the current time to 0 (not really necessary but cleaner) and resets the button title back to "Start".
Now you probably noticed that your code refers to an attribute of Stopwatch Window Controller that doesn't exist. As usual, you will force the editor to create this attribute for you. Close the case editing window and resume debugging. The input bar will be executed and after a bit, the Get operation for "Start Count" will attempt to be executed. At this point, a familiar notice will be put up stating that the attribute does not exist and "would you like to create it?". Click "Yes".
A new dialog will appear. Make this attribute an instance attribute:
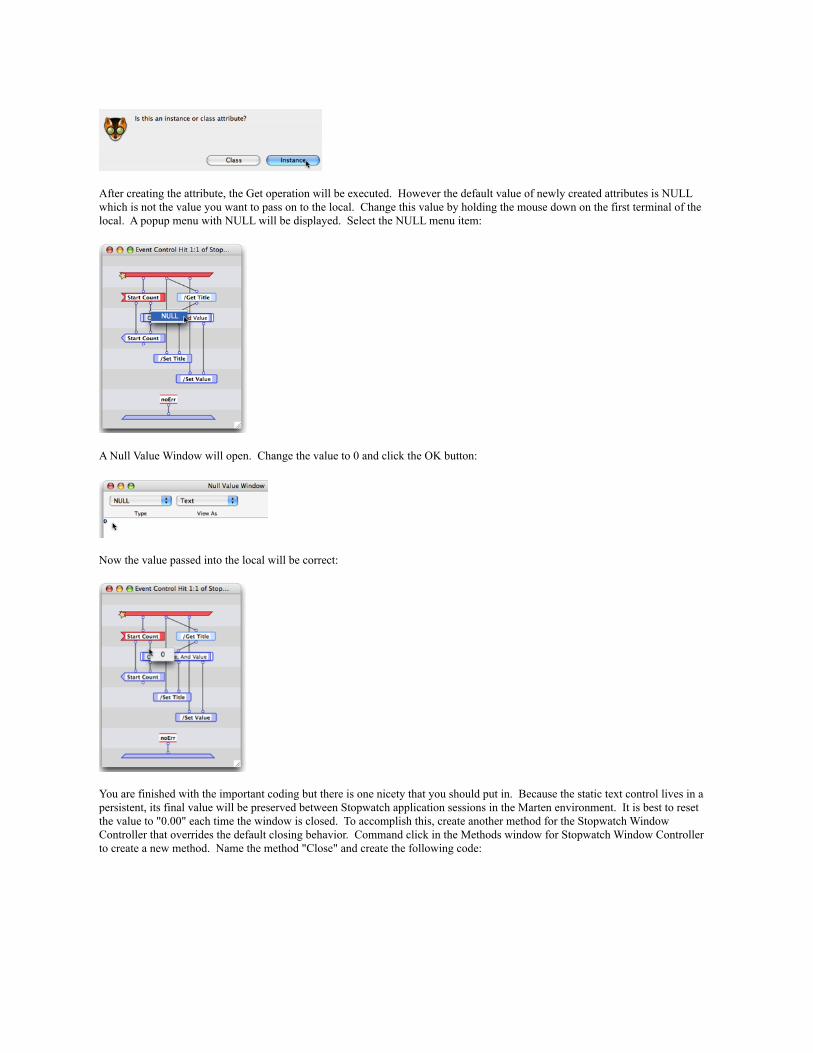
After creating the attribute, the Get operation will be executed. However the default value of newly created attributes is NULL which is not the value you want to pass on to the local. Change this value by holding the mouse down on the first terminal of the local. A popup menu with NULL will be displayed. Select the NULL menu item:
A Null Value Window will open. Change the value to 0 and click the OK button:
Now the value passed into the local will be correct:
You are finished with the important coding but there is one nicety that you should put in. Because the static text control lives in a persistent, its final value will be preserved between Stopwatch application sessions in the Marten environment. It is best to reset the value to "0.00" each time the window is closed. To accomplish this, create another method for the Stopwatch Window Controller that overrides the default closing behavior. Command click in the Methods window for Stopwatch Window Controller to create a new method. Name the method "Close" and create the following code:
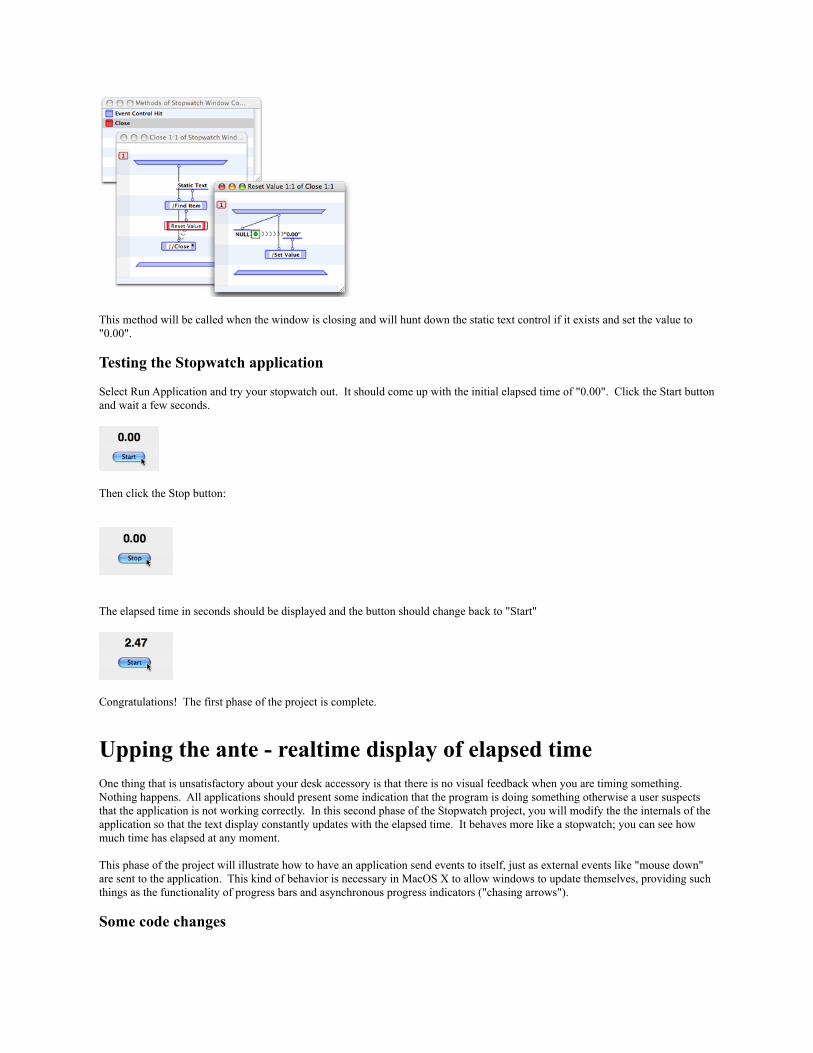
This method will be called when the window is closing and will hunt down the static text control if it exists and set the value to "0.00".
Testing the Stopwatch application
Select Run Application and try your stopwatch out. It should come up with the initial elapsed time of "0.00". Click the Start button and wait a few seconds.
Then click the Stop button:
The elapsed time in seconds should be displayed and the button should change back to "Start"
Congratulations! The first phase of the project is complete.
Upping the ante - realtime display of elapsed timeOne thing that is unsatisfactory about your desk accessory is that there is no visual feedback when you are timing something. Nothing happens. All applications should present some indication that the program is doing something otherwise a user suspects that the application is not working correctly. In this second phase of the Stopwatch project, you will modify the the internals of the application so that the text display constantly updates with the elapsed time. It behaves more like a stopwatch; you can see how much time has elapsed at any moment.
This phase of the project will illustrate how to have an application send events to itself, just as external events like "mouse down" are sent to the application. This kind of behavior is necessary in MacOS X to allow windows to update themselves, providing such things as the functionality of progress bars and asynchronous progress indicators ("chasing arrows").
Some code changes

To implement this functionality, you need to modify the Stopwatch Window Controller/Event Control Hit method. Change the code of the method so that it matches the cases displayed below:
Essentially, the "Start Count" Get operation has been moved inside the second case of the local. The combination of operations that get the Start Count value, subtract it from the current tick count, and then divide it by 60 ticks per second represents functionality that computes the elapsed time. This functionality is so useful it should be captured as a method of the Stopwatch Window Controller. The Marten IDE supports a powerful code refactoring capability that makes creating such a method very easy.
Mouse down and drag out a marquee rectangle that selects the following operations:
With those operations selected, go to the Operations menu and click the "Operations to Local" command.
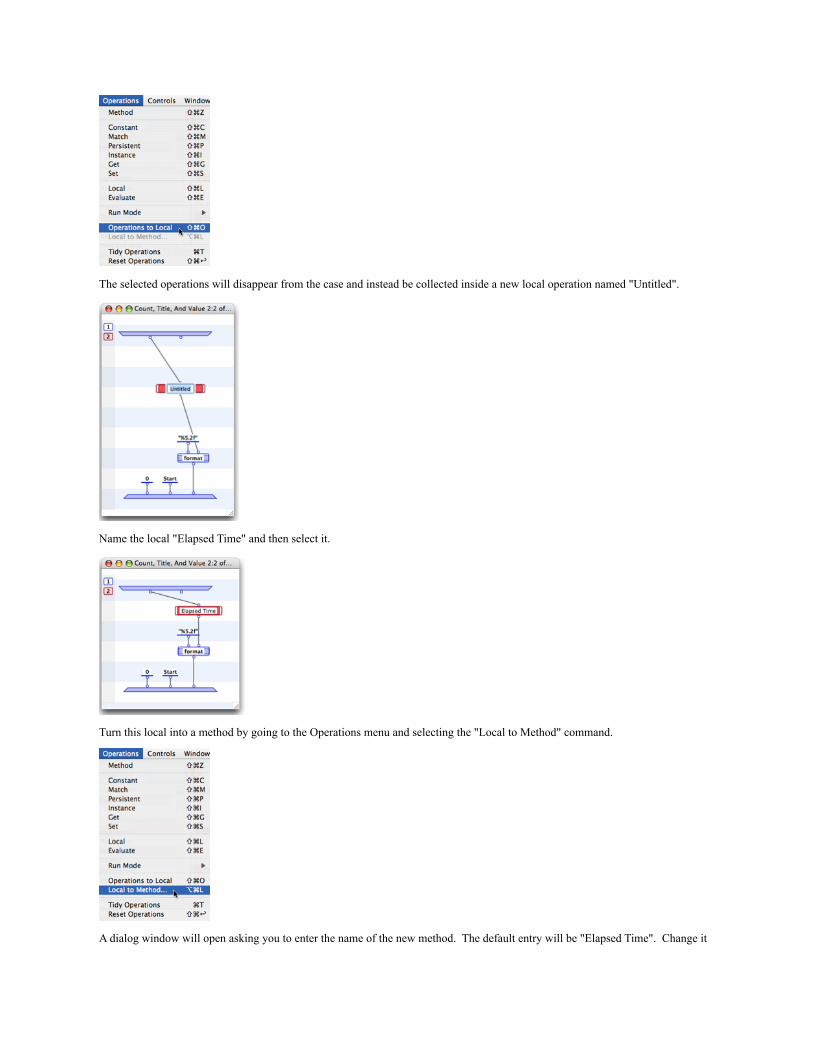
The selected operations will disappear from the case and instead be collected inside a new local operation named "Untitled".
Name the local "Elapsed Time" and then select it.
Turn this local into a method by going to the Operations menu and selecting the "Local to Method" command.
A dialog window will open asking you to enter the name of the new method. The default entry will be "Elapsed Time". Change it

to a data driven class method by typing a slash ( / ) in front of the name, then click the OK button.
The Marten environment will recognize that this is a class method and open a dialog requesting that you select the class that will contain the method. Select the Stopwatch Window Controller item and click OK.
The method will change to a class method operation.
While this is perfectly acceptable, you can give your code more flexibility by making this a data driven method operation. Select the class prefix and delete it, leaving behind a data driven method operation.
Generating an update event
You are almost done with the initial modifications. Return to the first case of the "Count, Title, And Value" local and create the following code.
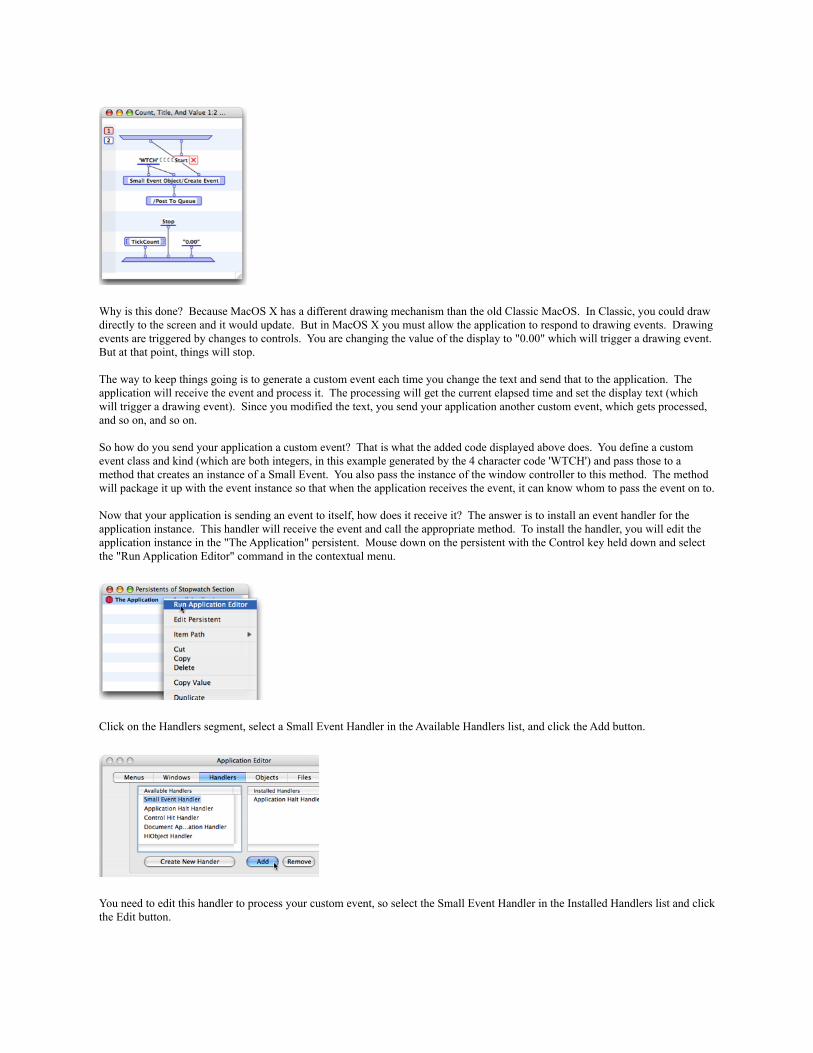
Why is this done? Because MacOS X has a different drawing mechanism than the old Classic MacOS. In Classic, you could draw directly to the screen and it would update. But in MacOS X you must allow the application to respond to drawing events. Drawing events are triggered by changes to controls. You are changing the value of the display to "0.00" which will trigger a drawing event. But at that point, things will stop.
The way to keep things going is to generate a custom event each time you change the text and send that to the application. The application will receive the event and process it. The processing will get the current elapsed time and set the display text (which will trigger a drawing event). Since you modified the text, you send your application another custom event, which gets processed, and so on, and so on.
So how do you send your application a custom event? That is what the added code displayed above does. You define a custom event class and kind (which are both integers, in this example generated by the 4 character code 'WTCH') and pass those to a method that creates an instance of a Small Event. You also pass the instance of the window controller to this method. The method will package it up with the event instance so that when the application receives the event, it can know whom to pass the event on to.
Now that your application is sending an event to itself, how does it receive it? The answer is to install an event handler for the application instance. This handler will receive the event and call the appropriate method. To install the handler, you will edit the application instance in the "The Application" persistent. Mouse down on the persistent with the Control key held down and select the "Run Application Editor" command in the contextual menu.
Click on the Handlers segment, select a Small Event Handler in the Available Handlers list, and click the Add button.
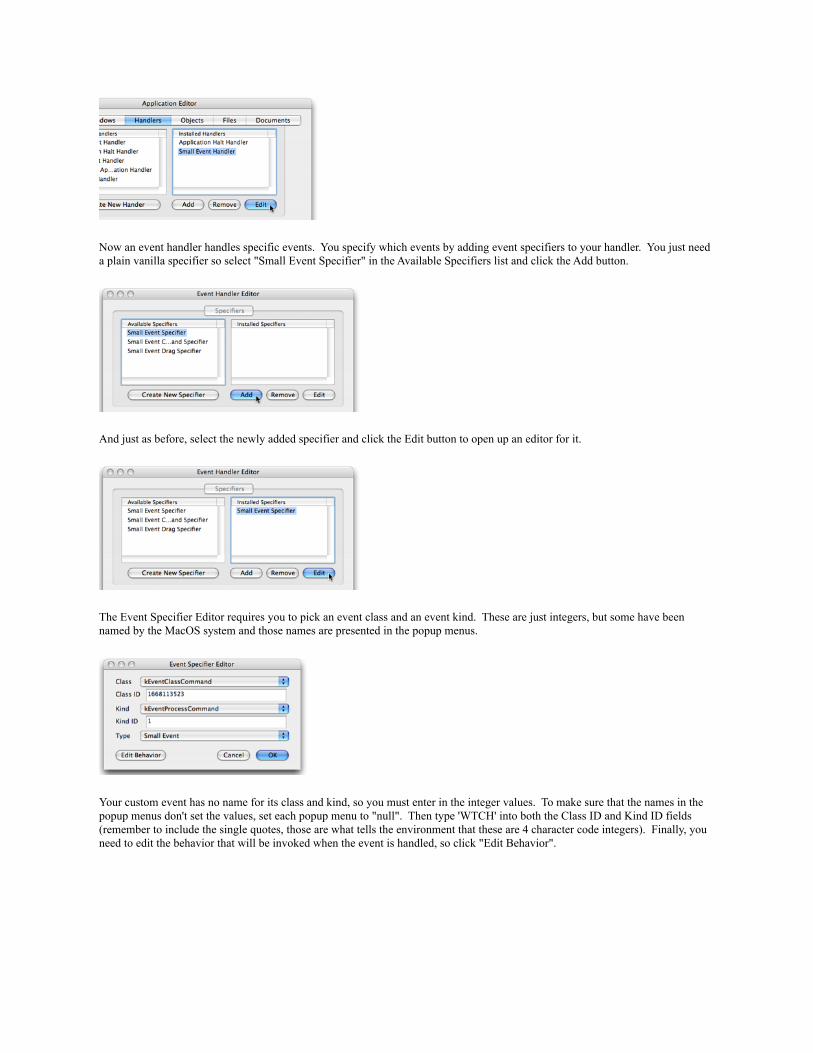
You need to edit this handler to process your custom event, so select the Small Event Handler in the Installed Handlers list and click the Edit button.
Now an event handler handles specific events. You specify which events by adding event specifiers to your handler. You just need a plain vanilla specifier so select "Small Event Specifier" in the Available Specifiers list and click the Add button.
And just as before, select the newly added specifier and click the Edit button to open up an editor for it.
The Event Specifier Editor requires you to pick an event class and an event kind. These are just integers, but some have been named by the MacOS system and those names are presented in the popup menus.
Your custom event has no name for its class and kind, so you must enter in the integer values. To make sure that the names in the popup menus don't set the values, set each popup menu to "null". Then type 'WTCH' into both the Class ID and Kind ID fields (remember to include the single quotes, those are what tells the environment that these are 4 character code integers). Finally, you need to edit the behavior that will be invoked when the event is handled, so click "Edit Behavior".
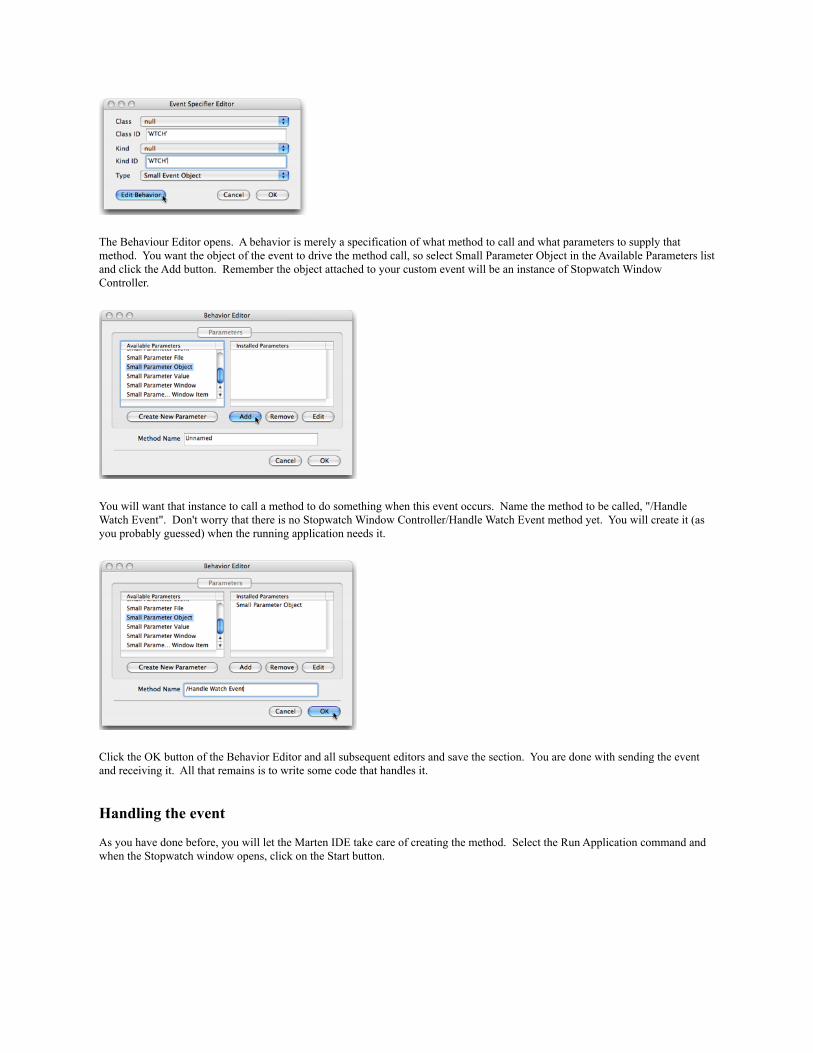
The Behaviour Editor opens. A behavior is merely a specification of what method to call and what parameters to supply that method. You want the object of the event to drive the method call, so select Small Parameter Object in the Available Parameters list and click the Add button. Remember the object attached to your custom event will be an instance of Stopwatch Window Controller.
You will want that instance to call a method to do something when this event occurs. Name the method to be called, "/Handle Watch Event". Don't worry that there is no Stopwatch Window Controller/Handle Watch Event method yet. You will create it (as you probably guessed) when the running application needs it.
Click the OK button of the Behavior Editor and all subsequent editors and save the section. You are done with sending the event and receiving it. All that remains is to write some code that handles it.
Handling the event
As you have done before, you will let the Marten IDE take care of creating the method. Select the Run Application command and when the Stopwatch window opens, click on the Start button.
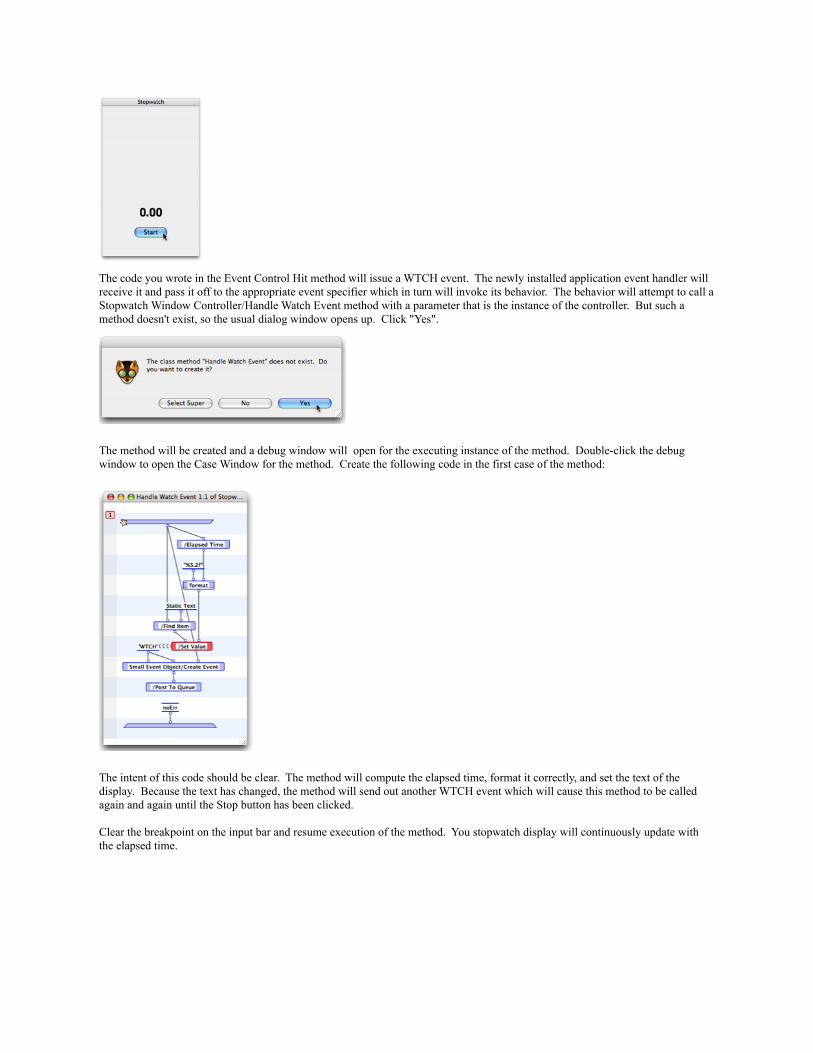
The code you wrote in the Event Control Hit method will issue a WTCH event. The newly installed application event handler will receive it and pass it off to the appropriate event specifier which in turn will invoke its behavior. The behavior will attempt to call a Stopwatch Window Controller/Handle Watch Event method with a parameter that is the instance of the controller. But such a method doesn't exist, so the usual dialog window opens up. Click "Yes".
The method will be created and a debug window will open for the executing instance of the method. Double-click the debug window to open the Case Window for the method. Create the following code in the first case of the method:
The intent of this code should be clear. The method will compute the elapsed time, format it correctly, and set the text of the display. Because the text has changed, the method will send out another WTCH event which will cause this method to be called again and again until the Stop button has been clicked.
Clear the breakpoint on the input bar and resume execution of the method. You stopwatch display will continuously update with the elapsed time.
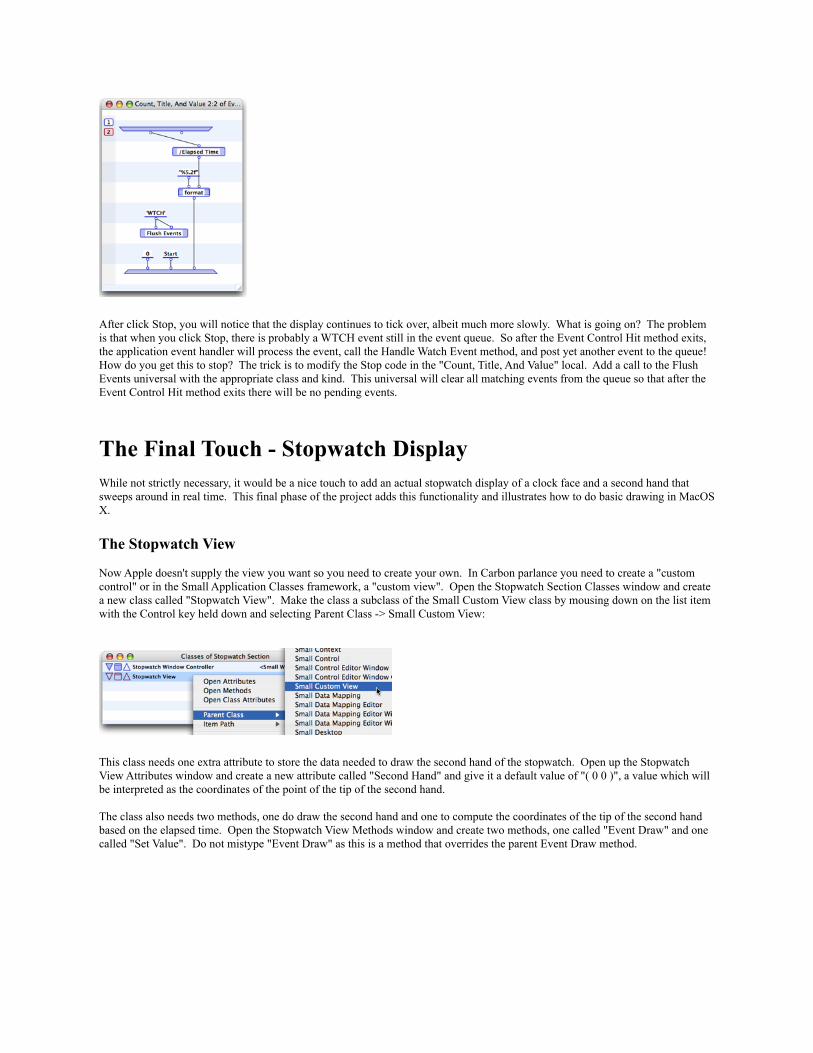
After click Stop, you will notice that the display continues to tick over, albeit much more slowly. What is going on? The problem is that when you click Stop, there is probably a WTCH event still in the event queue. So after the Event Control Hit method exits, the application event handler will process the event, call the Handle Watch Event method, and post yet another event to the queue! How do you get this to stop? The trick is to modify the Stop code in the "Count, Title, And Value" local. Add a call to the Flush Events universal with the appropriate class and kind. This universal will clear all matching events from the queue so that after the Event Control Hit method exits there will be no pending events.
The Final Touch - Stopwatch DisplayWhile not strictly necessary, it would be a nice touch to add an actual stopwatch display of a clock face and a second hand that sweeps around in real time. This final phase of the project adds this functionality and illustrates how to do basic drawing in MacOS X.
The Stopwatch View
Now Apple doesn't supply the view you want so you need to create your own. In Carbon parlance you need to create a "custom control" or in the Small Application Classes framework, a "custom view". Open the Stopwatch Section Classes window and create a new class called "Stopwatch View". Make the class a subclass of the Small Custom View class by mousing down on the list item with the Control key held down and selecting Parent Class -> Small Custom View:
This class needs one extra attribute to store the data needed to draw the second hand of the stopwatch. Open up the Stopwatch View Attributes window and create a new attribute called "Second Hand" and give it a default value of "( 0 0 )", a value which will be interpreted as the coordinates of the point of the tip of the second hand.
The class also needs two methods, one do draw the second hand and one to compute the coordinates of the tip of the second hand based on the elapsed time. Open the Stopwatch View Methods window and create two methods, one called "Event Draw" and one called "Set Value". Do not mistype "Event Draw" as this is a method that overrides the parent Event Draw method.
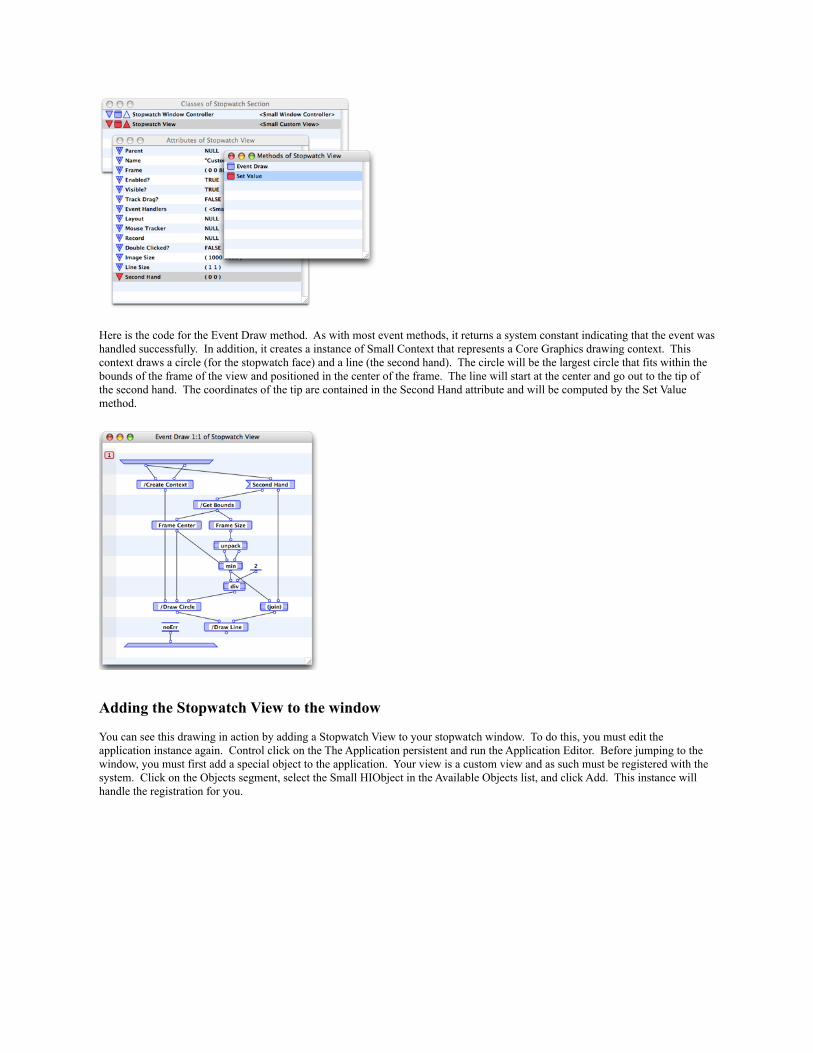
Here is the code for the Event Draw method. As with most event methods, it returns a system constant indicating that the event was handled successfully. In addition, it creates a instance of Small Context that represents a Core Graphics drawing context. This context draws a circle (for the stopwatch face) and a line (the second hand). The circle will be the largest circle that fits within the bounds of the frame of the view and positioned in the center of the frame. The line will start at the center and go out to the tip of the second hand. The coordinates of the tip are contained in the Second Hand attribute and will be computed by the Set Value method.
Adding the Stopwatch View to the window
You can see this drawing in action by adding a Stopwatch View to your stopwatch window. To do this, you must edit the application instance again. Control click on the The Application persistent and run the Application Editor. Before jumping to the window, you must first add a special object to the application. Your view is a custom view and as such must be registered with the system. Click on the Objects segment, select the Small HIObject in the Available Objects list, and click Add. This instance will handle the registration for you.
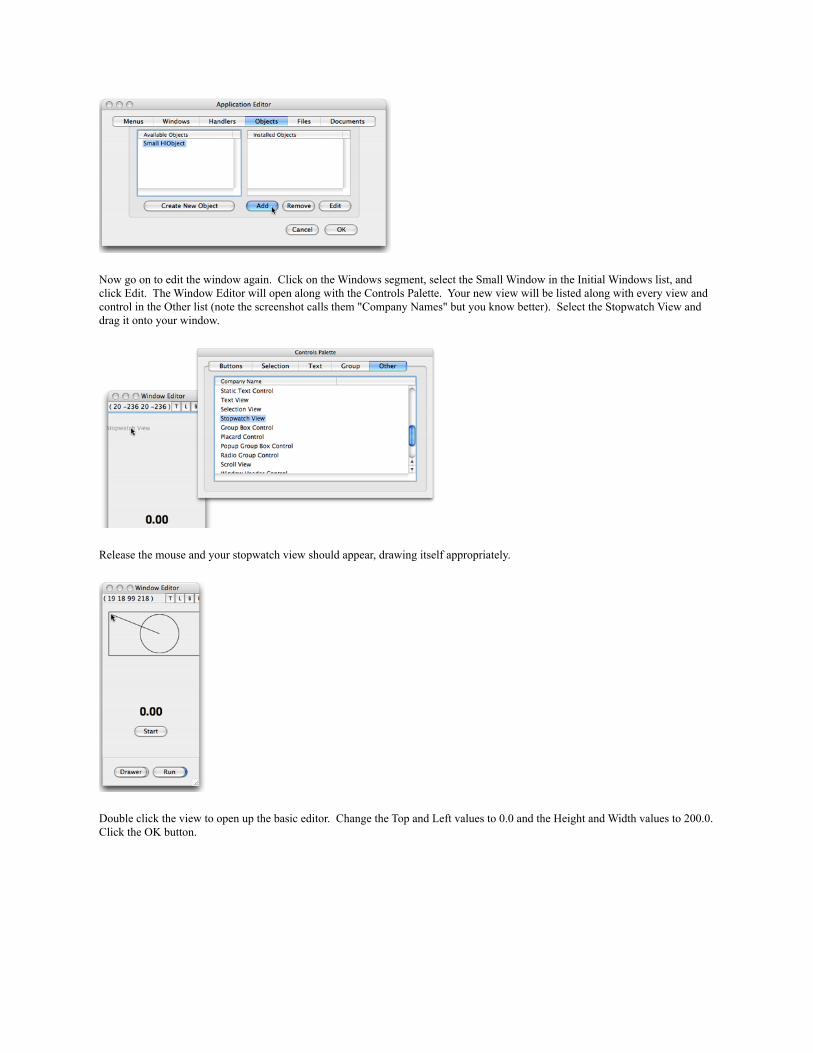
Now go on to edit the window again. Click on the Windows segment, select the Small Window in the Initial Windows list, and click Edit. The Window Editor will open along with the Controls Palette. Your new view will be listed along with every view and control in the Other list (note the screenshot calls them "Company Names" but you know better). Select the Stopwatch View and drag it onto your window.
Release the mouse and your stopwatch view should appear, drawing itself appropriately.
Double click the view to open up the basic editor. Change the Top and Left values to 0.0 and the Height and Width values to 200.0. Click the OK button.
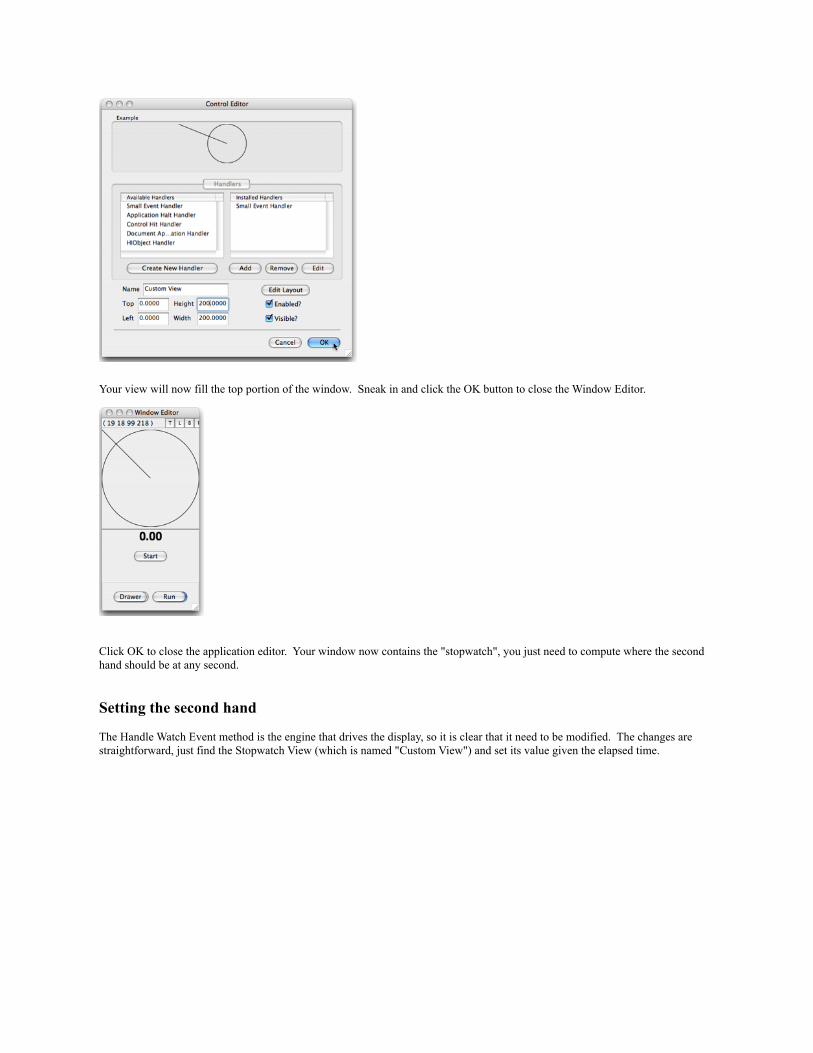
Your view will now fill the top portion of the window. Sneak in and click the OK button to close the Window Editor.
Click OK to close the application editor. Your window now contains the "stopwatch", you just need to compute where the second hand should be at any second.
Setting the second hand
The Handle Watch Event method is the engine that drives the display, so it is clear that it need to be modified. The changes are straightforward, just find the Stopwatch View (which is named "Custom View") and set its value given the elapsed time.
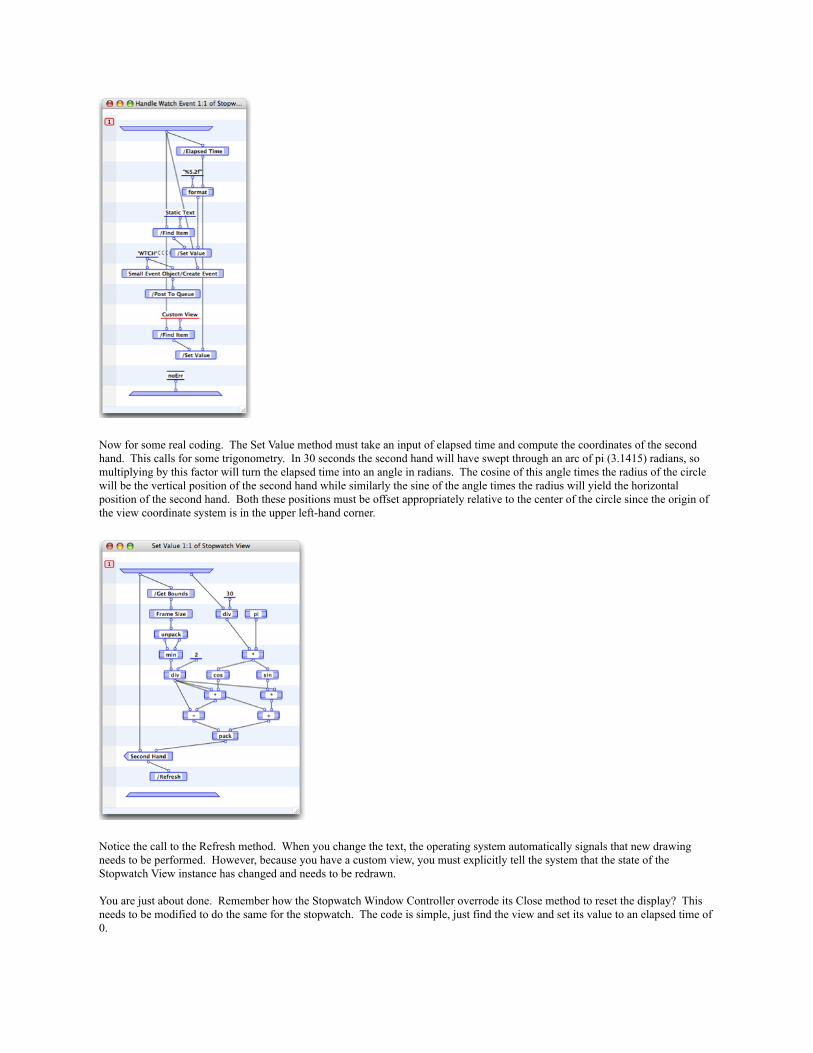
Now for some real coding. The Set Value method must take an input of elapsed time and compute the coordinates of the second hand. This calls for some trigonometry. In 30 seconds the second hand will have swept through an arc of pi (3.1415) radians, so multiplying by this factor will turn the elapsed time into an angle in radians. The cosine of this angle times the radius of the circle will be the vertical position of the second hand while similarly the sine of the angle times the radius will yield the horizontal position of the second hand. Both these positions must be offset appropriately relative to the center of the circle since the origin of the view coordinate system is in the upper left-hand corner.
Notice the call to the Refresh method. When you change the text, the operating system automatically signals that new drawing needs to be performed. However, because you have a custom view, you must explicitly tell the system that the state of the Stopwatch View instance has changed and needs to be redrawn.
You are just about done. Remember how the Stopwatch Window Controller overrode its Close method to reset the display? This needs to be modified to do the same for the stopwatch. The code is simple, just find the view and set its value to an elapsed time of 0.
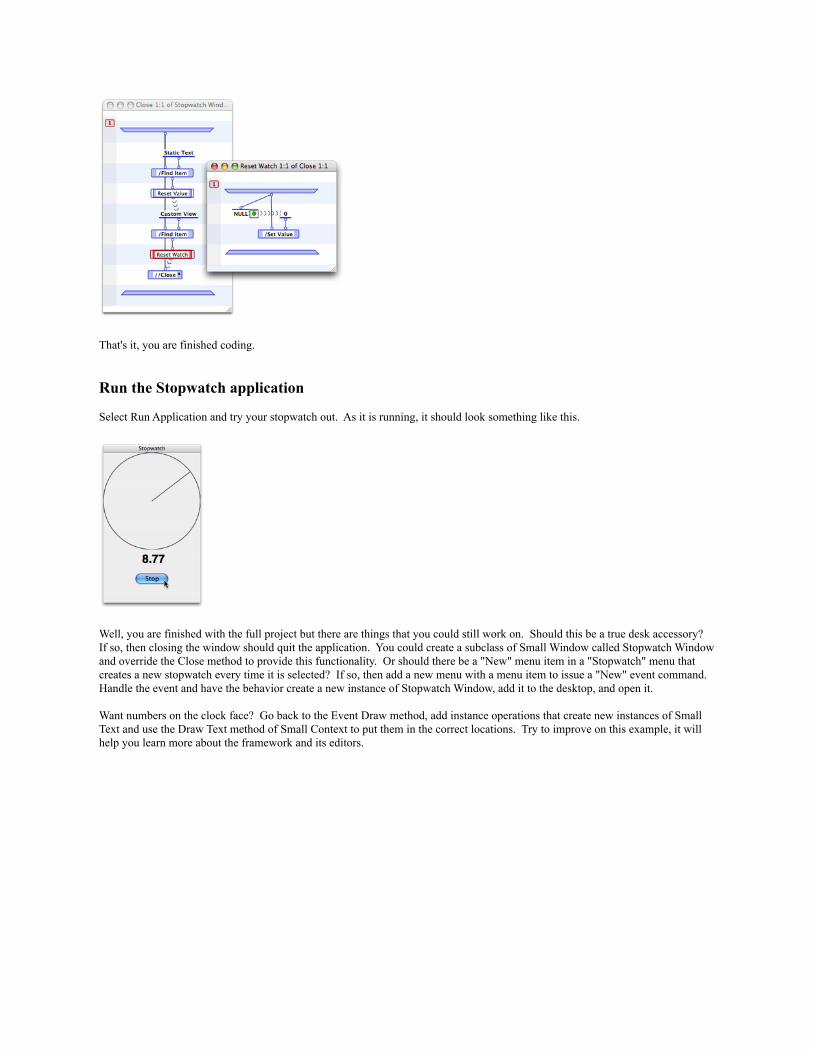
That's it, you are finished coding.
Run the Stopwatch application
Select Run Application and try your stopwatch out. As it is running, it should look something like this.
Well, you are finished with the full project but there are things that you could still work on. Should this be a true desk accessory? If so, then closing the window should quit the application. You could create a subclass of Small Window called Stopwatch Window and override the Close method to provide this functionality. Or should there be a "New" menu item in a "Stopwatch" menu that creates a new stopwatch every time it is selected? If so, then add a new menu with a menu item to issue a "New" event command. Handle the event and have the behavior create a new instance of Stopwatch Window, add it to the desktop, and open it.
Want numbers on the clock face? Go back to the Event Draw method, add instance operations that create new instances of Small Text and use the Draw Text method of Small Context to put them in the correct locations. Try to improve on this example, it will help you learn more about the framework and its editors.


![STOPWATCH TIME STUDY - debrina.lecture.ub.ac.iddebrina.lecture.ub.ac.id/files/2014/09/APK-10-Stopwatch-Time-Study.pdf · [WAKTU] KERJA PENGUKURAN ... stopwatch,&papan,&kalkulator,&form&pengukuran&kerja&!](https://img.pdfslide.net/doc/110x75/5cbb787288c9930a6f8be7de/stopwatch-time-study-waktu-kerja-pengukuran-stopwatchpapankalkulatorformpengukurankerja.jpg)