Embed Size (px)
Citation preview

28 Apr 2017
MAS OPERA Business Trusts E-Services Online User Guide
Version 1.2
MAS OPERA – Business Trusts E-Services User Guide Version 1.2
2
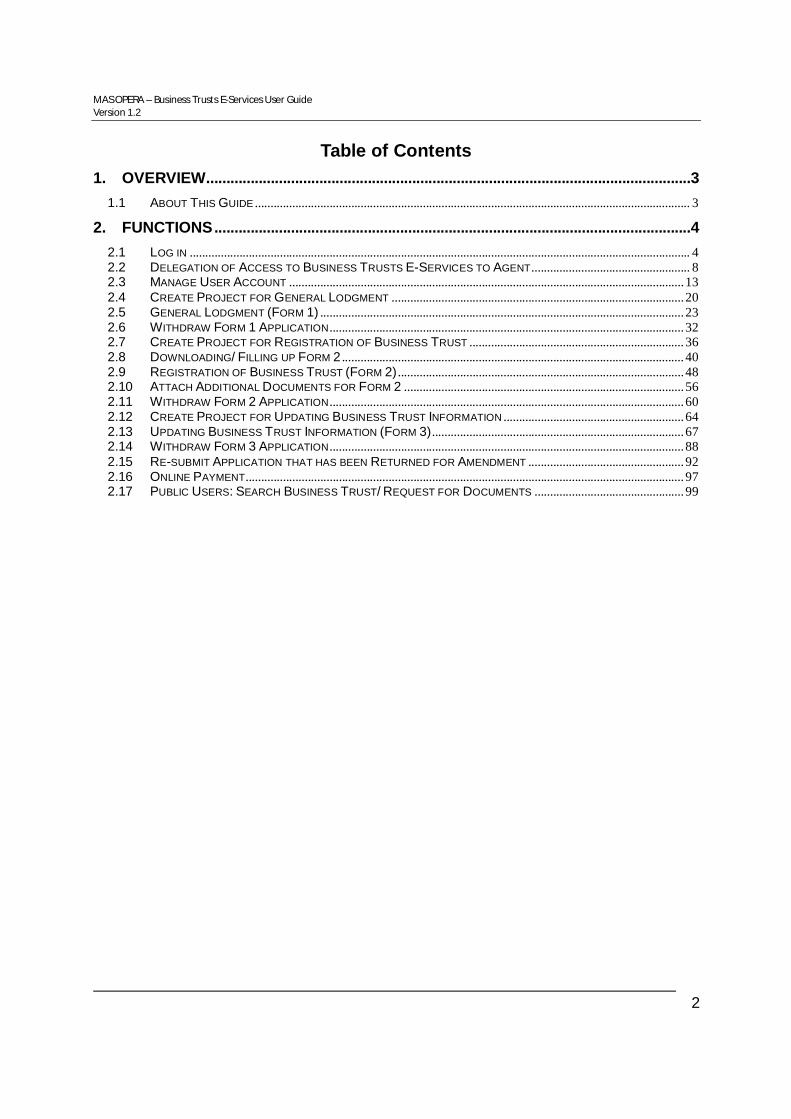
Table of Contents 1. OVERVIEW ........................................................................................................................3
1.1 ABOUT THIS GUIDE ............................................................................................................................................ 3
2. FUNCTIONS ......................................................................................................................4
2.1 LOG IN ................................................................................................................................................................. 4 2.2 DELEGATION OF ACCESS TO BUSINESS TRUSTS E-SERVICES TO AGENT ................................................... 8 2.3 MANAGE USER ACCOUNT ............................................................................................................................... 13 2.4 CREATE PROJECT FOR GENERAL LODGMENT .............................................................................................. 20 2.5 GENERAL LODGMENT (FORM 1) ..................................................................................................................... 23 2.6 WITHDRAW FORM 1 APPLICATION .................................................................................................................. 32 2.7 CREATE PROJECT FOR REGISTRATION OF BUSINESS TRUST ..................................................................... 36 2.8 DOWNLOADING/ FILLING UP FORM 2 .............................................................................................................. 40 2.9 REGISTRATION OF BUSINESS TRUST (FORM 2) ............................................................................................ 48 2.10 ATTACH ADDITIONAL DOCUMENTS FOR FORM 2 .......................................................................................... 56 2.11 WITHDRAW FORM 2 APPLICATION .................................................................................................................. 60 2.12 CREATE PROJECT FOR UPDATING BUSINESS TRUST INFORMATION .......................................................... 64 2.13 UPDATING BUSINESS TRUST INFORMATION (FORM 3) ................................................................................. 67 2.14 WITHDRAW FORM 3 APPLICATION .................................................................................................................. 88 2.15 RE-SUBMIT APPLICATION THAT HAS BEEN RETURNED FOR AMENDMENT .................................................. 92 2.16 ONLINE PAYMENT ............................................................................................................................................. 97 2.17 PUBLIC USERS: SEARCH BUSINESS TRUST/ REQUEST FOR DOCUMENTS ................................................ 99

MAS OPERA – Business Trusts E-Services User Guide Version 1.2
3
1. OVERVIEW
1.1 About This Guide
The MAS Offers and Prospectuses Electronic Repository and Access (OPERA) system is a web-based system consisting of various modules to host information and documents and manage submissions and applications to be made to the Corporate Finance Division of the Capital Markets Department. This document provides you a step-by-step guide on how to use the Business Trusts E-Services module of OPERA.

MAS OPERA – Business Trusts E-Services User Guide Version 1.2
4
2. FUNCTIONS
2.1 Log in This section will show how an authorized user can log in to OPERA. Only logged-in users will be allowed to submit Forms 1, 2 and 3 under the Business Trusts E-Services.
Figure 2.1-1 URL of OPERA
1. Access the OPERA site at https://eservices.mas.gov.sg/opera. See Figure 2.1-1
Figure 2.1-2 OPERA Log in page
2. Click to login using SingPass, or click to login using CorpPass. See Figure 2.1-2

MAS OPERA – Business Trusts E-Services User Guide Version 1.2
5
____________________________________________________________________________
For SingPass login, proceed to step 3. For CorpPass login, skip to step 5. ____________________________________________________________________________
Figure 2.1-3 SingPass Log-in page
3. For SingPass login, the user will be redirected to the SingPass log-in page. See Figure 2.1-
3 4. Enter the SingPass ID and password. Click Login.
Note: Please visit the SingPass website at http://www.singpass.gov.sg for queries related to SingPass.
____________________________________________________________________________
For SingPass login, skip to step 7. ____________________________________________________________________________

MAS OPERA – Business Trusts E-Services User Guide Version 1.2
6
Figure 2.1-4 CorpPass Log-in page
5. For CorpPass login, the user will be redirected to the CorpPass log-in page. See Figure 2.1-
4 6. Enter the UEN/Entity ID, CorpPass ID and password. Click Login. See Figure 2.1-4
Note: Please visit the CorpPass website at http://www.corppass.gov.sg for queries related to CorpPass.
Figure 2.1-5 UEN and OTP Authentication
7. After SingPass/ CorpPass login is successful, enter the UEN and OTP, and click on
. See Figure 2.1-5
MAS OPERA – Business Trusts E-Services User Guide Version 1.2
7
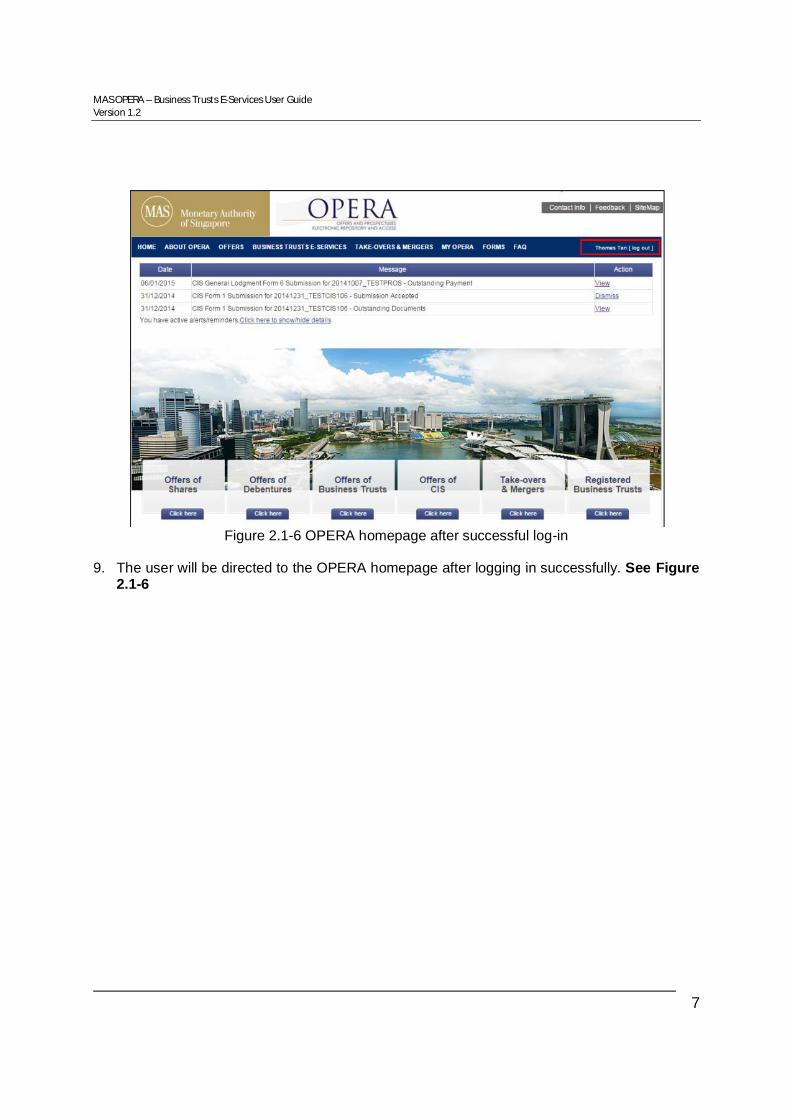
Figure 2.1-6 OPERA homepage after successful log-in
9. The user will be directed to the OPERA homepage after logging in successfully. See Figure
2.1-6
MAS OPERA – Business Trusts E-Services User Guide Version 1.2
8
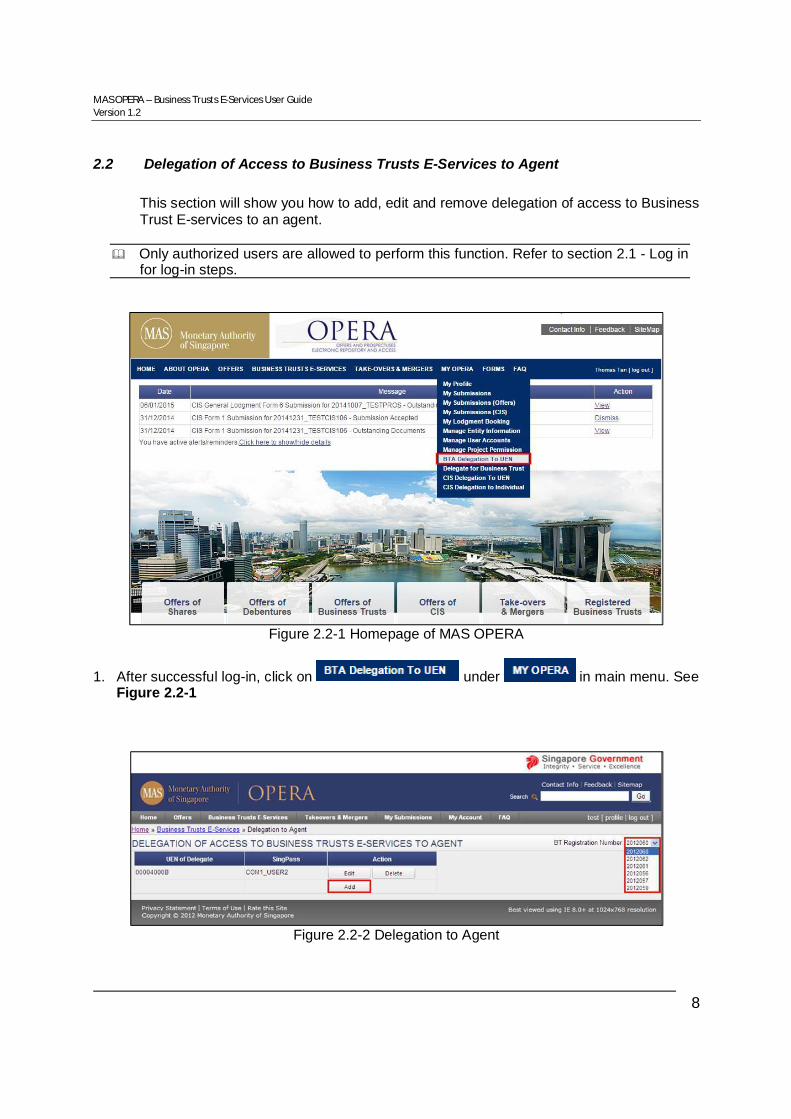
2.2 Delegation of Access to Business Trusts E-Services to Agent This section will show you how to add, edit and remove delegation of access to Business Trust E-services to an agent.
Only authorized users are allowed to perform this function. Refer to section 2.1 - Log in for log-in steps.
Figure 2.2-1 Homepage of MAS OPERA
1. After successful log-in, click on under in main menu. See Figure 2.2-1
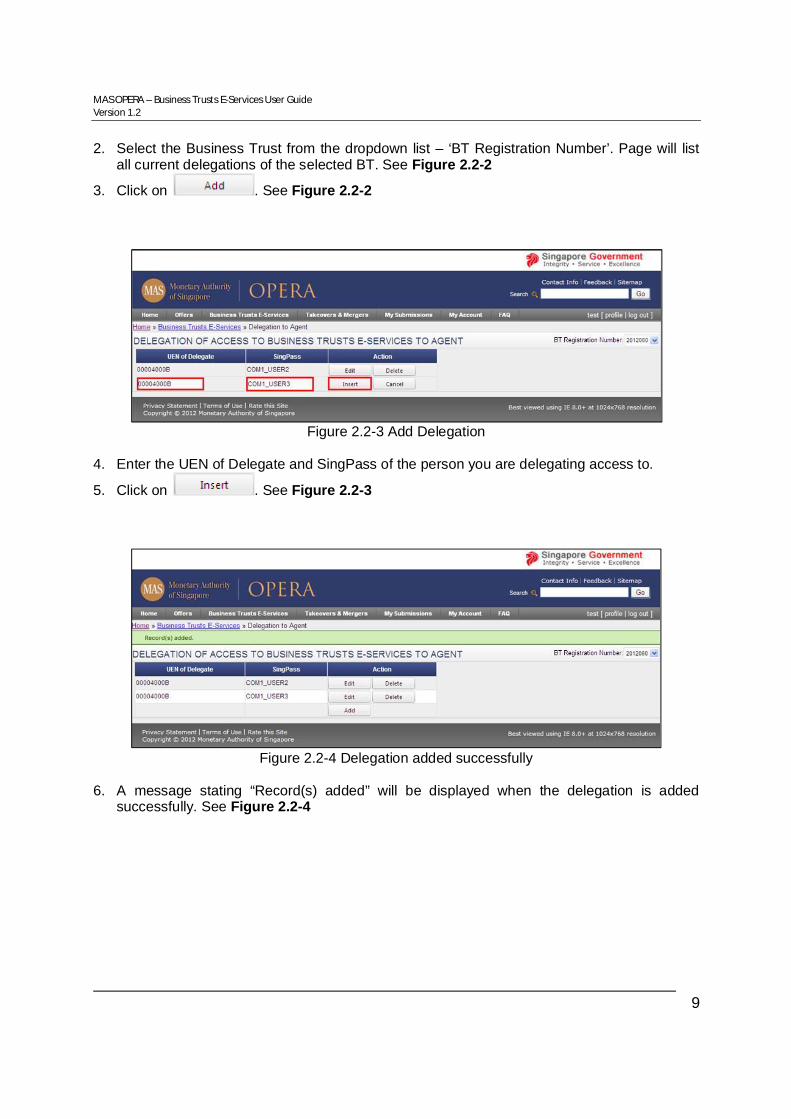
Figure 2.2-2 Delegation to Agent
MAS OPERA – Business Trusts E-Services User Guide Version 1.2
9
2. Select the Business Trust from the dropdown list – ‘BT Registration Number’. Page will list all current delegations of the selected BT. See Figure 2.2-2
3. Click on . See Figure 2.2-2
Figure 2.2-3 Add Delegation
4. Enter the UEN of Delegate and SingPass of the person you are delegating access to.
5. Click on . See Figure 2.2-3
Figure 2.2-4 Delegation added successfully
6. A message stating “Record(s) added” will be displayed when the delegation is added
successfully. See Figure 2.2-4

MAS OPERA – Business Trusts E-Services User Guide Version 1.2
10
Figure 2.2-5 Edit Delegation to Agent
7. To edit a delegation, select the BT Registration Number to show all current delegations. See
Figure 2.2-5
8. Click on . See Figure 2.2-5
Figure 2.2-6 Edit Delegation
9. Edit the UEN and/or SingPass. See Figure 2.2-6
10. Click on . See Figure 2.2-6

MAS OPERA – Business Trusts E-Services User Guide Version 1.2
11
Figure 2.2-7 Delegation edited successfully
11. A message stating “Record(s) updated” will be displayed when the delegation is edited
successfully. See Figure 2.2-7
Figure 2.2-8 Delete Delegation to Agent
12. To delete a delegation, select the BT Registration Number to show all current delegations.
See Figure 2.2-8
13. Click on . See Figure 2.2-8
Figure 2.2-9 Confirmation to delete delegation
14. To confirm the deletion, click on . See Figure 2.2-9
MAS OPERA – Business Trusts E-Services User Guide Version 1.2
12
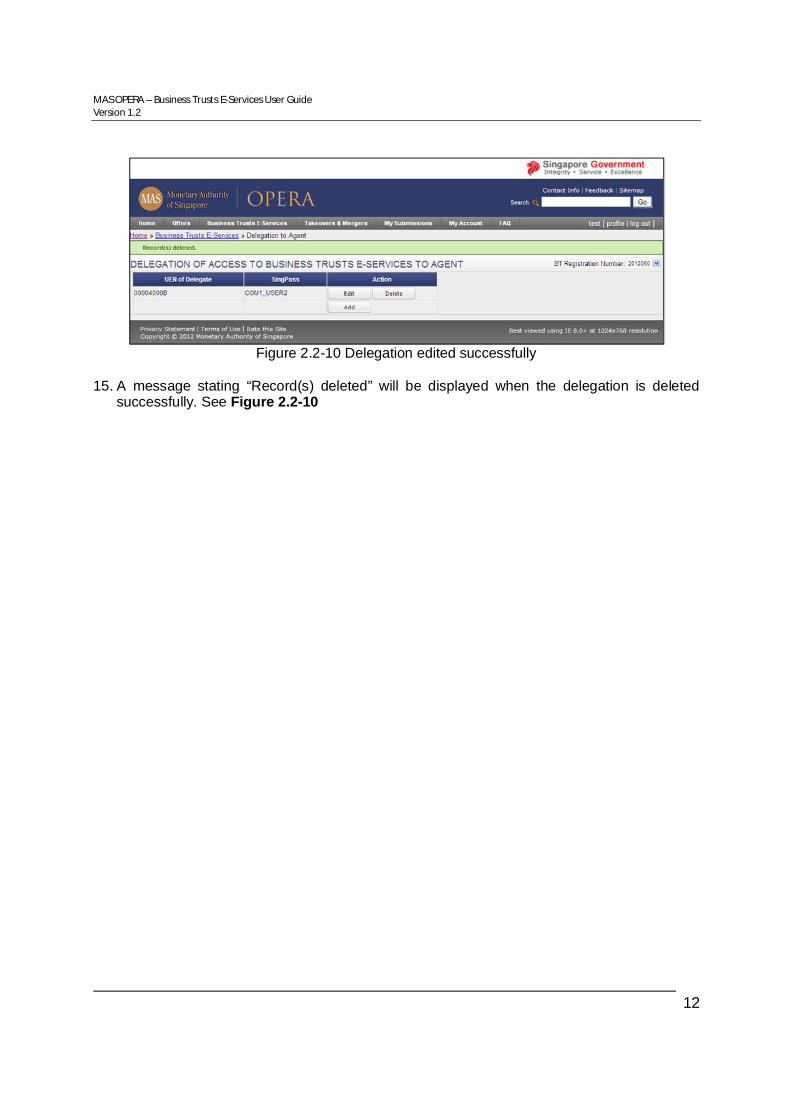
Figure 2.2-10 Delegation edited successfully
15. A message stating “Record(s) deleted” will be displayed when the delegation is deleted
successfully. See Figure 2.2-10
MAS OPERA – Business Trusts E-Services User Guide Version 1.2
13
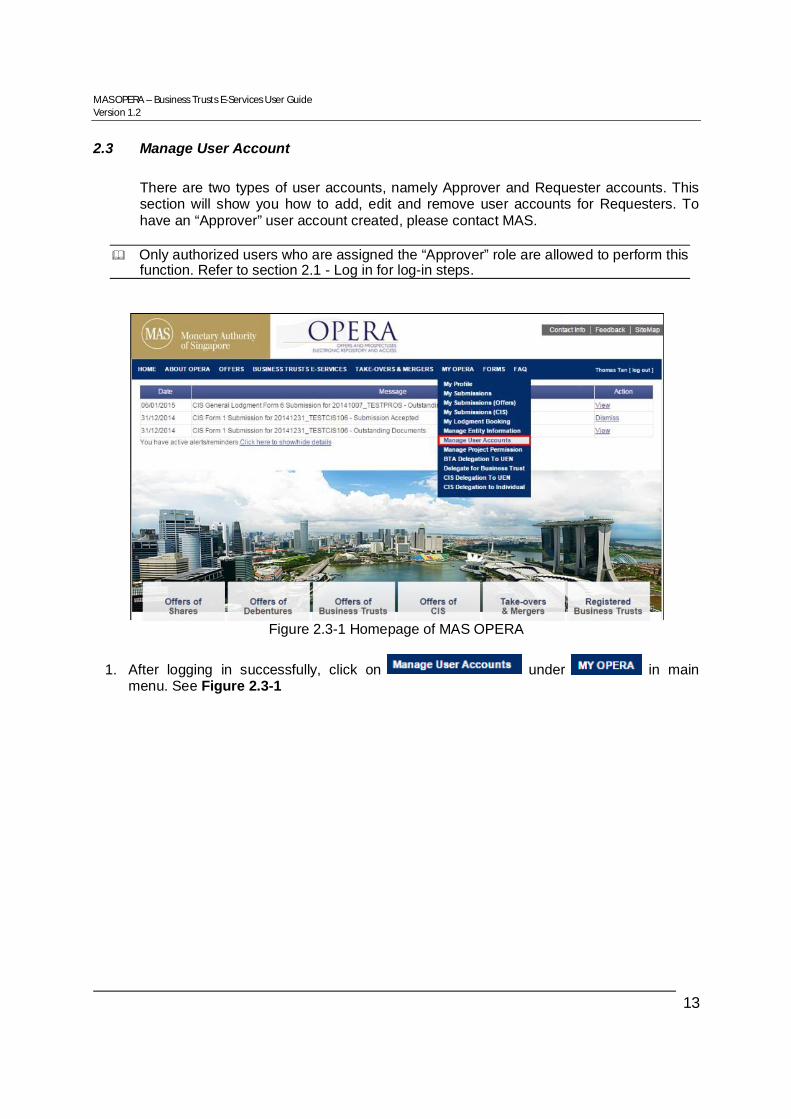
2.3 Manage User Account
There are two types of user accounts, namely Approver and Requester accounts. This section will show you how to add, edit and remove user accounts for Requesters. To have an “Approver” user account created, please contact MAS.
Only authorized users who are assigned the “Approver” role are allowed to perform this function. Refer to section 2.1 - Log in for log-in steps.
Figure 2.3-1 Homepage of MAS OPERA
1. After logging in successfully, click on under in main menu. See Figure 2.3-1

MAS OPERA – Business Trusts E-Services User Guide Version 1.2
14
Figure 2.3-2 Maintain User Account
2. To add a user, click on . See Figure 2.3-2
Figure 2.3-3 Add User Account
3. Enter the full name, NRIC or SingPass ID, email, contact number and OTP Device ID
number of the user being added.

MAS OPERA – Business Trusts E-Services User Guide Version 1.2
15
4. Set the status of the user account to ”Active”. Click on . See Figure 2.3-3
Note: Additional user accounts created will be Requester accounts.
Figure 2.3-4 User account added successfully
5. The message “Record(s) added” will be displayed once the user account has been added
successfully. See Figure 2.3-4
MAS OPERA – Business Trusts E-Services User Guide Version 1.2
16
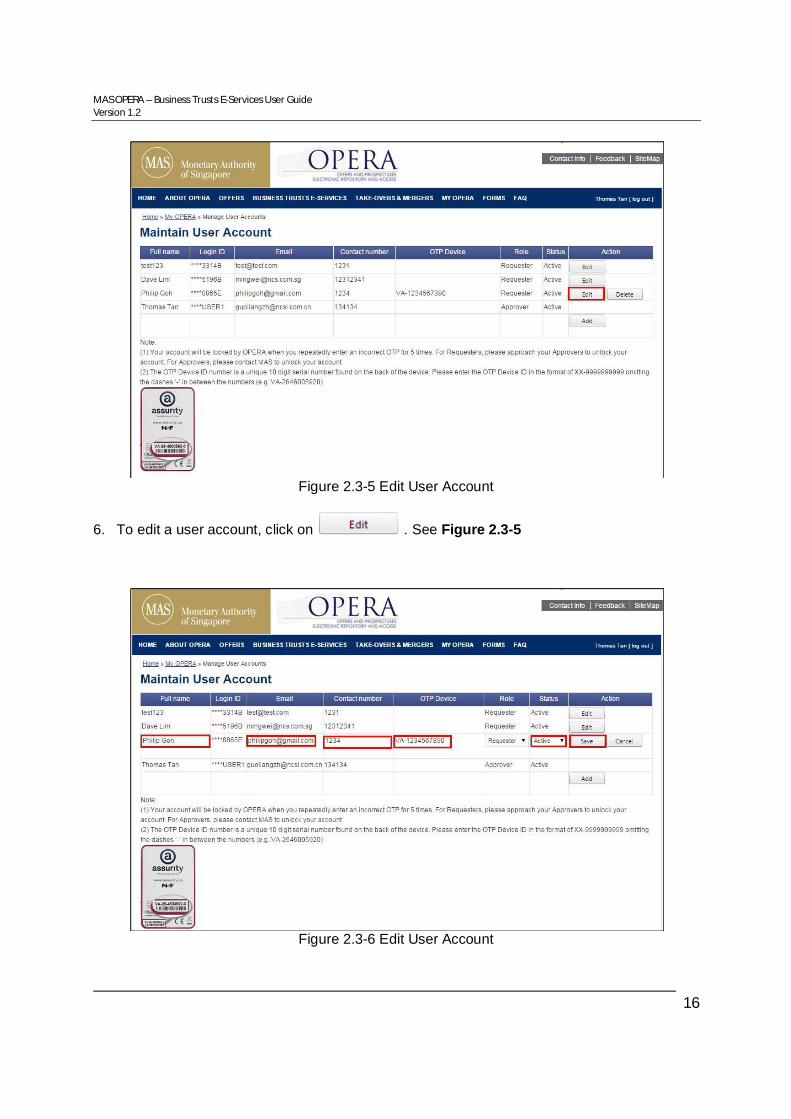
Figure 2.3-5 Edit User Account
6. To edit a user account, click on . See Figure 2.3-5
Figure 2.3-6 Edit User Account

MAS OPERA – Business Trusts E-Services User Guide Version 1.2
17
7. Edit the full name, email, contact number, OTP Device ID number and/or status of the user. See Figure 2.3-6
8. Click on . See Figure 2.3-6
Figure 2.3-7 User account edited successfully
9. The message “Record(s) updated” will be displayed once the user account has been edited
successfully. See Figure 2.3-7

MAS OPERA – Business Trusts E-Services User Guide Version 1.2
18
Figure 2.3-8 Delete User Account
10. To delete a user account, click on . See Figure 2.3-8
Figure 2.3-9 Confirmation to delete user account
11. To confirm the deletion, click on . See Figure 2.3-9
MAS OPERA – Business Trusts E-Services User Guide Version 1.2
19
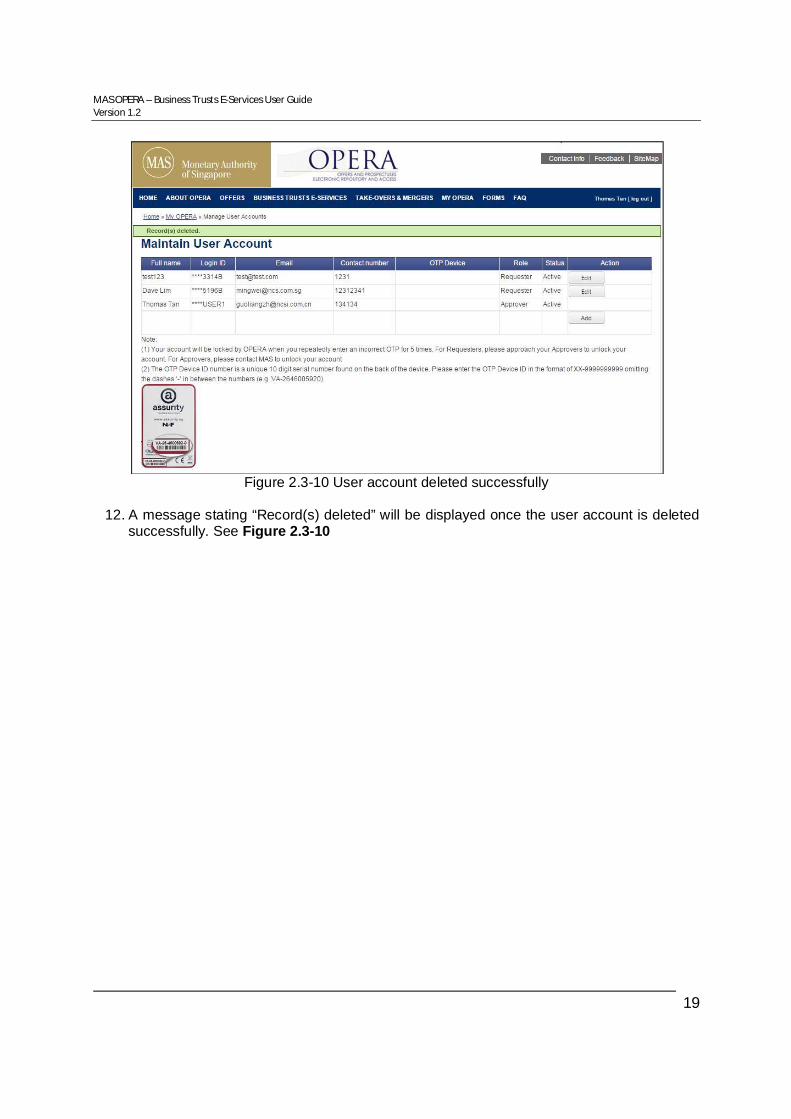
Figure 2.3-10 User account deleted successfully
12. A message stating “Record(s) deleted” will be displayed once the user account is deleted
successfully. See Figure 2.3-10

MAS OPERA – Business Trusts E-Services User Guide Version 1.2
20
2.4 Create Project for General Lodgment
This section will show you how to create a project to lodge a document on behalf of a Business Trust.
Only authorized users are allowed to perform this function. Refer to section 2.1 - Log in for log-in steps.
Figure 2.4-1 Homepage of MAS OPERA
1. After successful log-in, click on under in
main menu. See Figure 2.4-1
Figure 2.4-2 Instructions to create General Lodgment project
2. Click ‘Create [General Lodgment] Project’. See Figure 2.4-2

MAS OPERA – Business Trusts E-Services User Guide Version 1.2
21
Figure 2.4-3 Select Business Trust
3. Select the Business Trust from the dropdown list – ‘Name of Business Trust’. See Figure
2.4-3 4. To search for available users who may be granted access to the project, enter the user
name in the ‘Search Users’ textbox. Click on button.
Figure 2.4-4 Add/ Remove authorized users
5. To grant an authorized user access to the project, select the user name in the User list and
click on button. The name(s) of the user(s) will be displayed in the ‘Authorized User’ list. See Figure 2.4-4
MAS OPERA – Business Trusts E-Services User Guide Version 1.2
22
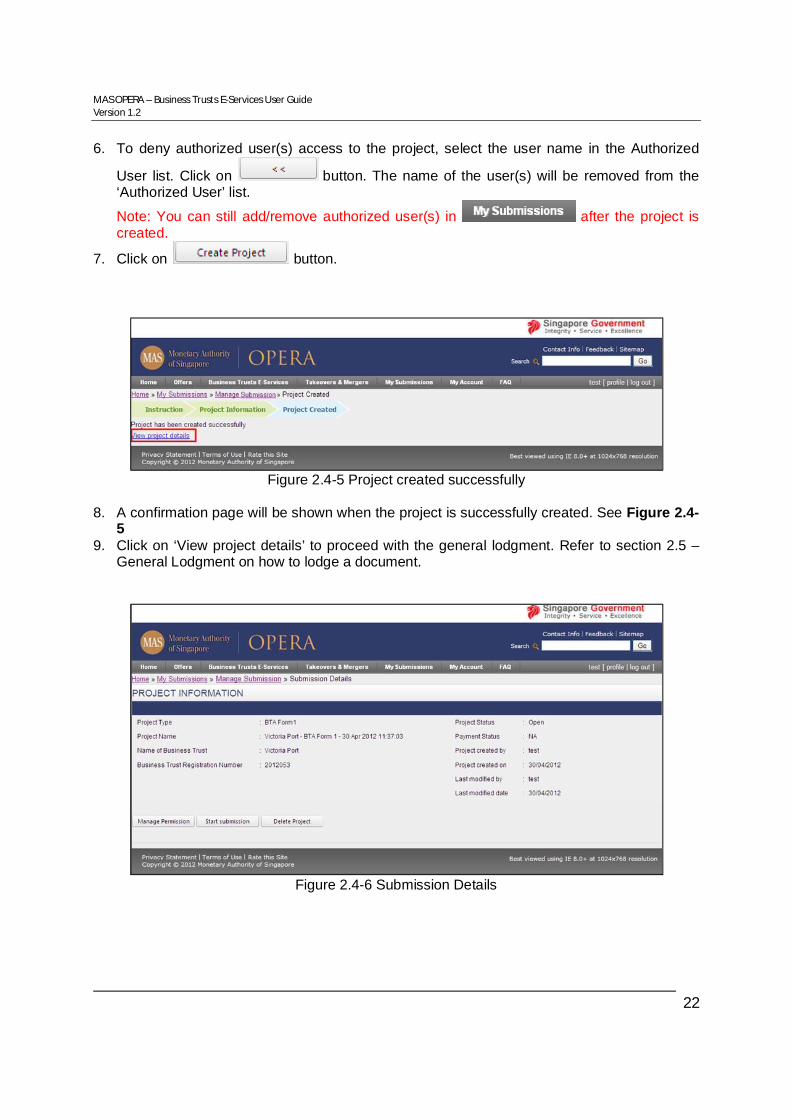
6. To deny authorized user(s) access to the project, select the user name in the Authorized
User list. Click on button. The name of the user(s) will be removed from the ‘Authorized User’ list.
Note: You can still add/remove authorized user(s) in after the project is created.
7. Click on button.
Figure 2.4-5 Project created successfully
8. A confirmation page will be shown when the project is successfully created. See Figure 2.4-
5 9. Click on ‘View project details’ to proceed with the general lodgment. Refer to section 2.5 –
General Lodgment on how to lodge a document.
Figure 2.4-6 Submission Details

MAS OPERA – Business Trusts E-Services User Guide Version 1.2
23
2.5 General Lodgment (Form 1) This section will show you how to lodge a document on behalf of a Business Trust.
Only authorized users are allowed to perform this function. Refer to section 2.1 – Log in for log-in steps.
Figure 2.5-1 Homepage of MAS OPERA
1. In OPERA Homepage, click under in main menu. See Figure 2.5-1

MAS OPERA – Business Trusts E-Services User Guide Version 1.2
24
Figure 2.5-2 Manage Submission
2. Click on ‘View’ to open the BTA Form 1 project for the general lodgment of documents. See
Figure 2.5-2
Figure 2.5-3 Submission Details
3. Click button to begin the submission steps. See Figure 2.5-3

MAS OPERA – Business Trusts E-Services User Guide Version 1.2
25
Figure 2.5-4 Submission Instructions
4. Click to indicate that you have read and understood the submission instructions.
5. Click to proceed, or click to go back to the previous screen.
Figure 2.5-5 Select documents for lodgment
6. Click to select the type(s) of document to lodge. See Figure 2.5-5 7. Enter the number of documents you will be lodging for each selected document type.
8. Click to proceed.

MAS OPERA – Business Trusts E-Services User Guide Version 1.2
26
Figure 2.5-6 Entering lodgment details
9. Enter the description of the document you are lodging in the “Description” field. 10. Click to display the calendar. See Figure 2.5-6
Figure 2.5-7 Calendar

MAS OPERA – Business Trusts E-Services User Guide Version 1.2
27
Figure 2.5-8 Calendar by month
11. Click button to select the previous month 12. Click button to select the next month.
13. Click to show the calendar by month. See Figure 2.5-8
14. Click to select the current date. 15. Click on the date to select it.
Figure 2.5-9 Date successfully entered
16. The selected date will automatically be entered into the ‘Relevant Date’ field.
17. Click button to proceed to upload the document for lodgment.

MAS OPERA – Business Trusts E-Services User Guide Version 1.2
28
Figure 2.5-10 Upload document
18. A BTA Form 1 will be generated with the details that you have provided. Click on
‘BTA_Form1_ALC.pdf’ to save or print the form for your records.
19. Click to open Windows browser. See Figure 2.5-10
Figure 2.5-11 Browse and select document

MAS OPERA – Business Trusts E-Services User Guide Version 1.2
29
20. Select the document for upload. See Figure 2.5-11
Figure 2.5-12 File upload progress bar
21. The upload process will be shown in a progress bar. See Figure 2.5-12
Figure 2.5-13 File uploaded successfully
22. The filename will be displayed upon successful upload. See Figure 2.5-13 23. Repeat steps 19-21 to upload multiple documents.
24. Click to remove the uploaded document.
25. Click button to proceed to submit the uploaded document(s).

MAS OPERA – Business Trusts E-Services User Guide Version 1.2
30
Figure 2.5-14 Summary
26. A summary page is displayed. Click button to submit application. See Figure 2.5-14
Figure 2.5-15 Payment details
27. A payment page is displayed. Click button to make payment. See Figure 2.5-15
28. Refer to section 2.16 – Online Payment on how to perform online payments.

MAS OPERA – Business Trusts E-Services User Guide Version 1.2
31
Figure 2.5-16 Payment reference number
29. After successful payment, a payment reference number is provided. See Figure 2.5-16
30. Click to see/print receipt.
Figure 2.5-17 Receipt
31. The receipt is shown and the lodgment process is completed. See Figure 2.5-17

MAS OPERA – Business Trusts E-Services User Guide Version 1.2
32
2.6 Withdraw Form 1 Application
An applicant may check in “Manage Submission” under “My Submissions”, if a BTA Form 1 lodgment has been accepted by MAS. If the lodgment has not been accepted by MAS, the applicant will be able to withdraw the lodgment, such as if the submission is erroneous. This section will show you how to withdraw a Form 1 lodgment after submission.
Only authorized users are allowed to perform this function. Refer to section 2.1 - Log in
for log-in steps.
Figure 2.6-1 Homepage of MAS OPERA
1. In OPERA Homepage, click under in main menu. See Figure 2.6-1

MAS OPERA – Business Trusts E-Services User Guide Version 1.2
33
Figure 2.6-2 Manage Submission
2. Click on ‘View’ to open the BTA Form 1 project for withdrawal. See Figure 2.6-2
Figure 2.6-3 Submission Details
3. Click button to withdraw the application. See Figure 2.6-3

MAS OPERA – Business Trusts E-Services User Guide Version 1.2
34
Figure 2.6-4 Upload document
4. Enter the reason for the withdrawal and click to indicate that you have read and
understood the terms of the withdrawal. See Figure 2.6-4. 5. To upload supporting documents (optional), refer to steps 6-9 in section 2.9
6. Click to go back to the previous page.
7. Click to proceed with the withdrawal.

MAS OPERA – Business Trusts E-Services User Guide Version 1.2
35
Figure 2.6-5 Submission Details page
8. The Submission Details page is displayed. The project status is withdrawn. See Figure 2.6-
5

MAS OPERA – Business Trusts E-Services User Guide Version 1.2
36
2.7 Create Project for Registration of Business Trust This section will show you how to create a project to apply to register a new Business Trust.
Only authorized users are allowed to perform this function. Refer to section 2.1 - Log in for log-in steps.
Figure 2.7-1 Homepage of MAS OPERA
1. After successful log-in, click on under
in main menu. See Figure 2.7-1
Figure 2.7-2 Instructions to create Registration of Business Trust project

MAS OPERA – Business Trusts E-Services User Guide Version 1.2
37
2. Click ‘Create [Registration of Business Trust] Project’. See Figure 2.7-2
Figure 2.7-3 Select Business Trust
3. Enter the proposed Name of Business Trust. See Figure 2.7-3 4. To search for available users who may be granted access to the project, enter the user
name in the ‘Search Users’ textbox. Click button.
Figure 2.7-4 Add/ Remove authorized users

MAS OPERA – Business Trusts E-Services User Guide Version 1.2
38
5. To grant an authorized user access to the project, select the user name in the User list and
click button. The name of the User will be displayed in the ‘Authorized User’ list. See Figure 2.7-4
6. To deny authorized user(s) access to the project, select the user name in the Authorized
User list. Click button. The name of the User(s) will be removed from the ‘Authorized User’ list.
Note: You can still add/remove authorized user(s) in after the project is created.
7. Click on button.
Figure 2.7-5 Project created successfully
8. A confirmation page will be shown when the project is successfully created. See Figure 2.7-
5 9. Click on ‘View project details’ to proceed with application to register the business trust. See
Figure 2.7-6. Refer to section 2.9 – Registration of Business Trust on how to apply to register a new Business Trust.

MAS OPERA – Business Trusts E-Services User Guide Version 1.2
39
Figure 2.7-6 View Project Details
MAS OPERA – Business Trusts E-Services User Guide Version 1.2
40
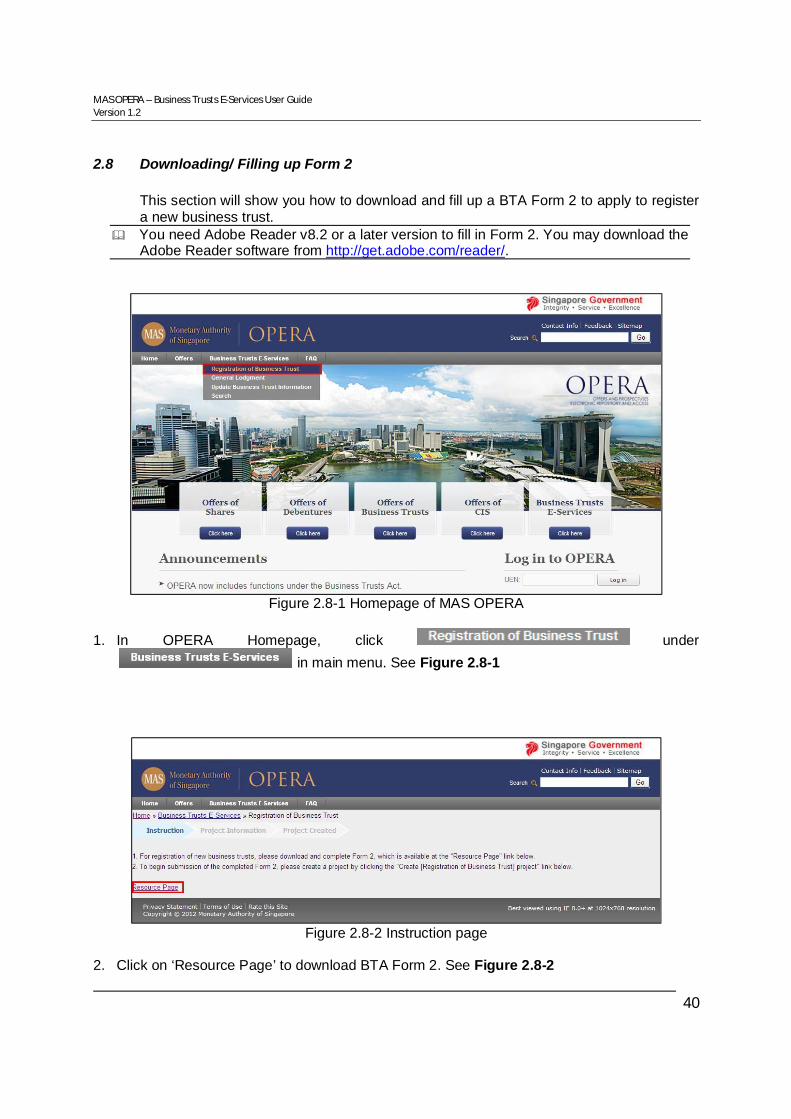
2.8 Downloading/ Filling up Form 2 This section will show you how to download and fill up a BTA Form 2 to apply to register a new business trust.
You need Adobe Reader v8.2 or a later version to fill in Form 2. You may download the Adobe Reader software from http://get.adobe.com/reader/.
Figure 2.8-1 Homepage of MAS OPERA
1. In OPERA Homepage, click under
in main menu. See Figure 2.8-1
Figure 2.8-2 Instruction page
2. Click on ‘Resource Page’ to download BTA Form 2. See Figure 2.8-2
MAS OPERA – Business Trusts E-Services User Guide Version 1.2
41
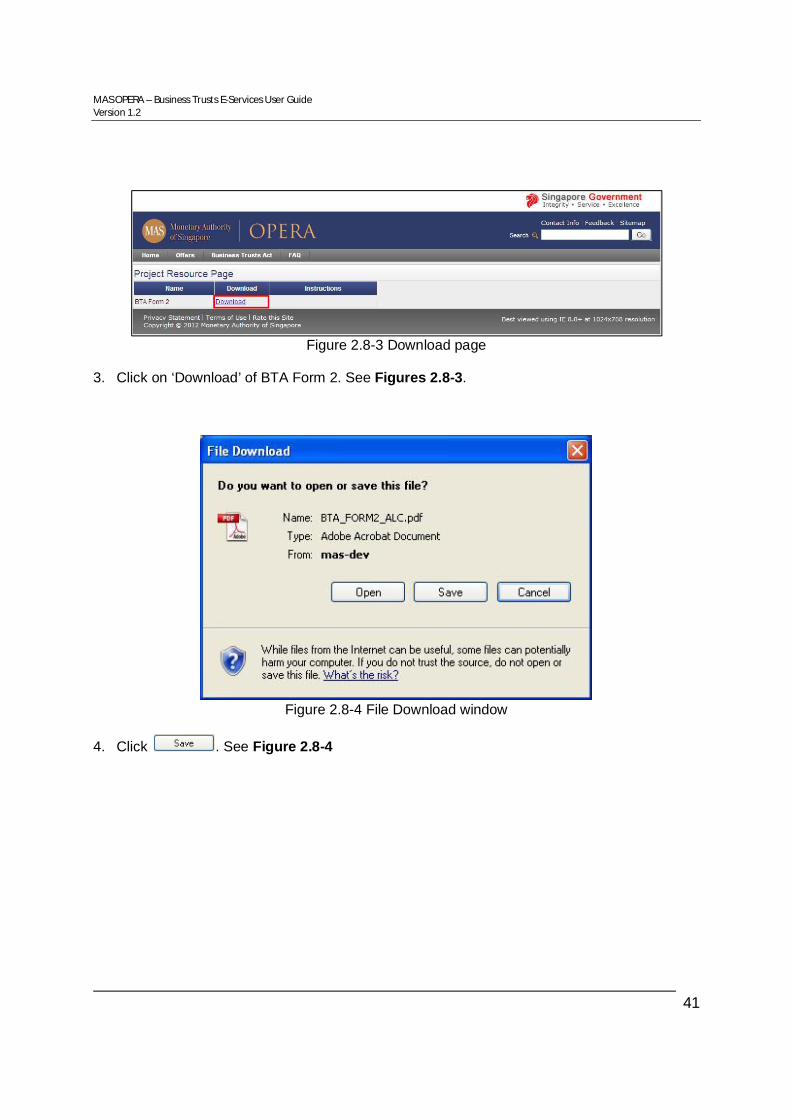
Figure 2.8-3 Download page
3. Click on ‘Download’ of BTA Form 2. See Figures 2.8-3.
Figure 2.8-4 File Download window
4. Click . See Figure 2.8-4

MAS OPERA – Business Trusts E-Services User Guide Version 1.2
42
Figure 2.8-5 Windows browser
5. Browse to desired folder and click to save the form in that folder. See Figure 2.8-
5. 6. Double-click to open the saved form. Ensure that Adobe Reader has been installed.
Figure 2.8-6 Form 2 – Edit button
MAS OPERA – Business Trusts E-Services User Guide Version 1.2
43
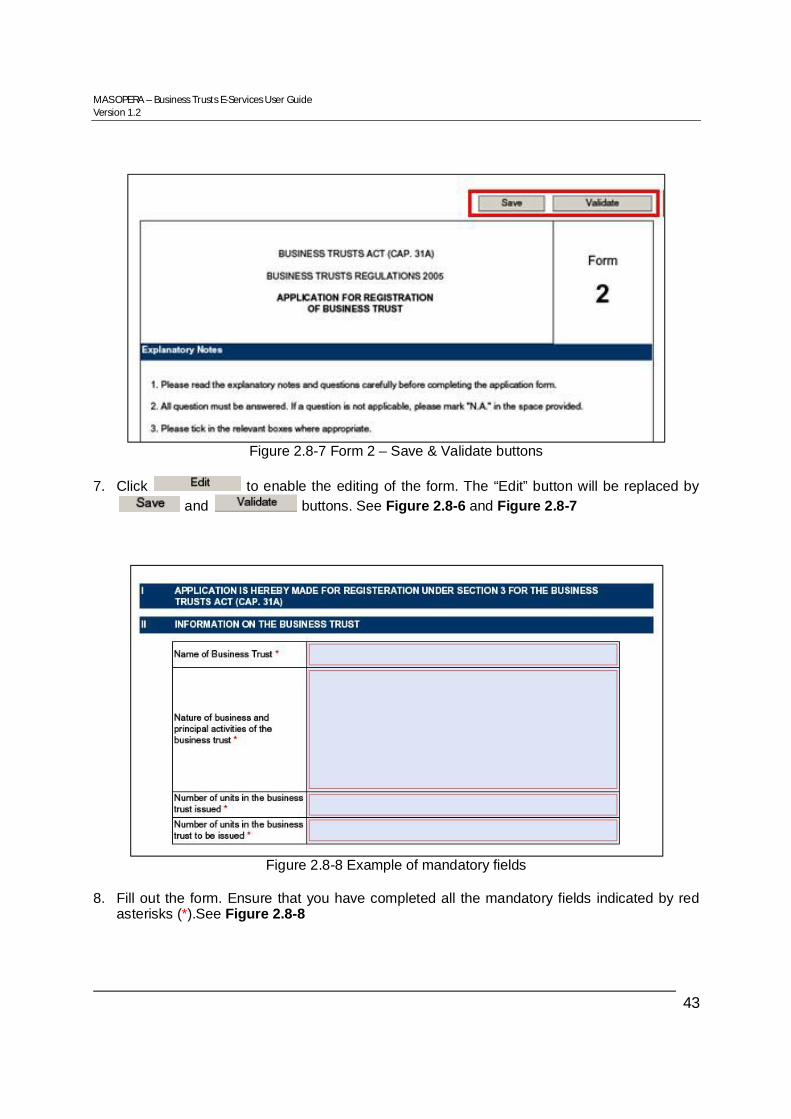
Figure 2.8-7 Form 2 – Save & Validate buttons
7. Click to enable the editing of the form. The “Edit” button will be replaced by
and buttons. See Figure 2.8-6 and Figure 2.8-7
Figure 2.8-8 Example of mandatory fields
8. Fill out the form. Ensure that you have completed all the mandatory fields indicated by red
asterisks (*).See Figure 2.8-8

MAS OPERA – Business Trusts E-Services User Guide Version 1.2
44
Figure 2.8-9 Example of local address
Figure 2.8-10 Example of overseas address
9. For Address type, select the desired checkbox ‘Local’ or ‘Overseas’ before starting to fill up
the form. See Figure 2.8-9 and Figure 2.8-10

MAS OPERA – Business Trusts E-Services User Guide Version 1.2
45
Figure 2.8-11 Add Auditor button
10. For sections where multiple entries are allowed (e.g. Auditor), click on to create
a new Auditor section. See Figure 2.8-11 Note: Sections that allow multiple entries include: Auditor CEO Composition of Board Director Directorship Composition of Audit Committee Secretary Substantial Shareholders Miscellaneous annexes

MAS OPERA – Business Trusts E-Services User Guide Version 1.2
46
Figure 2.8-12 Add Auditor section
11. To delete a completed section, click . See Figure 2.8-12.
Figure 2.8-13 Example of an error message
12. When completed, click button located at the first and the last page of the form.
The system will validate all entered data, and you will be prompted with an error message if there is any invalid data. See Figure 2.8-13.
MAS OPERA – Business Trusts E-Services User Guide Version 1.2
47
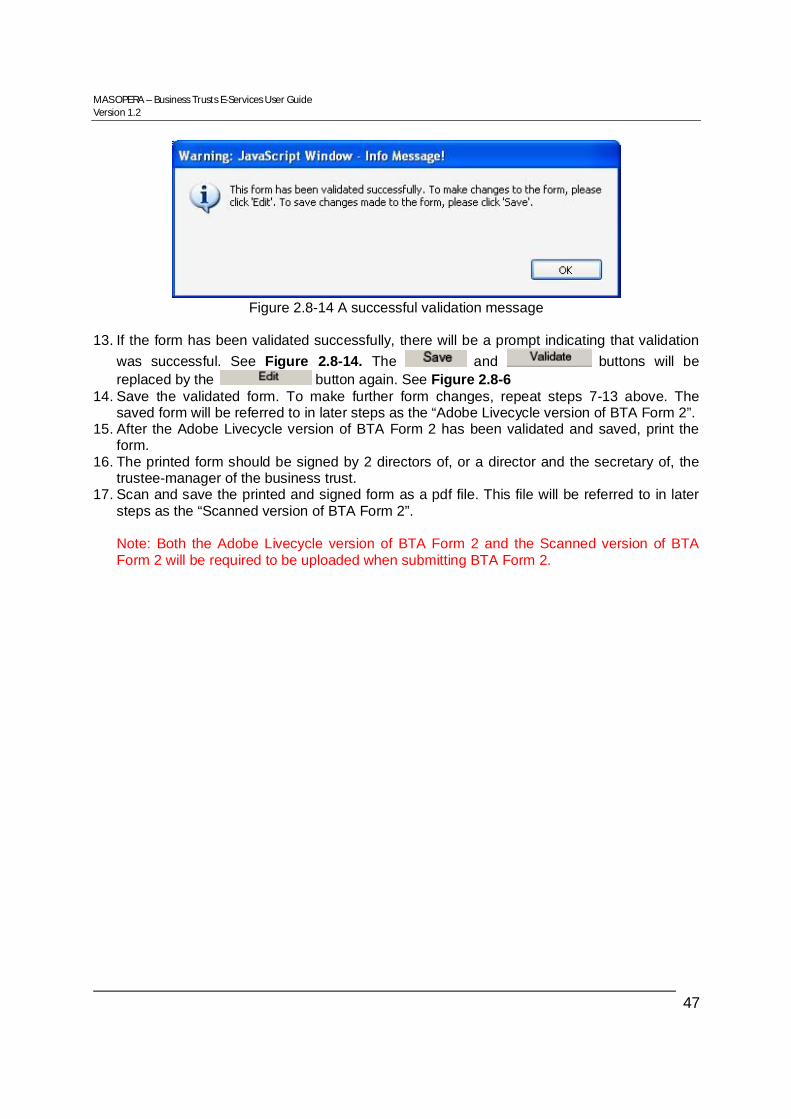
Figure 2.8-14 A successful validation message
13. If the form has been validated successfully, there will be a prompt indicating that validation
was successful. See Figure 2.8-14. The and buttons will be replaced by the button again. See Figure 2.8-6
14. Save the validated form. To make further form changes, repeat steps 7-13 above. The saved form will be referred to in later steps as the “Adobe Livecycle version of BTA Form 2”.
15. After the Adobe Livecycle version of BTA Form 2 has been validated and saved, print the form.
16. The printed form should be signed by 2 directors of, or a director and the secretary of, the trustee-manager of the business trust.
17. Scan and save the printed and signed form as a pdf file. This file will be referred to in later steps as the “Scanned version of BTA Form 2”. Note: Both the Adobe Livecycle version of BTA Form 2 and the Scanned version of BTA Form 2 will be required to be uploaded when submitting BTA Form 2.

MAS OPERA – Business Trusts E-Services User Guide Version 1.2
48
2.9 Registration of Business Trust (Form 2) This section will show you how to submit BTA Form 2 to apply to register a new Business Trust.
Only authorized users are allowed to perform this function. Refer to section 2.1 - Log in for log-in steps.
Figure 2.9-1 Homepage of MAS OPERA
1. In OPERA Homepage, click under in main menu. See Figure 2.9-1

MAS OPERA – Business Trusts E-Services User Guide Version 1.2
49
Figure 2.9-2 Manage Submission
2. Click on ‘View’ to open the project for Business Trust registration application. See Figure
2.9-2
Figure 2.9-3 Submission Details
3. Click button to begin the submission of BTA Form 2. See Figure 2.9-3

MAS OPERA – Business Trusts E-Services User Guide Version 1.2
50
Figure 2.9-4 Submission Instructions
4. Click to indicate that you have read and understood the submission instructions.
5. Click to proceed, or click to go back to the previous screen.
Figure 2.9-5 Upload BTA Form 2
6. Click to open Windows browser. See Figure 2.9-5

MAS OPERA – Business Trusts E-Services User Guide Version 1.2
51
Figure 2.9-6 Browse and select document
7. Select the Adobe Livecycle version of BTA Form 2 for upload. Please refer to steps 12 – 14
of section 2.8 on how to save the Adobe Livecycle version of BTA Form 2. See Figure 2.9-6
Figure 2.9-7 File to be uploaded
8. After selecting the document, the path and filename will be displayed. See Figure 2.9-7
9. Click to begin upload.

MAS OPERA – Business Trusts E-Services User Guide Version 1.2
52
Figure 2.9-8 Upload document
10. The system will prompt you to upload the draft trust deed of the business trust, which is
labelled as “BTA Form 2 Trust Deed”, and the Scanned version of BTA Form 2, which is labelled as “BTA Form 2 Signed form”. Please refer to steps 15 – 17 of section 2.8 on how to save the Scanned version of BTA Form 2.
11. Based on the information in the Adobe Livecycle version of BTA Form 2 that has been uploaded, the system will also prompt you to upload other Annexes and supporting documents..
12. Click to open Windows browser. See Figure 2.9-8 13. Select the document for upload. See Figure 2.9-6
Figure 2.9-9 File upload progress bar
14. The upload process will be shown in a progress bar. See Figure 2.9-9

MAS OPERA – Business Trusts E-Services User Guide Version 1.2
53
Figure 2.9-10 File uploaded successfully 15. The filename will be displayed upon successful upload. See Figure 2.9-10 16. Repeat steps 12-14 to upload multiple documents.
17. Click to remove the uploaded document.
18. Click button to commence submission of the uploaded Adobe Livecycle version of BTA Form 2, Scanned version of BTA Form 2, draft trust deed of the business trust, and Annexes and other supporting documents, if any.
MAS OPERA – Business Trusts E-Services User Guide Version 1.2
54
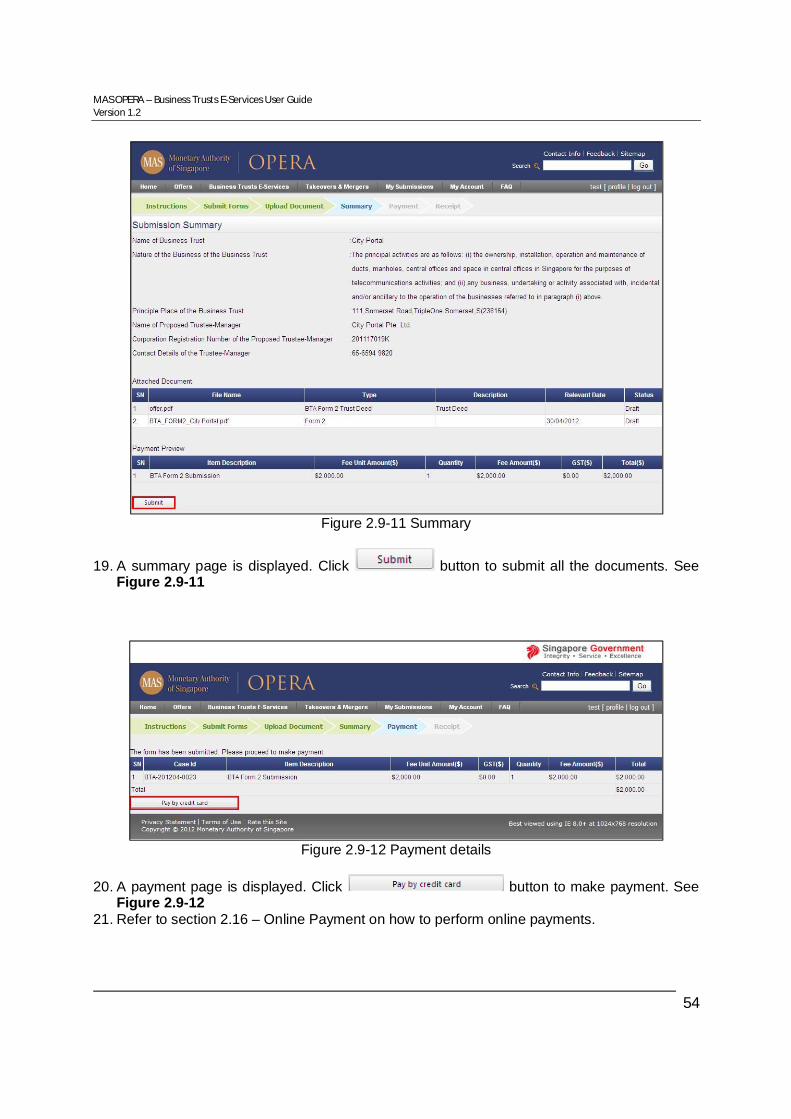
Figure 2.9-11 Summary
19. A summary page is displayed. Click button to submit all the documents. See Figure 2.9-11
Figure 2.9-12 Payment details
20. A payment page is displayed. Click button to make payment. See
Figure 2.9-12 21. Refer to section 2.16 – Online Payment on how to perform online payments.
MAS OPERA – Business Trusts E-Services User Guide Version 1.2
55
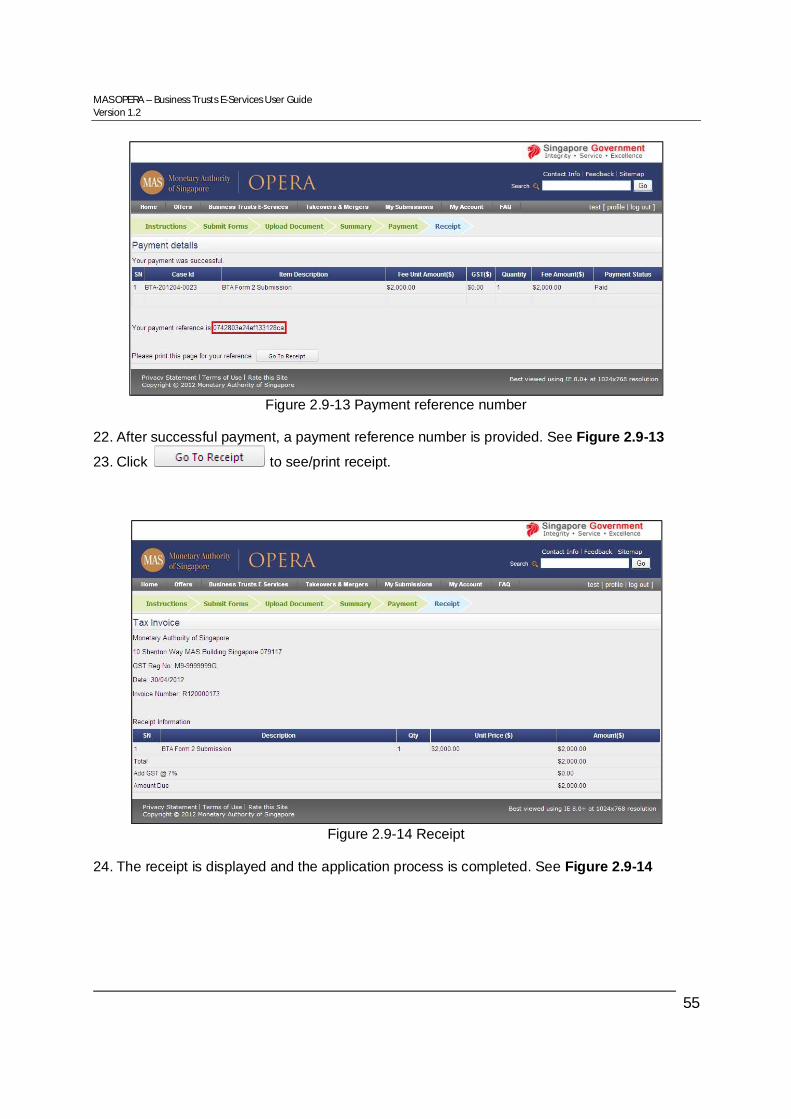
Figure 2.9-13 Payment reference number
22. After successful payment, a payment reference number is provided. See Figure 2.9-13
23. Click to see/print receipt.
Figure 2.9-14 Receipt
24. The receipt is displayed and the application process is completed. See Figure 2.9-14

MAS OPERA – Business Trusts E-Services User Guide Version 1.2
56
2.10 Attach Additional Documents for Form 2 This section will show you how to attach additional documents after submission of BTA Form 2.
Only authorized users are allowed to perform this function. Refer to section 2.1 - Log in for log-in steps.
Figure 2.10-1 Homepage of MAS OPERA
1. In OPERA Homepage, Click under in main menu. See Figure 2.10-1

MAS OPERA – Business Trusts E-Services User Guide Version 1.2
57
Figure 2.10-2 Manage Submission
2. Click on ‘View’ to open the BTA Form 2 project to upload additional documents. See Figure
2.10-2
Figure 2.10-3 Submission Details
3. Click button to begin attaching the additional documents. See Figure 2.10-3

MAS OPERA – Business Trusts E-Services User Guide Version 1.2
58
Figure 2.10-4 Upload document
4. Refer to steps 12-15 in section 2.9 to attach the documents. See Figure 2.10-4
5. Click to remove the uploaded document.
6. Click to commence submission of the additional documents.

MAS OPERA – Business Trusts E-Services User Guide Version 1.2
59
Figure 2.10-5 Summary
7. A summary page is displayed. Click button to submit the additional documents. See Figure 2.10-5
Figure 2.10-6 Payment page
8. The payment page is displayed. See Figure 2.10-6

MAS OPERA – Business Trusts E-Services User Guide Version 1.2
60
2.11 Withdraw Form 2 Application An applicant may check in “Manage Submission” under “My Submissions” if a BTA Form 2 has been accepted by MAS. If it has not been accepted by MAS, the applicant will be able to withdraw the application e.g. in the event of an erroneous submission. This section will show you how to withdraw a Form 2 application after it has been submitted.
Only authorized users are allowed to perform this function. Refer to section 2.1 - Log in
for log-in steps.
Figure 2.11-1 Homepage of MAS OPERA
1. In OPERA Homepage, click under in main menu. See Figure 2.11-1

MAS OPERA – Business Trusts E-Services User Guide Version 1.2
61
Figure 2.11-2 Manage Submission
2. Click on ‘View’ to open the BTA Form 2 project. See Figure 2.11-2
Figure 2.11-3 Submission Details
3. Click button to withdraw the application. See Figure 2.11-3

MAS OPERA – Business Trusts E-Services User Guide Version 1.2
62
Figure 2.11-4 Upload document
4. Enter the reason for the withdrawal and click to indicate that you have read and
understood the terms of the withdrawal. See Figure 2.11-4. 5. To upload supporting documents (optional), refer to steps 6-9 in section 2.8
6. Click to go back to the previous page.
7. Click to proceed with the withdrawal.

MAS OPERA – Business Trusts E-Services User Guide Version 1.2
63
Figure 2.11-5 Submission Details page
8. The Submission Details page is displayed. The project status is withdrawn. See Figure
2.11-5

MAS OPERA – Business Trusts E-Services User Guide Version 1.2
64
2.12 Create Project for Updating Business Trust Information This section will show you how to create a project to update the information on a Business Trust.
Only authorized users are allowed to perform this function. Refer to section 2.1 - Log in for log-in steps.
Figure 2.12-1 Homepage of MAS OPERA
1. After successful log-in, click on under
in main menu. See Figure 2.12-1
Figure 2.12-2 Instructions to create Update Business Trust Information project

MAS OPERA – Business Trusts E-Services User Guide Version 1.2
65
2. Click ‘Create [Update of Particulars] Project’. See Figure 2.12-2
Figure 2.12-3 Select Business Trust
3. Select the Business Trust from the dropdown list. See Figure 2.12-3 4. To search for available users who may be granted access to the project, enter the user
name in the ‘Search Users’ textbox. Click button.
Figure 2.12-4 Add/ Remove authorized users

MAS OPERA – Business Trusts E-Services User Guide Version 1.2
66
5. To grant an authorized user access to the project, select the user name in the User list and
click button. The name of the user will be displayed in the ‘Authorized User’ list. See Figure 2.12-4
6. To deny authorized user(s) access to the project, select the user name in the Authorized
User list. Click button. The name of the User(s) will be removed from the ‘Authorized User’ list.
Note: You can still add/remove authorized user(s) in after the project is created.
7. Click on button.
Figure 2.12-5 Project created successfully
8. A confirmation page that the project has been successfully created will be displayed. See
Figure 2.12-5 9. Click on ‘View project details’ to commence updating the business trust information. See
Figure 2.12-6. Refer to section 2.13 – Updating Business Trust Information.
Figure 2.12-6 View Project Details

MAS OPERA – Business Trusts E-Services User Guide Version 1.2
67
2.13 Updating Business Trust Information (Form 3) This section will show you how to update the information on a Business Trust by lodging a BTA Form 3.
Only authorized users are allowed to perform this function. Refer to section 2.1 - Log in for log-in steps.
Figure 2.13-1 Homepage of MAS OPERA
1. In OPERA Homepage, click under in main menu. See Figure 2.13-1

MAS OPERA – Business Trusts E-Services User Guide Version 1.2
68
Figure 2.13-2 Manage Submission
2. Click on ‘View’ to open the BTA Form 3 project to update information. See Figure 2.13-2
Figure 2.13-3 Submission Details
3. Click button to begin the submission. See Figure 2.13-3

MAS OPERA – Business Trusts E-Services User Guide Version 1.2
69
Figure 2.13-4 Submission Instructions
4. Click to indicate that you have read and understood the submission instructions.
5. Click to proceed, or click to go back to the previous screen.
Figure 2.13-5 Form 3
6. From the menu on the left of the screen, click on the section that you want to update. See
Figure 2.13-5

MAS OPERA – Business Trusts E-Services User Guide Version 1.2
70
____________________________________________________________________________ For updates to the following sections, refer to steps 7 – 17 below: Name of BT Other Particulars of BT For updates to other sections, please skip the above steps. ____________________________________________________________________________
Figure 2.13-6 Other Information on Business Trust
7. Click on the section you want to update in the menu on the left of the screen. See Figure
2.13-6.

MAS OPERA – Business Trusts E-Services User Guide Version 1.2
71
Figure 2.13-7 Update changes
8. Select ‘Update Section’ radio button. See Figure 2.13-7 9. Enter the updated information into the relevant fields. Ensure that you have completed all
the mandatory fields indicated by red asterisks (*).

MAS OPERA – Business Trusts E-Services User Guide Version 1.2
72
Figure 2.13-8 Calendar
10. Click on to select date using the calendar. See Figure 2.13-8.
Figure 2.13-9 Calendar

MAS OPERA – Business Trusts E-Services User Guide Version 1.2
73
Figure 2.13-10 Calendar by month
11. Click button to select the previous month. 12. Click button to select the next month.
13. Click to select the current date.
14. Click to show the calendar by month. See Figure 2.13-9 and 2.13-10 15. Click on the date to select it.
Figure 2.13-11 Save changes
16. The selected date will be displayed in the date field. See Figure 2.13-11
17. Click button.

MAS OPERA – Business Trusts E-Services User Guide Version 1.2
74
Note: Please click the Save button to save changes made to each section before navigating to a different section. ____________________________________________________________________________ For updates to the following sections, refer to steps 18 – 28 below: Trustee-Manager Auditor of BT CEO of TM Directors of TM Secretary of TM Substantial Shareholders . Note: The following guide uses Secretary as an example; the same steps apply to Trustee-Manager, Auditor, CEO, Director and Substantial Shareholders. ____________________________________________________________________________
Figure 2.13-12 Secretary of Trustee-Manager
18. Click on the section in the menu on the left of the screen. See Figure 2.13-12.

MAS OPERA – Business Trusts E-Services User Guide Version 1.2
75
Figure 2.13-13 Update details
19. To update the details of the current secretary, select ‘Update particulars of Secretary’ radio
button. See Figure 2.13-13 20. Enter the updated information into the relevant fields. Ensure that you have completed all
the mandatory fields indicated by red asterisks (*).
21. Click button.

MAS OPERA – Business Trusts E-Services User Guide Version 1.2
76
Figure 2.13-14 Cessation of service of secretary
22. To provide an update on the cessation of appointment of a secretary, select ‘Cessation of
service of existing secretary’ radio button. See Figure 2.13-14 23. Click on to select the date of cessation. Refer to steps 11-15 above for how to use the
calendar to select a date. 24. The selected date will be displayed in the date field.
25. Click button.

MAS OPERA – Business Trusts E-Services User Guide Version 1.2
77
Figure 2.13-15 Add new secretary
26. To add new secretary, click on button. See Figure 2.13-15

MAS OPERA – Business Trusts E-Services User Guide Version 1.2
78
Figure 2.13-16 New Secretary
27. In the New Secretary screen, enter the information into the relevant fields. Ensure that you
have completed all the mandatory fields indicated by red asterisks (*). See Figure 2.13-16
28. Click button to save changes, or click button to remove this newly added secretary.
____________________________________________________________________________ For updates to the following section, refer to steps 29 – 35 below. Audit Committee
For updates to other sections, please skip the above steps. ____________________________________________________________________________

MAS OPERA – Business Trusts E-Services User Guide Version 1.2
79
Figure 2.13-17 Audit committee
29. Click on the “Audit Committee” section in the menu. See Figure 2.13-17.
Figure 2.13-17 Select Update Section
30. To update the composition of the Audit Committee, select ‘Update Section’ radio button. See
Figure 2.13-17
31. Click to select the Date of earliest change in composition of Audit Committee. Refer to steps 11-15 above for how to use the calendar to select a date.

MAS OPERA – Business Trusts E-Services User Guide Version 1.2
80
Figure 2.13-18 Update chairman and members
32. To add Audit Committee chairman/ member, select a name in the ‘Directors of TM’ list and
click button. The name will be displayed in the ‘Selected Chairman’/ ‘Audit Committee’ list. See Figure 2.13-18
33. To remove Audit Committee chairman/ member(s), select the name(s) from the ‘Selected
Chairman’/ ‘Audit Committee’ list. Click button. The name will be removed from the list.
34. Click button ____________________________________________________________________________ To make the declaration which is required before submitting the changes, refer to steps 36 – 39 below. ____________________________________________________________________________

MAS OPERA – Business Trusts E-Services User Guide Version 1.2
81
Figure 2.13-19 Declaration
35. Click on the “Declaration” section in the menu. See Figure 2.13-19.
36. Click to select the Date of Declaration. Refer to steps 11-15 above for how to use the calendar to select a date. See Figure 2.13-19.
37. Enter the names of the signatories into the relevant fields.
38. Click button.
MAS OPERA – Business Trusts E-Services User Guide Version 1.2
82
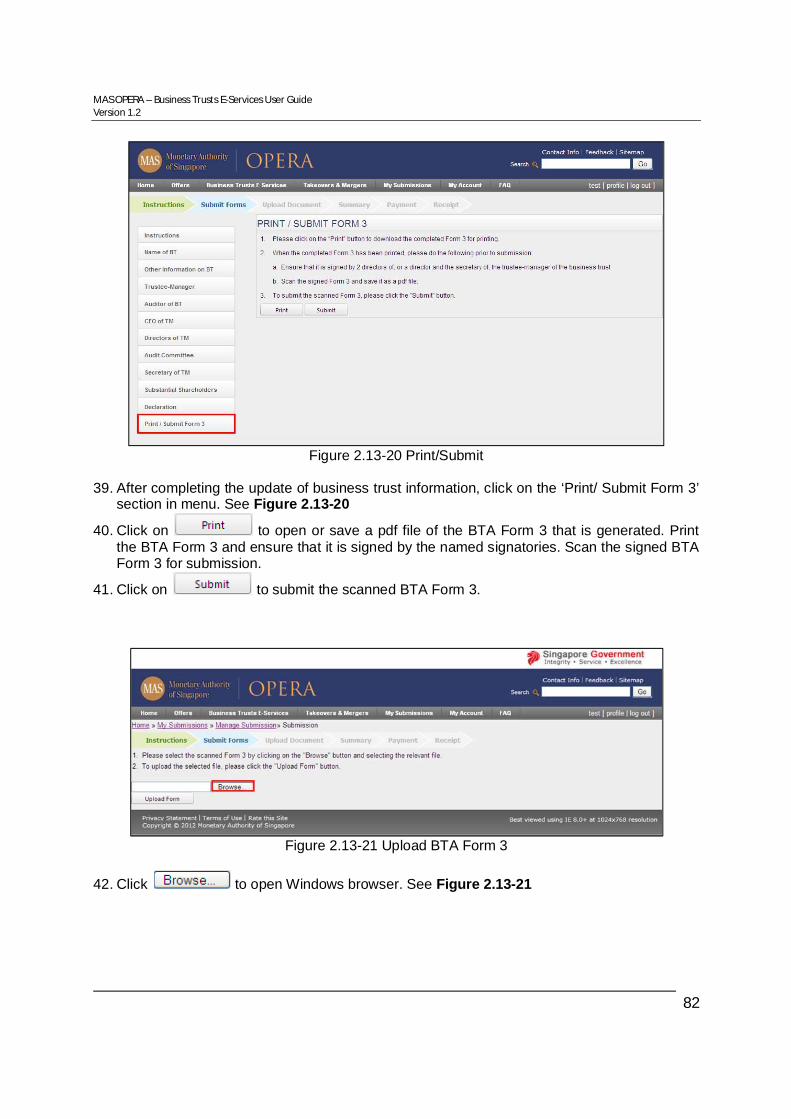
Figure 2.13-20 Print/Submit
39. After completing the update of business trust information, click on the ‘Print/ Submit Form 3’
section in menu. See Figure 2.13-20
40. Click on to open or save a pdf file of the BTA Form 3 that is generated. Print the BTA Form 3 and ensure that it is signed by the named signatories. Scan the signed BTA Form 3 for submission.
41. Click on to submit the scanned BTA Form 3.
Figure 2.13-21 Upload BTA Form 3
42. Click to open Windows browser. See Figure 2.13-21

MAS OPERA – Business Trusts E-Services User Guide Version 1.2
83
Figure 2.13-22 Browse and select document
43. Select the document for upload. See Figure 2.13-22
Figure 2.13-23 File to be uploaded
44. After selecting the document, the path and filename will be displayed. See Figure 2.13-23
45. Click to begin upload of the scanned BTA Form 3.

MAS OPERA – Business Trusts E-Services User Guide Version 1.2
84
Figure 2.13-24 Upload document
46. Click to open Windows browser. See Figure 2.13-24 47. Select the document for upload. See Figure 2.13-22
Figure 2.13-25 File upload progress bar
48. The upload process will be shown in a progress bar. See Figure 2.13-25

MAS OPERA – Business Trusts E-Services User Guide Version 1.2
85
Figure 2.13-26 File uploaded successfully
49. The filename will be displayed upon successful upload. See Figure 2.13-26 50. Repeat steps 47-49 to upload multiple documents. 51. Click to remove the uploaded document.
52. Click to proceed to submit the BTA Form 3.

MAS OPERA – Business Trusts E-Services User Guide Version 1.2
86
Figure 2.13-27 Summary
53. A summary page is displayed. Click button to submit Form. See Figure 2.13-27
Figure 2.13-28 Payment details
54. A payment page is displayed. Click button to make payment. See Figure 2.13-28
55. Refer to section 2.16 – Online Payment on how to perform online payments.

MAS OPERA – Business Trusts E-Services User Guide Version 1.2
87
Figure 2.13-29 Payment reference number
56. After successful payment, a payment reference number is provided. See Figure 2.13-29
57. Click to see/print receipt.
Figure 2.13-30 Receipt
58. The receipt is shown and the update submission process is completed. See Figure 2.13-30

MAS OPERA – Business Trusts E-Services User Guide Version 1.2
88
2.14 Withdraw Form 3 Application An applicant may check in “Manage Submission” under “My Submissions”, if a BTA Form 3 has been accepted by MAS. If the lodgment has not been accepted by MAS the applicant will be able to withdraw the Form. This section will show you how to withdraw a Form 3 after submission.
Only authorized users are allowed to perform this function. Refer to section 2.1 - Log in for log-in steps.
Figure 2.14-1 Homepage of MAS OPERA
1. In OPERA Homepage, click under in main menu. See Figure 2.14-1

MAS OPERA – Business Trusts E-Services User Guide Version 1.2
89
Figure 2.14-2 Manage Submission
2. Click on ‘View’ to open the BTA Form 3 project for withdrawal. See Figure 2.14-2
Figure 2.14-3 Submission Details
3. Click button to withdraw the application. See Figure 2.14-3

MAS OPERA – Business Trusts E-Services User Guide Version 1.2
90
Figure 2.14-4 Upload document
4. Enter the reason for the withdrawal and click to indicate that you have read and
understood the terms of the withdrawal. See Figure 2.14-4. 5. To upload supporting documents (optional), refer to steps 6-9 in section 2.10.
6. Click to go back to the previous page.
7. Click to proceed with the withdrawal.

MAS OPERA – Business Trusts E-Services User Guide Version 1.2
91
Figure 2.14-5 Submission Details page
8. The Submission Details page is displayed. The project status is withdrawn. See Figure 2.14-
5

MAS OPERA – Business Trusts E-Services User Guide Version 1.2
92
2.15 Re-submit Application that has been Returned for Amendment
MAS may return forms and/or documents to applicants if the forms and/or documents are erroneous or incomplete. MAS may return either the entire submission (i.e. Form and documents) or only certain documents for the applicant to amend. This section will show you how an applicant can re-submit the entire submission or certain documents after making the amendments.
Only authorized users are allowed to perform this function. Refer to section 2.1 - Log in for log-in steps.
Figure 2.15-1 Homepage of MAS OPERA
1. In OPERA Homepage, click under in main menu. See Figure 2.15-1

MAS OPERA – Business Trusts E-Services User Guide Version 1.2
93
Figure 2.15-2 Manage Submission
2. The status of a project where a form or document has been returned will be indicated as
‘Returned For Amendment’, under the Status column. See Figure 2.15-2. 3. Click on ‘View’ to open the project. See Figure 2.15-2. ____________________________________________________________________________ For submissions where only certain documents have been returned, refer to steps 4 - 6 for re-submission of those documents. For submissions which have been returned in their entirety, skip to step 7. ____________________________________________________________________________

MAS OPERA – Business Trusts E-Services User Guide Version 1.2
94
Figure 2.15-3 Partially Returned Submission
4. To re-submit documents that have been returned, click on to re-attach the new document(s). See Figure 2.15-3
Figure 2.15-5 Project Information
5. Refer to steps 17-24 in section 2.4 on how to upload documents.

MAS OPERA – Business Trusts E-Services User Guide Version 1.2
95
Figure 2.15-6 No payment required
6. (a) If payment for this application had been made previously, no further payment is required.
See Figure 2.15-6 (b) If payment had not been made previously, you have to make payment now. Refer to steps 27-30 in section 2.5.
____________________________________________________________________________ For submissions that have been returned in their entirety, refer to steps 7 - 9 for re-submission. ____________________________________________________________________________
Figure 2.15-4 Resubmit entire submission
7. For submissions that have been returned in their entirety, click on button to re-submit the entire application. See Figure 2.15-4.
8. (a) For re-submissions of entire BTA Form 1, please refer to steps 4 - 26 in section 2.5 on
how to submit BTA Form 1 application.

MAS OPERA – Business Trusts E-Services User Guide Version 1.2
96
(b) For re-submissions of entire BTA Form 2, please refer to steps 4 - 18 in section 2.9 on how to submit BTA Form 2 application. (c) For re-submissions of entire BTA Form 3, please refer to steps 4 - 54 in section 2.13 on how to submit BTA Form 3 application.
Figure 2.15-6 No payment required
9. (a) If payment for this application had been made previously, no further payment is required.
See Figure 2.15-6 (b) If payment had not been made, payment is required now. Refer to steps 27-30 in section 2.5.

MAS OPERA – Business Trusts E-Services User Guide Version 1.2
97
2.16 Online Payment This section will guide you through the process of making online payments for Business Trusts E-Services.
Figure 2.16-1 Select Payment Mode
1. Click on the logo of the preferred payment mode (American Express or VISA/MasterCard).
See Figure 2.16-1

MAS OPERA – Business Trusts E-Services User Guide Version 1.2
98
Figure 2.16-2 Enter credit/debit card details
2. Enter the credit or debit card details. Click on the checkbox to indicate that you have read,
understood and accepted the terms. See Figure 2.16-2 3. Click on the Submit button. 4. An acknowledgement screen will be shown when the payment is made successfully. Note: Please visit eNETS website at http://www.enets.com/ for queries related to eNETS.

MAS OPERA – Business Trusts E-Services User Guide Version 1.2
99
2.17 Public Users: Search Business Trust/ Request for Documents This section will guide you through the process of searching for a specific business trust and requesting for an extract of the register of the business trust and documents lodged by the business trust. This function is accessible by any member of the public.
Figure 2.17-1 URL of OPERA
1. Access the OPERA site at https://opera.mas.gov.sg/ExtPortal/. See Figure 2.17-1
Figure 2.17-2 Homepage of MAS OPERA
2. In the Home page, click on under
in main menu. See Figure 2.17-2

MAS OPERA – Business Trusts E-Services User Guide Version 1.2
100
Figure 2.17-3 Search for Business Trust
3. In the ‘Search for Business Trusts’ section, you can choose to enter one or more types of
search criteria. See Figure 2.17-3
Figure 2.17-4 Results of Search for Business Trusts
4. Enter search criteria and click on to begin searching. The general details of the relevant business trusts will be displayed. See Figure 2.17-4
5. Click on the Name of Business Trust to see Business Trust Details page.

MAS OPERA – Business Trusts E-Services User Guide Version 1.2
101
Figure 2.17-5 Request for document
6. Click on the button to see the list of documents that are available for request. See Figure 2.17-5
Figure 2.17-6 Search for documents
7. Select the ‘Document Type’ and the ‘Effective Dates’ to sort through the documents. See
Figure 2.17-6
8. Click on to begin searching. The relevant documents will be shown. See Figure 2.17-6
9. Check to select the document(s) that you wish to obtain.

MAS OPERA – Business Trusts E-Services User Guide Version 1.2
102
Figure 2.17-7 Add document(s) to cart
10. Click on button to add the selected documents to your cart. 11. The selected document(s) will be added to your cart.
12. To view the items in your cart, click on button. See Figure 2.17-7
Figure 2.17-8 View cart items
13. To add more items to your cart, click on button. See Figure 2.17-8
14. To check out the items in your cart, click on button. See Figure 2.17-8

MAS OPERA – Business Trusts E-Services User Guide Version 1.2
103
Figure 2.17-9 Contact details of person requesting the documents
15. To add more items to your cart, click on button. See Figure 2.17-9
16. Enter your contact details . Ensure that you have completed all the mandatory fields indicated by red asterisks (*).
17. Click on button. See Figure 2.17-9
Figure 2.17-10 Make payment

MAS OPERA – Business Trusts E-Services User Guide Version 1.2
104
18. To make payment for the requested document(s), click button. See Figure 2.17-10
19. Refer to section 2.16 – Online Payment on how to perform online payments.
Figure 2.17-11 Successful payment
20. After successful payment, a payment reference number will be provided. See Figure 2.17-
11
Figure 2.17-12 Receipt of successful payment

MAS OPERA – Business Trusts E-Services User Guide Version 1.2
105
21. Click on to see the receipt for your payment. See Figure 2.17-12. Please print or save a copy of the receipt for your records.
22. For certified true copies of an extract of a register of a business trust, MAS will contact the requester by telephone once the document is ready for collection. The requester can choose to collect the document in person or for it to be delivered by post. If you are collecting the document in person, you will be required to show MAS a receipt for the payment. Refer to step 21 above on how to print the receipt.
23. For all other documents, the document will be emailed to the requester.