Embed Size (px)
Citation preview

MASTMARKET ALIGNED SKILLS TRAINING
INDIA: 1003-1005,DLF City Court, MG Road, Gurgaon 122002 Tel (91) 124 4551850 Fax (91) 124 4551888NEW YORK: 216 E.45th Street, 7th Floor, New York, NY 10017
www.aif.org
MANUAL AND COMPUTER AIDED JEWELLERY DESIGN
TRAINING MODULE
In partnership with Supported by:

MANUAL AND COMPUTER AIDED JEWELLERY DESIGN
TRAINING MODULE

About the American India Foundation
The American India Foundation is committed to catalyzing social and economic change in India, and building a lasting bridge between the United States and India through high impact interventions ineducation, livelihoods, public health, and leadership development. Working closely with localcommunities, AIF partners with NGOs to develop and test innovative solutions and withgovernments to create and scale sustainable impact. Founded in 2001 at the initiative of PresidentBill Clinton following a suggestion from Indian Prime Minister Vajpayee, AIF has impacted the lives of 4.6million of India’s poor.
Learn more at www.AIF.org
About the Market Aligned Skills Training (MAST) program
Market Aligned Skills Training (MAST) provides unemployed young people with a comprehensive skillstraining that equips them with the knowledge and skills needed to secure employment and succeed on thejob. MAST not only meets the growing demands of the diversifying local industries across the country, itharnesses India’s youth population to become powerful engines of the economy.
AIF Team: Hanumant Rawat, Aamir Aijaz & Rowena Kay Mascarenhas
American India Foundation
10th Floor, DLF City Court, MG Road, Near Sikanderpur Metro Station, Gurgaon 122002
216 E. 45th Street, 7th Floor New York, NY 10017 530 Lytton Avenue, Palo Alto, CA 9430
This document is created for the use of underprivileged youth under American India Foundation’s Market Aligned Skills Training (MAST) Program.

iii
ACKNOWLEDGEMENTSThis curriculum has been developed by American India Foundation Trust in partnership with Mumbai University’s Garware Institute of Career Education and Development (GICED) as part of its Market Aligned Skills Training (MAST) Program. This is supported by Franklin Templeton India as part of the program.
This curriculum is designed specifically keeping in mind the learning needs of youth having poor-to-average educational background. The objective of this curriculum is to equip AIF’s MAST candidates with essentials of Jewellery Design – both manual and computer aided – like drawing, shading, rendering, colors, motifs, portfolio compilation, 3D objects creations, Linking & mechanism, model making with stone mounting etc. Jewellery design is the art or profession of designing and creating jewellery. The art has taken many forms throughout the centuries, from the simple beadwork of ancient times to the sophisticated metalworking and gem cutting is known in the modern day. It is essential for youth to understand the concepts thoroughly and therefore all five modules of the curriculum have been supported by textures, pictures, 3D graphics and aptitude paper.
We are grateful to Ms Manjusha Sunil and Mr Chetan Somkuwar from Mumbai University’s Garware Institute of Career Education and Development (GICED) for helping us in developing the content. We are also thankful to Dr.MedhaTapiawala, Director-GICED and Ms.ShilpaBorkar, Assistant Director-GICED for their continuous support and guidance in developing this curriculum.
We are also thankful to Mr Hanumant Rawat, Senior Advisor-AIF and Mr Aamir Aijaz, Program Manager-AIF to guide the content development and design team regularly.


Manual And Computer Aided Jewellery Design Training Module
MANUAL & COMPUTER AIDED JEWELLERY DESIGN

Manual And Computer Aided Jewellery Design Training Module
SYLLABUS STRUCTUREMANUAL & COMPUTER AIDED JEWELLERY DESIGN
Subject Total
Man
ual
D
esig
n
Aptitude Assesment 3
90
Free-hand drawing 6
Understanding colour 6
Shading & Rendering 9
Developing Motifs 6
Designing Products 24
Drawing in perspective, free hand 6
Product Estimation 6
Photographic Documentation 9
Presentation Techniques 6
Portfolio Compilation 9
Com
pu
ter
Aid
ed
Des
ign
Introduction to Rhino 3 150
Basic Command 10
Assignment 15
Introduction to Solid 3
Creation of 3D objects 6
Modification & Editing in 3D objects 15
3D assignment(assessment) 18
Different types of Stone Mounting (7) 9
Model Making with Stone Mountings 9
Parameters for Stone Mountings 12
3D Assignment 20
Linking & Mechanisms 12
3D Assignment 10
Rendering 6
Portfolio Compilation 2
TOTAL 240

Manual And Computer Aided Jewellery Design Training Module
INDEXSr. No. Contents Page No.
1 Free Hand Drawing 4
2 What is Desgn 4
3 Jewellery Terminology 6
4 Ec=nhancement of Design using techiques of decoration. 11
5 Clasps 14
6 Textures Used in Jewellery 19

4Manual And Computer Aided Jewellery Design Training Module
FREE HAND DRAWING
• Draw the exact mirror image of the half drawing with pencil without taking the help of any geometrical instruments.
• Finish the drawing by using the rotring pen / black micro tip pen.
• Fill flat colors with color pencils.
• Draw a symmetrical design as given on a cartridge drawing paper without taking the help of any instruments. You will have to maintain size and shape of the design.
Practice in ink:
• Follow the pencil drawing by using rotring pen.
• Color the same with flat colours.
Free hand drawing practice
flat colour
WHAT IS DESIGN?
I am sure you have heard of the term jewellery from all your various female relatives. Jewellery is not only worn by women, but also men. Why do women & men like wearing jewellery? There are various reasons like
• Adornment
• Social status
• Astrological value
• Investment value due to easy liquidity
• Denoting marital status
• Sentimental value
The visual appeal of a piece of jewellery lies in its structure, shape, form, movement, character of the design and colour scheme.
Jewellery is a fashion statement. The importance of aesthetics today is appreciated in the fast changing trends in the fashion industry. Design has now become a revolution as it represents the individual character of a person, reflects current trends, era, value system or beliefs.

5Manual And Computer Aided Jewellery Design Training Module
The design helps the product sell. You can have a brilliant manufacturing idea or concept but without the appropriate design the concept may not work. Design enhances the value of a piece of jewellery.
Design can sometimes make the difference between success & failure of a sale.
In the crowded display units, design is the only factor of focus. Designers are now extensively being used in most retail stores that customize jewellery and by manufacturers. While it’s easy to copy a design from a catalogue or someone’s showcase, there are designers who confidently present an original idea or concept. A designer can think of new concepts and ideas. They use these ideas to design collections to raise the company profits.
Design gives identity to a brand and it is this identity that the consumer looks for.
Example: For example: the budget of a teenager buying something for his girlfriend is different from the father who is shopping jewellery for his daughter’s forthcoming wedding.
Design and price ranges are relative to age. While price range is important during a process of sale but design is foremost in a clients’ mind. Even if a client is buying gold for investment purposes, the client wants to shop for something that is wearable.
Design is relative to the market one caters to. Position of the market and its culture influences the choice of designs sold in various parts of India. The price range and quality, relative to the market is what one needs to concentrate on when selling. The trends in the north of India compared to the south of India are different. The trends / likes / dislikes change from community to community because they depend on their cultural influence too.

6Manual And Computer Aided Jewellery Design Training Module
JEWELLERY TERMINOLOGY
Neckwear
Necklaces:
Chains Chokers Princess
Matinee Opera Rope
Lariat Coil Pearl strands
Collier

7Manual And Computer Aided Jewellery Design Training Module
Pendants:
Sliders Bails Crosses
Medallions Lockets Monogram

8Manual And Computer Aided Jewellery Design Training Module
Earrings:
Floral studs Diamond Studs Clip on earrings
Hoops Balis Chandeliers
Stilettos Jhumkas Cluster earrings/ Kudi
9Manual And Computer Aided Jewellery Design Training Module
Bracelets:
Slip on Cuffs Bangle bracelet
Tennis bracelet Id Bracelet Kadas
SETS:
Duo Jewellery set Trio Jewellery set
Brooch
Brooch

10Manual And Computer Aided Jewellery Design Training Module
Rings
Bands Eternity Solitaire ring
Three stone Engagement ring Inserts and Wraps
Fashion rings

11Manual And Computer Aided Jewellery Design Training Module
Accessories:
Body jewellery/body studs Cufflink Belts
Hair ornaments Money clips Tie pin
ENHANCEMENT OF A DESIGN USING TECHNIQUES OF DECORATION
A plain design or a sketch can be enhanced or decorated by using various techniques. These techniques can be used one at a time or by combining one, two or more.
Common techniques of decoration are
1. TWISTED WIRE: (VENI)
Twisted wire is locally known as “Veni”. It is a very popular technique of decoration in the local market. Here one or more wires are twisted together and soldered to the actual piece. It gives a delicate and traditional look to the piece of jewelry.
2. GRANULATION: (RAVA)
Granulation refers to the process of joining small, usually round balls or granules of metal to a base. Normally the base is a sheet metal. The local term for granulation is “Rava Work”.
3. INLAY:
Inlay refers to the technique of laying fine metal lines or stones into other metals to produce intricate patterns and designs in a finely finished surface. Agra is most famous for Inlay work. Wide ranges of ornamental objects are produced using this process drawing inspirations from The Taj Mahal.

12Manual And Computer Aided Jewellery Design Training Module
4. CHASING AND REPOUSSE:
Chasing and Repousse are collectively called “Embossing”.
Chasing is an art of controlling a small steel tool to push the lines of a pattern along the surface of the metal. The metal itself is not removed.
Repousse is the art of working with punches from the back of the metal to from shapes and lines that give the work a 3 dimensional appearance when it is viewed from the front. The techniques of Chasing and Repousse are complimentary to each other.
5. ENAMELLING: (MEENAKARI)
Enamel is a thin layer of molten glass fused by heat on the surface of the metal.
It is a unique and historical way of using colour to enhance the work. Enamels are a mixture of Silica, Lead Oxides, Salts of Soda, Potassium and Boric acids. It is generally available in lump or powder form. Very rarely are they found wet.
There are 3 types of enamels:
a. TRANSPARENT:
Enamels are transparent. The texture and the surface of the metal are clearly visible when enamel is applied.
b. OPAQUE:
When Opaque enamel is applied, the underlying metal can not be seen.
c. OPALESCENT:
Opalescent enamels have slightly milky appearance and some of the back ground metal is reflected through them.
6. ENGRAVING:
Engraving is the art of removing surface metal to create a decoration. It involves application of a design or a pattern to the front surface of metal or stone by incising and removing material from the surface.
7. STAMPING:
Stamping is a process where Rods, Tools, Nails, pins etc. are used as stamps to produce various design impressions on the metal. If you are going to be making a large number of pieces with a single pattern, it is worth considering having a stamp made for you. The stamp is placed on the metal and struck with one sharp blow from a hammer. This compresses the metal and leaves an impression. Metal that is to be stamped should not be too thick, because the thicker the metal, the greater the force that is required to make the impression. Metal that is 0.5 – 1.0 MM thick is suitable.
8. PIERCING: (CUT WORK I OPEN WORK)
Piercing is a decorative process where tools are used to pierce the surface to achieve a beautiful design. First the design is traced on the sheet metal. Then with the use of “Piercing Saw”, unwanted areas in the metal are cut out resulting in an intricate design.
9. USING WIRES:
Wires can be used in different ways to create various jewelry patterns. They can be used to make jump rings, spirals etc. to create number of designs. Metal wires are also bent, curved to create a pattern and then soldered on a sheet of metal)
10. FILIGREE: (JALI WORK)
Filigree is also termed as “Jali Work” locally. It is a very popular technique as it gives delicacy to the piece. It is done either by the process of piercing or by using fine metal wires to create a pattern or design.

13Manual And Computer Aided Jewellery Design Training Module
11. DIFFERENT LEVELS:
Here the design is created by placing more than one surface of the metal on each other forming different levels.
12. TEXTURES:
Textures are also very popular technique of decoration. One could use textures like matt, sand blasted, hammered etc to enhance the piece.
13. ETCHING:
Etching is a decorative technique which involves the application of a design or a pattern to the front surface of the metal using acid to remove metal from the surface.
14. ILLEGRAINING:
Mille graining is a decorative technique that involves using a knolling tool to create a series of small raised beads along the top edge of the metal strip or collet. It is also used for stone setting.
15. PANCHIKAM
Panchikam jewel were used in Gujarat and Kutch centuries ago. It dates back to the 18th and 19 centuries in India.
The setting of panchikam jewelry encases uncut semi precious stones and glass work in stimulated open claw workmanship. The actual process starts with the stone being inserted in a silver case. the edge of which is pressed on to the stone with the finger and then grooves are filed on it. A closer look shows a setting, that is crude in its execution, but it is in this quality that its aesthetical charm lies, making connoisseurs of beauty appreciate it.
The advantage of panchikam jewelry is. that it can not be mass produced. The piece is more or less exclusive. This jewelry is very flashy and can be worn on formal occasions.
16. THEWA
Thewa is often confused with Enameling. It is in fact completely different in appearance as well as technique. It originates from the district called Pratapgarh in Rajasthan.
The colours of glass used commonly are Blue, Red and Green. The desired piece of glass is encased in a frame of gold plated silver wire. A “Paper Thin” sheet of gold, of the same size as glass is cut and a free hand sketch of floral or historical motifs is made on it by special tools. It is then dipped in acid for a while and washed thoroughly with water. A mixture of cinnamon oil and other material called as “Ratti” is brushed at the back, to prevent the metal from melting. The glass is then semi fused and then the pattern in gold is carefully slipped over the edge and pressed onto the surface of the glass. The piece is re-heated till the gold and the glass firmly join together. A thin silver foil is fixed on the other side in order to give it a uniform luster. Some of the common motifs used are Deer and Lions, Krishna with Gopies, Peacocks. Gardens. Royal weddings, Maharana pratap riding his horse Chetak etc.
The most exquisite articles of Thewa work can be seen in the Metropolitan Museum of Art, New York, Geological Museum, London etc.
17. ELECTROFORMING
Elecroforming has become very popular. It is the process of building up gold by electro chemical deposit of a relatively thick layer of metal over a conductive or non conductive base material. Example: Wax Form or an Organic Form is the base material. Elecroforming is used to create hollow or light weight forms that might be impossible to create by other methods. This is an ideal process for making light weight pieces in large or unusual shapes, in creating special shapes. in special textures or in forming objects that is too large or too difficult to cast.
It uses a Bath type operation where the base material is placed in a relatively small beaker using solutions developed for this purpose.

14Manual And Computer Aided Jewellery Design Training Module
CLASPS
Jewelry clasps are more than just functional components used to securely connect two ends of a necklace or other piece of jewelry. Some clasps are there for function only, with a subdued appearance that keeps them from overpowering the jewelry. Other clasps are bold and are an important part of the jewelry’s overall design.
Some types of clasps are more secure than others and some are more difficult to open and close without help from another person.
Spring Ring ClaspsA spring ring clasp opens when you push backwards on a little lever that slides along a circular ring. Once the clasp is open you simply insert the chain or loop that’s attached to the piece you’re connecting into the open circle, then release the lever to return it to the closed position. There’s a tiny spring inside the clasp that puts pressure on the mechanism to keep the spring ring shut until you decide to open it again.
Spring ring clasps are commonly used to secure necklaces, bracelets and anklets, but some people have a difficult time operating very tiny spring ring clasps by themselves. Clasps that attach to a good sized loop that you can handle easily--or to a rigid piece--are easier to handle.

15Manual And Computer Aided Jewellery Design Training Module
Lobster Claw ClaspsIts name explains the general look of lobster claw clasps, but you can see in the photo that the look varies and can be fashioned to suit the jewelry the clasps are used to secure. A lobster claw clasp has a tiny spring in its mechanism that keeps the arm closed until you push on the lever. Lobster claws are secure clasps that are a popular for bracelets, necklaces and anklets. They’re somewhat easier to open and close by yourself than spring ring clasps are.
Box ClaspsBox clasps are two-piece clasps that open when you push down on the exterior lever of a wedgeshaped piece of metal, compressing it so that it slides out of the opening. Push it back in and it clicks into place. Box clasps are easy to use, but often do not have as much strength as lobster claw clasps. Box clasps can be plain or decorative and you’ll find them in a variety of shapes and size.

16Manual And Computer Aided Jewellery Design Training Module
Box Clasps with Safety Guards A safety guard flips into place to add extra security to a box clasp.
Toggle ClaspsToggle clasps are two-piece clasps that are attached to opposite ends of a piece of jewelry. One section of the clasp is formed into a circle or other shape with an open center. The other half is a thick bar that attaches to the components at the other end. When you insert the “T” into the circle extends past the circle’s edges to hold the jewelry in place.
Toggle clasps are widely used to secure bracelets and anklets, but jewelry artisans also incorporate them into their necklace designs. They are available in numerous sizes and designs. Toggle clasps are not as secure as clasps that have a lock-type closure.

17Manual And Computer Aided Jewellery Design Training Module
Hidden ClaspsHidden clasps blend in and seem to disappear when latched; allowing gems and other jewelry components flow uninterrupted around the piece. A safety latch provides additional security.
Decorative ClaspsSome clasps play a major role in jewelry design, like the heart clasp used in the bracelet shown on this page.

18Manual And Computer Aided Jewellery Design Training Module
Other ClaspsYou’ll see other clasp styles when you shop for jewelry. There are magnetic clasps that snap together quickly and easily when the two ends near each other; two-piece clasps that screw together; clasps that have a curved hook on one end that fits into a circular opening on the other. Put on a few necklaces and bracelets to see how easily you can open and close different types of clasps by yourself. Determine how secure the clasps are, especially when buying fine jewelry. When you begin to pay attention to clasps you’ll appreciate their contribution to jewelry design and functionality

19Manual And Computer Aided Jewellery Design Training Module
TEXTURES USED IN JEWELLERY
1. Smooth I High Polished Texture:
It is a smooth, high gloss finish on the surface of the metal.
First, decide whether the shape is flat, domed or flat curved. Then colour as white or yellow metal. The shadow will be in the area futhermost from the light source. Highlight will be in the area closest to the light source
2. Tree Bark ‘texture:
It is a very light nugget finish on the surface of the metal.
It is shown by drawing small strokes (standing) over the high polished metal. It is done by engraving these coarse lines in the metal which are roughly parallel to each other. It looks like a Tree Bark.
3. Matt I Sand Blasted Texture:
It is a dull, sand blasted finish on the surface of the metal. It is achieved by producing multiple numbers of pits which look like grains. It makes the metal look matt or frosted. In sand blasting metal is held against a powerful flow of sand blown by a machine. (Sand blasting machine) It gives a shimmering look to the metal.
4. Hammered Texture:
This texture dulls the surface of the metal. This technique consists in stimulating the hammer strokes by making depressions or concave marks at close intervals. It is shown by drawing texture marks on the shaded surface of the metal and then showing the textures by shading them closest to the light and placing highlight farest from the light
5. Florentine Texture:
It is a dull, soft, brushed finish on the surface of the metal.
It is achieved by very fine lines engraved in a variety of cross- hatched patterns. To show the same, shade metal form as smooth high polished. Then make intersecting lines with brown pencil to achieve the Florentine look.
6. Satin Texture:
It is a highly brushed finish on the surface of the metal. It is achieved by giving a dull effect to the shiny and bright surface of the metal. It gives the surface a metallic and pert like luster. To show the same, shade metal as smooth high polished. Then make small dots with pencil I brown pencil for the satin look.
7. Starfish I Organic I Animal like I Shell Texture:
Draw BUMPS (generally with brown pencil in case of yellow metal and pencil in case of white metal. Shade the BUMPS and make them look like little dome.
8. Basket Weave Texture:
The texture on the surface of the metal looks like basket weave.
To show the same, shade metal as smooth I high polished. Then make lines that look like basket weave with pencil I brown pencil.

20Manual And Computer Aided Jewellery Design Training Module

Manual And Computer Aided Jewellery Design Training Module
INDEXSr. No. Contents Page No.
1 Rhino 3D Aiided Design 22
2 Jewellery Products in CAD 23
3 Types of Setting 24
4 Prong Setting – Technical Parameters 24
5 Plate Prong Setting – Technical Parameters 25
6 Bezel Setting – Technical Parameters 26
7 Single Row Channel Setting 27
8 Double / Multiple Row Channel Setting 28
9 Closed Invisible Setting 29
10 Open Invisible Setting 30
11 Nick Setting 32
12 Pavé Setting & Metal Weight Calculations 33
22Manual And Computer Aided Jewellery Design Training Module
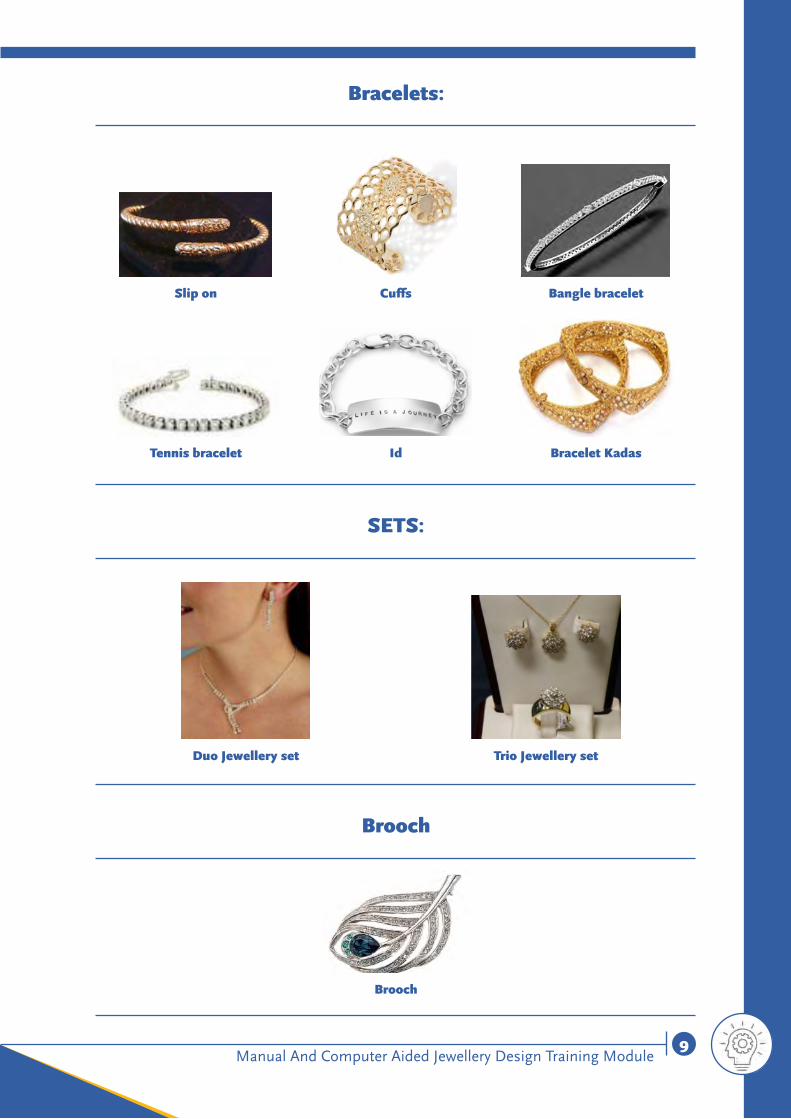
INNOVATE – RHINO 3D AIDED DESIGN
RHINOCEROS Ver. 4.00
Rhinoceros software is design and develops by McNeal Corporation USA.
Rhino is a playground for your imagination and a workbench where your ideas become masterpieces.
With Rhino you can realize your most complex ideas with no need to rely on someone else to interpret them. Create the 3–D model and show the client a rendering before beginning production. Once the design is approved, send it directly to 3-D printing or CAM to produce the model for casting. You can then use traditional techniques for manufacturing.
To be an effective designer today, you need tools to quickly develop your designs and accurately communicate them to everyone in the product research, development, marketing, and manufacturing or construction process.
Start with a sketch, drawing, physical model, scan data, or only an idea—Rhino provides the tools to accurately model and document your designs ready for rendering, animation, drafting, engineering, analysis, and manufacturing or construction.
Rhino can create, edit, analyze, document, render, animate, and translate NURBS curves, surfaces, and solids with no limits on complexity, degree, or size. Rhino also supports polygon meshes and point clouds. Rhino offers:
Uninhibited free-form 3-Dmodelling. Tools like those found only in products costing 20 to 50 times more. Accurately model any shape you can imagine.
Extreme precision. Design, prototype, engineer, analyze, document, and manufacture anything of any size no matter how small or how large.
Unrestricted editing. Revise freely without concern about how you got there or where you want to go next.
2-D drafting, annotation, and illustration. In addition, flatten 3-D surfaces into 2-D patterns and drive laser, plasma, and water jet cutters.
Large project organization. Work with both large models and large teams.
Compatibility. Exchange files with your other design, drafting, CAM, engineering, analysis, rendering, animation, and illustration software.
File read and repair. Fix extremely challenging IGES and mesh files.
Direct connection. Support for wide variety of 3-D digitizing arms, 3-D scanners, and 3-D printers.

23Manual And Computer Aided Jewellery Design Training Module
Customization. Easy-to-use tools let both you and software developers make Rhino fit your special needs.
Short learning curve. Focus on design and visualization without being distracted by the software.
Speed. Even on an ordinary laptop computer Rhino is fast. No special hardware is required.
Affordability. Ordinary hardware. Short learning curve. Priced like other Windows software. No maintenance fees. Worldwide support is included.
JEWELLERY PRODUCTS (DESIGNED ON CAD)
Jewellery Products
Jewellery Products

24Manual And Computer Aided Jewellery Design Training Module
TYPES OF SETTINGS
1. Prong setting.
2. Plate prong setting.
3. Bezel setting.
4. Channel setting.
5. Invisible setting.
6. Nick setting.
7. Pave setting.
8. Flush setting.
PRONG SETTING - TECHNICAL PARAMETERS

25Manual And Computer Aided Jewellery Design Training Module
Prong Setting - Technical Parameters
PLATE PRONG SETTING - TECHNICAL PARAMETER

26Manual And Computer Aided Jewellery Design Training Module
BEZEL SETTING - TECHNICAL PARAMETERS
Bezel With Different Shapes Of Diamonds
27Manual And Computer Aided Jewellery Design Training Module
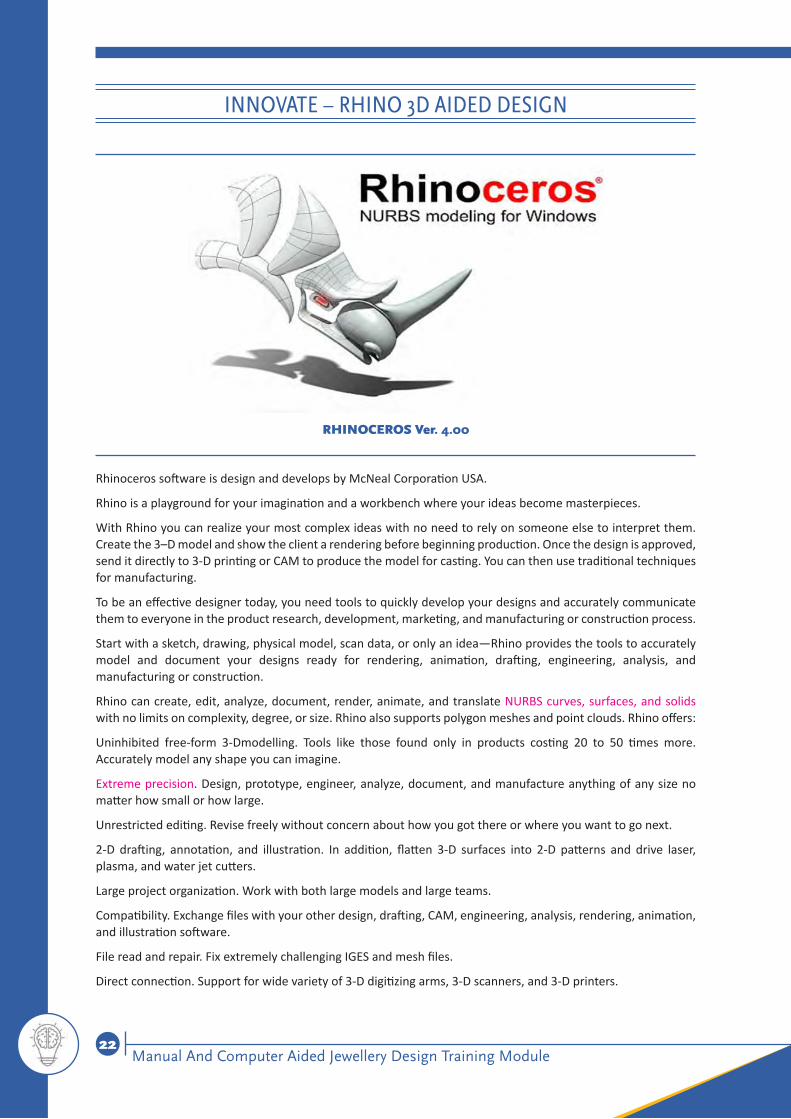
SINGLE ROW CHANNEL SETTING

28Manual And Computer Aided Jewellery Design Training Module
DOUBLE OR MULTIPLE ROW CHANNEL SETTING - TECHNICAL PARAMETERS

29Manual And Computer Aided Jewellery Design Training Module
CLOSED (SIDE CHANNEL WALL) INVISIBLE SETTING - TECHNICAL PARAMETERS.

30Manual And Computer Aided Jewellery Design Training Module
OPEN (SIDE CHANNEL WALL) INVISIBLE SETTING - TECHNICAL PARAMETERS
INVISIBLE SETTING

31Manual And Computer Aided Jewellery Design Training Module
NICK SETTING WITH TECHNICAL PARAMETER

32Manual And Computer Aided Jewellery Design Training Module
NICK SETTING

33Manual And Computer Aided Jewellery Design Training Module
PAVE SETTING
REFERENCES
1. http://www.rhino3d.com/features.htm#NURBS

Manual And Computer Aided Jewellery Design Training Module
INNOVATE – RHINO 3D AIDED DESIGN
RHINOCEROS Ver. 4.00
Rhinoceros software is design and develops by McNeal Corporation USA.
Rhino is a playground for your imagination and a workbench where your ideas become masterpieces.
With Rhino you can realize your most complex ideas with no need to rely on someone else to interpret them. Create the 3–D model and show the client a rendering before beginning production. Once the design is approved, send it directly to 3-D printing or CAM to produce the model for casting. You can then use traditional techniques for manufacturing.
To be an effective designer today, you need tools to quickly develop your designs and accurately communicate them to everyone in the product research, development, marketing, and manufacturing or construction process.
Start with a sketch, drawing, physical model, scan data, or only an idea—Rhino provides the tools to accurately model and document your designs ready for rendering, animation, drafting, engineering, analysis, and manufacturing or construction.
Rhino can create, edit, analyze, document, render, animate, and translate NURBS curves, surfaces, and solids with no limits on complexity, degree, or size. Rhino also supports polygon meshes and point clouds. Rhino offers:
Uninhibited free-form 3-Dmodelling. Tools like those found only in products costing 20 to 50 times more. Accurately model any shape you can imagine.
Extreme precision. Design, prototype, engineer, analyze, document, and manufacture anything of any size no matter how small or how large.
Unrestricted editing. Revise freely without concern about how you got there or where you want to go next.
2-D drafting, annotation, and illustration. In addition, flatten 3-D surfaces into 2-D patterns and drive laser, plasma, and water jet cutters.
Large project organization. Work with both large models and large teams.
Compatibility. Exchange files with your other design, drafting, CAM, engineering, analysis, rendering, animation, and illustration software.
File read and repair. Fix extremely challenging IGES and mesh files.
Shading practice

Direct connection. Support for wide variety of 3-D digitizing arms, 3-D scanners, and 3-D printers.
Customization. Easy-to-use tools let both you and software developers make Rhino fit your special needs.
Short learning curve. Focus on design and visualization without being distracted by the software.
Speed. Even on an ordinary laptop computer Rhino is fast. No special hardware is required.
Affordability. Ordinary hardware. Short learning curve. Priced like other Windows software. No maintenance fees. Worldwide support is included.
JEWELLERY PRODUCTS (DESIGNED ON CAD)
Jewellery Products
Jewellery Products

TYPES OF SETTINGS
1. Prong setting.
2. Plate prong setting.
3. Bezel setting.
4. Channel setting.
5. Invisible setting.
6. Nick setting.
7. Pave setting.
8. Flush setting.
PRONG SETTING - TECHNICAL PARAMETERS
Rendering 3 dimensional objects

Prong Setting - Technical Parameters
Repeat the following shapes in pencil. Try to imitate the exactness as shown in the sketches.
Use of eraser is not allowed.
Aptitude Paper

• Shade the boxes keeping in mind the description given under the box.
• Design your style of jewellery the way you think it looks best.
• Use whatever supplies you find around you.
LightFire Anger
WaterDarkHappiness