Embed Size (px)
DESCRIPTION
The Definitive Guide toPersonal Combat TheoryTraining and Application
Citation preview
Elite Fighter Seminar Series
Volume 3
The
Master of the
Ring
By Kevin & Eric Lamkin
The
Master of the
Ring
The Definitive Guide to Personal Combat Theory Training and Application
By Kevin and Eric Lamkin
Copyright © 2004 by Kevin Lamkin, Eric Lamkin, and Elite-Fighters.com
No part of this work may be reproduced by any mechanical, photographic, magnetic, or electronic process or otherwise copied for public or private use without prior written
permission of the author.
Printed in the United States of America
DISCLAIMER This publication is for informational purposes only. Please note that the author and Elite-Fighters.com are NOT RESPONSIBLE in any manner whatsoever for any injury or death that may result from the use or misuse from practicing the techniques and/or following the instructions given within. Since the physical activities described herein may be too strenuous in nature for some readers to engage in safely, it is essential that a physician be consulted prior to training.
i Master of the Ring Copyright 2004 by Eric & Kevin Lamkin
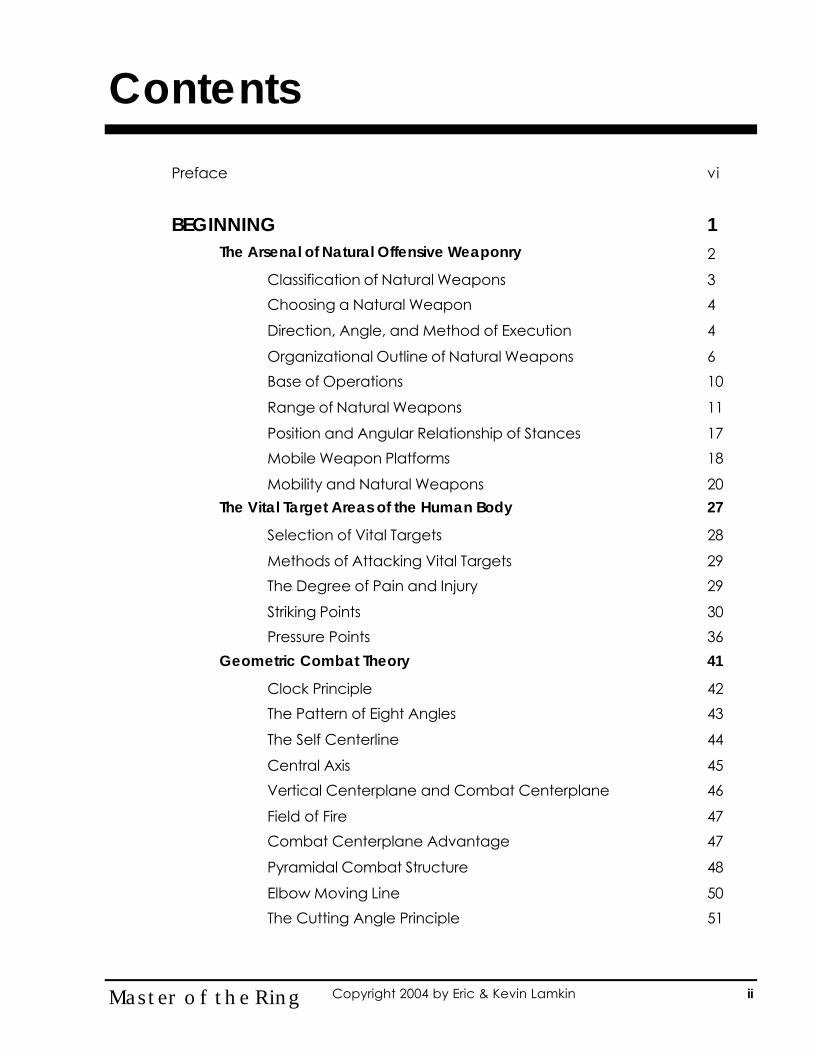
Contents
Preface vi
BEGINNING 1 The Arsenal of Natural Offensive Weaponry 2 Classification of Natural Weapons 3 Choosing a Natural Weapon 4 Direction, Angle, and Method of Execution 4 Organizational Outline of Natural Weapons 6 Base of Operations 10 Range of Natural Weapons 11 Position and Angular Relationship of Stances 17 Mobile Weapon Platforms 18 Mobility and Natural Weapons 20 The Vital Target Areas of the Human Body 27
Selection of Vital Targets 28 Methods of Attacking Vital Targets 29 The Degree of Pain and Injury 29 Striking Points 30 Pressure Points 36 Geometric Combat Theory 41
Clock Principle 42 The Pattern of Eight Angles 43 The Self Centerline 44 Central Axis 45 Vertical Centerplane and Combat Centerplane 46 Field of Fire 47 Combat Centerplane Advantage 47 Pyramidal Combat Structure 48 Elbow Moving Line 50 The Cutting Angle Principle 51
ii Master of the Ring Copyright 2004 by Eric & Kevin Lamkin
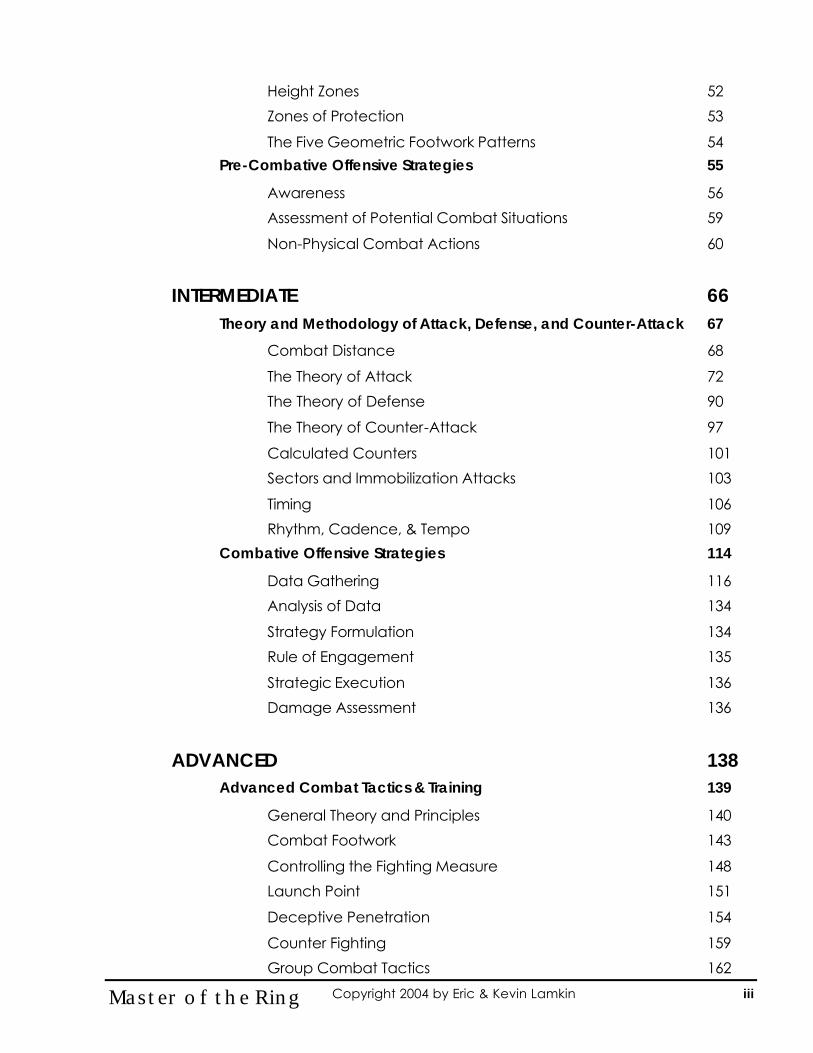
Height Zones 52 Zones of Protection 53 The Five Geometric Footwork Patterns 54 Pre-Combative Offensive Strategies 55
Awareness 56 Assessment of Potential Combat Situations 59 Non-Physical Combat Actions 60 INTERMEDIATE 66 Theory and Methodology of Attack, Defense, and Counter-Attack 67
Combat Distance 68 The Theory of Attack 72 The Theory of Defense 90 The Theory of Counter-Attack 97
Calculated Counters 101 Sectors and Immobilization Attacks 103 Timing 106 Rhythm, Cadence, & Tempo 109 Combative Offensive Strategies 114
Data Gathering 116 Analysis of Data 134 Strategy Formulation 134 Rule of Engagement 135 Strategic Execution 136 Damage Assessment 136 ADVANCED 138 Advanced Combat Tactics & Training 139
General Theory and Principles 140 Combat Footwork 143 Controlling the Fighting Measure 148 Launch Point 151 Deceptive Penetration 154 Counter Fighting 159 Group Combat Tactics 162
iii Master of the Ring Copyright 2004 by Eric & Kevin Lamkin
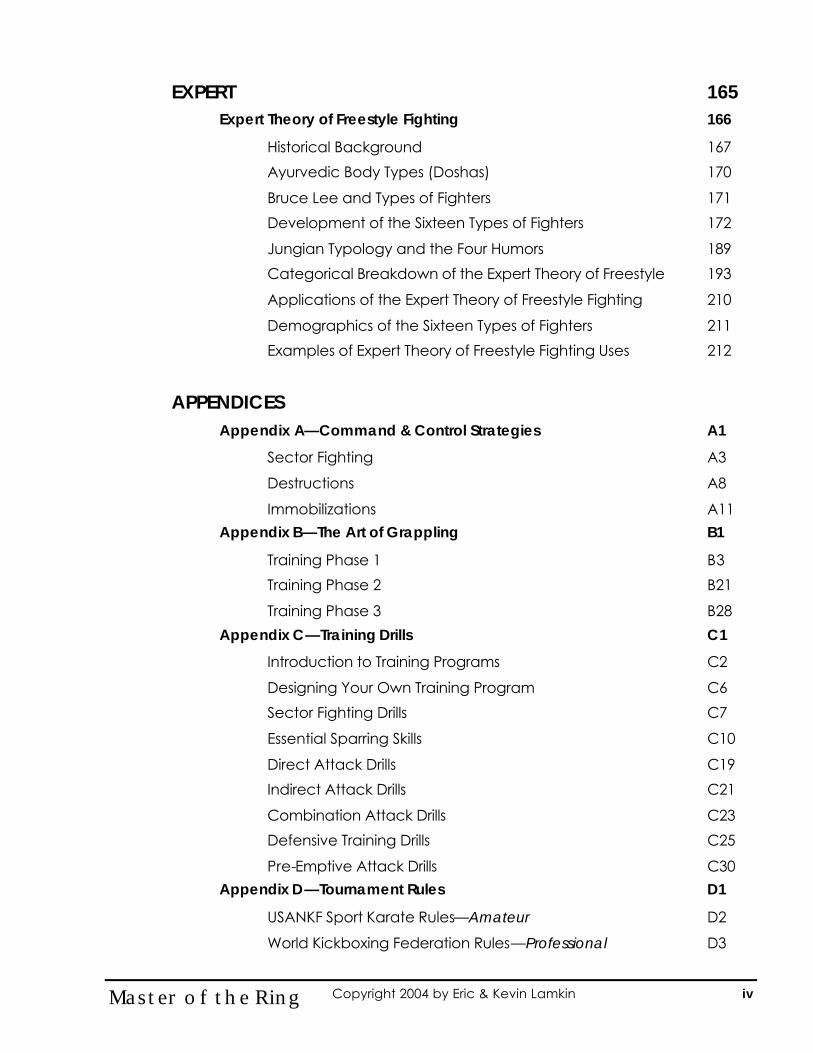
EXPERT 165 Expert Theory of Freestyle Fighting 166
Historical Background 167 Ayurvedic Body Types (Doshas) 170 Bruce Lee and Types of Fighters 171 Development of the Sixteen Types of Fighters 172 Jungian Typology and the Four Humors 189 Categorical Breakdown of the Expert Theory of Freestyle 193 Applications of the Expert Theory of Freestyle Fighting 210 Demographics of the Sixteen Types of Fighters 211 Examples of Expert Theory of Freestyle Fighting Uses 212
APPENDICES Appendix A—Command & Control Strategies A1
Sector Fighting A3 Destructions A8 Immobilizations A11 Appendix B—The Art of Grappling B1
Training Phase 1 B3 Training Phase 2 B21
Training Phase 3 B28 Appendix C—Training Drills C1
Introduction to Training Programs C2 Designing Your Own Training Program C6 Sector Fighting Drills C7 Essential Sparring Skills C10 Direct Attack Drills C19 Indirect Attack Drills C21 Combination Attack Drills C23 Defensive Training Drills C25 Pre-Emptive Attack Drills C30 Appendix D—Tournament Rules D1
USANKF Sport Karate Rules—Amateur D2 World Kickboxing Federation Rules—Professional D3
iv Master of the Ring Copyright 2004 by Eric & Kevin Lamkin
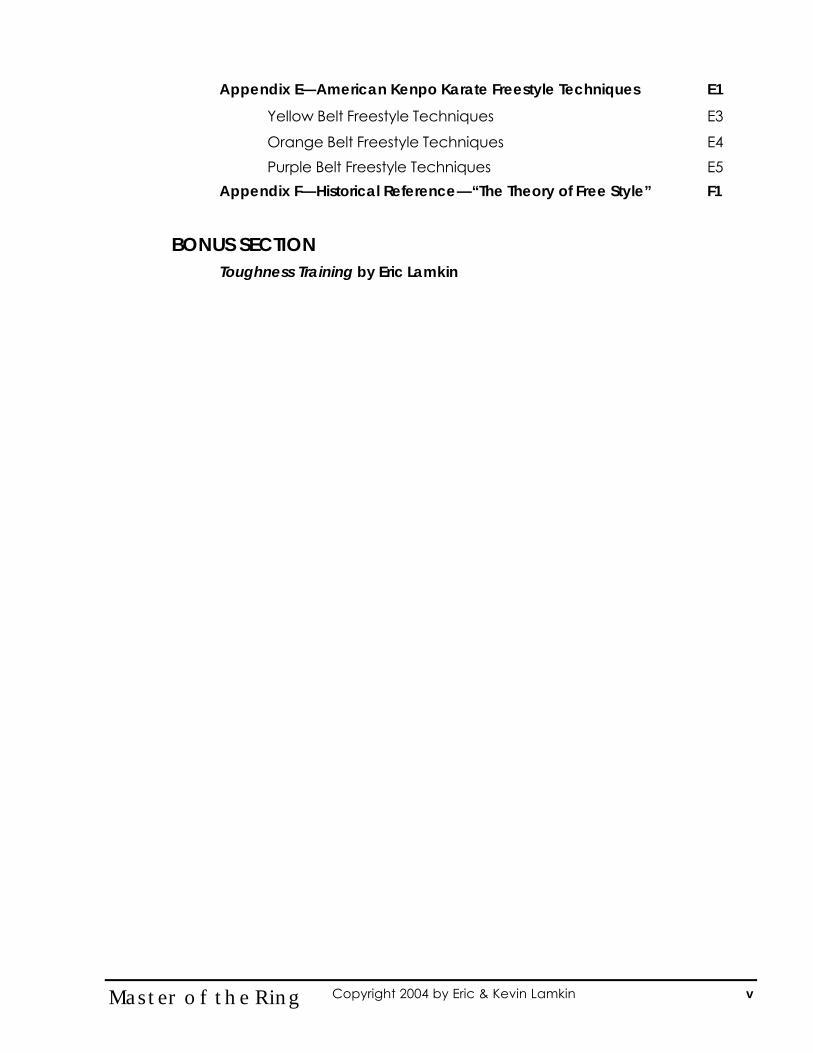
Appendix E—American Kenpo Karate Freestyle Techniques E1
Yellow Belt Freestyle Techniques E3 Orange Belt Freestyle Techniques E4 Purple Belt Freestyle Techniques E5 Appendix F—Historical Reference—“The Theory of Free Style” F1
BONUS SECTION Toughness Training by Eric Lamkin
v Master of the Ring Copyright 2004 by Eric & Kevin Lamkin
PREFACE The book you are holding is the culmination of over 17 years of research. It is the first book of its kind to fully describe all aspects of sparring along with training exercises designed to integrate these elements into your own fighting style. Most martial art schools teach light or no-contact point sparring; the school in which I began placed a heavy emphasis on street or combat oriented sparring—contact was moderate to heavy. Our instructors used Joe Lewis’ The Theory of Free Style (see Appendix F). This document (based upon the teachings of Bruce Lee) was one of the first systemized methods of teaching sparring to students. Though it was revolutionary in its day, it failed to cover all aspects of combat theory and did not have defined methods for training. Without it, however, the book you are now holding would never have come about. I salute all those who opened the door for my brother and myself so that we could break new ground in the martial arts and give a contribution back to the art we love. DEFINITION OF SPARRING The first concise definition of sparring (or freestyle) was presented by Ed Parker, father of American Kenpo Karate. Ed Parker identified two types of sparring—Tournament and Street. Tournament Freestyle, he explained, consists of Amateur (light or no contact) and Professional (full contact or knockout). Both of these aspects fall within the Sports Phase of martial arts; however, both “employ rules that restrict, limit, and hamper” the fighter’s versatility. He felt that Tournament Freestyle is sparring with rules and Street Freestyle is sparring without rules. While I agree with his definition and breakdown of Tournament Freestyle, I disagree with his definition of Street Freestyle. While it may be acceptable for criminals to attack others without a moral compass and a feeling of impunity, it is not acceptable under the law and certainly not acceptable for the martial artists. As citizens we are bound by the law to apply only as much force as is necessary under the circumstances to escape from an assault. If, for example, you are attacked by a knife-wielding assailant and you manage to disarm and incapacitate him, then you are protected under the law. However, if you pick up the knife and stab the incapacitated attacker and cause his death, then you have just crossed from being a victim to being a murderer. Citizens are not the only people bound by rules, so are police officers and military personnel. Police officers must use only the reasonable amount of force that is necessary to subdue a suspect. Once the suspect has been subdued and handcuffed, police officers must then protect the suspect from harm—even if the suspect had just tried to murder the officer! A soldier in the military may have orders to treat every citizen in a particular foreign city as the enemy and kill upon sight; however, the very next day, his commanding officer may give orders that those very same citizens are now “friends” and the military personnel must now act as humanitarians. This realization prompted me to develop a systemized manner that martial artists may use to determine the rules of engagement and the necessary force that may be applied before and after a tactical encounter (see Pre-Combative Offensive Strategies page 55 and Combative Offensive Strategies page 114).
vi Master of the Ring Copyright 2004 by Eric & Kevin Lamkin

OVERVIEW This work is the definitive guide to personal combat theory and training. It is divided into four sections—Beginning, Intermediate, Advanced, and Expert.
Beginning—At this stage, we will examine the natural weapons of the human body and the targets upon which those weapons will be applied. In addition, we will explore Geometric Combat Theory and Pre-Combative Offensive Strategies, these groundbreaking methods, developed by the authors, have revolutionized the martial arts world.
Intermediate—At this stage, we will examine the foundation of all combat theory. At
the conclusion of this section, the Combative Offensive Strategies will provide the student with the complete tools necessary to determine how to properly apply decide the correct course of action in any combat situation.
Advanced—If you are ever engaged in combat with an equally matched or
superior force, then this section will guide you in learning the refinements of personal combat and give you the necessary edge for victory. This section is also vital for anyone who wishes to be champion in sport competition—amateur or professional.
Expert—The epitome of personal combat is psychological combat. The material
found here will give you the edge in any tactical engagement and can even help you in personal and professional life! Also included is the revolutionary study of the Sixteen Types of Fighters.
Appendix—The appendix provides the reader with the following:
1. Command & Control Strategies—This section expands upon ideas found
in combat theory. 2. The Art of Grappling—A fighter’s knowledge is not complete unless he
knows all aspects of grappling. This section completes your knowledge.
3. Training Drills—This section will enable you to fully integrate all the lessons you have learned into your own personal fighting style.
4. Tournament Rules—For those who are interested in amateur or professional sport karate, this section will give you all the necessary rules and regulations that you will need for your own personal training.
5. American Kenpo Freestyle Techniques—Ed Parker, father of American Kenpo, advanced the idea of traditional one-step sparring to enable martial artists to design their own combinations.
6. Historical Reference “The Theory of Free Style”—This is a copy of the original and revolutionary sparring system developed by Joe Lewis which is based upon the teachings of Bruce Lee.
vi Master of the Ring Copyright 2004 by Eric & Kevin Lamkin
SPECIAL BONUS SECTION As a very special bonus, we have included a copy of our most popular publication—Toughness Training. Adapted by law enforcement and military personnel, this program contains some of the most important pieces that are missing from your training.
vi Master of the Ring Copyright 2004 by Eric & Kevin Lamkin

BeginningBeginning
1 Master of the Ring Copyright 2004 by Eric & Kevin Lamkin
The Arsenal of The Arsenal of
Natural Offensive Natural Offensive WeaponryWeaponry
2 Master of the Ring Copyright 2004 by Eric & Kevin Lamkin
Natural Weapons
NATURAL WEAPONS Natural weapons are specially formed anatomical points designed to deliver force to vital target areas. The amount of force that can be safely generated behind a particular strike varies according to the individual, and is based upon the following factors:
1. Size of bone 2. Strength of bone 3. Strength of supporting musculature 4. Nerve sensitivity 5. Hardness of target 6. Movement of target after impact
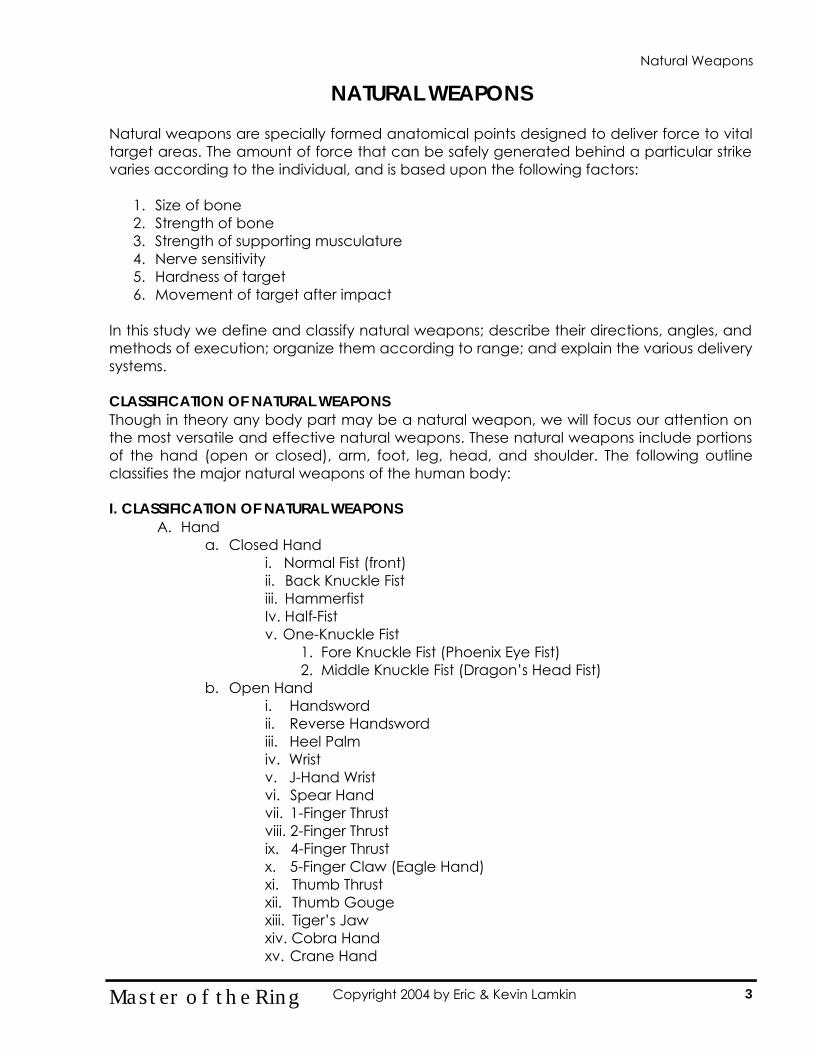
In this study we define and classify natural weapons; describe their directions, angles, and methods of execution; organize them according to range; and explain the various delivery systems. CLASSIFICATION OF NATURAL WEAPONS Though in theory any body part may be a natural weapon, we will focus our attention on the most versatile and effective natural weapons. These natural weapons include portions of the hand (open or closed), arm, foot, leg, head, and shoulder. The following outline classifies the major natural weapons of the human body: I. CLASSIFICATION OF NATURAL WEAPONS
A. Hand a. Closed Hand
i. Normal Fist (front) ii. Back Knuckle Fist iii. Hammerfist Iv. Half-Fist v. One-Knuckle Fist
1. Fore Knuckle Fist (Phoenix Eye Fist) 2. Middle Knuckle Fist (Dragon’s Head Fist)
b. Open Hand i. Handsword ii. Reverse Handsword iii. Heel Palm iv. Wrist v. J-Hand Wrist vi. Spear Hand vii. 1-Finger Thrust viii. 2-Finger Thrust ix. 4-Finger Thrust x. 5-Finger Claw (Eagle Hand) xi. Thumb Thrust xii. Thumb Gouge xiii. Tiger’s Jaw xiv. Cobra Hand xv. Crane Hand
Natural Weapons
3 Master of the Ring Copyright 2004 by Eric & Kevin Lamkin

B. Arm a. Forearm b. Elbow
C. Foot a. Ball of Foot b. Footsword c. Heel d. Instep e. Sole f. Toes
D. Leg a. Shin b. Knee
E. Head a. Front b. Rear
F. Shoulder a. Front b. Side
CHOOSING A NATURAL WEAPON The relative position of a fighter’s natural weapon to his opponent’s vital target will always determine the most appropriate natural weapon to use in any given situation. The fighter will choose the most readily available natural weapon for the most vulnerable vital target. In addition, the direction and angle of the vital target will determine the specific formation of the natural weapon and its method of execution. DIRECTION, ANGLE, AND METHOD OF EXECUTION Once the vital target area has been identified and a natural weapon has been chosen, the fighter must now determine the direction, angle, and the method of execution the weapon will follow. He will make these determinations based upon the necessary path his weapon must travel for the quickest and most effective strike as well as the intended result of the strike. The six directions a weapon may travel are:
1. Inward 2. Outward 3. Upward 4. Downward 5. Forward 6. Backward
4 Master of the Ring Copyright 2004 by Eric & Kevin Lamkin
Natural Weapons
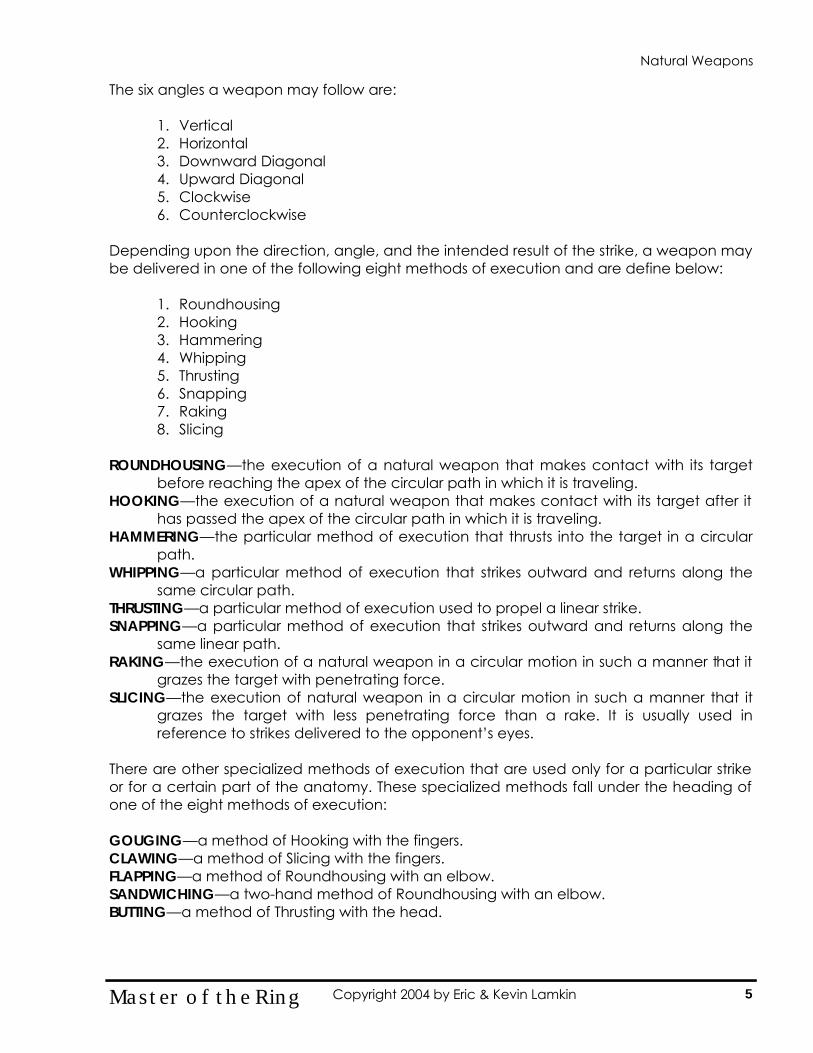
The six angles a weapon may follow are:
1. Vertical 2. Horizontal 3. Downward Diagonal 4. Upward Diagonal 5. Clockwise 6. Counterclockwise
Depending upon the direction, angle, and the intended result of the strike, a weapon may be delivered in one of the following eight methods of execution and are define below:
1. Roundhousing 2. Hooking 3. Hammering 4. Whipping 5. Thrusting 6. Snapping 7. Raking 8. Slicing
ROUNDHOUSING—the execution of a natural weapon that makes contact with its target
before reaching the apex of the circular path in which it is traveling. HOOKING—the execution of a natural weapon that makes contact with its target after it
has passed the apex of the circular path in which it is traveling. HAMMERING—the particular method of execution that thrusts into the target in a circular
path. WHIPPING—a particular method of execution that strikes outward and returns along the
same circular path. THRUSTING—a particular method of execution used to propel a linear strike. SNAPPING—a particular method of execution that strikes outward and returns along the
same linear path. RAKING—the execution of a natural weapon in a circular motion in such a manner that it
grazes the target with penetrating force. SLICING—the execution of natural weapon in a circular motion in such a manner that it
grazes the target with less penetrating force than a rake. It is usually used in reference to strikes delivered to the opponent’s eyes.
There are other specialized methods of execution that are used only for a particular strike or for a certain part of the anatomy. These specialized methods fall under the heading of one of the eight methods of execution: GOUGING—a method of Hooking with the fingers. CLAWING—a method of Slicing with the fingers. FLAPPING—a method of Roundhousing with an elbow. SANDWICHING—a two-hand method of Roundhousing with an elbow. BUTTING—a method of Thrusting with the head.
5 Master of the Ring Copyright 2004 by Eric & Kevin Lamkin
Natural Weapons
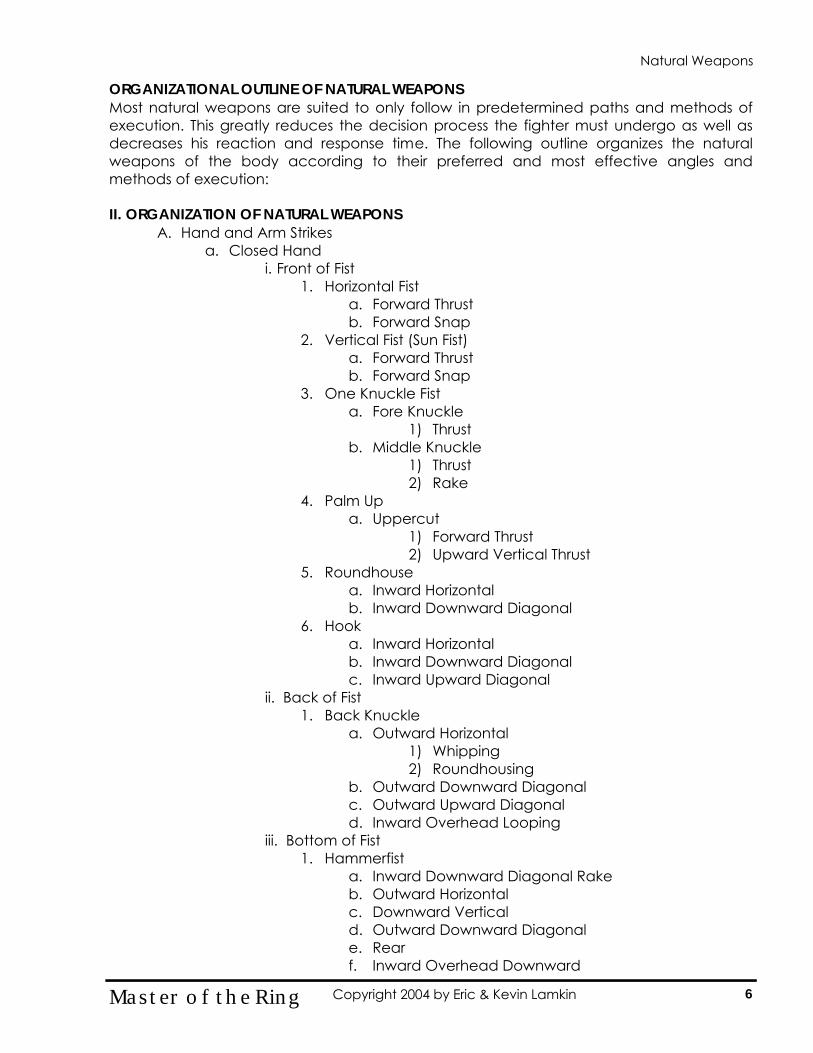
ORGANIZATIONAL OUTLINE OF NATURAL WEAPONS Most natural weapons are suited to only follow in predetermined paths and methods of execution. This greatly reduces the decision process the fighter must undergo as well as decreases his reaction and response time. The following outline organizes the natural weapons of the body according to their preferred and most effective angles and methods of execution: II. ORGANIZATION OF NATURAL WEAPONS
A. Hand and Arm Strikes a. Closed Hand
i. Front of Fist 1. Horizontal Fist
a. Forward Thrust b. Forward Snap
2. Vertical Fist (Sun Fist) a. Forward Thrust b. Forward Snap
3. One Knuckle Fist a. Fore Knuckle
1) Thrust b. Middle Knuckle
1) Thrust 2) Rake
4. Palm Up a. Uppercut
1) Forward Thrust 2) Upward Vertical Thrust
5. Roundhouse a. Inward Horizontal b. Inward Downward Diagonal
6. Hook a. Inward Horizontal b. Inward Downward Diagonal c. Inward Upward Diagonal
ii. Back of Fist 1. Back Knuckle
a. Outward Horizontal 1) Whipping 2) Roundhousing
b. Outward Downward Diagonal c. Outward Upward Diagonal d. Inward Overhead Looping
iii. Bottom of Fist 1. Hammerfist
a. Inward Downward Diagonal Rake b. Outward Horizontal c. Downward Vertical d. Outward Downward Diagonal e. Rear f. Inward Overhead Downward
6 Master of the Ring Copyright 2004 by Eric & Kevin Lamkin
Natural Weapons
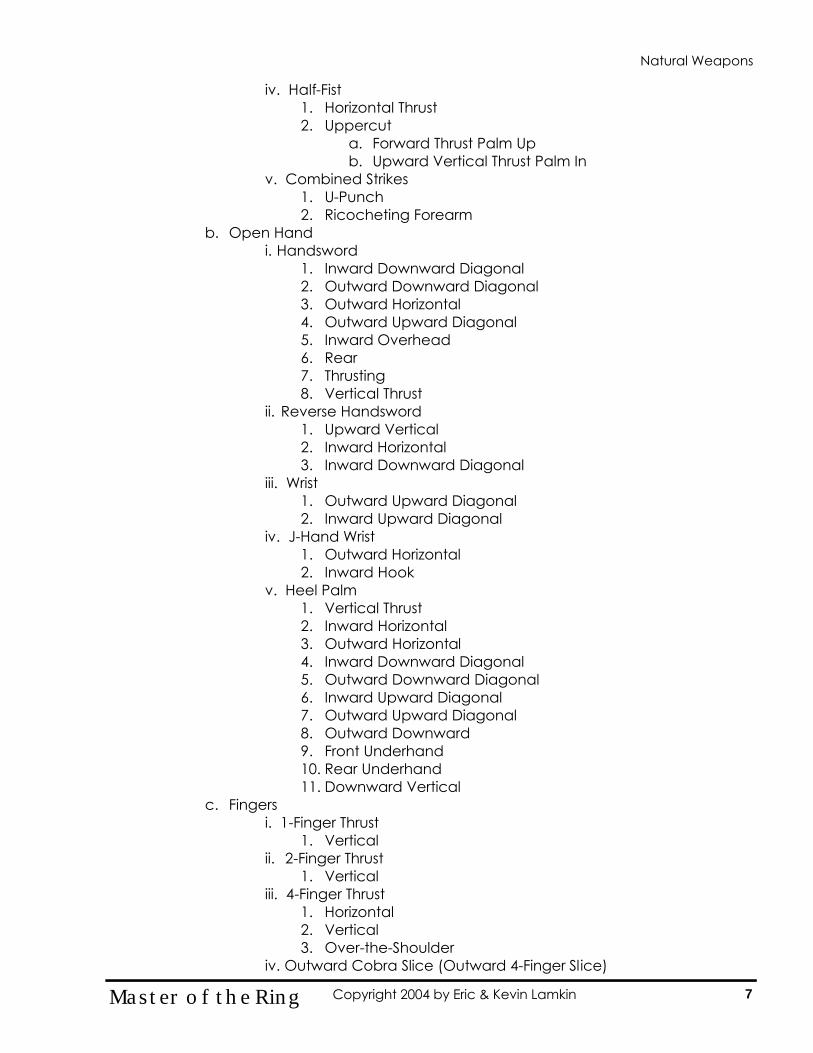
iv. Half-Fist 1. Horizontal Thrust 2. Uppercut
a. Forward Thrust Palm Up b. Upward Vertical Thrust Palm In
v. Combined Strikes 1. U-Punch 2. Ricocheting Forearm
b. Open Hand i. Handsword
1. Inward Downward Diagonal 2. Outward Downward Diagonal 3. Outward Horizontal 4. Outward Upward Diagonal 5. Inward Overhead 6. Rear 7. Thrusting 8. Vertical Thrust
ii. Reverse Handsword 1. Upward Vertical 2. Inward Horizontal 3. Inward Downward Diagonal
iii. Wrist 1. Outward Upward Diagonal 2. Inward Upward Diagonal
iv. J-Hand Wrist 1. Outward Horizontal 2. Inward Hook
v. Heel Palm 1. Vertical Thrust 2. Inward Horizontal 3. Outward Horizontal 4. Inward Downward Diagonal 5. Outward Downward Diagonal 6. Inward Upward Diagonal 7. Outward Upward Diagonal 8. Outward Downward 9. Front Underhand 10. Rear Underhand 11. Downward Vertical
c. Fingers i. 1-Finger Thrust
1. Vertical ii. 2-Finger Thrust
1. Vertical iii. 4-Finger Thrust
1. Horizontal 2. Vertical 3. Over-the-Shoulder
iv. Outward Cobra Slice (Outward 4-Finger Slice)
7 Master of the Ring Copyright 2004 by Eric & Kevin Lamkin
Natural Weapons
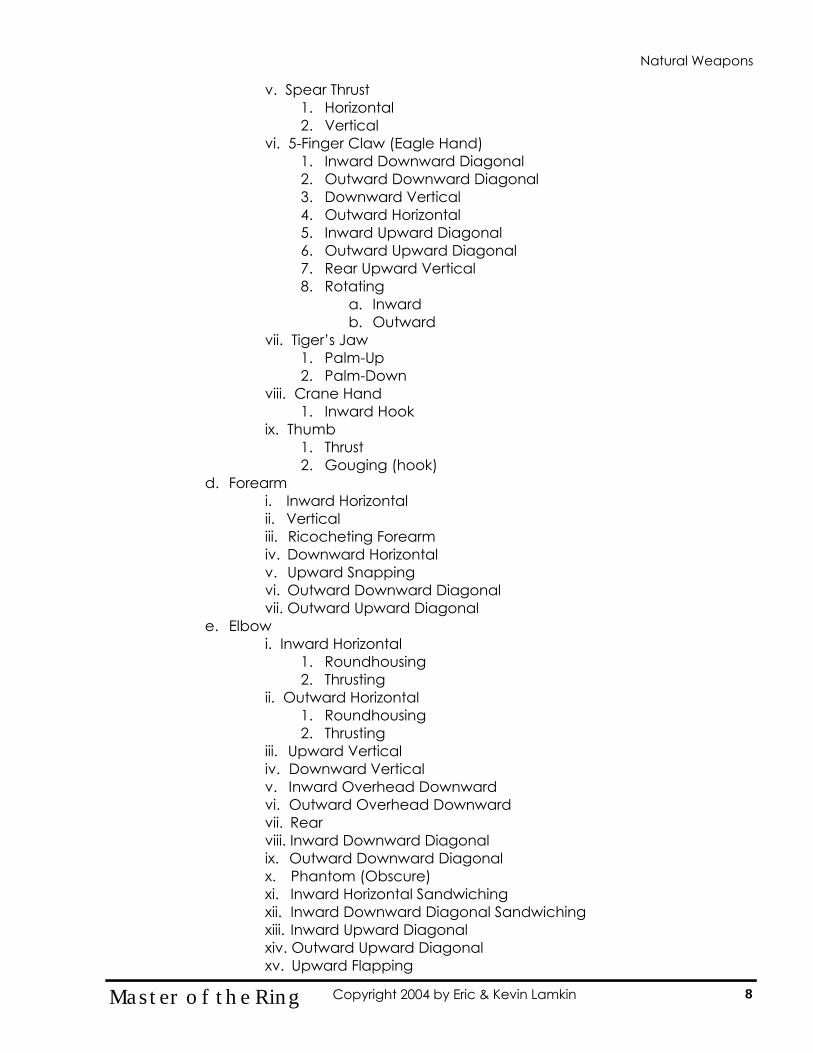
v. Spear Thrust 1. Horizontal 2. Vertical
vi. 5-Finger Claw (Eagle Hand) 1. Inward Downward Diagonal 2. Outward Downward Diagonal 3. Downward Vertical 4. Outward Horizontal 5. Inward Upward Diagonal 6. Outward Upward Diagonal 7. Rear Upward Vertical 8. Rotating
a. Inward b. Outward
vii. Tiger’s Jaw 1. Palm-Up 2. Palm-Down
viii. Crane Hand 1. Inward Hook
ix. Thumb 1. Thrust 2. Gouging (hook)
d. Forearm i. Inward Horizontal ii. Vertical iii. Ricocheting Forearm iv. Downward Horizontal v. Upward Snapping vi. Outward Downward Diagonal vii. Outward Upward Diagonal
e. Elbow i. Inward Horizontal
1. Roundhousing 2. Thrusting
ii. Outward Horizontal 1. Roundhousing 2. Thrusting
iii. Upward Vertical iv. Downward Vertical v. Inward Overhead Downward vi. Outward Overhead Downward vii. Rear viii. Inward Downward Diagonal ix. Outward Downward Diagonal x. Phantom (Obscure) xi. Inward Horizontal Sandwiching xii. Inward Downward Diagonal Sandwiching xiii. Inward Upward Diagonal xiv. Outward Upward Diagonal xv. Upward Flapping
8 Master of the Ring Copyright 2004 by Eric & Kevin Lamkin
Natural Weapons
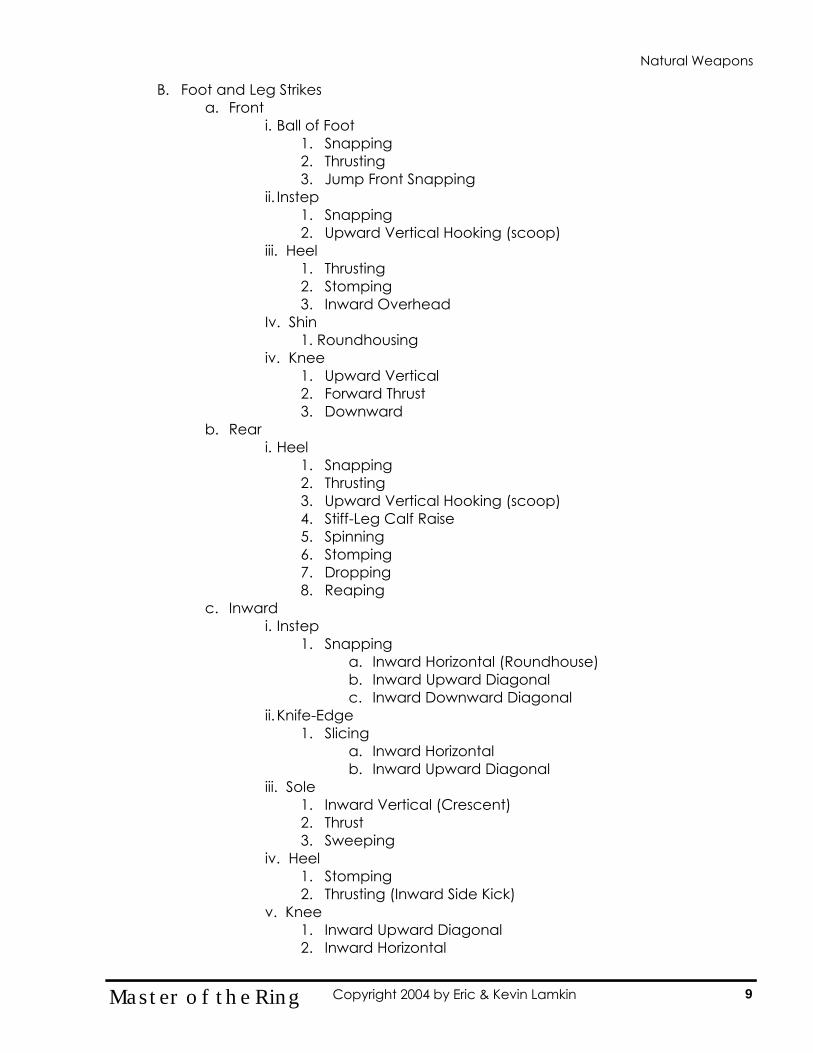
B. Foot and Leg Strikes a. Front
i. Ball of Foot 1. Snapping 2. Thrusting 3. Jump Front Snapping
ii. Instep 1. Snapping 2. Upward Vertical Hooking (scoop)
iii. Heel 1. Thrusting 2. Stomping 3. Inward Overhead
Iv. Shin 1. Roundhousing
iv. Knee 1. Upward Vertical 2. Forward Thrust 3. Downward
b. Rear i. Heel
1. Snapping 2. Thrusting 3. Upward Vertical Hooking (scoop) 4. Stiff-Leg Calf Raise 5. Spinning 6. Stomping 7. Dropping 8. Reaping
c. Inward i. Instep
1. Snapping a. Inward Horizontal (Roundhouse) b. Inward Upward Diagonal c. Inward Downward Diagonal
ii. Knife-Edge 1. Slicing
a. Inward Horizontal b. Inward Upward Diagonal
iii. Sole 1. Inward Vertical (Crescent) 2. Thrust 3. Sweeping
iv. Heel 1. Stomping 2. Thrusting (Inward Side Kick)
v. Knee 1. Inward Upward Diagonal 2. Inward Horizontal
9 Master of the Ring Copyright 2004 by Eric & Kevin Lamkin
Natural Weapons
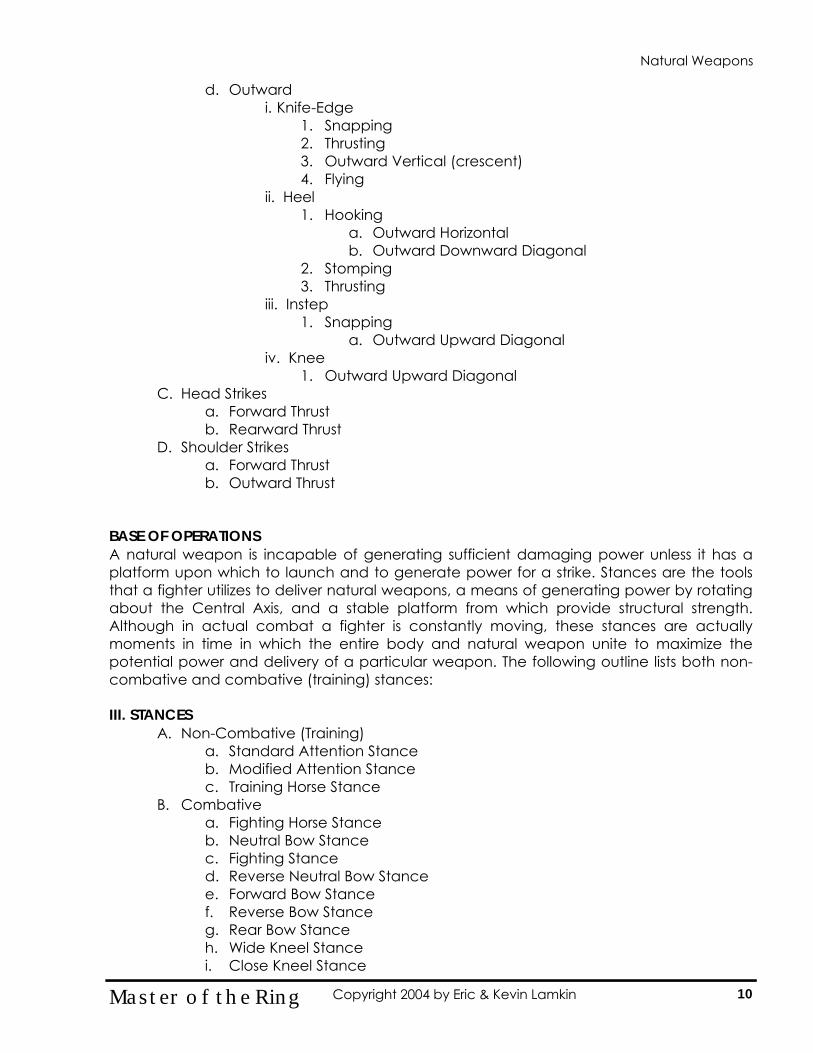
d. Outward i. Knife-Edge
1. Snapping 2. Thrusting 3. Outward Vertical (crescent) 4. Flying
ii. Heel 1. Hooking
a. Outward Horizontal b. Outward Downward Diagonal
2. Stomping 3. Thrusting
iii. Instep 1. Snapping
a. Outward Upward Diagonal iv. Knee
1. Outward Upward Diagonal C. Head Strikes
a. Forward Thrust b. Rearward Thrust
D. Shoulder Strikes a. Forward Thrust b. Outward Thrust
BASE OF OPERATIONS A natural weapon is incapable of generating sufficient damaging power unless it has a platform upon which to launch and to generate power for a strike. Stances are the tools that a fighter utilizes to deliver natural weapons, a means of generating power by rotating about the Central Axis, and a stable platform from which provide structural strength. Although in actual combat a fighter is constantly moving, these stances are actually moments in time in which the entire body and natural weapon unite to maximize the potential power and delivery of a particular weapon. The following outline lists both non-combative and combative (training) stances: III. STANCES
A. Non-Combative (Training) a. Standard Attention Stance b. Modified Attention Stance c. Training Horse Stance
B. Combative a. Fighting Horse Stance b. Neutral Bow Stance c. Fighting Stance d. Reverse Neutral Bow Stance e. Forward Bow Stance f. Reverse Bow Stance g. Rear Bow Stance h. Wide Kneel Stance i. Close Kneel Stance
10 Master of the Ring Copyright 2004 by Eric & Kevin Lamkin
Natural Weapons
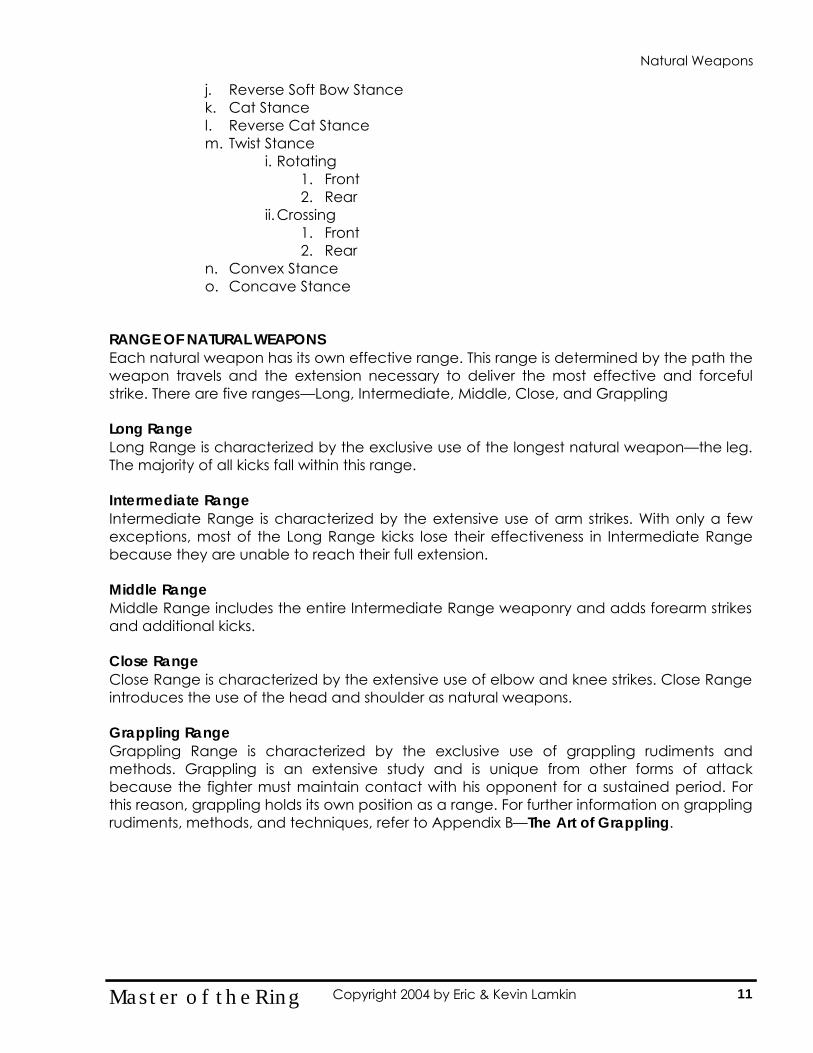
j. Reverse Soft Bow Stance k. Cat Stance l. Reverse Cat Stance m. Twist Stance
i. Rotating 1. Front 2. Rear
ii. Crossing 1. Front 2. Rear
n. Convex Stance o. Concave Stance
RANGE OF NATURAL WEAPONS Each natural weapon has its own effective range. This range is determined by the path the weapon travels and the extension necessary to deliver the most effective and forceful strike. There are five ranges—Long, Intermediate, Middle, Close, and Grappling Long Range Long Range is characterized by the exclusive use of the longest natural weapon—the leg. The majority of all kicks fall within this range. Intermediate Range Intermediate Range is characterized by the extensive use of arm strikes. With only a few exceptions, most of the Long Range kicks lose their effectiveness in Intermediate Range because they are unable to reach their full extension. Middle Range Middle Range includes the entire Intermediate Range weaponry and adds forearm strikes and additional kicks. Close Range Close Range is characterized by the extensive use of elbow and knee strikes. Close Range introduces the use of the head and shoulder as natural weapons. Grappling Range Grappling Range is characterized by the exclusive use of grappling rudiments and methods. Grappling is an extensive study and is unique from other forms of attack because the fighter must maintain contact with his opponent for a sustained period. For this reason, grappling holds its own position as a range. For further information on grappling rudiments, methods, and techniques, refer to Appendix B—The Art of Grappling.
11 Master of the Ring Copyright 2004 by Eric & Kevin Lamkin
Natural Weapons
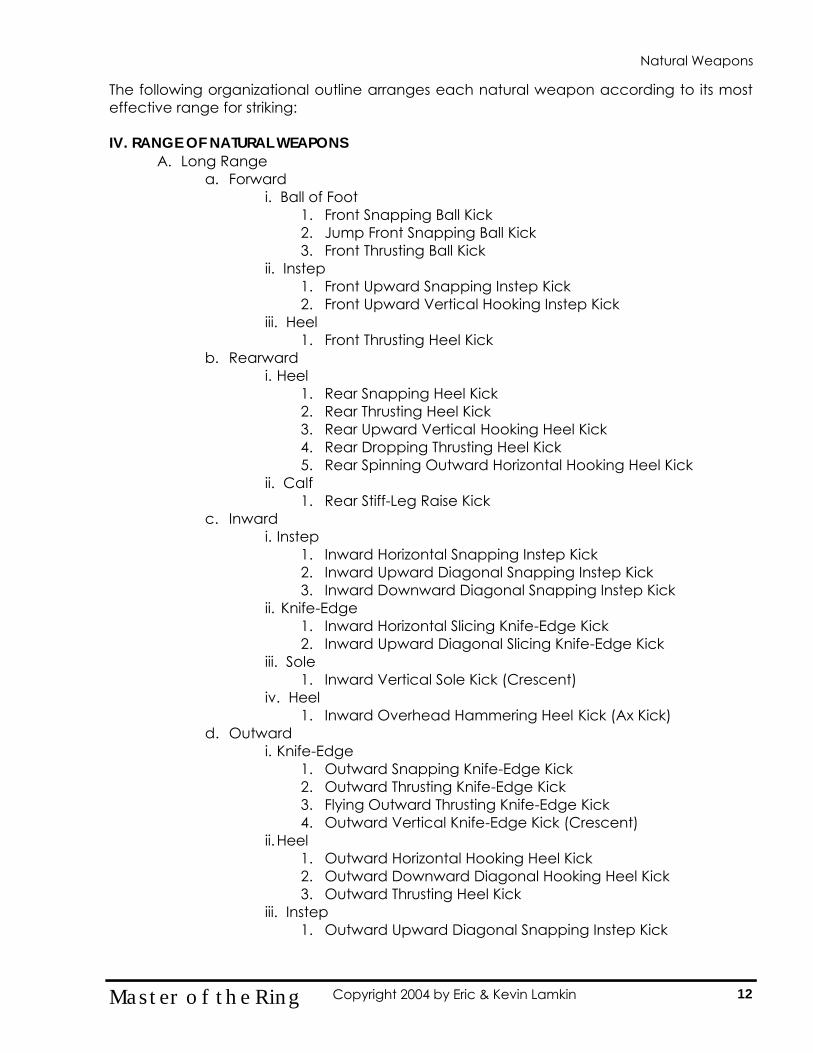
The following organizational outline arranges each natural weapon according to its most effective range for striking: IV. RANGE OF NATURAL WEAPONS
A. Long Range a. Forward
i. Ball of Foot 1. Front Snapping Ball Kick 2. Jump Front Snapping Ball Kick 3. Front Thrusting Ball Kick
ii. Instep 1. Front Upward Snapping Instep Kick 2. Front Upward Vertical Hooking Instep Kick
iii. Heel 1. Front Thrusting Heel Kick
b. Rearward i. Heel
1. Rear Snapping Heel Kick 2. Rear Thrusting Heel Kick 3. Rear Upward Vertical Hooking Heel Kick 4. Rear Dropping Thrusting Heel Kick 5. Rear Spinning Outward Horizontal Hooking Heel Kick
ii. Calf 1. Rear Stiff-Leg Raise Kick
c. Inward i. Instep
1. Inward Horizontal Snapping Instep Kick 2. Inward Upward Diagonal Snapping Instep Kick 3. Inward Downward Diagonal Snapping Instep Kick
ii. Knife-Edge 1. Inward Horizontal Slicing Knife-Edge Kick 2. Inward Upward Diagonal Slicing Knife-Edge Kick
iii. Sole 1. Inward Vertical Sole Kick (Crescent)
iv. Heel 1. Inward Overhead Hammering Heel Kick (Ax Kick)
d. Outward i. Knife-Edge
1. Outward Snapping Knife-Edge Kick 2. Outward Thrusting Knife-Edge Kick 3. Flying Outward Thrusting Knife-Edge Kick 4. Outward Vertical Knife-Edge Kick (Crescent)
ii. Heel 1. Outward Horizontal Hooking Heel Kick 2. Outward Downward Diagonal Hooking Heel Kick 3. Outward Thrusting Heel Kick
iii. Instep 1. Outward Upward Diagonal Snapping Instep Kick
12 Master of the Ring Copyright 2004 by Eric & Kevin Lamkin
Natural Weapons
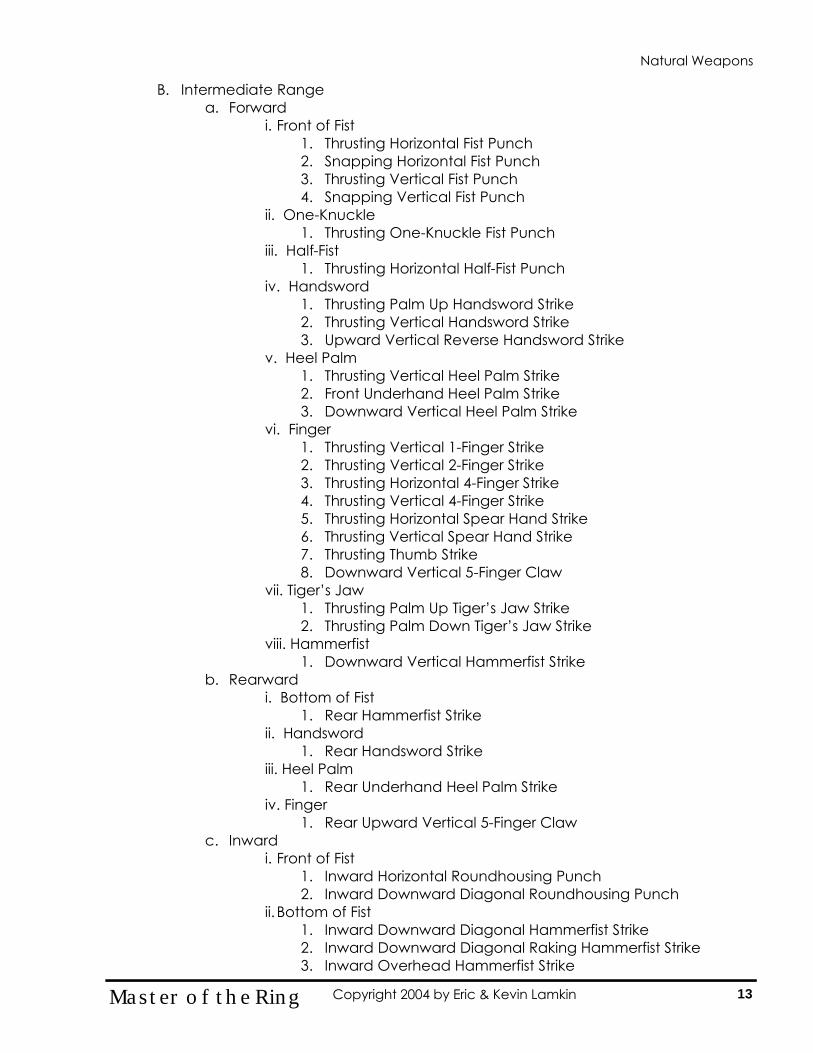
B. Intermediate Range a. Forward
i. Front of Fist 1. Thrusting Horizontal Fist Punch 2. Snapping Horizontal Fist Punch 3. Thrusting Vertical Fist Punch 4. Snapping Vertical Fist Punch
ii. One-Knuckle 1. Thrusting One-Knuckle Fist Punch
iii. Half-Fist 1. Thrusting Horizontal Half-Fist Punch
iv. Handsword 1. Thrusting Palm Up Handsword Strike 2. Thrusting Vertical Handsword Strike 3. Upward Vertical Reverse Handsword Strike
v. Heel Palm 1. Thrusting Vertical Heel Palm Strike 2. Front Underhand Heel Palm Strike 3. Downward Vertical Heel Palm Strike
vi. Finger 1. Thrusting Vertical 1-Finger Strike 2. Thrusting Vertical 2-Finger Strike 3. Thrusting Horizontal 4-Finger Strike 4. Thrusting Vertical 4-Finger Strike 5. Thrusting Horizontal Spear Hand Strike 6. Thrusting Vertical Spear Hand Strike 7. Thrusting Thumb Strike 8. Downward Vertical 5-Finger Claw
vii. Tiger’s Jaw 1. Thrusting Palm Up Tiger’s Jaw Strike 2. Thrusting Palm Down Tiger’s Jaw Strike
viii. Hammerfist 1. Downward Vertical Hammerfist Strike
b. Rearward i. Bottom of Fist
1. Rear Hammerfist Strike ii. Handsword
1. Rear Handsword Strike iii. Heel Palm
1. Rear Underhand Heel Palm Strike iv. Finger
1. Rear Upward Vertical 5-Finger Claw c. Inward
i. Front of Fist 1. Inward Horizontal Roundhousing Punch 2. Inward Downward Diagonal Roundhousing Punch
ii. Bottom of Fist 1. Inward Downward Diagonal Hammerfist Strike 2. Inward Downward Diagonal Raking Hammerfist Strike 3. Inward Overhead Hammerfist Strike
13 Master of the Ring Copyright 2004 by Eric & Kevin Lamkin
Natural Weapons
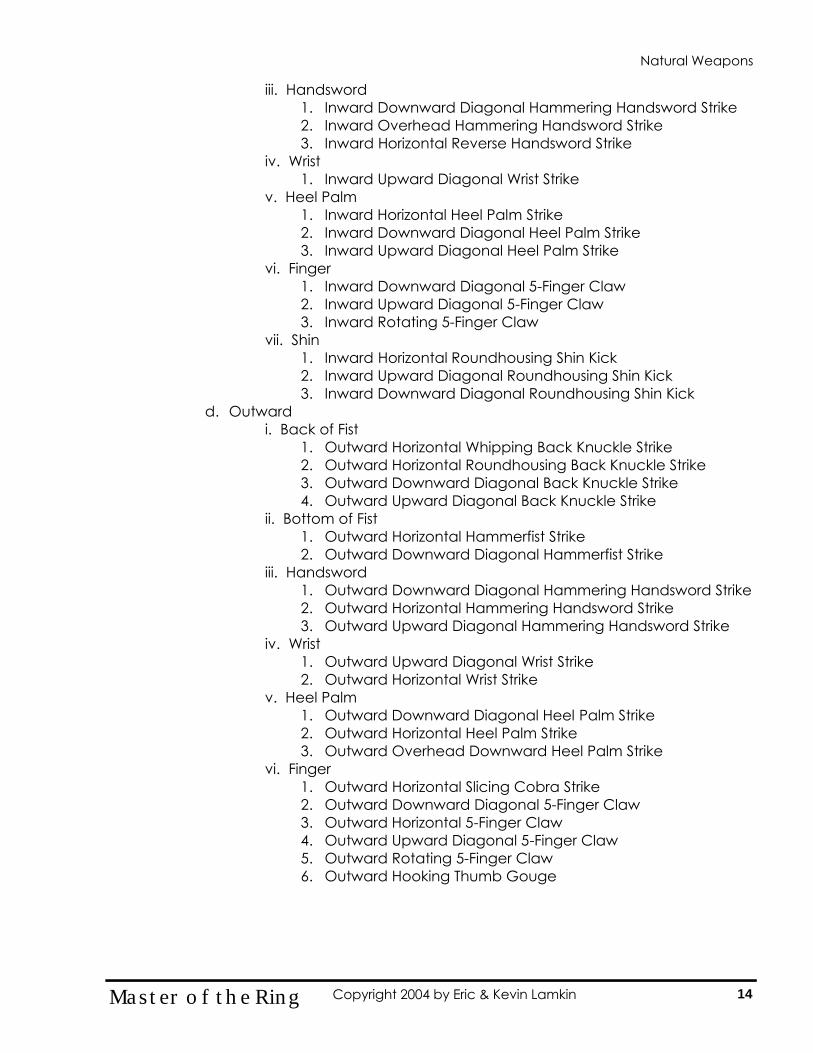
iii. Handsword 1. Inward Downward Diagonal Hammering Handsword Strike 2. Inward Overhead Hammering Handsword Strike 3. Inward Horizontal Reverse Handsword Strike
iv. Wrist 1. Inward Upward Diagonal Wrist Strike
v. Heel Palm 1. Inward Horizontal Heel Palm Strike 2. Inward Downward Diagonal Heel Palm Strike 3. Inward Upward Diagonal Heel Palm Strike
vi. Finger 1. Inward Downward Diagonal 5-Finger Claw 2. Inward Upward Diagonal 5-Finger Claw 3. Inward Rotating 5-Finger Claw
vii. Shin 1. Inward Horizontal Roundhousing Shin Kick 2. Inward Upward Diagonal Roundhousing Shin Kick 3. Inward Downward Diagonal Roundhousing Shin Kick
d. Outward i. Back of Fist
1. Outward Horizontal Whipping Back Knuckle Strike 2. Outward Horizontal Roundhousing Back Knuckle Strike 3. Outward Downward Diagonal Back Knuckle Strike 4. Outward Upward Diagonal Back Knuckle Strike
ii. Bottom of Fist 1. Outward Horizontal Hammerfist Strike 2. Outward Downward Diagonal Hammerfist Strike
iii. Handsword 1. Outward Downward Diagonal Hammering Handsword Strike 2. Outward Horizontal Hammering Handsword Strike 3. Outward Upward Diagonal Hammering Handsword Strike
iv. Wrist 1. Outward Upward Diagonal Wrist Strike 2. Outward Horizontal Wrist Strike
v. Heel Palm 1. Outward Downward Diagonal Heel Palm Strike 2. Outward Horizontal Heel Palm Strike 3. Outward Overhead Downward Heel Palm Strike
vi. Finger 1. Outward Horizontal Slicing Cobra Strike 2. Outward Downward Diagonal 5-Finger Claw 3. Outward Horizontal 5-Finger Claw 4. Outward Upward Diagonal 5-Finger Claw 5. Outward Rotating 5-Finger Claw 6. Outward Hooking Thumb Gouge
14 Master of the Ring Copyright 2004 by Eric & Kevin Lamkin
Natural Weapons
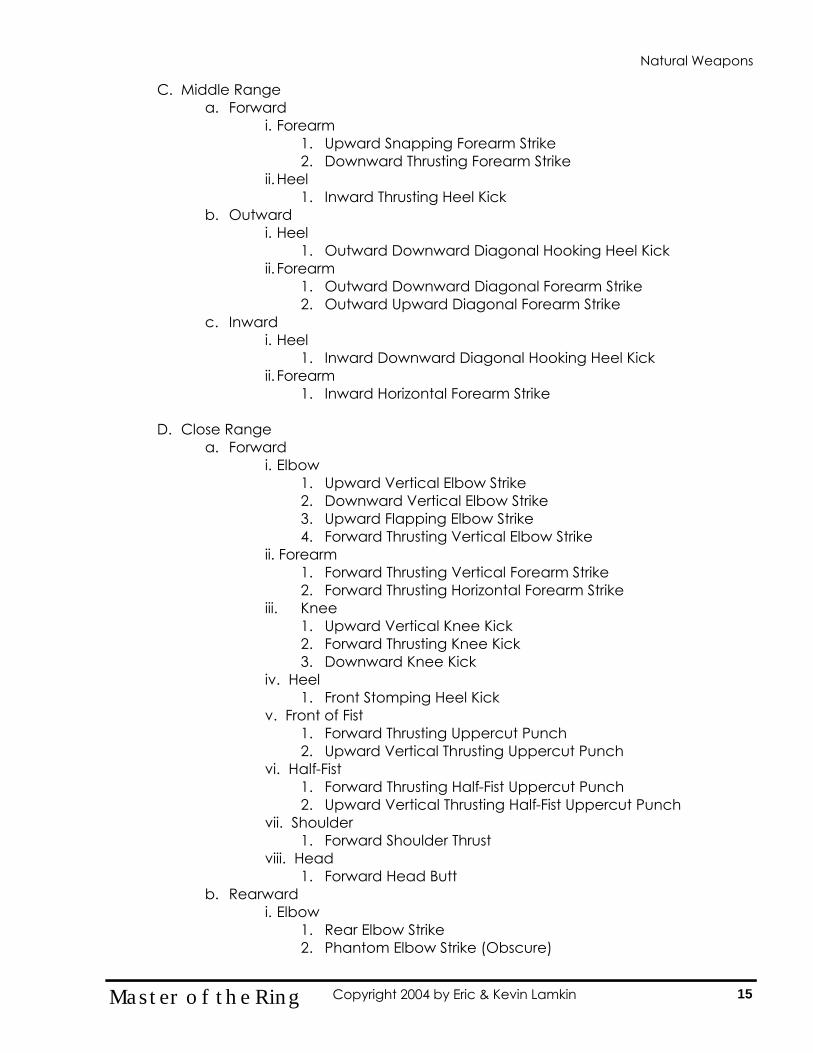
C. Middle Range a. Forward
i. Forearm 1. Upward Snapping Forearm Strike 2. Downward Thrusting Forearm Strike
ii. Heel 1. Inward Thrusting Heel Kick
b. Outward i. Heel
1. Outward Downward Diagonal Hooking Heel Kick ii. Forearm
1. Outward Downward Diagonal Forearm Strike 2. Outward Upward Diagonal Forearm Strike
c. Inward i. Heel
1. Inward Downward Diagonal Hooking Heel Kick ii. Forearm
1. Inward Horizontal Forearm Strike
D. Close Range a. Forward
i. Elbow 1. Upward Vertical Elbow Strike 2. Downward Vertical Elbow Strike 3. Upward Flapping Elbow Strike 4. Forward Thrusting Vertical Elbow Strike
ii. Forearm 1. Forward Thrusting Vertical Forearm Strike 2. Forward Thrusting Horizontal Forearm Strike
iii. Knee 1. Upward Vertical Knee Kick 2. Forward Thrusting Knee Kick 3. Downward Knee Kick
iv. Heel 1. Front Stomping Heel Kick
v. Front of Fist 1. Forward Thrusting Uppercut Punch 2. Upward Vertical Thrusting Uppercut Punch
vi. Half-Fist 1. Forward Thrusting Half-Fist Uppercut Punch 2. Upward Vertical Thrusting Half-Fist Uppercut Punch
vii. Shoulder 1. Forward Shoulder Thrust
viii. Head 1. Forward Head Butt
b. Rearward i. Elbow
1. Rear Elbow Strike 2. Phantom Elbow Strike (Obscure)
15 Master of the Ring Copyright 2004 by Eric & Kevin Lamkin
Natural Weapons
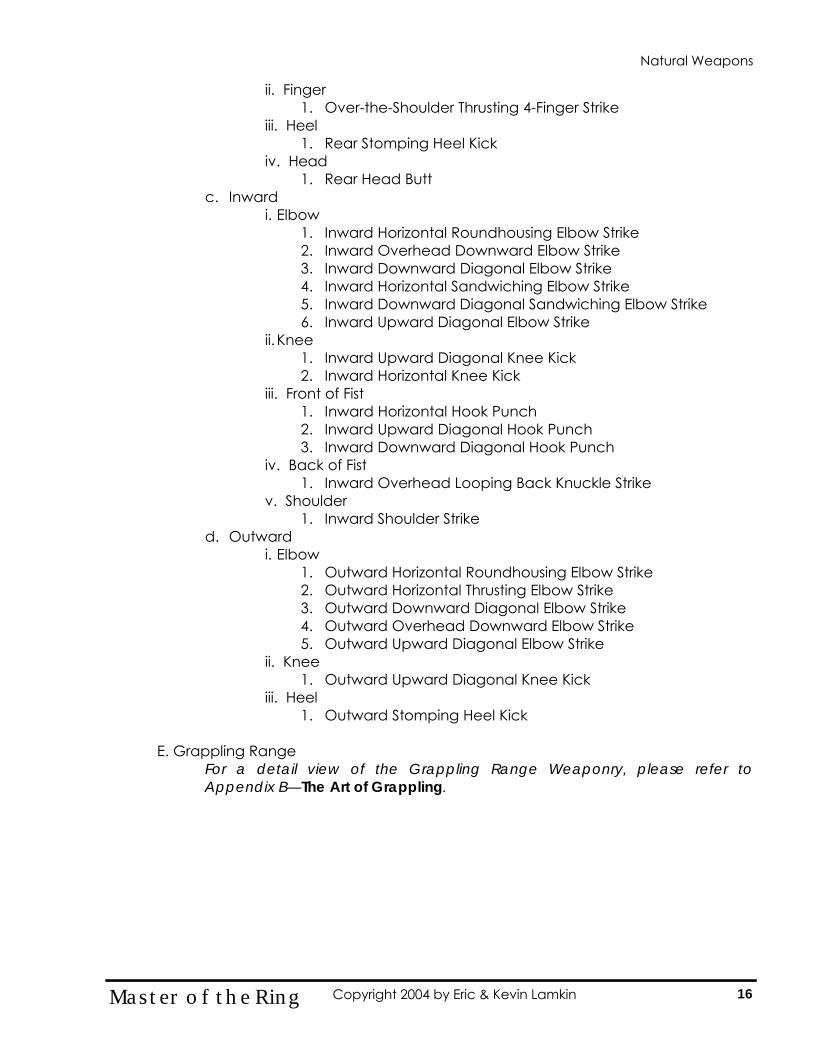
ii. Finger 1. Over-the-Shoulder Thrusting 4-Finger Strike
iii. Heel 1. Rear Stomping Heel Kick
iv. Head 1. Rear Head Butt
c. Inward i. Elbow
1. Inward Horizontal Roundhousing Elbow Strike 2. Inward Overhead Downward Elbow Strike 3. Inward Downward Diagonal Elbow Strike 4. Inward Horizontal Sandwiching Elbow Strike 5. Inward Downward Diagonal Sandwiching Elbow Strike 6. Inward Upward Diagonal Elbow Strike
ii. Knee 1. Inward Upward Diagonal Knee Kick 2. Inward Horizontal Knee Kick
iii. Front of Fist 1. Inward Horizontal Hook Punch 2. Inward Upward Diagonal Hook Punch 3. Inward Downward Diagonal Hook Punch
iv. Back of Fist 1. Inward Overhead Looping Back Knuckle Strike
v. Shoulder 1. Inward Shoulder Strike
d. Outward i. Elbow
1. Outward Horizontal Roundhousing Elbow Strike 2. Outward Horizontal Thrusting Elbow Strike 3. Outward Downward Diagonal Elbow Strike 4. Outward Overhead Downward Elbow Strike 5. Outward Upward Diagonal Elbow Strike
ii. Knee 1. Outward Upward Diagonal Knee Kick
iii. Heel 1. Outward Stomping Heel Kick
E. Grappling Range
For a detail view of the Grappling Range Weaponry, please refer to Appendix B—The Art of Grappling.
16 Master of the Ring Copyright 2004 by Eric & Kevin Lamkin
Natural Weapons
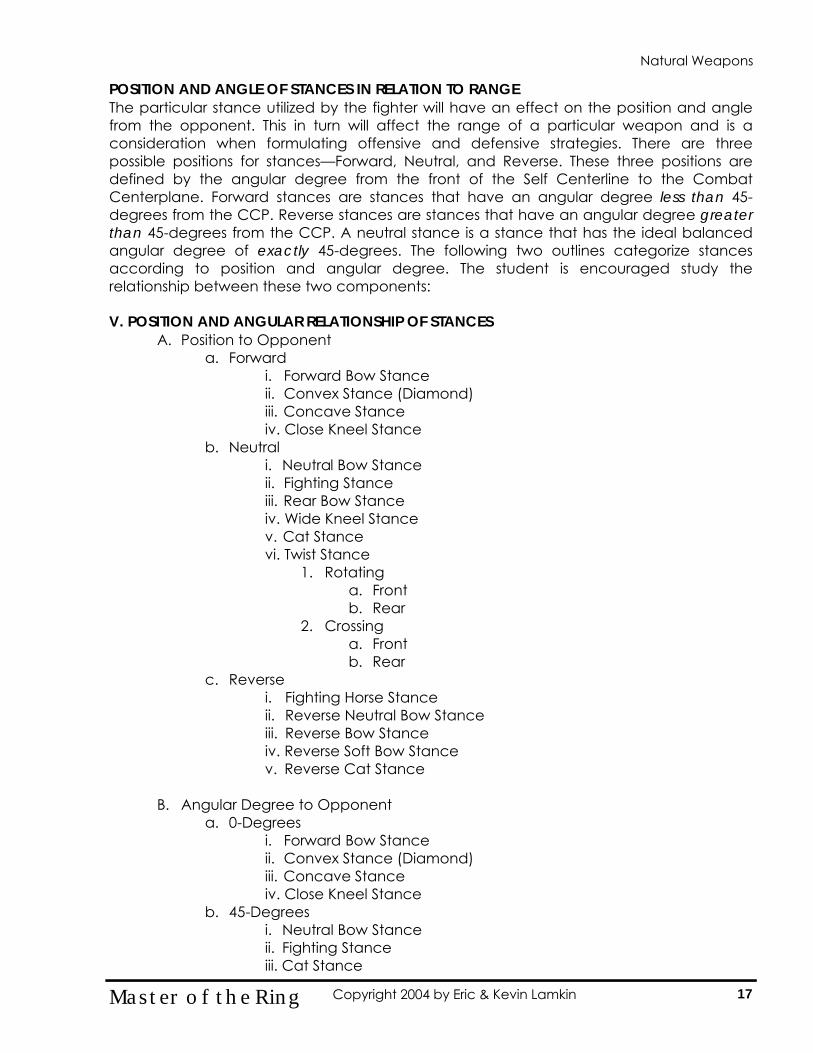
POSITION AND ANGLE OF STANCES IN RELATION TO RANGE The particular stance utilized by the fighter will have an effect on the position and angle from the opponent. This in turn will affect the range of a particular weapon and is a consideration when formulating offensive and defensive strategies. There are three possible positions for stances—Forward, Neutral, and Reverse. These three positions are defined by the angular degree from the front of the Self Centerline to the Combat Centerplane. Forward stances are stances that have an angular degree less than 45-degrees from the CCP. Reverse stances are stances that have an angular degree greater than 45-degrees from the CCP. A neutral stance is a stance that has the ideal balanced angular degree of exactly 45-degrees. The following two outlines categorize stances according to position and angular degree. The student is encouraged study the relationship between these two components: V. POSITION AND ANGULAR RELATIONSHIP OF STANCES
A. Position to Opponent a. Forward
i. Forward Bow Stance ii. Convex Stance (Diamond) iii. Concave Stance iv. Close Kneel Stance
b. Neutral i. Neutral Bow Stance ii. Fighting Stance iii. Rear Bow Stance iv. Wide Kneel Stance v. Cat Stance vi. Twist Stance
1. Rotating a. Front b. Rear
2. Crossing a. Front b. Rear
c. Reverse i. Fighting Horse Stance ii. Reverse Neutral Bow Stance iii. Reverse Bow Stance iv. Reverse Soft Bow Stance v. Reverse Cat Stance
B. Angular Degree to Opponent a. 0-Degrees
i. Forward Bow Stance ii. Convex Stance (Diamond) iii. Concave Stance iv. Close Kneel Stance
b. 45-Degrees i. Neutral Bow Stance ii. Fighting Stance iii. Cat Stance
17 Master of the Ring Copyright 2004 by Eric & Kevin Lamkin
Natural Weapons

iv. Wide Kneel Stance v. Rear Bow Stance vi. Twist Stance
1. Rotating a. Front b. Rear
2. Crossing a. Front b. Rear
c. 90-Degrees i. Fighting Horse Stance
d. 135-Degrees i. Reverse Bow Stance ii. Reverse Soft Bow Stance iii. Reverse Cat Stance iv. Reverse Neutral Bow Stance
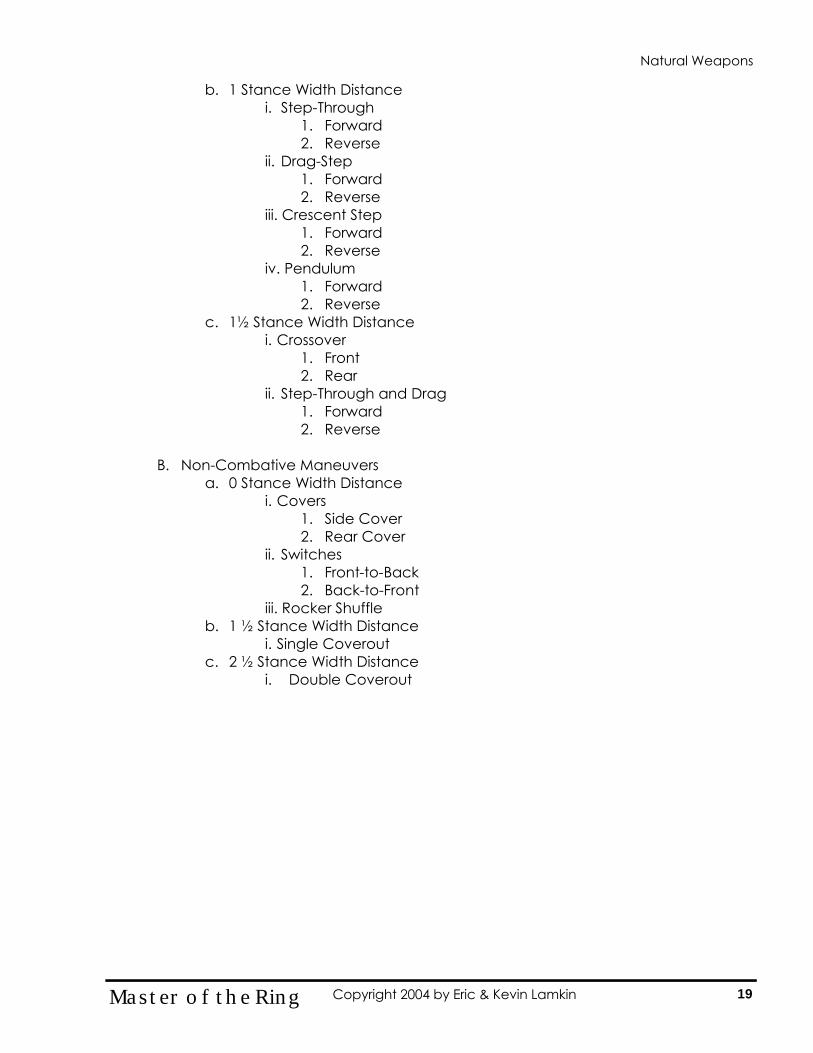
MOBILE WEAPON PLATFORMS No matter how powerful a fighter is able to execute his natural weapons, unless he has a means of moving them within range to strike his opponent, they are useless. Foot maneuvers are:
1. Tools used to move natural weapons/defenses from one point to another, 2. Methods used to increase the range of natural weapons, and 3. A means of increasing the power and effectiveness of natural weapons/defenses.
The distance that a particular maneuver is capable of traveling is based upon the maximum distance that is possible, and is measured against the width of a fighter’s neutral bow stance. The fighter may adjust these distances to fit the needs of the circumstances. The following organizational outline describes both combative and non-combative foot maneuvers according to the maximum distance they are able to travel: VI. FOOT MANEUVERS
A. Combative Foot Maneuvers a. ½ Stance Width Distance
i. Step-Drag 1. Forward 2. Reverse
ii. Push-Drag 1. Forward 2. Reverse
iii. Pull-Drag 1. Forward 2. Reverse
18 Master of the Ring Copyright 2004 by Eric & Kevin Lamkin
Natural Weapons
b. 1 Stance Width Distance i. Step-Through
1. Forward 2. Reverse
ii. Drag-Step 1. Forward 2. Reverse
iii. Crescent Step 1. Forward 2. Reverse
iv. Pendulum 1. Forward 2. Reverse
c. 1½ Stance Width Distance i. Crossover
1. Front 2. Rear
ii. Step-Through and Drag 1. Forward 2. Reverse
B. Non-Combative Maneuvers a. 0 Stance Width Distance
i. Covers 1. Side Cover 2. Rear Cover
ii. Switches 1. Front-to-Back 2. Back-to-Front
iii. Rocker Shuffle b. 1 ½ Stance Width Distance
i. Single Coverout c. 2 ½ Stance Width Distance
i. Double Coverout
19 Master of the Ring Copyright 2004 by Eric & Kevin Lamkin
Natural Weapons
Natural Weapons and Foot Maneuvers For tactical and structural reasons, individual natural weapons are more suited for certain maneuvers and not others. These considerations will vary depending upon the limb, angle, and method of execution in which the natural weapon is executed. For example, a thrusting horizontal fist punch may be delivered by either the lead or the rear hand. If a step-drag foot maneuver was used in conjunction with a lead hand thrusting horizontal fist punch, the resulting strike would be a slower and far less powerful attack than if the fighter utilized a push-drag foot maneuver. On the other hand, a step-drag foot maneuver would be well suited for a rear hand thrusting horizontal fist strike especially if it was used as a secondary attack (for the definition of a secondary attack, see the Theory and Methodology of Attack, Defense, and Counter-Attack). As an example of how foot maneuvers are used in conjunction with natural weapons, the following outline describes some commonly used natural weapons and their preferred methods of mobility. The student should examine these methods and discover preferred methods of mobility for all natural weapons. VII. MOBILITY AND NATURAL WEAPONS
A. Hand and Arm Strikes a. Thrusting Horizontal Fist Punch
i. Lead 1. Forward Push-Drag
ii. Rear 1. Forward Step-Drag 2. Forward Step-Through
b. Snapping Horizontal Fist Punch i. Lead
1. Forward Push-Drag ii. Rear
1. Forward Step-Drag 2. Forward Step-Through
c. Thrusting Vertical Fist Punch i. Lead
1. Forward Push-Drag ii. Rear
1. Forward Step-Drag 2. Forward Step Through
d. Snapping Vertical Fist Punch i. Lead
1. Forward Push-Drag ii. Rear
1. Forward Step-Drag 2. Forward Step-Through
e. Inward Horizontal Roundhousing Punch i. Lead
1. Forward Push-Drag
20 Master of the Ring Copyright 2004 by Eric & Kevin Lamkin
Natural Weapons
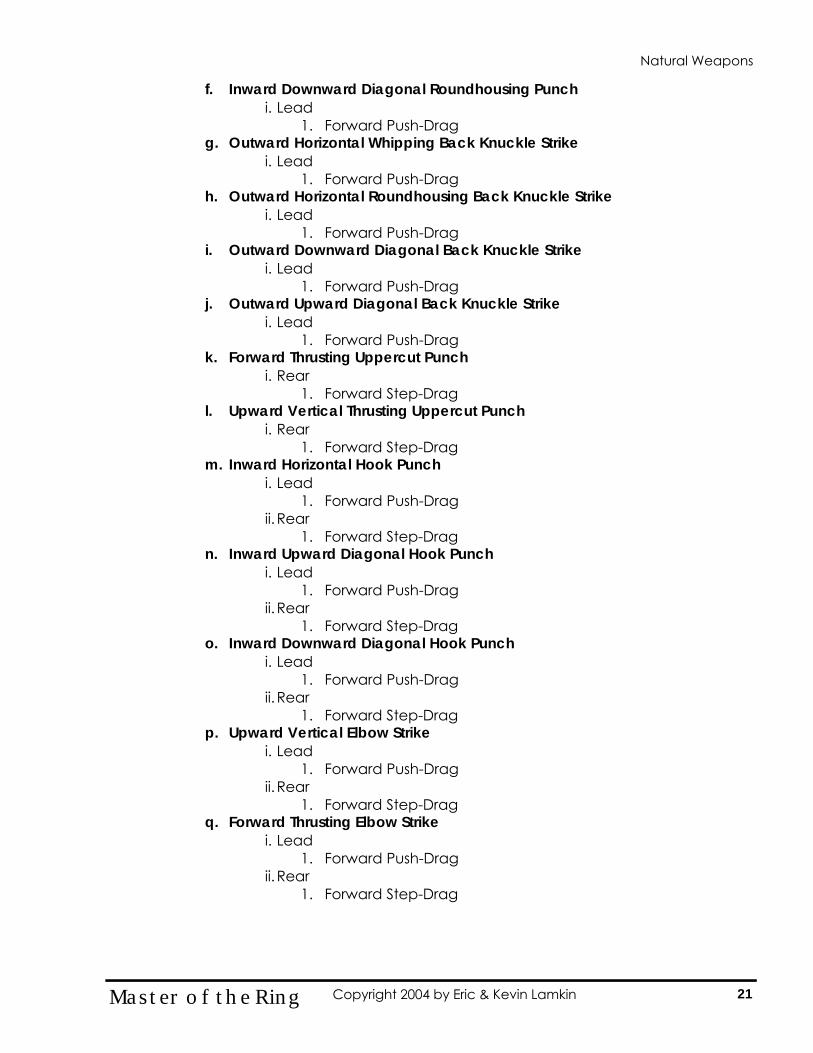
f. Inward Downward Diagonal Roundhousing Punch i. Lead
1. Forward Push-Drag g. Outward Horizontal Whipping Back Knuckle Strike
i. Lead 1. Forward Push-Drag
h. Outward Horizontal Roundhousing Back Knuckle Strike i. Lead
1. Forward Push-Drag i. Outward Downward Diagonal Back Knuckle Strike
i. Lead 1. Forward Push-Drag
j. Outward Upward Diagonal Back Knuckle Strike i. Lead
1. Forward Push-Drag k. Forward Thrusting Uppercut Punch
i. Rear 1. Forward Step-Drag
l. Upward Vertical Thrusting Uppercut Punch i. Rear
1. Forward Step-Drag m. Inward Horizontal Hook Punch
i. Lead 1. Forward Push-Drag
ii. Rear 1. Forward Step-Drag
n. Inward Upward Diagonal Hook Punch i. Lead
1. Forward Push-Drag ii. Rear
1. Forward Step-Drag o. Inward Downward Diagonal Hook Punch
i. Lead 1. Forward Push-Drag
ii. Rear 1. Forward Step-Drag
p. Upward Vertical Elbow Strike i. Lead
1. Forward Push-Drag ii. Rear
1. Forward Step-Drag q. Forward Thrusting Elbow Strike
i. Lead 1. Forward Push-Drag
ii. Rear 1. Forward Step-Drag
21 Master of the Ring Copyright 2004 by Eric & Kevin Lamkin
Natural Weapons
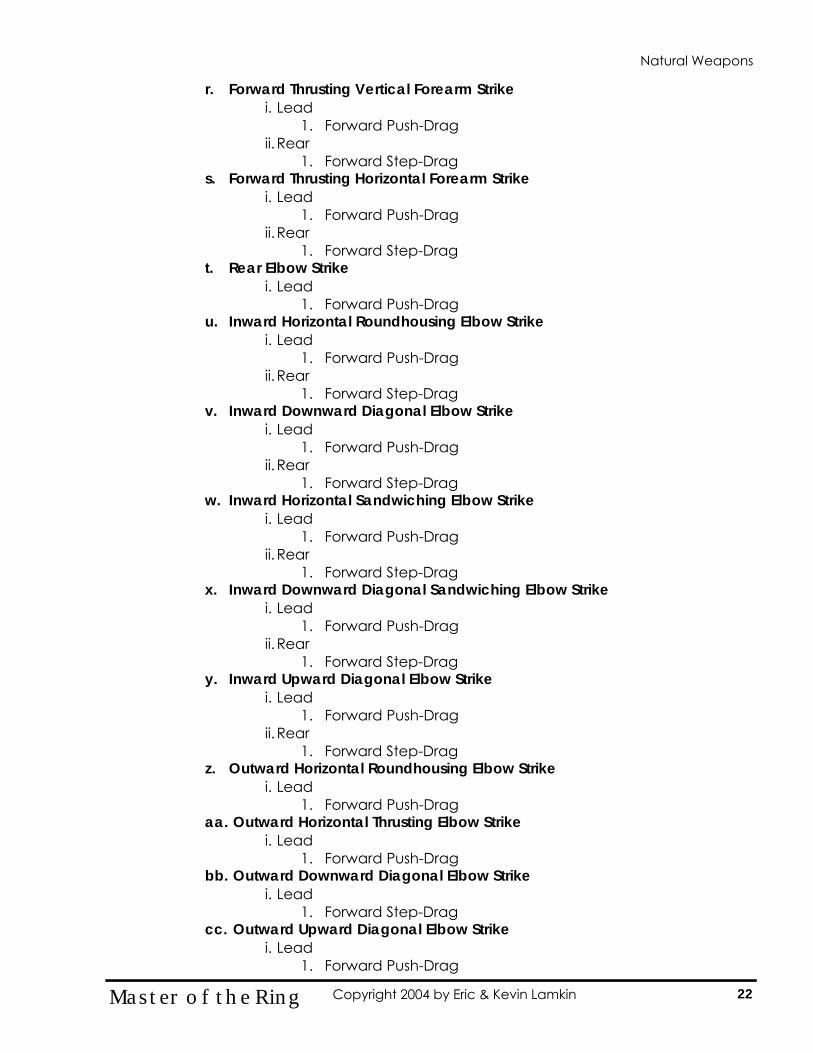
r. Forward Thrusting Vertical Forearm Strike i. Lead
1. Forward Push-Drag ii. Rear
1. Forward Step-Drag s. Forward Thrusting Horizontal Forearm Strike
i. Lead 1. Forward Push-Drag
ii. Rear 1. Forward Step-Drag
t. Rear Elbow Strike i. Lead
1. Forward Push-Drag u. Inward Horizontal Roundhousing Elbow Strike
i. Lead 1. Forward Push-Drag
ii. Rear 1. Forward Step-Drag
v. Inward Downward Diagonal Elbow Strike i. Lead
1. Forward Push-Drag ii. Rear
1. Forward Step-Drag w. Inward Horizontal Sandwiching Elbow Strike
i. Lead 1. Forward Push-Drag
ii. Rear 1. Forward Step-Drag
x. Inward Downward Diagonal Sandwiching Elbow Strike i. Lead
1. Forward Push-Drag ii. Rear
1. Forward Step-Drag y. Inward Upward Diagonal Elbow Strike
i. Lead 1. Forward Push-Drag
ii. Rear 1. Forward Step-Drag
z. Outward Horizontal Roundhousing Elbow Strike i. Lead
1. Forward Push-Drag aa. Outward Horizontal Thrusting Elbow Strike
i. Lead 1. Forward Push-Drag
bb. Outward Downward Diagonal Elbow Strike i. Lead
1. Forward Step-Drag cc. Outward Upward Diagonal Elbow Strike
i. Lead 1. Forward Push-Drag
22 Master of the Ring Copyright 2004 by Eric & Kevin Lamkin
Natural Weapons
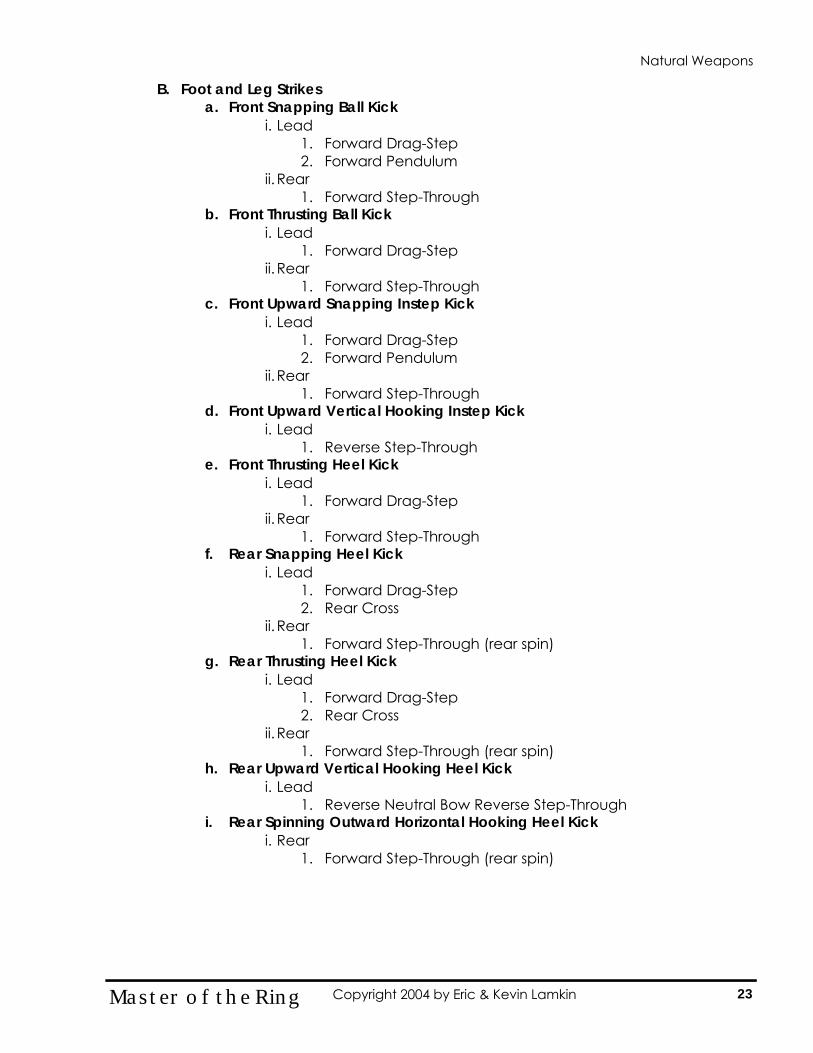
B. Foot and Leg Strikes a. Front Snapping Ball Kick
i. Lead 1. Forward Drag-Step 2. Forward Pendulum
ii. Rear 1. Forward Step-Through
b. Front Thrusting Ball Kick i. Lead
1. Forward Drag-Step ii. Rear
1. Forward Step-Through c. Front Upward Snapping Instep Kick
i. Lead 1. Forward Drag-Step 2. Forward Pendulum
ii. Rear 1. Forward Step-Through
d. Front Upward Vertical Hooking Instep Kick i. Lead
1. Reverse Step-Through e. Front Thrusting Heel Kick
i. Lead 1. Forward Drag-Step
ii. Rear 1. Forward Step-Through
f. Rear Snapping Heel Kick i. Lead
1. Forward Drag-Step 2. Rear Cross
ii. Rear 1. Forward Step-Through (rear spin)
g. Rear Thrusting Heel Kick i. Lead
1. Forward Drag-Step 2. Rear Cross
ii. Rear 1. Forward Step-Through (rear spin)
h. Rear Upward Vertical Hooking Heel Kick i. Lead
1. Reverse Neutral Bow Reverse Step-Through i. Rear Spinning Outward Horizontal Hooking Heel Kick
i. Rear 1. Forward Step-Through (rear spin)
23 Master of the Ring Copyright 2004 by Eric & Kevin Lamkin
Natural Weapons
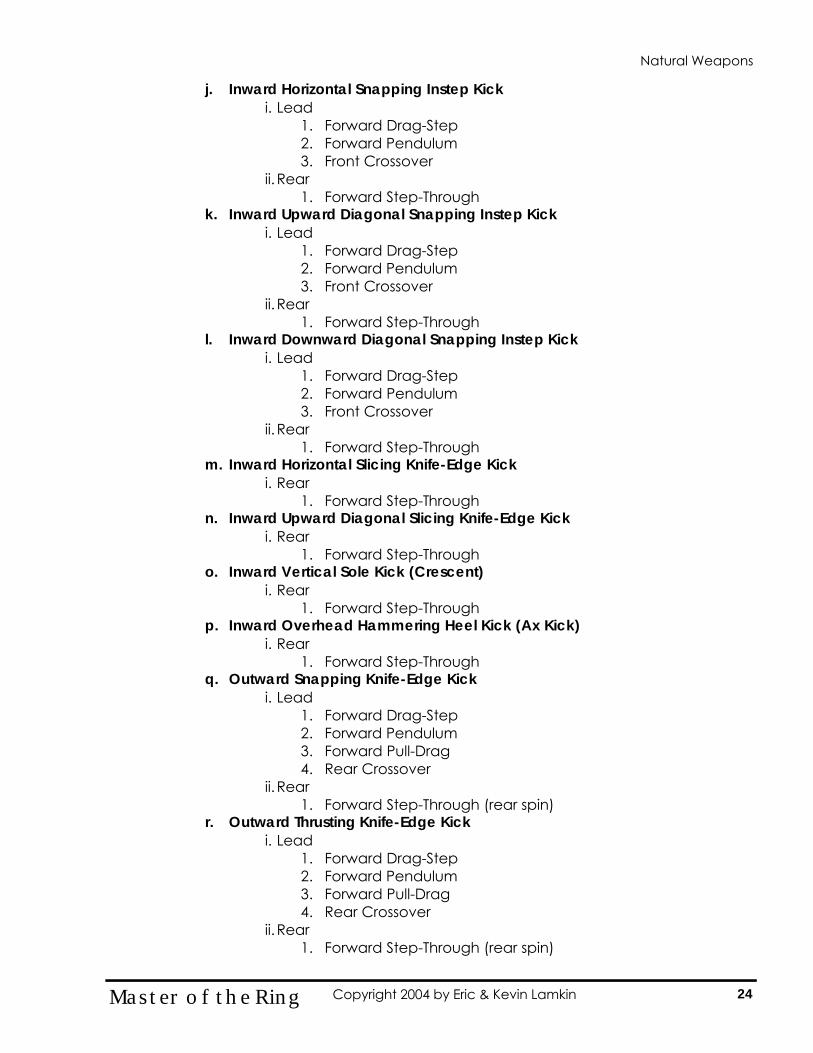
j. Inward Horizontal Snapping Instep Kick i. Lead
1. Forward Drag-Step 2. Forward Pendulum 3. Front Crossover
ii. Rear 1. Forward Step-Through
k. Inward Upward Diagonal Snapping Instep Kick i. Lead
1. Forward Drag-Step 2. Forward Pendulum 3. Front Crossover
ii. Rear 1. Forward Step-Through
l. Inward Downward Diagonal Snapping Instep Kick i. Lead
1. Forward Drag-Step 2. Forward Pendulum 3. Front Crossover
ii. Rear 1. Forward Step-Through
m. Inward Horizontal Slicing Knife-Edge Kick i. Rear
1. Forward Step-Through n. Inward Upward Diagonal Slicing Knife-Edge Kick
i. Rear 1. Forward Step-Through
o. Inward Vertical Sole Kick (Crescent) i. Rear
1. Forward Step-Through p. Inward Overhead Hammering Heel Kick (Ax Kick)
i. Rear 1. Forward Step-Through
q. Outward Snapping Knife-Edge Kick i. Lead
1. Forward Drag-Step 2. Forward Pendulum 3. Forward Pull-Drag 4. Rear Crossover
ii. Rear 1. Forward Step-Through (rear spin)
r. Outward Thrusting Knife-Edge Kick i. Lead
1. Forward Drag-Step 2. Forward Pendulum 3. Forward Pull-Drag 4. Rear Crossover
ii. Rear 1. Forward Step-Through (rear spin)
24 Master of the Ring Copyright 2004 by Eric & Kevin Lamkin
Natural Weapons
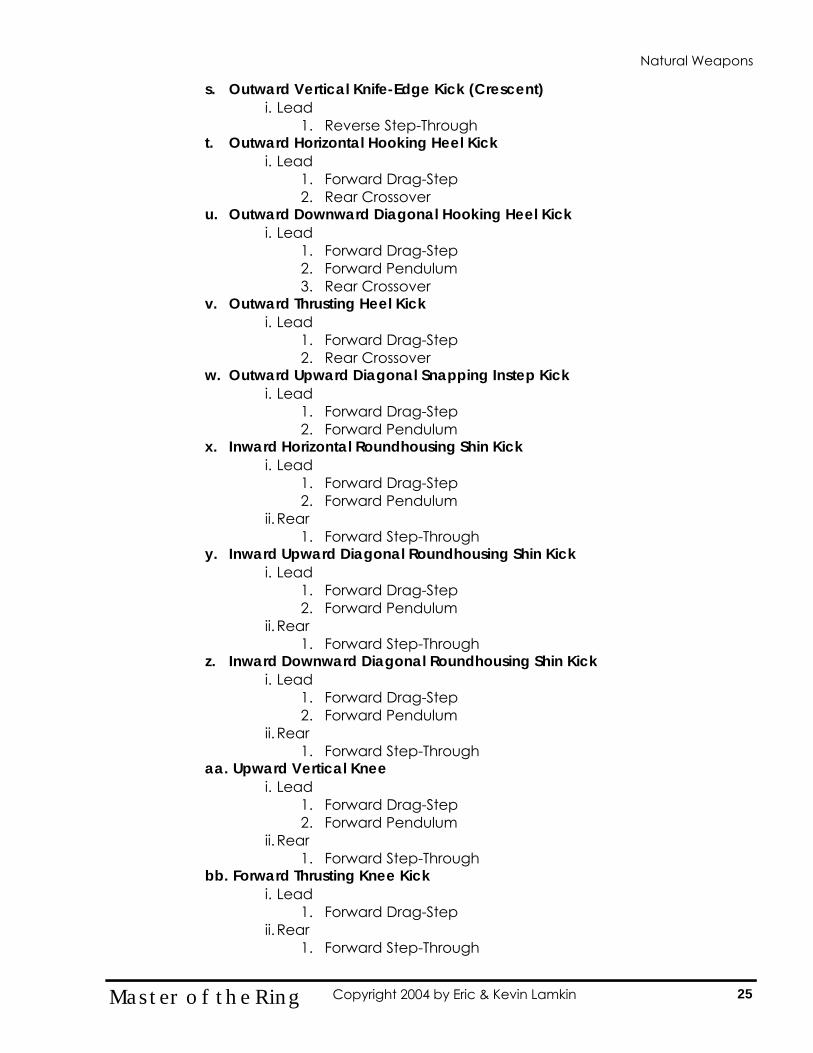
s. Outward Vertical Knife-Edge Kick (Crescent) i. Lead
1. Reverse Step-Through t. Outward Horizontal Hooking Heel Kick
i. Lead 1. Forward Drag-Step 2. Rear Crossover
u. Outward Downward Diagonal Hooking Heel Kick i. Lead
1. Forward Drag-Step 2. Forward Pendulum 3. Rear Crossover
v. Outward Thrusting Heel Kick i. Lead
1. Forward Drag-Step 2. Rear Crossover
w. Outward Upward Diagonal Snapping Instep Kick i. Lead
1. Forward Drag-Step 2. Forward Pendulum
x. Inward Horizontal Roundhousing Shin Kick i. Lead
1. Forward Drag-Step 2. Forward Pendulum
ii. Rear 1. Forward Step-Through
y. Inward Upward Diagonal Roundhousing Shin Kick i. Lead
1. Forward Drag-Step 2. Forward Pendulum
ii. Rear 1. Forward Step-Through
z. Inward Downward Diagonal Roundhousing Shin Kick i. Lead
1. Forward Drag-Step 2. Forward Pendulum
ii. Rear 1. Forward Step-Through
aa. Upward Vertical Knee i. Lead
1. Forward Drag-Step 2. Forward Pendulum
ii. Rear 1. Forward Step-Through
bb. Forward Thrusting Knee Kick i. Lead
1. Forward Drag-Step ii. Rear
1. Forward Step-Through
25 Master of the Ring Copyright 2004 by Eric & Kevin Lamkin
Natural Weapons
cc. Inward Upward Diagonal Knee Kick i. Lead
1. Forward Drag-Step 2. Front Crossover
ii. Rear 1. Forward Step Through
dd. Inward Horizontal Knee Kick i. Lead
1. Front Crossover ii. Rear
1. Forward Step-Through ee. Outward Upward Diagonal Knee Kick
i. Lead 1. Forward Drag-Step 2. Front Crossover
Natural weapons are certainly not limited to the maneuvers listed above. The student is encouraged to experiment with each natural weapon and discover methods of mobility that are suitable in other circumstances and for other environments.
26 Master of the Ring Copyright 2004 by Eric & Kevin Lamkin
Natural Weapons
TheThe
Vital Target Areas Vital Target Areas of theof the
Human BodyHuman Body
27 Master of the Ring Copyright 2004 by Eric & Kevin Lamkin
Vital Targets
VITAL TARGET AREAS The obvious way to get the greatest strategic effect out of any attack or defense is to direct it against the most vulnerable body target available. The fighter must have a fluent knowledge of these points and their effects before he can begin to understand how to neutralize or hurt without being hurt himself. Depending upon the strike and its intended result, attacks to these points may result in:
1. Involuntary muscle responses 2. Dislocated joints 3. Damaged muscles, tendons, or ligaments 4. Broken bones 5. Impairment of motor functions 6. Temporary paralysis or pain 7. Damaged internal organs 8. Interruption in the flow of blood or air 9. Loss of consciousness
Based upon the fighter’s strategic plan of attack, the intended result may be to:
1. Deter or discourage the opponent 2. Maintain a hold 3. Force a submission 4. Immobilize or cripple the opponent 5. Kill the opponent
SELECTION OF VITAL TARGETS There are several factors that must be considered when selecting and attacking a vital area. These factors are:
1. Relative positioning between the opponent and yourself 2. Availability of natural weapons 3. Degree to which the target is exposed 4. Degree of accuracy required 5. Degree of power required 6. Size and weight of the opponent 7. Likelihood of success 8. Risk of damage to yourself 9. Moral and Legal considerations 10. Intended result (deter, cripple, kill)
Through proper training, the fighter will develop the ability to instantly analyze his opponent and select the most effective vital target.
28 Master of the Ring Copyright 2004 by Eric & Kevin Lamkin
Vital Targets
METHODS OF ATTACKING VITAL TARGETS There are three methods of attacking a vital target—Striking, Pressing, and Displacing. Striking Vital Areas Strikes to vital areas are methods of delivering forceful attacks to vital or sensitive areas of the body. Damage to these areas may be internal or external, and the effects of the damage range from pain, paralysis, unconsciousness, to death. Pressing Vital Points Pressing Vital Points (Pressure Points) are methods of grabbing and pressing specific locations of the body, usually located around muscle, to create pain and local paralysis. These methods are commonly used in conjunction with grappling methods. Displacing Joints Displacing Joints are methods used to exert great stress on a joint in a linear and/or circular fashion to create pain and prevent movement. Displacing a joint ranges from a slight unnatural twist to total dislocation and tearing of the connective tissue. For further information on Displacing Joint techniques, refer to the Art of Grappling. THE DEGREE OF PAIN AND INJURY The level of damage that can be inflicted upon a particular area is dependent upon the following factors:
1. Force of the strike 2. Angle of the attack 3. Method of the attack 4. Natural weapon 5. Health and emotional state of the opponent 6. Individual anatomy of the opponent
In addition to the above factors, the introduction of a weapon will considerably increase the degree of pain, the likelihood of injury, the seriousness of that injury, and may pose a higher risk of fatality. For the sake of simplicity, we will analyze the effects of attacking these vital target areas by means of natural weapons only.
Vital Targets
29 Master of the Ring Copyright 2004 by Eric & Kevin Lamkin
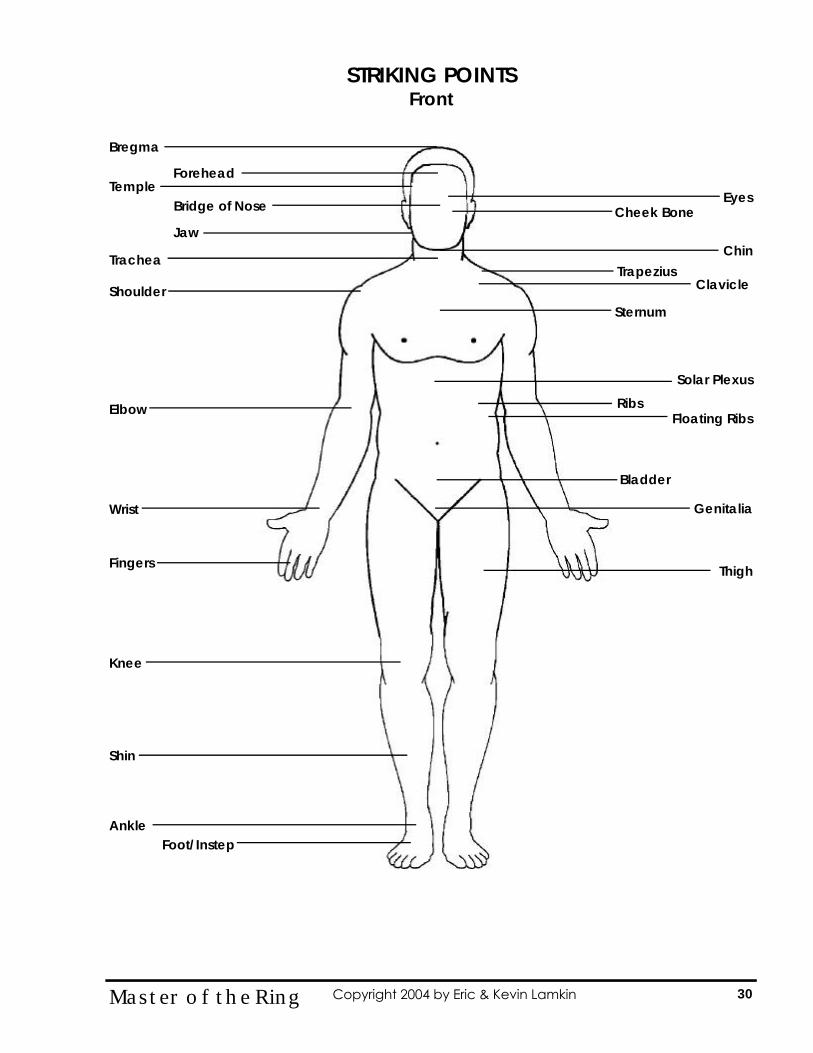
STRIKING POINTS Front
Fingers
Wrist
Elbow
Shoulder
Bregma
Forehead Temple
Eyes Bridge of Nose Cheek Bone
Chin
Solar Plexus
Jaw
Ribs
Trachea Trapezius
Clavicle
Sternum
Floating Ribs
Bladder
Genitalia
Knee
Shin
Ankle Foot/Instep
Thigh
30 Master of the Ring Copyright 2004 by Eric & Kevin Lamkin
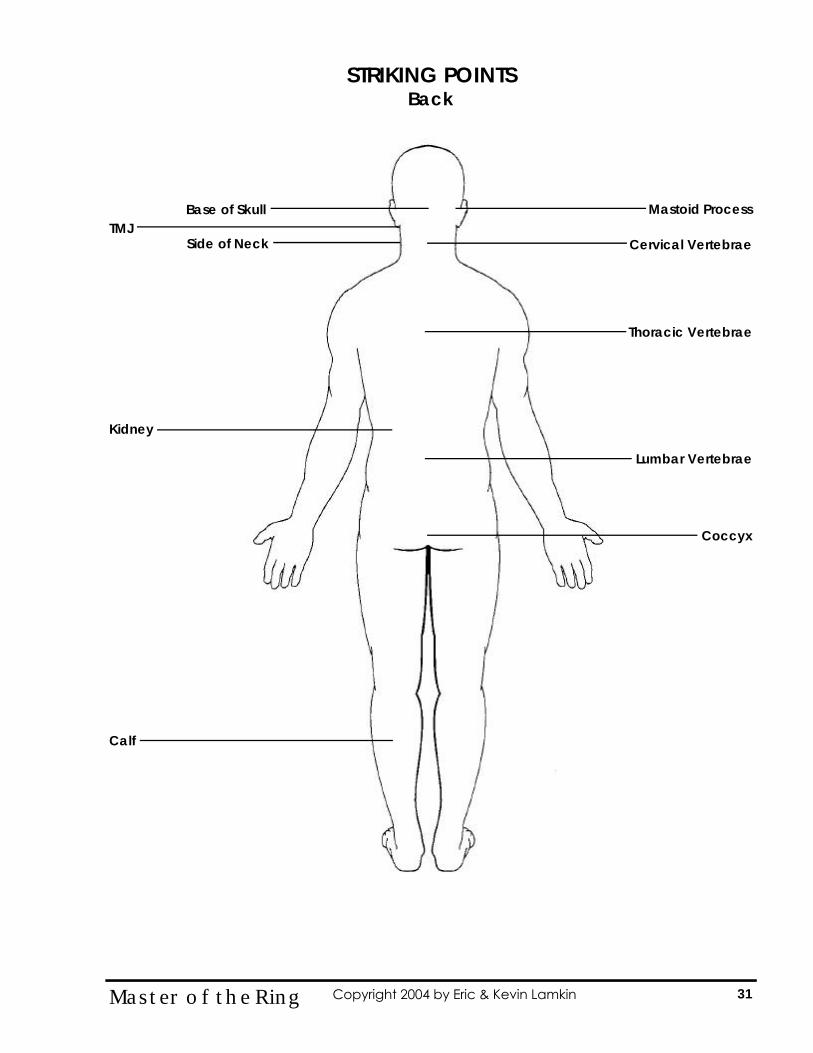
STRIKING POINTS Back
TMJ Mastoid Process Base of Skull
Side of Neck Cervical Vertebrae
Thoracic Vertebrae
Coccyx
Lumbar Vertebrae
Kidney
Calf
31 Master of the Ring Copyright 2004 by Eric & Kevin Lamkin
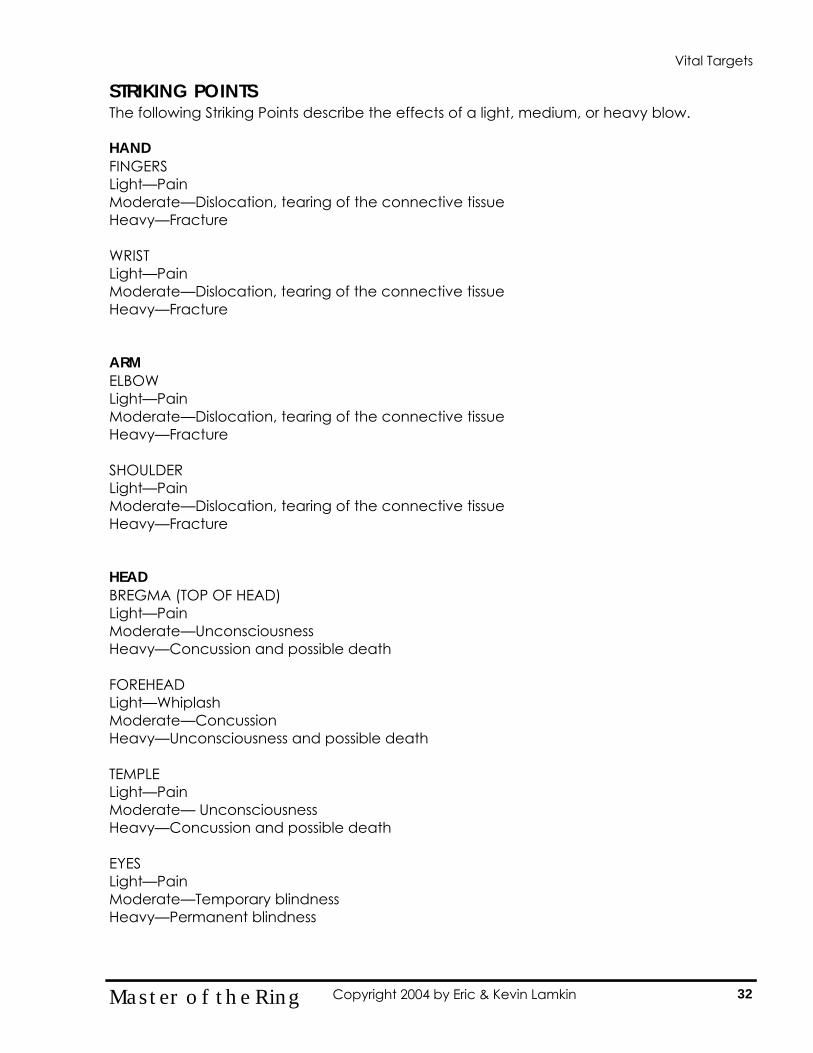
STRIKING POINTS The following Striking Points describe the effects of a light, medium, or heavy blow. HAND FINGERS Light—Pain Moderate—Dislocation, tearing of the connective tissue Heavy—Fracture WRIST Light—Pain Moderate—Dislocation, tearing of the connective tissue Heavy—Fracture ARM ELBOW Light—Pain Moderate—Dislocation, tearing of the connective tissue Heavy—Fracture SHOULDER Light—Pain Moderate—Dislocation, tearing of the connective tissue Heavy—Fracture HEAD BREGMA (TOP OF HEAD) Light—Pain Moderate—Unconsciousness Heavy—Concussion and possible death FOREHEAD Light—Whiplash Moderate—Concussion Heavy—Unconsciousness and possible death TEMPLE Light—Pain Moderate— Unconsciousness Heavy—Concussion and possible death EYES Light—Pain Moderate—Temporary blindness Heavy—Permanent blindness
32 Master of the Ring Copyright 2004 by Eric & Kevin Lamkin
Vital Targets
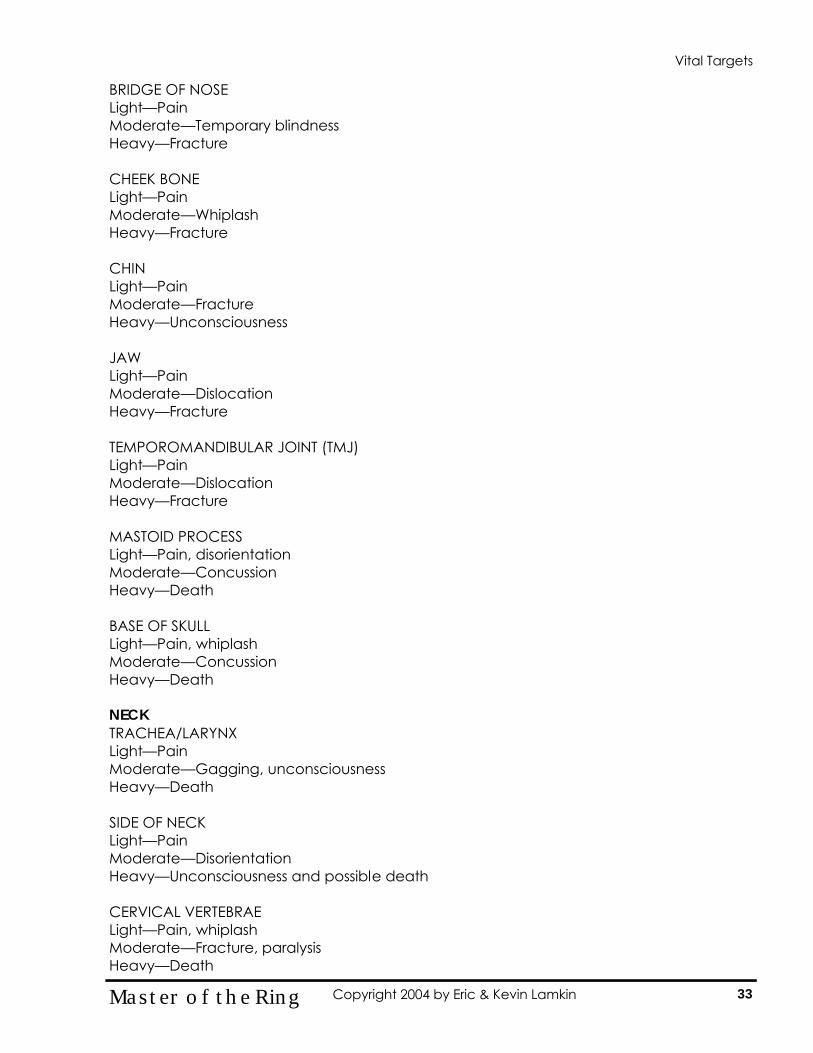
BRIDGE OF NOSE Light—Pain Moderate—Temporary blindness Heavy—Fracture CHEEK BONE Light—Pain Moderate—Whiplash Heavy—Fracture CHIN Light—Pain Moderate—Fracture Heavy—Unconsciousness JAW Light—Pain Moderate—Dislocation Heavy—Fracture TEMPOROMANDIBULAR JOINT (TMJ) Light—Pain Moderate—Dislocation Heavy—Fracture MASTOID PROCESS Light—Pain, disorientation Moderate—Concussion Heavy—Death BASE OF SKULL Light—Pain, whiplash Moderate—Concussion Heavy—Death NECK TRACHEA/LARYNX Light—Pain Moderate—Gagging, unconsciousness Heavy—Death SIDE OF NECK Light—Pain Moderate—Disorientation Heavy—Unconsciousness and possible death CERVICAL VERTEBRAE Light—Pain, whiplash Moderate—Fracture, paralysis Heavy—Death
33 Master of the Ring Copyright 2004 by Eric & Kevin Lamkin
Vital Targets
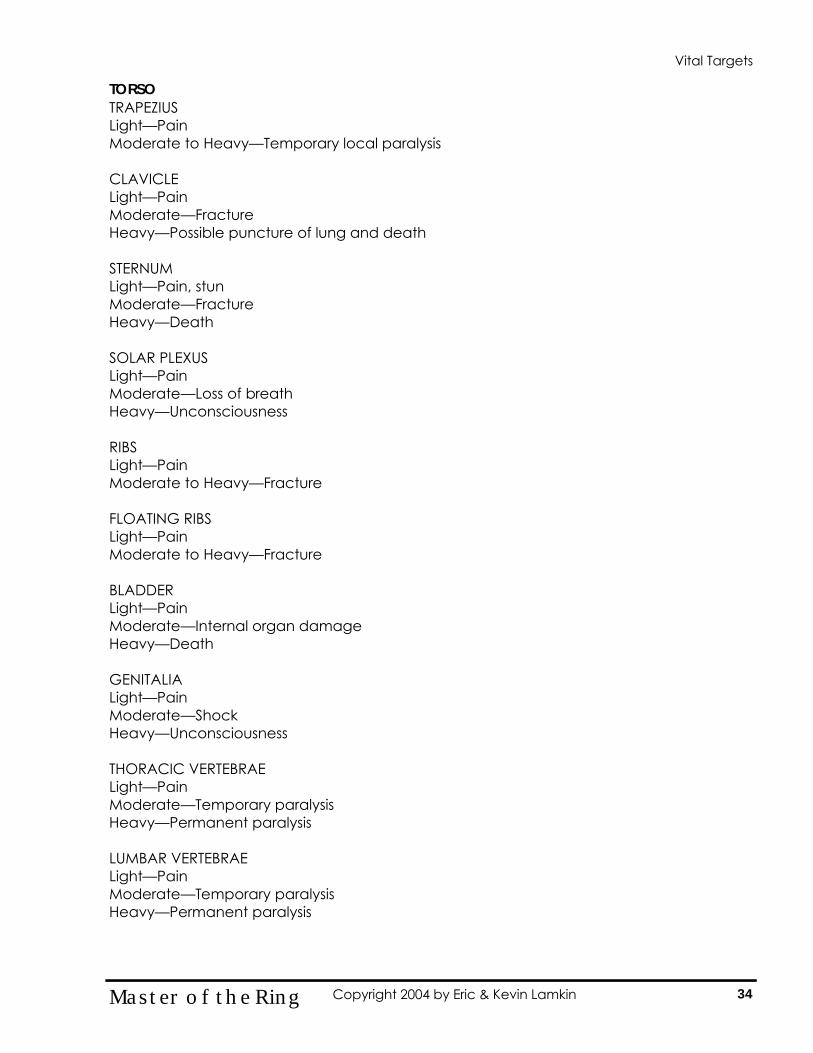
TORSO TRAPEZIUS Light—Pain Moderate to Heavy—Temporary local paralysis CLAVICLE Light—Pain Moderate—Fracture Heavy—Possible puncture of lung and death STERNUM Light—Pain, stun Moderate—Fracture Heavy—Death SOLAR PLEXUS Light—Pain Moderate—Loss of breath Heavy—Unconsciousness RIBS Light—Pain Moderate to Heavy—Fracture FLOATING RIBS Light—Pain Moderate to Heavy—Fracture BLADDER Light—Pain Moderate—Internal organ damage Heavy—Death GENITALIA Light—Pain Moderate—Shock Heavy—Unconsciousness THORACIC VERTEBRAE Light—Pain Moderate—Temporary paralysis Heavy—Permanent paralysis LUMBAR VERTEBRAE Light—Pain Moderate—Temporary paralysis Heavy—Permanent paralysis
34 Master of the Ring Copyright 2004 by Eric & Kevin Lamkin
Vital Targets
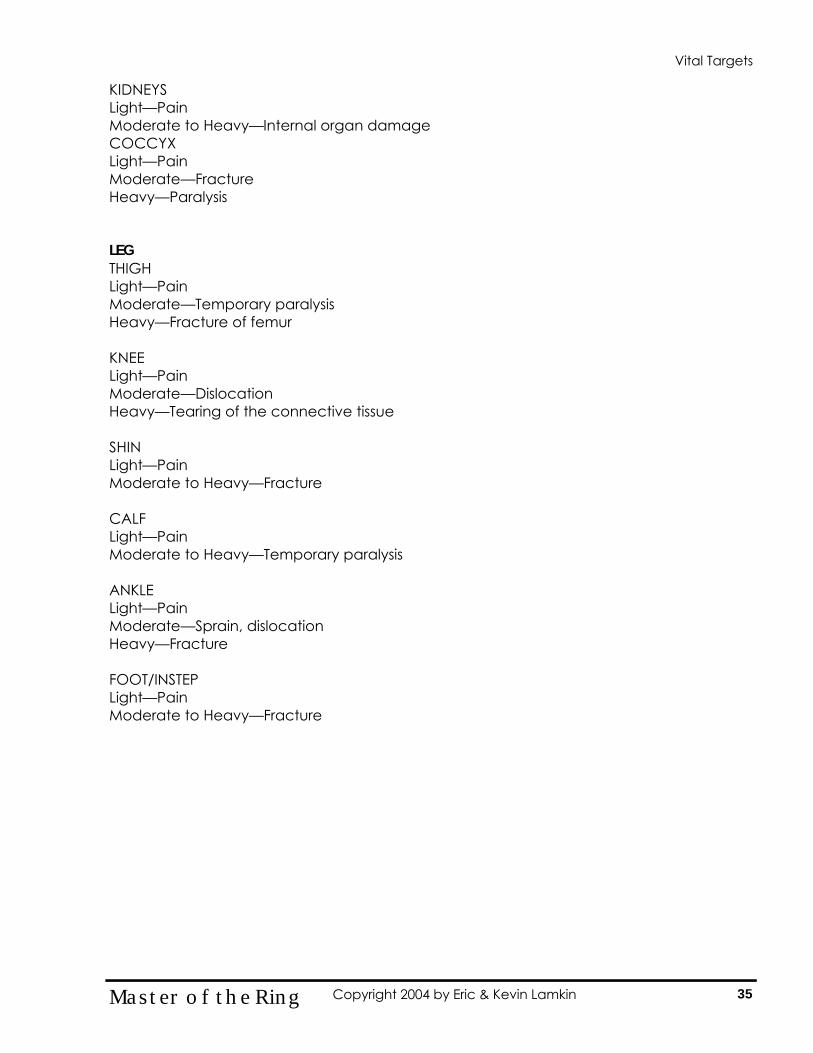
KIDNEYS Light—Pain Moderate to Heavy—Internal organ damage COCCYX Light—Pain Moderate—Fracture Heavy—Paralysis LEG THIGH Light—Pain Moderate—Temporary paralysis Heavy—Fracture of femur KNEE Light—Pain Moderate—Dislocation Heavy—Tearing of the connective tissue SHIN Light—Pain Moderate to Heavy—Fracture CALF Light—Pain Moderate to Heavy—Temporary paralysis ANKLE Light—Pain Moderate—Sprain, dislocation Heavy—Fracture FOOT/INSTEP Light—Pain Moderate to Heavy—Fracture
35 Master of the Ring Copyright 2004 by Eric & Kevin Lamkin
Vital Targets
29-PP
1-PP
PRESSURE POINTS Front
3-PP
4-PP
5-PP
8-PP
6-PP
11-PP 10-PP
12-PP
13-PP 14-PP
17-PP 18-PP
20-PP 19-PP 22-PP
23-PP
24-PP
25-PP
26-PP
30-PP
31-PP
33-PP
36 Master of the Ring Copyright 2004 by Eric & Kevin Lamkin
PRESSURE POINTS Back
2-PP
9-PP
7-PP
16-PP 15-PP
21-PP
27-PP 28-PP
32-PP
37 Master of the Ring Copyright 2004 by Eric & Kevin Lamkin
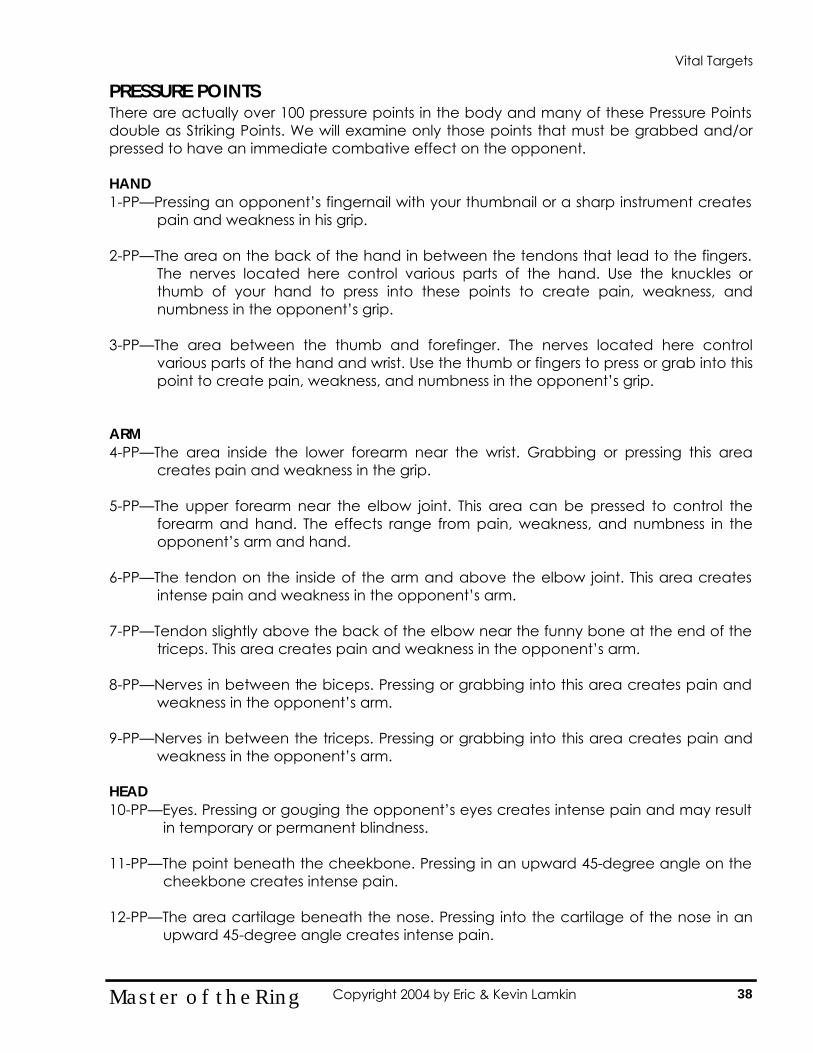
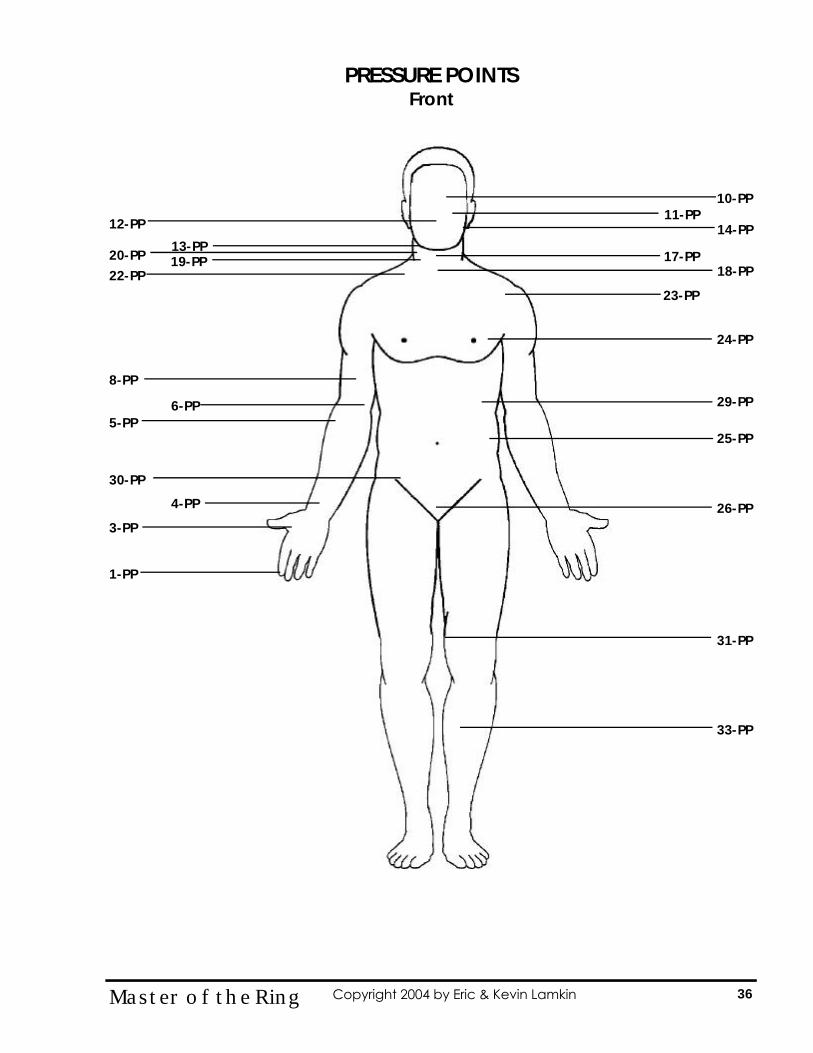
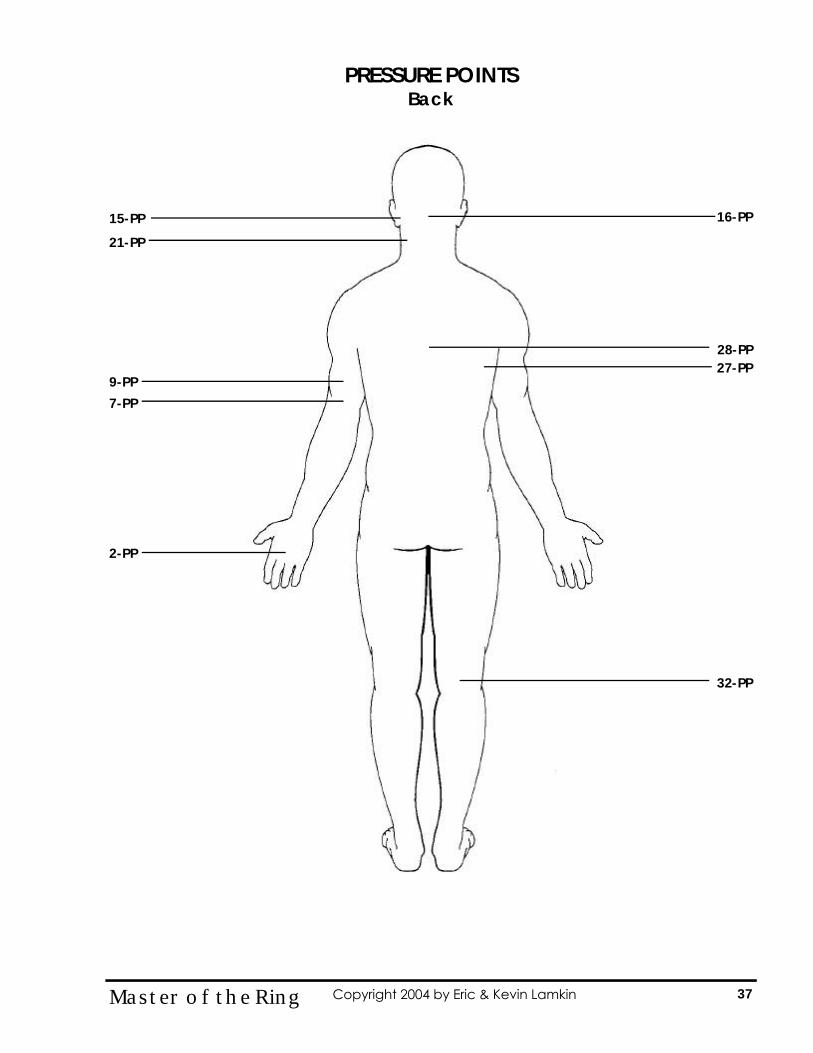
PRESSURE POINTS There are actually over 100 pressure points in the body and many of these Pressure Points double as Striking Points. We will examine only those points that must be grabbed and/or pressed to have an immediate combative effect on the opponent. HAND 1-PP—Pressing an opponent’s fingernail with your thumbnail or a sharp instrument creates
pain and weakness in his grip. 2-PP—The area on the back of the hand in between the tendons that lead to the fingers.
The nerves located here control various parts of the hand. Use the knuckles or thumb of your hand to press into these points to create pain, weakness, and numbness in the opponent’s grip.
3-PP—The area between the thumb and forefinger. The nerves located here control
various parts of the hand and wrist. Use the thumb or fingers to press or grab into this point to create pain, weakness, and numbness in the opponent’s grip.
ARM 4-PP—The area inside the lower forearm near the wrist. Grabbing or pressing this area
creates pain and weakness in the grip. 5-PP—The upper forearm near the elbow joint. This area can be pressed to control the
forearm and hand. The effects range from pain, weakness, and numbness in the opponent’s arm and hand.
6-PP—The tendon on the inside of the arm and above the elbow joint. This area creates
intense pain and weakness in the opponent’s arm. 7-PP—Tendon slightly above the back of the elbow near the funny bone at the end of the
triceps. This area creates pain and weakness in the opponent’s arm. 8-PP—Nerves in between the biceps. Pressing or grabbing into this area creates pain and
weakness in the opponent’s arm. 9-PP—Nerves in between the triceps. Pressing or grabbing into this area creates pain and
weakness in the opponent’s arm. HEAD 10-PP—Eyes. Pressing or gouging the opponent’s eyes creates intense pain and may result
in temporary or permanent blindness. 11-PP—The point beneath the cheekbone. Pressing in an upward 45-degree angle on the
cheekbone creates intense pain. 12-PP—The area cartilage beneath the nose. Pressing into the cartilage of the nose in an
upward 45-degree angle creates intense pain.
38 Master of the Ring Copyright 2004 by Eric & Kevin Lamkin
Vital Targets
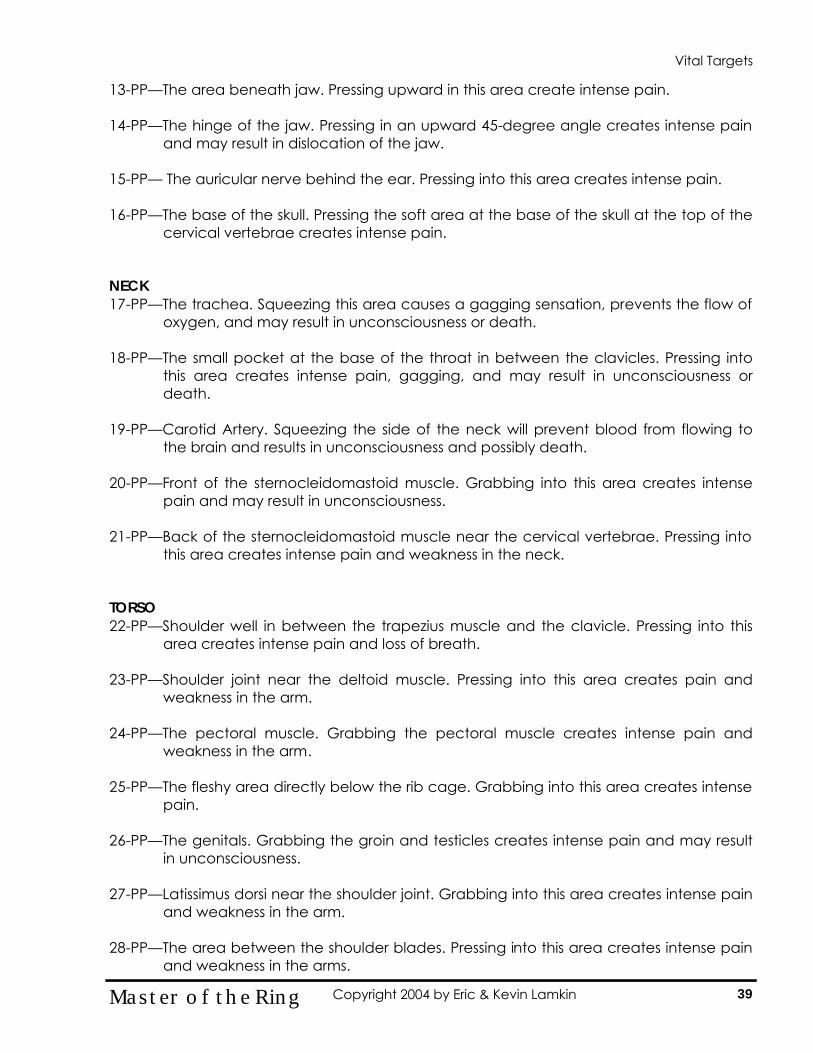
13-PP—The area beneath jaw. Pressing upward in this area create intense pain. 14-PP—The hinge of the jaw. Pressing in an upward 45-degree angle creates intense pain
and may result in dislocation of the jaw. 15-PP— The auricular nerve behind the ear. Pressing into this area creates intense pain. 16-PP—The base of the skull. Pressing the soft area at the base of the skull at the top of the
cervical vertebrae creates intense pain. NECK 17-PP—The trachea. Squeezing this area causes a gagging sensation, prevents the flow of
oxygen, and may result in unconsciousness or death. 18-PP—The small pocket at the base of the throat in between the clavicles. Pressing into
this area creates intense pain, gagging, and may result in unconsciousness or death.
19-PP—Carotid Artery. Squeezing the side of the neck will prevent blood from flowing to
the brain and results in unconsciousness and possibly death. 20-PP—Front of the sternocleidomastoid muscle. Grabbing into this area creates intense
pain and may result in unconsciousness. 21-PP—Back of the sternocleidomastoid muscle near the cervical vertebrae. Pressing into
this area creates intense pain and weakness in the neck. TORSO 22-PP—Shoulder well in between the trapezius muscle and the clavicle. Pressing into this
area creates intense pain and loss of breath. 23-PP—Shoulder joint near the deltoid muscle. Pressing into this area creates pain and
weakness in the arm. 24-PP—The pectoral muscle. Grabbing the pectoral muscle creates intense pain and
weakness in the arm. 25-PP—The fleshy area directly below the rib cage. Grabbing into this area creates intense
pain. 26-PP—The genitals. Grabbing the groin and testicles creates intense pain and may result
in unconsciousness. 27-PP—Latissimus dorsi near the shoulder joint. Grabbing into this area creates intense pain
and weakness in the arm. 28-PP—The area between the shoulder blades. Pressing into this area creates intense pain
and weakness in the arms.
39 Master of the Ring Copyright 2004 by Eric & Kevin Lamkin
Vital Targets
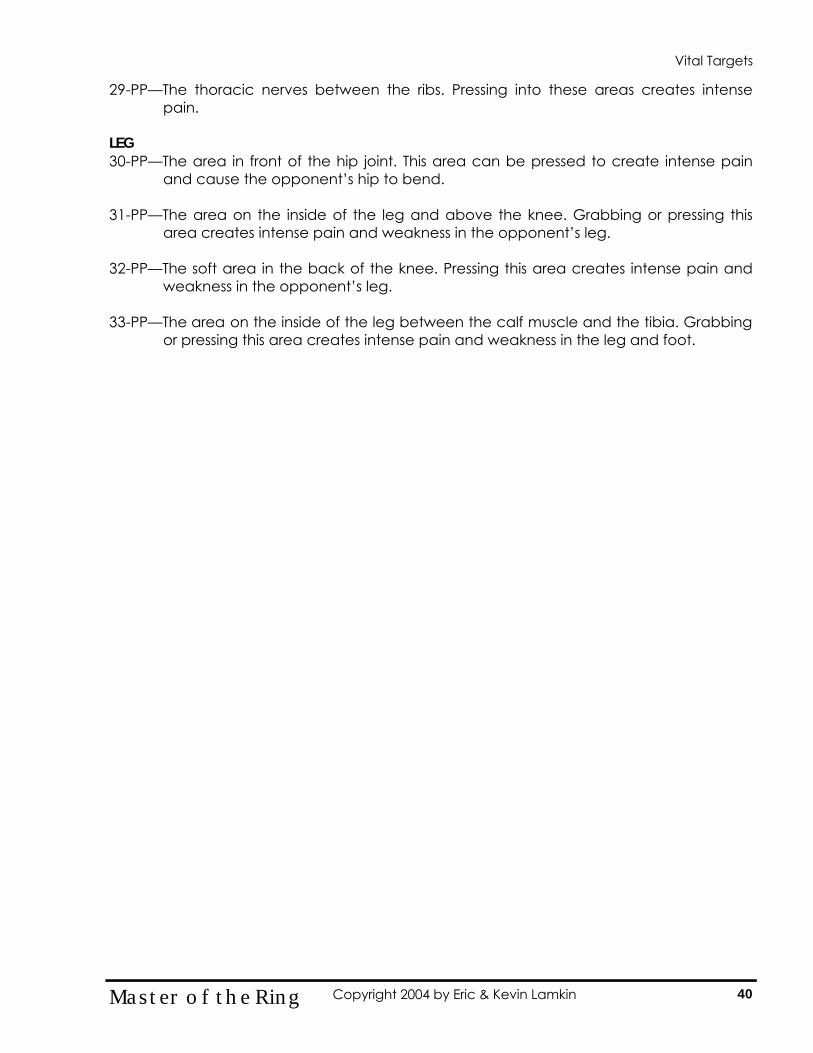
29-PP—The thoracic nerves between the ribs. Pressing into these areas creates intense pain.
LEG 30-PP—The area in front of the hip joint. This area can be pressed to create intense pain
and cause the opponent’s hip to bend. 31-PP—The area on the inside of the leg and above the knee. Grabbing or pressing this
area creates intense pain and weakness in the opponent’s leg. 32-PP—The soft area in the back of the knee. Pressing this area creates intense pain and
weakness in the opponent’s leg. 33-PP—The area on the inside of the leg between the calf muscle and the tibia. Grabbing
or pressing this area creates intense pain and weakness in the leg and foot.
40 Master of the Ring Copyright 2004 by Eric & Kevin Lamkin
Vital Targets

GeometricGeometric Combat TheoryCombat Theory
41 Master of the Ring Copyright 2004 by Eric & Kevin Lamkin
Geometric Combat Theory
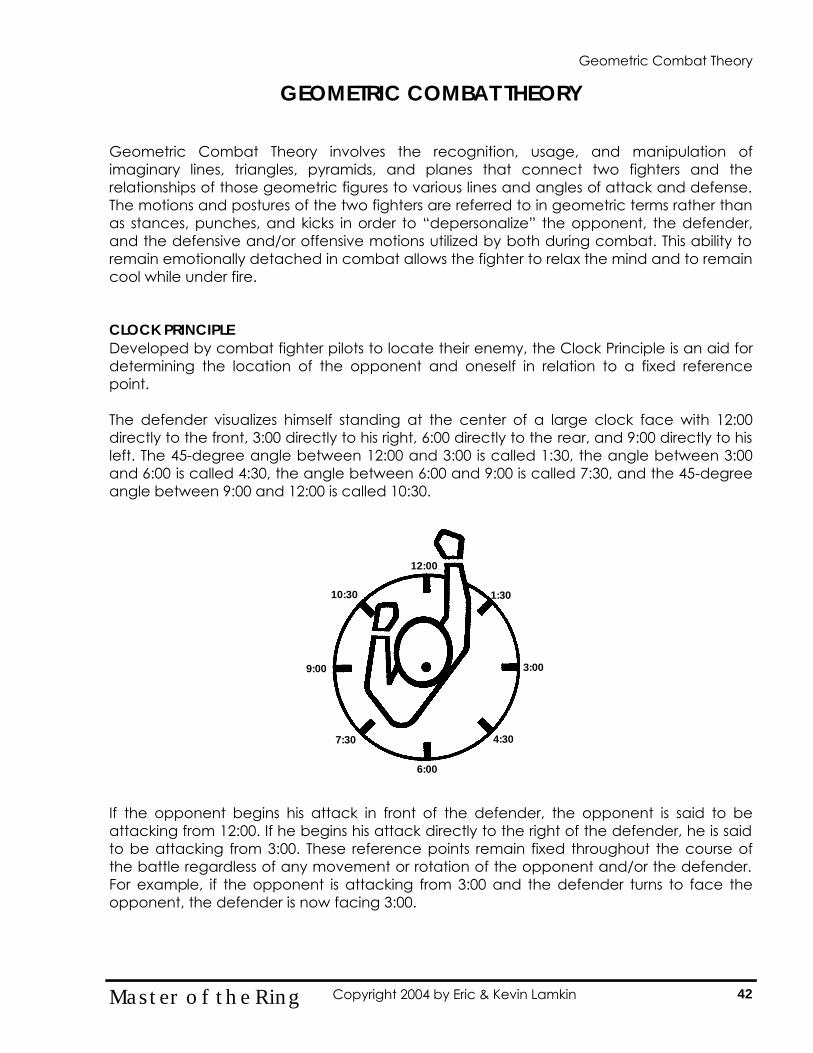
GEOMETRIC COMBAT THEORY Geometric Combat Theory involves the recognition, usage, and manipulation of imaginary lines, triangles, pyramids, and planes that connect two fighters and the relationships of those geometric figures to various lines and angles of attack and defense. The motions and postures of the two fighters are referred to in geometric terms rather than as stances, punches, and kicks in order to “depersonalize” the opponent, the defender, and the defensive and/or offensive motions utilized by both during combat. This ability to remain emotionally detached in combat allows the fighter to relax the mind and to remain cool while under fire. CLOCK PRINCIPLE Developed by combat fighter pilots to locate their enemy, the Clock Principle is an aid for determining the location of the opponent and oneself in relation to a fixed reference point. The defender visualizes himself standing at the center of a large clock face with 12:00 directly to the front, 3:00 directly to his right, 6:00 directly to the rear, and 9:00 directly to his left. The 45-degree angle between 12:00 and 3:00 is called 1:30, the angle between 3:00 and 6:00 is called 4:30, the angle between 6:00 and 9:00 is called 7:30, and the 45-degree angle between 9:00 and 12:00 is called 10:30. If the opponent begins his attack in front of the defender, the opponent is said to be attacking from 12:00. If he begins his attack directly to the right of the defender, he is said to be attacking from 3:00. These reference points remain fixed throughout the course of the battle regardless of any movement or rotation of the opponent and/or the defender. For example, if the opponent is attacking from 3:00 and the defender turns to face the opponent, the defender is now facing 3:00.
12:00
1:30
3:00
4:30
6:00
9:00
7:30
10:30
Geometric Combat Theory
42 Master of the Ring Copyright 2004 by Eric & Kevin Lamkin
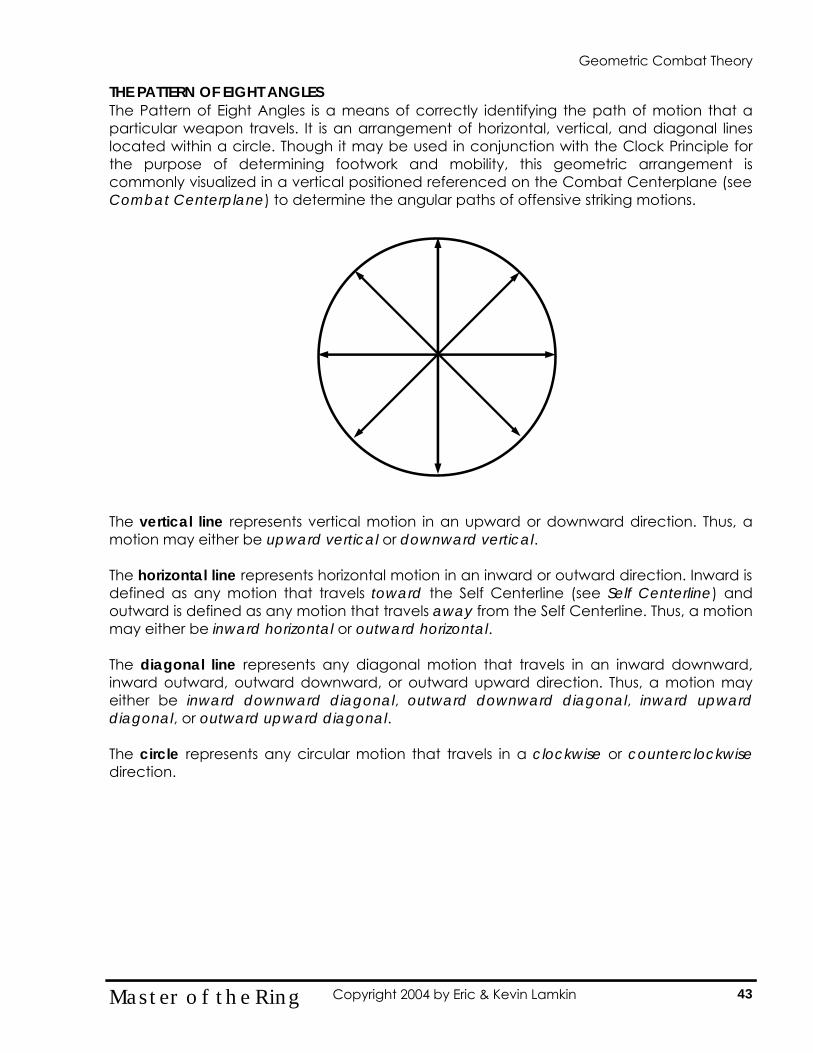
THE PATTERN OF EIGHT ANGLES The Pattern of Eight Angles is a means of correctly identifying the path of motion that a particular weapon travels. It is an arrangement of horizontal, vertical, and diagonal lines located within a circle. Though it may be used in conjunction with the Clock Principle for the purpose of determining footwork and mobility, this geometric arrangement is commonly visualized in a vertical positioned referenced on the Combat Centerplane (see Combat Centerplane) to determine the angular paths of offensive striking motions. The vertical line represents vertical motion in an upward or downward direction. Thus, a motion may either be upward vertical or downward vertical. The horizontal line represents horizontal motion in an inward or outward direction. Inward is defined as any motion that travels toward the Self Centerline (see Self Centerline) and outward is defined as any motion that travels away from the Self Centerline. Thus, a motion may either be inward horizontal or outward horizontal. The diagonal line represents any diagonal motion that travels in an inward downward, inward outward, outward downward, or outward upward direction. Thus, a motion may either be inward downward diagonal, outward downward diagonal, inward upward diagonal, or outward upward diagonal. The circle represents any circular motion that travels in a clockwise or counterclockwise direction.
Geometric Combat Theory
43 Master of the Ring Copyright 2004 by Eric & Kevin Lamkin
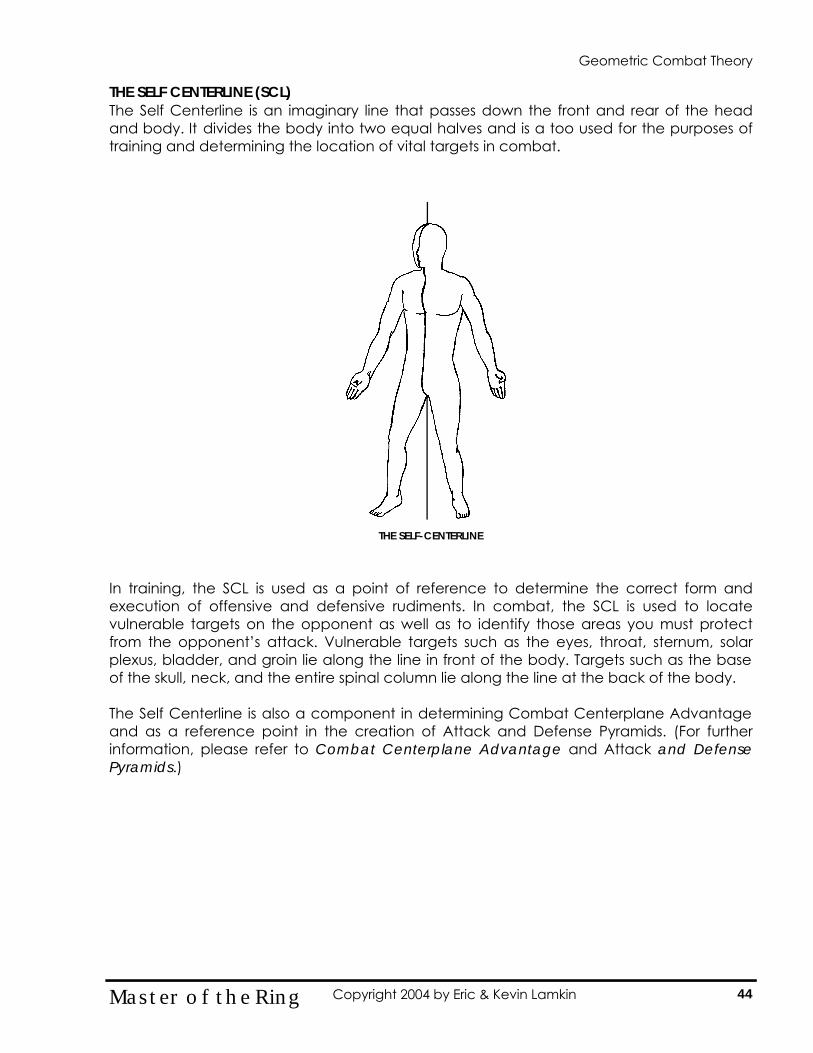
THE SELF CENTERLINE (SCL) The Self Centerline is an imaginary line that passes down the front and rear of the head and body. It divides the body into two equal halves and is a too used for the purposes of training and determining the location of vital targets in combat.
THE SELF-CENTERLINE
In training, the SCL is used as a point of reference to determine the correct form and execution of offensive and defensive rudiments. In combat, the SCL is used to locate vulnerable targets on the opponent as well as to identify those areas you must protect from the opponent’s attack. Vulnerable targets such as the eyes, throat, sternum, solar plexus, bladder, and groin lie along the line in front of the body. Targets such as the base of the skull, neck, and the entire spinal column lie along the line at the back of the body. The Self Centerline is also a component in determining Combat Centerplane Advantage and as a reference point in the creation of Attack and Defense Pyramids. (For further information, please refer to Combat Centerplane Advantage and Attack and Defense Pyramids.)
Geometric Combat Theory
44 Master of the Ring Copyright 2004 by Eric & Kevin Lamkin
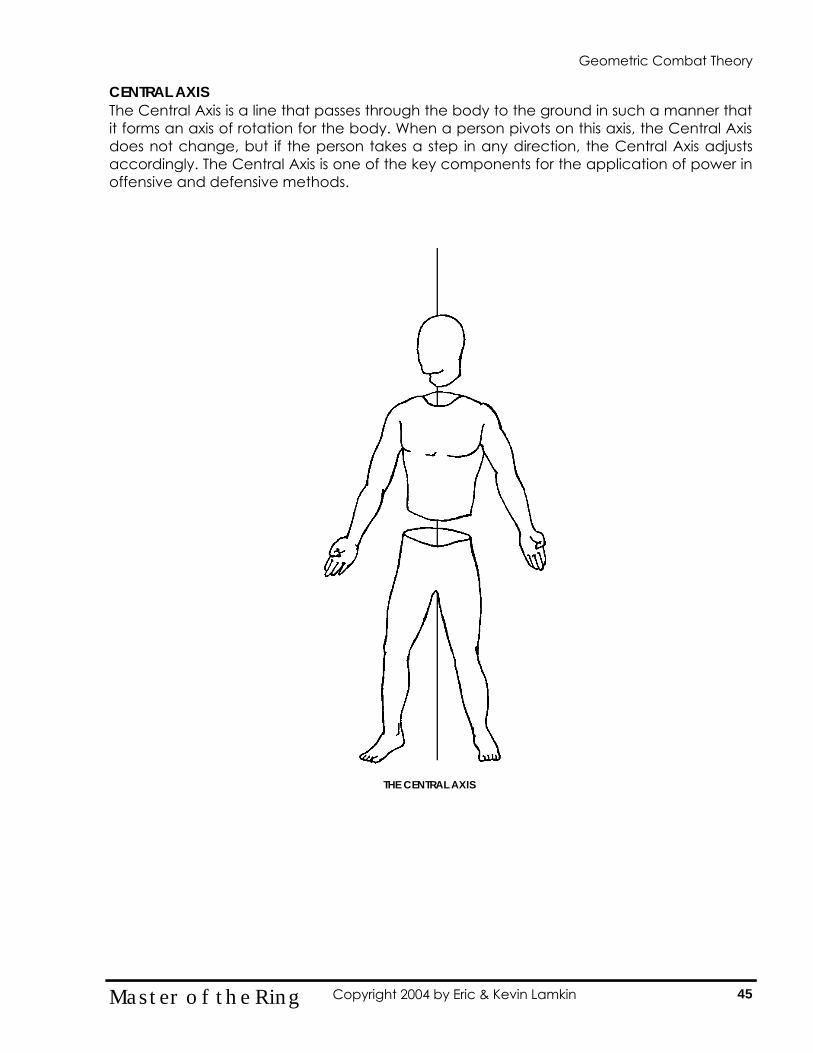
CENTRAL AXIS The Central Axis is a line that passes through the body to the ground in such a manner that it forms an axis of rotation for the body. When a person pivots on this axis, the Central Axis does not change, but if the person takes a step in any direction, the Central Axis adjusts accordingly. The Central Axis is one of the key components for the application of power in offensive and defensive methods.
THE CENTRAL AXIS
Geometric Combat Theory
45 Master of the Ring Copyright 2004 by Eric & Kevin Lamkin
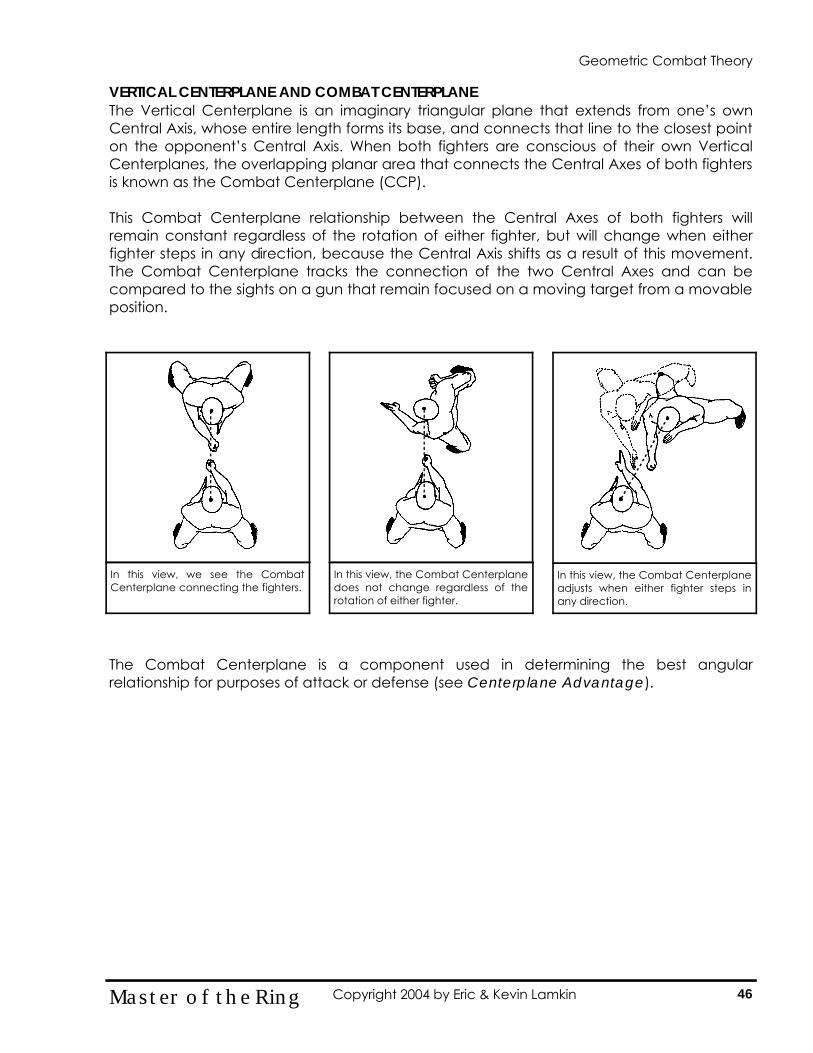
VERTICAL CENTERPLANE AND COMBAT CENTERPLANE The Vertical Centerplane is an imaginary triangular plane that extends from one’s own Central Axis, whose entire length forms its base, and connects that line to the closest point on the opponent’s Central Axis. When both fighters are conscious of their own Vertical Centerplanes, the overlapping planar area that connects the Central Axes of both fighters is known as the Combat Centerplane (CCP). This Combat Centerplane relationship between the Central Axes of both fighters will remain constant regardless of the rotation of either fighter, but will change when either fighter steps in any direction, because the Central Axis shifts as a result of this movement. The Combat Centerplane tracks the connection of the two Central Axes and can be compared to the sights on a gun that remain focused on a moving target from a movable position.
The Combat Centerplane is a component used in determining the best angular relationship for purposes of attack or defense (see Centerplane Advantage).
In this view, we see the Combat Centerplane connecting the fighters.
In this view, the Combat Centerplane does not change regardless of the rotation of either fighter.
In this view, the Combat Centerplane adjusts when either fighter steps in any direction.
Geometric Combat Theory Geometric Combat Theory
46 Master of the Ring Copyright 2004 by Eric & Kevin Lamkin
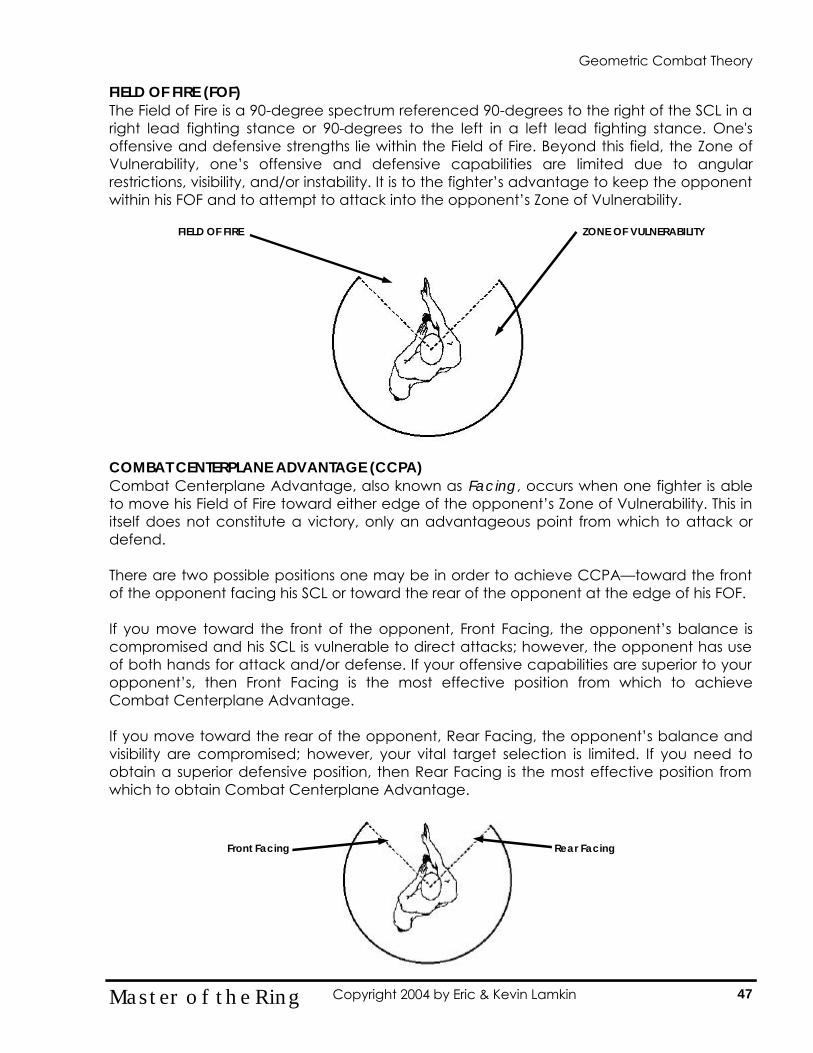
FIELD OF FIRE (FOF) The Field of Fire is a 90-degree spectrum referenced 90-degrees to the right of the SCL in a right lead fighting stance or 90-degrees to the left in a left lead fighting stance. One's offensive and defensive strengths lie within the Field of Fire. Beyond this field, the Zone of Vulnerability, one’s offensive and defensive capabilities are limited due to angular restrictions, visibility, and/or instability. It is to the fighter’s advantage to keep the opponent within his FOF and to attempt to attack into the opponent’s Zone of Vulnerability. COMBAT CENTERPLANE ADVANTAGE (CCPA) Combat Centerplane Advantage, also known as Facing, occurs when one fighter is able to move his Field of Fire toward either edge of the opponent’s Zone of Vulnerability. This in itself does not constitute a victory, only an advantageous point from which to attack or defend. There are two possible positions one may be in order to achieve CCPA—toward the front of the opponent facing his SCL or toward the rear of the opponent at the edge of his FOF. If you move toward the front of the opponent, Front Facing, the opponent’s balance is compromised and his SCL is vulnerable to direct attacks; however, the opponent has use of both hands for attack and/or defense. If your offensive capabilities are superior to your opponent’s, then Front Facing is the most effective position from which to achieve Combat Centerplane Advantage. If you move toward the rear of the opponent, Rear Facing, the opponent’s balance and visibility are compromised; however, your vital target selection is limited. If you need to obtain a superior defensive position, then Rear Facing is the most effective position from which to obtain Combat Centerplane Advantage.
Front Facing Rear Facing
ZONE OF VULNERABILITY FIELD OF FIRE
Geometric Combat Theory
47 Master of the Ring Copyright 2004 by Eric & Kevin Lamkin
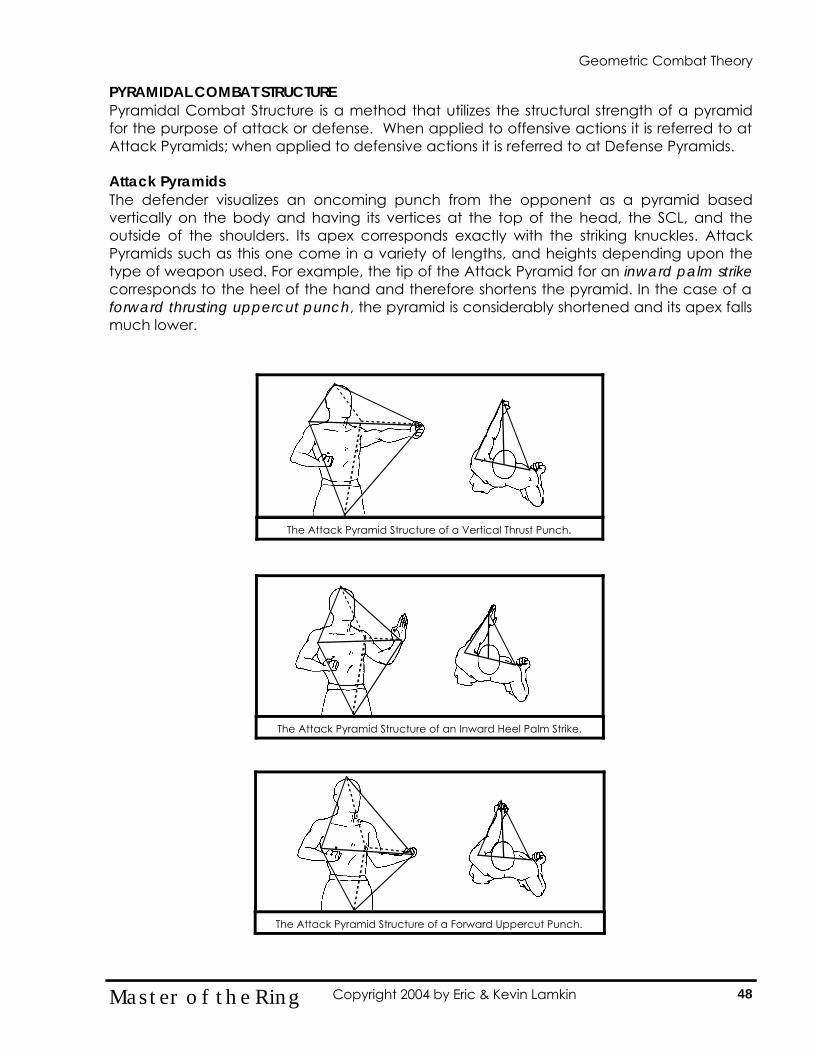
PYRAMIDAL COMBAT STRUCTURE Pyramidal Combat Structure is a method that utilizes the structural strength of a pyramid for the purpose of attack or defense. When applied to offensive actions it is referred to at Attack Pyramids; when applied to defensive actions it is referred to at Defense Pyramids. Attack Pyramids The defender visualizes an oncoming punch from the opponent as a pyramid based vertically on the body and having its vertices at the top of the head, the SCL, and the outside of the shoulders. Its apex corresponds exactly with the striking knuckles. Attack Pyramids such as this one come in a variety of lengths, and heights depending upon the type of weapon used. For example, the tip of the Attack Pyramid for an inward palm strike corresponds to the heel of the hand and therefore shortens the pyramid. In the case of a forward thrusting uppercut punch, the pyramid is considerably shortened and its apex falls much lower.
The Attack Pyramid Structure of a Vertical Thrust Punch.
The Attack Pyramid Structure of an Inward Heel Palm Strike.
The Attack Pyramid Structure of a Forward Uppercut Punch.
Geometric Combat Theory
48 Master of the Ring Copyright 2004 by Eric & Kevin Lamkin
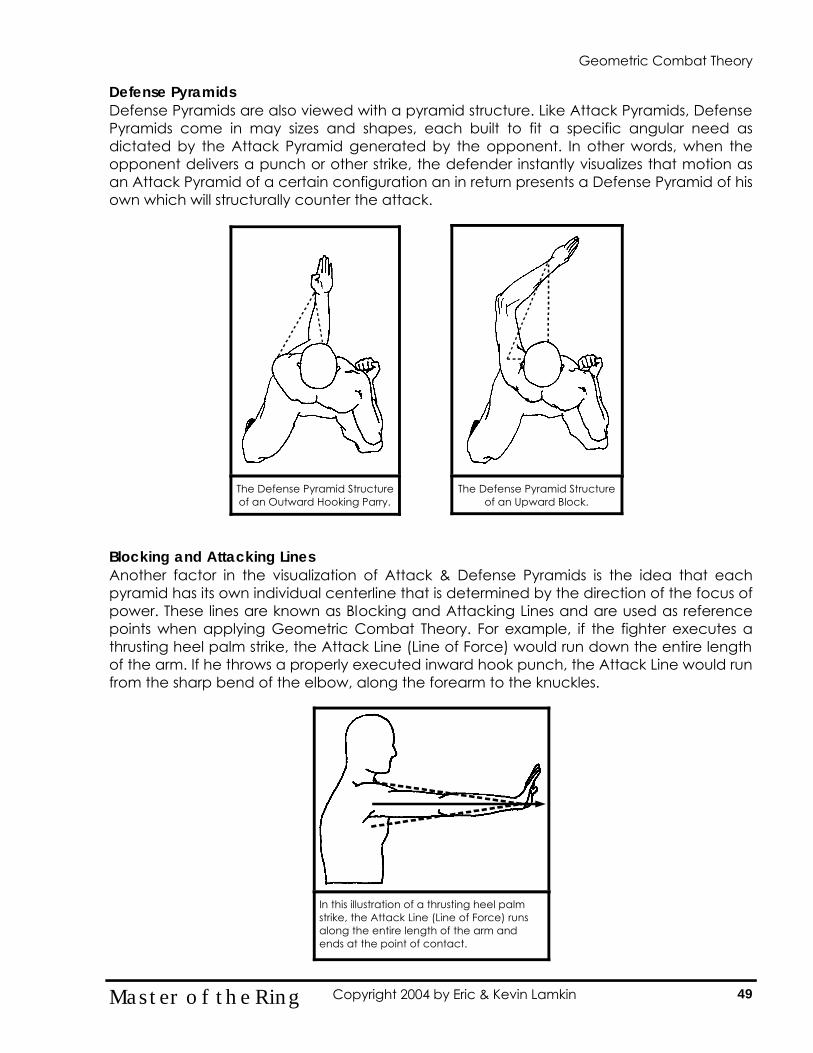
Defense Pyramids Defense Pyramids are also viewed with a pyramid structure. Like Attack Pyramids, Defense Pyramids come in may sizes and shapes, each built to fit a specific angular need as dictated by the Attack Pyramid generated by the opponent. In other words, when the opponent delivers a punch or other strike, the defender instantly visualizes that motion as an Attack Pyramid of a certain configuration an in return presents a Defense Pyramid of his own which will structurally counter the attack. Blocking and Attacking Lines Another factor in the visualization of Attack & Defense Pyramids is the idea that each pyramid has its own individual centerline that is determined by the direction of the focus of power. These lines are known as Blocking and Attacking Lines and are used as reference points when applying Geometric Combat Theory. For example, if the fighter executes a thrusting heel palm strike, the Attack Line (Line of Force) would run down the entire length of the arm. If he throws a properly executed inward hook punch, the Attack Line would run from the sharp bend of the elbow, along the forearm to the knuckles.
The Defense Pyramid Structure of an Outward Hooking Parry.
The Defense Pyramid Structure of an Upward Block.
Geometric Combat Theory
In this illustration of a thrusting heel palm strike, the Attack Line (Line of Force) runs along the entire length of the arm and ends at the point of contact.
49 Master of the Ring Copyright 2004 by Eric & Kevin Lamkin
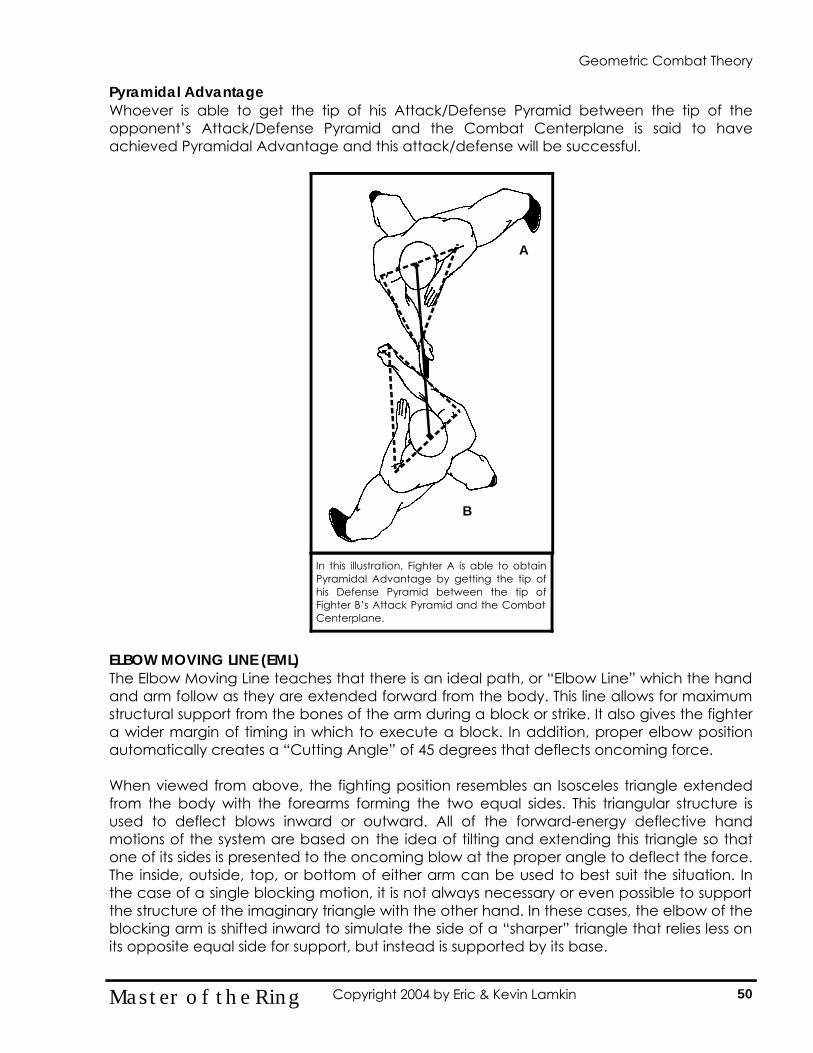
Pyramidal Advantage Whoever is able to get the tip of his Attack/Defense Pyramid between the tip of the opponent’s Attack/Defense Pyramid and the Combat Centerplane is said to have achieved Pyramidal Advantage and this attack/defense will be successful.
In this illustration, Fighter A is able to obtain Pyramidal Advantage by getting the tip of his Defense Pyramid between the tip of Fighter B’s Attack Pyramid and the Combat Centerplane.
B
A
ELBOW MOVING LINE (EML) The Elbow Moving Line teaches that there is an ideal path, or “Elbow Line” which the hand and arm follow as they are extended forward from the body. This line allows for maximum structural support from the bones of the arm during a block or strike. It also gives the fighter a wider margin of timing in which to execute a block. In addition, proper elbow position automatically creates a “Cutting Angle” of 45 degrees that deflects oncoming force. When viewed from above, the fighting position resembles an Isosceles triangle extended from the body with the forearms forming the two equal sides. This triangular structure is used to deflect blows inward or outward. All of the forward-energy deflective hand motions of the system are based on the idea of tilting and extending this triangle so that one of its sides is presented to the oncoming blow at the proper angle to deflect the force. The inside, outside, top, or bottom of either arm can be used to best suit the situation. In the case of a single blocking motion, it is not always necessary or even possible to support the structure of the imaginary triangle with the other hand. In these cases, the elbow of the blocking arm is shifted inward to simulate the side of a “sharper” triangle that relies less on its opposite equal side for support, but instead is supported by its base.
Geometric Combat Theory
50 Master of the Ring Copyright 2004 by Eric & Kevin Lamkin
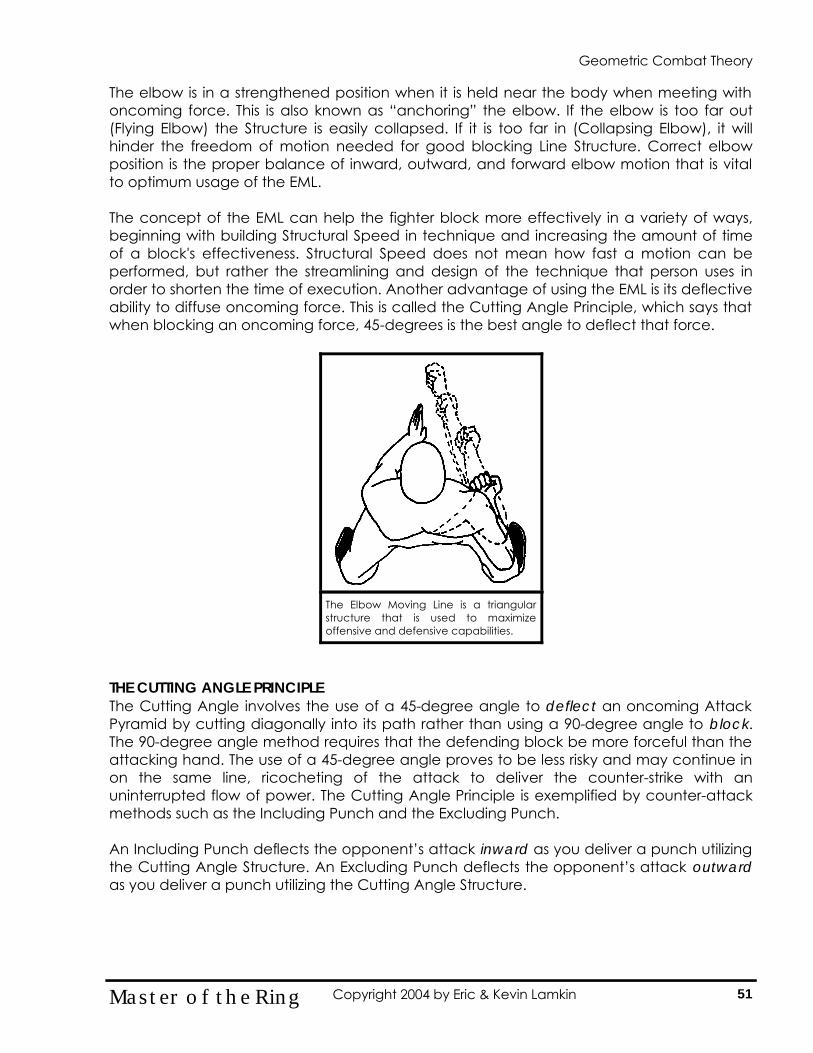
The elbow is in a strengthened position when it is held near the body when meeting with oncoming force. This is also known as “anchoring” the elbow. If the elbow is too far out (Flying Elbow) the Structure is easily collapsed. If it is too far in (Collapsing Elbow), it will hinder the freedom of motion needed for good blocking Line Structure. Correct elbow position is the proper balance of inward, outward, and forward elbow motion that is vital to optimum usage of the EML. The concept of the EML can help the fighter block more effectively in a variety of ways, beginning with building Structural Speed in technique and increasing the amount of time of a block's effectiveness. Structural Speed does not mean how fast a motion can be performed, but rather the streamlining and design of the technique that person uses in order to shorten the time of execution. Another advantage of using the EML is its deflective ability to diffuse oncoming force. This is called the Cutting Angle Principle, which says that when blocking an oncoming force, 45-degrees is the best angle to deflect that force.
The Elbow Moving Line is a triangular structure that is used to maximize offensive and defensive capabilities.
THE CUTTING ANGLE PRINCIPLE The Cutting Angle involves the use of a 45-degree angle to deflect an oncoming Attack Pyramid by cutting diagonally into its path rather than using a 90-degree angle to block. The 90-degree angle method requires that the defending block be more forceful than the attacking hand. The use of a 45-degree angle proves to be less risky and may continue in on the same line, ricocheting of the attack to deliver the counter-strike with an uninterrupted flow of power. The Cutting Angle Principle is exemplified by counter-attack methods such as the Including Punch and the Excluding Punch. An Including Punch deflects the opponent’s attack inward as you deliver a punch utilizing the Cutting Angle Structure. An Excluding Punch deflects the opponent’s attack outward as you deliver a punch utilizing the Cutting Angle Structure.
Geometric Combat Theory
51 Master of the Ring Copyright 2004 by Eric & Kevin Lamkin
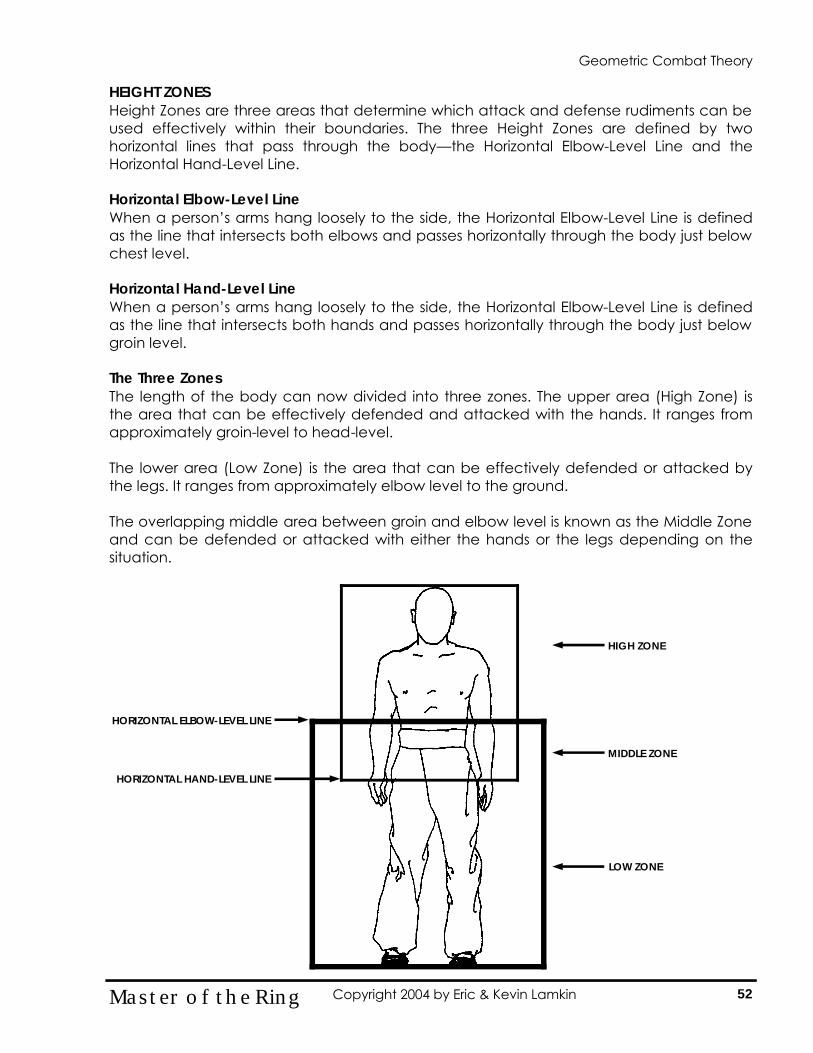
HEIGHT ZONES Height Zones are three areas that determine which attack and defense rudiments can be used effectively within their boundaries. The three Height Zones are defined by two horizontal lines that pass through the body—the Horizontal Elbow-Level Line and the Horizontal Hand-Level Line. Horizontal Elbow-Level Line When a person’s arms hang loosely to the side, the Horizontal Elbow-Level Line is defined as the line that intersects both elbows and passes horizontally through the body just below chest level. Horizontal Hand-Level Line When a person’s arms hang loosely to the side, the Horizontal Elbow-Level Line is defined as the line that intersects both hands and passes horizontally through the body just below groin level. The Three Zones The length of the body can now divided into three zones. The upper area (High Zone) is the area that can be effectively defended and attacked with the hands. It ranges from approximately groin-level to head-level. The lower area (Low Zone) is the area that can be effectively defended or attacked by the legs. It ranges from approximately elbow level to the ground. The overlapping middle area between groin and elbow level is known as the Middle Zone and can be defended or attacked with either the hands or the legs depending on the situation.
HORIZONTAL ELBOW-LEVEL LINE
HORIZONTAL HAND-LEVEL LINE
HIGH ZONE
MIDDLE ZONE
LOW ZONE
Geometric Combat Theory
52 Master of the Ring Copyright 2004 by Eric & Kevin Lamkin
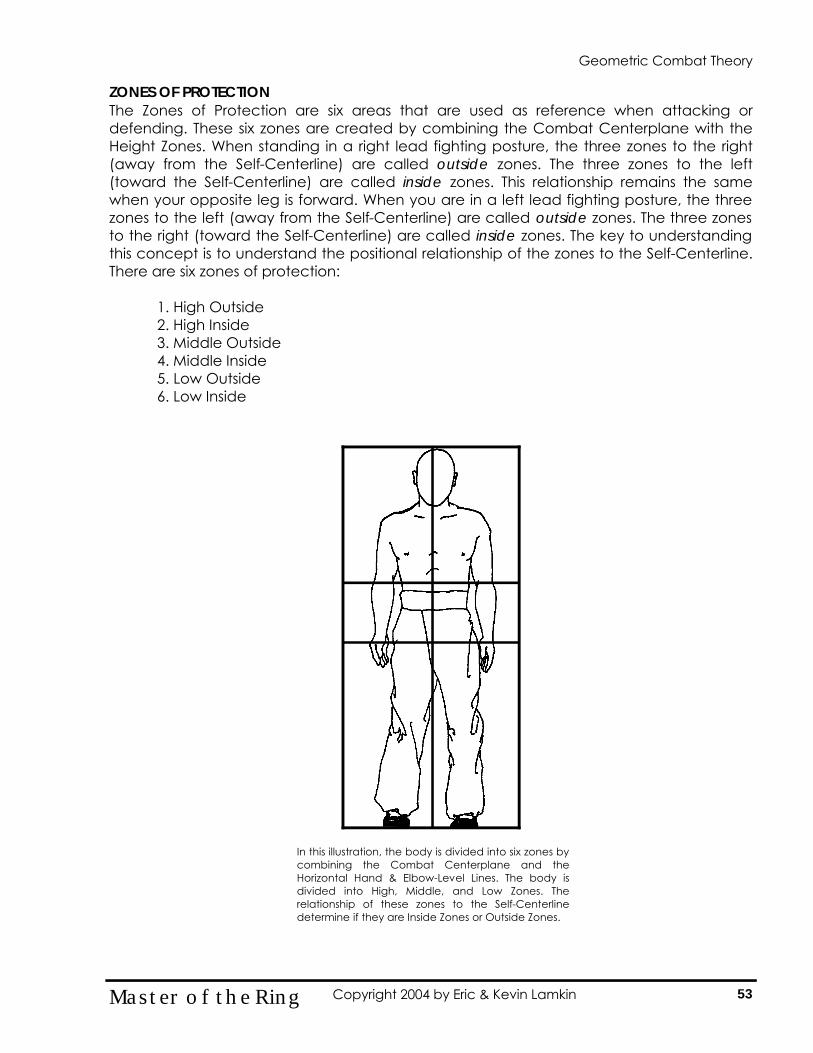
ZONES OF PROTECTION The Zones of Protection are six areas that are used as reference when attacking or defending. These six zones are created by combining the Combat Centerplane with the Height Zones. When standing in a right lead fighting posture, the three zones to the right (away from the Self-Centerline) are called outside zones. The three zones to the left (toward the Self-Centerline) are called inside zones. This relationship remains the same when your opposite leg is forward. When you are in a left lead fighting posture, the three zones to the left (away from the Self-Centerline) are called outside zones. The three zones to the right (toward the Self-Centerline) are called inside zones. The key to understanding this concept is to understand the positional relationship of the zones to the Self-Centerline. There are six zones of protection: 1. High Outside 2. High Inside 3. Middle Outside 4. Middle Inside 5. Low Outside 6. Low Inside
In this illustration, the body is divided into six zones by combining the Combat Centerplane and the Horizontal Hand & Elbow-Level Lines. The body is divided into High, Middle, and Low Zones. The relationship of these zones to the Self-Centerline determine if they are Inside Zones or Outside Zones.
Geometric Combat Theory
53 Master of the Ring Copyright 2004 by Eric & Kevin Lamkin
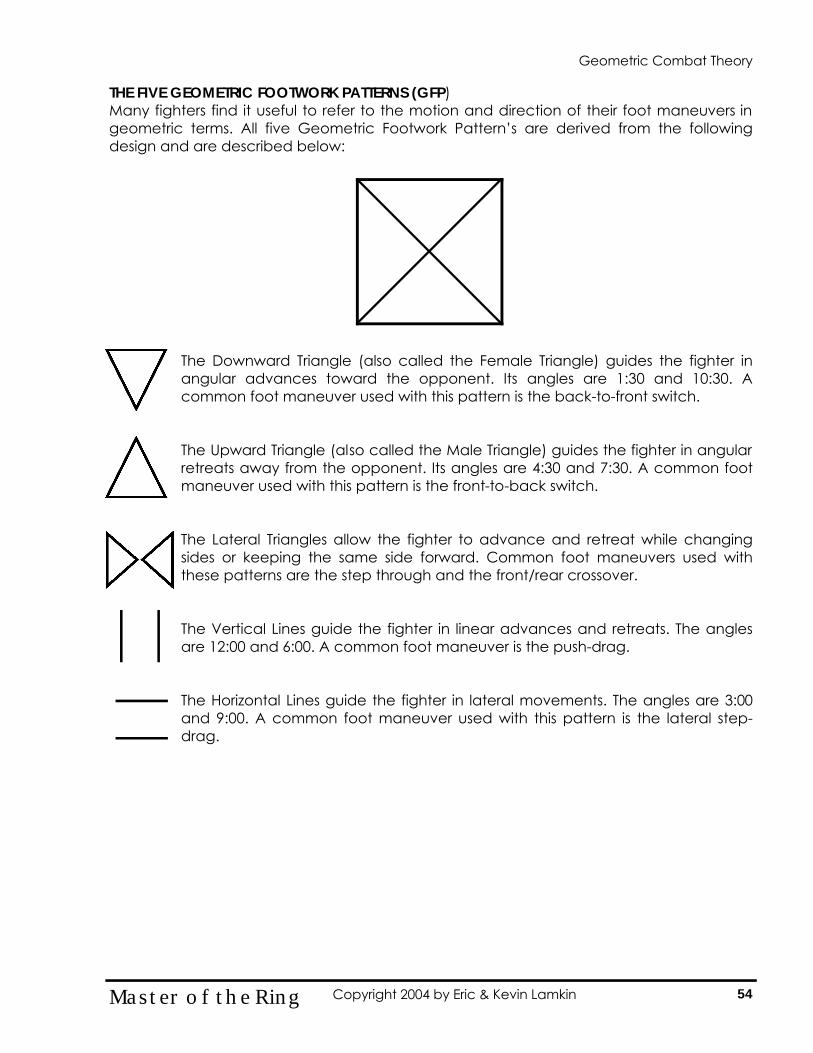
THE FIVE GEOMETRIC FOOTWORK PATTERNS (GFP) Many fighters find it useful to refer to the motion and direction of their foot maneuvers in geometric terms. All five Geometric Footwork Pattern’s are derived from the following design and are described below:
The Downward Triangle (also called the Female Triangle) guides the fighter in angular advances toward the opponent. Its angles are 1:30 and 10:30. A common foot maneuver used with this pattern is the back-to-front switch.
The Upward Triangle (also called the Male Triangle) guides the fighter in angular retreats away from the opponent. Its angles are 4:30 and 7:30. A common foot maneuver used with this pattern is the front-to-back switch.
The Lateral Triangles allow the fighter to advance and retreat while changing sides or keeping the same side forward. Common foot maneuvers used with these patterns are the step through and the front/rear crossover.
The Vertical Lines guide the fighter in linear advances and retreats. The angles are 12:00 and 6:00. A common foot maneuver is the push-drag.
The Horizontal Lines guide the fighter in lateral movements. The angles are 3:00 and 9:00. A common foot maneuver used with this pattern is the lateral step-drag.
Geometric Combat Theory
54 Master of the Ring Copyright 2004 by Eric & Kevin Lamkin
PrePre--Combative Combative Offensive StrategiesOffensive Strategies
55 Master of the Ring Copyright 2004 by Eric & Kevin Lamkin
Pre-Combative Offensive Strategies
PRE-COMBATIVE OFFENSIVE STRATEGIES The most effective defense comes before a confrontation becomes physically violent. The actions you take during a potential combat situation are based on the interplay between your general knowledge and experience of interpersonal aggression (Awareness) and your rapid evaluation of an immediately threatening situation (Assessment). These actions are also based on an understanding of strategies for combat and their potential outcomes. In many potential combat situations, your choice of action may be to retreat immediately. In other situations, you may attempt verbal and psychological tactics to discourage a threatening individual from becoming physically aggressive by using De-Escalation or Assertive Confrontation Tactics, which are useful in different contexts. Finally, you may be forced to physically defend yourself. This may follow one of the other three action strategies, or it may, of necessity, be your first response. In this study, we will examine Awareness, Assessment of Potential Combat Situations, and Non-Physical Combat Actions. AWARENESS Awareness encompasses the study of the types of threats that you will likely face, the level of awareness that you maintain to recognize these threats, and the foreknowledge of the physical effects that you will experience when you are faced with a threat. Types of Threats There are essentially two types of threats that you will face—Armed and Unarmed. Armed threats include the use of guns, knives, blunt instruments, and Weapons of Opportunity to inflict grave bodily harm on another for the purpose of robbery, murder, or assault. The most common type of threat, the Unarmed Threat, may occur for a variety of reasons and have several intended results. Unarmed threats include tackling, grabbing, holding, locking, choking, pushing, punching, and kicking. A complete system of martial arts thoroughly examines all threats (both armed and unarmed) in the study of Reactionary Defensive Methods. The Elite Fighter System of Martial Arts is a highly recommended system to study. Awareness Levels The key to winning a fight is having the proper mind-set. This begins by knowing that there is going to be a fight before it starts. Afighter needs to develop a state of mind where the appearance of a sudden threat will not be a surprise. Instead of meeting it with astonishment, he meets it with contempt. To ensure proper reactions, you need to develop an escalating state of alertness and subsequent readiness. This will help ensure appropriate reactions to any threat as well as protect against overreaction. The best way to develop this is through a study of the Color Codes of Awareness. Here, certain colors are associated with escalating states of awareness.
Pre-Combative Offensive Strategies
56 Master of the Ring Copyright 2004 by Eric & Kevin Lamkin
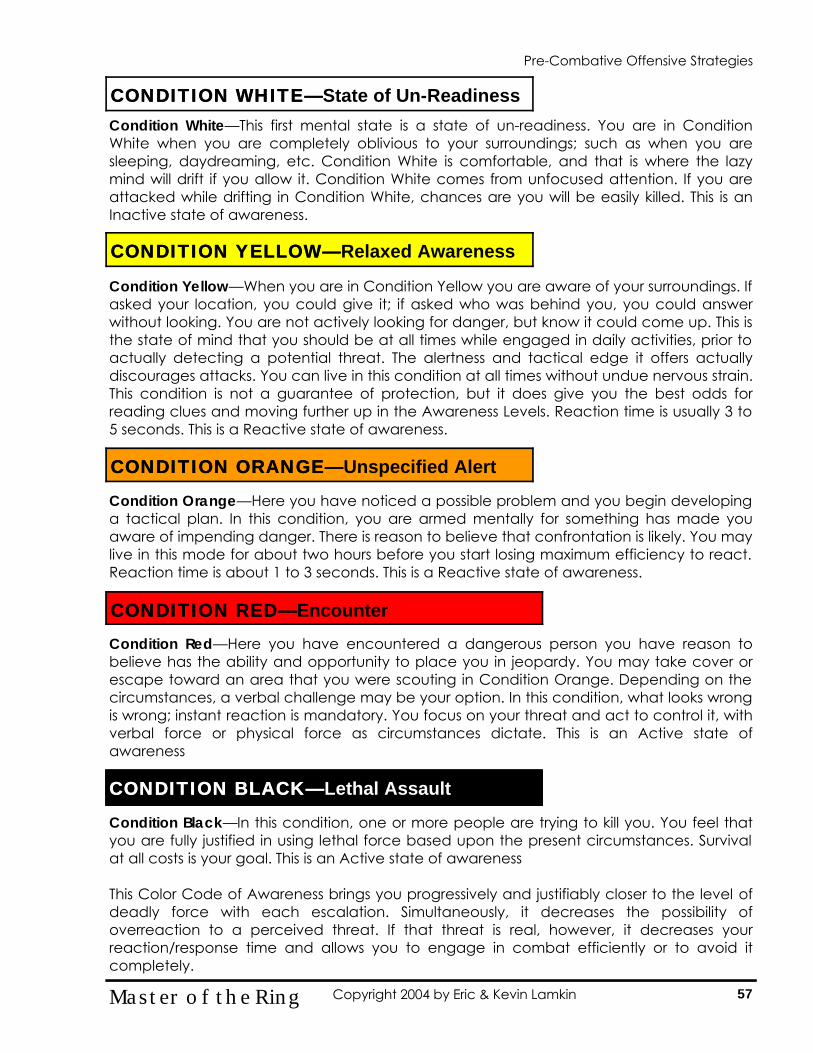
Condition White—This first mental state is a state of un-readiness. You are in Condition White when you are completely oblivious to your surroundings; such as when you are sleeping, daydreaming, etc. Condition White is comfortable, and that is where the lazy mind will drift if you allow it. Condition White comes from unfocused attention. If you are attacked while drifting in Condition White, chances are you will be easily killed. This is an Inactive state of awareness.
Condition Yellow—When you are in Condition Yellow you are aware of your surroundings. If asked your location, you could give it; if asked who was behind you, you could answer without looking. You are not actively looking for danger, but know it could come up. This is the state of mind that you should be at all times while engaged in daily activities, prior to actually detecting a potential threat. The alertness and tactical edge it offers actually discourages attacks. You can live in this condition at all times without undue nervous strain. This condition is not a guarantee of protection, but it does give you the best odds for reading clues and moving further up in the Awareness Levels. Reaction time is usually 3 to 5 seconds. This is a Reactive state of awareness.
Condition Orange—Here you have noticed a possible problem and you begin developing a tactical plan. In this condition, you are armed mentally for something has made you aware of impending danger. There is reason to believe that confrontation is likely. You may live in this mode for about two hours before you start losing maximum efficiency to react. Reaction time is about 1 to 3 seconds. This is a Reactive state of awareness.
Condition Red—Here you have encountered a dangerous person you have reason to believe has the ability and opportunity to place you in jeopardy. You may take cover or escape toward an area that you were scouting in Condition Orange. Depending on the circumstances, a verbal challenge may be your option. In this condition, what looks wrong is wrong; instant reaction is mandatory. You focus on your threat and act to control it, with verbal force or physical force as circumstances dictate. This is an Active state of awareness
Condition Black—In this condition, one or more people are trying to kill you. You feel that you are fully justified in using lethal force based upon the present circumstances. Survival at all costs is your goal. This is an Active state of awareness This Color Code of Awareness brings you progressively and justifiably closer to the level of deadly force with each escalation. Simultaneously, it decreases the possibility of overreaction to a perceived threat. If that threat is real, however, it decreases your reaction/response time and allows you to engage in combat efficiently or to avoid it completely.
CONDITION WHITECONDITION WHITE——State of Un-Readiness
CONDITION YELLOWCONDITION YELLOW——Relaxed Awareness
CONDITION ORANGECONDITION ORANGE——Unspecified Alert
CONDITION REDCONDITION RED——Encounter
CONDITION BLACKCONDITION BLACK——Lethal Assault
Pre-Combative Offensive Strategies
57 Master of the Ring Copyright 2004 by Eric & Kevin Lamkin
Physiological Effects During Combat From Condition Orange and up, you will experience “body alarm reaction”. The conscious mind has perceived danger, and the brain reacts by increasing the metabolic rate—the pulse pounds, blood pressure increases, concentration seems enhanced. Adrenaline (epinephrine), the most powerful hormone in the body, is instantly released. Blood flow is diverted into the large muscle groups, and into the viscera, because the body knows that it will have to produce a large amount of energy soon. This is what causes chalky, pale faces and cold clammy hands in persons facing danger—the blood has literally drained from the face and into other parts of the body. As the adrenaline surges, the body becomes clumsier. Trembling begins, usually in the weak hand first, then also instantly in the strong hand, and next in the knees. This cannot be eliminated; instead, you must learn to cope with this side effect. As the body gears up for the ultimate effort, strength increases, as does pain tolerance. . The highest form of body alarm reaction is called the Fight, Flight or Fortify Reflex. The conscious mind has perceived life-threatening danger and the “survival instinct” commands the body to prepare for an enormously taxing effort—to run harder than it has ever run, or to fight harder than it has ever fought. All the physiological effects are now greatly magnified. In the grip of the Fight, Flight or Fortify Reflex, physical strength reaches superhuman levels, pain tolerance goes through the roof, the loss of fine motor coordination becomes great, and the pulse and blood pressure hit levels that, if sustained, could kill even a healthy man—and are often known to do so in combat, even when the dead young soldier has sustained no actual wound. Tunnel vision and auditory exclusion occur. This means that the survival instinct makes you concentrate so much on the danger that you will likely be unaware of other assailants on your flank, and you are unlikely to hear the warning shouts of others. Although you cannot prevent these physiological effects, you can be prepared for them and learn to control them, using them to your advantage. The most common physiological effects of stress-induced metamorphosis are:
• Heart rate and breathing becomes faster to provide more blood and oxygen to the brain and muscles.
• Nose and throat openings are widened as saliva and mucous dry up, providing increased air to the lungs.
• Muscles tighten in preparation for strenuous activity. • Perspiration increases to cool the body. • Time Distortion. You may perceive incidents occurring much faster or much slower
than they actually do. • Tunnel Vision. The pupils dilate centering point of focus, eliminating peripheral
perception. • Auditory Blocking. Hearing sounds faintly or not at all.
Pre-Combative Offensive Strategies
58 Master of the Ring Copyright 2004 by Eric & Kevin Lamkin
ASSESSMENT OF POTENTIAL COMBAT SITUATIONS Skillful and rapid assessment of a potentially dangerous situation is necessary in order to select effective and appropriate strategies for combat. We rely on our observation skills to gather information that is as accurate and complete as possible in order to make the best tactical choices. The areas in which we will assess information are—Environment, the Threatening Individual, and Yourself. Environment In any combat situation, you need to gather as much information as possible about your surroundings. It is especially important to know:
1. Escape Routes—If you are indoors, this includes doors and windows. If you are outdoors, determine safe locations or locations that afford you tactical advantages.
2. Number, proximity, and identity of other people nearby—Determine whether others
are a source of help, or whether they represent an additional threat. 3. Environmental Defenses—Locate objects that can serve as barriers or objects/
locations that will hinder an opponent’s attack. 4. Weapons of Opportunity—Determine if there are objects lying around that may be
used as a weapon, if needed. 5. Time of Day—What are the lighting conditions? If you are in need of assistance, will
there be someone willing and available? Threatening Individual Analyze the person’s verbal and non-verbal cues and determine whether these are in agreement. Take in as much information as possible to assess his frame of mind and intentions. Things you will need to observe include:
1. Identity—Do you know this person? Is he who he says he is? 2. His position and proximity to yourself—Is he within your Critical Distance? 3. His size, strength and condition. 4. His demeanor, stance, and position—Does he seem angry, threatening, or fidgety? Is
he moving toward you? 5. His emotional state—Is he angry or upset? Does he seem to be in a sane frame of
mind? 6. Clothing—What, if anything, does this person’s clothing tell you about him? 7. What is he saying and how?—Is his voice loud and belligerent? Is his throat tight and
his voice strained? If he is speaking in a normal tone, does his actions match what he is saying?
8. Does he possess a weapon or are Weapons of Opportunity near?
Pre-Combative Offensive Strategies
59 Master of the Ring Copyright 2004 by Eric & Kevin Lamkin
Yourself An accurate sense of your own capabilities is a critical part of any assessment. Assess your:
• Strengths • Skills • Emotional State • Resources • Any injuries • Physical condition
NON-PHYSICAL COMBAT ACTIONS Immediate Retreat An immediate retreat, as a response to a potential combat situation, provides the best possible chance of avoiding injury or harm in most cases. Many people consider this option before any other, unless retreat would place them or another person at an even greater risk. In fact, most states have laws requiring retreat from potential violence whenever possible. People attacked in their homes are exempt from this legal requirement to retreat. How you retreat will depend on the circumstances. In some cases, retreat may take the form of a high-speed sprint in the direction that you perceive to be the safest. In other cases, you will abruptly walk in a direction deemed to be safe or where assistance may be found. In either case, watch over your shoulder to make sure that you are not being followed or use the reflective properties of mirrors and glass to note what is behind you without turning around. Psychological Combat Strategies There are two types of Psychological Combat Strategies—De-Escalation Tactics and Assertive Confrontation Tactics. The first is a passive tactic while the second is an active/aggressive tactic. Both are effective when applied against the right individual and work on the principle that you take control of the situation while controlling yourself.
1. De-Escalation Tactics—De-Escalation consists of verbal, psychological, and non-verbal methods for defusing potentially dangerous situations. The goal of De-Escalation is to build rapid rapport and a sense of connectedness with an agitated person in order to reduce the likelihood of escalation to physical combat. This requires that the fighter control his own emotional response to threat in order to deal with someone already close to losing control. These are not techniques for controlling another person. In fact, attempting to do so can be counter-productive. Controlling yourself, controlling the situation, and controlling communication enables you to reverse the escalating dynamics of the situation.
De-Escalation tactics are useful in dealing with people who are highly agitated, frustrated, angry, fearful, or intoxicated. These may be ordinarily peaceful individuals who are responding to unusual or extreme circumstances, or they may be persons who generally have volatile and disruptive personalities. There are both verbal and non-verbal principles in de-escalating a situation.
Pre-Combative Offensive Strategies
60 Master of the Ring Copyright 2004 by Eric & Kevin Lamkin
Verbal Principles of De-Escalation 1. Keep your voice calm, firm, and low, while speaking slowly and evenly.
A high-pitched voice and rapid speech tends to increase anxiety and agitation. Occasionally you may have to match the tone of voice of someone speaking loudly and rapidly in order to get his attention. Quickly lead him to a softer and slower pace.
2. Listen actively.
Interact with this person. Use observational inquiries such as “You’re pretty upset by this, aren’t you?” Ask open-ended questions and encourage the person to talk by making comments such as “Yes, I see”, “Uh, huh”, “Then what?” Note: it is not generally advisable to let someone to vent and rage indefinitely. This behavior intensifies feelings of frustration and anger and may increase the likelihood of escalation to a combative situation. Listen, gather information, ask questions, develop a rapport if possible, and begin to guide communication in a less volatile direction.
3. Acknowledge the agitated person’s feelings.
Reflecting a person's feelings back to him often lets him know that he is being heard. Some agitated people will have a difficult time problem solving until their feelings are dealt with first. You may need to say, “Look, I see that you are really angry about the situation, but we need to make sure that everyone is okay and that we can solve this problem.”
4. Communicate clearly.
Explain your intentions and convey your expectations clearly. You may need to repeat yourself until you are heard and understood. Use the person’s name, if you know it, and make requests or suggestions simple specific.
5. Avoid escalating behavior.
Certain behaviors have been found to be inflammatory in dealing with highly agitated people:
• Not listening to or ignoring the person • Making threats • Profanity • Personal insults • Arguing • Shouting • Using threatening gestures • Taking a self-righteous attitude
Pre-Combative Offensive Strategies
61 Master of the Ring Copyright 2004 by Eric & Kevin Lamkin
6. Use one or more of the following tactics, if appropriate for the situation— a. Brainstorm solutions with this person for whatever is causing the
agitation. b. Redirect the agitated person’s attention. Direct the person’s attention
to something related to the situation but less disturbing or agitating. c. Sit down with him. When a person sits there is an automatic lowering of
general arousal. d. Change the immediate environment. This is helpful when someone or
something in the immediate environment is contributing to the person’s agitation.
e. Get to “Yes”. It is quite effective to try to find a point of agreement (usually non-substantive) in order to break down excessive opposition and unrelenting resistance. This is known as “building little agreements” to establish rapport and connectedness. Note: when reaching agreements, do not side or agree with something that is not true or that you do not agree with yourself. Stay factual and truthful. Agreeing with something only to win his favor puts you in a less dominant position and this agreement may come back to haunt you.
f. Use humor—carefully. Humor is a powerful tension reliever and has significant psychological impact. It can reduce arousal by changing pulse, breathing patterns, and brain waves. On the other hand, if your humor is aggressive, insensitive, easily misunderstood, or out of context with the situation, the person may interpret it to mean that you are not taking his anger or the matter at hand seriously.
g. Define behavioral limits. This involves setting limits or conditions for further interaction and is usually necessary when the agitated person is becoming more aggressive. For example, the person begins shouting and you say, “I’ll continue this discussion with you, but first you must lower your voice.”
Non-Verbal Principles of De-Escalation It is said that non-verbal behaviors account for approximately 65-percent of communication. There are three general principles governing our non-verbal response to a threatening and agitated individual.
1. Project a confident and attentive demeanor.
• Maintain eye contact. Avoid averting your gaze because this can be interpreted as an expression of fear, lack of interest, or rejection. On the other hand, avoid staring, which can be interpreted as threatening.
• Assume a neutral facial expression. Looking bored or disapproving increases hostility, while a calm, attentive expression reduces hostility.
• Keep a relaxed, alert posture. • Minimize extraneous movement. Keep hand gestures to a minimum.
Pre-Combative Offensive Strategies
62 Master of the Ring Copyright 2004 by Eric & Kevin Lamkin
2. Mirror calm. Control your own level of arousal. High arousal states can interfere with mental and physical function—your own as well as that of the agitated individual. A low to moderate arousal level, on the other hand, keeps you alert and ready for necessary action. Two good techniques for controlling your own level of arousal are:
a. Breathe deeply and slowly from your diaphragm, and not your chest.
b. Use positive and affirming internal self-talk. Keep in mind that your thoughts about an event, person, or situation trigger particular emotional responses. (The Event) + (Self Talk) = (Feeling).
3. Position yourself for safety.
a. Keep your opponent outside of the Critical Distance Line. b. Angle your body 45-degrees away from the opponent. This will allow
you to quickly assume a fighting posture, if necessary. c. Keep your hands free and in front of your body. In this way, you can
quickly form a fighting posture and use your hands offensively or defensive. Avoid folding your arms, putting your hands in your pockets, or clasping your hands behind your back.
d. Position yourself behind a barrier, if possible. Summary This is far from being an exhaustive list of defusing techniques for use with highly agitated people. What is important is that you constantly monitor the impact of your own behaviors and statements on the arousal level of a potentially explosive person throughout your interaction. Finally, keep in mind that you are most likely to prevent a volatile situation from being violent by controlling your own anxiety, fear, or anger, and by controlling communication.
Pre-Combative Offensive Strategies
63 Master of the Ring Copyright 2004 by Eric & Kevin Lamkin
2. Assertive Confrontation Tactics—In some situations, De-Escalation Tactics are ineffective and may, in fact, exacerbate the situation. In such cases Assertive Confrontation Tactics must be employed. Assertive Confrontation refers to verbal and psychological skills useful in dealing with an assailant motivated by a desire for dominance and control. These tactics are most effective during the “testing stage” of the assault. This stage is characterized by efforts on the part of the assailant to establish the process of dominance through the use of verbal threat. This stage usually precedes physical aggression and combat. Confrontation at this stage represents the defender’s firm and direct refusal to comply with the behavioral demands that the assailant expects from a typical victim. Verbal and psychological resistance interrupts the assailant’s efforts to intimidate and control his intended victim.
Verbal Principles of Assertive Confrontation Your verbal response in a testing stage should be distinctly different from that used in a de-escalation situation, where you are trying to establish rapport and connectedness. Assertive Confrontation is the firm, verbal refusal on the part of the defender to be controlled, intimidated, or manipulated. There are two techniques to employ in a strong, free voice.
1. Name the offensive or intrusive behavior. Name the behavior that you find upsetting or offensive. Doing this tells the potential assailant that you are aware of his intentions. Be clear and direct. Do not use profanity or insults. Do not use qualifiers, such as “I think”, “If you don’t mind”, and so on. 2. Clearly communicate expectations. Tell the assailant exactly how you want him to change his behavior. Use direct commands so there is no chance of being misunderstood or of your attacker continuing to negotiate or manipulate you. There are times when you will need to communicate the consequences of his continued aggression, but, in many cases, you run the risk overtly threatening the individual and exacerbating the situation.
Non-Verbal Principles of Assertive Confrontation The non-verbal principles are essentially the same as those practiced in the de-escalation method, except that there is a slight difference. Your demeanor should be confident and vigilant, as opposed to attentive.
THE NEXT STEP Regardless of whether you retreat or utilized psychological combat strategies, at this stage the situation will either end peacefully or escalate to a physically combative situation. Refer to Combat Offensive Strategies for information concerning Combat Strategy, Rules of Engagement, and the Triangle of Tactic Formulation. The flow chart on the following page will aid you in your decision skills during this pre-combative phase.
Pre-Combative Offensive Strategies
64 Master of the Ring Copyright 2004 by Eric & Kevin Lamkin
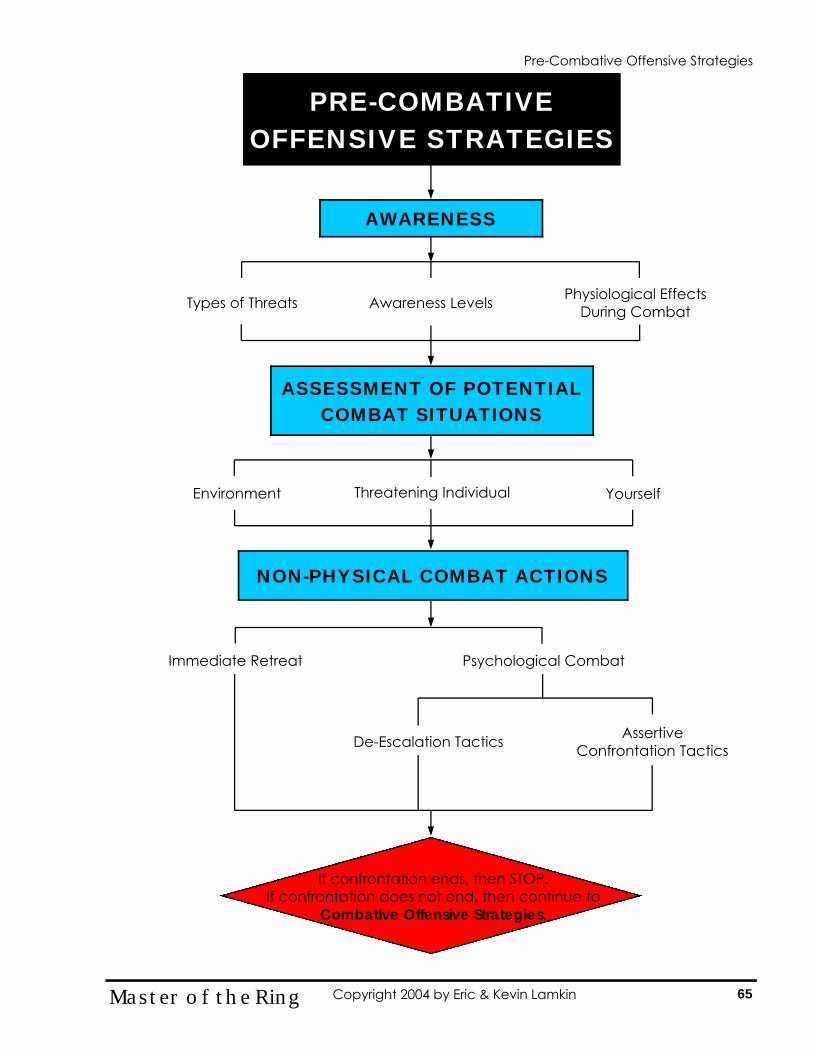
Pre-Combative Offensive Strategies
PRE-COMBATIVE OFFENSIVE STRATEGIES
AWARENESS
Types of Threats Awareness Levels Physiological Effects During Combat
ASSESSMENT OF POTENTIAL COMBAT SITUATIONS
Yourself
NON-PHYSICAL COMBAT ACTIONS
Immediate Retreat Psychological Combat
De-Escalation Tactics Assertive Confrontation Tactics
If confrontation ends, then STOP. If confrontation does not end, then continue to
Combative Offensive Strategies.
Environment Threatening Individual
65 Master of the Ring Copyright 2004 by Eric & Kevin Lamkin

IntermediateIntermediate
66 Master of the Ring Copyright 2004 by Eric & Kevin Lamkin
Theory and MethodologyTheory and Methodology ofof
Attack, Defense, and Attack, Defense, and CounterCounter--AttackAttack
67 Master of the Ring Copyright 2004 by Eric & Kevin Lamkin
Attack, Defense, and Counter-Attack Analysis
COMBAT DISTANCE Before we engage in an examination on the various methods of attack and defense, we must examine the spacial relationship that exists between you and your opponent and its relationship to the ranges of your natural weapons. THE FIGHTING MEASURE Distance is defined as the spatial relationship that exists between you and your opponent. This spatial relationship is continually shifting and changing as each fighter tries to:
1. Find the correct distance from which to launch an attack, 2. Cause his opponent’s attack to miss, or 3. Disturb his opponent’s plan of action.
Controlling distance offers you the ability to pursue an opponent without giving him the opportunity to develop his own attack or to quickly withdraw out of reach of his natural weapons. The ability to use distance to your best advantage requires three things:
1. Excellent footwork and mobility skills. You need smooth, fast footwork and good balance in order to be able to advance and retreat in and out of distance with respect to both your own and your opponent’s reach.
2. A precise evaluation of your own offensive and defensive distances. You need to know the length of your natural weapons.
3. A precise evaluation of the opponent’s distance of attack. You need to be able to gauge the length of the opponent’s attacking weapons.
In any combative situation, it is important that you are able to judge the exact distance you are from your opponent at all times. The distance you maintain against an opponent is referred to as the “Fighting Measure”. This measure, or distance, is determined by the following three factors:
1. The range and reach of your natural weapons. The moment the opponent moves within range of your weapons you can fire your weapon or readjust the distance with footwork.
2. Reach of the opponent’s natural weapons. You must regulate the Fighting Measure according to the size of the opponent and the reach of his weapons.
3. The relative speed and agility of both you and your opponent. If you are much faster and stronger than your opponent, you may shorten the distance. On the other hand, if the opponent is faster than you and has superior skills, you may have to increase the distance.
Attack, Defense, and Counter-Attack Analysis
68 Master of the Ring Copyright 2004 by Eric & Kevin Lamkin
CRITICAL DISTANCE LINE (CDL) The primary distance that you seek to maintain against an opponent is such that he cannot land a strike without first either taking a step forward or making some type of preparatory move. This distance is called the “Critical Distance”. Of course, maintaining such a distance also means that you cannot strike the opponent without either closing the distance yourself or luring the opponent into coming within range. Once either the opponent or yourself crosses that line, the person who delivers the strike first will have a greater probability of success due to reaction time. Never move beyond this line toward your opponent without either attacking or retreating immediately. Never let your opponent move inside your CDL without attacking, counter-attacking, jamming, or moving quickly out of range. BRIDGING THE GAP Once you understand how to control the distance, you can then “break” the distance. The covering of distance between you and your opponent is known as “Bridging the Gap”. In Bridging the Gap, both good timing and proper rhythm are critical. You have to not only choose the perfect moment to attack, but also adjust your rhythm accordingly in order to penetrate the opponent’s defenses. There is no time for wasted movement, either. Success in Bridging the Gap depends heavily on an unnoticeable, smooth start, and perfect harmony of your hand or foot movements. There are three methods of Bridging the Gap:
1. Explosive Speed—The first method of Bridging the Gap is your ability to cover distance quickly and effectively. Independent movement and proper footwork are the keys to make this method successful. After you have developed sufficient speed, work on extending the distance you can cover quickly so that you can strike at will from outside of your opponent’s CDL.
2. Broken Rhythm—In this method, you program the opponent into a controlled rhythm of moving; then, without any kind of warning, you suddenly break the rhythm at an unexpected moment, thereby gaining a half-cadence advantage on the opponent. For further information on Broken Rhythm see Timing—Rhythm, Cadence, and Tempo.
3. False Distance—Creating a false sense of distance is often used as a Counter-Time strategy against an opponent who is elusive but not aggressive (see Counter-Time). You can create a false sense of distance by adjusting your footwork or by gauging your strikes.
False Footwork—There are two methods of creating a false sense of distance with footwork—Shortening Steps and Stealing Steps. By progressively shortening your retreating steps, an opponent can be brought into range without his knowledge. This is known as “Short Stepping”. Or while advancing you may, with a very subtle motion, slide your rear foot several inches further forward. Then as you step again the opponent suddenly finds that you have somehow closed the distance. This is known as “Stealing a Step”. False Striking—The second method of creating a false sense of distance is by delivering a strike that purposefully falls short of hitting the opponent. This can cause the opponent to feel that you cannot reach him, and he may move closer. This is known as “Short Striking”.
Attack, Defense, and Counter-Attack Analysis
69 Master of the Ring Copyright 2004 by Eric & Kevin Lamkin
Your ability to Bridge the Gap will determine where you position yourself in relationship to your opponent’s Critical Distance Line. If you can effectively strike him from a greater distance than he can strike you, then you can stay right outside of his effective range and attack him at will. This demonstrates the importance of developing explosive footwork that allows you to cover a great deal of distance quickly both forward and backward. DISTANCE IN ATTACK There are several important principles concerning the use of distance in attack. The first principle is that for the quickest contact with an opponent, use your longest weapon to attack the opponent’s nearest target. In kicking, this could be a lead thrusting knife-edge kick to the opponent’s knee or shin. In striking, it could be a lead horizontal spear hand strike to his eyes. The second principle is that your attack should be aimed at the distance the opponent will be when he realizes he is being attacked, not the distance prior to the attack. For example, if you aim an attack so that your weapon reaches full extension at the point where the opponent is prior to the attack, all he has to do is shift back slightly and your attack will fall short. However, if you aim your attack several inches behind where the opponent is, even if he shifts back the strike will still land. One of the most common mistakes fighters make is to attempt a strike from outside of its effective range. This will leave the fighter open and vulnerable after the attack has failed. The third principle is that, when using distance as attack, it’s very important to ascertain the opponent’s possible reactions to an attack through the use of feints and false attacks, so as to evaluate the correct attacking distance. For example, does the opponent combine a retreat step with his parry or remain in the same place? Does he try to crash forward into your attack? DISTANCE IN DEFENSE When using distance in a defense, the idea is to frustrate an opponent’s attack by either opening the distance and nullifying his attacking or by closing the distance and smothering the attack before it has a chance to develop. Opening the distance allows you to recognize and analyze the opponent’s intentions, speed, reach, etc. Closing the distance allows you to deliver an immediate counter-attack. Both require sharp awareness and good judgment of the opponent’s length of penetration, along with coordinated footwork and good timing.
Attack, Defense, and Counter-Attack Analysis
70 Master of the Ring Copyright 2004 by Eric & Kevin Lamkin
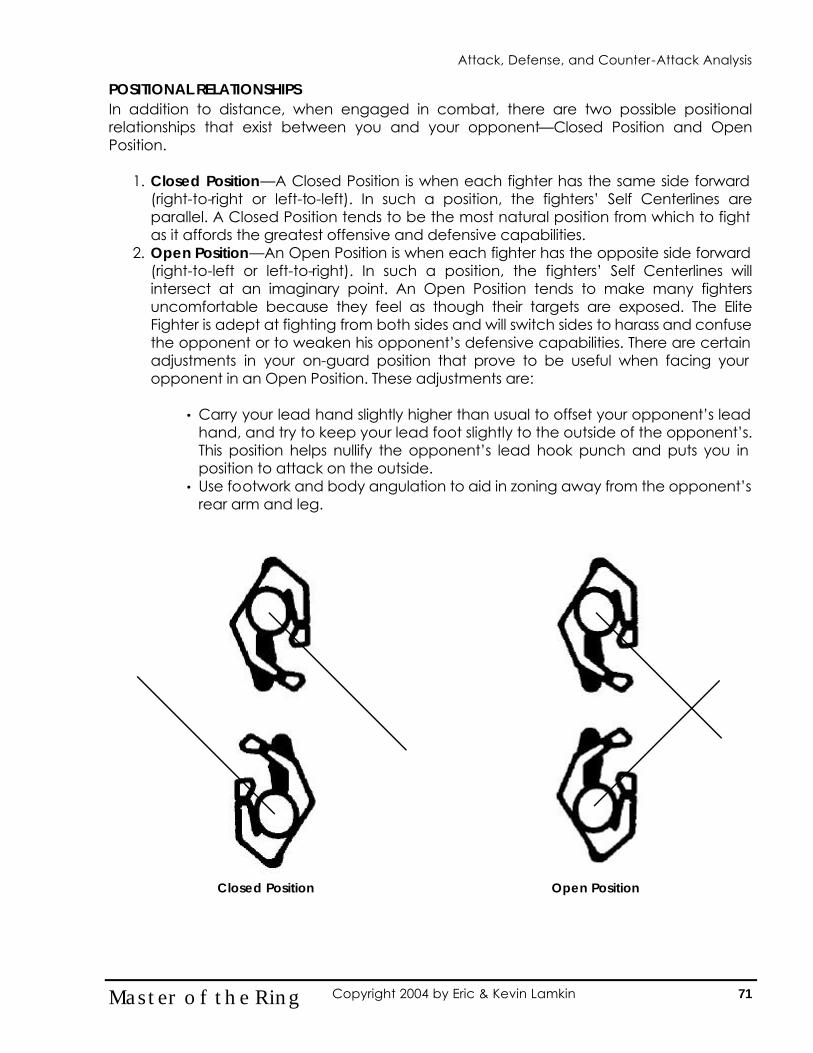
POSITIONAL RELATIONSHIPS In addition to distance, when engaged in combat, there are two possible positional relationships that exist between you and your opponent—Closed Position and Open Position.
1. Closed Position—A Closed Position is when each fighter has the same side forward (right-to-right or left-to-left). In such a position, the fighters’ Self Centerlines are parallel. A Closed Position tends to be the most natural position from which to fight as it affords the greatest offensive and defensive capabilities.
2. Open Position—An Open Position is when each fighter has the opposite side forward (right-to-left or left-to-right). In such a position, the fighters’ Self Centerlines will intersect at an imaginary point. An Open Position tends to make many fighters uncomfortable because they feel as though their targets are exposed. The Elite Fighter is adept at fighting from both sides and will switch sides to harass and confuse the opponent or to weaken his opponent’s defensive capabilities. There are certain adjustments in your on-guard position that prove to be useful when facing your opponent in an Open Position. These adjustments are:
• Carry your lead hand slightly higher than usual to offset your opponent’s lead
hand, and try to keep your lead foot slightly to the outside of the opponent’s. This position helps nullify the opponent’s lead hook punch and puts you in position to attack on the outside.
• Use footwork and body angulation to aid in zoning away from the opponent’s rear arm and leg.
Attack, Defense, and Counter-Attack Analysis
Closed Position Open Position
71 Master of the Ring Copyright 2004 by Eric & Kevin Lamkin
Theory of Theory of
AttackAttack
72 Master of the Ring Copyright 2004 by Eric & Kevin Lamkin
Attack, Defense, and Counter-Attack Analysis
ATTACK MAJOR AND MINOR STRIKES An attack is any offensive action that is directed toward a vital target area. Depending upon the intent, a strike may be a Major Strike or a Minor Strike. A Major Strike is a strike that is delivered to a vital target for the purpose of creating sufficient damage in order to end the battle and prevent further attack by immobilizing or incapacitating the opponent. In principle, any offensive action is ultimately for defensive purposes. Minor Strikes are not minor in terms of the extent of their use or effect, but in terms of overall power. Minor Strikes are those that are generally used to:
1. Irritate and offset the opponent as he prepares to launch an attack, 2. Set up a Major Strike by:
• Opening a target area • Momentarily stunning the opponent • Affecting the opponent’s balance
3. Distract or offset the possibility of the opponent counter-attacking in the midst of your attack.
FOUR PHASES OF ATTACK MOTION Regardless of the chosen method of attack, there are four phases to any offensive motion—Preparation, Initiation, Transition, and Recovery. Preparation—Before the initiation of any attack, you should be in a relaxed but poised position. You should maintain such a position at all times and be able to attack from any angle without having to “get set”. Initiation—The most important phase of any motion is the beginning phase of the movement. Care should be taken not to “telegraph” the motion and alert the opponent to your intentions. Note: a telegraphic motion is any extraneous or idiosyncratic motion not directly pertaining to the attack’s structural motion. Transition—The transition is the phase during which the attacking weapon travels from its neutral position to the target. This path of travel should be the shortest route possible. Recovery—Regardless of whether the attack makes contact with the intended target or not, the fighter should recover back to position as quickly as possible in order to continue to attack, defend, or retreat to safety.
Attack, Defense, and Counter-Attack Analysis
73 Master of the Ring Copyright 2004 by Eric & Kevin Lamkin
FIVE ESSENTIAL ATTACK QUALITIES Before launching any attack, the fighter must posses the Five Essential Attack Qualities—proper fighting posture, non-telegraphic motion, Economy of Motion, relaxation, and mobility. Fighting Posture—A Fighting Posture is an arrangement of the arms in relation to a neutral bow for the purposes of offense and defense. A proper Fighting Posture is one that:
• Is a neutral and non-committed posture. • Enables the fighter to move in any direction quickly and easily. • Allows the fighter to defend attacks from any angle. • Is balanced so that the fighter can launch attacks the instant an opening occurs. • Is continually shifting and adjusting the distance in relationship to the opponent.
Non-Telegraphic Motion—A telegraphic motion is any extraneous or idiosyncratic motion that alerts the opponent to your strike or your intent to strike. He may not know what strike is being delivered or the intended target, but his defenses and awareness are heightened. An Extraneous Telegraphic Motion is a motion that is not part of the structure of a particular natural weapon and is executed to compensate for a lack of flexibility, skill, speed, power, etc. Common Extraneous Telegraphic Motions include shifting your weight backward prior to a kick or cocking your arm before your deliver a punch. An Idiosyncratic Telegraphic Motion is a habitual motion or action the fighter makes prior to an attack. These motions vary from fighter to fighter. Common Idiosyncratic Telegraphic Motions include shifting your eyes to the intended target, subtle changes in breathing or body tension, or ceasing footwork to “set” the body for an attack. Telegraphic motion can be used purposefully to your advantage. When Feinting or using Broken Rhythm, you can use telegraphic to program the opponent to get a predictable reaction in order to take advantage of his confusion and the opening it creates. You can also learn your opponent’s telegraphic motions in order to take advantage of this weakness by striking him before he completes his attack. Economy of Motion—This principle teaches you to economize and not waste motion in any technique that you execute. Adhering to this principle will increase your speed, power, and will enable you to eliminate telegraphic motion by employing Independent Motion in your strikes. Relaxation—Learn to fight in a relaxed manner. When you strike from a relaxed state, your initial speed will increase, you will consume less energy, and increase your power. Mobility—Striking from an immobile position allows the opponent to always predict when a strike is coming. Mobility in your hands and feet allows for more deception and unpredictability.
Attack, Defense, and Counter-Attack Analysis
74 Master of the Ring Copyright 2004 by Eric & Kevin Lamkin
PENETRATING THE DEFENSIVE BARRIER All forms of attack are based upon the three methods used to penetrate the opponent’s defensive barrier—Precision, Subterfuge, and Force. Precision—This method relies on superior speed and accuracy to bypass the opponent’s defensive barrier and strike directly to the vital target area. These forms of attack are known as Direct Attacks. Subterfuge—This method utilizes various forms of deception to force the opponent to move his defensive barrier and open an area for attack. These forms of attack are known as Indirect Attacks. Force—This method attempts to open or remove the defensive barrier by means of a direct assault on the opponent’s defenses. This form of attack is known as an Immobilization Attack and may occur offensively or counter-offensively. THE FOUR TYPES OF ATTACK There are four types of attack—1. Direct Attacks, 2. Indirect Attacks, 3. Immobilization Attacks, and 4. Combination Attacks. 1. DIRECT ATTACKS A Direct Attack is an attack that is made with no attempt to disguise the motion. It may be delivered directly from its present location or by the use of body angulation. There are two types of Direct Attacks—Single Direct Attacks and Single Angulated Attacks. Single Direct Attacks (SDA)—A Single Direct Attack is a single offensive action that travels directly from where it is to the desired target without any attempt to conceal it. Although an SDA is technically the simplest method of attack, it is also the most difficult to successfully execute in combat because of the speed and timing of the attack as well as the penetrating of the opponent’s defensive barrier must all be perfect. Single Direct Attacks rely on tremendous speed, excellent timing, exact distance regulation, precision, and a correct evaluation of the defensive reflexes of the opponent. An SDA will stand a greater chance of being successful if it is well timed. Some good times to attack with a SDA are:
1. When the opponent is recovery after his own attack. 2. When the opponent makes a telegraphic motion. 3. When the opponent is physically or mentally unprepared, such as if he relaxes his
defenses or allows his concentration to slip for a moment. Single Angulated Attack (SAA)—While it is true that a fighter’s effectiveness is concentrated in a frontal direction, it is also true that shifting directions of attack cannot be done quickly or easily. Once the body has been committed to movement in one direction, its momentum must be overcome before it can radically change angles. This means that as much as is practical, you want to assume an angle away from your opponent’s forward momentum and attack where he is most vulnerable. The strategic advantage of a flank attack only lasts for a moment so it is best suited for very quick, singular attacks. These attacks should be used judiciously because overuse makes them obvious and easy to stop. The use of the flank attack varies depending upon which
Attack, Defense, and Counter-Attack Analysis
75 Master of the Ring Copyright 2004 by Eric & Kevin Lamkin
position you assume relative to your opponent. In the closed position where each fighter has the same side forward, attacks to both the inside flank and the outside flank are effective. In the open position where each fighter has the opposite side forward, only the outside flank is vulnerable to attack. An inside flank attack actually surrenders your outside flank to the opponent’s counter-attack. There are three types of Single Angulated Attacks—Orbiting, Sidestepping, Changing the Angle of Execution, and Rear Self-Centerline Attack.
1. Orbiting—In this tactic, circling forward is used in conjunction with small backward steps to set up one of the other flank. By orbiting around the opponent in one direction, you force the opponent to constantly adjust his defense of his Self-Centerline. Then, suddenly switching directions in time to the opponent’s movements, you use his body momentum to gain time for a flank attack.
2. Sidestepping—this tactic is designed to be used against an opponent who likes to charge you. Stepping out to one side not only avoids the rush but also gives you two strategic advantages. The opponent will be drawn off balance and you will be able to assume an angle against him.
3. Rear Self-Centerline Attack—The rear Self-Centerline is the most vulnerable because it is almost impossible to defend. This is often a surprise attack or the result of countering an opponent’s poorly executed spinning technique.
Primary Strikes—Both SDA and SAA utilize Primary Strikes as the preferred striking weapon. Primary Strikes are offensive methods that have minimal tactical exposure, require few preparatory motions, and are able to be delivered without any additional structural or tactical support. Some commonly used Primary Strikes are: I. PRIMARY STRIKES
A. Primary Strikes a. Hand Strikes
i. Lead Thrusting Horizontal Spear Hand Strike ii. Lead Snapping Horizontal Fist Punch iii. Lead Thrusting Horizontal Fist Punch iv. Lead Snapping Vertical Fist Punch v. Lead Thrusting Vertical Fist Punch vi. Lead Inward Horizontal Roundhouse Punch vii. Lead Outward Horizontal Back Knuckle Strike viii. Lead Outward Downward Diagonal Back Knuckle Strike ix. Lead Outward Upward Diagonal Back Knuckle Strike x. Lead Inward Horizontal Hook Punch xi. Lead Inward Upward Diagonal Hook Punch xii. Lead Inward Downward Diagonal Hook Punch
b. Foot Strikes i. Lead Front Snapping Ball Kick ii. Lead Front Upward Snapping Instep Kick iii. Lead Inward Horizontal Snapping Instep Kick iv. Lead Inward Upward Diagonal Snapping Instep Kick v. Lead Inward Downward Diagonal Snapping Instep Kick vi. Lead Outward Snapping Knife-Edge Kick vii. Lead Outward Thrusting Knife-Edge Kick
Attack, Defense, and Counter-Attack Analysis
76 Master of the Ring Copyright 2004 by Eric & Kevin Lamkin
viii. Lead Outward Vertical Knife-Edge Kick (Crescent) ix. Lead Outward Horizontal Hooking Heel Kick x. Lead Outward Downward Diagonal Hooking Heel Kick xi. Lead Outward Trusting Heel Kick xii. Lead Outward Upward Diagonal Snapping Instep Kick xiii. Lead Inward Horizontal Roundhousing Shin Kick xiv. Lead Inward Upward Diagonal Roundhousing Shin Kick xv. Lead Inward Downward Diagonal Roundhousing Shin Kick
2. INDIRECT ATTACKS An Indirect Attack is designed to create an opening in the opponent’s defensive barrier through deception or subterfuge. The actual strike must occur when the opening is at its greatest (or most exposed) point. There are two types of Indirect Attacks—Feints and False Attacks. Feints—A feint is an offensive action that leads an opponent to believe that either a specific or a general attack is being launched against him. Its objective is to divert the opponent’s attention from your final, or real point of attack. The idea behind feinting is to “send the opponent’s thoughts somewhere else” for a split-second during the initial phase of your attack. Feints are used to make an opponent react, either with a defensive or counter-offensive action, allowing you to act on that reaction and execute the final, real attack. The four primary objectives of feinting are:
1. To make an opponent hesitate momentarily as you close the distance. 2. To open the line in which you really intend to attack. 3. To deceive the opponent with one limb while striking him with another. 4. To determine how the opponent reacts, so that you can develop an effective
strategy. Feints can be divided into two categories—Simple and Compound. A Simple Feint is comprised of a single motion, such as extending your arm, lifting your knee, or suddenly lowering your body. A Compound Feint, on the other hand, is comprised of two or more motions used in conjunction, such as a low roundhouse kick feint followed by a high spear hand thrust feint. Compound feints can be used in three basic ways:
1. Vertically such as from low to high. 2. Laterally such as from the outside to the inside. 3. A combination of vertical and lateral, such as from low inside to high outside.
Types of Feints—The type of feint you choose to use depends upon the type of reaction you seek to draw, as well as on the distance you are from the opponent. Some of the various methods of feinting that you can use include:
1. Arm Feints—The arm can be used to feint an upward or downward attack. It can be drawn back as if preparing to hit, or it can feint a curved blow such as a hook or a back knuckle strike.
2. Leg Feints—The leg can be used to feint a kick simply by lifting the knee, or by using a small half-motion kick. Even a small, quick turn of the foot or hip can be used.
Attack, Defense, and Counter-Attack Analysis
77 Master of the Ring Copyright 2004 by Eric & Kevin Lamkin
3. Body Feints—For body feints, you can use the action of the body to create the impression that an attack is being launched. Body feints include such things the body-drop feint and the forward-bend feint.
4. Footwork Feints—You can use various types of footwork, such as a quick step forward or backward, or sidestepping to the right or left.
5. Change of Weapon—This involves switching from one arm to the other, one leg to the other, or from leg to arm or arm to leg.
6. Change of Zones—this involves switching the attack from high to low, inside to outside, etc.
7. Change of Angle of Execution—This involves switching the attack from a lead straight punch to a lead uppercut etc.
Speed of Feinting—The speed of any type of feint you use is crucial. It has to be regulated to the opponent’s reaction speed if it is to be successful. If you shift from your feint too quickly, before the opponent has reacted to your feint, your real attack may end up in a still-closed line. Whereas if you hold your feint too long, the opponent may have time to counter-attack you before you have a chance to complete your real attack. So, you should attempt to discover, as quickly as possible, the reaction speed of your opponent. Key Points of Feinting—When Feinting keep these two key points in mind:
1. The more feints you utilize in your offensive action, the greater the probability that the opponent can counter or escape out of range.
2. Every Feint must progress toward the target to emphasize its threat and to cover distance. A Feint must be believed.
False Attacks—A False Attack differs from a Feint in that it is an attack that is purposely designed to fall short of its target, yet travels deep enough to either draw a reaction or ascertain the opponent’s reactions. It is not a real attack, but a calculated Indirect Attack designed to:
1. Create an opening by drawing a reaction. 2. Ascertain the opponent’s defensive reactions 3. Deceive the distance between you and your opponent.
A false attack must be made with such conviction that the opponent will react just as if it were a real attack. Speed in False Attacks—As with Feints, the speed of your False Attack has to be regulated to fit the opponent. If it is too fast, the opponent may not react to it, and if it’s too slow, the opponent might counter-attack you in the midst of your actions. Utilizing Feints to Conceal Kicking Intentions Although kicks are the longest and most powerful of the natural weapons arsenal, they are also the slowest. To reduce the chances of a counter, certain methods of distraction may be utilized. These distractions can be visual, auditory, or combined. Examples include:
1. Tossing a finger jab towards the opponent’s face 2. Clapping the hands together. 3. Extending the rear hand outward, upward, downward, etc.
Attack, Defense, and Counter-Attack Analysis
78 Master of the Ring Copyright 2004 by Eric & Kevin Lamkin
4. Extending the lead hand upward and forward. 5. Quickly glancing downward, upward, left, or right. 6. Sinking the body low then kicking high. 7. One hand extends while the other hand slaps the thigh.
Dealing with Feints and False Attacks The primary factor in dealing with feints and false attacks is to learn to recognize a true threat versus a feint or false attack. This requires awareness. You must do your best to distinguish between an opponent’s false attacks and his real attacks, and try to ignore all his testing forays. Never believe in any of your opponent’s threats or feints. Keep in mind that they usually conceal a trap. Keep cool while awaiting the opponent’s attack and take great care not to show in advance what you will parry when actually attacked. Acquire an air of unpredictability so that you can keep the opponent guessing. 3. IMMOBILIZATION ATTACKS An Immobilization Attack is an offensive action that momentarily immobilizes either one or both of the opponent’s arms and/or legs to allow your strike to penetrate his defensive barrier. Immobilization Attacks are also a form of Trapping and may also be used in counter-offensive attacks. There are two types of Immobilization Attacks—Hand Immobilization Attack and Foot Immobilization Attack. Hand Immobilization Attack (HIA)—A Hand Immobilization Attack is a maneuver that allows you to move the opponent’s arms (defensive barrier) to a position that allows you to deliver a strike to a vital target. There are four types of Hand Immobilization Attack—Beat, Pinning, Pulling, and Jerking.
1. Beat—The term “beat” is derived from Fencing in which a sharp blow is delivered crisply on the opponent’s blade. A Beat is a lateral motion delivered to the opponent’s lead hand in order to:
• Secure an opening into which an attack can travel to a vital target. • Draw a reaction from the opponent. • Gauge the distance for a Major Strike • Distract the opponent from a Major Strike • Beating an opponent’s arm too hard may facilitate the opponent’s counter-
attack. 2. Pinning—A Pinning HIA is a forward palm strike that traps and controls the
opponent’s arm by pushing it against the body. The palm should make contact at or near the opponent’s elbow. The force of the pin should be directed toward his Central Axis to disturb his balance and prevent him from rolling out of the pin. While one hand pins, the opposite hand simultaneously delivers a strike.
3. Pulling—A Pulling HIA is executed by grabbing the opponent’s wrist and pulling his arm in a forward and downward diagonal direction. By pulling his arm along this angle, weight will be transferred to his lead foot thereby momentarily immobilizing his lead leg. In addition, by pulling with sufficient force, his shoulders will turn thereby momentarily immobilizing his opposite arm. While one hand pins, the opposite hand delivers a strike (in some cases, a kick may be delivered).
4. Jerking—A Jerking HIA is similar to a Pulling HIA but lacks the grab. It is executed as a short, sudden downward jerking motion that pulls the opponent momentarily forward. The hand that executes the Jerking HIA is often the hand that delivers the strike.
Attack, Defense, and Counter-Attack Analysis
79 Master of the Ring Copyright 2004 by Eric & Kevin Lamkin
Foot Immobilization Attack (FIA)—A Foot Immobilization Attack is a maneuver that momentarily restricts the opponent’s ability to move his leg. This action will affect the opponent’s mobility, offensive/defensive capability, and balance. When attempting a FIA, you should not alter your normal stance width or balance in order to execute the maneuver; otherwise, you will create a tactical liability that the opponent can use to his advantage. If you cannot reach his foot then you are too far away. Remember, all FIA methods are to be used in conjunction with attacks and/or immobilizations. There are three types of Foot Immobilization Attacks—Stepping, Locking, and Buckling.
1. Stepping—A Stepping FIA is executed by taking your lead foot and stepping on the instep of the opponent’s lead foot. This method controls the opponent’s mobility and may affect his balance if he attempts to move.
2. Locking—A Locking FIA involves placing your lead foot on the inside of the opponent’s lead foot and using your knee to force his knee to straighten and lock. This method is often used when you are attacking on the outside of his lead arm. This method will affect his balance and mobility by forcing more weight onto his rear leg.
3. Buckling—A Buckling FIA begins in the same position as a Locking FIA but forces the opponent’s knee to bend outward toward the edge of his foot. This method lowers the height of the opponent and turns his shoulders in a similar (though not as effective) action as the Pulling HIA.
4. COMBINATION ATTACKS Combination Attacks are compound offensive actions comprised of two or more movements that flow from one to the next in a well-planned, natural sequence, and are usually delivered to more than one target area. Combination Attacks are basically “set-ups”, their primary objective being to maneuver the opponent in such a position or create such an opening that the final strike or series of strikes will find an open target and land cleanly. All of the basic principles that cover single attacks also apply to Combination Attacks. These include such things as maintaining body control and balance, eliminating all wide and unnecessary movements, and maintaining a well-covered position while attacking. However, when using any Combination Attack, there are three major principles that you should keep in mind with regard to the combination of weapons and/or motions you use. They are:
1. Use motions that are economical. By using motions that don’t require extreme changes in your ready position and major preparatory motions, you will reduce your risk of being countered by the opponent.
2. Work on using movements that “fit together” naturally and smoothly without major gaps in them during which the opponent might be able to get away or counter.
3. Evaluate the combinations you use in terms of facilitating a fast recovery to your ready position. Be able to defend yourself from where you end up or are going to end up.
Combination Attacks are built upon Primary and Secondary Strikes sequenced according to a predetermined number and arrangement of the limbs.
Attack, Defense, and Counter-Attack Analysis
80 Master of the Ring Copyright 2004 by Eric & Kevin Lamkin
Primary and Secondary Strikes—Primary Strikes are offensive methods that have minimal tactical exposure and require few preparatory motions. Primary Strikes can be delivered without any additional structural or tactical support; however, Secondary Strikes have an increased tactical exposure and require a preceding action to mask its preparatory motion. For example, a lead snapping horizontal fist punch (Primary Strike) has minimal exposure and may stand alone as an attack, but a rear snapping horizontal fist punch (Secondary Strike) has an increased tactical exposure because in order to deliver the strike the body must turn, thereby exposing the Self-Centerline. This tactical exposure can be reduced by preceding it with the lead snapping horizontal fist punch. This preceding action will put the opponent on the defensive, mask the motion of the rear snapping horizontal fist punch, and, if contact is made, occupy his mind with pain. Some commonly used Primary and Secondary Strikes include: I. Primary and Secondary Strikes
A. Primary Strikes a. Hand Strikes
i. Lead Thrusting Horizontal Spear Hand Strike ii. Lead Snapping Horizontal Fist Punch iii. Lead Thrusting Horizontal Fist Punch iv. Lead Snapping Vertical Fist Punch v. Lead Thrusting Vertical Fist Punch vi. Lead Inward Horizontal Roundhouse Punch vii. Lead Outward Horizontal Back Knuckle Strike viii. Lead Outward Downward Diagonal Back Knuckle Strike ix. Lead Outward Upward Diagonal Back Knuckle Strike x. Lead Inward Horizontal Hook Punch xi. Lead Inward Upward Diagonal Hook Punch xii. Lead Inward Downward Diagonal Hook Punch
b. Foot Strikes i. Lead Front Snapping Ball Kick ii. Lead Front Upward Snapping Instep Kick iii. Lead Inward Horizontal Snapping Instep Kick iv. Lead Inward Upward Diagonal Snapping Instep Kick v. Lead Inward Downward Diagonal Snapping Instep Kick vi. Lead Outward Snapping Knife-Edge Kick vii. Lead Outward Thrusting Knife-Edge Kick viii. Lead Outward Vertical Knife-Edge Kick (Crescent) ix. Lead Outward Horizontal Hooking Heel Kick x. Lead Outward Downward Diagonal Hooking Heel Kick xi. Lead Outward Trusting Heel Kick xii. Lead Outward Upward Diagonal Snapping Instep Kick xiii. Lead Inward Horizontal Roundhousing Shin Kick xiv. Lead Inward Upward Diagonal Roundhousing Shin Kick xv. Lead Inward Downward Diagonal Roundhousing Shin Kick
Attack, Defense, and Counter-Attack Analysis
81 Master of the Ring Copyright 2004 by Eric & Kevin Lamkin
B. Secondary Strikes a. Hand Strikes
i. Rear Snapping Horizontal Fist Punch ii. Rear Thrusting Horizontal Fist Punch iii. Rear Snapping Vertical Fist Punch iv. Rear Thrusting Vertical Fist Punch v. Rear Inward Horizontal Roundhousing Punch vi. Rear Outward Horizontal Back Knuckle Strike vii. Lead Forward Thrusting Uppercut Punch viii. Rear Forward Thrusting Uppercut Punch ix. Lead Upward Vertical Thrusting Uppercut Punch x. Rear Upward Vertical Thrusting Uppercut Punch xi. Rear Inward Upward Diagonal Hook Punch
b. Foot Strikes i. Rear Front Snapping Ball Kick ii. Rear Front Thrusting Ball Kick iii. Rear Front Thrusting Heel Kick iv. Rear Spinning Outward Horizontal Hooking Heel Kick v. Rear Spinning Snapping Heel Kick vi. Rear Spinning Thrusting Heel Kick vii. Rear Inward Horizontal Snapping Instep Kick viii. Rear Inward Upward Diagonal Snapping Instep Kick ix. Rear Inward Downward Diagonal Snapping Instep Kick x. Rear Inward Horizontal Slicing Knife-Edge Kick xi. Rear Inward Upward Diagonal Slicing Knife-Edge Kick xii. Rear Inward Vertical Sole Kick (Crescent) xiii. Rear Inward Overhead Hammering Heel Kick xiv. Rear Spinning Outward Thrusting Knife-Edge Kick xv. Rear Spinning Outward Downward Diagonal Hooking Heel Kick xvi. Rear Inward Horizontal Roundhousing Shin Kick xvii. Rear Inward Upward Diagonal Roundhousing Shin Kick xviii. Rear Inward Downward Diagonal Roundhousing Shin Kick
Number of Strikes—Before constructing a Combination Attack, you must decide on the number of strikes that will be used. For the purposes of this study we will identify and define Single-Count Strikes, Two-Count Combinations, Three-Count Combinations, and Blitzing.
1. Single-Count Strikes—Single-Count Combinations are Direct Attacks consisting entirely of Primary Strikes. Refer to Direct Attacks for further information.
2. Two-Count Combinations—A combination consisting of two strikes are composed of
Primary and Secondary Strikes. When developing Two-Count Combinations keep these two points in mind:
• Do not begin a combination with a Secondary Strike unless that strike is utilized as an Indirect Attack. Every combination should begin with a Primary striking motion. In general, Secondary Strikes are tactical liabilities when executed alone
• When ending a combination with a Secondary Strike, quickly return to a well-covered position.
Attack, Defense, and Counter-Attack Analysis
82 Master of the Ring Copyright 2004 by Eric & Kevin Lamkin

There are two arrangements of Primary and Secondary Strikes for Two-Count Combinations that are tactically advantageous and follow the guidelines above. They are:
Primary-Primary Primary-Secondary
3. Three-Count Combinations—Three-Count Combinations consist of prefixing or
suffixing a Two-Count Combination with a Primary or Secondary Strike. When developing a Three-Count Combination keep these three points in mind:
• Do not begin a combination with a Secondary Strike unless that strike is utilized as an Indirect Attack. . Every combination should begin with a Primary striking motion. In general, Secondary Strikes are tactical liabilities when executed alone.
• When ending a combination with a Secondary Strike, quickly return to a well-covered position.
• Delivering three of more Primary Strikes in succession with the same limb significantly increases your chances of being countered. In addition, after the second strike, your speed, power, and ability to cover are severely compromised.
There are four arrangements of Primary and Secondary Strikes for Three-Count Combinations that are tactically advantageous and follow the guidelines above. They are:
Primary-Primary-Primary* Primary-Primary-Secondary Primary-Secondary-Primary
Primary-Secondary-Secondary *Do not deliver more than two Primary Strikes in succession with the same limb.
4. Blitzing—Blitzing consists of four or more strikes while decreasing the distance
between you and your opponent. The number of strikes delivered is determined by the number needed to cover the necessary distance and over-run the opponent. Blitzing is often used against fighters that continually retreats out of range. Blitzing should be used sparingly so that the opponent cannot counter your attack.
To construct a combination consisting of four or more strikes, you simply add Primary or Secondary Strikes to existing combinations. You may also combine combinations to other combinations to produce a higher ordered Combination Attack. For example, 2 Two-Count Combinations may be added together and create a Four-Count Combination, or a Two-Count Combination may be added to a Three-Count Combination to create a Five-Count Combination, etc.
Arrangement of Limbs—For any combination, the arms and legs may be arranged in several possible sequences. The arrangement of limbs may be alternating or consecutive based upon the needs of the situation and the structural restrictions of the combination. For a Two-Count Combination, the arrangement of limbs may be:
Arm-Arm Arm-Leg Leg-Arm
Leg-Leg
Attack, Defense, and Counter-Attack Analysis
83 Master of the Ring Copyright 2004 by Eric & Kevin Lamkin
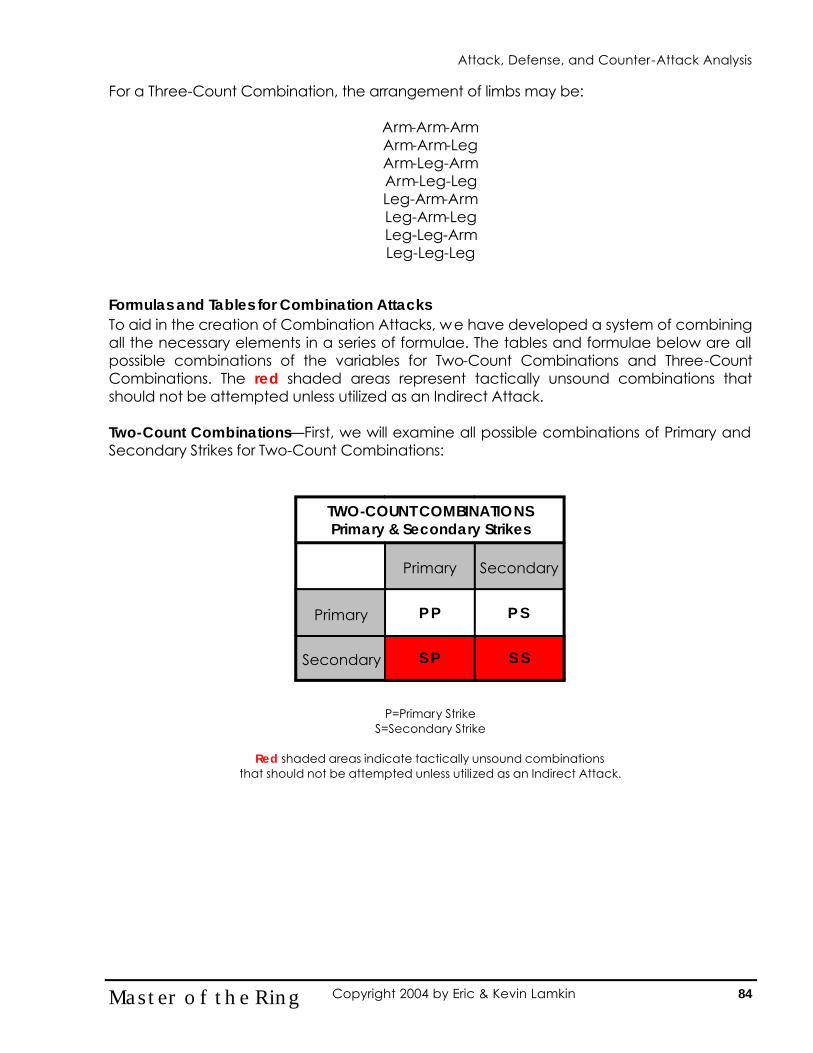
For a Three-Count Combination, the arrangement of limbs may be:
Arm-Arm-Arm Arm-Arm-Leg Arm-Leg-Arm Arm-Leg-Leg Leg-Arm-Arm Leg-Arm-Leg Leg-Leg-Arm Leg-Leg-Leg
Formulas and Tables for Combination Attacks To aid in the creation of Combination Attacks, we have developed a system of combining all the necessary elements in a series of formulae. The tables and formulae below are all possible combinations of the variables for Two-Count Combinations and Three-Count Combinations. The red shaded areas represent tactically unsound combinations that should not be attempted unless utilized as an Indirect Attack. Two-Count Combinations—First, we will examine all possible combinations of Primary and Secondary Strikes for Two-Count Combinations:
P=Primary Strike
S=Secondary Strike
Red shaded areas indicate tactically unsound combinations that should not be attempted unless utilized as an Indirect Attack.
Primary Secondary
Primary P P P S
Secondary S P S S
TWO-COUNT COMBINATIONS Primary & Secondary Strikes
Attack, Defense, and Counter-Attack Analysis
84 Master of the Ring Copyright 2004 by Eric & Kevin Lamkin
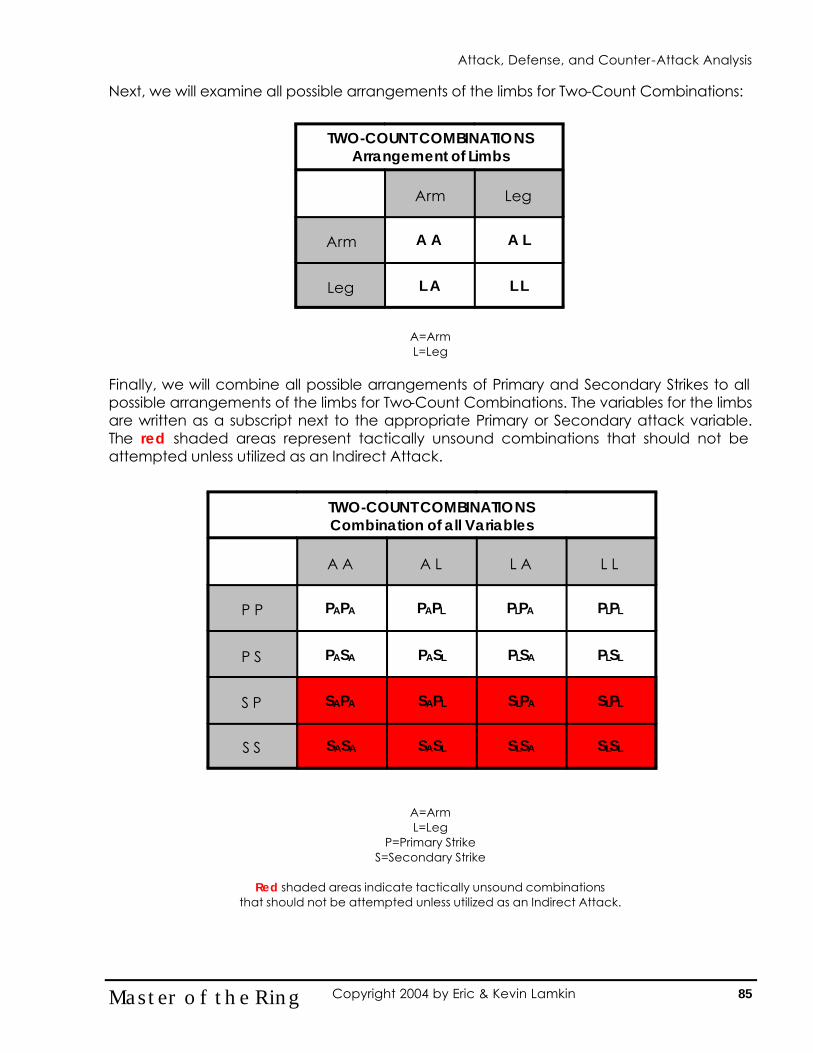
Next, we will examine all possible arrangements of the limbs for Two-Count Combinations:
A=Arm L=Leg
Finally, we will combine all possible arrangements of Primary and Secondary Strikes to all possible arrangements of the limbs for Two-Count Combinations. The variables for the limbs are written as a subscript next to the appropriate Primary or Secondary attack variable. The red shaded areas represent tactically unsound combinations that should not be attempted unless utilized as an Indirect Attack.
A=Arm L=Leg
P=Primary Strike S=Secondary Strike
Red shaded areas indicate tactically unsound combinations
that should not be attempted unless utilized as an Indirect Attack.
Arm Leg
Arm A A A L
Leg L A L L
TWO-COUNT COMBINATIONS Arrangement of Limbs
A A A L
P P PAPA PAPL
S S SASA SASL
TWO-COUNT COMBINATIONS Combination of all Variables
P S PASA PASL
S P SAPA SAPL
L A L L
PLPA PLPL
PLSA PLSL
SLPA SLPL
SLSA SLSL
Attack, Defense, and Counter-Attack Analysis
85 Master of the Ring Copyright 2004 by Eric & Kevin Lamkin

Using the Two-Count Combination Formulae To use a Two-Count combination Formula, choose which formula will be used and replace the variables with the desired Primary or Secondary Strikes. For example, if you have chosen the formula:
PASL You would then choose a Primary Arm Strike and combine it with a Secondary Leg Strike. So, if the Primary Arm Strike is a lead outward horizontal back knuckle strike and the Secondary Leg Strike is a rear inward horizontal snapping instep kick, then the combination would be:
Lead Outward Horizontal Back Knuckle Strike followed by a
Rear Inward Horizontal Snapping Instep Kick Three-Count Combinations—We begin by examining all possible combinations of Primary and Secondary Strikes for Three-Count Combinations:
P=Primary Strike S=Secondary Strike
Red shaded areas indicate tactically unsound combinations
that should not be attempted unless utilized as an Indirect Attack.
THREE-COUNT COMBINATIONS Primary & Secondary Strikes
P P P S S P
Primary P P P P P S P S P
Secondary S P P S P S S S P
S S
P S S
S S S
Attack, Defense, and Counter-Attack Analysis
86 Master of the Ring Copyright 2004 by Eric & Kevin Lamkin
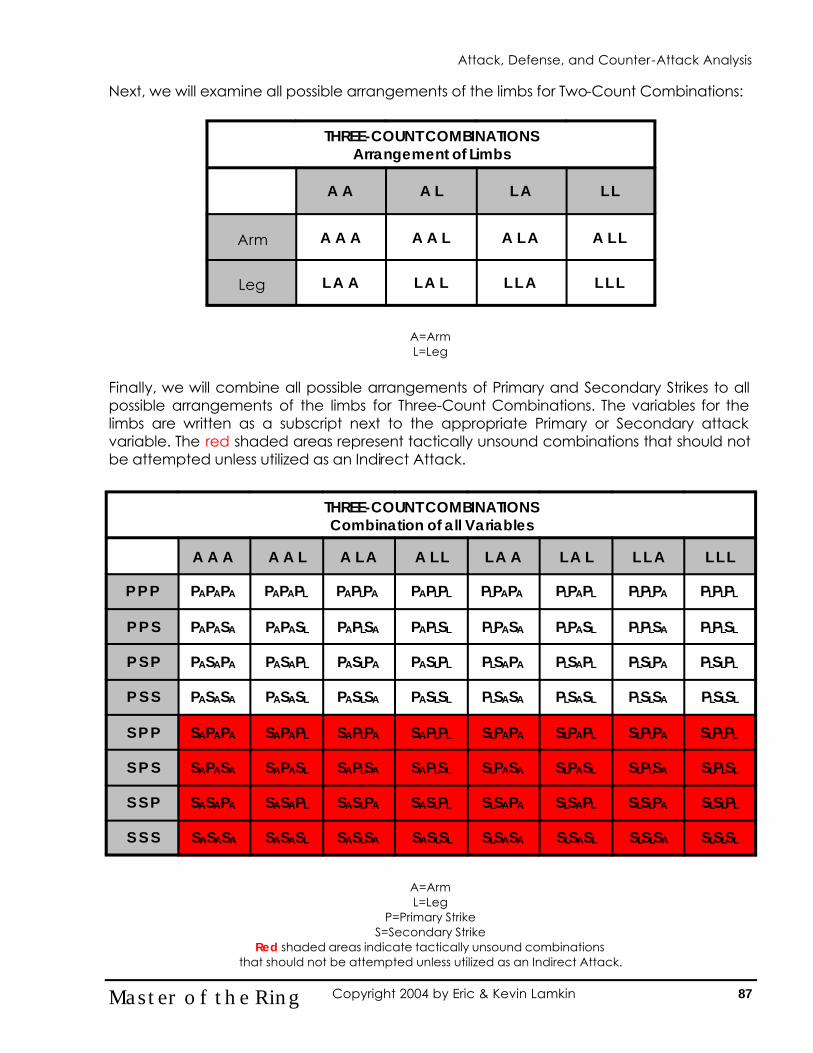
Next, we will examine all possible arrangements of the limbs for Two-Count Combinations:
A=Arm L=Leg
Finally, we will combine all possible arrangements of Primary and Secondary Strikes to all possible arrangements of the limbs for Three-Count Combinations. The variables for the limbs are written as a subscript next to the appropriate Primary or Secondary attack variable. The red shaded areas represent tactically unsound combinations that should not be attempted unless utilized as an Indirect Attack.
A=Arm L=Leg
P=Primary Strike S=Secondary Strike
Red shaded areas indicate tactically unsound combinations that should not be attempted unless utilized as an Indirect Attack.
THREE-COUNT COMBINATIONS Arrangement of Limbs
A A A L L A
Arm A A A A A L A L A
Leg L A A L A L L L A
L L
A L L
L L L
A A A A A L
P P P PAPAPA PAPAPL
P S S PASASA PASASL
THREE-COUNT COMBINATIONS Combination of all Variables
P P S PAPASA PAPASL
P S P PASAPA PASAPL
A L A A L L
PAPLPA PAPLPL
PAPLSA PAPLSL
PASLPA PASLPL
PASLSA PASLSL
S P P SAPAPA SAPAPL SAPLPA SAPLPL
S P S SAPASA SAPASL SAPLSA SAPLSL
S S P SASAPA SASAPL SASLPA SASLPL
S S S SASASA SASASL SASLSA SASLSL
L A A L A L L L A L L L
PLPAPA PLPAPL PLPLPA PLPLPL
PLPASA PLPASL PLPLSA PLPLSL
PLSAPA PLSAPL PLSLPA PLSLPL
PLSASA PLSASL PLSLSA PLSLSL
SLPAPA SLPAPL SLPLPA SLPLPL
SLPASA SLPASL SLPLSA SLPLSL
SLSAPA SLSAPL SLSLPA SLSLPL
SLSASA SLSASL SLSLSA SLSLSL
Attack, Defense, and Counter-Attack Analysis
87 Master of the Ring Copyright 2004 by Eric & Kevin Lamkin
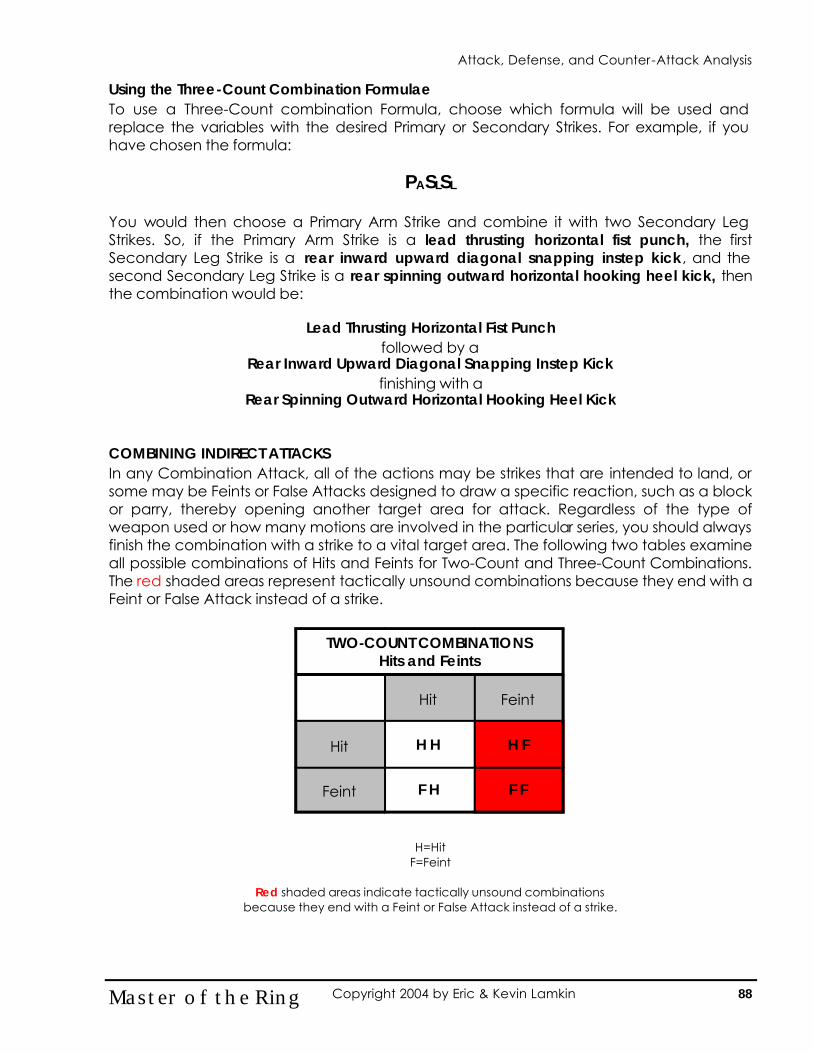
Using the Three-Count Combination Formulae To use a Three-Count combination Formula, choose which formula will be used and replace the variables with the desired Primary or Secondary Strikes. For example, if you have chosen the formula:
PASLSL You would then choose a Primary Arm Strike and combine it with two Secondary Leg Strikes. So, if the Primary Arm Strike is a lead thrusting horizontal fist punch, the first Secondary Leg Strike is a rear inward upward diagonal snapping instep kick, and the second Secondary Leg Strike is a rear spinning outward horizontal hooking heel kick, then the combination would be:
Lead Thrusting Horizontal Fist Punch followed by a
Rear Inward Upward Diagonal Snapping Instep Kick finishing with a
Rear Spinning Outward Horizontal Hooking Heel Kick COMBINING INDIRECT ATTACKS In any Combination Attack, all of the actions may be strikes that are intended to land, or some may be Feints or False Attacks designed to draw a specific reaction, such as a block or parry, thereby opening another target area for attack. Regardless of the type of weapon used or how many motions are involved in the particular series, you should always finish the combination with a strike to a vital target area. The following two tables examine all possible combinations of Hits and Feints for Two-Count and Three-Count Combinations. The red shaded areas represent tactically unsound combinations because they end with a Feint or False Attack instead of a strike.
H=Hit F=Feint
Red shaded areas indicate tactically unsound combinations
because they end with a Feint or False Attack instead of a strike.
Hit Feint
Hit H H H F
Feint F H F F
TWO-COUNT COMBINATIONS Hits and Feints
Attack, Defense, and Counter-Attack Analysis
88 Master of the Ring Copyright 2004 by Eric & Kevin Lamkin

H=Hit F=Feint
Red shaded areas indicate tactically unsound combinations
because they end with a Feint or False Attack instead of a strike. Indicating Indirect Attacks in Combination Attack Formulae To indicate in a Combination Attack Formula that a particular variable is intended to be a Feint or False Attack, the letter X is written as a subscript next to the appropriate Primary variable. For example, if the formula is:
and the second strike (the Secondary Arm Strike) is intended to be a Feint or False Attack, then the letter X is written as a superscript next to the S. SUMMARY A successful attack is the perfect blend of various interrelated elements, such as a fine sense of timing, perfect judgment of distance, keen judgment of target selection, deception, and boldness. The decision to use a particular offensive action is influenced by the opponent’s physical structure, his fighting style, and his defensive methods. There is no form of attack that is inherently better than another. You should be able to flow from one method of attack to another without having to think about it. Only by having at your command the various methods of attack for dealing with different types of opponents will you have the ability to adapt and “fit in” with any opponent. Regardless of which method of attack you choose to use at any given time, a golden rule to remember is to never use a more complex movement than is necessary to get the job done.
THREE-COUNT COMBINATIONS Hits and Feints
H H H F F H
Hit H H H H H F H F H
Feint F H H F H F F F H
F F
H F F
F F F
P S P A A A
X
P S P A A A
Attack, Defense, and Counter-Attack Analysis
89 Master of the Ring Copyright 2004 by Eric & Kevin Lamkin
Theory of Theory of
DefenseDefense
90 Master of the Ring Copyright 2004 by Eric & Kevin Lamkin
Attack, Defense, and Counter-Attack Analysis
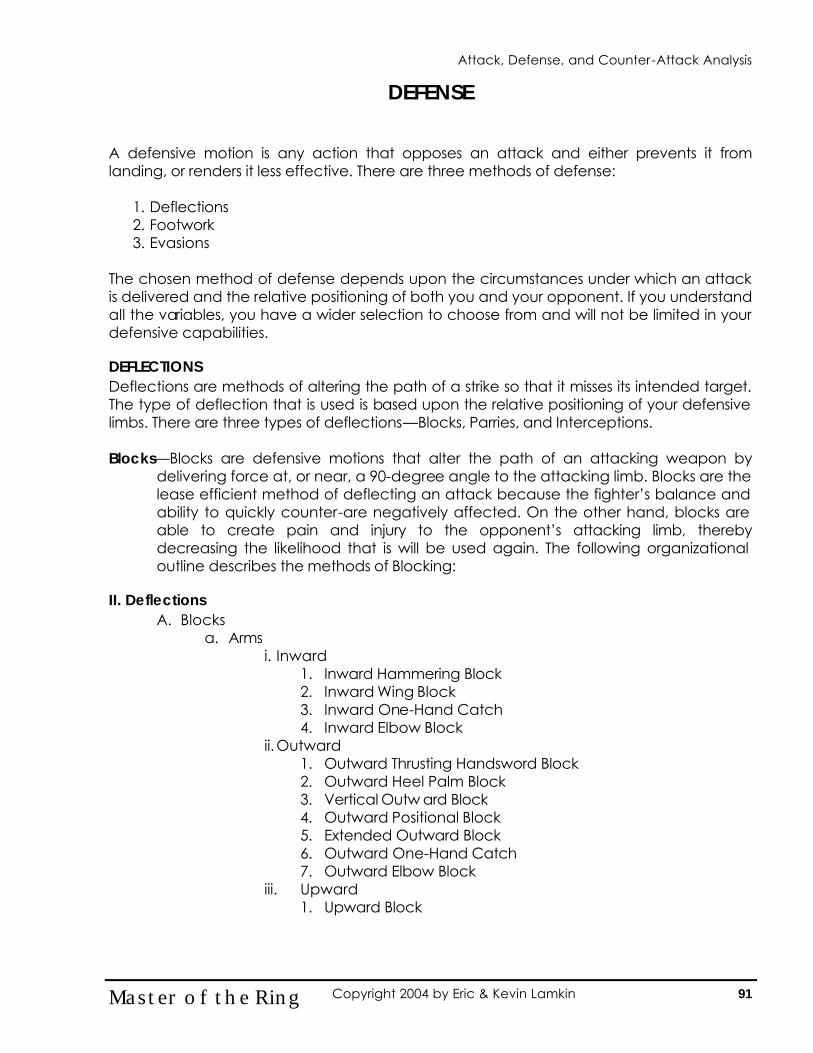
DEFENSE A defensive motion is any action that opposes an attack and either prevents it from landing, or renders it less effective. There are three methods of defense:
1. Deflections 2. Footwork 3. Evasions
The chosen method of defense depends upon the circumstances under which an attack is delivered and the relative positioning of both you and your opponent. If you understand all the variables, you have a wider selection to choose from and will not be limited in your defensive capabilities. DEFLECTIONS Deflections are methods of altering the path of a strike so that it misses its intended target. The type of deflection that is used is based upon the relative positioning of your defensive limbs. There are three types of deflections—Blocks, Parries, and Interceptions. Blocks—Blocks are defensive motions that alter the path of an attacking weapon by
delivering force at, or near, a 90-degree angle to the attacking limb. Blocks are the lease efficient method of deflecting an attack because the fighter’s balance and ability to quickly counter-are negatively affected. On the other hand, blocks are able to create pain and injury to the opponent’s attacking limb, thereby decreasing the likelihood that is will be used again. The following organizational outline describes the methods of Blocking:
II. Deflections
A. Blocks a. Arms
i. Inward 1. Inward Hammering Block 2. Inward Wing Block 3. Inward One-Hand Catch 4. Inward Elbow Block
ii. Outward 1. Outward Thrusting Handsword Block 2. Outward Heel Palm Block 3. Vertical Outw ard Block 4. Outward Positional Block 5. Extended Outward Block 6. Outward One-Hand Catch 7. Outward Elbow Block
iii. Upward 1. Upward Block
Attack, Defense, and Counter-Attack Analysis
91 Master of the Ring Copyright 2004 by Eric & Kevin Lamkin

iv. Downward 1. Downward Horizontal Forearm Block 2. Downward Palm Block 3. Outward Downward Block 4. Downward Elbow Block
v. Two-Handed Blocks 1. Augmented Vertical Outward Block 2. Wedge Block 3. Upward X-Block 4. Downward X-Block 5. Downward Butterfly Block 6. Universal Block 7. Two-Hand Catch 8. Windmill Block
b. Legs i. Inward 1. Inward Thrusting Sole Block 2. Inward Crescent Knee Block 3. Inward Crescent Sole Block 4. Inward Thrusting Shield Block ii. Outward 1. Outward Thrusting Knife-Edge B lock 2. Outward Crescent Knee Block 3. Outward Crescent Knife-Edge Block 4. Outward Hooking Heel Block iii. Upward 1. Upward Knee Block iv. Downward 1. Downward Horizontal Knee Block
Parries—Parries are defensive motions that alter the path of an attacking weapon by
traveling in the same direction, or near the same direction, as the attacking limb. As opposed to a block, which is force-against-force, a parry is a light, easy movement that relies on timing rather than force. The objective of a parry is to deflect the opponent’s incoming energy rather than meet it head-on. In parrying, you should feel that in deflecting the opponent’s punch or kick, you are literally “taking possession of it.” The following points should be remembered when using any parry:
1. Control your motion. Your parry should stop as soon as the attack is deflected. If you over-parry or parry too hard, you can give an extra “push” to the opponent’s strike that he may be able to use to his advantage by switching his attack onto another line, or by launching a follow-up motion. You might also inadvertently knock his arm into your own counter-attack. Think of using your parry to “close the door” on an attack rather than “slamming the door.” But make sure your parry is sufficient to deflect the strike. If you under-parry, the opponent’s strike still may hit you.
Attack, Defense, and Counter-Attack Analysis
92 Master of the Ring Copyright 2004 by Eric & Kevin Lamkin
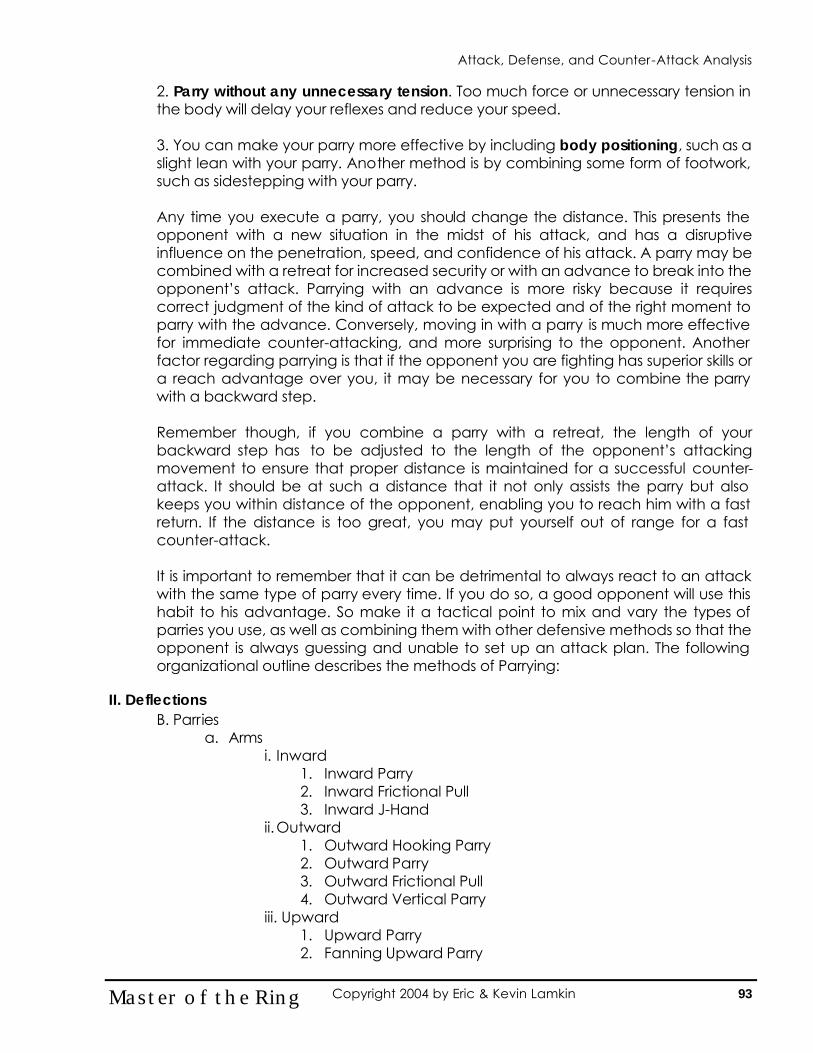
2. Parry without any unnecessary tension. Too much force or unnecessary tension in the body will delay your reflexes and reduce your speed. 3. You can make your parry more effective by including body positioning, such as a slight lean with your parry. Another method is by combining some form of footwork, such as sidestepping with your parry.
Any time you execute a parry, you should change the distance. This presents the opponent with a new situation in the midst of his attack, and has a disruptive influence on the penetration, speed, and confidence of his attack. A parry may be combined with a retreat for increased security or with an advance to break into the opponent’s attack. Parrying with an advance is more risky because it requires correct judgment of the kind of attack to be expected and of the right moment to parry with the advance. Conversely, moving in with a parry is much more effective for immediate counter-attacking, and more surprising to the opponent. Another factor regarding parrying is that if the opponent you are fighting has superior skills or a reach advantage over you, it may be necessary for you to combine the parry with a backward step. Remember though, if you combine a parry with a retreat, the length of your backward step has to be adjusted to the length of the opponent’s attacking movement to ensure that proper distance is maintained for a successful counter-attack. It should be at such a distance that it not only assists the parry but also keeps you within distance of the opponent, enabling you to reach him with a fast return. If the distance is too great, you may put yourself out of range for a fast counter-attack. It is important to remember that it can be detrimental to always react to an attack with the same type of parry every time. If you do so, a good opponent will use this habit to his advantage. So make it a tactical point to mix and vary the types of parries you use, as well as combining them with other defensive methods so that the opponent is always guessing and unable to set up an attack plan. The following organizational outline describes the methods of Parrying:
II. Deflections B. Parries
a. Arms i. Inward
1. Inward Parry 2. Inward Frictional Pull 3. Inward J-Hand
ii. Outward 1. Outward Hooking Parry 2. Outward Parry 3. Outward Frictional Pull 4. Outward Vertical Parry
iii. Upward 1. Upward Parry 2. Fanning Upward Parry
Attack, Defense, and Counter-Attack Analysis
93 Master of the Ring Copyright 2004 by Eric & Kevin Lamkin
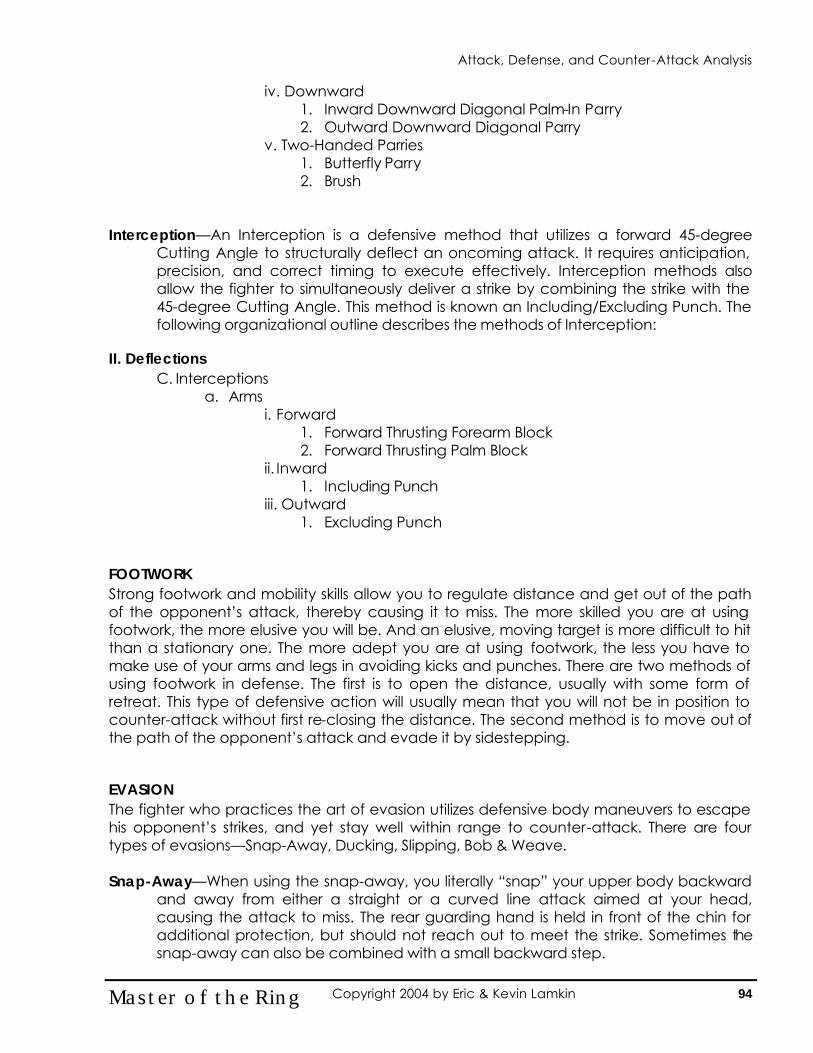
iv. Downward 1. Inward Downward Diagonal Palm-In Parry 2. Outward Downward Diagonal Parry
v. Two-Handed Parries 1. Butterfly Parry 2. Brush
Interception—An Interception is a defensive method that utilizes a forward 45-degree
Cutting Angle to structurally deflect an oncoming attack. It requires anticipation, precision, and correct timing to execute effectively. Interception methods also allow the fighter to simultaneously deliver a strike by combining the strike with the 45-degree Cutting Angle. This method is known an Including/Excluding Punch. The following organizational outline describes the methods of Interception:
II. Deflections C. Interceptions
a. Arms i. Forward
1. Forward Thrusting Forearm Block 2. Forward Thrusting Palm Block
ii. Inward 1. Including Punch
iii. Outward 1. Excluding Punch
FOOTWORK Strong footwork and mobility skills allow you to regulate distance and get out of the path of the opponent’s attack, thereby causing it to miss. The more skilled you are at using footwork, the more elusive you will be. And an elusive, moving target is more difficult to hit than a stationary one. The more adept you are at using footwork, the less you have to make use of your arms and legs in avoiding kicks and punches. There are two methods of using footwork in defense. The first is to open the distance, usually with some form of retreat. This type of defensive action will usually mean that you will not be in position to counter-attack without first re-closing the distance. The second method is to move out of the path of the opponent’s attack and evade it by sidestepping. EVASION The fighter who practices the art of evasion utilizes defensive body maneuvers to escape his opponent’s strikes, and yet stay well within range to counter-attack. There are four types of evasions—Snap-Away, Ducking, Slipping, Bob & Weave. Snap-Away—When using the snap-away, you literally “snap” your upper body backward
and away from either a straight or a curved line attack aimed at your head, causing the attack to miss. The rear guarding hand is held in front of the chin for additional protection, but should not reach out to meet the strike. Sometimes the snap-away can also be combined with a small backward step.
Attack, Defense, and Counter-Attack Analysis
94 Master of the Ring Copyright 2004 by Eric & Kevin Lamkin
Ducking—Ducking can be used to escape underneath swinging or hooking strikes aimed at your head. Ducking is performed by bending your waist and shifting your trunk slightly forward, while at the same time keeping your hands high and watching your opponent as the strike continues over your head. Ducking straight down allows you to counter with either hand, or even shift into grappling. An important thing to remember when under any strike is that you need to be aware of the possibility that the opponent might deliver a knee strike at your head while you’re Ducking. So keep yourself well covered with your arms close to your body and be ready to defend if necessary.
Slipping—Slipping is primarily used against linear attacks aimed at your head. Slipping calls
for exact timing and good judgment, because to be effective it must be done so that the opponent’s strike barely misses you. However, when used correctly it will surprise an opponent and leave him vulnerable to an immediate counter-attack. You can slip to the inside or the outside of an opponent, but the outside is generally safe because it takes you away from the opponents other arm and leg. As opposed to parrying, in which one hand is used in a defensive manner, slipping leaves both hands free to counter-attack. You can counter-attack at the same time you slip, or you can slip first and then counter-attack.
For example, to slip a punch over your right shoulder from a right lead fighting posture, drop your weight slightly back onto your rear leg by quickly turning your lead shoulder and body to the left. Your lead foot remains stationary, but the toe pivots inward. This will cause the opponent’s punch to slip harmlessly over your right shoulder. Sometimes, for added safety, you can combined a small sidestep to when you slip the punch. Finally, when slipping, make sure to keep yourself well covered by holding your hands high to offset any possible counter from the opponent.
Bob & Weave— As with ducking, the primary purpose of the Bob & Weave is to slide under
an opponent’s curved line attack and move into close range. The bob takes your upper body forward and inside the circumference of the strike, causing it to miss and allowing it to continue over your head without stopping. The weave moves you in the opposite direction of the strike’s force.
For example, from your fighting posture, bob forward and downward by bending your upper torso forward while at the same time bending your legs. Keep your eyes on your opponent and carry your hands high, maintaining a well-covered position, ready to slip at any time if necessary. At the bottom of the bob, weave your upper body to the right or left—depending upon which direction you want to go and which direction the blow is coming from. This is a “J” or a reverse “J” motion. Sometimes, in order to help you achieve a better position from which to counter, a small sidestep can be combined with your weave. Besides being used with the bob, the weave can also be combined with slipping. For example, you might slip outside of an opponent’s lead punch aimed at your head, then weave under his rear hand punch to change your position. You can also hit the opponent as you are weaving underneath his attack.
Attack, Defense, and Counter-Attack Analysis
95 Master of the Ring Copyright 2004 by Eric & Kevin Lamkin
MONITORS, JAMS, AND CHECKS There are other methods of preventing a weapon from attacking that rely on the concept of restraining the weapon at various points in time. These methods are known as Monitors, Jams, and Checks. Monitors—A Monitor is a method of restraining a weapon before it is used. It is often
performed by using the palm of the hand to press the weapon against the opponent’s body. If the opponent attempts to move his hand in order to use it for an attack or a defense, your tactile awareness will alert you to his intensions.
Jams—A Jam is a method of restraining a weapon on development before enough
momentum has been generated to necessitate a deflection. Jams are commonly executed by decreasing the distance between you and your opponent and using the palm of your hand, arm, or even your entire body to crowd the opponent so that he is unable to deliver a strike.
Checks—A Check is a method of restraining a weapon after it has been countered.
Checks are often performed by maintaining contact w ith the opponent’s deflected limb with the same hand that was used for the deflection. A Check enables the fighter to achieve tactile awareness and may present an opportunity to execute grappling techniques.
Attack, Defense, and Counter-Attack Analysis
96 Master of the Ring Copyright 2004 by Eric & Kevin Lamkin
Theory of Theory of
CounterCounter--AttackAttack
97 Master of the Ring Copyright 2004 by Eric & Kevin Lamkin
Attack, Defense, and Counter-Attack Analysis
COUNTER-ATTACK A Counter-Attack is an offensive action made against an opponent’s attack, either as he attacks on his own initiative or is provoked into attacking. Counter-Attacks are timed to exploit the offensive motions of the opponent’s limbs. Any striking motion contains three committed motions—extension of the limb, impact with the target, recoil back to position. Thus, Counter-Attacks are divided into three corresponding groups:
1. Pre-Emptive Counters 2. Timed Counters 3. Chasing Counters
PRE-EMPTIVE COUNTER-ATTACKS A Pre-Emptive Counter-Attack is designed to hit the opponent while he is preparing to attack or while the attack is under development. The strategy involved is to attack the opponent before his own attack becomes a danger and to put the opponent on the defensive. There are two types of Pre-Emptive Counter-Attacks—Stop Hits/Kicks and Jamming. Stop Hits/Kicks—As the name implies a Stop Hit/Kick is an offensive motion delivered by the
arm or leg that arrests or “stops” the opponent in the development of his attack. These strikes may be delivered directly to a vital target, or, in the case of a kick, may be delivered to the opponent’s attacking limb. While the Stop Hit/Kick can be an instinctive or opportunistic counter-attack, it is most effective when used as the result of observing the opponent’s telegraphic motions or faulty techniques. There are five types of Stop Hit/Kicks:
1. Telegraphic Counter—Telegraphic motions are motions that announce offensive intents. Being able to recognize these motions will give you an early warning of his attack. 2. Closing Distance Counter—A sudden rush or lunge from out of range is susceptible to a Stop Hit/Kick. 3. Linear Beats Circular—Any large spinning or swinging action takes longer to execute than a straight linear strike; therefore, it is susceptible to a Stop Hit/Kick. 4. Half-Beat Counter—You can counter an opponent between the motions of a combination attack. 5. Mental Counter—You can strike an opponent when he is preoccupied with his own feints or plans of attacks. Key Points 1. The best moment to execute a Stop Hit/Kick is at the very beginning of the opponent’s attack. This surprises the opponent and blocks his reflexive actions and prevents him from completing the attack or delaying the final movement of his action. 2. The longer you wait when using a Stop Hit/Kick, the greater the risk factor becomes. This is because the further an opponent’s attack develops, the more speed and power it will have behind it.
Attack, Defense, and Counter-Attack Analysis
98 Master of the Ring Copyright 2004 by Eric & Kevin Lamkin
Attack, Defense, and Counter-Attack Analysis
Jamming—Jamming is a method used to offset an opponent’s attack by quickly decreasing the distance in a well-covered position and crashing into and nullifying the opponent’s offensive motion. It is important to jam the opponent’s attack as early as possible, before the attack has had time to gain speed and power. You should also make sure that you are in a well-balanced position to prevent yourself from being knocked over by the opponent’s attack.
TIMED COUNTER-ATTACKS Timed Counter-Attacks are designed to hit the opponent at about the same time that his attacking limb reaches full extension. The strategy involved is to simultaneously neutralize the opponent’s attack and take advantage of the large opening created by the extended limb. Timed Counter-Attacks are the safest form of counter-attacks but they are also the most difficult to execute. They require accurate anticipation of the opponent’s intentions coupled with precise timing. There are four types of Timed Counter-Attack—Single Timed Defenses, Destructions, Interceptions, and Evasions. Single-Timed Defenses—In this counter, you deflect the attack and strike a vital target at
the same time instead of in two separate movements. This cuts the execution time in half and attacks the opponent at his most vulnerable moment. Usually, Single-Timed Defenses require you to deflect with the rear hand while striking with the lead hand.
Destructions—Destructions are similar to Single-Timed Defenses in that the deflection and
strike occur at the same time, but they differ as to the target struck. Destructions deliver damaging strikes to the opponent’s attacking limb or natural weapon. The strategy is to severely damage the opponent’s natural defenses and offensive weaponry before attacking a vital target. The following organizational outline lists the Destructions according to range:
I. Destructions
A. Middle Range Destructions a. Inward
i. Inward Horizontal Snapping Destruction ii. Inward Horizontal Hammering Destruction
b. Outward i. Outward Horizontal Destruction
1. Inside 2. Outside
c. Upward i. Upward Vertical Destruction
1. Inside 2. Outside 3. Split
99 Master of the Ring Copyright 2004 by Eric & Kevin Lamkin

Attack, Defense, and Counter-Attack Analysis
B. Close Range Destructions a. Elbow
i. Thrusting Horizontal Elbow Destruction ii. Thrusting Vertical Elbow Destruction iii. Thrusting Vertical Covering Elbow Destruction iv. Thrusting Vertical Driving Elbow Destruction v. Thrusting Vertical Cover & Driving Elbow Destruction
b. Knee i. Forward Thrusting Knee Destruction
Interceptions—Interceptions are methods that utilize the forward 45-degree Cutting Angle
to simultaneously deflect the opponent’s oncoming attack and deliver a strike of your own. There are two type of Interceptions—Including Punches, Excluding Punches.
Evasions—In this Timed Counter-Attack, the fighter utilizes footwork body movements to
avoid the opponent's attack, but stays within range to counter-strike. The most common types of evasions are:
1. Snap Away 2. Ducking 3. Slipping 4. Bob-and-Weave
CHASING COUNTER-ATTACKS Chasing Counter-Attacks are an immediate response to the opponent’s attack. Normally, they follow a deflection and attack the opponent before his attacking limb has recovered its guard. The choice of Chasing Counter, like the choice of attack, is determined by the defensive movements the opponent is likely to adopt against it. And again, the opponent’s reactions can only be ascertained by observing his habitual movements when recovering from an unsuccessful attack. there are two types of Chasing Counter-Attacks—Double-Timed Defenses and Response Hits/Kicks. Double-Timed Defenses—A Double-Timed Defense is a deflection followed by a counter,
wherein you first deflect the opponent’s attack, then launch your counter-attack. rhythmically, the action takes place on two separate and distinct beats. When using this method of counter-attack, your counter action may be immediate or delayed. You could counter immediately following your deflection , or you might delay your counter a moment in order to observe how the opponent recovers after his attack has failed. Structurally speaking, while a Double-Timed Defense may be the slowest forms of counter-attacking, it can be very useful if you suddenly find yourself caught unawares by an opponent, or if the opponent is much faster than you.
Response Hits/Kicks—This type of counter moves the body out of range of the opponent’s
strike, but brings it right back into range in time to counter-attack. Ideally, you counter should land while the opponent’s limb recoils. The snap-back and evasive footwork are common methods of Response Hitting/Kicking.
100 Master of the Ring Copyright 2004 by Eric & Kevin Lamkin
CalculatedCalculated CountersCounters
101 Master of the Ring Copyright 2004 by Eric & Kevin Lamkin
Attack, Defense, and Counter-Attack Analysis
CALCULATED COUNTERS A Calculated Counter differs from a counter-attack in that the opponent’s offensive or counter-offensive action is intentionally set up by you as the attacker. This method requires correct anticipation of the opponent’s actions and excellent timing. The invitation used to lure the opponent’s attack or counter-attack must be made convincingly. It must induce the opponent to initiate his action, but not be so obvious as to warn him of your intentions. There are two types of Calculated Counters—Attack by Drawing and Counter Time. Attack by Drawing—Attack by Drawing consists of provoking an offensive action from an
opponent under certain conditions so as to know the exact sector the attack will arrive in. Attack by Drawing is an effective method of attack to use against the type of opponent who refuses to attack and who bases his offensive strategy primarily on counter-attack. Attack by Drawing is performed by deliberately exposing a target to the opponent. Though exposing a target is a deliberate error, it must never appear so to the opponent or he will not take the opening. Common methods of baiting an opponent are:
• Lowering your lead guard to expose your head • Lowering your rear guard to expose your head • Raise an elbow to expose the body • Open the arms to invite a linear strike
For success, you must know the speed of the opponent. If you are too close, his attack may land before you can counter. If you are too far away, he may not take the bait.
Counter-Time—Counter-Time is the action of using some form of invitation to invite a Stop
Hit/Kick from the opponent, then counter-attacking that action. Counter-Time is a highly effective tactic to use against an opponent whose combative strategy is built upon counter-offensive actions, and who either has a predilection for Stop Hitting/Kicking, or who continually attacks into your attack. Success in using Counter-Time depends on concealing your real intentions and inducing the opponent to deliver his Stop Hit/Kick with conviction, so that he has little or no opportunity to recover when it is parried before your own attack lands. Feinting is a common method use to provoke a counter from the opponent that may then be used to your advantage.
Attack, Defense, and Counter-Attack Analysis
102 Master of the Ring Copyright 2004 by Eric & Kevin Lamkin

Sectors & Sectors & Immobilization Immobilization
AttacksAttacks
103 Master of the Ring Copyright 2004 by Eric & Kevin Lamkin
Attack, Defense, and Counter-Attack Analysis

SECTORS Sectors are tools used by fighters to aid in counter-attacking. They allow the fighter to respond instinctively to the opponent’s attack based upon the relative positioning of the arms. They also simplify the use of Hand Immobilization Attacks. The seven Sectors are: II. Sectors
A. Outside 1. Sector 1—Inward Parry and Strike 2. Sector 2—Outward Parry and Strike 3. Sector 3—Pin and Strike B. Inside 1. Sector 4—Inward Parry and Strike 2. Sector 5—Outward Parry and Strike 3. Sector 6—Pin and Strike C. Split 1. Sector 7—Inward Parry and Strike
IMMOBILIZATION ATTACKS Hand Immobilization Attacks—Hand Immobilization Attacks (HIA) are also known as
Trapping. HIA is an attacking action that momentarily immobilizes or “traps” either one or both of the opponent’s arms, allowing your strike to land in an open line, or draw a reaction which can then be countered with either another trap, or by shifting into another aspect of combat such as punching or grappling.
Objectives of HIA Trapping allows you to maneuver an opponent’s arms to where you want them, and to create a situation whereby the opponent is forced to give you a reaction that will be to his determent. He may not want to give you the reaction, but he has no other choice. Trapping an opponent’s hand can make it difficult for him to parry by confusing him. Also, by trapping one or both of the opponent’s arms while you attack, you can limit the possibility of him being able to attack or defend. One of the primary objectives in the use of HIA is to gain an attachment against one or both of the opponent’s arms. An attachment may be gained in one of two ways. It may be gained offensively, which means off of your own initiation or attack. Or it may be gained defensively, as a result of the opponent’s initiation or attack against you. Regardless of who initiates an attack, when you engage an opponent there are only six basic positions that your hands will end up in relation to the hands of your opponent:
1. Both of your arms are on the outside of the opponent’s arms. 2. One of your arms is on the inside and one arm is on the outside of the
opponent’s arms. 3. Both of your arms are on the inside of the opponent’s arms, either in a tight or
wide position.
Attack, Defense, and Counter-Attack Analysis
104 Master of the Ring Copyright 2004 by Eric & Kevin Lamkin
4. One of your arms is on the inside and one arm is on the outside of the opponent’s arms.
5. Both of your arms are on the outside of both of the opponent’s arms. 6. Both of the opponent’s arms are inside of your arms.
Even if one hand is up and one is down, it’s still the same. By understanding what type of trapping or immobilizing actions can be used from where your arms are in relation to those of the opponent, as well as by feeling the type of energy the opponent reacts with, you can tie up one or both of his arms and gain a split-second advantage in which to land a strike. Basic HIA Actions The following are basic actions that are utilized in HIA:
III. Immobilizations
A. Arm Trapping a. Pinning Trap b. Pulling Trap c. Jerking Trap d. Hooking Trap e. Disengage f. Sliding Leverage g. Hinging Trap 1) Outside 2) Inside 3) Snapping
Foot Immobilization Attacks—A Foot Immobilization Attack is a maneuver that momentarily
restricts the opponent’s ability to move his leg. This action will affect the opponent’s mobility, offensive/defensive capability, and balance. When attempting a FIA, you should not alter your normal stance width or balance in order to execute the maneuver; otherwise, you will create a tactical liability that the opponent can use to his advantage. If you cannot reach his foot then you are too far away. Remember, all FIA methods are to be used in conjunction with attacks and/or immobilizations. There are three types of Foot Immobilization Attacks—Stepping, Locking, and Buckling.
1. Stepping—A Stepping FIA is executed by taking your lead foot and stepping on the instep of the opponent’s lead foot. This method controls the opponent’s mobility and may affect his balance if he attempts to move. 2. Locking—A Locking FIA involves placing your lead foot on the inside of the opponent’s lead foot and using your knee to force his knee to straighten and lock. This method is often used when you are attacking on the outside of his lead arm. This method will affect his balance and mobility by forcing more weight onto his rear leg. 3. Buckling—A Buckling FIA begins in the same position as a Locking FIA but forces the opponent’s knee to bend outward toward the edge of his foot. This method lowers the height of the opponent and turns his shoulders in a similar (though not as effective) action as the Pulling HIA.
Attack, Defense, and Counter-Attack Analysis
105 Master of the Ring Copyright 2004 by Eric & Kevin Lamkin
TimingTiming
106 Master of the Ring Copyright 2004 by Eric & Kevin Lamkin
Attack, Defense, and Counter-Attack Analysis
TIMING In combat, Timing refers to the ability to recognize the most favorable moment to seize an opportunity to attack or counter-attack. This moment may occur naturally in the midst of the fight, such as if the opponent makes some error, loses his focus, or moves too soon. Or it may be provoked consciously by an action on your part, such as a feint or false attack. It may be physical (a moment of helplessness) or psychological (a moment of surprise). Either way, in most instances, the favorable moment usually has to be sensed rather than seen. To fully understand timing you need to recognize that there are actually two types: reaction time and movement time. Both are essential ingredients in developing your sense of timing to its highest potential. REACTION TIME Reaction Time is the measure of time from the arrival of a suddenly presented and unanticipated signal to the beginning of the physical response to it. Reaction time reflects the brain’s processing speed and actually consists of two stages—Stimulus Identification and Response Selection. Stimulus Identification—Stimulus Identification is the stage during which the fighter realizes
a stimulus has occurred and identifies it. This stimulus may be visual, auditory, or tactile. (Unconsciously: “I see something coming toward my face and that something is a punch.”)
Response Selection—Response Selection immediately follows Stimulus Identification and is
the stage in which the fighter decides what response to make. This stage also includes the time it takes to relay the impulses through the proper nerve fibers to the proper muscles (Unconsciously: “ I can run, block, or remain stationary. I am going to block.”)
So in a combative context, your total reaction time would be from the moment you see, hear, or feel the opponent’s action to the beginning of your physical response to it. Lengthening the Opponent’s Reaction Time An individual’s reaction time can become longer under four circumstances. The first is if the person has no training in any type of marital art, and therefore has no idea of what to do or how to do it. The second is if he is tired or fatigued. This could be physical fatigue, mental fatigue, or a combination of both. The third is if the person loses their focus or concentration. And the fourth condition is emotional upheavals, such as if the person loses his cool and gets angry, or if he is afraid. An opponent’s lengthened reaction time can be used to your advantage in timing your attacking or counters because you create a situation in which he is unable to react with a controlled action to your attack. This forces him to move involuntarily and without premeditation. Some moments during which an opponent’s reaction time is increased include:
Attack, Defense, and Counter-Attack Analysis
107 Master of the Ring Copyright 2004 by Eric & Kevin Lamkin
1. Immediately after the opponent completes a technique 2. When the opponent is concerned with multiple stimuli 3. As the opponent inhales 4. When the opponent withdraws his energy. 5. When the opponent’s attention has been diverted, or when he is off-balance
physically or mentally. MOVEMENT TIME Movement Time is defined as the time it takes to make one simple movement, be it an offensive, countering, or defensive action. Movement Time is the physical speed in which you respond and will vary according to each individual. Lengthening the Opponent’s Movement Time There are three ways you can cause the opponent to lose movement time. These include:
1. Jamming the opponent to disturb him and offset his rhythm. 2. Using various immobilizations to check his actions and control him. 3. Drawing a preliminary reaction, such as a parry in the first half of a PIA. 4. Deflecting his movement and scoring with your own.
RESPONSE TIME Response Time is the sum of Reaction Time and Movement Time. Reaction Time lasts from the beginning of the stimulus to the beginning of your response to it. Movement Time lasts from the beginning of the physical movement phase to the completion of the movement. Response Time is summarized in the equation below:
Response Time=Reaction Time + Movement Time The correct choice of time in moving is a major factor in determining the success of any offensive or counter-offensive action. Your attack or counter-attack must be “on time.” That is, neither too late nor too early. Any action, regardless of how technically perfect it might be, can be frustrated or offset by an opponent’s parry, block, evasion, or counter if it is timed incorrectly. Therefore, it is essential to time your action at exactly the right moment, when the opponent is unable to avoid being hit. This moment may be physical, such as when the opponent is off-balance or out of position, or psychological, such as if the opponent is surprised or caught unaware. To be able to seize the proper moment, you must maintain a state of constant vigilance and have the ability to control and manipulate distance against your opponent. By knowing an opponent’s timing, you can use a timing that he doesn’t expect, thus disrupting his capacities to attack or defend. Observe the opponent’s movements, and then adapt to fit in with his movement and complete your own action. Timing also requires confidence. You have to have complete faith in your abilities and your tools. Choosing the right moment to attack or counter-attack requires trained reflexes and a capacity for lightning fast judgment and decision, both of which will only come through proper training. A well-trained body and a developed capacity for sudden decision will give you the consistent ability to use timing to your fullest advantage.
Attack, Defense, and Counter-Attack Analysis
108 Master of the Ring Copyright 2004 by Eric & Kevin Lamkin

Rhythm, Rhythm, Cadence & Cadence &
TempoTempo
109 Master of the Ring Copyright 2004 by Eric & Kevin Lamkin
Attack, Defense, and Counter-Attack Analysis
RHYTHM, CADENCE, AND TEMPO RHYTHM Every action, be it simple or compound, has cadence, articulation, and also its own rhythm. In music, rhythm is the organization of music with respect to time. It is measured movement with uniform recurrence of beats. Rhythm is composed of beats and rests, or pauses. From a combative aspect, we could look at beats and pauses as action and non-action. The beat would be any action such as a forward step, a punch, a kick, or even a parry. And the pause would be the non-action between one action and the next. The pause is not a lack of motion, but an integral part of the overall action. A good fighter pays as much attention to pause and non-action as to action. Many fighters make the mistake of attacking continuously without observing the effect, if any, that their attacks are having on the opponent. When you attack, you should always include pauses in the action to allow you to assess the situation, study your opponent’s reactions, and adjust if necessary before taking further action. Avoid moving with the same rhythm all of the time. If you do, it will be very easy for an observant opponent to pick up on it and use it to his own advantage. Vary the rhythm of your movements in order to make it as difficult as possible for an opponent to “read” you. Force the opponent to react to you instead of allowing him to dictate his actions and yours. CADENCE While rhythm is measured movement with uniform recurrence of beat, cadence is the specific rhythm at which a particular succession of movements is executed. A three-punch combination such as a lead jab-rear cross-lead hook, for example, consists of a three cadence –one-two-three. The cadence of any succession of movements or compound attack can be varied by either slowing down or speeding up any of the motions with it. For example, the three-punch combination could be used with the following cadences:
Short-short-short Long-short-short Short-long-short Short-short-long Short-long-long Long-short-long Long-long-short Long-long-long
Thus, as you can see, a simple three-motion combination may have eight different cadences. Correctly judged cadence permits calm control of every stroke. Ideally, what you want to do is to impose your cadence on the opponent. This can be done by intentionally varying the cadence of your own movements. It is important to remember, though, that the speed of any particular cadence you use has to be regulated to the opponent you are fighting.
Attack, Defense, and Counter-Attack Analysis
110 Master of the Ring Copyright 2004 by Eric & Kevin Lamkin
If you use a cadence that is too fast you may end up hitting into a still-closed line and in effect, parrying yourself. Whereas if the cadence you use is too slow, the opponent might counter you in the midst of your actions. It is particularly important to ascertain an opponent’s cadence and adapt the rhythm of a compound attack to it. Ideally, the cadence you seek is a speed that is just a little faster than the opponent. In this way you will be ahead of him and he will continually have to try to catch up with you. TEMPO Tempo represents the most favorable moment in which to initiate an action; namely, that one particular moment when the opponent is either surprised or helpless. At such a moment the opponent is incapable of instantaneous action and you may exploit his condition of unreadiness. The moment may be physical, or it may be psychological. Physical unreadiness can be seen. Although the opponent is attentive and observant, he is for some reason either out of balance or in some way delayed, thereby preventing him from executing the desired movement at the proper time. In such a situation he may panic or freeze up or react in a way that is tactically to your advantage. Psychological unreadiness, on the other hand, can’t be seen, but only sensed. To sense genuine psychological opportunities is very difficult. Most of the time there are not visible signs, or, at the moment you see it it’s already too late and the opportunity has passed. To be successful in using tempo requires that you are, at all times, alert and able to coordinate your readiness to act with the opponent’s lack of preparedness. BROKEN RHYTHM If you and an opponent of equal technical ability are fighting each other, unless one of you is much faster, the confrontation will more likely result in a stalemate. This is because your offensive and defensive movements work almost in rhythm with that of the opponent. However, if you know how to break the rhythm, speed no longer becomes the principle element in the success of your attack or counter-attack. Broken rhythm can be used to either penetrate an opponent’s defenses with your attack, or to offset an opponent’s attacking rhythm. It is invaluable in both attack and counter-attack because it enables you to catch an opponent when he is “motor-set”, which in turn makes it difficult for him to counter or defend. There are several ways in which you can break rhythm. After a particular rhythm has been established with regard to any movement or series of movements, it can be broken by either:
1. Suddenly speeding the cadence of the movement. 2. Slowing down the cadence of the movement. 3. Hitting on the Half-Beat
Attack, Defense, and Counter-Attack Analysis
111 Master of the Ring Copyright 2004 by Eric & Kevin Lamkin
The following are three common ways one can break the rhythm in attack. Speeding the Cadence—To break the rhythm by speeding up the cadence, you first
establish a normal rhythm that lulls the opponent into a false sense of preparedness. In other words, he gets used to the speed at which you operate. Then, without warning, you suddenly speed up the movements of your attack and catch the opponent off-guard.
Slowing the Cadence—To break the rhythm by slowing down the cadence, you establish a
fast rhythm, and then suddenly slow down the movement. Finally, by inserting a hesitation in your movements or making a pause before delivering the final movement you can deceive an opponent as to your intentions. A momentary delay in delivering the final movement may disrupt him and cause him to reopen the line that would have been closed had the rhythm of ht attack been constant.
Half Beat—In a counter-attack, you can use “hitting on the half-beat” in order to break the
opponent’s rhythm and disrupt his attack plans. Let’s look at the ways in which one can break the rhythm of an attack comprised of a three-cadence motion; each motion is represented by one beat. If you hit the opponent before he completes his first movement, you break the rhythm on the half-beat. If you deal with the opponent’s first motion, then hit him between his first and second punch, you break the opponent’s rhythm on the “one-and-a-half-beat.” If you deal with the first two punches, then hit the opponent between the second and third punches, you break the opponent’s rhythm on the “two-and-a-half-beat.”
Additional Methods of Broking Rhythm Broken Rhythm is any alteration of rhythm, any change of pattern, any difference from normal timing, pace, technique, or speed that breaks down your opponent’s sense of timing. The following are example of Broken Rhythm:
1. Change Target Low—Low—High 2. Change Mode of Attack Direct—Direct—Indirect 3. Change Attitude Aggressive—Aggressive—Passive 4. Change your Defensive Choices Block—Block—Jam 5. Change Weapon Punch—Punch—Kick 6. Change your Distance Close—Close—Long
Attack, Defense, and Counter-Attack Analysis
112 Master of the Ring Copyright 2004 by Eric & Kevin Lamkin
7. Change Footwork In-out—In-out—In-in 8. Change Speed Slow—Slow—Fast
Attack, Defense, and Counter-Attack Analysis
113 Master of the Ring Copyright 2004 by Eric & Kevin Lamkin
Combative Combative Offensive StrategiesOffensive Strategies
114 Master of the Ring Copyright 2004 by Eric & Kevin Lamkin
Combative Offensive Strategies
COMBATIVE OFFENSIVE STRATEGIES Any tactical problem is first solved mentally and then physically. The mind’s job is to find the best solution for the tactical task at hand in the shortest possible time on the basis of the knowledge of one’s own capabilities and analysis of the situation. The prime prerequisite for high-level tactical training is that the fighter must have complete command of his weapons systems (arms, legs, etc.) and their variants. Only when you don’t have to consciously be concerned with such things as balance, freedom of movement, offensive and defensive motions can you then concentrate on the more tactical elements. The decision to use any particular method of attack or attacking motion is also greatly influenced and in some ways even determined by the opponent. His physical size, mental attitude, fighting style, and technical skills all play an integral part in the situational analysis of the threat. While it is true that no opponent should be attacked unwisely without first having ascertained his reactions with probing attacks, skirmishes, and feints, this is not always possible. One may not have time to decide, or one’s choices may be limited due to extraneous circumstances. In this case, the better trained you are in your observational and analytical skills the higher your chance of success. Likewise, the wider the variety of attacks and tactics you develop in training, the less chance you stand of being surprised by the opponent. Combative Offensive Strategies (COS) enable the fighter to plan when, where, and how to attack. It is based on the belief that you should thoroughly know and anticipate the enemy before you risk commitment to any one action. A strategic fighter will vary his attacks with each opponent based upon that opponent’s responses, and the specific attacks he selects will often change as the fight progresses. This is why COS’s must be considered an on-going process that continues until the battle ends. The development and execution of battle tactics is a five-step method:
1. Data Gathering 2. Data Analysis 3. Strategic Formulation 4. Strategic Execution 5. Damage Assessment
Combative Offensive Strategies
115 Master of the Ring Copyright 2004 by Eric & Kevin Lamkin
I. DATA GATHERING Collecting as much data about the situation at hand enables the fighter to design effective strategies to use against the opponent. Data Gathering is accomplished by two methods—Observational Skills and Probing Attacks. A. OBSERVATIONAL SKILLS Continuing from the Pre-Combative Phase, Observational Skills allow you to analyze your opponent for tactical engagement. There are three areas of observation—Threat Analysis, Determining Strategic Advantages, and Determining Logistical Advantages.
1. Threat Analysis—Threat Analysis is the examination of the assailant, his offensive and defensive capabilities, fighting style, and weapons for the purpose of determining appropriate tactics to use against the opponent. When analyzing the threat, you must determine the:
A. Number of Assailants B. Type of Weapon (if any) Involved C. Body Type of the Opponent D. Fighting Style of the Opponent.
A. Number of Assailants—Determine the number of assailants that pose an immediate threat. When gathered in a group, people are more aggressive and act out behavior that they would not normally exhibit when facing you alone. Therefore, the greater the number of assailants, the greater the threat of lethal violence. In such circumstances, you may find it necessary to introduce lethal and non-lethal weapons as part of your strategic plan. The use of such weapons will balance your defensive strengths against your opponent’s offensive capabilities. The use of such weapons must first be scrutinized under the Rules of Engagement.
Another effective tactic is to initiate a pre-emptive strike against one or all of the attackers. Pre-emptive attacks contain a surprise element that enables the defender to obtain a physical and psychological advantage. In some instances, you can break the morale of the group and discourage the attack by launching a pre-emptive strike against the leader or the strongest person in the group. This attack must be quick and final to allow you the freedom to defend against the other assailants, if necessary.
Possible tactics to use against multiple attackers:
• Lethal and Non-Lethal Weapons • Pre-emptive attack against the group • Pre-Emptive Attack Against the leader
Combative Offensive Strategies
116 Master of the Ring Copyright 2004 by Eric & Kevin Lamkin
B. Determine the Type of Weapon Involved If the opponent is threatening you with a weapon, you must determine the type of weapon involved, its capabilities, your defensive skill level against such a weapon, and the weapon’s immediate threat. For example, a gun in its holster does not pose an immediate threat, but one pointing at your chest does.
When the opponent is threatening you with a weapon, you may find it necessary to introduce a weapon of your own in order to balance the forces. The type of weapon you introduce must be appropriate for the threat imposed and the range involved. Another point to consider is the possibility of a hidden weapon. Is the opponent fumbling in his pocket? Does he have something behind his back? If there is a reason to believe that a weapon is being hidden, a pre-emptive attack may be appropriate.
Possible tactics to use against weapon-wielding attackers:
• Pre-Emptive attack • Disarm • Weapons
C. Body Type Strategies Most fighters fit into one broad physical category or another. Because of natural categorization, they often subconsciously approach combat with certain presumed physical advantages. Indeed, many Martial Art Systems are specifically designed to enhance some of those natural advantages. But when facing an opponent with an unfamiliar body type, these fighters are often at a loss to appreciate why an ordinary sound defense is suddenly found inadequate. (The Elite Fighter System of Modern Combat teaches the student how to tailor his battle plan to his opponent’s physique.) Even before the first attack is launched, he will plan how to use his physical advantages most effectively against the opponent’s disadvantages. There are two variables that suggest a specific plan of action—reach and power.
Reach—Attacks can only achieve their maximum effect when the limb is allowed to extend to its full extension. For this reason, the tall fighter needs to maintain the offensive space at an out-fighting range. There, he can make direct frontal attacks without risk of personal injury. The short fighter needs to in-fight as much as possible. He can use indirect flank attacks and counter-attack to move in closer, where his attacks are effective but his opponent’s lack sufficient time to develop.
Combative Offensive Strategies
117 Master of the Ring Copyright 2004 by Eric & Kevin Lamkin
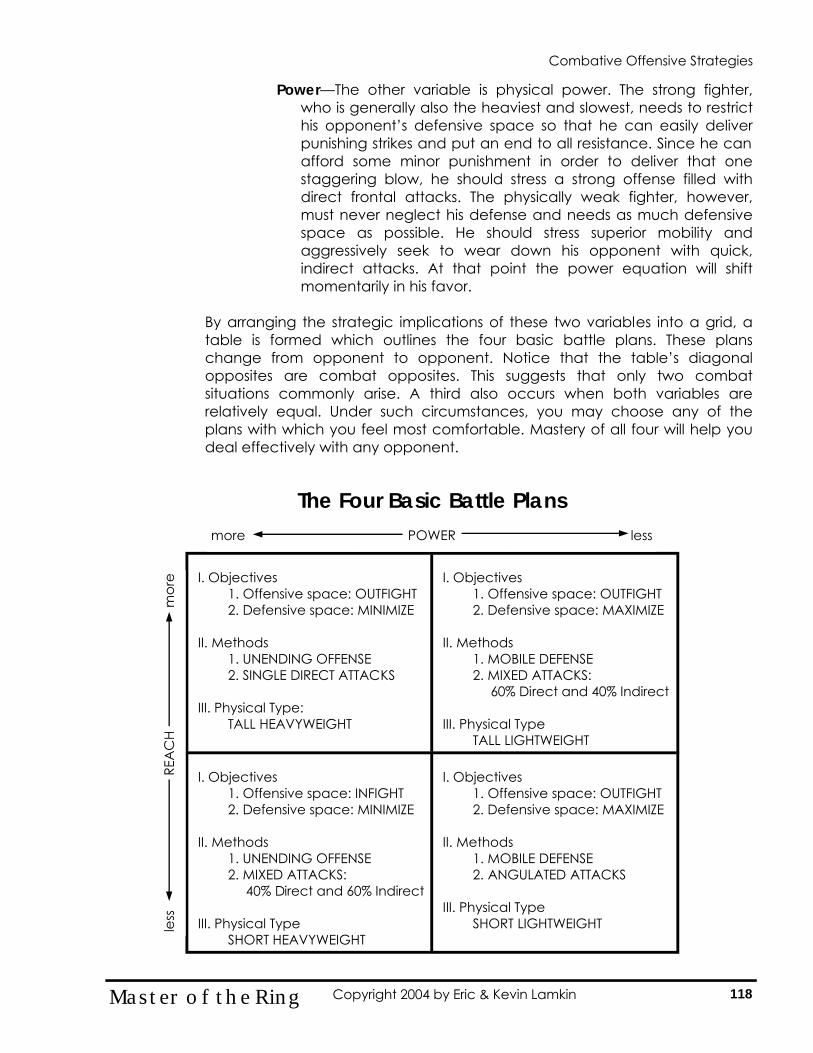
Power—The other variable is physical power. The strong fighter, who is generally also the heaviest and slowest, needs to restrict his opponent’s defensive space so that he can easily deliver punishing strikes and put an end to all resistance. Since he can afford some minor punishment in order to deliver that one staggering blow, he should stress a strong offense filled with direct frontal attacks. The physically weak fighter, however, must never neglect his defense and needs as much defensive space as possible. He should stress superior mobility and aggressively seek to wear down his opponent with quick, indirect attacks. At that point the power equation will shift momentarily in his favor.
By arranging the strategic implications of these two variables into a grid, a table is formed which outlines the four basic battle plans. These plans change from opponent to opponent. Notice that the table’s diagonal opposites are combat opposites. This suggests that only two combat situations commonly arise. A third also occurs when both variables are relatively equal. Under such circumstances, you may choose any of the plans with which you feel most comfortable. Mastery of all four will help you deal effectively with any opponent.
Combative Offensive Strategies
I. Objectives 1. Offensive space: OUTFIGHT 2. Defensive space: MINIMIZE
II. Methods
1. UNENDING OFFENSE 2. SINGLE DIRECT ATTACKS
III. Physical Type:
TALL HEAVYWEIGHT
I. Objectives 1. Offensive space: OUTFIGHT 2. Defensive space: MAXIMIZE
II. Methods
1. MOBILE DEFENSE 2. MIXED ATTACKS:
60% Direct and 40% Indirect III. Physical Type
TALL LIGHTWEIGHT
I. Objectives 1. Offensive space: INFIGHT 2. Defensive space: MINIMIZE
II. Methods
1. UNENDING OFFENSE 2. MIXED ATTACKS:
40% Direct and 60% Indirect III. Physical Type
SHORT HEAVYWEIGHT
I. Objectives 1. Offensive space: OUTFIGHT 2. Defensive space: MAXIMIZE
II. Methods
1. MOBILE DEFENSE 2. ANGULATED ATTACKS
III. Physical Type
SHORT LIGHTWEIGHT
more POWER less
less
RE
AC
H
mor
e
The Four Basic Battle Plans
118 Master of the Ring Copyright 2004 by Eric & Kevin Lamkin
Longer & Stronger If you are longer and stronger than your opponent, the main objective of your strategy is to keep the opponent at an out-fighting range so that you can attack him with your more powerful strikes. Seek to establish control over your opponent, force him to fight your fight with direct frontal attacks and a never-ending offense. This will be made easier if you can limit his ability to retreat such as backing him against an obstacle. Since you are bigger and have more body area to protect, a smart opponent will try to move in and out with quick attacks. Prevent this as much as possible through the use of powerful counter-attacks. However, should he succeed in getting close, resort to groundfighting as your size should give you the advantage. Points to remember:
1. Avoid wasteful attacks. The opponent must wear you down to win.
Therefore, move with him and wait for him to leave an opening before you begin an attack.
2. Maintain an out-fighting range before you and your opponent through the use of an unending offense.
3. Use direct frontal attacks to compliment your offense. However, be careful not to let the opponent counter-attack into your leads.
4. Don’t allow the opponent’s mobility to draw you off balance as it will create an opportunity for him to move in with a quick attack.
5. Try to limit the opponent’s mobility by closing off his defensive space.
6. When the opponent tries to close in for an attack, stop him with counter-attacks.
7. Whenever the opponent succeeds in getting in close, either force him away and begin anew or commence groundfighting.
Longer & Weaker If you are longer and weaker than your opponent, your objective is to wear the opponent down with quick, single attacks from an out-fighting range. Establish control over him through aggressive frontal attacks combined with a few indirect flank attacks. This can only be accomplished if you remain constantly aware of your defense. Use your greater mobility to stay well out of range until an opportunity for attack presents itself. Your opponent wants to limit your defensive space so he can force you to in-fight. Avoid this by sidestepping and launching indirect attacks. Should he succeed in closing in on you, drive him away to increase the range. Do not attempt groundfighting as his strength gives him the advantage. Your physical advantages stand about equal to the opponent’s. His ability to charge in with in-fighting tactics is the most dangerous tactic you must deal with. But if you use your superior reach and mobility, you will be able to dominate and control the fight. There may be instances, however, that you are confronted with an opponent of overwhelming strength or who has a greater tactical advantage. In such cases, it may be advisable to introduced weapons in order to balance the forces.
Combative Offensive Strategies
119 Master of the Ring Copyright 2004 by Eric & Kevin Lamkin
Important points to remember:
1. Stay out of range until you are ready to deliver a decisive attack. 2. Maintain an out-fighting range through a mobile defense and rapid
attacks. 3. Don’t attack foolishly. Move with the opponent and wait for an
opening. 4. Make your leads quick and accurate. Don’t give the opponent an
opportunity to counter-attack into your leads or to grab hold of you. 5. Vary your attacks to complement your defenses. Use a good
combination of direct attacks and angulated attacks, with the emphasis on direct attacks.
6. Try to use mobility to draw the opponent off-balance. As he charges, sidestep and counter-attack.
7. Always be aware of your defensive space. Don’t allow the opponent to limit your mobility.
8. When the opponent attempts to close in to in-fight, try to stop him with counter-attacks.
9. When the opponent does succeed in getting close, force him away and begin anew.
10.Don’t try to grapple with the opponent. His strength gives him an advantage.
11.Utilize weapons if you feel than you are no match against his strength and tactical superiority.
Shorter & Stronger If you are shorter and stronger than your opponent, the objective of your strategy is to keep the opponent at an in-fighting range so that you can force him into submission with powerful blows and crushing holds. Force the opponent to in-fight through a never-ending offense that combines indirect attacks with unexpected direct attacks. This will be made easier if you limit his defensive space. Your opponent wants to use his mobile footwork to base quick, out-fighting attacks. Use these attacks as an opportunity to counter-attack or seize hold of him. Since you are stronger and have less body area to protect, you can afford to take a few calculated risks. Without warning, charge forward, overpower the opponent, trap his limbs, and begin groundfighting. Your heavier build should allow you to have the advantage in groundfighting. Your physical advantages are equally balanced against the opponent’s. His ability to draw you off balance and sidestep your charges is the most dangerous tactics you must face. But these can be kept under control by deceptively mixing indirect attacks and counter-attacks with unexpected charges.
Combative Offensive Strategies
120 Master of the Ring Copyright 2004 by Eric & Kevin Lamkin
Important points to remember:
1. Stay well out of range until you are ready to attack. Don’t stand at a range the opponent can hit easily.
2. Avoid wasteful attacks. The opponent must wear you down to win. Therefore, move with him and wait for the proper opportunity to begin an attack.
3. Draw an attack from the opponent that you can use to slip, sidestep, or counter-attack your way in close.
4. Try to capture a limb and pull the opponent in close to in-fight or grapple.
5. Maintain an in-fighting range between you and your opponent through the use of an un-ending, forward moving offense.
6. Vary your attacks to compliment your offense. Use a good mixture of direct attacks and angulated attacks with the emphasis on indirect attacks.
7. Don’t be afraid to make a few unexpected charges to move in close. You can afford more calculated risks than your opponent. Be sure to trap his lead limbs as you close the distance.
8. Don’t let the opponent’s mobility draw you off balance as it will create an opportunity for him to move in with a quick attack.
9. Try to limit the opponent’s mobility by closing off his defensive space.
10.Don’t’ avoid opportunities for grappling. Your strength gives you the advantage.
Shorter & Weaker If you are shorter and weaker than your opponent, your objective is to wear the opponent down by moving in and out with quick attacks from close range. Since you cannot afford to absorb any of the opponent’s blows, limit in-fighting to one fast flurry of strikes at a time. Avoid out-fighting altogether. Try to keep the opponent under control through angulated attacks and counter-attacks. This can only be accomplished if you remain constantly aware of your defenses. Use your greater mobility to stay well out of range until an opportunity for attack presents itself. Your opponent wants to limit your defensive space so that his attacks will put an end to the fight. Avoid this by sidestepping his charges and counter-attack from the flank. Also, use joint attacks and trapping to progressively move your attack forward. Once in close, do not attempt to wrestle the opponent; force him away should he try it. It is advisable that you introduce weapons in order to balance the forces against you.
Combative Offensive Strategies
121 Master of the Ring Copyright 2004 by Eric & Kevin Lamkin
Important points to remember:
1. Stay well out of range until you are ready to attack. Don’t stand at a range the opponent can hit easily.
2. You cannot lead safely so don’t try. Move with the opponent and wait for an opportunity to attack.
3. Your attacks must compliment your defense. The opponent’s size advantage limits you to primarily angulated attacks.
4. Make your attacks quick and accurate. Don’t give the opponent an opportunity to counter-attack or to grab hold of you.
5. Use your mobile footwork to draw the opponent off balance. As he charges, sidestep and counter-attack. Hitting an off-balanced opponent increases the effectiveness of your strikes and decreases the effectiveness of his.
6. Draw an attack from the opponent that you can use to slip or sidestep your way in close to counter-attack.
7. Always be aware of your defensive space. Don’t allow the opponent to limit your mobility.
8. When the opponent tires, use joint attacks and trapping to close in. 9. Do not try to wrestle the opponent. His strength gives him the
advantage. 10.Utilize weapons to balance your defensive strengths against this
offensive superiority.
Physically Equal If you are physically equal to your opponent, the main objective of your strategy is still to use your strength to prevent the opponent from fighting his best fight. Most fighters, because of their physical size, specialize in one of four basics battle plans. Find out which one your opponent prefers and prevent him from using it. If the opponent prefers to in-fight, force him to out-fight. If he likes to hit and run, force him to stand and fight. The better versed you are in using different strategies, the greater your chances for success. The amount of time and effort that you put into your personal training will also have a direct bearing on your success in combat. At times, the slight advantage you have in flexibility, strength, speed, or endurance may be the determining factor in the outcome of the battle.
Combative Offensive Strategies
122 Master of the Ring Copyright 2004 by Eric & Kevin Lamkin
D. Fighting Style of the Opponent There are many types of opponents, but they can usually be categorized into three basic types:
• Those that GIVE ground. • Those that HOLD ground • Those that CLOSE ground
Those that GIVE ground—Those that Give ground are the Runner and the Creeper. The Runner is the type of opponent that runs out of distance any time you initiate an attack. The Creeper is an advanced Runner. He moves just enough out of range to make you miss while staying within range to deliver strikes of his own. The best tactics to use against fighters that give ground include:
• Broken Rhythm as you attack • HIA followed by a Single Direct Attack • Constant forward pressure
Those that HOLD ground—Those that Hold ground are the Blocker and the Angler. The Blocker is the type of fighter that holds a well-covered position while preparing to block and counter your attacks. The Angler is an advanced blocker who utilizes footwork and evasive body angulation to offset your attacks. The best tactics to use against those that Hold ground include:
• Indirect Attacks • HIA • Attack by Drawing • Counter Timed Attacks
Those that CLOSE ground—Those that Close ground are the Jammer and the Attacker. The Jammer is the type of opponent that prefers to crash into your attack in order to smother it while counter striking. He usually maintains a well-guarded position as he jams. The Attacker continually attacks forward, never allowing you to set your own attacks. The best tactics to use against the Jammer include:
• Counter-timed Attacks • Grappling Methods • Attack by Drawing • Constant forward pressure
The best tactics to use against the Attacker include:
• Stop Hits/Kicks • Counter-Time • Immobilizations • Grappling methods • Single Angular Attacks
Combative Offensive Strategies
123 Master of the Ring Copyright 2004 by Eric & Kevin Lamkin
2. DETERMINING STRATEGIC ADVANTAGES—Determining Strategic Advantages involves the analysis of your own tactical skills. This analysis is use to determine your strength and skill level with the tactics at your disposal. It is also used to determine which tactic will be appropriate to use under the threat you face. There are two types of strategic advantages—Psychological Operations and Combative Operations.
Psychological Operations—Psychological Operations are methods used to mentally off-balance your opponent. These methods enable you to gain an advantage over your opponent by attacking when your opponent is defending and/or offensively weakened. The types of Psychological Operations include:
A. Constant Forward Pressure B. Emotion Trapping C. Pre-Emptive Attacks D. Attack the Leader E. Attack the Head F. Manifest Distractions G. Psychological Distractions
A. Constant Forward Pressure—There are two types of Constant
Forward Pressure—mental and physical. Mental Constant Forward Pressure is demonstrated by being externally focused, showing no pain, and showing no signs of fatigue. Regardless of how you might actually feel, you must not show any weakness to your opponent. Any sign of weakness may encourage the opponent and strengthen his attacks.
Physical Constant Forward Pressure is demonstrated by forward attacking motions, offensive body positioning, aggressive body language, and relentless attack. This subtle body language sends a strong message to the opponent and places him on the defensive.
B. Emotion Trapping—The art of Emotion Trapping begins in the mind of the fighter. Through years of constant training and sharpening of the physical skills, the Elite Fighter gains the self-confidence necessary to project a winning attitude that can be clearly felt by the opponent.
Another tactic used by the fighter to gain the Emotional Advantage in combat is the strategic use- or non-use of voice during the moments just before a fight begins or between skirmishes. In some cases, a shout can startle or frighten the opponent for the split-second it takes to attack him. In a situation where a fight is unavoidable, a strong verbal stance can also attack him psychologically, loudly announcing the fact that the fighter has absolutely no fear of his opponent.
Combative Offensive Strategies
124 Master of the Ring Copyright 2004 by Eric & Kevin Lamkin
During clashing, however, the fighter does not open his mouth for any reason. This is a safety precaution taken to guard against being hit with an open mouth, which allows the jaw to be broken, the teeth to be smashed together, or the tongue to be caught between the teeth. On the other hand, complete silence before and during a confrontation can also intimidate and confuse the opponent. When a fighter determines that he has no alternative but to fight, he can spring immediately into action without giving his opponent any verbal indication of his intention to attack.
Finally, properly harnessing the emotions can help the fighter to mental prepare for combat. Properly channeling excitement, nervous energy, and even fear into “aggressive energy” can enhance performance and even dull the effects of pain or fatigue long enough to win the battle.
C. Pre-Emptive Attack—In a situation where the fighter has judged a fight imminent and unavoidable, he can gain considerable physical and psychological advantage by being the first to attack. If that attack is properly executed, it may well also be the last. In any case, attacking first puts the opponent on the defensive from the start, and lets him know that the fighter is not afraid of him. One very effective way of getting the first strike in is to attack mid-sentence during any conversation taking place in the build up of a fight. No one expects a strike to come until the fighter has finished saying whatever he has started to say.
D. Attack the Leader—In situations involving two or more
opponents, it is sometimes wise to attack the leader with a pre-emptive assault. This method demoralizes the rest of the group and often creates enough shock and confusion that it eliminates their desire to fight. However, group dynamics can be unpredictable. Be prepared to fight the entire group if necessary.
E. Attack the Head—Although body attacks can be effective and
are used frequently, in actual combat it is wise to attack the head and throat most often. This disorients and demoralizes the opponent. As the old saying goes, "Kill the head and the body will die".
F. Manifest Distractions—Any unexpected noise shocks the central
nervous system and momentarily reduces body coordination. The mind instinctively shifts its attention to the noise, until the meaning is understood. It is therefore a very useful device, and should be used frequently against a nervous, or emotionally upset opponent.
Combative Offensive Strategies
125 Master of the Ring Copyright 2004 by Eric & Kevin Lamkin
Always agitate an emotional opponent. Practically any sudden action you take will be enough of a distraction to set up a successful attack. Flashy movement of the hands, slapping the thigh, clapping the hands are all underused techniques. The most important manifest distraction is the yell. There are two types of yells. One is the very guttural, abdominal yell. The other is the high-pitched, falsetto yell. Switching between one and the other gives your yell more variety, giving it more potential as it is unexpected.
G. Psychological Distractions—Constantly suggest to your
opponent that he cannot cope with you, that his best efforts are failing, and that you make him look silly. It is important that your comments suggest a comparison between the two of you. In that way, you attack his sense of well-being and reduce his self-confidence.
It is a good idea to back up your verbal attacks as visibly as possible. Try to make your opponent think that his blows can’t hurt you, or that you are far less tired than he. Perhaps you could use a yell designed to annoy and make fun of him. All psychological attacks are intended to artificially put the opponent in the position of the weak competitor. They remind him of what he would not like to happen. And, if they do not reduce his will to resist, they should at least produce an emotional response. Once an opponent becomes mindful of his emotions, he stops thinking clearly or quickly. His thoughts and his movements become obvious. When you are confronted with psychological distractions, you must remain calm and recognize them for the nonsense that they are. If you give in to your emotions, your opponent will be able to back up his comments with positive results and eventually demoralize you. Instead, keep your head and look for ways to make the opponent pay for his insults. Try to draw him within range, and keep him there. His talk may distract himself from your intentions.
Combative Offensive Strategies
126 Master of the Ring Copyright 2004 by Eric & Kevin Lamkin
Combative Operations—Combative Operations include your complete arsenal of SOM tactics. This ever-growing arsenal enables you to choose the appropriate response to the threat you face. Combative Operations include:
A. The Four Types of Attack B. Counter-Attacks C. Calculated Counters D. Rhythmic Attacks E. Weapon Attacks.
A. The Four Types of Attack—The Four Types of Attack are: Direct
Attacks, Indirect Attacks, Immobilization Attacks, and Combination Attacks.
1) Direct Attacks—Direct Attacks are attacks made with not attempt to disguise the motion. There are two types—Single Direct Attacks and Single Angulated Attacks.
2) Indirect Attacks—An Indirect Attack is an offensive method designed to create an opening in the opponent’s defensive barrier through deception or subterfuge. There are two types of Indirect Attacks—Feints and False Attacks.
3) Immobilization Attacks—An Immobilization Attack is an offensive action that momentarily immobilizes either one or both of the opponent’s arms and/or legs to allow your strike to penetrate his defensive barrier. There are two types—Hand Immobilization Attacks and Foot Immobilization Attack.
4) Combination Attacks—Combination Attacks are compound offensive actions composed of two or more movements that flow from one to the next in a well-planned, natural sequence.
B. Counter Attack—A Counter Attack is an offensive action made
against an opponent’s attack, either as he attacks on his own initiative or is provoked into attacking. There are three types of Counter Attacks—Pre-Emptive Counter, Timed Counter, and Chasing Counter.
1) Pre-Emptive Counter Attacks—Pre-Emptive Counter Attacks are methods designed to strike the opponent when he is preparing to attack or while the attack is under development. There are two types—Stop Hits/Kicks and Jamming.
Combative Offensive Strategies
127 Master of the Ring Copyright 2004 by Eric & Kevin Lamkin
2) Timed Counter Attacks—Timed Counter Attacks are offensive actions designed to hit the opponent at about the same time that his attacking limb reaches full extension. There are four types of timed Counter Attacks—Single Timed Defense, Destructions, Interceptions, and Evasions.
3) Chasing Counter Attacks—Chasing Counter Attacks are an immediate response to the opponent’s attack. There are two types—Double Timed Defense and Response Hits/Kicks.
C. Calculated Counters—A Calculated Counter is a counter
offensive action that is initially set up by the fighter as the attacker. There are two types—Attack by Drawing and Counter Time
D. Rhythmic Attacks—Rhythmic Attacks function at the
subconscious level. They condition the opponent to expect one type of attack, speed, distance, etc. in order to catch him off-guard by suddenly switching to another aspect. For example, the first series of attacks establishes a pattern that sets-up the final attack.
E. Weapon Attacks—Weapons are devices designed to inflict
greater harm to the opponent than one is physically capable of doing by increasing the offensive range or offensive effectiveness. There are two types of weapons—Weapons of Opportunity and Tactical Weapons.
1) Weapons of Opportunity—Weapons of Opportunity are objects that are normally used for purposes other than combat, but may be utilized as a weapon if needed. For example, umbrellas, rocks, broom handles, kitchen knives, etc.
2) Tactical Weapons—Tactical Weapons are devices that are made specifically for use as a weapon. These devices include: batons, fighting knives, handguns, and tactical shotguns.
Combative Offensive Strategies
128 Master of the Ring Copyright 2004 by Eric & Kevin Lamkin
2. DETERMINING LOGISTICAL ADVANTAGES—Determining Logistical Advantages entails analyzing:
A. Position B. Space C. Environment
Position—There are always vulnerable targets available. However, some situations expose more of the dangerous targets to attack than others. By using the strengths of your position against the weaknesses in the opponent’s Self-Centerline, you can obtain a safe victory. This is the essence of the concept of position. It is concerned primarily with the arrangement of the limbs and body relative to the opponent at any given instant. The placement of the limbs is important for the ability to quickly defend your Self-Centerline and attack the opponent’s. The ideal position is one that:
1. Protects your own Self-Centerline. 2. Does not open any lines of attack to your Self-Centerline without
adequate compensation. 3. Maintains a good stable balance. 4. Offers greater attacking potential to yourself than to your
opponent. 5. Is prepared to meet any threat.
A positional analysis is always interpreted in terms of the entire combat scene, which in actual practice usually contains some advantages and some disadvantages for each fighter. Most unarmed conflicts consist of several waves of attack and defense until one fighter succeeds in breaking down the other’s defenses long enough to make a decisive assault upon his Self-Centerline. A positional fighter seeks to scientifically base each offensive and defensive wave on using his personal advantages to exploit the opponent’s weaknesses. In this way he guarantees his offense the greatest chance of victory and his defense the smallest chance for defeat. Once he succeeds in placing decisive pressure upon a positional weakness, he knows he can gain still other advantages until the momentum of his attack becomes unstoppable. There are two possible positional relationships that exist between you and your opponent—Closed Position and Open Position.
1. Closed Position—A Closed Position is when each fighter has the same side forward (right-to-right or left-to-left). In such a position, the fighters’ Self Centerlines are parallel. A Closed Position tends to be the most natural position from which to fight as it affords the greatest offensive and defensive capabilities.
2. Open Position—An Open Position is when each fighter has the opposite side forward (right-to-left or left-to-right). In such a position, the fighters’ Self Centerlines will intersect at an imaginary point. An Open Position tends to make many fighters uncomfortable because they feel as though their targets are exposed. The Elite Fighter is adept at fighting from both sides and
Combative Offensive Strategies
129 Master of the Ring Copyright 2004 by Eric & Kevin Lamkin

will switch sides to harass and confuse the opponent or to weaken his opponent’s defensive capabilities. There are certain adjustments in your on-guard position that prove to be useful when facing your opponent in an Open Position. These adjustments are:
• Carry your lead hand slightly higher than usual to
offset your opponent’s lead hand, and try to keep your lead foot slightly to the outside of the opponent’s. This position helps nullify the opponent’s lead hook punch and puts you in position to attack on the outside.
• Use footwork and body angulation to aid in zoning away from the opponent’s rear arm and leg.
Closed Position Open Position
Combative Offensive Strategies
130 Master of the Ring Copyright 2004 by Eric & Kevin Lamkin
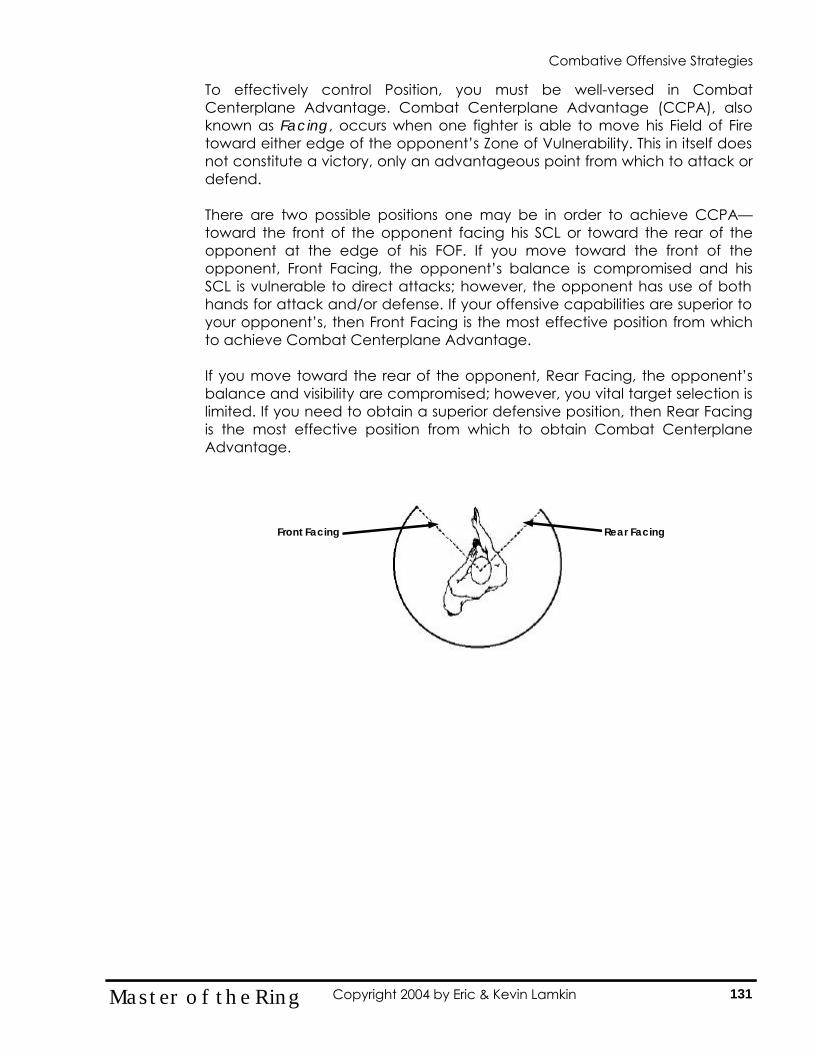
To effectively control Position, you must be well-versed in Combat Centerplane Advantage. Combat Centerplane Advantage (CCPA), also known as Facing, occurs when one fighter is able to move his Field of Fire toward either edge of the opponent’s Zone of Vulnerability. This in itself does not constitute a victory, only an advantageous point from which to attack or defend. There are two possible positions one may be in order to achieve CCPA—toward the front of the opponent facing his SCL or toward the rear of the opponent at the edge of his FOF. If you move toward the front of the opponent, Front Facing, the opponent’s balance is compromised and his SCL is vulnerable to direct attacks; however, the opponent has use of both hands for attack and/or defense. If your offensive capabilities are superior to your opponent’s, then Front Facing is the most effective position from which to achieve Combat Centerplane Advantage. If you move toward the rear of the opponent, Rear Facing, the opponent’s balance and visibility are compromised; however, you vital target selection is limited. If you need to obtain a superior defensive position, then Rear Facing is the most effective position from which to obtain Combat Centerplane Advantage.
Front Facing Rear Facing
Combative Offensive Strategies
131 Master of the Ring Copyright 2004 by Eric & Kevin Lamkin
Space—Spacial advantages come in two forms—maneuverability and range. An advantage in maneuverability concerns the ability to advance and retreat. For example, if you were able to back the opponent against a wall, you would have the advantage in attacking his Self-Centerline since he could not back away.
The second advantage is range. This concerns the actual distance between two opponents. If you do not stand at a range close enough to make a threatening attack, or quickly close the gap, then you cannot seize the initiative. This is why tall fighters generally have an easier time than short fighters when fighting a ranged attack. In addition, there are specialized tactics that can be employed depending upon the range involved. For example, various types of close quarter attacks can be used not only to strike but also to offset the opponent’s balance and prevent counter attacks. Examples include:
1. Shoving the opponent’s lead or rear shoulder. 2. Shoving the opponent’s lead or rear hip. 3. Punching into the opponent’s lead or rear shoulder. 4. Butting into opponent with shoulder. 5. Slamming shoulder upward into opponent’s jaw. 6. Buckling opponent’s knee (with or without a strike). 7. Spinning or twisting the opponent off-balance. 8. Shoving the opponent away. 9. The use of close-quarter pinching, hair pulling, stomping, etc.
Environment—Your environmental surroundings play a crucial role in your combat success. By properly manipulating your surroundings, you can inhibit your opponent’s vision, extend your range, distract your opponent, and even use the environment to physically harm him. For example, by positioning yourself so that a strong light source is behind your, you will negatively affect your opponent’s vision while improving your own. By standing higher than your opponent while on a sloped surface, you increase the range and effectiveness of your weapons while decreasing his. During combat, you can force your opponent backward into an obstacle or wall and possibly distract him or even cause a minor injury. Study your environment and learn to manipulate it to your tactical advantage.
Combative Offensive Strategies
132 Master of the Ring Copyright 2004 by Eric & Kevin Lamkin
B. PROBING ATTACKS Unless you have seen your opponent fight before, your opening moves must be concerned with the first step of this method. All fighters have certain preferred moves that they tend to use above all others in both offense and defense. Through experimentation and observation, you try to find them out early. These opening skirmishes will also help you discover any idiosyncrasies or bad habits your opponent may have developed. His defensive reactions can be tested through quick, superficial attacks directed toward different target locations. This forces him to reveal his preferred method of defense. Continue your attack, supporting them with an occasional fake for feint. You should be able to determine the opponent’s reaction time. Study his method and type of counter-attack. Use a feint, preceded by a grab or sudden pull on his lead arm, to test his likely reaction to traps and grappling techniques. Deliberately draw a few attacks to uncover his offensive reaction but be prepared to retreat out of range at the first sign of danger. This will enable you to determine the extent of his reach and his speed. At this point, and throughout the fight, take careful note of the attacks and target locations he chooses. And always be on the lookout for any new or varied patterns in his movements.
Combative Offensive Strategies
133 Master of the Ring Copyright 2004 by Eric & Kevin Lamkin
II. ANALYSIS OF DATA The next step is to analyze the data you have just collected and formulate a theory regarding the opponent’s possible responses to your combat stimuli. This analysis is an important part of SOM’s because it requires you to isolate and categorize the observed data according to the relative arrangements of the limbs. Based on your initial observations, formulate a theory about which offensive and defensive technique your opponent is likely to use. III. STRATEGIC FORMULATION Now that you have gathered and analyzed all the necessary information, you are ready to choose tactics that you feel will be effective against your opponent. However, you must choose only those tactics that follow the Rules of Engagement. The Rules of Engagement are guidelines to determine the amount of force that can be lawfully applied against your opponent. These rules will vary depending upon whether you are Military Personnel, a Law Enforcement Officer, or a private Citizen. Military Personnel must refer to their commanding officer (CO) to learn the rules of engagement for their particular theatre of combat. This is due to the fact that military Rules of Engagement can vary depending upon the theatre of combat, the stage of combat, and even the political climate. Law Enforcement Officers operate under similar Rules of Engagement as private Citizens but they must also follow rules that ensure the safe capture, control, and transportation of their prisoner. The following page lists the Rules of Engagement are specifically directed toward Citizens, but they are often applied to Law Enforcement and Military Personnel as well.
Combative Offensive Strategies
134 Master of the Ring Copyright 2004 by Eric & Kevin Lamkin
RULES OF ENGAGEMENT General Guidelines
1. The decision to use force must be based on logic and necessity, not on emotions.
2. Force should only be used when it is reasonable to believe that it is necessary to protect oneself against the use or immediate use of unlawful physical force.
3. The Fighter must avoid the use of unnecessary menacing actions for the purposes of intimidation.
4. The Fighter may not use force merely to prevent the use of offensive or insulting words.
5. In general, the use of deadly force is not authorized merely to protect property, but only when the safety of a human being is in jeopardy. Exceptions to this include burglary and home invasions.
Use of Force in Self Defense
1. The Fighter may use only the degree of force that is reasonably necessary to protect himself.
2. A Fighter may use deadly force in self defense when he reasonably believes that:
a. He is in imminent danger of losing his life or receiving great bodily
harm. b. He reasonably believes that the use of deadly force is necessary to
save himself from that danger.
Use of Force to Protect Others 1. A Fighter may use only the degree of force necessary to protect another
person against forcible offense. 2. A Fighter may in some instances use deadly force to prevent a violent or
forcible felony involving danger to life or great bodily harm. 3. When a Fighter uses force to protect another person, the he may use only
such force as is reasonably apparent that the other person could lawfully use to protect himself under the circumstances.
Combative Offensive Strategies
135 Master of the Ring Copyright 2004 by Eric & Kevin Lamkin
IV. STRATEGIC EXECUTION The final step is to prove the validity of your theory. Truth in combat is different for every person and changes with every opponent. This is the reason for so many different battle plans. Yours can be demonstrated by designing attacks to take advantage of the opponent’s predicted movements. The accuracy of your theory is directly proportional to the success of your planned attacks. But this method does not end here. It continues to help you develop attacks as the battle progresses. You must constantly observe your opponent. Note any changes of his movement patterns due to strategy, emotion, fatigue, or injury. Then formulate new theories and perform new combat tests until that one decisive assault finishes the struggle. V. DAMAGE ASSESSMENT Based upon your assessment of the damage caused by the success or failure of your attack, you may continue along with the same strategy or you may formulate a new strategy and develop new tactics until there is a final outcome of the battle. The flow chart on the following page summarizes your tactical thinking skills during combat.
Combative Offensive Strategies
136 Master of the Ring Copyright 2004 by Eric & Kevin Lamkin
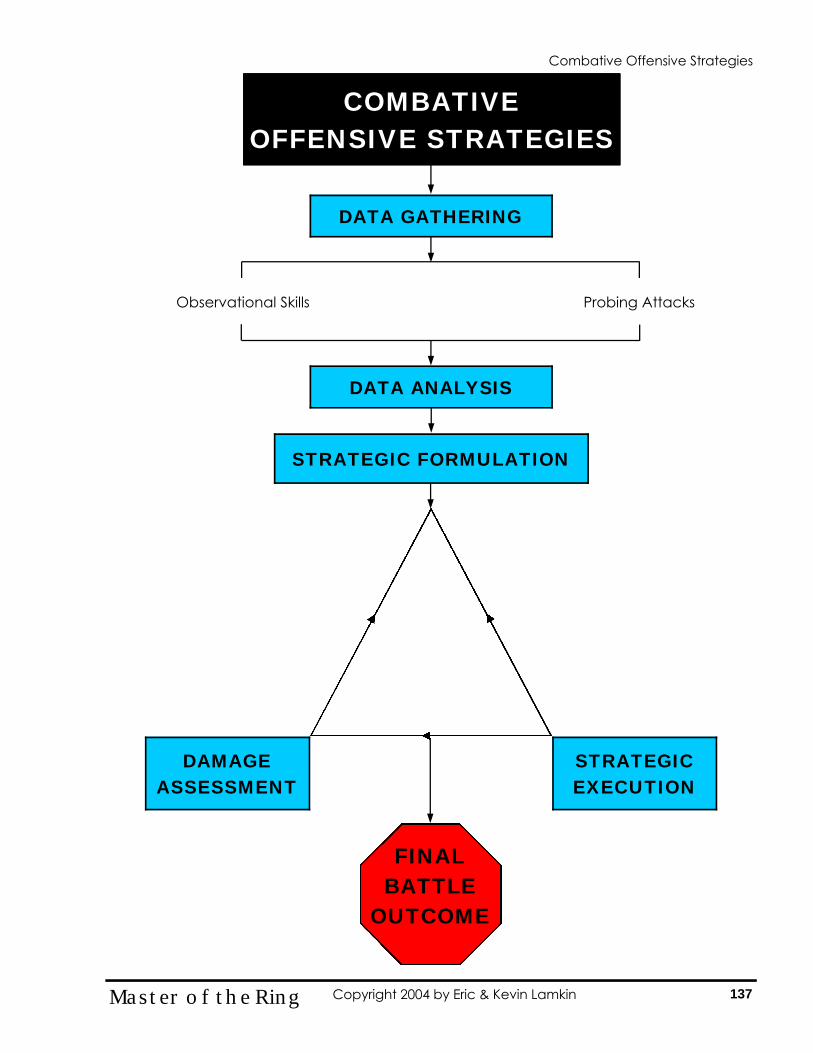
Combative Offensive Strategies
COMBATIVE OFFENSIVE STRATEGIES
DATA GATHERING
Observational Skills
DATA ANALYSIS
STRATEGIC FORMULATION
Probing Attacks
DAMAGE ASSESSMENT
STRATEGIC EXECUTION
FINAL BATTLE
OUTCOME
137 Master of the Ring Copyright 2004 by Eric & Kevin Lamkin

AdvancedAdvanced
138 Master of the Ring Copyright 2004 by Eric & Kevin Lamkin
AdvancedAdvanced CombatCombat
Tactics & TrainingTactics & Training
139 Master of the Ring Copyright 2004 by Eric & Kevin Lamkin
Advanced Combat T&T
ADVANCED COMBAT TACTICS & TRAINING
This section, Advanced Combat Tactics & Training, further refines the skills you have obtained in previous training levels. In this section, we will examine:
1. General Theory and Principles 2. Combat Footwork 3. Controlling the Fighting Measure 4. Launch Point 5. Deceptive Penetration 6. Counter Fighting 7. Group Combat Tactics
GENERAL THEORY AND PRINCIPLES Here are some key principles that apply to all strategic attacks regardless of the type and/or purpose of the attack. As you continue your study in the Enforcer Level, keep these principles in mind and apply them to your training. 1. Strengthen Your Lead-Off Technique
When attacking always begin with the weapon first, never begin with your body (the target). By leading off every attack with your weapon, you will:
1. Immediately place the opponent on the defensive. 2. Move your weapon at least half the distance to the target before he can
even perceive it. 3. Minimize your risk to a counter-attack.
The more complex the motion, the more at risk you are to a counter-attack and a weakened offensive motion. Some practitioners find it advantageous to break down the individual actions of a simple attack to focus on each stage. For example, a lead jab with a push drag foot maneuver is comprised of the following components:
1. The weapon arm extends and aims at the opponent. 2. The weapon begins to travel toward the opponent. 3. The shoulders turn as the arm extends. 4. The rear foot begins to press against the ground in preparation for the
advance. 5. The legs propel the body forward. 6. The weapon contacts its target a moment before the foot maneuver is
completed. 7. The body retracts to an on-guard position.
Apply this method of study to all of your lead off techniques (primary attack weapons).
Advanced Combat T&T
140 Master of the Ring Copyright 2004 by Eric & Kevin Lamkin
2. Prepare the Battlefield Before you attack, you MUST neutralize your opponent’s position, or his ability to attack and/or defend. An opponent’s position includes:
1. The opponent’s preferred distance. 2. Line of Fire 3. Aim 4. Balance 5. State of Mind
To disturb his preferred distance, determine if he prefers kicking or punching. If he is comfortable at kicking range, then draw closer and fight him at punching range or even grappling range. If he prefers to grapple, then keep him at kicking range. Always approach the fight according to YOUR terms and conditions—never his. To disturb his Line of Fire, continually change your position. This method often simultaneously affects his aim. Freely move within the Field of Fire and attempt to approach his Zone of Vulnerability. For more information refer to Geometric Combat Theory—Combat Centerplane To disturb his balance, keep him moving. When he tries to kick, quickly move out of range to make him miss and quickly attack before he re-establishes his fighting position. The more you can make him move in the direction of his heels, the more he will be off-balance. Also, always try to attack the opponent while he is in transition to correct his Line of Fire. To disturb his State of Mind keep him on the defensive and never let him know what you intend to do. Kick when he thinks you will punch, execute a takedown when he thinks you will kick. Utilize Psychological Set Ups (Broken rhythm) to establish an attack pattern that is unexpectedly disrupted and defeat one of his five key positional elements.
3. Tighten Your Combinations
All combinations MUST include:
1. A good lead off technique (primary attack weapon) 2. All combinations should gain distance and time on the opponent. 3. All combinations MUST have a good follow up (power) strike. 4. Use Penetration footwork with Penetration techniques and Clearing footwork
and Clearing techniques (refer to the section entitled, Combat Footwork) 5. Remove all unnecessary gaps in the attack sequence! These gaps are holes
in your defense.
141 Master of the Ring Copyright 2004 by Eric & Kevin Lamkin
Advanced Combat T&T
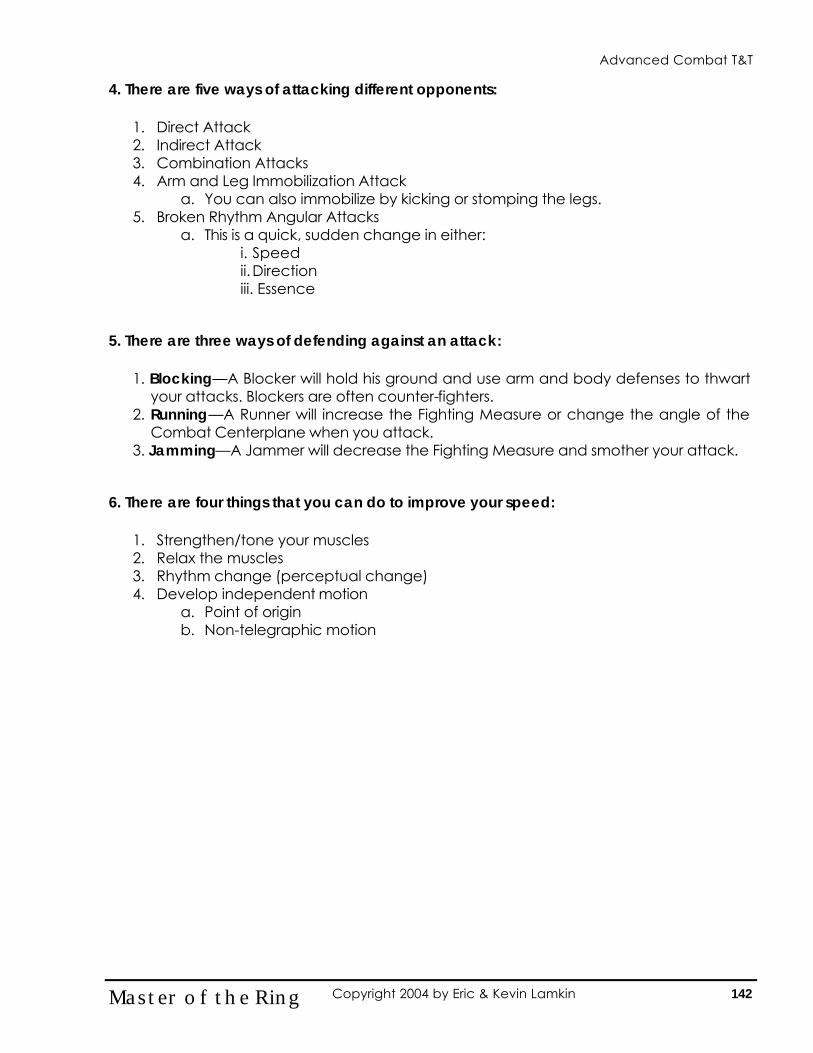
4. There are five ways of attacking different opponents:
1. Direct Attack 2. Indirect Attack 3. Combination Attacks 4. Arm and Leg Immobilization Attack
a. You can also immobilize by kicking or stomping the legs. 5. Broken Rhythm Angular Attacks
a. This is a quick, sudden change in either: i. Speed ii. Direction iii. Essence
5. There are three ways of defending against an attack:
1. Blocking—A Blocker will hold his ground and use arm and body defenses to thwart your attacks. Blockers are often counter-fighters.
2. Running—A Runner will increase the Fighting Measure or change the angle of the Combat Centerplane when you attack.
3. Jamming—A Jammer will decrease the Fighting Measure and smother your attack. 6. There are four things that you can do to improve your speed:
1. Strengthen/tone your muscles 2. Relax the muscles 3. Rhythm change (perceptual change) 4. Develop independent motion
a. Point of origin b. Non-telegraphic motion
142 Master of the Ring Copyright 2004 by Eric & Kevin Lamkin
Advanced Combat T&T
Combat Combat
FootworkFootwork
143 Master of the Ring Copyright 2004 by Eric & Kevin Lamkin
Advanced Combat T&T
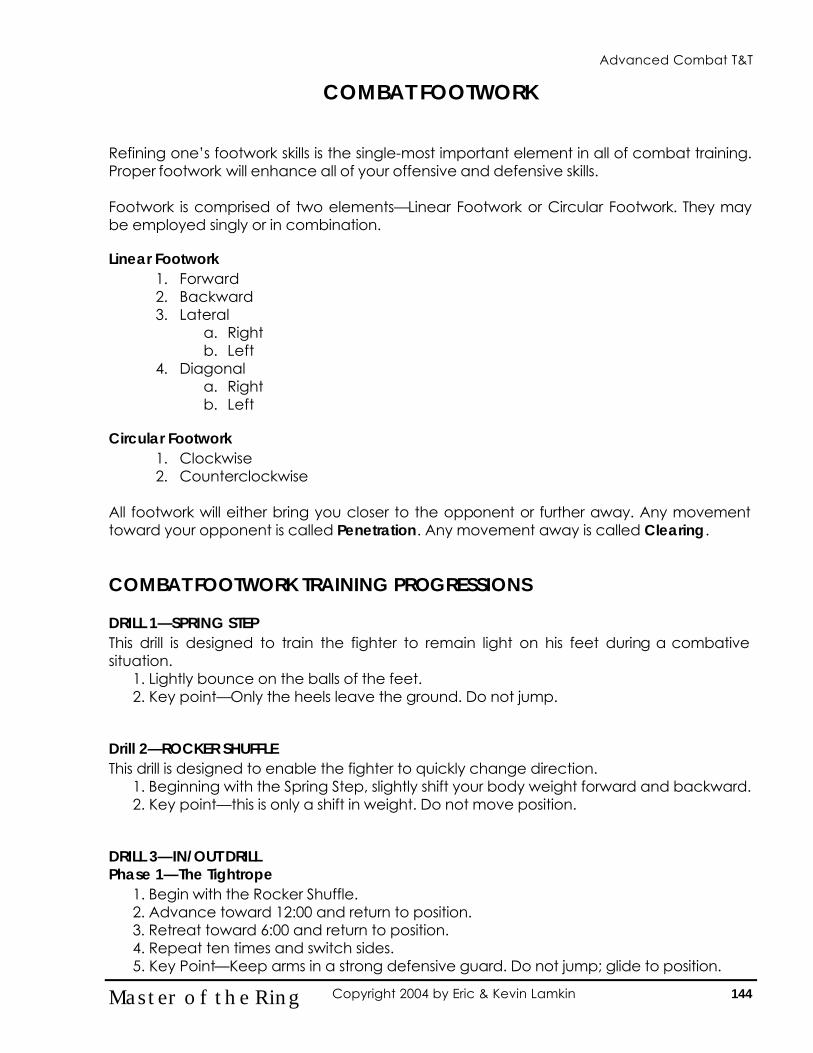
COMBAT FOOTWORK Refining one’s footwork skills is the single-most important element in all of combat training. Proper footwork will enhance all of your offensive and defensive skills. Footwork is comprised of two elements—Linear Footwork or Circular Footwork. They may be employed singly or in combination. Linear Footwork
1. Forward 2. Backward 3. Lateral
a. Right b. Left
4. Diagonal a. Right b. Left
Circular Footwork
1. Clockwise 2. Counterclockwise
All footwork will either bring you closer to the opponent or further away. Any movement toward your opponent is called Penetration. Any movement away is called Clearing. COMBAT FOOTWORK TRAINING PROGRESSIONS DRILL 1—SPRING STEP This drill is designed to train the fighter to remain light on his feet during a combative situation.
1. Lightly bounce on the balls of the feet. 2. Key point—Only the heels leave the ground. Do not jump.
Drill 2—ROCKER SHUFFLE This drill is designed to enable the fighter to quickly change direction.
1. Beginning with the Spring Step, slightly shift your body weight forward and backward. 2. Key point—this is only a shift in weight. Do not move position.
DRILL 3—IN/OUT DRILL Phase 1—The Tightrope
1. Begin with the Rocker Shuffle. 2. Advance toward 12:00 and return to position. 3. Retreat toward 6:00 and return to position. 4. Repeat ten times and switch sides. 5. Key Point—Keep arms in a strong defensive guard. Do not jump; glide to position.
144 Master of the Ring Copyright 2004 by Eric & Kevin Lamkin
Advanced Combat T&T
Phase 2—Around the Clock 1. Begin with the Rocker Shuffle. 2. Advance toward each clock position and return back to original starting position
(center) in the following manner:
12:00—Center 1:00—Center 2:00—Center 3:00—Center 4:00—Center 5:00—Center 6:00—Center 7:00—Center 8:00—Center 9:00—Center 10:00—Center 11:00—Center 12:00—Center
3. Repeat this drill in the reverse direction (counterclockwise) 4. Key points—Do not jump or bounce as you move. Your body momentum should
always be forward and backward. DRILL 4—PENETRATION
1. Advance with a strike (single) 2. Return immediately back to position Train to quickly cover a small distance first then
begin to increase the distance covered. 3. Use the Positional structure of your attacking weapon to protect your exposed Self
Centerline. 4. Advance around the clock in both directions. Train on both sides.
DRILL 5—DOUBLE UP
1. Repeat the Drill 4 but now double advance and deliver a strike with each advance. 2. Retreat only once.
DRILL 6—PENETRATE WITH THE LEGS
1. Repeat the Drill 4, but utilize a lead leg roundhouse kick as your weapon. DRILL 7—LEG DOUBLE UP
1. Repeat the Drill 6 with a double lead leg roundhouse kick without planting down between kicks.
2. You may add a pull-drag on the second kick. 3. Try to vary the height of the kicks.
145 Master of the Ring Copyright 2004 by Eric & Kevin Lamkin
Advanced Combat T&T
DRILL 8—PENETRATION COMBINATION Combination 1—All Forward
1. Advance with a lead jab 2. Drag up lead roundhouse kick to the opponent’s groin 3. Plant forward; deliver a lead jab followed by a rear cross 4. Retreat (Clear) toward 6:00.
Combination 2—Three as I leave
1. Repeat Combination 1. 2. As you Clear, add two retreating lead hand jabs and one retreating lead side thrust
kick. 3. You must first move back and then strike; do not strike AS you move backward or you
will weaken the strike and your position. Combination 3—Side Exit
1. Repeat Combination 1 2. Retreat (Clear) on a rear 45-degree angle rather than straight toward 6:00.
Combination 4—Fake and Exit
1. Repeat Combination 1. 2. Before you clear, first fake toward one rear 45-degree angle then clear toward the
other. Combination 5—Zig-Zag Clearance
1. Repeat Combination 2 2. As you clear, retreat on alternating rear 45-degree angles in a Zig-Zag pattern.
DRILL 9—LATERAL MOVEMENT Phase 1—Eight Count
This is similar to the “Around the Clock” Drill 1. Advance toward 12:00 2. Center 3. Clear toward 6:00 4. Center 5. Lateral toward 3:00 6. Center 7. Lateral toward 9:00 8. Center
146 Master of the Ring Copyright 2004 by Eric & Kevin Lamkin
Advanced Combat T&T
DECEPTIVE FOOTWORK Spring Probe
1. Begin with the Spring Step. 2. Penetrate just close enough toward the opponent to draw his fire, but not close
enough for him to make contact. 3. Purpose: (1) To ascertain the opponent’s preferred methods of attack and/or
defense. (2) To create an opening for an attack. Scatter Step
1. The purpose of this step is to disrupt your opponent’s mental processes. 2. To perform, suddenly drop your body weight as you incrementally increase the width
of your stance by making small steps with your feet. 3. Key Points—Make your steps loud to draw his attention. Perform this at a safe range.
Your movement is downward. Draw Step
1. The purpose of this tactic is to cause your opponent to believe that you are moving toward a particular direction.
2. To perform, suddenly move your entire body on a 45-degree angle (Penetrating or Clearing). Utilize a small shuffle with this action.
3. Lean your body in the same direction as the shuffle. This will enhance the effect. 4. Key Point—This method is never used by itself. It is always used in conjunction with
other maneuvers or strikes. Scramble Step
1. This is a series of Draw Steps as you advance. The purpose of this step is to confuse your opponent as you close the Fighting Measure.
2. To perform, execute three directional fakes that turn the body slightly with a slight advance (e.g., Left—Right—Left)
Draw Step and Clear
1. The Draw Step may also be used to create a safe opportunity to Clear. 2. To perform, execute the Draw Step in the opposite direction from which you wish to
Clear. When the opponent’s attention has been misdirected, clear toward the safe angle. For example, Draw Step toward 9:00 and Clear toward 4:30.
Quick Retreat
1. This method is used to quickly increase the distance between you and your opponent. Successful application of this method will not only place your opponent out of range for an effective attack, but yourself as well.
2. To perform, execute a Step Drag maneuver toward the desired direction immediately followed by a Double Drag Step.
147 Master of the Ring Copyright 2004 by Eric & Kevin Lamkin
Advanced Combat T&T
Controlling the Controlling the
Fighting MeasureFighting Measure
148 Master of the Ring Copyright 2004 by Eric & Kevin Lamkin
Advanced Combat T&T
CONTROLLING THE FIGHTING MEASURE The fighter who is able to control the Fighting Measure controls his opponent and ultimately the outcome of the fight. In addition to enabling the success of your own attacks, Controlling the Fighting Measure (a.k.a. Controlling Distance) enables you to thwart your opponent’s attacks by increasing or decreasing the distance between you and your opponent. Learning and perfecting the principle of Jamming is essential to Controlling Distance. A Jam is a method of restraining a weapon on development before enough momentum has been generated to necessitate a deflection. Jams are commonly executed by decreasing the distance between you and your opponent by using the palm of your hand, arm, or even your entire body to crowd the opponent so that he is unable to deliver or complete his attack. When jamming a kick, do not get caught between the foot and the knee. When jamming a punch, do not get caught between the fist and the elbow. CONTROLLING THE FIGHTING MEASURE TRAINING PROGRESSIONS DRILL 1—REACTIONS & RECOGNITION
1. Designate an Attacker, a Defender, and an Observer (if one is available). 2. The Attacker advances and cocks hip in preparation to deliver a side thrust kick. The
Defender (acting as a target) attempts to maintain the gap by utilizing a retreat. 3. The Observer will determine who controlled the distance by either covering the
ground (Attacker) or keeping the ground (Defender). DRILL 2—AWARENESS & REACTION
1. This drill is the same as Drill 1; however, the Attacker delivers a side thrust kick. No attempt is made to make contact with the kick.
2. To perform, the Attacker delivers a drag-step side kick toward the Defender’s lead hip. The Defender defends with only footwork.
DRILL 3—THE ACTUAL KICK
1. In this drill the Attacker will attempt to land a side thrust kick safely on the Defender’s lead hip.
2. To perform, each partner will open a target on their ribs (lead side) to act as a target for the drill. The Attacker delivers a lead side kick. The Defender then uses footwork to make him miss. Determine if you moved too far out of range.
3. The drill continues as in a limited sparring drill. 4. Key Points—Move just enough out of range to make him miss and no more. If you are
too far away, you will be unable to retaliate.
149 Master of the Ring Copyright 2004 by Eric & Kevin Lamkin
Advanced Combat T&T
DRILL 4—JAMMING RECOGNITION 1. In this drill, one person advances as the other (the Jammer) advances with a
counter. When you jam, you want to make contact while the opponent is STILL IN MOTION. This will greatly upset his balance and his ability to counter attack.
2. Key Points—Always jam with a counter. After the jam, you may immediately “bump” him before you counter.
DRILL 5—JAMMING DRILL
1. In this drill, the Attacker delivers a lead side thrust kick as the Defender makes him miss by:
a. Increasing the distance (running) b. Decreasing the distance (jamming)
2. Key Point—When you jam, simultaneously counterstrike and move him off balance.
DRILL 6—KICKING VS. PUNCHING 1. This limited sparring drill studies jamming with a range differential. 2. Designate one person as the Kicker and the other as the Puncher. The Kicker is
limited to a lead side kick as his weapon; the Puncher is limited to a lead or rear hand punch as his weapon. The Kicker is the attacker. The Puncher may defend against the kick by either running or jamming. When jamming, the Puncher must simultaneously deliver his strike.
DRILL 7—NO, YOU DON’T!
1. In this drill, the attacker (Kicker) is able to defend against the punch by employing the concept of running.
2. To perform, the Kicker attempts a drag step side thrust kick. The Puncher makes him miss and attempts to counter punch. The Kicker will defend against the punch by executing a push drag retreat and immediately returning with another (defensive)side kick.
DRILL 8—LIMITED SPARRING
1. In this drill, one person is given only punches as weapons and the other is given only side thrust kicks. There is not a designated Attacker and Defender; instead, each partner is attempting to land as many strikes as possible whilst utilizing the principles of:
A. Penetration B. Clearing C. Jamming
150 Master of the Ring Copyright 2004 by Eric & Kevin Lamkin
Advanced Combat T&T

Launch PointLaunch Point (Set Point) (Set Point)
151 Master of the Ring Copyright 2004 by Eric & Kevin Lamkin
Advanced Combat T&T
LAUNCH POINT (SET POINT)
In order to launch a defense or an attack, the fighter must be “set” (ready) both physically and mentally. This means being at the Critical Distance Line and prepared to defend and/or attack. The Launch Point (or “Set Point”) can be identified by the stationary position of the lead foot. Although the rear foot may move and change angle, the lead foot determines the Fighting Measure and the Critical Distance Line. Effective control of the opponent’s Set Point is crucial because when he is set, he is dangerous and will be quicker to attack. Controlling the opponent’s Set Point follows the first rule of fighting:
Neutralize the opponent’s position by neutralizing his strengths. How to Control the Opponent’s Launch Point There are two essential tools used to control the opponent’s set point—Movement and Fire Power.
Movement—If the opponent is about to attack, then move! When the opponent attacks, you must either close the distance, retreat, or change angle.
Fire Power—The moment he begins to attack, immediately attack into his open line.
LAUNCH POINT TRAINING PROGRESSIONS DRILL 1—FOLLOW DRILL
1. One person leads the other around by changing distance and angle (This is essentially sparring without striking). The other person maintains the Fighting Measure and the Line of Fire while staying out of the Critical Distance of the opponent.
DRILL 2—SET POINT VISUAL DETECTION DRILL
1. Repeat Drill 1. 2. The person leading will periodically set his position in preparation to attack while a
third person (the Observer) calls out, “Set!” as soon as the leader sets his position. The goal is for the Observer to reduce the delay from the time the fighter sets his position and the time it is recognized.
DRILL 3—SET POINT DETECTION ATTACK DRILL
1. The two partners move about as in Drill 1. 2. In this drill, the Leader periodically sets his position. The instant the Follower perceives
the set he delivers a lead roundhouse kick. 3. If there is a third person available, the Observer may call, “Set!” as soon as he sees
it. The goal of this drill is to reduce the delay between the time a person is set and the time a strike makes contact.
152 Master of the Ring Copyright 2004 by Eric & Kevin Lamkin
Advanced Combat T&T
DRILL 4—MOVEMENT VS. FIREPOWER Phase 1—Focus on the Defense
1. In this drill, the Attacker delivers a roundhouse kick (Firepower) and the Defender utilizes footwork as a defense (Movement).
2. In order for the Attacker to deliver the roundhouse kick, he must first be set. To defend against the kick, the Defender may:
a. Increase the distance. b. Jam the attack c. Fake in one direction and slide off angle toward another direction to
make him miss. At this point he will be in the zone of vulnerability. Phase 2—Take That!
1. Repeat Drill 4—Phase 1. 2. In this drill the Defender may deliver counterstrikes after he makes the Attacker miss.
Phase 3—Timing Adjustment
1. In this drill, one person is designated as Firepower. His goal is to strike his opponent by keeping him from being set.
2. The other person is designated as the Counterstriker. This person’s goal is to make his partner miss, strike him, and then safely clear away.
DRILL 5—Freesparring
1. Freespar to test these new strategies.
153 Master of the Ring Copyright 2004 by Eric & Kevin Lamkin
Advanced Combat T&T
Deceptive Deceptive
PenetrationPenetration
154 Master of the Ring Copyright 2004 by Eric & Kevin Lamkin
Advanced Combat T&T

DECEPTIVE PENETRATION There are three methods to successfully penetrate the opponent’s defenses and make contact with your strike:
1. Perfect the delivery of your strike so that no motion is wasted and no unnecessary actions draw the opponent’s attention to your attack (telegraphic motion).
2. Hide or mask your faulty technique. 3. Utilize deception in your attacks. Experienced fighters find that ALL methods are essential to any attack.
METHOD ONE—PERFECT YOUR DELIVERY To illustrate this method, we will study one of the most difficult yet most effective Penetration Attacks—the Step Through Lunge Punch. The punch itself lacks sufficient stopping power but it does have several advantages such as quickly covering the Fighting Measure. The lunge punch can be used to quickly cover the Fighting Measure in preparation for a more powerful follow-up kick or punch. When used to break the gap, aim toward the opponent’s face. The elements of a Step Through Lunge Punch are: 1. Aim and extend weapon arm (not to full extension) 2. Lean body forward slightly 3. Turn hip 4. Shift weight forward 5. Step forward Key points to remember:
1. The weapon hand always moves first. 2. During the step through, your feet come together. 3. At the end of your movement, your feet will form a neutral bow stance. If you
are too close, form a 45-degree angle fighting horse stance (boxer’s stance). 4. Your weapon hand must retract at end of the strike. 5. When executing the lunge punch, have the sensation that your opponent is
pulling you forward rather than your feet pushing off. 6. When you train, hyperextend for this lunge. Hyperextending (exaggerating the
motion) during training is a method used to instill correct motion. This is based upon the theory that in actual combat you will be tense and your motion will be shortened.
155 Master of the Ring Copyright 2004 by Eric & Kevin Lamkin
Advanced Combat T&T
DRILL 1—QUICK PENETRATION 1. The Defender gives the Attacker a target by dropping his lead arm. 2. The Attacker delivers a step through lunge punch to his partner’s chest. 3. When the Defender perceives the punch, he simply pivots and delivers a rear hand
counter punch to the Attacker’s chest. 4. Train this drill at different distances.
METHOD TWO—LEADING CENTERS A Leading Center is an idiosyncratic movement that may or may not be related to the motion or action involved. Everyone has a Leading Center. It may be the head, eyes, shoulder, hips, etc. It may be the result of tension or it may be due to poor or improper training. Leading Centers may even change from day to day. The concept of Leading Centers is an element in the principle of “Telegraphing”. DRILL 1—ISOLATION
1. Deliver two lead jabs in succession to isolate the motion. 2. On the third strike, deliver the jab as you advance with penetration footwork. 3. Note: Don’t run the drill together. Focus on each motion. The purpose of this drill is to
isolate your hand from your footwork. Remember—Weapon First!
DRILL 2—SECOND SET OF EYES 1. Repeat Drill 2. 2. One person performs it solo; the other calls the leading center. 3. As your partner recognizes your Leading Center, make corrections/adjustments as
needed to eliminate or mitigate them. DRILL 3—PREPARATORY COMBINATION
1. Practice the following combination: Lead Jab—Step Through Lunge Punch
DRILL 4—FAKE AND LUNGE PUNCH
1. Designate an Attacker and a Defender. 2. At any moment, the Attacker will deliver one of the following:
a. Lead jab with advance b. Lead jab—Step Through Lunge Punch c. Body fake Lead Jab—Step Through Lunge Punch
3. The Defender must move out of range. 4. The purpose of this drill is to cause the Defender to react in order to gain distance
before delivering the lunge punch. In order for the Defender to react properly, he must be kept mentally off-balance by alternating the real with the fake strikes (see Defender Reference Manual—Feints and False Attacks).
156 Master of the Ring Copyright 2004 by Eric & Kevin Lamkin
Advanced Combat T&T
DRILL 5—LIMITED SPARRING ROUND ONE 1. Designate an Attacker and a Defender. 2. Repeat Drill 5, but this time the Defender is allowed to counter with a rear hand
punch. 3. The Defender may either hold his ground or increase the distance before
countering. DRILL 6—FINAL COMBINATION
1. Now, repeat Drill 6 with the following combination:
Lead Jab—Step Through Lunge Punch—Uppercut
2. The purpose of the Lead Jab is to get the opponent’s attention or to distract him. The Lunge Punch gains distance, and the uppercut delivers a punishing blow.
DRILL 7—LIMITED SPARRING ROUND TWO
1. Repeat Drill 6 and add the combination learned in Drill 7. METHOD 3—DECEPTIVE ATTACKS A highly effective method in which to successfully penetrate the opponent’s defenses with your attack is to utilize misdirection. Misdirection conceals your true attack by focusing the opponent’s attention to where you will NOT be. There are various methods and combinations that may be utilized. The following exercises will sufficiently introduce you to the concept. DRILL 1—DRAW STEP
1. Begin in a right lead. 2. Utilize a spring step and probe toward 12:00 three times. 3. Draw the opponent’s attention toward 9:00 by suddenly shifting the body and rear
foot toward 9:00. By keeping your lead foot in position, you will draw the opponent’s reaction, but you will still maintain your fighting measure. When you execute the draw, you must have a noticeable change in speed, movement, and intent in order to convince the opponent of your “intentions”. By doing so you will successfully deceive your opponent by drawing his aim and misdirecting his attention.
4. Once the opponent’s attention is misdirected, return your focus toward 12:00 and attack to his now open line.
5. This drill employs the concept of Broken Rhythm. Broken Rhythm entails changing: a. Speed b. Direction c. Intent (essence)
157 Master of the Ring Copyright 2004 by Eric & Kevin Lamkin
Advanced Combat T&T
DRILL 2—ANGLE CHANGE 1. This drill is similar to Drill 1, but with the following set-up:
a. Probe toward 12:00; change angle b. Probe toward 12:00; change angle c. Probe forward; lean backward. d. Wait for his reaction. e. Attack to the now open line.
DRILL 3—LIVE FIRE DEMONSTRATION
1. The Attacker will practice the set-ups in either Drill 1 or Drill 2. 2. The Defender will respond with a defensive side kick. 3. The object of this drill is to draw the Defender’s reaction (side kick) and attack into
the open line. You must convince the Defender that you intend to attack otherwise he may take advantage of the situation.
4. The defender should train not to take a half-step backward on the counter kick. This will emphasize his timing. During actual combat, however, a half step back is advised.
DRILL 4—SCRAMBLE STEP FORWARD
1. This set-up method is deal for approaching a taller opponent:
a. Scramble step draw to 10:00 b. Scramble step draw to 2:00 c. Attack toward 12:00 d. One foot must remain on the CCP at all times.
DRILL 5—CIRCLE SNEAK
1. Circle around your opponent and force him to adjust the aim
a. Circle and move toward 4:00 b. Circle and move toward 8:00 c. Circle and move toward 4:00. d. Draw the opponent toward 8:00 and immediately cut the angle by attacking
toward 10:00 e. If you draw him properly toward 8:00, he will cover the distance for you. f. Gradual decrease the distance between your opponent and yourself g. Keep your body facing the same direction
158 Master of the Ring Copyright 2004 by Eric & Kevin Lamkin
Advanced Combat T&T

Counter Counter
FightingFighting
159 Master of the Ring Copyright 2004 by Eric & Kevin Lamkin
Advanced Combat T&T
COUNTER FIGHTING Counter Fighting is the art of making your opponent miss. It is an offensive action made against the opponent’s attack, either as he attacks on his own initiative or when is provoked into attacking you. Counter-Attacks are timed to exploit the offensive motions of the opponent’s limbs. All striking motions contain three committed motions—extension of the limb, impact with the target, and recoil back to position. Thus, Counter-Attacks are divided into three corresponding groups. For more information refer to the Defender Level Reference Manual—Counter-Attack. The opponent’s initial attack is often the most vulnerable, this is because of the distance he must travel coupled with the fact that many people have weak lead off techniques. In addition, there are four points of vulnerability during any engagement. They are:
1. Your initial movement 2. Your follow up movement 3. Your Opponent’s initial movement 4. Your opponent’s follow up movement
COUNTER FIGHTING TRAINING PROGRESSIONS DRILL 1—STATIONARY POSITION
1. Measure distance by locking out a lead jab and move back about 18 inches. 2. The Attacker will attempt to strike with a lead jab to the Defender’s forehead. 3. The Defender will place his hands behind his back and remain stationary. He will
defend by moving his body to make the strike miss. Use your knees to bend the body and move the target.
4. Defending attacks to the head.
1. Bobbing—bend the knee to drop the head and body straight down. 2. Weaving—Shift your body from leg to leg (45 degree to 45 degree by
dipping and ending on either leg. Use a descending arch). 5. Work at a slow to moderate pace to develop the technique and feel for the
exercise. 6. In combat, aim for the neck, this will ensure that you will hit the target.
DRILL 2—A LITTLE MORE TIME
1. The Attacker now delivers a lead jab with an advance. The Defender defends with the bob and weave.
2. Keep the shoulders above the hips; do not rock back in this drill.
160 Master of the Ring Copyright 2004 by Eric & Kevin Lamkin
Advanced Combat T&T
DRILL 3—SECONDARY DEFENSE 1. Repeat Drill 2. 2. The Defender will now put his hands in front of his body in a defensive position. Use
the rear hand to block the strike. Keep the block near the striking hand and quickly return it to the guard. You can catch it or paw it to the side. The Defender will still bob and weave. The rear hand is here utilized as a second line of defense.
DRILL 4—MOBILITY
1. The Defender places his hands behind his back. 2. The Defender moves around and utilizes body evasion as the Attacker delivers a
lead jab. 3. The Defender may either move his position or, if he is stationary, he may move the
target. Remember to always keep moving. DRILL 5—WITH A DEFENSE
1. Repeat Drill 4. 2. In this drill the Defender will have his hands in a defensive position.
DRILL 6—ANTE UP
1. Now repeat the previous drill with multiple strikes. 2. The Attacker may deliver double or triple jabs. He should move (or advance) with
each strike. 3. For the sake of the drill, don’t crowd your partner. You are trying to develop each
other’s skill; not to prove your own. DRILL 7—THE COUNTER FIGHTER
1. Attacker delivers a lead jab with an advance. The Defender (the counter fighter) counters with a counter side kick.
DRILL 8—LIMITED SPARRING
1. Both partners have the following weapons: a. Lead Jab b. Lead Roundhouse Kick c. Defensive Side Kick
Important Point to Remember You can defeat a counter fighter is you have superior speed, or you can draw his counter before you attack. The counter fighter’s strongest defense is when he is striking. His weakest is when he leads off. By drawing him you force him to fight his weakest game, that of a lead off fighter. Attacking a counter fighter is risky but you have to take risks. If you are caught with his kick or strike, keep driving forward otherwise you will build his confidence and reinforce his morale.
161 Master of the Ring Copyright 2004 by Eric & Kevin Lamkin
Advanced Combat T&T
Group Combat Group Combat
TacticsTactics
162 Master of the Ring Copyright 2004 by Eric & Kevin Lamkin
Advanced Combat T&T
GROUP COMBAT TACTICS Most street confrontations will involve several people. Varying levels of force will be appropriate based upon the situation and the rules of engagement. Regardless of the situation, you should not enter a fight without a well-rehearsed plan and an overall fighting strategy. We will examine essential strategies for the following group tactic scenarios:
1. Two Against One 2. Three Against Two 3. Parity 4. One Against Two 5. Two Against Three
TWO AGAINST ONE When fighting two against one, the fighters should advance together, spreading out so that if the opponent turns to face either fighter he will expose his flank to the other. One fighter should attack the opponent’s legs and the other should concentrate on his upper body. This can be done by a signal, or the fighter attacking the flank can automatically go low. After the opponent is on the ground, good communication is necessary so that you can control and then finish him. THREE AGAINST TWO When fighting three against two, the fighters should advance so that the outside two are outside of the opponent’s. One of the opponents will have to make a choice to face either the outside or inside man. When he does, he will expose his flank to the other one. The fighter who is facing his opponent alone will stall until the other two have finished and can come to his aid. Not only must the two who are fighting the same opponent communicate with each other, but also the fighter who is alone must keep them abreast of his situation. If he is in trouble, it may be necessary for one of them to disengage and come to his aid. PARITY If both groups have the same number of fighters, one fighter stays in reserve until the opponents have committed their entire force. When they have committed, the reserve fighter will attack the exposed back of the opponents.
163 Master of the Ring Copyright 2004 by Eric & Kevin Lamkin
Advanced Combat T&T
ONE AGAINST TWO When fighting one against two, defeating two opponents simultaneously is very difficult. When outnumbered, you should usually try to remain standing. Mobility is critical for an effective defense or escape. It is very important not to expose your back. You must use the obstacles around you to restrict the opponents’ movements so that you face only one at a time, or maneuver yourself to the flank of the one nearest to you and use him to block the other one. Attack the first opponent using str ikes or weapons of opportunity, and then deal with the remaining one. If you should lose your footing or be taken to the ground, you must protect your back. Your best defense is to move into a corner or against a wall. Use a modified guard, so that your legs are not exposed. This will limit the opponents’ ability to attack simultaneously. TWO AGAINST THREE When fighting two against three, you should maneuver to the flanks either together or separately. If you can get to one flank together, with the help of restrictive terrain if possible, use strikes to attack one opponent at a time until you have defeated all three. If you are separated, one of you defends as in one against two while the other attacks the remaining enemy with strikes and then comes to the aid of the first.
164 Master of the Ring Copyright 2004 by Eric & Kevin Lamkin
Advanced Combat T&T
ExpertExpert
165 Master of the Ring Copyright 2004 by Eric & Kevin Lamkin

ExpertExpert Theory of Theory of
Freestyle FightingFreestyle Fighting
166 Master of the Ring Copyright 2004 by Eric & Kevin Lamkin
Expert Theory of Freestyle Fighting
EXPERT THEORY OF FREESTYLE FIGHTING The Sixteen Types of Fighters
HISTORICAL BACKGROUND In combat, the outcome of a fight can be determined by a variety of components. In general, the stronger, faster and more aggressive individual is most likely to prevail. However, when two combatants are equal in physicality, tactics, technique and attitude, the combatant with the superior grasp of fighting strategies possesses the advantage for victory. In fact, when all things are equal, correct analysis of the combat theater and correct application of strategy may be the only thing that will ensure victory. One of the most fascinating aspects of the legendary Bruce Lee is his breakdown and analysis of fighting. Bruce Lee’s works revolutionized modern fighting. In the few years that he had advanced his theories of fighting, his works had aided the developments of champions; like Joe Lewis. Joe Lewis was instrumental in Bruce Lee’s theories. Bruce Lee discussed and introduced ideas that were then battle tested by Joe Lewis in full-contact matches. The summary of the Lee/Lewis collaboration yielded the Three Types of Fighters and Five Ways (Angles) of Attack. In the late 1960s and throughout most of the 1970s, Joe Lewis was hired by the Tracy International Studios of Self Defense to teach his fighting method throughout the Tracy’s franchise. The Lee/Lewis fighting method is the material that he taught. Whenever Joe Lewis visited a school, he would distribute a handout that itemized his theories. [See Appendix F for a copy of the actual handout.] Over three decades have passed since Bruce Lee developed his legendary theories. Some of his work was flawed due to improper labeling, misapplying psychological techniques, and not standing the test of time. A great deal of research and fine-tuning has expanded these ideas. The Five Angles of Attack has been correctly addressed on page 127. This section is to expand on the concept of the Three Types of Fighters. Basically, the Lee/Lewis fighting model characterizes all fighters within the three types of fighters as:
1. The Runner 2. The Jammer 3. The Blocker
The superior fighter was theorized to be able to switch between these types of fighters whenever the proper strategy dictated.
167 Master of the Ring Copyright 2004 by Eric & Kevin Lamkin
Expert Theory of Freestyle Fighting
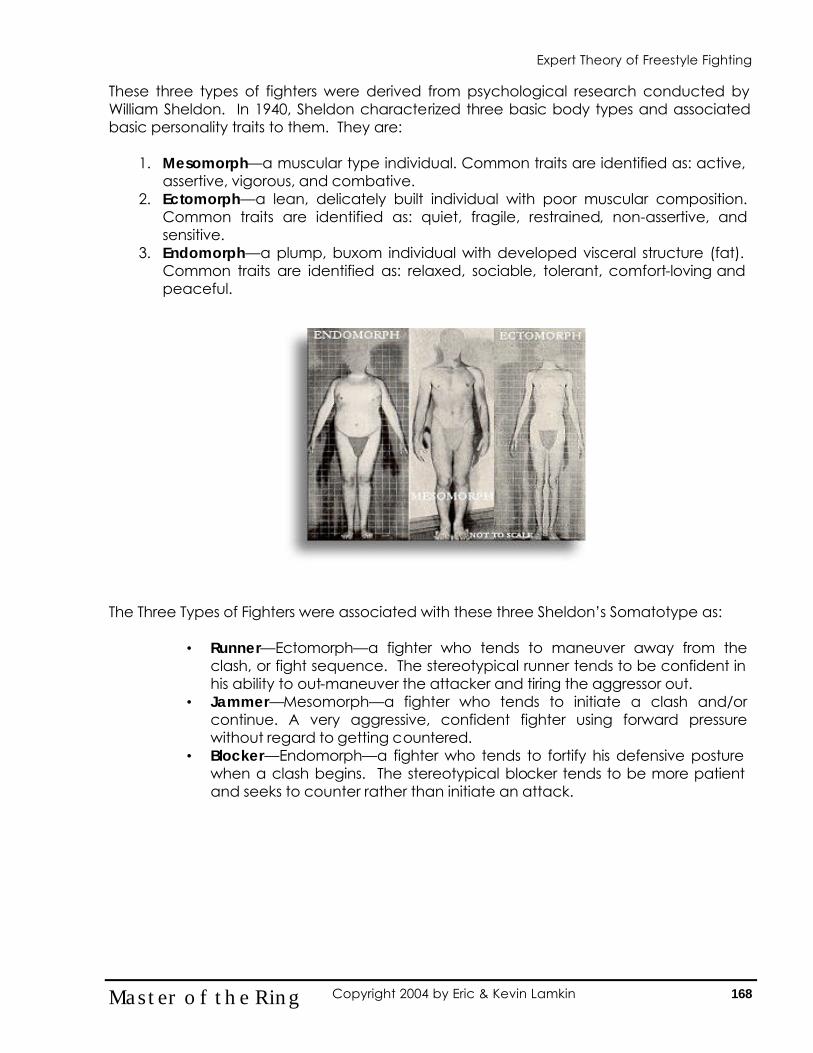
These three types of fighters were derived from psychological research conducted by William Sheldon. In 1940, Sheldon characterized three basic body types and associated basic personality traits to them. They are:
1. Mesomorph—a muscular type individual. Common traits are identified as: active, assertive, vigorous, and combative.
2. Ectomorph—a lean, delicately built individual with poor muscular composition. Common traits are identified as: quiet, fragile, restrained, non-assertive, and sensitive.
3. Endomorph—a plump, buxom individual with developed visceral structure (fat). Common traits are identified as: relaxed, sociable, tolerant, comfort-loving and peaceful.
The Three Types of Fighters were associated with these three Sheldon’s Somatotype as:
• Runner—Ectomorph—a fighter who tends to maneuver away from the clash, or fight sequence. The stereotypical runner tends to be confident in his ability to out-maneuver the attacker and tiring the aggressor out.
• Jammer—Mesomorph—a fighter who tends to initiate a clash and/or continue. A very aggressive, confident fighter using forward pressure without regard to getting countered.
• Blocker—Endomorph—a fighter who tends to fortify his defensive posture when a clash begins. The stereotypical blocker tends to be more patient and seeks to counter rather than initiate an attack.
168 Master of the Ring Copyright 2004 by Eric & Kevin Lamkin
Expert Theory of Freestyle Fighting
To further categorize a person’s somatotype, an individual is given a rating from 1 to 7 on each of the three body types. 1 = very low; 7 = very high. For example:
• a stereotypical basketball player 1-1-7 (ectomorph) • Mohammed Ali, Joe Lewis 1-7-1 (mesomorph) • a pear-shaped person 7-1-1 (endomorph)
Body types have been criticized for very weak empirical methodology and are not generally used in psychology. The use of somatotyping (using different taxonomies) is used more often in alternative therapies and Eastern psychology and spirituality.
169 Master of the Ring Copyright 2004 by Eric & Kevin Lamkin
Expert Theory of Freestyle Fighting

Ayurvedic Doshas (Sheldon
Somatotype) Personality (character) Shape
VATA (Ectomorph)
• Changeability, unpredictability, variability - in size, shape, mood, and action
• Moody, enthusiastic, imaginative, and impulsive, quick to grasp ideas and good at initiating things but poor at finishing them.
• Energy fluctuates, with jagged peaks and valleys able, tolerant, comfort-loving, peaceful
• Slender with prominent features, joints, and veins, with cool, dry skin.
• Eat and sleep erratically
• Prone to anxiety, insomnia, premenstrual syndrome, and constipation.
PITA (Mesomorph)
• Relatively predictable. • Quick, articulate, biting
intelligence, and can be critical or passionate with short, explosive tempers.
• Efficient and moderate in daily habits, eats and sleeps regularly
• Medium build, strength, and endurance.
• Well-proportioned and easily maintains a stable weight. Often fair haired, red or blond, ruddy complexion.
• Tends to perspire heavily and are warm and often thirsty.
• Prone to acne, ulcers, hemorrhoids, and
KAPHA (Endomorph)
• Relaxed Slow to anger, slow to eat, slow to act.
• They sleep long and heavily.
• Tends to procrastinate and be obstinate.
• Solid, heavy, and strong, with a tendency to be overweight.
• Slow digestion and somewhat oily hair, and cool, damp, pale skin.
• Prone to high cholesterol, obesity, allergies, and sinus problems.
AYURVEDIC BODY TYPES (DOSHAS) (India, ~3000 BC to present)
In Ayurvedic medicine (used in India since ~3000 BC), there are three main metabolic body types (doshas) - Vata, Pita, & Kapha.
170 Master of the Ring Copyright 2004 by Eric & Kevin Lamkin
Expert Theory of Freestyle Fighting
BRUCE LEE AND TYPES OF FIGHTERS Bruce Lee’s connection of the Three Types of Fighters with the three basic body types was to be used a generalization. The problem that exists in utilizing these studies is known as ‘pigeon-holing’. As a generalization, the Three Types of Fighters is good. However, often the casual, non-committed martial artist seeks to utilize simplistic assumptions, such as the Three Types of Fighters, and make them inviolable laws (pigeon-holing). These practitioners soon find out that these assumptions break down when these theories are applied in ‘real-life’ sparring encounters. Joe Lewis states that the Three Types of Fighters can be broken down to further sub-categories. As stated in the Theory of Free Style that Joe Lewis used to hand out at the Tracy’s Schools, “A good fighter mixes up his running, jamming and blocking techniques!!” In order for the Theory of Freestyle to be considered to be scientifically sound, these sub-categories must be identified to reduce subjective reasoning. To further break down these categories to their completion, we analyzed all of the major personality modeling utilized in psychology today. These models include the Four Humors introduced by Hippocrates (400 B.C.), William Sheldon’s sonatotypes (1940s), Carl Jung’s typology, and the Enneagram typology. The problem reconciling the differences of these systems stem from the number of personality types that these systems are resolved. The Four Humors contain four basic types of individuals. Carl Jung derived his 16 personality types from variations of these four humors. William Sheldon derived his three sonatotypes from the ancient Indian holistic Ayurvedic medicine listed above. One of the newest models, the Enneagram typology, utilized nine basic personality types as a model. After careful research, we have resolved the Humors (4 types), Sheldon and Ayurvedic sonatotypes (3 types), the Enneagram typology (9 types) and Jungian typologies (16 types) into a single system of study, which fully extends itself into the Bruce Lee/Joe Lewis fighting methodologies. This system is detailed; however, if you consider one Fighter Type at a time, you will be able to begin to utilize this system in your strategic application of sparring, fighting, and combat.
171 Master of the Ring Copyright 2004 by Eric & Kevin Lamkin
Expert Theory of Freestyle Fighting
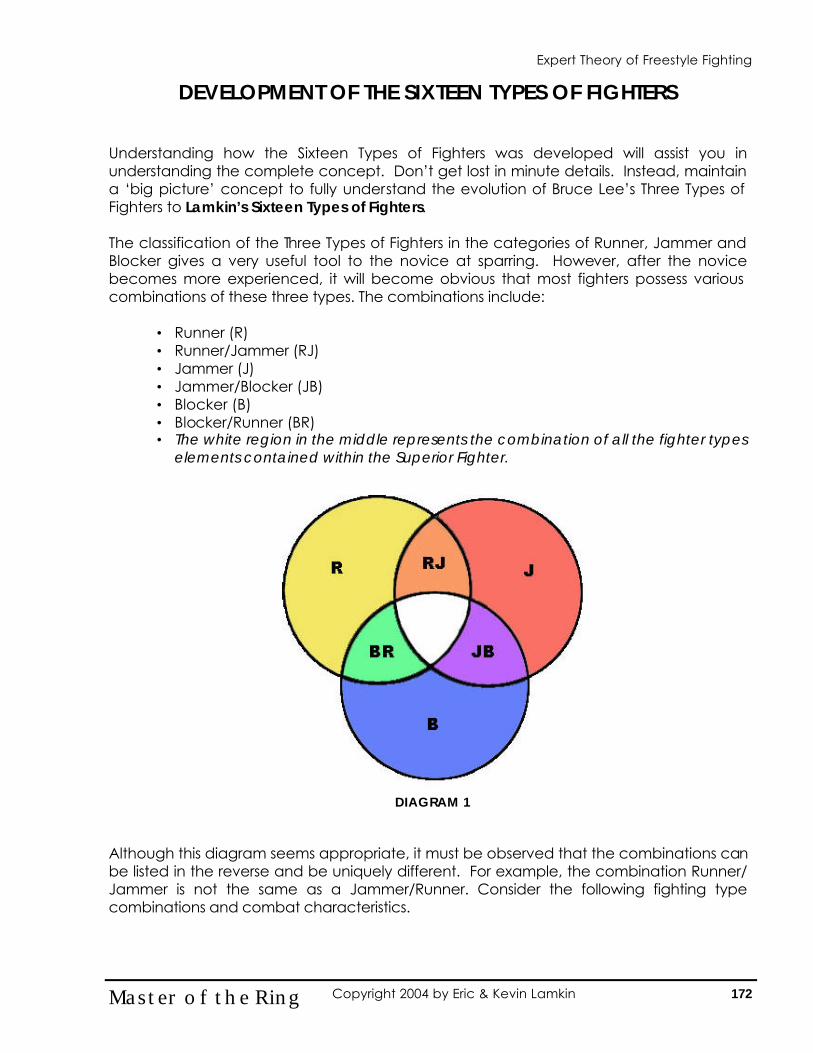
DEVELOPMENT OF THE SIXTEEN TYPES OF FIGHTERS Understanding how the Sixteen Types of Fighters was developed will assist you in understanding the complete concept. Don’t get lost in minute details. Instead, maintain a ‘big picture’ concept to fully understand the evolution of Bruce Lee’s Three Types of Fighters to Lamkin’s Sixteen Types of Fighters. The classification of the Three Types of Fighters in the categories of Runner, Jammer and Blocker gives a very useful tool to the novice at sparring. However, after the novice becomes more experienced, it will become obvious that most fighters possess various combinations of these three types. The combinations include:
• Runner (R) • Runner/Jammer (RJ) • Jammer (J) • Jammer/Blocker (JB) • Blocker (B) • Blocker/Runner (BR) • The white region in the middle represents the combination of all the fighter types
elements contained within the Superior Fighter.
Although this diagram seems appropriate, it must be observed that the combinations can be listed in the reverse and be uniquely different. For example, the combination Runner/Jammer is not the same as a Jammer/Runner. Consider the following fighting type combinations and combat characteristics.
172 Master of the Ring Copyright 2004 by Eric & Kevin Lamkin
DIAGRAM 1
Expert Theory of Freestyle Fighting
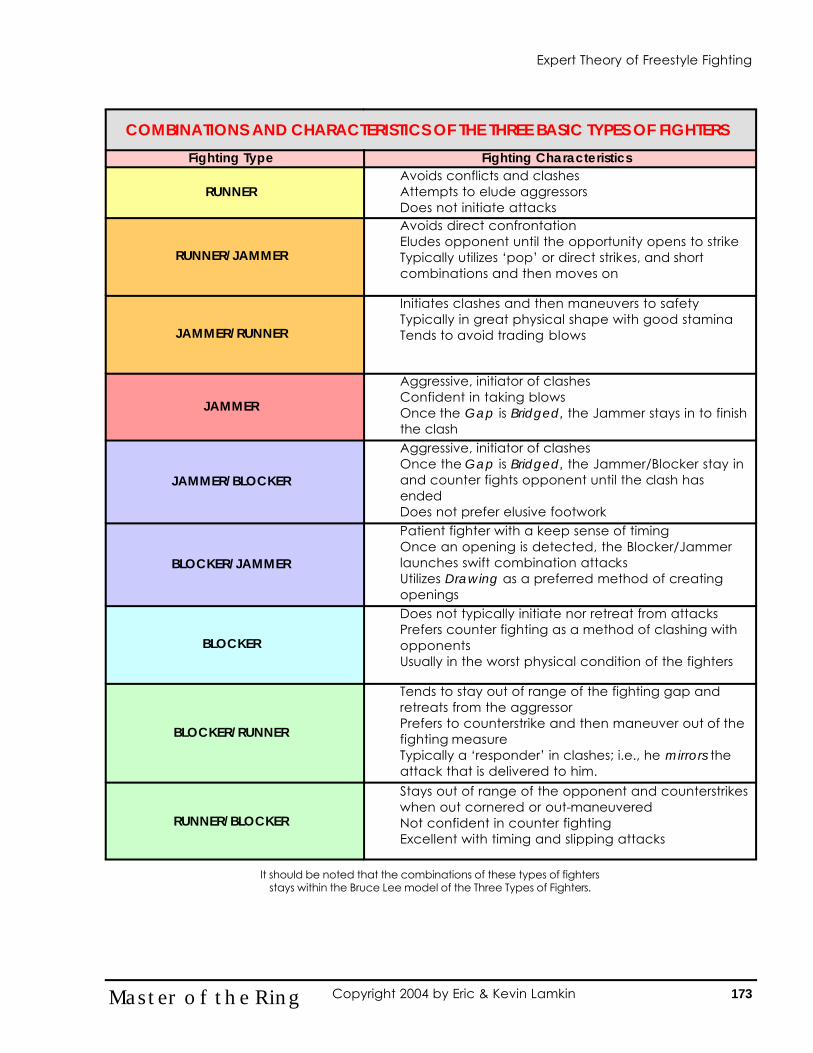
173 Master of the Ring Copyright 2004 by Eric & Kevin Lamkin
It should be noted that the combinations of these types of fighters stays within the Bruce Lee model of the Three Types of Fighters.
Fighting Type Fighting Characteristics
RUNNER � Avoids conflicts and clashes � Attempts to elude aggressors � Does not initiate attacks
RUNNER/JAMMER
� Avoids direct confrontation � Eludes opponent until the opportunity opens to strike � Typically utilizes ‘pop’ or direct strikes, and short
combinations and then moves on
JAMMER/RUNNER
� Initiates clashes and then maneuvers to safety � Typically in great physical shape with good stamina � Tends to avoid trading blows
JAMMER
� Aggressive, initiator of clashes � Confident in taking blows � Once the Gap is Bridged, the Jammer stays in to finish
the clash
JAMMER/BLOCKER
� Aggressive, initiator of clashes � Once the Gap is Bridged, the Jammer/Blocker stay in
and counter fights opponent until the clash has ended
� Does not prefer elusive footwork
BLOCKER/JAMMER
� Patient fighter with a keep sense of timing � Once an opening is detected, the Blocker/Jammer
launches swift combination attacks � Utilizes Drawing as a preferred method of creating
openings
BLOCKER
� Does not typically initiate nor retreat from attacks � Prefers counter fighting as a method of clashing with
opponents � Usually in the worst physical condition of the fighters
BLOCKER/RUNNER
� Tends to stay out of range of the fighting gap and retreats from the aggressor
� Prefers to counterstrike and then maneuver out of the fighting measure
� Typically a ‘responder’ in clashes; i.e., he mirrors the attack that is delivered to him.
RUNNER/BLOCKER
� Stays out of range of the opponent and counterstrikes when out cornered or out-maneuvered
� Not confident in counter fighting � Excellent with timing and slipping attacks
COMBINATIONS AND CHARACTERISTICS OF THE THREE BASIC TYPES OF FIGHTERS
Expert Theory of Freestyle Fighting

The following diagram further illustrates how these combinations can be visualized: We will now apply the Enneagram typology to these the combinations listed in the above table and diagram. The following diagram and chart indicates corresponding Enneagram Type number with the fighter combination types.
174 Master of the Ring Copyright 2004 by Eric & Kevin Lamkin
DIAGRAM 2
DIAGRAM 3
Expert Theory of Freestyle Fighting
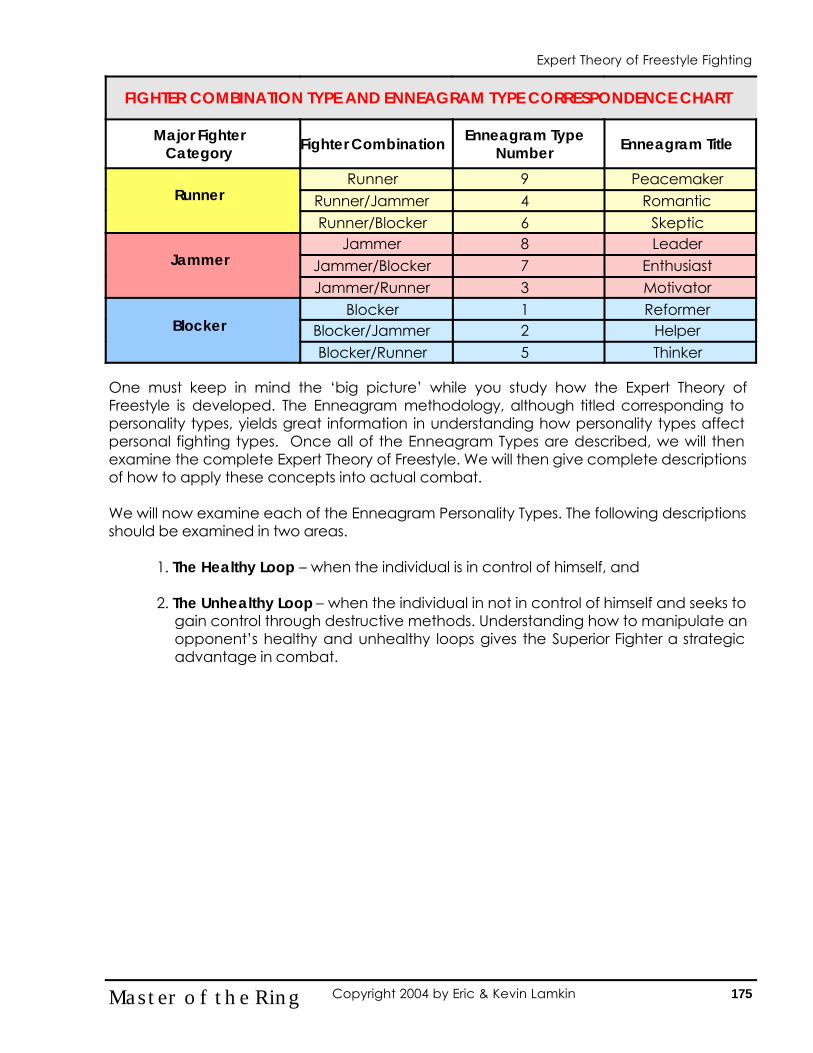
One must keep in mind the ‘big picture’ while you study how the Expert Theory of Freestyle is developed. The Enneagram methodology, although titled corresponding to personality types, yields great information in understanding how personality types affect personal fighting types. Once all of the Enneagram Types are described, we will then examine the complete Expert Theory of Freestyle. We will then give complete descriptions of how to apply these concepts into actual combat. We will now examine each of the Enneagram Personality Types. The following descriptions should be examined in two areas.
1. The Healthy Loop – when the individual is in control of himself, and 2. The Unhealthy Loop – when the individual in not in control of himself and seeks to
gain control through destructive methods. Understanding how to manipulate an opponent’s healthy and unhealthy loops gives the Superior Fighter a strategic advantage in combat.
175 Master of the Ring Copyright 2004 by Eric & Kevin Lamkin
FIGHTER COMBINATION TYPE AND ENNEAGRAM TYPE CORRESPONDENCE CHART
Major Fighter Category
Fighter Combination Enneagram Type
Number Enneagram Title
Runner
Runner 9 Peacemaker Runner/Jammer 4 Romantic Runner/Blocker 6 Skeptic
Jammer
Jammer 8 Leader Jammer/Blocker 7 Enthusiast Jammer/Runner 3 Motivator
Blocker 1 Reformer Blocker/Jammer 2 Helper Blocker/Runner 5 Thinker
Blocker
Expert Theory of Freestyle Fighting
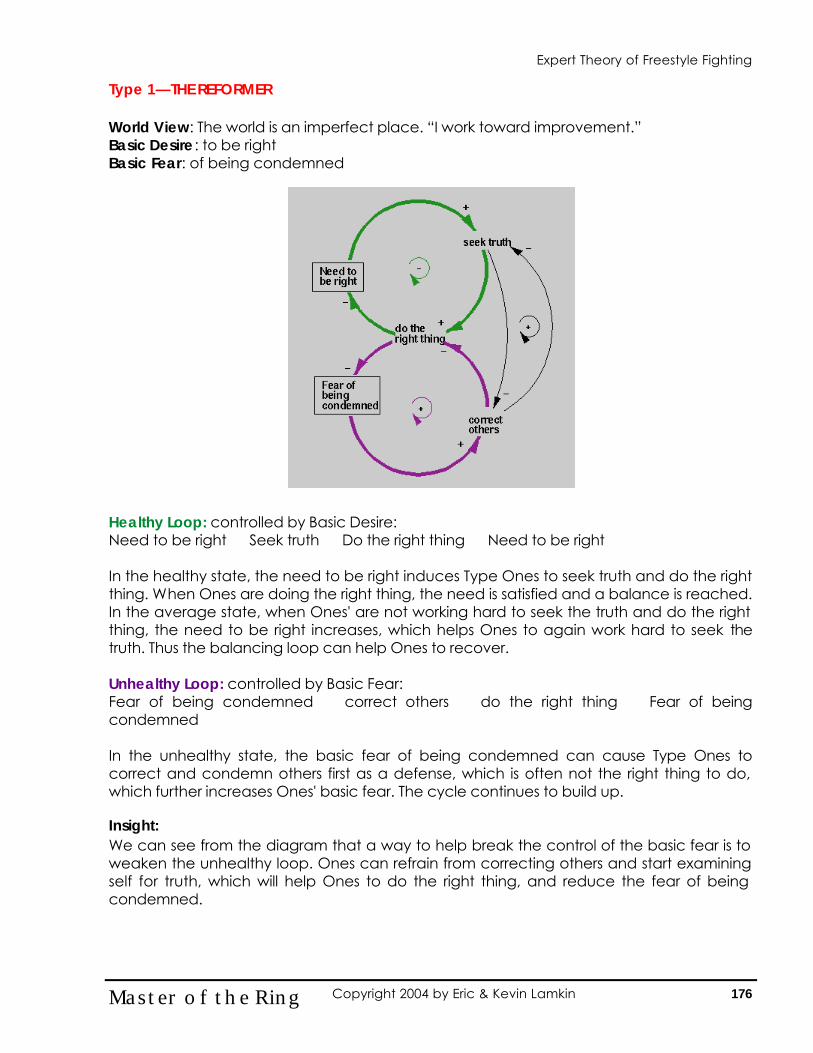
Type 1—THE REFORMER World View: The world is an imperfect place. “I work toward improvement.” Basic Desire: to be right Basic Fear: of being condemned Healthy Loop: controlled by Basic Desire: Need to be right � Seek truth � Do the right thing � Need to be right In the healthy state, the need to be right induces Type Ones to seek truth and do the right thing. When Ones are doing the right thing, the need is satisfied and a balance is reached. In the average state, when Ones' are not working hard to seek the truth and do the right thing, the need to be right increases, which helps Ones to again work hard to seek the truth. Thus the balancing loop can help Ones to recover. Unhealthy Loop: controlled by Basic Fear: Fear of being condemned � correct others � do the right thing � Fear of being condemned In the unhealthy state, the basic fear of being condemned can cause Type Ones to correct and condemn others first as a defense, which is often not the right thing to do, which further increases Ones' basic fear. The cycle continues to build up. Insight: We can see from the diagram that a way to help break the control of the basic fear is to weaken the unhealthy loop. Ones can refrain from correcting others and start examining self for truth, which will help Ones to do the right thing, and reduce the fear of being condemned.
176 Master of the Ring Copyright 2004 by Eric & Kevin Lamkin
Expert Theory of Freestyle Fighting
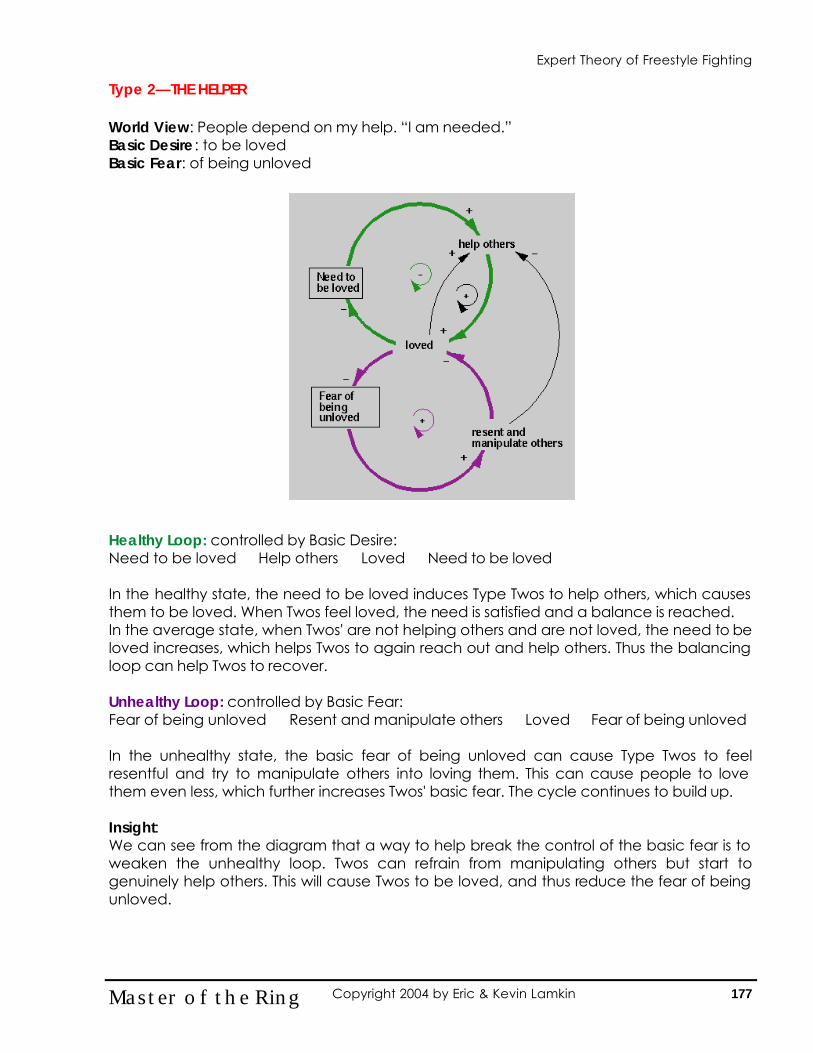
Type 2—THE HELPER World View: People depend on my help. “I am needed.” Basic Desire: to be loved Basic Fear: of being unloved Healthy Loop: controlled by Basic Desire: Need to be loved � Help others � Loved � Need to be loved In the healthy state, the need to be loved induces Type Twos to help others, which causes them to be loved. When Twos feel loved, the need is satisfied and a balance is reached. In the average state, when Twos' are not helping others and are not loved, the need to be loved increases, which helps Twos to again reach out and help others. Thus the balancing loop can help Twos to recover. Unhealthy Loop: controlled by Basic Fear: Fear of being unloved � Resent and manipulate others � Loved � Fear of being unloved In the unhealthy state, the basic fear of being unloved can cause Type Twos to feel resentful and try to manipulate others into loving them. This can cause people to love them even less, which further increases Twos' basic fear. The cycle continues to build up. Insight: We can see from the diagram that a way to help break the control of the basic fear is to weaken the unhealthy loop. Twos can refrain from manipulating others but start to genuinely help others. This will cause Twos to be loved, and thus reduce the fear of being unloved.
177 Master of the Ring Copyright 2004 by Eric & Kevin Lamkin
Expert Theory of Freestyle Fighting
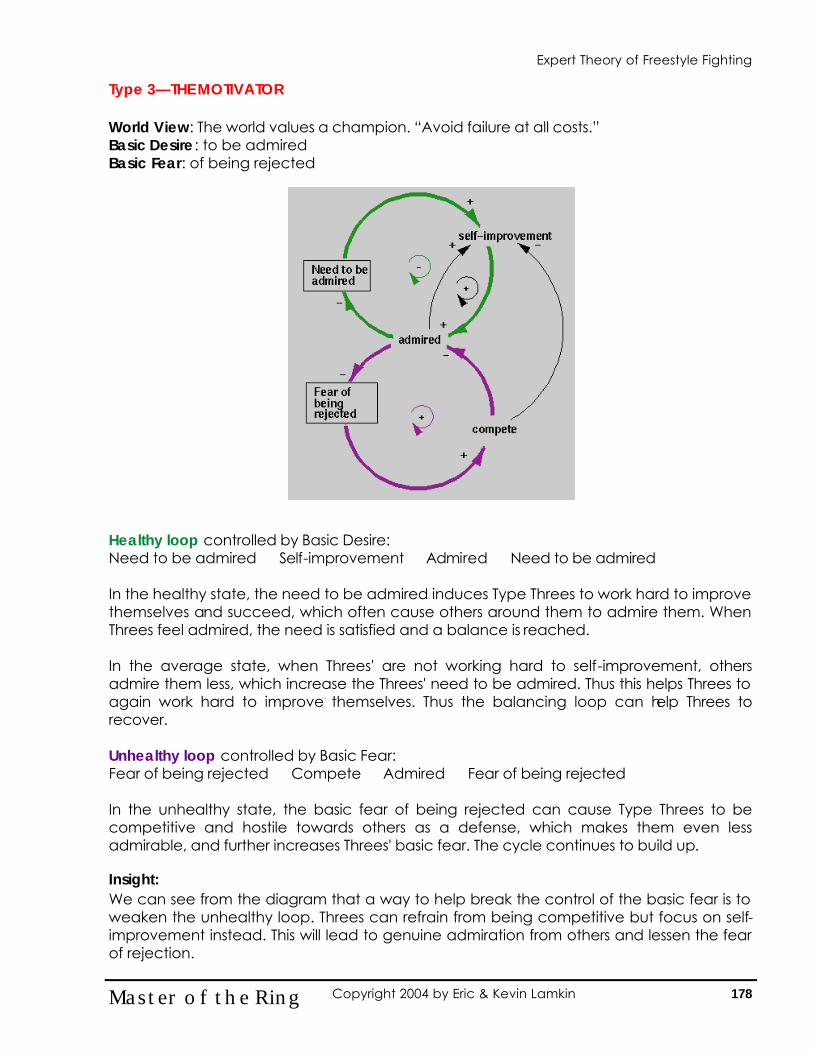
Type 3—THE MOTIVATOR
World View: The world values a champion. “Avoid failure at all costs.” Basic Desire: to be admired Basic Fear: of being rejected Healthy loop controlled by Basic Desire: Need to be admired � Self-improvement � Admired � Need to be admired In the healthy state, the need to be admired induces Type Threes to work hard to improve themselves and succeed, which often cause others around them to admire them. When Threes feel admired, the need is satisfied and a balance is reached. In the average state, when Threes' are not working hard to self-improvement, others admire them less, which increase the Threes' need to be admired. Thus this helps Threes to again work hard to improve themselves. Thus the balancing loop can help Threes to recover. Unhealthy loop controlled by Basic Fear: Fear of being rejected � Compete � Admired � Fear of being rejected In the unhealthy state, the basic fear of being rejected can cause Type Threes to be competitive and hostile towards others as a defense, which makes them even less admirable, and further increases Threes' basic fear. The cycle continues to build up. Insight: We can see from the diagram that a way to help break the control of the basic fear is to weaken the unhealthy loop. Threes can refrain from being competitive but focus on self-improvement instead. This will lead to genuine admiration from others and lessen the fear of rejection.
178 Master of the Ring Copyright 2004 by Eric & Kevin Lamkin
Expert Theory of Freestyle Fighting
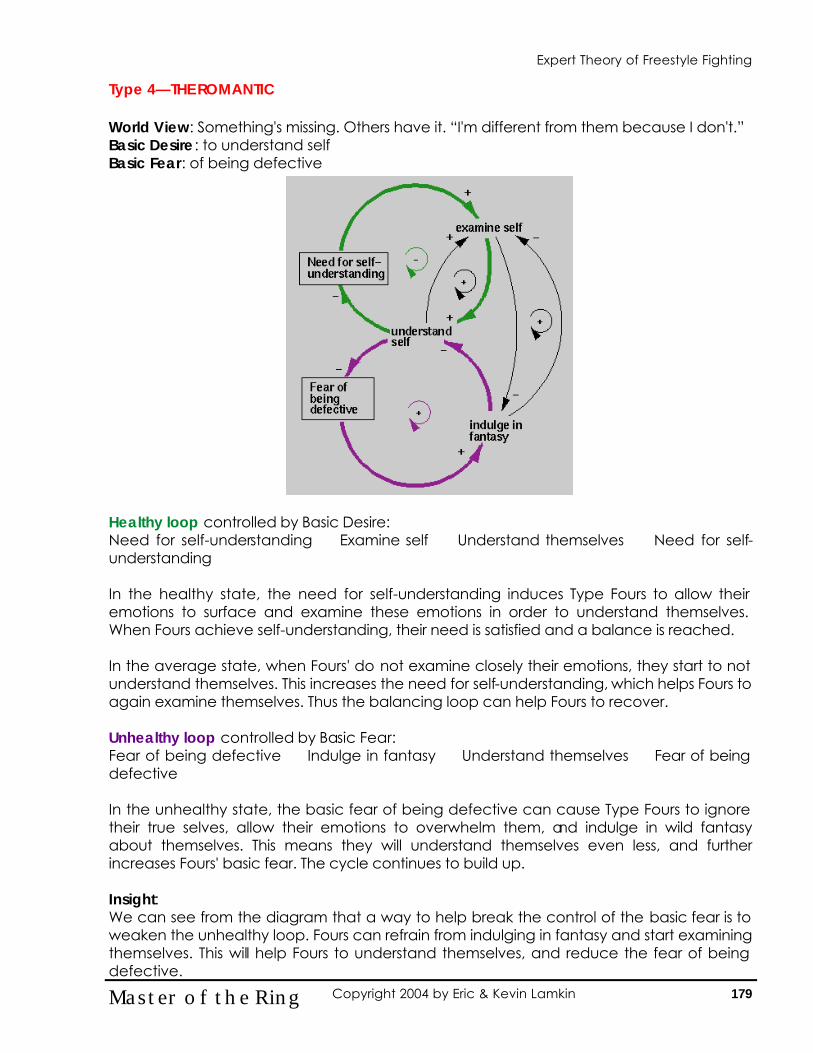
Type 4—THE ROMANTIC World View: Something's missing. Others have it. “I'm different from them because I don't.” Basic Desire: to understand self Basic Fear: of being defective Healthy loop controlled by Basic Desire: Need for self-understanding � Examine self � Understand themselves � Need for self-understanding In the healthy state, the need for self-understanding induces Type Fours to allow their emotions to surface and examine these emotions in order to understand themselves. When Fours achieve self-understanding, their need is satisfied and a balance is reached. In the average state, when Fours' do not examine closely their emotions, they start to not understand themselves. This increases the need for self-understanding, which helps Fours to again examine themselves. Thus the balancing loop can help Fours to recover. Unhealthy loop controlled by Basic Fear: Fear of being defective � Indulge in fantasy � Understand themselves � Fear of being defective In the unhealthy state, the basic fear of being defective can cause Type Fours to ignore their true selves, allow their emotions to overwhelm them, and indulge in wild fantasy about themselves. This means they will understand themselves even less, and further increases Fours' basic fear. The cycle continues to build up. Insight: We can see from the diagram that a way to help break the control of the basic fear is to weaken the unhealthy loop. Fours can refrain from indulging in fantasy and start examining themselves. This will help Fours to understand themselves, and reduce the fear of being defective.
179 Master of the Ring Copyright 2004 by Eric & Kevin Lamkin
Expert Theory of Freestyle Fighting
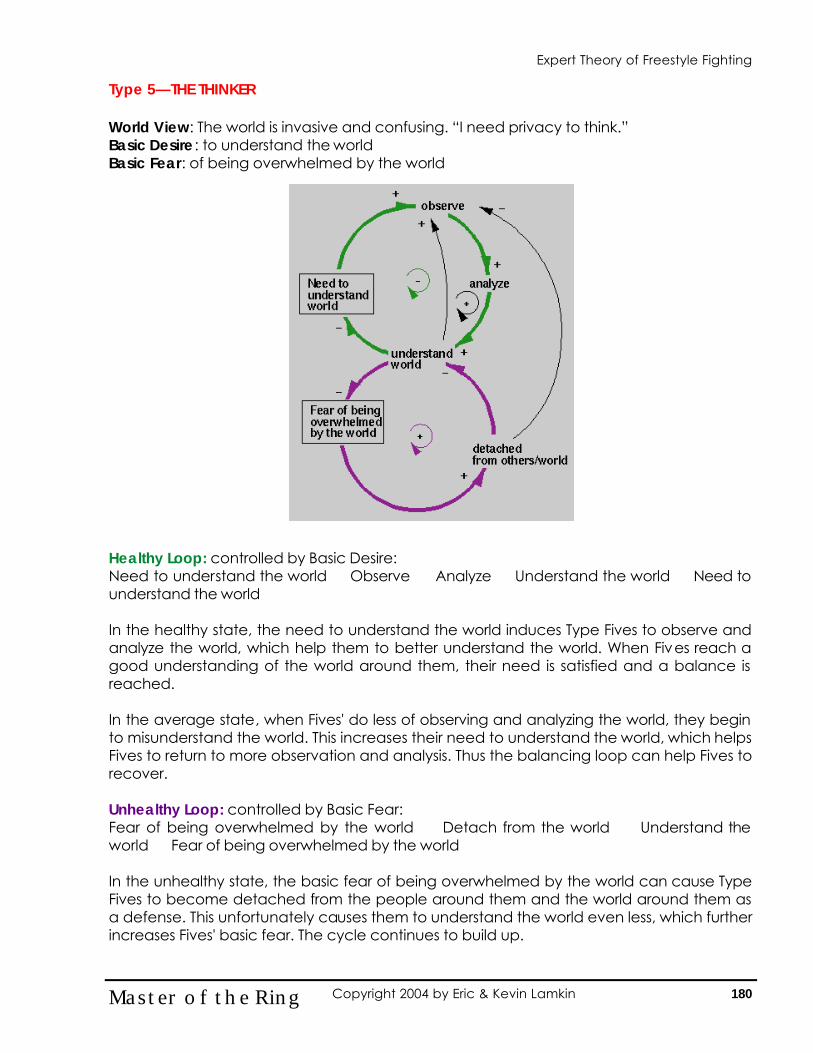
Type 5—THE THINKER World View: The world is invasive and confusing. “I need privacy to think.” Basic Desire: to understand the world Basic Fear: of being overwhelmed by the world Healthy Loop: controlled by Basic Desire: Need to understand the world � Observe � Analyze � Understand the world � Need to understand the world In the healthy state, the need to understand the world induces Type Fives to observe and analyze the world, which help them to better understand the world. When Fives reach a good understanding of the world around them, their need is satisfied and a balance is reached. In the average state, when Fives' do less of observing and analyzing the world, they begin to misunderstand the world. This increases their need to understand the world, which helps Fives to return to more observation and analysis. Thus the balancing loop can help Fives to recover. Unhealthy Loop: controlled by Basic Fear: Fear of being overwhelmed by the world � Detach from the world � Understand the world � Fear of being overwhelmed by the world In the unhealthy state, the basic fear of being overwhelmed by the world can cause Type Fives to become detached from the people around them and the world around them as a defense. This unfortunately causes them to understand the world even less, which further increases Fives' basic fear. The cycle continues to build up.
180 Master of the Ring Copyright 2004 by Eric & Kevin Lamkin
Expert Theory of Freestyle Fighting
Insight: We can see from the diagram that a way to help break the control of the basic fear is to weaken the unhealthy loop. Fives can stop their detachment from the world, and start to observe and analyze the real world more. This will increase their understanding of the world, and reduce their fear of being overwhelmed by the world.
181 Master of the Ring Copyright 2004 by Eric & Kevin Lamkin
Expert Theory of Freestyle Fighting
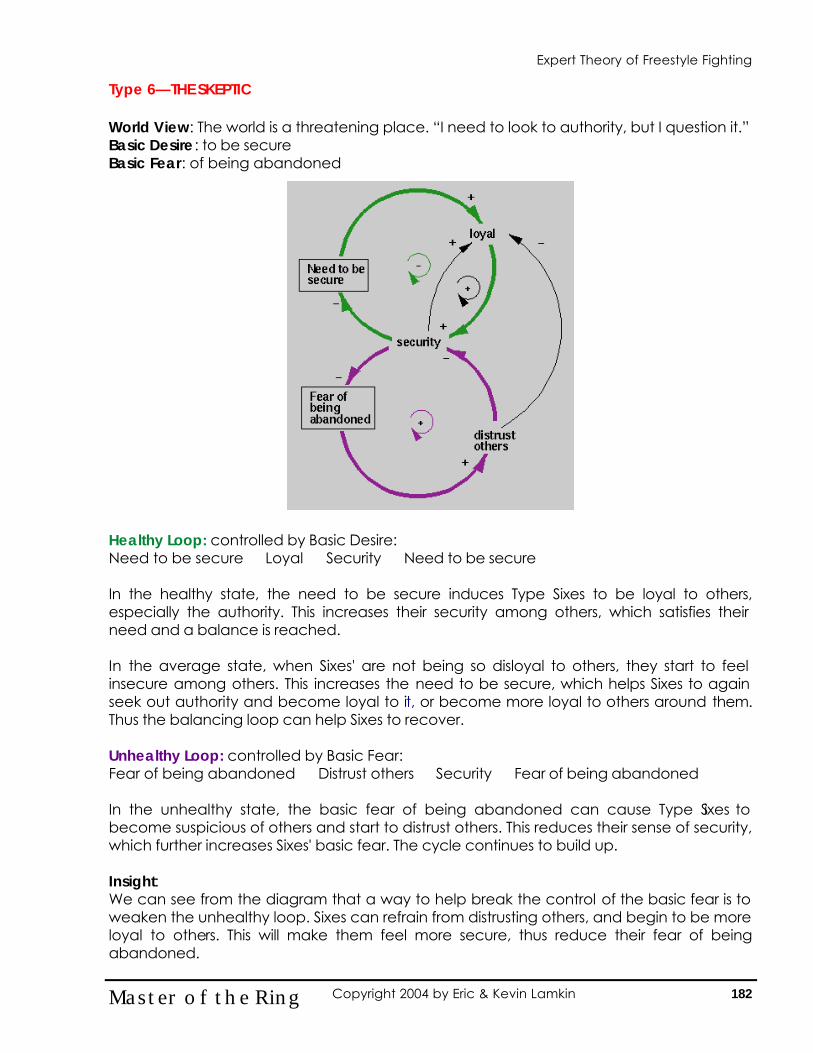
Type 6—THE SKEPTIC World View: The world is a threatening place. “I need to look to authority, but I question it.” Basic Desire: to be secure Basic Fear: of being abandoned Healthy Loop: controlled by Basic Desire: Need to be secure � Loyal � Security � Need to be secure In the healthy state, the need to be secure induces Type Sixes to be loyal to others, especially the authority. This increases their security among others, which satisfies their need and a balance is reached. In the average state, when Sixes' are not being so disloyal to others, they start to feel insecure among others. This increases the need to be secure, which helps Sixes to again seek out authority and become loyal to it, or become more loyal to others around them. Thus the balancing loop can help Sixes to recover. Unhealthy Loop: controlled by Basic Fear: Fear of being abandoned � Distrust others � Security � Fear of being abandoned In the unhealthy state, the basic fear of being abandoned can cause Type Sixes to become suspicious of others and start to distrust others. This reduces their sense of security, which further increases Sixes' basic fear. The cycle continues to build up. Insight: We can see from the diagram that a way to help break the control of the basic fear is to weaken the unhealthy loop. Sixes can refrain from distrusting others, and begin to be more loyal to others. This will make them feel more secure, thus reduce their fear of being abandoned.
182 Master of the Ring Copyright 2004 by Eric & Kevin Lamkin
Expert Theory of Freestyle Fighting
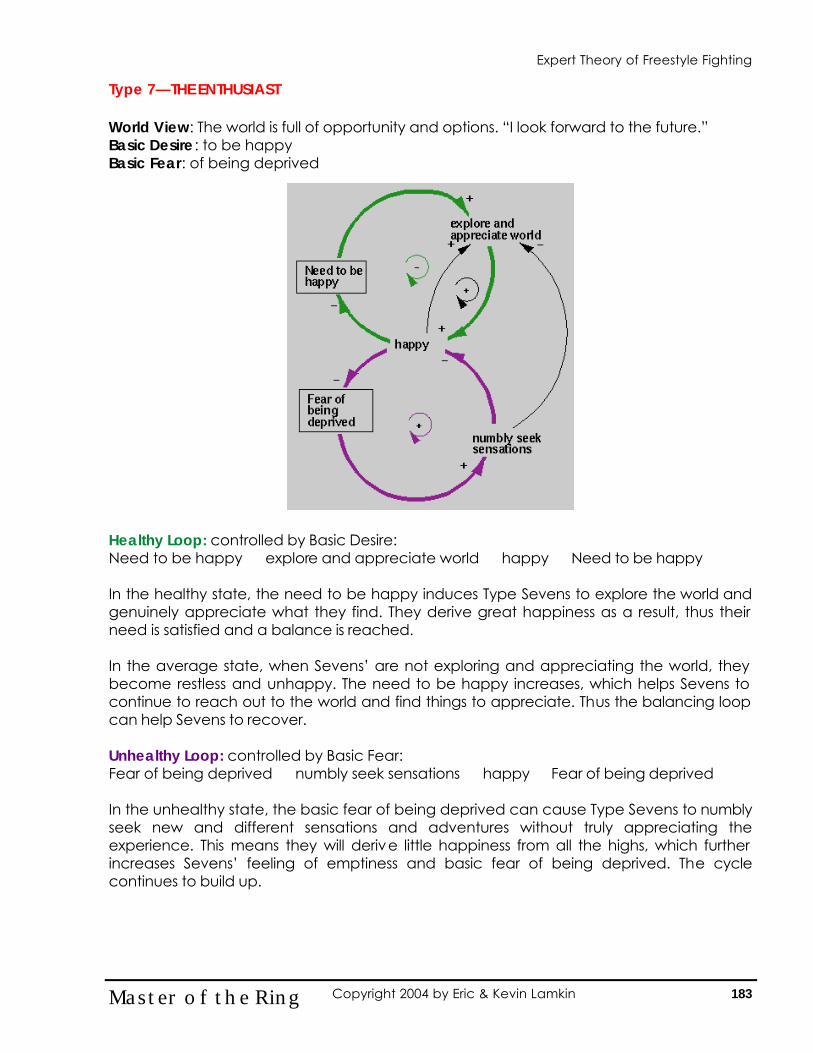
Type 7—THE ENTHUSIAST World View: The world is full of opportunity and options. “I look forward to the future.” Basic Desire: to be happy Basic Fear: of being deprived Healthy Loop: controlled by Basic Desire: Need to be happy � explore and appreciate world � happy � Need to be happy In the healthy state, the need to be happy induces Type Sevens to explore the world and genuinely appreciate what they find. They derive great happiness as a result, thus their need is satisfied and a balance is reached. In the average state, when Sevens’ are not exploring and appreciating the world, they become restless and unhappy. The need to be happy increases, which helps Sevens to continue to reach out to the world and find things to appreciate. Thus the balancing loop can help Sevens to recover. Unhealthy Loop: controlled by Basic Fear: Fear of being deprived � numbly seek sensations � happy � Fear of being deprived In the unhealthy state, the basic fear of being deprived can cause Type Sevens to numbly seek new and different sensations and adventures without truly appreciating the experience. This means they will derive little happiness from all the highs, which further increases Sevens’ feeling of emptiness and basic fear of being deprived. The cycle continues to build up.
183 Master of the Ring Copyright 2004 by Eric & Kevin Lamkin
Expert Theory of Freestyle Fighting

Insight: We can see from the diagram that a way to help break the control of the basic fear is to weaken the unhealthy loop. Sevens can refrain from jumping into the next project, and appreciate more what they experience. This will cause them to be happier, and thus reduce their fear of being deprived.
184 Master of the Ring Copyright 2004 by Eric & Kevin Lamkin
Expert Theory of Freestyle Fighting
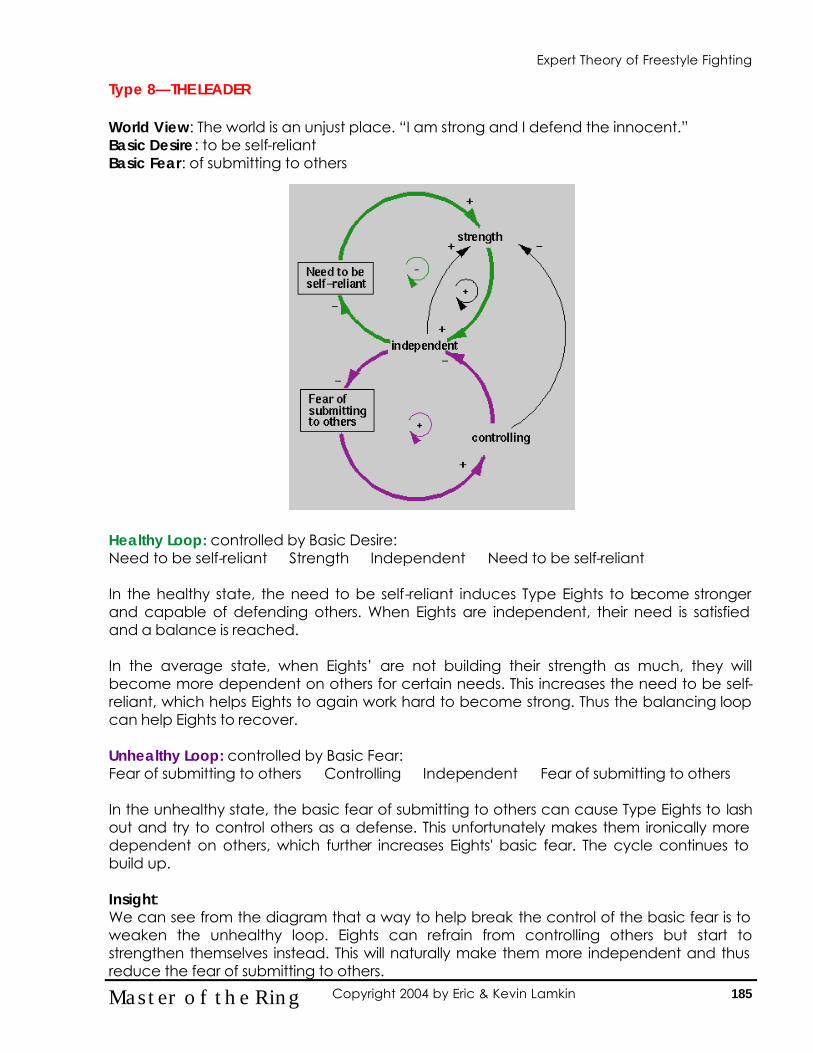
Type 8—THE LEADER World View: The world is an unjust place. “I am strong and I defend the innocent.” Basic Desire: to be self-reliant Basic Fear: of submitting to others Healthy Loop: controlled by Basic Desire: Need to be self-reliant � Strength � Independent � Need to be self-reliant In the healthy state, the need to be self-reliant induces Type Eights to become stronger and capable of defending others. When Eights are independent, their need is satisfied and a balance is reached. In the average state, when Eights’ are not building their strength as much, they will become more dependent on others for certain needs. This increases the need to be self-reliant, which helps Eights to again work hard to become strong. Thus the balancing loop can help Eights to recover. Unhealthy Loop: controlled by Basic Fear: Fear of submitting to others � Controlling � Independent � Fear of submitting to others In the unhealthy state, the basic fear of submitting to others can cause Type Eights to lash out and try to control others as a defense. This unfortunately makes them ironically more dependent on others, which further increases Eights' basic fear. The cycle continues to build up. Insight: We can see from the diagram that a way to help break the control of the basic fear is to weaken the unhealthy loop. Eights can refrain from controlling others but start to strengthen themselves instead. This will naturally make them more independent and thus reduce the fear of submitting to others.
185 Master of the Ring Copyright 2004 by Eric & Kevin Lamkin
Expert Theory of Freestyle Fighting

Type 9—THE PEACEMAKER World View: My efforts won't matter to the world. “It’s best to keep the peace.” Basic Desire: to find union and peace Basic Fear: of separation Healthy Loop: controlled by Basic Desire: Need to find union � Accept others � Do the right thing � Need to find union In the healthy state, the need to find union induces Type Nines to genuinely open up to others and accept them as they are. Others often find their acceptance welcoming and build up a strong bond or union. In this way, the Nines’ needs are satisfied and a balance is reached. In the average state, when Nines’ are less accepting of others or the world, they perceive the union to begin to weaken. This causes the need to find union to increase, which helps Nines to again become more accepting of others. Thus the balancing loop can help Nines to recover. Unhealthy Loop: controlled by Basic Fear: Fear of separation � Illusions of union � Accommodating � Union � Fear of separation In the unhealthy state, the basic fear of separation can cause Type Nines to delude themselves with illusions of union, which they sustain by ignoring reality and blindly accommodating others or the world. Unfortunately, this means they won't achieve true union, which further increases Nines' basic fear. The cycle continues to build up. Insight: We can see from the diagram that a way to help break the control of the basic fear is to weaken the unhealthy loop. Nines can stop indulging in illusions of union, and start to really accept others. This will build real union, and reduce the fear of separation.
186 Master of the Ring Copyright 2004 by Eric & Kevin Lamkin
Expert Theory of Freestyle Fighting
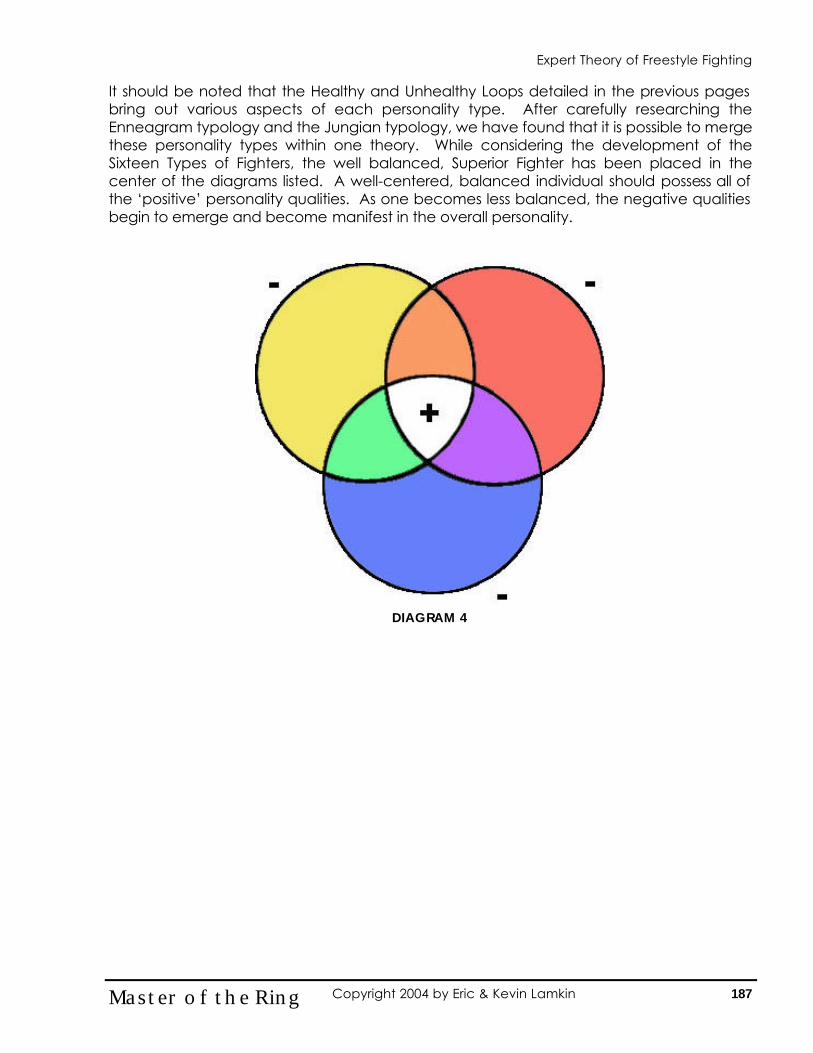
It should be noted that the Healthy and Unhealthy Loops detailed in the previous pages bring out various aspects of each personality type. After carefully researching the Enneagram typology and the Jungian typology, we have found that it is possible to merge these personality types within one theory. While considering the development of the Sixteen Types of Fighters, the well balanced, Superior Fighter has been placed in the center of the diagrams listed. A well-centered, balanced individual should possess all of the ‘positive’ personality qualities. As one becomes less balanced, the negative qualities begin to emerge and become manifest in the overall personality.
187 Master of the Ring Copyright 2004 by Eric & Kevin Lamkin
DIAGRAM 4
Expert Theory of Freestyle Fighting

Applying negative and positive traits to Diagram 2, we then arrive at sixteen different areas of personality types from which to study.
188 Master of the Ring Copyright 2004 by Eric & Kevin Lamkin
DIAGRAM 5
Expert Theory of Freestyle Fighting
JUNGIAN TYPOLOGY AND THE FOUR HUMORS The Jungian Typology Model is an extension from the ancient Greek Four Humors. They are broken down into four preferences from which personality develops. They are:
• Extraversion and Introversion • Sensing and Intuition • Thinking and Feeling • Judging and Perceiving
EXTRAVERSION AND INTROVERSION When we talk about “extraversion” and “introversion”, we are distinguishing between the two worlds in which all of us live. There is a world inside ourselves, and a world outside ourselves. When we are dealing with the world outside of our self, we are “extraverting”. When we are inside our own minds, we are “introverting”. We are extraverting when we:
• Talk to other people • Listen to what someone is saying • Cook dinner, or make a cup of coffee • Work on a car
We are introverting when we: • Read a book • Think about what we want to say or do • Are aware of how we feel • Think through a problem so that we understand it
Within the context of personality typing, the important distinction is which world we live in more often. Do we define our life's direction externally or internally? Which world gives us our energy, and which do we perhaps find draining? SENSING AND INTUITION The “SN” preference refers to how we gather information. We all need data on which to base our decisions. We gather data through our five senses. Jung contended that there are two distinct ways of perceiving the data that we gather. The “Sensing” preference absorbs data in a literal, concrete fashion. The “Intuitive” preference generates abstract possibilities from information that is gathered. We all use both Sensing and Intuition in our lives, but to different degrees of effectiveness and with different levels of comfort. We are Sensing when we:
• Taste food • Notice a stoplight has changed • Memorize a speech • Follow steps in a plan
189 Master of the Ring Copyright 2004 by Eric & Kevin Lamkin
Expert Theory of Freestyle Fighting
We are Intuitive when we: • Come up with a new way of doing things • Think about future implications for a current action • Perceive underlying meaning in what people say or do • See the big picture
Within the context of personality typing, the important distinction is which method of gathering information do we trust the most? Do we rely on our five senses and want concrete, practical data to work with? Or do we trust our intuitions without necessarily building upon a solid foundation of facts? THINKING AND FEELING When Jung studied human behavior, he noticed that people have the capability to make decisions based on two very different sets of criteria: Thinking and Feeling. When someone makes a decision that is based on logic and reason, they are operating in the Thinking mode. When someone makes a decision that is based on their value system, or what he or she believes to be right, they are operating in Feeling mode. We all use both modes for making decisions, but we put more trust into one mode or the other. A “Thinker” makes decisions in a rational, logical, impartial manner, based on what they believe to be fair and correct by pre-defined rules of behavior. A “Feeler” makes decisions on the individual case, in a subjective manner based on what they believe to be right within their own value systems. We are making decisions in the Thinking mode when we:
• Research a product via consumer reports, and buy the best one to meet our needs
• Do “The Right Thing”, whether or not we like it • Choose not to buy a blue shirt which we like, because we have two blue shirts • Establish guidelines to follow for performing tasks
We are making decisions in the Feeling mode when we:
• Decide to buy something because we like it • Refrain from telling someone something which we feel may upset them • Decide not to take a job because we don't like the work environment • Decide to move somewhere to be close to someone we care about
Some decisions are made entirely by Thinking or Feelings processes. Most decisions involve some Thinking and some Feeling. Decisions that we find most difficult are those in which we have conflicts between our Thinking and Feeling sides. In these situations, our dominant preference will take over. Decisions that we find easy to make and feel good about are usually a result of being in sync with both our Feeling and Thinking sides.
190 Master of the Ring Copyright 2004 by Eric & Kevin Lamkin
Expert Theory of Freestyle Fighting
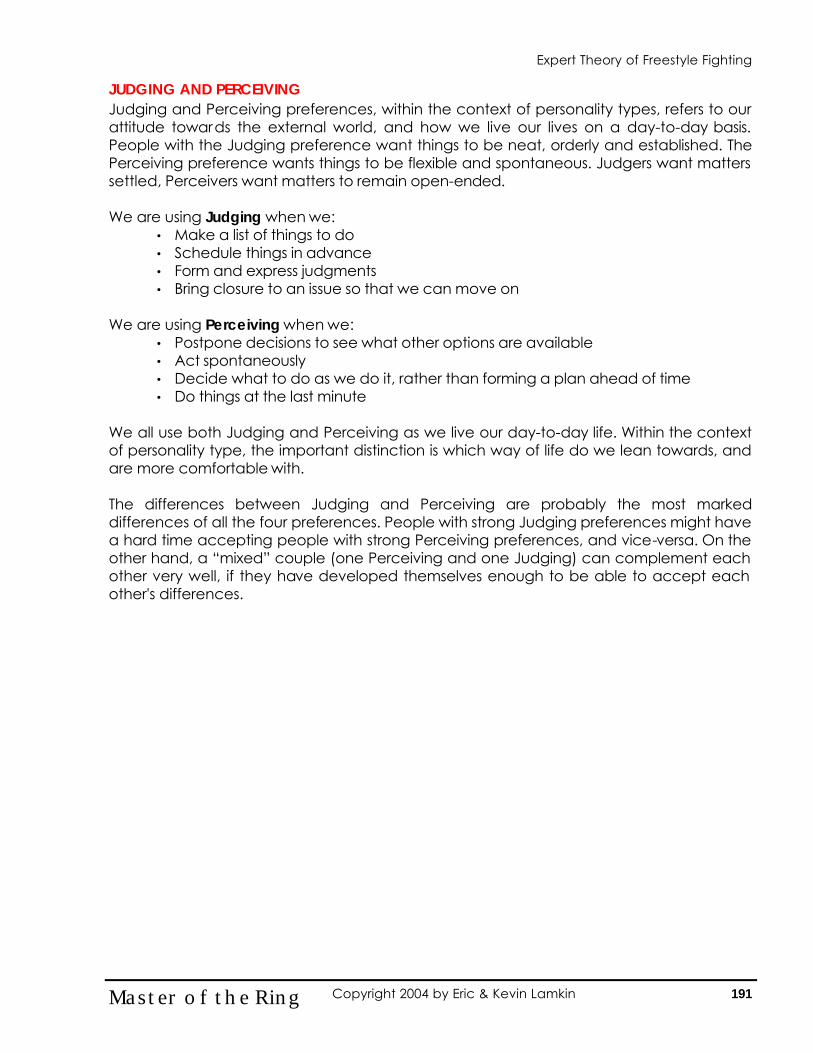
JUDGING AND PERCEIVING Judging and Perceiving preferences, within the context of personality types, refers to our attitude towards the external world, and how we live our lives on a day-to-day basis. People with the Judging preference want things to be neat, orderly and established. The Perceiving preference wants things to be flexible and spontaneous. Judgers want matters settled, Perceivers want matters to remain open-ended. We are using Judging when we:
• Make a list of things to do • Schedule things in advance • Form and express judgments • Bring closure to an issue so that we can move on
We are using Perceiving when we:
• Postpone decisions to see what other options are available • Act spontaneously • Decide what to do as we do it, rather than forming a plan ahead of time • Do things at the last minute
We all use both Judging and Perceiving as we live our day-to-day life. Within the context of personality type, the important distinction is which way of life do we lean towards, and are more comfortable with. The differences between Judging and Perceiving are probably the most marked differences of all the four preferences. People with strong Judging preferences might have a hard time accepting people with strong Perceiving preferences, and vice-versa. On the other hand, a “mixed” couple (one Perceiving and one Judging) can complement each other very well, if they have developed themselves enough to be able to accept each other's differences.
191 Master of the Ring Copyright 2004 by Eric & Kevin Lamkin
Expert Theory of Freestyle Fighting
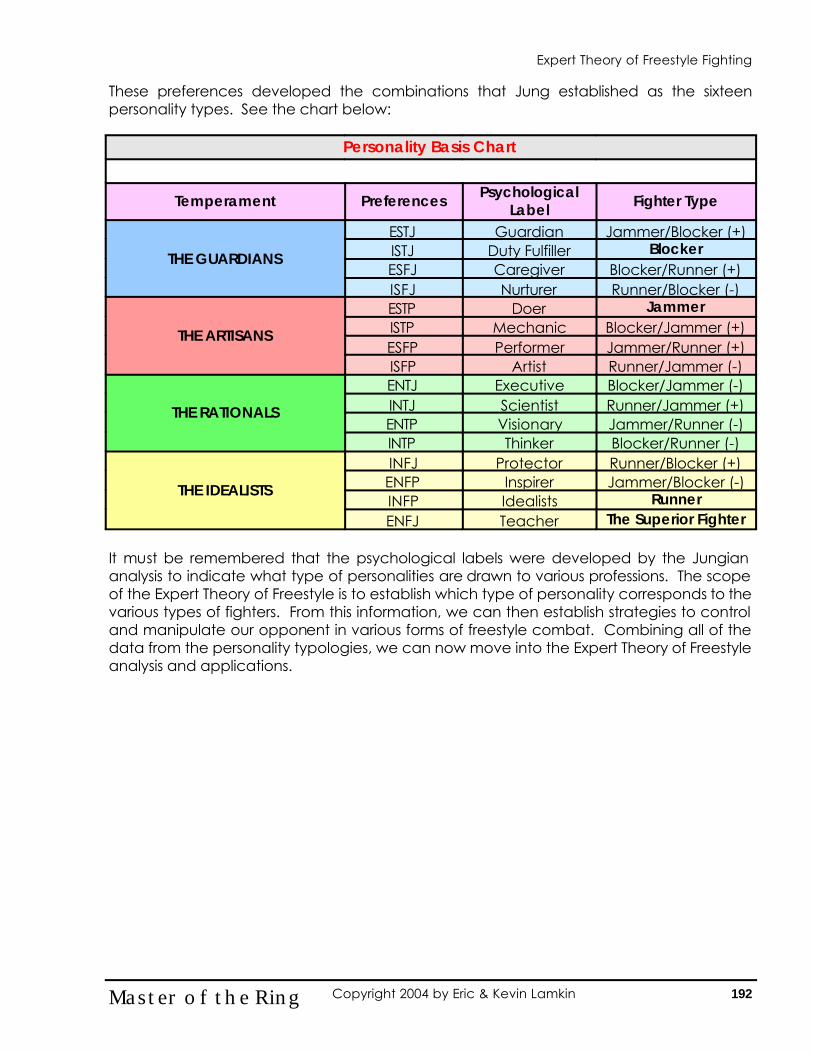
These preferences developed the combinations that Jung established as the sixteen personality types. See the chart below:
It must be remembered that the psychological labels were developed by the Jungian analysis to indicate what type of personalities are drawn to various professions. The scope of the Expert Theory of Freestyle is to establish which type of personality corresponds to the various types of fighters. From this information, we can then establish strategies to control and manipulate our opponent in various forms of freestyle combat. Combining all of the data from the personality typologies, we can now move into the Expert Theory of Freestyle analysis and applications.
192 Master of the Ring Copyright 2004 by Eric & Kevin Lamkin
Personality Basis Chart
Temperament Preferences Psychological
Label Fighter Type
THE GUARDIANS
ESTJ Guardian Jammer/Blocker (+) ISTJ Duty Fulfiller Blocker ESFJ Caregiver Blocker/Runner (+) ISFJ Nurturer Runner/Blocker (-)
THE ARTISANS
ESTP Doer Jammer ISTP Mechanic Blocker/Jammer (+) ESFP Performer Jammer/Runner (+) ISFP Artist Runner/Jammer (-)
THE RATIONALS
ENTJ Executive Blocker/Jammer (-) INTJ Scientist Runner/Jammer (+) ENTP Visionary Jammer/Runner (-) INTP Thinker Blocker/Runner (-) INFJ Protector Runner/Blocker (+) ENFP Inspirer Jammer/Blocker (-) INFP Idealists Runner ENFJ Teacher The Superior Fighter
THE IDEALISTS
Expert Theory of Freestyle Fighting
CATEGORICAL BREAKDOWN OF THE EXPERT THEORY OF FREESTYLE The Expert Theory of Freestyle incorporates all of previously listed personality typing and organizes them in to categories from general to specific. In the pages that follow, charts are presented that categorizes the tendencies of personality types in regard to fighting. The strengths and weaknesses listed are not all of the aspects that each personality types exhibits. They are however, the most predominant personality traits exhibited when subject is in his positive zone (strengths) and his negative zone (weaknesses). The charts further break down how to identify your opponent’s fighting type when you initialize an attack with a fake or feint. The archetypical Runner, Jammer and Blocker w ill respond respectively by either running, attacking or blocking. The combinations of the other fighter types will be identified by various other reactions to your initial fake. Finally, the charts will give you basic strategies how to combat the Sixteen Types of Fighters. You will notice that we list both tactics to diffuse conflict as well as tactics designed to escalate conflict. Basically, if your opponent is superior to you, you do not want to engage into combat with him. Negotiation skills (stroking his ego) may be all that you possess to save your life. On the other hand, in order to break your opponent’s strategies, confidence and mental skills, it may be necessary of defeat him psychologically by ‘pushing-his buttons.’
193 Master of the Ring Copyright 2004 by Eric & Kevin Lamkin
Expert Theory of Freestyle Fighting
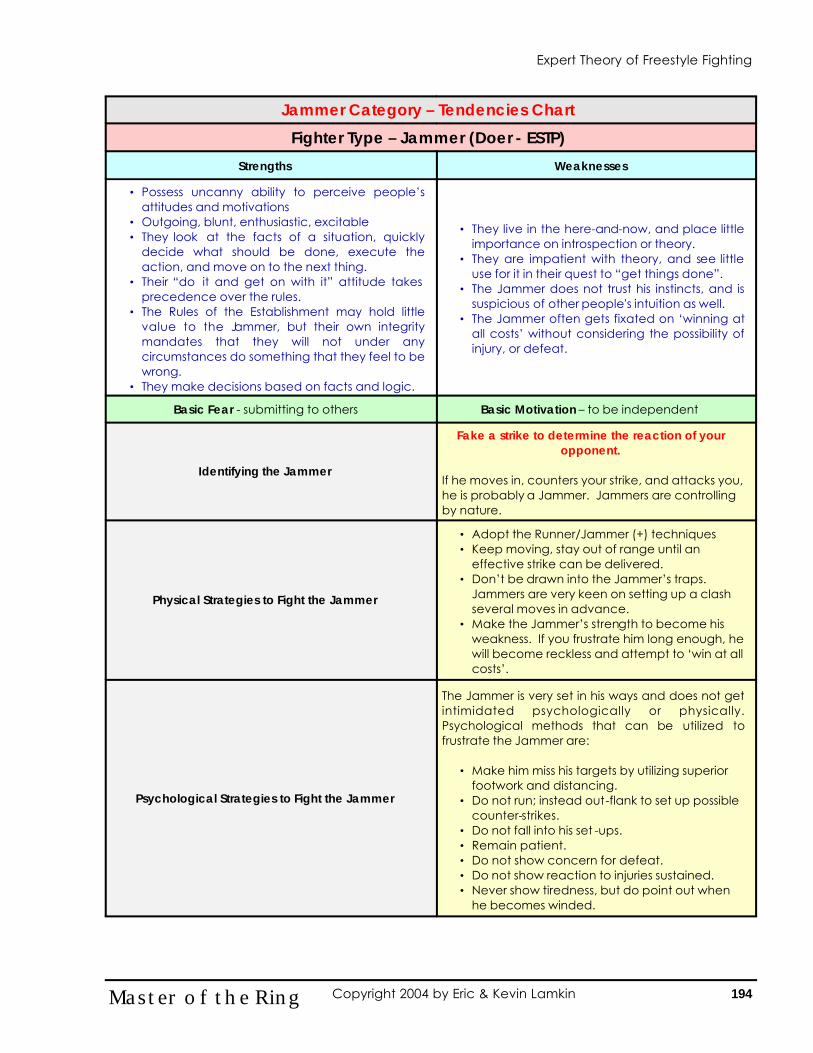
194 Master of the Ring Copyright 2004 by Eric & Kevin Lamkin
Jammer Category – Tendencies Chart
Strengths Weaknesses
• Possess uncanny ability to perceive people’s attitudes and motivations
• Outgoing, blunt, enthusiastic, excitable • They look at the facts of a situation, quickly
decide what should be done, execute the action, and move on to the next thing.
• Their “do it and get on with it” attitude takes precedence over the rules.
• The Rules of the Establishment may hold little value to the Jammer, but their own integrity mandates that they will not under any circumstances do something that they feel to be wrong.
• They make decisions based on facts and logic.
• They live in the here-and-now, and place little importance on introspection or theory.
• They are impatient with theory, and see little use for it in their quest to “get things done”.
• The Jammer does not trust his instincts, and is suspicious of other people's intuition as well.
• The Jammer often gets fixated on ‘winning at all costs’ without considering the possibility of injury, or defeat.
Basic Fear - submitting to others Basic Motivation – to be independent
Identifying the Jammer
Fake a strike to determine the reaction of your opponent.
If he moves in, counters your strike, and attacks you, he is probably a Jammer. Jammers are controlling by nature.
Physical Strategies to Fight the Jammer
• Adopt the Runner/Jammer (+) techniques • Keep moving, stay out of range until an
effective strike can be delivered. • Don’t be drawn into the Jammer’s traps.
Jammers are very keen on setting up a clash several moves in advance.
• Make the Jammer’s strength to become his weakness. If you frustrate him long enough, he will become reckless and attempt to ‘win at all costs’.
Psychological Strategies to Fight the Jammer
The Jammer is very set in his ways and does not get intimidated psychologically or physically. Psychological methods that can be utilized to frustrate the Jammer are:
• Make him miss his targets by utilizing superior
footwork and distancing. • Do not run; instead out-flank to set up possible
counter-strikes. • Do not fall into his set -ups. • Remain patient. • Do not show concern for defeat. • Do not show reaction to injuries sustained. • Never show tiredness, but do point out when
he becomes winded.
Fighter Type – Jammer (Doer - ESTP)
Expert Theory of Freestyle Fighting
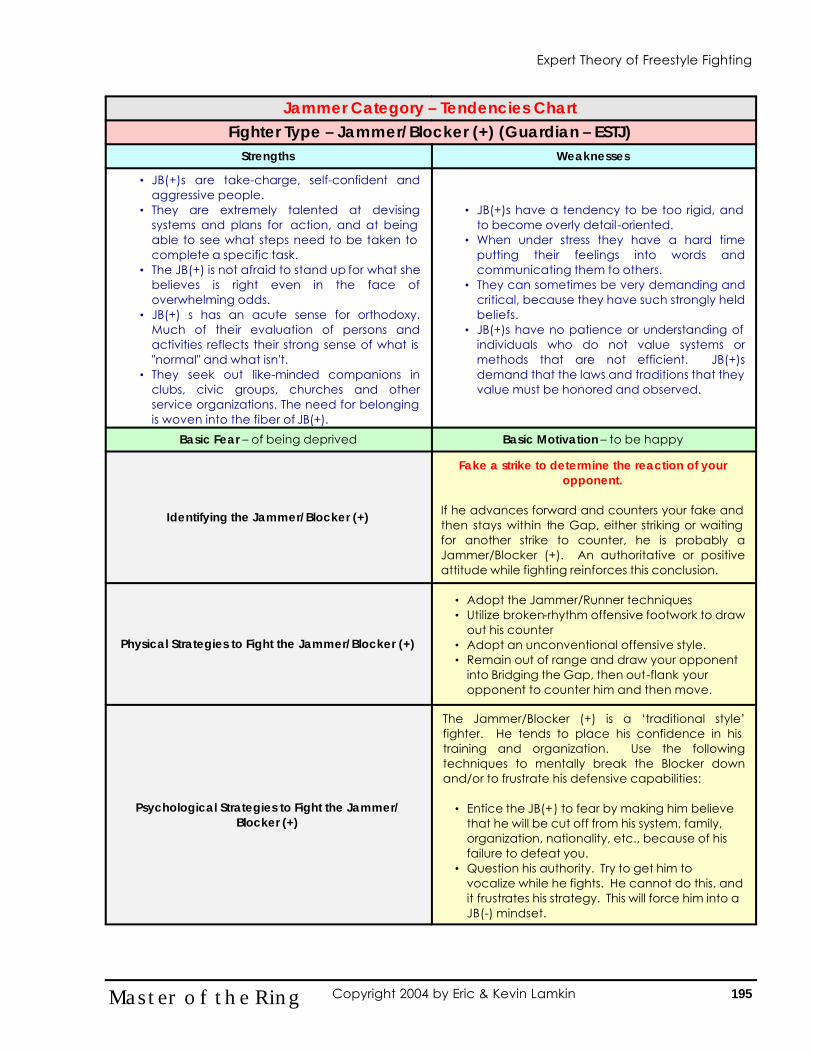
195 Master of the Ring Copyright 2004 by Eric & Kevin Lamkin
Jammer Category – Tendencies Chart
Strengths Weaknesses
• JB(+)s are take-charge, self-confident and aggressive people.
• They are extremely talented at devising systems and plans for action, and at being able to see what steps need to be taken to complete a specific task.
• The JB(+) is not afraid to stand up for what she believes is right even in the face of overwhelming odds.
• JB(+) s has an acute sense for orthodoxy. Much of their evaluation of persons and activities reflects their strong sense of what is "normal" and what isn't.
• They seek out like-minded companions in clubs, civic groups, churches and other service organizations. The need for belonging is woven into the fiber of JB(+).
• JB(+)s have a tendency to be too rigid, and to become overly detail-oriented.
• When under stress they have a hard time putting their feelings into words and communicating them to others.
• They can sometimes be very demanding and critical, because they have such strongly held beliefs.
• JB(+)s have no patience or understanding of individuals who do not value systems or methods that are not efficient. JB(+)s demand that the laws and traditions that they value must be honored and observed.
Basic Fear – of being deprived Basic Motivation – to be happy
Identifying the Jammer/Blocker (+)
Fake a strike to determine the reaction of your opponent.
If he advances forward and counters your fake and then stays within the Gap, either striking or waiting for another strike to counter, he is probably a Jammer/Blocker (+). An authoritative or positive attitude while fighting reinforces this conclusion.
Physical Strategies to Fight the Jammer/Blocker (+)
• Adopt the Jammer/Runner techniques • Utilize broken-rhythm offensive footwork to draw
out his counter • Adopt an unconventional offensive style. • Remain out of range and draw your opponent
into Bridging the Gap, then out-flank your opponent to counter him and then move.
Psychological Strategies to Fight the Jammer/Blocker (+)
The Jammer/Blocker (+) is a ‘traditional style’ fighter. He tends to place his confidence in his training and organization. Use the following techniques to mentally break the Blocker down and/or to frustrate his defensive capabilities:
• Entice the JB(+) to fear by making him believe
that he will be cut off from his system, family, organization, nationality, etc., because of his failure to defeat you.
• Question his authority. Try to get him to vocalize while he fights. He cannot do this, and it frustrates his strategy. This will force him into a JB(-) mindset.
Fighter Type – Jammer/Blocker (+) (Guardian – ESTJ)
Expert Theory of Freestyle Fighting
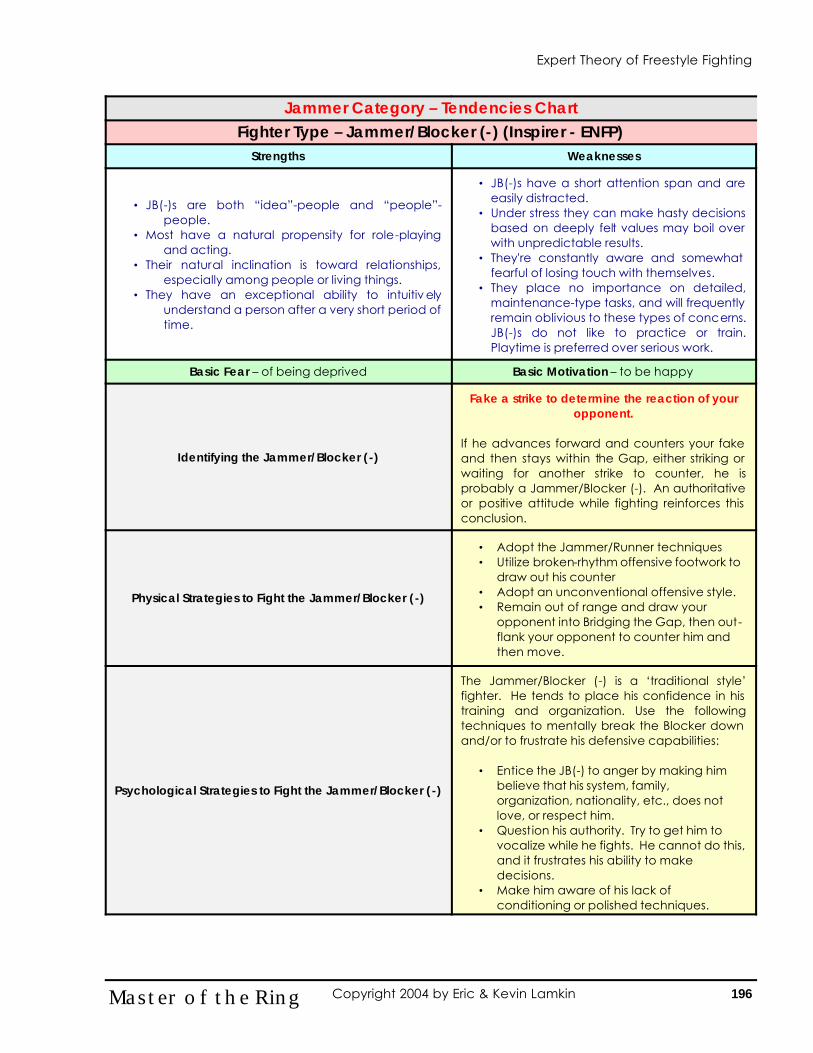
196 Master of the Ring Copyright 2004 by Eric & Kevin Lamkin
Jammer Category – Tendencies Chart
Strengths Weaknesses
• JB(-)s are both “idea”-people and “people”-people.
• Most have a natural propensity for role-playing and acting.
• Their natural inclination is toward relationships, especially among people or living things.
• They have an exceptional ability to intuitiv ely understand a person after a very short period of time.
• JB(-)s have a short attention span and are easily distracted.
• Under stress they can make hasty decisions based on deeply felt values may boil over with unpredictable results.
• They're constantly aware and somewhat fearful of losing touch with themselves.
• They place no importance on detailed, maintenance-type tasks, and will frequently remain oblivious to these types of concerns. JB(-)s do not like to practice or train. Playtime is preferred over serious work.
Basic Fear – of being deprived Basic Motivation – to be happy
Identifying the Jammer/Blocker (-)
Fake a strike to determine the reaction of your opponent.
If he advances forward and counters your fake and then stays within the Gap, either striking or waiting for another strike to counter, he is probably a Jammer/Blocker (-). An authoritative or positive attitude while fighting reinforces this conclusion.
Physical Strategies to Fight the Jammer/Blocker (-)
• Adopt the Jammer/Runner techniques • Utilize broken-rhythm offensive footwork to
draw out his counter • Adopt an unconventional offensive style. • Remain out of range and draw your
opponent into Bridging the Gap, then out-flank your opponent to counter him and then move.
Psychological Strategies to Fight the Jammer/Blocker (-)
The Jammer/Blocker (-) is a ‘traditional style’ fighter. He tends to place his confidence in his training and organization. Use the following techniques to mentally break the Blocker down and/or to frustrate his defensive capabilities:
• Entice the JB(-) to anger by making him believe that his system, family, organization, nationality, etc., does not love, or respect him.
• Question his authority. Try to get him to vocalize while he fights. He cannot do this, and it frustrates his ability to make decisions.
• Make him aware of his lack of conditioning or polished techniques.
Fighter Type – Jammer/Blocker (-) (Inspirer - ENFP)
Expert Theory of Freestyle Fighting
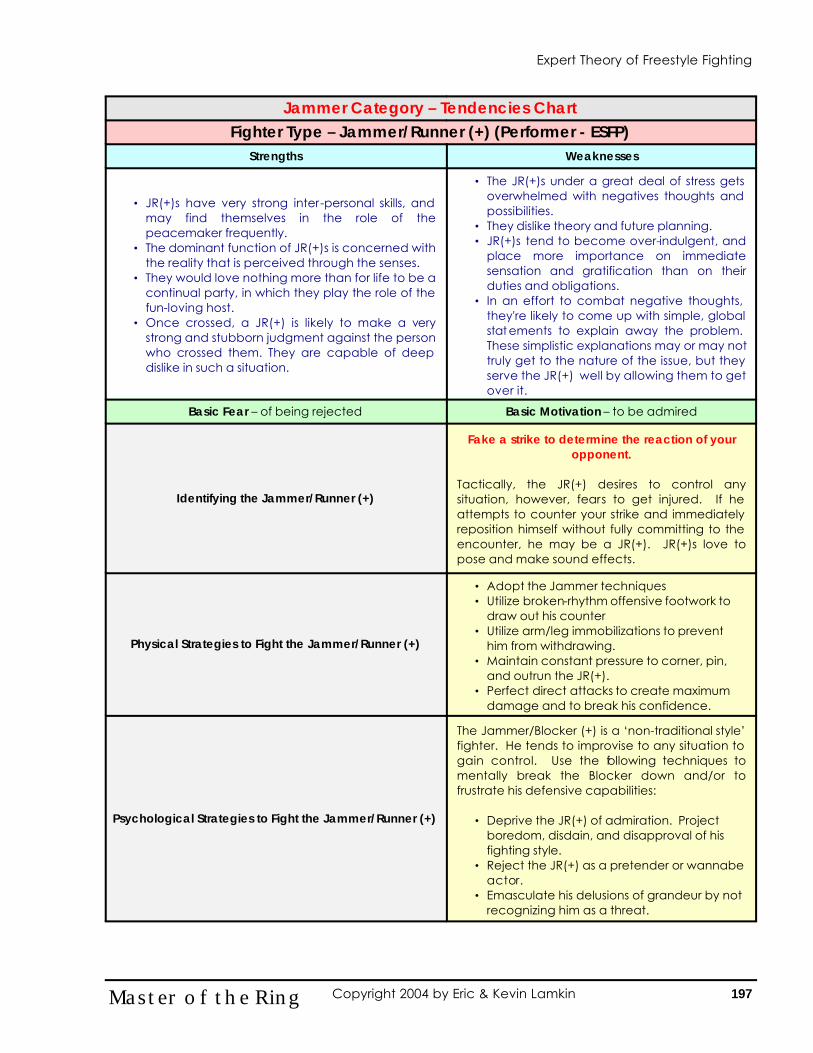
197 Master of the Ring Copyright 2004 by Eric & Kevin Lamkin
Jammer Category – Tendencies Chart
Strengths Weaknesses
• JR(+)s have very strong inter-personal skills, and may find themselves in the role of the peacemaker frequently.
• The dominant function of JR(+)s is concerned with the reality that is perceived through the senses.
• They would love nothing more than for life to be a continual party, in which they play the role of the fun-loving host.
• Once crossed, a JR(+) is likely to make a very strong and stubborn judgment against the person who crossed them. They are capable of deep dislike in such a situation.
• The JR(+)s under a great deal of stress gets overwhelmed with negatives thoughts and possibilities.
• They dislike theory and future planning. • JR(+)s tend to become over-indulgent, and
place more importance on immediate sensation and gratification than on their duties and obligations.
• In an effort to combat negative thoughts, they're likely to come up with simple, global stat ements to explain away the problem. These simplistic explanations may or may not truly get to the nature of the issue, but they serve the JR(+) well by allowing them to get over it.
Basic Fear – of being rejected Basic Motivation – to be admired
Identifying the Jammer/Runner (+)
Fake a strike to determine the reaction of your opponent.
Tactically, the JR(+) desires to control any situation, however, fears to get injured. If he attempts to counter your strike and immediately reposition himself without fully committing to the encounter, he may be a JR(+). JR(+)s love to pose and make sound effects.
Physical Strategies to Fight the Jammer/Runner (+)
• Adopt the Jammer techniques • Utilize broken-rhythm offensive footwork to
draw out his counter • Utilize arm/leg immobilizations to prevent
him from withdrawing. • Maintain constant pressure to corner, pin,
and outrun the JR(+). • Perfect direct attacks to create maximum
damage and to break his confidence.
Psychological Strategies to Fight the Jammer/Runner (+)
The Jammer/Blocker (+) is a ‘non-traditional style’ fighter. He tends to improvise to any situation to gain control. Use the following techniques to mentally break the Blocker down and/or to frustrate his defensive capabilities:
• Deprive the JR(+) of admiration. Project
boredom, disdain, and disapproval of his fighting style.
• Reject the JR(+) as a pretender or wannabe actor.
• Emasculate his delusions of grandeur by not recognizing him as a threat.
Fighter Type – Jammer/Runner (+) (Performer - ESFP)
Expert Theory of Freestyle Fighting
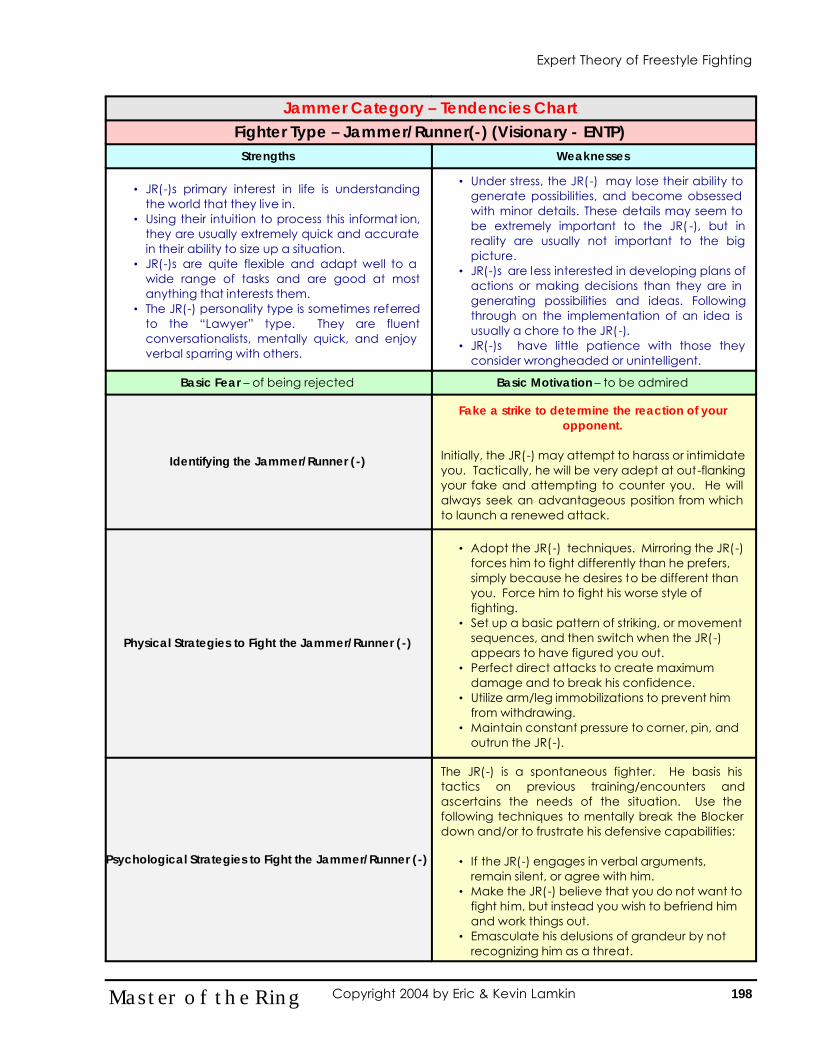
198 Master of the Ring Copyright 2004 by Eric & Kevin Lamkin
Jammer Category – Tendencies Chart
Strengths Weaknesses
• JR(-)s primary interest in life is understanding the world that they live in.
• Using their intuition to process this informat ion, they are usually extremely quick and accurate in their ability to size up a situation.
• JR(-)s are quite flexible and adapt well to a wide range of tasks and are good at most anything that interests them.
• The JR(-) personality type is sometimes referred to the “Lawyer” type. They are fluent conversationalists, mentally quick, and enjoy verbal sparring with others.
• Under stress, the JR(-) may lose their ability to generate possibilities, and become obsessed with minor details. These details may seem to be extremely important to the JR( -), but in reality are usually not important to the big picture.
• JR(-)s are less interested in developing plans of actions or making decisions than they are in generating possibilities and ideas. Following through on the implementation of an idea is usually a chore to the JR(-).
• JR(-)s have little patience with those they consider wrongheaded or unintelligent.
Basic Fear – of being rejected Basic Motivation – to be admired
Identifying the Jammer/Runner (-)
Fake a strike to determine the reaction of your opponent.
Initially, the JR(-) may attempt to harass or intimidate you. Tactically, he will be very adept at out-flanking your fake and attempting to counter you. He will always seek an advantageous position from which to launch a renewed attack.
Physical Strategies to Fight the Jammer/Runner (-)
• Adopt the JR(-) techniques. Mirroring the JR(-) forces him to fight differently than he prefers, simply because he desires to be different than you. Force him to fight his worse style of fighting.
• Set up a basic pattern of striking, or movement sequences, and then switch when the JR(-) appears to have figured you out.
• Perfect direct attacks to create maximum damage and to break his confidence.
• Utilize arm/leg immobilizations to prevent him from withdrawing.
• Maintain constant pressure to corner, pin, and outrun the JR(-).
Psychological Strategies to Fight the Jammer/Runner (-)
The JR(-) is a spontaneous fighter. He basis his tactics on previous training/encounters and ascertains the needs of the situation. Use the following techniques to mentally break the Blocker down and/or to frustrate his defensive capabilities:
• If the JR(-) engages in verbal arguments, remain silent, or agree with him.
• Make the JR(-) believe that you do not want to fight him, but instead you wish to befriend him and work things out.
• Emasculate his delusions of grandeur by not recognizing him as a threat.
Fighter Type – Jammer/Runner(-) (Visionary - ENTP)
Expert Theory of Freestyle Fighting
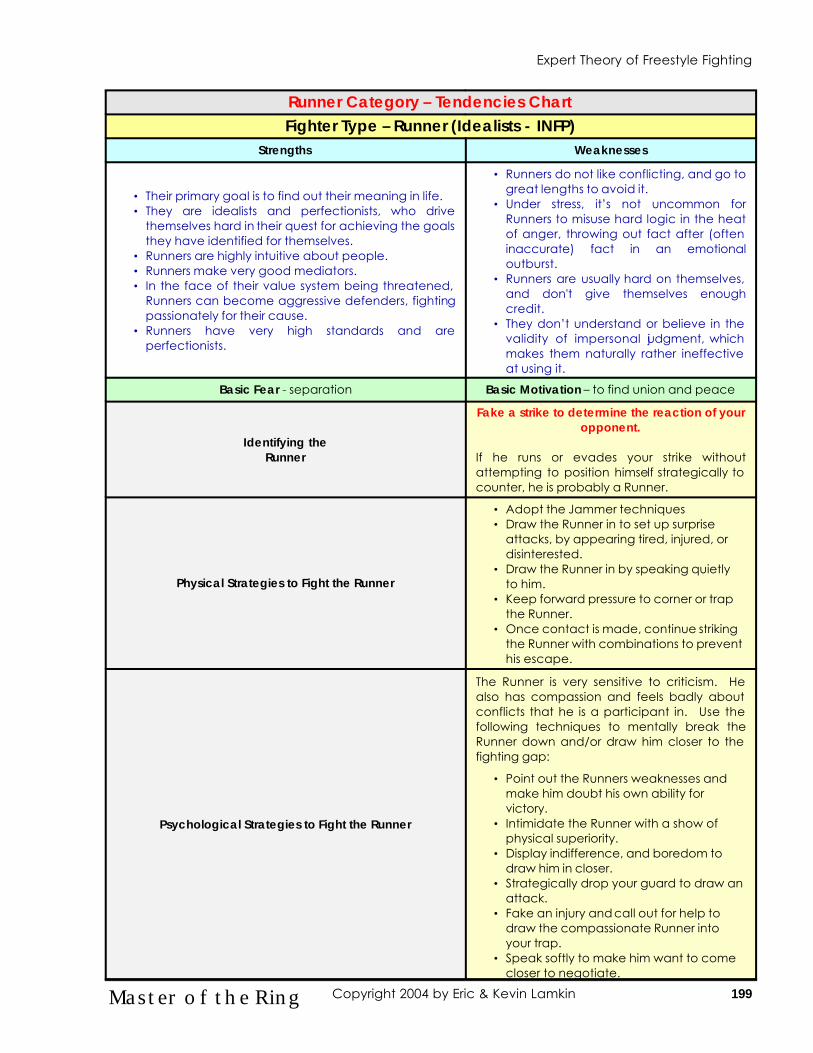
199 Master of the Ring Copyright 2004 by Eric & Kevin Lamkin
Runner Category – Tendencies Chart
Strengths Weaknesses
• Their primary goal is to find out their meaning in life. • They are idealists and perfectionists, who drive
themselves hard in their quest for achieving the goals they have identified for themselves.
• Runners are highly intuitive about people. • Runners make very good mediators. • In the face of their value system being threatened,
Runners can become aggressive defenders, fighting passionately for their cause.
• Runners have very high standards and are perfectionists.
• Runners do not like conflicting, and go to great lengths to avoid it.
• Under stress, it’s not uncommon for Runners to misuse hard logic in the heat of anger, throwing out fact after (often inaccurate) fact in an emotional outburst.
• Runners are usually hard on themselves, and don't give themselves enough credit.
• They don’t understand or believe in the validity of impersonal judgment, which makes them naturally rather ineffective at using it.
Basic Fear - separation Basic Motivation – to find union and peace
Identifying the Runner
Fake a strike to determine the reaction of your opponent.
If he runs or evades your strike without attempting to position himself strategically to counter, he is probably a Runner.
Physical Strategies to Fight the Runner
• Adopt the Jammer techniques • Draw the Runner in to set up surprise
attacks, by appearing tired, injured, or disinterested.
• Draw the Runner in by speaking quietly to him.
• Keep forward pressure to corner or trap the Runner.
• Once contact is made, continue striking the Runner with combinations to prevent his escape.
Psychological Strategies to Fight the Runner
The Runner is very sensitive to criticism. He also has compassion and feels badly about conflicts that he is a participant in. Use the following techniques to mentally break the Runner down and/or draw him closer to the fighting gap:
• Point out the Runners weaknesses and make him doubt his own ability for victory.
• Intimidate the Runner with a show of physical superiority.
• Display indifference, and boredom to draw him in closer.
• Strategically drop your guard to draw an attack.
• Fake an injury and call out for help to draw the compassionate Runner into your trap.
• Speak softly to make him want to come closer to negotiate.
Fighter Type – Runner (Idealists - INFP)
Expert Theory of Freestyle Fighting

200 Master of the Ring Copyright 2004 by Eric & Kevin Lamkin
Runner Category – Tendencies Chart
Strengths Weaknesses
• RJ(+)s live in the world of ideas and strategic planning. They value intelligence, knowledge, and competence, and typically have high standards in these regards, which they continuously strive to fulfill.
• RJ(+)s focus their energy on observing the world, and generating ideas and possibilities. Their mind constantly gathers information and makes associations about it. They are tremendously insightful and usually are very quick to understand new ideas.
• RJ(+)s are the supreme strategists - always scanning available ideas and concepts to plan for every conceivable contingency.
• It is not easy for the RJ(+) to express their internal images, insights, and abstractions.
• They dislike messiness and inefficiency, and anything that is muddled or unclear.
• RJ(+)s tend to blame misunderstandings on others, rather than accepting responsibility for themselves.
• When under a great deal of stress, the RJ(+) may become obsessed with mindless repetitive, Sensate activities, such as over-drinking. They may also tend to become absorbed with minutia and details that they would not normally consider important to their overall goal.
Basic Fear – being defective Basic Motivation – to understand self
Identifying the Runner/Jammer (+)
Fake a strike to determine the reaction of your opponent.
The JR(+) will attempt to counter with his favorite strike. He will usually apply pressure at various flanks, until his strike will be guaranteed.
Physical Strategies to Fight the Runner/Jammer (+)
• Adopt the Jammer/Blocker techniques • Utilize unconventional footwork, attacks and
combinations. • Perfect direct attacks to create maximum
damage and to break his confidence. • Utilize arm/leg immobilizations to prevent him
from withdrawing.
Psychological Strategies to Fight the Runner/Jammer (+)
The JR(+) fears doing wrong and being wrong. Use the following techniques to mentally break the RJ(+) down and/or draw him closer to the fighting gap:
• Make him second-guess his tactics by ridiculing and laughing at his attempts.
• Attempt to get the JR(+) to express his feelings. • Force the JR(+) to feel inferior to your
authoritative action. JR(+)s normally exhibit self-righteous behavior; however, when confronted by a higher authority, the JR(+) shuts down.
Fighter Type – Runner/Jammer(+) (Scientist - INTJ)
Expert Theory of Freestyle Fighting
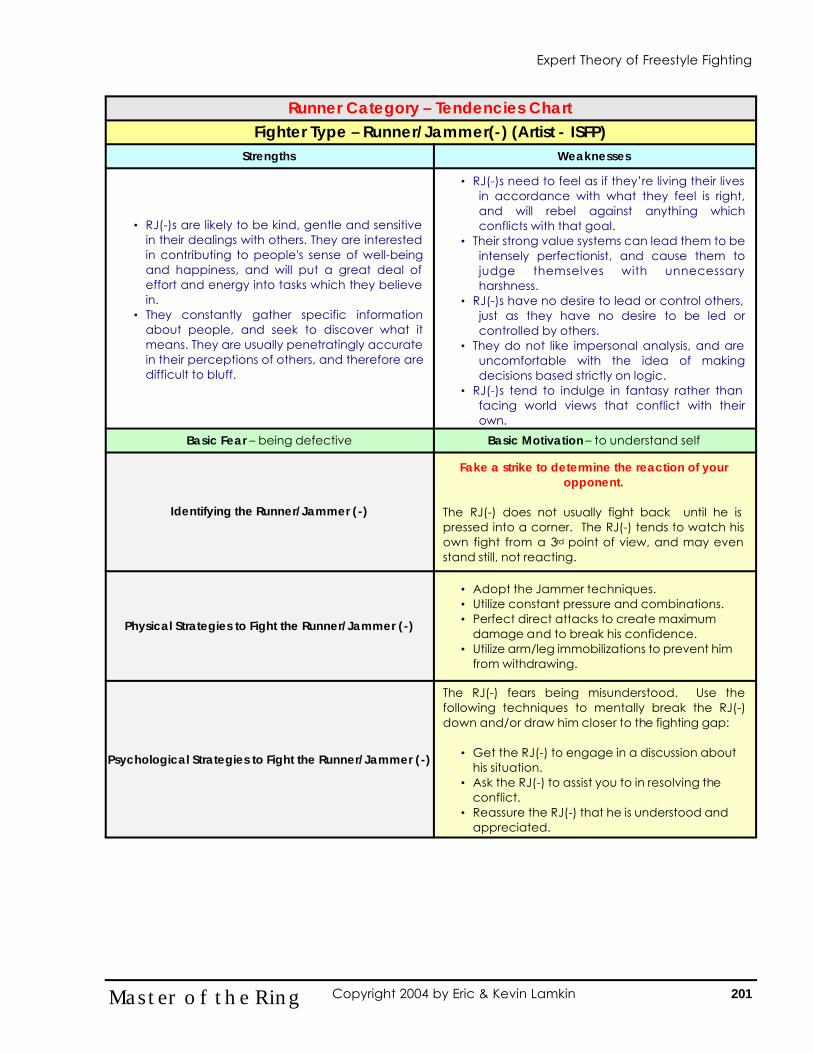
201 Master of the Ring Copyright 2004 by Eric & Kevin Lamkin
Runner Category – Tendencies Chart
Strengths Weaknesses
• RJ(-)s are likely to be kind, gentle and sensitive in their dealings with others. They are interested in contributing to people's sense of well-being and happiness, and will put a great deal of effort and energy into tasks which they believe in.
• They constantly gather specific information about people, and seek to discover what it means. They are usually penetratingly accurate in their perceptions of others, and therefore are difficult to bluff.
• RJ(-)s need to feel as if they’re living their lives in accordance with what they feel is right, and will rebel against anything which conflicts with that goal.
• Their strong value systems can lead them to be intensely perfectionist, and cause them to judge themselves with unnecessary harshness.
• RJ(-)s have no desire to lead or control others, just as they have no desire to be led or controlled by others.
• They do not like impersonal analysis, and are uncomfortable with the idea of making decisions based strictly on logic.
• RJ(-)s tend to indulge in fantasy rather than facing world views that conflict with their own.
Basic Fear – being defective Basic Motivation – to understand self
Identifying the Runner/Jammer (-)
Fake a strike to determine the reaction of your opponent.
The RJ(-) does not usually fight back until he is pressed into a corner. The RJ(-) tends to watch his own fight from a 3rd point of view, and may even stand still, not reacting.
Physical Strategies to Fight the Runner/Jammer (-)
• Adopt the Jammer techniques. • Utilize constant pressure and combinations. • Perfect direct attacks to create maximum
damage and to break his confidence. • Utilize arm/leg immobilizations to prevent him
from withdrawing.
Psychological Strategies to Fight the Runner/Jammer (-)
The RJ(-) fears being misunderstood. Use the following techniques to mentally break the RJ(-) down and/or draw him closer to the fighting gap:
• Get the RJ(-) to engage in a discussion about his situation.
• Ask the RJ(-) to assist you to in resolving the conflict.
• Reassure the RJ(-) that he is understood and appreciated.
Fighter Type – Runner/Jammer(-) (Artist - ISFP)
Expert Theory of Freestyle Fighting
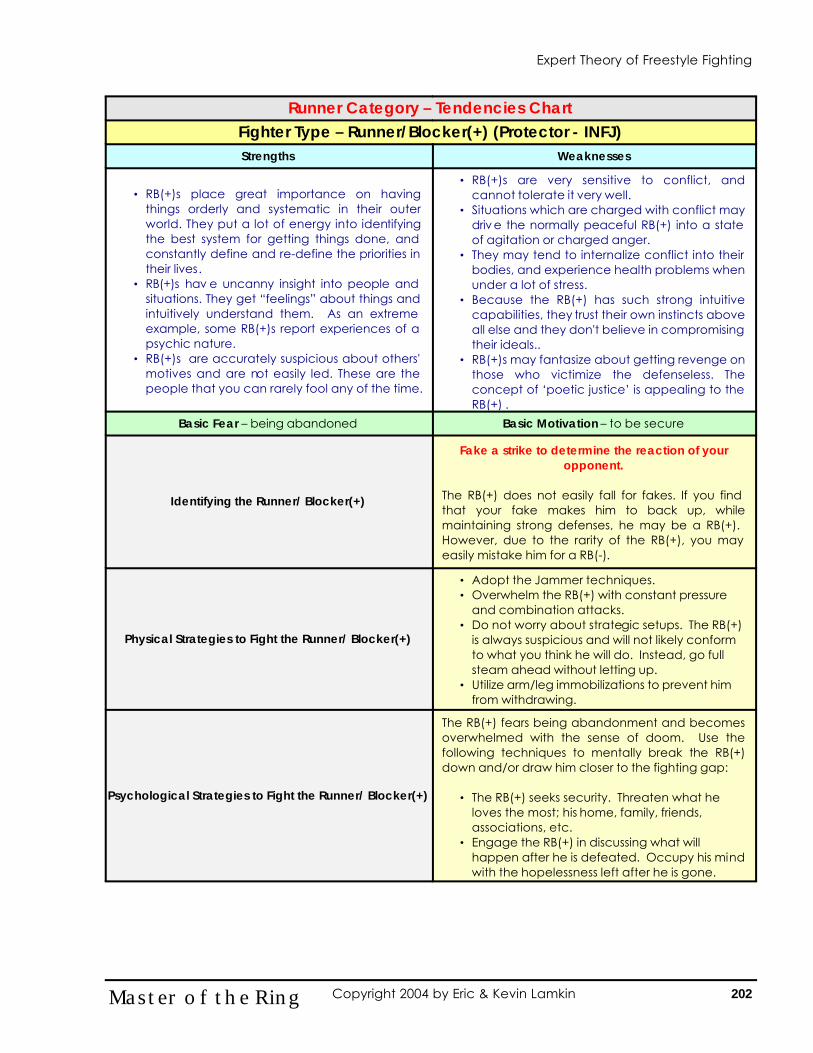
202 Master of the Ring Copyright 2004 by Eric & Kevin Lamkin
Runner Category – Tendencies Chart
Strengths Weaknesses
• RB(+)s place great importance on having things orderly and systematic in their outer world. They put a lot of energy into identifying the best system for getting things done, and constantly define and re-define the priorities in their lives.
• RB(+)s hav e uncanny insight into people and situations. They get “feelings” about things and intuitively understand them. As an extreme example, some RB(+)s report experiences of a psychic nature.
• RB(+)s are accurately suspicious about others' motives and are not easily led. These are the people that you can rarely fool any of the time.
• RB(+)s are very sensitive to conflict, and cannot tolerate it very well.
• Situations which are charged with conflict may driv e the normally peaceful RB(+) into a state of agitation or charged anger.
• They may tend to internalize conflict into their bodies, and experience health problems when under a lot of stress.
• Because the RB(+) has such strong intuitive capabilities, they trust their own instincts above all else and they don't believe in compromising their ideals..
• RB(+)s may fantasize about getting revenge on those who victimize the defenseless. The concept of ‘poetic justice’ is appealing to the RB(+) .
Basic Fear – being abandoned Basic Motivation – to be secure
Identifying the Runner/ Blocker(+)
Fake a strike to determine the reaction of your opponent.
The RB(+) does not easily fall for fakes. If you find that your fake makes him to back up, while maintaining strong defenses, he may be a RB(+). However, due to the rarity of the RB(+), you may easily mistake him for a RB(-).
Physical Strategies to Fight the Runner/ Blocker(+)
• Adopt the Jammer techniques. • Overwhelm the RB(+) with constant pressure
and combination attacks. • Do not worry about strategic setups. The RB(+)
is always suspicious and will not likely conform to what you think he will do. Instead, go full steam ahead without letting up.
• Utilize arm/leg immobilizations to prevent him from withdrawing.
Psychological Strategies to Fight the Runner/ Blocker(+)
The RB(+) fears being abandonment and becomes overwhelmed with the sense of doom. Use the following techniques to mentally break the RB(+) down and/or draw him closer to the fighting gap:
• The RB(+) seeks security. Threaten what he loves the most; his home, family, friends, associations, etc.
• Engage the RB(+) in discussing what will happen after he is defeated. Occupy his mind with the hopelessness left after he is gone.
Fighter Type – Runner/Blocker(+) (Protector - INFJ)
Expert Theory of Freestyle Fighting
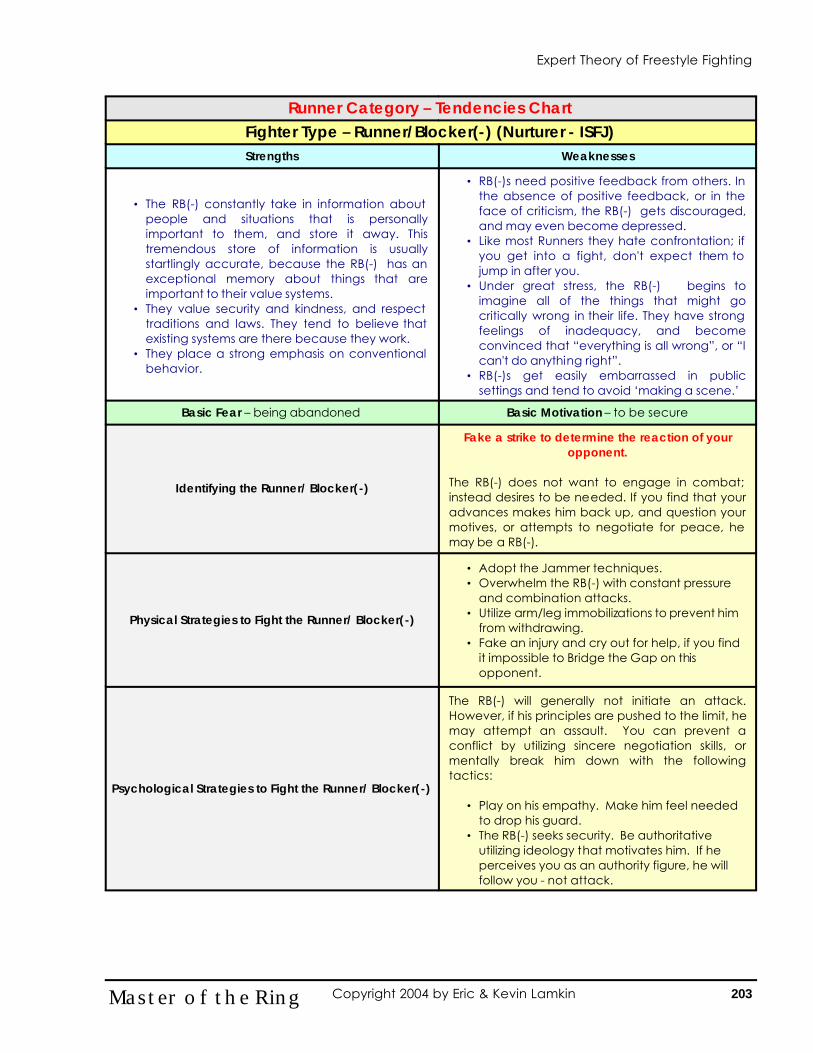
203 Master of the Ring Copyright 2004 by Eric & Kevin Lamkin
Runner Category – Tendencies Chart
Strengths Weaknesses
• The RB(-) constantly take in information about people and situations that is personally important to them, and store it away. This tremendous store of information is usually startlingly accurate, because the RB(-) has an exceptional memory about things that are important to their value systems.
• They value security and kindness, and respect traditions and laws. They tend to believe that existing systems are there because they work.
• They place a strong emphasis on conventional behavior.
• RB(-)s need positive feedback from others. In the absence of positive feedback, or in the face of criticism, the RB(-) gets discouraged, and may even become depressed.
• Like most Runners they hate confrontation; if you get into a fight, don't expect them to jump in after you.
• Under great stress, the RB(-) begins to imagine all of the things that might go critically wrong in their life. They have strong feelings of inadequacy, and become convinced that “everything is all wrong”, or “I can't do anything right”.
• RB(-)s get easily embarrassed in public settings and tend to avoid ‘making a scene.’
Basic Fear – being abandoned Basic Motivation – to be secure
Identifying the Runner/ Blocker(-)
Fake a strike to determine the reaction of your opponent.
The RB(-) does not want to engage in combat; instead desires to be needed. If you find that your advances makes him back up, and question your motives, or attempts to negotiate for peace, he may be a RB(-).
Physical Strategies to Fight the Runner/ Blocker(-)
• Adopt the Jammer techniques. • Overwhelm the RB(-) with constant pressure
and combination attacks. • Utilize arm/leg immobilizations to prevent him
from withdrawing. • Fake an injury and cry out for help, if you find
it impossible to Bridge the Gap on this opponent.
Psychological Strategies to Fight the Runner/ Blocker(-)
The RB(-) will generally not initiate an attack. However, if his principles are pushed to the limit, he may attempt an assault. You can prevent a conflict by utilizing sincere negotiation skills, or mentally break him down with the following tactics:
• Play on his empathy. Make him feel needed to drop his guard.
• The RB(-) seeks security. Be authoritative utilizing ideology that motivates him. If he perceives you as an authority figure, he will follow you - not attack.
Fighter Type – Runner/Blocker(-) (Nurturer - ISFJ)
Expert Theory of Freestyle Fighting

204 Master of the Ring Copyright 2004 by Eric & Kevin Lamkin
Blocker Category – Tendencies Chart
Strengths Weaknesses
• They have a keen sense of right and wrong, especially in their area of interest and/or responsibility.
• They seem to perform at highest efficiency when employing a step-by-step approach.
• Blockers are highly patient, methodical, rational and logical.
• Blockers make very good inspectors. • Organized and methodical in their approach,
they can generally succeed at any task, which they undertake.
• Blockers usually have a great sense of space and function.
• Blockers are easily frustrated by the inconsistencies of others, especially when the second parties don't keep their commitments.
• Threats to time-honored traditions or established organizations are the undoing of Blockers, and are to be fought at all costs.
• Under stress, Blockers may fall into “catastrophe mode”, where they see nothing but all of the possibilities of what could go wrong.
• Blockers are not comfortable with breaking laws or going against the rules.
Basic Fear – of being condemned Basic Motivation – to be right
Identifying the Blocker
Fake a strike to determine the reaction of your opponent.
If he does not react to the fake, or if he repositions himself to launch a counter attack, he is probably a Blocker.
Physical Strategies to Fight the Blocker
• Adopt the Jammer/Runner techniques • Utilize deep fakes and feints to draw the
Blocker’s counters, make him miss, counter-strike and then move out of range.
• Bridge the Gap utilizing broken rhythm, overwhelm his defenses with combination attacks, and then move out of range.
• Establish a ‘style’ of fighting, and then switch to an unconventional, broken rhythm attack.
• Defeat the Blockers defenses with superior direct attacks.
Psychological Strategies to Fight the Blocker
The Blocker is a ‘traditional style’ fighter, even if his system is eclectic. He does not understand how to improvise very well and prefers to attempt ‘by-the-book’ methods of fighting. Use the following techniques to mentally break the Blocker down and/or to frustrate his defensive capabilities:
• Verbally insult the Blocker’s style, instructors, heritage or nationality, etc.
• Utilize an authoritative attitude to belittle the Blocker’s capabilities.
• When the Blocker attempts to counter, or initiate an attack, make him feel impotent and powerless by not reacting. Point out how he should improve his technique.
• Never show tiredness – Patient and endurance is the Blocker’s strength.
Fighter Type – Blocker (Duty Fulfiller - ISTJ)
Expert Theory of Freestyle Fighting
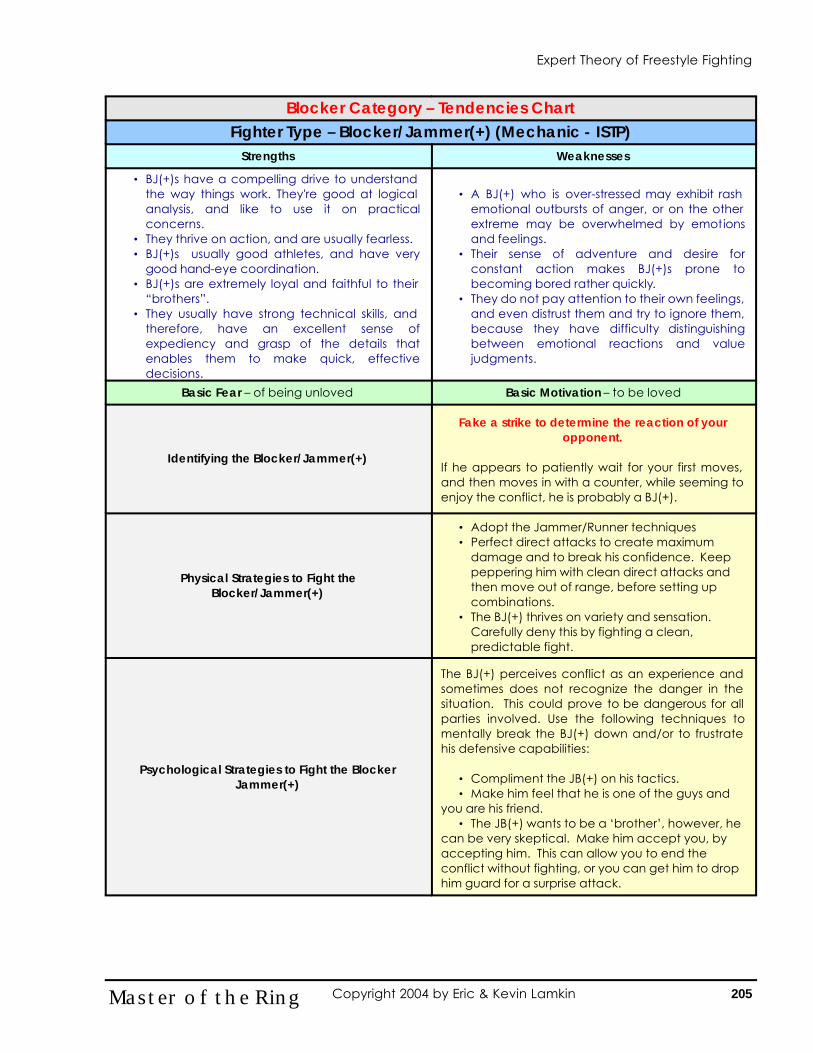
205 Master of the Ring Copyright 2004 by Eric & Kevin Lamkin
Blocker Category – Tendencies Chart
Strengths Weaknesses
• BJ(+)s have a compelling drive to understand the way things work. They're good at logical analysis, and like to use it on practical concerns.
• They thrive on action, and are usually fearless. • BJ(+)s usually good athletes, and have very
good hand-eye coordination. • BJ(+)s are extremely loyal and faithful to their
“brothers”. • They usually have strong technical skills, and
therefore, have an excellent sense of expediency and grasp of the details that enables them to make quick, effective decisions.
• A BJ(+) who is over-stressed may exhibit rash emotional outbursts of anger, or on the other extreme may be overwhelmed by emotions and feelings.
• Their sense of adventure and desire for constant action makes BJ(+)s prone to becoming bored rather quickly.
• They do not pay attention to their own feelings, and even distrust them and try to ignore them, because they have difficulty distinguishing between emotional reactions and value judgments.
Basic Fear – of being unloved Basic Motivation – to be loved
Identifying the Blocker/Jammer(+)
Fake a strike to determine the reaction of your opponent.
If he appears to patiently wait for your first moves, and then moves in with a counter, while seeming to enjoy the conflict, he is probably a BJ(+).
Physical Strategies to Fight the Blocker/Jammer(+)
• Adopt the Jammer/Runner techniques • Perfect direct attacks to create maximum
damage and to break his confidence. Keep peppering him with clean direct attacks and then move out of range, before setting up combinations.
• The BJ(+) thrives on variety and sensation. Carefully deny this by fighting a clean, predictable fight.
Psychological Strategies to Fight the Blocker Jammer(+)
The BJ(+) perceives conflict as an experience and sometimes does not recognize the danger in the situation. This could prove to be dangerous for all parties involved. Use the following techniques to mentally break the BJ(+) down and/or to frustrate his defensive capabilities:
• Compliment the JB(+) on his tactics. • Make him feel that he is one of the guys and
you are his friend. • The JB(+) wants to be a ‘brother’, however, he
can be very skeptical. Make him accept you, by accepting him. This can allow you to end the conflict without fighting, or you can get him to drop him guard for a surprise attack.
Fighter Type – Blocker/Jammer(+) (Mechanic - ISTP)
Expert Theory of Freestyle Fighting
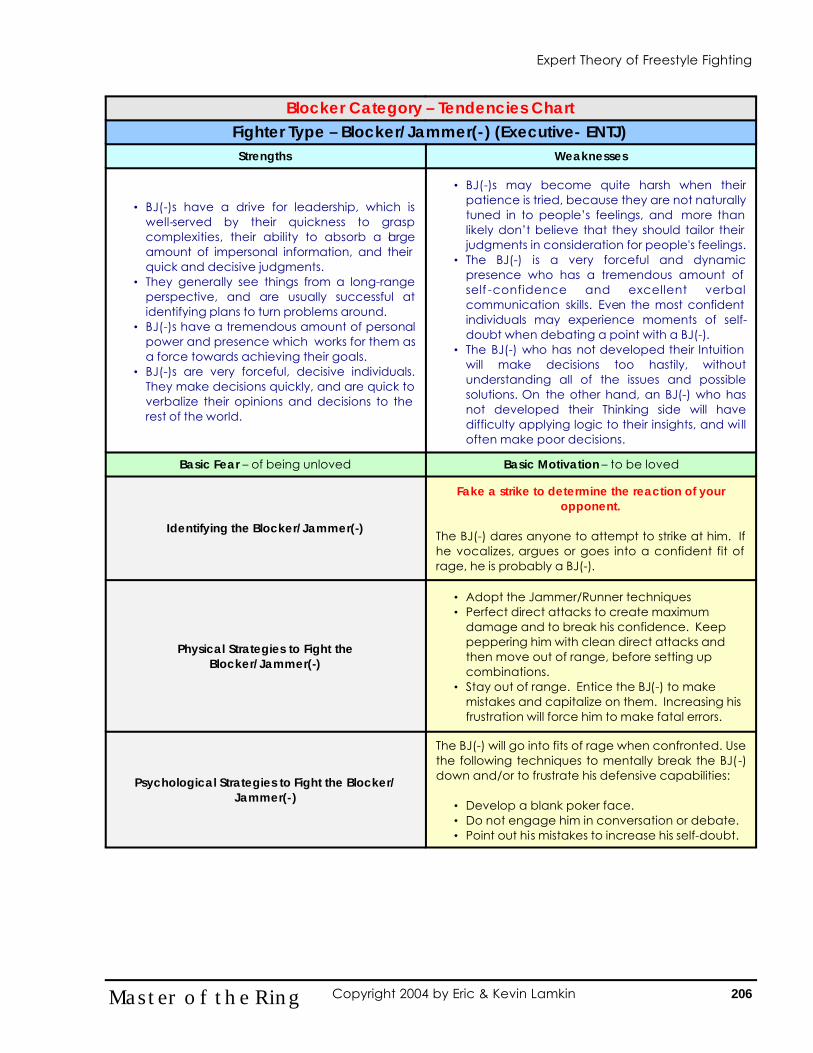
206 Master of the Ring Copyright 2004 by Eric & Kevin Lamkin
Blocker Category – Tendencies Chart
Strengths Weaknesses
• BJ(-)s have a drive for leadership, which is well-served by their quickness to grasp complexities, their ability to absorb a large amount of impersonal information, and their quick and decisive judgments.
• They generally see things from a long-range perspective, and are usually successful at identifying plans to turn problems around.
• BJ(-)s have a tremendous amount of personal power and presence which works for them as a force towards achieving their goals.
• BJ(-)s are very forceful, decisive individuals. They make decisions quickly, and are quick to verbalize their opinions and decisions to the rest of the world.
• BJ(-)s may become quite harsh when their patience is tried, because they are not naturally tuned in to people’s feelings, and more than likely don’t believe that they should tailor their judgments in consideration for people's feelings.
• The BJ(-) is a very forceful and dynamic presence who has a tremendous amount of self -confidence and excellent verbal communication skills. Even the most confident individuals may experience moments of self-doubt when debating a point with a BJ(-).
• The BJ(-) who has not developed their Intuition will make decisions too hastily, without understanding all of the issues and possible solutions. On the other hand, an BJ(-) who has not developed their Thinking side will have difficulty applying logic to their insights, and will often make poor decisions.
Basic Fear – of being unloved Basic Motivation – to be loved
Identifying the Blocker/Jammer(-)
Fake a strike to determine the reaction of your opponent.
The BJ(-) dares anyone to attempt to strike at him. If he vocalizes, argues or goes into a confident fit of rage, he is probably a BJ(-).
Physical Strategies to Fight the Blocker/Jammer(-)
• Adopt the Jammer/Runner techniques • Perfect direct attacks to create maximum
damage and to break his confidence. Keep peppering him with clean direct attacks and then move out of range, before setting up combinations.
• Stay out of range. Entice the BJ(-) to make mistakes and capitalize on them. Increasing his frustration will force him to make fatal errors.
Psychological Strategies to Fight the Blocker/Jammer(-)
The BJ(-) will go into fits of rage when confronted. Use the following techniques to mentally break the BJ(-) down and/or to frustrate his defensive capabilities:
• Develop a blank poker face. • Do not engage him in conversation or debate. • Point out his mistakes to increase his self-doubt.
Fighter Type – Blocker/Jammer(-) (Executive- ENTJ)
Expert Theory of Freestyle Fighting
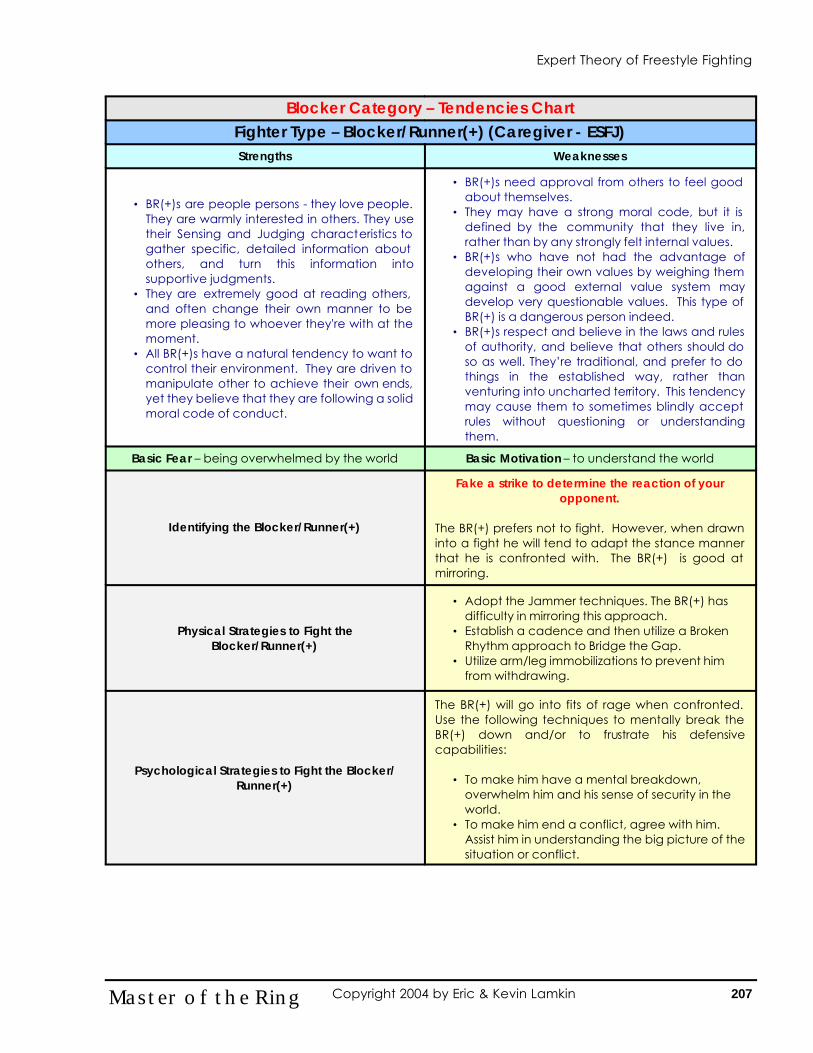
207 Master of the Ring Copyright 2004 by Eric & Kevin Lamkin
Blocker Category – Tendencies Chart
Strengths Weaknesses
• BR(+)s are people persons - they love people. They are warmly interested in others. They use their Sensing and Judging characteristics to gather specific, detailed information about others, and turn this information into supportive judgments.
• They are extremely good at reading others, and often change their own manner to be more pleasing to whoever they're with at the moment.
• All BR(+)s have a natural tendency to want to control their environment. They are driven to manipulate other to achieve their own ends, yet they believe that they are following a solid moral code of conduct.
• BR(+)s need approval from others to feel good about themselves.
• They may have a strong moral code, but it is defined by the community that they live in, rather than by any strongly felt internal values.
• BR(+)s who have not had the advantage of developing their own values by weighing them against a good external value system may develop very questionable values. This type of BR(+) is a dangerous person indeed.
• BR(+)s respect and believe in the laws and rules of authority, and believe that others should do so as well. They’re traditional, and prefer to do things in the established way, rather than venturing into uncharted territory. This tendency may cause them to sometimes blindly accept rules without questioning or understanding them.
Basic Fear – being overwhelmed by the world Basic Motivation – to understand the world
Identifying the Blocker/Runner(+)
Fake a strike to determine the reaction of your opponent.
The BR(+) prefers not to fight. However, when drawn into a fight he will tend to adapt the stance manner that he is confronted with. The BR(+) is good at mirroring.
Physical Strategies to Fight the Blocker/Runner(+)
• Adopt the Jammer techniques. The BR(+) has difficulty in mirroring this approach.
• Establish a cadence and then utilize a Broken Rhythm approach to Bridge the Gap.
• Utilize arm/leg immobilizations to prevent him from withdrawing.
Psychological Strategies to Fight the Blocker/Runner(+)
The BR(+) will go into fits of rage when confronted. Use the following techniques to mentally break the BR(+) down and/or to frustrate his defensive capabilities:
• To make him have a mental breakdown,
overwhelm him and his sense of security in the world.
• To make him end a conflict, agree with him. Assist him in understanding the big picture of the situation or conflict.
Fighter Type – Blocker/Runner(+) (Caregiver - ESFJ)
Expert Theory of Freestyle Fighting
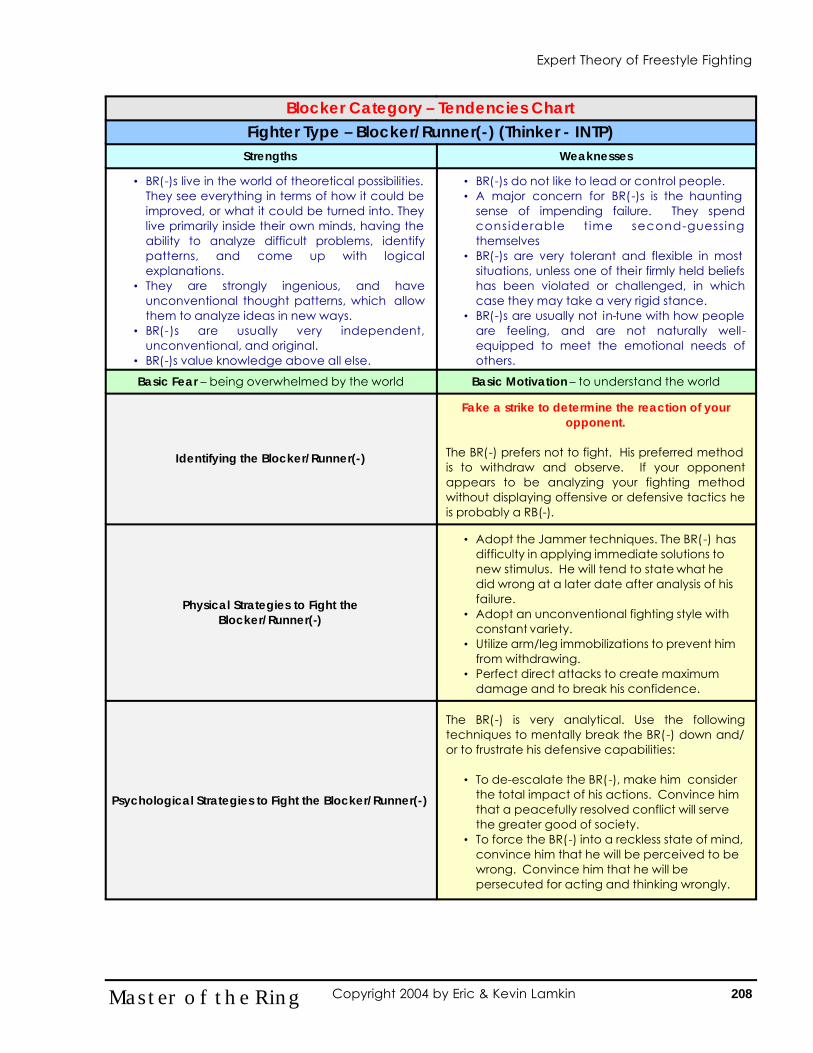
208 Master of the Ring Copyright 2004 by Eric & Kevin Lamkin
Blocker Category – Tendencies Chart
Strengths Weaknesses
• BR(-)s live in the world of theoretical possibilities. They see everything in terms of how it could be improved, or what it could be turned into. They live primarily inside their own minds, having the ability to analyze difficult problems, identify patterns, and come up with logical explanations.
• They are strongly ingenious, and have unconventional thought patterns, which allow them to analyze ideas in new ways.
• BR(-)s are usually very independent, unconventional, and original.
• BR(-)s value knowledge above all else.
• BR(-)s do not like to lead or control people. • A major concern for BR(-)s is the haunting
sense of impending failure. They spend considerable t ime second-guessing themselves
• BR(-)s are very tolerant and flexible in most situations, unless one of their firmly held beliefs has been violated or challenged, in which case they may take a very rigid stance.
• BR(-)s are usually not in-tune with how people are feeling, and are not naturally well-equipped to meet the emotional needs of others.
Basic Fear – being overwhelmed by the world Basic Motivation – to understand the world
Identifying the Blocker/Runner(-)
Fake a strike to determine the reaction of your opponent.
The BR(-) prefers not to fight. His preferred method is to withdraw and observe. If your opponent appears to be analyzing your fighting method without displaying offensive or defensive tactics he is probably a RB(-).
Physical Strategies to Fight the Blocker/Runner(-)
• Adopt the Jammer techniques. The BR(-) has difficulty in applying immediate solutions to new stimulus. He will tend to state what he did wrong at a later date after analysis of his failure.
• Adopt an unconventional fighting style with constant variety.
• Utilize arm/leg immobilizations to prevent him from withdrawing.
• Perfect direct attacks to create maximum damage and to break his confidence.
Psychological Strategies to Fight the Blocker/Runner(-)
The BR(-) is very analytical. Use the following techniques to mentally break the BR(-) down and/or to frustrate his defensive capabilities:
• To de-escalate the BR(-), make him consider the total impact of his actions. Convince him that a peacefully resolved conflict will serve the greater good of society.
• To force the BR(-) into a reckless state of mind, convince him that he will be perceived to be wrong. Convince him that he will be persecuted for acting and thinking wrongly.
Fighter Type – Blocker/Runner(-) (Thinker - INTP)
Expert Theory of Freestyle Fighting
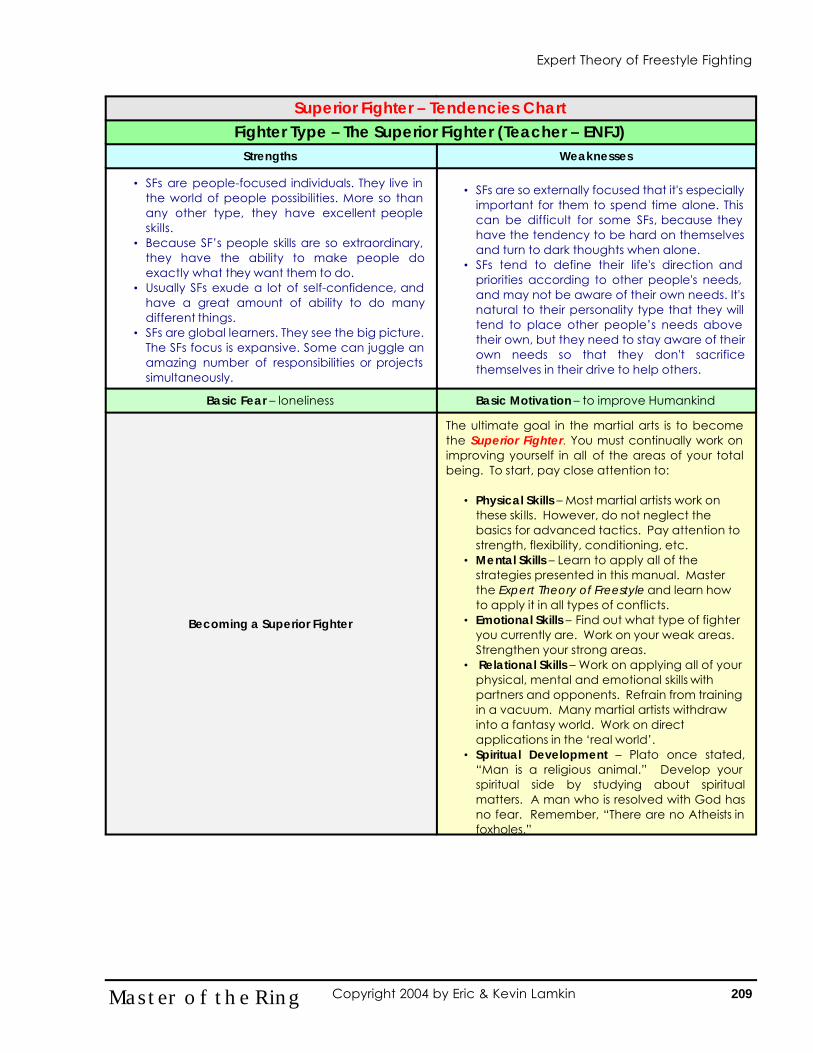
Superior Fighter – Tendencies Chart
Strengths Weaknesses
• SFs are people-focused individuals. They live in the world of people possibilities. More so than any other type, they have excellent people skills.
• Because SF’s people skills are so extraordinary, they have the ability to make people do exactly what they want them to do.
• Usually SFs exude a lot of self-confidence, and have a great amount of ability to do many different things.
• SFs are global learners. They see the big picture. The SFs focus is expansive. Some can juggle an amazing number of responsibilities or projects simultaneously.
• SFs are so externally focused that it's especially important for them to spend time alone. This can be difficult for some SFs, because they have the tendency to be hard on themselves and turn to dark thoughts when alone.
• SFs tend to define their life's direction and priorities according to other people's needs, and may not be aware of their own needs. It's natural to their personality type that they will tend to place other people’s needs above their own, but they need to stay aware of their own needs so that they don't sacrifice themselves in their drive to help others.
Basic Fear – loneliness Basic Motivation – to improve Humankind
Becoming a Superior Fighter
The ultimate goal in the martial arts is to become the Superior Fighter. You must continually work on improving yourself in all of the areas of your total being. To start, pay close attention to:
• Physical Skills – Most martial artists work on these skills. However, do not neglect the basics for advanced tactics. Pay attention to strength, flexibility, conditioning, etc.
• Mental Skills – Learn to apply all of the strategies presented in this manual. Master the Expert Theory of Freestyle and learn how to apply it in all types of conflicts.
• Emotional Skills – Find out what type of fighter you currently are. Work on your weak areas. Strengthen your strong areas.
• Relational Skills – Work on applying all of your physical, mental and emotional skills with partners and opponents. Refrain from training in a vacuum. Many martial artists withdraw into a fantasy world. Work on direct applications in the ‘real world’.
• Spiritual Development – Plato once stated, “Man is a religious animal.” Develop your spiritual side by studying about spiritual matters. A man who is resolved with God has no fear. Remember, “There are no Atheists in foxholes.”
Fighter Type – The Superior Fighter (Teacher – ENFJ)
209 Master of the Ring Copyright 2004 by Eric & Kevin Lamkin
Expert Theory of Freestyle Fighting
APPLICATIONS OF THE EXPERT THEORY OF FREESTYLE At first, you may feel overwhelmed by all of the information presented in the Fighter Type Tendencies Charts. Do not let this defer you from adapting these skills and strategies from your fighting. Remember, you should view your opponent in the following order, from:
• Generalization • Specialization • Individualization
EXAMPLE When you execute a fake at your opponent and he backs away, you can then conclude that he is a runner (generalization). The next thing you should pay attention to is how he evaded your strike. If he evaded and snapped back with a counter-strike, you could conclude that he is a Runner/Jammer (specialization). He can further be specialized by observing whether he reacted as a last resort (JB-), or if he is more engaged in the fight (JB+). After a few more observations, you will have identified that exact fighting style that your opponent possesses (individualization). HOW TO LEARN TO USE THE EXPERT THEORY OF FREESTYLE
1. Take each major category and master them. Learn how to recognize a Runner, Jammer or Blocker.
2. Next, work within the major category. Learn how to discern the subtle differences between a Runner/Jammer and a Jammer/Runner, etc.
3. After, you feel confident discerning between these intermediate categories, begin to discern the differences between the +/- fighter types.
SUGGESTIONS
• Experiment with the Methods of Attack on all situations where negotiation, or interaction is necessary.
• Learn to manipulate the psychology of co-workers, family members, friends, etc. when conflicts arise. You will soon realize that it is relatively easy to win conflicts without losing your integrity.
• Watch competitive sporting events; like boxing, kickboxing, etc. Learn to identify the combatants and see if your strategies determine the outcome.
• When sparring, try to become the various types of fighters utilizing limited sparring drills.
• Find out what personality type you are. You can find free personality profiling tests on the Internet.
210 Master of the Ring Copyright 2004 by Eric & Kevin Lamkin
Expert Theory of Freestyle Fighting
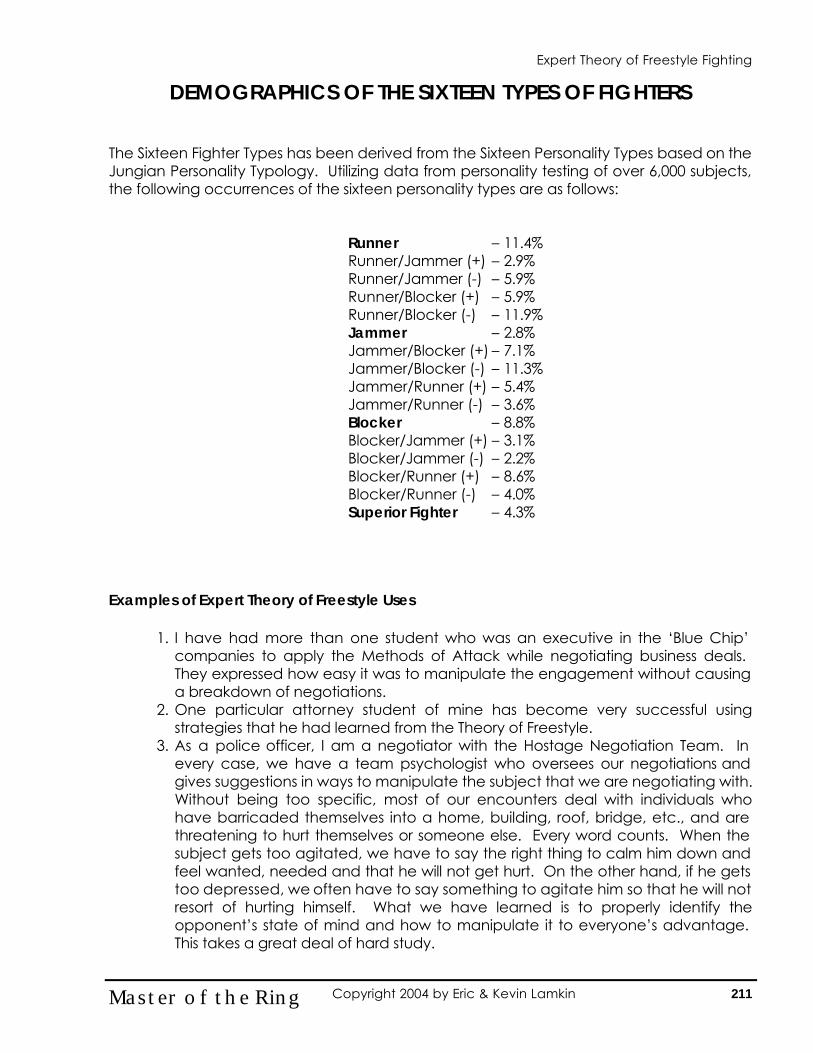
DEMOGRAPHICS OF THE SIXTEEN TYPES OF FIGHTERS The Sixteen Fighter Types has been derived from the Sixteen Personality Types based on the Jungian Personality Typology. Utilizing data from personality testing of over 6,000 subjects, the following occurrences of the sixteen personality types are as follows:
Runner – 11.4% Runner/Jammer (+) – 2.9% Runner/Jammer (-) – 5.9% Runner/Blocker (+) – 5.9% Runner/Blocker (-) – 11.9% Jammer – 2.8% Jammer/Blocker (+) – 7.1% Jammer/Blocker (-) – 11.3% Jammer/Runner (+) – 5.4% Jammer/Runner (-) – 3.6% Blocker – 8.8% Blocker/Jammer (+) – 3.1% Blocker/Jammer (-) – 2.2% Blocker/Runner (+) – 8.6% Blocker/Runner (-) – 4.0% Superior Fighter – 4.3%
Examples of Expert Theory of Freestyle Uses
1. I have had more than one student who was an executive in the ‘Blue Chip’ companies to apply the Methods of Attack while negotiating business deals. They expressed how easy it was to manipulate the engagement without causing a breakdown of negotiations.
2. One particular attorney student of mine has become very successful using strategies that he had learned from the Theory of Freestyle.
3. As a police officer, I am a negotiator with the Hostage Negotiation Team. In every case, we have a team psychologist who oversees our negotiations and gives suggestions in ways to manipulate the subject that we are negotiating with. Without being too specific, most of our encounters deal with individuals who have barricaded themselves into a home, building, roof, bridge, etc., and are threatening to hurt themselves or someone else. Every word counts. When the subject gets too agitated, we have to say the right thing to calm him down and feel wanted, needed and that he will not get hurt. On the other hand, if he gets too depressed, we often have to say something to agitate him so that he will not resort of hurting himself. What we have learned is to properly identify the opponent’s state of mind and how to manipulate it to everyone’s advantage. This takes a great deal of hard study.
211 Master of the Ring Copyright 2004 by Eric & Kevin Lamkin
Expert Theory of Freestyle Fighting
EXAMPLES OF EXPERT THEORY OF FREESTYLE USES
1. I have had more than one student who was an executive in the ‘Blue Chip’ companies to apply the Methods of Attack while negotiating business deals. They expressed how easy it was to manipulate the engagement without causing a breakdown of negotiations.
2. One particular attorney student of mine has become very successful using strategies that he had learned from the Theory of Freestyle.
3. As a police officer, I am a negotiator with the Hostage Negotiation Team. In every case, we have a team psychologist who oversees our negotiations and gives suggestions in ways to manipulate the subject that we are negotiating with. Without being too specific, most of our encounters deal with individuals who have barricaded themselves into a home, building, roof, bridge, etc., and are threatening to hurt themselves or someone else. Every word counts. When the subject gets too agitated, we have to say the right thing to calm him down and feel wanted, needed and that he will not get hurt. On the other hand, if he gets too depressed, we often have to say something to agitate him so that he will not resort of hurting himself. What we have learned is to properly identify the opponent’s state of mind and how to manipulate it to everyone’s advantage. This takes a great deal of hard study.
One reaction that we occasionally get is, “This theory is too complicated. How can anyone remember all of this stuff?” The answer is, “How did you learn all of your techniques, kata, etc.?” Consider your mental skills as important as your physical skills. Do not, however, relinquish your physical skills for mental only. You are striving to become a Superior Fighter. This requires superior development in all areas .
212 Master of the Ring Copyright 2004 by Eric & Kevin Lamkin
Expert Theory of Freestyle Fighting
AppendicesAppendices
Master of the Ring Copyright 2004 by Eric & Kevin Lamkin
Appendix AAppendix A
Command & ControlCommand & Control StrategiesStrategies
A1 Master of the Ring Copyright 2004 by Eric & Kevin Lamkin
COMMAND AND CONTROL STRATEGIES Command and Control Strategies (CCS) are methods (primarily counter-offensive methods) designed to take advantage of the opponent’s extended limbs, to damage them, or to prevent their use. There are three principle methods of Command and Control Strategies:
1. Sector Fighting 2. Destructions 3. Immobilizations
SECTOR FIGHTING—Sector Fighting (Sectors) are tools used by fighters to aid in counter-attacking. They allow the fighter to respond instinctively to the opponent’s attack based upon the relative positioning of the arms. They allow one to penetrate the opponent’s defenses by attacking during the weakest moment of the opponent’s attack. They also simplify the use of Immobilization Attacks. DESTRUCTIONS—Destructions deliver damaging strikes to the opponent’s attacking limb or natural weapon. The strategy is to severely damage the opponent’s natural defenses and offensive weaponry before attacking a vital target. IMMOBILIZATIONS—Immobilization Attacks are also known as Trapping. This method is an offensive action that momentarily immobilizes or “traps” either one or both of the opponent’s arms, allowing your strike to land in an open line, or draw a reaction which can then be countered with either another trap, or by shifting into another aspect of combat such as punching or grappling.
Command & Control Strategies
A2 Master of the Ring Copyright 2004 by Eric & Kevin Lamkin
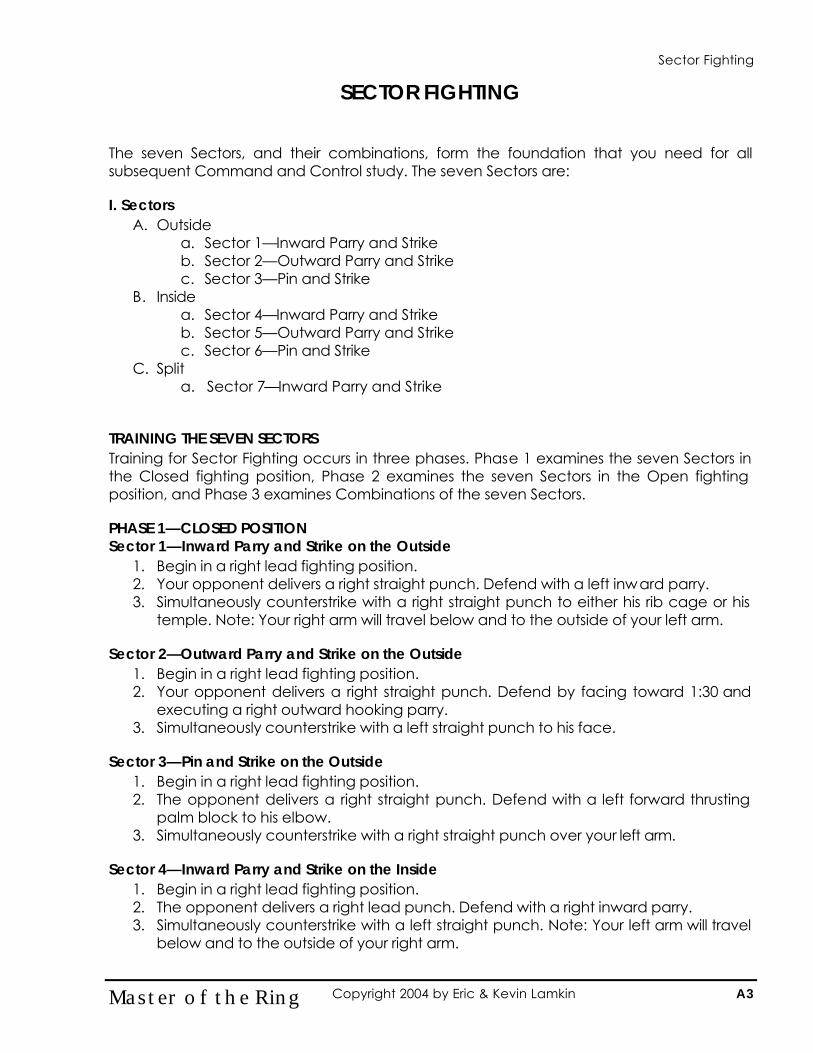
SECTOR FIGHTING The seven Sectors, and their combinations, form the foundation that you need for all subsequent Command and Control study. The seven Sectors are: I. Sectors
A. Outside a. Sector 1—Inward Parry and Strike b. Sector 2—Outward Parry and Strike c. Sector 3—Pin and Strike
B. Inside a. Sector 4—Inward Parry and Strike b. Sector 5—Outward Parry and Strike c. Sector 6—Pin and Strike
C. Split a. Sector 7—Inward Parry and Strike
TRAINING THE SEVEN SECTORS Training for Sector Fighting occurs in three phases. Phase 1 examines the seven Sectors in the Closed fighting position, Phase 2 examines the seven Sectors in the Open fighting position, and Phase 3 examines Combinations of the seven Sectors. PHASE 1—CLOSED POSITION Sector 1—Inward Parry and Strike on the Outside
1. Begin in a right lead fighting position. 2. Your opponent delivers a right straight punch. Defend with a left inward parry. 3. Simultaneously counterstrike with a right straight punch to either his rib cage or his
temple. Note: Your right arm will travel below and to the outside of your left arm. Sector 2—Outward Parry and Strike on the Outside
1. Begin in a right lead fighting position. 2. Your opponent delivers a right straight punch. Defend by facing toward 1:30 and
executing a right outward hooking parry. 3. Simultaneously counterstrike with a left straight punch to his face.
Sector 3—Pin and Strike on the Outside
1. Begin in a right lead fighting position. 2. The opponent delivers a right straight punch. Defend with a left forward thrusting
palm block to his elbow. 3. Simultaneously counterstrike with a right straight punch over your left arm.
Sector 4—Inward Parry and Strike on the Inside
1. Begin in a right lead fighting position. 2. The opponent delivers a right lead punch. Defend with a right inward parry. 3. Simultaneously counterstrike with a left straight punch. Note: Your left arm will travel
below and to the outside of your right arm.
A3 Master of the Ring Copyright 2004 by Eric & Kevin Lamkin
Sector Fighting
Sector 5—Outward Parry and Strike on the Inside 1. Begin in a right lead fighting position. 2. Your opponent delivers a right straight punch. Defend by facing toward 10:30 and
executing a left outward hooking parry. 3. Simultaneously counterstrike with a right straight punch to his face.
Sector 6—Pin and Strike on the Inside
1. Begin in a right lead fighting position. 2. The opponent delivers a right straight punch. Defend with a right forward thrusting
palm block to his elbow. 3. Simultaneously counterstr ike with a left straight punch over your right arm.
Sector 7—Inward Parry and Strike; Split Sector
1. Begin in a right lead fighting position. 2. The opponent delivers a right straight punch. Defend with a left inward parry. 3. Simultaneously deliver a right lead punch to either his ribs or his face. Note: Your left
arm will be on the outside of his arm while your right arm will be on the inside.
PHASE 2—OPEN POSITION Sector 1—Inward Parry and Strike on the Outside
1. Begin in a right lead fighting position. 2. Your opponent delivers a left straight punch. Defend with a right inward parry. 3. Simultaneously counterstrike with a left straight punch to either his rib cage or his
temple. Note: Your left arm will travel below and to the outside of your right arm. Sector 2—Outward Parry and Strike on the Outside
1. Begin in a right lead fighting position. 2. Your opponent delivers a left straight punch. Defend by facing toward 10:30 and
executing a left outward hooking parry. 3. Simultaneously counterstrike with a right straight punch to his face.
Sector 3—Pin and Strike on the Outside
1. Begin in a right lead fighting position. 2. The opponent delivers a left straight punch. Defend with a right forward thrusting
palm block to his elbow. 3. Simultaneously counterstrike with a left straight punch over your right arm.
Sector 4—Inward Parry and Strike on the Inside
1. Begin in a right lead fighting position. 2. The opponent delivers a left lead punch. Defend with a left inward parry. 3. Simultaneously counterstrike with a right straight punch. Note: Your right arm will
travel below and to the outside of your left arm.
A4 Master of the Ring Copyright 2004 by Eric & Kevin Lamkin
Sector Fighting
Sector 5—Outward Parry and Strike on the Inside 1. Begin in a right lead fighting position. 2. Your opponent delivers a left straight punch. Defend by facing toward 1:30 and
executing a right outward hooking parry. 3. Simultaneously counterstrike with a left straight punch to his face.
Sector 6—Pin and Strike on the Inside
1. Begin in a right lead fighting position. 2. The opponent delivers a left straight punch. Defend with a left forward thrusting
palm block to his elbow. 3. Simultaneously counterstrike with a right straight punch over your left arm.
Sector 7—Inward Parry and Strike; Split Sector
1. Begin in a right lead fighting position. 2. The opponent delivers a left straight punch. Defend with a right inward parry. 3. Simultaneously deliver a left lead punch to either his ribs or his face. Note: Your right
arm will be on the outside of his arm while your left arm will be on the inside. PHASE 3—SECTOR COMBINATIONS This phase of training is concerned with the study of Sector Combinations. Though there are many possible combinations of Sectors, not every combination will be favorable to the defender. The effectiveness of Sector Combinations are rated according to the following scale: Primary Sector Combinations—Primary Sector Combinations take advantage of the natural retraction/extension of the limb to simultaneously defend and attack. These are the most efficient and most effective combat methods. Secondary Sector Combinations—Due to the relative positioning of your and your opponent’s hands, you will occasionally discover that either your defensive hand or your offensive hand must slightly orbit in order to properly execute its defensive or offensive motion. Any combination in which one hand must alter its normal path is considered a Secondary Sector Combination. These are not as efficient as primary combinations, but they are still effective methods. Tertiary Sector Combinations—Due to the relative positioning of your and your opponent’s hands, you will occasionally discover that your defensive hand and your offensive hand must slightly orbit in order to properly execute their defensive and offensive motions. Any combination in which both hands must alter their normal paths is considered a Tertiary Sector Combination. These are the least efficient and least effective combat methods.
A5 Master of the Ring Copyright 2004 by Eric & Kevin Lamkin
Sector Fighting
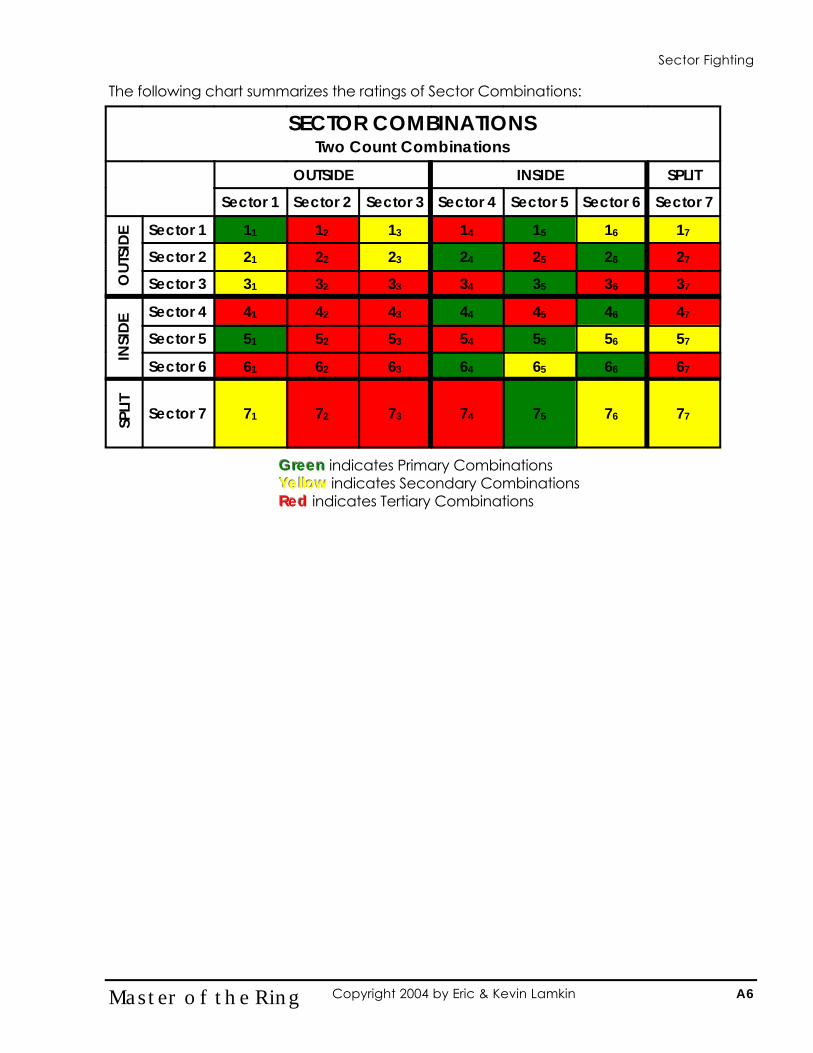
The following chart summarizes the ratings of Sector Combinations:
SECTOR COMBINATIONS Two Count Combinations
OUTSIDE INSIDE SPLIT
Sector 1 Sector 2 Sector 3 Sector 4 Sector 5 Sector 6 Sector 7
Sector 1 11 12 13 14 15 16 17
Sector 2 21 22 23 24 25 26 27
Sector 3 31 32 33 34 35 36 37
Sector 4 41 42 43 44 45 46 47
Sector 5 51 52 53 54 55 56 57
Sector 6 61 62 63 64 65 66 67
Sector 7 71 72 73 74 75 76 77
OU
TSID
E IN
SID
E SP
LIT
Green Green Green indicates Primary Combinations YellowYellowYellow indicates Secondary Combinations RedRedRed indicates Tertiary Combinations
A6 Master of the Ring Copyright 2004 by Eric & Kevin Lamkin
Sector Fighting
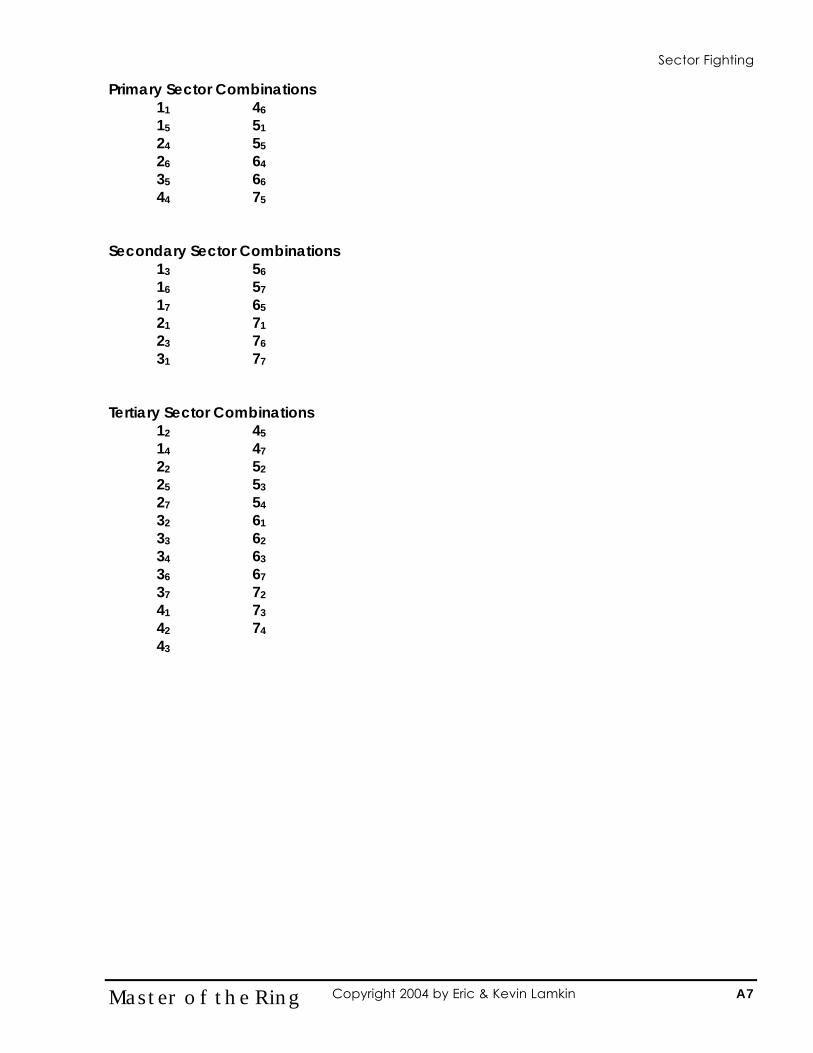
Primary Sector Combinations 11 46 15 51 24 55 26 64 35 66 44 75
Secondary Sector Combinations 13 56
16 57
17 65
21 71
23 76
31 77
Tertiary Sector Combinations 12 45
14 47
22 52
25 53
27 54
32 61
33 62
34 63
36 67
37 72
41 73
42 74
43
A7 Master of the Ring Copyright 2004 by Eric & Kevin Lamkin
Sector Fighting
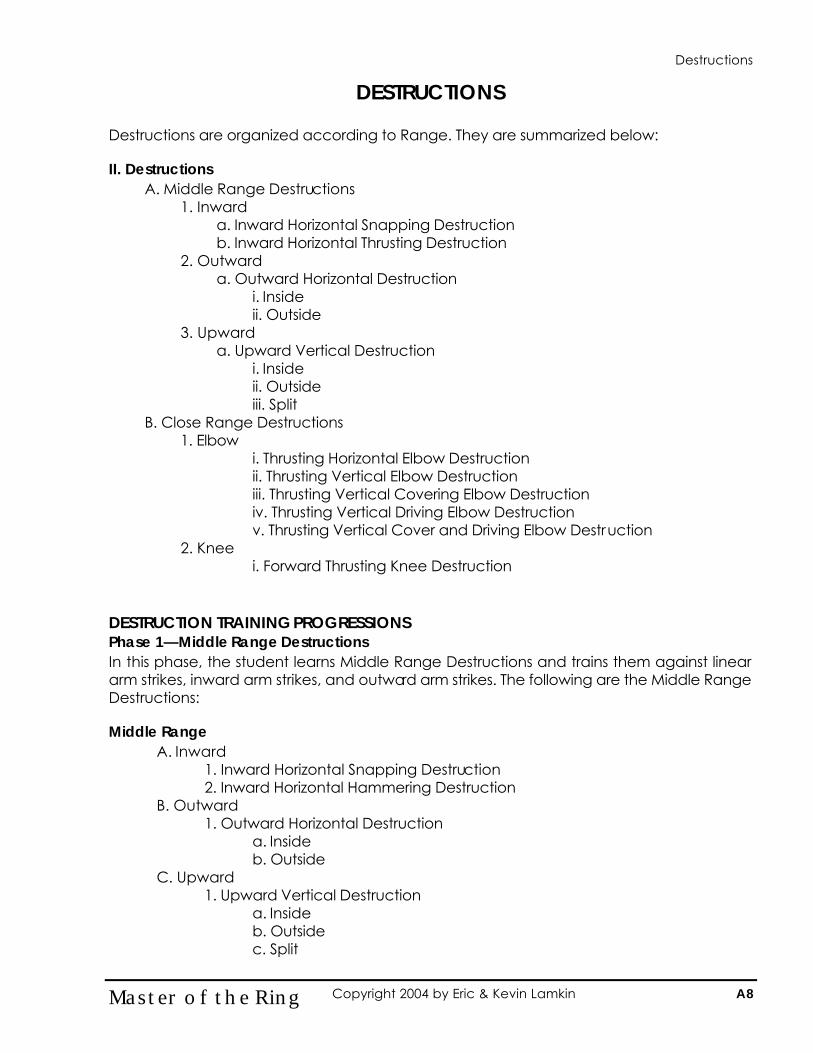
DESTRUCTIONS Destructions are organized according to Range. They are summarized below: II. Destructions
A. Middle Range Destructions 1. Inward
a. Inward Horizontal Snapping Destruction b. Inward Horizontal Thrusting Destruction
2. Outward a. Outward Horizontal Destruction
i. Inside ii. Outside
3. Upward a. Upward Vertical Destruction
i. Inside ii. Outside iii. Split
B. Close Range Destructions 1. Elbow
i. Thrusting Horizontal Elbow Destruction ii. Thrusting Vertical Elbow Destruction iii. Thrusting Vertical Covering Elbow Destruction iv. Thrusting Vertical Driving Elbow Destruction v. Thrusting Vertical Cover and Driving Elbow Destruction
2. Knee i. Forward Thrusting Knee Destruction
DESTRUCTION TRAINING PROGRESSIONS Phase 1—Middle Range Destructions In this phase, the student learns Middle Range Destructions and trains them against linear arm strikes, inward arm strikes, and outward arm strikes. The following are the Middle Range Destructions: Middle Range A. Inward 1. Inward Horizontal Snapping Destruction 2. Inward Horizontal Hammering Destruction B. Outward 1. Outward Horizontal Destruction a. Inside b. Outside C. Upward 1. Upward Vertical Destruction a. Inside b. Outside c. Split
A8 Master of the Ring Copyright 2004 by Eric & Kevin Lamkin
Destructions
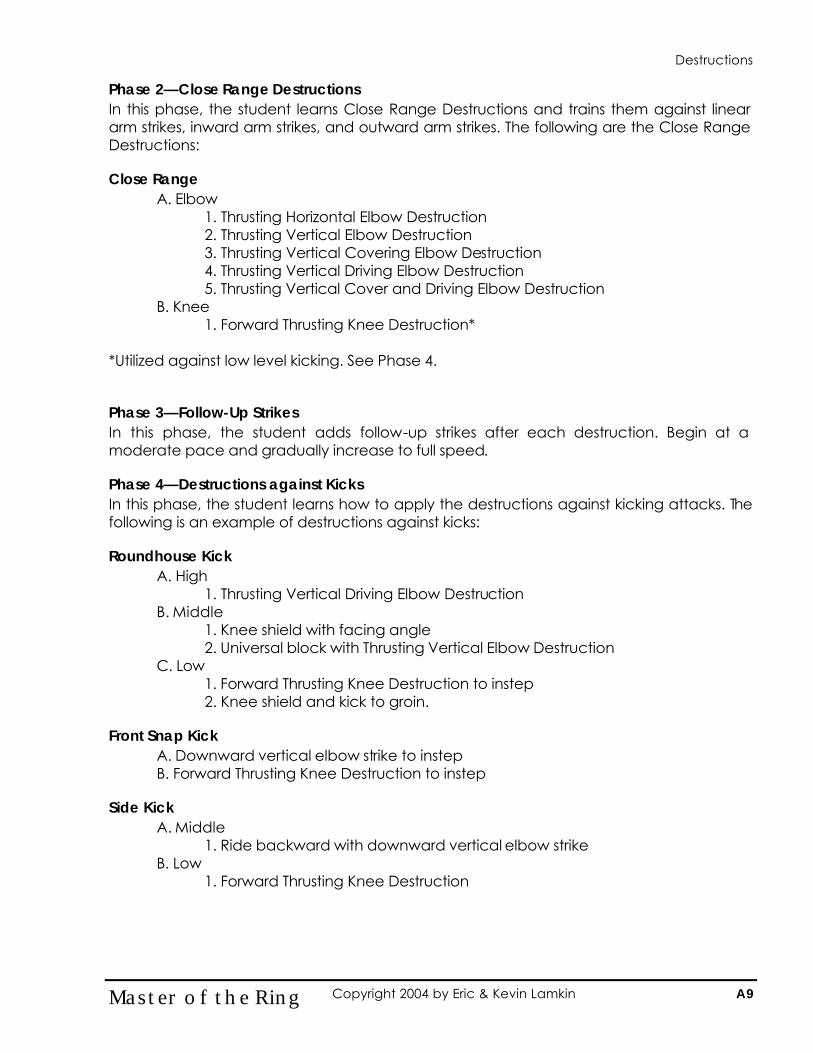
Phase 2—Close Range Destructions In this phase, the student learns Close Range Destructions and trains them against linear arm strikes, inward arm strikes, and outward arm strikes. The following are the Close Range Destructions: Close Range A. Elbow 1. Thrusting Horizontal Elbow Destruction 2. Thrusting Vertical Elbow Destruction 3. Thrusting Vertical Covering Elbow Destruction 4. Thrusting Vertical Driving Elbow Destruction 5. Thrusting Vertical Cover and Driving Elbow Destruction B. Knee 1. Forward Thrusting Knee Destruction* *Utilized against low level kicking. See Phase 4. Phase 3—Follow-Up Strikes In this phase, the student adds follow-up strikes after each destruction. Begin at a moderate pace and gradually increase to full speed. Phase 4—Destructions against Kicks In this phase, the student learns how to apply the destructions against kicking attacks. The following is an example of destructions against kicks: Roundhouse Kick A. High 1. Thrusting Vertical Driving Elbow Destruction B. Middle 1. Knee shield with facing angle 2. Universal block with Thrusting Vertical Elbow Destruction C. Low 1. Forward Thrusting Knee Destruction to instep 2. Knee shield and kick to groin. Front Snap Kick A. Downward vertical elbow strike to instep B. Forward Thrusting Knee Destruction to instep Side Kick A. Middle 1. Ride backward with downward vertical elbow strike B. Low 1. Forward Thrusting Knee Destruction
A9 Master of the Ring Copyright 2004 by Eric & Kevin Lamkin
Destructions

Hook Kick 1. Thrusting Vertical Covering Elbow Destruction 2. Thrusting Vertical Driving Elbow Destruction 3. Thrusting Vertical Cover and Driving Elbow Destruction Phase 5—Random Destructions In this phase, the student trains all Destructions randomly (both single Sectors and Combination Sectors) with follow-up strikes.
A10 Master of the Ring Copyright 2004 by Eric & Kevin Lamkin
Destructions
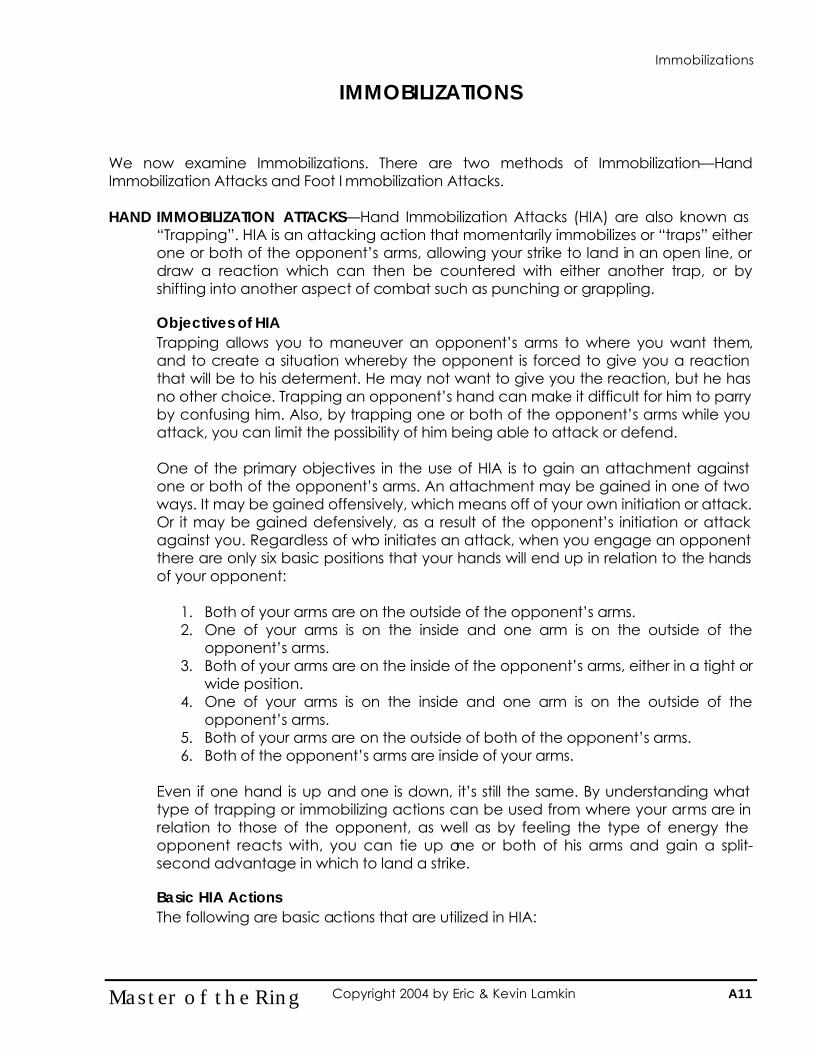
IMMOBILIZATIONS We now examine Immobilizations. There are two methods of Immobilization—Hand Immobilization Attacks and Foot I mmobilization Attacks. HAND IMMOBILIZATION ATTACKS—Hand Immobilization Attacks (HIA) are also known as
“Trapping”. HIA is an attacking action that momentarily immobilizes or “traps” either one or both of the opponent’s arms, allowing your strike to land in an open line, or draw a reaction which can then be countered with either another trap, or by shifting into another aspect of combat such as punching or grappling.
Objectives of HIA Trapping allows you to maneuver an opponent’s arms to where you want them, and to create a situation whereby the opponent is forced to give you a reaction that will be to his determent. He may not want to give you the reaction, but he has no other choice. Trapping an opponent’s hand can make it difficult for him to parry by confusing him. Also, by trapping one or both of the opponent’s arms while you attack, you can limit the possibility of him being able to attack or defend. One of the primary objectives in the use of HIA is to gain an attachment against one or both of the opponent’s arms. An attachment may be gained in one of two ways. It may be gained offensively, which means off of your own initiation or attack. Or it may be gained defensively, as a result of the opponent’s initiation or attack against you. Regardless of who initiates an attack, when you engage an opponent there are only six basic positions that your hands will end up in relation to the hands of your opponent:
1. Both of your arms are on the outside of the opponent’s arms. 2. One of your arms is on the inside and one arm is on the outside of the
opponent’s arms. 3. Both of your arms are on the inside of the opponent’s arms, either in a tight or
wide position. 4. One of your arms is on the inside and one arm is on the outside of the
opponent’s arms. 5. Both of your arms are on the outside of both of the opponent’s arms. 6. Both of the opponent’s arms are inside of your arms.
Even if one hand is up and one is down, it’s still the same. By understanding what type of trapping or immobilizing actions can be used from where your arms are in relation to those of the opponent, as well as by feeling the type of energy the opponent reacts with, you can tie up one or both of his arms and gain a split-second advantage in which to land a strike. Basic HIA Actions The following are basic actions that are utilized in HIA:
Immobilizations
A11 Master of the Ring Copyright 2004 by Eric & Kevin Lamkin
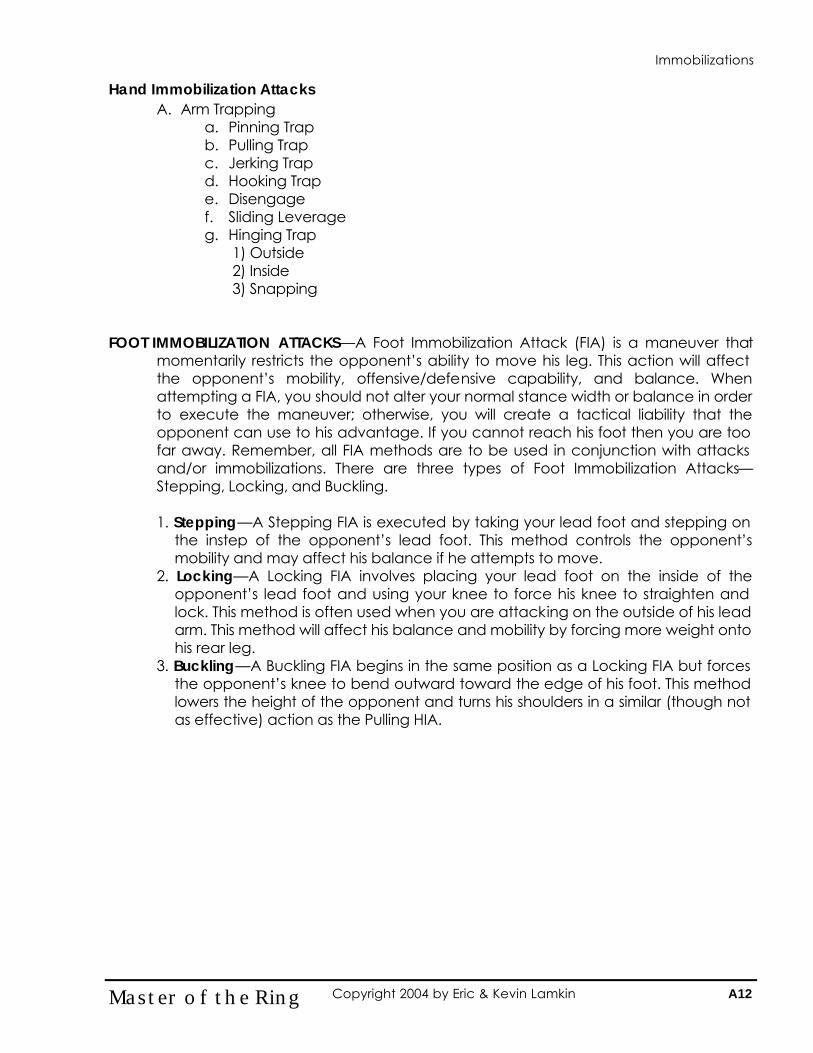
Hand Immobilization Attacks A. Arm Trapping
a. Pinning Trap b. Pulling Trap c. Jerking Trap d. Hooking Trap e. Disengage f. Sliding Leverage g. Hinging Trap 1) Outside 2) Inside 3) Snapping
FOOT IMMOBILIZATION ATTACKS—A Foot Immobilization Attack (FIA) is a maneuver that
momentarily restricts the opponent’s ability to move his leg. This action will affect the opponent’s mobility, offensive/defensive capability, and balance. When attempting a FIA, you should not alter your normal stance width or balance in order to execute the maneuver; otherwise, you will create a tactical liability that the opponent can use to his advantage. If you cannot reach his foot then you are too far away. Remember, all FIA methods are to be used in conjunction with attacks and/or immobilizations. There are three types of Foot Immobilization Attacks—Stepping, Locking, and Buckling.
1. Stepping—A Stepping FIA is executed by taking your lead foot and stepping on
the instep of the opponent’s lead foot. This method controls the opponent’s mobility and may affect his balance if he attempts to move.
2. Locking—A Locking FIA involves placing your lead foot on the inside of the opponent’s lead foot and using your knee to force his knee to straighten and lock. This method is often used when you are attacking on the outside of his lead arm. This method will affect his balance and mobility by forcing more weight onto his rear leg.
3. Buckling—A Buckling FIA begins in the same position as a Locking FIA but forces the opponent’s knee to bend outward toward the edge of his foot. This method lowers the height of the opponent and turns his shoulders in a similar (though not as effective) action as the Pulling HIA.
A12 Master of the Ring Copyright 2004 by Eric & Kevin Lamkin
Immobilizations
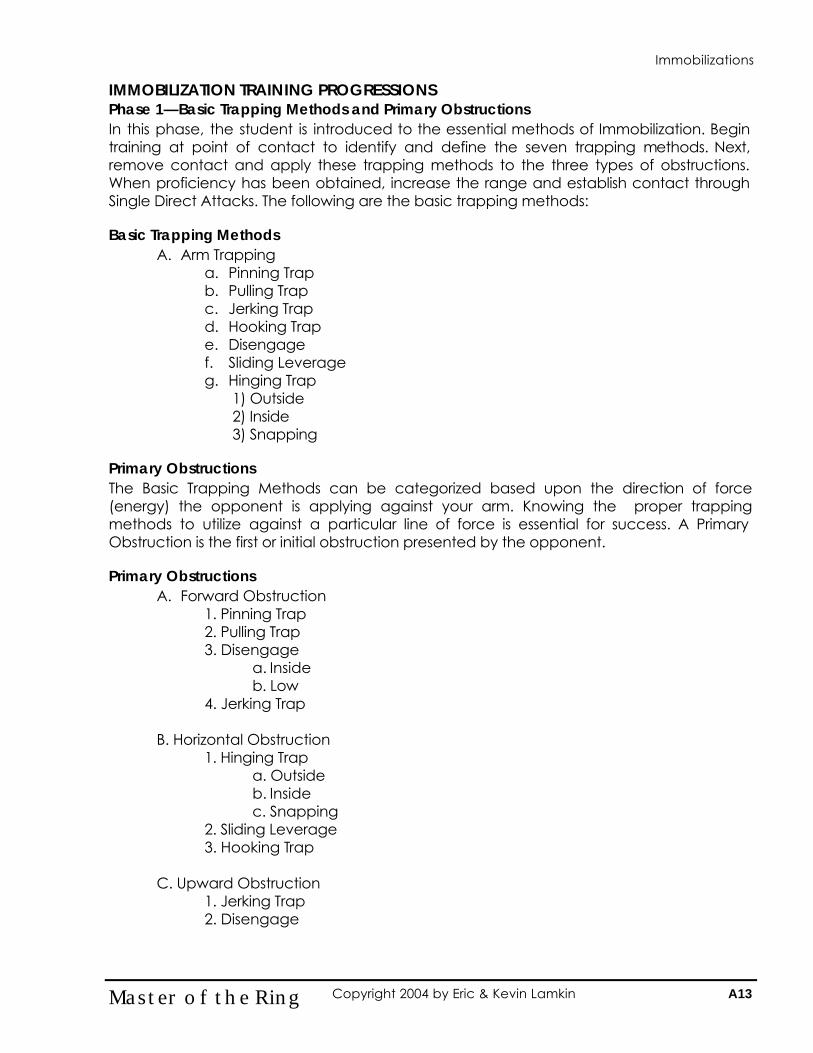
IMMOBILIZATION TRAINING PROGRESSIONS Phase 1—Basic Trapping Methods and Primary Obstructions In this phase, the student is introduced to the essential methods of Immobilization. Begin training at point of contact to identify and define the seven trapping methods. Next, remove contact and apply these trapping methods to the three types of obstructions. When proficiency has been obtained, increase the range and establish contact through Single Direct Attacks. The following are the basic trapping methods: Basic Trapping Methods
A. Arm Trapping a. Pinning Trap b. Pulling Trap c. Jerking Trap d. Hooking Trap e. Disengage f. Sliding Leverage g. Hinging Trap 1) Outside 2) Inside
3) Snapping Primary Obstructions The Basic Trapping Methods can be categorized based upon the direction of force (energy) the opponent is applying against your arm. Knowing the proper trapping methods to utilize against a particular line of force is essential for success. A Primary Obstruction is the first or initial obstruction presented by the opponent. Primary Obstructions
A. Forward Obstruction 1. Pinning Trap 2. Pulling Trap 3. Disengage
a. Inside b. Low 4. Jerking Trap
B. Horizontal Obstruction 1. Hinging Trap a. Outside b. Inside c. Snapping 2. Sliding Leverage 3. Hooking Trap C. Upward Obstruction 1. Jerking Trap 2. Disengage
A13 Master of the Ring Copyright 2004 by Eric & Kevin Lamkin
Immobilizations
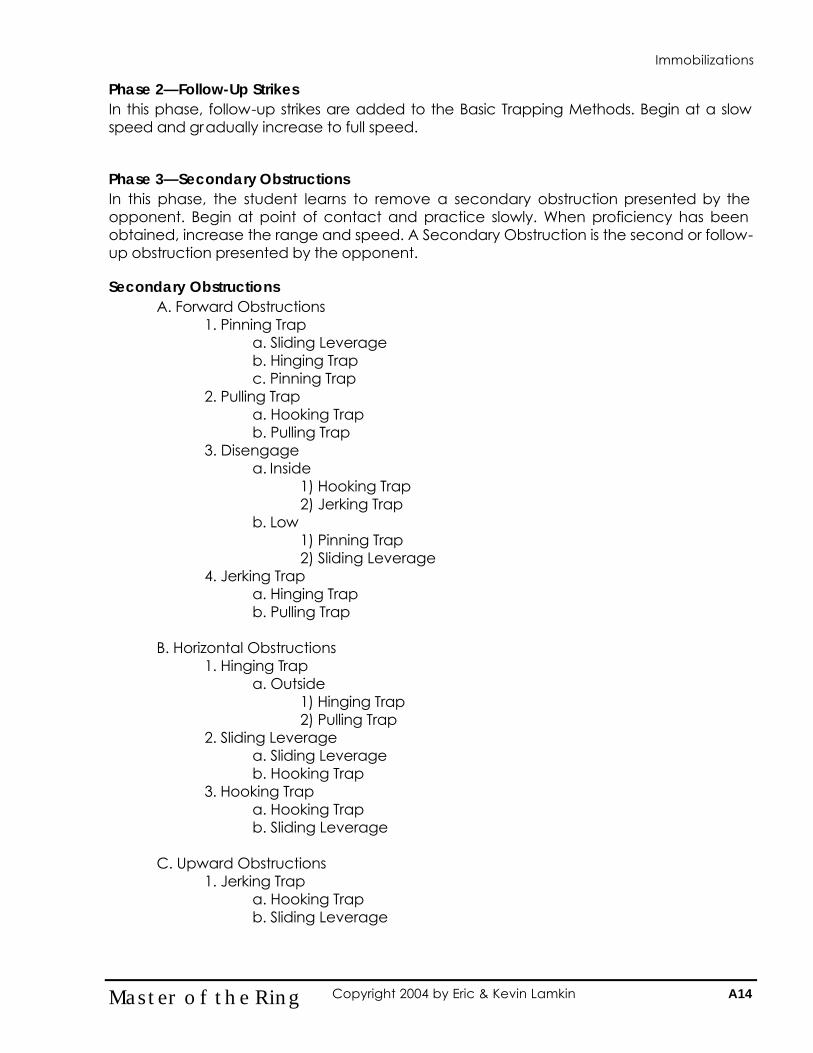
Phase 2—Follow-Up Strikes In this phase, follow-up strikes are added to the Basic Trapping Methods. Begin at a slow speed and gradually increase to full speed. Phase 3—Secondary Obstructions In this phase, the student learns to remove a secondary obstruction presented by the opponent. Begin at point of contact and practice slowly. When proficiency has been obtained, increase the range and speed. A Secondary Obstruction is the second or follow-up obstruction presented by the opponent. Secondary Obstructions A. Forward Obstructions 1. Pinning Trap a. Sliding Leverage b. Hinging Trap c. Pinning Trap 2. Pulling Trap a. Hooking Trap b. Pulling Trap 3. Disengage a. Inside 1) Hooking Trap 2) Jerking Trap b. Low 1) Pinning Trap 2) Sliding Leverage 4. Jerking Trap a. Hinging Trap b. Pulling Trap B. Horizontal Obstructions 1. Hinging Trap a. Outside 1) Hinging Trap 2) Pulling Trap 2. Sliding Leverage a. Sliding Leverage b. Hooking Trap 3. Hooking Trap a. Hooking Trap b. Sliding Leverage C. Upward Obstructions 1. Jerking Trap a. Hooking Trap b. Sliding Leverage
A14 Master of the Ring Copyright 2004 by Eric & Kevin Lamkin
Immobilizations
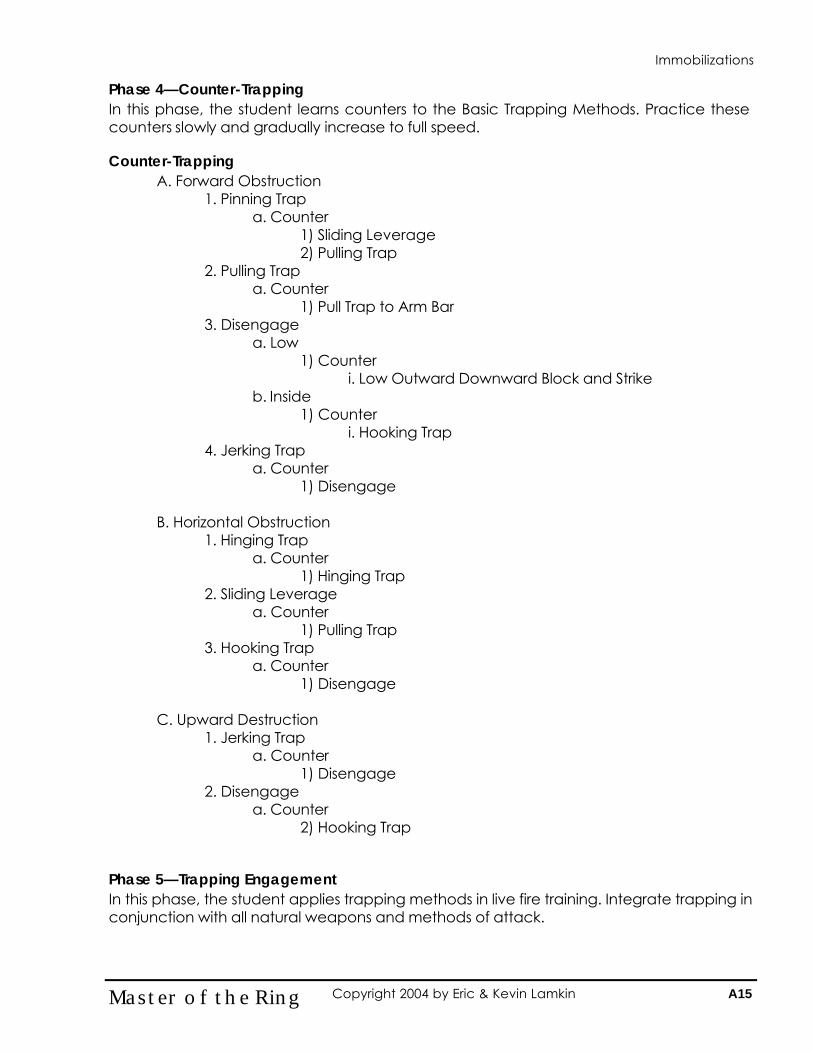
Phase 4—Counter-Trapping In this phase, the student learns counters to the Basic Trapping Methods. Practice these counters slowly and gradually increase to full speed. Counter-Trapping A. Forward Obstruction 1. Pinning Trap a. Counter 1) Sliding Leverage 2) Pulling Trap 2. Pulling Trap a. Counter 1) Pull Trap to Arm Bar 3. Disengage a. Low 1) Counter i. Low Outward Downward Block and Strike b. Inside 1) Counter i. Hooking Trap 4. Jerking Trap a. Counter 1) Disengage B. Horizontal Obstruction 1. Hinging Trap a. Counter 1) Hinging Trap 2. Sliding Leverage a. Counter 1) Pulling Trap 3. Hooking Trap a. Counter 1) Disengage C. Upward Destruction 1. Jerking Trap a. Counter
1) Disengage 2. Disengage a. Counter 2) Hooking Trap Phase 5—Trapping Engagement In this phase, the student applies trapping methods in live fire training. Integrate trapping in conjunction with all natural weapons and methods of attack.
A15 Master of the Ring Copyright 2004 by Eric & Kevin Lamkin
Immobilizations
Appendix BAppendix B
The ArtThe Art OfOf
GrapplingGrappling
B1 Master of the Ring Copyright 2004 by Eric & Kevin Lamkin
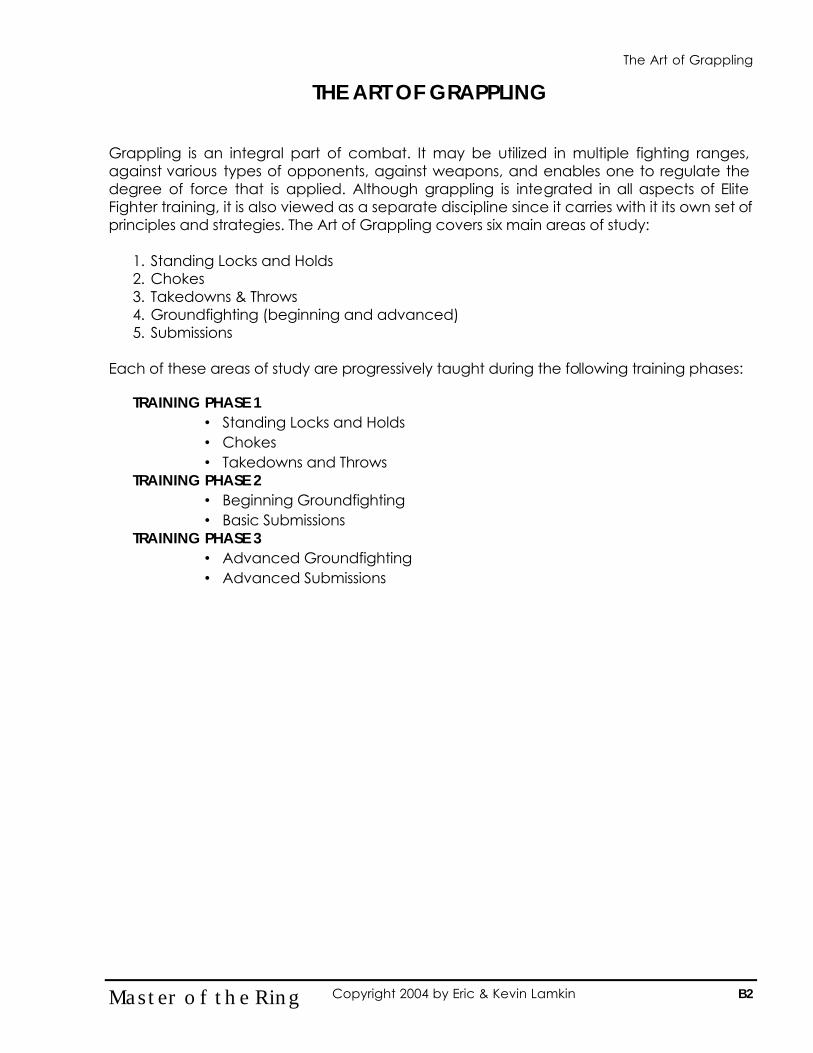
THE ART OF GRAPPLING Grappling is an integral part of combat. It may be utilized in multiple fighting ranges, against various types of opponents, against weapons, and enables one to regulate the degree of force that is applied. Although grappling is integrated in all aspects of Elite Fighter training, it is also viewed as a separate discipline since it carries with it its own set of principles and strategies. The Art of Grappling covers six main areas of study:
1. Standing Locks and Holds 2. Chokes 3. Takedowns & Throws 4. Groundfighting (beginning and advanced) 5. Submissions
Each of these areas of study are progressively taught during the following training phases:
TRAINING PHASE 1 • Standing Locks and Holds • Chokes • Takedowns and Throws
TRAINING PHASE 2 • Beginning Groundfighting • Basic Submissions
TRAINING PHASE 3 • Advanced Groundfighting • Advanced Submissions
The Art of Grappling
B2 Master of the Ring Copyright 2004 by Eric & Kevin Lamkin

TRAINING PHASE 1 OVERVIEW OF TRAINING PHASE 1
• Training Considerations • Principles of Grappling • Preliminaries • Pressure Points • Joint Locks • Holds • Chokes • Takedowns • Escapes and Lock Reversals • Lock Flow Drills
TRAINING CONSIDERATIONS
• Work with different partners. This will teach you to make adjustments for variations in size, body weight, and strength. It will also show you the limitations of your technique.
• Pay attention to unusual pain. It often indicates something is wrong with your
technique. • During training, throws incorporating joint locks should be modified to reduce risk of
injury. This often involves changing grips or turning a limb to unlock the joint. • Take the opponent down with light to moderate force. Control your partner’s
descent, guiding him to a safe landing. • Train for improvement—not to prove something. Safety should always be your first
consideration. • Observe the protocol of the tap. When your partner taps your body or taps the mat,
immediately release the hold to prevent injury and avoid unnecessary pain. PRINCIPLES OF GRAPPLING
1. Grab and Stick Before you can apply any holding technique, you must first secure the opponent’s limb by remaining in constant contact (sticking) as you enter into the hold.
2. Lead Into a Hold
Leading refers to the act of directing your opponent into a hold by using his own motion against himself. This may involve redirecting a strike or charge, or creating an initially deceptive movement that causes your opponent to react by moving in a direction that assists the execution of your technique.
B3 Master of the Ring Copyright 2004 by Eric & Kevin Lamkin
The Art of Grappling
3. Eliminate Space and Play When applying holds, particularly joint locks and chokes, it is important to eliminate extra space. Any looseness or free-play in the hold will diminish its effectiveness and encourage escapes or counters.
4. Apply Complex Force
Complex force refers to the application of force in two or more directions. For example, you may bend the opponent’s wrist toward him, while twisting it in an outward circular motion. Applying complex force puts greater stress on a joint, thereby reducing the level of force needed to create pain or to cause damage to the joint.
5. Modulate Force
Varying the amount of force, or the direction of your attack, can be used to reduce an opponent’s resistance to a technique. Radical changes in direct can assist a hold by unbalancing an opponent.
6. Distract and Deceive Whenever you engage in grappling, distract your opponent from your real intentions by delivering minor strikes or pressing vital points. Occupy his mind with pain and he will not be able to formulate an escape.
7. Do Not Chase the Lock
If the opponent is resisting the application of a lock or you find that your lock is ineffective, immediately switch to another aspect of combat such as striking or weapons.
8. Transition Within the Flow of Combat
When executing a hold, always be ready to make a transition to another hold, strike, or throw as circumstances dictate.
9. Be Aware of His Other Weapons and of Other Opponents
Do not become so focused on the application of your grappling maneuver that you lose your awareness of the opponent’s other weapons and of other opponents in the vicinity.
10. Finish in a Controlling Position
Always finish your grappling maneuvers in such a manner that you are placed in a strategically superior position.
B4 Master of the Ring Copyright 2004 by Eric & Kevin Lamkin
The Art of Grappling
PRELIMINARIES Before engaging in your formal study of grappling methods, you need to have a working knowledge of the various grips that will be used, the principles of escape, and be able to perform all required breakfalls.
Grips—Grips enable you to apply the various grappling maneuvers that you will learn. Some locks and chokes require a particular grip, but many of these grips may be used in a variety of grappling methods. The Grips that you need to know for Training Phase 1 are:
1. Finger Hook 2. Full Hand Grip 3. 3-Finger Grip 4. Butterfly 5. Figure-Four 6. Tombstone
Escape Principles—Much of your early training will consist countering and reversing grabs applied to your own body. By having an understanding of Escape Principles, you will be a more elusive fighter as well as possess the knowledge to prevent your opponent’s escape. The following are the Escape Principles for Training Phase 1:
1. Single to Single, Arm Up, Regular Direct 2. Single to Single, Arm Up, Irregular Direct 3. Single to Single, Arm Up, Regular Cross 4. Single to Single, Arm Up, Irregular Cross 5. Single to Single, Arm Down, Regular Direct 6. Single to Single, Arm Down, Irregular Direct 7. Single to Single, Arm Down, Regular Cross 8. Single to Single, Arm Down, Irregular Cross 9. Double to Single, Center Escape
Breakfalls—Breakfalls enable to you safely land after a takedown or throw. These methods will aid you in training as well as in actual combat. The Breakfalls for Training Phase 1 are:
1. Front Breakfall 2. Rear Breakfall 3. Side Breakfall 4. Forward Roll
a. Straight b. Diagonal
5. Backward Roll
B5 Master of the Ring Copyright 2004 by Eric & Kevin Lamkin
The Art of Grappling
PRESSURE POINTS Pressure Points are attacks that use grabbing, pressing, squeezing, or gouging actions to attack sensitive nerve locations. They are used to cause pain, control movement, impair motor function, create weakness, or produce unconsciousness. The effect depends upon the point targeted and the degree of accuracy. These points are used in conjunction with (never independently of) locks, holds, and chokes. For further information, please refer to the section entitled, Vital Target Areas of the Human Body. JOINT LOCKS Joint locks are used to restrain movement, assist in a takedown, direct an opponent into an obstacle, or escort a person from one location to another. If you limit joint movement, you reduce the opponent’s ability to move. Joint locks force a joint (or a series of joints) to move in an abnormal direction. The level of force applied determines the degree of damage. This may involve extreme pain or tearing of muscles, tendons, and cartilage. In most situations, it is not necessary to damage the joint, since pain alone will deter many attacks and secure most holds. However, in certain situations, breaking or dislocating the joint may be required to ensure your safety. In Training Phase 1, you will study the standing versions of Finger Locks, Wrist Locks, Elbow Locks, Shoulder Locks, Leg Locks, and Headlocks. They are as follows: I. Standing Locks
A. Finger locks 1. Downward Straight Finger Lock 2. Upward Straight Finger Lock 3. Forward Straight Finger Lock 4. Inward Bent Finger Lock 5. Outward Bent Finger Lock
B. Wrist Locks 1. Inward Two-Hand Straight Arm Wrist Lock 2. Inward Straight Arm Wrist Lock with Upper Arm Pressure 3. Inward Elevated Bent Arm Wrist Lock 4. Outward Two-Hand Straight Arm Wrist Lock 5. Outward Two-Hand Bent Arm Wrist Lock 6. Outward One-Hand Bent Arm Wrist Lock—Direct 7. Outward One-Hand Bent Arm Wrist Lock—Top Cross 8. Outward One-Hand Bent Arm Wrist Lock—Bottom Cross 9. Downward Two-Hand Z-Lock Wrist Lock 10. Downward One-Hand Z-Lock Wrist Lock with Elbow Pressure 11. Downward Snaking Z-Lock Wrist Lock 12. Forward Gooseneck Wrist Lock
C. Elbow Locks 1. Downward Arm Bar with Forearm Pressure 2. Downward Arm Bar with Palm Pressure 3. Downward Arm Bar w ith Knee Pressure 4. Downward Arm Bar with Upper Arm Pressure—Standing 5. Downward Arm Bar with Upper Arm Pressure—Prone 6. Downward Arm Bar Between Leg—Opponent’s Fulcrum 7. Downward Arm Bar Between Leg—Fighter’s Fulcrum
B6 Master of the Ring Copyright 2004 by Eric & Kevin Lamkin
The Art of Grappling
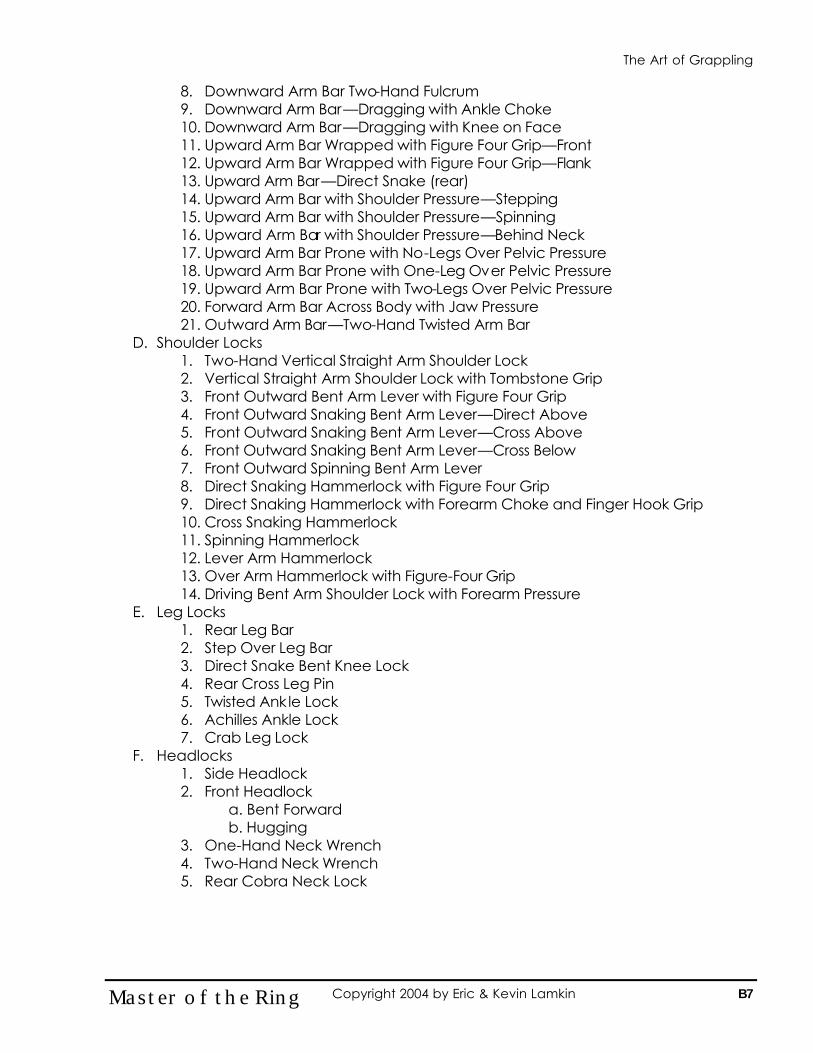
8. Downward Arm Bar Two-Hand Fulcrum 9. Downward Arm Bar—Dragging with Ankle Choke 10. Downward Arm Bar—Dragging with Knee on Face 11. Upward Arm Bar Wrapped with Figure Four Grip—Front 12. Upward Arm Bar Wrapped with Figure Four Grip—Flank 13. Upward Arm Bar—Direct Snake (rear) 14. Upward Arm Bar with Shoulder Pressure—Stepping 15. Upward Arm Bar with Shoulder Pressure—Spinning 16. Upward Arm Bar with Shoulder Pressure—Behind Neck 17. Upward Arm Bar Prone with No-Legs Over Pelvic Pressure 18. Upward Arm Bar Prone with One-Leg Over Pelvic Pressure 19. Upward Arm Bar Prone with Two-Legs Over Pelvic Pressure 20. Forward Arm Bar Across Body with Jaw Pressure 21. Outward Arm Bar—Two-Hand Twisted Arm Bar
D. Shoulder Locks 1. Two-Hand Vertical Straight Arm Shoulder Lock 2. Vertical Straight Arm Shoulder Lock with Tombstone Grip 3. Front Outward Bent Arm Lever with Figure Four Grip 4. Front Outward Snaking Bent Arm Lever—Direct Above 5. Front Outward Snaking Bent Arm Lever—Cross Above 6. Front Outward Snaking Bent Arm Lever—Cross Below 7. Front Outward Spinning Bent Arm Lever 8. Direct Snaking Hammerlock with Figure Four Grip 9. Direct Snaking Hammerlock with Forearm Choke and Finger Hook Grip 10. Cross Snaking Hammerlock 11. Spinning Hammerlock 12. Lever Arm Hammerlock 13. Over Arm Hammerlock with Figure-Four Grip 14. Driving Bent Arm Shoulder Lock with Forearm Pressure
E. Leg Locks 1. Rear Leg Bar 2. Step Over Leg Bar 3. Direct Snake Bent Knee Lock 4. Rear Cross Leg Pin 5. Twisted Ank le Lock 6. Achilles Ankle Lock 7. Crab Leg Lock
F. Headlocks 1. Side Headlock 2. Front Headlock
a. Bent Forward b. Hugging
3. One-Hand Neck Wrench 4. Two-Hand Neck Wrench 5. Rear Cobra Neck Lock
B7 Master of the Ring Copyright 2004 by Eric & Kevin Lamkin
The Art of Grappling
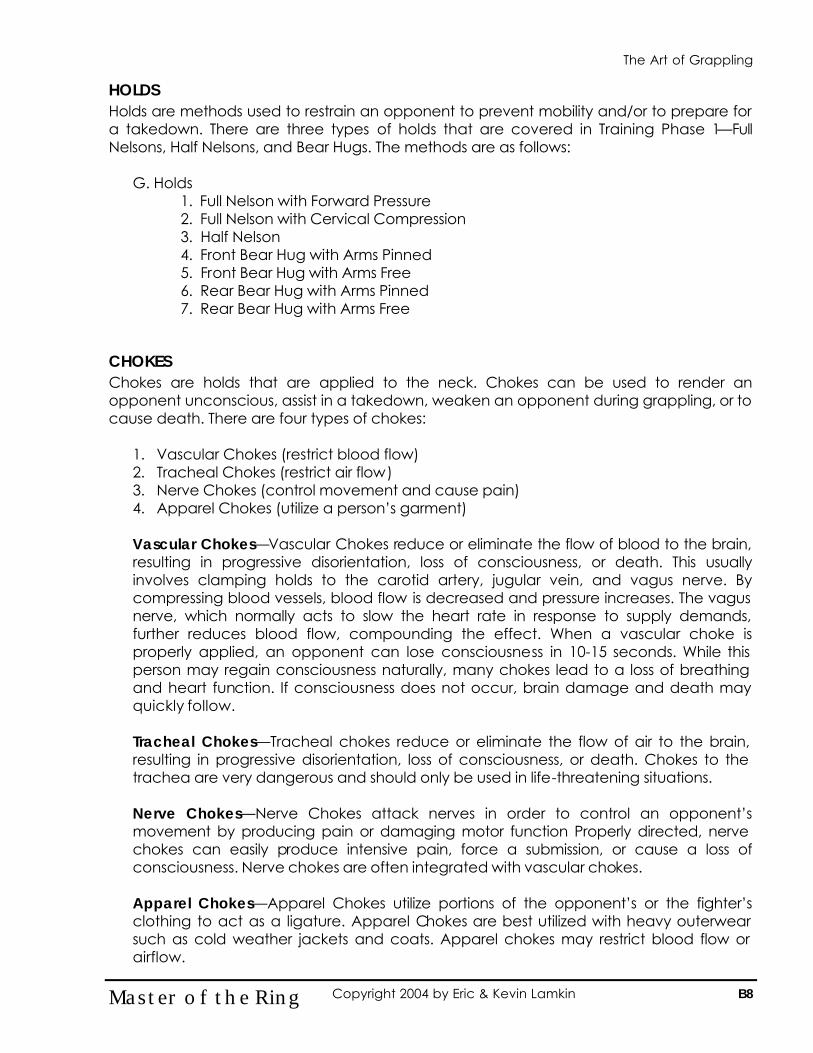
HOLDS Holds are methods used to restrain an opponent to prevent mobility and/or to prepare for a takedown. There are three types of holds that are covered in Training Phase 1—Full Nelsons, Half Nelsons, and Bear Hugs. The methods are as follows:
G. Holds 1. Full Nelson with Forward Pressure 2. Full Nelson with Cervical Compression 3. Half Nelson 4. Front Bear Hug with Arms Pinned 5. Front Bear Hug with Arms Free 6. Rear Bear Hug with Arms Pinned 7. Rear Bear Hug with Arms Free
CHOKES Chokes are holds that are applied to the neck. Chokes can be used to render an opponent unconscious, assist in a takedown, weaken an opponent during grappling, or to cause death. There are four types of chokes:
1. Vascular Chokes (restrict blood flow) 2. Tracheal Chokes (restrict air flow) 3. Nerve Chokes (control movement and cause pain) 4. Apparel Chokes (utilize a person’s garment)
Vascular Chokes—Vascular Chokes reduce or eliminate the flow of blood to the brain, resulting in progressive disorientation, loss of consciousness, or death. This usually involves clamping holds to the carotid artery, jugular vein, and vagus nerve. By compressing blood vessels, blood flow is decreased and pressure increases. The vagus nerve, which normally acts to slow the heart rate in response to supply demands, further reduces blood flow, compounding the effect. When a vascular choke is properly applied, an opponent can lose consciousness in 10-15 seconds. While this person may regain consciousness naturally, many chokes lead to a loss of breathing and heart function. If consciousness does not occur, brain damage and death may quickly follow.
Tracheal Chokes—Tracheal chokes reduce or eliminate the flow of air to the brain, resulting in progressive disorientation, loss of consciousness, or death. Chokes to the trachea are very dangerous and should only be used in life-threatening situations.
Nerve Chokes—Nerve Chokes attack nerves in order to control an opponent’s movement by producing pain or damaging motor function Properly directed, nerve chokes can easily produce intensive pain, force a submission, or cause a loss of consciousness. Nerve chokes are often integrated with vascular chokes.
Apparel Chokes—Apparel Chokes utilize portions of the opponent’s or the fighter’s clothing to act as a ligature. Apparel Chokes are best utilized with heavy outerwear such as cold weather jackets and coats. Apparel chokes may restrict blood flow or airflow.
B8 Master of the Ring Copyright 2004 by Eric & Kevin Lamkin
The Art of Grappling
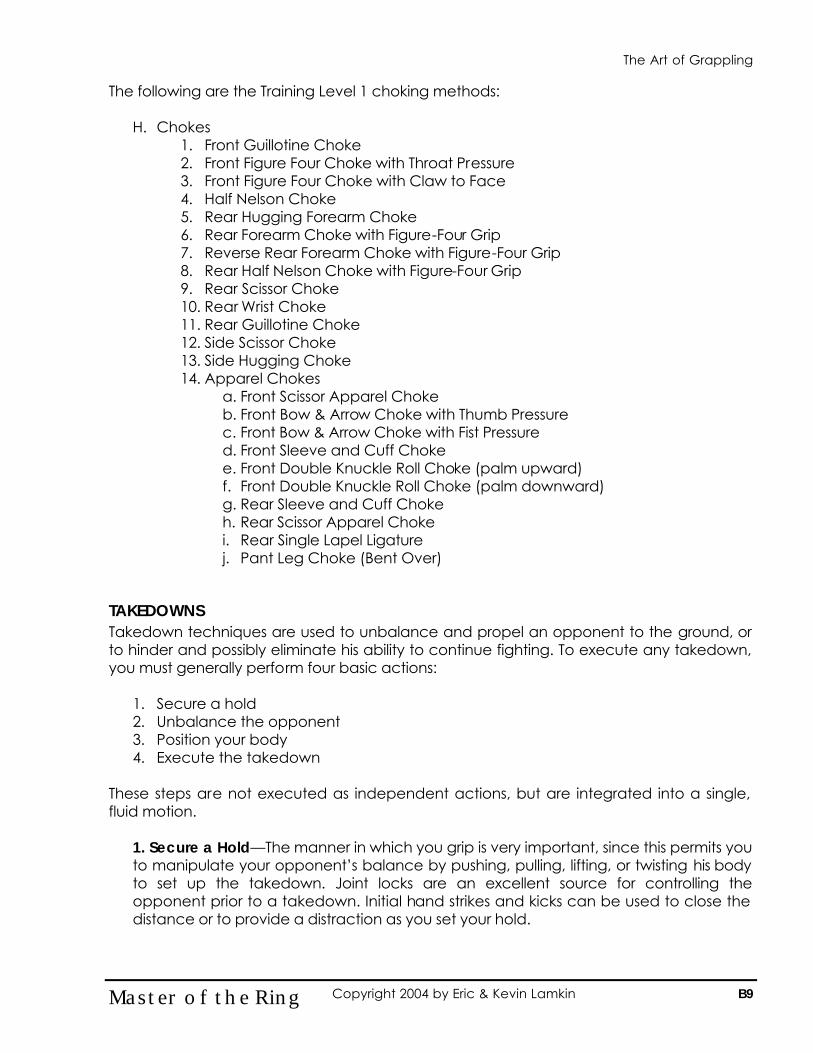
The following are the Training Level 1 choking methods:
H. Chokes 1. Front Guillotine Choke 2. Front Figure Four Choke with Throat Pressure 3. Front Figure Four Choke with Claw to Face 4. Half Nelson Choke 5. Rear Hugging Forearm Choke 6. Rear Forearm Choke with Figure-Four Grip 7. Reverse Rear Forearm Choke with Figure-Four Grip 8. Rear Half Nelson Choke with Figure-Four Grip 9. Rear Scissor Choke 10. Rear Wrist Choke 11. Rear Guillotine Choke 12. Side Scissor Choke 13. Side Hugging Choke 14. Apparel Chokes
a. Front Scissor Apparel Choke b. Front Bow & Arrow Choke with Thumb Pressure c. Front Bow & Arrow Choke with Fist Pressure d. Front Sleeve and Cuff Choke e. Front Double Knuckle Roll Choke (palm upward) f. Front Double Knuckle Roll Choke (palm downward) g. Rear Sleeve and Cuff Choke h. Rear Scissor Apparel Choke i. Rear Single Lapel Ligature j. Pant Leg Choke (Bent Over)
TAKEDOWNS Takedown techniques are used to unbalance and propel an opponent to the ground, or to hinder and possibly eliminate his ability to continue fighting. To execute any takedown, you must generally perform four basic actions:
1. Secure a hold 2. Unbalance the opponent 3. Position your body 4. Execute the takedown
These steps are not executed as independent actions, but are integrated into a single, fluid motion.
1. Secure a Hold—The manner in which you grip is very important, since this permits you to manipulate your opponent’s balance by pushing, pulling, lifting, or twisting his body to set up the takedown. Joint locks are an excellent source for controlling the opponent prior to a takedown. Initial hand strikes and kicks can be used to close the distance or to provide a distraction as you set your hold.
B9 Master of the Ring Copyright 2004 by Eric & Kevin Lamkin
The Art of Grappling
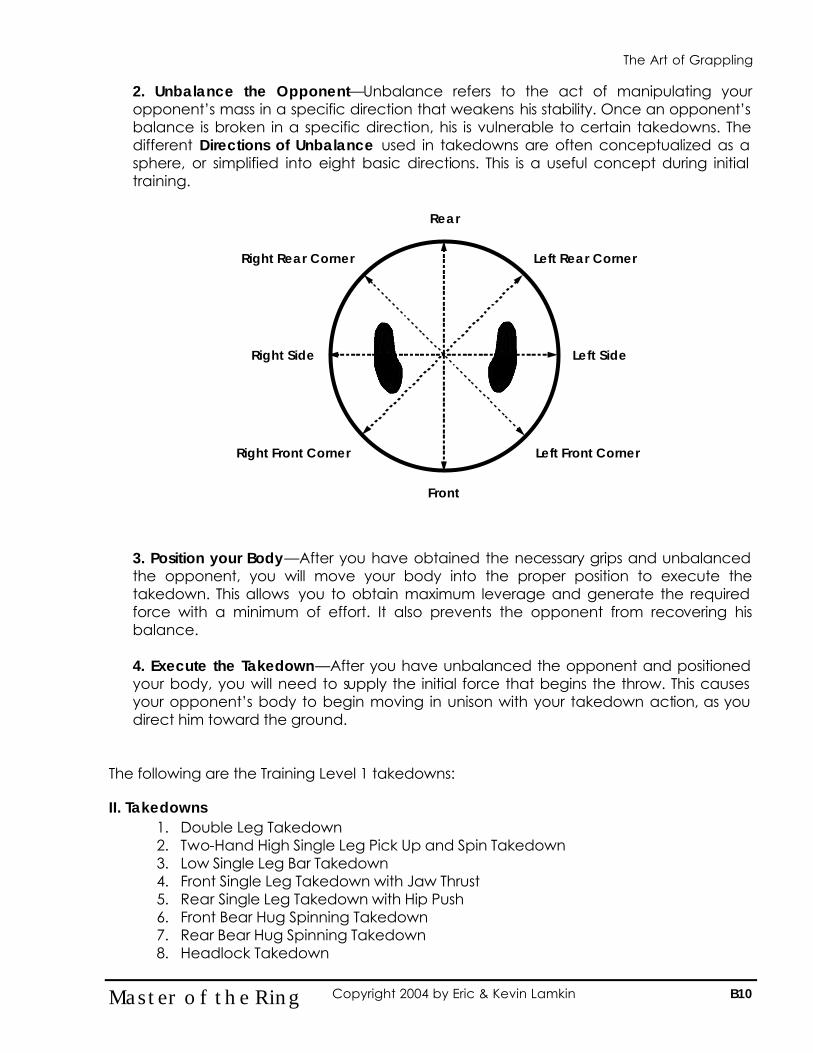
2. Unbalance the Opponent—Unbalance refers to the act of manipulating your opponent’s mass in a specific direction that weakens his stability. Once an opponent’s balance is broken in a specific direction, his is vulnerable to certain takedowns. The different Directions of Unbalance used in takedowns are often conceptualized as a sphere, or simplified into eight basic directions. This is a useful concept during initial training. 3. Position your Body—After you have obtained the necessary grips and unbalanced the opponent, you will move your body into the proper position to execute the takedown. This allows you to obtain maximum leverage and generate the required force with a minimum of effort. It also prevents the opponent from recovering his balance. 4. Execute the Takedown—After you have unbalanced the opponent and positioned your body, you will need to supply the initial force that begins the throw. This causes your opponent’s body to begin moving in unison with your takedown action, as you direct him toward the ground.
The following are the Training Level 1 takedowns:
II. Takedowns
1. Double Leg Takedown 2. Two-Hand High Single Leg Pick Up and Spin Takedown 3. Low Single Leg Bar Takedown 4. Front Single Leg Takedown with Jaw Thrust 5. Rear Single Leg Takedown with Hip Push 6. Front Bear Hug Spinning Takedown 7. Rear Bear Hug Spinning Takedown 8. Headlock Takedown
B10 Master of the Ring Copyright 2004 by Eric & Kevin Lamkin
Rear
Front
Left Side Right Side
Left Front Corner
Left Rear Corner
Right Front Corner
Right Rear Corner
The Art of Grappling
9. Leg Scissor Takedown into Leg Figure-Four Hold 10. Palm Strike with Rear Reap Takedown 11. Outward Horizontal Elbow with Back Trip Takedown 12. Elbow Force Takedown—Self-Centerline Method 13. Foot Pin with Sciatic Nerve Press Takedown 14. Two-Hand Rear Head Tilt Takedown 15. Two-Hand Front Head Twist Takedown 16. Arm Lift Head Spiral Takedown 17. Front Headlock Backward Roll Takedown (Sacrifice) 18. Circle Throw (Sacrifice) 19. Rear Forearm Choke and Lumbar Press Takedown 20. Arm Bar Throw 21. Neck Twist and Arm Pull Takedown (Bow and Arrow Takedown) 22. Front Outward Bent Arm Lever with Figure-Four Grip Takedown 23. Half Nelson Spin and Takedown 24. Spinning Shoulder Lock Takedown 25. Arm Pull and Reap Takedown 26. Leg Reap Takedown 27. Leg Sweep Takedown 28. Front Knee Lock Takedown 29. Inside Knee Lock Takedown 30. Head Tilt and Throat Strike Takedown
ESCAPES AND LOCK REVERSALS Just as joint locks are an integral part of your arsenal, it may also the weapon of choice for your opponent. For this reason, it is important that you have an understanding of defensive theory against locks. Proficiency in applying joint locks in combat situations takes years to master. Consequently, most joint lock attacks directed at you are likely to come from skilled fighters. Their level of skill determines the degree of danger they pose. Since most joint locks can cause serious damage—broken bones or torn muscles, tendons, and ligaments—your first concern is always to nullify and protect your joints. There are three moments during which your escape may occur—Before the lock is applied, During the application of the lock, and After the lock is applied.
Before the Lock is Applied—The easiest way to avoid most joint locks is not to get in them. While this may seem self-evident, it is also a fairly realistic option. Since most joint locks cannot be applied unless they are unexpected or well set up, anticipation and prevention are the best defenses. The sooner you detect the attack, the easier it will be to counter. If you confront an opponent who is prone to engage in grappling, utilize your long and intermediate ranged weapons and tactics to keep him at a safe distance.
During the Application of the Lock—Against a novice, almost any form of counter will usually nullify a hold. Simple resistance or counterstrikes will often suffice. Against a more knowledgeable opponent, or one who is much stronger, more sophisticated techniques are required. Since most joint locks require a precise and skillful application
B11 Master of the Ring Copyright 2004 by Eric & Kevin Lamkin
The Art of Grappling
of complex forces to work, a simple adjustment in your body position will often neutralize the hold. While this sounds easy, where you move makes all the difference. You must understand the inherent weaknesses in the hold you are countering—why it works and why it usually fails. This tells you where and how to move. Although the answers are very simple once you grasp them, they can take years of regular training to attain. The following are strategies that you may apply:
1. Try to detect the attack at the earliest possible moment. Avoid the hold by
stepping, or by changing your body position. For example, twisting or bending your arm will negate most arm bar holds.
2. Move ahead of the attacker’s motion. This creates slack in the hold, which is needed to set up a counter or an escape.
3. Execute strikes to distract the attacker. Often they will be concentrating all their resources on applying the hold, and will be unprepared for attacks to other areas.
4. Try to force the attacker to operate from a weak position. Keep the opponent from using his own body weight. Try to disrupt his balance by forcing him to take awkward steps. Pushing, pulling, or twisting as an attacker attempts to apply a hold will often cause it to fail and may create an opportunity for a counter.
5. Find and eliminate the fulcrum. Every joint lock has a point in which force is applied; this is called the fulcrum. Find this point and prevent force from being applied by either removing the fulcrum or blocking the force.
After the Lock is Applied—Counter or escape before the hold is tight. Once your joint is locked, counters are more difficult, if not impossible. If the hold is well applied, you may not even be able to move. When you cannot escape or counter, channel all your energy into resisting the hold. Focus your mind on a single task: resistance. Use jerking motions to disrupt the attacker’s force and to seek an opening. Talking or yelling can also be disruptive. Anything that causes your opponent to hesitate may provide the opening you need to save your joints and initiate an escape. Be ready to capitalize on any opening that appears. If the situation becomes desperate, seek a weapon that may be used to equalize the forces.
The following lock counters will provide you with a foundation for developing your own counters.
1. Counter to an Outward Two-Hand Bent Arm Wrist Lock a. The opponent is applying an Outward Two-Hand Bent Arm Wrist Lock to your
right wrist. b. Use your left hand to clear the opponent’s right hand by striking on top of the
opponent’s hand. c. Step forward with your right foot and drive your right elbow upward to his chin. d. Apply a Stepping Upward Arm Bar with Shoulder Pressure to his left arm.
2. Counter to an Inward Two-Hand Straight Arm Wrist Lock
a. The opponent is applying an Inward Two-Hand Straight Arm Wrist Lock to your right wrist.
b. Spin CW or CCW to relieve the pressure. c. Utilize striking techniques to clear the hold and counter-strike the opponent.
B12 Master of the Ring Copyright 2004 by Eric & Kevin Lamkin
The Art of Grappling
3. Counter to a Downward Arm Bar with Forearm Pressure a. The opponent is applying a Downward Arm Bar with Forearm Pressure to your
right arm. b. Grab the opponent’s left wrist with your left hand and pull his arm forward to
release the pressure that is being applied to your elbow. c. Simultaneously deliver a right outward horizontal elbow strike to his solar plexus. d. Finish by forcing his left arm into a Downward Arm Bar with Forearm Pressure.
4. Counter to an Upward Arm Bar with Shoulder Pressure
a. The opponent is applying an Upward Arm Bar with Shoulder Pressure to your right arm. This counter will work if the lock is applied to either shoulder.
b. Push the opponent’s shoulder (the fulcrum point) with your left hand as you pull your right arm backward. Use your right elbow to brace on this back.
c. Set a left forearm choke to the opponent’s throat. 5. Counter to Upward Arm Bar Wrapped with Figure Four Grip from the Front
a. The opponent is applying an Upward Arm Bar Wrapped with a Figure Four Grip from the Front to your left arm.
b. Use your right arm to clear the opponent’s left arm (fulcrum). c. Manipulate the opponent into a Left Direct Snaking Hammerlock with Forearm
Choke and Finger Hook Grip. 6. Counter to a Direct Snaking Hammerlock
a. The opponent is applying a Direct Snaking Hammerlock to your right arm. b. Counter circle your right arm and strike to the back of his neck with a right
inward heel palm strike. c. Force the opponent’s head into a left inward horizontal elbow strike. d. Finish with a Two-Hand Front Head Twist Takedown.
7. Counter to a Front Outward Bent Arm Lever with Figure Four Grip
a. The opponent is applying a Front Outward Bent Arm Lever with Figure Four Grip to your right arm.
b. Use your left arm to forcefully guide his right arm across his body. c. Pull your right arm free. d. Execute a right inward horizontal elbow strike to his rib cage. e. Finish with a right thrusting knife-edge kick to the back of his right knee.
8. Counter to a Front Outward Snaking Bent Arm Lever—Direct Above
a. The opponent is applying a Front Outward Snaking Bent Arm Lever by snaking directly above your right arm.
b. Use your left palm to stop the opponent’s application of pressure by pushing on your right elbow.
c. Finish by forcing the opponent’s arm into a shoulder lock. 9. Counter to a Two-Hand Vertical Straight Arm Shoulder Lock
a. The opponent is applying a Two-Hand Vertical Straight Arm Shoulder Lock to your right arm.
b. Use your left hand to force the opponent’s right arm off of your right shoulder. c. Simultaneously rotate your arm 90-degrees to release the hold.
B13 Master of the Ring Copyright 2004 by Eric & Kevin Lamkin
The Art of Grappling
d. Turn and deliver a left uppercut punch to any available target. e. Finish with a Two-Hand Front Head Twist Takedown
10. Counter to a Forward Gooseneck Wrist Lock
a. The opponent is applying a Forward Gooseneck Wrist Lock. b. Rotate your wrist to release the pressure that is being applied by the fulcrum. c. Set a side scissor choke to your opponent.
LOCK FLOW DRILLS Real combat is rarely decided on the basis of single technique. The ability to make transitions from one lock to another is crucial, as is the ability to recognize these opportunities during the flow of combat, which is constantly changing. For every technique, there is a counter; and for every counter, another counter. When executing a lock, always be ready to make a transition at any time into another lock, strike, or takedown as circumstances dictate. When making a transition between a lock, maintain pressure and control throughout the change. The hallmark of an Elite Fighter is that person’s ability to make smooth, effortless transitions from one technique to another, constantly adjusting to the opponent’s rhythm, balance, and power. If you are confronting an opponent who negates your counters and transitions with superior skill or power, try switching your attack to a different part of the body. If the opponent’s attention is focused on protecting the joints of one arm, then he will likely be unprepared for an attack to other areas, such as the head, legs, or other arm. The key to successful transitions is to anticipate, and to move just slightly ahead of your opponent. When the opponent gets ahead of you, you will then be vulnerable to his counters. The following are the lock flow drills for Training Level 1:
Lock Flow Drill 1 a. Inward Two-Hand Straight Arm Wrist Lock b. Forward Gooseneck Wrist Lock c. Front Outward Bent Arm Lever with Figure-Four Grip Takedown
Lock Flow Drill 2
a. Outward One-Hand Bent Arm Wrist Lock—Bottom Cross b. Front Outward Snaking Bent Arm Lever—Direct Above c. Upward Arm Bar Wrapped with Figure Four Grip—Front d. Arm Lift Head Spiral e. Front Outward Snaking Bent Arm Lever—Cross Below Takedown
Lock Flow Drill 3
a. Downward Arm Bar with Forearm Pressure b. Direct Snaking Hammerlock with Figure-Four Grip c. Arm Lift and Head Spiral Takedown d. Rear Wrist Choke
B14 Master of the Ring Copyright 2004 by Eric & Kevin Lamkin
The Art of Grappling
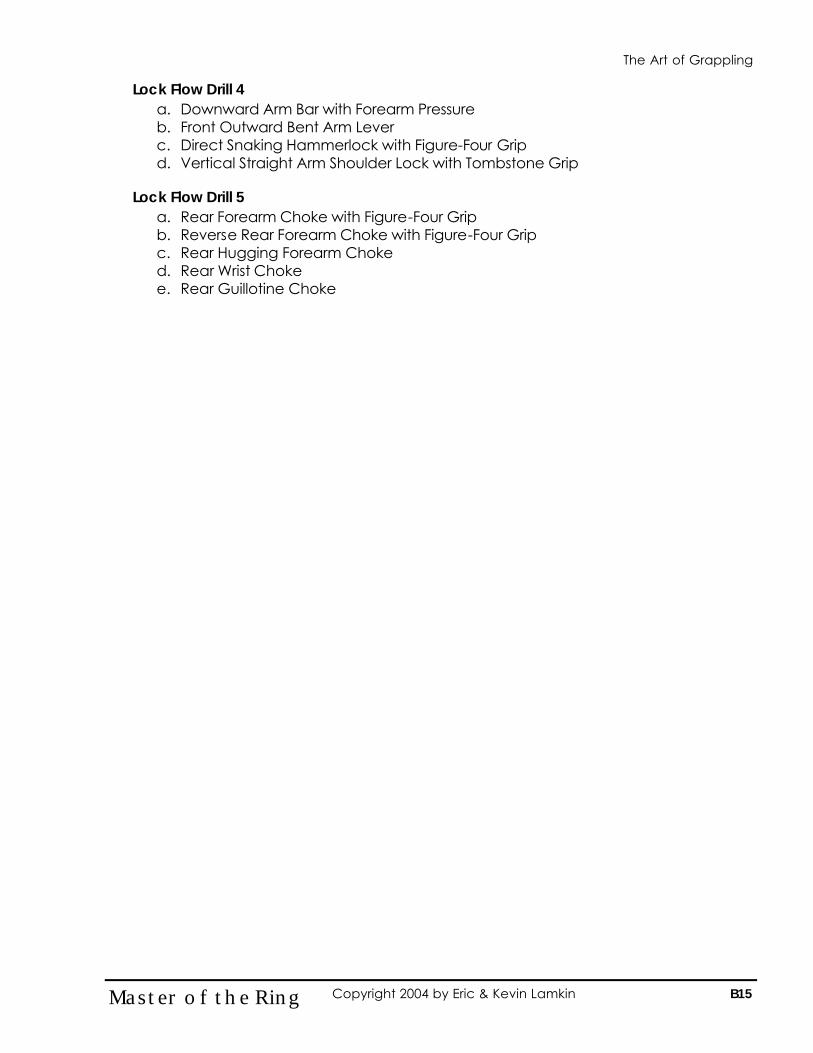
Lock Flow Drill 4 a. Downward Arm Bar with Forearm Pressure b. Front Outward Bent Arm Lever c. Direct Snaking Hammerlock with Figure-Four Grip d. Vertical Straight Arm Shoulder Lock with Tombstone Grip
Lock Flow Drill 5
a. Rear Forearm Choke with Figure-Four Grip b. Reverse Rear Forearm Choke with Figure-Four Grip c. Rear Hugging Forearm Choke d. Rear Wrist Choke e. Rear Guillotine Choke
B15 Master of the Ring Copyright 2004 by Eric & Kevin Lamkin
The Art of Grappling
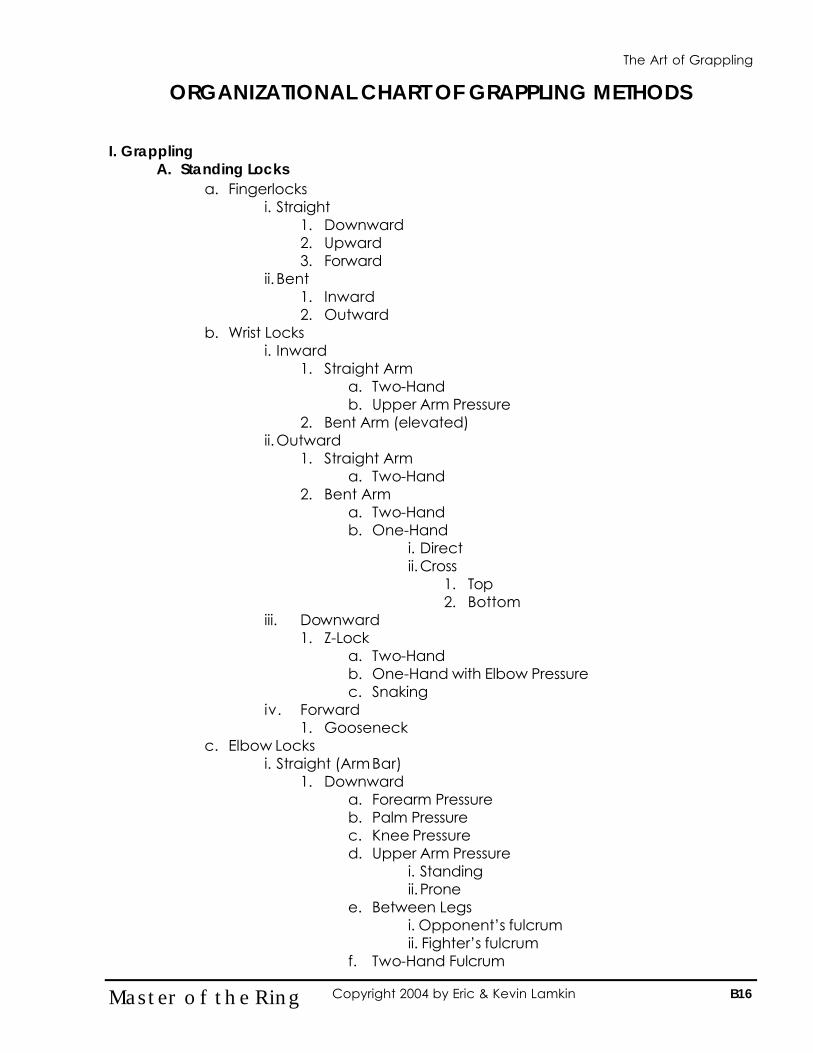
ORGANIZATIONAL CHART OF GRAPPLING METHODS I. Grappling
A. Standing Locks a. Fingerlocks
i. Straight 1. Downward 2. Upward 3. Forward
ii. Bent 1. Inward 2. Outward
b. Wrist Locks i. Inward
1. Straight Arm a. Two-Hand b. Upper Arm Pressure
2. Bent Arm (elevated) ii. Outward
1. Straight Arm a. Two-Hand
2. Bent Arm a. Two-Hand b. One-Hand
i. Direct ii. Cross
1. Top 2. Bottom
iii. Downward 1. Z-Lock
a. Two-Hand b. One-Hand with Elbow Pressure c. Snaking
iv. Forward 1. Gooseneck
c. Elbow Locks i. Straight (Arm Bar)
1. Downward a. Forearm Pressure b. Palm Pressure c. Knee Pressure d. Upper Arm Pressure
i. Standing ii. Prone
e. Between Legs i. Opponent’s fulcrum ii. Fighter’s fulcrum
f. Two-Hand Fulcrum
B16 Master of the Ring Copyright 2004 by Eric & Kevin Lamkin
The Art of Grappling
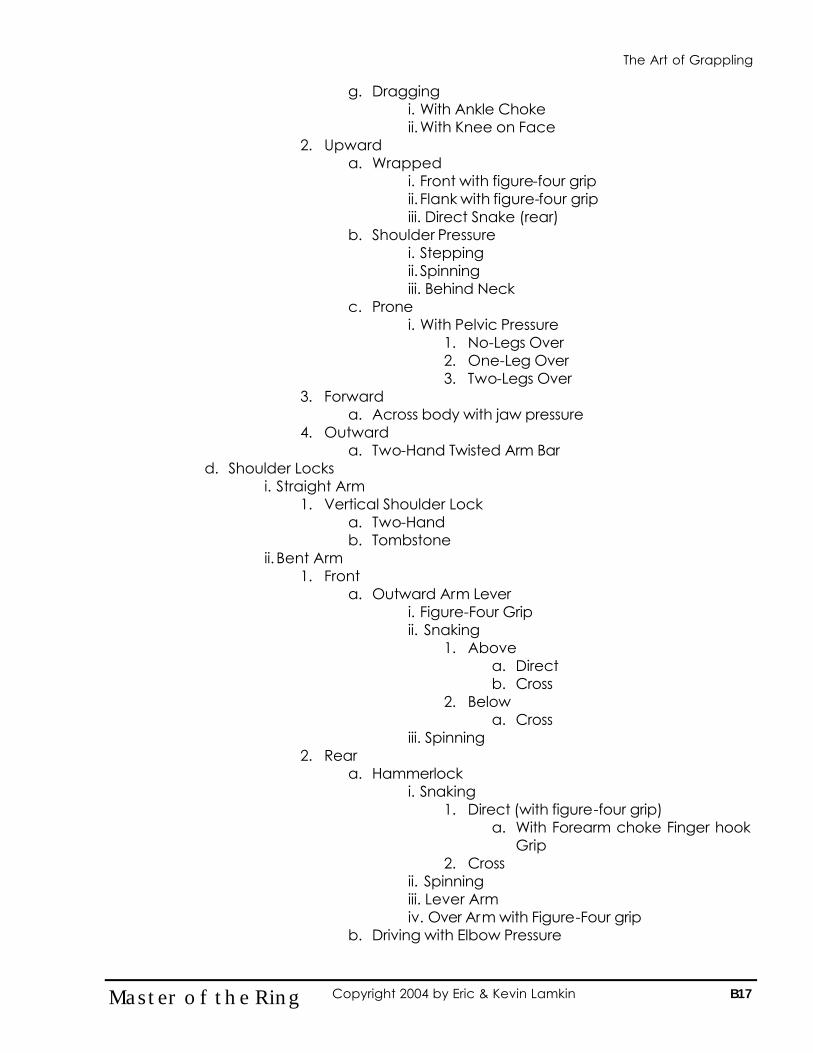
g. Dragging i. With Ankle Choke ii. With Knee on Face
2. Upward a. Wrapped
i. Front with figure-four grip ii. Flank with figure-four grip iii. Direct Snake (rear)
b. Shoulder Pressure i. Stepping ii. Spinning iii. Behind Neck
c. Prone i. With Pelvic Pressure
1. No-Legs Over 2. One-Leg Over 3. Two-Legs Over
3. Forward a. Across body with jaw pressure
4. Outward a. Two-Hand Twisted Arm Bar
d. Shoulder Locks i. Straight Arm
1. Vertical Shoulder Lock a. Two-Hand b. Tombstone
ii. Bent Arm 1. Front
a. Outward Arm Lever i. Figure-Four Grip ii. Snaking
1. Above a. Direct b. Cross
2. Below a. Cross
iii. Spinning 2. Rear
a. Hammerlock i. Snaking
1. Direct (with figure-four grip) a. With Forearm choke Finger hook
Grip 2. Cross
ii. Spinning iii. Lever Arm iv. Over Arm with Figure-Four grip
b. Driving with Elbow Pressure
B17 Master of the Ring Copyright 2004 by Eric & Kevin Lamkin
The Art of Grappling
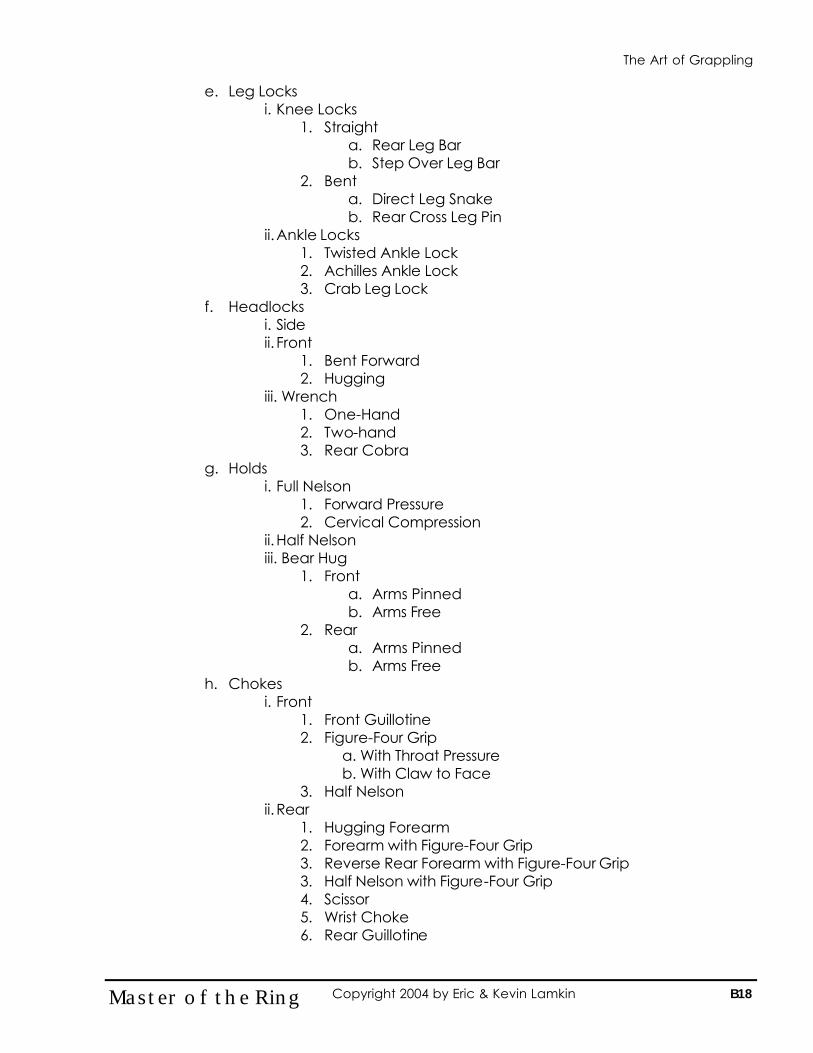
e. Leg Locks i. Knee Locks
1. Straight a. Rear Leg Bar b. Step Over Leg Bar
2. Bent a. Direct Leg Snake b. Rear Cross Leg Pin
ii. Ankle Locks 1. Twisted Ankle Lock 2. Achilles Ankle Lock 3. Crab Leg Lock
f. Headlocks i. Side ii. Front
1. Bent Forward 2. Hugging
iii. Wrench 1. One-Hand 2. Two-hand 3. Rear Cobra
g. Holds i. Full Nelson
1. Forward Pressure 2. Cervical Compression
ii. Half Nelson iii. Bear Hug
1. Front a. Arms Pinned b. Arms Free
2. Rear a. Arms Pinned b. Arms Free
h. Chokes i. Front
1. Front Guillotine 2. Figure-Four Grip
a. With Throat Pressure b. With Claw to Face
3. Half Nelson ii. Rear
1. Hugging Forearm 2. Forearm with Figure-Four Grip 3. Reverse Rear Forearm with Figure-Four Grip 3. Half Nelson with Figure-Four Grip 4. Scissor 5. Wrist Choke 6. Rear Guillotine
B18 Master of the Ring Copyright 2004 by Eric & Kevin Lamkin
The Art of Grappling
iii. Side 1. Scissor 2. Hugging
iv. Apparel 1. Front Scissor Apparel Choke 2. Front Bow & Arrow Choke
a. With Thumb Pressure b. With Fist Pressure
3. Front Sleeve and Cuff Choke 4. Double Knuckle Roll Choke
a. Palm Upward b. Palm Downward
5. Rear Sleeve and Cuff Choke 6. Rear Scissor Apparel Choke 7. Rear Single Lapel Ligature 8. Pant Leg Choke (bent over)
B. Takedowns
a. Double Leg Takedown Single Leg Takedown
i. Two Hand High Single Leg Pick Up and Spin ii. Low Single Leg Bar iii. Front with Jaw Thrust iv. Rear with Hip Push
b. Spinning Bear Hug Takedown i. Front ii. Rear
c. Headlock Takedown d. Leg Scissor Takedown into Leg Figure-Four Hold e. Palm Strike with Rear Reap Takedown f. Outward Horizontal Elbow with Back Trip Takedown g. Elbow Force Takedown —Self-Centerline Method h. Foot Pin with Sciatic Nerve Press Takedown i. Two-Hand Rear Head Tilt Takedown j. Two-Hand Front Head Twist Takedown k. Arm Lift Head Spiral Takedown l. Sacrifice Takedown
i. Front Headlock Backward Roll ii. Circle Throw
m. Rear Forearm Choke and Lumbar Press Takedown n. Arm Bar Throw o. Neck Twist and Arm Pull Takedown (Bow & Arrow Takedown) p. Front Outward Bent Arm Lock with Figure-Four Grip Takedown q. Half Nelson Spin and Takedown r. Spinning Shoulder Lock Takedown s. Arm Pull and Reap Takedown t. Leg Reap Takedown u. Leg Sweep Takedown v. Front Knee Lock Takedown
B19 Master of the Ring Copyright 2004 by Eric & Kevin Lamkin
The Art of Grappling
w. Inside Knee Lock Takedown x. Head Tilt and Throat Strike Takedown
B20 Master of the Ring Copyright 2004 by Eric & Kevin Lamkin
The Art of Grappling
TRAINING PHASE 2 OVERVIEW OF TRAINING PHASE 2
• Leg Controls • Ground Maneuvers • Basic Ground Positions • Transitions • Positional Escapes • Lock Submissions • Choke Submissions
LEG CONTROLS Groundfighting involves the use of your ENTIRE body. Just as your arms are used to hold, control, restrain, and lock your opponent; your legs are employed in the same way. There are four basic leg controls:
1. Grapevine 2. Leg Scissor 3. Leg Figure-Four 4. Inside/Outside Leg Control
The Grapevine is a method of snaking your leg around the opponent’s leg in such as manner that he is unable to freely move his leg and body. The key components in a snake vine is your ankle (used to lock the control) and the strength of your leg (used to control the opponent). The Leg Scissor may be used to choke, restrain, or lock the opponent. In this method, your ankles entwine to secure your hold. The Leg Figure-Four utilizes the same structure as the offensive method; however, it is now used against the opponent to restrain and support finishing holds. The Inside-Outside Leg Control uses your feet and ankle to turn, spin, move, and displace the position of your opponent with the following four possible combinations of your legs:
1. Both Inside 2. Both Outside 3. Right Inside/Left Outside 4. Left Inside/Right Outside
B21 Master of the Ring Copyright 2004 by Eric & Kevin Lamkin
The Art of Grappling
GROUND MANEUVERS Mobility is the key to any successful attack and/or defense. If you are unable to move, your attacks will lack power and your defenses will lack sufficient and effective protection. The following methods are essential for mobility while on the ground.
1. Bridge 2. Coming to a Base 3. Shrimping 4. Reverse Shrimping 5. Switch to Base 6. Shoulder Sprint 7. Reverse Shoulder Sprint
The Bridge is a method of getting your hips off the ground to escape or reverse the ground position you are in. To bridge, as you lie on your back, place your heels as near to your buttocks as possible and arch your hips upward. When you arch your will place the majority of your weight on your shoulders. Experience and trained grapplers will rest on the top of the head. If you find yourself in a disadvantageous positions such as on your stomach, it is essential that you Come to a Base as quickly as possible. This places your hips underneath your body so that you can properly maneuver. To come to a base, first keep your elbows against your body. Next, slide one of your knees to the outside of your elbow. This will prevent the opponent from setting a lock. Repeat this on the opposite side. Shrimping is used to escape top and side positions in order to set up your offensive maneuvers. To shrimp, push both feet against the ground (mat) as you push against the opponent with both hands. This action will allow you to move your hips to the side and away from the opponent. Shrimping moves your body from side-to-side. Reverse Shrimping is similar to Shrimping but you move from head-to-feet. It is often used to pass the opponent over your head. When you find yourself on your back, it is often vital to switch your position and come to a base. To Switch to Base begin with a Shrimp and end in a face-downward position on your hands and knees (Turtle Position). Shoulder Sprints are methods of “walking” on your back. To perform, bridge to your shoulders and use a rolling motion to “walk” yourself toward your head. If you move toward the direction of your feet, this is called Reverse Shoulder Sprints.
B22 Master of the Ring Copyright 2004 by Eric & Kevin Lamkin
The Art of Grappling
BASIC GROUND POSITIONS One of the most important principles in all of ground fighting is maintaining a dominant position. By doing so you will nullify your opponent’s defensive capability and set up your own finishing moves/methods. If a finishing move is attempted from a dominant fighting position and it fails, then you can simply try again. If, however, a finishing move is attempted while in something other than a dominant position and it fails, it will lead to defeat. Always remember the axiom, “Position THEN Submission.” There are six basic positions for ground fighting:
1. The Mount 2. The Guard 3. Side Position 4. North-South Position 5. Rear Mount 6. Turtle Position
THE MOUNT This position is effective because it enables the fighter to deliver effective strikes to his opponent without the danger of effective return strikes. It also provides the leverage necessary to deliver punishing joint locks and chokes. There are five variations of the Mount:
1. Grapevine Mount 2. High & Tight (Striking Position) 3. Big Brother (Striking Position) 4. Knee Mount 5. Half Mount
THE GUARD If you find yourself on the bottom, the Guard is the best position for defense and the only position for offense. There are three variations of the Guard:
1. Closed Guard 2. Open Guard 3. Inside Guard
THE SIDE POSITION Although not a dominant position, it is very common for a fighter to find himself in this position especially when in transition from one position to another. It is very important to know how to control the opponent from this position and protect against his defensive maneuvers. There are two variations of the Side Position:
1. Cross Body 2. Head & Arm
THE NORTH-SOUTH POSITION Although not a commonly used position, this position offers many offensive methods with little opportunity for defense. Finishing chokes are very common in this position.
B23 Master of the Ring Copyright 2004 by Eric & Kevin Lamkin
The Art of Grappling
THE REAR MOUNT The Rear Mount gives the fighter the best control of the fight. This position affords the opponent little opportunity for any offense or defense. Once this position is achieved the challenge is to keep it. THE TURTLE POSITION The Turtle Position is not necessarily a position you want to find yourself in. Training takes places from this position primarily to teach you how to escape it and establish a better position. TRANSITIONS Ground fighting is one of the most dynamic modes of combat. There is more positional changes during the course of a ground conflict than during a standing conflict. During the battle you will find that as the opponent moves and shifts his position, you must immediately adjust to the next best position. Transitions enable the fighter to move from one dominant position to another. The following are essential ground combat positional transitions.
1. Guard to Mount a. Scissor Sweep b. Double Ankle Grab Sweep c. Push Sweep d. Elevator Sweep
2. Inside Guard to Side Position
a. Passing b. Standing Pass
3. Bottom Mount to Guard Position
a. Elbow Escape
4. Side Position to Mount a. Hip-Switch Mount b. Knee Sneak c. High Leg Over
5. Side Position to Head & Arm Position a. Hip Cut
B24 Master of the Ring Copyright 2004 by Eric & Kevin Lamkin
The Art of Grappling
POSITIONAL ESCAPES So far we have stressed the importance of position and have given you the ideal positions from which to fight. But, suppose you find yourself in the less dominant position—what would you do? It is vital that you completely familiarize yourself with Positional Escapes:
1. Mount Escapes a. Bridge & Roll b. Elbow Escape
2. Guard Escapes a. Sprawl Slither b. Pressure Squat c. Knee Drive d. Near Knee Pass
3. Side Position Escapes a. Knee Through b. Bridge & Roll
4. North-South Escapes a. Over-the-Top b. Bottom inverted Figure-four leg choke
5. Rear Mount Escapes a. Bridge to Side Position
SUBMISSIONS Now that you are able to gain the dominant position, it is now time to apply a submission. The purpose of a submission ranges from making your opponent yield, to deliver devastating injuries, or even death. There are two basic types of submissions—Lock Submissions and Choke Submissions. There is an endless number of submissions possible, but they are all based upon a few simple principles. Below are the most common and effective submissions for modern street combat. Each are categorized according to the position from which to attack. Remember—Position THEN Submission. Familiarize yourself with these and you will have the essential skills needed. Lock Submissions
1. The Mount a. Front Outward Bent Arm Lever with Figure Four Grip b. Upward Prone Arm Bar with Pelvic Pressure c. Over Arm Hammerlock with Figure Four Grip d. Figure Four Neck Lock e. Hugging Outward Two-hand Bent Arm Wrist Lock f. Ankle Choke with Upward Arm Bar—Fighter’s Fulcrum
B25 Master of the Ring Copyright 2004 by Eric & Kevin Lamkin
The Art of Grappling
2. The Guard a. Closed Guard
i. Over Arm Hammerlock with Figure Four Grip ii. Upward Arm Bar Prone with Pelvic Pressure iii. Upward Arm Bar with Leg Figure Four Assist
b. Inside Guard i. Stack to Prone Achilles Ankle Lock ii. Figure Four Leg bar iii. Crab Leg Lock
3. Side Position a. Cross Body
i. Upward Arm Bar Prone with Pelvic Pressure ii. Vertical Straight Arm Shoulder Lock w ith Tombstone Grip iii. Front Outward Bent Arm Lever with Figure Four Grip iv. Over Arm Hammerlock with Figure Four Grip v. Front Outward Snaking Bent Arm Lever—Direct Below with Elbow in
Neck vi. Hugging Bent Wrist Lock with Double Knee Pin
b. Head & Arm i. Front Outward Snaking Bent Arm Lever (Direct Above) with Face Push ii. Front Upward Arm Bar Wrapped and Leg Figure Four Head Scissor iii. Front Outward Snaking Bent Arm Lever (Cross Below with Leg) and
Downward Pressing Forearm Choke
4. Turtle Position a. Step Over and Rollover Upward Arm Bar Prone with Pelvic Pressure b. Face Down, Two-Leg In, Downward Arm Bar with Pelvic Pressure
Choke Submissions
1. The Mount a. Downward Pressing Forearm Choke b. Figure Four Choke with Throat Pressure c. Front Bow and Arrow Choke with Fist Pressure d. Front Double Knuckle Roll Choke (palm downward) e. Front Scissor Apparel Choke
2. The Guard a. Closed Guard
i. Triangle Choke ii. Front Guillotine Choke iii. Pant Leg Scissor Choke iv. Pant Leg Scissor Choke with Leg Figure Four Assist v. Front Figure-Four Choke with Throat Pressure vi. Front Scissor Apparel Choke vii. Front Scissor Apparel Choke with Single Leg Over viii. Scissor Leg Choke
B26 Master of the Ring Copyright 2004 by Eric & Kevin Lamkin
The Art of Grappling
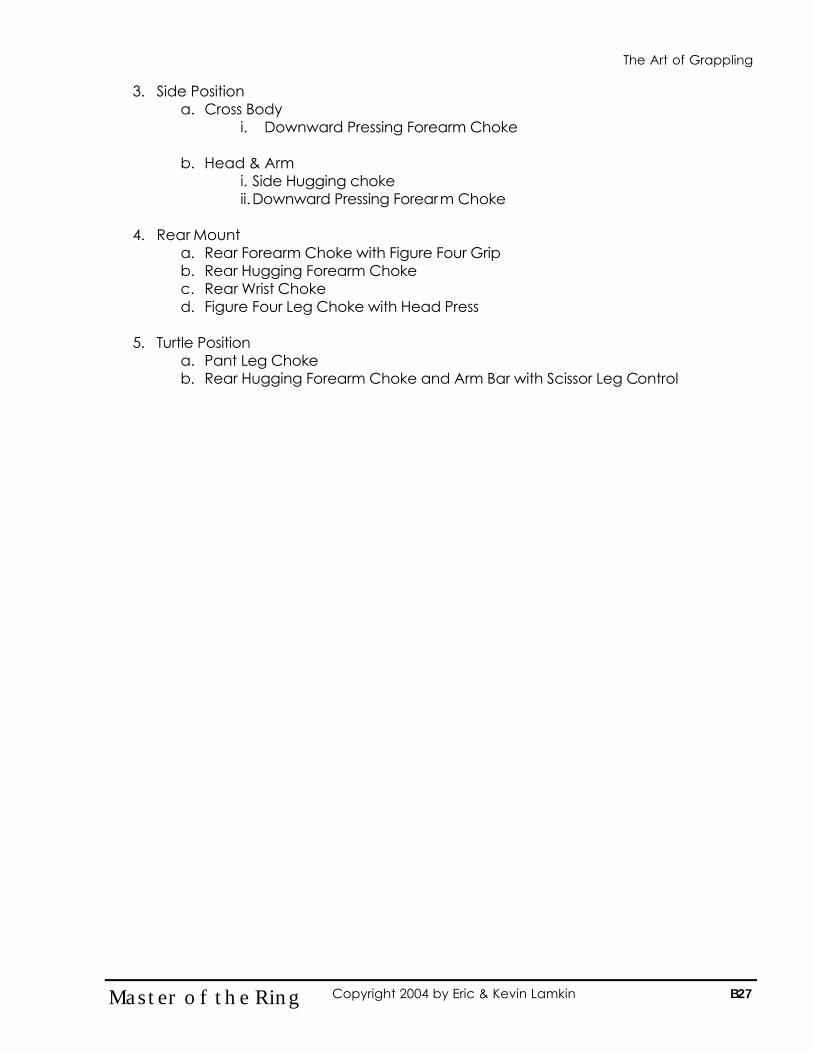
3. Side Position a. Cross Body
i. Downward Pressing Forearm Choke
b. Head & Arm i. Side Hugging choke ii. Downward Pressing Forearm Choke
4. Rear Mount a. Rear Forearm Choke with Figure Four Grip b. Rear Hugging Forearm Choke c. Rear Wrist Choke d. Figure Four Leg Choke with Head Press
5. Turtle Position a. Pant Leg Choke b. Rear Hugging Forearm Choke and Arm Bar with Scissor Leg Control
B27 Master of the Ring Copyright 2004 by Eric & Kevin Lamkin
The Art of Grappling
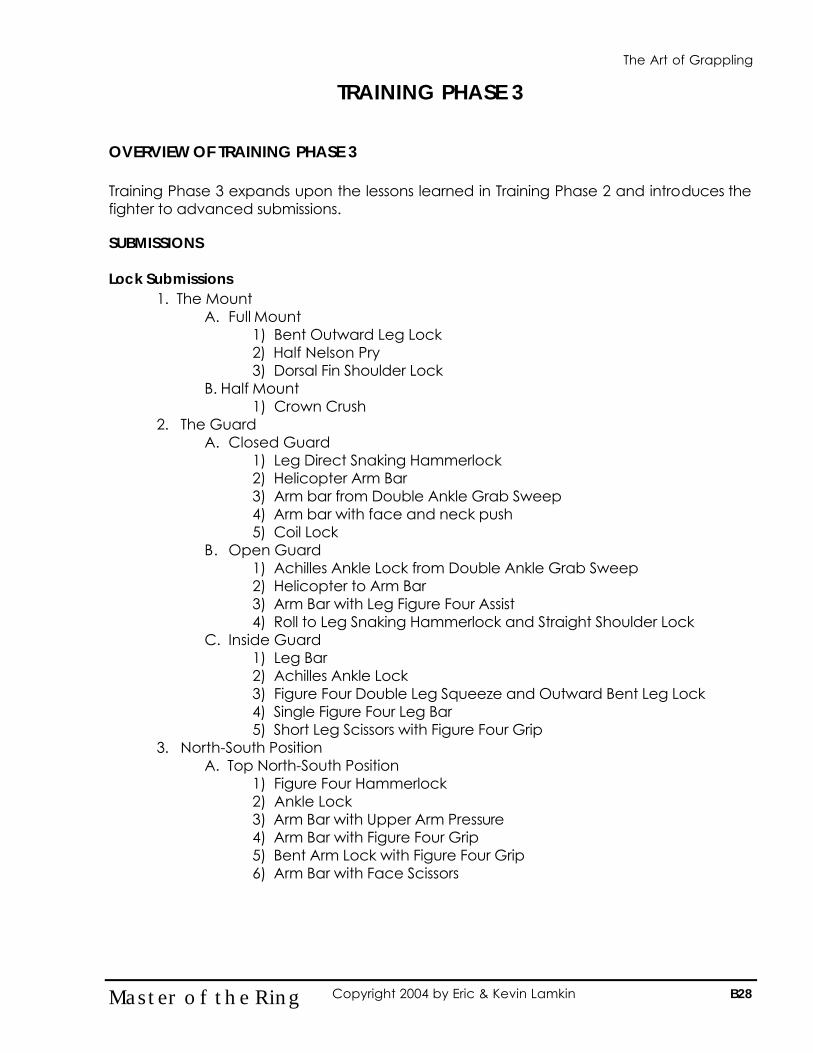
TRAINING PHASE 3 OVERVIEW OF TRAINING PHASE 3 Training Phase 3 expands upon the lessons learned in Training Phase 2 and introduces the fighter to advanced submissions. SUBMISSIONS Lock Submissions
1. The Mount A. Full Mount
1) Bent Outward Leg Lock 2) Half Nelson Pry 3) Dorsal Fin Shoulder Lock
B. Half Mount 1) Crown Crush
2. The Guard A. Closed Guard 1) Leg Direct Snaking Hammerlock 2) Helicopter Arm Bar 3) Arm bar from Double Ankle Grab Sweep 4) Arm bar with face and neck push 5) Coil Lock B. Open Guard 1) Achilles Ankle Lock from Double Ankle Grab Sweep 2) Helicopter to Arm Bar 3) Arm Bar with Leg Figure Four Assist 4) Roll to Leg Snaking Hammerlock and Straight Shoulder Lock C. Inside Guard 1) Leg Bar 2) Achilles Ankle Lock 3) Figure Four Double Leg Squeeze and Outward Bent Leg Lock 4) Single Figure Four Leg Bar 5) Short Leg Scissors with Figure Four Grip
3. North-South Position A. Top North-South Position 1) Figure Four Hammerlock 2) Ankle Lock 3) Arm Bar with Upper Arm Pressure 4) Arm Bar with Figure Four Grip 5) Bent Arm Lock with Figure Four Grip 6) Arm Bar with Face Scissors
B28 Master of the Ring Copyright 2004 by Eric & Kevin Lamkin
The Art of Grappling
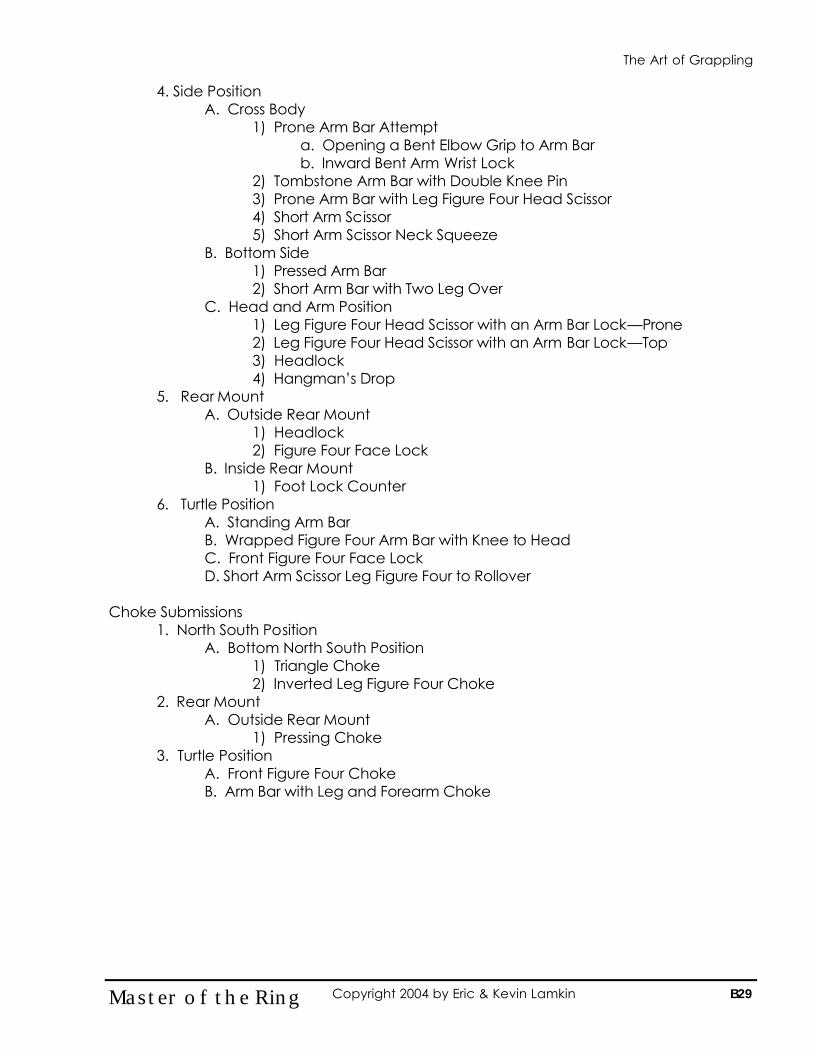
4. Side Position A. Cross Body 1) Prone Arm Bar Attempt a. Opening a Bent Elbow Grip to Arm Bar b. Inward Bent Arm Wrist Lock 2) Tombstone Arm Bar with Double Knee Pin 3) Prone Arm Bar with Leg Figure Four Head Scissor 4) Short Arm Scissor 5) Short Arm Scissor Neck Squeeze B. Bottom Side 1) Pressed Arm Bar 2) Short Arm Bar with Two Leg Over C. Head and Arm Position 1) Leg Figure Four Head Scissor with an Arm Bar Lock—Prone 2) Leg Figure Four Head Scissor with an Arm Bar Lock—Top 3) Headlock 4) Hangman’s Drop 5. Rear Mount A. Outside Rear Mount 1) Headlock 2) Figure Four Face Lock B. Inside Rear Mount 1) Foot Lock Counter 6. Turtle Position A. Standing Arm Bar B. Wrapped Figure Four Arm Bar with Knee to Head C. Front Figure Four Face Lock D. Short Arm Scissor Leg Figure Four to Rollover
Choke Submissions 1. North South Position A. Bottom North South Position 1) Triangle Choke 2) Inverted Leg Figure Four Choke 2. Rear Mount A. Outside Rear Mount 1) Pressing Choke 3. Turtle Position A. Front Figure Four Choke B. Arm Bar with Leg and Forearm Choke
B29 Master of the Ring Copyright 2004 by Eric & Kevin Lamkin
The Art of Grappling
Appendix CAppendix C
Training DrillsTraining Drills
C1 Master of the Ring Copyright 2004 by Eric & Kevin Lamkin
INTRODUCTION TO TRAINING PROGRAMS In this section, we will provide you with training drills designed to instill the concepts and principles taught in previous chapters into your over-all reactionary fighting styles. In order to obtain peak performance, you follow an over-all scientifically-based structure. All training sessions, regardless of the theme, must contain these six essential parts to ensure proper development:
1. Warm Up 2. Main Phase 3. Auxiliary Training 4. Cool Down 5. Stretch 6. Rest
1. WARM UP Warming up prepares all the systems of the body to perform at top efficiency. It affects the heart, blood vessels, nervous system, muscles, tendons, ligaments, and joints. The goals of the Warm Up are:
• Improved elasticity and contractibility of the muscles. • Greater efficiency of the respiratory and cardiovascular systems. • Improved (shorter) reaction/response time. • Increased awareness. • Better concentration. • Improved coordination.
The exercises during a warm up are arranged from distant joints to proximal (to the center of the body), and from one end of the body to the other (top to bottom or vice versa). Doing static stretches before a workout that consists of dynamic actions is counterproductive. The goals of the warm up cannot be achieved by doing static, isometric, or relaxed stretches. Isometric tensions will only make you tired and decrease your coordination. Passive, relaxed stretches have a calming effect and can even make you sleepy. There are two types of warm ups—General Warm Ups and Specific Warm Ups.
A. General Warm Ups General warm ups consists of exercises that are not specific to combative movements. The General Warm Up consists of exercises such as:
• Light Jogging • Rope Skipping • Wrist Rotations • Arm Swings • Neck Circles • Waist Twists • Leg Raises
C2 Master of the Ring Copyright 2004 by Eric & Kevin Lamkin
Training Drills
B. Specific Warm Ups The Specific Warm Up “tunes” the fighter to the predominant type of motion that will be performed during the Main Phase of the training session. The Specific Warm Up may consist of reviewing particular strikes, kicks, and/or combinations. Even though this is a warm up, do not perform the movements during this phase sloppily. What you repeat, you will learn, and then in a crucial life or death moment, you will execute a substandard technique. Remember, the way you practice is the way you will perform.
2. MAIN PHASE After an adequate warm up, the fighter learns new skills, tests tactical maneuvers, develops bio-motor abilities, and enhances his combative qualities. New techniques and tactics are taught at the beginning of this phase. Learning a new technique or tactical element at the beginning of the Main Phase is based on the fact that learning is more effective when the nervous system is still rested. Should learning or perfecting of a technical element be performed following speed, strength, or endurance exercises, the retention would be impeded by fatigue. (the reference here is to Central Nervous System fatigue, which means a loss of the capacity to respond to a stimulus.) There are certain drills, however, that are performed at the end of the Main Phase with a certain level of fatigue or occasionally even under the condition of residual fatigue. In this situation, the goal is not for learning but for performing under certain combat situations. Topics during the Main Phase include:
• Learning new skills • Reviewing previous skills • Sector Fighting Drills • Sparring Drills • Grappling Training • Sparring Drills • Sparring Sessions
3. AUXILIARY TRAINING Apart from regular training sessions, fighters usually participate in Auxiliary (supplementary) workouts. The purpose of these workouts is to improve the fighter’s weaknesses. Typically auxiliary workouts are dedicated to improving aerobic endurance, strength, or flexibility. For further information on Auxiliary Training, please refer to the Elite Fighter’s Guide to Auxiliary Training. 4. COOL DOWN AND STRETCH The Cool Down and Stretch should include exercises that slow down the physiological functions of the fighter’s body and enhance the recovery after the workout. Static stretches designed to increase flexibility are usually conducted during this phase on the same day that kicking exercises are performed.
C3 Master of the Ring Copyright 2004 by Eric & Kevin Lamkin
Training Drills
5. REST PERIODS Advances in the fighter’s abilities are achieved not when one actively engages in training, but during the rest periods immediately following a training session. Paying particular attention to the proper balance between the training session and the rest period ensures an increase in one’s ability. There are three types of rest—Active, Inactive, and Interval.
Active Rest—Active Rest is a method of resting one type of muscle group while actively training another. For example, you may train your arms on Monday, Wednesday, and Friday and rest them as you train your legs during Tuesday, Thursday, and Saturday. Inactive Rest—Inactive Rest is a method of resting from all physical activity and training regimen. One must engage in an Inactive Rest Period for 24 hours each week. This is planned in the Training Guide on Sunday. Interval Rest—Interval Rest is a method of resting at a key moment in the training cycle. During this time, the fighter should engage in Inactive Rest for a period of one week. A typical training regimen includes an Interval Rest Period every 14 days of consecutive training.
MAXIMIZING YOUR TRAINING The participant should endeavor to prevent anything that may inhibit or slow down his training. Obviously, improper nutrition, alcoholic beverage consumption, smoking, and substance abuse will significantly impair your development, but one must not overlook signs of overtraining. Overtraining results when one’s rest, nutrition, and training load are out of balance. There are three stages of overtraining. Awareness of these three stages will aid you in preventing this often overlooked danger.
Stage 1—Skill development stops increasing or even declines. The fighter shows signs of irritability, weight loss, inability to sleep well, and breathing becomes heavier after workouts. To stop the development of overtraining at this stage, it is necessary to include additional days of Active Rest, closely watch and improve the quality of nutrition, rest, and consider a medical check-up.
Stage 2—If the proper measures are not taken, the second stage of overtraining may follow. In this stage, performance is clearly getting worse and the ability to handle training loads is lowered. After workouts the fighter is unusually weak and tired. The fighter complains of pain in the vicinity of the heart (feeling of squeezing, irregular beats), and also a heaviness o the right side, below the rib cage. The resting pulse rate increases and so does the pulse rate measured when routine exercises are performed. Often, in this stage, the fighter gets various illnesses and aggravates previous injuries (or the existing conditions are aggravated). In certain cases performance results get better (only for a short time; as a rule, the improvement is not lasting). This temporary improvement result can deceive the trainer and the fighter. To re-establish full combat trainability, in addition to the measures used in the treatment of the first stage of overtraining, the fighter should focus on Active Rest for one week and consult a physician.
C4 Master of the Ring Copyright 2004 by Eric & Kevin Lamkin
Training Drills
Stage 3—If the violation of the proper methodology of training continues—insufficient rest, poor nutrition, increased workloads, stress, and illness—overtraining enters the third stage. The fighter is apathetic, lacks interest in the art, becomes weak, depressed, and loses faith in his abilities. The fighter sleeps poorly at night and is sleepy during the day. Physical efforts may cause a sharp increase in his pulse rate, a lowering of the systolic blood pressure, and an increase of the diastolic pressure (asthenic type of reaction). The fighter who enters this stage needs special medical attention and must cease all training for a period of two months.
C5 Master of the Ring Copyright 2004 by Eric & Kevin Lamkin
Training Drills
DESIGNING YOUR OWN TRAINING PROGRAMS Now that you have an understanding of the overall structure, you are now ready to begin customizing the most important part of any training session—the Main Phase. There are three basic themes of the Main Phase from which to choose:
1. Maintenance & Review 2. New Skill Development 3. Sparring
Maintenance & Review The theme of this type of training session is to review previous learned material and to maintain your physical fitness level. The workload of this session is designed to be light and is often used during periods of vacation or recuperation from injuries. New Skill Development This type of training session is designed to acquire knowledge and to perfect new combative skills. The exercises may be repetitions of a particular strike or they may be drills designed to engrain a particular trait. Most practitioners find it beneficial to have a combination of both during all training sessions. Sparring This is an important though sometimes over used part of training. A sparring training session often begins with limited sparring drills to develop a particular skill and ends with a controlled free-sparring session. Personal control and safety should always be stressed during ALL training sessions. You are sparring to improve NOT to prove. It should be noted that all properly designed sparring sessions are not point-based. In other words, the two fighters do not pause between each clash to determine who was hit first (unless, of course, your are training for amateur sport competition). Most martial art training is combat oriented and emphasizes an over-all strategy. Pauses during the session are the result of the natural course of the engagement. Sparring sessions may be comprised of three minute rounds with one minute rest period between, or they may be marathon sessions of fifteen or more minutes. WEEKLY TRAINING SESSIONS Most practitioners use each of the three types of Main Phase training sessions twice per week. Maintenance & Review is trained on Monday and Thursday; New Skill Development on Tuesday and Friday; and Sparring on Wednesday and Saturday. Those who are recovering from and illness or injury often stay with Maintenance & Review until they are ready to engage in more strenuous activity.
C6 Master of the Ring Copyright 2004 by Eric & Kevin Lamkin
Training Drills
Training DrillsTraining Drills
Sector Fighting Sector Fighting DrillsDrills
C7 Master of the Ring Copyright 2004 by Eric & Kevin Lamkin
Training Drills
SECTOR FIGHTING DRILLS Sector Drill 1 Phase 1, closed position, stationary 1. Face your partner in a closed fighting position; designate the attacker and the
defender. 2. Practice each of the seven sectors 10 times each. 3. Switch roles and repeat. Practice both sides. Sector Drill 2 Phase 1, closed position, mobile 1. Face your partner in a closed fighting position; designate the attacker and the
defender. Assume combat distance 2. Practice each of the seven sectors 10 times each while mobile. 3. Switch roles and repeat. Practice both sides. Sector Drill 3 Phase 1, closed position, adding striking combinations
1. Face your partner in a closed fighting position; designate the attacker and the defender. Assume combat distance 2. Practice each of the seven sectors 10 times each while mobile. 3. Add striking combinations chosen from the Training Clusters. 4. Switch roles and repeat. Practice both sides. Sector Drill 4 Phase 2, open position, stationary 1. Face your partner in a open fighting position; designate the attacker and the defender. 2. Practice each of the seven sectors 10 times each. 3. Switch roles and repeat. Practice both sides. Sector Drill 5 Phase 2, open position, mobile 1. Face your partner in a open fighting position; designate the attacker and the defender.
Assume combat distance 2. Practice each of the seven sectors 10 times each while mobile. 3. Switch roles and repeat. Practice both sides. Sector Drill 6 Phase 2, open position, adding striking combinations, mobile 1. Face your partner in a open fighting position; designate the attacker and the defender.
Assume combat distance 2. Practice each of the seven sectors 10 times each while mobile. 3. Add striking combinations chosen from the Training Clusters. 4. Switch roles and repeat. Practice both sides.
C8 Master of the Ring Copyright 2004 by Eric & Kevin Lamkin
Training Drills
Sector Drill 7 Phase 3, closed position, primary combinations, stationary 1. Face your partner in a closed fighting position; designate the attacker and the
defender. Assume combat distance 2. Train all Primary Sector Combinations 10 times each. 3. Switch roles and repeat. Practice both sides. Sector Drill 8 Phase 3, closed position, secondary combinations, stationary 1. Face your partner in a closed fighting position; designate the attacker and the
defender. Assume combat distance 2. Train all Secondary Sector Combinations 10 times each. 3. Switch roles and repeat. Practice both sides. Sector Drill 9 Phase 3, closed position, primary and secondary combinations, mobile 1. Face your partner in a closed fighting position; designate the attacker and the
defender. Assume combat distance 2. Train all Primary and Secondary Sector Combinations 10 times each while mobile. 3. Switch roles and repeat. Practice both sides. Sector Drill 10 Phase 3, closed position, primary and secondary combinations, mobile with added striking combinations 1. Face your partner in a closed fighting position; designate the attacker and the
defender. Assume combat distance 2. Train all Primary and Secondary Sector Combinations 10 times each while mobile. 3. Add striking combinations chosen from the Training Clusters. 4. Switch roles and repeat. Practice both sides.
C9 Master of the Ring Copyright 2004 by Eric & Kevin Lamkin
Training Drills
C10 Master of the Ring Copyright 2004 by Eric & Kevin Lamkin
Training DrillsTraining Drills
EssentialEssential Sparring SkillsSparring Skills
Training Drills
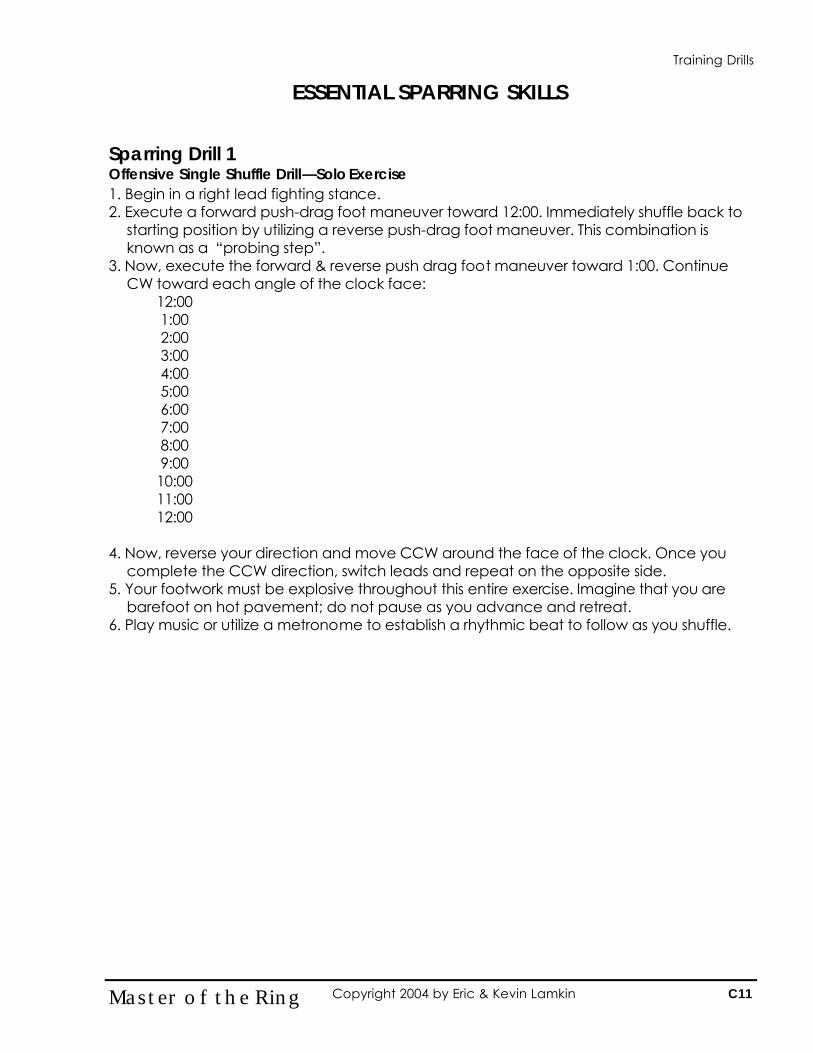
ESSENTIAL SPARRING SKILLS Sparring Drill 1 Offensive Single Shuffle Drill—Solo Exercise 1. Begin in a right lead fighting stance. 2. Execute a forward push-drag foot maneuver toward 12:00. Immediately shuffle back to
starting position by utilizing a reverse push-drag foot maneuver. This combination is known as a “probing step”.
3. Now, execute the forward & reverse push drag foot maneuver toward 1:00. Continue CW toward each angle of the clock face:
12:00 1:00 2:00 3:00 4:00 5:00 6:00 7:00 8:00 9:00 10:00 11:00 12:00 4. Now, reverse your direction and move CCW around the face of the clock. Once you
complete the CCW direction, switch leads and repeat on the opposite side. 5. Your footwork must be explosive throughout this entire exercise. Imagine that you are
barefoot on hot pavement; do not pause as you advance and retreat. 6. Play music or utilize a metronome to establish a rhythmic beat to follow as you shuffle.
C11 Master of the Ring Copyright 2004 by Eric & Kevin Lamkin
Training Drills
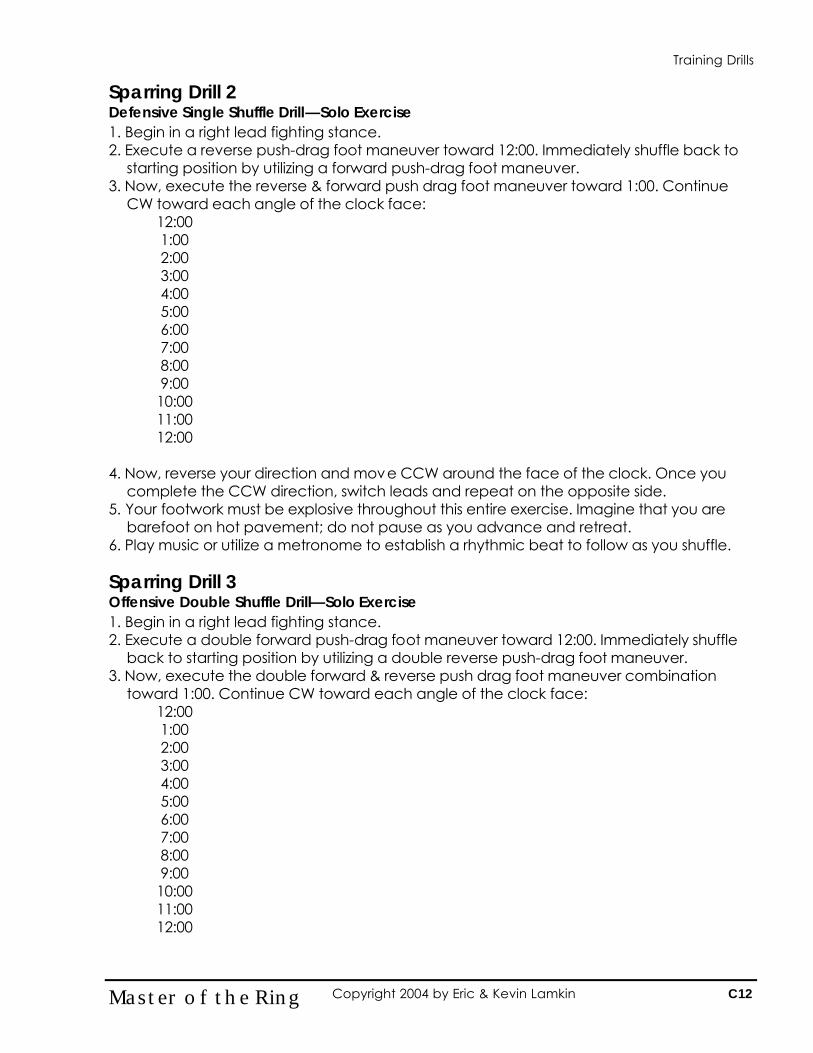
Sparring Drill 2 Defensive Single Shuffle Drill—Solo Exercise 1. Begin in a right lead fighting stance. 2. Execute a reverse push-drag foot maneuver toward 12:00. Immediately shuffle back to
starting position by utilizing a forward push-drag foot maneuver. 3. Now, execute the reverse & forward push drag foot maneuver toward 1:00. Continue
CW toward each angle of the clock face: 12:00 1:00 2:00 3:00 4:00 5:00 6:00 7:00 8:00 9:00 10:00 11:00 12:00 4. Now, reverse your direction and move CCW around the face of the clock. Once you
complete the CCW direction, switch leads and repeat on the opposite side. 5. Your footwork must be explosive throughout this entire exercise. Imagine that you are
barefoot on hot pavement; do not pause as you advance and retreat. 6. Play music or utilize a metronome to establish a rhythmic beat to follow as you shuffle. Sparring Drill 3 Offensive Double Shuffle Drill—Solo Exercise 1. Begin in a right lead fighting stance. 2. Execute a double forward push-drag foot maneuver toward 12:00. Immediately shuffle
back to starting position by utilizing a double reverse push-drag foot maneuver. 3. Now, execute the double forward & reverse push drag foot maneuver combination
toward 1:00. Continue CW toward each angle of the clock face: 12:00 1:00 2:00 3:00 4:00 5:00 6:00 7:00 8:00 9:00 10:00 11:00 12:00
C12 Master of the Ring Copyright 2004 by Eric & Kevin Lamkin
Training Drills
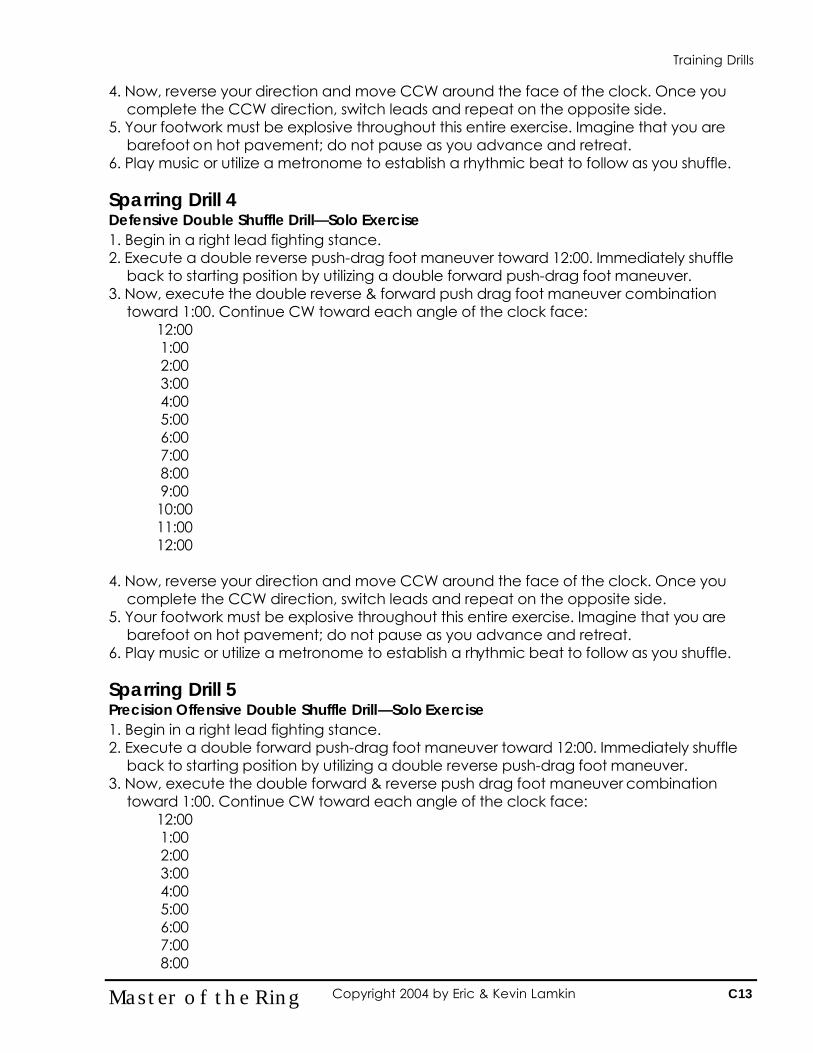
4. Now, reverse your direction and move CCW around the face of the clock. Once you complete the CCW direction, switch leads and repeat on the opposite side.
5. Your footwork must be explosive throughout this entire exercise. Imagine that you are barefoot on hot pavement; do not pause as you advance and retreat.
6. Play music or utilize a metronome to establish a rhythmic beat to follow as you shuffle. Sparring Drill 4 Defensive Double Shuffle Drill—Solo Exercise 1. Begin in a right lead fighting stance. 2. Execute a double reverse push-drag foot maneuver toward 12:00. Immediately shuffle
back to starting position by utilizing a double forward push-drag foot maneuver. 3. Now, execute the double reverse & forward push drag foot maneuver combination
toward 1:00. Continue CW toward each angle of the clock face: 12:00 1:00 2:00 3:00 4:00 5:00 6:00 7:00 8:00 9:00 10:00 11:00 12:00 4. Now, reverse your direction and move CCW around the face of the clock. Once you
complete the CCW direction, switch leads and repeat on the opposite side. 5. Your footwork must be explosive throughout this entire exercise. Imagine that you are
barefoot on hot pavement; do not pause as you advance and retreat. 6. Play music or utilize a metronome to establish a rhythmic beat to follow as you shuffle. Sparring Drill 5 Precision Offensive Double Shuffle Drill—Solo Exercise 1. Begin in a right lead fighting stance. 2. Execute a double forward push-drag foot maneuver toward 12:00. Immediately shuffle
back to starting position by utilizing a double reverse push-drag foot maneuver. 3. Now, execute the double forward & reverse push drag foot maneuver combination
toward 1:00. Continue CW toward each angle of the clock face: 12:00 1:00 2:00 3:00 4:00 5:00 6:00 7:00 8:00
C13 Master of the Ring Copyright 2004 by Eric & Kevin Lamkin
Training Drills
9:00 10:00 11:00 12:00 4. Now, reverse your direction and move CCW around the face of the clock. Once you
complete the CCW direction, switch leads and repeat on the opposite side. 5. As you execute each shuffle, change the speed at which you move. For example,
Fast-Fast Fast-Slow Slow-Fast Slow-Slow
Sparring Drill 6 Precision Defensive Double Shuffle Drill—Solo Exercise 1. Begin in a right lead fighting stance. 2. Execute a double reverse push-drag foot maneuver toward 12:00. Immediately shuffle
back to starting position by utilizing a double forward push-drag foot maneuver. 3. Now, execute the double reverse & forward push drag foot maneuver combination
toward 1:00. Continue CW toward each angle of the clock face: 12:00 1:00 2:00 3:00 4:00 5:00 6:00 7:00 8:00 9:00 10:00 11:00 12:00 4. Now, reverse your direction and move CCW around the face of the clock. Once you
complete the CCW direction, switch leads and repeat on the opposite side. 5. As you execute each shuffle, change the speed at which you move. For example,
Fast-Fast Fast-Slow Slow-Fast Slow-Slow
C14 Master of the Ring Copyright 2004 by Eric & Kevin Lamkin
Training Drills
Sparring Drill 7 Offensive Single Shuffle Drill with Strikes—Solo Exercise 1. Begin in a right lead fighting stance. 2. Execute a forward push-drag foot maneuver toward 12:00 and deliver a lead jab.
Immediately shuffle back to starting position by utilizing a reverse push-drag foot maneuver.
3. Now, execute the forward & reverse push drag foot maneuver with the lead jab toward 1:00. Continue CW toward each angle of the clock face:
12:00 1:00 2:00 3:00 4:00 5:00 6:00 7:00 8:00 9:00 10:00 11:00 12:00 4. Now, reverse your direction and move CCW around the face of the clock. Once you
complete the CCW direction, switch leads and repeat on the opposite side. 5. Your footwork must be explosive throughout this entire exercise. Imagine that you are
barefoot on hot pavement; do not pause as you advance and retreat. 6. Make sure that your strikes are crisp, powerful, and non-telegraphic. 7. Play music or utilize a metronome to establish a rhythmic beat to follow as you shuffle. 8. Repeat this exercise with the following strikes:
• Lead back knuckle strike • Lead inward horizontal roundhouse punch • Lead side kick • Lead roundhouse kick • Lead outward horizontal hook kick
C15 Master of the Ring Copyright 2004 by Eric & Kevin Lamkin
Training Drills
Sparring Drill 8 Defensive Single Shuffle Drill—Solo Exercise 1. Begin in a right lead fighting stance. 2. Execute a reverse push-drag foot maneuver toward 12:00. Immediately shuffle back to
starting position by utilizing a forward push-drag foot maneuver and deliver a lead snapping side kick.
3. Now, execute the reverse & forward push drag foot maneuver with the lead snapping side kick toward 1:00. Continue CW toward each angle of the clock face:
12:00 1:00 2:00 3:00 4:00 5:00 6:00 7:00 8:00 9:00 10:00 11:00 12:00 4. Now, reverse your direction and move CCW around the face of the clock. Once you
complete the CCW direction, switch leads and repeat on the opposite side. 5. Your footwork must be explosive throughout this entire exercise. Imagine that you are
barefoot on hot pavement; do not pause as you advance and retreat. 6. Make sure that your strikes are crisp, powerful, and non-telegraphic. 7. Play music or utilize a metronome to establish a rhythmic beat to follow as you shuffle. 8. Repeat this exercise with the following strike:
• Lead horizontal punch (jab) Sparring Drill 9 Single Shuffle Mirror Drill—Interactive Exercise 1. The purpose of this drill is to maintain the fighting measure while in combat. 2. Determine who will lead the exercise and who will follow. Face each other in closed
fighting postures. 3. The Leader will execute a forward push-drag shuffle while the Follower will execute a
reverse push-drag shuffle. 4. When the Leader shuffles forward, the Follower must shuffle backward in order to
maintain the fighting measure. When the Follower shuffles forward, the Leader must shuffle backward to maintain the fighting measure.
5. The challenge is to move at the same time as your partner without a time lag between movements.
6. Practice this for three minutes and switch roles. 7. After both of your have assumed the role of Leader and Follower, then switch sides. 8. After you have practiced both sides, repeat this drill in an open fighting posture.
C16 Master of the Ring Copyright 2004 by Eric & Kevin Lamkin
Training Drills
Sparring Drill 10 Double Shuffle Mirror Drill—Interactive Exercise 1. The purpose of this drill is to maintain the fighting measure while in combat. 2. Determine who will lead the exercise and who will follow. Face each other in closed
fighting postures. 3. The Leader will execute a double forward push-drag shuffle while the Follower will
execute a double reverse push-drag shuffle. 4. When the Leader shuffles forward, the Follower must shuffle backward in order to
maintain the fighting measure. When the Follower shuffles forward, the Leader must shuffle backward to maintain the fighting measure.
5. The challenge is to move at the same time as your partner without a time lag between movements.
6. Practice this for three minutes and switch roles. 7. After both of your have assumed the role of Leader and Follower, then switch sides. 8. After you have practiced both sides, repeat this drill in an open fighting posture. Sparring Drill 11 Explosive Speed Drill 1—Backfist A. Stationary
1. Partner A extends his open hand at shoulder length. This hand will become a target for Partner B.
2. Partner B attempts to deliver a back knuckle strike to Partner A’s hand. 3. Partner A watches for telegraphic motion. If he can sense that a strike is
approaching, he will move his hand away causing Partner B to miss. Notes—Use this exercise to learn of your telegraphic motions and work to eliminate them. B. With an Advance
1. Repeat the same drill but now Partner B must execute a push-drag foot maneuver in order to come within range of the target.
2. Partner A remains stationary but will have more opportunities to notice telegraphic motion.
C. Moving Target
1. Partner A offers the outside of his lead shoulder as a target, but he is now able to shuffle or move away to avoid the strike. Partner A should make no attempt to block the strike.
2. Partner B’s success depends upon quick timing, explosive speed, accuracy, and flawless execution for success.
C17 Master of the Ring Copyright 2004 by Eric & Kevin Lamkin
Training Drills
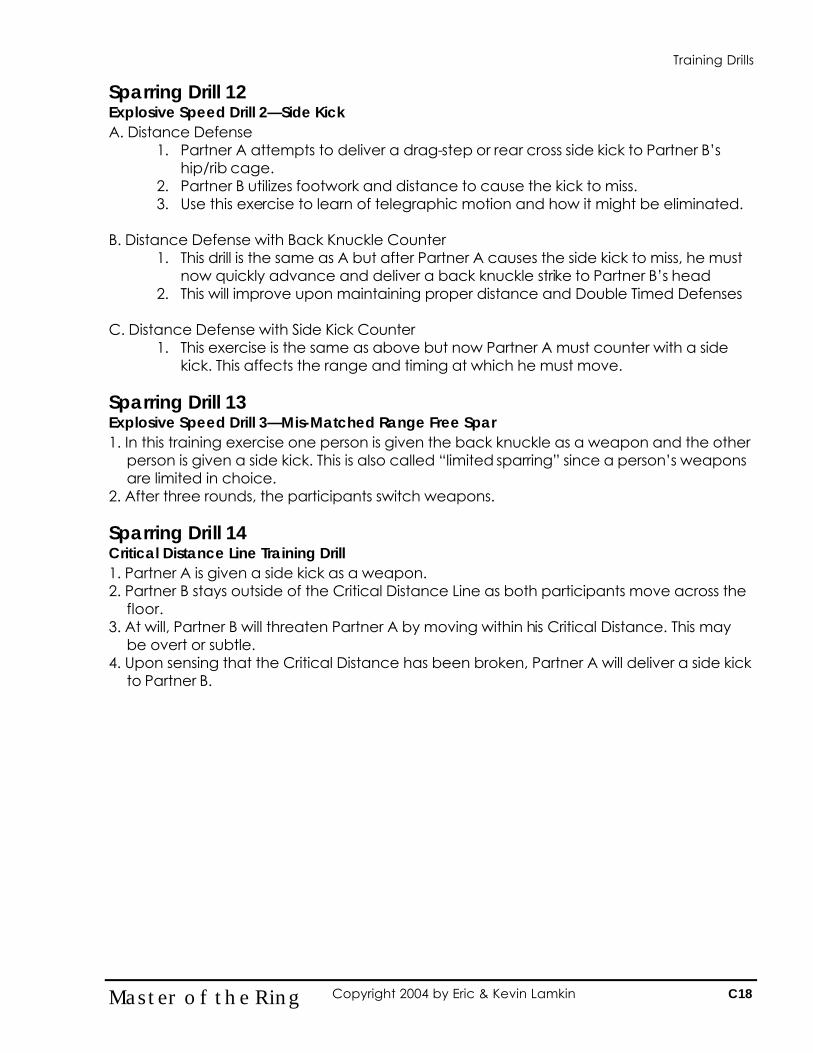
Sparring Drill 12 Explosive Speed Drill 2—Side Kick A. Distance Defense
1. Partner A attempts to deliver a drag-step or rear cross side kick to Partner B’s hip/rib cage.
2. Partner B utilizes footwork and distance to cause the kick to miss. 3. Use this exercise to learn of telegraphic motion and how it might be eliminated.
B. Distance Defense with Back Knuckle Counter
1. This drill is the same as A but after Partner A causes the side kick to miss, he must now quickly advance and deliver a back knuckle strike to Partner B’s head
2. This will improve upon maintaining proper distance and Double Timed Defenses C. Distance Defense with Side Kick Counter
1. This exercise is the same as above but now Partner A must counter with a side kick. This affects the range and timing at which he must move.
Sparring Drill 13 Explosive Speed Drill 3—Mis-Matched Range Free Spar 1. In this training exercise one person is given the back knuckle as a weapon and the other
person is given a side kick. This is also called “limited sparring” since a person’s weapons are limited in choice.
2. After three rounds, the participants switch weapons. Sparring Drill 14 Critical Distance Line Training Drill 1. Partner A is given a side kick as a weapon. 2. Partner B stays outside of the Critical Distance Line as both participants move across the
floor. 3. At will, Partner B will threaten Partner A by moving within his Critical Distance. This may
be overt or subtle. 4. Upon sensing that the Critical Distance has been broken, Partner A will deliver a side kick
to Partner B.
C18 Master of the Ring Copyright 2004 by Eric & Kevin Lamkin
Training Drills
C19 Master of the Ring Copyright 2004 by Eric & Kevin Lamkin
Training DrillsTraining Drills
Direct Attack Direct Attack DrillsDrills
Training Drills
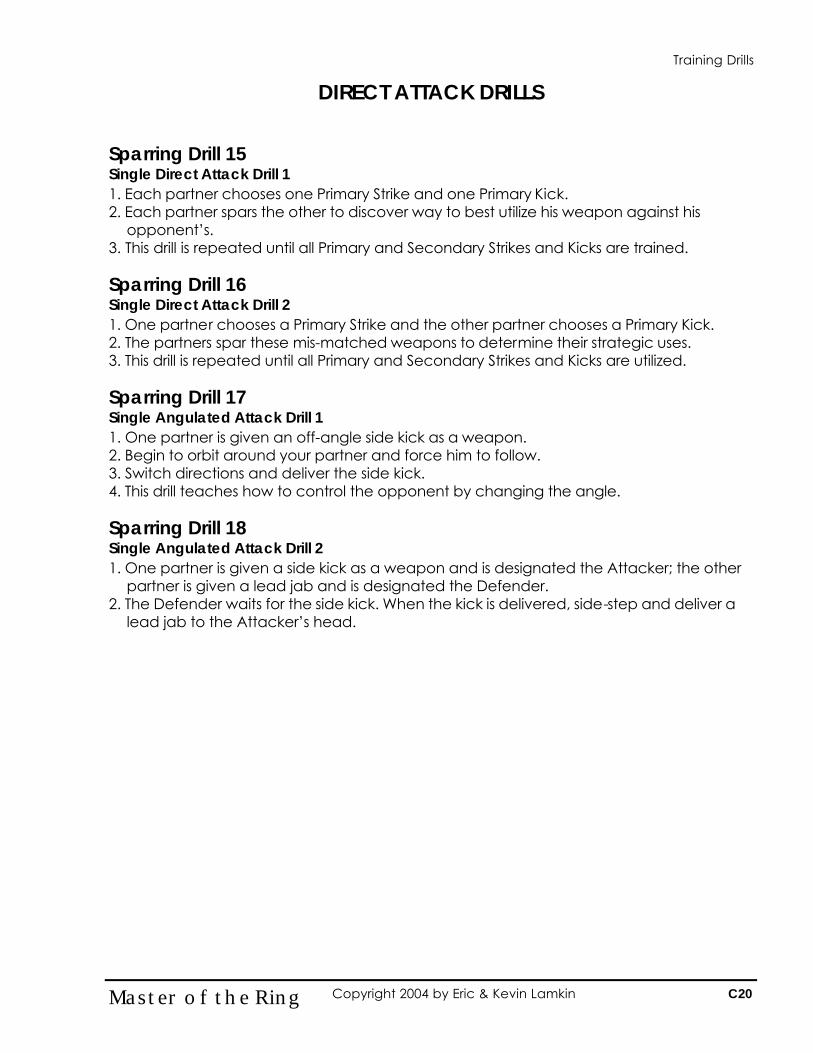
DIRECT ATTACK DRILLS Sparring Drill 15 Single Direct Attack Drill 1 1. Each partner chooses one Primary Strike and one Primary Kick. 2. Each partner spars the other to discover way to best utilize his weapon against his
opponent’s. 3. This drill is repeated until all Primary and Secondary Strikes and Kicks are trained. Sparring Drill 16 Single Direct Attack Drill 2 1. One partner chooses a Primary Strike and the other partner chooses a Primary Kick. 2. The partners spar these mis-matched weapons to determine their strategic uses. 3. This drill is repeated until all Primary and Secondary Strikes and Kicks are utilized. Sparring Drill 17 Single Angulated Attack Drill 1 1. One partner is given an off-angle side kick as a weapon. 2. Begin to orbit around your partner and force him to follow. 3. Switch directions and deliver the side kick. 4. This drill teaches how to control the opponent by changing the angle. Sparring Drill 18 Single Angulated Attack Drill 2 1. One partner is given a side kick as a weapon and is designated the Attacker; the other
partner is given a lead jab and is designated the Defender. 2. The Defender waits for the side kick. When the kick is delivered, side-step and deliver a
lead jab to the Attacker’s head.
C20 Master of the Ring Copyright 2004 by Eric & Kevin Lamkin
Training Drills
C21 Master of the Ring Copyright 2004 by Eric & Kevin Lamkin
Training DrillsTraining Drills
Indirect Attack Indirect Attack DrillsDrills
Training Drills
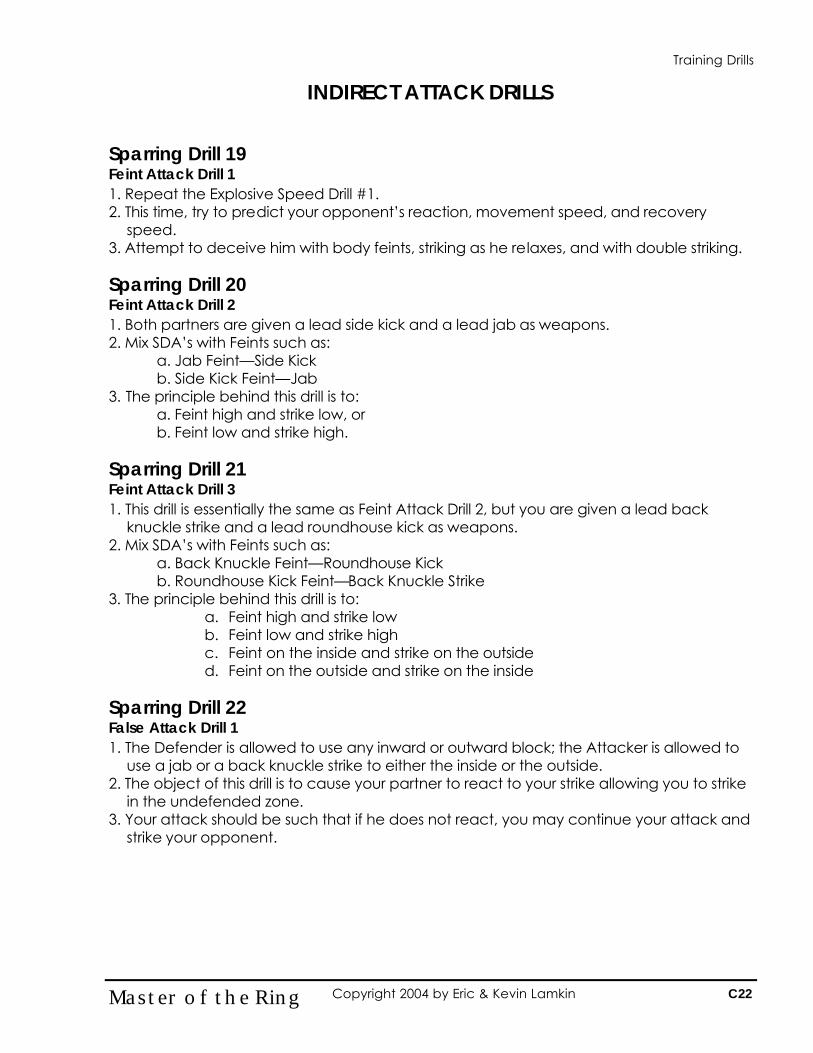
INDIRECT ATTACK DRILLS Sparring Drill 19 Feint Attack Drill 1 1. Repeat the Explosive Speed Drill #1. 2. This time, try to predict your opponent’s reaction, movement speed, and recovery
speed. 3. Attempt to deceive him with body feints, striking as he relaxes, and with double striking. Sparring Drill 20 Feint Attack Drill 2 1. Both partners are given a lead side kick and a lead jab as weapons. 2. Mix SDA’s with Feints such as: a. Jab Feint—Side Kick b. Side Kick Feint—Jab 3. The principle behind this drill is to:
a. Feint high and strike low, or b. Feint low and strike high.
Sparring Drill 21 Feint Attack Drill 3 1. This drill is essentially the same as Feint Attack Drill 2, but you are given a lead back
knuckle strike and a lead roundhouse kick as weapons. 2. Mix SDA’s with Feints such as: a. Back Knuckle Feint—Roundhouse Kick b. Roundhouse Kick Feint—Back Knuckle Strike 3. The principle behind this drill is to:
a. Feint high and strike low b. Feint low and strike high c. Feint on the inside and strike on the outside d. Feint on the outside and strike on the inside
Sparring Drill 22 False Attack Drill 1 1. The Defender is allowed to use any inward or outward block; the Attacker is allowed to
use a jab or a back knuckle strike to either the inside or the outside. 2. The object of this drill is to cause your partner to react to your strike allowing you to strike
in the undefended zone. 3. Your attack should be such that if he does not react, you may continue your attack and
strike your opponent.
C22 Master of the Ring Copyright 2004 by Eric & Kevin Lamkin
Training Drills
C23 Master of the Ring Copyright 2004 by Eric & Kevin Lamkin
Training DrillsTraining Drills
Combination AttackCombination Attack DrillsDrills
Training Drills
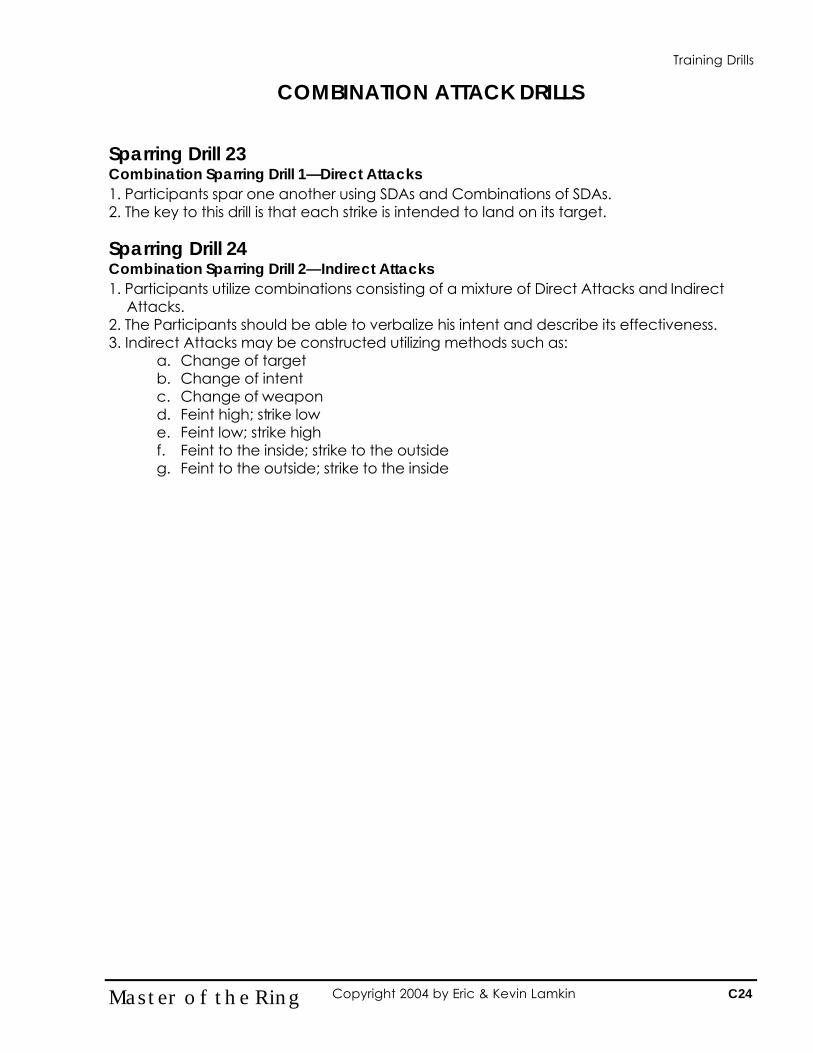
COMBINATION ATTACK DRILLS Sparring Drill 23 Combination Sparring Drill 1—Direct Attacks 1. Participants spar one another using SDAs and Combinations of SDAs. 2. The key to this drill is that each strike is intended to land on its target. Sparring Drill 24 Combination Sparring Drill 2—Indirect Attacks 1. Participants utilize combinations consisting of a mixture of Direct Attacks and Indirect
Attacks. 2. The Participants should be able to verbalize his intent and describe its effectiveness. 3. Indirect Attacks may be constructed utilizing methods such as:
a. Change of target b. Change of intent c. Change of weapon d. Feint high; strike low e. Feint low; strike high f. Feint to the inside; strike to the outside g. Feint to the outside; strike to the inside
C24 Master of the Ring Copyright 2004 by Eric & Kevin Lamkin
Training Drills
C25 Master of the Ring Copyright 2004 by Eric & Kevin Lamkin
Training DrillsTraining Drills
Defensive Training Defensive Training DrillsDrills
Training Drills

DEFENSIVE TRAINING DRILLS Sparring Drill 25 Defense Drill 1—Stationary Single Strikes 1. Participants face each other. One person is designated the Attacker, the other is
designated the Defender. 2. The Attacker delivers random single strikes to each of the Defender’s six Zones of
Protection. 3. The Defender protects these areas with either the lead hand/leg or the rear hand/leg. Sparring Drill 26 Defense Drill 2—Stationary Double Strikes 1. Participants face each other. One person is designated the Attacker, the other is
designated the Defender. 2. The Attacker delivers random double strike combinations to one or more of the
Defender’s six Zones of Protection. 3. The Defender protects these areas with either the lead hand/leg or the rear hand/leg. Sparring Drill 27 Defense Drill 3—Stationary Triple Strikes 1. Participants face each other. One person is designated the Attacker, the other is
designated the Defender. 2. The Attacker delivers random triple strike combinations to one or more of the Defender’s
six Zones of Protection. 3. The Defender protects these areas with either the lead hand/leg or the rear hand/leg. Sparring Drill 28 Double-Time Defensive Drill 4—Mobility with Counter 1. Participants face each other. One person is designated the Attacker, the other is
designated the Defender. 2. The Attacker delivers random SDA’s and Combination Attacks (direct and indirect) to
one or more of the Defender’s six Zones of Protection. 3. The Defender protects these areas with either the lead hand/leg or the rear hand/leg
and immediately strikes with a counter to his opponent’s vulnerable area. Sparring Drill 29 Jamming Drill 1—Side Kick 1. One participant is designated the Attacker; the other is designated the Defender. 2. The Attacker is given a lead side kick as a weapon. He attempts to deliver a waist level
kick on his partner. 3. The Defender attempts to perceive the attack, and jam the kick by quickly advancing
forward and covering the fighting distance before the kick is launched.
C26 Master of the Ring Copyright 2004 by Eric & Kevin Lamkin
Training Drills

Sparring Drill 30 Jamming Drill 2—Lead Jab 1. One participant is designated the Attacker; the other is designated the Defender. 2. The Attacker is given a lead jab as a weapon. 3. The Defender attempts to perceive the attack, and jam the strike by quickly advancing
forward and moving into close range with his own attack. Sparring Drill 31 Jamming Drill 3—Against two weapons 1. One participant is designated the Attacker; the other is designated the Defender. 2. The Attacker is given a lead side kick and a lead jab as weapons. 3. The Defender attempts to perceive the attack, and jam the strike or kick by quickly
advancing forward and moving into range with his own attack. Sparring Drill 32 Including Punch Drill 1—Open Position 1. One participant is designated the Attacker, the other is designated the Defender. Face
each other in an Open Position. 2. The Attacker delivers a straight lead punch to the Defender’s head. 3. The Defender utilizes a lead including punch to simultaneously deflect the attack and
strike his opponent. 4. You may need to utilize outside facing in order to obtain a better Cutting Angle. Sparring Drill 33 Including Punch Drill 2—Closed Position 1. One participant is designated the Attacker, the other is designated the Defender. Face
each other in a Closed Position. 2. The Attacker delivers a straight lead punch to the Defender’s head. 3. The Defender utilizes a rear including punch to simultaneously deflect the attack and
strike his opponent. 4. You may need to utilize outside facing in order to obtain a better Cutting Angle. Sparring Drill 34 Excluding Punch Drill 1—Open Position 1. One participant is designated the Attacker, the other is designated the Defender. Face
each other in an Open Position. 2. The Attacker delivers a straight lead punch to the Defender’s head. 3. The Defender utilizes a lead excluding punch to simultaneously deflect the attack and
strike his opponent. 4. You may need to utilize your rear hand to aid in protection.
C27 Master of the Ring Copyright 2004 by Eric & Kevin Lamkin
Training Drills
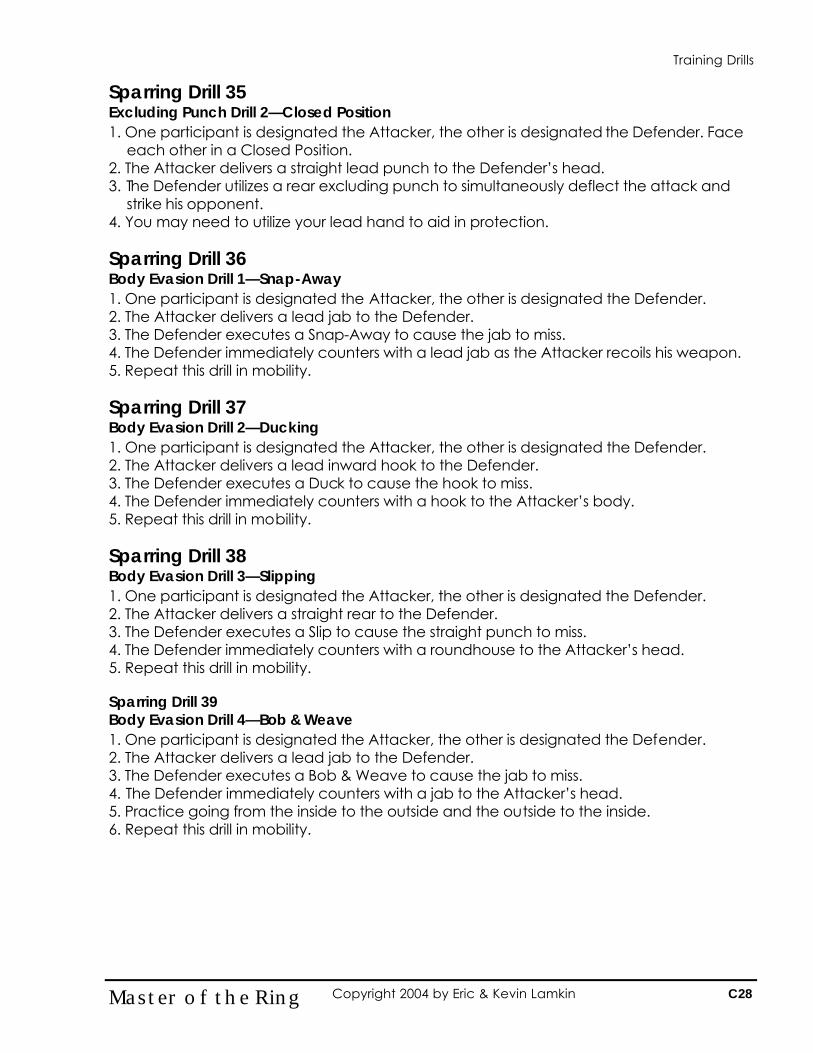
Sparring Drill 35 Excluding Punch Drill 2—Closed Position 1. One participant is designated the Attacker, the other is designated the Defender. Face
each other in a Closed Position. 2. The Attacker delivers a straight lead punch to the Defender’s head. 3. The Defender utilizes a rear excluding punch to simultaneously deflect the attack and
strike his opponent. 4. You may need to utilize your lead hand to aid in protection. Sparring Drill 36 Body Evasion Drill 1—Snap-Away 1. One participant is designated the Attacker, the other is designated the Defender. 2. The Attacker delivers a lead jab to the Defender. 3. The Defender executes a Snap-Away to cause the jab to miss. 4. The Defender immediately counters with a lead jab as the Attacker recoils his weapon. 5. Repeat this drill in mobility. Sparring Drill 37 Body Evasion Drill 2—Ducking 1. One participant is designated the Attacker, the other is designated the Defender. 2. The Attacker delivers a lead inward hook to the Defender. 3. The Defender executes a Duck to cause the hook to miss. 4. The Defender immediately counters with a hook to the Attacker’s body. 5. Repeat this drill in mobility. Sparring Drill 38 Body Evasion Drill 3—Slipping 1. One participant is designated the Attacker, the other is designated the Defender. 2. The Attacker delivers a straight rear to the Defender. 3. The Defender executes a Slip to cause the straight punch to miss. 4. The Defender immediately counters with a roundhouse to the Attacker’s head. 5. Repeat this drill in mobility. Sparring Drill 39 Body Evasion Drill 4—Bob & Weave 1. One participant is designated the Attacker, the other is designated the Defender. 2. The Attacker delivers a lead jab to the Defender. 3. The Defender executes a Bob & Weave to cause the jab to miss. 4. The Defender immediately counters with a jab to the Attacker’s head. 5. Practice going from the inside to the outside and the outside to the inside. 6. Repeat this drill in mobility.
C28 Master of the Ring Copyright 2004 by Eric & Kevin Lamkin
Training Drills
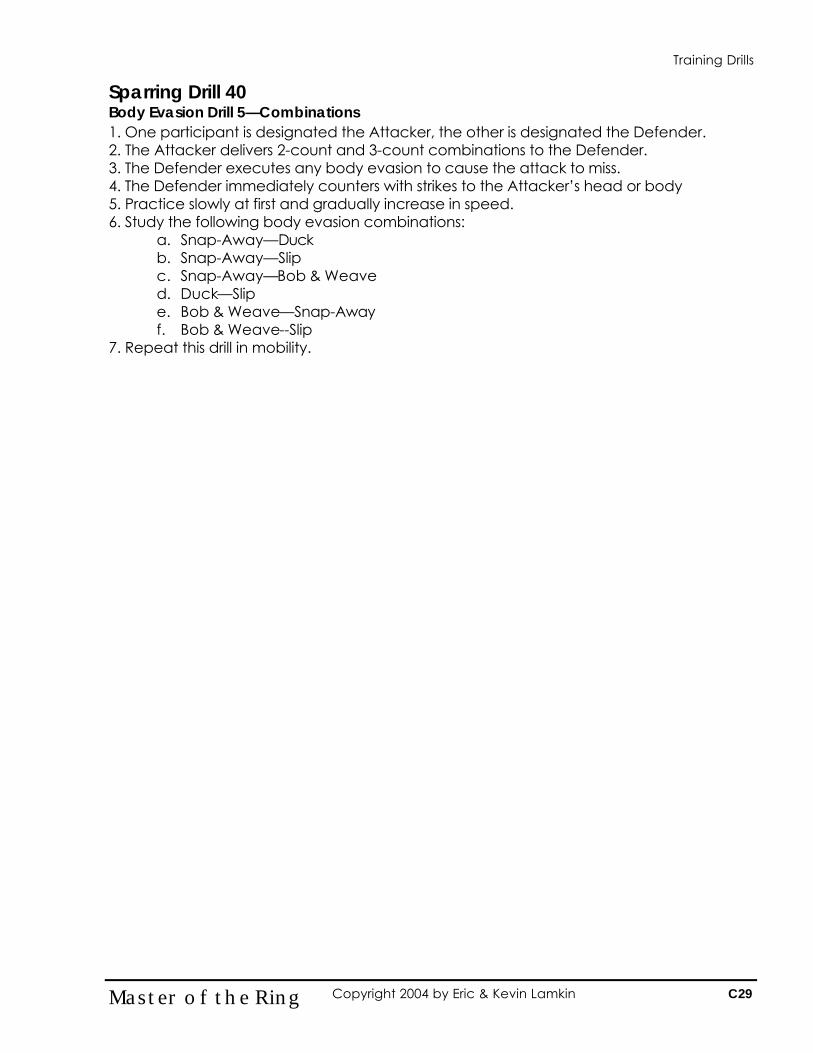
Sparring Drill 40 Body Evasion Drill 5—Combinations 1. One participant is designated the Attacker, the other is designated the Defender. 2. The Attacker delivers 2-count and 3-count combinations to the Defender. 3. The Defender executes any body evasion to cause the attack to miss. 4. The Defender immediately counters with strikes to the Attacker’s head or body 5. Practice slowly at first and gradually increase in speed. 6. Study the following body evasion combinations:
a. Snap-Away—Duck b. Snap-Away—Slip c. Snap-Away—Bob & Weave d. Duck—Slip e. Bob & Weave—Snap-Away f. Bob & Weave--Slip
7. Repeat this drill in mobility.
C29 Master of the Ring Copyright 2004 by Eric & Kevin Lamkin
Training Drills
C30 Master of the Ring Copyright 2004 by Eric & Kevin Lamkin
Training DrillsTraining Drills
PrePre--Emptive Emptive CounterCounter--Attack Attack
DrillsDrills
Training Drills
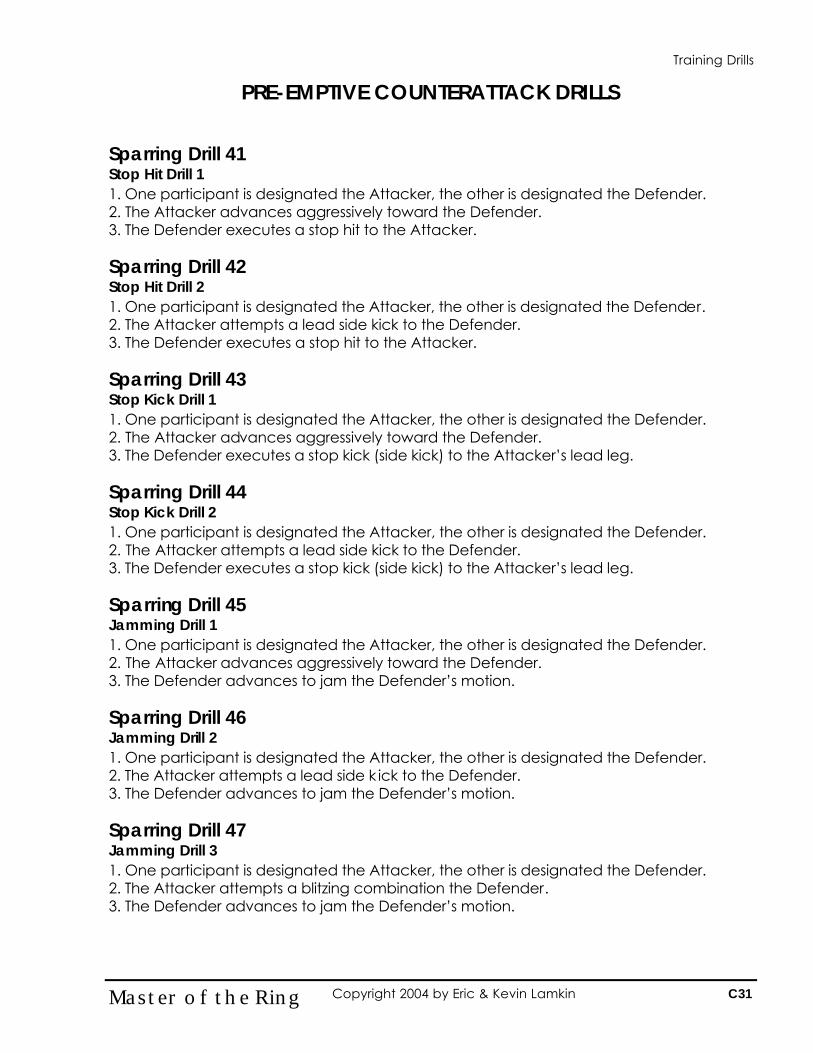
PRE-EMPTIVE COUNTERATTACK DRILLS Sparring Drill 41 Stop Hit Drill 1 1. One participant is designated the Attacker, the other is designated the Defender. 2. The Attacker advances aggressively toward the Defender. 3. The Defender executes a stop hit to the Attacker. Sparring Drill 42 Stop Hit Drill 2 1. One participant is designated the Attacker, the other is designated the Defender. 2. The Attacker attempts a lead side kick to the Defender. 3. The Defender executes a stop hit to the Attacker. Sparring Drill 43 Stop Kick Drill 1 1. One participant is designated the Attacker, the other is designated the Defender. 2. The Attacker advances aggressively toward the Defender. 3. The Defender executes a stop kick (side kick) to the Attacker’s lead leg. Sparring Drill 44 Stop Kick Drill 2 1. One participant is designated the Attacker, the other is designated the Defender. 2. The Attacker attempts a lead side kick to the Defender. 3. The Defender executes a stop kick (side kick) to the Attacker’s lead leg. Sparring Drill 45 Jamming Drill 1 1. One participant is designated the Attacker, the other is designated the Defender. 2. The Attacker advances aggressively toward the Defender. 3. The Defender advances to jam the Defender’s motion. Sparring Drill 46 Jamming Drill 2 1. One participant is designated the Attacker, the other is designated the Defender. 2. The Attacker attempts a lead side k ick to the Defender. 3. The Defender advances to jam the Defender’s motion. Sparring Drill 47 Jamming Drill 3 1. One participant is designated the Attacker, the other is designated the Defender. 2. The Attacker attempts a blitzing combination the Defender. 3. The Defender advances to jam the Defender’s motion.
C31 Master of the Ring Copyright 2004 by Eric & Kevin Lamkin
Training Drills
C32 Master of the Ring Copyright 2004 by Eric & Kevin Lamkin
Training DrillsTraining Drills
Combat Footwork Combat Footwork DrillsDrills
Training Drills
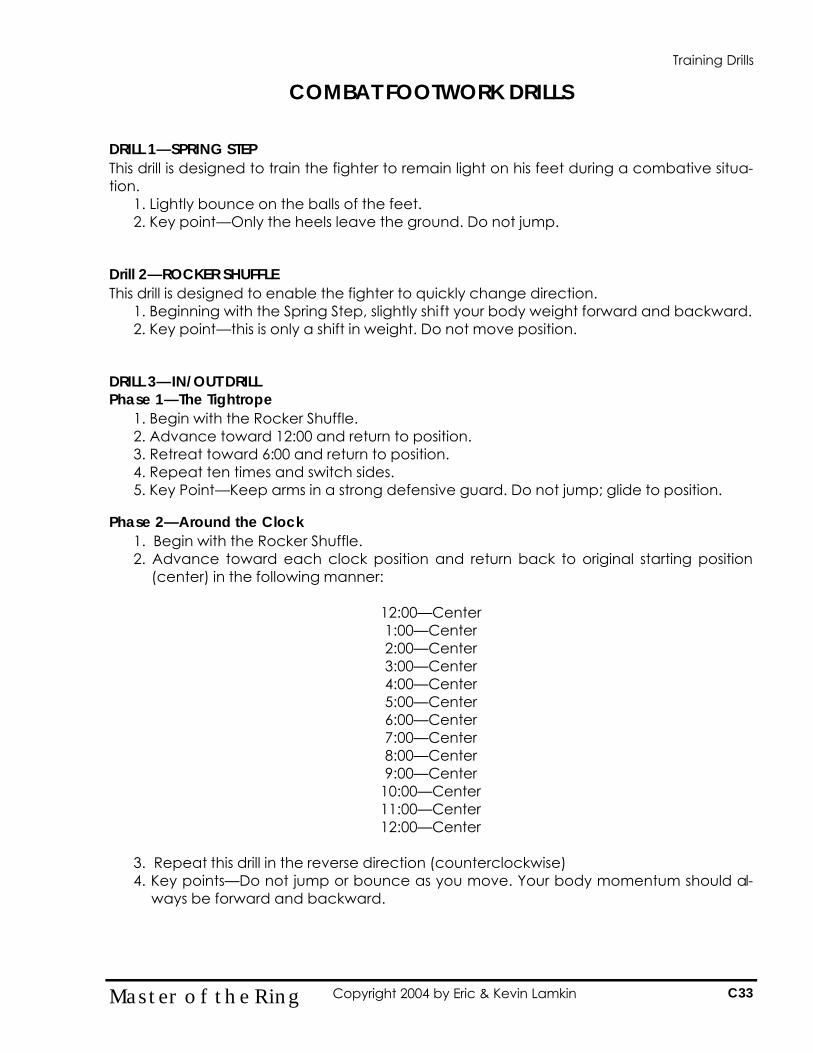
COMBAT FOOTWORK DRILLS DRILL 1—SPRING STEP This drill is designed to train the fighter to remain light on his feet during a combative situa-tion.
1. Lightly bounce on the balls of the feet. 2. Key point—Only the heels leave the ground. Do not jump.
Drill 2—ROCKER SHUFFLE This drill is designed to enable the fighter to quickly change direction.
1. Beginning with the Spring Step, slightly shift your body weight forward and backward. 2. Key point—this is only a shift in weight. Do not move position.
DRILL 3—IN/OUT DRILL Phase 1—The Tightrope
1. Begin with the Rocker Shuffle. 2. Advance toward 12:00 and return to position. 3. Retreat toward 6:00 and return to position. 4. Repeat ten times and switch sides. 5. Key Point—Keep arms in a strong defensive guard. Do not jump; glide to position.
Phase 2—Around the Clock
1. Begin with the Rocker Shuffle. 2. Advance toward each clock position and return back to original starting position
(center) in the following manner:
12:00—Center 1:00—Center 2:00—Center 3:00—Center 4:00—Center 5:00—Center 6:00—Center 7:00—Center 8:00—Center 9:00—Center
10:00—Center 11:00—Center 12:00—Center
3. Repeat this drill in the reverse direction (counterclockwise) 4. Key points—Do not jump or bounce as you move. Your body momentum should al-
ways be forward and backward.
C33 Master of the Ring Copyright 2004 by Eric & Kevin Lamkin
Training Drills
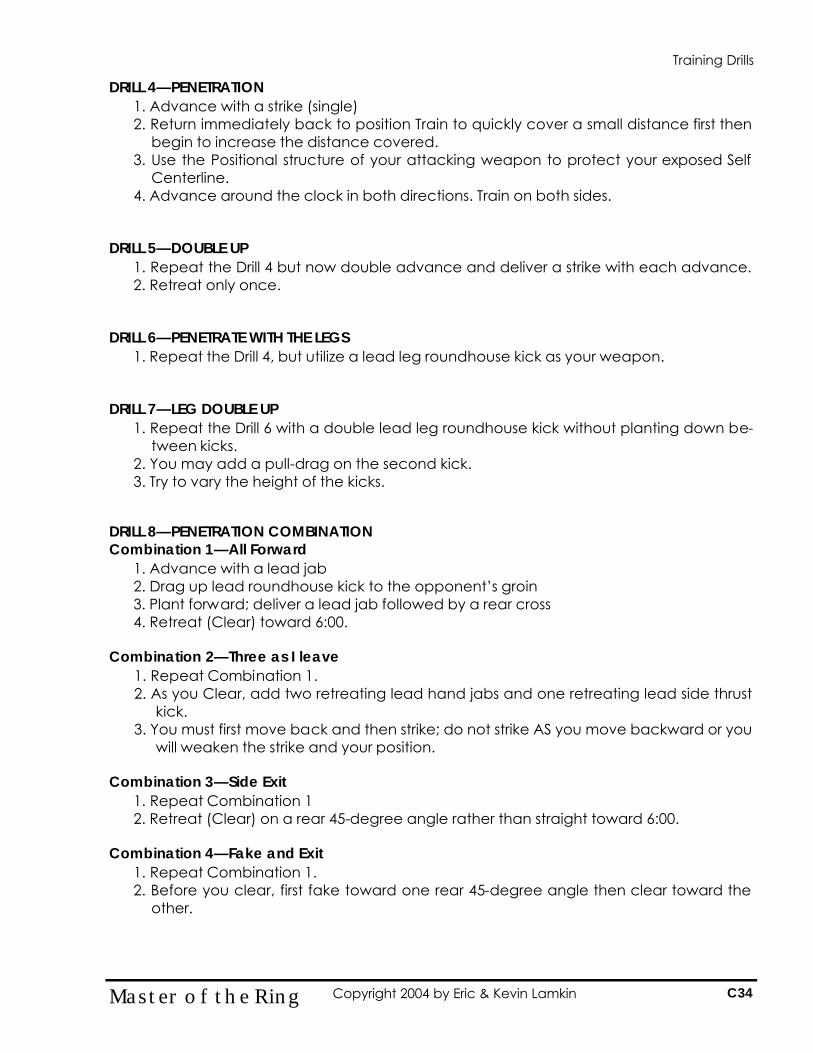
DRILL 4—PENETRATION 1. Advance with a strike (single) 2. Return immediately back to position Train to quickly cover a small distance first then
begin to increase the distance covered. 3. Use the Positional structure of your attacking weapon to protect your exposed Self
Centerline. 4. Advance around the clock in both directions. Train on both sides.
DRILL 5—DOUBLE UP
1. Repeat the Drill 4 but now double advance and deliver a strike with each advance. 2. Retreat only once.
DRILL 6—PENETRATE WITH THE LEGS
1. Repeat the Drill 4, but utilize a lead leg roundhouse kick as your weapon. DRILL 7—LEG DOUBLE UP
1. Repeat the Drill 6 with a double lead leg roundhouse kick without planting down be-tween kicks.
2. You may add a pull-drag on the second kick. 3. Try to vary the height of the kicks.
DRILL 8—PENETRATION COMBINATION Combination 1—All Forward
1. Advance with a lead jab 2. Drag up lead roundhouse kick to the opponent’s groin 3. Plant forward; deliver a lead jab followed by a rear cross 4. Retreat (Clear) toward 6:00.
Combination 2—Three as I leave
1. Repeat Combination 1. 2. As you Clear, add two retreating lead hand jabs and one retreating lead side thrust
kick. 3. You must first move back and then strike; do not strike AS you move backward or you
will weaken the strike and your position. Combination 3—Side Exit
1. Repeat Combination 1 2. Retreat (Clear) on a rear 45-degree angle rather than straight toward 6:00.
Combination 4—Fake and Exit
1. Repeat Combination 1. 2. Before you clear, first fake toward one rear 45-degree angle then clear toward the
other.
C34 Master of the Ring Copyright 2004 by Eric & Kevin Lamkin
Training Drills
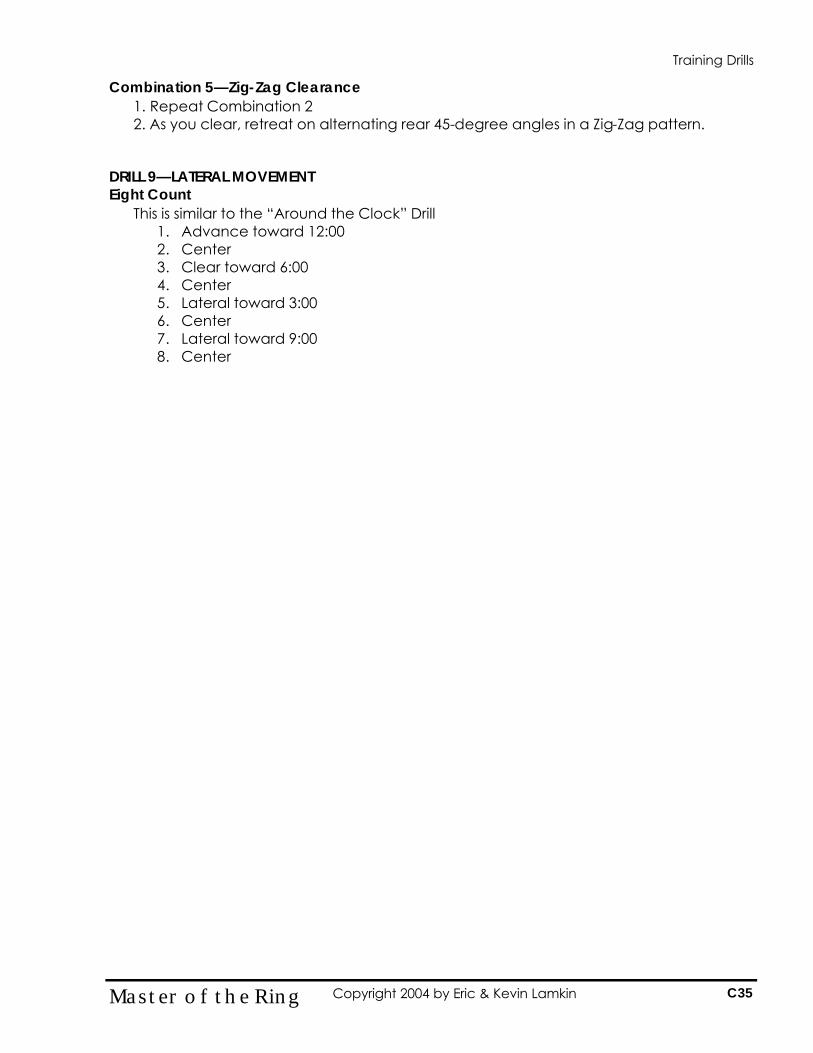
Combination 5—Zig-Zag Clearance 1. Repeat Combination 2 2. As you clear, retreat on alternating rear 45-degree angles in a Zig-Zag pattern.
DRILL 9—LATERAL MOVEMENT Eight Count
This is similar to the “Around the Clock” Drill 1. Advance toward 12:00 2. Center 3. Clear toward 6:00 4. Center 5. Lateral toward 3:00 6. Center 7. Lateral toward 9:00 8. Center
C35 Master of the Ring Copyright 2004 by Eric & Kevin Lamkin
Training Drills
C36 Master of the Ring Copyright 2004 by Eric & Kevin Lamkin
Training DrillsTraining Drills
Controlling the Controlling the Fighting Measure Fighting Measure
DrillsDrills
Training Drills
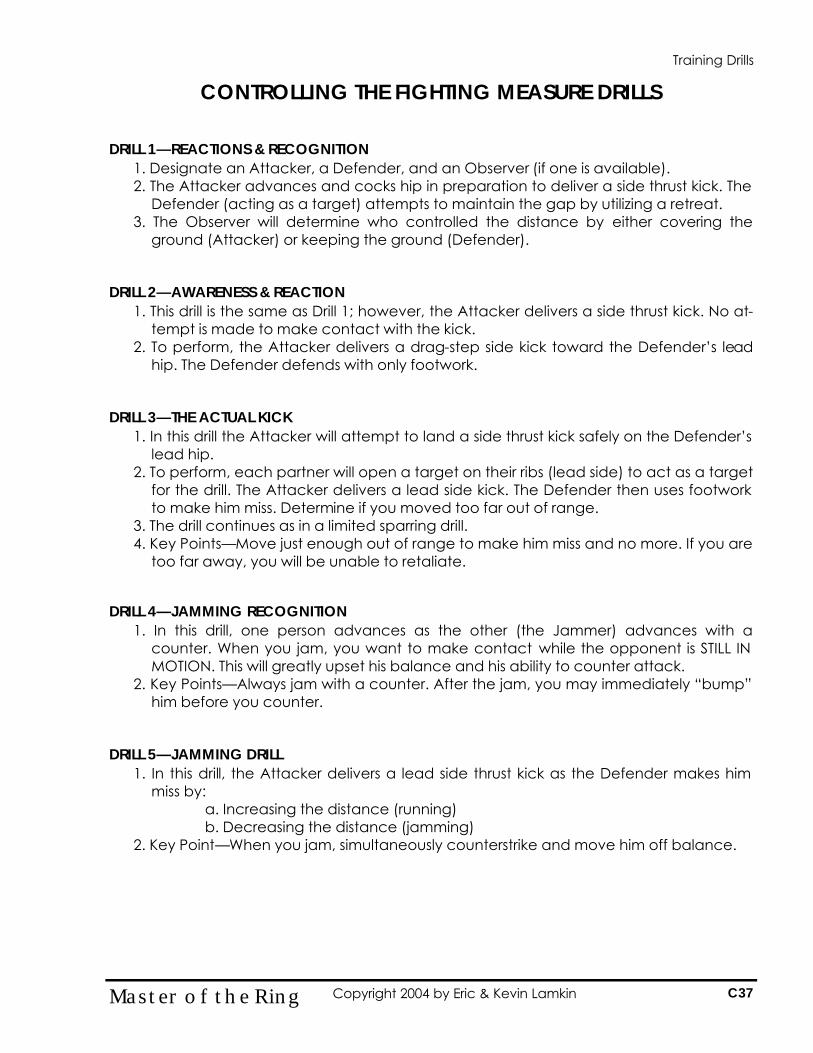
CONTROLLING THE FIGHTING MEASURE DRILLS DRILL 1—REACTIONS & RECOGNITION
1. Designate an Attacker, a Defender, and an Observer (if one is available). 2. The Attacker advances and cocks hip in preparation to deliver a side thrust kick. The
Defender (acting as a target) attempts to maintain the gap by utilizing a retreat. 3. The Observer will determine who controlled the distance by either covering the
ground (Attacker) or keeping the ground (Defender). DRILL 2—AWARENESS & REACTION
1. This drill is the same as Drill 1; however, the Attacker delivers a side thrust kick. No at-tempt is made to make contact with the kick.
2. To perform, the Attacker delivers a drag-step side kick toward the Defender’s lead hip. The Defender defends with only footwork.
DRILL 3—THE ACTUAL KICK
1. In this drill the Attacker will attempt to land a side thrust kick safely on the Defender’s lead hip.
2. To perform, each partner will open a target on their ribs (lead side) to act as a target for the drill. The Attacker delivers a lead side kick. The Defender then uses footwork to make him miss. Determine if you moved too far out of range.
3. The drill continues as in a limited sparring drill. 4. Key Points—Move just enough out of range to make him miss and no more. If you are
too far away, you will be unable to retaliate. DRILL 4—JAMMING RECOGNITION
1. In this drill, one person advances as the other (the Jammer) advances with a counter. When you jam, you want to make contact while the opponent is STILL IN MOTION. This will greatly upset his balance and his ability to counter attack.
2. Key Points—Always jam with a counter. After the jam, you may immediately “bump” him before you counter.
DRILL 5—JAMMING DRILL
1. In this drill, the Attacker delivers a lead side thrust kick as the Defender makes him miss by:
a. Increasing the distance (running) b. Decreasing the distance (jamming)
2. Key Point—When you jam, simultaneously counterstrike and move him off balance.
Training Drills
C37 Master of the Ring Copyright 2004 by Eric & Kevin Lamkin
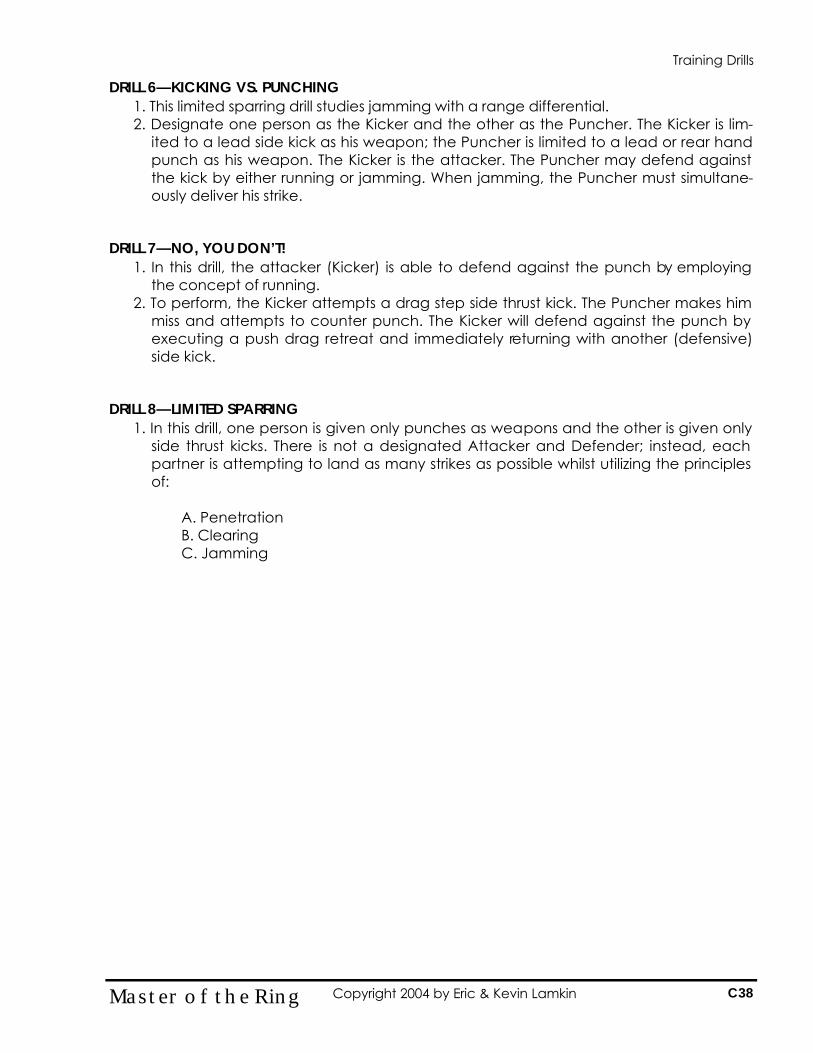
DRILL 6—KICKING VS. PUNCHING 1. This limited sparring drill studies jamming with a range differential. 2. Designate one person as the Kicker and the other as the Puncher. The Kicker is lim-
ited to a lead side kick as his weapon; the Puncher is limited to a lead or rear hand punch as his weapon. The Kicker is the attacker. The Puncher may defend against the kick by either running or jamming. When jamming, the Puncher must simultane-ously deliver his strike.
DRILL 7—NO, YOU DON’T!
1. In this drill, the attacker (Kicker) is able to defend against the punch by employing the concept of running.
2. To perform, the Kicker attempts a drag step side thrust kick. The Puncher makes him miss and attempts to counter punch. The Kicker will defend against the punch by executing a push drag retreat and immediately returning with another (defensive)side kick.
DRILL 8—LIMITED SPARRING
1. In this drill, one person is given only punches as weapons and the other is given only side thrust kicks. There is not a designated Attacker and Defender; instead, each partner is attempting to land as many strikes as possible whilst utilizing the principles of:
A. Penetration B. Clearing C. Jamming
Training Drills
C38 Master of the Ring Copyright 2004 by Eric & Kevin Lamkin
C39 Master of the Ring Copyright 2004 by Eric & Kevin Lamkin
Training DrillsTraining Drills
Launch Point Launch Point DrillsDrills
Training Drills
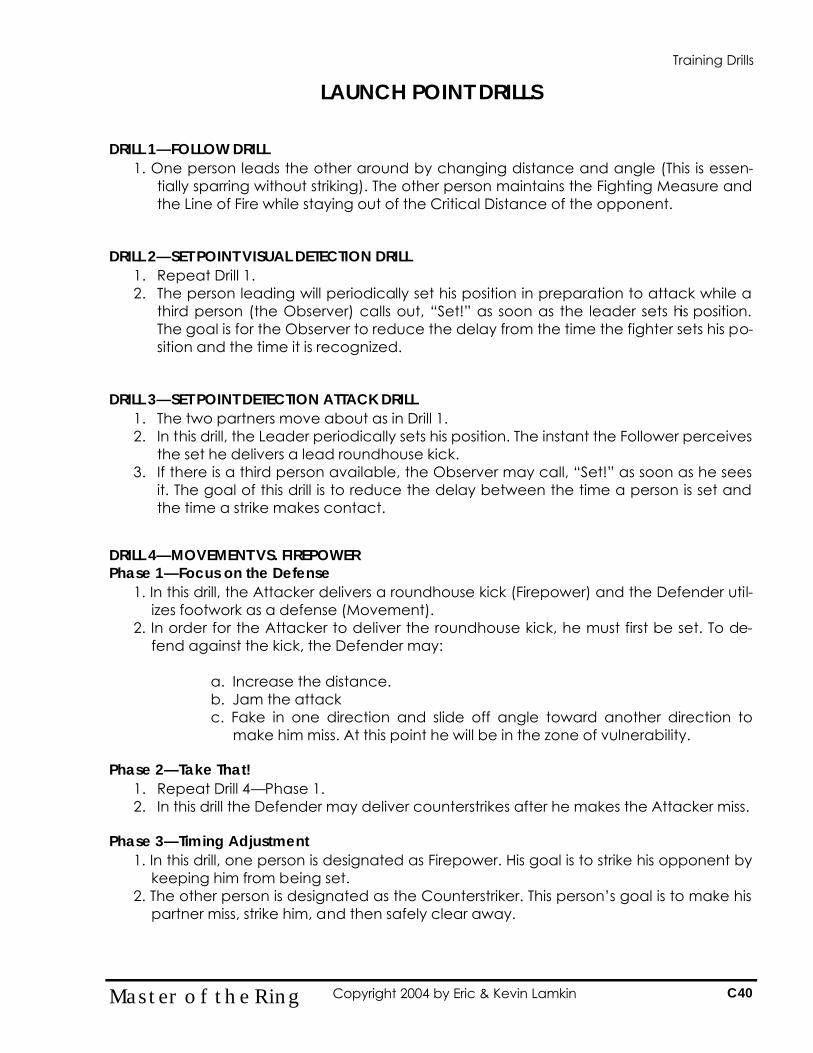
LAUNCH POINT DRILLS DRILL 1—FOLLOW DRILL
1. One person leads the other around by changing distance and angle (This is essen-tially sparring without striking). The other person maintains the Fighting Measure and the Line of Fire while staying out of the Critical Distance of the opponent.
DRILL 2—SET POINT VISUAL DETECTION DRILL
1. Repeat Drill 1. 2. The person leading will periodically set his position in preparation to attack while a
third person (the Observer) calls out, “Set!” as soon as the leader sets his position. The goal is for the Observer to reduce the delay from the time the fighter sets his po-sition and the time it is recognized.
DRILL 3—SET POINT DETECTION ATTACK DRILL
1. The two partners move about as in Drill 1. 2. In this drill, the Leader periodically sets his position. The instant the Follower perceives
the set he delivers a lead roundhouse kick. 3. If there is a third person available, the Observer may call, “Set!” as soon as he sees
it. The goal of this drill is to reduce the delay between the time a person is set and the time a strike makes contact.
DRILL 4—MOVEMENT VS. FIREPOWER Phase 1—Focus on the Defense
1. In this drill, the Attacker delivers a roundhouse kick (Firepower) and the Defender util-izes footwork as a defense (Movement).
2. In order for the Attacker to deliver the roundhouse kick, he must first be set. To de-fend against the kick, the Defender may:
a. Increase the distance. b. Jam the attack c. Fake in one direction and slide off angle toward another direction to
make him miss. At this point he will be in the zone of vulnerability. Phase 2—Take That!
1. Repeat Drill 4—Phase 1. 2. In this drill the Defender may deliver counterstrikes after he makes the Attacker miss.
Phase 3—Timing Adjustment
1. In this drill, one person is designated as Firepower. His goal is to strike his opponent by keeping him from being set.
2. The other person is designated as the Counterstriker. This person’s goal is to make his partner miss, strike him, and then safely clear away.
Training Drills
C40 Master of the Ring Copyright 2004 by Eric & Kevin Lamkin

DRILL 5—Freesparring 1. Freespar to test these new strategies.
Training Drills
C41 Master of the Ring Copyright 2004 by Eric & Kevin Lamkin
C42 Master of the Ring Copyright 2004 by Eric & Kevin Lamkin
Training DrillsTraining Drills
DeceptiveDeceptive Penetration DrillsPenetration Drills
Training Drills
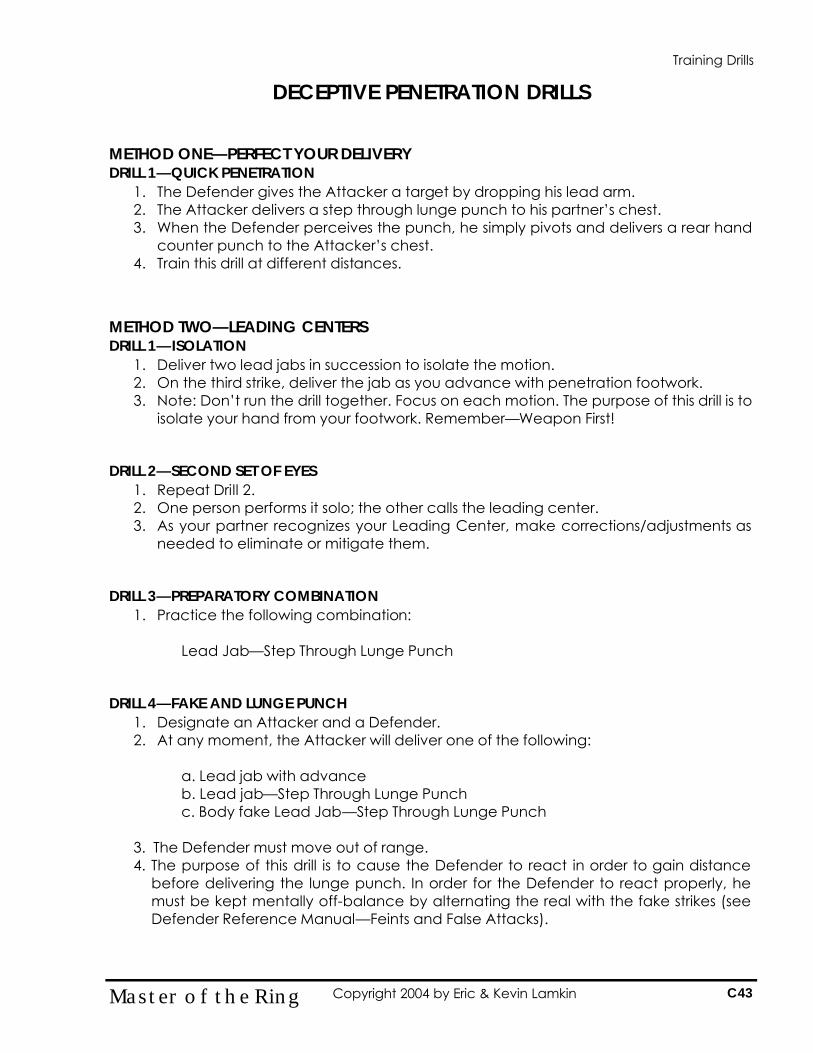
DECEPTIVE PENETRATION DRILLS METHOD ONE—PERFECT YOUR DELIVERY DRILL 1—QUICK PENETRATION
1. The Defender gives the Attacker a target by dropping his lead arm. 2. The Attacker delivers a step through lunge punch to his partner’s chest. 3. When the Defender perceives the punch, he simply pivots and delivers a rear hand
counter punch to the Attacker’s chest. 4. Train this drill at different distances.
METHOD TWO—LEADING CENTERS DRILL 1—ISOLATION
1. Deliver two lead jabs in succession to isolate the motion. 2. On the third strike, deliver the jab as you advance with penetration footwork. 3. Note: Don’t run the drill together. Focus on each motion. The purpose of this drill is to
isolate your hand from your footwork. Remember—Weapon First!
DRILL 2—SECOND SET OF EYES 1. Repeat Drill 2. 2. One person performs it solo; the other calls the leading center. 3. As your partner recognizes your Leading Center, make corrections/adjustments as
needed to eliminate or mitigate them. DRILL 3—PREPARATORY COMBINATION
1. Practice the following combination:
Lead Jab—Step Through Lunge Punch DRILL 4—FAKE AND LUNGE PUNCH
1. Designate an Attacker and a Defender. 2. At any moment, the Attacker will deliver one of the following:
a. Lead jab with advance b. Lead jab—Step Through Lunge Punch c. Body fake Lead Jab—Step Through Lunge Punch
3. The Defender must move out of range. 4. The purpose of this drill is to cause the Defender to react in order to gain distance
before delivering the lunge punch. In order for the Defender to react properly, he must be kept mentally off-balance by alternating the real with the fake strikes (see Defender Reference Manual—Feints and False Attacks).
Training Drills
C43 Master of the Ring Copyright 2004 by Eric & Kevin Lamkin
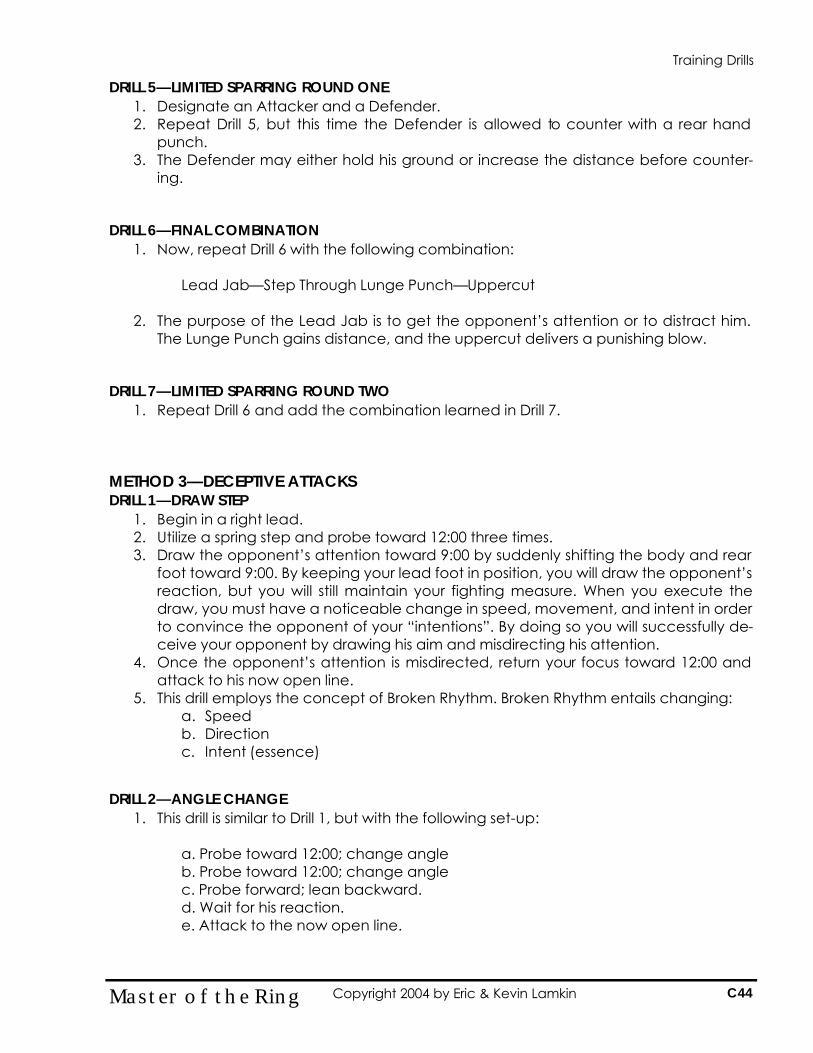
DRILL 5—LIMITED SPARRING ROUND ONE 1. Designate an Attacker and a Defender. 2. Repeat Drill 5, but this time the Defender is allowed to counter with a rear hand
punch. 3. The Defender may either hold his ground or increase the distance before counter-
ing.
DRILL 6—FINAL COMBINATION 1. Now, repeat Drill 6 with the following combination:
Lead Jab—Step Through Lunge Punch—Uppercut
2. The purpose of the Lead Jab is to get the opponent’s attention or to distract him. The Lunge Punch gains distance, and the uppercut delivers a punishing blow.
DRILL 7—LIMITED SPARRING ROUND TWO
1. Repeat Drill 6 and add the combination learned in Drill 7. METHOD 3—DECEPTIVE ATTACKS DRILL 1—DRAW STEP
1. Begin in a right lead. 2. Utilize a spring step and probe toward 12:00 three times. 3. Draw the opponent’s attention toward 9:00 by suddenly shifting the body and rear
foot toward 9:00. By keeping your lead foot in position, you will draw the opponent’s reaction, but you will still maintain your fighting measure. When you execute the draw, you must have a noticeable change in speed, movement, and intent in order to convince the opponent of your “intentions”. By doing so you will successfully de-ceive your opponent by drawing his aim and misdirecting his attention.
4. Once the opponent’s attention is misdirected, return your focus toward 12:00 and attack to his now open line.
5. This drill employs the concept of Broken Rhythm. Broken Rhythm entails changing: a. Speed b. Direction c. Intent (essence)
DRILL 2—ANGLE CHANGE
1. This drill is similar to Drill 1, but with the following set-up:
a. Probe toward 12:00; change angle b. Probe toward 12:00; change angle c. Probe forward; lean backward. d. Wait for his reaction. e. Attack to the now open line.
Training Drills
C44 Master of the Ring Copyright 2004 by Eric & Kevin Lamkin
DRILL 3—LIVE FIRE DEMONSTRATION 1. The Attacker will practice the set-ups in either Drill 1 or Drill 2. 2. The Defender will respond with a defensive side kick. 3. The object of this drill is to draw the Defender’s reaction (side kick) and attack into
the open line. You must convince the Defender that you intend to attack otherwise he may take advantage of the situation.
4. The defender should train not to take a half-step backward on the counter kick. This will emphasize his timing. During actual combat, however, a half step back is ad-vised.
DRILL 4—SCRAMBLE STEP FORWARD
1. This set-up method is deal for approaching a taller opponent:
a. Scramble step draw to 10:00 b. Scramble step draw to 2:00 c. Attack toward 12:00 d. One foot must remain on the CCP at all times.
DRILL 5—CIRCLE SNEAK
1. Circle around your opponent and force him to adjust the aim
a. Circle and move toward 4:00 b. Circle and move toward 8:00 c. Circle and move toward 4:00. d. Draw the opponent toward 8:00 and immediately cut the angle by attacking
toward 10:00 e. If you draw him properly toward 8:00, he will cover the distance for you. f. Gradual decrease the distance between your opponent and yourself g. Keep your body facing the same direction
Training Drills
C45 Master of the Ring Copyright 2004 by Eric & Kevin Lamkin
C46 Master of the Ring Copyright 2004 by Eric & Kevin Lamkin
Training DrillsTraining Drills
Counter Fighting Counter Fighting DrillsDrills
Training Drills
COUNTER FIGHTING DRILLS
DRILL 1—STATIONARY POSITION
1. Measure distance by locking out a lead jab and move back about 18 inches. 2. The Attacker will attempt to strike with a lead jab to the Defender’s forehead. 3. The Defender will place his hands behind his back and remain stationary. He will de-
fend by moving his body to make the strike miss. Use your knees to bend the body and move the target.
4. Defending attacks to the head. 1. Bobbing—bend the knee to drop the head and body straight down. 2. Weaving—Shift your body from leg to leg (45 degree to 45 degree by dip-
ping and ending on either leg. Use a descending arch). 5. Work at a slow to moderate pace to develop the technique and feel for the exer-
cise. 6. In combat, aim for the neck, this will ensure that you will hit the target.
DRILL 2—A LITTLE MORE TIME
1. The Attacker now delivers a lead jab with an advance. The Defender defends with the bob and weave.
2. Keep the shoulders above the hips; do not rock back in this drill. DRILL 3—SECONDARY DEFENSE
1. Repeat Drill 2. 2. The Defender will now put his hands in front of his body in a defensive position. Use
the rear hand to block the strike. Keep the block near the striking hand and quickly return it to the guard. You can catch it or paw it to the side. The Defender will still bob and weave. The rear hand is here utilized as a second l ine of defense.
DRILL 4—MOBILITY
1. The Defender places his hands behind his back. 2. The Defender moves around and utilizes body evasion as the Attacker delivers a
lead jab. 3. The Defender may either move his position or, if he is stationary, he may move the
target. Remember to always keep moving. DRILL 5—WITH A DEFENSE
1. Repeat Drill 4. 2. In this drill the Defender will have his hands in a defensive position.
DRILL 6—ANTE UP
1. Now repeat the previous drill with multiple strikes. 2. The Attacker may deliver double or triple jabs. He should move (or advance) with
each strike.
Training Drills
C47 Master of the Ring Copyright 2004 by Eric & Kevin Lamkin
3. For the sake of the drill, don’t crowd your partner. You are trying to develop each other’s skill; not to prove your own.
DRILL 7—THE COUNTER FIGHTER 1. Attacker delivers a lead jab with an advance. The Defender (the counter fighter)
counters with a counter side kick. DRILL 8—LIMITED SPARRING
1. Both partners have the following weapons: a. Lead Jab b. Lead Roundhouse Kick c. Defensive Side Kick
Training Drills
C48 Master of the Ring Copyright 2004 by Eric & Kevin Lamkin
Appendix DAppendix D
Tournament RulesTournament Rules
D1 Master of the Ring Copyright 2004 by Eric & Kevin Lamkin
usankfusankf Sport Karate Sport Karate
RulesRules
AmateurAmateur
D2 Master of the Ring Copyright 2004 by Eric & Kevin Lamkin
Amateur Sport Karate Rules
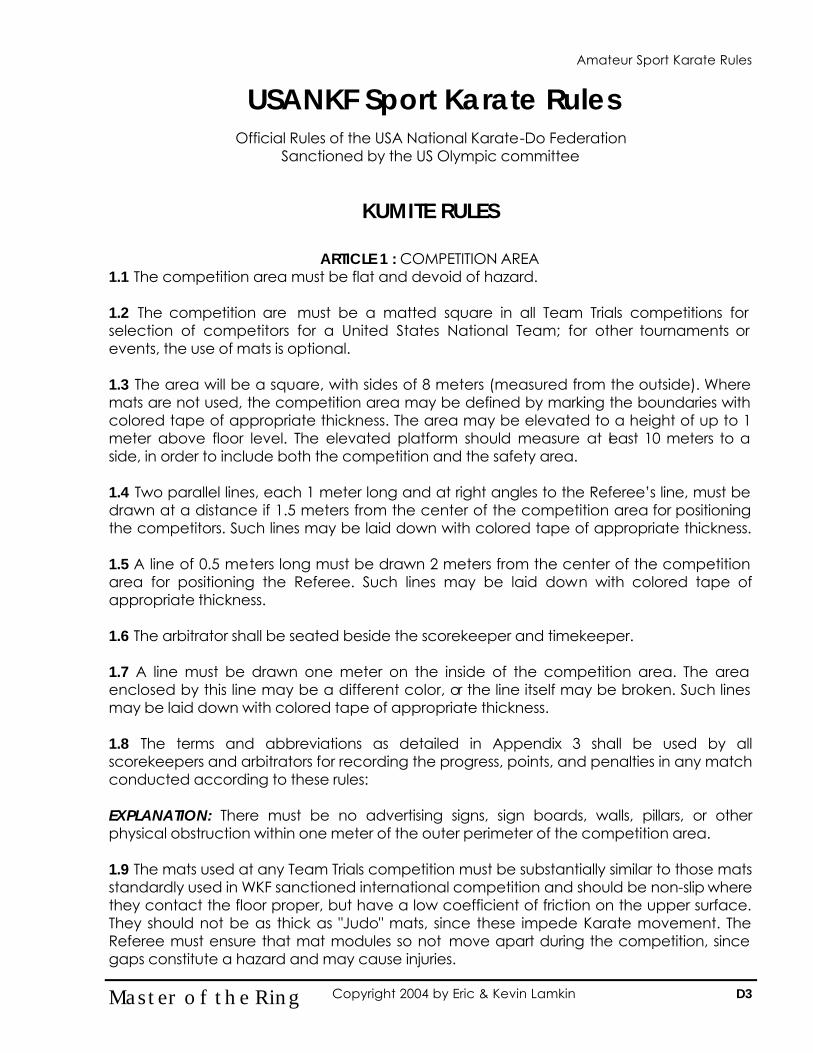
USANKF Sport Karate Rules
Official Rules of the USA National Karate-Do Federation Sanctioned by the US Olympic committee
KUMITE RULES
ARTICLE 1 : COMPETITION AREA 1.1 The competition area must be flat and devoid of hazard. 1.2 The competition are must be a matted square in all Team Trials competitions for selection of competitors for a United States National Team; for other tournaments or events, the use of mats is optional. 1.3 The area will be a square, with sides of 8 meters (measured from the outside). Where mats are not used, the competition area may be defined by marking the boundaries with colored tape of appropriate thickness. The area may be elevated to a height of up to 1 meter above floor level. The elevated platform should measure at least 10 meters to a side, in order to include both the competition and the safety area. 1.4 Two parallel lines, each 1 meter long and at right angles to the Referee’s line, must be drawn at a distance if 1.5 meters from the center of the competition area for positioning the competitors. Such lines may be laid down with colored tape of appropriate thickness. 1.5 A line of 0.5 meters long must be drawn 2 meters from the center of the competition area for positioning the Referee. Such lines may be laid down with colored tape of appropriate thickness. 1.6 The arbitrator shall be seated beside the scorekeeper and timekeeper. 1.7 A line must be drawn one meter on the inside of the competition area. The area enclosed by this line may be a different color, or the line itself may be broken. Such lines may be laid down with colored tape of appropriate thickness. 1.8 The terms and abbreviations as detailed in Appendix 3 shall be used by all scorekeepers and arbitrators for recording the progress, points, and penalties in any match conducted according to these rules: EXPLANATION: There must be no advertising signs, sign boards, walls, pillars, or other physical obstruction within one meter of the outer perimeter of the competition area. 1.9 The mats used at any Team Trials competition must be substantially similar to those mats standardly used in WKF sanctioned international competition and should be non-slip where they contact the floor proper, but have a low coefficient of friction on the upper surface. They should not be as thick as "Judo" mats, since these impede Karate movement. The Referee must ensure that mat modules so not move apart during the competition, since gaps constitute a hazard and may cause injuries.
Amateur Sport Karate Rules
D3 Master of the Ring Copyright 2004 by Eric & Kevin Lamkin
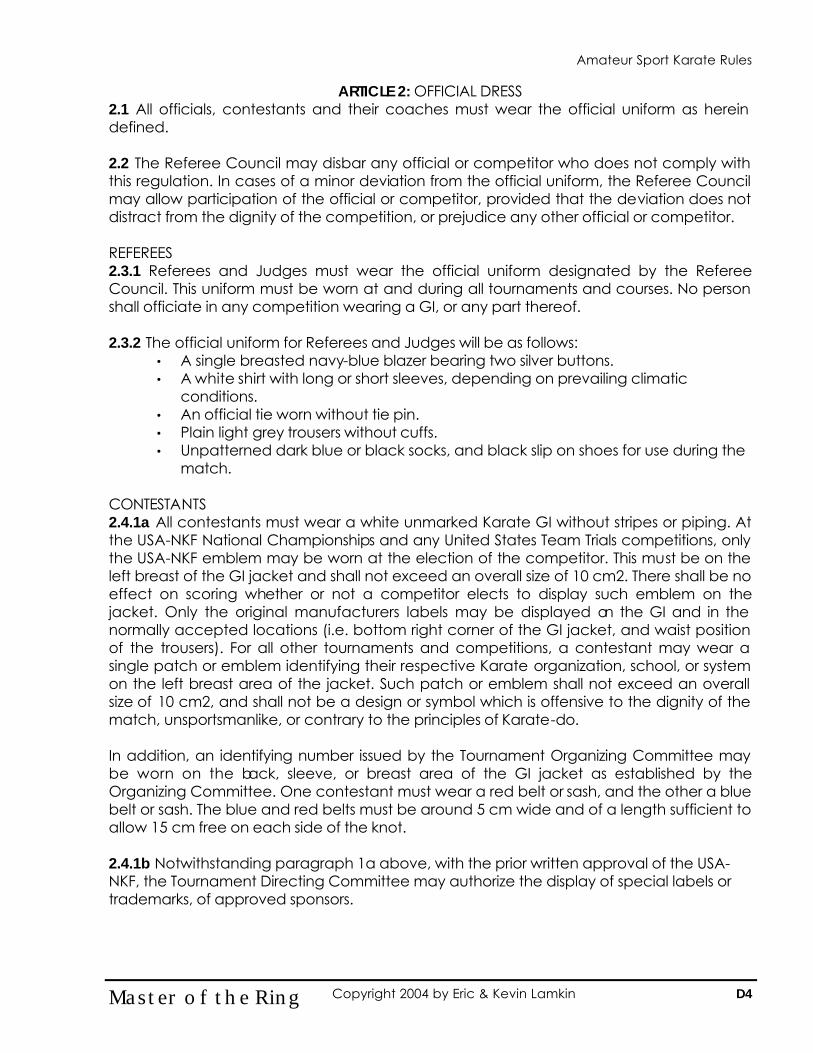
ARTICLE 2: OFFICIAL DRESS 2.1 All officials, contestants and their coaches must wear the official uniform as herein defined. 2.2 The Referee Council may disbar any official or competitor who does not comply with this regulation. In cases of a minor deviation from the official uniform, the Referee Council may allow participation of the official or competitor, provided that the deviation does not distract from the dignity of the competition, or prejudice any other official or competitor. REFEREES 2.3.1 Referees and Judges must wear the official uniform designated by the Referee Council. This uniform must be worn at and during all tournaments and courses. No person shall officiate in any competition wearing a GI, or any part thereof. 2.3.2 The official uniform for Referees and Judges will be as follows:
• A single breasted navy-blue blazer bearing two silver buttons. • A white shirt with long or short sleeves, depending on prevailing climatic
conditions. • An official tie worn without tie pin. • Plain light grey trousers without cuffs. • Unpatterned dark blue or black socks, and black slip on shoes for use during the
match.
CONTESTANTS 2.4.1a All contestants must wear a white unmarked Karate GI without stripes or piping. At the USA-NKF National Championships and any United States Team Trials competitions, only the USA-NKF emblem may be worn at the election of the competitor. This must be on the left breast of the GI jacket and shall not exceed an overall size of 10 cm2. There shall be no effect on scoring whether or not a competitor elects to display such emblem on the jacket. Only the original manufacturers labels may be displayed on the GI and in the normally accepted locations (i.e. bottom right corner of the GI jacket, and waist position of the trousers). For all other tournaments and competitions, a contestant may wear a single patch or emblem identifying their respective Karate organization, school, or system on the left breast area of the jacket. Such patch or emblem shall not exceed an overall size of 10 cm2, and shall not be a design or symbol which is offensive to the dignity of the match, unsportsmanlike, or contrary to the principles of Karate-do. In addition, an identifying number issued by the Tournament Organizing Committee may be worn on the back, sleeve, or breast area of the GI jacket as established by the Organizing Committee. One contestant must wear a red belt or sash, and the other a blue belt or sash. The blue and red belts must be around 5 cm wide and of a length sufficient to allow 15 cm free on each side of the knot. 2.4.1b Notwithstanding paragraph 1a above, with the prior written approval of the USA-NKF, the Tournament Directing Committee may authorize the display of special labels or trademarks, of approved sponsors.
D4 Master of the Ring Copyright 2004 by Eric & Kevin Lamkin
Amateur Sport Karate Rules
2.5 The GI jacket, when tightened around the waist with the belt, must be of minimum length that covers the hips, but no longer than mid-thigh. A female contestant may elect to wear a plain white T-shirt or leotard beneath the GI jacket. Male contestants may not wear any shirt of any kind or color underneath the GI jacket without the prior consent of the Tournament Referee Council. 2.6 The maximum length of the GI jacket sleeves must be no longer than the bend of the wrist and no shorter than halfway down the forearm. Jacket sleeves may not be tolled up, either on the outside or inside of the sleeve. 2.7 The GI trousers must be long enough to cover at least two-thirds of the shin, and may not be rolled up, either on the outside or inside of the leg. 2.8 Each contestant must keep their hair clean and cut to a length that does not obstruct smooth bout conduct or present a safety hazard to competitors. Hachimaki (headband) of any kind will not be allowed. Should the Referee consider any contestant’s hair too long and/ or unclean, the Referee may, with the Referee Council’s approval, disqualify the contestant from the bout. In Kumite matches hair slides ("scrunchies")are prohibited, as are metal hair clips ("barrettes"). In Kata a discreet hair clip is permitted. 2.9 Contestants must have short fingernails, and must not wear jewelry or other objects which might injure their opponents. 2.10 Fist pads and gum shields are compulsory in all Divisions. Competitors shall supply one pair of fist pads in red, and one pair in blue. In all divisions, groin protectors (cups) are required for male competitors, and soft shin pads which do not cover the instep of the foot are allowed. For all adult Advanced Kumite divisions and Junior National Team Trials divisions, the following restrictions apply:
1. Instep protectors are forbidden; shin protectors which do not cover the foot are allowed; 2. Glasses are forbidden ( soft contact lenses can be worn at the contestant’s own discretion); 3. The wearing of unauthorized clothing or equipment is forbidden; 4. Women may wear the authorized additional protective equipment for the chest area.
For all other divisions, an athlete may elect to wear shatterproof, safety athletic goggles of an approved design. For Junior Beginner, Novice and Intermediate Kumite divisions, under 14 years of age, a competitor may elect to use a soft foam head protector, provided that such protector is a solid color, and of an approved design which does not impede the ability of the athlete to score or be scored upon.
D5 Master of the Ring Copyright 2004 by Eric & Kevin Lamkin
Amateur Sport Karate Rules
2.12 Any protective equipment must meet standard specifications and be an approved design. 2.13 The use of tape, bandages, or soft elastic braces because of injury must be approved by the Referee Council, on the advice of the official Doctor. No braces which include any metallic parts shall be used. No tape shall be applied in more than a single layer on the hands or feet of any competitor, as this creates an unfair advantage and increases the risk of injury to an opponent. The Referee may disqualify any competitor who attempts to compete with excessive taping of the hands or feet. COACHES 2.14 A coach shall at all times during the tournament, wear a tracksuit and display the coach’s license. EXPLANATION 1. The contestant must wear a single belt. This will be red if the athlete is the "AKA" fighter, and blue if "Shiro". Belts of grandee or rank should not be worn during the bout, unless a colored sash is utilized in place of a red or blue belt. 2. Red or blue protective mitts (fist-pads) approved by the USA-NKF, with an uncovered thumb must be worn. The padding must not be capable of displacement. 3. The design of any mitts must be approved by the USA-NKF Board of Directors on the recommendation of the Medical Committee and the Referee Committee. 4. Gum shields (mouth-guards) must be properly fitted by a dentist. Groin protectors using a removable plastic cup slipped into a jockstrap will not be permitted, and the persons found wearing them will be penalized. 5. There may well be a religious basis for the wearing of certain items such as turbans. Persons wishing, by virtue of their religion, to wear what would otherwise be construed as unauthorized clothing must notify the Referee Council in advance of a tournament. The Referee Council will examine each application on its merit. No accommodation will be made for people who neglect to notify the Referee Council in advance, and expect to be allowed to participate in violation of these rules. 6. If an athlete comes in to the match area inappropriately dressed, he or she will not be immediately disqualified; instead the competitor will be given one minute to remedy matters. 7. If the Referee Council agrees, Refereeing Officials may be allowed to remove their blazers while officiating a match.
D6 Master of the Ring Copyright 2004 by Eric & Kevin Lamkin
Amateur Sport Karate Rules
ARTICLE 3 : ORGANIZATION OF KUMITE COMPETITIONS 3.1 A Karate tournament may comprise Kumite competition and/ or Kata competition, including Kobudo divisions. The Kumite competition may be further divided into the team match and the individual match. The individual match may be further divided into weight divisions and an open weight category. Weight divisions are divided ultimately into bouts. The term "bout" also describes the individual Kumite competitions between opposing pairs of team members. 3.2 In team matches, each team must have an odd number of contestants. 3.3 The contestants are all members of a team. There are no fixed reserves. 3.4 Before each match, a team representative must hand in to the official table, an official form defining the names and fighting order of the team members. The fighting order can be changed for each round, but once notified it cannot then be changed. 3.5 A team will be disqualified if any of its members or its coach changes the team’s composition without submitting the written fighting order. 3.6 In the first round of a team match, a team will be allowed to participate only when it presents the prescribed number of competitors. 3.7 No contestant may be replaced by another in an individual title match. 3.8 Individual contestants or teams that do not arrive at the competition venue before the tournament is declared open will be disqualified from participation in that tournament. EXPLANATION 1. A "round" is a discrete stage in a competition leading to the eventual indication of finalists. In an elimination Kumite competition, a round eliminates fifty percent of contestants within it, counting byes as contestants. In this context, the round can apply equally to a stage in either primary elimination or repechage. In a matrix, or "round robin" competition, a round allows all contestants in a pool to fight once. 2. The use of contestant’s names causes problems of pronunciation and identification. Tournament numbers should be allotted and used. 3. When lining up before a match, a team will present the actual fighters. The unused fighter(s) and the Coach will not be included and shall sit in an area set aside for them. 4. The fighting order form can be presented by the Coach, or a nominated contestant from the team. If the coach hands in the form, he/ she must be clearly identifiable as such, otherwise it may be rejected. The list must include the name of the country/ club, the belt color allotted to the team for that match, and the order of the fighters from one to five. Both the fighters names and their tournament numbers must be included and the form signed by the coach, or nominated person. 5. If through an error in charting, the wrong contestants compete, then regardless of the outcome, that match is declared null and void. To reduce such errors, the winner of each bout/ match must confirm victory with the control table before leaving the area.
D7 Master of the Ring Copyright 2004 by Eric & Kevin Lamkin
Amateur Sport Karate Rules
ARTICLE 4 : THE REFEREE PANEL 4.1 The Refereeing Panel for each match shall consist of one Referee (Shushin), three Judges (Fukushin), and one Arbitrator (Kansa). 4.2 In addition, for the purpose if facilitating the operation of matches, several timekeepers, caller-announcers, and record-keepers shall be appointed. EXPLANATION 1. At the start of a Kumite match, the Referee stands on the outside edge of the official match area. On the Referee’s left stand Judges number 1 and 2, on the right stands the Arbitrator and Judge number 3. 2. After the formal exchange of bows by contestants and Referee Panel, the Referee takes a step back and the Judges turn inwards and all bow together. 3. Changing the Referee Panel - The departing Officials take one step forward, turn around and face the incoming Panel. They bow to each other on the command of the incoming Referee and in one line (facing the same direction) leave the competition area. 4. Changing an individual Judge - the incoming Judge goes to the outgoing Judge, they bow together and change positions.
ARTICLE 5 : DURATION OF A BOUT 5.1 Duration of the Kumite bout is defined as two minutes (stop time) for ages 14 and over (both team and individuals), and one and one-half minutes for ages 13 and under. The first competitor to reach eight points, or who is ahead on points when "Time" is called, shall be declared the winner, and the bout terminated. In adult Advanced (WKF) Kumite divisions, the bout shall be three minutes (stop time) for men, and two minutes (stop time) for women, with scoring according to Section 13 of these rules. 5.2 The timing of the bout starts when the Referee gives the signal to start and stops each time he/ she calls "Yame". In any Beginner, Novice, or Intermediate division, the Referee Council may determine that "running time" shall be utilized to conduct such divisions. 5.3 The timekeeper shall give signals by a clearly audible gong or buzzer indicating "30 seconds to go", or "Time up". The "Time Up" signal marks the end of the bout.
ARTICLE 6 : SCORING 6.1 The scores are as follows:
1) SANBON Three Points 2) NIHON Two Points 3) IPPON One Point
6.2 A score is awarded when a technique is performed according to the following criteria to a scoring area:
D8 Master of the Ring Copyright 2004 by Eric & Kevin Lamkin
Amateur Sport Karate Rules

a) Good form b) Sporting attitude c) Vigorous application d) Awareness (Zanshin) e) Good timing f) Correct distance
6.3 SANBON is awarded for:
a) Jodan kicks; b) Throwing or leg sweeping the opponent to the mat followed by a scoring technique.
6.4 NIHON is awarded for:
a) Chudan kicks; b) Deflecting an attack and scoring to the unguarded back of the opponent; c) Combination hand techniques, the individual components of which each score in their own right; d) Unbalancing the opponent and scoring; e) Successfully scoring at the precise moment the opponent attacks.
6.5 IPPON is awarded for:
a) Chudan or Jodan Tsuki; b) Uchi.
The Refereeing Panel must look for Nihons in the first instance and only award an Ippon in the second instance. 6.6 Attacks are limited to the following areas:
a) Head b) Face c) Neck d) Abdomen e) Chest f) Back g) Side
6.7 A victory over an opponent who has been given a Hansoku or Shikkaku will be worth Kachi. If a contestant is absent, withdraws, or is withdrawn, the opponent will be credited with a win by Kiken. 6.8 An effective technique delivered at the same time as the end of a bout is signaled, is considered valid. An attack, even if effective, delivered after an order to suspend or stop the bout shall not be scored any may result in a penalty being imposed on the offender. 6.9 No technique, even if technically correct, will be scored if it is delivered when the two contestants are outside the competition area. However, if one of the opponents delivers an effective technique while still inside the competition area and before the Referee calls "Yame", the technique will be scored.
D9 Master of the Ring Copyright 2004 by Eric & Kevin Lamkin
Amateur Sport Karate Rules
6.10 Simultaneous effective scoring techniques delivered by both contestants, the one on the other (Aiuchi) shall not score. EXPLANATION: 1. Grabbing the opponent and throwing may be attempted only after a genuine attempt at a karate striking technique is made first, or as a counter to an opponent who has attacked and attempted to throw or clinch. 2. For reasons of safety, throws where the opponent is thrown without being held onto, or thrown dangerously, or where the pivot point is above hip level, are prohibited and will incur a warning or penalty. Exceptions are conventional karate leg sweeping techniques, which do not require the opponent to be held while executing the sweep such as De Ashi-Barai, KO Uchi Gari, Kani Waza, etc. After a throw has been executed the Referee will allow the contestant two to three seconds in which to attempt a scoring technique. 3. A technique with "Good Form" is said to have characteristics conferring probable effectiveness within the framework of traditional Karate concepts. 4. Sporting Attitude is a component of good form and refers to a non-malicious attitude of great concentration which is obvious during delivery of the scoring technique. 5. Vigorous Application defines the power an speed of the technique and the palpable will for it to succeed; nothing is held back. 6. Awareness (Zanshin) is that criterion most often missed when a score is assessed. It is the state of continued commitment in which the contestant maintains total concentration, observation, and awareness of the opponent’s potentiality to counterattack. He does not turn his face away during delivery of the technique, and remains facing the opponent afterwards, continuing with proper form. 7. Good Timing means delivering a technique when it will have the greatest potential effect. 8. Correct Distance similarly means delivering a technique at the precise distance where it will have the greatest potential effect. Thus if the technique is delivered on an opponent who is rapidly moving away, the potential effect of that blow is reduced. 9. Distancing also relates to the point at which the completed technique comes to rest on or near the target. To score, the technique must have the potential to penetrate deep into the target, so straight arm punches are seen as having a low potential in this respect and must be evaluated accordingly. A punch or kick that comes somewhere between skin touch and 2-3 centimeters from the face, may be said to have the correct distance. However, Jodan punches, which come from a reasonable distance of the target, and which the opponent makes no attempt to block or avoid will be scored, provided the technique meets the other criteria. 10. A worthless technique is a worthless technique - regardless of where and how it is delivered. A technique which is badly deficient in good form, or lacking power, will score nothing. However, in order to encourage technically difficult techniques, the Referee
D10 Master of the Ring Copyright 2004 by Eric & Kevin Lamkin
Amateur Sport Karate Rules
should lean toward awarding Ippon or Nihon for them, even if there is a slight deficiency in good form; as long as it is only slight. As a simple rule of thumb, techniques which would normally merit an Ippon are scored as Nihon if they are scheduled as "technically difficult". Deflecting an attack and delivering a good technique to any unguarded target area of the opponent’s body can be scored as Nihon - not just attacks to the opponent’s unguarded back. 11. Combination attacks are those sequences of techniques which each individually merit at least an Ippon, occurring in rapid succession. 12. Techniques which land below the belt may score, as long as they are above the pubic bone. The neck is a target area and so is the throat. However, no contact to the throat is permitted, although a score may be awarded for a properly controlled technique, which does not touch. 13. A technique which lands upon the shoulder blades may score. The non-scoring part of the shoulder is the junction of the upper bone of the arm with the shoulder blade and collarbone. 14. The time up bell signals the end of scoring possibilities in that bout, even though the Referee may inadvertently not halt the bout immediately. However, the time up bell does not mean that penalties cannot be imposed. Penalties can be imposed by the Refereeing Panel up to the point where the contestants leave the area after the bout’s conclusion. Penalties can be imposed after that, but only by the Referee Council. 15. True Aiuchis are rare. Not only must two techniques land simultaneously, but both must be valid scoring techniques, each with good form, etc. Two techniques may well land simultaneously, but seldom are both, if indeed either, effective scores. The Referee must not dismiss as Aiuchi, a situation where only one of the simultaneous pair is actually a score. This is not Aiuchi.
ARTICLE 7 : CRITERIA FOR DECISION The result of a bout is determined by a contestant obtaining a clear lead of eight points, or at time-up, having the highest number of points, obtaining a decision (Hantei), or by a Hansoku, Shikkaku, or Kiken imposed against a contestant. 7.1 When a bout ends with equal scores, or no scores, the winner will be decided by vote of the Referee Panel (Hantei). The decision is taken on the basis of the following:
a) The attitude, fighting spirit and strength demonstrated by the contestants; b) The superiority of tactics and techniques displayed; c) Which of the contestants has initiated the majority of the action.
7.2 In individual bouts, if there is a tie, then the decision for that bout shall be a draw (Hikiwake), and an extension not exceeding one minute may be fought (Encho-Sen). An Encho-Sen is an extension of the bout, and all penalties and warnings issued in the initial bout carry over. The first competitor to obtain an award will be declared the winner. In the event that neither competitor is aw arded a score during the Encho-Sen, the decision will
D11 Master of the Ring Copyright 2004 by Eric & Kevin Lamkin
Amateur Sport Karate Rules
be made by a final vote of the Referee Panel (Hantei). A decision in favor of one or the other competitor is obligatory. 7.3 In team competition, there will be no extension (Encho-Sen) in the event of drawn bouts. 7.4 The winning team is the one with the most bout victories. Should the two teams have the same number of bout victories, then the winning team will be the one with the most points, taking both winning and losing bouts into account. 7.5 If the two teams have the same number of bout victories and points, then a deciding bout will be held. The selectees must be nominated within one minute of the announcement of this bout and the persons making the nomination will be those who signed the original fighting order form for that match. In the event of a continuing tie, there will be an extension (Encho-Sen) not exceeding one minute. The first competitor to obtain a score wins. In the event that there is no score, the decision will be made by vote (Hantei). 7.6 In male team matches, a team which obtains a lead of three bout victories will be declared the winner at that point, or in the case of female teams, a lead of two bout victories. EXPLANATION: 1. When scores are unequal, the contestant who completes the bout satisfactorily an Ippon or Nihon ahead of the opponent shall be given the victory. 2. Taking the above criteria into account, when superiority can be established, it is quite in order for one contestant to be given the victory, even when the score situation is equal. 3. When deciding the outcome of a bout by vote (Hantei), the Referee will move to the match area perimeter and call "Hantei", followed by a two-tone blast of the whistle. The Judges will indicate their opinions by means of their flags, and the Referee will at the same time indicate his own vote by raising the arm on the side of the preferred contestant. 4. In the event of a tied Encho-Sen, on returning to his original position, the Referee will place one arm across his chest and raise his bent arm on the side of the preferred choice to show he is using his casting vote. He will then indicate the winner in the normal way.
ARTICLE 8 : PROHIBITED BEHAVIOR There are two categories of prohibited behavior, Category 1 and Category 2. CATEGORY 1 1. Techniques which make excessive contact, having regard to the scoring area attacked. All techniques must be controlled. Any technique which impacts the head, face or neck and results in visible injury must be penalized, unless caused by the recipient. 2. Techniques which make contact with the throat.
D12 Master of the Ring Copyright 2004 by Eric & Kevin Lamkin
Amateur Sport Karate Rules
3. Attacks to the arms or legs, groin, joints or instep. 4. Attacks to the face with open hand techniques (Teisho or Nukite). 5. Dangerous or forbidden throwing techniques, which cause injury; or which by their nature preclude or prejudice the opponent’s ability to land with safety. CATEGORY 2 1. Feigning or exaggerating injury. 2. Repeated exits from the competition area (Jogai), or movements which waste too much time. Jogai relates to a situation where a contestant’s body, or part thereof touches the floor outside of the competition area. An exception is when the contestant is actually pushed or thrown from the area by his opponent. 3. Self-endangerment by indulging in behavior, which exposes the contestant to injury by the opponent, or failing to take adequate measures for self-protection (Mubobi). 4. Avoiding combat as a means of preventing the opponent having the opportunity to score. 5. Grabbing and attempting to throw or take down the opponent, without first making a genuine attack, except when the opponent has attempted to grab or throw first, and throwing techniques where the pivotal point is above hip-level. 6. Unnecessary clinching, wrestling, pushing, or seizing without attempting a striking technique. 7. Techniques which by their nature, cannot be controlled for the safety of the opponent and dangerous and uncontrolled attacks, whether they land or not. 8. Attacks with the head, knees or elbows. 9. Talking to, or goading the opponent, failing to obey the orders of the Referee, discourteous behavior towards the Refereeing Officials, or other breaches of etiquette. EXPLANATION 1. Traditional Karate techniques delivered full-power can cause extremely serious injury, even death. Karate competition is a sport, and for that reason some of the most dangerous techniques are banned and all techniques must be controlled . Trained competitors can absorb relatively powerful blows on muscled areas such as the abdomen, but the fact remains that the head, face, neck, groin and joints are particularly susceptible to injury. The accidental kick in the groin can reduce the opponent’s potential for winning as surely as a deliberate one. Therefore, any technique, which results in injury, may be penalized unless caused by the recipient. Foot sweeps which land high on the leg can cause knee injury. The Referee must assess the validity of any sweep-attack to the leg; an ineffectual but painful attack of this sort should be immediately penalized. The contestants must perform all techniques with
D13 Master of the Ring Copyright 2004 by Eric & Kevin Lamkin
Amateur Sport Karate Rules
control and good form. If they cannot, then regardless of the technique misused, a warning or penalty must be imposed. 2. Face Contact - Adults and Juniors 14 years old and older- Non-injurious, light, controlled "touch" contact to the face, head and neck is allowed; but not to the throat. "Touch" does not mean a solid impact. When assessing the contact force used, the Referee must take all circumstances into account. Did the victim exacerbate the impact of an otherwise controlled technique by an injudicious movement? This is the reason most often given for scoring what would otherwise appear to be excessive contact, but it must not be used as a justification for a bad assessment. The Referee must also consider the effects of a marked disparity in size between contestants - as can occur in a team match, or in an open weight bout. Where contact is deemed by the Referee to be too strong, but does not diminish the competitor’s chances of winning, a warning (Chukoku) may be given. A second contact under the same circumstances will be penalized by Keikoku and Ippon (one point) will be given to the opponent. A third offense will be given Hansoku Chui and Nihon (two points) given to the injured competitor. A further offense will result in disqualification by Hansoku. 3. Face Contact - Cadets and Children 13 years old and younger - All hand techniques to the head, face and neck must have absolute control. Should the glove touch the target, the Referee Panel will not award a score , and should ordinarily give a penalty. Kicking techniques to the head, face and neck are allowed to make a light "skin touch" only. In the case of techniques which make contact considered to be more than a "glove" or "skin" touch, the Referee Panel will give a warning or penalty. Any technique to the head, face or neck which causes injury, no matter how slight, will be warned or penalized unless caused by the recipient. 4. The Referee must constantly observe the injured contestant. A short delay in giving a judgment allows injury symptoms such as a nosebleed to develop. Observation will also reveal any efforts by the contestant to aggravate slight injury for tactical advantage. Examples of this are blowing violently through an injured nose, or rubbing the face roughly with the back of a mitt. 5. Preexisting injury can produce symptoms out of all proportion to the degree of contact used and Referees must take this into account when considering penalties for seemingly excessive contact. For example, what appears to be a relatively light contact could result in a competitor being unable to continue due to the cumulative effect of injury sustained in an earlier bout. Before the start of a match or bout, the Match Area Controller must examine the medical cards and ensure that the contestants are fit to fight. The Referee must be informed if a contestant has been treated for injury. 6. Contestants who overreact to light contact, in an effort to have the Referee penalize their opponent, such as holding the face and staggering about, or falling unnecessarily, will be immediately warned or penalized themselves. 7. Feigning of an injury, which does not exist, is a serious infraction of the rules. Shikkaku will be imposed on the contestant feigning injury; i.e. when such things as collapse and rolling about on the floor are not supported by evidence of commensurate injury as reported by
D14 Master of the Ring Copyright 2004 by Eric & Kevin Lamkin
Amateur Sport Karate Rules
a neutral doctor. Exaggerating an injury, which does not exist is less serious. A warning or a penalty should be imposed for exaggerating injury. 8. Competitors who receive Shikkaku for feigning injury will be taken from the competition area and put directly into the hands of the Medical Committee, who will carry out an immediate examination of the competitor. The Medical Committee will submit its report before the end of the competition for the consideration of the Referee Council. Competitors who feign injury will be subject to the strongest penalties, up to and including suspension for life for repeated offenses. 9. The throat is a particularly vulnerable area and even the slightest contact will be warned or penalized, unless it is the recipient’s own fault. 10. The face is defined as covering an area which begins one centimeter above the eyebrows, extending down and including the temples, narrowing from the cheekbones, and finishing just under the chin. 11. Open hand techniques to the face are forbidden due to the danger to the contestant’s sight. The two open hand techniques referred to in Category 1 are merely examples of the class of prohibited techniques. 12. Throwing techniques are divided into two types. The established "conventional" Karate leg sweeping techniques such as De Ashi Barai, Ko Uchi Gari, etc., where the opponent is swept off balance or thrown without being grabbed first - and those throws requiring that the opponent be grabbed or held as the throw is executed. Such throws may be attempted only after a genuine attempt at a Karate striking technique is made first, or as a counter to an opponent who has attacked and attempted to throw or clinch. The pivotal point of the throw must not be above the hip and the opponent must be held onto throughout, so that a safe landing can be made. Over the shoulder throws such as Seio Nage, Kata Garuma, etc., are expressly forbidden, as are so-called "sacrifice" throws such as Tomoe Nage, Sumi Gaeshi, etc. If an opponent is injured as a result of a throwing technique, the Referee Panel will decide whether a penalty is called for. 13. The point at which "Yame" is called is helpful in determining if Jogai has occurred. If Aka delivers a successful technique and then exits immediately afterwards, "Yame" should occur at the instant of score and the exit therefore occurs outside of bout time and may not be penalized. If Aka’s attempt to score is unsuccessful, "Yame" will not be called and the exit will be recorded. If Shiro exits just after Aka scores with a successful attack, then "Yame" will occur immediately on the score and Shiro’s exit will not be recorded. If Shiro exits, or has exited as Aka’s score is made (with Aka remaining within the area), then both Aka’s score will be awarded and Shiro’s Jogai penalty will be imposed. 14. Movements which waste time include pointless circling, where on or both contestants do not engage in combat. It is expected that they will initially test each other, but within a short time deliberate and effective attack and counters should occur. If for any reason this does not happen after a reasonable interval, the Referee must stop the bout and caution the offender(s).
D15 Master of the Ring Copyright 2004 by Eric & Kevin Lamkin
Amateur Sport Karate Rules
15. The contestant who constantly retreats without effective counter, rather than allow the opponent an opportunity to score must be warned or penalized. This often occurs during the closing seconds of a bout. If the offense occurs within ten seconds or more of the bout time remaining, the Referee will warn the offender. If there has been a previous Category 2 offense or offenses, this will result in a penalty being imposed. However, if there is less than ten seconds to go, the Referee will penalize the offender with Keikoku and award an Ippon to the opponent. If there has been a previous Category 2 offense or offenses, the contestant will receive the next penalty up on the penalty scale. However, the Referee must ensure that the contestant is not retreating because the opponent is acting in a reckless, or dangerous manner, in which case the attacker should be warned or penalized. 16. As a tactical theatrical move, some fighters turn away immediately in a mock display of dominance to demonstrate a scored point. They drop their guard and lapse awareness of the opponent. The purpose of the turn-away is to draw the Referee’s attention to their technique. This is a clear act of Mubobi. In order to score, Zanshin must be preserved. Should the offender sustain an injury and the fault is considered to be the recipient’s, the Referee may decline to give a penalty to the opponent. 17. An example of Mubobi is the instance in which the contestant launches a committed attack without regard for personal safety. Some contestants throw themselves into a long reverse-punch, and are unable to block a counter move. Such open attacks constitute an act of Mubobi and cannot score. 18. Any discourteous behavior from a member of an official delegation can earn the disqualification of a competitor, the entire team, or delegation from the competition. 19. The Coach will be assigned a specific place by the Referee Council in conjunction with the Tournament Organizing Officials. This area will be close to the competition area and the Coach allowed a free and uninterrupted access to contestants between bouts. To assist the contestants, a visible scoreboard must be employed which can be clearly viewed by Coaches and contestants.
ARTICLE 9 : PENALTIES WARNING (CHUKOKU or ATENAI YONI) : May be imposed for attendant minor infractions, or the first instance of a minor infraction. KEIKOKU : This is a penalty in which one Ippon (one point) is added to the opponent’s score. Keikoku is imposed for minor infractions for which a warning has previously been given in that bout, or for infractions not sufficiently serious to merit Hansoku-Chui. HANSOKU-CHUI : This is a penalty in which Nihon (two points) is added to the opponent’s score. Hansoku-Chui is usually imposed for infractions for which a Keikoku has previously been given in that bout, although it may be imposed directly for serious infringements which do not merit Hansoku.
D16 Master of the Ring Copyright 2004 by Eric & Kevin Lamkin
Amateur Sport Karate Rules

HANSOKU : This is imposed following a very serious infraction, or when Hansoku-Chui has already been given. It results in the disqualification of the contestant. ** In team matches the injured competitor will receive an additional eight points plus the opponent’s score, if that should be higher than their own. SHIKKAKU: This is a disqualification from the actual tournament, competition, or match. In order to define the limit of Shikkaku, the Referee Council must be consulted. Shikkaku may be invoked when a contestant fails to obey the orders of the Referee, acts maliciously, commits an act which harms the prestige and honor of Karate-Do, or when other actions are considered to violate the rules and spirit of the tournament. ** In team matches, should a team member receive Shikkaku, the opponent will receive an additional eight points plus the opponent’s score, if that should be higher than their own. EXPLANATION: 1. A penalty can be directly imposed for a rule infraction, but once given, repeats of that category of infraction must be accompanied by an increase in severity of penalty imposed. For example, it is not possible to give a Keikoku for excessive contact, then give a warning (Atenai Yoni or Chukoku) for a second instance of excessive contact. 2. Penalties do not cross-accumulate. This is to say that a warning for the first instance of Mubobi will not be followed by an automatic Keikoku for the first instance of Jogai. The general penalties imposed are those of Keikoku, Hansoku-Chui, Hansoku and Shikkaku. The infraction should be indicated by prefacing the Hansoku-Chui or Keikoku with an explanation such as "Jogai (or Mubobi) Keikoku/ Hansoku-Chui". 3. When through various infractions, the penalties incurred in any one bout equal 8 points (or, in WKF divisions, a lead of 8 points), then the offender will be declared the loser and the winner announced as "AKA/Shiro No Kachi". 4. Warnings (Atenai Yoni or Chukoku) are given where there has clearly been a minor infraction of the rules, but the contestant’s potential for winning is not diminished (in the opinion of the Referee Panel) by the opponent’s foul. 5. A Keikoku may be imposed directly, without first giving a warning. Keikoku is normally imposed where the contestant’s potential for winning is slightly diminished (in the opinion of the Referee Panel) by the opponent’s foul. 6. A Hansoku-Chui may be imposed directly, or following a warning, or following Keikoku and s used where the contestant’s potential for winning has been seriously reduced (in the opinion of the Referee Panel) by the opponent’s foul. 7. A Hansoku is imposed for cumulative penalties, but can also be imposed directly for serious rules infractions. It is used when the contestant’s potential for winning has been reduced virtually to zero (in the opinion of the Referee Panel) by the opponent’s foul. 8. Any competitor who receives Hansoku for causing injury, and who has in the opinion of the Referee Panel and Match Area Controller, acted recklessly or dangerously or who is considered not to have the requisite control skills necessary for that particular experience category (i.e. Intermediate or Advanced divisions), will be reported to the Referee Council. The Referee Council will decide if that competitor shall be suspended from the
D17 Master of the Ring Copyright 2004 by Eric & Kevin Lamkin
Amateur Sport Karate Rules
rest of that competition and/or subsequent competitions. 9. A Shikkaku can be directly imposed without warnings of any kind. The contestant need have done nothing to merit it - it is sufficient if the Coach or noncombatant members of the contestant’s delegation behave in such a way as to harm the prestige and honor of Karate-Do. If the Referee believes that a contestant has acted maliciously, regardless of whether or not actual physical injury has been caused, Shikkaku not Hansoku is the correct penalty. 10. A public announcement of Shikkaku must be made.
ARTICLE 10 : INJURIES AND ACCIDENTS IN COMPETITION 10.1 Kiken, or forfeiture is the decision given when a contestant or contestants fail to present themselves when called, are unable to continue, abandon the bout, or are withdrawn on the order of the Referee. The grounds for abandonment may include injury not ascribable to the opponent’s actions. 10.2 If two contestants injure each other, or are suffering from the effects of previously incurred injuries, and are declared by the tournament Doctor to be unable to continue, the bout is awarded to the contestant who has amassed the most points. If the points score is equal, then a vote (Hantei) will decide the outcome of the bout. 10.3 An injured contestant who has been declared unfit to fight by the tournament Doctor cannot fight again in that competition. 10.4 An injured contestant who wins a bout through disqualification due to injury is not allowed to fight again in the competition without permission from the Doctor. If he is injured, he may win a second bout by disqualification, but is immediately withdrawn from further Kumite competition in that tournament. 10.5 When a contestant is injured, the Referee shall immediately halt the bout and call the doctor. The doctor is authorized to diagnose and treat injury only. 10.6 A competitor who is injured during a bout in progress and requires medical treatment will be allowed three minutes in which to receive it. If treatment is not completed within the time allowed, the Referee will decide if the competitor shall be declared unfit to fight (Article 13, Paragraph 9d), or whether an extension of treatment time shall be given. 10.7 Any competitor who falls, is thrown or knocked down and does not fully regain his or her feet within ten seconds, is considered unfit to continue fighting and will be automatically withdrawn from all Kumite events in that tournament. In the event that a competitor falls, is thrown or knocked down and does not regain his or her feet immediately, the Referee will signal to the timekeeper to start the ten second countdown by a blast on his whistle, at the same time calling for the Doctor, if required. The timekeeper will stop the clock when the Referee raises his arm.
D18 Master of the Ring Copyright 2004 by Eric & Kevin Lamkin
Amateur Sport Karate Rules
EXPLANATION: 1. When the Doctor declares the contestant unfit, the appropriate entry must be made on the contestant’s monitoring card. The extent of the unfitness must be made clear to other Refereeing Panels. 2. A contestant may win through disqualification of the opponent for accumulated minor Category 1 infractions. Perhaps the winner has sustained no significant injury. A second win on the same grounds must lead to withdrawal, even though the contestant may be physically able to continue. 3. Self inflicted injury and those injuries caused by the athlete are easy to deal with, but when assessing an injury caused by the opponent’s technique, the Panel must consider whether the technique was valid. Was it properly applied to the proper area at the correct time and with the correct degree of control? Consideration of this will assist the Referee Panel in deciding whether the injured contestant should be declared the loser by Kiken, or ether the opponent should be penalized for a foul. 4. The Referee should only call the Doctor when a contestant is injured and needs medical treatment. 5. The Doctor is obliged to make safety recommendations only as they relate to the proper medical management of that particular injured contestant. 6. When applying the "Ten Second Rule" the time will be kept by a timekeeper appointed for this specific purpose. A warning will be sounded at seven seconds followed by the final bell at ten seconds. The timekeeper will start the clock only on the Referee’s signal. The timekeeper will stop the clock when the competitor stands fully upright and the Referee raises his arm. 7. The Referee Panel will decide the winner on the basis of Hansoku, Kiken or Shikkaku as the case may be. 8. In team matches, should a team member receive Kiken, the opponent will receive an additional eight points plus the opponent’s score, if that should be higher than their own.
ARTICLE 11 : OFFICIAL PROTEST 11.1 No one may protest about a judgment to the members of the Refereeing Panel. 11.2 I f a refereeing procedure appears to contravene the rules, the President of the Federation, or the Official Representative, is the only one allowed to make a protest. 11.3 The protest will take the form of a written report submitted immediately after the bout in which the protest was generated. (The sole exception is when the protest concerns an administrative malfunction. The Match Area Controller should be notified immediately when an administrative malfunction is detected). 11.4 The protest must be submitted to a representative of the Referee Council. In due course the Council will review the circumstances leading to the protested decision. Having
D19 Master of the Ring Copyright 2004 by Eric & Kevin Lamkin
Amateur Sport Karate Rules
considered all the facts available, they will produce a report, and shall be empowered to take action as may be called for. 11.5 Any protest concerning application of the rules must be made in accordance with the complaints procedure defined by the USA-NKF and submitted in writing on an approved form and signed by the official representative of the team or contestant(s). 11.6 The complainant must deposit a sum of money in an amount as shall be established by the USA-NKF, with the Treasurer and a duplicate receipt will be issued. The protest, plus a copy of the receipt, must be lodged with the Chairman of the Referee Council. EXPLANATION: 1. The protest must give the names of the contestants, the Referee Panel officiating, and the precise details of what is being protested. No general claims about overall standards will be accepted as a legitimate protest. The burden of proving the validity of the protest lies with the complainant. 2. The protest will be reviewed by the Referee Council and as part of this review, the Council will study the evidence submitted in support of the protest. The Council will also study official videos and question Match Area Controllers in an effort to objectively examine the protest’s validity. 3. If the protest is held by the Referee Council to be valid, the appropriate action will be taken. In addition, all such measures will be taken to avoid a recurrence in future competitions. The deposit paid will be refunded by the Treasury. 4. If the protest is held by the Referee Council to be invalid, it will be rejected and the deposit forfeited to the USA-NKF. 5. Ensuing matches or bouts will not be delayed, even if an official protest is being prepared. It is the responsibility of the Arbitrator to ensure that the match as been conducted in accordance with the Rules of Competition. 6. In the case of an administrative malfunction during a match in progress, the Coach can notify the Match Area Controller directly. In turn, the Match Area Controller will notify the Referee.
ARTICLE 12 : POWERS AND DUTIES REFEREE COUNCIL The Referee Council’s powers and duties shall be as follows: 1. To ensure the correct preparation for each given tournament in consultation with the Organizing Committee, with regard to competition area arrangement, the provision and deployment of all equipment and necessary facilities, match operation and supervision, safety precautions, etc. 2. To appoint and deploy the Match Area Controllers (Chief Referees) to their respective areas and to act upon and take such action as may be required by the reports of Match Area Controllers.
D20 Master of the Ring Copyright 2004 by Eric & Kevin Lamkin
Amateur Sport Karate Rules
3. To supervise and coordinate the overall performance of the refereeing officials. 4. To nominate substitute officials where such are required. The composition of a Panel of officials may not be changed at the sole discretion of the Arbitrator, Referee, or Judge. 5. To investigate and render judgment on matters of official protest. 6. To pass the final judgment on matters of a technical nature which may arise during a given match and for which there are no stipulations in the rules. MATCH AREA CONTROLLERS The Match Area Controllers powers and duties shall be as follows: 1. To delegate, appoint, and supervise the Referees and Judges, for all matches in areas under their control. 2. To oversee the performance of the Referees and Judges in their areas, and to ensure that the Officials appointed are capable of the tasks allotted them. 3. To order the Referee to halt the match when the arbitrator signals a contravention of the Rules of Competition. 4. To prepare a daily, written report on the performance of each official under their supervision, together with their recommendations, if any, to the Referee Council and the Examining Committee. REFEREES The Referee’s powers and duties shall be as follows: 1. The Referee (Shushin) shall have the power to conduct matches, including announcing the start, the suspension, and the end of the match. 2. To award points. 3. To explain to the Match Area Controller, or Referee Council if necessary, the basis for giving a judgment. 4. To impose penalties, and to issue warnings before, during, or after a bout. 5. To obtain and act upon the opinion(s) of the Judges (by flag gestures). 6. To announce extensions. 7. To conduct voting of the Referee Panel (Hantei), and announce the result. 8. To announce the winner of the bout. 9. The authority of the Referee is not confined solely to the competition area, but also to all of its immediate perimeter. 10. The Referee shall give all commands and make all announcements.
D21 Master of the Ring Copyright 2004 by Eric & Kevin Lamkin
Amateur Sport Karate Rules

11. When the Judges signal, the referee must consider their opinions and render a judgment. The Referee however, will only stop the match if he agrees with the opinions tendered. JUDGES The Judges (Fukushin) powers and duties shall be as follows: 1. To assist the Referee by flag signals. 2. To exercise a right to vote on a decision to be taken. 3. The Judges shall carefully observe the actions of the contestants and signal to the Referee an opinion in the following cases:
a) When a score is observed; b) When a contestant has committed a prohibited act and/or technique; c) When an injury or illness of a contestant is noticed; d) When both or either of the contestants have moved out of the competition area (Jogai); e) In other cases when it is deemed necessary to call the attention of the Referee.
ARBITRATORS The Arbitrator (Kansa) will assist the Match Area Controller by overseeing the match or bout in progress. Should decisions of the Referee and/or Judges, not be in accordance with the Rules of Competition, the Arbitrator will immediately raise the red flag or sign and sound the buzzer. The Match Area Controller will instruct the Referee to halt the match or bout, and correct the irregularity. Records kept of the match shall become official records subject to the approval of the Arbitrator. SCORE SUPERVISORS The Score Supervisor will keep a separate record of the scores awarded by the Referee and at the same time oversee the actions of the appointed timekeepers and scorekeepers. EXPLANATION: 1. When three Judges give the same signal, or indicate a score for the same competitor, the Referee will stop the bout and render the majority decision. Should the Referee fail to stop the bout, the Arbitrator will raise the red flag or sign and sound the buzzer. 2. When two Judges give the same signal, or indicate a score for the same competitor, the Referee will consider their opinions, but may decline to stop the bout if he believes them to be mistaken. The Referee’s judgment in this instance is made "on the move". Before overruling the Judges signal, the Referee must consider whether the Judges were better sighted. Judges will signal only by flag gesture, they will not use whistles. 3. However, when the bout is halted, the majority decision will prevail. The Referee may ask the Judges to reconsider, but may not give a decision against two Judges, unless he has the positive support of the other Judge.
D22 Master of the Ring Copyright 2004 by Eric & Kevin Lamkin
Amateur Sport Karate Rules
4. The Referee may ask the Judges to reconsider when he believes them mistaken, or when implementation would be a violation of the rules, such as when a technique has made excessive contact, when a score is signaled for a competitor who was outside of the match area (Jogai), or when the Referee considers the score signaled is too high or too low. 5. When three Judges each have different opinions, the Referee may give a decision which is supported by one of the Judges. 6. At Hantei the Referee and Judges each have one vote. In the event of a tied Encho-Sen, the Referee will have a casting vote. 7. The judges must only score what they actually see. If they are not sure that a technique actually reached a scoring area, they should signal that they did not see (Mienai) . 8. The role of the Arbitrator is to ensure that the match or bout is conducted in accordance with the Rules of Competition. He is not there as an additional Judge. He has no vote, not has he any authority in matters of judgment, such as whether a score was valid or if Jogai occurred. His sole responsibility is in matters of procedure. 9. In the event that the Referee does not hear the time-up bell, the Score Supervisor will blow his whistle. 10. The good Referee will not halt the smooth flow of the bout unless it is necessary to do so. All halts with no outcome, such as "Yame - Torimasen" must be avoided. 11. When explaining the basis for a judgment after the match, the Referee Panel may speak to the Match Area Controller or the Referee Council. They will explain to no one else.
ARTICLE 13 : STARTING, SUSPENDING AND ENDING OF MATCHES 13.1 The terms and gestures to be used by the Referee and Judges in the operation of a match shall be as specified in Appendices 1 and 2. 13.2 The Referee and Judges shall take up their prescribed positions and following an exchange of bows between the contestants, the Referee will announce "Shobu Hajime!" and the bout will commence. 13.3 The Referee will stop the bout by announcing "Yame!" . If necessary, the Referee will order the contestants to take up their original positions (Moto No Ichi) . 13.4 The Referee returns to his position and the Judges indicate their opinion by means of a signal. In the case of a score to be awarded the Referee identifies the contestant (Aka or Shiro) , the area attacked (Chudan or Jodan) , the scoring technique (Tsuki, Uchi or Keri) , and then awards the relevant score using the prescribed gesture. The Referee then restarts the bout by calling "Tsuzukete Hajime!" . 13.5 In adult Advanced (WKF) Kumite divisions, when a contestant has established a clear lead of eight points during a bout, the Referee shall call "Yame" and order the contestants
D23 Master of the Ring Copyright 2004 by Eric & Kevin Lamkin
Amateur Sport Karate Rules
back to their starting lines as he returns to his. The winner is then declared and indicated by the Referee raising a hand on the side of the winner and declaring "Shiro (Aka) No Kachi" . The bout is ended at this point. In all other Kumite divisions, the first contestant to accumulate eight points shall be declared the winner. 13.6 When time is up, the contestant who has the most points is declared the winner, indicated by the Referee raising a hand on the side of the winner, and declaring "Shiro (Aka) No Kachi" . The bout is ended at this point. 13.7 When time is up and the scores are equal, or no scores have been awarded, the Referee shall call "Yame" and return to his position. Moving to the match area perimeter, the Referee will call "Hantei" and give a two-tone blast on his whistle. The Referee and the Judges together will indicate their opinions, the Judges by raising their flags and the Referee by raising his arm. In the event of equal votes, the Referee will announce a tie (Hikiwake) , and the start of Encho-Sen where applicable by calling "Shobu Hajime" . 13.8 The Judges and Referee have one vote each at Hantei , except at the end of an inconclusive Encho-Sen , when the Referee may use a casting vote to break any further tie. 13.9 When faced with the following situations, the Referee will call out "Yame" and halt the bout temporarily.
a) When either or both contestants are out of the match area, or when a judge signals Jogai; b) When either the Referee orders the contestant to adjust the Karate GI or protective equipment; c) When a contestant has contravened the rules; d) When the Referee considers that one or both of the contestants cannot continue with the bout owing to injuries, illness, or other causes. Heeding the tournament Doctor’s opinion, the Referee will decide whether the bout should be continued;e) When a contestant seizes the opponent and does not perform an immediate technique or throw within two to three seconds; f) When one or both contestants fall or are thrown and no effective techniques are made within two to three seconds; g) When both contestants are off their feet following a fall or attempted throw and begin to wrestle; h) When three Judges give the same signal, or indicate a score for the same competitor.
EXPLANATION: 1. When beginning a bout, the Referee first calls the contestants to their starting lines. If a contestant enters the area prematurely, they must be motioned off. The contestants must bow properly to each other - a quick nod is both discourteous and insufficient. The Referee can call for a bow where none is volunteered by motioning as shown in Appendix 2 of the rules. 2. When restarting the bout, the Referee should check that both contestants are on their lines and properly composed. Contestants jumping up and down, or otherwise fidgeting
D24 Master of the Ring Copyright 2004 by Eric & Kevin Lamkin
Amateur Sport Karate Rules

must be stilled before combat can recommence. The Referee must restart the bout with the minimum of delay.
ARTICLE 14 : MODI FICATIONS 14.1 Only the USA-NKF Referee Council and Technical Committee with the approval of the Board of Directors can alter or modify these rules. KATA RULES The Kata Rules herein are required for the "WKF" or "Mandatory" Kata divisions. All other divisions, shall be conducted with a panel of 5 (five) Judges awarding numerical scores in the standard and accepted tournament procedures.
D25 Master of the Ring Copyright 2004 by Eric & Kevin Lamkin
Amateur Sport Karate Rules
KATA RULES
ARTICLE 1 : KATA COMPETITION AREA 1.1 The competition area must be flat and devoid of hazard. 1.2 The competition area must be of sufficient size to permit the uninterrupted performance of Kata. EXPLANATION: 1. For the proper performance of Kata, a stable smooth surface is required. Usually the matted Kumite areas will be suitable.
ARTICLE 2 : OFFICIAL DRESS
2.1 Contestants and Judges must wear the official uniform as defined in Article 2 of the Kumite Rules. 2.2 Any person who does not comply with this regulation may be disbarred. EXPLANATION: 1. The Karate GI jacket may not be removed during the performance of Kata. 2. Contestants who present themselves incorrectly dressed will be given one minute in which to remedy matters.
ARTICLE 3 : ORGANIZATION OF KATA COMPETITION 3.1 Kata competition takes the form of Team and Individual matches. Team matches consist of competition between three person teams. Each team is exclusively male, or exclusively female. The individual Kata match consists of individual performance in separate male and female divisions. 3.2 The elimination system with repechage will be applied. 3.3 The contestants will be expected to perform both compulsory (Shitei) and free selection (Tokui) Kata during the competition. Kata will be in accordance with the schools of Karate-Do recognized by the World Karate Federation (WKF), based on the Goju, Shito, Shoto, and Wado systems. In the first two rounds, no variations will be permitted. A schedule of the compulsory Kata is given in Appendix 6, and a list of the recognized Kata in Appendix 7. 3.4 In the first two rounds, contestants may choose only from the list of compulsory Kata. No variation of the chosen Kata will be permitted. 3.5 In subsequent rounds, contestants may choose from the list of Tokui Kata in Appendix 7. Variations as taught by the contestant’s school are permitted.
D26 Master of the Ring Copyright 2004 by Eric & Kevin Lamkin
Amateur Sport Karate Rules
3.6 The score table will be notified of the choice of Kata prior to the round. 3.7 Contestants must perform a different Kata in each round. Once performed, a Kata may not be repeated. However, should a preliminary qualifying round be required due to numbers competing, the pre-qualifying Kata, chosen from the compulsory list, may be repeated in the round proper. 3.8 In the finals of Team Kata competition, the two finalist Teams will perform their chosen Kata from the Tokui list in Appendix 7 in the normal way. They will then perform a demonstration of the meaning of the Kata (Bunkai). The time allotted for the Bunkai demonstration is three minutes.
ARTICLE 4 : THE JUDGING PANEL
4.1 The Panel of three Judges for each match will be designated by the Referee Council or Match Area Controller. 4.2 In addition, scorekeepers and caller/ announcers will be appointed. EXPLANATION: 1. The Chief Kata Judge will sit at the perimeter of the competition area facing the contestant(s). The other two Judges will sit on the left and right sides, two meters from the centerline of the area, and towards the contestant’s entry point. All three will have a red and a blue flag.
ARTICLE 5 : CRITERIA FOR DECISION 5.1 The Kata must be performed with competence, and must demonstrate a clear understanding of the traditional principles it contains. In assessing the performance of contestant or team the Judges will look for:
a) A realistic demonstration of the Kata meaning; b) Understanding of the techniques being used (Bunkai); c) Good timing, rhythm, speed, balance, and focus of power (Kime); d) Correct and proper use of breathing as an aid to Kime; e) Correct focus of attention (Chakugan) and concentration; f) Correct stances (Dachi) with proper tension in the legs, and feet flat on the floor as appropriate to the particular stance; g) Proper tension in the abdomen (Hara), and no bobbing up and down of the hips when moving; h) Correct form (Kihon) of the style being demonstrated; i) The performance should also be evaluated with a view to discerning other points; j) In Team Kata, synchronization without external cues is an added factor.
5.2 In the first two rounds, a contestant who varies the Kata will be disqualified. A contestant who comes to a halt during the performance of the Kata, or who performs a Kata different from that announced will be disqualified.
D27 Master of the Ring Copyright 2004 by Eric & Kevin Lamkin
Amateur Sport Karate Rules
EXPLANATION: 1. Kata is not a dance or theatrical performance. It must adhere to the traditional values and principles. It must be realistic in fighting terms and display concentration, power, and potential impact in its techniques. In must demonstrate strength, power and speed - as well as grace, rhythm and balance. 2. In Team Kata, all three team members must start the Kata facing in the same direction and towards the Chief Judge. 3. The members of the team must demonstrate competence in all aspects of the Kata performance, as well as synchronization. 4. Commands to start and stop the performance, stamping the feet, slapping the chest, arms, or Karate GI, and inappropriate exhalation, are all examples of external cues and should be taken into account by the Judges when arriving at a decision.
ARTICLE 6 : OPERATION OF MATCHES
6.1 At the start of each bout and in answer to their names, the two contestants, one wearing a red belt (AKA), and the other wearing a blue belt (Shiro), will line up at the match area perimeter facing the Chief Kata Judge. Following a bow to the Judging Panel, Shiro will then step back out of the Match area. After moving to the starting position and a clear announcement of the name of the Kata that is to be performed, AKA will begin. On completion of the Kata, AKA will leave the area to await the performance of Shiro. After Shiro’s Kata has been completed, both will return to the match area perimeter and await the decision of the Panel. 6.2 If the Kata does not conform to the Rules, or there is some other irregularity, the Chief Judge may call the other Judges in order to reach a verdict. 6.3 If a contestant is disqualified, the Chief Judge will cross and uncross the flags (as in the Kumite "Torimasen" signal). 6.4 After completion of both Kata, the contestants will stand side by side on the perimeter. The Chief Judge will call for a decision (Hantei), and blow a two-tone blast on the whistle. The three flags will be raised at the same time. 6.5 The Chief Judge will blow a further short blast on the whistle, whereupon the flags will be lowered. 6.6 The decision will be for AKA or Shiro. No ties are permitted. The competitor who receives two or three votes is declared the winner by the caller/ announcer. 6.7 The competitors will bow to each other, then to the Judging Panel, and leave the area.
D28 Master of the Ring Copyright 2004 by Eric & Kevin Lamkin
Amateur Sport Karate Rules
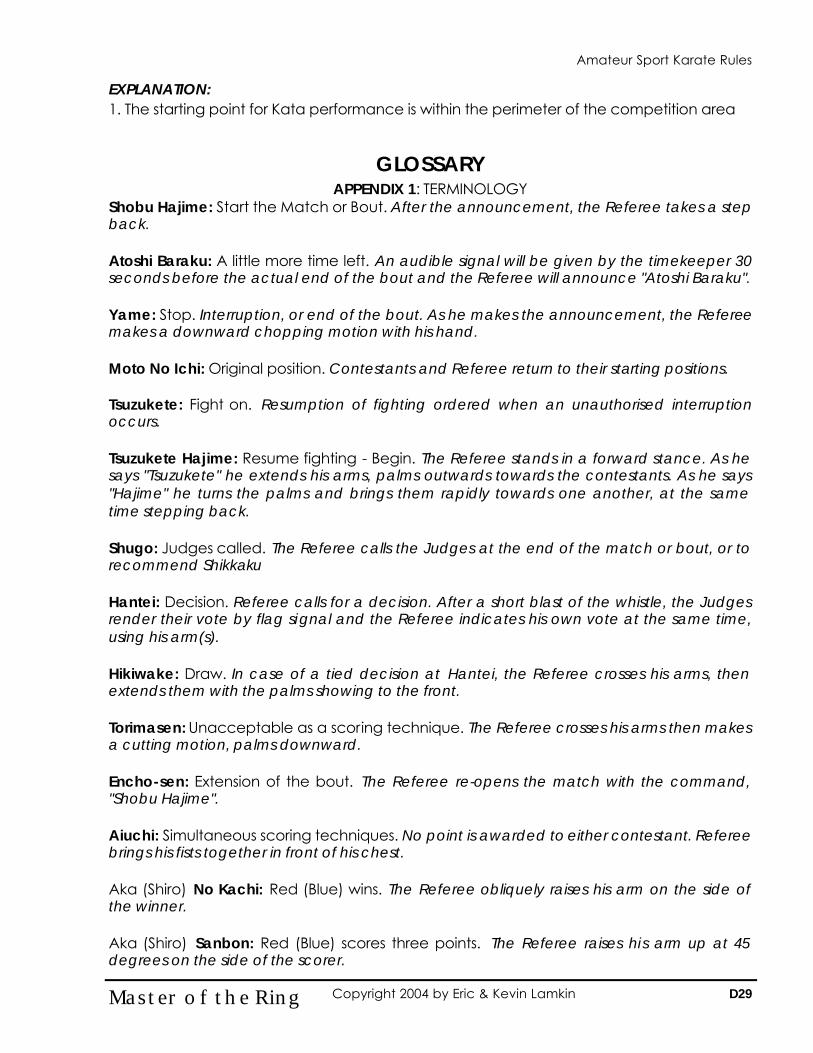
EXPLANATION: 1. The starting point for Kata performance is within the perimeter of the competition area
GLOSSARY APPENDIX 1: TERMINOLOGY
Shobu Hajime: Start the Match or Bout. After the announcement, the Referee takes a step back. Atoshi Baraku: A little more time left. An audible signal will be given by the timekeeper 30 seconds before the actual end of the bout and the Referee will announce "Atoshi Baraku". Yame: Stop. Interruption, or end of the bout. As he makes the announcement, the Referee makes a downward chopping motion with his hand. Moto No Ichi: Original position. Contestants and Referee return to their starting positions. Tsuzukete: Fight on. Resumption of fighting ordered when an unauthorised interruption occurs. Tsuzukete Hajime: Resume fighting - Begin. The Referee stands in a forward stance. As he says "Tsuzukete" he extends his arms, palms outwards towards the contestants. As he says "Hajime" he turns the palms and brings them rapidly towards one another, at the same time stepping back. Shugo: Judges called. The Referee calls the Judges at the end of the match or bout, or to recommend Shikkaku Hantei: Decision. Referee calls for a decision. After a short blast of the whistle, the Judges render their vote by flag signal and the Referee indicates his own vote at the same time, using his arm(s). Hikiwake: Draw. In case of a tied decision at Hantei, the Referee crosses his arms, then extends them with the palms showing to the front. Torimasen: Unacceptable as a scoring technique. The Referee crosses his arms then makes a cutting motion, palms downward. Encho-sen: Extension of the bout. The Referee re-opens the match with the command, "Shobu Hajime". Aiuchi: Simultaneous scoring techniques. No point is awarded to either contestant. Referee brings his fists together in front of his chest. Aka (Shiro) No Kachi: Red (Blue) wins. The Referee obliquely raises his arm on the side of the winner. Aka (Shiro) Sanbon: Red (Blue) scores three points. The Referee raises hi s arm up at 45 degrees on the side of the scorer.
D29 Master of the Ring Copyright 2004 by Eric & Kevin Lamkin
Amateur Sport Karate Rules

Aka (Shiro) Nihon: Red (Blue) scores two points. The Referee extends his arm at shoulder level on the side of the scorer. Aka (Shiro) Ippon: Red (Blue) scores one point. The Referee extends his arm downward at 45 degrees on the side of the scorer. Chukoku: First Category 1 or Category 2 warning without penalty. For Category 1 offences, the Referee turns toward the offender and crosses his arms at chest level. For Category 2 offences, the Referee points his index finger (arm bent), at the face of the offender. Keikoku: Warning with Ippon penalty. The Referee indicates a Category 1 or 2 offence then points with his index finger downwards at 45 degrees in the direction of the offender, and awards Ippon (one point) to the opponent. Hansoku-chu: Warning with Nihon penalty. The Referee indicates a Category 1 or 2 offence then points with his index finger horizontally in the direction of the offender and awards Nihon (two points) to the opponent. Hansoku: Disqualification. The Referee indicates a Category 1 or 2 offence then points with his index finger upwards at 45 degrees in the direction of the offender, and announces a win for the opponent. Jogai: Exit from the match area. The Referee points his index finger on the side of the offender to indicate to the Judges that the contestant has moved out of the area. Shikkaku: Disqualification "Leave the Area". The Referee points first upwards at 45 degrees in the direction of the offender then motions out and behind with the announcement "Aka (Shiro) Shikkaku!" He then announces a win for the opponent. Kiken: Renunciation. The Referee points downwards at 45 degrees in the direction of the contestant's starting line. Mubobi: Self Endangerment. The Referee touches his face then turning his hand edge forward, moves it back and forth to indicate to the Judges that the contestant is endangering himself.
D30 Master of the Ring Copyright 2004 by Eric & Kevin Lamkin
Amateur Sport Karate Rules
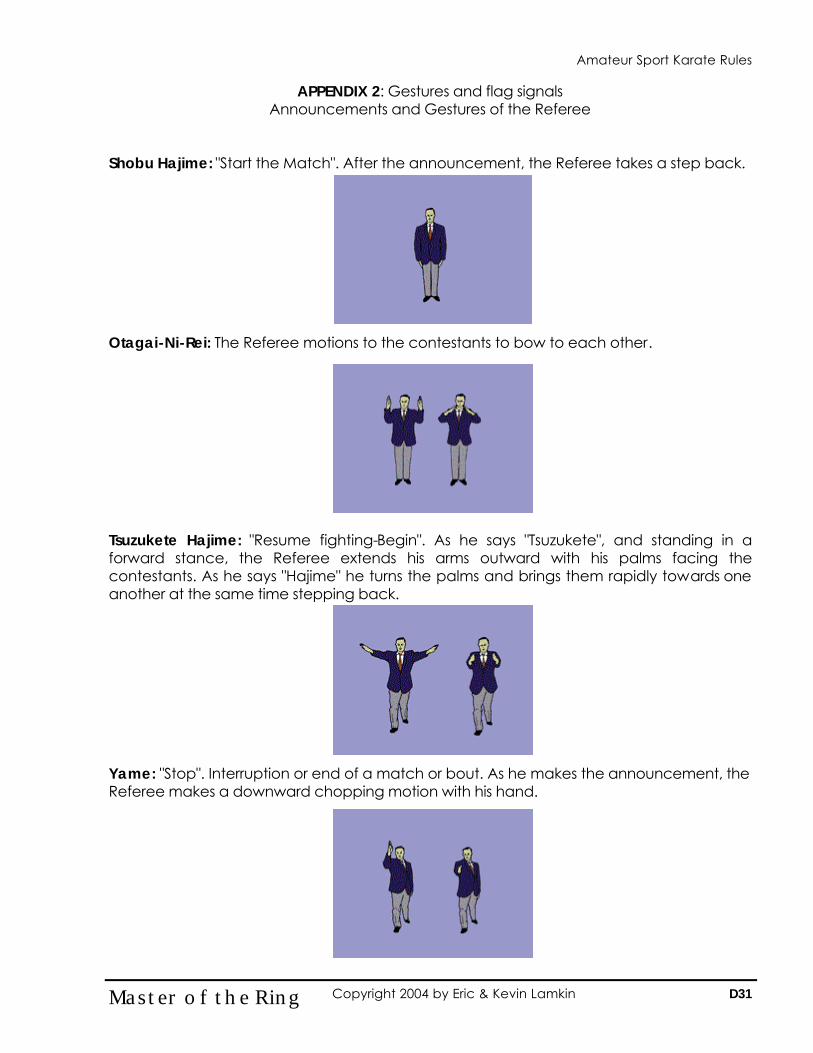
APPENDIX 2: Gestures and flag signals Announcements and Gestures of the Referee
Shobu Hajime: "Start the Match". After the announcement, the Referee takes a step back.
Otagai-Ni-Rei: The Referee motions to the contestants to bow to each other. Tsuzukete Hajime: "Resume fighting-Begin". As he says "Tsuzukete", and standing in a forward stance, the Referee extends his arms outward with his palms facing the contestants. As he says "Hajime" he turns the palms and brings them rapidly towards one another at the same time stepping back. Yame: "Stop". Interruption or end of a match or bout. As he makes the announcement, the Referee makes a downward chopping motion with his hand.
D31 Master of the Ring Copyright 2004 by Eric & Kevin Lamkin
Amateur Sport Karate Rules
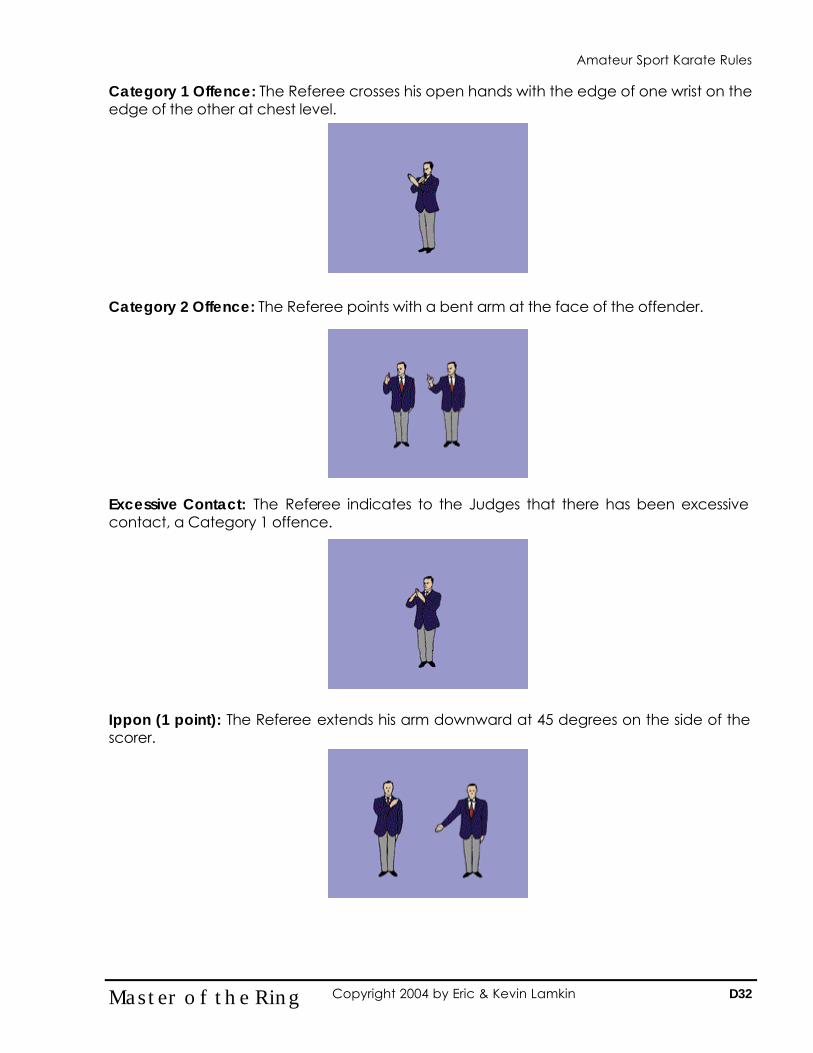
Category 1 Offence: The Referee crosses his open hands with the edge of one wrist on the edge of the other at chest level. Category 2 Offence: The Referee points with a bent arm at the face of the offender. Excessive Contact: The Referee indicates to the Judges that there has been excessive contact, a Category 1 offence. Ippon (1 point): The Referee extends his arm downward at 45 degrees on the side of the scorer.
D32 Master of the Ring Copyright 2004 by Eric & Kevin Lamkin
Amateur Sport Karate Rules
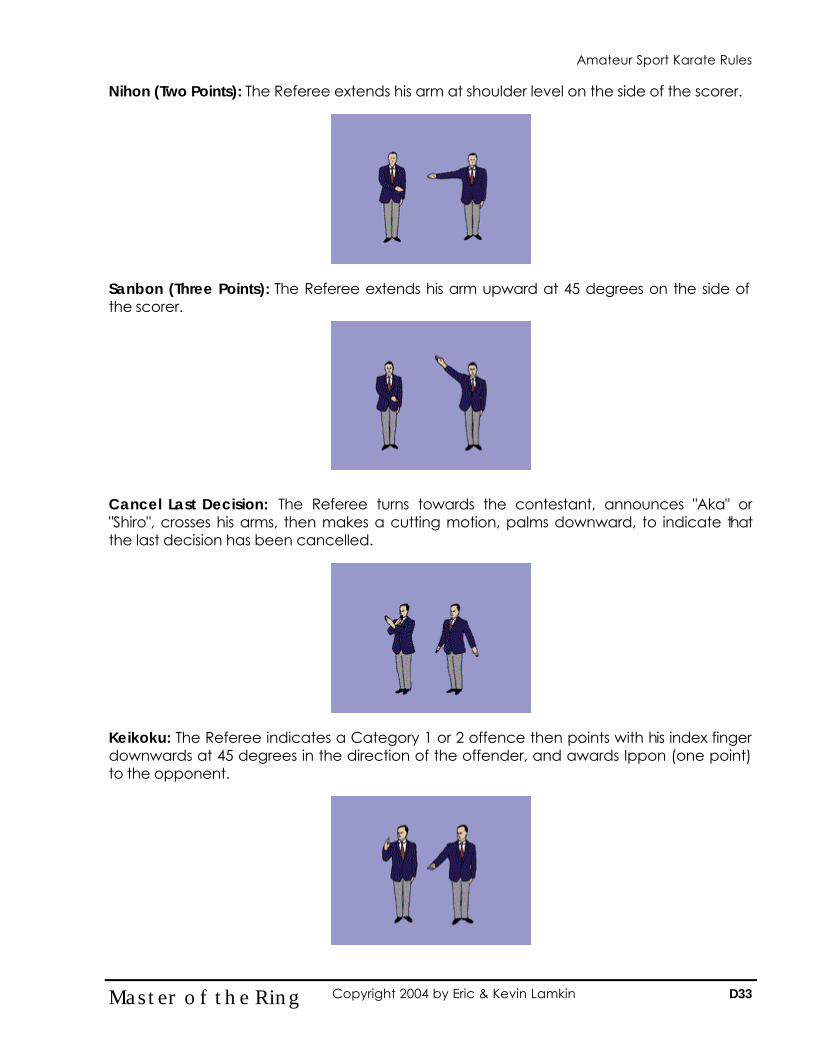
Nihon (Two Points): The Referee extends his arm at shoulder level on the side of the scorer. Sanbon (Three Points): The Referee extends his arm upward at 45 degrees on the side of the scorer. Cancel Last Decision: The Referee turns towards the contestant, announces "Aka" or "Shiro", crosses his arms, then makes a cutting motion, palms downward, to indicate that the last decision has been cancelled. Keikoku: The Referee indicates a Category 1 or 2 offence then points with his index finger downwards at 45 degrees in the direction of the offender, and awards Ippon (one point) to the opponent.
D33 Master of the Ring Copyright 2004 by Eric & Kevin Lamkin
Amateur Sport Karate Rules
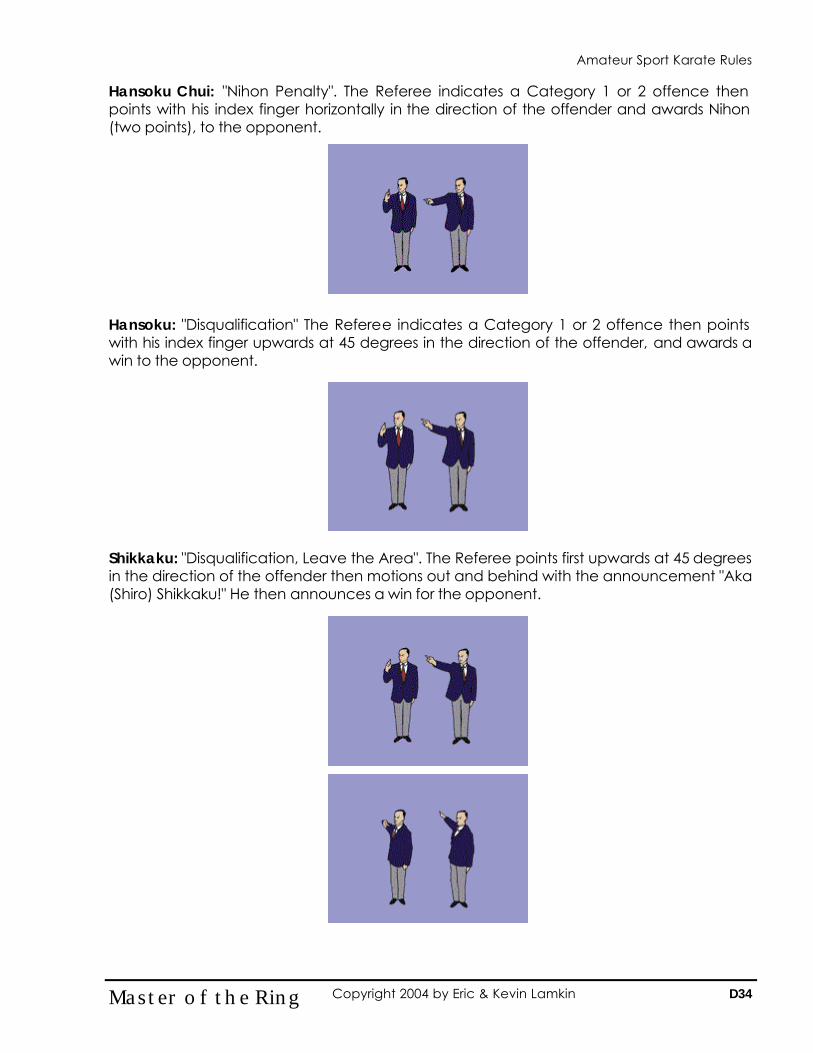
Hansoku Chui: "Nihon Penalty". The Referee indicates a Category 1 or 2 offence then points with his index finger horizontally in the direction of the offender and awards Nihon (two points), to the opponent. Hansoku: "Disqualification" The Referee indicates a Category 1 or 2 offence then points with his index finger upwards at 45 degrees in the direction of the offender, and awards a win to the opponent. Shikkaku: "Disqualification, Leave the Area". The Referee points first upwards at 45 degrees in the direction of the offender then motions out and behind with the announcement "Aka (Shiro) Shikkaku!" He then announces a win for the opponent.
D34 Master of the Ring Copyright 2004 by Eric & Kevin Lamkin
Amateur Sport Karate Rules
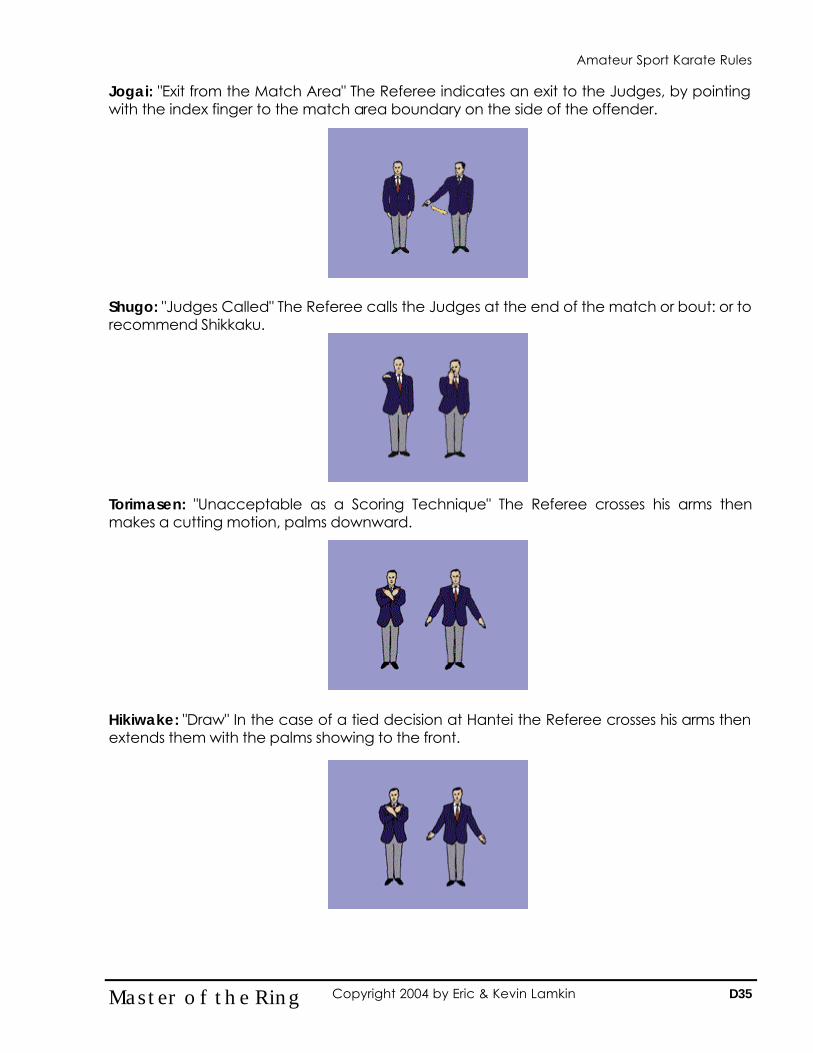
Jogai: "Exit from the Match Area" The Referee indicates an exit to the Judges, by pointing with the index finger to the match area boundary on the side of the offender. Shugo: "Judges Called" The Referee calls the Judges at the end of the match or bout: or to recommend Shikkaku. Torimasen: "Unacceptable as a Scoring Technique" The Referee crosses his arms then makes a cutting motion, palms downward. Hikiwake: "Draw" In the case of a tied decision at Hantei the Referee crosses his arms then extends them with the palms showing to the front.
D35 Master of the Ring Copyright 2004 by Eric & Kevin Lamkin
Amateur Sport Karate Rules
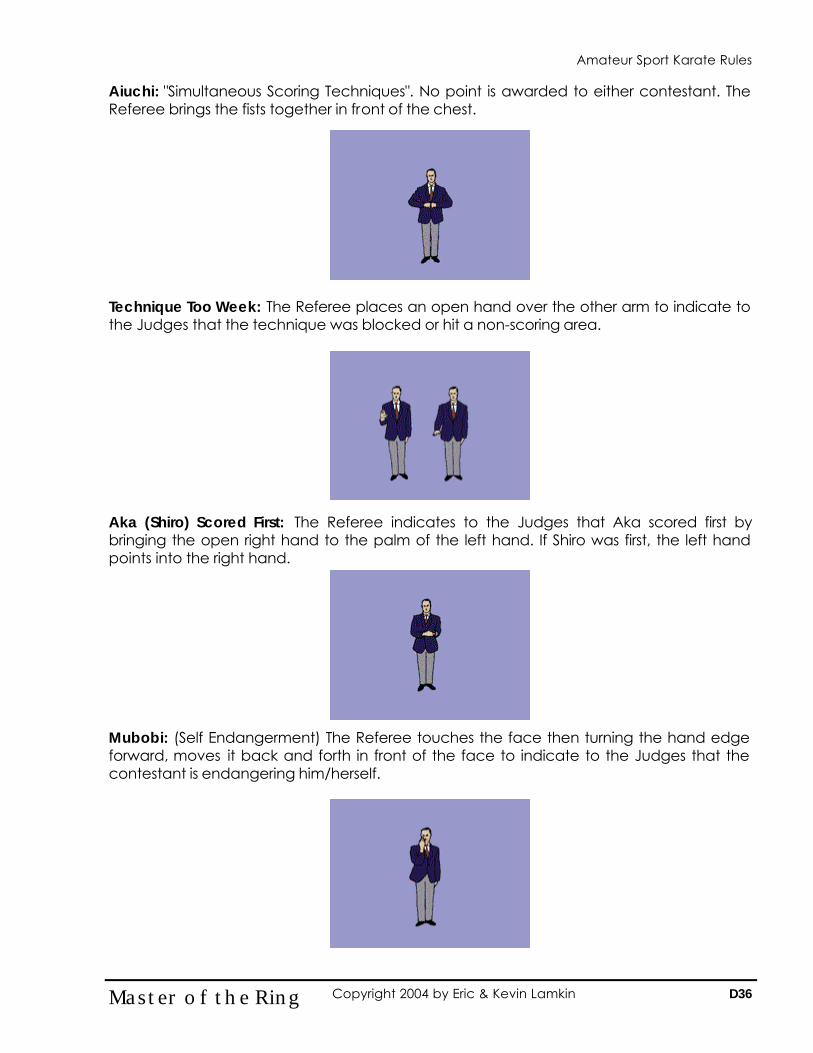
Aiuchi: "Simultaneous Scoring Techniques". No point is awarded to either contestant. The Referee brings the fists together in front of the chest. Technique Too Week: The Referee places an open hand over the other arm to indicate to the Judges that the technique was blocked or hit a non-scoring area. Aka (Shiro) Scored First: The Referee indicates to the Judges that Aka scored first by bringing the open right hand to the palm of the left hand. If Shiro was first, the left hand points into the right hand. Mubobi: (Self Endangerment) The Referee touches the face then turning the hand edge forward, moves it back and forth in front of the face to indicate to the Judges that the contestant is endangering him/herself.
D36 Master of the Ring Copyright 2004 by Eric & Kevin Lamkin
Amateur Sport Karate Rules
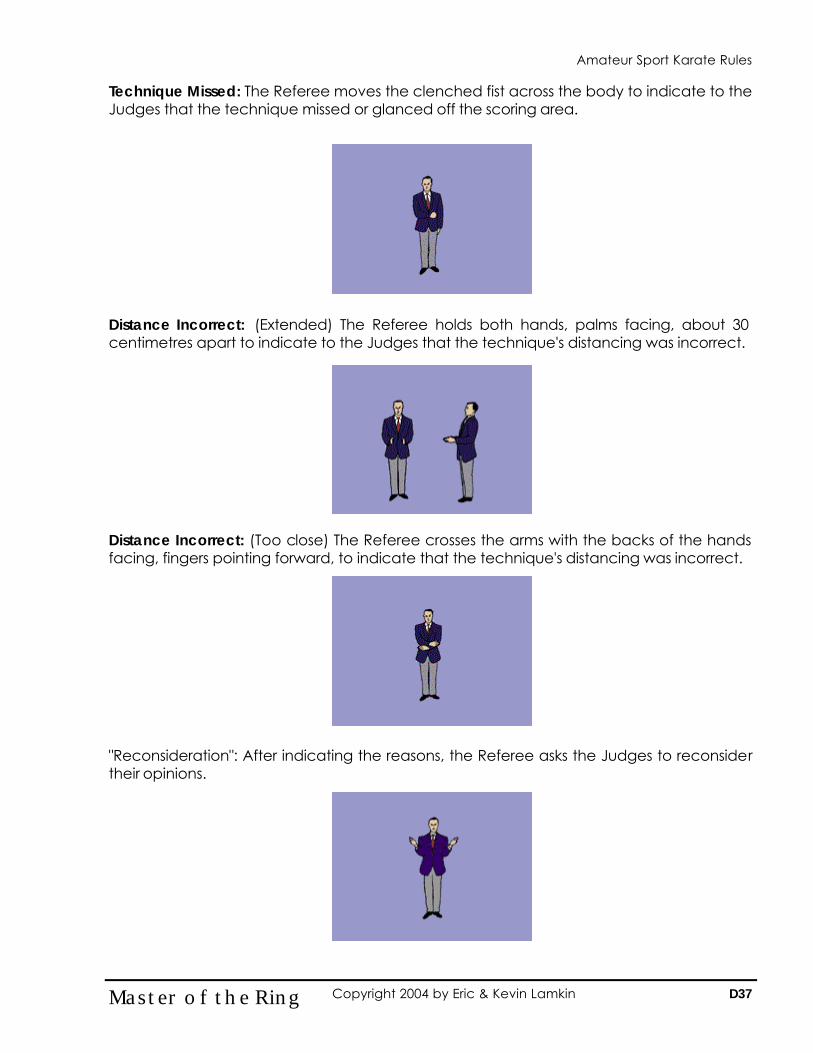
Technique Missed: The Referee moves the clenched fist across the body to indicate to the Judges that the technique missed or glanced off the scoring area. Distance Incorrect: (Extended) The Referee holds both hands, palms facing, about 30 centimetres apart to indicate to the Judges that the technique's distancing was incorrect. Distance Incorrect: (Too close) The Referee crosses the arms with the backs of the hands facing, fingers pointing forward, to indicate that the technique's distancing was incorrect. "Reconsideration": After indicating the reasons, the Referee asks the Judges to reconsider their opinions.
D37 Master of the Ring Copyright 2004 by Eric & Kevin Lamkin
Amateur Sport Karate Rules
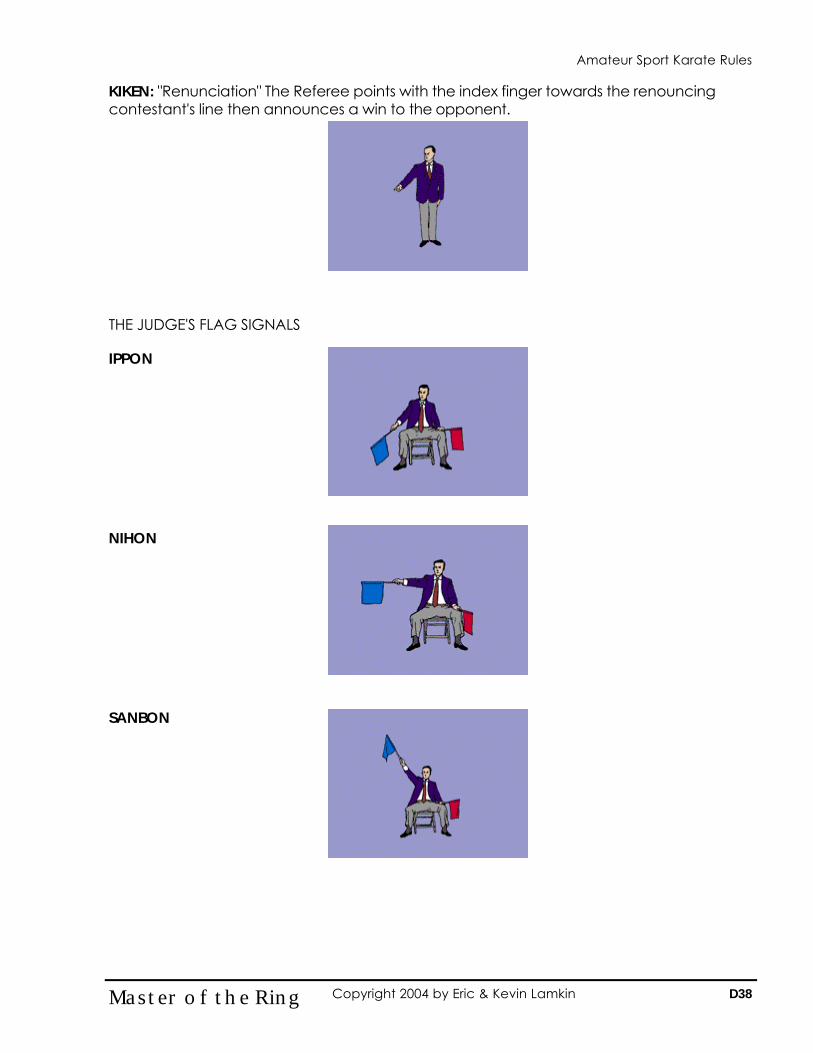
KIKEN: "Renunciation" The Referee points with the index finger towards the renouncing contestant's line then announces a win to the opponent. THE JUDGE'S FLAG SIGNALS IPPON NIHON SANBON
D38 Master of the Ring Copyright 2004 by Eric & Kevin Lamkin
Amateur Sport Karate Rules
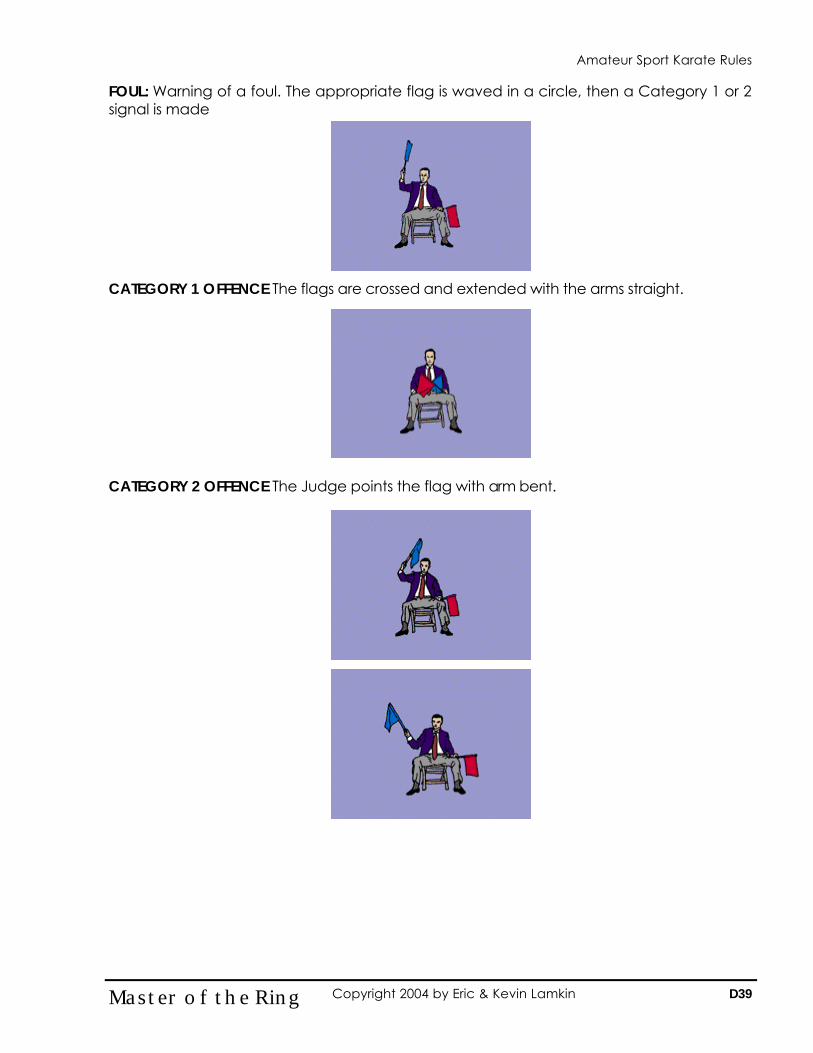
FOUL: Warning of a foul. The appropriate flag is waved in a circle, then a Category 1 or 2 signal is made CATEGORY 1 OFFENCE The flags are crossed and extended with the arms straight. CATEGORY 2 OFFENCE The Judge points the flag with arm bent.
D39 Master of the Ring Copyright 2004 by Eric & Kevin Lamkin
Amateur Sport Karate Rules
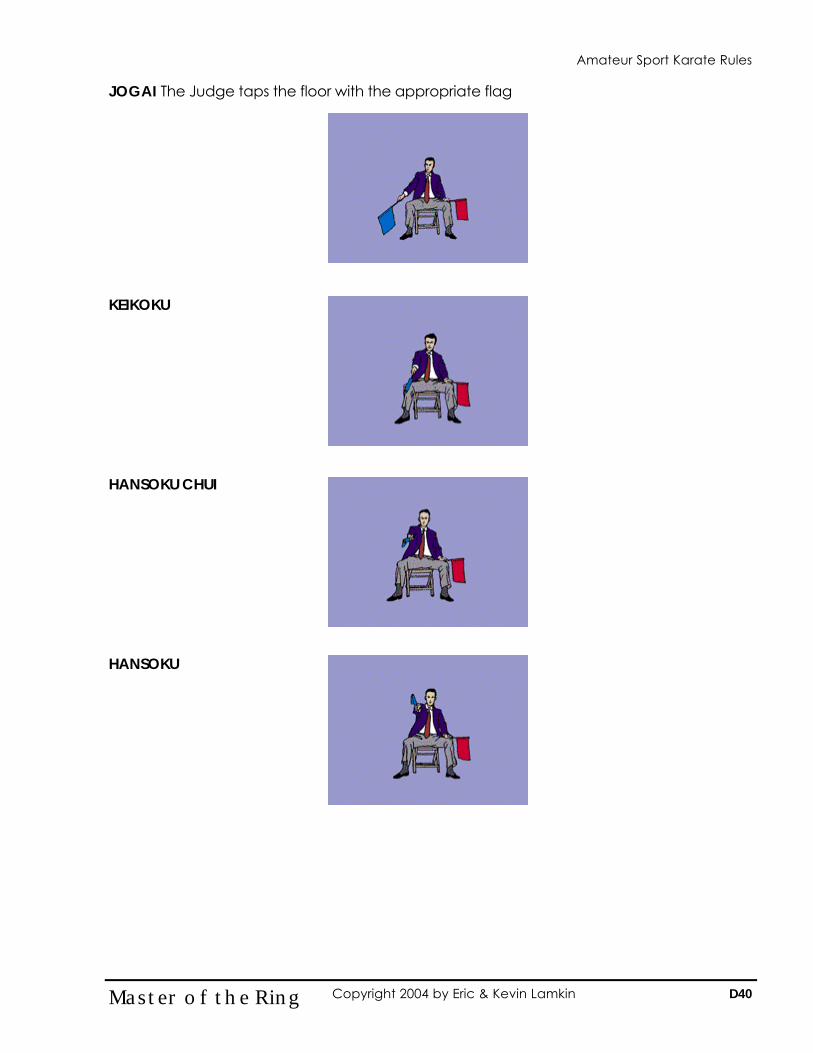
JOGAI The Judge taps the floor with the appropriate flag KEIKOKU HANSOKU CHUI HANSOKU
D40 Master of the Ring Copyright 2004 by Eric & Kevin Lamkin
Amateur Sport Karate Rules
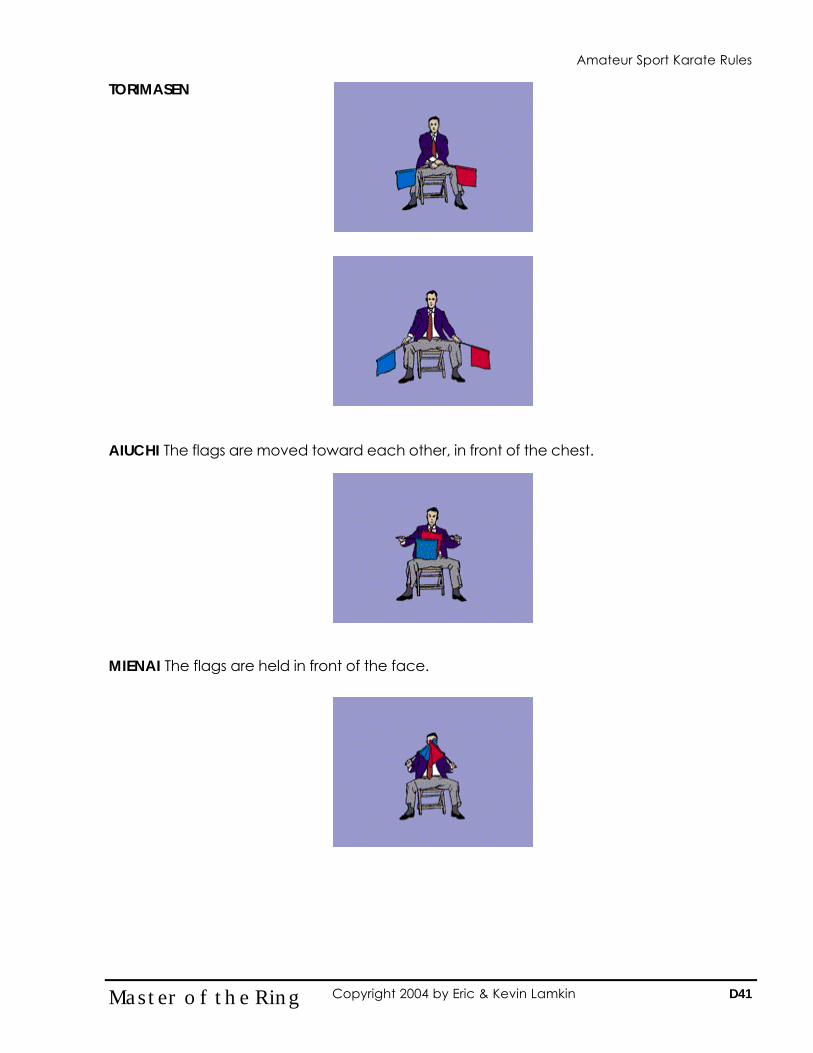
TORIMASEN AIUCHI The flags are moved toward each other, in front of the chest. MIENAI The flags are held in front of the face.
D41 Master of the Ring Copyright 2004 by Eric & Kevin Lamkin
Amateur Sport Karate Rules
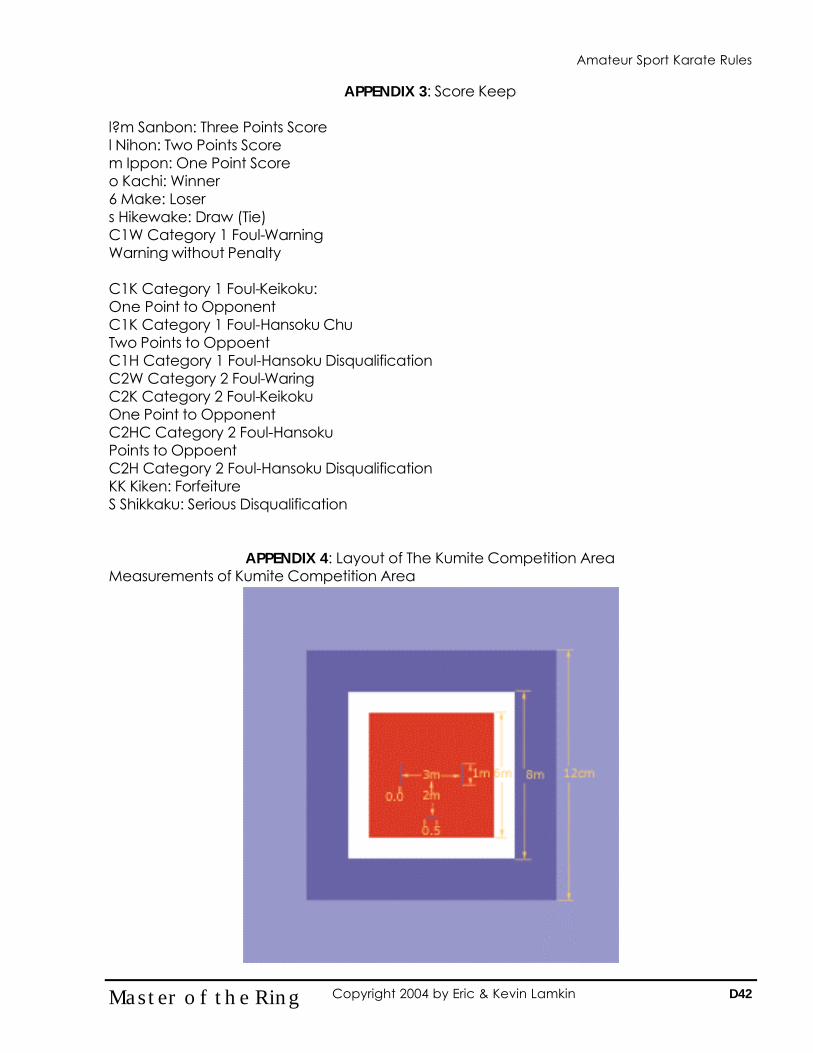
APPENDIX 3: Score Keep l?m Sanbon: Three Points Score l Nihon: Two Points Score m Ippon: One Point Score o Kachi: Winner 6 Make: Loser s Hikewake: Draw (Tie) C1W Category 1 Foul-Warning Warning without Penalty C1K Category 1 Foul-Keikoku: One Point to Opponent C1K Category 1 Foul-Hansoku Chu Two Points to Oppoent C1H Category 1 Foul-Hansoku Disqualification C2W Category 2 Foul-Waring C2K Category 2 Foul-Keikoku One Point to Opponent C2HC Category 2 Foul-Hansoku Points to Oppoent C2H Category 2 Foul-Hansoku Disqualification KK Kiken: Forfeiture S Shikkaku: Serious Disqualification
APPENDIX 4: Layout of The Kumite Competition Area
Measurements of Kumite Competition Area
D42 Master of the Ring Copyright 2004 by Eric & Kevin Lamkin
Amateur Sport Karate Rules
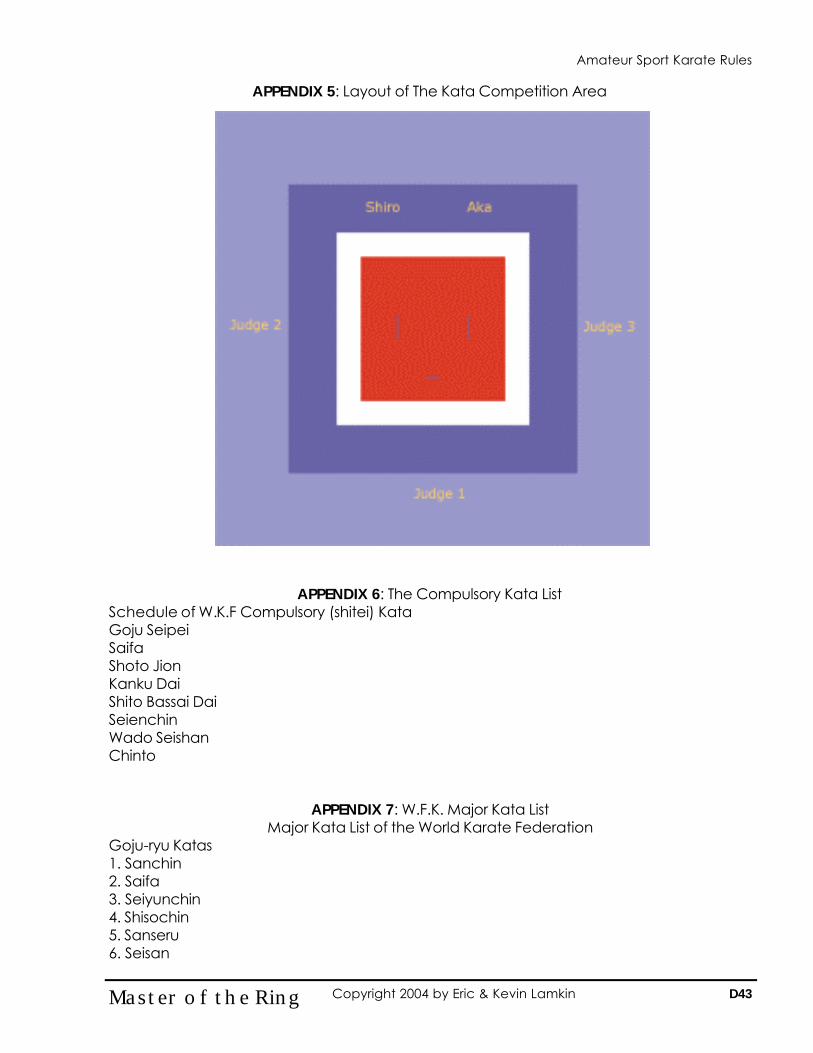
APPENDIX 5: Layout of The Kata Competition Area
APPENDIX 6: The Compulsory Kata List Schedule of W.K.F Compulsory (shitei) Kata Goju Seipei Saifa Shoto Jion Kanku Dai Shito Bassai Dai Seienchin Wado Seishan Chinto
APPENDIX 7: W.F.K. Major Kata List
Major Kata List of the World Karate Federation Goju-ryu Katas 1. Sanchin 2. Saifa 3. Seiyunchin 4. Shisochin 5. Sanseru 6. Seisan
D43 Master of the Ring Copyright 2004 by Eric & Kevin Lamkin
Amateur Sport Karate Rules
7. Seipai 8. Kururunfa 9. Suparimpei 10. Tensho Wado-Ryu Katas 1. Kushanuku 2. Naihanchi 3. Seihan 4. Chinto 5. Passai 6. Niseishi 7. Rohai 8. Wanshu 9. Jion 10. Jitte 11. Suparimpei Shotokan Katas 1. Bassai-Dai 2. Bassai-Sho 3. Kanku-Dai 4. Kanku-Sho 5. Tekki-Shodan 6. Tekki-Nidan 7. Tekki-Sandan 8. Hangetsu 9. Jitte 10. Enpi 11. Gankaku 12. Jion 13. Sochin 14. Nijushiho Sho 15. Goju Shiho-Dai 16. Goju Shiho-sho 17. Chinte 18. Unsu 19. Meikyo 20. Wankan 21. Jiin Shito-Ryu Katas 1. Jitte 2. Jion 3. Jiin 4. Matsukaze 5. Wanshu 6. Rohai 7. Bassai Dai
D44 Master of the Ring Copyright 2004 by Eric & Kevin Lamkin
Amateur Sport Karate Rules
8. Bassai Sho 9. Tomari Bassai 10. Matsumura Bassai 11. Kosokun Dai 12. Kosokun Sho 13. Kosokun Shiho 14. Chinto 15. Chinte 16. Seiechin 17. Sochin 18. Niseishi 19. Gojushiho 20. Unshu 21. Seisan 22. Naifanchin Shodan 23. Naifanchin Nidan 24. Naifanching Sandan 25. Aoyanagi (Seiryu) 26. Jyuroku 27. Nipaipo 28. Sanchin 29. Tensho 30. Seipai 31. Sanseiru 32. Saifa 33. Shisochin 34. Kururunfa 35. Suparimpei 36. Hakucho 37. Pachu 38. Heiku 39. Paiku 40. Annan 41. Annanko 42. Papuren 43. Chatanyara Kusha-ku
D45 Master of the Ring Copyright 2004 by Eric & Kevin Lamkin
Amateur Sport Karate Rules
World KickboxingWorld Kickboxing FederationFederation
RulesRules
ProfessionalProfessional
D46 Master of the Ring Copyright 2004 by Eric & Kevin Lamkin
Professional Sport Karate Rules
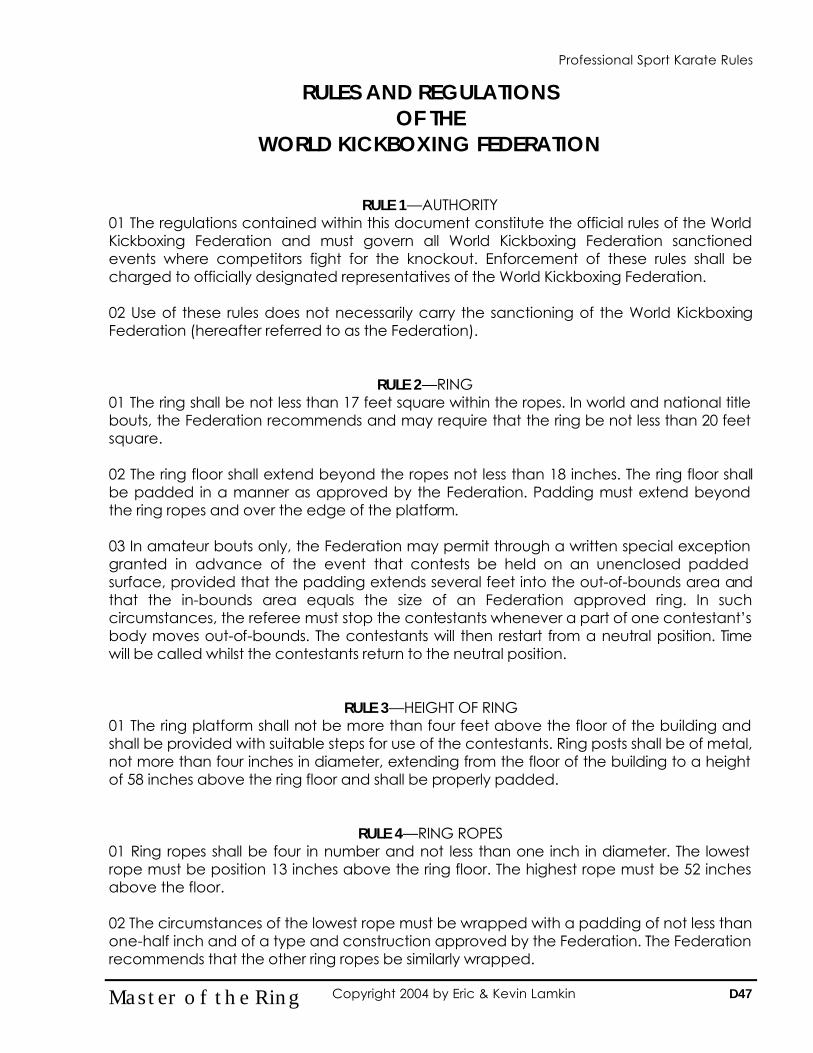
RULES AND REGULATIONS OF THE
WORLD KICKBOXING FEDERATION
RULE 1—AUTHORITY 01 The regulations contained within this document constitute the official rules of the World Kickboxing Federation and must govern all World Kickboxing Federation sanctioned events where competitors fight for the knockout. Enforcement of these rules shall be charged to officially designated representatives of the World Kickboxing Federation. 02 Use of these rules does not necessarily carry the sanctioning of the World Kickboxing Federation (hereafter referred to as the Federation).
RULE 2—RING 01 The ring shall be not less than 17 feet square within the ropes. In world and national title bouts, the Federation recommends and may require that the ring be not less than 20 feet square. 02 The ring floor shall extend beyond the ropes not less than 18 inches. The ring floor shall be padded in a manner as approved by the Federation. Padding must extend beyond the ring ropes and over the edge of the platform. 03 In amateur bouts only, the Federation may permit through a written special exception granted in advance of the event that contests be held on an unenclosed padded surface, provided that the padding extends several feet into the out-of-bounds area and that the in-bounds area equals the size of an Federation approved ring. In such circumstances, the referee must stop the contestants whenever a part of one contestant’s body moves out-of-bounds. The contestants will then restart from a neutral position. Time will be called whilst the contestants return to the neutral position.
RULE 3—HEIGHT OF RING 01 The ring platform shall not be more than four feet above the floor of the building and shall be provided with suitable steps for use of the contestants. Ring posts shall be of metal, not more than four inches in diameter, extending from the floor of the building to a height of 58 inches above the ring floor and shall be properly padded.
RULE 4—RING ROPES 01 Ring ropes shall be four in number and not less than one inch in diameter. The lowest rope must be position 13 inches above the ring floor. The highest rope must be 52 inches above the floor. 02 The circumstances of the lowest rope must be wrapped with a padding of not less than one-half inch and of a type and construction approved by the Federation. The Federation recommends that the other ring ropes be similarly wrapped.
Professional Sport Karate Rules
D47 Master of the Ring Copyright 2004 by Eric & Kevin Lamkin
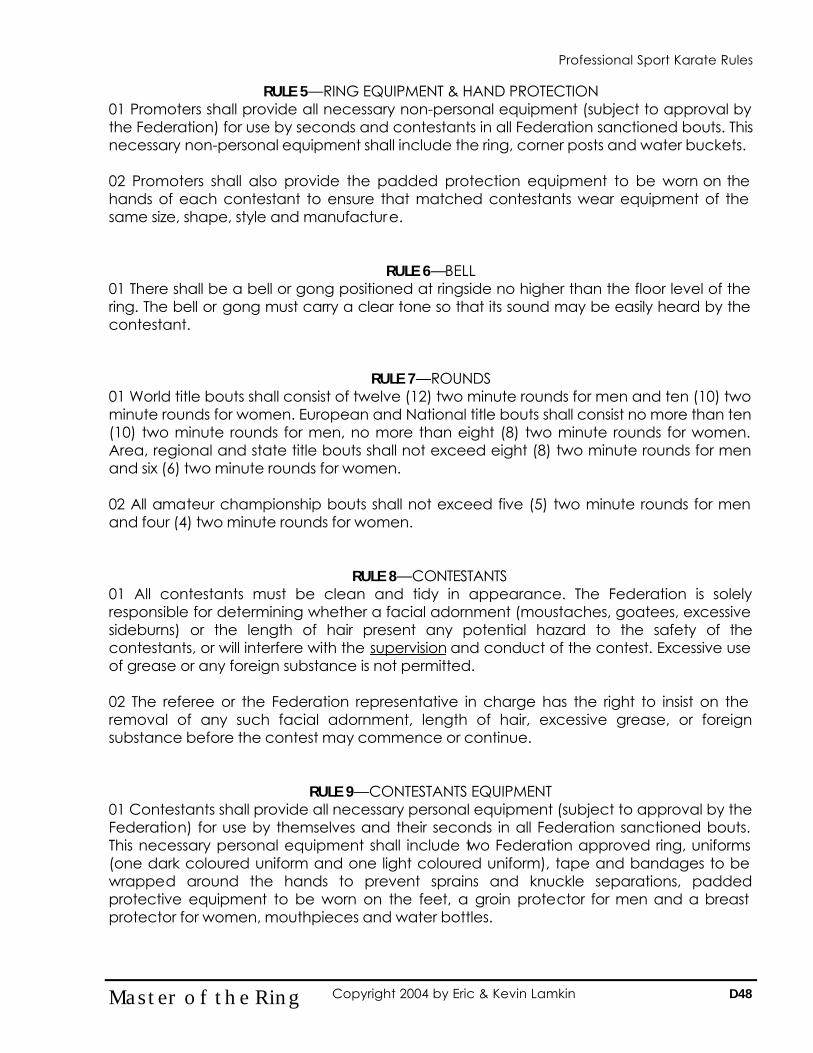
RULE 5—RING EQUIPMENT & HAND PROTECTION 01 Promoters shall provide all necessary non-personal equipment (subject to approval by the Federation) for use by seconds and contestants in all Federation sanctioned bouts. This necessary non-personal equipment shall include the ring, corner posts and water buckets. 02 Promoters shall also provide the padded protection equipment to be worn on the hands of each contestant to ensure that matched contestants wear equipment of the same size, shape, style and manufacture.
RULE 6—BELL 01 There shall be a bell or gong positioned at ringside no higher than the floor level of the ring. The bell or gong must carry a clear tone so that its sound may be easily heard by the contestant.
RULE 7—ROUNDS 01 World title bouts shall consist of twelve (12) two minute rounds for men and ten (10) two minute rounds for women. European and National title bouts shall consist no more than ten (10) two minute rounds for men, no more than eight (8) two minute rounds for women. Area, regional and state title bouts shall not exceed eight (8) two minute rounds for men and six (6) two minute rounds for women. 02 All amateur championship bouts shall not exceed five (5) two minute rounds for men and four (4) two minute rounds for women.
RULE 8—CONTESTANTS 01 All contestants must be clean and tidy in appearance. The Federation is solely responsible for determining whether a facial adornment (moustaches, goatees, excessive sideburns) or the length of hair present any potential hazard to the safety of the contestants, or will interfere with the supervision and conduct of the contest. Excessive use of grease or any foreign substance is not permitted. 02 The referee or the Federation representative in charge has the right to insist on the removal of any such facial adornment, length of hair, excessive grease, or foreign substance before the contest may commence or continue.
RULE 9—CONTESTANTS EQUIPMENT 01 Contestants shall provide all necessary personal equipment (subject to approval by the Federation) for use by themselves and their seconds in all Federation sanctioned bouts. This necessary personal equipment shall include two Federation approved ring, uniforms (one dark coloured uniform and one light coloured uniform), tape and bandages to be wrapped around the hands to prevent sprains and knuckle separations, padded protective equipment to be worn on the feet, a groin protector for men and a breast protector for women, mouthpieces and water bottles.
D48 Master of the Ring Copyright 2004 by Eric & Kevin Lamkin
Professional Sport Karate Rules
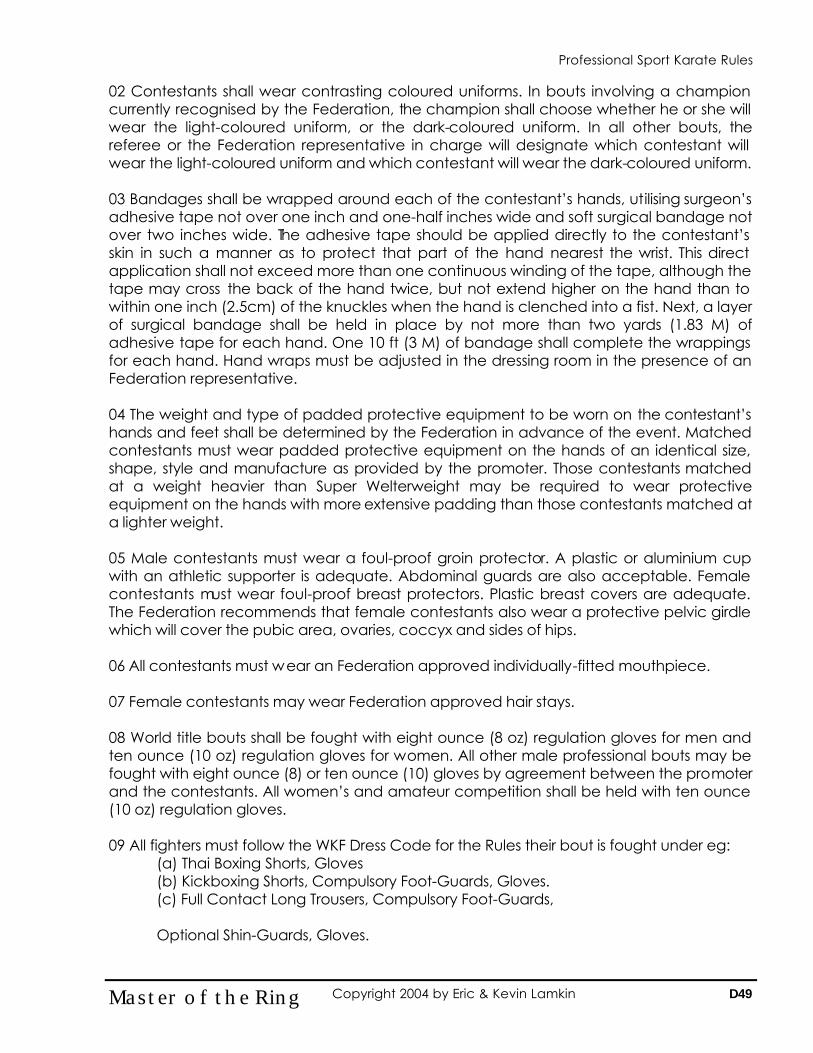
02 Contestants shall wear contrasting coloured uniforms. In bouts involving a champion currently recognised by the Federation, the champion shall choose whether he or she will wear the light-coloured uniform, or the dark-coloured uniform. In all other bouts, the referee or the Federation representative in charge will designate which contestant will wear the light-coloured uniform and which contestant will wear the dark-coloured uniform. 03 Bandages shall be wrapped around each of the contestant’s hands, utilising surgeon’s adhesive tape not over one inch and one-half inches wide and soft surgical bandage not over two inches wide. The adhesive tape should be applied directly to the contestant’s skin in such a manner as to protect that part of the hand nearest the wrist. This direct application shall not exceed more than one continuous winding of the tape, although the tape may cross the back of the hand twice, but not extend higher on the hand than to within one inch (2.5cm) of the knuckles when the hand is clenched into a fist. Next, a layer of surgical bandage shall be held in place by not more than two yards (1.83 M) of adhesive tape for each hand. One 10 ft (3 M) of bandage shall complete the wrappings for each hand. Hand wraps must be adjusted in the dressing room in the presence of an Federation representative. 04 The weight and type of padded protective equipment to be worn on the contestant’s hands and feet shall be determined by the Federation in advance of the event. Matched contestants must wear padded protective equipment on the hands of an identical size, shape, style and manufacture as provided by the promoter. Those contestants matched at a weight heavier than Super Welterweight may be required to wear protective equipment on the hands with more extensive padding than those contestants matched at a lighter weight. 05 Male contestants must wear a foul-proof groin protector. A plastic or aluminium cup with an athletic supporter is adequate. Abdominal guards are also acceptable. Female contestants must wear foul-proof breast protectors. Plastic breast covers are adequate. The Federation recommends that female contestants also wear a protective pelvic girdle which will cover the pubic area, ovaries, coccyx and sides of hips. 06 All contestants must wear an Federation approved individually-fitted mouthpiece. 07 Female contestants may wear Federation approved hair stays. 08 World title bouts shall be fought with eight ounce (8 oz) regulation gloves for men and ten ounce (10 oz) regulation gloves for women. All other male professional bouts may be fought with eight ounce (8) or ten ounce (10) gloves by agreement between the promoter and the contestants. All women’s and amateur competition shall be held with ten ounce (10 oz) regulation gloves. 09 All fighters must follow the WKF Dress Code for the Rules their bout is fought under eg:
(a) Thai Boxing Shorts, Gloves (b) Kickboxing Shorts, Compulsory Foot-Guards, Gloves. (c) Full Contact Long Trousers, Compulsory Foot-Guards, Optional Shin-Guards, Gloves.
D49 Master of the Ring Copyright 2004 by Eric & Kevin Lamkin
Professional Sport Karate Rules
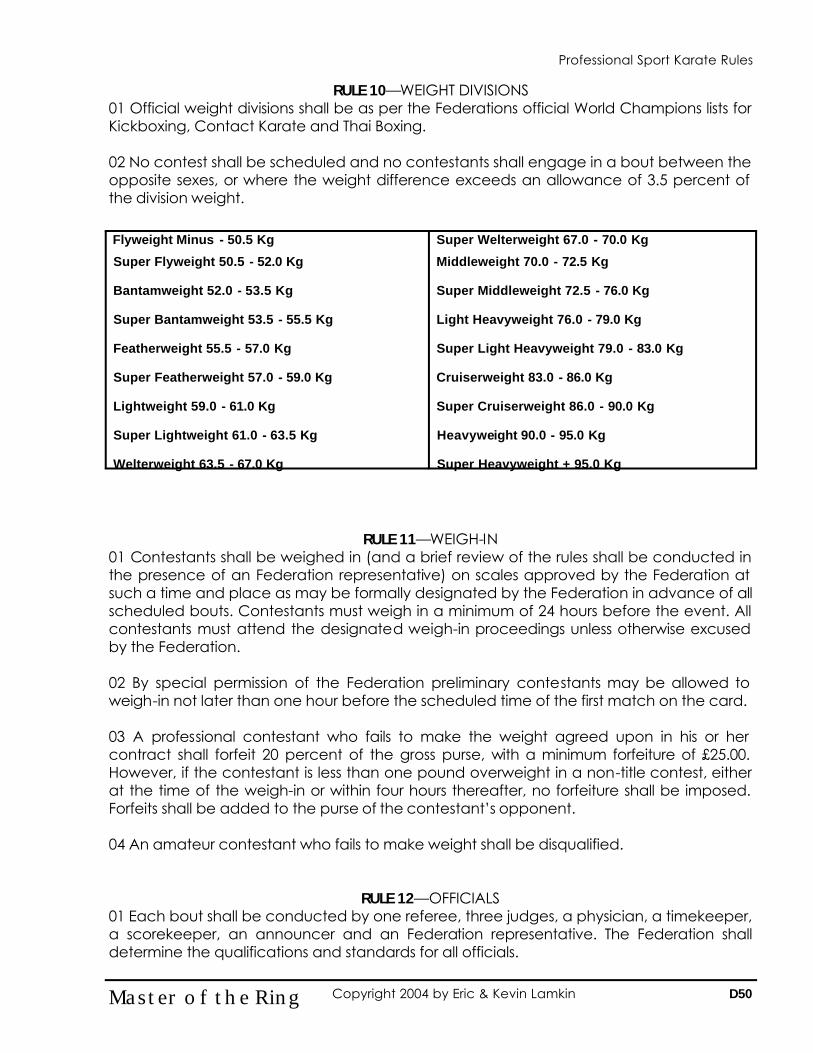
RULE 10—WEIGHT DIVISIONS 01 Official weight divisions shall be as per the Federations official World Champions lists for Kickboxing, Contact Karate and Thai Boxing. 02 No contest shall be scheduled and no contestants shall engage in a bout between the opposite sexes, or where the weight difference exceeds an allowance of 3.5 percent of the division weight.
RULE 11—WEIGH-IN 01 Contestants shall be weighed in (and a brief review of the rules shall be conducted in the presence of an Federation representative) on scales approved by the Federation at such a time and place as may be formally designated by the Federation in advance of all scheduled bouts. Contestants must weigh in a minimum of 24 hours before the event. All contestants must attend the designated weigh-in proceedings unless otherwise excused by the Federation. 02 By special permission of the Federation preliminary contestants may be allowed to weigh-in not later than one hour before the scheduled time of the first match on the card. 03 A professional contestant who fails to make the weight agreed upon in his or her contract shall forfeit 20 percent of the gross purse, with a minimum forfeiture of £25.00. However, if the contestant is less than one pound overweight in a non-title contest, either at the time of the weigh-in or within four hours thereafter, no forfeiture shall be imposed. Forfeits shall be added to the purse of the contestant’s opponent. 04 An amateur contestant who fails to make weight shall be disqualified.
RULE 12—OFFICIALS 01 Each bout shall be conducted by one referee, three judges, a physician, a timekeeper, a scorekeeper, an announcer and an Federation representative. The Federation shall determine the qualifications and standards for all officials.
Flyweight Minus - 50.5 Kg
Super Flyweight 50.5 - 52.0 Kg
Bantamweight 52.0 - 53.5 Kg
Super Bantamweight 53.5 - 55.5 Kg
Featherweight 55.5 - 57.0 Kg
Super Featherweight 57.0 - 59.0 Kg
Lightweight 59.0 - 61.0 Kg
Super Lightweight 61.0 - 63.5 Kg
Welterweight 63.5 - 67.0 Kg
Super Welterweight 67.0 - 70.0 Kg
Middleweight 70.0 - 72.5 Kg
Super Middleweight 72.5 - 76.0 Kg
Light Heavyweight 76.0 - 79.0 Kg
Super Light Heavyweight 79.0 - 83.0 Kg
Cruiserweight 83.0 - 86.0 Kg
Super Cruiserweight 86.0 - 90.0 Kg
Heavyweight 90.0 - 95.0 Kg
Super Heavyweight + 95.0 Kg
D50 Master of the Ring Copyright 2004 by Eric & Kevin Lamkin
Professional Sport Karate Rules
RULE 13—REFEREE 01 The referee shall be charged with the general supervision of the bout. He or she enforces the rules, promotes safety of the contestants and ensures fair play. 02 Before starting a contest, the referee shall ascertain from each contestant the name of his or her chief second and shall hold the named chief second responsible for the conduct of the assistant seconds during the progress of the contest. The referee shall call contestants together before each bout for final instructions at which time each contestant shall be accompanied by the chief second only.
RULE 14—-JUDGES 01 The judges shall be stationed at ringside at locations designated by the Federation representative in charge. The judges work in conjunction with the referee and are charged with scoring the outcome of each round of a bout.
RULE 15—PHYSICIAN + PARAMEDICS 01 A licensed physician shall sit at the immediate ringside of all bouts. No bout shall be allowed to proceed unless the physician is in his or her seat. The physician shall not leave until after the decision in the final bout. He or she shall be prepared to assist if any serious emergency arises and shall render temporary or emergency treatments for cuts and minor injuries sustained by the contestants. 02 No manager or second shall attempt to render aid to a contestant during the course of a round before the physician has had an opportunity to examine the contestant who may have been injured. Time our shall be called for such examinations. 03 No event shall take place, amateur and/or professional, without a team of equippted, qualified paramedics present at the ringside for each bout. 04 No event shall take place, amateur and/or professional, without a fully equipped paramedic ambulance on standby at the venue. 05 Promoters shall inform the nearest neuro surgigcal hospital giving details of their event and have the hospital telephone number to hand and the name(s) of the duty physicians.
RULE 16—BOUTS 01 A bout begins when the bell sounds to start the first round and ends when the bell sounds to conclude the final round. No persons other than the contestants and the referee may be inside the ring during the progress of a round. 02 Fighters are allowed 3 people in their corner, one chief cornerman, two seconds. All 3 must remain seated during the rounds. Only the chief cornerman may give direction to the fighter during the round. Cornermen or seconds cannot place their hands on the ring apron, the ropes or any part of the ring during the rounds. Cornermen or seconds cannot
D51 Master of the Ring Copyright 2004 by Eric & Kevin Lamkin
Professional Sport Karate Rules
enter into any verbal dispute with the referee or officials during the bout,. All bouts governed by the rules and regulations of the WKF World Kickboxing Federation.
RULE 17—FOULS 01 Any contestant guilty of foul tactics in a bout shall be given an immediate warning and points deducted from the contestant’s total score as determined by the referee. The use of foul tactics also may result in disqualification of the contestant, his or her purse (if any) withheld from payment and the contestant automatically suspended. Disposition of the purse and the penalty to be imposed upon the contestant shall be determined by a written action of the Federation. 02 The following tactics are considered fouls:
(1) Spitting, biting, or the use of abusive language in the r ing. (2) Headbutts, knee strikes, elbow strikes, palm-heel strikes, or clubbing blows with
the hands. (3) Jabbing the eyes with the thumb of the glove. (4) Striking the groin, the spine, the throat, the collarbone, women’s breasts, or that
part of the body over the kidneys. (5) Deliberate use of any scraping blow, or rabbit blow. (6) Hitting with the open glove, or with the wrist. (7) Kicking into the knee, or striking below the belt in any unauthorised manner. (8) Anti-joint techniques (striking or applying leverage against any joint). (9) Holding an opponent with one hand and hitting with the other. (10) Grabbing or holding onto an opponent’s leg or foot. (11) Leg checking the opponent’s leg or stepping on the opponent’s foot to
prevent the opponent from moving or kicking. (12) Holding any part of the body or deliberately maintaining a clinch for any
purpose. (13) Attacking on the break. (14) Attacking after the bell has sounded ending the round, or when the opponent
is out of the ring. (15) Intentionally pushing, shoving, or wrestling an opponent out of the ring with any
part of the body. (16) Throwing or taking an opponent to the floor in any unauthorised manner. (17) Striking a downed opponent, or an opponent who is getting up after being
down. (18) Purposely going down without being hit. (19) Any unsportsmanlike action which causes injury to an opponent. (20)Using a spinning back fist.
RULE 18—PERMITTED STRIKES 01 All punches must land with the knuckle part of the glove, no other part of the glove or forearm can be used. All kicks must connect with the ball of the foot, the instep, the heel, side of the foot or the shin from below the knee to the instep.
D52 Master of the Ring Copyright 2004 by Eric & Kevin Lamkin
Professional Sport Karate Rules

02 Contestants may kick or sweep to the inside or outside region of the leg. Any deliberate kick to the knee, groin or hip joint shall be prohibited and shall constitute a foul. The referee may issue a warning, order point deductions from the judges scoring or may disqualify the offending contestant for repeated violations.
RULE 19—MINIMUM KICK REQUIREMENT 01 In professional Kickboxing competition there is a minimum kick requirement of eight kicks per round although kick counters are no longer used by the Federation. If the referee feels that a fighter is not kicking enough he may give a verbal warning. If the fighter continues without using enough kicks, the referee may deduct a point. Judges should take note of referees warnings and score against the fighter who is not performing enough kicks.
RULE 20—STALLING 01 A contestant who intentionally refuses to engage an opponent for a prolonged period of time, or who deliberately clinches or holds onto an opponent shall receive an immediate warning from the referee. If the contestant continues to utilise such passive tactics after receiving one warning during the round, points shall be deducted from the contestant’s total score as determined by the referee. 02 If the contestant repeats the passive tactics, either in the same round or in the following rounds, he or she may be considered guilty of a foul and penalised accordingly. 03 In amateur bouts, the referee shall stop the clock and separate the contestants whenever one contestant’s mouthpiece is knocked free of the mouth. The referee will wash and replace the mouthpiece in the contestant’s mouth. No contestant will be permitted to fight without a mouthpiece. Continuous dropping of the mouthpiece by a contestant shall be considered a foul and will be penalised accordingly. 04 In professional bouts, the contest will not be stopped by the loss of a mouthpiece.
RULE 21—ACCIDENTAL FOULS 01 If a bout is stopped because of an accidental foul, the referee shall determine whether or not the contestant who has been fouled can continue. The referee may consult with the attending physician. If the contestant’s chances have not been seriously jeopardised as a result of the foul, the referee may order the bout continued after a reasonable interval. 02 On the other hand, if by reason of accidental foul a contestant shall be rendered unfit to continue the contest, the bout shall be terminated. The scorekeeper shall tally all scores, subtracting all penalties. If the injured contestant is behind on points in the majority opinion of the judges, then the referee shall declare the contest to be a technical draw. But if the injured contestant has a lead in points, then the referee shall declare him or her to be the winner by technical decision. 03 Further, should an accidental foul terminate a bout during the first round, the referee shall declare the contest to be a technical draw.
D53 Master of the Ring Copyright 2004 by Eric & Kevin Lamkin
Professional Sport Karate Rules
RULE 22—STOPPING THE CONTEST 01 The referee shall have the power to stop a contest at any stage if he or she considers the bout too one-sided, or if either contestant is in such condition that to continue might subject him or her to serious injury. In either case, the referee shall declare the fit contestant to be the winner by technical knockout. 02 Should both contestants be in such condition that to continue might subject them to serious injury, the referee shall declare the contest to be a technical draw. 03 In cases where a contestant receives a cut eye from a fair blow, or an accidental foul, or any other injury which the referee believes may incapacitate the contestant, the referee must call the attending physician into the ring for examination of the contestant before the referee decides whether to stop the contest. Time will be called during the examination.
RULE 23—FAILURE TO COMPETE 01 In any case where the referee decides that the contestants are not honestly competing, or that the knockout or the foul has been a prearranged termination of the contest, he or she shall neither finish the knockout count nor disqualify a contestant for fouling nor render a decision. Instead, the referee shall stop the bout and declare the contest ended not later than before the end of the last round. The referee shall then order the purses of both contestants held pending investigation and disposition of funds by the Federation.
RULE 24—FAILURE TO RESUME CONTEST 01 No contestant shall leave the ring during the one-minute rest period between rounds. Should a contestant fail or refuse to resume the contest when the bell sounds denoting the start of the next round, the referee shall declare the contestant’s opponent to be the winner by knockout as of the round which last ended. 02 However, should the referee decide that the circumstances surround the bout’s termination require investigation, or disciplinary action, then the referee shall not make a decision, but rather shall order the purses of both contestants held pending investigation and disposition of funds by the Federation.
RULE 25—KNOCKOUT 01 A contestant shall be declared knocked down in any portion of the contestant’s body other than the feet touch the floor, or if the contestant hangs helplessly over the ropes. 02 A contestant shall not be declared knocked down if he or she is punched, thrown, or accidentally slips to the floor. The determination as to whether a contestant is pushed, thrown or slips to the floor, rather than being knocked down, shall be made by the referee.
D54 Master of the Ring Copyright 2004 by Eric & Kevin Lamkin
Professional Sport Karate Rules
RULE 26—COUNTING 01 Whenever a contestant is knocked down, the referee shall order the contestant’s opponent to retire to the farthest corner of the ring, pointing to the corner and immediately begin the count over the knocked down contestant. The referee will audibly announce the passing of each one-second interval, indicating its passage with a downward motion of the arm. 02 Any time a contestant is knocked down, the referee shall automatically begin a mandatory eight-count and then, if the contestant appears able to continue, will allow the bout to resume. The timekeeper, through effective signalling, shall give the referee the correct one-second intervals for the count. The referee’s count is the only official count. 03 Should a contestant be knocked down three times in one round from blows to the head, the referee shall stop the contest and declare the contestants opponent to be the winner by technical knockout. 03a Whenever a contestant is knocked out primarily as a result of a kick, whether or not the kick occurred in combination with punches, the referee shall declare the contestants opponent to be the winner by either kick knockout or technical kick knockout whichever is appropriate and shall be entered into the fighters official record as a KKO. 04 Should a contestant who is down rise before the count of ten is reached and then go down immediately without being struck, the referee shall resume the count where it was left off. 05 If the contestant taking the count is still down when the referee calls the count of ten, the referee shall wave both arms to indicate that the contestant has been knocked out and will signal that the contestant’s opponent is the winner. 06 A round’s ending before the referee reached the count of ten will have no bearing on the count. The contestant must still rise before the count of ten to avert a knockout. 07 Should both contestants go down at the same time, the referee shall continue to count as long as one of the contestants is down. If both contestants remain down until the count of ten, the contest will be stopped and the referee shall declare the bout to be a technical draw. But if one contestant rises before the count of ten and the other contestant remains down, the first contestant to rise shall be declared the winner by knockout. Should both contestants rise before the count of ten, the round will continue.
RULE 27—STANDING EIGHT-COUNT 01 The referee may, at his or her discretion, administer an eight-count to a contestant who has been stunned, but who remains standing. He or she shall direct the contestant’s opponent to a neutral corner, then begin counting from one to eight, examining the stunned contestant as he or she counts. If, after completing the standing eight-count, the referee determines that the contestant is able to continue, he or she shall order the bout to resume. But if the referee determines that the contestant is not able to continue, he or she shall stop the contest and declare the contestant’s opponent to be the winner by technical knockout.
D55 Master of the Ring Copyright 2004 by Eric & Kevin Lamkin
Professional Sport Karate Rules
RULE 28—COMMUNICATING THE COUNT 01 As soon as a contestant has been knocked down, the timekeeper begins calling the count, from one to ten, while the referee directs the contestant’s opponent to a neutral corner. When the referee has finished directing the opponent to a neutral corner, he or she returns to the knocked down contestant and counts over him or her, picking up the count from the timekeeper.
RULE 29—FALLING FROM THE RING 01 A contestant who has been wrestled, pushed, or who has fallen through the ropes during the contest, may be helped back by anyone except the contestant’s own seconds or manager. The referee shall allow reasonable time for the return. When on the ring platform outside the ropes, the contestant must enter the ring immediately. Should the contestant stall for time outside the ropes, the referee shall start the count without waiting for the contestant to re-enter the ring. 02 Once a fallen contestant re-enters the ring, the referee may either resume the contest or start the round from the moment that the contestant is back in the ring. 03 Whenever contestant falls through the ropes, the contestant’s opponent must retire to the farthest corner, as directed by the referee and remain there until ordered to resume the contest. 04 A contestant who deliberately wrestles or throws an opponent from the ring, or who hits an opponent who is partly out of the ring and thus prevented by the ropes from assuming a position of defence, may be penalised.
RULE 30—WIPING THE GLOVES 01 Before a fallen contestant resumes competition, after having been knocked to, slipped to, or fallen to the floor, the referee shall wipe the contestant’s gloves free of any foreign substance.
RULE 31—CONSULTING THE PHYSICIAN 01 The referee may, at his or her discretion, request the physician to examine a contestant during the bout. Should the examination occur during the course of a round, the clock shall be stopped until the examination is completed. 02 If after consulting with the physician, the referee decides that further contact below the belt, whether from fair or foul blow, will result in injury to a contestant’s knee, he or she shall prohibit striking below the belt for the remainder of the bout. 03 Also, the physician shall have the power to order the referee to stop the bout, at any time, due to the incapacitation of one or both contestants. The referee will then render the appropriate decision.
D56 Master of the Ring Copyright 2004 by Eric & Kevin Lamkin
Professional Sport Karate Rules
RULE 32—SCORING 01 The judges shall score all contests and determine the winner through the use of the ten-point must system. In this system the winner of each round receives ten points and the opponent receives a proportionately smaller number. But in no circumstances shall a judge award the loser of each round with fewer than seven points. If a round is judged even, each contestant shall receive ten points. No fraction of points may be given. 02 Judges should base their scores on the relative effectiveness of each contestant in a given round. An official knockdown always demonstrates superior effectiveness. However, a contestant who is knocked down more from instability than from an opponent’s blow, may be able to return from the knockdown and dominate the round by a large enough margin to be judged the winner. Also, the weight given to an official knockdown scored by one contestant must be equal to the weight given to an official knockdown scored by the contestant’s opponent. 03 Generally, sweeps should not be given the same weight as an official knockdown. Judges should watch for the technique’s effectiveness in slowing down a contestant. 04 A contestant who wins the round and does so with exceptional above-the-belt kicking technique, should be given a more favourable point advantage then the contestant who wins a round with a predominance of punching technique. Below-the-belt kicking technique should be given the same weight as punching techniques. 05 Further, a contestant who aggressively presses an opponent throughout a round, but cannot land a threatening kick or punch, should not be judged as favourably as the contestant who back-pedals throughout the round but counter-attacks with visible impact. 06 A contestant who wins the round and does so with exceptional above the belt kicking technique should be given a more favourable point advantage than the contestant who wins a round with a predominance of punching techniques . Below the belt kicking techniques should be given the same weight as punching techniques. An otherwise event round should be awarded to the overall most effective above the waist kicker. 07 More specifically, the judges shall award points to contestants on the basis of round by round outcomes and in accordance with the following scores:
(1) 10 points to 10 points whenever neither contestant dominates the other with a superiority in effectiveness.
(2) 10 points to 9 points whenever the winning contestant dominates the losing contestant with a marginal superiority in effectiveness.
(3) 10 points to 8 points whenever the winning contestant dominates the losing contestant with exceptional above-the-belt kicking technique, or whenever the winning contestant dominates the losing contestant with a significant superiority in effectiveness as might be indicated by one knockdown.
4) 10 points to 7 points whenever the winning contestant dominates the losing contestant with an overwhelming superiority ineffectiveness as must be indicated by more than one knockdown.
D57 Master of the Ring Copyright 2004 by Eric & Kevin Lamkin
Professional Sport Karate Rules
07a Following each round and at the termination of the contest, the referee shall pick up the ballots of the judges. The referee shall then deliver the ballots to the scorekeeper who shall tally all scores, subtract all penalties and deliver the totals to the Federation representative assigned to verify them. The majority opinion of the three judges, less penalty points, shall be conclusive. If there is no majority opinion, then the decision shall be a draw. 08 When the Federation representative has completed verifying and totalling the scores, the announcer then in turn shall inform the audience of the decision over the public address system. The referee shall raise the winner’s hand.
RULE 33—CHANGING THE DECISION 01 A decision rendered at the termination of any contest shall be final and cannot be changed unless the Federation determines that any one of the following has occurred.
(1) There was collusion affecting the result of the contest. (2) The compilation of the scorecards of the judges shows an error which would
mean that the decision was given to the wrong contestant. (3) There was a clear violation of the rules and regulations of the WORLD
KICKBOXING FEDERATION which affected the result of the contest.
02 If the Federation determines that any of the above occurred with regards to any contest, then the decision rendered shall be changed as the Federation may direct.
RULES FOR CHAMPIONS CHALLENGERS AND CONTESTANTS
RULE 34—CHAMPIONSHIP TITLES
01 World, National and Regional championship titles shall be established by the Federation to formally recognise champions on the basis of sex differences and in accordance with Federation approved weight divisions. 02 All championship titles must be won in an Federation sanctioned championship contest, although a championship may be lost by default, forfeit, or inability to make the weight.
RULE 35—CHAMPIONS 01 A champion shall be that contestant who has been awarded a championship title by the Federation, in formal recognition of his or her supremacy in a particular division of Kickboxing and who remains ready to contend with any qualified challenger. 02 The Federation shall only recognise those champions whose titles were won in a Federation sanctioned championship contest, of the required number of rounds, where any one of the following has occurred:
D58 Master of the Ring Copyright 2004 by Eric & Kevin Lamkin
Professional Sport Karate Rules

(1) The recognised champion has been defeated in a title defence. (2) A vacant title has been filled through a divisional elimination amongst the
highest qualified challengers available. (3) A vacant title has been filled in a contest between the highest qualified
challenger availableand the second highest qualified challenger available. 03 In the event of a draw in an Federation sanctioned championship contest, the champion shall retain his or her title, or if there is no champion, the title shall remain vacant.
RULE 36—CHALLENGERS 01 A challenger shall be that contestant who has been formally recognised by the Federation as being qualified to challenge a champion and who remains ready to offer such challenge. 02 The Federation shall only recognise those challengers whose challengership status was in an Association approved contest, of the required number of rounds, where any one of the following as occurred:
(1) The challenger has been identified as a top contender on an Federation approved rating list which ranks challengers based upon their performances in contests.
(2) A national or continental champion has challenged a world champion, or a regional or area champion has challenged a national champion.
(3) A recognised challenger or champion from one division has challenged a recognised challenger in another division.
(4) A formerly recognised challenger or champion has returned from recent retirement to challenge a challenger or champion.
(5) A champion or challenger from the related sports of boxing, Kickboxing or Savate, with the approval of the Federation, has challenged a Kickboxing champion or challenger of equal stature.
RULE 37—CHAMPIONSHIP TITLE AT STAKE 01 The title of the champion shall be at stake in all Federation sanctioned championship contests where the official weigh-in shows the challenger to be within the maximum weight limit of the division. 02 Should the champion in a Federation sanctioned championship contest fail to make the maximum weight limit of the division within one hour before the bout, then the Federation shall declare the champion’s title to be vacant.
D59 Master of the Ring Copyright 2004 by Eric & Kevin Lamkin
Professional Sport Karate Rules
RULE 38—NON-TITLE CONTESTS 01 Champions may be allowed to engage in non-title contests by obtaining the written consent of the Federation. 02 Should a champion be defeated in a non-title contest, whether or not the bout was matched in the champion’s weight division, the champion must extend an offer to defend his or her title at weight against the winning contestant within six months from the date of the champion’s defeat. The offer must be received in writing at the Federation’s world headquarters not later than two weeks after the defeat and must include a reasonable purse request based upon the current market potential of the champion. The Federation may then assign responsibility for the bout to the Association promoter who submits the most favourable bid. Should the defeated champion fail to extend the written offer, then the Federation shall declare the champion’s title to be vacant.
RULE 39—MANDATORY TITLE DEFENCES • All champions must defend their titles a minimum of twice a year.
02 A world champion must defend his or her title against the number-one contender, as determined by the Federation, one time each year. The number-one contender must accept any offer to challenge the champion for a reasonable purse amount, based upon the current market potential of the contender. Should the number-one contender fail to accept a championship offer, the Federation shall declare the next highest qualified challenger available to be the number-one contender. However, a number-one contender may be exempted from the annual title challenge by the Federation due to personal hardship, physical injury, or illness. 03 At the discretion of the Federation, a world champion may be required to defend his or her title against the winner of a divisional elimination, amongst the highest qualified contenders available, in place of the mandatory annual title defence against the number-one contender. 04 Should a champion not receive a promotional offer to make a mandatory title defence, he or she must submit a written notice of availability for title defence to the Federation’s world headquarters no later than two weeks after the end of the defined six month periods (30 June and 31 December). The notice must include a reasonable purse request based upon the current market potential of the champion. The Federation may then assign responsibility for the bout to the Federation promoter who submits the most favourable bid. Should the inactive champion fail to submit the written notice, then the Federation shall declare the champion’s title to be vacant. 05 A champion may be exempted from a mandatory title defence by the Federation due to personal hardship, physical injury, or illness.
D60 Master of the Ring Copyright 2004 by Eric & Kevin Lamkin
Professional Sport Karate Rules
RULE 40—ILLNESS 01 Whenever a contestant, because of injuries or illness, is unable to take part in a contest for which he or she is under contract, that contestant or the contestant’s designated representative must immediately report the fact to the Federation. The Federation may then require the contestant to submit to an examination by a physician. The examination fee of the physician shall be paid by the contestant, or by the promoter if the latter requests the examination.
RULE 41—ABSENCE 1 Any contestant who fails to appear for a contest in which he or she is under contract shall be subject to disciplinary action, unless the contestant has submitted to the Federation a written valid excuse or physician’s certification of illness in advance of the event.
• The Federation shall immediately declare vacant the title of any champion guilty of such misconduct.
• The Federation will give consideration to the promoter affected by
non-attendance and impose, where appropriate, a fine equal to the purse of the fighter together with out of pocket proven expenses.
RULE 42—DISABILITY 01 Any contestant who has been knocked out, has engaged in a hard contest, or who has sustained significant injuries, shall be suspended from all contests by the Federation for 30 days, or longer if recommended by a physician, for the contestant’s own medical protection. 02 Contestants shall not be permitted to engage in contact sparring during the period of their suspension.
RULE 43—TIME BETWEEN BOUTS 01 Unless special approval has been obtained from the Federation, a contestant who has engaged in a bout in excess of five rounds shall not be permitted to engage in another contest until 15 days have elapsed.
RULE 44—DRUGS 01 The use of any drug, alcoholic or stimulants, or injections by a contestant either before or during a contest shall be prohibited. Any contestant guilty of such misconduct shall be subject to disciplinary action. See addendum for list of banned substances.
D61 Master of the Ring Copyright 2004 by Eric & Kevin Lamkin
Professional Sport Karate Rules
RULE 45—MANDATORY EXAMINATIONS 01 Any contestant, who has been contracted to engage in any contest, may be ordered by the Federation to appear at any time to be weighed or to be examined by any physician which the Federation may designate.
RULES FOR ADMINISTRATION
RULE 46—SPECIAL EXCEPTIONS 01 Without disregarding the need for uniformity of rules and regulations governing world Kickboxing contests, the Federation may at its discretion authorise a special exception to the rules provided the safety and welfare of the contestants and public are not jeopardised and provided one of the following purposes is being served:
(1) The personal safety, health and welfare of a contestant or contestants has been protected.
(2) Regional difficulties resulting from international competition have been overcome.
(3) A proposed rule change, which may later be incorporated into the official rules of the WORLD KICKBOXING FEDERATION, has been tested.
02 All special exceptions shall be granted by the Federation at least two weeks in advance of any affected contests. All affected contestants and officials must be notified.
RULE 47—ACTIONS OF THE FEDERATION 01 All official actions of the Federation shall take the form of a written document signed by the President of the WORLD KICKBOXING FEDERATION or the President’s designated representative. 02 All parties affected by an official action of the Federation must be given reasonable access to the written document, or a copy of the document.
RULE 48—AMENDMENTS
01 Amendments and revisions to these rules shall be made annually, effective every 1 January, based upon the recommendations of the President, the Board of Directors, the Board of Advisers and the recognised champions of the WORLD KICKBOXING FEDERATION.
D62 Master of the Ring Copyright 2004 by Eric & Kevin Lamkin
Professional Sport Karate Rules
THAI BOXING THE EUROPEAN RULES
RULE 49—TYPE OF CONTEST
(a) The rules delineate the standard form of Thai Boxing contest to be employed in Europe. Certain attacks are prohibited which would be allowed in Asia. (b) Allowances are made for the amateur status of most European fighters, in order to reduce any risk of injury to the minimum. In a simplified form, the changes to the Asian rules are:
(i) No elbow or knee attacks to the head. (ii) No attacks to the spine, groin, joints, back of head. (iii) No attacks to a downed opponent.
RULE 50—CLOTHING (a) The contestant will wear shorts and bare top. (b) The wearing of trousers, shirts, or any other item of clothing is not permitted. (c) Anklets may be worn if required; no other padding or protection may be worn, except as stated below. Padding not allowed; neither is heavy bandaging of an injury except at the discretion of the referee. (d) No spectacles, contact lenses, or dentures may be worn. (e) The contestant may not wear any metal objects of any kind on his clothing or body, with the exception of the groin guard, which may have a metal cup. (f) A gum-shield and groin guard are compulsory. (g) The hands may be bandaged with up to ten feet of two inch soft bandage per hand, together with up to ten feet of one inch adhesive tape. No hard materials may be used. Excessive use of materials may be cause for disqualification.
Rules of European Thai Boxing (h) Gloves will be provided by the promoter. (I) The gloves will be of standard boxing design, made of leather, with a lace-up fastening.No other type of glove is allowed. (j) Both competitors will wear the same make and weight of glove. (k) The weight of the gloves will be: (i) Eight ounce gloves for up to and including the Middleweight division.
D63 Master of the Ring Copyright 2004 by Eric & Kevin Lamkin
Professional Sport Karate Rules
(ii) Ten ounce gloves for over Middleweight. (l) Light application of Vaseline, liniment, or water is allowed. Excessive use is illegal.
RULE 51—NUMBER OF ROUNDS (a)As detailed in the following table, experienced fighters compete over five rounds and novice over two or three.
Class N Two, two-minute rounds. Class C Three, two-minute rounds. Class B Five, two-minute rounds. Class A Five, three-minute rounds.
(b) There is a one-minute rest between rounds.
RULE 52—CLASSIFICATION OF FIGHTERS (a) The officials must ensure that fighters compete in the correct class. (b) Classification is normally effected by each fighter’s coach and such classification should be stated in the Record Book in the appropriate place. (c) In the event of a contestant being unclassified, this must be rectified by the officials before matching takes place. This is done by ascertaining the number of wins that the fighter has (not the number of fights which is unimportant) and classifying him accordingly. (d) The European standard for classes in:
Class N Novice class. After 2 wins, progress to: Class C Junior intermediate class. After 6 wins in this class, promote to: Class B Intermediate class. After 8 wins in this class, promote to: Class A Open class fighter.
(e) The fighter may be promoted before the set number of wins for promotion. He may not stay in the class after he has achieved the set number of w ins in that class.
RULE 53—SCORING (a) The Whole body will be a scoring area, with the exception of illegal targets. Rules of European Thai Boxing (b) Points will be scored by:
(I) An effective strike or series of strikes by punch, kick, or other method. (ii) An effective throw. (iii) Any other effective method not being illegal which the judge deems to weaken
the opponent.
D64 Master of the Ring Copyright 2004 by Eric & Kevin Lamkin
Professional Sport Karate Rules
(c) The judges will deduct points as follows:
(I) A point deduction ordered by the referee. (ii) An appropriate amount for counts received.
(d) The judge may not deduct points except by direction of the referee (except when making his personal deduction for counts). (e) The ten-point scoring system will be used. Ten points are awarded to the winner of the round. The loser is given an appropriate amount less, to a minimum score of five points. After these scores have been awarded, any necessary points are deducted. The round may be drawn, i.e. 10 - 10. (f) Where a fight is stopped as a no-contest, there is no winner. The bout is fully recorded. (g) Where a fight is stopped as a result of a foul and the fighter who was fouled cannot continue, even after a reasonable time has been given to him to recover, the fighter who committed the foul will be disqualified. (h) Where a fight is stopped as a result of an accidental injury:
(I) If the fight is stopped in the first two rounds, a no-contest will be declared. (ii) If the stoppage occurs in the third round or later, the points will be totalled and
the fighter ahead on points will be adjudged the winner.
RULE 54—FOULS (a) The referee may disqualify a contestant at any time, should he feel it in the interests of
safety to do so. (b) If a foul is committed, he may issue a warning, or a point deduction, or disqualify the offender. He is under no obligation to issue any particular penalty, but will base his decision on:
(I) The safety factor. (ii) The correct application of the rules to afford both contestants a fair chance of
winning. (c) There is NO specific number of warnings before a point deduction, or points deducted before disqualification. (d) The following offences are fouls and may result in action against the offender.
(I) Failing to obey the referee’s directions. (ii) Acting in a vicious or malicious manner. (iii) Becoming so over-excited that the contestant is a danger to himself or his
opponent.
D65 Master of the Ring Copyright 2004 by Eric & Kevin Lamkin
Professional Sport Karate Rules
(e) The following actions are fouls:
(I) Attacking a fallen opponent; attacking from the ground. (ii) Attacking after the command to break. (iii) Unsportsmanlike behaviour. (iv) Elbow or knee attacks to the head or neck; elbow attacks to the back. (v) Attacking the groin, spine, joints, or back of head. (vi) Dangerous throws likely to cause injury through (1) landing the opponent on his
head or neck areas, or (2) due to the method of application, e.g. joint-lock throws.
(vii) Striking with an unpadded part of the glove. (viii) Head-butts; biting; gouging. (ix) Choking. (x) Turning away; retreating continuously. (xi) Inactivity; continuous clinching without attempt to attack. (xii) Holding the ropes in attack or defence. (xiii) Needless or offensive utterances. This also applies to the boxer’s seconds,
infringements by whom can result in a fighter being disqualified.
ADDENDUM RULE 60—CORNERMENS’ DRESS
01 Cornermen and seconds must be clean tidy and presentable. Jeans and T-shirts are not considered acceptable attire. The use of track-suits and all-in-one bear suits are approved including club/camp logos and motifs.
RULE 61—CORNERMENS’ CONDUCT 1. Fighters are allowed 3 people in their corner, one chief cornerman
and 2 seconds. All 3 must remain seated during the rounds. Only the chief cornerman may give direction to the fighter during the round. Cornermen or seconds cannot place their hands on the ring apron, the ropes or any part of the ring during the rounds. Cornermen or seconds cannot enter into any verbal dispute with the referee or officials during the bout. All bouts governed by the rules and regulations of the WKF World Kickboxing Federation.
2. Should corner persons fail to abide by the rules and/or cause a disturbance during the progress of the bout they will receive an official warning by the referee or supervisor/official. Should the infringement continue their fighter will receive a minus point and in aberrant cases the bout will be abandoned or if continued referred to the WKF Committee.
D66 Master of the Ring Copyright 2004 by Eric & Kevin Lamkin
Professional Sport Karate Rules
DOPING CONTROL TESTING PROCEDURES
The Federation will perform random dope testing. A test can be requested from a fighter at any time, during training, out of season and before or after a bout. A fighter may be given 24 hours notice of a test. If a fighter tests positive for any of the banned substances listed below, he will be suspended for two years from competing in any WKF sanctioned event. If a fighter fails to give a sample on request, he will automatically be suspended for two years.
BANNED SUBSTANCES Stimulants Stimulants include various drugs which act on the brain, competitors may use stimulants to reduce tiredness, to increase alertness, competitiveness and aggression. They are banned because they stimulate the body mentally and physically which may give the competitor an unfair advantage. In addition they produce harmful side effects. Competitors have died through misusing stimulants as they make it difficult for the body to cool down especially when a competitor has been exercising for long periods of time. If the body overheats and is unable to cool down it dehydrates and blood circulation decreases. The heart and other organs will stop working normally, this can be fatal. Stimulant Substances Amphetamine / Ephedrine* Caffeine* / Phentermine Cocaine / Phenylpropanolamine* Diethylpropion / Strychnine * Beware - these substances may be found in low doses in cough and cold medications. Narcotic Analgesics Narcotic Analgesics are pain killers. They act on the brain to reduce the amount of pain felt from injury or illness and in medicine they can have important use. However, competitors may use them to offset or deaden pain, to mask injuries and to increase their pain limit. Narcotic Analgesics are banned because they are extremely addictive and because they make the original injury much worse. Increasing the pain threshold may lead to further injury or to permanent damage. Narcotic Analgesics can cause physical dependence leading to addiction. Narcotic Analgesic Substances Dextropropoxyphene / Morphine Methadone / Pethidine Anabolic Agents Anabolic Agents class includes anabolic androgenic steroid and beta agonists. Androgenic anabolic steroids are a type of hormone known as testosterone whilst there are a small number of medical conditions which could be treated with low doses of androgenic anabolic steroids in sport they are misused to try and make a competitor
D67 Master of the Ring Copyright 2004 by Eric & Kevin Lamkin
Professional Sport Karate Rules
larger and stronger. For scientific reasons bigger muscles do not necessarily mean extra strength. Androgenic anabolic steroids may increase aggression which may help people train harder. Competitors misuse them in an attempt to increase strength, power and endurance and build up muscles to be competitive. In addition to their therapeutic use beta agonists may be used for the same reason. When given systematically beta agonists may have powerful anabolic effects. Hence their use is banned. Anabolic Agents are banned because using them is cheating. In addition there could be harmful side effects particularly when androgenic anabolic steroids are misused for long periods of time and/or in large quantities. Androgenic Anabolic Steroid Substances Boldenone / Stanozolol Mesterolone / Testosterone Methandienone / Nandrolone Diuretics Diuretics are drugs which help to remove fluids from the body. They can be used medically to treat diseases of the heart, kidney and liver and for pre-menstrual tension. Diuretics may be misused in sport for two main reasons, to lose weight quickly in sports which have weight categories and to increase the rate at which competitors can pass urine because some believe that this will make it more difficult for the laboratory to detect a banned substance. Misuse of diuretics has serious health risks it is also cheating. Diuretic Substances Bendrofluazide / Triameterine Frusemide / Spironolactone Hydrochlorothiazide Peptide Hormones and Analogues Peptide Hormones ‘carry messages’ around the body to increase growth influence sexual and general behaviour and to control pain. Analogues are man made (synthetic) drugs which have similar effects to the natural substances. The original and synthetic versions are banned in sport. Competitors misuse peptide hormones and analogues for various reasons, to stimulate production of naturally occurring (endogenous) steroids, to build up muscles, to mend body tissue and to improve the body’s ability to carry oxygen. Because everyone has hormones in their bodies it is difficult to say how much harm is caused by misusing them. Peptide Hormones and Analogues Substances Chorionic Gonadotrophin: In men HCG increases the production of endogenous steroid and is similar to using testosterone. Corticotrophin: This drug increases the level of endogenous corticosteroids which in turn could cause a feeling of well being. It helps to repair damaged tissue and muscle, but if used for long periods of time will cause muscle wasting.
D68 Master of the Ring Copyright 2004 by Eric & Kevin Lamkin
Professional Sport Karate Rules

Growth Hormone: In medicine low doses of growth hormones help to treat children with growth problems. However, in sport adults who attempt to build their muscles using growth hormones risk abnormal growth of hands, feet and face (Acromegaly) and of the internal organs, eg liver. Enlarged organs could cause further health problems if damaged by severe bruising which might occur in a contact sport. Erythropoietin (EPO): EPO increases the number of red cells in the blood. However thickening the blood could be dangerous as it may clot or overload the heart. Increased viscosity of the blood increases the risk of blood clotting and may lead to a stroke.
D69 Master of the Ring Copyright 2004 by Eric & Kevin Lamkin
Professional Sport Karate Rules
Appendix EAppendix E
American Kenpo Karate American Kenpo Karate
Freestyle TechniquesFreestyle Techniques
E1 Master of the Ring Copyright 2004 by Eric & Kevin Lamkin
American Kenpo Freestyle Techniques
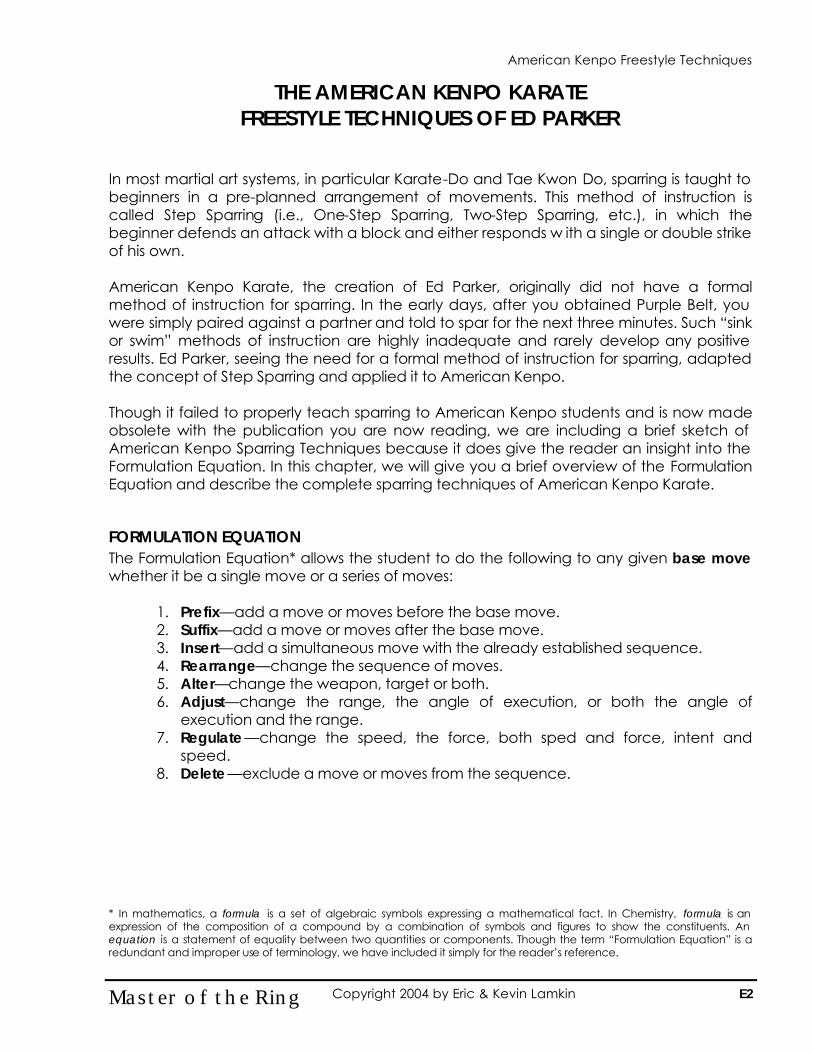
THE AMERICAN KENPO KARATE FREESTYLE TECHNIQUES OF ED PARKER
In most martial art systems, in particular Karate-Do and Tae Kwon Do, sparring is taught to beginners in a pre-planned arrangement of movements. This method of instruction is called Step Sparring (i.e., One-Step Sparring, Two-Step Sparring, etc.), in which the beginner defends an attack with a block and either responds w ith a single or double strike of his own. American Kenpo Karate, the creation of Ed Parker, originally did not have a formal method of instruction for sparring. In the early days, after you obtained Purple Belt, you were simply paired against a partner and told to spar for the next three minutes. Such “sink or swim” methods of instruction are highly inadequate and rarely develop any positive results. Ed Parker, seeing the need for a formal method of instruction for sparring, adapted the concept of Step Sparring and applied it to American Kenpo. Though it failed to properly teach sparring to American Kenpo students and is now made obsolete with the publication you are now reading, we are including a brief sketch of American Kenpo Sparring Techniques because it does give the reader an insight into the Formulation Equation. In this chapter, we will give you a brief overview of the Formulation Equation and describe the complete sparring techniques of American Kenpo Karate. FORMULATION EQUATION The Formulation Equation* allows the student to do the following to any given base move whether it be a single move or a series of moves:
1. Prefix—add a move or moves before the base move. 2. Suffix—add a move or moves after the base move. 3. Insert—add a simultaneous move with the already established sequence. 4. Rearrange—change the sequence of moves. 5. Alter—change the weapon, target or both. 6. Adjust—change the range, the angle of execution, or both the angle of
execution and the range. 7. Regulate—change the speed, the force, both sped and force, intent and
speed. 8. Delete—exclude a move or moves from the sequence.
* In mathematics, a formula is a set of algebraic symbols expressing a mathematical fact. In Chemistry, formula is an expression of the composition of a compound by a combination of symbols and figures to show the constituents. An equation is a statement of equality between two quantities or components. Though the term “Formulation Equation” is a redundant and improper use of terminology, we have included it simply for the reader’s reference.
E2 Master of the Ring Copyright 2004 by Eric & Kevin Lamkin
American Kenpo Freestyle Techniques
YELLOW BELT FREESTYLE TECHNIQUES There are eight Yellow Belt Freestyle techniques. There are no names to these techniques; instead, numbers and letters are used to describe the individual components. They are:
B1a B1b B2a B2b B3a B3b B4a B4b
B (uppercase)—this represents the base move. It consists of two variations—a & b. a (lowercase)—this symbolizes the first variation of the base move. From a left-to-left fighting position, your left hand will hook, grab and pull your opponent’s left arm diagonally downward toward your left as your right hand simultaneously delivers a right vertical thrust punch to the opponent’s face. b (lowercase)—this symbolizes the second variation of the base move. From a left-to-left fighting position, your left hand will hook, grab and pull your opponent’s left arm diagonally downward toward your left which simultaneously executing a right uppercut punch to his rib cage. The numbers denote body and foot maneuvers that are necessary to gauge distance between your opponent and you. They are synchronized with the base move and its variations. 1—refers to pivoting in place into a forward bow stance. 2—refers to executing a push-drag foot maneuver. 3—refers to executing a front crossover and step out. 4—refers to executing a front crossover, step out, and a forward step through maneuver.
E3 Master of the Ring Copyright 2004 by Eric & Kevin Lamkin
American Kenpo Freestyle Techniques
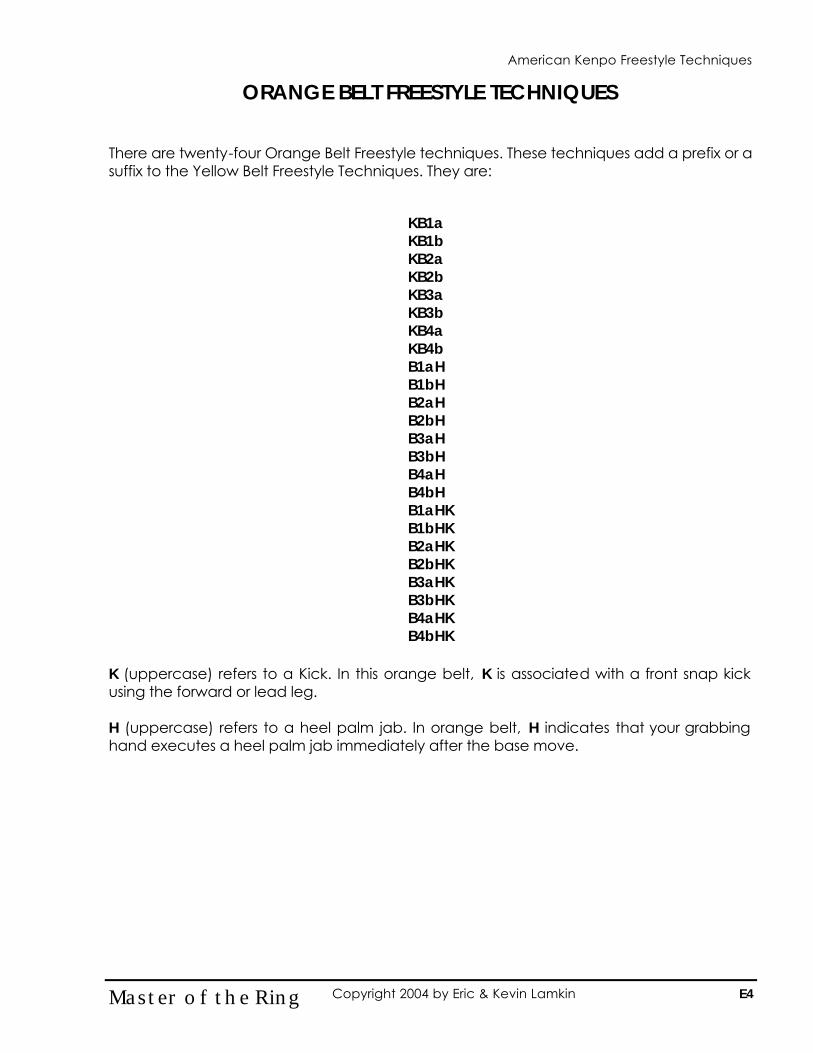
ORANGE BELT FREESTYLE TECHNIQUES There are twenty-four Orange Belt Freestyle techniques. These techniques add a prefix or a suffix to the Yellow Belt Freestyle Techniques. They are:
KB1a KB1b KB2a KB2b KB3a KB3b KB4a KB4b B1aH B1bH B2aH B2bH B3aH B3bH B4aH B4bH B1aHK B1bHK B2aHK B2bHK B3aHK B3bHK B4aHK B4bHK
K (uppercase) refers to a Kick. In this orange belt, K is associated with a front snap kick using the forward or lead leg. H (uppercase) refers to a heel palm jab. In orange belt, H indicates that your grabbing hand executes a heel palm jab immediately after the base move.
E4 Master of the Ring Copyright 2004 by Eric & Kevin Lamkin
American Kenpo Freestyle Techniques
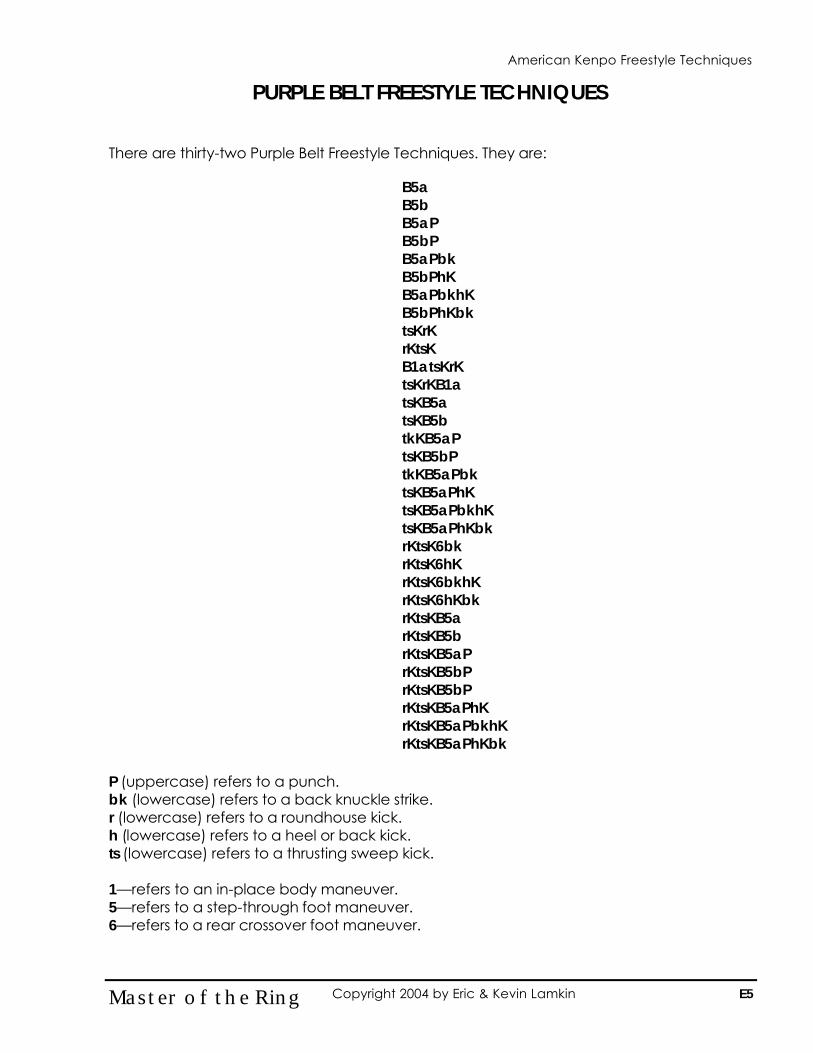
PURPLE BELT FREESTYLE TECHNIQUES There are thirty-two Purple Belt Freestyle Techniques. They are:
B5a B5b B5aP B5bP B5aPbk B5bPhK B5aPbkhK B5bPhKbk tsKrK rKtsK B1atsKrK tsKrKB1a tsKB5a tsKB5b tkKB5aP tsKB5bP tkKB5aPbk tsKB5aPhK tsKB5aPbkhK tsKB5aPhKbk rKtsK6bk rKtsK6hK rKtsK6bkhK rKtsK6hKbk rKtsKB5a rKtsKB5b rKtsKB5aP rKtsKB5bP rKtsKB5bP rKtsKB5aPhK rKtsKB5aPbkhK rKtsKB5aPhKbk
P (uppercase) refers to a punch. bk (lowercase) refers to a back knuckle strike. r (lowercase) refers to a roundhouse kick. h (lowercase) refers to a heel or back kick. ts (lowercase) refers to a thrusting sweep kick. 1—refers to an in-place body maneuver. 5—refers to a step-through foot maneuver. 6—refers to a rear crossover foot maneuver.
E5 Master of the Ring Copyright 2004 by Eric & Kevin Lamkin
American Kenpo Freestyle Techniques
Appendix FAppendix F
Historical ReferenceHistorical Reference
The Theory of Free styleThe Theory of Free style
F1 Master of the Ring Copyright 2004 by Eric & Kevin Lamkin
Theory of Free Style
HISTORICAL REFERENCE
“THE THEORY OF FREE STYLE” In the early days of martial arts, there wasn’t a systemized training method for sparring. After the instructor felt that the student was ready, the beginner was simply paired against an experienced fighter and was given the command, “Fight!” While there are advocates of the “Sink or Swim” method, it is clearly a crude and archaic method of teaching. It wasn’t until the early 1970’s that theories of freestyle began to appear and attempts made to properly instruct students. Two of the leading exponents of this revolution in sparring were Bruce Lee and Joe Lewis. On the following page is a copy of an actual document that was circulated throughout the Tracy’s Karate schools. Developed by Joe Lewis and based upon the teachings and theories of Bruce Lee, the Theory of Free Style was the first attempt to systematically teach sparring. Although the Theory of Free Style is only an outline, it illustrates the thought that was put into sparring by two of the greatest fighters of modern time. The core of the theory rests upon three principles:
1. The selection of the appropriate attack (technique) 2. The method of carrying out that attack (Angles of Attack) 3. The type of opponent you face.
As you look over this document you may notice that some terminology is crude and improperly used. One example is the term Angles of Attack; instead, the proper term is Methods of Attack as an angle refers to a direction rather than a type of attack. This notwithstanding, it is an important historical document of modern martial arts and assisted the authors Kevin and Eric Lamkin in producing the revolutionary method of sparring that you are now reading.
F2 Master of the Ring Copyright 2004 by Eric & Kevin Lamkin
Theory of Free Style
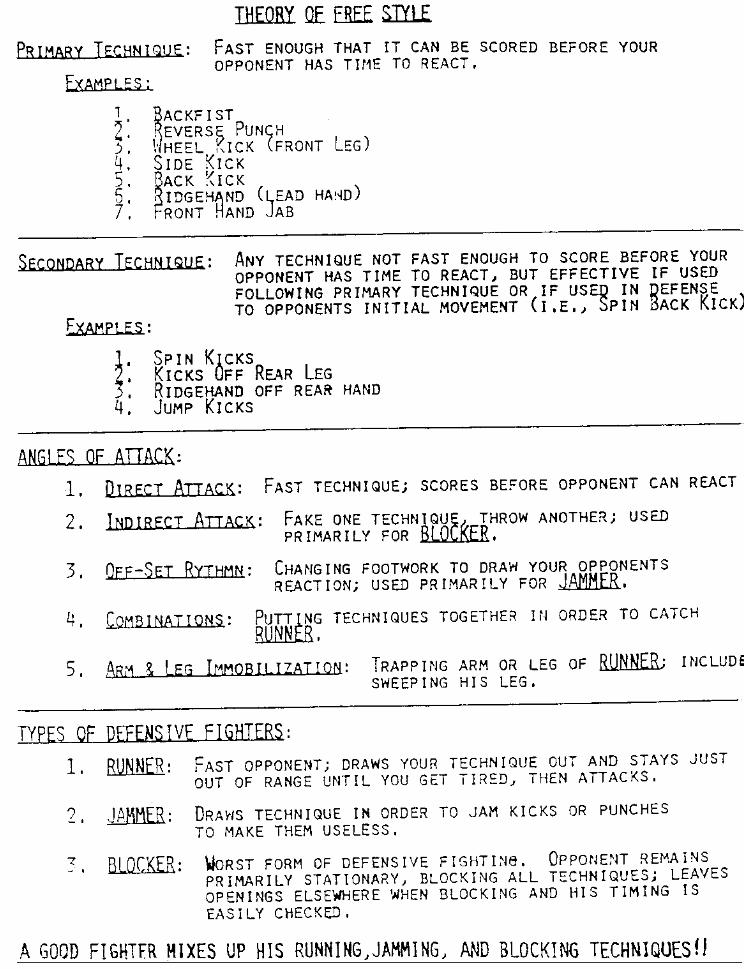
Bonus SectionBonus Section
Toughness TrainingToughness Training by Eric Lamkinby Eric Lamkin
Master of the Ring Copyright 2004 by Eric & Kevin Lamkin

The Institute of Modern Personal Combat Tactics and Training
PRESENTS
TOUGHNESSTOUGHNESS TRAININGTRAINING
Elite Fighter System of Modern Personal Combat
Copyright © 2003 by Eric Lamkin and Elite-Fighters.com
No part of this work may be reproduced by any mechanical, photographic, magnetic, or electronic process or otherwise copied for public or private use without prior written
permission of the author.
Printed in the United States of America
i Toughness Training Copyright 2003 by Eric Lamkin and Elite-Fighters.com
DISCLAIMER This publication is for informational purposes only. Please note that the author and Elite-Fighters.com are NOT RESPONSIBLE in any manner whatsoever for any injury or death that may result from the use or misuse from practicing the techniques and/or following the instructions given within. Since the physical activities described herein may be too strenuous in nature for some readers to engage in safely, it is essential that a physician be consulted prior to training.
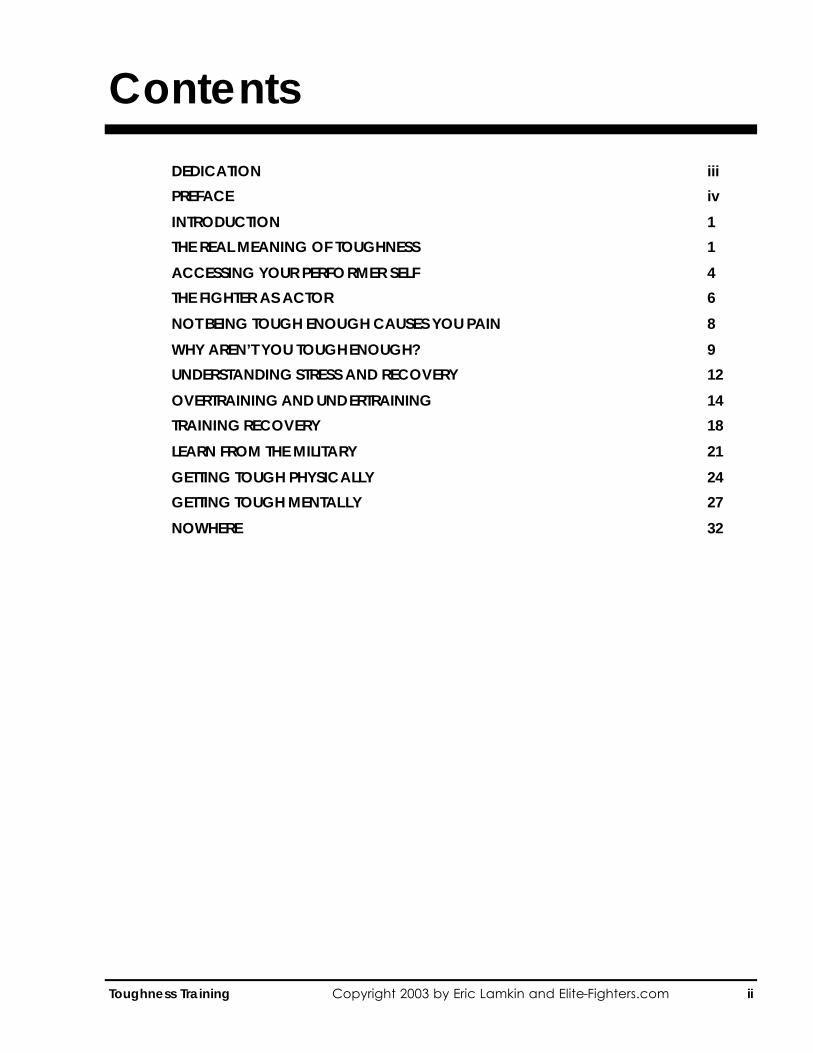
Contents
DEDICATION iii
PREFACE iv
INTRODUCTION 1
THE REAL MEANING OF TOUGHNESS 1
ACCESSING YOUR PERFORMER SELF 4
THE FIGHTER AS ACTOR 6
NOT BEING TOUGH ENOUGH CAUSES YOU PAIN 8
WHY AREN’T YOU TOUGH ENOUGH? 9
UNDERSTANDING STRESS AND RECOVERY 12
OVERTRAINING AND UNDERTRAINING 14
TRAINING RECOVERY 18
LEARN FROM THE MILITARY 21
GETTING TOUGH PHYSICALLY 24
GETTING TOUGH MENTALLY 27
NOWHERE 32
ii Toughness Training Copyright 2003 by Eric Lamkin and Elite-Fighters.com
DEDICATION The work you are about to read is the single most important document that you will ever read in martial arts literature. In the following pages, you will learn the keys to success in the martial arts and in life. I give full credit to the information herein to my brother, Kevin Lamkin. For it was from his guidance and the lessons he taught that have brought me to where I am today and the paths that I will follow in the future.
Toughness Training
iii Toughness Training Copyright 2003 by Eric Lamkin and Elite-Fighters.com
PREFACE The martial art world has always centered around a religious-mystical power source called Chi or Ki. As the fable goes, if you are able to harness Chi, then you will have flawless technique, powerful strikes, and be unbeatable in combat. But what martial artists eventually discover is that no such magic exists. The answers do not lie in some mystical force, but rather in the dedication one shows to training. Expert martial artists discover their Ideal Performance State (IPS) also called “the Zone”. But unlike Chi, the IPS is real and attainable, it is not shrouded in mystery, nor do you have to subscribe to a religious belief. Instead, you train to be tough. This is what Toughness Training is all about. Developing yourself to have flawless technique, powerful strikes, and be unbeatable in combat.
iv Toughness Training Copyright 2003 by Eric Lamkin and Elite-Fighters.com
Toughness Training
TOUGHNESS TRAINING INTRODUCTION What is Toughness Training? Toughness Training is the art and science of increasing your ability to handle all kinds of stress—physical, mental, and emotional—so that you’ll be a more effective fighter. It’s a highly sophisticated and thoroughly proven method of perfecting your combat skills while minimizing the risk of physical injuries and emotional setbacks that so often attend overtraining. A key element in Toughness Training is improving your recover-from-stress routines during practice. Balancing the stress of training with adequate recovery is vital; failing to do so will always undermine a fighter’s potential. To achieve that essential balance you have to know how to recognize when you’re out of balance. Toughness Training gives you the necessary skills. What Does Toughness Training Toughen? Your mind, body, and emotions will become more flexible, responsive, resilient, and stronger—the real meaning of tough as used here—through Toughness Training. THE REAL MEANING OF TOUGHNESS Talent, Skill, or Toughness? To understand the meaning of toughness, you must first grasp the meaning of talent and skill. Everyone has talent—some have it big, some not so big. Talent is genetic potential. Theoretically, talent defines the outer limits of your athletic potential. Now, let’s look at the notion of skill. Whereas talent is a gift, skills are learned. The mechanics of kicking, punching, and grappling are skills. They are acquired through hard work, repetition, and practice. Theoretically, skills affect achievement in martial arts in much the same way that talent does. Poor physical skills seriously limit potential for success, and great physical skills open it up. Talent and skill are important contributors to achievement in martial arts, but they are obviously not the most important factors. There are many highly successful martial artists that exist today who are not gifted. So, what is the critical factor in martial art achievement? The answer is Toughness. What Toughness Is Countless myths persist about the real meaning of toughness. Tough has nothing to do with the killer instinct or being mean. It also has nothing to do with being cold, hard, insensitive, calloused, or ruthless. The definition of toughness is:
TOUGHNESS IS THE ABILITY TO CONSISTENTLY PERFORM TOWARD THE UPPER RANGE OF YOUR TALENT AND SKILL REGARDLESS OF CIRCUMSTANCES.
1 Toughness Training Copyright 2003 by Eric Lamkin and Elite-Fighters.com
Toughness Training

Although this explanation seems simple enough, a much deeper understanding is necessary before we can move forward. To help you with this, I’ve expanded the above definition further. Toughness is Learned—Make no mistake about it: toughness has nothing to do with genetics or inherited instincts. It is acquired in precisely the same way all skills are. If you don’t have it, it simply means you haven’t learned it. Anyone can learn to get tougher at any stage in his life. Toughness is the skill that enables you to bring all your talent and skill to life on demand—If you have toughness, you can achieve great things regardless if you have talent or skill. With toughness you can learn whatever mechanical skills you need, and toughness will push your talent to its absolute limits. Only through toughness can you discover your real limits. Far too many martial artists sell themselves short by assuming they are not talented enough. The limiting factor for most martial artists is not talent but toughness. Toughness is Ideal Performance State control—An Ideal Performance State (IPS) exists for every martial artist. It’s simply the optimal state of physiological and psychological arousal for performing at your peak. Arousal is reflected in heart rate, muscle tension, brain wave frequency, blood pressure, and a host of other measures. IPS is typically accompanied by a highly distinctive pattern of feelings and emotions. You are most likely to experience IPS and perform at your peak when you feel:
• Confident • Relaxed and calm • Energized with positive emotion • Challenged • Focused and alert • Automatic and instinctive • Ready for fun and enjoyment
Emotions run the performance show—Emotion runs the show in martial art training. Some emotions are empowering and free your talent and skill; other emotions are disempowering and effectively lock your potential out. Empowering emotions are those associated with challenge, drive, confidence, determination, positive fight, energy, spirit, persistence, and fun. Disempowering emotions are those associated with feelings of fatigue, helplessness, insecurity, low energy, weakness, fear, and confusion. The reason emotion is so important is its connection to arousal. Emotions are biochemical events in the brain that can lead to a cascade of powerful changes in the body. These changes either move you closer to or further away from your IPS. Fear moves you away, confidence brings you closer; temper and rage move you away, fun and enjoyment bring you back. Toughness is the ability to consistently access empowering emotions during training and combat—Learning to access empowering emotions during training and combat is the basis for learning to be a great fighter. Emotional control brings you bodily control.
Toughness Training
2 Toughness Training Copyright 2003 by Eric Lamkin and Elite-Fighters.com
Toughness is mental, physical, and—ultimately—emotional—What you think and visualize, how you act, when and what you eat, the quantity and quality of your sleep and rest, and especially your level of fitness, can all have profound effects on your emotional state at any given time. As you will see, tough thinking, tough acting, fitness, proper rest, and diet are prerequisites for feeling tough. Too many martial artists make the mistake of believing that toughness is strictly a mental feat. In the final analysis, toughness is physical—The body is physical; talent and skill are physical; and thinking and visualization are electrochemical events in the brain and are also physical. Martial artists often make the mistake of believing that what they think, particularly negative thinking, has little effect on their performance. Since they can’t see their thoughts and emotions, they view those thoughts and emotions as not as real or as important as the physical aspects. Thoughts and feelings are just as real and every bit as fundamental to achievement as talent and skill. Summary Never limit yourself by believing you are not talented enough or smart enough, or that you haven’t been given the genetic gifts to achieve great heights. Your future is determined far more by what you do than what you are genetically. The most powerful force in your life as a martial artist will clearly be your acquired level of toughness. And the toughness you learn for the martial arts will also prove invaluable to you in the greater arena of life.
Toughness Training
3 Toughness Training Copyright 2003 by Eric Lamkin and Elite-Fighters.com
ACCESSING YOUR PERFORMER SELF Performing toward the upper range of your talent and skill is directly related to your ability to maintain an Ideal Performance State. Mobilizing your body’s performance potential requires a very special kind of psychological and physiological balance. Feelings of relaxation, calmness, high energy, positiveness, alertness, focus, confidence, instinctiveness, determination, and enjoyment form the basis of this delicate state and reflect a very special condition of bodily arousal. Feelings and emotions simply mirror what’s happening deep within your body’s physiology. For example, feeling relaxed reflects the amount of electrical energy being transmitted through the muscles of your body. When your muscles feel tight it means a great deal of bioelectrical energy is being delivered, and feeling loose means the opposite. Feelings of calmness, alertness, and focus reflect a particular pattern of neurological (brain) arousal. Feelings of confidence, energy, aggressiveness, and fun reflect a very specific bio-chemical and neurological balance in the body. Feelings of helplessness and fatigue are rooted in opposing bio-chemical processes. Blood sugar levels, blood sugar stored in the muscle (called glycogen), levels of adrenaline and noradrenaline, and concentrations of special brain hormones (called neurotransmitters and neuropeptides) are just a few of the factors that influence our moment-to-moment feelings and emotions during training and combat. When your feelings shift from confident to fearful, powerful changes occur in the brain’s chemistry that can profoundly influence coordination and balance, concentration and muscle-response accuracy. Feelings and emotions, like the instrument gauges of a fighter jet, constantly feed back information about the internal condition of our bodies and our capacity for continued energy expenditure. Negative feelings and emotions may point to critical bodily deficiencies that should be immediately tended to, such as the need to consume more cold water to prevent further dehydration or to consume more carbohydrates to raise blood sugar. The chemistry underlying our negative feelings and emotions can block your efforts to achieve Ideal Performance State control . This makes our emotional state during training and combat crucial to success. The Performer Self Versus the Real Self The way you really feel and the way you need to feel to perform at your best level may be worlds apart. In the context of Toughness Training, the way you really feel is called your Real Self and the way you need to feel to perform at your peak is called your Performer Self. Understanding how the two interact is fundamental to becoming a tough fighter. Feelings and emotions are flowing all the time, some positive and some negative. Emotions are really body talk carried on by the body’s chemical messengers. Positive emotions generally signal balance and health; negative emotions typically signal unmet needs of some kind. Each and every negative feeling and emotion that we experience serves a purpose.
Toughness Training
4 Toughness Training Copyright 2003 by Eric Lamkin and Elite-Fighters.com
Some negative states signal important unmet needs and some signal trivial needs. A child crying because of hunger obviously has an important unmet need; a child crying because his mother won’t buy a certain toy sends quite a different message. Similarly, a fighter feeling low energy and helplessness due to excessive water loss clearly has an important unmet need; becoming angry and throwing a temper tantrum because someone connected a flawless sidekick to his rib cage reveals quite another need. The important thing to remember here is that the body gets its needs met by sending chemical messengers that take the form of feelings and emotions. This brings attention to whatever condition of imbalance that exists within the body. Needs can be physical, such as hunger and thirst, or they can by psychological, such as needs for recognition, approval, and self-esteem. Toughness comes from responding to negative messages in appropriate ways; if you totally block them out, meeting your needs becomes virtually impossible, meaning that your combat performance will go into a steep decline. The fighter’s dilemma surfaces here. We know the feelings and emotions we need to feel during training and combat to perform at our best (IPS) level, but the reality is that what we need to feel may be light-years from the way we actually feel. Feelings of confidence, high energy, relaxation, enjoyment may never appear at all or suddenly evaporate at the first sign of trouble. Confidence may be replaced with fear, relaxation with tightness, energy with fatigue, enjoyment with frustration or anger—the list goes on and on. Corresponding changes in brain chemistry and physiology accompany these shifts in feelings. Summary When basic needs for food, rest, sleep, water, and so forth are not met, toughness and IPS control quickly become unattainable. The same thing holds true emotionally: when ones emotional needs are not adequately met before entering training or battle, particularly those associated with self-esteem and self-worth, the problems with nerves, self-doubt, frustration, and perceived failure are inevitable. Another requirement for toughness is a highly developed and skillful Performer Self. The ability to move from the Real Self to the Performer Self on demand calls for precise thinking and acting skills. The final requirement is the capacity to endure great physical, mental, and emotional stress. A fundamental component of toughness is physical fitness. A low tolerance for physical stress typically means the battle will be lost before it begins. Once fighters reach their physical limits, it’s like unplugging the computer from its power source. Toughness requires great physical flexibility, responsiveness, strength, and resiliency. The same thing holds true emotionally. Toughness also requires a great capacity for mental and emotional stress, and great flexibility, responsiveness, strength, and resiliency. As you will see in later chapters, this capacity is acquired only through exposure to a specific level of stress. Too little stress and overprotection, or too much stress and overstimulation, reduces your capacity for coping effectively with the challenges of training and combat.
Toughness Training
5 Toughness Training Copyright 2003 by Eric Lamkin and Elite-Fighters.com
THE FIGHTER AS ACTOR Do you think that your opponent cares if you have a headache or a sinus infection? Not on your life. The only thing that your opponent cares about is pounding your face into the ground. So, what do Elite Fighters do when they do not physically feel well and they are faced with an opponent? How do Elite Fighters overcome the stress from work in order to focus on their training sessions? Here’s how: they learn exceptional performer skills. Research has confirmed that the physiological changes that occur in the acted-out (faked) emotion are the same as those that occur in spontaneous, genuine emotion. And how does this research relate to the martial arts? Elite Fighters have learned to bring to life feelings of confidence, high energy, relaxation, and challenge no matter how they really feel.
EMOTIONS RESPOND MUCH AS MUSCLES DO. THE ONES YOU STIMULATE THE MOST BECOME THE STRONGEST AND MOST ACCESSIBLE.
The skills needed to access targeted emotions are called performer skills and generally involve three things:
1. Disciplined thinking and imaging skills. The thoughts and images you carry in your head have precise emotional consequences. Undisciplined thinking and imaging generally kicks your emotional targets far out of range. 2. Disciplined physical acting skills. The way you carry your head and shoulders, the look on your face, the way you walk, your body language, also have precise emotional consequences. Acting the way you feel generally intensifies whatever emotion that may be present. Acting the way you want to feel to achieve IPS moves you closer to your intended emotional targets. 3. Emotional response practice. If you’re hoping for a new emotional response to the same old problem and you haven’t had a chance to practice, the odds are strongly against you. Emotional responses need time and stimulation to grow, just as muscles do. Emotional responses require practice time—the more intense, the better—to train the underlying biochemical mechanisms.
Performer Skills of Fighters
1. Tough Thinking This is simply your ability to use words and images to control your Ideal Performance State. This means disciplined thinking and visualization during training. Tough thinking will keep you from losing your temper when you make the unthinkable mistake and prevent you from surrendering when the battle appears lost. Here are some examples of tough thinking. When you are training and your lungs are burning, you feel exhausted, think:
“This is really tough—but I’m a whole lot tougher!”
Toughness Training
6 Toughness Training Copyright 2003 by Eric Lamkin and Elite-Fighters.com
When you feel tired, burned out, negative, and weak before class even starts, think: “Today will be a great challenge for me. I’ve go to be super-tough today to make it. If I can do it here and now, I can do it anywhere. I’m going to hang in there no
matter what! No excuses! When your life is in danger and you feel like giving in, think:
“I never surrender! Not me. Not ever. I will fight until it’s over and I am victorious!”
2. Tough Acting This is simply your ability to use your body to control your Ideal Performance State. This means disciplined, precise acting during training and combat. Like tough thinking, tough acting is a powerful weapon with which to control fear, anger, helplessness, and doubt. Here are some examples: When you feel that your energy is gone—Force yourself to look as fresh as if you’d just rolled out of bed on the greatest day of your life. When you make the worst mistake possible—Quickly turn away from the mistake and show nothing on the outside but supreme confidence. When the enemy is approaching—Look courageous. Act courageous. Think victory!
Can the Performer Self become too dominant? If you don’t develop and use your performer skills you probably won’t accomplish much. Your talent and skill will remain largely untapped. On the other hand, if your Performer Self dominates your personality, important needs of the Real Self often get suppressed and therefore remain unmet. When the Performer Self dominates a person’s personality, a characteristic sense of phoniness is given off. The person will often begin to mask his mistakes rather than improve them. True toughness in martial arts requires a great balance.
Toughness Training
7 Toughness Training Copyright 2003 by Eric Lamkin and Elite-Fighters.com
NOT BEING TOUGH ENOUGH CAUSES YOU PAIN The ultimate measure of your toughness is the extent to which you can consistently perform toward the upper range of your talent and skill. Another measure, surprisingly, is pain. Let’s look at physical toughness first. How do you know when you’ve exceeded your body’s capacity for coping with physical stress? Think about running, weight lifting, or doing push-ups. The closer you get to your absolute limits, the more discomfort you feel. When you clearly exceed your limits, pain hits. Therefore, if you can sustain a great volume of physical stress without pain, you have acquired a high level of physical toughness. Martial artists with poor physical fitness are always hurting or injured. This stems from their being in a constant state of physical over-training because their bodies have such a low tolerance for physical stress. What do instructors get from their physically non-tough students? Constant complaints about how their bodies are always hurting or breaking down. The same holds true both mentally and emotionally: exceeding your capacity for coping mentally or emotionally also results in pain. Psychological pain comes in the form of negative feelings and emotions. If you’re not tough enough mentally and emotionally, it shows as persistent negative thinking and feeling. Just as in the physical realm, martial artists suffering from these weaknesses are also in a constant state of mental and emotional over-training. Because their capacity to cope can’t meet the day-to-day psychological demands to train, they are always complaining, always negative. Examples of mental and emotional pain include the following:
• Mental and emotional fatigue • Persistent negative thinking • Bad moods • Depression • Nervousness and anxiety • Boredom • Low motivation • Low enjoyment • Low self-esteem and confidence • Burnout • Feeling defensive and threatened
The more pain you experience mentally, physically, or emotionally, the greater the chance that you simply aren’t tough enough. The martial artist who enters training totally unprepared and unfit offers a good example. All the pain and discomfort felt in the training class signal overtraining. Constantly exceeding your limits spells big trouble in terms of injuries, broken confidence, and poor performance.
Toughness Training
8 Toughness Training Copyright 2003 by Eric Lamkin and Elite-Fighters.com
WHY AREN’T YOU TOUGH ENOUGH? Why are some martial artists tough and others not? Why do some martial artists choke or go crazy with anger in situations where others stay calm and focused? To answer these questions, let’s explore what might be termed nontough emotional responses. You’ve learned that toughness is a learned capacity to produce a unique emotional response in training and combat. That emotional response might best be embodied in the word challenge. When you’re challenged you’re positively engaged, mobilized, moving forward. The challenge feeling often accompanies feelings of fun, positive fight, confidence, and focus. To consistently respond with challenge when things get rough during training requires great emotional skill. Let’s look at the least skillful and most primitive emotional response to the stresses of training—simply giving up inside, also called “tanking”. Excuse-making is one of the most common forms of tanking. Martial artists also use the withdrawal of effort to control their nerves. Tanking is particularly common among fighters who have been labeled gifted or talented. To preserve their image of being talented, martial artists create a thousand and one excuses to explain poor performances. The most talented martial artists often become the worst head cases precisely for that reason. These excuses help protect his pride and ego. Although tanking will lessen your pain and reduce your nervousness, it carries a staggering price tag: tankers never fulfill their potential. When you withdraw energy, motivation, or effort, everything starts shutting down, meaning that the battle to bring your talent and skill to life certainly will be lost. So, for those martial artists who tank in any form, the answer to the question of why they are not tough enough is:
THEY FAIL TO GIVE THEIR BEST EFFORT AND THEN REFUSE TO ACCEPT FULL RESPONSIBILITY FOR THE OUTCOME
Anger Once you learn to control the tanking response, your next emotional obstacle will be anger and negativism. Martial artists who fuel their training and sparring sessions with negative emotion never achieve real toughness. Anger, temper, and negativism often serve as misguided attempts to protect the Real Self (ego) from pain and, just like tanking, can drive nervousness away. Once that connection is made, the temptation to use negative thinking and emotion to control choking and emotional pain can become powerful. It’s important to note that negativism can flow in two directions, toward self or away from self. Of the two, self-directed anger and negativism disrupt Ideal Performance State control the most, and inflict the greatest damage to the Real Self. Fueling performance with the chemistry of anger is like pouring gasoline on a fire to keep it going. Sometimes you get away with it, but all too often the fire blows up in your face.
Toughness Training
9 Toughness Training Copyright 2003 by Eric Lamkin and Elite-Fighters.com
Here are some of the ways anger and negativism are used by martial artists during training. To reduce pressure—Telling yourself you’re stupid, dumb, or brain-dead reduces expectations and helps control nerves. To increase arousal—Martial artists learn to use anger and temper to get themselves more activated and stimulated. Anger clearly mobilizes more fighting energy. To prevent choking—Anger can definitely overcome fear. This gives the martial artist a powerful temptation—made more irresistible by repetition—to blow helplessness and fear away with temper. Nobody likes feeling helpless. Most martial artists would gladly trade fear for anger. From the above examples it’s easy to see why so many martial artists get off track with negative emotion. Although superior to tanking as a strategy for managing pressure, negative emotions obviously won’t take you where you want to go. So, for those martial artists who use negativism in any form, the answer to the question why they are not tough enough unmistakably is:
THEY FAIL TO FUEL THEIR COMPETITIVE FIRES WITH POSITIVE EMOTION Choking Once the fear-reducing strategies of tanking and anger are no longer used, martial artists come face to face with the choking response. Choking means performing poorly because of fear. Fear unleashes powerful, primitive hormonal responses that can be extremely disruptive to performance. Martial artists who choke are clearly tougher and more emotionally skilled than those who either tank or use temper and negativism to cope. Here are some basic truths about choking:
• Everyone chokes sometimes. No matter how tough you get you’ll always be vulnerable to choking.
• Choking simply means you care and are engaged emotionally. • Toughness means being able to cope with choking rather than being able to
eliminate it. • Tough thinking and tough acting will help substantially in controlling the choking
response. • Choking is a biochemical event. The hormones associated with fear are real and
so are the effects. • Choking is not all in your head!
Toughness Training
10 Toughness Training Copyright 2003 by Eric Lamkin and Elite-Fighters.com
So, why do some martial artists choke more often than others? Why are some martial artists more vulnerable? Here are some additional insights that are crucial for answering those questions:
1. The more fragile and insecure you are, the more vulnerable you are to choking. 2. Higher confidence lowers the risk of choking. 3. Higher motivation increases the risk of choking. 4. The more you fear choking, the more you will choke. 5. Learning to control the choking response involves a number of acquired
toughness skills. Choking indicates strength in a very real sense. Choking means you’re tough enough to face fear head-on and not back out emotionally with tanking or temper. The key point is:
MARTIAL ARTISTS WHO CHOKE BUT STILL CONTINUE TO FIGHT WITH 100 PERCENT EFFORT AND TOTAL POSITIVISM SHOW GREAT TOUGHNESS.
The Challenge Response When adversity strikes it means no retreating, no whining, no excusing, no raging. Rather than fear and helplessness, what you get is distinct feelings of aggressiveness, spirit, and fight combined with a profound sense of calmness and confidence. Competitive problems become stimulating rather than threatening and a sense of loving the battle gradually takes form.
TO LOVE WINNING IS EASY; TO LOVE THE BATTLE REQUIRES TOUGHNESS. Responding to crisis, adversity, and pressure with a sense of challenge and love of the battle is neither common nor normal. Instead it is the mark of the winner, the leader, and the champion. Habits of tanking and negativism tragically block the learning process. Only through acquired toughness will this unique and priceless emotional response come within reach.
Toughness Training
11 Toughness Training Copyright 2003 by Eric Lamkin and Elite-Fighters.com
UNDERSTANDING STRESS AND RECOVERY Too much stress or too little stress will undermine the toughening process. Getting tougher is fundamentally linked to two specific abilities:
1. Your ability to balance stress and recovery in your training as well as in the broader arena of your life.
2. Your ability to generate as many waves of stress and recovery as possible in the area you wish to toughen.
To fully understand how stress and recovery relate to the toughening process, we need some working definitions. In the Toughness Training context, stress is anything that causes energy to be expended; recovery is anything that causes energy to be re-captured. Physical stress occurs when you expend energy in moving muscles; mental stress happens when you expend energy in thinking and concentration; emotional stress comes when you expend energy in feeling fear, anger, or other emotions. Physical stress is engaging in a sparring session; mental stress is thinking about sparring tactics; emotional stress is worrying about how you’re going to do during sparring. Recovery occurs at three levels as well—physical, mental, and emotional. Recovery often simply means rest. When you rest, you temporarily break episodes of stress and allow energy to be re-stored. Reducing muscle stimulation represents physical recovery; breaking concentration and reducing mental stimulation represents mental recovery; replacing negative feelings of anger and fear with positive feelings of calmness and confidence represents emotional recovery. Stress and recovery are also closely connected to need fulfillment. Unfulfilled needs represent cycles of stress; fulfillment of those needs is recovery. Likewise, feelings of hunger, tiredness, fear, and depression represent stress; relief from those feelings is recovery. Balancing your Energy Expending more energy than you recover has serious consequences. Failure to balance your physical energy leads to muscle failure, exhaustion, and injury. Failure to balance your mental energy affects your focus, concentration, or problem solving. Failure to balance your emotional energy can lead to negativism and burnout. In all three areas, imbalance leads directly to victories by opponents who otherwise would have been defeated. Here are some important stress/recovery insights related to toughening:
1. Stress is anything that causes energy to be expended; it occurs physically, mentally, and emotionally.
2. Recovery is anything that causes energy to be re-captured; it occurs physically, mentally, and emotionally.
3. Unfulfilled needs represent forms of stress. Fulfillment of needs is recovery. 4. In order to fight great battles, your energy deposits should be roughly equal to
your energy withdrawals. Your goal should be to enter battle fully recovered whenever possible.
12 Toughness Training Copyright 2003 by Eric Lamkin and Elite-Fighters.com
Toughness Training
5. Balancing stress and recovery is fundamental to becoming a tough fighter. Stress and Recovery Examples In order to balance your energy, it’s important that you clearly understand when you are expending energy and when you are recovering it. The chart below lists common examples of various kinds of stress.
The following below lists common examples of recovery:
Learn to recognize when you are experiencing stress as opposed to recovery. We tend to think of physical stress as being unmistakable, as in punching a heavy bag for three minutes. Mental and emotional stress can be somewhat more subtle, as when you can’t doze off while trying to take a needed nap because you’re worried that you might be embarrassed during tomorrow’s sparring session. Being able to distinguish between stress and recovery is extremely important. Martial artists have little chance of finding and maintaining stress/recovery balance without such understanding.
Physical Stress Mental Stress Emotional Stress
Running Thinking Feeling Angry
Hitting Concentrating Feeling Fearful
Jumping Focusing Feeling Sad
Weight Lifting Visualizing Feeling Depressed
Walking Imaging Feeling Negative
Moving Analyzing Feeling Frustrated
Exercising Problem-Solving Feeling Hurt
Physical Recovery Feelings of bodily relief
Mental Recovery Feelings of mental relief
Emotional Recovery Feelings of emotional relief
Eating Increasing calmness Increasing positive feelings
Drinking Increasing sense of slowing down mentally Decreasing fear and anger
Sleeping Increasing fantasy Increasing fun and enjoyment
Napping Decreasing focus Increasing feelings of safety and security
Heart rate slowing down Increasing creativity Increasing feelings of self-esteem
Breathing rate slowing down Increasing spontaneous imagery
Increasing feelings of personal fulfillment
Toughness Training
13 Toughness Training Copyright 2003 by Eric Lamkin and Elite-Fighters.com
OVERTRAINING AND UNDERTRAINING Overtraining occurs when the volume of stress—physical, mental, or emotional—exceeds the limit of what you can handle. That limit is called your adaptation threshold. Undertraining occurs when the volume of stress is insufficient for the desired adaptation to take place. As seen in the figure below, overtraining is too much stress on one extreme and undertraining is too little stress on the other. Both are conditions of imbalance and have distinct performance consequences. Another way of conceptualizing overtraining and undertraining is in terms of recovery. Undertraining is too much recovery and overtraining is too little recovery. Consequences of imbalance Too much stress leads to overtraining and too much recovery leads to undertraining. It’s critical that you recognize and understand the body’s messages of over- and undertraining. The body is always talking through feelings and emotions. Martial Artists who wish to move to the next level of toughness—physically, mentally, or emotionally—must expose themselves to additional stress. Understanding the body’s language of stress and recovery is fundamental to positive growth. Here are some common signals of over-and undertraining:
High Overtraining (too much stress)
STRESS
Low Undertraining (not enough stress)
Physical Mental Emotional
Chronic fatigue Confused thinking Boredom
Muscle soreness Poor concentration Depression
Injuries Persistent mental mistakes Sadness
Constant illness Chronic mental fatigue Low motivation
Aches and pains Irrational thinking Anger
Eating problems Poor problem-solving moodiness
Sleeping problems Negative thinking Anxiety
Weight problems Nervousness Lack of enjoyment
Toughness Training
14 Toughness Training Copyright 2003 by Eric Lamkin and Elite-Fighters.com
Perhaps the two most important consequences of overtraining and undertraining are that (1) you typically perform well below your potential, and (2) rather than getting tougher, you get progressively weaker. Both undertraining and overtraining result in decreasing toughness. You should also understand:
1. Excessive physical stress will lead to mental and emotional problems. 2. Excessive emotional stress will lead to mental and physical problems. 3. Low motivation, low energy, and fatigue often reflect the body’s way of
protecting itself against further overtraining (over-stimulation) 4. Depression, moodiness, and negative emotion serve the same purpose as
physical pain. 5. Persistent problems with concentration, negative thinking, and nervousness often
reflect stress/recovery problems. 6. Sleeping and eating problems are common consequences of overtraining.
Stress that Toughens You now understand that too much stress or too much recovery will lead to progressive weakening. You also know that physical, mental, or emotional pain is the language of over- and undertraining. The question now is, how can you distinguish between stress that toughens and stress that weakens? To answer this you need to look at the issue of stress a little more closely. As seen in the diagram, the volume of stress can be divided into four categories relative to toughening:
1. Undertraining—too little stress 2. Overtraining—too much stress 3. Maintenance Training—too little stress (at this level of stress you will simply
maintain your current level of toughness) 4. Toughness Training—the volume of stress that leads to toughening (this is called
adaptive stress)
High Overtraining (excessive stress)
Toughness Training (adaptive stress)
STRESS Mantenance Training (maintenance stress)
Low Undertraining (not enough stress)
Toughness Training
15 Toughness Training Copyright 2003 by Eric Lamkin and Elite-Fighters.com
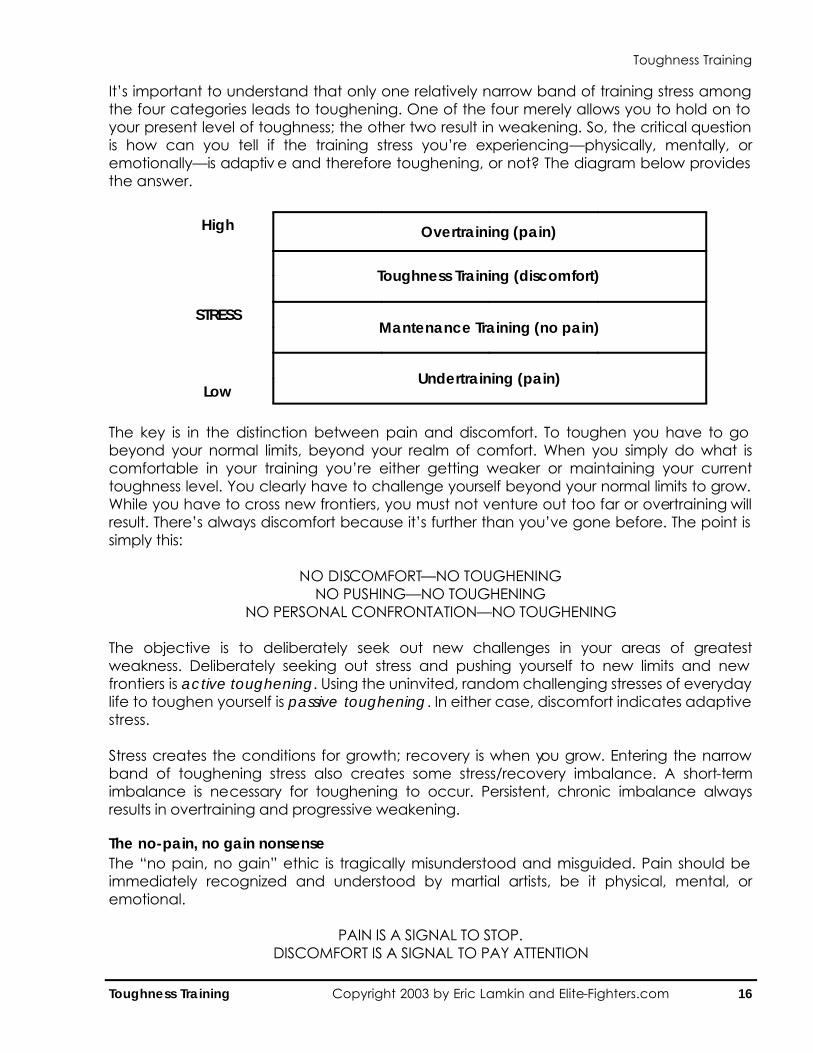
It’s important to understand that only one relatively narrow band of training stress among the four categories leads to toughening. One of the four merely allows you to hold on to your present level of toughness; the other two result in weakening. So, the critical question is how can you tell if the training stress you’re experiencing—physically, mentally, or emotionally—is adaptiv e and therefore toughening, or not? The diagram below provides the answer. The key is in the distinction between pain and discomfort. To toughen you have to go beyond your normal limits, beyond your realm of comfort. When you simply do what is comfortable in your training you’re either getting weaker or maintaining your current toughness level. You clearly have to challenge yourself beyond your normal limits to grow. While you have to cross new frontiers, you must not venture out too far or overtraining will result. There’s always discomfort because it’s further than you’ve gone before. The point is simply this:
NO DISCOMFORT—NO TOUGHENING NO PUSHING—NO TOUGHENING
NO PERSONAL CONFRONTATION—NO TOUGHENING The objective is to deliberately seek out new challenges in your areas of greatest weakness. Deliberately seeking out stress and pushing yourself to new limits and new frontiers is active toughening. Using the uninvited, random challenging stresses of everyday life to toughen yourself is passive toughening. In either case, discomfort indicates adaptive stress. Stress creates the conditions for growth; recovery is when you grow. Entering the narrow band of toughening stress also creates some stress/recovery imbalance. A short-term imbalance is necessary for toughening to occur. Persistent, chronic imbalance always results in overtraining and progressive weakening. The no-pain, no gain nonsense The “no pain, no gain” ethic is tragically misunderstood and misguided. Pain should be immediately recognized and understood by martial artists, be it physical, mental, or emotional.
PAIN IS A SIGNAL TO STOP. DISCOMFORT IS A SIGNAL TO PAY ATTENTION
High Overtraining (pain)
Toughness Training (discomfort)
STRESS Mantenance Training (no pain)
Low Undertraining (pain)
Toughness Training
16 Toughness Training Copyright 2003 by Eric Lamkin and Elite-Fighters.com
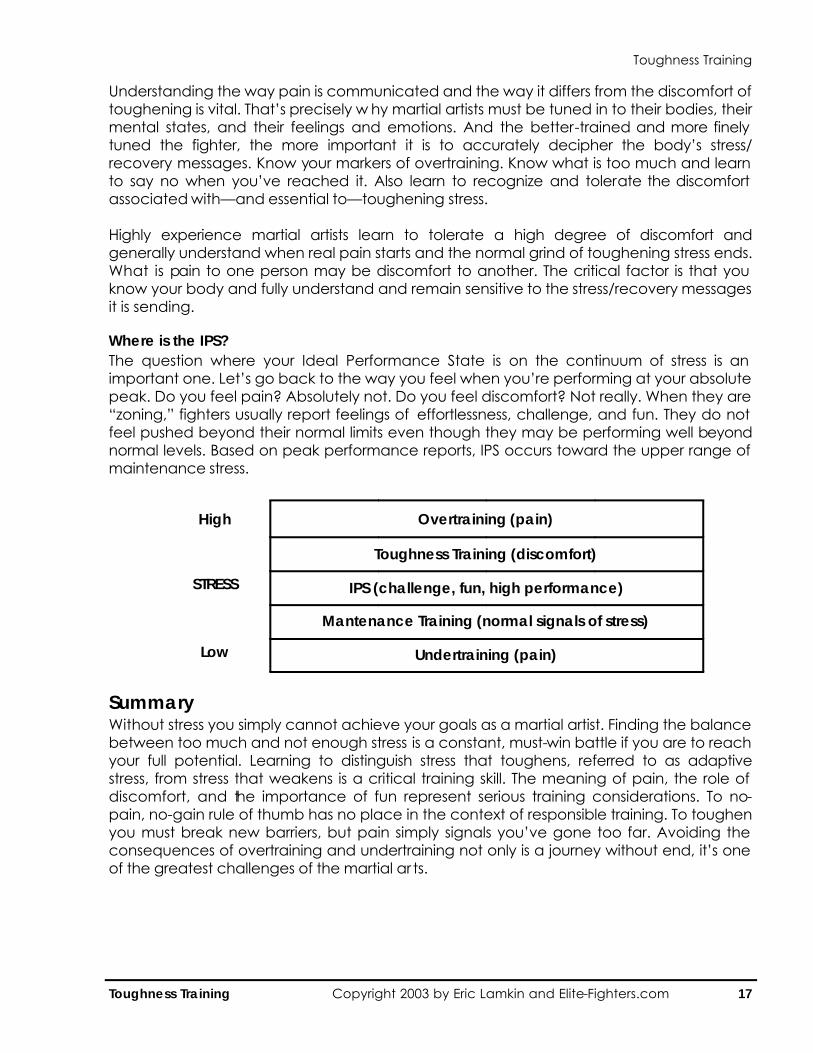
Understanding the way pain is communicated and the way it differs from the discomfort of toughening is vital. That’s precisely w hy martial artists must be tuned in to their bodies, their mental states, and their feelings and emotions. And the better-trained and more finely tuned the fighter, the more important it is to accurately decipher the body’s stress/recovery messages. Know your markers of overtraining. Know what is too much and learn to say no when you’ve reached it. Also learn to recognize and tolerate the discomfort associated with—and essential to—toughening stress. Highly experience martial artists learn to tolerate a high degree of discomfort and generally understand when real pain starts and the normal grind of toughening stress ends. What is pain to one person may be discomfort to another. The critical factor is that you know your body and fully understand and remain sensitive to the stress/recovery messages it is sending. Where is the IPS? The question where your Ideal Performance State is on the continuum of stress is an important one. Let’s go back to the way you feel when you’re performing at your absolute peak. Do you feel pain? Absolutely not. Do you feel discomfort? Not really. When they are “zoning,” fighters usually report feelings of effortlessness, challenge, and fun. They do not feel pushed beyond their normal limits even though they may be performing well beyond normal levels. Based on peak performance reports, IPS occurs toward the upper range of maintenance stress.
Summary Without stress you simply cannot achieve your goals as a martial artist. Finding the balance between too much and not enough stress is a constant, must-win battle if you are to reach your full potential. Learning to distinguish stress that toughens, referred to as adaptive stress, from stress that weakens is a critical training skill. The meaning of pain, the role of discomfort, and the importance of fun represent serious training considerations. To no-pain, no-gain rule of thumb has no place in the context of responsible training. To toughen you must break new barriers, but pain simply signals you’ve gone too far. Avoiding the consequences of overtraining and undertraining not only is a journey without end, it’s one of the greatest challenges of the martial ar ts.
High Overtraining (pain)
Toughness Training (discomfort)
STRESS IPS (challenge, fun, high performance)
Mantenance Training (normal signals of stress)
Low Undertraining (pain)
Toughness Training
17 Toughness Training Copyright 2003 by Eric Lamkin and Elite-Fighters.com
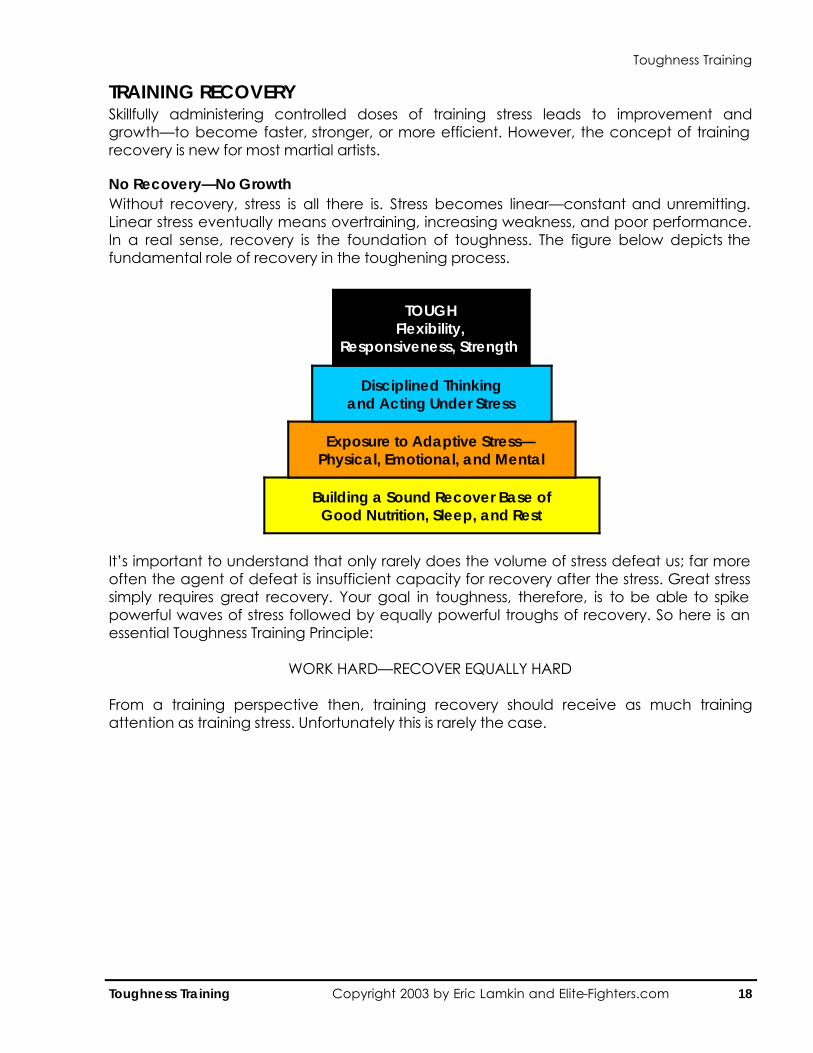
TRAINING RECOVERY Skillfully administering controlled doses of training stress leads to improvement and growth—to become faster, stronger, or more efficient. However, the concept of training recovery is new for most martial artists. No Recovery—No Growth Without recovery, stress is all there is. Stress becomes linear—constant and unremitting. Linear stress eventually means overtraining, increasing weakness, and poor performance. In a real sense, recovery is the foundation of toughness. The figure below depicts the fundamental role of recovery in the toughening process.
Building a Sound Recover Base of Good Nutrition, Sleep, and Rest
Exposure to Adaptive Stress— Physical, Emotional, and Mental
Disciplined Thinking and Acting Under Stress
TOUGH Flexibility,
Responsiveness, Strength,
It’s important to understand that only rarely does the volume of stress defeat us; far more often the agent of defeat is insufficient capacity for recovery after the stress. Great stress simply requires great recovery. Your goal in toughness, therefore, is to be able to spike powerful waves of stress followed by equally powerful troughs of recovery. So here is an essential Toughness Training Principle:
WORK HARD—RECOVER EQUALLY HARD From a training perspective then, training recovery should receive as much training attention as training stress. Unfortunately this is rarely the case.
Toughness Training
18 Toughness Training Copyright 2003 by Eric Lamkin and Elite-Fighters.com

The Mechanisms of Recovery Let’s review what recovery means. At the most basic level, recovery is simply anything that causes energy to be recaptured. Because the body expresses its recovery need through feelings and emotions—for example, “I feel hungry,” “I feel tired, “—it is vital to respond to feelings. In fact, the fulfillment of felt needs represents recovery. It’s essential also to understand that recovery occurs in three areas—physical, mental, and emotional—just like stress. Recovery is also the period in which growth and healing occur. The first step in training recovery is learning to recognize when recovery is occurring. The most common signs of physical recovery are reduced feelings of hunger, thirst, sleepiness, and tension; a slower heart and breathing rates; decreases in blood pressure, muscular tension, and brain wave activity. The most common signs of emotional recovery are feelings of emotional relief; increased positive feelings of joy, fun, humor, and happiness; decreased negative feelings of anger, fear, and frustration; increased feelings of self-esteem and personal fulfillment. The most common signs of mental recovery are feelings of mental relief; increased feelings of calmness; and a sense of mental relaxation. The mechanisms of recovery are divided into four categories:
1. Sleep/Naps 2. Diet 3. Active and Passive Rest 4. Seizing recovery opportunities
1. Sleep/Naps Along with food and water intake, sleep ranks highest in terms of recovery activities. Poor sleep habits can completely undermine the toughening process. Both too much sleep (excessive recovery) and not enough sleep (insufficient recovery) are problematic. Here are the most important Toughness Training recommendations concerning sleep and naps:
• Get between eight to ten hours of sleep every night. • Go to bed and get up within thirty minutes of your normal sleep times daily. • Attempt to go to bed early and get up early whenever possible. • Learn to take short naps (ten to fifteen minutes) and wake up feeling
completely energized and refreshed. • Keep a daily record of the quantity and quality of your sleep, particularly
during periods of high stress.
Toughness Training
19 Toughness Training Copyright 2003 by Eric Lamkin and Elite-Fighters.com
2. Diet Consuming adequate amounts of water and nutritious food is a recovery activity of the highest priority. When nutrition and hydration needs are not met, all stress eventually becomes excessive and all other recovery mechanisms that are fundamental to growth fail. Here are the most important Toughness Training recommendations concerning intake of food and water:
• Follow a consistent schedule of eating and drinking. • Always consume a nourishing breakfast. • Eat and drink every two hours whenever possible. • Consume four to six meals per day, but eat lightly. Frequent small meals
increase your metabolism and helps to stabilize your blood sugar, giving you more energy over longer periods.
• Eat your last meal rather early in the evening. Meals after eight-thirty are disruptive to sleep.
• Drink a minimum of eight glasses of water per day. • Eat as wide a variety of foods as possible, with a preference for natural, fresh
foods.
3. Active and Passive Rest The distinction between Active and Passive Rest is based on the fact that recovery from stress can occur both from movement and nonmovement of the physical body. Active Rest involves nonvigorous physical activities that break cycles of physical, emotional, and mental stress. Any activity that involves movement of the body and breaks cycles of mental, physical, or emotional stress represents a form of Active Rest. Examples of Active Rest are walking, stretching, swimming, and hiking. Passive Rest activities break cycles of stress without involving body movement. Listening to music, playing a musical instrument, or going for a relaxing drive are forms of Passive Rest. Other examples are:
• Laughing • Watching TV or a movie • Reading • Taking an afternoon nap • Relaxing in a whirlpool
All of these, if done specifically to enhance the recovery process, are forms of recovery training.
4. Seizing Recovery Opportunities An important aspect of recovery training is working to improve your ability to extract the maximum value from the recovery opportunities that exists while engaged in training, sparring, or combat. Though brief, there are opportunities between skirmishes and clashes that allow you the opportunity to recover. Planning to better use your down time between training sessions is also very important in the context of recovery training. How you spend your time and with whom can make all the difference in the world in terms of how well you manage periods of intense training stress.
20 Toughness Training Copyright 2003 by Eric Lamkin and Elite-Fighters.com
Toughness Training
LEARN FROM THE MILITARY The military has an effective system of toughening an individual. It can take un-disciplined, un-focused, un-brave teenagers and within eight weeks transform most of them into soldiers tough enough to conquer the ultimate fear—the fear of death. This physical and emotional conversion of fearful adolescents into courageous combat soldiers in so short a time is an astonishing feat, even given the fact that mankind has been perfecting military training methods for five thousand years. But could the military succeed so well so quickly without using highly skilled and deliberately obnoxious drill instructors to dish out large and carefully orchestrated doses of mental, emotional, and physical stress to recruits? Absolutely not! Without obnoxious drill instructors the military not only would fail to produce reliable soldiers quickly, it wouldn’t be able to produce them at all. In creating the Elite Fighter System of Modern Personal Combat, I believed that by studying the military system, it would yield many important insights regarding personal combat training and toughness training. That assumption proved true, although getting to the useful things required me to brush aside many useless aspects of military life. Why March? For thousands of years men marched into battle. Although they’re now more likely to ride vehicles into the combat zone, new recruits still spend many hours marching in formation. Why does the practice of marching remain so crucial to the making of a soldier? No one marches on modern battlefields—they run, hide, jump into foxholes, or charge forward. Nobody stays alive very long marching in the face of the enemy. It’s clear that in times past when soldiers still marched into battle, that’s not what they did during battle. Marching is for between battles. Clearly this regimented practice of walking in a particular way somehow breeds courage, confidence, and decisiveness during battle. Let’s examine the practice more closely. First of all, how do marching soldiers look on the outside? You never see any visible sign of weakness. No visible fatigue, no sagging shoulders, no negativism, no fear. What you see is total focus, confidence, positive energy, and precision. Every movement is decisive and clean, nothing sloppy or lazy. Every breath is synchronized to exact movement. Marching prepares soldiers for battle by giving them practice in being decisive, and in looking strong and confident regardless of how they feel. It trains discipline, sustained concentration, decisiveness, and poise, all essential elements in conquering fear. The Gladiator Walk All Elite Fighters have the same walk between their training and sparring sessions. Elite Fighters show the same focus, confidence, energy, and precision that soldiers do when they walk. No weakness, nothing sloppy, nothing but strength. This is called the Gladiator Walk. Practice looking and acting the way you want to feel in your training sessions. Doing that pays off in terms of victory in combat.
Toughness Training
21 Toughness Training Copyright 2003 by Eric Lamkin and Elite-Fighters.com
The Art of Soldier-Making The transition from fearful adolescent to fearless—or at least enormously more confident—warrior occurs in response to the following requirements:
1. A strict code of acting and behaving under stress. This includes: • A disciplined way of responding to stress. • A precise way of walking—head and shoulders erect, chin up, chest out. • Quick and decisive response to commands—no hesitation tolerated.
2. No visible sign allowed of weakness or negative emotion of any kind in response to stress. The expression of negative emotion is simply not permitted. 3. Regular exposure to high levels of mental, emotional, and physical training stress to accelerate the toughening process. 4. Precise control and regulation of cycles of sleep, eating, drinking, and rest. 5. A rigorous physical fitness program. This essential component of the toughening process involves two elements:
• Aerobic and Anaerobic training. • Strength Training
6. An enforced schedule of trained recovery. This includes:
• Regularly scheduled R&R. • Enforced cycles of stress followed by enforced cycles of recovery.
Undesirable Features of the Military Training System In studying military training methods, these are some feature that are inappropriate outside of non-military life:
1. The stripping of personal identity and its replacement by group identity are not appropriate to non-military life. Where this does happen—primarily in gangs and cults—it indicates seriously low levels of self-esteem. 2. Military values, skills, and beliefs have little application to civilian life. Many, though not all, of the military skills (for example, close-order drill and use of heavy weapons) have no value except in a military career. 3. Blind adherence to authority is rarely appropriate outside the military. Decisions in the military are made by next higher command, not by the individual. When you are faced with a life or death situation, you must make the decisions. 4. The mental and emotional inflexibility and rigidity often associated with the military mind would severely limit the careers of martial artists who must cope with the subtleties and swift changes of civilian life. 5. Acquired dislike of physical exercise is a common result of the pain and boredom of basic training. Although this blind reaction robs some people of all desire to remain physically fit, many others find that military service sets a pattern of fitness that they maintain throughout their lives.
22 Toughness Training Copyright 2003 by Eric Lamkin and Elite-Fighters.com
Toughness Training
The Role of the Obnoxious Drill Instructor The Drill Instructor serves as a powerful mental and emotional stressor. Remember, no stress, no growth. As long as the recruits fight the DI, as long as they get their feelings hurt, feel insulted, abused, afraid, and angry, they confirm that they are not yet tough enough. Only when they can remain calm, fearless, and unruffled by the DI’s obnoxious treatment have the toughening adaptations taken place. Experienced DI’s get very skillful at detecting weakness in recruits, and their response is always the same—apply more stress, not less. Protecting weaker recruits from stress is the last thing an experienced DI would do. Accelerating the toughening process in the military always involves exposure to increased stress followed by enforced recovery. One of the most important criteria for entry into elite training units such as the Rangers, SEALS, and Green Berets is the capacity to manager high volumes of physical, mental, and emotional stress. The more elite the training corps, the greater the exposure to training stress. It’s unfortunate in the martial arts when trainers and instructors decide to become obnoxious DI’s to hasten the toughening process. It is particularly tragic for young martial artists. The screaming, yelling, threats, and punishment will lead to many accelerated adaptations, but at a very heavy price—the steady undermining of the martial artists love for the art. Once that love is killed off, or even seriously injured, the game is over—maybe for a lifetime. A note here for those martial artists who must face misguided instructors who—for whatever reason—elect to assume the obnoxious DI role. If you’re in this situation, without being aware of what’s happening you suddenly awaken to the reality that your interest has died, your motivation is gone, your drive has vanished. In such situations, you have to protect your passion and love for the martial arts. Never allow any instructor to dampen your spirit. View the misguided instructor as an opportunity to accelerate your toughness and prevent his treatment of you from eroding your passion and devotion to the martial arts. Always seek a trained and qualified martial arts instructor.
Toughness Training
23 Toughness Training Copyright 2003 by Eric Lamkin and Elite-Fighters.com
GETTING TOUGH PHYSICALLY This section will deal with outside-in training, meaning from outside the body inward toward the emotional chemistry. As you’ll see in this section, physical toughening means three things:
1. Improving your physical fitness 2. Looking and acting tougher on the outside 3. Being well recovered physically before going into battle
1. Improving Your Physical Fitness Whether the battle is intense or mild, competing in any arena—physical, mental, or emotional—requires energy. When the energy is gone, the fight is all but over. Great martial art instructors have always understood the connection between fitness and confidence, and between fitness and the ability to hold up under pressure. So have the military, police forces, and the FBI. Fitness is simply a measure of your capacity for energy expenditure, for accepting stress. The fitter you are as a martial artist, the greater has been your exposure to physical stress. That means you can take physical hits and keep going. You won’t buckle as soon as you are physically pushed. Being more physically fit also means you’ll have more energy to fight mental and emotional battles. Becoming physically stronger and more responsive deepens your belief in yourself as well. You become confident that you can go the distance; you simply refuse to surrender. You truly start believing that you can turn things around, that you can handle anything your opponent throws at you.
ONE OF THE MOST EFFECTIVE STRATEGIES FOR IMPROVING IPS CONTROL IS FOR MARTIAL ARTISTS TO EXPOSE THEMSELVES TO INCREASED PHYSICAL STRESS.
When done properly, greater exposure to physical stress will always lead to greater emotional toughness. For some martial artists, this automatically leads to important psychological breakthroughs as well. Based on my many years of martial art training and teaching, here are the physical fitness priorities I recommend to you: Priority 1—Expose yourself to abdominal stress—This may come as quite a surprise, but your abdominals and obliques (the muscles on the side of your lower abdominals) represents the core of all strength. Weak abdominals and poor fitness go hand in hand. Problems with movement, low-back pain, poor posture, and faulty breathing can be linked to abdominal weakness. Weak abdominals predispose you to injury and undermine the entire physical toughening process. Priority 2—Expose yourself to heart and lung stress—Your heart and lungs must be sufficiently challenged to meet your physical, mental, and emotional energy needs for however long or hard the battle might be. Increased heart and lung fitness can be accomplished via any number of exercise routines using the large muscles of the upper and lower body. Examples are running, cycling, swimming, sparring, and heavy bag workouts.
24 Toughness Training Copyright 2003 by Eric Lamkin and Elite-Fighters.com
Toughness Training
Priority 3—Expose yourself to overall muscular stress—Regular overloading your muscles with stress to increase overall strength is a must. The ability to generate and resist force is a major component of toughness. Weight machines, free weights, swimming and other types of resistance training equipment can be used to achieve greater total body strength. Being physically stronger automatically translates into more IPS control. Priority 4—Expose areas prone to injury to progressively increasing stress—Just as we break under pressure at our weakest points emotionally, the same thing happens to us physically. How many times have you been forced out of training because the same weak ankle, knee, or back pain let you down again? How much confidence can you have when the threat of your knee’s or ankle’s breaking down hangs over you? When a martial artist has a physical weakness that is prone to injury, the natural instinct is to protect it. Since the weaker knee can’t take as much stress as the healthy one, the impulse is simply not to push the weakened knee as much. That’s precisely why the weak knee eventually breaks down again. The key to rebuilding confidence in that knee or ankle always is the same two-step procedure:
1. Protect the injured limb, tendon, or joint from stress immediately following breakdown.
2. Expose the injured area to progressively increasing stress as soon as the injury has stabilized.
Another tragic mistake made by martial artists after serious injury or surgery is to stop doing their rehabilitation exercises as soon as the injured knee or ankle is as strong as the healthy one. The injured limb should be taken to a much higher level of fitness than the healthy one. That obviously means more exposure to stress. Priority 5—Expose muscles to the stress of daily stretching—Injuries can have a devastating effect on confidence. Muscle flexibility plays a critical role in any injury prevention program. 2. Looking and acting tougher Tougher physically also means better acting with the body. Because the connection between the way you feel and the way you act is so powerful, the following is often referred to as the First Rule of Toughness:
PROJECT ON THE OUTSIDE THE WAY YOU WANT TO FEEL ON THE INSIDE It’s very important to understand the communication process between emotions and the muscles of your body. When you’re angry, sad, or fearful the muscles of your face, shoulders, arms, and legs become stimulated in emotion-specific ways. You immediately start looking the way you feel: angry, sad, or afraid. Unless, of course, you are an Elite Fighter. Elite Fighters have learned to reverse the stimulation process. To achieve this feat, which is essential to success, they use the same transmission channels that consistent losers use. However, rather than allowing their emotions to stimulate their muscles in the losing way, they use their muscles to stimulate the emotions they want to feel in the winning way. The key can be stated in just nine words:
THE LINK BETWEEN EMOTIONS AND MUSCLES RUNS BOTH WAYS
25 Toughness Training Copyright 2003 by Eric Lamkin and Elite-Fighters.com
Toughness Training
Here are some critical truths that you, as a martial artist seeking to improve your skills, should carve into your consciousness so deeply you’ll never forget to apply them in every training session:
1. The way you walk, the way you carry your head and shoulders, and the expressions flowing across your face stimulate targeted IPS emotions. Simply moving your facial muscles from helplessness to fight, or from anger to fun, can be enough to give your blood chemistry a generous boost in those winning directions.
2. Acting as if you feel a particular way stimulates emotion-specific changes in your
body. 3. What begins as a faked emotion can quickly lead to genuine emotion.
Developing a strict code for the way you act and look in training and combat gives you a powerful tool for controlling the feelings that lock out your talent and skill—feelings like fear, frustration, anger, and despair. Remember, looking the way you feel enhances your current feeling. If you don’t like your current emotional state, change the way you look. 3. Being Fully Recovered Before Battle The third arm of physical toughness is to enter battle fully recovered. The main point is:
NO MATTER HOW TALENTED, SKILLED, PHYSICALLY FIT, OR MENTALLY TOUGH YOU ARE, IF YOU ARE NOT RECOVERED SUFFICIENTLY TO SUSTAIN THE ENERGY
DEMANDS THAT YOU FACE, IT’S OVER. When glycogen (stored sugar) has been completely used up in your muscles, they can no longer properly contract and expend energy. When blood sugar falls below a certain point in your brain, precise concentration and clear thinking are not possible. Here are three essential guidelines to follow:
1. Choose your recovery habits with care—Undisciplined martial artists who don’t follow sensible rules regarding sleep, diet, and rest are the most likely to crack under pressure. In other words, they collapse first. In the long run, undisciplined martial artists always lose to disciplined martial artists of the same ability.
2. Recover before your next training session—Before taking on another dose of
training stress, make every effort to be physically, mentally, and emotionally recovered.
3. Defend yourself against low blood sugar—Guard against letting your blood sugar
bottom out during training. Remember to eat often and lightly.
There is more to being an Elite Fighter than merely being mentally tough. That’s only half the battle. Being physically fit and entering the battle fully recovered represent the other half. It’s vital for martial artists to understand how everything is interconnected. Sleep, diet, fitness, free time, and emotional toughness are all interrelated. Physical toughening, referred to as outside-in training, is an indispensable component of enduring competitive stress.
26 Toughness Training Copyright 2003 by Eric Lamkin and Elite-Fighters.com
Toughness Training
GETTING TOUGH MENTALLY Ideal Performance State control can be acquired in two ways. The first is by getting tougher physically through more outside-in training. The second way can be acquired by getting tougher mentally. The connection between thoughts and emotions is very real. Getting tougher mentally means more inside-out training. It calls for learning when, how, and what to think and visualize before, during, and after training to get the desired effect emotionally. Being tough mentally means that you have acquired skills in thinking, believing, and visualization that enable you to:
• Readily access empowering emotions during training and combat. • Quickly change from a negative emotional state to a positive one. • Cope emotionally with mistakes and failures. • Trigger an Ideal Performance State at will. • Cope with crisis and adversity.
Mental toughness means that under the pressure of combat you can continue to think constructively, nondefensively, positively, and realistically—and do it with calm clarity. Strategies for Getting Tougher Mentally Helping martial artists become stronger, more resilient, more flexible, and more responsive mentally has always been the greatest challenge in teaching. Both instructors and martial artists have found the paths to better mechanics or better fitness far easier to follow than the path to training mental skills. Here are strategies for getting tougher mentally:
1. Change your thinking to change how you feel—The connection between thought and emotions works both ways: the way you’re feeling affects the way you’re thinking; the way you’re thinking affects the way you’re feeling. The important element here is that you can exercise substantial control over the direction and content of your thoughts. That’s precisely why great martial artists are always disciplined thinkers. Sloppy, careless, negative thinking completely undermines IPS control. Mentally tough martial artists have learned to reverse the forces of negative emotion through tough thinking. Overriding the temptation to think negatively because that’s how you feel is no easy task. That’s precisely why so many martial artists fail to reach their full potential.
2. If You Don’t Like the Feeling, Change the Picture—Images are more powerful
triggers of emotion than words. That’s how actors and actresses are trained to perform emotionally. They are taught to skillfully use emotionally charged images to access the targeted emotions. Tough martial artists do the same thing. They consistently use images of success, of fighting back, of having fun, of staying relaxed, of being strong in the face of adversity, to move their chemistry in those directions. However, if you expect to change fear into challenge, or disappointment into determined hope, practice is essential. The most powerful and important image you carry in your arsenal is your self-image. Work daily to make it strong, vivid, and courageous—and that’s exactly what you’ll get back in return.
Toughness Training
27 Toughness Training Copyright 2003 by Eric Lamkin and Elite-Fighters.com
3. Take Full Responsibility For What and How You Think—You’ve learned that negative feelings often serve the vital purpose of signaling important unmet needs of various kinds. You’ve also learned that negative feelings have no place in the Ideal Performance State. Do you go with the negative feelings and search for unmet needs, or do you block the negativism and go with IPS? The solution is fundamentally this:
MAKE EVERY EFFORT TO SUPPRESS NEGATIVE FEELINGS DURING
TRAINING AND COMBAT UNLESS YOU CAN DO SOMETHING POSITIVE RIGHT AWAY TO MEET THE EXPRESSED NEED.
One of the most powerful things you can do to suppress negative thoughts and feelings is to say “Stop” to yourself and immediately begin processing positive thoughts and images. Put your heart into not allowing negative feelings to lead you into negative thinking. You aren’t always responsible for negative feelings, but you are always completely responsible for any negative thinking you permit. After all, nobody but you is inside your head.
4. Constantly Practice Positive Thinking—Positive thinking and positive imagery skills
are acquired in the same way motor skills are—through repetition. Sloppy, undisciplined motor movements lead to bad mechanical habits. The same principle holds true for sloppy, undisciplined thinking. Lazy, negative thinking in practice will come back to haunt you in combat the same way sloppy mechanics will. You’ve got to practice the right mental habits to be strong enough to hold up under the pressure and frustration of competition. That’s exactly what being tough-minded means—you continue to think positively and constructively during the toughest of times.
5. Never Think or Say Can’t; Never Think or Say Hate—“I can’t handle it. I can’t
stand it. I can’t believe it. I can’t do it. I can’t make it…I hate myself. I hate my opponent. I hate his place. I hate my instructor. I hate mistakes.” These are all examples of nontough thinking. They rapidly build emotional roadblocks. This type of inflexible, rigid thinking always leads to problems.
6. Think—Visualize in Vivid Emotional Terms—These Thoughts Daily:
“I will put myself on the line every day.” “I will not surrender.” “I will not turn against myself during tough times.” “I will come totally prepared to train every day.” “I will not show weakness on the outside.”
7. Think Humorously to Break Up Negative Emotions—When you think nutty, goofy,
silly, funny, off-the-wall thoughts, fear and anger vaporize. When you are overly aroused with emotion, internal laughter puts you back in control.
Toughness Training
28 Toughness Training Copyright 2003 by Eric Lamkin and Elite-Fighters.com
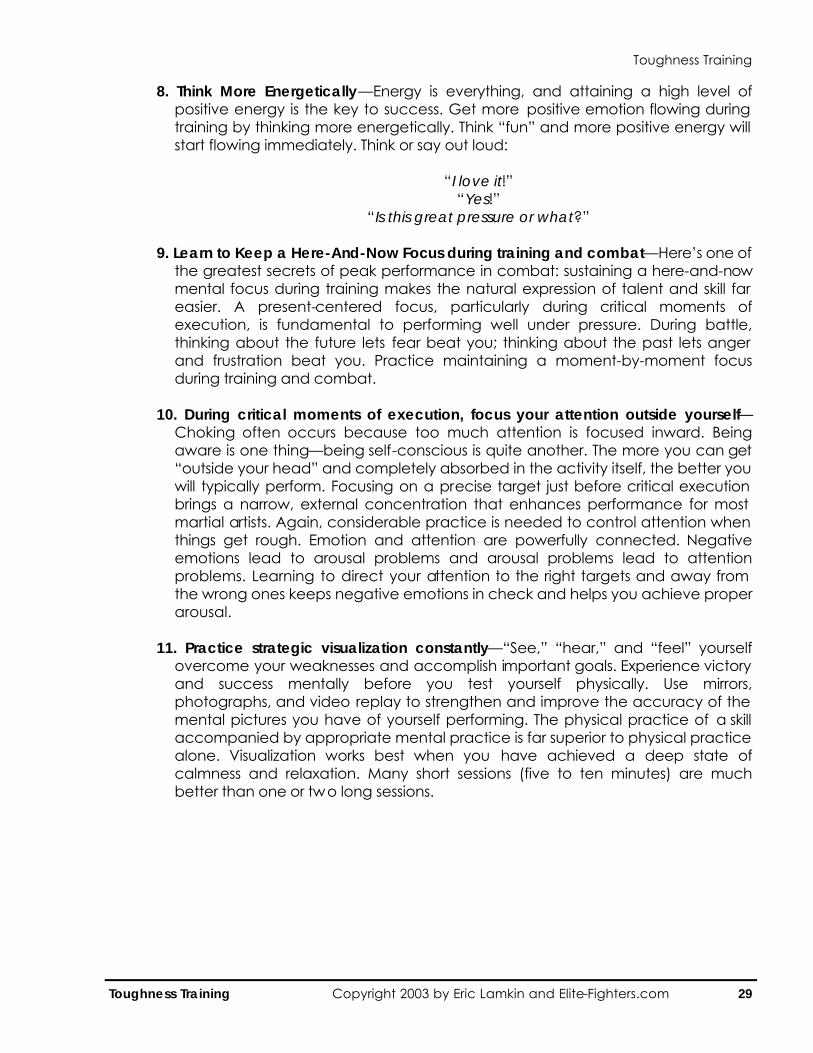
8. Think More Energetically—Energy is everything, and attaining a high level of positive energy is the key to success. Get more positive emotion flowing during training by thinking more energetically. Think “fun” and more positive energy will start flowing immediately. Think or say out loud:
“I love it!”
“Yes!” “Is this great pressure or what?”
9. Learn to Keep a Here-And-Now Focus during training and combat—Here’s one of
the greatest secrets of peak performance in combat: sustaining a here-and-now mental focus during training makes the natural expression of talent and skill far easier. A present-centered focus, particularly during critical moments of execution, is fundamental to performing well under pressure. During battle, thinking about the future lets fear beat you; thinking about the past lets anger and frustration beat you. Practice maintaining a moment-by-moment focus during training and combat.
10. During critical moments of execution, focus your attention outside yourself—
Choking often occurs because too much attention is focused inward. Being aware is one thing—being self-conscious is quite another. The more you can get “outside your head” and completely absorbed in the activity itself, the better you will typically perform. Focusing on a precise target just before critical execution brings a narrow, external concentration that enhances performance for most martial artists. Again, considerable practice is needed to control attention when things get rough. Emotion and attention are powerfully connected. Negative emotions lead to arousal problems and arousal problems lead to attention problems. Learning to direct your attention to the right targets and away from the wrong ones keeps negative emotions in check and helps you achieve proper arousal.
11. Practice strategic visualization constantly—“See,” “hear,” and “feel” yourself
overcome your weaknesses and accomplish important goals. Experience victory and success mentally before you test yourself physically. Use mirrors, photographs, and video replay to strengthen and improve the accuracy of the mental pictures you have of yourself performing. The physical practice of a skill accompanied by appropriate mental practice is far superior to physical practice alone. Visualization works best when you have achieved a deep state of calmness and relaxation. Many short sessions (five to ten minutes) are much better than one or two long sessions.
Toughness Training
29 Toughness Training Copyright 2003 by Eric Lamkin and Elite-Fighters.com
12. Be more disciplined in the way you think about your mistakes—If you fear mistakes, you will make them. If you fear losing, you will lose. Playing not to lose or not to make mistakes locks you up inside and has tragic performance consequences. How you think about mistakes has a major impact on the emotional state you carry into battle. Here’s the winning way to think about mistakes:
“Mistakes are a necessary part of learning. No mistakes—no learning. I’ll
make my mistakes fearlessly and aggressively. I’m not playing it safe, holding back or looking for excuses. I’m going for it—I’ll accept whatever happens and move on. I don’t fear mistakes; I learn from them.” After making a painful mistake, ask yourself three questions and move on:
1. What could I or should I have done differently? 2. What can I learn from this? 3. What can I take away from this that will help me in the future?
Once these questions have been answered, make a conscious decision to let it go!
13. Be clear why it’s important to fight before the battle begins; then make the
commitment—Without a clear commitment to fight, you probably won’t. It’s just too painful and requires too much energy. Will you put yourself totally on the line and risk losing—giving everything you have to give?
14. Use Adversity to get stronger—Just like mistakes, the way you think about
adversity and crisis largely determines the impact these things will have on you. Every crisis is an opportunity to grow, to reach further, to extend beyond your normal limits. A major component of emotional toughness is learning the right attitudes regarding tough times.
15. Constantly remind yourself to love the battle—Love the process, the fight, the
marshaling of your resources, the pushing, the falling back, the breakthroughs, the struggles. Loving to win is easy. Loving the process moves you to a whole new level of skill. Loving the battle happens because you make it happen.
16. Just for today—Use the “just for today” approach to changing your habits. Here
are some “just for today” resolutions to make to yourself.
“Just for today, I will become challenged when problems come my way. Today I will be a great problem-solver.” “Just for today, I will love the battle. I can create my own state of enjoyment. No complaining!” “Just for today, I will exercise, eat, and train right. Self-discipline will bring the confidence I search for.”
Toughness Training
30 Toughness Training Copyright 2003 by Eric Lamkin and Elite-Fighters.com
“Just for today, I will take charge of how I feel. I am not at the mercy of my emotions.”
“Just for today, I will set aside some time to relax and simply let go. Relaxation is an essential part of training.” “Just for today, I will stop saying, ‘If I had time.’ If I want time, I will take it.” “Just for today, I will find humor in my mistakes. When I can smile at myself, I am in control .”
Toughness Training
31 Toughness Training Copyright 2003 by Eric Lamkin and Elite-Fighters.com
NOWHERE Nowhere is the mind-body connection more dramatically visible than in the martial arts.
Mind, body, spirit, thoughts, feelings, emotions are all part of the same continuum of life. There is and can be no separation.
Nowhere is it more abundantly clear than in the martial arts that everything is
interconnected. What you think, how you act, what you eat, how much you sleep, your fighting spirit, your fitness, your passion for life, are all intimately connected.
Nowhere is the need for balancing stress and recovery more evident than in the martial
arts. The consequences of overtraining and undertraining are painfully clear. Nowhere is it more evident than in the martial arts that, in the long run, toughness prevails
over talent every time. Victories in any arena in life will be determined far more by spirit and ability to fight than by genetic gifts.
Nowhere is it clearer than in the martial arts that toughness and capacity to fight is formed
most powerfully in response to adversity and crisis. It is not the good times, the easy, or fun times that form strength and resiliency in life or martial arts.
Nowhere is it clearer than in the martial arts that every crisis is an opportunity for growth. In
life and in sport, stress is the stimulus for growth; during recovery is when you grow. No stress, no growth. No recovery, no growth.
Nowhere is it clearer than in the martial arts that you have to love it. Love the grinding, the
searching, the pushing, the pulling, the victories, the lessons, the battle itself. And the crazier it gets, the more you have to love it. Becoming the best fighter you can be means loving to fight more than winning. Becoming the best you can be at anything means loving the journey—from beginning to end.
Nowhere is it clearer than in the martial arts that you must put yourself on the line every
day. You must come totally prepared to fight. You must not turn against yourself during tough times. You must never show weakness. Then and only then will your dreams of total victory take form.
Nowhere is it clearer than in the martial arts that the journey into toughness is forever. You
never finally arrive, never finally get it, never finally get over the top. You only get stronger or weaker, closer or further away; you only grow or don’t grow. The objective is to continue growing, moving forward, challenging yourself to reach beyond and replace weakness with strength.
Nowhere is it clearer than in the martial arts that it’s not over till it’s over and that you must
never, ever surrender.
Toughness Training
32 Toughness Training Copyright 2003 by Eric Lamkin and Elite-Fighters.com