Embed Size (px)
Citation preview

EXPLORING ADOBE INDESIGN CS6 • © 2013 DELMAR, CENGAGE LEARNING CHAPTER 9 • PAGE 1
▶ KEYBOARD SHORTCUTS
Function Mac WindowsRelease object from master page
Shift+Cmd+ Click
Shift+Ctrl+ Click
Automatic page number
Shift+Cmd+ Opt+N
Shift+Ctrl+ Alt+N
Jump lineContext Menu>Insert Special Character> Markers>Next Page Number
Continuation lineContext Menu>Insert Special Character> Markers>Previous Page Number
▶ production tips• Apply a master page by dragging its icon to the target
document page and releasing the mouse when the border of the target page is highlighted.
• Remove All Local Overrides returns a page to its original master page format.
• Once an object is detached from the master, its connection with the master is severed.
• When setting automatic page numbers, the prefix letter assigned to each master page is used as the auto page number marker.
• Jump lines and continuation lines need to be in separate text frames that touch the linked frames. If the jump or continuation line text frames do not touch the linked text frame, they will not be able to “read” the page number to which they belong.
MASTER PAGES AND OBJECT STYLESStudent Handout
▶ WORK EFFICIENTLYMaster pages and styles go hand-in-hand. Both involve planning and organization on the front end of a project, and both save time during production, editing, and later revisions. A project that uses master pages and styles, is one that many people can work on, while maintaining continuity from page to page. Use them whenever possible.
▶ CHAPTER GOALS• Createmultiplemasterpages• Setupautomaticpagenumbering,jumplines,andcontinuationlines• ManagedocumentpagesusingthePagespanel• Insert,duplicate,andremovepages• Createandapplyobjectstyles• Createanobjectlibrary
▶ TERMINOLOGYMasterpage Header Footer
Localoverride
RemoveSelectedLocalOverrides
RemoveAllLocalOverrides
Continuationline Objectlibrary Objectstyle
DetachSelectionfromMaster
Automaticpagenumber Jumpline
▶ PROJECTS09A Zaffinni’s09B Steve Miljat Brochure
9

EXPLORING ADOBE INDESIGN CS6 • © 2013 DELMAR, CENGAGE LEARNING CHAPTER 9 • PAGE 2
▶ 09A ZAFFINNI’S1. Prepare document:
Document size: 4.25" x 10". Number of pages: 4. Facing pages: On. All margins: 0.25". Bleed: 0.125" all edges.
2. Create spreads: Open the Pages panel. Deselect Allow Document Pages to Shuffle. Select Page 4 and carefully move it to the left of Page 1. When you see the grabber hand with the arrow pointing to the left, release the page. You should now have four pages, in two spreads.
3. Create formatting: Load all Text styles from the document 09A Zaffinni Styles. The styles file is in the 09 Artwork and Resources folder on the student online companion. If you don’t have Caflisch Pro and Adobe Caslon Pro, you will need to edit the styles and substitute suitable typefaces. Open the 09 Zaffinni library you created while working through Chapter 9. On the master page, drag the green rectangle from the library to the top and bottom of each page. They should extend to the edges of the bleed.
4. Build front cover: Build the front cover, as shown in the example to the right. The front cover should be on the right-hand (recto) page of the first spread. Override, and delete the top and bottom color bars. Find the photo in the 09 Zaffinni library. Position it so the feathered edges extend to the bleed. Type the restaurant name, Zaffinni’s Authentic Mediterranean Dining, using Caflisch Script Pro and Adobe Caslon Pro Semibold. You
may need to use a left tab stop to line up the text in the second line. The second line is all lowercase, small caps. Open the Glyphs panel and choose an alternate Z for the Z in Zaffinni’s. Highlight the type and check the toolbox to make sure the text fill is active, not the text outline. Select the Eyedropper tool and click on a light gold wood tone portion of the chair in the photograph. The type color will change to the color sampled with the Eyedropper tool. (Continued on next page)

EXPLORING ADOBE INDESIGN CS6 • © 2013 DELMAR, CENGAGE LEARNING CHAPTER 9 • PAGE 3
Body Copy Tabbed
Sub Head
Body Copy
Headline First Line
Headline Second Line
Ornament
Body Copy Centered
▶ 09A ZAFFINNI’S (CONTINUED)5. Build inside spread:
Go to spread [3-4] and drag the rest of the elements in from the 09 Zaffinni library. Place them, as shown in the example below. Apply Text Wrap, as necessary.
6. Place text and apply styles: Place 09A Zaffinni Text.doc on the inside pages. The text file is found in the 09 Artwork and Resources folder on the student online companion. Apply styles, as specified in the example below. Change all the “1” place holders with the leaf glyph after assigning “ornament” style. (continued on next page)

EXPLORING ADOBE INDESIGN CS6 • © 2013 DELMAR, CENGAGE LEARNING CHAPTER 9 • PAGE 4
▶ 09A ZAFFINNI’S (CONTINUED)
7. Build the back cover: The top and bottom of the back cover should have green rectangles, placed on the master during Step 3. (If your page doesn’t have the rectangles, bring them in from the library, and align the bars to the center fold and outside bleed edges.) Next, drag the black and white back cover photo in from the 09 Zaffinni library. Type the back cover text, as shown in the example. Apply the Headline Second Line style to Zaffinni’s and fill with C=23, M=86, Y=100, K=16. The text below the name is Adobe Caslon Pro, lower case, small caps. Center the text frame under the photo frame. Group these elements, and center them horizontally on the page.
8. Fine tune and print your document: Print your first draft, and examine it carefully for placement issues, readability, and correct use of dashes and hyphens. Revise as necessary and print a final draft. If you have a printer that can handle 11" x 17" paper, you will be able to print this document as full-size spreads. In the Print dialog box, select Spreads on General page. On the Setup page, choose 11" x 17" or Tabloid under Paper Size. If you don’t have a large-format printer, you can still print out spreads, but at a reduced size. Choose Spreads in the Print dialog box. Under Setup, choose Scale to Fit, as in the example below. Notice that the document in the preview pane below, has All Printer’s Marks turned on. Printer’s marks are activated on the Marks and Bleed page. If you were going to make a mock up to show your client, you would want to print out with crop marks to tell where the document will be trimmed.
EXPLORING ADOBE INDESIGN CS6 • © 2013 DELMAR, CENGAGE LEARNING CHAPTER 9 • PAGE 5
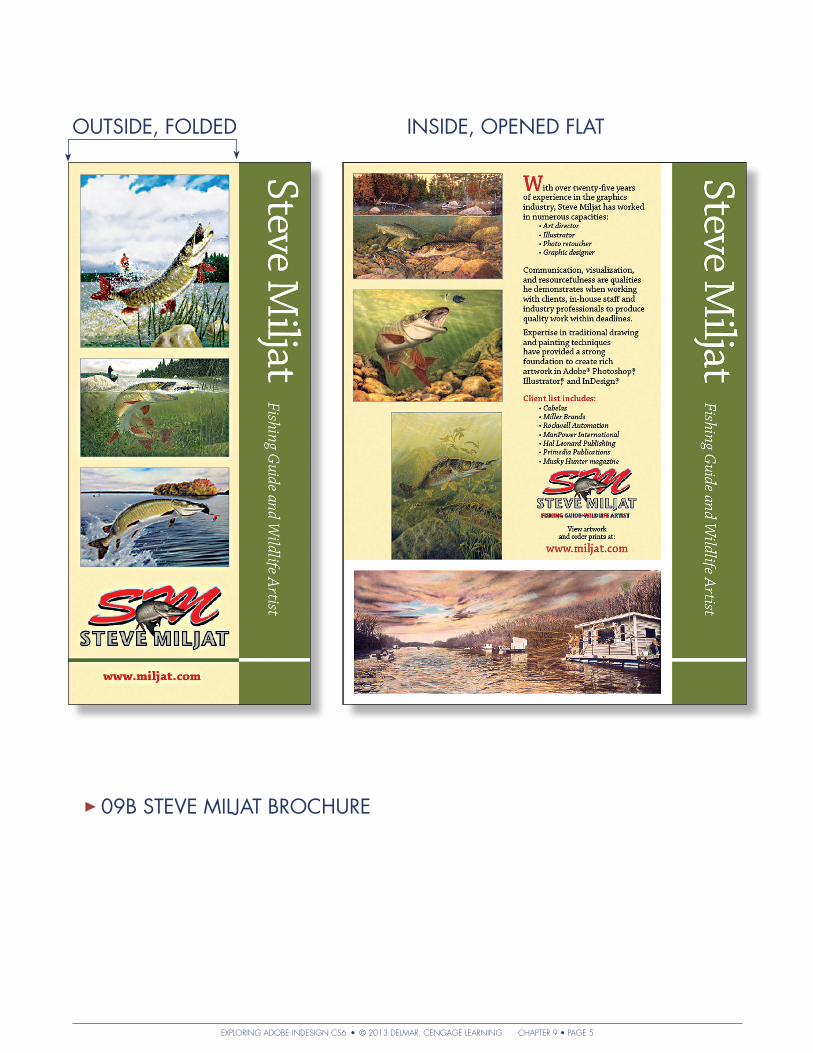
▶ 09B STEVE MILJAT BROCHURE
INSIDE, OPENED FLATOUTSIDE, FOLDED

EXPLORING ADOBE INDESIGN CS6 • © 2013 DELMAR, CENGAGE LEARNING CHAPTER 9 • PAGE 6
▶ 09B STEVE MILJAT BROCHURE
1. Analyze the Project Open the 09B Steve Miljat Brochure file that you created while working through Chapter 9. The file is partially built, and you already created the object styles that will be used in the project. As you scroll from Page 1 to Page 2, please notice these characteristics of the document: the masters have been named to A-Outside and B-Inside; a full bleed has been specified, and a slug area beyond the top and bottom trim is being used to hold lines that indicate fold marks. This brochure has an offset fold—the front cover extends up to the vertical green bar which is on the inside page. Part of the challenge of this project will be to have everything align perfectly so that the brochure looks correct when printed and folded.
2. Create the page structure Select master page A-Outside. Go to View>Grids and Guides>and deselect Lock Column Guides (if necessary). This will allow the column guides to move. With the Selection tool, click on the left-hand gutter guide and carefully slide it to the fold guide. You should see a slight change in guide color when the gutter guide is exactly positioned on top of the fold guide. Press F to activate the Frame tool. On master page A-Outside, draw a rectangle from the bleed edge in the upper left corner to the bleed edge in the lower right corner. Fill the rectangle with C=0, M=5, Y=32, K=0. Now, select master page B-Inside. Under Layout>Margins and Columns, change the right margin to 1.1667 in. Change the number of columns to 3, with a gutter of 0.1667 in. Position the right gutter guide of the center column on the fold line. Then, slide the right gutter guide of the third column, as close as possible to the margin. Now that the structure is prepared, go to View>Grids and Guides and check Lock Column Guides. This will prevent you from accidently moving a guide. Draw a rectangle frame: W=5.111," H=6.3529". Assign the Light Gold Background object style. Position it at the upper left top bleed edge.
3. Assign master pages Assign master A-Outside to Page 1 of the document. Assign master B-Inside to Page 2 of the document.
A-Outside masterLeft gutter guide is
aligned to fold guide.
A-Outside masterLeft gutter guide is
aligned to fold guide.A-Outside master
Left gutter guide is aligned to fold guide.
Slug area
B-Inside masterRight gutter guide of center column is
aligned to fold guide.
B-Inside masterRight gutter guide of third column is aligned to margin
guide.

EXPLORING ADOBE INDESIGN CS6 • © 2013 DELMAR, CENGAGE LEARNING CHAPTER 9 • PAGE 7
4. Assemble the Outside of the Brochure Move to page 1 and set the reference point on the Control panel proxy to the upper left corner. Draw a horizontal 4-pt, line that extends from the left bleed edge to the right bleed edge. Assign C=61, M=38, Y=100, K=12 to the stroke. Position the line at the Y coordinate of 7.75 in. Place the images on the right half of the front cover. Images should be proportional, and extend from the right gutter guide to the outer margin guide. The top photo should be flush with the top margin guide. Place these images: Still On.psd, bigfishnarrows.psd, and whitejaw.psd. Open the Align panel and use Distribute Spacing to specify 1 pica (0.1667 in) between each image. Edit the InDesign File Handling preferences to position snippets at their original location. Place the snippet Miljat logo.idms near the bottom of the cover. The outside of the brochure is completed.
5. Assemble the Inside of the Brochure Move to page 2 and draw a 9" x 1.5” text frame. Assign the object style Green Text Frame. Type Steve Miljat [insert em space] Fishing Guide and Wildlife Artist. Format the copy as shown. Rotate the text frame 90° Clockwise, and adjust the size of the frame so that it extends to the bleed edges and to the right-hand gutter guide on the master page. Draw a horizontal 4-pt. [Paper] rule that extends from inside edge of the green text frame to the outer bleed edge. Y=7.75". When the brochure is printed and folded, this rule should align perfectly with the green rule on the outside cover. Place logo small.idms. If you changed your InDesign File Handling preferences, it should be positioned accurately. Draw a text frame above the small logo that extends to the fold line, and the top and right margin guides. Assign a 1-pica left and right inset. Type the copy, formatting it according to the example shown at right. The typeface is Chaparral Pro, you will need to do the paragraph formatting including the space after, bullets, and balancing ragged lines. By now you should be able to closely match this copy without additional instruction. Make the register mark (®) by pressing Option+r (Mac) or Alt+r (Windows). You can also find a register mark in the Glyphs panel. Place fishingparty.psd, dragging the frame to the left, bottom and right margin guides. Then place these images, dragging their right frame edges flush to the gutter guide: underwater fish.psd, fishbite.psd, and murky.psd. The lower edge of musky.psd is flush with the lower edge of the light gold background. Assign the Photo Boxes object style to all images. Use the Align panel to distribute space evenly between the images. The inside is now complete.
Chaparral Pro Regular52 pt. Tracking -40
Chaparral Pro Italic19 pt.
With over twenty-five years of experience in the graphics industry, Steve Miljat has worked in numerous capacities:
• Art director• Illustrator• Photo retoucher• Graphic designer
Communication, visualization, and resourcefulness are qualities he demonstrates when working with clients, in-house staff and industry professionals to produce quality work within deadlines.
Expertise in traditional drawing and painting techniques have provided a strong foundation to create rich artwork in Adobe® Photoshop®, Illustrator®, and InDesign®.
Client list includes:• Cabelas• Miller Brands• Rockwell Automation• ManPower International• Hal Leonard Publishing• Primedia Publications • Musky Hunter magazine

EXPLORING ADOBE INDESIGN CS6 • © 2013 DELMAR, CENGAGE LEARNING CHAPTER 9 • PAGE 8
1. In your own words, describe a master page and its purpose.
2. What is the keyboard shortcut for releasing an element from the master page so that you can edit it on the document page?
3. If an element is detached from the master page and the master is changed, will those changes affect the detached element?
4. Where in InDesign will you find the Auto Page Number character?
5. If you create a jump line and it just isn’t working, what might be the problem?
6. What is the process for creating an InDesign library?
7. What are the default object styles for any document?
8. What does a plus (+) sign mean when it follows the name of an object style?
9. How can you change the document default for a text or graphics frame?
10. What is the process for breaking the link to an object style?
NAME ���������������������������������������� Review Questions EXPLORING INDESIGN CS6
9