Embed Size (px)
Citation preview
© 2018 Kimberbell Designs 1®
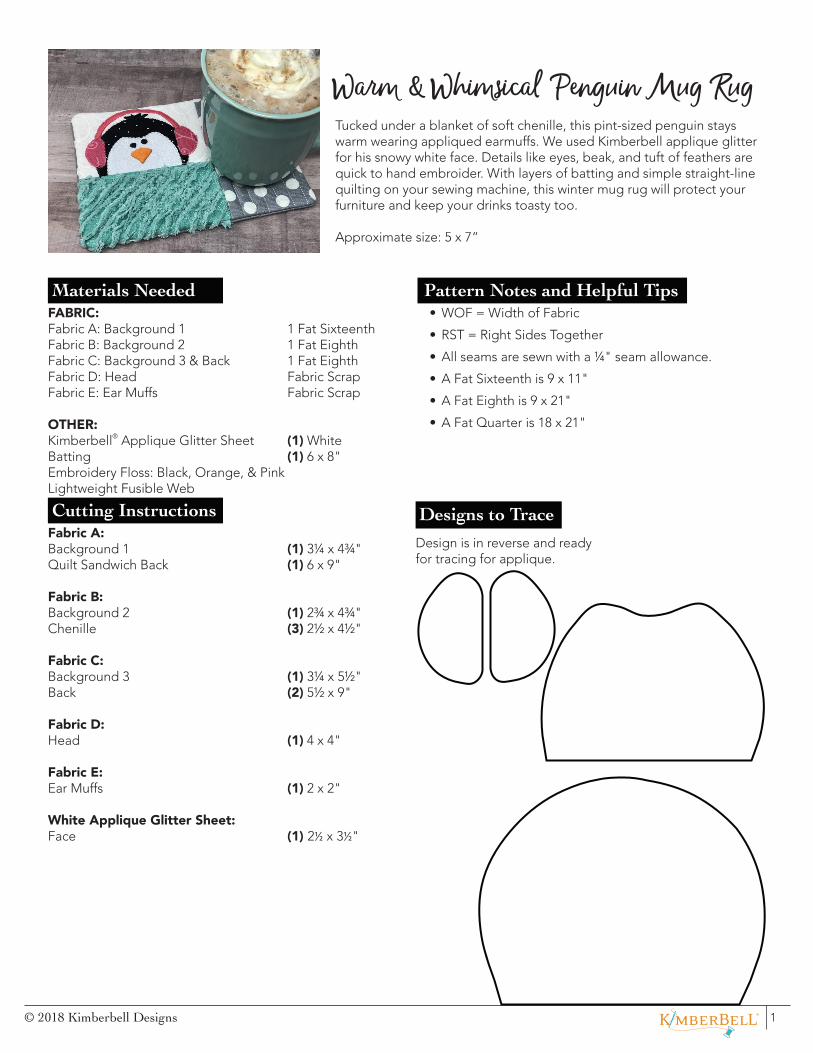
Tucked under a blanket of soft chenille, this pint-sized penguin stays warm wearing appliqued earmuffs. We used Kimberbell applique glitter for his snowy white face. Details like eyes, beak, and tuft of feathers are quick to hand embroider. With layers of batting and simple straight-line quilting on your sewing machine, this winter mug rug will protect your furniture and keep your drinks toasty too.
Approximate size: 5 x 7”
Pattern Notes and Helpful Tips• WOF = Width of Fabric
• RST = Right Sides Together
• All seams are sewn with a ¼" seam allowance.
• A Fat Sixteenth is 9 x 11"
• A Fat Eighth is 9 x 21"
• A Fat Quarter is 18 x 21"
Warm & Whimsical Penguin Mug Rug
Materials NeededFABRIC:Fabric A: Background 1 1 Fat SixteenthFabric B: Background 2 1 Fat EighthFabric C: Background 3 & Back 1 Fat EighthFabric D: Head Fabric ScrapFabric E: Ear Muffs Fabric Scrap
OTHER:Kimberbell® Applique Glitter Sheet (1) WhiteBatting (1) 6 x 8"Embroidery Floss: Black, Orange, & PinkLightweight Fusible Web
Cutting InstructionsFabric A: Background 1 (1) 3¼ x 4¾"Quilt Sandwich Back (1) 6 x 9"
Fabric B: Background 2 (1) 2¾ x 4¾"Chenille (3) 2½ x 4½"
Fabric C: Background 3 (1) 3¼ x 5½"Back (2) 5½ x 9"
Fabric D: Head (1) 4 x 4"
Fabric E: Ear Muffs (1) 2 x 2"
White Applique Glitter Sheet:Face (1) 2½ x 3½"
Designs to TraceDesign is in reverse and ready for tracing for applique.

© 2018 Kimberbell Designs 2®
We love the simplicity of using lightweight fusible web for applique. All of the images are printed in reverse, ready for tracing. Designs that are layered should be traced individually for each fabric. To begin, you will need the applique image, lightweight fusible web, pencil, and an iron.
1. Place fusible web, paper side up, over the Penguin Head applique design. Trace with a pencil.
2. Trim around the shape, but not directly on the outline.3. With a warm iron, adhere fusible web to the wrong
side of the fabric.
4. Cut out the Penguin Head directly on the traced pencil outline.
5. Peel fusible web paper from fabric.6. Center Penguin Head applique onto the Background
Fabric, with the penguin head on the bottom edge. With a warm iron, fuse the fabric shape to the fabric.
7. Repeat steps 1-7 to applique the Ear Muffs to the Penguin.
Applique Instructions
Applique Glitter InstructionsKimberbell Applique Glitter Sheets can be used in place of fabric for a fun glitter effect. Always remove the clear plastic film before stitching. A pressing cloth is needed for fusing and ironing on applique glitter.
1. Trace penguin face on a sheet of paper. 2. Cut penguin face from paper.3. Use the template to trace the paper template on back
of glitter sheet.
4. Cut out the design and remove the clear plastic film from glitter material.
5. Place Penguin Face on block. With a hot iron and a pressing cloth covering the glitter, fuse the Penguin Face to the block, by pressing for 15-20 seconds.
6. Prepare the block for hand embroidery by tracing the eyes, beak, and ear muff band with a disappearing pen.
Sewing Instructions
1. Arrange blocks as shown.2. Right sides together (RST), sew the Penguin Block to
the Background 2 Block, using a ¼" seam allowance.3. Sew Background 3 Block to the right of the
Background 1 & 2 unit.
4. Make a quilt sandwich by laying the Quilt Sandwich Back, Batting, and Mug Rug Top together. Pin in place.
5. Set sewing machine to zigzag or blanket stitch and sew around the penguin head, face and ear muffs to finish the edges.
6. Set sewing machine to straight stitch and sew straight lines vertically on Background 3 Block, use the edge of the presser foot to evenly space rows.
Hand Embroidery Instructions1. Following the diagram, satin stitch the ear muff band
with 3 strands pink embroidery floss.2. Satin stitch the hair with 3 strands black floss.3. Satin stitch the eyes with 3 strands black floss.4. Satin stitch the beak with 3 strands orange floss.
battingback fabric
1 2 3
4 5 6
1 2 3
4 4 5
1 2 3
4 5 6

© 2018 Kimberbell Designs 3®
Satin StitchBefore starting the satin stitch, outline the embroidery shape with a Backstitch. To help keep your stitches even, come up from the back of the design at the widest point of the shape to begin.1. Bring needle up from back of fabric, alongside the
outside edge of outline stitches through point A. 2. Insert the needle directly across the shape at point B
pulling floss taut in a straight line.3. Bring needle up from back, close
to the first stitch and pull floss through.
4. Keeping stitches close together, continue satin stitches back and forth across the shape until it is filled in. A
B
Chenille Instructions
1. Stack the (3) Chenille Fabric Pieces right side up, on top of the Background 2 Fabric, aligning the edges. Pin all layers together.
2. With a heat sensitive or water soluble pen, draw lines ⅜" apart diagonally across the fabric.
3. Sew directly on the marked lines, beginning and ending with a backstitch to secure stitches. Note: Use pins if necessary to hold the layers of fabric in place while stitching, being careful not to catch the pins under the presser foot.
4. With fine tip scissors, gently lift the top (3) layers of fabric and cut a straight line down the channels of stitching. Be very careful not to cut through th original Background 3 Fabric.
5. Tuft fabric layers with a nail file to fray the edges creating the chenille.
Finishing Instructions
1. Trim excess batting and back fabric even with the edges of the mug rug.
2. Prepare Back Pieces by ironing them in half widthwise, wrong sides together.
3. Place mug rug right side up. Place Back Pieces over mug rug top, aligning edges and overlapping folded edges.
4. Sew around the perimeter of the mug rug with a ¼"
seam allowance. Clip corners.5. Turn mug rug right side out. Poke corners with a blunt
tip to square. Press well.
Placement TemplatesDesign is ready for tracing for hand embroidery and can be used as a placement guide. Design for applique
tracing is on page 1.
2 3
4 5
12
3
4 5


![Design Pattern Representation for Safety-Critical Embedded ......design pattern in the software domain [2,5,6,7,8,9], but further research is still needed in the domain of safety-](https://img.pdfslide.net/doc/110x75/5f2dc80ff8202600a725f8b3/design-pattern-representation-for-safety-critical-embedded-design-pattern.jpg)