Embed Size (px)
Citation preview
Matter Manager
ContentsAbout Matter ManagerNavigating Matter ManagerTabsTab Dependent FeaturesMatter Manager Security
About Matter ManagerMatter Manager is a multi-purpose utility timekeepers use to handle cases in PCLaw™. Contained in Matter Manager are all the tools required to manage every aspect of matters in PCLaw™. This document details Matter Manager for PCLaw™ version 10 and higher.
Navigating Matter ManagerThis topic describes methods for starting Matter Manager and many of the standard components found in the module:
• Starting Matter Manager• Selecting Matters• Toolbar.
Starting Matter Manager
You can open Matter Manager using a variety of methods:• click the Matter Manager button on the PCLaw™ toolbar• select Matter Manager from the File pull-down menu• click the Matter Manager button on the Quick Step menu• press the keyboard shortcut [Ctrl] + [Y]• click the Change button in Pop Up Help - Matters• click the Next button in the New Matter window.
Selecting Matters
When starting Matter Manager for the first time, you must select a matter. A Pop Up Help - Matters window appears automatically if the Matter box is blank. Thereafter, you can direct PCLaw™ to remember the last matter viewed by selecting Remember Last Matter When Opening Matter Manager located on the Data Entry tab of System Settings.
The Matter Information bar in Matter Manager
Matter• Select the matter nickname to bring information for that matter into Matter Manager.
Matter Manager
Refresh• Click to reload the Matter Manager window.
Load Last• Click to select the settings from the last Matter Manager session.
Client Totals• Click to view totals by client or matter using the Client Totals window• See “Client Totals Window” on page 3.
Label• Click to create a label for the active matter using the Label Template Selection window• See “Label Template Selection Window” on page 3.
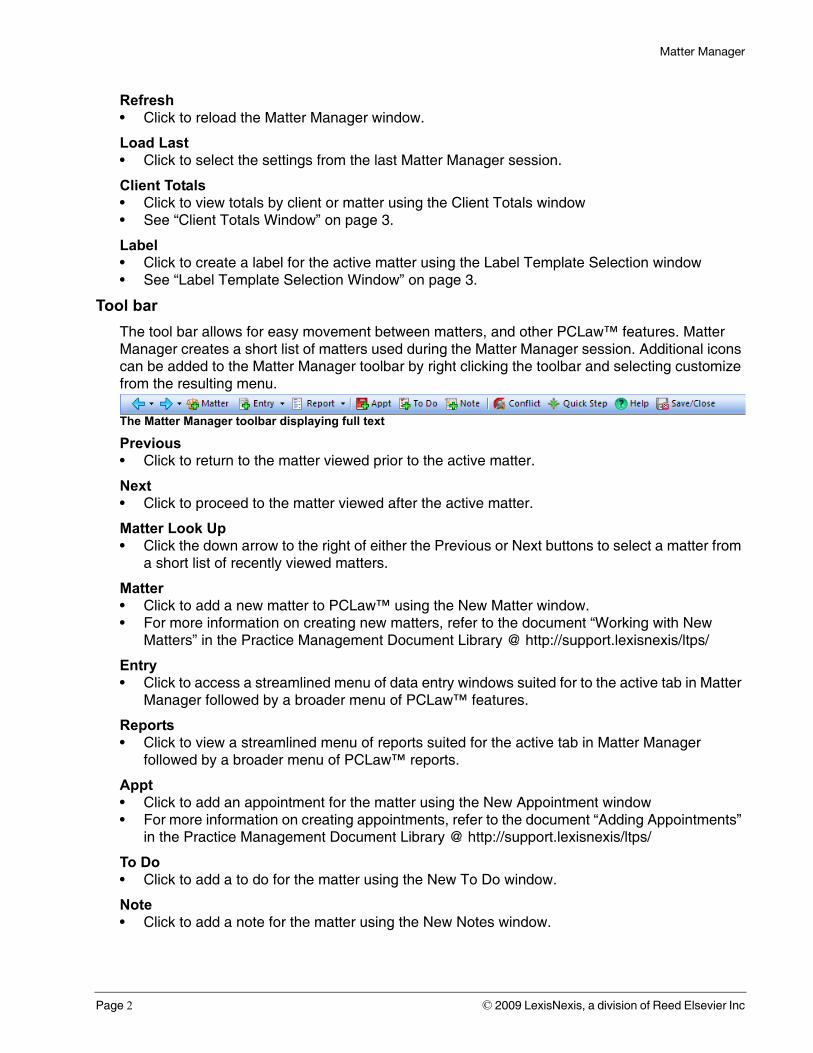
Tool bar
The tool bar allows for easy movement between matters, and other PCLaw™ features. Matter Manager creates a short list of matters used during the Matter Manager session. Additional icons can be added to the Matter Manager toolbar by right clicking the toolbar and selecting customize from the resulting menu.
The Matter Manager toolbar displaying full text
Previous• Click to return to the matter viewed prior to the active matter.
Next• Click to proceed to the matter viewed after the active matter.
Matter Look Up• Click the down arrow to the right of either the Previous or Next buttons to select a matter from
a short list of recently viewed matters.
Matter• Click to add a new matter to PCLaw™ using the New Matter window.• For more information on creating new matters, refer to the document “Working with New
Matters” in the Practice Management Document Library @ http://support.lexisnexis/ltps/
Entry• Click to access a streamlined menu of data entry windows suited for to the active tab in Matter
Manager followed by a broader menu of PCLaw™ features.
Reports• Click to view a streamlined menu of reports suited for the active tab in Matter Manager
followed by a broader menu of PCLaw™ reports.
Appt• Click to add an appointment for the matter using the New Appointment window• For more information on creating appointments, refer to the document “Adding Appointments”
in the Practice Management Document Library @ http://support.lexisnexis/ltps/
To Do• Click to add a to do for the matter using the New To Do window.
Note• Click to add a note for the matter using the New Notes window.
Page 2 © 2009 LexisNexis, a division of Reed Elsevier Inc
Matter Manager
Conflict• Click to open perform a conflict search using the File Conflict List• For more information on conflict search, see the document “Performing Conflict and Global
Searches” in the Practice Management Document Library @ http://support.lexisnexis/ltps/.
Save and Close• Click to save your work and close Matter Manager.
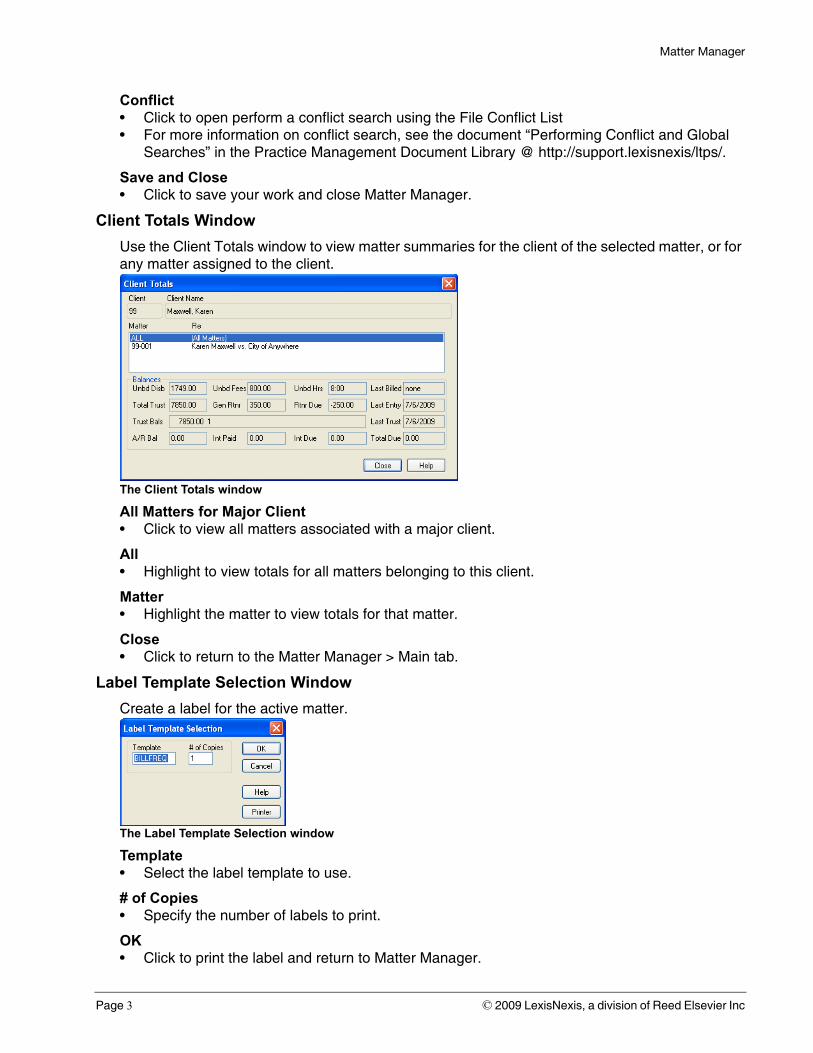
Client Totals Window
Use the Client Totals window to view matter summaries for the client of the selected matter, or for any matter assigned to the client.
The Client Totals window
All Matters for Major Client• Click to view all matters associated with a major client.
All• Highlight to view totals for all matters belonging to this client.
Matter• Highlight the matter to view totals for that matter.
Close• Click to return to the Matter Manager > Main tab.
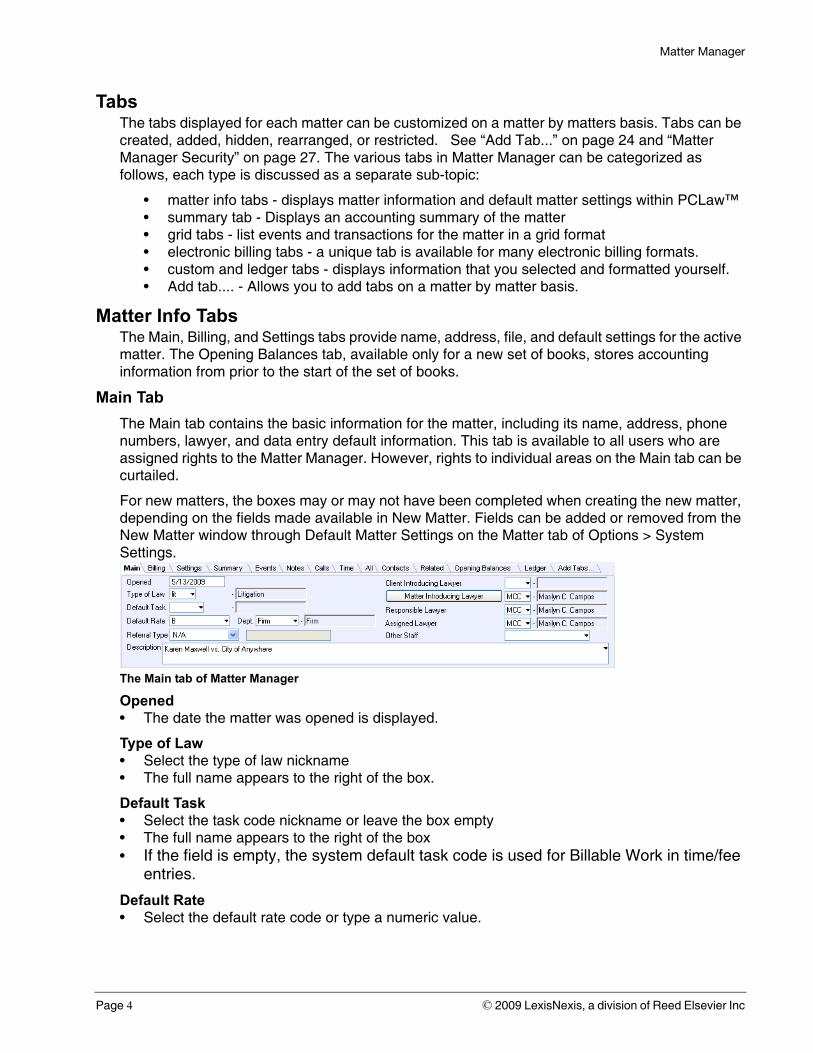
Label Template Selection Window
Create a label for the active matter.
The Label Template Selection window
Template• Select the label template to use.
# of Copies• Specify the number of labels to print.
OK• Click to print the label and return to Matter Manager.
Page 3 © 2009 LexisNexis, a division of Reed Elsevier Inc
Matter Manager
TabsThe tabs displayed for each matter can be customized on a matter by matters basis. Tabs can be created, added, hidden, rearranged, or restricted. See “Add Tab...” on page 24 and “Matter Manager Security” on page 27. The various tabs in Matter Manager can be categorized as follows, each type is discussed as a separate sub-topic:
• matter info tabs - displays matter information and default matter settings within PCLaw™• summary tab - Displays an accounting summary of the matter• grid tabs - list events and transactions for the matter in a grid format• electronic billing tabs - a unique tab is available for many electronic billing formats.• custom and ledger tabs - displays information that you selected and formatted yourself.• Add tab.... - Allows you to add tabs on a matter by matter basis.
Matter Info TabsThe Main, Billing, and Settings tabs provide name, address, file, and default settings for the active matter. The Opening Balances tab, available only for a new set of books, stores accounting information from prior to the start of the set of books.
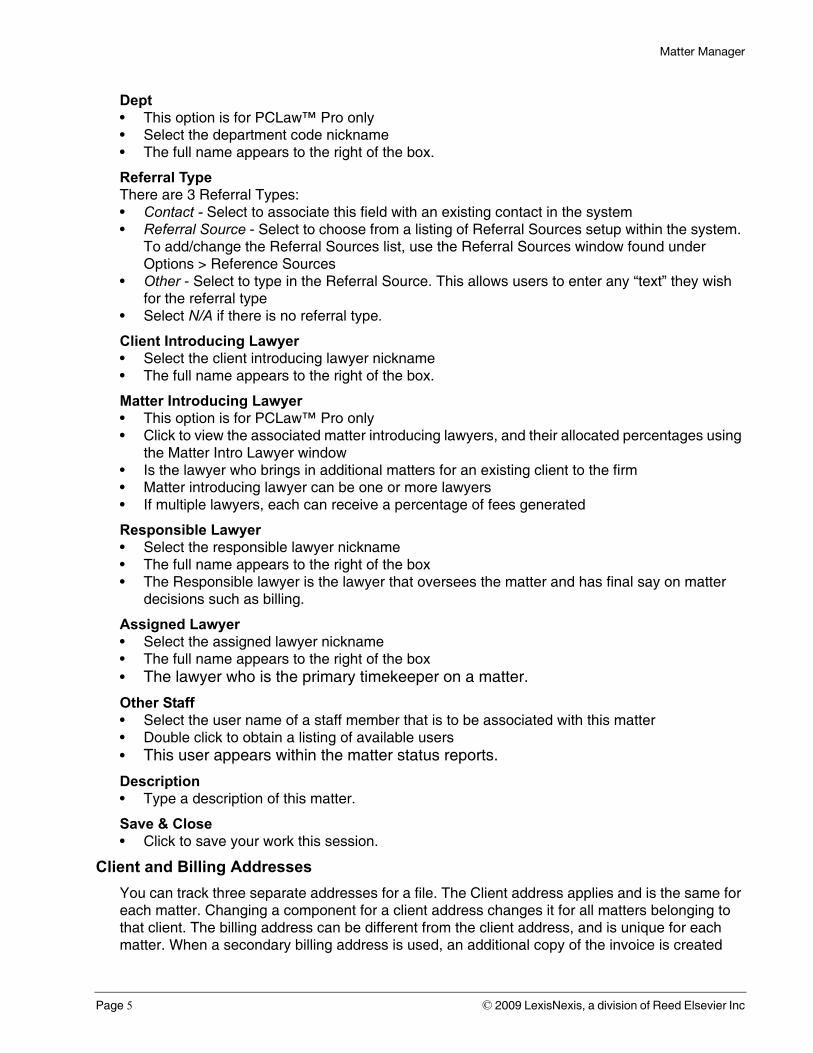
Main Tab
The Main tab contains the basic information for the matter, including its name, address, phone numbers, lawyer, and data entry default information. This tab is available to all users who are assigned rights to the Matter Manager. However, rights to individual areas on the Main tab can be curtailed.
For new matters, the boxes may or may not have been completed when creating the new matter, depending on the fields made available in New Matter. Fields can be added or removed from the New Matter window through Default Matter Settings on the Matter tab of Options > System Settings.
The Main tab of Matter Manager
Opened• The date the matter was opened is displayed.
Type of Law• Select the type of law nickname• The full name appears to the right of the box.
Default Task• Select the task code nickname or leave the box empty• The full name appears to the right of the box• If the field is empty, the system default task code is used for Billable Work in time/fee
entries.
Default Rate• Select the default rate code or type a numeric value.
Page 4 © 2009 LexisNexis, a division of Reed Elsevier Inc
Matter Manager
Dept• This option is for PCLaw™ Pro only• Select the department code nickname• The full name appears to the right of the box.
Referral TypeThere are 3 Referral Types:• Contact - Select to associate this field with an existing contact in the system• Referral Source - Select to choose from a listing of Referral Sources setup within the system.
To add/change the Referral Sources list, use the Referral Sources window found under Options > Reference Sources
• Other - Select to type in the Referral Source. This allows users to enter any “text” they wish for the referral type
• Select N/A if there is no referral type.
Client Introducing Lawyer• Select the client introducing lawyer nickname• The full name appears to the right of the box.
Matter Introducing Lawyer• This option is for PCLaw™ Pro only• Click to view the associated matter introducing lawyers, and their allocated percentages using
the Matter Intro Lawyer window• Is the lawyer who brings in additional matters for an existing client to the firm• Matter introducing lawyer can be one or more lawyers• If multiple lawyers, each can receive a percentage of fees generated
Responsible Lawyer• Select the responsible lawyer nickname• The full name appears to the right of the box• The Responsible lawyer is the lawyer that oversees the matter and has final say on matter
decisions such as billing.
Assigned Lawyer• Select the assigned lawyer nickname• The full name appears to the right of the box• The lawyer who is the primary timekeeper on a matter.
Other Staff• Select the user name of a staff member that is to be associated with this matter• Double click to obtain a listing of available users• This user appears within the matter status reports.
Description• Type a description of this matter.
Save & Close• Click to save your work this session.
Client and Billing Addresses
You can track three separate addresses for a file. The Client address applies and is the same for each matter. Changing a component for a client address changes it for all matters belonging to that client. The billing address can be different from the client address, and is unique for each matter. When a secondary billing address is used, an additional copy of the invoice is created
Page 5 © 2009 LexisNexis, a division of Reed Elsevier Inc
Matter Manager
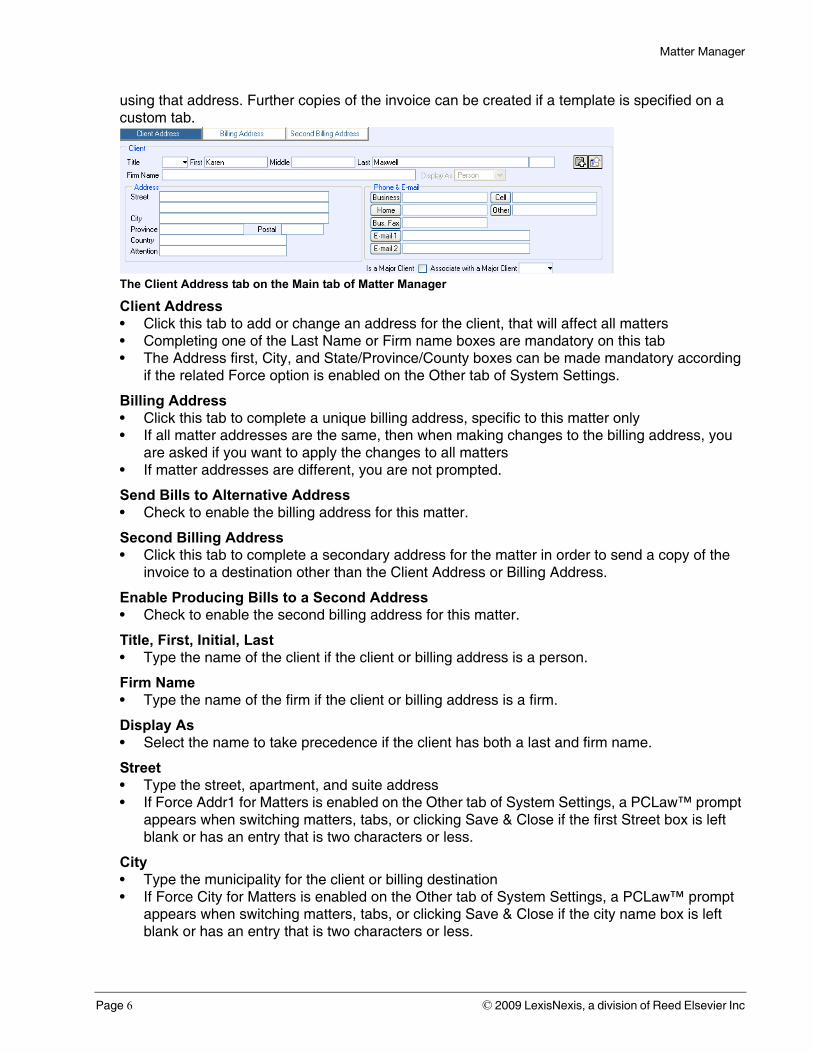
using that address. Further copies of the invoice can be created if a template is specified on a custom tab.
The Client Address tab on the Main tab of Matter Manager
Client Address• Click this tab to add or change an address for the client, that will affect all matters• Completing one of the Last Name or Firm name boxes are mandatory on this tab• The Address first, City, and State/Province/County boxes can be made mandatory according
if the related Force option is enabled on the Other tab of System Settings.
Billing Address• Click this tab to complete a unique billing address, specific to this matter only• If all matter addresses are the same, then when making changes to the billing address, you
are asked if you want to apply the changes to all matters• If matter addresses are different, you are not prompted.
Send Bills to Alternative Address• Check to enable the billing address for this matter.
Second Billing Address• Click this tab to complete a secondary address for the matter in order to send a copy of the
invoice to a destination other than the Client Address or Billing Address.
Enable Producing Bills to a Second Address• Check to enable the second billing address for this matter.
Title, First, Initial, Last• Type the name of the client if the client or billing address is a person.
Firm Name• Type the name of the firm if the client or billing address is a firm.
Display As• Select the name to take precedence if the client has both a last and firm name.
Street• Type the street, apartment, and suite address• If Force Addr1 for Matters is enabled on the Other tab of System Settings, a PCLaw™ prompt
appears when switching matters, tabs, or clicking Save & Close if the first Street box is left blank or has an entry that is two characters or less.
City• Type the municipality for the client or billing destination• If Force City for Matters is enabled on the Other tab of System Settings, a PCLaw™ prompt
appears when switching matters, tabs, or clicking Save & Close if the city name box is left blank or has an entry that is two characters or less.
Page 6 © 2009 LexisNexis, a division of Reed Elsevier Inc
Matter Manager
State/Province/County• Type the territory for the client or billing destination• If Force State/County/Province for Matters is enabled on the Other tab of System Settings, a
PCLaw™ prompt appears when switching matters, tabs, or clicking Save & Close if the territory box is left blank or has an entry that is two characters or less.
Zip/Postal/Post Code• Type the mailing code.
Attention• Type the name of the person to whom the correspondence or invoice is to be forwarded.
Copy Address To Clipboard• Click the icon to copy the current address to the clipboard.
Copy Address From List• Click the icon to copy an address from a different contact, client, or vendor using the Copy
Address From window.
Business, Home, Bus Fax, Cell, Other• Type the corresponding phone number of the firm. Click the adjacent button to create a phone
call record using the New Phone Call window.
E-mail 1, E-mail 2• Type the e-mail addresses of the person or firm. Click the adjacent button to open a compose
e-mail window with the adjacent address filled.
Is a Major Client• This option is for PCLaw™ Pro only• Check if the client is a major client with subsidiary clients• This check box is greyed out if the client is already a major or subsidiary client.
Associate with a Major Client• This option is for PCLaw™ Pro only• Select the major client nickname if the client is a subsidiary client to a major client• This check box is greyed out if the client is already a major or subsidiary client.
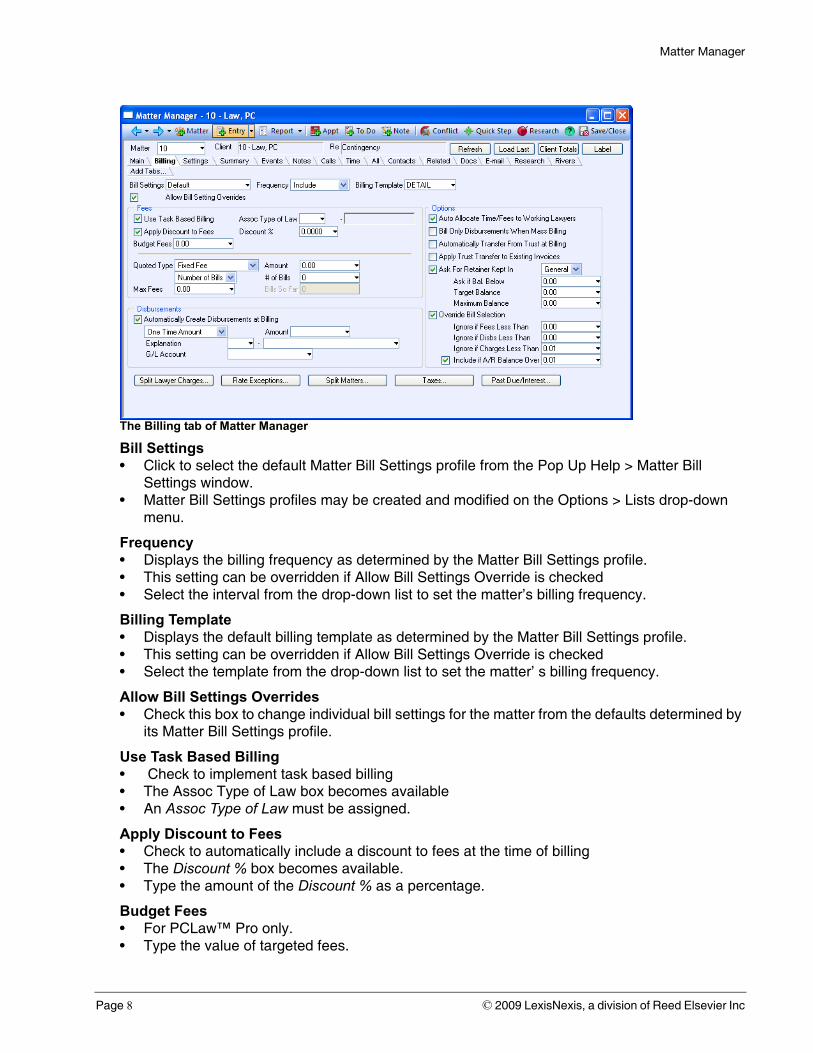
Billing Tab
The Billing tab consists of five basic components. • The Billing area contains defaults applied to the matter when billing. • The Interest area personalizes how interest and past due options are applied to the
matter. • Split lawyer charges determines how fees are divided between lawyers. • Split matters enables matter charges to be divided between two or more matters at the
time of billing. • For firms collections sales tax, GST, and VAT, the Taxes area sets matter eligibility and
percentage.
Defaults for individual matters are set on the Billing tab of Matter Manager. Settings on this tab are populated according to the defaults selected on the Matter Billing tab of Options > System Settings and can be modified for each matter.
Page 7 © 2009 LexisNexis, a division of Reed Elsevier Inc
Matter Manager
The Billing tab of Matter Manager
Bill Settings• Click to select the default Matter Bill Settings profile from the Pop Up Help > Matter Bill
Settings window.• Matter Bill Settings profiles may be created and modified on the Options > Lists drop-down
menu.
Frequency• Displays the billing frequency as determined by the Matter Bill Settings profile. • This setting can be overridden if Allow Bill Settings Override is checked• Select the interval from the drop-down list to set the matter’s billing frequency.
Billing Template• Displays the default billing template as determined by the Matter Bill Settings profile.• This setting can be overridden if Allow Bill Settings Override is checked• Select the template from the drop-down list to set the matter’ s billing frequency.
Allow Bill Settings Overrides• Check this box to change individual bill settings for the matter from the defaults determined by
its Matter Bill Settings profile.
Use Task Based Billing• Check to implement task based billing• The Assoc Type of Law box becomes available• An Assoc Type of Law must be assigned.
Apply Discount to Fees• Check to automatically include a discount to fees at the time of billing• The Discount % box becomes available.• Type the amount of the Discount % as a percentage.
Budget Fees• For PCLaw™ Pro only.• Type the value of targeted fees.
Page 8 © 2009 LexisNexis, a division of Reed Elsevier Inc
Matter Manager
Quoted Type• Select from the drop-down list to attach a quote to the matter.• Type the Amount if the quote involves a quantitative target or ceiling.• Select either Every Bill or Number of Bills from the drop-down list if the quote applies to all
billing or a fixed number of bills. This option is not available for all quoted types.• If Number of Bills is selected, in the # of Bills box, type the total number of bills that will include
the quoted amount.• Type in the Max Fees box, a maximum quoted value for fees.
Auto Create Disbursements at Billing• Check to add disbursements when invoicing this matter.• Select one of One Time Amount, Amount Every Invoice, or Percent of Fees from the drop-
down list. These choices will make the invoice a one-time amount, a base charge on every invoice, or a percentage of billed fees, respectively.
• Type the dollar Amount of the auto-disbursement if it is a one- time charge or the same amount on every invoice.
• Type the Percent if the auto-disbursement is calculated from fees billed on the invoice.• Type the default Explanation for the auto-disbursement.• Select the default G/L Account for the auto-disbursement.
Auto Allocate Time/Fees to Working Lawyers• Check to automatically allocate time and fee charges to working lawyers.
Bill Only Disbursements When Mass Billing• Check to include contingency matters in mass billing but not bill any assigned fees.
Automatically Transfer From Trust at Billing• Check to automatically transfer funds from the matter’s trust account when billing.
Apply Trust Transfer to Existing Invoices• Check to allow Trust to General transfers to pre-existing invoices for this matter• This option is new to PCLaw™ version 10.
Ask for Retainer• Check to include an automatic retainer refurbishment on the invoice• Categorize from the Kept In drop-down list the retainer as a general retainer or trust fund• You can place separate tokens on templates, to include a retainer replenishment if the
retainer balance falls below a minimum (Ask if Bal Below) or preferred (Target Balance)• If when adding a general retainer or trust receipt, the retainer balance exceeds the Maximum
balance, PCLaw™ displays a confirmation prompt prior to posting the transaction• Target and Maximum replenishment balances are available only for PCLaw™ version 10.
Override Bill Selection• Check to set matter specific settings for minimum fee, disbursement, and charges when
including matters using this profile in mass billing.• Type, in the Ignore if Fees Less Than box, the minimum dollar value for fees to include
matters using this profile in a mass billing.• Type, in the Ignore if Disbs Less Than box, the minimum dollar value for disbursements to
include matters using this profile in a mass billing.• Type, in the Ignore if Charges Less Than box, the minimum dollar value of both fees and
disbursements to include matters using this profile in a mass billing.• Check Ignore if A/R Balance Less Than to include matters using this profile in a mass billing if
there are no new charges but the matter does hold an A/R balance. Type the minimum balance in the adjacent box.
Page 9 © 2009 LexisNexis, a division of Reed Elsevier Inc
Matter Manager
Split Lawyer Charges• Click to assign automatic allocation of time and fee charges using the Split Lawyer Charges
window• Allocations do not need to add to 100%• See “Split Lawyer Charges” on page 10.
Rate Exceptions• Click to assign rate exceptions to either fees or disbursements using the Rate Exceptions
window• Providing Rate Exceptions to disbursements are available only on PCLaw™ version 10 and
higher.• See “Rate Exceptions” on page 11.
Split Matters• Click to split the invoices for this matter between two or more subsidiary matters• See “Split Matters” on page 11.
Taxes• Click to assign past due or interest settings using the Past Due / Interest Settings window• This option is only available if one or both of Goods and Services or Sales tax is enabled on
the Tax tab of System Settings.• See “Taxes” on page 12.
Past Due/Interest• Click to assign past due or interest settings using the Past Due / Interest Settings window.• See “Past Due/Interest” on page 13.
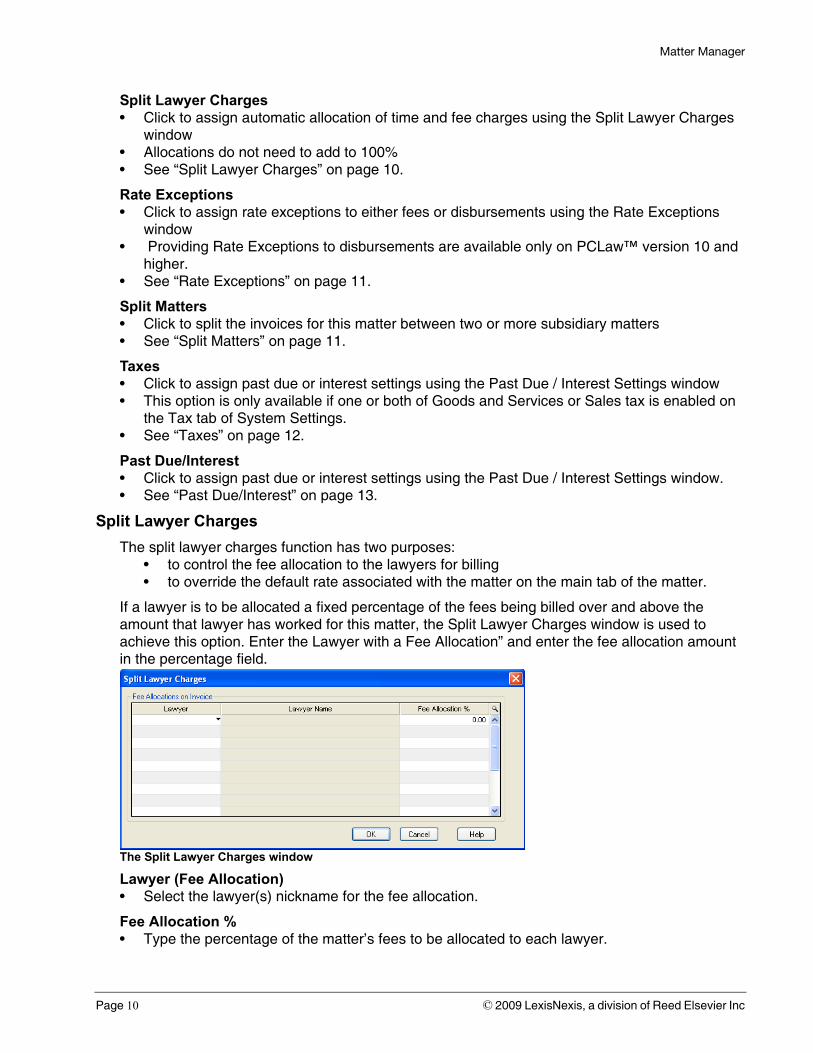
Split Lawyer Charges
The split lawyer charges function has two purposes:• to control the fee allocation to the lawyers for billing• to override the default rate associated with the matter on the main tab of the matter.
If a lawyer is to be allocated a fixed percentage of the fees being billed over and above the amount that lawyer has worked for this matter, the Split Lawyer Charges window is used to achieve this option. Enter the Lawyer with a Fee Allocation” and enter the fee allocation amount in the percentage field.
The Split Lawyer Charges window
Lawyer (Fee Allocation)• Select the lawyer(s) nickname for the fee allocation.
Fee Allocation %• Type the percentage of the matter’s fees to be allocated to each lawyer.
Page 10 © 2009 LexisNexis, a division of Reed Elsevier Inc
Matter Manager
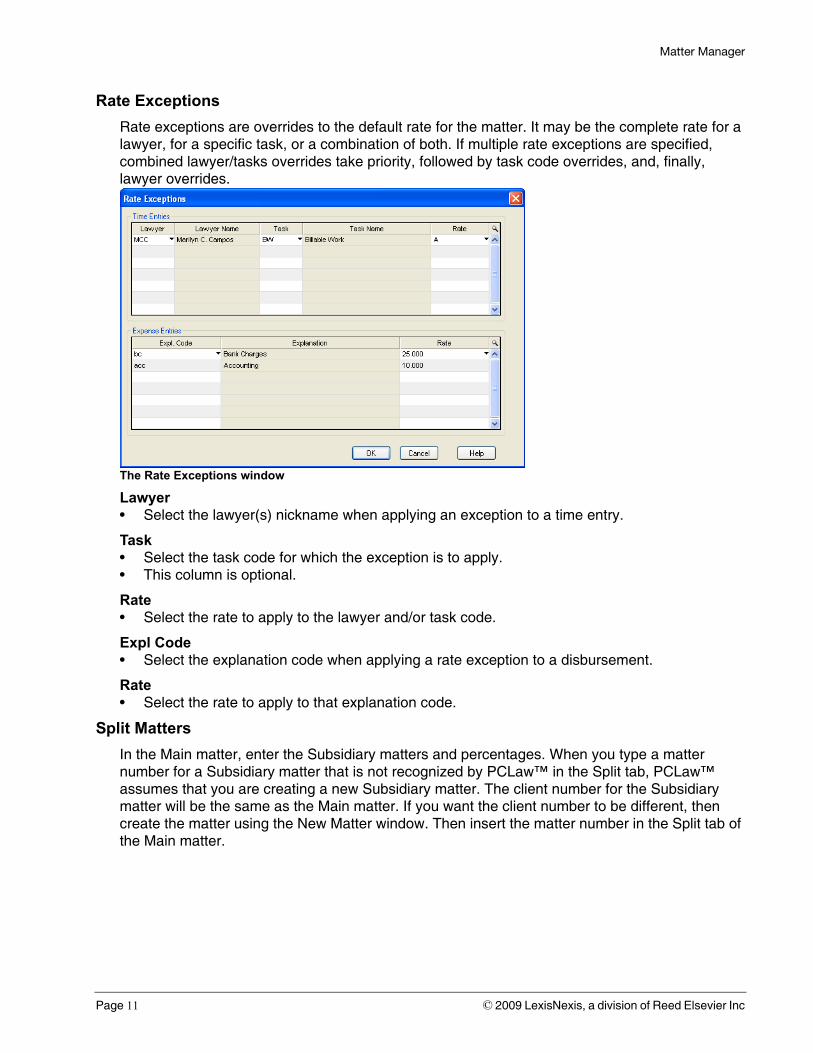
Rate Exceptions
Rate exceptions are overrides to the default rate for the matter. It may be the complete rate for a lawyer, for a specific task, or a combination of both. If multiple rate exceptions are specified, combined lawyer/tasks overrides take priority, followed by task code overrides, and, finally, lawyer overrides.
The Rate Exceptions window
Lawyer• Select the lawyer(s) nickname when applying an exception to a time entry.
Task• Select the task code for which the exception is to apply.• This column is optional.
Rate• Select the rate to apply to the lawyer and/or task code.
Expl Code• Select the explanation code when applying a rate exception to a disbursement.
Rate• Select the rate to apply to that explanation code.
Split Matters
In the Main matter, enter the Subsidiary matters and percentages. When you type a matter number for a Subsidiary matter that is not recognized by PCLaw™ in the Split tab, PCLaw™ assumes that you are creating a new Subsidiary matter. The client number for the Subsidiary matter will be the same as the Main matter. If you want the client number to be different, then create the matter using the New Matter window. Then insert the matter number in the Split tab of the Main matter.
Page 11 © 2009 LexisNexis, a division of Reed Elsevier Inc
Matter Manager
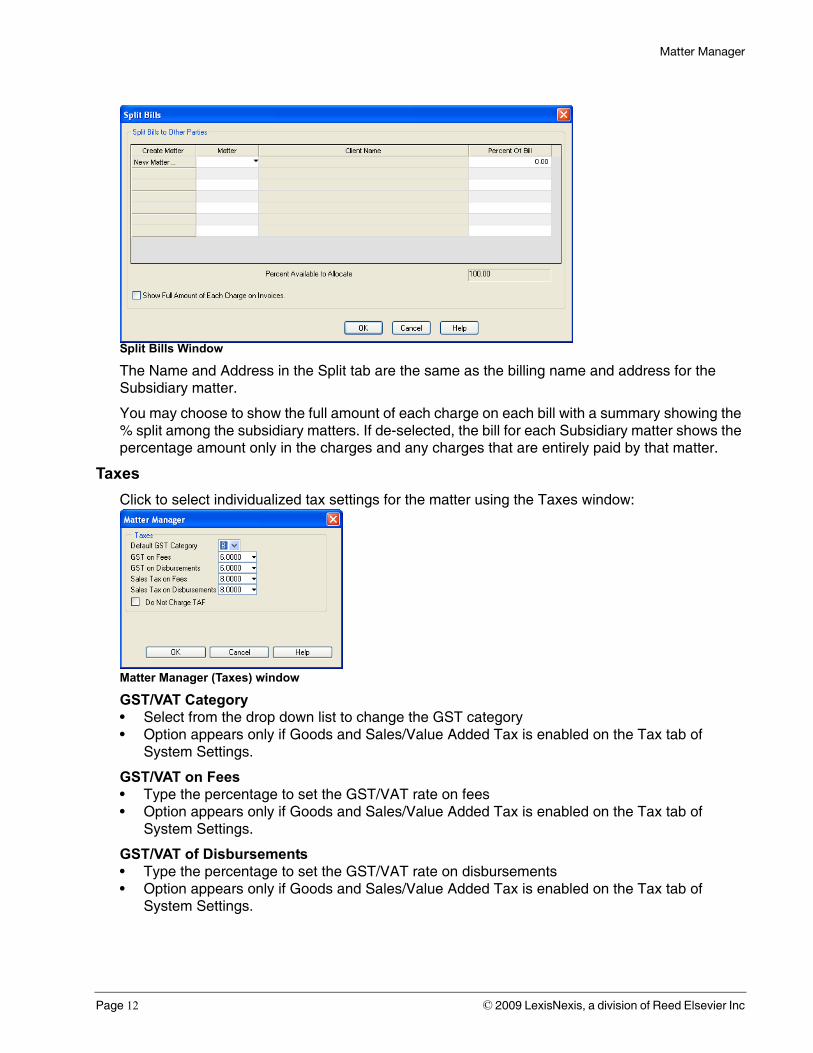
Split Bills Window
The Name and Address in the Split tab are the same as the billing name and address for the Subsidiary matter.
You may choose to show the full amount of each charge on each bill with a summary showing the % split among the subsidiary matters. If de-selected, the bill for each Subsidiary matter shows the percentage amount only in the charges and any charges that are entirely paid by that matter.
Taxes
Click to select individualized tax settings for the matter using the Taxes window:
Matter Manager (Taxes) window
GST/VAT Category• Select from the drop down list to change the GST category• Option appears only if Goods and Sales/Value Added Tax is enabled on the Tax tab of
System Settings.
GST/VAT on Fees• Type the percentage to set the GST/VAT rate on fees• Option appears only if Goods and Sales/Value Added Tax is enabled on the Tax tab of
System Settings.
GST/VAT of Disbursements• Type the percentage to set the GST/VAT rate on disbursements• Option appears only if Goods and Sales/Value Added Tax is enabled on the Tax tab of
System Settings.
Page 12 © 2009 LexisNexis, a division of Reed Elsevier Inc
Matter Manager
Sales on Fees• Type the percentage to set the sales tax on fees• Option appears only if Sales Tax is enabled on the Tax tab of System Settings.
Sales on Disbursements• Type the percentage to set the sales tax on disbursements• Option appears only if Sales Tax is enabled on the Tax tab of System Settings.
Do Not Charge TAF• For British Columbia firms only• Check to exempt the matter from paying TAF.
Past Due/Interest
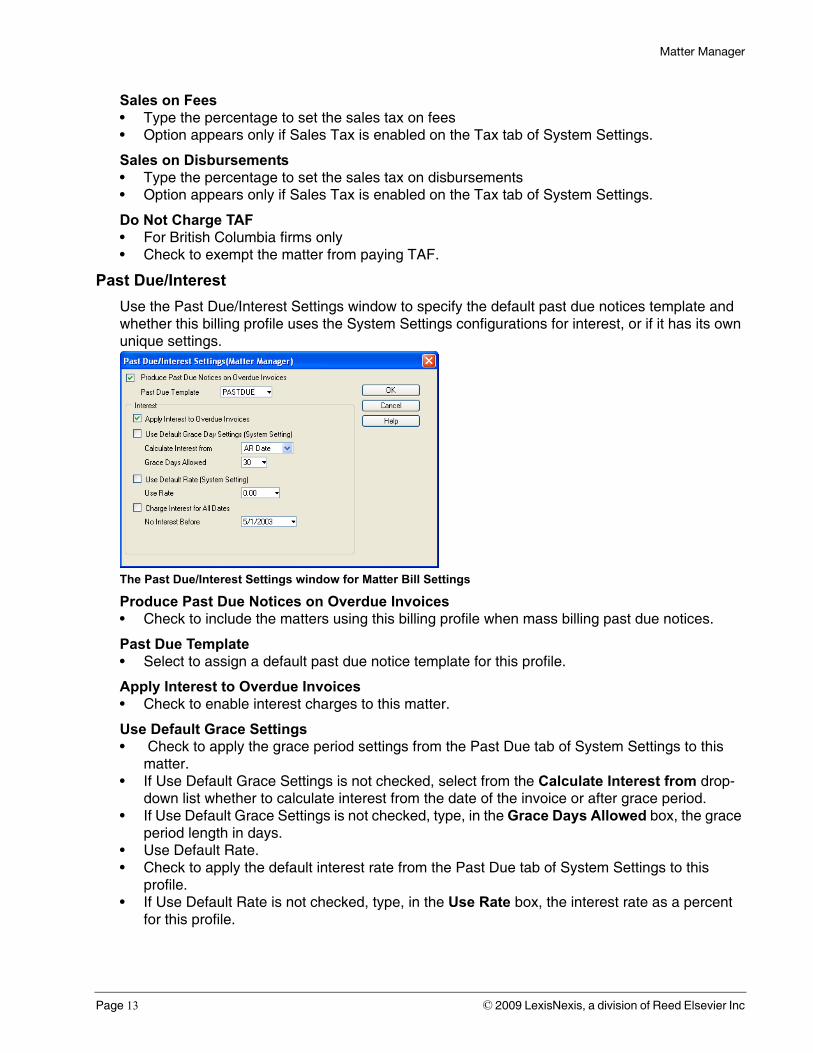
Use the Past Due/Interest Settings window to specify the default past due notices template and whether this billing profile uses the System Settings configurations for interest, or if it has its own unique settings.
The Past Due/Interest Settings window for Matter Bill Settings
Produce Past Due Notices on Overdue Invoices• Check to include the matters using this billing profile when mass billing past due notices.
Past Due Template• Select to assign a default past due notice template for this profile.
Apply Interest to Overdue Invoices• Check to enable interest charges to this matter.
Use Default Grace Settings• Check to apply the grace period settings from the Past Due tab of System Settings to this
matter.• If Use Default Grace Settings is not checked, select from the Calculate Interest from drop-
down list whether to calculate interest from the date of the invoice or after grace period. • If Use Default Grace Settings is not checked, type, in the Grace Days Allowed box, the grace
period length in days.• Use Default Rate.• Check to apply the default interest rate from the Past Due tab of System Settings to this
profile.• If Use Default Rate is not checked, type, in the Use Rate box, the interest rate as a percent
for this profile.
Page 13 © 2009 LexisNexis, a division of Reed Elsevier Inc
Matter Manager
Charge Interest for All Dates• Check to apply interest from the earliest invoice date.• If Charge Interest for All Dates is not checked, select, in the No Interest Before box, the
earliest date to apply interest to this profile.
OK• Click OK to save your work and return to the Add/Change Matter Bill Settings window.
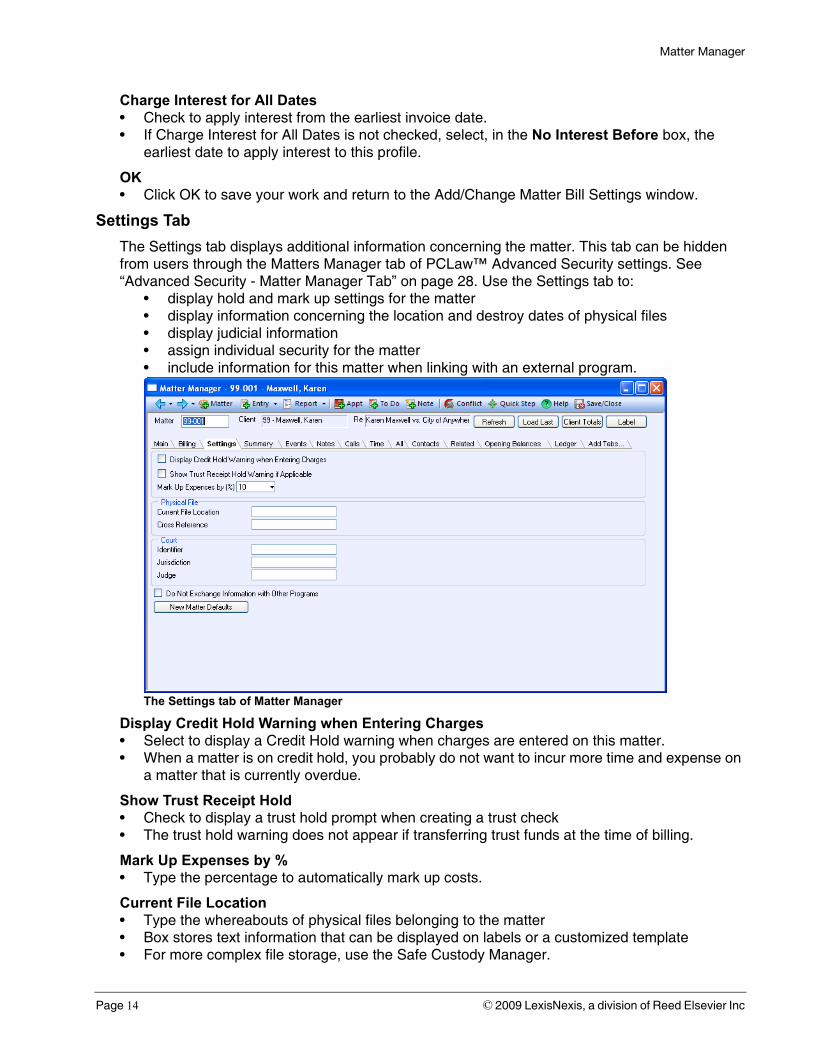
Settings Tab
The Settings tab displays additional information concerning the matter. This tab can be hidden from users through the Matters Manager tab of PCLaw™ Advanced Security settings. See “Advanced Security - Matter Manager Tab” on page 28. Use the Settings tab to:
• display hold and mark up settings for the matter• display information concerning the location and destroy dates of physical files• display judicial information • assign individual security for the matter• include information for this matter when linking with an external program.
The Settings tab of Matter Manager
Display Credit Hold Warning when Entering Charges• Select to display a Credit Hold warning when charges are entered on this matter.• When a matter is on credit hold, you probably do not want to incur more time and expense on
a matter that is currently overdue.
Show Trust Receipt Hold• Check to display a trust hold prompt when creating a trust check• The trust hold warning does not appear if transferring trust funds at the time of billing.
Mark Up Expenses by %• Type the percentage to automatically mark up costs.
Current File Location• Type the whereabouts of physical files belonging to the matter• Box stores text information that can be displayed on labels or a customized template• For more complex file storage, use the Safe Custody Manager.
Page 14 © 2009 LexisNexis, a division of Reed Elsevier Inc
Matter Manager
Cross Reference• Type the matter cross reference• Box stores text information that can be displayed on labels or a customized template.
Closed File Number• For closed matters, the Cross Reference box changes to a Closed File Number box.
Destroy Date• This box displays when the matter’s physical files can be destroyed• PCLaw™ uses the matter open date and adds the value in the Files Can Be Destroyed After
Years box on the System Settings > Matter tab.
Identifier• Type the court identifier.
Jurisdiction• Type the jurisdiction in which the matter falls.
Judge• Type the name of the magistrate presiding over the matter.
Do Not Exchange Information with Other Programs• Check to not have matter information exchange with external applications that link with
PCLaw™.
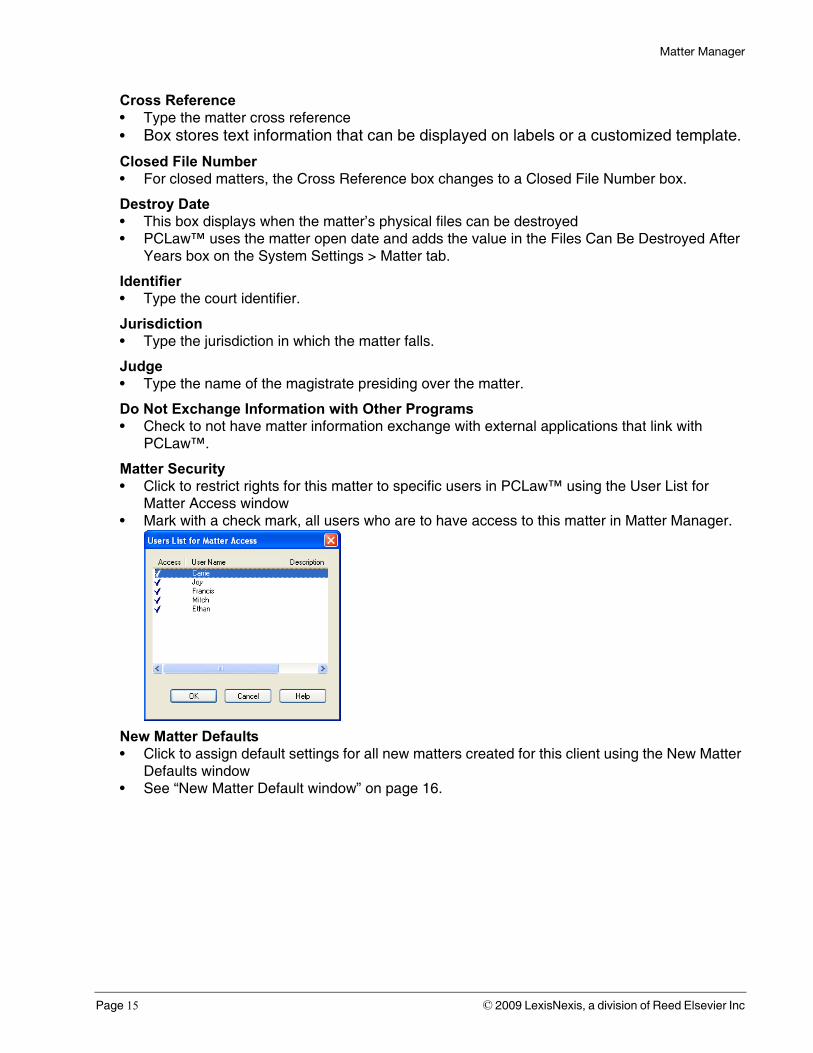
Matter Security• Click to restrict rights for this matter to specific users in PCLaw™ using the User List for
Matter Access window• Mark with a check mark, all users who are to have access to this matter in Matter Manager.
New Matter Defaults• Click to assign default settings for all new matters created for this client using the New Matter
Defaults window• See “New Matter Default window” on page 16.
Page 15 © 2009 LexisNexis, a division of Reed Elsevier Inc
Matter Manager
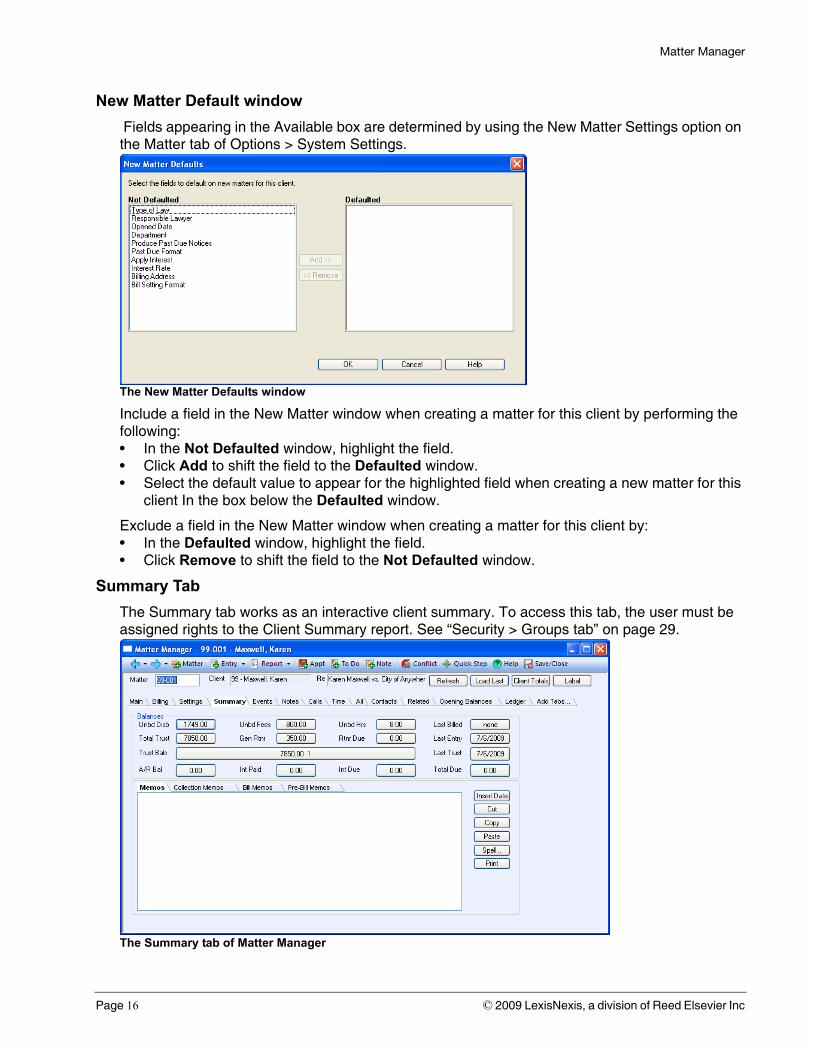
New Matter Default window
Fields appearing in the Available box are determined by using the New Matter Settings option on the Matter tab of Options > System Settings.
The New Matter Defaults window
Include a field in the New Matter window when creating a matter for this client by performing the following:• In the Not Defaulted window, highlight the field.• Click Add to shift the field to the Defaulted window.• Select the default value to appear for the highlighted field when creating a new matter for this
client In the box below the Defaulted window.
Exclude a field in the New Matter window when creating a matter for this client by:• In the Defaulted window, highlight the field.• Click Remove to shift the field to the Not Defaulted window.
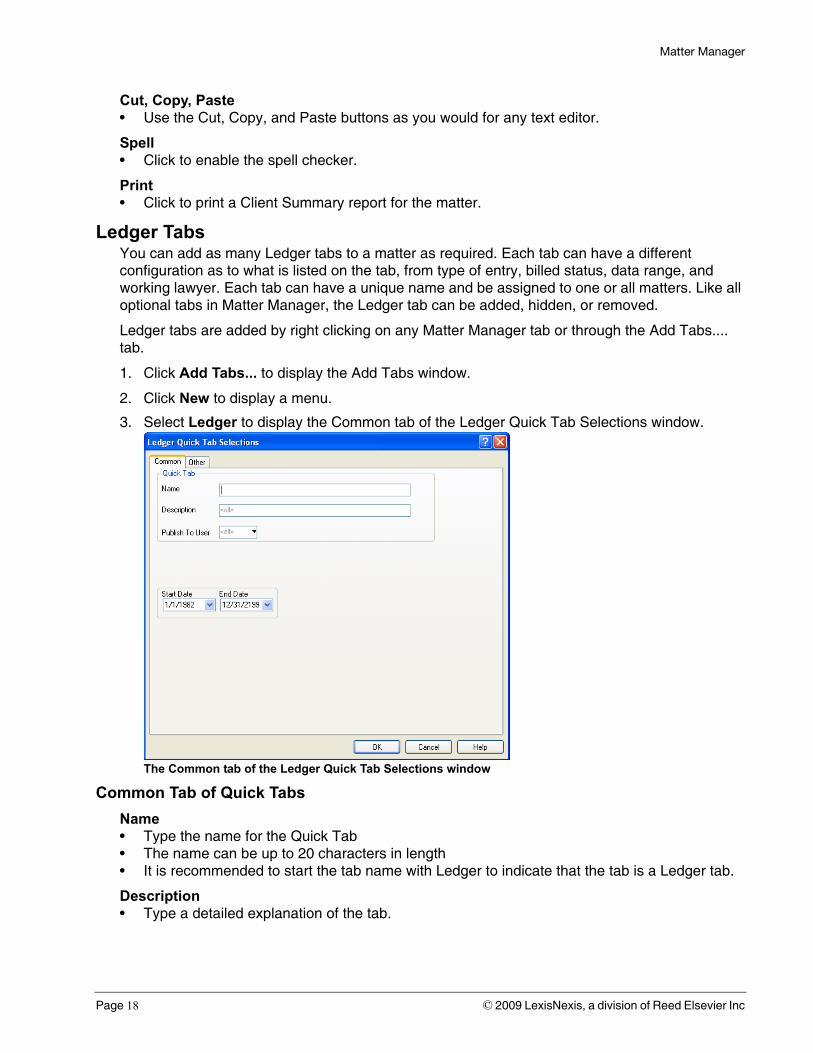
Summary Tab
The Summary tab works as an interactive client summary. To access this tab, the user must be assigned rights to the Client Summary report. See “Security > Groups tab” on page 29.
The Summary tab of Matter Manager
Page 16 © 2009 LexisNexis, a division of Reed Elsevier Inc

Matter Manager
Use the Summary tab for balances
• Click a total button to display all transactions that comprise that total• Print a Client Summary for the matter.
Or memos/collection memos
• Add or change memos• Add or change collection memos
BalancesClient Summary information appears in the Balances area. Each balance is displayed on a button. Click that button to view detailed transactions that comprise the balance. The displayed transactions are filtered for the active matter only.
Memos/Collection Memos/The lower area of the Summary tab contains space for storing memos and collection memos.
• Memos tab information appears on the Client Manager > Matters tab and the List of Clients report.
• Collections Memos information appears on the Client Manager > Matters tab, List of Clients and the Receivables by Client reports.
• Bill Memos tab information appears on any bill where the billing template contains one of the Bill Memo or Bill/Run Time Memo tokens.
• Pre-Bill Memos• tab information appears on any pre-bill where the pre-billing template contains one of the
Pre-Bill Memo or Pre-Bill/Run Time Memo tokens.
Insert Date• Click to insert the Default Entry date for a new Memo or Collection Memo.
Summary Button Opens to.... Filter Restrictions/Notes
Unbd Disb Register > Ledger tab Disbs & Unbilled
Unbd Fees Register > Time tab Unbilled & Both
Unbd Hrs Register > Time tab Unbilled & Both
Total Trust Register > Ledger tab Trust & Billed + Unbilled
Gen Rtnr Register > Ledger tab Receipts & Billed + Unbilled
Rtnr Due Register > Ledger tab Receipts & Billed + Unbilled
Trust Bals Register > Ledger tab Trust & Billed + Unbilled
A/R Bal Register > Invoice tab Refer to matter summary
Int Paid Receivables by Client report For matter
Int Due Receivables by Client report For matter
Last Billed Register > Invoice tab Not filtered
Last Entry Register > Ledger tab Not filtered
Last Trust Register > Ledger tab Trust
Total Due Register > Ledger tab Not filtered
Page 17 © 2009 LexisNexis, a division of Reed Elsevier Inc
Matter Manager
Cut, Copy, Paste• Use the Cut, Copy, and Paste buttons as you would for any text editor.
Spell• Click to enable the spell checker.
Print• Click to print a Client Summary report for the matter.
Ledger TabsYou can add as many Ledger tabs to a matter as required. Each tab can have a different configuration as to what is listed on the tab, from type of entry, billed status, data range, and working lawyer. Each tab can have a unique name and be assigned to one or all matters. Like all optional tabs in Matter Manager, the Ledger tab can be added, hidden, or removed.
Ledger tabs are added by right clicking on any Matter Manager tab or through the Add Tabs.... tab.
1. Click Add Tabs... to display the Add Tabs window.
2. Click New to display a menu.
3. Select Ledger to display the Common tab of the Ledger Quick Tab Selections window.
The Common tab of the Ledger Quick Tab Selections window
Common Tab of Quick Tabs
Name• Type the name for the Quick Tab• The name can be up to 20 characters in length• It is recommended to start the tab name with Ledger to indicate that the tab is a Ledger tab.
Description• Type a detailed explanation of the tab.
Page 18 © 2009 LexisNexis, a division of Reed Elsevier Inc
Matter Manager
Publish to User• Select the staff member to whom this tab is to be made available• Leave this box empty to make the tab available to all staff.
Start Date• Select the date to limit items displayed on the tab to after a specific period.
End Date• Select the date to limit items displayed on the tab to prior to a specific period.
Advanced• Click to button to display the Options tab if that tab is not already displayed.
OK• Click to save the tab• By default, the tab is applied to all matters for the selected user, however the tab can be
hidden or removed from any matter.
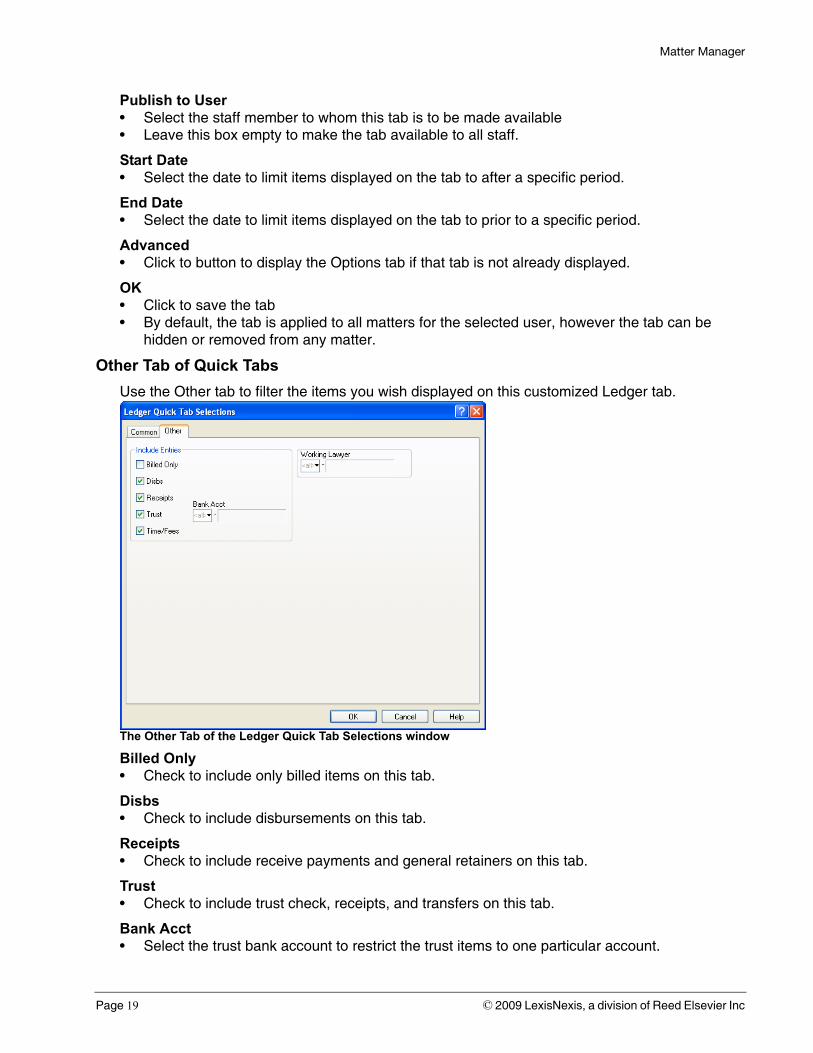
Other Tab of Quick Tabs
Use the Other tab to filter the items you wish displayed on this customized Ledger tab.
The Other Tab of the Ledger Quick Tab Selections window
Billed Only• Check to include only billed items on this tab.
Disbs• Check to include disbursements on this tab.
Receipts• Check to include receive payments and general retainers on this tab.
Trust• Check to include trust check, receipts, and transfers on this tab.
Bank Acct• Select the trust bank account to restrict the trust items to one particular account.
Page 19 © 2009 LexisNexis, a division of Reed Elsevier Inc
Matter Manager
Time/Fees• Check to include time and fees on this tab.
Working Lawyer• Select to display only items posted by a specific working lawyer.
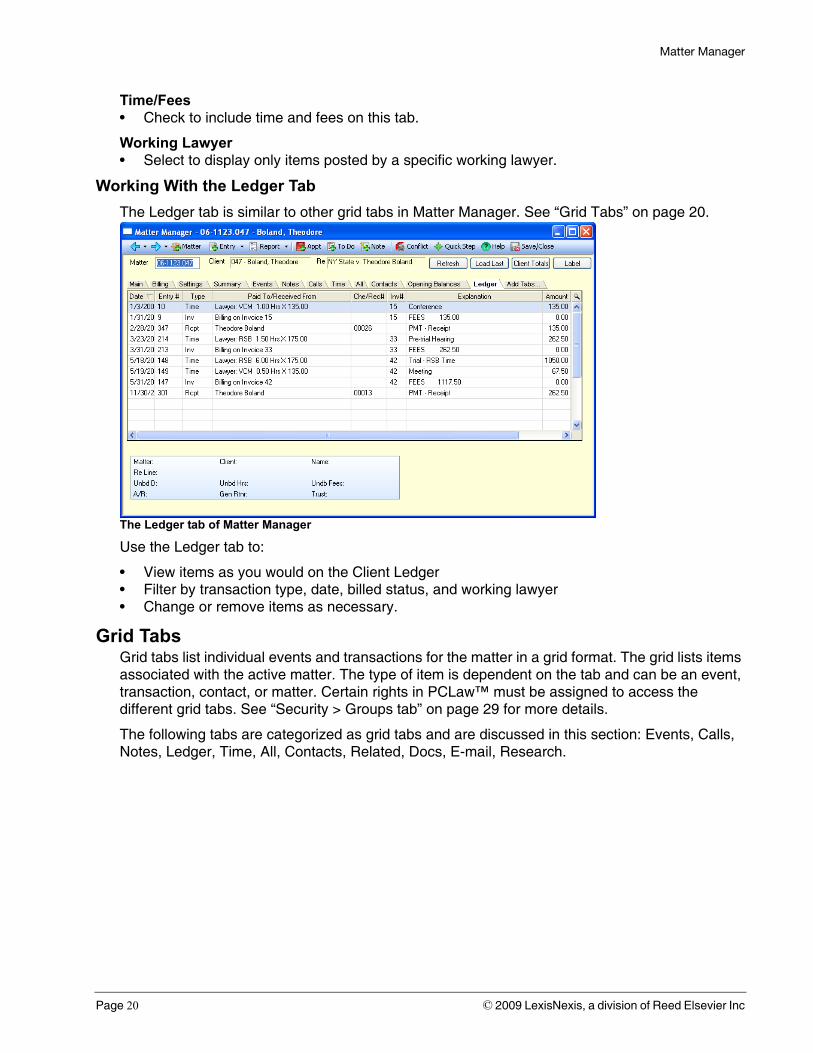
Working With the Ledger Tab
The Ledger tab is similar to other grid tabs in Matter Manager. See “Grid Tabs” on page 20.
The Ledger tab of Matter Manager
Use the Ledger tab to:
• View items as you would on the Client Ledger• Filter by transaction type, date, billed status, and working lawyer• Change or remove items as necessary.
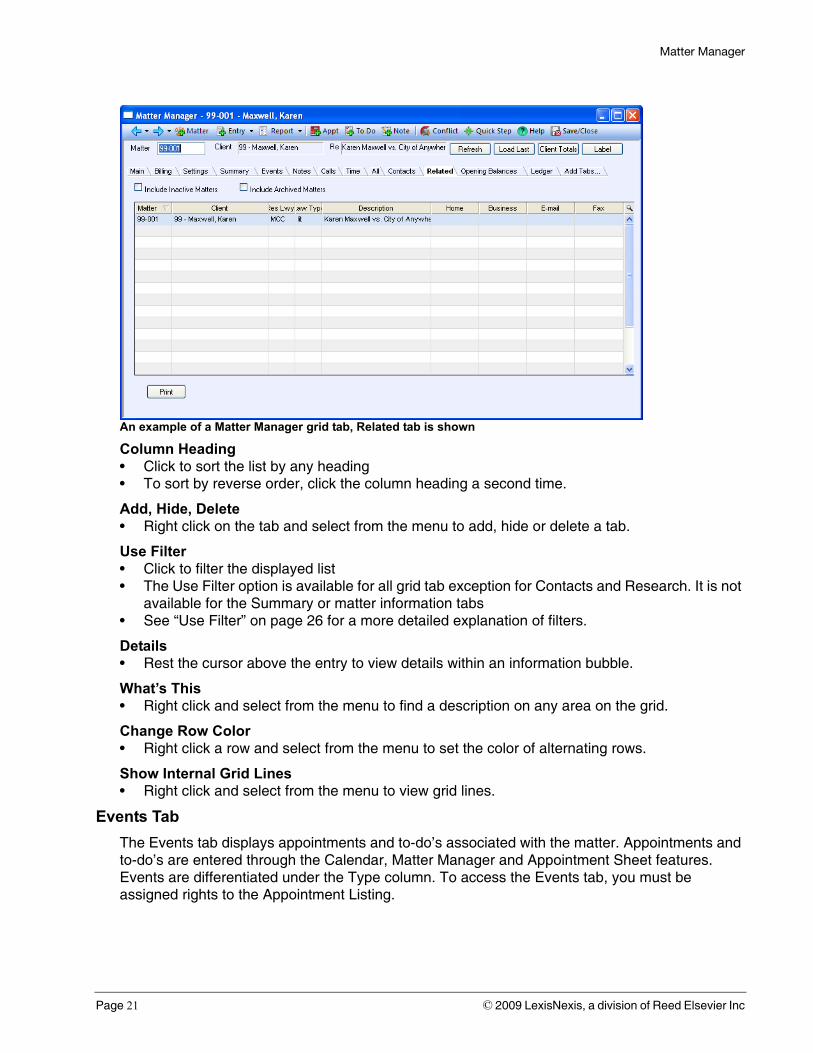
Grid TabsGrid tabs list individual events and transactions for the matter in a grid format. The grid lists items associated with the active matter. The type of item is dependent on the tab and can be an event, transaction, contact, or matter. Certain rights in PCLaw™ must be assigned to access the different grid tabs. See “Security > Groups tab” on page 29 for more details.
The following tabs are categorized as grid tabs and are discussed in this section: Events, Calls, Notes, Ledger, Time, All, Contacts, Related, Docs, E-mail, Research.
Page 20 © 2009 LexisNexis, a division of Reed Elsevier Inc
Matter Manager
An example of a Matter Manager grid tab, Related tab is shown
Column Heading• Click to sort the list by any heading• To sort by reverse order, click the column heading a second time.
Add, Hide, Delete• Right click on the tab and select from the menu to add, hide or delete a tab.
Use Filter• Click to filter the displayed list• The Use Filter option is available for all grid tab exception for Contacts and Research. It is not
available for the Summary or matter information tabs• See “Use Filter” on page 26 for a more detailed explanation of filters.
Details• Rest the cursor above the entry to view details within an information bubble.
What’s This• Right click and select from the menu to find a description on any area on the grid.
Change Row Color• Right click a row and select from the menu to set the color of alternating rows.
Show Internal Grid Lines• Right click and select from the menu to view grid lines.
Events Tab
The Events tab displays appointments and to-do’s associated with the matter. Appointments and to-do’s are entered through the Calendar, Matter Manager and Appointment Sheet features. Events are differentiated under the Type column. To access the Events tab, you must be assigned rights to the Appointment Listing.
Page 21 © 2009 LexisNexis, a division of Reed Elsevier Inc
Matter Manager
Use the Events tab to:• view appointments and to-do’s• filter the listing by completion, date range, appointment or location code • add, change or remove events• mark to do’s as completed• convert events to time entries• print an Appointment Listing.
Calls Tab
The Calls tab displays records added through the Phone Call and Phone Message features on the Data Entry pull-down menu and the New Call and New Message buttons in Phone Call Manager. To access the Calls tab, you must be assigned rights to Data Entry > New Calls and New Messages.
Use the Calls tab to:• view calls associated with the matter• filter the list by completed status, date range, contacts, or users• add or change calls or messages• print a List of Phone Calls report.
The List of Phone Calls report can only be printed from the Matter Manager and the Phone Call Manager.
Notes Tab
With the Notes tab, create or edit notes associated with the active matter. To access the Notes tab, you must be assigned rights to Data Entry > New Notes.
Use the Notes tab to:• view notes about the matter• filter the list by date range or lawyer. • add, change or remove notes• print a Notes Listing.
Ledger Tab
The Ledger tab displays an interactive Client Ledger where it is possible to view and edit all entries that appear on that report. To access the Ledger tab, you must be assigned rights to the Client Ledger report.
Use the Ledger tab to: • view entries from the Client Ledger• filter the list by entry type or billing status • change or remove entries from the Client Ledger• print a Client Ledger.
Time Tab
The Time tab provides greater detail for time and fee entries than the Ledger tab. Listed are all time and fee entries posted to the matter through the Time Sheet, Fee Sheet, Quick Timer, third party linked software, and other related features. To access the Time tab, you must be assigned rights to the Time Listing.
Page 22 © 2009 LexisNexis, a division of Reed Elsevier Inc
Matter Manager
Use the Time tab to:• view time and fee entries• filter listing by time or fees, or held status• add or change time entries• print a Time Listing.
All TabThe All tab displays client ledger transactions, calendar events, and notes associated with the matter.
Use the All tab to:• view client ledger entries, calendar events, and notes• change any unbilled ledger entry, calendar event or note.
Contacts Tab
With the Contacts tab, work with contacts associated with the active matter.
Use the Contacts tab to:• view contacts associated with the matter• add change or remove contacts• associate a contact with a matter• print a Contact Listing for the associated matters.
Related Tab
The Related tab enables you to work with matters assigned to the same client as the active matter. To access the Related tab, you must be assigned rights to the List of Clients report.
Use the Related tab to:• list all matters with the same client nickname• select a different matter with the same client nickname • add a new matter with the same client nickname• change matter information• print a List of Clients for the current client.
Docs Tab
The Docs tab displays documents associated with the matter. To access the Docs tab, you must be assigned rights to the Document Listing.
Use the Docs tab to: • view documents associated with the matter• e-mail a document• create a new document• copy a document to another location• view the properties of a document• add an existing document.
E-mail Tab
The E-mail tab lists e-mails associated with the matter. To access the E-mails tab, you must be assigned rights to the Document Listing.
Page 23 © 2009 LexisNexis, a division of Reed Elsevier Inc
Matter Manager
Use the E-mails tab to: • view, change, or remove e-mails for the active matter.• associate an e-mail with the matter• copy an e-mail to another location• view the properties of an e-mail.
Research Tab
The Research tab lists research items that are associated with the matter. To access the Research tab, you must be assigned rights to the Research Listing.
Use the Research tab to: • view, change, or remove research items for the active matter.• initiate research on behalf of the matter• generate a Research Listing of research items for the matter.
Matter Opening BalancesThis tab is available only for a new set of books where a month has not been closed. Matter opening balances are for matters that existed prior to the start date for the set of books. The tab stores data for previous accounts receivables, unbilled fees and disbursements, and trust balances for up to five trust accounts. Add previous invoices using the original issue date.
Electronic Billing TabsFirms using the Electronic Billing module have access to specialized Electronic Billing tabs. PCLaw™ supplies a series of pre-configured Electronic Billing tabs, representing the formats that PCLaw™ currently supports. Refer to the Custom Tabs feature on the Options pull-down menu for a current list.
Electronic Billing tabs do not appear by default for existing matters, but can be added using the Add.... tab. See “Add Tab...” on page 24 for more details. Electronic Billing tabs can be added automatically for newly created matters through the Custom Tab feature. Tabs can be added for all matters, for only for matters assigned to a particular type of law.
Custom TabsUser defined tabs can be created through the Custom Tabs feature, and added manually to existing matters, or automatically for newly created matters. Adding and removing custom tabs can be restricted through the Matter Manager tab of PCLaw™ Security > Advanced settings. See “Advanced Security - Matter Manager Tab” on page 28 for more details.
Add Tab...Tabs can be added, hidden, removed, or the tab order changed. Tabs that can be added include tabs previously hidden or removed, electronic billing tabs for firms using the Electronic Billing module, or custom tabs. The ability to add or remove tabs can be restricted under the Matters Manager tab of PCLaw™ Security > Advanced settings
Adding a Tab
Take the following steps to add a tab to Matter Manager:
1. Click the Add Tab.... tab or right click and select Add Tabs to display the Add Tabs window.
2. Select the tab to include in Matter Manager.
3. Click Add to insert the tab to the right of the active tab.
Page 24 © 2009 LexisNexis, a division of Reed Elsevier Inc
Matter Manager
Hiding a Tab
Take the following steps to hide a tab in Matter Manager:
1. Right click the tab to display a menu.
2. Select Hide Tab.
Note: The tab no longer appears in Matter Manager. Only the Main tab cannot be hidden.
Although hidden tabs are not visible, settings on the tabs are still read and acted upon by PCLaw™. For PCLaw™ not to act upon tab settings, that tab must be removed.
Removing a Tab
Take the following steps to remove a tab in Matter Manager:
1. Right click the tab to display a menu.
2. Select Delete Tab.
Note: The tab no longer appears in Matter Manager. Only electronic billing and custom tabs can be removed. Removing a tab removes all information on that tab.
Changing the Order of Tabs
Take the following steps to change the order of tabs:
1. Left click on a tab and drag it to the desired location
or
1. Right click on the tab to display a cascade menu.
2. Select Change Tab Order to display a Set Tab Order window.
3. Highlight the tab
4. Use the Move Up and Move Down buttons to position the tab to the desired location.
5. Click OK to position the tab in the location you selected.
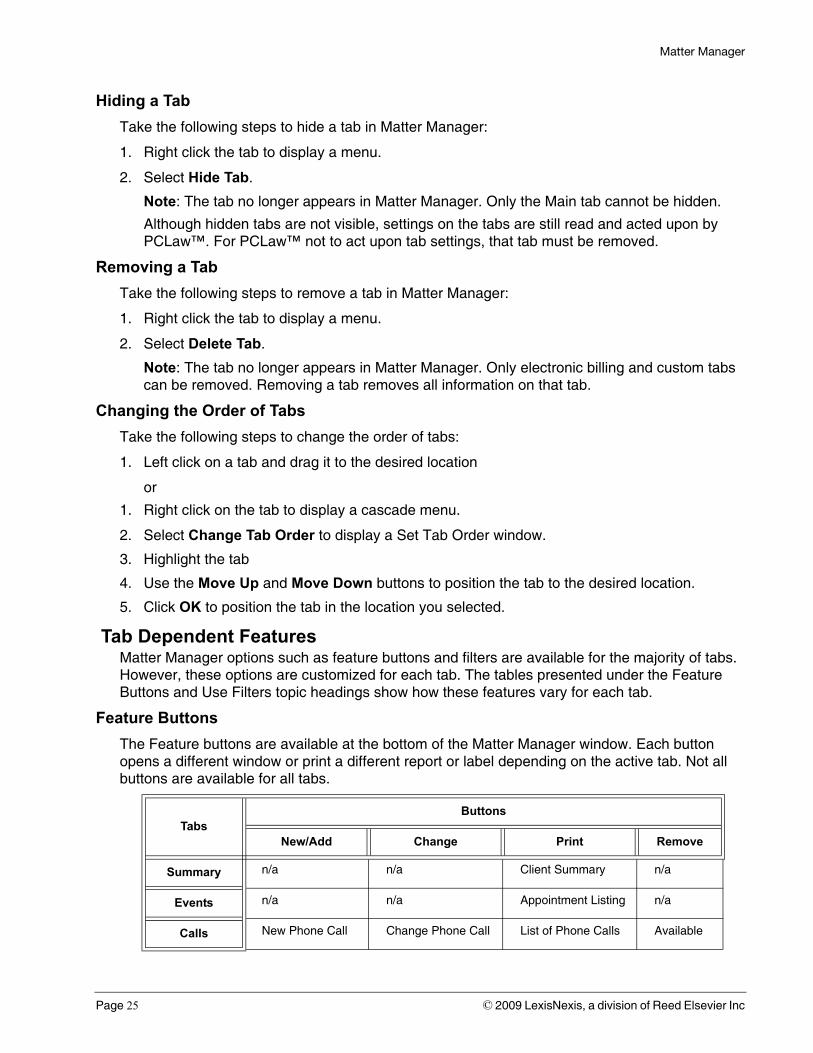
Tab Dependent FeaturesMatter Manager options such as feature buttons and filters are available for the majority of tabs. However, these options are customized for each tab. The tables presented under the Feature Buttons and Use Filters topic headings show how these features vary for each tab.
Feature Buttons
The Feature buttons are available at the bottom of the Matter Manager window. Each button opens a different window or print a different report or label depending on the active tab. Not all buttons are available for all tabs.
TabsButtons
New/Add Change Print Remove
Summary n/a n/a Client Summary n/a
Events n/a n/a Appointment Listing n/a
Calls New Phone Call Change Phone Call List of Phone Calls Available
Page 25 © 2009 LexisNexis, a division of Reed Elsevier Inc
Matter Manager
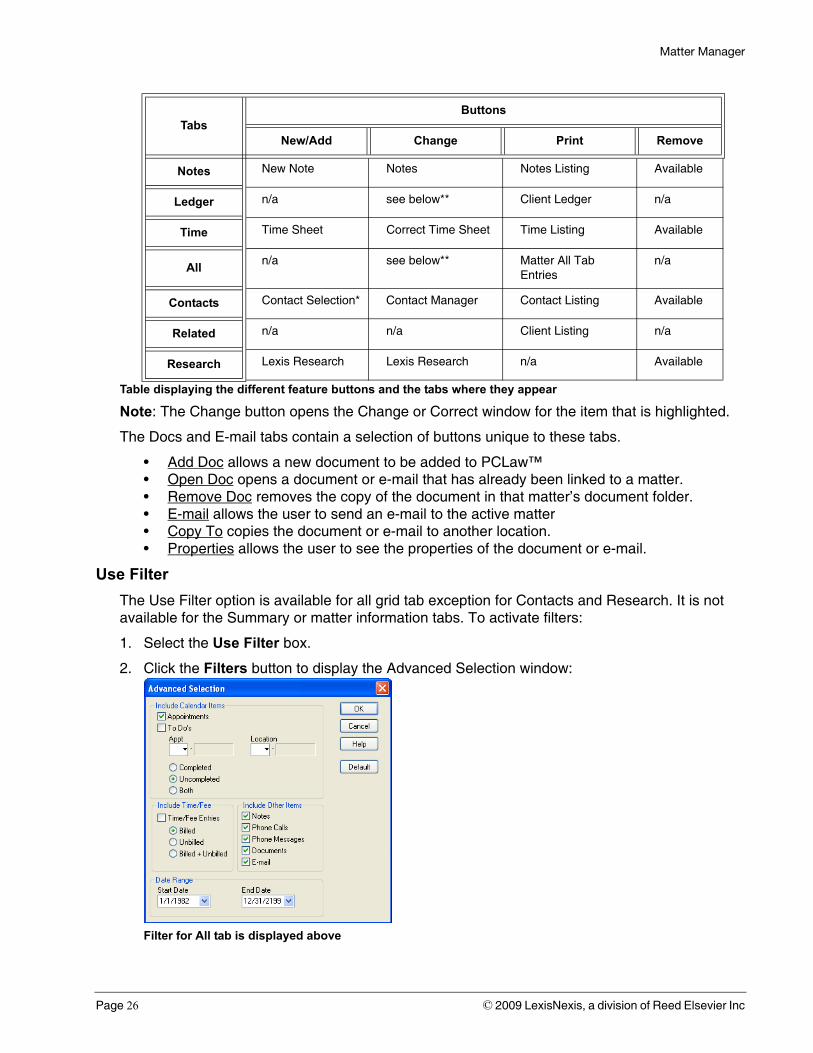
Table displaying the different feature buttons and the tabs where they appear
Note: The Change button opens the Change or Correct window for the item that is highlighted.
The Docs and E-mail tabs contain a selection of buttons unique to these tabs.
• Add Doc allows a new document to be added to PCLaw™• Open Doc opens a document or e-mail that has already been linked to a matter.• Remove Doc removes the copy of the document in that matter’s document folder.• E-mail allows the user to send an e-mail to the active matter• Copy To copies the document or e-mail to another location.• Properties allows the user to see the properties of the document or e-mail.
Use Filter
The Use Filter option is available for all grid tab exception for Contacts and Research. It is not available for the Summary or matter information tabs. To activate filters:
1. Select the Use Filter box.
2. Click the Filters button to display the Advanced Selection window:
Filter for All tab is displayed above
TabsButtons
New/Add Change Print Remove
Notes New Note Notes Notes Listing Available
Ledger n/a see below** Client Ledger n/a
Time Time Sheet Correct Time Sheet Time Listing Available
Alln/a see below** Matter All Tab
Entriesn/a
Contacts Contact Selection* Contact Manager Contact Listing Available
Related n/a n/a Client Listing n/a
Research Lexis Research Lexis Research n/a Available
Page 26 © 2009 LexisNexis, a division of Reed Elsevier Inc
Matter Manager
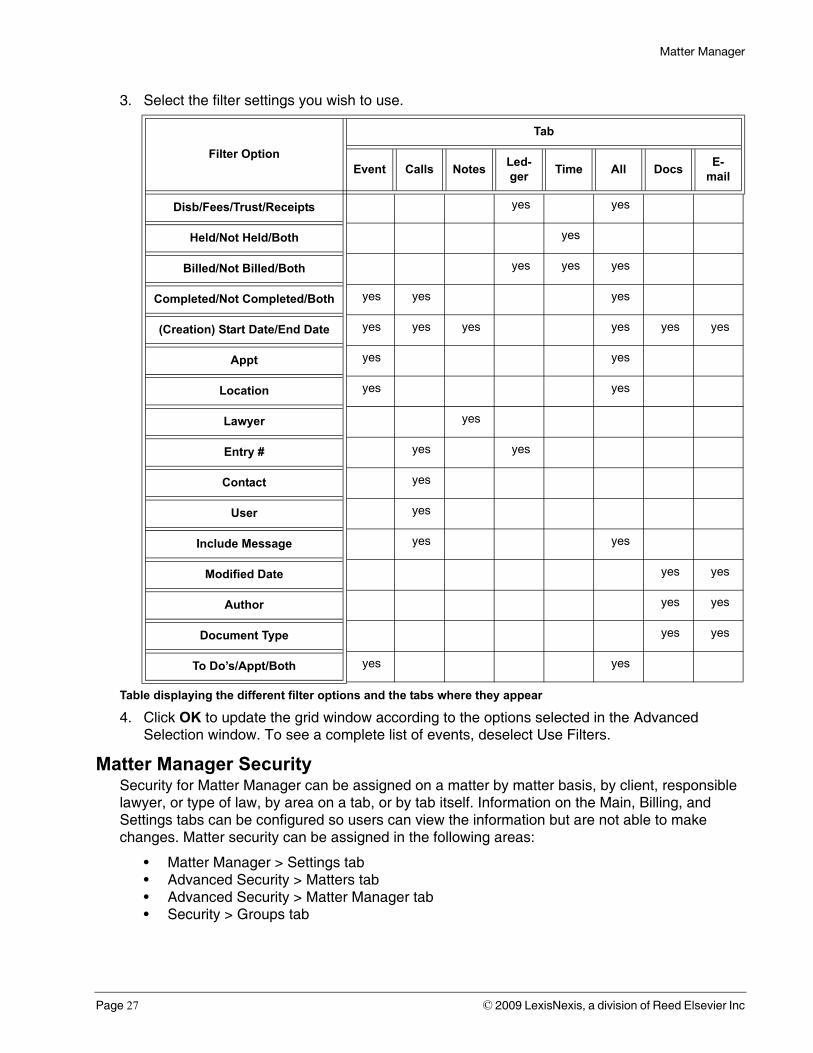
3. Select the filter settings you wish to use.
Filter Option
Tab
Event Calls NotesLed-ger
Time All DocsE-
Disb/Fees/Trust/Receipts yes yes
Held/Not Held/Both yes
Billed/Not Billed/Both yes yes yes
Completed/Not Completed/Both yes yes yes
(Creation) Start Date/End Date yes yes yes yes yes yes
Appt yes yes
Location yes yes
Lawyer yes
Entry # yes yes
Contact yes
User yes
Include Message yes yes
Modified Date yes yes
Author yes yes
Document Type yes yes
To Do’s/Appt/Both yes yes
Table displaying the different filter options and the tabs where they appear
4. Click OK to update the grid window according to the options selected in the Advanced Selection window. To see a complete list of events, deselect Use Filters.
Matter Manager SecuritySecurity for Matter Manager can be assigned on a matter by matter basis, by client, responsible lawyer, or type of law, by area on a tab, or by tab itself. Information on the Main, Billing, and Settings tabs can be configured so users can view the information but are not able to make changes. Matter security can be assigned in the following areas:
• Matter Manager > Settings tab• Advanced Security > Matters tab• Advanced Security > Matter Manager tab• Security > Groups tab
Page 27 © 2009 LexisNexis, a division of Reed Elsevier Inc
Matter Manager
Matter Manager > Settings Tab
Security for an individual matter can be restricted to specific users. On the Settings tab of Matter Manager, click Matter Security. In the User List for Matter Access window, select the users who will have rights to the active matter. A check mark should appear under the Access column for all users who have access to this matter.
Advanced Security > Matters Tab
The Matters tab allows you to restrict access to matters on a client, responsible lawyer or type of law, or to specifically select matters to whom to grant or restrict access.
1. In PCLaw™ Security, highlight the user to assign rights.
2. Click the Advanced button.
3. Select the Matters tab.
4. To enable matter security, select Enable Access on a Matters Basis.
5. To grant access to a specific client, responsible lawyer, or type of law only, check Selected in the appropriate area.
Click the Select button.
Choose all the applicable clients, responsible lawyers or types of law.
6. To include specific matters, select Always Include Matters.
Select the matters to include.
7. To exclude specific matters, select Always Exclude Matters.
Select the matters to exclude.
8. To allow the user access to Matter Security on the Settings tab of Matter Manager, select Allow User to Change Matter Security from Matter Manager.
Advanced Security - Matter Manager Tab
Settings on the Matter Manager tab determine if the user can view or change areas under the Main, Billing, Settings, and Custom tabs of Matter Manager. Rights to hide or add custom tabs can also be assigned.
1. In PCLaw™ Security, highlight the user to assign rights.
2. Click the Advanced button.
3. Select the Matter Manager tab.
4. For each individual area:
To allow the user full access to the assigned area, select Full Access
To allow the user to view the area without rights to modify information, select View Only.
To prevent the user from viewing information for the specific area, select Hidden.
The Hidden setting for the Settings and Custom tab options hides the entire tab from view.
Page 28 © 2009 LexisNexis, a division of Reed Elsevier Inc
Matter Manager
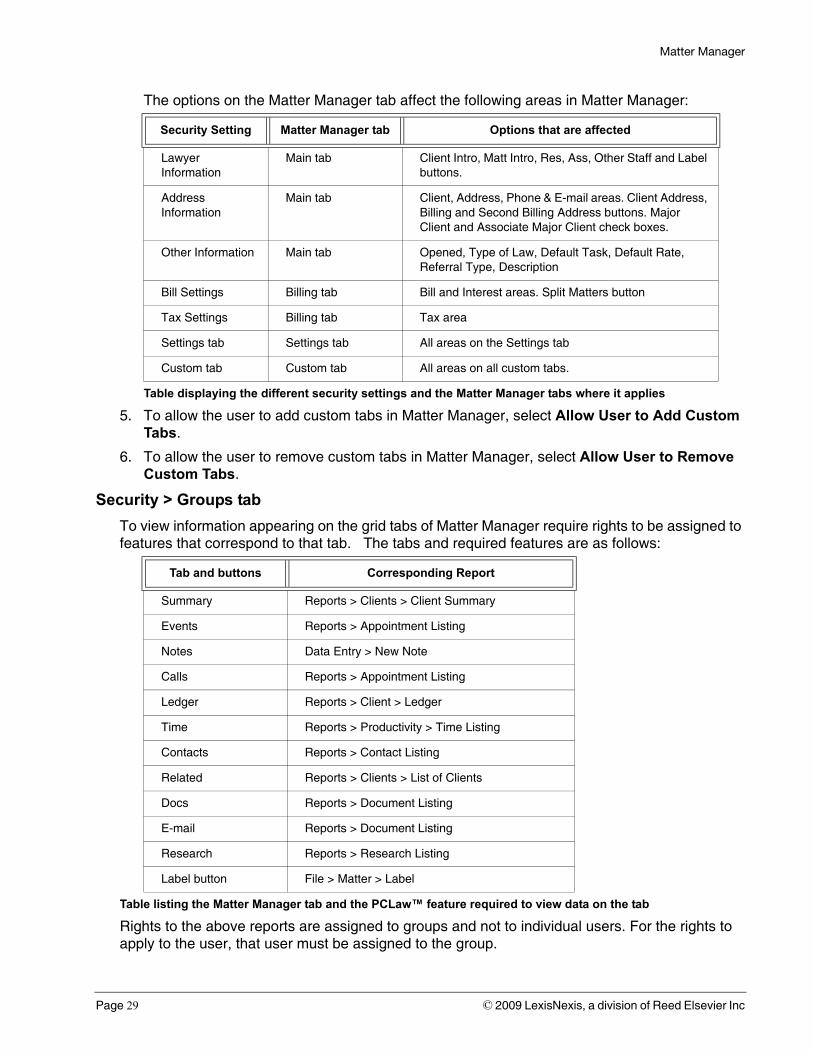
The options on the Matter Manager tab affect the following areas in Matter Manager:
Security Setting Matter Manager tab Options that are affected
Lawyer Information
Main tab Client Intro, Matt Intro, Res, Ass, Other Staff and Label buttons.
Address Information
Main tab Client, Address, Phone & E-mail areas. Client Address, Billing and Second Billing Address buttons. Major Client and Associate Major Client check boxes.
Other Information Main tab Opened, Type of Law, Default Task, Default Rate, Referral Type, Description
Bill Settings Billing tab Bill and Interest areas. Split Matters button
Tax Settings Billing tab Tax area
Settings tab Settings tab All areas on the Settings tab
Custom tab Custom tab All areas on all custom tabs.
Table displaying the different security settings and the Matter Manager tabs where it applies
5. To allow the user to add custom tabs in Matter Manager, select Allow User to Add Custom Tabs.
6. To allow the user to remove custom tabs in Matter Manager, select Allow User to Remove Custom Tabs.
Security > Groups tab
To view information appearing on the grid tabs of Matter Manager require rights to be assigned to features that correspond to that tab. The tabs and required features are as follows:
Table listing the Matter Manager tab and the PCLaw™ feature required to view data on the tab
Rights to the above reports are assigned to groups and not to individual users. For the rights to apply to the user, that user must be assigned to the group.
Tab and buttons Corresponding Report
Summary Reports > Clients > Client Summary
Events Reports > Appointment Listing
Notes Data Entry > New Note
Calls Reports > Appointment Listing
Ledger Reports > Client > Ledger
Time Reports > Productivity > Time Listing
Contacts Reports > Contact Listing
Related Reports > Clients > List of Clients
Docs Reports > Document Listing
E-mail Reports > Document Listing
Research Reports > Research Listing
Label button File > Matter > Label
Page 29 © 2009 LexisNexis, a division of Reed Elsevier Inc