Embed Size (px)
Citation preview
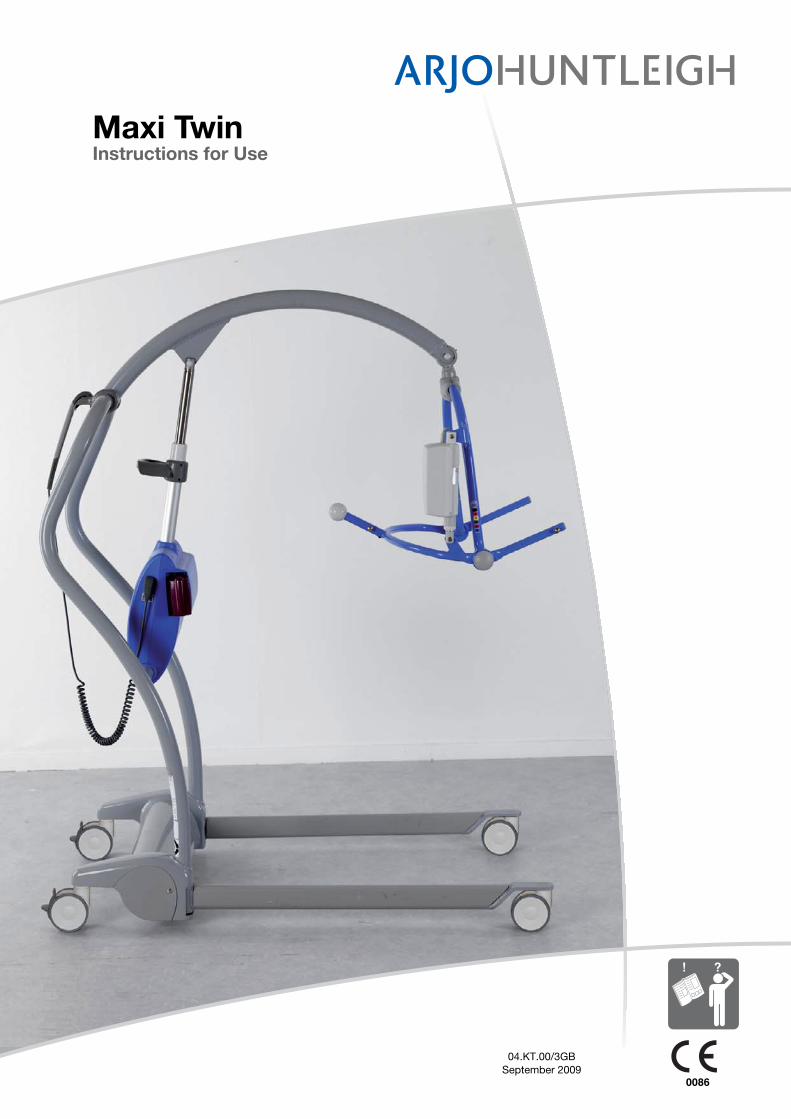
04.KT.00/3GBSeptember 2009
0086
Maxi TwinInstructions for Use

© ARJO Hospital Equipment AB 2009
ArjoHuntleigh products are patented or patent pending. Patent information is available by contacting ARJO Hospital Equipment AB.
Our policy is one of continuous development, and we therefore reserve the right to make technical alterations without notice. The content of this publication may not be copied either whole or in part without the consent of ARJO Hospital Equipment AB

3
Foreword ............................................................................................4Safety Instructions ..............................................................................5
Intended use ...................................................................................5Warnings..............................................................................................6Preparations ........................................................................................8Part designations ................................................................................9Spreader bars .....................................................................................10Loop spreader bars ............................................................................11Slings ................................................................................................12Product description/function ............................................................14
Hand control ...............................................................................14Lifting .........................................................................................14Adjustable width of chassis legs .................................................14Castor Brakes ..............................................................................14Driving/positioning handles .......................................................14Scale on the powered spreader bar ..............................................14Emergency Stop Button ..............................................................16Emergency Lowering .................................................................16Automatic Safety Stop.................................................................16Powered spreader bar ..................................................................16Battery ........................................................................................18Battery Indicator Light ................................................................18Battery charger ...........................................................................18
Powered Spreader Bar .......................................................................20Using your Maxi Twin ......................................................................22Transferring the resident - Spreader Bar ...........................................24
To lift from a chair ......................................................................24To lift from a bed ........................................................................26To lift from the floor ...................................................................28
Transferring the resident - Loop Bar .................................................30To lift from a chair ......................................................................30To lift from a bed ........................................................................32To lift from the floor ...................................................................32
Battery and Battery charger ..............................................................36Cleaning/Disinfection instructions ...................................................38Care and Preventive Maintenance ....................................................40Trouble shooting ..............................................................................44Technical specifications ...................................................................46
Dimensions ..................................................................................48Labels on battery and battery charger ..............................................50Labels on battery charger, Japan .......................................................51Labels on the lift ...............................................................................52
Contents

Foreword
Thank you for purchasing ArjoHuntleigh equipment.Your Maxi Twin mobile passive lift is part of a series of quality products designed especially for hospitals, nursing homes and other health care use.We are dedicated to serving your needs and providing the best products available along with training that will bring your staff maxi-mum benefit from every ArjoHuntleigh prod-uct.Please contact us if you have any questions about the operation or maintenance of your ArjoHuntleigh equipment.
Please read this manual thoroughly!Please read this manual in its entirety before using your Maxi Twin mobile passive lift. Information in the manual is crucial to the proper operation and maintenance of the equip-ment and will help protect your product and ensure that the equipment performs to your sat-isfaction. Some of the information in this man-ual is important for your safety and must be read and understood to help prevent possible injury. ArjoHuntleigh strongly advise and warn that only ArjoHuntleigh designed parts, which are designed for the purpose, should be used on equipment and other appliances supplied by ArjoHuntleigh, to avoid injuries caused by the use of inadequate parts.
Unauthorized modifications on any Arjo-Huntleigh equipment may affect its safety. ArjoHuntleigh will not be held responsible for any accidents, incidents or lack of performance that occur as a result of any unauthorized mod-ification to its products.
Service and SupportA service routine must be performed on your Maxi Twin every year by ArjoHuntleigh authorized service personnel to ensure the safety and daily operation of your product.
If you require further information, please con-tact your local ArjoHuntleigh representative who can offer comprehensive support and serv-ice programs to maximize the long-term safety, reliability and value of the product. Contact your local ArjoHuntleigh representative for replacement parts. Your service representative stocks the parts you will need.
The telephone number appears on the last page of this manual.
4

Safety Instructions
Definitions in this manual:
Means:Safety warning. Failure to understand and obey this warning may result in injury to you or to others.
Means:Failure to follow these instructions may cause damage to all or parts of the system.
Means:This is important information for the correct use of this system or equipment.
Means:The name and address of the manufacturer
The equipment must be used in accordance with these safety instructions. Anyone using the equipment must also have read and under-stood the instructions in this manual. If there is anything you are not sure about, contact your ArjoHuntleigh representative.
Intended useMaxi Twin is a mobile passive lift. The lift is intended to be used for lifting and transfers in hospitals, nursing homes or other health care facilities for the different categories of resi-dents,
when the resident:
• sits in a wheelchair• has no capacity to support himself/herself• cannot stand unsupported and is not able to
bear weight, not even partially• is dependent on the caregiver in most
situations
or, when the resident:
• is passive• might be almost or completely bedridden• is often stiff or has contracted joints• is totally dependent on the caregiver.The resident can not suffer from uncontrollable head movements.
If a resident does not meet these criteria an alternative lift/system must be used.
The Maxi Twin equipment must be used by an adult, appropriately trained caregiver with adequate knowledge of the care environment, its common practices and procedures and in accordance with the guidelines in these Instructions for Use. The transfer with Maxi Twin takes place indoors in the resident room, common areas or in a bathroom, but is not intended to be used in the shower or outdoors. The expected lifetime of this equipment, unless otherwise stated, is ten (10) years, subject to preventive maintenance being carried out in accordance with the instructions for care and maintenance found in the Instructions for Use. Maxi Twin is intended to only be used with ArjoHuntleigh slings that are specified in this manual.
WARNING
CAUTION
NOTE
right
The directions right or left on the Maxi Twin are given as shown in the illustration.left
5
6
Any other use is prohibited. The lift should only be used for the purpose specified here.
We recommend that facilities establish regular assessment routines.
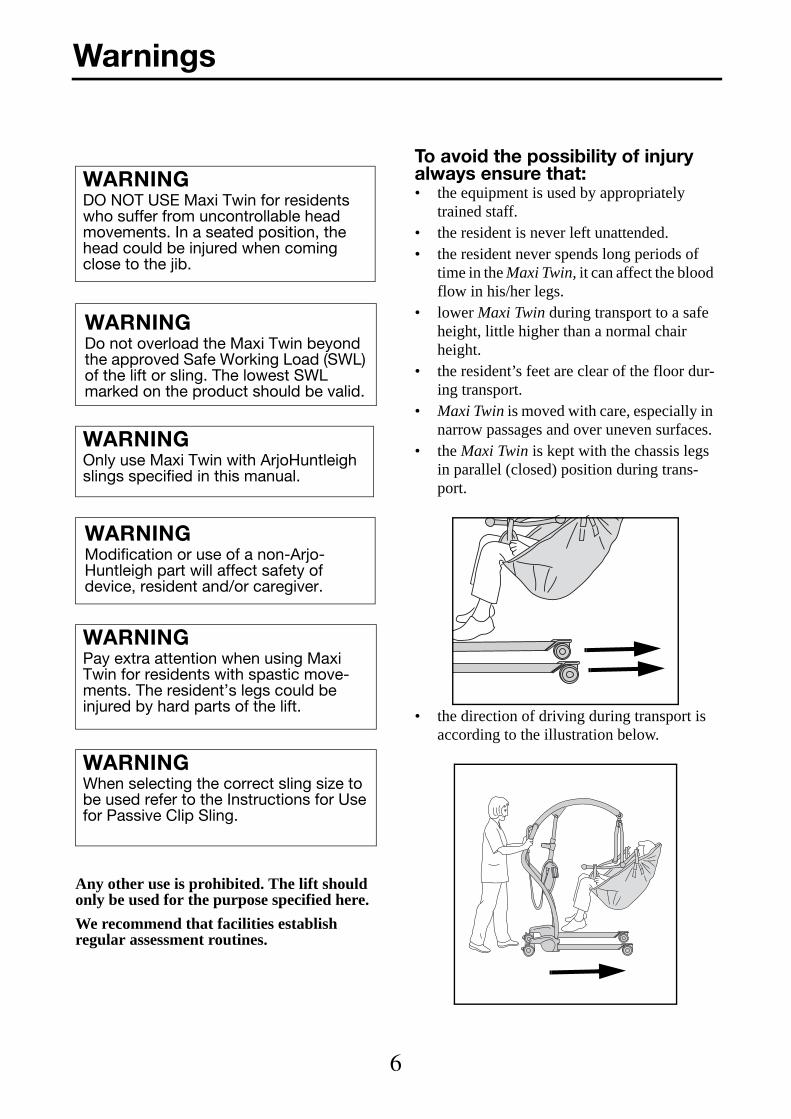
To avoid the possibility of injury always ensure that:• the equipment is used by appropriately
trained staff.• the resident is never left unattended.• the resident never spends long periods of
time in the Maxi Twin, it can affect the blood flow in his/her legs.
• lower Maxi Twin during transport to a safe height, little higher than a normal chair height.
• the resident’s feet are clear of the floor dur-ing transport.
• Maxi Twin is moved with care, especially in narrow passages and over uneven surfaces.
• the Maxi Twin is kept with the chassis legs in parallel (closed) position during trans-port.
• the direction of driving during transport is according to the illustration below.
WARNINGDO NOT USE Maxi Twin for residents who suffer from uncontrollable head movements. In a seated position, the head could be injured when coming close to the jib.
WARNINGDo not overload the Maxi Twin beyond the approved Safe Working Load (SWL) of the lift or sling. The lowest SWL marked on the product should be valid.
WARNINGOnly use Maxi Twin with ArjoHuntleigh slings specified in this manual.
WARNINGModification or use of a non-Arjo-Huntleigh part will affect safety of device, resident and/or caregiver.
WARNINGPay extra attention when using Maxi Twin for residents with spastic move-ments. The resident’s legs could be injured by hard parts of the lift.
WARNINGWhen selecting the correct sling size to be used refer to the Instructions for Use for Passive Clip Sling.
Warnings
7
• the castors and brakes work freely.• the wheels of the bed are locked when
transferring a resident between the bed and Maxi Twin.
• if there is a drain cover in the area where the lift is manoeuvred, the drain cover must be smooth and set level with the floor.
• the slope of the floor does not exceed the ratio 1:50.
Intended use slingsSee the Instructions for Use for Passive Clip Sling.
Intended use Battery chargerThis charger is only intended to charge an ArjoHuntleigh battery NEA 0100.
Battery charger safety practices:
• The charger is designed for dry areas only and for normal air humidity conditions.
• Don’t expose the charger to water or dust. • Do not cover the battery charger.
Battery safety practices:• Only use the charger supplied with the
equipment.• Do not charge battery in a sealed compart-
ment.• Be careful not to drop the battery.• Do not place battery near a heat source or
fire.• Do not short-circuit the battery. • Do not store battery at a temperature higher
than 30 °C (86 °F).• Do not crush, puncture, open, dismantle or
otherwise mechanically interfere with the battery.
• Should the battery casing crack and cause contents to come in contact with skin or clothing, rinse immediately with water. If contents come in contact with the eyes, rinse immediately with plenty of water and seek medical attention.
• Inhalation of the contents can cause respira-tory irritation. Sensitivity of nickel can cause allergic asthma. Provide fresh air and medical attention.
• Contact the appropriate local authority for advice to dispose of the battery.
• Check labels on the battery.
CAUTIONDo not leave/use Maxi Twin and acces-sories for extended periods in humid, wet areas or in the shower.
WARNINGDo not connect/disconnect batteries in presence of inflammable anesthetic gases. Sparks may occur and ignite the gas.

8
Actions before the first use1 Visually check the package for damage.
If the product looks damaged make a com-plaint to the transport agency.
2 The packaging should be recycled accord-ing to local regulations.
3 Check that all parts of the product are sup-plied. Compare with the product description in this manual. If any part is missing or dam-aged - do not use the product!
4 Unpack the battery charger. Select and attach the adapter correctly suited to your power outlet. See “Battery and Battery Charger”
5 Charge each battery for approximately 8 hours (Japan 3.5 hours).
6 Clean the product according to ”cleaning/disinfecting instructions”
7 Prepare a dry and good ventilated area to store the lift.
8 Choose a designated area, where the operat-ing manual should be kept and is easily accessible at all times for the users.
9 If you have any questions, please contact your local ArjoHuntleigh representative for support and service. The contact numbers appear on the last page of this manual.
Actions before every use1 Check that all parts of the lift are in place.
Compare to Part Designations page.
Preparations
9
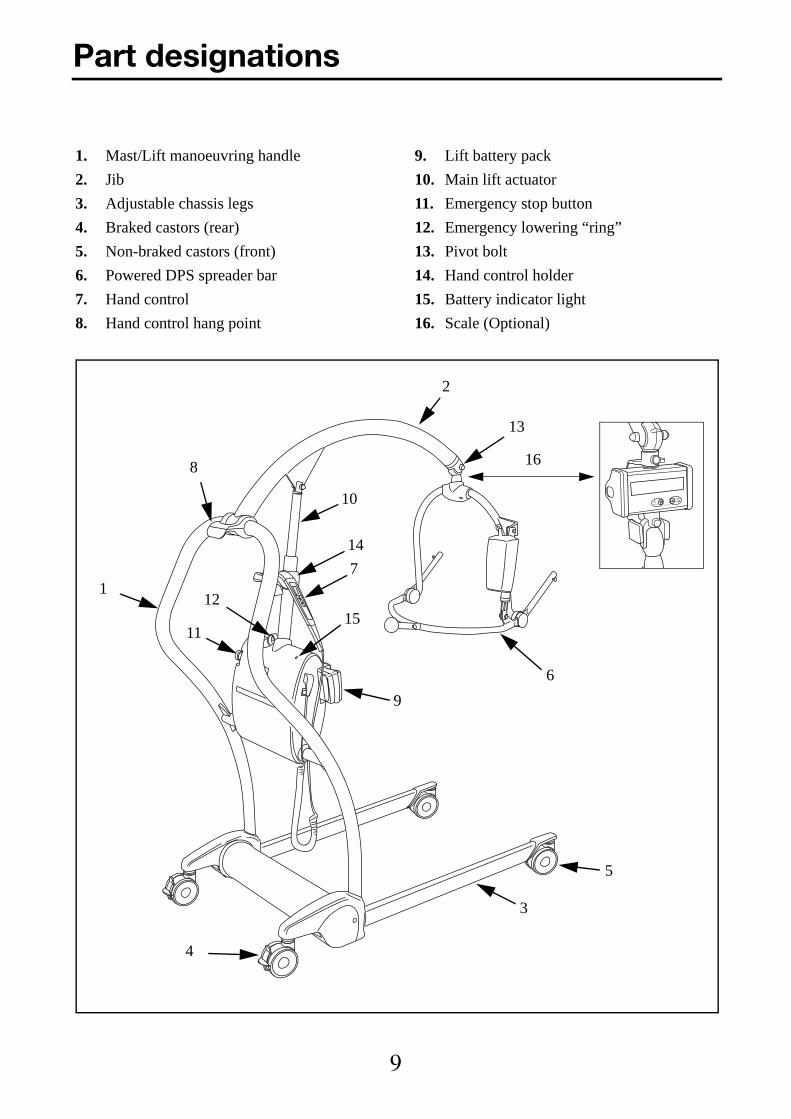
1. Mast/Lift manoeuvring handle
2. Jib
3. Adjustable chassis legs
4. Braked castors (rear)
5. Non-braked castors (front)
6. Powered DPS spreader bar
7. Hand control
8. Hand control hang point
9. Lift battery pack
10. Main lift actuator
11. Emergency stop button
12. Emergency lowering “ring”
13. Pivot bolt
14. Hand control holder
15. Battery indicator light
16. Scale (Optional)
Part designations
3
4
5
6
2
17
9
8
11
10
12
13
14
15
16
ONG N0 T
OFF Dialog

10
Spreader Bars
Manual DPS (Dynamic Positioning System) Spreader Bar
Powered DPS Spreader Bar
Powered DPS Spreader Bar with Scale
DPS = Dynamic Positioning System
ONG N0 T
OFF Dialog
11
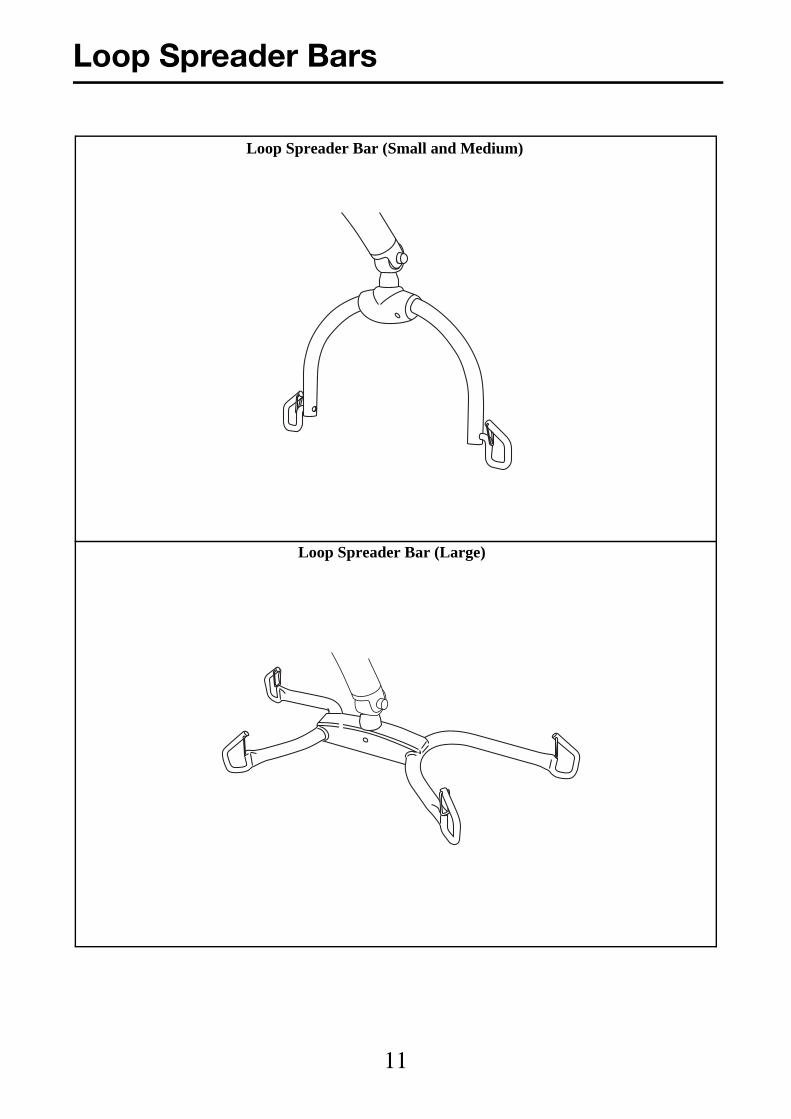
Loop Spreader Bars
Loop Spreader Bar (Small and Medium)
Loop Spreader Bar (Large)

12
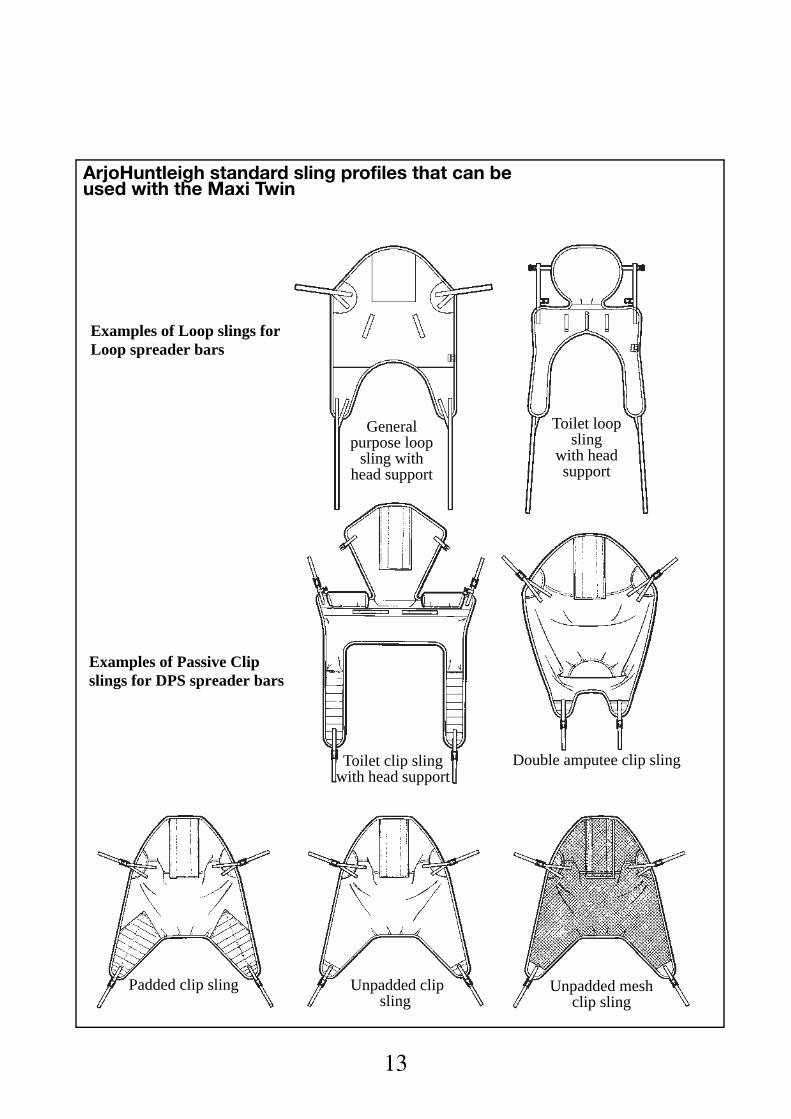
A sling range label is located on the side of the spreader/loop bar for quick colour to size reference (see “Labels on the lift” section).
Refer to the Instructions for Use for Passive Clip Sling when the size of sling should be chosen.
All ArjoHuntleigh slings have a coloured edge binding and colour coded by size:Brown - Extra Small - XSRed - Small - SYellow - Medium - MGreen - Large - LPurple - Large Large - LLBlue - Extra Large - XL
WARNINGNever exceed the Safe Working Load of the sling or the lift. The lowest value should always be valid.
WARNINGOnly use Maxi Twin with ArjoHuntleigh slings specified in this manual. The illus-trated sling profiles will help to identify the various ArjoHuntleigh slings availa-ble.
WARNINGArjoHuntleigh slings with head support have two pockets at the head section which contain plastic reinforcement pieces. Always ensure these reinforce-ment pieces have been inserted into the sling pockets before using the sling.
NOTEIf ArjoHuntleigh Flites (disposable slings) are used with the Maxi Twin, then always refer to their instructions before use.
WARNINGMake sure to match:Passive Clip sling with DPS Spreader Bar only!Loop sling with Loop spreader bar only!Always ensure that the sling is properly attached before using the sling.
Slings
13
Unpadded clip sling
Padded clip sling Unpadded mesh clip sling
Double amputee clip slingToilet clip sling with head support
ArjoHuntleigh standard sling profiles that can be used with the Maxi Twin
Toilet loop sling
with head support
General purpose loop
sling with head support
Examples of Loop slings for Loop spreader bars
Examples of Passive Clip slings for DPS spreader bars
14
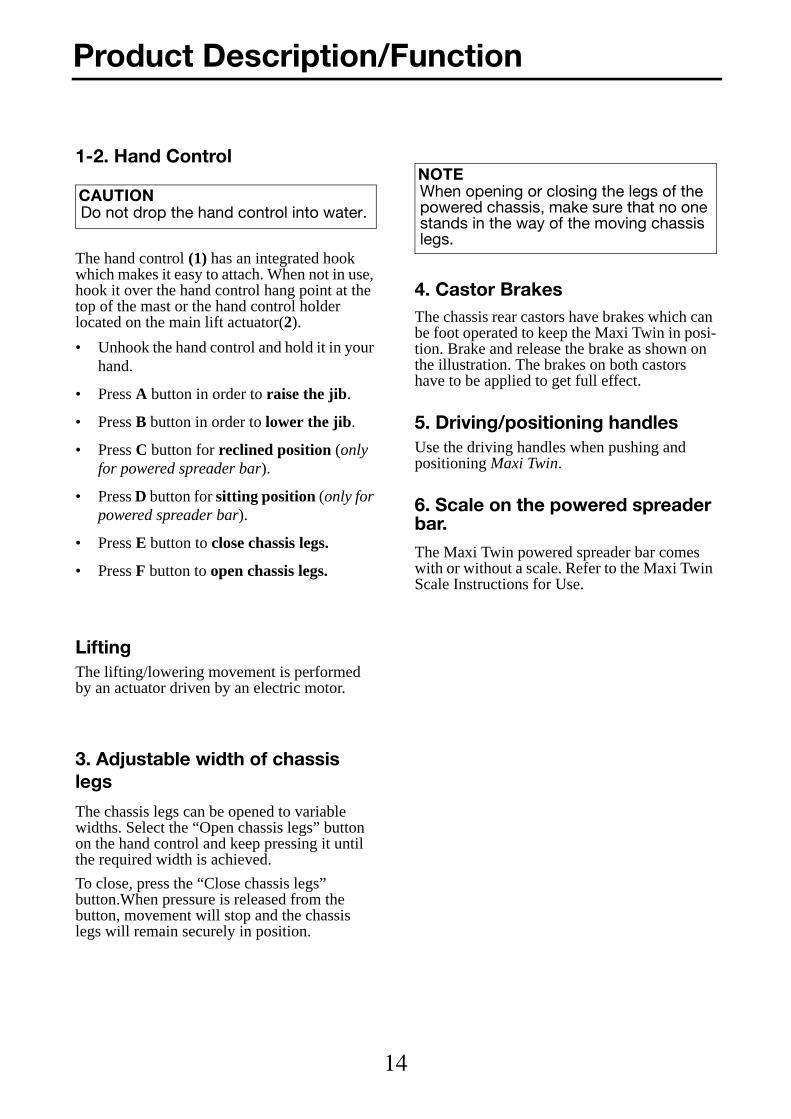
1-2. Hand Control
The hand control (1) has an integrated hook which makes it easy to attach. When not in use, hook it over the hand control hang point at the top of the mast or the hand control holder located on the main lift actuator(2).
• Unhook the hand control and hold it in your hand.
• Press A button in order to raise the jib.
• Press B button in order to lower the jib.
• Press C button for reclined position (only for powered spreader bar).
• Press D button for sitting position (only for powered spreader bar).
• Press E button to close chassis legs.
• Press F button to open chassis legs.
Lifting The lifting/lowering movement is performed by an actuator driven by an electric motor.
3. Adjustable width of chassis legs
The chassis legs can be opened to variable widths. Select the “Open chassis legs” button on the hand control and keep pressing it until the required width is achieved.
To close, press the “Close chassis legs” button.When pressure is released from the button, movement will stop and the chassis legs will remain securely in position.
4. Castor Brakes The chassis rear castors have brakes which can be foot operated to keep the Maxi Twin in posi-tion. Brake and release the brake as shown on the illustration. The brakes on both castors have to be applied to get full effect.
5. Driving/positioning handles Use the driving handles when pushing and positioning Maxi Twin.
6. Scale on the powered spreader bar.The Maxi Twin powered spreader bar comes with or without a scale. Refer to the Maxi Twin Scale Instructions for Use.
CAUTIONDo not drop the hand control into water.
NOTEWhen opening or closing the legs of the powered chassis, make sure that no one stands in the way of the moving chassis legs.
Product Description/Function

15
1 2
Brake
Release brake
1 2
3 4
5 6
A
B
CD
E
F
ONG N0 T
OFF Dialog
16
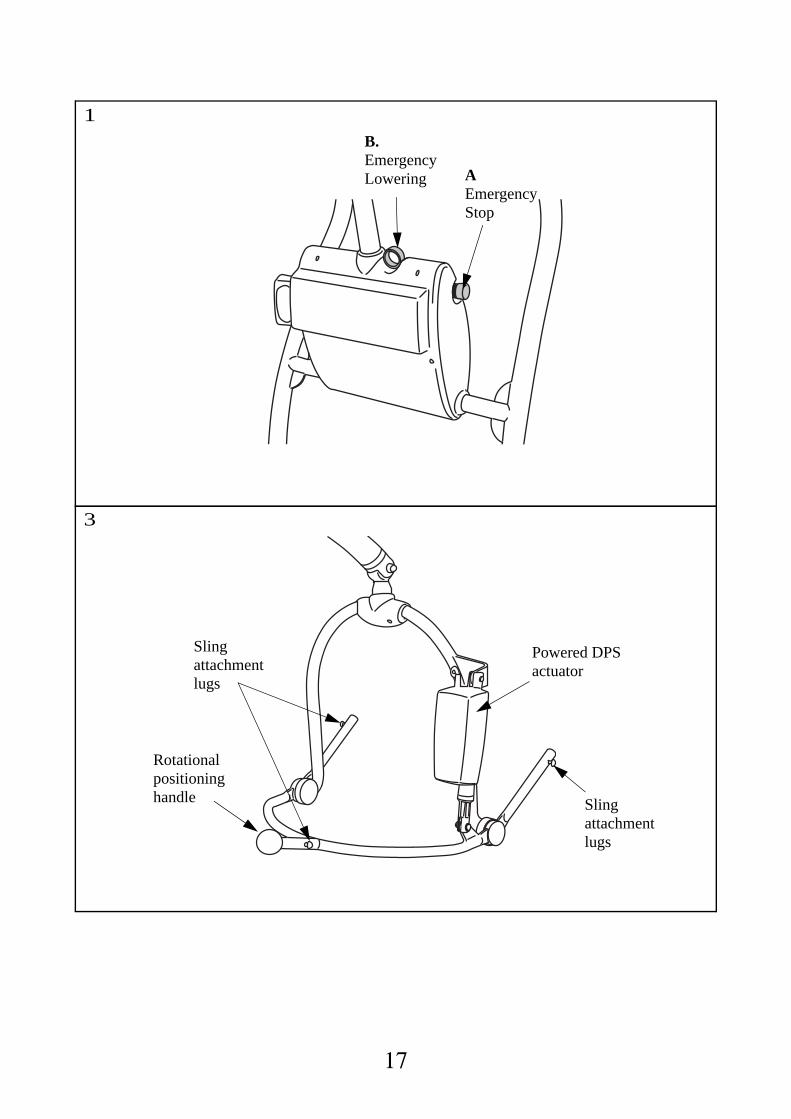
1a. Emergency Stop Button (Red) In case of an emergency, where you immediately have to stop any powered movement, (other than by releasing pressure on the hand control button), press the “emergency stop button”, located on the side of the main lift actuator cover (see illustration).
Once the emergency stop button (A) has been operated, it will have to be reset before any powered movement can be utilised.
1b. Emergency Lowering “Ring”
The emergency lowering function will only work when there is a load in the Maxi Twin exceeding 2 kg (4.4 lbs).It can be used in the event of a main control failure. The Emergency Lowering “Ring” is on the top of the main lift actuator housing, a green and white identification label is positioned near the emergency lowering ring for quick and easy recognition. Pull the emergency lowering ring up to operate, release the control during use and lowering will stop.
2. Automatic Safety StopThis is not operator controlled but a function built into the electronics of the lift.
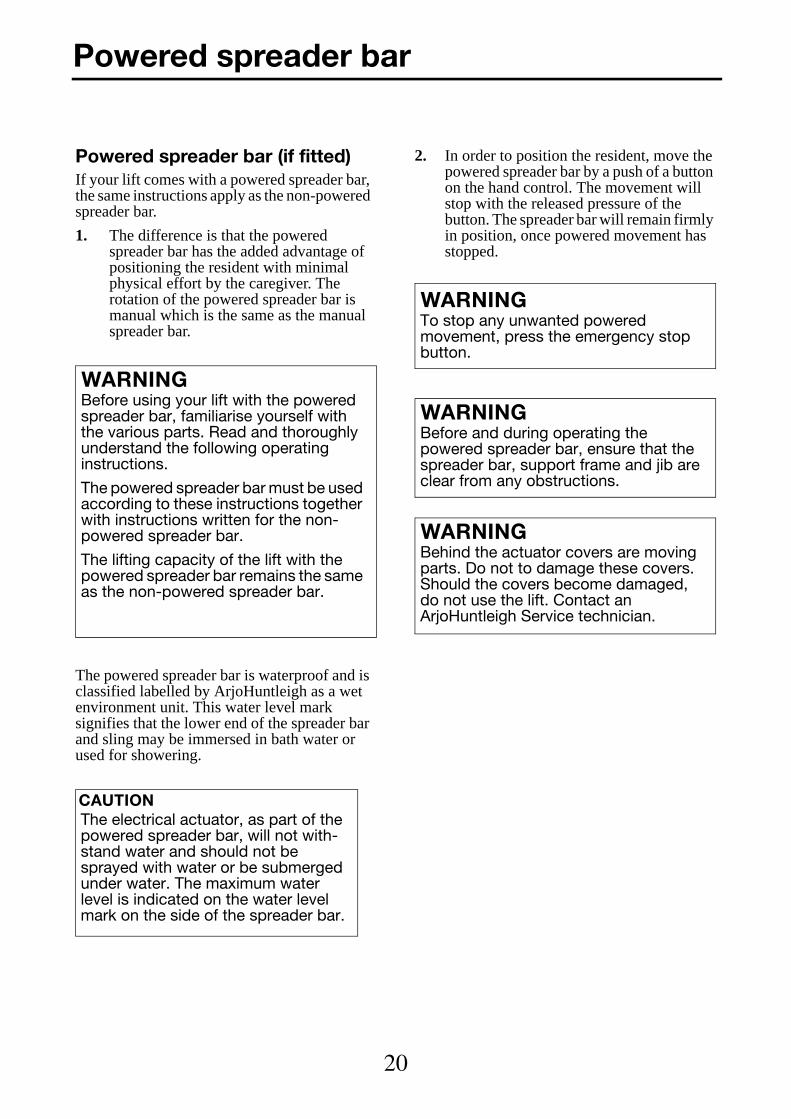
3. Powered spreader barFour sling attachment lugs enable the sling clips to be attached.
The rotational positioning handle allows you to position the resident sideways.
The powered spreader bar is operated from the hand control. The resident can be positioned in a reclined or sitting position.
WARNINGIt is necessary to pull the ring slowly and carefully to get a controlled lowering of a heavy resident. If pulled too quickly, the lowering might be too fast.
NOTEDue to internal friction, the speed of low-ering will vary depending on the weight of the resident. You may have to assist the downwards movement by pulling down the jib.
Function I: If the lift is moving up /down and it moves against something, the move-ment will be stopped by an automatic safety stop. Release the up /down but-ton on the hand control.
Function II: If the lift is mistakenly overloaded with a resident heavier than permitted, an auto-matic safety stop will automatically be activated. If this occurs, stop pressing the up button on the hand control. Lower the resident by pressing the down button and then remove the resident from the lift.
17
1
3
B. EmergencyLowering A
Emergency Stop
Powered DPS actuator
Sling attachment lugs
Rotational positioning handle
Sling attachment lugs
18
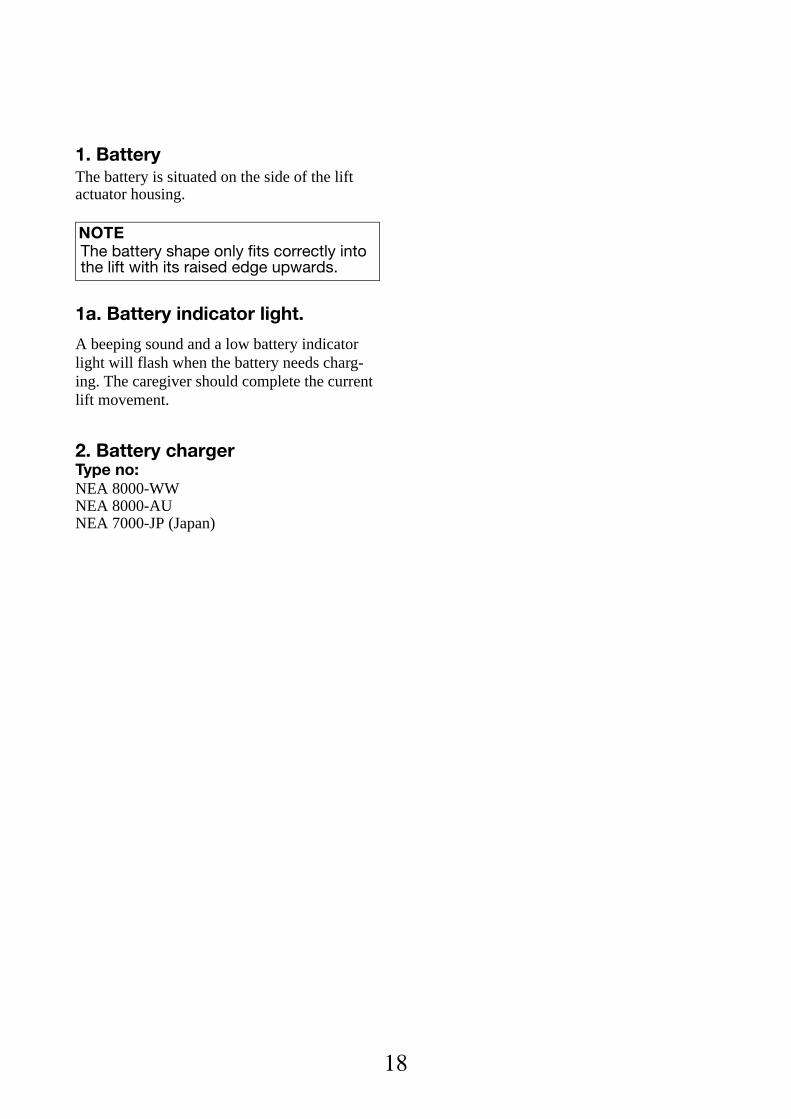
1. Battery The battery is situated on the side of the lift actuator housing.
1a. Battery indicator light.
A beeping sound and a low battery indicator light will flash when the battery needs charg-ing. The caregiver should complete the current lift movement.
2. Battery charger Type no:NEA 8000-WW NEA 8000-AUNEA 7000-JP (Japan)
NOTEThe battery shape only fits correctly into the lift with its raised edge upwards.

19
1
2
1A.
Low Battery Indicator
20
Powered spreader bar (if fitted)If your lift comes with a powered spreader bar, the same instructions apply as the non-powered spreader bar.
1. The difference is that the powered spreader bar has the added advantage of positioning the resident with minimal physical effort by the caregiver. The rotation of the powered spreader bar is manual which is the same as the manual spreader bar.
The powered spreader bar is waterproof and is classified labelled by ArjoHuntleigh as a wet environment unit. This water level mark signifies that the lower end of the spreader bar and sling may be immersed in bath water or used for showering.
2. In order to position the resident, move the powered spreader bar by a push of a button on the hand control. The movement will stop with the released pressure of the button. The spreader bar will remain firmly in position, once powered movement has stopped.
WARNINGBefore using your lift with the powered spreader bar, familiarise yourself with the various parts. Read and thoroughly understand the following operating instructions.
The powered spreader bar must be used according to these instructions together with instructions written for the non-powered spreader bar.
The lifting capacity of the lift with the powered spreader bar remains the same as the non-powered spreader bar.
CAUTIONThe electrical actuator, as part of the powered spreader bar, will not with-stand water and should not be sprayed with water or be submerged under water. The maximum water level is indicated on the water level mark on the side of the spreader bar.
WARNINGTo stop any unwanted powered movement, press the emergency stop button.
WARNINGBefore and during operating the powered spreader bar, ensure that the spreader bar, support frame and jib are clear from any obstructions.
WARNINGBehind the actuator covers are moving parts. Do not to damage these covers. Should the covers become damaged, do not use the lift. Contact an ArjoHuntleigh Service technician.
Powered spreader bar

21
1
2
Sling attachment lugs
Rotationalpositioninghandle
Powered DPS actuator.
DPS = Dynamic Positioning System
Lower Raise
Recline
Sit up
Chassis leg close
Chassis leg open

22
Before the resident is transferred to a Maxi Twin, ensure that:• the battery pack is fully charged before use.
Remove it from the charger unit and the arched top of the battery should face upwards when inserted into the battery opening. Electrical connection will be made automatically.
• a selection of sling types and sizes are easily available for all types of lifting procedures when using Maxi Twin.
• when possible, approach the resident from the front.
• if necessary, open the chassis legs to go around a chair or wheelchair.
Powered chassis legsSelect the appropriate button on the hand control and keep it pressed down until the required leg width is achieved. To close, press the close chassis leg button. The opening/closing of the chassis legs will stop if pressure is released from the button.
WARNINGAlways pay close attention to the resi-dent during a transfer/transport. Do not let the resident hold onto the spreader bar.
WARNINGWhen opening or closing the legs on a powered chassis, do not to allow anyone to stand in the way of the moving chassis legs and castors.
Transport the Maxi Twin with thechassis legs in parallel (closed) position only.
Using your Maxi Twin

23
Transferring resident - Spreader Bar
24
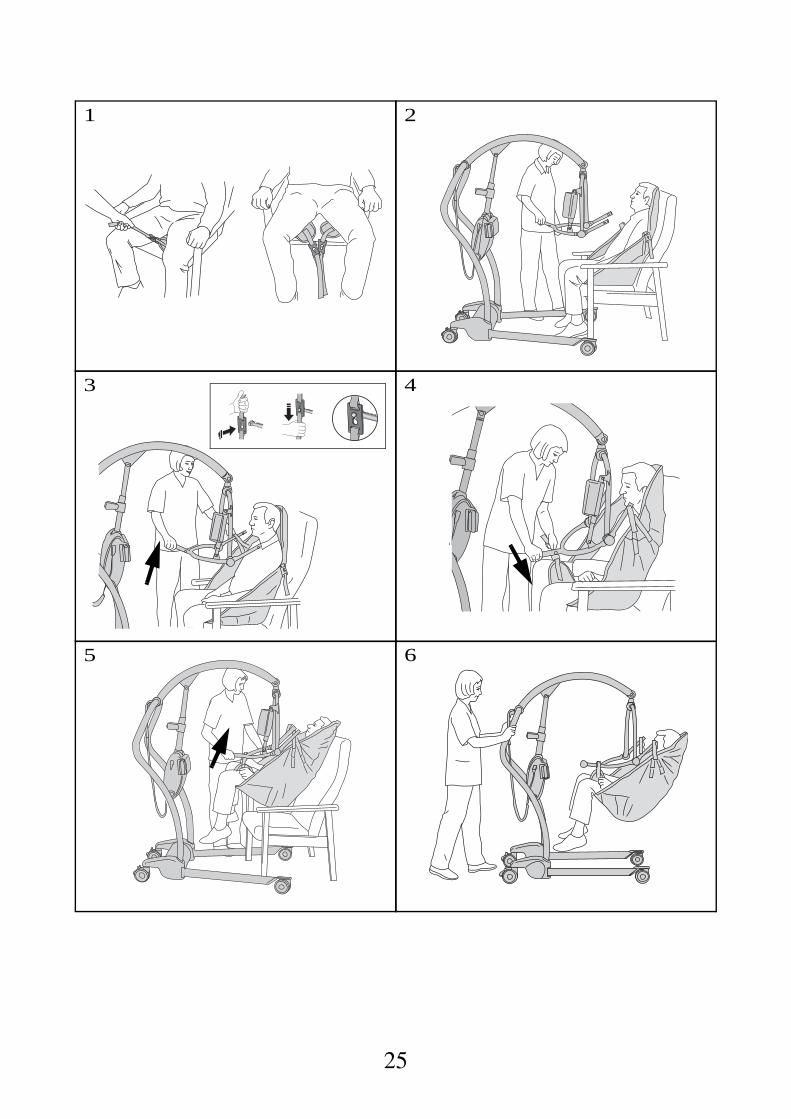
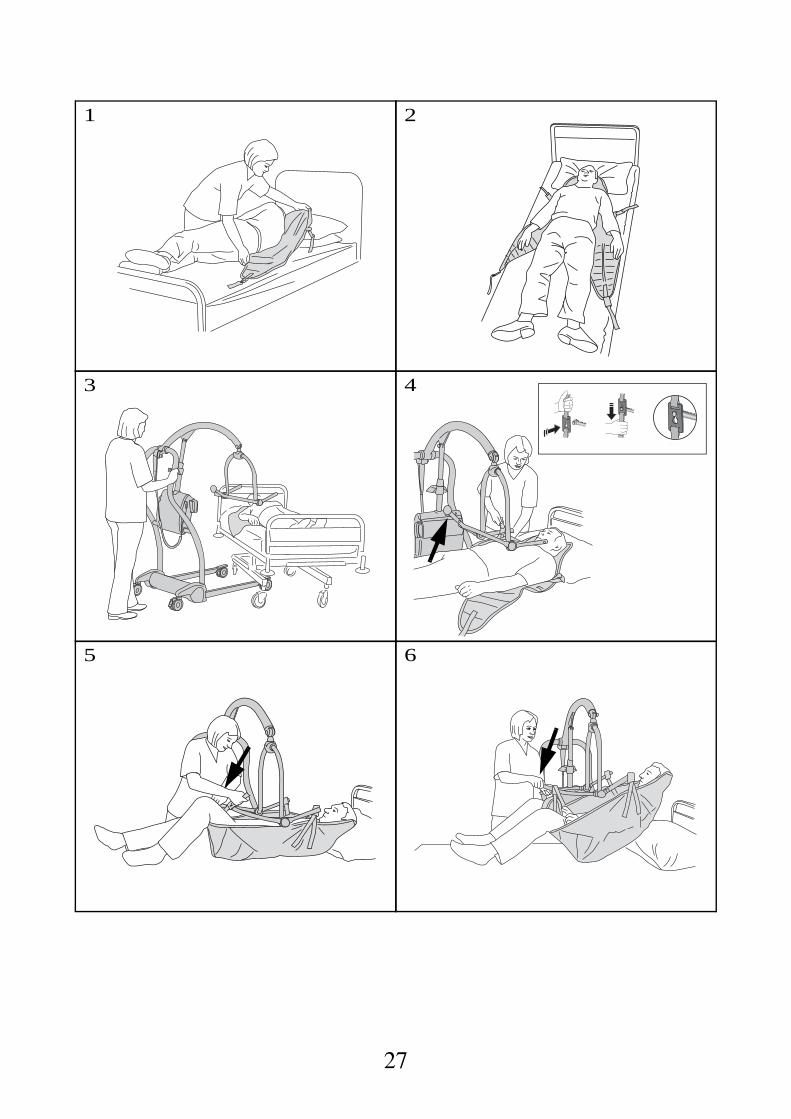
To Lift from a Chair1. Place the sling around the resident so that
it covers his/her lower back and the head support covers behind the head. Pull each leg piece and position it under each thigh. The leg pieces should be brought under and between the thighs.
2. Ensure the positioning handle on the spreader bar is facing away from the resident. The wide part of the spreader bar should positioned at, or just below shoulder level. Ensure that the Maxi Twin is close enough to be able to attach the sling shoulder clips to the spreader bar.
3. Once the Maxi Twin is in position, attach the shoulder strap clips to the lugs on the spreader bar.
4. Press down on the positioning handle of the spreader bar and attach the leg strap clips.
If necessary, lower the spreader bar using the hand control. Being careful not to lower it on the resident, in that case stop pressing the button on the hand control.
5. Raise the resident by operating the hand control and move the lift away from the chair. Carefully lift the positioning handle until the resident is reclined in the sling with head support. This is the most comfortable position for transport, as it reduces pressure on the thighs from the leg pieces. The angle of recline can be adjusted for increased comfort if the resident is uncomfortable.
6. Before transport, turn the resident to face the caregiver at normal chair height. This provides confidence, secure feeling and improves the Maxi Twin’s stability.
Remember to release the brakes, if these have been applied, before attempting to transport the resident. Close the legs of the chassis to help out in the transport process.
To lower the resident back into a chair - or when transferring from bed to chair. To avoid further lifting effort, push down on the positioning handle to put the resident into a good sitting position. Do not to push down too quickly, as this may jerk the resident’s head forward.
WARNINGWhen using the sling with the spreader bar, ensure that hands and arms of the resident are kept inside the sling. Do not allow the resident to ‘hold on’ to the spreader bar.
NOTEThe chassis rear castors have brakes which can be foot operated. Do not apply castor brakes at this stage. The position of the resident will adjust to his/her centre of gravity while being lifted.
WARNINGApply the castor brakes if Maxi Twin or the resident is positioned on a sloping surface to prevent it from accidentally moving from its position and cause harm or injury.
NOTEIf the hand control button is released dur-ing lifting or lowering, the powered motion will stop immediately.
WARNINGAlways check that the sling clips are fully in position before/during a lifting cycle. Keep an eye on the tension as the resident’s weight is gradually picked up.
WARNINGWhen lowering the lift ensure that the resident’s or caregiver’s legs and feet are away from moving parts.
25
1 2
3 4
5 6

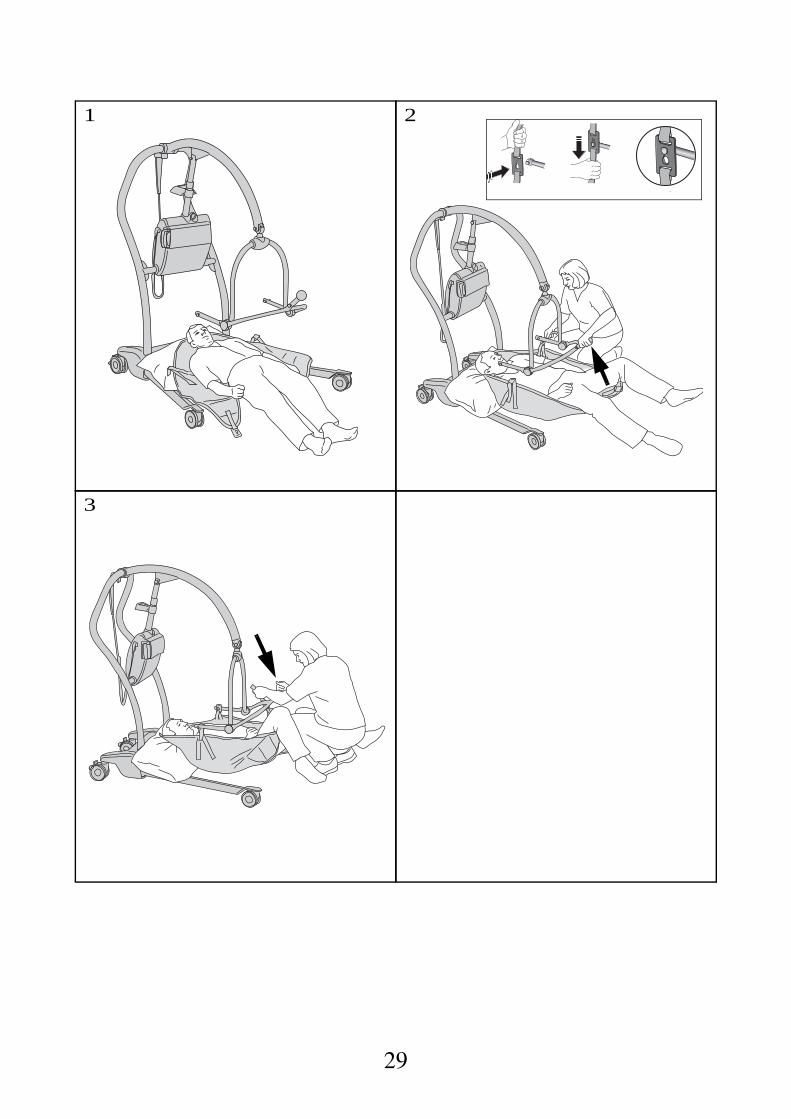
To Lift from a BedBefore lifting a resident from a bed, make sure there is enough space underneath the bed to accommodate the Maxi Twin chassis legs.
1. Position the resident onto the sling. Roll the resident towards you then fold the sling in half and place it behind the resident’s back.
2. Position the sling carefully so that the resident gets rolled back centrally on the sling. The head support area of the sling should cover behind the resident’s neck.
Alternatively, the resident can be brought into a sitting posture. Position the sling as detailed in the previous section “To Lift From A Chair”.
3. Approach the bed with the open side of the spreader bar towards the resident’s chest. Using the adjustable width chassis legs, it is possible to manoeuvre around obstructions such as bed legs.
Position the Maxi Twin so that the spreader bar is just above and centrally situated over the resident.
4. Tilt the spreader bar by using the positioning handle, until the shoulder attachment lugs can be connected to the sling shoulder strap clips.
The leg pieces must be brought under the thighs to connect, this may involve lifting one leg at a time. You may need to lower the spreader bar a little more, using the hand control. Press down on the positioning handle until the sling leg pieces reach the connections.
5. When lifting from the bed, some caregivers prefer to connect the leg pieces first. This particularly applies to residents’ with large thighs. In that case, raise the hip and knee into maximum flexion and attach the leg strap clips. Tilt the spreader bar towards the shoulders for connection.
Lift the resident using the hand control and adjust resident to a comfortable position before the transfer. The specially designed sling with head support, enables one person to carry out a complete lifting function without additional help.
6. When returning to a bed, move the resident into a desired position above the bed. Adjust the sling position if necessary and then lower the resident using the hand control.
Move the Maxi Twin lift away before removing the sling from under the resident. If transferring the resident to a chair refer to the previous section “To Lift from a Chair”.
NOTETo bring out the folded sling under the resident, roll the resident from the oppo-site direction and pull the folded sling out
WARNINGBe careful not to lower the spreader bar on to the resident.
WARNINGAlways check that the sling clips are securely attached before and during the start of the lifting process. Keep an eye on the tension as the resident’s weight is picked up.
WARNINGWhen lowering the lift ensure that the resident’s or caregiver’s legs and feet are away from moving parts.
Only detach the sling clips when the resident’s body weight is fully supported by the bed. Start with the leg clips followed by the shoulder clips.
26
27
1 2
3 4
5 6

To lift from the floor1. Put the sling around the resident by using
the rolling or sitting up method. Depending on circumstances, space and/or position of resident etc. approach with the open part of the chassis. Open the chassis legs if necessary.
The resident’s head and shoulders could be resting on pillows for comfort. This is not a necessity when connecting the sling to a spreader bar.
2. With the open part of the spreader bar directed down towards the resident’s shoulders, attach the shoulder strap clips.
3. Once attached, raise the hip and knee into maximum flexion and push down on the positioning handle in order to connect the leg strap clips. This will raise the resident’s head and shoulders slightly.
4. When lifting from the floor, some caregivers prefer to connect the leg pieces first. This in particular applies to the very large residents with large thighs. In that case, raise the hip and knee into maximum flexion and attach the leg straps first. Tilt the spreader bar towards the shoulders for connection.
When all the straps have been properly connected, raise the resident from the floor. Support behind the head can be comfortable and reassuring for the resident. The leg pieces can be positioned fairly high in the crotch, straighten them out for added comfort. The resident may be positioned in a chair or placed onto a bed.
If the resident is prone to spasms, he/she may be lifted with the Maxi Twin. However, special attention needs to be paid to support the head during the early part of the lift.
When lifting residents with leg amputations, use an amputee sling (available as an accessory from ArjoHuntleigh). This sling is specially designed to accommodate a different centre of gravity.
WARNINGAlways check that the sling clips are securely attached before and during the start of the lifting process. Keep an eye on the tension as the resident’s weight is picked up.
WARNINGWhen lowering the lift ensure that the resident’s or caregiver’s legs and feet are away from moving parts.
Transport of a resident should always be done with the chassis legs parallel (closed). Manoeuvrability will be easier, especially through doorways. The resident should be positioned facing the caregiver.
WARNINGEnsure that the sling is not put around or caught under the legs of the Maxi Twin. This might damage the spreader bar during the lifting.
28
29
1 2
3

Transferring the resident - Loop Bar
Use ArjoHuntleigh loop slings with the loop spreader bar. The slings are available in different sizes, (extra small, small, medium, large, large large and extra large etc.) and all colour coded. A range of more specialised slings are available. Please contact ArjoHuntleigh or their authorised distributors for details.
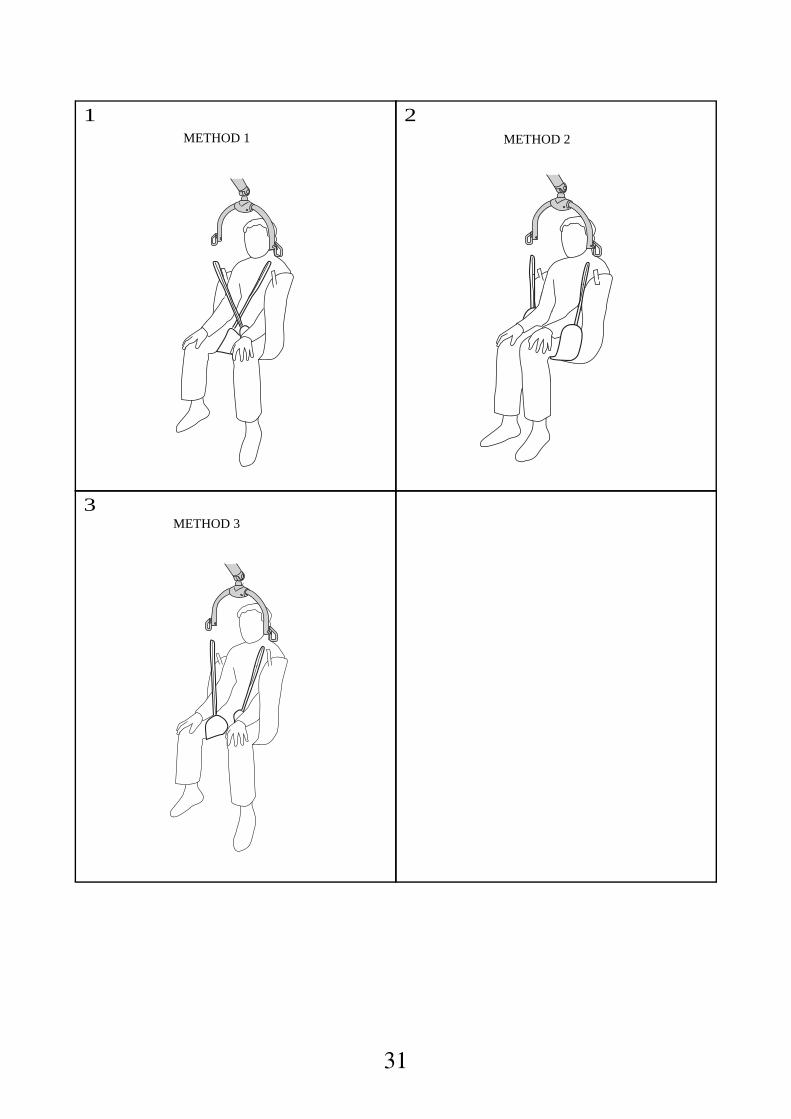
To lift from a chair1. Method 1
Lean the resident forward if necessary. Slide the sling down the resident’s back until seam “C” reaches the base of the spine. Take attachment points “B” and loop the leg pieces of the sling underneath the resident’s thighs. Make sure the sling pieces are not twisted underneath the resident. Bring the loops in a cross formation between the thighs. Attach the leg pieces to the “opposite side” hooks of the loop spreader bar.
2. Method 2
Just like method 1 above, except cross the leg pieces of the sling under both thighs. The leg pieces will pass on the outside of the thighs before attaching loops “B” to the hooks.
3. Method 3
Start like method 1, except loop the leg pieces of the sling under each thigh and attach to the same side hook as the shoulder attachment (left straps to left hook and right straps to right hook). This method holds the legs apart and offers better access for cleaning, toiletting or similar. This method may offer extra support for amputees or residents with special conditions. Extra care should be taken to prevent the resident from falling out of the sling.
WARNINGBefore attaching the loop sling ensure the loop spreader bar is rotated into position like the illustration above.
When attaching the sling to the loop spreader bar, always ensure the sling attachment loops are positioned correctly into the retaining hooks and that the retaining hooks gates move freely as illustrated below.
retaining hook gate
loop sling attachment hook
A
B
C
A
B
30
31
1 2
3
METHOD 2METHOD 1
METHOD 3

Once the sling has been positioned and attached securely to the loop bar then lifting can be carried out using the hand control.
Apart from the previous three lifting methods mentioned, the loop spreader bar with loop slings is also extremely useful for lifting residents with contracted legs, since it typically offers more space for the resident.
To lift from a bedPlace the sling under the resident as if it was a drawsheet. Flex the resident’s legs and bring the sling leg pieces under the thighs. Attach the sling to the loop bar using any of the three lifting methods mentioned on the previous page.
To lift from the floorRaise and support the resident into a sitting, orhalf sitting position. Put the sling down behindthe resident’s back and bring the leg pieces ofthe sling into position. Place the resident’s legsover the chassis and bring the lift into position.With the jib as low as possible, attach theshoulder loops. Bend up the resident’s knees tohelp the connection of the leg pieces.
When lifting or lowering a resident who is supported by a sling it is not necessary to use the brakes. This allows the lift to move to the correct position relative to the centre of gravity of the resident.
It’s recommended to apply the brakes however, when lifting a resident from the floor.This may prevent any unwanted or accidental movement of the Maxi Twin that my cause harm or injury.
WARNINGAlways check that all the sling loops are fully in position before and during the lifting cycle. Keep an eye on the tension as the resident’s weight is gradually taken up.
When lowering the lift ensure that the resident’s or caregiver’s legs and feet are away from any moving parts.
WARNINGCheck that all four points of the loop sling are securely attached before lifting.
WARNINGMake sure not to get fingers trapped between chassis and moving legs of the lift.
WARNINGEnsure that the sling is not put around or caught under the legs of the Maxi Twin. This might damage the spreader bar during the lifting.
WARNINGCheck that all the loops are securely attached before lifting.
32
When the resident has been returned to the bed he/she may be lowered some more before the sling is detached.
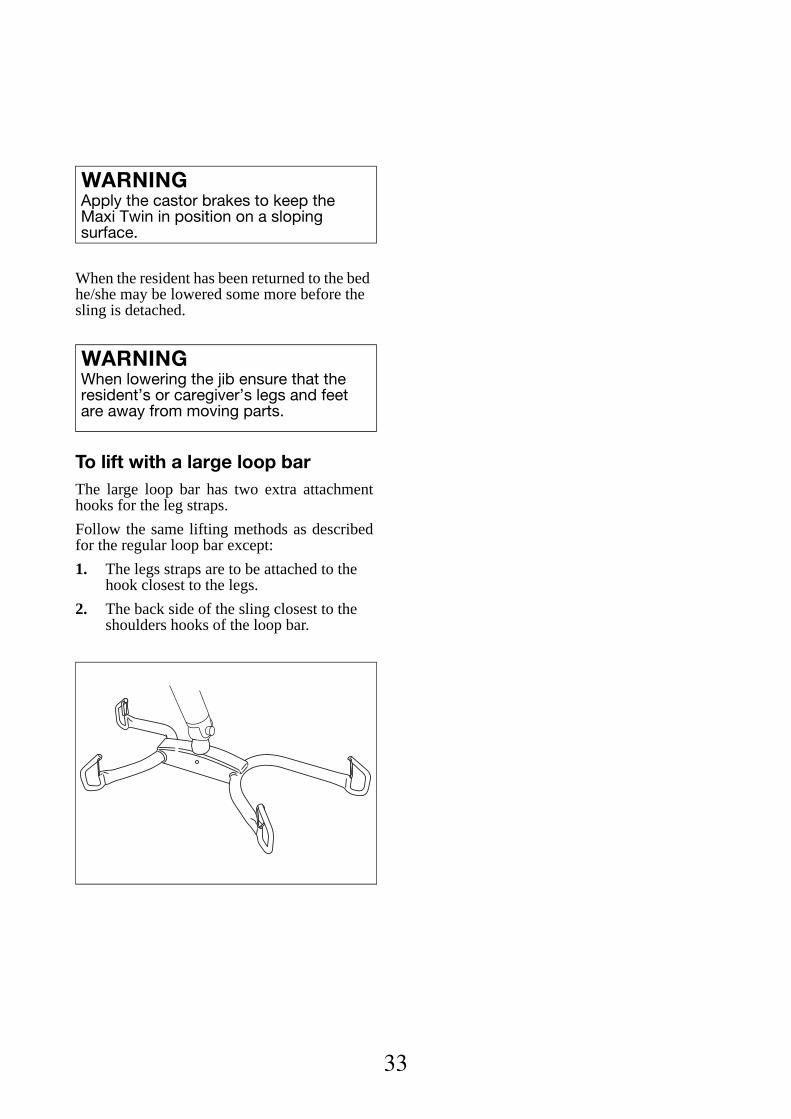
To lift with a large loop barThe large loop bar has two extra attachmenthooks for the leg straps.
Follow the same lifting methods as describedfor the regular loop bar except:
1. The legs straps are to be attached to the hook closest to the legs.
2. The back side of the sling closest to the shoulders hooks of the loop bar.
WARNINGApply the castor brakes to keep the Maxi Twin in position on a sloping surface.
WARNINGWhen lowering the jib ensure that the resident’s or caregiver’s legs and feet are away from moving parts.
33

34
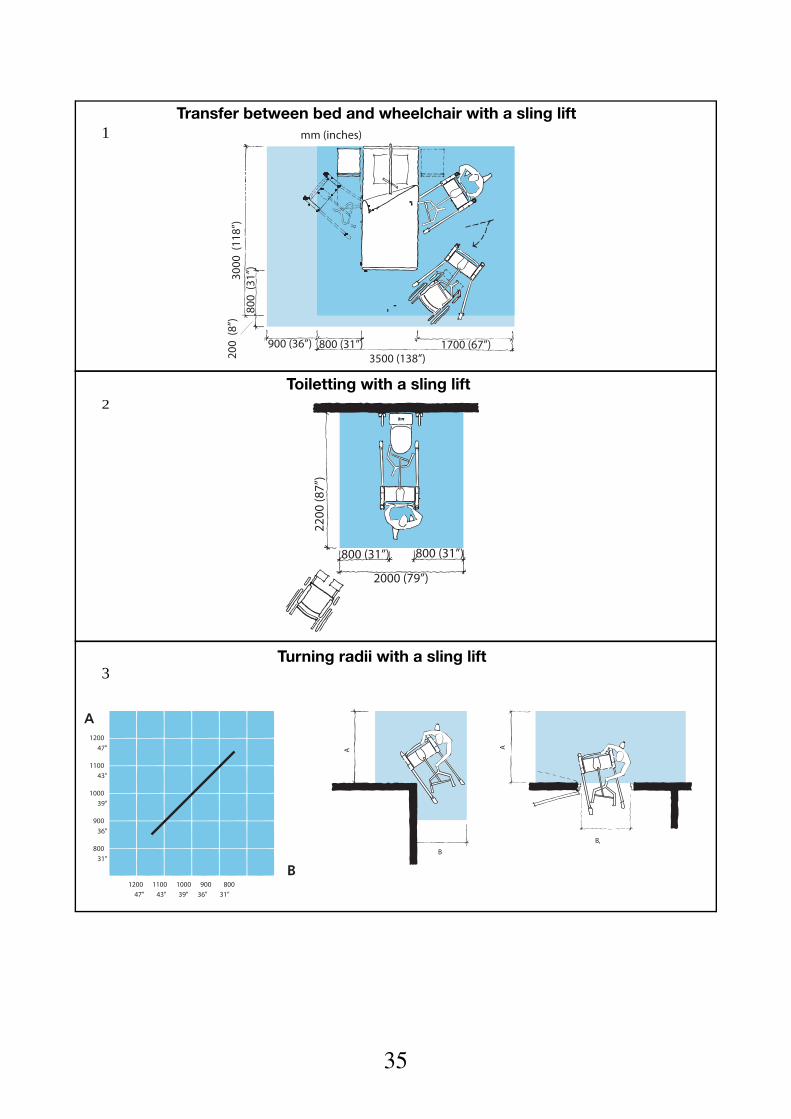
35
1
2
3Turning radii with a sling lift
Transfer between bed and wheelchair with a sling lift
Toiletting with a sling lift
3000
(11
8”)
800
(31”
)
200
(8”)
900 (36”)
mm (inches)
800 (31”)3500 (138”)
1700 (67”)
2200
(87”
)
800 (31”) 800 (31”)
2000 (79”)
1200 47"
1100 43"
1000 39"
900 36"
800 31"
1200 1100 1000 900 800
47" 43" 39" 36" 31"
B,
B
AA
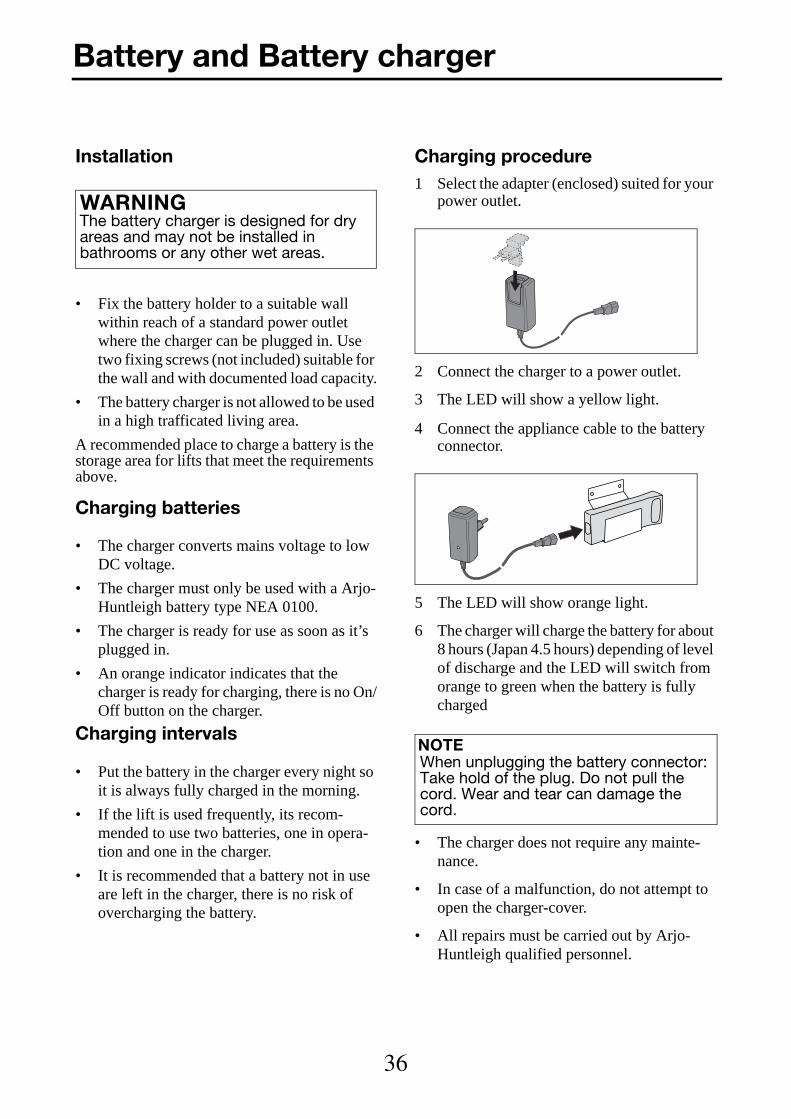
Installation
• Fix the battery holder to a suitable wall within reach of a standard power outlet where the charger can be plugged in. Use two fixing screws (not included) suitable for the wall and with documented load capacity.
• The battery charger is not allowed to be used in a high trafficated living area.
A recommended place to charge a battery is the storage area for lifts that meet the requirements above.
Charging batteries
• The charger converts mains voltage to low DC voltage.
• The charger must only be used with a Arjo-Huntleigh battery type NEA 0100.
• The charger is ready for use as soon as it’s plugged in.
• An orange indicator indicates that the charger is ready for charging, there is no On/Off button on the charger.
Charging intervals
• Put the battery in the charger every night so it is always fully charged in the morning.
• If the lift is used frequently, its recom-mended to use two batteries, one in opera-tion and one in the charger.
• It is recommended that a battery not in use are left in the charger, there is no risk of overcharging the battery.
Charging procedure1 Select the adapter (enclosed) suited for your
power outlet.
2 Connect the charger to a power outlet.
3 The LED will show a yellow light.
4 Connect the appliance cable to the battery connector.
5 The LED will show orange light.
6 The charger will charge the battery for about 8 hours (Japan 4.5 hours) depending of level of discharge and the LED will switch from orange to green when the battery is fully charged
• The charger does not require any mainte-nance.
• In case of a malfunction, do not attempt to open the charger-cover.
• All repairs must be carried out by Arjo-Huntleigh qualified personnel.
WARNINGThe battery charger is designed for dry areas and may not be installed in bathrooms or any other wet areas.
NOTEWhen unplugging the battery connector: Take hold of the plug. Do not pull the cord. Wear and tear can damage the cord.
Battery and Battery charger
36
Storage of batteries
• Batteries are charged when delivered but we recommend to charge the batteries when received due to a low self-discharge.
• The batteries will slowly discharge when not used.
• Batteries that will not be used for a longer period should be kept in a cool place, not under 0 °C (32 °F) and not over room tem-perature + 25 °C (77 °F).
• Batteries that are charged for the first time or after a longer storage period must be charged for 8 hours (Japan 4.5 hours) or until the LED turns green.
All repairs must be carried out by ArjoHuntleigh authorised personnel.
WARNINGIn case of a malfunction, do not attempt to open the charger cover.
37
Cleaning/Disinfecting Instructions
Only use ArjoHuntleigh branded disinfectant cleansers.If you have any questions regarding disinfect-ing the equipment, or wish to order cleaning fluid, contact ArjoHuntleigh Customer Service.
Unless otherwise stated, before each and every use follow the cleaning, care and inspection procedures described in this section.
1 Remove slings from the lift.
2 Use a disinfection spray bottle, gently spray disinfection fluid at the correct dilution ratio over Maxi Twin. Use properly labelled squirt bottle containing disinfection fluid mixed according to instructions on the con-tainer.
3 Use a sponge, rag or disposable cloth and clean all surfaces of the lift.
4 Allow an appropriate contact time for sani-tation or disinfection according to the instructions for the disinfectant cleaner or your local regulations.
5 Rinse with water to get of all the disinfect-ant cleaner.
6 Wipe the lift and all parts dry with a cloth.
Failure to clean the equipment may cause cross contamination.
WARNING
WARNINGAlways use protective gloves and pro-tective glasses when handling concen-trated cleaning agents. Avoid getting the cleaning agent on your skin or in your eyes. If this does occur, rinse thoroughly with plenty of water. Seek medical advice if irritation occurs. Always read the material safety data sheet on the dis-infectant cleanser.
Do not use phenol, citric acid or petro-leum-based solvents, trichloroethylene, chlorine and hydrogen peroxide or simi-lar cleaning agents as these may dam-age the plastic material.Steam, ethylene oxide sterilization and high pressure wash can not be used either.
WARNING
For disinfection of contaminated lifts, equipment and accessories, use the preferred method of wiping the product completely with “hard surface disinfectant wipes” that are supplied impregnated with a 70% v/v solution of Isopropyl Alcohol.
WARNING
NOTE70% v/v Isopropyl Alcohol wipes have been proven to be effective against MRSA and several other micro-organisms under light soiling conditions.
CAUTIONDo not over spray areas of the product which could cause problems with electrical components and/or internal corrosion.
38

Sling care and cleaningHow often the following actions are taken depends on how often the equipment is used.
Unless otherwise stated, before each and every use follow the cleaning, care and inspection procedures described in this section.
WARNING 1.With regard to laundering, slings
should not be classified as linen, but as an accessory to a resident transfer lift and therefore classified as a medical device. Slings should be cleaned and disinfected only in strict accordance with the manufacturers instructions.
2. Mechanical pressure should be avoided during the washing and drying procedure e.g. rolling or pressing, as these can damage parts vital to the safe and comfortable operation of the sling.
3. Washing and drying temperatures must not exceed the temperatures specified on the sling and the sling instruction sheet. Wash using normal detergents, do not iron. Refer to Sling Instruction sheet.
4. It is essential that the sling attachment cords, the slings, their straps and attachment clips are carefully inspected before each and every use. If the slings, cords or straps are frayed, or clips damaged, the sling or attachment cord should be withdrawn from use immediately and replaced.
39

Maxi Twin is subject to wear and tear, and the following actions must be performed when specified to ensure that the product remains within its original manufacturing specification
PREVENTIVE MAINTENANCE SCHEDULE Maxi Twin
CAREGIVER OBLIGATIONS Action/Check EveryDAY
EveryWEEK
EveryYEAR
Every2:nd
YEAR
Cleaning/Disinfecting XVisually check the slings XReplace with charged battery XVisually check all exposed parts XVisually check mechanical attachments XCheck hand control and cable XCheck and clean castors XCheck the brake function XVisually check battery charger and battery XPerform functionality test X
WARNINGThe points on this checklist are the minimum the manufacturer recommends. In some cases due to heavy use of the product and exposure to aggressive environment, more fre-quent inspections should be carried out. Continuing to use this product without conduct-ing regular inspections or continuing to use this product when a fault is found will seriously compromise the user and residents safety. Local regulations and standards may be higher than the manufacturers. Preventive maintenance specified in this manual can prevent accidents.
WARNINGThe following actions must be carried out by qualified personnel, using correct tools and knowledge of procedures. Failure to meet these requirements could result in personal inju-ries and/or unsafe product.
Care and Preventative Maintenance
40

QUALIFIED PERSONNEL Action/Check EveryDAY
EveryWEEK
EveryYEAR
Every2:nd
YEAR
Check that the latest upgrades have been implemented XCheck all vital parts for corrosion and damage XCheck mechanical attachments XPerform a safe working load test (local requirements) XCheck all actuators for function and range XCheck movable parts of the spreader bar XCheck function of emergency lowering XCheck function of emergency stop XCheck the safety stop function XCheck/replace castors XPerform full feature functionality test X
NOTEAll Caregiver Obligations are to be checked when performing the Qualified Personnel Service.
41

42
Caregiver obligations shall be carried out by personnel with sufficient knowledge following the instructions in this manual.
Every day• Cleaning/Disinfecting. Maxi Twin has to be
cleaned immediately after use. Arjo-Huntleigh cleaning agents should be used in recommended concentrations.
• Visually check the slings. Check for fray-ing, holes, cuts, loose stitching and damaged plastic clips. If the sling is found damaged in any way, take out of use immediately and replace the sling (1).
• Use a fully charged battery at the begin-ning of the day.
Every week• Visually check all exposed parts, espe-
cially where personal contact is made by either the resident or caregiver. Make sure no cracks or sharp edges have developed that could cause the resident or user injury or that has become unhygienic. Replace damaged parts.
• Visually check all mechanical parts. Visu-ally check the attachment for the actuators (2a) and the attachment between jib and spreader bar (2b). Visually check the sling attachment knobs(2c), for damage. Check the spreader bar pivot for any suspect dam-age, for instance, such as protruding plastic (2d).
• Check hand control and cable: Visually check the condition of the hand control and its cable. If found cut, damaged or exposed wiring, replace it. (3).
• Check that the castors are properly fixed and that they roll and swivel freely. Clean with water. (the function can be affected by soap, hair, dust and chemicals from floor cleaning). Check the brake function (4).
• Visually check the condition of the bat-tery charger, its cable and the batteries. Remove and replace immediately if dam-aged (5).
• Perform a full functionality test and by lifting up and down. Test the movement of the spreader bar and the open/close function of the legs. All functions should work as expected without divergences.
YearlyMaxi Twin has to be serviced according to the Preventive Maintenance Schedule (Qualified Personnel Action/Check).
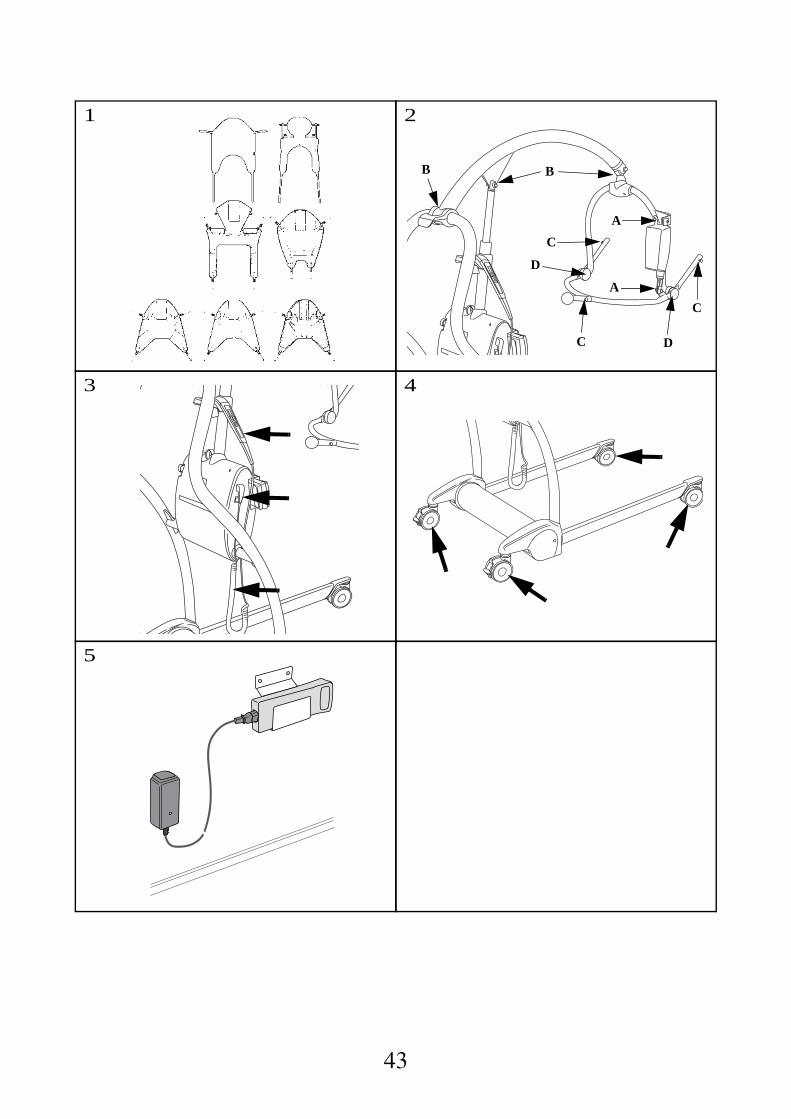
43
B
A
C
D
B
C
C
D
A
1 2
3 4
5

44
PROBLEM ACTION
Using the lift
The lift raises or lowers after the hand control buttons are released.
Activate the red emergency stop button and pull the battery out - remove the resident from the lift and call for authorised service.
The lift does not raise or descend when the hand control buttons are pressed.
1. Make sure that the battery is fully connected in the battery compartment 2. Make sure that the hand control connection plug is properly connected to the socket 3. Make sure that the battery is charged
4. Make sure the emergency stop button is inactivated by turning the red knob clockwise 5. Use the emergency lowering to lower the resident. Pull the purple ring up to operate. When the ring is released the movement will stop - call for authorised service as soon as the resident is removed from the lift.
The lift is hard to manoeuvre during transport.
1. Make sure all brakes are released 2. Make sure all castors roll and swivel freely - if not, remove the resident from the lift and call for authorised service.
The lift is making abnormal sounds during lift-ing or transport.
Remove the resident from the lift and call for authorised service.
Alarms
A buzzing is heard as the lift is raised.
The battery needs charging - complete the transfer operation in progress and change to a fully charged battery.
The lift stops its motion as the lift is lowered/raised or when the spreader bar is moved to a sitting position.
The lift has been lowered/raised against a fixed object. Carefully raise/lower and reposition the lift.
Only a few lifts are carried out before battery indicator will flash and sound. Change to a new battery.
WARNINGDo not leave the resident unattended while doing this.
WARNINGDo not leave the resident unattended.
Trouble shooting

45

46
Maxi Twin Safe working load 182 kg (400 lbs.)
Weight of lift without a spreader bar 46.5 kg (101 lbs.)
Powered DPS spreader bar 6.9 kg (15.2 lbs.)
DPS spreader bar 5 kg (11 lbs.)
Small loop spreader bar 1.7 kg (3.7 lbs.)
Medium loop spreader bar 1.9 kg (4.2 lbs.)
Large loop spreader bar 2.8 kg (6.2 lbs.)
Weight of the battery 1.5 kg (3,3 lbs.)
Colour Grey
Medical equipment type
Sound level 49dB (A)
Mode of operation ED max 10%; Max 2 min ON, Min 18 min OFF
Operating forces of controls 2.7 N
Max ambient temperature + 10°C to +40°C (+ 50°F to +104 °F)
Max relative humidity 15-100%
Max atmospheric pressure 700-1060 hPa
Transport and storageAmbient temperature range - Transport –25 °C to +60 °C (-13 °F to +140 °F)
Ambient temperature range - Storage –25 °C to +30 °C (-13 °F to +86 °F)
Relative humidity range 10% to 95%
Atmospheric pressure range 500 -1060 hPa (transport) 700-1060 hPa (storage)
ElectricityBattery ArjoHuntleigh NEA 0100
Equipment voltage 24 V DC
Protection class IP X4
Hand control Protection class IP X7
Fuse F1 F10AL 250 V
Fuse F2 T4AL 250 V
RecyclingThe device should be recycled according to national regulations
Battery NiMH. Recyclable.Not for disposal. Environment danger
Package Wood and corrugated cardboard, recyclable
The Lift Electric, steel and plastic parts shall be separated and recycled according to marking on the unit
Technical specifications

47
Charger model NEA 8000 -WWNEA 8000 -AU NEA 7000-JP
Voltage 100 – 240 V ~ ±10% 100V ±10%
Frequency 50 – 60 Hz 50 – 60 Hz
Normal charge current 400 mA 900 mA for 3.5 hours
Standby charge current 25mA 50mA
Max charge voltage 41 V 41 V
Max power 0.35A 32 W
Weight 200 g (0.44 lb.) 210 g (0.46 lb.)
Dimensions 102 x 47 x 38 mm (4" x 1 7/8” x 1 1/2”)
60 x 70 x 100mm(2 3/8”x 2 3/4”x 4")
Max ambient temperature + 40 °C (+ 104 °F) + 40 °C (+ 104 °F)
Max relative humidity 75% 75%
Max atmospheric pressure 1060 hPa 1060 hPa
Degree of protection IPX0 IPX0
Battery to this charger ArjoHuntleigh NEA 0100 ArjoHuntleigh NEA 0100
WARNINGStacking or placing electrical or magnetic equipment close to this device is not recom-mended, it can interfere with the equipment’s operation and safety.Portable and mobile radio-frequency (RF) communications equipment can interfere with this equipment’s operation and safety.

48
Dimensions of Maxi Twin.
P
BA
IG
KM
O
L
H
N
J
FEDC
C.S.P = Central Suspension Point
Reference Note DimensionA Max. External Length 1298,3B Max. Internal Length 929,3C Max. External Width 1370,7D Max. Internal Width 1231,3E Min. External Length 755F Min.Internal Width 518,1G Height of C.S.P at Max. Hoisting Reach 1281H Max. Hoisting Reach 900,4I Min. Height of C.S.P 758J Hoisting Reach at Min. Height of C.S.P 699,4K Max. Height of C.S.P 1984,9L Hoisting Reach at Max. Height of C.S.P 621,7M Hoisting Range 1226,9N Min. Clearance 30,5O Max. Height Std. Castors 113P Turning Diameter 1444
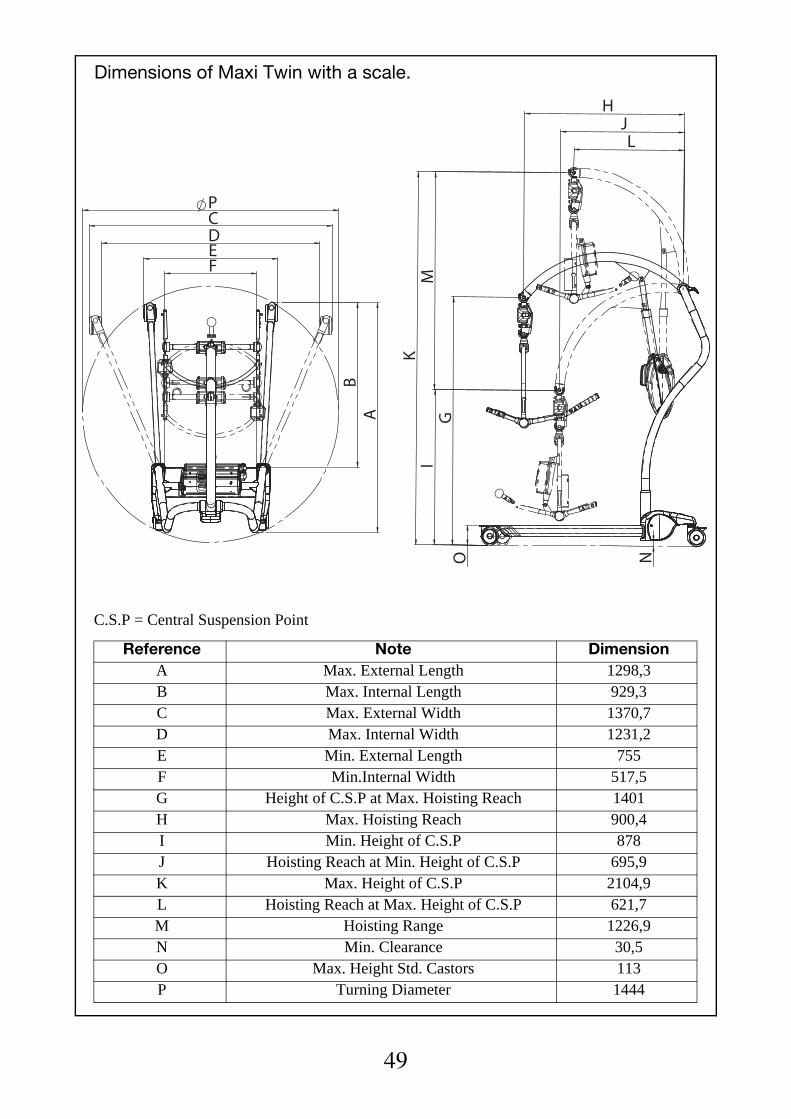
49
BA
P
O N
GI
MK
LJ
H
FEDC
C.S.P = Central Suspension Point
Reference Note DimensionA Max. External Length 1298,3B Max. Internal Length 929,3C Max. External Width 1370,7D Max. Internal Width 1231,2E Min. External Length 755F Min.Internal Width 517,5G Height of C.S.P at Max. Hoisting Reach 1401H Max. Hoisting Reach 900,4I Min. Height of C.S.P 878J Hoisting Reach at Min. Height of C.S.P 695,9K Max. Height of C.S.P 2104,9L Hoisting Reach at Max. Height of C.S.P 621,7M Hoisting Range 1226,9N Min. Clearance 30,5O Max. Height Std. Castors 113P Turning Diameter 1444
Dimensions of Maxi Twin with a scale.
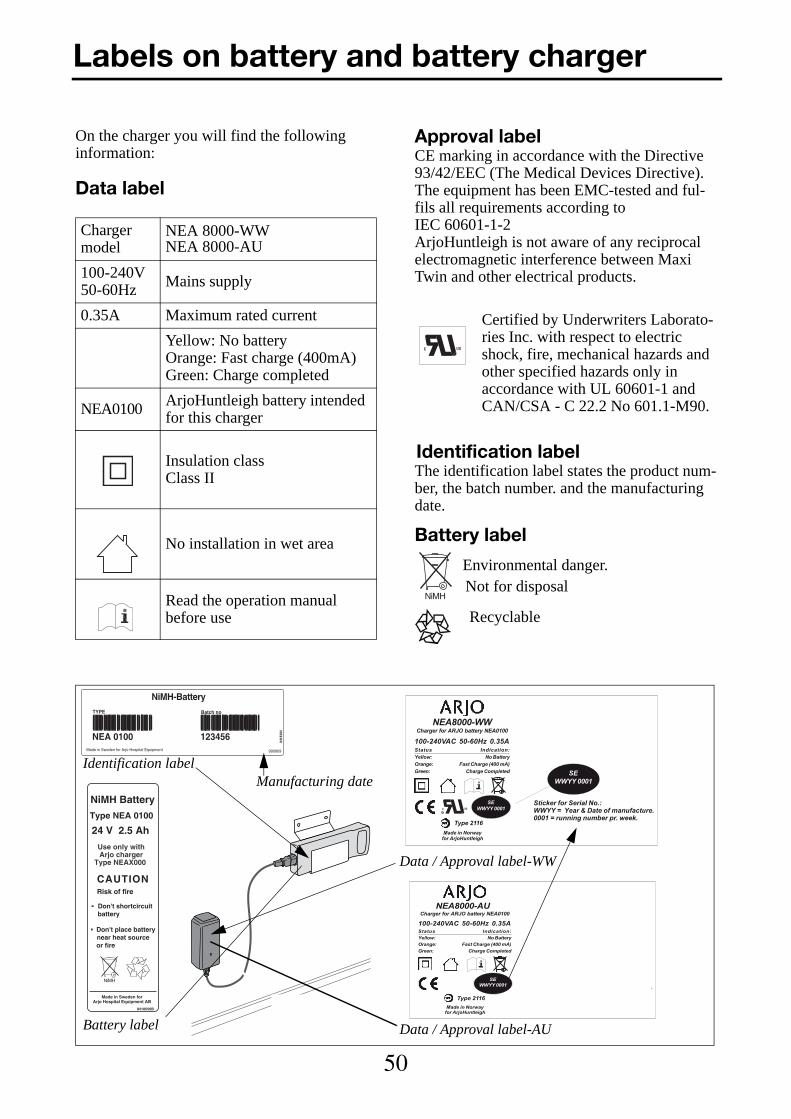
50
On the charger you will find the followinginformation:
Data label
Approval labelCE marking in accordance with the Directive 93/42/EEC (The Medical Devices Directive).The equipment has been EMC-tested and ful-fils all requirements according to IEC 60601-1-2ArjoHuntleigh is not aware of any reciprocal electromagnetic interference between Maxi Twin and other electrical products.
Identification labelThe identification label states the product num-ber, the batch number. and the manufacturing date.
Battery label
Charger model
NEA 8000-WWNEA 8000-AU
100-240V 50-60Hz Mains supply
0.35A Maximum rated current
Yellow: No batteryOrange: Fast charge (400mA)Green: Charge completed
NEA0100 ArjoHuntleigh battery intended for this charger
Insulation classClass II
No installation in wet area
Read the operation manual before use
Certified by Underwriters Laborato-ries Inc. with respect to electric shock, fire, mechanical hazards and other specified hazards only in accordance with UL 60601-1 and CAN/CSA - C 22.2 No 601.1-M90.
S
Environmental danger.
Recyclable
Not for disposalNiMH
8418556B
Don't place batterynear heat source or fire
Risk of fire
Don't shortcircuitbattery
NiMH Battery
Made in Sweden forArjo Hospital Equipment AB
CAUTION
Use only withArjo charger
Type NEAX000
Type NEA 0100
24 V 2.5 Ah
NiMH
TYPE Batch no
NiMH-Battery
123456NEA 0100 Made in Sweden for Arjo Hospital Equipment 990909
8418
384
Battery label
Identification label
Data / Approval label-WW
Manufacturing date
Status Indication: oN:wolleY Battery
Orange: Fast Charge (400 mA)Green: Charge Completed
Charger for ARJO battery NEA0100NEA8000-WW
100-240VAC 50-60Hz 0.35A
Type 2116Made in Norway
for ArjoHuntleigh
SEWWYY 0001
SEWWYY 0001
Sticker for Serial No.:WWYY = Year & Date of manufacture.0001 = running number pr. week.
SR
Data / Approval label-AU
Status Indication: oN:wolleY Battery
Orange: Fast Charge (400 mA)Green: Charge Completed
Charger for ARJO battery NEA0100NEA8000-AU
100-240VAC 50-60Hz 0.35A
Type 2116Made in Norway
for ArjoHuntleigh
SEWWYY 0001
SEWWYY 0001
Sticker for Serial No.:WWYY = Year & Date of manufacture.0001 = running number pr. week.
Labels on battery and battery charger

51
On the charger you will find the following infor-mation:
Data label
Approval labelThe equipment has been tested and fulfils all requirements according to J60335-1 3rd edition-H14, J60335-2-29 H14, J55014 H14 (EMC) and Appendix 4 of the Enforcement Regulation of the Electrical Appliance and Material Safety Law.
Identification labelThe identification label states the batch number and the manufacturing country.
Charger model NEA 7000-JP (Japan)
100V 50-60Hz Mains supply
0.8A Maximum current
Output voltage and charge current 41 V Fast charge 0.9A Standby charge current 50 mA
NEA0100 ArjoHuntleigh battery intended for this charger
Insulation classClass II
No installation in wet area
Read the operation instructions before use
Made in Norway for:
Arjo Hospital Equipment AB
Eslöv Sweden
Serial No. SE 1499 0001
Data / Approval label
Identification label on the bottom side
NEA 7000-JP
100VAC 50-60Hz 0.8A
BATTERY CHARGER FOR:ARJO BATTERY NEA 0100
S t a t u s - I n d i c a t i o n :Yellow: No BatteryOrange: Fast charge (0.9A)Green: Charge Completed
Made inNorway
Labels on battery charger, Japan

52
The data label, the identification label and the approval label are located on the pillar, behind the battery.
Data labelOn the data label you will find the following information:
Identification labelThe identification label states the type of equipment and serial number (see figure).
Sling range labelFitted to the spreader bar frame for quick col-our reference to size and safe working load.
Attention labelOn the spreader bar frame to indicate “not for use in bath or shower”.
Clips instructions labelsLabels placed by the knobs where the clips should be connected and on the spreader bar actuator.
Battery indicator labelPositioned on the battery housing to indicate when the battery needs charging.
Emergency lowering labelPositioned near the control of emergency low-ering.
Approval label
SWL Safe Working Load 182 kg (400 lbs).
Lifting stroke 1240 mm (48 3/4”)
24V DC Supply voltage
200VA Lift max power
Fuse F1 F10AL
Fuse F2 T4AL
IP 44 Protection class
Type BApplied part: protection against electrical shock in accordance with EN 60 601-1.
ED MAX 10%
Mode of operation for Hi/Low function: Max 2min ON and 18 min OFF
NDA010024V 2.5Ah
Product no and data of the bat-tery
Read the operation instruc-tionsbefore use.
Separate electrical and elec-tronic components for recy-cling in accordance with the European Directive 2002/96/EG (WEEE)
CE marking in accordance with the Directive 93/42/EEC (The Medical Devices Directive)
Classified with respect to electric shock, fire mechanical and other specified hazards only in accordance with UL60 601-1 and CAN/CSA C22.2 No 601.1-M90 including measuring device.
0086
Labels on the lift
TÜV marking. The lift has been safely tested according to:
EN/ISO 10535
EN/ISO 12182
EN/ISO 60601-1 (NTRL - National Recognized Testing Laboratory)
Biocompability ISO 10993
Note: Applies to USA and Canada
Note: Applies to USA and Canada
PRODUCT SERVICE
Production
Production
monitored
monitoredSafeSafe
tyty
teste
tested
NRTLNRTL
53
Product no
Serial no
CCB7001-01
0909XXXXX
Made by Arjo in Eslov, Sweden
010115
0909XXXXX
Running
numberassembly
MonthYear
XS
S
M
L
LL
XL
182 kg400 lb
PRODUCT SERVICE
Production
Production
monitored
monitoredSafeSafe
tyty
teste
tested
NRTLNRTL
Clips InstructionsLabel
EmergencyLowering Label
Water Level Mark
Battery Indicator Label
Sling range label
Approval Label
Product Name
Brand Name
Identification Label Data Label with scale
Data Label

54

ARJO Hospital Equipment AB, PO Box 61, Verkstadsvägen 5, SE-241 21 Eslöv, Sweden
www.arjohuntleigh.com
If your country is not listed here, please contact your local distributor
or: ARJO INTERNATIONAL AB, Box 61, S-241 21 ESLÖV, SWEDEN
Tel: +46 413 645 00; Fax: +46 413 645 63;
www.arjo.com
AUSTRALIA
ArjoHuntleigh Pty Ltd
78, Forsyth street
O’Connor
AU-6163 Western Australia
Tel: +61 89337 4111
Free +1800 072 040
Fax: + 61 89337 9077
AUSTRIA
ArjoHuntleigh GmbH
Dörrstrasse 85
AT-6020 INNSBRUCK
Tel: +43(0)512 204 160 -0
Fax: +43(0)512 204 160-75
BELGIUM
ArjoHuntleigh NV/SA
Evenbroekveld 16
B-9420 ERPE-MERE
Tel: +32 (0)53 60 73 80
Fax: +32 (0)53 60 73 81
E-mail: [email protected]
Website: www.arjohuntleigh.be
CANADA
ArjoHuntleigh Canada Inc.
1575 South Gateway Road
Unit "C"
MISSISSAUGA, ON, L4W 5JI
Tel: +1 905 238 7880
Fax: +1 905 238 7881
E-mail: [email protected]
Web page: www.arjohuntleigh.com.
CZECH REPUBLIC
ARJO Hospital Equipment s.r.o.
Hlinky 118
CZ- 603 00 BRNO
Tel.: +420 549 254 252
Fax: +420 541 213 550
DENMARK
ArjoHuntleigh A/S
Vassingerödvej 52
DK-3450 LYNGE
Tel: +45 49 13 84 86
Fax: +45 49 13 84 87
FAR EAST
ARJO Far East Limited
Unit 3A, 4/F., block B Hoi Luen Industrial Centre
55 Hoi Yuen Road, Kwun Tong, Kowloon
HONG KONG
Tel: +2508 9553
Fax: +2508 1416
FINLAND
ArjoHuntleigh OY
Vanha Porvoontie 229
FI-01380 VANTAA
Tel: +358 9 4730 4320
Fax: +358 9 4730 4999
FRANCE
ARJO Equipements Hospitaliers S.A.
45, Avenue de l’Europe
Eurocit BP 133
F-59436 RONCQ CEDEX
Tel: +33(0)3 20 28 13 13
Fax: +33(0)3 20 28 13 14
E-mail: [email protected]
GERMANY
ArjoHuntleigh GmbH
Peter-Sander-Strasse 10
D-55252 MAINZ-KASTEL
Tel: +49(0)6134-186-0
Fax: +49(0)6134 186 160
E-mail: [email protected]
GREECE
C. Psimitis Co Ltd
Dimitriou Andr. 59
GR-16121 KAISARIANI ATTIKIS
Tel: 21 0724 36 68
Fax: 21 0721 55 53
ITALY
ArjoHuntleigh S.p.A.
Via Tor Vergata 432
00133 ROMA - ITALIA
Tel: +39(0)6-87426211
Fax: +39(0)6-87426222
E-mail: [email protected]: www.arjohuntleigh.it
THE NETHERLANDS
ArjoHuntleigh BV
Biezenwei 21
4004 MB TIEL
Postbus 6116
NL-4000 HC TIEL
Tel: +31(0)344-64 08 00
Fax: +31(0)344-64 08 85
E-mail: [email protected]
NORWAY
ARJO Scandinavia AB
Ryenstubben 2
NO-0679 OSLO
Tel: +47 22 08 00 50
Fax: +47 22 57 06 52
POLAND
ArjoHuntleigh Healthcare Polska Sp. z o.o.
ul. Ks Wawrzyniaka 2
PL 62-052 KOMORNIKI (Poznan)
Tel. +48 61 662 15 50
Fax +48 61 662 15 90
PORTUGAL
ArjoHuntleigh Iberica, SL - Sucursal Portugal
Rua Poeta Bocage Nº 2 - 2G
1600-233 Lisboa
E-mail: [email protected]
Tel: +351 217 163 546
Fax: +351 217 162 534
SPAIN
ArjoHuntleigh Ibérica S.L.
Ctra. de Rubí, 88 1ª planta - A1
08173 Sant Cugat del Vallés
ES- BARCELONA 08130
Tel: +34 93 583 11 20
Fax: +34 93 583 11 22
SWEDEN
ARJO Scandinavia AB/Huntleigh Healthcare AB
Verkstadsvägen 5
Box 61
SE-241 21 ESLÖV
Tel: +46(0)413-645 00
Fax: +46(0)413-645 83
E-mail: [email protected]
SWITZERLAND
ArjoHuntleigh AG
Florenzstrasse 1d
Postfach
CH-BASEL4023
Tel: +41(0)61-337 97 77
Fax: +41(0)61-311 97 42
UNITED KINGDOM
ARJO Med AB Limited
St Catherine Street
UK-GLOUCESTER GL1 2SL
Tel: +44 1452 428200
Fax: +44 1452 428344
USA
ARJO, Inc.
2349 W Lake Street Suite 250
Addison, IL 60101
Tel: +1 630-307-2756
Free +1 800 323 1245
Fax: +1 630 307 6195
E-mail: [email protected]
7000202
RE
GISTERED
FM 24321 ISO 9001MD 87841 ISO 13485