Embed Size (px)
Citation preview
8/2/2019 Mazda5 Owners Manual
http://slidepdf.com/reader/full/mazda5-owners-manual 1/375

8/2/2019 Mazda5 Owners Manual
http://slidepdf.com/reader/full/mazda5-owners-manual 2/375
8/2/2019 Mazda5 Owners Manual
http://slidepdf.com/reader/full/mazda5-owners-manual 3/375
Thank you for choosing a Mazda. We at Mazda design and build vehicles with completecustomer satisfaction in mind.
To help ensure enjoyable and trouble-free operation of your Mazda, read this manualcarefully and follow its recommendations.
An Authorized Mazda Dealer knows your vehicle best. So when maintenance or service isnecessary, that's the place to go.
Our nationwide network of Mazda professionals is dedicated to providing you with the best possible service.
We assure you that all of us at Mazda have an ongoing interest in your motoring pleasure
and in your full satisfaction with your Mazda product.Mazda Motor Corporation
HIROSHIMA, JAPAN
Important Notes About This ManualKeep this manual in the glove box as a handy reference for the safe and enjoyable use of your Mazda. Should youresell the vehicle, leave this manual with it for the next owner.
All specifications and descriptions are accurate at the time of printing. Because improvement is a constant goal at Mazda, we reserve the right to make changes in specifications at any time without notice and without obligation.
Event Data RecorderThis vehicle is equipped with an event data recorder. In the event of a crash, this device records data related tovehicle dynamics and safety systems for a short period of time. These data can help provide a better understanding of the circumstances in which crashes and injuries occur and lead to the designing of safer vehicles.
Air Conditioning and the EnvironmentYour Mazda's genuine air conditioner is filled with HFC134a (R134a), a refrigerant that has been found not todamage the earth's ozone layer. If the air conditioner does not operate properly, consult an Authorized Mazda Dealer.
PerchlorateCertain components of this vehicle such as [air bag modules, seat belt pretensioners, lithium batteries, ...] maycontain Perchlorate Material – Special handling may apply for service or vehicle end of life disposal. Seewww.dtsc.ca.gov/hazardouswaste/perchlorate.
Please be aware that this manual applies to all models, equipment and options. As a result, you may findsome explanations for equipment not installed on your vehicle.
©2008 Mazda Motor Corporation
Printed in Japan June 2008(Print1)
A Word to Mazda Owners
8/2/2019 Mazda5 Owners Manual
http://slidepdf.com/reader/full/mazda5-owners-manual 4/375
We want to help you get the most driving pleasure from your vehicle. Your owner's
manual, when read from cover to cover,can do that in many ways.
Illustrations complement the words of themanual to best explain how to enjoy your Mazda. By reading your manual, you canfind out about the features, important safety information, and driving under various road conditions.
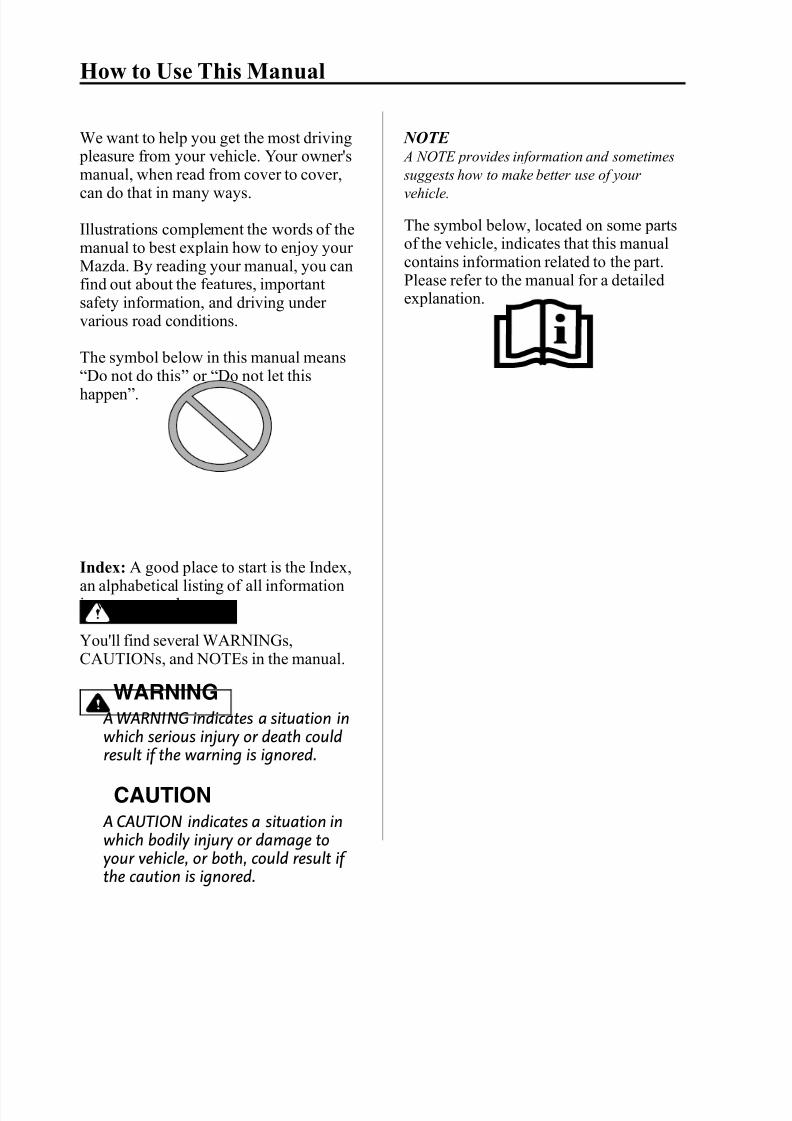
The symbol below in this manual means“ Do not do this ” or “ Do not let thishappen ” .
Index: A good place to start is the Index,an alphabetical listing of all informationin your manual.
You'll find several WARNINGs,CAUTIONs, and NOTEs in the manual.
WARNING
A WARNING indicates a situation inwhich serious injury or death couldresult if the warning is ignored.
CAUTION
A CAUTION indicates a situation inwhich bodily injury or damage toyour vehicle, or both, could result if the caution is ignored.
NOTE A NOTE provides information and sometimes
suggests how to make better use of your vehicle.
The symbol below, located on some partsof the vehicle, indicates that this manualcontains information related to the part.Please refer to the manual for a detailedexplanation.
How to Use This Manual
8/2/2019 Mazda5 Owners Manual
http://slidepdf.com/reader/full/mazda5-owners-manual 5/375
Table of Contents
Your Vehicle at a GlanceInterior, exterior views and part identification of your Mazda.
1
Essential Safety EquipmentUse of safety equipment, including seats, seat belt system, child-restraint systems and SRS air bags.
2
Knowing Your MazdaExplanation of basic operations and controls; opening/closing and adjustment of various parts.
3
Before Driving Your MazdaImportant information about driving your Mazda. 4
Driving Your MazdaExplanation of instruments and controls.
5
Interior ComfortUse of various features for drive comfort, including air-conditioning and audiosystem.
6
In Case of an EmergencyHelpful information on what to do in an emergency.
7
Maintenance and CareHow to keep your Mazda in top condition.
8
Customer Information
Important consumer information including warranties and add-on equipment.
9
SpecificationsTechnical information about your Mazda.
10
Index 11

8/2/2019 Mazda5 Owners Manual
http://slidepdf.com/reader/full/mazda5-owners-manual 6/375
8/2/2019 Mazda5 Owners Manual
http://slidepdf.com/reader/full/mazda5-owners-manual 7/375
1 Your Vehicle at a Glance
Interior, exterior views and part identification of your Mazda.
Dashboard and Interior Overview .............................................. 1-2
Exterior Overview ......................................................................... 1-4
1-1
8/2/2019 Mazda5 Owners Manual
http://slidepdf.com/reader/full/mazda5-owners-manual 8/375
1-2
Your Vehicle at a Glance
The equipment and installation position varies by vehicle
Dashboard and Interior Overview
8/2/2019 Mazda5 Owners Manual
http://slidepdf.com/reader/full/mazda5-owners-manual 9/375
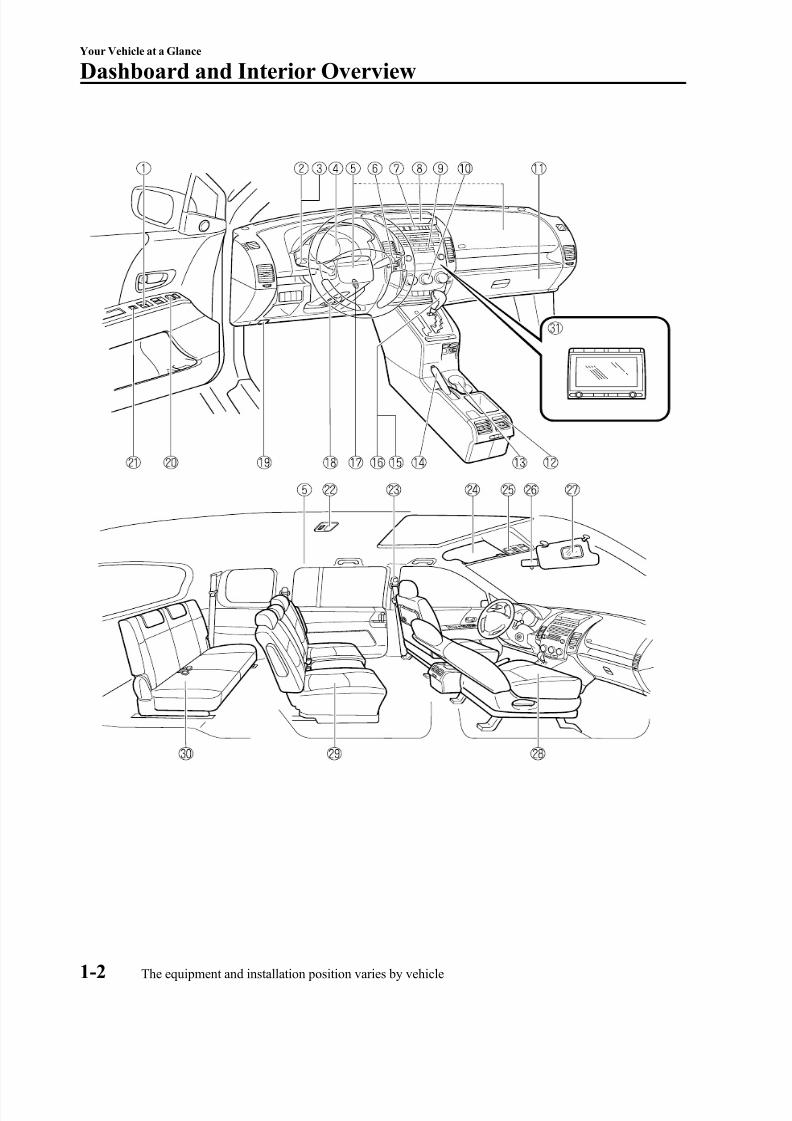
Power window switches .................................................................................... page 3-14Lighting control ................................................................................................. page 5-45
Turn and lane-change signals ............................................................................ page 5-48Instrument cluster .............................................................................................. page 5-28Air bags ............................................................................................................. page 2-38Wiper and washer lever ..................................................................................... page 5-49Hazard warning flasher switch .......................................................................... page 5-55Information display ............................................................................................ page 6-66Audio system ..................................................................................................... page 6-18Climate control system ........................................................................................ page 6-2
Glove box .......................................................................................................... page 6-71Rear ventilation system ..................................................................................... page 6-17Cup holder ......................................................................................................... page 6-68Parking brake ....................................................................................................... page 5-6MT shift lever ...................................................................................................... page 5-9AT shift lever (Sport AT) ................................................................................... page 5-11Ignition switch ..................................................................................................... page 5-2Steering column release lever ............................................................................ page 3-26Hood release handle .......................................................................................... page 3-17Outside mirror switch ........................................................................................ page 3-26Power window lock switch ................................................................................ page 3-15Interior light ....................................................................................................... page 6-64Seat belts ............................................................................................................ page 2-14Sunvisor ............................................................................................................. page 6-64Map light ........................................................................................................... page 6-65Rearview mirror ................................................................................................. page 3-27Vanity mirror ...................................................................................................... page 6-64
Front seats ............................................................................................................ page 2-2Second-row seat ................................................................................................... page 2-5Third-row seat ..................................................................................................... page 2-9 Navigation system (if equipped) .......................................... Refer to the separate manual
Your Vehicle at a Glance
Dashboard and Interior Overview
1-3The equipment and installation position varies by vehicle
8/2/2019 Mazda5 Owners Manual
http://slidepdf.com/reader/full/mazda5-owners-manual 10/375
1-4
Your Vehicle at a Glance
The equipment and installation position varies by vehicle
Exterior Overview

8/2/2019 Mazda5 Owners Manual
http://slidepdf.com/reader/full/mazda5-owners-manual 11/375
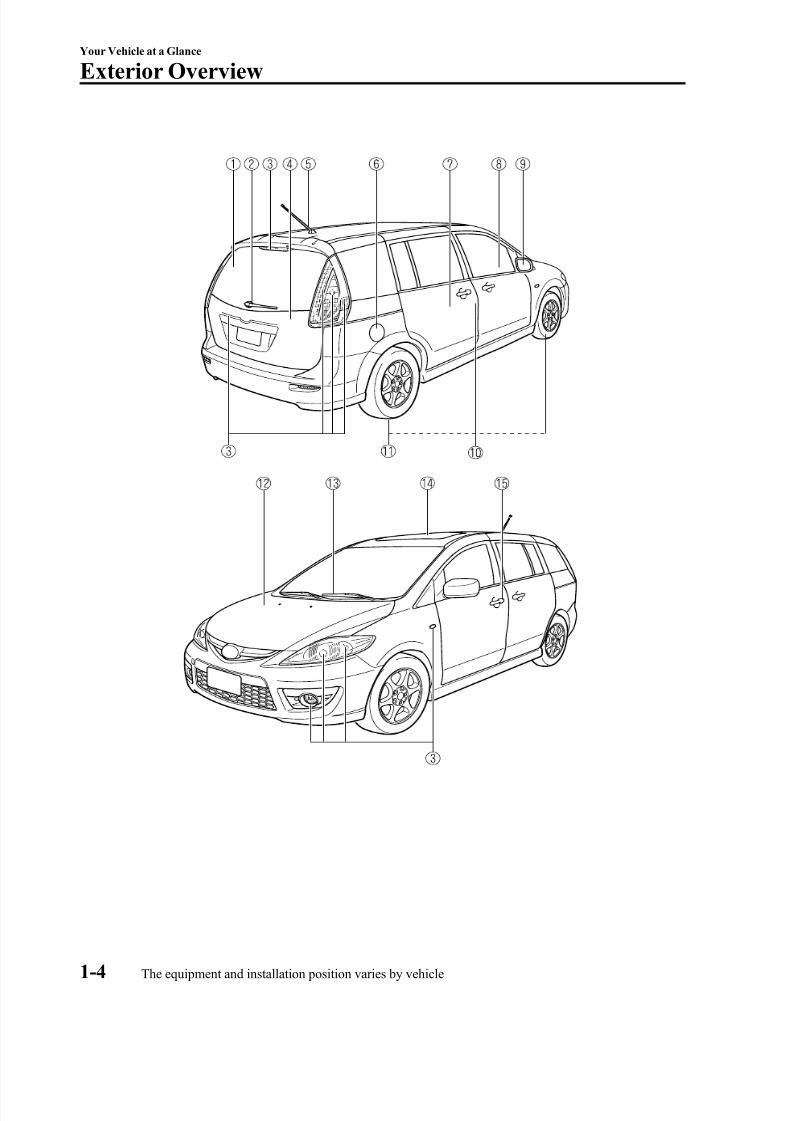
Rear window defroster ....................................................................................... page 5-54Rear wiper blade ................................................................................................ page 8-27
Light bulbs ......................................................................................................... page 8-35Liftgate .............................................................................................................. page 3-12Antenna ............................................................................................................. page 6-18Fuel-filler lid ...................................................................................................... page 3-16Sliding doors ........................................................................................................ page 3-9Power windows ................................................................................................. page 3-14Outside mirror .................................................................................................... page 3-26Child safety locks .............................................................................................. page 3-11
Tires ................................................................................................................... page 8-31Hood .................................................................................................................. page 3-17Windshield wiper blades .................................................................................... page 8-26Moonroof ........................................................................................................... page 3-19Doors and keys .................................................................................................... page 3-7
Your Vehicle at a Glance
Exterior Overview
1-5The equipment and installation position varies by vehicle

8/2/2019 Mazda5 Owners Manual
http://slidepdf.com/reader/full/mazda5-owners-manual 12/375
1-6
8/2/2019 Mazda5 Owners Manual
http://slidepdf.com/reader/full/mazda5-owners-manual 13/375
2 Essential Safety Equipment
Use of safety equipment, including seats, seat belt system, child-restraint systems and SRS air bags.
Seats ............................................................................................... 2-2Front Seats ................................................................................ 2-2Second-Row Seats .................................................................... 2-5Third-Row Seat ......................................................................... 2-9Head Restraints ....................................................................... 2-11
Seat Warmer í
......................................................................... 2-12
Seat Belt Systems ........................................................................ 2-14Seat Belt Precautions .............................................................. 2-14Seat Belt .................................................................................. 2-18Front Seat Belt Pretensioner and Load Limiting Systems ....... 2-20Seat Belt Extender ................................................................... 2-22Seat Belt Warning Light/Beep ................................................ 2-23
Child Restraint ............................................................................ 2-25Child Restraint Precautions ..................................................... 2-25Installing Child-Restraint Systems .......................................... 2-29LATCH Child-Restraint Systems ............................................ 2-35
SRS Air Bags ............................................................................... 2-38Supplemental Restraint Systems (SRS) Precautions ............... 2-38Supplemental Restraint System Components ......................... 2-42How the Air Bags Work .......................................................... 2-44
2-1íSome models.

8/2/2019 Mazda5 Owners Manual
http://slidepdf.com/reader/full/mazda5-owners-manual 14/375
Front Seats
WARNINGDo not modify or replace the frontseats:
Modifying or replacing the front seatssuch as replacing the upholstery or loosening any bolts is dangerous. Thefront seats contain air bagcomponents essential to thesupplemental restraint system. Such
modifications could damage thesupplemental restraint system andresult in serious injury. Consult an Authorized Mazda Dealer if there isany need to remove or reinstall thefront seats.
Do not drive with damaged front seats:Driving with damaged front seats isdangerous. A collision, even one notstrong enough to inflate the air bags,could damage the front seats whichcontain essential air bagcomponents. If there was asubsequent collision, an air bag may not deploy which could lead toinjuries. Always have an AuthorizedMazda Dealer inspect the front seats,front seat belt pretensioners and air bags after a collision.
Make sure the adjustable componentsof a seat are locked in place:
Adjustable seats and seatbacks thatare not securely locked aredangerous. In a sudden stop or collision, the seat or seatback couldmove, causing injury. Make sure theadjustable components of the seatare locked in place by attempting toslide the seat forward and backwardand rocking the seatback.
q Seat Slide
WARNING Adjust the driver's seat only when thevehicle is stopped:
Adjusting the driver's seat while thevehicle is moving is dangerous. Thedriver could lose control of the vehicleand have an accident.
To move a seat forward or backward, raisethe lever and slide the seat to the desired
position and release the lever.
Make sure the lever returns to its original position and the seat is locked in place byattempting to push it forward and backward.
2-2
Essential Safety Equipment
Seats
8/2/2019 Mazda5 Owners Manual
http://slidepdf.com/reader/full/mazda5-owners-manual 15/375
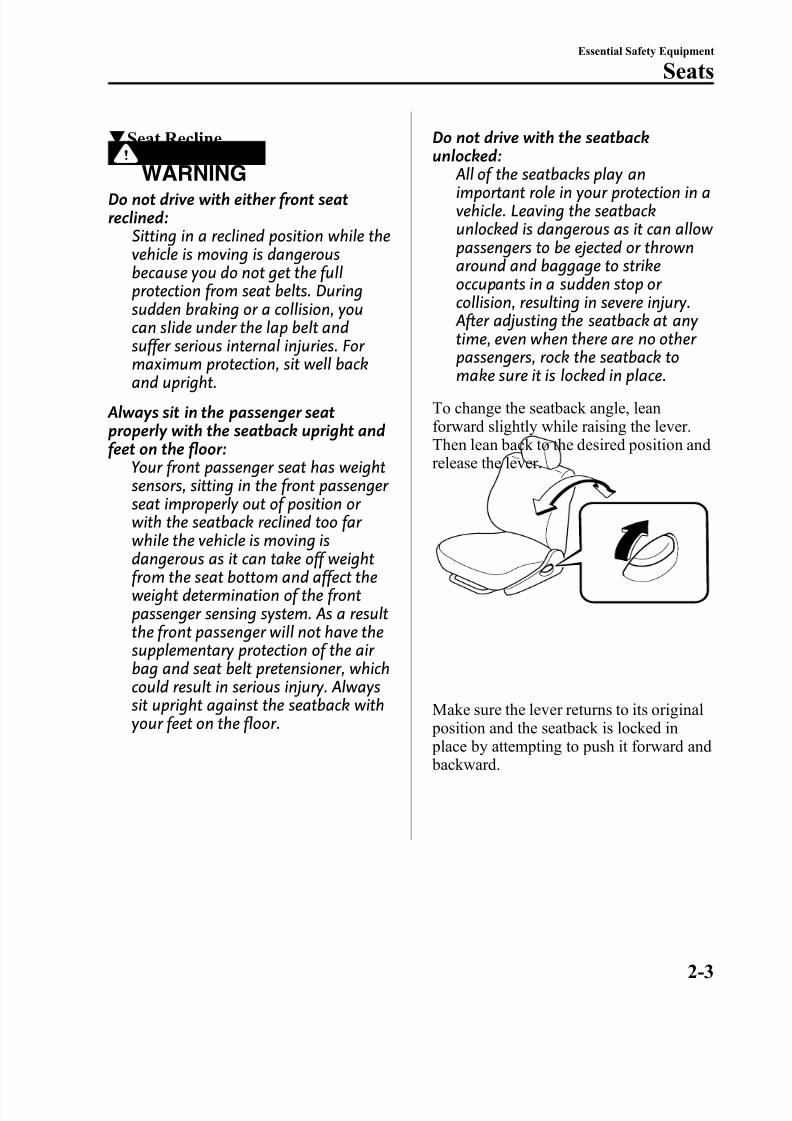
q Seat Recline
WARNINGDo not drive with either front seatreclined:
Sitting in a reclined position while thevehicle is moving is dangerousbecause you do not get the fullprotection from seat belts. Duringsudden braking or a collision, youcan slide under the lap belt andsuffer serious internal injuries. For maximum protection, sit well backand upright.
Always sit in the passenger seatproperly with the seatback upright andfeet on the floor:
Your front passenger seat has weightsensors, sitting in the front passenger seat improperly out of position or with the seatback reclined too far
while the vehicle is moving isdangerous as it can take off weightfrom the seat bottom and affect theweight determination of the frontpassenger sensing system. As a resultthe front passenger will not have thesupplementary protection of the air bag and seat belt pretensioner, whichcould result in serious injury. Alwayssit upright against the seatback withyour feet on the floor.
Do not drive with the seatbackunlocked:
All of the seatbacks play animportant role in your protection in avehicle. Leaving the seatbackunlocked is dangerous as it can allow passengers to be ejected or thrownaround and baggage to strikeoccupants in a sudden stop or collision, resulting in severe injury. After adjusting the seatback at any time, even when there are no other
passengers, rock the seatback tomake sure it is locked in place.
To change the seatback angle, leanforward slightly while raising the lever.Then lean back to the desired position andrelease the lever.
Make sure the lever returns to its original position and the seatback is locked in place by attempting to push it forward and backward.
Essential Safety Equipment
Seats
2-3
8/2/2019 Mazda5 Owners Manual
http://slidepdf.com/reader/full/mazda5-owners-manual 16/375
CAUTION
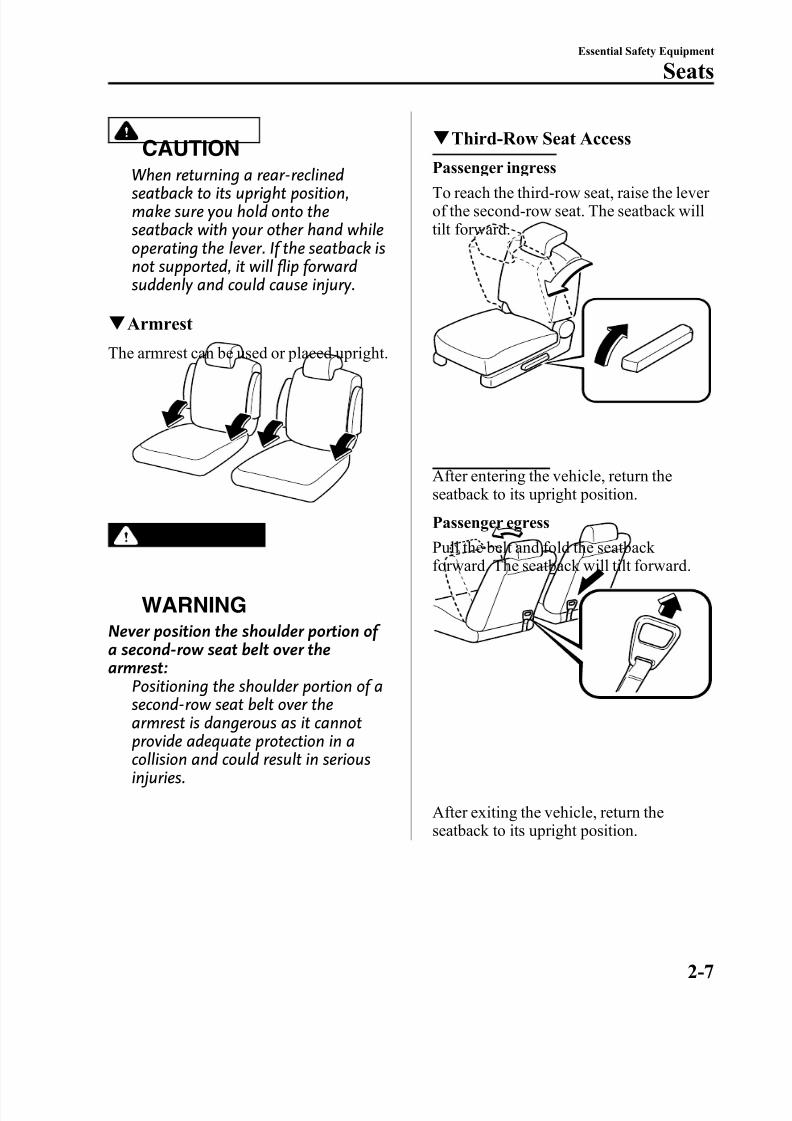
When returning a rear-reclinedseatback to its upright position,make sure you hold onto theseatback with your other hand whileoperating the lever. If the seatback isnot supported, it will flip forwardsuddenly and could cause injury.
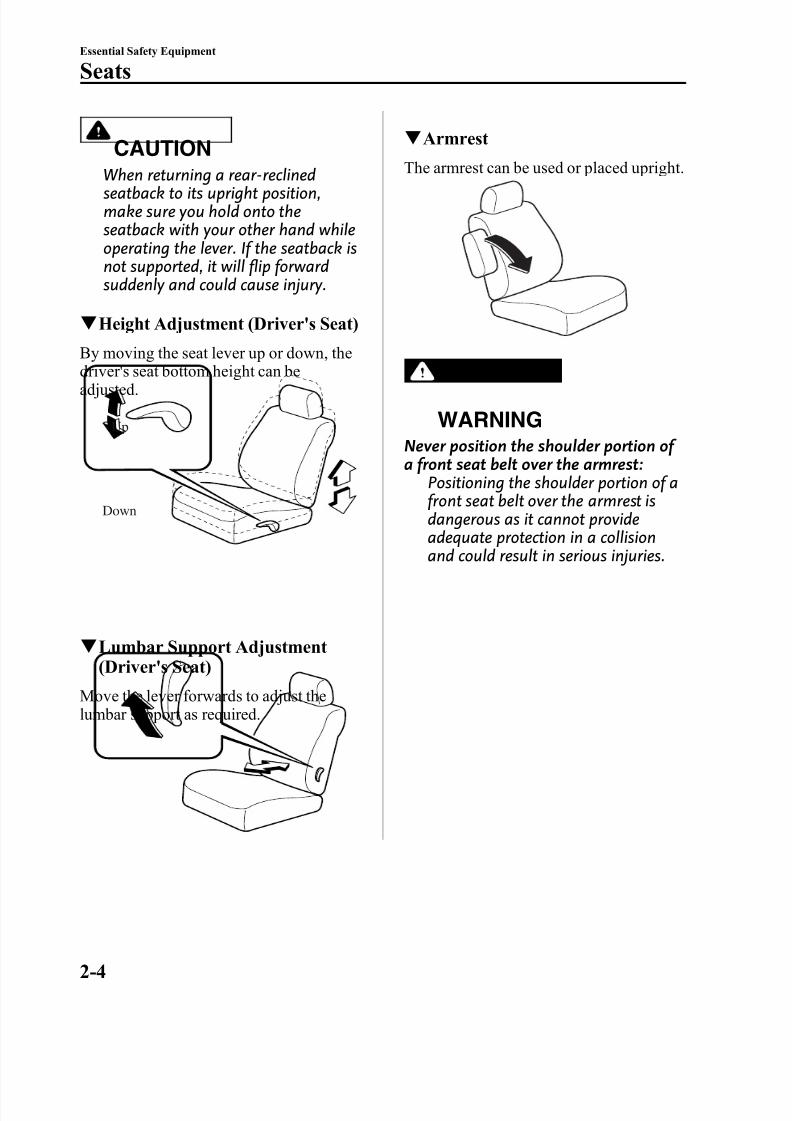
q Height Adjustment (Driver's Seat)
By moving the seat lever up or down, thedriver's seat bottom height can beadjusted.
Down
Up
q Lumbar Support Adjustment(Driver's Seat)
Move the lever forwards to adjust thelumbar support as required.
q Armrest
The armrest can be used or placed upright.
WARNING
Never position the shoulder portion of a front seat belt over the armrest:
Positioning the shoulder portion of afront seat belt over the armrest isdangerous as it cannot provide
adequate protection in a collisionand could result in serious injuries.
2-4
Essential Safety Equipment
Seats
8/2/2019 Mazda5 Owners Manual
http://slidepdf.com/reader/full/mazda5-owners-manual 17/375
Second-Row Seats
WARNINGDo not stack cargo higher than theseatbacks:
Stacking luggage or other cargohigher than the seatbacks isdangerous. During a sudden stop or collision, objects can fly around andbecome projectiles that could hit andinjure passengers.
Make sure luggage and cargo issecured before driving:
Not securing cargo while driving isdangerous as it could move or becrushed during sudden braking or acollision and cause injury.
Make sure the adjustable componentsof a seat are locked in place by attempting to slide the seat forwardand backward and rocking theseatback:
Adjustable seats that are not securely latched are dangerous. In a suddenstop or collision, the seat or seatbackcould move, causing injury.
Adjust the seat only when the vehicle isstopped:
Adjusting the seat while the vehicle is
moving is dangerous. Suddenbraking or a collision could causeserious injury.
Do not drive with the seatbackunlocked:
All of the seatbacks play animportant role in your protection in avehicle. Leaving the seatbackunlocked is dangerous as it can allow passengers to be ejected or thrownaround and baggage to strikeoccupants in a sudden stop or collision, resulting in severe injury. After adjusting the seatback at any time, even when there are no other
passengers, rock the seatback tomake sure it is locked in place.
Never allow a passenger to sit or standon the folded seatback while thevehicle is moving:
Driving with a passenger on thefolded seatback is dangerous. Allowing a child to sit up on thefolded seatback while the vehicle ismoving is particularly dangerous. Ina sudden stop or even a minor collision, a child not in a proper seator child-restraint system and seatbelt could be thrown forward, backor even out of the vehicle resulting inserious injuries or death. The child inthe baggage area could be throwninto other occupants and causeserious injury.
NOTE l The second-row seats cannot be removed.l When returning a second-row seat to its
original position, also replace the seat belt to its normal position. Verify that the seat belt pulls out and retracts.
Essential Safety Equipment
Seats
2-5
8/2/2019 Mazda5 Owners Manual
http://slidepdf.com/reader/full/mazda5-owners-manual 18/375
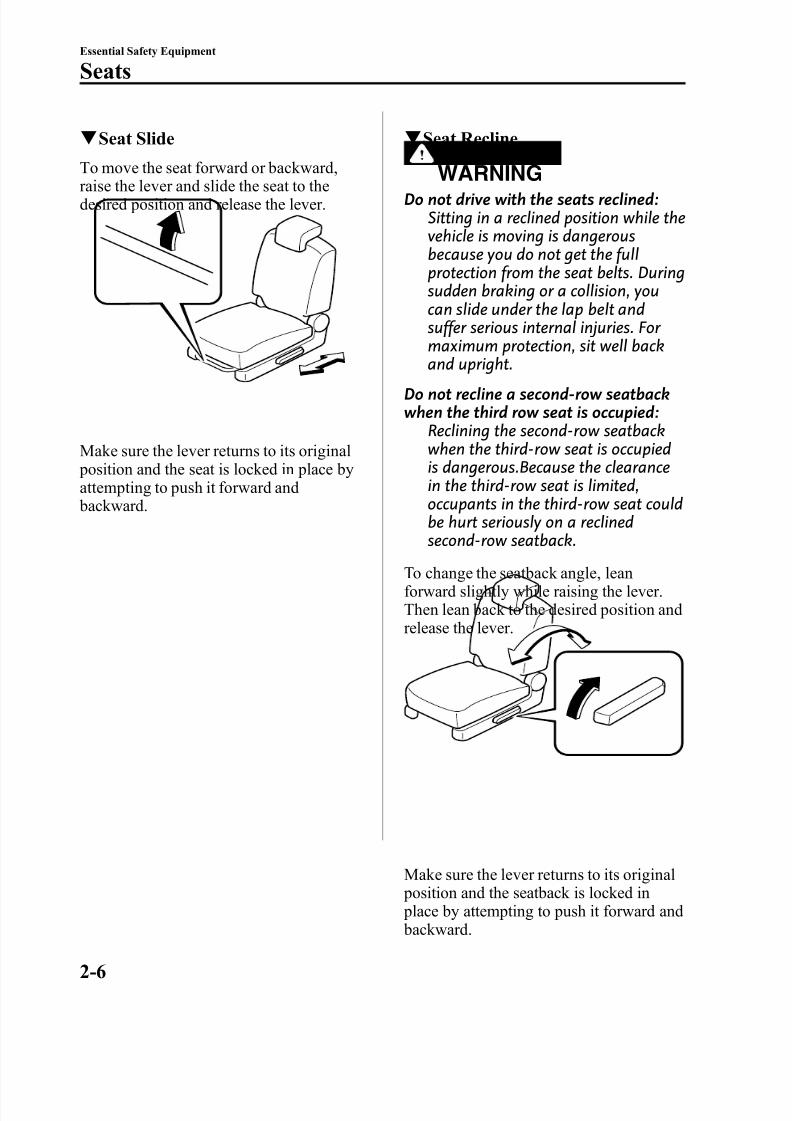
q Seat Slide
To move the seat forward or backward,raise the lever and slide the seat to thedesired position and release the lever.
Make sure the lever returns to its original position and the seat is locked in place byattempting to push it forward and backward.
q Seat Recline
WARNINGDo not drive with the seats reclined:
Sitting in a reclined position while thevehicle is moving is dangerousbecause you do not get the fullprotection from the seat belts. Duringsudden braking or a collision, youcan slide under the lap belt andsuffer serious internal injuries. For maximum protection, sit well backand upright.
Do not recline a second-row seatbackwhen the third row seat is occupied:
Reclining the second-row seatbackwhen the third-row seat is occupiedis dangerous.Because the clearancein the third-row seat is limited,occupants in the third-row seat couldbe hurt seriously on a reclined
second-row seatback.To change the seatback angle, leanforward slightly while raising the lever.Then lean back to the desired position andrelease the lever.
Make sure the lever returns to its original position and the seatback is locked in place by attempting to push it forward and backward.
2-6
Essential Safety Equipment
Seats
8/2/2019 Mazda5 Owners Manual
http://slidepdf.com/reader/full/mazda5-owners-manual 19/375
CAUTION
When returning a rear-reclinedseatback to its upright position,make sure you hold onto theseatback with your other hand whileoperating the lever. If the seatback isnot supported, it will flip forwardsuddenly and could cause injury.
q Armrest
The armrest can be used or placed upright.
WARNING
Never position the shoulder portion of a second-row seat belt over thearmrest:
Positioning the shoulder portion of asecond-row seat belt over thearmrest is dangerous as it cannotprovide adequate protection in acollision and could result in seriousinjuries.
q Third-Row Seat Access
Passenger ingress
To reach the third-row seat, raise the lever of the second-row seat. The seatback willtilt forward.
After entering the vehicle, return theseatback to its upright position.
Passenger egress
Pull the belt and fold the seatback forward. The seatback will tilt forward.
After exiting the vehicle, return theseatback to its upright position.
Essential Safety Equipment
Seats
2-7
8/2/2019 Mazda5 Owners Manual
http://slidepdf.com/reader/full/mazda5-owners-manual 20/375
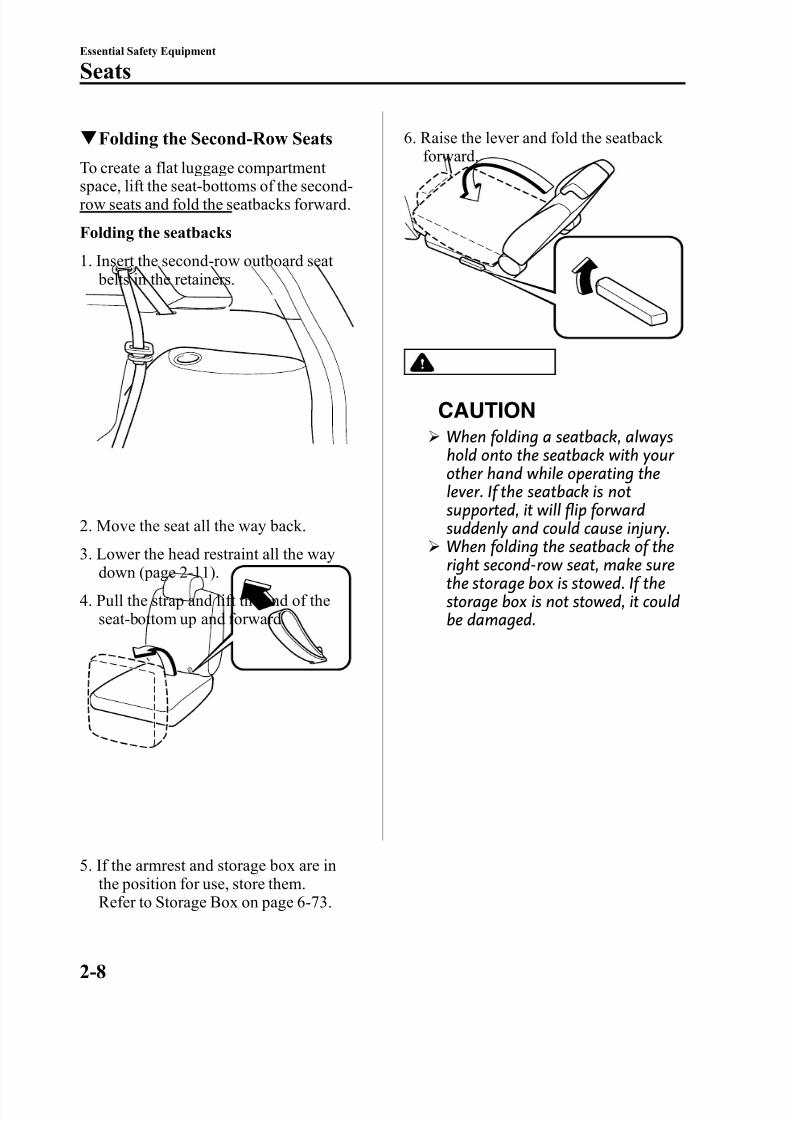
q Folding the Second-Row Seats
To create a flat luggage compartment space, lift the seat-bottoms of the second-row seats and fold the seatbacks forward.
Folding the seatbacks
1. Insert the second-row outboard seat belts in the retainers.
2. Move the seat all the way back.
3. Lower the head restraint all the waydown (page 2-11).
4. Pull the strap and lift the end of theseat-bottom up and forward.
5. If the armrest and storage box are inthe position for use, store them.
Refer to Storage Box on page 6-73.
6. Raise the lever and fold the seatback forward.
CAUTIONØ When folding a seatback, always
hold onto the seatback with your other hand while operating thelever. If the seatback is notsupported, it will flip forwardsuddenly and could cause injury.
Ø When folding the seatback of theright second-row seat, make surethe storage box is stowed. If thestorage box is not stowed, it couldbe damaged.
2-8
Essential Safety Equipment
Seats
8/2/2019 Mazda5 Owners Manual
http://slidepdf.com/reader/full/mazda5-owners-manual 21/375
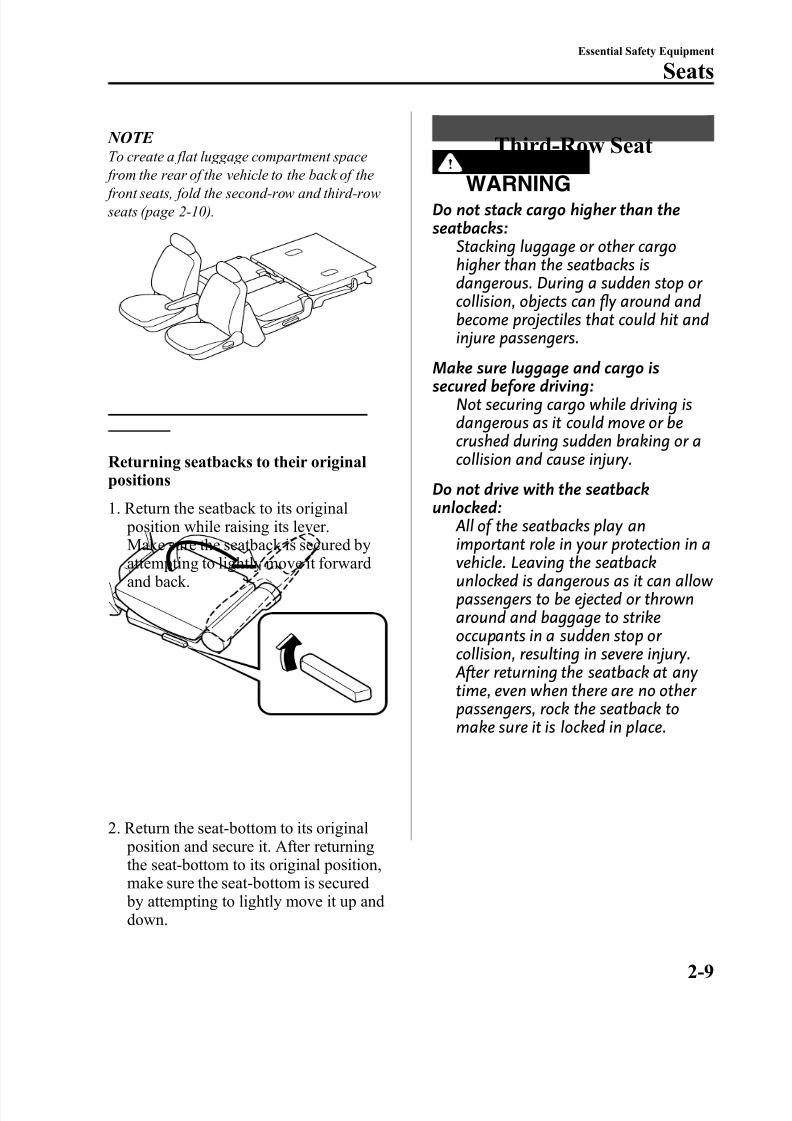
NOTE To create a flat luggage compartment space
from the rear of the vehicle to the back of the front seats, fold the second-row and third-row seats (page 2-10).
Returning seatbacks to their originalpositions
1. Return the seatback to its original position while raising its lever.Make sure the seatback is secured byattempting to lightly move it forwardand back.
2. Return the seat-bottom to its original position and secure it. After returningthe seat-bottom to its original position,make sure the seat-bottom is secured
by attempting to lightly move it up anddown.
Third-Row Seat
WARNINGDo not stack cargo higher than theseatbacks:
Stacking luggage or other cargohigher than the seatbacks isdangerous. During a sudden stop or collision, objects can fly around andbecome projectiles that could hit andinjure passengers.
Make sure luggage and cargo issecured before driving:
Not securing cargo while driving isdangerous as it could move or becrushed during sudden braking or acollision and cause injury.
Do not drive with the seatbackunlocked:
All of the seatbacks play animportant role in your protection in avehicle. Leaving the seatbackunlocked is dangerous as it can allow passengers to be ejected or thrownaround and baggage to strikeoccupants in a sudden stop or collision, resulting in severe injury. After returning the seatback at any time, even when there are no other passengers, rock the seatback tomake sure it is locked in place.
Essential Safety Equipment
Seats
2-9

8/2/2019 Mazda5 Owners Manual
http://slidepdf.com/reader/full/mazda5-owners-manual 22/375
Never allow a passenger to sit or standon the folded seatback while the
vehicle is moving:Driving with a passenger on thefolded seatback is dangerous. Allowing a child to sit up on thefolded seatback while the vehicle ismoving is particularly dangerous. Ina sudden stop or even a minor collision, a child not in a proper seator child-restraint system and seatbelt could be thrown forward, back
or even out of the vehicle resulting inserious injuries or death. The child inthe baggage area could be throwninto other occupants and causeserious injury.
NOTE l The third-row seat cannot be removed.l When returning a third-row seat to its
original position, also replace the seat belt
to its normal position. Verify that the seat belt pulls out and retracts.
q Split-Folding the Third-RowSeatback
To create a flat luggage compartment space, fold the seatbacks forward.
To fold third-row seat
1. Slide the second-row seat all the wayforward.
2. Insert the third-row outboard seat beltsin the retainers.
3. Lower the head restraints all the waydown (page 2-11).
4. Pull the strap and fold the seatback forward.
2-10
Essential Safety Equipment
Seats
8/2/2019 Mazda5 Owners Manual
http://slidepdf.com/reader/full/mazda5-owners-manual 23/375
NOTE To create a flat luggage compartment space
from the rear of the vehicle to the back of the front seats, fold the second-row and third-row seats (page 2-8).
To return third-row seat to its originalposition
Return the seatback to its original positionwhile pulling its strap.
Make sure the seatback is secured byattempting to lightly move it forward and back.
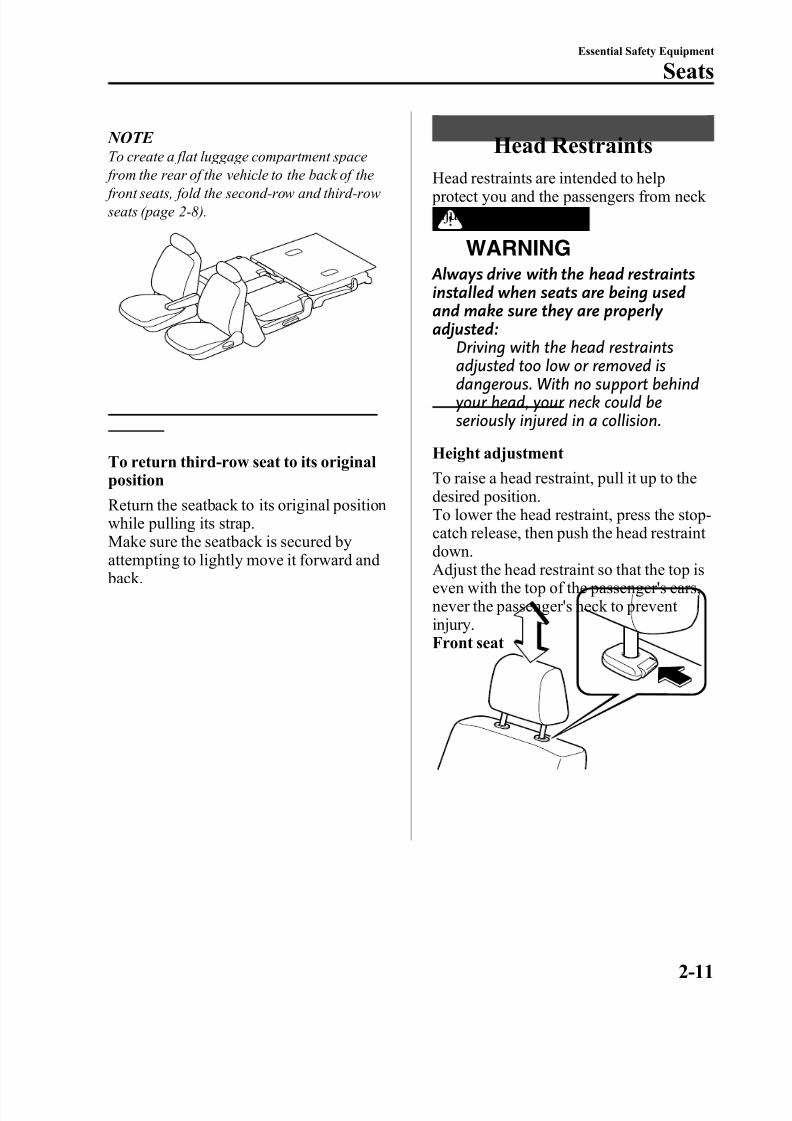
Head Restraints
Head restraints are intended to help protect you and the passengers from neck injury.
WARNING
Always drive with the head restraintsinstalled when seats are being usedand make sure they are properly adjusted:
Driving with the head restraintsadjusted too low or removed isdangerous. With no support behindyour head, your neck could beseriously injured in a collision.
Height adjustment
To raise a head restraint, pull it up to thedesired position.To lower the head restraint, press the stop-catch release, then push the head restraint down.Adjust the head restraint so that the top iseven with the top of the passenger's ears,never the passenger's neck to prevent injury.Front seat
Essential Safety Equipment
Seats
2-11

8/2/2019 Mazda5 Owners Manual
http://slidepdf.com/reader/full/mazda5-owners-manual 24/375
Second-Row seat
Third-Row seat
Removal/Installation
To remove the head restraint, pull it upwhile pressing the stop-catch.To install the head restraint, press theuprights into the holes while pressing thestop-catch.
WARNING
Always drive with the head restraintsset up when seats are being used andmake sure they are properly set up:
Driving with the head restraints notset up is dangerous. With no supportbehind your head, your neck could be
seriously injured in a collision.
Seat Warmer í
The front seats are electrically heated. Theignition switch must be in the ON position.
Press the switch to turn the seat warmer on or off. When the switch is in the ON position, the indicator light will come on.
Indicator
OFFON
2-12
Essential Safety Equipment
íSome models.
Seats
8/2/2019 Mazda5 Owners Manual
http://slidepdf.com/reader/full/mazda5-owners-manual 25/375
WARNINGØ
Be careful when using the seatwarmer. The heat from the seatwarmer may be too hot for somepeople, as indicated below, andcould cause a low-temperatureburn.Ø Infants, small babies, elderly
people, and physically challenged people
Ø People with delicate skinØ
People who are excessively fatiguedØ People who are drunkØ People who have taken sleep-
inducing medicine such assleeping pills or cold medicine
Ø Do not use the seat warmer withanything having high moisture-retention ability such as a blanketor cushion on the seat. The seat
may be heated excessively andcause a low-temperature burn.Ø Do not use the seat warmer even
when taking a short nap in thevehicle. The seat may be heatedexcessively and cause a low-temperature burn.
Ø Do not place heavy objects withsharp projections on the seat, or insert needles or pins into it. This
could cause the seat to becomeexcessively heated and result ininjury from a minor burn.
CAUTION
Do not use organic solvents to cleanthe seat. It may damage the seatsurface and the heater.
NOTE Use the seat warmer when the engine is
running, and do not continue to use it for along period of time.The temperature of the seat warmer cannot beadjusted beyond High and Low because the seat warmer is controlled by a thermostat.
Essential Safety Equipment
Seats
2-13
8/2/2019 Mazda5 Owners Manual
http://slidepdf.com/reader/full/mazda5-owners-manual 26/375
Seat Belt Precautions
Seat belts help to decrease the possibility of severe injury during accidents and suddenstops. Mazda recommends that the driver and all passengers always wear seat belts.
All of the seat belt retractors are designed to keep the lap/shoulder belts out of the waywhen not in use.
The driver's seat belt has no provisions for child-restraint systems and has only anemergency locking mode. The driver may wear it comfortably, and it will lock during a collision.
However, the front passenger's seat and all rear lap/shoulder belt retractors operate in twomodes: emergency locking mode, and for child-restraint systems, automatic locking mode.While we recommend you put all children in the rear seats, if you must use the front passenger seat for a child, slide the front passenger seat as far back as possible and makesure any child-restraint system is secured properly.
2-14
Essential Safety Equipment
Seat Belt Systems
8/2/2019 Mazda5 Owners Manual
http://slidepdf.com/reader/full/mazda5-owners-manual 27/375
WARNING
Always wear your seat belt and make sure all occupants are properly restrained:Not wearing a seat belt is extremely dangerous. During a collision, occupants notwearing seat belts could hit someone or things inside the vehicle or even be thrownout of the vehicle. They could be seriously injured or even killed. In the samecollision, occupants wearing seat belts would be much safer.
Do not wear twisted seat belts:Twisted seat belts are dangerous. In a collision, the full width of the belt is notavailable to absorb the impact. This puts more force on the bones beneath the belt,which could cause serious injury or death.
Never use one seat belt on more than one person at a time:Using one seat belt for more than one person at a time is dangerous. A seat beltused in this way cannot spread the impact forces properly and the two passengerscould be crushed together and seriously injured or even killed. Never use one belt for more than one person at a time and always operate the vehicle with each occupantproperly restrained.
Do not operate a vehicle with a damaged seat belt:Using a damaged seat belt is dangerous. An accident could damage the beltwebbing of the seat belt in use. A damaged seat belt cannot provide adequate
protection in a collision. Have an Authorized Mazda Dealer inspect all seat beltsystems in use during an accident before they are used again.
Have your seat belts changed immediately if the pretensioner or load limiter hasbeen expended:
One or both front air bags may deploy, and the corresponding pretensioner(s) may also deploy at the same time. Like the air bags, the seat belt pretensioners will only function once. While it is safer to use a post-crash (a seat belt that was used in anaccident) than no seat belt at all, using a seat belt with an expended pretensioner or load limiter loaded reduces the safety available to you. If the seat belt pretensionersare not replaced, the risk of injury in a collision will increase. Expended seat beltpretensioners and air bags must be replaced after any collision which caused themto deploy. Additionally, the load limiter will only limit loads on the chest once in acollision and this is another reason to have the front seat belts inspected. Alwayshave an Authorized Mazda Dealer inspect the seat belt pretensioners and air bagsafter any collision.
Essential Safety Equipment
Seat Belt Systems
2-15
8/2/2019 Mazda5 Owners Manual
http://slidepdf.com/reader/full/mazda5-owners-manual 28/375
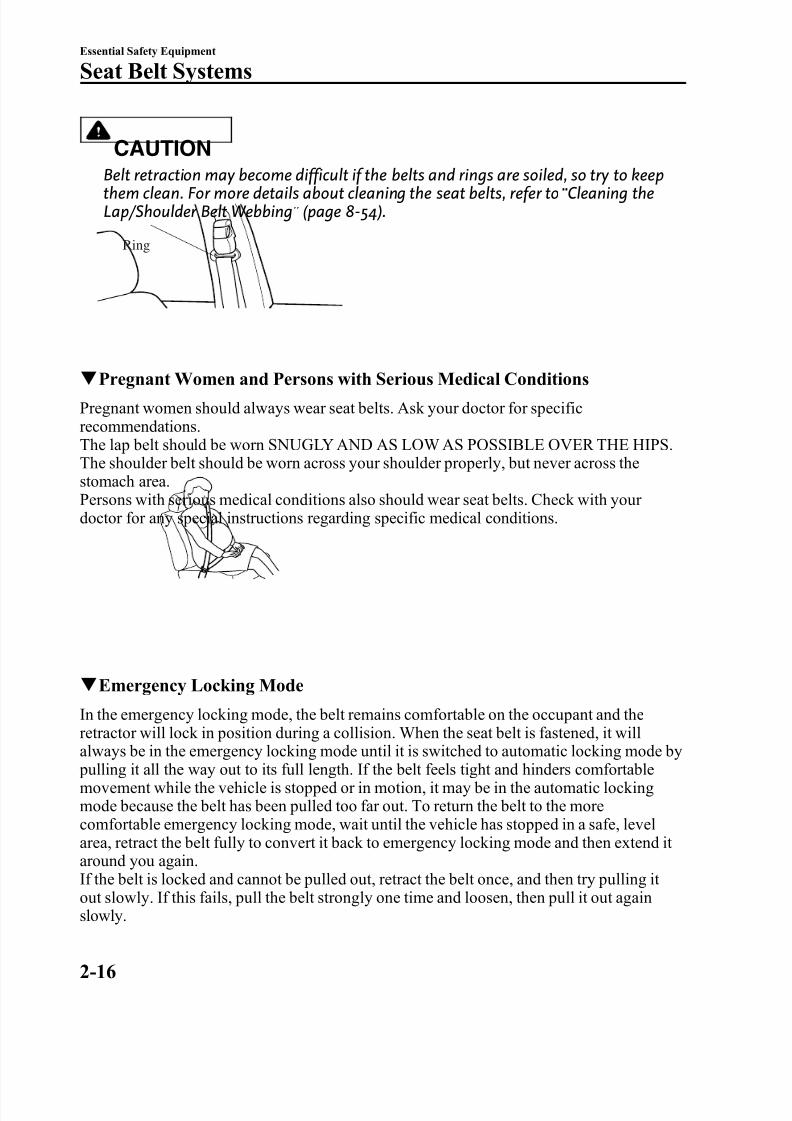
CAUTION
Belt retraction may become difficult if the belts and rings are soiled, so try to keepthem clean. For more details about cleaning the seat belts, refer to“ Cleaning theLap/Shoulder Belt Webbing” (page 8-54).
Ring
q Pregnant Women and Persons with Serious Medical Conditions
Pregnant women should always wear seat belts. Ask your doctor for specificrecommendations.The lap belt should be worn SNUGLY AND AS LOW AS POSSIBLE OVER THE HIPS.The shoulder belt should be worn across your shoulder properly, but never across thestomach area.Persons with serious medical conditions also should wear seat belts. Check with your doctor for any special instructions regarding specific medical conditions.
q Emergency Locking Mode
In the emergency locking mode, the belt remains comfortable on the occupant and theretractor will lock in position during a collision. When the seat belt is fastened, it willalways be in the emergency locking mode until it is switched to automatic locking mode by pulling it all the way out to its full length. If the belt feels tight and hinders comfortablemovement while the vehicle is stopped or in motion, it may be in the automatic lockingmode because the belt has been pulled too far out. To return the belt to the morecomfortable emergency locking mode, wait until the vehicle has stopped in a safe, levelarea, retract the belt fully to convert it back to emergency locking mode and then extend it around you again.If the belt is locked and cannot be pulled out, retract the belt once, and then try pulling it
out slowly. If this fails, pull the belt strongly one time and loosen, then pull it out againslowly.
2-16
Essential Safety Equipment
Seat Belt Systems
8/2/2019 Mazda5 Owners Manual
http://slidepdf.com/reader/full/mazda5-owners-manual 29/375
q Automatic Locking Mode
Always use the automatic locking mode to keep the child-restraint system from shifting toan unsafe position in the event of an accident. To enable seat belt automatic locking mode, pull it all the way out and connect it as instructed on the child-restraint system. It willretract down to the child-restraint system and stay locked on it. See the section on childrestraint (page 2-25).
Essential Safety Equipment
Seat Belt Systems
2-17
8/2/2019 Mazda5 Owners Manual
http://slidepdf.com/reader/full/mazda5-owners-manual 30/375
Seat Belt
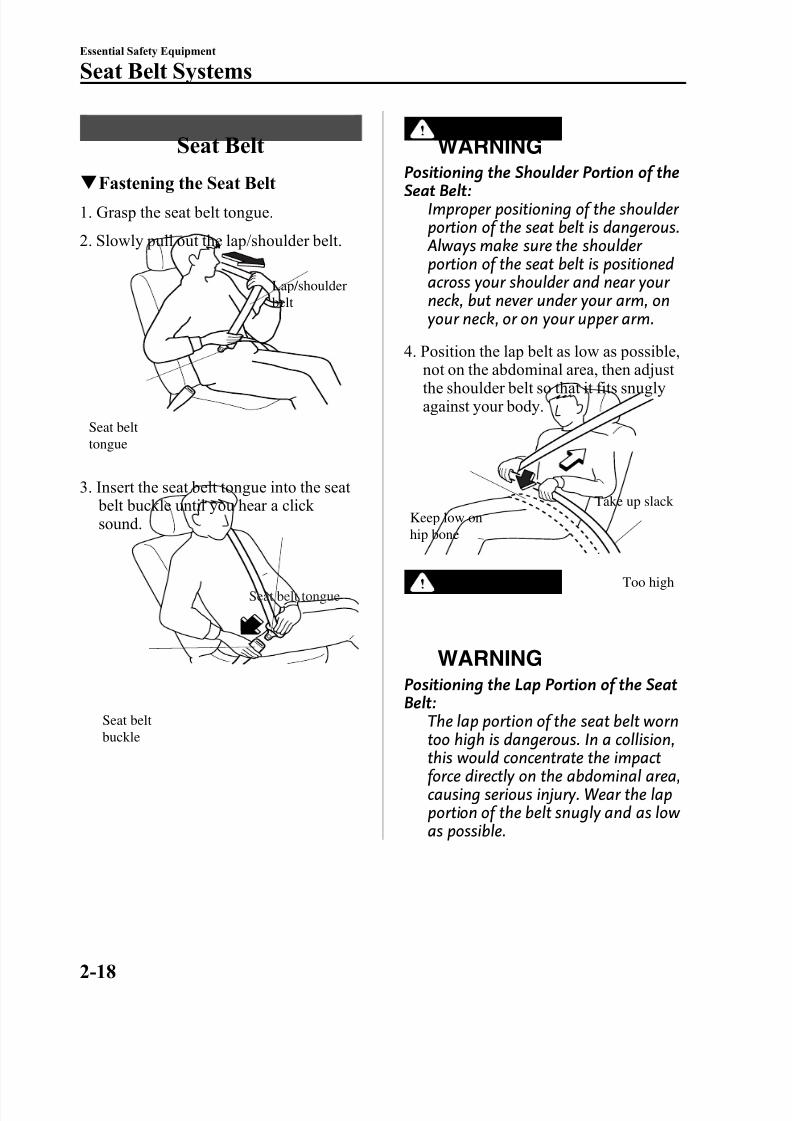
q Fastening the Seat Belt1. Grasp the seat belt tongue.
2. Slowly pull out the lap/shoulder belt.
Lap/shoulderbelt
Seat belttongue
3. Insert the seat belt tongue into the seat belt buckle until you hear a click sound.
Seat belt tongue
Seat beltbuckle
WARNING
Positioning the Shoulder Portion of theSeat Belt:Improper positioning of the shoulder portion of the seat belt is dangerous. Always make sure the shoulder portion of the seat belt is positionedacross your shoulder and near your neck, but never under your arm, onyour neck, or on your upper arm.
4. Position the lap belt as low as possible,not on the abdominal area, then adjust the shoulder belt so that it fits snuglyagainst your body.
Keep low onhip bone
Too high
Take up slack
WARNING
Positioning the Lap Portion of the SeatBelt:
The lap portion of the seat belt worntoo high is dangerous. In a collision,this would concentrate the impactforce directly on the abdominal area,causing serious injury. Wear the lapportion of the belt snugly and as low as possible.
2-18
Essential Safety Equipment
Seat Belt Systems
8/2/2019 Mazda5 Owners Manual
http://slidepdf.com/reader/full/mazda5-owners-manual 31/375
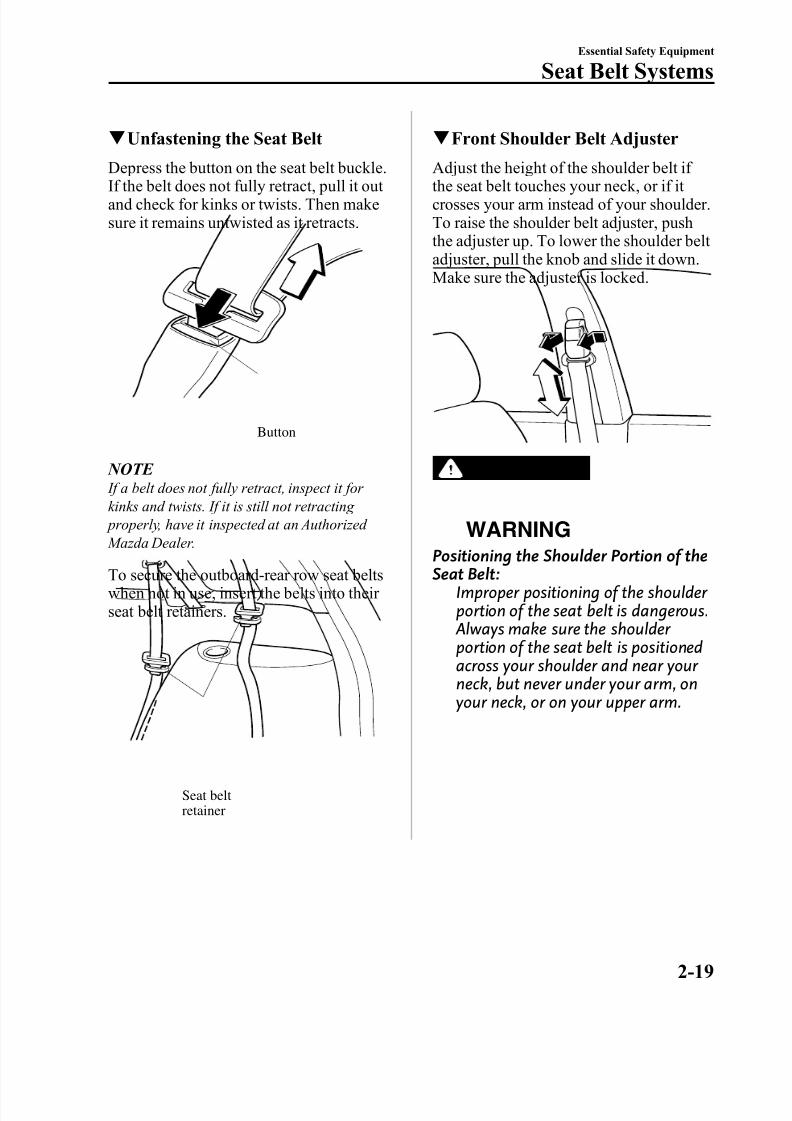
q Unfastening the Seat Belt
Depress the button on the seat belt buckle.If the belt does not fully retract, pull it out and check for kinks or twists. Then makesure it remains untwisted as it retracts.
Button
NOTE If a belt does not fully retract, inspect it for kinks and twists. If it is still not retracting properly, have it inspected at an Authorized
Mazda Dealer.
To secure the outboard-rear row seat beltswhen not in use, insert the belts into their seat belt retainers.
Seat beltretainer
q Front Shoulder Belt Adjuster
Adjust the height of the shoulder belt if the seat belt touches your neck, or if it crosses your arm instead of your shoulder.To raise the shoulder belt adjuster, pushthe adjuster up. To lower the shoulder belt adjuster, pull the knob and slide it down.Make sure the adjuster is locked.
WARNING
Positioning the Shoulder Portion of theSeat Belt:
Improper positioning of the shoulder portion of the seat belt is dangerous. Always make sure the shoulder portion of the seat belt is positionedacross your shoulder and near your neck, but never under your arm, onyour neck, or on your upper arm.
Essential Safety Equipment
Seat Belt Systems
2-19
8/2/2019 Mazda5 Owners Manual
http://slidepdf.com/reader/full/mazda5-owners-manual 32/375
Front Seat Belt Pretensioner
and Load Limiting SystemsFor optimum protection, the driver andfront passenger seat belts are equippedwith pretensioner and load limitingsystems. For both these systems to work properly you must wear the seat belt properly.
Pretensioners:
In moderate or severe frontal or near-frontal accidents, the front air bag and pretensioner systems deploysimultaneously. The front seat belt retractors remove slack quickly as the air bags are expanding.In addition, the pretensioner system for the front passenger, like the front passenger air bag, is designed to onlydeploy in accordance with the total seated
weight on the front passenger seat. Anytime the air bags and seat belt pretensioners have fired they must bereplaced. For details, refer to the front passenger seat weight sensors (page 2-44).
Load limiter:The load limiting system releases belt webbing in a controlled manner to reduce belt force on the occupant's chest. While
the most severe load on a seat belt occursin frontal collisions, the load limiter hasan automatic mechanical function and canactivate in any accident mode withsufficient occupant movement.Even if the pretensioners have not fired,the load limiting function must bechecked by an Authorized Mazda Dealer after any collision.
WARNING
Wear seat belts only as recommendedin this owner's manual:Incorrect positioning of the driver andfront passenger seat belts isdangerous. Without proper positioning, the pretensioner andload limiting systems cannot provideadequate protection in an accidentand this could result in serious injury.For more details about wearing seat
belts, refer to“
Fastening the seatbelts” (page 2-18).
Have your seat belts changedimmediately if the pretensioner or loadlimiter has been expended:
One or both front air bags may deploy, and the correspondingpretensioner(s) may also deploy atthe same time. Like the air bags, the
seat belt pretensioners will only function once. While it is safer to usea post-crash (a seat belt that wasused in an accident) than no seat beltat all, using a seat belt with anexpended pretensioner or load limiter loaded reduces the safety available toyou. If the seat belt pretensioners arenot replaced, the risk of injury in acollision will increase. Expended seat
belt pretensioners and air bags mustbe replaced after any collision whichcaused them to deploy. Additionally,the load limiter will only limit loadson the chest once in a collision andthis is another reason to have thefront seat belts inspected. Alwayshave an Authorized Mazda Dealer inspect the seat belt pretensionersand air bags after any collision.
2-20
Essential Safety Equipment
Seat Belt Systems
8/2/2019 Mazda5 Owners Manual
http://slidepdf.com/reader/full/mazda5-owners-manual 33/375
Do not modify the components or wiring, or use electronic testing devices
on the pretensioner system:Modifying the components or wiringof the pretensioner system, includingthe use of electronic testing devices isdangerous. You could accidentally activate it or make it inoperablewhich would prevent it fromactivating in an accident. Theoccupants or repairers could beseriously injured.
Properly dispose of the pretensioner system:
Improper disposal of the pretensioner system or a vehicle with non-deactivated pretensioners isdangerous. Unless all safety procedures are followed, injury couldresult. Ask an Authorized MazdaDealer how to safely dispose of the
pretensioner system or how to scrapa pretensioner-equipped vehicle.
NOTE l The pretensioner system will activate in a
moderate or greater frontal or near-frontal collision. The pretensioner system for the front passenger is designed to only deployin accordance with the total seated weight on the front passenger seat. It will not
activate in most rollovers, side or rear impacts.l Some smoke (non-toxic gas) will be
released when the air bags and pretensioners deploy. This does not indicatea fire. This gas normally has no effect onoccupants, however, those with sensitive skin may experience light skin irritation. If residue from the deployment of the air bagsor the front pretensioner system gets on the
skin or in the eyes, wash it off as soon as possible.
q Air Bag/Front Seat BeltPretensioner System Warning Light
If the air bag/front seat belt pretensioner system is working properly, the warninglight illuminates when the ignition switchis turned to the ON position or after theengine is cranked. The warning light turnsoff after a specified period of time.
A system malfunction is indicated if thewarning light constantly flashes,constantly illuminates or does not illuminate at all when the ignition switchis turned to the ON position. If any of
these occur, consult an Authorized Mazda Dealer as soon as possible. The systemmay not work in an accident.
WARNING
Never tamper with the air bag/ pretensioner systems and always havean Authorized Mazda Dealer performall servicing and repairs:
Self-servicing or tampering with thesystems is dangerous. An air bag/ pretensioner could accidentally activate or become disabled causingserious injury or death.
Essential Safety Equipment
Seat Belt Systems
2-21
8/2/2019 Mazda5 Owners Manual
http://slidepdf.com/reader/full/mazda5-owners-manual 34/375
Seat Belt Extender
If your seat belt is not long enough, evenwhen fully extended, a seat belt extender may be available to you at no charge fromyour Authorized Mazda Dealer.This extender will be only for you and for the particular vehicle and seat. Even if it plugs into other seat belts, it may not holdin the critical moment of a crash.When ordering an extender, only order one that provides the necessary additional
length to fasten the seat belt properly.Please contact your Authorized Mazda Dealer for more information.
WARNING
Do not use a seat belt extender unlessit is necessary:Using a seat belt extender when notnecessary is dangerous. The seat beltwill be too long and not fit properly.In an accident, the seat belt will notprovide adequate protection and youcould be seriously injured. Only usethe extender when it is required tofasten the seat belt properly.
Do not use an improper extender:Using a seat belt extender that is for another person or a different vehicleor seat is dangerous. The seat beltwill not provide adequate protectionand the user could be seriously injured in an accident. Only use theextender provided for you and for theparticular vehicle and seat. NEVERuse the extender in a different vehicleor seat. If you sell your Mazda, donot leave your seat belt extender inthe vehicle. It could be usedaccidentally by the new owner of thevehicle. After removing the seat beltextender, discard it. Never use theseat belt extender in any other vehicle you may own in the future.
Do not use an extender that is toolong:
Using an extender that is too long isdangerous. The seat belt will not fitproperly. In an accident, the seat beltwill not provide adequate protectionand you could be seriously injured.Do not use the extender or chooseone shorter in length if the distancebetween the extender's buckle andthe center of the user's body is lessthan 15 cm (6 in).
2-22
Essential Safety Equipment
Seat Belt Systems
8/2/2019 Mazda5 Owners Manual
http://slidepdf.com/reader/full/mazda5-owners-manual 35/375
NOTE When not in use, remove the seat belt extender
and store it in the vehicle. If the seat belt extender is left connected, the seat belt extender might get damaged as it will not retract with the rest of the seat belt and caneasily fall out of the door when not in use and be damaged. In addition, the seat belt warning light will not illuminate and function properly.
Seat Belt Warning Light/Beep
The seat belt warning light illuminatesand a beep sound will be heard if thedriver's seat belt is not fastened when the
ignition switch is turned to the ON position.
Conditions of operation
Condition Result
The driver's seat belt is not fastened when the ignitionswitch is turned to the ON position.
The warning light flashes and a beepsound will be heardfor about 6 seconds.
The driver's seat belt is
fastened while the warninglight and the beep sound areactivated.
The warning light turns off and the beepsound stops.
The driver's seat belt isfastened before the ignitionswitch is turned to the ON position.
The warning light willnot illuminate and the beep sound will not beheard.
q Belt Minder
NOTE
The belt minder can be deactivated. Consult an Authorized Mazda Dealer to deactivate or restore the seat belt minder.
Essential Safety Equipment
Seat Belt Systems
2-23
8/2/2019 Mazda5 Owners Manual
http://slidepdf.com/reader/full/mazda5-owners-manual 36/375
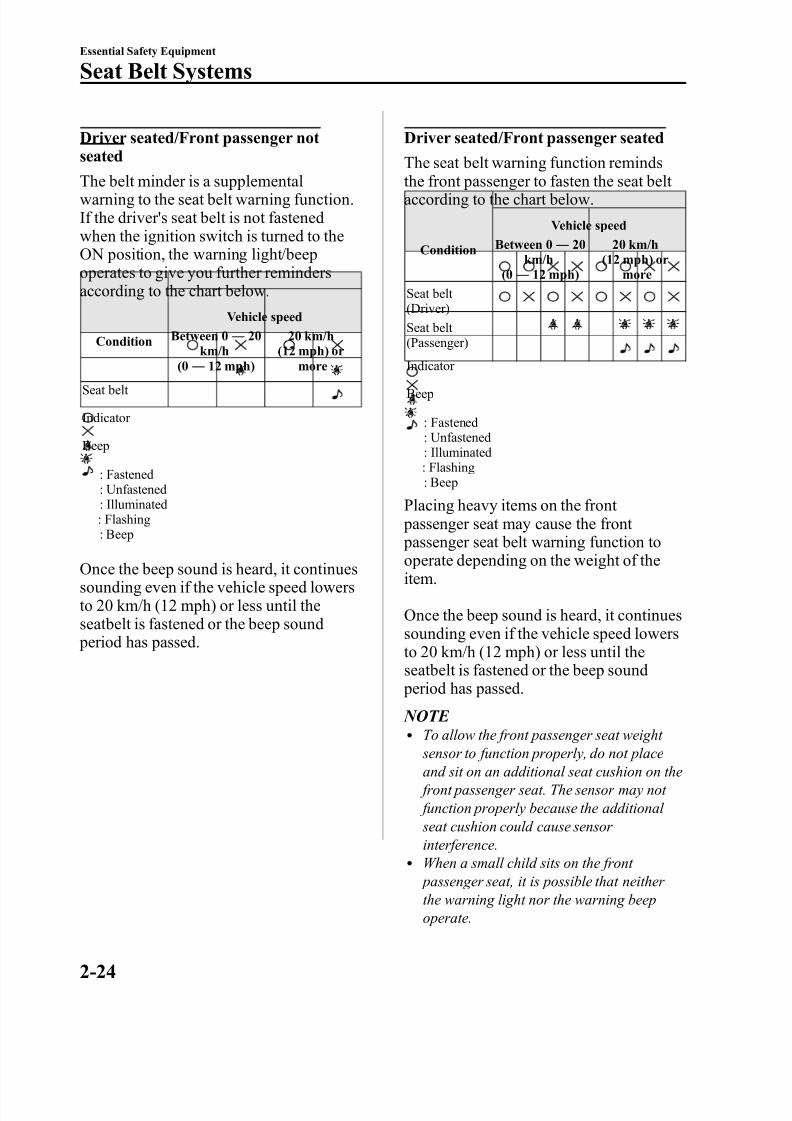
Driver seated/Front passenger notseated
The belt minder is a supplementalwarning to the seat belt warning function.If the driver's seat belt is not fastenedwhen the ignition switch is turned to theON position, the warning light/beepoperates to give you further remindersaccording to the chart below.
Condition
Vehicle speed
Between 0 ― 20km/h
(0 ― 12 mph)
20 km/h(12 mph) or
more
Seat belt
Indicator
Beep
: Fastened: Unfastened: Illuminated: Flashing: Beep
Once the beep sound is heard, it continuessounding even if the vehicle speed lowersto 20 km/h (12 mph) or less until theseatbelt is fastened or the beep sound period has passed.
Driver seated/Front passenger seated
The seat belt warning function reminds
the front passenger to fasten the seat belt according to the chart below.
Condition
Vehicle speed
Between 0 ― 20km/h
(0 ― 12 mph)
20 km/h(12 mph) or
more
Seat belt (Driver)Seat belt (Passenger)
Indicator
Beep
: Fastened: Unfastened: Illuminated: Flashing: Beep
Placing heavy items on the front passenger seat may cause the front
passenger seat belt warning function tooperate depending on the weight of theitem.
Once the beep sound is heard, it continuessounding even if the vehicle speed lowersto 20 km/h (12 mph) or less until theseatbelt is fastened or the beep sound period has passed.
NOTE l To allow the front passenger seat weight sensor to function properly, do not placeand sit on an additional seat cushion on the front passenger seat. The sensor may not function properly because the additional seat cushion could cause sensor interference.
l When a small child sits on the front passenger seat, it is possible that neither
the warning light nor the warning beepoperate.
2-24
Essential Safety Equipment
Seat Belt Systems
8/2/2019 Mazda5 Owners Manual
http://slidepdf.com/reader/full/mazda5-owners-manual 37/375
Child Restraint Precautions
Mazda strongly urges the use of child-restraint systems for children small enough to usethem.
You are required by law to use a child-restraint system for children in the U.S. and Canada.Check your local and state or provincial laws for specific requirements regarding the safetyof children riding in your vehicle.
Whatever child-restraint system you consider, please pick the appropriate one for the ageand size of the child, obey the law and follow the instructions that come with the individualchild-restraint system.
A child who has outgrown child-restraint systems should sit in the rear and use seat belts, both lap and shoulder. If the shoulder belt crosses the neck or face, move the child closer tothe center of the vehicle.
Statistics confirm that the rear seats are the best place for all children up to 12 years of age,and more so with a supplemental restraint system (air bags).
A rear-facing child-restraint system should NEVER be used on the front seat with the air bag system activated. The front passenger's seat is also the least preferred seat for other child-restraint systems.
To reduce the chance of injuries caused by deployment of the front passenger air bag, thefront passenger seat weight sensors work as a part of the supplemental restraint system.This system deactivates the front passenger front and side air bags and also the front passenger seat belt pretensioner system when the total seated weight on the front passenger seat is less than approximately 30 kg (66 lb).
When an infant or small child sits on the front passenger seat, the system shuts off the front passenger front and side air bags and seat belt pretensioner system, so make sure the front passenger air bag deactivation indicator light illuminates.
Even if the front passenger air bag is shut off, Mazda strongly recommends that children be properly restrained and child-restraint systems of all kinds are properly secured on the rear seats which are the best place for children.
For more details, refer to “ Front passenger seat weight sensors ” (page 2-44).
Essential Safety Equipment
Child Restraint
2-25

8/2/2019 Mazda5 Owners Manual
http://slidepdf.com/reader/full/mazda5-owners-manual 38/375
WARNING
Use the correct size child-restraint system:For effective protection in vehicle accidents and sudden stops, a child must beproperly restrained using a seat belt or child-restraint system depending on age andsize. If not, the child could be seriously injured or even killed in an accident.
Follow the manufacturer's instructions and always keep the child-restraint systembuckled down:
An unsecured child-restraint system is dangerous. In a sudden stop or a collision itcould move causing serious injury or death to the child or other occupants. Makesure any child-restraint system is properly secured in place according to the child-restraint system manufacturer's instructions. When not in use, remove it from thevehicle or fasten it with a seat belt, or latch it down to BOTH LATCH lower anchorsfor LATCH child-restraint systems and the corresponding tether anchor.
Always secure a child in a proper child-restraint system:Holding a child in your arms while the vehicle is moving is extremely dangerous. Nomatter how strong the person may be, he or she cannot hold onto a child in asudden stop or collision and it could result in serious injury or death to the child or other occupants. Even in a moderate accident, the child may be exposed to air bagforces that could result in serious injury or death to the child, or the child may beslammed into an adult, causing injury to both child and adult.
Never use a rear-facing child-restraint system in the front seat with an air bag thatcould deploy:
Rear-facing child-restraint systems on the front seat are particularly dangerous eventhough you may feel assured that a front passenger air bag will not deploy based onthe fact that the front passenger air bag deactivation indicator light illuminates.The child-restraint system can be hit by a deploying air bag and moved violently backward resulting in serious injury or death to the child.
2-26
Essential Safety Equipment
Child Restraint
8/2/2019 Mazda5 Owners Manual
http://slidepdf.com/reader/full/mazda5-owners-manual 39/375
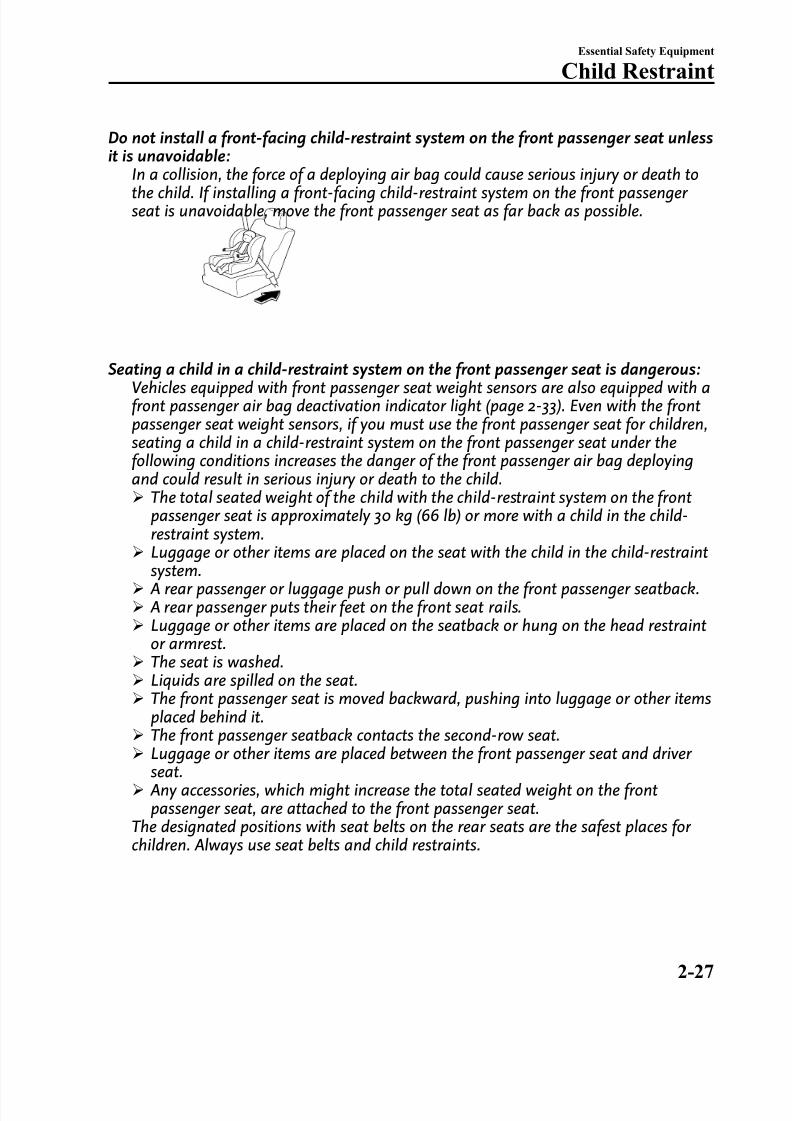
Do not install a front-facing child-restraint system on the front passenger seat unlessit is unavoidable:
In a collision, the force of a deploying air bag could cause serious injury or death tothe child. If installing a front-facing child-restraint system on the front passenger seat is unavoidable, move the front passenger seat as far back as possible.
Seating a child in a child-restraint system on the front passenger seat is dangerous:Vehicles equipped with front passenger seat weight sensors are also equipped with afront passenger air bag deactivation indicator light (page 2-33). Even with the frontpassenger seat weight sensors, if you must use the front passenger seat for children,seating a child in a child-restraint system on the front passenger seat under thefollowing conditions increases the danger of the front passenger air bag deployingand could result in serious injury or death to the child.Ø The total seated weight of the child with the child-restraint system on the front
passenger seat is approximately 30 kg (66 lb) or more with a child in the child-
restraint system.Ø Luggage or other items are placed on the seat with the child in the child-restraintsystem.
Ø A rear passenger or luggage push or pull down on the front passenger seatback.Ø A rear passenger puts their feet on the front seat rails.Ø Luggage or other items are placed on the seatback or hung on the head restraint
or armrest.Ø The seat is washed.Ø Liquids are spilled on the seat.Ø The front passenger seat is moved backward, pushing into luggage or other items
placed behind it.Ø The front passenger seatback contacts the second-row seat.Ø Luggage or other items are placed between the front passenger seat and driver
seat.Ø Any accessories, which might increase the total seated weight on the front
passenger seat, are attached to the front passenger seat.The designated positions with seat belts on the rear seats are the safest places for children. Always use seat belts and child restraints.
Essential Safety Equipment
Child Restraint
2-27

8/2/2019 Mazda5 Owners Manual
http://slidepdf.com/reader/full/mazda5-owners-manual 40/375
Do not allow a child or anyone to lean over or against the side window of a vehiclewith side and curtain air bags:
It is dangerous to allow anyone to lean over or against the side window, the area of the front passenger seat, the front and rear window pillars and the roof edge alongboth sides from which the side and curtain air bags deploy, even if a child-restraintsystem is used. The impact of inflation from a side or curtain air bag could causeserious injury or death to an out of position child. Furthermore, leaning over or against the front door could block the side and curtain air bags and eliminate theadvantages of supplemental protection. With the front air bag and the additionalside air bag that comes out of the front seat, the rear seat is always a better locationfor children. Take special care not to allow a child to lean over or against the sidewindow, even if the child is seated in a child-restraint system.
Never use one seat belt on more than one person at a time:Using one seat belt for more than one person at a time is dangerous. A seat beltused in this way cannot spread the impact forces properly and the two passengerscould be crushed together and seriously injured or even killed. Never use one belt for more than one person at a time and always operate the vehicle with each occupantproperly restrained.
CAUTION
A seat belt or child-restraint system can become very hot in a closed vehicle duringwarm weather. To avoid burning yourself or a child, check them before you or your child touches them.
NOTE Your Mazda is equipped with LATCH lower anchors for attachment of specially designed LATCH child-restraint systems in the rear seats. When using these anchors to secure a child-restraint system,refer to “ LATCH Child-Restraint Systems ” (page 2-35).
2-28
Essential Safety Equipment
Child Restraint
8/2/2019 Mazda5 Owners Manual
http://slidepdf.com/reader/full/mazda5-owners-manual 41/375
Installing Child-Restraint
SystemsAccident statistics reveal that a child issafer in the rear seats. The front passenger's seat is clearly the worst choicefor any child under 12, and with rear-facing child-restraint systems it is clearlyunsafe due to air bags.
Some child-restraint systems now come
with tethers and therefore must beinstalled on the seats that take tethers to be effective. In your Mazda, tetheredchild-restraint systems can only beaccommodated in the four positions onthe rear seats.
Even if your vehicle is equipped withfront passenger seat weight sensors (page2-44), which automatically deactivates the
front passenger air bag, a rear seat is thesafest place for a child of any age or size.
Some child-restraint systems also employspecially designed LATCH attachments;refer to “ LATCH Child-Restraint Systems ” (page 2-35).
WARNING
Tethered Child-Restraint Systems WorkOnly on Tether-Equipped Rear Seats:
Installation of a tether equippedchild-restraint system in the frontpassenger's seat defeats the safety design of the system and will result inan increased chance of serious injury if the child-restraint system goesforward without benefit of beingtethered.Place tether equipped child-restraintsystems where there are tether anchors.
q Rear Seats Child-RestraintSystem Installation
Follow these instructions when using a child-restraint system, unless you areattaching a LATCH-equipped child-restraint system to the rear LATCH lower anchors. Refer to “ LATCH Child-Restraint Systems ” (page 2-35).
NOTE Follow the child-restraint systemmanufacturer's instructions carefully. If you
are not sure whether you have a LATCH system or tether, check in the child-restraint system manufacturer's instructions and followthem accordingly. Depending on the type of child-restraint system, it may use LATCH system instead of seat belts or if the belt goesacross the child's chest, may recommend against using automatic locking mode.
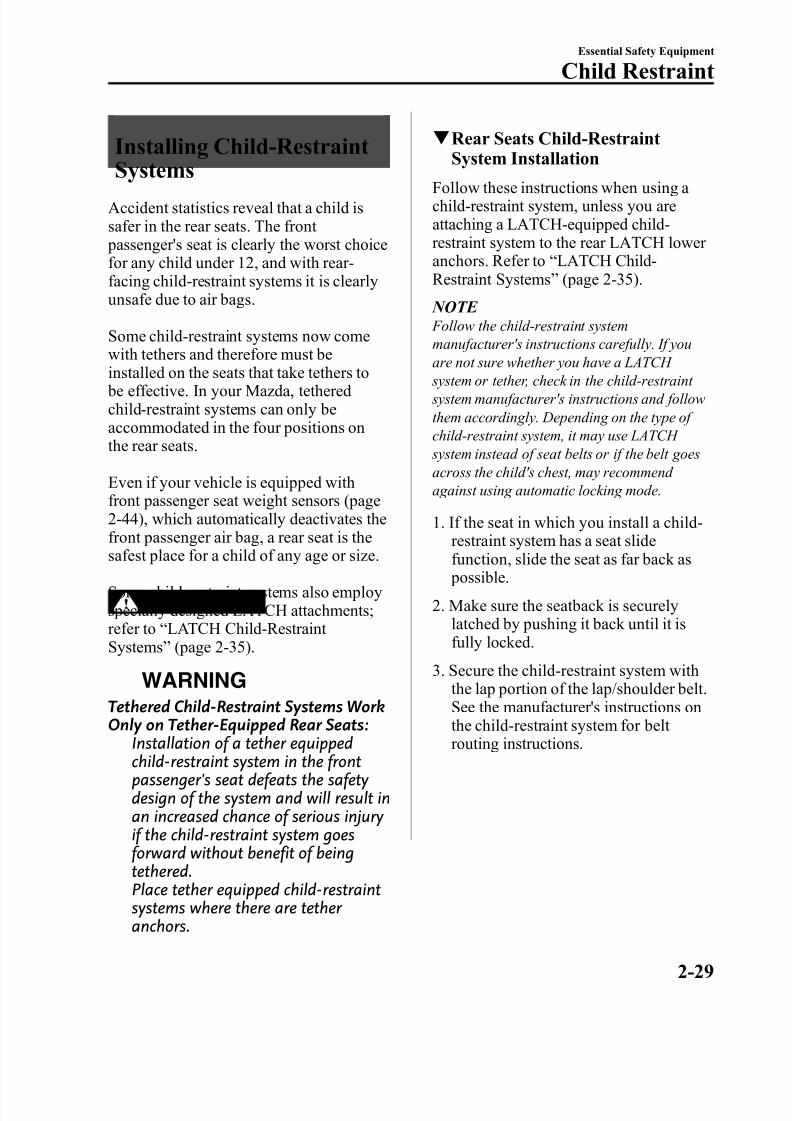
1. If the seat in which you install a child-
restraint system has a seat slidefunction, slide the seat as far back as possible.
2. Make sure the seatback is securelylatched by pushing it back until it isfully locked.
3. Secure the child-restraint system withthe lap portion of the lap/shoulder belt.See the manufacturer's instructions onthe child-restraint system for belt routing instructions.
Essential Safety Equipment
Child Restraint
2-29
8/2/2019 Mazda5 Owners Manual
http://slidepdf.com/reader/full/mazda5-owners-manual 42/375
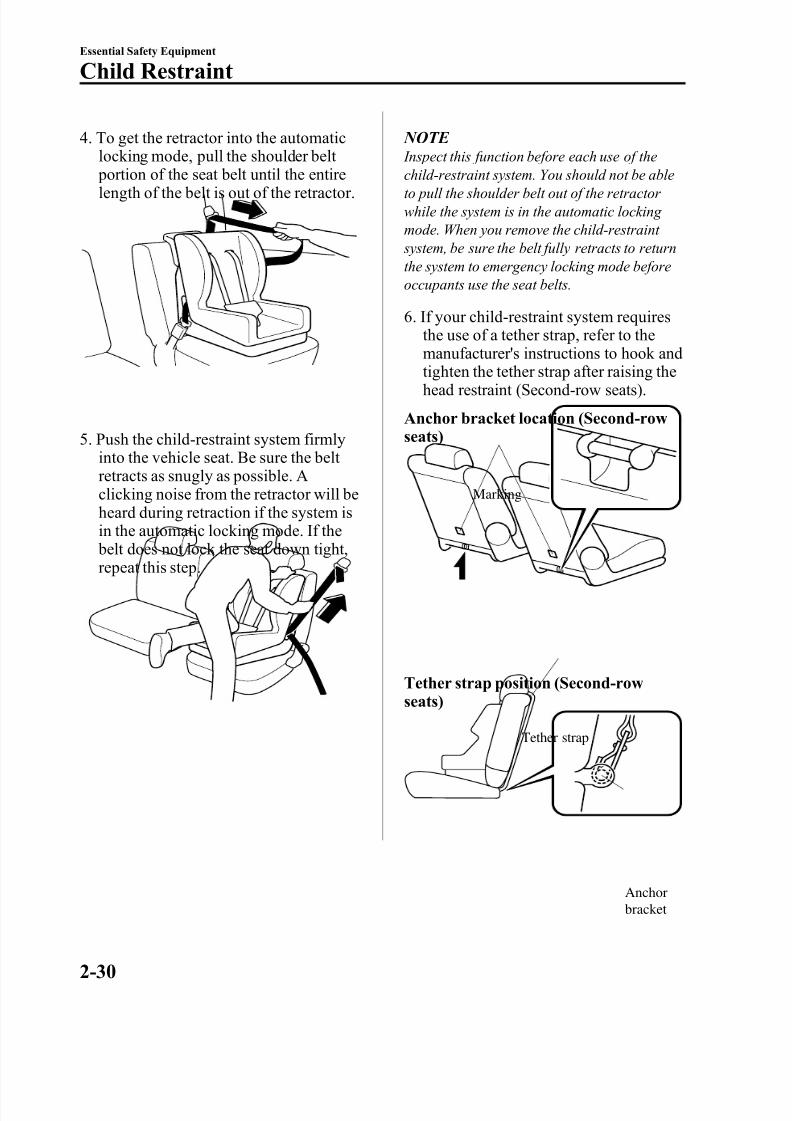
4. To get the retractor into the automaticlocking mode, pull the shoulder belt
portion of the seat belt until the entirelength of the belt is out of the retractor.
5. Push the child-restraint system firmlyinto the vehicle seat. Be sure the belt retracts as snugly as possible. Aclicking noise from the retractor will beheard during retraction if the system isin the automatic locking mode. If the belt does not lock the seat down tight,repeat this step.
NOTE Inspect this function before each use of the
child-restraint system. You should not be ableto pull the shoulder belt out of the retractor while the system is in the automatic locking mode. When you remove the child-restraint system, be sure the belt fully retracts to returnthe system to emergency locking mode beforeoccupants use the seat belts.
6. If your child-restraint system requiresthe use of a tether strap, refer to themanufacturer's instructions to hook andtighten the tether strap after raising thehead restraint (Second-row seats).
Anchor bracket location (Second-rowseats)
Marking
Tether strap position (Second-rowseats)
Tether strap
Anchorbracket
2-30
Essential Safety Equipment
Child Restraint
8/2/2019 Mazda5 Owners Manual
http://slidepdf.com/reader/full/mazda5-owners-manual 43/375
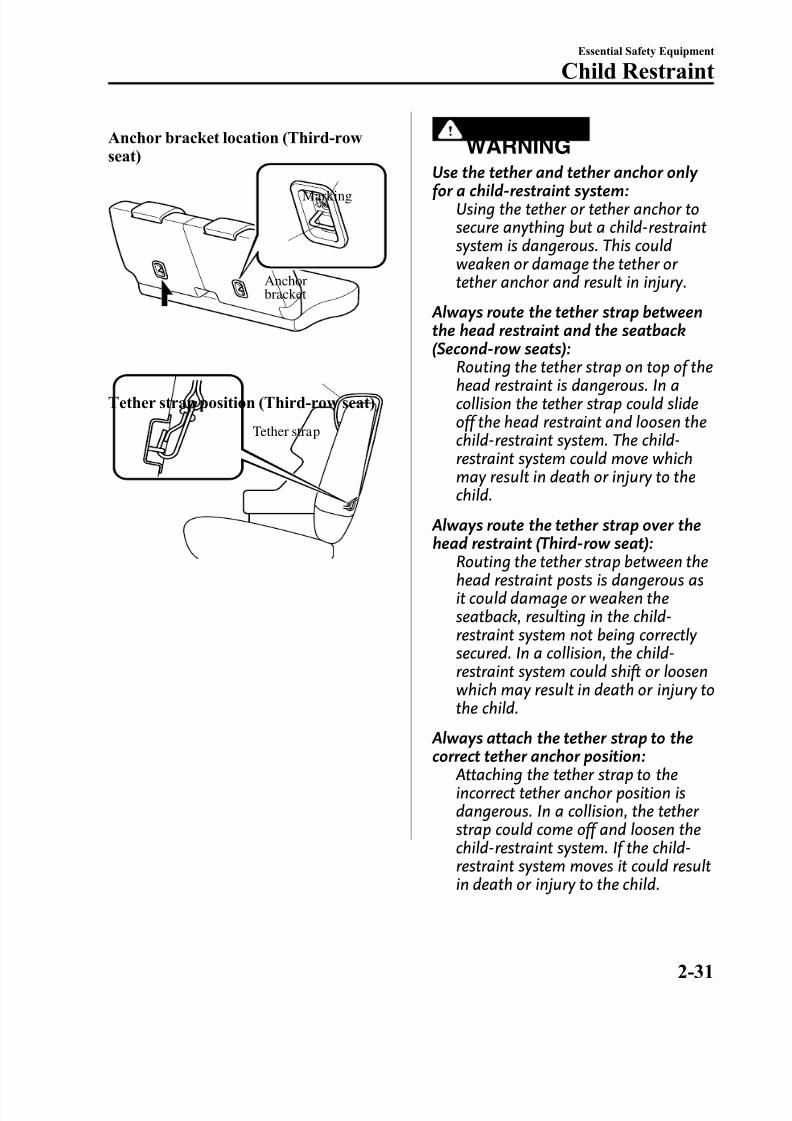
Anchor bracket location (Third-rowseat)
Anchorbracket
Marking
Tether strap position (Third-row seat)
Tether strap
WARNING
Use the tether and tether anchor only for a child-restraint system:Using the tether or tether anchor tosecure anything but a child-restraintsystem is dangerous. This couldweaken or damage the tether or tether anchor and result in injury.
Always route the tether strap betweenthe head restraint and the seatback(Second-row seats):
Routing the tether strap on top of thehead restraint is dangerous. In acollision the tether strap could slideoff the head restraint and loosen thechild-restraint system. The child-restraint system could move whichmay result in death or injury to thechild.
Always route the tether strap over thehead restraint (Third-row seat):Routing the tether strap between the
head restraint posts is dangerous asit could damage or weaken theseatback, resulting in the child-restraint system not being correctly secured. In a collision, the child-restraint system could shift or loosenwhich may result in death or injury tothe child.
Always attach the tether strap to thecorrect tether anchor position:
Attaching the tether strap to theincorrect tether anchor position isdangerous. In a collision, the tether strap could come off and loosen thechild-restraint system. If the child-restraint system moves it could resultin death or injury to the child.
Essential Safety Equipment
Child Restraint
2-31
8/2/2019 Mazda5 Owners Manual
http://slidepdf.com/reader/full/mazda5-owners-manual 44/375
q If You Must Use the Front Seatfor Children
If you cannot put all children in the rear seats, at least put the smallest children inthe rear and be sure the largest child upfront uses the shoulder belt over theshoulder. NEVER put a rear-facing child-restraint system on the front passenger seat, evenwith a seat weight sensor equippedvehicle.This seat is also not set up for tetheredchild-restraint systems, put them in one of the rear seat positions set up with tether anchors.Likewise the LATCH child-restraint system cannot be secured in the front passenger's seat and should be used in thesecond-row seats.Do not allow anyone to sleep against theside window if you have an optional side
and curtain air bag, it could cause seriousinjuries to an out of position occupant. Aschildren more often sleep in cars, it is better to put them in the rear seat. If installing the child-restraint system on thefront seat is unavoidable, follow theseinstructions when using a front-facingchild-restraint system in the front passenger's seat.
NOTE l To check if your front seats have side air
bags: Mazda vehicles equipped with side air bag will have a “ SRS AIRBAG ” tag on theoutboard shoulder of the front seats.
l To check if your vehicle has curtain air bags: Mazda vehicles equipped with curtain air bag will have an “ SRS AIRBAG ” marking on the window pillars along the roof edge.
WARNING
Always move the front passenger seatas far back as possible if installing afront-facing child-restraint system on itis unavoidable:
As your vehicle has front air bagsand doubly so because your vehiclehas side air bags, a front-facingchild-restraint system should be puton the front passenger seat only when it is unavoidable.
Even if the front passenger air bagdeactivation indicator lightilluminates, always move the seat asfar back as possible, because theforce of a deploying air bag couldcause serious injury or death to thechild.
Never use a rear-facing child-restraintsystem in the front seat with an air bagthat could deploy:
Rear-facing child-restraint systemson the front seat are particularly dangerous.Even in a moderate collision, thechild-restraint system can be hit by adeploying air bag and movedviolently backward resulting inserious injury or death to the child.Even though you may feel assuredthat the front passenger air bag willnot deploy based on the fact that thefront passenger air bag deactivationindicator light illuminates.
2-32
Essential Safety Equipment
Child Restraint

8/2/2019 Mazda5 Owners Manual
http://slidepdf.com/reader/full/mazda5-owners-manual 45/375
Do not allow a child or anyone to leanover or against the side window of a
vehicle with side and curtain air bags:It is dangerous to allow anyone tolean over or against the side window,the area of the front passenger seat,the front and rear window pillars andthe roof edge along both sides fromwhich the side and curtain air bagsdeploy, even if a child-restraintsystem is used. The impact of inflation from a side or curtain air
bag could cause serious injury or death to an out of position child.Furthermore, leaning over or againstthe front door could block the sideand curtain air bags and eliminatethe advantages of supplementalprotection. With the front air bag andthe additional side air bag thatcomes out of the front seat, the rear seat is always a better location for
children. Take special care not toallow a child to lean over or againstthe side window, even if the child isseated in a child-restraint system.
q Front Passenger's Seat Child-Restraint System Installation
1. Slide the seat as far back as possible.
2. Secure the child-restraint system withthe lap portion of the lap/shoulder belt.
See the manufacturer's instructions onthe child-restraint system for belt routing instructions.
3. To get the retractor into the automaticlocking mode, pull the shoulder belt portion of the seat belt until the entirelength of the belt is out of the retractor.
4. Push the child-restraint system firmlyinto the vehicle seat. Be sure the belt
retracts as snugly as possible. Aclicking noise from the retractor will beheard during retraction if the system isin automatic locking mode. If the belt does not lock the seat down tight,repeat the previous step and also thisone.
NOTE l Inspect this function before each use of the
child-restraint system. You should not beable to pull the shoulder belt out of theretractor while the system is in theautomatic locking mode. When you removethe child-restraint system, be sure the belt fully retracts to return the system toemergency locking mode before occupantsuse the seat belts.
l Follow the child-restraint systemmanufacturer's instructions carefully.
Depending on the type of child-restraint system, it may not employ seat belts whichare in automatic locking mode.
Essential Safety Equipment
Child Restraint
2-33

8/2/2019 Mazda5 Owners Manual
http://slidepdf.com/reader/full/mazda5-owners-manual 46/375
5. Make sure the front passenger air bagdeactivation indicator light illuminates
after installing a child-restraint systemon the front passenger seat.Refer to Front passenger air bagdeactivation indicator light on page2-44.
WARNING
Do not seat a child in a child-restraintsystem on the front passenger seat if the front passenger air bagdeactivation indicator light does notilluminate:
While it is always better to install any child-restraint system on the rear seat, it is imperative that a child-restraint system ONLY be used on thefront passenger seat if the
deactivation indicator lightilluminates when the child is seatedin the child-restraint system (page 2-44). Seating a child in a child-restraint system installed on the frontpassenger seat with the frontpassenger air bag deactivationindicator light not illuminated isdangerous. If this indicator light doesnot illuminate even when the total
seated weight is less thanapproximately 30 kg (66 lb), thismeans that the front passenger frontand side air bags, and seat beltpretensioner are ready for deployment. If an accident were todeploy an air bag, a child in a child-restraint system sitting in the frontpassenger seat could be seriously injured or killed. If the indicator light
does not illuminate after seating achild in a child-restraint system onthe front passenger seat, seat a childin a child-restraint system on the rear seat and consult an AuthorizedMazda Dealer as soon as possible.
2-34
Essential Safety Equipment
Child Restraint
8/2/2019 Mazda5 Owners Manual
http://slidepdf.com/reader/full/mazda5-owners-manual 47/375
LATCH Child-Restraint Systems
Your Mazda is equipped with LATCH lower anchors for attachment of specially designedLATCH child-restraint systems in the rear seats. Both anchors must be used, otherwise theseat will bounce around and put the child in danger. Most LATCH child-restraint systemsmust also be used in conjunction with a tether to be effective. If they have a tether youmust use it to better assure your child's safety.
WARNING
Follow the manufacturer's instructions for the use of the child-restraint system: An unsecured child-restraint system is dangerous. In a sudden stop or a collision itcould move causing serious injury or death to the child or other occupants. Makesure the child-restraint system is properly secured in place according to the child-restraint system manufacturer's instructions.
Never attach two child-restraint systems to the same LATCH lower anchor: Attaching two child-restraint systems to the same LATCH lower anchor is dangerous.In a collision, one anchor may not be strong enough to hold two child-restraintsystem attachments, and it may break, causing serious injury or death. If you use theseat position for another child-restraint system when an outboard LATCH position isoccupied, use the center seat belts instead, and the tether if tether-equipped.
Make sure the child-restraint system is properly secured: An unsecured child-restraint system is dangerous. In a sudden stop or a collision itcould move causing serious injury or death to the child or other occupants. Follow the child-restraint system manufacturer's instructions on belt routing to secure theseat just as you would with a child in it so that nobody is tempted to put a child inan improperly secured seat later on. When not in use, remove it from the vehicle or fasten it with a seat belt, or latch it down to BOTH LATCH lower anchors for LATCHchild-restraint systems.
Make sure there are no seat belts or foreign objects near or around the LATCH child-restraint system:
Not following the child-restraint system manufacturer's instructions when installingthe child-restraint system is dangerous. If seat belts or a foreign object prevent thechild-restraint system from being securely attached to the LATCH lower anchors andthe child-restraint system is installed improperly, the child-restraint system couldmove in a sudden stop or collision causing serious injury or death to the child or other occupants. When installing the child-restraint system, make sure there are noseat belts or foreign objects near or around the LATCH lower anchors. Always follow the child-restraint system manufacturer's instructions.
Essential Safety Equipment
Child Restraint
2-35
8/2/2019 Mazda5 Owners Manual
http://slidepdf.com/reader/full/mazda5-owners-manual 48/375
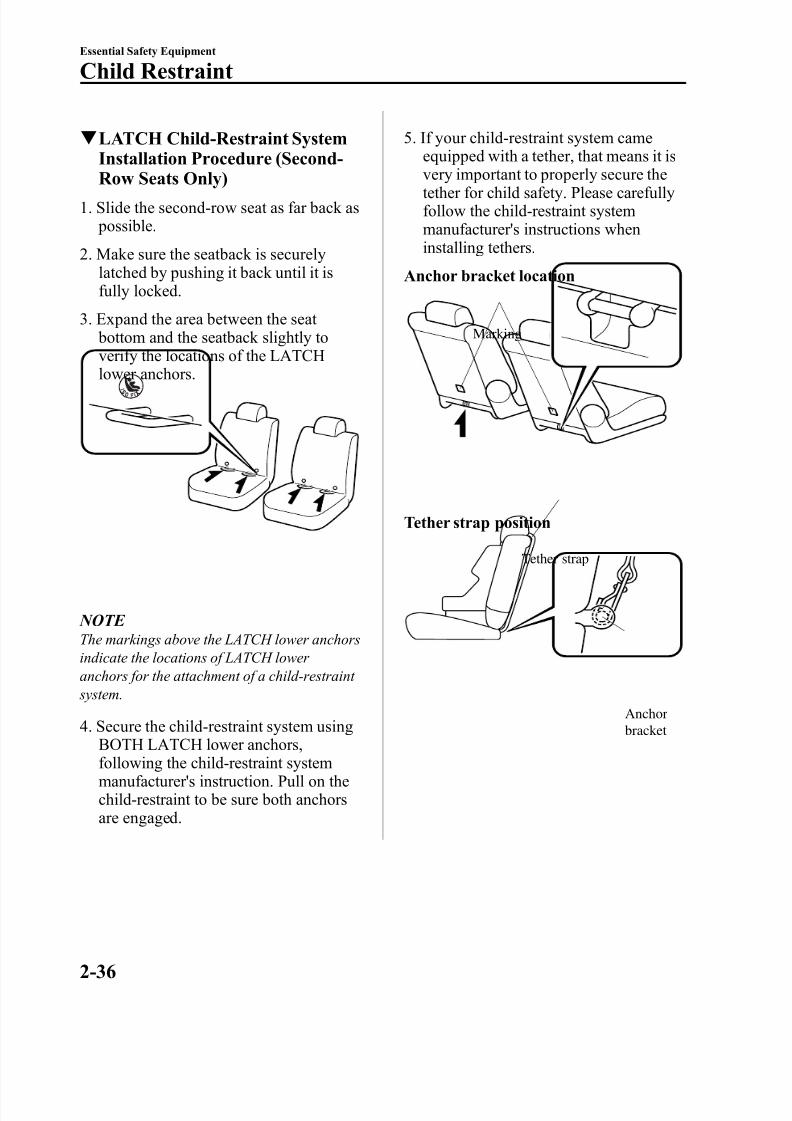
q LATCH Child-Restraint SystemInstallation Procedure (Second-
Row Seats Only)1. Slide the second-row seat as far back as
possible.
2. Make sure the seatback is securelylatched by pushing it back until it isfully locked.
3. Expand the area between the seat bottom and the seatback slightly to
verify the locations of the LATCHlower anchors.
NOTE The markings above the LATCH lower anchorsindicate the locations of LATCH lower anchors for the attachment of a child-restraint system.
4. Secure the child-restraint system usingBOTH LATCH lower anchors,following the child-restraint systemmanufacturer's instruction. Pull on thechild-restraint to be sure both anchorsare engaged.
5. If your child-restraint system cameequipped with a tether, that means it is
very important to properly secure thetether for child safety. Please carefullyfollow the child-restraint systemmanufacturer's instructions wheninstalling tethers.
Anchor bracket location
Marking
Tether strap position
Tether strap
Anchorbracket
2-36
Essential Safety Equipment
Child Restraint
8/2/2019 Mazda5 Owners Manual
http://slidepdf.com/reader/full/mazda5-owners-manual 49/375
WARNING
Use the tether and tether anchor only for a child-restraint system:Using the tether or tether anchor tosecure anything but a child-restraintsystem is dangerous. This couldweaken or damage the tether or tether anchor and result in injury.
Always route the tether strap betweenthe head restraint and the seatback:
Routing the tether strap on top of thehead restraint is dangerous. In acollision the tether strap could slideoff the head restraint and loosen thechild-restraint system. The child-restraint system could move whichmay result in death or injury to thechild.
Always attach the tether strap to thecorrect tether anchor position:
Attaching the tether strap to theincorrect tether anchor position isdangerous. In a collision, the tether strap could come off and loosen thechild-restraint system. If the child-restraint system moves it could resultin death or injury to the child.
Essential Safety Equipment
Child Restraint
2-37
8/2/2019 Mazda5 Owners Manual
http://slidepdf.com/reader/full/mazda5-owners-manual 50/375
Supplemental Restraint Systems (SRS) Precautions
The front and side supplemental restraint systems (SRS) include 6 air bags. Please verifythe air bags equipped on your vehicle by locating the “ SRS AIRBAG ” locationindicators. These indicators are visible in the area where the air bags are installed.The air bags are installed in the following locations:
l The steering wheel hub (driver air bag)l The front passenger dashboard (front passenger air bag)l The outboard sides of the front seatbacks (side air bags)l The front and rear window pillars, and the roof edge along both sides (curtain air bags)
These systems operate independently depending on the type of accident encountered; theside and curtain air bags are not likely to deploy on both sides in the same accident becausea vehicle is not often hit from both sides. The side and curtain air bags and the frontal air bag system will not normally deploy during the same type of accident unless a combinationof frontal and side impacts occur.
The air bag supplemental restraint systems are designed to provide supplemental protectiononly in the front seats in certain situations and the rear outside passenger positions only insame-side collisions, so seat belts are always important in the following ways:
Without seat belt usage, the air bags cannot provide adequate protection during an accident.Seat belt usage is necessary to:l Keep the occupant from being thrown into an inflating air bag.l Reduce the possibility of injuries during an accident that is not designed for air bag
inflation, such as roll-over or rear impact.l Reduce the possibility of injuries in frontal or side collisions that are not severe enough
to activate the air bags.l Reduce the possibility of being thrown from your vehicle.l Reduce the possibility of injuries to lower body and legs during an accident because the
air bags provide no protection to these parts of the body.l Hold the driver in a position which allows better control of the vehicle.
Children should be protected by a child-restraint system as stipulated by law in every stateand province. In certain states and provinces, laws vary on the size a child must be to use a child-restraint system (page 2-25).Carefully consider which child-restraint system is necessary for your child and follow theinstallation directions in this Owner's Manual as well as the child-restraint systemmanufacturer's instructions.
2-38
Essential Safety Equipment
SRS Air Bags

8/2/2019 Mazda5 Owners Manual
http://slidepdf.com/reader/full/mazda5-owners-manual 51/375
WARNING
Seat belts must be worn in air bag equipped vehicles:Depending only on the air bags for protection during an accident is dangerous. Alone, air bags may not prevent serious injuries. The appropriate air bags can beexpected to inflate only in the first collision with frontal, near frontal or side forcesthat are at least moderate. Vehicle occupants should always wear seat belts.
Children should not ride in the front passenger seat:Placing a child, 12 years or under, in the front seat is dangerous. The child could behit by a deploying air bag and be seriously injured or even killed. A sleeping child ismore likely to lean against the door and be hit by the side air bag in a moderate,right-side collision. Whenever possible, always secure a child 12 years and under onthe rear seats with an appropriate child-restraint system for the child's age and size.
Never use a rear-facing child-restraint system in the front seat with an air bag thatcould deploy:
Rear-facing child-restraint systems on the front seat are particularly dangerous eventhough you may feel assured that a front passenger air bag will not deploy based onthe fact that the front passenger air bag deactivation indicator light illuminates.The child-restraint system can be hit by a deploying air bag and moved violently backward resulting in serious injury or death to the child.
Do not sit too close to the driver and front passenger air bags:Sitting too close to the driver and front passenger air bag modules or placing handsor feet on them is extremely dangerous. The driver and front passenger air bags
inflate with great force and speed. Serious injuries could occur if someone is tooclose. The driver should always hold onto only the rim of the steering wheel. Thefront seat passenger should keep both feet on the floor. Front seat occupants shouldadjust their seats as far back as possible and always sit upright against theseatbacks with seat belts worn properly.
Essential Safety Equipment
SRS Air Bags
2-39
8/2/2019 Mazda5 Owners Manual
http://slidepdf.com/reader/full/mazda5-owners-manual 52/375
Sit in the center of the seat and wear seat belts properly:Sitting too close to the side air bag modules or placing hands on them is extremely
dangerous. The side air bags inflate with great force and speed directly out of theoutboard side of the front seat and expand along the front door on the side the car ishit. Serious injury could occur if someone is sitting too close to the door or leaningagainst a window, or if rear seat occupants grab the sides of the front seatbacks.Furthermore, sleeping up against the door or hanging out the windows in the vehiclecould block the side and curtain air bags and eliminate the advantages of supplemental protection. Give the side and curtain air bags room to work by sittingin the center of the seat while the vehicle is moving with seat belts worn properly.
Do not attach objects on or around the area where driver and front passenger air bags deploy:
Attaching an object to the driver and front passenger air bag modules or placingsomething in front of them is dangerous. In an accident, an object could interferewith air bag inflation and injure the occupants.
Do not attach objects on or around the area where a side air bag deploys: Attaching objects to a front seat in such a way as to cover the outboard side of theseat in any way is dangerous. In an accident the object could interfere with the sideair bag, which inflates from the outboard side of the front seats, impeding the addedprotection of the side air bag system or redirecting the air bag in a way that isdangerous. Furthermore, the bag could be cut open releasing the gas.Do not hang net bags, map pouches or backpacks with side straps on the frontseats. Never use seat covers on the front seats. Always keep the side air bag modulesin your front seats free to deploy in the event of a side collision.
Do not attach objects on or around the area where a curtain air bag deploys: Attaching objects to the areas where the curtain air bag deploys such as on thewindshield glass, side door glass, front and rear window pillars, and along the roof edge and assist grips is dangerous. In an accident the object could interfere with thecurtain air bag, which inflates from the front and rear window pillars and along theroof edge, impeding the added protection of the curtain air bag system or redirecting
the air bag in a way that is dangerous. Furthermore, the bag could be cut openspewing exhaust.Do not place hangers or any other objects on the assist grips. When hanging clothes,hang them on the coat hook directly. Always keep the curtain air bag modules freeto deploy in the event of a side collision.
Do not touch the components of the supplemental restraint system after the air bagshave inflated:
Touching the components of the supplemental restraint system after the air bagshave inflated is dangerous. Immediately after inflation, they are very hot. You could
get burned.
2-40
Essential Safety Equipment
SRS Air Bags
8/2/2019 Mazda5 Owners Manual
http://slidepdf.com/reader/full/mazda5-owners-manual 53/375
Never install any front-end equipment to your vehicle:Installation of front-end equipment, such as frontal protection bar (kangaroo bar,
bull bar, push bar, or other similar devices.), snowplow, or winches is dangerous. Theair bag crash sensor system could be affected. This could cause air bags to inflateunexpectedly, or it could prevent the air bags from inflating during an accident.Front occupants could be seriously injured.
Do not modify the suspension:Modifying the vehicle suspension is dangerous. If the vehicle's height or thesuspension is modified, the vehicle will be unable to accurately detect a collisionresulting in incorrect or unexpected air bag deployment and the possibility of seriousinjuries.
Do not modify the supplemental restraint system:Modifying the components or wiring of the supplemental restraint system isdangerous. You could accidentally activate it or make it inoperable. Do not makeany modifications to the supplemental restraint system. This includes installing trim,badges, or anything else over the air bag modules. It also includes installing extraelectrical equipment on or near system components or wiring. An Authorized MazdaDealer can provide the special care needed in the removal and installation of frontseats. It is important to protect the side and curtain air bag wiring and connectionsto assure that the bags do not accidentally deploy and that the seats retain anundamaged air bag connection.
Do not place luggage or other objects under the front seats:Placing luggage or other objects under the front seats is dangerous. The componentsessential to the supplemental restraint system could be damaged, and in the event of a side collision, the appropriate air bags may not deploy, which could result in deathor serious injury. To prevent damage to the components essential to thesupplemental restraint system, do not place luggage or other objects under the frontseats.
NOTE l
When an air bag deploys, a loud inflation noise can be heard and some smoke will be released. Neither is likely to cause injury, however, the texture of the air bags may cause light skin injurieson body parts not covered with clothing through friction.
l Should you sell your Mazda, we urge you to tell the new owner of its air bag systems and that familiarization with all instructions about them, from the Owner's Manual, is important.
Essential Safety Equipment
SRS Air Bags
2-41
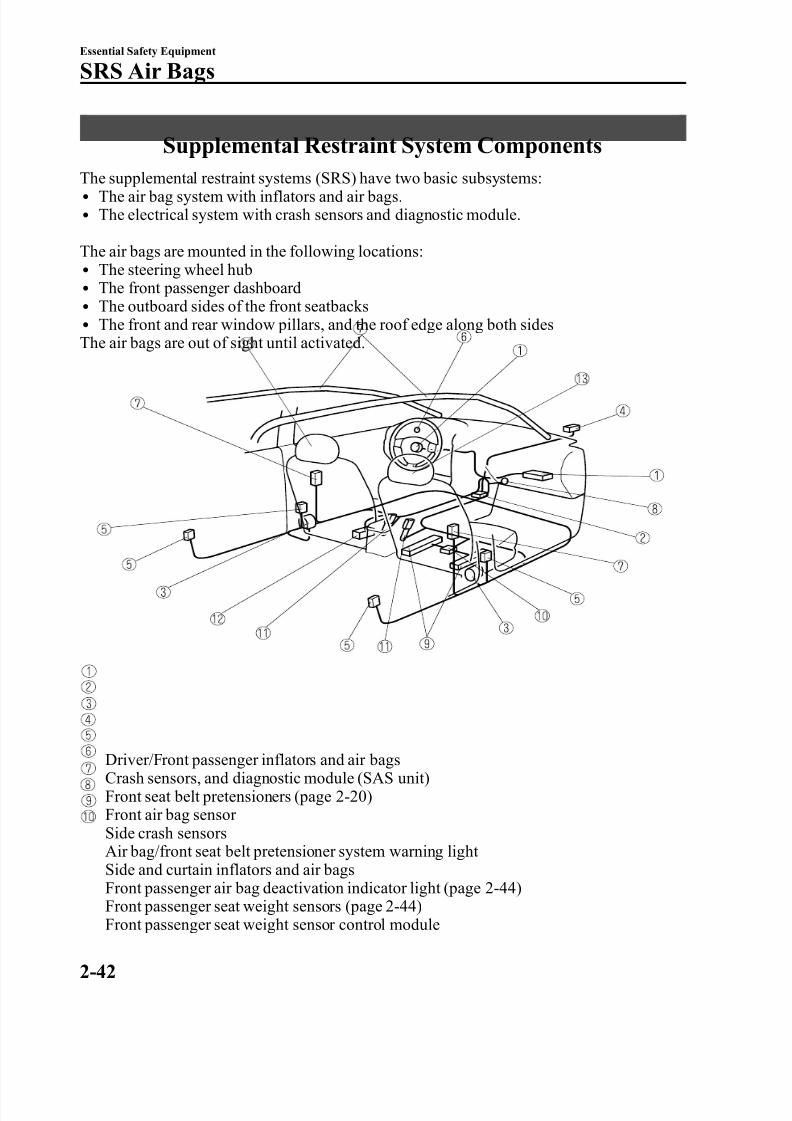
8/2/2019 Mazda5 Owners Manual
http://slidepdf.com/reader/full/mazda5-owners-manual 54/375
Supplemental Restraint System Components
The supplemental restraint systems (SRS) have two basic subsystems:l The air bag system with inflators and air bags.l The electrical system with crash sensors and diagnostic module.
The air bags are mounted in the following locations:l The steering wheel hubl The front passenger dashboardl The outboard sides of the front seatbacksl The front and rear window pillars, and the roof edge along both sidesThe air bags are out of sight until activated.
Driver/Front passenger inflators and air bagsCrash sensors, and diagnostic module (SAS unit)Front seat belt pretensioners (page 2-20)Front air bag sensor Side crash sensorsAir bag/front seat belt pretensioner system warning light Side and curtain inflators and air bagsFront passenger air bag deactivation indicator light (page 2-44)Front passenger seat weight sensors (page 2-44)Front passenger seat weight sensor control module
2-42
Essential Safety Equipment
SRS Air Bags
8/2/2019 Mazda5 Owners Manual
http://slidepdf.com/reader/full/mazda5-owners-manual 55/375
Driver and front passenger seat belt buckle switches (page 2-44)Driver seat slide position sensor
Front seats
Essential Safety Equipment
SRS Air Bags
2-43
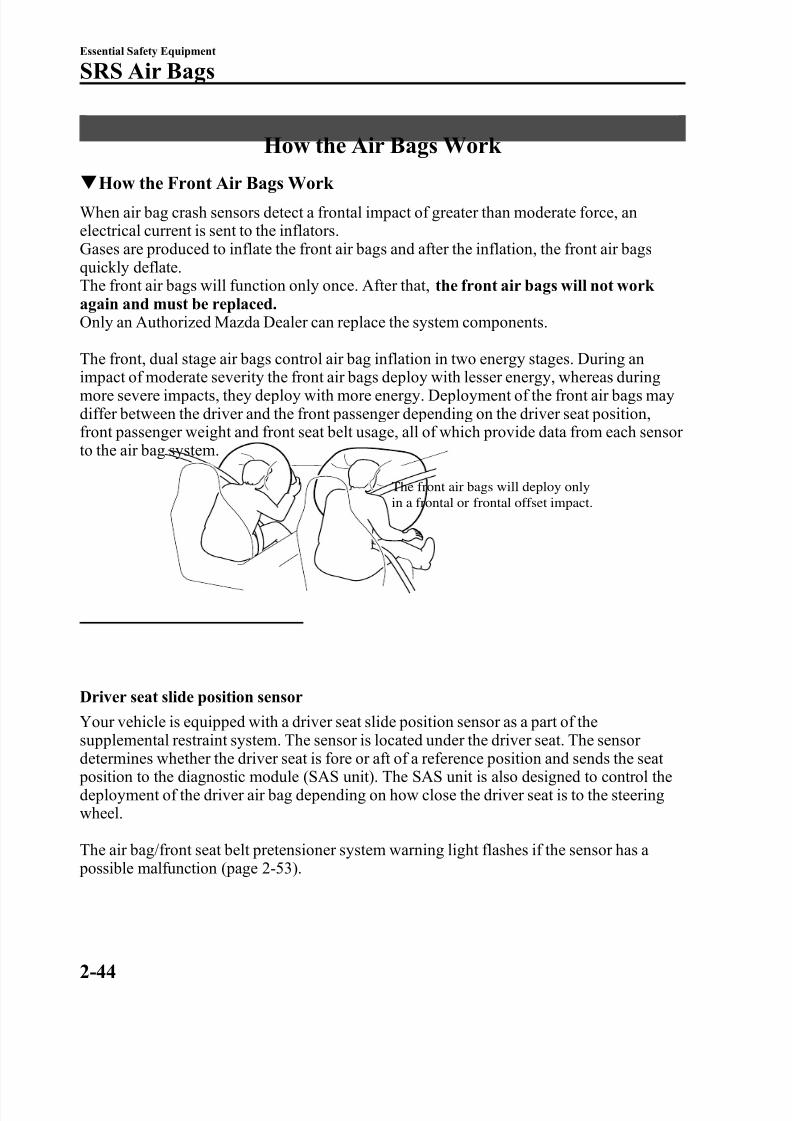
8/2/2019 Mazda5 Owners Manual
http://slidepdf.com/reader/full/mazda5-owners-manual 56/375
How the Air Bags Work
q How the Front Air Bags Work When air bag crash sensors detect a frontal impact of greater than moderate force, anelectrical current is sent to the inflators.Gases are produced to inflate the front air bags and after the inflation, the front air bagsquickly deflate.The front air bags will function only once. After that, the front air bags will not work again and must be replaced.Only an Authorized Mazda Dealer can replace the system components.
The front, dual stage air bags control air bag inflation in two energy stages. During animpact of moderate severity the front air bags deploy with lesser energy, whereas duringmore severe impacts, they deploy with more energy. Deployment of the front air bags maydiffer between the driver and the front passenger depending on the driver seat position,front passenger weight and front seat belt usage, all of which provide data from each sensor to the air bag system.
The front air bags will deploy onlyin a frontal or frontal offset impact.
Driver seat slide position sensor
Your vehicle is equipped with a driver seat slide position sensor as a part of thesupplemental restraint system. The sensor is located under the driver seat. The sensor determines whether the driver seat is fore or aft of a reference position and sends the seat position to the diagnostic module (SAS unit). The SAS unit is also designed to control thedeployment of the driver air bag depending on how close the driver seat is to the steeringwheel.
The air bag/front seat belt pretensioner system warning light flashes if the sensor has a possible malfunction (page 2-53).
2-44
Essential Safety Equipment
SRS Air Bags
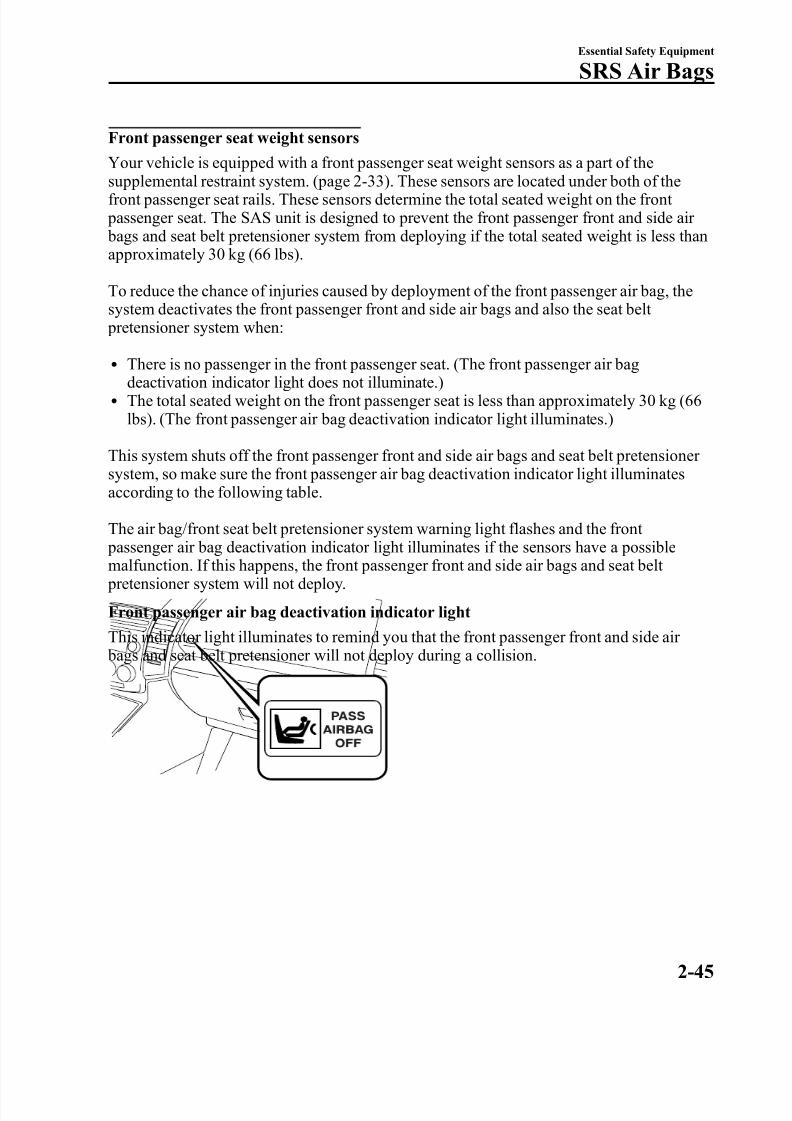
8/2/2019 Mazda5 Owners Manual
http://slidepdf.com/reader/full/mazda5-owners-manual 57/375
Front passenger seat weight sensors
Your vehicle is equipped with a front passenger seat weight sensors as a part of the
supplemental restraint system. (page 2-33). These sensors are located under both of thefront passenger seat rails. These sensors determine the total seated weight on the front passenger seat. The SAS unit is designed to prevent the front passenger front and side air bags and seat belt pretensioner system from deploying if the total seated weight is less thanapproximately 30 kg (66 lbs).
To reduce the chance of injuries caused by deployment of the front passenger air bag, thesystem deactivates the front passenger front and side air bags and also the seat belt pretensioner system when:
l There is no passenger in the front passenger seat. (The front passenger air bagdeactivation indicator light does not illuminate.)
l The total seated weight on the front passenger seat is less than approximately 30 kg (66lbs). (The front passenger air bag deactivation indicator light illuminates.)
This system shuts off the front passenger front and side air bags and seat belt pretensioner system, so make sure the front passenger air bag deactivation indicator light illuminatesaccording to the following table.
The air bag/front seat belt pretensioner system warning light flashes and the front passenger air bag deactivation indicator light illuminates if the sensors have a possiblemalfunction. If this happens, the front passenger front and side air bags and seat belt pretensioner system will not deploy.
Front passenger air bag deactivation indicator light
This indicator light illuminates to remind you that the front passenger front and side air bags and seat belt pretensioner will not deploy during a collision.
Essential Safety Equipment
SRS Air Bags
2-45
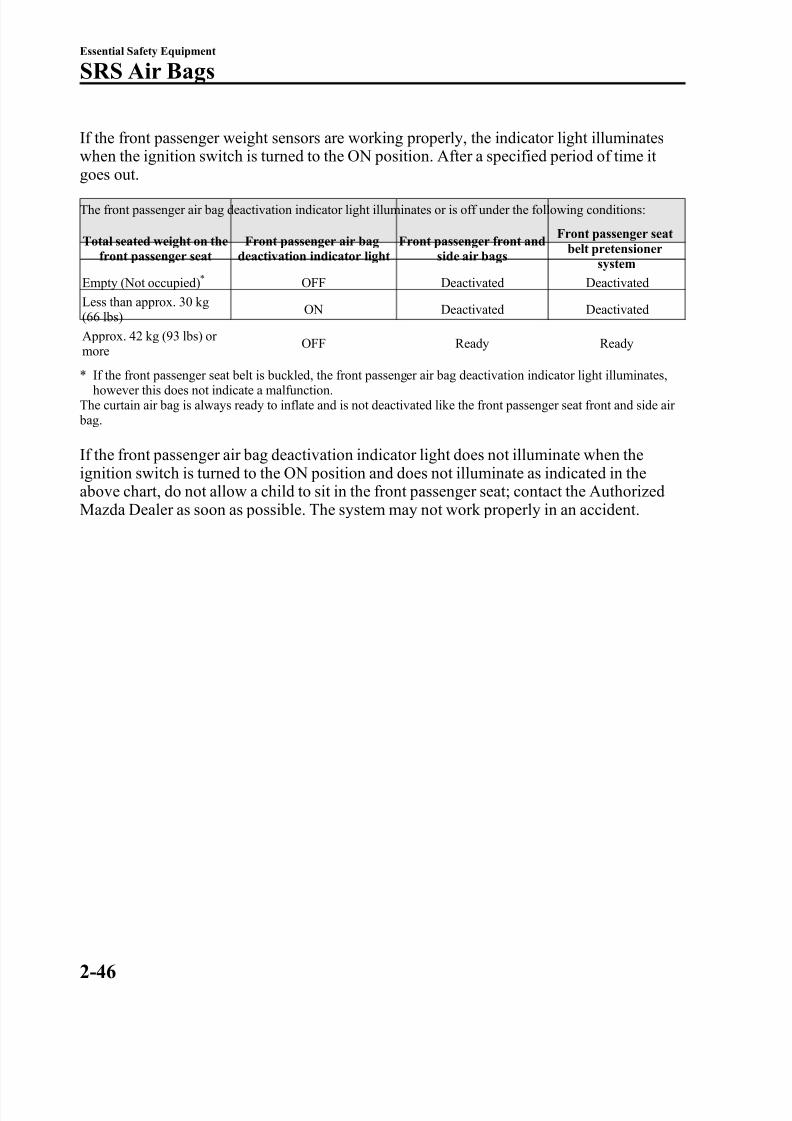
8/2/2019 Mazda5 Owners Manual
http://slidepdf.com/reader/full/mazda5-owners-manual 58/375
If the front passenger weight sensors are working properly, the indicator light illuminateswhen the ignition switch is turned to the ON position. After a specified period of time it
goes out.The front passenger air bag deactivation indicator light illuminates or is off under the following conditions:
Total seated weight on thefront passenger seat
Front passenger air bagdeactivation indicator light
Front passenger front andside air bags
Front passenger seatbelt pretensioner
system
Empty (Not occupied)*
OFF Deactivated DeactivatedLess than approx. 30 kg(66 lbs) ON Deactivated Deactivated
Approx. 42 kg (93 lbs) or more OFF Ready Ready
* If the front passenger seat belt is buckled, the front passenger air bag deactivation indicator light illuminates,however this does not indicate a malfunction.
The curtain air bag is always ready to inflate and is not deactivated like the front passenger seat front and side air bag.
If the front passenger air bag deactivation indicator light does not illuminate when theignition switch is turned to the ON position and does not illuminate as indicated in theabove chart, do not allow a child to sit in the front passenger seat; contact the AuthorizedMazda Dealer as soon as possible. The system may not work properly in an accident.
2-46
Essential Safety Equipment
SRS Air Bags
8/2/2019 Mazda5 Owners Manual
http://slidepdf.com/reader/full/mazda5-owners-manual 59/375
WARNING
Do not decrease the total seated weight on the front passenger seat:When an adult or large child sits on the front passenger seat, decreasing the totalseated weight on the front passenger seat from the total seated weight of approximately 42 kg (93 lbs) required for air bag deployment is dangerous. The frontpassenger seat weight sensors will detect the reduced total seated weight conditionand the front passenger front and side air bags and seat belt pretensioner systemwill not deploy during an accident. The front passenger will not have thesupplementary protection of the air bag, which could result in serious injury.Decreasing the total seated weight on the front passenger seat from the total seatedweight of approximately 42 kg (93 lbs) could result in an air bag not deploying under
the following conditions, for example:Ø A rear passenger pushes up on the front passenger seat with their feet.Ø Luggage or other items placed under the front passenger seat or between the
front passenger seat and driver seat that push up the front passenger seatbottom.
Ø The front passenger seat occupant sits in a manner that does not place the entireweight of the occupant on the seat such as by sitting too close to the door, grasping the assist grip or the rim of the moonroof and sitting with the seatbackreclined too far.
Ø Any accessories which might decrease the total seated weight on the front
passenger seat are attached to the front passenger seat.The front passenger front and side air bags and seat belt pretensioner systems willdeactivate if the total seated weight on the front passenger seat is close to 30 kg (66lbs) and they will reactivate before the weight exceeds 42 kg (93 lbs).
Essential Safety Equipment
SRS Air Bags
2-47
8/2/2019 Mazda5 Owners Manual
http://slidepdf.com/reader/full/mazda5-owners-manual 60/375
Do not increase the total seated weight on the front passenger seat:When an infant or small child sits on the front passenger seat, increasing the total
seated weight on the front passenger seat from the total seated weight of approximately 30 kg (66 lbs) is dangerous. The front passenger seat weight sensorswill detect the increased total seated weight, which could result in the unexpecteddeployment of the front passenger front and side air bags and seat belt pretensioner system in an accident and may cause serious injury. Increasing the total seatedweight on the front passenger seat beyond the total seated weight of approximately 30 kg (66 lbs) could result in the front passenger front and side air bags and seatbelt pretensioner system deployment in an accident under the following conditions,for example:Ø Luggage or other items are placed on the seat with the child in the child-restraint
system.Ø A rear passenger or luggage push or pull down on the front passenger seatback.Ø A rear passenger steps on the front passenger seat rails with their feet.Ø Luggage or other items are placed on the seatback or hung on the head restraint
or armrest.Ø The seat is washed.Ø Liquids are spilled on the seat.Ø The front passenger seat is moved backward, pushing into luggage or other items
placed behind it.Ø The front passenger seatback contacts the second-row seat.Ø Luggage or other items are placed between the front passenger seat and driver seat.Ø Any accessories which might increase the total seated weight on the front
passenger seat are attached to the front passenger seat.The front passenger front and side air bags and seat belt pretensioner systems willdeactivate if the total seated weight on the front passenger seat is less thanapproximately 30 kg (66 lbs) and they will reactivate when the weight exceedsapproximately 42 kg (93 lbs).
CAUTIONØ To assure proper deployment of the front air bag and to prevent damage to the
sensors in the front seat bottoms:Ø Do not place sharp objects on the front seat bottoms or leave heavy luggage on
them.Ø Do not spill any liquids on the front seats or under the front seats.
Ø To allow the sensors to function properly, always perform the following:Ø Adjust the front seats as far back as possible and always sit upright against the
seatbacks with seat belts worn properly.Ø If you place your child on the front passenger seat, secure the child-restraint
system properly and slide the front passenger seat as far back as possible (page 2-33).
2-48
Essential Safety Equipment
SRS Air Bags
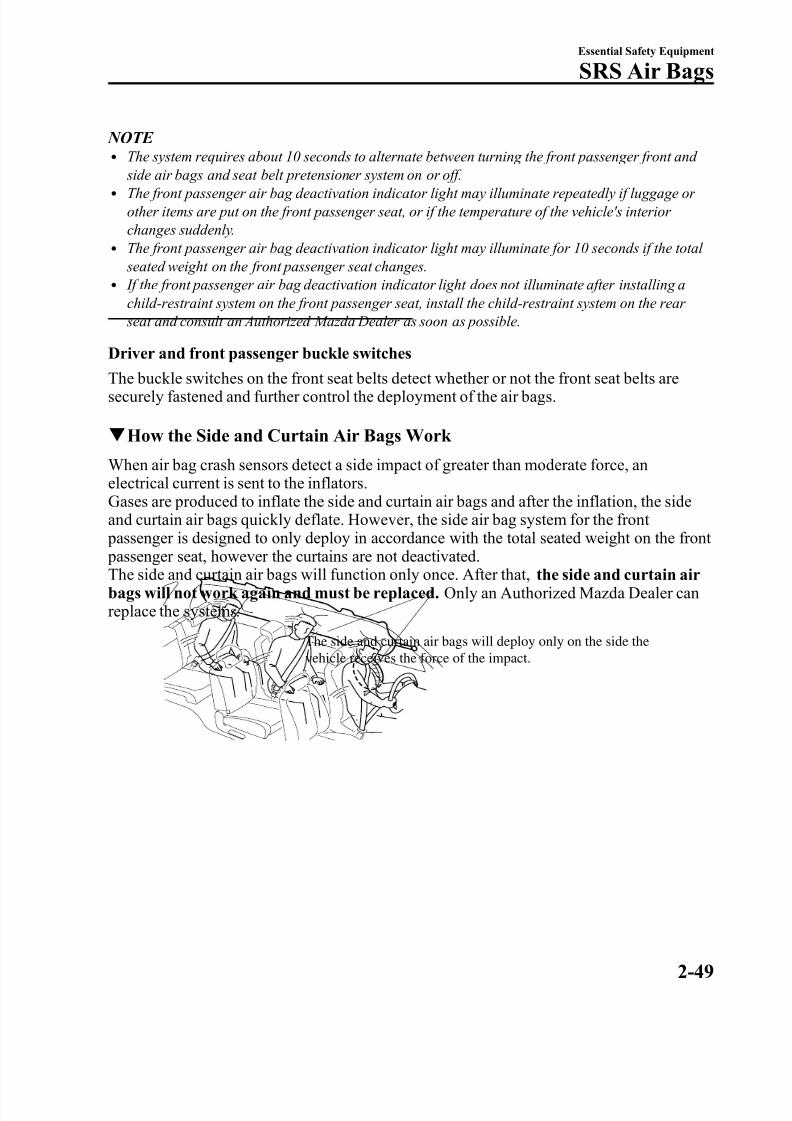
8/2/2019 Mazda5 Owners Manual
http://slidepdf.com/reader/full/mazda5-owners-manual 61/375
NOTE l The system requires about 10 seconds to alternate between turning the front passenger front and
side air bags and seat belt pretensioner system on or off.l The front passenger air bag deactivation indicator light may illuminate repeatedly if luggage or other items are put on the front passenger seat, or if the temperature of the vehicle's interior changes suddenly.
l The front passenger air bag deactivation indicator light may illuminate for 10 seconds if the total seated weight on the front passenger seat changes.
l If the front passenger air bag deactivation indicator light does not illuminate after installing achild-restraint system on the front passenger seat, install the child-restraint system on the rear seat and consult an Authorized Mazda Dealer as soon as possible.
Driver and front passenger buckle switches
The buckle switches on the front seat belts detect whether or not the front seat belts aresecurely fastened and further control the deployment of the air bags.
q How the Side and Curtain Air Bags Work
When air bag crash sensors detect a side impact of greater than moderate force, anelectrical current is sent to the inflators.Gases are produced to inflate the side and curtain air bags and after the inflation, the sideand curtain air bags quickly deflate. However, the side air bag system for the front
passenger is designed to only deploy in accordance with the total seated weight on the front passenger seat, however the curtains are not deactivated.The side and curtain air bags will function only once. After that, the side and curtain airbags will not work again and must be replaced. Only an Authorized Mazda Dealer canreplace the systems.
The side and curtain air bags will deploy only on the side thevehicle receives the force of the impact.
Essential Safety Equipment
SRS Air Bags
2-49
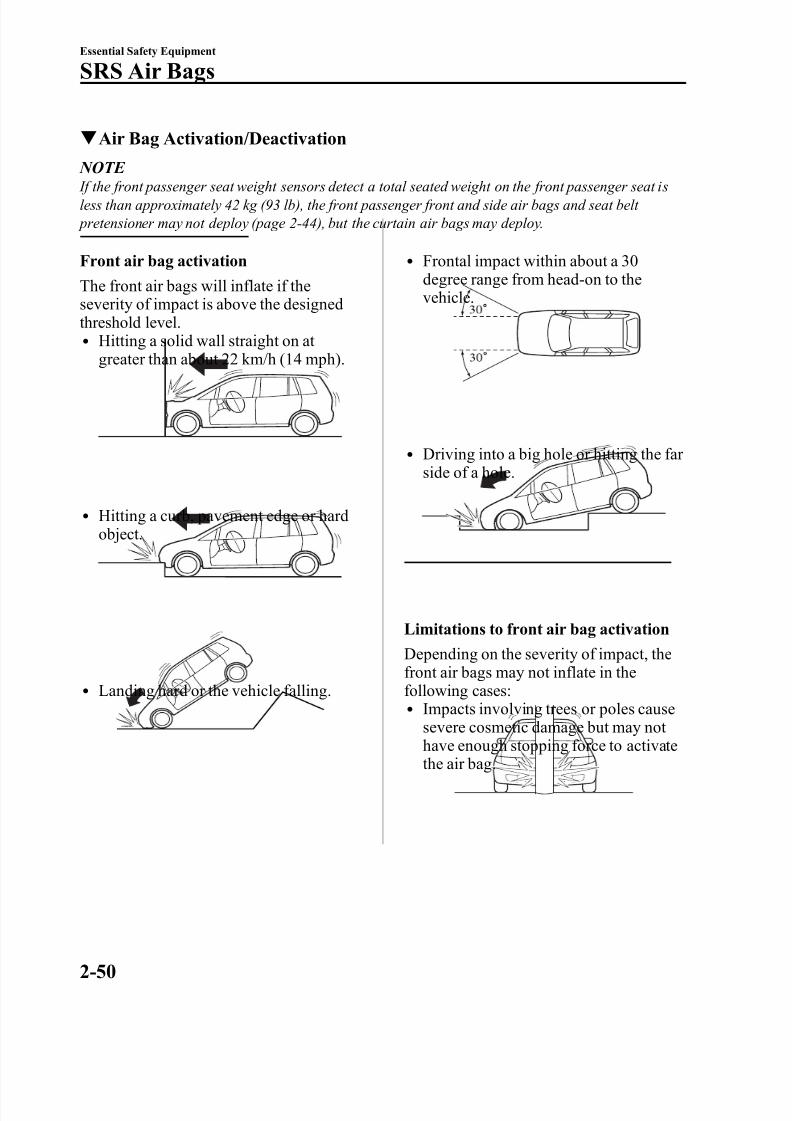
8/2/2019 Mazda5 Owners Manual
http://slidepdf.com/reader/full/mazda5-owners-manual 62/375
q Air Bag Activation/Deactivation
NOTE If the front passenger seat weight sensors detect a total seated weight on the front passenger seat isless than approximately 42 kg (93 lb), the front passenger front and side air bags and seat belt pretensioner may not deploy (page 2-44), but the curtain air bags may deploy.
Front air bag activation
The front air bags will inflate if theseverity of impact is above the designedthreshold level.l Hitting a solid wall straight on at
greater than about 22 km/h (14 mph).
l Hitting a curb, pavement edge or hardobject.
l Landing hard or the vehicle falling.
l Frontal impact within about a 30degree range from head-on to thevehicle.
l Driving into a big hole or hitting the far side of a hole.
Limitations to front air bag activation
Depending on the severity of impact, thefront air bags may not inflate in thefollowing cases:l Impacts involving trees or poles cause
severe cosmetic damage but may not have enough stopping force to activatethe air bag.
2-50
Essential Safety Equipment
SRS Air Bags
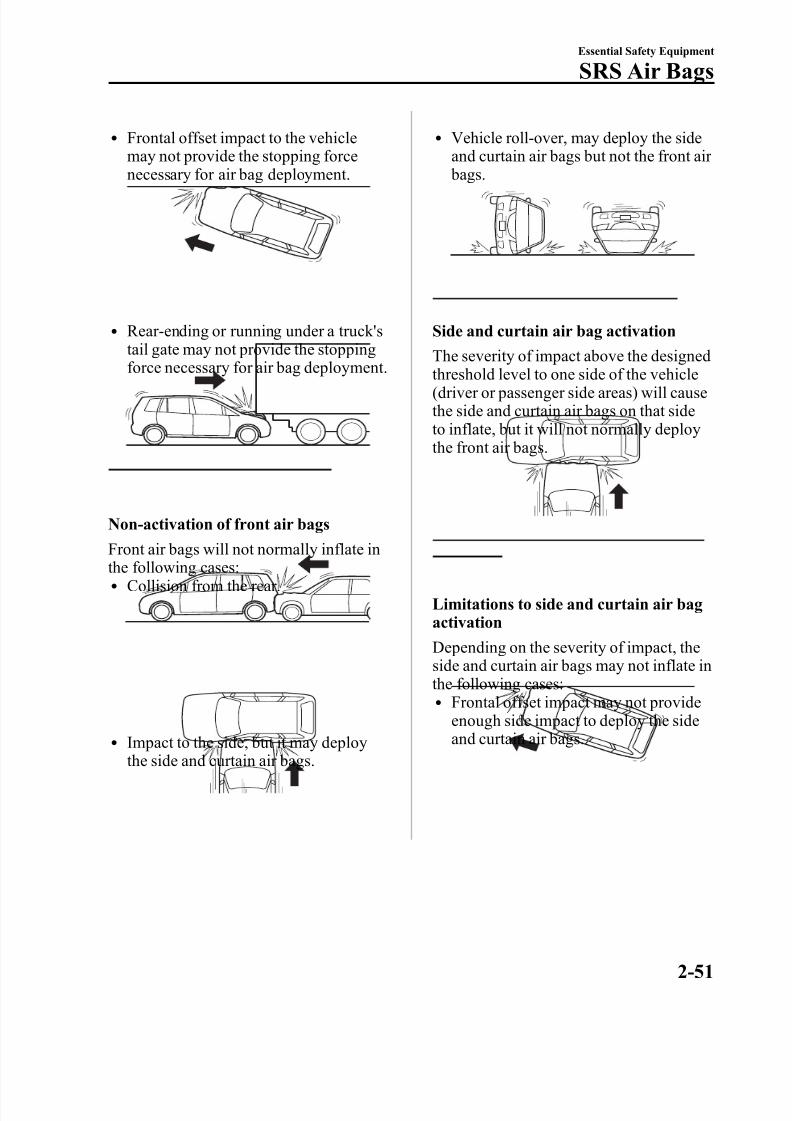
8/2/2019 Mazda5 Owners Manual
http://slidepdf.com/reader/full/mazda5-owners-manual 63/375
l Frontal offset impact to the vehiclemay not provide the stopping force
necessary for air bag deployment.
l Rear-ending or running under a truck'stail gate may not provide the stoppingforce necessary for air bag deployment.
Non-activation of front air bags
Front air bags will not normally inflate inthe following cases:l Collision from the rear.
l Impact to the side, but it may deploythe side and curtain air bags.
l Vehicle roll-over, may deploy the sideand curtain air bags but not the front air
bags.
Side and curtain air bag activation
The severity of impact above the designedthreshold level to one side of the vehicle(driver or passenger side areas) will causethe side and curtain air bags on that sideto inflate, but it will not normally deploythe front air bags.
Limitations to side and curtain air bagactivation
Depending on the severity of impact, theside and curtain air bags may not inflate inthe following cases:l Frontal offset impact may not provide
enough side impact to deploy the sideand curtain air bags.
Essential Safety Equipment
SRS Air Bags
2-51
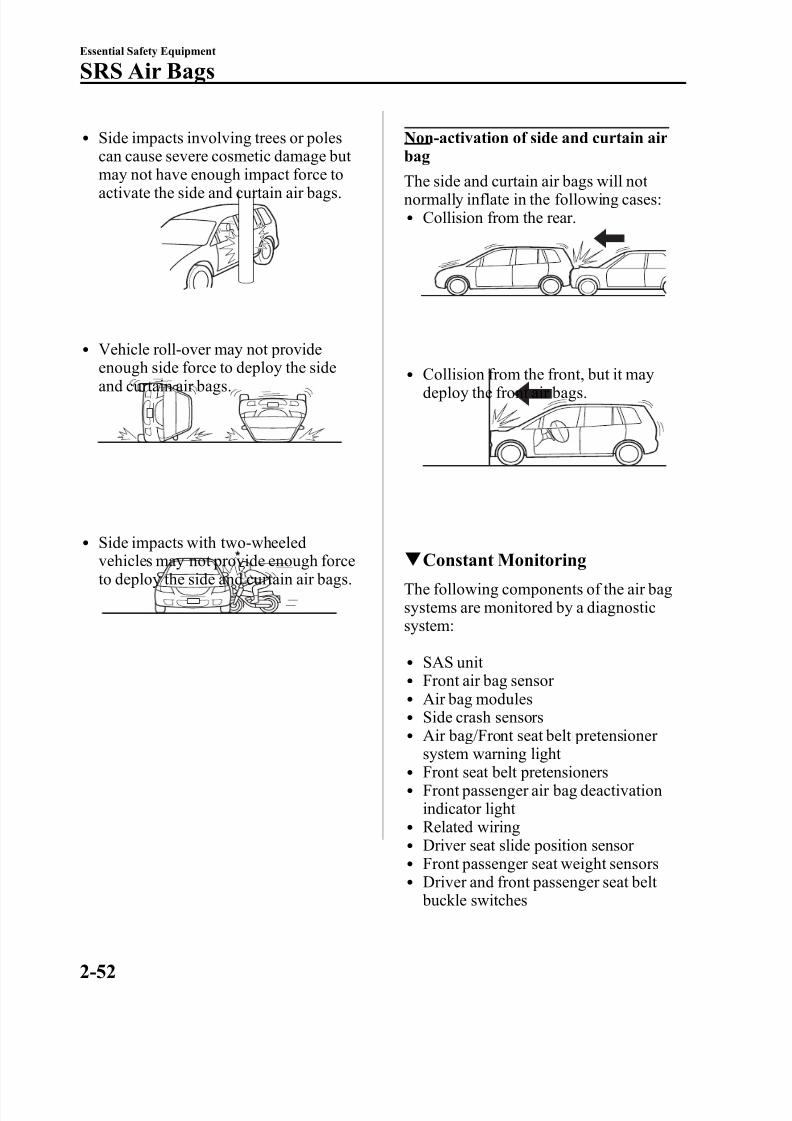
8/2/2019 Mazda5 Owners Manual
http://slidepdf.com/reader/full/mazda5-owners-manual 64/375
l Side impacts involving trees or polescan cause severe cosmetic damage but
may not have enough impact force toactivate the side and curtain air bags.
l Vehicle roll-over may not provideenough side force to deploy the sideand curtain air bags.
l Side impacts with two-wheeledvehicles may not provide enough forceto deploy the side and curtain air bags.
Non-activation of side and curtain airbag
The side and curtain air bags will not normally inflate in the following cases:l Collision from the rear.
l Collision from the front, but it maydeploy the front air bags.
q Constant Monitoring
The following components of the air bagsystems are monitored by a diagnosticsystem:
l SAS unit l Front air bag sensor l Air bag modulesl
Side crash sensorsl Air bag/Front seat belt pretensioner system warning light
l Front seat belt pretensionersl Front passenger air bag deactivation
indicator light l Related wiringl Driver seat slide position sensor l Front passenger seat weight sensorsl Driver and front passenger seat belt
buckle switches
2-52
Essential Safety Equipment
SRS Air Bags
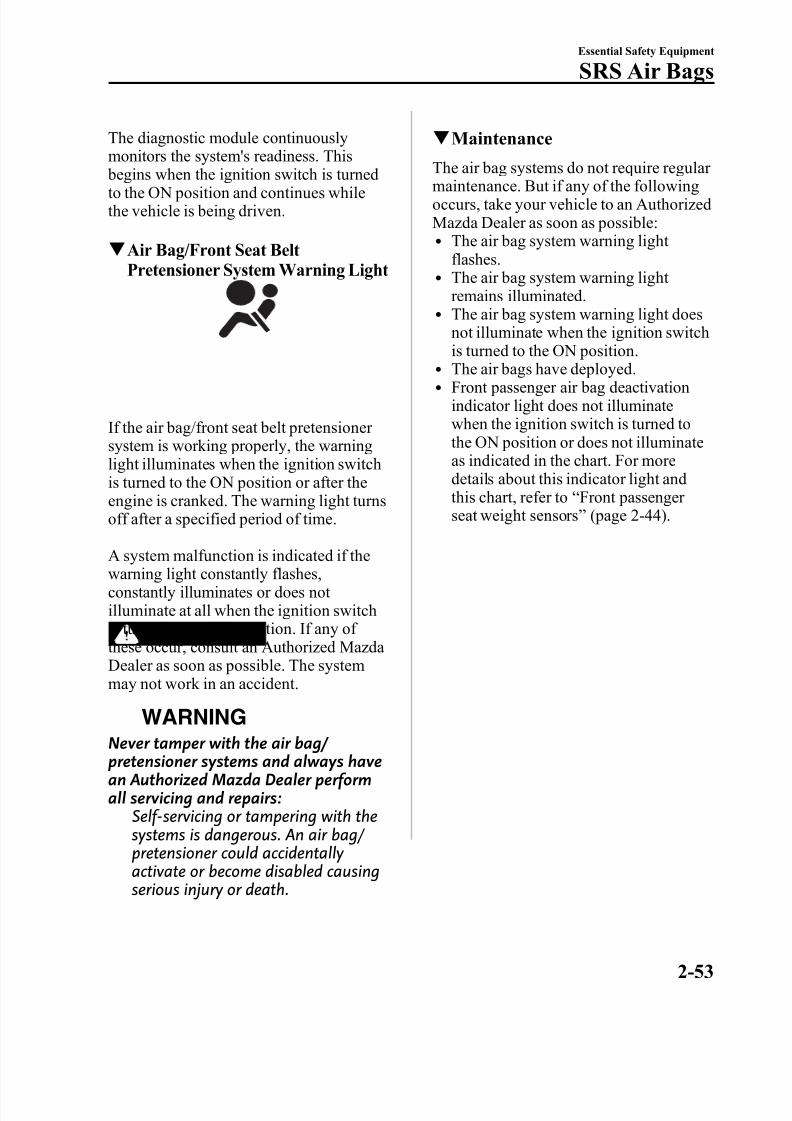
8/2/2019 Mazda5 Owners Manual
http://slidepdf.com/reader/full/mazda5-owners-manual 65/375
The diagnostic module continuouslymonitors the system's readiness. This
begins when the ignition switch is turnedto the ON position and continues whilethe vehicle is being driven.
q Air Bag/Front Seat BeltPretensioner System Warning Light
If the air bag/front seat belt pretensioner system is working properly, the warninglight illuminates when the ignition switchis turned to the ON position or after theengine is cranked. The warning light turnsoff after a specified period of time.
A system malfunction is indicated if thewarning light constantly flashes,constantly illuminates or does not illuminate at all when the ignition switchis turned to the ON position. If any of these occur, consult an Authorized Mazda Dealer as soon as possible. The systemmay not work in an accident.
WARNINGNever tamper with the air bag/ pretensioner systems and always havean Authorized Mazda Dealer performall servicing and repairs:
Self-servicing or tampering with thesystems is dangerous. An air bag/ pretensioner could accidentally activate or become disabled causingserious injury or death.
q Maintenance
The air bag systems do not require regular maintenance. But if any of the followingoccurs, take your vehicle to an AuthorizedMazda Dealer as soon as possible:l The air bag system warning light
flashes.l The air bag system warning light
remains illuminated.l The air bag system warning light does
not illuminate when the ignition switchis turned to the ON position.
l The air bags have deployed.l Front passenger air bag deactivation
indicator light does not illuminatewhen the ignition switch is turned tothe ON position or does not illuminateas indicated in the chart. For moredetails about this indicator light andthis chart, refer to “ Front passenger seat weight sensors ” (page 2-44).
Essential Safety Equipment
SRS Air Bags
2-53
8/2/2019 Mazda5 Owners Manual
http://slidepdf.com/reader/full/mazda5-owners-manual 66/375
WARNING
Do not operate a vehicle with damagedair bag/seat belt pretensioner systemcomponents:
Expended or damaged air bag/seatbelt pretensioner system componentsmust be replaced after any collisionwhich caused them to deploy or damage them. Only a trained Authorized Mazda Dealer can fully evaluate these systems to see that
they will work in any subsequentaccident. Driving with an expendedor damaged air bag or pretensioner unit will not afford you the necessary protection in the event of any subsequent accident which couldresult in serious injury or death.
Do not remove interior air bag parts:Removing any components such as
the front seats, front dashboard, thesteering wheel or parts on the frontand rear window pillars and alongthe roof edge, containing air bagparts or sensors is dangerous. Theseparts contain essential air bagcomponents. The air bag couldaccidentally activate and causeserious injuries. Always have an Authorized Mazda Dealer remove
these parts.Dispose of the air bag properly:
Improper disposal of an air bag or avehicle with live air bags in it can beextremely dangerous. Unless allsafety procedures are followed, injury can result. Ask an Authorized MazdaDealer how to safely dispose of an air bag or how to scrap an air bagequipped vehicle.
NOTE If it becomes necessary to have the components
or wiring system for the supplementaryrestraint system modified to accommodate a person with certain medical conditions inaccordance with a certified physician, contact an Authorized Mazda Dealer, refer to“ Customer Assistance (U.S.A.) ” (page 9-2).
2-54
Essential Safety Equipment
SRS Air Bags
8/2/2019 Mazda5 Owners Manual
http://slidepdf.com/reader/full/mazda5-owners-manual 67/375
3 Knowing Your Mazda
Explanation of basic operations and controls; opening/closing and adjustment of various parts.
Doors and Locks ........................................................................... 3-2Keys .......................................................................................... 3-2Keyless Entry System ............................................................... 3-3Door Locks ............................................................................... 3-7Liftgate .................................................................................... 3-12
Power Windows ...................................................................... 3-14Fuel-Filler Lid and Cap ........................................................... 3-16Hood ....................................................................................... 3-17Moonroof
í............................................................................. 3-19
Security System ........................................................................... 3-21Immobilizer System ................................................................ 3-21Theft-Deterrent System í ........................................................ 3-23
Steering Wheel and Mirrors ...................................................... 3-26Steering Wheel ........................................................................ 3-26Mirrors .................................................................................... 3-26
3-1íSome models.
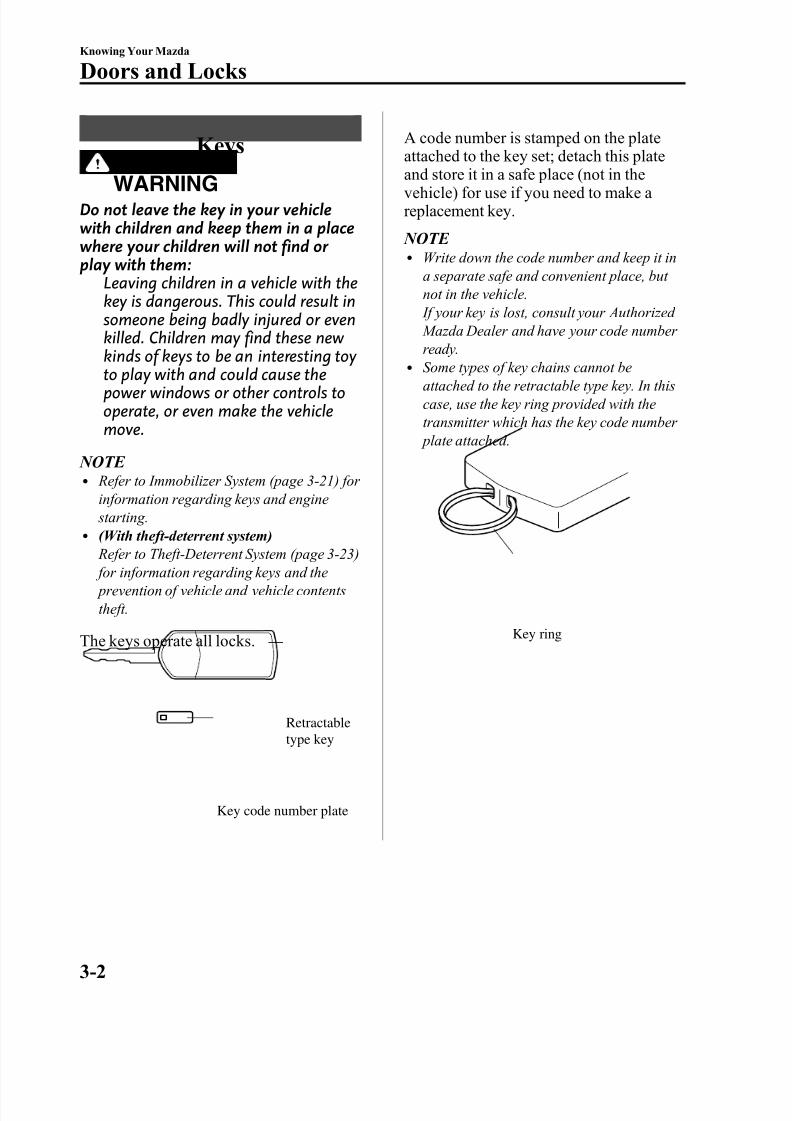
8/2/2019 Mazda5 Owners Manual
http://slidepdf.com/reader/full/mazda5-owners-manual 68/375
Keys
WARNINGDo not leave the key in your vehiclewith children and keep them in a placewhere your children will not find or play with them:
Leaving children in a vehicle with thekey is dangerous. This could result insomeone being badly injured or evenkilled. Children may find these new
kinds of keys to be an interesting toy to play with and could cause thepower windows or other controls tooperate, or even make the vehiclemove.
NOTE l Refer to Immobilizer System (page 3-21) for
information regarding keys and engine starting.
l
(With theft-deterrent system) Refer to Theft-Deterrent System (page 3-23) for information regarding keys and the prevention of vehicle and vehicle contentstheft.
The keys operate all locks.
Key code number plate
Retractabletype key
A code number is stamped on the plateattached to the key set; detach this plate
and store it in a safe place (not in thevehicle) for use if you need to make a replacement key.
NOTE l Write down the code number and keep it in
a separate safe and convenient place, but not in the vehicle. If your key is lost, consult your Authorized Mazda Dealer and have your code number ready.
l Some types of key chains cannot beattached to the retractable type key. In thiscase, use the key ring provided with thetransmitter which has the key code number plate attached.
Key ring
3-2
Knowing Your Mazda
Doors and Locks
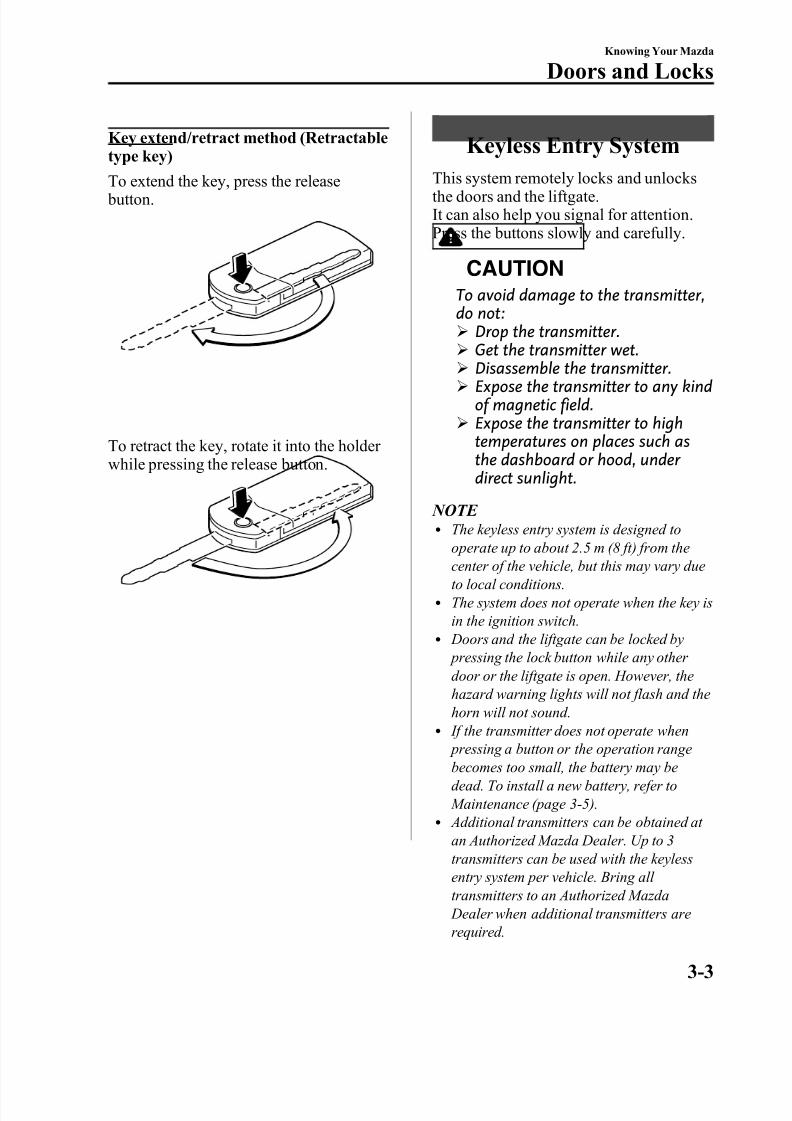
8/2/2019 Mazda5 Owners Manual
http://slidepdf.com/reader/full/mazda5-owners-manual 69/375
Key extend/retract method (Retractabletype key)
To extend the key, press the release button.
To retract the key, rotate it into the holder while pressing the release button.
Keyless Entry System
This system remotely locks and unlocksthe doors and the liftgate.It can also help you signal for attention.Press the buttons slowly and carefully.
CAUTION
To avoid damage to the transmitter,do not:Ø Drop the transmitter.Ø Get the transmitter wet.Ø Disassemble the transmitter.Ø Expose the transmitter to any kind
of magnetic field.Ø Expose the transmitter to high
temperatures on places such asthe dashboard or hood, under direct sunlight.
NOTE l The keyless entry system is designed to
operate up to about 2.5 m (8 ft) from thecenter of the vehicle, but this may vary dueto local conditions.
l The system does not operate when the key isin the ignition switch.
l Doors and the liftgate can be locked by pressing the lock button while any other door or the liftgate is open. However, thehazard warning lights will not flash and thehorn will not sound.
l If the transmitter does not operate when pressing a button or the operation rangebecomes too small, the battery may bedead. To install a new battery, refer to Maintenance (page 3-5).
l Additional transmitters can be obtained at an Authorized Mazda Dealer. Up to 3transmitters can be used with the keylessentry system per vehicle. Bring all transmitters to an Authorized Mazda Dealer when additional transmitters arerequired.
Knowing Your Mazda
Doors and Locks
3-3

8/2/2019 Mazda5 Owners Manual
http://slidepdf.com/reader/full/mazda5-owners-manual 70/375
q Transmitter
Lock button
Unlock button
Panic button
Operationindicator light
NOTE l (U.S.A.)
This device complies with Part 15 of the FCC Rules. Operation is subject to the following two conditions: (1) this devicemay not cause harmful interference, and (2)this device must accept any interferencereceived, including interference that maycause undesired operation.
l (CANADA)This device complies with RSS-210 of Industry CANADA. Operation is subject tothe following two conditions: (1) this devicemay not cause interference, and (2) thisdevice must accept any interference,including interference that may causeundesired operation of the device.
The operation indicator light flashes whenthe buttons are pressed.
Lock button
To lock the doors and the liftgate, pressthe lock button and the hazard warninglights will flash once.
To confirm that all doors and the liftgatehave been locked, press the lock buttonagain within 5 seconds. If they are closedand locked, the horn will sound and thehazard warning lights will flash once.
NOTE l Pressing the transmitter lock button to lock
the doors while any door is open does not sound the horn.l (Without theft-deterrent system)
The hazard warning lights will flash onceto indicate that all doors and the liftgateare locked.
l (With theft-deterrent system)The hazard warning lights only flash whenthe theft deterrent system is armed.The hazard warning lights do not flash if all
the doors and the liftgate are locked beforethe theft-deterrent system is properlyarmed. Refer to the theft-deterrent system on page3-23.
NOTE l All doors and the liftgate cannot be locked
when the key is in the ignition switch.l Confirm that all doors and the liftgate are
locked visually or audibly by use of thedouble click.
Unlock button
To unlock the driver's door, press theunlock button and the hazard warninglights will flash twice.
To unlock all doors and the liftgate, pressthe unlock button again within 5 seconds
and the hazard warning lights will flashtwice.
3-4
Knowing Your Mazda
Doors and Locks
8/2/2019 Mazda5 Owners Manual
http://slidepdf.com/reader/full/mazda5-owners-manual 71/375
NOTE (Without theft-deterrent system)
The hazard warning lights will flash twice toindicate that all doors and the liftgate areunlocked.(With theft-deterrent system)The hazard warning lights only flash when thetheft deterrent system is turned off.The hazard warning lights do not flash unlessthe theft deterrent system has been properlyturned off. Refer to the theft-deterrent system on page
3-23.
NOTE Auto re-lock function After unlocking with the transmitter, all doorsand the liftgate will automatically lock if oneof the doors or the liftgate is not opened withinabout 30 seconds.
Panic button
If you witness from a distance someoneattempting to break into or damage your vehicle, pressing the panic button willactivate the vehicle's alarm.
NOTE The panic button will work whether any door or the liftgate is open or closed.
Turning on the alarm
Pressing the panic button for 1 second or more will trigger the alarm for about 2minutes and 30 seconds, and thefollowing will occur:l The horn sounds intermittently.l The hazard warning lights flash.
Turning off the alarm
Press any button on the transmitter.
q Transmitter Maintenance
If the buttons on the transmitter areinoperable and the operation indicator light does not flash, the battery may bedead.Replace with a new battery before thetransmitter becomes unusable.
CAUTIONØ Install the battery with the positive
pole ( ) facing down. Battery
leakage could occur if it is notinstalled correctly.Ø When replacing the battery, be
careful not to bend the electricalterminals or get oil on them. Alsobe careful not to get dirt in thetransmitter as it could bedamaged.
Ø There is the danger of explosion if the battery is not correctly
replaced.Ø Replace only with the same typebattery (CR1620 or equivalent).
Ø Dispose of used batteriesaccording to the followinginstructions.Ø Insulate the plus and minus
terminals of the battery usingcellophane or equivalent tape.
Ø Never disassemble.Ø Never throw the battery intofire and/or water.Ø Never deform or crush.
Replacing the transmitter battery
1. Unfold the key (page 3-2).
Knowing Your Mazda
Doors and Locks
3-5
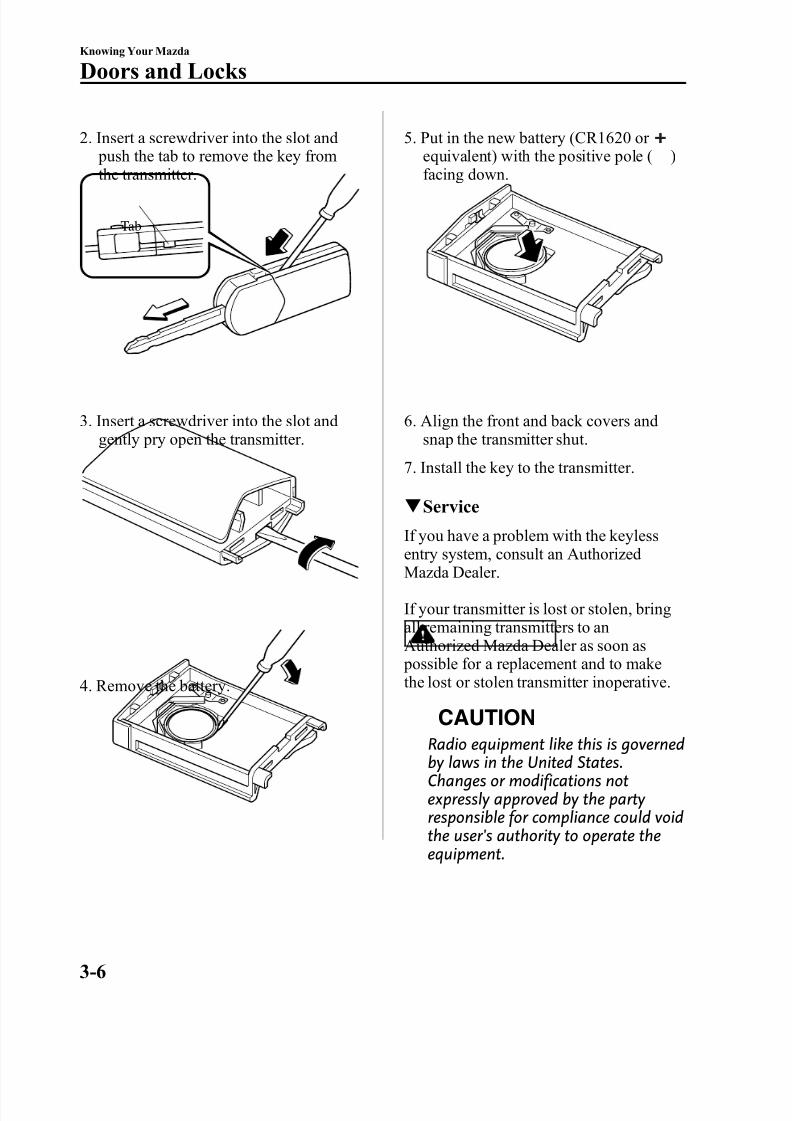
8/2/2019 Mazda5 Owners Manual
http://slidepdf.com/reader/full/mazda5-owners-manual 72/375
2. Insert a screwdriver into the slot and push the tab to remove the key from
the transmitter.
Tab
3. Insert a screwdriver into the slot andgently pry open the transmitter.
4. Remove the battery.
5. Put in the new battery (CR1620 or equivalent) with the positive pole ( )
facing down.
6. Align the front and back covers andsnap the transmitter shut.
7. Install the key to the transmitter.
q Service
If you have a problem with the keylessentry system, consult an AuthorizedMazda Dealer.
If your transmitter is lost or stolen, bringall remaining transmitters to anAuthorized Mazda Dealer as soon as possible for a replacement and to makethe lost or stolen transmitter inoperative.
CAUTIONRadio equipment like this is governedby laws in the United States.Changes or modifications notexpressly approved by the party responsible for compliance could voidthe user's authority to operate theequipment.
3-6
Knowing Your Mazda
Doors and Locks
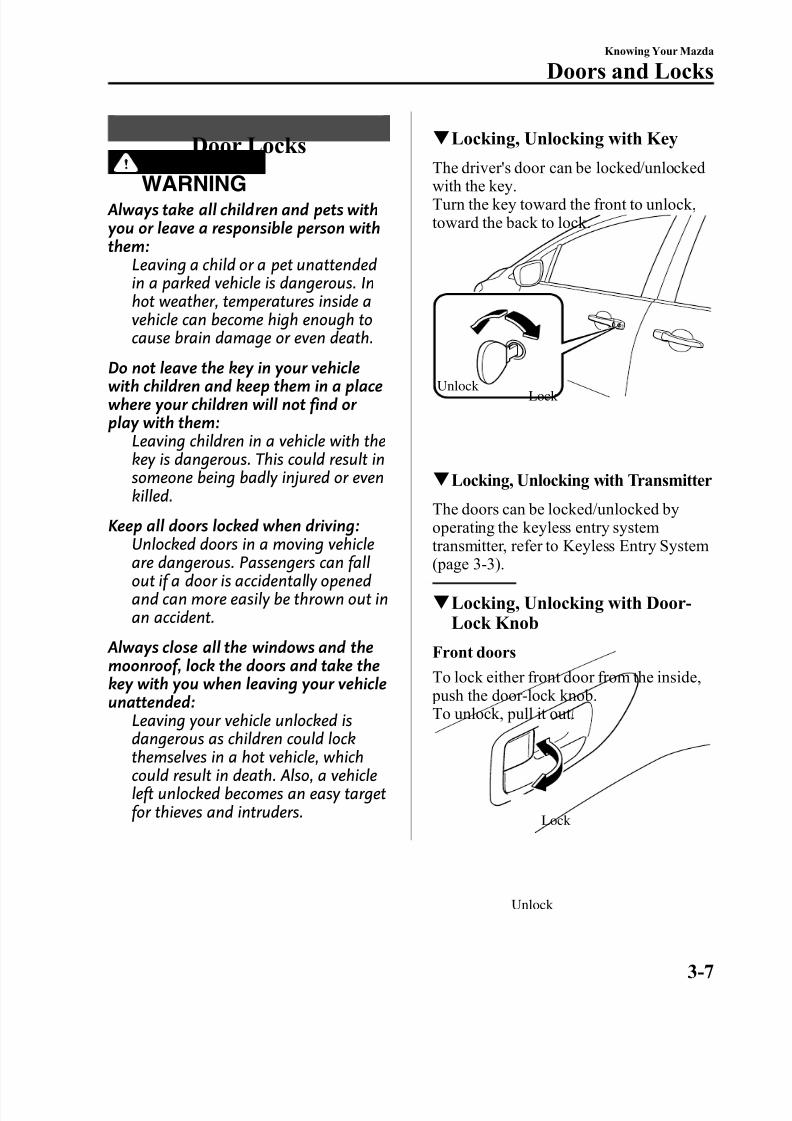
8/2/2019 Mazda5 Owners Manual
http://slidepdf.com/reader/full/mazda5-owners-manual 73/375
Door Locks
WARNING Always take all children and pets withyou or leave a responsible person withthem:
Leaving a child or a pet unattendedin a parked vehicle is dangerous. Inhot weather, temperatures inside avehicle can become high enough tocause brain damage or even death.
Do not leave the key in your vehiclewith children and keep them in a placewhere your children will not find or play with them:
Leaving children in a vehicle with thekey is dangerous. This could result insomeone being badly injured or evenkilled.
Keep all doors locked when driving:Unlocked doors in a moving vehicleare dangerous. Passengers can fallout if a door is accidentally openedand can more easily be thrown out inan accident.
Always close all the windows and themoonroof, lock the doors and take thekey with you when leaving your vehicleunattended:
Leaving your vehicle unlocked isdangerous as children could lockthemselves in a hot vehicle, whichcould result in death. Also, a vehicleleft unlocked becomes an easy targetfor thieves and intruders.
q Locking, Unlocking with Key
The driver's door can be locked/unlockedwith the key.Turn the key toward the front to unlock,toward the back to lock.
Unlock Lock
q Locking, Unlocking with Transmitter
The doors can be locked/unlocked byoperating the keyless entry systemtransmitter, refer to Keyless Entry System(page 3-3).
q Locking, Unlocking with Door-Lock Knob
Front doors
To lock either front door from the inside, push the door-lock knob.To unlock, pull it out.
Unlock
Lock
Knowing Your Mazda
Doors and Locks
3-7
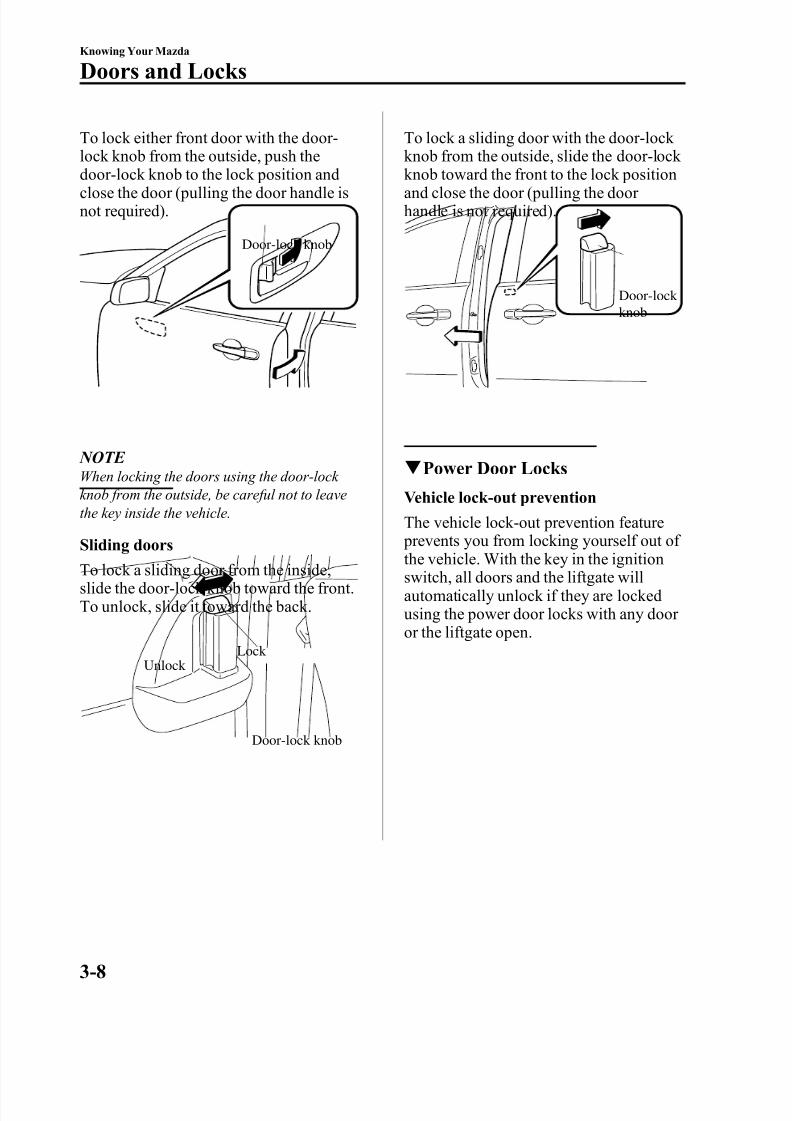
8/2/2019 Mazda5 Owners Manual
http://slidepdf.com/reader/full/mazda5-owners-manual 74/375
To lock either front door with the door-lock knob from the outside, push the
door-lock knob to the lock position andclose the door (pulling the door handle isnot required).
Door-lock knob
NOTE When locking the doors using the door-lock knob from the outside, be careful not to leavethe key inside the vehicle.
Sliding doorsTo lock a sliding door from the inside,slide the door-lock knob toward the front.To unlock, slide it toward the back.
Unlock Lock
Door-lock knob
To lock a sliding door with the door-lock knob from the outside, slide the door-lock
knob toward the front to the lock positionand close the door (pulling the door handle is not required).
Door-lock knob
q Power Door Locks
Vehicle lock-out prevention
The vehicle lock-out prevention feature
prevents you from locking yourself out of the vehicle. With the key in the ignitionswitch, all doors and the liftgate willautomatically unlock if they are lockedusing the power door locks with any door or the liftgate open.
3-8
Knowing Your Mazda
Doors and Locks
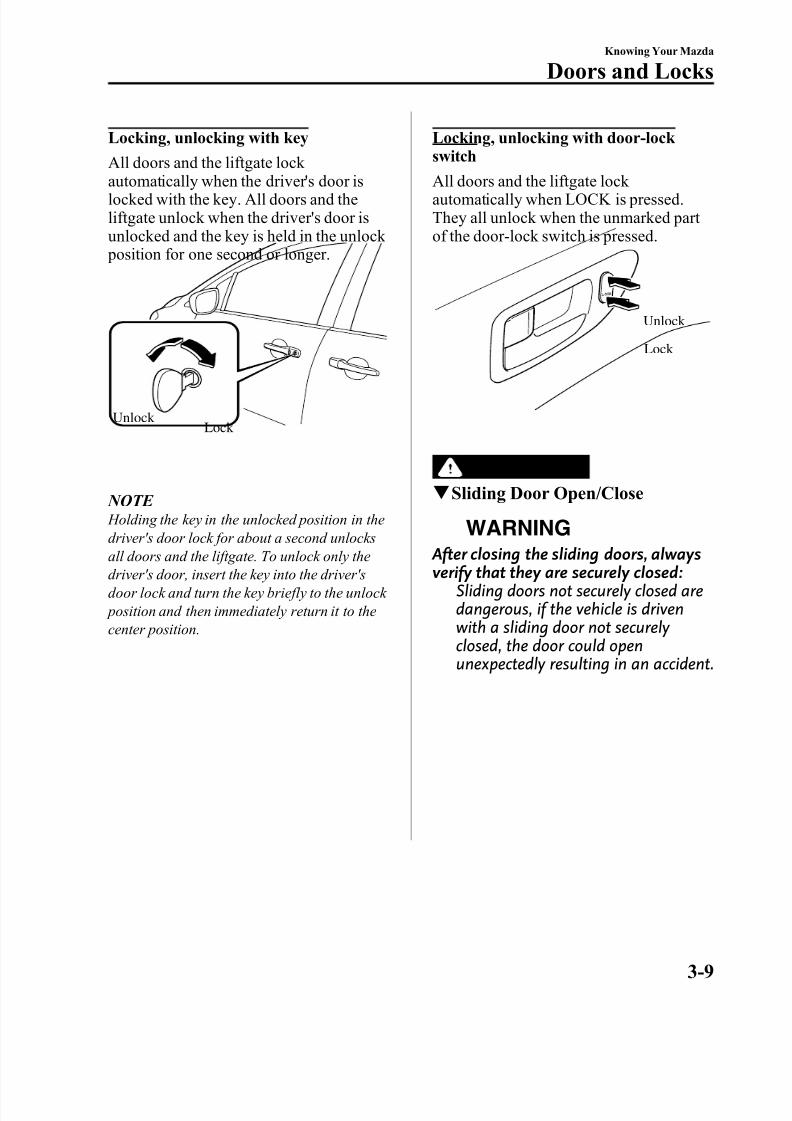
8/2/2019 Mazda5 Owners Manual
http://slidepdf.com/reader/full/mazda5-owners-manual 75/375
Locking, unlocking with key
All doors and the liftgate lock
automatically when the driver's door islocked with the key. All doors and theliftgate unlock when the driver's door isunlocked and the key is held in the unlock position for one second or longer.
Unlock Lock
NOTE Holding the key in the unlocked position in the
driver's door lock for about a second unlocksall doors and the liftgate. To unlock only thedriver's door, insert the key into the driver'sdoor lock and turn the key briefly to the unlock position and then immediately return it to thecenter position.
Locking, unlocking with door-lock switch
All doors and the liftgate lock automatically when LOCK is pressed.They all unlock when the unmarked part of the door-lock switch is pressed.
Unlock
Lock
q Sliding Door Open/Close
WARNING
After closing the sliding doors, alwaysverify that they are securely closed:
Sliding doors not securely closed aredangerous, if the vehicle is drivenwith a sliding door not securely closed, the door could openunexpectedly resulting in an accident.
Knowing Your Mazda
Doors and Locks
3-9

8/2/2019 Mazda5 Owners Manual
http://slidepdf.com/reader/full/mazda5-owners-manual 76/375
CAUTION
When opening/closing a sliding door,follow the cautions below. If thecautions are not heeded, hands, feet,or even a head may be caught in adoor resulting in an injury.Ø Use the door handle.Ø Keep your hands, feet, and head
away from the sliding door openings.
Ø Make sure that there is nothing
behind the sliding doors.Ø Keep your hands and feet away from the sliding door rails, armsand pillars.
Pillar
ArmRail
Door handle
NOTE When you leave the vehicle, stop the engineand lock the doors. And do not put valuables
in your vehicle to prevent theft.
Opening/closing from inside
To open, pull the inner door handle
toward the back.To close, push the inner door handletoward the front.
Open
Close
Opening/closing from outside
Pull the outer door handle and slide thedoor.
NOTE The right sliding door cannot fully open whenthe fuel-filler lid is open. Close the fuel filler lid before opening the sliding door.
3-10
Knowing Your Mazda
Doors and Locks

8/2/2019 Mazda5 Owners Manual
http://slidepdf.com/reader/full/mazda5-owners-manual 77/375
NOTE When closing the sliding door from the fully-
opened position and from outside the vehicle, pull the outside door handle outward torelease the latch, and slide the door toward the front.
q Rear Door Child Safety Locks
These locks are intended to help prevent children from accidentally opening thesliding doors. Use them both whenever a child rides in the vehicle.
If you slide the child safety lock to thelock position before closing that door, thedoor cannot be opened from the inside.The door can be opened only by pullingthe outside handle.
Unlock
Lock
q Easy Closureí
The Easy Closure system automaticallycloses the doors completely from the near-shut position.
WARNING
When closing a sliding door, alwayskeep hands and fingers away from thedoor:
Placing hands or fingers around asliding door is dangerous because the
door closes automatically from thenear-shut position, which couldcause hands and fingers to bepinched and injured.
NOTE If a door handle is pulled while the easyclosure function is operating, the easy closure function can be stopped.
Knowing Your Mazda
Doors and Locks
3-11íSome models.

8/2/2019 Mazda5 Owners Manual
http://slidepdf.com/reader/full/mazda5-owners-manual 78/375
Liftgate
WARNINGNever allow a person to ride in theluggage compartment:
Allowing a person to ride in theluggage compartment is dangerous.The person in the luggagecompartment could be seriously injured or killed during suddenbraking or a collision.
Do not drive with the liftgate open:Exhaust gas in the cabin of a vehicleis dangerous. An open liftgate in amoving vehicle will cause exhaust gas to be drawn into the cabin. This gas contains CO (carbon monoxide),which is colorless, odorless, andhighly poisonous, and it can causeloss of consciousness and death.Moreover, an open liftgate couldcause occupants to fall out in anaccident.
q Locking, Unlocking with Key
The liftgate can be locked/unlocked byinserting the key into the driver's door keyslot, refer to Power Door Locks (page3-8).
q Locking, Unlocking with Transmitter
The liftgate can be locked/unlocked byoperating the keyless entry systemtransmitter, refer to Keyless Entry System(page 3-3).
q Locking, Unlocking with Door-Lock Switch
The liftgate can be locked/unlocked byoperating the door-lock switch, refer toPower Door Locks (page 3-8).
q Opening and Closing the Liftgate
Opening the liftgate
Pull up on the handle.
NOTE The liftgate opens to a position ( ) slightlylower than the fully open position. To fullyopen the liftgate ( ), push it up around thearea indicated by the arrow. Do not applyexcessive force when pushing it up.
3-12
Knowing Your Mazda
Doors and Locks
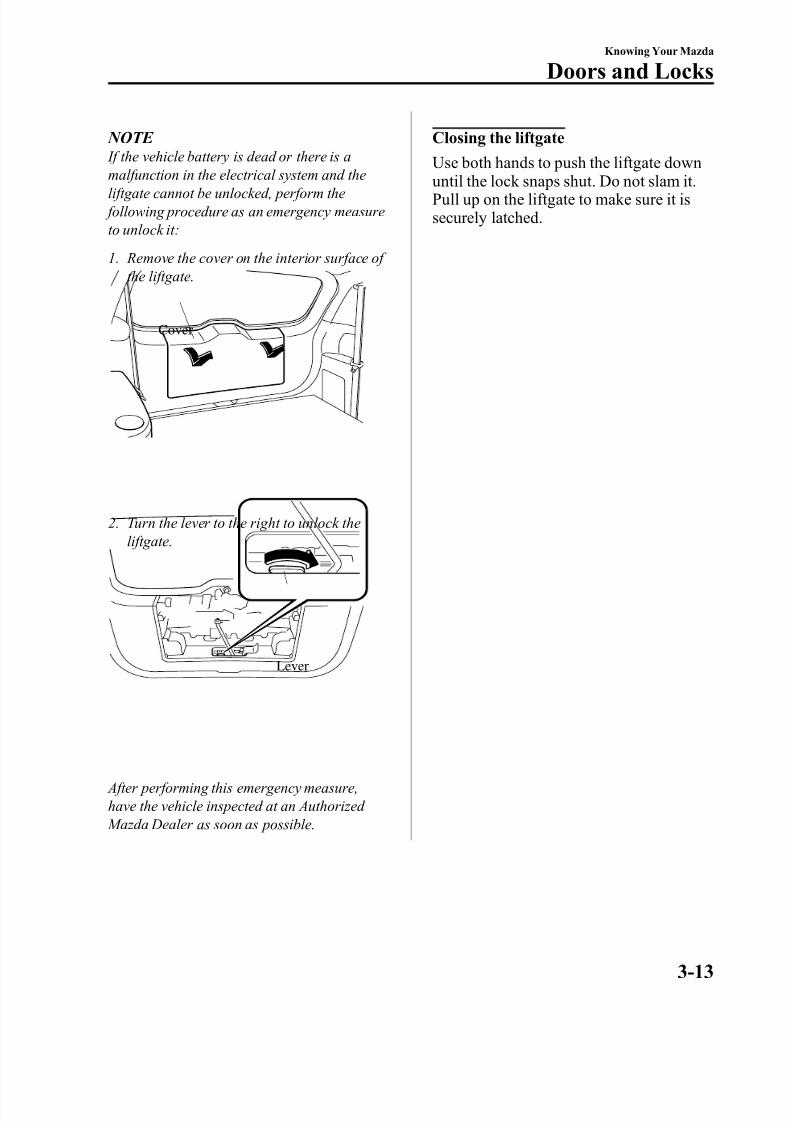
8/2/2019 Mazda5 Owners Manual
http://slidepdf.com/reader/full/mazda5-owners-manual 79/375
NOTE If the vehicle battery is dead or there is a
malfunction in the electrical system and theliftgate cannot be unlocked, perform the following procedure as an emergency measureto unlock it:
1. Remove the cover on the interior surface of the liftgate.
Cover
2. Turn the lever to the right to unlock the
liftgate.
Lever
After performing this emergency measure,have the vehicle inspected at an Authorized Mazda Dealer as soon as possible.
Closing the liftgate
Use both hands to push the liftgate down
until the lock snaps shut. Do not slam it.Pull up on the liftgate to make sure it issecurely latched.
Knowing Your Mazda
Doors and Locks
3-13
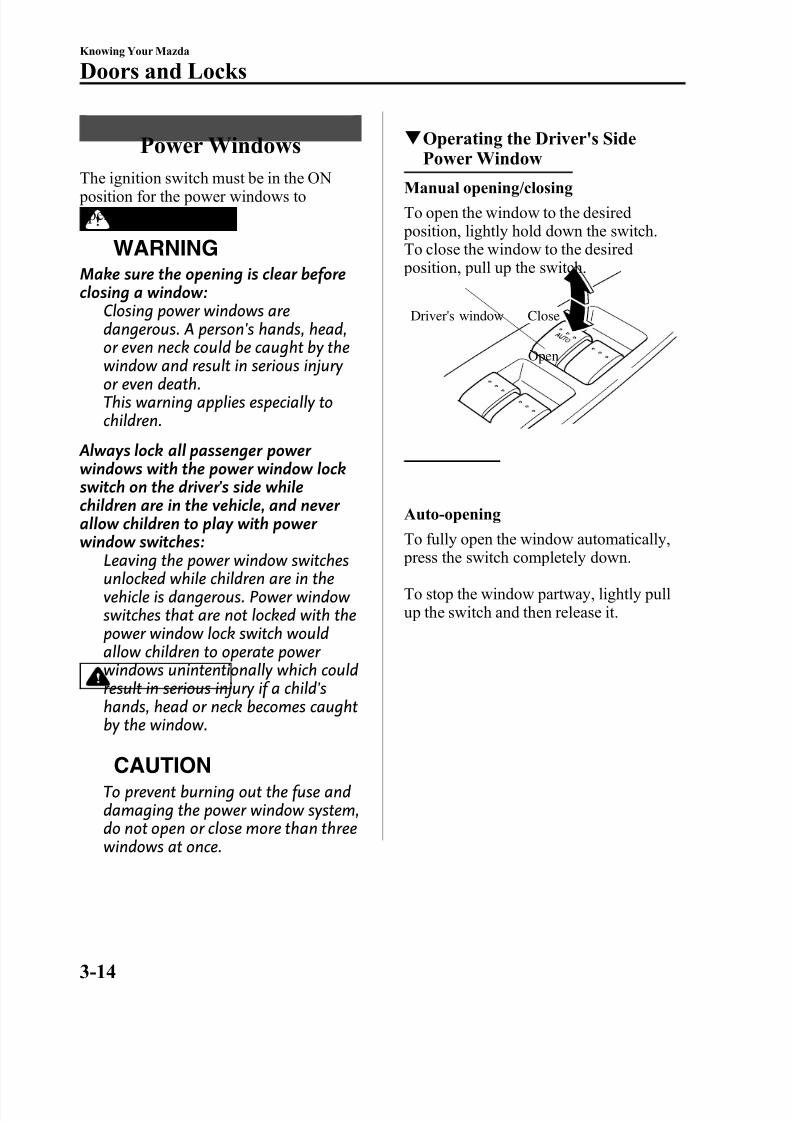
8/2/2019 Mazda5 Owners Manual
http://slidepdf.com/reader/full/mazda5-owners-manual 80/375
Power Windows
The ignition switch must be in the ON position for the power windows tooperate.
WARNING
Make sure the opening is clear beforeclosing a window:
Closing power windows aredangerous. A person's hands, head,or even neck could be caught by thewindow and result in serious injury or even death.This warning applies especially tochildren.
Always lock all passenger power windows with the power window lockswitch on the driver's side whilechildren are in the vehicle, and never allow children to play with power window switches:Leaving the power window switches
unlocked while children are in thevehicle is dangerous. Power window switches that are not locked with thepower window lock switch wouldallow children to operate power windows unintentionally which couldresult in serious injury if a child'shands, head or neck becomes caughtby the window.
CAUTION
To prevent burning out the fuse anddamaging the power window system,do not open or close more than threewindows at once.
q Operating the Driver's SidePower Window
Manual opening/closing
To open the window to the desired position, lightly hold down the switch.To close the window to the desired position, pull up the switch.
Open
CloseDriver's window
Auto-opening
To fully open the window automatically, press the switch completely down.
To stop the window partway, lightly pullup the switch and then release it.
3-14
Knowing Your Mazda
Doors and Locks
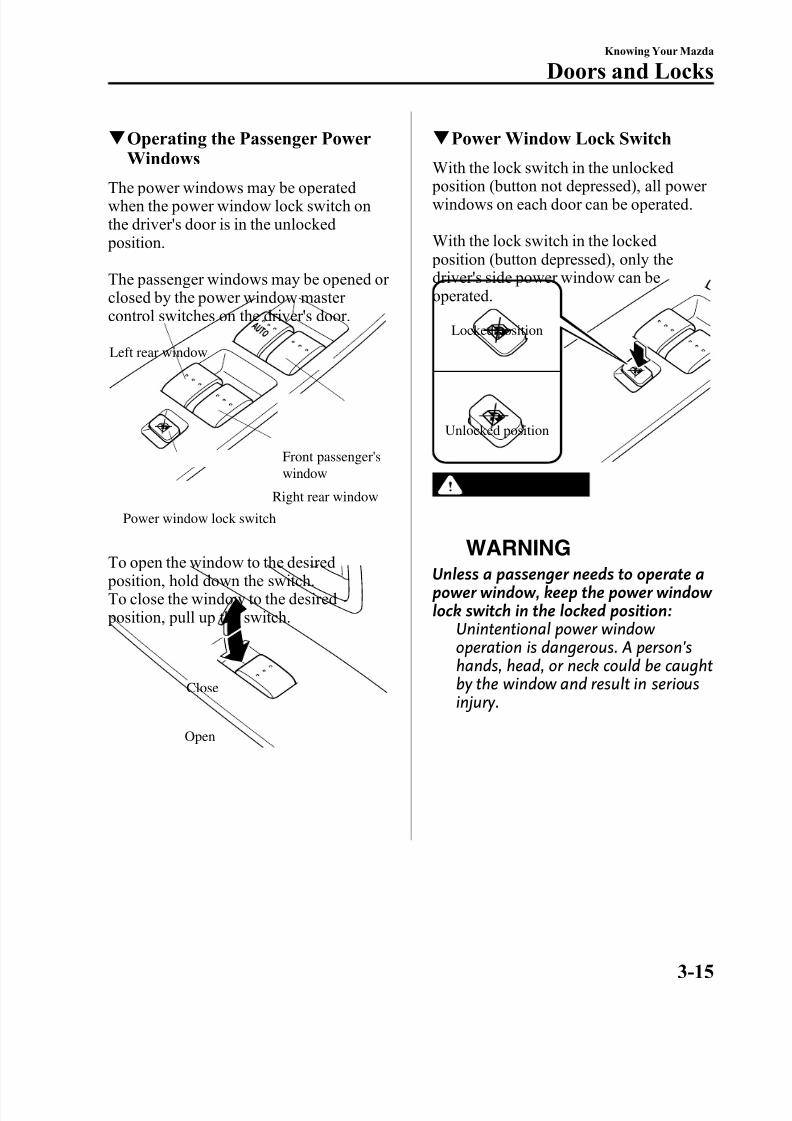
8/2/2019 Mazda5 Owners Manual
http://slidepdf.com/reader/full/mazda5-owners-manual 81/375
q Operating the Passenger PowerWindows
The power windows may be operatedwhen the power window lock switch onthe driver's door is in the unlocked position.
The passenger windows may be opened or closed by the power window master control switches on the driver's door.
Left rear window
Power window lock switch
Front passenger'swindow
Right rear window
To open the window to the desired position, hold down the switch.To close the window to the desired position, pull up the switch.
Close
Open
q Power Window Lock Switch
With the lock switch in the unlocked position (button not depressed), all power windows on each door can be operated.
With the lock switch in the locked position (button depressed), only thedriver's side power window can beoperated.
Locked position
Unlocked position
WARNINGUnless a passenger needs to operate apower window, keep the power window lock switch in the locked position:
Unintentional power window operation is dangerous. A person'shands, head, or neck could be caughtby the window and result in seriousinjury.
Knowing Your Mazda
Doors and Locks
3-15
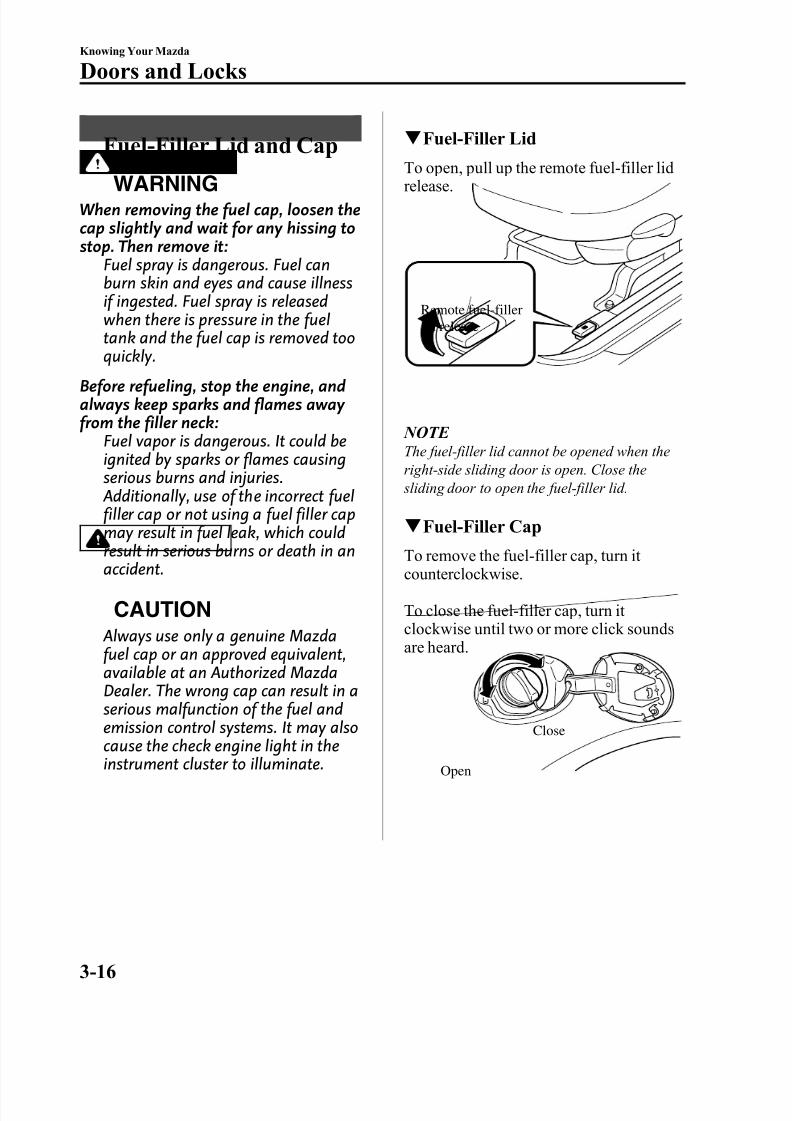
8/2/2019 Mazda5 Owners Manual
http://slidepdf.com/reader/full/mazda5-owners-manual 82/375
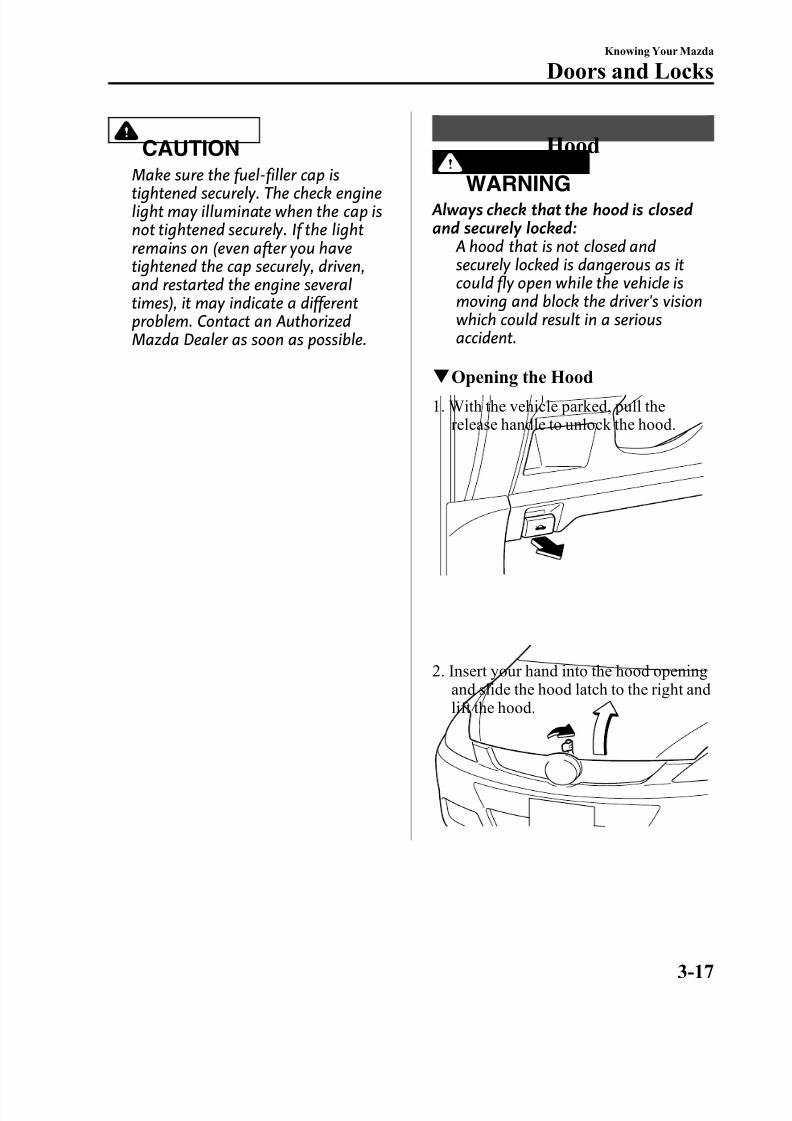
8/2/2019 Mazda5 Owners Manual
http://slidepdf.com/reader/full/mazda5-owners-manual 83/375
CAUTION
Make sure the fuel-filler cap istightened securely. The check enginelight may illuminate when the cap isnot tightened securely. If the lightremains on (even after you havetightened the cap securely, driven,and restarted the engine severaltimes), it may indicate a differentproblem. Contact an AuthorizedMazda Dealer as soon as possible.
Hood
WARNING Always check that the hood is closedand securely locked:
A hood that is not closed andsecurely locked is dangerous as itcould fly open while the vehicle ismoving and block the driver's visionwhich could result in a seriousaccident.
q Opening the Hood
1. With the vehicle parked, pull therelease handle to unlock the hood.
2. Insert your hand into the hood openingand slide the hood latch to the right andlift the hood.
Knowing Your Mazda
Doors and Locks
3-17
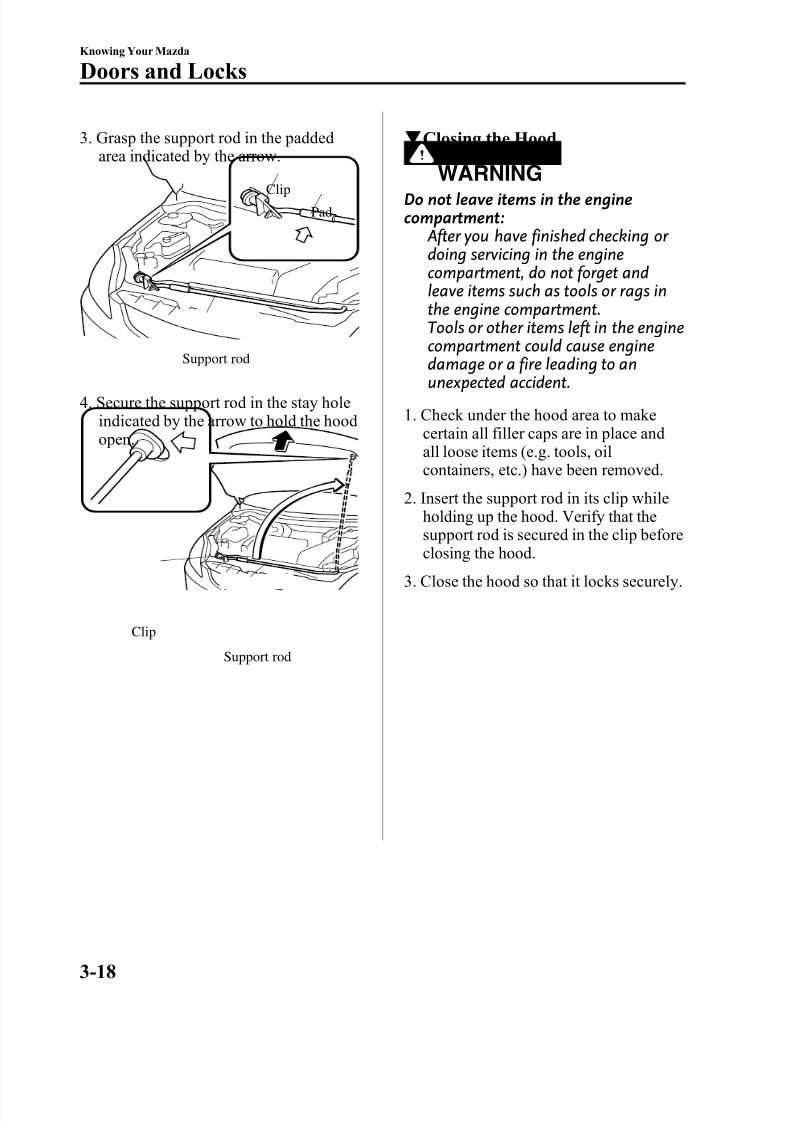
8/2/2019 Mazda5 Owners Manual
http://slidepdf.com/reader/full/mazda5-owners-manual 84/375
3. Grasp the support rod in the paddedarea indicated by the arrow.
Support rod
Clip
Pad
4. Secure the support rod in the stay holeindicated by the arrow to hold the hoodopen.
Support rod
Clip
q Closing the Hood
WARNINGDo not leave items in the enginecompartment:
After you have finished checking or doing servicing in the enginecompartment, do not forget andleave items such as tools or rags inthe engine compartment.Tools or other items left in the enginecompartment could cause enginedamage or a fire leading to anunexpected accident.
1. Check under the hood area to makecertain all filler caps are in place andall loose items (e.g. tools, oilcontainers, etc.) have been removed.
2. Insert the support rod in its clip whileholding up the hood. Verify that the
support rod is secured in the clip beforeclosing the hood.
3. Close the hood so that it locks securely.
3-18
Knowing Your Mazda
Doors and Locks
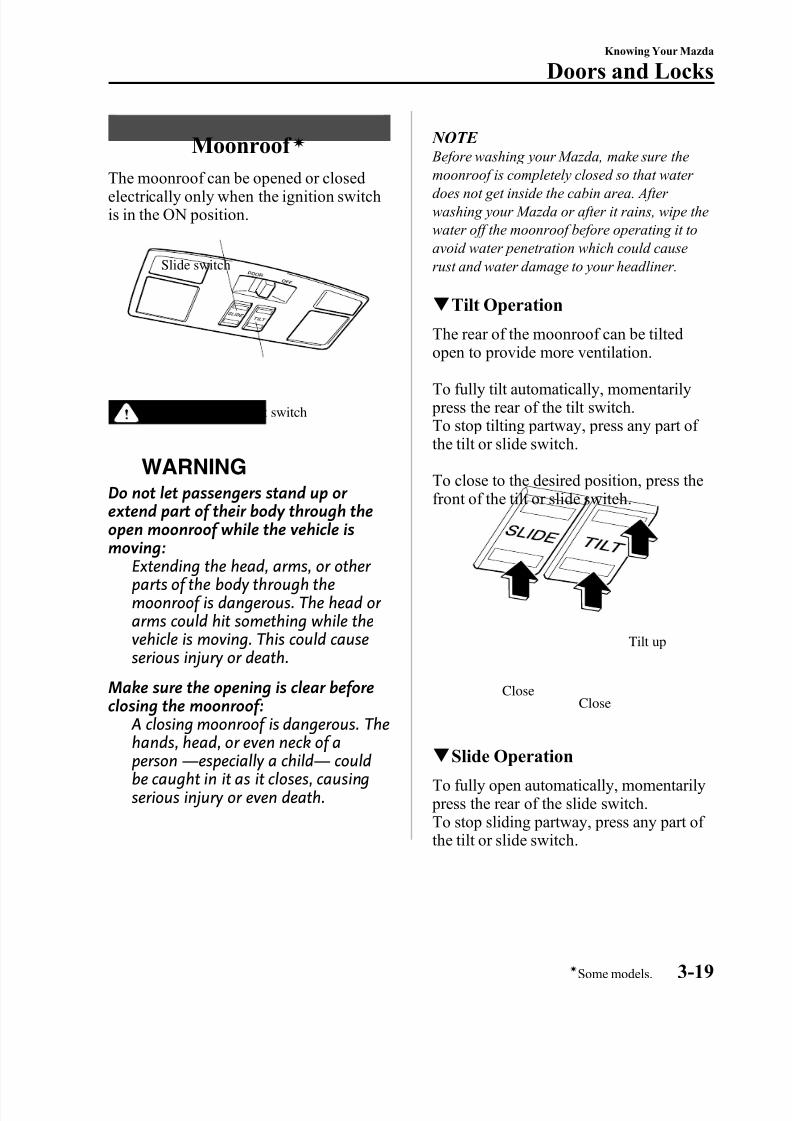
8/2/2019 Mazda5 Owners Manual
http://slidepdf.com/reader/full/mazda5-owners-manual 85/375
Moonroof í
The moonroof can be opened or closedelectrically only when the ignition switchis in the ON position.
Tilt switch
Slide switch
WARNING
Do not let passengers stand up or extend part of their body through theopen moonroof while the vehicle ismoving:
Extending the head, arms, or other parts of the body through themoonroof is dangerous. The head or arms could hit something while thevehicle is moving. This could causeserious injury or death.
Make sure the opening is clear beforeclosing the moonroof:
A closing moonroof is dangerous. Thehands, head, or even neck of aperson ― especially a child― couldbe caught in it as it closes, causingserious injury or even death.
NOTE Before washing your Mazda, make sure the
moonroof is completely closed so that water does not get inside the cabin area. After washing your Mazda or after it rains, wipe thewater off the moonroof before operating it toavoid water penetration which could causerust and water damage to your headliner.
q Tilt Operation
The rear of the moonroof can be tiltedopen to provide more ventilation.
To fully tilt automatically, momentarily press the rear of the tilt switch.To stop tilting partway, press any part of the tilt or slide switch.
To close to the desired position, press thefront of the tilt or slide switch.
Close
Tilt up
Close
q Slide Operation
To fully open automatically, momentarily press the rear of the slide switch.To stop sliding partway, press any part of the tilt or slide switch.
Knowing Your Mazda
Doors and Locks
3-19íSome models.
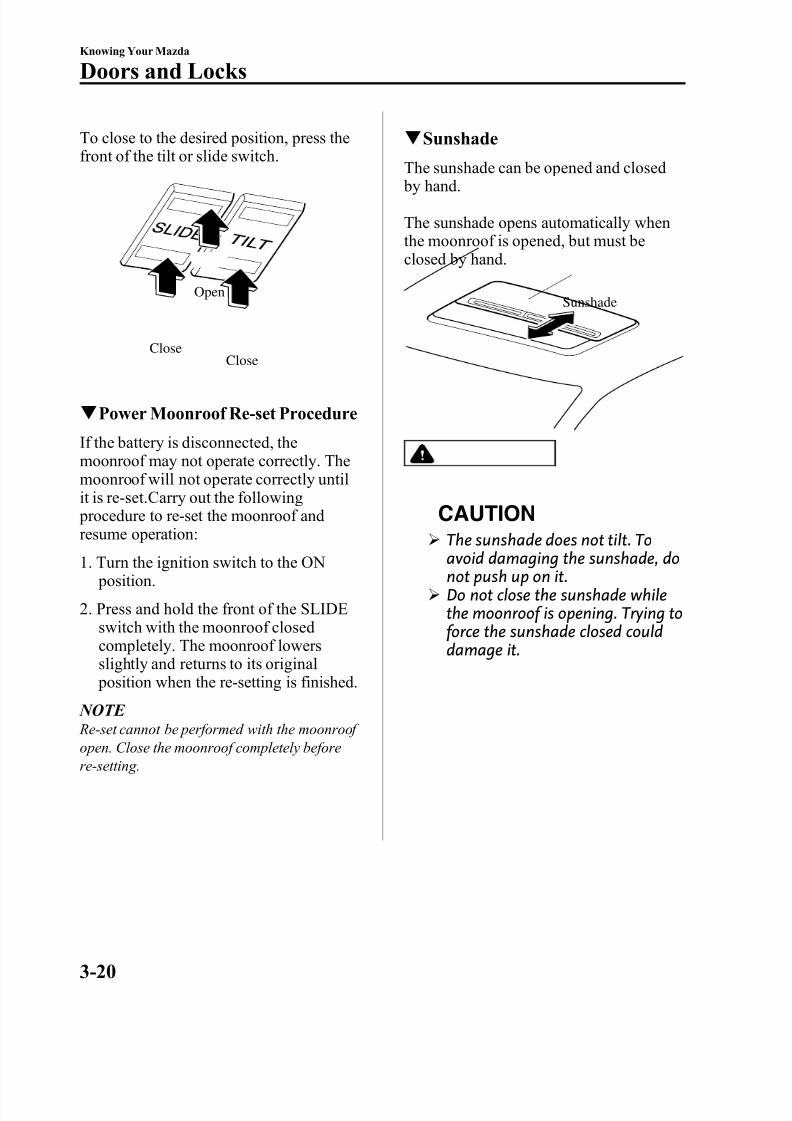
8/2/2019 Mazda5 Owners Manual
http://slidepdf.com/reader/full/mazda5-owners-manual 86/375
To close to the desired position, press thefront of the tilt or slide switch.
CloseClose
Open
q Power Moonroof Re-set Procedure
If the battery is disconnected, themoonroof may not operate correctly. Themoonroof will not operate correctly untilit is re-set.Carry out the following procedure to re-set the moonroof andresume operation:
1. Turn the ignition switch to the ON position.
2. Press and hold the front of the SLIDEswitch with the moonroof closedcompletely. The moonroof lowersslightly and returns to its original position when the re-setting is finished.
NOTE Re-set cannot be performed with the moonroof open. Close the moonroof completely beforere-setting.
q Sunshade
The sunshade can be opened and closed by hand.
The sunshade opens automatically whenthe moonroof is opened, but must beclosed by hand.
Sunshade
CAUTION
Ø The sunshade does not tilt. Toavoid damaging the sunshade, donot push up on it.
Ø Do not close the sunshade whilethe moonroof is opening. Trying toforce the sunshade closed coulddamage it.
3-20
Knowing Your Mazda
Doors and Locks
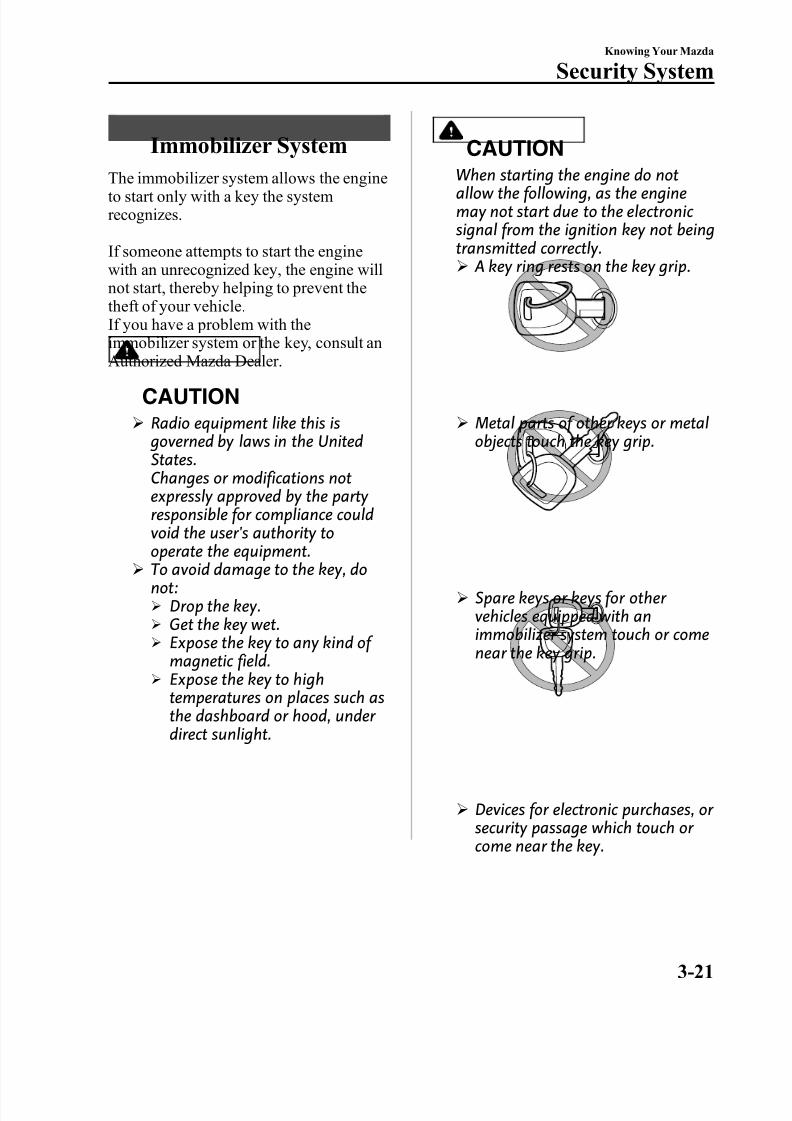
8/2/2019 Mazda5 Owners Manual
http://slidepdf.com/reader/full/mazda5-owners-manual 87/375
Immobilizer System
The immobilizer system allows the engineto start only with a key the systemrecognizes.
If someone attempts to start the enginewith an unrecognized key, the engine willnot start, thereby helping to prevent thetheft of your vehicle.If you have a problem with theimmobilizer system or the key, consult an
Authorized Mazda Dealer.
CAUTIONØ Radio equipment like this is
governed by laws in the UnitedStates.Changes or modifications notexpressly approved by the party responsible for compliance couldvoid the user's authority tooperate the equipment.
Ø To avoid damage to the key, donot:Ø Drop the key.Ø Get the key wet.Ø Expose the key to any kind of
magnetic field.Ø Expose the key to high
temperatures on places such as
the dashboard or hood, under direct sunlight.
CAUTION
When starting the engine do notallow the following, as the enginemay not start due to the electronic signal from the ignition key not beingtransmitted correctly.Ø A key ring rests on the key grip.
Ø Metal parts of other keys or metalobjects touch the key grip.
Ø Spare keys or keys for other vehicles equipped with animmobilizer system touch or comenear the key grip.
Ø Devices for electronic purchases, or security passage which touch or come near the key.
Knowing Your Mazda
Security System
3-21
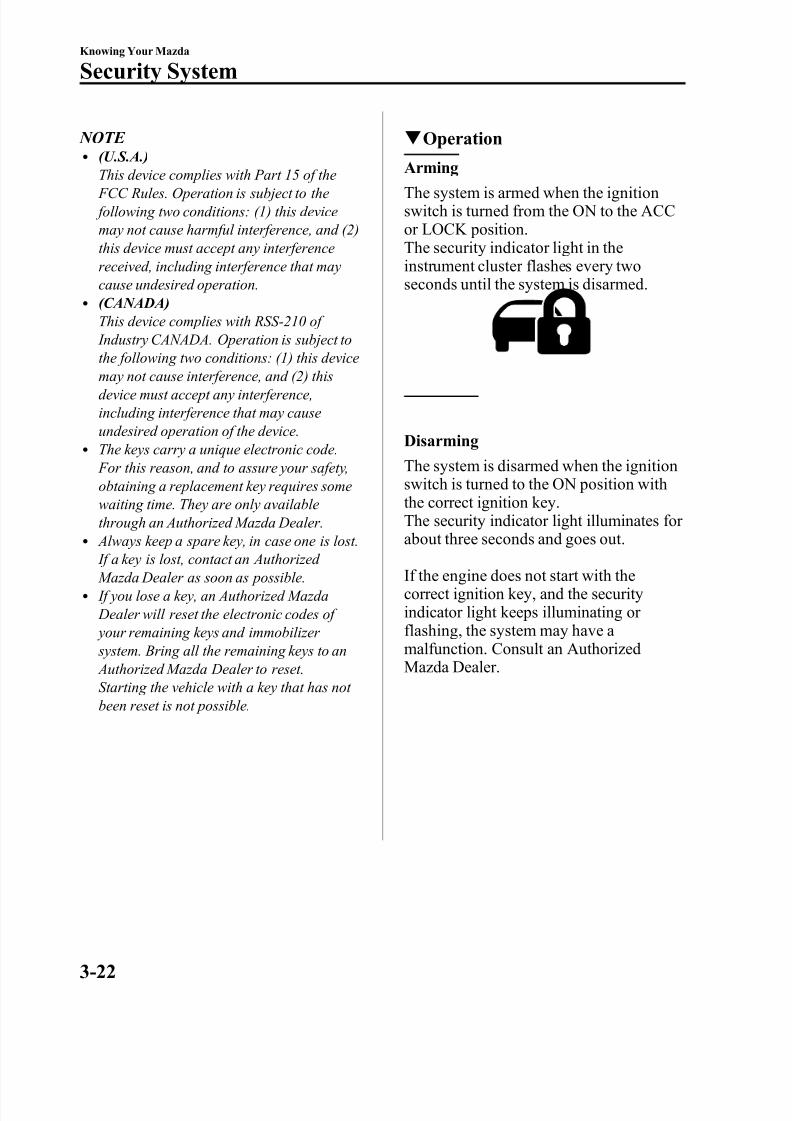
8/2/2019 Mazda5 Owners Manual
http://slidepdf.com/reader/full/mazda5-owners-manual 88/375
NOTE l (U.S.A.)
This device complies with Part 15 of the FCC Rules. Operation is subject to the following two conditions: (1) this devicemay not cause harmful interference, and (2)this device must accept any interferencereceived, including interference that maycause undesired operation.
l (CANADA)This device complies with RSS-210 of Industry CANADA. Operation is subject to
the following two conditions: (1) this devicemay not cause interference, and (2) thisdevice must accept any interference,including interference that may causeundesired operation of the device.
l The keys carry a unique electronic code. For this reason, and to assure your safety,obtaining a replacement key requires somewaiting time. They are only availablethrough an Authorized Mazda Dealer.
l Always keep a spare key, in case one is lost. If a key is lost, contact an Authorized Mazda Dealer as soon as possible.
l If you lose a key, an Authorized Mazda Dealer will reset the electronic codes of your remaining keys and immobilizer system. Bring all the remaining keys to an Authorized Mazda Dealer to reset.Starting the vehicle with a key that has not been reset is not possible.
q Operation
Arming
The system is armed when the ignitionswitch is turned from the ON to the ACCor LOCK position.The security indicator light in theinstrument cluster flashes every twoseconds until the system is disarmed.
Disarming
The system is disarmed when the ignitionswitch is turned to the ON position withthe correct ignition key.The security indicator light illuminates for
about three seconds and goes out.
If the engine does not start with thecorrect ignition key, and the securityindicator light keeps illuminating or flashing, the system may have a malfunction. Consult an AuthorizedMazda Dealer.
3-22
Knowing Your Mazda
Security System
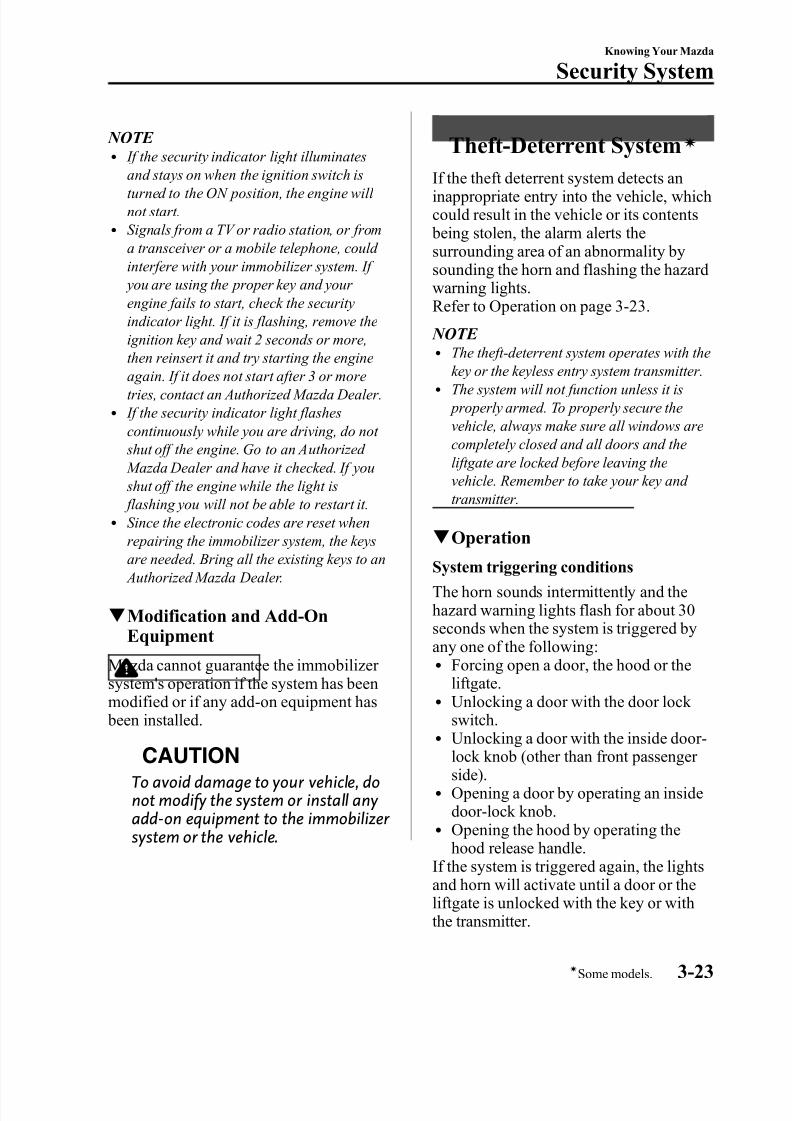
8/2/2019 Mazda5 Owners Manual
http://slidepdf.com/reader/full/mazda5-owners-manual 89/375
NOTE l If the security indicator light illuminates
and stays on when the ignition switch isturned to the ON position, the engine will not start.
l Signals from a TV or radio station, or froma transceiver or a mobile telephone, could interfere with your immobilizer system. If you are using the proper key and your engine fails to start, check the securityindicator light. If it is flashing, remove theignition key and wait 2 seconds or more,
then reinsert it and try starting the engineagain. If it does not start after 3 or moretries, contact an Authorized Mazda Dealer.
l If the security indicator light flashescontinuously while you are driving, do not shut off the engine. Go to an Authorized Mazda Dealer and have it checked. If you shut off the engine while the light is flashing you will not be able to restart it.
l Since the electronic codes are reset when
repairing the immobilizer system, the keysare needed. Bring all the existing keys to an Authorized Mazda Dealer.
q Modification and Add-OnEquipment
Mazda cannot guarantee the immobilizer system's operation if the system has beenmodified or if any add-on equipment has
been installed.CAUTION
To avoid damage to your vehicle, donot modify the system or install any add-on equipment to the immobilizer system or the vehicle.
Theft-Deterrent System í
If the theft deterrent system detects aninappropriate entry into the vehicle, whichcould result in the vehicle or its contents being stolen, the alarm alerts thesurrounding area of an abnormality bysounding the horn and flashing the hazardwarning lights.Refer to Operation on page 3-23.
NOTE l The theft-deterrent system operates with the
key or the keyless entry system transmitter.l The system will not function unless it is
properly armed. To properly secure thevehicle, always make sure all windows arecompletely closed and all doors and theliftgate are locked before leaving thevehicle. Remember to take your key and transmitter.
q OperationSystem triggering conditions
The horn sounds intermittently and thehazard warning lights flash for about 30seconds when the system is triggered byany one of the following:l Forcing open a door, the hood or the
liftgate.l Unlocking a door with the door lock
switch.l Unlocking a door with the inside door-lock knob (other than front passenger side).
l Opening a door by operating an insidedoor-lock knob.
l Opening the hood by operating thehood release handle.
If the system is triggered again, the lightsand horn will activate until a door or the
liftgate is unlocked with the key or withthe transmitter.
Knowing Your Mazda
Security System
3-23íSome models.
8/2/2019 Mazda5 Owners Manual
http://slidepdf.com/reader/full/mazda5-owners-manual 90/375
NOTE If the battery goes dead while the theft-
deterrent system is armed, the horn will activate and the hazard warning lights will flash when the battery is charged or replaced.
q How to Arm the System
1. Remove the key from the ignitionswitch.
2. Make sure the hood is closed. Closeand lock all doors and the liftgate from
the outside using the key or press thelock button on your keyless entrysystem transmitter.
The following method will also arm thetheft-deterrent system:Close the hood and the liftgate . Pressthe area on the door-lock switchmarked “ LOCK ” once. Close all doors.The hazard warning lights will flash
once to indicate that the system isarmed.
The theft deterrent system can also bearmed by activating the auto re-lock function with all the doors, the liftgate andthe hood closed.
NOTE Locking the doors with the inside door-lock knob will not arm the system.
NOTE Auto re-lock function After unlocking with the transmitter, all doorsand the liftgate will automatically lock if oneof the doors or the liftgate is not opened withinabout 30 seconds.
q To Turn off an Armed System
An armed system can be turned off by anyone of the following methods:l Unlock a door with the key.l Press the unlock button on the keyless
entry system transmitter.l Insert the key into the ignition switch
and turn it to the ON position.
The hazard warning lights will flash twiceto indicate that the system is turned off.
q To Stop an Alarm
A triggered alarm can be turned off byany one of the following methods:l Unlock a door with the key.l Press the unlock button on the keyless
entry system transmitter.
NOTE If you have any problem with the theft-
deterrent system, consult an Authorized Mazda Dealer.
q Modification and Add-OnEquipment
Mazda cannot guarantee the theft-deterrent system's operation if the systemhas been modified or if any add-onequipment has been installed.
CAUTION
To avoid damage to your vehicle, donot modify the system or install any add-on equipment to the theft-deterrent system or the vehicle.
3-24
Knowing Your Mazda
Security System
8/2/2019 Mazda5 Owners Manual
http://slidepdf.com/reader/full/mazda5-owners-manual 91/375
q Theft-Deterrent Labels
A label indicating that your vehicle isequipped with a Theft-Deterrent System isin the glove compartment.
Mazda recommends that you affix it to thelower rear corner of a front door window.
Knowing Your Mazda
Security System
3-25
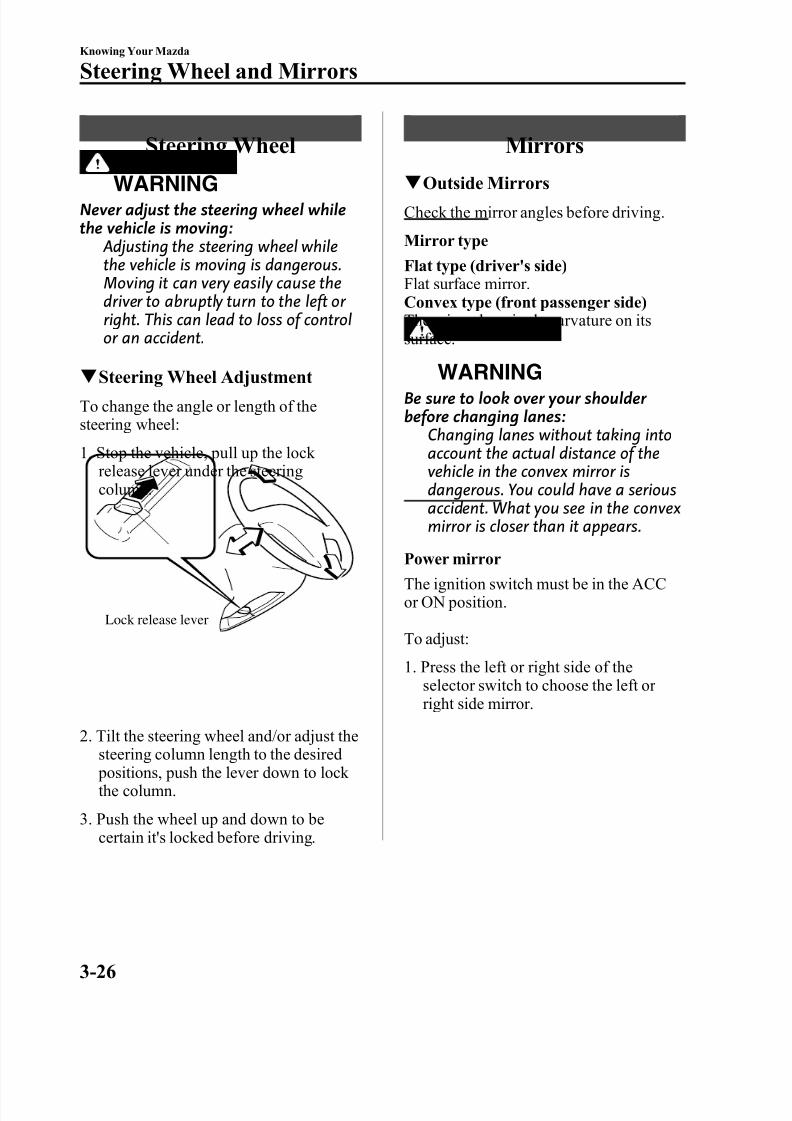
8/2/2019 Mazda5 Owners Manual
http://slidepdf.com/reader/full/mazda5-owners-manual 92/375
Steering Wheel
WARNINGNever adjust the steering wheel whilethe vehicle is moving:
Adjusting the steering wheel whilethe vehicle is moving is dangerous.Moving it can very easily cause thedriver to abruptly turn to the left or right. This can lead to loss of controlor an accident.
q Steering Wheel Adjustment
To change the angle or length of thesteering wheel:
1. Stop the vehicle, pull up the lock release lever under the steeringcolumn.
Lock release lever
2. Tilt the steering wheel and/or adjust thesteering column length to the desired positions, push the lever down to lock the column.
3. Push the wheel up and down to becertain it's locked before driving.
Mirrors
q Outside MirrorsCheck the mirror angles before driving.
Mirror type
Flat type (driver's side)Flat surface mirror.Convex type (front passenger side)The mirror has single curvature on itssurface.
WARNING
Be sure to look over your shoulder before changing lanes:
Changing lanes without taking intoaccount the actual distance of thevehicle in the convex mirror isdangerous. You could have a seriousaccident. What you see in the convexmirror is closer than it appears.
Power mirror
The ignition switch must be in the ACCor ON position.
To adjust:
1. Press the left or right side of theselector switch to choose the left or right side mirror.
3-26
Knowing Your Mazda
Steering Wheel and Mirrors
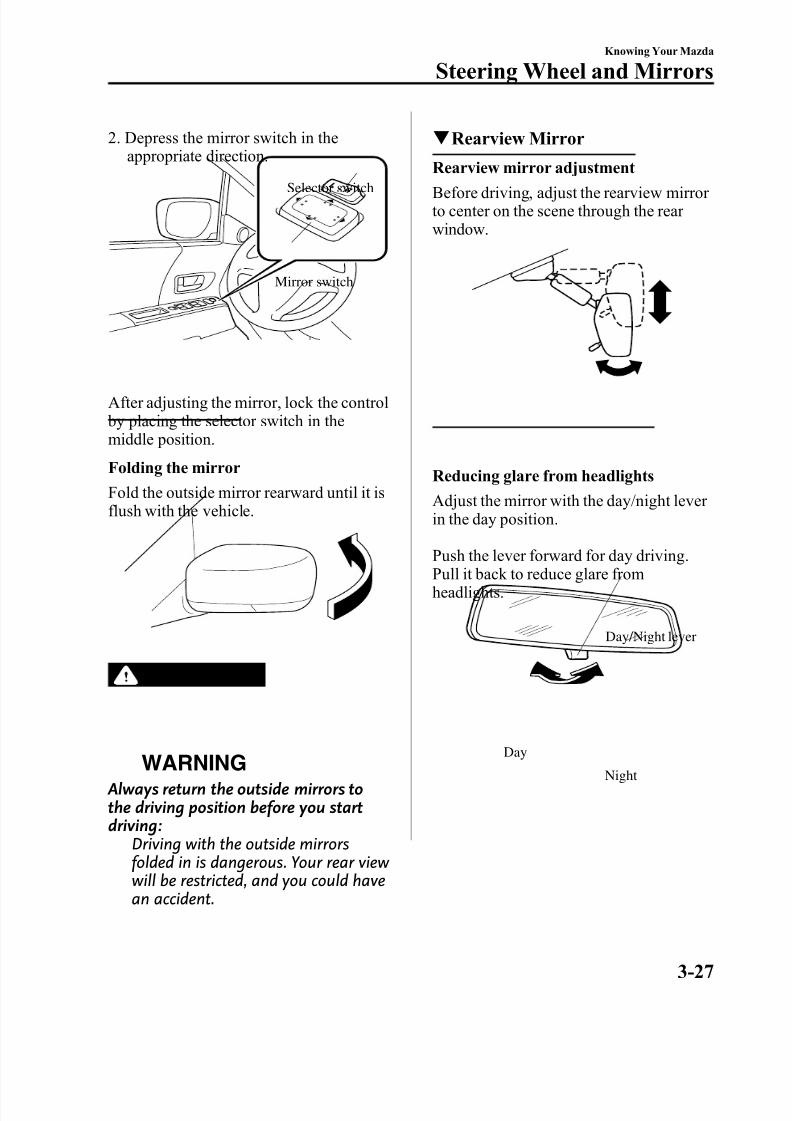
8/2/2019 Mazda5 Owners Manual
http://slidepdf.com/reader/full/mazda5-owners-manual 93/375
2. Depress the mirror switch in theappropriate direction.
Mirror switch
Selector switch
After adjusting the mirror, lock the control by placing the selector switch in themiddle position.
Folding the mirror
Fold the outside mirror rearward until it isflush with the vehicle.
WARNING
Always return the outside mirrors tothe driving position before you startdriving:
Driving with the outside mirrorsfolded in is dangerous. Your rear view will be restricted, and you could have
an accident.
q Rearview Mirror
Rearview mirror adjustment
Before driving, adjust the rearview mirror to center on the scene through the rear window.
Reducing glare from headlights
Adjust the mirror with the day/night lever in the day position.
Push the lever forward for day driving.Pull it back to reduce glare fromheadlights.
Night
Day
Day/Night lever
Knowing Your Mazda
Steering Wheel and Mirrors
3-27

8/2/2019 Mazda5 Owners Manual
http://slidepdf.com/reader/full/mazda5-owners-manual 94/375
WARNING
Do not stack cargo or objects higher than the seatbacks:Cargo stacked higher than theseatbacks is dangerous. It can blockyour view in the rearview mirror,which might cause you to hit another car when changing lanes.
3-28
Knowing Your Mazda
Steering Wheel and Mirrors
8/2/2019 Mazda5 Owners Manual
http://slidepdf.com/reader/full/mazda5-owners-manual 95/375
4 Before Driving Your Mazda
Important information about driving your Mazda.
Fuel and Engine Exhaust Precautions ........................................ 4-2Fuel Requirements .................................................................... 4-2Emission Control System .......................................................... 4-3Engine Exhaust (Carbon Monoxide) ......................................... 4-4
Before Starting the Engine ........................................................... 4-5Before Getting In ...................................................................... 4-5After Getting In ......................................................................... 4-5
Driving Tips ................................................................................... 4-6Break-In Period ......................................................................... 4-6Money-Saving Suggestions ...................................................... 4-6Hazardous Driving .................................................................... 4-7Rocking the Vehicle .................................................................. 4-7
Winter Driving .......................................................................... 4-8Driving In Flooded Area ........................................................... 4-9Overloading ............................................................................ 4-10
Towing .......................................................................................... 4-11Trailer Towing ......................................................................... 4-11
4-1
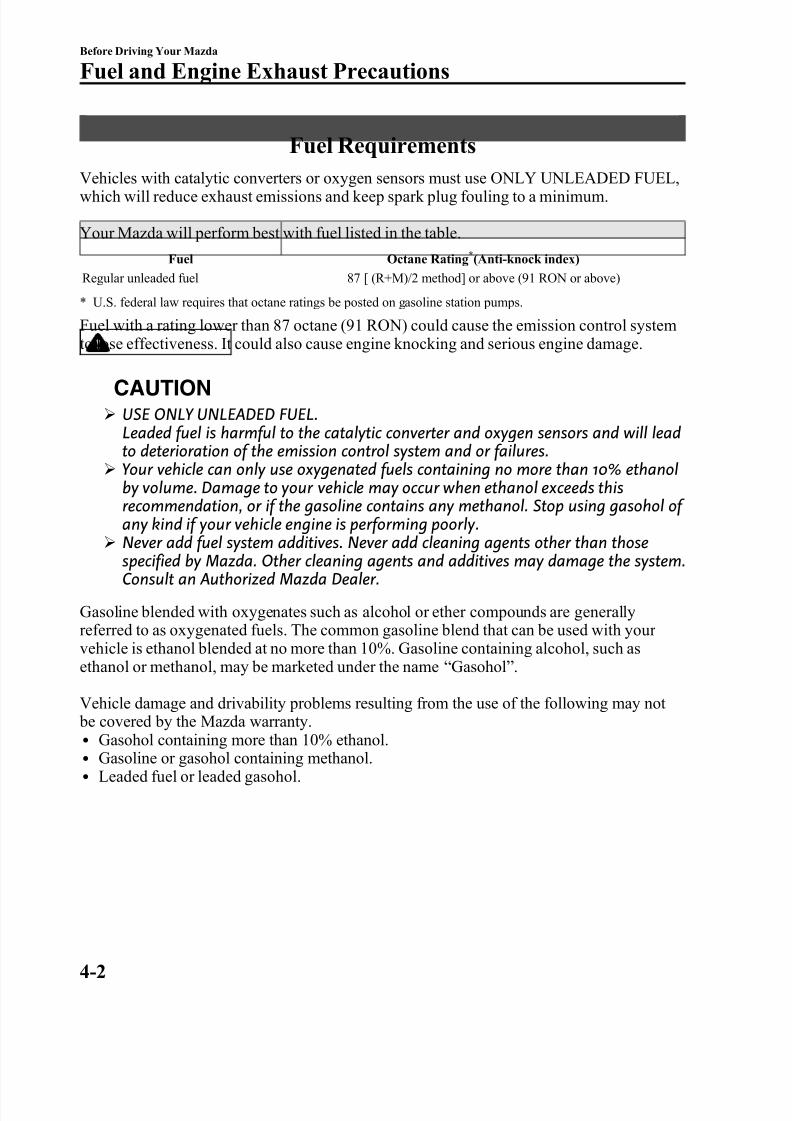
8/2/2019 Mazda5 Owners Manual
http://slidepdf.com/reader/full/mazda5-owners-manual 96/375
Fuel Requirements
Vehicles with catalytic converters or oxygen sensors must use ONLY UNLEADED FUEL,which will reduce exhaust emissions and keep spark plug fouling to a minimum.
Your Mazda will perform best with fuel listed in the table.
Fuel Octane Rating*
(Anti-knock index)
Regular unleaded fuel 87 [ (R+M)/2 method] or above (91 RON or above)
* U.S. federal law requires that octane ratings be posted on gasoline station pumps.
Fuel with a rating lower than 87 octane (91 RON) could cause the emission control systemto lose effectiveness. It could also cause engine knocking and serious engine damage.
CAUTIONØ USE ONLY UNLEADED FUEL.
Leaded fuel is harmful to the catalytic converter and oxygen sensors and will leadto deterioration of the emission control system and or failures.
Ø Your vehicle can only use oxygenated fuels containing no more than 10% ethanolby volume. Damage to your vehicle may occur when ethanol exceeds thisrecommendation, or if the gasoline contains any methanol. Stop using gasohol of any kind if your vehicle engine is performing poorly.
Ø Never add fuel system additives. Never add cleaning agents other than thosespecified by Mazda. Other cleaning agents and additives may damage the system.Consult an Authorized Mazda Dealer.
Gasoline blended with oxygenates such as alcohol or ether compounds are generallyreferred to as oxygenated fuels. The common gasoline blend that can be used with your vehicle is ethanol blended at no more than 10%. Gasoline containing alcohol, such asethanol or methanol, may be marketed under the name “ Gasohol ” .
Vehicle damage and drivability problems resulting from the use of the following may not
be covered by the Mazda warranty.l Gasohol containing more than 10% ethanol.l Gasoline or gasohol containing methanol.l Leaded fuel or leaded gasohol.
4-2
Before Driving Your Mazda
Fuel and Engine Exhaust Precautions
8/2/2019 Mazda5 Owners Manual
http://slidepdf.com/reader/full/mazda5-owners-manual 97/375
Emission Control System
Your vehicle is equipped with an emission control system (the catalytic converter is part of this system) that enables your vehicle to comply with existing exhaust emissionsrequirements.
WARNING
Never park over or near anything flammable:Parking over or near anything flammable, such as dry grass, is dangerous. Even withthe engine turned off, the exhaust system remains very hot after normal use andcould ignite anything flammable. A resulting fire could cause serious injury or death.
CAUTION
Ignoring the following precautions could cause lead to accumulate on the catalystinside the converter or cause the converter to get very hot. Either condition willdamage the converter and cause poor performance.Ø USE ONLY UNLEADED FUEL.Ø Do not drive your Mazda with any sign of engine malfunction.Ø Do not coast with the ignition switch turned off.Ø Do not descend steep grades in gear with the ignition switch turned off.Ø Do not operate the engine at high idle for more than 2 minutes.Ø Do not tamper with the emission control system. All inspections and adjustmentsmust be made by a qualified technician.Ø Do not push-start or pull-start your vehicle.
NOTE Under U.S. federal law, any modification to the original-equipment emission control system beforethe first sale and registration of a vehicle is subject to penalties. In some states, such modificationmade on a used vehicle is also subject to penalties.
NOTE
While the engine is off, the sound of a valve opening and closing can be heard at the middle rear of the vehicle, however this does not indicate an abnormality. Your vehicle has a self-checking deviceand it operates while the engine is off.
Before Driving Your Mazda
Fuel and Engine Exhaust Precautions
4-3
8/2/2019 Mazda5 Owners Manual
http://slidepdf.com/reader/full/mazda5-owners-manual 98/375
Engine Exhaust (Carbon Monoxide)
WARNINGDo not drive your vehicle if you smell exhaust gas inside the vehicle:
Engine exhaust gas is dangerous. This gas contains carbon monoxide (CO), which iscolorless, odorless, and poisonous. When inhaled, it can cause loss of consciousnessand death. If you smell exhaust gas inside your vehicle, keep all windows fully openand contact an Authorized Mazda Dealer immediately.
Do not run the engine when inside an enclosed area:Running the engine inside an enclosed area, such as a garage, is dangerous. Exhaust gas, which contains poisonous carbon monoxide, could easily enter the cabin. Lossof consciousness or even death could occur.
Open the windows or adjust the heating or cooling system to draw fresh air whenidling the engine:
Exhaust gas is dangerous. When your vehicle is stopped with the windows closedand the engine running for a long time even in an open area, exhaust gas, whichcontains poisonous carbon monoxide, could enter the cabin. Loss of consciousness or even death could occur.
Clear snow from underneath and around your vehicle, particularly the tail pipe,
before starting the engine:Running the engine when a vehicle is stopped in deep snow is dangerous. Theexhaust pipe could be blocked by the snow, allowing exhaust gas to enter the cabin.Because exhaust gas contains poisonous carbon monoxide, it could cause loss of consciousness or even death to occupants in the cabin.
4-4
Before Driving Your Mazda
Fuel and Engine Exhaust Precautions
8/2/2019 Mazda5 Owners Manual
http://slidepdf.com/reader/full/mazda5-owners-manual 99/375
Before Getting Inl Be sure the windows, outside mirrors,and outside lights are clean.l Inspect inflation pressures and
condition of tires.l Look under the vehicle for any sign of
fluid leaks.l If you plan to back up, make sure
nothing is in your way.
NOTE Engine oil, engine coolant, brake/clutch fluid,washer fluid, and other fluid levels should beinspected. See Maintenance, Section 8.
After Getting Inl Are all doors closed and locked?l Is the seat adjusted properly?l Are the inside and outside mirrors
adjusted?l Is the steering wheel adjusted properly?l Is everyone's seat belt fastened?l Check all gauges.l Check all warning lights when the
ignition switch is turned to the ON position.
l Release the parking brake and makesure the brake warning light goes off.
Always be thoroughly familiar with your Mazda.
Before Driving Your Mazda
Before Starting the Engine
4-5
8/2/2019 Mazda5 Owners Manual
http://slidepdf.com/reader/full/mazda5-owners-manual 100/375
Break-In Period
No special break-in is necessary, but a few precautions in the first 1,000 km (600miles) may add to the performance,economy, and life of your Mazda.l Do not race the engine.l Do not maintain one constant speed,
either slow or fast, for a long period of time.
l Do not drive constantly at full-throttleor high engine rpm for extended
periods of time.l Avoid unnecessary hard stops.l Avoid full-throttle starts.
Money-Saving Suggestions
How you operate your Mazda determineshow far it will travel on a tank of fuel. Usethese suggestions to help save money onfuel and repairs.l Avoid long warm-ups. Once the engine
runs smoothly, begin driving.l Avoid fast starts.l Keep the engine tuned. Follow the
maintenance schedule (page 8-3) andhave an Authorized Mazda Dealer
perform inspections and servicing.l Use the air conditioner only when
necessary.l Slow down on rough roads.l Keep the tires properly inflated.l Do not carry unnecessary weight.l Do not rest your foot on the brake
pedal while driving.l Keep the wheels in correct alignment.l Keep windows closed at high speeds.l Slow down when driving in crosswinds
and headwinds.
WARNING
Never stop the engine when goingdown a hill:
Stopping the engine when goingdown a hill is dangerous. This causesthe loss of power steering and power brake control, and may causedamage to the drivetrain. Any loss of steering or braking control couldcause an accident.
4-6
Before Driving Your Mazda
Driving Tips
8/2/2019 Mazda5 Owners Manual
http://slidepdf.com/reader/full/mazda5-owners-manual 101/375
Hazardous Driving
WARNINGBe extremely careful if it is necessary todownshift on slippery surfaces:
Downshifting into lower gear whiledriving on slippery surfaces isdangerous. The sudden change in tirespeed could cause the tires to skid.This could lead to loss of vehiclecontrol and an accident.
Do not rely on ABS as a substitute for safe driving:
The ABS cannot compensate for unsafe and reckless driving, excessivespeed, tailgating (following another vehicle too closely), driving on ice andsnow, and hydroplaning (reduced tirefriction and road contact because of water on the road surface). You canstill have an accident.
When driving on ice or in water, snow,mud, sand, or similar hazards:l Be cautious and allow extra distance
for braking.l Avoid sudden braking and sudden
maneuvering.l Do not pump the brakes. Continue to
press down on the brake pedal.Refer to Anti-Lock Brake System(ABS) on page 5-7.
l If you get stuck, select a lower gear andaccelerate slowly. Do not spin the front wheels.
l For more traction in starting onslippery surfaces such as ice or packedsnow, use sand, rock salt, chains,carpeting, or other nonslip materialunder the front wheels.
NOTE Use snow chains only on the front wheels.
Rocking the Vehicle
WARNINGDo not spin the wheels at more than 56km/h (35 mph), and do not allow anyone to stand behind a wheel whenpushing the vehicle:
When the vehicle is stuck, spinningthe wheels at high speed isdangerous. The spinning tire couldoverheat and explode. This could
cause serious injuries.CAUTION
Too much rocking may cause engineoverheating, transaxle failure, andtire damage.
If you must rock the vehicle to free it fromsnow, sand or mud, depress theaccelerator slightly and slowly move theshift lever from 1 (D) to R.
Before Driving Your Mazda
Driving Tips
4-7
8/2/2019 Mazda5 Owners Manual
http://slidepdf.com/reader/full/mazda5-owners-manual 102/375
Winter Drivingl Carry emergency gear, including tirechains, window scraper, flares, a small
shovel, jumper cables, and a small bagof sand or salt.
Ask an Authorized Mazda Dealer to perform the following precautions:
l Have the proper ratio of antifreeze inthe radiator.Refer to Engine Coolant on page 8-20.
l Inspect the battery and its cables. Cold
reduces battery capacity.l Inspect the ignition system for damage
and loose connections.l Use washer fluid made with
antifreeze ― but do not use enginecoolant antifreeze for washer fluid(page 8-24).
l Do not use the parking brake infreezing weather as it may freeze.Instead, shift to P with an automatictransaxle and to 1 or R with a manualtransaxle. Block the rear wheels.
q Snow Tires
Use snow tires on all four wheels
Do not go faster than 120 km/h (75 mph)while driving with snow tires. Inflatesnow tires 30 kPa (0.3 kgf/cm
2, 4.3 psi)
more than recommended on the tire pressure label (driver's door frame), but never more than the maximum cold-tire pressure shown on the tires.Your vehicle is originally equipped withall season radials designed to be used allyear around. In some extreme climatesyou may find it necessary to replace themwith snow tires during the winter monthsto further improve traction on snow andice covered roads.
WARNING
Use only the same size and type tires(snow, radial, or non-radial) on all four wheels:
Using tires different in size or type isdangerous. Your vehicle's handlingcould be greatly affected and resultin an accident.
CAUTION
Check local regulations before usingstudded tires.
NOTE If your vehicle is equipped with the tire pressure monitoring system, the system maynot function correctly when using tires with steel wire reinforcement in the sidewalls (page5-26).
q Tire Chains
Check local regulations before using tirechains.
CAUTIONØ Chains may affect handling.Ø Do not go faster than 50 km/h (30
mph) or the chain manufacturer'srecommended limit, whichever islower.
Ø Drive carefully and avoid bumps,holes, and sharp turns.
Ø Avoid locked-wheel braking.Ø Do not use chains on a temporary
spare tire; it may result in damageto the vehicle and to the tire.
Ø Do not use chains on roads thatare free of snow or ice. The tiresand chains could be damaged.
Ø
Chains may scratch or chipaluminum wheels.
4-8
Before Driving Your Mazda
Driving Tips
8/2/2019 Mazda5 Owners Manual
http://slidepdf.com/reader/full/mazda5-owners-manual 103/375
NOTE If your vehicle is equipped with the tire
pressure monitoring system, the system maynot function correctly when using tire chains.
Install the chains on the front tires.Do not use chains on the rear tires.Use only genuine Mazda tire chains.Please consult an Authorized Mazda Dealer.
Installing the chains
1. Remove the wheel covers, or the chain bands will scratch them.
2. Secure the chains on the front tires astightly as possible. Always follow thechain manufacturer's instructions.
3. Retighten the chains after driving 1/2― 1 km (1/4 ― 1/2 mile).
Driving In Flooded Area
WARNINGDry wet brakes by driving very slowly and applying the brakes lightly untilbrake performance returns to normal:
Driving with wet brakes isdangerous. Increased stoppingdistance or the vehicle pulling to oneside when braking could result in aserious accident. Light braking will
indicate whether the brakes havebeen affected.
CAUTION
Do not drive the vehicle on floodedroads as it could cause shortcircuiting of electrical/electronic parts, or engine damage or stallingfrom water absorption. If the vehiclehas been immersed in water, consultan Authorized Mazda Dealer.
Before Driving Your Mazda
Driving Tips
4-9
8/2/2019 Mazda5 Owners Manual
http://slidepdf.com/reader/full/mazda5-owners-manual 104/375
Overloading
WARNINGBe careful not to overload your vehicle:
The gross axle weight rating (GAWR)and the gross vehicle weight rating(GVWR) of your vehicle are on theMotor Vehicle Safety Standard Labelon the driver's door frame. Exceedingthese ratings can cause an accidentor vehicle damage. You can estimate
the weight of your load by weighingthe items (or people) before puttingthem in the vehicle.
4-10
Before Driving Your Mazda
Driving Tips
8/2/2019 Mazda5 Owners Manual
http://slidepdf.com/reader/full/mazda5-owners-manual 105/375
Trailer Towing
The Mazda5 is not designed for towing. Never tow a trailer with your Mazda5.
Before Driving Your Mazda
Towing
4-11

8/2/2019 Mazda5 Owners Manual
http://slidepdf.com/reader/full/mazda5-owners-manual 106/375
4-12
8/2/2019 Mazda5 Owners Manual
http://slidepdf.com/reader/full/mazda5-owners-manual 107/375
5 Driving Your Mazda
Explanation of instruments and controls.
Starting and Driving ..................................................................... 5-2Ignition Switch .......................................................................... 5-2Starting the Engine .................................................................... 5-4Brake System ............................................................................ 5-5Manual Transaxle Operation ..................................................... 5-9
Automatic Transaxle Controls ................................................. 5-11Power Steering ........................................................................ 5-17Cruise Control
í ...................................................................... 5-18Tire Pressure Monitoring System
í......................................... 5-22
Instrument Cluster and Indicators ............................................ 5-28Meters and Gauges .................................................................. 5-28
Warning/Indicator Lights and Beep Sounds ............................ 5-33
Warning/Indicator Lights ........................................................ 5-33Beep Sounds ........................................................................... 5-44
Switches and Controls ................................................................ 5-45Lighting Control ..................................................................... 5-45Turn and Lane-Change Signals ............................................... 5-48Fog Lights
í............................................................................ 5-49
Windshield Wipers and Washer .............................................. 5-49Rear Window Wiper and Washer ............................................ 5-53
Rear Window Defroster ........................................................... 5-54Horn ........................................................................................ 5-55Hazard Warning Flasher .......................................................... 5-55
5-1íSome models.
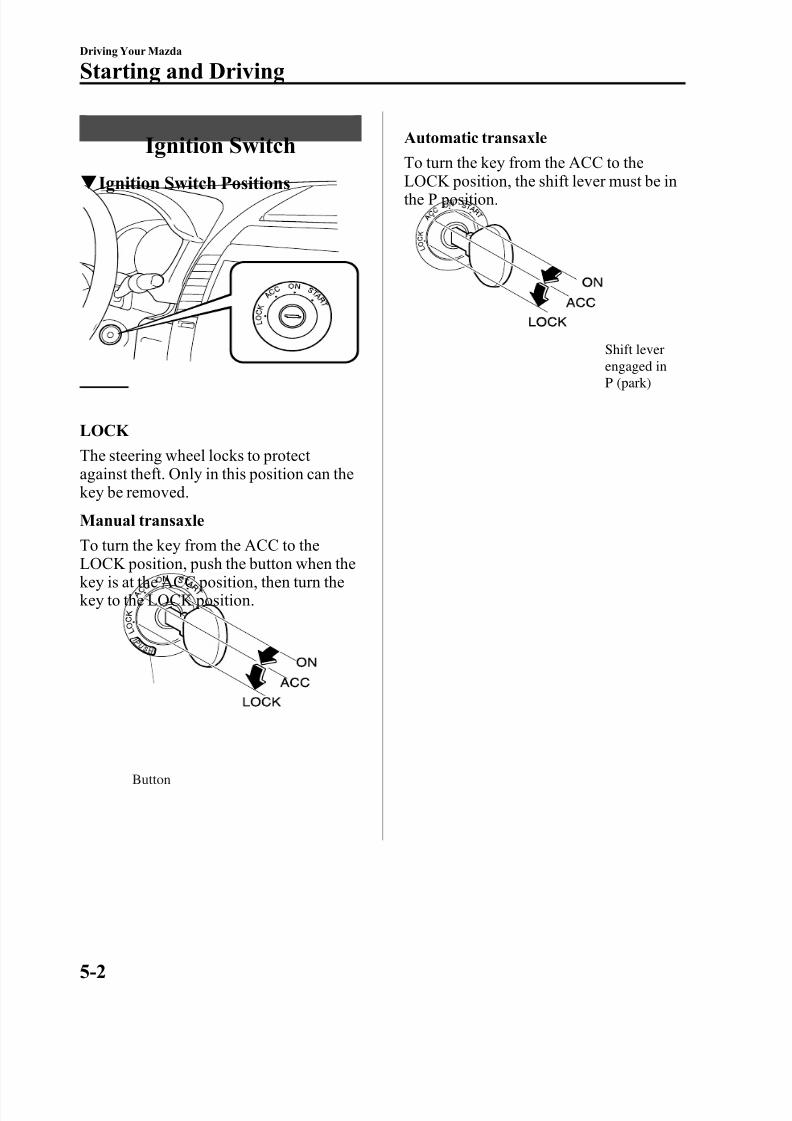
8/2/2019 Mazda5 Owners Manual
http://slidepdf.com/reader/full/mazda5-owners-manual 108/375
Ignition Switch
q Ignition Switch Positions
LOCK
The steering wheel locks to protect against theft. Only in this position can thekey be removed.
Manual transaxle
To turn the key from the ACC to theLOCK position, push the button when thekey is at the ACC position, then turn thekey to the LOCK position.
Button
Automatic transaxle
To turn the key from the ACC to the
LOCK position, the shift lever must be inthe P position.
Shift leverengaged inP (park)
5-2
Driving Your Mazda
Starting and Driving
8/2/2019 Mazda5 Owners Manual
http://slidepdf.com/reader/full/mazda5-owners-manual 109/375
WARNING
Remove the key only when the vehicleis parked:Removing the key from the ignitionswitch while the vehicle is moving isdangerous. Removing the key allowsthe steering wheel to lock. You willlose steering control and a seriousaccident could occur.
Before leaving the driver's seat, alwaysput the key to LOCK position, set theparking brake and make sure the shiftlever is in P with an automatic transaxle or in 1 or R with a manualtransaxle:
It is important to place the key in theLOCK position even if you are notremoving the key from the ignition or leaving the vehicle. Leaving the key in other positions will disable some of the vehicle security systems and runthe battery down.Leaving the driver's seat withoutputting the ignition switch in LOCK position, setting the parking brakeand shifting the shift lever to P withan automatic transaxle, or to 1 or Rwith a manual transaxle isdangerous. Unexpected vehiclemovement could occur. This couldcause an accident.
NOTE If turning the key is difficult, jiggle the steering wheel from side to side. Leaving the key in any position but LOCK position also disables some of the security features and may run the battery down.
ACC (Accessory)
The steering wheel unlocks and someelectrical accessories will operate.
ON
This is the normal running position after
the engine is started. The warning lights(except brakes) should be inspected before the engine is started (page 5-33).
NOTE When the ignition switch is turned to the ON position, the sound of the fuel pump motor operating near the fuel tank can be heard. Thisdoes not indicate an abnormality.
START
The engine is started in this position. It will crank until you release the key; thenit returns to the ON position. The brakewarning light can be checked after theengine is started (page 5-33).
q Ignition Key Reminder
If the ignition switch is in the LOCK or
ACC position with the key inserted, a continuous beep sound will be heardwhen the driver's door is opened.
Driving Your Mazda
Starting and Driving
5-3
8/2/2019 Mazda5 Owners Manual
http://slidepdf.com/reader/full/mazda5-owners-manual 110/375
Starting the Engine
NOTE Engine-starting is controlled by the spark ignition system.This system meets all Canadian Interference-Causing Equipment Standard requirementsregulating the impulse electrical field strengthof radio noise.
1. Occupants should fasten their seat belts.
2. Make sure the parking brake is on.
3. Depress the brake pedal.
4. (Manual transaxle)Depress the clutch pedal all the wayand shift into neutral.Keep the clutch pedal depressed whilecranking the engine.
(Automatic transaxle)
Put the vehicle in park (P). If you must restart the engine while the vehicle ismoving, shift into neutral (N).
NOTE (Manual transaxle)The starter will not operate unless the clutch isdepressed sufficiently.
(Automatic transaxle)
The starter will not operate if the shift lever isnot in P or N.
5. Turn the ignition switch to the START position and hold (up to 10 seconds at a time) until the engine starts.
CAUTION
Do not try the starter for more than10 seconds at a time. If the enginestalls or fails to start, wait 10 secondsbefore trying again. Otherwise, youmay damage the starter and drainthe battery.
6. After starting the engine, let it idle for about 10 seconds.
NOTE l In extremely cold weather or after the
vehicle has not been driven in several days,let the engine warm up without operating the accelerator.
l Whether the engine is cold or warm, it should be started without use of theaccelerator.
l If the engine does not start the first time,refer to Starting a Flooded Engine under Emergency Starting. If the engine still doesnot start, have your vehicle inspected by an Authorized Mazda Dealer (page 7-15).
5-4
Driving Your Mazda
Starting and Driving
8/2/2019 Mazda5 Owners Manual
http://slidepdf.com/reader/full/mazda5-owners-manual 111/375
Brake System
q Foot BrakeYour Mazda has power-assisted brakesthat adjust automatically through normaluse.
Should power-assist fail, you can stop byapplying greater force than normal to the brake pedal. But the distance required tostop will be greater than usual.
WARNING
Do not coast with the engine stalled or turned off, find a safe place to stop:Coasting with the engine stalled or turned off is dangerous. Braking willrequire more effort, and the brake'spower-assist could be depleted if youpump the brake. This will causelonger stopping distances or even anaccident.
Shift to a lower gear when going downsteep hills:
Driving with your foot continuously on the brake pedal or steadily applying the brakes for longdistances is dangerous. This causesoverheated brakes, resulting inlonger stopping distances or eventotal brake failure. This could causeloss of vehicle control and a seriousaccident. Avoid continuousapplication of the brakes.
Dry brakes that have become wet by driving very slowly and applying thebrakes lightly until brake performanceis normal:
Driving with wet brakes isdangerous. Increased stoppingdistance or the vehicle pulling to oneside when braking could result in aserious accident. Light braking willindicate whether the brakes havebeen affected.
Driving Your Mazda
Starting and Driving
5-5
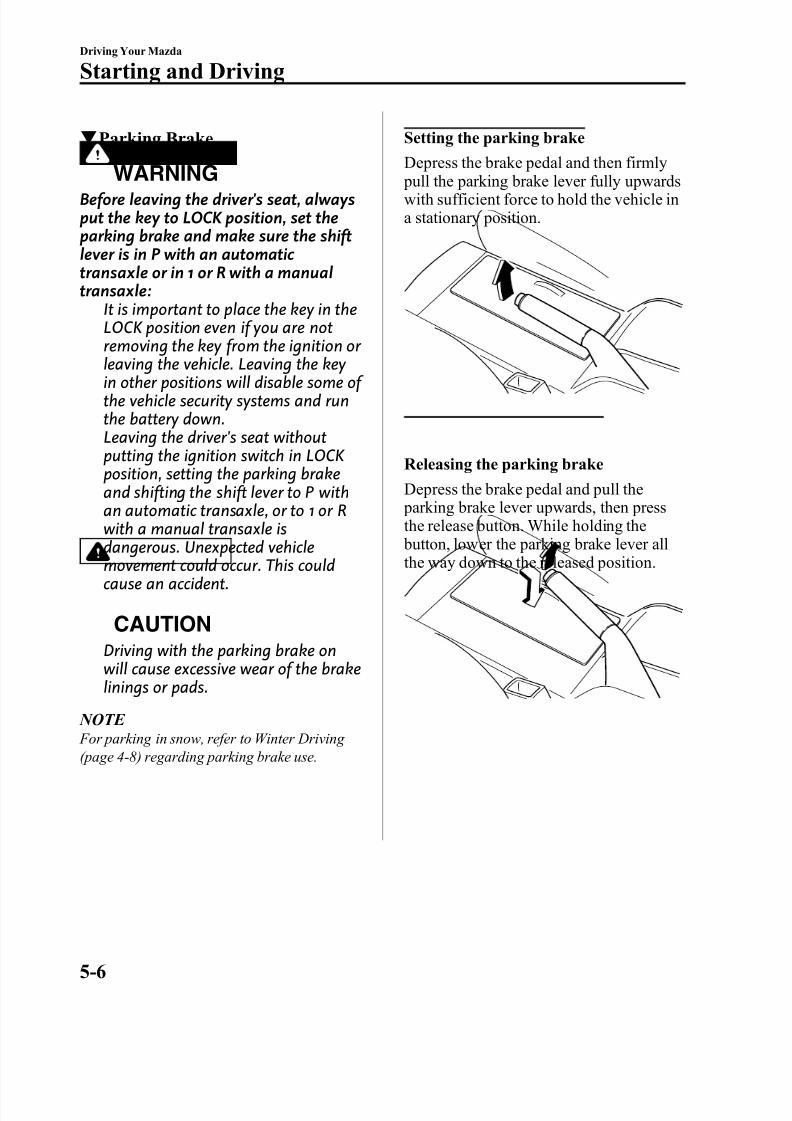
8/2/2019 Mazda5 Owners Manual
http://slidepdf.com/reader/full/mazda5-owners-manual 112/375
q Parking Brake
WARNINGBefore leaving the driver's seat, alwaysput the key to LOCK position, set theparking brake and make sure the shiftlever is in P with an automatic transaxle or in 1 or R with a manualtransaxle:
It is important to place the key in theLOCK position even if you are notremoving the key from the ignition or leaving the vehicle. Leaving the key in other positions will disable some of the vehicle security systems and runthe battery down.Leaving the driver's seat withoutputting the ignition switch in LOCK position, setting the parking brakeand shifting the shift lever to P withan automatic transaxle, or to 1 or Rwith a manual transaxle isdangerous. Unexpected vehiclemovement could occur. This couldcause an accident.
CAUTION
Driving with the parking brake onwill cause excessive wear of the brakelinings or pads.
NOTE For parking in snow, refer to Winter Driving (page 4-8) regarding parking brake use.
Setting the parking brake
Depress the brake pedal and then firmly
pull the parking brake lever fully upwardswith sufficient force to hold the vehicle ina stationary position.
Releasing the parking brake
Depress the brake pedal and pull the parking brake lever upwards, then pressthe release button. While holding the button, lower the parking brake lever allthe way down to the released position.
5-6
Driving Your Mazda
Starting and Driving
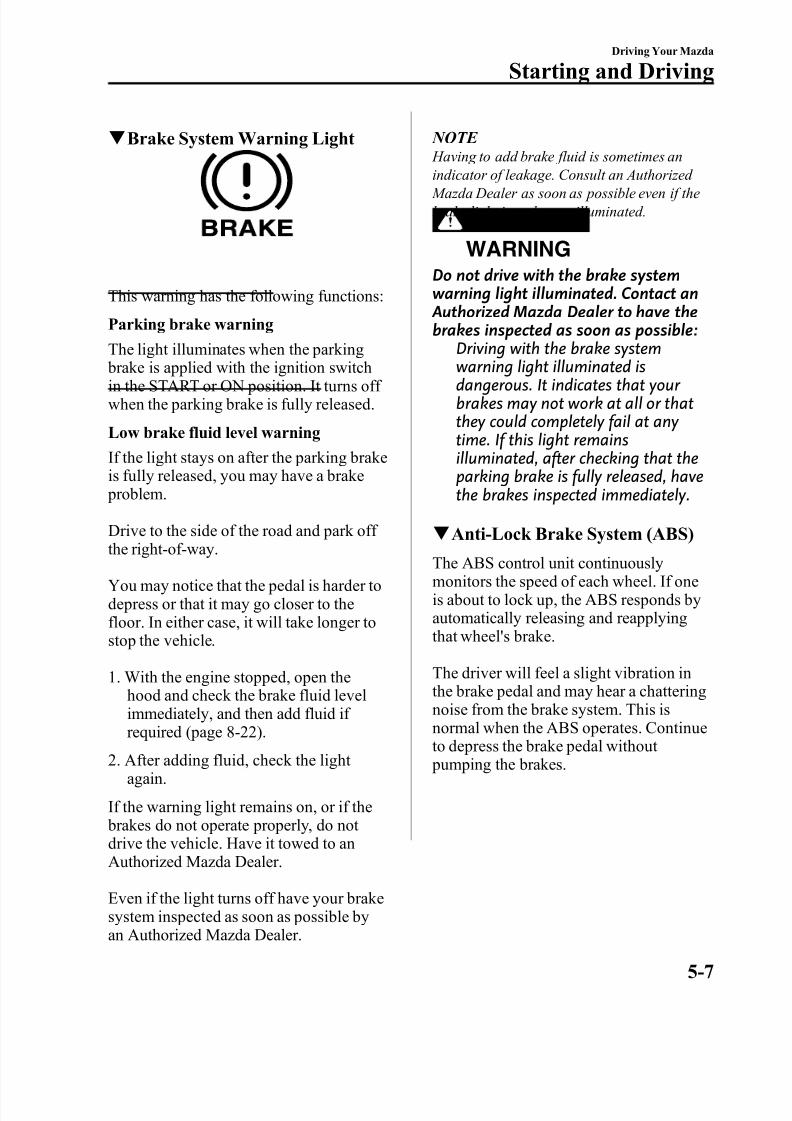
8/2/2019 Mazda5 Owners Manual
http://slidepdf.com/reader/full/mazda5-owners-manual 113/375
q Brake System Warning Light
This warning has the following functions:
Parking brake warning
The light illuminates when the parking brake is applied with the ignition switchin the START or ON position. It turns off when the parking brake is fully released.
Low brake fluid level warning
If the light stays on after the parking brakeis fully released, you may have a brake problem.
Drive to the side of the road and park off the right-of-way.
You may notice that the pedal is harder todepress or that it may go closer to thefloor. In either case, it will take longer tostop the vehicle.
1. With the engine stopped, open thehood and check the brake fluid levelimmediately, and then add fluid if required (page 8-22).
2. After adding fluid, check the light again.
If the warning light remains on, or if the brakes do not operate properly, do not drive the vehicle. Have it towed to anAuthorized Mazda Dealer.
Even if the light turns off have your brakesystem inspected as soon as possible byan Authorized Mazda Dealer.
NOTE Having to add brake fluid is sometimes an
indicator of leakage. Consult an Authorized Mazda Dealer as soon as possible even if thebrake light is no longer illuminated.
WARNING
Do not drive with the brake systemwarning light illuminated. Contact an Authorized Mazda Dealer to have thebrakes inspected as soon as possible:
Driving with the brake systemwarning light illuminated isdangerous. It indicates that your brakes may not work at all or thatthey could completely fail at any time. If this light remainsilluminated, after checking that theparking brake is fully released, havethe brakes inspected immediately.
qAnti-Lock Brake System (ABS)
The ABS control unit continuouslymonitors the speed of each wheel. If oneis about to lock up, the ABS responds byautomatically releasing and reapplyingthat wheel's brake.
The driver will feel a slight vibration inthe brake pedal and may hear a chatteringnoise from the brake system. This isnormal when the ABS operates. Continueto depress the brake pedal without pumping the brakes.
Driving Your Mazda
Starting and Driving
5-7
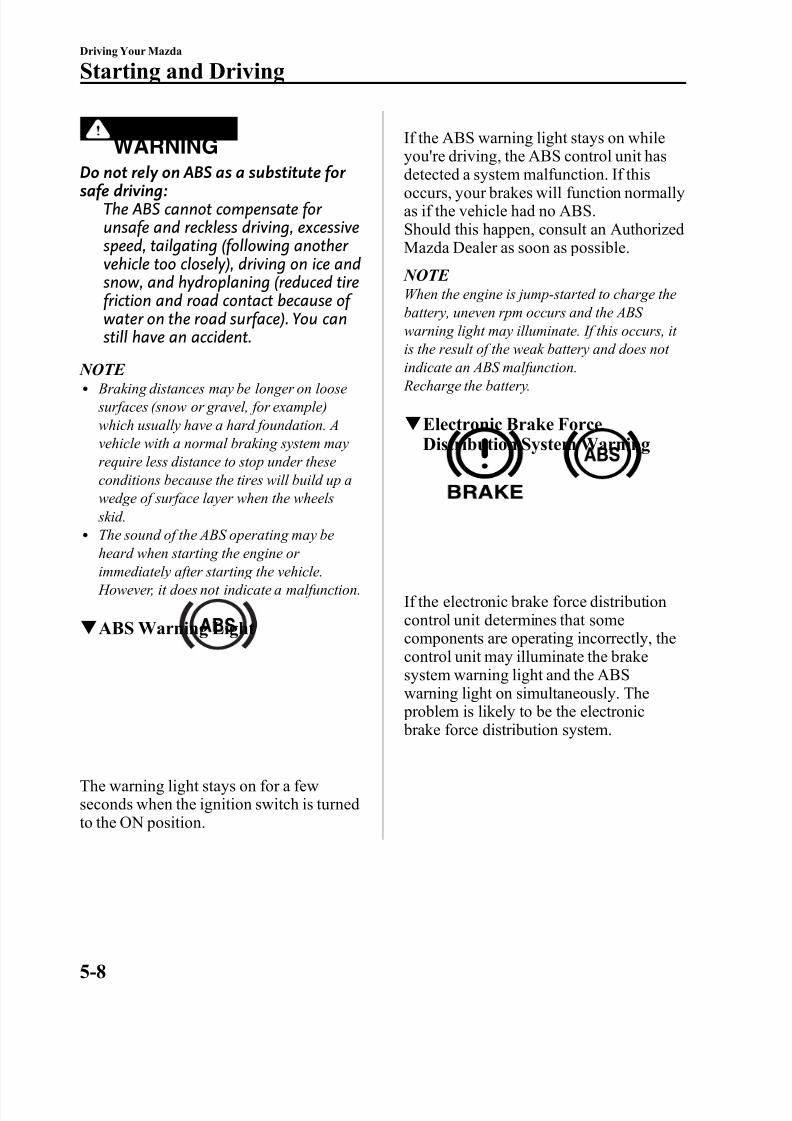
8/2/2019 Mazda5 Owners Manual
http://slidepdf.com/reader/full/mazda5-owners-manual 114/375
WARNING
Do not rely on ABS as a substitute for safe driving:The ABS cannot compensate for unsafe and reckless driving, excessivespeed, tailgating (following another vehicle too closely), driving on ice andsnow, and hydroplaning (reduced tirefriction and road contact because of water on the road surface). You canstill have an accident.
NOTE l Braking distances may be longer on loose
surfaces (snow or gravel, for example)which usually have a hard foundation. Avehicle with a normal braking system mayrequire less distance to stop under theseconditions because the tires will build up awedge of surface layer when the wheels skid.
l The sound of the ABS operating may beheard when starting the engine or immediately after starting the vehicle. However, it does not indicate a malfunction.
q ABS Warning Light
The warning light stays on for a fewseconds when the ignition switch is turnedto the ON position.
If the ABS warning light stays on whileyou're driving, the ABS control unit has
detected a system malfunction. If thisoccurs, your brakes will function normallyas if the vehicle had no ABS.Should this happen, consult an AuthorizedMazda Dealer as soon as possible.
NOTE When the engine is jump-started to charge thebattery, uneven rpm occurs and the ABS warning light may illuminate. If this occurs, it is the result of the weak battery and does not indicate an ABS malfunction. Recharge the battery.
q Electronic Brake ForceDistribution System Warning
If the electronic brake force distributioncontrol unit determines that somecomponents are operating incorrectly, thecontrol unit may illuminate the brakesystem warning light and the ABSwarning light on simultaneously. The problem is likely to be the electronic brake force distribution system.
5-8
Driving Your Mazda
Starting and Driving

8/2/2019 Mazda5 Owners Manual
http://slidepdf.com/reader/full/mazda5-owners-manual 115/375
WARNING
Do not drive with both the ABS warninglight and brake warning lightilluminated. Have the vehicle towed toan Authorized Mazda Dealer to havethe brakes inspected as soon aspossible:
Driving when the brake systemwarning light and ABS warning lightare illuminated simultaneously isdangerous.
When both lights are illuminated, therear wheels could lock more quickly in an emergency stop than under normal circumstances.
q Brake Assist
During emergency braking situationswhen it is necessary to depress the brake pedal with greater force, the brake assist system provides braking assistance, thusenhancing braking performance.
When the brake pedal is depressed hard or depressed more quickly, the brakes applymore firmly.
NOTE l When the brake pedal is depressed hard or
depressed more quickly, the pedal will feel softer but the brakes will apply more firmly.
This is a normal effect of the brake assist operation and does not indicate anabnormality.
l When the brake pedal is depressed hard or depressed more quickly, a clicking noise from the brake booster may be heard. Thisis a normal effect of the brake assist and does not indicate an abnormality.
l The brake assist equipment does not supersede the functionality of the vehicle'smain braking system.
Manual Transaxle Operation
q Manual Transaxle Shift Pattern
Neutral position
The shift pattern of the transaxle isconventional, as shown.
Depress the clutch pedal all the way downwhile shifting; then release it slowly.
A safety feature prevents accidentalshifting from 5 to R (reverse). The shift lever must be put in neutral before beingshifted to R.
Driving Your Mazda
Starting and Driving
5-9
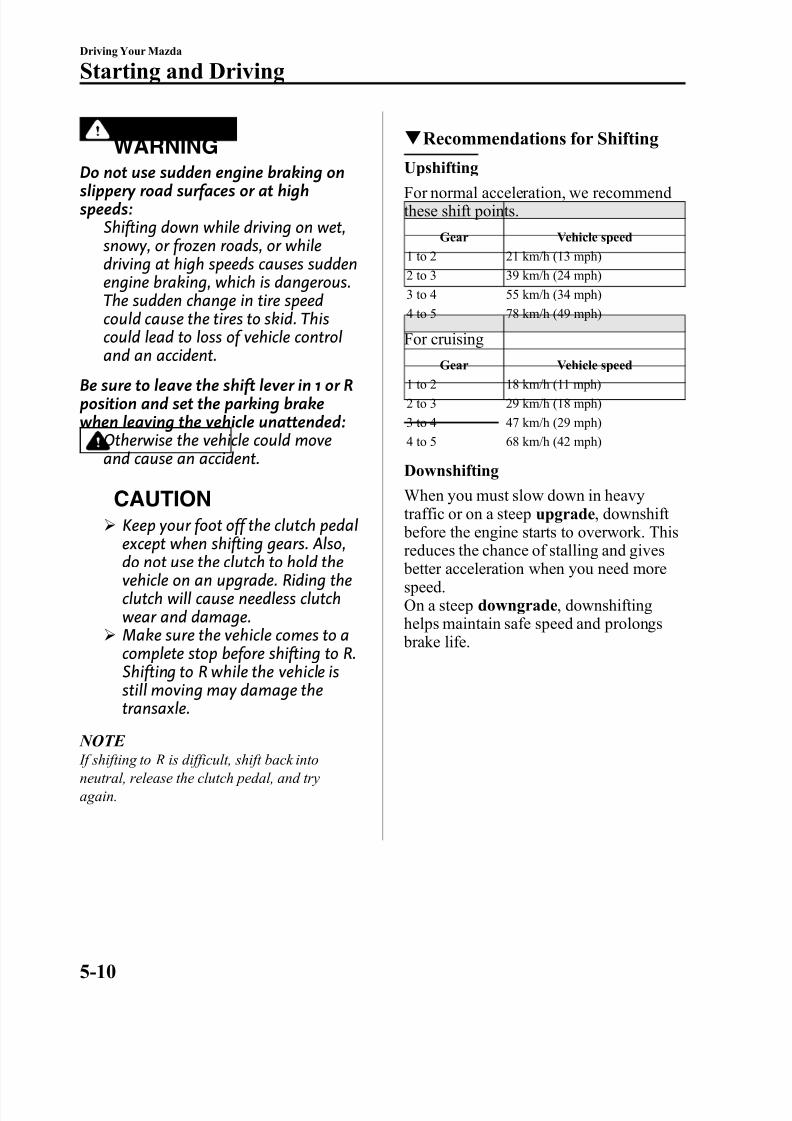
8/2/2019 Mazda5 Owners Manual
http://slidepdf.com/reader/full/mazda5-owners-manual 116/375
WARNING
Do not use sudden engine braking onslippery road surfaces or at highspeeds:
Shifting down while driving on wet,snowy, or frozen roads, or whiledriving at high speeds causes suddenengine braking, which is dangerous.The sudden change in tire speedcould cause the tires to skid. Thiscould lead to loss of vehicle control
and an accident.Be sure to leave the shift lever in 1 or Rposition and set the parking brakewhen leaving the vehicle unattended:
Otherwise the vehicle could moveand cause an accident.
CAUTIONØ Keep your foot off the clutch pedal
except when shifting gears. Also,do not use the clutch to hold thevehicle on an upgrade. Riding theclutch will cause needless clutchwear and damage.
Ø Make sure the vehicle comes to acomplete stop before shifting to R.Shifting to R while the vehicle isstill moving may damage thetransaxle.
NOTE If shifting to R is difficult, shift back intoneutral, release the clutch pedal, and tryagain.
q Recommendations for Shifting
Upshifting
For normal acceleration, we recommendthese shift points.
Gear Vehicle speed
1 to 2 21 km/h (13 mph)2 to 3 39 km/h (24 mph)3 to 4 55 km/h (34 mph)4 to 5 78 km/h (49 mph)
For cruising
Gear Vehicle speed1 to 2 18 km/h (11 mph)2 to 3 29 km/h (18 mph)3 to 4 47 km/h (29 mph)4 to 5 68 km/h (42 mph)
Downshifting
When you must slow down in heavytraffic or on a steep upgrade , downshift before the engine starts to overwork. Thisreduces the chance of stalling and gives better acceleration when you need morespeed.On a steep downgrade , downshiftinghelps maintain safe speed and prolongs brake life.
5-10
Driving Your Mazda
Starting and Driving
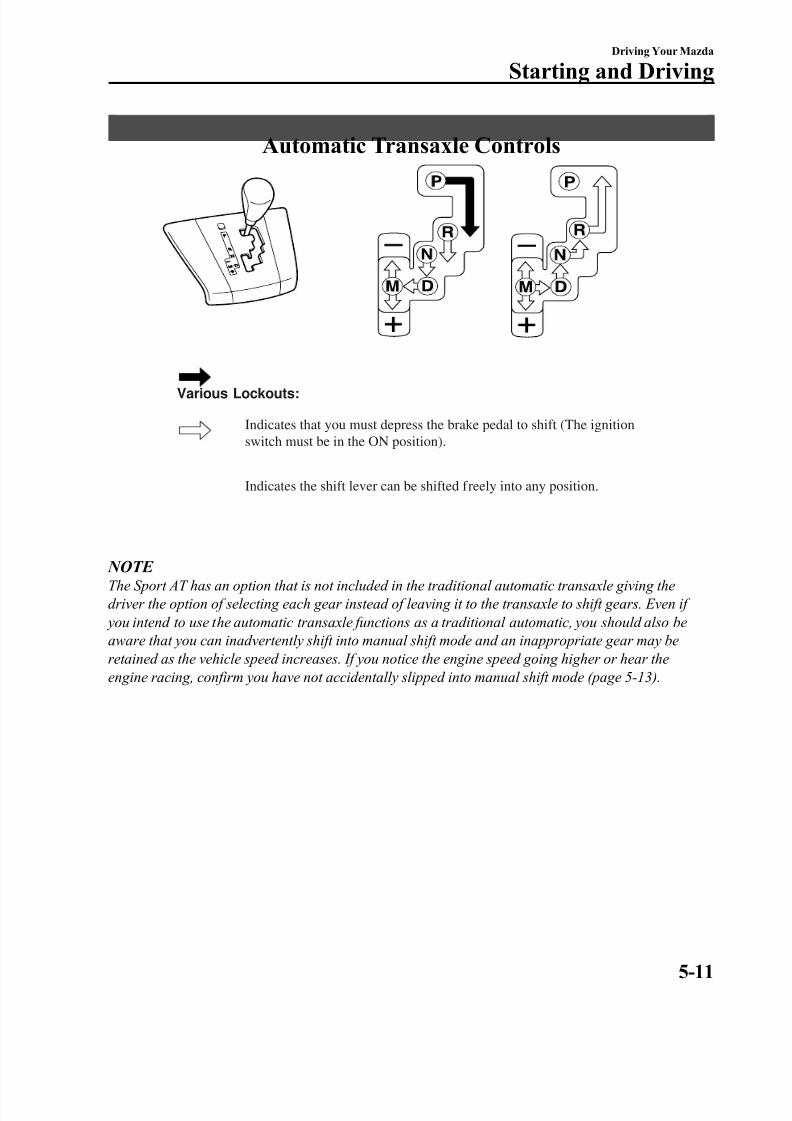
8/2/2019 Mazda5 Owners Manual
http://slidepdf.com/reader/full/mazda5-owners-manual 117/375
Automatic Transaxle Controls
Indicates that you must depress the brake pedal to shift (The ignitionswitch must be in the ON position).
Indicates the shift lever can be shifted freely into any position.
Various Lockouts:
NOTE The Sport AT has an option that is not included in the traditional automatic transaxle giving thedriver the option of selecting each gear instead of leaving it to the transaxle to shift gears. Even if you intend to use the automatic transaxle functions as a traditional automatic, you should also beaware that you can inadvertently shift into manual shift mode and an inappropriate gear may beretained as the vehicle speed increases. If you notice the engine speed going higher or hear theengine racing, confirm you have not accidentally slipped into manual shift mode (page 5-13).
Driving Your Mazda
Starting and Driving
5-11
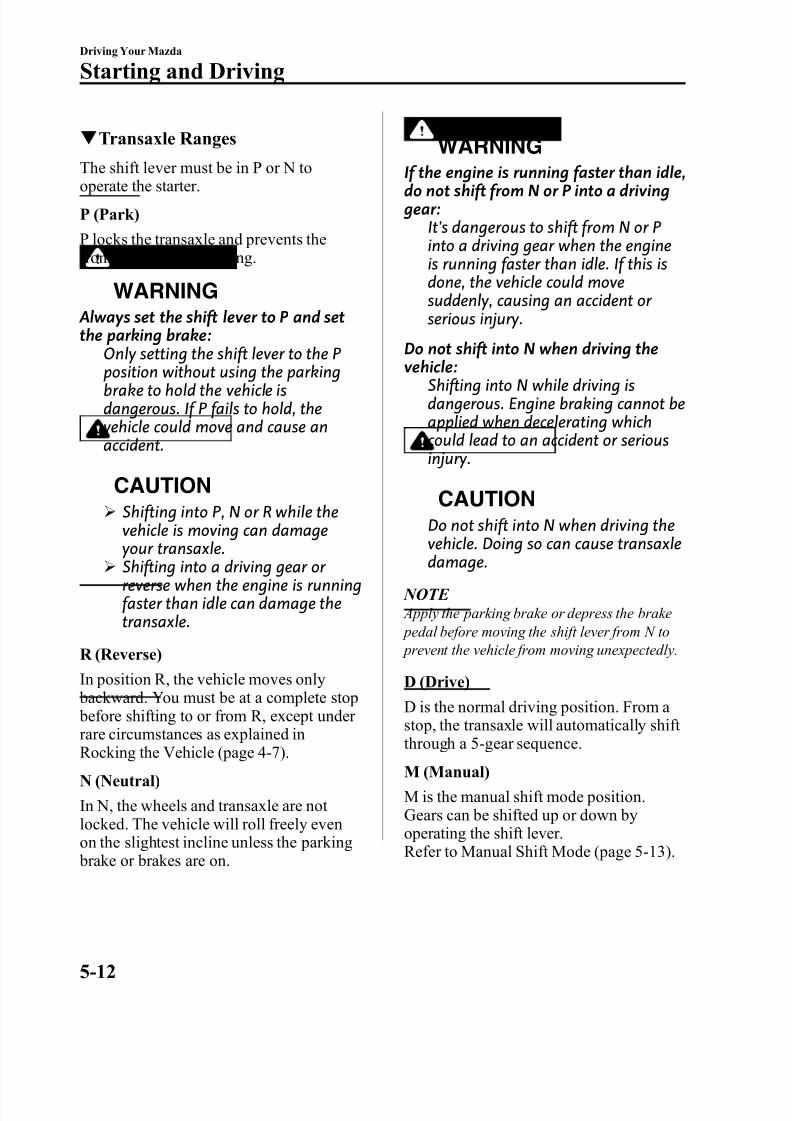
8/2/2019 Mazda5 Owners Manual
http://slidepdf.com/reader/full/mazda5-owners-manual 118/375
q Transaxle Ranges
The shift lever must be in P or N tooperate the starter.
P (Park)
P locks the transaxle and prevents thefront wheels from rotating.
WARNING
Always set the shift lever to P and setthe parking brake:
Only setting the shift lever to the Pposition without using the parkingbrake to hold the vehicle isdangerous. If P fails to hold, thevehicle could move and cause anaccident.
CAUTIONØ Shifting into P, N or R while the
vehicle is moving can damageyour transaxle.
Ø Shifting into a driving gear or reverse when the engine is runningfaster than idle can damage thetransaxle.
R (Reverse)
In position R, the vehicle moves only backward. You must be at a complete stop
before shifting to or from R, except under rare circumstances as explained inRocking the Vehicle (page 4-7).
N (Neutral)
In N, the wheels and transaxle are not locked. The vehicle will roll freely evenon the slightest incline unless the parking brake or brakes are on.
WARNING
If the engine is running faster than idle,do not shift from N or P into a driving gear:
It's dangerous to shift from N or Pinto a driving gear when the engineis running faster than idle. If this isdone, the vehicle could movesuddenly, causing an accident or serious injury.
Do not shift into N when driving thevehicle:
Shifting into N while driving isdangerous. Engine braking cannot beapplied when decelerating whichcould lead to an accident or seriousinjury.
CAUTION
Do not shift into N when driving thevehicle. Doing so can cause transaxledamage.
NOTE Apply the parking brake or depress the brake pedal before moving the shift lever from N to prevent the vehicle from moving unexpectedly.
D (Drive)
D is the normal driving position. From a stop, the transaxle will automatically shift through a 5-gear sequence.
M (Manual)
M is the manual shift mode position.Gears can be shifted up or down byoperating the shift lever.Refer to Manual Shift Mode (page 5-13).
5-12
Driving Your Mazda
Starting and Driving
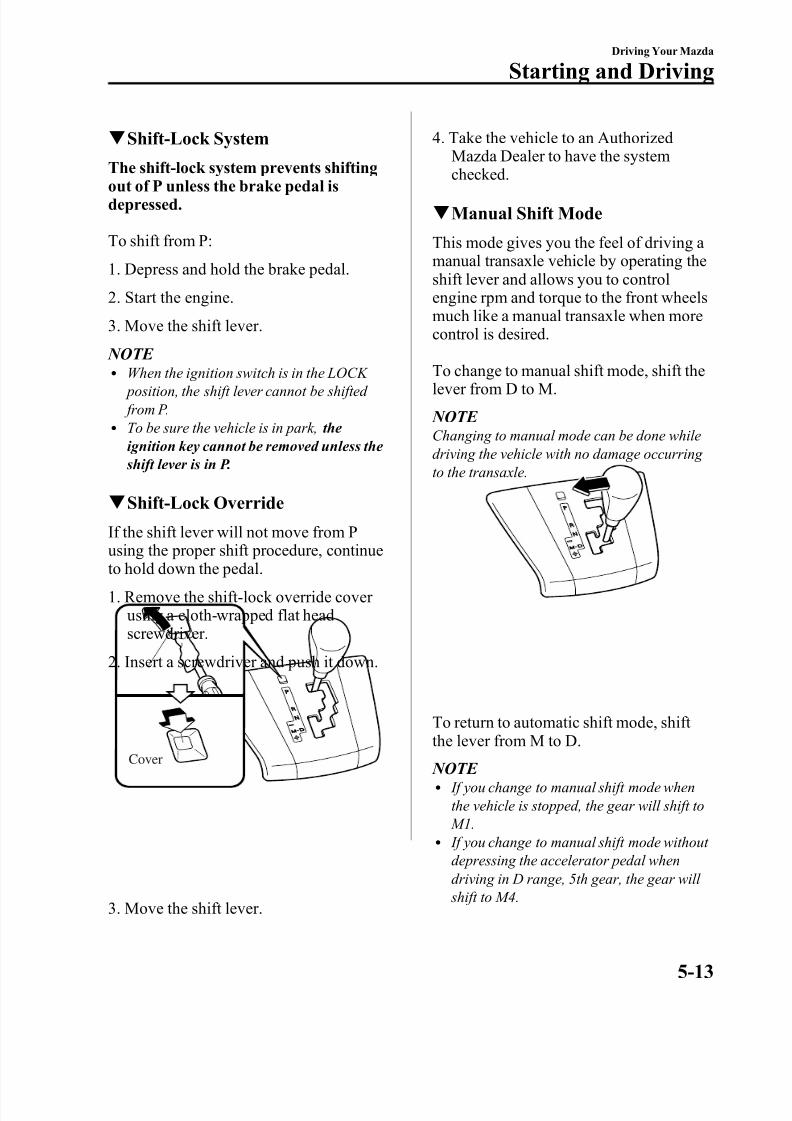
8/2/2019 Mazda5 Owners Manual
http://slidepdf.com/reader/full/mazda5-owners-manual 119/375
q Shift-Lock System
The shift-lock system prevents shiftingout of P unless the brake pedal isdepressed.
To shift from P:
1. Depress and hold the brake pedal.
2. Start the engine.
3. Move the shift lever.
NOTE l When the ignition switch is in the LOCK position, the shift lever cannot be shifted from P.
l To be sure the vehicle is in park, the ignition key cannot be removed unless the shift lever is in P.
q Shift-Lock Override
If the shift lever will not move from Pusing the proper shift procedure, continueto hold down the pedal.
1. Remove the shift-lock override cover using a cloth-wrapped flat headscrewdriver.
2. Insert a screwdriver and push it down.
Cover
3. Move the shift lever.
4. Take the vehicle to an AuthorizedMazda Dealer to have the system
checked.q Manual Shift Mode
This mode gives you the feel of driving a manual transaxle vehicle by operating theshift lever and allows you to controlengine rpm and torque to the front wheelsmuch like a manual transaxle when morecontrol is desired.
To change to manual shift mode, shift thelever from D to M.
NOTE Changing to manual mode can be done whiledriving the vehicle with no damage occurring to the transaxle.
To return to automatic shift mode, shift the lever from M to D.
NOTE l If you change to manual shift mode when
the vehicle is stopped, the gear will shift to M1.
l If you change to manual shift mode without depressing the accelerator pedal whendriving in D range, 5th gear, the gear will shift to M4.
Driving Your Mazda
Starting and Driving
5-13
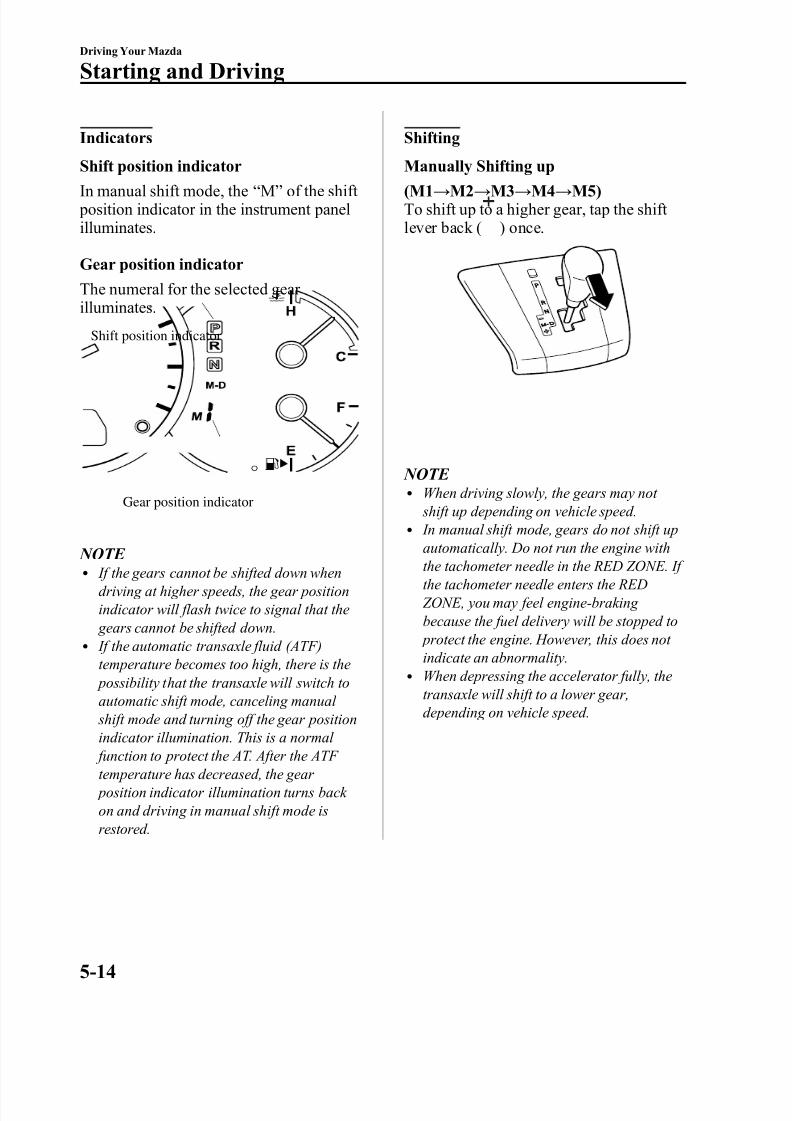
8/2/2019 Mazda5 Owners Manual
http://slidepdf.com/reader/full/mazda5-owners-manual 120/375
Indicators
Shift position indicator
In manual shift mode, the “ M ” of the shift position indicator in the instrument panelilluminates.
Gear position indicator
The numeral for the selected gear illuminates.
Shift position indicator
Gear position indicator
NOTE l If the gears cannot be shifted down when
driving at higher speeds, the gear positionindicator will flash twice to signal that the gears cannot be shifted down.
l If the automatic transaxle fluid (ATF)temperature becomes too high, there is the possibility that the transaxle will switch toautomatic shift mode, canceling manual
shift mode and turning off the gear positionindicator illumination. This is a normal function to protect the AT. After the ATF temperature has decreased, the gear position indicator illumination turns back on and driving in manual shift mode isrestored.
Shifting
Manually Shifting up
(M1 → M2 → M3 → M4 → M5)To shift up to a higher gear, tap the shift lever back ( ) once.
NOTE l When driving slowly, the gears may not
shift up depending on vehicle speed.l In manual shift mode, gears do not shift up
automatically. Do not run the engine withthe tachometer needle in the RED ZONE. If the tachometer needle enters the RED ZONE, you may feel engine-braking because the fuel delivery will be stopped to protect the engine. However, this does not indicate an abnormality.
l When depressing the accelerator fully, thetransaxle will shift to a lower gear,depending on vehicle speed.
5-14
Driving Your Mazda
Starting and Driving
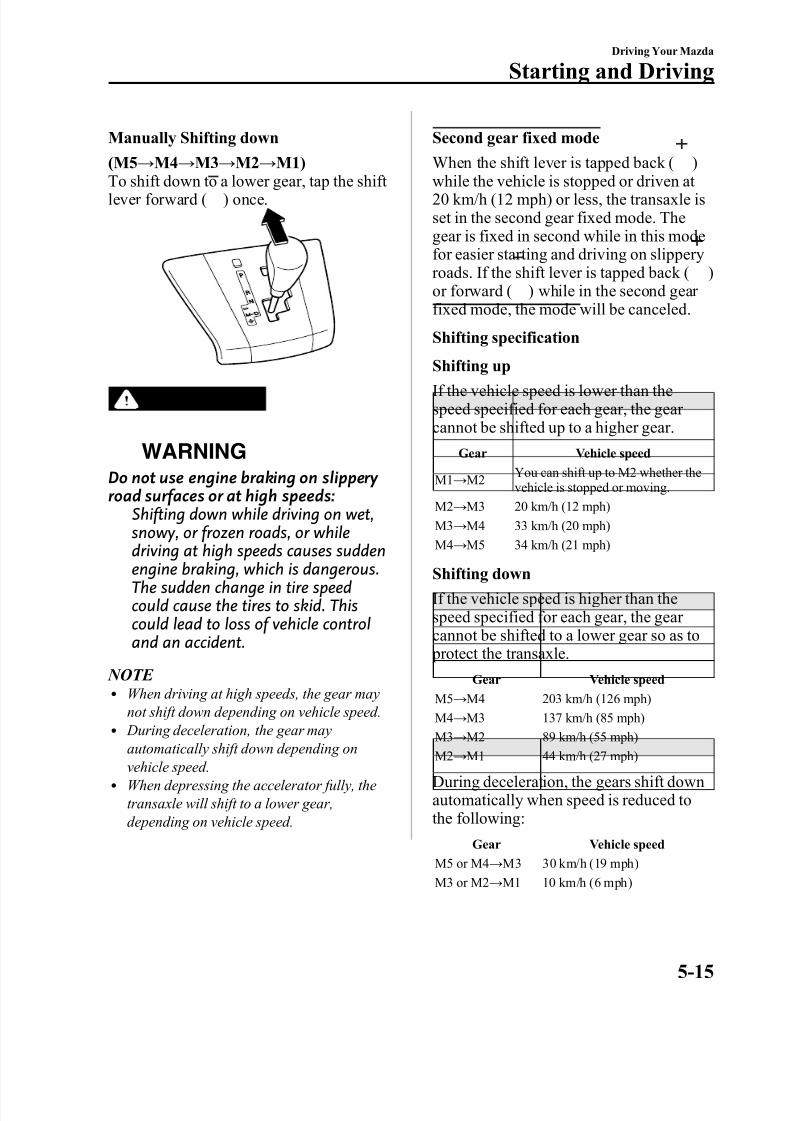
8/2/2019 Mazda5 Owners Manual
http://slidepdf.com/reader/full/mazda5-owners-manual 121/375
Manually Shifting down
(M5 → M4 → M3 → M2 → M1)
To shift down to a lower gear, tap the shift lever forward ( ) once.
WARNING
Do not use engine braking on slippery road surfaces or at high speeds:
Shifting down while driving on wet,snowy, or frozen roads, or whiledriving at high speeds causes suddenengine braking, which is dangerous.The sudden change in tire speedcould cause the tires to skid. Thiscould lead to loss of vehicle controland an accident.
NOTE l When driving at high speeds, the gear may
not shift down depending on vehicle speed.l During deceleration, the gear may
automatically shift down depending onvehicle speed.
l When depressing the accelerator fully, thetransaxle will shift to a lower gear,depending on vehicle speed.
Second gear fixed mode
When the shift lever is tapped back ( )
while the vehicle is stopped or driven at 20 km/h (12 mph) or less, the transaxle isset in the second gear fixed mode. Thegear is fixed in second while in this modefor easier starting and driving on slipperyroads. If the shift lever is tapped back ( )or forward ( ) while in the second gear fixed mode, the mode will be canceled.
Shifting specification
Shifting upIf the vehicle speed is lower than thespeed specified for each gear, the gear cannot be shifted up to a higher gear.
Gear Vehicle speed
M1 → M2 You can shift up to M2 whether thevehicle is stopped or moving.
M2 → M3 20 km/h (12 mph)M3 → M4 33 km/h (20 mph)
M4 → M5 34 km/h (21 mph)
Shifting down
If the vehicle speed is higher than thespeed specified for each gear, the gear cannot be shifted to a lower gear so as to protect the transaxle.
Gear Vehicle speed
M5 → M4 203 km/h (126 mph)
M4→
M3 137 km/h (85 mph)M3 → M2 89 km/h (55 mph)M2 → M1 44 km/h (27 mph)
During deceleration, the gears shift downautomatically when speed is reduced tothe following:
Gear Vehicle speed
M5 or M4 → M3 30 km/h (19 mph)M3 or M2 → M1 10 km/h (6 mph)
Driving Your Mazda
Starting and Driving
5-15
8/2/2019 Mazda5 Owners Manual
http://slidepdf.com/reader/full/mazda5-owners-manual 122/375
NOTE The gear does not shift down to M1
automatically while in the second gear fixed mode.
Recommendations for shifting
Upshifting
For normal acceleration and cruising, werecommend these shift points.
Gear Vehicle speed
M1 to M2 24 km/h (15 mph)
M2 to M3 40 km/h (25 mph)M3 to M4 65 km/h (40 mph)M4 to M5 73 km/h (45 mph)
Downshifting
When you must slow down in heavytraffic or on a steep upgrade , downshift before the engine starts to overwork. Thisgives better acceleration when you needmore speed.
On a steep downgrade , downshiftinghelps maintain safe speed and prolongs brake life.
q Driving Tips
Passing
For extra power when passing another vehicle or climbing steep grades, depressthe accelerator fully. The transaxle willshift to a lower gear, depending on vehiclespeed.
Climbing steep grades from a stop
To climb a steep grade from a stopped position:
1. Depress the brake pedal.
2. Shift to D or M1, depending on theload weight and grade steepness.
3. Release the brake pedal whilegradually accelerating.
Descending steep gradesWhen descending a steep grade, shift tolower gears, depending on load weight and grade steepness. Descend slowly,using the brakes only occasionally to prevent them from overheating.
5-16
Driving Your Mazda
Starting and Driving

8/2/2019 Mazda5 Owners Manual
http://slidepdf.com/reader/full/mazda5-owners-manual 123/375
Power Steering
Power steering is only operable when theengine is running. If the engine is off or if the power steering system is inoperable,you can still steer, but it requires more physical effort.
If the steering feels stiffer than usualduring normal driving, consult anAuthorized Mazda Dealer.
CAUTIONNever hold the steering wheel to theextreme left or right for more than 5seconds with the engine running.This could damage the power steering system.
q Power Steering MalfunctionIndicator Light
This indicator light illuminates when theignition switch is turned to the ON position and goes off when the engine isstarted.
If the light stays illuminated after theengine is started or illuminates while
driving, turn off the engine after parkingin a safe place, and then start the engineagain.If the light does not illuminate after restarting the engine, this indicates that the power steering is restored and normalsteering is possible.If the light remains illuminated, the power steering is still inoperable. Consult anAuthorized Mazda Dealer.
NOTE The power steering system is inoperable whenthe power steering malfunction indicator light illuminates. Steering is possible, but requiresmore physical effort.
Driving Your Mazda
Starting and Driving
5-17
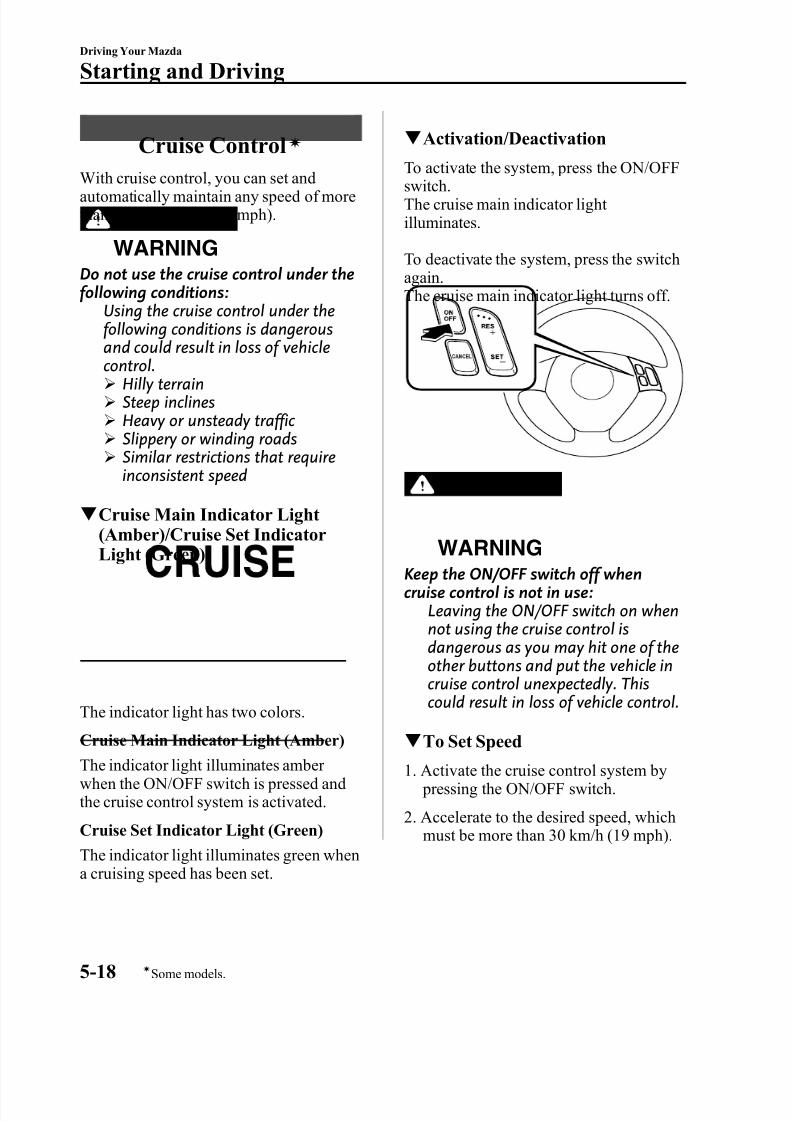
8/2/2019 Mazda5 Owners Manual
http://slidepdf.com/reader/full/mazda5-owners-manual 124/375
Cruise Control í
With cruise control, you can set andautomatically maintain any speed of morethan about 30 km/h (19 mph).
WARNING
Do not use the cruise control under thefollowing conditions:
Using the cruise control under thefollowing conditions is dangerousand could result in loss of vehiclecontrol.Ø Hilly terrainØ Steep inclinesØ Heavy or unsteady traffic Ø Slippery or winding roadsØ Similar restrictions that require
inconsistent speed
q Cruise Main Indicator Light
(Amber)/Cruise Set IndicatorLight (Green)
The indicator light has two colors.
Cruise Main Indicator Light (Amber)
The indicator light illuminates amber when the ON/OFF switch is pressed andthe cruise control system is activated.
Cruise Set Indicator Light (Green)
The indicator light illuminates green whena cruising speed has been set.
q Activation/Deactivation
To activate the system, press the ON/OFFswitch.The cruise main indicator light illuminates.
To deactivate the system, press the switchagain.The cruise main indicator light turns off.
WARNINGKeep the ON/OFF switch off whencruise control is not in use:
Leaving the ON/OFF switch on whennot using the cruise control isdangerous as you may hit one of theother buttons and put the vehicle incruise control unexpectedly. Thiscould result in loss of vehicle control.
q To Set Speed
1. Activate the cruise control system by pressing the ON/OFF switch.
2. Accelerate to the desired speed, whichmust be more than 30 km/h (19 mph).
5-18
Driving Your Mazda
íSome models.
Starting and Driving
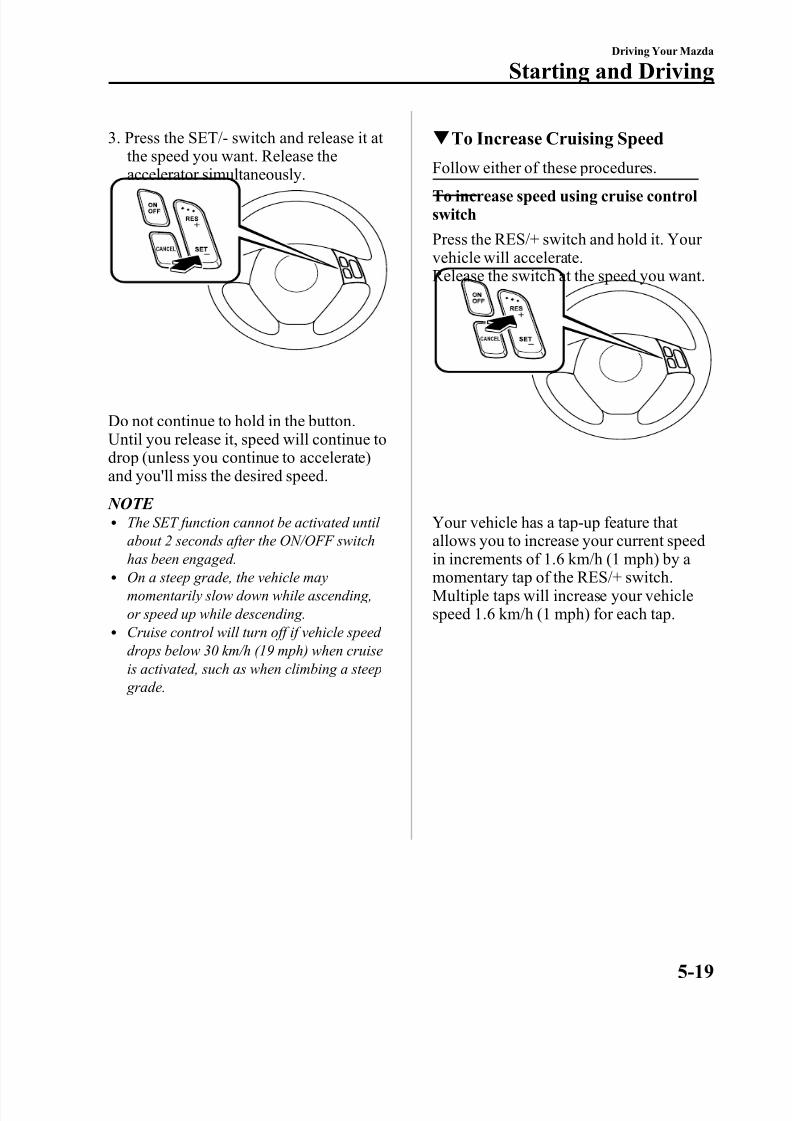
8/2/2019 Mazda5 Owners Manual
http://slidepdf.com/reader/full/mazda5-owners-manual 125/375
3. Press the SET/- switch and release it at the speed you want. Release the
accelerator simultaneously.
Do not continue to hold in the button.Until you release it, speed will continue todrop (unless you continue to accelerate)and you'll miss the desired speed.
NOTE l The SET function cannot be activated until
about 2 seconds after the ON/OFF switchhas been engaged.
l On a steep grade, the vehicle maymomentarily slow down while ascending,or speed up while descending.
l Cruise control will turn off if vehicle speed drops below 30 km/h (19 mph) when cruiseis activated, such as when climbing a steep grade.
q To Increase Cruising Speed
Follow either of these procedures.
To increase speed using cruise controlswitch
Press the RES/+ switch and hold it. Your vehicle will accelerate.Release the switch at the speed you want.
Your vehicle has a tap-up feature that
allows you to increase your current speedin increments of 1.6 km/h (1 mph) by a momentary tap of the RES/+ switch.Multiple taps will increase your vehiclespeed 1.6 km/h (1 mph) for each tap.
Driving Your Mazda
Starting and Driving
5-19
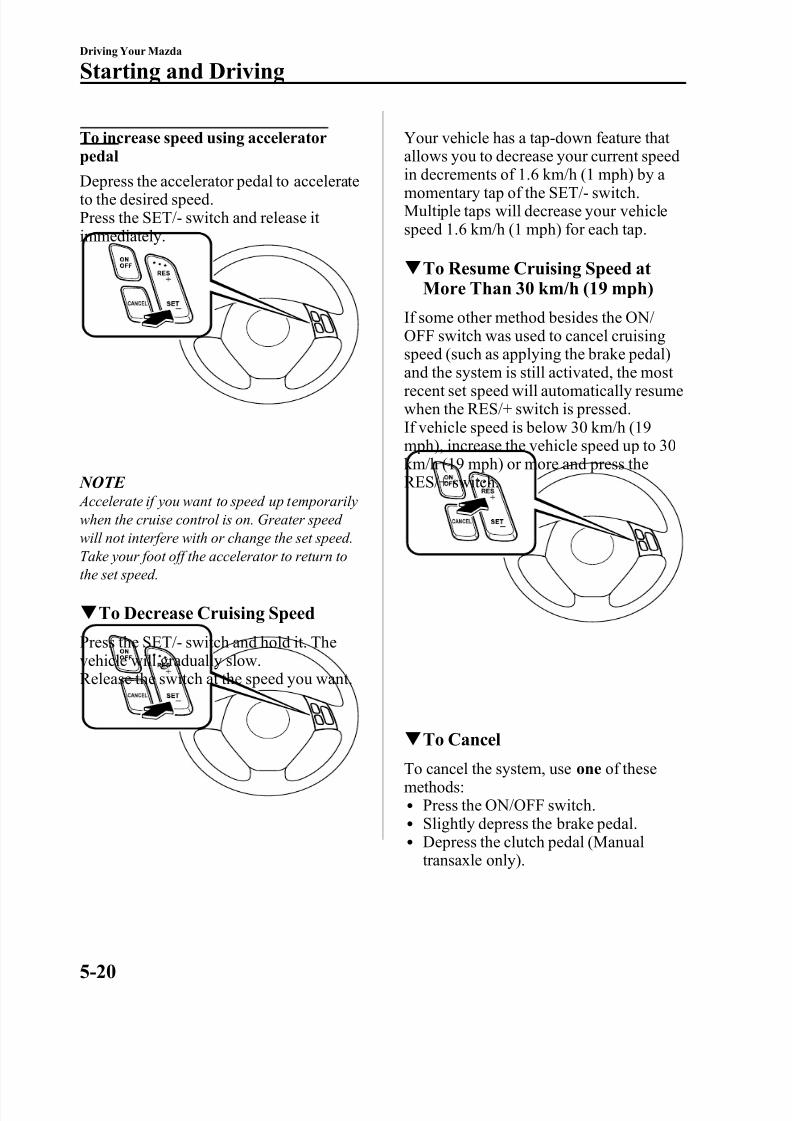
8/2/2019 Mazda5 Owners Manual
http://slidepdf.com/reader/full/mazda5-owners-manual 126/375
To increase speed using acceleratorpedal
Depress the accelerator pedal to accelerateto the desired speed.Press the SET/- switch and release it immediately.
NOTE Accelerate if you want to speed up temporarilywhen the cruise control is on. Greater speed
will not interfere with or change the set speed.Take your foot off the accelerator to return tothe set speed.
q To Decrease Cruising Speed
Press the SET/- switch and hold it. Thevehicle will gradually slow.Release the switch at the speed you want.
Your vehicle has a tap-down feature that allows you to decrease your current speed
in decrements of 1.6 km/h (1 mph) by a momentary tap of the SET/- switch.Multiple taps will decrease your vehiclespeed 1.6 km/h (1 mph) for each tap.
q To Resume Cruising Speed atMore Than 30 km/h (19 mph)
If some other method besides the ON/ OFF switch was used to cancel cruising
speed (such as applying the brake pedal)and the system is still activated, the most recent set speed will automatically resumewhen the RES/+ switch is pressed.If vehicle speed is below 30 km/h (19mph), increase the vehicle speed up to 30km/h (19 mph) or more and press theRES/+ switch.
q To Cancel
To cancel the system, use one of thesemethods:l Press the ON/OFF switch.l Slightly depress the brake pedal.l Depress the clutch pedal (Manual
transaxle only).
5-20
Driving Your Mazda
Starting and Driving
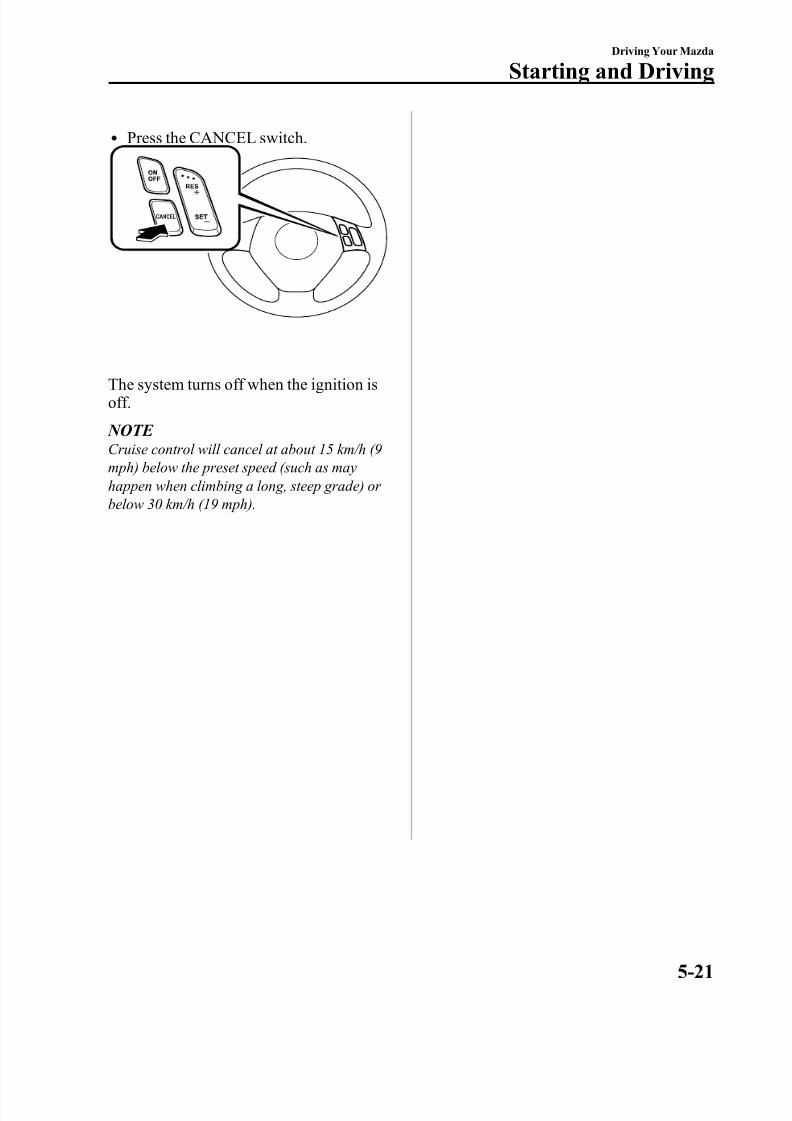
8/2/2019 Mazda5 Owners Manual
http://slidepdf.com/reader/full/mazda5-owners-manual 127/375
l Press the CANCEL switch.
The system turns off when the ignition isoff.
NOTE Cruise control will cancel at about 15 km/h (9mph) below the preset speed (such as mayhappen when climbing a long, steep grade) or below 30 km/h (19 mph).
Driving Your Mazda
Starting and Driving
5-21
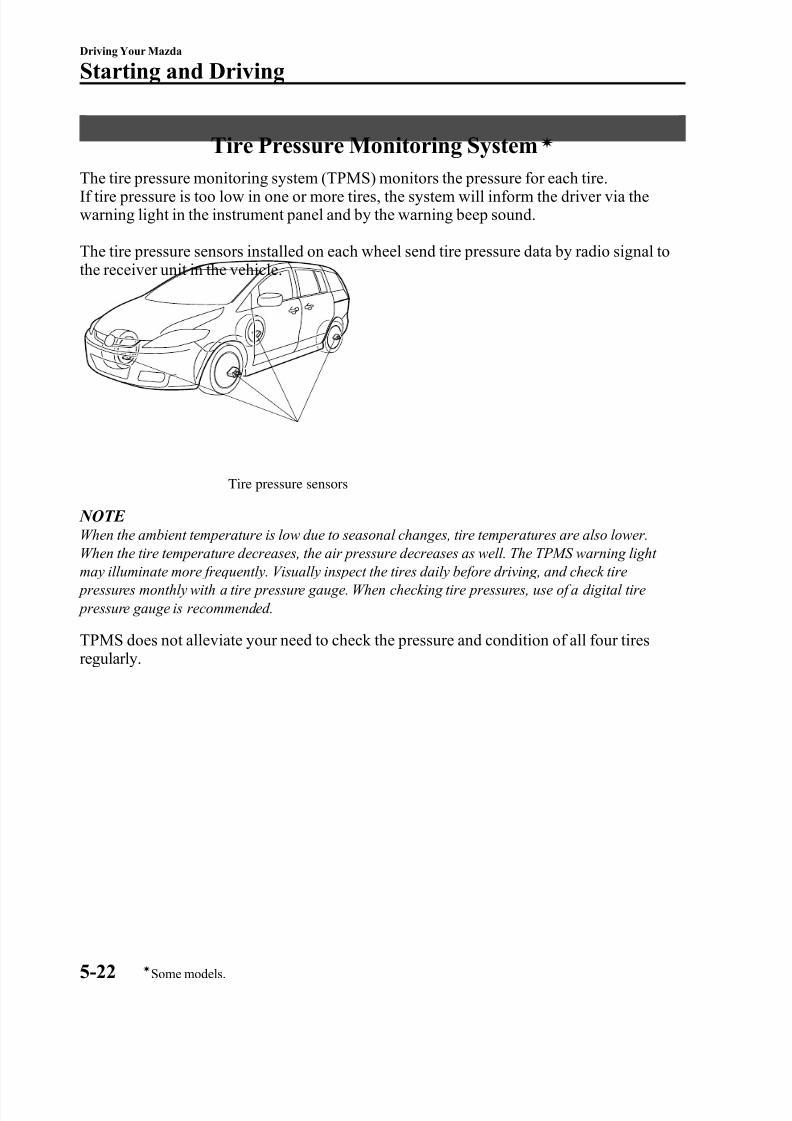
8/2/2019 Mazda5 Owners Manual
http://slidepdf.com/reader/full/mazda5-owners-manual 128/375
Tire Pressure Monitoring System í
The tire pressure monitoring system (TPMS) monitors the pressure for each tire.If tire pressure is too low in one or more tires, the system will inform the driver via thewarning light in the instrument panel and by the warning beep sound.
The tire pressure sensors installed on each wheel send tire pressure data by radio signal tothe receiver unit in the vehicle.
Tire pressure sensors
NOTE When the ambient temperature is low due to seasonal changes, tire temperatures are also lower.When the tire temperature decreases, the air pressure decreases as well. The TPMS warning light may illuminate more frequently. Visually inspect the tires daily before driving, and check tire pressures monthly with a tire pressure gauge. When checking tire pressures, use of a digital tire pressure gauge is recommended.
TPMS does not alleviate your need to check the pressure and condition of all four tiresregularly.
5-22
Driving Your Mazda
íSome models.
Starting and Driving
8/2/2019 Mazda5 Owners Manual
http://slidepdf.com/reader/full/mazda5-owners-manual 129/375
CAUTIONØ
Each tire, including the spare (if provided), should be checked monthly when coldand inflated to the inflation pressure recommended by the vehicle manufacturer on the vehicle placard or tire inflation pressure label. (If your vehicle has tires of adifferent size than the size indicated on the vehicle placard or tire inflationpressure label, you should determine the proper tire inflation pressure for thosetires.) As an added safety feature, your vehicle has been equipped with a tire pressuremonitoring system (TPMS) that illuminates a low tire pressure telltale when oneor more of your tires is significantly under-inflated. Accordingly, when the low tirepressure telltale illuminates, you should stop and check your tires as soon as
possible, and inflate them to the proper pressure. Driving on a significantly under-inflated tire causes the tire to overheat and can lead to tire failure. Under-inflationalso reduces fuel efficiency and tire tread life, and may affect the vehicle'shandling and stopping ability.Please note that the TPMS is not a substitute for proper tire maintenance, and itis the driver's responsibility to maintain correct tire pressure, even if under-inflation has not reached the level to trigger illumination of the TPMS low tirepressure telltale.
Ø Your vehicle has also been equipped with a TPMS malfunction indicator toindicate when the system is not operating properly.
The TPMS malfunction indicator is combined with the low tire pressure telltale.When the system detects a malfunction, the telltale will flash for approximately one minute and then remain continuously illuminated. This sequence willcontinue upon subsequent vehicle start-ups as long as the malfunction exists.When the malfunction indicator is illuminated, the system may not be able todetect or signal low tire pressure as intended. TPMS malfunctions may occur for avariety of reasons, including the installation of replacement or alternate tires or wheels on the vehicle that prevent the TPMS from functioning properly. Alwayscheck the TPMS malfunction telltale after replacing one or more tires or wheels onyour vehicle to ensure that the replacement or alternate tires and wheels allow the TPMS to continue to function properly.Ø To avoid false readings, the system samples for a little while before indicating aproblem. As a result it will not instantaneously register a rapid tire deflation or blow out.
NOTE This device complies with part 15 of the FCC Rules. Operation is subject to the following twoconditions: (1) This device may not cause harmful interference, and (2) this device must accept anyinterference received, including interference that may cause undesired operation.
Driving Your Mazda
Starting and Driving
5-23
8/2/2019 Mazda5 Owners Manual
http://slidepdf.com/reader/full/mazda5-owners-manual 130/375
q Tire Pressure Monitoring SystemWarning Light
This warning light illuminates for a fewseconds when the ignition switch is turnedto the ON position.
Thereafter, the warning light illuminatesand a beep is heard when tire pressure istoo low in one or more tires, and flasheswhen there is a system malfunction.
WARNING
If the tire pressure monitoring systemwarning light illuminates or flashes, or the tire pressure warning beep sound isheard, decrease vehicle speedimmediately and avoid suddenmaneuvering and braking:
If the tire pressure monitoring systemwarning light illuminates or flashes,or the tire pressure warning beepsound is heard, it is dangerous to
drive the vehicle at high speeds, or perform sudden maneuvering or braking. Vehicle drivability couldworsen and result in an accident.To determine if you have a slow leakor a flat, pull over to a safe positionwhere you can check the visualcondition of the tire and determine if you have enough air to proceed to aplace where air may be added and
the system monitored again, an Authorized Mazda Dealer or a tirerepair station.
Do not ignore the TPMS Warning Light:Ignoring the TPMS warning light isdangerous, even if you know why it isilluminated. Have the problem takencare of as soon as possible before itdevelops into a more serioussituation that could lead to tirefailure and a dangerous accident.
Warning light illuminates/Warningbeep sounds
When the warning light illuminates, andthe warning beep sound is heard (about 3seconds), tire pressure is too low in one or more tires.
5-24
Driving Your Mazda
Starting and Driving
8/2/2019 Mazda5 Owners Manual
http://slidepdf.com/reader/full/mazda5-owners-manual 131/375
Adjust the tire pressure to the correct tire pressure. Refer to the specification charts
(page 10-6).
CAUTION
When replacing/repairing the tires or wheels or both, have the work doneby an Authorized Mazda Dealer, or the tire pressure sensors may bedamaged.
NOTE l Perform tire pressure adjustment when the
tires are cold. Tire pressure will varyaccording to the tire temperature, thereforelet the vehicle stand for 1 hour or only driveit 1.6 km (1 mile) or less before adjusting the tire pressures. When pressure isadjusted on hot tires to the cold inflation pressure, the TPMS warning light/beep mayturn on after the tires cool and pressuredrops below specification. Also, an illuminated TPMS warning light,
resulting from the tire air pressure dropping due to cold ambient temperature, may turnoff if the ambient temperature rises. In thiscase, it will also be necessary to adjust thetire air pressures. If the TPMS warning light illuminates due to a drop in tire air pressure, make sure to check and adjust thetire air pressures.
l After adjusting the tire air pressures, it mayrequire some time for the TPMS warning
light to turn off. If the TPMS warning light remains illuminated, drive the vehicle at a speed of at least 25 km/h (16 mph) for 10minutes, and then verify that it turns off.
l Tires loose air naturally over time and theTPMS cannot tell if the tires are getting too soft over time or you have a flat. However,when you find one low tire in a set of four-that is an indication of trouble; you should have someone drive the vehicle slowly
forward so you can inspect any low tire for cuts and any metal objects sticking throughtread or sidewall. Put a few drops of water in the valve stem to see if it bubblesindicating a bad valve. Leaks need to beaddressed by more than simply refilling thetrouble tire as leaks are dangerous - take it to an Authorized Mazda Dealer which hasall the equipment to fix tires, TPMS systemsand order the best replacement tire for your
vehicle.
Driving Your Mazda
Starting and Driving
5-25
8/2/2019 Mazda5 Owners Manual
http://slidepdf.com/reader/full/mazda5-owners-manual 132/375
If the warning light illuminates again evenafter the tire pressures are adjusted, there
may be a tire puncture. Replace the punctured tire with the temporary sparetire (page 7-7).
NOTE A tire pressure sensor is not installed to thetemporary spare tire. The warning light will flash continuously while the temporary sparetire is being used.
Warning light flashes
When the warning light flashes, there may be a system malfunction. Consult anAuthorized Mazda Dealer.
q System Error Activation
When the warning light flashes, there may be a system malfunction. Consult anAuthorized Mazda Dealer.A system error activation may occur inthe following cases:l When there is equipment or a device
near the vehicle using the same radiofrequency as that of the tire pressuresensors.
l When a large metallic object (e.g. a large electric household appliance or a desk-top computer) is placed on theright side of the rear seat, which may block radio signals from the tire pressure sensor to the receiver unit.
l When using the following devices inthe vehicle that may cause radiointerference with the receiver unit.l A digital device such as a personal
computer.l A current converter device such as a
DC-AC converter.l When excess snow or ice adheres to
the vehicle, especially around thewheels.
l When the tire pressure sensor batteriesare exhausted.
l
When using a wheel with no tire pressure sensor installed.l When using tires with steel wire
reinforcement in the side walls.l When using tire chains.
q Tires and Wheels
CAUTION
When inspecting or adjusting the tireair pressures, do not apply excessiveforce to the stem part of the wheelunit. The stem part could bedamaged.
Changing tires and wheels
The following procedure allows theTPMS to recognize a tire pressure sensor'sunique ID signal code whenever tires or
wheels are changed, such as changing toand from winter tires.
NOTE Each tire pressure sensor has a unique ID signal code. The signal code must beregistered with the TPMS before it can work.The easiest way to do it is to have an Authorized Mazda Dealer change your tire and complete ID signal code registration.
When having tires changed at anAuthorized Mazda Dealer
Tire pressure sensor ID signal coderegistration is completed when anAuthorized Mazda Dealer changes your vehicle's tires.
5-26
Driving Your Mazda
Starting and Driving
8/2/2019 Mazda5 Owners Manual
http://slidepdf.com/reader/full/mazda5-owners-manual 133/375
When changing tires yourself
If you or someone else changes tires, you
or someone else can also undertake thesteps for the TPMS to complete the IDsignal code registration.
1. After tires have been changed, turn theignition switch to the ON position, thenturn it back to the ACC or LOCK position.
2. Wait for about 15 minutes.
3. After about 15 minutes, drive thevehicle at a speed of at least 25 km/h(16 mph) for 10 minutes and the tire pressure sensor ID signal code will beregistered automatically.
NOTE If the vehicle is driven within about 15 minutesof changing tires, the tire pressure monitoring system warning light will flash because the sensor ID signal code would not have beenregistered. If this happens, park the vehicle for about 15 minutes, after which the sensor ID signal code will register upon driving thevehicle for 10 minutes.
Replacing tires and wheels
CAUTIONØ When replacing/repairing the tires
or wheels or both, have the workdone by an Authorized MazdaDealer, or the tire pressure sensorsmay be damaged.
Ø The wheels equipped on your Mazda are specially designed for installation of the tire pressuresensors. Do not use non-genuinewheels, otherwise it may not bepossible to install the tire pressure
sensors.
Be sure to have the tire pressure sensorsinstalled whenever tires or wheels are
replaced.When having a tire or wheel or bothreplaced, the following types of tire pressure sensor installations are possible.
l The tire pressure sensor is removedfrom the old wheel and installed to thenew one.
l The same tire pressure sensor is usedwith the same wheel. Only the tire isreplaced.
l
A new tire pressure sensor is installedto a new wheel.
NOTE l The tire pressure sensor ID signal code
must be registered when a new tire pressure sensor is purchased. For purchase of a tire pressure sensor and registration of the tire pressure sensor ID signal code, consult an Authorized Mazda Dealer.
l When reinstalling a previously removed tire pressure sensor to a wheel, replace the grommet (seal between valve body/sensor and wheel) for the tire pressure sensor.
Driving Your Mazda
Starting and Driving
5-27
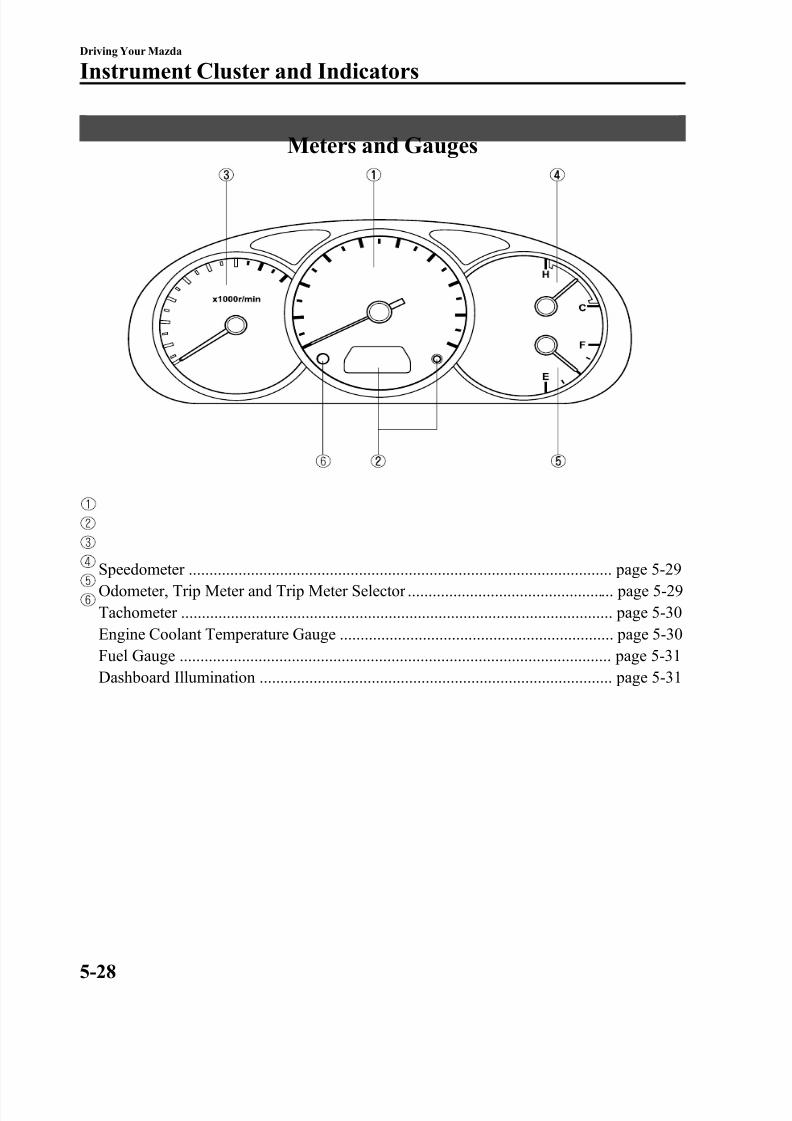
8/2/2019 Mazda5 Owners Manual
http://slidepdf.com/reader/full/mazda5-owners-manual 134/375
Meters and Gauges
Speedometer ...................................................................................................... page 5-29Odometer, Trip Meter and Trip Meter Selector .................................................. page 5-29Tachometer ........................................................................................................ page 5-30Engine Coolant Temperature Gauge .................................................................. page 5-30Fuel Gauge ........................................................................................................ page 5-31Dashboard Illumination ..................................................................................... page 5-31
5-28
Driving Your Mazda
Instrument Cluster and Indicators
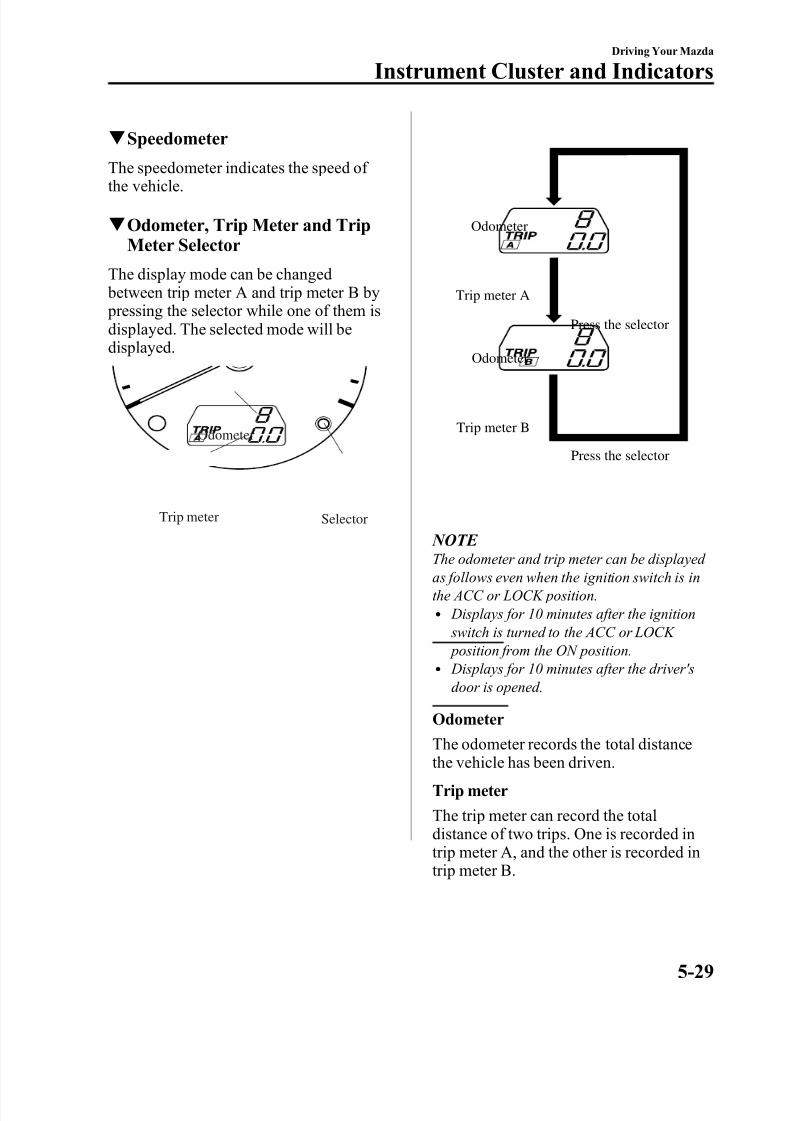
8/2/2019 Mazda5 Owners Manual
http://slidepdf.com/reader/full/mazda5-owners-manual 135/375
q Speedometer
The speedometer indicates the speed of the vehicle.
q Odometer, Trip Meter and TripMeter Selector
The display mode can be changed between trip meter A and trip meter B by pressing the selector while one of them isdisplayed. The selected mode will bedisplayed.
SelectorTrip meter
Odometer Trip meter B
Press the selector
Press the selector
Trip meter A
Odometer
Odometer
NOTE The odometer and trip meter can be displayed as follows even when the ignition switch is inthe ACC or LOCK position.
l Displays for 10 minutes after the ignition switch is turned to the ACC or LOCK position from the ON position.
l Displays for 10 minutes after the driver'sdoor is opened.
OdometerThe odometer records the total distancethe vehicle has been driven.
Trip meter
The trip meter can record the totaldistance of two trips. One is recorded intrip meter A, and the other is recorded intrip meter B.
Driving Your Mazda
Instrument Cluster and Indicators
5-29

8/2/2019 Mazda5 Owners Manual
http://slidepdf.com/reader/full/mazda5-owners-manual 136/375
For instance, trip meter A can record thedistance from the point of origin, and trip
meter B can record the distance fromwhere the fuel tank is filled.
When trip meter A is selected, pressingthe selector again within one second willchange to trip meter B mode.
When trip meter A is selected, TRIP Awill be displayed. When trip meter B isselected, TRIP B will be displayed.
The trip meter records the total distancethe vehicle is driven until the meter isagain reset. Return it to “ 0.0 ” by holdingthe selector depressed for 1 second or more. Use this meter to measure tripdistances and to compute fuelconsumption.
NOTE l Only the trip meters record tenths of
kilometers (miles).l The trip record will be erased when:
l The power supply is interrupted (blown fuse or the battery is disconnected).
l The vehicle is driven over 999.9 km(mile).
q Tachometer
The tachometer shows engine speed inthousands of revolutions per minute(rpm).
Red zone
CAUTION
Do not run the engine with thetachometer needle in the RED ZONE.This may cause severe engine
damage.q Engine Coolant Temperature Gauge
The engine coolant temperature gaugeshows the temperature of the enginecoolant.
If the needle is near H, it indicatesoverheating.
5-30
Driving Your Mazda
Instrument Cluster and Indicators
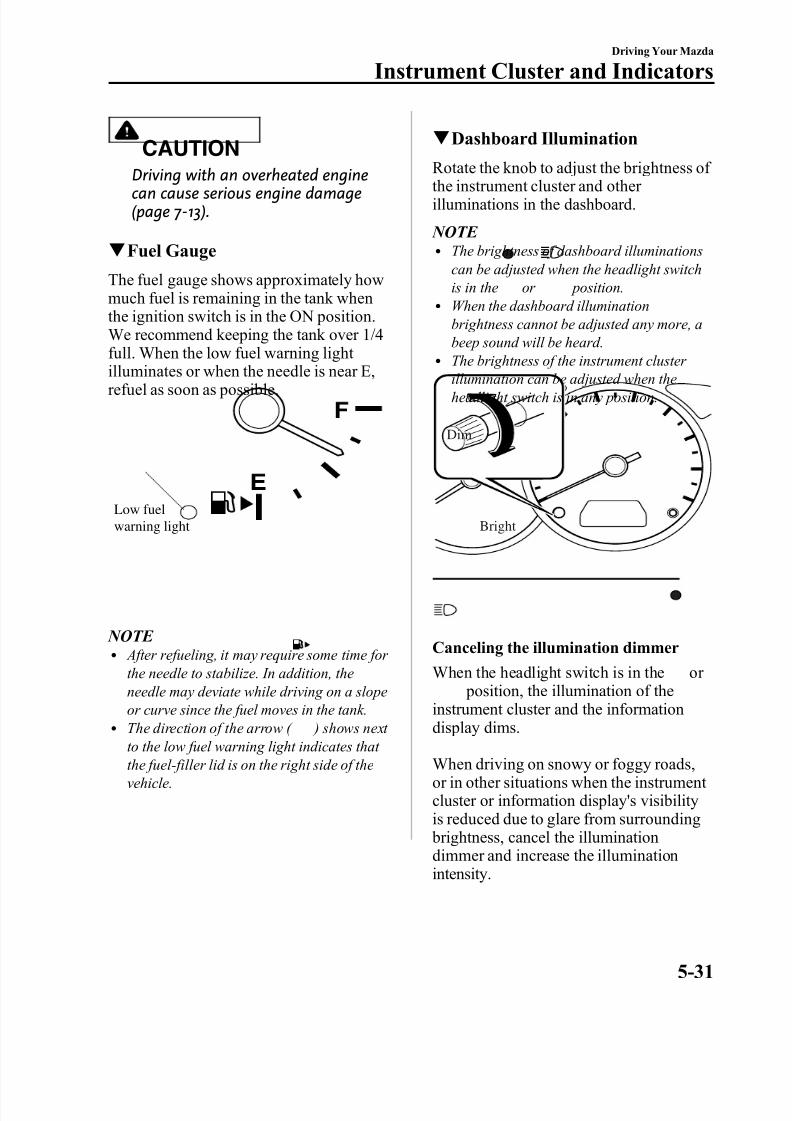
8/2/2019 Mazda5 Owners Manual
http://slidepdf.com/reader/full/mazda5-owners-manual 137/375
CAUTION
Driving with an overheated enginecan cause serious engine damage(page 7-13).
q Fuel Gauge
The fuel gauge shows approximately howmuch fuel is remaining in the tank whenthe ignition switch is in the ON position.We recommend keeping the tank over 1/4full. When the low fuel warning light illuminates or when the needle is near E,refuel as soon as possible.
Low fuelwarning light
NOTE l After refueling, it may require some time for
the needle to stabilize. In addition, theneedle may deviate while driving on a slopeor curve since the fuel moves in the tank.
l The direction of the arrow ( ) shows next to the low fuel warning light indicates that the fuel-filler lid is on the right side of thevehicle.
q Dashboard Illumination
Rotate the knob to adjust the brightness of the instrument cluster and other illuminations in the dashboard.
NOTE l The brightness of dashboard illuminations
can be adjusted when the headlight switchis in the or position.
l When the dashboard illuminationbrightness cannot be adjusted any more, abeep sound will be heard.
l The brightness of the instrument cluster illumination can be adjusted when theheadlight switch is in any position.
Dim
Bright
Canceling the illumination dimmer
When the headlight switch is in the or position, the illumination of the
instrument cluster and the informationdisplay dims.
When driving on snowy or foggy roads,or in other situations when the instrument cluster or information display's visibilityis reduced due to glare from surrounding brightness, cancel the illuminationdimmer and increase the illuminationintensity.
Driving Your Mazda
Instrument Cluster and Indicators
5-31
8/2/2019 Mazda5 Owners Manual
http://slidepdf.com/reader/full/mazda5-owners-manual 138/375
To cancel the illumination dimmer, rotatethe knob clockwise fully. You will hear a
beep sound and the illumination dimmer will be canceled.
NOTE If the dashboard illumination knob is kept at the illumination dimmer cancel position, theinstrument cluster and the information displaywill not dim when the headlight switch isturned to the or position again.
5-32
Driving Your Mazda
Instrument Cluster and Indicators
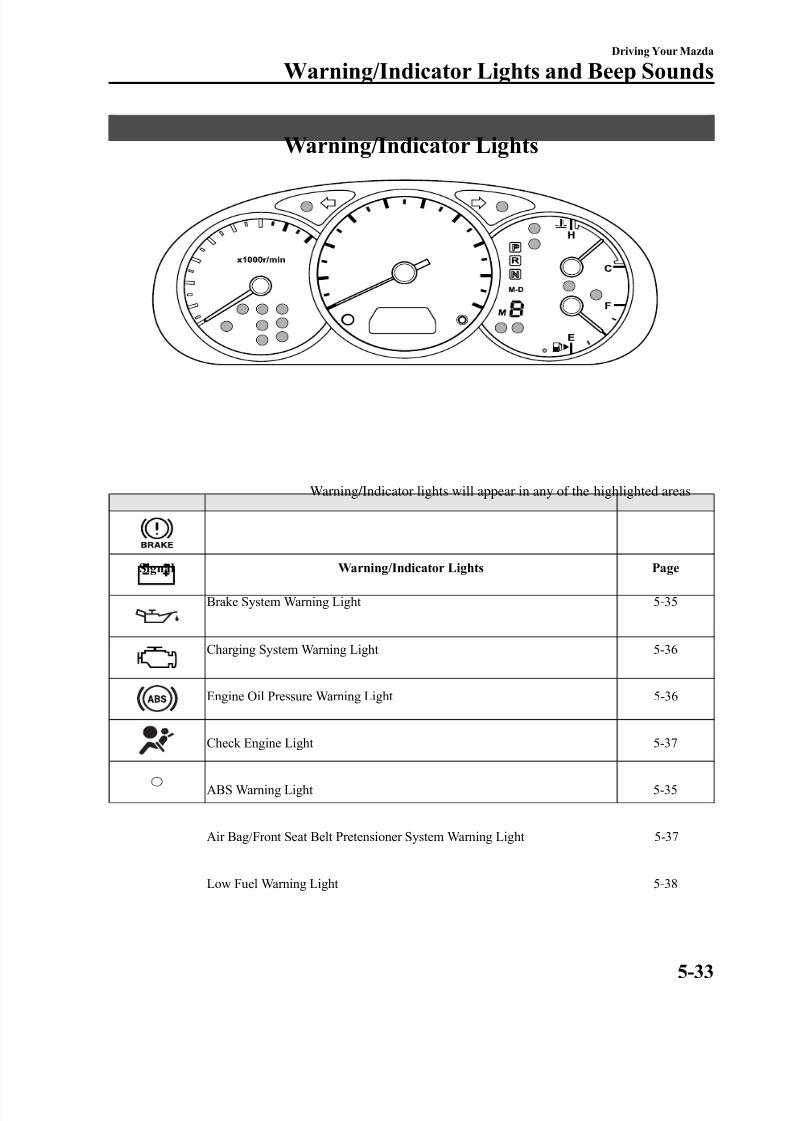
8/2/2019 Mazda5 Owners Manual
http://slidepdf.com/reader/full/mazda5-owners-manual 139/375
Warning/Indicator Lights
Warning/Indicator lights will appear in any of the highlighted areas
Signal Warning/Indicator Lights Page
Brake System Warning Light 5-35
Charging System Warning Light 5-36
Engine Oil Pressure Warning Light 5-36
Check Engine Light 5-37
ABS Warning Light 5-35
Air Bag/Front Seat Belt Pretensioner System Warning Light 5-37
Low Fuel Warning Light 5-38
Driving Your Mazda
Warning/Indicator Lights and Beep Sounds
5-33
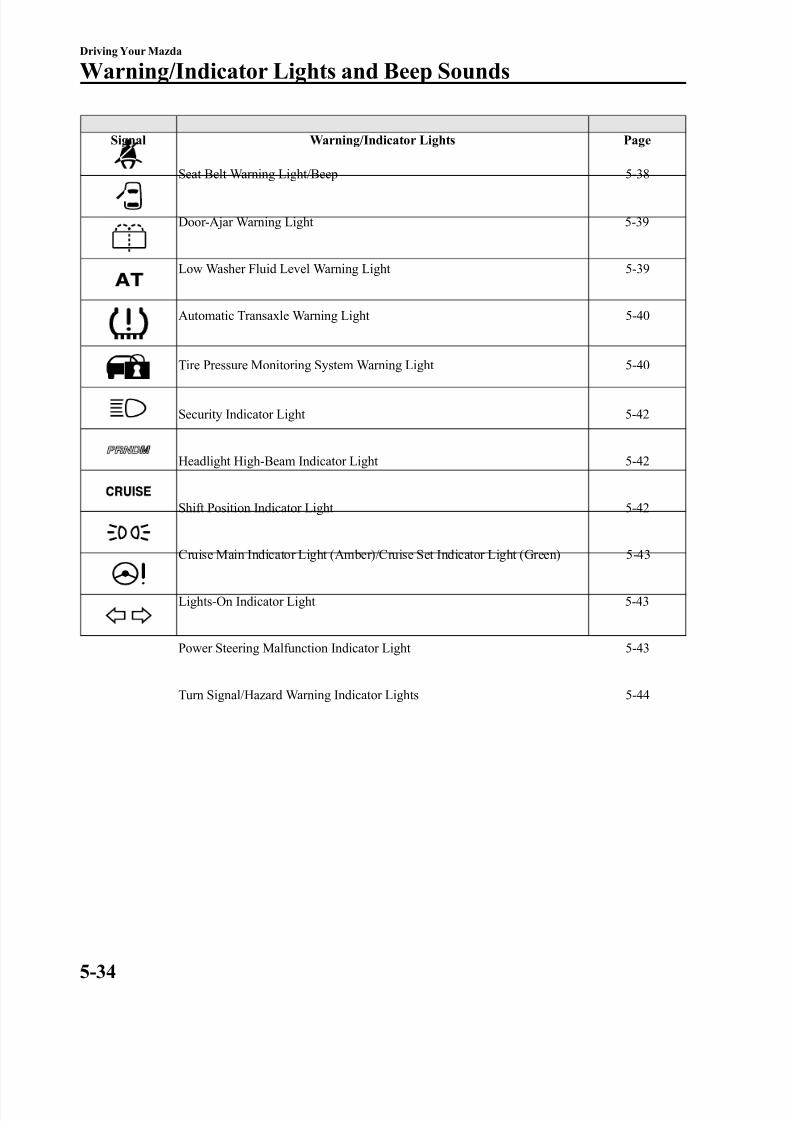
8/2/2019 Mazda5 Owners Manual
http://slidepdf.com/reader/full/mazda5-owners-manual 140/375
Signal Warning/Indicator Lights Page
Seat Belt Warning Light/Beep 5-38
Door-Ajar Warning Light 5-39
Low Washer Fluid Level Warning Light 5-39
Automatic Transaxle Warning Light 5-40
Tire Pressure Monitoring System Warning Light 5-40
Security Indicator Light 5-42
Headlight High-Beam Indicator Light 5-42
Shift Position Indicator Light 5-42
Cruise Main Indicator Light (Amber)/Cruise Set Indicator Light (Green) 5-43
Lights-On Indicator Light 5-43
Power Steering Malfunction Indicator Light 5-43
Turn Signal/Hazard Warning Indicator Lights 5-44
5-34
Driving Your Mazda
Warning/Indicator Lights and Beep Sounds
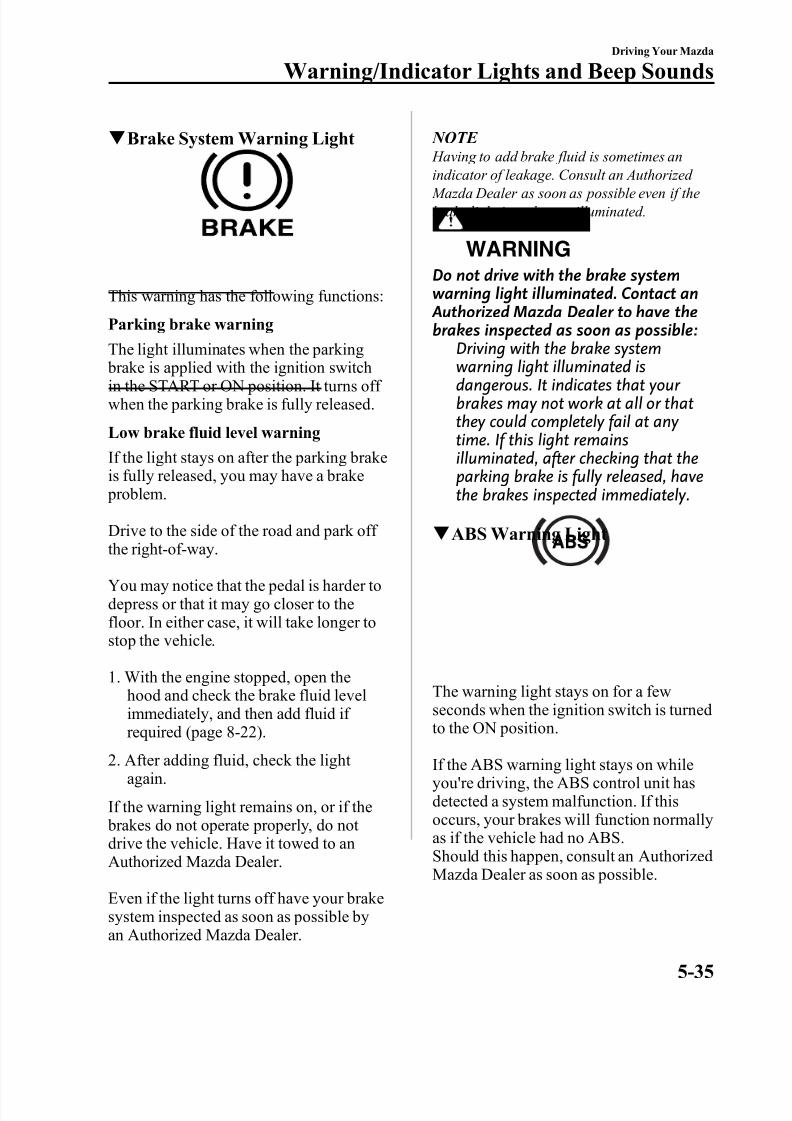
8/2/2019 Mazda5 Owners Manual
http://slidepdf.com/reader/full/mazda5-owners-manual 141/375
q Brake System Warning Light
This warning has the following functions:
Parking brake warning
The light illuminates when the parking brake is applied with the ignition switchin the START or ON position. It turns off when the parking brake is fully released.
Low brake fluid level warning
If the light stays on after the parking brakeis fully released, you may have a brake problem.
Drive to the side of the road and park off the right-of-way.
You may notice that the pedal is harder todepress or that it may go closer to thefloor. In either case, it will take longer tostop the vehicle.
1. With the engine stopped, open thehood and check the brake fluid levelimmediately, and then add fluid if required (page 8-22).
2. After adding fluid, check the light again.
If the warning light remains on, or if the brakes do not operate properly, do not drive the vehicle. Have it towed to anAuthorized Mazda Dealer.
Even if the light turns off have your brakesystem inspected as soon as possible byan Authorized Mazda Dealer.
NOTE Having to add brake fluid is sometimes an
indicator of leakage. Consult an Authorized Mazda Dealer as soon as possible even if thebrake light is no longer illuminated.
WARNING
Do not drive with the brake systemwarning light illuminated. Contact an Authorized Mazda Dealer to have thebrakes inspected as soon as possible:
Driving with the brake systemwarning light illuminated isdangerous. It indicates that your brakes may not work at all or thatthey could completely fail at any time. If this light remainsilluminated, after checking that theparking brake is fully released, havethe brakes inspected immediately.
qABS Warning Light
The warning light stays on for a fewseconds when the ignition switch is turnedto the ON position.
If the ABS warning light stays on whileyou're driving, the ABS control unit hasdetected a system malfunction. If thisoccurs, your brakes will function normallyas if the vehicle had no ABS.Should this happen, consult an AuthorizedMazda Dealer as soon as possible.
Driving Your Mazda
Warning/Indicator Lights and Beep Sounds
5-35

8/2/2019 Mazda5 Owners Manual
http://slidepdf.com/reader/full/mazda5-owners-manual 142/375
NOTE When the engine is jump-started to charge the
battery, uneven rpm occurs and the ABS warning light may illuminate. If this occurs, it is the result of the weak battery and does not indicate an ABS malfunction. Recharge the battery.
q Electronic Brake ForceDistribution System Warning
If the electronic brake force distributioncontrol unit determines that somecomponents are operating incorrectly, thecontrol unit may illuminate the brake
system warning light and the ABSwarning light on simultaneously. The problem is likely to be the electronic brake force distribution system.
WARNING
Do not drive with both the ABS warninglight and brake warning lightilluminated. Have the vehicle towed toan Authorized Mazda Dealer to havethe brakes inspected as soon aspossible:
Driving when the brake systemwarning light and ABS warning lightare illuminated simultaneously isdangerous.When both lights are illuminated, therear wheels could lock more quickly in an emergency stop than under normal circumstances.
q Charging System Warning Light
This warning light illuminates when theignition switch is turned to the ON position and turns off when the engine isstarted.
If the warning light illuminates whiledriving, it indicates a malfunction of thealternator or of the charging system.Drive to the side of the road and park off the right-of-way. Consult an AuthorizedMazda Dealer.
CAUTION
Do not continue driving when thecharging system warning light isilluminated because the engine couldstop unexpectedly.
q Engine Oil Pressure Warning Light
This warning light illuminates when theignition switch is turned to the ON position and turns off when the engine isstarted.
This warning light indicates low engine
oil pressure.
5-36
Driving Your Mazda
Warning/Indicator Lights and Beep Sounds
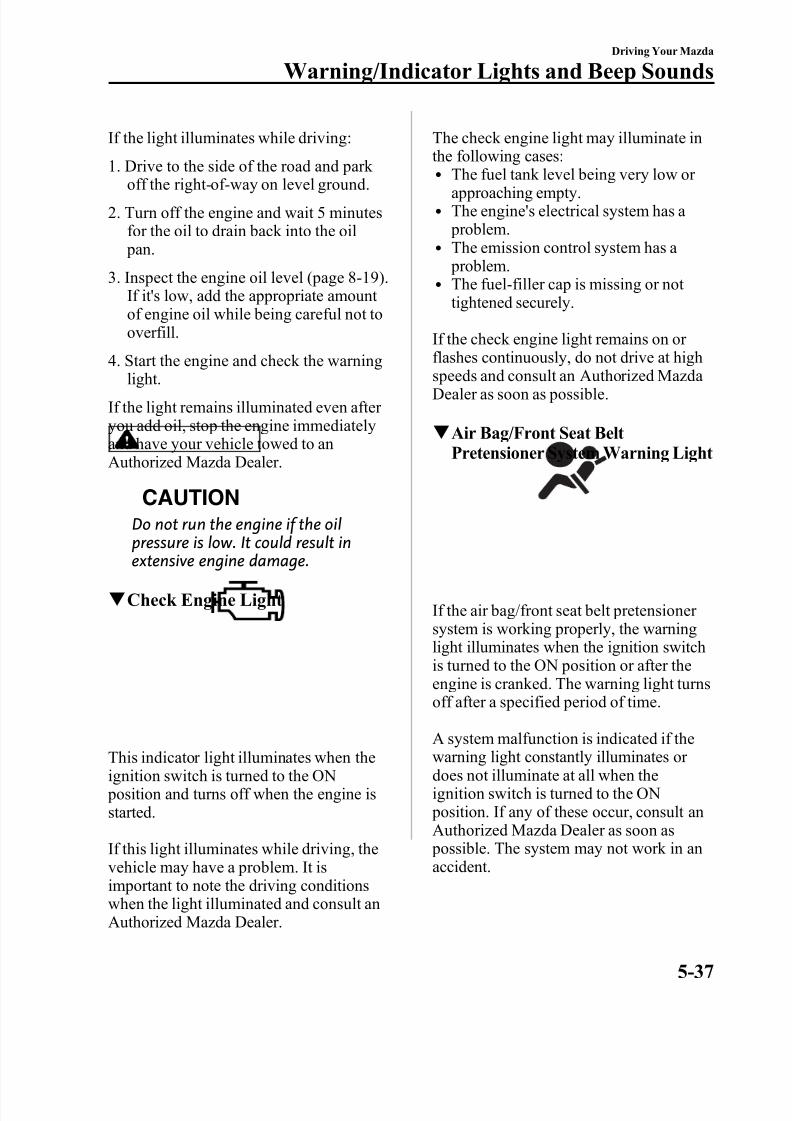
8/2/2019 Mazda5 Owners Manual
http://slidepdf.com/reader/full/mazda5-owners-manual 143/375
If the light illuminates while driving:
1. Drive to the side of the road and park off the right-of-way on level ground.
2. Turn off the engine and wait 5 minutesfor the oil to drain back into the oil pan.
3. Inspect the engine oil level (page 8-19).If it's low, add the appropriate amount of engine oil while being careful not tooverfill.
4. Start the engine and check the warninglight.
If the light remains illuminated even after you add oil, stop the engine immediatelyand have your vehicle towed to anAuthorized Mazda Dealer.
CAUTION
Do not run the engine if the oilpressure is low. It could result inextensive engine damage.
q Check Engine Light
This indicator light illuminates when theignition switch is turned to the ON position and turns off when the engine isstarted.
If this light illuminates while driving, thevehicle may have a problem. It isimportant to note the driving conditions
when the light illuminated and consult anAuthorized Mazda Dealer.
The check engine light may illuminate inthe following cases:l
The fuel tank level being very low or approaching empty.l The engine's electrical system has a
problem.l The emission control system has a
problem.l The fuel-filler cap is missing or not
tightened securely.
If the check engine light remains on or
flashes continuously, do not drive at highspeeds and consult an Authorized Mazda Dealer as soon as possible.
q Air Bag/Front Seat BeltPretensioner System Warning Light
If the air bag/front seat belt pretensioner system is working properly, the warninglight illuminates when the ignition switchis turned to the ON position or after theengine is cranked. The warning light turnsoff after a specified period of time.
A system malfunction is indicated if thewarning light constantly illuminates or does not illuminate at all when theignition switch is turned to the ON position. If any of these occur, consult anAuthorized Mazda Dealer as soon as possible. The system may not work in anaccident.
Driving Your Mazda
Warning/Indicator Lights and Beep Sounds
5-37
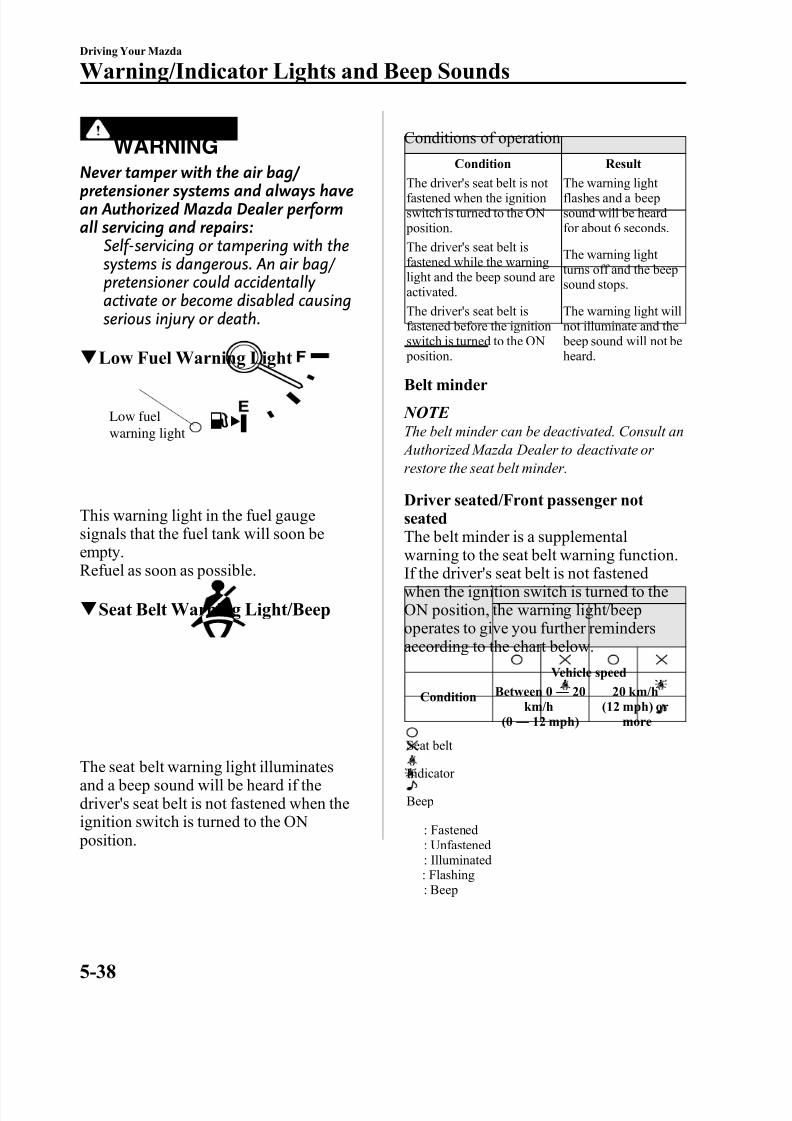
8/2/2019 Mazda5 Owners Manual
http://slidepdf.com/reader/full/mazda5-owners-manual 144/375
WARNING
Never tamper with the air bag/ pretensioner systems and always havean Authorized Mazda Dealer performall servicing and repairs:
Self-servicing or tampering with thesystems is dangerous. An air bag/ pretensioner could accidentally activate or become disabled causingserious injury or death.
q Low Fuel Warning Light
Low fuelwarning light
This warning light in the fuel gaugesignals that the fuel tank will soon beempty.Refuel as soon as possible.
q Seat Belt Warning Light/Beep
The seat belt warning light illuminatesand a beep sound will be heard if thedriver's seat belt is not fastened when theignition switch is turned to the ON position.
Conditions of operation
Condition Result
The driver's seat belt is not fastened when the ignitionswitch is turned to the ON position.
The warning light flashes and a beepsound will be heardfor about 6 seconds.
The driver's seat belt isfastened while the warninglight and the beep sound areactivated.
The warning light turns off and the beepsound stops.
The driver's seat belt isfastened before the ignitionswitch is turned to the ON
position.
The warning light willnot illuminate and the beep sound will not be
heard.Belt minder
NOTE The belt minder can be deactivated. Consult an Authorized Mazda Dealer to deactivate or restore the seat belt minder.
Driver seated/Front passenger notseated
The belt minder is a supplementalwarning to the seat belt warning function.If the driver's seat belt is not fastenedwhen the ignition switch is turned to theON position, the warning light/beepoperates to give you further remindersaccording to the chart below.
Condition
Vehicle speed
Between 0 ― 20km/h
(0―
12 mph)
20 km/h(12 mph) or
moreSeat belt
Indicator
Beep
: Fastened: Unfastened: Illuminated: Flashing: Beep
5-38
Driving Your Mazda
Warning/Indicator Lights and Beep Sounds
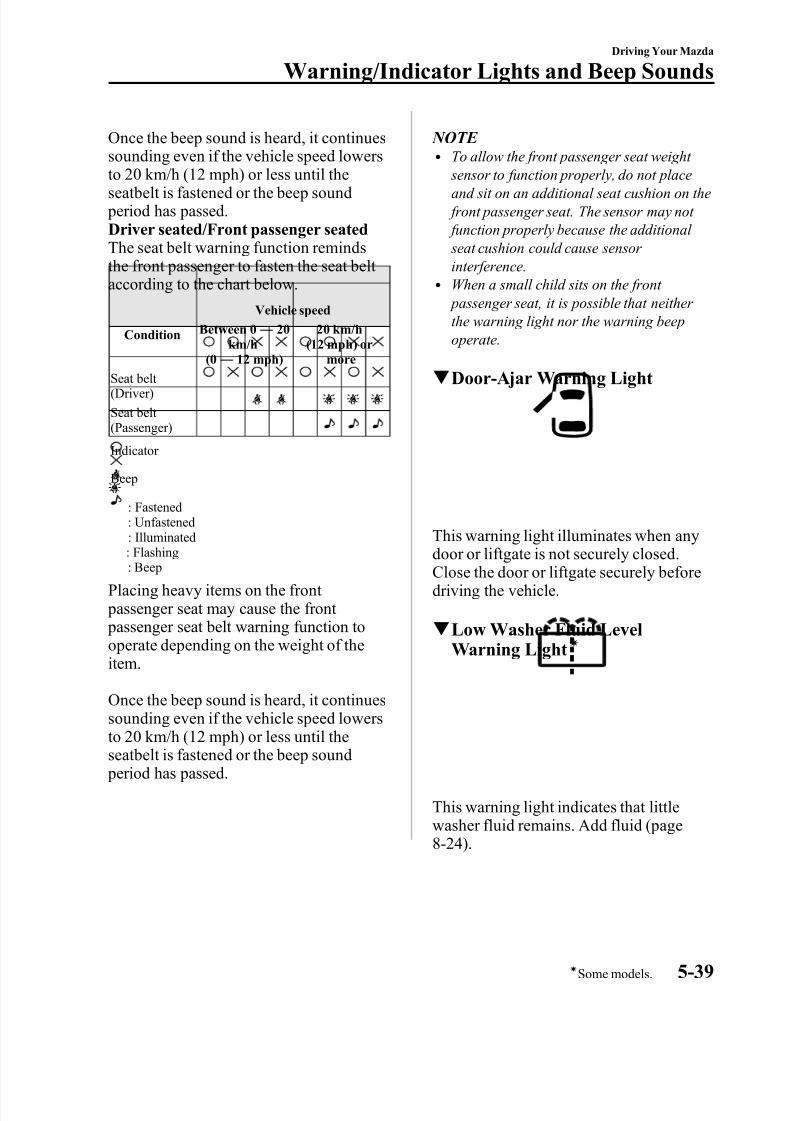
8/2/2019 Mazda5 Owners Manual
http://slidepdf.com/reader/full/mazda5-owners-manual 145/375
Once the beep sound is heard, it continuessounding even if the vehicle speed lowers
to 20 km/h (12 mph) or less until theseatbelt is fastened or the beep sound period has passed.Driver seated/Front passenger seatedThe seat belt warning function remindsthe front passenger to fasten the seat belt according to the chart below.
Condition
Vehicle speed
Between 0 ― 20km/h
(0―
12 mph)
20 km/h(12 mph) or
moreSeat belt (Driver)Seat belt (Passenger)
Indicator
Beep
: Fastened: Unfastened
: Illuminated: Flashing: Beep
Placing heavy items on the front passenger seat may cause the front passenger seat belt warning function tooperate depending on the weight of theitem.
Once the beep sound is heard, it continues
sounding even if the vehicle speed lowersto 20 km/h (12 mph) or less until theseatbelt is fastened or the beep sound period has passed.
NOTE l To allow the front passenger seat weight
sensor to function properly, do not placeand sit on an additional seat cushion on the front passenger seat. The sensor may not function properly because the additional seat cushion could cause sensor interference.
l When a small child sits on the front passenger seat, it is possible that neither the warning light nor the warning beepoperate.
q Door-Ajar Warning Light
This warning light illuminates when anydoor or liftgate is not securely closed.Close the door or liftgate securely beforedriving the vehicle.
q Low Washer Fluid LevelWarning Light
í
This warning light indicates that littlewasher fluid remains. Add fluid (page8-24).
Driving Your Mazda
Warning/Indicator Lights and Beep Sounds
5-39íSome models.
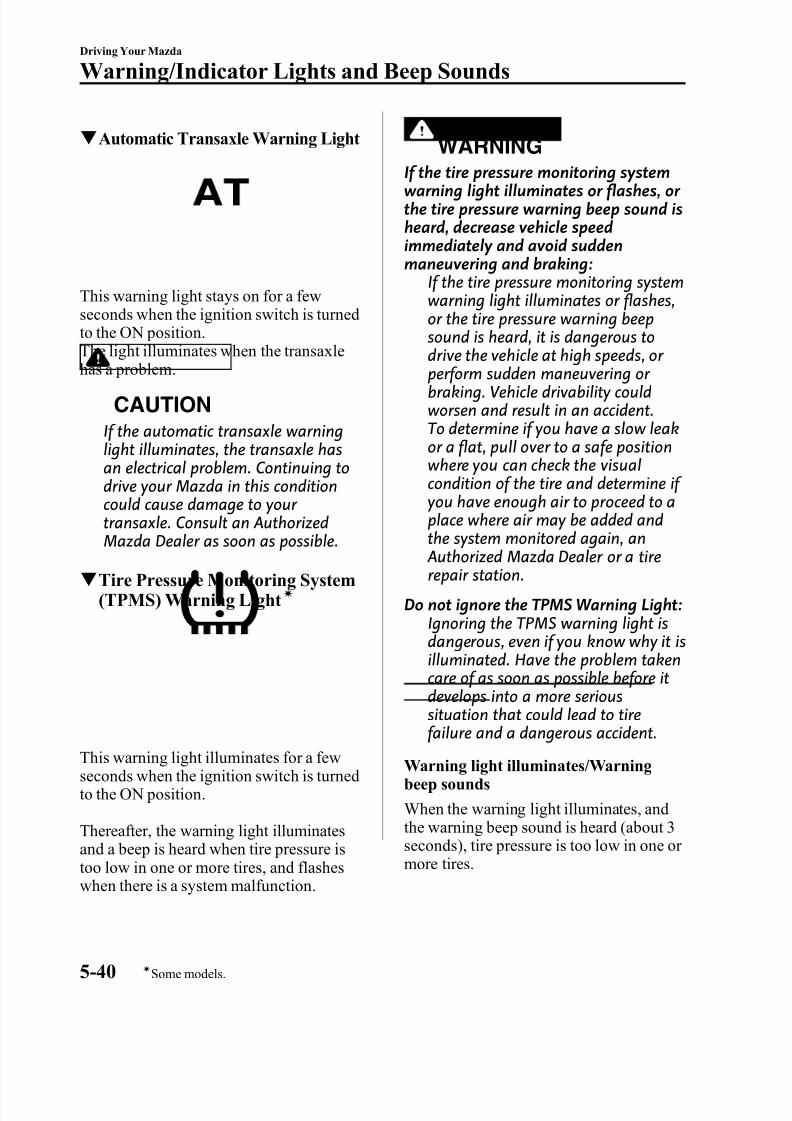
8/2/2019 Mazda5 Owners Manual
http://slidepdf.com/reader/full/mazda5-owners-manual 146/375
q Automatic Transaxle Warning Light
This warning light stays on for a fewseconds when the ignition switch is turnedto the ON position.The light illuminates when the transaxlehas a problem.
CAUTION
If the automatic transaxle warninglight illuminates, the transaxle hasan electrical problem. Continuing todrive your Mazda in this conditioncould cause damage to your transaxle. Consult an Authorized
Mazda Dealer as soon as possible.q Tire Pressure Monitoring System
(TPMS) Warning Lightí
This warning light illuminates for a fewseconds when the ignition switch is turnedto the ON position.
Thereafter, the warning light illuminatesand a beep is heard when tire pressure istoo low in one or more tires, and flasheswhen there is a system malfunction.
WARNING
If the tire pressure monitoring systemwarning light illuminates or flashes, or the tire pressure warning beep sound isheard, decrease vehicle speedimmediately and avoid suddenmaneuvering and braking:
If the tire pressure monitoring systemwarning light illuminates or flashes,or the tire pressure warning beepsound is heard, it is dangerous to
drive the vehicle at high speeds, or perform sudden maneuvering or braking. Vehicle drivability couldworsen and result in an accident.To determine if you have a slow leakor a flat, pull over to a safe positionwhere you can check the visualcondition of the tire and determine if you have enough air to proceed to aplace where air may be added and
the system monitored again, an Authorized Mazda Dealer or a tirerepair station.
Do not ignore the TPMS Warning Light:Ignoring the TPMS warning light isdangerous, even if you know why it isilluminated. Have the problem takencare of as soon as possible before itdevelops into a more serioussituation that could lead to tirefailure and a dangerous accident.
Warning light illuminates/Warningbeep sounds
When the warning light illuminates, andthe warning beep sound is heard (about 3seconds), tire pressure is too low in one or more tires.
5-40
Driving Your Mazda
íSome models.
Warning/Indicator Lights and Beep Sounds
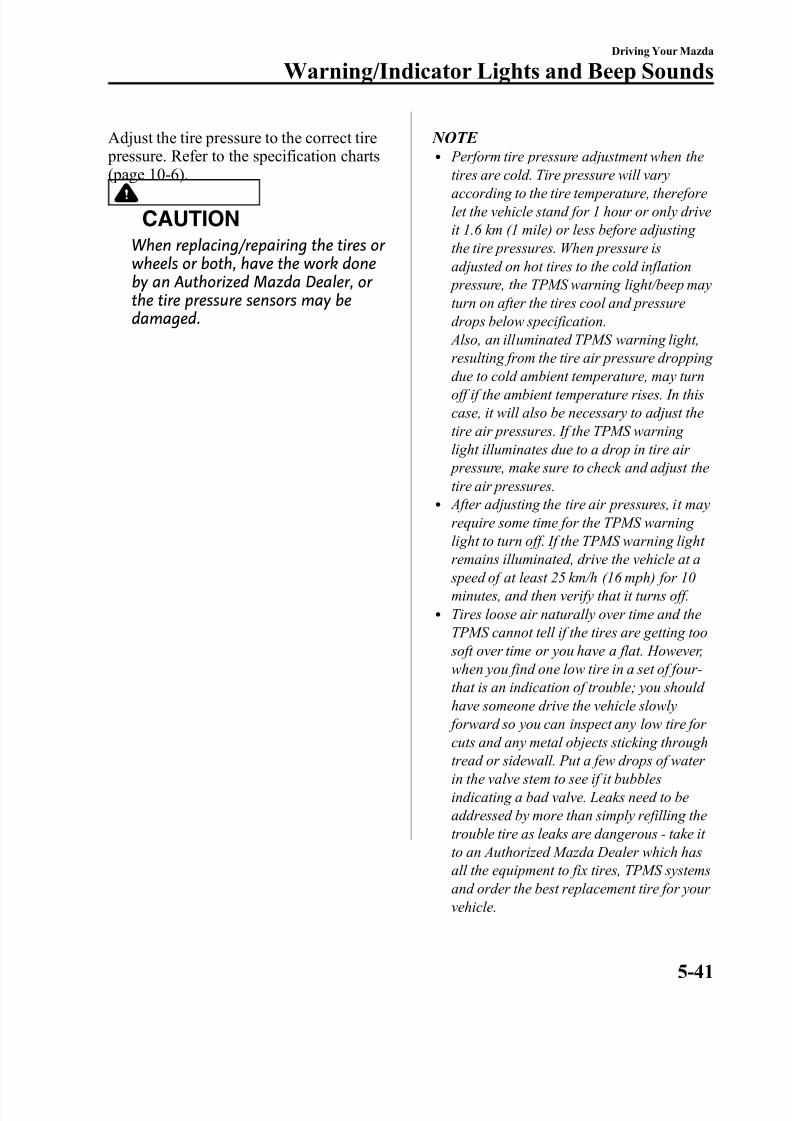
8/2/2019 Mazda5 Owners Manual
http://slidepdf.com/reader/full/mazda5-owners-manual 147/375
Adjust the tire pressure to the correct tire pressure. Refer to the specification charts
(page 10-6).
CAUTION
When replacing/repairing the tires or wheels or both, have the work doneby an Authorized Mazda Dealer, or the tire pressure sensors may bedamaged.
NOTE l Perform tire pressure adjustment when the
tires are cold. Tire pressure will varyaccording to the tire temperature, thereforelet the vehicle stand for 1 hour or only driveit 1.6 km (1 mile) or less before adjusting the tire pressures. When pressure isadjusted on hot tires to the cold inflation pressure, the TPMS warning light/beep mayturn on after the tires cool and pressuredrops below specification. Also, an illuminated TPMS warning light,
resulting from the tire air pressure dropping due to cold ambient temperature, may turnoff if the ambient temperature rises. In thiscase, it will also be necessary to adjust thetire air pressures. If the TPMS warning light illuminates due to a drop in tire air pressure, make sure to check and adjust thetire air pressures.
l After adjusting the tire air pressures, it mayrequire some time for the TPMS warning
light to turn off. If the TPMS warning light remains illuminated, drive the vehicle at a speed of at least 25 km/h (16 mph) for 10minutes, and then verify that it turns off.
l Tires loose air naturally over time and theTPMS cannot tell if the tires are getting too soft over time or you have a flat. However,when you find one low tire in a set of four-that is an indication of trouble; you should have someone drive the vehicle slowly
forward so you can inspect any low tire for cuts and any metal objects sticking throughtread or sidewall. Put a few drops of water in the valve stem to see if it bubblesindicating a bad valve. Leaks need to beaddressed by more than simply refilling thetrouble tire as leaks are dangerous - take it to an Authorized Mazda Dealer which hasall the equipment to fix tires, TPMS systemsand order the best replacement tire for your
vehicle.
Driving Your Mazda
Warning/Indicator Lights and Beep Sounds
5-41
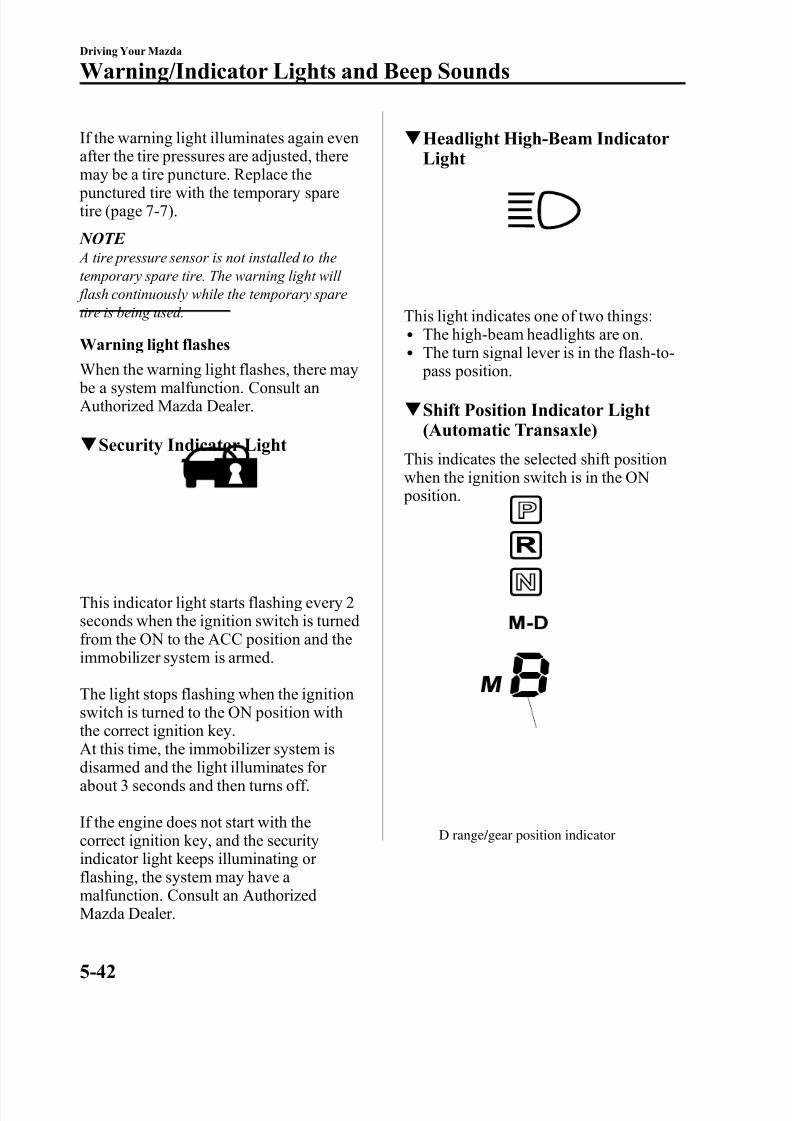
8/2/2019 Mazda5 Owners Manual
http://slidepdf.com/reader/full/mazda5-owners-manual 148/375
If the warning light illuminates again evenafter the tire pressures are adjusted, there
may be a tire puncture. Replace the punctured tire with the temporary sparetire (page 7-7).
NOTE A tire pressure sensor is not installed to thetemporary spare tire. The warning light will flash continuously while the temporary sparetire is being used.
Warning light flashes
When the warning light flashes, there may be a system malfunction. Consult anAuthorized Mazda Dealer.
q Security Indicator Light
This indicator light starts flashing every 2seconds when the ignition switch is turnedfrom the ON to the ACC position and theimmobilizer system is armed.
The light stops flashing when the ignitionswitch is turned to the ON position withthe correct ignition key.At this time, the immobilizer system isdisarmed and the light illuminates for about 3 seconds and then turns off.
If the engine does not start with thecorrect ignition key, and the securityindicator light keeps illuminating or flashing, the system may have a malfunction. Consult an AuthorizedMazda Dealer.
q Headlight High-Beam IndicatorLight
This light indicates one of two things:l The high-beam headlights are on.l The turn signal lever is in the flash-to-
pass position.
q Shift Position Indicator Light(Automatic Transaxle)
This indicates the selected shift positionwhen the ignition switch is in the ON position.
D range/gear position indicator
5-42
Driving Your Mazda
Warning/Indicator Lights and Beep Sounds
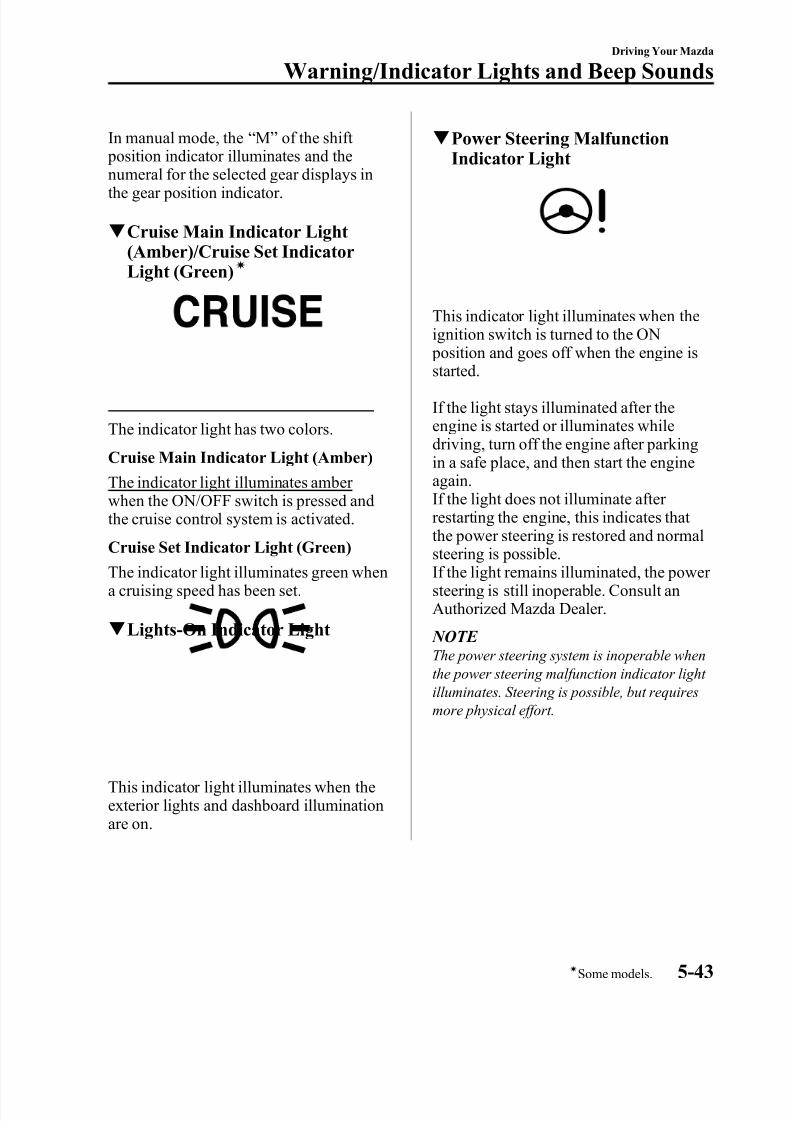
8/2/2019 Mazda5 Owners Manual
http://slidepdf.com/reader/full/mazda5-owners-manual 149/375
In manual mode, the “ M ” of the shift position indicator illuminates and the
numeral for the selected gear displays inthe gear position indicator.
q Cruise Main Indicator Light(Amber)/Cruise Set IndicatorLight (Green)
í
The indicator light has two colors.
Cruise Main Indicator Light (Amber)
The indicator light illuminates amber when the ON/OFF switch is pressed andthe cruise control system is activated.
Cruise Set Indicator Light (Green)The indicator light illuminates green whena cruising speed has been set.
q Lights-On Indicator Light
This indicator light illuminates when theexterior lights and dashboard illuminationare on.
q Power Steering MalfunctionIndicator Light
This indicator light illuminates when theignition switch is turned to the ON position and goes off when the engine isstarted.
If the light stays illuminated after theengine is started or illuminates whiledriving, turn off the engine after parkingin a safe place, and then start the engineagain.If the light does not illuminate after restarting the engine, this indicates that
the power steering is restored and normalsteering is possible.If the light remains illuminated, the power steering is still inoperable. Consult anAuthorized Mazda Dealer.
NOTE The power steering system is inoperable whenthe power steering malfunction indicator light illuminates. Steering is possible, but requiresmore physical effort.
Driving Your Mazda
Warning/Indicator Lights and Beep Sounds
5-43íSome models.
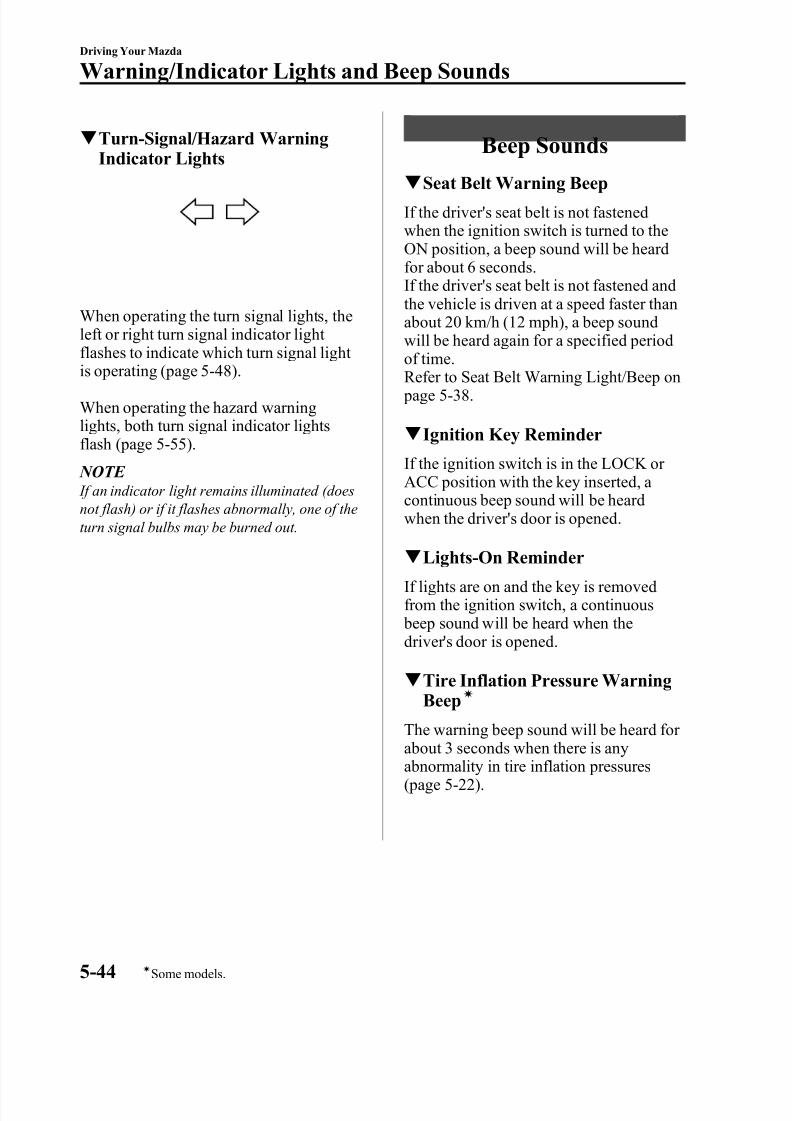
8/2/2019 Mazda5 Owners Manual
http://slidepdf.com/reader/full/mazda5-owners-manual 150/375
q Turn-Signal/Hazard WarningIndicator Lights
When operating the turn signal lights, theleft or right turn signal indicator light flashes to indicate which turn signal light is operating (page 5-48).
When operating the hazard warninglights, both turn signal indicator lightsflash (page 5-55).
NOTE If an indicator light remains illuminated (doesnot flash) or if it flashes abnormally, one of theturn signal bulbs may be burned out.
Beep Sounds
q Seat Belt Warning BeepIf the driver's seat belt is not fastenedwhen the ignition switch is turned to theON position, a beep sound will be heardfor about 6 seconds.If the driver's seat belt is not fastened andthe vehicle is driven at a speed faster thanabout 20 km/h (12 mph), a beep soundwill be heard again for a specified period
of time.Refer to Seat Belt Warning Light/Beep on page 5-38.
q Ignition Key Reminder
If the ignition switch is in the LOCK or ACC position with the key inserted, a continuous beep sound will be heardwhen the driver's door is opened.
q Lights-On Reminder
If lights are on and the key is removedfrom the ignition switch, a continuous beep sound will be heard when thedriver's door is opened.
q Tire Inflation Pressure WarningBeep
í
The warning beep sound will be heard for about 3 seconds when there is anyabnormality in tire inflation pressures(page 5-22).
5-44
Driving Your Mazda
íSome models.
Warning/Indicator Lights and Beep Sounds
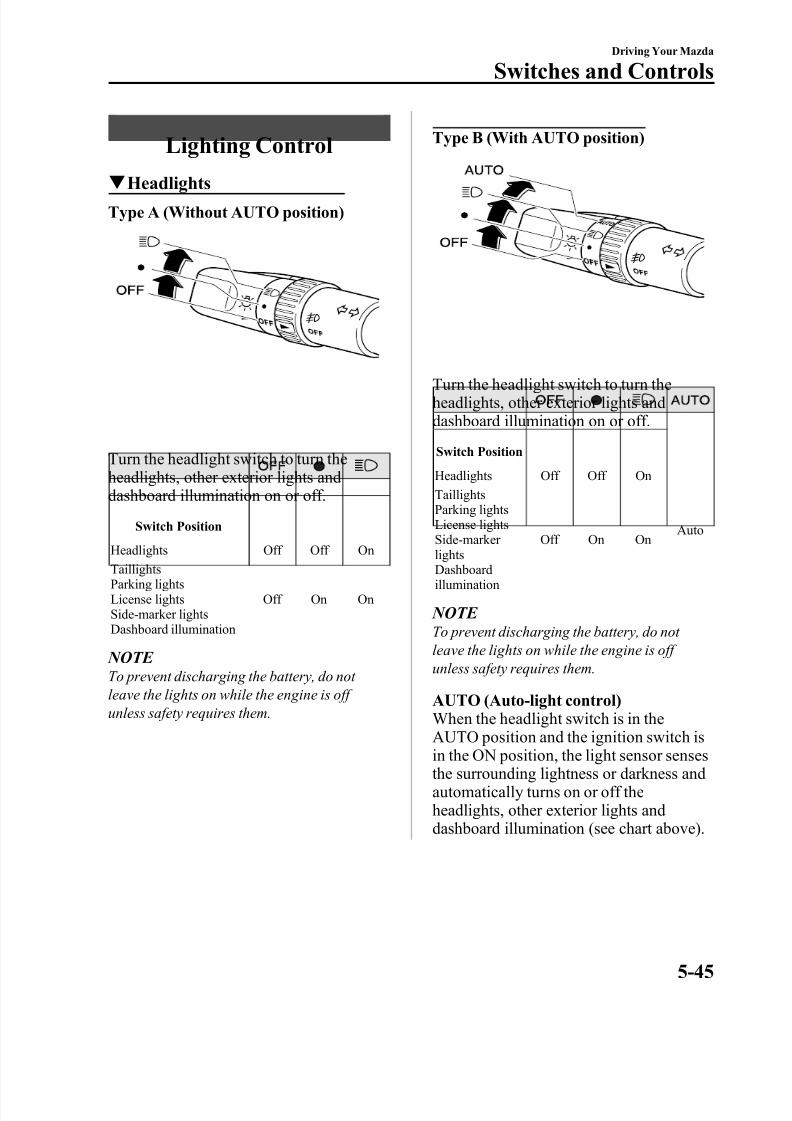
8/2/2019 Mazda5 Owners Manual
http://slidepdf.com/reader/full/mazda5-owners-manual 151/375
Lighting Control
q HeadlightsType A (Without AUTO position)
Turn the headlight switch to turn theheadlights, other exterior lights anddashboard illumination on or off.
Switch Position
Headlights Off Off OnTaillightsParking lightsLicense lightsSide-marker lightsDashboard illumination
Off On On
NOTE To prevent discharging the battery, do not leave the lights on while the engine is off unless safety requires them.
Type B (With AUTO position)
Turn the headlight switch to turn theheadlights, other exterior lights anddashboard illumination on or off.
Switch Position
Headlights Off Off On
Auto
TaillightsParking lightsLicense lights
Side-marker lightsDashboardillumination
Off On On
NOTE To prevent discharging the battery, do not leave the lights on while the engine is off unless safety requires them.
AUTO (Auto-light control)
When the headlight switch is in theAUTO position and the ignition switch isin the ON position, the light sensor sensesthe surrounding lightness or darkness andautomatically turns on or off theheadlights, other exterior lights anddashboard illumination (see chart above).
Driving Your Mazda
Switches and Controls
5-45
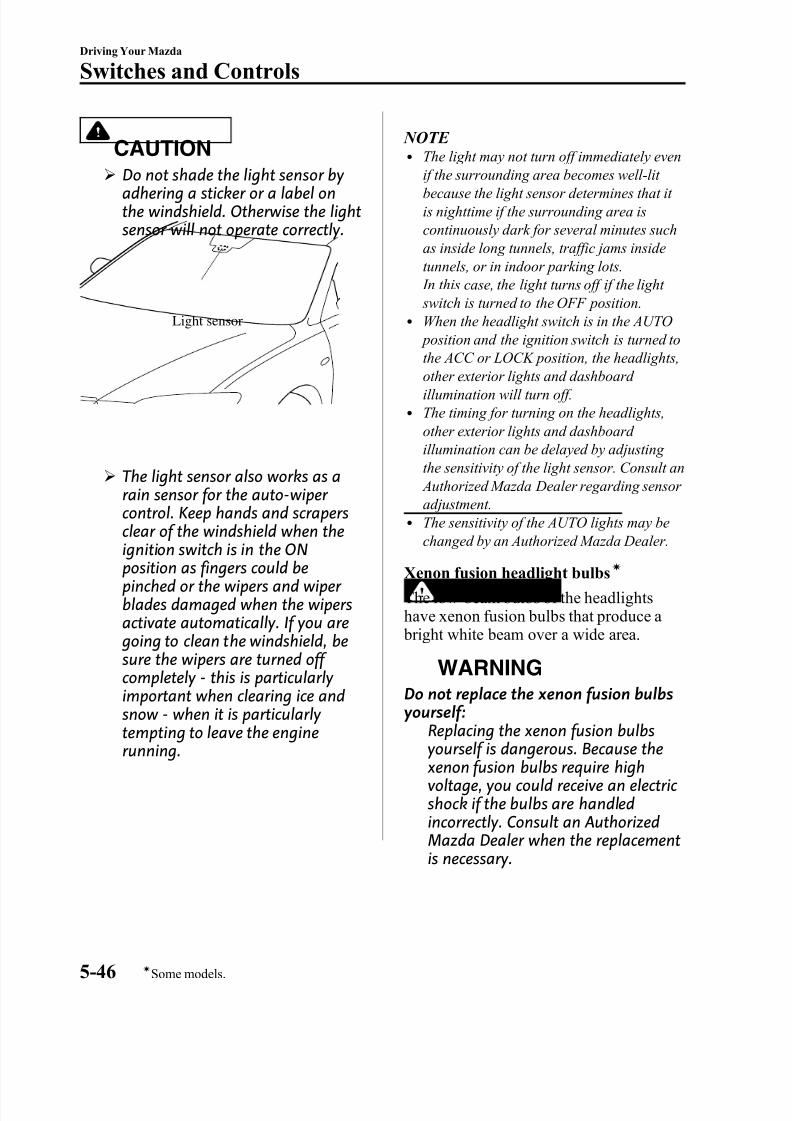
8/2/2019 Mazda5 Owners Manual
http://slidepdf.com/reader/full/mazda5-owners-manual 152/375
CAUTIONØ
Do not shade the light sensor by adhering a sticker or a label onthe windshield. Otherwise the lightsensor will not operate correctly.
Light sensor
Ø The light sensor also works as arain sensor for the auto-wiper control. Keep hands and scrapersclear of the windshield when theignition switch is in the ONposition as fingers could bepinched or the wipers and wiper blades damaged when the wipersactivate automatically. If you are going to clean the windshield, besure the wipers are turned off completely - this is particularly important when clearing ice andsnow - when it is particularly tempting to leave the enginerunning.
NOTE l The light may not turn off immediately even
if the surrounding area becomes well-lit because the light sensor determines that it is nighttime if the surrounding area iscontinuously dark for several minutes suchas inside long tunnels, traffic jams insidetunnels, or in indoor parking lots. In this case, the light turns off if the light switch is turned to the OFF position.
l When the headlight switch is in the AUTO position and the ignition switch is turned to
the ACC or LOCK position, the headlights,other exterior lights and dashboard illumination will turn off.
l The timing for turning on the headlights,other exterior lights and dashboard illumination can be delayed by adjusting the sensitivity of the light sensor. Consult an Authorized Mazda Dealer regarding sensor adjustment.
l The sensitivity of the AUTO lights may be
changed by an Authorized Mazda Dealer.
Xenon fusion headlight bulbsí
The low-beam bulbs of the headlightshave xenon fusion bulbs that produce a bright white beam over a wide area.
WARNING
Do not replace the xenon fusion bulbsyourself:
Replacing the xenon fusion bulbsyourself is dangerous. Because the xenon fusion bulbs require highvoltage, you could receive an electric shock if the bulbs are handledincorrectly. Consult an AuthorizedMazda Dealer when the replacementis necessary.
5-46
Driving Your Mazda
íSome models.
Switches and Controls
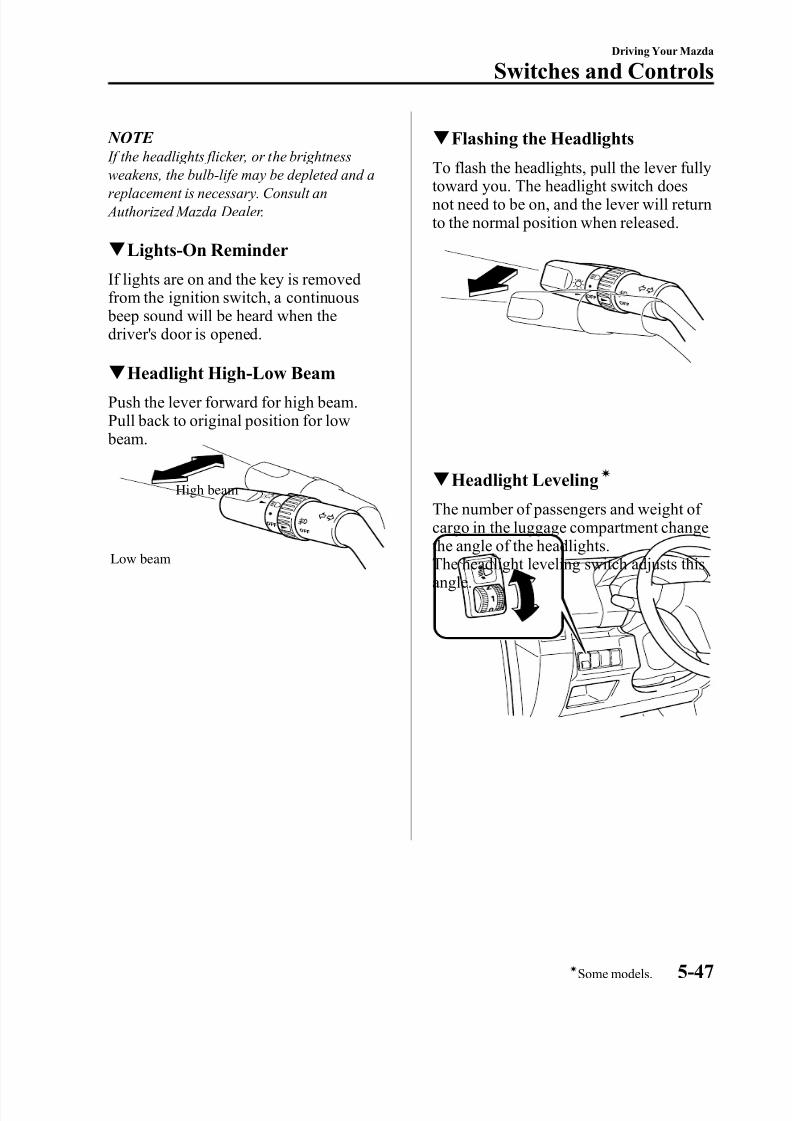
8/2/2019 Mazda5 Owners Manual
http://slidepdf.com/reader/full/mazda5-owners-manual 153/375
NOTE If the headlights flicker, or the brightness
weakens, the bulb-life may be depleted and areplacement is necessary. Consult an Authorized Mazda Dealer.
q Lights-On Reminder
If lights are on and the key is removedfrom the ignition switch, a continuous beep sound will be heard when thedriver's door is opened.
q Headlight High-Low Beam
Push the lever forward for high beam.Pull back to original position for low beam.
High beam
Low beam
q Flashing the Headlights
To flash the headlights, pull the lever fullytoward you. The headlight switch doesnot need to be on, and the lever will returnto the normal position when released.
q Headlight Levelingí
The number of passengers and weight of cargo in the luggage compartment changethe angle of the headlights.The headlight leveling switch adjusts thisangle.
Driving Your Mazda
Switches and Controls
5-47íSome models.
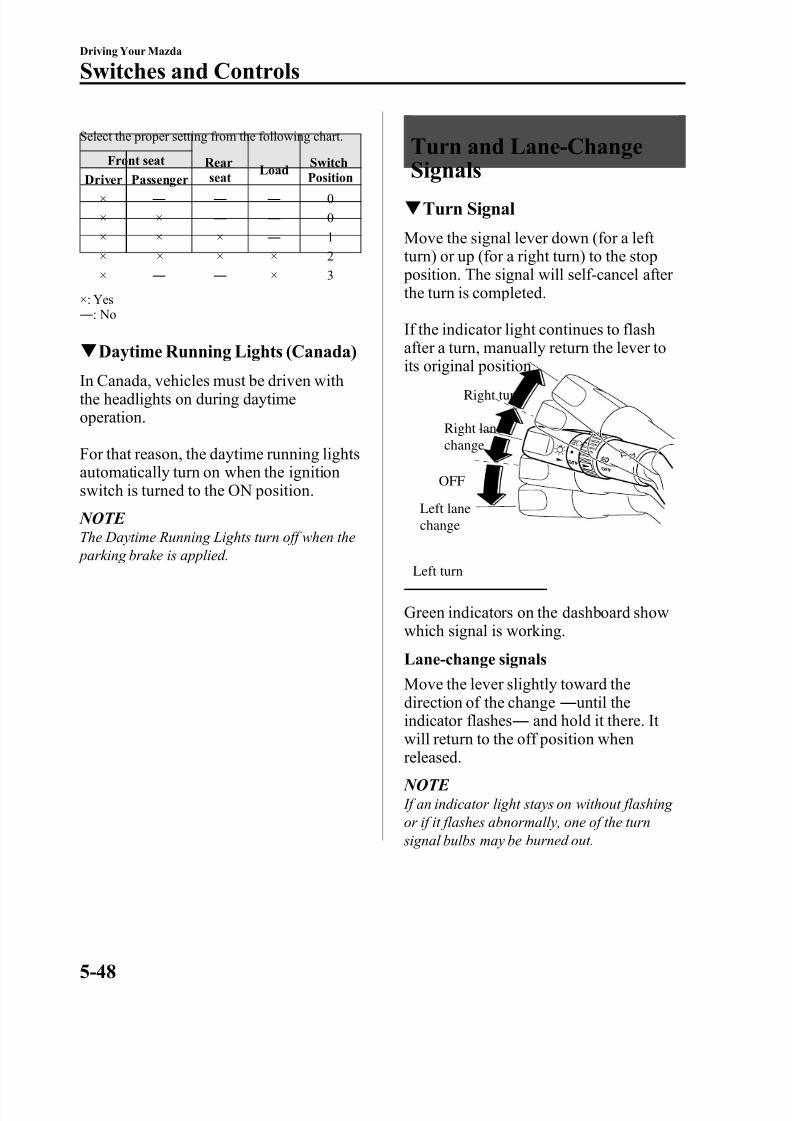
8/2/2019 Mazda5 Owners Manual
http://slidepdf.com/reader/full/mazda5-owners-manual 154/375
Select the proper setting from the following chart.
Front seat Rear
seatLoad Switch
PositionDriver Passenger× ― ― ― 0× × ― ― 0× × × ― 1× × × × 2× ― ― × 3
×: Yes― : No
q Daytime Running Lights (Canada)
In Canada, vehicles must be driven withthe headlights on during daytimeoperation.
For that reason, the daytime running lightsautomatically turn on when the ignitionswitch is turned to the ON position.
NOTE
The Daytime Running Lights turn off when the parking brake is applied.
Turn and Lane-Change
Signalsq Turn Signal
Move the signal lever down (for a left turn) or up (for a right turn) to the stop position. The signal will self-cancel after the turn is completed.
If the indicator light continues to flashafter a turn, manually return the lever toits original position.
Right turn
Left turn
OFF
Right lanechange
Left lanechange
Green indicators on the dashboard showwhich signal is working.
Lane-change signals
Move the lever slightly toward thedirection of the change ― until the
indicator flashes―
and hold it there. It will return to the off position whenreleased.
NOTE If an indicator light stays on without flashing or if it flashes abnormally, one of the turn signal bulbs may be burned out.
5-48
Driving Your Mazda
Switches and Controls

8/2/2019 Mazda5 Owners Manual
http://slidepdf.com/reader/full/mazda5-owners-manual 155/375
Fog Lights í
The fog lights help you to see as well asto be seen.
The headlights must be turned on to turnon the fog lights.
To turn the fog lights on, rotate the foglight switch to the position.
Fog light switch
To turn the fog lights off, rotate the foglight switch to the OFF position or turnthe headlights off.
NOTE l The fog lights will turn off when the
headlights are set at high beam.l (With auto-light control)
If the headlight switch is in the AUTO position, the fog lights can be turned onwhen the headlights, the exterior lights and dashboard illumination are on.
Windshield Wipers and
WasherThe ignition switch must be in the ON position.
WARNING
Use only windshield washer fluid or plain water in the reservoir:
Using radiator antifreeze as washer fluid is dangerous. If sprayed on the
windshield, it will dirty thewindshield, affect your visibility, andcould result in an accident.
Only use windshield washer fluidmixed with anti-freeze protection infreezing weather conditions:
Using windshield washer fluidwithout anti-freeze protection infreezing weather conditions is
dangerous as it could freeze on thewindshield and block your visionwhich could cause an accident.In addition, make sure thewindshield is sufficiently warmedusing the defroster before sprayingthe washer fluid.
Driving Your Mazda
Switches and Controls
5-49íSome models.
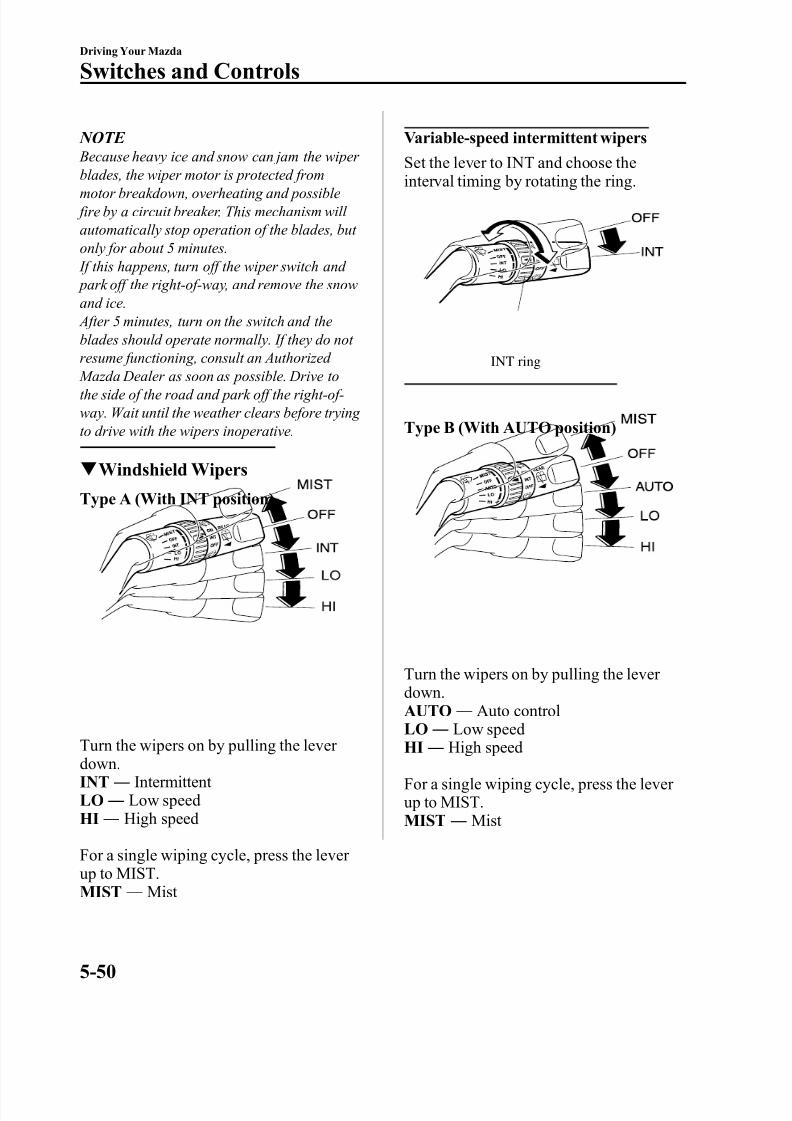
8/2/2019 Mazda5 Owners Manual
http://slidepdf.com/reader/full/mazda5-owners-manual 156/375
NOTE Because heavy ice and snow can jam the wiper
blades, the wiper motor is protected frommotor breakdown, overheating and possible fire by a circuit breaker. This mechanism will automatically stop operation of the blades, but only for about 5 minutes. If this happens, turn off the wiper switch and park off the right-of-way, and remove the snowand ice. After 5 minutes, turn on the switch and theblades should operate normally. If they do not
resume functioning, consult an Authorized Mazda Dealer as soon as possible. Drive tothe side of the road and park off the right-of-way. Wait until the weather clears before trying to drive with the wipers inoperative.
q Windshield Wipers
Type A (With INT position)
Turn the wipers on by pulling the lever down.INT ― Intermittent LO ― Low speedHI ― High speed
For a single wiping cycle, press the lever up to MIST.MIST ― Mist
Variable-speed intermittent wipers
Set the lever to INT and choose the
interval timing by rotating the ring.
INT ring
Type B (With AUTO position)
Turn the wipers on by pulling the lever down.AUTO ― Auto controlLO ― Low speedHI ― High speed
For a single wiping cycle, press the lever up to MIST.MIST ― Mist
5-50
Driving Your Mazda
Switches and Controls
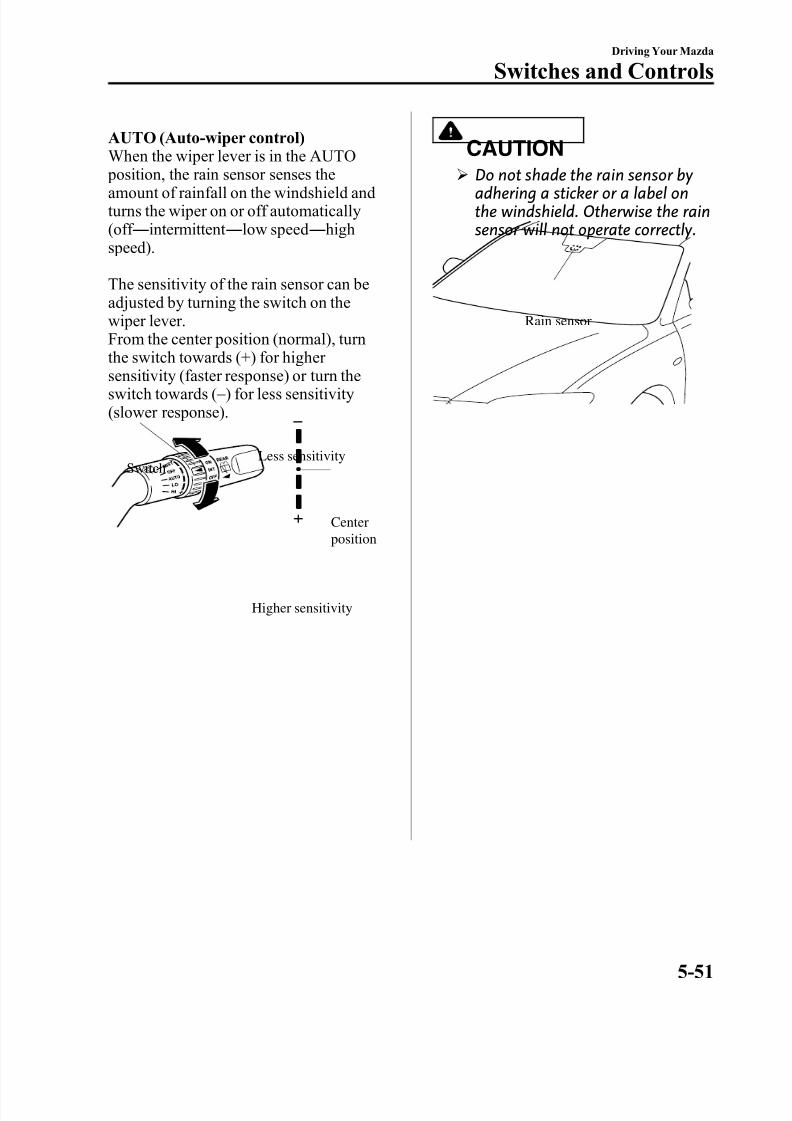
8/2/2019 Mazda5 Owners Manual
http://slidepdf.com/reader/full/mazda5-owners-manual 157/375
AUTO (Auto-wiper control)When the wiper lever is in the AUTO
position, the rain sensor senses theamount of rainfall on the windshield andturns the wiper on or off automatically(off ― intermittent ― low speed ― highspeed).
The sensitivity of the rain sensor can beadjusted by turning the switch on thewiper lever.From the center position (normal), turn
the switch towards (+) for higher sensitivity (faster response) or turn theswitch towards ( _ ) for less sensitivity(slower response).
Center
position
Higher sensitivity
Less sensitivitySwitch
CAUTIONØ
Do not shade the rain sensor by adhering a sticker or a label onthe windshield. Otherwise the rainsensor will not operate correctly.
Rain sensor
Driving Your Mazda
Switches and Controls
5-51
8/2/2019 Mazda5 Owners Manual
http://slidepdf.com/reader/full/mazda5-owners-manual 158/375
Ø When the wiper lever is in the AUTO position and the ignition
switch is in the ON position, thewipers may move automatically inthe following cases:Ø If the windshield above the rain
sensor is touched.Ø If the windshield above the rain
sensor is wiped with a cloth.Ø If the windshield is struck with
a hand or other object.Ø If the rain sensor is struck with
a hand or other object frominside the vehicle.Keep hands and scrapers clear of the windshield when the ignitionswitch is in the ON position asfingers could be pinched or thewipers and wiper blades damagedwhen they activate automatically.If you are going to clean thewindshield, be sure the wipers are
turned off completely - this isparticularly important whenclearing ice and snow - when it isparticularly tempting to leave theengine running.
NOTE l Switching the auto-wiper lever from the
OFF to the AUTO position while driving at a vehicle speed of 4 km/h (2 mph) or higher (or after driving the vehicle) activates thewindshield wipers once, after which theyoperate according to the rainfall amount.
l The auto-wiper control may not operatewhen the rain sensor temperature is about _ 10 °C (14 °F) or lower, or about 85 °C (185 °F) or higher.
l If the windshield is coated with water
repellent, the rain sensor may not be able to sense the amount of rainfall correctly and auto-wiper control may not operate properly.
l If dirt or foreign matter (e.g. ice or matter containing salt water) adheres to thewindshield above the rain sensor or if thewindshield is iced, it could cause the wipersto move automatically. However, if thewipers cannot remove this ice, dirt or
foreign matter, the auto-wiper control will stop operation. In this case, pull the wiper lever to the low speed or high speed position for manual operation, or removethe ice, dirt or foreign matter by hand torestore the auto-wiper operation.
5-52
Driving Your Mazda
Switches and Controls

8/2/2019 Mazda5 Owners Manual
http://slidepdf.com/reader/full/mazda5-owners-manual 159/375
q Windshield Washer
Pull the lever toward you and hold it tospray washer fluid.
OFF
Washer
NOTE With the wiper lever in the OFF or INT (Type A)/AUTO (Type B) position, the wipers will operate continuously until the lever isreleased.
If the washer does not work, inspect thefluid level (page 8-24). If it's normal,consult an Authorized Mazda Dealer.
Rear Window Wiper and
WasherThe ignition switch must be in the ON position.
q Rear Window Wiper
Turn the wiper on by turning the rear wiper/washer switch.ON ― NormalINT ― Intermittent
q Rear Window Washer
To spray washer fluid, turn the rear wiper/ washer switch to the position. After the switch is released, the washer willstop.If the washer doesn't work, inspect thefluid level (page 8-24). If it's OK and thewasher still doesn't work, consult anAuthorized Mazda Dealer.
Driving Your Mazda
Switches and Controls
5-53
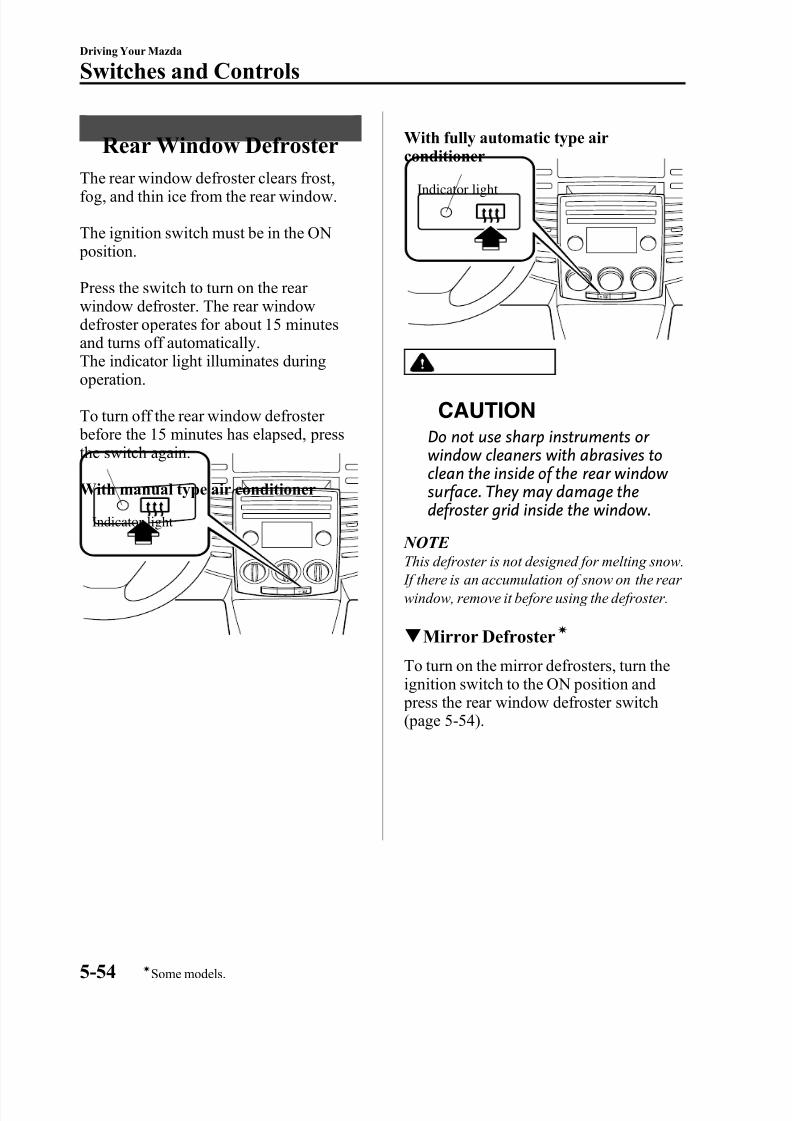
8/2/2019 Mazda5 Owners Manual
http://slidepdf.com/reader/full/mazda5-owners-manual 160/375
Rear Window Defroster
The rear window defroster clears frost,fog, and thin ice from the rear window.
The ignition switch must be in the ON position.
Press the switch to turn on the rear window defroster. The rear windowdefroster operates for about 15 minutesand turns off automatically.
The indicator light illuminates duringoperation.
To turn off the rear window defroster before the 15 minutes has elapsed, pressthe switch again.
With manual type air conditioner
Indicator light
With fully automatic type airconditioner
Indicator light
CAUTION
Do not use sharp instruments or window cleaners with abrasives toclean the inside of the rear window surface. They may damage thedefroster grid inside the window.
NOTE This defroster is not designed for melting snow. If there is an accumulation of snow on the rear window, remove it before using the defroster.
q Mirror Defrosterí
To turn on the mirror defrosters, turn theignition switch to the ON position and press the rear window defroster switch
(page 5-54).
5-54
Driving Your Mazda
íSome models.
Switches and Controls

8/2/2019 Mazda5 Owners Manual
http://slidepdf.com/reader/full/mazda5-owners-manual 161/375
Horn
To sound the horn, press the mark onthe steering wheel.
Hazard Warning Flasher
The hazard warning lights should always be used when you stop on or near a roadway in an emergency.
The hazard warning lights warn other drivers that your vehicle is a traffic hazardand that they must take extreme cautionwhen near it.
Depress the hazard warning flasher and allthe turn signals will flash.
NOTE l The turn signals do not work when the
hazard warning lights are on.l Check local regulations about the use of
hazard warning lights while the vehicle isbeing towed to verify that it is not inviolation of the law.
Driving Your Mazda
Switches and Controls
5-55

8/2/2019 Mazda5 Owners Manual
http://slidepdf.com/reader/full/mazda5-owners-manual 162/375
5-56
8/2/2019 Mazda5 Owners Manual
http://slidepdf.com/reader/full/mazda5-owners-manual 163/375
6 Interior Comfort
Use of various features for drive comfort, including air-conditioning and audiosystem.
Climate Control System ............................................................... 6-2Operating Tips ........................................................................... 6-2Vent Operation .......................................................................... 6-3Types of the Climate Control System ....................................... 6-5Manual Type
í.......................................................................... 6-6
Fully Automatic Typeí
........................................................... 6-11Rear Ventilation Systemí
....................................................... 6-17
Audio System ............................................................................... 6-18Antenna ................................................................................... 6-18Operating Tips for Audio System ........................................... 6-18Audio Set ................................................................................ 6-25Audio Control Switch Operation (Steering Wheel) í ............. 6-40AUX Mode (Auxiliary input) ................................................. 6-42
Safety Certification ................................................................. 6-45
Bluetooth Hands-Free ................................................................. 6-46Bluetooth Hands-Free
í.......................................................... 6-46
Basic Bluetooth Hands-Free Operation ................................... 6-50Convenient Use of the Hands-Free System ............................. 6-53Hands-Free Telephone Setting ................................................ 6-58When Bluetooth Hands-Free cannot be used .......................... 6-62Safety Certification ................................................................. 6-63
Mazda Bluetooth Hands-Free Customer Service .................... 6-63
Interior Equipment ..................................................................... 6-64Sunvisors ................................................................................. 6-64Interior Lights ......................................................................... 6-64Information Display ................................................................ 6-66Cup Holder .............................................................................. 6-68Bottle Holder ........................................................................... 6-70Storage Compartments ............................................................ 6-71
Accessory Sockets .................................................................. 6-76
6-1íSome models.
8/2/2019 Mazda5 Owners Manual
http://slidepdf.com/reader/full/mazda5-owners-manual 164/375
Operating Tips
q Operating the Climate ControlSystem
Operate the climate control system withthe engine running.
NOTE To prevent the battery from being discharged,do not leave the fan control dial on for a long period of time with the ignition switch in theON position when the engine is not running.
q Clearing the Air Inlet
Clear all obstructions such as leaves,snow and ice from the hood and the air inlet in the cowl grille to improve thesystem efficiency.
q Foggy Windows
The windows may fog up easily in humidweather. Use the climate control system todefog the windows.
To help defog the windows, operate theair conditioner to dehumidify the air.
NOTE The air conditioner may be used along with theheater to dehumidify the air.
q Outside/Recirculated Air Position
Use the outside air position in normalconditions. The recirculated air positionshould be used only when driving ondusty roads or for quick cooling of theinterior.
q Parking in Direct Sunlight
If the vehicle has been parked in direct sunlight during hot weather, open thewindows to let warm air escape, then runthe climate control system.
q Not Using for a Long Period
Run the air conditioner about 10 minutesat least once a month to keep internal parts lubricated.
q Check the Refrigerant before theWeather Gets Hot
Have the air conditioner checked beforethe weather gets hot. Lack of refrigerant may make the air conditioner lessefficient. Consult an Authorized Mazda Dealer for refrigerant inspection.
The air conditioner is filled with
HFC134a (R134a), a refrigerant that willnot damage the ozone layer.If the air conditioner is low on refrigerant or has a malfunction, consult anAuthorized Mazda Dealer.
q Replacement of the Cabin Air Filter
If your vehicle is equipped with an air filter for the air conditioner, it is necessary
to change the filter periodically asindicated in scheduled maintenance (page8-3). Consult an Authorized Mazda Dealer for replacement of the cabin air filter.
6-2
Interior Comfort
Climate Control System
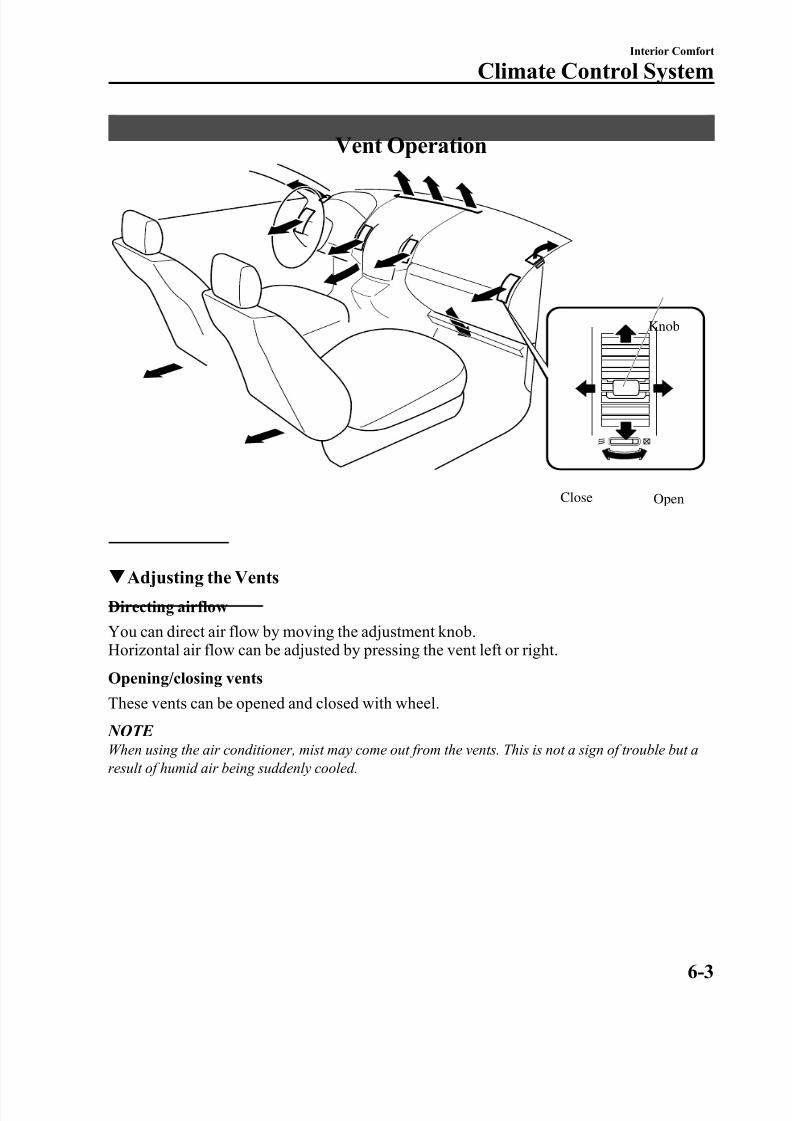
8/2/2019 Mazda5 Owners Manual
http://slidepdf.com/reader/full/mazda5-owners-manual 165/375
Vent Operation
Knob
Close Open
q Adjusting the Vents
Directing airflow
You can direct air flow by moving the adjustment knob.Horizontal air flow can be adjusted by pressing the vent left or right.
Opening/closing vents
These vents can be opened and closed with wheel.
NOTE When using the air conditioner, mist may come out from the vents. This is not a sign of trouble but aresult of humid air being suddenly cooled.
Interior Comfort
Climate Control System
6-3
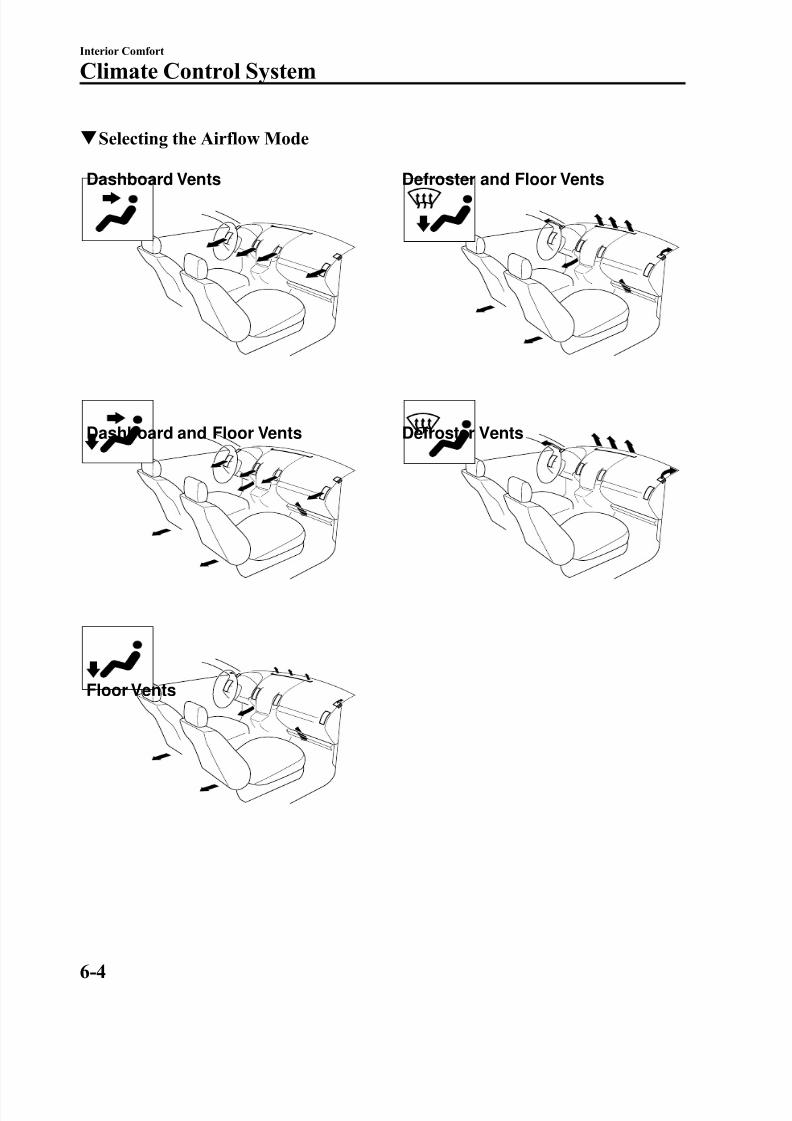
8/2/2019 Mazda5 Owners Manual
http://slidepdf.com/reader/full/mazda5-owners-manual 166/375
q Selecting the Airflow Mode
Floor Vents
Dashboard and Floor Vents
Dashboard Vents Defroster and Floor Vents
Defroster Vents
6-4
Interior Comfort
Climate Control System
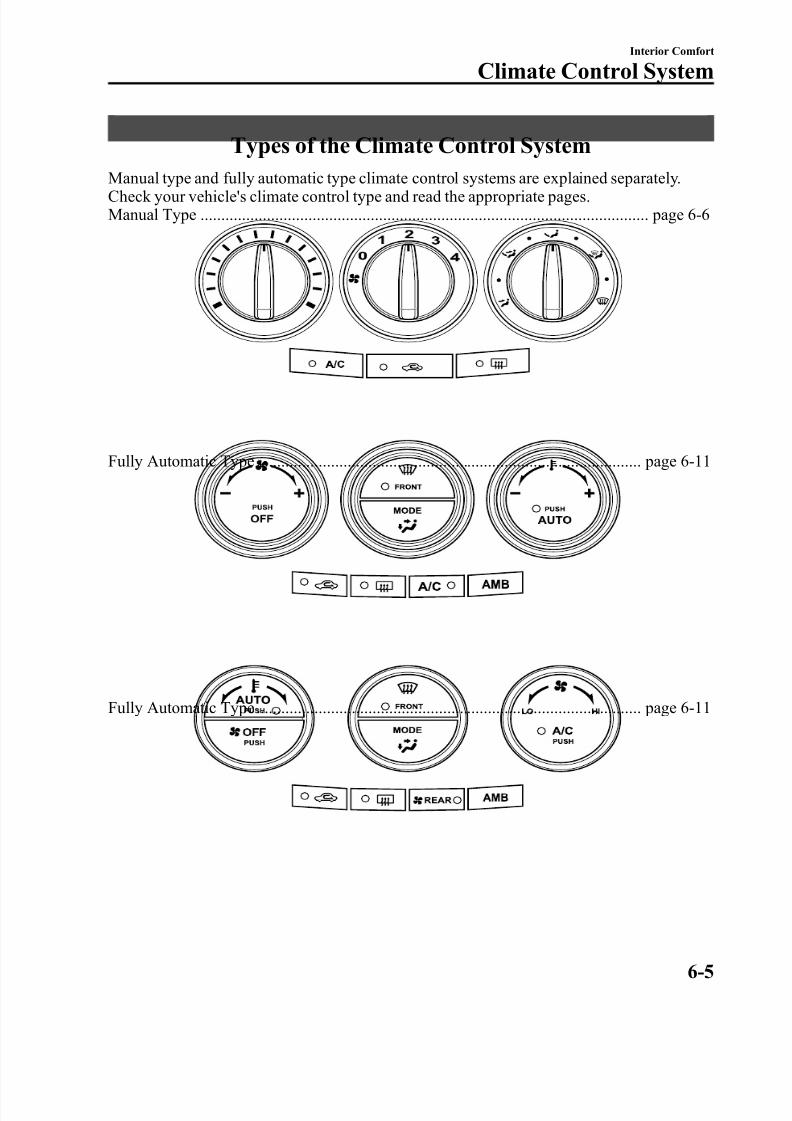
8/2/2019 Mazda5 Owners Manual
http://slidepdf.com/reader/full/mazda5-owners-manual 167/375
Types of the Climate Control System
Manual type and fully automatic type climate control systems are explained separately.Check your vehicle's climate control type and read the appropriate pages.Manual Type ............................................................................................................ page 6-6
Fully Automatic Type ............................................................................................. page 6-11
Fully Automatic Type ............................................................................................. page 6-11
Interior Comfort
Climate Control System
6-5
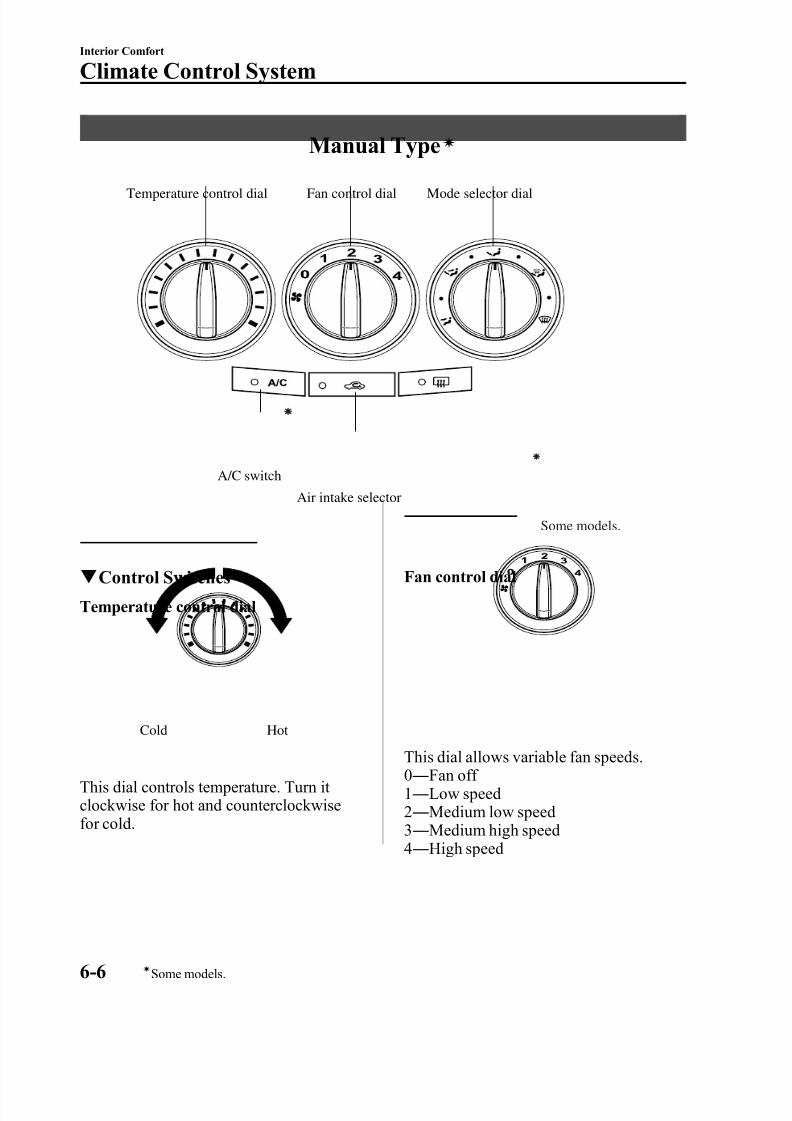
8/2/2019 Mazda5 Owners Manual
http://slidepdf.com/reader/full/mazda5-owners-manual 168/375
Manual Type í
Temperature control dial Fan control dial Mode selector dial
A/C switch
Air intake selector
Some models.
q Control Switches
Temperature control dial
Cold Hot
This dial controls temperature. Turn it clockwise for hot and counterclockwisefor cold.
Fan control dial
This dial allows variable fan speeds.0― Fan off 1― Low speed2― Medium low speed3― Medium high speed4― High speed
6-6
Interior Comfort
íSome models.
Climate Control System
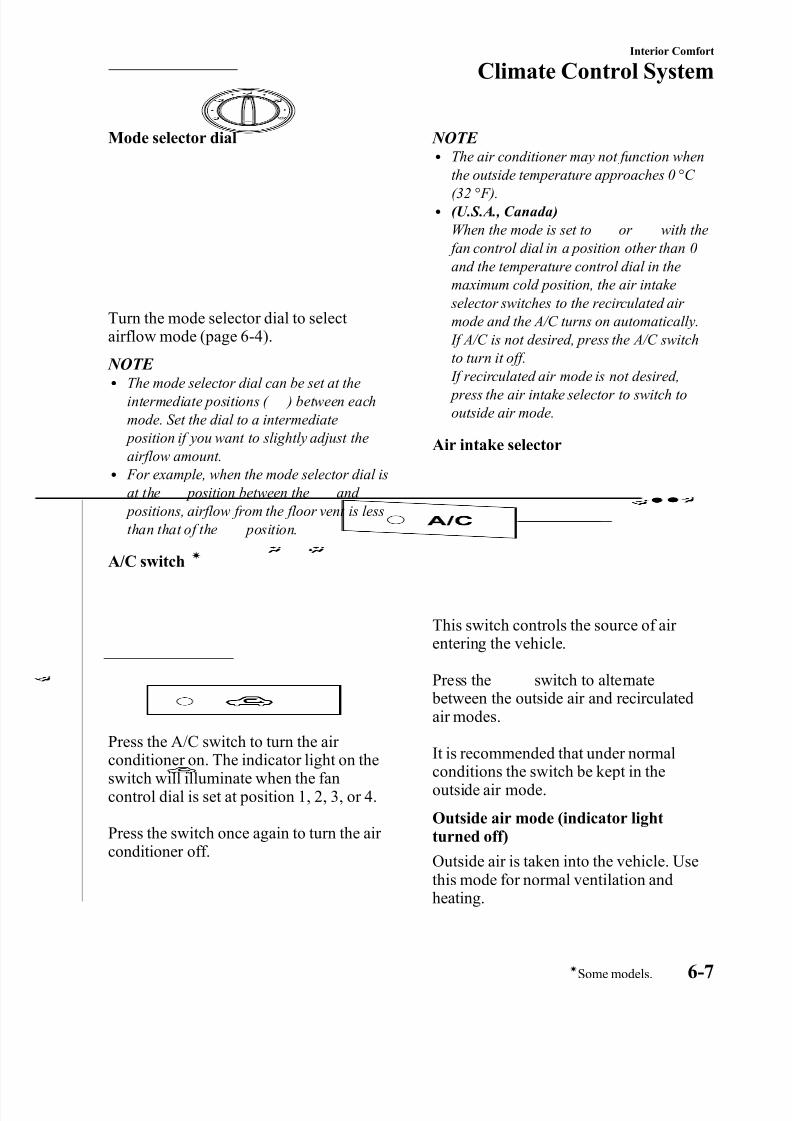
8/2/2019 Mazda5 Owners Manual
http://slidepdf.com/reader/full/mazda5-owners-manual 169/375
Mode selector dial
Turn the mode selector dial to select airflow mode (page 6-4).
NOTE l The mode selector dial can be set at the
intermediate positions ( ) between eachmode. Set the dial to a intermediate position if you want to slightly adjust theairflow amount.
l For example, when the mode selector dial isat the position between the and positions, airflow from the floor vent is lessthan that of the position.
A/C switchí
Press the A/C switch to turn the air conditioner on. The indicator light on theswitch will illuminate when the fancontrol dial is set at position 1, 2, 3, or 4.
Press the switch once again to turn the air conditioner off.
NOTE l The air conditioner may not function when
the outside temperature approaches 0 °C (32 °F).l (U.S.A., Canada)
When the mode is set to or with the fan control dial in a position other than 0and the temperature control dial in themaximum cold position, the air intake selector switches to the recirculated air mode and the A/C turns on automatically. If A/C is not desired, press the A/C switch
to turn it off. If recirculated air mode is not desired, press the air intake selector to switch tooutside air mode.
Air intake selector
This switch controls the source of air entering the vehicle.
Press the switch to alternate between the outside air and recirculated
air modes.It is recommended that under normalconditions the switch be kept in theoutside air mode.
Outside air mode (indicator lightturned off)
Outside air is taken into the vehicle. Usethis mode for normal ventilation and
heating.
Interior Comfort
Climate Control System
6-7íSome models.
8/2/2019 Mazda5 Owners Manual
http://slidepdf.com/reader/full/mazda5-owners-manual 170/375
Recirculated air mode (indicator lightilluminated)
Outside air is shut off. Air within thevehicle is recirculated.
This mode can be used when driving on a dusty road or in similar conditions. It alsohelps to provide quicker cooling of theinterior.
WARNING
Do not use the recirculated air mode incold or rainy weather:
Using the recirculated air mode incold or rainy weather is dangerous asit will cause the windows to fog up.Your vision will be hampered, whichcould lead to a serious accident.
q Heating
1. Set the mode selector dial to the position.
2. Set the temperature control dial to thehot position.
3. Set the fan control dial to the desiredspeed.
NOTE l If the windshield fogs up easily, set the
mode selector dial to the position.l If cooler air is desired at face level, set themode selector dial at the position and adjust the temperature control dial tomaintain maximum comfort.
l The air to the floor is warmer than air tothe face (except when the temperaturecontrol dial is set at the extreme hot or cold position).
l In the , , or position, the air
conditioner is automatically turned on(however, the indicator light does not illuminate) and the outside air mode isautomatically selected to defrost thewindshield. In the or position, the outside air mode cannot be changed to the recirculated air mode.
q Cooling (With Air Conditioner)í
1. Set the mode selector dial to the position.
2. Set the temperature control dial to thecold position.
3. Set the fan control dial to the desiredspeed.
4. Turn on the air conditioner by pressingthe A/C switch.
5. Adjust the fan control dial andtemperature control dial to maintainmaximum comfort.
6-8
Interior Comfort
íSome models.
Climate Control System

8/2/2019 Mazda5 Owners Manual
http://slidepdf.com/reader/full/mazda5-owners-manual 171/375
CAUTION
When using the air conditioner whiledriving up long hills or in heavy traffic, closely monitor thetemperature gauge (page 5-30).The air conditioner may cause engineoverheating. If the gauge indicatesoverheating, turn the air conditioner off (page 7-13).
NOTE l
When maximum cooling is desired, set thetemperature control dial to the extreme cold position and set the air intake selector tothe recirculated air mode, then set the fancontrol dial to position 4.
l If warmer air is desired at floor level, set the mode selector dial at the positionand adjust the temperature control dial tomaintain maximum comfort.
l The air to the floor is warmer than air to
the face (except when the temperaturecontrol dial is set at the extreme hot or cold position).
q Ventilation
1. Set the mode selector dial to the position.
2. Set the air intake selector to the outsideair mode.
3. Set the temperature control dial to thedesired position.
4. Set the fan control dial to the desiredspeed.
q Windshield Defrosting and Defogging
1. Set the mode selector dial to the position.
2. Set the temperature control dial to thedesired position.
3. Set the fan control dial to the desiredspeed.
WARNING
Do not defog the windshield using the
position with the temperaturecontrol set to the cold position:Using the position with thetemperature control set to the coldposition is dangerous as it will causethe outside of the windshield to fogup. Your vision will be hampered,which could lead to a seriousaccident. Set the temperature controlto the hot or warm position when
using the position. NOTE
l For maximum defrosting, set thetemperature control dial to the extreme hot position and the fan control dial to position4.
l If warm air is desired at the floor, set themode selector dial to the position.
l In the , , or position, the air
conditioner is automatically turned on(however, the indicator light does not illuminate) and the outside air mode isautomatically selected to defrost thewindshield. In the or position, the outside air mode cannot be changed to the recirculated air mode.
Interior Comfort
Climate Control System
6-9
8/2/2019 Mazda5 Owners Manual
http://slidepdf.com/reader/full/mazda5-owners-manual 172/375
q Dehumidifying (With AirConditioner)
í
Operate the air conditioner in cool or coldweather to help defog the windshield andside windows.
1. Set the mode selector dial to thedesired position.
2. Set the air intake selector to the outsideair mode.
3. Set the temperature control dial to thedesired position.
4. Set the fan control dial to the desiredspeed.
5. Turn on the air conditioner by pressingthe A/C switch.
NOTE One of the functions of the air conditioner isdehumidifying the air and, to use this function,
the temperature does not have to be set to cold.Therefore, set the temperature control dial tothe desired position (hot or cold) and turn onthe air conditioner when you want todehumidify the cabin air.
6-10
Interior Comfort
íSome models.
Climate Control System
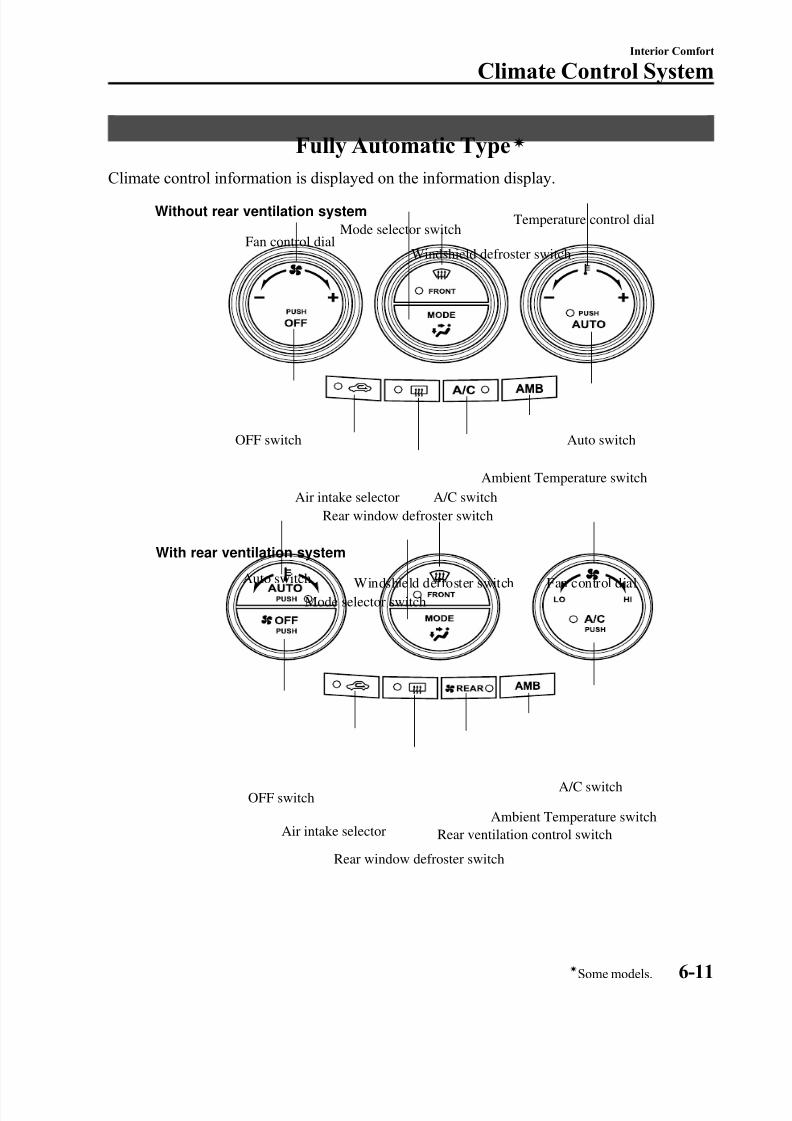
8/2/2019 Mazda5 Owners Manual
http://slidepdf.com/reader/full/mazda5-owners-manual 173/375
Fully Automatic Type í
Climate control information is displayed on the information display.Without rear ventilation system
Fan control dialMode selector switch
Temperature control dial
Windshield defroster switch
OFF switch
Air intake selectorRear window defroster switch
Ambient Temperature switch
Auto switch
A/C switch
With rear ventilation system
Auto switch
Mode selector switchWindshield defroster switch Fan control dial
OFF switchA/C switch
Ambient Temperature switchRear ventilation control switch
Rear window defroster switch
Air intake selector
Interior Comfort
Climate Control System
6-11íSome models.
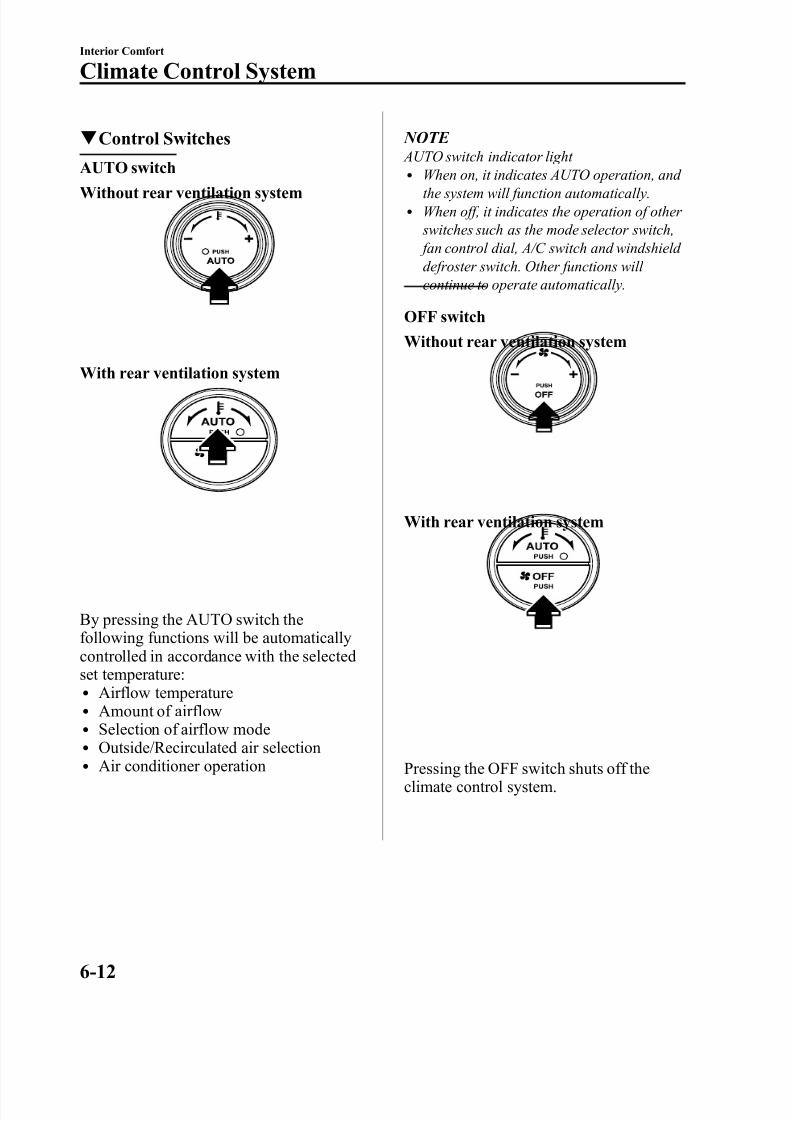
8/2/2019 Mazda5 Owners Manual
http://slidepdf.com/reader/full/mazda5-owners-manual 174/375
q Control Switches
AUTO switch
Without rear ventilation system
With rear ventilation system
By pressing the AUTO switch thefollowing functions will be automaticallycontrolled in accordance with the selectedset temperature:l Airflow temperaturel Amount of airflowl Selection of airflow model Outside/Recirculated air selectionl Air conditioner operation
NOTE AUTO switch indicator light
l
When on, it indicates AUTO operation, and the system will function automatically.l When off, it indicates the operation of other
switches such as the mode selector switch, fan control dial, A/C switch and windshield defroster switch. Other functions will continue to operate automatically.
OFF switch
Without rear ventilation system
With rear ventilation system
Pressing the OFF switch shuts off theclimate control system.
6-12
Interior Comfort
Climate Control System
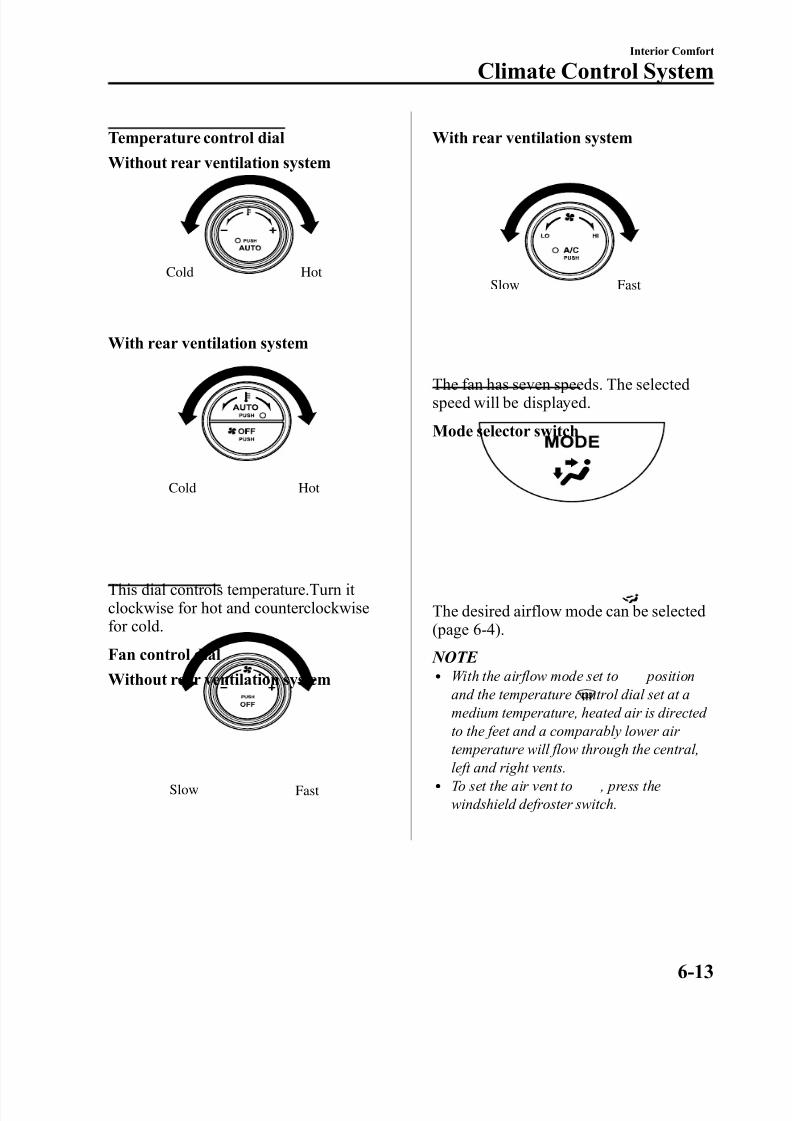
8/2/2019 Mazda5 Owners Manual
http://slidepdf.com/reader/full/mazda5-owners-manual 175/375
Temperature control dial
Without rear ventilation system
Cold Hot
With rear ventilation system
Cold Hot
This dial controls temperature.Turn it clockwise for hot and counterclockwisefor cold.
Fan control dial
Without rear ventilation system
Slow Fast
With rear ventilation system
Slow Fast
The fan has seven speeds. The selectedspeed will be displayed.
Mode selector switch
The desired airflow mode can be selected(page 6-4).
NOTE l With the airflow mode set to position
and the temperature control dial set at amedium temperature, heated air is directed to the feet and a comparably lower air temperature will flow through the central,left and right vents.
l To set the air vent to , press thewindshield defroster switch.
Interior Comfort
Climate Control System
6-13
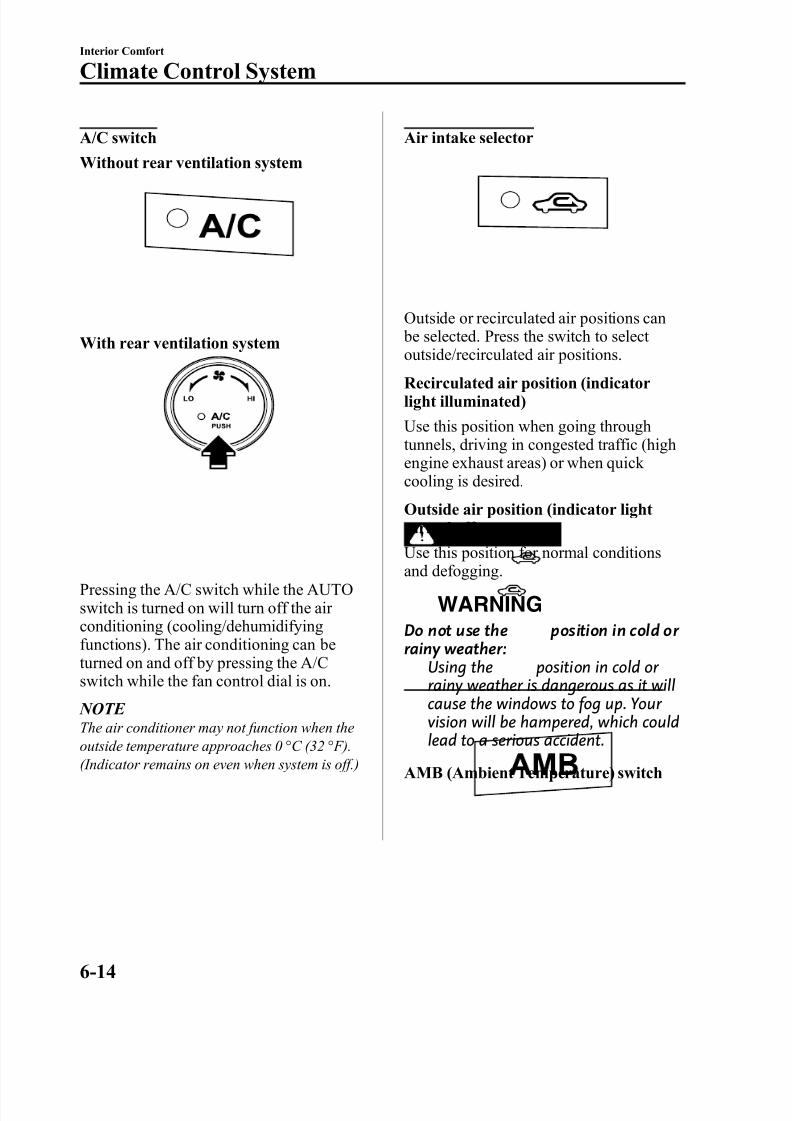
8/2/2019 Mazda5 Owners Manual
http://slidepdf.com/reader/full/mazda5-owners-manual 176/375
A/C switch
Without rear ventilation system
With rear ventilation system
Pressing the A/C switch while the AUTOswitch is turned on will turn off the air conditioning (cooling/dehumidifyingfunctions). The air conditioning can beturned on and off by pressing the A/Cswitch while the fan control dial is on.
NOTE The air conditioner may not function when theoutside temperature approaches 0 °C (32 °F).(Indicator remains on even when system is off.)
Air intake selector
Outside or recirculated air positions can be selected. Press the switch to select
outside/recirculated air positions.Recirculated air position (indicatorlight illuminated)
Use this position when going throughtunnels, driving in congested traffic (highengine exhaust areas) or when quick cooling is desired.
Outside air position (indicator lightturned off)
Use this position for normal conditionsand defogging.
WARNING
Do not use the position in cold or rainy weather:
Using the position in cold or rainy weather is dangerous as it willcause the windows to fog up. Your
vision will be hampered, which couldlead to a serious accident.
AMB (Ambient Temperature) switch
6-14
Interior Comfort
Climate Control System
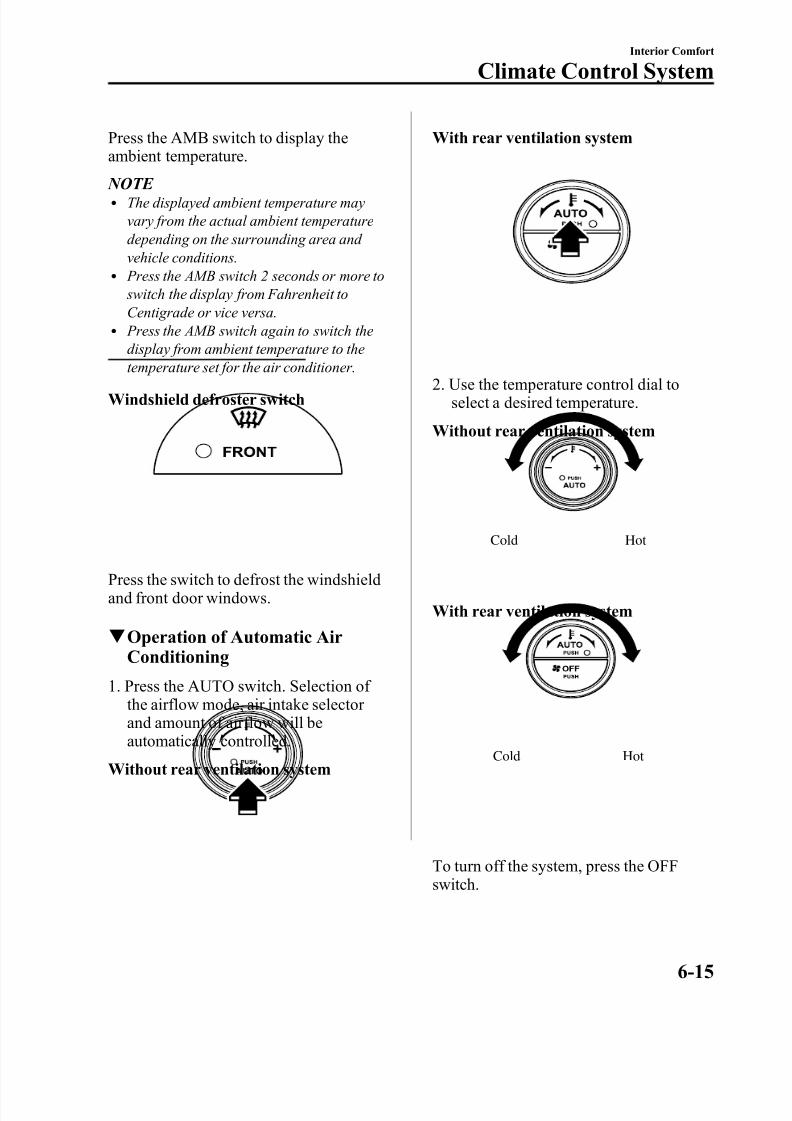
8/2/2019 Mazda5 Owners Manual
http://slidepdf.com/reader/full/mazda5-owners-manual 177/375
Press the AMB switch to display theambient temperature.
NOTE l The displayed ambient temperature may
vary from the actual ambient temperaturedepending on the surrounding area and vehicle conditions.
l Press the AMB switch 2 seconds or more to switch the display from Fahrenheit toCentigrade or vice versa.
l Press the AMB switch again to switch thedisplay from ambient temperature to thetemperature set for the air conditioner.
Windshield defroster switch
Press the switch to defrost the windshieldand front door windows.
q Operation of Automatic AirConditioning
1. Press the AUTO switch. Selection of the airflow mode, air intake selector
and amount of airflow will beautomatically controlled.
Without rear ventilation system
With rear ventilation system
2. Use the temperature control dial toselect a desired temperature.
Without rear ventilation system
Cold Hot
With rear ventilation system
Cold Hot
To turn off the system, press the OFFswitch.
Interior Comfort
Climate Control System
6-15
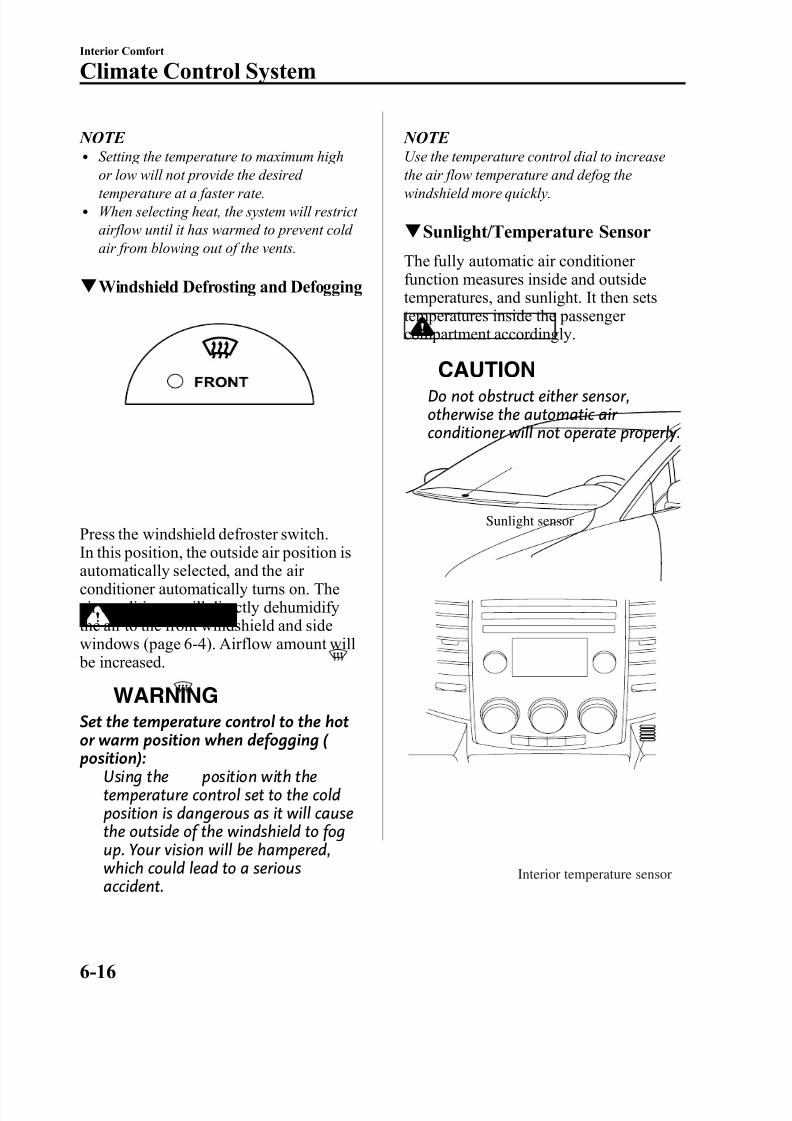
8/2/2019 Mazda5 Owners Manual
http://slidepdf.com/reader/full/mazda5-owners-manual 178/375
NOTE l Setting the temperature to maximum high
or low will not provide the desired temperature at a faster rate.l When selecting heat, the system will restrict
airflow until it has warmed to prevent cold air from blowing out of the vents.
q Windshield Defrosting and Defogging
Press the windshield defroster switch.In this position, the outside air position isautomatically selected, and the air conditioner automatically turns on. Theair conditioner will directly dehumidifythe air to the front windshield and sidewindows (page 6-4). Airflow amount will be increased.
WARNING
Set the temperature control to the hotor warm position when defogging ( position):
Using the position with thetemperature control set to the coldposition is dangerous as it will causethe outside of the windshield to fogup. Your vision will be hampered,which could lead to a seriousaccident.
NOTE Use the temperature control dial to increase
the air flow temperature and defog thewindshield more quickly.
q Sunlight/Temperature Sensor
The fully automatic air conditioner function measures inside and outsidetemperatures, and sunlight. It then setstemperatures inside the passenger compartment accordingly.
CAUTION
Do not obstruct either sensor,otherwise the automatic air conditioner will not operate properly.
Sunlight sensor
Interior temperature sensor
6-16
Interior Comfort
Climate Control System
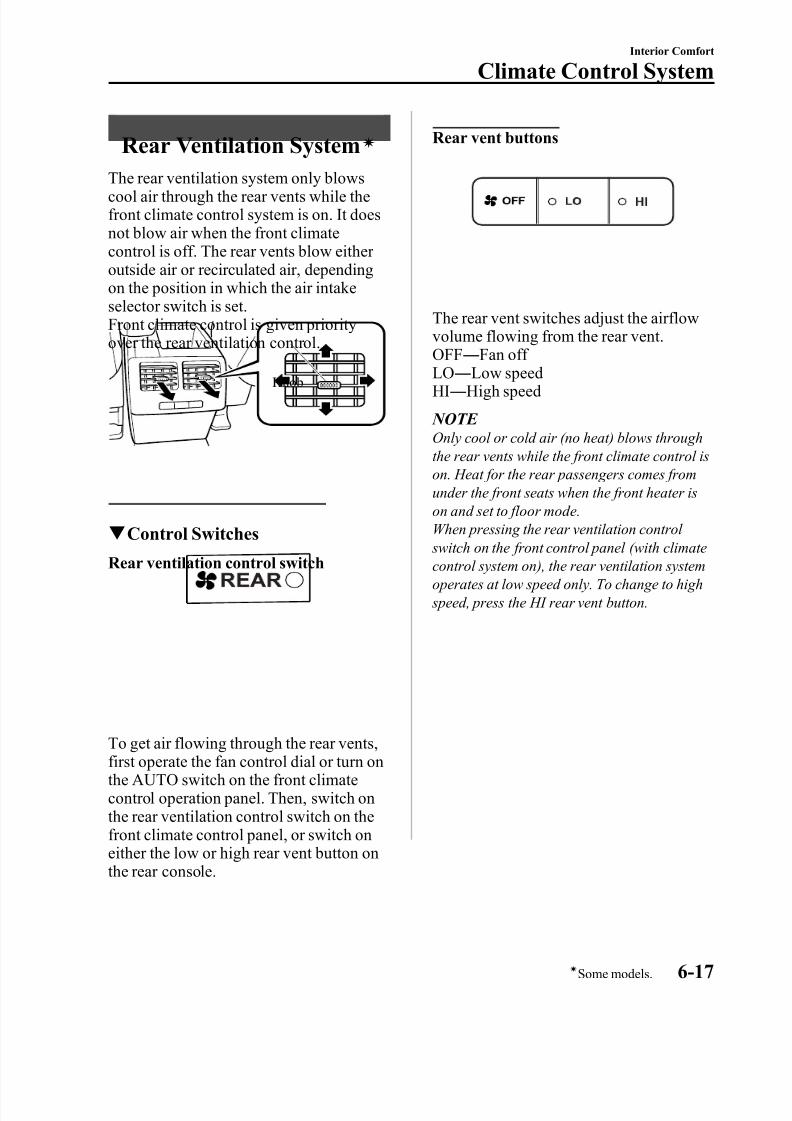
8/2/2019 Mazda5 Owners Manual
http://slidepdf.com/reader/full/mazda5-owners-manual 179/375
Rear Ventilation System í
The rear ventilation system only blowscool air through the rear vents while thefront climate control system is on. It doesnot blow air when the front climatecontrol is off. The rear vents blow either outside air or recirculated air, dependingon the position in which the air intakeselector switch is set.Front climate control is given priorityover the rear ventilation control.
Knob
qControl Switches
Rear ventilation control switch
To get air flowing through the rear vents,first operate the fan control dial or turn onthe AUTO switch on the front climatecontrol operation panel. Then, switch onthe rear ventilation control switch on thefront climate control panel, or switch oneither the low or high rear vent button onthe rear console.
Rear vent buttons
The rear vent switches adjust the airflowvolume flowing from the rear vent.
OFF―
Fan off LO ― Low speedHI― High speed
NOTE Only cool or cold air (no heat) blows throughthe rear vents while the front climate control ison. Heat for the rear passengers comes fromunder the front seats when the front heater ison and set to floor mode.When pressing the rear ventilation control switch on the front control panel (with climatecontrol system on), the rear ventilation systemoperates at low speed only. To change to high speed, press the HI rear vent button.
Interior Comfort
Climate Control System
6-17íSome models.
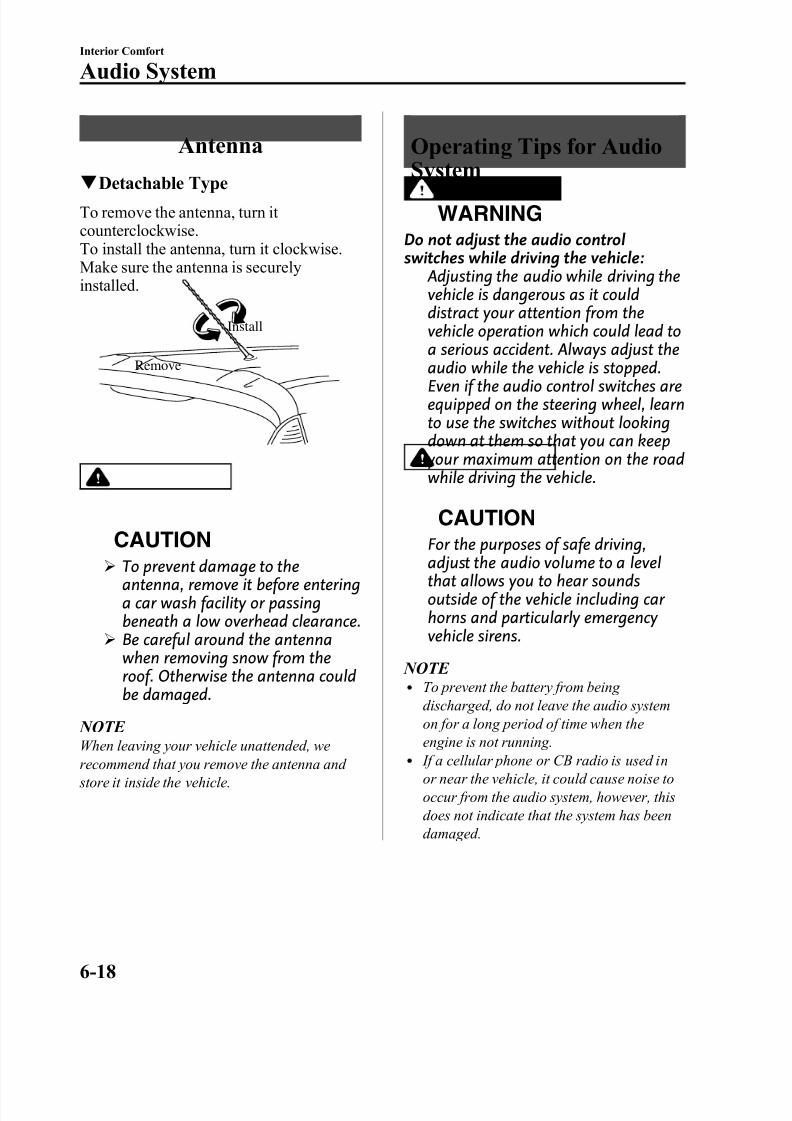
8/2/2019 Mazda5 Owners Manual
http://slidepdf.com/reader/full/mazda5-owners-manual 180/375
Antenna
q Detachable TypeTo remove the antenna, turn it counterclockwise.To install the antenna, turn it clockwise.Make sure the antenna is securelyinstalled.
Install
Remove
CAUTIONØ To prevent damage to the
antenna, remove it before enteringa car wash facility or passingbeneath a low overhead clearance.
Ø Be careful around the antennawhen removing snow from theroof. Otherwise the antenna couldbe damaged.
NOTE When leaving your vehicle unattended, werecommend that you remove the antenna and store it inside the vehicle.
Operating Tips for Audio
SystemWARNING
Do not adjust the audio controlswitches while driving the vehicle:
Adjusting the audio while driving thevehicle is dangerous as it coulddistract your attention from thevehicle operation which could lead toa serious accident. Always adjust theaudio while the vehicle is stopped.Even if the audio control switches areequipped on the steering wheel, learnto use the switches without lookingdown at them so that you can keepyour maximum attention on the roadwhile driving the vehicle.
CAUTION
For the purposes of safe driving,adjust the audio volume to a levelthat allows you to hear soundsoutside of the vehicle including car horns and particularly emergency vehicle sirens.
NOTE l To prevent the battery from being
discharged, do not leave the audio system
on for a long period of time when theengine is not running.
l If a cellular phone or CB radio is used inor near the vehicle, it could cause noise tooccur from the audio system, however, thisdoes not indicate that the system has beendamaged.
6-18
Interior Comfort
Audio System
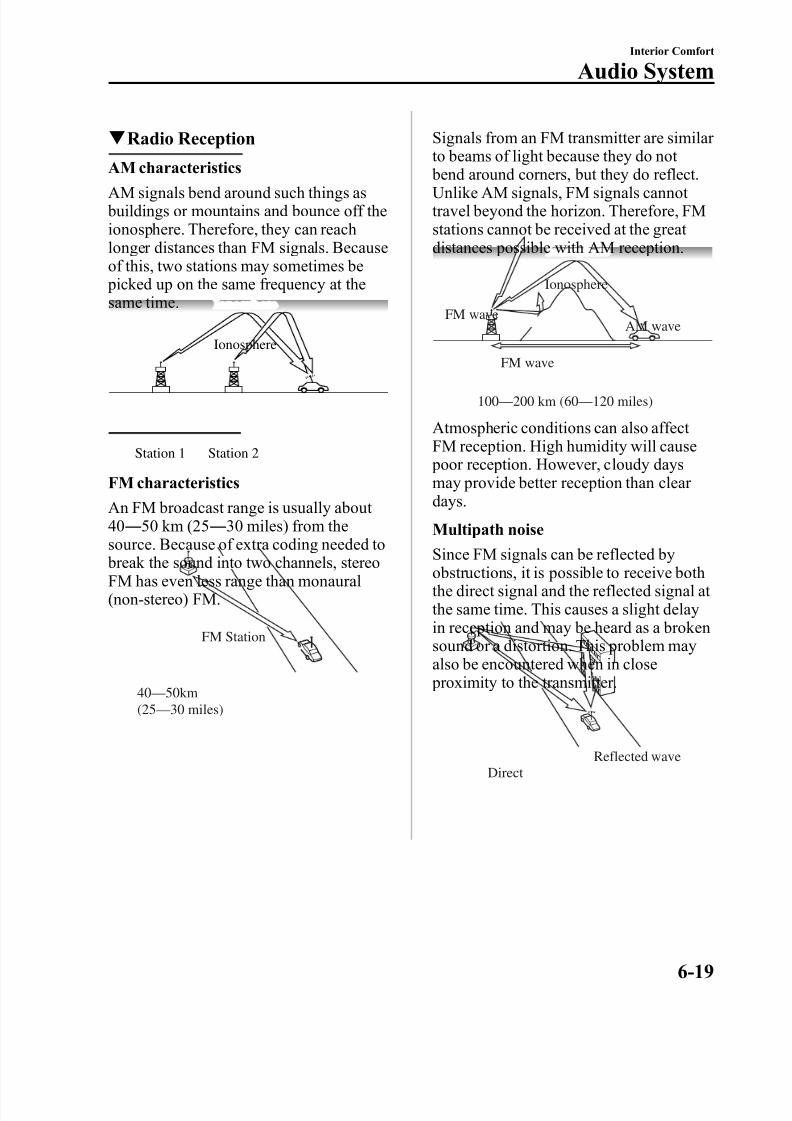
8/2/2019 Mazda5 Owners Manual
http://slidepdf.com/reader/full/mazda5-owners-manual 181/375
q Radio Reception
AM characteristics
AM signals bend around such things as buildings or mountains and bounce off theionosphere. Therefore, they can reachlonger distances than FM signals. Becauseof this, two stations may sometimes be picked up on the same frequency at thesame time.
Station 2Station 1
Ionosphere
FM characteristics
An FM broadcast range is usually about 40 ― 50 km (25 ― 30 miles) from thesource. Because of extra coding needed to break the sound into two channels, stereoFM has even less range than monaural(non-stereo) FM.
FM Station
40—50km(25—30 miles)
Signals from an FM transmitter are similar to beams of light because they do not
bend around corners, but they do reflect.Unlike AM signals, FM signals cannot travel beyond the horizon. Therefore, FMstations cannot be received at the great distances possible with AM reception.
AM waveFM wave
FM wave
100—200 km (60—120 miles)
Ionosphere
Atmospheric conditions can also affect FM reception. High humidity will cause poor reception. However, cloudy daysmay provide better reception than clear days.
Multipath noise
Since FM signals can be reflected byobstructions, it is possible to receive boththe direct signal and the reflected signal at the same time. This causes a slight delayin reception and may be heard as a brokensound or a distortion. This problem mayalso be encountered when in close proximity to the transmitter.
Reflected waveDirect
Interior Comfort
Audio System
6-19
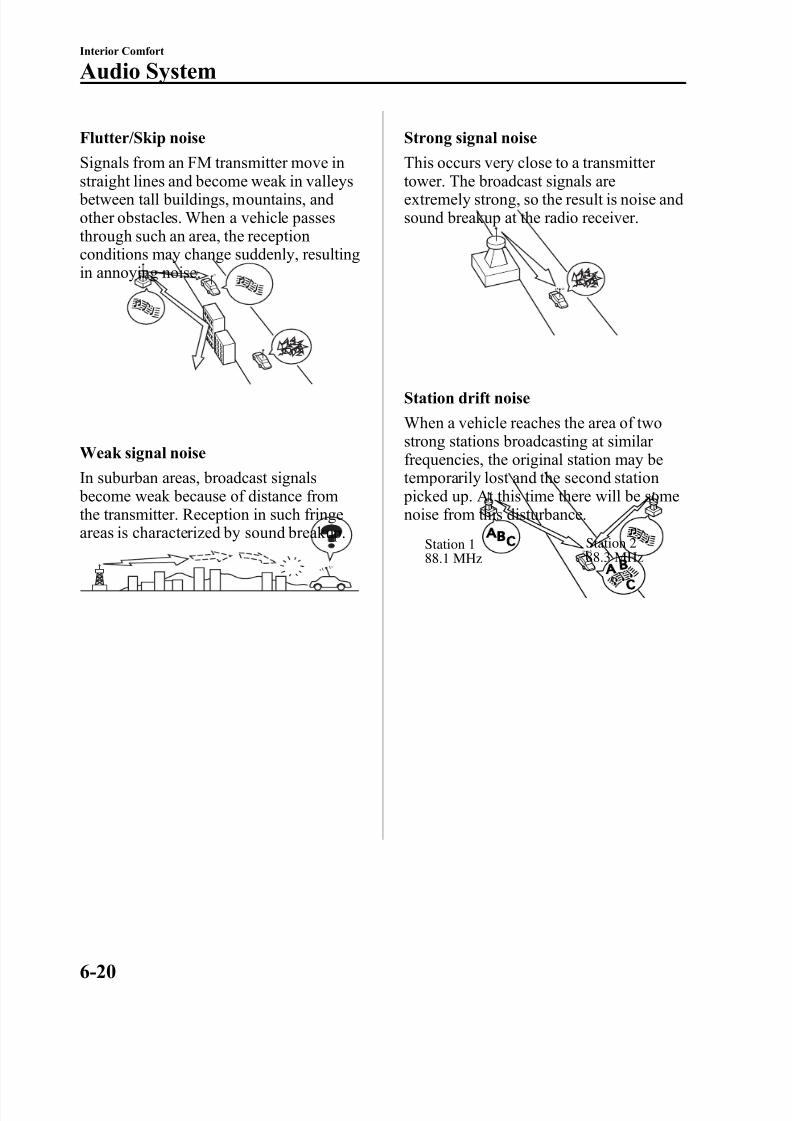
8/2/2019 Mazda5 Owners Manual
http://slidepdf.com/reader/full/mazda5-owners-manual 182/375
Flutter/Skip noise
Signals from an FM transmitter move in
straight lines and become weak in valleys between tall buildings, mountains, andother obstacles. When a vehicle passesthrough such an area, the receptionconditions may change suddenly, resultingin annoying noise.
Weak signal noise
In suburban areas, broadcast signals become weak because of distance fromthe transmitter. Reception in such fringeareas is characterized by sound breakup.
Strong signal noise
This occurs very close to a transmitter
tower. The broadcast signals areextremely strong, so the result is noise andsound breakup at the radio receiver.
Station drift noise
When a vehicle reaches the area of twostrong stations broadcasting at similar frequencies, the original station may betemporarily lost and the second station picked up. At this time there will be somenoise from this disturbance.
Station 288.3 MHz
Station 188.1 MHz
6-20
Interior Comfort
Audio System
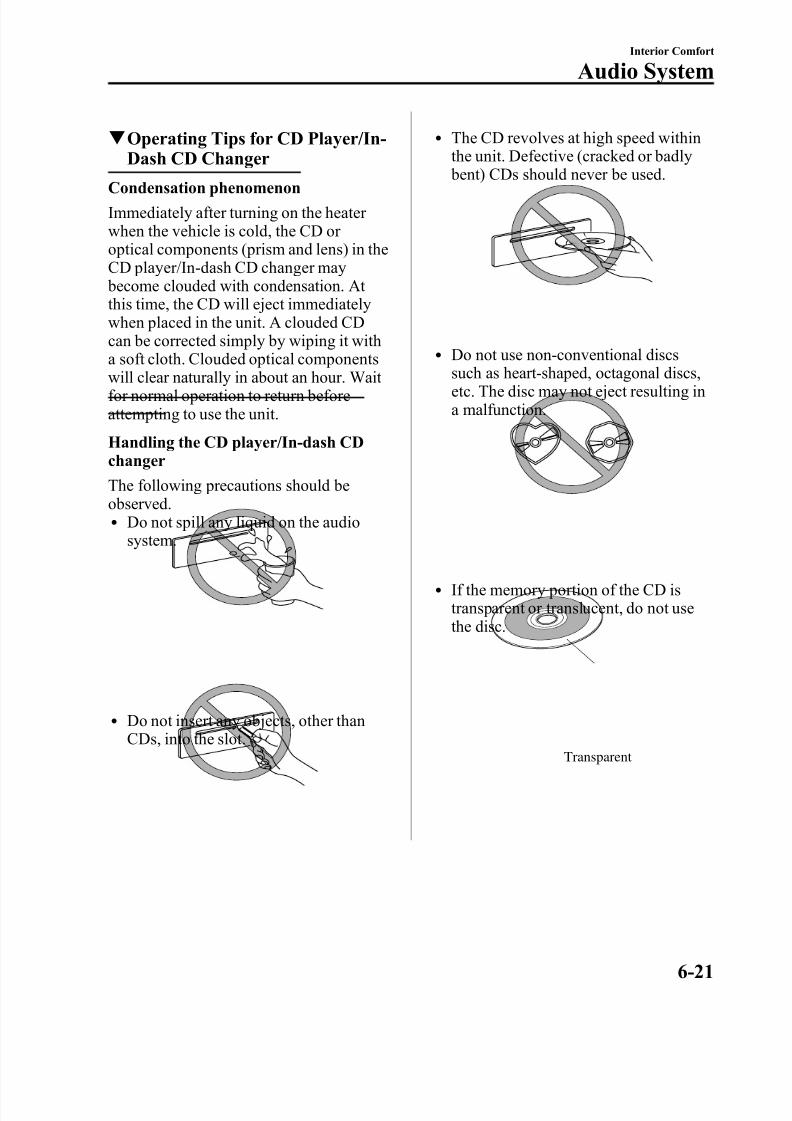
8/2/2019 Mazda5 Owners Manual
http://slidepdf.com/reader/full/mazda5-owners-manual 183/375
q Operating Tips for CD Player/In-Dash CD Changer
Condensation phenomenon
Immediately after turning on the heater when the vehicle is cold, the CD or optical components (prism and lens) in theCD player/In-dash CD changer may become clouded with condensation. At this time, the CD will eject immediatelywhen placed in the unit. A clouded CDcan be corrected simply by wiping it with
a soft cloth. Clouded optical componentswill clear naturally in about an hour. Wait for normal operation to return beforeattempting to use the unit.
Handling the CD player/In-dash CDchanger
The following precautions should beobserved.l Do not spill any liquid on the audio
system.
l
Do not insert any objects, other thanCDs, into the slot.
l The CD revolves at high speed withinthe unit. Defective (cracked or badly
bent) CDs should never be used.
l
Do not use non-conventional discssuch as heart-shaped, octagonal discs,etc. The disc may not eject resulting ina malfunction.
l If the memory portion of the CD istransparent or translucent, do not usethe disc.
Transparent
Interior Comfort
Audio System
6-21
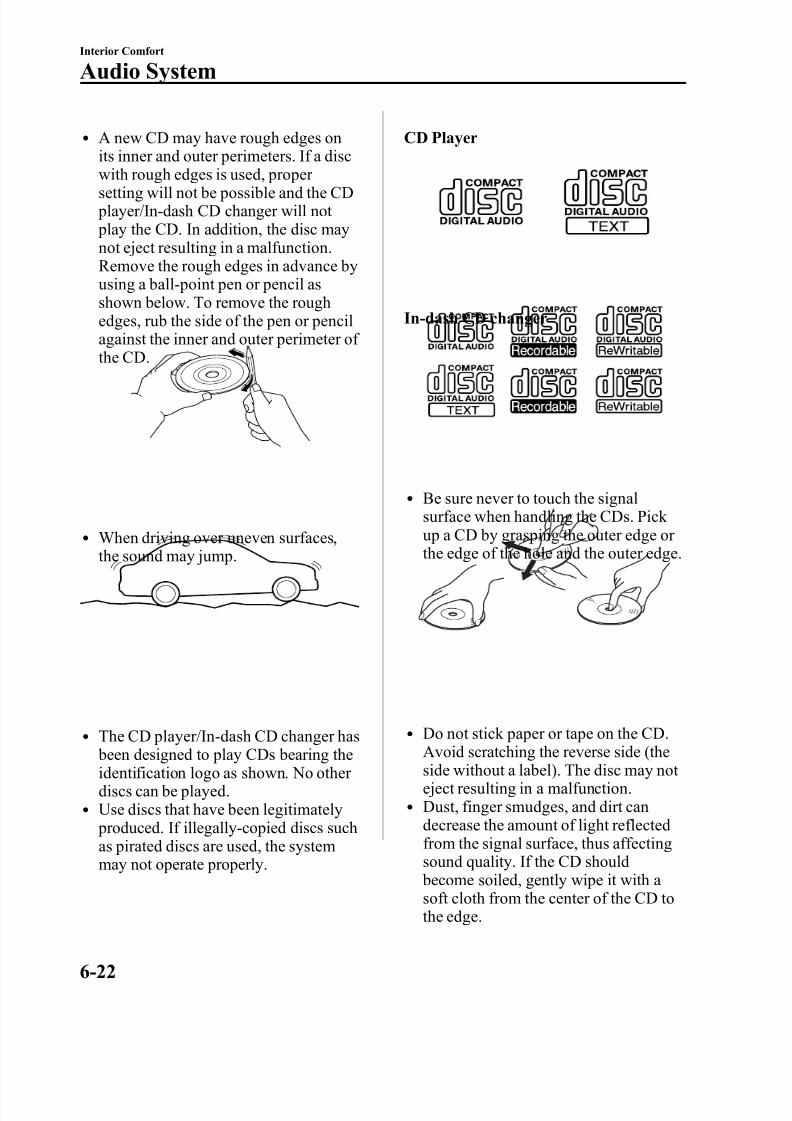
8/2/2019 Mazda5 Owners Manual
http://slidepdf.com/reader/full/mazda5-owners-manual 184/375
l A new CD may have rough edges onits inner and outer perimeters. If a disc
with rough edges is used, proper setting will not be possible and the CD player/In-dash CD changer will not play the CD. In addition, the disc maynot eject resulting in a malfunction.Remove the rough edges in advance byusing a ball-point pen or pencil asshown below. To remove the roughedges, rub the side of the pen or pencilagainst the inner and outer perimeter of
the CD.
l
When driving over uneven surfaces,the sound may jump.
l The CD player/In-dash CD changer has been designed to play CDs bearing theidentification logo as shown. No other discs can be played.
l Use discs that have been legitimately produced. If illegally-copied discs suchas pirated discs are used, the systemmay not operate properly.
CD Player
In-dash CD changer
l Be sure never to touch the signalsurface when handling the CDs. Pick
up a CD by grasping the outer edge or the edge of the hole and the outer edge.
l Do not stick paper or tape on the CD.Avoid scratching the reverse side (theside without a label). The disc may not eject resulting in a malfunction.
l Dust, finger smudges, and dirt candecrease the amount of light reflectedfrom the signal surface, thus affectingsound quality. If the CD should become soiled, gently wipe it with a
soft cloth from the center of the CD tothe edge.
6-22
Interior Comfort
Audio System
8/2/2019 Mazda5 Owners Manual
http://slidepdf.com/reader/full/mazda5-owners-manual 185/375
l Do not use record sprays, antistaticagents, or household spray cleaners.
Volatile chemicals such as benzine andthinner can also damage the surface of the CD and must not be used. Anythingthat can damage, warp, or fog plasticshould never be used to clean CDs.
l Insert discs one by one. If two discs areinserted at the same time, the systemmay not operate properly.
l The CD player/In-dash CD changer ejects the CD if the CD is inserted
upside down. Also dirty and/or defective CDs may be ejected.l An 8 cm (3 in) CD can be played in the
CD player.The In-dash CD changer is speciallymade for 12 cm (5 in) CDs.An 8 cm (3 in) CD cannot be played inthe In-dash CD changer even if an 8cm (3 in) CD adapter is used.
l Do not insert cleaning discs in the CD
player/In-dash CD changer.l Do not insert any disc with a peel-off
seal affixed to it.
Handling the In-dash CD changerl This unit may not be able to play
certain CD-R/CD-RWs made using a computer or music CD recorder due todisc characteristics, scratches,smudges, dirt, etc., or due to dust or
condensation on the lens inside theunit.l Storing CDs in the vehicle exposed to
direct sunlight or high temperature maydamage the CD-R/CD-RWs, and makethem unplayable.
l CD-R/CD-RW exceeding 700 MBcannot be played.
l This unit may not be able to playcertain discs made using a computer
due to the application (writingsoftware) setting used. (For details,consult the store where the applicationwas purchased.)
l It is possible that certain text data, suchas titles, recorded on a CD-R/CD-RWmay not be displayed when musicaldata (CD-DA) is playing.
l The period from when a CD-RW isinserted to when it begins playing is
longer than a normal CD or CD-R.l Completely read the instruction manualand cautions for CD-R/CD-RWs.
l Do not use discs with cellophane tapeadhering, partially peeled off labels, or adhesive material exuding from theedges of the CD label. Also, do not usediscs with a commercially-availableCD-R label affixed. The disc may not eject resulting in a malfunction.
Interior Comfort
Audio System
6-23

8/2/2019 Mazda5 Owners Manual
http://slidepdf.com/reader/full/mazda5-owners-manual 186/375
MEMO
6-24

8/2/2019 Mazda5 Owners Manual
http://slidepdf.com/reader/full/mazda5-owners-manual 187/375
Audio Set
Audio information is displayed on the information display.
Illustration is of a representative audio unit.
CD Player (non-MP3 compatible) In-Dash CD Changer (non-MP3 compatible)
Power/Volume/Sound Controls .............................................................................. page 6-26Operating the Radio ............................................................................................... page 6-30Operating the Compact Disc (CD) Player .............................................................. page 6-34Operating the In-Dash CD Changer ....................................................................... page 6-36Operating the Auxiliary jack .................................................................................. page 6-38Error Indications ..................................................................................................... page 6-39
Interior Comfort
Audio System
6-25
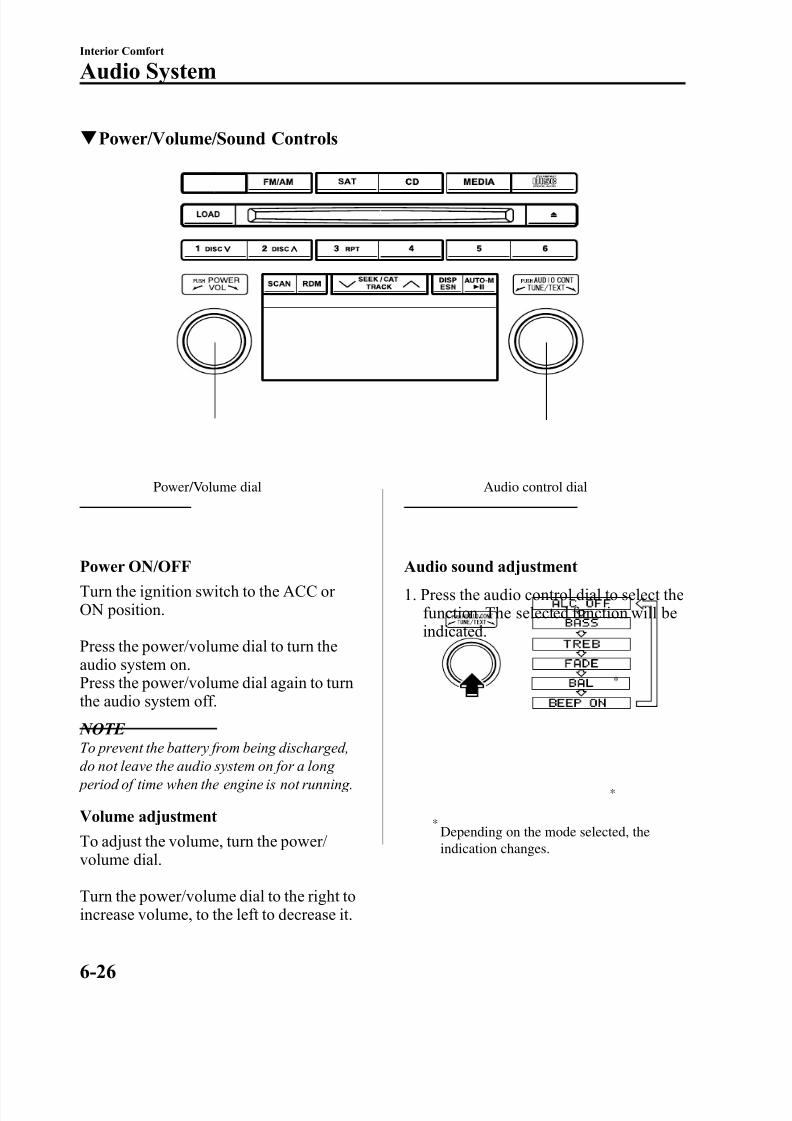
8/2/2019 Mazda5 Owners Manual
http://slidepdf.com/reader/full/mazda5-owners-manual 188/375
q Power/Volume/Sound Controls
Power/Volume dial Audio control dial
Power ON/OFF
Turn the ignition switch to the ACC or ON position.
Press the power/volume dial to turn theaudio system on.Press the power/volume dial again to turnthe audio system off.
NOTE To prevent the battery from being discharged,do not leave the audio system on for a long period of time when the engine is not running.
Volume adjustment
To adjust the volume, turn the power/ volume dial.
Turn the power/volume dial to the right toincrease volume, to the left to decrease it.
Audio sound adjustment
1. Press the audio control dial to select thefunction. The selected function will beindicated.
*
*
*Depending on the mode selected, theindication changes.
6-26
Interior Comfort
Audio System
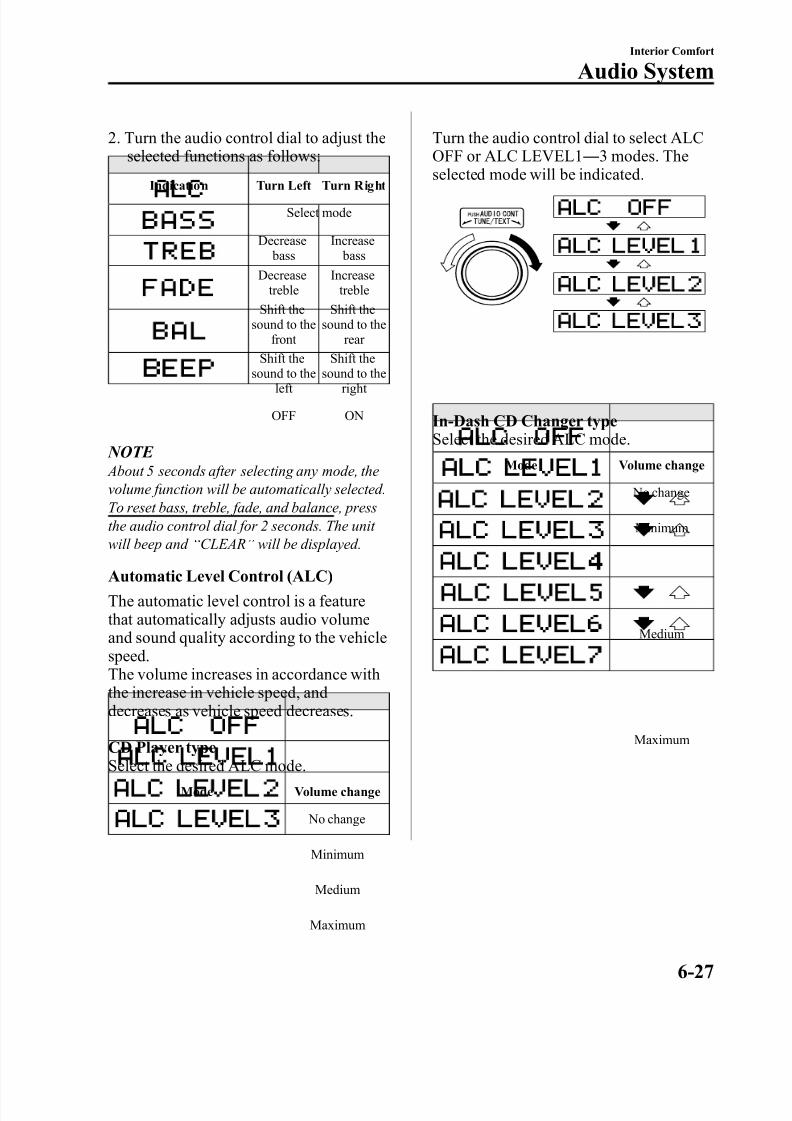
8/2/2019 Mazda5 Owners Manual
http://slidepdf.com/reader/full/mazda5-owners-manual 189/375
2. Turn the audio control dial to adjust theselected functions as follows:
Indication Turn Left Turn Right
Select mode
Decrease bass
Increase bass
Decreasetreble
Increasetreble
Shift thesound to the
front
Shift thesound to the
rear
Shift thesound to theleft
Shift thesound to theright
OFF ON
NOTE About 5 seconds after selecting any mode, thevolume function will be automatically selected.To reset bass, treble, fade, and balance, pressthe audio control dial for 2 seconds. The unit
will beep and “
CLEAR”
will be displayed.
Automatic Level Control (ALC)
The automatic level control is a featurethat automatically adjusts audio volumeand sound quality according to the vehiclespeed.The volume increases in accordance withthe increase in vehicle speed, anddecreases as vehicle speed decreases.
CD Player typeSelect the desired ALC mode.
Mode Volume change
No change
Minimum
Medium
Maximum
Turn the audio control dial to select ALCOFF or ALC LEVEL1 ― 3 modes. The
selected mode will be indicated.
In-Dash CD Changer typeSelect the desired ALC mode.
Mode Volume change
No change
Minimum
Medium
Maximum
Interior Comfort
Audio System
6-27

8/2/2019 Mazda5 Owners Manual
http://slidepdf.com/reader/full/mazda5-owners-manual 190/375
Turn the audio control dial to select ALCOFF or ALC LEVEL1 ― 7 modes. The
selected mode will be indicated.
BEEP setting
The beep-sound when operating the audiosystem can be set on or off.
6-28
Interior Comfort
Audio System

8/2/2019 Mazda5 Owners Manual
http://slidepdf.com/reader/full/mazda5-owners-manual 191/375
MEMO
6-29
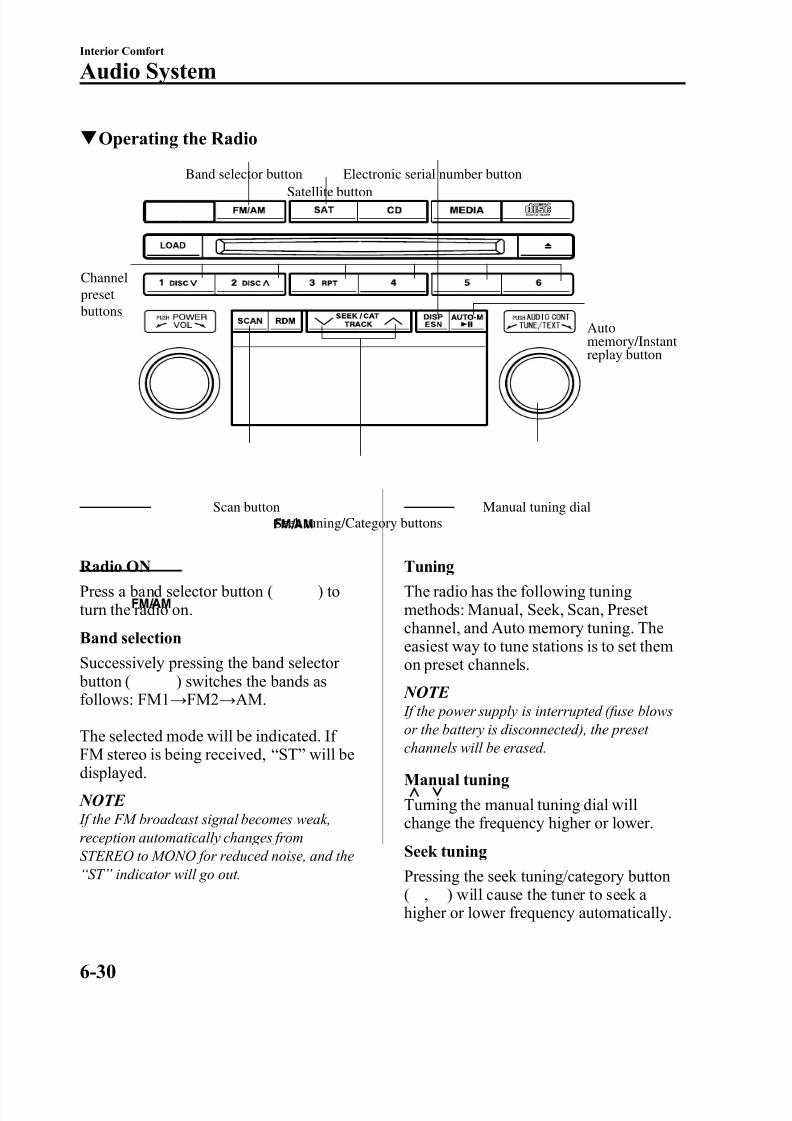
8/2/2019 Mazda5 Owners Manual
http://slidepdf.com/reader/full/mazda5-owners-manual 192/375
q Operating the Radio
Channelpresetbuttons
Automemory/Instantreplay button
Electronic serial number button
Scan buttonSeek tuning/Category buttons
Manual tuning dial
Satellite buttonBand selector button
Radio ON
Press a band selector button ( ) toturn the radio on.
Band selection
Successively pressing the band selector button ( ) switches the bands asfollows: FM1 → FM2 → AM.
The selected mode will be indicated. If FM stereo is being received, “ ST ” will bedisplayed.
NOTE If the FM broadcast signal becomes weak,reception automatically changes fromSTEREO to MONO for reduced noise, and the“ ST ” indicator will go out.
Tuning
The radio has the following tuningmethods: Manual, Seek, Scan, Preset channel, and Auto memory tuning. Theeasiest way to tune stations is to set themon preset channels.
NOTE If the power supply is interrupted (fuse blowsor the battery is disconnected), the preset channels will be erased.
Manual tuning
Turning the manual tuning dial willchange the frequency higher or lower.
Seek tuning
Pressing the seek tuning/category button( , ) will cause the tuner to seek a higher or lower frequency automatically.
6-30
Interior Comfort
Audio System
8/2/2019 Mazda5 Owners Manual
http://slidepdf.com/reader/full/mazda5-owners-manual 193/375
NOTE If you continue to press and hold the button,
the frequency will continue changing without stopping.
Scan tuning
Press the scan button ( ) toautomatically sample strong stations.Scanning stops at each station for about 5seconds. To hold a station, press the scan button ( ) again during this interval.
Preset channel tuning
The 6 preset channels can be used to store6 AM and 12 FM stations.
1. To set a channel first select AM, FM1,or FM2. Tune to the desired station.
2. Depress a channel preset button for about 2 seconds until a beep sound isheard. The preset channel number andstation frequency will be displayed.
The station is now held in the memory.3. Repeat this operation for the other
stations and bands you want to store.To tune one in the memory, select AM,FM1, or FM2 and then press itschannel preset button. The stationfrequency and the channel number will be displayed.
NOTE If the power supply is interrupted (fuse blowsor the battery is disconnected), the preset channels will be erased.
Auto memory tuning
This is especially useful when driving inan area where the local stations are not known. Additional AM/FM stations can be stored without disturbing the previously set channels.
Press and hold the auto memory/instant replay button ( ) for about 2
seconds until a beep sound is heard; thesystem will automatically scan andtemporarily store up to 6 stations with thestrongest frequencies in each selected band in that area.
After scanning is completed, the stationwith the strongest frequency will be tunedand its frequency displayed.Press and release the auto memory/instant
replay button ( ) to recall stationsfrom the auto-stored stations. One storedstation will be selected each time; itsfrequency and channel number will bedisplayed.
NOTE If no stations can be tuned after scanning operations, “ A” will be displayed.
SATELLITE RADIO (SAT)
Vehicles equipped with the separately purchased SIRIUS digital satellite radiounit have the ability to receive channels of digital quality programming coast to coast via satellite. For information on use, readthe Satellite Radio Kit manualaccompanying the SIRIUS digital satelliteradio unit. A subscription to SIRIUSdigital satellite radio service is required
(available in the U.S. - Except Alaska andHawaii) to enable this feature once theseparately purchased SIRIUS digitalsatellite radio unit has been installed. For subscription and channel information, or for digital satellite radio technical issues,contact SIRIUS directly at:
- Web: www.siriusradio.com- Phone (24 hrs/day, 7 days/week): 888-
539-SIRI (7474)- E-mail: [email protected]
Interior Comfort
Audio System
6-31

8/2/2019 Mazda5 Owners Manual
http://slidepdf.com/reader/full/mazda5-owners-manual 194/375
- Mailing Address: Sirius Satellite Radio1221 Avenue Of The Americas
New York, NY 10020Attention: Customer Care
Include your Sirius Radio ESN(Electronic Serial Number) whensubscribing or requesting technicalassistance. See the Satellite Radio Kit manual accompanying the SIRIUS unit for complete satellite radio activation procedures and information on how to
display the ESN#.
6-32
Interior Comfort
Audio System

8/2/2019 Mazda5 Owners Manual
http://slidepdf.com/reader/full/mazda5-owners-manual 195/375
MEMO
6-33
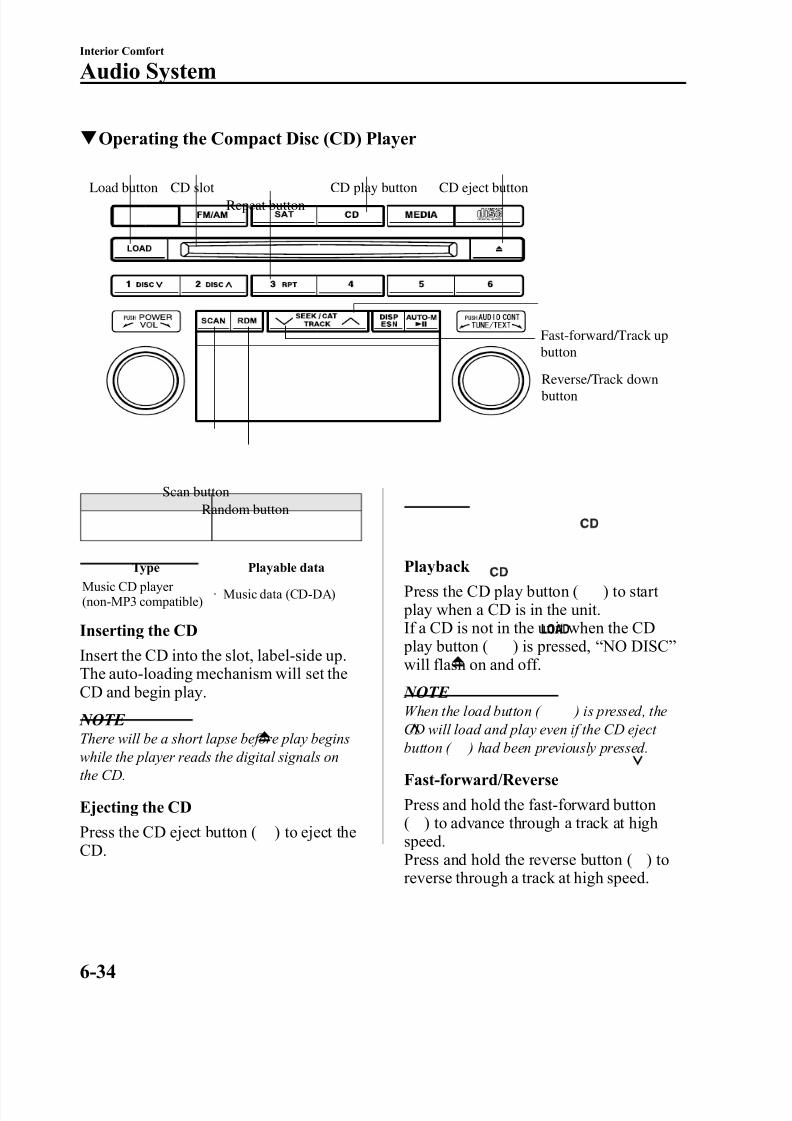
8/2/2019 Mazda5 Owners Manual
http://slidepdf.com/reader/full/mazda5-owners-manual 196/375
q Operating the Compact Disc (CD) Player
Load button
Fast-forward/Track upbutton
Reverse/Track downbutton
CD slot CD play buttonRepeat button
CD eject button
Scan buttonRandom button
Type Playable data
Music CD player (non-MP3 compatible) · Music data (CD-DA)
Inserting the CD
Insert the CD into the slot, label-side up.The auto-loading mechanism will set theCD and begin play.
NOTE There will be a short lapse before play beginswhile the player reads the digital signals onthe CD.
Ejecting the CD
Press the CD eject button ( ) to eject theCD.
Playback
Press the CD play button ( ) to start play when a CD is in the unit.If a CD is not in the unit when the CD play button ( ) is pressed, “ NO DISC ”
will flash on and off.
NOTE When the load button ( ) is pressed, theCD will load and play even if the CD eject button ( ) had been previously pressed.
Fast-forward/Reverse
Press and hold the fast-forward button( ) to advance through a track at highspeed.Press and hold the reverse button ( ) toreverse through a track at high speed.
6-34
Interior Comfort
Audio System

8/2/2019 Mazda5 Owners Manual
http://slidepdf.com/reader/full/mazda5-owners-manual 197/375
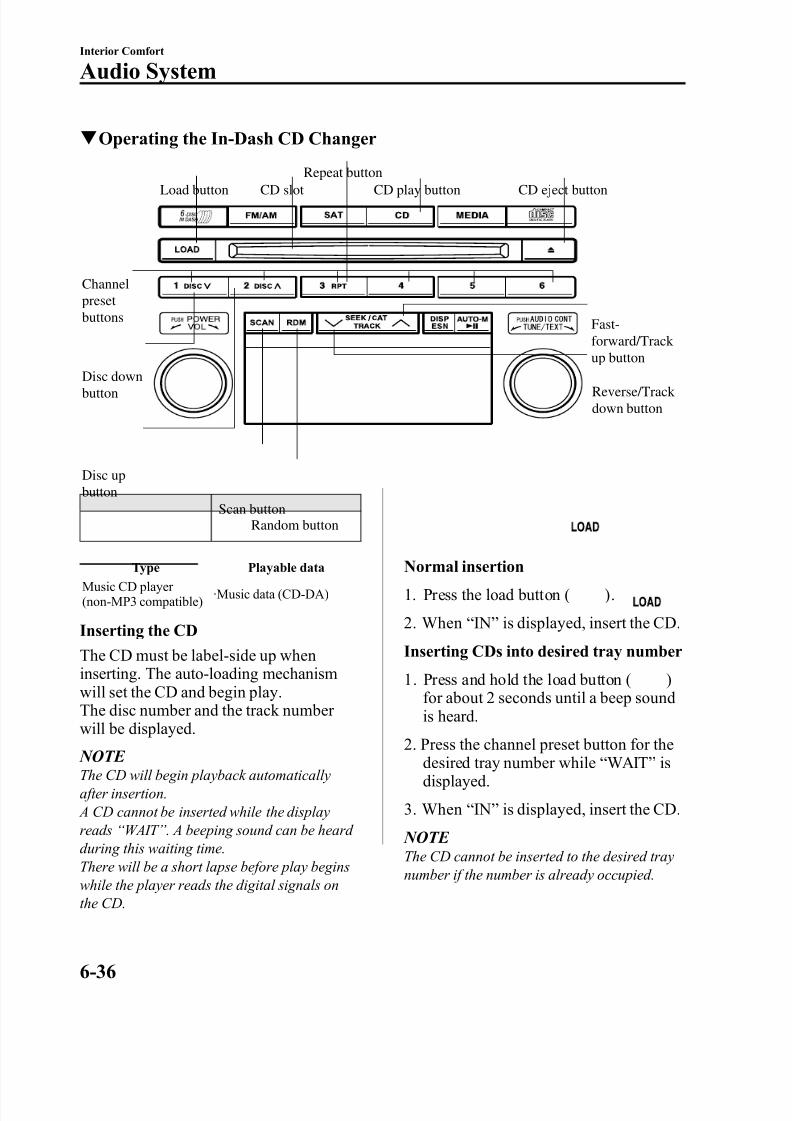
8/2/2019 Mazda5 Owners Manual
http://slidepdf.com/reader/full/mazda5-owners-manual 198/375
q Operating the In-Dash CD Changer
Disc upbutton
Disc downbutton
Random buttonScan button
Channelpresetbuttons
Load buttonRepeat button
CD slot CD eject buttonCD play button
Fast-forward/Track
up button
Reverse/Track down button
Type Playable data
Music CD player (non-MP3 compatible) ·Music data (CD-DA)
Inserting the CD
The CD must be label-side up wheninserting. The auto-loading mechanismwill set the CD and begin play.The disc number and the track number will be displayed.
NOTE The CD will begin playback automaticallyafter insertion. A CD cannot be inserted while the displayreads “ WAIT ” . A beeping sound can be heard during this waiting time.There will be a short lapse before play beginswhile the player reads the digital signals on
the CD.
Normal insertion
1. Press the load button ( ).
2. When “ IN ” is displayed, insert the CD.
Inserting CDs into desired tray number
1. Press and hold the load button ( )for about 2 seconds until a beep sound
is heard.2. Press the channel preset button for the
desired tray number while “ WAIT ” isdisplayed.
3. When “ IN ” is displayed, insert the CD.
NOTE The CD cannot be inserted to the desired traynumber if the number is already occupied.
6-36
Interior Comfort
Audio System
8/2/2019 Mazda5 Owners Manual
http://slidepdf.com/reader/full/mazda5-owners-manual 199/375
Multiple insertion
1. Press and hold the load button ( )for about 2 seconds until a beep soundis heard.
2. When “ IN ” is displayed, insert the CD.
3. When “ IN ” is displayed again, insert the next CD.
NOTE The first-inserted CD will be played automatically when:
l No other CD is inserted within 15 secondsafter “ IN ” is displayed.
l The CD trays are full.
Displaying the CD-inserted traynumber
When you want to know the number for a CD-inserted tray, press the display button( ). The tray number will be displayedfor 5 seconds.
Ejecting the CD
Normal ejection
1. Press the CD eject button ( ). Thedisc number and “ DISC OUT ” will bedisplayed.
2. Pull out the CD.
NOTE When the CD is ejected during play, the next CD will be played automatically.
Ejecting CDs from desired tray number
1. Press and hold the CD eject button ( )for about 2 seconds until a beep soundis heard.The “ DISC OUT ” display flashes.
2. Press the channel preset button for the
desired CD number for less than 5seconds after the beep sound is heard.
3. Pull out the CD.
Multiple ejection
1. Press and hold the CD eject button ( )for about 2 seconds until a beep soundis heard.The “ DISC OUT ” display flashes.
2. Press the CD eject button ( ) againfor less than 5 seconds after the beepsound is heard.
NOTE
If the button is not pressed and about 5 seconds have elapsed while “ DISC OUT ” is flashing, CDs are automatically ejected.
3. Pull out the CD, then the next CD will be ejected.
NOTE l CDs will be ejected starting with the one
with the lowest number.l All CDs in the tray will be ejected
continuously.l CDs can be ejected when the ignition
switch is off. Press and hold the CD eject button ( ) for about 2 seconds and all CDs will eject.
Playback
Press the CD play button ( ) to start play when a CD is in the unit.
If a CD is not in the unit when the CD play button ( ) is pressed, “ NO DISC ”
will flash on and off.
Fast-forward/Reverse
Press and hold the fast-forward button( ) to advance through a track at highspeed.Press and hold the reverse button ( ) toreverse through a track at high speed.
Interior Comfort
Audio System
6-37
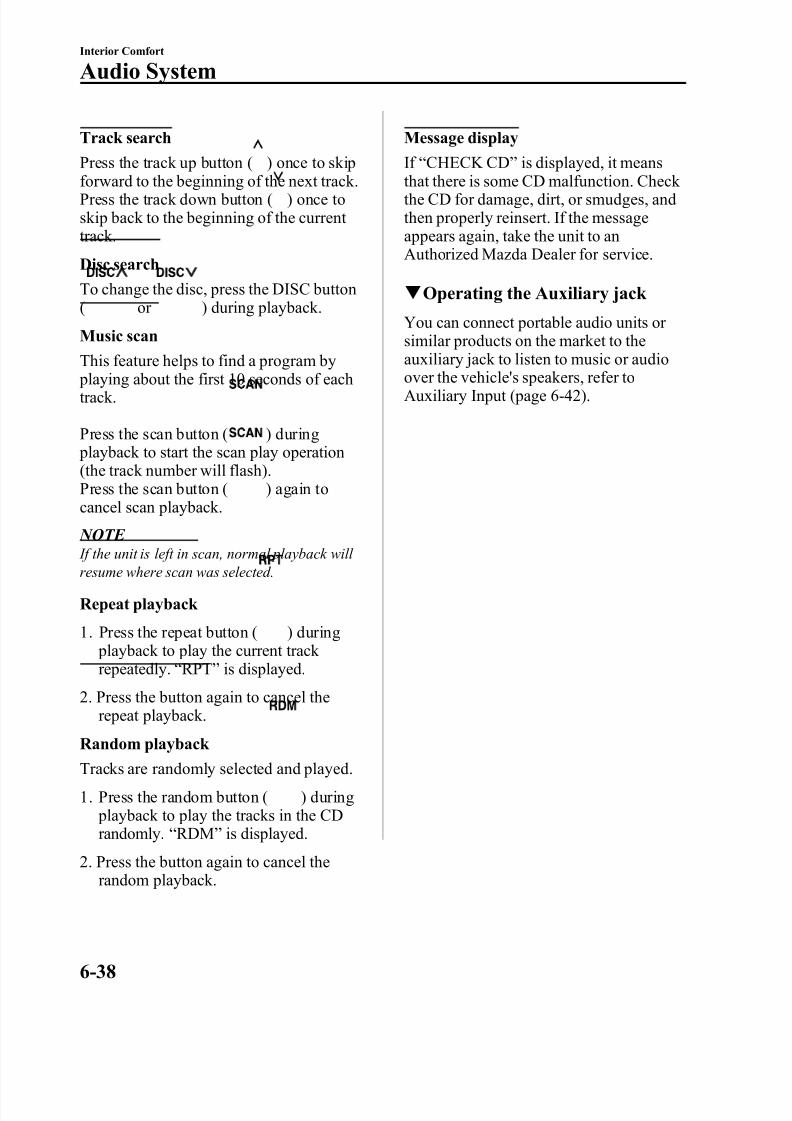
8/2/2019 Mazda5 Owners Manual
http://slidepdf.com/reader/full/mazda5-owners-manual 200/375
Track search
Press the track up button ( ) once to skip
forward to the beginning of the next track.Press the track down button ( ) once toskip back to the beginning of the current track.
Disc search
To change the disc, press the DISC button( or ) during playback.
Music scan
This feature helps to find a program by playing about the first 10 seconds of eachtrack.
Press the scan button ( ) during playback to start the scan play operation(the track number will flash).Press the scan button ( ) again tocancel scan playback.
NOTE If the unit is left in scan, normal playback will resume where scan was selected.
Repeat playback
1. Press the repeat button ( ) during playback to play the current track repeatedly. “ RPT ” is displayed.
2. Press the button again to cancel therepeat playback.
Random playback
Tracks are randomly selected and played.
1. Press the random button ( ) during playback to play the tracks in the CDrandomly. “ RDM ” is displayed.
2. Press the button again to cancel therandom playback.
Message display
If “ CHECK CD ” is displayed, it means
that there is some CD malfunction. Check the CD for damage, dirt, or smudges, andthen properly reinsert. If the messageappears again, take the unit to anAuthorized Mazda Dealer for service.
q Operating the Auxiliary jack
You can connect portable audio units or similar products on the market to the
auxiliary jack to listen to music or audioover the vehicle's speakers, refer toAuxiliary Input (page 6-42).
6-38
Interior Comfort
Audio System
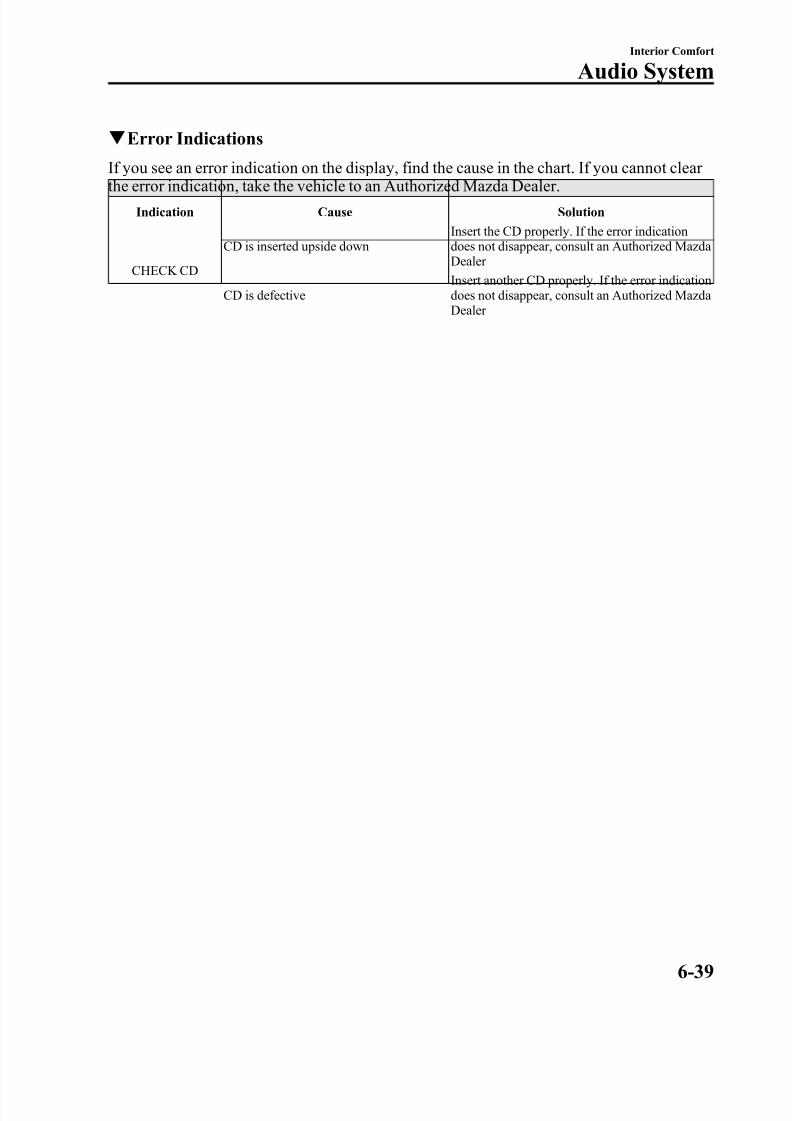
8/2/2019 Mazda5 Owners Manual
http://slidepdf.com/reader/full/mazda5-owners-manual 201/375
q Error Indications
If you see an error indication on the display, find the cause in the chart. If you cannot clear the error indication, take the vehicle to an Authorized Mazda Dealer.
Indication Cause Solution
CHECK CD
CD is inserted upside downInsert the CD properly. If the error indicationdoes not disappear, consult an Authorized Mazda Dealer
CD is defectiveInsert another CD properly. If the error indicationdoes not disappear, consult an Authorized Mazda Dealer
Interior Comfort
Audio System
6-39
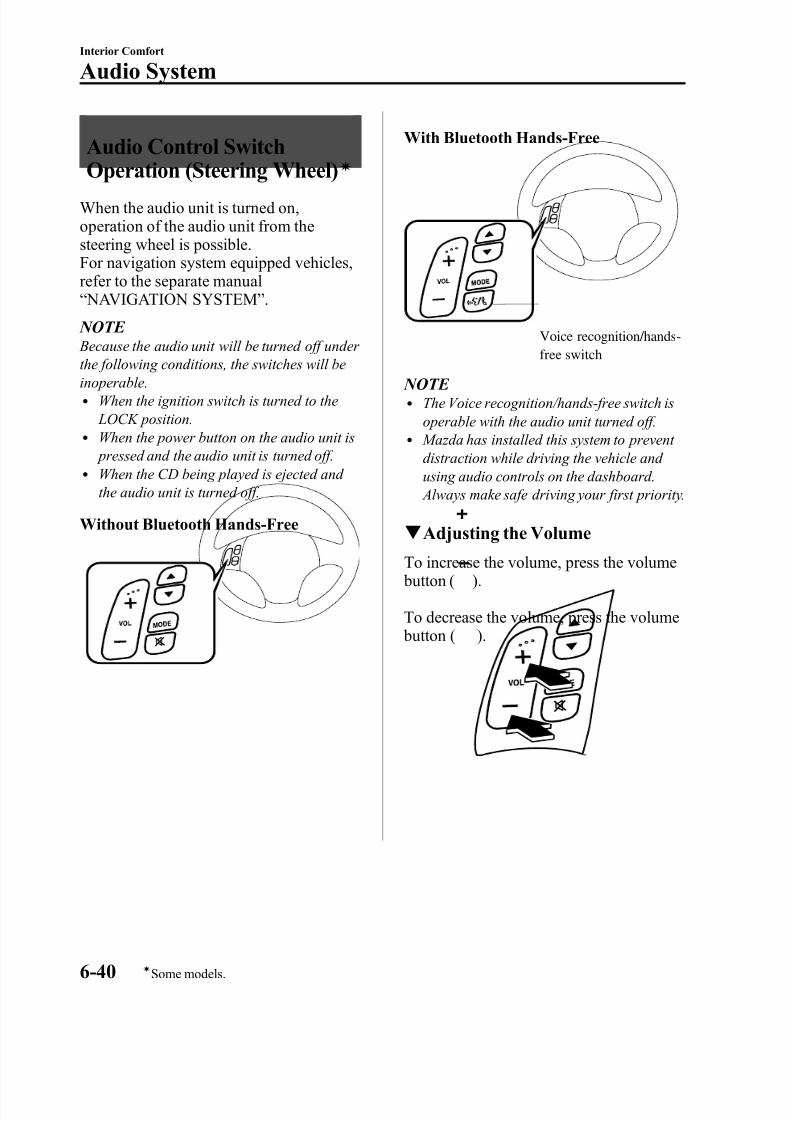
8/2/2019 Mazda5 Owners Manual
http://slidepdf.com/reader/full/mazda5-owners-manual 202/375
Audio Control Switch
Operation (Steering Wheel)í
When the audio unit is turned on,operation of the audio unit from thesteering wheel is possible.For navigation system equipped vehicles,refer to the separate manual“ NAVIGATION SYSTEM ” .
NOTE Because the audio unit will be turned off under the following conditions, the switches will beinoperable.l When the ignition switch is turned to the
LOCK position.l When the power button on the audio unit is
pressed and the audio unit is turned off.l When the CD being played is ejected and
the audio unit is turned off.
Without Bluetooth Hands-Free
With Bluetooth Hands-Free
Voice recognition/hands -free switch
NOTE l The Voice recognition/hands-free switch is
operable with the audio unit turned off.l Mazda has installed this system to prevent
distraction while driving the vehicle and using audio controls on the dashboard. Always make safe driving your first priority.
q Adjusting the Volume
To increase the volume, press the volume button ( ).
To decrease the volume, press the volume button ( ).
6-40
Interior Comfort
íSome models.
Audio System
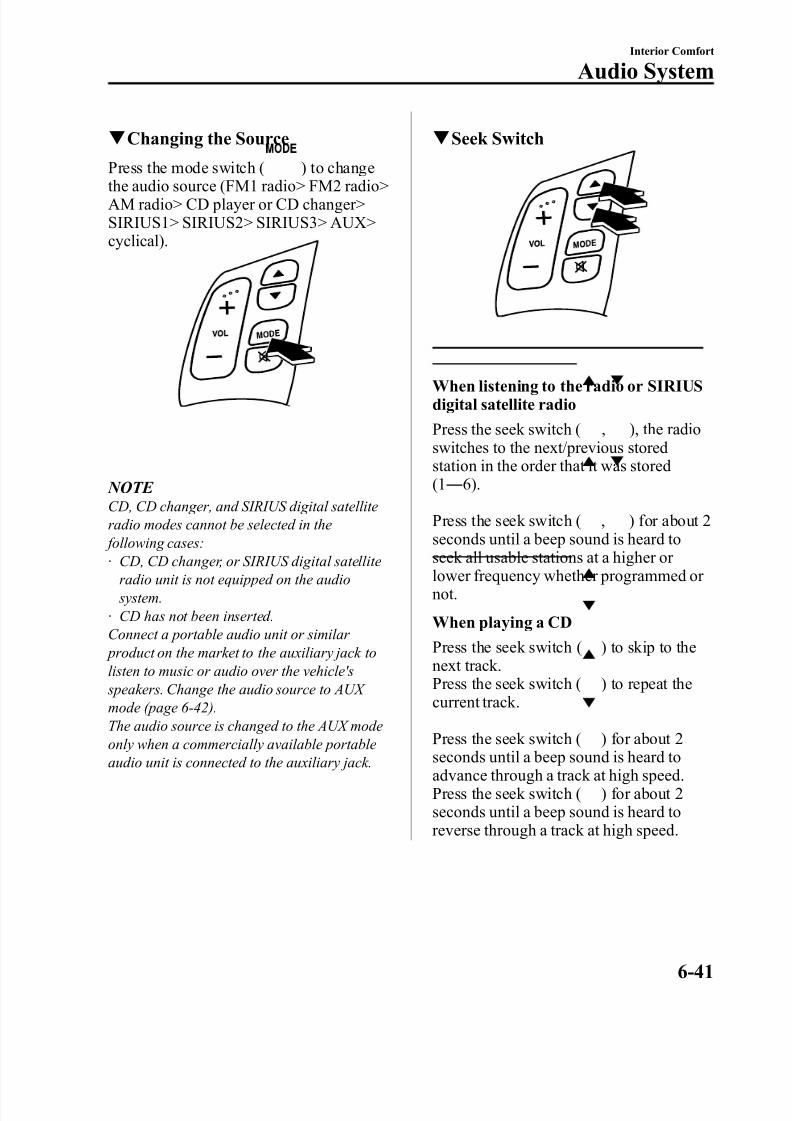
8/2/2019 Mazda5 Owners Manual
http://slidepdf.com/reader/full/mazda5-owners-manual 203/375
q Changing the Source
Press the mode switch ( ) to changethe audio source (FM1 radio> FM2 radio>AM radio> CD player or CD changer>SIRIUS1> SIRIUS2> SIRIUS3> AUX>cyclical).
NOTE CD, CD changer, and SIRIUS digital satelliteradio modes cannot be selected in the
following cases:· CD, CD changer, or SIRIUS digital satellite
radio unit is not equipped on the audio system.
· CD has not been inserted.Connect a portable audio unit or similar product on the market to the auxiliary jack tolisten to music or audio over the vehicle's speakers. Change the audio source to AUX mode (page 6-42).
The audio source is changed to the AUX modeonly when a commercially available portableaudio unit is connected to the auxiliary jack.
q Seek Switch
When listening to the radio or SIRIUSdigital satellite radio
Press the seek switch ( , ), the radioswitches to the next/previous storedstation in the order that it was stored(1― 6).
Press the seek switch ( , ) for about 2
seconds until a beep sound is heard toseek all usable stations at a higher or lower frequency whether programmed or not.
When playing a CD
Press the seek switch ( ) to skip to thenext track.Press the seek switch ( ) to repeat thecurrent track.
Press the seek switch ( ) for about 2seconds until a beep sound is heard toadvance through a track at high speed.Press the seek switch ( ) for about 2seconds until a beep sound is heard toreverse through a track at high speed.
Interior Comfort
Audio System
6-41
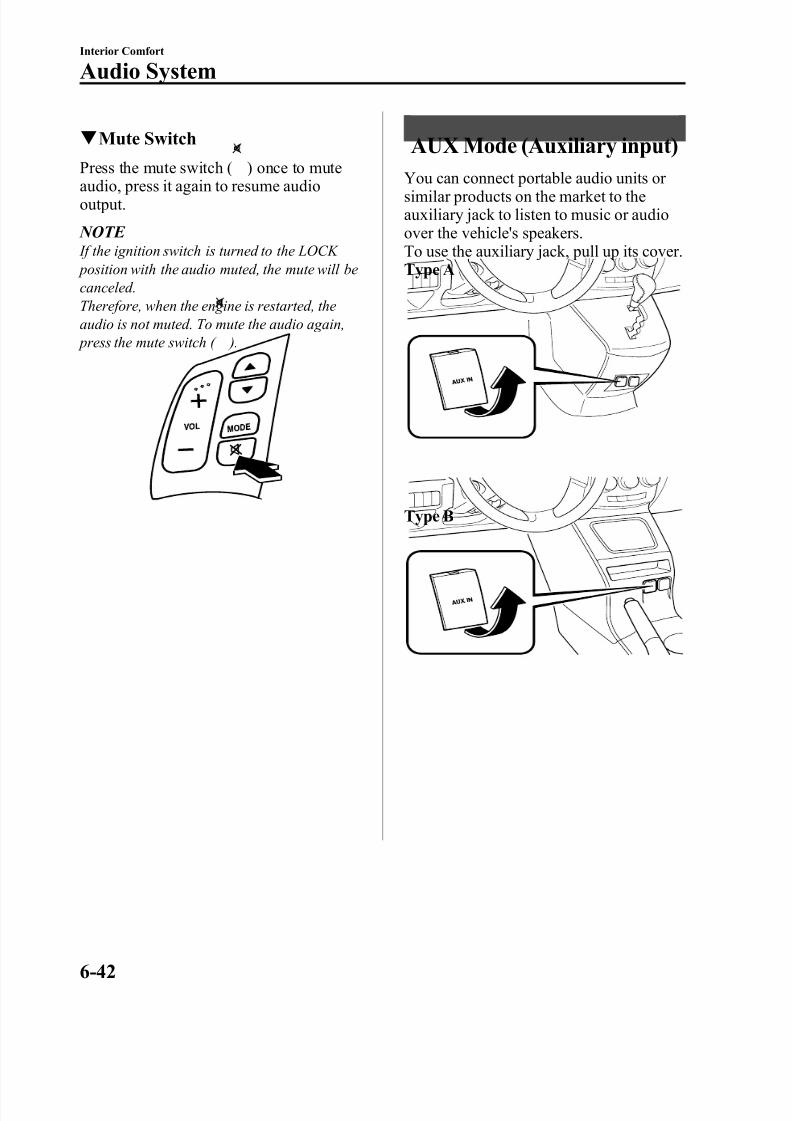
8/2/2019 Mazda5 Owners Manual
http://slidepdf.com/reader/full/mazda5-owners-manual 204/375
q Mute Switch
Press the mute switch ( ) once to muteaudio, press it again to resume audiooutput.
NOTE If the ignition switch is turned to the LOCK position with the audio muted, the mute will becanceled.Therefore, when the engine is restarted, theaudio is not muted. To mute the audio again, press the mute switch ( ).
AUX Mode (Auxiliary input)
You can connect portable audio units or similar products on the market to theauxiliary jack to listen to music or audioover the vehicle's speakers.To use the auxiliary jack, pull up its cover.Type A
Type B
6-42
Interior Comfort
Audio System
8/2/2019 Mazda5 Owners Manual
http://slidepdf.com/reader/full/mazda5-owners-manual 205/375
WARNING
Do not adjust the portable audio unitor a similar product while driving thevehicle:
Adjusting the portable audio unit or a similar product while driving thevehicle is dangerous as it coulddistract your attention from thevehicle operation which could lead toa serious accident. Always adjust theportable audio unit or a similar
product while the vehicle is stopped.Do not allow the connection plug cordto get tangled with the parking brakeor the shift lever:
Allowing the plug cord to becometangled with the parking brake or the shift lever is dangerous as itcould interfere with driving, resultingin an accident.
CAUTIONØ Close the cover when the auxiliary
jack is not in use to preventforeign objects and liquids frompenetrating the auxiliary jack.
Ø Do not place objects or apply forceto the auxiliary jack with the plugconnected.
Ø Noise may occur during playbackif the accessory socket equippedon the vehicle is used. (If noiseoccurs, do not use the accessory socket.)
NOTE l Before using the auxiliary jack, read the
manufacturer's instructions for the product being connected.l Use a commercially-available, non-
impedance (3.5 ) stereo mini plug for connecting the portable audio unit to theauxiliary jack. Before using the auxiliary jack, read the manufacture's instructions for connecting a portable audio unit to theauxiliary jack.
l To prevent discharging of the battery, do
not use the auxiliary input for long periodswith the engine off or idling.l Noise may occur depending on the product
connected to the auxiliary jack.l With regard to connecting a portable audio
or similar device to a power source, use thebattery for the device, not the accessory socket.
l Insert the plug to the auxiliary jack securely.
l Insert or remove the plug with the plug perpendicular to the auxiliary jack hole.
l Insert or remove the plug by holding itsbase.
To operate the portable audio unit
1. Turn the ignition switch to the ACC or ON position.
2. Insert the connection plug into the
auxiliary jack.3. Press the power/volume dial to turn the
audio system on.
Interior Comfort
Audio System
6-43

8/2/2019 Mazda5 Owners Manual
http://slidepdf.com/reader/full/mazda5-owners-manual 206/375
4. Press the source change button( ) of the audio unit or the mode
switch ( ) of the audio controlswitches on the steering wheel tochange to the AUX mode.
Audio Unit Audio ControlSwitches
NOTE l Set the volume of the portable audio unit to
the maximum within the range that the sound does not become distorted, thenadjust the volume using the power/volumedial of the audio unit or the volume button( , ) of the audio control switch.
l If the connection plug is pulled out from theauxiliary jack while in AUX mode, noisemay occur.
6-44
Interior Comfort
Audio System
8/2/2019 Mazda5 Owners Manual
http://slidepdf.com/reader/full/mazda5-owners-manual 207/375
Safety Certification
This CD player is made and tested to meet exacting safety standards. It meets FCCrequirements and complies with safety performance standards of the U.S. Department of Health and Human Services.
CAUTIONØ This CD player should not be adjusted or repaired by anyone except qualified
service personnel.If servicing is required, contact an Authorized Mazda Dealer.
Ø Use of controls or adjustments or performance of procedures other than thosespecified herein may result in hazardous laser exposure. Never operate the CDplayer with the top case of the unit removed.
Ø Changes or modifications not expressly approved by the party responsible for compliance could void the user's authority to operate this equipment.
NOTE For CD player section:This device complies with part 15 of the FCC Rules. Operation is subject to the following twoconditions: (1) This device may not cause harmful interference, and (2) this device must accept anyinterference received, including interference that may cause undesired operation.
NOTE This equipment has been tested and found to comply with the limits for a Class B digital device, pursuant to part 15 of the FCC Rules. These limits are designed to provide reasonable protectionagainst harmful interference in a residential installation. This equipment generates, uses, and canradiate radio frequency energy and, if not installed and used in accordance with the instructions,may cause harmful interference to radio communications. However, there is no guarantee that interference will not occur in a particular installation.
Interior Comfort
Audio System
6-45
8/2/2019 Mazda5 Owners Manual
http://slidepdf.com/reader/full/mazda5-owners-manual 208/375
Bluetooth Hands-Free í
q What is Bluetooth Hands-Free?Bluetooth Hands-Free Outline
By connecting a Bluetooth equippedmobile telephone to the hands-free unit equipped on the vehicle, making andreceiving calls are possible using thevoice recognition/hands-free switchlocated on the steering wheel, and sayingthe voice commands.
WARNING
Perform phonebook registration relatedoperations while the vehicle is parked:
Performing phonebook registrationwhile driving the vehicle could be adistraction to your driving and resultin an unexpected accident. Inaddition, a mistake in performing the
phonebook operation could result inthe loss of important data.
Bluetooth equipped mobile telephone
A Bluetooth equipped mobile telephonecommunicates with the hands-free unit equipped on the vehicle using radiotransmission (Bluetooth).For example, if the mobile telephone is placed in a coat pocket, the phone calls
can be made through your mobile servicewithout direct use of the mobiletelephone.
CAUTION
The types of mobile phones whichcan be connected to the hands-freeunit are limited, so before purchasingor changing your mobile phonemodel, consult an Authorized MazdaDealer.Mobile phones which can beconnected to the hands-free systemneed to be compliant with Bluetoothspecifications and the appropriate
profile, however, even among theseBluetooth phones are some whichwill not connect with your Mazda or will have limited function. Therefore,consult Mazda Bluetooth Hands-FreeCustomer Service for informationregarding mobile phonecompatibility:Phone: 800-430-0153Web: www.MazdaUSA.com/
bluetoothApplicable Bluetooth specificationVer. 1.1 or higher Response profilel HFP (Hands Free Profile) Ver. 1.0l DUN (Dial-up Networking Profile)
Ver. 1.1
Bluetooth is the registered trademark of Bluetooth SIG. Inc.
6-46
Interior Comfort
íSome models.
Bluetooth Hands-Free
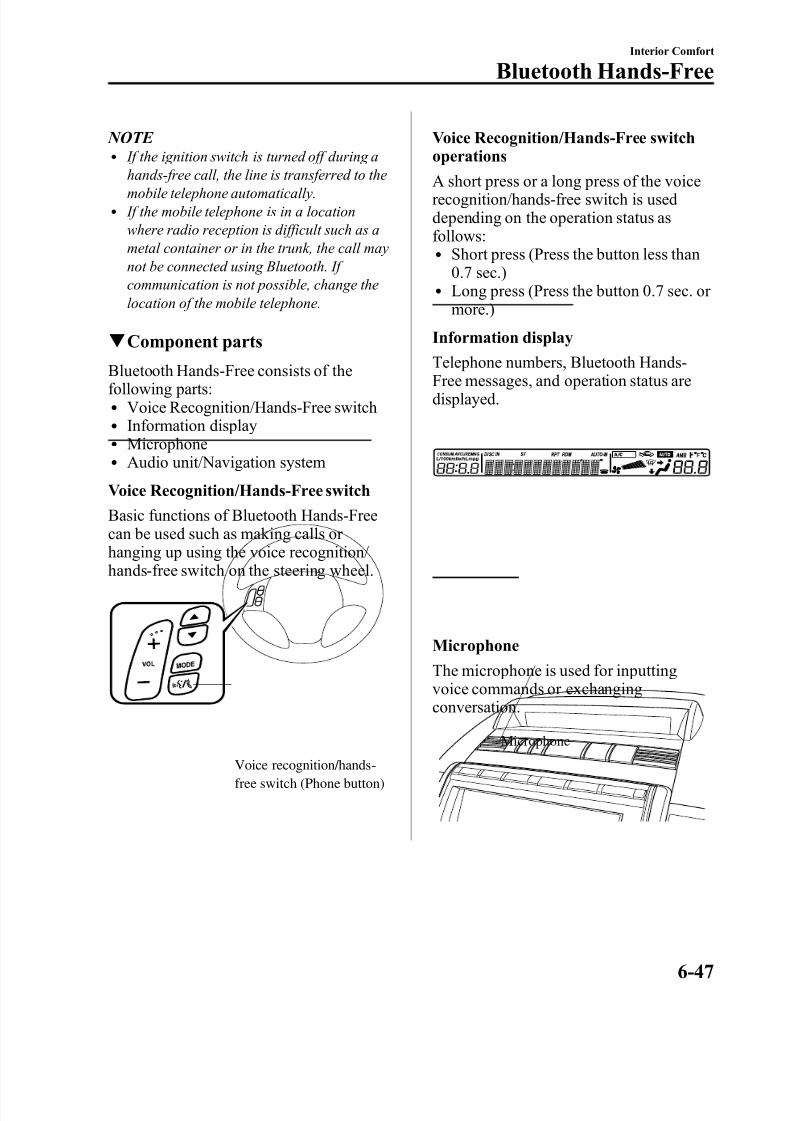
8/2/2019 Mazda5 Owners Manual
http://slidepdf.com/reader/full/mazda5-owners-manual 209/375
NOTE l If the ignition switch is turned off during a
hands-free call, the line is transferred to themobile telephone automatically.l If the mobile telephone is in a location
where radio reception is difficult such as ametal container or in the trunk, the call maynot be connected using Bluetooth. If communication is not possible, change thelocation of the mobile telephone.
q Component parts
Bluetooth Hands-Free consists of thefollowing parts:l Voice Recognition/Hands-Free switchl Information displayl Microphonel Audio unit/Navigation system
Voice Recognition/Hands-Free switch
Basic functions of Bluetooth Hands-Freecan be used such as making calls or hanging up using the voice recognition/ hands-free switch on the steering wheel.
Voice recognition/hands -free switch (Phone button)
Voice Recognition/Hands-Free switchoperations
A short press or a long press of the voicerecognition/hands-free switch is useddepending on the operation status asfollows:l Short press (Press the button less than
0.7 sec.)l Long press (Press the button 0.7 sec. or
more.)
Information display
Telephone numbers, Bluetooth Hands-Free messages, and operation status aredisplayed.
Microphone
The microphone is used for inputtingvoice commands or exchangingconversation.
Microphone
Interior Comfort
Bluetooth Hands-Free
6-47

8/2/2019 Mazda5 Owners Manual
http://slidepdf.com/reader/full/mazda5-owners-manual 210/375
Audio unit/Navigation system
The audio unit or navigation system is
used for adjusting the volume.If Bluetooth Hands-Free is operated,information such as mobile phone signalstrength of Bluetooth Hands-Free aredisplayed on the screen. (With navigationsystem)
Bluetooth Hands-Free information
q Voice
To prevent the deterioration in voicerecognition rate and voice quality, thefollowing points must be observed:l It is not necessary to face the
microphone or approach it. Speak thevoice commands while maintaining a safe driving position.
l Close the windows and/or themoonroof to reduce loud noises from
outside the vehicle, or turn down theairflow of the climate control systemwhile Bluetooth Hands-Free is beingused. Voice recognition may not function correctly or voice quality maydeteriorate under the followingconditions.l A passenger is speaking.l Driving with the window and/or the
moonroof open.l
Driving on bumpy roads.l Noise outside of the vehicle is loud.(Construction sites, inside tunnels,excess oncoming traffic, or heavyrain.)
l Operation noise from turn signals,wipers, or the horn is heard.
l A/C airflow is strong or wind is blowing on the microphone.
l There is noise coming from cargo
loaded in the vehicle.l Voice commands may not be
recognized depending on the voice. If the voice commands are not recognizedcorrectly, repeat the commands in a louder voice, at a natural pace, as if speaking to another person.
l Dialects or different wording other thanhands-free prompts cannot berecognized by voice recognition. Speak
in the wording specified by the voicecommands.
Please be aware that the voice recognitionmay error despite following the above points.
6-48
Interior Comfort
Bluetooth Hands-Free
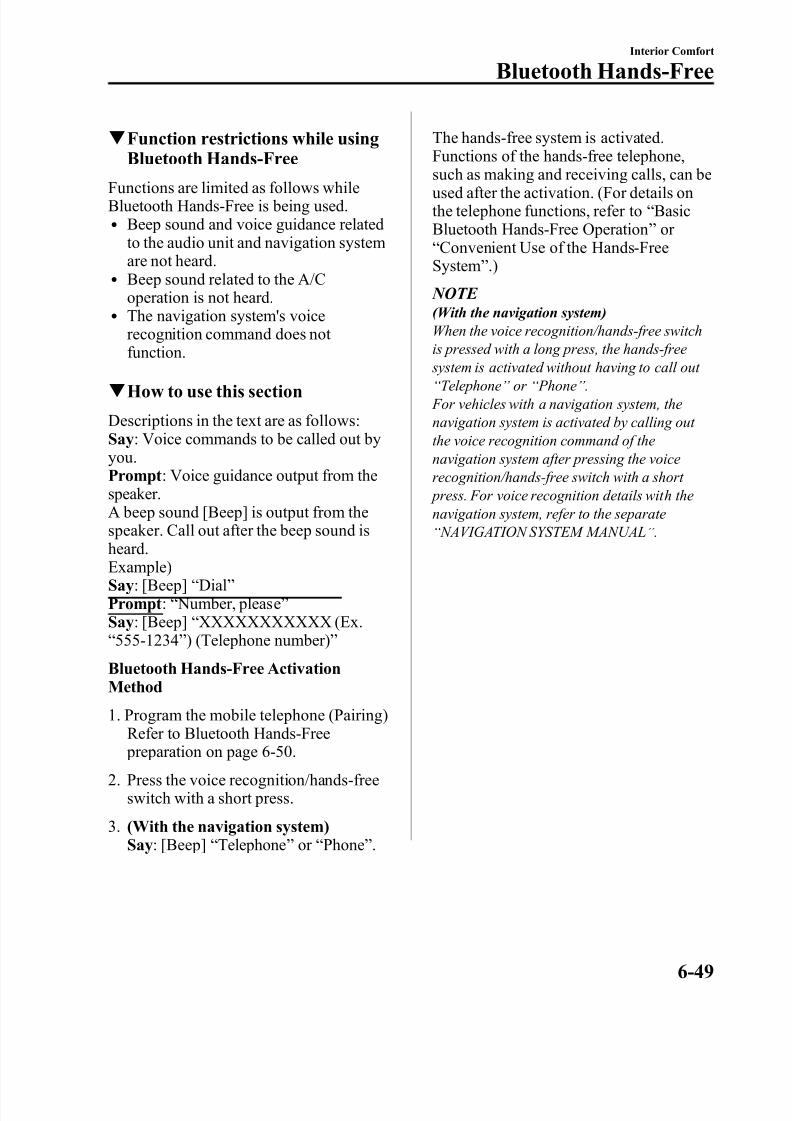
8/2/2019 Mazda5 Owners Manual
http://slidepdf.com/reader/full/mazda5-owners-manual 211/375
q Function restrictions while usingBluetooth Hands-Free
Functions are limited as follows whileBluetooth Hands-Free is being used.l Beep sound and voice guidance related
to the audio unit and navigation systemare not heard.
l Beep sound related to the A/Coperation is not heard.
l The navigation system's voicerecognition command does not function.
q How to use this section
Descriptions in the text are as follows:Say : Voice commands to be called out byyou.Prompt : Voice guidance output from thespeaker.A beep sound [Beep] is output from thespeaker. Call out after the beep sound isheard.Example)Say : [Beep] “ Dial ”
Prompt : “ Number, please ”
Say : [Beep] “ XXXXXXXXXXX (Ex.“ 555-1234 ” ) (Telephone number) ”
Bluetooth Hands-Free ActivationMethod
1. Program the mobile telephone (Pairing)Refer to Bluetooth Hands-Free preparation on page 6-50.
2. Press the voice recognition/hands-freeswitch with a short press.
3. (With the navigation system)Say : [Beep] “ Telephone ” or “ Phone ” .
The hands-free system is activated.Functions of the hands-free telephone,
such as making and receiving calls, can beused after the activation. (For details onthe telephone functions, refer to “ BasicBluetooth Hands-Free Operation ” or “ Convenient Use of the Hands-FreeSystem ” .)
NOTE (With the navigation system)When the voice recognition/hands-free switchis pressed with a long press, the hands-free system is activated without having to call out
“ Telephone ” or “ Phone ” . For vehicles with a navigation system, thenavigation system is activated by calling out the voice recognition command of thenavigation system after pressing the voicerecognition/hands-free switch with a short press. For voice recognition details with thenavigation system, refer to the separate“ NAVIGATION SYSTEM MANUAL” .
Interior Comfort
Bluetooth Hands-Free
6-49
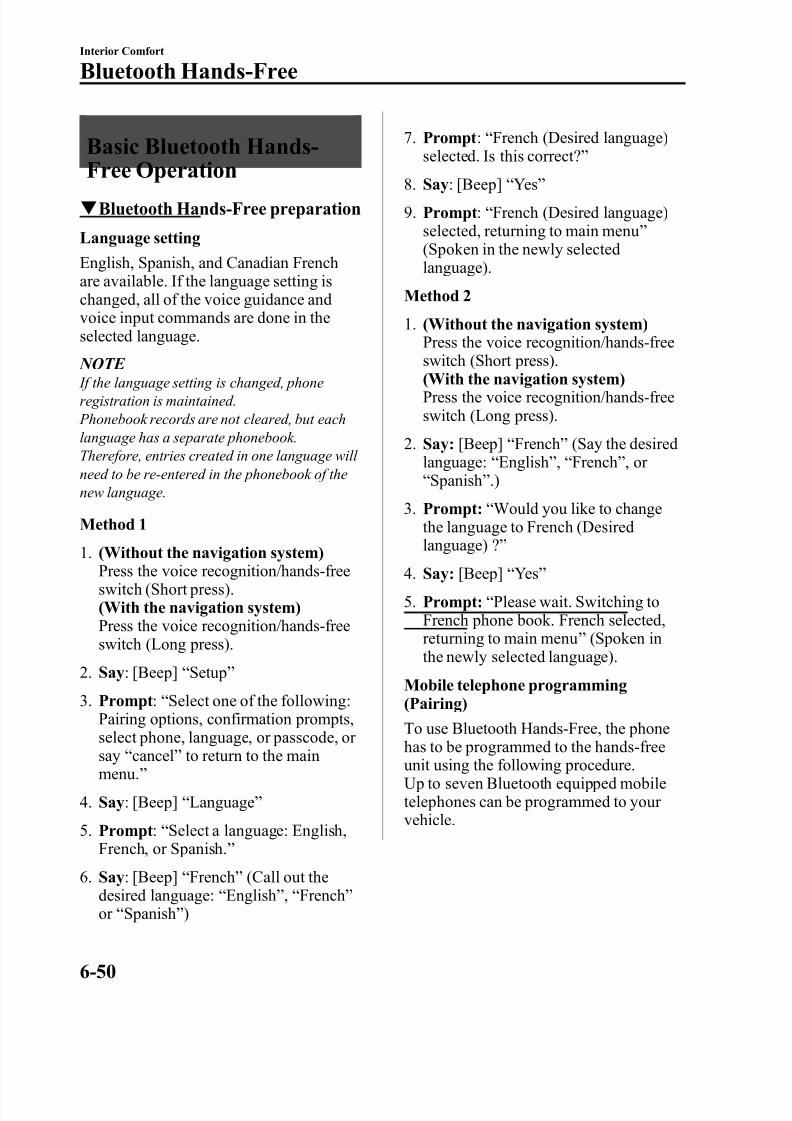
8/2/2019 Mazda5 Owners Manual
http://slidepdf.com/reader/full/mazda5-owners-manual 212/375
Basic Bluetooth Hands-
Free Operationq Bluetooth Hands-Free preparation
Language setting
English, Spanish, and Canadian Frenchare available. If the language setting ischanged, all of the voice guidance andvoice input commands are done in theselected language.
NOTE If the language setting is changed, phoneregistration is maintained. Phonebook records are not cleared, but eachlanguage has a separate phonebook.Therefore, entries created in one language will need to be re-entered in the phonebook of thenew language.
Method 1
1. (Without the navigation system)Press the voice recognition/hands-freeswitch (Short press).(With the navigation system)Press the voice recognition/hands-freeswitch (Long press).
2. Say : [Beep] “ Setup ”
3. Prompt : “ Select one of the following:
Pairing options, confirmation prompts,select phone, language, or passcode, or say “ cancel ” to return to the mainmenu. ”
4. Say : [Beep] “ Language ”
5. Prompt : “ Select a language: English,French, or Spanish. ”
6. Say : [Beep] “ French ” (Call out thedesired language: “ English ” , “ French ”
or “ Spanish ” )
7. Prompt : “ French (Desired language)selected. Is this correct? ”
8. Say : [Beep] “ Yes ”
9. Prompt : “ French (Desired language)selected, returning to main menu ”
(Spoken in the newly selectedlanguage).
Method 2
1. (Without the navigation system)Press the voice recognition/hands-free
switch (Short press).(With the navigation system)Press the voice recognition/hands-freeswitch (Long press).
2. Say: [Beep] “ French ” (Say the desiredlanguage: “ English ” , “ French ” , or “ Spanish ” .)
3. Prompt: “ Would you like to changethe language to French (Desiredlanguage) ? ”
4. Say: [Beep] “ Yes ”
5. Prompt: “ Please wait. Switching toFrench phone book. French selected,returning to main menu ” (Spoken inthe newly selected language).
Mobile telephone programming(Pairing)
To use Bluetooth Hands-Free, the phonehas to be programmed to the hands-freeunit using the following procedure.Up to seven Bluetooth equipped mobiletelephones can be programmed to your vehicle.
6-50
Interior Comfort
Bluetooth Hands-Free
8/2/2019 Mazda5 Owners Manual
http://slidepdf.com/reader/full/mazda5-owners-manual 213/375
NOTE l A mobile telephone can be programmed
only when the vehicle is parked.l Since the communication range of a Bluetooth equipped mobile telephone isabout 10 meters (32 ft), if a mobiletelephone is placed within a 10-meter (32 ft) radius of the vehicle, it may be detected/ programmed unintentionally while another telephone is being programmed.
1. Activate the Bluetooth application of the mobile telephone.
NOTE For the operation of the mobile telephone,refer to its instruction manual.
2. Press the voice recognition/hands-freeswitch (Long press).
3. Say : [Beep] “ Setup ”
4. Prompt : “ Select one of the following:Pairing options, confirmation prompts,select phone, language, or passcode, or say “ cancel ” to return to the mainmenu. ”
5. Say : [Beep] “ Pairing options ”
6. Prompt : “ Do you want to pair a phone,delete a phone, or list paired phones? ”
7. Say : [Beep] “ Pair a phone ”
8. Prompt : “ Please say a 4-digit pairingcode. ”
9. Say : [Beep] “ XXXX ” (Call out anarbitrary 4-digit pairing code. This can be any combination of 4 numbers.)
NOTE Record the code as it will be used to program your phone in Step 16.
10. Prompt : “ Pairing code XXXX (4-digit number). Is this correct? ”
11. Say : [Beep] “ Yes ” or “ No ”
12. If “ Yes ” , go to Step 13.If “ No” , the procedure returns to Step8.
13. Prompt : “ Start pairing procedure on phone. See phone's manual for instructions. ”
14. Using the mobile telephone, performa search for the Bluetooth device(Peripheral device).
NOTE For the operation of the mobile telephone,refer to its instruction manual.
15. Select “ Mazda ” from the device list searched by the mobile phone.
16. Input the 4-digit pairing code set inStep 9 to the mobile telephone.
17. Prompt : “ Please say the name of the
phone after the beep.”
18. Say : [Beep] “ XXXX - - - ” (Call out a “ phone tag ” , an arbitrary name for the phone.)Example: “ Stan's phone. ”
NOTE Call out a programmed “ phone tag ” within 10 seconds. If more than two mobile telephones are to be
programmed, they cannot be programmed withthe same or similar “ phone tag ” .
19. Prompt : “ Adding XXXXXX - - -(Ex. “ Stan's phone ” ) (Phone tag). Isthis correct? ”
20. Say : [Beep] “ Yes ”
21. Prompt : “ Assign a priority for this phone between 1 and 7, where 1 isthe phone used most often. ”
Interior Comfort
Bluetooth Hands-Free
6-51
8/2/2019 Mazda5 Owners Manual
http://slidepdf.com/reader/full/mazda5-owners-manual 214/375
22. Say : [Beep] “ 1” (Call out a number of the desired priority from 1 to 7.)
NOTE l Normally, “ 1 ” is to be input (Highest
priority).l If more than two mobile telephones are
registered, input the priority order from 1 to7.
23. Prompt : “ XXXXXX - - - (Ex. “ Stan's phone ” ) (Phone tag) set to priority X(Priority number). Is this correct? ”
24. Say : [Beep] “ Yes ”
25. Prompt : “ Pairing complete ”
After a mobile telephone is registered, thesystem automatically identifies the phone.By pressing the voice recognition/hands-free switch again, or by pressing the voicerecognition/hands-free switch first after turning the ignition switch from the
LOCK to the ACC position, the systemreads out a voice guidance, “ XXXXXX -- - (Ex. “ Stan's phone ” ) (Phone tag) isconnected ” . If two or more telephones areregistered, the one with the highest priority is selected.
q Making a call using a telephonenumber
1. Activate the Bluetooth Hands-Free(page 6-49).
2. Say : [Beep] “ Dial ”
3. Prompt : “ Number, please ”
4. Say : [Beep] “ XXXXXXXXXXX (Ex.“ 555-1234 ” ) (Telephone number) ”
5. Prompt : “ Dialing XXXXXXXXXXX(Ex. “ 555-1234 ” ) (Telephone number)
is this correct? ”
6. Say : [Beep] “ Yes ” or “ No ” .
7. When “ Yes ” is called out, the call ismade.
When“
No”
is called out, the procedurereturns to Step 3.
q Receiving an incoming call
1. Prompt : “ Incoming call, press the phone button to answer ” .
2. To accept the call, press the voicerecognition/hands-free switch (Short press).
To reject the call, press the voicerecognition/hands-free switch (Long press).
q Hanging up a call
Press the voice recognition/hands-freeswitch during the call (Long press).Beep will confirm that call is ended.
q Volume adjustmentTurn the power/volume dial of the audiounit or navigation system to adjust thevolume.Turn the power/volume dial to the right toincrease volume, to the left to decrease it.
Audio unit Navigation system
6-52
Interior Comfort
Bluetooth Hands-Free
8/2/2019 Mazda5 Owners Manual
http://slidepdf.com/reader/full/mazda5-owners-manual 215/375
NOTE l The volume can also be adjusted using the
volume button on the steering wheel.l The music volume of the audio unit and thenavigation system cannot be adjusted while Bluetooth Hands-Free is being used.
q Help function use
The help function informs the user of allthe available voice commands under thecurrent conditions.
1. Press the voice recognition/hands-freeswitch (Short press).
2. Say : [Beep] “ Help ”
3. Follow the prompts to receive theappropriate voice guidanceinstructions.
Convenient Use of the
Hands-Free Systemq Phone book usage
Phone book registration
Phone numbers can be registered to theBluetooth Hands-Free phone book.
1. Activate the Bluetooth Hands-Free(page 6-49).
2. Say: [Beep]“
Phone book ”
3. Prompt: “ Select one of the following:new entry, edit, list names, delete or erase all..., or say “ cancel ” to return tomain menu. ”
4. Say: [Beep] “ New entry ”
5. Prompt: “ Name please. ”
6. Say: [Beep] “ XXXXX... (Ex. “ Mary's
phone ” )” (Say a voice tag for the nameregistered.)
7. Prompt: “ Adding XXXXX... (Ex.“ Mary's phone ” ) (Registered voicetag). Is this correct? ”
8. Say: [Beep] “ Yes ”
9. Prompt: “ Home, Work, Mobile, or Pager? ”
10. Say: [Beep] “ Mobile ” (Say “ Home ” ,“ Work ” , “ Mobile ” , or “ Pager ” , for thedesired location to be registered.)
11. Prompt: “ Mobile ” (Location to beregistered). Is this correct?
12. Say: [Beep] “ Yes ”
13. Prompt: “ Number, please. ”
14. Say: [Beep] “ XXXXXXXXXXX(Ex. “ 555-1234 ” )” (Say the phonenumber to be registered.)
Interior Comfort
Bluetooth Hands-Free
6-53
8/2/2019 Mazda5 Owners Manual
http://slidepdf.com/reader/full/mazda5-owners-manual 216/375
15. Prompt: “ XXXXXXXXXXX (Ex.“ 555-1234 ” ) (Phone number
registration). Is this correct?”
16. Say: [Beep] “ Yes ”
17. Prompt: “ Number saved. Would youlike to add another number for thisentry? ”
18. Say: [Beep] “ Yes ” or “ No ” .
19. If “ Yes ” , an additional phone number registration can be made for the same
entry.If “ No ” , the procedure proceeds toStep 20.
20. Prompt: “ Returning to main menu. ”
Making calls using the phone book
Telephone calls can be made by sayingthe name of a person (voice tag) whose phone number has been registered inBluetooth Hands-Free in advance.For the phone book setting method, refer to (page 6-55).
1. Activate the Bluetooth Hands-Free(page 6-49).
2. Say: [Beep] “ Call ”
3. Prompt: “ Name please. ”
4. Say: [Beep] “ XXXXX... (Ex. “ John's
phone”
)”
(Say a voice tag registered inthe phone book.)
5. Prompt: “ Calling XXXXX... (Ex.“ John's phone ” ) XXXX (Ex. “ at home ” ). Is this correct? ” (Voice tag and phone number location registered in phone book).
6. Say: [Beep] “ Yes ”
7. Prompt: “ Dialing ”
q Redialing function
Redialing the number of the person previously dialed using the phone is possible.
1. Activate the Bluetooth Hands-Free(page 6-49).
2. Say: [Beep] “ Redial ”
3. Prompt: “ Dialing ”
q Emergency calls
A call can be made to the emergency phone number (911) using the voice input command.
1. (Without the navigation system)Press the voice recognition/hands-freeswitch (Short press).(With the navigation system)Activate the Bluetooth Hands-Free(page 6-49).
2. (Without the navigation system)Go to Step 3.(With the navigation system)Say: [Beep] “ Telephone ” or “ Phone ” ,or press the voice recognition/hands-free switch (Long press).
3. Say: [Beep] “ Emergency ”
4. Prompt: “ Calling “ 911 ” , is thiscorrect? ”
5. Say: [Beep] “ Yes ”
6. Prompt: “ Dialing ”
q Refusing an incoming call
For incoming call refusal, refer to“ Receiving an incoming call ” (page 6-52).
6-54
Interior Comfort
Bluetooth Hands-Free
8/2/2019 Mazda5 Owners Manual
http://slidepdf.com/reader/full/mazda5-owners-manual 217/375
q Mute
The microphone can be muted during a call.
1. Press the voice recognition/hands-freeswitch (Short press).
2. Say: [Beep] “ Mute ”
3. Prompt: “ Microphone muted ”
Canceling mute
1. Press the voice recognition/hands-freeswitch (Short press).
2. Say: [Beep] “ Mute off ”
3. Prompt: “ Microphone unmuted ”
q Transferring a call
Transferring a call from Hands-Free toa mobile phone
Communication between the hands-freeunit and a mobile phone is canceled, andthe line can be switched to a standard callusing a mobile phone.
1. Press the voice recognition/hands-freeswitch (Short press).
2. Say: [Beep] “ Transfer call ”
3. Prompt: “ Transferred call to phone ”
Transferring a call from a mobilephone to Hands-Free
Communication between mobile phonescan be switched to the Bluetooth Hands-Free system.
1. Press the voice recognition/hands-freeswitch (Short press).
2. Say: [Beep] “ Transfer call ”
3. Prompt:“
Transferred call to HandsFree system ”
Call waiting
A call can be interrupted to receive an
incoming call from a third party.Call interrupt
A call can be switched to a new incomingcall.Press the voice recognition/hands-freeswitch (Short press).
NOTE l To refuse an incoming call, press the voice
recognition/hands-free switch (Long press).l After receiving a new incoming call, the
previous call is placed on hold.
Switching calls
Switching back to the previous call canalso be done.Press the voice recognition/hands-freeswitch (Short press).
Ending the current call
Press the voice recognition/hands-freeswitch during the call (Long press).
q Voice guidance interrupt operation
Voice guidance can be stopped by pressing the voice recognition/hands-freeswitch (Short press) while it is beingheard. A new voice input command canthen be called out by the user.· Press the voice recognition/hands-free
switch (Short press).
q Phone book settings
Editing phone book
The data registered to the BluetoothHands-Free phone book can be edited.
1. Activate the Bluetooth Hands-Free(page 6-49).
Interior Comfort
Bluetooth Hands-Free
6-55
8/2/2019 Mazda5 Owners Manual
http://slidepdf.com/reader/full/mazda5-owners-manual 218/375
2. Say: [Beep] “ Phone book ”
3. Prompt: “ Select one of the following:new entry, edit, list names, delete or erase all..., or say “ cancel ” to return tomain menu. ”
4. Say: [Beep] “ Edit ”
5. Prompt: “ Please say the name of theentry you would like to edit, or say“ List names ” ..., or say “ cancel ” toreturn to main menu. ”
6. Say: [Beep] “ XXXXX... (Ex. “ Mary's phone ” )” (Say the voice tag for theregistered name to be edited in the phone book.)
7. Prompt: “ Home, Work, Mobile, or Pager? ”
8. Say: [Beep] “ Home ” (Say theregistered location to be edited:“ Home ” , “ Work ” , “ Mobile ” , or “ Pager ” ).
9. Prompt: “ XXXXX... (Ex. “ Mary's phone ” ) (Registered voice tag) XXXX(Ex. “ home ” ) (Registered location). Isthis correct? ”
10. Say: [Beep] “ Yes ”
11. Prompt: “ The current number isXXXXXXXXXXX (Ex. “ 555-1234 ” )
(Currently registered number). Newnumber, please. ”
NOTE If there was no previous phone number registered to a location (Ex. “ Work ” ), the prompt will only read out “ Number, please ” .
12. Say: [Beep] “ XXXXXXXXXXX(Ex. “ 666-1234 ” )” (Say the new phone number to be registered.)
13. Prompt: “ XXXXXXXXXXX (Ex.“ 666-1234 ” ) (The new phone number
to be registered). Is this correct?”
14. Say: [Beep] “ Yes ”
15. Prompt: “ Number changed. Wouldyou like to call this number, edit another entry..., or say “ cancel ” toreturn to main menu. ”
Phone book data deletion
Erasing individual phone book data
Individual data registered to the BluetoothHands-Free phone book can be cleared.
1. Activate the Bluetooth Hands-Free(page 6-49).
2. Say: [Beep] “ Phone book ”
3. Prompt: “ Select one of the following:new entry, edit, list names, delete or erase all..., or say “ cancel ” to return to
main menu. ”
4. Say: [Beep] “ Delete ”
5. Prompt: “ Please say the name of theentry you would like to delete, or say“ List names ” ..., or say “ cancel ” toreturn to main menu. ”
6. Say: [Beep] “ XXXXX... (Ex. “ John's phone ” )” (Say the registered voice tag
to be deleted from the phone book.)7. Prompt: “ Deleting XXXXX... (Ex.
“ John's phone ” ) (Registered voice tag)Home (Registered location). Is thiscorrect? ”
8. Say: [Beep] “ Yes ”
9. Prompt: “ XXXXX... (Ex. “ John's phone ” ) (Registered voice tag) Home(Registered location) deleted, returningto main menu. ”
6-56
Interior Comfort
Bluetooth Hands-Free
8/2/2019 Mazda5 Owners Manual
http://slidepdf.com/reader/full/mazda5-owners-manual 219/375
Complete deletion of the phone book data
All data registered to the BluetoothHands-Free phone book can be erased.
1. Activate the Bluetooth Hands-Free(page 6-49).
2. Say: [Beep] “ Phone book ”
3. Prompt: “ Select one of the following:new entry, edit, list names, delete or erase all..., or say “ cancel ” to return to
main menu.”
4. Say: [Beep] “ Erase all ”
5. Prompt: “ Are you sure you want toerase everything from your Hands Freesystem phone book? ”
6. Say: [Beep] “ Yes ”
7. Prompt: “ You are about to deleteeverything from your Hands Free
system phone book. Do you want tocontinue? ”
8. Say: [Beep] “ Yes ”
9. Prompt: “ Please wait, erasing theHands Free system phone book. ”
10. Prompt: “ Hands-Free system phone book erased, returning to mainmenu. ”
Read-out of names registered to theBluetooth Hands-Free phone book
The Bluetooth Hands-Free system canread out the list of names registered to its phone book.
1. Activate the Bluetooth Hands-Free(page 6-49).
2. Say: [Beep] “ Phone book ”
3. Prompt: “ Select one of the following:new entry, edit, list names, delete or
erase all..., or say“
cancel”
to return tomain menu. ”
4. Say: [Beep] “ List names ”
5. Prompt: “ XXXXX..., XXXXX...,XXXXX... (Ex. “ John's phone ” , Mary's phone, Bill's phone) ” (Voice guidancereads out the voice tags registered tothe phone book.)
Press the voice recognition/hands-freeswitch during the read-out at the desiredname, and then say one of the followingvoice commands to execute it.l “ Continue ” : Continues the voice
guidance.l “ Call ” : Calls the registered phone
number.l “ Edit ” : Edits the registered phone
number.l “ Delete ” : Deletes the registered phone
number.l “ Previous ” : Returns to the previous
phone number.l “ Cancel ” : Returns to main menu.
6. Prompt: “ End of list, would you liketo start from the beginning? ”
7. Say: [Beep] “ No ”
8. Prompt: “ Returning to main menu. ”
Interior Comfort
Bluetooth Hands-Free
6-57

8/2/2019 Mazda5 Owners Manual
http://slidepdf.com/reader/full/mazda5-owners-manual 220/375
Hands-Free Telephone Setting
q Mobile phoneMobile phone registration
For the registration of a Bluetoothequipped mobile telephone to BluetoothHands-Free, refer to “ Bluetooth Hands-Free preparation ” (page 6-50).
Registered mobile phone read-out
Bluetooth Hands-Free can read-out themobile phones registered to its system.1. Activate the Bluetooth Hands-Free
(page 6-49).
2. Say: [Beep] “ Setup ”
3. Prompt: “ Select one of the following: pairing options, confirmation prompts,select phone, language, or passcode...,or say “ cancel ” to return to main
menu.”
4. Say: [Beep] “ Pairing options ”
5. Prompt: “ Do you want to pair a phone, delete a phone, or list paired phones? ”
6. Say: [Beep] “ List phones ”
7. Prompt: “ XXXXX..., XXXXX...,XXXXX... (Ex. Phone A, phone B, phone C) ” (The voice guidance readsout the phone tags registered to thehands-free system.)
Press the voice recognition/hands-freeswitch during the read-out at the desired phone, and then say one of the followingvoice commands to execute it.l “ Select ” : Programmed the mobile
phone when the voice recognition/
hands-free switch was pressed.
l “ Continue ” : Continues the voiceguidance.
l “
Delete”
: Deletes the registered mobile phone.l “ Previous ” : Returns to the previous
mobile phone.
8. Prompt: “ End of list, would you liketo start from the beginning? ”
9. Say: [Beep] “ No ”
10. Prompt: “ Returning to main menu. ”
Mobile phone selectionThis function is for switching to a different mobile phone which has beenregistered beforehand. The selectedmobile phone will remain in effect untilthe ignition switch is turned off.
1. Activate the Bluetooth Hands-Free(page 6-49).
2. Say: [Beep] “ Setup ”
3. Prompt: “ Select one of the following: pairing options, confirmation prompts,select phone, language, or passcode...,or say “ cancel ” to return to mainmenu. ”
4. Say: [Beep] “ Select phone ”
5. Prompt: “ Please say 1 (priority 1) for XXXXX... (Ex. phone A), 2 (priority2) for XXXXX... (Ex. phone B...) ”
6. Say: [Beep] “ 2” (Say the prioritynumber for the mobile phone to beused as first priority.)
7. Prompt: “ XXXXX... (Ex. phone B...)(Registered phone tag) selected, is thiscorrect? ”
8. Say: [Beep] “ Yes ”
6-58
Interior Comfort
Bluetooth Hands-Free
8/2/2019 Mazda5 Owners Manual
http://slidepdf.com/reader/full/mazda5-owners-manual 221/375
9. Prompt: “ XXXXX... (Ex. phone B...)(Phone tag) will temporarily override
phone priorities, returning to mainmenu. ”
Registered mobile phone deletion
Registered mobile phones can be deletedindividually or collectively.
1. Activate the Bluetooth Hands-Free(page 6-49).
2. Say: [Beep] “ Setup ”
3. Prompt: “ Select one of the following: pairing options, confirmation prompts,select phone, language, or passcode...,or say “ cancel ” to return to mainmenu. ”
4. Say: [Beep] “ Pairing options ”
5. Prompt: “ Do you want to pair a phone, delete a phone, or list paired phones? ”
NOTE A registered mobile phone can be deleted using the registration list.
6. Say: [Beep] “ Delete phone ”
7. Prompt: “ Please say 1 (priority 1) for XXXXX... (Ex. phone A), 2 (priority2) for XXXXX... (Ex. phone B...) ”
(The voice guidance reads out each phone in the order of priority and the phone tag).
8. Say: [Beep] “ 2” (Say the order of priority of the mobile phone to bedeleted.)
NOTE Say “ All ” to delete all mobile phones.
9. Prompt: “ Removing XXXXX... (Ex. phone B...) (Registered phone tag). Isthis correct? ”
10. Say: [Beep] “ Yes ”
11. Prompt: “ Deleted ”
q Security setting
If a passcode is set, the system cannot beactivated unless the passcode is input.
Passcode setting
1. Activate the Bluetooth Hands-Free(page 6-49).
2. Say: [Beep]“
Setup”
3. Prompt: “ Select one of the following: pairing options, confirmation prompts,select phone, language, or passcode...,or say “ cancel ” to return to mainmenu. ”
4. Say: [Beep] “ Passcode ”
5. Prompt: “ Passcode is disabled. Wouldyou like to enable it? ”
6. Say: [Beep] “ Yes ”
7. Prompt: “ Please say a 4-digit passcode.Remember this passcode. It will berequired to use this system. ”
8. Say: [Beep] “ XXXX ” (Say a desired 4-digit passcode, “ PCode ” .)
9. Prompt: “ Passcode XXXX (Passcode,
PCode). Is this correct?”
10. Say: [Beep] “ Yes ”
11. Prompt: “ Passcode is enabled,returning to main menu. ”
Using Bluetooth Hands-Free with apasscode
1. Activate the Bluetooth Hands-Free(page 6-49).
2. Prompt: “ Hands-Free system is locked.State the passcode to continue. ”
Interior Comfort
Bluetooth Hands-Free
6-59
8/2/2019 Mazda5 Owners Manual
http://slidepdf.com/reader/full/mazda5-owners-manual 222/375
3. Say: [Beep] “ XXXX ” (Say the set passcode “ PCode ” .)
4. If the correct passcode is input, voiceguidance “ XXXXXX... (Ex. “ Mary's phone) (Phone tag) is connected ” isannounced.If the passcode is incorrect, voiceguidance “ XXXX (4-digit passcode,Pcode) incorrect passcode, please tryagain ” is announced.
Canceling the passcode
1. Activate the Bluetooth Hands-Free(page 6-49).
2. Say: [Beep] “ Setup ”
3. Prompt: “ Select one of the following: pairing options, confirmation prompts,select phone, language, or passcode...,or say “ cancel ” to return to mainmenu. ”
4. Say: [Beep] “ Passcode ”
5. Prompt: “ Passcode is enabled. Wouldyou like to disable it? ”
6. Say: [Beep] “ Yes ”
7. Prompt: “ Passcode is disabled,returning to main menu. ”
Confirmation Prompts
The confirmation prompt confirms thecommand content to the user beforeadvancing to the operation requested bythe user. When this function is turned on,the system reads out the voice input command previously received andconfirms whether the command is correct before advancing to the commandexecution.
When the confirmation prompt function isturned on:
(Ex.“
Calling John's phone. Is thiscorrect? ” )When the confirmation prompt function isturned off:(Ex. “ Calling John's phone. ” )
NOTE If the confirmation prompt function is turned off when making an emergency call, the systemreads out and confirms the command beforeexecuting it.
1. Activate the Bluetooth Hands-Free(page 6-49).
2. Say: [Beep] “ Setup ”
3. Prompt: “ Select one of the following: pairing options, confirmation prompts,select phone, language, or passcode...,or say “ cancel ” to return to mainmenu. ”
4. Say: [Beep] “ Confirmation prompts ”
5. Prompt: “ Confirmation prompts areon/off. Would you like to turnconfirmation prompts off/on? ”
6. Say: [Beep] “ Yes ”
7. Prompt: “ Confirmation prompts areoff/on, returning to main menu. ”
6-60
Interior Comfort
Bluetooth Hands-Free
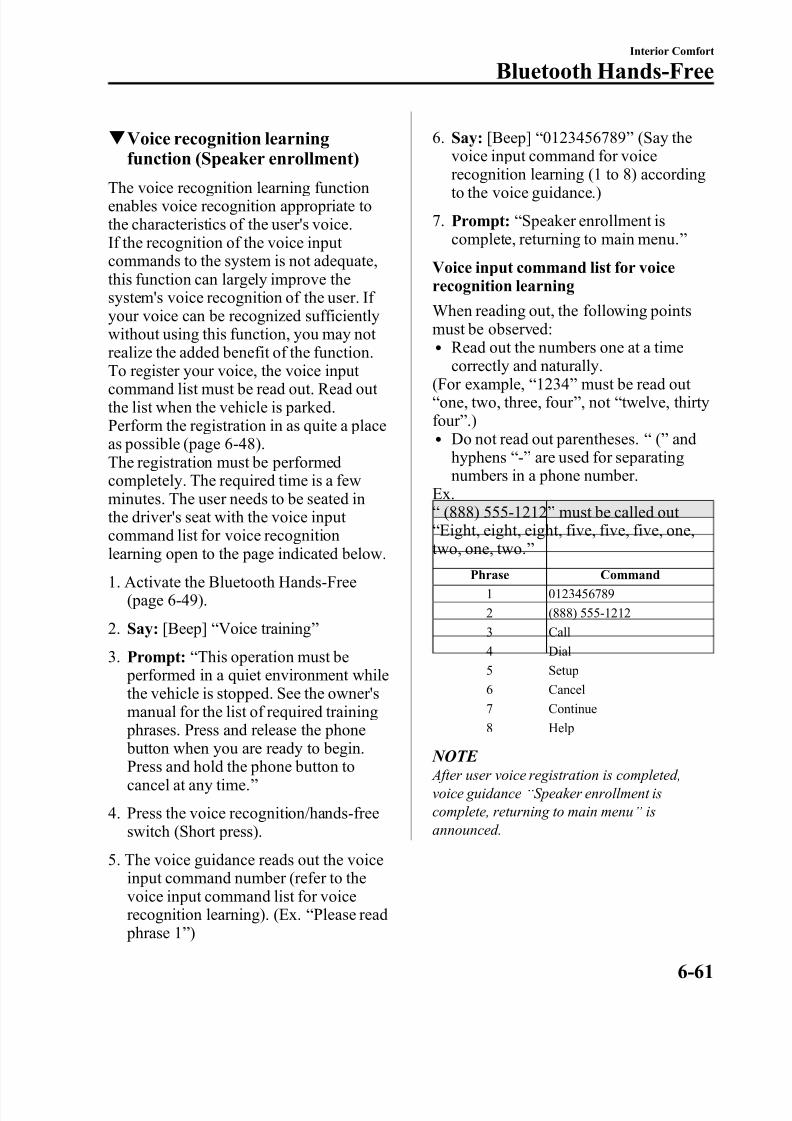
8/2/2019 Mazda5 Owners Manual
http://slidepdf.com/reader/full/mazda5-owners-manual 223/375
q Voice recognition learningfunction (Speaker enrollment)
The voice recognition learning functionenables voice recognition appropriate tothe characteristics of the user's voice.If the recognition of the voice input commands to the system is not adequate,this function can largely improve thesystem's voice recognition of the user. If your voice can be recognized sufficientlywithout using this function, you may not realize the added benefit of the function.To register your voice, the voice input command list must be read out. Read out the list when the vehicle is parked.Perform the registration in as quite a placeas possible (page 6-48).The registration must be performedcompletely. The required time is a fewminutes. The user needs to be seated inthe driver's seat with the voice input
command list for voice recognitionlearning open to the page indicated below.
1. Activate the Bluetooth Hands-Free(page 6-49).
2. Say: [Beep] “ Voice training ”
3. Prompt: “ This operation must be performed in a quiet environment whilethe vehicle is stopped. See the owner'smanual for the list of required training phrases. Press and release the phone button when you are ready to begin.Press and hold the phone button tocancel at any time. ”
4. Press the voice recognition/hands-freeswitch (Short press).
5. The voice guidance reads out the voiceinput command number (refer to thevoice input command list for voicerecognition learning). (Ex. “ Please read phrase 1 ” )
6. Say: [Beep] “ 0123456789 ” (Say thevoice input command for voice
recognition learning (1 to 8) accordingto the voice guidance.)
7. Prompt: “ Speaker enrollment iscomplete, returning to main menu. ”
Voice input command list for voicerecognition learning
When reading out, the following pointsmust be observed:l Read out the numbers one at a time
correctly and naturally.(For example, “ 1234 ” must be read out “ one, two, three, four ” , not “ twelve, thirtyfour ” .)l Do not read out parentheses. “ (” and
hyphens “ -” are used for separatingnumbers in a phone number.
Ex.“ (888) 555-1212 ” must be called out “ Eight, eight, eight, five, five, five, one,two, one, two. ”
Phrase Command
1 01234567892 (888) 555-12123 Call4 Dial5 Setup6 Cancel7 Continue
8 Help
NOTE After user voice registration is completed,voice guidance “ Speaker enrollment iscomplete, returning to main menu ” isannounced.
Interior Comfort
Bluetooth Hands-Free
6-61
8/2/2019 Mazda5 Owners Manual
http://slidepdf.com/reader/full/mazda5-owners-manual 224/375
q DTMF (dual tone multi-frequency signal) transmission
This function is used when transmittingDTMF via the user's voice. The receiver of a DTMF transmission is generally a home telephone answering machine or a company's automated guidance call center (When you send tone signals back according to the voice guidancerecording).
1. Press the voice recognition/hands-free
switch (Short press).2. Say: [Beep] “ XXXX... send ” (Say
DTMF code)
3. Prompt: “ Sending XXXX... (DTMFcode) ”
When Bluetooth Hands-
Free cannot be usedBluetooth Hands-Free cannot be usedunder the following conditions:l The mobile telephone is outside of the
communication area.l The mobile telephone has a
malfunction.l The mobile telephone is not connected
to the hands-free unit equipped on the
vehicle.l The mobile telephone battery is weak.l The mobile telephone is turned off.l The mobile telephone is placed where
radio reception is difficult.
6-62
Interior Comfort
Bluetooth Hands-Free
8/2/2019 Mazda5 Owners Manual
http://slidepdf.com/reader/full/mazda5-owners-manual 225/375
Safety Certification
FCC ID: CB2MBLUEC07 IC:279B-MBLUEC07This device complies with Part 15 of theFCC Rules and with RSS-210 of IndustryCanada. Operation is subject to thefollowing two conditions:(1) This device may not cause harmful
interference, and(2) This device must accept any
interference received, including
interference that may cause undesiredoperation.
WARNING
Changes or modifications notexpressively approved by the party responsible for compliance could voidthe user's authority to operate theequipment.
The term “ IC: ” before the radiocertification number only signifies that Industry Canada technical specificationswere met.The antenna used for this transmitter must not be co-located or operating inconjunction with any other antenna or transmitter. End-users and installers must be provided with installation instructionsand transmitter operating conditions for satisfying RF exposure compliance.
Mazda Bluetooth Hands-
Free Customer ServiceFor toll-free Bluetooth Hands-Freecustomer service call 800-430-0153 or goto www.MazdaUSA.com/bluetooth for assistance.
Interior Comfort
Bluetooth Hands-Free
6-63
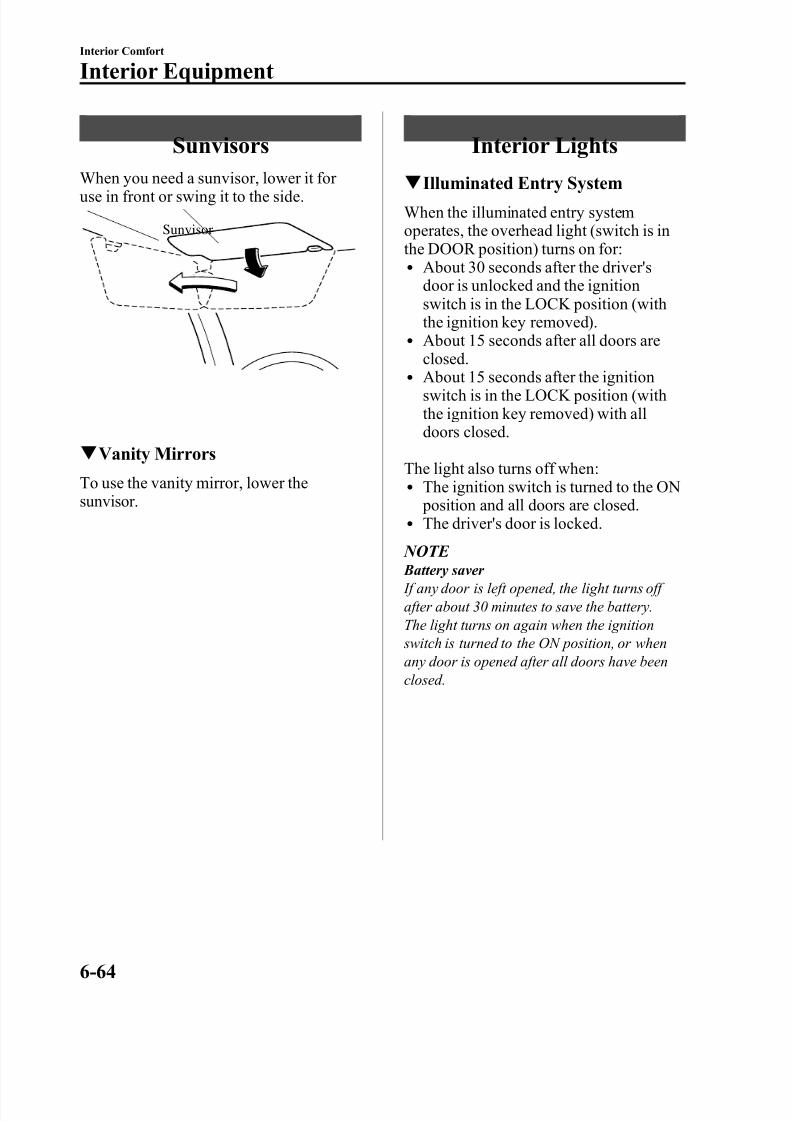
8/2/2019 Mazda5 Owners Manual
http://slidepdf.com/reader/full/mazda5-owners-manual 226/375
Sunvisors
When you need a sunvisor, lower it for use in front or swing it to the side.
Sunvisor
q Vanity Mirrors
To use the vanity mirror, lower thesunvisor.
Interior Lights
q Illuminated Entry SystemWhen the illuminated entry systemoperates, the overhead light (switch is inthe DOOR position) turns on for:l About 30 seconds after the driver's
door is unlocked and the ignitionswitch is in the LOCK position (withthe ignition key removed).
l About 15 seconds after all doors are
closed.l About 15 seconds after the ignition
switch is in the LOCK position (withthe ignition key removed) with alldoors closed.
The light also turns off when:l The ignition switch is turned to the ON
position and all doors are closed.l The driver's door is locked.
NOTE Battery saver If any door is left opened, the light turns off after about 30 minutes to save the battery.The light turns on again when the ignition switch is turned to the ON position, or whenany door is opened after all doors have beenclosed.
6-64
Interior Comfort
Interior Equipment
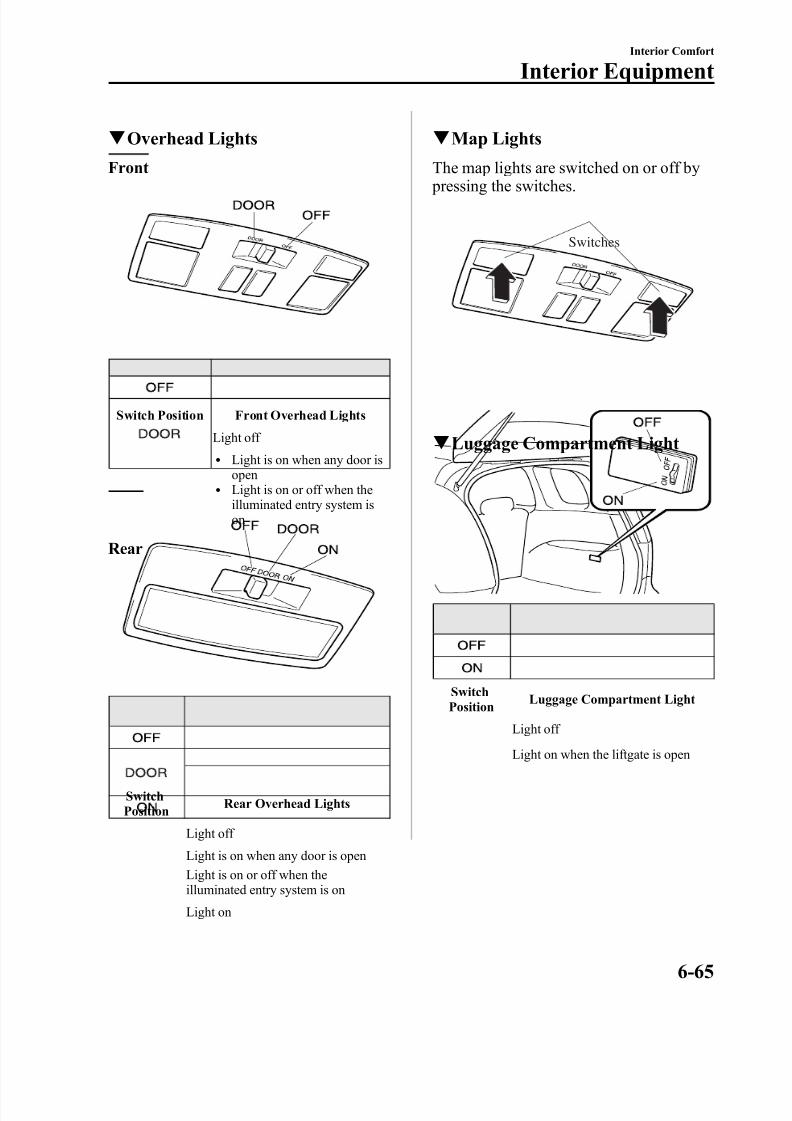
8/2/2019 Mazda5 Owners Manual
http://slidepdf.com/reader/full/mazda5-owners-manual 227/375
q Overhead Lights
Front
Switch Position Front Overhead Lights
Light off l Light is on when any door is
openl Light is on or off when the
illuminated entry system ison
Rear
SwitchPosition Rear Overhead Lights
Light off
Light is on when any door is openLight is on or off when theilluminated entry system is on
Light on
q Map Lights
The map lights are switched on or off by pressing the switches.
Switches
q Luggage Compartment Light
SwitchPosition Luggage Compartment Light
Light off
Light on when the liftgate is open
Interior Comfort
Interior Equipment
6-65
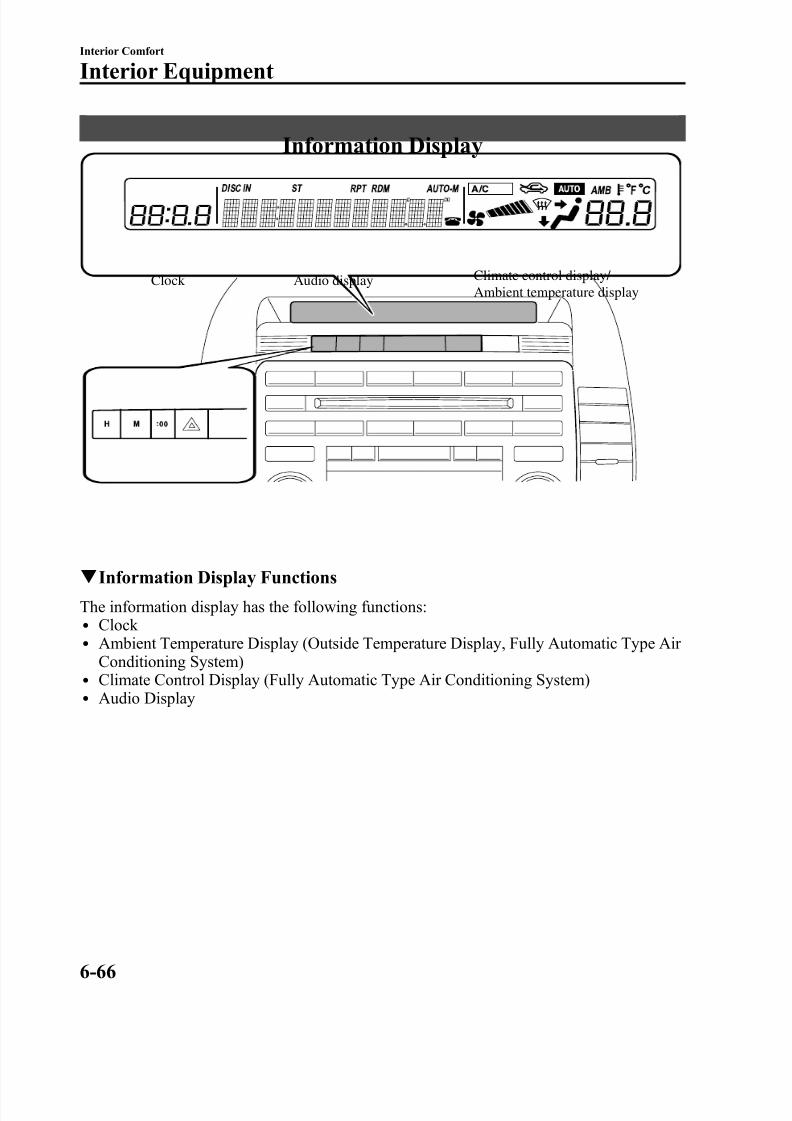
8/2/2019 Mazda5 Owners Manual
http://slidepdf.com/reader/full/mazda5-owners-manual 228/375
Information Display
Clock Audio display Climate control display/ Ambient temperature display
q Information Display Functions
The information display has the following functions:l Clock l Ambient Temperature Display (Outside Temperature Display, Fully Automatic Type Air
Conditioning System)l Climate Control Display (Fully Automatic Type Air Conditioning System)l Audio Display
6-66
Interior Comfort
Interior Equipment
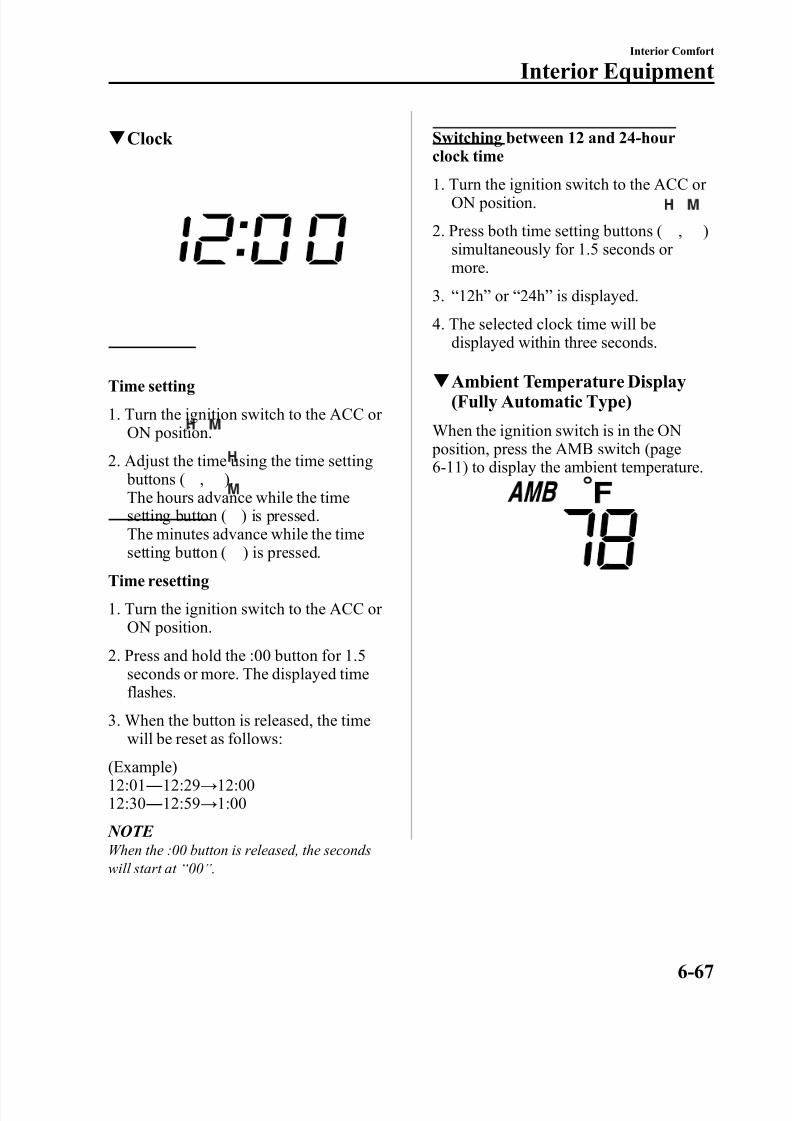
8/2/2019 Mazda5 Owners Manual
http://slidepdf.com/reader/full/mazda5-owners-manual 229/375
q Clock
Time setting
1. Turn the ignition switch to the ACC or ON position.
2. Adjust the time using the time setting buttons ( , ).The hours advance while the timesetting button ( ) is pressed.The minutes advance while the timesetting button ( ) is pressed.
Time resetting
1. Turn the ignition switch to the ACC or ON position.
2. Press and hold the :00 button for 1.5seconds or more. The displayed timeflashes.
3. When the button is released, the timewill be reset as follows:
(Example)12:01 ― 12:29 → 12:0012:30 ― 12:59 → 1:00
NOTE When the :00 button is released, the secondswill start at “ 00 ” .
Switching between 12 and 24-hourclock time
1. Turn the ignition switch to the ACC or ON position.
2. Press both time setting buttons ( , )simultaneously for 1.5 seconds or more.
3. “ 12h ” or “ 24h ” is displayed.
4. The selected clock time will bedisplayed within three seconds.
q Ambient Temperature Display(Fully Automatic Type)
When the ignition switch is in the ON position, press the AMB switch (page6-11) to display the ambient temperature.
Interior Comfort
Interior Equipment
6-67
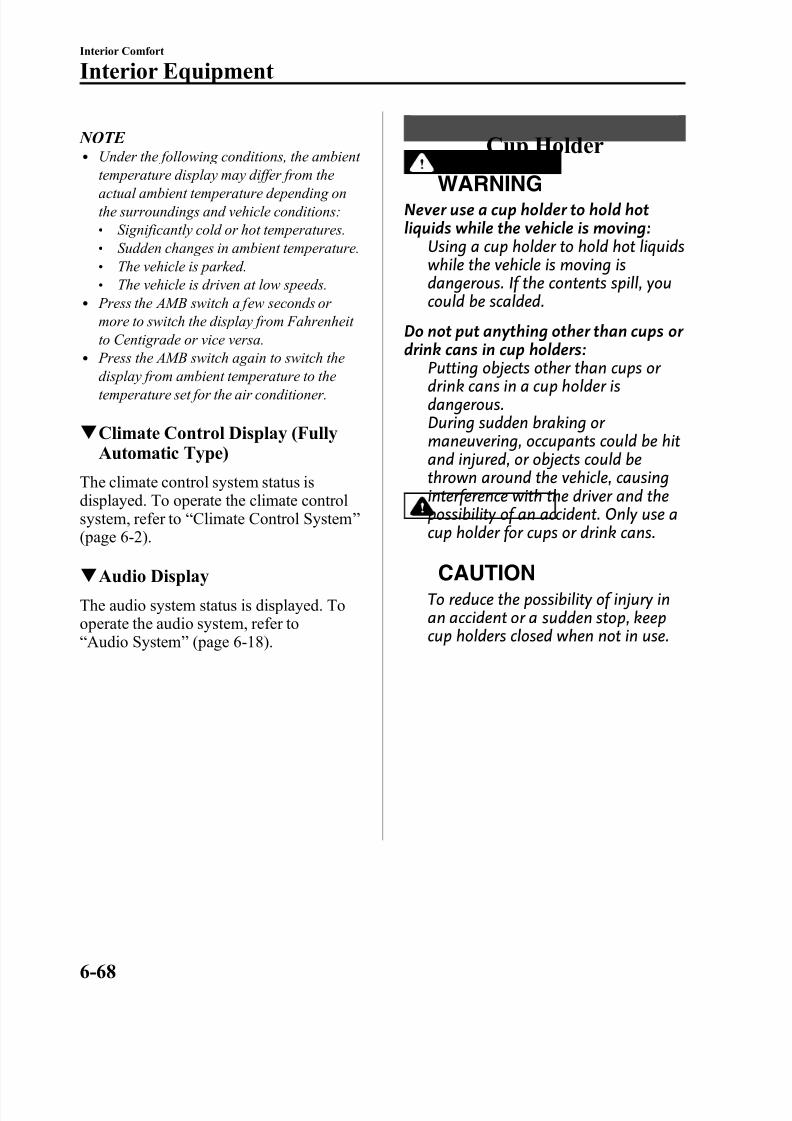
8/2/2019 Mazda5 Owners Manual
http://slidepdf.com/reader/full/mazda5-owners-manual 230/375
NOTE l Under the following conditions, the ambient
temperature display may differ from theactual ambient temperature depending onthe surroundings and vehicle conditions:l Significantly cold or hot temperatures.l Sudden changes in ambient temperature.l The vehicle is parked.l The vehicle is driven at low speeds.
l Press the AMB switch a few seconds or more to switch the display from Fahrenheit to Centigrade or vice versa.
l
Press the AMB switch again to switch thedisplay from ambient temperature to thetemperature set for the air conditioner.
q Climate Control Display (FullyAutomatic Type)
The climate control system status isdisplayed. To operate the climate controlsystem, refer to “ Climate Control System ”
(page 6-2).q Audio Display
The audio system status is displayed. Tooperate the audio system, refer to“ Audio System ” (page 6-18).
Cup Holder
WARNINGNever use a cup holder to hold hotliquids while the vehicle is moving:
Using a cup holder to hold hot liquidswhile the vehicle is moving isdangerous. If the contents spill, youcould be scalded.
Do not put anything other than cups or drink cans in cup holders:
Putting objects other than cups or drink cans in a cup holder isdangerous.During sudden braking or maneuvering, occupants could be hitand injured, or objects could bethrown around the vehicle, causinginterference with the driver and thepossibility of an accident. Only use acup holder for cups or drink cans.
CAUTION
To reduce the possibility of injury inan accident or a sudden stop, keepcup holders closed when not in use.
6-68
Interior Comfort
Interior Equipment
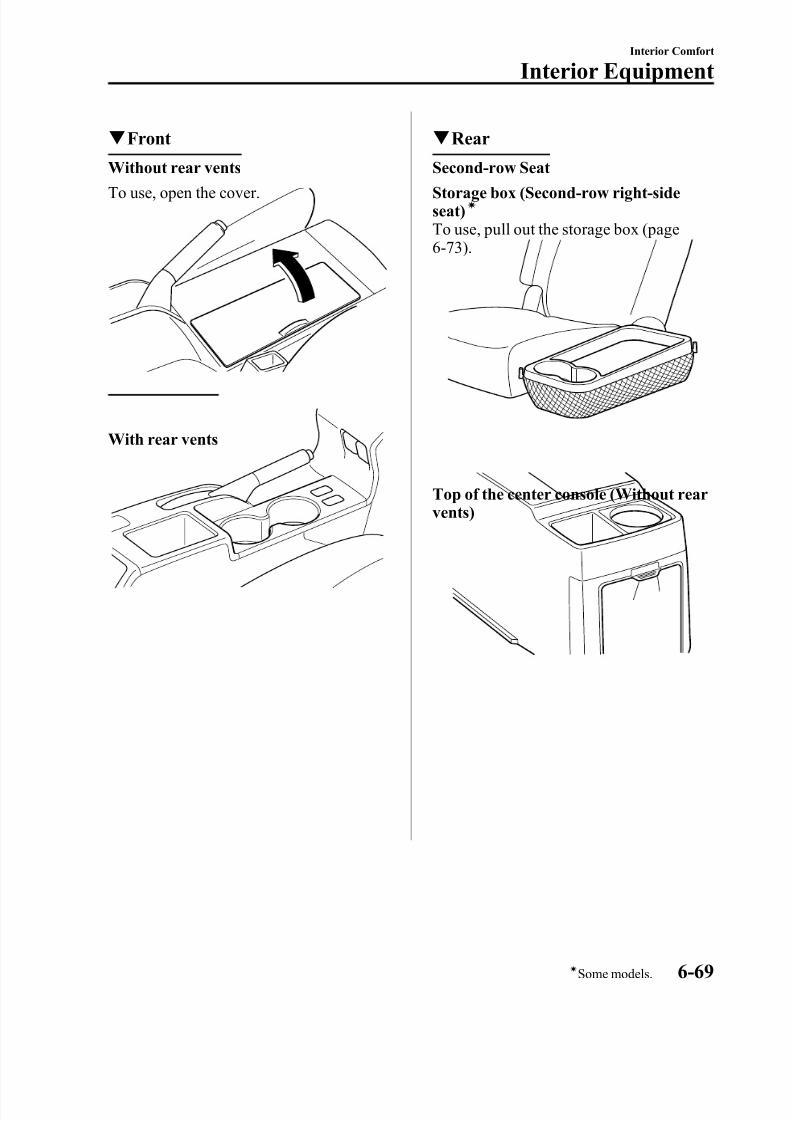
8/2/2019 Mazda5 Owners Manual
http://slidepdf.com/reader/full/mazda5-owners-manual 231/375
q Front
Without rear vents
To use, open the cover.
With rear vents
q Rear
Second-row Seat
Storage box (Second-row right-sideseat)
í
To use, pull out the storage box (page6-73).
Top of the center console (Without rearvents)
Interior Comfort
Interior Equipment
6-69íSome models.
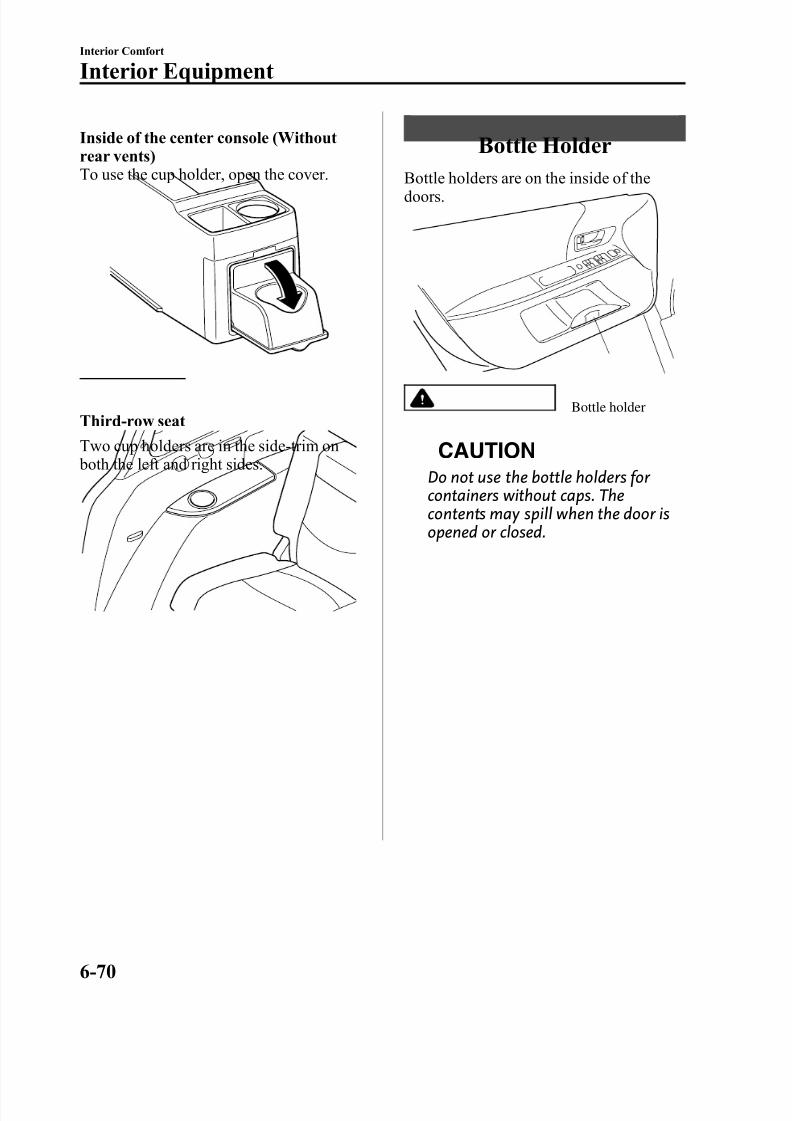
8/2/2019 Mazda5 Owners Manual
http://slidepdf.com/reader/full/mazda5-owners-manual 232/375
Inside of the center console (Withoutrear vents)
To use the cup holder, open the cover.
Third-row seat
Two cup holders are in the side-trim on both the left and right sides.
Bottle Holder
Bottle holders are on the inside of thedoors.
Bottle holder
CAUTION
Do not use the bottle holders for containers without caps. Thecontents may spill when the door isopened or closed.
6-70
Interior Comfort
Interior Equipment
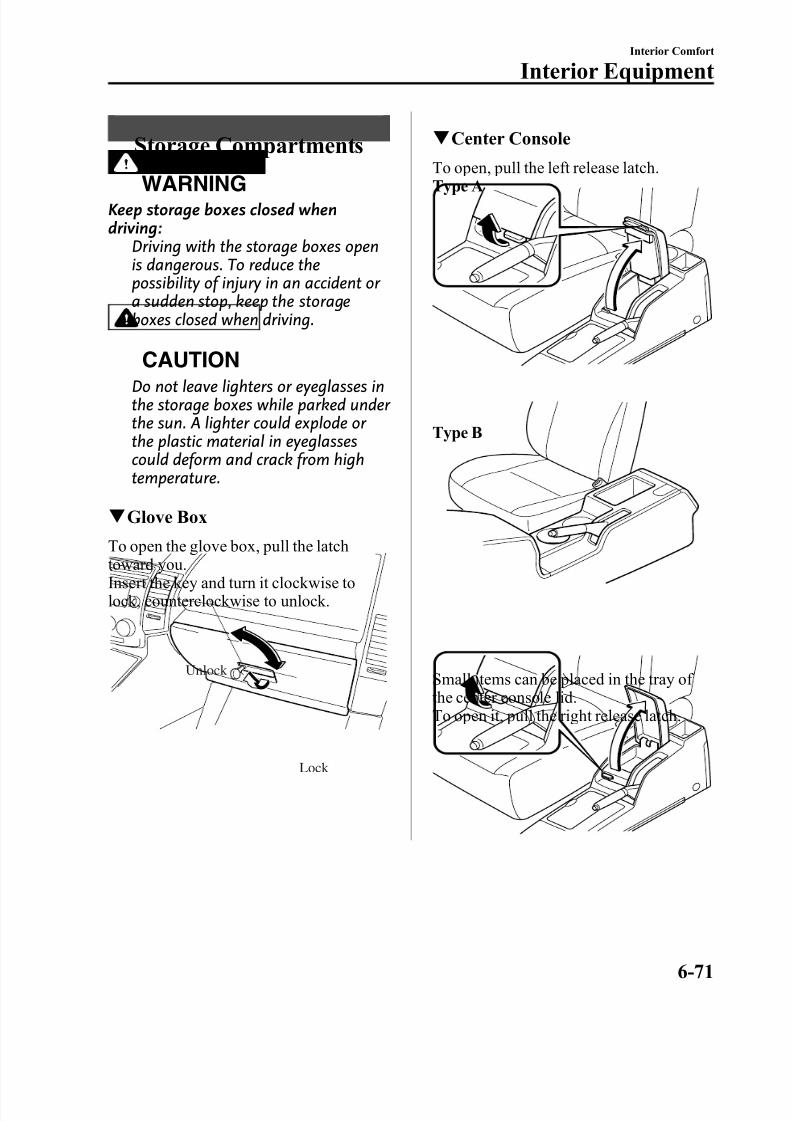
8/2/2019 Mazda5 Owners Manual
http://slidepdf.com/reader/full/mazda5-owners-manual 233/375
Storage Compartments
WARNINGKeep storage boxes closed whendriving:
Driving with the storage boxes openis dangerous. To reduce thepossibility of injury in an accident or a sudden stop, keep the storageboxes closed when driving.
CAUTIONDo not leave lighters or eyeglasses inthe storage boxes while parked under the sun. A lighter could explode or the plastic material in eyeglassescould deform and crack from hightemperature.
q Glove Box
To open the glove box, pull the latchtoward you.Insert the key and turn it clockwise tolock, counterclockwise to unlock.
Lock
Unlock
q Center Console
To open, pull the left release latch.Type A
Type B
Small items can be placed in the tray of the center console lid.To open it, pull the right release latch.
Interior Comfort
Interior Equipment
6-71
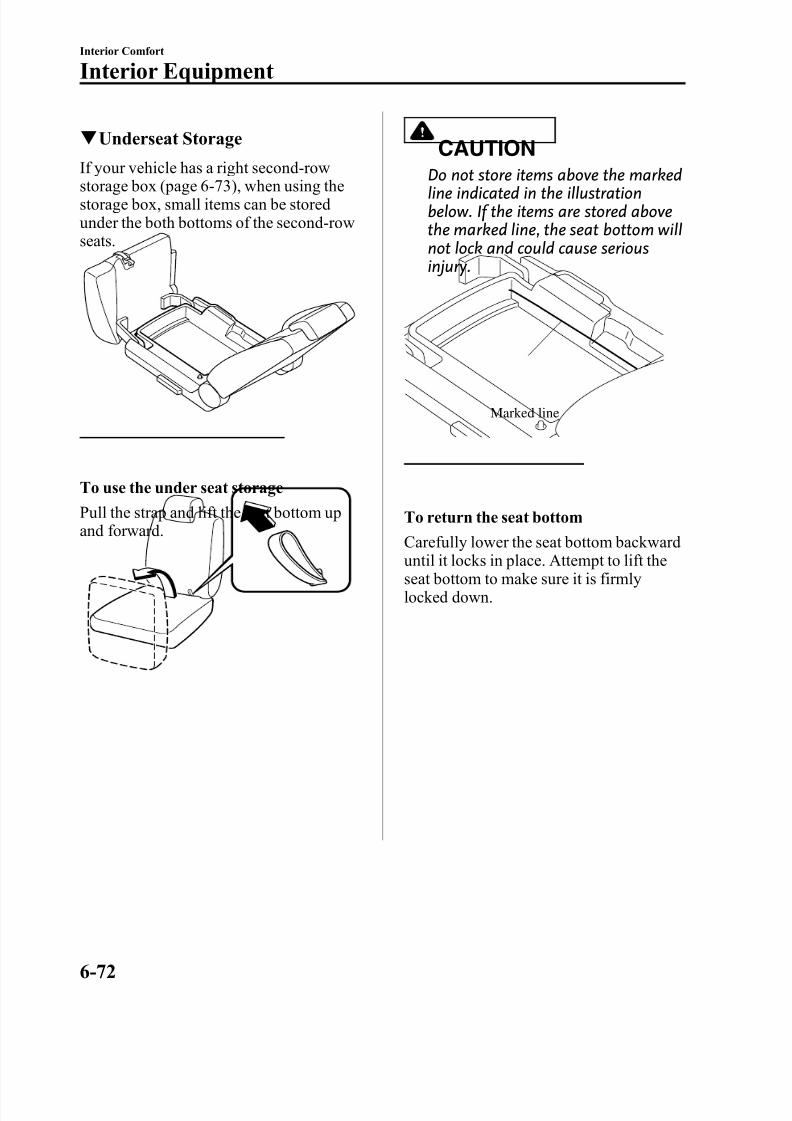
8/2/2019 Mazda5 Owners Manual
http://slidepdf.com/reader/full/mazda5-owners-manual 234/375
q Underseat Storage
If your vehicle has a right second-rowstorage box (page 6-73), when using thestorage box, small items can be storedunder the both bottoms of the second-rowseats.
To use the under seat storage
Pull the strap and lift the seat bottom upand forward.
CAUTION
Do not store items above the markedline indicated in the illustrationbelow. If the items are stored abovethe marked line, the seat bottom willnot lock and could cause seriousinjury.
Marked line
To return the seat bottom
Carefully lower the seat bottom backwarduntil it locks in place. Attempt to lift theseat bottom to make sure it is firmlylocked down.
6-72
Interior Comfort
Interior Equipment
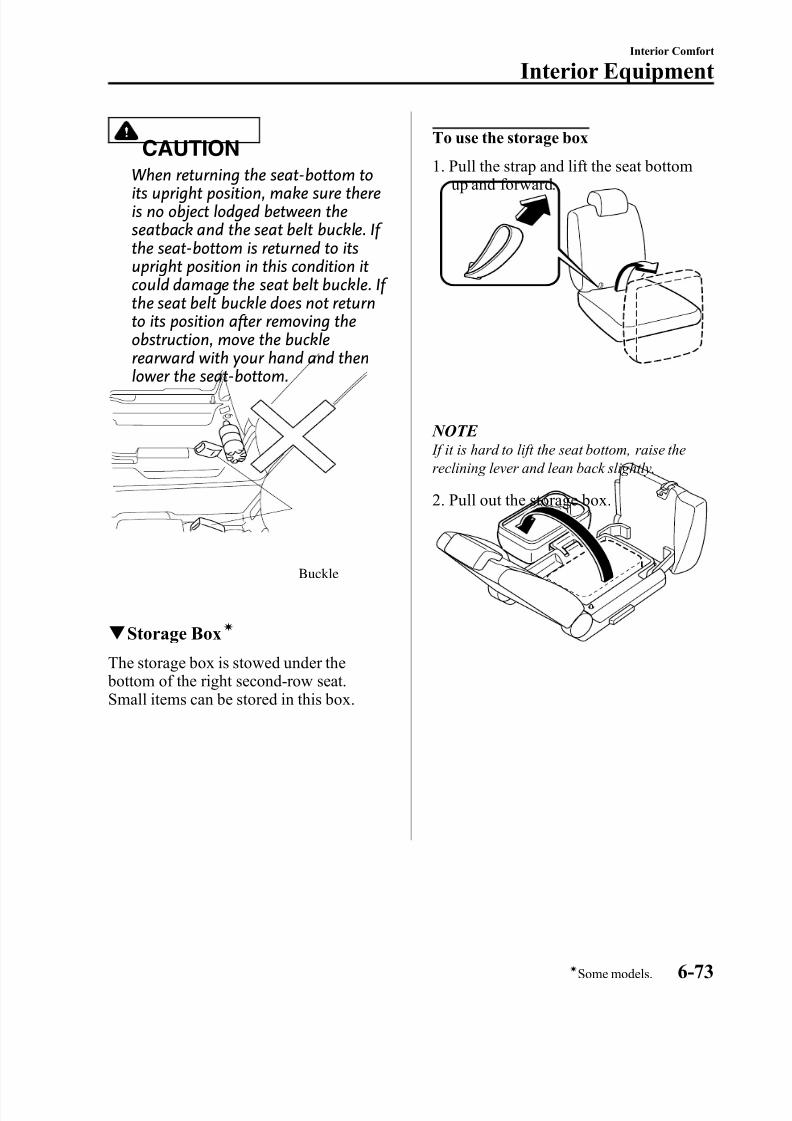
8/2/2019 Mazda5 Owners Manual
http://slidepdf.com/reader/full/mazda5-owners-manual 235/375
CAUTION
When returning the seat-bottom toits upright position, make sure thereis no object lodged between theseatback and the seat belt buckle. If the seat-bottom is returned to itsupright position in this condition itcould damage the seat belt buckle. If the seat belt buckle does not returnto its position after removing theobstruction, move the buckle
rearward with your hand and thenlower the seat-bottom.
Buckle
q Storage Boxí
The storage box is stowed under the bottom of the right second-row seat.Small items can be stored in this box.
To use the storage box
1. Pull the strap and lift the seat bottomup and forward.
NOTE If it is hard to lift the seat bottom, raise thereclining lever and lean back slightly.
2. Pull out the storage box.
Interior Comfort
Interior Equipment
6-73íSome models.
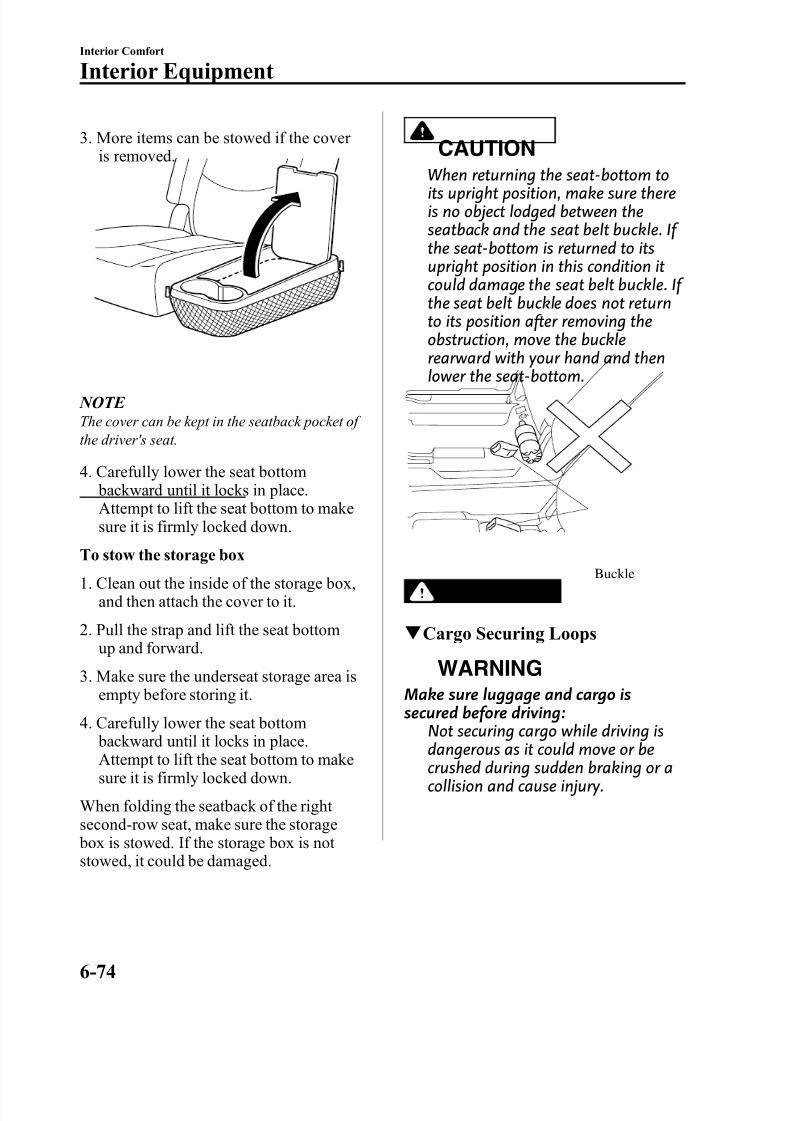
8/2/2019 Mazda5 Owners Manual
http://slidepdf.com/reader/full/mazda5-owners-manual 236/375
3. More items can be stowed if the cover is removed.
NOTE The cover can be kept in the seatback pocket of the driver's seat.
4. Carefully lower the seat bottom backward until it locks in place.Attempt to lift the seat bottom to makesure it is firmly locked down.
To stow the storage box
1. Clean out the inside of the storage box,and then attach the cover to it.
2. Pull the strap and lift the seat bottomup and forward.
3. Make sure the underseat storage area isempty before storing it.
4. Carefully lower the seat bottom backward until it locks in place.Attempt to lift the seat bottom to makesure it is firmly locked down.
When folding the seatback of the right second-row seat, make sure the storage box is stowed. If the storage box is not stowed, it could be damaged.
CAUTION
When returning the seat-bottom toits upright position, make sure thereis no object lodged between theseatback and the seat belt buckle. If the seat-bottom is returned to itsupright position in this condition itcould damage the seat belt buckle. If the seat belt buckle does not returnto its position after removing theobstruction, move the buckle
rearward with your hand and thenlower the seat-bottom.
Buckle
q Cargo Securing Loops
WARNING
Make sure luggage and cargo issecured before driving:
Not securing cargo while driving isdangerous as it could move or becrushed during sudden braking or acollision and cause injury.
6-74
Interior Comfort
Interior Equipment
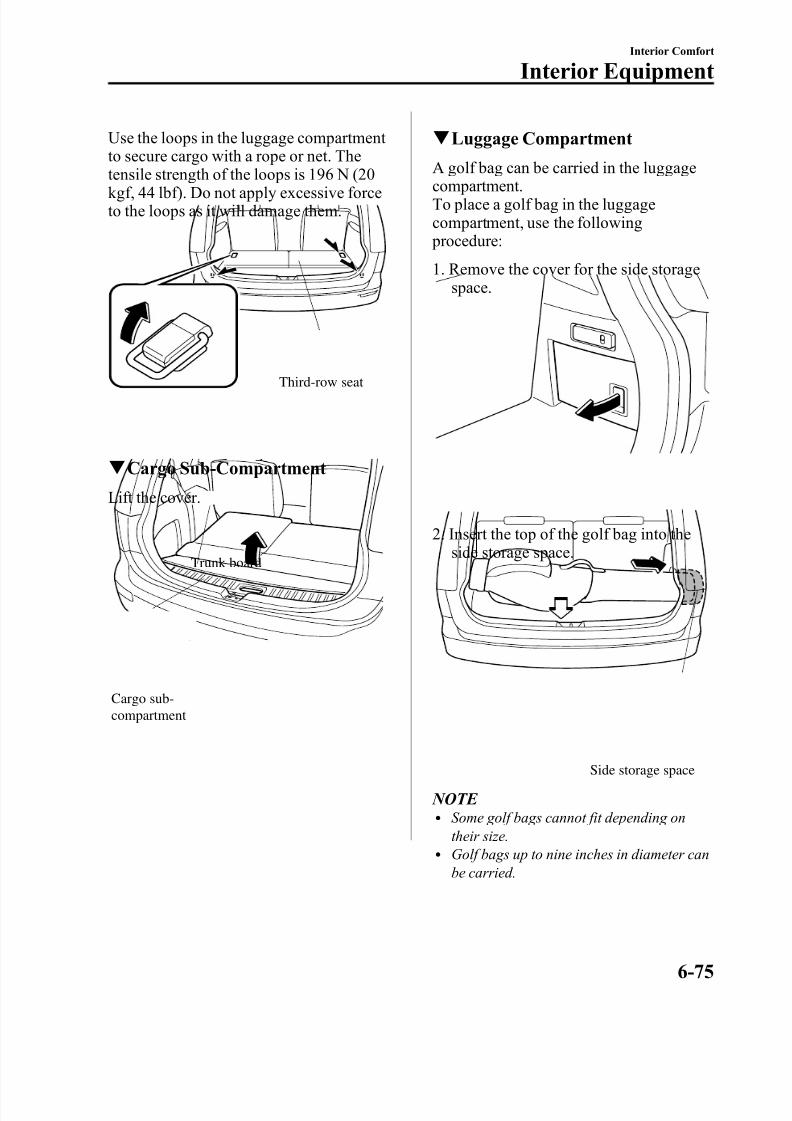
8/2/2019 Mazda5 Owners Manual
http://slidepdf.com/reader/full/mazda5-owners-manual 237/375
Use the loops in the luggage compartment to secure cargo with a rope or net. The
tensile strength of the loops is 196 N (20kgf, 44 lbf). Do not apply excessive forceto the loops as it will damage them.
Third-row seat
q Cargo Sub-Compartment
Lift the cover.
Trunk board
Cargo sub-compartment
q Luggage Compartment
A golf bag can be carried in the luggagecompartment.To place a golf bag in the luggagecompartment, use the following procedure:
1. Remove the cover for the side storagespace.
2. Insert the top of the golf bag into theside storage space.
Side storage space
NOTE l Some golf bags cannot fit depending on
their size.l Golf bags up to nine inches in diameter can
be carried.
Interior Comfort
Interior Equipment
6-75
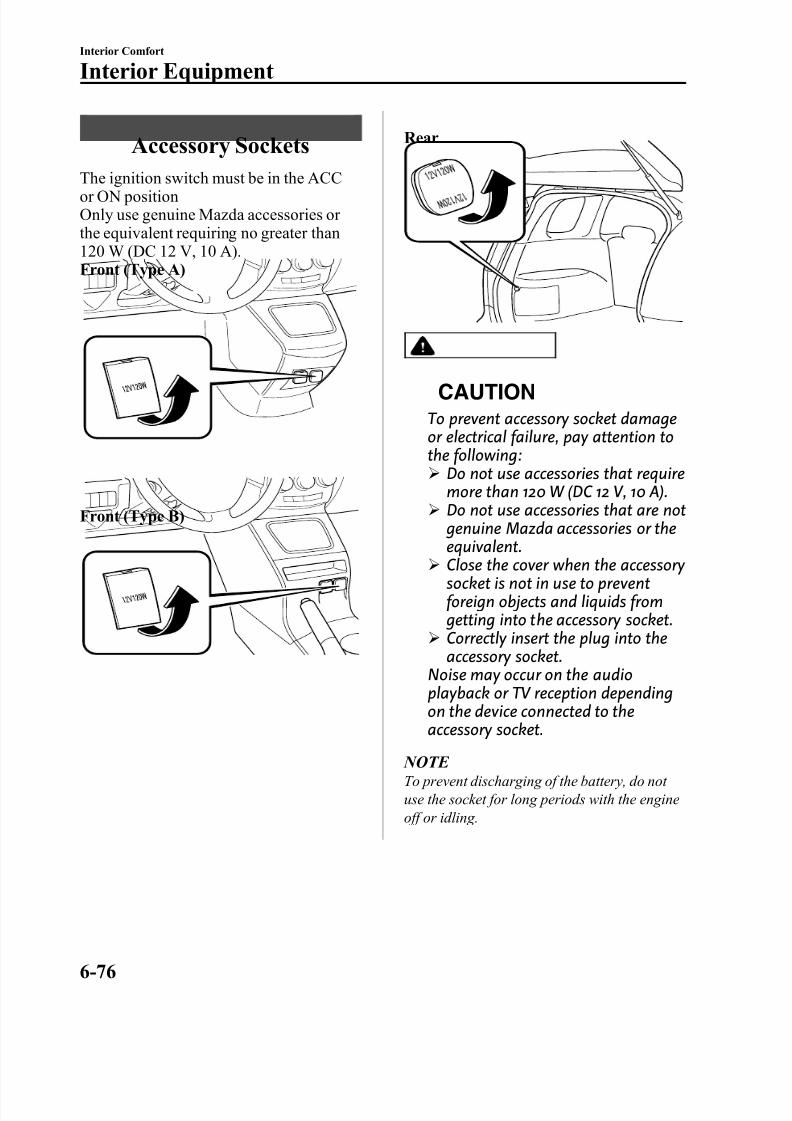
8/2/2019 Mazda5 Owners Manual
http://slidepdf.com/reader/full/mazda5-owners-manual 238/375
Accessory Sockets
The ignition switch must be in the ACCor ON positionOnly use genuine Mazda accessories or the equivalent requiring no greater than120 W (DC 12 V, 10 A).Front (Type A)
Front (Type B)
Rear
CAUTION
To prevent accessory socket damageor electrical failure, pay attention tothe following:Ø Do not use accessories that require
more than 120 W (DC 12 V, 10 A).Ø Do not use accessories that are not
genuine Mazda accessories or theequivalent.
Ø Close the cover when the accessory socket is not in use to preventforeign objects and liquids from getting into the accessory socket.
Ø Correctly insert the plug into theaccessory socket.
Noise may occur on the audioplayback or TV reception dependingon the device connected to theaccessory socket.
NOTE To prevent discharging of the battery, do not use the socket for long periods with the engineoff or idling.
6-76
Interior Comfort
Interior Equipment
8/2/2019 Mazda5 Owners Manual
http://slidepdf.com/reader/full/mazda5-owners-manual 239/375
7 In Case of an Emergency
Helpful information on what to do in an emergency.
Parking in an Emergency ............................................................. 7-2Parking in an Emergency .......................................................... 7-2
Flat Tire ......................................................................................... 7-3Spare Tire and Tool Storage ...................................................... 7-3
Changing a Flat Tire ................................................................. 7-7
Overheating ................................................................................. 7-13Overheating ............................................................................. 7-13
Emergency Starting .................................................................... 7-15Starting a Flooded Engine ....................................................... 7-15Jump-Starting .......................................................................... 7-16Push-Starting ........................................................................... 7-19
Emergency Towing ..................................................................... 7-20Towing Description ................................................................. 7-20Tiedown Hooks ....................................................................... 7-21Recreational Towing ............................................................... 7-23
7-1
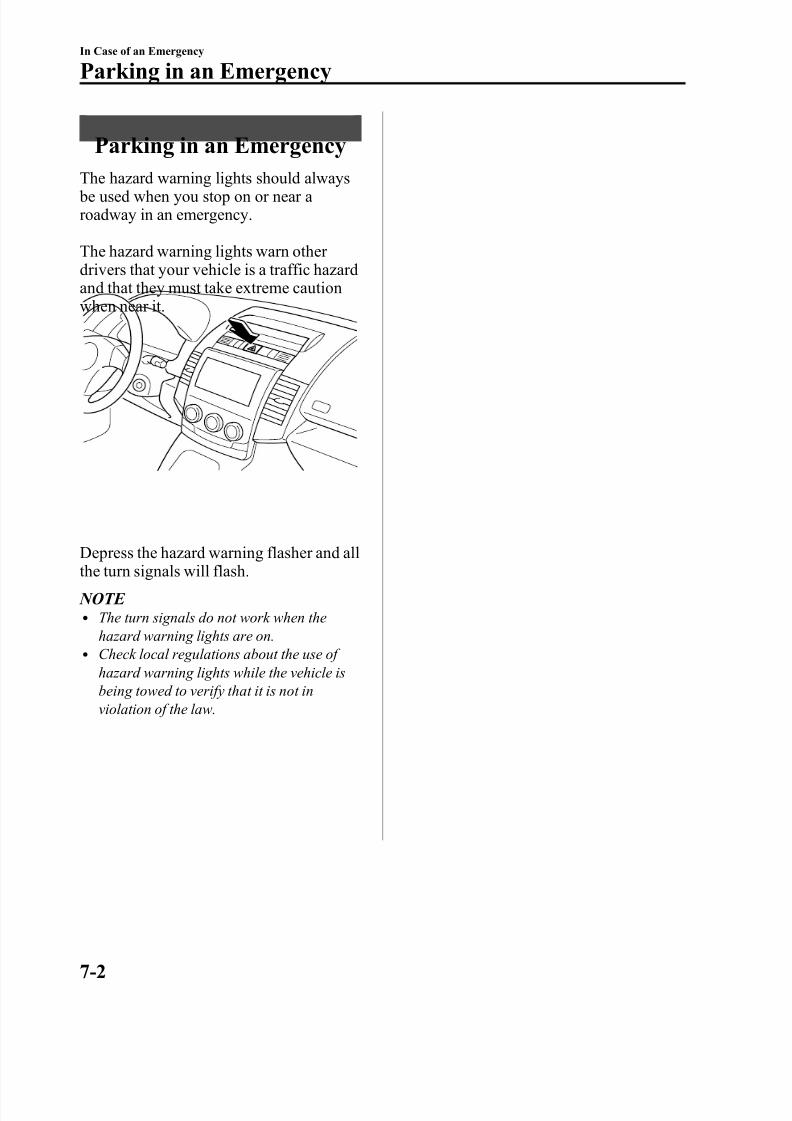
8/2/2019 Mazda5 Owners Manual
http://slidepdf.com/reader/full/mazda5-owners-manual 240/375
Parking in an Emergency
The hazard warning lights should always be used when you stop on or near a roadway in an emergency.
The hazard warning lights warn other drivers that your vehicle is a traffic hazardand that they must take extreme cautionwhen near it.
Depress the hazard warning flasher and allthe turn signals will flash.
NOTE l The turn signals do not work when the
hazard warning lights are on.l Check local regulations about the use of
hazard warning lights while the vehicle isbeing towed to verify that it is not inviolation of the law.
7-2
In Case of an Emergency
Parking in an Emergency
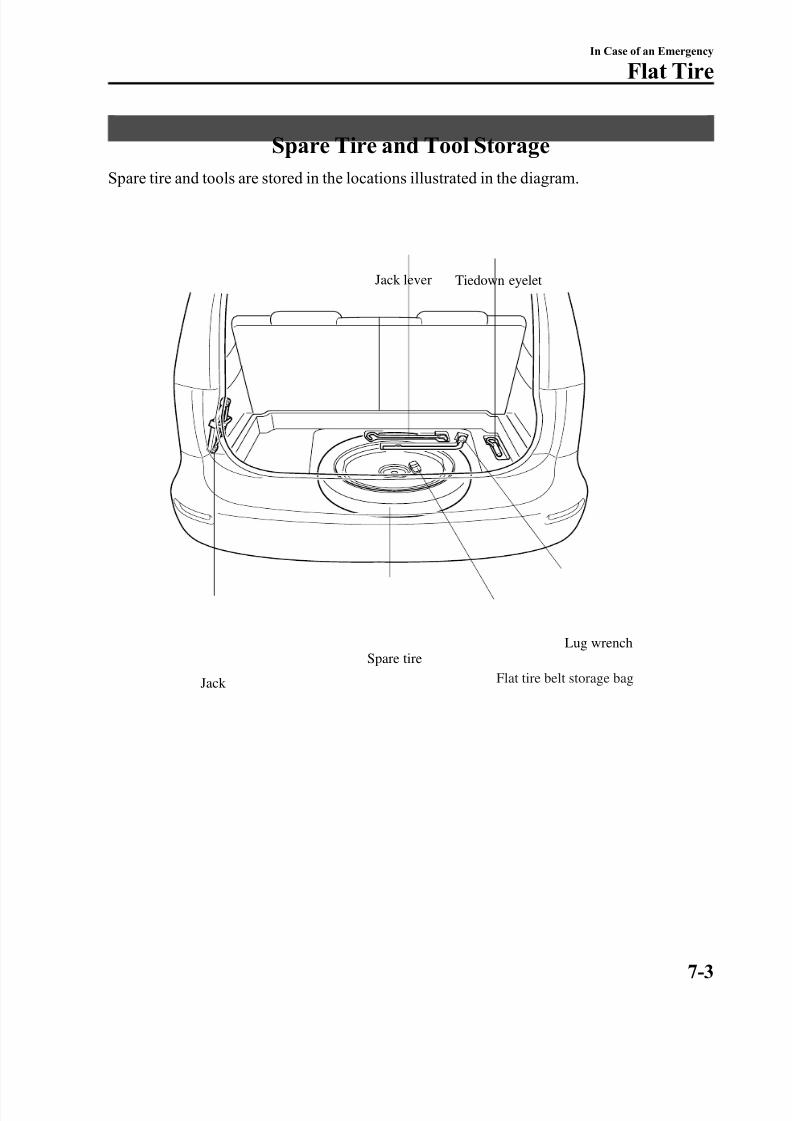
8/2/2019 Mazda5 Owners Manual
http://slidepdf.com/reader/full/mazda5-owners-manual 241/375
Spare Tire and Tool Storage
Spare tire and tools are stored in the locations illustrated in the diagram.
Flat tire belt storage bag
Jack lever Tiedown eyelet
Jack
Spare tireLug wrench
In Case of an Emergency
Flat Tire
7-3
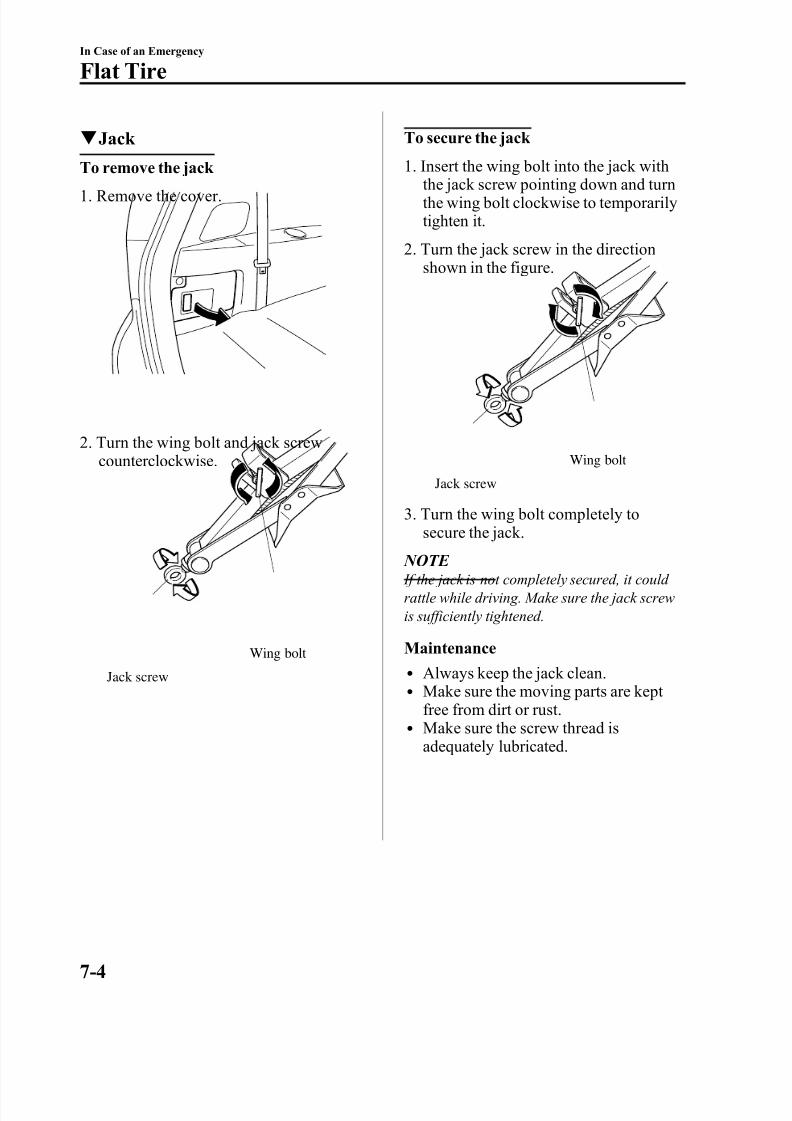
8/2/2019 Mazda5 Owners Manual
http://slidepdf.com/reader/full/mazda5-owners-manual 242/375
q Jack
To remove the jack
1. Remove the cover.
2. Turn the wing bolt and jack screwcounterclockwise.
Wing bolt
Jack screw
To secure the jack
1. Insert the wing bolt into the jack withthe jack screw pointing down and turnthe wing bolt clockwise to temporarilytighten it.
2. Turn the jack screw in the directionshown in the figure.
Wing bolt
Jack screw
3. Turn the wing bolt completely tosecure the jack.
NOTE If the jack is not completely secured, it could rattle while driving. Make sure the jack screwis sufficiently tightened.
Maintenancel Always keep the jack clean.l Make sure the moving parts are kept
free from dirt or rust.l Make sure the screw thread is
adequately lubricated.
7-4
In Case of an Emergency
Flat Tire
8/2/2019 Mazda5 Owners Manual
http://slidepdf.com/reader/full/mazda5-owners-manual 243/375
q Spare Tire
The temporary spare tire is lighter andsmaller than a conventional tire, and isdesigned only for emergency use andshould be used only for VERY short periods. Temporary spare tires should NEVER be used for long drives or extended periods.
WARNING
Do not install the temporary spare tire
on the front wheels (driving wheels):Driving with the temporary spare tireon one of the front driving wheels isdangerous. Handling will be affected.You could lose control of the vehicle,especially on ice or snow boundroads, and have an accident. Move aregular tire to the front wheel andinstall the temporary spare tire to therear.
CAUTIONØ
When using the temporary sparetire, driving stability may decreasecompared to when using only theconventional tire.Drive carefully.
Ø To avoid damage to the temporary spare tire or to the vehicle, observethe following precautions:Ø Do not exceed 80 km/h (50
mph).Ø Avoid driving over obstacles. Also, do not drive through an
automatic car wash. This tire'sdiameter is smaller than aconventional tire, so the groundclearance is reduced about 25 mm (1 in).
Ø Do not use a tire chain on thistire because it won't fitproperly.
Ø Do not use your temporary spare tire on any other vehicle;it has been designed only for your Mazda.
Ø Use only one temporary sparetire on your vehicle at the sametime.
NOTE (With Tire Pressure Monitoring System)
A tire pressure sensor is not installed to thetemporary spare tire. The warning light will flash continuously while the temporary sparetire is being used (page 5-24).
To remove the spare tire
1. Fold the third-row seat forward (page2-9).
In Case of an Emergency
Flat Tire
7-5
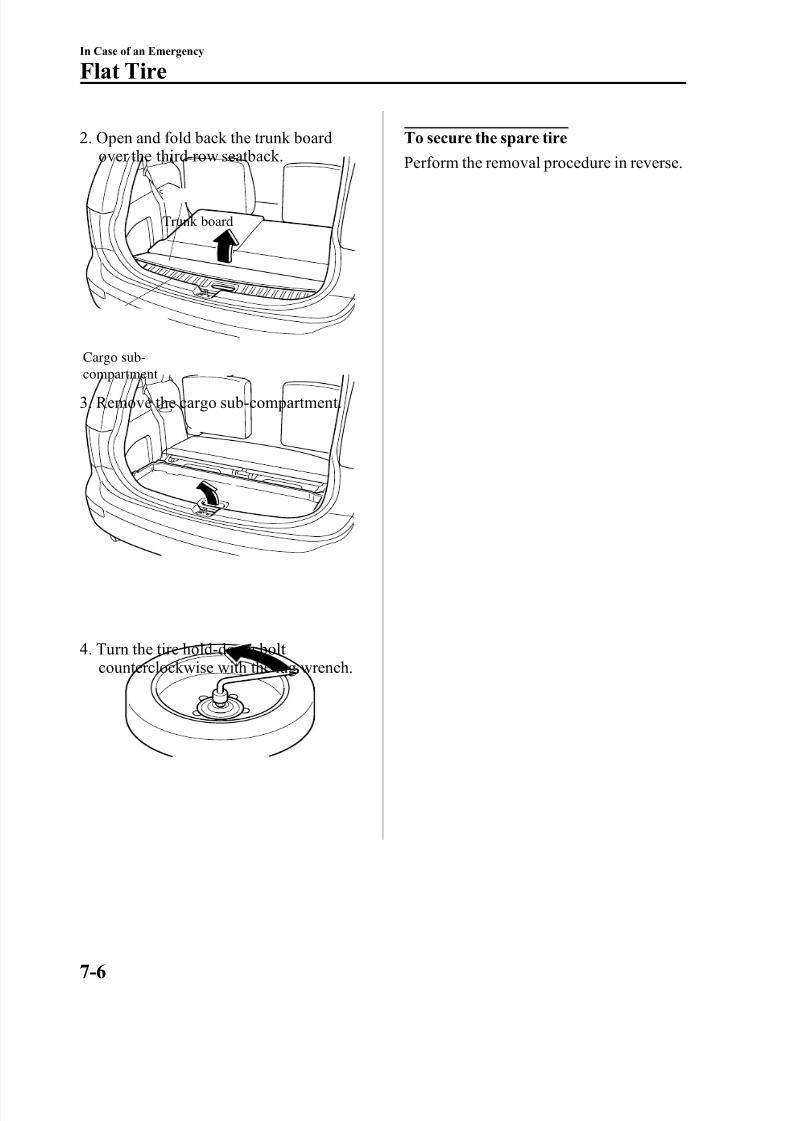
8/2/2019 Mazda5 Owners Manual
http://slidepdf.com/reader/full/mazda5-owners-manual 244/375
2. Open and fold back the trunk boardover the third-row seatback.
Trunk board
Cargo sub-compartment
3. Remove the cargo sub-compartment.
4. Turn the tire hold-down bolt counterclockwise with the lug wrench.
To secure the spare tire
Perform the removal procedure in reverse.
7-6
In Case of an Emergency
Flat Tire
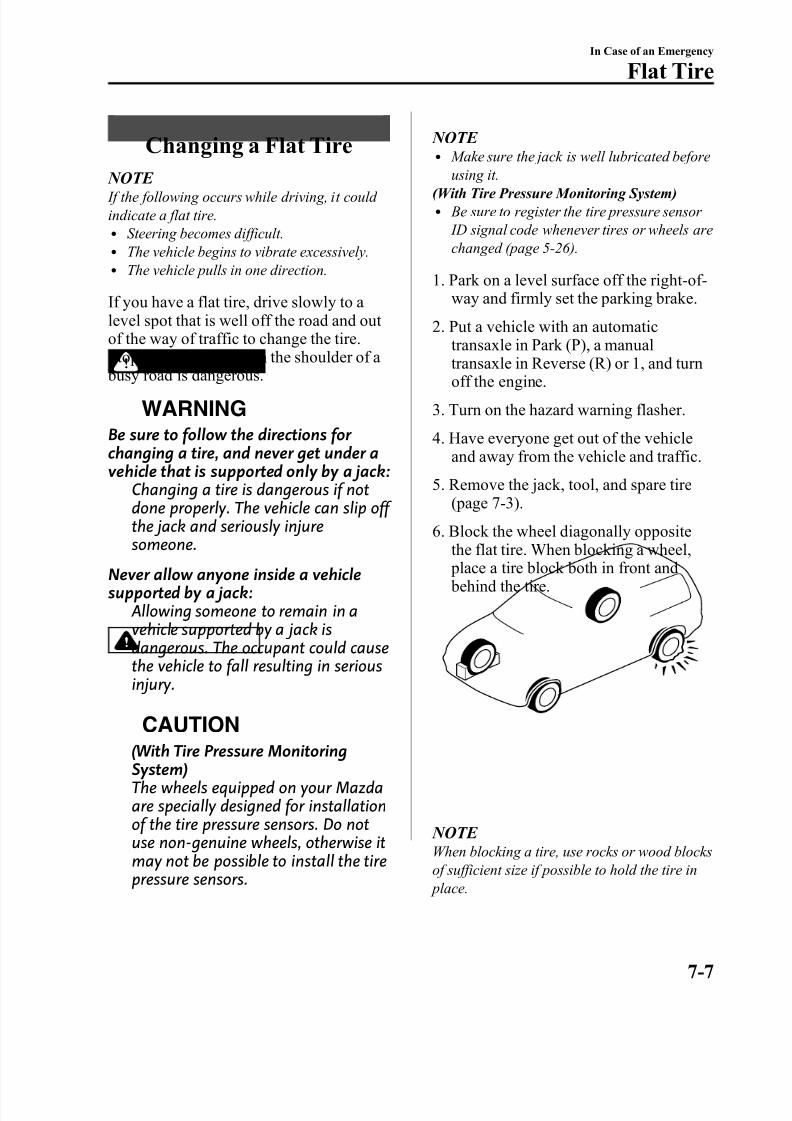
8/2/2019 Mazda5 Owners Manual
http://slidepdf.com/reader/full/mazda5-owners-manual 245/375
Changing a Flat Tire
NOTE If the following occurs while driving, it could indicate a flat tire.
l Steering becomes difficult.l The vehicle begins to vibrate excessively.l The vehicle pulls in one direction.
If you have a flat tire, drive slowly to a level spot that is well off the road and out of the way of traffic to change the tire.
Stopping in traffic or on the shoulder of a busy road is dangerous.
WARNING
Be sure to follow the directions for changing a tire, and never get under avehicle that is supported only by a jack:
Changing a tire is dangerous if notdone properly. The vehicle can slip off the jack and seriously injuresomeone.
Never allow anyone inside a vehiclesupported by a jack:
Allowing someone to remain in avehicle supported by a jack isdangerous. The occupant could causethe vehicle to fall resulting in seriousinjury.
CAUTION(With Tire Pressure MonitoringSystem)The wheels equipped on your Mazdaare specially designed for installationof the tire pressure sensors. Do notuse non-genuine wheels, otherwise itmay not be possible to install the tirepressure sensors.
NOTE l Make sure the jack is well lubricated before
using it.(With Tire Pressure Monitoring System)l Be sure to register the tire pressure sensor
ID signal code whenever tires or wheels arechanged (page 5-26).
1. Park on a level surface off the right-of-way and firmly set the parking brake.
2. Put a vehicle with an automatictransaxle in Park (P), a manualtransaxle in Reverse (R) or 1, and turnoff the engine.
3. Turn on the hazard warning flasher.
4. Have everyone get out of the vehicleand away from the vehicle and traffic.
5. Remove the jack, tool, and spare tire(page 7-3).
6. Block the wheel diagonally oppositethe flat tire. When blocking a wheel, place a tire block both in front and behind the tire.
NOTE When blocking a tire, use rocks or wood blocksof sufficient size if possible to hold the tire in place.
In Case of an Emergency
Flat Tire
7-7

8/2/2019 Mazda5 Owners Manual
http://slidepdf.com/reader/full/mazda5-owners-manual 246/375
q Removing a Flat Tire
1. Loosen the lug nuts by turning themcounterclockwise one turn each, but don't remove any lug nuts until the tirehas been raised off the ground.
2. Place the jack under the jacking position closest to the tire beingchanged.
Jacking position
WARNING
Use only the front and rear jackingpositions recommended in this manual: Attempting to jack the vehicle inpositions other than thoserecommended in this manual isdangerous. The vehicle could slip off the jack and seriously injure or evenkill someone. Use only the front andrear jacking positions recommendedin this manual.
Use only the jack provided with your Mazda:
Using a jack that is not designed for your Mazda is dangerous. The vehiclecould slip off the jack and seriously injure someone.
Never place objects under the jack: Jacking the vehicle with an objectunder the jack is dangerous. The jackcould slip and someone could beseriously injured by the jack or thefalling vehicle.
3. Insert the jack lever and attach the lugwrench to tire jack.
7-8
In Case of an Emergency
Flat Tire
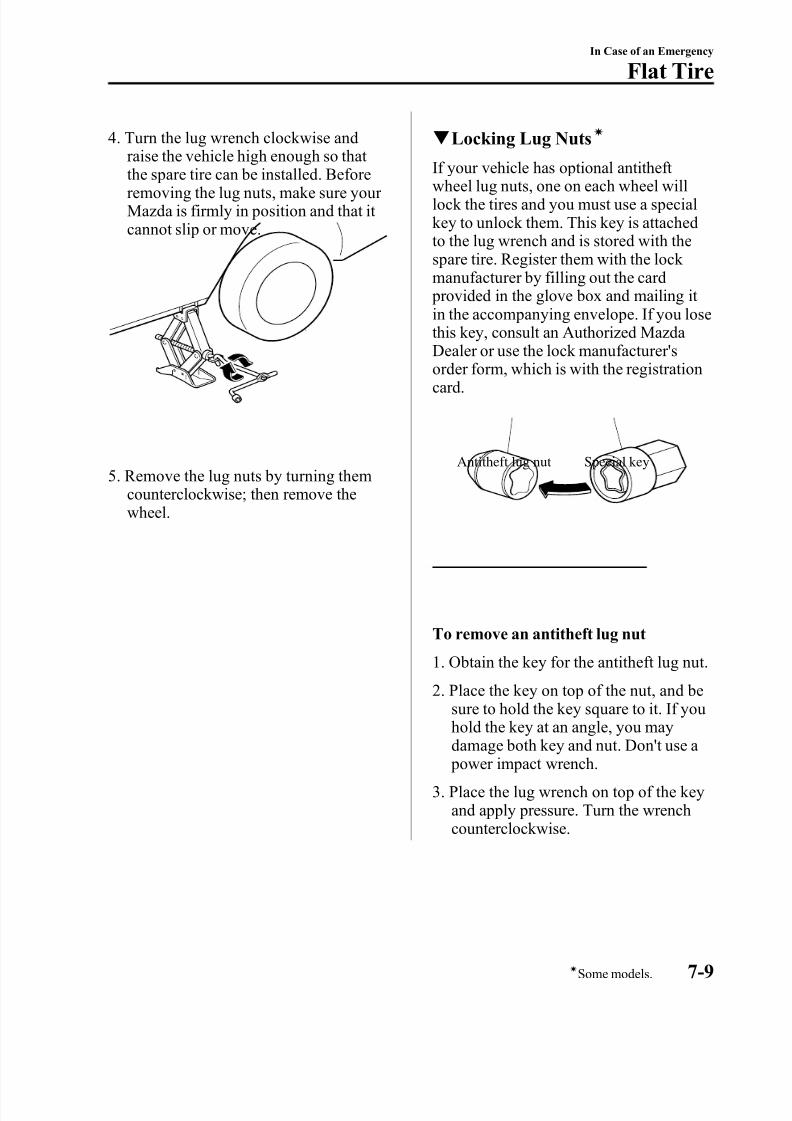
8/2/2019 Mazda5 Owners Manual
http://slidepdf.com/reader/full/mazda5-owners-manual 247/375
4. Turn the lug wrench clockwise andraise the vehicle high enough so that
the spare tire can be installed. Beforeremoving the lug nuts, make sure your Mazda is firmly in position and that it cannot slip or move.
5. Remove the lug nuts by turning themcounterclockwise; then remove thewheel.
q Locking Lug Nutsí
If your vehicle has optional antitheft wheel lug nuts, one on each wheel willlock the tires and you must use a specialkey to unlock them. This key is attachedto the lug wrench and is stored with thespare tire. Register them with the lock manufacturer by filling out the card provided in the glove box and mailing it in the accompanying envelope. If you losethis key, consult an Authorized Mazda Dealer or use the lock manufacturer'sorder form, which is with the registrationcard.
Special keyAntitheft lug nut
To remove an antitheft lug nut
1. Obtain the key for the antitheft lug nut.
2. Place the key on top of the nut, and besure to hold the key square to it. If youhold the key at an angle, you maydamage both key and nut. Don't use a power impact wrench.
3. Place the lug wrench on top of the keyand apply pressure. Turn the wrenchcounterclockwise.
In Case of an Emergency
Flat Tire
7-9íSome models.
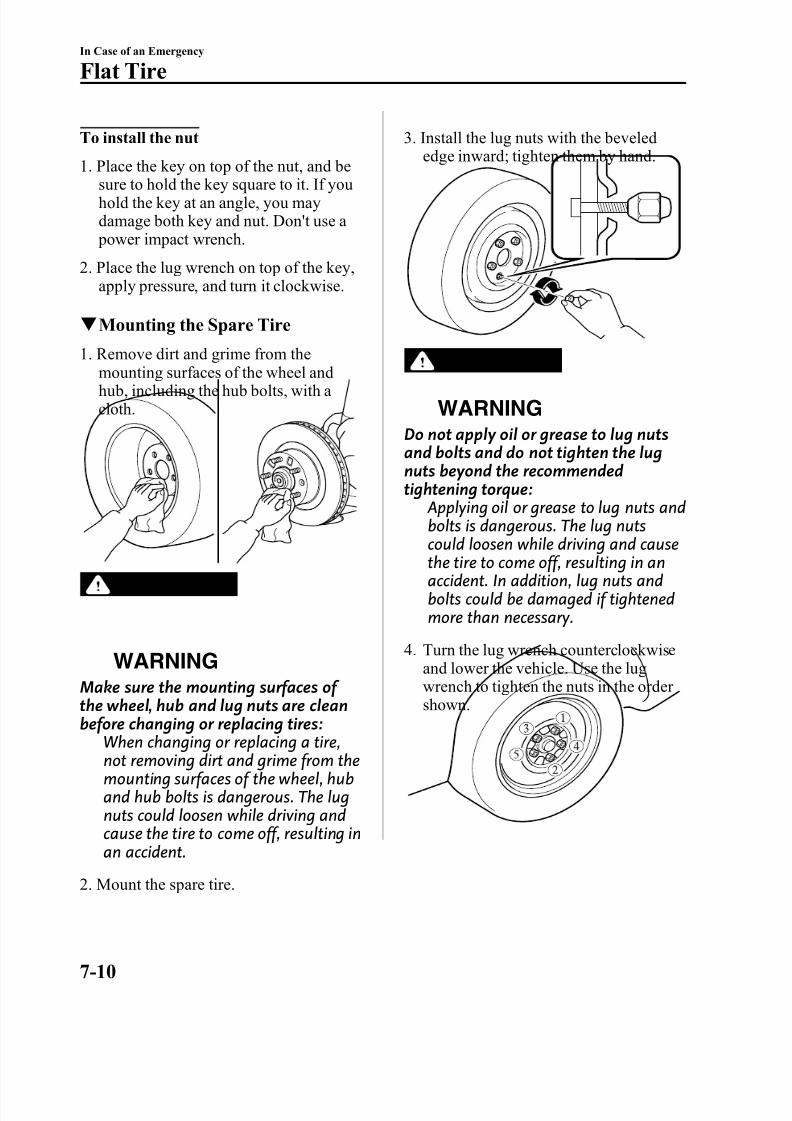
8/2/2019 Mazda5 Owners Manual
http://slidepdf.com/reader/full/mazda5-owners-manual 248/375
To install the nut
1. Place the key on top of the nut, and besure to hold the key square to it. If youhold the key at an angle, you maydamage both key and nut. Don't use a power impact wrench.
2. Place the lug wrench on top of the key,apply pressure, and turn it clockwise.
q Mounting the Spare Tire
1. Remove dirt and grime from themounting surfaces of the wheel andhub, including the hub bolts, with a cloth.
WARNING
Make sure the mounting surfaces of the wheel, hub and lug nuts are cleanbefore changing or replacing tires:When changing or replacing a tire,
not removing dirt and grime from themounting surfaces of the wheel, huband hub bolts is dangerous. The lugnuts could loosen while driving andcause the tire to come off, resulting inan accident.
2. Mount the spare tire.
3. Install the lug nuts with the bevelededge inward; tighten them by hand.
WARNING
Do not apply oil or grease to lug nutsand bolts and do not tighten the lugnuts beyond the recommendedtightening torque:
Applying oil or grease to lug nuts andbolts is dangerous. The lug nutscould loosen while driving and causethe tire to come off, resulting in anaccident. In addition, lug nuts andbolts could be damaged if tightenedmore than necessary.
4. Turn the lug wrench counterclockwiseand lower the vehicle. Use the lugwrench to tighten the nuts in the order shown.
7-10
In Case of an Emergency
Flat Tire
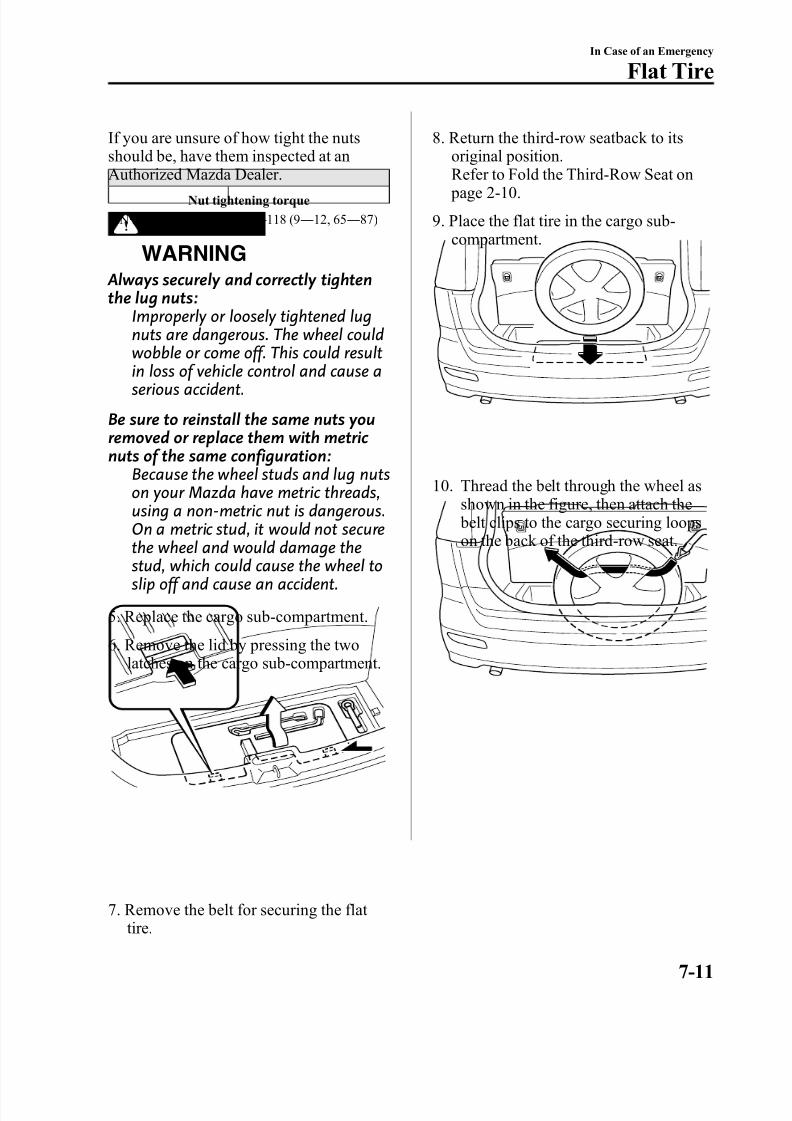
8/2/2019 Mazda5 Owners Manual
http://slidepdf.com/reader/full/mazda5-owners-manual 249/375
If you are unsure of how tight the nutsshould be, have them inspected at an
Authorized Mazda Dealer.Nut tightening torque
N·m (kgf·m, ft·lbf) 88 ― 118 (9 ― 12, 65 ― 87)
WARNING
Always securely and correctly tightenthe lug nuts:
Improperly or loosely tightened lugnuts are dangerous. The wheel could
wobble or come off. This could resultin loss of vehicle control and cause aserious accident.
Be sure to reinstall the same nuts youremoved or replace them with metric nuts of the same configuration:
Because the wheel studs and lug nutson your Mazda have metric threads,using a non-metric nut is dangerous.On a metric stud, it would not securethe wheel and would damage thestud, which could cause the wheel toslip off and cause an accident.
5. Replace the cargo sub-compartment.
6. Remove the lid by pressing the twolatches on the cargo sub-compartment.
7. Remove the belt for securing the flat tire.
8. Return the third-row seatback to itsoriginal position.
Refer to Fold the Third-Row Seat on page 2-10.
9. Place the flat tire in the cargo sub-compartment.
10. Thread the belt through the wheel asshown in the figure, then attach the belt clips to the cargo securing loops
on the back of the third-row seat.
In Case of an Emergency
Flat Tire
7-11
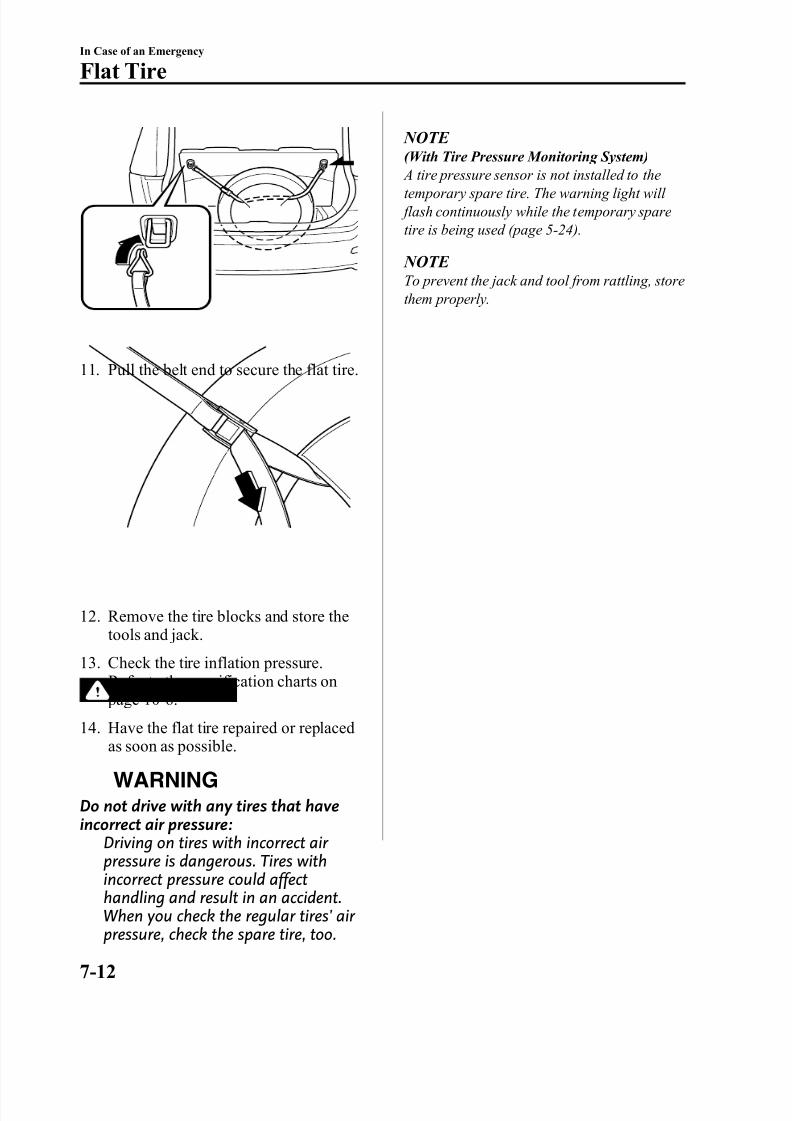
8/2/2019 Mazda5 Owners Manual
http://slidepdf.com/reader/full/mazda5-owners-manual 250/375
11. Pull the belt end to secure the flat tire.
12. Remove the tire blocks and store thetools and jack.
13. Check the tire inflation pressure.Refer to the specification charts on page 10-6.
14. Have the flat tire repaired or replacedas soon as possible.
WARNING
Do not drive with any tires that haveincorrect air pressure:
Driving on tires with incorrect air pressure is dangerous. Tires withincorrect pressure could affect
handling and result in an accident.When you check the regular tires' air pressure, check the spare tire, too.
NOTE (With Tire Pressure Monitoring System)
A tire pressure sensor is not installed to thetemporary spare tire. The warning light will flash continuously while the temporary sparetire is being used (page 5-24).
NOTE To prevent the jack and tool from rattling, storethem properly.
7-12
In Case of an Emergency
Flat Tire
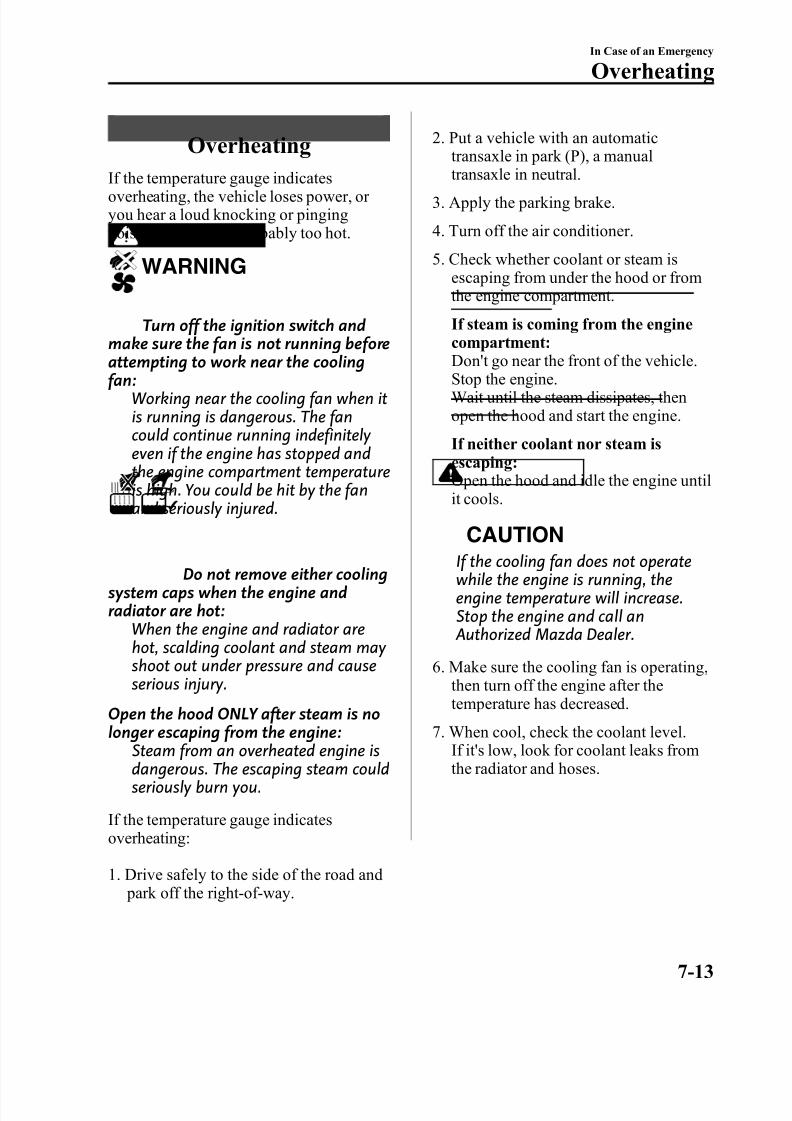
8/2/2019 Mazda5 Owners Manual
http://slidepdf.com/reader/full/mazda5-owners-manual 251/375
Overheating
If the temperature gauge indicatesoverheating, the vehicle loses power, or you hear a loud knocking or pingingnoise, the engine is probably too hot.
WARNING
Turn off the ignition switch andmake sure the fan is not running beforeattempting to work near the coolingfan:
Working near the cooling fan when itis running is dangerous. The fancould continue running indefinitely even if the engine has stopped andthe engine compartment temperatureis high. You could be hit by the fanand seriously injured.
Do not remove either coolingsystem caps when the engine andradiator are hot:
When the engine and radiator arehot, scalding coolant and steam may shoot out under pressure and causeserious injury.
Open the hood ONLY after steam is nolonger escaping from the engine:
Steam from an overheated engine isdangerous. The escaping steam couldseriously burn you.
If the temperature gauge indicatesoverheating:
1. Drive safely to the side of the road and park off the right-of-way.
2. Put a vehicle with an automatictransaxle in park (P), a manual
transaxle in neutral.3. Apply the parking brake.
4. Turn off the air conditioner.
5. Check whether coolant or steam isescaping from under the hood or fromthe engine compartment.
If steam is coming from the enginecompartment:
Don't go near the front of the vehicle.Stop the engine.Wait until the steam dissipates, thenopen the hood and start the engine.
If neither coolant nor steam isescaping:Open the hood and idle the engine untilit cools.
CAUTION
If the cooling fan does not operatewhile the engine is running, theengine temperature will increase.Stop the engine and call an Authorized Mazda Dealer.
6. Make sure the cooling fan is operating,then turn off the engine after thetemperature has decreased.
7. When cool, check the coolant level.If it's low, look for coolant leaks fromthe radiator and hoses.
In Case of an Emergency
Overheating
7-13

8/2/2019 Mazda5 Owners Manual
http://slidepdf.com/reader/full/mazda5-owners-manual 252/375
If you find a leak or other damage, or if coolant is still leaking:
Stop the engine and call an AuthorizedMazda Dealer.
Cooling fan
Coolant reservoir
Cooling system cap
If you find no problems, the engine iscool, and no leaks are obvious:Carefully add coolant as required (page8-20).
CAUTION
If the engine continues to overheat or frequently overheats, have thecooling system inspected. The enginecould be seriously damaged unlessrepairs are made. Consult an Authorized Mazda Dealer.
7-14
In Case of an Emergency
Overheating
8/2/2019 Mazda5 Owners Manual
http://slidepdf.com/reader/full/mazda5-owners-manual 253/375
Starting a Flooded Engine
If the engine fails to start, it may beflooded (excessive fuel in the engine).
Follow this procedure:
1. If the engine does not start within fiveseconds on the first try, turn the key tothe LOCK position, wait ten secondsand try again.
2. Depress the accelerator all the way andhold it there.
3. Turn the ignition switch to the START position and hold it there ― for up toten seconds. If the engine starts, releasethe key and accelerator immediately because the engine will suddenly revup.
4. If the engine fails to start, crank it
without depressing the accelerator ―
for up to ten seconds.
If the engine still does not start using theabove procedure, have your vehicleinspected by an Authorized Mazda Dealer.
In Case of an Emergency
Emergency Starting
7-15
8/2/2019 Mazda5 Owners Manual
http://slidepdf.com/reader/full/mazda5-owners-manual 254/375
Jump-Starting
Jump-starting is dangerous if done incorrectly. So follow the procedure carefully. If youfeel unsure about jump-starting, we strongly recommend that you have a competent servicetechnician do the work.
WARNING
Follow These Precautions Carefully:To ensure safe and correct handling of the battery, read the following precautionscarefully before using the battery or inspecting it.
Always wear eye protection when working near the battery:Working without eye protection is dangerous. Battery fluid contains SULFURIC ACIDwhich could cause blindness if splashed into your eyes. Also, hydrogen gas producedduring normal battery operation, could ignite and cause the battery to explode.
Wear eye protection and protective gloves to prevent contact with battery fluid:
Spilled battery fluid is dangerous.Battery fluid contains SULFURIC ACID which could cause serious injuries if it gets ineyes, skin or clothing. If this happens, immediately flush your eyes with water for 15minutes or wash your skin thoroughly and get medical attention.
Always keep batteries out of the reach of children: Allowing children to play near batteries is dangerous. Battery fluid could causeserious injuries if it gets in the eyes or on the skin.
Do not allow the positive ( ) terminal to contact any other metal object thatcould cause sparks:
Flames and sparks near open battery cells are dangerous. Hydrogen gas, producedduring normal battery operation, could ignite and cause the battery to explode. Anexploding battery can cause serious burns and injuries. When working near abattery, do not allow metal tools to contact the positive ( ) or negative ( )terminal of the battery.
7-16
In Case of an Emergency
Emergency Starting

8/2/2019 Mazda5 Owners Manual
http://slidepdf.com/reader/full/mazda5-owners-manual 255/375
Keep all flames, including cigarettes, and sparks away from open battery cells:Flames and sparks near open battery cells are dangerous. Hydrogen gas, produced
during normal battery operation, could ignite and cause the battery to explode. Anexploding battery can cause serious burns and injuries.
Do not jump-start a frozen battery or one with a low fluid level: Jump-starting a frozen battery or one with a low fluid level is dangerous. It may rupture or explode, causing serious injury.
Connect the negative cable to a good ground point away from the battery:Connecting the end of the second jumper cable to the negative ( ) terminal of thedischarged battery is dangerous. A spark could cause the gas around the battery to explode and injure someone.
Route the jumper cables away from parts that will be moving:Connecting a jumper cable near or to moving parts (cooling fans, belts) is dangerous.The cable could get caught when the engine starts and cause serious injury.
CAUTION
Use only a 12 V booster system. You can damage a 12 V starter, ignition system, andother electrical parts beyond repair with a 24 V power supply (two 12 V batteries inseries or a 24 V motor generator set).
Connect cables in numerical order and disconnect in reverse order.
Jumper cables
Booster battery
Dischargedbattery
In Case of an Emergency
Emergency Starting
7-17
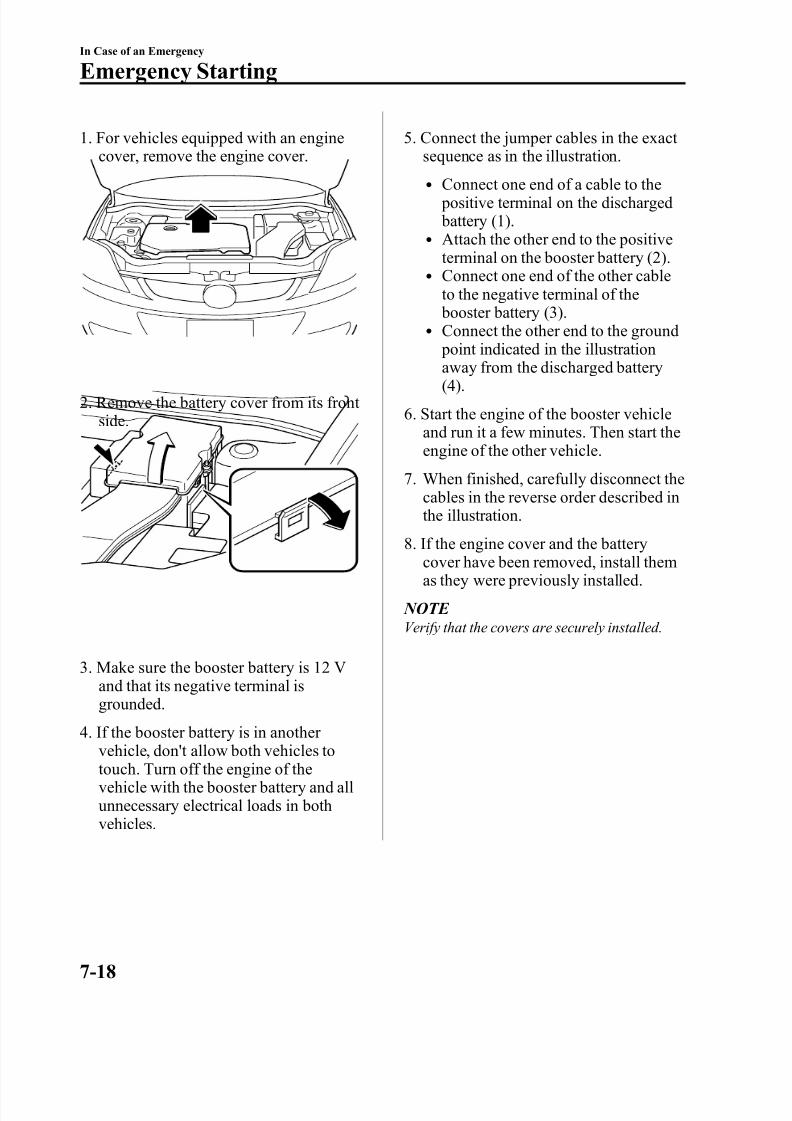
8/2/2019 Mazda5 Owners Manual
http://slidepdf.com/reader/full/mazda5-owners-manual 256/375
1. For vehicles equipped with an enginecover, remove the engine cover.
2. Remove the battery cover from its front side.
3. Make sure the booster battery is 12 Vand that its negative terminal isgrounded.
4. If the booster battery is in another vehicle, don't allow both vehicles totouch. Turn off the engine of thevehicle with the booster battery and allunnecessary electrical loads in bothvehicles.
5. Connect the jumper cables in the exact sequence as in the illustration.
l Connect one end of a cable to the positive terminal on the discharged battery (1).
l Attach the other end to the positiveterminal on the booster battery (2).
l Connect one end of the other cableto the negative terminal of the booster battery (3).
l Connect the other end to the ground point indicated in the illustrationaway from the discharged battery(4).
6. Start the engine of the booster vehicleand run it a few minutes. Then start theengine of the other vehicle.
7. When finished, carefully disconnect thecables in the reverse order described inthe illustration.
8. If the engine cover and the batterycover have been removed, install themas they were previously installed.
NOTE Verify that the covers are securely installed.
7-18
In Case of an Emergency
Emergency Starting
8/2/2019 Mazda5 Owners Manual
http://slidepdf.com/reader/full/mazda5-owners-manual 257/375
Push-Starting
Do not push-start your Mazda.WARNING
Never tow a vehicle to start it:Towing a vehicle to start it isdangerous. The vehicle being towedcould surge forward when its enginestarts, causing the two vehicles tocollide. The occupants could beinjured.
CAUTION
Do not push-start a vehicle that hasa manual transaxle. It can damagethe emission control system.
NOTE You can't start a vehicle with an automatictransaxle by pushing it.
In Case of an Emergency
Emergency Starting
7-19
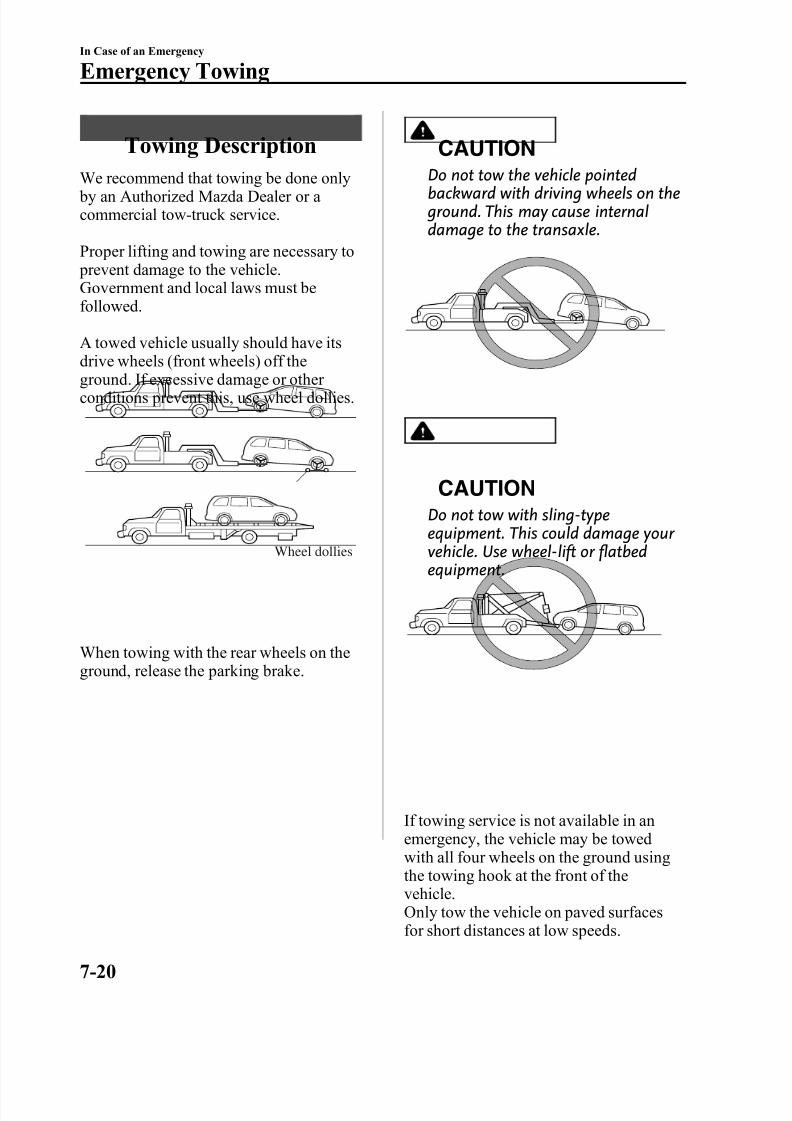
8/2/2019 Mazda5 Owners Manual
http://slidepdf.com/reader/full/mazda5-owners-manual 258/375
Towing Description
We recommend that towing be done only by an Authorized Mazda Dealer or a commercial tow-truck service.
Proper lifting and towing are necessary to prevent damage to the vehicle.Government and local laws must befollowed.
A towed vehicle usually should have its
drive wheels (front wheels) off theground. If excessive damage or other conditions prevent this, use wheel dollies.
Wheel dollies
When towing with the rear wheels on theground, release the parking brake.
CAUTION
Do not tow the vehicle pointedbackward with driving wheels on the ground. This may cause internaldamage to the transaxle.
CAUTION
Do not tow with sling-typeequipment. This could damage your vehicle. Use wheel-lift or flatbedequipment.
If towing service is not available in anemergency, the vehicle may be towedwith all four wheels on the ground usingthe towing hook at the front of thevehicle.Only tow the vehicle on paved surfacesfor short distances at low speeds.
7-20
In Case of an Emergency
Emergency Towing
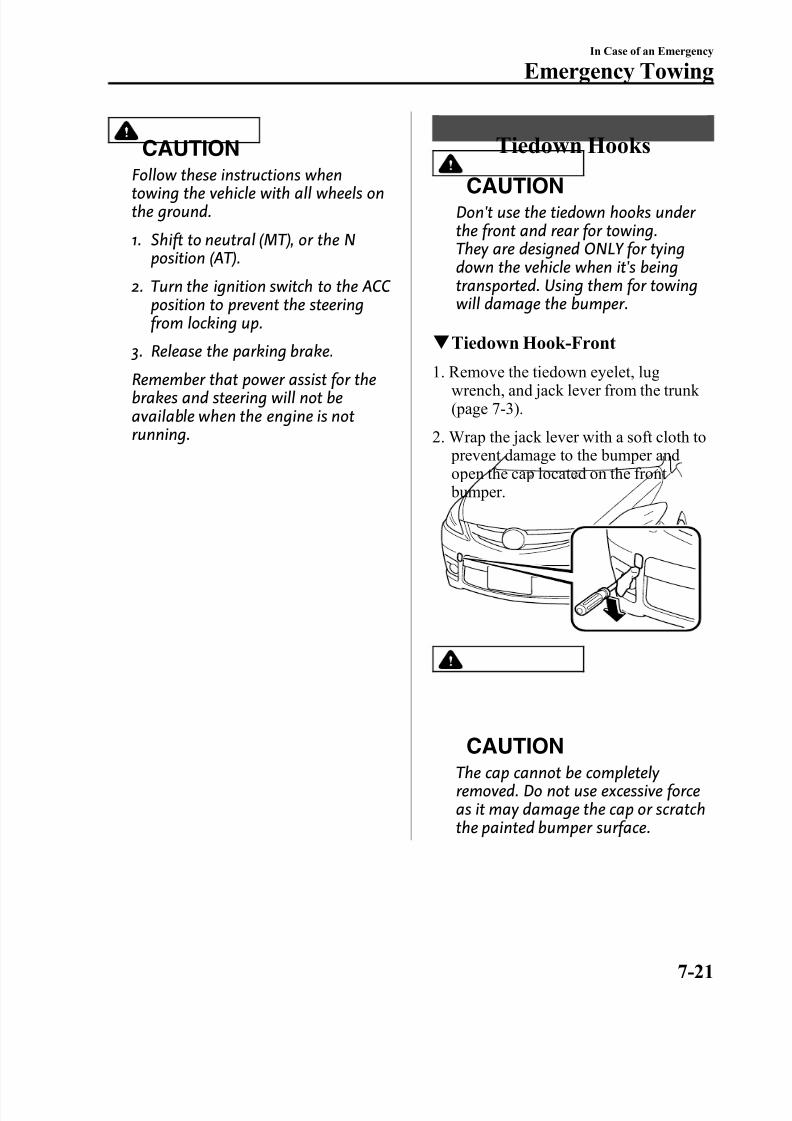
8/2/2019 Mazda5 Owners Manual
http://slidepdf.com/reader/full/mazda5-owners-manual 259/375
CAUTION
Follow these instructions whentowing the vehicle with all wheels onthe ground.
1. Shift to neutral (MT), or the Nposition (AT).
2. Turn the ignition switch to the ACC position to prevent the steeringfrom locking up.
3. Release the parking brake.
Remember that power assist for thebrakes and steering will not beavailable when the engine is notrunning.
Tiedown Hooks
CAUTIONDon't use the tiedown hooks under the front and rear for towing.They are designed ONLY for tyingdown the vehicle when it's beingtransported. Using them for towingwill damage the bumper.
q Tiedown Hook-Front
1. Remove the tiedown eyelet, lugwrench, and jack lever from the trunk (page 7-3).
2. Wrap the jack lever with a soft cloth to prevent damage to the bumper andopen the cap located on the front bumper.
CAUTION
The cap cannot be completely removed. Do not use excessive forceas it may damage the cap or scratchthe painted bumper surface.
In Case of an Emergency
Emergency Towing
7-21
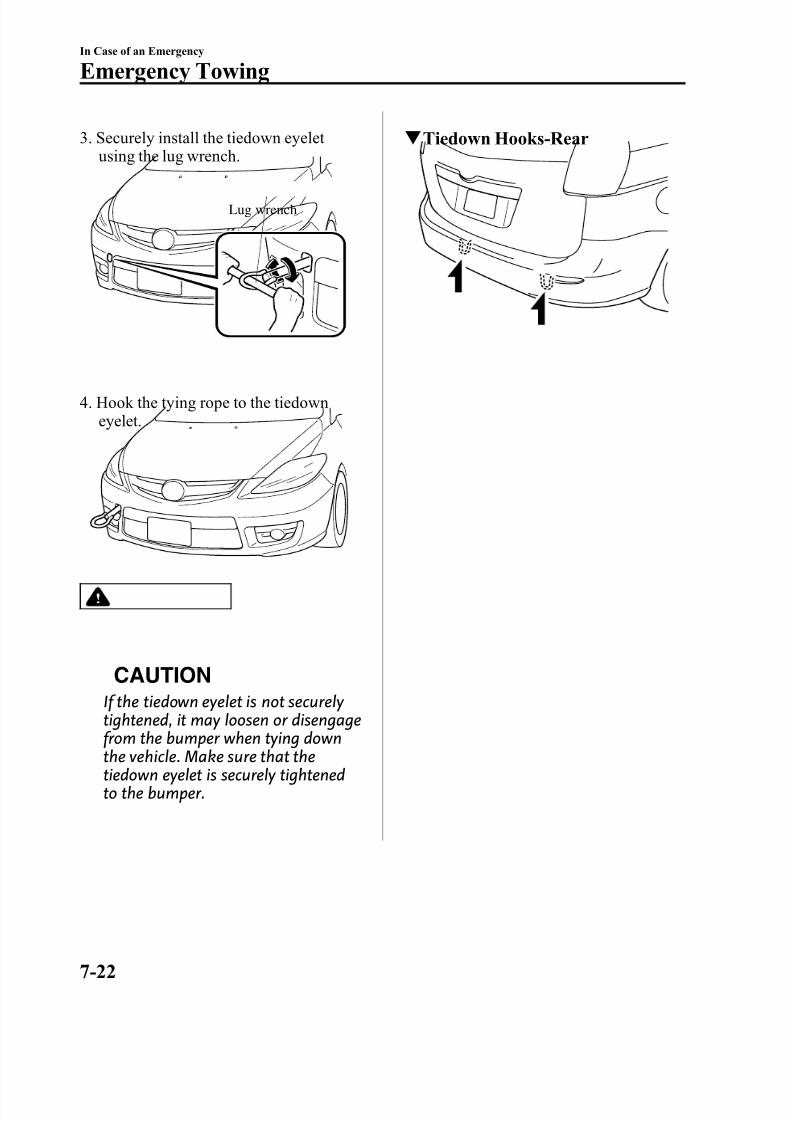
8/2/2019 Mazda5 Owners Manual
http://slidepdf.com/reader/full/mazda5-owners-manual 260/375
3. Securely install the tiedown eyelet using the lug wrench.
Lug wrench
4. Hook the tying rope to the tiedowneyelet.
CAUTION
If the tiedown eyelet is not securely
tightened, it may loosen or disengagefrom the bumper when tying downthe vehicle. Make sure that thetiedown eyelet is securely tightenedto the bumper.
q Tiedown Hooks-Rear
7-22
In Case of an Emergency
Emergency Towing
8/2/2019 Mazda5 Owners Manual
http://slidepdf.com/reader/full/mazda5-owners-manual 261/375
Recreational Towing
An example of “
recreational towing”
istowing your vehicle behind a motorhome.The transaxle is not designed for towingthis vehicle on all 4 wheels.When doing recreational towing refer to“ Towing Description ” (page 7-20) and“ Tiedown Hook ” (page 7-21) andcarefully follow the instructions.
In Case of an Emergency
Emergency Towing
7-23

8/2/2019 Mazda5 Owners Manual
http://slidepdf.com/reader/full/mazda5-owners-manual 262/375
7-24
8/2/2019 Mazda5 Owners Manual
http://slidepdf.com/reader/full/mazda5-owners-manual 263/375
8 Maintenance and Care
How to keep your Mazda in top condition.
Introduction .................................................................................. 8-2Introduction ............................................................................... 8-2
Scheduled Maintenance ................................................................ 8-3Scheduled Maintenance (USA, Canada, and Puerto Rico) ....... 8-3
Scheduled Maintenance (Mexico) ............................................. 8-8
Owner Maintenance ................................................................... 8-15Owner Maintenance Schedule ................................................ 8-15Owner Maintenance Precautions ............................................. 8-16Engine Compartment Overview .............................................. 8-17Engine Oil ............................................................................... 8-18Engine Coolant ....................................................................... 8-20Brake/Clutch Fluid .................................................................. 8-22
Power Steering Fluid ............................................................... 8-23Automatic transaxle Fluid (ATF) ............................................ 8-23Washer Fluid ........................................................................... 8-24Body Lubrication .................................................................... 8-25Wiper Blades ........................................................................... 8-26Battery ..................................................................................... 8-29Tires ........................................................................................ 8-31Light Bulbs ............................................................................. 8-35Fuses ....................................................................................... 8-42
Appearance Care ........................................................................ 8-48How to Minimize Environmental Paint Damage .................... 8-48Exterior Care ........................................................................... 8-50Interior Care ............................................................................ 8-53
8-1
8/2/2019 Mazda5 Owners Manual
http://slidepdf.com/reader/full/mazda5-owners-manual 264/375
Introduction
Be extremely careful and prevent injury to yourself and others or damage to your vehiclewhen using this manual for inspection and maintenance.
If you're unsure about any procedure it describes, we strongly urge you to have a reliableand qualified service shop perform the work, preferably an Authorized Mazda Dealer.
Factory-trained Mazda technicians and genuine Mazda parts are best for your vehicle.Without this expertise and the parts that have been designed and made especially for your Mazda, inadequate, incomplete, and insufficient servicing may result in problems. Thiscould lead to vehicle damage or an accident and injuries.
For expert advice and quality service, consult an Authorized Mazda Dealer.
The owner should retain evidence that proper maintenance has been performed as prescribed.
Claims against the warranty resulting from lack of maintenance, as opposed to defectivematerials or authorized Mazda workmanship, will not be honored.
Any auto repair shop using parts equivalent to your Mazda's original equipment may perform maintenance. But we recommend that it always be done by an AuthorizedMazda Dealer using genuine Mazda parts.
8-2
Maintenance and Care
Introduction
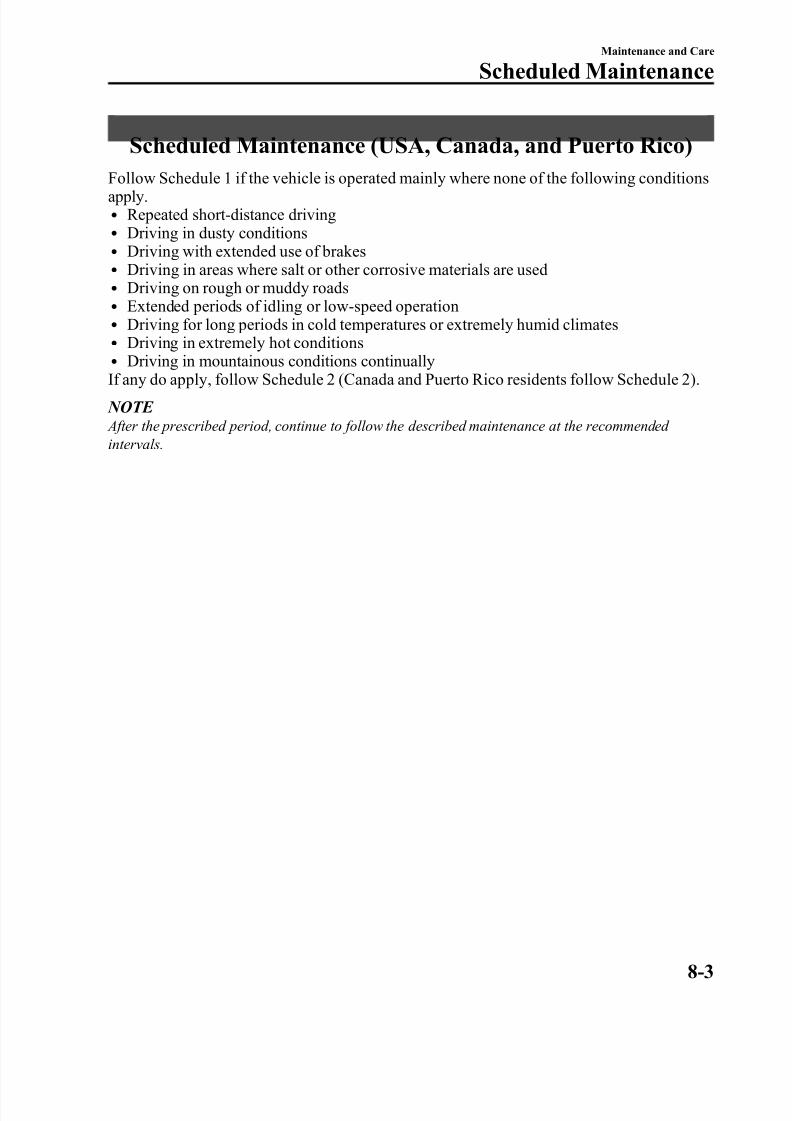
8/2/2019 Mazda5 Owners Manual
http://slidepdf.com/reader/full/mazda5-owners-manual 265/375
Scheduled Maintenance (USA, Canada, and Puerto Rico)
Follow Schedule 1 if the vehicle is operated mainly where none of the following conditionsapply.l Repeated short-distance drivingl Driving in dusty conditionsl Driving with extended use of brakesl Driving in areas where salt or other corrosive materials are usedl Driving on rough or muddy roadsl Extended periods of idling or low-speed operationl Driving for long periods in cold temperatures or extremely humid climatesl Driving in extremely hot conditionsl Driving in mountainous conditions continuallyIf any do apply, follow Schedule 2 (Canada and Puerto Rico residents follow Schedule 2).
NOTE After the prescribed period, continue to follow the described maintenance at the recommended intervals.
Maintenance and Care
Scheduled Maintenance
8-3
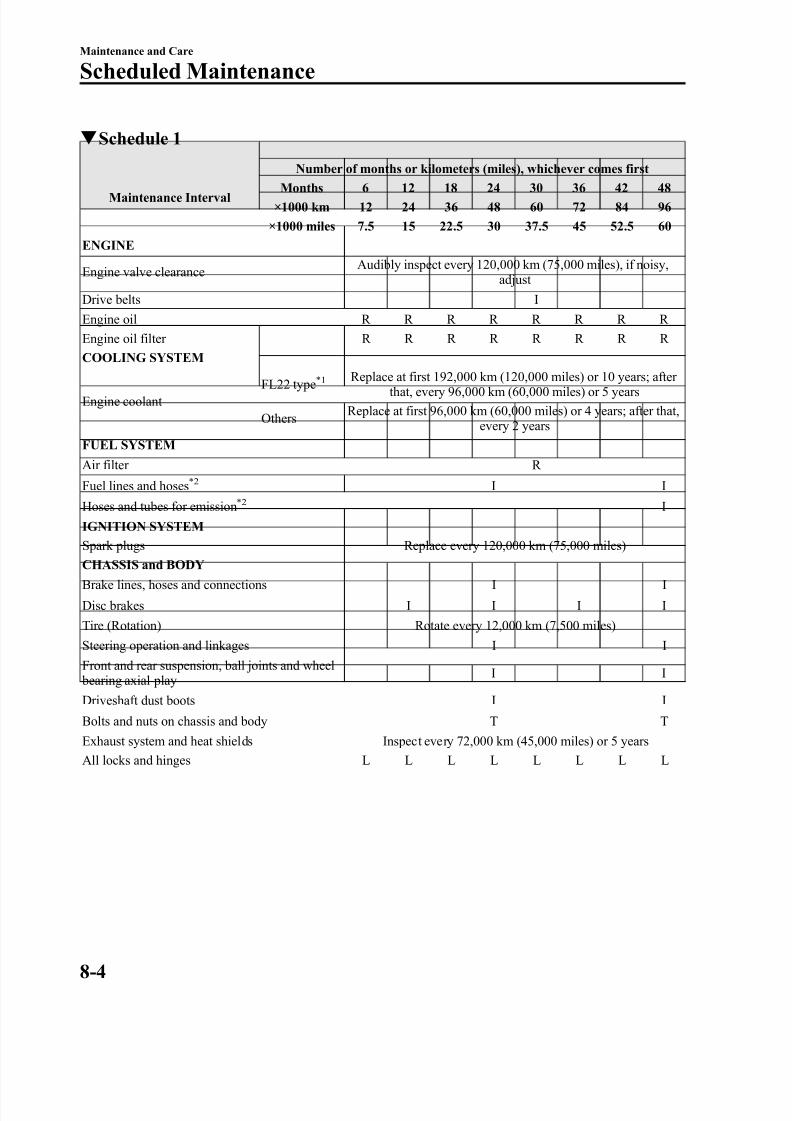
8/2/2019 Mazda5 Owners Manual
http://slidepdf.com/reader/full/mazda5-owners-manual 266/375
q Schedule 1
Maintenance Interval
Number of months or kilometers (miles), whichever comes first
Months 6 12 18 24 30 36 42 48
×1000 km 12 24 36 48 60 72 84 96
×1000 miles 7.5 15 22.5 30 37.5 45 52.5 60
ENGINE
Engine valve clearance Audibly inspect every 120,000 km (75,000 miles), if noisy,adjust
Drive belts I
Engine oil R R R R R R R R Engine oil filter R R R R R R R R
COOLING SYSTEM
Engine coolant FL22 type
*1 Replace at first 192,000 km (120,000 miles) or 10 years; after that, every 96,000 km (60,000 miles) or 5 years
Others Replace at first 96,000 km (60,000 miles) or 4 years; after that,every 2 years
FUEL SYSTEM
Air filter R
Fuel lines and hoses*2
I I
Hoses and tubes for emission *2 I
IGNITION SYSTEM
Spark plugs Replace every 120,000 km (75,000 miles)CHASSIS and BODY
Brake lines, hoses and connections I I
Disc brakes I I I I
Tire (Rotation) Rotate every 12,000 km (7,500 miles)
Steering operation and linkages I I
Front and rear suspension, ball joints and wheel bearing axial play I I
Driveshaft dust boots I I
Bolts and nuts on chassis and body T TExhaust system and heat shields Inspect every 72,000 km (45,000 miles) or 5 yearsAll locks and hinges L L L L L L L L
8-4
Maintenance and Care
Scheduled Maintenance
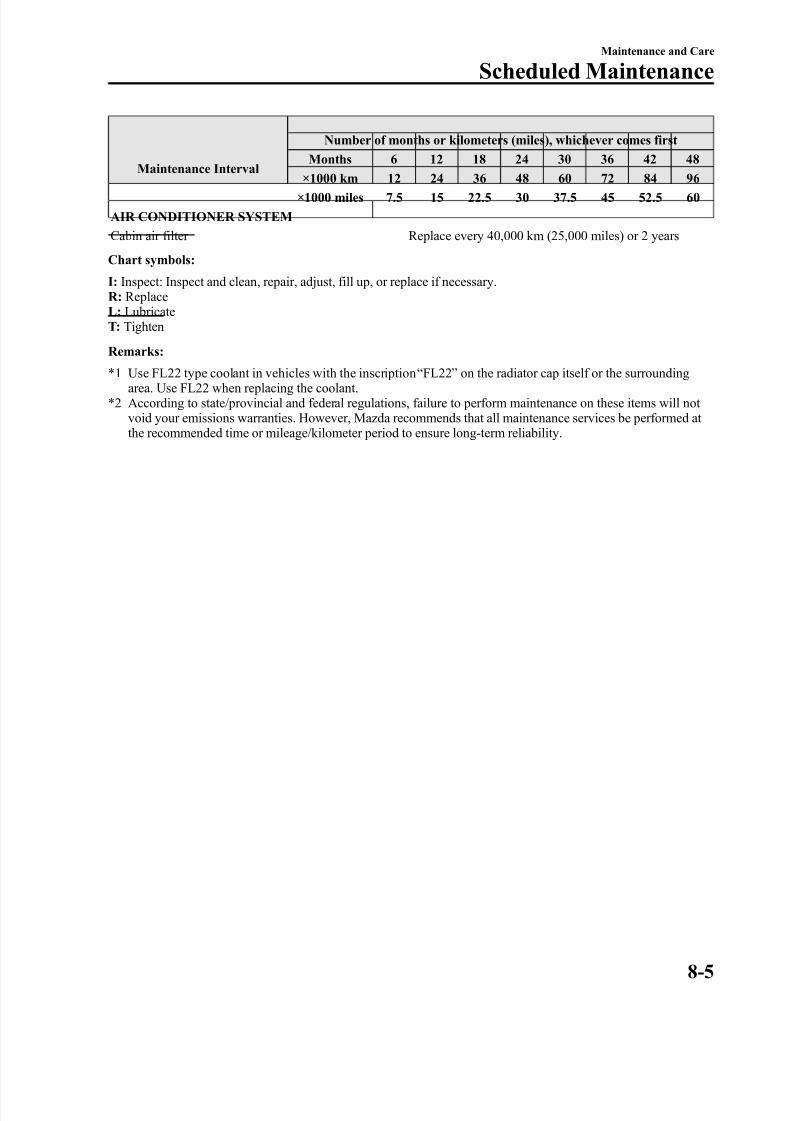
8/2/2019 Mazda5 Owners Manual
http://slidepdf.com/reader/full/mazda5-owners-manual 267/375
Maintenance Interval
Number of months or kilometers (miles), whichever comes first
Months 6 12 18 24 30 36 42 48
×1000 km 12 24 36 48 60 72 84 96×1000 miles 7.5 15 22.5 30 37.5 45 52.5 60
AIR CONDITIONER SYSTEM
Cabin air filter Replace every 40,000 km (25,000 miles) or 2 years
Chart symbols:
I: Inspect: Inspect and clean, repair, adjust, fill up, or replace if necessary.R: ReplaceL: LubricateT: Tighten
Remarks:
*1 Use FL22 type coolant in vehicles with the inscription “ FL22 ” on the radiator cap itself or the surroundingarea. Use FL22 when replacing the coolant.
*2 According to state/provincial and federal regulations, failure to perform maintenance on these items will not void your emissions warranties. However, Mazda recommends that all maintenance services be performed at the recommended time or mileage/kilometer period to ensure long-term reliability.
Maintenance and Care
Scheduled Maintenance
8-5

8/2/2019 Mazda5 Owners Manual
http://slidepdf.com/reader/full/mazda5-owners-manual 268/375
q Schedule 2
Maintenance Interval
Number of months or kilometers (miles), whichever comes first
Months 4 8 12 16 20 24 28 32 36 40 44 48
×1000 km 8 16 24 32 40 48 56 64 72 80 88 96
×1000 miles 5 10 15 20 25 30 35 40 45 50 55 60
ENGINE
Engine valve clearance Audibly inspect every 120,000 km (75,000 miles), if noisy,adjust
Drive belts I
Engine oilPuerto Rico Replace every 5,000 km (3,000 miles) or 3 monthsOthers R R R R R R R R R R R R
Engine oil filter R R R R R R R R R R R R COOLING SYSTEM
Engine coolant FL22 type
*1 Replace at first 192,000 km (120,000 miles) or 10 years; after that, every 96,000 km (60,000 miles) or 5 years
Others Replace at first 96,000 km (60,000 miles) or 4 years; after that,every 2 years
Engine coolant level I I I I I I I I I I I IFUEL SYSTEM
Air filter Puerto Rico R R
Others R
Fuel lines and hoses*2
I IHoses and tubes for emission
*2I
IGNITION SYSTEM
Spark plugs Replace every 120,000 km (75,000 miles)ELECTRICAL SYSTEM
Function of all lights I I I I I I I I I I I ICHASSIS and BODY
Brake lines, hoses and connections I I
Brake fluid level I I I I I I I I I I I I
Disc brakes I I I ITire (Rotation) Rotate every 8,000 km (5,000 miles)Tire inflation pressure and tire wear I I I I I I I I I I I I
Steering operation and linkages I I
Power steering fluid level I I I I I I I I I I I IFront and rear suspension, ball joints and wheel bearing axial play I I
Driveshaft dust boots I I
Bolts and nuts on chassis and body T T
Exhaust system and heat shields Inspect every 72,000 km (45,000 miles) or 5 yearsAll locks and hinges L L L L L L L L L L L LWasher fluid level I I I I I I I I I I I I
8-6
Maintenance and Care
Scheduled Maintenance

8/2/2019 Mazda5 Owners Manual
http://slidepdf.com/reader/full/mazda5-owners-manual 269/375
Maintenance Interval
Number of months or kilometers (miles), whichever comes first
Months 4 8 12 16 20 24 28 32 36 40 44 48
×1000 km 8 16 24 32 40 48 56 64 72 80 88 96×1000 miles 5 10 15 20 25 30 35 40 45 50 55 60
AIR CONDITIONER SYSTEM
Cabin air filter Replace every 40,000 km (25,000 miles) or 2 years
Chart symbols:
I: Inspect: Inspect and clean, repair, adjust, fill up, or replace if necessary.R: ReplaceL: LubricateT: Tighten
Remarks:
*1 Use FL22 type coolant in vehicles with the inscription “ FL22 ” on the radiator cap itself or the surroundingarea. Use FL22 when replacing the coolant.
*2 According to state/provincial and federal regulations, failure to perform maintenance on these items will not void your emissions warranties. However, Mazda recommends that all maintenance services be performed at the recommended time or mileage/kilometer period to ensure long-term reliability.
Maintenance and Care
Scheduled Maintenance
8-7
8/2/2019 Mazda5 Owners Manual
http://slidepdf.com/reader/full/mazda5-owners-manual 270/375
Scheduled Maintenance (Mexico)
Follow Schedule 1 if the vehicle is operated mainly where none of the following conditionsapply.l Repeated short-distance drivingl Driving in dusty conditionsl Driving with extended use of brakesl Driving in areas where salt or other corrosive materials are usedl Driving on rough or muddy roadsl Extended periods of idling or low-speed operationl Driving for long periods in cold temperatures or extremely humid climatesl Driving in extremely hot conditionsl Driving in mountainous conditions continuallyIf any do apply, follow Schedule 2.
NOTE After the prescribed period, continue to follow the described maintenance at the recommended intervals.
8-8
Maintenance and Care
Scheduled Maintenance

8/2/2019 Mazda5 Owners Manual
http://slidepdf.com/reader/full/mazda5-owners-manual 271/375
q Schedule 1
Maintenance Interval
Number of months or kilometers, whichever comes first
Months 6 12 18 24 30 36 42 48 54 60 66 72
×1000 km 10 20 30 40 50 60 70 80 90 100 110 120
ENGINE
Engine valve clearance Audibly inspect every 120,000 km, if noisy, adjust
Drive belts I I I
Engine oil R R R R R R R R R R R R Engine oil filter R R R R R R R R R R R R COOLING SYSTEM
Cooling system I I I
Engine coolant FL22 type *1 Replace at first 190,000 km or 10 years; after that, every
60,000 km or 3 years
Others R R R
FUEL SYSTEM
Air filter R R R R R R
Fuel lines and hoses I*2
I*2
I
Hoses and tubes for emission I *2 I*2 I
Fuel filter R R R
IGNITION SYSTEM
Spark plugs Replace every 60,000 kmCHASSIS and BODY
Brake lines, hoses and connections I I I I I I
Brake fluid level I I I I I I I I I
Brake fluid R R R
Disc brakes I I I I I I I I I I I ITire (Rotation) Rotate every 10,000 kmTire inflation pressure and tire wear I I I I I I I I I I I ISteering operation and linkages I I I I I I I I I I I IPower steering fluid level I I I I I I I I I I I IFront and rear suspension, ball joints and wheel bearing axial play I I I I I I
Driveshaft dust boots I I I I I I
Bolts and nuts on chassis and body T T T T T T
Exhaust system and heat shields I I I I I I
All locks and hinges L L L L L L L L L L L LWasher fluid level I I I I I I I I I I I I
Maintenance and Care
Scheduled Maintenance
8-9

8/2/2019 Mazda5 Owners Manual
http://slidepdf.com/reader/full/mazda5-owners-manual 272/375
Maintenance Interval
Number of months or kilometers, whichever comes first
Months 6 12 18 24 30 36 42 48 54 60 66 72
×1000 km 10 20 30 40 50 60 70 80 90 100 110 120AIR CONDITIONER SYSTEM
Cabin air filter R R R
Chart symbols:
I: Inspect: Inspect and clean, repair, adjust, fill up, or replace if necessary.R: ReplaceL: LubricateT: Tighten
Remarks:
*1 Use FL22 type coolant in vehicles with the inscription“
FL22”
on the radiator cap itself or the surroundingarea. Use FL22 when replacing the coolant.*2 According to state/provincial and federal regulations, failure to perform maintenance on these items will not
void your emissions warranties. However, Mazda recommends that all maintenance services be performed at the recommended time or kilometer period to ensure long-term reliability.
8-10
Maintenance and Care
Scheduled Maintenance
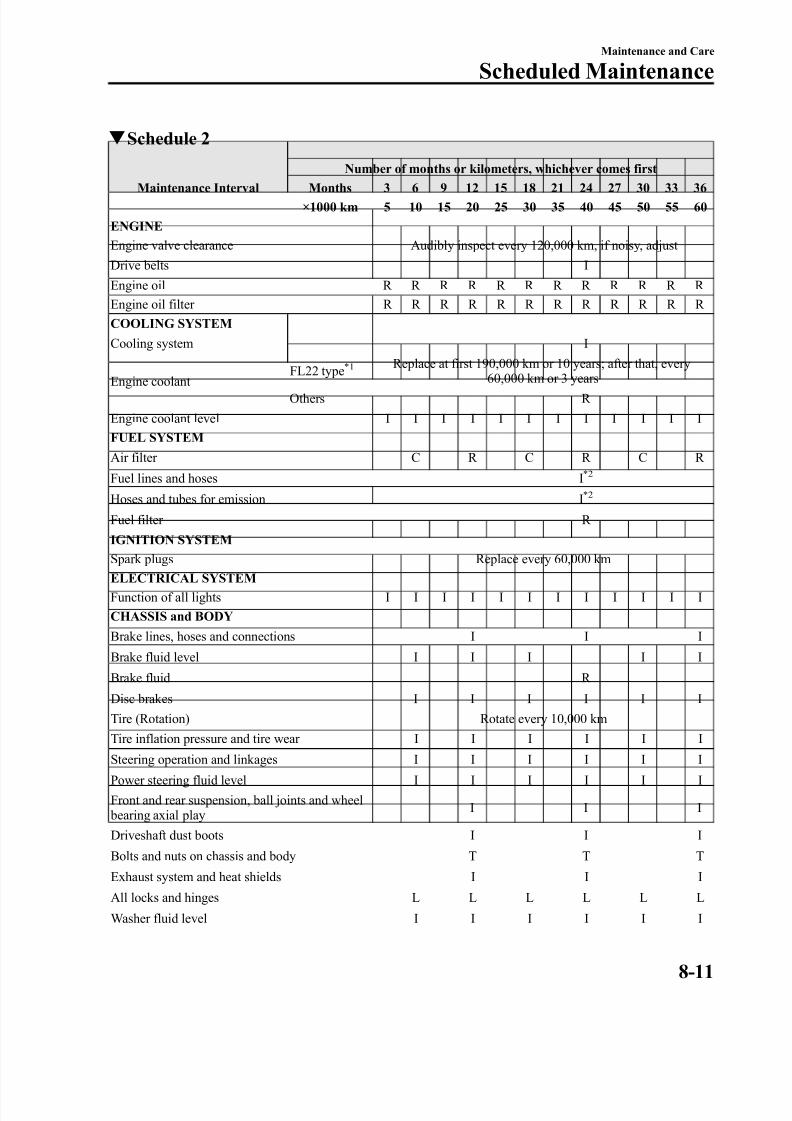
8/2/2019 Mazda5 Owners Manual
http://slidepdf.com/reader/full/mazda5-owners-manual 273/375
q Schedule 2
Maintenance Interval
Number of months or kilometers, whichever comes first
Months 3 6 9 12 15 18 21 24 27 30 33 36
×1000 km 5 10 15 20 25 30 35 40 45 50 55 60
ENGINE
Engine valve clearance Audibly inspect every 120,000 km, if noisy, adjust
Drive belts I
Engine oil R R R R R R R R R R R R Engine oil filter R R R R R R R R R R R R COOLING SYSTEM
Cooling system I
Engine coolant FL22 type *1 Replace at first 190,000 km or 10 years; after that, every
60,000 km or 3 years
Others R
Engine coolant level I I I I I I I I I I I IFUEL SYSTEM
Air filter C R C R C R
Fuel lines and hoses I*2
Hoses and tubes for emission I *2
Fuel filter R
IGNITION SYSTEMSpark plugs Replace every 60,000 kmELECTRICAL SYSTEM
Function of all lights I I I I I I I I I I I ICHASSIS and BODY
Brake lines, hoses and connections I I I
Brake fluid level I I I I I
Brake fluid R
Disc brakes I I I I I I
Tire (Rotation) Rotate every 10,000 kmTire inflation pressure and tire wear I I I I I I
Steering operation and linkages I I I I I I
Power steering fluid level I I I I I I
Front and rear suspension, ball joints and wheel bearing axial play I I I
Driveshaft dust boots I I I
Bolts and nuts on chassis and body T T T
Exhaust system and heat shields I I I
All locks and hinges L L L L L L
Washer fluid level I I I I I I
Maintenance and Care
Scheduled Maintenance
8-11
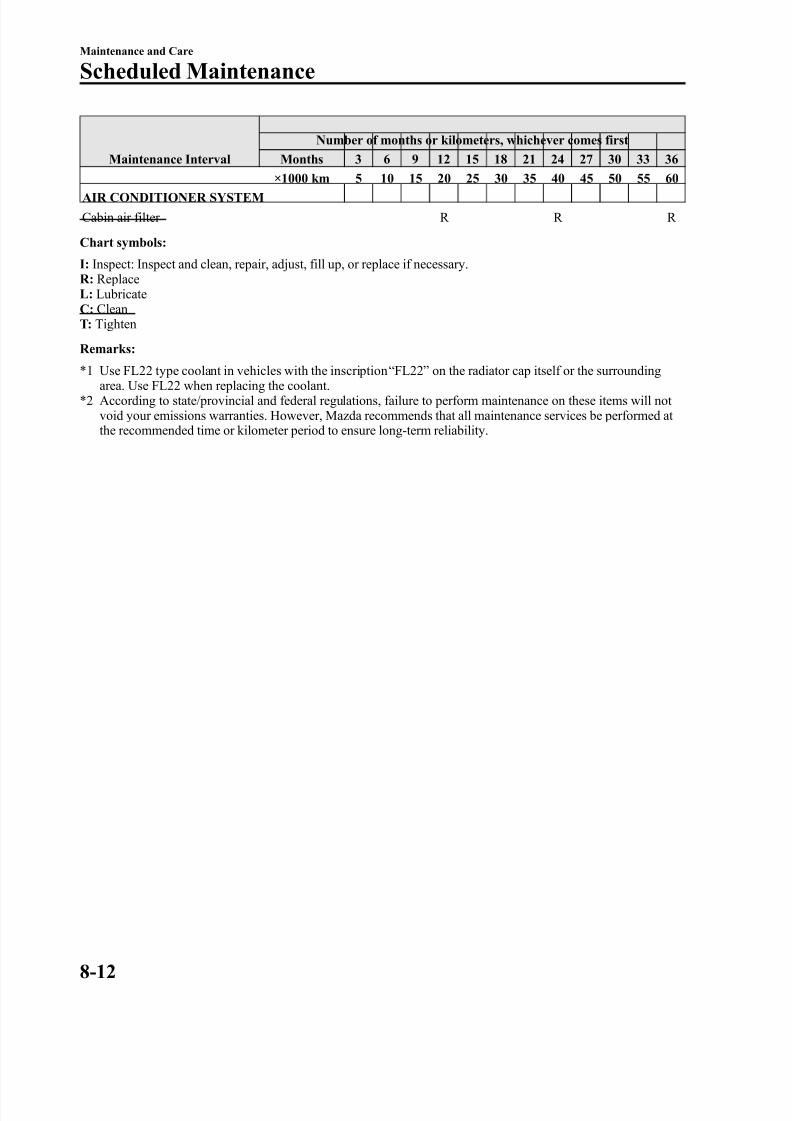
8/2/2019 Mazda5 Owners Manual
http://slidepdf.com/reader/full/mazda5-owners-manual 274/375
Maintenance Interval
Number of months or kilometers, whichever comes first
Months 3 6 9 12 15 18 21 24 27 30 33 36
×1000 km 5 10 15 20 25 30 35 40 45 50 55 60AIR CONDITIONER SYSTEM
Cabin air filter R R R
Chart symbols:
I: Inspect: Inspect and clean, repair, adjust, fill up, or replace if necessary.R: ReplaceL: LubricateC: CleanT: Tighten
Remarks:
*1 Use FL22 type coolant in vehicles with the inscription “ FL22 ” on the radiator cap itself or the surroundingarea. Use FL22 when replacing the coolant.
*2 According to state/provincial and federal regulations, failure to perform maintenance on these items will not void your emissions warranties. However, Mazda recommends that all maintenance services be performed at the recommended time or kilometer period to ensure long-term reliability.
8-12
Maintenance and Care
Scheduled Maintenance
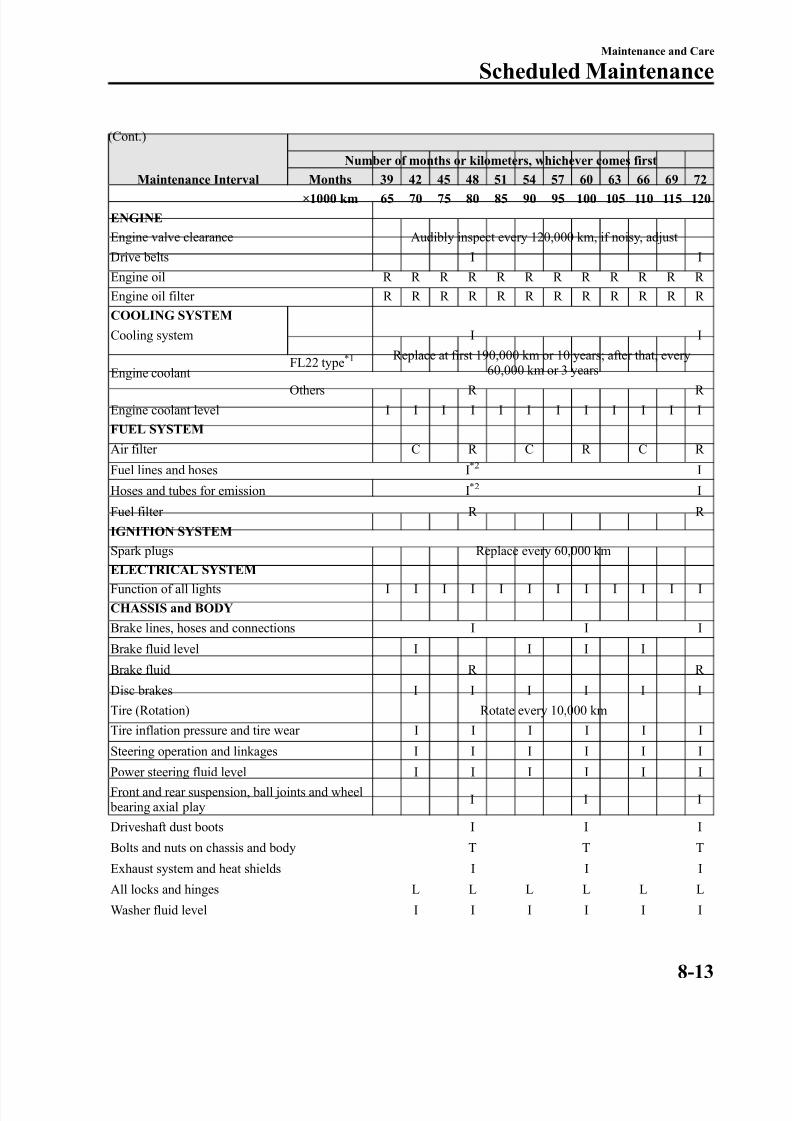
8/2/2019 Mazda5 Owners Manual
http://slidepdf.com/reader/full/mazda5-owners-manual 275/375
(Cont.)
Maintenance Interval
Number of months or kilometers, whichever comes first
Months 39 42 45 48 51 54 57 60 63 66 69 72×1000 km 65 70 75 80 85 90 95 100 105 110 115 120
ENGINE
Engine valve clearance Audibly inspect every 120,000 km, if noisy, adjust
Drive belts I I
Engine oil R R R R R R R R R R R R Engine oil filter R R R R R R R R R R R R COOLING SYSTEM
Cooling system I I
Engine coolant FL22 type*1
Replace at first 190,000 km or 10 years; after that, every60,000 km or 3 years
Others R R
Engine coolant level I I I I I I I I I I I IFUEL SYSTEM
Air filter C R C R C R
Fuel lines and hoses I*2
I
Hoses and tubes for emission I *2 I
Fuel filter R R
IGNITION SYSTEM
Spark plugs Replace every 60,000 kmELECTRICAL SYSTEM
Function of all lights I I I I I I I I I I I ICHASSIS and BODY
Brake lines, hoses and connections I I I
Brake fluid level I I I I
Brake fluid R R
Disc brakes I I I I I I
Tire (Rotation) Rotate every 10,000 km
Tire inflation pressure and tire wear I I I I I I
Steering operation and linkages I I I I I I
Power steering fluid level I I I I I I
Front and rear suspension, ball joints and wheel bearing axial play I I I
Driveshaft dust boots I I I
Bolts and nuts on chassis and body T T T
Exhaust system and heat shields I I I
All locks and hinges L L L L L L
Washer fluid level I I I I I I
Maintenance and Care
Scheduled Maintenance
8-13

8/2/2019 Mazda5 Owners Manual
http://slidepdf.com/reader/full/mazda5-owners-manual 276/375
Maintenance Interval
Number of months or kilometers, whichever comes first
Months 39 42 45 48 51 54 57 60 63 66 69 72
×1000 km 65 70 75 80 85 90 95 100 105 110 115 120AIR CONDITIONER SYSTEM
Cabin air filter R R R
Chart symbols:
I: Inspect: Inspect and clean, repair, adjust, fill up, or replace if necessary.R: ReplaceL: LubricateC: CleanT: Tighten
Remarks:
*1 Use FL22 type coolant in vehicles with the inscription “ FL22 ” on the radiator cap itself or the surroundingarea. Use FL22 when replacing the coolant.
*2 According to state/provincial and federal regulations, failure to perform maintenance on these items will not void your emissions warranties. However, Mazda recommends that all maintenance services be performed at the recommended time or kilometer period to ensure long-term reliability.
8-14
Maintenance and Care
Scheduled Maintenance
8/2/2019 Mazda5 Owners Manual
http://slidepdf.com/reader/full/mazda5-owners-manual 277/375
Owner Maintenance Schedule
The owner or a qualified service technician should make these vehicle inspections at theindicated intervals to ensure safe and dependable operation.
Bring any problem to the attention of an Authorized Mazda Dealer or qualified servicetechnician as soon as possible.
q When Refuelingl Brake and clutch fluid level (page 8-22)l Engine coolant level (page 8-20)l
Engine oil level (page 8-19)l Washer fluid level (page 8-24)
q At Least Monthly
Tire inflation pressures (page 8-31)
q At Least Twice a Year (For Example, Every Spring and Fall)l Automatic transaxle fluid level (page 8-23)l Power steering fluid level (page 8-23)You can do the following scheduled maintenance items if you have some mechanicalability and a few basic tools and if you closely follow the directions in this manual.l Engine coolant (page 8-20)l Engine oil (page 8-18)
Maintenance and Care
Owner Maintenance
8-15
8/2/2019 Mazda5 Owners Manual
http://slidepdf.com/reader/full/mazda5-owners-manual 278/375
Owner Maintenance Precautions
Improper or incomplete service may result in problems. This section gives instructions onlyfor items that are easy to perform.
As explained in the Introduction (page 8-2), several procedures can be done only by a qualified service technician with special tools.
Improper owner maintenance during the warranty period may affect warranty coverage.For details, read the separate Mazda Warranty statement provided with the vehicle. If you're unsure about any servicing or maintenance procedure, have it done by anAuthorized Mazda Dealer.
There are strict environmental laws regarding the disposal of waste oil and fluids. Pleasedispose of your waste properly and with due regard to the environment.
We recommend that you entrust the oil and fluid changes of your vehicle to an AuthorizedMazda Dealer.
WARNING
Do not perform maintenance work if you lack sufficient knowledge and experience or the proper tools and equipment to do the work. Have maintenance work done by aqualified technician:
Performing maintenance work on a vehicle is dangerous if not done properly. Youcan be seriously injured while performing some maintenance procedures.
If you must run the engine while working under the hood, make certain that youremove all jewelry (especially rings, bracelets, watches, and necklaces) and allneckties, scarves, and similar loose clothing before getting near the engine or coolingfan which may turn on unexpectedly:
Working under the hood with the engine running is dangerous. It becomes evenmore dangerous when you wear jewelry or loose clothing.Either can become entangled in moving parts and result in injury.
Turn off the ignition switch and make sure the fan is not running before attemptingto work near the cooling fan:
Working near the cooling fan when it is running is dangerous. The fan couldcontinue running indefinitely even if the engine has stopped and the enginecompartment temperature is high. You could be hit by the fan and seriously injured.
Do not leave items in the engine compartment: After you have finished checking or doing servicing in the engine compartment, donot forget and leave items such as tools or rags in the engine compartment.Tools or other items left in the engine compartment could cause engine damage or afire leading to an unexpected accident.
8-16
Maintenance and Care
Owner Maintenance

8/2/2019 Mazda5 Owners Manual
http://slidepdf.com/reader/full/mazda5-owners-manual 279/375
Engine Compartment Overview
Engine oil-filler capPower steeringfluid reservoir
Engine oil dipstick
Cooling System Cap
Automatic transaxle fluid-leveldipstick (only for automatic transaxle)
Fuse block
Brake/Clutch fluidreservoir
Battery
Engine coolant reservoir
Windshieldwasher fluidreservoir
Maintenance and Care
Owner Maintenance
8-17
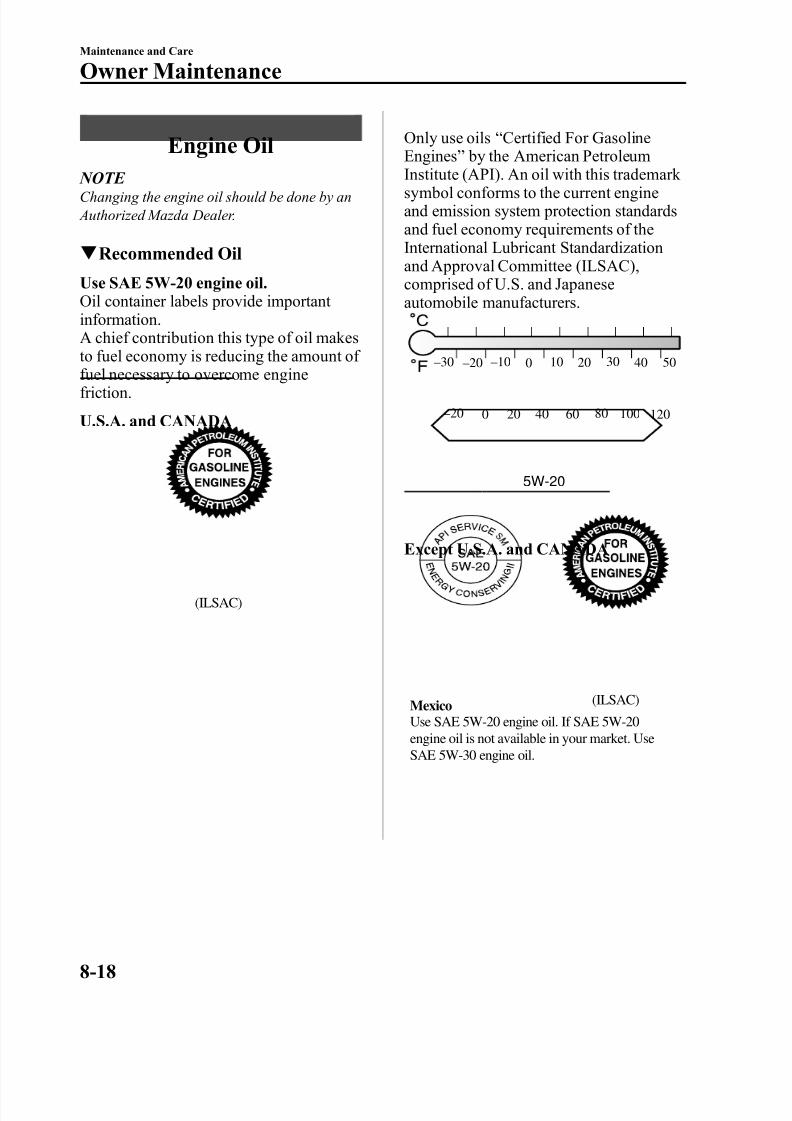
8/2/2019 Mazda5 Owners Manual
http://slidepdf.com/reader/full/mazda5-owners-manual 280/375
Engine Oil
NOTE Changing the engine oil should be done by an Authorized Mazda Dealer.
q Recommended Oil
Use SAE 5W-20 engine oil.Oil container labels provide important information.A chief contribution this type of oil makes
to fuel economy is reducing the amount of fuel necessary to overcome enginefriction.
U.S.A. and CANADA
(ILSAC)
Only use oils “ Certified For GasolineEngines ” by the American Petroleum
Institute (API). An oil with this trademark symbol conforms to the current engineand emission system protection standardsand fuel economy requirements of theInternational Lubricant Standardizationand Approval Committee (ILSAC),comprised of U.S. and Japaneseautomobile manufacturers.
5W-20
120100806040200–20
50403020100–10–20–30
Except U.S.A. and CANADA
(ILSAC)
Use SAE 5W-20 engine oil. If SAE 5W-20engine oil is not available in your market. UseSAE 5W-30 engine oil.
Mexico
8-18
Maintenance and Care
Owner Maintenance

8/2/2019 Mazda5 Owners Manual
http://slidepdf.com/reader/full/mazda5-owners-manual 281/375
The quality designation SM, or ILSACmust be on the label.
5W-20
120100806040200–20
50403020100–10–20–30
q Inspecting Engine Oil Level
1. Be sure the vehicle is on a levelsurface.
2. Warm up the engine to normaloperating temperature.
3. Turn it off and wait at least 5 minutesfor the oil to return to the oil pan.
4. Pull out the dipstick, wipe it clean, andreinsert it fully.
Full
Low
OK
5. Pull it out again and examine the level.It's OK between MIN and MAX.But if it's near or below MIN, add
enough oil to bring the level to MAX.
CAUTION
Don't add engine oil over MAX. Thismay cause engine damage.
6. Make sure the O-ring on the dipstick is positioned properly before reinsertingthe dipstick.
The distance between MIN and MAX onthe dipstick represents the following:
Oil capacity
L (US qt, Imp qt) 0.75 (0.79, 0.66)
Maintenance and Care
Owner Maintenance
8-19
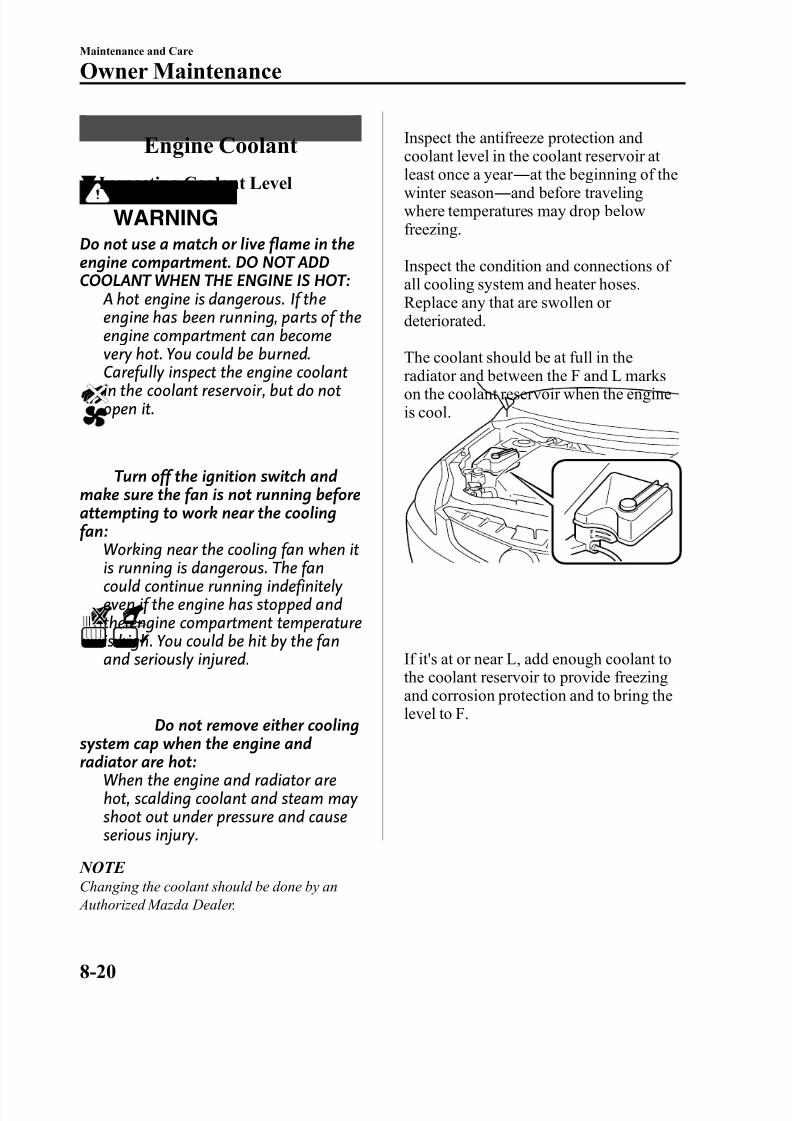
8/2/2019 Mazda5 Owners Manual
http://slidepdf.com/reader/full/mazda5-owners-manual 282/375
Engine Coolant
q Inspecting Coolant Level
WARNING
Do not use a match or live flame in theengine compartment. DO NOT ADDCOOLANT WHEN THE ENGINE IS HOT:
A hot engine is dangerous. If theengine has been running, parts of theengine compartment can become
very hot. You could be burned.Carefully inspect the engine coolantin the coolant reservoir, but do notopen it.
Turn off the ignition switch andmake sure the fan is not running beforeattempting to work near the coolingfan:
Working near the cooling fan when itis running is dangerous. The fancould continue running indefinitely even if the engine has stopped andthe engine compartment temperatureis high. You could be hit by the fanand seriously injured.
Do not remove either coolingsystem cap when the engine andradiator are hot:
When the engine and radiator arehot, scalding coolant and steam may shoot out under pressure and causeserious injury.
NOTE Changing the coolant should be done by an
Authorized Mazda Dealer.
Inspect the antifreeze protection andcoolant level in the coolant reservoir at
least once a year ―
at the beginning of thewinter season ― and before travelingwhere temperatures may drop belowfreezing.
Inspect the condition and connections of all cooling system and heater hoses.Replace any that are swollen or deteriorated.
The coolant should be at full in theradiator and between the F and L markson the coolant reservoir when the engineis cool.
If it's at or near L, add enough coolant tothe coolant reservoir to provide freezingand corrosion protection and to bring thelevel to F.
8-20
Maintenance and Care
Owner Maintenance

8/2/2019 Mazda5 Owners Manual
http://slidepdf.com/reader/full/mazda5-owners-manual 283/375
CAUTIONØ
Radiator coolant will damagepaint.Rinse it off quickly if spilled.
Ø Use only soft (demineralized)water in the coolant mixture.Water that contains minerals willcut down on the coolant'seffectiveness.
Ø Don't add only water. Always adda proper coolant mixture.
Ø The engine has aluminum partsand must be protected by anethylene-glycol-based coolant toprevent corrosion and freezing.
Ø DO NOT USE coolants Containing Alcohol, methanol, Borate or Silicate.These coolants could damage thecooling system.
Ø DO NOT MIX alcohol or methanol
with the coolant. This coulddamage the cooling system.Ø Don't use a solution that contains
more than 60% antifreeze.This would reduce effectiveness.
NOTE If the “ FL22 ” mark is shown on or near the
cooling system cap, use FL22 type enginecoolant. If engine coolant other than FL22type is used, the engine coolant must bereplaced earlier than the specified replacement interval indicated in the scheduled maintenance (page 8-3).
If the coolant reservoir is empty or new
coolant is required frequently, consult anAuthorized Mazda Dealer.
Maintenance and Care
Owner Maintenance
8-21
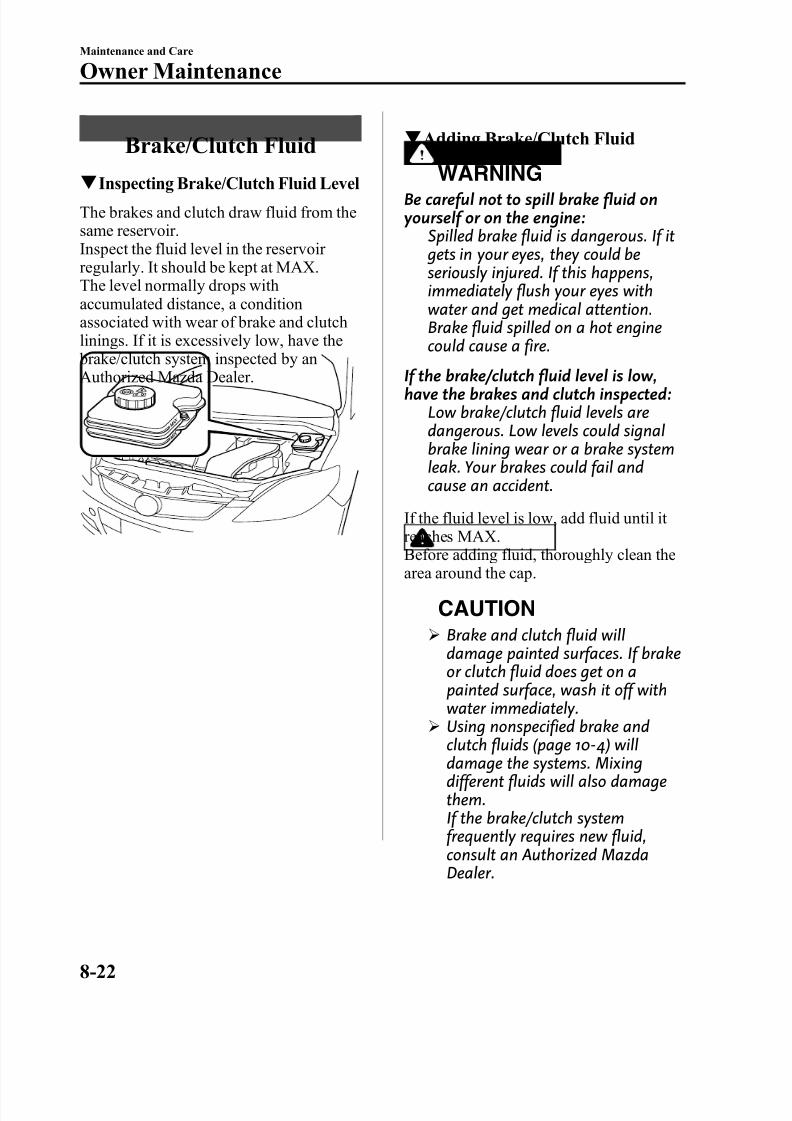
8/2/2019 Mazda5 Owners Manual
http://slidepdf.com/reader/full/mazda5-owners-manual 284/375
Brake/Clutch Fluid
q Inspecting Brake/Clutch Fluid LevelThe brakes and clutch draw fluid from thesame reservoir.Inspect the fluid level in the reservoir regularly. It should be kept at MAX.The level normally drops withaccumulated distance, a conditionassociated with wear of brake and clutchlinings. If it is excessively low, have the
brake/clutch system inspected by anAuthorized Mazda Dealer.
q Adding Brake/Clutch Fluid
WARNINGBe careful not to spill brake fluid onyourself or on the engine:
Spilled brake fluid is dangerous. If it gets in your eyes, they could beseriously injured. If this happens,immediately flush your eyes withwater and get medical attention.Brake fluid spilled on a hot enginecould cause a fire.
If the brake/clutch fluid level is low,have the brakes and clutch inspected:
Low brake/clutch fluid levels aredangerous. Low levels could signalbrake lining wear or a brake systemleak. Your brakes could fail andcause an accident.
If the fluid level is low, add fluid until it
reaches MAX.Before adding fluid, thoroughly clean thearea around the cap.
CAUTIONØ Brake and clutch fluid will
damage painted surfaces. If brakeor clutch fluid does get on apainted surface, wash it off withwater immediately.
Ø Using nonspecified brake andclutch fluids (page 10-4) willdamage the systems. Mixingdifferent fluids will also damagethem.If the brake/clutch systemfrequently requires new fluid,consult an Authorized MazdaDealer.
8-22
Maintenance and Care
Owner Maintenance
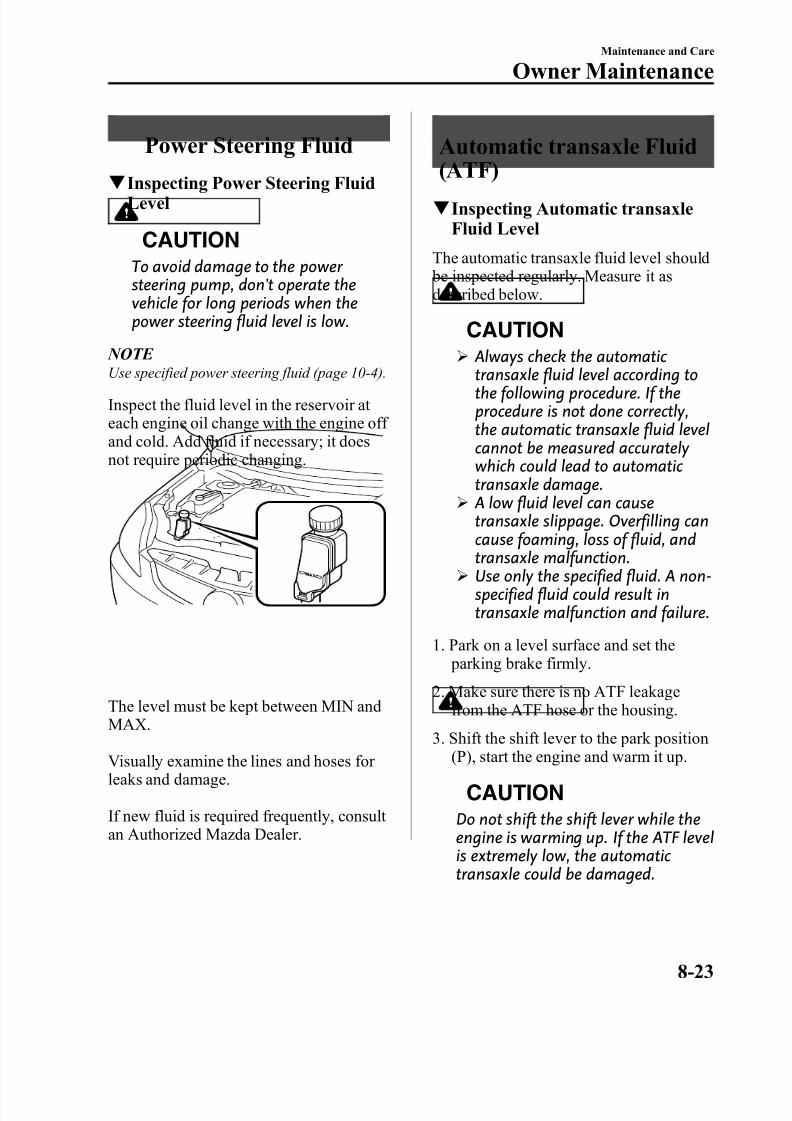
8/2/2019 Mazda5 Owners Manual
http://slidepdf.com/reader/full/mazda5-owners-manual 285/375
Power Steering Fluid
q Inspecting Power Steering FluidLevel
CAUTION
To avoid damage to the power steering pump, don't operate thevehicle for long periods when thepower steering fluid level is low.
NOTE Use specified power steering fluid (page 10-4).
Inspect the fluid level in the reservoir at each engine oil change with the engine off and cold. Add fluid if necessary; it doesnot require periodic changing.
The level must be kept between MIN and
MAX.
Visually examine the lines and hoses for leaks and damage.
If new fluid is required frequently, consult an Authorized Mazda Dealer.
Automatic transaxle Fluid
(ATF)q Inspecting Automatic transaxle
Fluid Level
The automatic transaxle fluid level should be inspected regularly. Measure it asdescribed below.
CAUTIONØ
Always check the automatic transaxle fluid level according tothe following procedure. If theprocedure is not done correctly,the automatic transaxle fluid levelcannot be measured accurately which could lead to automatic transaxle damage.
Ø A low fluid level can causetransaxle slippage. Overfilling can
cause foaming, loss of fluid, andtransaxle malfunction.Ø Use only the specified fluid. A non-
specified fluid could result intransaxle malfunction and failure.
1. Park on a level surface and set the parking brake firmly.
2. Make sure there is no ATF leakagefrom the ATF hose or the housing.
3. Shift the shift lever to the park position(P), start the engine and warm it up.
CAUTION
Do not shift the shift lever while theengine is warming up. If the ATF levelis extremely low, the automatic transaxle could be damaged.
Maintenance and Care
Owner Maintenance
8-23
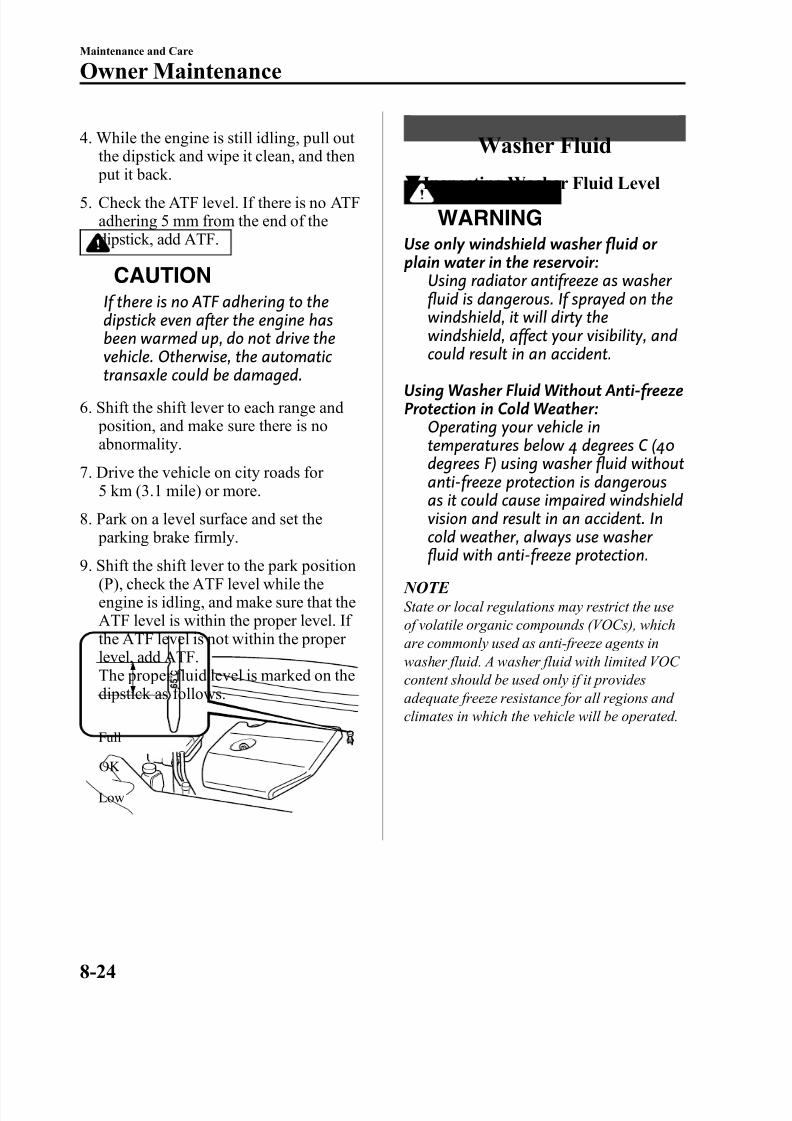
8/2/2019 Mazda5 Owners Manual
http://slidepdf.com/reader/full/mazda5-owners-manual 286/375
4. While the engine is still idling, pull out the dipstick and wipe it clean, and then
put it back.5. Check the ATF level. If there is no ATF
adhering 5 mm from the end of thedipstick, add ATF.
CAUTION
If there is no ATF adhering to thedipstick even after the engine hasbeen warmed up, do not drive the
vehicle. Otherwise, the automatic transaxle could be damaged.
6. Shift the shift lever to each range and position, and make sure there is noabnormality.
7. Drive the vehicle on city roads for 5 km (3.1 mile) or more.
8. Park on a level surface and set the
parking brake firmly.9. Shift the shift lever to the park position
(P), check the ATF level while theengine is idling, and make sure that theATF level is within the proper level. If the ATF level is not within the proper level, add ATF.The proper fluid level is marked on thedipstick as follows.
Full
OK
Low
Washer Fluid
q Inspecting Washer Fluid Level
WARNING
Use only windshield washer fluid or plain water in the reservoir:
Using radiator antifreeze as washer fluid is dangerous. If sprayed on thewindshield, it will dirty thewindshield, affect your visibility, and
could result in an accident.Using Washer Fluid Without Anti-freezeProtection in Cold Weather:
Operating your vehicle intemperatures below 4 degrees C (40degrees F) using washer fluid withoutanti-freeze protection is dangerousas it could cause impaired windshieldvision and result in an accident. In
cold weather, always use washer fluid with anti-freeze protection.
NOTE State or local regulations may restrict the useof volatile organic compounds (VOCs), whichare commonly used as anti-freeze agents inwasher fluid. A washer fluid with limited VOC content should be used only if it providesadequate freeze resistance for all regions and climates in which the vehicle will be operated.
8-24
Maintenance and Care
Owner Maintenance
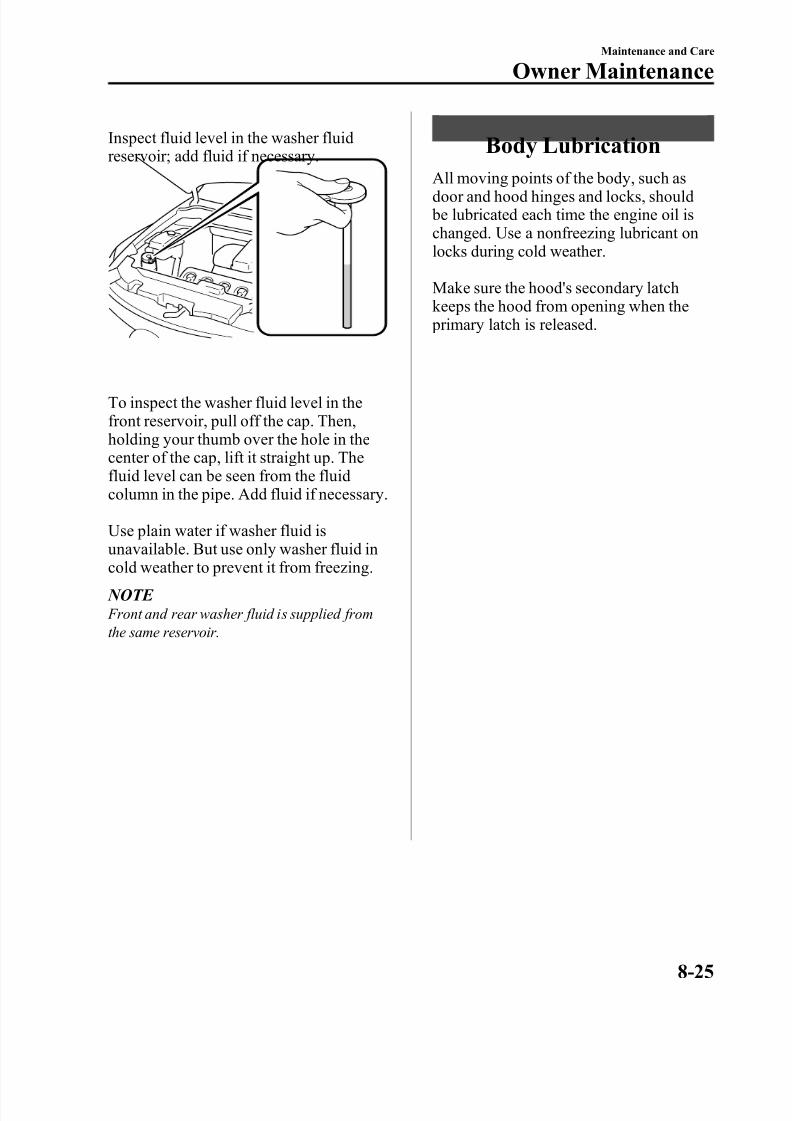
8/2/2019 Mazda5 Owners Manual
http://slidepdf.com/reader/full/mazda5-owners-manual 287/375
Inspect fluid level in the washer fluidreservoir; add fluid if necessary.
To inspect the washer fluid level in thefront reservoir, pull off the cap. Then,holding your thumb over the hole in thecenter of the cap, lift it straight up. Thefluid level can be seen from the fluidcolumn in the pipe. Add fluid if necessary.
Use plain water if washer fluid isunavailable. But use only washer fluid incold weather to prevent it from freezing.
NOTE Front and rear washer fluid is supplied fromthe same reservoir.
Body Lubrication
All moving points of the body, such asdoor and hood hinges and locks, should be lubricated each time the engine oil ischanged. Use a nonfreezing lubricant onlocks during cold weather.
Make sure the hood's secondary latchkeeps the hood from opening when the primary latch is released.
Maintenance and Care
Owner Maintenance
8-25
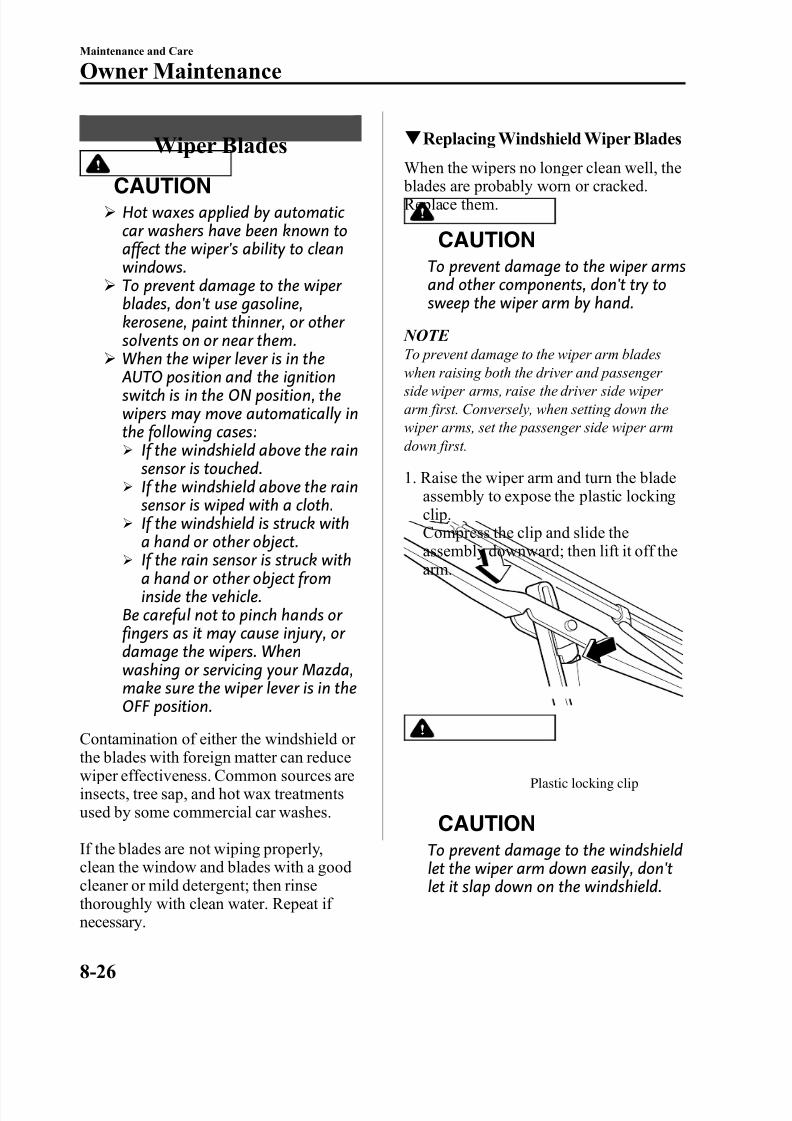
8/2/2019 Mazda5 Owners Manual
http://slidepdf.com/reader/full/mazda5-owners-manual 288/375
Wiper Blades
CAUTIONØ Hot waxes applied by automatic
car washers have been known toaffect the wiper's ability to cleanwindows.
Ø To prevent damage to the wiper blades, don't use gasoline,kerosene, paint thinner, or other solvents on or near them.
Ø When the wiper lever is in the AUTO position and the ignitionswitch is in the ON position, thewipers may move automatically inthe following cases:Ø If the windshield above the rain
sensor is touched.Ø If the windshield above the rain
sensor is wiped with a cloth.Ø If the windshield is struck with
a hand or other object.Ø If the rain sensor is struck witha hand or other object frominside the vehicle.
Be careful not to pinch hands or fingers as it may cause injury, or damage the wipers. Whenwashing or servicing your Mazda,make sure the wiper lever is in theOFF position.
Contamination of either the windshield or the blades with foreign matter can reducewiper effectiveness. Common sources areinsects, tree sap, and hot wax treatmentsused by some commercial car washes.
If the blades are not wiping properly,clean the window and blades with a goodcleaner or mild detergent; then rinse
thoroughly with clean water. Repeat if necessary.
q Replacing Windshield Wiper Blades
When the wipers no longer clean well, the blades are probably worn or cracked.Replace them.
CAUTION
To prevent damage to the wiper armsand other components, don't try tosweep the wiper arm by hand.
NOTE
To prevent damage to the wiper arm bladeswhen raising both the driver and passenger side wiper arms, raise the driver side wiper arm first. Conversely, when setting down thewiper arms, set the passenger side wiper armdown first.
1. Raise the wiper arm and turn the bladeassembly to expose the plastic lockingclip.Compress the clip and slide theassembly downward; then lift it off thearm.
Plastic locking clip
CAUTION
To prevent damage to the windshieldlet the wiper arm down easily, don'tlet it slap down on the windshield.
8-26
Maintenance and Care
Owner Maintenance
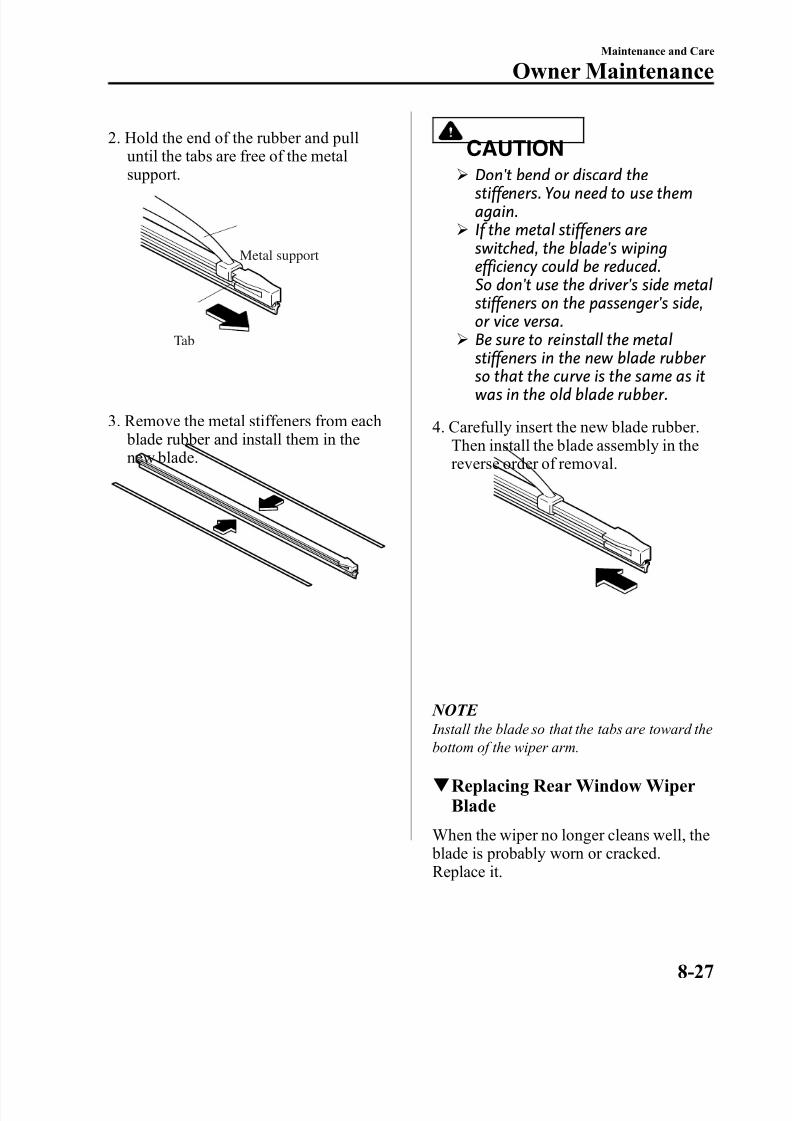
8/2/2019 Mazda5 Owners Manual
http://slidepdf.com/reader/full/mazda5-owners-manual 289/375
2. Hold the end of the rubber and pulluntil the tabs are free of the metal
support.
Metal support
Tab
3. Remove the metal stiffeners from each blade rubber and install them in thenew blade.
CAUTIONØ
Don't bend or discard thestiffeners. You need to use themagain.
Ø If the metal stiffeners areswitched, the blade's wipingefficiency could be reduced.So don't use the driver's side metalstiffeners on the passenger's side,or vice versa.
Ø Be sure to reinstall the metal
stiffeners in the new blade rubber so that the curve is the same as itwas in the old blade rubber.
4. Carefully insert the new blade rubber.Then install the blade assembly in thereverse order of removal.
NOTE Install the blade so that the tabs are toward thebottom of the wiper arm.
q Replacing Rear Window WiperBlade
When the wiper no longer cleans well, the blade is probably worn or cracked.Replace it.
Maintenance and Care
Owner Maintenance
8-27
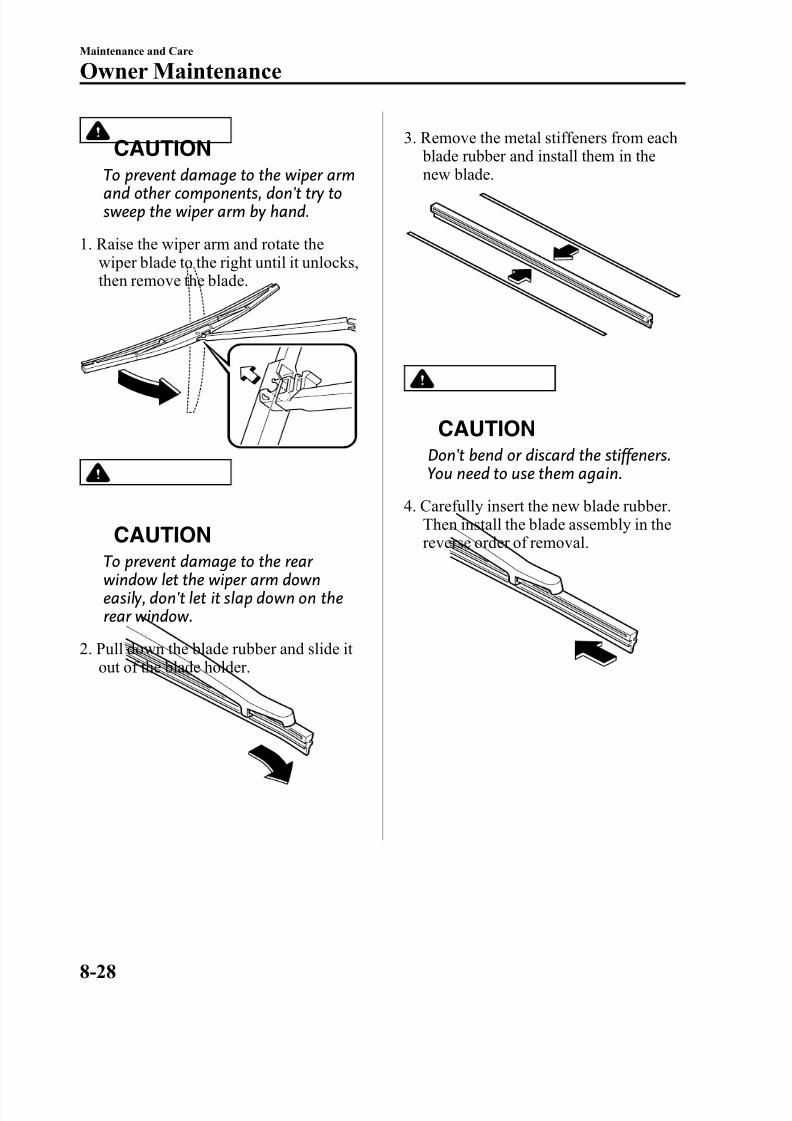
8/2/2019 Mazda5 Owners Manual
http://slidepdf.com/reader/full/mazda5-owners-manual 290/375
CAUTION
To prevent damage to the wiper armand other components, don't try tosweep the wiper arm by hand.
1. Raise the wiper arm and rotate thewiper blade to the right until it unlocks,then remove the blade.
CAUTION
To prevent damage to the rear window let the wiper arm downeasily, don't let it slap down on therear window.
2. Pull down the blade rubber and slide it out of the blade holder.
3. Remove the metal stiffeners from each blade rubber and install them in the
new blade.
CAUTION
Don't bend or discard the stiffeners.You need to use them again.
4. Carefully insert the new blade rubber.Then install the blade assembly in the
reverse order of removal.
8-28
Maintenance and Care
Owner Maintenance
8/2/2019 Mazda5 Owners Manual
http://slidepdf.com/reader/full/mazda5-owners-manual 291/375
Battery
WARNING
Read the following precautions carefully before using the battery or inspectingto ensure safe and correct handling:
Always wear eye protection when working near the battery:Working without eye protection is dangerous. Battery fluid contains SULFURIC ACIDwhich could cause blindness if splashed into your eyes. Also, hydrogen gas producedduring normal battery operation, could ignite and cause the battery to explode.
Wear eye protection and protective gloves to prevent contact with battery fluid:
Spilled battery fluid is dangerous.Battery fluid contains SULFURIC ACID which could cause serious injuries if it gets ineyes, or on the skin or clothing. If this happens, immediately flush your eyes withwater for 15 minutes or wash your skin thoroughly and get medical attention.
Always keep batteries out of the reach of children: Allowing children to play near batteries is dangerous. Battery fluid could causeserious injuries if it gets in the eyes or on the skin.
Keep flames and sparks away from open battery cells and do not allow metaltools to contact the positive ( ) or negative ( ) terminal of the battery when
working near a battery. Do not allow the positive ( ) terminal to contact the vehiclebody:Flames and sparks near open battery cells are dangerous. Hydrogen gas, producedduring normal battery operation, could ignite and cause the battery to explode. Anexploding battery can cause serious burns and injuries. Keep all flames includingcigarettes and sparks away from open battery cells.
Keep all flames, including cigarettes, and sparks away from open battery cells:Flames and sparks near open battery cells are dangerous. Hydrogen gas, produced
during normal battery operation, could ignite and cause the battery to explode. Anexploding battery can cause serious burns and injuries.
Maintenance and Care
Owner Maintenance
8-29
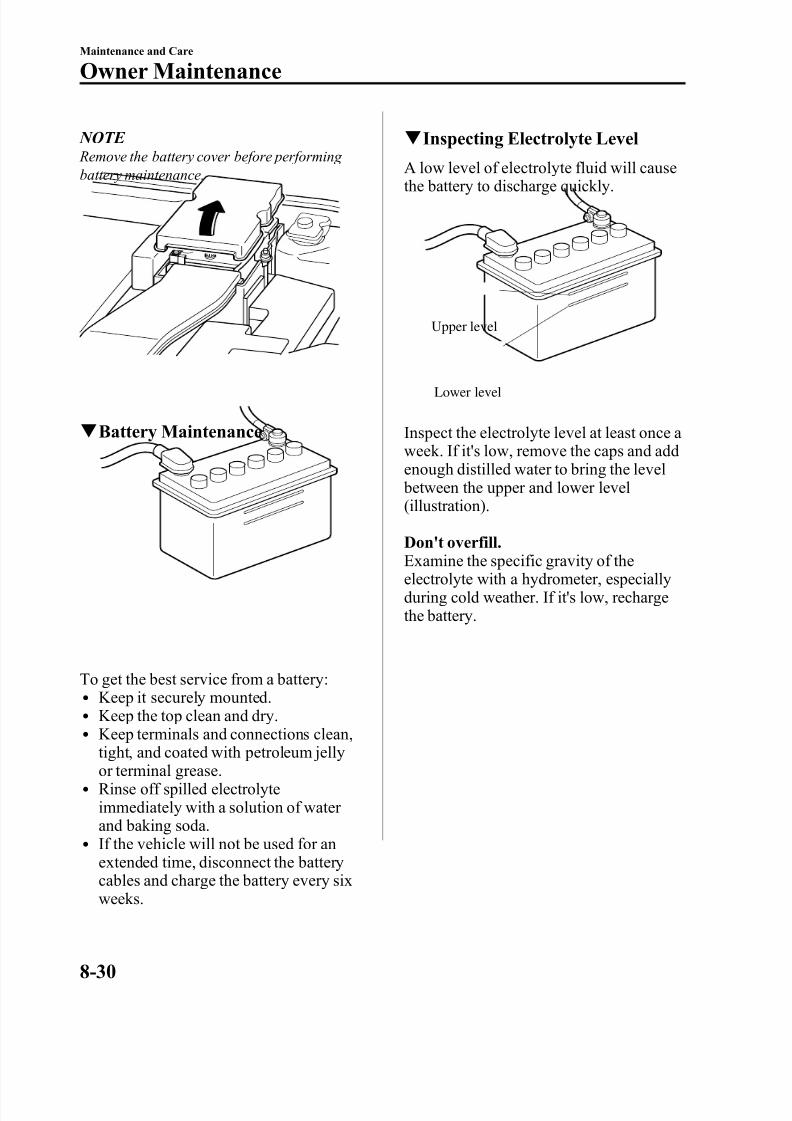
8/2/2019 Mazda5 Owners Manual
http://slidepdf.com/reader/full/mazda5-owners-manual 292/375
NOTE Remove the battery cover before performing
battery maintenance.
q Battery Maintenance
To get the best service from a battery:l Keep it securely mounted.l Keep the top clean and dry.l Keep terminals and connections clean,
tight, and coated with petroleum jellyor terminal grease.
l Rinse off spilled electrolyteimmediately with a solution of water and baking soda.
l If the vehicle will not be used for anextended time, disconnect the batterycables and charge the battery every six
weeks.
q Inspecting Electrolyte Level
A low level of electrolyte fluid will causethe battery to discharge quickly.
Upper level
Lower level
Inspect the electrolyte level at least once a week. If it's low, remove the caps and addenough distilled water to bring the level between the upper and lower level(illustration).
Don't overfill.Examine the specific gravity of theelectrolyte with a hydrometer, especiallyduring cold weather. If it's low, rechargethe battery.
8-30
Maintenance and Care
Owner Maintenance
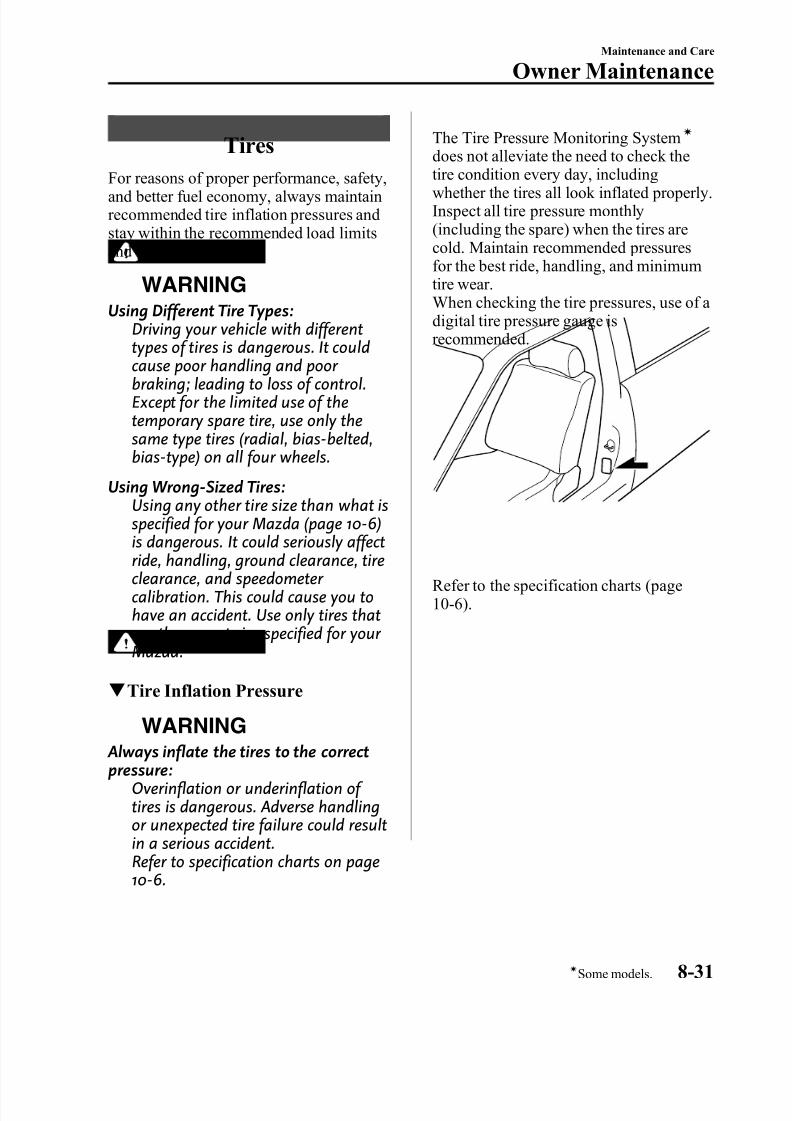
8/2/2019 Mazda5 Owners Manual
http://slidepdf.com/reader/full/mazda5-owners-manual 293/375
Tires
For reasons of proper performance, safety,and better fuel economy, always maintainrecommended tire inflation pressures andstay within the recommended load limitsand weight distribution.
WARNING
Using Different Tire Types:Driving your vehicle with differenttypes of tires is dangerous. It couldcause poor handling and poor braking; leading to loss of control.Except for the limited use of thetemporary spare tire, use only thesame type tires (radial, bias-belted,bias-type) on all four wheels.
Using Wrong-Sized Tires:Using any other tire size than what isspecified for your Mazda (page 10-6)is dangerous. It could seriously affectride, handling, ground clearance, tireclearance, and speedometer calibration. This could cause you tohave an accident. Use only tires thatare the correct size specified for your Mazda.
q Tire Inflation Pressure
WARNING Always inflate the tires to the correctpressure:
Overinflation or underinflation of tires is dangerous. Adverse handlingor unexpected tire failure could resultin a serious accident.Refer to specification charts on page10-6.
The Tire Pressure Monitoring Systemí
does not alleviate the need to check the
tire condition every day, includingwhether the tires all look inflated properly.Inspect all tire pressure monthly(including the spare) when the tires arecold. Maintain recommended pressuresfor the best ride, handling, and minimumtire wear.When checking the tire pressures, use of a digital tire pressure gauge isrecommended.
Refer to the specification charts (page10-6).
Maintenance and Care
Owner Maintenance
8-31íSome models.
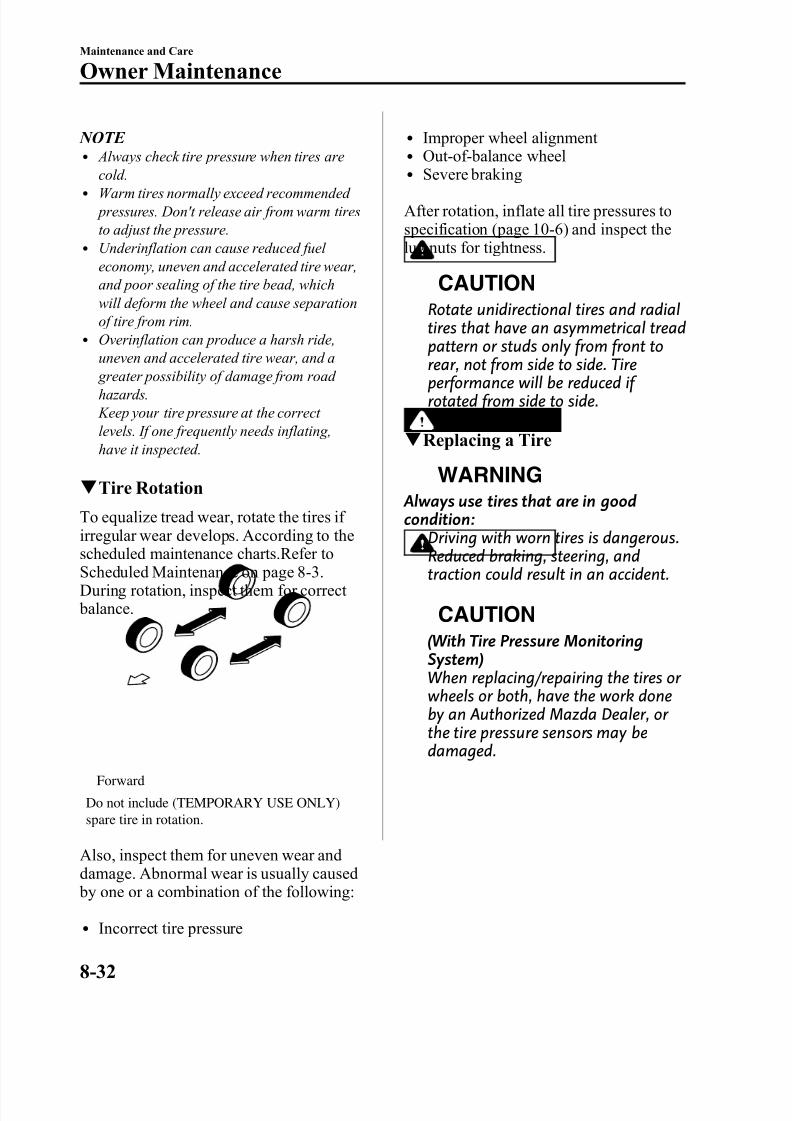
8/2/2019 Mazda5 Owners Manual
http://slidepdf.com/reader/full/mazda5-owners-manual 294/375
NOTE l Always check tire pressure when tires are
cold.l Warm tires normally exceed recommended pressures. Don't release air from warm tiresto adjust the pressure.
l Underinflation can cause reduced fuel economy, uneven and accelerated tire wear,and poor sealing of the tire bead, whichwill deform the wheel and cause separationof tire from rim.
l Overinflation can produce a harsh ride,
uneven and accelerated tire wear, and a greater possibility of damage from road hazards. Keep your tire pressure at the correct levels. If one frequently needs inflating,have it inspected.
q Tire Rotation
To equalize tread wear, rotate the tires if
irregular wear develops. According to thescheduled maintenance charts.Refer toScheduled Maintenance on page 8-3.During rotation, inspect them for correct balance.
Do not include (TEMPORARY USE ONLY)spare tire in rotation.
Forward
Also, inspect them for uneven wear anddamage. Abnormal wear is usually caused by one or a combination of the following:
l Incorrect tire pressure
l Improper wheel alignment l Out-of-balance wheell
Severe brakingAfter rotation, inflate all tire pressures tospecification (page 10-6) and inspect thelug nuts for tightness.
CAUTION
Rotate unidirectional tires and radialtires that have an asymmetrical treadpattern or studs only from front torear, not from side to side. Tireperformance will be reduced if rotated from side to side.
q Replacing a Tire
WARNING
Always use tires that are in goodcondition:
Driving with worn tires is dangerous.Reduced braking, steering, andtraction could result in an accident.
CAUTION
(With Tire Pressure MonitoringSystem)When replacing/repairing the tires or wheels or both, have the work doneby an Authorized Mazda Dealer, or the tire pressure sensors may bedamaged.
8-32
Maintenance and Care
Owner Maintenance
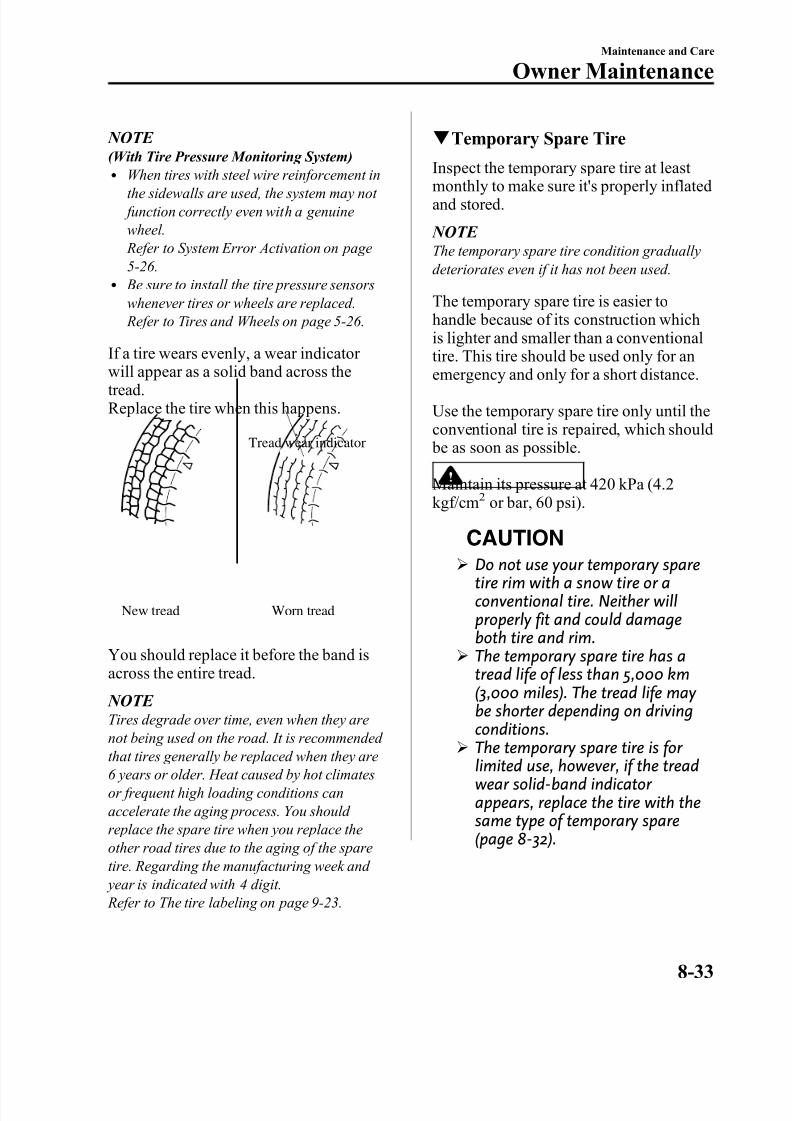
8/2/2019 Mazda5 Owners Manual
http://slidepdf.com/reader/full/mazda5-owners-manual 295/375
NOTE (With Tire Pressure Monitoring System)
l
When tires with steel wire reinforcement inthe sidewalls are used, the system may not function correctly even with a genuinewheel. Refer to System Error Activation on page5-26.
l Be sure to install the tire pressure sensorswhenever tires or wheels are replaced. Refer to Tires and Wheels on page 5-26.
If a tire wears evenly, a wear indicator will appear as a solid band across thetread.Replace the tire when this happens.
New tread
Tread wear indicator
Worn tread
You should replace it before the band isacross the entire tread.
NOTE
Tires degrade over time, even when they arenot being used on the road. It is recommended that tires generally be replaced when they are6 years or older. Heat caused by hot climatesor frequent high loading conditions canaccelerate the aging process. You should replace the spare tire when you replace theother road tires due to the aging of the sparetire. Regarding the manufacturing week and year is indicated with 4 digit.
Refer to The tire labeling on page 9-23.
q Temporary Spare Tire
Inspect the temporary spare tire at least monthly to make sure it's properly inflatedand stored.
NOTE The temporary spare tire condition graduallydeteriorates even if it has not been used.
The temporary spare tire is easier tohandle because of its construction whichis lighter and smaller than a conventional
tire. This tire should be used only for anemergency and only for a short distance.
Use the temporary spare tire only until theconventional tire is repaired, which should be as soon as possible.
Maintain its pressure at 420 kPa (4.2kgf/cm
2or bar, 60 psi).
CAUTIONØ Do not use your temporary spare
tire rim with a snow tire or aconventional tire. Neither willproperly fit and could damageboth tire and rim.
Ø The temporary spare tire has atread life of less than 5,000 km(3,000 miles). The tread life may be shorter depending on drivingconditions.
Ø The temporary spare tire is for limited use, however, if the treadwear solid-band indicator appears, replace the tire with thesame type of temporary spare(page 8-32).
Maintenance and Care
Owner Maintenance
8-33
8/2/2019 Mazda5 Owners Manual
http://slidepdf.com/reader/full/mazda5-owners-manual 296/375
NOTE Tires degrade over time, even when they are
not being used on the road. It is recommended that tires generally be replaced when they are6 years or older. Heat caused by hot climatesor frequent high loading conditions canaccelerate the aging process. You should replace the spare tire when you replace theother road tires due to the aging of the sparetire. Regarding the manufacturing week and year is indicated with 4 digit. Refer to The tire labeling on page 9-23.
q Replacing a Wheel
WARNING
Always use wheels of the correct sizeon your vehicle:
Using a wrong-sized wheel isdangerous. Braking and handlingcould be affected, leading to loss of control and an accident.
CAUTIONØ
A wrong-sized wheel may adversely affect:Ø Tire fitØ Wheel and bearing lifeØ Ground clearanceØ Snow-chain clearanceØ Speedometer calibrationØ Headlight aimØ Bumper heightØ Tire Pressure Monitoring
SystemØ (With Tire Pressure MonitoringSystem)Ø When replacing/repairing the
tires or wheels or both, have thework done by an AuthorizedMazda Dealer, or the tirepressure sensors may bedamaged.
Ø The wheels equipped on your
Mazda are specially designedfor installation of the tirepressure sensors. Do not usenon-genuine wheels, otherwiseit may not be possible to installthe tire pressure sensors.
NOTE Be sure to install the tire pressure sensorswhenever tires or wheels are replaced. Refer to
Tires and Wheels on page 5-26.
When replacing a wheel, make sure thenew one is the same as the original factorywheel in diameter, rim width, and offset.
Proper tire balancing provides the best riding comfort and helps reduce treadwear. Out-of-balance tires can causevibration and uneven wear, such as
cupping and flat spots.
8-34
Maintenance and Care
Owner Maintenance
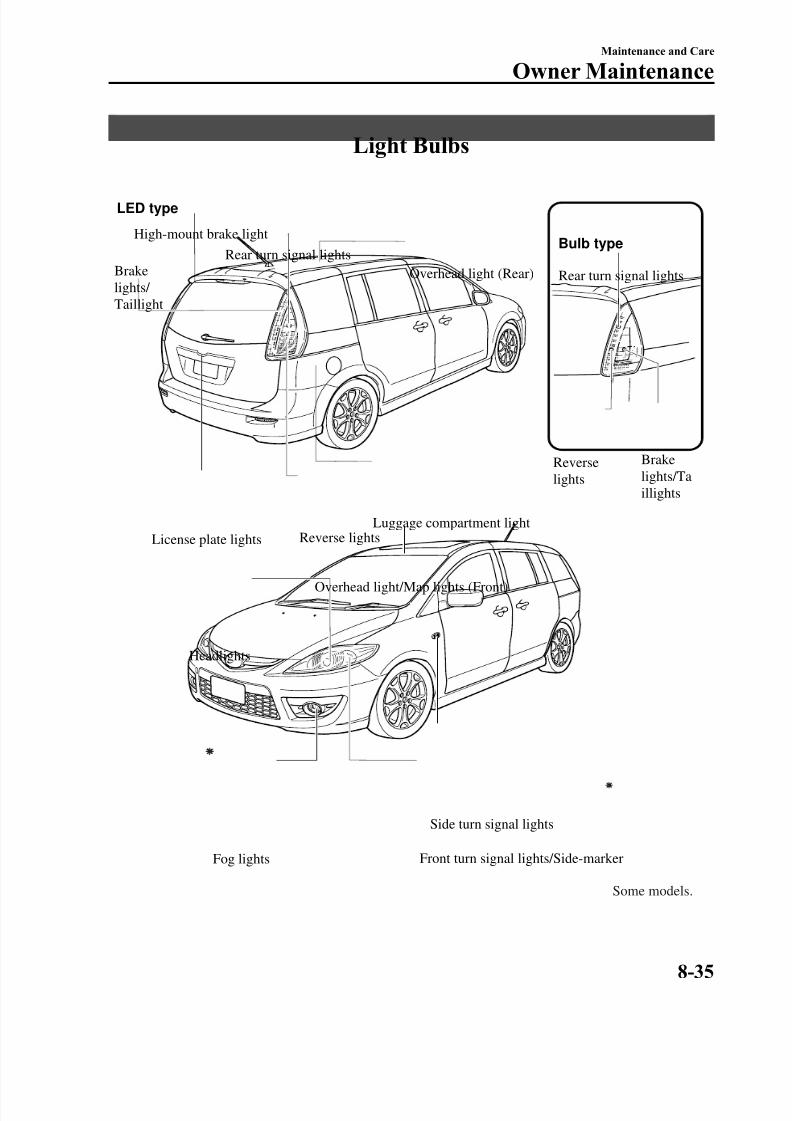
8/2/2019 Mazda5 Owners Manual
http://slidepdf.com/reader/full/mazda5-owners-manual 297/375
Light Bulbs
Luggage compartment light
LED type
Bulb type
Headlights
Overhead light (Rear)
License plate lights
Rear turn signal lights
Rear turn signal lights
Overhead light/Map lights (Front)
Front turn signal lights/Side-marker
Side turn signal lights
Reverse lights
High-mount brake light
Fog lights
Brakelights/ Taillight
Reverselights
Brakelights/Taillights
Some models.
Maintenance and Care
Owner Maintenance
8-35
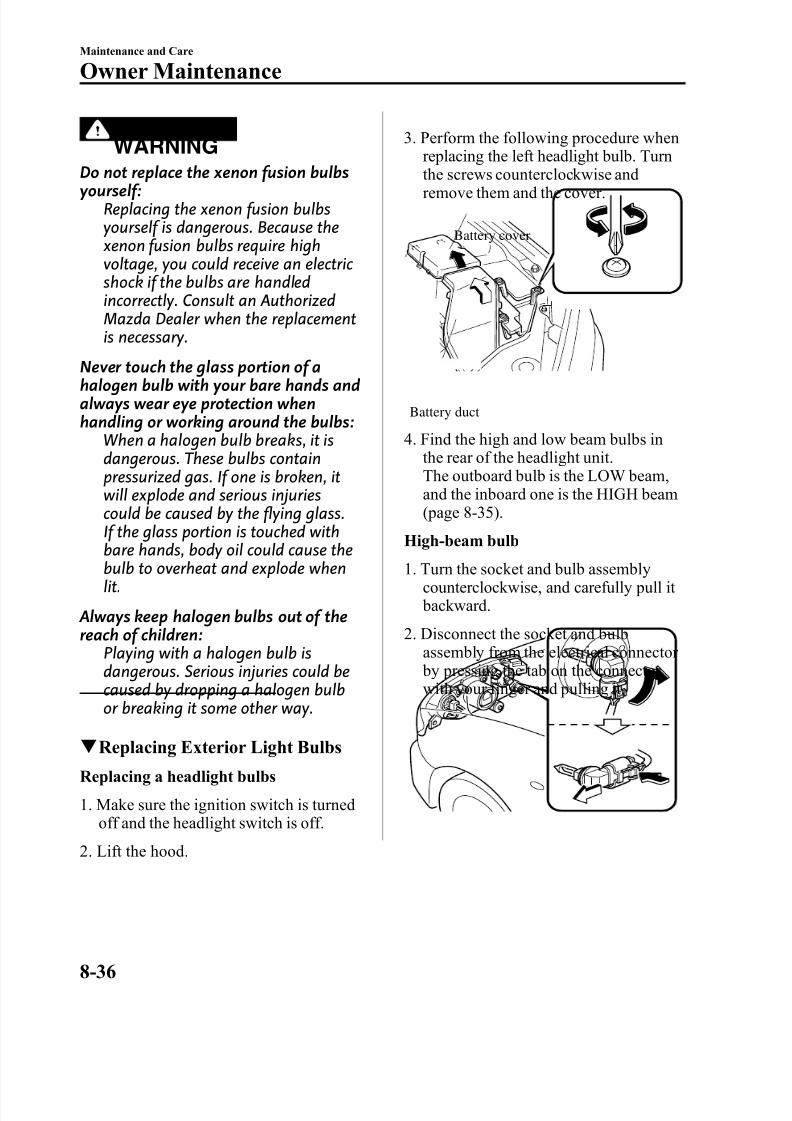
8/2/2019 Mazda5 Owners Manual
http://slidepdf.com/reader/full/mazda5-owners-manual 298/375
WARNING
Do not replace the xenon fusion bulbsyourself:Replacing the xenon fusion bulbsyourself is dangerous. Because the xenon fusion bulbs require highvoltage, you could receive an electric shock if the bulbs are handledincorrectly. Consult an AuthorizedMazda Dealer when the replacementis necessary.
Never touch the glass portion of ahalogen bulb with your bare hands andalways wear eye protection whenhandling or working around the bulbs:
When a halogen bulb breaks, it isdangerous. These bulbs containpressurized gas. If one is broken, itwill explode and serious injuriescould be caused by the flying glass.If the glass portion is touched withbare hands, body oil could cause thebulb to overheat and explode whenlit.
Always keep halogen bulbs out of thereach of children:
Playing with a halogen bulb isdangerous. Serious injuries could becaused by dropping a halogen bulbor breaking it some other way.
q Replacing Exterior Light Bulbs
Replacing a headlight bulbs
1. Make sure the ignition switch is turnedoff and the headlight switch is off.
2. Lift the hood.
3. Perform the following procedure whenreplacing the left headlight bulb. Turn
the screws counterclockwise andremove them and the cover.
Battery duct
Battery cover
4. Find the high and low beam bulbs inthe rear of the headlight unit.The outboard bulb is the LOW beam,and the inboard one is the HIGH beam(page 8-35).
High-beam bulb1. Turn the socket and bulb assembly
counterclockwise, and carefully pull it backward.
2. Disconnect the socket and bulbassembly from the electrical connector by pressing the tab on the connector with your finger and pulling it.
8-36
Maintenance and Care
Owner Maintenance
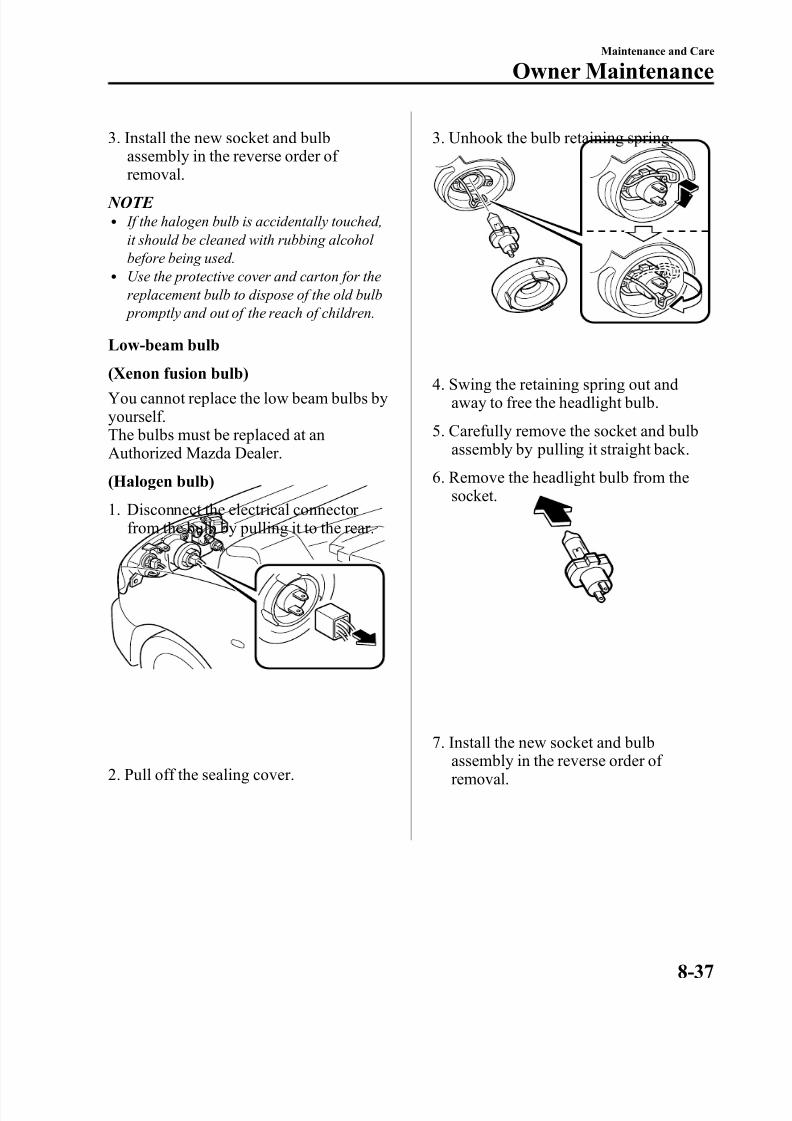
8/2/2019 Mazda5 Owners Manual
http://slidepdf.com/reader/full/mazda5-owners-manual 299/375
3. Install the new socket and bulbassembly in the reverse order of
removal. NOTE
l If the halogen bulb is accidentally touched,it should be cleaned with rubbing alcohol before being used.
l Use the protective cover and carton for thereplacement bulb to dispose of the old bulb promptly and out of the reach of children.
Low-beam bulb
(Xenon fusion bulb)
You cannot replace the low beam bulbs byyourself.The bulbs must be replaced at anAuthorized Mazda Dealer.
(Halogen bulb)
1. Disconnect the electrical connector from the bulb by pulling it to the rear.
2. Pull off the sealing cover.
3. Unhook the bulb retaining spring.
4. Swing the retaining spring out andaway to free the headlight bulb.
5. Carefully remove the socket and bulbassembly by pulling it straight back.
6. Remove the headlight bulb from thesocket.
7. Install the new socket and bulbassembly in the reverse order of removal.
Maintenance and Care
Owner Maintenance
8-37
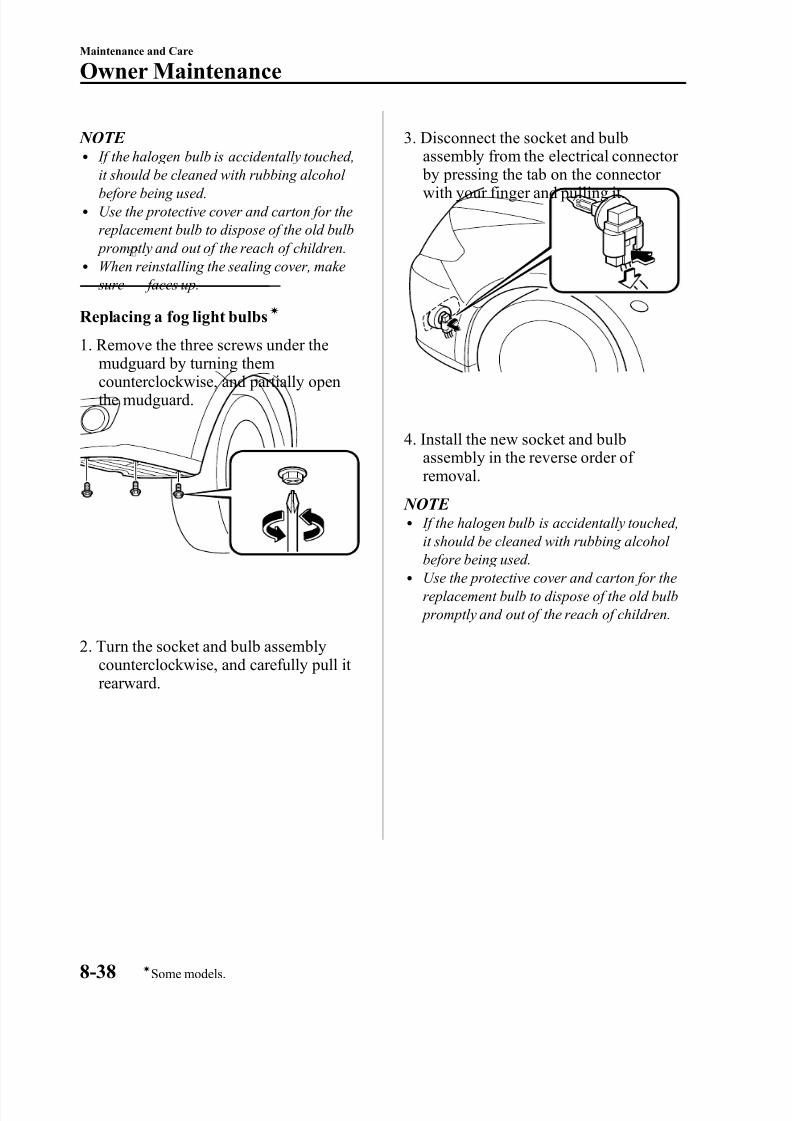
8/2/2019 Mazda5 Owners Manual
http://slidepdf.com/reader/full/mazda5-owners-manual 300/375
NOTE l If the halogen bulb is accidentally touched,
it should be cleaned with rubbing alcohol before being used.l Use the protective cover and carton for the
replacement bulb to dispose of the old bulb promptly and out of the reach of children.
l When reinstalling the sealing cover, make sure faces up.
Replacing a fog light bulbsí
1. Remove the three screws under themudguard by turning themcounterclockwise, and partially openthe mudguard.
2. Turn the socket and bulb assemblycounterclockwise, and carefully pull it rearward.
3. Disconnect the socket and bulbassembly from the electrical connector
by pressing the tab on the connector with your finger and pulling it.
4. Install the new socket and bulbassembly in the reverse order of removal.
NOTE l If the halogen bulb is accidentally touched,
it should be cleaned with rubbing alcohol before being used.
l Use the protective cover and carton for thereplacement bulb to dispose of the old bulb promptly and out of the reach of children.
8-38
Maintenance and Care
íSome models.
Owner Maintenance

8/2/2019 Mazda5 Owners Manual
http://slidepdf.com/reader/full/mazda5-owners-manual 301/375
Front turn signal lights/Front side-marker lights
1. Turn the center section of the plasticretainers counterclockwise and removethem, then partially peel back themudguard.
Removal
Installation
2. Turn the socket and bulb assemblycounterclockwise and remove it.
3. Remove the bulb by pushing it inslightly and turning it counterclockwise.
4. Install the new bulb in the reverse order of removal.
Side turn signal lights
1. Slide the unit as shown in the figure toremove it.
2. Disconnect the electrical connector from the unit.
3. Install the new side turn signal unit inthe reverse order of removal.
NOTE Bulb replacement is not possible because it isbuilt into the unit. Replace the unit.
Brake lights/Taillights/Rear side-
marker lights, Rear turn signal lights,Reverse lights
1. Wrap a flathead screwdriver with a soft cloth to prevent damage to the rear combination component and gentlyinsert it in the cover as shown in thefigure, and then remove the cover.
2. Turn the screws counterclockwise andremove them.
Maintenance and Care
Owner Maintenance
8-39
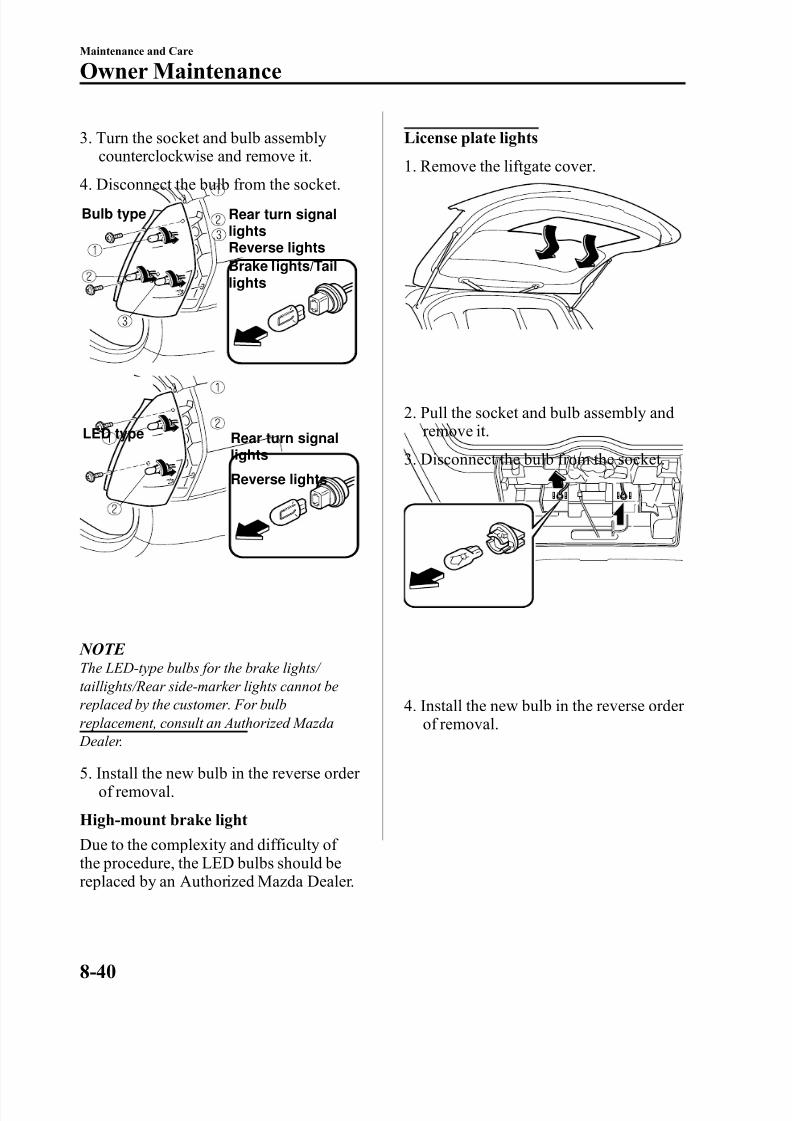
8/2/2019 Mazda5 Owners Manual
http://slidepdf.com/reader/full/mazda5-owners-manual 302/375
3. Turn the socket and bulb assemblycounterclockwise and remove it.
4. Disconnect the bulb from the socket.
Rear turn signallightsReverse lightsBrake lights/Taillights
Bulb type
Reverse lights
Rear turn signallights
LED type
NOTE The LED-type bulbs for the brake lights/ taillights/Rear side-marker lights cannot bereplaced by the customer. For bulb
replacement, consult an Authorized Mazda Dealer.
5. Install the new bulb in the reverse order of removal.
High-mount brake light
Due to the complexity and difficulty of the procedure, the LED bulbs should bereplaced by an Authorized Mazda Dealer.
License plate lights
1. Remove the liftgate cover.
2. Pull the socket and bulb assembly andremove it.
3. Disconnect the bulb from the socket.
4. Install the new bulb in the reverse order
of removal.
8-40
Maintenance and Care
Owner Maintenance
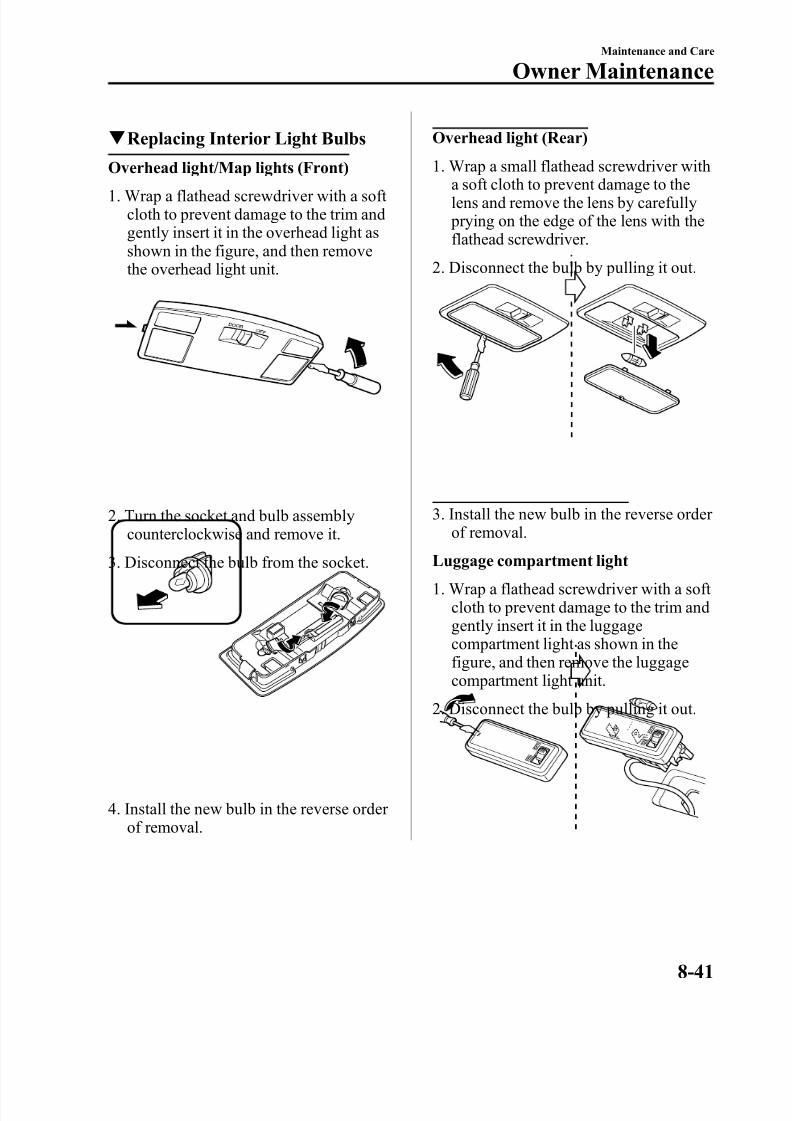
8/2/2019 Mazda5 Owners Manual
http://slidepdf.com/reader/full/mazda5-owners-manual 303/375
q Replacing Interior Light Bulbs
Overhead light/Map lights (Front)
1. Wrap a flathead screwdriver with a soft cloth to prevent damage to the trim andgently insert it in the overhead light asshown in the figure, and then removethe overhead light unit.
2. Turn the socket and bulb assemblycounterclockwise and remove it.
3. Disconnect the bulb from the socket.
4. Install the new bulb in the reverse order of removal.
Overhead light (Rear)
1. Wrap a small flathead screwdriver witha soft cloth to prevent damage to thelens and remove the lens by carefully prying on the edge of the lens with theflathead screwdriver.
2. Disconnect the bulb by pulling it out.
3. Install the new bulb in the reverse order of removal.
Luggage compartment light
1. Wrap a flathead screwdriver with a soft cloth to prevent damage to the trim andgently insert it in the luggagecompartment light as shown in thefigure, and then remove the luggagecompartment light unit.
2. Disconnect the bulb by pulling it out.
Maintenance and Care
Owner Maintenance
8-41
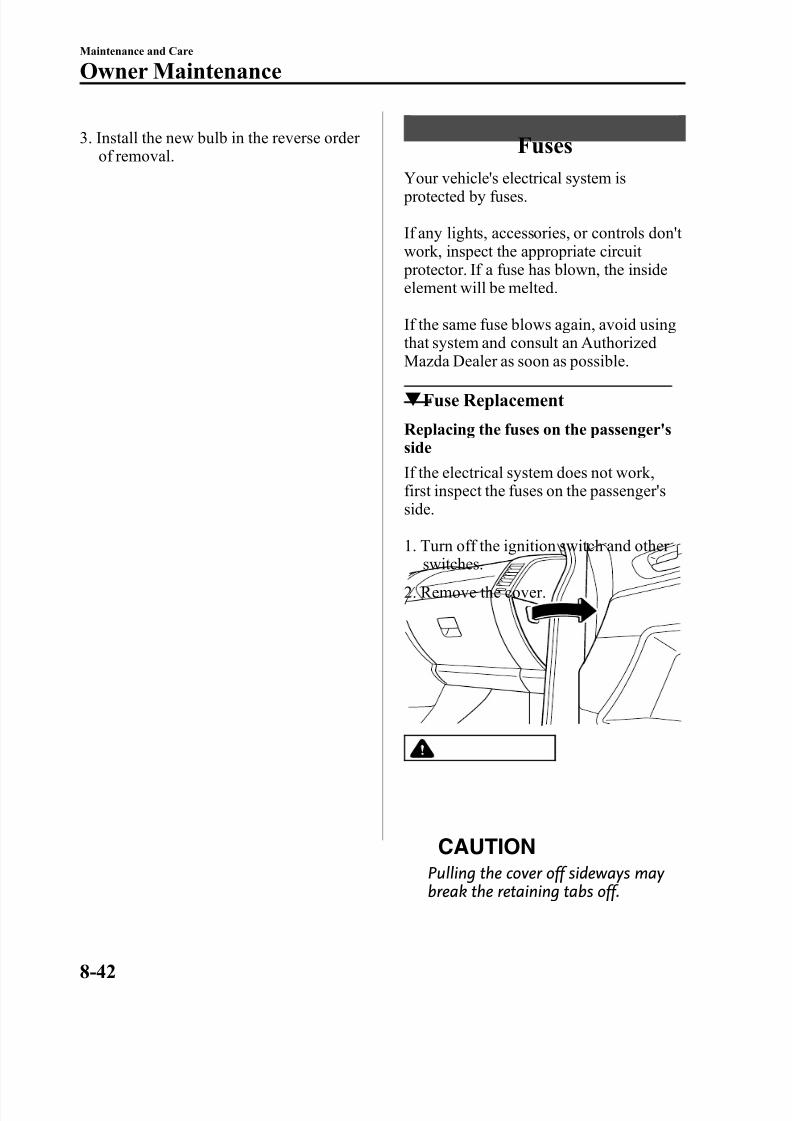
8/2/2019 Mazda5 Owners Manual
http://slidepdf.com/reader/full/mazda5-owners-manual 304/375
3. Install the new bulb in the reverse order of removal. Fuses
Your vehicle's electrical system is protected by fuses.
If any lights, accessories, or controls don't work, inspect the appropriate circuit protector. If a fuse has blown, the insideelement will be melted.
If the same fuse blows again, avoid usingthat system and consult an Authorized
Mazda Dealer as soon as possible.
q Fuse Replacement
Replacing the fuses on the passenger'sside
If the electrical system does not work,first inspect the fuses on the passenger'sside.
1. Turn off the ignition switch and other switches.
2. Remove the cover.
CAUTION
Pulling the cover off sideways may break the retaining tabs off.
8-42
Maintenance and Care
Owner Maintenance
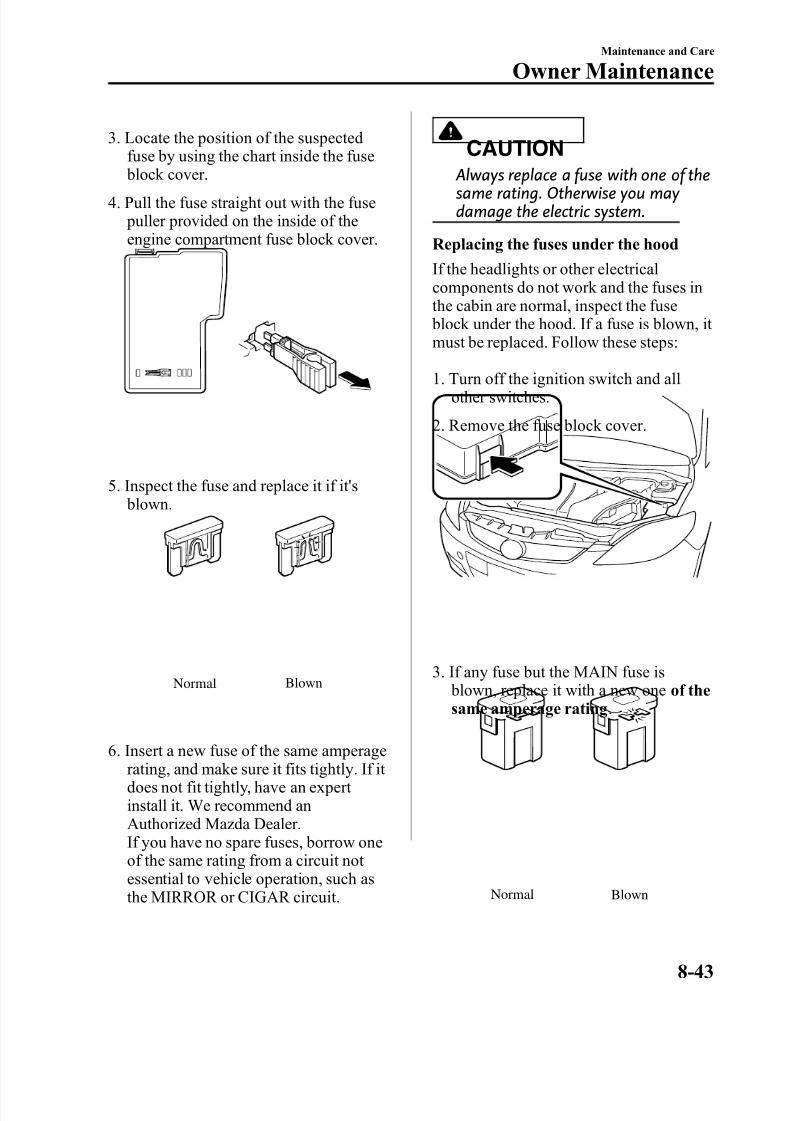
8/2/2019 Mazda5 Owners Manual
http://slidepdf.com/reader/full/mazda5-owners-manual 305/375
3. Locate the position of the suspectedfuse by using the chart inside the fuse
block cover.4. Pull the fuse straight out with the fuse
puller provided on the inside of theengine compartment fuse block cover.
5. Inspect the fuse and replace it if it's blown.
Normal Blown
6. Insert a new fuse of the same amperagerating, and make sure it fits tightly. If it does not fit tightly, have an expert install it. We recommend anAuthorized Mazda Dealer.If you have no spare fuses, borrow oneof the same rating from a circuit not essential to vehicle operation, such as
the MIRROR or CIGAR circuit.
CAUTION
Always replace a fuse with one of thesame rating. Otherwise you may damage the electric system.
Replacing the fuses under the hood
If the headlights or other electricalcomponents do not work and the fuses inthe cabin are normal, inspect the fuse block under the hood. If a fuse is blown, it must be replaced. Follow these steps:
1. Turn off the ignition switch and allother switches.
2. Remove the fuse block cover.
3. If any fuse but the MAIN fuse is blown, replace it with a new one of thesame amperage rating .
Normal Blown
Maintenance and Care
Owner Maintenance
8-43
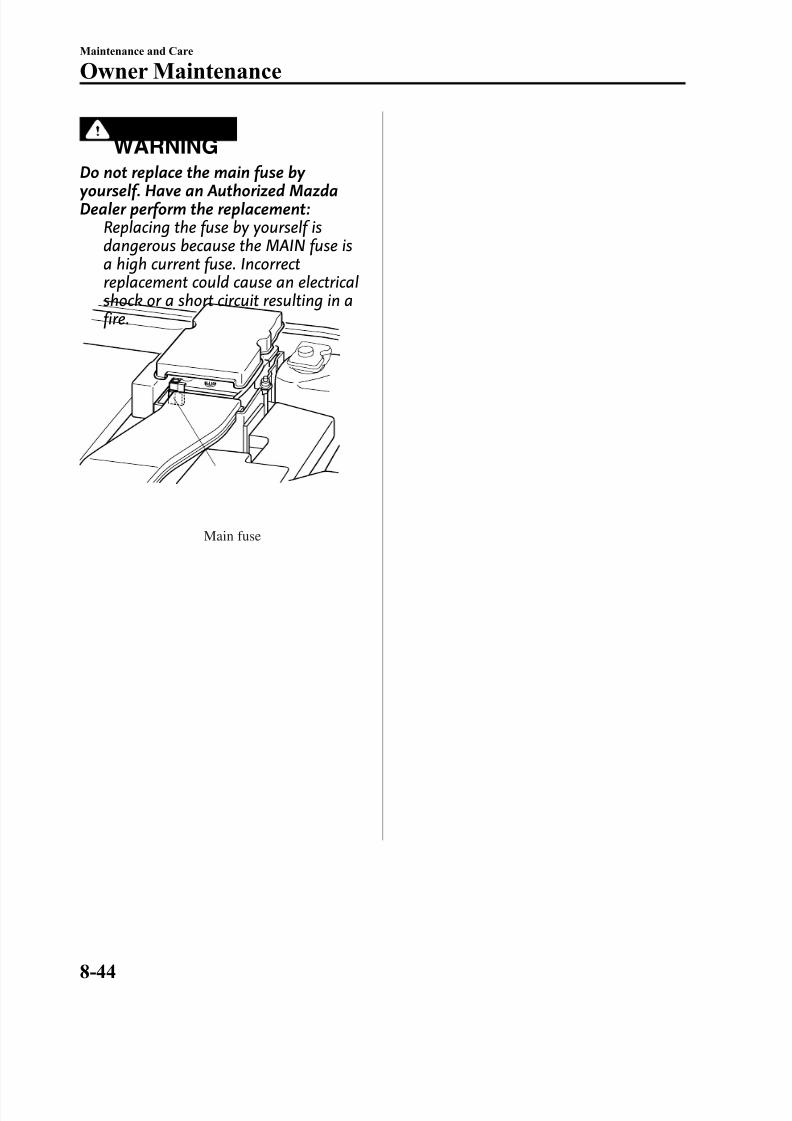
8/2/2019 Mazda5 Owners Manual
http://slidepdf.com/reader/full/mazda5-owners-manual 306/375
WARNING
Do not replace the main fuse by yourself. Have an Authorized MazdaDealer perform the replacement:
Replacing the fuse by yourself isdangerous because the MAIN fuse isa high current fuse. Incorrectreplacement could cause an electricalshock or a short circuit resulting in afire.
Main fuse
8-44
Maintenance and Care
Owner Maintenance
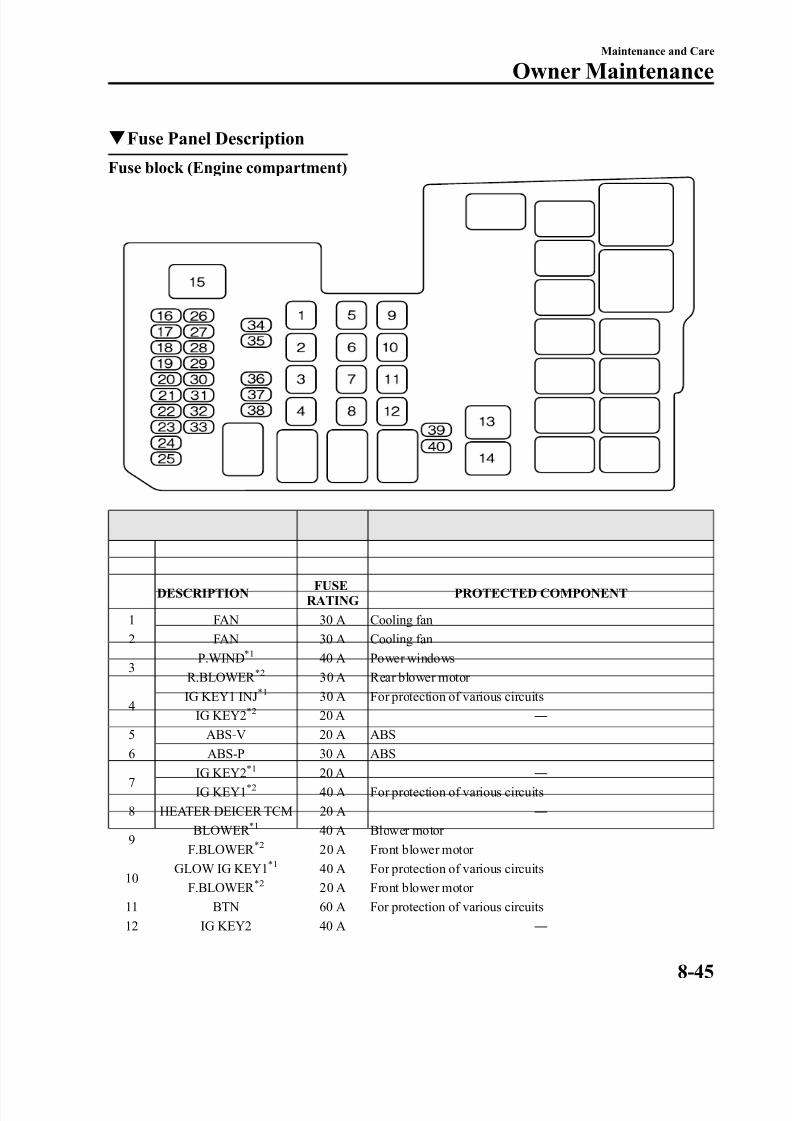
8/2/2019 Mazda5 Owners Manual
http://slidepdf.com/reader/full/mazda5-owners-manual 307/375
q Fuse Panel Description
Fuse block (Engine compartment)
DESCRIPTION FUSERATING PROTECTED COMPONENT
1 FAN 30 A Cooling fan2 FAN 30 A Cooling fan
3P.WIND
*140 A Power windows
R.BLOWER *2
30 A Rear blower motor
4IG KEY1 INJ
*130 A For protection of various circuits
IG KEY2 *2 20 A ―
5 ABS-V 20 A ABS6 ABS-P 30 A ABS
7IG KEY2 *1 20 A ―
IG KEY1*2
40 A For protection of various circuits8 HEATER DEICER TCM 20 A ―
9BLOWER
*140 A Blower motor
F.BLOWER *2
20 A Front blower motor
10GLOW IG KEY1
*140 A For protection of various circuits
F.BLOWER *2 20 A Front blower motor
11 BTN 60 A For protection of various circuits12 IG KEY2 40 A ―
Maintenance and Care
Owner Maintenance
8-45
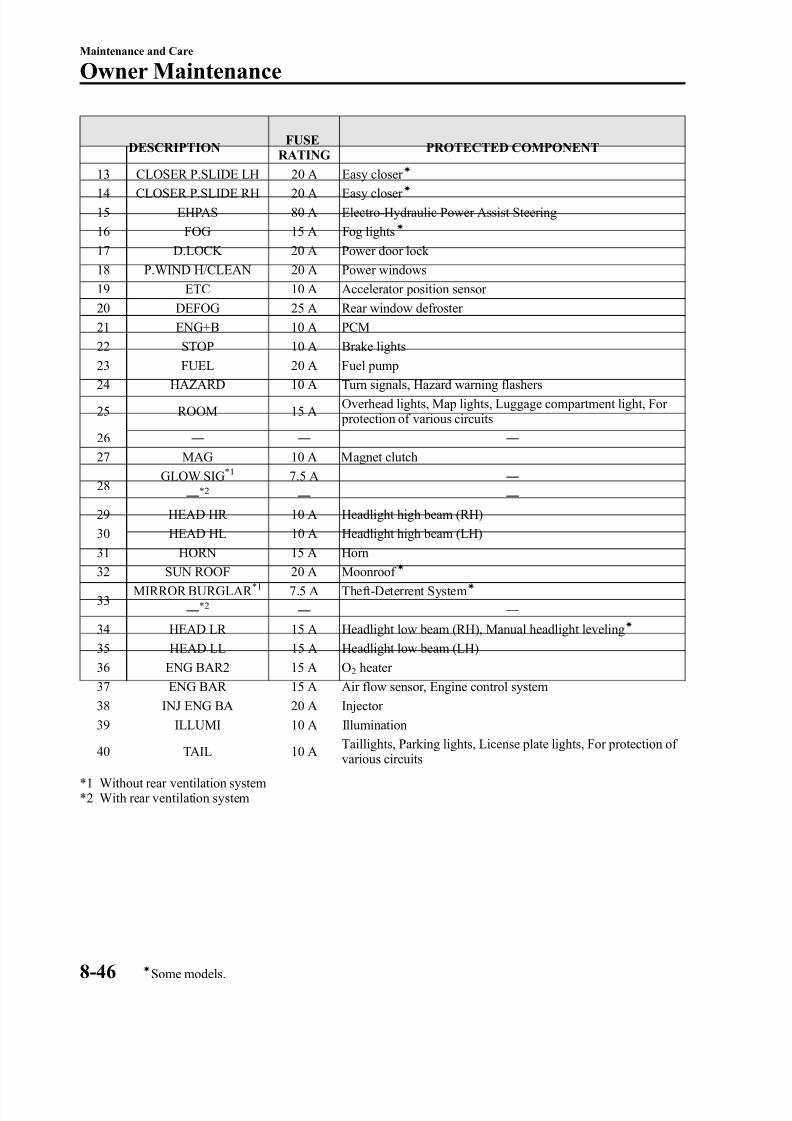
8/2/2019 Mazda5 Owners Manual
http://slidepdf.com/reader/full/mazda5-owners-manual 308/375
DESCRIPTION FUSERATING PROTECTED COMPONENT
13 CLOSER P.SLIDE LH 20 A Easy closer
í
14 CLOSER P.SLIDE RH 20 A Easy closer í
15 EHPAS 80 A Electro-Hydraulic Power Assist Steering16 FOG 15 A Fog lights
í
17 D.LOCK 20 A Power door lock 18 P.WIND H/CLEAN 20 A Power windows19 ETC 10 A Accelerator position sensor 20 DEFOG 25 A Rear window defroster 21 ENG+B 10 A PCM22 STOP 10 A Brake lights
23 FUEL 20 A Fuel pump24 HAZARD 10 A Turn signals, Hazard warning flashers
25 ROOM 15 A Overhead lights, Map lights, Luggage compartment light, For protection of various circuits
26 ― ― ―
27 MAG 10 A Magnet clutch
28GLOW SIG
*17.5 A ―
― *2 ― ―
29 HEAD HR 10 A Headlight high beam (RH)30 HEAD HL 10 A Headlight high beam (LH)31 HORN 15 A Horn32 SUN ROOF 20 A Moonroof
í
33MIRROR BURGLAR *1 7.5 A Theft-Deterrent System
í
― *2 ― ―
34 HEAD LR 15 A Headlight low beam (RH), Manual headlight levelingí
35 HEAD LL 15 A Headlight low beam (LH)36 ENG BAR2 15 A O 2 heater 37 ENG BAR 15 A Air flow sensor, Engine control system38 INJ ENG BA 20 A Injector
39 ILLUMI 10 A Illumination
40 TAIL 10 A Taillights, Parking lights, License plate lights, For protection of various circuits
*1 Without rear ventilation system*2 With rear ventilation system
8-46
Maintenance and Care
íSome models.
Owner Maintenance
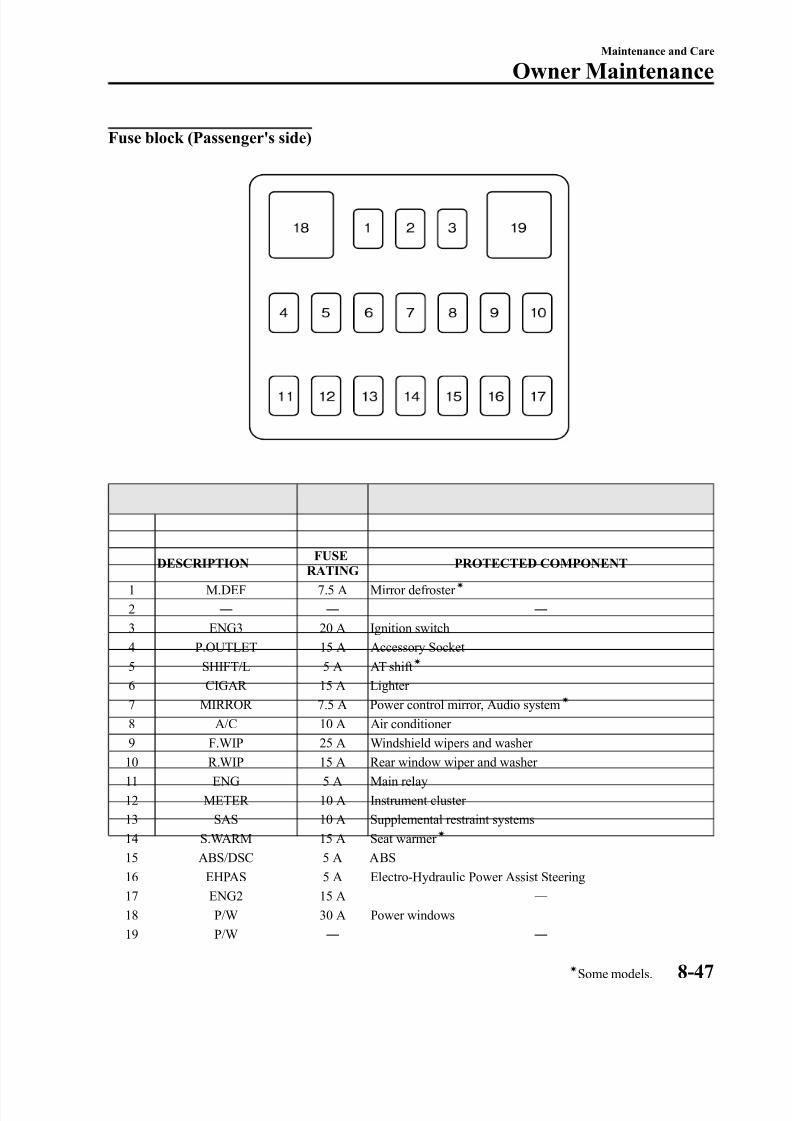
8/2/2019 Mazda5 Owners Manual
http://slidepdf.com/reader/full/mazda5-owners-manual 309/375
Fuse block (Passenger's side)
DESCRIPTION FUSERATING PROTECTED COMPONENT
1 M.DEF 7.5 A Mirror defroster í
2 ― ― ―
3 ENG3 20 A Ignition switch4 P.OUTLET 15 A Accessory Socket 5 SHIFT/L 5 A AT shift
í
6 CIGAR 15 A Lighter 7 MIRROR 7.5 A Power control mirror, Audio system
í
8 A/C 10 A Air conditioner 9 F.WIP 25 A Windshield wipers and washer
10 R.WIP 15 A Rear window wiper and washer 11 ENG 5 A Main relay12 METER 10 A Instrument cluster 13 SAS 10 A Supplemental restraint systems14 S.WARM 15 A Seat warmer
í
15 ABS/DSC 5 A ABS16 EHPAS 5 A Electro-Hydraulic Power Assist Steering17 ENG2 15 A ―
18 P/W 30 A Power windows19 P/W ― ―
Maintenance and Care
Owner Maintenance
8-47íSome models.

8/2/2019 Mazda5 Owners Manual
http://slidepdf.com/reader/full/mazda5-owners-manual 310/375
How to Minimize
Environmental Paint DamageThe paintwork on your Mazda representsthe latest technical developments incomposition and methods of application.
Environmental hazards, however, canharm the paint's protective properties, if proper care is not taken.
Here are some examples of possibledamage, with tips on how to prevent them.
q Etching Caused by Acid Rain orIndustrial Fallout
Occurrence
Industrial pollutants and vehicle emissionsdrift into the air and mix with rain or dew
to form acids. These acids can settle on a vehicle's finish. As the water evaporates,the acid becomes concentrated and candamage the finish.And the longer the acid remains on thesurface, the greater the chance is for damage.
Prevention
It is necessary to wash and wax your
vehicle to preserve its finish according tothe instructions in this section. Thesesteps should be taken immediately after you suspect that acid rain has settled onyour vehicle's finish.
q Damage Caused by BirdDropping, Insects, or Tree Sap
Occurrence
Bird droppings contain acids. If thesearen't removed they can eat away the clear and color base coat of the vehicle's paintwork.
When insects stick to the paint surfaceand decompose, corrosive compoundsform. These can erode the clear and color
base coat of the vehicle's paintwork if they are not removed.
Tree sap will harden and adhere permanently to the paint finish. If youscratch the sap off while it is hard, somevehicle paint could come off with it.
Prevention
It is necessary to have your Mazda
washed and waxed to preserve its finishaccording to the instructions in thissection. This should be done as soon as possible.
Bird droppings can be removed with a soft sponge and water. If you are travelingand these are not available, a moistenedtissue may also take care of the problem.The cleaned area should be waxed
according to the instructions in thissection.Insects and tree sap are best removed witha soft sponge and water or a commerciallyavailable chemical cleaner.
Another method is to cover the affectedarea with dampened newspaper for one totwo hours. After removing the newspaper,rinse off the loosened debris with water.
8-48
Maintenance and Care
Appearance Care
8/2/2019 Mazda5 Owners Manual
http://slidepdf.com/reader/full/mazda5-owners-manual 311/375
q Water Marks
Occurrence
Rain, fog, dew, and even tap water cancontain harmful minerals such as salt andlime. If moisture containing theseminerals settles on the vehicle andevaporates, the minerals will concentrateand harden to form white rings. The ringscan damage your vehicle's finish.
Prevention
It is necessary to wash and wax your vehicle to preserve its finish according tothe instructions in this section. Thesesteps should be taken immediately after you find water marks on your vehicle'sfinish.
q Paint Chipping
Occurrence
Paint chipping occurs when gravel thrownin the air by another vehicle's tires hitsyour vehicle.
How to avoid paint chipping
Keeping a safe distance between you andthe vehicle ahead reduces the chances of having your paint chipped by flyinggravel.
NOTE l The paint chipping zone varies with the
speed of the vehicle. For example, whentraveling at 90 km/h (56 mph), the paint chipping zone is 50 m (164 ft).
l In low temperatures a vehicle's finishhardens. This increases the chance of paint chipping.
l Chipped paint can lead to rust forming on your Mazda. Before this happens, repair thedamage by using Mazda touch-up paint according to the instructions in this section.
Failure to repair the affected area could lead to serious rusting and expensiverepairs.
Maintenance and Care
Appearance Care
8-49
8/2/2019 Mazda5 Owners Manual
http://slidepdf.com/reader/full/mazda5-owners-manual 312/375
Exterior Care
Follow all label and container directionswhen using a chemical cleaner or polish.Read all warnings and cautions.
q Maintaining the Finish
Washing
CAUTION
When the wiper lever is in the AUTOposition and the ignition switch is inthe ON position, the wipers may move automatically in the followingcases:Ø If the windshield above the rain
sensor is touched.Ø If the windshield above the rain
sensor is wiped with a cloth.Ø If the windshield is struck with a
hand or other object.Ø If the rain sensor is struck with a
hand or other object from insidethe vehicle.
Be careful not to pinch hands or fingers as it may cause injury, or damage the wipers. When washingor servicing your Mazda, make surethe wiper lever is in the OFF position.
To help protect the finish from rust anddeterioration, wash your Mazda thoroughly and frequently, at least once a month, with lukewarm or cold water.
If the vehicle is washed improperly, the paint surface could be scratched. Here aresome examples of how scratching couldoccur.
Scratches occur on the paint surfacewhen:l
The vehicle is washed without first rinsing off dirt and other foreignmatter.
l The vehicle is washed with a rough,dry, or dirty cloth.
l The vehicle is washed at a car washthat uses brushes that are dirty or toostiff.
l Cleansers or wax containing abrasivesare used.
NOTE l Mazda is not responsible for scratches
caused by automatic car washes or improper washing.
l Scratches are more noticeable on vehicleswith darker paint finishes.
To minimize scratches on the vehicle's paint finish:
l Rinse off any dirt or other foreignmatter using lukewarm or cold water before washing.
l Use plenty of lukewarm or cold water and a soft cloth when washing thevehicle. Do not use a nylon cloth.
l Rub gently when washing or drying thevehicle.
l Take your vehicle only to a car washthat keeps its brushes well maintained.
l Don't use abrasive cleansers or waxthat contain abrasives.
8-50
Maintenance and Care
Appearance Care
8/2/2019 Mazda5 Owners Manual
http://slidepdf.com/reader/full/mazda5-owners-manual 313/375
CAUTIONØ
Don't use steel wool, abrasivecleaners, or strong detergentscontaining highly alkaline or caustic agents on chrome-platedor anodized aluminum parts. Thismay damage the protectivecoating; also, cleaners anddetergents may discolor or deteriorate the paint.
Ø To prevent damaging the antenna,
remove it before entering a car wash facility or passing beneath alow overhead clearance.
Pay special attention to removing salt,dirt, mud, and other foreign material fromthe underside of the fenders, and makesure the drain holes in the lower edges of the doors and rocker panels are clean.
Insects, tar, tree sap, bird droppings,industrial fallout, and similar deposits candamage the finish if not removedimmediately. When prompt washing with plain water is ineffective, use a mild soapmade for use on vehicles.
Thoroughly rinse off all soap withlukewarm or cold water. Don't allow soapto dry on the finish.
After washing the vehicle, dry it with a clean chamois to prevent water spots fromforming.
WARNING
Dry wet brakes by driving very slowly and applying the brakes lightly untilbrake performance is normal:
Driving with wet brakes isdangerous. Increased stoppingdistance or the vehicle pulling to oneside when braking could result in aserious accident. Light braking willindicate whether the brakes havebeen affected.
Waxing
Your vehicle needs to be waxed whenwater no longer beads on the finish.Always wash and dry the vehicle beforewaxing it. In addition to the vehicle body,wax the metal trim to maintain its luster.
1. Use wax which contains no abrasives.Waxes containing abrasive will remove
paint and could damage bright metal parts.
2. Use a good grade of natural wax for metallic, mica, and solid colors.
3. When waxing, coat evenly with thesponge supplied or a soft cloth.
4. Wipe off the wax with a soft cloth.
NOTE A spot remover to remove oil, tar, and similar materials will usually also take off the wax. Rewax these areas even if the rest of thevehicle doesn't need it.
Maintenance and Care
Appearance Care
8-51
8/2/2019 Mazda5 Owners Manual
http://slidepdf.com/reader/full/mazda5-owners-manual 314/375
q Repairing Damage to the Finish
Deep scratches or chips on the finishshould be repaired promptly. Exposedmetal quickly rusts and can lead to major repairs.
CAUTION
If your Mazda is damaged and needsmetal parts repaired or replaced,make sure the body shop appliesanti-corrosion materials to all parts,
both repaired and new. This willprevent them from rusting.
q Bright-Metal Maintenancel Use tar remover to remove road tar and
insects. Never do this with a knife or similar tool.
l To prevent corrosion on bright-metalsurfaces, apply wax or chrome
preservative and rub it to a high luster.l During cold weather or in coastal areas,cover bright-metal parts with a coatingof wax or preservative heavier thanusual. It would also help to coat themwith noncorrosive petroleum jelly or some other protective compound.
CAUTION
Don't use steel wool, abrasivecleaners, or strong detergentscontaining highly alkaline or caustic agents on chrome-plated or anodizedaluminum parts. This may result indamage to the protective coating andcause discoloration or paintdeterioration.
q Underbody Maintenance
Road chemicals and salt used for ice andsnow removal and solvents used for dust control may collect on the underbody. If not removed, they will speed up rustingand deterioration of such underbody partsas fuel lines, frame, floor pan, and exhaust system, even though these parts may becoated with anti-corrosive material.
Thoroughly flush the underbody andwheel housings with lukewarm or coldwater at the end of each winter. Try alsoto do this every month.
Pay special attention to these areas because they easily hide mud and dirt. Itwill do more harm than good to wetdown the road grime without removingit.
The lower edges of doors, rocker panels,and frame members have drain holes that should not be clogged. Water trappedthere will cause rusting.
WARNING
Dry wet brakes by driving very slowly and applying the brakes lightly untilbrake performance is normal:
Driving with wet brakes is
dangerous. Increased stoppingdistance or the vehicle pulling to oneside when braking could result in aserious accident. Light braking willindicate whether the brakes havebeen affected.
8-52
Maintenance and Care
Appearance Care
8/2/2019 Mazda5 Owners Manual
http://slidepdf.com/reader/full/mazda5-owners-manual 315/375
q Aluminum Wheel Maintenance
A protective coating is provided over thealuminum wheels. Special care is neededto protect this coating.
NOTE l Do not use a wire brush or any abrasive
cleaner, polishing compound, or solvent onaluminum wheels. They may damage thecoating.
l Only use a mild soap or neutral detergent and always use a sponge or soft cloth to
clean the wheels. Rinse thoroughly with lukewarm or cold water. Also, be sure to clean the wheelsafter driving on dusty or salted roads. Thishelps prevent corrosion.
l Avoid washing your vehicle in an automaticcar wash that uses high-speed or hard brushes.
l If your aluminum wheels lose luster, waxthe wheels.
(With Tire Pressure Monitoring System)Check special requirements for Tire Pressure Monitoring System. Refer to Tires and Wheels on page 5-26.
Interior Care
q Dashboard PrecautionsPrevent caustic solutions such as perfumeand cosmetic oils from contacting thedashboard. They'll damage and discolor it.If these solutions get on the dashboard,wipe them off immediately.
CAUTION
Do not use glazing agents.Glazing agents contain ingredientswhich may cause discoloration,wrinkling, cracks and peeling.
q Cleaning the Upholstery andInterior Trim
Vinyl
Remove dust and loose dirt from vinylwith a whisk broom or vacuum cleaner.Clean vinyl with a leather-and-vinylcleaner.
Leatherí
Real leather isn't uniform and may havescars, scratches, and wrinkles. Clean it with a leather cleaner or mild soap.
Wipe it with a damp soft cloth; then dryand buff it with a dry soft cloth.
Fabric
Remove dust and loose dirt from fabricwith a whisk broom or vacuum cleaner.Clean it with a mild soap solution goodfor upholstery and carpets. Remove freshspots immediately with a fabric spot cleaner.
Maintenance and Care
Appearance Care
8-53íSome models.
8/2/2019 Mazda5 Owners Manual
http://slidepdf.com/reader/full/mazda5-owners-manual 316/375
To keep the fabric looking clean andfresh, take care of it. Otherwise its color
will be affected, it can be stained easily,and its fire-resistance may be reduced.
CAUTION
Use only recommended cleaners andprocedures. Others may affectappearance and fire-resistance.
Piano black panelí
The following parts are fitted with panelsthat have been treated with a specialcoating that resists scratching.Center panelWhen the panel needs to be cleaned, use a soft cloth to wipe off dirt from the surface.
NOTE Scratches or nicks on the panels resulting fromthe use of a hard brush or cloth may not berepairable.
q Cleaning the Lap/Shoulder BeltWebbing
Clean the webbing with a mild soapsolution recommended for upholstery or carpets. Follow instructions. Don't bleachor dye the webbing; this may weaken it.
After cleaning the belts, thoroughly dry
the belt webbing and make sure there isno remaining moisture before retractingthem.
WARNING
Have an Authorized Mazda Dealer replace damaged seat beltsimmediately:
Using damaged seat belts isdangerous. In a collision, damagedbelts cannot provide adequateprotection.
q Cleaning the Window Interiors
If the windows become covered with anoily, greasy, or waxy film, clean themwith glass cleaner. Follow the directionson the container.
CAUTION
Don't scrape or scratch the inside of the rear window. You may damagethe rear window defroster grid.
8-54
Maintenance and Care
íSome models.
Appearance Care
8/2/2019 Mazda5 Owners Manual
http://slidepdf.com/reader/full/mazda5-owners-manual 317/375
9 Customer Information
Important consumer information including warranties and add-on equipment.
Customer Assistance ............................... 9-2Customer Assistance (U.S.A.) ............ 9-2Customer Assistance (Canada) ........... 9-7Customer Assistance (Puerto Rico) ... 9-10Customer Assistance (Mexico) ......... 9-11
Mazda Importer/Distributors ............... 9-13Importer/Distributor .......................... 9-13Distributor in Each Area ................... 9-13
Warranty ................................................ 9-15Warranties for Your Mazda ............... 9-15Outside the United States .................. 9-16Outside Canada ................................. 9-17Registering Your Vehicle in A Foreign
Country (Except United States andCanada) ............................................. 9-18Add-On Non-Genuine Parts andAccessories ....................................... 9-19
Cell Phones ............................................. 9-20Cell Phones Warning ......................... 9-20
Uniform Tire Quality Grading System(UTQGS) ................................................ 9-21
Uniform Tire Quality Grading System(UTQGS) .......................................... 9-21
Tire Information (U.S.A.) ..................... 9-23Tire Labeling ..................................... 9-23Location of the Tire Label(Placard) ............................................ 9-29Tire Maintenance .............................. 9-32Vehicle Loading ................................ 9-35Steps for Determining the Correct Load
Limit: ................................................ 9-42
Reporting Safety Defects ....................... 9-43Reporting Safety Defects (U.S.A.) .... 9-43Reporting Safety Defects (Canada) ... 9-44
Service Publications .............................. 9-45Service Publications .......................... 9-45
9-1
8/2/2019 Mazda5 Owners Manual
http://slidepdf.com/reader/full/mazda5-owners-manual 318/375
Customer Assistance (U.S.A.)
Your complete and permanent satisfaction is our business. We are here to serve you. AllAuthorized Mazda Dealers have the knowledge and the tools to keep your Mazda vehiclein top condition.If you have any questions or recommendations for improvement regarding the service of your Mazda vehicle or servicing by Mazda Dealer personnel, we recommend that you takethe following steps:
NOTE If it becomes necessary to have the components or wiring system for the supplementary restraint system modified to accommodate a person with certain medical conditions in accordance with acertified physician, contact an Authorized Mazda Dealer.
q STEP 1: Contact Your Mazda Dealer
Discuss the matter with an Authorized Mazda Dealer. This is the quickest and best way toaddress the issue.l If your concern has not been resolved by the CUSTOMER RELATIONS, SALES,
SERVICE, or PARTS MANAGER, then please contact the GENERAL MANAGER of the dealership or the OWNER.
l If it becomes necessary to have the components or wiring system for the supplementaryrestraint system modified to accommodate a person with certain medical conditions inaccordance with a certified physician, go to STEP2.
q STEP 2: Contact Mazda North American Operations
If for any reason you feel the need for further assistance after contacting your dealershipmanagement and it becomes necessary to have the components or wiring system for thesupplementary restraint system modified to accommodate a person with certain medicalconditions in accordance with a certified physician, you can reach Mazda North AmericanOperations by one of the following ways.
Log on: at www.mazdaUSA.com
Answers to many questions, including how to locate or contact a local Mazda dealership inthe U.S., can be found here.
E-mail: click on “ Contact Us ” located on the “ Inside Mazda ” tab, or at the bottom of the page at www.mazdaUSA.com
By phone at: 1 (800) 222-5500
9-2
Customer Information
Customer Assistance
8/2/2019 Mazda5 Owners Manual
http://slidepdf.com/reader/full/mazda5-owners-manual 319/375
By letter at:Attn: Customer Assistance
Mazda North American Operations7755 Irvine Center DriveIrvine, CA 92618-2922P.O. Box 19734Irvine, CA 92623-9734
In order to serve you efficiently and effectively, please help us by providing the followinginformation:
1. Your name, address, and telephone number
2. Year and model of vehicle3. Vehicle Identification Number (17 digits, noted on your registration or title or located on
the upper driver's side corner of the dash)
4. Purchase date and current mileage
5. Your dealer's name and location
6. Your question(s)
If you live outside the U.S.A., please contact your nearest Mazda Distributor.
q STEP 3: Contact Better Business Bureau (BBB)
Mazda North American Operations realizes that mutual agreement on some issues may not be possible. As a final step to ensure that your concerns are being fairly considered, Mazda North American Operations has agreed to participate in a dispute settlement programadministered by the Better Business Bureau (BBB) system, at no cost to you the consumer.
BBB AUTO LINE works with consumers and the manufacturer in an attempt to reach a mutually acceptable resolution of any warranty related concerns. If the BBB is not able tofacilitate a settlement they will provide an informal hearing before an arbitrator.
You are required to resort to BBB AUTO LINE before exercising rights or seekingremedies under the Federal Magnuson-Moss Warranty Act, 15 U.S.C. § 2301 et seq. To theextent permitted by the applicable state “ Lemon Law ” , you are also required to resort toBBB AUTO LINE before exercising any rights or seeking remedies under the “ LemonLaw ” . If you choose to seek remedies that are not created by the Magnuson-Moss WarrantyAct or the applicable state “ Lemon Law ” , you are not required to first use BBB AUTOLINE.
Customer Information
Customer Assistance
9-3
8/2/2019 Mazda5 Owners Manual
http://slidepdf.com/reader/full/mazda5-owners-manual 320/375
The whole process normally takes 40 days or less. The arbitration decision is not bindingon you or Mazda else you accept the decision. For more information about BBB AUTO
LINE, including current eligibility standards, please call 1-800-955-5100 or visit the BBBwebsite at www.lemonlaw.bbb.org.
Being truly committed to customer satisfaction is more than a phrase with Mazda. We hopeto satisfy every customer directly, but if there is ever a question about our decision, Mazda believes in providing a fast, fair and free method such as the BBB AUTO LINE to ensureMazda delivers on our commitment to do the right thing for our customers!
For California Residents:
1. Mazda North American Operations ( “ Mazda ” ) participates in BBB AUTO LINE, a
mediation/arbitration program administered by the Council of Better Business Bureaus[4200 Wilson Boulevard, Arlington, Virginia 22203] through local Better BusinessBureaus. BBB AUTO LINE and Mazda have been certified by the ArbitrationCertification Program of the California Department of Consumer Affairs.
2. If you have a problem arising under a Mazda written warranty, we encourage you to bring it to our attention. If we are unable to resolve it, you may file a claim with BBBAUTO LINE. Claims must be filed with BBB AUTO LINE within six (6) months after the expiration of the warranty.
3. To file a claim with BBB AUTO LINE, call 1-800-955-5100. There is no charge for the
call.4. In order to file a claim with BBB AUTO LINE, you will have to provide your name and
address, the brand name and vehicle identification number (VIN) of your vehicle, and a statement of the nature of your problem or complaint. You will also be asked to provide:the approximate date of your acquisition of the vehicle, the vehicle's current mileage, theapproximate date and mileage at the time any problem(s) were first brought to theattention of Mazda or one of our dealers, and a statement of the relief you are seeking.
5. BBB AUTO LINE staff may try to help resolve your dispute through mediation. If mediation is not successful, or if you do not wish to participate in mediation, claimswithin the program's jurisdiction may be presented to an arbitrator at an informalhearing. The arbitrator's decision should ordinarily be issued within 40 days from thetime your complaint is filed; there may be a delay of 7 days if you did not first contact Mazda about your problem, or a delay of up to 30 days if the arbitrator requests aninspection/report by an impartial technical expert or further investigation and report byBBB AUTO LINE.
9-4
Customer Information
Customer Assistance
8/2/2019 Mazda5 Owners Manual
http://slidepdf.com/reader/full/mazda5-owners-manual 321/375
6. You are required to use BBB AUTO LINE before asserting in court any rights or remedies conferred by California Civil Code Section 1793.22. You are also required to
use BBB AUTO LINE before exercising rights or seeking remedies created by Title I of the Magnuson-Moss Warranty Act, 15 U.S.C. sec. 2301 et seq. If you choose to seek redress by pursuing rights and remedies not created by California Civil Code Section1793.22 or Title I of the Magnuson-Moss Warranty Act, resort to BBB AUTO LINE isnot required by those statutes.
7. California Civil Code Section 1793.2 (d) requires that, if Mazda or its representative isunable to repair a new motor vehicle to conform to the vehicle's applicable expresswarranty after a reasonable number of attempts, Mazda may be required to replace or repurchase the vehicle. California Civil Code Section 1793.22 (b) creates a presumptionthat Mazda has had a reasonable number of attempts to conform the vehicle to itsapplicable express warranties if, within 18 months from delivery to the buyer or 18,000miles on the vehicle's odometer, whichever occurs first, one or more of the followingoccurs:
The same nonconformity [a failure to conform to the written warranty that substantiallyimpairs the use, value or safety of the vehicle] results in a condition that is likely tocause death or serious bodily injury if the vehicle is driven AND the nonconformity has been subject to repair two or more times by Mazda or its agents AND the buyer or lessee has directly notified Mazda of the need for the repair of the nonconformity; or thesame nonconformity has been subject to repair 4 or more times by Mazda or its agents
AND the buyer has notified Mazda of the need for the repair of the nonconformity; or the vehicle is out of service by reason of repair of nonconformities by Mazda or itsagents for a cumulative total of more than 30 calendar days after delivery of the vehicleto the buyer.
NOTICE TO Mazda AS REQUIRED ABOVE SHALL BE SENT TO THEFOLLOWING ADDRESS:Mazda North American Operations7755 Irvine Center DriveIrvine, CA 92618
ATTN: Customer Mediation8. The following remedies may be sought in BBB AUTO LINE: repairs, reimbursement
for money paid to repair a vehicle or other expenses incurred as result of a vehiclenonconformity, repurchase or replacement of your vehicle, and compensation for damages and remedies available under Mazda'S written warranty or applicable law.
9. The following remedies may not be sought in BBB AUTO LINE: punitive or multipledamages, attorneys' fees, or consequential damages other than as provided in California Civil Code Section 1794 (a) and (b).
10. You may reject the decision issued by a BBB AUTO LINE arbitrator. If you reject thedecision, you will be free to pursue further legal action. The arbitrator's decision andany findings will be admissible in a court action.
Customer Information
Customer Assistance
9-5
8/2/2019 Mazda5 Owners Manual
http://slidepdf.com/reader/full/mazda5-owners-manual 322/375
11. If you accept the arbitrator's decision, Mazda will be bound by the decision, and willcomply with the decision within a reasonable time
9-6
Customer Information
Customer Assistance
8/2/2019 Mazda5 Owners Manual
http://slidepdf.com/reader/full/mazda5-owners-manual 323/375
Customer Assistance (Canada)
q Satisfaction Review ProcessYour complete and permanent satisfaction is of primary concern to Mazda. All AuthorizedMazda Dealers have both the knowledge and tools to keep your Mazda in top condition. Inour experience, any questions, problems, or complaints regarding the operation of your Mazda or any other general service transactions are most effectively resolved by your dealer. If the cause of your dissatisfaction cannot adequately be addressed by normaldealership procedures, we recommend that you take the following steps:
q STEP 1: Contact the Mazda Dealer
Discuss the matter with a member of dealership management. If the Service Manager hasalready reviewed your concerns, contact the owner of the dealership or its GeneralManager.
q STEP 2: Contact the Mazda Regional Office
If you feel that you still require assistance, ask the dealer Service Manager to arrange for you to meet the local Mazda Service Representative. If more expedient, contact Mazda Canada Inc.Regional Office nearest you for such arrangements. Regional Office addressand phone numbers are shown (page 9-9).
q STEP 3: Contact the Mazda Customer Relations Department
If still not substantially satisfied, contact the Customer Relations Department, Mazda Canada Inc., 55 Vogell Road, Richmond Hill, Ontario, L4B 3K5 Canada TEL: 1 (800)263-4680.Provide the Department with the following information:
1. Your name, address and telephone number
2. Year and model of vehicle3. Vehicle Identification Number (VIN). Refer to the “ Vehicle Identification Labels ” page
of section 10 of this manual for the location of the VIN.
4. Purchase date
5. Present odometer reading
6. Your dealer's name and location
7. The nature of your problem and/or cause of dissatisfaction
The Department, in cooperation with the local Mazda Service Representative, will reviewthe case to determine if everything possible has been done to ensure your satisfaction.
Customer Information
Customer Assistance
9-7
8/2/2019 Mazda5 Owners Manual
http://slidepdf.com/reader/full/mazda5-owners-manual 324/375
Please recognize that the resolution of service problems in most cases requires the use of your Mazda dealer's service facilities, personnel and equipment. We urge you to follow the
above three steps in sequence for most effective results.q Mediation/Arbitration Program
Occasionally a customer concern cannot be resolved through Mazda's Customer Satisfaction Program. If after exhausting the procedures in this manual your concern is stillnot resolved, you have another option.
Mazda Canada Inc. participates in an arbitration program administered by theCanadian Motor Vehicle Arbitration Plan (CAMVAP). CAMVAP will advise you about how your concern may be reviewed and resolved by an independent third party through binding arbitration.
Your complete satisfaction is the goal of Mazda Canada Inc. and our dealers.Mazda's participation in CAMVAP makes a valuable contribution to our achieving that goal. There is no charge for using CAMVAP. CAMVAP results are fast, fair and final as theaward is binding on both you and Mazda Canada Inc.
q Canadian Motor Vehicle Arbitration Plan (CAMVAP)
If a specific item of concern arises, where a solution cannot be reached between an owner,Mazda, and/or one of it's dealers (that all parties cannot agree upon), the owner may wishto use the services offered by the Canadian Motor Vehicle Arbitration Plan (CAMVAP).
CAMVAP uses the services of Provincial Administrators to assist consumers in schedulingand preparing for their arbitration hearings. However, before you can proceed withCAMVAP you must follow your Mazda dispute resolution process as outlined previously.
9-8
Customer Information
Customer Assistance
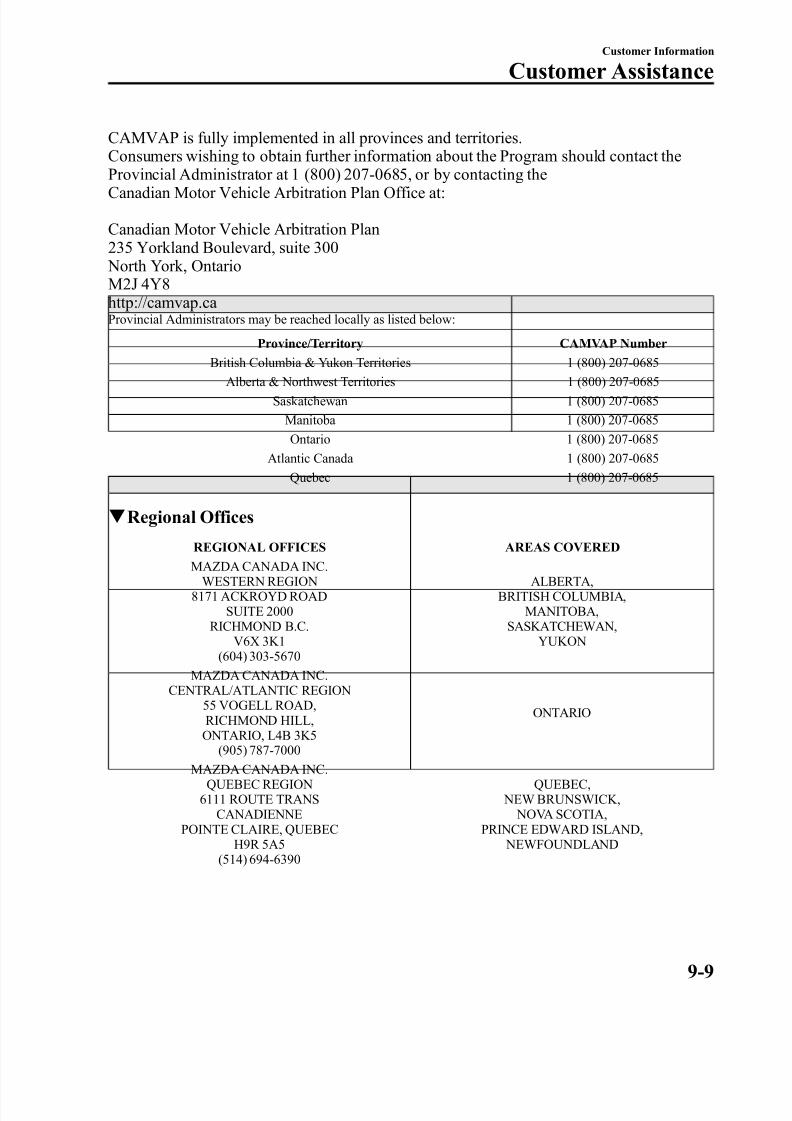
8/2/2019 Mazda5 Owners Manual
http://slidepdf.com/reader/full/mazda5-owners-manual 325/375
CAMVAP is fully implemented in all provinces and territories.Consumers wishing to obtain further information about the Program should contact the
Provincial Administrator at 1 (800) 207-0685, or by contacting theCanadian Motor Vehicle Arbitration Plan Office at:
Canadian Motor Vehicle Arbitration Plan235 Yorkland Boulevard, suite 300 North York, OntarioM2J 4Y8http://camvap.ca Provincial Administrators may be reached locally as listed below:
Province/Territory CAMVAP Number
British Columbia & Yukon Territories 1 (800) 207-0685Alberta & Northwest Territories 1 (800) 207-0685
Saskatchewan 1 (800) 207-0685Manitoba 1 (800) 207-0685Ontario 1 (800) 207-0685
Atlantic Canada 1 (800) 207-0685Quebec 1 (800) 207-0685
q Regional Offices
REGIONAL OFFICES AREAS COVEREDMAZDA CANADA INC.
WESTERN REGION8171 ACKROYD ROAD
SUITE 2000RICHMOND B.C.
V6X 3K1(604) 303-5670
ALBERTA,BRITISH COLUMBIA,
MANITOBA,SASKATCHEWAN,
YUKON
MAZDA CANADA INC.CENTRAL/ATLANTIC REGION
55 VOGELL ROAD,
RICHMOND HILL,ONTARIO, L4B 3K5(905) 787-7000
ONTARIO
MAZDA CANADA INC.QUEBEC REGION
6111 ROUTE TRANSCANADIENNE
POINTE CLAIRE, QUEBECH9R 5A5
(514) 694-6390
QUEBEC, NEW BRUNSWICK,
NOVA SCOTIA,PRINCE EDWARD ISLAND,
NEWFOUNDLAND
Customer Information
Customer Assistance
9-9
8/2/2019 Mazda5 Owners Manual
http://slidepdf.com/reader/full/mazda5-owners-manual 326/375
Customer Assistance (Puerto Rico)
Your complete and permanent satisfaction is our business. That is why all AuthorizedMazda Dealers have the knowledge and the tools to keep your Mazda vehicle in topcondition.If you have any questions or recommendations for improvement regarding the service of your Mazda vehicle or servicing by Mazda Dealer personnel, we recommend that you takethe following steps:
q STEP 1
Discuss the matter with an Authorized Mazda Dealer. This is the quickest and best way to
address the issue. If your concern has not been resolved by the CUSTOMER RELATIONS,SALES, SERVICE, or PARTS MANAGER, then please contact the GENERALMANAGER of the dealership or the OWNER.
q STEP 2
If, after following STEP 1, you feel the need for further assistance, please contact your area's Mazda representative (Indicated on the next page).
Please help us by providing the following information:
1. Your name, address, and telephone number
2. Year and model of vehicle
3. Vehicle Identification Number (17 digits, noted on your registration or title or located onthe upper driver's side corner of the dash)
4. Purchase date and current mileage
5. Your dealer's name and location
6. Your question(s)
9-10
Customer Information
Customer Assistance
8/2/2019 Mazda5 Owners Manual
http://slidepdf.com/reader/full/mazda5-owners-manual 327/375
Customer Assistance (Mexico)
Your complete and permanent satisfaction is our business. We are here to serve you. AllAuthorized Mazda Dealers have the knowledge and the tools to keep your Mazda vehiclein top condition.If you have any questions or recommendations for improvement regarding the service of your Mazda vehicle or servicing by Mazda Dealer personnel, we recommend that you takethe following steps:
q STEP 1: Contact Your Mazda Dealer
Discuss the matter with an Authorized Mazda Dealer. This is the quickest and best way to
address the issue.l If your concern has not been resolved by the CUSTOMER RELATIONS, SALES,SERVICE, or PARTS MANAGER, then please contact the GENERAL MANAGER of the dealership or the OWNER.
l If it becomes necessary to have the components or wiring system for the supplementaryrestraint system modified to accommodate a person with certain medical conditions inaccordance with a certified physician, go to STEP2.
q STEP 2: Contact Mazda Motor de Mexico
If for any reason you feel the need for further assistance after contacting your dealershipmanagement and it becomes necessary to have the components or wiring system for thesupplementary restraint system modified to accommodate a person with certain medicalconditions in accordance with a certified physician, you can reach Mazda Motor de Mexico by one of the following ways.
Log on: at www.MazdaMexico.com.mx
Answers to many questions, including how to locate or contact a local Mazda dealership inMexico, can be found here.
E-mail: click on “ Contactanos ” at the top of the page at www.MazdaMexico.com.mx
By phone at: 1 (866) 315 0220
By letter at:Attn: Customer AssistanceMazda North American Operations7755 Irvine Center DriveIrvine, CA 92618-2922
P.O. Box 19734Irvine, CA 92623-9734
Customer Information
Customer Assistance
9-11

8/2/2019 Mazda5 Owners Manual
http://slidepdf.com/reader/full/mazda5-owners-manual 328/375
In order to serve you efficiently and effectively, please help us by providing the followinginformation:
1. Your name, address, and telephone number 2. Year and model of vehicle3. Vehicle Identification Number (17 digits, noted on your registration or title or located on
the upper driver's side corner of the dash)4. Purchase date and current mileage5. Your dealer's name and location6. Your question(s)
9-12
Customer Information
Customer Assistance
8/2/2019 Mazda5 Owners Manual
http://slidepdf.com/reader/full/mazda5-owners-manual 329/375
Importer/Distributor
q U.S.A.Mazda North American Operations7755 Irvine Center DriveIrvine, CA 92618-2922 U.S.A.P.O. Box 19734Irvine, CA 92623-9734 U.S.A.TEL: 1 (800) 222-5500 (in U.S.A.)(949) 727-1990 (outside U.S.A.)
Distributor in Each Area
q CANADAMazda Canada Inc.55 Vogell Road, Richmond Hill,Ontario, L4B 3K5 Canada TEL: 1 (800) 263-4680 (in Canada)(905) 787-7000 (outside Canada)
q PUERTO RICO/U.S. Virgin Island
Plaza Motors Corp. (Mazda de PuertoRico)P.O. Box 362722, San Juan, Puerto Rico00936-2722TEL: (787) 641-9300
q MEXICO
Mazda Motor de MexicoCircuito Guillermo Gonzalez Camarena N1500 Col. Centro de Ciudad Santa Fe.01210, Mexico, D.F.TEL: Center of Attention to Clients:01 (800) 016 2932. in Mexico
q GUAM
Triple J Motors157 South Marine Drive, Tamuning,GUAM 96911 USAP.O. Box 6066 Tamuning, Guam 96931TEL: (671) 649-6555
q SAIPAN
Pacific International Marianas, Inc.(d.b.a. Midway Motors)
P.O. Box 887 Saipan, MP 96950TEL: (670) 234-7524
Customer Information
Mazda Importer/Distributors
9-13
8/2/2019 Mazda5 Owners Manual
http://slidepdf.com/reader/full/mazda5-owners-manual 330/375
Triple J Saipan, Inc.(d.b.a. Triple J Motors)
P.O. Box 500487 Saipan, MP 96950-0487TEL: (670) 234-7133/3051
q AMERICAN SAMOA
Polynesia Motors, Inc.P.O. Box 1120, Pago Pago, AmericanSamoa 96799TEL: (684) 699-9347
9-14
Customer Information
Mazda Importer/Distributors
8/2/2019 Mazda5 Owners Manual
http://slidepdf.com/reader/full/mazda5-owners-manual 331/375
Warranties for Your Mazdal New Vehicle Limited Warrantyl Distributor Major Component Limited Warranty (Canada only)l Safety Restraint System Limited Warrantyl Anti-perforation Limited Warrantyl Federal Emission Control Warranty (U.S.A. only)
l Emission Defect Warrantyl Emission Performance Warranty
l California Emission Control Warranty (U.S.A. only)l Emission Control Warranty (Canada only)l Replacement Parts and Accessories Limited Warrantyl Tire Warranty
NOTE Detailed warranty information is provided with your Mazda.
Customer Information
Warranty
9-15

8/2/2019 Mazda5 Owners Manual
http://slidepdf.com/reader/full/mazda5-owners-manual 332/375
Outside the United States
Government regulations in the United States require that automobiles meet specificemission regulations and safety standards. Therefore, vehicles built for use in the UnitedStates may differ from those sold in other countries.
The differences may make it difficult or even impossible for your vehicle to receivesatisfactory servicing in other countries. We strongly recommend that you NOT take your Mazda outside the United States. However, in the event that you are moving to Canada permanently, Mazda vehicles built for use in the United States could be eligible for exportation to Canada with specific vehicle modifications to comply with the CanadianMotor Vehicle Safety requirements (CMVSS).
NOTE The above is applicable for a permanent import/export situation and not related to travelers onvacation.
You may have the following problems if you do take your vehicle outside of the UnitedStates:l Recommended fuel may be unavailable. Any kind of leaded fuel or low-octane fuel will
affect vehicle performance and damage the emission controls and engine.l Proper repair facilities, tools, testing equipment, and replacement parts may not be
available.Please refer to your Manufacturer's Warranty Booklet for more information.
9-16
Customer Information
Warranty
8/2/2019 Mazda5 Owners Manual
http://slidepdf.com/reader/full/mazda5-owners-manual 333/375
Outside Canada
Government regulations in Canada require that automobiles meet specific emissionregulations and safety regulations. Therefore, vehicles built for use in Canada may differ from those sold in other countries.
The differences may make it difficult or even impossible for your vehicle to receivesatisfactory servicing in other countries. We strongly recommend that you NOT take your Mazda outside Canada. However, in the event that you are moving to the United States permanently, Mazda vehicles built for use in Canada could be eligible for exportation to theUnited States with specific vehicle modifications to comply with the United States FederalMotor Vehicle Safety Standards (FMVSS).
NOTE The above is applicable for a permanent import/export situation and not related to travelers onvacation.
You may have the following problems if you do take your vehicle outside of Canada:l Recommended fuel may be unavailable. Any kind of leaded fuel or low-octane fuel will
affect vehicle performance and damage the emission controls and engine.l Proper repair facilities, tools, testing equipment, and replacement parts may not be
available.Please refer to your Manufacturer's Warranty Booklet for more information.
Customer Information
Warranty
9-17
8/2/2019 Mazda5 Owners Manual
http://slidepdf.com/reader/full/mazda5-owners-manual 334/375
Registering Your Vehicle in A Foreign Country (Except
United States and Canada)Government regulations in your country could require that automobiles meet specificemission and safety standards.Vehicles built for your country may differ from those built for other countries. In additionto registration problems, satisfactory service may be difficult or even impossible in another country.
The fuel specified for your vehicle may be unavailable.
Parts, servicing techniques, and tools necessary to maintain and repair your vehicle may beunavailable.
There might not be an Authorized Mazda Dealer in the country you plan to take your vehicle.
The Mazda warranty is valid only in certain countries.
9-18
Customer Information
Warranty
8/2/2019 Mazda5 Owners Manual
http://slidepdf.com/reader/full/mazda5-owners-manual 335/375
Add-On Non-Genuine Parts and Accessories
Non-genuine parts and accessories for Mazda vehicles can be found in stores.These may fit your vehicle, but they are not approved by Mazda for use with Mazda vehicles. When you install non-genuine parts or accessories, they could affect your vehicle's performance or safety systems; the Mazda warranty doesn't cover this. Before youinstall any non-genuine parts or accessories, consult an Authorized Mazda Dealer.
WARNING
Always consult an Authorized Mazda Dealer before you install non-genuine parts or accessories:
Installation of non-genuine parts or accessories is dangerous. Improperly designedparts or accessories could seriously affect your vehicle's performance or safety systems. This could cause you to have an accident or increase your chances of injuries in an accident.
Be very careful in choosing and installing add-on electrical equipment, such asmobile telephones, two-way radios, stereo systems, and car alarm systems:
Incorrectly choosing or installing improper add-on equipment or choosing animproper installer is dangerous. Essential systems could be damaged, causing enginestalling, air-bag (SRS) activation, ABS inactivation, or a fire in the vehicle.
Mazda assumes no responsibility for death, injury, or expenses that may result from theinstallation of add-on non-genuine parts or accessories.
Customer Information
Warranty
9-19
8/2/2019 Mazda5 Owners Manual
http://slidepdf.com/reader/full/mazda5-owners-manual 336/375
Cell Phones Warning
WARNINGPlease comply with the legal regulations concerning the use of communicationequipment in vehicles in your State or Province:
Use of any electrical devices such as cell phones, computers, portable radios, vehiclenavigation or other devices by the driver while the vehicle is moving is dangerous.Dialing a number on a cell phone while driving also ties-up the driver's hands. Use of these devices will cause the driver to be distracted and could lead to a seriousaccident. If a passenger is unable to use the device, pull off the right-of-way to a safearea before use. If use of a cell phone is necessary despite this warning, use a hands-
free system to at least leave the hands free to drive the vehicle. Never use a cellphone or other electrical devices while the vehicle is moving and, instead,concentrate on the full-time job of driving.
9-20
Customer Information
Cell Phones
8/2/2019 Mazda5 Owners Manual
http://slidepdf.com/reader/full/mazda5-owners-manual 337/375
Uniform Tire Quality Grading System (UTQGS)
This information relates to the tire grading system developed by the U.S. NationalHighway Traffic Safety Administration for grading tires by tread wear, traction, andtemperature performance.
q Tread Wear
The tread wear grade is a comparative rating based on the wear rate of the tire when testedunder controlled conditions on a specified government test course.For example, a tire graded 150 would wear one-and-a-half times as well on the government course as a tire graded 100.
The relative performance of tires depends upon the actual conditions of their use, however,and may depart significantly from the norm because of variations in driving habits, service practices and differences in road characteristics and climate.
q Traction-AA, A, B, C
The traction grades, from highest to lowest, are AA, A, B, and C. These grades represent the tire's ability to stop on wet pavement as measured under controlled conditions onspecified government test surfaces of asphalt and concrete. A tire marked C may have poor traction performance.
WARNING
The traction grade assigned to this tire is based on braking (straight ahead) tractiontests and does not include acceleration cornering (turning), hydroplaning, or peaktraction characteristics.
q Temperature-A, B, C
The temperature grades A (the highest), B, and C, represent the tire's resistance to the
generation of heat and its ability to dissipate heat when tested under controlled conditionson a specified indoor laboratory test wheel.Sustained high temperature can cause the material of the tire to degenerate and reduce tirelife, and excessive temperatures can lead to sudden tire failure.
Grade C corresponds to a level of performance which all passenger vehicle tires must meet under the Federal Motor Vehicle Safety Standard No. 109. Grades B and A represent higher levels of performance on the laboratory test wheel than the minimum required bylaw.
Customer Information
Uniform Tire Quality Grading System (UTQGS)
9-21
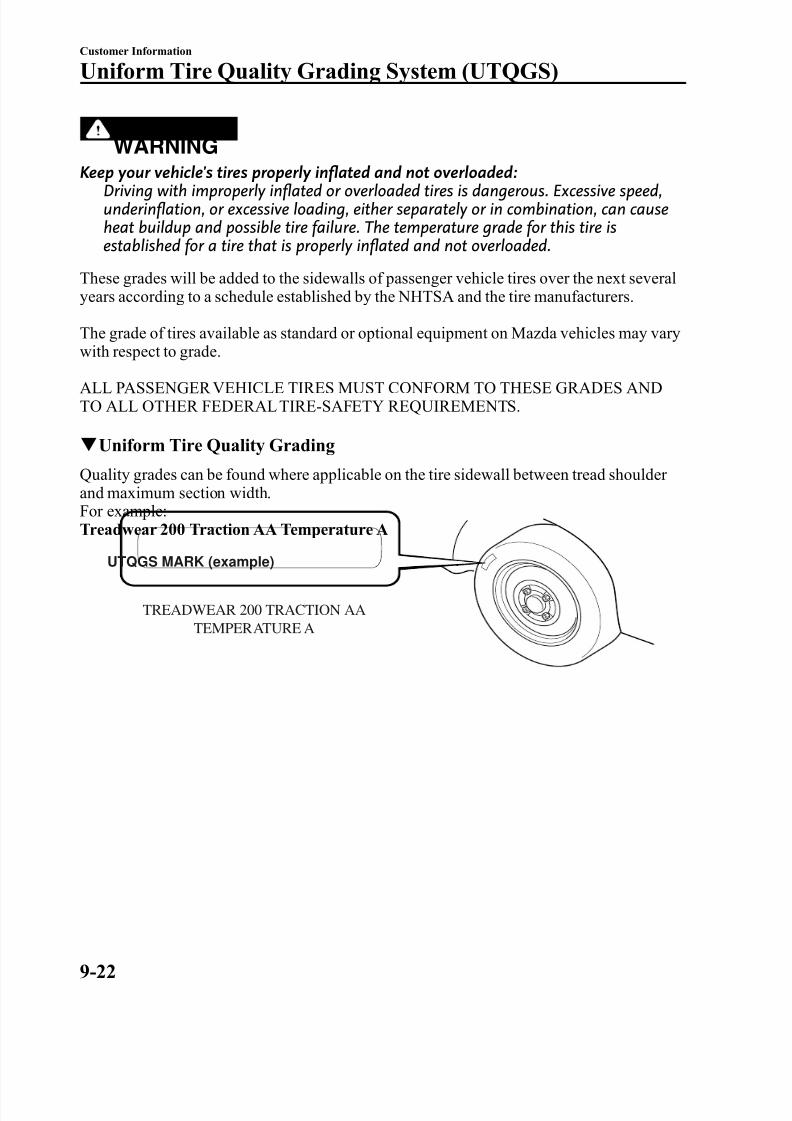
8/2/2019 Mazda5 Owners Manual
http://slidepdf.com/reader/full/mazda5-owners-manual 338/375
WARNING
Keep your vehicle's tires properly inflated and not overloaded:Driving with improperly inflated or overloaded tires is dangerous. Excessive speed,underinflation, or excessive loading, either separately or in combination, can causeheat buildup and possible tire failure. The temperature grade for this tire isestablished for a tire that is properly inflated and not overloaded.
These grades will be added to the sidewalls of passenger vehicle tires over the next severalyears according to a schedule established by the NHTSA and the tire manufacturers.
The grade of tires available as standard or optional equipment on Mazda vehicles may varywith respect to grade.
ALL PASSENGER VEHICLE TIRES MUST CONFORM TO THESE GRADES ANDTO ALL OTHER FEDERAL TIRE-SAFETY REQUIREMENTS.
q Uniform Tire Quality Grading
Quality grades can be found where applicable on the tire sidewall between tread shoulder and maximum section width.For example:Treadwear 200 Traction AA Temperature A
TREADWEAR 200 TRACTION AATEMPERATURE A
UTQGS MARK (example)
9-22
Customer Information
Uniform Tire Quality Grading System (UTQGS)
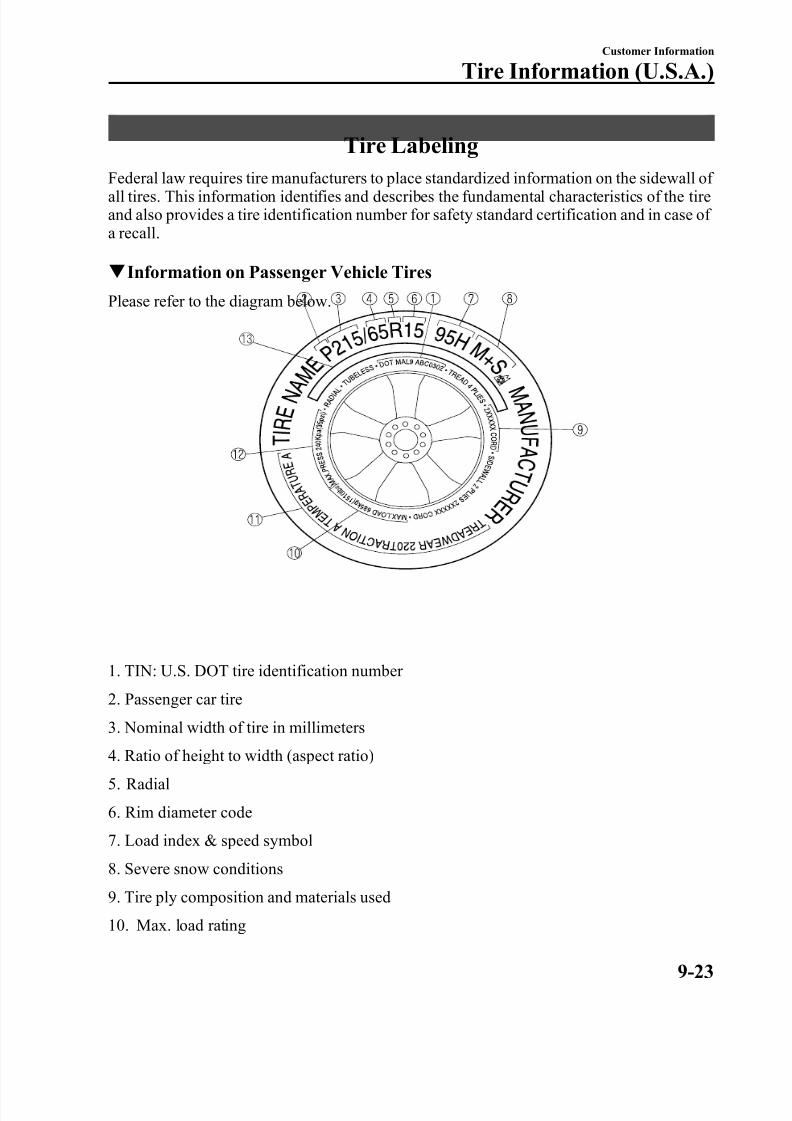
8/2/2019 Mazda5 Owners Manual
http://slidepdf.com/reader/full/mazda5-owners-manual 339/375
Tire Labeling
Federal law requires tire manufacturers to place standardized information on the sidewall of all tires. This information identifies and describes the fundamental characteristics of the tireand also provides a tire identification number for safety standard certification and in case of a recall.
q Information on Passenger Vehicle Tires
Please refer to the diagram below.
1. TIN: U.S. DOT tire identification number
2. Passenger car tire
3. Nominal width of tire in millimeters
4. Ratio of height to width (aspect ratio)
5. Radial
6. Rim diameter code
7. Load index & speed symbol
8. Severe snow conditions
9. Tire ply composition and materials used10. Max. load rating
Customer Information
Tire Information (U.S.A.)
9-23
8/2/2019 Mazda5 Owners Manual
http://slidepdf.com/reader/full/mazda5-owners-manual 340/375
8/2/2019 Mazda5 Owners Manual
http://slidepdf.com/reader/full/mazda5-owners-manual 341/375

8/2/2019 Mazda5 Owners Manual
http://slidepdf.com/reader/full/mazda5-owners-manual 342/375
Tread Wear, Traction and Temperature Grades
Tread wear: The tread wear grade is a comparative rating based on the wear rate of the tire
when tested under controlled conditions on a specified government test course. For example, a tire graded 150 would wear one and one-half (1 1/2) times as well on thegovernment course as a tire graded 100.Traction: The traction grades, from highest to lowest are AA, A, B, and C. The gradesrepresent the tire's ability to stop on wet pavement as measured under controlled conditionson specified government test surfaces of asphalt and concrete. A tire marked C may have poor traction performance.Temperature: The temperature grades are A (the highest), B and C, representing the tire'sresistance to the generation of heat and its ability to dissipate heat when tested under controlled conditions on a specified indoor laboratory test wheel.
Snow Tires
In some heavy snow areas, local governments may require true snow tires, those with verydeeply cut tread. These tires should only be used in pairs or placed on all four wheels.Make sure you purchase snow tires that are the same size and construction type as the other tires on your vehicle.
SAFETY WARNING
The following safety warning appears on the tire's sidewall.SERIOUS INJURY MAY RESULT FROM:l EXPLOSION OF TIRE/RIM ASSEMBLY DUE TO IMPROPER MOUNTING-
MATCH TIRE DIAMETER TO RIM DIAMETER; NEVER EXCEED 40 psi (275 kPa)TO SEAT BEADS-ONLY SPECIALLY TRAINED PERSONS SHOULD MOUNTTIRES.
l TIRE FAILURE DUE TO UNDER-INFLATION/OVERLOADING/DAMAGE-FOLLOW OWNER'S MANUAL AND PLACARD IN VEHICLE-FREQUENTLYCHECK INFLATION PRESSURE AND INSPECT FOR DAMAGE.
9-26
Customer Information
Tire Information (U.S.A.)
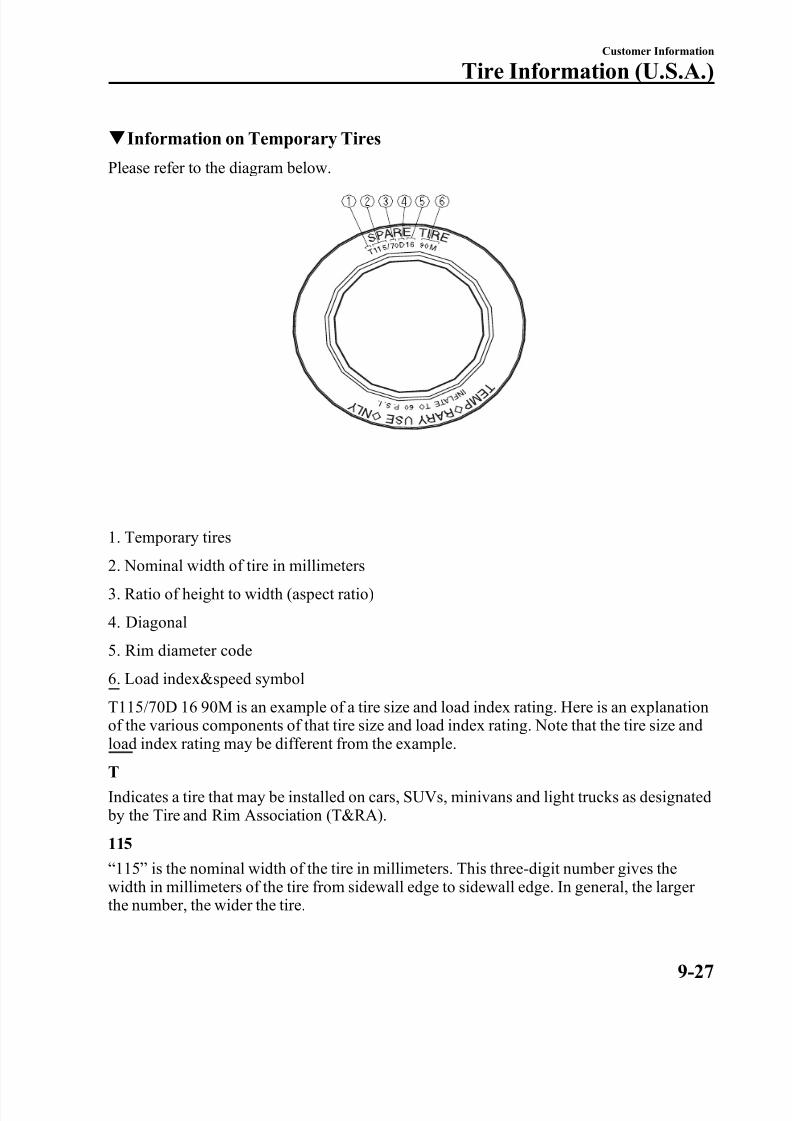
8/2/2019 Mazda5 Owners Manual
http://slidepdf.com/reader/full/mazda5-owners-manual 343/375
q Information on Temporary Tires
Please refer to the diagram below.
1. Temporary tires2. Nominal width of tire in millimeters
3. Ratio of height to width (aspect ratio)
4. Diagonal
5. Rim diameter code
6. Load index&speed symbol
T115/70D 16 90M is an example of a tire size and load index rating. Here is an explanationof the various components of that tire size and load index rating. Note that the tire size andload index rating may be different from the example.
T
Indicates a tire that may be installed on cars, SUVs, minivans and light trucks as designated by the Tire and Rim Association (T&RA).
115“ 115 ” is the nominal width of the tire in millimeters. This three-digit number gives thewidth in millimeters of the tire from sidewall edge to sidewall edge. In general, the larger
the number, the wider the tire.
Customer Information
Tire Information (U.S.A.)
9-27
8/2/2019 Mazda5 Owners Manual
http://slidepdf.com/reader/full/mazda5-owners-manual 344/375
70“ 70 ” is the aspect ratio. This two-digit number indicates the tire's ratio of height to width.
D“ D ” is the tire construction symbol. D indicates “ diagonal ply construction ” .
16“ 16 ” is the wheel rim diameter in inches.
90“ 90 ” is the Load Index. This two-or three-digit number indicates how much weight eachtire can support.
M“ M ” is the speed rating. The speed rating denotes the maximum speed for which the use of the tire is rated.
Letter Rating Speed Rating
M 81 mph
9-28
Customer Information
Tire Information (U.S.A.)
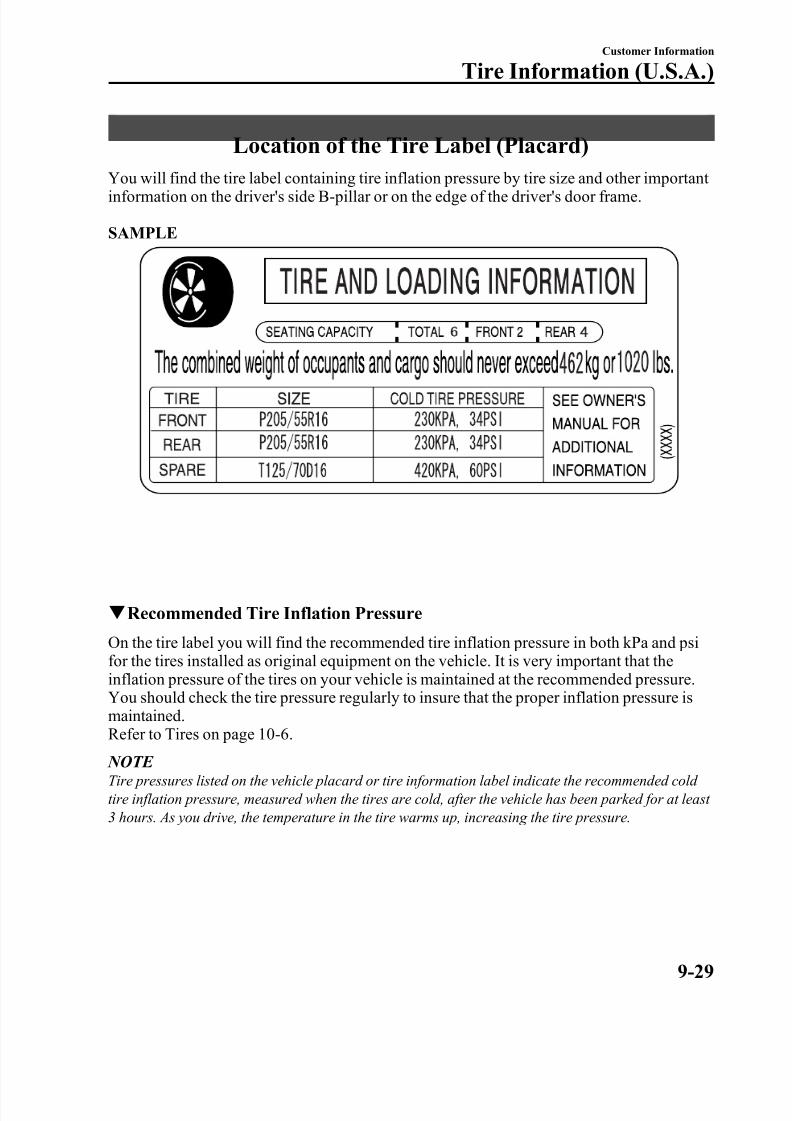
8/2/2019 Mazda5 Owners Manual
http://slidepdf.com/reader/full/mazda5-owners-manual 345/375
Location of the Tire Label (Placard)
You will find the tire label containing tire inflation pressure by tire size and other important information on the driver's side B-pillar or on the edge of the driver's door frame.
SAMPLE
q Recommended Tire Inflation Pressure
On the tire label you will find the recommended tire inflation pressure in both kPa and psifor the tires installed as original equipment on the vehicle. It is very important that theinflation pressure of the tires on your vehicle is maintained at the recommended pressure.You should check the tire pressure regularly to insure that the proper inflation pressure ismaintained.Refer to Tires on page 10-6.
NOTE Tire pressures listed on the vehicle placard or tire information label indicate the recommended cold tire inflation pressure, measured when the tires are cold, after the vehicle has been parked for at least 3 hours. As you drive, the temperature in the tire warms up, increasing the tire pressure.
Customer Information
Tire Information (U.S.A.)
9-29
8/2/2019 Mazda5 Owners Manual
http://slidepdf.com/reader/full/mazda5-owners-manual 346/375
WARNING
Always check the tire inflation pressures on a regular basis according to therecommended tire inflation pressure on the tire label and in conjunction with theinformation in this owner's manual:
Driving your vehicle with under-inflated tires is dangerous.Under-inflation is the most common cause of failures in any kind of tire and may result in severe cracking, tread separation or “ blowout” , with unexpected loss of vehicle control and increased risk of injury. Under-inflation increases sidewall flexingand rolling resistance, resulting in heat buildup and internal damage to the tire. Itresults in unnecessary tire stress, irregular wear, loss of control and accidents. A tirecan lose up to half of its air pressure and not appear to be flat!
It is impossible to determine whether or not tires are properly inflated just by lookingat them.
q Checking Tire Pressure
1. When you check the air pressure, make sure the tires are cold ― meaning they are not hot from driving even a mile.
2. Remove the cap from the valve on one tire.
3. Firmly press a tire gauge onto the valve.
4. Add air to achieve recommended air pressure.5. If you overfill the tire, release air by pushing on the metal stem in the center of the
valve. Then recheck the pressure with your tire gauge.
6. Replace the valve cap.
7. Repeat with each tire, including the spare.
NOTE Some spare tires require higher inflation pressure.
8. Visually inspect the tires to make sure there are no nails or other objects embedded that could poke a hole in the tire and cause an air leak.
9. Check the sidewalls to make sure there are no gouges, cuts, bulges, cracks or other irregularities.
NOTE Warm tires normally exceed recommended pressures. Don't release air from warm tires to adjust the pressure.Under-inflation can cause serious failures and accidents.Over-inflation can produce a harsh ride and the greater possibility of damage from road hazards.
9-30
Customer Information
Tire Information (U.S.A.)
8/2/2019 Mazda5 Owners Manual
http://slidepdf.com/reader/full/mazda5-owners-manual 347/375
q Glossary of Terms
Tire Placard: A label indicating the OE tire sizes, recommended inflation pressure, andthe maximum weight the vehicle can carry.Tire Identification Number (TIN): A number on the sidewall of each tire providinginformation about the tire brand and manufacturing plant, tire size, and date of manufacture.Inflation Pressure: A measure of the amount of air in a tire.kPa: Kilopascal, the metric unit for air pressure.psi: Pounds per square inch, the English unit for air pressure.B-pillar: The structural member at the side of the vehicle behind the front door.Original Equipment (OE): Describes components originally equipped on the vehicle.Vehicle Load Limit: The maximum value of the combination weight of occupants andcargo.Bead Area of the Tire: Area of the tire next to the rim.Sidewall Area of the Tire: Area between the bead area and the tread.Tread Area of the Tire: Area on the perimeter of the tire that contacts the road when it'smounted on the vehicle.
Seating capacity means the total allowable number of vehicle occupants. Seating capacityis described on the tire label.
Production options weight is the combination weight of installed regular productionoptions weighing over 2.3 kilograms in excess of the standard items which they replace,and not previously considered in the curb weight or accessory weight, including heavyduty brakes, ride levelers, roof rack, heavy duty battery, and special trim.
Rim is the metal support (wheel) for a tire or a tire and tube assembly upon which the tire beads are seated.
Customer Information
Tire Information (U.S.A.)
9-31
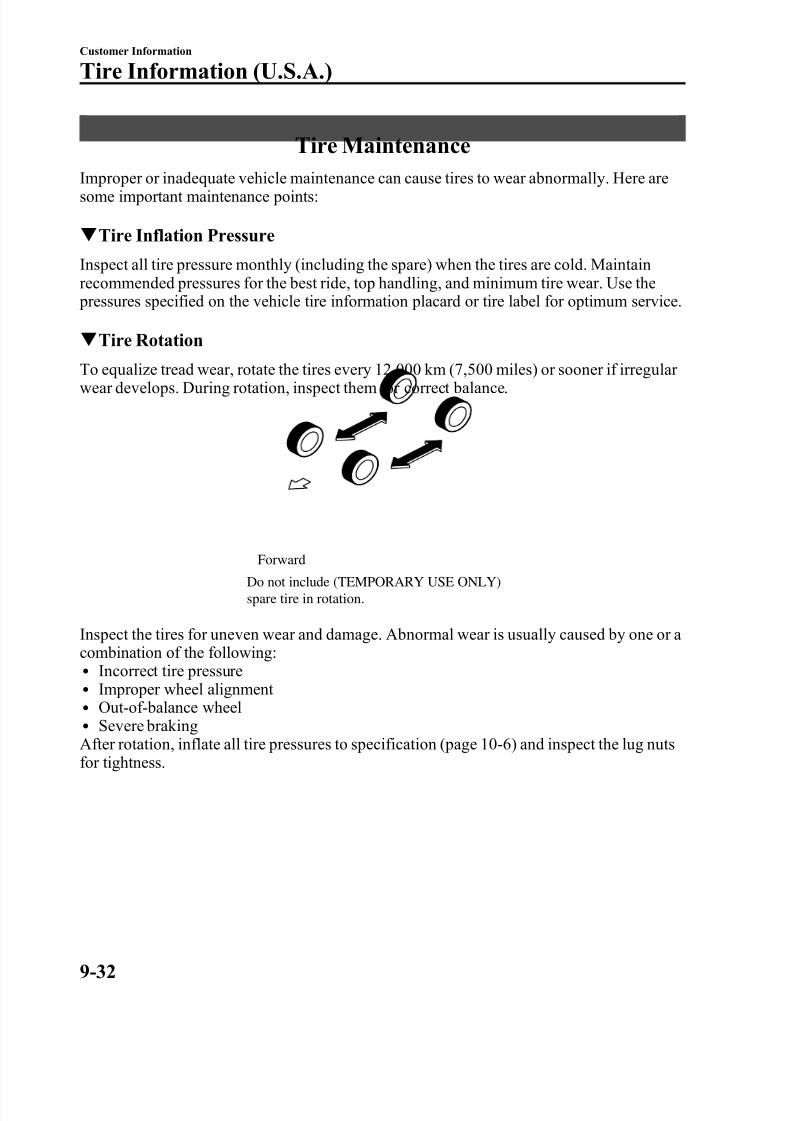
8/2/2019 Mazda5 Owners Manual
http://slidepdf.com/reader/full/mazda5-owners-manual 348/375
Tire Maintenance
Improper or inadequate vehicle maintenance can cause tires to wear abnormally. Here aresome important maintenance points:
q Tire Inflation Pressure
Inspect all tire pressure monthly (including the spare) when the tires are cold. Maintainrecommended pressures for the best ride, top handling, and minimum tire wear. Use the pressures specified on the vehicle tire information placard or tire label for optimum service.
q Tire Rotation
To equalize tread wear, rotate the tires every 12,000 km (7,500 miles) or sooner if irregular wear develops. During rotation, inspect them for correct balance.
Do not include (TEMPORARY USE ONLY)spare tire in rotation.
Forward
Inspect the tires for uneven wear and damage. Abnormal wear is usually caused by one or a combination of the following:l Incorrect tire pressurel Improper wheel alignment l Out-of-balance wheell Severe brakingAfter rotation, inflate all tire pressures to specification (page 10-6) and inspect the lug nutsfor tightness.
9-32
Customer Information
Tire Information (U.S.A.)
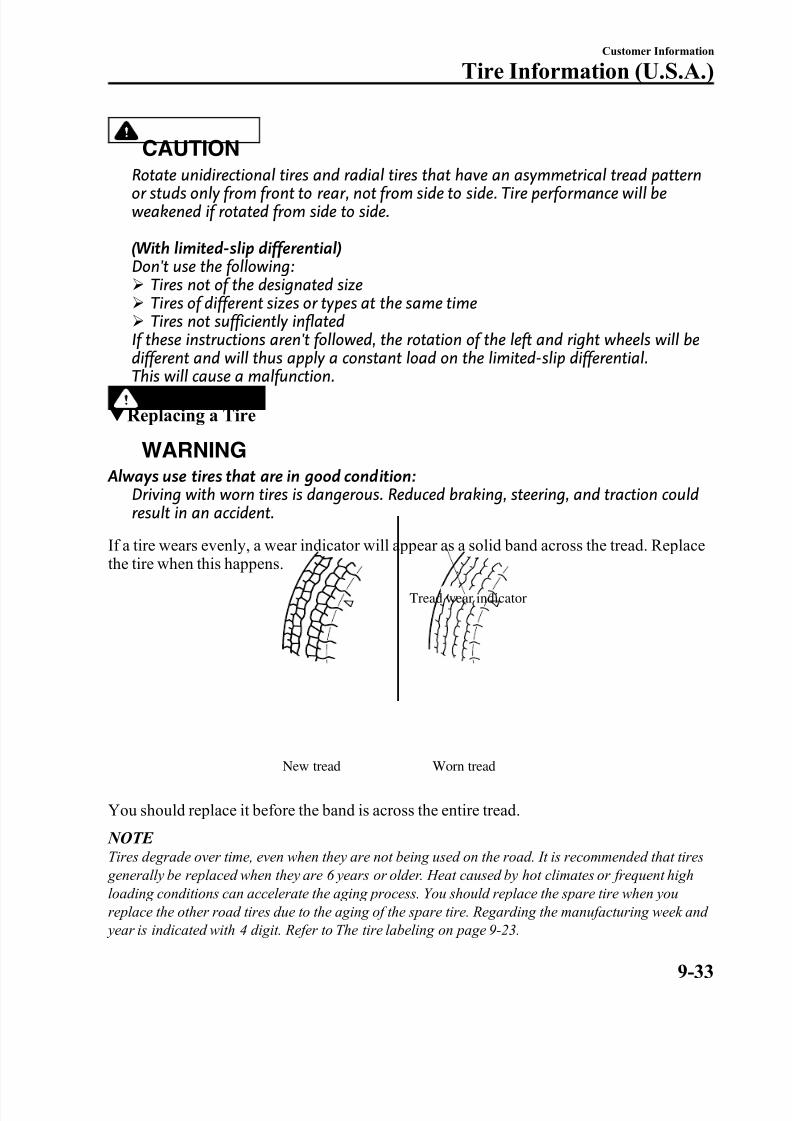
8/2/2019 Mazda5 Owners Manual
http://slidepdf.com/reader/full/mazda5-owners-manual 349/375
CAUTION
Rotate unidirectional tires and radial tires that have an asymmetrical tread patternor studs only from front to rear, not from side to side. Tire performance will beweakened if rotated from side to side.
(With limited-slip differential)Don't use the following:Ø Tires not of the designated sizeØ Tires of different sizes or types at the same timeØ Tires not sufficiently inflatedIf these instructions aren't followed, the rotation of the left and right wheels will be
different and will thus apply a constant load on the limited-slip differential.This will cause a malfunction.
q Replacing a Tire
WARNING
Always use tires that are in good condition:Driving with worn tires is dangerous. Reduced braking, steering, and traction couldresult in an accident.
If a tire wears evenly, a wear indicator will appear as a solid band across the tread. Replacethe tire when this happens.
New tread
Tread wear indicator
Worn tread
You should replace it before the band is across the entire tread.
NOTE Tires degrade over time, even when they are not being used on the road. It is recommended that tires generally be replaced when they are 6 years or older. Heat caused by hot climates or frequent highloading conditions can accelerate the aging process. You should replace the spare tire when youreplace the other road tires due to the aging of the spare tire. Regarding the manufacturing week and year is indicated with 4 digit. Refer to The tire labeling on page 9-23.
Customer Information
Tire Information (U.S.A.)
9-33
8/2/2019 Mazda5 Owners Manual
http://slidepdf.com/reader/full/mazda5-owners-manual 350/375
q Safety Practices
The way you drive has a great deal to do with your tire mileage and safety. So cultivategood driving habits for your own benefit.l Observe posted speed limitsl Avoid fast starts, stops and turnsl Avoid potholes and objects on the roadl Do no run over curbs or hit the tire against the curb when parking
CAUTION
If you feel a sudden vibration or ride disturbance while driving or you suspect your tire or vehicle has been damaged, immediately reduce your speed. Drive with caution
until you can safely pull off the road. Stop and inspect the tire for damage. If the tireis under-inflated or damaged, deflate it, remove the tire and rim and replace it withyour spare tire. If you cannot detect a cause, have the vehicle towed to the nearestvehicle or tire dealer to have the vehicle inspected.
9-34
Customer Information
Tire Information (U.S.A.)

8/2/2019 Mazda5 Owners Manual
http://slidepdf.com/reader/full/mazda5-owners-manual 351/375
Vehicle Loading
WARNINGDo not taw a trailer with this vehicle:
Towing a trailer with this vehicle is dangerous because it has not been designed totow a trailer and doing so will affect the drive system which could result in vehicledamage.
This section will guide you in the proper loading of your vehicle and/or trailer, to keepyour loaded vehicle weight within its design rating capability, with or without a trailer.Properly loading your vehicle will provide maximum return of vehicle design performance.Before loading your vehicle, familiarize yourself with the following terms for determiningyour vehicle's weight ratings, with or without a trailer, from the vehicle's SafetyCertification Label and Tire and Load Information Label:
WARNING
Overloaded Vehicle:Overloading a vehicle is dangerous. The results of overloading can have seriousconsequences in terms of passenger safety. Too much weight on a vehicle'ssuspension system can cause spring or shock absorber failure, brake failure,handling or steering problems, irregular tire wear, tire failure or other damage.
Overloading makes a vehicle harder to drive and control. It also increases thedistance required for stopping. In cases of serious overloading, brakes can failcompletely, particularly on steep grades. The load a tire will carry safely is acombination of the size of the tire, its load range, and corresponding inflationpressure.Never overload the vehicle and always observe the vehicle's weight ratings from thevehicle's Safety Certification and Tire and Load Information labels.
Customer Information
Tire Information (U.S.A.)
9-35
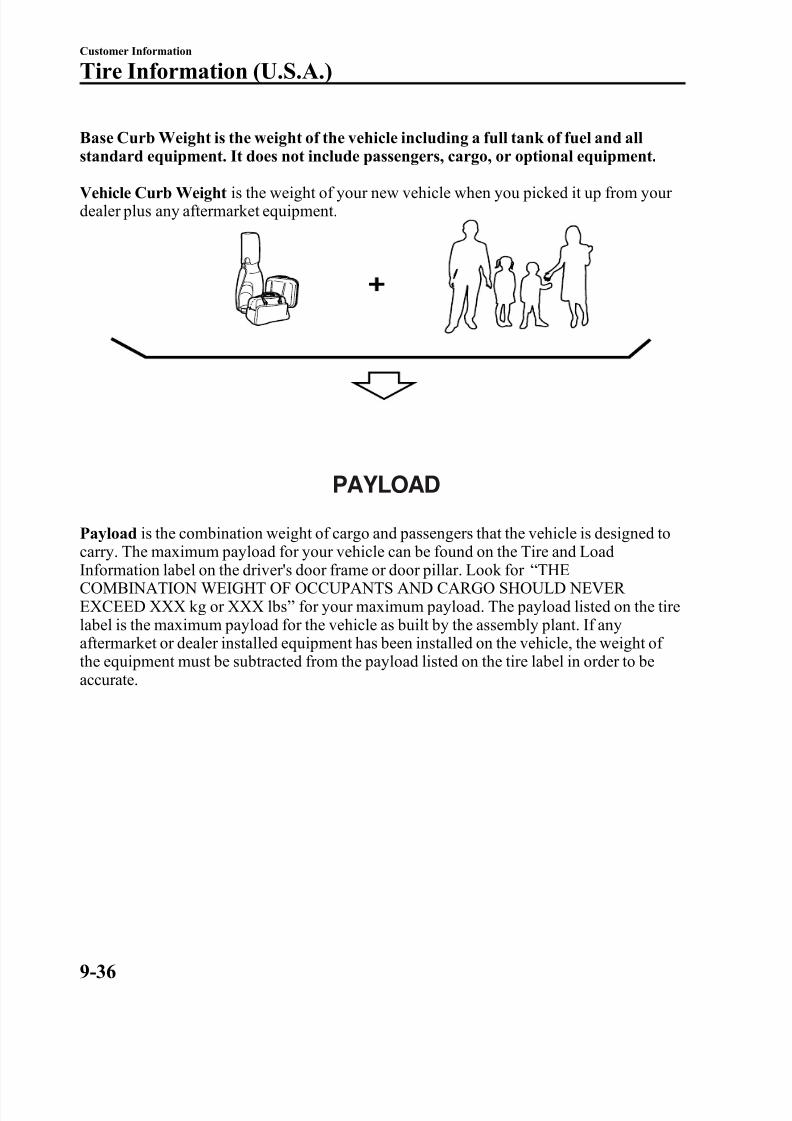
8/2/2019 Mazda5 Owners Manual
http://slidepdf.com/reader/full/mazda5-owners-manual 352/375
Base Curb Weight is the weight of the vehicle including a full tank of fuel and allstandard equipment. It does not include passengers, cargo, or optional equipment.
Vehicle Curb Weight is the weight of your new vehicle when you picked it up from your dealer plus any aftermarket equipment.
PAYLOAD
Payload is the combination weight of cargo and passengers that the vehicle is designed tocarry. The maximum payload for your vehicle can be found on the Tire and LoadInformation label on the driver's door frame or door pillar. Look for “ THECOMBINATION WEIGHT OF OCCUPANTS AND CARGO SHOULD NEVER EXCEED XXX kg or XXX lbs ” for your maximum payload. The payload listed on the tirelabel is the maximum payload for the vehicle as built by the assembly plant. If anyaftermarket or dealer installed equipment has been installed on the vehicle, the weight of the equipment must be subtracted from the payload listed on the tire label in order to beaccurate.
9-36
Customer Information
Tire Information (U.S.A.)

8/2/2019 Mazda5 Owners Manual
http://slidepdf.com/reader/full/mazda5-owners-manual 353/375
SAMPLE
CARGO
Cargo Weight includes all weight added to the Base Curb Weight, including cargo andoptional equipment. When towing, trailer tongue load or king pin weight is also part of cargo weight.
The cargo weight limit decreases depending on the number of vehicle occupants. The cargoweight limit can be calculated by subtracting the total weight of the vehicle occupants fromthe “ combination weight of occupants and cargo should never exceed ” value on the tirelabel.
Customer Information
Tire Information (U.S.A.)
9-37
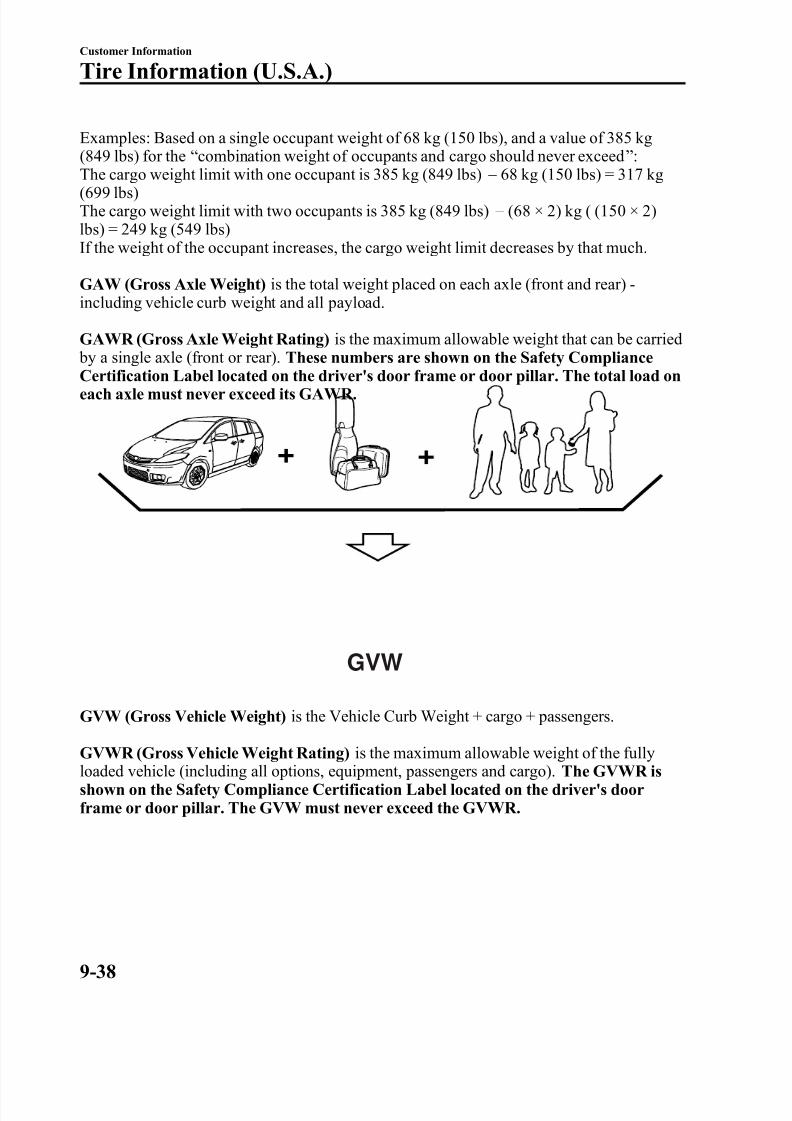
8/2/2019 Mazda5 Owners Manual
http://slidepdf.com/reader/full/mazda5-owners-manual 354/375
Examples: Based on a single occupant weight of 68 kg (150 lbs), and a value of 385 kg(849 lbs) for the “ combination weight of occupants and cargo should never exceed ” :
The cargo weight limit with one occupant is 385 kg (849 lbs)_
68 kg (150 lbs) = 317 kg(699 lbs)The cargo weight limit with two occupants is 385 kg (849 lbs) _ (68 × 2) kg ( (150 × 2)lbs) = 249 kg (549 lbs)If the weight of the occupant increases, the cargo weight limit decreases by that much.
GAW (Gross Axle Weight) is the total weight placed on each axle (front and rear) -including vehicle curb weight and all payload.
GAWR (Gross Axle Weight Rating) is the maximum allowable weight that can be carried
by a single axle (front or rear). These numbers are shown on the Safety ComplianceCertification Label located on the driver's door frame or door pillar. The total load oneach axle must never exceed its GAWR.
GVW
GVW (Gross Vehicle Weight) is the Vehicle Curb Weight + cargo + passengers.GVWR (Gross Vehicle Weight Rating) is the maximum allowable weight of the fullyloaded vehicle (including all options, equipment, passengers and cargo). The GVWR isshown on the Safety Compliance Certification Label located on the driver's doorframe or door pillar. The GVW must never exceed the GVWR.
9-38
Customer Information
Tire Information (U.S.A.)
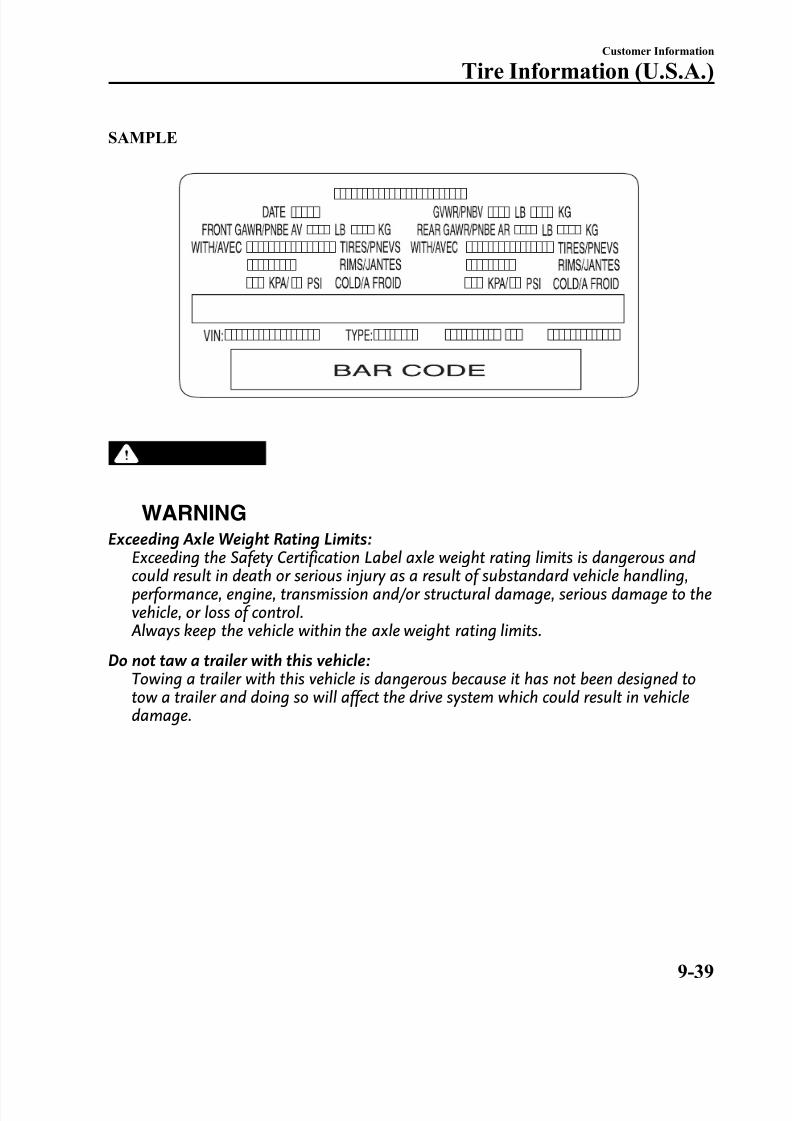
8/2/2019 Mazda5 Owners Manual
http://slidepdf.com/reader/full/mazda5-owners-manual 355/375
SAMPLE
WARNING
Exceeding Axle Weight Rating Limits:Exceeding the Safety Certification Label axle weight rating limits is dangerous andcould result in death or serious injury as a result of substandard vehicle handling,performance, engine, transmission and/or structural damage, serious damage to thevehicle, or loss of control. Always keep the vehicle within the axle weight rating limits.
Do not taw a trailer with this vehicle:Towing a trailer with this vehicle is dangerous because it has not been designed totow a trailer and doing so will affect the drive system which could result in vehicle
damage.
Customer Information
Tire Information (U.S.A.)
9-39
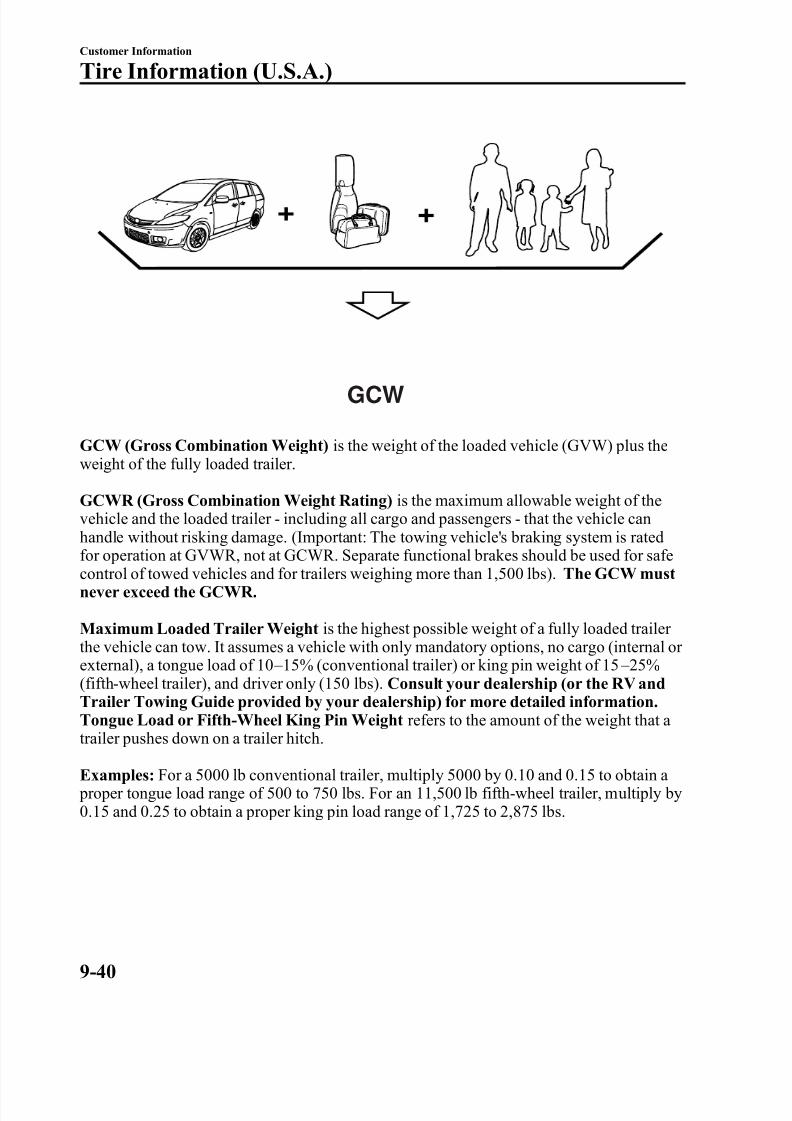
8/2/2019 Mazda5 Owners Manual
http://slidepdf.com/reader/full/mazda5-owners-manual 356/375
GCW
GCW (Gross Combination Weight) is the weight of the loaded vehicle (GVW) plus theweight of the fully loaded trailer.
GCWR (Gross Combination Weight Rating) is the maximum allowable weight of thevehicle and the loaded trailer - including all cargo and passengers - that the vehicle can
handle without risking damage. (Important: The towing vehicle's braking system is ratedfor operation at GVWR, not at GCWR. Separate functional brakes should be used for safecontrol of towed vehicles and for trailers weighing more than 1,500 lbs). The GCW mustnever exceed the GCWR.
Maximum Loaded Trailer Weight is the highest possible weight of a fully loaded trailer the vehicle can tow. It assumes a vehicle with only mandatory options, no cargo (internal or external), a tongue load of 10 _ 15% (conventional trailer) or king pin weight of 15 _ 25%(fifth-wheel trailer), and driver only (150 lbs). Consult your dealership (or the RV andTrailer Towing Guide provided by your dealership) for more detailed information.
Tongue Load or Fifth-Wheel King Pin Weight refers to the amount of the weight that a trailer pushes down on a trailer hitch.
Examples: For a 5000 lb conventional trailer, multiply 5000 by 0.10 and 0.15 to obtain a proper tongue load range of 500 to 750 lbs. For an 11,500 lb fifth-wheel trailer, multiply by0.15 and 0.25 to obtain a proper king pin load range of 1,725 to 2,875 lbs.
9-40
Customer Information
Tire Information (U.S.A.)
8/2/2019 Mazda5 Owners Manual
http://slidepdf.com/reader/full/mazda5-owners-manual 357/375
WARNING
Exceeding GVWR or GAWR Specifications:Exceeding the GVWR or the GAWR specified on the certification label is dangerous.Exceeding any vehicle rating limitation could result in a serious accident, injury, or damage to the vehicle.Do not use replacement tires with lower load carrying capacities than the originalsbecause they may lower the vehicle's GVWR and GAWR limitations. Replacementtires with a higher limit than the originals do not increase the GVWR and GAWRlimitations.Never exceed the GVWR or the GAWR specified on the certification label.
Customer Information
Tire Information (U.S.A.)
9-41
8/2/2019 Mazda5 Owners Manual
http://slidepdf.com/reader/full/mazda5-owners-manual 358/375
Steps for Determining the Correct Load Limit:
Steps for Determining Correct Load Limit:(1) Locate the statement “ The combined weight of occupants and cargo should
never exceed XXX kg or XXX lbs ” on your vehicle's placard.(2) Determine the combined weight of the driver and passengers that will be
riding in your vehicle.(3) Subtract the combined weight of the driver and passengers from XXX kg
or XXX lbs.(4) The resulting figure equals the available amount of cargo and luggage load
capacity. For example, if the “ XXX ” amount equals 1400 lbs. and therewill be five 150 lb passengers in your vehicle, the amount of availablecargo and luggage load capacity is 650 lbs. (1400 _ 750 (5 × 150) = 650lbs.)
(5) Determine the combined weight of luggage and cargo being loaded on thevehicle. That weight may not safely exceed the available cargo and luggageload capacity calculated in Step 4.
(6) If your vehicle will be towing a trailer, the load from your trailer will betransferred to your vehicle. Consult this manual to determine how this
reduces the available cargo and luggage load capacity of your vehicle.
9-42
Customer Information
Tire Information (U.S.A.)
8/2/2019 Mazda5 Owners Manual
http://slidepdf.com/reader/full/mazda5-owners-manual 359/375
Reporting Safety Defects (U.S.A.)
If you believe that your vehicle has a defect which could cause a crash or couldcause injury or death, you should immediately inform the National HighwayTraffic Safety Administration (NHTSA) in addition to notifying Mazda Motor Corporation (Your Mazda Importer/Distributor).
If NHTSA receives similar complaints, it may open an investigation, and if it finds that a safety defect exists in a group of vehicles, it may order a recall andremedy campaign. However, NHTSA cannot become involved in individual problems between you, your dealer, or Mazda Motor Corporation (Your Mazda Importer/Distributor).
To contact NHTSA, you may call the Vehicle Safety Hotline toll-free at 1-888-327-4236 (TTY:1-800-424-9153) ; go to http://www.safercar.gov; or write to:Administrator, NHTSA, 1200 New Jersey Avenue, SE., Washington, DC,20590. You can also obtain other information about motor vehicle safety fromhttp://www.safercar.gov.
NOTE
If you live in the U.S.A., all correspondence to Mazda Motor Corporation should be forwarded to:
Mazda North American Operations7755 Irvine Center Drive Irvine, California 92618-2922or P.O. Box 19734 Irvine, CA 92623-9734Customer Assistance Center or toll free at 1 (800) 222-5500
If you live outside of the U.S.A., please contact the nearest Mazda Distributor shown (page 9-13) inthis booklet.
Customer Information
Reporting Safety Defects
9-43
8/2/2019 Mazda5 Owners Manual
http://slidepdf.com/reader/full/mazda5-owners-manual 360/375
8/2/2019 Mazda5 Owners Manual
http://slidepdf.com/reader/full/mazda5-owners-manual 361/375
Service Publications
Factory-authorized Mazda service publications are available for owners who wish to dosome of their own maintenance and repair.
When requesting any of our publications through an Authorized Mazda Dealer, refer to thechart below.
If they don't have what you need in stock, they can order it for you.
PUBLICATION ORDER NUMBER PUBLICATION DESCRIPTION
9999-95-012B-09 2009 WORKSHOP MANUAL (English)9999-MX-012B-09 2009 WORKSHOP MANUAL (Spanish)9999-95-074G-09 2009 WIRING DIAGRAM (English)9999-MX-074G-09 2009 WIRING DIAGRAM (Spanish)9999-95-005C-09 (U.S.A. only) 2009 OWNER'S MANUAL9999-EC-005C-09 (Canada only) 2009 OWNER'S MANUAL9999-PR-005C-09 (Puerto Rico, Mexico only) 2009 OWNER'S MANUAL9999-95-MODL-09 2009 SERVICE HIGHLIGHTS9999-95-NAV1-09R (U.S.A. only) 2009 NAVIGATION SYSTEM OWNER'S MANUAL9999-EC-NAV1-09R (Canada only) 2009 NAVIGATION SYSTEM OWNER'S MANUAL9999-PR-NAV1-09R (Puerto Rico Mexico only) 2009 NAVIGATION SYSTEM OWNER'S MANUAL
q WORKSHOP MANUAL:
Covers recommended maintenance and repair procedures of the drive train, body andchassis.
q WIRING DIAGRAM:
Provides electrical schematics as well as component location for the entire electricalsystem.
q OWNER'S MANUAL:
This booklet contains information regarding the proper care and operation of your vehicle.This is not a technician's manual.
q SERVICE HIGHLIGHTS:
Provides description and operation of the many systems of your Mazda.
Customer Information
Service Publications
9-45
8/2/2019 Mazda5 Owners Manual
http://slidepdf.com/reader/full/mazda5-owners-manual 362/375
8/2/2019 Mazda5 Owners Manual
http://slidepdf.com/reader/full/mazda5-owners-manual 363/375
10 Specifications
Technical information about your Mazda.
Identification Numbers ............................................................... 10-2Vehicle Information Labels ..................................................... 10-2
Specifications ............................................................................... 10-4Specifications .......................................................................... 10-4
10-1
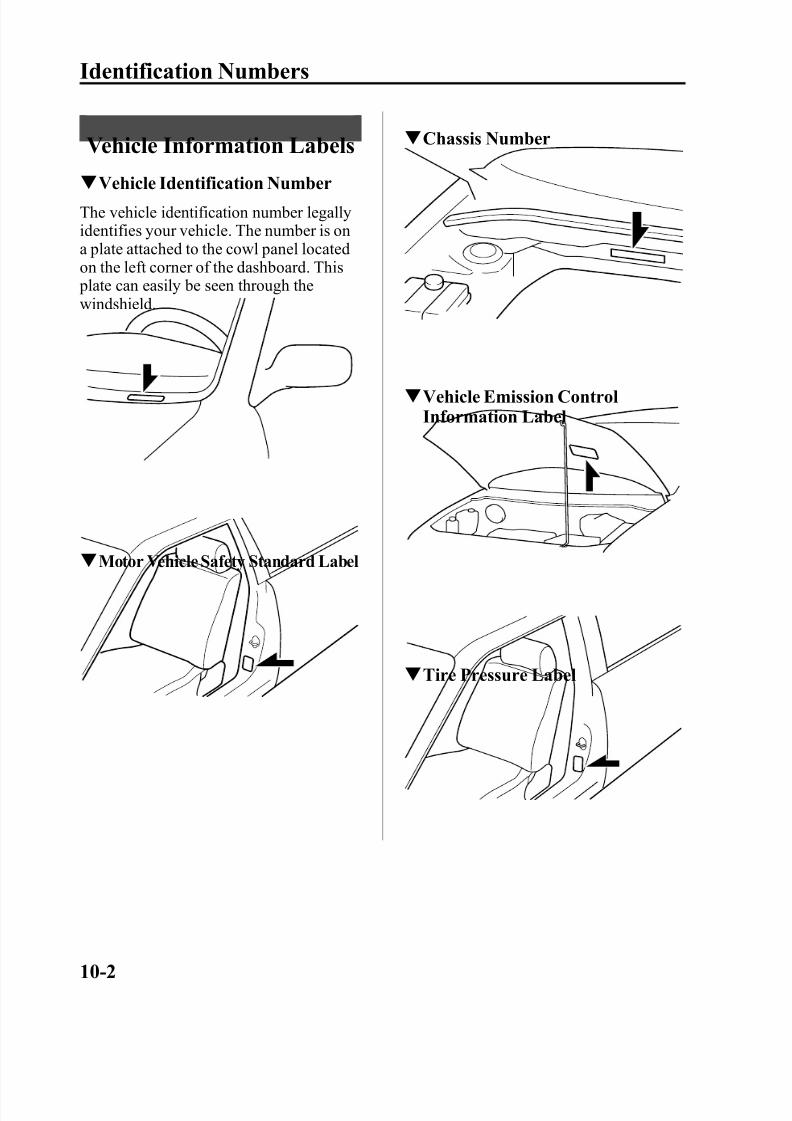
8/2/2019 Mazda5 Owners Manual
http://slidepdf.com/reader/full/mazda5-owners-manual 364/375
Vehicle Information Labels
q Vehicle Identification NumberThe vehicle identification number legallyidentifies your vehicle. The number is ona plate attached to the cowl panel locatedon the left corner of the dashboard. This plate can easily be seen through thewindshield.
q Motor Vehicle Safety Standard Label
q Chassis Number
q Vehicle Emission ControlInformation Label
q Tire Pressure Label
10-2
Identification Numbers
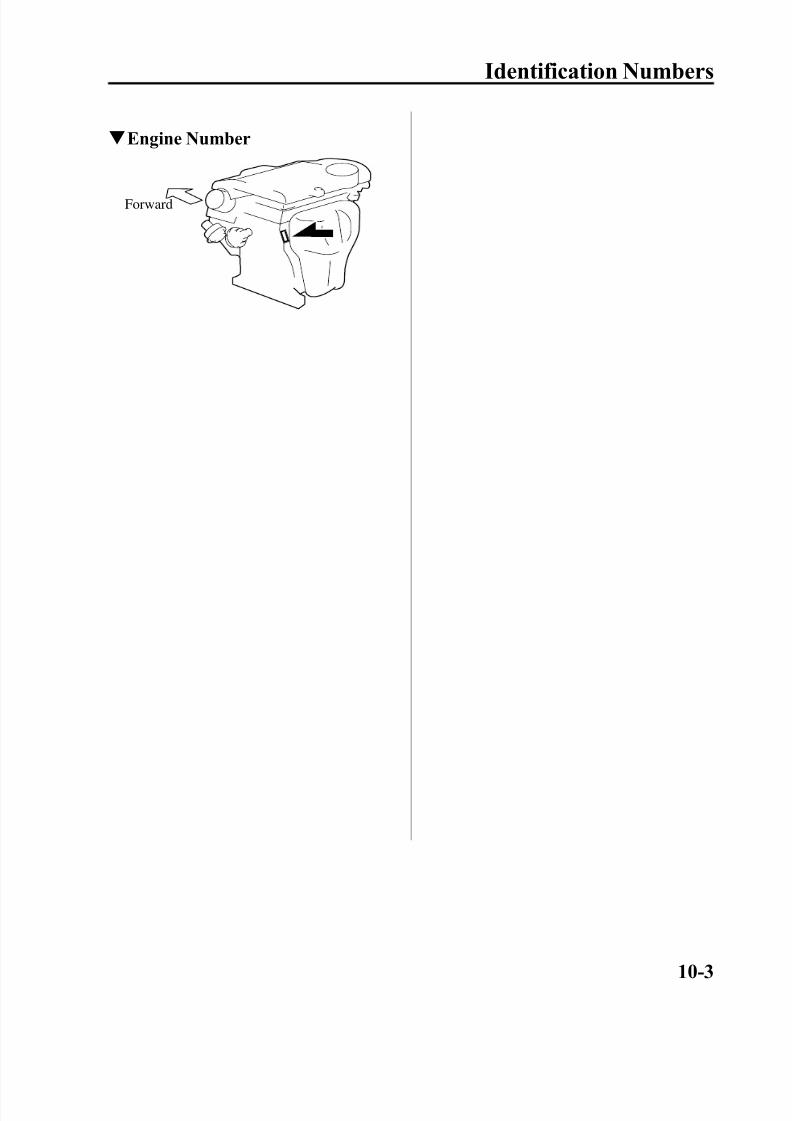
8/2/2019 Mazda5 Owners Manual
http://slidepdf.com/reader/full/mazda5-owners-manual 365/375
q Engine Number
Forward
Identification Numbers
10-3
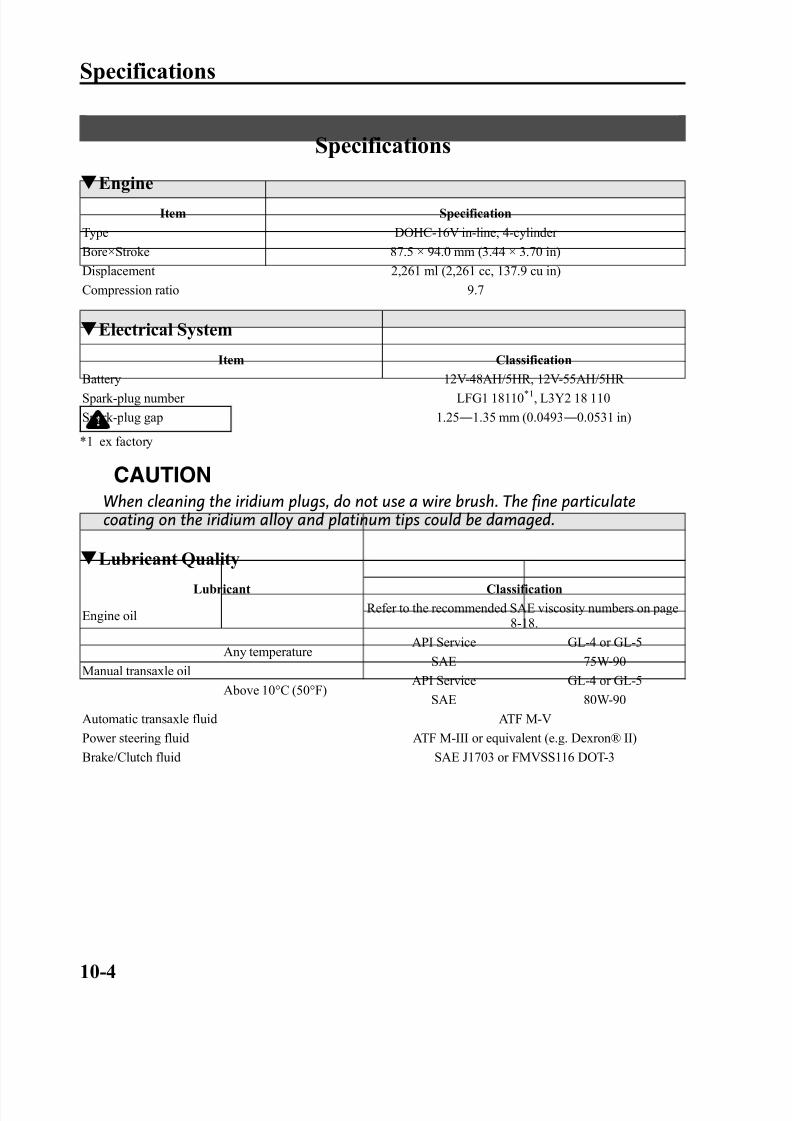
8/2/2019 Mazda5 Owners Manual
http://slidepdf.com/reader/full/mazda5-owners-manual 366/375
Specifications
q EngineItem Specification
Type DOHC-16V in-line, 4-cylinder Bore×Stroke 87.5 × 94.0 mm (3.44 × 3.70 in)Displacement 2,261 ml (2,261 cc, 137.9 cu in)Compression ratio 9.7
q Electrical System
Item ClassificationBattery 12V-48AH/5HR, 12V-55AH/5HR Spark-plug number LFG1 18110
*1, L3Y2 18 110
Spark-plug gap 1.25 ― 1.35 mm (0.0493 ― 0.0531 in)
*1 ex factory
CAUTION
When cleaning the iridium plugs, do not use a wire brush. The fine particulatecoating on the iridium alloy and platinum tips could be damaged.
q Lubricant Quality
Lubricant Classification
Engine oil Refer to the recommended SAE viscosity numbers on page8-18.
Manual transaxle oilAny temperature
API Service GL-4 or GL-5SAE 75W-90
Above 10°C (50°F)API Service GL-4 or GL-5
SAE 80W-90
Automatic transaxle fluid ATF M-VPower steering fluid ATF M-III or equivalent (e.g. Dexron® II)Brake/Clutch fluid SAE J1703 or FMVSS116 DOT-3
10-4
Specifications
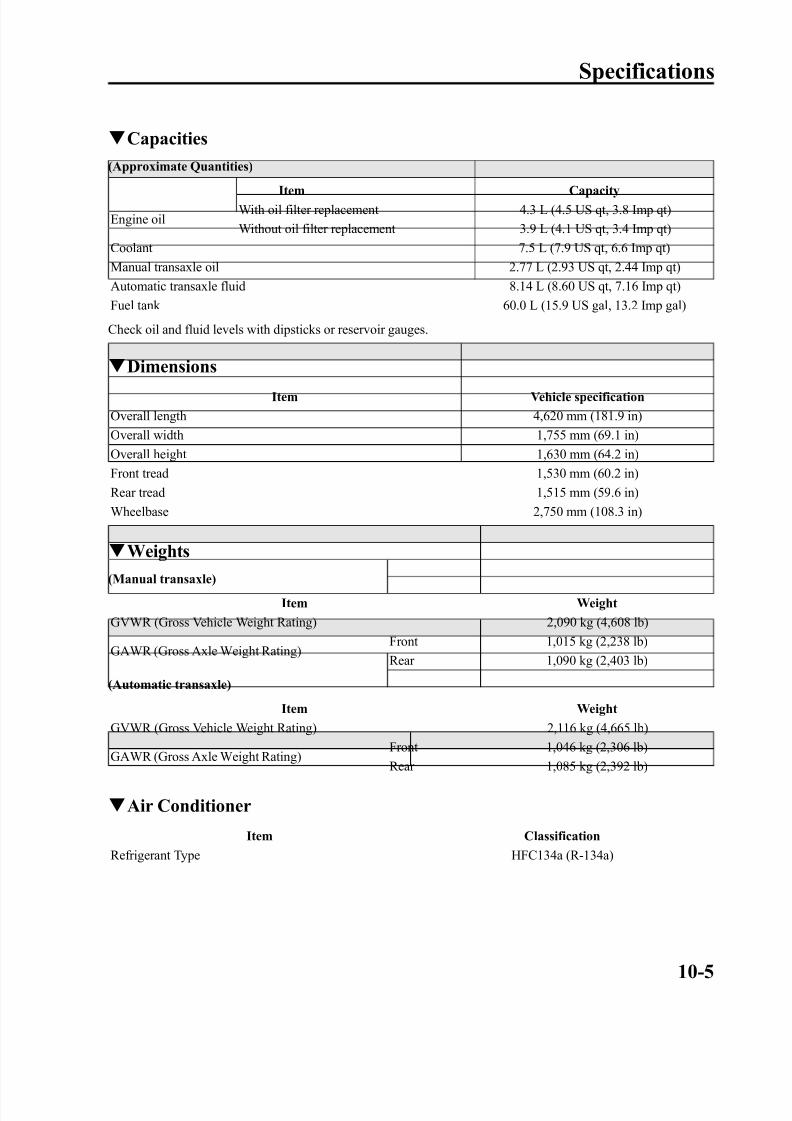
8/2/2019 Mazda5 Owners Manual
http://slidepdf.com/reader/full/mazda5-owners-manual 367/375
q Capacities(Approximate Quantities)
Item Capacity
Engine oilWith oil filter replacement 4.3 L (4.5 US qt, 3.8 Imp qt)Without oil filter replacement 3.9 L (4.1 US qt, 3.4 Imp qt)
Coolant 7.5 L (7.9 US qt, 6.6 Imp qt)Manual transaxle oil 2.77 L (2.93 US qt, 2.44 Imp qt)Automatic transaxle fluid 8.14 L (8.60 US qt, 7.16 Imp qt)Fuel tank 60.0 L (15.9 US gal, 13.2 Imp gal)
Check oil and fluid levels with dipsticks or reservoir gauges.
q DimensionsItem Vehicle specification
Overall length 4,620 mm (181.9 in)Overall width 1,755 mm (69.1 in)Overall height 1,630 mm (64.2 in)Front tread 1,530 mm (60.2 in)Rear tread 1,515 mm (59.6 in)Wheelbase 2,750 mm (108.3 in)
q Weights(Manual transaxle)
Item Weight
GVWR (Gross Vehicle Weight Rating) 2,090 kg (4,608 lb)
GAWR (Gross Axle Weight Rating)Front 1,015 kg (2,238 lb)Rear 1,090 kg (2,403 lb)
(Automatic transaxle)
Item Weight
GVWR (Gross Vehicle Weight Rating) 2,116 kg (4,665 lb)
GAWR (Gross Axle Weight Rating)Front 1,046 kg (2,306 lb)Rear 1,085 kg (2,392 lb)
q Air Conditioner
Item Classification
Refrigerant Type HFC134a (R-134a)
Specifications
10-5
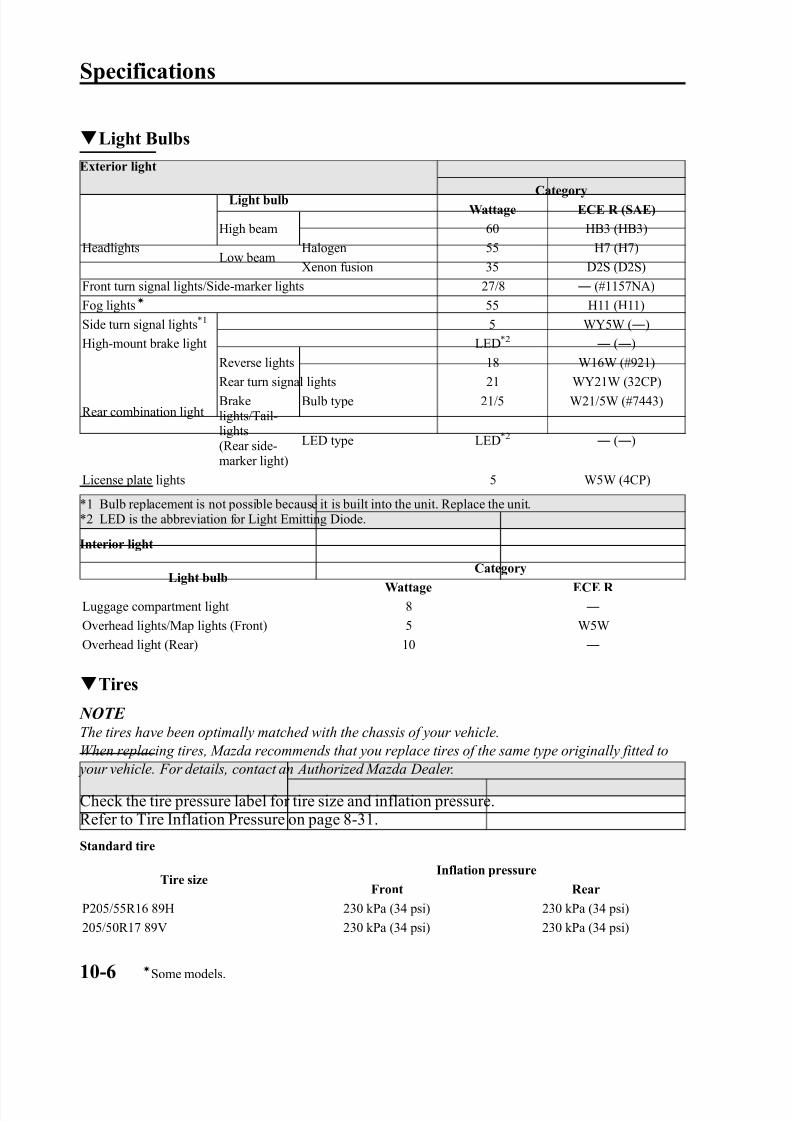
8/2/2019 Mazda5 Owners Manual
http://slidepdf.com/reader/full/mazda5-owners-manual 368/375
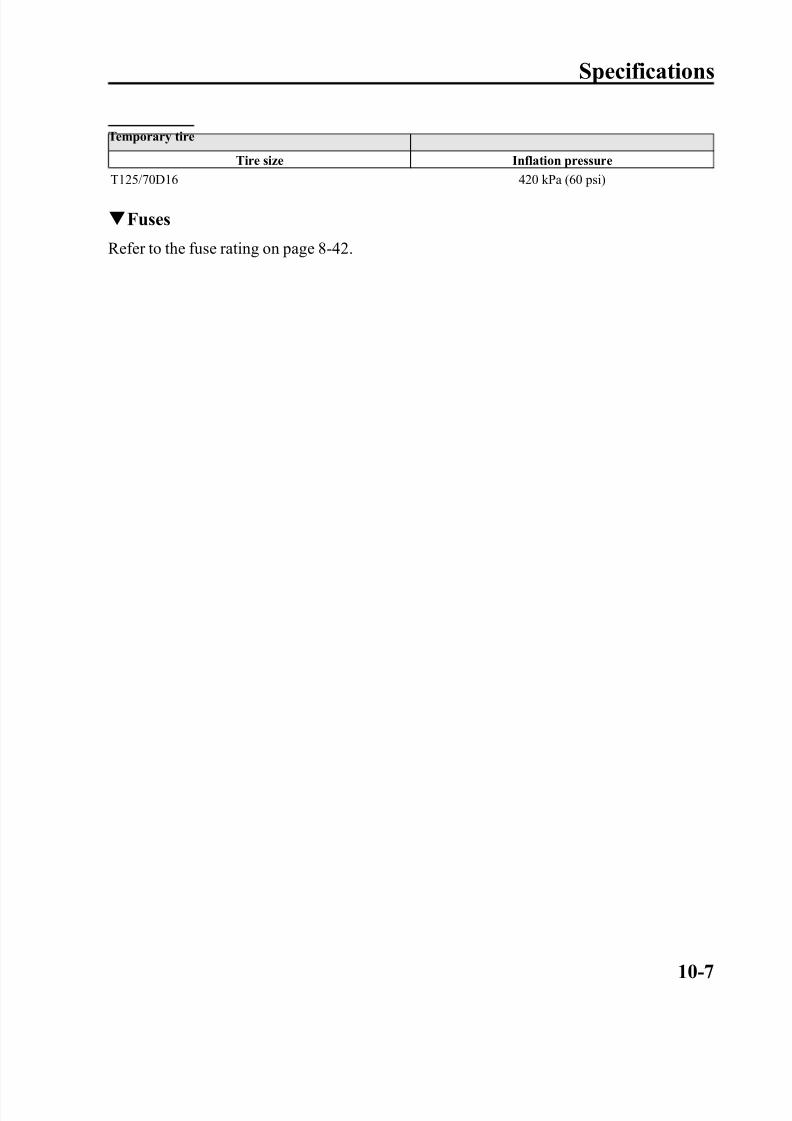
8/2/2019 Mazda5 Owners Manual
http://slidepdf.com/reader/full/mazda5-owners-manual 369/375
Temporary tire
Tire size Inflation pressure
T125/70D16 420 kPa (60 psi)
q Fuses
Refer to the fuse rating on page 8-42.
Specifications
10-7

8/2/2019 Mazda5 Owners Manual
http://slidepdf.com/reader/full/mazda5-owners-manual 370/375
10-8

8/2/2019 Mazda5 Owners Manual
http://slidepdf.com/reader/full/mazda5-owners-manual 371/375
11 Index
11-1
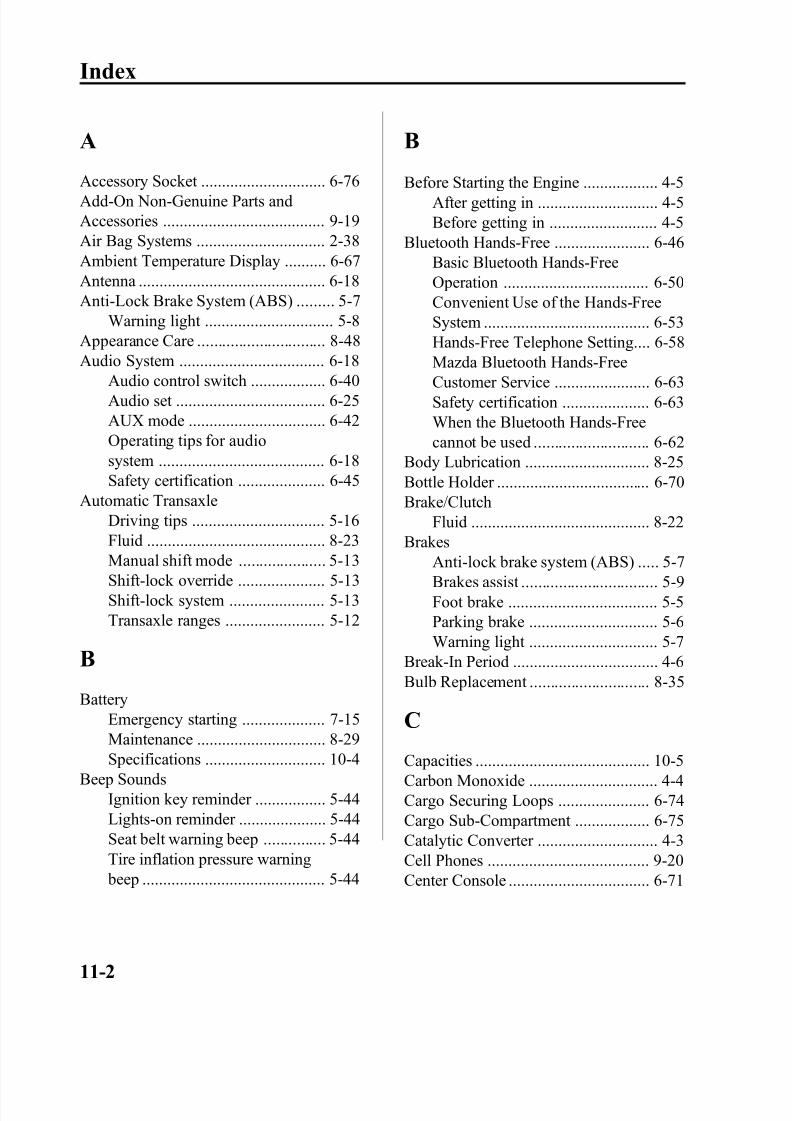
8/2/2019 Mazda5 Owners Manual
http://slidepdf.com/reader/full/mazda5-owners-manual 372/375
A
Accessory Socket .............................. 6-76Add-On Non-Genuine Parts andAccessories ....................................... 9-19Air Bag Systems ............................... 2-38Ambient Temperature Display .......... 6-67Antenna ............................................. 6-18Anti-Lock Brake System (ABS) ......... 5-7
Warning light ............................... 5-8Appearance Care ............................... 8-48
Audio System ................................... 6-18Audio control switch .................. 6-40Audio set .................................... 6-25AUX mode ................................. 6-42Operating tips for audiosystem ........................................ 6-18Safety certification ..................... 6-45
Automatic TransaxleDriving tips ................................ 5-16
Fluid ........................................... 8-23Manual shift mode ..................... 5-13Shift-lock override ..................... 5-13Shift-lock system ....................... 5-13Transaxle ranges ........................ 5-12
B
Battery
Emergency starting .................... 7-15Maintenance ............................... 8-29Specifications ............................. 10-4
Beep SoundsIgnition key reminder ................. 5-44Lights-on reminder ..................... 5-44Seat belt warning beep ............... 5-44Tire inflation pressure warning beep ............................................ 5-44
B
Before Starting the Engine .................. 4-5After getting in ............................. 4-5Before getting in .......................... 4-5
Bluetooth Hands-Free ....................... 6-46Basic Bluetooth Hands-FreeOperation ................................... 6-50Convenient Use of the Hands-FreeSystem ........................................ 6-53Hands-Free Telephone Setting.... 6-58
Mazda Bluetooth Hands-FreeCustomer Service ....................... 6-63Safety certification ..................... 6-63When the Bluetooth Hands-Freecannot be used ............................ 6-62
Body Lubrication .............................. 8-25Bottle Holder ..................................... 6-70Brake/Clutch
Fluid ........................................... 8-22
BrakesAnti-lock brake system (ABS) ..... 5-7Brakes assist ................................. 5-9Foot brake .................................... 5-5Parking brake ............................... 5-6Warning light ............................... 5-7
Break-In Period ................................... 4-6Bulb Replacement ............................. 8-35
CCapacities .......................................... 10-5Carbon Monoxide ............................... 4-4Cargo Securing Loops ...................... 6-74Cargo Sub-Compartment .................. 6-75Catalytic Converter ............................. 4-3Cell Phones ....................................... 9-20Center Console .................................. 6-71
11-2
Index
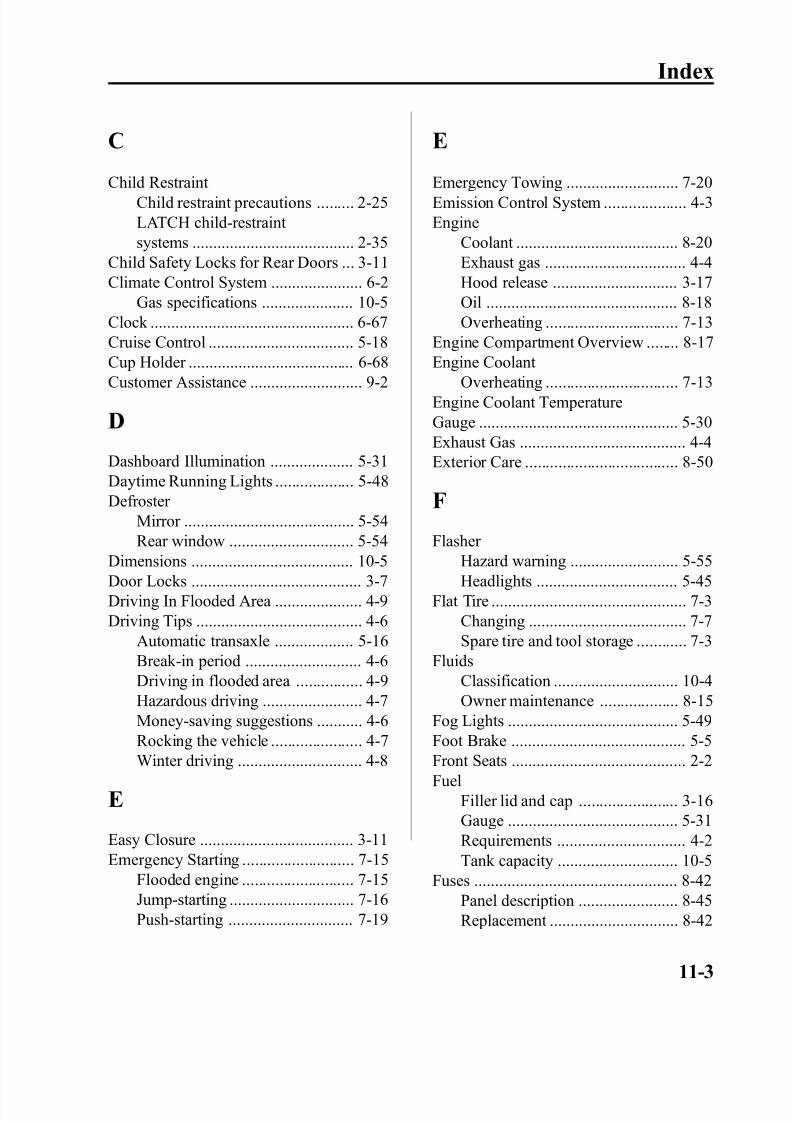
8/2/2019 Mazda5 Owners Manual
http://slidepdf.com/reader/full/mazda5-owners-manual 373/375
C
Child Restraint Child restraint precautions ......... 2-25LATCH child-restraint systems ....................................... 2-35
Child Safety Locks for Rear Doors ... 3-11Climate Control System ...................... 6-2
Gas specifications ...................... 10-5Clock ................................................. 6-67Cruise Control ................................... 5-18
Cup Holder ........................................ 6-68Customer Assistance ........................... 9-2
D
Dashboard Illumination .................... 5-31Daytime Running Lights ................... 5-48Defroster
Mirror ......................................... 5-54
Rear window .............................. 5-54Dimensions ....................................... 10-5Door Locks ......................................... 3-7Driving In Flooded Area ..................... 4-9Driving Tips ........................................ 4-6
Automatic transaxle ................... 5-16Break-in period ............................ 4-6Driving in flooded area ................ 4-9Hazardous driving ........................ 4-7
Money-saving suggestions ........... 4-6Rocking the vehicle ...................... 4-7Winter driving .............................. 4-8
E
Easy Closure ..................................... 3-11Emergency Starting ........................... 7-15
Flooded engine ........................... 7-15
Jump-starting .............................. 7-16Push-starting .............................. 7-19
E
Emergency Towing ........................... 7-20Emission Control System .................... 4-3Engine
Coolant ....................................... 8-20Exhaust gas .................................. 4-4Hood release .............................. 3-17Oil .............................................. 8-18Overheating ................................ 7-13
Engine Compartment Overview ........ 8-17
Engine Coolant Overheating ................................ 7-13
Engine Coolant TemperatureGauge ................................................ 5-30Exhaust Gas ........................................ 4-4Exterior Care ..................................... 8-50
F
Flasher Hazard warning .......................... 5-55Headlights .................................. 5-45
Flat Tire ............................................... 7-3Changing ...................................... 7-7Spare tire and tool storage ............ 7-3
FluidsClassification .............................. 10-4Owner maintenance ................... 8-15
Fog Lights ......................................... 5-49Foot Brake .......................................... 5-5Front Seats .......................................... 2-2Fuel
Filler lid and cap ........................ 3-16Gauge ......................................... 5-31Requirements ............................... 4-2Tank capacity ............................. 10-5
Fuses ................................................. 8-42
Panel description ........................ 8-45Replacement ............................... 8-42
Index
11-3
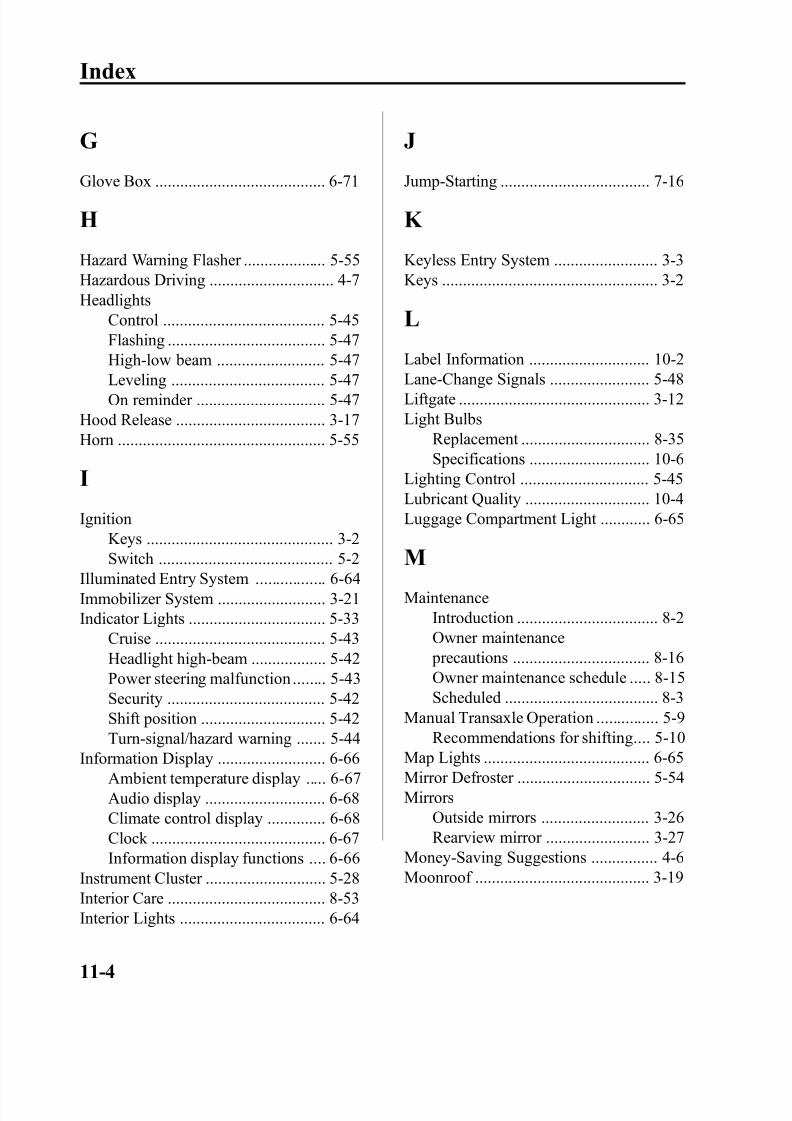
8/2/2019 Mazda5 Owners Manual
http://slidepdf.com/reader/full/mazda5-owners-manual 374/375
G
Glove Box ......................................... 6-71
H
Hazard Warning Flasher .................... 5-55Hazardous Driving .............................. 4-7Headlights
Control ....................................... 5-45Flashing ...................................... 5-47
High-low beam .......................... 5-47Leveling ..................................... 5-47On reminder ............................... 5-47
Hood Release .................................... 3-17Horn .................................................. 5-55
I
Ignition
Keys ............................................. 3-2Switch .......................................... 5-2Illuminated Entry System ................. 6-64Immobilizer System .......................... 3-21Indicator Lights ................................. 5-33
Cruise ......................................... 5-43Headlight high-beam .................. 5-42Power steering malfunction ........ 5-43Security ...................................... 5-42
Shift position .............................. 5-42Turn-signal/hazard warning ....... 5-44Information Display .......................... 6-66
Ambient temperature display ..... 6-67Audio display ............................. 6-68Climate control display .............. 6-68Clock .......................................... 6-67Information display functions .... 6-66
Instrument Cluster ............................. 5-28
Interior Care ...................................... 8-53Interior Lights ................................... 6-64
J
Jump-Starting .................................... 7-16
K
Keyless Entry System ......................... 3-3Keys .................................................... 3-2
L
Label Information ............................. 10-2Lane-Change Signals ........................ 5-48Liftgate .............................................. 3-12Light Bulbs
Replacement ............................... 8-35Specifications ............................. 10-6
Lighting Control ............................... 5-45Lubricant Quality .............................. 10-4Luggage Compartment Light ............ 6-65
M
MaintenanceIntroduction .................................. 8-2Owner maintenance precautions ................................. 8-16Owner maintenance schedule ..... 8-15Scheduled ..................................... 8-3
Manual Transaxle Operation ............... 5-9Recommendations for shifting.... 5-10Map Lights ........................................ 6-65Mirror Defroster ................................ 5-54Mirrors
Outside mirrors .......................... 3-26Rearview mirror ......................... 3-27
Money-Saving Suggestions ................ 4-6Moonroof .......................................... 3-19
11-4
Index
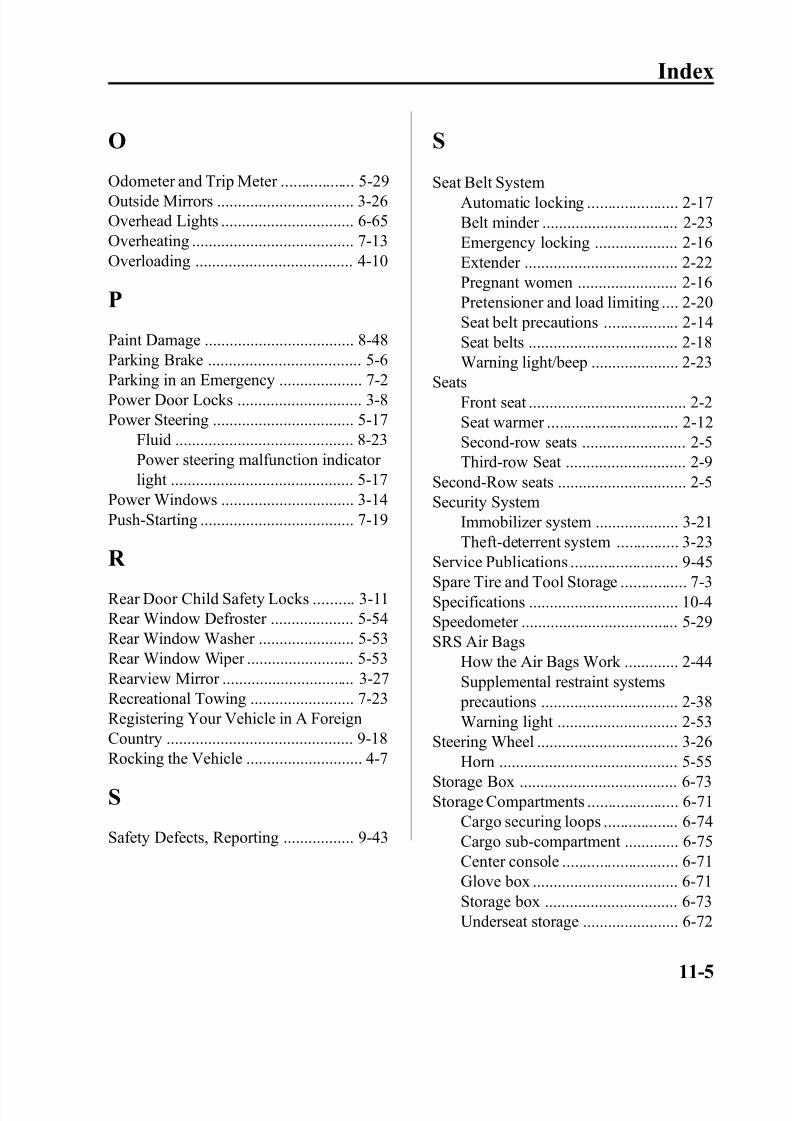
8/2/2019 Mazda5 Owners Manual
http://slidepdf.com/reader/full/mazda5-owners-manual 375/375
O
Odometer and Trip Meter .................. 5-29Outside Mirrors ................................. 3-26Overhead Lights ................................ 6-65Overheating ....................................... 7-13Overloading ...................................... 4-10
P
Paint Damage .................................... 8-48
Parking Brake ..................................... 5-6Parking in an Emergency .................... 7-2Power Door Locks .............................. 3-8Power Steering .................................. 5-17
Fluid ........................................... 8-23Power steering malfunction indicator light ............................................ 5-17
Power Windows ................................ 3-14Push-Starting ..................................... 7-19
R
Rear Door Child Safety Locks .......... 3-11Rear Window Defroster .................... 5-54Rear Window Washer ....................... 5-53Rear Window Wiper .......................... 5-53Rearview Mirror ................................ 3-27Recreational Towing ......................... 7-23
Registering Your Vehicle in A ForeignCountry ............................................. 9-18Rocking the Vehicle ............................ 4-7
S
Safety Defects, Reporting ................. 9-43
S
Seat Belt SystemAutomatic locking ...................... 2-17Belt minder ................................. 2-23Emergency locking .................... 2-16Extender ..................................... 2-22Pregnant women ........................ 2-16Pretensioner and load limiting .... 2-20Seat belt precautions .................. 2-14Seat belts .................................... 2-18
Warning light/beep ..................... 2-23Seats
Front seat ...................................... 2-2Seat warmer ................................ 2-12Second-row seats ......................... 2-5Third-row Seat ............................. 2-9
Second-Row seats ............................... 2-5Security System
Immobilizer system .................... 3-21
Theft-deterrent system ............... 3-23Service Publications .......................... 9-45Spare Tire and Tool Storage ................ 7-3Specifications .................................... 10-4Speedometer ...................................... 5-29SRS Air Bags
How the Air Bags Work ............. 2-44Supplemental restraint systems precautions ................................. 2-38
Warning light ............................. 2-53Steering Wheel .................................. 3-26
Horn ........................................... 5-55Storage Box ...................................... 6-73Storage Compartments ...................... 6-71
Cargo securing loops .................. 6-74Cargo sub-compartment ............. 6-75
Index