Embed Size (px)
Citation preview
1 of 20
McAfee SIEM Alarms
Setting up and Managing Alarms in McAfee ESM 10.x
Introduction
McAfee SIEM provides the ability to send alarms on a multitude of conditions. These alarms allow for users to be notified in near real time of things that happen on the network. In return for triggering an alarm, there are many actions that can be taken when an alarm is triggered. This portion of the McAfee SIEM Best Practices Guide will help you understand what alarms can do for you and your environment, explain the different options that are available with the device, and describes the basic setup of Alarms. At the end of this section you should understand a basic Alarm Setup, and understand the options that are available to you in the Alarms.
What does it do?
Alarms can be set up to watch for:
• Single Events • Correlated Events • Deviations from Baseline • Device Failures • Device Status Changes • FIPS Failures • Field Matches • HA Failures • Internal Event Matches • Specified Event Rate
The Actions of these alarms can:
• Log Events • Show Visual Alerts
2 of 20
• Create Cases • Update Watchlist • Send Messages • Generate reports • Execute remote commands • Function with ePO, and even execute remote commands stored on remote locations.
What doesn’t it do?
Scope, exclusions, procedural limitations, and so on.
Alarms are not meant to replace the human element. They are meant to work with the user to aid in understanding important events on the network and more. Alarms cannot replace a qualified security person.
Configuration
Prerequisites
The following is needed prior to setting up Alarms
• Email must be set up under ESM Properties, Email Setup in order to send email notifications.
• There are three preinstalled sound files. Additional sound files must be uploaded in order to play a custom sound notification. These can be uploaded under the “Settings” tab under the ESM Properties, Alarms, Settings tab
• SMS must be configured in order to send SMS messages using Alarms. This can be configured under ESM Properties, Alarms, Settings tab, Recipients SMS.
• SNMP must be configured in order to send alarm notifications via SNMP. This can be configured under ESM Properties, Alarms, Settings tab, Recipients, SNMP. SNMP also requires a system profile for SNMP traps under the Profile Manager (ESM Properties, Profile Management.)
• Syslog notifications can be configured for Alarms as well under the ESM Properties, Alarms, Settings, Recipients, Syslog. The proper configuration for Syslog alarms to be sent must be configured in such a way that the device receiving the syslog alarm understands the message sent. Please consult with your administrators for proper setup.
Settings
• Alarms have the ability to perform some other actions as well. We will discuss the following in the Basic Alarm Setup: Generating Reports, Executing Remote Commands, Utilizing Remedy, Assigning tags with ePO and ePO Real Time Actions and finally Blacklist.
3 of 20
Settings
In this section we'll review how to navigate through the alarms section, and how alarms are used.
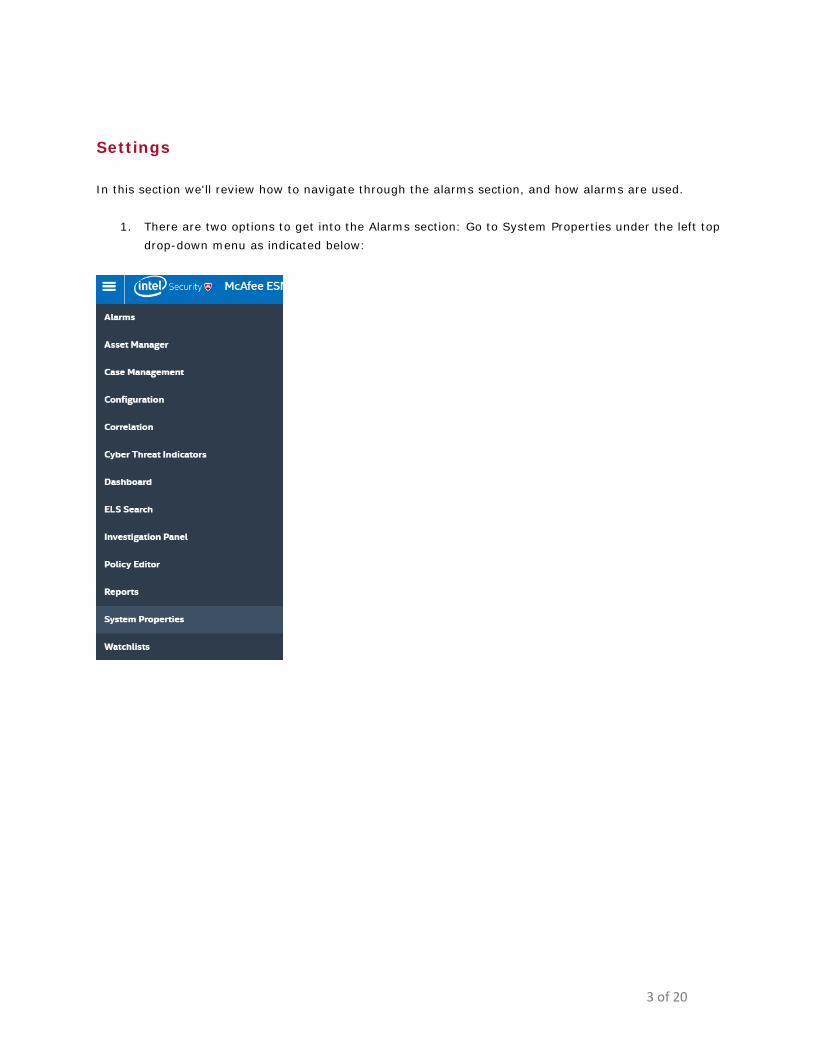
1. There are two options to get into the Alarms section: Go to System Properties under the left top drop-down menu as indicated below:
4 of 20
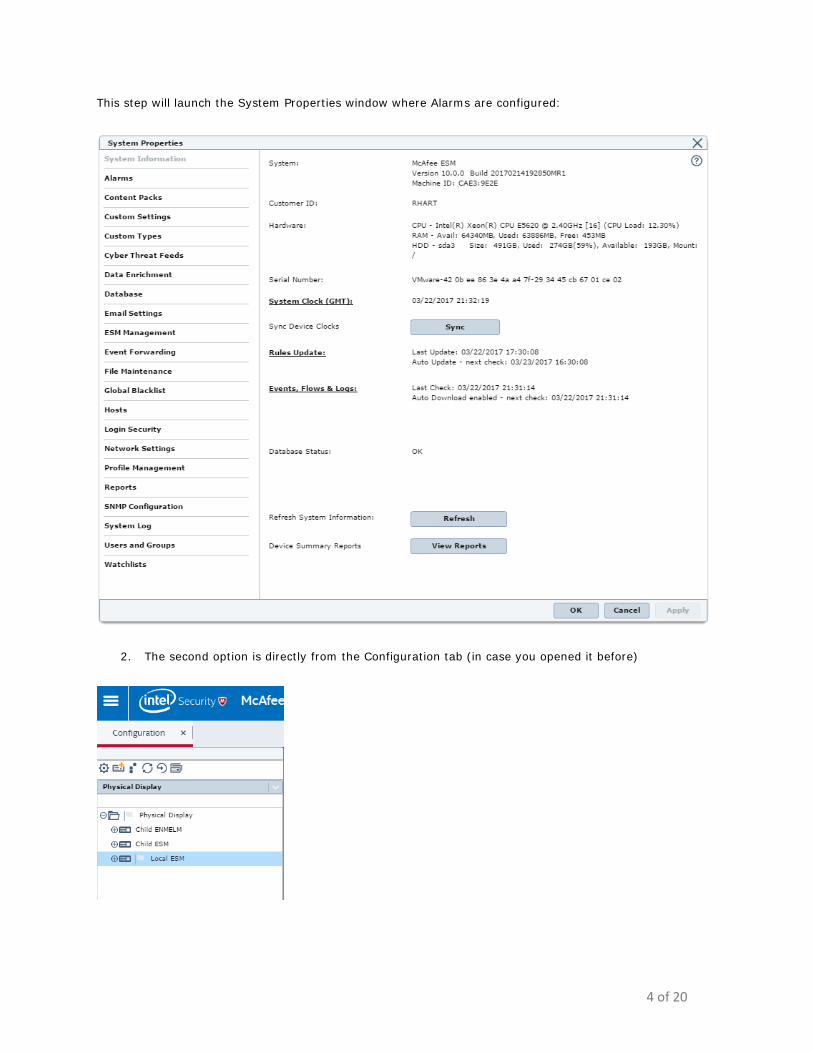
This step will launch the System Properties window where Alarms are configured:
2. The second option is directly from the Configuration tab (in case you opened it before)
5 of 20
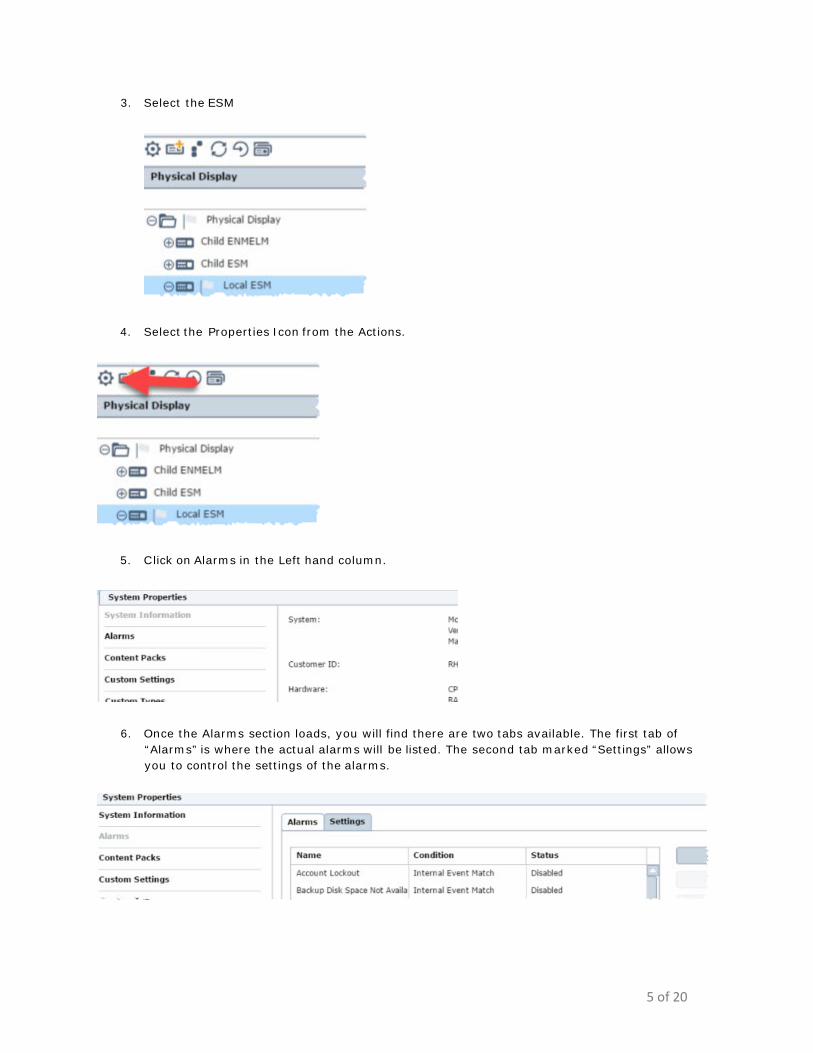
3. Select the ESM
4. Select the Properties Icon from the Actions.
5. C lick on Alarms in the Left hand column.
6. Once the Alarms section loads, you will find there are two tabs available. The first tab of “Alarms” is where the actual alarms will be listed. The second tab marked “Settings” allows you to control the settings of the alarms.
6 of 20
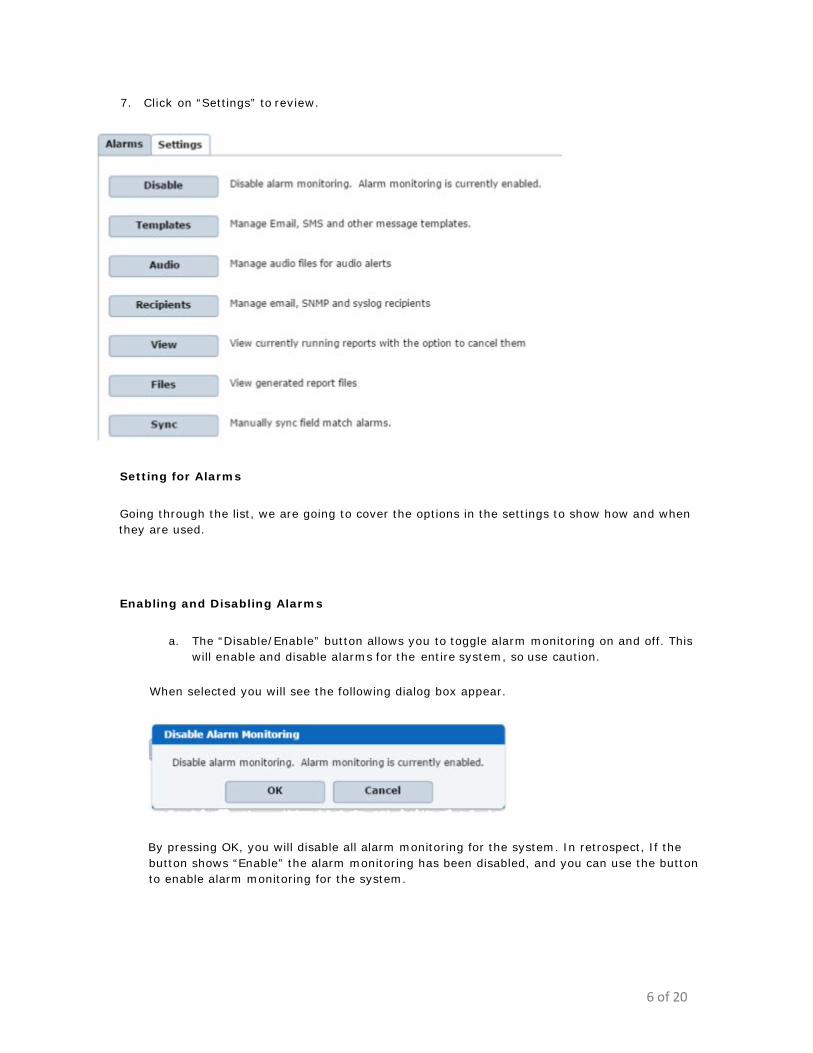
7. Click on “Settings” to review.
Setting for Alarms
Going through the list, we are going to cover the options in the settings to show how and when they are used.
Enabling and Disabling Alarms
a. The “Disable/Enable” button allows you to toggle alarm monitoring on and off. This will enable and disable alarms for the entire system, so use caution.
When selected you will see the following dialog box appear.
By pressing OK, you will disable all alarm monitoring for the system. In retrospect, If the button shows “Enable” the alarm monitoring has been disabled, and you can use the button to enable alarm monitoring for the system.
7 of 20
Templates
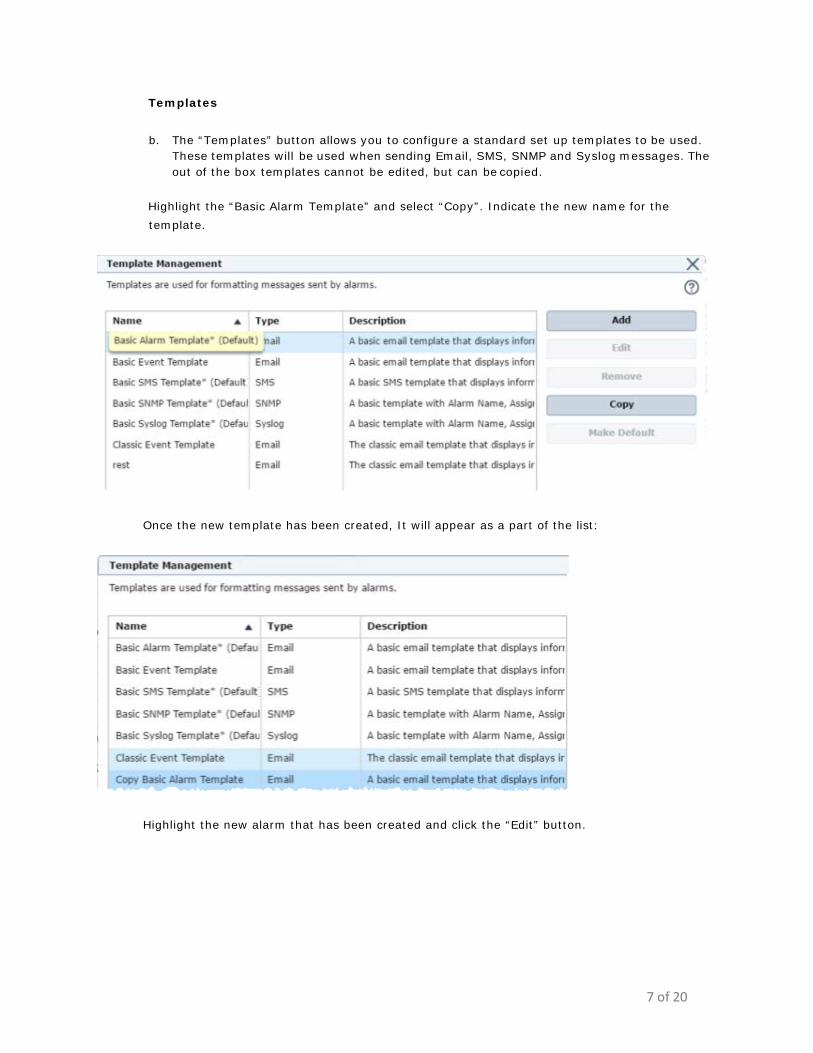
b. The “Templates” button allows you to configure a standard set up templates to be used. These templates will be used when sending Email, SMS, SNMP and Syslog messages. The out of the box templates cannot be edited, but can be copied.
Highlight the “Basic Alarm Template” and select “Copy”. Indicate the new name for the template.
Once the new template has been created, It will appear as a part of the list:
Highlight the new alarm that has been created and click the “Edit” button.
8 of 20
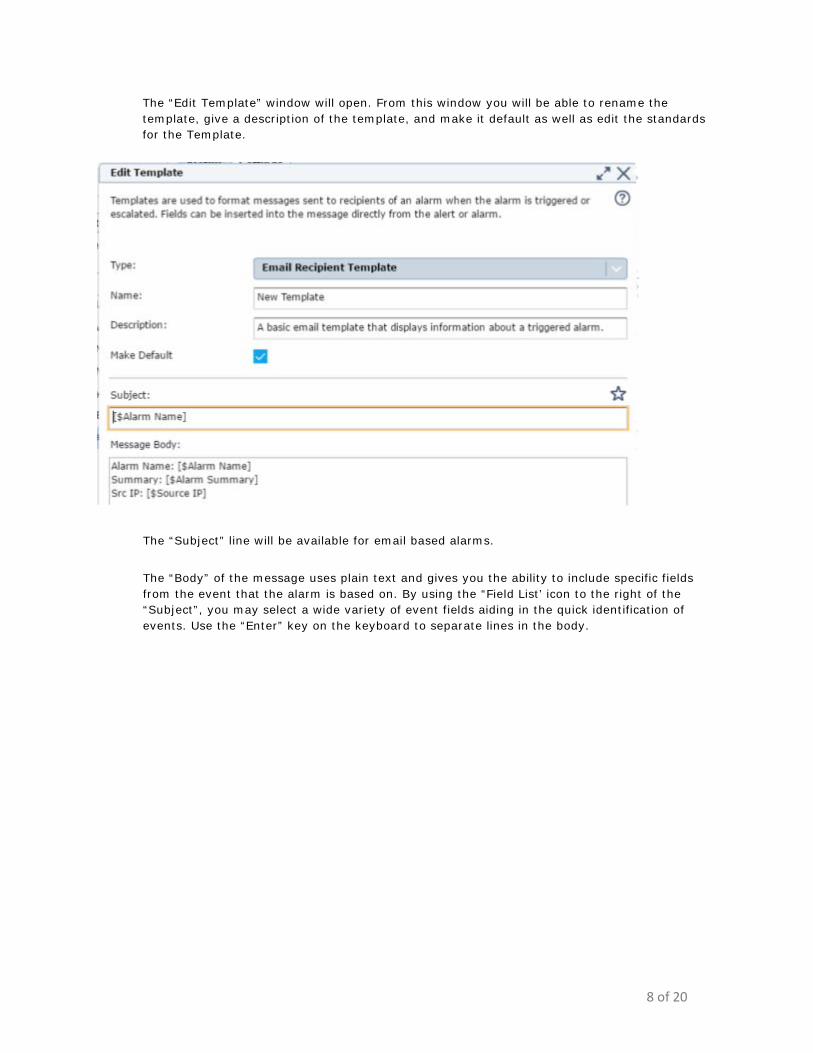
The “Edit Template” window will open. From this window you will be able to rename the template, give a description of the template, and make it default as well as edit the standards for the Template.
The “Subject” line will be available for email based alarms.
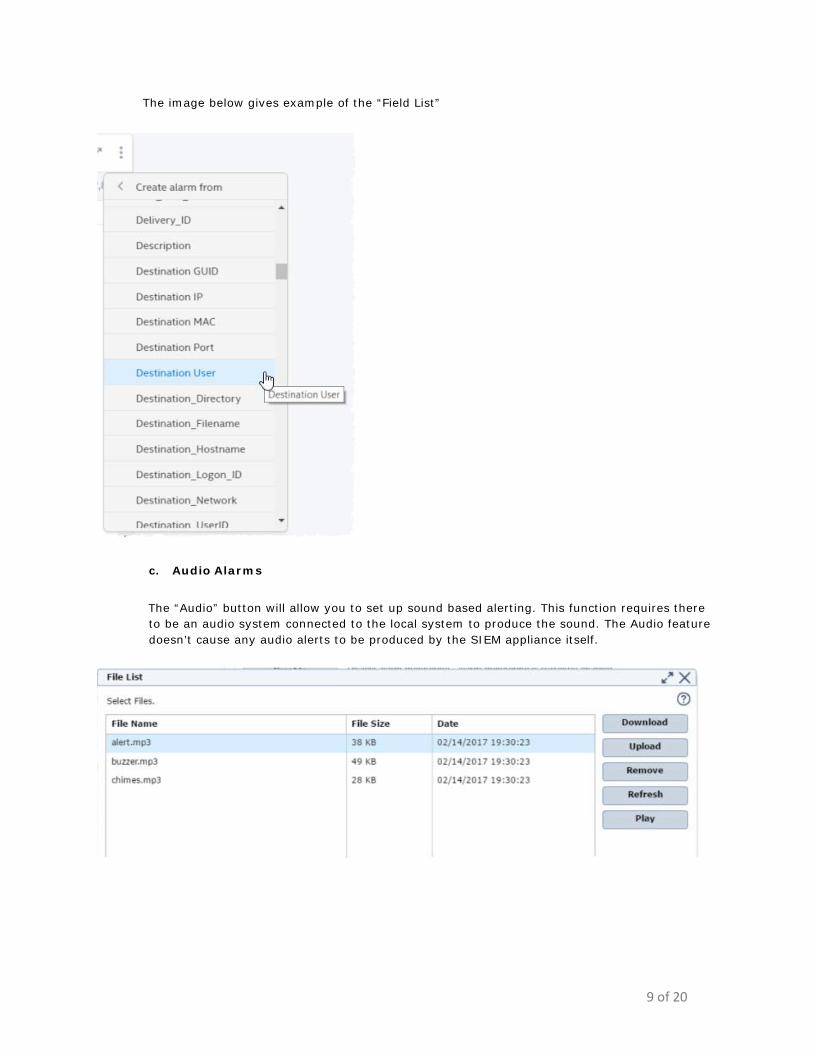
The “Body” of the message uses plain text and gives you the ability to include specific fields from the event that the alarm is based on. By using the “Field List’ icon to the right of the “Subject”, you may select a wide variety of event fields aiding in the quick identification of events. Use the “Enter” key on the keyboard to separate lines in the body.
9 of 20
The image below gives example of the “Field List”
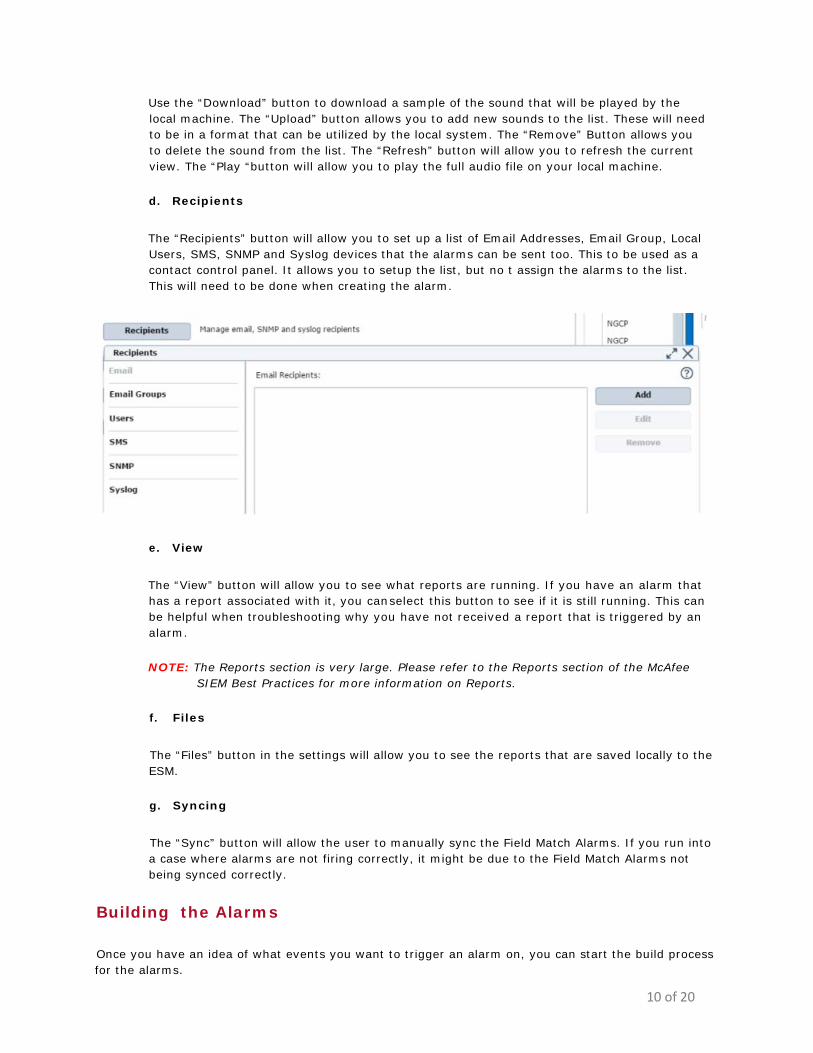
c. Audio Alarms
The “Audio” button will allow you to set up sound based alerting. This function requires there to be an audio system connected to the local system to produce the sound. The Audio feature doesn’t cause any audio alerts to be produced by the SIEM appliance itself.
10 of 20
Use the “Download” button to download a sample of the sound that will be played by the local machine. The “Upload” button allows you to add new sounds to the list. These will need to be in a format that can be utilized by the local system. The “Remove” Button allows you to delete the sound from the list. The “Refresh” button will allow you to refresh the current view. The “Play “button will allow you to play the full audio file on your local machine.
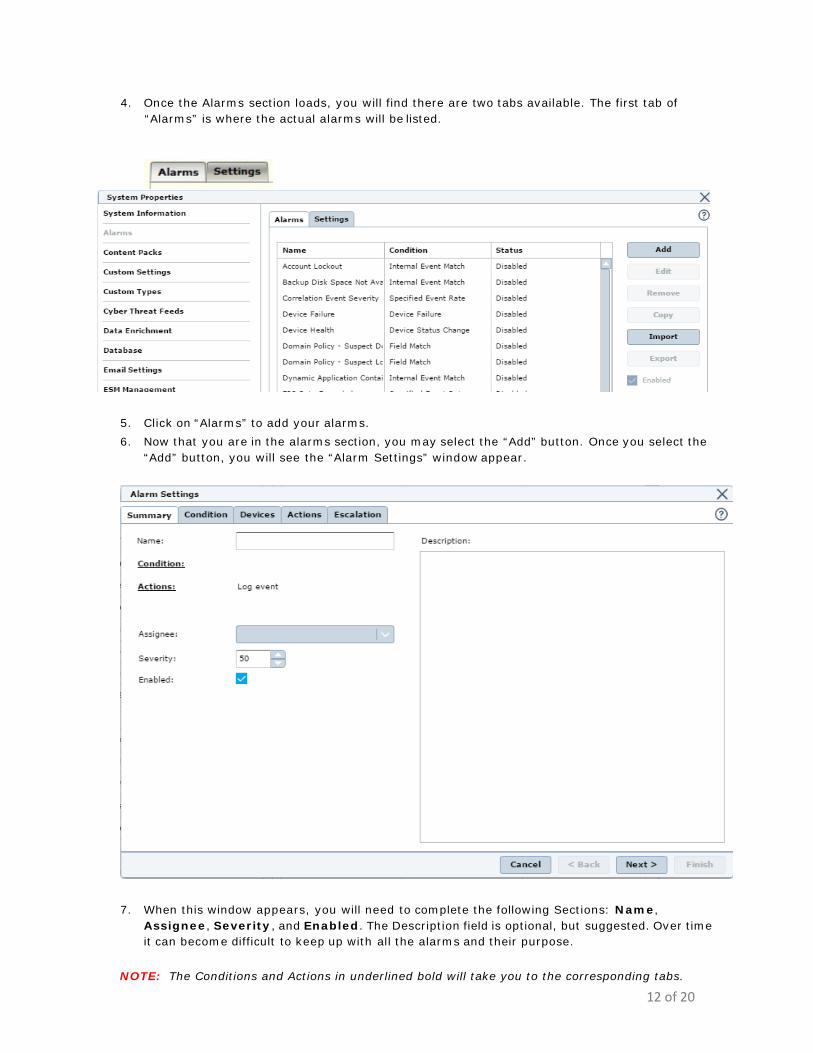
d. Recipients
The “Recipients” button will allow you to set up a list of Email Addresses, Email Group, Local Users, SMS, SNMP and Syslog devices that the alarms can be sent too. This to be used as a contact control panel. It allows you to setup the list, but no t assign the alarms to the list. This will need to be done when creating the alarm.
e. View
The “View” button will allow you to see what reports are running. If you have an alarm that has a report associated with it, you can select this button to see if it is still running. This can be helpful when troubleshooting why you have not received a report that is triggered by an alarm.
NOTE: The Reports section is very large. Please refer to the Reports section of the McAfee SIEM Best Practices for more information on Reports.
f. Files
The “Files” button in the settings will allow you to see the reports that are saved locally to the ESM.
g. Syncing
The “Sync” button will allow the user to manually sync the Field Match Alarms. If you run into a case where alarms are not firing correctly, it might be due to the Field Match Alarms not being synced correctly.
Building the Alarms
Once you have an idea of what events you want to trigger an alarm on, you can start the build process for the alarms.

11 of 20
Return to the Alarms Setting
1. Select the ESM
2. Select the Properties Icon from the Actions.
3. C lick on Alarms in the Left hand column.
12 of 20
4. Once the Alarms section loads, you will find there are two tabs available. The first tab of “Alarms” is where the actual alarms will be listed.
5. Click on “Alarms” to add your alarms. 6. Now that you are in the alarms section, you may select the “Add” button. Once you select the
“Add” button, you will see the “Alarm Settings” window appear.
7. When this window appears, you will need to complete the following Sections: Name, Assignee, Severity , and Enabled. The Description field is optional, but suggested. Over time it can become difficult to keep up with all the alarms and their purpose.
NOTE: The Conditions and Actions in underlined bold will take you to the corresponding tabs.
13 of 20
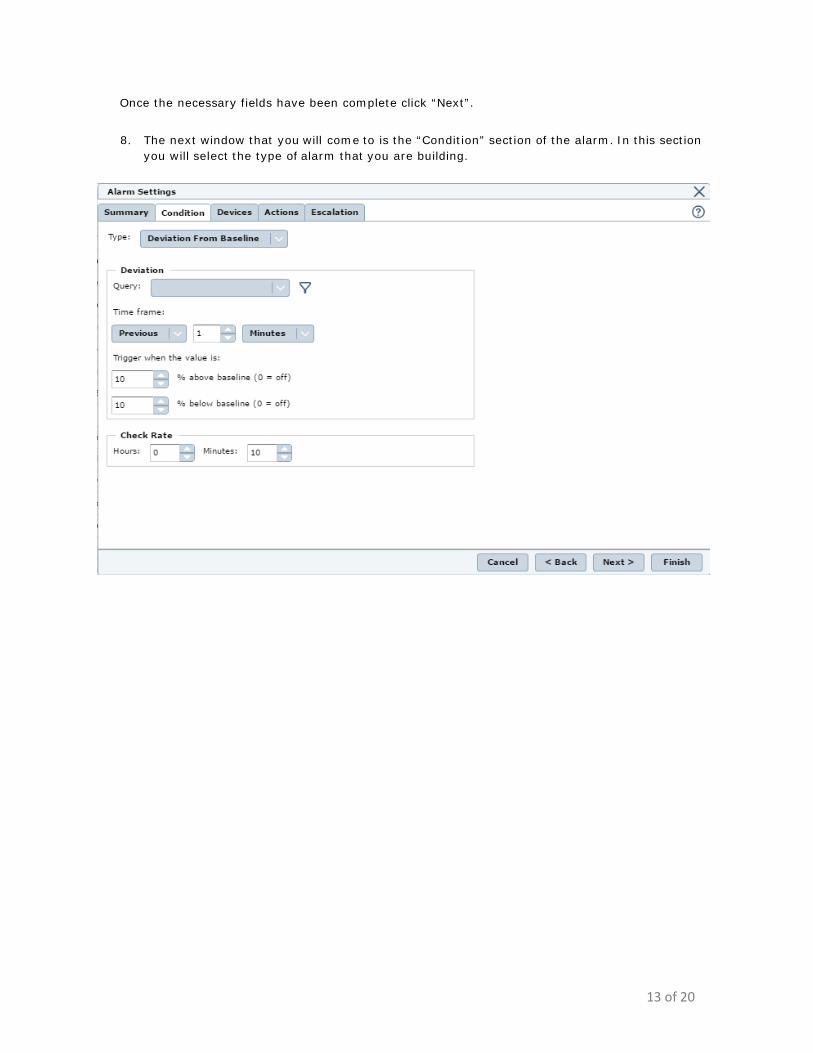
Once the necessary fields have been complete click “Next”.
8. The next window that you will come to is the “Condition” section of the alarm. In this section you will select the type of alarm that you are building.
14 of 20
In this section you will be selecting the “Type” of alarm that is being configured. The type will be based on your needs.
The following Alarms are available:
• Deviation from Baseline – allows you to set an alarm that will trigger if a “Query” sees a change in a “Field” of a user defined percentage over a user defined amount of time. Hence, it is Deviating from a Baseline Average/Total
• Device Failure – will notify user/users if a device has been offline for a user defined amount of time.
• Device Status Change – sends an alarm trigger if the Health Monitor Service on the SIEM creates an event for specified event types over a specified amount to time.
• FIPS Failure – will send an alarm based on any FIPS failure over a specified amount of time.
• Field Match – New for 9.4, it allows for an alarm to trigger when Multiple fields are matches inside a user defined AND/OR statements. Works similarly to correlation.
• HA Failure – will send an alarm if any HA device sends a Failure event. • Internal Event Match – allows the user to setup an alarm to trigger based on an events
individual field match. It also has the ability to alarm when a value doesn’t match as well (Less used). Watchlist may also be used in this system as well. This is the most common type of alarm setup as it can be matched on a Signature ID.
• Specified Event Rate – allows the user to setup an alarm if a specified event rate is reached over a user defined amount of time on single or multiple devices.
9. Once you have selected the prerequisites for the alarms trigger, you will need to assign it to the devices. Select the “Devices” tab at the top of the window.
15 of 20
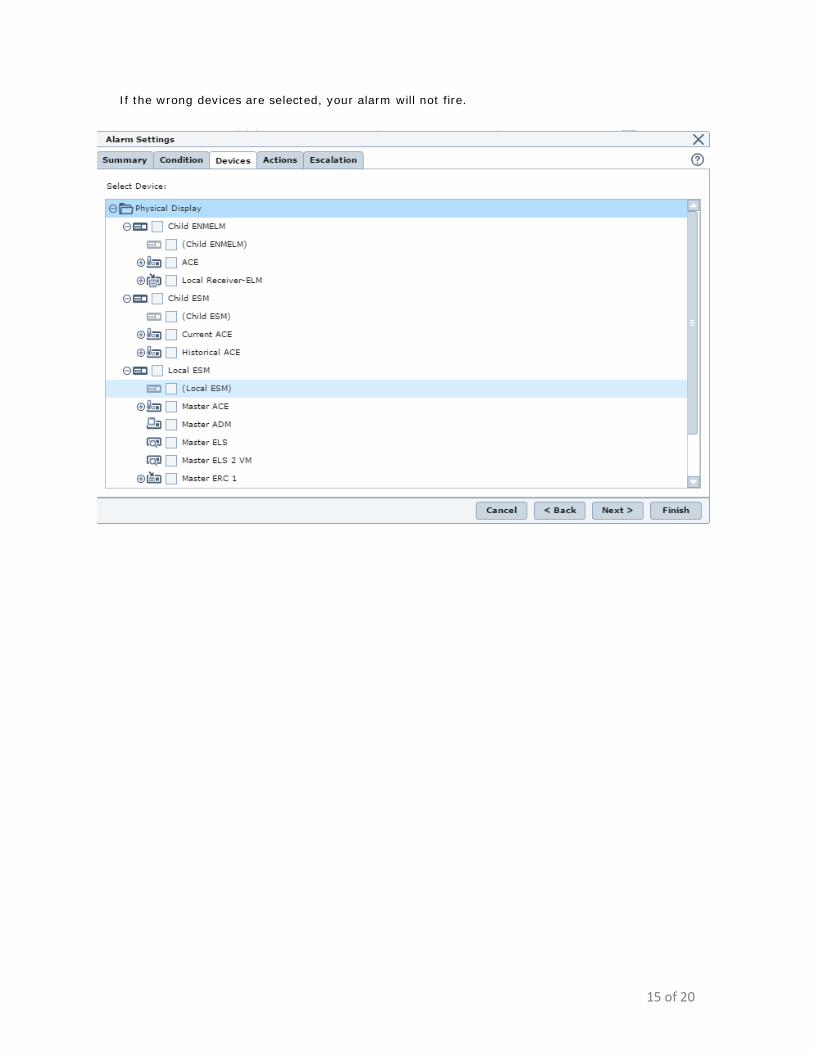
If the wrong devices are selected, your alarm will not fire.
e 16 of 20
Place a check mark next to the Devices that you want to attribute the alarm too. The “ + “ sign next to a device will allow you to assign the alarm to sub devices. ( i.e. Data Sources)
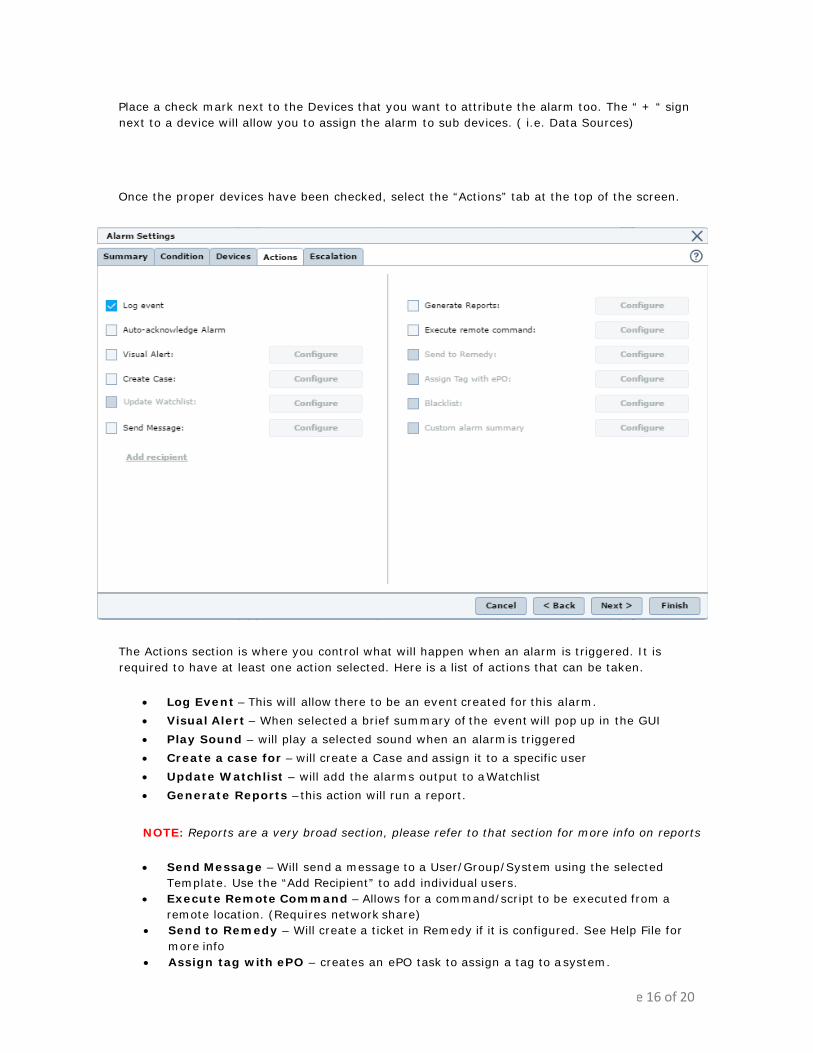
Once the proper devices have been checked, select the “Actions” tab at the top of the screen.
The Actions section is where you control what will happen when an alarm is triggered. It is required to have at least one action selected. Here is a list of actions that can be taken.
• Log Event – This will allow there to be an event created for this alarm. • Visual Alert – When selected a brief summary of the event will pop up in the GUI • Play Sound – will play a selected sound when an alarm is triggered • Create a case for – will create a Case and assign it to a specific user • Update Watchlist – will add the alarms output to a Watchlist • Generate Reports – this action will run a report.
NOTE: Reports are a very broad section, please refer to that section for more info on reports
• Send Message – Will send a message to a User/Group/System using the selected Template. Use the “Add Recipient” to add individual users.
• Execute Remote Command – Allows for a command/script to be executed from a remote location. (Requires network share)
• Send to Remedy – Will create a ticket in Remedy if it is configured. See Help File for more info
• Assign tag with ePO – creates an ePO task to assign a tag to a system.
e 17 of 20
• Real Time for ePO – Allows you to create a task in Real Time for ePO (Requires Real Time for ePO)
• Black List – Adds a system/Systems to a blacklist in the SIEM
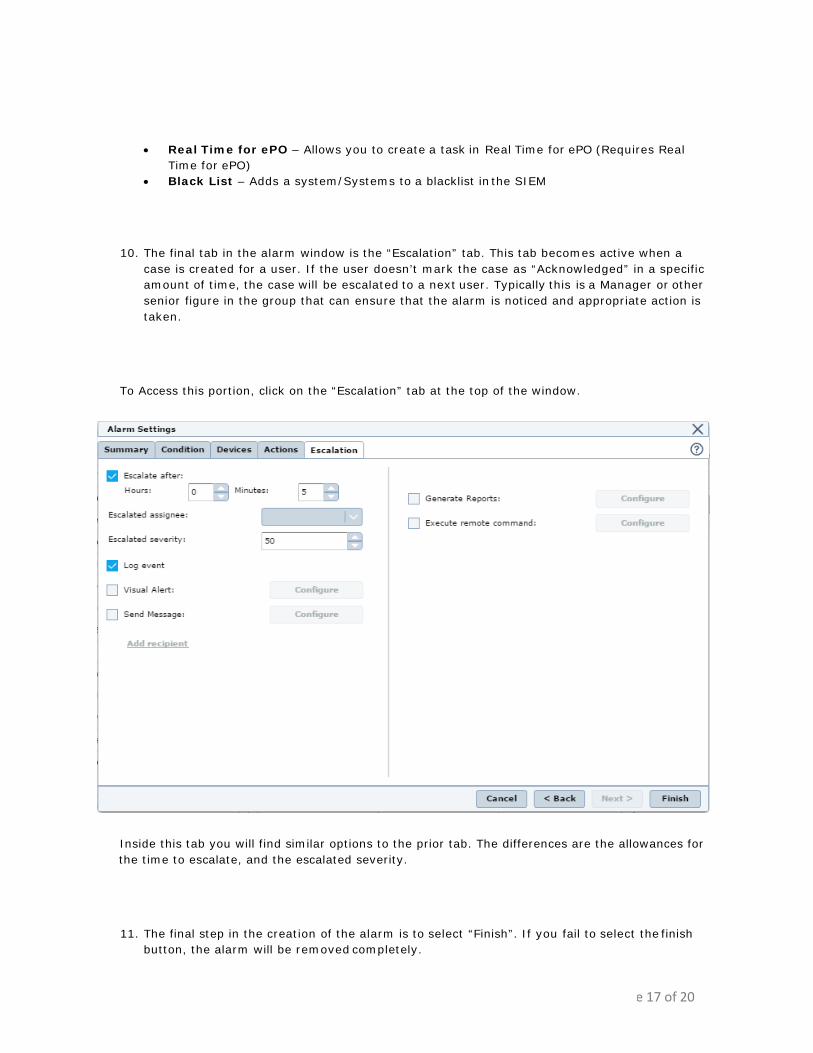
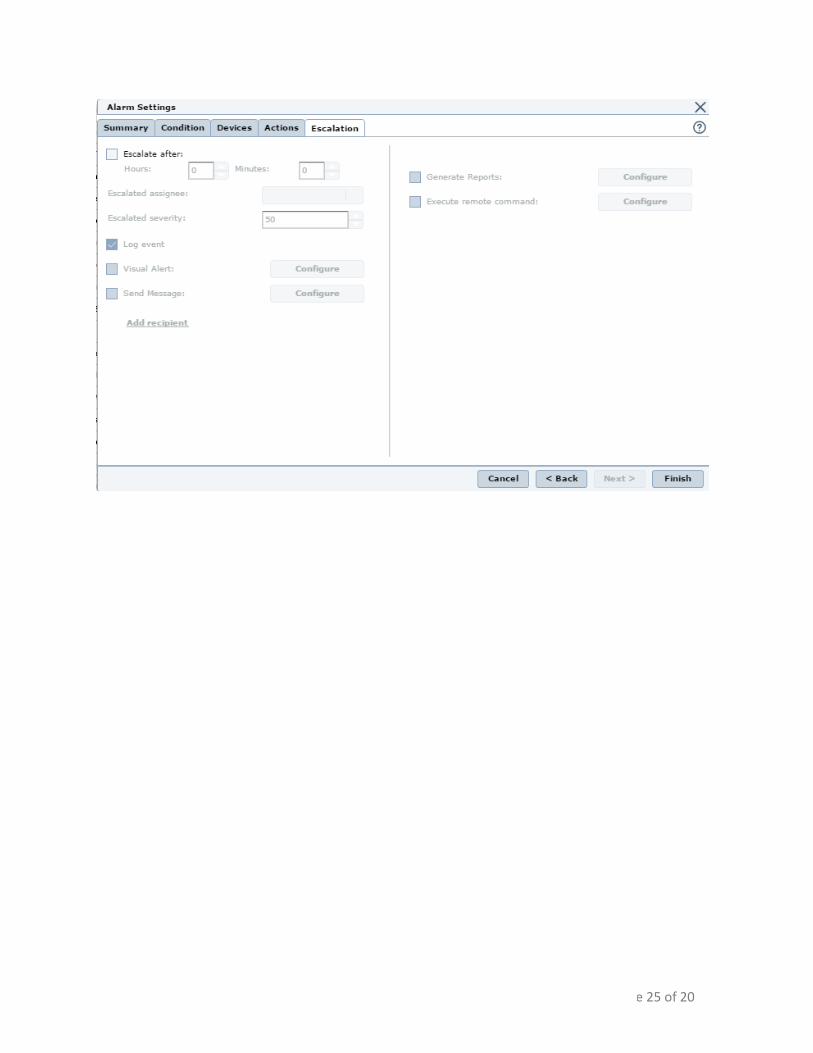
10. The final tab in the alarm window is the “Escalation” tab. This tab becomes active when a case is created for a user. If the user doesn’t mark the case as “Acknowledged” in a specific amount of time, the case will be escalated to a next user. Typically this is a Manager or other senior figure in the group that can ensure that the alarm is noticed and appropriate action is taken.
To Access this portion, click on the “Escalation” tab at the top of the window.
Inside this tab you will find similar options to the prior tab. The differences are the allowances for the time to escalate, and the escalated severity.
11. The final step in the creation of the alarm is to select “Finish”. If you fail to select the finish button, the alarm will be removed completely.
e 18 of 20
12. If for any reason you need to make changes to the alarm, you can simply highlight the alarm from the main alarm screen (ESM, Properties, Alarms) and select the “Edit” button. This will take you back to the Summary tab in the alarm settings window.
Triggered Alarms View
The Triggered Alarms View gives users quick access to what alarms have been triggered quickly and from one screen. Additional Filters will allow to narrow the scope of alarms to aid in finding a specific alarm event.
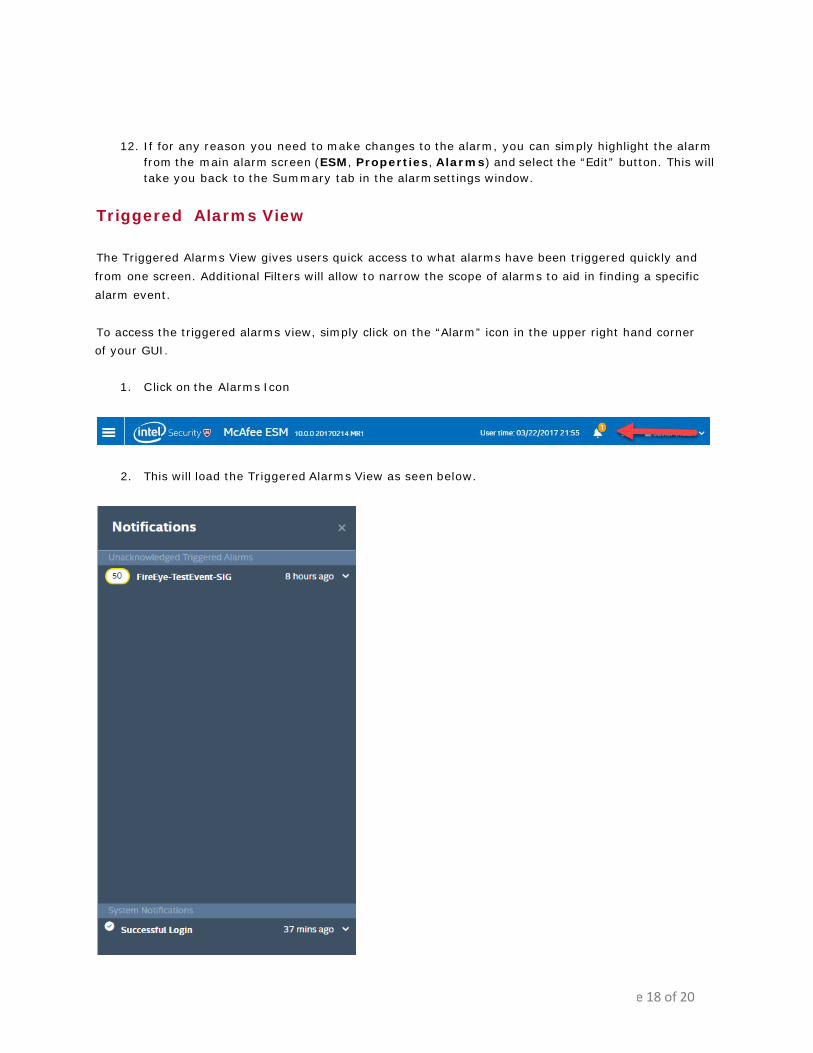
To access the triggered alarms view, simply click on the “Alarm” icon in the upper right hand corner of your GUI.
1. C lick on the Alarms Icon
2. This will load the Triggered Alarms View as seen below.
e 19 of 20
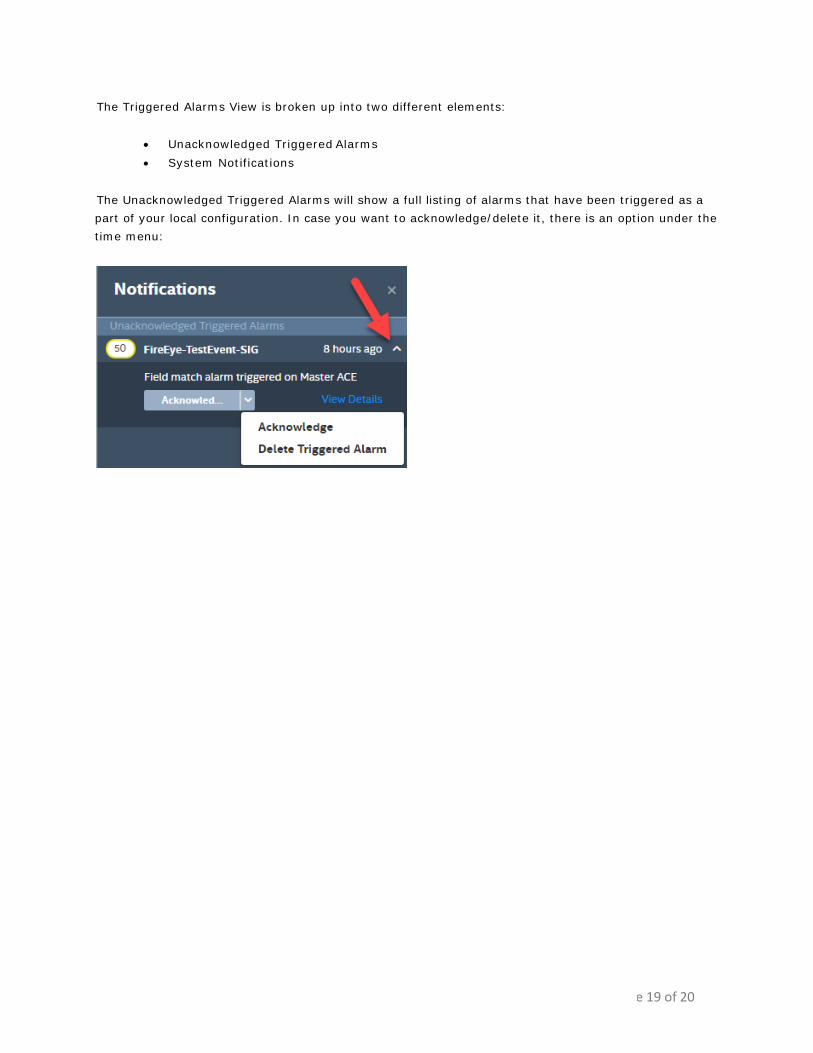
The Triggered Alarms View is broken up into two different elements:
• Unacknowledged Triggered Alarms • System Notifications
The Unacknowledged Triggered Alarms will show a full listing of alarms that have been triggered as a part of your local configuration. In case you want to acknowledge/delete it, there is an option under the time menu:
e 20 of 20
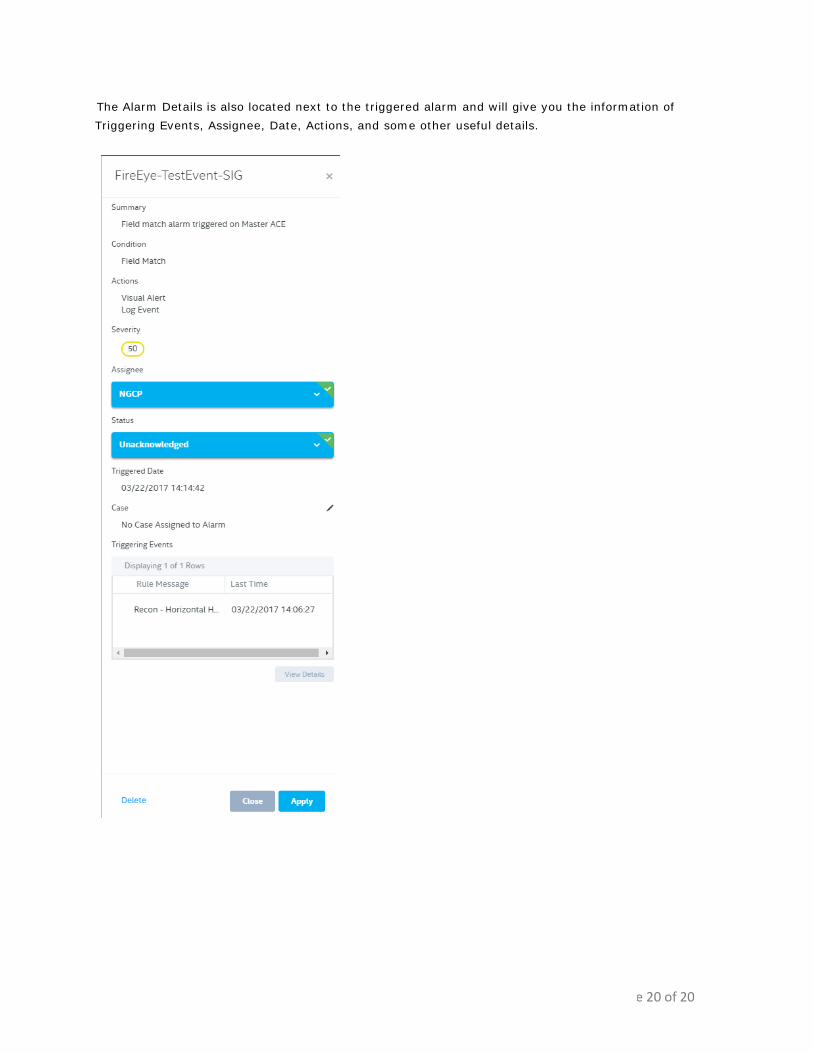
The Alarm Details is also located next to the triggered alarm and will give you the information of Triggering Events, Assignee, Date, Actions, and some other useful details.
e 21 of 20
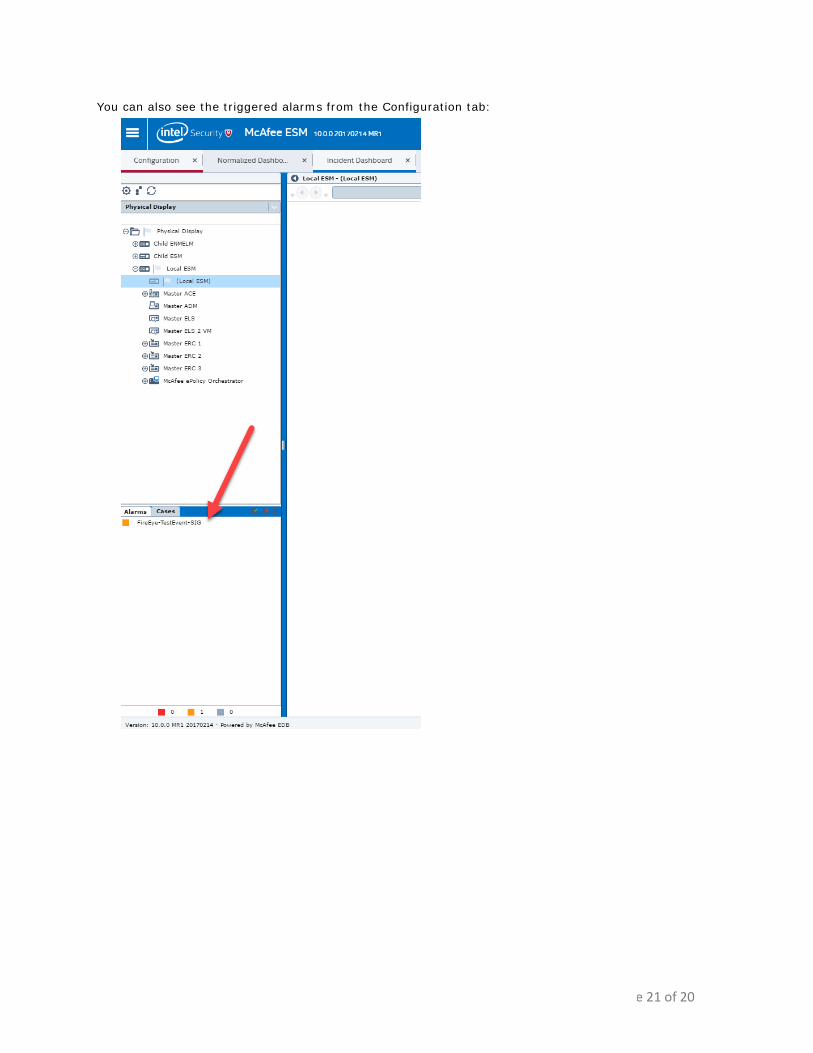
You can also see the triggered alarms from the Configuration tab:
e 22 of 20
Definitions Alarm – A notification that is sent to a user/system to acknowledge that a specified event is happening.
Settings – A set of options that are user defined that aid in the global control of the alarms.
Templates – A set of settings that can be defined for managing the standards for data sent when an alarm is produced.
Recipients – Allows for a predefined list of users/systems that can be setup to receive alarms.
View – Allows you to see the currently running reports with the option to cancel them.
Files – generated report files. These are created when a report is saved as a file locally on the ESM.
Sync – gives the user the ability to manually sync the field match alarms.
Check Rate – This is the user defined amount of time that an alarm will view data over.
Maximum Condition Trigger Frequency – Length of time between when alarms are
triggered. Field – This is an actual field of the Data Base.
HA – Stands for High Availability
Watchlist – a set of values as matched by a user defined variables.
Event Count – A specified number of events
Devices – SIEM Devices or Data Sources
Visual Alert – An alert that is viewed on the users monitor
Case – An task that is setup for a user based on an alarm trigger
Remote Command – A script, program or simple command that is stored on a remote file share.
Action – A set of events that should be taken when an alarm is triggered .
Escalation – If an “Action” is not taken in a specified amount of time, the Alarm is assigned to another user.

e 23 of 20
Updates
Always consult your release notes for the current version to ensure that you are aware of any new updates to the alarms. As alarms are a very important part of the McAfee SIEM, it is extremely important to read them prior to every update of the device.
Examples
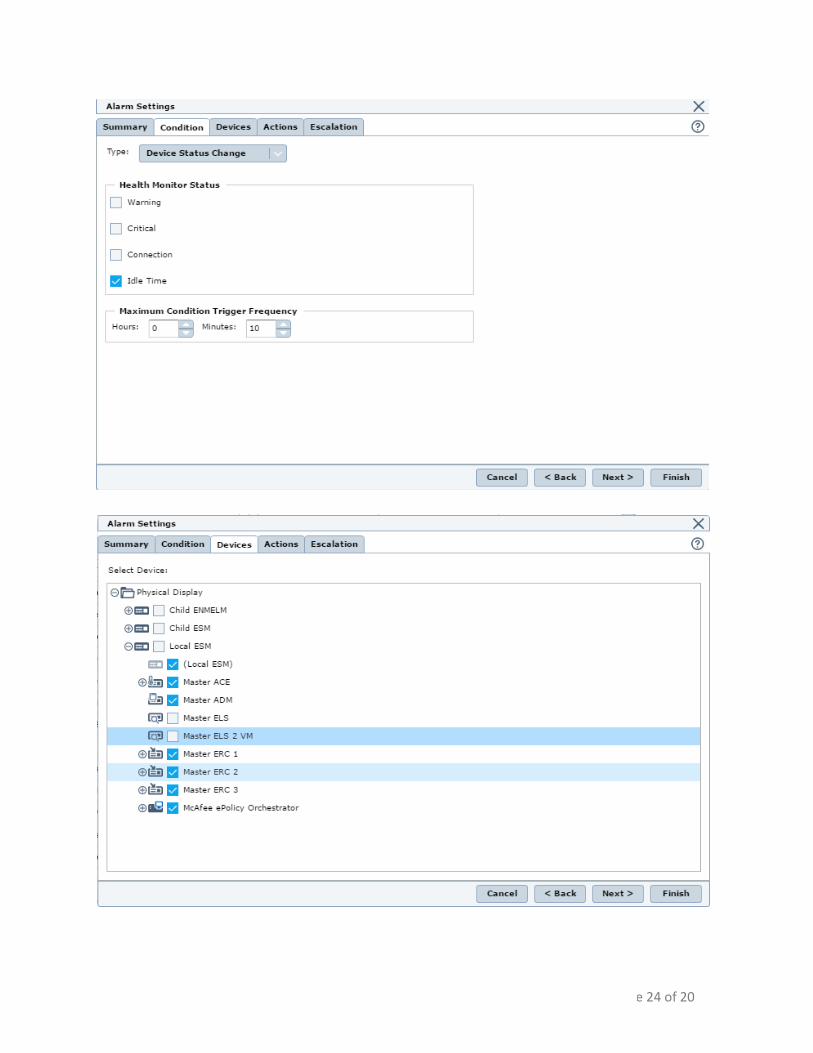
Example 1 – Here is an example of an “Inactivity Alarm” for all devices on the SIEM except the ELS.
This alarm is setup to fire a visual alarm for the specific user of “NGCP” with no escalation path as there is not a case created.
The alarm is set to create an event with a severity of 50 and will have an event trigger of 10 min.
NOTE: Inactivity events only trigger once, so there would only be one alarm triggered. If this were an event that triggered continuously, a new alarm would be sent every 10 minutes
e 24 of 20
e 25 of 20
20 of 20
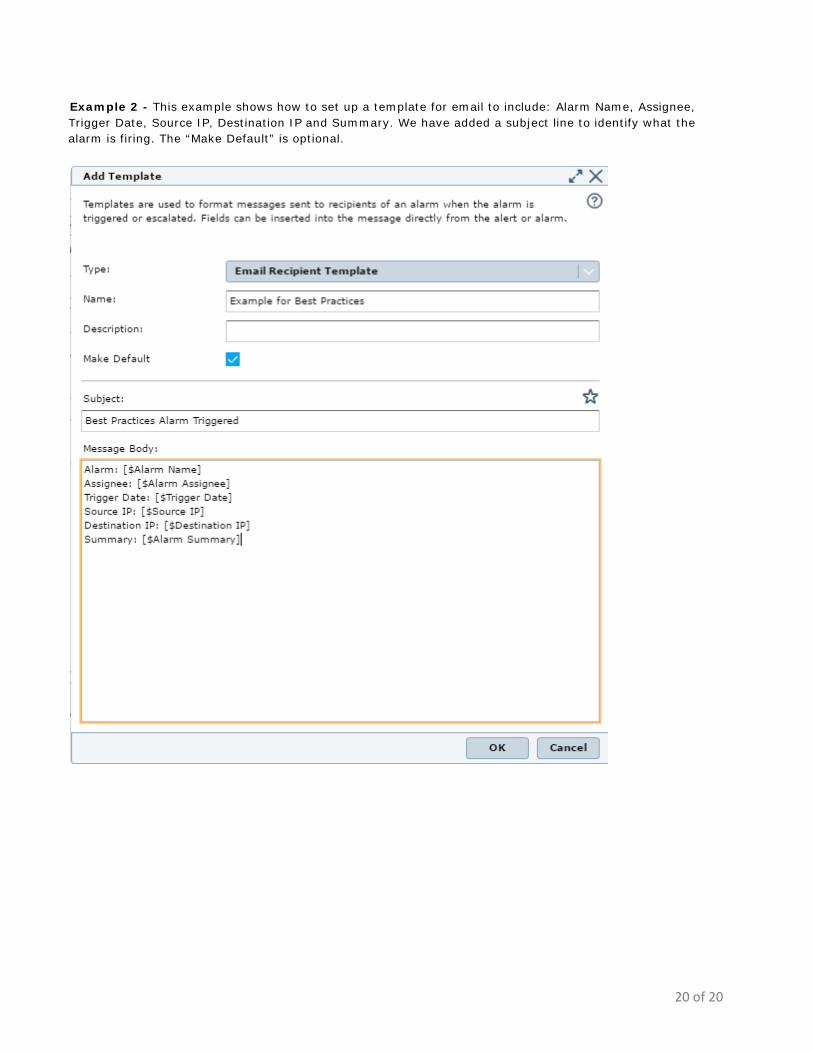
Example 2 - This example shows how to set up a template for email to include: Alarm Name, Assignee, Trigger Date, Source IP, Destination IP and Summary. We have added a subject line to identify what the alarm is firing. The “Make Default” is optional.
20 of 20
Common Questions How do I limit the amount of alarms that I am being sent?
A. Use the “Maximum Condition Trigger Frequency to set how often the alarm can trigger.
How do I setup an alarm for a specific Signature ID?
A. Use the “Internal Event Match” under the condition tab. Set the Field to Signature ID and enter the actual Signature ID in the Values box .
How do I alter what information is sent when an Alarm sends an Email?
A. Select the ESM, Properties, Alarms, Settings tab, Templates. In the Body section, label the info being sent and use the Field List to add the fields required.
Why am I not receiving any alarms?
A. Check to ensure that the Alarm in Enabled. B. Check to ensure that any recipients are setup correctly. C. Check to ensure that Email is setup and functioning. D. Check to ensure that the User is setup correctly.
Why can't I setup an alarm for multiple signature ID’s?
A. Alarms are meant for only one Signature ID. You will want to setup a Correlation Rule and use the Signature ID of the Correlation Rule in the Alarm Setup.
Why am I not receiving my reports from my alarms?
Check the following:
A. The report will run on its own. B. The report is not getting caught up by your email server due to extension or size. C. Try saving the report to the local ESM to ensure it is getting produced D. Refer to the Reports Best Practices for more info.
20 of 20
Conclusion
After reading this guide, you should be able to set up alarms for any event that happens on your SIEM, and set up Templates to send all info needed to any system that is compatible. Alarms can be a very useful tool for your environment, or a nuisance. It is recommended that you experiment with your alarms, to find the right fit for you. With correct setup and maintenance, your work load can be reduced and duplicate work avoided thus aiding to your return on investment.
Additional Resources KB77549 – Rules / Signature IDs in alarms generated by McAfee SIEM
KB79181 - SIEM alarm email fails to include packet data.
Release Notes for multiple versions of SIEM. OS
For assistance:
Training Courses - email: [email protected]
Professional Services email: [email protected]
SIEM Community - website: https://community.mcafee.com/community/business/siem