Embed Size (px)
Citation preview

MCC-SVU01A
§Ÿà¡◊Õ°“√„™âß“π
April 2013
ModelsCooling OnlyMCC 518 2BMCC 524 2BMCC 530 2BMCC 536 2BMCC 542 2BMCC 548 2B
‡§√◊ËÕߪ√—∫Õ“°“»·¬° à«π·∫∫´àÕπ„πΩÑ“‡æ¥“π18,000 - 48,000 Btu/h MCC Series 50 Hz
√ÿà𧓠‡´Á∑
MCC-SVU01A_Th.indd 1MCC-SVU01A_Th.indd 1 4/17/13 4:49:25 PM4/17/13 4:49:25 PM

MCC-SVU01A2
¢ŒÍÁÙÅ·ÑèÇä»
MCC-SVU01A_Th.indd 2MCC-SVU01A_Th.indd 2 4/17/13 4:49:26 PM4/17/13 4:49:26 PM

MCC-SVU01A 3
ÊÒúÑÞ
ข�อมลทวไป 2
ข�อควรระวงเพอความปลอดภย 4
รปภาพระบบเครองปรบอากาศ 5
การควบคมการทำงาน 6
การดแลและการบำรงรกษา 10
คำแนะนำในการใช�เครองปรบอากาศ 11
เหตการณ�ทไม�ใช�ป�ญหาเครองปรบอากาศ 12
เมอท�านคดว�าเครองปรบอากาศของท�านมป�ญหา 13
การแก�ไขเมอเครองไม�ทำงานตามปกต 14
MCC-SVU01A_Th.indd 3MCC-SVU01A_Th.indd 3 4/17/13 4:49:27 PM4/17/13 4:49:27 PM

MCC-SVU01A4
- ‚ª√¥Õà“π¢âÕ§«√√–«—߇æ◊ËÕ§«“¡ª≈Õ¥¿—¬°àÕπμ‘¥μ—È߇§√◊ËÕߪ√—∫Õ“°“»
μ‘¥μ—È߇§√◊ËÕߪ√—∫Õ“°“»‚¥¬™à“ߺŸâ™”π“≠ß“π Àâ“¡μ‘¥μ—È߇§√◊ËÕߪ√—∫Õ“°“»¥â«¬μ—«‡Õß
μ‘¥μ—È߇§√◊ËÕߪ√—∫Õ“°“»μ“¡¢—ÈπμÕπ∑’Ë·π–π”„π§Ÿà¡◊Õ°“√μ‘¥μ—Èß
- °“√μ‘¥μ—Èß∑’ˉ¡à∂Ÿ°«‘∏’Õ“®°àÕ„À⇰‘ ’¬À“¬°—∫μ—«‡§√◊ËÕ߇°‘¥πÈ”√—Ë«À√◊Õ°“√∫“¥‡®Á∫®“°‡ª≈«‰ø ‰øøÑ“™ÁÕμ
- °“√μ‘¥μ—Èß∑’ˉ¡à∂Ÿ°«‘∏’Õ“®°àÕ„À⇰‘ ’¬À“¬°—∫μ—«‡§√◊ËÕ߇°‘¥πÈ”√—Ë«À√◊Õ°“√∫“¥‡®Á∫®“°‡ª≈«‰ø ‰øøÑ“™ÁÕμ
μ‘¥μ—È߇§√◊ËÕߪ√—∫Õ“°“»∫πºπ—ß∑’Ë·¢Á√Õß√—∫πÈ”Àπ—°¢Õ߇§√◊ËÕ߉¥â
À≈—ßμ‘¥μ—È Á®‡√’¬∫√âÕ¬„Àâ à“‰¡à¡’√Õ¬√—Ë∑”§«“¡‡¬Áπ
- À“°μ‘¥μ—È߇§√◊ËÕß∫πºπ—ß∑’ˉ¡à·¢Áß·√ßæÕ®–∑”„À⇧√◊ËÕߪ√—∫Õ“°“»μ°·≈–°àÕ„À⇰‘¥°“√∫“¥‡®Á∫‰¥â
- °“√√—Ë Áπ®–∑”„À⇧√◊ËÕߪ√—∫Õ“°“»∑”§«“¡‡¬Áπ‰¡à‰¥â
„™â â —∫‡§√◊ËÕߪ√—∫Õ“°“»·≈–μà‰ø‡¢â“°—∫¢—È«μàÕ∑’ˇ§√◊ËÕß„Àâ·πà ‘∑
μà ’Ë·π–π”„πº—ß°“√μà ৫√„™â◊ËÕߪ√—∫Õ“°“»√à«¡°—∫Õÿª°√≥åÕ◊Ëπ
- °“√μà â“°—∫¢—È«μàÕ∑’ˉ¡à·πà ‘∑Õ“®°àÕ„À⇰‘¥‰øøÑ“™ÁÕμÀ√◊Õ‰ø‰À¡â‰¥â
- °“√μà ’Ë‰¡à∂Ÿ°μâÕßÕ“®°àÕ„À⇰‘¥‰øøÑ“™ÁÕμÀ√◊Õ‰ø‰À¡â‰¥â
‰¡àμ‘¥μ—È߇§√◊ËÕߪ√—∫Õ“°“»„π∫√‘‡«≥∑’Ë¡’‰«‰ø
μ‘¥μ—Èß∑àÕπÈ”¬“·≈–∑àÕπÈ”√–∫“¬μ“¡∑’Ë·π–π”„π§Ÿà¡◊Õ°“√μ‘¥μ—Èß
- À“°‡°‘¥°“√√—Ë àÕ„À⇰‘¥°“√μ‘¥‰ø·≈–√–‡∫‘¥‰¥â
- ¡‘‡™àππ—ÈπÕ“®‡°‘¥πÈ”√—Ë« ÷¡·≈–°àÕ„À⇰‘ ’¬À“¬μàÕÕÿª°√≥å‰øøÑ“Õ◊Ëπ Ê
¢ŒÍ¤ÇÃÃÐÇѧà¾×èͤÇÒÁ»ÅÍ´ÀÑÂ
MCC-SVU01A_Th.indd 4MCC-SVU01A_Th.indd 4 4/17/13 4:49:27 PM4/17/13 4:49:27 PM
MCC-SVU01A 5
·øπ§Õ¬≈å·≈–§Õπ‡¥π´‘Ë߬Ÿπ‘μ “¬‰ø‡™◊ËÕ¡√–À«à“ß
§Õπ‡¥π´‘Ë߬Ÿπ‘μ
™àÕß≈¡√âÕπÕÕ°
™àÕß≈¡‡¢â“Õ¬Ÿà¥â“π¢â“ß·≈–¥â“πÀ≈—ß
·øπ§Õ¬≈嬟π‘μ
Ω“ÀπⓇ§√◊ËÕß
™àÕß àß≈¡‡¬Áπ™àÕß≈¡°≈—∫
∑àÕπÈ”∑‘Èß
™àÕ߇°Á∫√’‚¡∑
‰ø· ¥ß°“√∑”ß“π·ºàπ°√ÕßÕ“°“»
√’‚¡∑§Õπ‚∑√≈„™â§«∫§ÿ¡°“√∑”ß“π¢Õ߇§√◊ËÕߪ√—∫Õ“°“»
‡°‘¥„π¢≥–∑”§«“¡‡¬Áπ∑àÕπÈ”∑‘Èß√–∫“¬πÈ”∑’Ë
∑àÕπÈ”¬“
¿“æ· ¥ß√–∫∫ ™◊ËÕ·≈–μ”·Àπàß™‘Èπ à«π
ÃÙ»ÀÒ¾Ãкºà¤Ã×èͧ»ÃѺÍÒ¡ÒÈ
MCC-SVU01A_Th.indd 5MCC-SVU01A_Th.indd 5 4/17/13 4:49:27 PM4/17/13 4:49:27 PM

MCC-SVU01A6
รโมทคอนโทรลแบบไร�สาย
ชอและหน�าทของป�มบนรโมท
1. ตวส�งสญญาณอนฟราเรดส�งสญญาณไปยงตวเครองในห�อง
2. ป�มปรบตงอณหภม (TEMP) กดป�ม เพอปรบเพมอณหภมทตงไว� กดป�ม เพอปรบลดอณหภมทตงไว�
3. ป�มเป�ด-ป�ดเครองปรบอากาศ (ON/OFF) กดป�มนเพอเป�ดให�เครองทำงาน ในกรณท ต�องการป�ดการทำงานให�กดป�มนอกครง
4. ป�มปรบให�ลมพดไป-มาอตโนมต (SWING) กดป�มนเมอต�องการให�ลมกระจาย ขน-ลง โดยอตโนมต
5. ป�ม AIR FLOW เครองปรบอากาศจะไม�ตอบสนองใดๆ เมอกดป�มน
6. ป�มควบคมอณหภมขณะนอนหลบ (SLEEP) กดป�มนเมอต�องการควบคมอณหภมขณะนอนหลบโดยอตโนมต
7. ป�ม CLEAN เครองปรบอากาศจะไม�ตอบสนองใดๆ เมอกดป�มน
8. ป�ม LAMP เครองปรบอากาศจะไม�ตอบสนองใดๆ เมอกดป�มน
9. ป�มลอกการทำงานของรโมท (HOLD) กดป�มนเมอต�องการลอกการทำงานของป�มกดบนรโมท
10. ป�ม TURBO เครองปรบอากาศจะไม�ตอบสนองใดๆ เมอกดป�มน
11. ป�มตงเวลาเป�ด-ป�ดเครองโดยอตโนมต (TIMER) ใช�สำหรบตงเวลา เป�ด-ป�ด เครองโดยอตโนมต
12. ป�มปรบความเรวพดลม (FAN SPEED) กดป�มนเพอเลอกระดบความเรวพดลม
13. ป�มเลอกระบบการทำงานของเครอง (MODE) กดป�มนเพอเลอกระบบการทำงานของเครองปรบอากาศ ลำดบของคำสงการทำงาน คอ พดลม (FAN) ทำความเยน (COOL) และลดความชน (DRY) ตามลำดบ
วธใส�แบตเตอร 1. ถอดฝาครอบช�องใส�แบตเตอร ด�านหลงของ
รโมทคอนโทรลออก โดยเลอนฝาครอบตามแนว 2. ใส�แบตเตอร AAA 2 ก�อน โดยตรวจสอบขนาดและขว
แบตเตอรให�ถกต�อง 3. ใส�ฝาครอบกลบตามเดม ควรถอดแบตเตอรเกบไว�เมอไม�
ได�ใช�เครองปรบอากาศเป�นเวลานาน
1
3
4
6
5
2
10 7
8
11
12
13
9
¡ÒäǺ¤ØÁ¡Ò÷ӧҹ
MCC-SVU01A_Th.indd 6MCC-SVU01A_Th.indd 6 4/17/13 4:49:28 PM4/17/13 4:49:28 PM

MCC-SVU01A 7
การเลอกระบบการทำงานของเครอง 1. การสงให�ทำงานแบบพดลมอย�างเดยว (FAN MODE)
กดป�ม POWER หน�าจอจะแสดงค�าทตงไว�จากการทำงานครงก�อน
กดป�ม MODE เพอเลอกระบบการทำงานจนมสญลกษณ� ตดขนทตำแหน�ง FAN
กดป�ม FAN SPEED เพอเลอกระดบความเรวของพดลมทต�องการ บนหน�าจอจะแสดงเครองหมาย
2. การสงทำความเยน (COOL MODE) กดป�ม POWER หน�าจอจะแสดงค�าทตงไว�จากการทำงานครงก�อน
กดป�ม MODE เพอเลอกระบบการทำงานจนมสญลกษณ� ตดขนทตำแหน�ง COOL
กดป�ม TEMP หรอ TEMP เพอปรบตงอณหภมตามต�องการ ซงสามารถปรบได�ตงแต� 16 - 32 องศาเซลเซยส
กดป�ม FAN SPEED เพอเลอกระดบความเรวของพดลมทต�องการ บนหน�าจอจะแสดงเครองหมาย
ขนอย�กบระดบความเรวพดลมอตโนมต ตำ กลาง หรอ สง ตามลำดบ
หมายเหต - เมออย�ใน FAN MODE หน�าจอจะไม�แสดงค�าอณหภมทตงไว� และไม�สามารถใช�ป�มปรบอณหภมหรอ SLEEP ได�
ขนอย�กบระดบความเรวพดลมอตโนมต ตำ กลาง หรอ สง ตามลำดบ
3. การสงลดความชน (DRY MODE)
กดป�ม POWER หน�าจอจะแสดงค�าทตงไว�จากการทำงานครงก�อน
กดป�ม MODE เพอเลอกระบบการทำงานจนมสญลกษณ� ตดขนทตำแหน�ง DRY
กดป�ม TEMP หรอ TEMP เพอปรบตงอณหภมตามต�องการ ซงสามารถปรบได�ตงแต� 16 - 32 องศาเซลเซยส
ความเรวพดลมจะถกปรบไปทระดบตำ และไม�สามารถเปลยนระดบความเรวพดลมได�
การปรบทศทางลมอตโนมต (Swing Mode)
SWING MODE จะช�วยให�ลมกระจายได�ทวทงห�องดขน กดป�ม SWING เพอให�ใบส�งลมเยนกระจายลมขน-ลงโดยอตโนมต
กดป�ม SWING อกครง เพอหยดการกระจายลมเยนโดยอตโนมต โดยหยดใบส�งลมเยนในตำแหน�งของทศทางการกระจายลมทต�องการ
Auto –> Low –> Medium –> High
A
Auto –> Low –> Medium –> High
A
¡ÒäǺ¤ØÁ¡Ò÷ӧҹ
MCC-SVU01A_Th.indd 7MCC-SVU01A_Th.indd 7 4/17/13 4:49:28 PM4/17/13 4:49:28 PM

MCC-SVU01A8
การตงเวลาเป�ด-ป�ดเครองโดยอตโนมต
เมอเลอกการทำงานแบบตงเวลาอตโนมต ค�าทตงไว�จะถก
เกบไว�บนหน�วยความจำบนตวรโมท หลงจากนนเครองปรบ
อากาศจะเรมทำงานภายใต�ระบบการทำงานเช�นเดยวกบการ
กดป�มเป�ดเครอง (POWER) บนรโมท
1. การตงเวลาเป�ดเครองอตโนมต
สามารถตงเวลาเป�ดเครองอตโนมตล�วงหน�าได� 24 ชวโมง กดป�ม TIMER เมอเครองปรบอากาศไม�ได�ทำงาน หน�าจอจะแสดงจำนวนชวโมงทต�องการตงเป�ดเครองล�วงหน�าให�เลอกตามลำดบ ดงน 1H 2H 3H ... 24H Cancel
กดป�ม TIMER อกครง เมอต�องการยกเลกการตงเวลาเป�ดเครองอตโนมต
2. การตงเวลาป�ดเครองอตโนมต
สามารถตงเวลาป�ดเครองอตโนมตล�วงหน�าได� 24 ชวโมง กดป�ม TIMER เมอเครองปรบอากาศกำลงทำงาน หน�าจอจะแสดงจำนวนชวโมงทต�องการตงป�ดเครองล�วงหน�าให�เลอกตามลำดบ ดงน 1H 2H 3H ... 24H Cancel
กดป�ม TIMER อกครง เมอต�องการยกเลกการตงเวลาป�ดเครองอตโนมต
การทำงานในระบบปรบอณหภมขณะนอนหลบ
ระบบปรบอณหภมขณะนอนหลบจะปรบค�าอณหภมภายใน
ห�องโดยอตโนมตให�เหมาะสมกบอณหภมของร�างกายขณะ
นอนหลบ กดป�ม SLEEP เพอเลอกระบบการทำงานจนมสญลกษณ� ตดขนทตำแหน�ง SLEEP
หลงจากเครองปรบอากาศทำงานใน SLEEP Mode ได� 1 ชวโมง เครองปรบอากาศจะปรบอณหภมห�องให�สงขน 1 องศาเซลเซยสโดยอตโนมต หลงจากนนอก 1 ชวโมง เครองจะปรบอณหภมห�องให�สงขนอก 1 องศาเซลเซยส (โดยทหน�าจอรโมทยงแสดงค�าอณหภมเดมทตงไว�) และเครองปรบอากาศจะทำงานต�อไปทค�าอณหภมใหม�นจนกว�าผ�ใช�จะกดยกเลก SLEEP Mode หรอป�ดเครองปรบอากาศ
กดป�ม SLEEP อกครงเพอยกเลกการทำงาน หากเกดระบบไฟฟ�าขดข�อง SLEEP Mode จะถกยกเลกไปโดยอตโนมต
การลอกการทำงานของป�มบนรโมท
สามารถลอกการทำงานของป�มบนรโมทได�โดยการกดป�ม
HOLD ป�มทกป�มบนรโมทยกเว�นป�ม HOLD จะไม�สามารถใช�
งานได� กดป�ม HOLD อกครงเพอให�ป�มต�างๆ สามารถใช�งาน
ได�อกครง
ข�อควรระวง อย�าวางรโมทใกล�กบแหล�งความร�อน รโมทไม�ควรโดนแสงแดดโดยตรง ควรระวงไม�ให�รโมทตกจากทสง ไม�ควรมสงกดขวางระหว�างรโมทกบเครองปรบอากาศ ซงอาจจะขดขวางการส�งสญญาณของรโมทได�
ห�ามไม�ให�ละอองนำหรอของเหลวสมผสกบรโมทโดยตรง
หากรโมท ไม�สามารถใช�งานได� ขนแรกควรทำการเปลยนถ�าน ถ�ายงไม�สามารถใช�งานได�อกกรณาตดต�อศนย�บรการใกล�บ�านท�าน
¡ÒäǺ¤ØÁ¡Ò÷ӧҹ
MCC-SVU01A_Th.indd 8MCC-SVU01A_Th.indd 8 4/17/13 4:49:29 PM4/17/13 4:49:29 PM

MCC-SVU01A 9
Display Unit
ท Panel ของเครองปรบอากาศ จะมตวแสดงผลแบบ LED
4 ดวง ดงน
POWER RUN TIMER PROTECTION
EMERGENCY
ช�องรบสญญาณ Infrared จากรโมท
POWER LED แสดงสถานะว�ามการต�อไฟจากแหล�งกำเนดไฟฟ�าเข�าส�ตวเครองปรบอากาศ
RUN LED แสดงสถานะการทำงานของเครองปรบอากาศ
TIMER LED แสดงสถานะการตงเป�ดหรอป�ดเครองปรบอากาศล�วงหน�า
PROTECTION LED แสดงสถานะเมอเครองปรบอากาศขดข�อง
ป�มฉกเฉน (Emergency Key) ใช�ป�มฉกเฉนเพอควบคมการเป�ด-ป�ดเครองปรบอากาศกรณทรโมทคอนโทรลไม�สามารถใช�งานได�
¡ÒäǺ¤ØÁ¡Ò÷ӧҹ
สาเหต การแจ�งเตอน หมายเหต
Room Sensor ขาด
Run LED กระพรบ 2 ครง ใน 4 วนาท
Protection LED ตดค�าง
Freeze Sensor ขาด
Run LED กระพรบ 3 ครง ใน 5 วนาท
Protection LED ตดค�าง
เกดนำแขงท Evaporator
Run LED กระพรบ 5 ครง ใน 7 วนาท
Protection LED ตดค�าง
Drain Pump Run LED กระพรบ 9 ครง ใน 11 วนาท
Protection LED ตดค�าง
ระบบแจ�งเตอนเมอเครองปรบอากาศขดข�อง
(Self-Diagnostic Function)
MCC-SVU01A_Th.indd 9MCC-SVU01A_Th.indd 9 4/17/13 4:49:29 PM4/17/13 4:49:29 PM

MCC-SVU01A10
°“√‡ª≈’ˬπ·ºàπøÕ°Õ“°“» (Option)§«√‡ª≈’ˬπ·ºàπøÕ°Õ“°“» ∑ÿ°Ê 3-6 ‡¥◊Õπ ∑—Èßπ’È¢÷Èπ°—∫ ¿“æ°“√„™âß“π
ë ∂Õ¥Ω“≈¡°≈—∫ÕÕ°®“°Ω“ÀπⓇ§√◊ËÕß ‚¥¬¥÷ß≈äÕ§∑’ËÕ¬Ÿàμ√ßΩ“ÀπⓇ§√◊ËÕßÕÕ°
ë ‡ªî¥Ω“≈¡°≈—∫·≈â«∂Õ¥øî≈‡μÕ√å°√ÕßΩÿÉπ ÕÕ°®“°Ω“≈¡°≈—∫
ë §≈“¬ °√Ÿ 4 μ—«∑’ˇø√¡øî≈‡μÕ√å°√ÕßΩÿÉπ ÕÕ° ∂Õ¥øî≈‡μÕ√åøÕ°Õ“°“»®“°‡ø√¡ øî≈‡μÕ√å
ë „ àøî≈‡μÕ√åøÕ°Õ“°“»„À¡à„ÀâÕ¬Ÿà„π μ”·Àπà߇¥‘¡ ¬÷¥ °√Ÿ 4 μ—«‡¢â“∑’˪î¥Ω“≈¡ °≈—∫„πμ”·Àπà߇¥‘¡‚¥¬°¥„À⇢â“≈äÕ§∑’ËÕ¬Ÿà μ√ßΩ“ÀπⓇ§√◊ËÕߥ—ß√Ÿª
‡ø√¡ø‘≈‡μÕ√å
·ºàπøÕ°Õ“°“» øî≈‡μÕ√åøÕ°Õ“°“»
¢âÕ§«√∑√“∫ª√‘¡“≥≈¡®–≈¥≈߇≈Á°πâÕ¬ ‡¡◊ËÕ„ àøî≈‡μÕ√åøÕ°Õ“°“» ·≈–°√≥’·ºàπøÕ°Õ“°“» °ª√°Õÿ¥μ—𠧫√‡ª≈’ˬπ„À¡à∑ÿ°Ê 3-6 ‡¥◊Õπ
°“√∑”§«“¡ –Õ“¥·ºàπ°√ÕßÕ“°“» °àÕπ∑’Ë®–∑”°“√ ”√«®μ√«®μ√“·≈–∫”√ÿß√—°…“„Àâªî¥ «‘μ å POWER ·≈– «‘μ´å‡∫√°‡°Õ√å≈ߥ⫬‡ ¡Õ
ë ∂Õ¥Ω“≈¡°≈—∫®“°Ω“ÀπⓇ§√◊ËÕß ‚¥¬¥÷ß ≈äÕ§∑’ËÕ¬Ÿàμ√ßΩ“Àπâ“ÕÕ°
ë ‡ªî¥Ω“≈¡°≈—∫·≈â«∂Õ¥øî≈‡μÕ√å°√ÕßΩÿÉπ ÕÕ°
ë „ àΩ“≈¡°≈—∫‡¢â“∑’ˇ¥‘¡®π°√–∑—Ëß≈ÁÕ§Õ¬Ÿà „πμ”·Àπàß∑’Ë∂Ÿ°μâÕ߉¥â¬‘π‡ ’¬ß ç§≈‘Í°é
°“√∑”§«“¡ –Õ“¥‡§√◊ËÕß°“√∑”§«“¡ –Õ“¥‡§√◊ËÕß·≈–√’‚¡∑§Õπ‚∑√≈ ‡™Á¥¥â«¬ºâ“·ÀâßÀ√◊Õ‡§√◊ËÕߥŸ¥ΩÿÉπ ∂â“„™âºâ“‡ªï¬°„Àâ∫‘¥À¡“¥Ê ·≈⫇™Á¥¥â«¬ºâ“·ÀâßÕ’°§√—ÈߢâÕ§«√√–«—ßë Àâ“¡„™âπÈ”¡—π‡∫π´‘π ∑‘π‡πÕ√å ∑”§«“¡ –Õ“¥‡§√◊ËÕßë Àâ“¡„™âπÈ”∑’Ë¡’Õÿ≥À¿Ÿ¡‘‡°‘π°«à“ 40 oC ∑”§«“¡ –Õ“¥ ‡æ√“–®–∑”„À♑Èπ à«π ∫“ß™‘Èπ‡ ’¬À“¬‰¥â
‡¡◊ËÕ‡√‘Ë¡„™â‡§√◊ËÕßë „Àâμ√«®¥Ÿ«à“‰¡à¡’ ‘àß°’¥¢«“ß∑“ß≈¡‡¢â“ ·≈–ÕÕ°∑—Èßμ—«·øπ§Õ¬≈å ·≈– §Õπ‡¥π´‘Ë߬Ÿπ‘μë °“√‡¥‘π‡§√◊ËÕß‚¥¬‰¡à¡’·ºàπ°√ÕßÕ“°“» ®–∑”„À⇧√◊ËÕß∑”ß“πº‘¥ª°μ‘ ‡π◊ËÕß®“° ‘Ëß °ª√° ·≈–ΩÿÉπºßÕÿ¥μ—π μâÕß„ à·ºàπ °√ÕßÕ“°“»‰«â‡ ¡Õë μ√«®¥Ÿ«à“∑àÕπÈ”∑‘È߉¡à‰¥âßÕÀ√◊ÕÕÿ¥μ—πë μ√«®¥Ÿ§«“¡‡√’¬∫√âÕ¬¢Õß°“√μ‘¥μ—Èß
„π™à«ß‡«≈“∑’ˉ¡à‰¥â„™â‡§√◊ËÕ߇ªìπ‡«≈“π“πë ªî¥ «‘μ´å‡∫√°‡°Õ√å≈ßë ∑”§«“¡ –Õ“¥·ºàπ°√ÕßÕ“°“»·≈– ™‘Èπ à«πÕ◊ËπÊë „À⇧√◊ËÕß∑”ß“π„π√–∫∫ FAN ª√–¡“≥ 2-3 ™¡. ‡æ◊ËÕ∑”„Àâ¿“¬„π‡§√◊ËÕß·Àâß
ë ∂Õ¥øî≈‡μÕ√å°√ÕßΩÿÉπÕÕ°·≈–∑”§«“¡ –Õ“¥¥â«¬‡§√◊ËÕߥŸ¥ΩÿÉπ À√◊Õ∂â“ °ª√° ¡“°≈â“ߥ⫬πÈ” ∫Ÿà·≈â«μ“°‰«â„π∑’Ë√à¡®π ·Àâß
¡ÒôÙáÅáÅСÒúÓÃاÃÑ¡ÉÒ
MCC-SVU01A_Th.indd 10MCC-SVU01A_Th.indd 10 4/17/13 4:49:30 PM4/17/13 4:49:30 PM

MCC-SVU01A 11
¢âÕ§«√√–«—ß„π°“√„™â‡§√◊ËÕߪ√—∫Õ“°“»ë μ√«® Õ∫√–∫∫‰øøÑ“ (®”π«π‚«≈∑å
·≈–§«“¡∂’Ë) μ“¡∑’ˇ§√◊ËÕß°”À𥉫â„Àâ∂Ÿ°μâÕß·≈–„Àâ„™âøî« å¢π“¥·Õ¡·ª√å∑’Ë°”Àπ¥‡∑à“π—ÈπÕ¬à“„™â‡ âπ≈«¥·∑πøî« å
ë Õ¬à“ Õ¥«—μ∂ÿ‡¢â“‰ª∑“ß™àÕßÕ“°“»‡¢â“À√◊Õ≈¡ÕÕ° ¢≥–‡§√◊ËÕß°”≈—ß∑”ß“πÕ“®∑”„À⇪ìπÕ—πμ√“¬μàÕ§πÀ√◊Õ‡§√◊ËÕ߇ ’¬À“¬‰¥â
ë Õ¬à“„Àâ≈¡‡¬Áπ‡ªÉ“∂Ÿ°μ—«‡¥Á°∑“√° ºŸâ ŸßÕ“¬ÿÀ√◊ÕºŸâªÉ«¬‚¥¬μ√߇ªìπ‡«≈“π“πÊ
ë ‡¡◊ËÕ‰øøÑ“¢—¥¢âÕߢ≥–‡§√◊ËÕß°”≈—ß∑”ß“π„Àâªî¥ «‘∑´å À√◊Õ∂Ⓣ¡à„™â‡§√◊ËÕ߇ªìπ‡«≈“π“π „Àâ —∫ «‘∑´å‡∫√°‡°Õ√å≈ß
ë Õ¬à“„Àâ¡’ ‘Ëß°’¥¢«“ß∑“ß√–∫“¬Õ“°“»¢Õ߇§√◊ËÕߪ√—∫Õ“°“»∑—Èß·øπ§Õ¬≈嬟π‘μ·≈–§Õπ‡¥π´‘Ë ß¬Ÿπ‘μ‡æ√“–®–∑”„Àâª√– ‘∑∏‘¿“æ°“√∑”§«“¡‡¬Áπ≈¥≈ßÀ√◊Õ‡§√◊ËÕ߇ ’¬À“¬‰¥â
ë Õ¬à“μ‘¥μ—È߇§√◊ËÕߪ√—∫Õ“°“»„°≈â·À≈àߧ«“¡√âÕπ Ÿß‡æ√“–®–∑”„Àâ√Ÿª√à“ߢÕß à«π∑’ˇªìπæ≈“ μ‘°‡°‘¥°“√‡ ’¬À“¬
§”·π–π”„π°“√„™â‡§√◊ËÕߪ√—∫Õ“°“»ë ‰¡à§«√ª√—∫Õÿ≥À¿Ÿ¡‘„πÀâÕß„À⇬Áπ‡°‘π
§«“¡®”‡ªìπ‡æ√“–®–μâÕß ‘Èπ‡ª≈◊Õß§à“°√–· ‰øøÑ“‚¥¬‡ª≈à“ª√–‚¬™πå
ë §«√∑”§«“¡ –Õ“¥·ºàπ°√ÕßÕ“°“»(Filter) ∑ÿ°Ê 2 —ª¥“Àå‡æ◊ËÕ„À⇧√◊ËÕߪ√—∫Õ“°“»∑”ß“πÕ¬à“ß¡’ª√– ‘∑∏‘¿“æ
ë §«√ªî¥ºâ“¡à“πÀ√◊Õ°√–®°¿“¬„πÀâÕß„Àâ¡‘¥™‘¥¢≥–∑’Ë„™â‡§√◊ËÕߪ√—∫Õ“°“»‡æ◊ËÕªÑÕß°—𧫓¡√âÕπ®“°· ß·¥¥∑’Ë àÕ߇¢â“¡“∑”„À⇧√◊ËÕߪ√—∫Õ“°“»∑”ß“πÀπ—°¢÷Èπ·≈–∑”„À⇪≈◊Õß§à“„™â®à“¬¥â«¬
ë °“√®à“¬§«“¡‡¬Áπ„Àâ∑—Ë«ÀâÕߧ◊Õ °“√ª√—∫∑‘»∑“ߢÕß°√–· ≈¡„Àâ°√–®“¬μ“¡·π«≈Ÿ°»√™’È ‡æ◊ËÕ∑’Ë®–„À⧫“¡‡¬Áπ¿“¬„πÀâÕ߇¬Áπ ¡Ë”‡ ¡Õ
ë §«√ªî¥ª√–μŸ·≈–Àπâ“μà“ß„Àâ¡‘¥™‘¥ ‡æ◊ËÕªÑÕß°—π‰¡à„À⧫“¡‡¬Áπ√—Ë«‰À≈ÕÕ°πÕ°ÀâÕß‚¥¬‡ª≈à“ª√–‚¬™πå
ë ‡√“ “¡“√∂√–∫“¬Õ“°“»¿“¬„πÀâÕßÕÕ°∑“ßÀπâ“μà“߉¥â‡ªìπ∫“ߧ√—Èß∫“ߧ√“«„π°√≥’∑’ˇ§√◊ËÕߥŸ¥Õ“°“»‰¡à “¡“√∂®–√–∫“¬Õ“°“»¿“¬„πÀâÕ߉¥â∑—π ·μàÕ¬à“√–∫“¬‚¥¬«‘∏’¥—ß°≈à“«‡ªìπ‡«≈“π“πʇæ√“–®–∑”„À⧫“¡‡¬Áπ°√–®“¬ÕÕ°‚¥¬‡ª≈à“ª√–‚¬™πå
¤Óá¹Ð¹Ó㹡ÒÃ㪌à¤Ã×èͧ»ÃѺÍÒ¡ÒÈ
MCC-SVU01A_Th.indd 11MCC-SVU01A_Th.indd 11 4/17/13 4:49:30 PM4/17/13 4:49:30 PM
MCC-SVU01A12
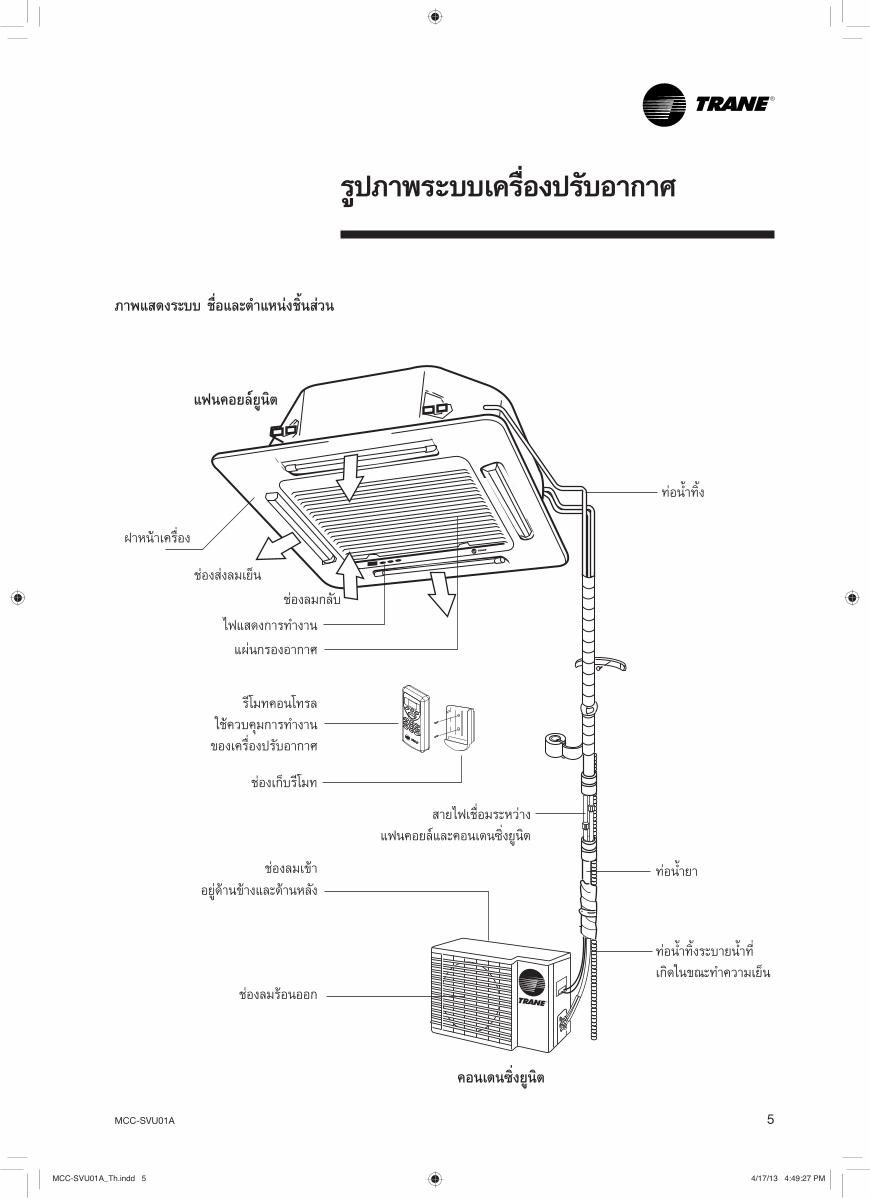
เหตการณ� คำอธบาย
มหมอกออกจากช�องลมออกของ
เครองปรบอากาศภายใน
- ลมเยนจากตวเครองทำให�ความชนในอากาศภายในห�องเยนขนอย�างรวดเรว
จนกลายเป�นหมอก
เครองไม�เรมทำงานทนท
- เมอกดสวทซ�เป�ดใหม�หลงจาก
ป�ดเครองเพยงชวขณะ
- เมอโหมดการทำงานถกเลอก
ใหม�
- เป�นกลไกการป�องกนของเครองปรบอากาศ ควรจะรอประมาณ 3 นาท
มกลนไม�พงประสงค�จากเครอง
ภายใน
- กรณนเกดขนเมอเครองภายในดดซบกลนของห�อง เครองใช�ภายในห�องหรอ
กลนบหรเข�าไป แล�วปล�อยออกมาพร�อมลมเยน (ในกรณเช�นนขอแนะนำให�
ทำความสะอาดเครองภายในโดยช�างผ�เชยวชาญ โปรดปรกษาตวแทนจำหน�าย
ของท�าน)
เกดนำรวจากเครองภายนอก - ระหว�างการทำงานแบบ COOL (ทำความเยน) และ DRY (ลดความชน) ท�อ
และจดเชอมท�อต�างๆ จะเยนตวทำให�ไอนำเกดการกลนตวได�
เกดเสยงดงแครก - เสยงนอาจเกดจากการขยาย/หดตวของฝาครอบด�านหน�า ฯลฯ ซงมเหตมา
จากการเปลยนอณหภม
เกดเสยงคล�ายการเกดฟองอากาศ - เสยงนอาจได�ยนเมออากาศภายนอกห�องถกดดเข�ามาภายในท�อนำทง เพราะ
การทำงานของเครองดดควนหรอพดลมระบายอากาศ ซงจะทำให�นำทอย�ในท�อ
นำทงเกดฟองอากาศได� เสยงนอาจได�ยนเมออากาศภายนอกห�องเป�าเข�ามาใน
ท�อนำทงในกรณทลมภายนอกห�องแรง
ได�ยนเสยงเครองจกรจาก
เครองภายนอกอาคาร
- เป�นเสยงของการเป�ด/ป�ดพดลม หรอคอมเพรสเซอร�
ได�ยนเสยงนำไหล - เป�นเสยงของนำยาทำความเยนหรอนำควบแน�นไหลภายในเครอง
àËμ Ø¡Òó �·ÕèäÁ‹ãª‹»˜ÞËÒà¤Ã×èͧ»ÃѺÍÒ¡ÒÈ
MCC-SVU01A_Th.indd 12MCC-SVU01A_Th.indd 12 4/17/13 4:49:31 PM4/17/13 4:49:31 PM

MCC-SVU01A 13
อาการ รายละเอยดและจดตรวจสอบ
เครองปรบอากาศไม�สามารถ
ทำให�ห�องเยนได�เพยงพอ
- อณหภมทตงไว�เหมาะสมหรอไม�
- ความเรวใบพดและทศทางการปล�อยลม ตงไว�อย�างเหมาะสมหรอไม�
- แผ�นกรองอากาศสะอาดหรอไม�
- ใบพดหรอตวแลกเปลยนความร�อนของเครองภายในสะอาดหรอไม�
- มสงกดขวางทช�องลมเข�าหรอช�องลมออกของเครองภายในอาคารหรอ
ภายนอกอาคารหรอไม�
- เป�ดหน�าต�างหรอประตทงไว�หรอไม�
- หากใช�พดลมระบายอากาศ หรอเตาแก�สทำอาหารภายในห�อง ระบบ
ทำความเยนจะต�องทำงานหนกมากขน จงทำให�ความเยนไม�เพยงพอ
- หากอณหภมภายนอกสง ความเยนอาจไม�เพยงพอ
ได�ยนเสยงหงๆในบางครง - จะเกดเสยงนขนเมอสารทำความเยนภายในตวเครองเปลยนทศการไหล
- จดยดฝาคอนเดนซงไม�แน�น
สญญาณจากรโมทคอนโทรลไม�
สามารถได�รบได�
- หลอดไฟส�องสว�างอย�ใกล�ตวรบสญญาณรโมท
- พลงงานแบตเตอรในรโมทไม�เพยงพอ
àÁ×èÍ·‹Ò¹¤Ô´Ç‹Òà¤Ã×èͧ»ÃѺÍÒ¡ÒȢͧ·‹Ò¹ÁÕ»˜ÞËÒ
ในกรณต�อไปน ให�ท�านหยดใช�งาน และปรกษาตวแทนจำหน�าย- เมอมนำรวหรอหยดนำจากเครองภายใน - เมอเบรกเกอร�ตดวงจรบ�อยครง - การทำงานของเครองปรบอากาศจะรบกวนการรบสญญาณวทยหรอโทรทศน� อปกรณ�ทได�รบผลกระทบอาจจำเป�น
ต�องใช�เครองขยายสญญาณ - เมอได�ยนเสยงดงรนแรงผดปกต
MCC-SVU01A_Th.indd 13MCC-SVU01A_Th.indd 13 4/17/13 4:49:31 PM4/17/13 4:49:31 PM

MCC-SVU01A14
„Àâμ√«® Õ∫ ‘ËßμàÕ‰ªπ’È°àÕπ°“√‡√’¬°™à“߇æ√“–∑à“πÕ“® “¡“√∂·°â‰¢‰¥â ∂â“¿“¬À≈—ß®“°∑’ˉ¥âμ√«® Õ∫¥Ÿ·≈⫇§√◊ËÕߪ√—∫Õ“°“»¬—ß∑”ß“πº‘¥ª°μ‘ °√ÿ≥“À¬ÿ¥°“√„™ââß“π‡§√◊ËÕߪ√—∫Õ“°“» ·≈–ª√÷°…“μ—«·∑π®”Àπà“¬¢Õß∑à“π
¢âÕ∫°æ√àÕß
‡§√◊ËÕߪ√—∫Õ“°“»‰¡à∑”ß“π‡≈¬
‡§√◊ËÕߪ√—∫Õ“°“»∑”ß“π·μà‡¬ÁππâÕ¬
‰ÕπÈ”À√◊ÕÀ¡Õ°§«—πÕÕ°¡“®“°‡§√◊ËÕߪ√—∫Õ“°“»¢≥–∑”ß“π
™ÿ¥√’‚¡∑§Õπ‚∑√≈‰¡à∑”ß“π
“‡Àμÿ
ë μ√«®¥Ÿ “¬‰ø«à“¢“¥À√◊Õ‰¡à ·≈–¥Ÿ«à“ «‘∑´å‡∫√°‡°Õ√凪î¥Õ¬ŸàÀ√◊Õ‰¡à
ë μ√«®¥Ÿ‰øøÑ“¢—¥¢âÕßÀ√◊Õ‰¡àë μ√«®¥Ÿ«à“√’‚¡∑§Õπ‚∑√≈μ—È߇«≈“∂Ÿ°μâÕßÀ√◊Õ‰¡à
ë μ√«® Õ∫¥Ÿ«à“Õÿ≥À¿Ÿ¡‘∑’Ëμ—È߉«â‡À¡“– ¡À√◊Õ‰¡àë μ√«® Õ∫¥Ÿ«à“· ß·¥¥ àÕ߇¢â“¡“„πÀâÕß‚¥¬μ√ßÀ√◊Õ‰¡àë μ√«® Õ∫¥Ÿ«à“Àπâ“μà“ßÀ√◊Õª√–μŸ‡ªî¥Õ¬ŸàÀ√◊Õ‰¡àë μ√«® Õ∫¥Ÿ«à“ ‘Ëß„¥‰ª°’¥¢«“ß ™àÕß àß≈¡‡¬Áπ¢Õ߇§√◊ËÕß
∑’ËÕ¬Ÿà¥â“π„π·≈–¥â“ππÕ°À√◊Õ‰¡àë μ√«® Õ∫¥Ÿ«à“¡’·À≈àß„À⧫“¡√âÕπ¡“°‡°‘π‰ªÕ¬Ÿà„πÀâÕß
À√◊Õ‰¡àë μ√«® Õ∫¥Ÿ«à“æ—¥≈¡√–∫“¬Õ“°“»¬—ß∑”ß“πÕ¬ŸàÀ√◊Õ‰¡àë μ√«® Õ∫¥Ÿ«à“·ºàπ°√ÕßÕ“°“»·≈–·ºàπøÕ°Õ“°“»
°ª√° Õÿ¥μ—πÀ√◊Õ‰¡à
ë “‡ÀμÿÕ“®‡°‘¥®“°§«“¡√âÕπ¿“¬„πÀâÕß∑”ªØ‘°√‘¬“°—∫§«“¡‡¬Áπ∑’ËÕÕ°¡“®“°‡§√◊ËÕߪ√—∫Õ“°“» ®÷ß∑”„Àâ‡ÀÁπ‡ªìπÀ¡Õ°§«—π
ë ·∫μ‡μÕ√’ËÀ¡¥Õ“¬ÿ°“√„™âß“πÀ√◊Õ‰¡àë „ à·∫μ‡μÕ√’Ë∂Ÿ°μâÕßμ“¡¢—È«∑’Ë°”Àπ¥À√◊Õ‰¡à
¡ÒÃá¡Œä¢àÁ×èÍà¤Ã×èͧäÁ‹·Ó§Ò¹μÒÁ»¡μ Ô
MCC-SVU01A_Th.indd 14MCC-SVU01A_Th.indd 14 4/17/13 4:49:31 PM4/17/13 4:49:31 PM

MCC-SVU01A
Owner Manual
Split System,18,000 - 48,000 Btu/hUnderceiling TypeMCC Series 50 Hz
CASSETTE
April 2013
ModelsCooling OnlyMCC 518 2BMCC 524 2BMCC 530 2BMCC 536 2BMCC 542 2BMCC 548 2B
MCC-SVU01A_En.indd 1MCC-SVU01A_En.indd 1 4/18/13 5:31:26 PM4/18/13 5:31:26 PM
MCC-SVU01A2
General InformationCongratulations on your choice of a
Trane mini-split system. These
systems have been carefully designed
and manufactured under strict TraneWorldwide Quality Standards to
provide you with years of comfortable,
convenient cooling with a minimum
of service.
This Owner Manual is given as a guide
to start-up, operation and periodic
maintenance by the user of MCC split-
system. It does not contain the full
service procedures necessary for the
continued successful operation of this
equipment. The services of a qualified
service technician should be
employed, through the maintenance
contract with a reputable service
company.
Read it completely before doing
anything with your air conditioning
system.
About this ManualCautions appear at appropriate places
in this instruction manual. Your
personal safety and the proper
operation of this machine require that
you follow them carefully. The Trane
Company assumes no liability for the
inappropriate usage of the unit.
About the UnitThese MCC units are assembled,
pressure tested, dehydrated, charged
and run tested before shipment. The
information contained in this manual
applies to MCC units are designed to
operate in cooling mode only.
Trane MCC series offer ceiling
mounted installation to leave the floor
space uncluttered, and equipped with
LCD wireless remote control.
ReceptionOn arrival, inspect the unit before
signing the delivery note. Specify any
damage of the unit on the delivery
note, and send a registered letter of
protest to the last carrier of the goods
within 72 hours of delivery. Notify the
dealer at the same time.
The unit should be totally inspected
within 7 days of delivery. If any
concealed damage is discovered,
send a registered letter of protest to
the carrier within 7 days of delivery
and notify the dealer.
WarningWarnings are provided at appropriate
places in this manual to indicate to
installers, operators and service
personnel of potentially hazardous
situations which, if not avoided,
COULD result in death or serious
injury.
CautionCautions are provided at appropriate
places in this manual to indicate to
installers, operators, and service
personnel of potentially hazardous
situations which, if not avoided, MAY
result in minor or moderate injury or
malfunction of the unit.
Your personal safety and the proper
operation of this unit require that you
follow them carefully. The Trane
Company assumes no liability for
installations or servicing performed by
unqualified personnel.
WarrantyWarranty is based on the general
terms and conditions by country. The
warranty is void if the equipment is
modified or repaired without the
written approval of The Trane
Company, if the operating limits are
exceeded or if the control system or
the electrical wiring is modified.
Damage due to misusage, lack of
maintenance or failure to comply with
the manufacturer’s instructions, is not
covered by the warranty obligation. If
the user does not conform to the rules
described in Owner Manual, it may
entail cancellation of warranty and
liabilities by The Trane Company.
ImportantThese instructions do not cover all
variations in systems, nor do they
provide for every possible contingency
to be met.
Should further information be desired
or should particular problems arise
which are not covered sufficiently for
the purchaser’s purposes, the matter
should be referred to your authorized
Trane dealer.
General Information
MCC-SVU01A_En.indd 2MCC-SVU01A_En.indd 2 4/18/13 5:31:27 PM4/18/13 5:31:27 PM
MCC-SVU01A 3
Contents
General Information 2
Safety Precautions 4
System Appearance 5
Control Operation 6
Maintenance 10
System Operation 11
Conditions that appear to be abnormal
but are not operational problems. 12
When you think that trouble has occurred 13
Troubleshooting 14
MCC-SVU01A_En.indd 3MCC-SVU01A_En.indd 3 4/18/13 5:31:27 PM4/18/13 5:31:27 PM
MCC-SVU01A4
Safety Precautions
MCC-SVU01A_En.indd 4MCC-SVU01A_En.indd 4 4/18/13 5:31:28 PM4/18/13 5:31:28 PM
MCC-SVU01A 5
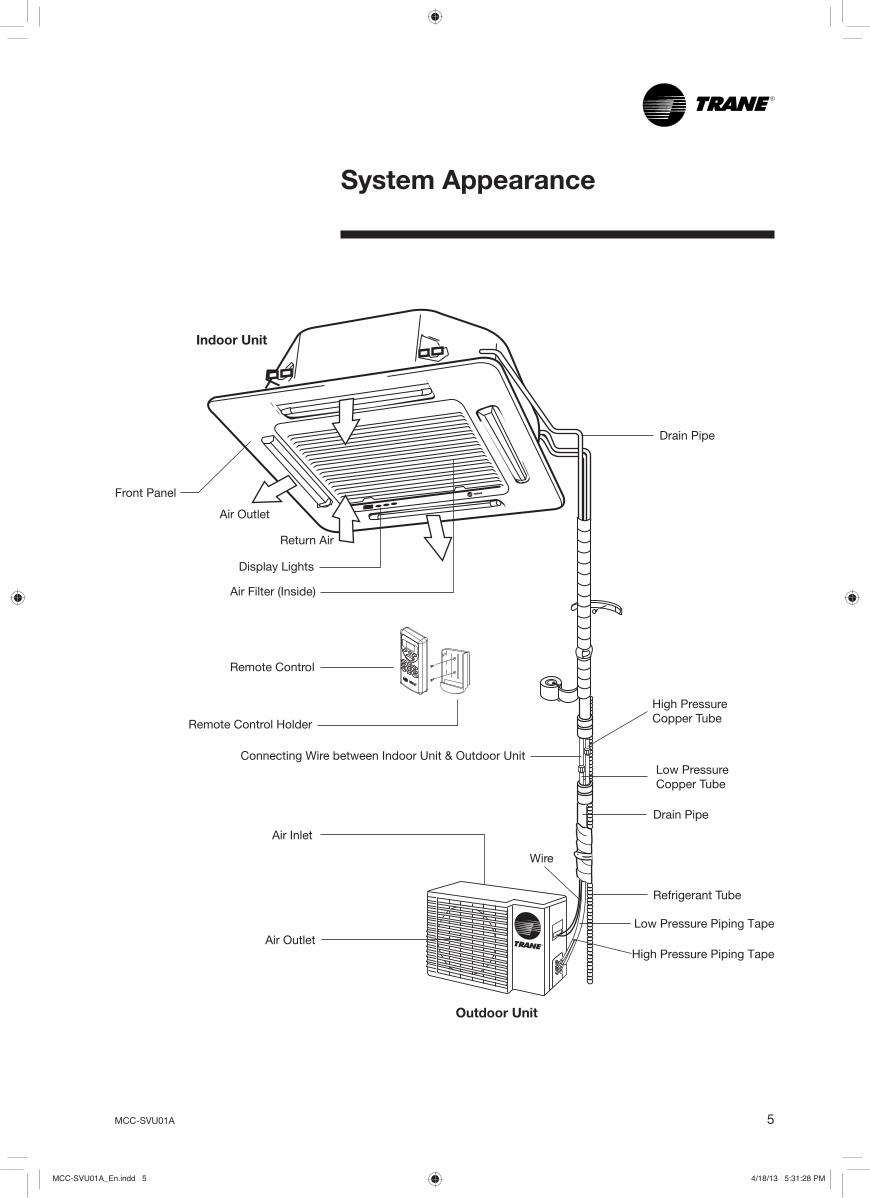
Connecting Wire between Indoor Unit & Outdoor Unit
Outdoor Unit
Air Outlet
Air Inlet
Indoor Unit
Front Panel
Air Outlet
Return Air
Drain Pipe
Remote Control Holder
Display Lights
Air Filter (Inside)
Remote Control
Refrigerant Tube
Drain Pipe
High Pressure
Copper Tube
Low Pressure
Copper Tube
Wire
Low Pressure Piping Tape
High Pressure Piping Tape
System Appearance
MCC-SVU01A_En.indd 5MCC-SVU01A_En.indd 5 4/18/13 5:31:28 PM4/18/13 5:31:28 PM

MCC-SVU01A6
1
3
4
6
5
2
10 7
8
11
12
13
9
Control Operation
Infrared Remote Control
Name and function of buttons1. Infrared Signal Transmitter
Transmits the signal to indoor unit.
2. Temperature Setting Button
TEMP : Press this button to increase set
temperature.
TEMP : Press this button to decrease set
temperature.
3. POWER Button
Press this button to start unit operation.
Press this button again to stop unit operation.
4. SWING Button
Press this button to active or in-active swing motor to
distribute airfl ow.
5. AIR FLOW Button
This button has no response function.
6. SLEEP Button
Press this button to control temperature while sleeping
and press this button again to cancel.
7. CLEAN Button
This button has no response function.
8. LAMP Button
This button has no response function.
9. HOLD Button
Press this button to lock the key pad. Press this
button again to unlock.
10. TURBO Button
This button has no response function.
11. TIMER Button
Press this button to set the ON/OFF timer of the unit
operation.
12. FAN SPEED Button
Press this button to select fan speed.
13. MODE Button
Press this button to select system operation mode
which is a sequence as FAN, COOL, DRY and back to
FAN.
MCC-SVU01A_En.indd 6MCC-SVU01A_En.indd 6 4/18/13 5:31:29 PM4/18/13 5:31:29 PM

MCC-SVU01A 7
Auto –> Low –> Medium –> High
A
Auto –> Low –> Medium –> High
A
Control Operation
Installation of Batteries1. Slide the back cover of the remote control down to
take it off.
2. Insert two dry AAA batteries into the slot. Be sure that
the + and - directions are correct.
3. Fix the back cover to the remote control as before.
Operation Mode1. FAN MODE
Press POWER button to turn unit on.
Press MODE button to select operation mode
until indicator shows at “FAN” position on LCD
display.
Press FAN SPEED button to select the desired fan
speed level and the display will show Auto, Low,
Medium, and High respectively.
Note
- In FAN MODE, the LCD display will not show
setting temperature and cannot adjust setting
temperature, SLEEP.
2. COOL MODE Press POWER button to turn unit on.
Press MODE button to select operation mode
until indicator shows at “COOL” position on LCD
display.
Press or TEMP button to set the desired
temperature between 16 – 32 °C.
Press FAN SPEED button to select the desired fan
speed level and the display will show Auto, Low,
Medium, and High respectively.
3. DRY MODE Press POWER button to turn unit on.
Press MODE button to select operation mode
until indicator shows at “DRY” position on LCD
display.
Press or TEMP button to set the desired
temperature between 16 – 32 °C.
FAN SPEED will be automatically set at Low and
cannot be changed.
Swing ModeSwing mode help distribute better airfl ow
throughout the room.
Press SWING button to activate swing motor, the
supply air grill will automatically swing to distribute
airfl ow throughout the room.
Press SWING button again to stop the supply air
grill at any specifi c direction.
MCC-SVU01A_En.indd 7MCC-SVU01A_En.indd 7 4/18/13 5:31:29 PM4/18/13 5:31:29 PM
MCC-SVU01A8
Control Operation
Timer OperationOnce you select the timer operation, the settings
are saved in the remote control. Thereafter, the
air conditioner will start operating under the same
conditions when you simply push the POWER
button on remote control.
1. ON TIMER SettingYou can set ON TIMER to start the unit automatically
up to 24 hours.
Press TIMER button when unit is off operation,
display will show number of hours to be set for
TIMER in sequence of 1H 2H 3H ... 24H
Cancel
Once TIMER is set, press TIMER button again to
cancel TIMER.
2. OFF TIMER SettingYou can set OFF TIMER to stop the unit automatically
up to 24 hours.
Press TIMER button when unit is in operation,
display will show number of hours to be set for
TIMER in sequence of 1H 2H 3H ... 24H
Cancel
Once TIMER is set, press TIMER button again to
cancel TIMER.
SLEEP ModeSleep mode automatically and gradually adjusts
room temperature to provide great comfort during
your sleep.
Press SLEEP button, indicator shows at
“SLEEP” position on LCD display. After one
hour operation of SLEEP mode, the unit will
automatically raise set temperature by 1 °C. One
hour after that it will again raise set temperature
by 1 °C (while the set temperature shown on
remote control is still not changed). The unit will
be working at that setting temperature until SLEEP
Mode is cancelled or unit is turned off.
Press SLEEP button again to cancel this operation.
In case of power failure, changing in operation
mode, or turning off air conditioner, SLEEP mode
will be automatically cancelled.
Hold KeyHold key is used to lock the operation of key pad
of the remote control. Press Hold key to lock the
key pad. All the buttons except Hold key will be
inactive. Press this button again to active the key
pad buttons.
Notice for Operating Remote Control Do not place the remote control near high heat
source.
Do not expose the remote control in the sun.
Take care for it and prevent it from damage for
falling down.
Do not place any rolling obstacle to between the
signal receiver of the unit and remote control,
otherwise it may affect sending or incepting the
signal.
Do not spray water or other liquid on remote
control.
Do not place any clog on the remote control.
When the remote control is out of order, try
replacing the battery and operating it again. If
the failure has not been solved, please take the
emergency button to stop the air conditioner and
contact the nearest Trane service center.
MCC-SVU01A_En.indd 8MCC-SVU01A_En.indd 8 4/18/13 5:31:30 PM4/18/13 5:31:30 PM
MCC-SVU01A 9
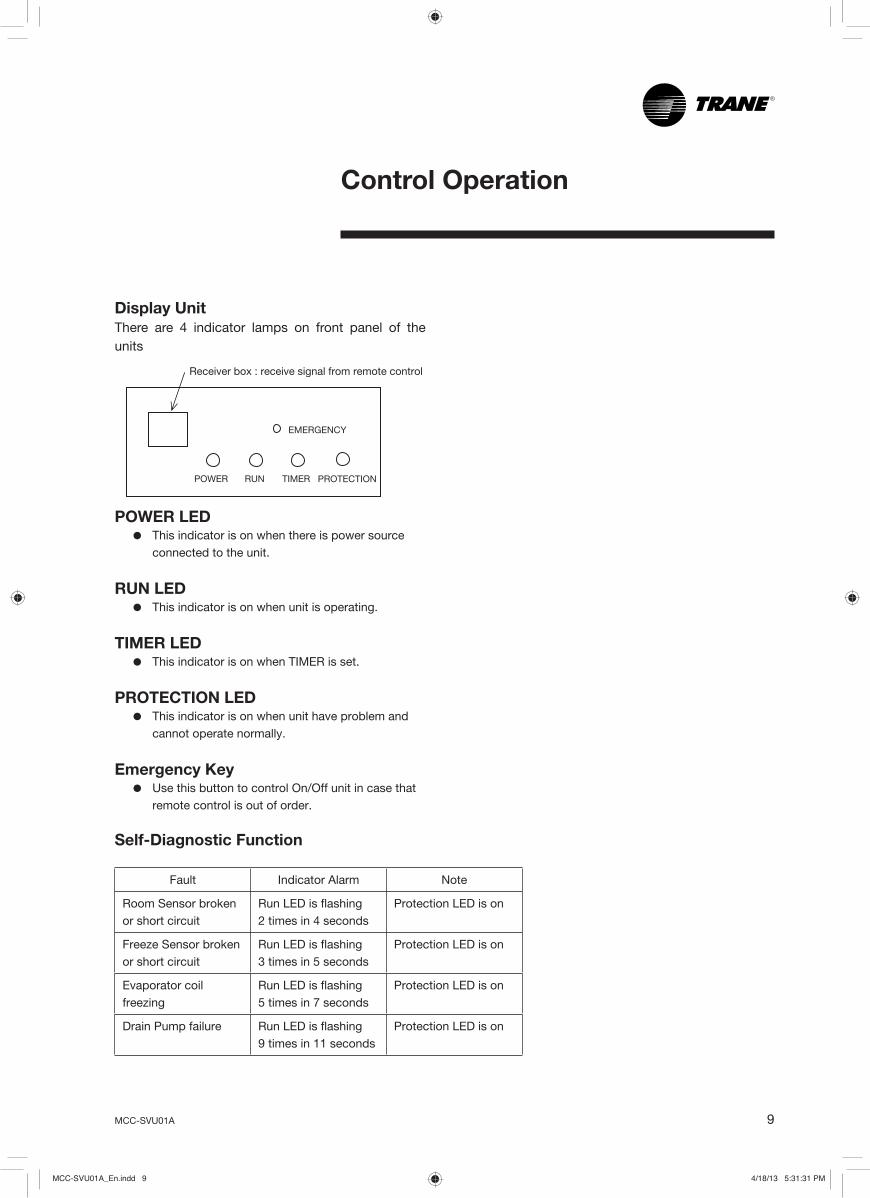
Control Operation
Display UnitThere are 4 indicator lamps on front panel of the
units
POWER LED This indicator is on when there is power source
connected to the unit.
RUN LED This indicator is on when unit is operating.
TIMER LED This indicator is on when TIMER is set.
PROTECTION LED This indicator is on when unit have problem and
cannot operate normally.
Emergency Key Use this button to control On/Off unit in case that
remote control is out of order.
Self-Diagnostic Function
POWER RUN TIMER PROTECTION
EMERGENCY
Receiver box : receive signal from remote control
Fault Indicator Alarm Note
Room Sensor broken
or short circuit
Run LED is fl ashing
2 times in 4 seconds
Protection LED is on
Freeze Sensor broken
or short circuit
Run LED is fl ashing
3 times in 5 seconds
Protection LED is on
Evaporator coil
freezing
Run LED is fl ashing
5 times in 7 seconds
Protection LED is on
Drain Pump failure Run LED is fl ashing
9 times in 11 seconds
Protection LED is on
MCC-SVU01A_En.indd 9MCC-SVU01A_En.indd 9 4/18/13 5:31:31 PM4/18/13 5:31:31 PM

MCC-SVU01A10
Filter Frame
Air Filter Air Purifying Filter
- Swing up the grille until the latches
click into the positions.
Cleaning the UnitClean the air conditioner and the
remote control with dry cloth or a
vacuum cleaner. If damp cloth is used,
remove moisture by using dry cloth
afterward.
At the Start of the Season- Check that nothing blocks the air
inlet and outlet of indoor and
outdoor units.
- Running the unit without an air filter
can cause malfunctions due to dirt
or dust. Always install an air filter at
all times.
- Check that a drainage hose does
not bend or clog.
- Check that the units are properly
installed.
During the Off Season- Cut off the power supply main
switch.
- Clean the air filter and other parts.
- Operate unit in “FAN” mode for
2-3 hours to dry out the inside of
the unit.
Suggestion:- If the filter is dirty, it will cause the
reduction of airflow, the unit is
overload and consume 6% more
of electricity. So, regular cleaning
is necessary.
Replacing Air Purifying Filter(Option)Replacement of air purifying filters.
(recommend once every three months)
- Open the grille by pulling the
latches from the front frame.
- Swing the grille open and remove
the air filter out off the grille.
- Unscrew the filter frame and
remove the air purifying filter from
the filter frame.
- Re-insert the air filter to the grille,
swing up the grille until the lacthes
click into the positions.
Information- Airflow volume is reduced when
an air purifying filter have been
installed.
Cleaning the Air FiltersBefore inspection and maintenance
of the unit, always set the main
power switch to “OFF” to cut off
power supply.
- Unclip the grille from the front
frame by pull the latches from
the front frame.
- Swing the grille open and remove
the air filter out off the grille.
- Remove the air filter and clean by
vacuum cleaner or if it is very dirty,
wash it with soap water then dry it
up in the shade and make sure it is
completely dry before reinstall it to
unit.
Maintenance
MCC-SVU01A_En.indd 10MCC-SVU01A_En.indd 10 4/18/13 5:31:31 PM4/18/13 5:31:31 PM

MCC-SVU01A 11
- The temperature should not be
set lower than what you need.
This would result to increase
energy cost.
- Clean the air filter every week for
higher efficiency.
- Draw close curtains or close glass
windows when cooling to prevent
heat load from sun light which may
cause more electricity cost.
- To distribute cool air through out
the room, adjust air flow direction
to diffuse cool air.
- Close windows and doors while
operating the unit to prevent
leakage of cooled air to save
energy.
- In case of ineffective ventilation,
open the window to ventilate the
room air once in a while but not
too long since cooled air will be
uselessly drained out.
- Check electrical system (voltage
and frequency). Use the proper
power supply indicated on the unit
to operate the air conditioner and
only fuses with specified capacity.
Do not use pieces of wire instead
of fuse.
- Do not insert objects into the air
inlet or outlet when the air
conditioner is running as it may
cause damage or personal injury.
- Do not channel the air flow directly
at people, especially infants, aged
persons, or patients.
- Turn off the air conditioner if, while
running electricity interference
occurs. If the unit is not to be used
for a long time, cut off the power
supply main switch.
- Do not locate any obstacles
against the air flow direction of
indoor and outdoor units. Inefficient
performance or malfunction may
result.
- Do not locate a heater or any other
heat sources close to the unit. The
heat may deform the plastic parts.
System Operation
MCC-SVU01A_En.indd 11MCC-SVU01A_En.indd 11 4/18/13 5:31:31 PM4/18/13 5:31:31 PM

MCC-SVU01A12
Case Explanation
Mist is discharged from the air
outlet of the indoor unit
- The cool air from the unit rapidly cools moisture in the air inside the
room, and it turns into mist.
Operation does not start
quickly.
- When ON/OFF button was
pressed soon after operation
was stopped.
- When the mode was
reselected.
- This is to protect the air conditioner. You should wait for about 3 minutes.
The indoor unit gives out odor. - This happens when smells of the room, furniture, or cigarettes are
absorbed into the unit and discharged with the airflow. (if this happens, we
recommend you to have the indoor unit washed by a technician. Consult
your authorized dealer where you bought the air conditioner.)
Water leak from the outdoor
unit.
- During COOL and DRY operation, pipe or pipe connecting sections are
cooled and this causes water to condense.
Cracking sound is heard. - This sound is generated by the expansion/contraction of the front panel,
etc. due to change in temperature.
"Burbling" sound is heard. - This sound is heard when the outside air is absorbed from the drain hose
by turning on the range hood or the ventilation fan, making water flowing
in the drain hose to spout out. This sound is also heard when the outside
air blows into the drain hose in case the outside wind is strong.
Mechanical sound is heard from
the indoor unit.
- This is the switching sound in turning on/off the fan or the compressor.
The sound of water flowing is
heard.
- This is the sound of refrigerant or condensed water flowing in the unit.
Conditions that appear to be abnormal but are not operational problems.
The following cases are not abnormal problems and you may just continue using it.
MCC-SVU01A_En.indd 12MCC-SVU01A_En.indd 12 4/18/13 5:31:32 PM4/18/13 5:31:32 PM
MCC-SVU01A 13
Symptom Explanation & Check points
The room cannot be cooled
sufficiently.
- Is the temperature setting appropriate?
- Are the airflow rate and the air direction set appropriate?
- Are the air filters clean?
- Is the fan or heat exchanger of the indoor unit clean?
- Is anything blocking the air inlet or the outlet of the indoor and the
outdoor units?
- Are the windows and doors closed?
- When a ventilation fan or gas cooker is used in a room, the cooling load
increases, resulting in an insufficient cooling effect.
- When the outside temperature is high, the cooling effect may not be
sufficient.
Hissing sound is sometimes
heard.
- This is the sound when the flow of refrigerant inside the unit is switched.
- Condenser’s casing looses.
The remote control signal is not
received
- An electric lamp is near the fan coil’s signal receiver.
- Battery power of the remote controller is not enough.
When you think that trouble has occurred
In the following cases, stop using the air conditioner and consult your dealer. When water leaks or drips from the indoor unit.
When the POWER lamp blinks.
Operation of the air conditioner interferes with radio or TV reception. An amplifi er may be required for the
affected device.
When an abnormal sound is heard.
MCC-SVU01A_En.indd 13MCC-SVU01A_En.indd 13 4/18/13 5:31:32 PM4/18/13 5:31:32 PM

MCC-SVU01A14
Check the following before contact the service man. You may find the solution to
your problems. After checking, if it still does not operate, please contact your
local dealer.
sesuaCmelborP
No operation • Check if electrical wire is damaged & check if breaker
switch is still on.
• Check if the power supply is in order.
• Check if the timer switch is on or not.
The air conditioner • Check if the preset temperature is too high.
runs but does not • Check if the sunlight shines directly into the room.
cool enough. • Check if the door and window are opened.
• Check if there is anything obstructing the air discharge.
• Check if the exhaust fan still operates.
• Check if the air filter is dirty or clogged.
Vapor or mist fume • Hot air in the room mixes with cool air.
coming out of the This causes smoke fume.
unit while running.
Inoperative remote • Loosened or disconnected wire between the unit and
control. the remote control.
• Check if the batteries are inserted in correct directions.
• Check if the batteries are exhausted or not.
Troubleshooting
MCC-SVU01A_En.indd 14MCC-SVU01A_En.indd 14 4/18/13 5:31:32 PM4/18/13 5:31:32 PM

MCC-SVU01A 15
Notes
MCC-SVU01A_En.indd 15MCC-SVU01A_En.indd 15 4/18/13 5:31:33 PM4/18/13 5:31:33 PM

Literature Order Number: MCC-SVU01A
Date: Apr 2013
Supersedes: Mar 2007
Stocking Location: Bangkok, Thailand
Trane has a policy of continuous product and product data improvement and reserves the right to change
design and specifications without notice.
Amair Limited 999/1 Moo 9 Bangna-Trad km.19 Road, Bangchalong, Bangplee, Samutprakarn 10540 Thailand
‡∑√π (ª√–‡∑»‰∑¬)‡≈¢∑’Ë 1126/2 Õ“§“√«“π‘™ 2 ™—Èπ 30-31 ∂ππ‡æ™√∫ÿ√’μ—¥„À¡à·¢«ß¡—°°– —π ‡¢μ√“™‡∑«’ °√ÿ߇∑æœ 10400
www.tranethailand.com
∫√‘…—∑ ·Õ¡·Õ√å ®”°—¥999/1 À¡Ÿà∑’Ë 9 ∂ππ∫“ßπ“-μ√“¥ °¡.19 μ”∫≈∫“ß‚©≈ß Õ”‡¿Õ∫“ßæ≈’ ®—ßÀ«—¥ ¡ÿ∑√ª√“°“√ 10540
MCC-SVU01A_En.indd 16MCC-SVU01A_En.indd 16 4/18/13 5:31:33 PM4/18/13 5:31:33 PM