Embed Size (px)
DESCRIPTION
Gliding
Citation preview

Orientation, Pre-Flight, Post-Flight1
CHAPTER 1: ORIENTATION, PRE-FLIGHT,POST-FLIGHT
You must learn some basic information before you can take to the air. In thischapter, you will learn about the glider’s controls and instruments, how toinspect the glider and towrope, how to move the glider around on the ground,and how to secure the glider when you are finished with it.

Lesson 1.1 Orientation, Pre-Flight, Post-Flight2
1.1 Primary Flight ControlsPurpose
In this lesson, you will learn the names, locations, and effects of the glider’sprimary flight controls.
Procedure
The primary flight controls consist of the stick and rudder pedals. They controlthe movement of the glider about its three axes: pitch, roll, and yaw.
Figure 1.1 – The pitch, roll, and yaw axes intersect at the center ofgravity of the glider.
Pitch is rotation of the glider about the horizontal axis that is parallel to thewings. Pitching the glider moves the nose up and down.
Roll is rotation of the glider about the horizontal axis that is parallel to thefuselage (often referred to as the longitudinal axis). Rolling the glider causes onewing to move up and the other down.
Yaw is rotation about the vertical axis. Yawing the glider causes the nose to movefrom side to side.
Pitch ControlMoving the stick fore and aft causes the elevator (or stabilator) to deflect,changing the pitch of the glider and the angle of attack of the wing. In normal,level flight, moving the stick forward causes the nose of the glider to pitch down,decreasing the angle of attack and increasing the airspeed of the glider. Movingthe stick back pitches the nose up, increasing the angle of attack and decreasingthe airspeed of the glider.
Orientation, Pre-Flight, Post-Flight Lesson 1.13
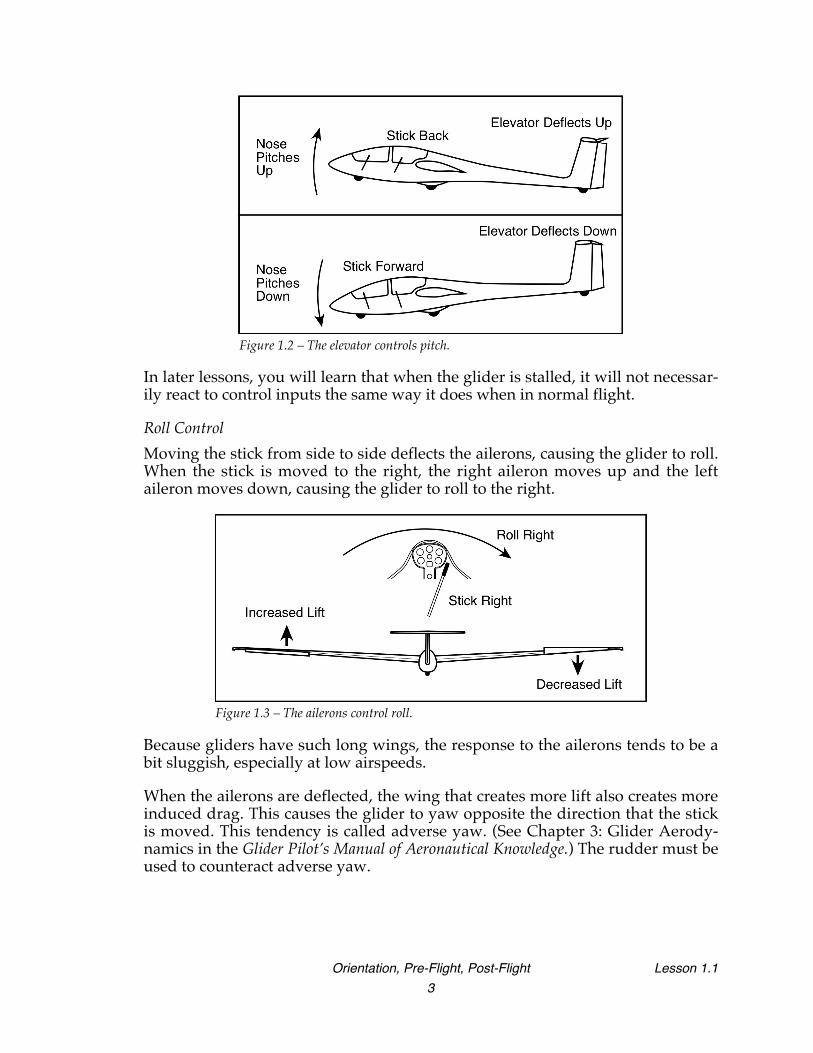
Figure 1.2 – The elevator controls pitch.
In later lessons, you will learn that when the glider is stalled, it will not necessar-ily react to control inputs the same way it does when in normal flight.
Roll ControlMoving the stick from side to side deflects the ailerons, causing the glider to roll.When the stick is moved to the right, the right aileron moves up and the leftaileron moves down, causing the glider to roll to the right.
Figure 1.3 – The ailerons control roll.
Because gliders have such long wings, the response to the ailerons tends to be abit sluggish, especially at low airspeeds.
When the ailerons are deflected, the wing that creates more lift also creates moreinduced drag. This causes the glider to yaw opposite the direction that the stickis moved. This tendency is called adverse yaw. (See Chapter 3: Glider Aerody-namics in the Glider Pilot’s Manual of Aeronautical Knowledge.) The rudder must beused to counteract adverse yaw.

Lesson 1.1 Orientation, Pre-Flight, Post-Flight4
Yaw ControlThe rudder pedals control the glider about the yaw axis. Pushing on the rightrudder deflects the rudder to the right, forcing the nose to the right, and viceversa.
Figure 1.4 – The rudder controls yaw.
Again, the long wings of a glider tend to make it respond to the rudder ratherslowly. The glider will tend to oscillate in yaw because of the momentum of thewings and the relatively small amount of damping provided by the verticalstabilizer.
Completion Standard
This lesson is complete when you can locate and describe the effects of the stickand rudder pedals.

Orientation, Pre-Flight, Post-Flight Lesson 1.25
1.2 Secondary Flight ControlsPurpose
In this lesson, you will learn about the remaining flight controls, including thetowrope release, the airbrakes, the wheel brake, and the elevator trim. If theglider you are using for flight training is equipped with a retractable undercar-riage or flaps, the location and use of their controls will also be covered in thislesson.
ProcedureTowrope ReleaseThe tow hook is opened by the towrope release knob. This knob is usuallylocated on the instrument panel or on the left side of the glider. Your instructorwill show you the location of the towrope release knob in the glider that you willuse for training.
AirbrakesThe airbrakes are used for glide slope control. In this manual, the term “air-brakes” will be used to refer to both dive brakes and spoilers. The airbrakes areused to control the glide path of the glider. For a steeper path, you use moreairbrakes.
Figure 1.5 – As the airbrake handle is pulled back, the airbrakes open. The airbrakes control the glide path.On most gliders, pulling the airbrakes all the way open engages the wheel brake.
The airbrakes are deployed by moving the airbrake handle. The airbrake handleis usually located on the left side of the glider. Your instructor will demonstratehow to unlock and deploy the airbrakes. On many gliders, pulling the airbrakehandle all the way back engages the wheel brake. On others, the wheel brake isactivated by a lever mounted on the control stick, or elsewhere in the cockpit.
Elevator TrimThe elevator trim is used to set the airspeed at which the glider will fly when nofore or aft force is applied to the control stick. Your instructor will show you thelocation and function of the trim control on the glider you are using for yourtraining.

Lesson 1.2 Orientation, Pre-Flight, Post-Flight6
FlapsSome gliders have flaps that decrease the stall speed by increasing the amount oflift that the wing can produce. Flaps can also be used to decrease the drag at highairspeeds. If your glider is equipped with flaps, your instructor will show youthe location and function of the flap control.
UndercarriageSome gliders have retractable landing gear (also referred to as the undercarriage)for decreasing drag during flight. If your glider is so equipped, your instructorwill explain the procedure for retracting and lowering the gear.
Completion Standard
This lesson is complete when you can locate and describe the use of the towroperelease, airbrakes, wheel brake, and trim controls, and if the training glider is soequipped, the flaps and undercarriage controls.