Embed Size (px)
Citation preview

MCRP 3-01B Pistol Marksmanship
Chapter 3 Weapons Handling
Weapons handling is a method of providing consistent and standardized procedures for handling, operating, and employing the M9 service pistol. Understanding and applying the principles of weapons handling are critical to developing safe and consistent weapons skills. Strict adherence to training and diligent practice will make weapons handling instinctive. Mission accomplishment and survival in combat depend on it.
Note The procedures in this chapter are written for right-handed
Marines; left-handed Marines should reverse directions as needed.
3001. Safety Rules The four safety rules are the foundation for responsible weapons handling. These rules must be observed at all times whether in training or in combat. a. Rule 1: Treat every weapon as if it were loaded. This rule is intended to prevent unintentional injury to personnel or damage to property from handling or transferring possession of a weapon. (See paragraph 3018 on transferring the pistol from one Marine to another.) b. Rule 2: Never point a weapon at anything you do not intend to shoot. This rule enforces the importance of muzzle awareness and reinforces positive identification of the target. c. Rule 3: Keep your finger straight and off the trigger until you are ready to fire. When not firing, the trigger finger is straight along the receiver, outside of the trigger guard. This rule is intended to minimize the risk of firing the weapon negligently. This rule also reinforces positive identification of the target. d. Rule 4: Keep weapon on safe until you intend to fire. This rule enforces the use of the weapon's own safety feature and reinforces positive identification of the target. 3002. Weapons Conditions The M9 service pistol's level of readiness is defined by three specific conditions. The steps in the loading and unloading process take the weapon through the specific conditions which indicate the weapon's readiness for live fire. The Marine must understand and know the condition of his weapon at all times. The conditions for the M9 service pistol are:
3-1
MCRP 3-01B Pistol Marksmanship
a. Condition 1. Magazine inserted, round in chamber, slide forward, and safety on. b. Condition 2. Not applicable to the M9 service pistol. c. Condition 3. Magazine inserted, chamber empty, slide forward, and safety on. d. Condition 4. Magazine removed, chamber empty, slide forward, and safety on. 3003. Determining a Weapon’s Condition There are two methods for determining the weapon’s condition: checking the round indicator on the right side of the pistol, and conducting a chamber check.
a. Checking the Round Indicator. When there is a round in the chamber, the upper surface of the extractor protrudes from the right side of the slide. The protrusion can be felt by sliding either the thumb or the index finger of the left hand over the top of the slide and across the extractor. See figure 3-1.
Figure 3-1. Checking the Round Indicator.
b. Conducting a Chamber Check
�� With the weapon pointed in a safe direction, grasp the pistol grip with the right hand.
3-2

MCRP 3-01B Pistol Marksmanship
Place the trigger guard in the palm of the left hand and, with the thumb and index finger, grasp the forward end of the slide at the indendations under the front sight, behind the muzzle. See figure 3-2.
CAUTION Ensure the muzzle does not cover the hand or fingers.
Figure 3-2. Chamber Check - Placement of the Left Hand.
Keeping the thumb in place around the backstrap of the pistol, rotate the fingers of the right hand over the top of the slide in front of the rear sight.
��
�� Pull the slide to the rear by pushing forward with the right thumb and pulling back on the
rear sight with the fingers. Use the left hand to steady the weapon and to assist in pulling the slide to the rear.
�� Hold the slide to the rear with the right hand just enough to visually inspect the chamber
for a round. Physically check for a round by inserting a finger of the right hand into the chamber area. See figure 3-3. At night or in low light conditions, the Marine will have to rely on the physical check with the finger to determine if a round is in the chamber.
3-3

MCRP 3-01B Pistol Marksmanship
Figure 3-3. Chamber Check.
CAUTION Pulling the slide too far to the rear while inspecting the chamber
may cause a double feed or the ejection of a round.
�� Remove the finger from the chamber and release tension on both hands to allow the slide to go forward. Ensure the slide is all the way forward.
3004. Weapons Commands Weapons commands direct the Marine to safely load, unload, and employ the M9 service pistol. Six commands are used in weapons handling. a. “Load.” This command is used to take a weapon from Condition 4 to Condition 3. b. “Make Ready.” This command is used to take a weapon from Condition 3 to Condition 1. c. “Fire.” This command is used to engage targets. d. “Cease Fire.” This command is used to cease target engagement. e. “Unload.” This command is used to take a weapon from any condition to Condition 4.
3-4

MCRP 3-01B Pistol Marksmanship
f. “Unload, Show Clear.” This command is used to require a second individual to check the weapon to verify that no ammunition is present before the weapon is put into Condition 4. 3005. Loading the Pistol Perform the following steps to load the pistol (take the pistol from Condition 4 to Condition 3):
�� Ensure the pistol is on safe.
�� With the right hand firmly gripping the pistol grip and the pistol pointed in a safe direction, bring the trigger guard to the right of eye level and cant the pistol so the magazine well is facing inboard at approximately a 45-degree angle to the deck. Draw the right elbow in to facilitate control of the weapon.
�� With the left hand, remove a filled magazine from the ammunition pocket. Index the
magazine by sliding the index finger along the forward edge of the magazine. See figure 3-4.
Figure 3-4. Indexing the Magazine.
�� Insert the filled magazine into the magazine well by guiding it with the index finger and,
with the fingers extended, pushing it in with the heel of the hand until it is fully seated. Do not relinquish contact with the magazine until it is fully seated. See figure 3-5.
3-5

MCRP 3-01B Pistol Marksmanship
Figure 3-5. Seating the Magazine. 3006. Making the Pistol Ready Perform the following steps to take the pistol from Condition 3 to Condition 1:
�� Firmly grip the pistol grip with the right hand. Ensure the pistol is pointed in a safe direction and the slide is in its forward position.
�� To facilitate pulling the slide to the rear, rotate the magazine well outboard. With the
fingers and thumb of the left hand, grasp the serrated sides of the slide just forward of the safety. See figure 3-6a and 3-6b.
CAUTION Ensure the muzzle does not cover the hand or fingers.
Figure 3-6a. Grasping the Slide to Make Ready (Right-Side View).
3-6
MCRP 3-01B Pistol Marksmanship
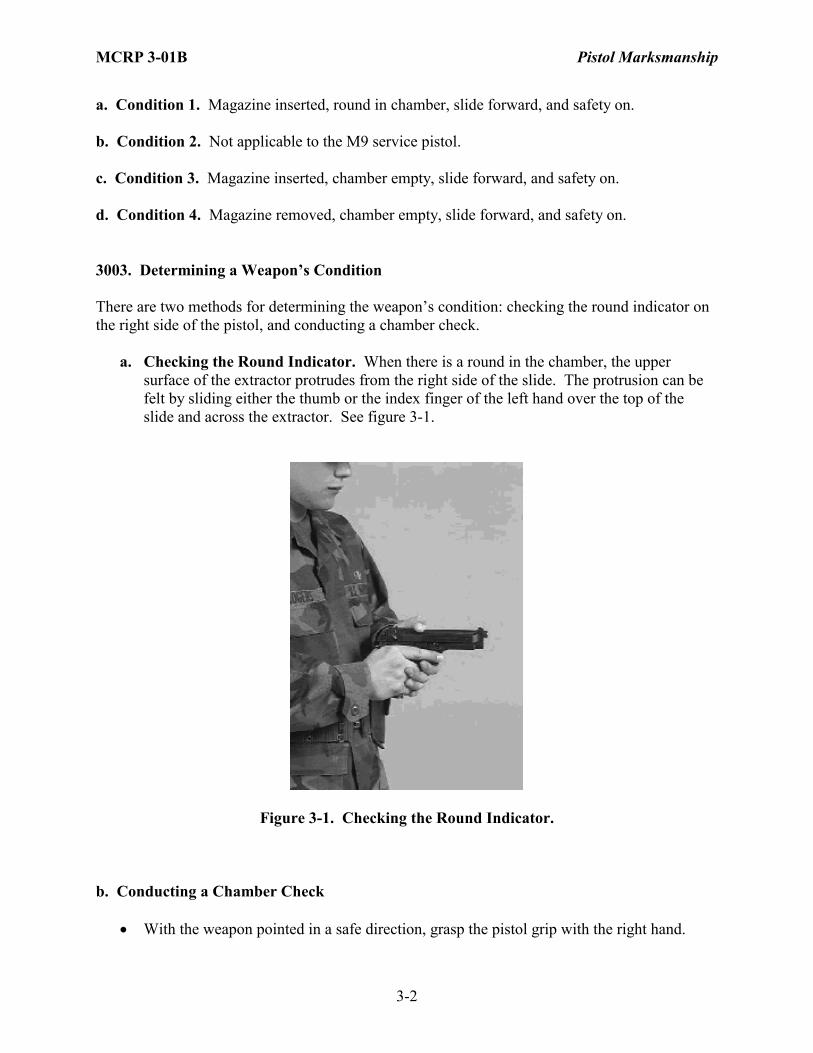
Figure 3-6b. Grasping the Slide to Make Ready (Left-Side View).
�� Pull the slide to its rearmost position by pushing forward with the right hand while
pulling back on the slide with the left hand.
�� Release the slide. This will strip a round from the magazine and chamber it as the slide moves forward.
�� Ensure the weapon remains on safe.
�� Conduct a chamber check to ensure a round is in the chamber. (A chamber check may be conducted at any time to check the pistol's condition.)
3007. Fire Perform the following steps to fire the pistol:
�� With a straight trigger finger, take the weapon off safe with the right thumb.
�� Place the trigger finger on the trigger and apply pressure to the trigger until the shot is fired.
3008. Cease Fire Perform the following steps to stop firing the pistol:
�� Remove the finger from the trigger and place it straight along the receiver.
3-7

MCRP 3-01B Pistol Marksmanship
�� Place the weapon on safe without breaking the grip of the right hand.
�� Assume a carry or transport.
3009. Unloading the Pistol Perform the following steps to take the pistol from any condition to Condition 4:
�� With the right hand firmly gripping the pistol, ensure the pistol is on safe.
�� Rotate the pistol so the magazine well is pointed inboard and angled down.
Note The angle of the magazine well must facilitate the magazine falling freely from the well when the magazine release button is engaged.
�� Depress the magazine release button to remove the magazine from the pistol. Catch the
magazine with the left hand and retain it.
�� Push upward on the slide stop with the right thumb and maintain pressure. Rotate the weapon so the chamber is outboard.
Note
A left-handed Marine will push upward on the slide stop with the left index finger.
�� Reach over the top of the pistol with the left hand and grasp the slide serrations with the
thumb and index finger. The left hand should partially cover the ejection port so it is positioned to catch an ejected round.
�� With the weapon pointed in a safe direction, fully retract the slide and lock it to the rear.
At the same time, catch the ejected round with the left hand. See figure 3-7.
3-8

MCRP 3-01B Pistol Marksmanship
Figure 3-7. Catching the Ejected Round.
�� Rotate the pistol so the inside of the chamber can be seen. Visually inspect the chamber
to ensure it is empty.
�� Press the slide stop to release the slide and observe it going forward on an empty chamber.
3010. Unloading and Showing the Pistol Clear Perform the following steps to take the pistol from any condition to Condition 4:
�� With the right hand firmly gripping the pistol, ensure the pistol is on safe.
�� Rotate the pistol so the magazine well is pointed inboard and angled down.
Note The angle of the magazine well must facilitate the magazine falling freely from the well when the magazine release button is engaged.
�� Depress the magazine release button to remove the magazine from the pistol. Catch the
magazine with the left hand and retain it.
�� Push upward on the slide stop with the right thumb and maintain pressure. Rotate the weapon so the chamber is outboard.
3-9

MCRP 3-01B Pistol Marksmanship
Note A left-handed Marine will push upward on the
slide stop with the left index finger.
�� Reach over the top of the pistol with the left hand and grasp the slide serrations with the thumb abd index finger. The left hand should partially cover the ejection port so it is positioned to catch an ejected round.
�� With the weapon pointed in a safe direction, fully retract the slide and lock it to the rear.
At the same time, catch the ejected round with the left hand.
�� Rotate the pistol so the inside of the chamber can be seen. Visually inspect the chamber to ensure it is empty.
�� Bring the pistol to the administrative transport and have a second party inspect the
chamber to ensure no ammunition is present. See figure 3-8. The second individual:
�� Visually inspects the pistol's chamber to ensure it is empty, no ammunition is present, and the magazine is removed.
�� Ensures the weapon is on safe. �� Acknowledges the pistol is clear.
�� Press the slide stop to release the slide and observe it going forward on an empty
chamber.
Figure 3-8. Unload, Show Clear.
3-10

MCRP 3-01B Pistol Marksmanship
3011. Emptying the Magazine Once the weapon is unloaded, the pistol magazine can be emptied of ammunition. To empty the magazine, perform the following steps:
�� Hold the magazine upright with the back of the magazine tube against the palm of the hand.
�� Push the top round forward with the thumb and catch it with the other hand as it is
removed.
�� Repeat until the magazine is empty. 3012. Filling the Magazine Prior to loading the weapon, the pistol magazine must be filled with the prescribed number of rounds of ammunition. To fill the magazine, perform the following steps:
�� Hold the magazine with the back of the magazine against the palm of the hand and the follower up.
�� With the other hand, place a round (primer end first) on the follower in front of the
magazine lips.
�� Press down on the round and slide the round completely back under the lips. The thumb or finger may push down on the back of the round to assist. The base of the round should be flush with the back of the magazine. See figure 3-9.
3-11

MCRP 3-01B Pistol Marksmanship
Figure 3-9. Filling the Magazine.
�� Repeat this procedure until the magazine is filled with the appropriate number of rounds.
Holes on the back of the magazine allow the visual counting of rounds in five-round increments.
3013. Reloading the Pistol The ability to reload the pistol quickly will improve the Marine's chances for success on the battlefield. a. Dry Reload. A dry reload is conducted when the pistol runs out of ammunition during engagement and the slide locks to the rear. To perform a dry reload with the slide locked to the rear, perform the following steps:
Note The weapon is not placed on safe during a dry reload;
the trigger finger is taken out of the trigger guard and placed straight along the side of the receiver.
3-12

MCRP 3-01B Pistol Marksmanship
�� Seek cover, if the situation permits.
�� While retaining the firing grip with the right hand, pull the pistol in close to the body to facilitate control. Bring the trigger guard to the right of eye level and cant the pistol so the magazine well is facing inboard at approximately a 45-degree angle to the deck.
�� Press the magazine release button and let the empty magazine fall to the deck. At the
same time, unfasten the ammunition pocket to withdraw a filled magazine:
Note The primary objective during a dry reload is to
get the pistol back in action as quickly as possible. Following engagement, retain the
magazine before moving.
Grasp the magazine by curling the middle finger and thumb of the left hand around the base of the magazine, with the index finger straight along the ammunition pocket.
��
��
��
As the magazine is being withdrawn from the pocket, the index finger should be along the front of the magazine. This is known as indexing the magazine.
Rotate the hand up so the magazine is aligned with the magazine well.
�� With a quick glance at the magazine well, insert the magazine into the magazine well.
�� While bringing the eyes back on target, seat the magazine with the heel of the left hand
without relinquishing contact with the magazine.
�� Roll both hands inward to establish a two-handed grip and press the slide release with the left thumb to allow the slide to move forward, chambering the first round, and present the weapon to the target.
Note
A left-handed Marine will press the slide release with his trigger finger.
b. Condition 1 Reload. In a Condition 1 reload, a partially filled magazine is removed from the pistol and replaced with a fully filled magazine. A Condition 1 reload is performed when there is a lull in the action or whenever deemed necessary by the Marine. To perform a Condition 1 reload:
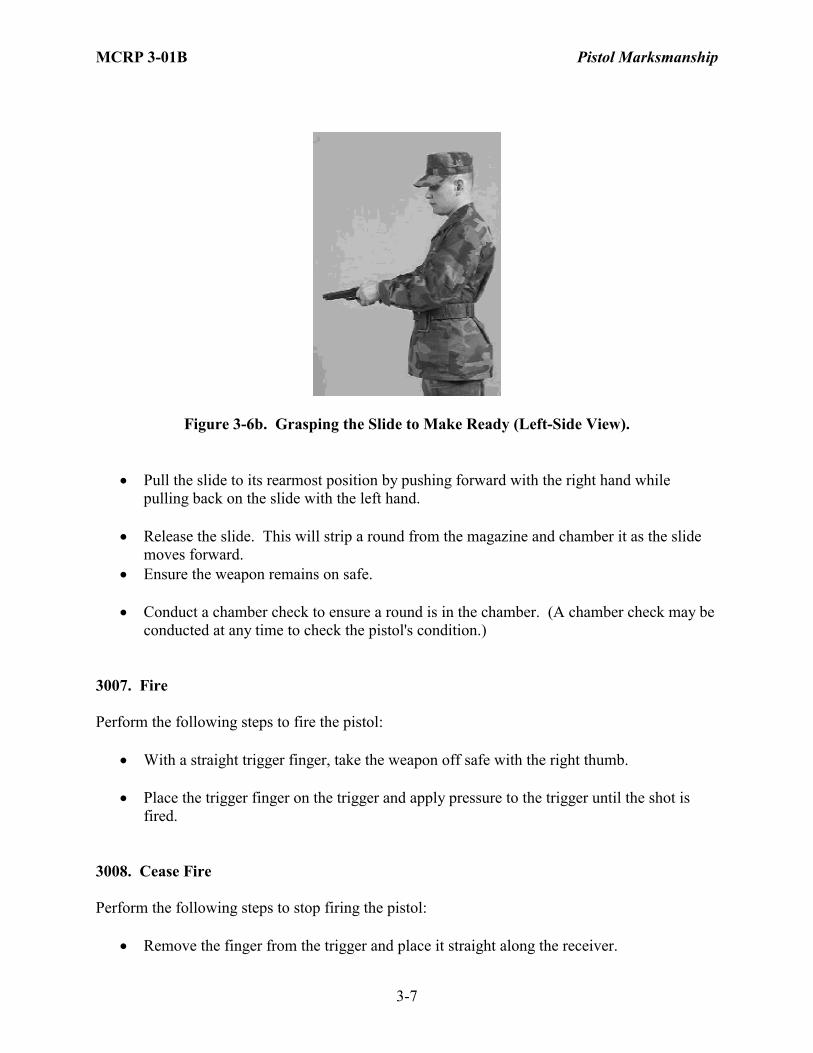
�� While retaining the firing grip with the right hand, pull the pistol in close to the body to facilitate control. Keep the weapon pointed in the direction of the likely threat. See figure 3-10.
3-13
MCRP 3-01B Pistol Marksmanship
Figure 3-10. Condition 1 Reload – Facilitating Control of Pistol.
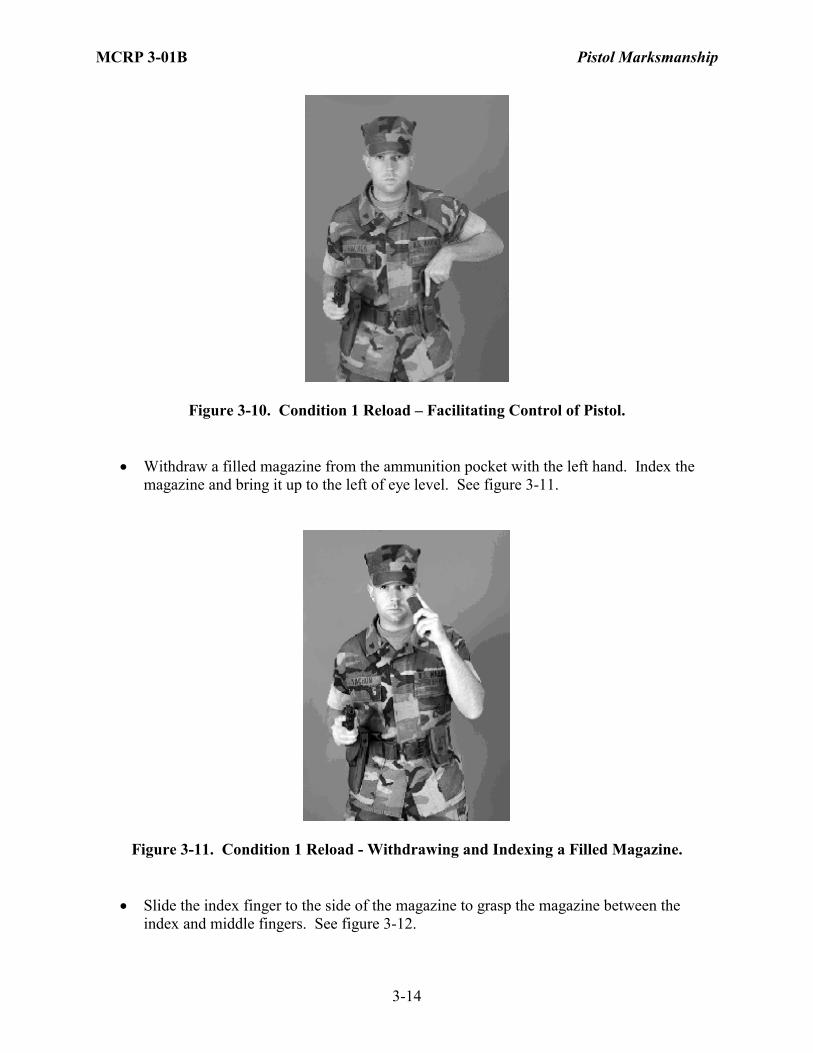
�� Withdraw a filled magazine from the ammunition pocket with the left hand. Index the
magazine and bring it up to the left of eye level. See figure 3-11.
Figure 3-11. Condition 1 Reload - Withdrawing and Indexing a Filled Magazine.
�� Slide the index finger to the side of the magazine to grasp the magazine between the
index and middle fingers. See figure 3-12.
3-14

MCRP 3-01B Pistol Marksmanship
Figure 3-12. Condition 1 Reload – Grasping a Filled Magazine.
�� Raise the pistol and bring the trigger guard to the right of eye level and cant the pistol so
the magazine well is facing inboard at approximately a 45-degree angle to the deck.
Note The angle of the magazine well must facilitate the magazine
falling freely from the well when the magazine release button is engaged.
�� Press the magazine release button with the right thumb to eject the partially filled magazine from the magazine well to grasp it between the index finger and thumb. See figure 3-13.
Figure 3-13. Condition 1 Reload - Removing a Partially Filled Magazine.
3-15

MCRP 3-01B Pistol Marksmanship
�� Insert the filled magazine into the magazine well and using the heel of the hand, ensure it is fully seated. See figures 3-14 and 3-15.
Figure 3-14. Condition 1 Reload - Inserting a Filled Magazine.
Figure 3-15. Condition 1 Reload - Seating a Filled Magazine.
3-16

MCRP 3-01B Pistol Marksmanship
Lower the pistol and point it in the direction of the likely threat. ��
�� If time permits, examine the partially filled magazine to determine the number of rounds
remaining. Stow the partially filled magazine in the ammunition pocket for later use. c. Considerations for Reloading
(1) The first priority when performing a reload is to get the pistol reloaded and back into action. (2) The second priority when performing a reload is to retain the magazine so when the Marine moves, the magazine moves with him. (3) When time permits (i.e., Condition 1 reload), retain magazines securely (e.g., ammunition pocket, flak jacket). It requires discipline to retain all equipment. (4) The combat situation may dictate dropping the magazine to the deck when performing a reload (i.e., dry reload). When possible, pick it up and retain it before moving to another location. (5) Take cover before reloading, if possible. Always reload before leaving cover to take advantage of the protection. (6) When reloading, the focus should be on reloading only. Do not focus on the enemy; focus for that instant second on the magazine change.
3014. Remedial Action The M9 service pistol is an effective and extremely reliable weapon. Proper care and preventive maintenance will usually ensure the pistol's serviceability. Stoppages, while infrequent, do occur. To keep the weapon in action, stoppages must be cleared as quickly as possible through remedial action. a. Stoppage. A stoppage is an unintentional interruption in the cycle of operation. An example of a stoppage is the slide not going fully forward. A stoppage is normally discovered when the pistol will not fire. Most stoppages can be prevented by proper care, cleaning, and lubrication of the pistol. b. Malfunction. A malfunction is a failure of the pistol to fire satisfactorily or to perform as designed. A malfunction does not necessarily cause an interruption in the cycle of operation. An example of a malfunction is a broken front sight which does not affect the functioning of the weapon. When a malfunction occurs, the weapon must be repaired by an armorer. c. Introduction to Remedial Action. There is no one set of procedures (i.e., immediate action) that can be performed to clear all or even most of the stoppages that can occur with the M9
3-17
MCRP 3-01B Pistol Marksmanship
service pistol. Therefore, with the pistol, the stoppage must be investigated and remedial action must be performed to clear it. d. Shooter-induced Stoppages. Many stoppages of the M9 service pistol are caused by shooter error. The Marine must be aware of these shooter-induced stoppages so he can avoid making these mistakes and, if he does make a mistake, can quickly identify and remedy a problem and get his weapon back into action. Shooter-induced stoppages include:
(1) The shooter fails to make ready. (2) The shooter fails to take the weapon off safe prior to firing. (3) The shooter engages the safety while firing. (4) The shooter engages the magazine release button while firing. (5) The shooter engages the slide stop while firing. This is particularly prevalent when firing with an Isosceles grip. (6) The shooter fails to reset the trigger. (7) The shooter fails to recognize the weapon has run dry and the slide has locked to the rear.
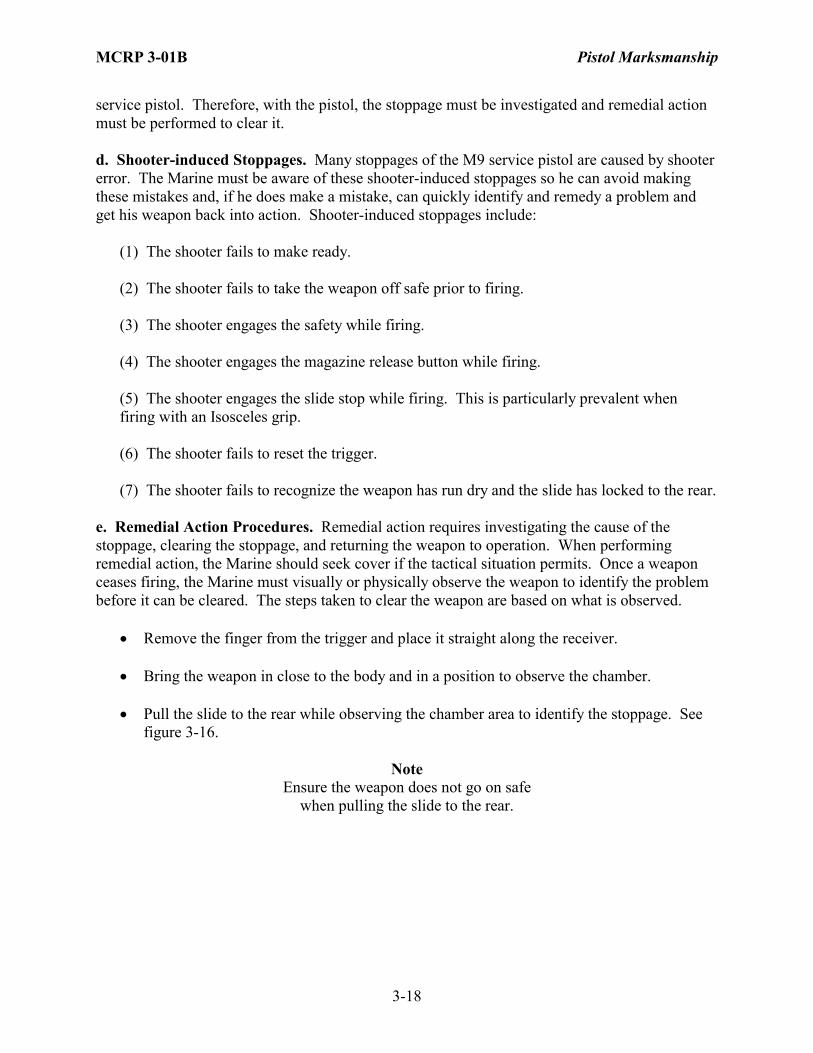
e. Remedial Action Procedures. Remedial action requires investigating the cause of the stoppage, clearing the stoppage, and returning the weapon to operation. When performing remedial action, the Marine should seek cover if the tactical situation permits. Once a weapon ceases firing, the Marine must visually or physically observe the weapon to identify the problem before it can be cleared. The steps taken to clear the weapon are based on what is observed.
Remove the finger from the trigger and place it straight along the receiver. ��
��
��
Bring the weapon in close to the body and in a position to observe the chamber.
Pull the slide to the rear while observing the chamber area to identify the stoppage. See figure 3-16.
Note
Ensure the weapon does not go on safe when pulling the slide to the rear.
3-18

MCRP 3-01B Pistol Marksmanship
Figure 3-16. Remedial Action – Observing Chamber.
��
��
Correct the stoppage:
If there is a round in the magazine but not in the chamber (see figure 3-17):
Figure 3-17. Remedial Action – Round in Magazine but Not in Chamber.
3-19

MCRP 3-01B Pistol Marksmanship
Release the slide and observe a round being chambered. ��
��
If you do not observe a round being chambered, tap the bottom of the magazine to seat it properly, and rack the slide to the rear. See figure 3-18.
Figure 3-18. Remedial Action – Round Not Being Chambered.
If there is no round in the magazine or chamber, conduct a reload. See figure 3-19. ��
��
Fire the weapon.
Figure 3-19. Remedial Action – No Round in Magazine or Chamber. f. Indicator – Audible Pop or Reduced Recoil
WARNING
3-20

MCRP 3-01B Pistol Marksmanship
When an audible pop or reduced recoil is experienced, under no circumstances is remedial action performed.
An audible pop occurs when only a portion of the propel- lant is ignited. It is normally identifiable by reduced recoil and a lower report – the pistol will not cycle.
This is sometimes accompanied by excessive smoke escaping from the chamber area.
(1) Training Environment. If an audible pop or reduced recoil is experienced during firing, immediately cease fire. Do not apply remedial action; instead, perform the following steps:
�� Remove the finger from the trigger and place it straight along the receiver.
�� Point the pistol down range.
�� Place the pistol on safe.
�� Raise a hand for assistance from range personnel.
(2) Combat Environment. The tactical situation may dictate correction of an audible pop or reduced recoil. To clear the pistol, perform the following steps:
�� Remove the finger from the trigger and place it straight along the receiver.
�� Seek cover if the tactical situation permits.
�� Unload the pistol, but leave the slide locked to the rear.
�� Insert something into the bore and clear the obstruction.
�� Observe the barrel for cracks or bulges.
�� Reload the weapon.
3015. Weapons Carries As the threat level increases, so should the Marine's readiness for engagement. The weapons carries are designed to place the Marine in a state of increased readiness as the threat level increases. There are two carries with the pistol; the carries permit quick engagement when necessary.
a. Alert. The Alert is used when enemy contact is likely (probable). See figures 3-20. The Marine performs the following steps to assume the Alert:
3-21

MCRP 3-01B Pistol Marksmanship
Figure 3-20. Alert.
�� Ensure the pistol is on safe.
�� Grasp the pistil grip firmly with two hands. The trigger finger is straight and the right thumb is on the safety in a position to operate it.
�� The arms may be extended down at approximately a 45-degree angle to the body or the
elbows may be bent. Bending the elbows is particularly advantageous in close quarter environments for additional control when moving. See figures 3-21.
�� The muzzle of the pistol is pointed in the likely direction of the threat.
3-22

MCRP 3-01B Pistol Marksmanship
Figure 3-21. Alert - Close Quarters.
b. Ready. The Ready is used when there is no target, but contact with the enemy is imminent. See figures 3-22. The Marine performs the following steps to assume the Ready:
�� Ensure the pistol is on safe.
�� Grasp the pistol firmly with two hands. The trigger finger is straight and the right thumb is on the safety in a position to operate it.
�� Extend the arms and raise the pistol to just below eye level so a clear field of view is
maintained.
�� The muzzle of the pistol is pointed in the direction of enemy contact.
3-23

MCRP 3-01B Pistol Marksmanship
Figure 3-22. Ready.
3016. Weapons Transports The M9 service pistol is transported in either the holster transport or the administrative transport. a. Holster Transport. The holster transport is the most common method of carrying the pistol because it can be transported safely in the holster. This transport is used when there is no immediate threat (enemy contact remote). See figure 3-23. To transport the pistol in the holster:
�� With the pistol pointed in a safe direction, ensure the safety is on, the slide is forward, and the trigger finger is straight.
�� With the right hand firmly gripping the pistol grip, place the pistol in the holster:
�� Lift the flap of the holster with the left hand.
�� Look down at the holster, bring the pistol back to a position above the holster and
rotate the muzzle down into the holster.
CAUTION Ensure the pistol is pointed in a safe
direction at all times and does not cover any part of the body while holstering.
3-24

MCRP 3-01B Pistol Marksmanship
�� Push the pistol snugly into the holster and fasten the flap with the right hand.
Figure 3-23. Holster Transport.
b. Administrative Transport. The administrative transport is used to transport the pistol when the Marine does not have a holster. See figure 3-24. The Marine performs the following steps to assume the administrative transport:
�� Establish a firm grip around the pistol grip with the right hand.
�� Ensure the pistol is on safe, the magazine is removed, the slide is locked to the rear, and the trigger finger is straight along the receiver.
�� Bend the elbow to approximately a 45-degree angle so the pistol is positioned near
shoulder level. The wrist should be straight so the muzzle of the weapon is pointing up.
3-25

MCRP 3-01B Pistol Marksmanship
Figure 3-24. Administrative Transport.
3017. Development of a Combat Mindset The development of a combat mindset can be associated with the carries and holster transport for the pistol. The use of each carry/transport is dictated by the perceived level of threat. Each carry and transport should signify a stage of mental preparedness for combat. The intensity of the Marine's mental and physical preparation will depend on the likelihood of enemy contact. At this point, the physical techniques for assuming each carry/transport should be automatic, allowing the Marine to focus on the development of the appropriate level of mental preparation associated with each. The threat level should dictate the carry/transport used. As the carry/transport is assumed, the Marine should mentally prepare himself to engage a target. a. No Immediate Threat. When there is no immediate threat, assume the Holster Transport. The pistol should be in Condition 1. In terms of mental preparation, this is the lowest level of awareness for the Marine in a combat environment. The Marine should be constantly alert and aware of any activity in his surroundings. To be prepared for target engagement at this level, the Marine must:
(1) Be aware of likely areas of enemy contact. (2) Be aware of the condition of his pistol. (3) Establish a plan or course of action to present the weapon to a target should a target appear. (4) Mentally review appropriate actions such as reloading and remedial action.
b. Contact Likely (Probable). When enemy contact is likely (probable), assume the Alert. When enemy contact is likely the Marine should:
3-26

MCRP 3-01B Pistol Marksmanship
(1) Expect enemy contact and be constantly prepared to present the weapon. (2) Search the entire area for indications of enemy targets and for suitable terrain features that offer cover and concealment. Avoid restricting the search to a single terrain feature because this will hinder an awareness of the Marine’s sector of the battlefield and of likely enemy approach. Avoid tunnel vision. (3) Be mentally prepared for contact. Plan a course of action for immediate response to a target. Modify the plan of action as the situation dictates. (4) Be physically prepared to fire. Maintain proper balance at all times. Avoid self-induced physical fatigue. For example, do not grip the weapon so tightly that fingers, hands, and arms tire from carrying the weapon.
c. Contact Imminent. When contact with an enemy target is imminent, assume the Ready. In this carry the Marine should be at his highest level of awareness and should be constantly searching for and expecting a target. To fire well-aimed shots upon target detection, the Marine must be at the peak of his mental preparation. All distractions must be eliminated and his focus must be on firing an accurate shot. In the Ready, the Marine must:
(1) Keep the pistol oriented in the general direction of observation (eyes, muzzle, target). (2) Maintain a clear field of view above the weapon sights until the target is detected. (3) Be mentally and physically prepared to engage the target. The Marine must be ready to:
(a) Identify the target. (b) Sweep the safety. (c) Apply the fundamentals of marksmanship.
(4) Move only as fast as he is capable of delivering well-aimed shots. Ensure the speed of engagement does not exceed his physical abilities. (5) Search the entire area for indications of enemy targets, lowering the pistol enough to observe a clear field of view of the area. Avoid tunnel vision.
3-27

MCRP 3-01B Pistol Marksmanship
3018. Transferring the Pistol The Marine's ability to transfer a weapon to another Marine is critical to safe weapons handling. There are two methods for transferring the pistol from one Marine to another. Each is performed based on the operational environment/combat situation. a. "Show Clear" Transfer. To transfer the weapon:
�� While grasping the pistol firmly in the right hand, ensure the pistol is on safe.
�� Remove and retain the magazine.
�� Lock the slide to the rear and catch the round if there is a round in the chamber.
�� Visually inspect the chamber to ensure it is empty and leave the slide locked to the rear.
�� If the other Marine is to the right: Cradle the trigger guard in the palm of the left hand and wrap the fingers around the top of the pistol. Release the firing grip.
If the other Marine is to the left: With the left hand, grasp the slide of the pistol with the thumb over the slide and the fingers underneath. Release the firing grip.
��
�� With the muzzle pointed up at a 45-degree angle in a safe direction and the chamber
exposed, hand the pistol to the other Marine, grip first. See figure 3-25.
Figure 3-25. “Show Clear” Transfer.
�� The other Marine:
3-28

MCRP 3-01B Pistol Marksmanship
�� Grasps the pistol grip with the trigger finger straight along the receiver.
�� Visually inspects the chamber to ensure it is empty.
�� Ensures the pistol is on safe.
b. Condition Unknown Transfer. To transfer the weapon:
�� While grasping the pistol firmly in the right hand, ensure the pistol is on safe.
�� If the other Marine is to the right: Cradle the trigger guard in the palm of the left hand and wrap the fingers around the top of the pistol. Release the firing grip. See figure 3-26.
Figure 3-26. Condition Unknown Transfer – to the Right.
If the other Marine is to the left: With the left hand, grasp the slide of the pistol with the thumb over the slide and the fingers underneath. Release the firing grip. See figure 3-27.
��
3-29

MCRP 3-01B Pistol Marksmanship
Figure 3-27. Condition Unknown – to the Left.
�� With the muzzle pointed up at a 45-degree angle in a safe direction, hand the pistol to the
other Marine, grip first.
�� The other Marine:
�� Grasps the pistol grip with the trigger finger straight along the receiver.
�� Ensures the pistol is on safe.
�� Conducts a chamber check to determine the condition of the weapon.
�� If time permits, remove the magazine and count the number of rounds in the magazine by using the counting holes. Reinsert the magazine into the magazine well ensuring it is fully seated.
3-30