Embed Size (px)
Citation preview
MDCStoreTools™ Data Management Utility
Version 1.1
User Guide
0112-0195 FJuly 2012

This document is provided to customers who have purchased Molecular Devices, LLC (“Molecular Devices”) equipment, software, reagents, and consumables to use in the operation of such Molecular Devices equipment, software, reagents, and consumables. This document is copyright protected and any reproduction of this document, in whole or any part, is strictly prohibited, except as Molecular Devices may authorize in writing.
Software that may be described in this document is furnished under a license agreement. It is against the law to copy, modify, or distribute the software on any medium, except as specifically allowed in the license agreement. Furthermore, the license agreement may prohibit the software from being disassembled, reverse engineered, or decompiled for any purpose.
Portions of this document may make reference to other manufacturers and/or their products, which may contain parts whose names are registered as trademarks and/or function as trademarks of their respective owners. Any such usage is intended only to designate those manufacturers’ products as supplied by Molecular Devices for incorporation into its equipment and does not imply any right and/or license to use or permit others to use such manufacturers’ and/or their product names as trademarks.
Molecular Devices makes no warranties or representations as to the fitness of this equipment for any particular purpose and assumes no responsibility or contingent liability, including indirect or consequential damages, for any use to which the purchaser may put the equipment described herein, or for any adverse circumstances arising therefrom.
For research use only. Not for use in diagnostic procedures.
The MDCStore™ SDK and associated documentation are copyrighted and property of Molecular Devices, LLC. Use of the MDCStore™ API (Application Programming Interface) and acceptance of the associated documentation is prohibited without the express written consent of Molecular Devices, LLC which consent shall limit the scope of use of the MDCStore™ technology, shall be personal to the licensed user, and shall be non-transferable.
The trademarks mentioned herein are the property of Molecular Devices, LLC or their respective owners. These trademarks may not be used in any type of promotion or advertising without the prior written permission of Molecular Devices, LLC.
Patents: http://www.moleculardevices.com/productpatents
Product manufactured by Molecular Devices, LLC.
1311 Orleans Drive, Sunnyvale, California, United States of America 94089.
Molecular Devices, LLC is ISO 9001 registered.
© 2012 Molecular Devices, LLC.
All rights reserved.
Contents
Chapter 1: Introduction. . . . . . . . . . . . . . . . . . . . . . . . . . 7Before You Begin . . . . . . . . . . . . . . . . . . . . . . . . . . . . . . 7Planning Your Database Strategy. . . . . . . . . . . . . . . . . . . 8Obtaining Support . . . . . . . . . . . . . . . . . . . . . . . . . . . . 12
Chapter 2: Installing the MDCStoreTools Utility . . . . . . 13Introduction . . . . . . . . . . . . . . . . . . . . . . . . . . . . . . . . 13Choosing the Appropriate Installer . . . . . . . . . . . . . . . . . 14Using the Standalone Installer. . . . . . . . . . . . . . . . . . . . 15
Chapter 3: Starting and Setting Up the MDCStoreTools Utility . . . . . . . . . . . . . . . . . . . . . . . . . . 17
Introduction . . . . . . . . . . . . . . . . . . . . . . . . . . . . . . . . 17Starting the Utility and Connecting to a Database . . . . . . 17Setting the Auto-Run Timeout Value . . . . . . . . . . . . . . . 20
Chapter 4: Increasing Security with a Lab Head Administrator . . . . . . . . . . . . . . . . . . . . . . . . . 23
Introduction . . . . . . . . . . . . . . . . . . . . . . . . . . . . . . . . 23Creating a Lab Head User . . . . . . . . . . . . . . . . . . . . . . . 24Adding the Lab Head User to the Administrators Group . . 28
Chapter 5: Managing User Accounts and Groups. . . . . . 31Introduction . . . . . . . . . . . . . . . . . . . . . . . . . . . . . . . . 31Managing User Accounts . . . . . . . . . . . . . . . . . . . . . . . . 32Managing the Administrators Group . . . . . . . . . . . . . . . . 38Creating or Removing User Groups . . . . . . . . . . . . . . . . 43Adding Users to or Removing Users from User Groups . . . 46
0112-0195 F 3
Contents
Chapter 6: Setting Up and Managing Image File Storage . . . . . . . . . . . . . . . . . . . . . . . . . . . . . 51
Introduction. . . . . . . . . . . . . . . . . . . . . . . . . . . . . . . . . 51Creating an Image Storage Location . . . . . . . . . . . . . . . . 52Modifying an Image Storage Location . . . . . . . . . . . . . . . 54Checking the Availability of an Image Storage Location. . . 56Removing an Image Storage Location. . . . . . . . . . . . . . . 58Moving Images to a New Location . . . . . . . . . . . . . . . . . 59Mapping Images and Plates to a New Location . . . . . . . . . 60
Chapter 7: Managing Plates and Image Files . . . . . . . . . 63Introduction. . . . . . . . . . . . . . . . . . . . . . . . . . . . . . . . . 63Setting Folder and Plate Security Permissions . . . . . . . . . 63Creating or Modifying a Plate . . . . . . . . . . . . . . . . . . . . . 70Changing the Display of the Dialog . . . . . . . . . . . . . . . . . 73
Chapter 8: Managing Measurement Sets . . . . . . . . . . . . 77Introduction. . . . . . . . . . . . . . . . . . . . . . . . . . . . . . . . . 77Managing Measurement Sets . . . . . . . . . . . . . . . . . . . . . 77Managing Measurement Sets in the Recycle Bin . . . . . . . . 81Removing Cell Outlines From Measurement Sets . . . . . . . 82
Chapter 9: Removing Data in the Database . . . . . . . . . . 85Introduction. . . . . . . . . . . . . . . . . . . . . . . . . . . . . . . . . 85Marking Data for Deletion . . . . . . . . . . . . . . . . . . . . . . . 85Removing Data that has been Marked for Deletion . . . . . . 88
Chapter 10: Backing Up Images and Optimizing the Database . . . . . . . . . . . . . . . . . . . . . . . . 89
Introduction. . . . . . . . . . . . . . . . . . . . . . . . . . . . . . . . . 89Backing Up, Archiving, and Restoring Images . . . . . . . . . 89Cleaning Up and Optimizing a Database . . . . . . . . . . . . . 95
Chapter 11: Managing a Microsoft SQL Database . . . . . 97Introduction. . . . . . . . . . . . . . . . . . . . . . . . . . . . . . . . . 97Managing the Size of a Microsoft SQL Database . . . . . . . . 97Attaching and Detaching a Microsoft SQL Database . . . . 100Backing Up and Restoring a Microsoft SQL Database. . . . 102
4 0112-0195 F
MDCStoreTools Data Management Utility User Guide
Chapter 12: Managing an Oracle Database . . . . . . . . . 105Introduction . . . . . . . . . . . . . . . . . . . . . . . . . . . . . . . 105Managing the Size of an Oracle Database . . . . . . . . . . . 105
Chapter 13: Tracking Operation History . . . . . . . . . . . 107Introduction . . . . . . . . . . . . . . . . . . . . . . . . . . . . . . . 107Logging All Operations . . . . . . . . . . . . . . . . . . . . . . . . 107Viewing a Report for a Single Operation . . . . . . . . . . . . 109
Chapter 14: Managing Operation Status . . . . . . . . . . . 111Introduction . . . . . . . . . . . . . . . . . . . . . . . . . . . . . . . 111Canceling an Operation. . . . . . . . . . . . . . . . . . . . . . . . 112Removing Completed Operations from the Operation Progress Tab . . . . . . . . . . . . . . . . . . . . . . . 113
Appendix A: Setting Up the MDC File Server Application . . . . . . . . . . . . . . . . . . . . . 115
Introduction . . . . . . . . . . . . . . . . . . . . . . . . . . . . . . . 115Installing the MDC File Server Application . . . . . . . . . . . 116Starting and Configuring the File Server . . . . . . . . . . . . 116Modifying the Privileges of the MDC File Server . . . . . . . 117
0112-0195 F 5

Contents
6 0112-0195 F

1
IntroductionThis guide explains how to use the MDCStoreTools™ Data Management Utility to set up and maintain an MDCStore™ High Content Data Management Solution database, manage users and data, and optimize the supporting SQL and Oracle servers. Topics in this section:
• Before You Begin• Planning Your Database Strategy• Obtaining Support
Before You BeginBefore working with the MDCStoreTools utility using the instructions in this guide, perform the following tasks:
• Make sure the appropriate database server software is installed. The MDCStore Data Manager database schema is available for installation on both Oracle and Microsoft SQL Server. See the vendor’s documentation for instructions on installing the database server. The server can be located either on the computer on which the MetaXpress® High Content Image Acquisition and Analysis Software is installed or on another computer connected to your network.
• Make sure the MDCStore database schema (version 2.0 or later) is installed. The MDCStore database resides on the SQL or Oracle server and holds the MetaXpress Software screening data and settings. Install the MDCStore database after the SQL or Oracle server software is installed and running. To install or upgrade the MDCStore database on the SQL or Oracle server, see the MDCStore Database Schema Installation and Upgrade Guide, available on the MetaXpress Software Installation flash drive.
Note: The options that the MDCStoreTools utility provides for moving, backing up, archiving, and restoring images are available only with version 2.2 or later of the MDCStore Data Manager.
0112-0195 F 7

Introduction
• To verify that you have compatible versions of the various software components needed for the MetaXpress Software and the MDCStore database schema, check the version compatibility chart in the knowledge base on the Molecular Devices support web site: www.moleculardevices.com/support.html.
In minimal configurations, one computer can run both client and server software. However, the recommended specifications provide the best performance. For information on recommended specifications, see the document MetaXpress and AcuityXpress Computer Requirements in the Knowledge Base on the Molecular Devices support web site: www.moleculardevices.com/support.html.
Planning Your Database StrategyWhen users of the MetaXpress software acquire images, import images, or run analyses of experiments, the related data is stored in the MDCStore database. Molecular Devices recommends that you store only the data associated with images in the MDCStore database and that you store image files in a separate dedicated location. This section describes how to estimate your image file storage requirements, discusses the three options available for storing image files, and stresses the importance of backing up your data.
Note: The MDCStoreTools utility is compatible with version 3.0 or later of the MetaXpress Software.
Note: Molecular Devices recommends that you consult a database administrator (DBA) before setting up a new database or updating the schema of an existing database. A DBA will monitor the usage of your database configuration and can optimize the database for best performance. Molecular Devices can recommend consultants who specialize in determining and implementing appropriate database strategies. See Obtaining Support on page 12 for contact information.
8 0112-0195 F

MDCStoreTools Data Management Utility User Guide
Calculate Your Image File Storage RequirementsStorage space requirements for image files will grow very quickly. You should allocate more space for image files than is initially required to allow adequate room for growth. To calculate the file storage requirements for a plate, use the following formula:
(image file size (see Table 1-1)) X (number of wells) X (sites per well) X (number of wavelengths or scan lines) = plate file storage size
Then, if there are multiple time points, multiply the plate file storage size by the number of time points. For example, using the ImageXpress® Micro System to acquire three wavelengths on a plate with 384 wells and four sites per well, with 2X2 binning, the storage requirement is:
(0.7 MB image file size) X (384 wells) X (4 sites/well) X (3 wavelengths) = 3.2 GB
If the timelapse consisted of four time points, the storage requirement would be 3.2 GB multiplied by 4 time points, which equals approximately 13 GB.Table 1-1 provides estimates of image file sizes, which depend on the hardware platform and binning method.
Table 1-1 Individual Image File Size Estimates
Hardware Platform
Image File Size
Unbinned Binned 2X2 Binned 3X3
ImageXpress Micro System (Standard model)
(1392X1040) bytes per pixel = 2.8 MB
(696X520) bytes per pixel = 0.7 MB
(464X346) bytes per pixel = 0.3 MB
ImageXpress Micro System (XL model)
(2160X2160X2) bytes per pixel = 9.1 MB
(1080X1080X2) bytes per pixel = 2.3 MB
(720X720X2) bytes per pixel = 1.0 MB
ImageXpress Ultra System
(2000X500X2)bytes per pixel = 2.0 MB
(1000X250X2) bytes per pixel = 0.5 MB
(667X167X2) bytes per pixel = 0.2 MB
(2000X2000X2) bytes per pixel = 8.0 MB
(1000X1000X2) bytes per pixel = 2.0 MB
(667X667X2) bytes per pixel = 0.8 MB
(2000X32000X2) bytes per pixel = 128.0 MB
(1000X16000X2) bytes per pixel = 32.0 MB
(667X10667X2) bytes per pixel = 14.0 MB
0112-0195 F 9
Introduction
Determine How You Will Store Image FilesThree options are available for storing image files:
• MDC File Server • UNC paths• MDCStore database (recommended only as a short-term
solution)
MDC File Server
The MetaXpress Software Installation flash drive includes the MDC File Server application. This application is an optional network service that you can use to create and manage file servers to store MetaXpress Software images outside the MDCStore database. Molecular Devices recommends that you use the MDC File Server application to store screening images on a separate dedicated networked computer. Because the MDC File Server application runs as a client/server application, it provides a high level of security. On the server side, you can limit access to image storage locations.Using the MDC File Server provides the following advantages over saving data directly over a network using a UNC path:
• The client computer does not need Windows permissions to access the server computer, as the file server uses the socket layer for communication.
• The client computer does not need to be on the same domain as the server computer.
• Using the socket layer simplifies access to the server through firewalls.
After you have installed the MDC File Server and MDCStoreTools utility, you use the MDCStoreTools utility to administer the file servers. You add to the MDCStore database the names of computers on which file servers are installed. Then, MetaXpress Software users will be able to select a file server from the Names and Description tab on the Plate Acquisition Setup dialog.
Note: If you plan to use the MDC File Server application, Molecular Devices recommends that you install it before you install the MDCStoreTools utility. The MDC File Server must be installed on a computer running the Windows operating system. Only one instance of the MDC File Server can be installed on a computer. See Appendix A: Setting Up the MDC File Server Application on page 115 for instructions on installing the MDC File Server application.
10 0112-0195 F

MDCStoreTools Data Management Utility User Guide
UNC Path Storage
Using the MDCStoreTools utility, you can provide UNC paths to specific Windows directories on a local or networked computer in which images will be stored. UNC path storage locations are easier to configure than file servers (UNC path storage locations do not require the MDC File Server application) but they do not provide as much security as file servers. Users and all clients (ImageXpress® system acquisition computers, MetaXpress Software offline computers, and AcuityXpress Software offline computers) must have full read and write access to the directories specified by the UNC paths. In addition, all of these computers must be on a network to have a valid UNC path.
MDCStore Database
Although the MDCStore database is capable of storing images, it should be used only to store data associated with images (metadata), such as measurements, overlays, and settings. Because storing images in a database is inefficient, we strongly recommend that images be stored in a file server or directory on a separate dedicated networked computer. The MDCStore database can serve as a short-term storage solution for your initial, small sets of screening images.The MDCStore database stores:
• Metadata associated with images acquired using the MetaXpress Software
• Settings for plate acquisition or analysis• The results of the analysis of images with MetaXpress Software
application modules and journals• AcuityXpress Software data mining results
See Chapter 6: Setting Up and Managing Image File Storage on page 51 for information about how to implement each of these image storage strategies.
Establish a Data Backup ScheduleAll important data and images must be backed up on a regular basis. Molecular Devices recommends that regularly scheduled backups of the MDCStore database and image storage locations become a part of your database administration. A number of backup solutions are available for SQL and Oracle servers. See Backing Up, Archiving, and Restoring Images on page 89.
Note: We suggest that you discuss the appropriate data backup solution for your configuration with your IT department or software vendor.
0112-0195 F 11
Introduction
Obtaining SupportMolecular Devices provides a wide range of support. For example, we provide:
• Technical and user documentation. Check the user guide that shipped with the system, as well as the online help available within the MetaXpress Software application. Press the F1 key to access the online help for an active dialog.
• The Molecular Devices Support and Knowledge Base website. The support web site, www.moleculardevices.com/support.html, has links to technical notes, software upgrades, and other resources. If you do not find the answers you are seeking, follow the links to the Technical Support Request Form.
• Internet Support. Fill out the Technical Support Request Form at www.moleculardevices.com/support.html to send an email message to a pool of technical support representatives.
• Technical Support. Contact Technical Support at 800-635-5577 (U.S. only) or +1 408-747-1700. Please have the system ID number, system serial number, software version number, and the system owner’s name available when you call.
12 0112-0195 F
2
Installing the MDCStoreTools UtilityIntroductionThe MDCStoreTools™ utility is available for the Windows operating system in 32-bit and 64-bit versions. If you are installing the software on a 64-bit operating system, you can install either the 32-bit or 64-bit version. Molecular Devices recommends that you use the 64-bit version if you have a 64-bit operating system. If you are installing the software on a 32-bit operating system, you can install only the 32-bit version.The MetaXpress® Software does not have to be installed before you install the MDCStoreTools utility.
Note: The MDCStoreTools utility is compatible with version 3.0 or later of the MetaXpress Software. Before you use the MDCStoreTools utility for the first time, you must have started version 3.0 or later of the MetaXpress Software at least once. When you start the MetaXpress Software, it “activates” the MDCStore™ database (version 2.1 or later). Then, you can close the MetaXpress Software and start the MDCStoreTools utility as described in Chapter 3: Starting and Setting Up the MDCStoreTools Utility on page 17. You need to perform this procedure only once. You do not need to start the MetaXpress Software every time you want to use the MDCStoreTools utility.
0112-0195 F 13
Installing the MDCStoreTools Utility
Choosing the Appropriate InstallerThe MDCStoreTools utility installer is available on the MetaXpress® Software version 5.0 USB flash drive and also as a standalone installer. If you are installing the software on a 64-bit operating system, you can install either the 32-bit or 64-bit version of each component. Molecular Devices recommends that you use the 64-bit version if you have a 64-bit operating system. If you are installing the software on a 32-bit operating system, you can install only the 32-bit version of each component.
• If you are installing from the MetaXpress Software Installation flash drive, you can choose to install the appropriate 32-bit or 64-bit version. For complete instructions, see the MetaXpress High Content Image Acquisition and Analysis Software Suite Installation and Update Guide.
• If you are installing from a standalone installer, make sure that you download the appropriate version of the MDCStoreTools installation package for your operating system (either 32-bit or 64-bit). Instructions for using the standalone installer are included in this chapter. See Using the Standalone Installer on page 15.
14 0112-0195 F
MDCStoreTools Data Management Utility User Guide
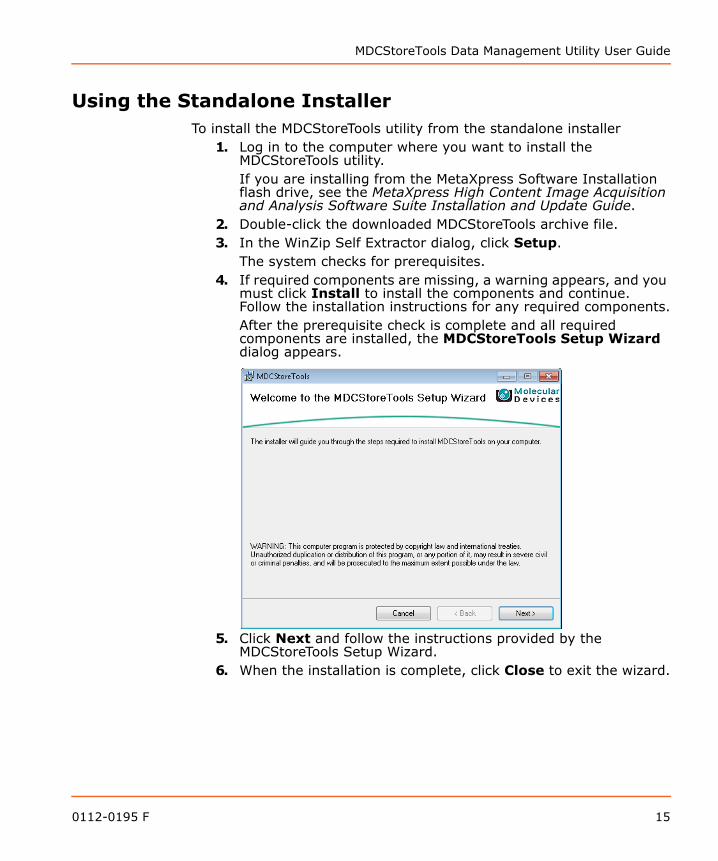
Using the Standalone InstallerTo install the MDCStoreTools utility from the standalone installer
1. Log in to the computer where you want to install the MDCStoreTools utility.If you are installing from the MetaXpress Software Installation flash drive, see the MetaXpress High Content Image Acquisition and Analysis Software Suite Installation and Update Guide.
2. Double-click the downloaded MDCStoreTools archive file.3. In the WinZip Self Extractor dialog, click Setup.
The system checks for prerequisites.4. If required components are missing, a warning appears, and you
must click Install to install the components and continue. Follow the installation instructions for any required components.After the prerequisite check is complete and all required components are installed, the MDCStoreTools Setup Wizard dialog appears.
5. Click Next and follow the instructions provided by the MDCStoreTools Setup Wizard.
6. When the installation is complete, click Close to exit the wizard.
0112-0195 F 15

Installing the MDCStoreTools Utility
16 0112-0195 F
3
Starting and Setting Up the MDCStoreTools UtilityIntroductionWhen you start the MDCStoreTools™ utility, you must select a datasource to log in to the desired database. After you log in, the main dialog of the MDCStoreTools utility appears. The Connection Info tab lists information about Oracle or SQL server, the MDCStore™ database to which you are connected, and the ODBC connection. At any time, you can connect to a different MDCStore database without exiting the MDCStoreTools utility. After starting the MDCStoreTools utility, you can set the Auto-Run Timeout Value for the MetaXpress® Software.Topics in this section:
• Starting the Utility and Connecting to a Database• Setting the Auto-Run Timeout Value
Starting the Utility and Connecting to a Database
To start the MDCStoreTools utility1. On the Start menu, select All Programs > MDCStore >
MDCStoreTools > MDCStoreTools or from the Meta Imaging Series® Administrator click Launch MDCStoreTools.
Note: Before you use the MDCStoreTools utility for the first time, you must have started version 3.0 or later of the MetaXpress Software at least once. When you start the MetaXpress Software and connect to the database instance, it “activates” the MDCStore™ database (version 2.1 or later). Then, you can close the MetaXpress Software and start the MDCStoreTools utility. You need to perform this procedure only once. You do not need to start the MetaXpress Software every time you want to use the MDCStoreTools utility.
Tip! To create a new ODBC connection in Windows 7, you need to run the MDCStoreTools Data Management Utility as an administrator.
0112-0195 F 17

Starting and Setting Up the MDCStoreTools Utility
2. In the Connect to Datasource dialog, in the Data Source field, select the database that you want to connect to, or create a new data source.To create a new data source: Click New Data Source, select the server type (SQL or
Oracle), and click OK. Select the type of database server, if required. Select the computer where the database is located (either
locally or on a networked computer), and log in to the server.
Select the database name, edit the New Data Source field if needed, and click Create.
The new data source is available in the Data Source field on the Connect to Datasource dialog.
3. Enter your login name and password, and click OK.
4. Click OK.If you logged in using the system administrator (“sa” or “sys”) account, a warning appears informing you that multiple users should not be provided with the system administrator account.
5. Click OK.
Note: If you do not know your login name and password, contact your network or database administrator.
Note: For information on creating user accounts for users who will be managing the database, see Chapter 4: Increasing Security with a Lab Head Administrator on page 23.
18 0112-0195 F
MDCStoreTools Data Management Utility User Guide
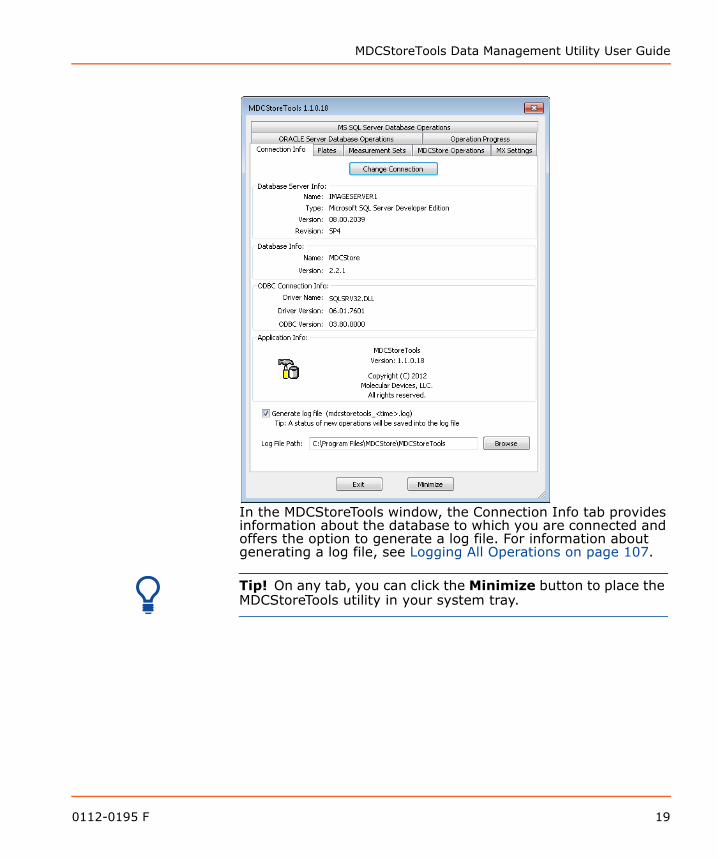
In the MDCStoreTools window, the Connection Info tab provides information about the database to which you are connected and offers the option to generate a log file. For information about generating a log file, see Logging All Operations on page 107.
Tip! On any tab, you can click the Minimize button to place the MDCStoreTools utility in your system tray.
0112-0195 F 19

Starting and Setting Up the MDCStoreTools Utility
To connect to a different MDCStore database1. On the Connection Info tab, click Change Connection.2. In the Connect to Datasource dialog, go to To start the
MDCStoreTools utility on page 17 and follow Step 2 through Step 4.The information on the Connection Info tab reflects the new database that you connected to.If the attempt to connect to another database fails, you will stay connected to the current database.
Setting the Auto-Run Timeout ValueThe MetaXpress Software application has an Auto-Run Mode, which automatically starts running an analysis on plates after they have been acquired. If you use two computers to acquire and analyze the screening data, you can greatly reduce the overall screening time. The main computer, on which the MetaXpress Software runs, can continue acquisition while the other computer can analyze data. You can also set up more than one computer to run in Auto-Run Mode, further reducing the time it takes to process multiple plates.After each plate is acquired, the MetaXpress Software application records information about the analysis of the plate in a queue in the database. When other computers that run the MetaXpress Software and are connected to the database are set in Auto-Run Mode, they check the queue and run analysis on plates as the data becomes available. One of the possible values in the queue is Timeout. Timeout indicates that the analysis has not completed on a well or a site in the expected amount of time. Use the MDCStoreTools utility to set the expected amount of time in seconds before a Timeout is reported.A timeout is normally caused by an error on the computer running the analysis. To diagnose the cause of the timeout, inspect the computer that has timed out for error messages or other problems. Sometimes the problem can be resolved and the analysis can continue, in which case the status will return to Running. In other cases, the Auto-Run Mode must be canceled and the analysis must be run again. If an analysis is expected to take a long time to complete (for example, if the analysis was created through the journaling system or if the images are very large), increase the timeout value to allow enough time to run the analysis.
20 0112-0195 F

MDCStoreTools Data Management Utility User Guide
To set the Auto-Run Timeout value1. On the MX Settings tab, type the time (in seconds) that an
analysis in Auto-Run Mode can run before timing out.
2. Click Update.The Timeout value is set for analyses run in Auto-Run mode using the MetaXpress Software.
Note: Molecular Devices recommends using 30 seconds as the default Auto-Run Timeout value.
0112-0195 F 21

Starting and Setting Up the MDCStoreTools Utility
22 0112-0195 F
4
Increasing Security with a Lab Head AdministratorIntroductionMolecular Devices strongly recommends that you do not provide users with access to the SQL server database System Administrator (“sa”) account or Oracle system (“sys”) account to manage an MDCStore™ database. The SQL server database “sa” account is able to access and manipulate much more on the server than just an MDCStore database. Logging in to the SQL server as “sa” gives the user administrative access to all accounts and databases on the server and possibly, depending on the particular environment, access to other computers. While the Oracle “sys” account might not have access to the host computer, sharing the “sys” account password with too many users poses a security risk, and data integrity can be jeopardized. The first time you use the MDCStoreTools™ utility to log in to the MDCStore database schema, you must log in using the System Administrator account. Immediately after installing the MDCStoreTools utility:
• Create a Lab Head user (see Creating a Lab Head User on page 24)
• Add the Lab Head user to the Administrators group (see Adding the Lab Head User to the Administrators Group on page 28)
Then, instead of giving the System Administrator password to users who will be managing the database, provide these users with access to the Lab Head Administrator login name and password.
The Lab Head user with Administrator privileges has full control over the data in the database and is able to add application users and create groups. Molecular Devices recommends that you limit the number of users who have Administrator privileges. After you have created a Lab Head Administrator, you will need to log in using the System Administrator account only to create new databases or perform database schema updates.You can also protect plate and image data by controlling the type of access that user groups have to plates and folders. See Setting Folder and Plate Security Permissions on page 63.
Note: You should not provide the Lab Head Administrator account information to all users, just those who will be responsible for managing the database. Give other users accounts with Read-Write and Read-Only permissions as appropriate.
0112-0195 F 23
Increasing Security with a Lab Head Administrator
Topics in this section:• Creating a Lab Head User• Adding the Lab Head User to the Administrators Group
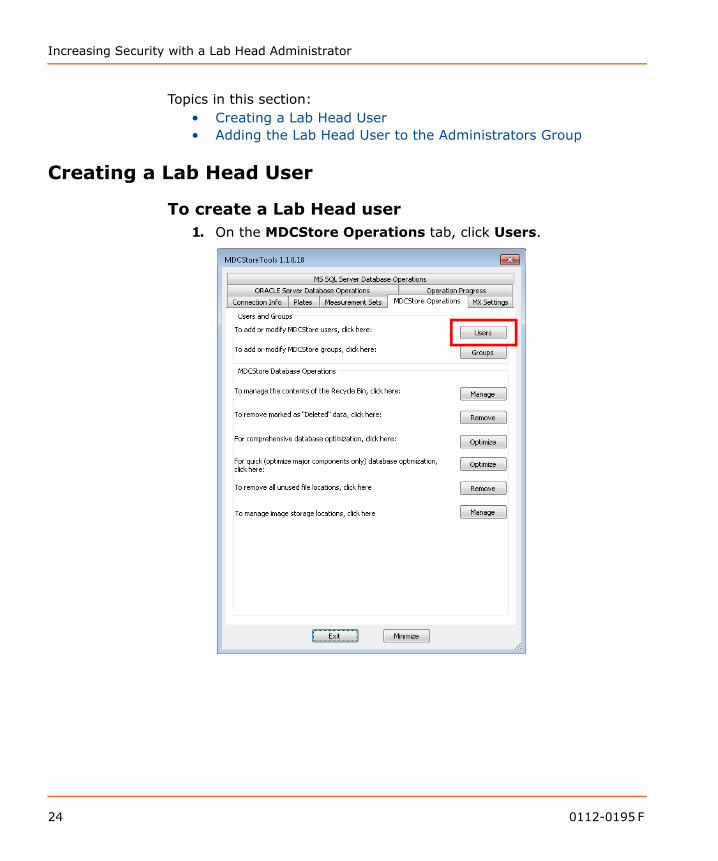
Creating a Lab Head User
To create a Lab Head user1. On the MDCStore Operations tab, click Users.
24 0112-0195 F
MDCStoreTools Data Management Utility User Guide
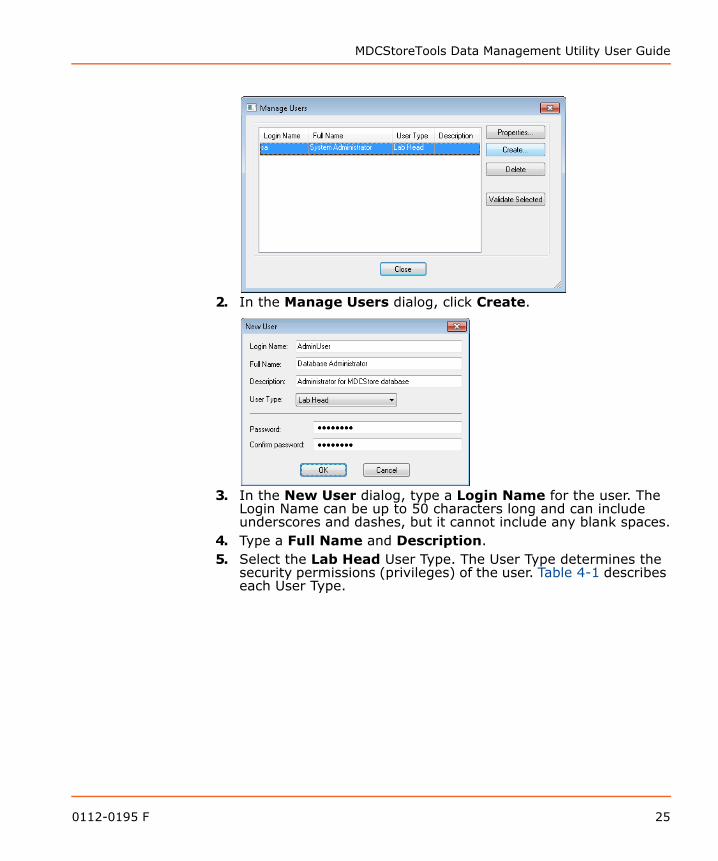
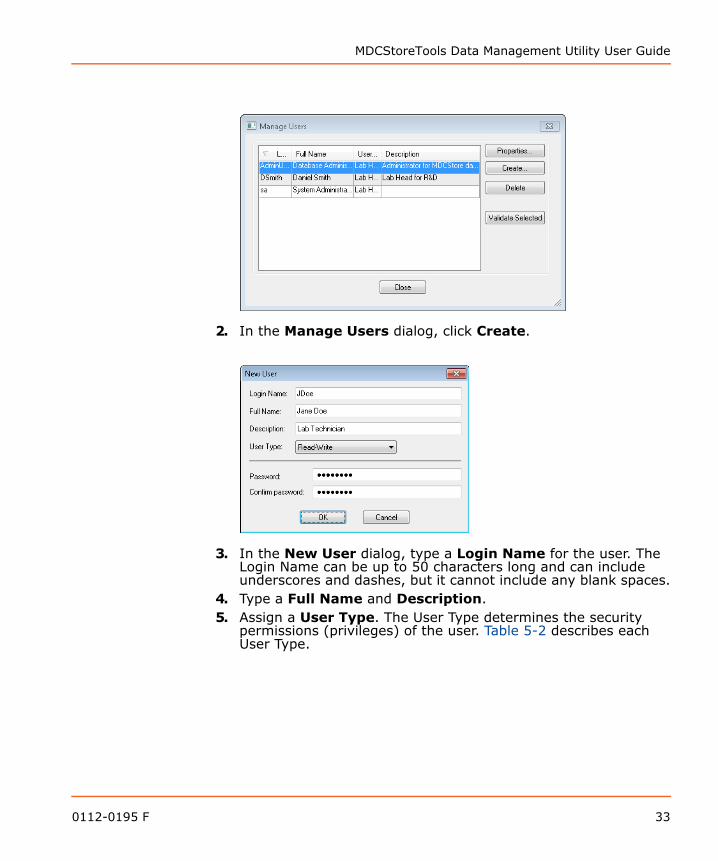
2. In the Manage Users dialog, click Create.
3. In the New User dialog, type a Login Name for the user. The Login Name can be up to 50 characters long and can include underscores and dashes, but it cannot include any blank spaces.
4. Type a Full Name and Description.5. Select the Lab Head User Type. The User Type determines the
security permissions (privileges) of the user. Table 4-1 describes each User Type.
0112-0195 F 25
Increasing Security with a Lab Head Administrator
6. Type a password for the new Lab Head user and click OK.It is important to create a secure and strong password. For SQL Server, the password must meet Windows password complexity requirements. For Oracle, the password must meet the password complexity requirements of the Oracle instance. Consult your Windows system administrator or Oracle database administrator to determine the minimum password complexity requirements.In general, a secure password: Should be a minimum of six characters long Should not be the same as the userid or login name Should include at least one alphabet character, one numeric
character, and one special character
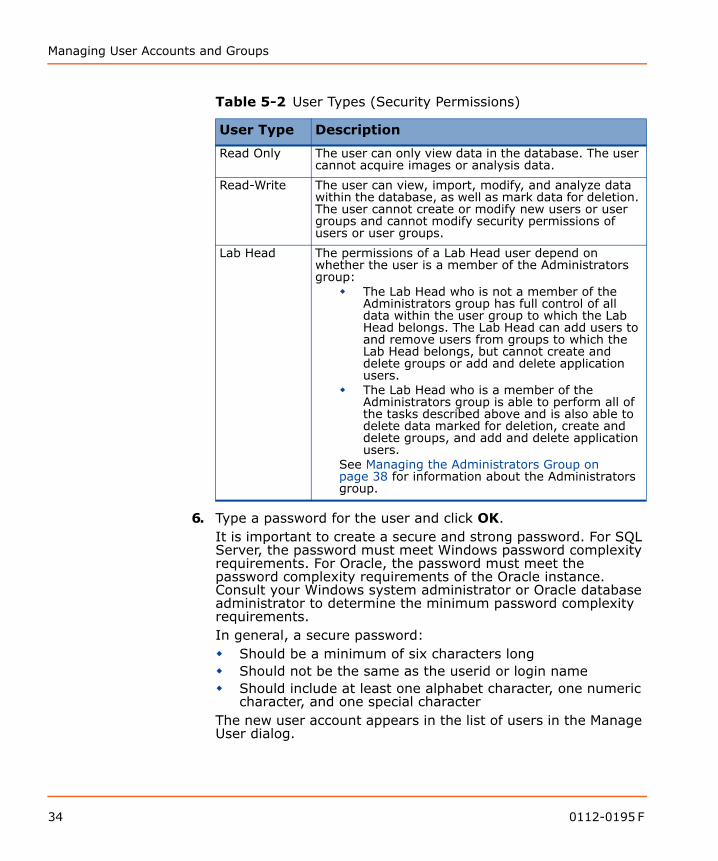
Table 4-1 User Types (Security Permissions)
User Type Description
Read Only The user can only view data in the database. The user cannot acquire images or analyze data.
Read-Write The user can view, import, modify, and analyze data within the database, as well as mark data for deletion. The user cannot create or modify new users or user groups and cannot modify security permissions of users or user groups.
Lab Head The permissions of a Lab Head user depend on whether the user is a member of the Administrators group:
The Lab Head who is not a member of the Administrators group has full control of all data within the user group to which the Lab Head belongs. The Lab Head can add users to and remove users from groups to which the Lab Head belongs, but cannot create and delete groups or add and delete application users.
The Lab Head who is a member of the Administrators group is able to perform all of the tasks described above and is also able to delete data marked for deletion, create and delete groups, and add and delete application users.
See Managing the Administrators Group on page 38 for information about the Administrators group.
26 0112-0195 F
MDCStoreTools Data Management Utility User Guide
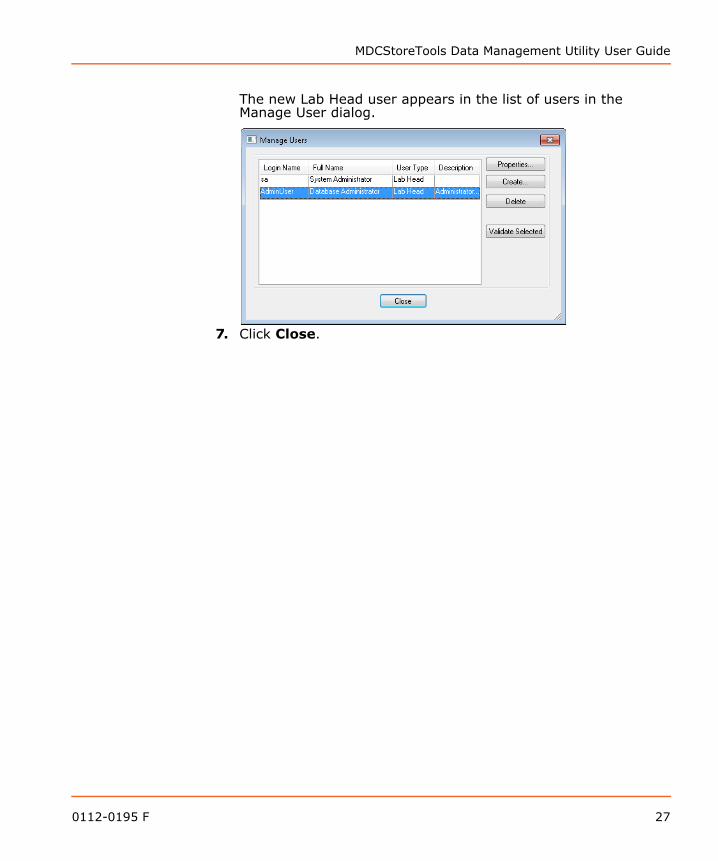
The new Lab Head user appears in the list of users in the Manage User dialog.
7. Click Close.
0112-0195 F 27
Increasing Security with a Lab Head Administrator
Adding the Lab Head User to the Administrators Group
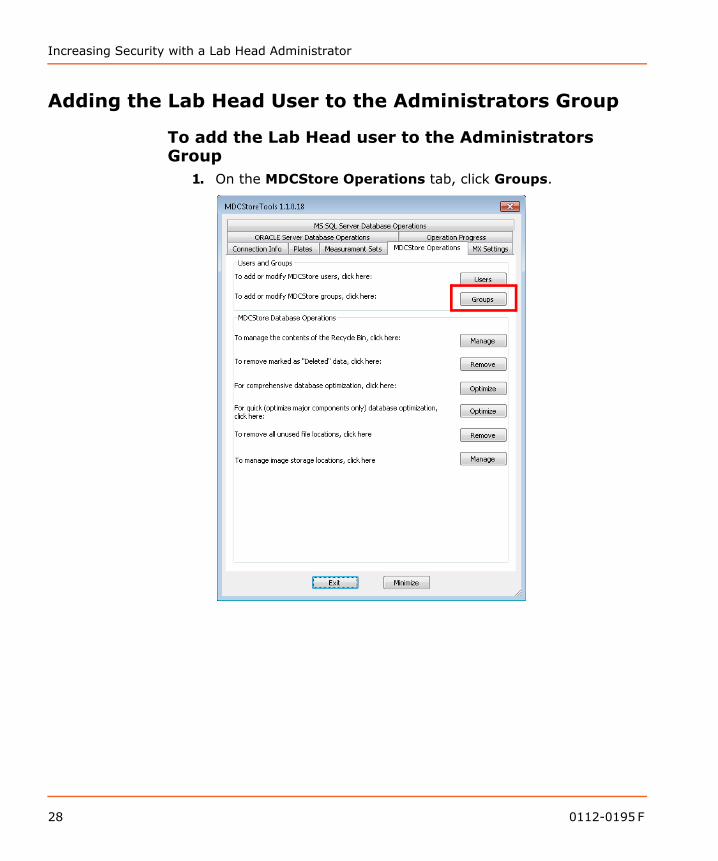
To add the Lab Head user to the Administrators Group
1. On the MDCStore Operations tab, click Groups.
28 0112-0195 F
MDCStoreTools Data Management Utility User Guide
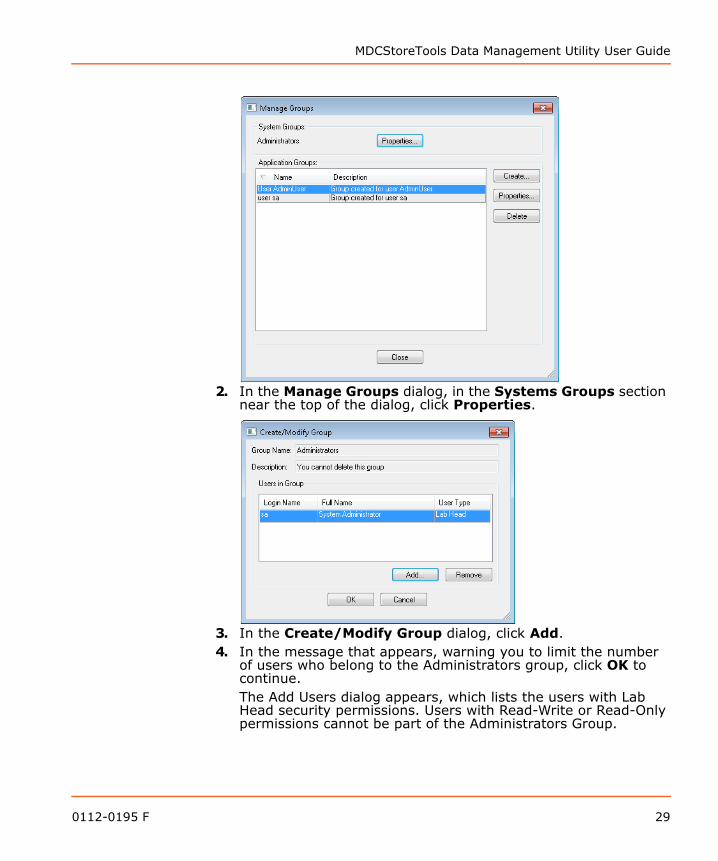
2. In the Manage Groups dialog, in the Systems Groups section near the top of the dialog, click Properties.
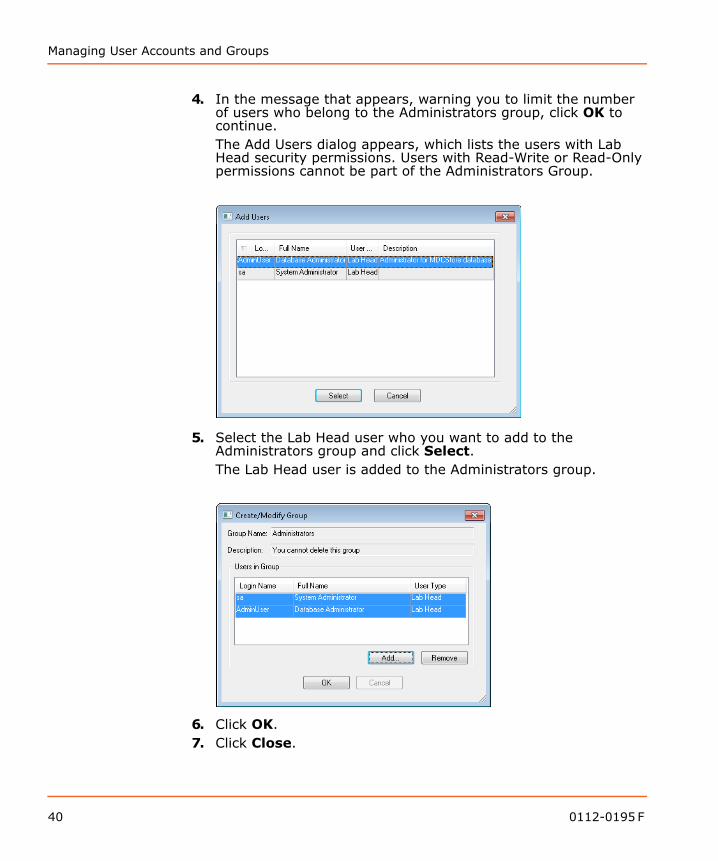
3. In the Create/Modify Group dialog, click Add.4. In the message that appears, warning you to limit the number
of users who belong to the Administrators group, click OK to continue.The Add Users dialog appears, which lists the users with Lab Head security permissions. Users with Read-Write or Read-Only permissions cannot be part of the Administrators Group.
0112-0195 F 29
Increasing Security with a Lab Head Administrator
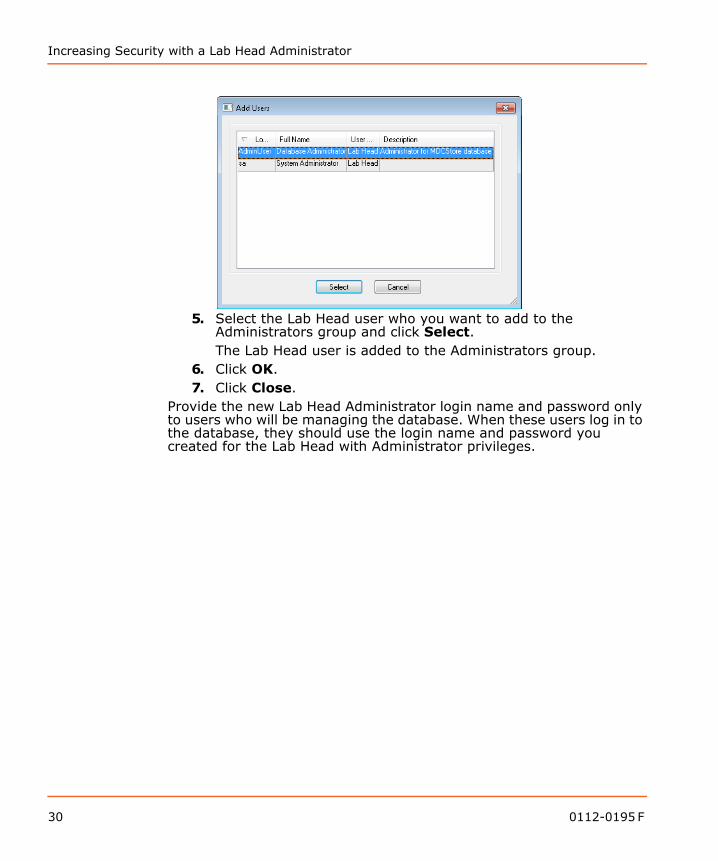
5. Select the Lab Head user who you want to add to the Administrators group and click Select.The Lab Head user is added to the Administrators group.
6. Click OK.7. Click Close.
Provide the new Lab Head Administrator login name and password only to users who will be managing the database. When these users log in to the database, they should use the login name and password you created for the Lab Head with Administrator privileges.
30 0112-0195 F
5
Managing User Accounts and GroupsIntroductionThe MDCStoreTools™ utility organizes user accounts and groups into three categories:
• User accounts: Each user is assigned a User Type (Read Only, Read-Write, or Lab Head). For a description of each user type, see Table 5-2.
• Administrators group: Only Lab Head users can belong to the Administrators group. A Lab Head user does not automatically belong to the Administrators group. A Lab Head user must be assigned to the Administrators group.
• User groups: Any type of user can belong to a user groupAs shown in Table 5-1, your security permissions determine what you can do with user accounts and groups.
Topics in this section:• Managing User Accounts• Managing the Administrators Group• Creating or Removing User Groups• Adding Users to or Removing Users from User Groups
Table 5-1 Required Security Permissions
Task Security Permissions Required
Create a new user account Lab Head Administrator
Modify the permissions of a user account
Lab Head Administrator
Remove a user account Lab Head Administrator
Add a user to the Administrators group
Lab Head Administrator
Remove a user from the Administrators group
Lab Head Administrator
Create a new user group Lab Head Administrator
Remove a user group Lab Head Administrator
Add a user to an existing user group Lab Head or Lab Head Administrator
Remove a user from an existing user group
Lab Head or Lab Head Administrator
0112-0195 F 31
Managing User Accounts and Groups
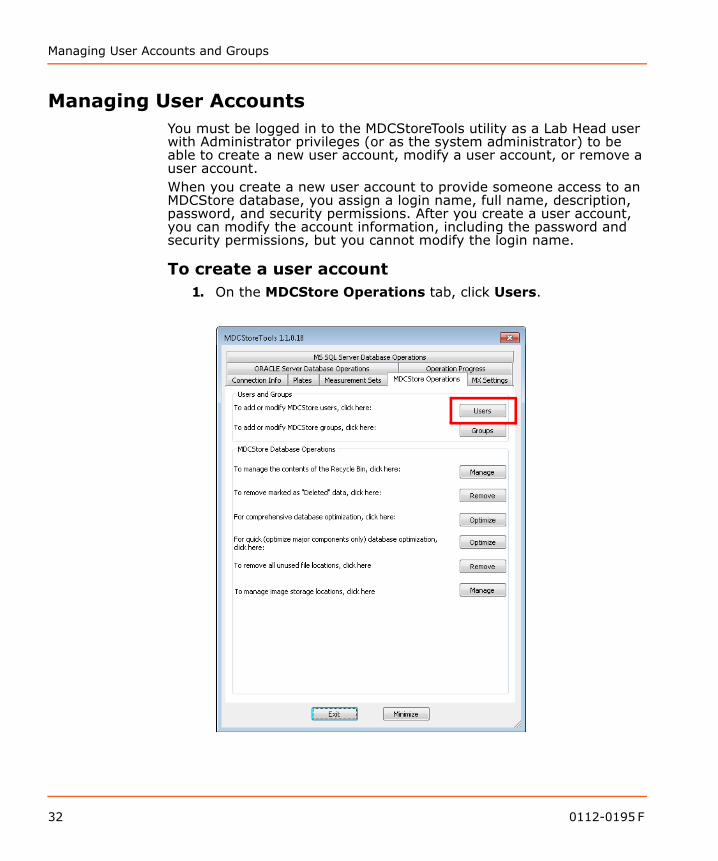
Managing User AccountsYou must be logged in to the MDCStoreTools utility as a Lab Head user with Administrator privileges (or as the system administrator) to be able to create a new user account, modify a user account, or remove a user account. When you create a new user account to provide someone access to an MDCStore database, you assign a login name, full name, description, password, and security permissions. After you create a user account, you can modify the account information, including the password and security permissions, but you cannot modify the login name.
To create a user account1. On the MDCStore Operations tab, click Users.
32 0112-0195 F
MDCStoreTools Data Management Utility User Guide
2. In the Manage Users dialog, click Create.
3. In the New User dialog, type a Login Name for the user. The Login Name can be up to 50 characters long and can include underscores and dashes, but it cannot include any blank spaces.
4. Type a Full Name and Description.5. Assign a User Type. The User Type determines the security
permissions (privileges) of the user. Table 5-2 describes each User Type.
0112-0195 F 33
Managing User Accounts and Groups
6. Type a password for the user and click OK.It is important to create a secure and strong password. For SQL Server, the password must meet Windows password complexity requirements. For Oracle, the password must meet the password complexity requirements of the Oracle instance. Consult your Windows system administrator or Oracle database administrator to determine the minimum password complexity requirements.In general, a secure password: Should be a minimum of six characters long Should not be the same as the userid or login name Should include at least one alphabet character, one numeric
character, and one special characterThe new user account appears in the list of users in the Manage User dialog.
Table 5-2 User Types (Security Permissions)
User Type Description
Read Only The user can only view data in the database. The user cannot acquire images or analysis data.
Read-Write The user can view, import, modify, and analyze data within the database, as well as mark data for deletion. The user cannot create or modify new users or user groups and cannot modify security permissions of users or user groups.
Lab Head The permissions of a Lab Head user depend on whether the user is a member of the Administrators group:
The Lab Head who is not a member of the Administrators group has full control of all data within the user group to which the Lab Head belongs. The Lab Head can add users to and remove users from groups to which the Lab Head belongs, but cannot create and delete groups or add and delete application users.
The Lab Head who is a member of the Administrators group is able to perform all of the tasks described above and is also able to delete data marked for deletion, create and delete groups, and add and delete application users.
See Managing the Administrators Group on page 38 for information about the Administrators group.
34 0112-0195 F
MDCStoreTools Data Management Utility User Guide
To Change the Password or Security Permissions of a User Account
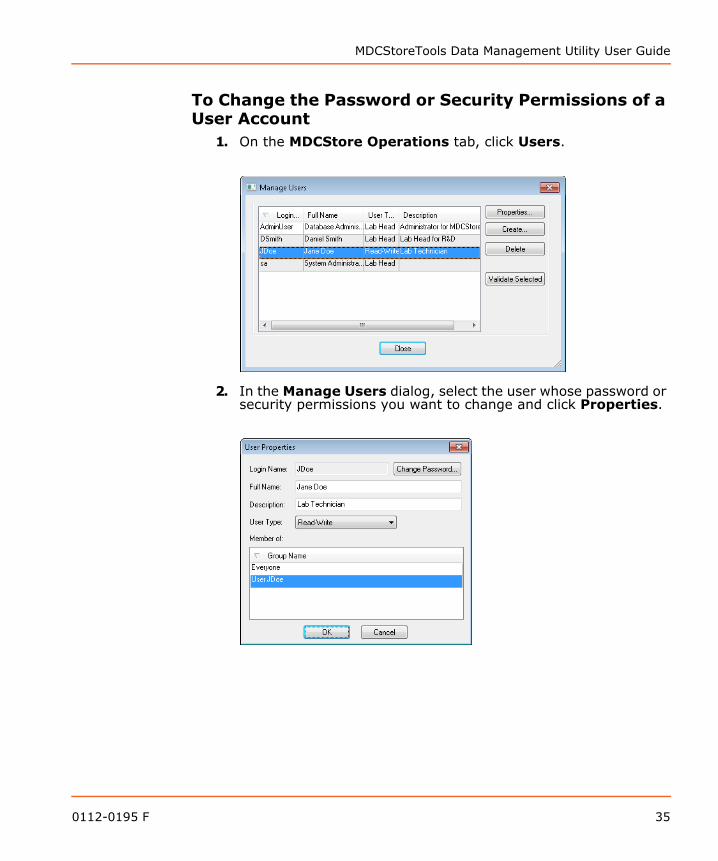
1. On the MDCStore Operations tab, click Users.
2. In the Manage Users dialog, select the user whose password or security permissions you want to change and click Properties.
0112-0195 F 35
Managing User Accounts and Groups
3. In the User Properties dialog, make the required changes: To change the password, click Change Password, assign a
new password, and click OK. For guidelines on creating a secure password, see Step 6 on page 34.
To change security permissions, choose a different User Type (Read Only, Read-Write, or Lab Head). For an explanation of the three User Types, see Table 5-2 on page 34.
4. Click OK.The user’s password is changed or, if you changed the security permissions, the updated security permissions are reflected in the Manage Users dialog.
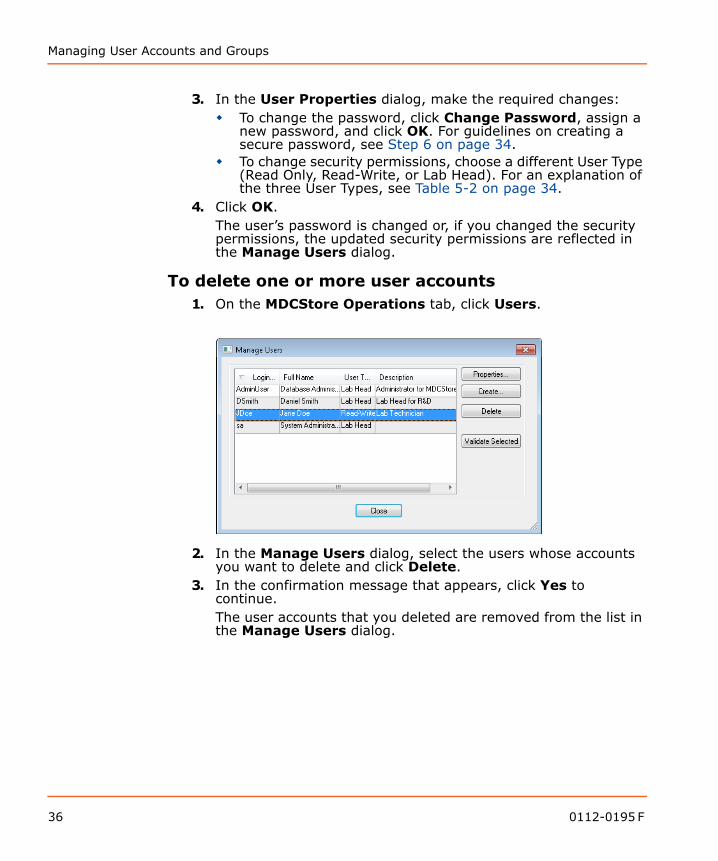
To delete one or more user accounts1. On the MDCStore Operations tab, click Users.
2. In the Manage Users dialog, select the users whose accounts you want to delete and click Delete.
3. In the confirmation message that appears, click Yes to continue.The user accounts that you deleted are removed from the list in the Manage Users dialog.
36 0112-0195 F
MDCStoreTools Data Management Utility User Guide
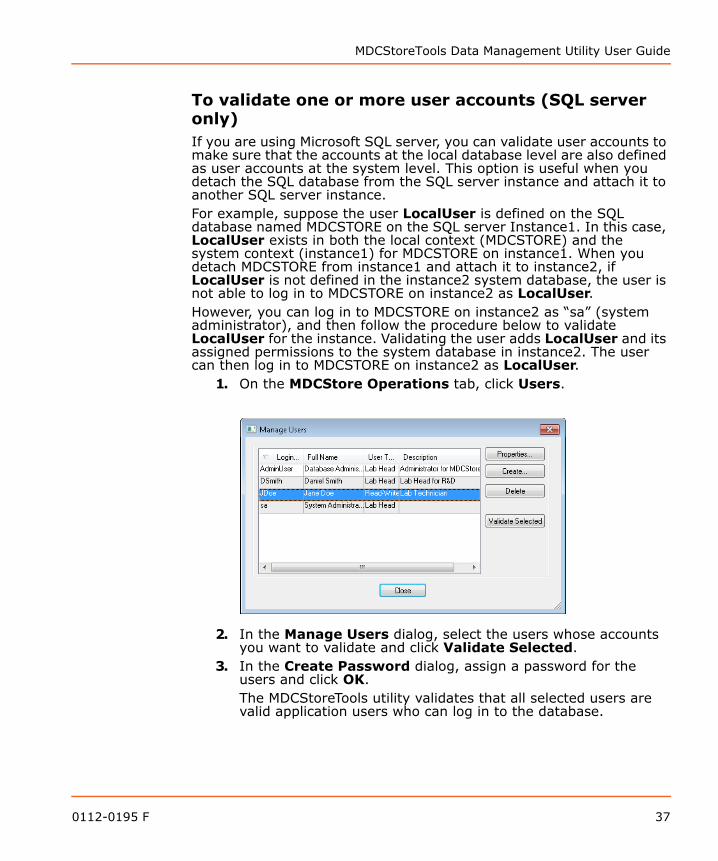
To validate one or more user accounts (SQL server only)If you are using Microsoft SQL server, you can validate user accounts to make sure that the accounts at the local database level are also defined as user accounts at the system level. This option is useful when you detach the SQL database from the SQL server instance and attach it to another SQL server instance.For example, suppose the user LocalUser is defined on the SQL database named MDCSTORE on the SQL server Instance1. In this case, LocalUser exists in both the local context (MDCSTORE) and the system context (instance1) for MDCSTORE on instance1. When you detach MDCSTORE from instance1 and attach it to instance2, if LocalUser is not defined in the instance2 system database, the user is not able to log in to MDCSTORE on instance2 as LocalUser.However, you can log in to MDCSTORE on instance2 as “sa” (system administrator), and then follow the procedure below to validate LocalUser for the instance. Validating the user adds LocalUser and its assigned permissions to the system database in instance2. The user can then log in to MDCSTORE on instance2 as LocalUser.
1. On the MDCStore Operations tab, click Users.
2. In the Manage Users dialog, select the users whose accounts you want to validate and click Validate Selected.
3. In the Create Password dialog, assign a password for the users and click OK. The MDCStoreTools utility validates that all selected users are valid application users who can log in to the database.
0112-0195 F 37

Managing User Accounts and Groups
Managing the Administrators GroupYou must be logged in as the system administrator or have Lab Head Administrator privileges to add users to or remove users from the Administrators group.Only users who have been assigned Lab Head security permissions can belong to the Administrators group. Lab Head users who belong to the Administrators group can:
• Add users to and remove users from the Administrators group• Create and delete user groups
You can add Lab Head users to or remove Lab Head users from the Administrators group. You cannot delete the Administrators group.
Note: Molecular Devices strongly recommends that you limit the number of users who belong to the Administrators group. For information on the importance of creating a Lab Head user with Administrator privileges so that users who manage the database can log in with that account rather than the system administrator account, see Chapter 4: Increasing Security with a Lab Head Administrator on page 23.
38 0112-0195 F
MDCStoreTools Data Management Utility User Guide
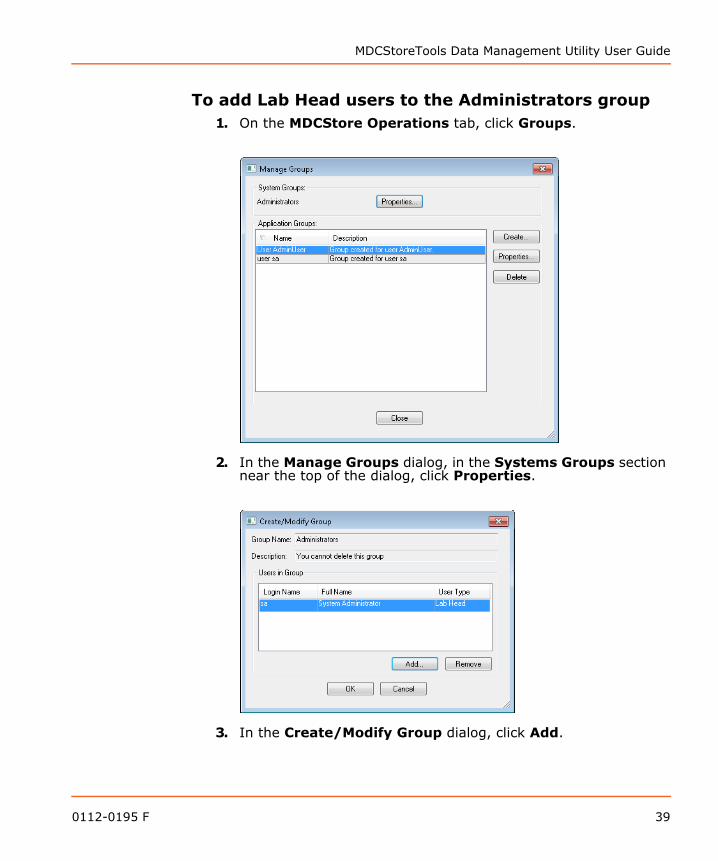
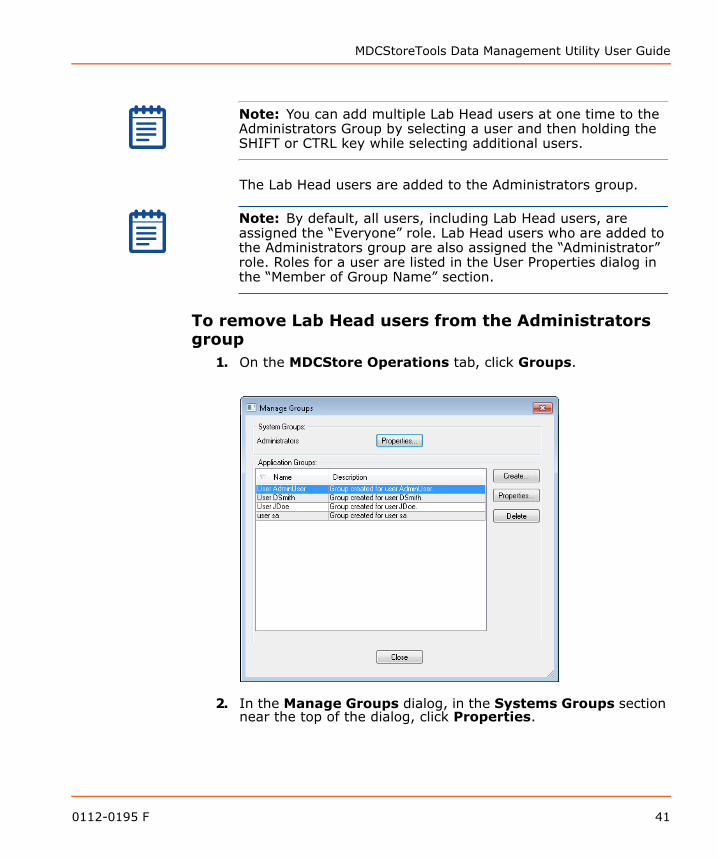
To add Lab Head users to the Administrators group1. On the MDCStore Operations tab, click Groups.
2. In the Manage Groups dialog, in the Systems Groups section near the top of the dialog, click Properties.
3. In the Create/Modify Group dialog, click Add.
0112-0195 F 39
Managing User Accounts and Groups
4. In the message that appears, warning you to limit the number of users who belong to the Administrators group, click OK to continue.The Add Users dialog appears, which lists the users with Lab Head security permissions. Users with Read-Write or Read-Only permissions cannot be part of the Administrators Group.
5. Select the Lab Head user who you want to add to the Administrators group and click Select.The Lab Head user is added to the Administrators group.
6. Click OK.7. Click Close.
40 0112-0195 F
MDCStoreTools Data Management Utility User Guide
The Lab Head users are added to the Administrators group.
To remove Lab Head users from the Administrators group
1. On the MDCStore Operations tab, click Groups.
2. In the Manage Groups dialog, in the Systems Groups section near the top of the dialog, click Properties.
Note: You can add multiple Lab Head users at one time to the Administrators Group by selecting a user and then holding the SHIFT or CTRL key while selecting additional users.
Note: By default, all users, including Lab Head users, are assigned the “Everyone” role. Lab Head users who are added to the Administrators group are also assigned the “Administrator” role. Roles for a user are listed in the User Properties dialog in the “Member of Group Name” section.
0112-0195 F 41
Managing User Accounts and Groups
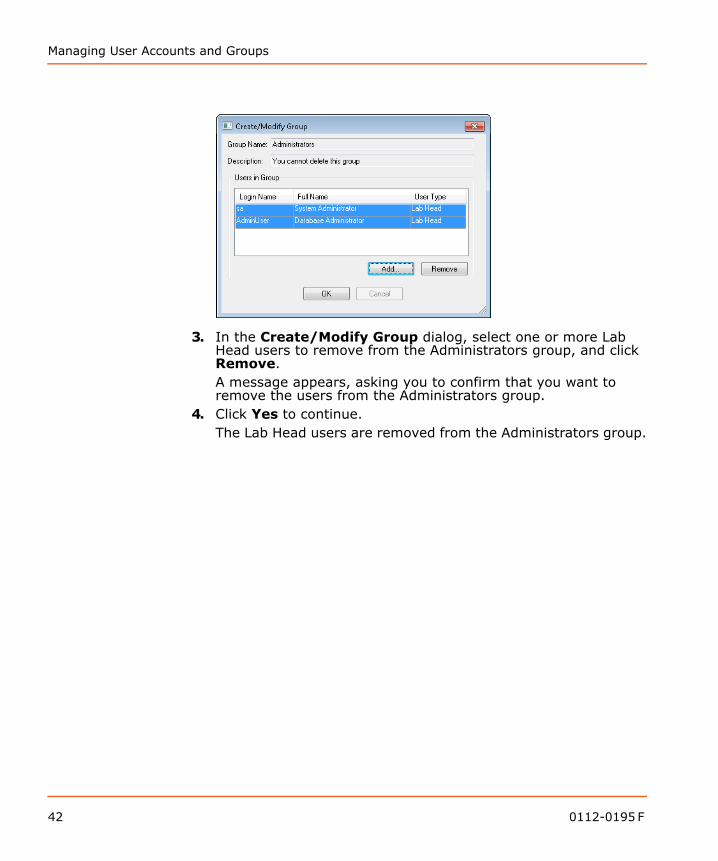
3. In the Create/Modify Group dialog, select one or more Lab Head users to remove from the Administrators group, and click Remove.A message appears, asking you to confirm that you want to remove the users from the Administrators group.
4. Click Yes to continue.The Lab Head users are removed from the Administrators group.
42 0112-0195 F
MDCStoreTools Data Management Utility User Guide
Creating or Removing User GroupsYou must be logged in as the system administrator or have Lab Head Administrator privileges to create or remove user groups.
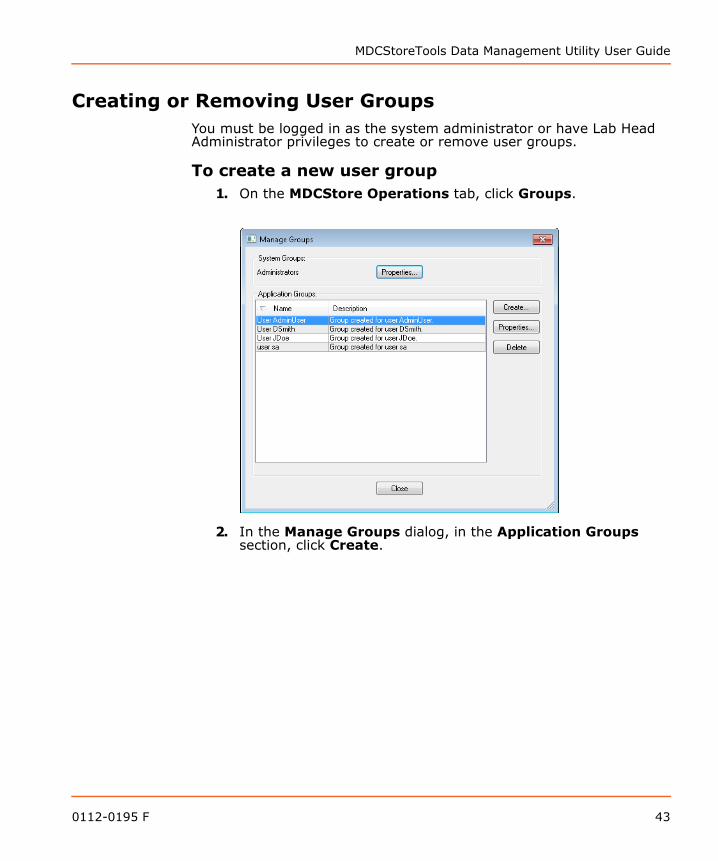
To create a new user group1. On the MDCStore Operations tab, click Groups.
2. In the Manage Groups dialog, in the Application Groups section, click Create.
0112-0195 F 43
Managing User Accounts and Groups
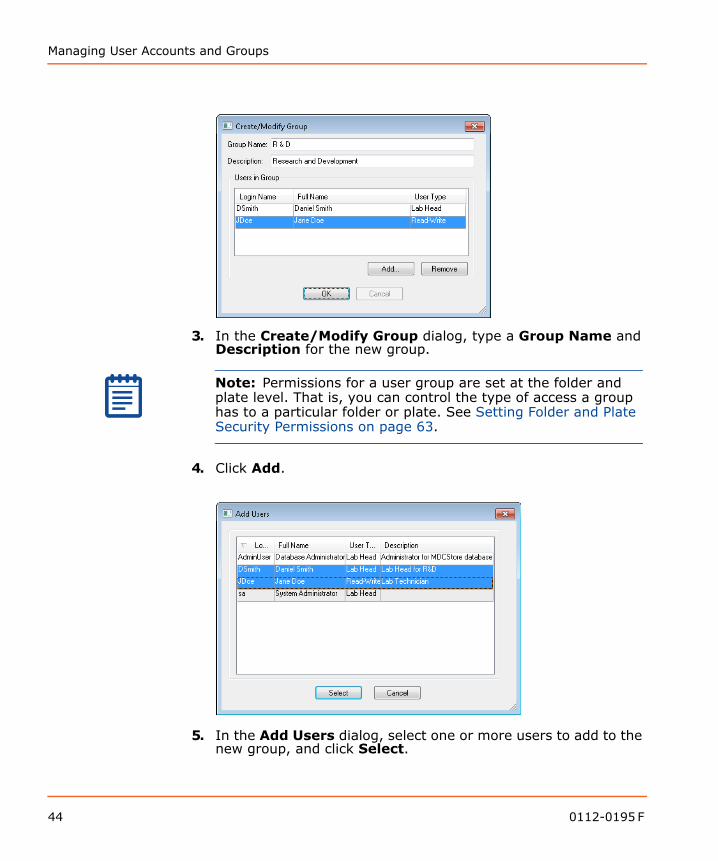
3. In the Create/Modify Group dialog, type a Group Name and Description for the new group.
4. Click Add.
5. In the Add Users dialog, select one or more users to add to the new group, and click Select.
Note: Permissions for a user group are set at the folder and plate level. That is, you can control the type of access a group has to a particular folder or plate. See Setting Folder and Plate Security Permissions on page 63.
44 0112-0195 F
MDCStoreTools Data Management Utility User Guide
The users are listed in the Users in Group section in the Create/Modify Group dialog.
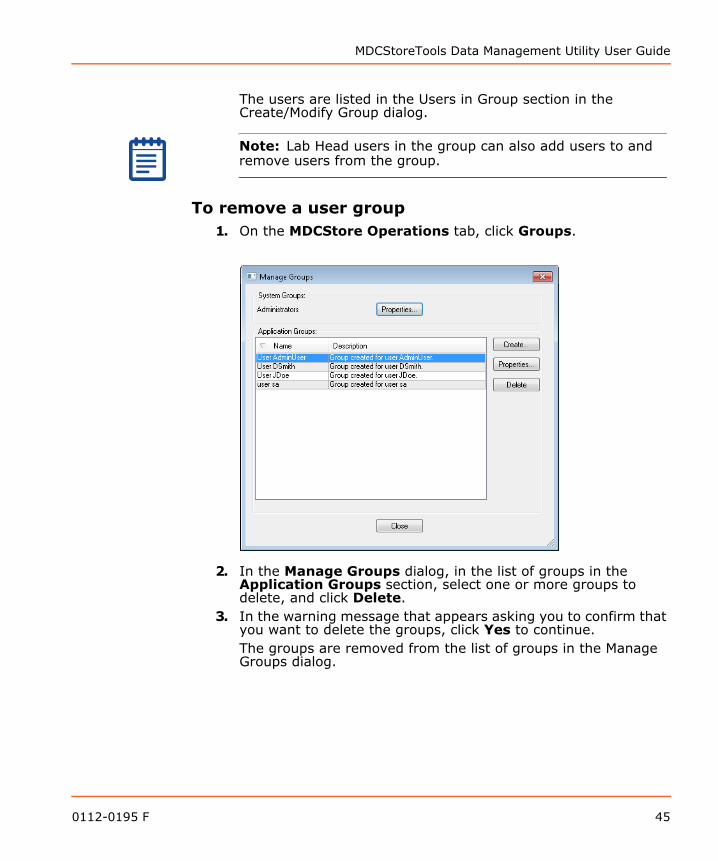
To remove a user group1. On the MDCStore Operations tab, click Groups.
2. In the Manage Groups dialog, in the list of groups in the Application Groups section, select one or more groups to delete, and click Delete.
3. In the warning message that appears asking you to confirm that you want to delete the groups, click Yes to continue.The groups are removed from the list of groups in the Manage Groups dialog.
Note: Lab Head users in the group can also add users to and remove users from the group.
0112-0195 F 45
Managing User Accounts and Groups
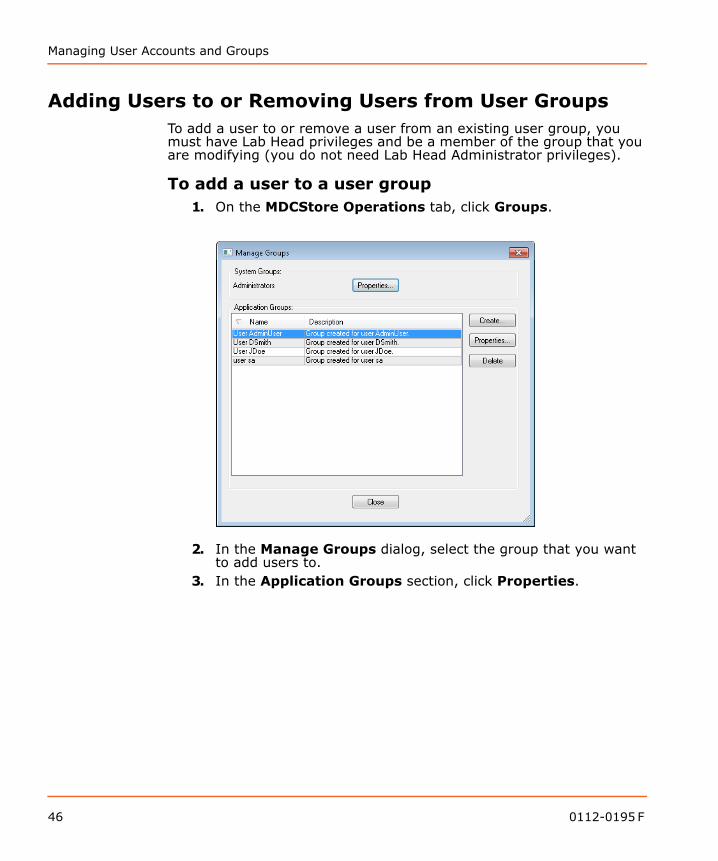
Adding Users to or Removing Users from User GroupsTo add a user to or remove a user from an existing user group, you must have Lab Head privileges and be a member of the group that you are modifying (you do not need Lab Head Administrator privileges).
To add a user to a user group1. On the MDCStore Operations tab, click Groups.
2. In the Manage Groups dialog, select the group that you want to add users to.
3. In the Application Groups section, click Properties.
46 0112-0195 F
MDCStoreTools Data Management Utility User Guide
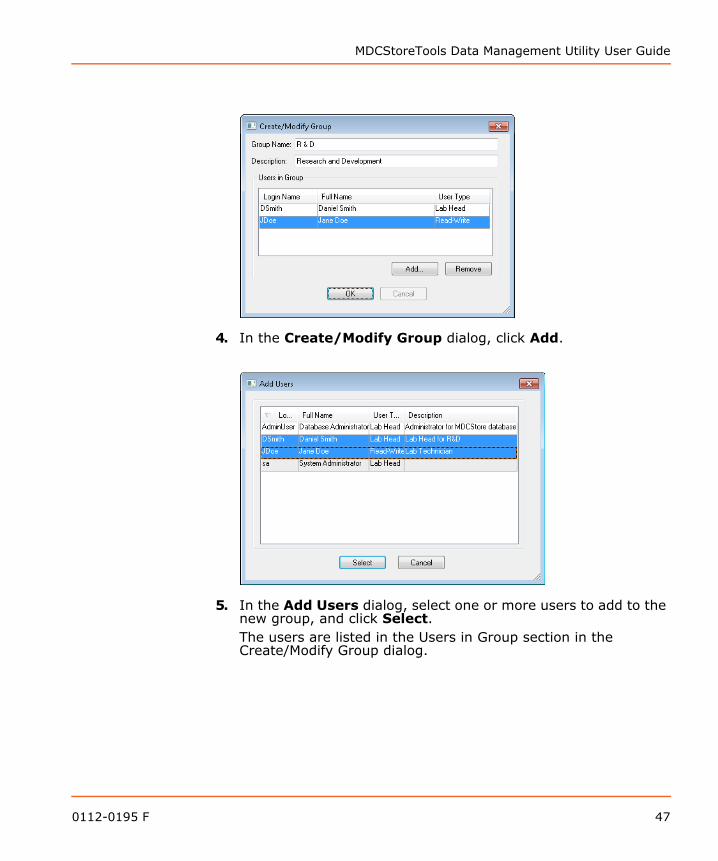
4. In the Create/Modify Group dialog, click Add.
5. In the Add Users dialog, select one or more users to add to the new group, and click Select.The users are listed in the Users in Group section in the Create/Modify Group dialog.
0112-0195 F 47
Managing User Accounts and Groups
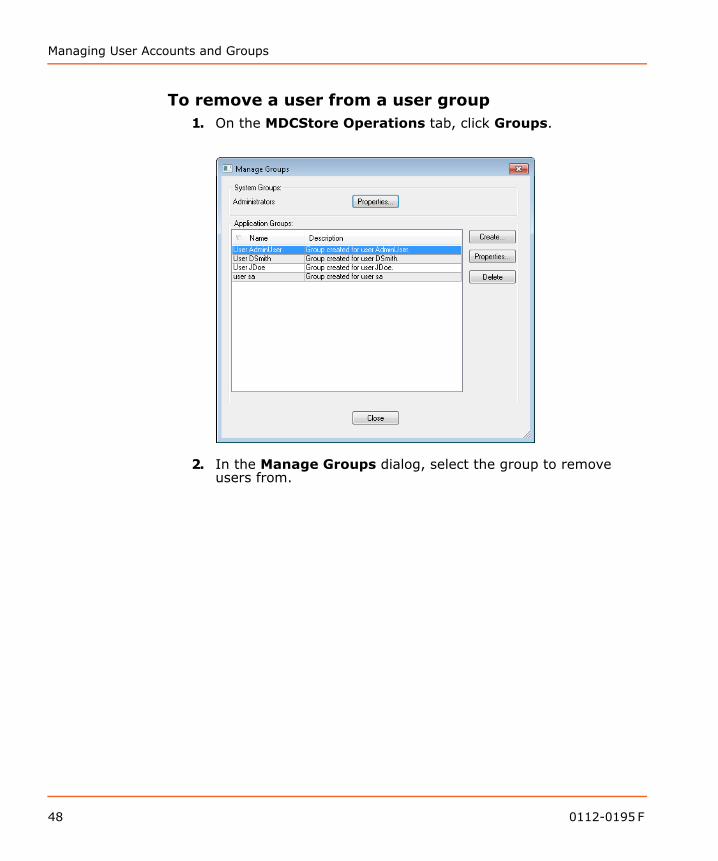
To remove a user from a user group1. On the MDCStore Operations tab, click Groups.
2. In the Manage Groups dialog, select the group to remove users from.
48 0112-0195 F
MDCStoreTools Data Management Utility User Guide
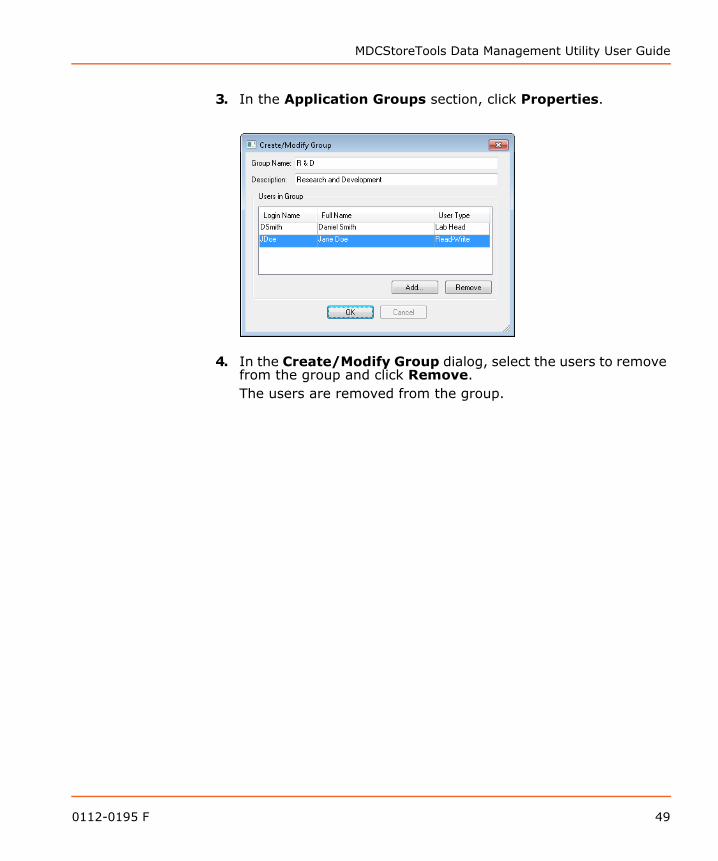
3. In the Application Groups section, click Properties.
4. In the Create/Modify Group dialog, select the users to remove from the group and click Remove.The users are removed from the group.
0112-0195 F 49

Managing User Accounts and Groups
50 0112-0195 F
6
Setting Up and Managing Image File StorageIntroductionThis section explains how to configure the MDCStore™ database so that image files are stored in the appropriate location. Essentially, you connect the MDCStore database to storage locations so that those locations are available to MetaXpress® Software users on the Import Images and Plate Acquisition dialogs. See Planning Your Database Strategy on page 8 for an explanation of the advantages and disadvantages of the image file storage options.You can store images in a file server, a directory on the network, or in the MDCStore database (not recommended). After the image file storage locations are configured, you can map and move image locations when needed, and check the availability of the storage locations to ensure that the locations are accessible to users.Topics in this section:
• Creating an Image Storage Location• Modifying an Image Storage Location• Checking the Availability of an Image Storage Location• Removing an Image Storage Location• Moving Images to a New Location• Mapping Images and Plates to a New Location
0112-0195 F 51
Setting Up and Managing Image File Storage
Creating an Image Storage Location
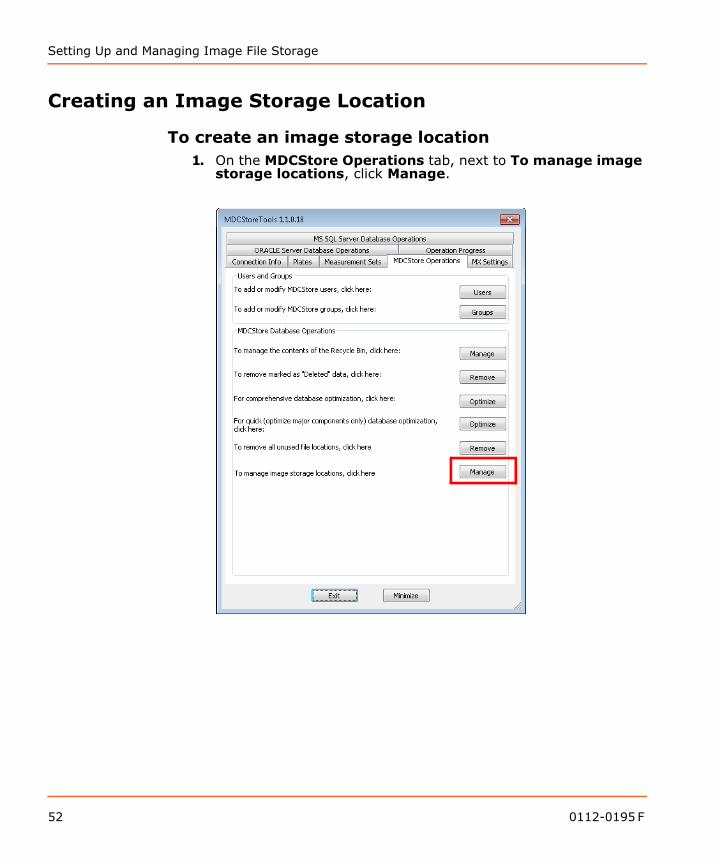
To create an image storage location1. On the MDCStore Operations tab, next to To manage image
storage locations, click Manage.
52 0112-0195 F
MDCStoreTools Data Management Utility User Guide
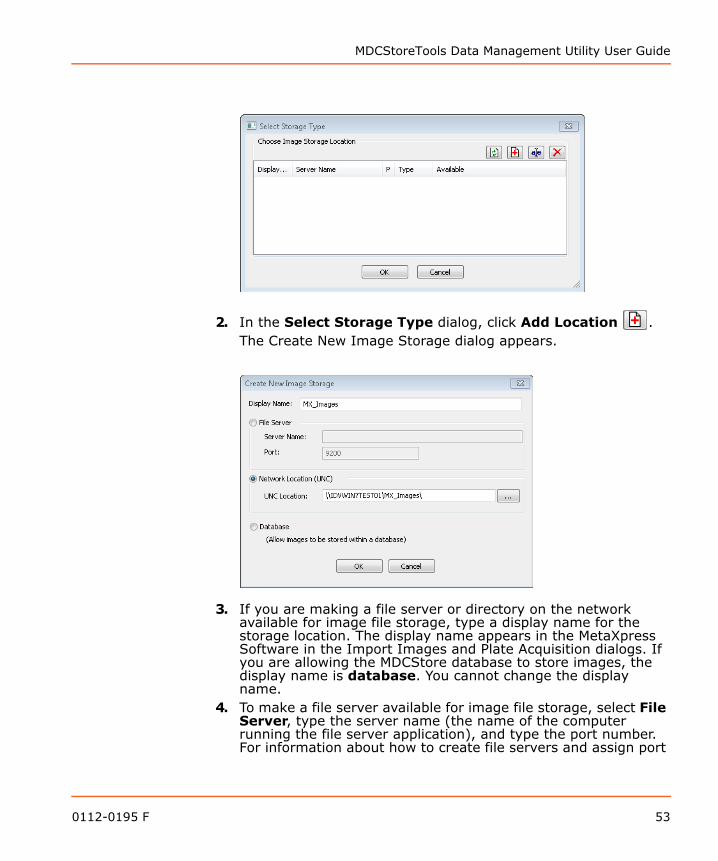
2. In the Select Storage Type dialog, click Add Location .The Create New Image Storage dialog appears.
3. If you are making a file server or directory on the network available for image file storage, type a display name for the storage location. The display name appears in the MetaXpress Software in the Import Images and Plate Acquisition dialogs. If you are allowing the MDCStore database to store images, the display name is database. You cannot change the display name.
4. To make a file server available for image file storage, select File Server, type the server name (the name of the computer running the file server application), and type the port number. For information about how to create file servers and assign port
0112-0195 F 53
Setting Up and Managing Image File Storage
numbers, see Installing the MDC File Server Application on page 116.
5. To make a directory on the network available for image file storage, select Network Location (UNC) and type or browse to the path of the directory.
6. To allow the MDCStore database to store images (not recommended), select Database.
7. Click OK.The new image storage location is added to the list in the Select Storage Type dialog.
8. Click OK.
Modifying an Image Storage LocationYou can change the display name or location of an existing image storage location. You cannot change the type of storage location. You must delete an existing location and add a new one to “change” a storage location type. When you modify an image storage location for future acquisitions, users are still able to access images that are currently stored in the image storage location. If you want to move images from the storage location to a new location where new images will be stored, see Moving Images to a New Location on page 59.
Note: If the MDCStore database is running on a different computer than the MDC File Server, Windows Permissions do not have to be configured to communicate between the computers. However, if you need to save data through the MDC File Server application to another networked computer (using a URL), the file server service must be run with an account that gives it permission to read and write to the remote computer’s file system.
54 0112-0195 F

MDCStoreTools Data Management Utility User Guide
To modify an image storage location1. On the MDCStore Operations tab, next to To manage image
storage locations, click Manage.
2. In the Select Storage Type dialog, click Edit Location .
3. In the Edit Image Storage dialog change the display name if needed or change the server name, port, or UNC path.
4. Click OK.The changes you made to the image storage location are reflected in the list in the Select Storage Type dialog.
0112-0195 F 55
Setting Up and Managing Image File Storage
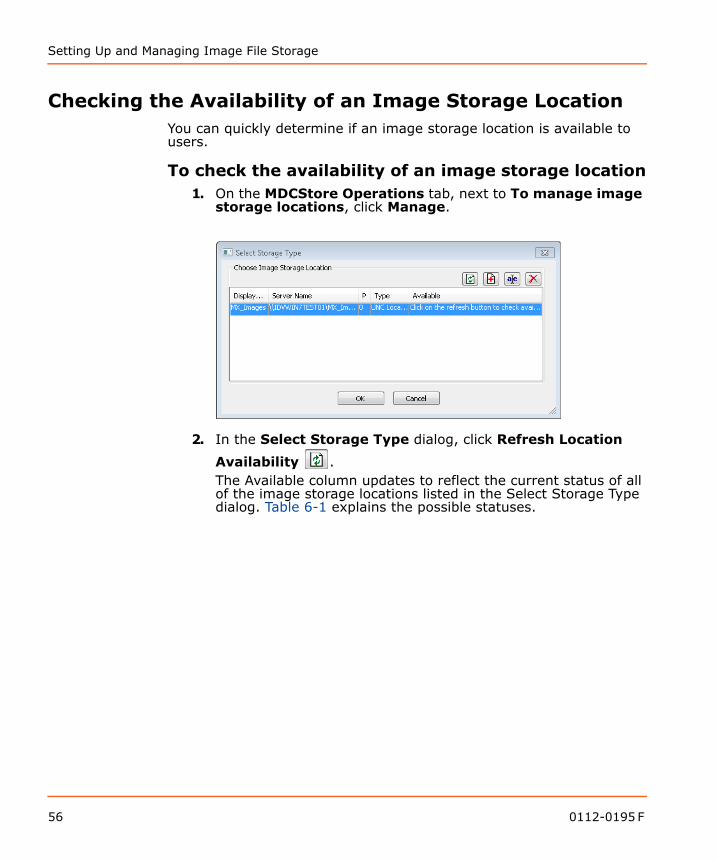
Checking the Availability of an Image Storage LocationYou can quickly determine if an image storage location is available to users.
To check the availability of an image storage location1. On the MDCStore Operations tab, next to To manage image
storage locations, click Manage.
2. In the Select Storage Type dialog, click Refresh Location
Availability .The Available column updates to reflect the current status of all of the image storage locations listed in the Select Storage Type dialog. Table 6-1 explains the possible statuses.
56 0112-0195 F
MDCStoreTools Data Management Utility User Guide
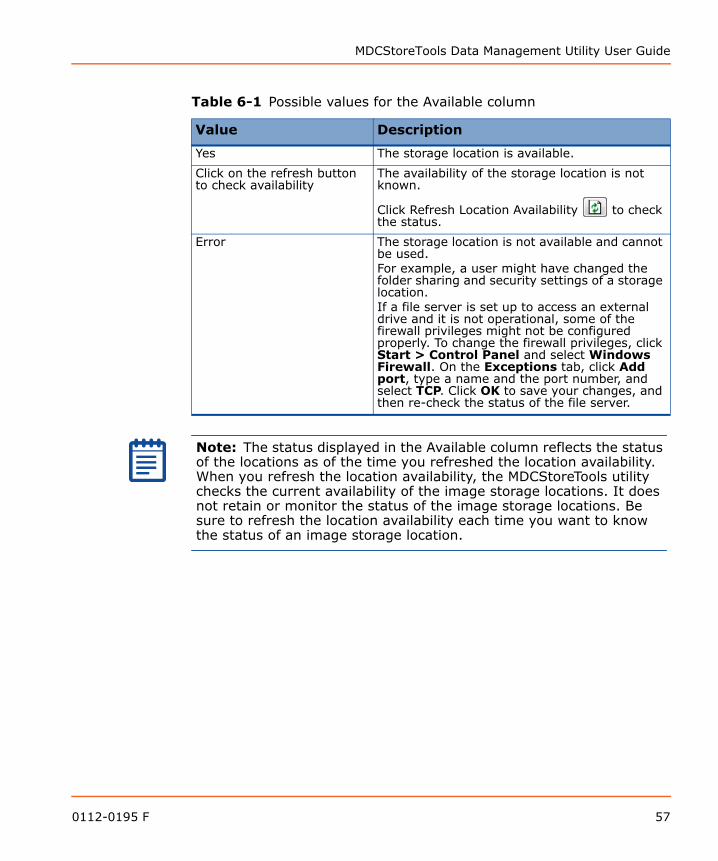
Table 6-1 Possible values for the Available column
Value Description
Yes The storage location is available.
Click on the refresh button to check availability
The availability of the storage location is not known.
Click Refresh Location Availability to check the status.
Error The storage location is not available and cannot be used.For example, a user might have changed the folder sharing and security settings of a storage location.If a file server is set up to access an external drive and it is not operational, some of the firewall privileges might not be configured properly. To change the firewall privileges, click Start > Control Panel and select Windows Firewall. On the Exceptions tab, click Add port, type a name and the port number, and select TCP. Click OK to save your changes, and then re-check the status of the file server.
Note: The status displayed in the Available column reflects the status of the locations as of the time you refreshed the location availability. When you refresh the location availability, the MDCStoreTools utility checks the current availability of the image storage locations. It does not retain or monitor the status of the image storage locations. Be sure to refresh the location availability each time you want to know the status of an image storage location.
0112-0195 F 57
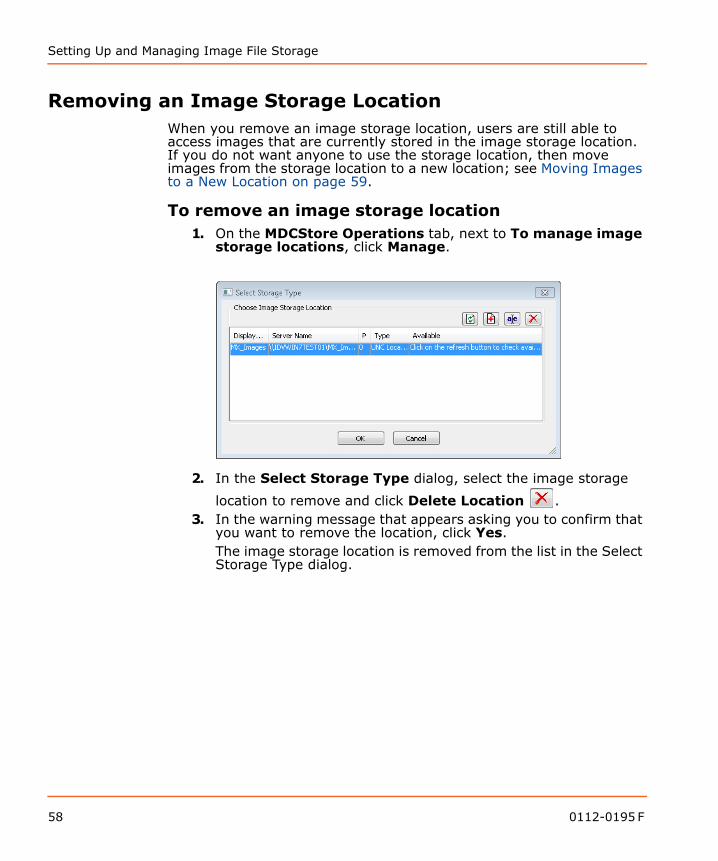
Setting Up and Managing Image File Storage
Removing an Image Storage LocationWhen you remove an image storage location, users are still able to access images that are currently stored in the image storage location. If you do not want anyone to use the storage location, then move images from the storage location to a new location; see Moving Images to a New Location on page 59.
To remove an image storage location1. On the MDCStore Operations tab, next to To manage image
storage locations, click Manage.
2. In the Select Storage Type dialog, select the image storage
location to remove and click Delete Location .3. In the warning message that appears asking you to confirm that
you want to remove the location, click Yes.The image storage location is removed from the list in the Select Storage Type dialog.
58 0112-0195 F
MDCStoreTools Data Management Utility User Guide
Moving Images to a New Location
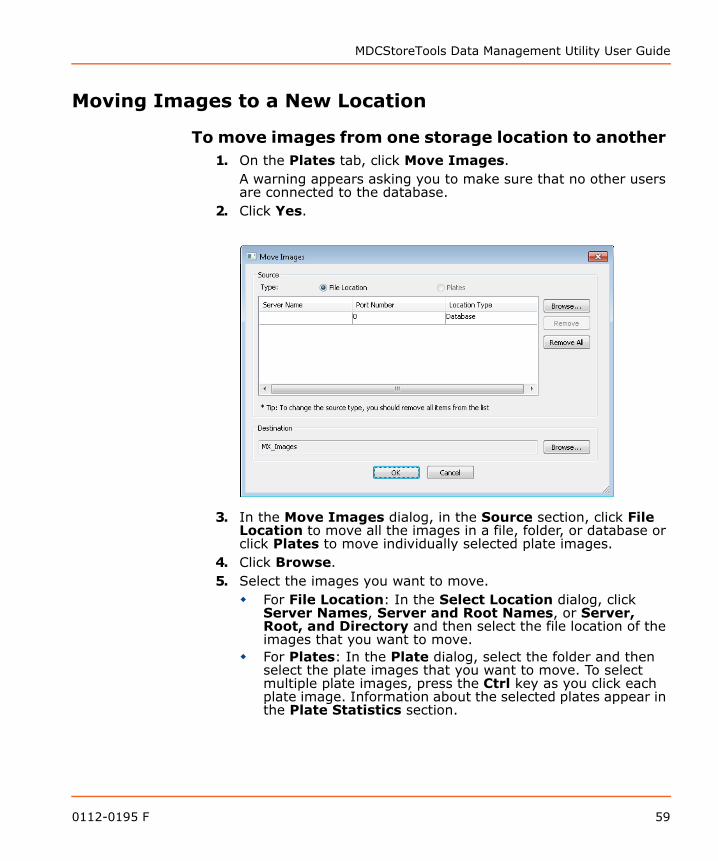
To move images from one storage location to another 1. On the Plates tab, click Move Images.
A warning appears asking you to make sure that no other users are connected to the database.
2. Click Yes.
3. In the Move Images dialog, in the Source section, click File Location to move all the images in a file, folder, or database or click Plates to move individually selected plate images.
4. Click Browse.5. Select the images you want to move.
For File Location: In the Select Location dialog, click Server Names, Server and Root Names, or Server, Root, and Directory and then select the file location of the images that you want to move.
For Plates: In the Plate dialog, select the folder and then select the plate images that you want to move. To select multiple plate images, press the Ctrl key as you click each plate image. Information about the selected plates appear in the Plate Statistics section.
0112-0195 F 59
Setting Up and Managing Image File Storage
6. In the Destination section, click Browse 7. In the Select Storage Type dialog, select the destination
storage location for the images and click OK.8. Verify that the Source and Destination locations are correct
and then click OK.A message appears, informing you that the operation was added to the queue and asking if you want to view the progress of the operation.
9. Click Yes to view the progress of the operation on the Operation Progress tab.For more information about the Operation Progress tab, see Chapter 14: Managing Operation Status on page 111.
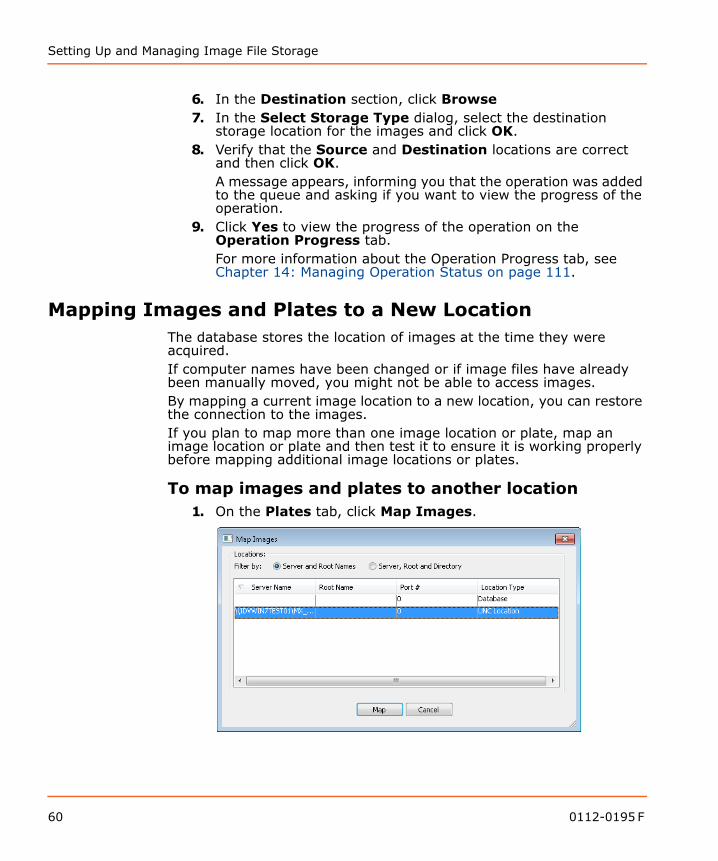
Mapping Images and Plates to a New LocationThe database stores the location of images at the time they were acquired.If computer names have been changed or if image files have already been manually moved, you might not be able to access images. By mapping a current image location to a new location, you can restore the connection to the images.If you plan to map more than one image location or plate, map an image location or plate and then test it to ensure it is working properly before mapping additional image locations or plates.
To map images and plates to another location1. On the Plates tab, click Map Images.
60 0112-0195 F
MDCStoreTools Data Management Utility User Guide
2. In the Map Images dialog, in the Filter by section, click one of the following: Server and Root Names to map an image location. Server, Root, and Directory to map a plate.
3. Select the location or plate that you want to map and click Map.
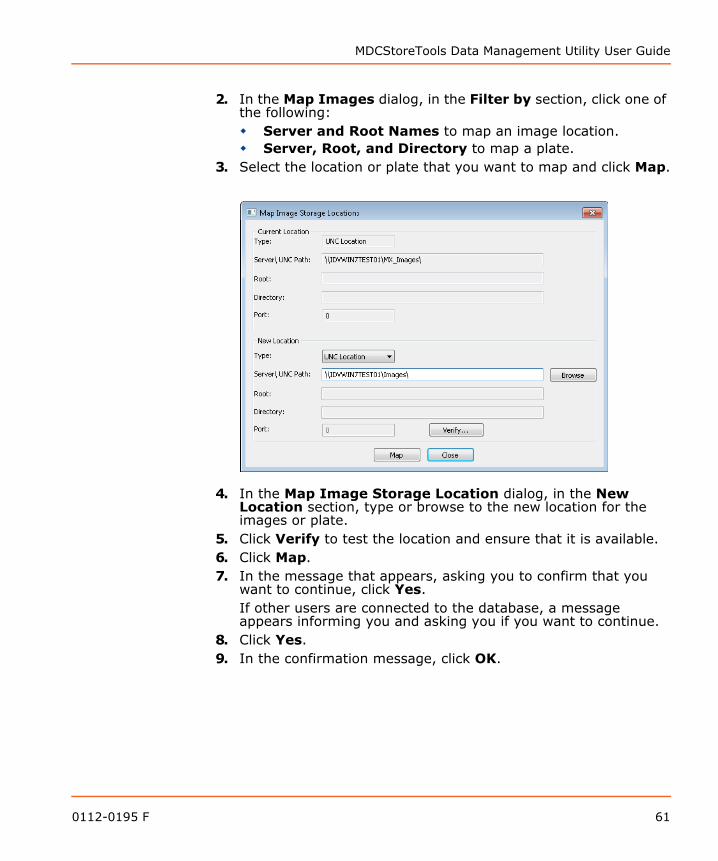
4. In the Map Image Storage Location dialog, in the New Location section, type or browse to the new location for the images or plate.
5. Click Verify to test the location and ensure that it is available.6. Click Map.7. In the message that appears, asking you to confirm that you
want to continue, click Yes.If other users are connected to the database, a message appears informing you and asking you if you want to continue.
8. Click Yes.9. In the confirmation message, click OK.
0112-0195 F 61
Setting Up and Managing Image File Storage
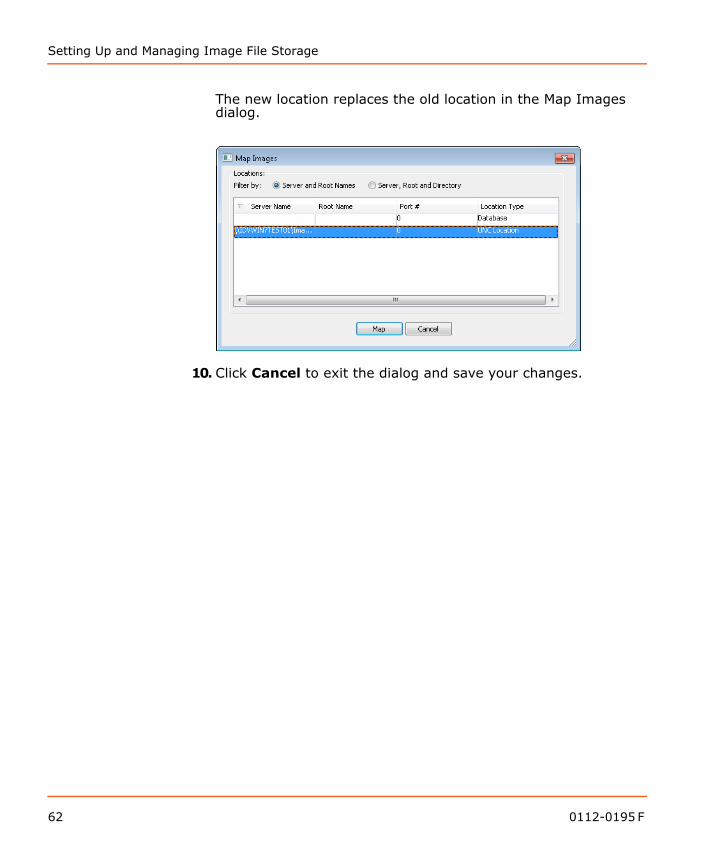
The new location replaces the old location in the Map Images dialog.
10. Click Cancel to exit the dialog and save your changes.
62 0112-0195 F
7
Managing Plates and Image FilesIntroductionSome of the plate and image file management tasks described in this section can also be performed using the Plate dialog in the MetaXpress® Software and the AcuityXpress™ Software. The Plate dialog interfaces with the MDCStore™ database and file servers. Topics in this section:
• Setting Folder and Plate Security Permissions• Creating or Modifying a Plate• Changing the Display of the Dialog
Setting Folder and Plate Security PermissionsYou can control the type of access a user group has to a folder or an individual plate. Table 7-1 describes the types of access a user group can have to a folder or plate.
Table 7-1 Security Permissions for user groups
Permission Description
Read Only The users in the user group can only view data.
Read-Write The users in the user group can view, import, modify, delete, and analyze data.
Lab Head The users in the user group can create folders and plates, and can grant users access to plates.
0112-0195 F 63
Managing Plates and Image Files
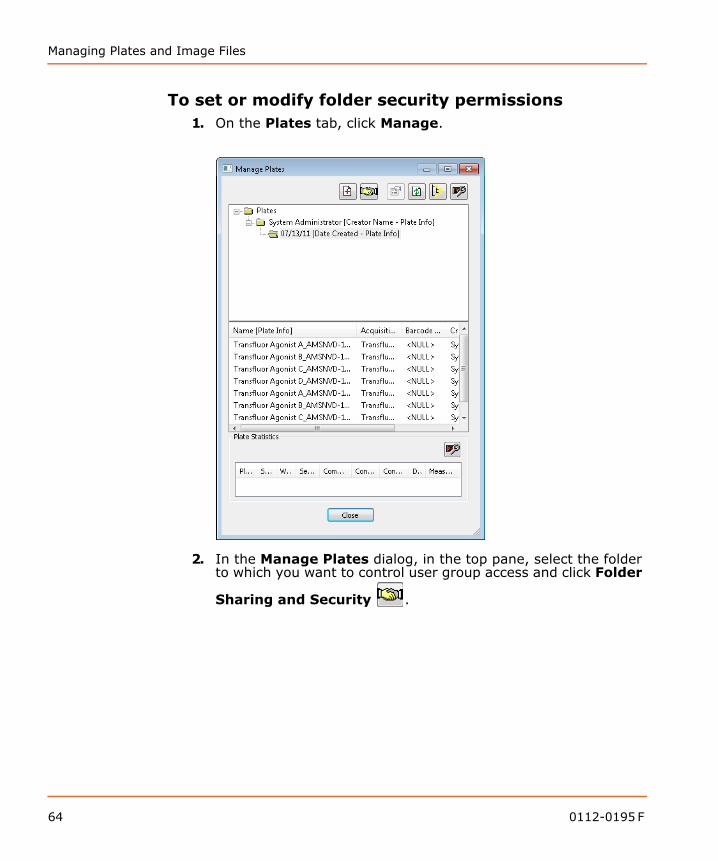
To set or modify folder security permissions1. On the Plates tab, click Manage.
2. In the Manage Plates dialog, in the top pane, select the folder to which you want to control user group access and click Folder
Sharing and Security .
64 0112-0195 F
MDCStoreTools Data Management Utility User Guide
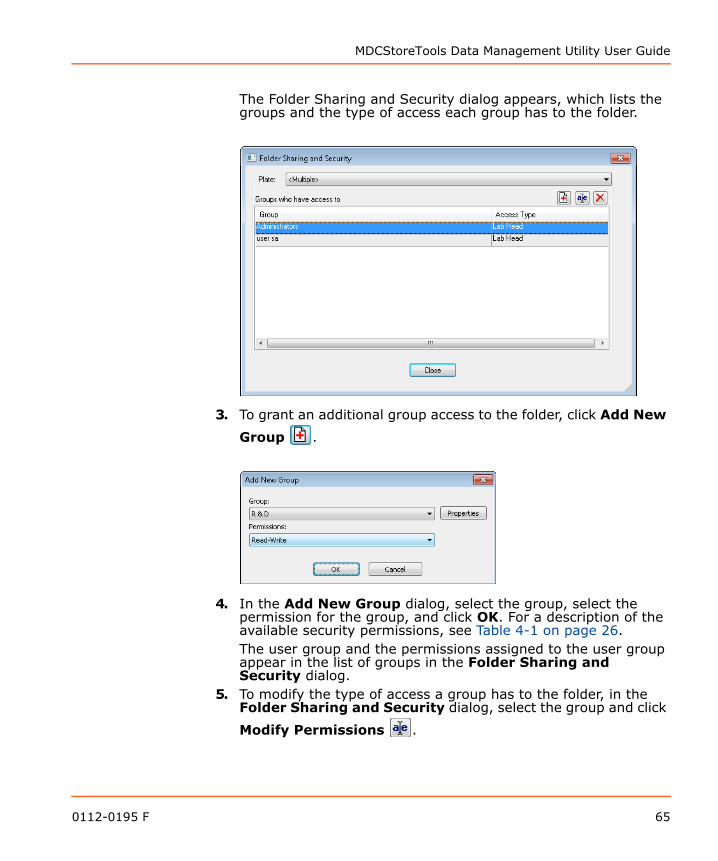
The Folder Sharing and Security dialog appears, which lists the groups and the type of access each group has to the folder.
3. To grant an additional group access to the folder, click Add New
Group .
4. In the Add New Group dialog, select the group, select the permission for the group, and click OK. For a description of the available security permissions, see Table 4-1 on page 26.The user group and the permissions assigned to the user group appear in the list of groups in the Folder Sharing and Security dialog.
5. To modify the type of access a group has to the folder, in the Folder Sharing and Security dialog, select the group and click
Modify Permissions .
0112-0195 F 65
Managing Plates and Image Files
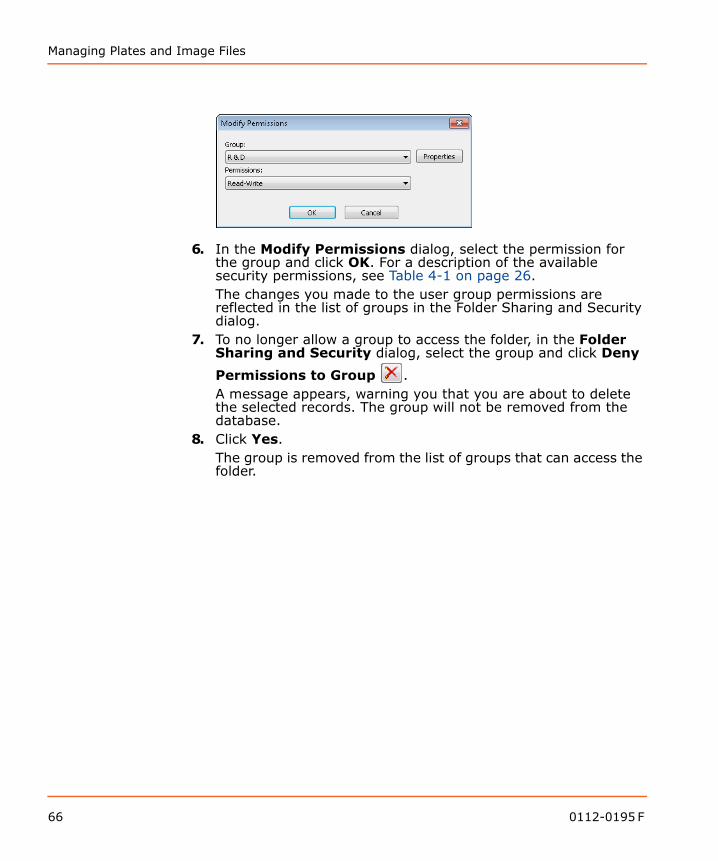
6. In the Modify Permissions dialog, select the permission for the group and click OK. For a description of the available security permissions, see Table 4-1 on page 26.The changes you made to the user group permissions are reflected in the list of groups in the Folder Sharing and Security dialog.
7. To no longer allow a group to access the folder, in the Folder Sharing and Security dialog, select the group and click Deny
Permissions to Group .A message appears, warning you that you are about to delete the selected records. The group will not be removed from the database.
8. Click Yes.The group is removed from the list of groups that can access the folder.
66 0112-0195 F
MDCStoreTools Data Management Utility User Guide
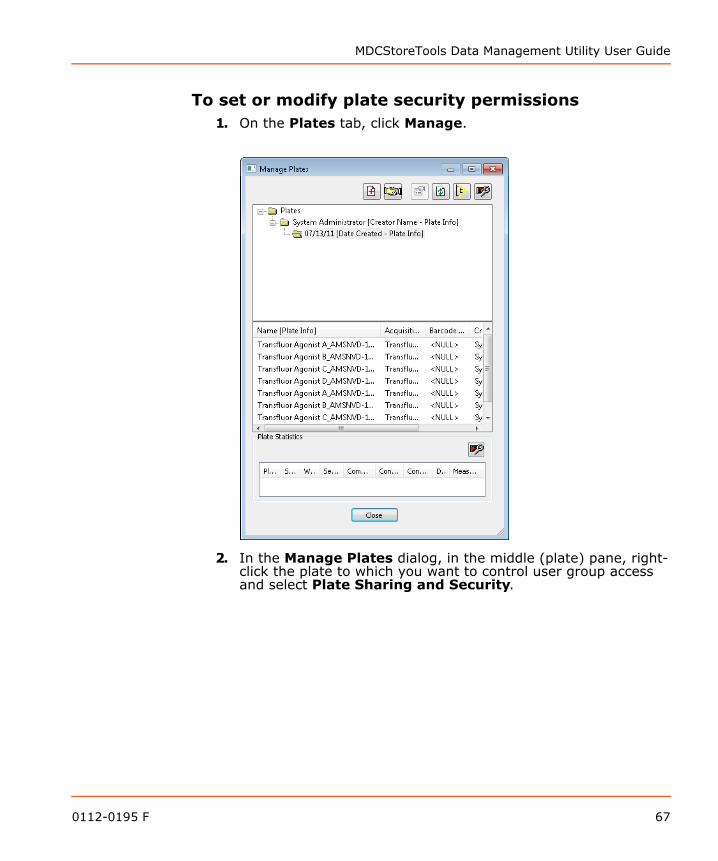
To set or modify plate security permissions1. On the Plates tab, click Manage.
2. In the Manage Plates dialog, in the middle (plate) pane, right-click the plate to which you want to control user group access and select Plate Sharing and Security.
0112-0195 F 67
Managing Plates and Image Files
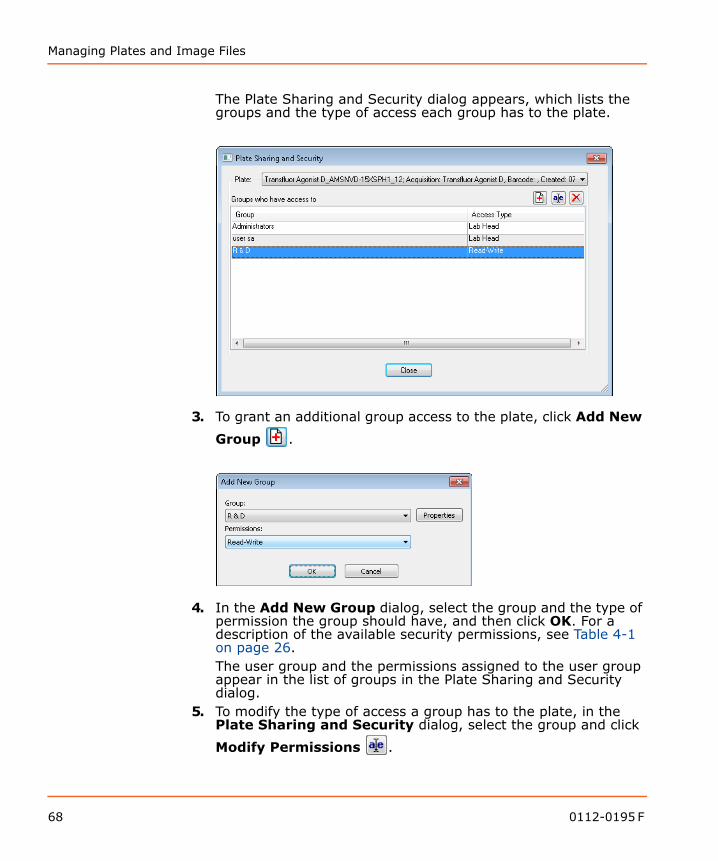
The Plate Sharing and Security dialog appears, which lists the groups and the type of access each group has to the plate.
3. To grant an additional group access to the plate, click Add New
Group .
4. In the Add New Group dialog, select the group and the type of permission the group should have, and then click OK. For a description of the available security permissions, see Table 4-1 on page 26.The user group and the permissions assigned to the user group appear in the list of groups in the Plate Sharing and Security dialog.
5. To modify the type of access a group has to the plate, in the Plate Sharing and Security dialog, select the group and click
Modify Permissions .
68 0112-0195 F
MDCStoreTools Data Management Utility User Guide
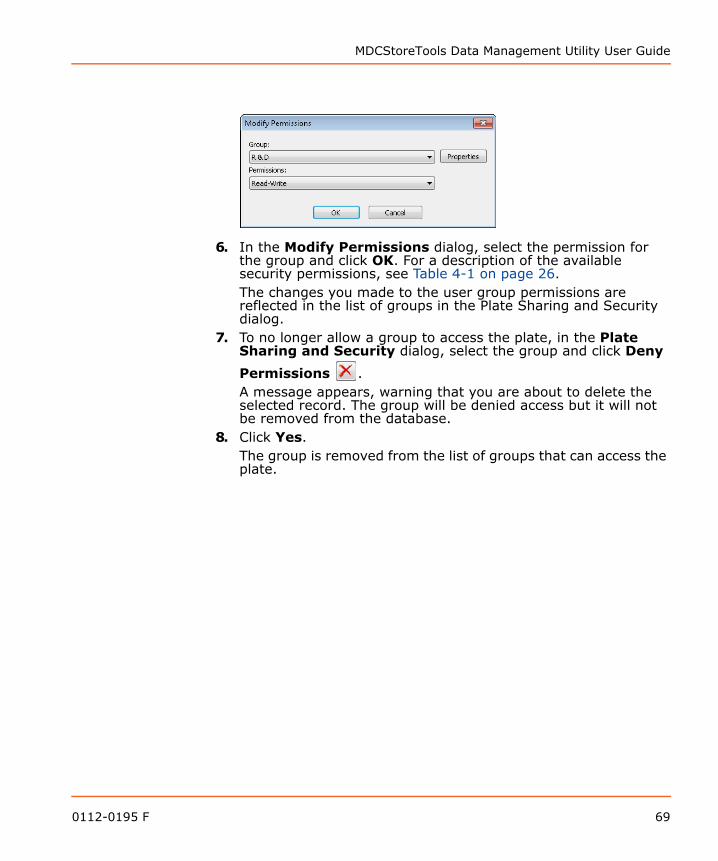
6. In the Modify Permissions dialog, select the permission for the group and click OK. For a description of the available security permissions, see Table 4-1 on page 26.The changes you made to the user group permissions are reflected in the list of groups in the Plate Sharing and Security dialog.
7. To no longer allow a group to access the plate, in the Plate Sharing and Security dialog, select the group and click Deny
Permissions .A message appears, warning that you are about to delete the selected record. The group will be denied access but it will not be removed from the database.
8. Click Yes.The group is removed from the list of groups that can access the plate.
0112-0195 F 69
Managing Plates and Image Files
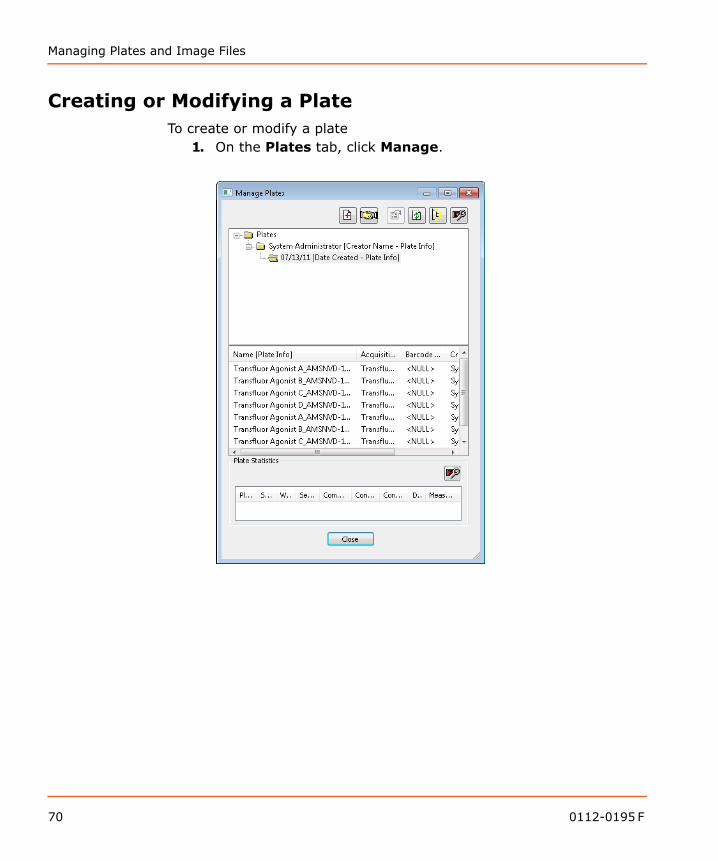
Creating or Modifying a PlateTo create or modify a plate
1. On the Plates tab, click Manage.
70 0112-0195 F
MDCStoreTools Data Management Utility User Guide
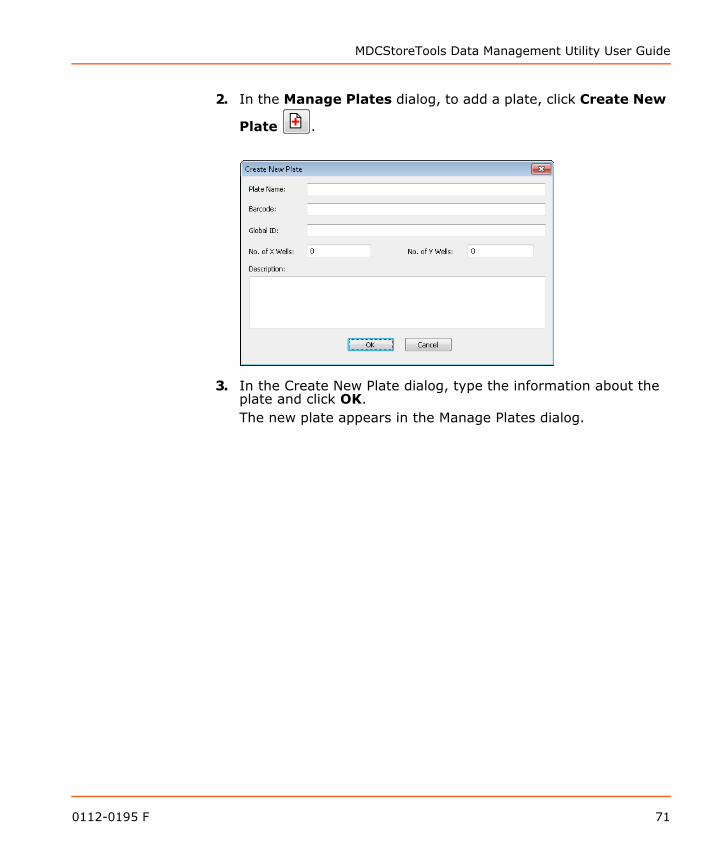
2. In the Manage Plates dialog, to add a plate, click Create New
Plate .
3. In the Create New Plate dialog, type the information about the plate and click OK.The new plate appears in the Manage Plates dialog.
0112-0195 F 71
Managing Plates and Image Files
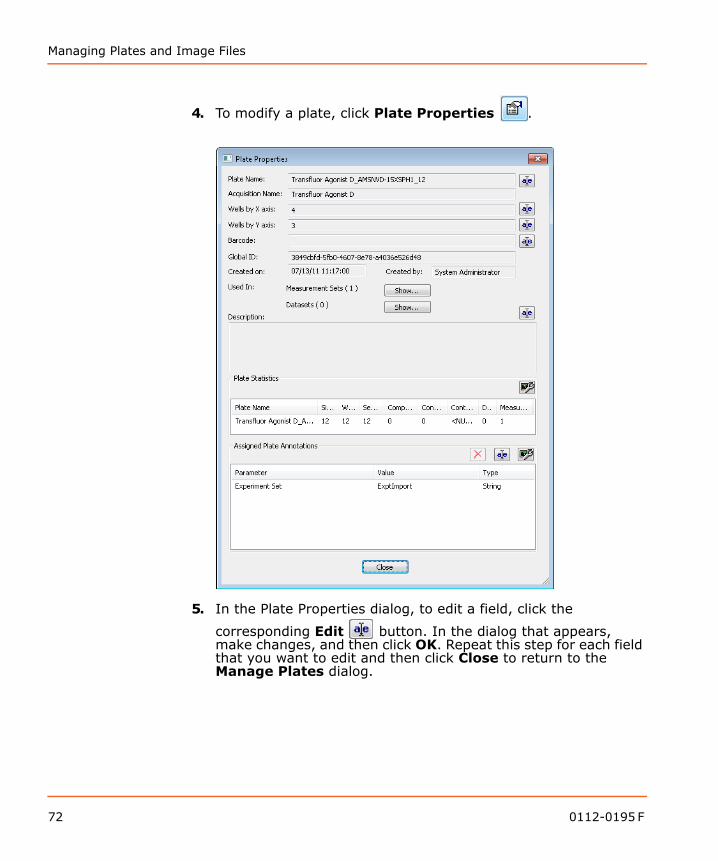
4. To modify a plate, click Plate Properties .
5. In the Plate Properties dialog, to edit a field, click the
corresponding Edit button. In the dialog that appears, make changes, and then click OK. Repeat this step for each field that you want to edit and then click Close to return to the Manage Plates dialog.
72 0112-0195 F
MDCStoreTools Data Management Utility User Guide
Changing the Display of the DialogYou can control what information is displayed and how it appears in the Manage Plates dialog. You can:
• Add, remove, or rearrange columns.• Add, remove, or rearrange folders.• Move the middle (plate) pane.
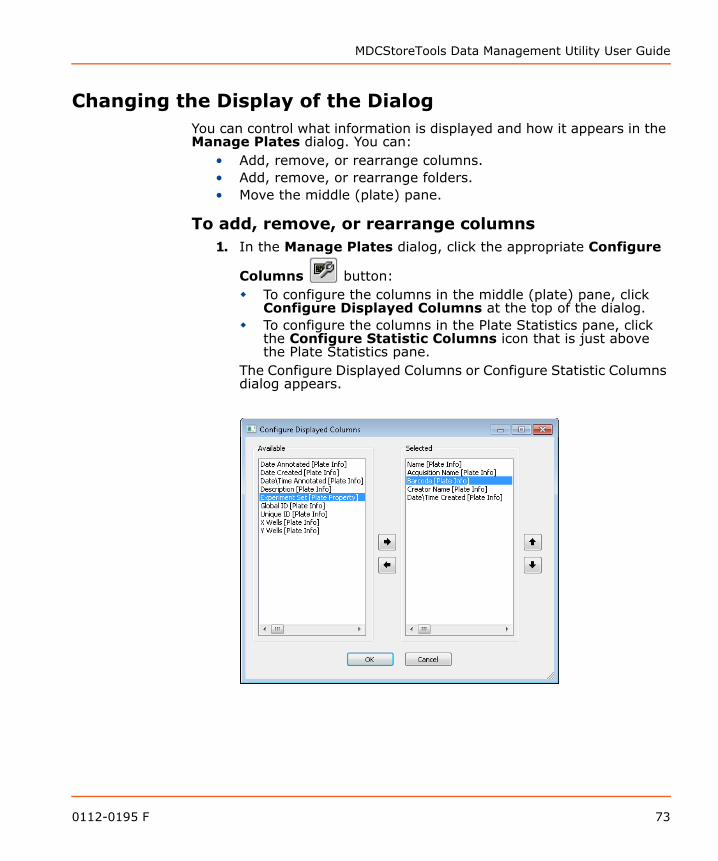
To add, remove, or rearrange columns1. In the Manage Plates dialog, click the appropriate Configure
Columns button: To configure the columns in the middle (plate) pane, click
Configure Displayed Columns at the top of the dialog. To configure the columns in the Plate Statistics pane, click
the Configure Statistic Columns icon that is just above the Plate Statistics pane.
The Configure Displayed Columns or Configure Statistic Columns dialog appears.
0112-0195 F 73
Managing Plates and Image Files
The Available pane lists the columns that are currently not displayed in the Manage Plates dialog, and the Selected pane lists the columns that are displayed. To add a column to the Manage Plates dialog, in the
Available pane select a column and click the right arrow button to move the column to the Selected pane.
To rearrange columns that are displayed in the Manage Plates dialog, in the Selected pane select a column and click the up or down arrow.
To remove a column from the Manage Plates dialog, in the Selected pane select the column and click the left arrow button.
2. Click OK.Your changes are reflected in the Manage Plates dialog.
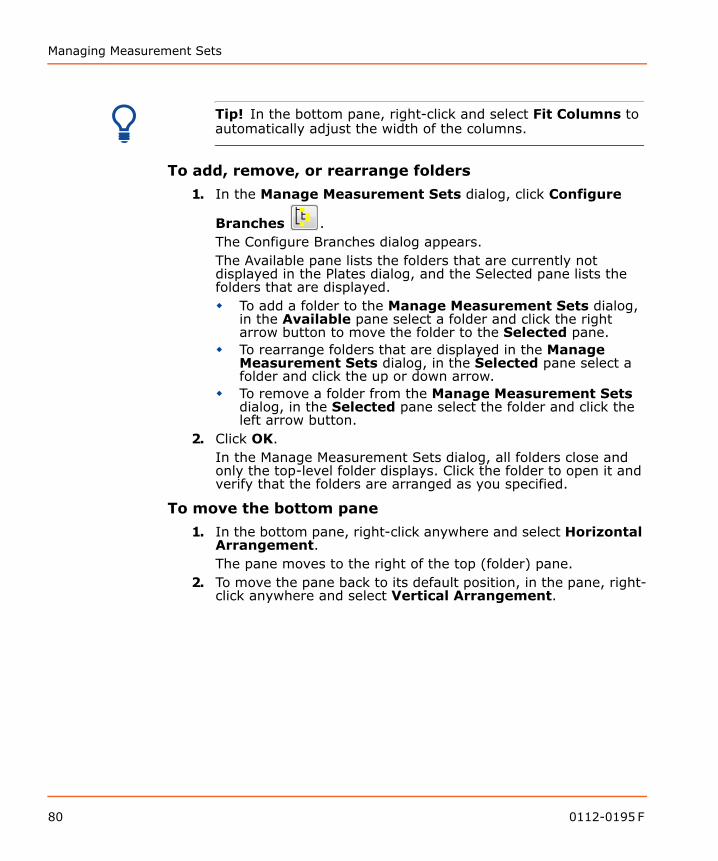
To add, remove, or rearrange folders
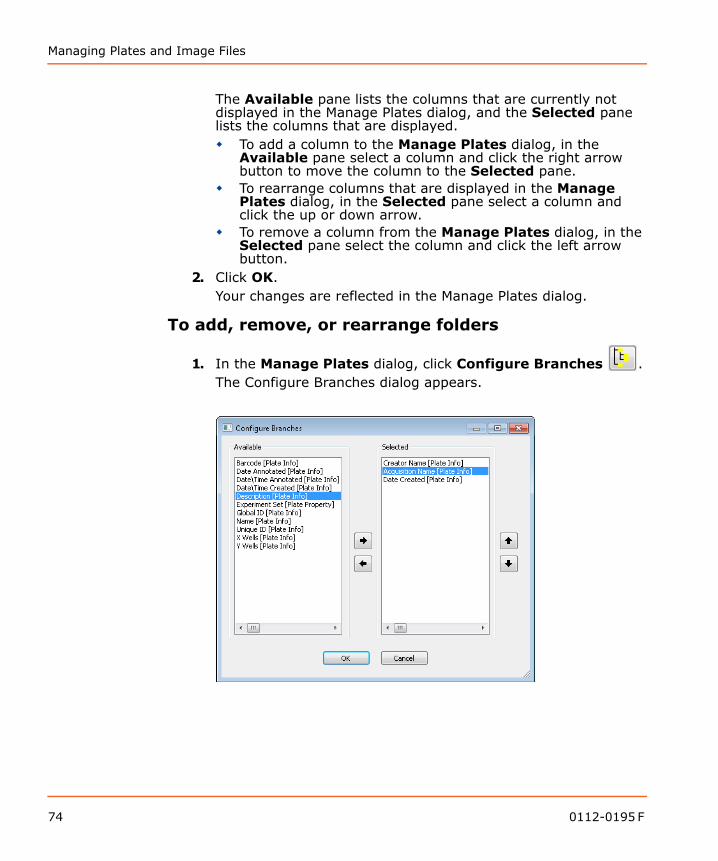
1. In the Manage Plates dialog, click Configure Branches .The Configure Branches dialog appears.
74 0112-0195 F
MDCStoreTools Data Management Utility User Guide
The Available pane lists the folders that are currently not displayed in the Plates dialog, and the Selected pane lists the folders that are displayed. To add a folder to the Manage Plates dialog, in the
Available pane select a folder and click the right arrow button to move the folder to the Selected pane.
To rearrange folders that are displayed in the Manage Plates dialog, in the Selected pane select a folder and click the up or down arrow.
To remove a folder from the Manage Plates dialog, in the Selected pane select the folder and click the left arrow button.
2. Click OK.In the Manage Plates dialog, all folders close and just the top-level folder is displayed. Click the folder to open it and ensure that the folders are arranged as you specified.
To move the middle (plate) pane 1. In the middle (plate) pane, right-click anywhere and select
Vertical Arrangement.The pane moves to the right of the top (folder) pane.
2. To move the middle (plate) pane back to its default position, in the middle (plate) pane, right-click anywhere and select Vertical Arrangement.The pane moves below the top (folder) pane.
Tip! In the Plate Statistics pane, right-click and select Fit Columns to automatically adjust the width of the columns.
0112-0195 F 75

Managing Plates and Image Files
76 0112-0195 F
8
Managing Measurement SetsIntroductionThis section explains the options available for managing measurement sets, which include saving a measurement set as a text file, attaching a file to a measurement set, and removing cell outlines from a measurement set. Topics in this section:
• Managing Measurement Sets• Managing Measurement Sets in the Recycle Bin• Removing Cell Outlines From Measurement Sets
Managing Measurement SetsThe MDCStoreTools™ utility provides many options for managing measurement sets. With the Manage option on the Measurement Sets tab, you can:
• Modify the name of measurement types or delete measurement types in a selected measurement set.
• Save a measurement set as a text file.• Add a file as an attachment to a measurement set.• Duplicate a measurement set.• Delete a measurement set.• View measurement set properties.
When you delete a measurement set, it goes into the MDCStoreTools™ recycle bin. To manage the measurement sets in the recycle bin, see Managing Measurement Sets in the Recycle Bin on page 81.
0112-0195 F 77
Managing Measurement Sets
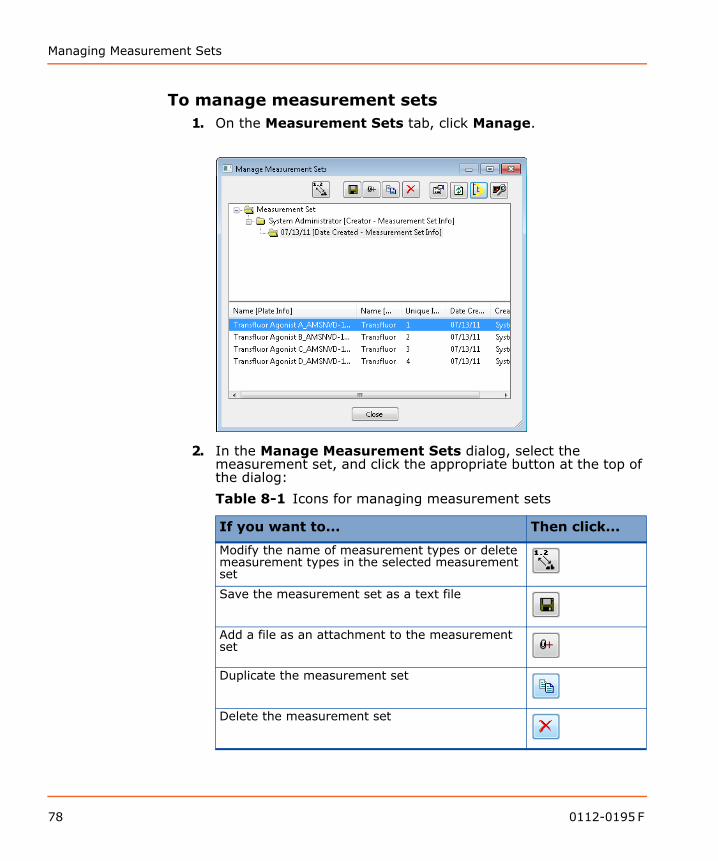
To manage measurement sets 1. On the Measurement Sets tab, click Manage.
2. In the Manage Measurement Sets dialog, select the measurement set, and click the appropriate button at the top of the dialog:
Table 8-1 Icons for managing measurement sets
If you want to... Then click...
Modify the name of measurement types or delete measurement types in the selected measurement set
Save the measurement set as a text file
Add a file as an attachment to the measurement set
Duplicate the measurement set
Delete the measurement set
78 0112-0195 F

MDCStoreTools Data Management Utility User Guide
3. Type the required information in the dialog that appears and click OK.
To change the display of the dialogYou can control what information is displayed and how it appears in the Manage Measurement Sets dialog. You can:
• Add, remove, or rearrange columns.• Add, remove, or rearrange folders.• Move the bottom pane.
To add, remove, or rearrange columns
1. In the Manage Measurement Sets dialog, click Configure
Displayed Columns .The Configure Displayed Columns dialog appears. The Available pane lists the columns that are currently not displayed in the Plates dialog, and the Selected pane lists the columns that are displayed. To add a column to the Manage Measurement Sets dialog,
in the Available pane select a column and click the right arrow button to move the column to the Selected pane.
To rearrange columns that are displayed in the Manage Measurement Sets dialog, in the Selected pane select a column and click the up or down arrow.
To remove a column from the Manage Measurement Sets dialog, in the Selected pane select the column and click the left arrow button.
2. Click OK.Your changes are reflected in the Manage Measurement Sets dialog.
View the measurement set properties
Table 8-1 Icons for managing measurement sets (cont’d)
If you want to... Then click...
Tip! To refresh the display of data in the dialog, click
Retrieve/Refresh Branch Data .
0112-0195 F 79
Managing Measurement Sets
To add, remove, or rearrange folders
1. In the Manage Measurement Sets dialog, click Configure
Branches .The Configure Branches dialog appears.The Available pane lists the folders that are currently not displayed in the Plates dialog, and the Selected pane lists the folders that are displayed. To add a folder to the Manage Measurement Sets dialog,
in the Available pane select a folder and click the right arrow button to move the folder to the Selected pane.
To rearrange folders that are displayed in the Manage Measurement Sets dialog, in the Selected pane select a folder and click the up or down arrow.
To remove a folder from the Manage Measurement Sets dialog, in the Selected pane select the folder and click the left arrow button.
2. Click OK.In the Manage Measurement Sets dialog, all folders close and only the top-level folder displays. Click the folder to open it and verify that the folders are arranged as you specified.
To move the bottom pane
1. In the bottom pane, right-click anywhere and select Horizontal Arrangement.The pane moves to the right of the top (folder) pane.
2. To move the pane back to its default position, in the pane, right-click anywhere and select Vertical Arrangement.
Tip! In the bottom pane, right-click and select Fit Columns to automatically adjust the width of the columns.
80 0112-0195 F

MDCStoreTools Data Management Utility User Guide
Managing Measurement Sets in the Recycle BinThe MDCStoreTools recycle bin holds measurement sets that have been deleted from the Manage Measurement Sets dialog. Using the recycle bin, you can restore deleted measurement sets or mark measurement sets for deletion from the database.When you mark a measurement set for deletion in the recycle bin, users of the MetaXpress® Software will not be able to access the measurement set. However, when you mark a measurement set for deletion, the measurement set is not permanently removed from the database. To permanently delete measurement sets that are marked for deletion, you must click the Remove button on the MDCStore Operations tab. See Removing Data that has been Marked for Deletion on page 88.
To Manage the Contents of the Recycle Bin1. On the MDCStore Operations tab, next to To manage the
contents of the Recycle Bin, click Manage.
2. In the Recycle Bin dialog, select the measurement set that you want to restore to the database or mark for deletion.To view information about the selected measurement set, click Properties.
3. Click Restore or Delete.
0112-0195 F 81
Managing Measurement Sets
4. In the confirmation message that appears, click Yes to continue with the operation.
5. Click Close.When you mark a measurement set for deletion in the recycle bin, users of the MetaXpress Software will not be able to access the measurement set. However, when you mark a measurement set for deletion, the measurement set is not permanently removed from the database. To permanently delete measurement sets that are marked for deletion, you must click the Remove button on the MDCStore Operations tab. See Removing Data that has been Marked for Deletion on page 88.
Removing Cell Outlines From Measurement SetsIn the MetaXpress Software, users can log cell overlays (outlines) with measurement sets so that the measurements correlate to individual cells. Logging this information results in very large files. The MDCStoreTools utility provides a way to remove cell outlines from selected measurement sets.
82 0112-0195 F
MDCStoreTools Data Management Utility User Guide
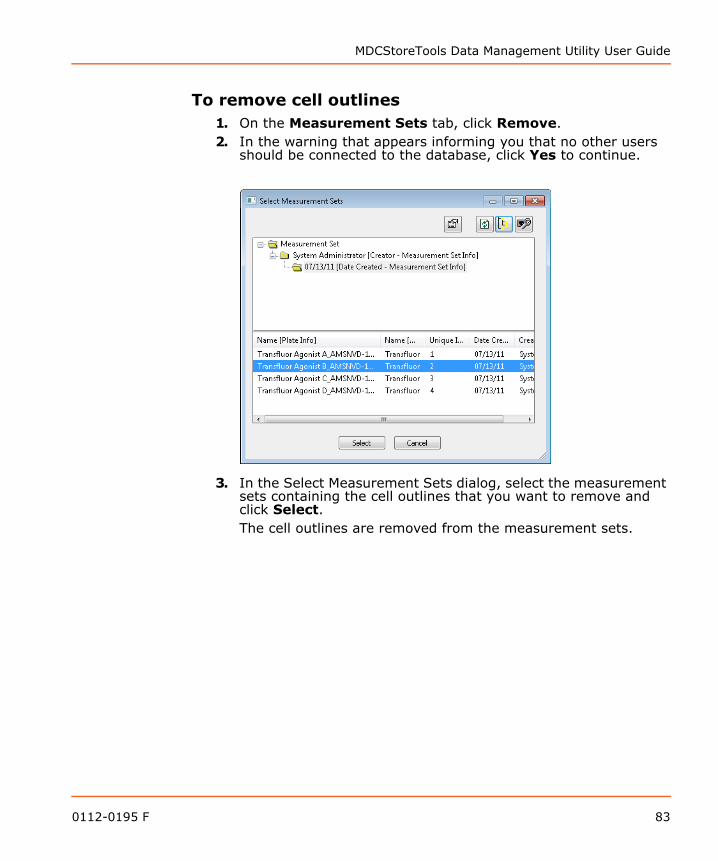
To remove cell outlines1. On the Measurement Sets tab, click Remove.2. In the warning that appears informing you that no other users
should be connected to the database, click Yes to continue.
3. In the Select Measurement Sets dialog, select the measurement sets containing the cell outlines that you want to remove and click Select.The cell outlines are removed from the measurement sets.
0112-0195 F 83

Managing Measurement Sets
84 0112-0195 F

9
Removing Data in the DatabaseIntroductionRemoving data from the database is a two-step process: first a user with at least Read-Write permissions marks the plates or images for deletion and then a Lab Head user with administrative privileges removes the data that is marked for deletion.For information about deleting measurement sets, see Chapter 8: Managing Measurement Sets on page 77.
Topics in this section:• Marking Data for Deletion• Removing Data that has been Marked for Deletion
Marking Data for Deletion
To mark plates for deletionWhen you mark a plate for deletion, users of the MetaXpress® Software will not be able to select the plate in the Plate dialog. However, when you mark a plate for deletion, the plate is not permanently removed from the database. To permanently delete plates that are marked for deletion, you must click the Remove button on the MDCStore Operations tab. See Removing Data that has been Marked for Deletion on page 88.For information about deleting measurement sets, see Chapter 8: Managing Measurement Sets on page 77.
Note: Make sure that you use version 1.1 or later of the MDCStoreTools™ utility to mark data for deletion if you also plan to back up or archive plate or image data using version 1.1 or later of the MDCStoreTools utility. If you do not use the same version of the utility to carry out both tasks, you risk losing or corrupting existing backups and archives.
0112-0195 F 85
Removing Data in the Database
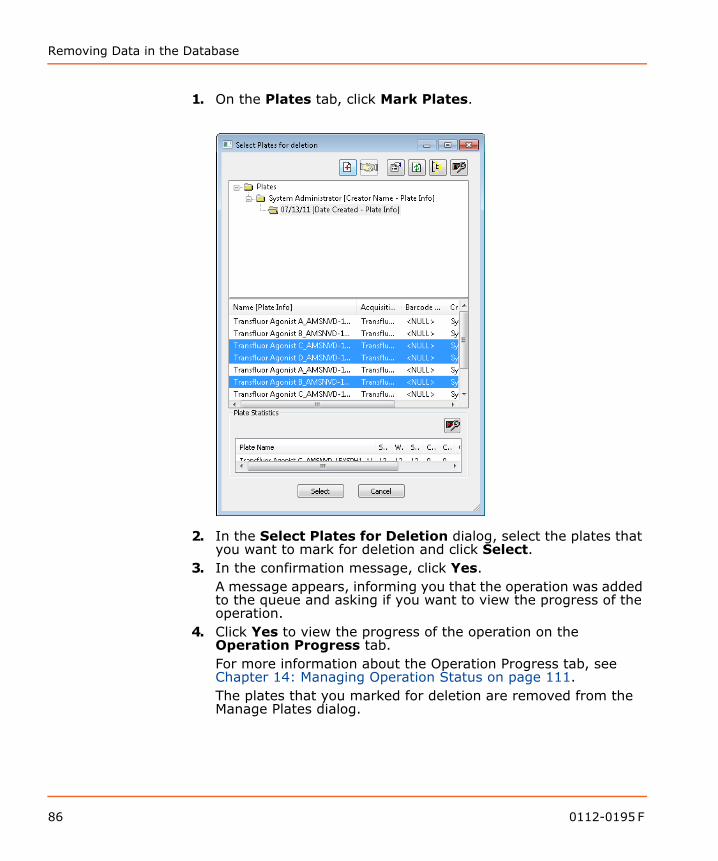
1. On the Plates tab, click Mark Plates.
2. In the Select Plates for Deletion dialog, select the plates that you want to mark for deletion and click Select.
3. In the confirmation message, click Yes.A message appears, informing you that the operation was added to the queue and asking if you want to view the progress of the operation.
4. Click Yes to view the progress of the operation on the Operation Progress tab. For more information about the Operation Progress tab, see Chapter 14: Managing Operation Status on page 111.The plates that you marked for deletion are removed from the Manage Plates dialog.
86 0112-0195 F
MDCStoreTools Data Management Utility User Guide
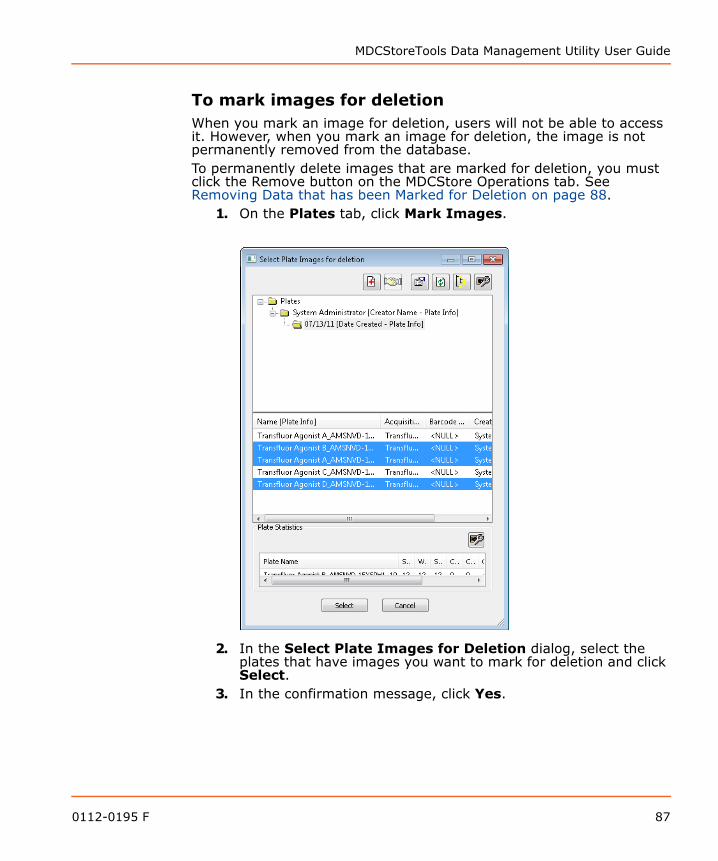
To mark images for deletionWhen you mark an image for deletion, users will not be able to access it. However, when you mark an image for deletion, the image is not permanently removed from the database. To permanently delete images that are marked for deletion, you must click the Remove button on the MDCStore Operations tab. See Removing Data that has been Marked for Deletion on page 88.
1. On the Plates tab, click Mark Images.
2. In the Select Plate Images for Deletion dialog, select the plates that have images you want to mark for deletion and click Select.
3. In the confirmation message, click Yes.
0112-0195 F 87
Removing Data in the Database
A message appears, informing you that the operation was added to the queue and asking if you want to view the progress of the operation.
4. Click Yes to view the progress of the operation on the Operation Progress tab. See Chapter 14: Managing Operation Status on page 111 for more information about the Operation Progress tab.The images that you marked for deletion are no longer accessible in the MetaXpress Software.
Removing Data that has been Marked for Deletion1. On the MDCStore Operations tab, click Remove.
A warning message appears, asking you to confirm that no other users are currently connected to the database.
2. Click Yes.A message appears asking if you would like to view the Operation Progress tab to monitor the progress of the operation.
3. Click Yes to view the progress of the operation on the Operation Progress tab.See Chapter 14: Managing Operation Status on page 111 for information about the Operation Progress tab.The MDCStoreTools™ utility removes plates, images, measurement sets, and associated data that have been marked for deletion.
88 0112-0195 F
10
Backing Up Images and Optimizing the DatabaseIntroductionRegularly scheduled backups are a part of any sound database management practice. Also, as users perform experiments and acquire data, the image storage locations will reach capacity, at which point you need to archive images. Images can be restored from backup copies or archives at any time.To maintain optimum performance, you should periodically clean up and manage the size of MDCStore™ databases.You must log in as a Lab Head user with administrative privileges to carry out the tasks described in this section.Topics in this section:
• Backing Up, Archiving, and Restoring Images• Cleaning Up and Optimizing a Database
Backing Up, Archiving, and Restoring ImagesBacking up is the process of copying data to a different storage location while leaving the original data where it is, entirely accessible. Archiving is the process of moving data from online, accessible storage to offline storage. When images are archived, some information about the archived images remains online, so that offline media can be reconnected and restored. Images can be restored from backup or archive to the original database.
Note: The Backup, Archive, and Restore options are available only with version 1.1 or later of the MDCStoreTools™ utility and also require version 2.2 or later of the MDCStore database. In addition, if you use version 1.1 or later of the MDCStoreTools utility to back up or archive image or plate data, you must use version 1.1 or later of the utility to mark data for deletion. If you do not use the same version of the MDCStoreTools utility to carry out both tasks, you risk losing or corrupting existing backups and archives.
0112-0195 F 89
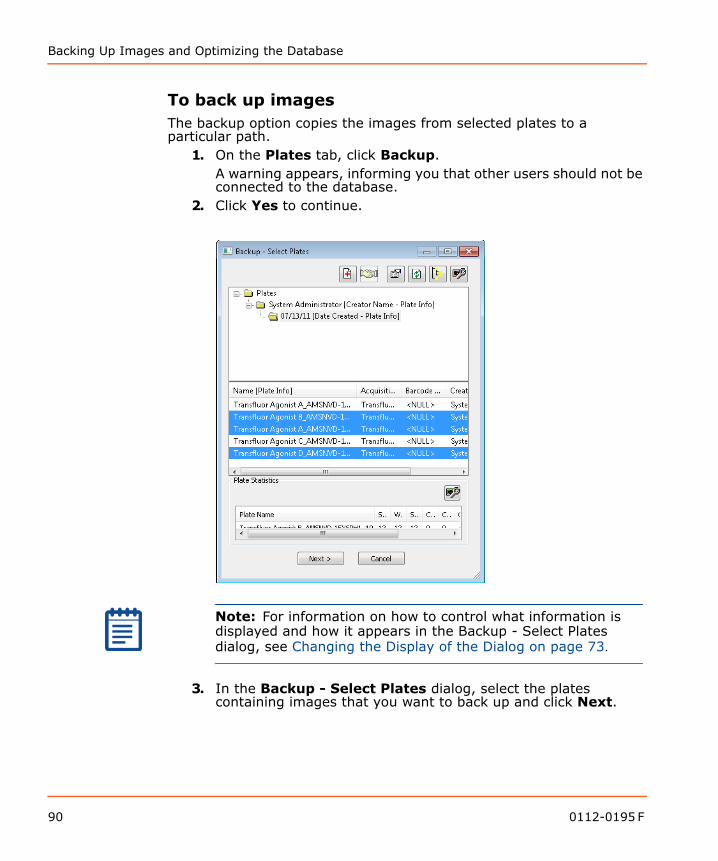
Backing Up Images and Optimizing the Database
To back up images The backup option copies the images from selected plates to a particular path.
1. On the Plates tab, click Backup.A warning appears, informing you that other users should not be connected to the database.
2. Click Yes to continue.
3. In the Backup - Select Plates dialog, select the plates containing images that you want to back up and click Next.
Note: For information on how to control what information is displayed and how it appears in the Backup - Select Plates dialog, see Changing the Display of the Dialog on page 73.
90 0112-0195 F
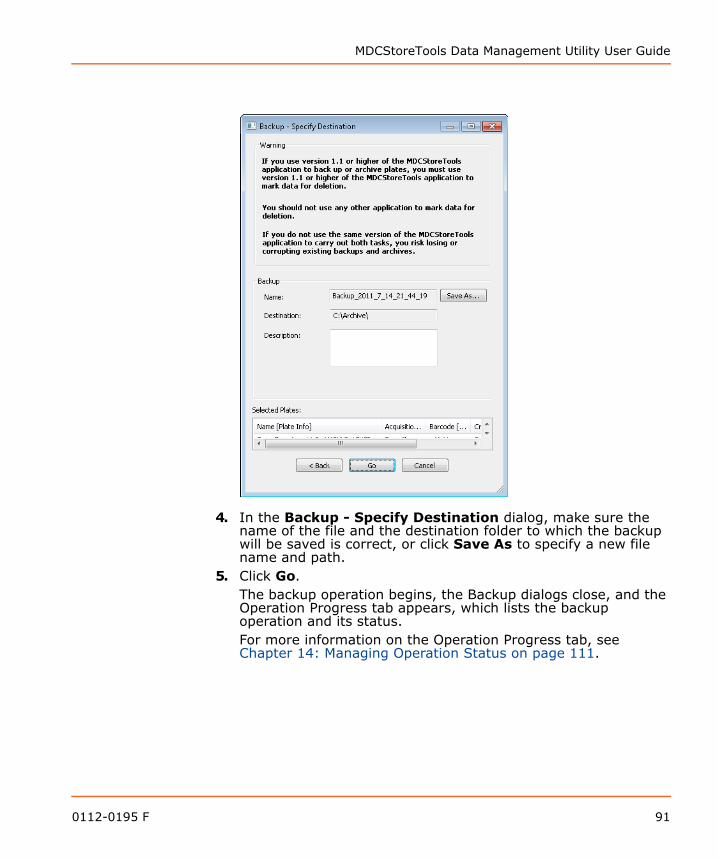
MDCStoreTools Data Management Utility User Guide
4. In the Backup - Specify Destination dialog, make sure the name of the file and the destination folder to which the backup will be saved is correct, or click Save As to specify a new file name and path.
5. Click Go.The backup operation begins, the Backup dialogs close, and the Operation Progress tab appears, which lists the backup operation and its status. For more information on the Operation Progress tab, see Chapter 14: Managing Operation Status on page 111.
0112-0195 F 91
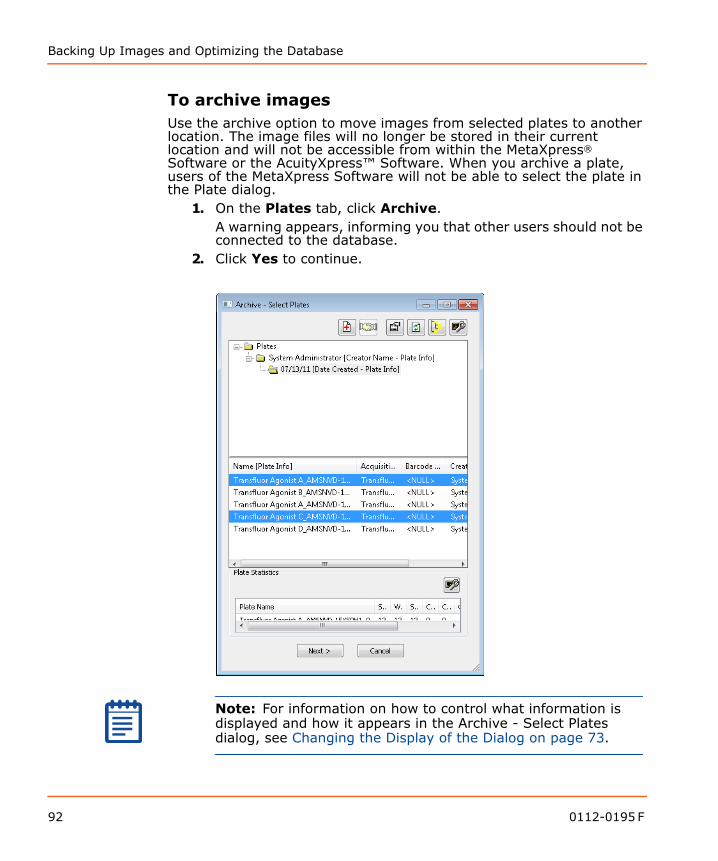
Backing Up Images and Optimizing the Database
To archive imagesUse the archive option to move images from selected plates to another location. The image files will no longer be stored in their current location and will not be accessible from within the MetaXpress® Software or the AcuityXpress™ Software. When you archive a plate, users of the MetaXpress Software will not be able to select the plate in the Plate dialog.
1. On the Plates tab, click Archive.A warning appears, informing you that other users should not be connected to the database.
2. Click Yes to continue.
Note: For information on how to control what information is displayed and how it appears in the Archive - Select Plates dialog, see Changing the Display of the Dialog on page 73.
92 0112-0195 F
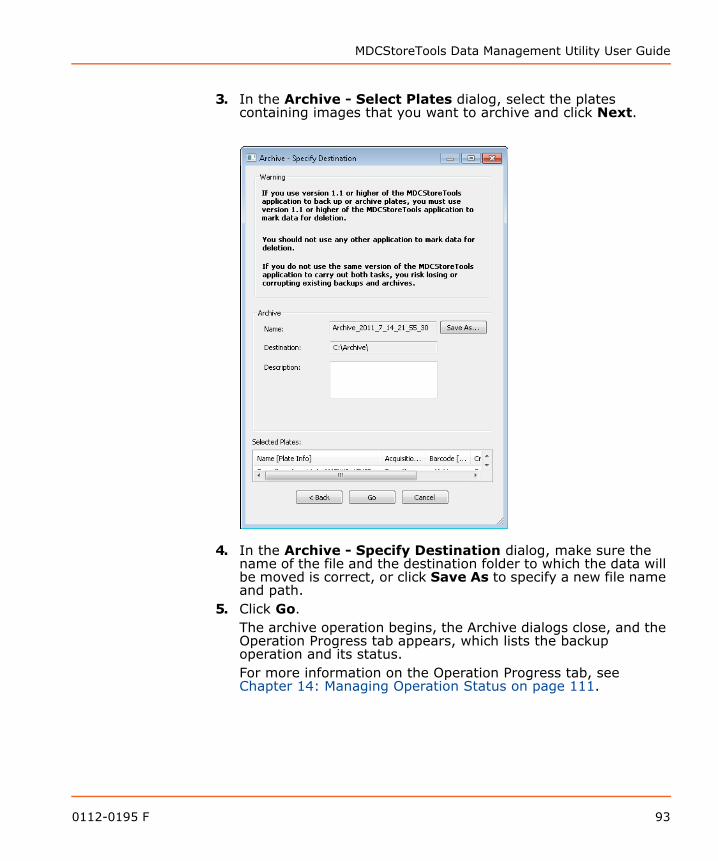
MDCStoreTools Data Management Utility User Guide
3. In the Archive - Select Plates dialog, select the plates containing images that you want to archive and click Next.
4. In the Archive - Specify Destination dialog, make sure the name of the file and the destination folder to which the data will be moved is correct, or click Save As to specify a new file name and path.
5. Click Go.The archive operation begins, the Archive dialogs close, and the Operation Progress tab appears, which lists the backup operation and its status. For more information on the Operation Progress tab, see Chapter 14: Managing Operation Status on page 111.
0112-0195 F 93
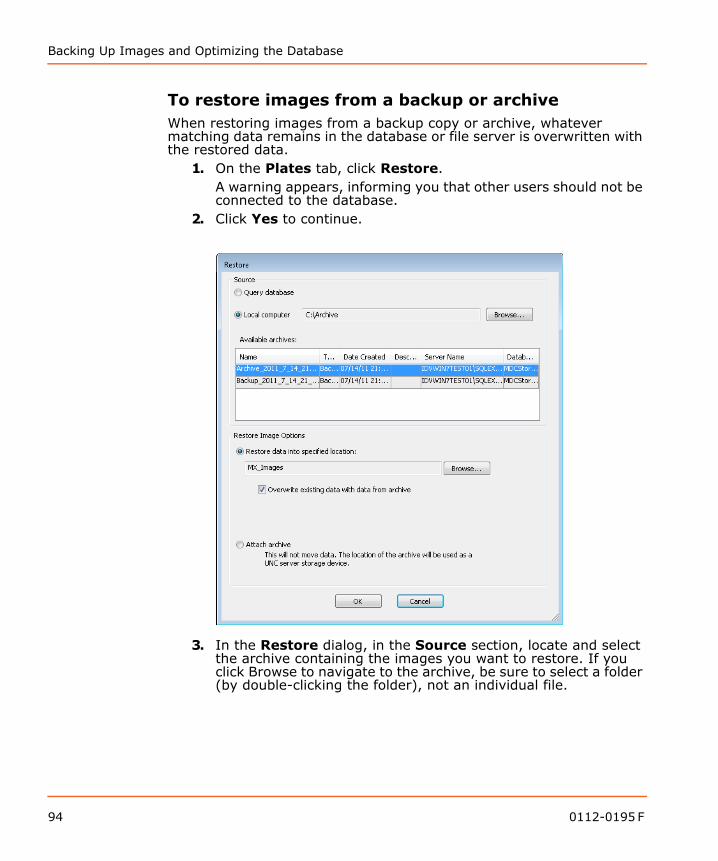
Backing Up Images and Optimizing the Database
To restore images from a backup or archiveWhen restoring images from a backup copy or archive, whatever matching data remains in the database or file server is overwritten with the restored data.
1. On the Plates tab, click Restore.A warning appears, informing you that other users should not be connected to the database.
2. Click Yes to continue.
3. In the Restore dialog, in the Source section, locate and select the archive containing the images you want to restore. If you click Browse to navigate to the archive, be sure to select a folder (by double-clicking the folder), not an individual file.
94 0112-0195 F
MDCStoreTools Data Management Utility User Guide
4. In the Restore Image Options section, select either A specified location to which the images will be restored. Attach archive to keep data where it is but use the archive
location as an image storage location.
5. Click OK.The restore operation begins, the Restore dialogs close, and the Operation Progress tab appears, which lists the restore operation and its status. For more information on the Operation Progress tab, see Chapter 14: Managing Operation Status on page 111.
Cleaning Up and Optimizing a DatabaseTo improve MDCStore database performance, you can:
• Remove unused file locations.• Optimize the major components of the database (limited but
quick).• Optimize all of the components of the database (comprehensive
but can be slow).
Note: You can restore images only to their original database.
Note: Before you attempt to perform a task described in this section, make sure no other users are connected to the database. These database operations can significantly decrease database performance, and users can be disconnected from the database and lose their data.
0112-0195 F 95
Backing Up Images and Optimizing the Database
To remove unused file locations The MDCStoreTools utility maintains a list of file locations for each image in the database. When you use the Remove option, the MDCStoreTools utility deletes file location listings from the database that are no longer associated with a plate, for example, if the plate was moved or deleted.
1. On the MDCStore Operations tab, click Remove.A warning message appears, asking you to confirm that no other users are currently connected to the database.
2. Click Yes.A message appears asking if you would like to view the Operation Progress tab to monitor the progress of the operation.For information about the Operation Progress tab, see Chapter 14: Managing Operation Status on page 111.
To perform limited database optimizationA limited database optimization rebuilds the index for application tables, excluding dynamic tables, in the MDCStore database schema.
1. On the MDCStore Operations tab, next to For quick database optimization, click Optimize.A warning message appears, asking you to confirm that no other users are currently connected to the database.
2. Click Yes.A message appears asking if you would like to view the Operation Progress tab to monitor the progress of the operation.For information about the Operation Progress tab, see Chapter 14: Managing Operation Status on page 111.
To perform comprehensive database optimizationA comprehensive database optimization rebuilds the index for application tables, including dynamic tables, in the MDCStore database schema.
1. On the MDCStore Operations tab, next to For comprehensive database optimization, click Optimize.A warning message appears, asking you to confirm that no other users are currently connected to the database.
2. Click Yes.A message appears asking if you would like to view the Operation Progress tab to monitor the progress of the operation.For information about the Operation Progress tab, see Chapter 14: Managing Operation Status on page 111.
96 0112-0195 F
11
Managing a Microsoft SQL DatabaseIntroductionThe MDCStoreTools™ utility provides several options to help you manage a Microsoft SQL database.Topics in this section:
• Managing the Size of a Microsoft SQL Database• Attaching and Detaching a Microsoft SQL Database• Backing Up and Restoring a Microsoft SQL Database
Managing the Size of a Microsoft SQL DatabaseYou can compact or shrink the database to reclaim unused space, and you can modify the growth options for a database file.
0112-0195 F 97
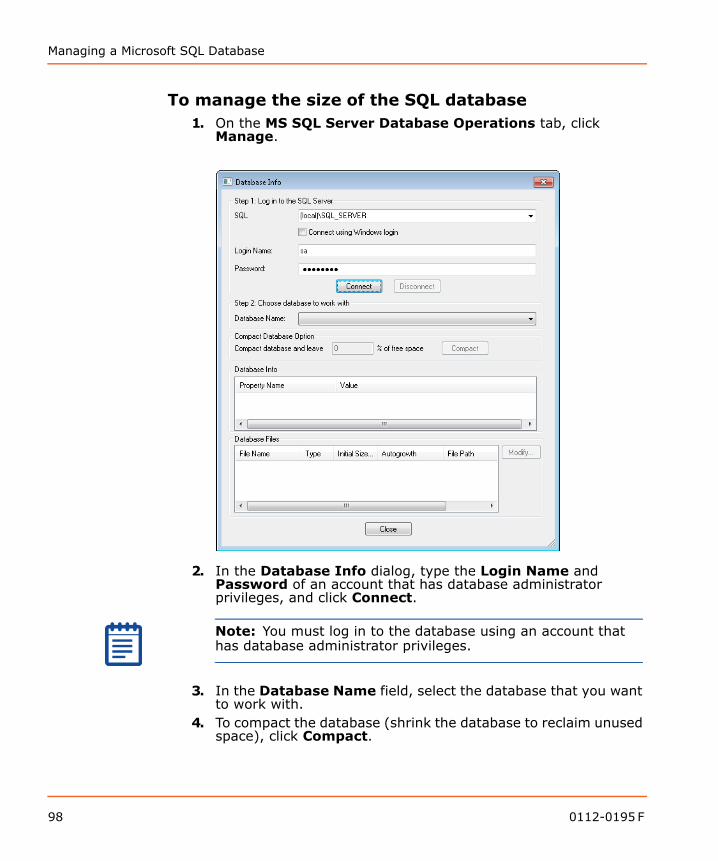
Managing a Microsoft SQL Database
To manage the size of the SQL database 1. On the MS SQL Server Database Operations tab, click
Manage.
2. In the Database Info dialog, type the Login Name and Password of an account that has database administrator privileges, and click Connect.
3. In the Database Name field, select the database that you want to work with.
4. To compact the database (shrink the database to reclaim unused space), click Compact.
Note: You must log in to the database using an account that has database administrator privileges.
98 0112-0195 F
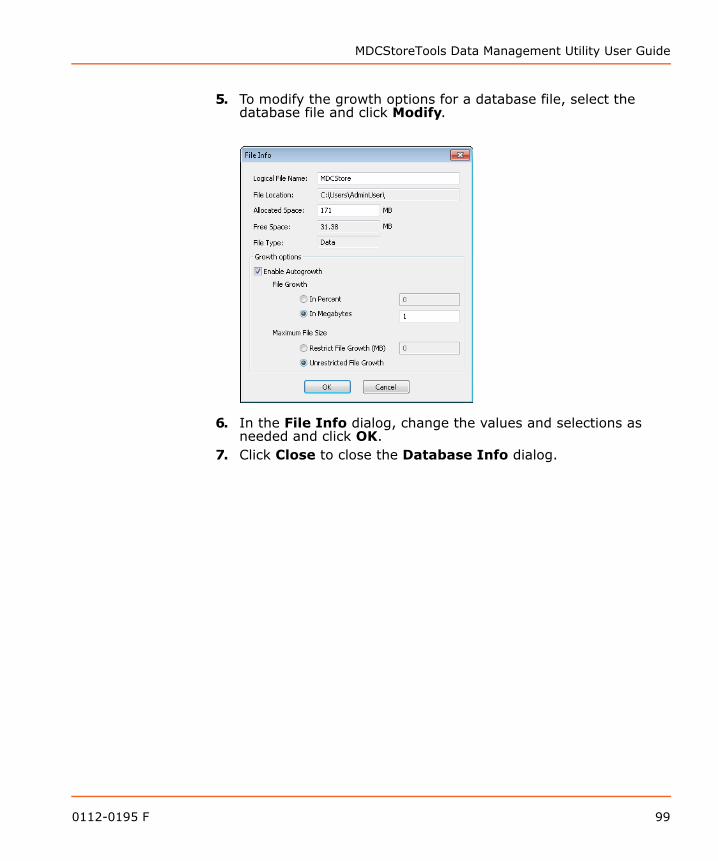
MDCStoreTools Data Management Utility User Guide
5. To modify the growth options for a database file, select the database file and click Modify.
6. In the File Info dialog, change the values and selections as needed and click OK.
7. Click Close to close the Database Info dialog.
0112-0195 F 99

Managing a Microsoft SQL Database
Attaching and Detaching a Microsoft SQL Database
To attach the SQL database to another database1. On the MS SQL Server Database Operations tab, click
Attach.The Attach Database dialog appears.
2. Type your Login Name and Password, and click Connect.3. Click Browse to navigate to the database file that you want to
attach, type the database name, and click Attach.When you detach the SQL database from one SQL server instance and attach it to another SQL server instance, you might need to validate user accounts. Validating user accounts ensures that the accounts at the local database level are also defined as user accounts at the system level. See To validate one or more user accounts (SQL server only) on page 37.
100 0112-0195 F
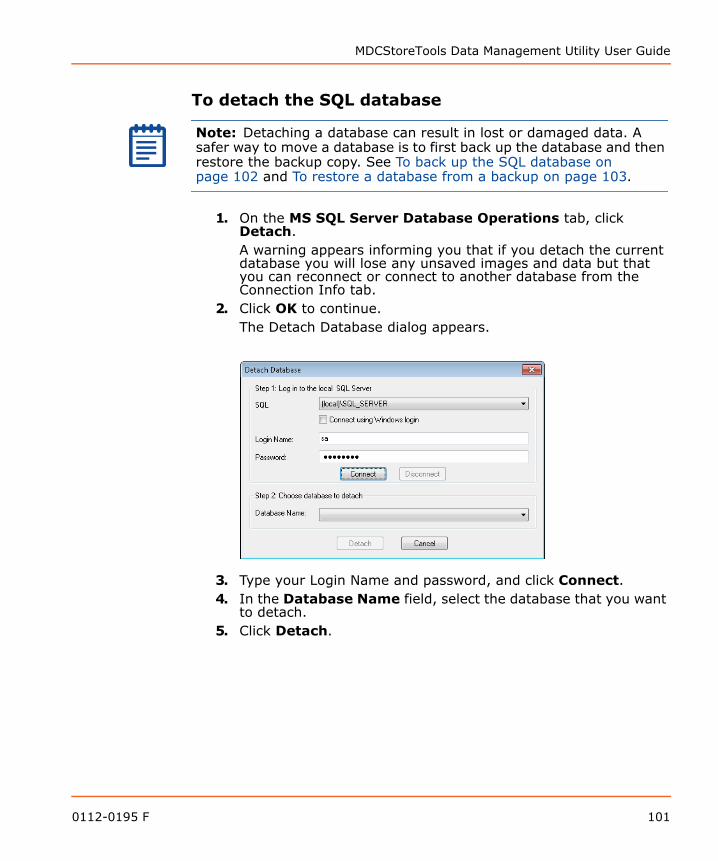
MDCStoreTools Data Management Utility User Guide
To detach the SQL database
1. On the MS SQL Server Database Operations tab, click Detach.A warning appears informing you that if you detach the current database you will lose any unsaved images and data but that you can reconnect or connect to another database from the Connection Info tab.
2. Click OK to continue.The Detach Database dialog appears.
3. Type your Login Name and password, and click Connect.4. In the Database Name field, select the database that you want
to detach.5. Click Detach.
Note: Detaching a database can result in lost or damaged data. A safer way to move a database is to first back up the database and then restore the backup copy. See To back up the SQL database on page 102 and To restore a database from a backup on page 103.
0112-0195 F 101

Managing a Microsoft SQL Database
Backing Up and Restoring a Microsoft SQL Database
To back up the SQL database1. On the MS SQL Server Database Operations tab, click
Backup\Restore.
2. In the Backup\Restore Utility dialog, type your User Name and Password, and then click Backup.A warning appears, informing you that any users who are connected to the database might experience reduced database performance.
3. Click Yes to continue.
102 0112-0195 F
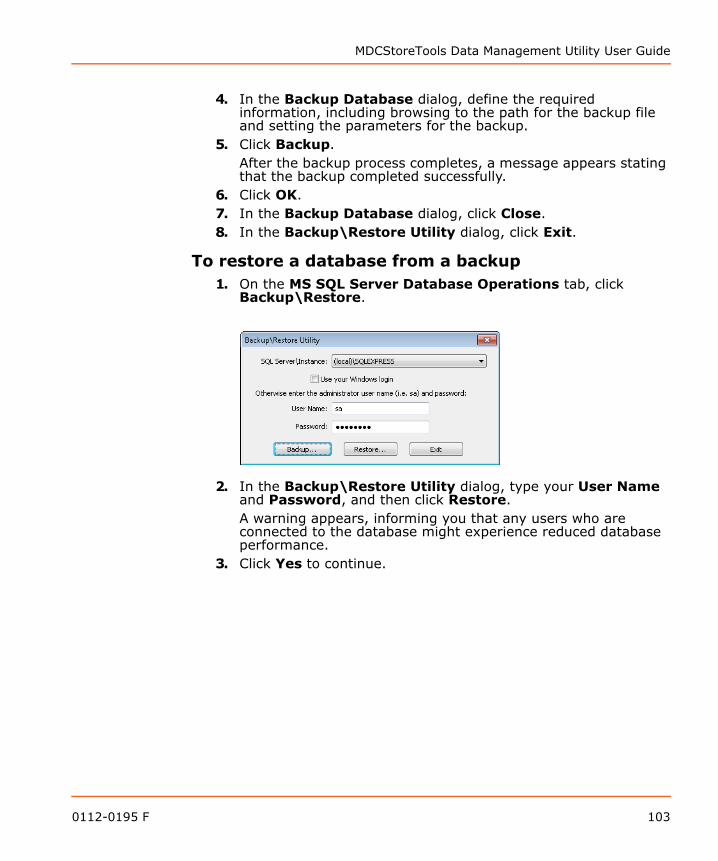
MDCStoreTools Data Management Utility User Guide
4. In the Backup Database dialog, define the required information, including browsing to the path for the backup file and setting the parameters for the backup.
5. Click Backup.After the backup process completes, a message appears stating that the backup completed successfully.
6. Click OK.7. In the Backup Database dialog, click Close.8. In the Backup\Restore Utility dialog, click Exit.
To restore a database from a backup 1. On the MS SQL Server Database Operations tab, click
Backup\Restore.
2. In the Backup\Restore Utility dialog, type your User Name and Password, and then click Restore.A warning appears, informing you that any users who are connected to the database might experience reduced database performance.
3. Click Yes to continue.
0112-0195 F 103
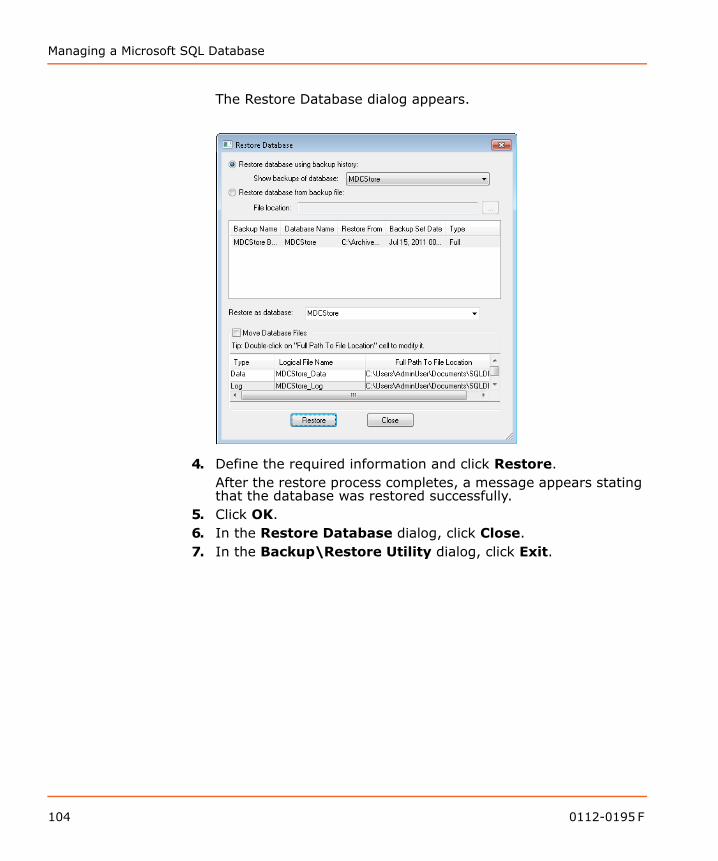
Managing a Microsoft SQL Database
The Restore Database dialog appears.
4. Define the required information and click Restore.After the restore process completes, a message appears stating that the database was restored successfully.
5. Click OK.6. In the Restore Database dialog, click Close.7. In the Backup\Restore Utility dialog, click Exit.
104 0112-0195 F
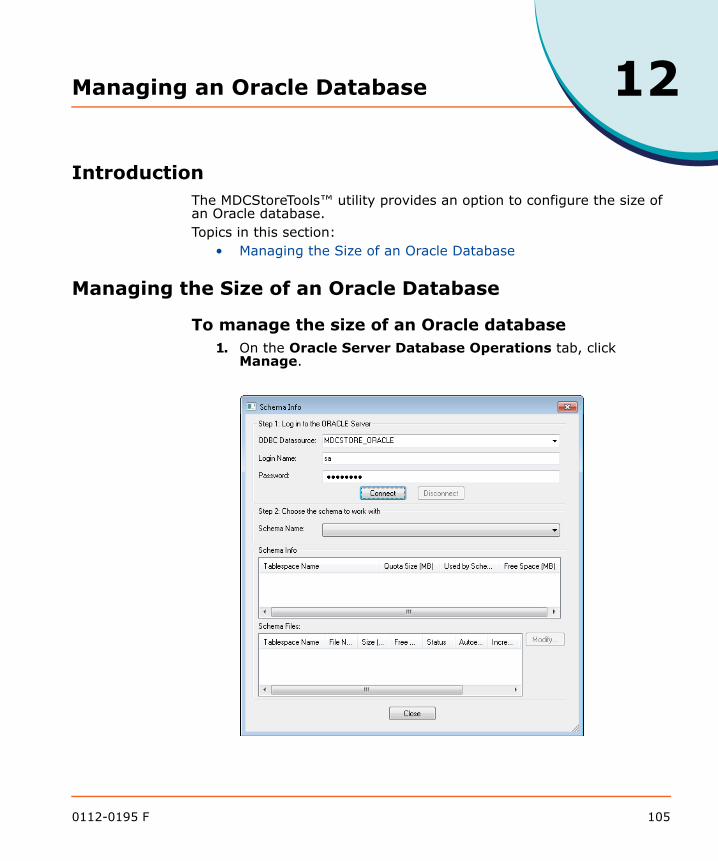
12
Managing an Oracle DatabaseIntroductionThe MDCStoreTools™ utility provides an option to configure the size of an Oracle database.Topics in this section:
• Managing the Size of an Oracle Database
Managing the Size of an Oracle Database
To manage the size of an Oracle database1. On the Oracle Server Database Operations tab, click
Manage.
0112-0195 F 105

Managing an Oracle Database
2. In the Schema Info dialog, select the ODBC Datasource, type the Login Name and Password of an account that has database administrator privileges, and then click Connect.
3. Select the schema file you want to manage and click Modify.
Oracle uses the following formula to calculate the maximum file size:
Maximum data file size = (block size) X (maximum number of blocks allowed per file)
For example, if a block size is 8KB and the maximum number of blocks allowed per file is 4,194,304, then the maximum file size is 32,768MB or 32GB (8 X 4,194,304).
4. In the Datafile Info dialog, modify the information as needed.5. Click OK.6. Click Close to close the Schema Info dialog.
Note: If you set the Maximum File Size to Unrestricted, Oracle automatically sets the maximum file size to be the largest table size that your platform supports. The next time you open the Datafile Info dialog, the Restrict File Growth To field displays the value that Oracle calculated.
106 0112-0195 F

13
Tracking Operation HistoryIntroductionThe MDCStoreTools™ utility provides two ways to view the history and details of completed database operations:
• An optional MDCStoreTools utility log file records the details of all operations carried out while the utility is open.
• A report is available for each operation listed in the queue on the Operation Progress tab.
Topics in this section:• Logging All Operations• Viewing a Report for a Single Operation
Logging All OperationsIf you request that the MDCStoreTools utility generate a log file, the utility records details of all the database management operations carried out while the utility is open. The log is saved as a text file in a folder that you specify. The log file lists the following information about each operation:
• Date and time that an operation was started• Process ID of the operation• Name of the operation (for example, removing data or marking
plates)• Description of the operation• Database that was connected• Database name• User who initiated the operation• Date and time of any error encountered, error message, as well
as the process ID with which the error is associated• Date and time as well as process IDs of operations in progress
and operations that have finished
0112-0195 F 107
Tracking Operation History
To log all operations
1. On the Connection Info tab, select the Generate log file check box.
2. In the Log File Path field, click the browse button to define the folder where the log file will be saved.
3. In the Select log file location dialog navigate to the folder where you want to save the log fie.
If the folder does not exist, click Create New Folder and type a name for the new folder.
4. Click Select.The path to the folder you selected appears in the Log File Path field.The MDCStoreTools utility assigns a default name to the log file, mdcstoretools_<time>.log, where <time> is the year, month, day, and time.
To view the logUse Windows Explorer to navigate to the folder where the log file was saved and open the file with a text editor, such as Notepad.The log file lists the following information about each operation:
• Date and time that an operation was started• Process ID of the operation• Name of the operation (for example, removing data or marking
plates)• Description of the operation• Database that was connected• Database name• User who initiated the operation• Date and time of any error encountered, error message, as well
as the process ID with which the error is associated
Note: You cannot select or clear the Generate log file check box while an operation is in progress.
Note: You cannot change the name of the log file from the Connections Info tab. After the log file is generated, you can navigate to the folder that contains the log file and rename the file.
108 0112-0195 F

MDCStoreTools Data Management Utility User Guide
• Date and time as well as process IDs of operations in progress and operations that have finished
Viewing a Report for a Single OperationThe Operation Progress tab lists the status of all database management operations initiated since the MDCStoreTools utility was started. If you exit the utility and then immediately start it again, the Operation Progress tab is “cleared” and might not list any operations.
To view a report1. On the Operation Progress tab, select the operation.2. Right-click and select View Report.
0112-0195 F 109
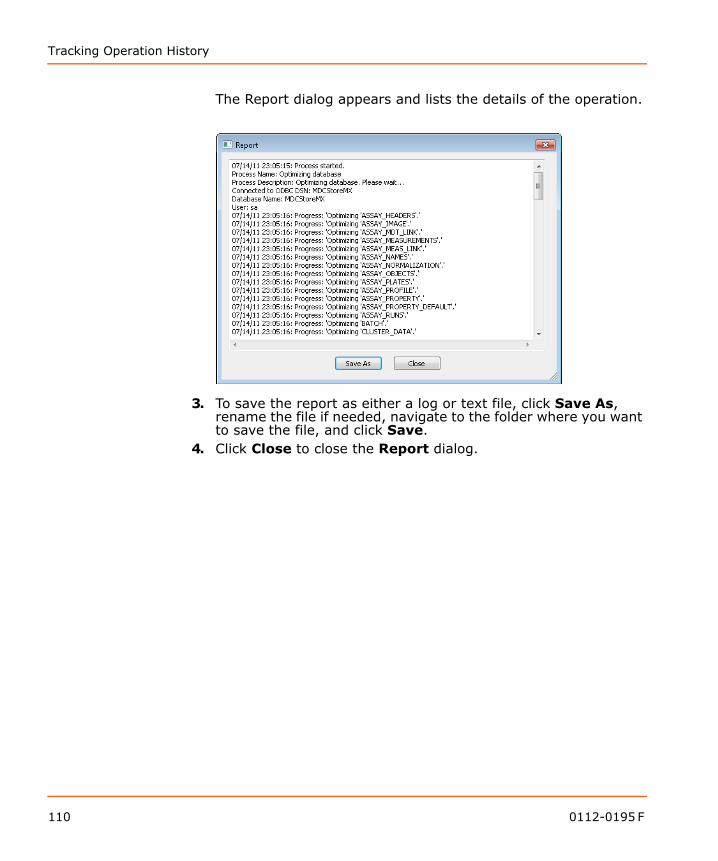
Tracking Operation History
The Report dialog appears and lists the details of the operation.
3. To save the report as either a log or text file, click Save As, rename the file if needed, navigate to the folder where you want to save the file, and click Save.
4. Click Close to close the Report dialog.
110 0112-0195 F

14
Managing Operation StatusIntroductionYou can cancel an operation, remove an operation, or remove all completed operations from the Operation Progress tab. The Operation Progress tab lists the status of all database management operations initiated since the MDCStoreTools™ utility was started. If you exit the utility and then immediately start it again, the Operation Progress tab is “cleared” and might not list operations that are running.
Topics in this section:• Canceling an Operation• Removing Completed Operations from the Operation Progress
Tab
Note: To see the details of all completed operations at the same time, you can generate a log file as explained in Logging All Operations on page 107. To learn how to view the details of a single operation, see Viewing a Report for a Single Operation on page 109.
0112-0195 F 111
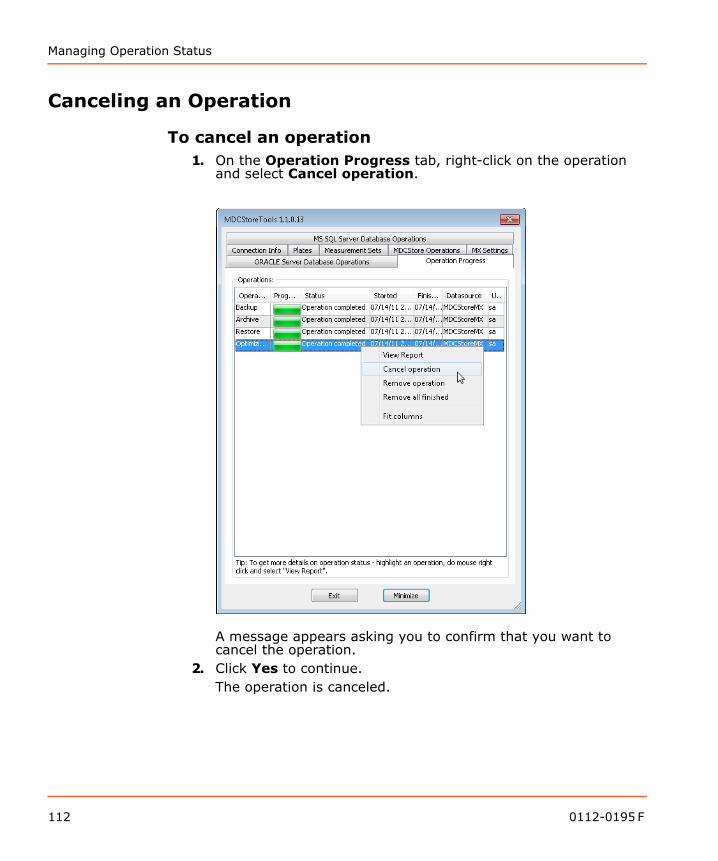
Managing Operation Status
Canceling an Operation
To cancel an operation1. On the Operation Progress tab, right-click on the operation
and select Cancel operation.
A message appears asking you to confirm that you want to cancel the operation.
2. Click Yes to continue.The operation is canceled.
112 0112-0195 F
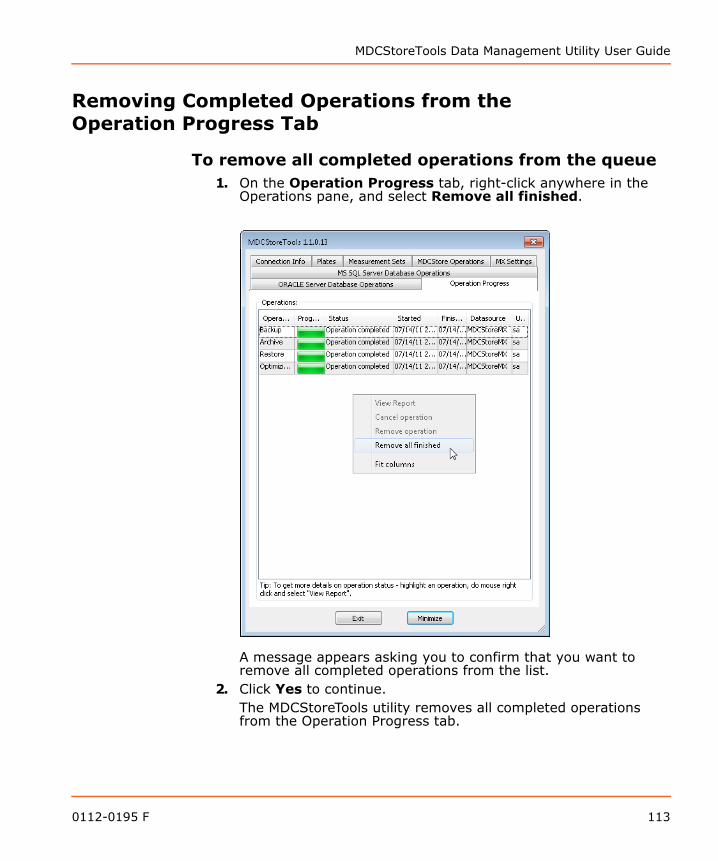
MDCStoreTools Data Management Utility User Guide
Removing Completed Operations from the Operation Progress Tab
To remove all completed operations from the queue1. On the Operation Progress tab, right-click anywhere in the
Operations pane, and select Remove all finished.
A message appears asking you to confirm that you want to remove all completed operations from the list.
2. Click Yes to continue.The MDCStoreTools utility removes all completed operations from the Operation Progress tab.
0112-0195 F 113

Managing Operation Status
114 0112-0195 F
A
Setting Up the MDC File Server ApplicationIntroductionYou can use the MDC File Server application to set up a file server on a dedicated, networked Windows computer without installing any additional database or MetaXpress® Software.Topics in this appendix:
• Installing the MDC File Server Application• Starting and Configuring the File Server• Modifying the Privileges of the MDC File Server
0112-0195 F 115
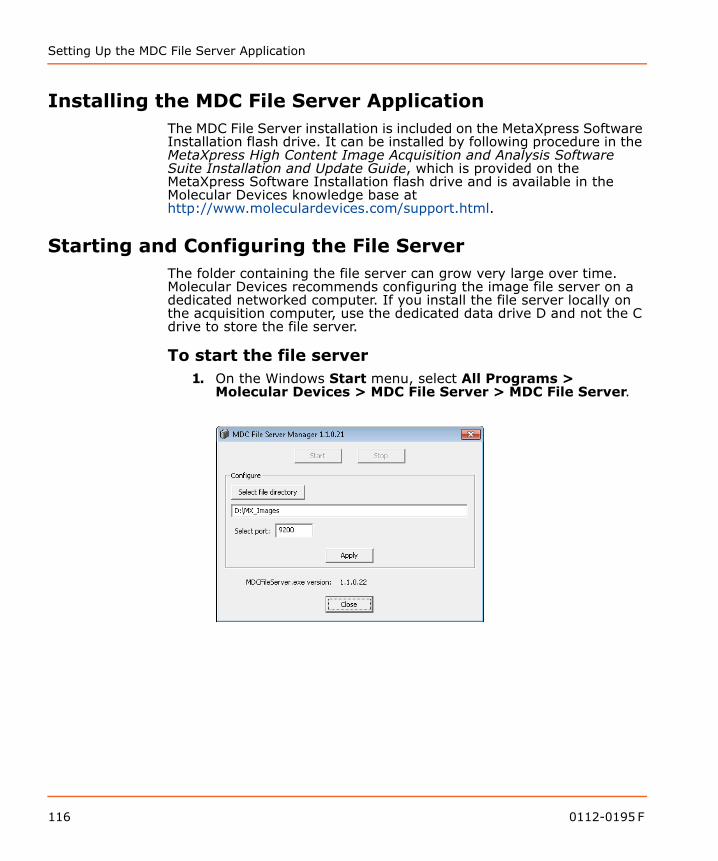
Setting Up the MDC File Server Application
Installing the MDC File Server ApplicationThe MDC File Server installation is included on the MetaXpress Software Installation flash drive. It can be installed by following procedure in the MetaXpress High Content Image Acquisition and Analysis Software Suite Installation and Update Guide, which is provided on the MetaXpress Software Installation flash drive and is available in the Molecular Devices knowledge base at http://www.moleculardevices.com/support.html.
Starting and Configuring the File ServerThe folder containing the file server can grow very large over time. Molecular Devices recommends configuring the image file server on a dedicated networked computer. If you install the file server locally on the acquisition computer, use the dedicated data drive D and not the C drive to store the file server.
To start the file server1. On the Windows Start menu, select All Programs >
Molecular Devices > MDC File Server > MDC File Server.
116 0112-0195 F
MDCStoreTools Data Management Utility User Guide
2. In the MDC File Server Manager dialog, click Select file directory.
3. In the Browse for Folder dialog, navigate to or type the path name of a local folder or an external drive that will store the file server, and click OK. You can create a new folder if needed.
4. Note the default port number, 9200. You will need to enter this port number when you configure the file server for image storage using the MDCStoreTools™ utility. See Creating an Image Storage Location on page 52.
5. Click Apply, and then click Start to start the file server.6. Click Close to close the MDC File Server Manager.
Modifying the Privileges of the MDC File ServerBy default, the MDC File Server service runs on the local system account, which does not have adequate privileges. You must change the service to run under your domain account.
To modify the privileges of the MDC File Server for a file server set up to access an external driveBy default, the MDC File Server service runs on the local system account, which does not have adequate privileges. If you set up the file server to access an external drive, you must change the service to run under your domain account.
Note: If you are setting up the file server to access an external drive, after completing this procedure see To modify the privileges of the MDC File Server for a file server set up to access an external drive on page 117.
Note: If you plan to create more than one file server, each one must be assigned a separate port number. Use numbers in the range of 9200 to 9300.
Note: Molecular Devices recommends that you seek assistance from your IT department if you want to set up the MDC File Server to access an external drive. The MDC File Server must be run as a service under a Windows account that has full privileges to the external storage location.
0112-0195 F 117
Setting Up the MDC File Server Application
1. Click Start > Control Panel and go to Administrative Tools > Computer Management > Services.
2. In the list of services, locate MDC File Server.3. Right-click MDC File Server and select Stop.4. Right-click MDC File Server and select Properties.
The MDC File Server Properties dialog appears.5. Select the Log On tab.6. In the Log on as section, click This account and type your
domain account name and password.7. Click OK to save your changes and close the MDC File Server
Properties dialog.8. On the Start menu, select All Programs > Molecular Devices
> MDC File Server > MDC File Server.9. In the MDC File Server dialog, click Start, and wait until the
Stop button becomes available.10. Click Close.11. Try to acquire or import an image into the database to confirm
that the file server is accessible.
Note: If more than one computer on a network is running the MetaXpress Software, log on to one of the computers and confirm that the file server is operational as described in Checking the Availability of an Image Storage Location on page 56. If the file server is not operational, some of the firewall privileges might not be set up properly. To change the firewall privileges, click Start > Control Panel and go to Windows Firewall. On the Exceptions tab, click Add port, type a name and the port number, and select TCP. Click OK to save your changes, and then re-check the status of the file server.
118 0112-0195 F