Embed Size (px)
Citation preview
Medical Office System Page 15-1
Version 05.00.00
Medical Office System
Chapter 15: Adding/Changing Forms
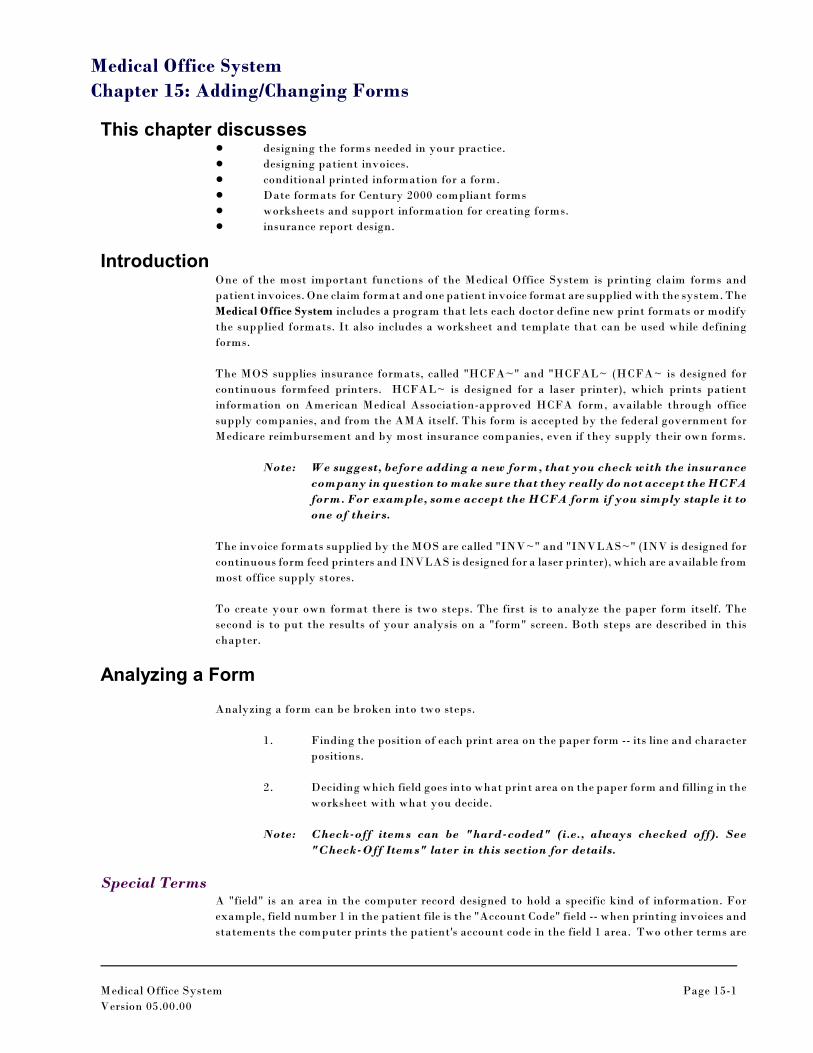
This chapter discusses! designing the forms needed in your practice.
! designing patient invoices.
! conditional printed information for a form.
! Date formats for Century 2000 compliant forms
! worksheets and support information for creating forms.
! insurance report design.
IntroductionOne of the most important functions of the Medical Office System is printing claim forms and
patient invoices. One claim format and one patient invoice format are supplied with the system. The
Medical Office System includes a program that lets each doctor define new print formats or modify
the supplied formats. It also includes a worksheet and template that can be used while defining
forms.
The MOS supplies insurance formats, called "HCFA~" and "HCFAL~ (HCFA~ is designed for
continuous formfeed printers. HCFAL~ is designed for a laser printer), which prints patient
information on American Medical Association-approved HCFA form, available through office
supply companies, and from the AMA itself. This form is accepted by the federal government for
Medicare reimbursement and by most insurance companies, even if they supply their own forms.
Note: We suggest, before adding a new form, that you check with the insurance
company in question to make sure that they really do not accept the HCFA
form. For example, some accept the HCFA form if you simply staple it to
one of theirs.
The invoice formats supplied by the MOS are called "INV~" and "INVLAS~" (INV is designed for
continuous form feed printers and INVLAS is designed for a laser printer), which are available from
most office supply stores.
To create your own format there is two steps. The first is to analyze the paper form itself. The
second is to put the results of your analysis on a "form" screen. Both steps are described in this
chapter.
Analyzing a Form
Analyzing a form can be broken into two steps.
1. Finding the position of each print area on the paper form -- its line and character
positions.
2. Deciding which field goes into what print area on the paper form and filling in the
worksheet with what you decide.
Note: Check-off items can be "hard-coded" (i.e., always checked off). See
"Check-Off Items" later in this section for details.
Special TermsA "field" is an area in the computer record designed to hold a specific kind of information. For
example, field number 1 in the patient file is the "Account Code" field -- when printing invoices and
statements the computer prints the patient's account code in the field 1 area. Two other terms are
Page 15-2 Medical Office System
Version 05.00.00
"character position" and "line position." Character position refers to the number of characters across
the paper form; line position refers to the number of lines down the form. The standard claim form
accepts 85 characters across (not counting the margins) at 10 pitch. Continuous-feed claim forms
are usually 66 lines deep from the top perforation to the bottom perforation. Invoices are usually
shorter -- about 44 lines deep.
Planning FormatsWhen a new form is created or modified, the location of each field of data must be located on the
paper form. The tools required to figure out exactly where the fields go, are a copy of the paper
claim form and a copy of the supplied grid with which to analyze it (see below for details).
Printing the WorksheetsFirst print a form worksheet, which is simply a list of all available fields and their lengths. Then
print the template, which is a grid that can be used to figure out the line and character position of
each entry area. When setting up the format, lay the template on top of the claim form or invoice
and note the character and line positions. Samples of the worksheets are included in Appendix C.
Note: If your office copier can print on acetate sheets (the kinds of sheets used
in overhead projectors), we suggest that you make a copy of the grid on
acetate.
To print the worksheets, press 3 from the Define Print Formats Menu.
Marking the Paper FormYour first step is to mark up an actual invoice or claim form, showing the line number and the
starting and ending positions of each entry area.
Start by placing the template on the form (the last page printed), with the top edge on the
perforation -- if the template is placed correctly, the bottom edge of the form is line 60. The first
print line is probably line 6 or 7. Adjust the template horizontally, with the left edge of the grid on
the left edge of the data area -- not on the edge of the paper or the perforation. Now, number each
line of the form and find the beginning and starting points of each entry area. Fill the worksheet
with the line and character positions for each field, checking them against their defined lengths.
The "Account Code" field (Figure 15.1) is eight characters long, and the "Title" field is five
characters long. Character position 1 is the edge of the print area, character position 3 is the
starting point for the account number and 11 is the endpoint. For a one-character space between
fields, the title field should start at character position 13; character position 18 is the endpoint.
Medical Office System Page 15-3
Version 05.00.00
Your Practice Name Medical Office System DEFINE FORMS WORKSHEETNAME OF FORM: Page: 1
DATE CREATED: 02/01/2000 BY: Nancy
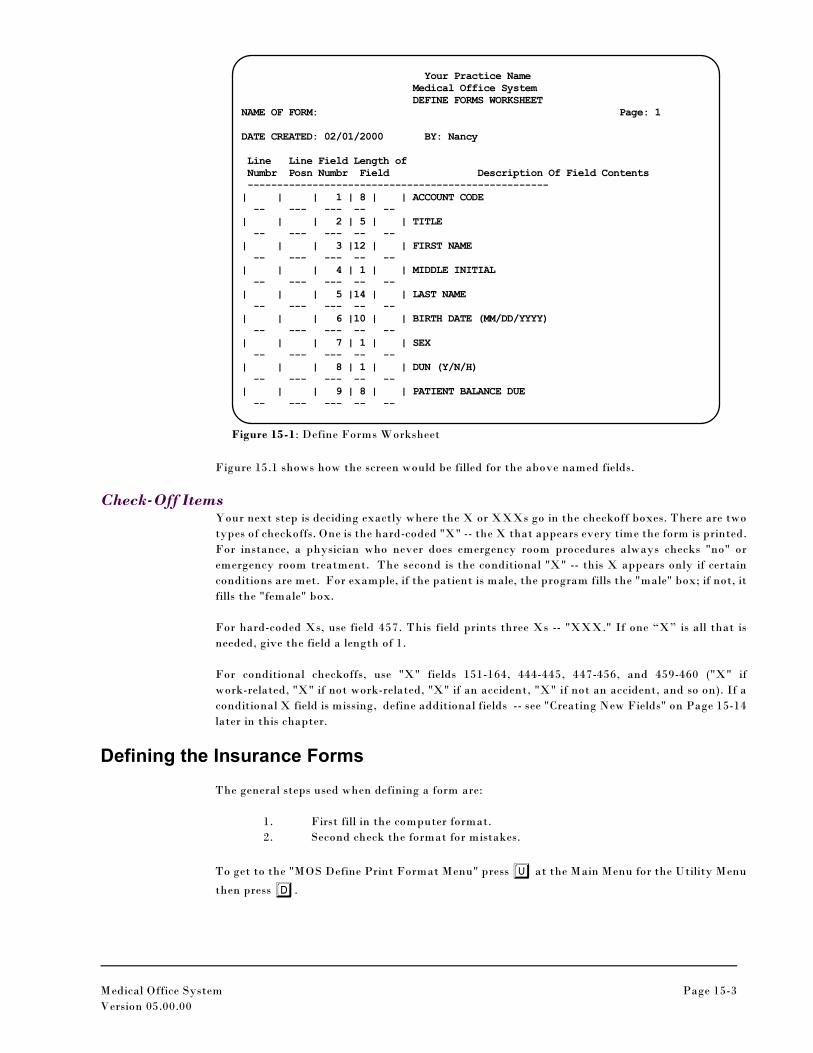
Line Line Field Length of Numbr Posn Numbr Field Description Of Field Contents ---------------------------------------------------| | | 1 | 8 | | ACCOUNT CODE -- --- --- -- --| | | 2 | 5 | | TITLE -- --- --- -- --| | | 3 |12 | | FIRST NAME -- --- --- -- --| | | 4 | 1 | | MIDDLE INITIAL -- --- --- -- --| | | 5 |14 | | LAST NAME -- --- --- -- --| | | 6 |10 | | BIRTH DATE (MM/DD/YYYY) -- --- --- -- --| | | 7 | 1 | | SEX -- --- --- -- --| | | 8 | 1 | | DUN (Y/N/H) -- --- --- -- --| | | 9 | 8 | | PATIENT BALANCE DUE -- --- --- -- --
Figure 15-1: Define Forms Worksheet
Figure 15.1 shows how the screen would be filled for the above named fields.
Check-Off ItemsYour next step is deciding exactly where the X or XXXs go in the checkoff boxes. There are two
types of checkoffs. One is the hard-coded "X" -- the X that appears every time the form is printed.
For instance, a physician who never does emergency room procedures always checks "no" or
emergency room treatment. The second is the conditional "X" -- this X appears only if certain
conditions are met. For example, if the patient is male, the program fills the "male" box; if not, it
fills the "female" box.
For hard-coded Xs, use field 457. This field prints three Xs -- "XXX." If one “X” is all that is
needed, give the field a length of 1.
For conditional checkoffs, use "X" fields 151-164, 444-445, 447-456, and 459-460 ("X" if
work-related, "X" if not work-related, "X" if an accident, "X" if not an accident, and so on). If a
conditional X field is missing, define additional fields -- see "Creating New Fields" on Page 15-14
later in this chapter.
Defining the Insurance Forms
The general steps used when defining a form are:
1. First fill in the computer format.
2. Second check the format for mistakes.
To get to the "MOS Define Print Format Menu" press U at the Main Menu for the Utility Menu
then press D.

Page 15-4 Medical Office System
Version 05.00.00
Figure 15-2: Define Print Format Menu
Figure 15-3 : Record Selection Screen
Figure 15-4 : Forms Selection
Press 1, Define Print Formats and the "The
Record Selection Menu" appears.
Add New Form
To add new forms, press 3. To change an already-existing record, look for it using the record
number, scan, or index option. (See Chapter 13 for more information about the Record Selection
Menu.)
Press 3 (add records) and a blank four-column screen appears. Each field on the screen is
described in "Filling in the Format" later in this chapter.
As the information from your paper form is copied to the electronic form, help is available by
pressing q whenever the cursor enters the "field" column. A listing of the first 20 fields, their
descriptions, and lengths appears. Press the arrow keys to see more fields, and press X to go back
to return. To search by field name, press F.
Updating a Form
To locate an existing form, use the Index Selection option. Select Index A and enter the form name
to be updated.
When updating an existing form, the following
options appear at the bottom of the screen:
Although not listed on the option line, the up
and down arrow keys will page through the
file, one form (or actually, record) at a time.
When the first page of the form is located it will look like the screen shown in figure 15.1. Refer to
section called “Filling in the Format” later in this chapter for an explanation of each field shown
on the screen and how to fill in the information correctly.
Medical Office System Page 15-5
Version 05.00.00
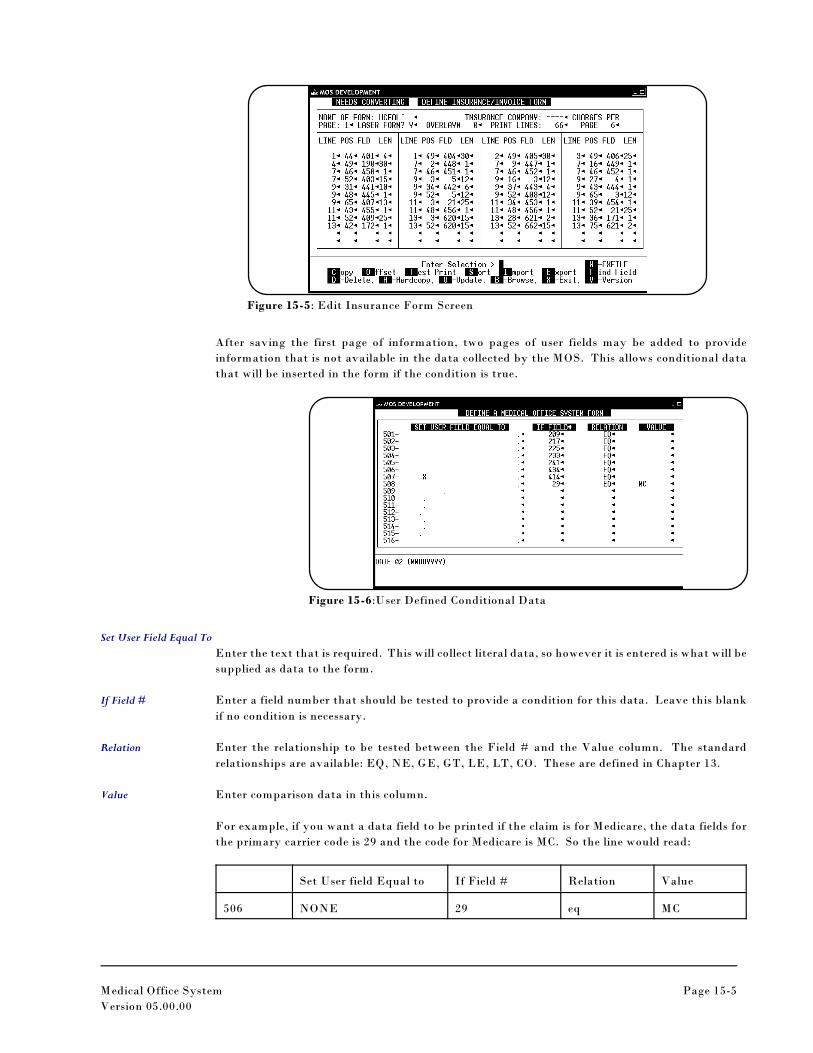
Figure 15-5: Edit Insurance Form Screen
Figure 15-6:User Defined Conditional Data
After saving the first page of information, two pages of user fields may be added to provide
information that is not available in the data collected by the MOS. This allows conditional data
that will be inserted in the form if the condition is true.
Set User Field Equal To
Enter the text that is required. This will collect literal data, so however it is entered is what will be
supplied as data to the form.
If Field # Enter a field number that should be tested to provide a condition for this data. Leave this blank
if no condition is necessary.
Relation Enter the relationship to be tested between the Field # and the Value column. The standard
relationships are available: EQ, NE, GE, GT, LE, LT, CO. These are defined in Chapter 13.
Value Enter comparison data in this column.
For example, if you want a data field to be printed if the claim is for Medicare, the data fields for
the primary carrier code is 29 and the code for Medicare is MC. So the line would read:
Set User field Equal to If Field # Relation Value
506 NONE 29 eq MC
Page 15-6 Medical Office System
Version 05.00.00
Press ̂ to save the screen and a second screen of user fields is displayed. Continue to add more
user fields or press ^ to continue to the end of the screen update.
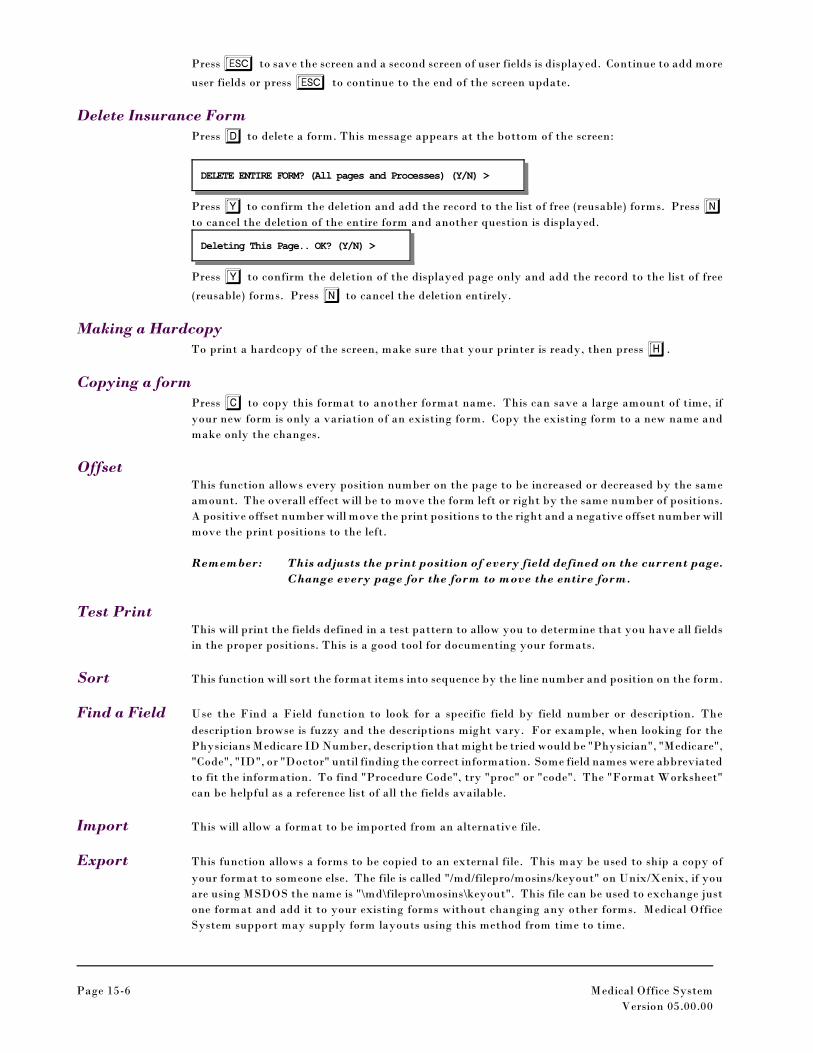
Delete Insurance FormPress D to delete a form. This message appears at the bottom of the screen:
DELETE ENTIRE FORM? (All pages and Processes) (Y/N) >
Press Y to confirm the deletion and add the record to the list of free (reusable) forms. Press Nto cancel the deletion of the entire form and another question is displayed.
Deleting This Page.. OK? (Y/N) >
Press Y to confirm the deletion of the displayed page only and add the record to the list of free
(reusable) forms. Press N to cancel the deletion entirely.
Making a HardcopyTo print a hardcopy of the screen, make sure that your printer is ready, then press H.
Copying a formPress C to copy this format to another format name. This can save a large amount of time, if
your new form is only a variation of an existing form. Copy the existing form to a new name and
make only the changes.
OffsetThis function allows every position number on the page to be increased or decreased by the same
amount. The overall effect will be to move the form left or right by the same number of positions.
A positive offset number will move the print positions to the right and a negative offset number will
move the print positions to the left.
Remember: This adjusts the print position of every field defined on the current page.
Change every page for the form to move the entire form.
Test PrintThis will print the fields defined in a test pattern to allow you to determine that you have all fields
in the proper positions. This is a good tool for documenting your formats.
Sort This function will sort the format items into sequence by the line number and position on the form.
Find a Field Use the Find a Field function to look for a specific field by field number or description. The
description browse is fuzzy and the descriptions might vary. For example, when looking for the
Physicians Medicare ID Number, description that might be tried would be "Physician", "Medicare",
"Code", "ID", or "Doctor" until finding the correct information. Some field names were abbreviated
to fit the information. To find "Procedure Code", try "proc" or "code". The "Format Worksheet"
can be helpful as a reference list of all the fields available.
Import This will allow a format to be imported from an alternative file.
Export This function allows a forms to be copied to an external file. This may be used to ship a copy of
your format to someone else. The file is called "/md/filepro/mosins/keyout" on Unix/Xenix, if you
are using MSDOS the name is "\md\filepro\mosins\keyout". This file can be used to exchange just
one format and add it to your existing forms without changing any other forms. Medical Office
System support may supply form layouts using this method from time to time.
Medical Office System Page 15-7
Version 05.00.00
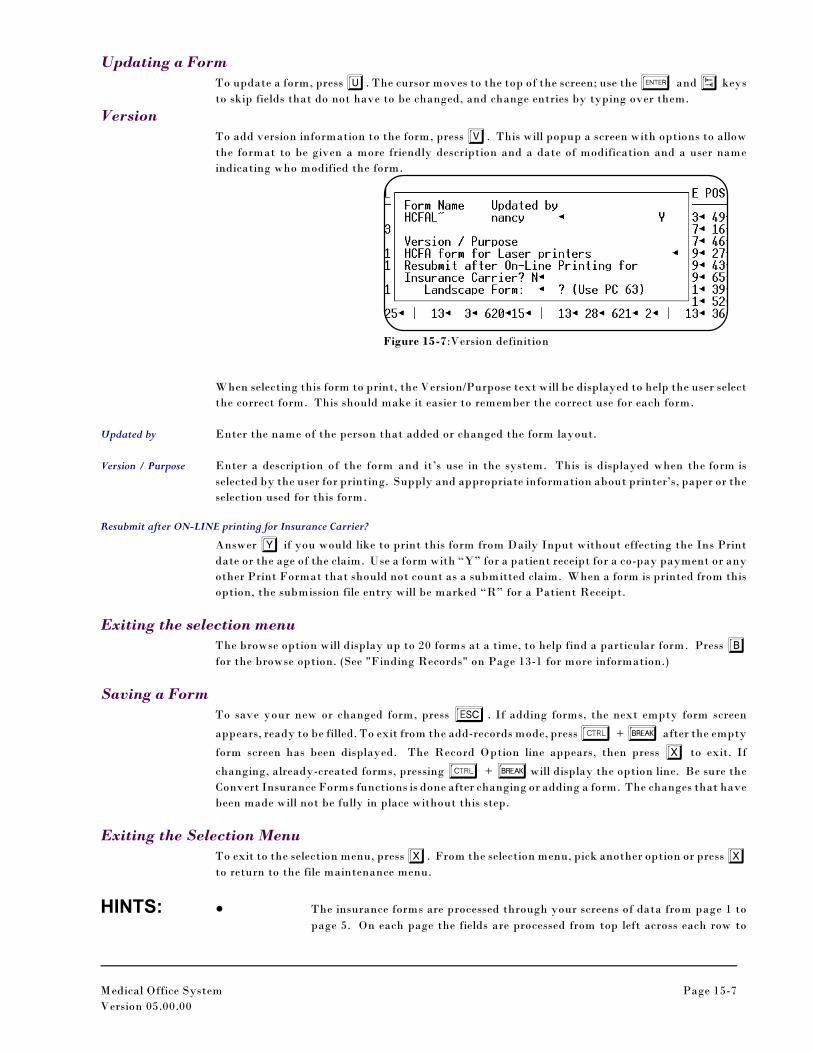
Figure 15-7:Version definition
Updating a FormTo update a form, press U. The cursor moves to the top of the screen; use the e and v keys
to skip fields that do not have to be changed, and change entries by typing over them.
VersionTo add version information to the form, press V. This will popup a screen with options to allow
the format to be given a more friendly description and a date of modification and a user name
indicating who modified the form.
When selecting this form to print, the Version/Purpose text will be displayed to help the user select
the correct form. This should make it easier to remember the correct use for each form.
Updated by Enter the name of the person that added or changed the form layout.
Version / Purpose Enter a description of the form and it’s use in the system. This is displayed when the form is
selected by the user for printing. Supply and appropriate information about printer’s, paper or the
selection used for this form.
Resubmit after ON-LINE printing for Insurance Carrier?
Answer Y if you would like to print this form from Daily Input without effecting the Ins Print
date or the age of the claim. Use a form with “Y” for a patient receipt for a co-pay payment or any
other Print Format that should not count as a submitted claim. When a form is printed from this
option, the submission file entry will be marked “R” for a Patient Receipt.
Exiting the selection menuThe browse option will display up to 20 forms at a time, to help find a particular form. Press Bfor the browse option. (See "Finding Records" on Page 13-1 for more information.)
Saving a FormTo save your new or changed form, press ^. If adding forms, the next empty form screen
appears, ready to be filled. To exit from the add-records mode, press b + ~ after the empty
form screen has been displayed. The Record Option line appears, then press X to exit. If
changing, already-created forms, pressing b + ~will display the option line. Be sure the
Convert Insurance Forms functions is done after changing or adding a form. The changes that have
been made will not be fully in place without this step.
Exiting the Selection MenuTo exit to the selection menu, press X. From the selection menu, pick another option or press Xto return to the file maintenance menu.
HINTS: ! The insurance forms are processed through your screens of data from page 1 to
page 5. On each page the fields are processed from top left across each row to
Page 15-8 Medical Office System
Version 05.00.00
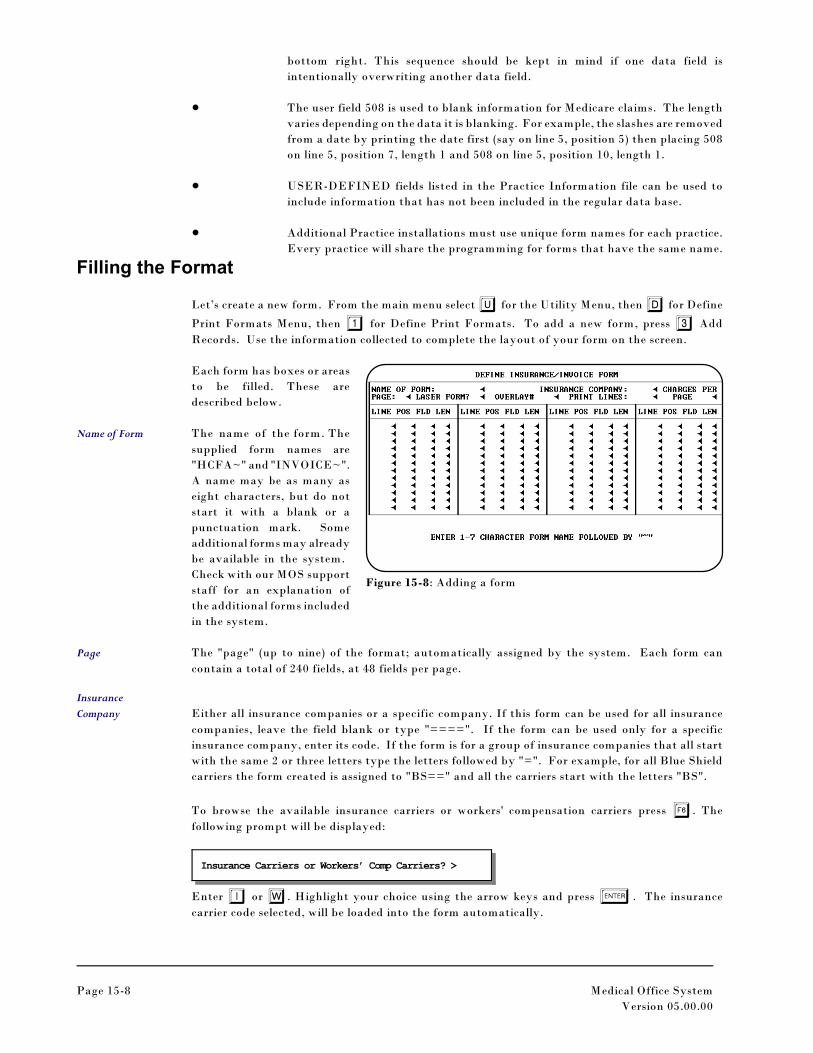
Figure 15-8: Adding a form
bottom right. This sequence should be kept in mind if one data field is
intentionally overwriting another data field.
! The user field 508 is used to blank information for Medicare claims. The length
varies depending on the data it is blanking. For example, the slashes are removed
from a date by printing the date first (say on line 5, position 5) then placing 508
on line 5, position 7, length 1 and 508 on line 5, position 10, length 1.
! USER-DEFINED fields listed in the Practice Information file can be used to
include information that has not been included in the regular data base.
! Additional Practice installations must use unique form names for each practice.
Every practice will share the programming for forms that have the same name.
Filling the Format
Let’s create a new form. From the main menu select U for the Utility Menu, then D for Define
Print Formats Menu, then 1 for Define Print Formats. To add a new form, press 3 Add
Records. Use the information collected to complete the layout of your form on the screen.
Each form has boxes or areas
to be filled. These are
described below.
Name of Form The name of the form. The
supplied form names are
"HCFA~" and "INVOICE~".
A name may be as many as
eight characters, but do not
start it with a blank or a
punctuation mark. Some
additional forms may already
be available in the system.
Check with our MOS support
staff for an explanation of
the additional forms included
in the system.
Page The "page" (up to nine) of the format; automatically assigned by the system. Each form can
contain a total of 240 fields, at 48 fields per page.
Insurance
Company Either all insurance companies or a specific company. If this form can be used for all insurance
companies, leave the field blank or type "====". If the form can be used only for a specific
insurance company, enter its code. If the form is for a group of insurance companies that all start
with the same 2 or three letters type the letters followed by "=". For example, for all Blue Shield
carriers the form created is assigned to "BS==" and all the carriers start with the letters "BS".
To browse the available insurance carriers or workers' compensation carriers press q. The
following prompt will be displayed:
Insurance Carriers or Workers’ Comp Carriers? >
Enter I or W. Highlight your choice using the arrow keys and press e. The insurance
carrier code selected, will be loaded into the form automatically.
Medical Office System Page 15-9
Version 05.00.00
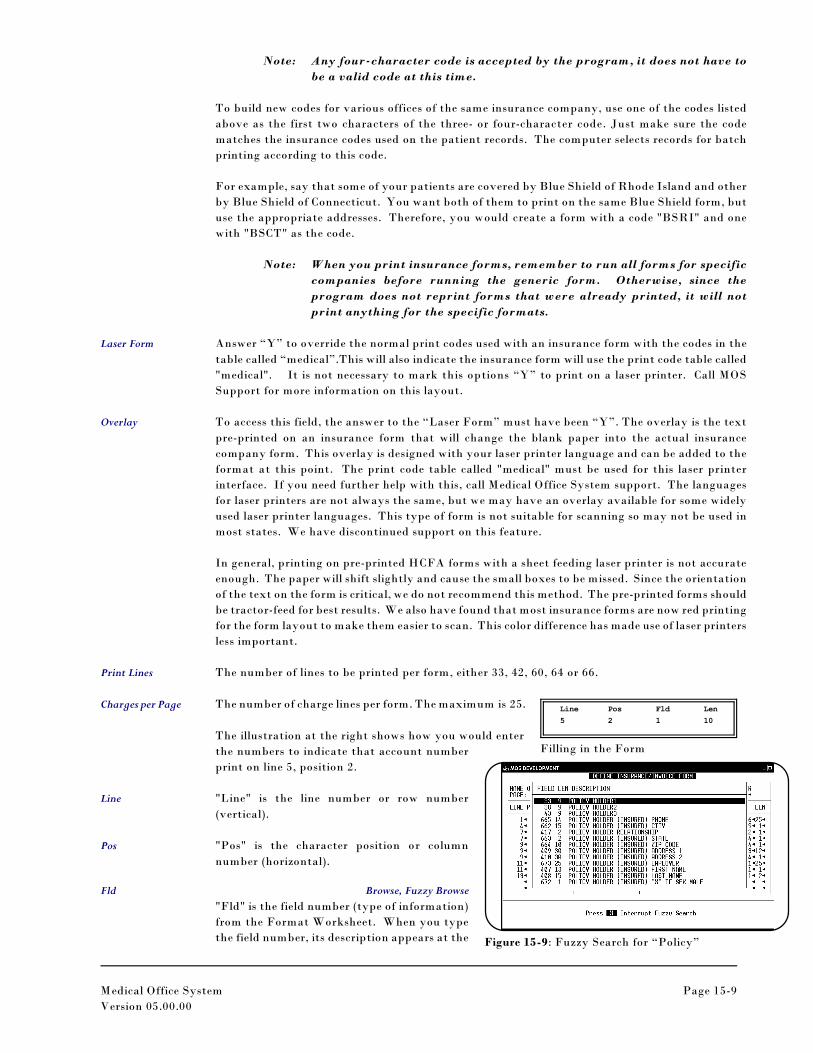
Line Pos Fld Len
5 2 1 10
Filling in the Form
Figure 15-9: Fuzzy Search for “Policy”
Note: Any four-character code is accepted by the program, it does not have to
be a valid code at this time.
To build new codes for various offices of the same insurance company, use one of the codes listed
above as the first two characters of the three- or four-character code. Just make sure the code
matches the insurance codes used on the patient records. The computer selects records for batch
printing according to this code.
For example, say that some of your patients are covered by Blue Shield of Rhode Island and other
by Blue Shield of Connecticut. You want both of them to print on the same Blue Shield form, but
use the appropriate addresses. Therefore, you would create a form with a code "BSRI" and one
with "BSCT" as the code.
Note: When you print insurance forms, remember to run all forms for specific
companies before running the generic form. Otherwise, since the
program does not reprint forms that were already printed, it will not
print anything for the specific formats.
Laser Form Answer “Y” to override the normal print codes used with an insurance form with the codes in the
table called “medical”.This will also indicate the insurance form will use the print code table called
"medical". It is not necessary to mark this options “Y” to print on a laser printer. Call MOS
Support for more information on this layout.
Overlay To access this field, the answer to the “Laser Form” must have been “Y”. The overlay is the text
pre-printed on an insurance form that will change the blank paper into the actual insurance
company form. This overlay is designed with your laser printer language and can be added to the
format at this point. The print code table called "medical" must be used for this laser printer
interface. If you need further help with this, call Medical Office System support. The languages
for laser printers are not always the same, but we may have an overlay available for some widely
used laser printer languages. This type of form is not suitable for scanning so may not be used in
most states. We have discontinued support on this feature.
In general, printing on pre-printed HCFA forms with a sheet feeding laser printer is not accurate
enough. The paper will shift slightly and cause the small boxes to be missed. Since the orientation
of the text on the form is critical, we do not recommend this method. The pre-printed forms should
be tractor-feed for best results. We also have found that most insurance forms are now red printing
for the form layout to make them easier to scan. This color difference has made use of laser printers
less important.
Print Lines The number of lines to be printed per form, either 33, 42, 60, 64 or 66.
Charges per Page The number of charge lines per form. The maximum is 25.
The illustration at the right shows how you would enter
the numbers to indicate that account number
print on line 5, position 2.
Line "Line" is the line number or row number
(vertical).
Pos "Pos" is the character position or column
number (horizontal).
Fld Browse, Fuzzy Browse
"Fld" is the field number (type of information)
from the Format Worksheet. When you type
the field number, its description appears at the
Page 15-10 Medical Office System
Version 05.00.00
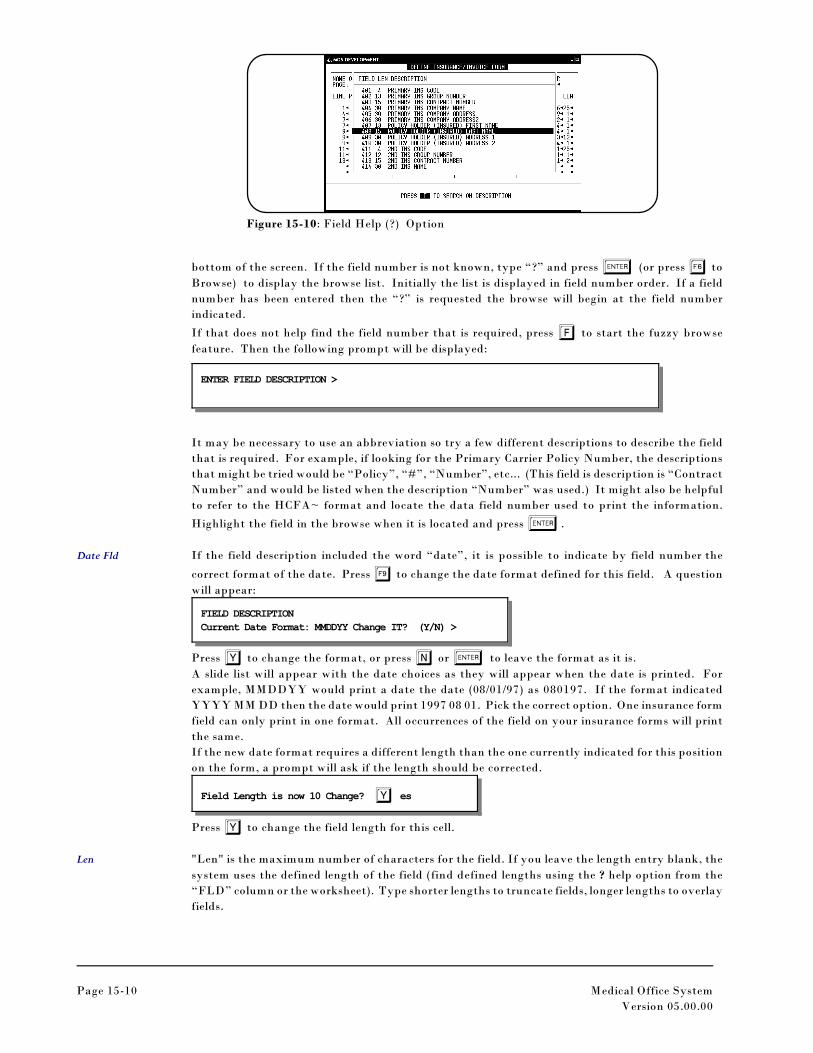
Figure 15-10: Field Help (?) Option
ENTER FIELD DESCRIPTION >
bottom of the screen. If the field number is not known, type “?” and press e (or press q to
Browse) to display the browse list. Initially the list is displayed in field number order. If a field
number has been entered then the “?” is requested the browse will begin at the field number
indicated.
If that does not help find the field number that is required, press F to start the fuzzy browse
feature. Then the following prompt will be displayed:
It may be necessary to use an abbreviation so try a few different descriptions to describe the field
that is required. For example, if looking for the Primary Carrier Policy Number, the descriptions
that might be tried would be “Policy”, “#”, “Number”, etc... (This field is description is “Contract
Number” and would be listed when the description “Number” was used.) It might also be helpful
to refer to the HCFA~ format and locate the data field number used to print the information.
Highlight the field in the browse when it is located and press e.
Date Fld If the field description included the word “date”, it is possible to indicate by field number the
correct format of the date. Press t to change the date format defined for this field. A question
will appear:
FIELD DESCRIPTION
Current Date Format: MMDDYY Change IT? (Y/N) >
Press Y to change the format, or press N or e to leave the format as it is.
A slide list will appear with the date choices as they will appear when the date is printed. For
example, MMDDYY would print a date the date (08/01/97) as 080197. If the format indicated
YYYY MM DD then the date would print 1997 08 01. Pick the correct option. One insurance form
field can only print in one format. All occurrences of the field on your insurance forms will print
the same.
If the new date format requires a different length than the one currently indicated for this position
on the form, a prompt will ask if the length should be corrected.
Field Length is now 10 Change? Y es
Press Y to change the field length for this cell.
Len "Len" is the maximum number of characters for the field. If you leave the length entry blank, the
system uses the defined length of the field (find defined lengths using the ? help option from the
“FLD” column or the worksheet). Type shorter lengths to truncate fields, longer lengths to overlay
fields.
Medical Office System Page 15-11
Version 05.00.00
Note: If fields are overlaid on the format, the last field listed on the line is the
one that prints in full. Although field overlays are usually done by
mistake, you can consciously overlay fields to make the computer print
the answer you want.
You don't have to enter the data in any sort of order. In other words, you can type the data for line
12 before line 11. The system automatically puts the lines and fields in the correct places on the
form.
DATES To allow for all the variation required when printing dates, the format of the date field selected in
the Insurance Form Fields file can be modified to print in any format required, with or without
century numbers, with or without slashes, etc. Press tfrom the fld column to select a data
format.
Changing the date formats in the Insurance Form Fields File Directly.
To change the format of a date in the insurance form fields , select UZ4 from the Main MOS
Menu to open the Insurance Forms Fields File. (MOS TOOLS menu requires a password to access.
MOS Support can give you that password or speak to your administrator.) Then use the index
option to find the field that should have the new date format. The Description of the field must
have the word DATE to apply a Special Date Edit. Update the field and move to the Special Date
Edit option. A list of available formats will appear, if it does not, press q to display the choices.
Highlight and press e on the selected format. The description of the field will indicate the
selected format.
The length of the field will automatically be changed, be sure to make the length correct on the
insurance form definition, also.
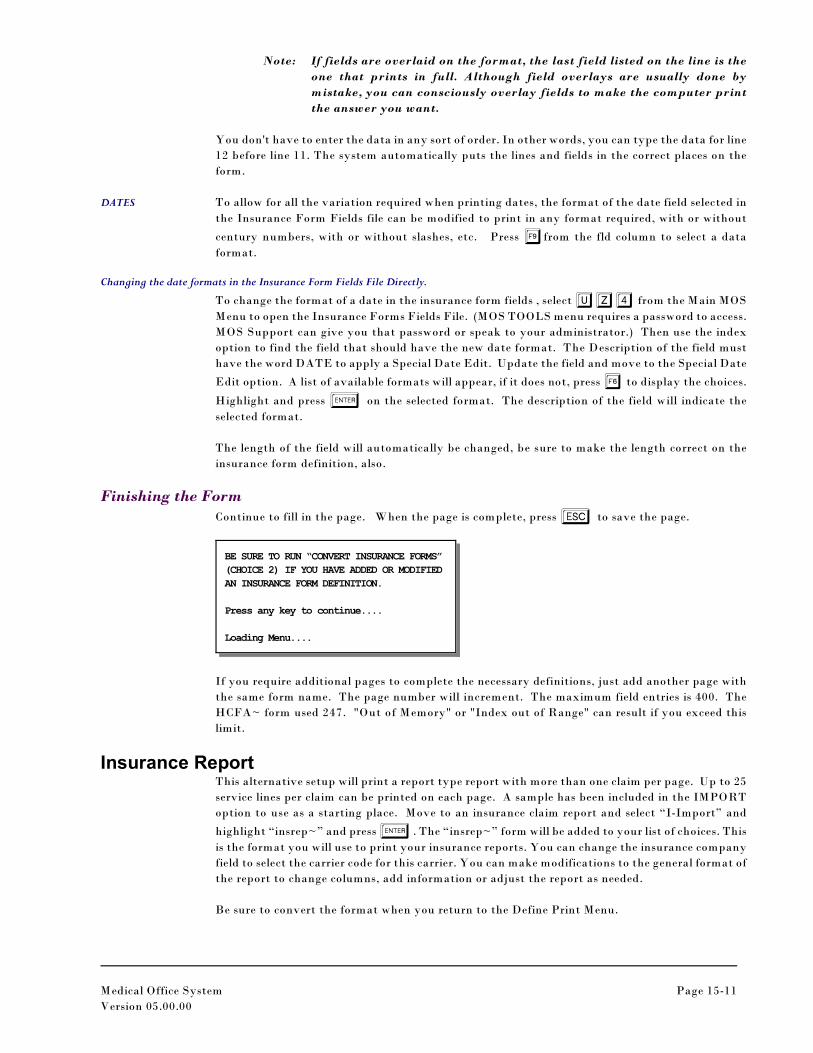
Finishing the FormContinue to fill in the page. When the page is complete, press ^ to save the page.
BE SURE TO RUN “CONVERT INSURANCE FORMS”
(CHOICE 2) IF YOU HAVE ADDED OR MODIFIED
AN INSURANCE FORM DEFINITION.
Press any key to continue....
Loading Menu....
If you require additional pages to complete the necessary definitions, just add another page with
the same form name. The page number will increment. The maximum field entries is 400. The
HCFA~ form used 247. "Out of Memory" or "Index out of Range" can result if you exceed this
limit.
Insurance ReportThis alternative setup will print a report type report with more than one claim per page. Up to 25
service lines per claim can be printed on each page. A sample has been included in the IMPORT
option to use as a starting place. Move to an insurance claim report and select “I-Import” and
highlight “insrep~” and press e. The “insrep~” form will be added to your list of choices. This
is the format you will use to print your insurance reports. You can change the insurance company
field to select the carrier code for this carrier. You can make modifications to the general format of
the report to change columns, add information or adjust the report as needed.
Be sure to convert the format when you return to the Define Print Menu.
Page 15-12 Medical Office System
Version 05.00.00
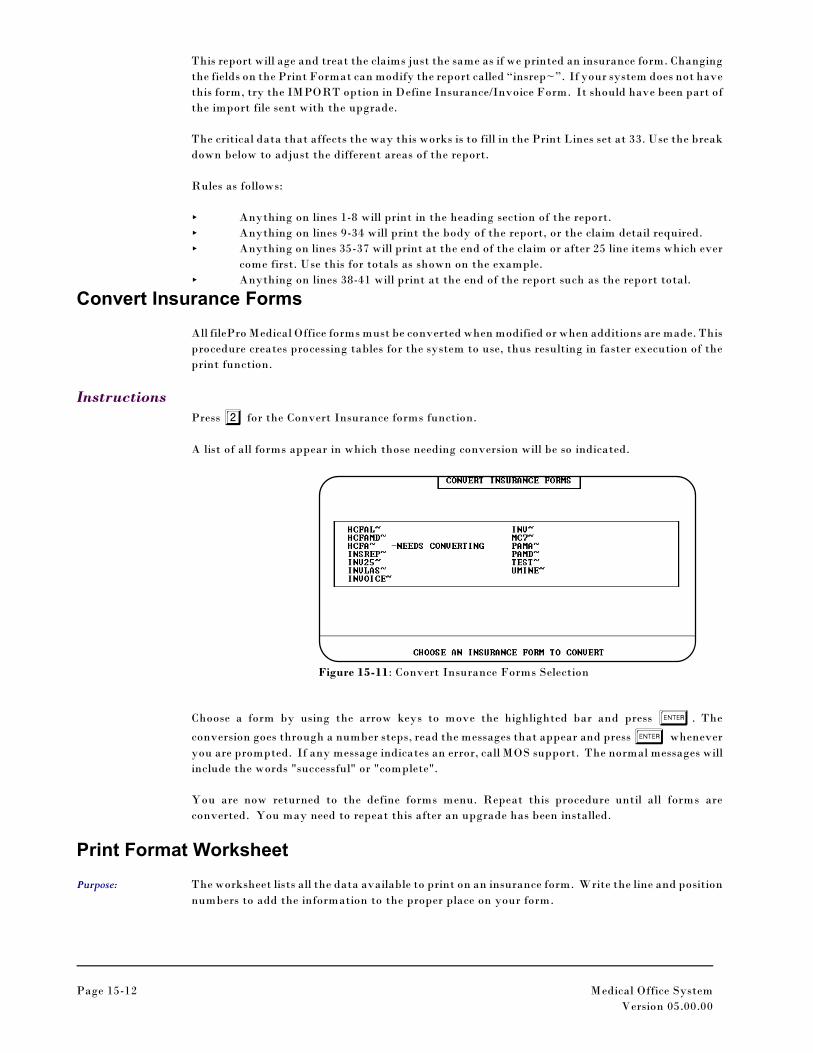
Figure 15-11: Convert Insurance Forms Selection
This report will age and treat the claims just the same as if we printed an insurance form. Changing
the fields on the Print Format can modify the report called “insrep~”. If your system does not have
this form, try the IMPORT option in Define Insurance/Invoice Form. It should have been part of
the import file sent with the upgrade.
The critical data that affects the way this works is to fill in the Print Lines set at 33. Use the break
down below to adjust the different areas of the report.
Rules as follows:
< Anything on lines 1-8 will print in the heading section of the report.
< Anything on lines 9-34 will print the body of the report, or the claim detail required.
< Anything on lines 35-37 will print at the end of the claim or after 25 line items which ever
come first. Use this for totals as shown on the example.
< Anything on lines 38-41 will print at the end of the report such as the report total.
Convert Insurance Forms
All filePro Medical Office forms must be converted when modified or when additions are made. This
procedure creates processing tables for the system to use, thus resulting in faster execution of the
print function.
InstructionsPress 2 for the Convert Insurance forms function.
A list of all forms appear in which those needing conversion will be so indicated.
Choose a form by using the arrow keys to move the highlighted bar and press e. The
conversion goes through a number steps, read the messages that appear and press e whenever
you are prompted. If any message indicates an error, call MOS support. The normal messages will
include the words "successful" or "complete".
You are now returned to the define forms menu. Repeat this procedure until all forms are
converted. You may need to repeat this after an upgrade has been installed.
Print Format Worksheet
Purpose: The worksheet lists all the data available to print on an insurance form. Write the line and position
numbers to add the information to the proper place on your form.

Medical Office System Page 15-13
Version 05.00.00
This report also prints a grid. Photocopy this grip to acetate to use as an overlay on your paper
insurance form. This will allow you to read line and position number from the overlay to properly
place the data.
Sort: By field number
Selection: All data available for the insurance forms.
Paper: Prints to default printer. No special printer control codes were used. The report will print on 8.5
inch by 11 inch paper.
Procedure: Press UD3 from the MOS Main Menu. The report runs with no further intervention.
Testing Print with DATA
To make sure that your format is correct, go into Daily Input and reprint a form that has already
been printed in batch. Use the "form" option -- press F at the invoice screen.
Check the print-out carefully for the following:
! wrong information in the blanks
! missing information
! missing check-offs
! inappropriate hard-coded check-offs
! printing over the edges of the blanks
! printing on the wrong lines
! overlapping fields
Make any necessary revisions in the form, and test it again. Repeat the process until you're satisfied.
(Remember, you can revise a form at any time.
Page 15-14 Medical Office System
Version 05.00.00
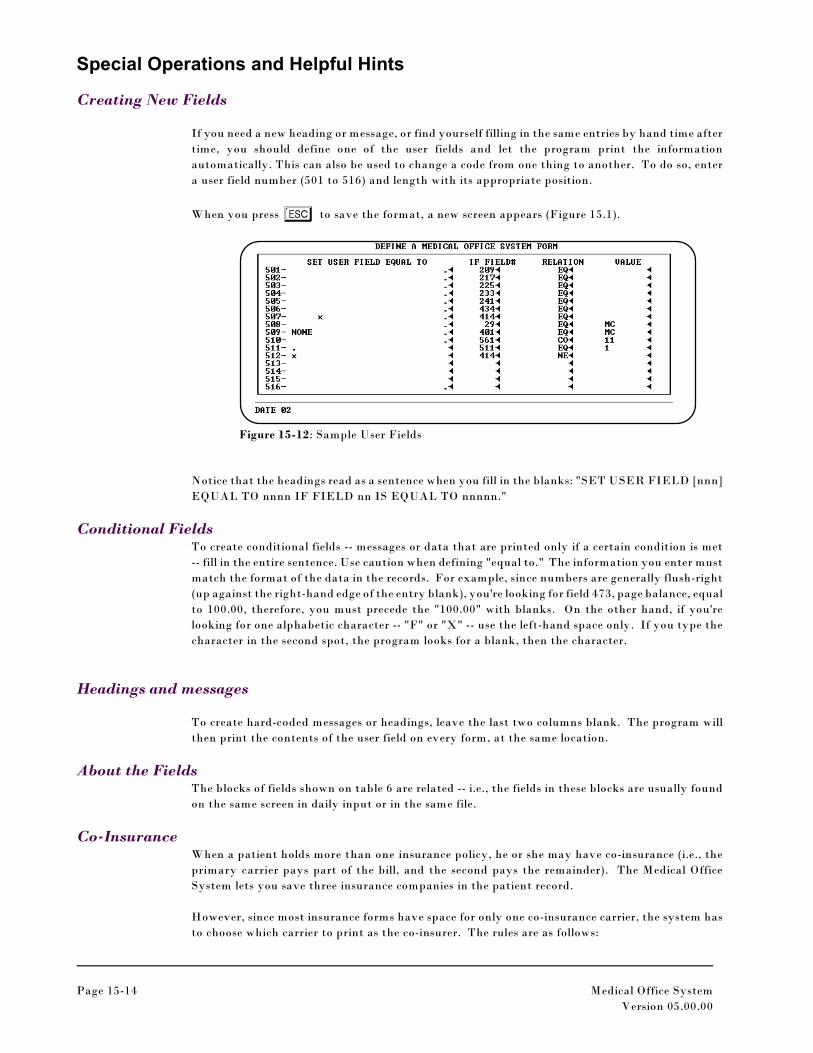
Figure 15-12: Sample User Fields
Special Operations and Helpful Hints
Creating New Fields
If you need a new heading or message, or find yourself filling in the same entries by hand time after
time, you should define one of the user fields and let the program print the information
automatically. This can also be used to change a code from one thing to another. To do so, enter
a user field number (501 to 516) and length with its appropriate position.
When you press ^ to save the format, a new screen appears (Figure 15.1).
Notice that the headings read as a sentence when you fill in the blanks: "SET USER FIELD [nnn]
EQUAL TO nnnn IF FIELD nn IS EQUAL TO nnnnn."
Conditional FieldsTo create conditional fields -- messages or data that are printed only if a certain condition is met
-- fill in the entire sentence. Use caution when defining "equal to." The information you enter must
match the format of the data in the records. For example, since numbers are generally flush-right
(up against the right-hand edge of the entry blank), you're looking for field 473, page balance, equal
to 100.00, therefore, you must precede the "100.00" with blanks. On the other hand, if you're
looking for one alphabetic character -- "F" or "X" -- use the left-hand space only. If you type the
character in the second spot, the program looks for a blank, then the character.
Headings and messages
To create hard-coded messages or headings, leave the last two columns blank. The program will
then print the contents of the user field on every form, at the same location.
About the FieldsThe blocks of fields shown on table 6 are related -- i.e., the fields in these blocks are usually found
on the same screen in daily input or in the same file.
Co-InsuranceWhen a patient holds more than one insurance policy, he or she may have co-insurance (i.e., the
primary carrier pays part of the bill, and the second pays the remainder). The Medical Office
System lets you save three insurance companies in the patient record.
However, since most insurance forms have space for only one co-insurance carrier, the system has
to choose which carrier to print as the co-insurer. The rules are as follows:
Medical Office System Page 15-15
Version 05.00.00
1. If the patient has two carriers, the second insurance company is used as the co-insurer on
any form printed for the primary insurance company.
2. The primary insurance company is used as the co-insurer on any form printed for the
secondary insurance company.
3. If the patient has three co-insurers, and insurance forms are printed for all three, the
system uses the second as co-insurer for the first, the first as the co-insurer for the second,
and the third as co-insurer for the second.
Note: That’s if, in the patient's record, you list his or her carrier as 1 and 3
instead of 1 and 2, the program prints no co-insurance carrier on the
insurance form.
Provider ID’s for Insurance Forms
Billing Provider: The doctor that will be paid for the claim. This might be a practice id or a group id. This
information usually is printed in box 33 of a HCFA-1500 form. This is often sent electronically on
the BA0 record in the NSF format.Rendering
Provider: This is the doctor that is responsible for the for doing the procedure. On many claims, this number
would be reported in 24K of the HCFA-1500 form. This information would be reported
electronically on the FA0 record.
Now sending or printing the correct number can be difficult. When designing an insurance form,
you can select a specific number that will always be printed on every claim. For example, insurance
field number 425 will always print the Physician ID #3 which should be the Medicare ID number.
If you wanted to use the same form for Medicaid and the number for Medicaid is different this
presents a problem. You can make another form layout for Medicaid that will put insurance field
number 435 in that same place.
SOLUTION If instead you put the insurance form field 179 on the form, it will be smarter and fill in the data
correctly for either type of insurance. Form field 179 is for the billing provider and will load data
as follows:
Billing Doctor 1. Load the correct provider number from the provider screen depending on the Insurance Type
of the primary carrier.
2. If the primary carrier screen has a Practice ID filled in then use the Practice ID.
3. If a code has been added to the Additional ID Numbers (Cross-Reference ) file for that doctor and
specifically for the primary insurance company than use the code for ALL Types.
4. If a code has been added to the Additional ID Numbers (Cross-Reference ) file for that doctor
and specifically for the primary insurance company than use the code for Billing Provider.
Cross-Reference Numbers
These numbers can be added from the Provider Data and are specific to a carrier. You can identify
a number as for ALL Types, Billing or Rendering. They can be 20 characters long so can allow for
a longer number than might be available on the Provider Data.
Rendering Doctor Now if you have the same difficulty with the rendering provider numbers, they can be handled in
the same way. Like all service line data, there is a different number for each line. On service line
1, you can place 945 in 24K to print the correct rendering provider code for the provider of service
for procedure 1, the other lines will use insurance form field 946-950. These are loaded in the same
Page 15-16 Medical Office System
Version 05.00.00
sequence as the billing provider. The only difference is will be in step 4 where it will use the
Rendering Provider number as the final option.
Additional Practices - Billing Services
Insurance Form Code
The base company on the MOS will have no choice and this is not relevant to an MOS system that
only supports one company.
It is possible with the MOS to use the software to bill for more than one practice. Each additional
practice will simply add a layer to the file data; sharing the same programming. This option is
available at an additional charge per practice.
When creating form variations for this new billing service, it was previously not possible to have
a form for the first practice called HCFA and a form for the second practice called HCFA. This
caused some confusion. To solve this problem, it is now possible to use a Insurance Form Code that
will distinguish the forms for up to four different practices. Currently, a tilde (~) is added to the end
of the form name to insure that the form names are always unique. Three additional characters are
now available for use in the additional practices that will provide the same function, but allow for
up to four versions of a form called HCFA and still have them uniquely defined for each practice.
The new characters possible are underline ( _ ), dash ( - ), and plus (+). It can be defined in the
practice information and all claims formatted and converted with this practice will then use the new
code. If you copy a claim into the new practice the code will always be adjusted to the correct code
for that practice.
Medical Office System Page 15-17
Version 05.00.00
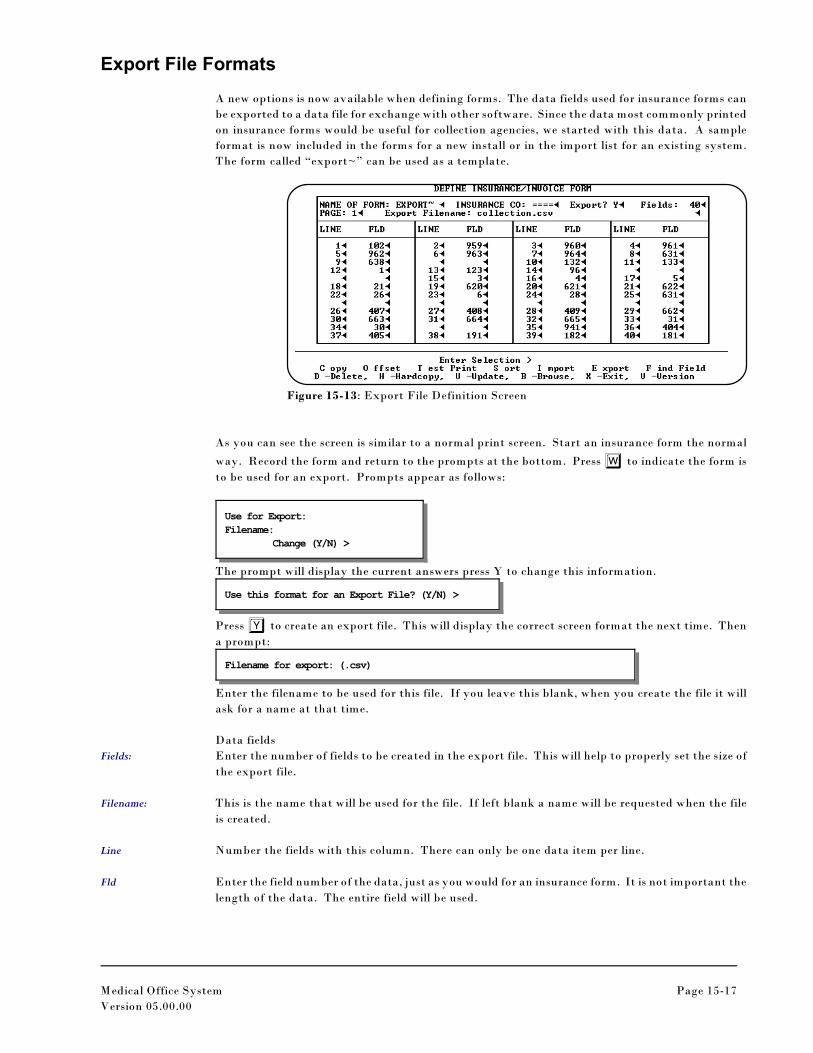
Figure 15-13: Export File Definition Screen
Export File Formats
A new options is now available when defining forms. The data fields used for insurance forms can
be exported to a data file for exchange with other software. Since the data most commonly printed
on insurance forms would be useful for collection agencies, we started with this data. A sample
format is now included in the forms for a new install or in the import list for an existing system.
The form called “export~” can be used as a template.
As you can see the screen is similar to a normal print screen. Start an insurance form the normal
way. Record the form and return to the prompts at the bottom. Press W to indicate the form is
to be used for an export. Prompts appear as follows:
Use for Export:
Filename:
Change (Y/N) >
The prompt will display the current answers press Y to change this information.
Use this format for an Export File? (Y/N) >
Press Y to create an export file. This will display the correct screen format the next time. Then
a prompt:
Filename for export: (.csv)
Enter the filename to be used for this file. If you leave this blank, when you create the file it will
ask for a name at that time.
Data fields
Fields: Enter the number of fields to be created in the export file. This will help to properly set the size of
the export file.
Filename: This is the name that will be used for the file. If left blank a name will be requested when the file
is created.
Line Number the fields with this column. There can only be one data item per line.
Fld Enter the field number of the data, just as you would for an insurance form. It is not important the
length of the data. The entire field will be used.
Page 15-18 Medical Office System
Version 05.00.00
Test Print Use the test print option at the bottom of the screen to get a list of the fields, to check your setup.
This will provide a good map of the data.
Convert the Export File
When the file format has been created, it is necessary to convert the format. A new prompt on the
MOS Define Print Format Menu is used for the export formats. Select “7-Convert Export Forms”.
It behaves similar to the Insurance form convert that is currently used.
Exporting a file
Since the first application of this was for Collection Agencies, an option was added to the Insurance
Forms Menu.
8 - Collection Report / Export
Select this option to print a collection report of invoices in collection and create an export file with
this same data. This file can then be sent to a collection agency.
9 - Export Data Select this option to print a list of invoices and select the same invoices for the export file. The
selection for this option is left open to the user. A list of all invoice from a certain location, between
two dates, for a certain doctor, etc. could be selected and a corresponding export file created. This
should give you some flexibility for other applications of this logic.
Note: If interest is there, a similar batch format will be created for exporting patient
demographics information. It would select from the patient file and supporting files. Not
sure if invoice data would be included, but I expect not.
File Location: On a Unix system, the file is written in the directory /md/fpmerge
On a Windows system, the file is written to \md\fpmerge. If the directory does not exist, please
create it.
“Datafield1",”datafield2",”datafield3"
“datafield1",”datafield2",”datafield3"
Each record has a record delimiter. Unix uses LF and Windows would have CR/LF.