Embed Size (px)
DESCRIPTION
The Melodyne online manual
Citation preview
user manual Last updated on 07/04/2013
Melodyne editor
© Celemony Software GmbH 2013 • Last updated on 04.07.2013 • • Online Manual www.celemony.com 2
The Melodyne online manual and this PDF document
This PDF document was generated automatically from the contents of the Melodyne online manual. It
contains what was the latest version of text and images at the time indicated on the front page.
We are regularly adding to and updating the online edition of the manual, which is accompanied by
numerous films and inspiring tutorials. You will find these as well as the latest version of this PDF
document on our web site. Why not take a look now?
The Melodyne online manual: http://www.celemony.com/id/helpcenter
IntroductionInstallation and Activation
Installation and Terminology • Melodyne "singletrack" – and what that means •
Important Information Regarding Activation • The iLok Alternative • Where can I find my
Melodyne serial number?
Welcome!
What Melodyne is and what it's for
Quick Start Guide
Stand-Alone or Plugin • Transfers and replace ranges • Note detection and algorithm
selection • Navigation, playback functions and cycle mode • Note selection and copying
• Macros and tools • The pitch grid and scale functions • Tempo functions • Saving
your work and file management
Melodyne condensed : the interface in a nutshell
General program functions • Navigation, selection and playback • Tool functions •
Other functions
Melodyne editor
© Celemony Software GmbH 2013 • Last updated on 04.07.2013 • • Online Manual www.celemony.com 3
Strategies for optimizing performance and stability
Tip 1: The size of your DAW's buffer • Tip 2: Avoid running short of RAM • Tip 3: The
correct DAW settings • Tip 4: Always use the latest version of Melodyne • Tip 5: Use
the correct audio driver format • Tip 6: Use the latest version of the audio driver • If our
tips are of no help
Preferences
Melodyne Plugin's preferences property sheet • Melodyne Stand-Alone's preferences
property sheet
Loading, transferring and savingTransferring audio material to Melodyne Plugin
Transferring audio • Replace Ranges
Loading and saving audio in Melodyne Stand-Alone
Opening files from the File menu • Opening files by drag-and-drop • Saving your work •
Save as Melodyne Project Document
Recording audio in Melodyne Stand-Alone
Audio settings • Tempo and metronome • Starting and stopping the recording
Saving as MIDI
Audio-to-MIDI • Saving as MIDI • Save all notes or only those in the cycle zone
Managing audio files and assigning missing files
Melodyne Plugin's transfer files • Melodyne Plugin's file manager • Deleting unwanted
files in the plug-in • The assignment of missing files in the plug-in • Assigning missing
files in the Stand-Alone implementation
Operating Melodyne with Rewire
Rewire and Melodyne • Activating Rewire in Melodyne Stand-Alone • Activating Rewire
in your DAW and establishing the link • Selecting Rewire channels in Melodyne •
Synchronization and tempo behavior
Checking and editing the note detection
Melodyne editor
© Celemony Software GmbH 2013 • Last updated on 04.07.2013 • • Online Manual www.celemony.com 4
Choosing the algorithm
The detection process • Melodic • Percussive • Polyphonic • Switching algorithms •
Setting a default algorithm (Melodyne editor only)
Checking and editing the note detection within melodic material
The procedure • The Monitoring Synthesizer • Note separation • Quitting note
assignment mode
Checking and editing the detection of notes within polyphonic material
Activating and deactivating notes • The monitoring synthesizer • Note separation • The
note assignment slider • The venetian blinds • Pulling open note ends • Leaving note
assignment mode
Checking and editing the note detection within rhythmic material
The procedure • Leaving note assignment mode
Displaying, navigating and playing back audio
Playback, navigation and zooming
Resizing the window • Controlling playback using the keyboard and transport bar •
Controlling playback, scrubbing and zooming using the bar ruler • Scrolling and
zooming in the edit pane • Playback functions in Melodyne Stand-Alone and Plugin
(when the DAW is stopped) • Navigation and zoom functions
Activating and setting a cycle range
The procedure
Select display options
Auto Scroll • Show Pitch Curve • Show Note Separations • Show Note Tails • Show
Blob Info • Show Intended Notes • Show Notation • Show Replace Ranges (Plugin
only) • Highlight Playing Notes • Show real-time controls (Plugin only)
Selecting notes
Standard selection techniques • Snake selection • Selection using the pitch ruler •
Selection commands in the menu
Melodyne editor
© Celemony Software GmbH 2013 • Last updated on 04.07.2013 • • Online Manual www.celemony.com 5
Copying notes
Inserting one note • Replacing a note • Copying and pasting multiple notes
The real-time controls
The real-time pitch, formant and volume knobs
Setting the Time Grid and the Pitch Grid
Time grid selection
The procedure
Matching Melodyne Stand-Alone's time grid to the audio
Moving the '1' • Correcting the tempo interpretation • Specifying a fixed tempo • Set
Bar 1 to Start of File • Redetecting the tempo
Adjusting to tempo variation in the DAW
A new constant tempo • A progressive tempo change • Important when working with
variable tempo
The pitch grid and scales
Melodyne's scale functions • The pitch grid and display options • The scale and
reference pitch rulers • Adjusting the master tuning • Selecting the tonic and scale
variety • The Open Scale window • The Scale Pool and file management functions •
Saving scales
Editing and creating scales
The extended scale functions • Editing modes • Editing intervals • Intervals displayed
as frequency ratios • Defining intervals • Creating your own scales • Working with
stretch tuning
Identifying scales with the scale detective
What the scale detective does • Showing the scale detective and adjusting its sensitivity
• Scale detection options • Applying the detected scale.
Editing notes using the Macros and Tools
Melodyne editor
© Celemony Software GmbH 2013 • Last updated on 04.07.2013 • • Online Manual www.celemony.com 6
Correcting intonation by macro
The procedure
Correcting timing using the macro
Correcting timing: the 'what' and 'where' of it • Use of the quantize time macro
Working with the main tool
Modifying pitch and timing • Modifying note lengths • Editing note separations
Editing pitch
The pitch tool • Monitoring • The inspector • Quantizing pitch to the semitone • Pitch
transitions • Resetting specific edits and introducing random deviations
Editing pitch modulation and drift
The tools • The inspector • The Reset commands
Shifting formants
Editing formants • The inspector • Formant transitions • The Reset commands
Editing amplitude and muting notes
Adjusting the amplitude • The inspector • Amplitude transitions • Muting and unmuting
notes • The Reset commands
Editing timing
Modifying position and length • Correcting timing with a double-click • Adding random
deviations
Time handles and changing the attack speed
Modifying the evolution of notes using time handles • Changing the attack speed of
notes • Time handles and attack speed combined

Melodyne editor
© Celemony Software GmbH 2013 • Last updated on 04.07.2013 • • Online Manual www.celemony.com 7
Editing note separations
Inserting, moving and removing note separations
Melodyne editor
© Celemony Software GmbH 2013 • Last updated on 04.07.2013 • • Online Manual www.celemony.com 8
Installation and Activation
In the following, you will learn how to install and activate Melodyne.
Installation and Terminology
Melodyne is extremely easy to install: just launch the installation program (either from the program CD
or the download) and follow the onscreen instructions. The whole installation takes, at most, a few
minutes. Before using the program, however, you must register and activate Melodyne. Here is a brief
explanation of the terminology:
Serial number: Your serial number represents your license for Melodyne and determines which
Melodyne edition you possess and to which functions you are entitled.
Registration: Registration involves the creation of a myCelemony account linked to your serial number.
To register you must enter certain personal details and state whether you wish to receive a newsletter
from Celemony and, if so, what type. If you purchased Melodyne from our web shop, the registration is
already complete.
Activation: Once registered, Melodyne must be activated before it will run. We offer, as standard, a
computer-based activation for two computers, and, as an alternative, the transfer of your license to an
iLok.
Before we come to the details of the activation procedure, we should take a quick look at the installed
software and its characteristics.
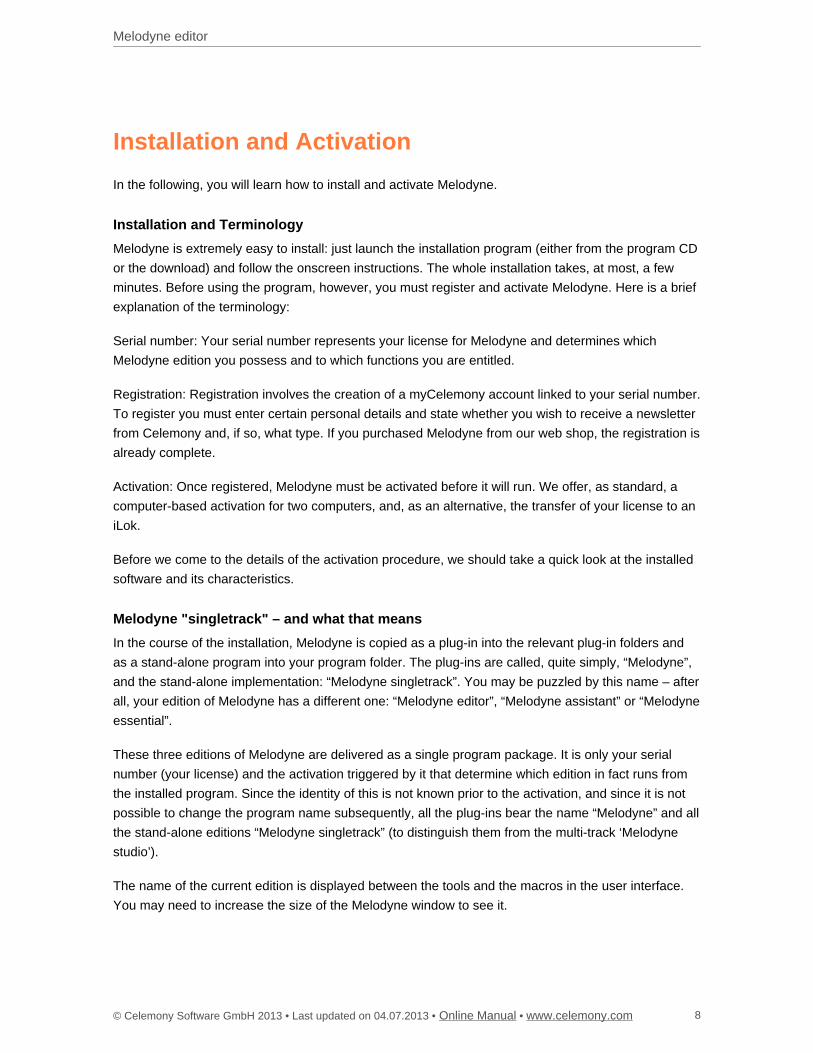
Melodyne "singletrack" – and what that means
In the course of the installation, Melodyne is copied as a plug-in into the relevant plug-in folders and
as a stand-alone program into your program folder. The plug-ins are called, quite simply, “Melodyne”,
and the stand-alone implementation: “Melodyne singletrack”. You may be puzzled by this name – after
all, your edition of Melodyne has a different one: “Melodyne editor”, “Melodyne assistant” or “Melodyne
essential”.
These three editions of Melodyne are delivered as a single program package. It is only your serial
number (your license) and the activation triggered by it that determine which edition in fact runs from
the installed program. Since the identity of this is not known prior to the activation, and since it is not
possible to change the program name subsequently, all the plug-ins bear the name “Melodyne” and all
the stand-alone editions “Melodyne singletrack” (to distinguish them from the multi-track ‘Melodyne
studio’).
The name of the current edition is displayed between the tools and the macros in the user interface.
You may need to increase the size of the Melodyne window to see it.
Melodyne editor
© Celemony Software GmbH 2013 • Last updated on 04.07.2013 • • Online Manual www.celemony.com 9
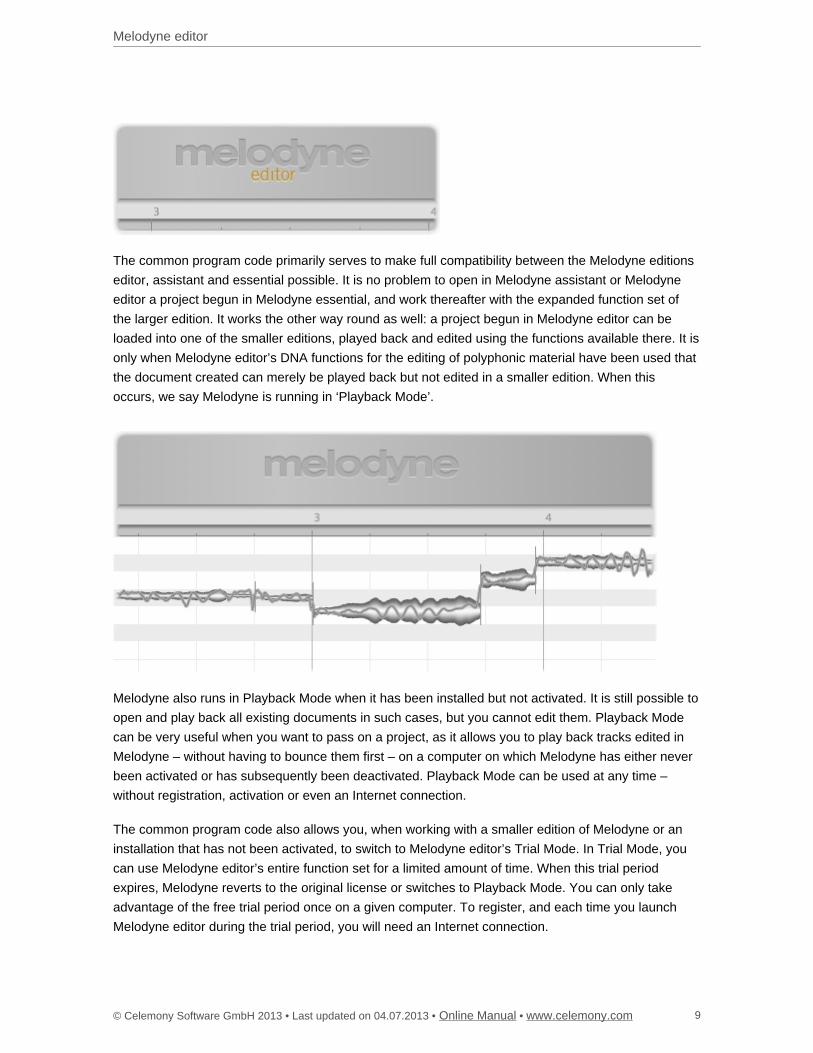
The common program code primarily serves to make full compatibility between the Melodyne editions
editor, assistant and essential possible. It is no problem to open in Melodyne assistant or Melodyne
editor a project begun in Melodyne essential, and work thereafter with the expanded function set of
the larger edition. It works the other way round as well: a project begun in Melodyne editor can be
loaded into one of the smaller editions, played back and edited using the functions available there. It is
only when Melodyne editor’s DNA functions for the editing of polyphonic material have been used that
the document created can merely be played back but not edited in a smaller edition. When this
occurs, we say Melodyne is running in ‘Playback Mode’.
Melodyne also runs in Playback Mode when it has been installed but not activated. It is still possible to
open and play back all existing documents in such cases, but you cannot edit them. Playback Mode
can be very useful when you want to pass on a project, as it allows you to play back tracks edited in
Melodyne – without having to bounce them first – on a computer on which Melodyne has either never
been activated or has subsequently been deactivated. Playback Mode can be used at any time –
without registration, activation or even an Internet connection.
The common program code also allows you, when working with a smaller edition of Melodyne or an
installation that has not been activated, to switch to Melodyne editor’s Trial Mode. In Trial Mode, you
can use Melodyne editor’s entire function set for a limited amount of time. When this trial period
expires, Melodyne reverts to the original license or switches to Playback Mode. You can only take
advantage of the free trial period once on a given computer. To register, and each time you launch
Melodyne editor during the trial period, you will need an Internet connection.
Melodyne editor
© Celemony Software GmbH 2013 • Last updated on 04.07.2013 • • Online Manual www.celemony.com 10
The common program code also makes it possible to upgrade at any time, and without a fresh
installation, from Melodyne assistant or Melodyne essential to Melodyne editor. It is enough for this
purpose simply to purchase a license for Melodyne editor and then activate it – all of which can be
done with a few clicks in our Web Shop.
Important Information Regarding Activation
The first time you launch Melodyne, the Activation Assistant appears. If you purchased your Melodyne
from our Web Shop, a single click in the Assistant is all that is required and your Melodyne will be
activated and ready to use. If your Melodyne came in a box, the Assistant will guide you through all
the steps that are necessary for registration and activation. The activation is performed on line. If your
computer is not connected to the Internet, the Assistant will propose a method of activating the
program offline.
You can reach the Activation Assistant whenever you need to via “License ...” in Melodyne’s Help
menu. All the options offered by the Assistant are explained in the Assistant itself. The following
sections explain how these options relate to one another as well as providing important background
information regarding activation. Please read them through carefully as they are concerned directly
with such questions as when, why and how often you can install and use Melodyne on computers.
Two computer-based activations: Melodyne activation is, by default, computer-based; in other
words, the activation is tied to the computer upon which it is performed. A Melodyne license
entitles you to activate and use Melodyne on two different computers simultaneously, such as
your studio computer and your laptop. The activations are managed and granted by our server.
You will see how many activation credits you have at any given moment in your myCelemony
account as soon as you log in.
Deactivating a computer: We allow you complete control over the allocation of your activation
rights by allowing you the option also of deactivating computers. Suppose, for example, that
you have already activated Melodyne on two computers but wish to use a third one temporarily.
No problem: all you have to do is deactivate one of the computers currently activated. This will
free up one activation credit, which will then be transferred to our server. You can use this then
to activate the third computer. If, later, you wish to go back to your original pairing, just
deactivate the third computer and reactivate the one you deactivated earlier.
So our server provides you with two activations that you can share freely between your various
computers. This makes it very simple, for example, to switch to a new music computer. Instead of
having to worry about whether or not you will be entitled to activate Melodyne on the new computer,
you just deactivate the old one, thereby automatically freeing up an activation credit for the new one.
This possibility also means, however, that you need to act in a carefully considered way! The
activations are intended exclusively for you and are tied to your customer account. Do not, therefore,
give away an activation to a third party. Please bear in mind also that the procedure for removing an
activation from a computer can only be performed on that computer. If you no longer have access to
Melodyne editor
© Celemony Software GmbH 2013 • Last updated on 04.07.2013 • • Online Manual www.celemony.com 11
an activated computer, the activation, as far as you are concerned, is lost. This is something you need
to bear in mind, for example, before selling or throwing away a computer upon which Melodyne is
active. Be sure to deactivate Melodyne first!
You have nothing to worry about, on the other hand, if all you are doing is changing or formatting your
hard disk in order to reinstall the operating system. Your activation in this case will not be lost. The
first time you launch Melodyne after doing either of these things, it will contact the Celemony server,
which will recognize the computer at once and reactivate it—without this costing you an activation
credit.
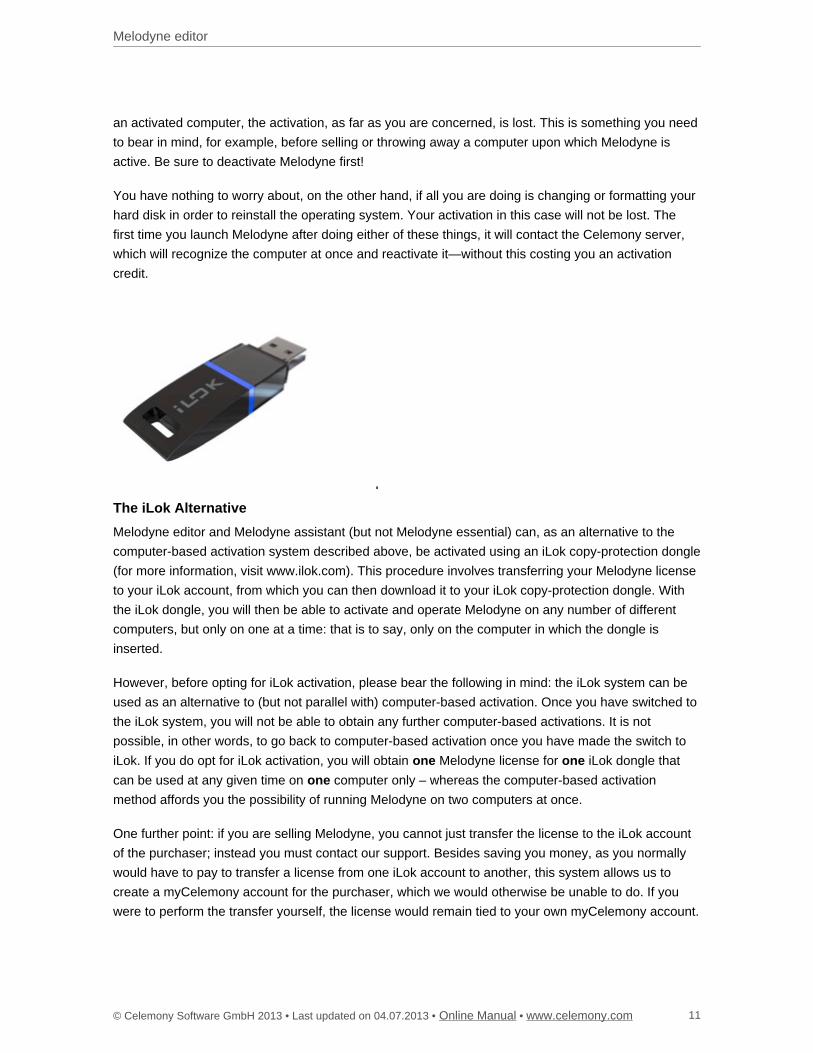
The iLok Alternative
Melodyne editor and Melodyne assistant (but not Melodyne essential) can, as an alternative to the
computer-based activation system described above, be activated using an iLok copy-protection dongle
(for more information, visit www.ilok.com). This procedure involves transferring your Melodyne license
to your iLok account, from which you can then download it to your iLok copy-protection dongle. With
the iLok dongle, you will then be able to activate and operate Melodyne on any number of different
computers, but only on one at a time: that is to say, only on the computer in which the dongle is
inserted.
However, before opting for iLok activation, please bear the following in mind: the iLok system can be
used as an alternative to (but not parallel with) computer-based activation. Once you have switched to
the iLok system, you will not be able to obtain any further computer-based activations. It is not
possible, in other words, to go back to computer-based activation once you have made the switch to
iLok. If you do opt for iLok activation, you will obtain Melodyne license for iLok dongle thatone one
can be used at any given time on computer only – whereas the computer-based activationone
method affords you the possibility of running Melodyne on two computers at once.
One further point: if you are selling Melodyne, you cannot just transfer the license to the iLok account
of the purchaser; instead you must contact our support. Besides saving you money, as you normally
would have to pay to transfer a license from one iLok account to another, this system allows us to
create a myCelemony account for the purchaser, which we would otherwise be unable to do. If you
were to perform the transfer yourself, the license would remain tied to your own myCelemony account.
Melodyne editor
© Celemony Software GmbH 2013 • Last updated on 04.07.2013 • • Online Manual www.celemony.com 12
Where can I find my Melodyne serial number?
Here we explain where you can find your new serial number after purchasing a full version, upgrade or
update of Melodyne and where to enter it. Serial numbers form the basis for the registration and
activation – and therefore also the use – of Melodyne.
Full version purchased through a dealer: You will find your serial number in the user manual, which
is in the box. When you install and launch Melodyne for the first time, an activation assistant will
appear. This will ask you for your serial number and guide you through the remaining steps of the
registration and activation procedure.
Full version purchased in the web shop: Since you already registered Melodyne and received a
personalized installation program when you made your purchase in the web shop, you don’t need at
this time to enter a serial number. The first time you launch the program after the installation, our
server will recognize your copy and activate it. If you do need your serial number, however, you will
find it at the top of the activation assistant window, which opens when you choose License from the
Help menu.
Upgrade or update purchased through a dealer: If you buy an upgrade to a more powerful edition,
or else an update to a newer version, of Melodyne in a retail outlet, you will find a new serial number
in the pack. When you first launch the program after installing your upgrade or update, the activation
assistant will appear. This will ask you for your serial number and guide you through the remaining
steps.
Upgrade or update purchased in the web shop: Since you have to log in to purchase an upgrade
or update in the web shop, your new serial number will be added automatically to your customer
account data. When you launch your new edition or version of the program for the first time after the
installation, our server will recognize and activate your copy automatically. If you do need your serial
number, however, you will find it at the top of the activation assistant window, which opens when you
choose License from the Help menu.
New serial numbers and the iLok: Whenever you purchase an upgrade or update, or download a
major free update (such as from Version 1.x to Version 2.x), of Melodyne, you will be issued with a
new serial number. Our server will then send automatically a new license to your iLok account. Just
log in at www.iLok.com and download the new license to your dongle, so that you can use your new
edition or version of Melodyne in the same way as the previous one.
Melodyne essential bundled with Studio One: In the “Studio One Installation ...” window, click
“Download content from Presonus User Account” and scroll down to the entry “Melodyne essential”.
From there, you can copy the serial number and download the installation program directly. Please
note that only Studio One Professional comes with a Melodyne serial number, but if you are using one
of the other editions, you can still download the installation program and run Melodyne in trial mode.

Melodyne editor
© Celemony Software GmbH 2013 • Last updated on 04.07.2013 • • Online Manual www.celemony.com 13
Related topics
Welcome!
Melodyne editor
© Celemony Software GmbH 2013 • Last updated on 04.07.2013 • • Online Manual www.celemony.com 14
Welcome!
Many thanks for your interest in Melodyne and a warm welcome to the circle of Melodyne users!
Melodyne is at home in all the great studios of the world and has for years been prized for its intuitive
editing functions and the high quality of its sound. As a Melodyne user, you are in the finest – we
could even say ‘the most illustrious’ - company!
Here at Celemony, we have worked hard to make Melodyne as pleasant to use, as powerful, and as
useful, as possible. We really hope that Melodyne will make your life in the studio easier, be a delight
to use, and inspire you to greater heights of creativity. Let us know how you like it. And don’t hesitate
to contact us if anything doesn’t work quite the way it should – at www.celemony.com, we’re always
here for you.
We hope your work with Melodyne will be productive and that it will bring you a great deal of
satisfaction and pleasure!
Kindest regards,
all at Celemony
Melodyne editor
© Celemony Software GmbH 2013 • Last updated on 04.07.2013 • • Online Manual www.celemony.com 15
What Melodyne is and what it's for
Melodyne allows you edit and display audio material in a highly musical way. What’s remarkable about
it is that Melodyne recognizes the notes in the audio data and displays them on pitch and time grids.
This is far more informative than the kind of display of amplitude values along a time axis offered by
typical sample editors and audio sequencers. With Melodyne, you don’t just see which parts of a
recording are loud and which quiet; you see where notes begin and end, as well as the pitch of each.
That (obviously!) makes a huge difference.
And naturally it is possible not simply to observe but also to seize hold of and modify the notes
displayed. If a tone is flat, for example, you can simply drag it to the correct pitch; if it’s too short, you
can make it longer.
Melodyne’s note-based approach not only makes it a highly sensitive tool for correcting and optimizing
your recordings but also offers you the possibility of making profound changes to your audio material,
restructuring it, and creating from it something altogether new.
Melodyne has for years enjoyed an outstanding reputation for the editing of lead vocals, as it allows
you to make corrections in a musical and intuitive manner that are virtually undetectable by ear. But
what works for this most critical of disciplines works wonders too with other sources, such as musical
instruments. And once you’ve worked for a while with Melodyne, you’ll realize that aside from the
correction of errors there’s a wealth of other valuable applications for you to explore. A few examples:
The creation of second voices or entire ensembles from copies of the original track
The introduction of melodic or harmonic variations when phrases are repeated
Correcting and reconciling the timing of drums and bass
Tidying-up rhythms or using quantization techniques to alter them
Creating breaks and variations in drum loops
and standard disciplines like pitch-shifting and time-stretching, too, of which Melodyne editor
offers complete mastery, delivering outstanding sound quality into the bargain.
Melodyne editor offers you the possibility of intervening in the harmonies of polyphonic audio material
in order, for example, to change a single note within a chord from a major to a minor third – this is
something unprecedented in the history of audio processing and introduces a wholly new dimension of
creative freedom.
With Melodyne assistant and essential, you can edit monophonic sound sources (lead vocals,
saxophone, bass, flute, etc.) as well as rhythmic or unpitched audio material (such as drum loops,
percussion, ambient sounds and noise).
Melodyne editor
© Celemony Software GmbH 2013 • Last updated on 04.07.2013 • • Online Manual www.celemony.com 16
For Mac OS X (dmg, 44,1 MB)
For Windows XP, Vista, 7 (exe, 42,8 MB)
1.
Download Demo arrangements
Quick Start Guide
The following guide explains in a nutshell everything you need to know in order to make successful
use of Melodyne.
To get you started, we recommend in addition to this tour the multilingual First Steps film, which you
will find at the top of this page and in which the most important points are clearly demonstrated. You
can also try out the things shown in the film, as all the audio files used in the film are available for
download, ready-packed in arrangements for the most common DAWs.
In the case of keyboard shortcuts, where here we refer to the ‘Command’ key, we mean the key on
the Mac described as either the ‘Command’ or the ‘Apple’ key; on a PC it is marked ‘Ctrl’. The other
keys referred to have the same names on the Mac as the PC.
Stand-Alone or Plugin
You can use Melodyne as either a stand-alone application or a plug-in with any compatible DAW, in
which case you will find Melodyne among the audio-effect plug-ins (not the instrument plug-ins);
Melodyne is used in the same way as an audio insert effect not an instrument plug-in. The plug-in runs
in step with your DAW, which is ideal if you want to perform and check your editing within the context
of a song; for this purpose you can open as many instances of Melodyne simultaneously as the
memory and processing power of your computer will permit.
You will find the stand-alone implementation in your computer’s Programs folder after the installation.
Use this version just like a sample editor: launch the application, open your audio files, edit them, then
save them at the end. The stand-alone implementation is easily to hand when you want to edit
samples independently of a song project. Thanks to ReWire support, however, it can also be
connected to a DAW, which provides an alternative to running Melodyne as a plug-in. You should take
advantage of this possibility if your DAW has no plug-in interface or is incompatible with Melodyne but
does support ReWire.
In terms of core functions, there is no difference between the plug-in and stand-alone implementations
of Melodyne; both offer the same possibilities for editing your audio material.
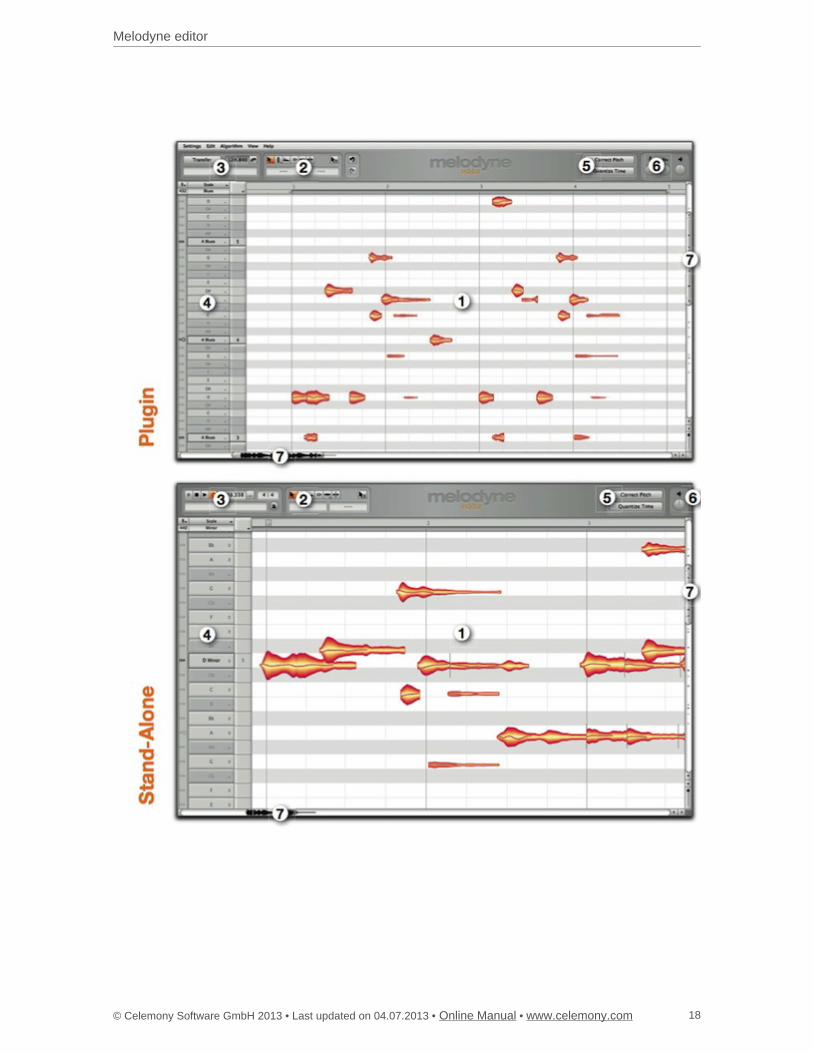
Areas of the user interface and their functions
Melodyne editor
© Celemony Software GmbH 2013 • Last updated on 04.07.2013 • • Online Manual www.celemony.com 17
1.
2.
3.
4.
5.
6.
7.
Editing pane and notes
toolbox and inspector
Transfer button (Plugin) or transport bar (Stand-Alone)
Pitch ruler and scale area
Macros for pitch and time correction
Real-time volume (Stand-Alone), pitch and formant (Plugin only) controls
Zoom and scroll bars
Melodyne editor
© Celemony Software GmbH 2013 • Last updated on 04.07.2013 • • Online Manual www.celemony.com 18
Melodyne editor
© Celemony Software GmbH 2013 • Last updated on 04.07.2013 • • Online Manual www.celemony.com 19
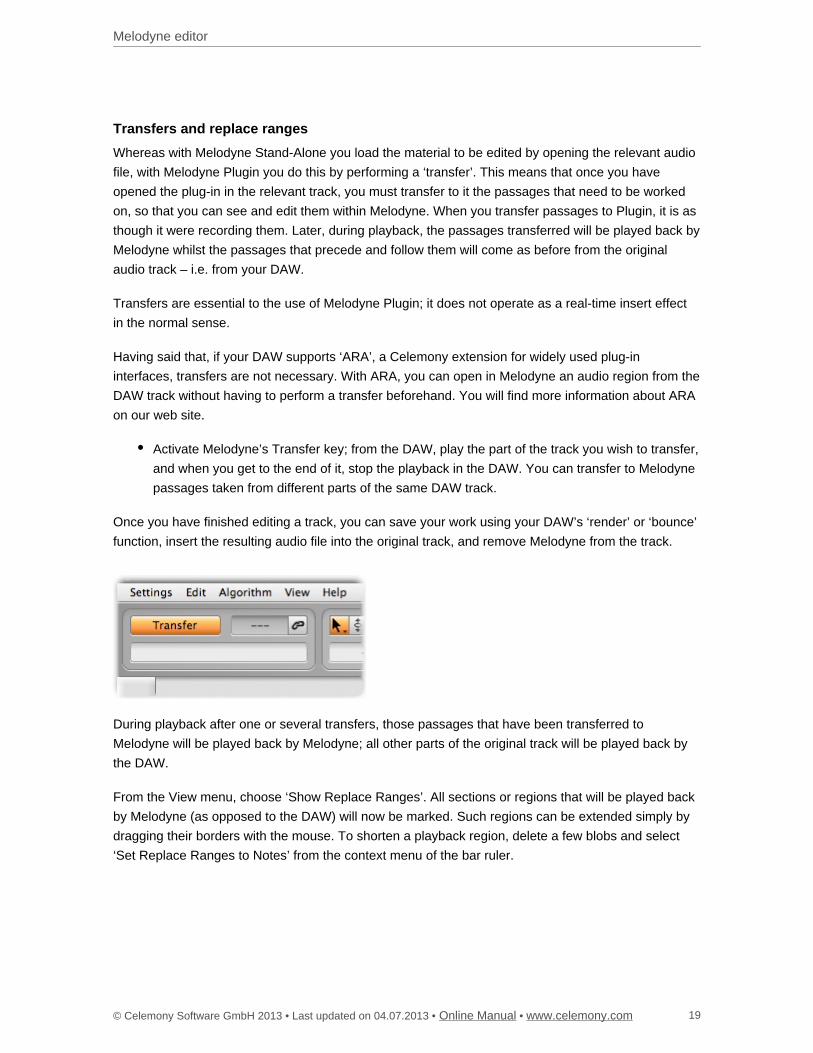
Transfers and replace ranges
Whereas with Melodyne Stand-Alone you load the material to be edited by opening the relevant audio
file, with Melodyne Plugin you do this by performing a ‘transfer’. This means that once you have
opened the plug-in in the relevant track, you must transfer to it the passages that need to be worked
on, so that you can see and edit them within Melodyne. When you transfer passages to Plugin, it is as
though it were recording them. Later, during playback, the passages transferred will be played back by
Melodyne whilst the passages that precede and follow them will come as before from the original
audio track – i.e. from your DAW.
Transfers are essential to the use of Melodyne Plugin; it does not operate as a real-time insert effect
in the normal sense.
Having said that, if your DAW supports ‘ARA’, a Celemony extension for widely used plug-in
interfaces, transfers are not necessary. With ARA, you can open in Melodyne an audio region from the
DAW track without having to perform a transfer beforehand. You will find more information about ARA
on our web site.
Activate Melodyne’s Transfer key; from the DAW, play the part of the track you wish to transfer,
and when you get to the end of it, stop the playback in the DAW. You can transfer to Melodyne
passages taken from different parts of the same DAW track.
Once you have finished editing a track, you can save your work using your DAW’s ‘render’ or ‘bounce’
function, insert the resulting audio file into the original track, and remove Melodyne from the track.
During playback after one or several transfers, those passages that have been transferred to
Melodyne will be played back by Melodyne; all other parts of the original track will be played back by
the DAW.
From the View menu, choose ‘Show Replace Ranges’. All sections or regions that will be played back
by Melodyne (as opposed to the DAW) will now be marked. Such regions can be extended simply by
dragging their borders with the mouse. To shorten a playback region, delete a few blobs and select
‘Set Replace Ranges to Notes’ from the context menu of the bar ruler.
Melodyne editor
© Celemony Software GmbH 2013 • Last updated on 04.07.2013 • • Online Manual www.celemony.com 20
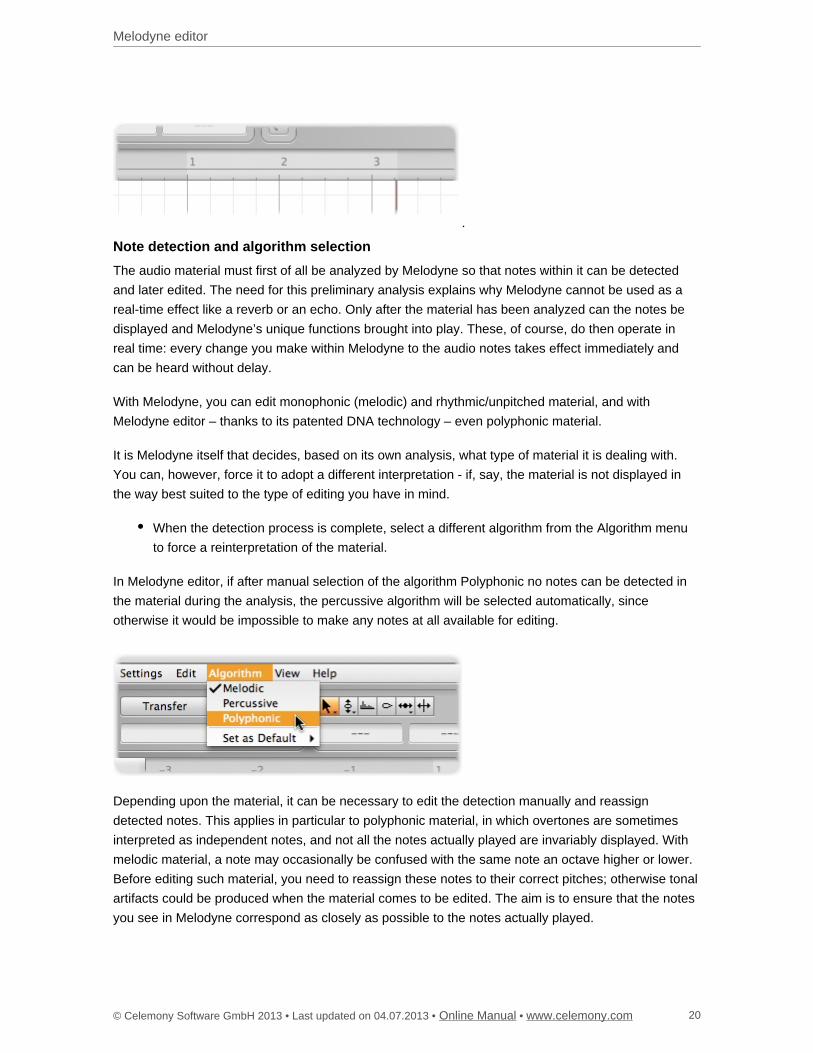
Note detection and algorithm selection
The audio material must first of all be analyzed by Melodyne so that notes within it can be detected
and later edited. The need for this preliminary analysis explains why Melodyne cannot be used as a
real-time effect like a reverb or an echo. Only after the material has been analyzed can the notes be
displayed and Melodyne’s unique functions brought into play. These, of course, do then operate in
real time: every change you make within Melodyne to the audio notes takes effect immediately and
can be heard without delay.
With Melodyne, you can edit monophonic (melodic) and rhythmic/unpitched material, and with
Melodyne editor – thanks to its patented DNA technology – even polyphonic material.
It is Melodyne itself that decides, based on its own analysis, what type of material it is dealing with.
You can, however, force it to adopt a different interpretation - if, say, the material is not displayed in
the way best suited to the type of editing you have in mind.
When the detection process is complete, select a different algorithm from the Algorithm menu
to force a reinterpretation of the material.
In Melodyne editor, if after manual selection of the algorithm Polyphonic no notes can be detected in
the material during the analysis, the percussive algorithm will be selected automatically, since
otherwise it would be impossible to make any notes at all available for editing.
Depending upon the material, it can be necessary to edit the detection manually and reassign
detected notes. This applies in particular to polyphonic material, in which overtones are sometimes
interpreted as independent notes, and not all the notes actually played are invariably displayed. With
melodic material, a note may occasionally be confused with the same note an octave higher or lower.
Before editing such material, you need to reassign these notes to their correct pitches; otherwise tonal
artifacts could be produced when the material comes to be edited. The aim is to ensure that the notes
you see in Melodyne correspond as closely as possible to the notes actually played.
Melodyne editor
© Celemony Software GmbH 2013 • Last updated on 04.07.2013 • • Online Manual www.celemony.com 21
Select the Note Assignment tool, which is set slightly apart from the others, to switch to Note
Assignment mode.
You can leave Note Assignment mode at any time simply by selecting another tool.
In the case of melodic material, all you need to do is drag a falsely detected note in the direction of the
correct pitch. Melodyne will then search again for the pitch in this new area and position the note itself
at the correct pitch.
In the case of polyphonic material, you will see in Note Assignment mode solid blobs (representing
‘active’ notes) and hollow ones (representing ‘potential’ notes). Potential notes are those that during
the detection were classed as overtones of some other note rather than notes in their own right. By
double-clicking, you can now deactivate superfluous notes and activate potential ones.
With instruments in particular that generate powerful overtones, it can happen that over a wide range
notes are detected that you know perfectly well are far higher (or lower) than any you actually played.
In such cases, the ‘venetian blinds’ come in handy; if you can’t see these at the top or bottom of the
editing area, scroll upwards or downwards until you can. If you drag the thick horizontal line vertically,
you can alter the range within which Melodyne editor assigns notes. All notes partially concealed by
the venetian blinds are automatically deactivated unless they have previously been activated by hand.
You can still ‘reach through’ the venetian blinds, however, to turn notes on or off with a mouse click.
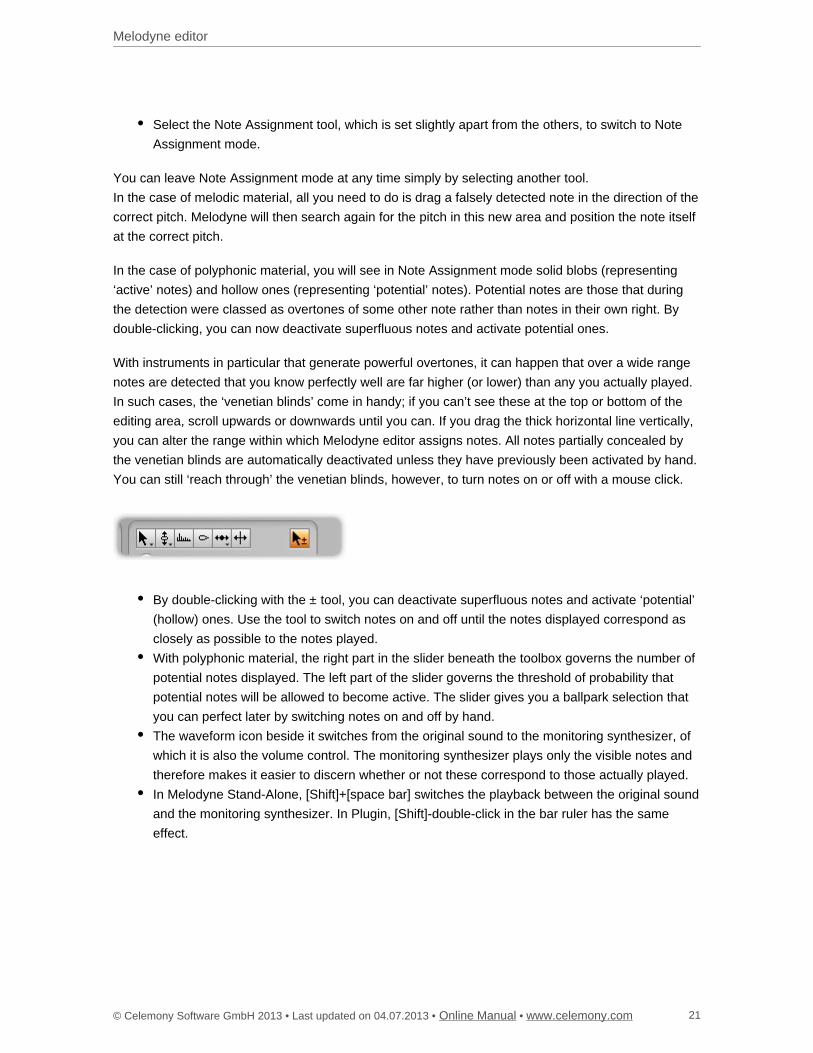
By double-clicking with the ± tool, you can deactivate superfluous notes and activate ‘potential’
(hollow) ones. Use the tool to switch notes on and off until the notes displayed correspond as
closely as possible to the notes played.
With polyphonic material, the right part in the slider beneath the toolbox governs the number of
potential notes displayed. The left part of the slider governs the threshold of probability that
potential notes will be allowed to become active. The slider gives you a ballpark selection that
you can perfect later by switching notes on and off by hand.
The waveform icon beside it switches from the original sound to the monitoring synthesizer, of
which it is also the volume control. The monitoring synthesizer plays only the visible notes and
therefore makes it easier to discern whether or not these correspond to those actually played.
In Melodyne Stand-Alone, [Shift]+[space bar] switches the playback between the original sound
and the monitoring synthesizer. In Plugin, [Shift]-double-click in the bar ruler has the same
effect.
Melodyne editor
© Celemony Software GmbH 2013 • Last updated on 04.07.2013 • • Online Manual www.celemony.com 22
Navigation, playback functions and cycle mode
All the detected tones are displayed as blobs in the editing area. The size of the editing area can be
altered and the blob display zoomed and scrolled.
To resize the window (also in Plugin), drag the bottom right corner
Hold down the [Command] key and drag the editing background to move the area displayed
Use the mouse wheel to scroll up and down or else (holding the [Shift] key) left and right
Press [Command]+[Alt] and drag in the editing area to zoom the display horizontally and/or
vertically
Press [Command]+[Alt] and use the mouse wheel to zoom both axes simultaneously
Press [Command] and double-click to zoom in on a blob or the current selection
Press [Command} and double-click in the editing background to zoom back
Drag the scrollers to move the display horizontally or vertically
Drag the ends of the slider to zoom horizontally or vertically
Pull one end of the horizontal or vertical slider as far as it will go and hold it to increase the size
of the section displayed (important in the plug-in e.g. when you have only transferred the first
four bars and wish to confine navigation to this area but wish to insert something at Bar 20)
Double-click the scrollers to zoom horizontally or vertically on all notes
The slider in the bottom right corner governs the size of the blob display
In Melodyne Stand-Alone, the usual transport keys are at the top left of the window. You can scrub
through the material in the bar ruler and start the playback by double-clicking on the bar ruler in the
desired place. The same is possible, provided the DAW is stopped, in Melodyne Plugin. It is not
possible to control the DAW’s playback functions from within Melodyne Plugin.
Playback functions in Melodyne Stand-Alone and Plugin (when the DAW is stopped):
Melodyne editor
© Celemony Software GmbH 2013 • Last updated on 04.07.2013 • • Online Manual www.celemony.com 23
Click in the bar ruler to position the playback cursor
Double-click in the bar ruler to start playback from the place where you click
[Alt]-double-click anywhere in the bar ruler to play back the current selection
With most DAWs, pressing the space bar stops the local Plugin playback
Use the arrow keys to select and play the next/previous blob or the blob above/below.
Click in the bar ruler to stop the playback and position the playback cursor
Click and drag in the bar ruler to begin scrubbing
Playback functions in Melodyne Stand-Alone:
[Space bar]: Play/Pause
[Alt]+[space bar]: Play the current selection
[Numeric keypad Enter]: Play
[Numeric keypad null] x 1: Stop
[Numeric keypad null] x 2: Return to previous start position
[Numeric keypad null] x 3: Return to the beginning of the file
Tempo box: Drag the old or type in a new value to alter the tempo and stretch the audio. You
can also type in percentage values in this box
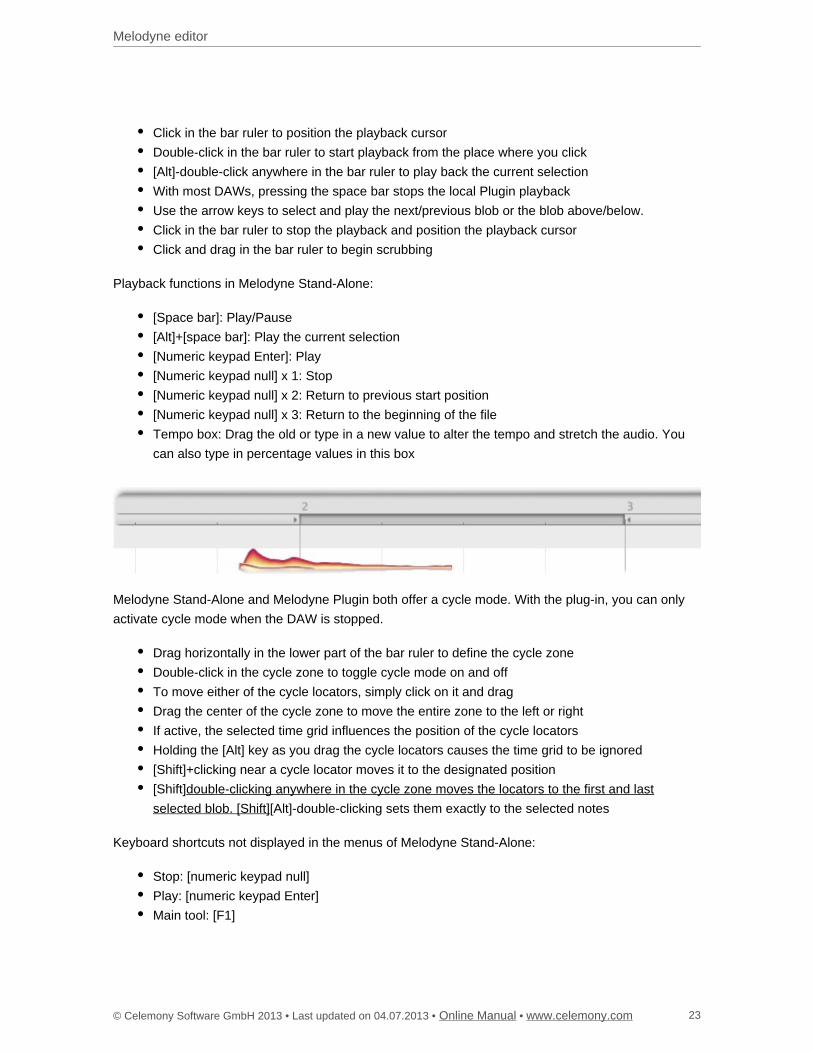
Melodyne Stand-Alone and Melodyne Plugin both offer a cycle mode. With the plug-in, you can only
activate cycle mode when the DAW is stopped.
Drag horizontally in the lower part of the bar ruler to define the cycle zone
Double-click in the cycle zone to toggle cycle mode on and off
To move either of the cycle locators, simply click on it and drag
Drag the center of the cycle zone to move the entire zone to the left or right
If active, the selected time grid influences the position of the cycle locators
Holding the [Alt] key as you drag the cycle locators causes the time grid to be ignored
[Shift]+clicking near a cycle locator moves it to the designated position
[Shift]double-clicking anywhere in the cycle zone moves the locators to the first and last
[Alt]-double-clicking sets them exactly to the selected notesselected blob. [Shift]
Keyboard shortcuts not displayed in the menus of Melodyne Stand-Alone:
Stop: [numeric keypad null]
Play: [numeric keypad Enter]
Main tool: [F1]

Melodyne editor
© Celemony Software GmbH 2013 • Last updated on 04.07.2013 • • Online Manual www.celemony.com 24
Pitch tool: [F2]
Formant tool: [F3]
Amplitude tool: [F4]
Time tool: [F5]
Note separation tool: [F6]
Open correct pitch macro: [Command] [P][Shift]
Open quantize time macro: [Command] [T][Shift]
Note selection and copying
Blobs in the editing area can be selected using all the standard techniques: clicking, [Shift]-clicking,
marquee/lasso/rubber-band selection, etc. In addition, the edit menu offers a sub-menu with a variety
of selection commands. To make a selection, use one of the following techniques:
Standard techniques such as clicking, [Shift]-clicking and lassoing to select and deselect notes
[Shift]-click and then drag the mouse to enter Snake Selection mode
Select notes by clicking or dragging in the pitch ruler; double-clicking selects notes with the
same name in all octaves rather than simply at the pitch clicked
In the pitch ruler also, you can [Shift]-click or [Shift]-drag to add or remove notes from the
selection
In the Edit menu, you will find the usual Select All command but also a sub-menu with special
selection commands
Melodyne allows you to cut, copy and paste blobs. If prior to pasting a blob (the ‘source’ blob) you
select another (the ‘target’ blob), when you paste, the former will replace the latter. If no blob is
selected at the time of pasting, the source blob will be pasted at the cursor position. If, however, the
blob was offset from the grid prior to copying, it will be offset from the playback cursor after pasting
and by the same amount; if you want the insert point and the cursor position to coincide exactly, set
the time grid to Seconds prior to pasting.
Macros and tools
The pitch and time correction macros (reached via the buttons in the top right corner) can be applied
to a selection. If no tones are selected, the macro in question operates on all the notes.
Manual editing is performed using the tools in the toolbox. The tools are in some cases
context-sensitive, offering different functions when moved over different parts of a blob. For finer
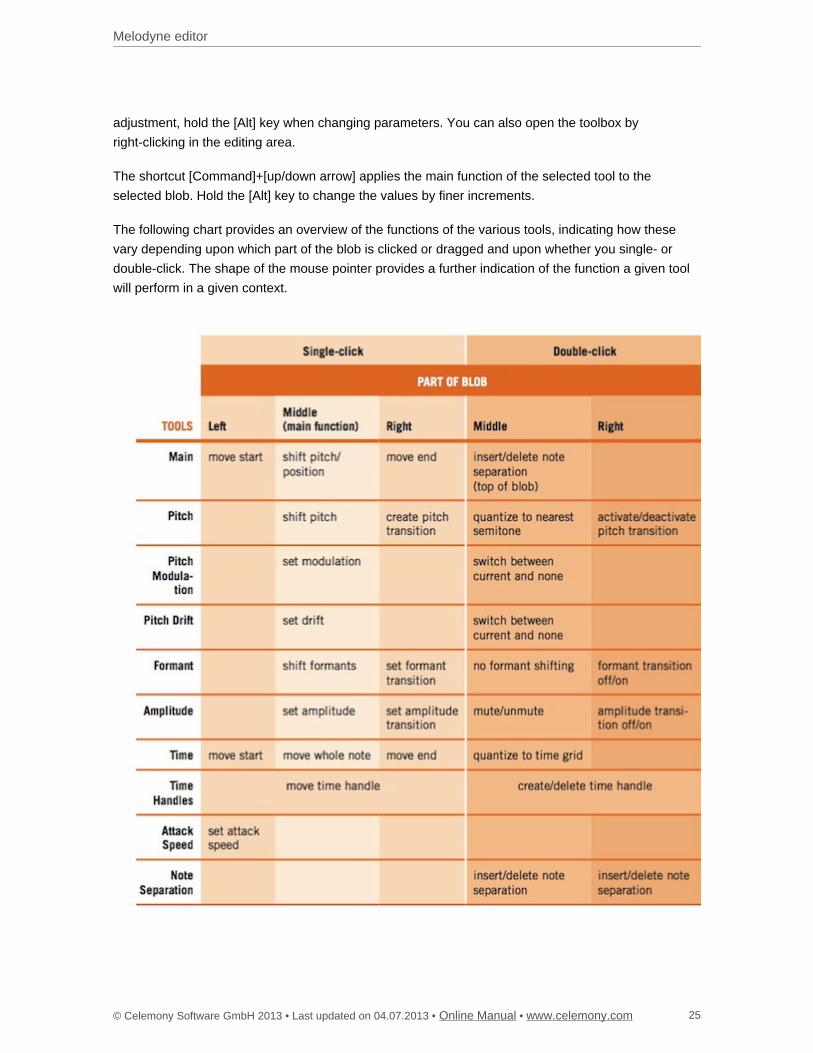
Melodyne editor
© Celemony Software GmbH 2013 • Last updated on 04.07.2013 • • Online Manual www.celemony.com 25
adjustment, hold the [Alt] key when changing parameters. You can also open the toolbox by
right-clicking in the editing area.
The shortcut [Command]+[up/down arrow] applies the main function of the selected tool to the
selected blob. Hold the [Alt] key to change the values by finer increments.
The following chart provides an overview of the functions of the various tools, indicating how these
vary depending upon which part of the blob is clicked or dragged and upon whether you single- or
double-click. The shape of the mouse pointer provides a further indication of the function a given tool
will perform in a given context.
Melodyne editor
© Celemony Software GmbH 2013 • Last updated on 04.07.2013 • • Online Manual www.celemony.com 26
The pitch grid and scale functions
In Melodyne, you can change the pitch of notes either continuously or in such a way that they snap to
a grid. If the snap function is active, notes can only be moved to pitches allowed by the grid. The grid
can be based on the chromatic scale, the scale of C Major or any other scale.
Melodyne offers you a wide choice of scales and a comprehensive set of functions for the editing and
creation of scales – which even include the ability using the scale detective to identify the scale used
in one recording and apply it to another.
All these functions and options are reached via the pitch ruler. They are organized in such a way that
you only ever see the parameters you actually need for a given task. Think of a drawer that can either
be pulled slightly open or else opened to its maximum extent.
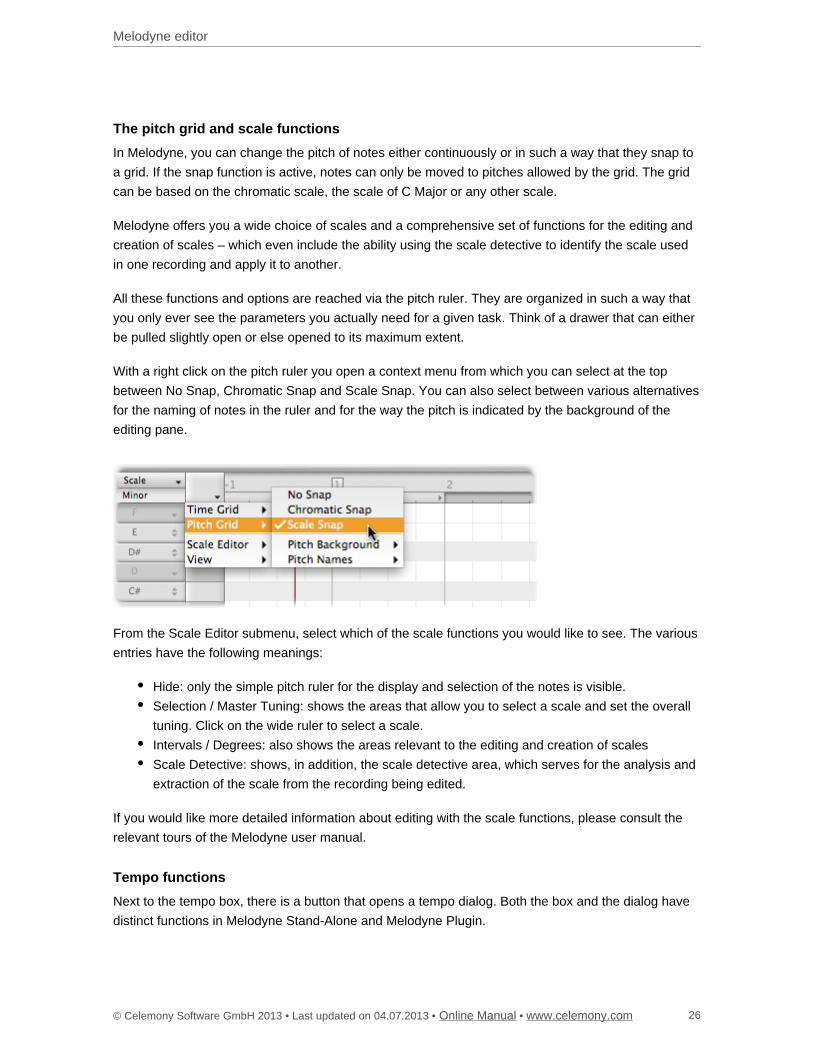
With a right click on the pitch ruler you open a context menu from which you can select at the top
between No Snap, Chromatic Snap and Scale Snap. You can also select between various alternatives
for the naming of notes in the ruler and for the way the pitch is indicated by the background of the
editing pane.
From the Scale Editor submenu, select which of the scale functions you would like to see. The various
entries have the following meanings:
Hide: only the simple pitch ruler for the display and selection of the notes is visible.
Selection / Master Tuning: shows the areas that allow you to select a scale and set the overall
tuning. Click on the wide ruler to select a scale.
Intervals / Degrees: also shows the areas relevant to the editing and creation of scales
Scale Detective: shows, in addition, the scale detective area, which serves for the analysis and
extraction of the scale from the recording being edited.
If you would like more detailed information about editing with the scale functions, please consult the
relevant tours of the Melodyne user manual.
Tempo functions
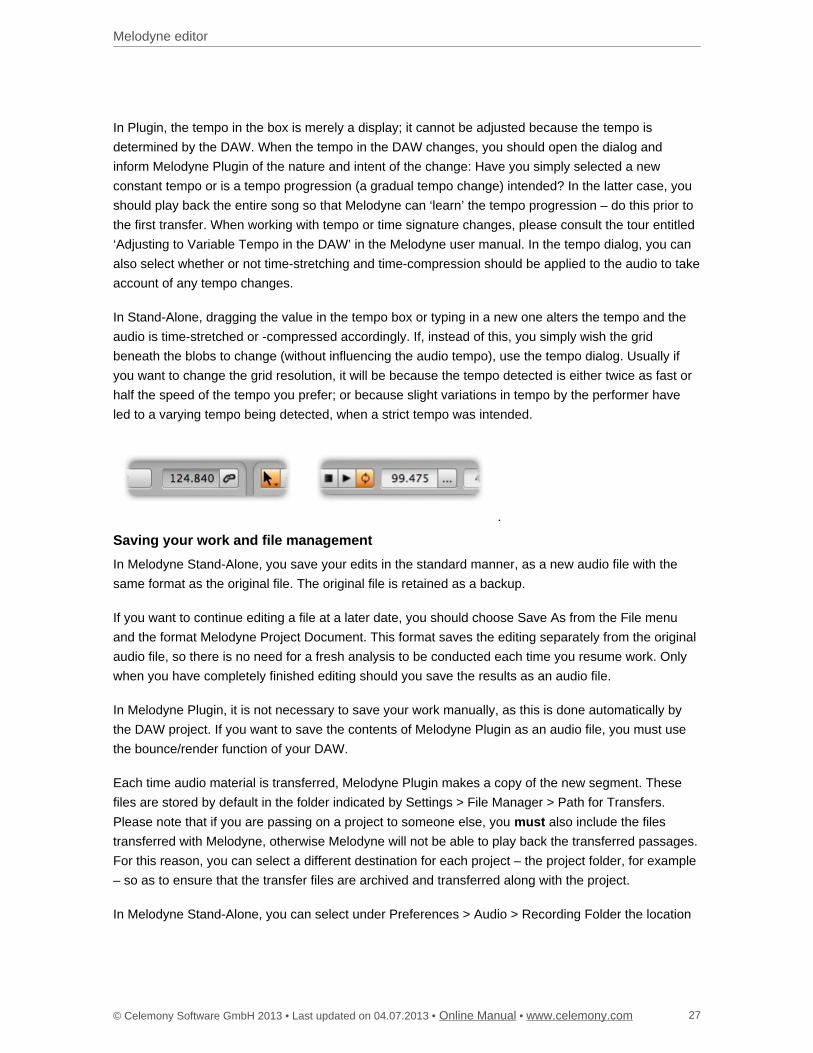
Next to the tempo box, there is a button that opens a tempo dialog. Both the box and the dialog have
distinct functions in Melodyne Stand-Alone and Melodyne Plugin.
Melodyne editor
© Celemony Software GmbH 2013 • Last updated on 04.07.2013 • • Online Manual www.celemony.com 27
In Plugin, the tempo in the box is merely a display; it cannot be adjusted because the tempo is
determined by the DAW. When the tempo in the DAW changes, you should open the dialog and
inform Melodyne Plugin of the nature and intent of the change: Have you simply selected a new
constant tempo or is a tempo progression (a gradual tempo change) intended? In the latter case, you
should play back the entire song so that Melodyne can ‘learn’ the tempo progression – do this prior to
the first transfer. When working with tempo or time signature changes, please consult the tour entitled
‘Adjusting to Variable Tempo in the DAW’ in the Melodyne user manual. In the tempo dialog, you can
also select whether or not time-stretching and time-compression should be applied to the audio to take
account of any tempo changes.
In Stand-Alone, dragging the value in the tempo box or typing in a new one alters the tempo and the
audio is time-stretched or -compressed accordingly. If, instead of this, you simply wish the grid
beneath the blobs to change (without influencing the audio tempo), use the tempo dialog. Usually if
you want to change the grid resolution, it will be because the tempo detected is either twice as fast or
half the speed of the tempo you prefer; or because slight variations in tempo by the performer have
led to a varying tempo being detected, when a strict tempo was intended.
Saving your work and file management
In Melodyne Stand-Alone, you save your edits in the standard manner, as a new audio file with the
same format as the original file. The original file is retained as a backup.
If you want to continue editing a file at a later date, you should choose Save As from the File menu
and the format Melodyne Project Document. This format saves the editing separately from the original
audio file, so there is no need for a fresh analysis to be conducted each time you resume work. Only
when you have completely finished editing should you save the results as an audio file.
In Melodyne Plugin, it is not necessary to save your work manually, as this is done automatically by
the DAW project. If you want to save the contents of Melodyne Plugin as an audio file, you must use
the bounce/render function of your DAW.
Each time audio material is transferred, Melodyne Plugin makes a copy of the new segment. These
files are stored by default in the folder indicated by Settings > File Manager > Path for Transfers.
Please note that if you are passing on a project to someone else, you also include the filesmust
transferred with Melodyne, otherwise Melodyne will not be able to play back the transferred passages.
For this reason, you can select a different destination for each project – the project folder, for example
– so as to ensure that the transfer files are archived and transferred along with the project.
In Melodyne Stand-Alone, you can select under Preferences > Audio > Recording Folder the location
Melodyne editor
© Celemony Software GmbH 2013 • Last updated on 04.07.2013 • • Online Manual www.celemony.com 28
in which the recordings created by Melodyne Stand-Alone are stored temporarily.
Related topics
Welcome!
Installation and Activation
Melodyne editor
© Celemony Software GmbH 2013 • Last updated on 04.07.2013 • • Online Manual www.celemony.com 29
Melodyne condensed : the interface in a nutshell
Keyboard shortcuts allow you to work more swiftly by eliminating mouse movements. Furthermore,
holding down particular keys whilst working with the mouse often gives you access to additional
options. You will find all such techniques listed here – as well as all the most important operations you
can perform in Melodyne with a click or double-click.
Note: where we refer here to the ‘COMMAND’ key, we mean the command or Apple key on the Mac
and the Ctrl key on the PC.
General program functions
Here you will find the keyboard and mouse commands for basic Melodyne functions
Open context menu for blobs and various other objects
in the user interfaceRight-click on object
Select all COMMAND+A
Delete selection DELETE (PC) BACKSPACE (Mac)
Cut selection COMMAND+X
Copy selection COMMAND+C
Paste selection COMMAND+V
Undo COMMAND+Z
RedoCOMMAND+SHIFT+Z, under Windows
also COMMAND+Y
Make fine adjustments with tools or value fields ALT-drag
Select value in inspector Double-click value
Select entire entry in inspector Triple-click in inspector
Additional program functions (Stand-Alone only)
The following addiitonal commands are only available in the stand-alone implementation of Melodyne.
New document COMMAND+N
Open document COMMAND+O
Save document COMMAND+S
Save document as COMMAND+SHIFT+S
Close document COMMAND+W
Scroll the display automatically during playback COMMAND+ALT+F
Melodyne editor
© Celemony Software GmbH 2013 • Last updated on 04.07.2013 • • Online Manual www.celemony.com 30
Activate/deactivate time grid COMMAND+ALT+T
Open ‘correct pitch’ macro COMMAND+SHIFT+P
Open ‘quantize time’ macro COMMAND+SHIFT+T
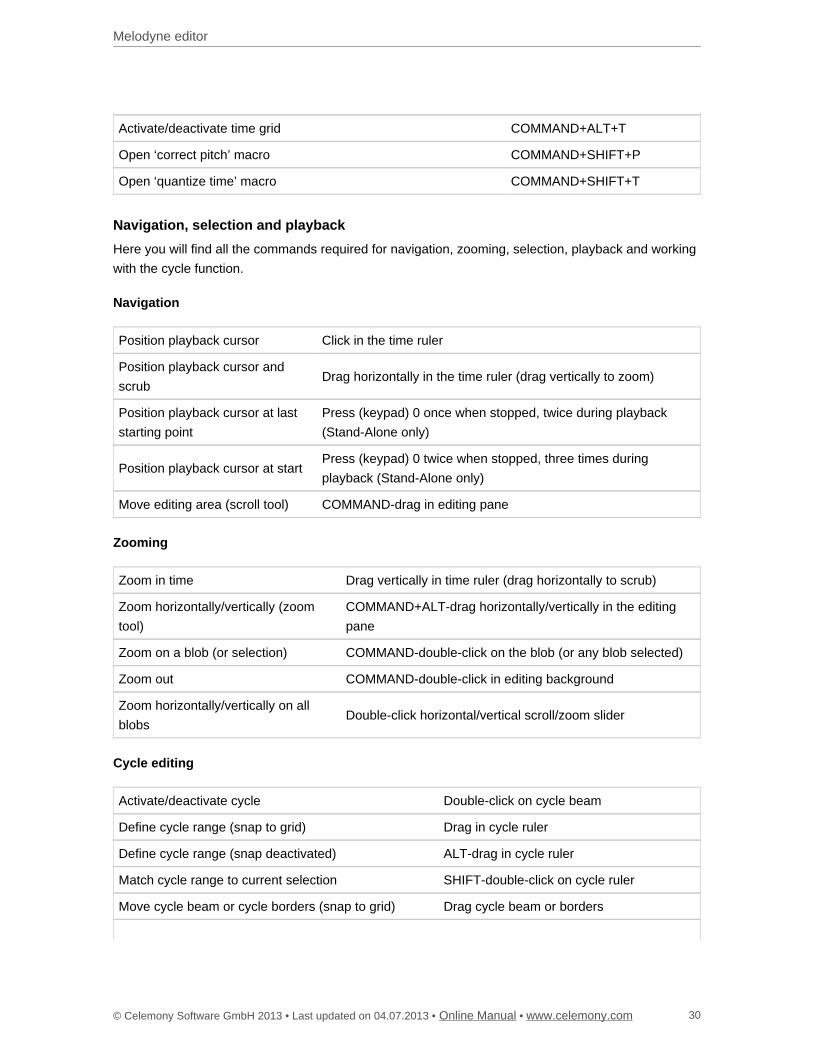
Navigation, selection and playback
Here you will find all the commands required for navigation, zooming, selection, playback and working
with the cycle function.
Navigation
Position playback cursor Click in the time ruler
Position playback cursor and
scrubDrag horizontally in the time ruler (drag vertically to zoom)
Position playback cursor at last
starting point
Press (keypad) 0 once when stopped, twice during playback
(Stand-Alone only)
Position playback cursor at startPress (keypad) 0 twice when stopped, three times during
playback (Stand-Alone only)
Move editing area (scroll tool) COMMAND-drag in editing pane
Zooming
Zoom in time Drag vertically in time ruler (drag horizontally to scrub)
Zoom horizontally/vertically (zoom
tool)
COMMAND+ALT-drag horizontally/vertically in the editing
pane
Zoom on a blob (or selection) COMMAND-double-click on the blob (or any blob selected)
Zoom out COMMAND-double-click in editing background
Zoom horizontally/vertically on all
blobsDouble-click horizontal/vertical scroll/zoom slider
Cycle editing
Activate/deactivate cycle Double-click on cycle beam
Define cycle range (snap to grid) Drag in cycle ruler
Define cycle range (snap deactivated) ALT-drag in cycle ruler
Match cycle range to current selection SHIFT-double-click on cycle ruler
Move cycle beam or cycle borders (snap to grid) Drag cycle beam or borders
Melodyne editor
© Celemony Software GmbH 2013 • Last updated on 04.07.2013 • • Online Manual www.celemony.com 31
Move cycle beam or cycle borders (snap deactivated) ALT-drag cycle beam or borders
Reposition cycle border SHIFT-click near border in cycle ruler
Reposition cycle border (snap deactivated) SHIFT+ALT-click near border in cycle ruler
Selection
Select blob Click on blob
Add/remove blob(s) to/from selectionSHIFT-click on blob(s) or use
lasso
Add/remove notes to/from selection using the pitch ruler (only
within cycle range when cycling)
SHIFT-click or drag in the pitch
ruler
Add/remove notes (in all octaves) to/from selection using the
pitch ruler (only within cycle range when cycling)SHIFT-double-click
Select adjacent blob ARROW KEYS
Add adjacent blob to selection SHIFT+ARROW KEYS
Snake selectionSHIFT-click on a blob and drag to
others
Rotate and select hidden blobsCOMMAND+SHIFT+R (Melodyne
editor Stand-Alone only)
Select all COMMAND+A
Playback (Plugin)
In the plug-in implementation of Melodyne, you can begin playback independently of the DAW in order
to hear only Melodyne. This is only possible when playback in the DAW is stopped. We call it ‘local
playback’.
Start local playback Double-click on time ruler with playback in the DAW stopped
Start local playback (selected notes
only)
ALT-double-click on time ruler with playback in the DAW
stopped
Stop local playback SPACE or click on time ruler
To facilitate editing in note assignment mode, you can opt to hear the notes played back by a
synthesizer, or switch back and forth between the synthesized and original sounds.
Toggle between synthensizer and original sound in note assignment
mode
SHIFT-double-click on time
ruler
Playback (Stand-Alone)
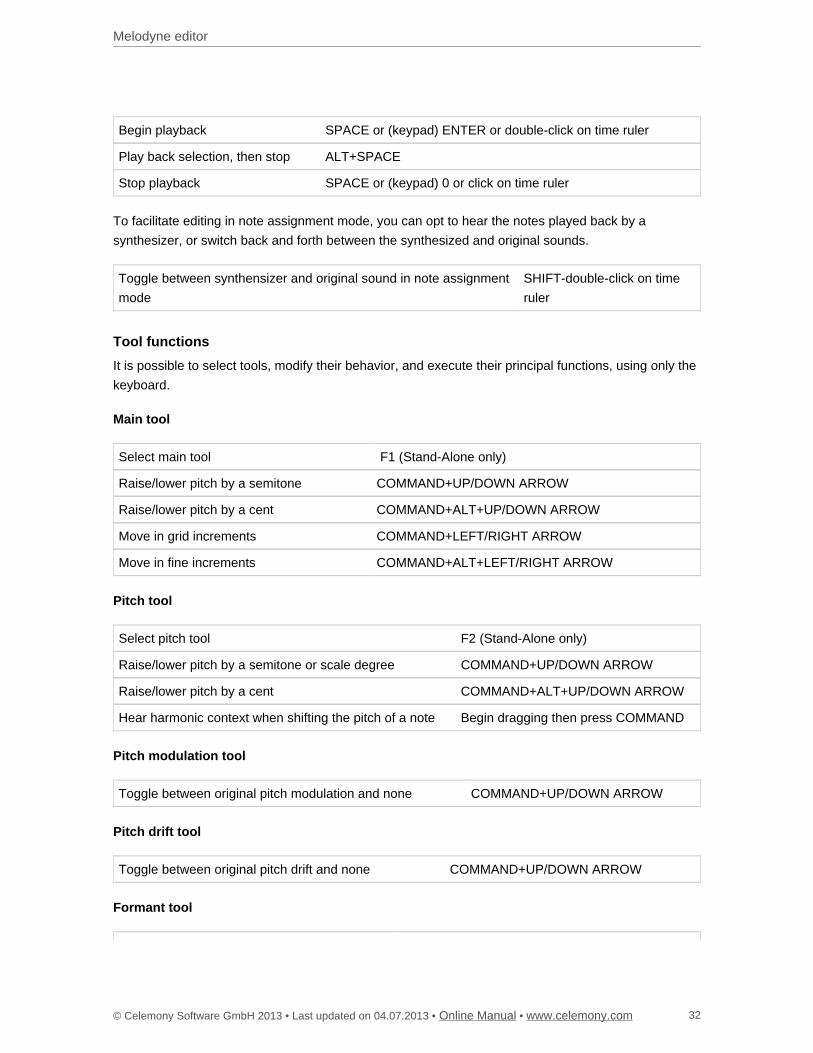
Melodyne editor
© Celemony Software GmbH 2013 • Last updated on 04.07.2013 • • Online Manual www.celemony.com 32
Begin playback SPACE or (keypad) ENTER or double-click on time ruler
Play back selection, then stop ALT+SPACE
Stop playback SPACE or (keypad) 0 or click on time ruler
To facilitate editing in note assignment mode, you can opt to hear the notes played back by a
synthesizer, or switch back and forth between the synthesized and original sounds.
Toggle between synthensizer and original sound in note assignment
mode
SHIFT-double-click on time
ruler
Tool functions
It is possible to select tools, modify their behavior, and execute their principal functions, using only the
keyboard.
Main tool
Select main tool F1 (Stand-Alone only)
Raise/lower pitch by a semitone COMMAND+UP/DOWN ARROW
Raise/lower pitch by a cent COMMAND+ALT+UP/DOWN ARROW
Move in grid increments COMMAND+LEFT/RIGHT ARROW
Move in fine increments COMMAND+ALT+LEFT/RIGHT ARROW
Pitch tool
Select pitch tool F2 (Stand-Alone only)
Raise/lower pitch by a semitone or scale degree COMMAND+UP/DOWN ARROW
Raise/lower pitch by a cent COMMAND+ALT+UP/DOWN ARROW
Hear harmonic context when shifting the pitch of a note Begin dragging then press COMMAND
Pitch modulation tool
Toggle between original pitch modulation and none COMMAND+UP/DOWN ARROW
Pitch drift tool
Toggle between original pitch drift and none COMMAND+UP/DOWN ARROW
Formant tool
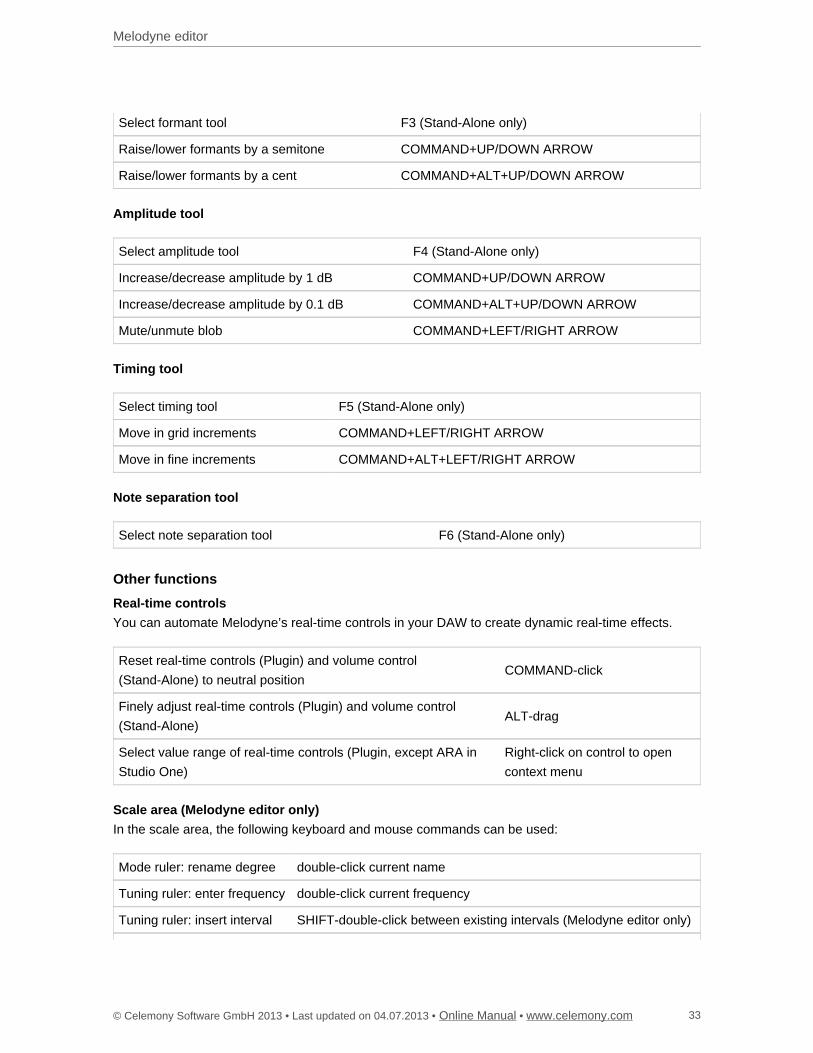
Melodyne editor
© Celemony Software GmbH 2013 • Last updated on 04.07.2013 • • Online Manual www.celemony.com 33
Select formant tool F3 (Stand-Alone only)
Raise/lower formants by a semitone COMMAND+UP/DOWN ARROW
Raise/lower formants by a cent COMMAND+ALT+UP/DOWN ARROW
Amplitude tool
Select amplitude tool F4 (Stand-Alone only)
Increase/decrease amplitude by 1 dB COMMAND+UP/DOWN ARROW
Increase/decrease amplitude by 0.1 dB COMMAND+ALT+UP/DOWN ARROW
Mute/unmute blob COMMAND+LEFT/RIGHT ARROW
Timing tool
Select timing tool F5 (Stand-Alone only)
Move in grid increments COMMAND+LEFT/RIGHT ARROW
Move in fine increments COMMAND+ALT+LEFT/RIGHT ARROW
Note separation tool
Select note separation tool F6 (Stand-Alone only)
Other functions
Real-time controls
You can automate Melodyne’s real-time controls in your DAW to create dynamic real-time effects.
Reset real-time controls (Plugin) and volume control
(Stand-Alone) to neutral positionCOMMAND-click
Finely adjust real-time controls (Plugin) and volume control
(Stand-Alone)ALT-drag
Select value range of real-time controls (Plugin, except ARA in
Studio One)
Right-click on control to open
context menu
Scale area (Melodyne editor only)
In the scale area, the following keyboard and mouse commands can be used:
Mode ruler: rename degree double-click current name
Tuning ruler: enter frequency double-click current frequency
Tuning ruler: insert interval SHIFT-double-click between existing intervals (Melodyne editor only)

Melodyne editor
© Celemony Software GmbH 2013 • Last updated on 04.07.2013 • • Online Manual www.celemony.com 34
Tuning ruler: remove interval SHIFT-double-click on unwanted interval (Melodyne editor only)
Related topics
Preferences
Installation and Activation
Quick Start Guide
Strategies for optimizing performance and stability
Melodyne editor
© Celemony Software GmbH 2013 • Last updated on 04.07.2013 • • Online Manual www.celemony.com 35
Strategies for optimizing performance and stability
Melodyne offers unique possibilities at the very frontiers of what is technically possible, but it does
make certain demands on your computer in return. These can prove particularly exacting when you
have multiple instances of Melodyne and other processor-intensive plug-ins loaded into your DAW at
the same time. Knowing how to make the most of the resources available at such times is of crucial
importance to the smooth operation and stability of the overall system. In this tour, therefore, we will
show you how to get the best out of Melodyne and your working environment.
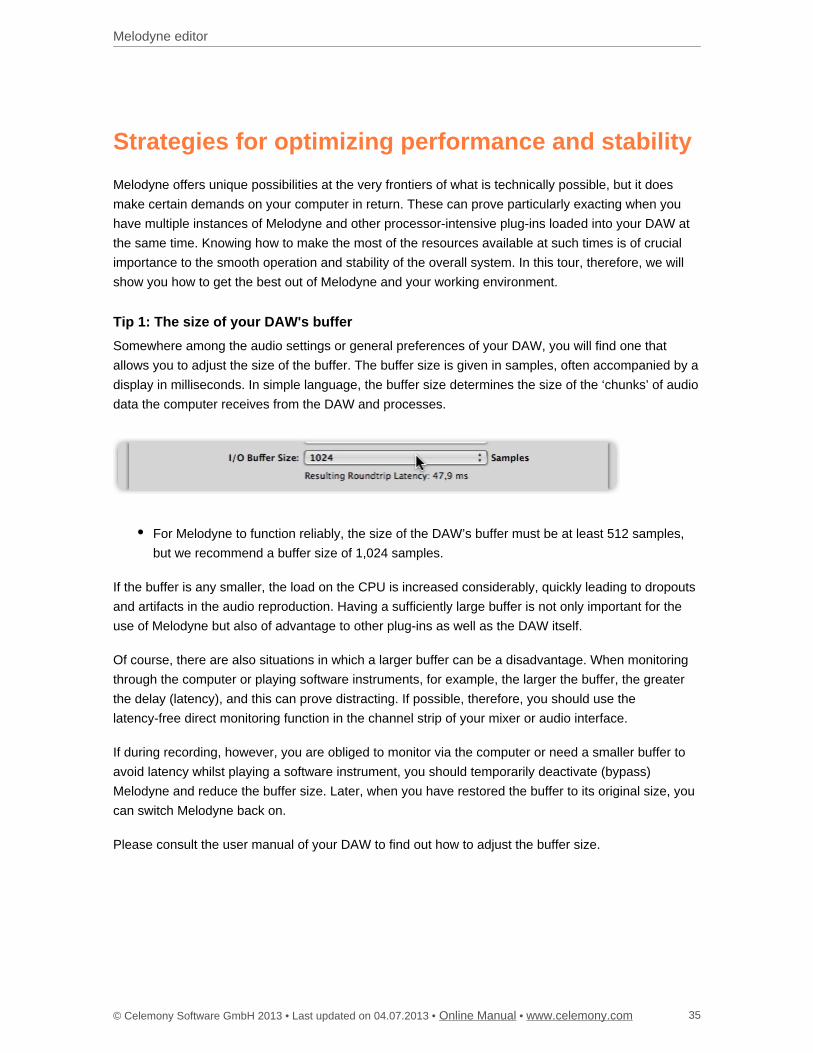
Tip 1: The size of your DAW's buffer
Somewhere among the audio settings or general preferences of your DAW, you will find one that
allows you to adjust the size of the buffer. The buffer size is given in samples, often accompanied by a
display in milliseconds. In simple language, the buffer size determines the size of the ‘chunks’ of audio
data the computer receives from the DAW and processes.
For Melodyne to function reliably, the size of the DAW’s buffer must be at least 512 samples,
but we recommend a buffer size of 1,024 samples.
If the buffer is any smaller, the load on the CPU is increased considerably, quickly leading to dropouts
and artifacts in the audio reproduction. Having a sufficiently large buffer is not only important for the
use of Melodyne but also of advantage to other plug-ins as well as the DAW itself.
Of course, there are also situations in which a larger buffer can be a disadvantage. When monitoring
through the computer or playing software instruments, for example, the larger the buffer, the greater
the delay (latency), and this can prove distracting. If possible, therefore, you should use the
latency-free direct monitoring function in the channel strip of your mixer or audio interface.
If during recording, however, you are obliged to monitor via the computer or need a smaller buffer to
avoid latency whilst playing a software instrument, you should temporarily deactivate (bypass)
Melodyne and reduce the buffer size. Later, when you have restored the buffer to its original size, you
can switch Melodyne back on.
Please consult the user manual of your DAW to find out how to adjust the buffer size.
Melodyne editor
© Celemony Software GmbH 2013 • Last updated on 04.07.2013 • • Online Manual www.celemony.com 36
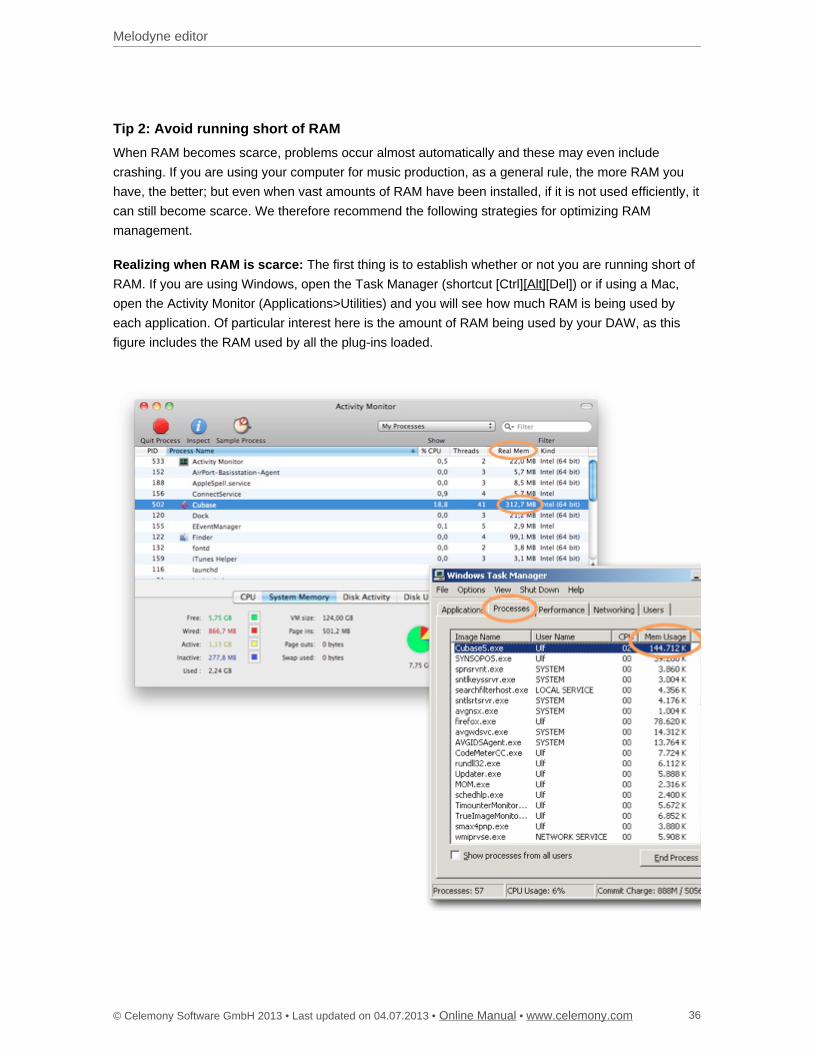
Tip 2: Avoid running short of RAM
When RAM becomes scarce, problems occur almost automatically and these may even include
crashing. If you are using your computer for music production, as a general rule, the more RAM you
have, the better; but even when vast amounts of RAM have been installed, if it is not used efficiently, it
can still become scarce. We therefore recommend the following strategies for optimizing RAM
management.
Realizing when RAM is scarce: The first thing is to establish whether or not you are running short of
RAM. If you are using Windows, open the Task Manager (shortcut [Ctrl] [Del]) or if using a Mac,[Alt]
open the Activity Monitor (Applications>Utilities) and you will see how much RAM is being used by
each application. Of particular interest here is the amount of RAM being used by your DAW, as this
figure includes the RAM used by all the plug-ins loaded.
Melodyne editor
© Celemony Software GmbH 2013 • Last updated on 04.07.2013 • • Online Manual www.celemony.com 37
When it comes to RAM use, there is an important difference between 32-bit and 64-bit DAWs: 32-bit
DAWs are only capable of addressing 2 GB of RAM, even if the computer itself contains considerably
more. As soon as the RAM requirements of a 32-bit DAW begin to approach this 2 GB limit, the
application will become unstable and malfunctions inevitable. In this case, you should use the
measures outlined below to reduce your RAM requirements. With a 64-bit DAW, of course, you can
use considerably more RAM, but here, too, shortages can occur, if the DAW claims virtually all the
RAM that is physically available. In either case, the following measures are recommended.
Only transfer the passages you need to edit: Each passage transferred to Melodyne claims a
certain amount of RAM. For this reason, you should only transfer to Melodyne the passages you really
intend to edit. If, for example, you only want to edit the vocals during the refrain (chorus), transfer the
refrain only to Melodyne and not the verse as well.
In this way, you can prevent Melodyne claiming RAM it doesn’t need. This does not mean, of course,
that you cannot transfer longer passages to Melodyne when you need to edit them. Only that you
should not do so unless it is necessary. If you are aware of the problem and adopt the measures we
recommend to avoid wasting RAM, when you do need to edit longer passages, you will be able to do
so without experiencing the instability associated with RAM shortage.
Transfer one track at a time: Admittedly you can save time by selecting multiple tracks for transfer
and transferring them all in one go, but such a procedure requires considerably more RAM than the
track-by-track method. By transferring your material one track at a time, you can avoid the spikes in
demand that are inevitable when Melodyne has to analyze (or ‘detect’) multiple tracks simultaneously.
Reduce the maximum number of undo steps: Melodyne allows you to undo up to 100 editing steps.
However, managing the undo history also requires memory – and the more undo steps are stored
there, the greater the memory requirement. Each possible undo step therefore costs memory, and
does so in all instances of Melodyne plugin. For this reason, since version 2.1 of Melodyne editor,
assistant and essential, it has been possible to reduce the maximum number of undo steps and with it
the amount of RAM needed by the undo function. By default, the parameter is set to 25. Reduce this
value if you find memory running short or decide you really don’t need that many undo steps.
Bounce tracks: All tracks containing instances of Melodyne and also all tracks containing software
samplers consume RAM, and this is reflected in the overall amount of RAM used by your DAW. By
bouncing Melodyne and/or sampler tracks you’ve finished working on, you can make more efficient
use of the RAM available.
Melodyne editor
© Celemony Software GmbH 2013 • Last updated on 04.07.2013 • • Online Manual www.celemony.com 38
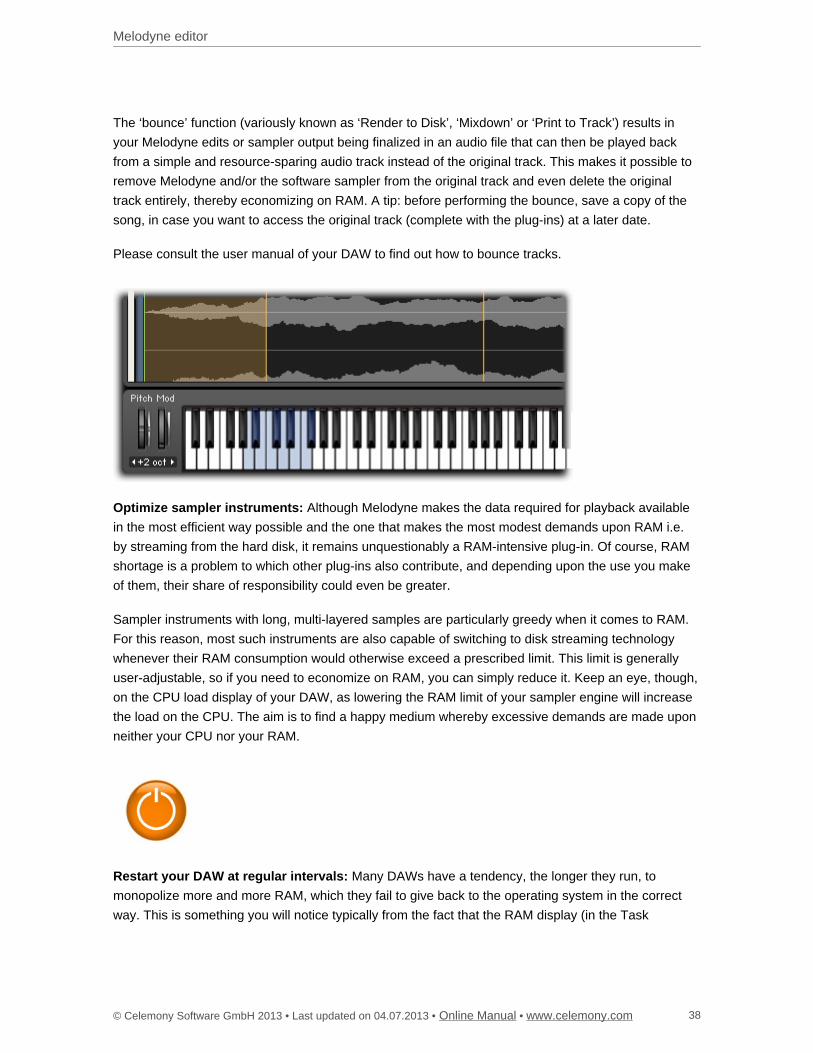
The ‘bounce’ function (variously known as ‘Render to Disk’, ‘Mixdown’ or ‘Print to Track’) results in
your Melodyne edits or sampler output being finalized in an audio file that can then be played back
from a simple and resource-sparing audio track instead of the original track. This makes it possible to
remove Melodyne and/or the software sampler from the original track and even delete the original
track entirely, thereby economizing on RAM. A tip: before performing the bounce, save a copy of the
song, in case you want to access the original track (complete with the plug-ins) at a later date.
Please consult the user manual of your DAW to find out how to bounce tracks.
Optimize sampler instruments: Although Melodyne makes the data required for playback available
in the most efficient way possible and the one that makes the most modest demands upon RAM i.e.
by streaming from the hard disk, it remains unquestionably a RAM-intensive plug-in. Of course, RAM
shortage is a problem to which other plug-ins also contribute, and depending upon the use you make
of them, their share of responsibility could even be greater.
Sampler instruments with long, multi-layered samples are particularly greedy when it comes to RAM.
For this reason, most such instruments are also capable of switching to disk streaming technology
whenever their RAM consumption would otherwise exceed a prescribed limit. This limit is generally
user-adjustable, so if you need to economize on RAM, you can simply reduce it. Keep an eye, though,
on the CPU load display of your DAW, as lowering the RAM limit of your sampler engine will increase
the load on the CPU. The aim is to find a happy medium whereby excessive demands are made upon
neither your CPU nor your RAM.
Restart your DAW at regular intervals: Many DAWs have a tendency, the longer they run, to
monopolize more and more RAM, which they fail to give back to the operating system in the correct
way. This is something you will notice typically from the fact that the RAM display (in the Task

Melodyne editor
© Celemony Software GmbH 2013 • Last updated on 04.07.2013 • • Online Manual www.celemony.com 39
Manager under Windows or the Activity Monitor on the Mac) will show less and less free RAM
available even though you haven’t performed any additional editing in Melodyne or added new
sampler instruments. Restarting your DAW at regular intervals, you will find, works wonders in such
cases. As a rule of thumb, we recommend the following: each time you leave off editing one (fairly
long) track with Melodyne, before you begin work on the next, you should save the song and restart
your DAW. Only then should you perform the next transfer and resume editing.
Reboot your computer: It is less often necessary but can still do no harm to reboot your computer
from time to time, thereby defragmenting the RAM. Severely fragmented RAM can sometimes be
responsible for your DAW becoming unstable — even when, at first sight, the level of RAM
consumption is far from critical. Even though the total quantity of RAM available may seem sufficient, if
it is fragmented (i.e. if no large blocks are available but only a multitude of fragments scattered all over
the place), hiccups can be experienced in the communication between the operating system and the
DAW or between the DAW and the plug-in. You can solve such problems at a stroke simply by
rebooting the computer.
Tip 3: The correct DAW settings
We try to ensure Melodyne functions flawlessly in as many DAWs as possible. Each DAW, however,
has its own specific characteristics and setting options that can influence the operation of Melodyne.
The number of so-called ‘render threads’, for example, can have a direct influence on Melodyne and it
can be useful to reduce these progressively to see whether any problems you are experiencing can be
eliminated in that way.
We have documented a variety of points such as these that can affect the operation of Melodyne in
the various DAWs we have tested. You will find the relevant information on the onCompatibility page
our web site
Tip 4: Always use the latest version of Melodyne
We are constantly improving our products through regular updates. It may be that you are
experiencing a problem that has been eliminated in the latest version. We therefore recommend you
to use at all times the latest version of the software. You can easily discover whether a newer version
is available using the ‘Check for Updates’ function on the Settings tab of the Preferences property
sheet of Melodyne editor, assistant and essential or, in the case of Melodyne studio, in the Help menu.
If a newer version does exist, you can then download it immediately.
Melodyne editor
© Celemony Software GmbH 2013 • Last updated on 04.07.2013 • • Online Manual www.celemony.com 40
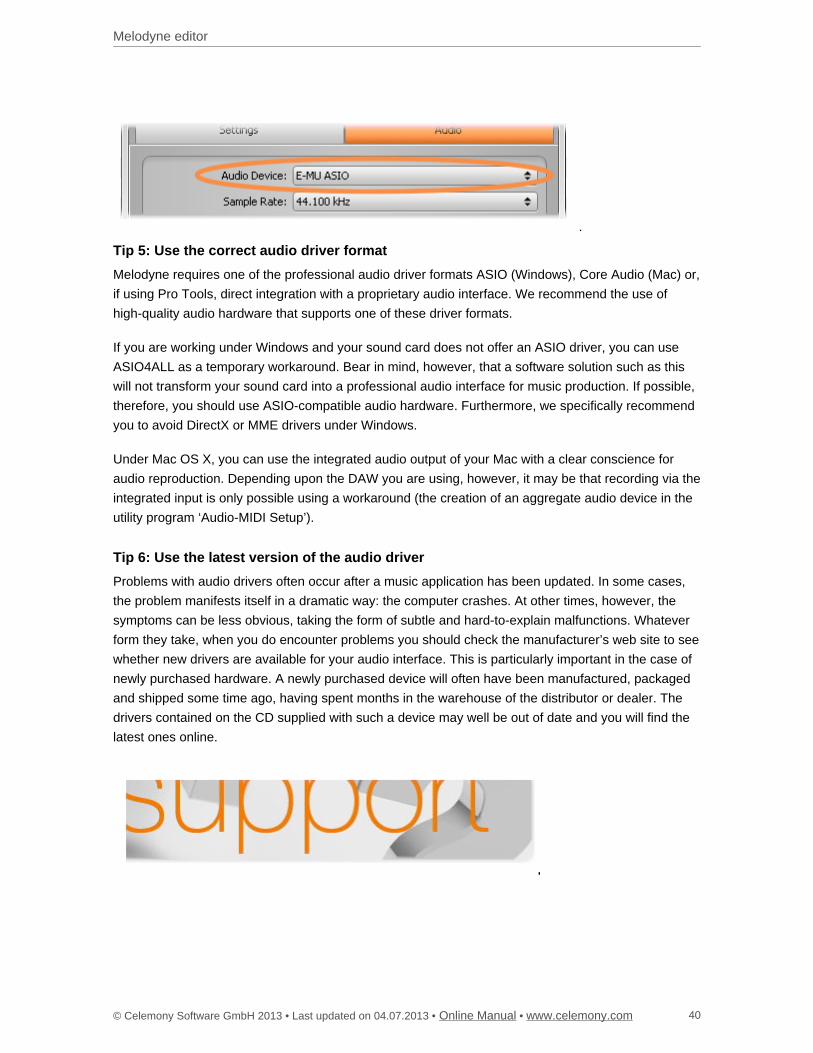
Tip 5: Use the correct audio driver format
Melodyne requires one of the professional audio driver formats ASIO (Windows), Core Audio (Mac) or,
if using Pro Tools, direct integration with a proprietary audio interface. We recommend the use of
high-quality audio hardware that supports one of these driver formats.
If you are working under Windows and your sound card does not offer an ASIO driver, you can use
ASIO4ALL as a temporary workaround. Bear in mind, however, that a software solution such as this
will not transform your sound card into a professional audio interface for music production. If possible,
therefore, you should use ASIO-compatible audio hardware. Furthermore, we specifically recommend
you to avoid DirectX or MME drivers under Windows.
Under Mac OS X, you can use the integrated audio output of your Mac with a clear conscience for
audio reproduction. Depending upon the DAW you are using, however, it may be that recording via the
integrated input is only possible using a workaround (the creation of an aggregate audio device in the
utility program ‘Audio-MIDI Setup’).
Tip 6: Use the latest version of the audio driver
Problems with audio drivers often occur after a music application has been updated. In some cases,
the problem manifests itself in a dramatic way: the computer crashes. At other times, however, the
symptoms can be less obvious, taking the form of subtle and hard-to-explain malfunctions. Whatever
form they take, when you do encounter problems you should check the manufacturer’s web site to see
whether new drivers are available for your audio interface. This is particularly important in the case of
newly purchased hardware. A newly purchased device will often have been manufactured, packaged
and shipped some time ago, having spent months in the warehouse of the distributor or dealer. The
drivers contained on the CD supplied with such a device may well be out of date and you will find the
latest ones online.
Melodyne editor
© Celemony Software GmbH 2013 • Last updated on 04.07.2013 • • Online Manual www.celemony.com 41
If our tips are of no help
If you encounter problems when using Melodyne and the troubleshooting techniques outlined here fail
to help, please send an e-mail to our support team: [email protected]
Related topics
Managing audio files and assigning missing files
Transferring audio material to Melodyne Plugin
Installation and Activation
Melodyne editor
© Celemony Software GmbH 2013 • Last updated on 04.07.2013 • • Online Manual www.celemony.com 42
Preferences
This tour looks at Melodyne’s preferences property sheet, which governs fundamental aspects of the
way the program operates.
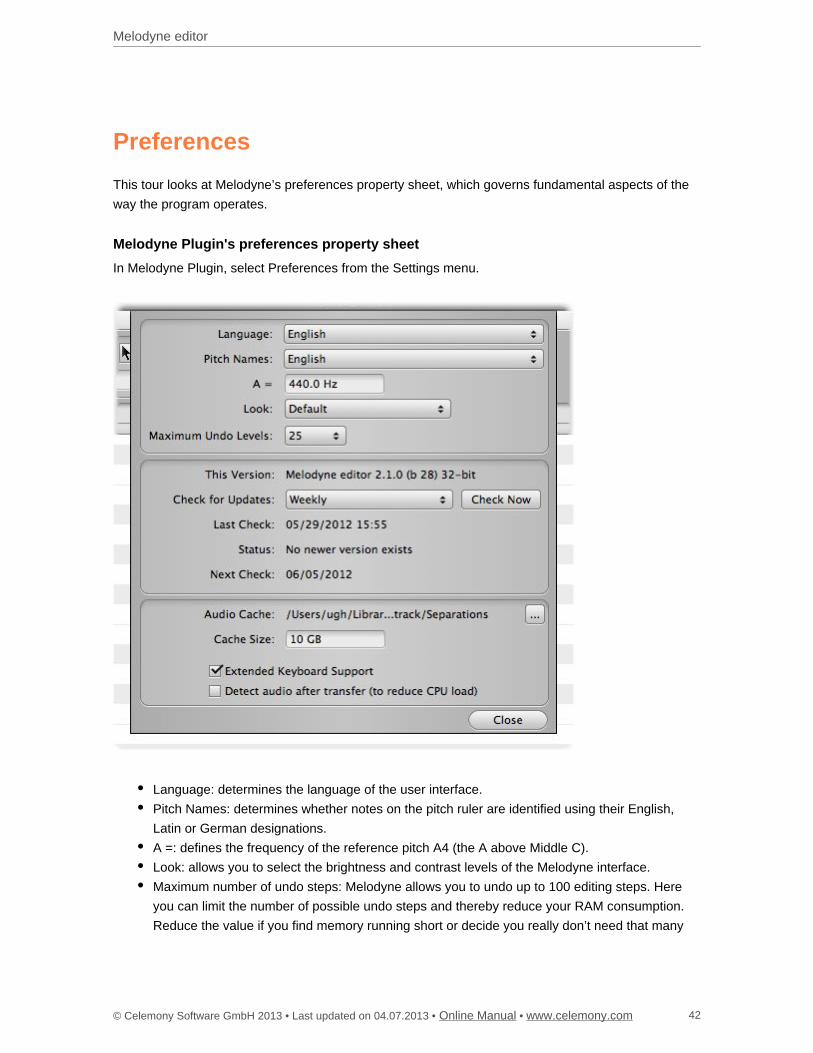
Melodyne Plugin's preferences property sheet
In Melodyne Plugin, select Preferences from the Settings menu.
Language: determines the language of the user interface.
Pitch Names: determines whether notes on the pitch ruler are identified using their English,
Latin or German designations.
A =: defines the frequency of the reference pitch A4 (the A above Middle C).
Look: allows you to select the brightness and contrast levels of the Melodyne interface.
Maximum number of undo steps: Melodyne allows you to undo up to 100 editing steps. Here
you can limit the number of possible undo steps and thereby reduce your RAM consumption.
Reduce the value if you find memory running short or decide you really don’t need that many
Melodyne editor
© Celemony Software GmbH 2013 • Last updated on 04.07.2013 • • Online Manual www.celemony.com 43
undo steps.
The entries in the following pane are designed to help you keep your software up to date. As
well as specifying how often Melodyne should check with the server to see whether a newer
version of the program is available, you can instruct Melodyne to perform an immediate check.
The version currently installed is also displayed.
Audio Cache: sets the path on your hard disk of the audio buffer required by Melodyne editor
when working with polyphonic material.
Cache Size: determines the maximum size of the audio buffer.
Extended Keyboard Support: activate this option to use keyboard shortcuts (undo, select all,
copy, paste, arrow keys etc.) within Plugin. How well these function depends upon the DAW
you are using; clear the option if you find Melodyne’s keyboard shortcuts are entering into
conflict with your DAW.
Detect audio after transfer: if you check this option the analysis of the audio material only
begins when the transfer has been completed, thereby considerably reducing the load on the
computer. Activate this option, therefore, on less powerful computers if during the transfer
bottlenecks occur (indicated by clicks, dropouts, extreme slowing-down etc.).
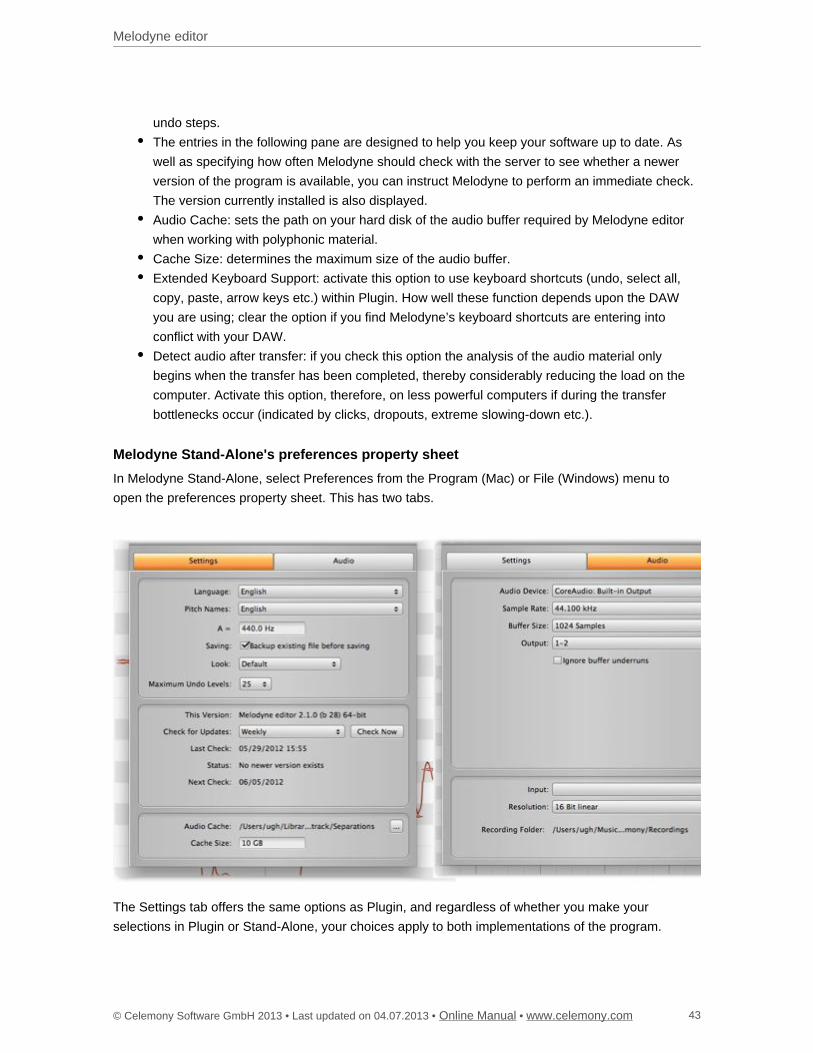
Melodyne Stand-Alone's preferences property sheet
In Melodyne Stand-Alone, select Preferences from the Program (Mac) or File (Windows) menu to
open the preferences property sheet. This has two tabs.
The Settings tab offers the same options as Plugin, and regardless of whether you make your
selections in Plugin or Stand-Alone, your choices apply to both implementations of the program.
Melodyne editor
© Celemony Software GmbH 2013 • Last updated on 04.07.2013 • • Online Manual www.celemony.com 44
An additional feature here, however, is the Saving check box: if the option is selected, before saving
the audio file you have just been editing, Melodyne copies the original file, appending ‘backup’ to its
file name. This will allow you to revert to the original later, should you so desire. Clear the check box if
this feature is of no interest to you.
The Audio tab contains the following additional options:
Upper pane
Audio Device: allows you to select an audio driver or the audio hardware driven by it.
Sample Rate: determines the sample rate used by Melodyne.
Buffer Size: determines the size of the buffer used for audio editing. The smaller the value, the
lower the latency but the greater the load on the CPU.
Output: allows you to select the output of the audio hardware used by Melodyne Stand-Alone in
case your hardware offers multiple outputs.
Ignore buffer underruns: if Melodyne Stand-Alone is running on a slow computer where the
possibility of an overload (and an ensuing click or dropout) exists, by checking this box, you
inform Melodyne that you consider the former to be the lesser of the two evils – the point being
that audio hardware is often very sensitive to dropouts and can even in such cases cause the
entire computer to crash. Check the box if ever this happens. Such occurrences are very rare,
however, and most users can safely ignore this option.
Lower pane
Input: allows you to select the input of the audio hardware used by Melodyne Stand-Alone in
case your hardware offers multiple inputs.
Resolution: determines the bit resolution for recordings made by Melodyne Stand-Alone.
Recording Folder: specifies the folder in which new recordings should be saved.
Related topics
Operating Melodyne with Rewire
Recording audio in Melodyne Stand-Alone
Melodyne editor
© Celemony Software GmbH 2013 • Last updated on 04.07.2013 • • Online Manual www.celemony.com 45
Transferring audio material to Melodyne Plugin
In this tour, you will learn how to transfer audio material to Melodyne Plugin as well as the
fundamentals of its use.
Transferring audio
Open in your DAW the project you wish to edit.
Load Melodyne Plugin as an audio insert effect in the audio track containing the material you wish to
edit. Position Melodyne Plugin above any insert effects you may be using in the track – if in doubt, put
it in the first insert slot. For the analysis (or ‘detection’) to achieve the best possible results, Melodyne
needs to be given as dry and clean an input signal as possible.
Move the playback cursor in the DAW to a point before the beginning of the passage you wish to edit
with Melodyne.
Click the ‘Transfer’ button at the top left of the Melodyne window to prepare it to accept the transfer.
Press Play in the DAW to transfer the material, which Melodyne will import automatically. Press Stop
when the end of the passage you wish to edit is reached. Stopping the DAW playback automatically
brings to an end Melodyne’s transfer readiness. You can also interrupt a transfer in progress at any
time by clicking the Transfer button.
If you wish, you can transfer to Melodyne further passages from different parts of the DAW track.
Clicking the Transfer button during playback by the DAW toggles Melodyne’s ‘enable transfer’ function
on and off, allowing you to punch in and out as the playback proceeds. Alternatively, as you reach the
end of each of the passages you wish to transfer you can stop playback by the DAW, find the start of
the next passage, transfer-enable Melodyne again, restart playback by the DAW, stop it again, and so
on. If you wish, you can just transfer the entire track or even several tracks simultaneously to multiple
instances of Melodyne.
Important: If your DAW project contains changes of tempo or time signature, please consult the tour
entitled “Adjusting to tempo variations in the DAW”.
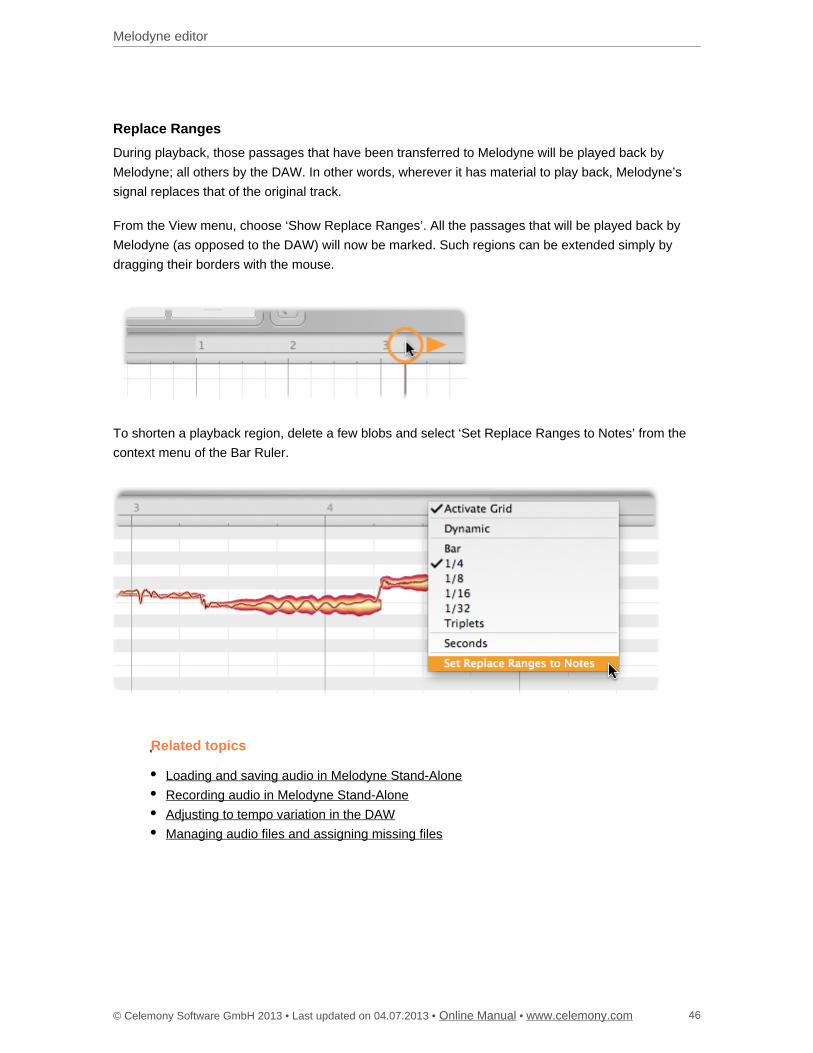
Melodyne editor
© Celemony Software GmbH 2013 • Last updated on 04.07.2013 • • Online Manual www.celemony.com 46
Replace Ranges
During playback, those passages that have been transferred to Melodyne will be played back by
Melodyne; all others by the DAW. In other words, wherever it has material to play back, Melodyne’s
signal replaces that of the original track.
From the View menu, choose ‘Show Replace Ranges’. All the passages that will be played back by
Melodyne (as opposed to the DAW) will now be marked. Such regions can be extended simply by
dragging their borders with the mouse.
To shorten a playback region, delete a few blobs and select ‘Set Replace Ranges to Notes’ from the
context menu of the Bar Ruler.
Related topics
Loading and saving audio in Melodyne Stand-Alone
Recording audio in Melodyne Stand-Alone
Adjusting to tempo variation in the DAW
Managing audio files and assigning missing files
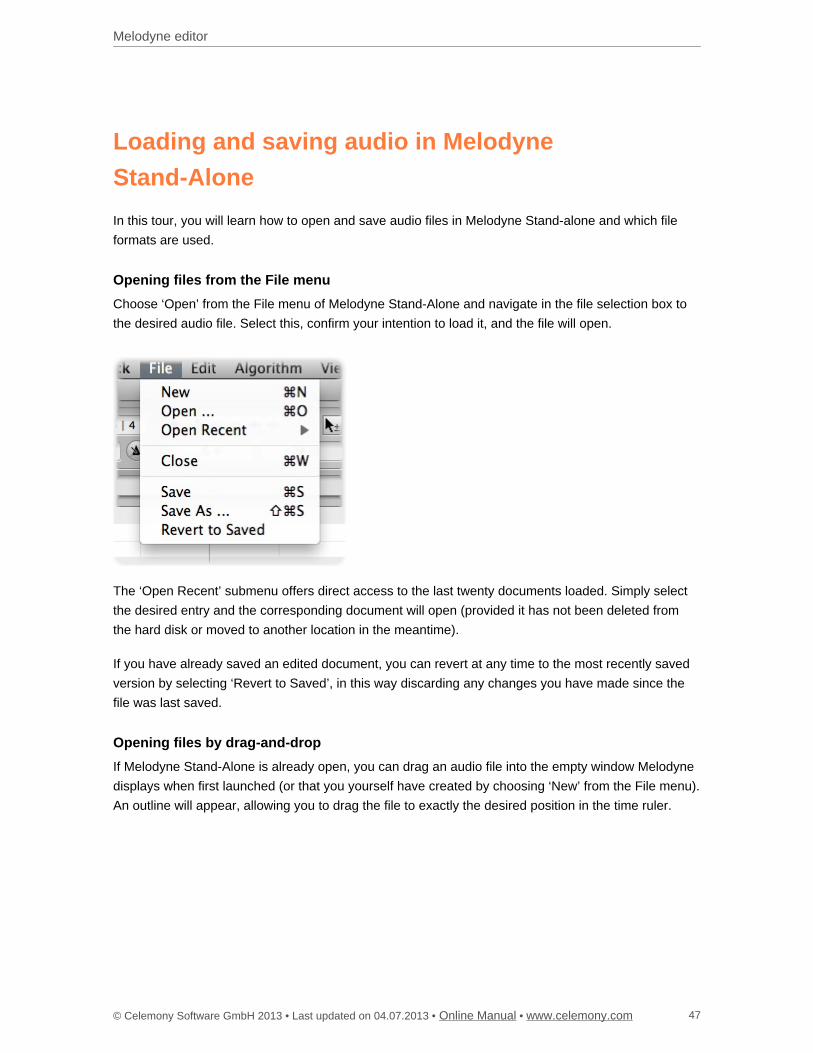
Melodyne editor
© Celemony Software GmbH 2013 • Last updated on 04.07.2013 • • Online Manual www.celemony.com 47
Loading and saving audio in Melodyne
Stand-Alone
In this tour, you will learn how to open and save audio files in Melodyne Stand-alone and which file
formats are used.
Opening files from the File menu
Choose ‘Open’ from the File menu of Melodyne Stand-Alone and navigate in the file selection box to
the desired audio file. Select this, confirm your intention to load it, and the file will open.
The ‘Open Recent’ submenu offers direct access to the last twenty documents loaded. Simply select
the desired entry and the corresponding document will open (provided it has not been deleted from
the hard disk or moved to another location in the meantime).
If you have already saved an edited document, you can revert at any time to the most recently saved
version by selecting ‘Revert to Saved’, in this way discarding any changes you have made since the
file was last saved.
Opening files by drag-and-drop
If Melodyne Stand-Alone is already open, you can drag an audio file into the empty window Melodyne
displays when first launched (or that you yourself have created by choosing ‘New’ from the File menu).
An outline will appear, allowing you to drag the file to exactly the desired position in the time ruler.
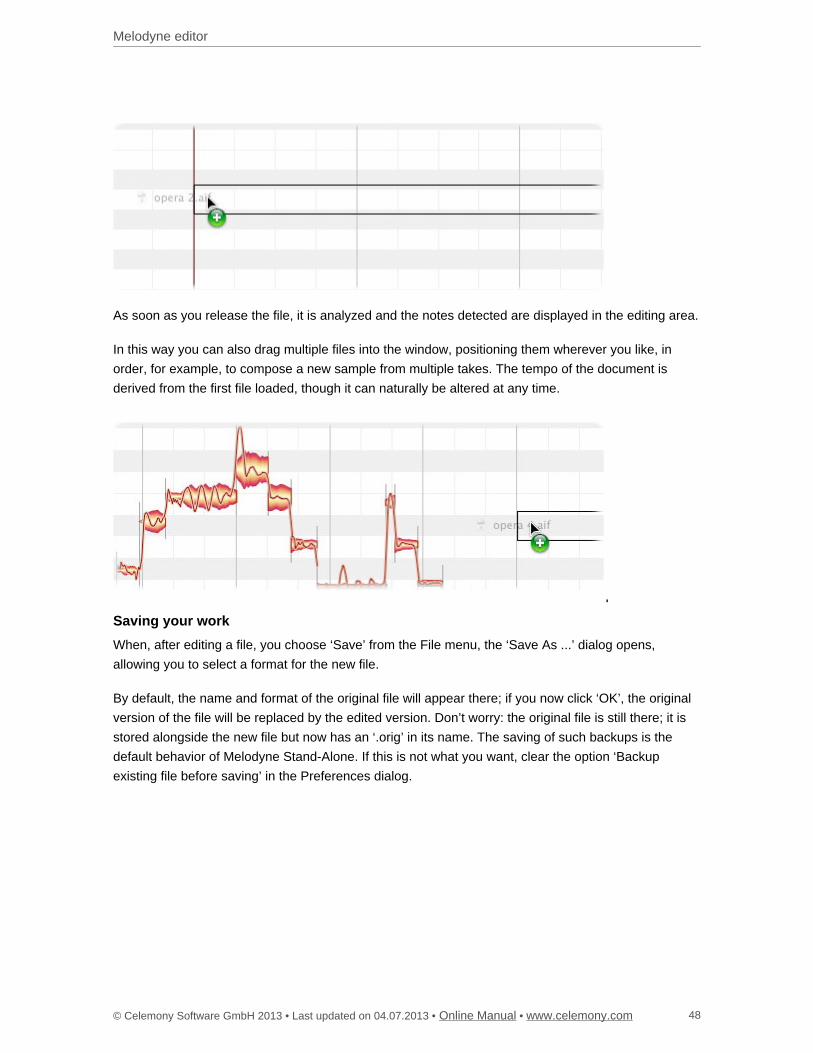
Melodyne editor
© Celemony Software GmbH 2013 • Last updated on 04.07.2013 • • Online Manual www.celemony.com 48
As soon as you release the file, it is analyzed and the notes detected are displayed in the editing area.
In this way you can also drag multiple files into the window, positioning them wherever you like, in
order, for example, to compose a new sample from multiple takes. The tempo of the document is
derived from the first file loaded, though it can naturally be altered at any time.
Saving your work
When, after editing a file, you choose ‘Save’ from the File menu, the ‘Save As ...’ dialog opens,
allowing you to select a format for the new file.
By default, the name and format of the original file will appear there; if you now click ‘OK’, the original
version of the file will be replaced by the edited version. Don’t worry: the original file is still there; it is
stored alongside the new file but now has an ‘.orig’ in its name. The saving of such backups is the
default behavior of Melodyne Stand-Alone. If this is not what you want, clear the option ‘Backup
existing file before saving’ in the Preferences dialog.
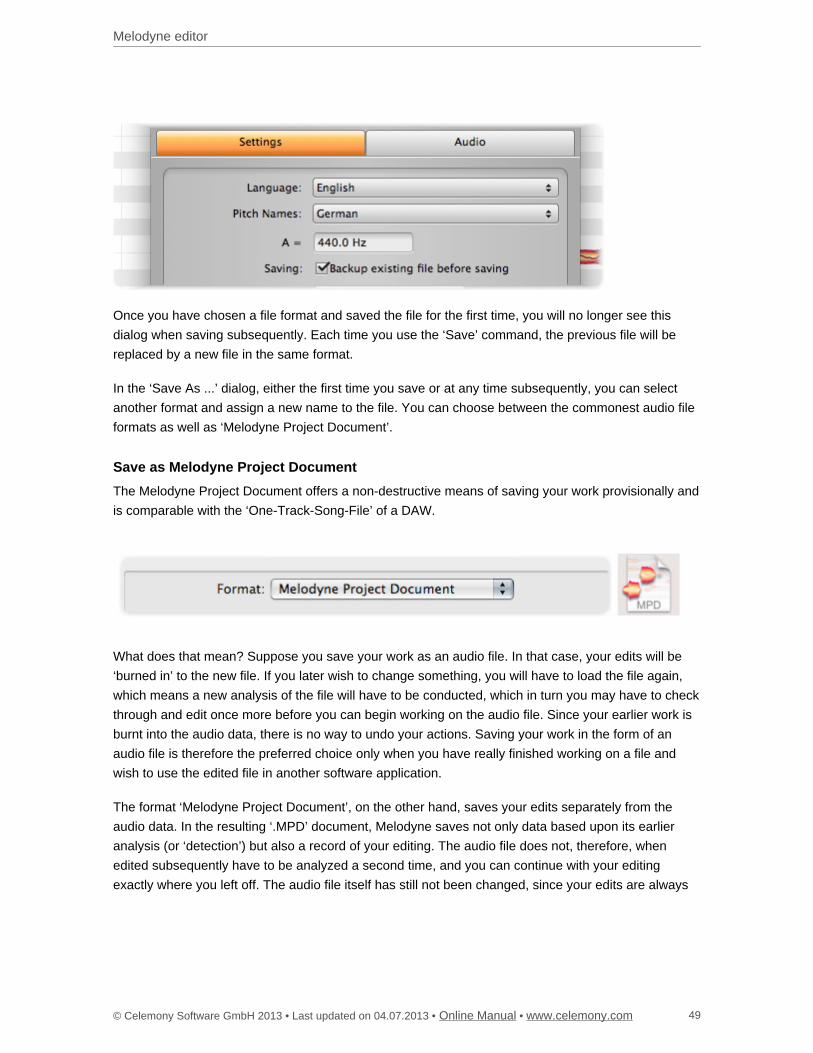
Melodyne editor
© Celemony Software GmbH 2013 • Last updated on 04.07.2013 • • Online Manual www.celemony.com 49
Once you have chosen a file format and saved the file for the first time, you will no longer see this
dialog when saving subsequently. Each time you use the ‘Save’ command, the previous file will be
replaced by a new file in the same format.
In the ‘Save As ...’ dialog, either the first time you save or at any time subsequently, you can select
another format and assign a new name to the file. You can choose between the commonest audio file
formats as well as ‘Melodyne Project Document’.
Save as Melodyne Project Document
The Melodyne Project Document offers a non-destructive means of saving your work provisionally and
is comparable with the ‘One-Track-Song-File’ of a DAW.
What does that mean? Suppose you save your work as an audio file. In that case, your edits will be
‘burned in’ to the new file. If you later wish to change something, you will have to load the file again,
which means a new analysis of the file will have to be conducted, which in turn you may have to check
through and edit once more before you can begin working on the audio file. Since your earlier work is
burnt into the audio data, there is no way to undo your actions. Saving your work in the form of an
audio file is therefore the preferred choice only when you have really finished working on a file and
wish to use the edited file in another software application.
The format ‘Melodyne Project Document’, on the other hand, saves your edits separately from the
audio data. In the resulting ‘.MPD’ document, Melodyne saves not only data based upon its earlier
analysis (or ‘detection’) but also a record of your editing. The audio file does not, therefore, when
edited subsequently have to be analyzed a second time, and you can continue with your editing
exactly where you left off. The audio file itself has still not been changed, since your edits are always
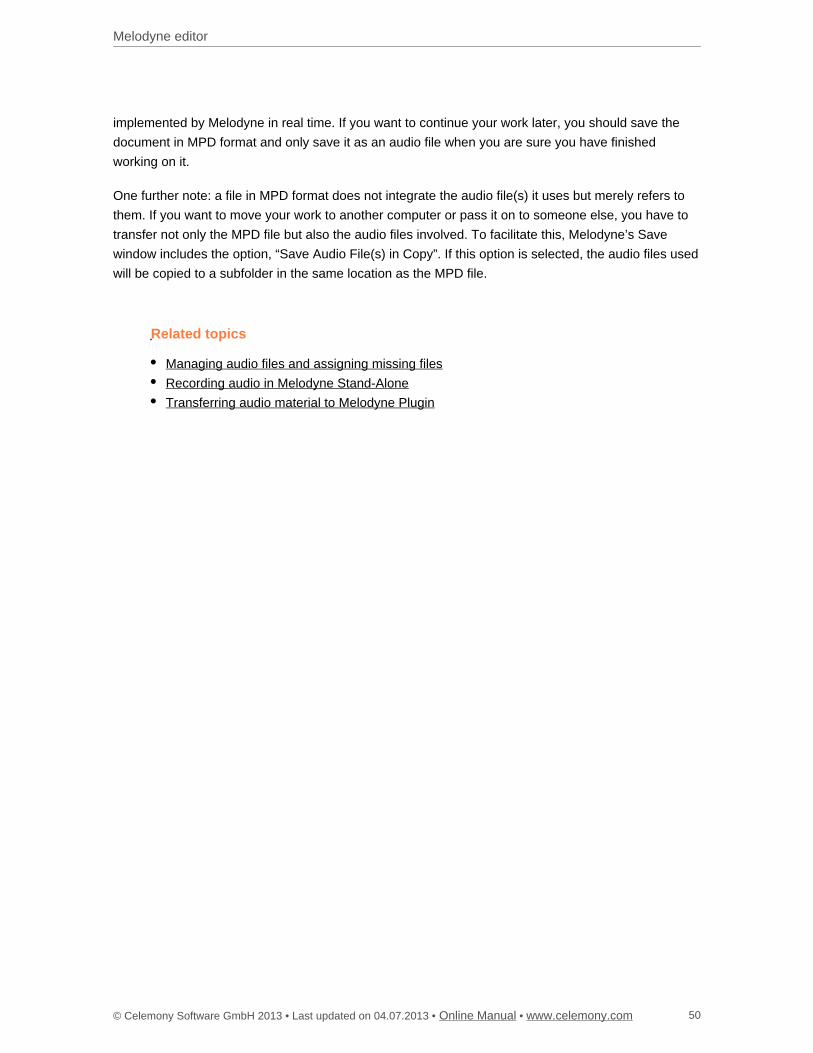
Melodyne editor
© Celemony Software GmbH 2013 • Last updated on 04.07.2013 • • Online Manual www.celemony.com 50
implemented by Melodyne in real time. If you want to continue your work later, you should save the
document in MPD format and only save it as an audio file when you are sure you have finished
working on it.
One further note: a file in MPD format does not integrate the audio file(s) it uses but merely refers to
them. If you want to move your work to another computer or pass it on to someone else, you have to
transfer not only the MPD file but also the audio files involved. To facilitate this, Melodyne’s Save
window includes the option, “Save Audio File(s) in Copy”. If this option is selected, the audio files used
will be copied to a subfolder in the same location as the MPD file.
Related topics
Managing audio files and assigning missing files
Recording audio in Melodyne Stand-Alone
Transferring audio material to Melodyne Plugin
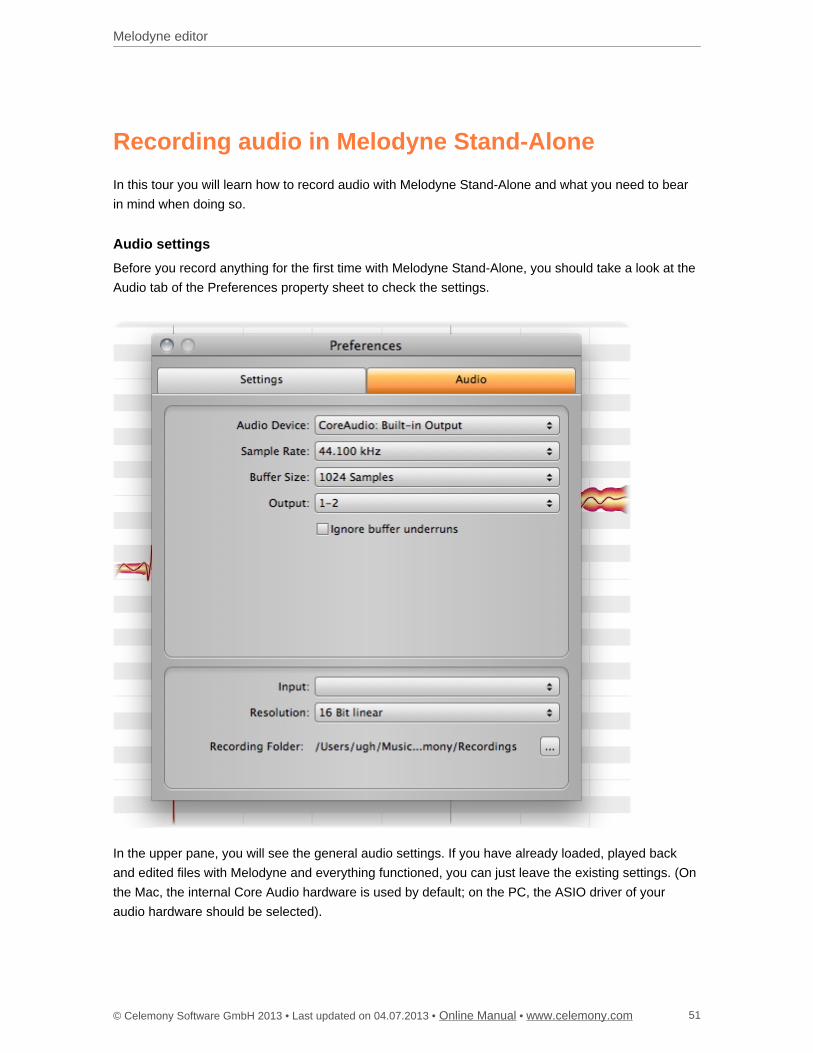
Melodyne editor
© Celemony Software GmbH 2013 • Last updated on 04.07.2013 • • Online Manual www.celemony.com 51
Recording audio in Melodyne Stand-Alone
In this tour you will learn how to record audio with Melodyne Stand-Alone and what you need to bear
in mind when doing so.
Audio settings
Before you record anything for the first time with Melodyne Stand-Alone, you should take a look at the
Audio tab of the Preferences property sheet to check the settings.
In the upper pane, you will see the general audio settings. If you have already loaded, played back
and edited files with Melodyne and everything functioned, you can just leave the existing settings. (On
the Mac, the internal Core Audio hardware is used by default; on the PC, the ASIO driver of your
audio hardware should be selected).

Melodyne editor
© Celemony Software GmbH 2013 • Last updated on 04.07.2013 • • Online Manual www.celemony.com 52
In the lower pane, you can select the audio inputs of the audio hardware you wish to use. This
parameter is naturally only relevant if your audio hardware actually has multiple inputs. From the list
box, you can select the bit-resolution for recording, popular choices here being 16- and 24-bit linear.
Below you can select the folder in which your recordings will be saved.
We recommend you to select a general ‘Temp’ folder, as the recording folder referred to here simply
serves as a buffer for your work until you save it. There is no reason yet to choose a dedicated
destination for your recording session; you decide the final destination of a recording when you come
to save it.
Tempo and metronome
Before you begin recording in Melodyne, you should think about the tempo. There are two possible
modi operandi: either the grid follows the music (in which case Melodyne interprets variations in tempo
as evidence that the song tempo varies and stretches and/or compresses the grid accordingly); or the
music follows the grid, which in this case will be uniform, so where deviations occur notes will lie
sometimes to the left, sometimes to the right, of the gridlines nearest them.
When you create a new empty document (File > New) in Melodyne, the default tempo is 120 BPM. If
you now, without changing the Tempo parameter and without switching on the metronome, begin
recording and then stop the recording at some point, in the course of the ensuing analysis, the tempo
throughout the recording will be detected. This option functions well and reliably as a general rule, but
will usually lead to tempo fluctuations in your performance being interpreted as changes in tempo. In
consequence, the Tempo display will change in the course of playback and the grid in the editing area
will also expand or contract in response to tempo fluctuations in the recording.
If you would rather use a fixed tempo and uniformly spaced gridlines as the basis of your recording,
simply set the desired tempo manually prior to recording and/or activate the metronome. As soon as
you do either or both of these things, Melodyne will conclude that you want a uniform tempo. In this
case, the Tempo display will not change during the recording and the grid will remain rigid; any tempo
fluctuations in your performance will be revealed, when the analysis is complete, by the fact that
certain notes are offset from – i.e. lie between, or not precisely on – the gridlines.
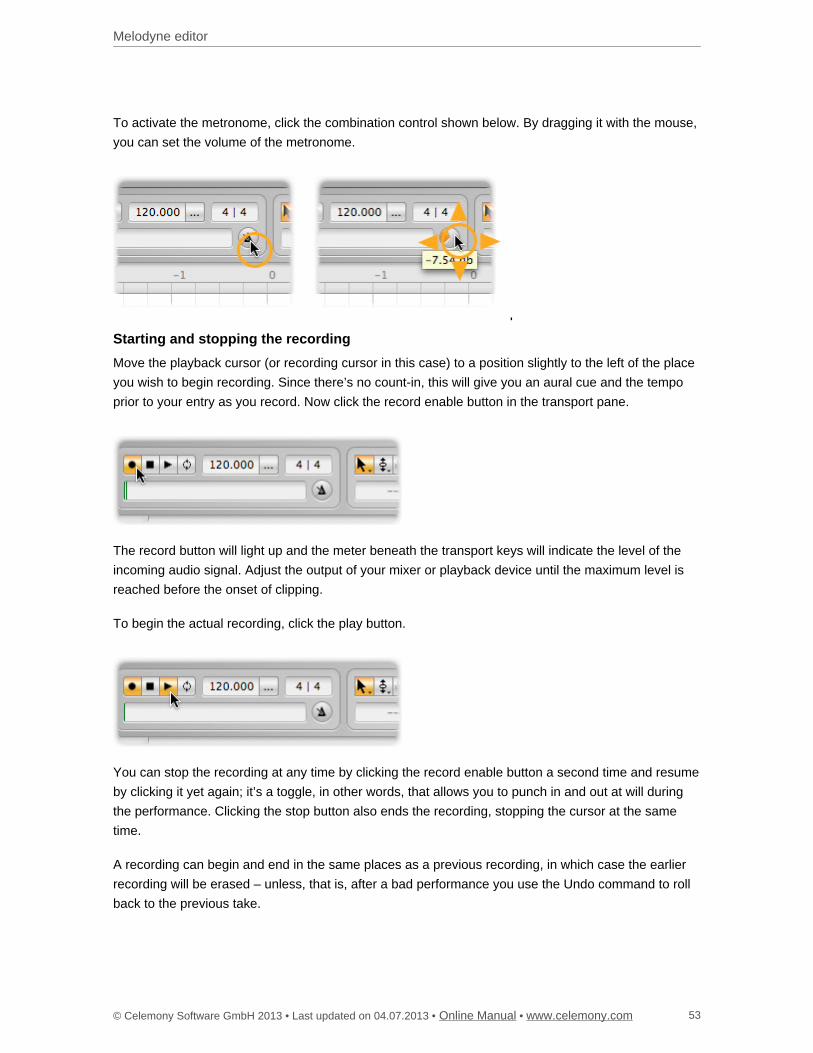
Melodyne editor
© Celemony Software GmbH 2013 • Last updated on 04.07.2013 • • Online Manual www.celemony.com 53
To activate the metronome, click the combination control shown below. By dragging it with the mouse,
you can set the volume of the metronome.
Starting and stopping the recording
Move the playback cursor (or recording cursor in this case) to a position slightly to the left of the place
you wish to begin recording. Since there’s no count-in, this will give you an aural cue and the tempo
prior to your entry as you record. Now click the record enable button in the transport pane.
The record button will light up and the meter beneath the transport keys will indicate the level of the
incoming audio signal. Adjust the output of your mixer or playback device until the maximum level is
reached before the onset of clipping.
To begin the actual recording, click the play button.
You can stop the recording at any time by clicking the record enable button a second time and resume
by clicking it yet again; it’s a toggle, in other words, that allows you to punch in and out at will during
the performance. Clicking the stop button also ends the recording, stopping the cursor at the same
time.
A recording can begin and end in the same places as a previous recording, in which case the earlier
recording will be erased – unless, that is, after a bad performance you use the Undo command to roll
back to the previous take.
Melodyne editor
© Celemony Software GmbH 2013 • Last updated on 04.07.2013 • • Online Manual www.celemony.com 54
You can listen to a recording even when the detection analysis is still underway and undo it in the
same way.
Related topics
Transferring audio material to Melodyne Plugin
Managing audio files and assigning missing files
Loading and saving audio in Melodyne Stand-Alone
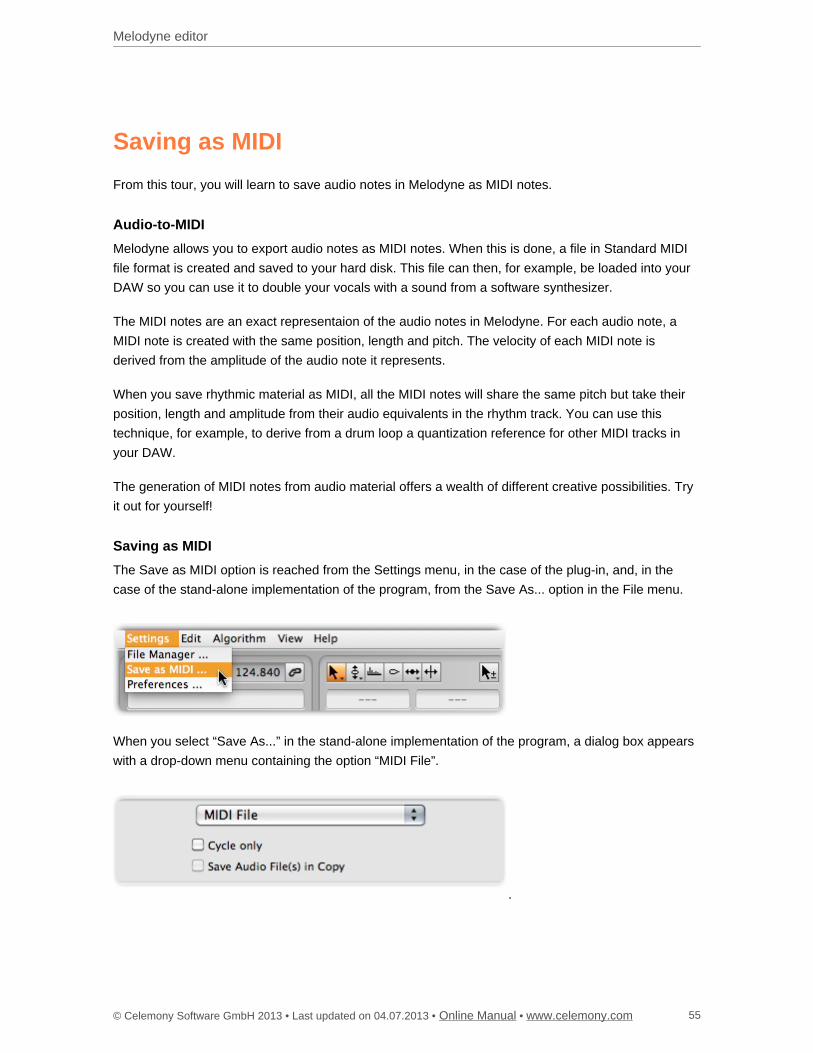
Melodyne editor
© Celemony Software GmbH 2013 • Last updated on 04.07.2013 • • Online Manual www.celemony.com 55
Saving as MIDI
From this tour, you will learn to save audio notes in Melodyne as MIDI notes.
Audio-to-MIDI
Melodyne allows you to export audio notes as MIDI notes. When this is done, a file in Standard MIDI
file format is created and saved to your hard disk. This file can then, for example, be loaded into your
DAW so you can use it to double your vocals with a sound from a software synthesizer.
The MIDI notes are an exact representaion of the audio notes in Melodyne. For each audio note, a
MIDI note is created with the same position, length and pitch. The velocity of each MIDI note is
derived from the amplitude of the audio note it represents.
When you save rhythmic material as MIDI, all the MIDI notes will share the same pitch but take their
position, length and amplitude from their audio equivalents in the rhythm track. You can use this
technique, for example, to derive from a drum loop a quantization reference for other MIDI tracks in
your DAW.
The generation of MIDI notes from audio material offers a wealth of different creative possibilities. Try
it out for yourself!
Saving as MIDI
The Save as MIDI option is reached from the Settings menu, in the case of the plug-in, and, in the
case of the stand-alone implementation of the program, from the Save As... option in the File menu.
When you select “Save As...” in the stand-alone implementation of the program, a dialog box appears
with a drop-down menu containing the option “MIDI File”.
Melodyne editor
© Celemony Software GmbH 2013 • Last updated on 04.07.2013 • • Online Manual www.celemony.com 56
Save all notes or only those in the cycle zone
When saving as MIDI, you can choose whether you wish to export all the notes or only those lying
within Melodyne’s cycle zone. For the latter option, whether you are using the stand-alone application
or the plug-in, you should check the ‘Cycle only’ box in the Save dialog.
If you choose to save all the notes (i.e. you clear the ‘Cycle only’ checkbox), the export begins
invariably from the start of bar one. This is true even if the first notes do not appear until some later
bar. When exporting MIDI from the plug-in, this ensures that the MIDI notes when loaded back into
your DAW can be synchronized easily with the audio notes from which they were derived. To do this,
simply drag the MIDI file to a track in such a way that it begins at bar one.
If you save as MIDI with the ‘Cycle only’ option checked, only notes lying within the cycle zone are
exported. This is useful, for example, when you want to save a precise phrase or single bar in MIDI
format.
Please note that the ‘Cycle only’ option in the plug-in refers to Melodyne’s cycle range – not to that of
your DAW! You can define the cycle range in Melodyne while playback in the DAW is halted. By
default, the cycle range in Melodyne is the range occupied by the first transfer. If the cycle is left
unchanged with this setting, when you are exporting MIDI the start and end of the cycle range, if not
there already, will snap outwards to the nearest bar lines, in order to make it easier for you to position
the MIDI file later.
The MIDI file exported by Melodyne also contains tempo information. Most DAWs offer you the choice
of either adopting the tempo defined in the file or else ignoring it and allowing the current tempo of the
DAW to prevail.
Related topics
Loading and saving audio in Melodyne Stand-Alone
Transferring audio material to Melodyne Plugin
Choosing the algorithm
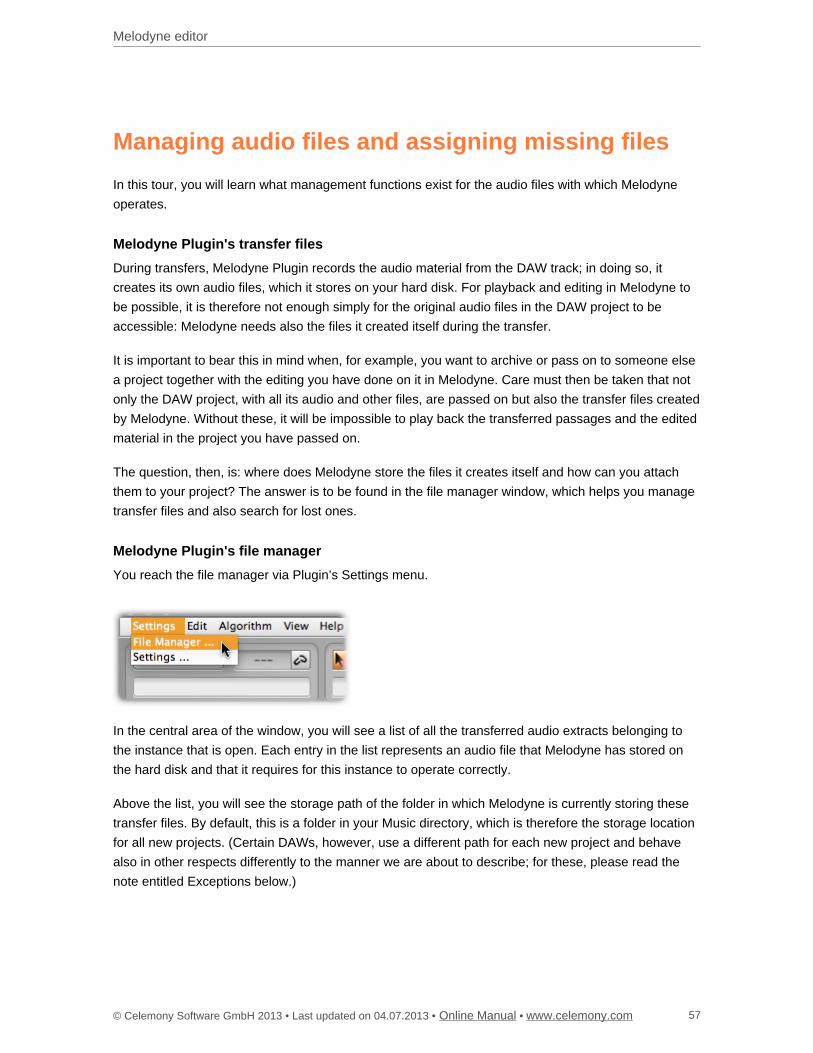
Melodyne editor
© Celemony Software GmbH 2013 • Last updated on 04.07.2013 • • Online Manual www.celemony.com 57
Managing audio files and assigning missing files
In this tour, you will learn what management functions exist for the audio files with which Melodyne
operates.
Melodyne Plugin's transfer files
During transfers, Melodyne Plugin records the audio material from the DAW track; in doing so, it
creates its own audio files, which it stores on your hard disk. For playback and editing in Melodyne to
be possible, it is therefore not enough simply for the original audio files in the DAW project to be
accessible: Melodyne needs also the files it created itself during the transfer.
It is important to bear this in mind when, for example, you want to archive or pass on to someone else
a project together with the editing you have done on it in Melodyne. Care must then be taken that not
only the DAW project, with all its audio and other files, are passed on but also the transfer files created
by Melodyne. Without these, it will be impossible to play back the transferred passages and the edited
material in the project you have passed on.
The question, then, is: where does Melodyne store the files it creates itself and how can you attach
them to your project? The answer is to be found in the file manager window, which helps you manage
transfer files and also search for lost ones.
Melodyne Plugin's file manager
You reach the file manager via Plugin’s Settings menu.
In the central area of the window, you will see a list of all the transferred audio extracts belonging to
the instance that is open. Each entry in the list represents an audio file that Melodyne has stored on
the hard disk and that it requires for this instance to operate correctly.
Above the list, you will see the storage path of the folder in which Melodyne is currently storing these
transfer files. By default, this is a folder in your Music directory, which is therefore the storage location
for all new projects. (Certain DAWs, however, use a different path for each new project and behave
also in other respects differently to the manner we are about to describe; for these, please read the
note entitled Exceptions below.)
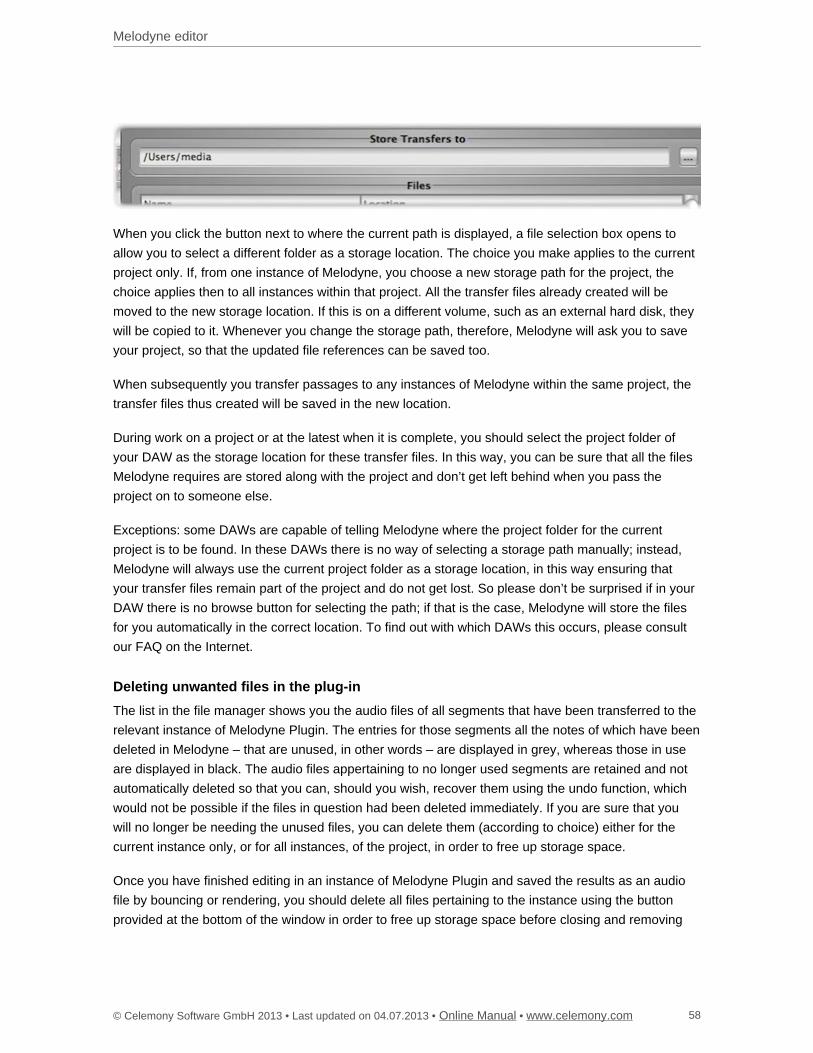
Melodyne editor
© Celemony Software GmbH 2013 • Last updated on 04.07.2013 • • Online Manual www.celemony.com 58
When you click the button next to where the current path is displayed, a file selection box opens to
allow you to select a different folder as a storage location. The choice you make applies to the current
project only. If, from one instance of Melodyne, you choose a new storage path for the project, the
choice applies then to all instances within that project. All the transfer files already created will be
moved to the new storage location. If this is on a different volume, such as an external hard disk, they
will be copied to it. Whenever you change the storage path, therefore, Melodyne will ask you to save
your project, so that the updated file references can be saved too.
When subsequently you transfer passages to any instances of Melodyne within the same project, the
transfer files thus created will be saved in the new location.
During work on a project or at the latest when it is complete, you should select the project folder of
your DAW as the storage location for these transfer files. In this way, you can be sure that all the files
Melodyne requires are stored along with the project and don’t get left behind when you pass the
project on to someone else.
Exceptions: some DAWs are capable of telling Melodyne where the project folder for the current
project is to be found. In these DAWs there is no way of selecting a storage path manually; instead,
Melodyne will always use the current project folder as a storage location, in this way ensuring that
your transfer files remain part of the project and do not get lost. So please don’t be surprised if in your
DAW there is no browse button for selecting the path; if that is the case, Melodyne will store the files
for you automatically in the correct location. To find out with which DAWs this occurs, please consult
our FAQ on the Internet.
Deleting unwanted files in the plug-in
The list in the file manager shows you the audio files of all segments that have been transferred to the
relevant instance of Melodyne Plugin. The entries for those segments all the notes of which have been
deleted in Melodyne – that are unused, in other words – are displayed in grey, whereas those in use
are displayed in black. The audio files appertaining to no longer used segments are retained and not
automatically deleted so that you can, should you wish, recover them using the undo function, which
would not be possible if the files in question had been deleted immediately. If you are sure that you
will no longer be needing the unused files, you can delete them (according to choice) either for the
current instance only, or for all instances, of the project, in order to free up storage space.
Once you have finished editing in an instance of Melodyne Plugin and saved the results as an audio
file by bouncing or rendering, you should delete all files pertaining to the instance using the button
provided at the bottom of the window in order to free up storage space before closing and removing
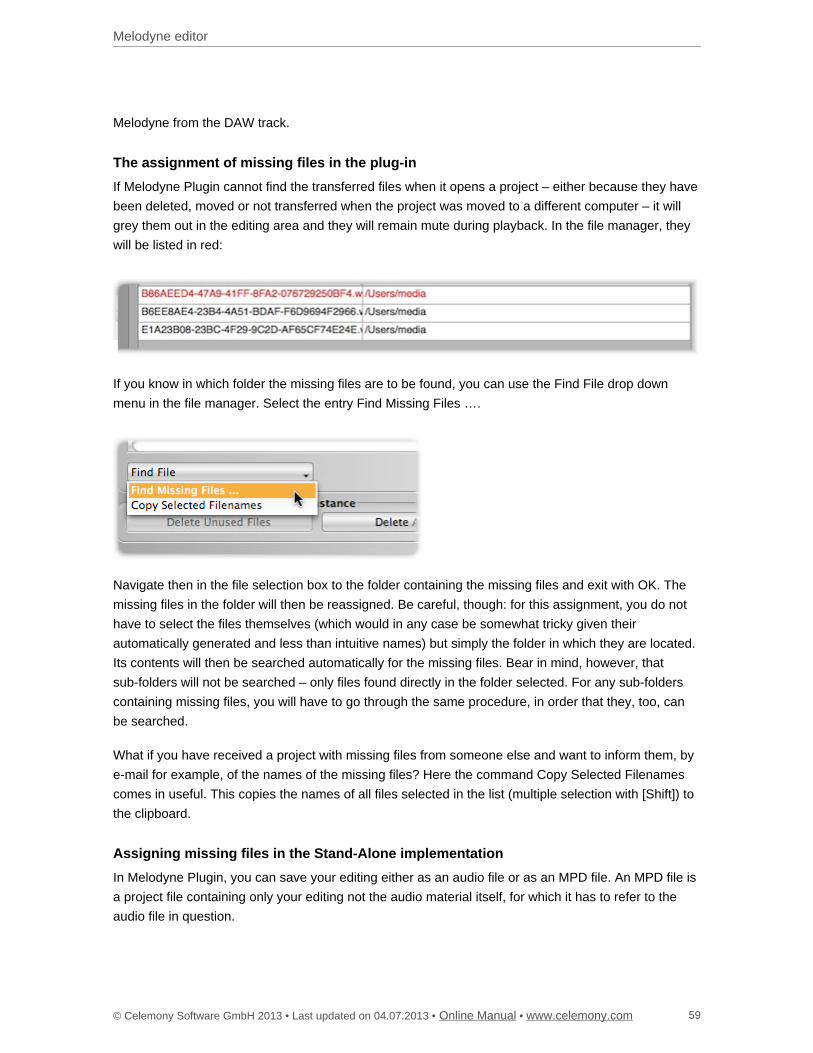
Melodyne editor
© Celemony Software GmbH 2013 • Last updated on 04.07.2013 • • Online Manual www.celemony.com 59
Melodyne from the DAW track.
The assignment of missing files in the plug-in
If Melodyne Plugin cannot find the transferred files when it opens a project – either because they have
been deleted, moved or not transferred when the project was moved to a different computer – it will
grey them out in the editing area and they will remain mute during playback. In the file manager, they
will be listed in red:
If you know in which folder the missing files are to be found, you can use the Find File drop down
menu in the file manager. Select the entry Find Missing Files ….
Navigate then in the file selection box to the folder containing the missing files and exit with OK. The
missing files in the folder will then be reassigned. Be careful, though: for this assignment, you do not
have to select the files themselves (which would in any case be somewhat tricky given their
automatically generated and less than intuitive names) but simply the folder in which they are located.
Its contents will then be searched automatically for the missing files. Bear in mind, however, that
sub-folders will not be searched – only files found directly in the folder selected. For any sub-folders
containing missing files, you will have to go through the same procedure, in order that they, too, can
be searched.
What if you have received a project with missing files from someone else and want to inform them, by
e-mail for example, of the names of the missing files? Here the command Copy Selected Filenames
comes in useful. This copies the names of all files selected in the list (multiple selection with [Shift]) to
the clipboard.
Assigning missing files in the Stand-Alone implementation
In Melodyne Plugin, you can save your editing either as an audio file or as an MPD file. An MPD file is
a project file containing only your editing not the audio material itself, for which it has to refer to the
audio file in question.
Melodyne editor
© Celemony Software GmbH 2013 • Last updated on 04.07.2013 • • Online Manual www.celemony.com 60
If Melodyne, when opening an MPD file, cannot find the audio file it references, a file selection box will
open to help you find and reassign the missing file. Once you have done this, save the MPD file to
update the path of the audio file.
If an audio file is not found and reassigned, the corresponding blobs in the Melodyne document will be
greyed out and mute.
Related topics
Loading and saving audio in Melodyne Stand-Alone
Transferring audio material to Melodyne Plugin
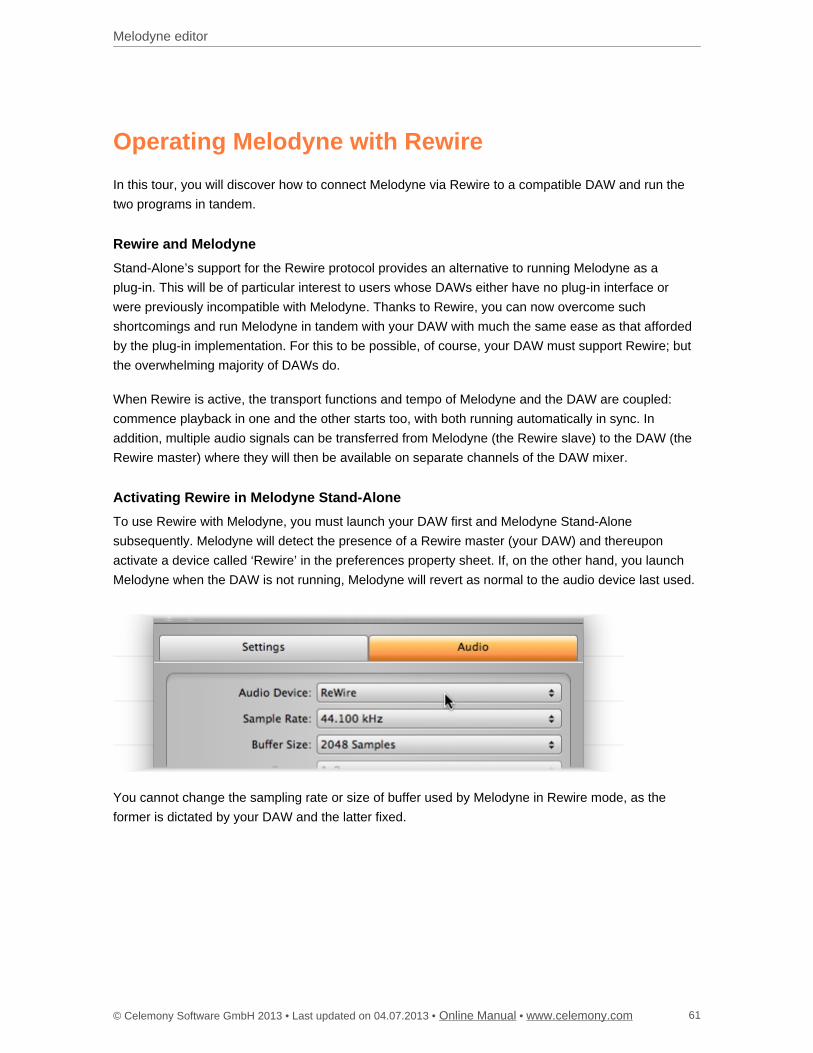
Melodyne editor
© Celemony Software GmbH 2013 • Last updated on 04.07.2013 • • Online Manual www.celemony.com 61
Operating Melodyne with Rewire
In this tour, you will discover how to connect Melodyne via Rewire to a compatible DAW and run the
two programs in tandem.
Rewire and Melodyne
Stand-Alone’s support for the Rewire protocol provides an alternative to running Melodyne as a
plug-in. This will be of particular interest to users whose DAWs either have no plug-in interface or
were previously incompatible with Melodyne. Thanks to Rewire, you can now overcome such
shortcomings and run Melodyne in tandem with your DAW with much the same ease as that afforded
by the plug-in implementation. For this to be possible, of course, your DAW must support Rewire; but
the overwhelming majority of DAWs do.
When Rewire is active, the transport functions and tempo of Melodyne and the DAW are coupled:
commence playback in one and the other starts too, with both running automatically in sync. In
addition, multiple audio signals can be transferred from Melodyne (the Rewire slave) to the DAW (the
Rewire master) where they will then be available on separate channels of the DAW mixer.
Activating Rewire in Melodyne Stand-Alone
To use Rewire with Melodyne, you must launch your DAW first and Melodyne Stand-Alone
subsequently. Melodyne will detect the presence of a Rewire master (your DAW) and thereupon
activate a device called ‘Rewire’ in the preferences property sheet. If, on the other hand, you launch
Melodyne when the DAW is not running, Melodyne will revert as normal to the audio device last used.
You cannot change the sampling rate or size of buffer used by Melodyne in Rewire mode, as the
former is dictated by your DAW and the latter fixed.
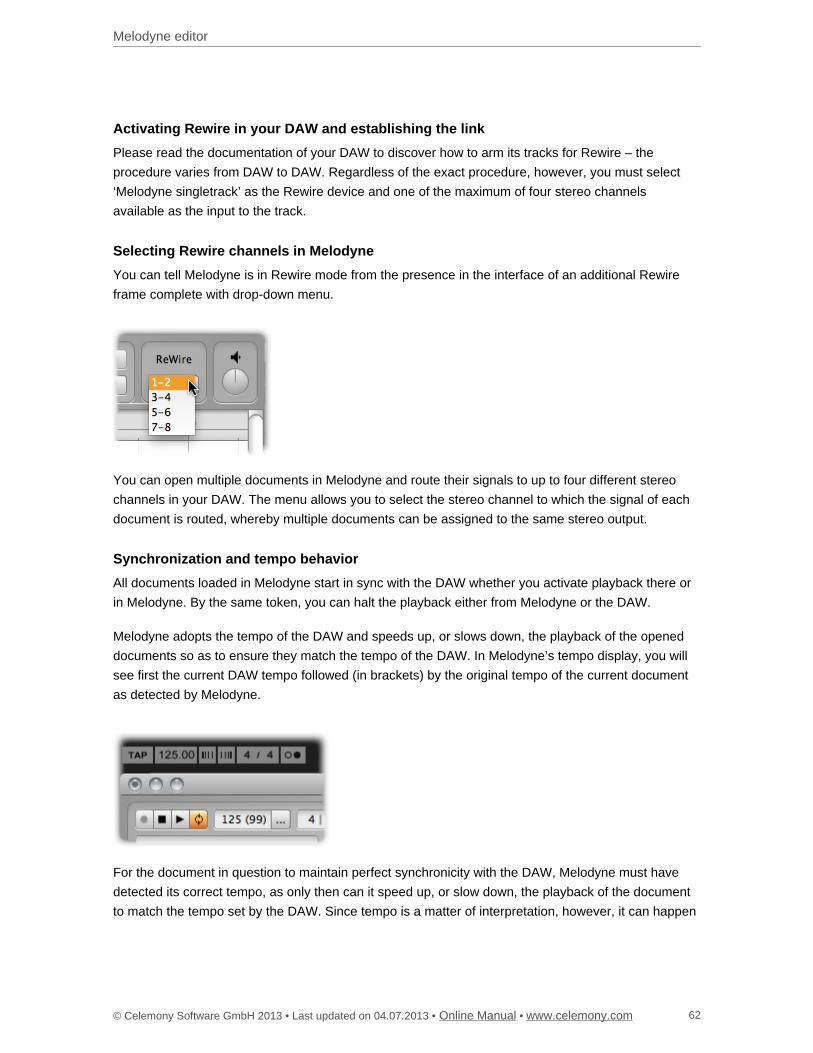
Melodyne editor
© Celemony Software GmbH 2013 • Last updated on 04.07.2013 • • Online Manual www.celemony.com 62
Activating Rewire in your DAW and establishing the link
Please read the documentation of your DAW to discover how to arm its tracks for Rewire – the
procedure varies from DAW to DAW. Regardless of the exact procedure, however, you must select
‘Melodyne singletrack’ as the Rewire device and one of the maximum of four stereo channels
available as the input to the track.
Selecting Rewire channels in Melodyne
You can tell Melodyne is in Rewire mode from the presence in the interface of an additional Rewire
frame complete with drop-down menu.
You can open multiple documents in Melodyne and route their signals to up to four different stereo
channels in your DAW. The menu allows you to select the stereo channel to which the signal of each
document is routed, whereby multiple documents can be assigned to the same stereo output.
Synchronization and tempo behavior
All documents loaded in Melodyne start in sync with the DAW whether you activate playback there or
in Melodyne. By the same token, you can halt the playback either from Melodyne or the DAW.
Melodyne adopts the tempo of the DAW and speeds up, or slows down, the playback of the opened
documents so as to ensure they match the tempo of the DAW. In Melodyne’s tempo display, you will
see first the current DAW tempo followed (in brackets) by the original tempo of the current document
as detected by Melodyne.
For the document in question to maintain perfect synchronicity with the DAW, Melodyne must have
detected its correct tempo, as only then can it speed up, or slow down, the playback of the document
to match the tempo set by the DAW. Since tempo is a matter of interpretation, however, it can happen
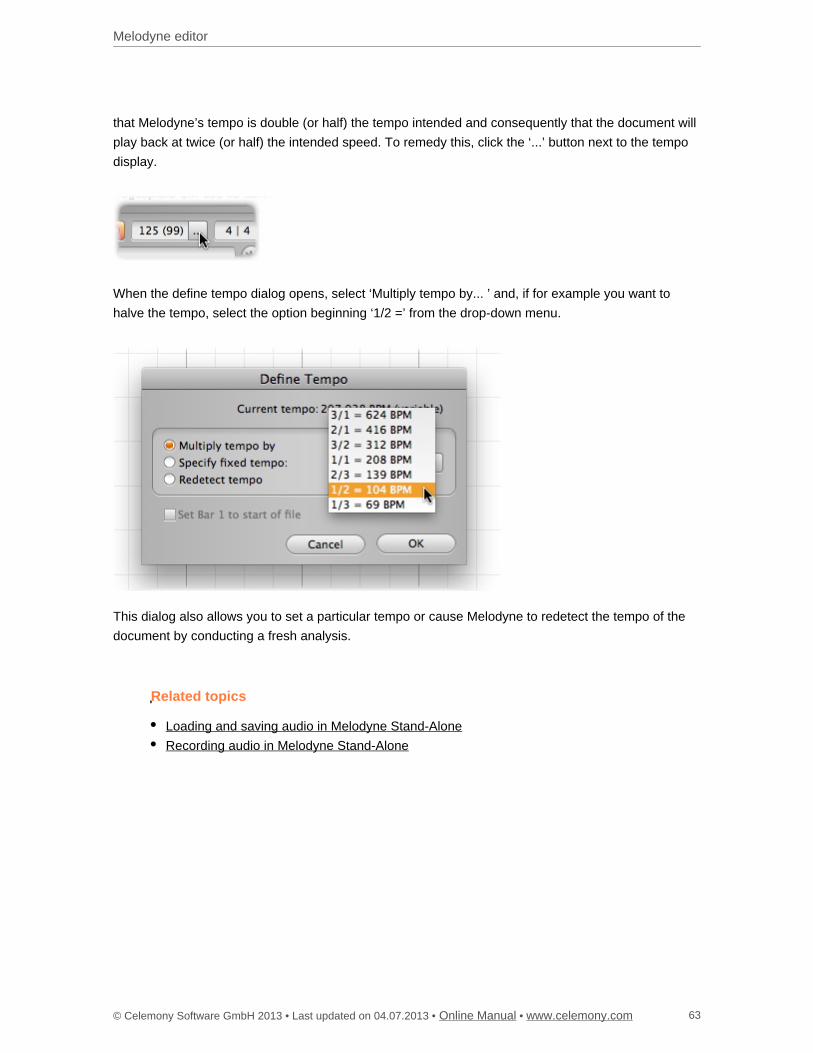
Melodyne editor
© Celemony Software GmbH 2013 • Last updated on 04.07.2013 • • Online Manual www.celemony.com 63
that Melodyne’s tempo is double (or half) the tempo intended and consequently that the document will
play back at twice (or half) the intended speed. To remedy this, click the ‘...’ button next to the tempo
display.
When the define tempo dialog opens, select ‘Multiply tempo by... ’ and, if for example you want to
halve the tempo, select the option beginning ‘1/2 =’ from the drop-down menu.
This dialog also allows you to set a particular tempo or cause Melodyne to redetect the tempo of the
document by conducting a fresh analysis.
Related topics
Loading and saving audio in Melodyne Stand-Alone
Recording audio in Melodyne Stand-Alone
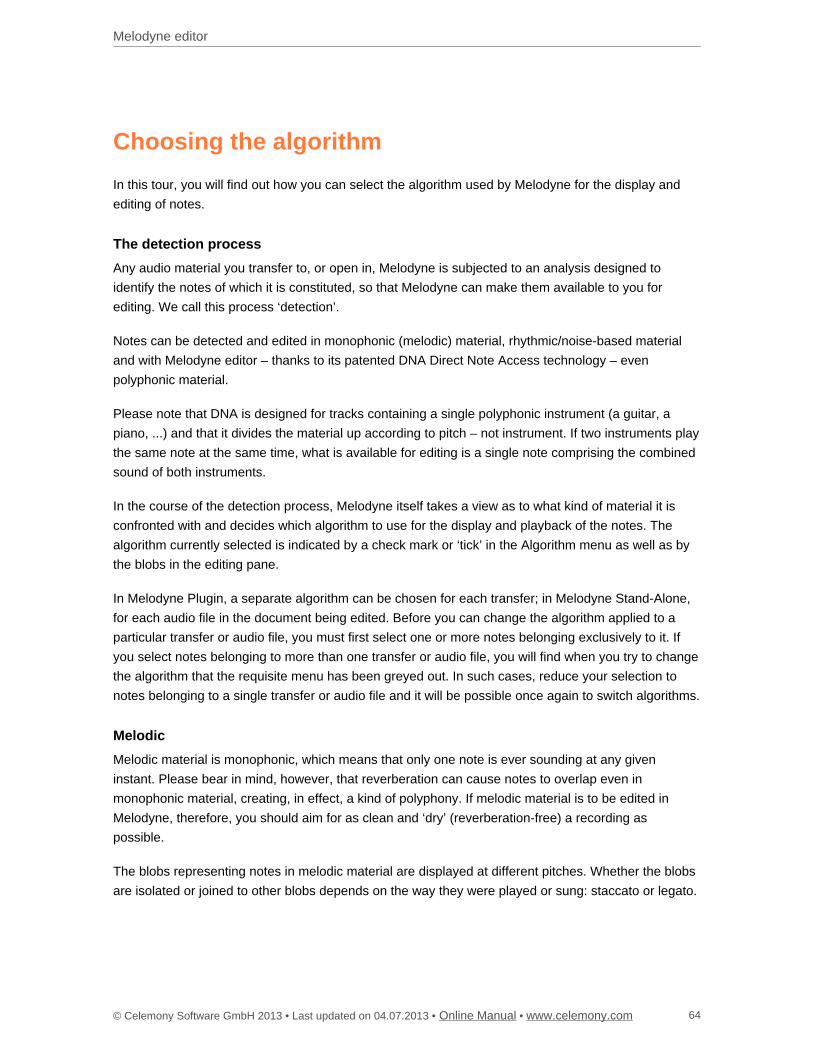
Melodyne editor
© Celemony Software GmbH 2013 • Last updated on 04.07.2013 • • Online Manual www.celemony.com 64
Choosing the algorithm
In this tour, you will find out how you can select the algorithm used by Melodyne for the display and
editing of notes.
The detection process
Any audio material you transfer to, or open in, Melodyne is subjected to an analysis designed to
identify the notes of which it is constituted, so that Melodyne can make them available to you for
editing. We call this process ‘detection’.
Notes can be detected and edited in monophonic (melodic) material, rhythmic/noise-based material
and with Melodyne editor – thanks to its patented DNA Direct Note Access technology – even
polyphonic material.
Please note that DNA is designed for tracks containing a single polyphonic instrument (a guitar, a
piano, ...) and that it divides the material up according to pitch – not instrument. If two instruments play
the same note at the same time, what is available for editing is a single note comprising the combined
sound of both instruments.
In the course of the detection process, Melodyne itself takes a view as to what kind of material it is
confronted with and decides which algorithm to use for the display and playback of the notes. The
algorithm currently selected is indicated by a check mark or ‘tick’ in the Algorithm menu as well as by
the blobs in the editing pane.
In Melodyne Plugin, a separate algorithm can be chosen for each transfer; in Melodyne Stand-Alone,
for each audio file in the document being edited. Before you can change the algorithm applied to a
particular transfer or audio file, you must first select one or more notes belonging exclusively to it. If
you select notes belonging to more than one transfer or audio file, you will find when you try to change
the algorithm that the requisite menu has been greyed out. In such cases, reduce your selection to
notes belonging to a single transfer or audio file and it will be possible once again to switch algorithms.
Melodic
Melodic material is monophonic, which means that only one note is ever sounding at any given
instant. Please bear in mind, however, that reverberation can cause notes to overlap even in
monophonic material, creating, in effect, a kind of polyphony. If melodic material is to be edited in
Melodyne, therefore, you should aim for as clean and ‘dry’ (reverberation-free) a recording as
possible.
The blobs representing notes in melodic material are displayed at different pitches. Whether the blobs
are isolated or joined to other blobs depends on the way they were played or sung: staccato or legato.
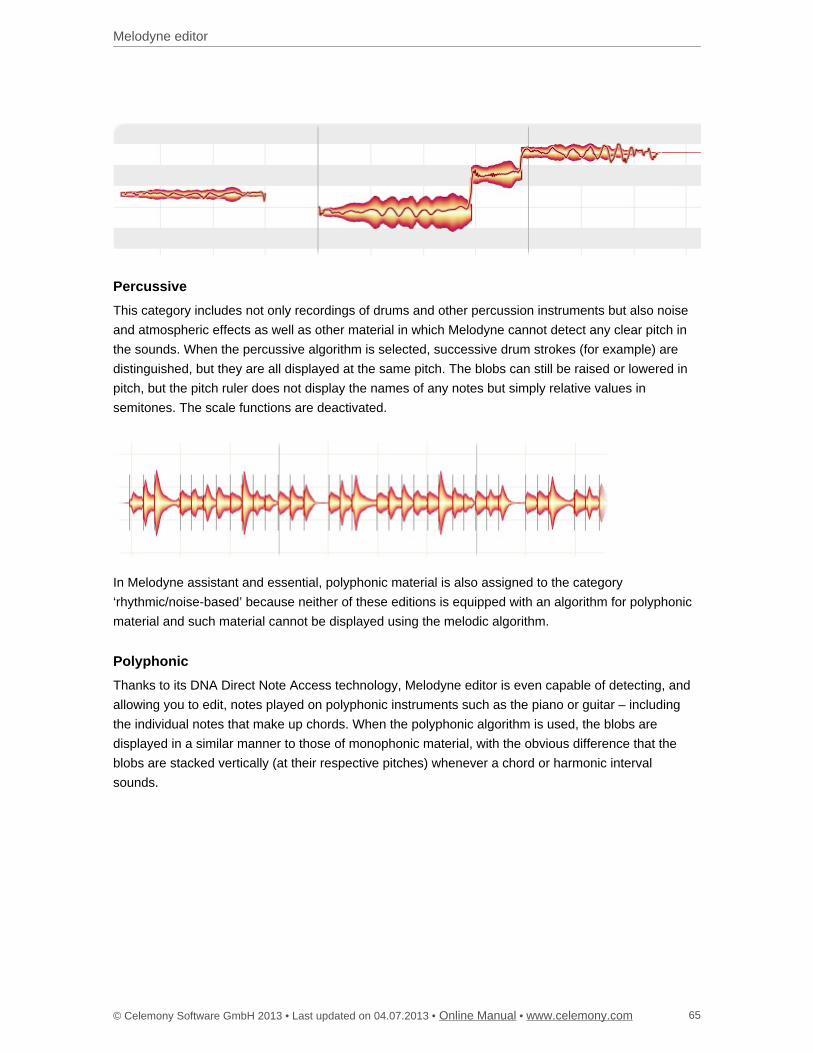
Melodyne editor
© Celemony Software GmbH 2013 • Last updated on 04.07.2013 • • Online Manual www.celemony.com 65
Percussive
This category includes not only recordings of drums and other percussion instruments but also noise
and atmospheric effects as well as other material in which Melodyne cannot detect any clear pitch in
the sounds. When the percussive algorithm is selected, successive drum strokes (for example) are
distinguished, but they are all displayed at the same pitch. The blobs can still be raised or lowered in
pitch, but the pitch ruler does not display the names of any notes but simply relative values in
semitones. The scale functions are deactivated.
In Melodyne assistant and essential, polyphonic material is also assigned to the category
‘rhythmic/noise-based’ because neither of these editions is equipped with an algorithm for polyphonic
material and such material cannot be displayed using the melodic algorithm.
Polyphonic
Thanks to its DNA Direct Note Access technology, Melodyne editor is even capable of detecting, and
allowing you to edit, notes played on polyphonic instruments such as the piano or guitar – including
the individual notes that make up chords. When the polyphonic algorithm is used, the blobs are
displayed in a similar manner to those of monophonic material, with the obvious difference that the
blobs are stacked vertically (at their respective pitches) whenever a chord or harmonic interval
sounds.

Melodyne editor
© Celemony Software GmbH 2013 • Last updated on 04.07.2013 • • Online Manual www.celemony.com 66
In Melodyne assistant and essential, the algorithm for polyphonic material is present but greyed out in
the Algorithm menu. This is because in these editions you can still open and play back documents that
were created by Melodyne editor and contain polyphonic material, and in such cases, Melodyne
automatically selects the polyphonic algorithm. These editions do not, however, permit you to edit
polyphonic material nor to select the polyphonic algorithm manually.
Switching algorithms
You can at any time select a different algorithm to that chosen automatically for you by Melodyne. You
might want to do this, for example, if you find that the material has not been interpreted in a way that
suits your editing needs. To do this, while playback is halted, select the algorithm you prefer from the
Algorithm menu, whereupon Melodyne will reinterpret the material in the light of your choice and
adjust the display accordingly. Note: when you do this, any editing you have already performed prior
to switching algorithms will be lost. The right time to decide which algorithm you wish to use, therefore,
is before you begin editing.
If in Melodyne editor you have selected the polyphonic algorithm manually but no pitches can be
identified in the material, Melodyne will switch automatically to the percussive algorithm, since
otherwise no notes at all would be available for editing.
Setting a default algorithm (Melodyne editor only)
In Melodyne editor, you can prevent Melodyne automatically selecting an algorithm during the
detection process by setting a default, thereby stipulating in advance which algorithm you wish it to
use. This can be useful if, for example, you regularly want to edit particular files using the percussive
algorithm but Melodyne, each time they are opened, is interpreting the material as polyphonic. By
preselecting the percussive algorithm in such cases you can save time, as you will no longer have to
wait needlessly as Melodyne performs its polyphonic analysis, only to discard the results moments
later when you manually select the percussive algorithm.
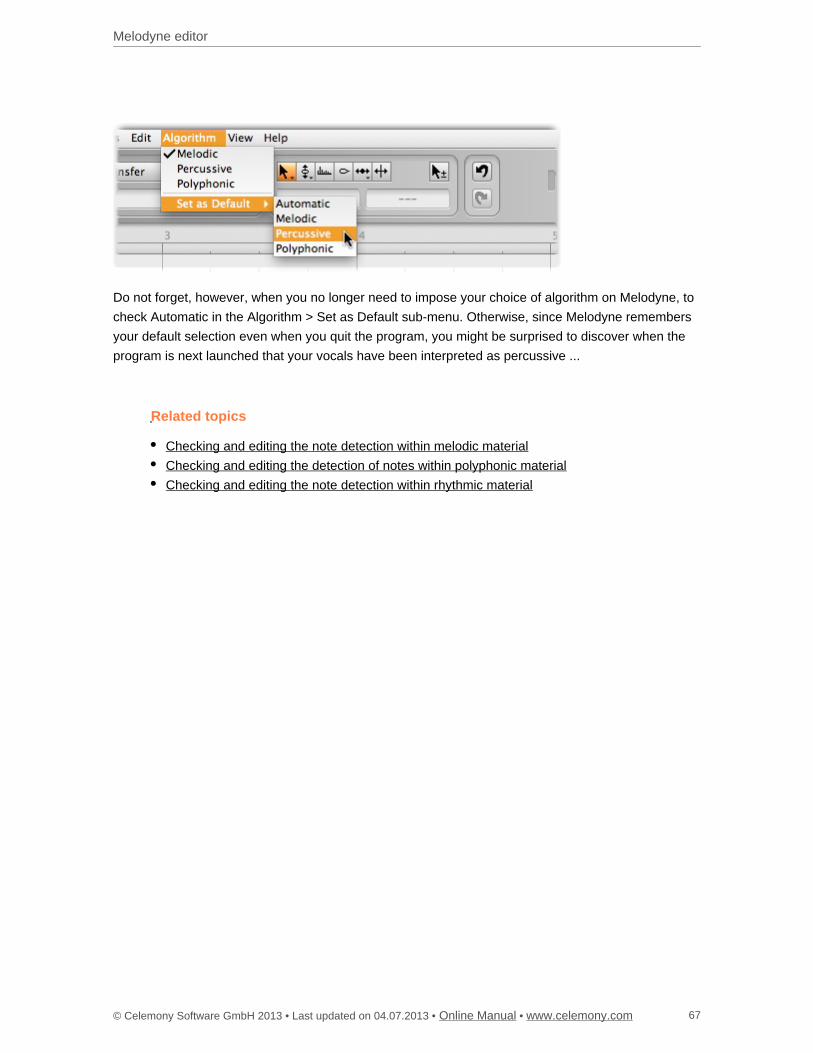
Melodyne editor
© Celemony Software GmbH 2013 • Last updated on 04.07.2013 • • Online Manual www.celemony.com 67
Do not forget, however, when you no longer need to impose your choice of algorithm on Melodyne, to
check Automatic in the Algorithm > Set as Default sub-menu. Otherwise, since Melodyne remembers
your default selection even when you quit the program, you might be surprised to discover when the
program is next launched that your vocals have been interpreted as percussive ...
Related topics
Checking and editing the note detection within melodic material
Checking and editing the detection of notes within polyphonic material
Checking and editing the note detection within rhythmic material
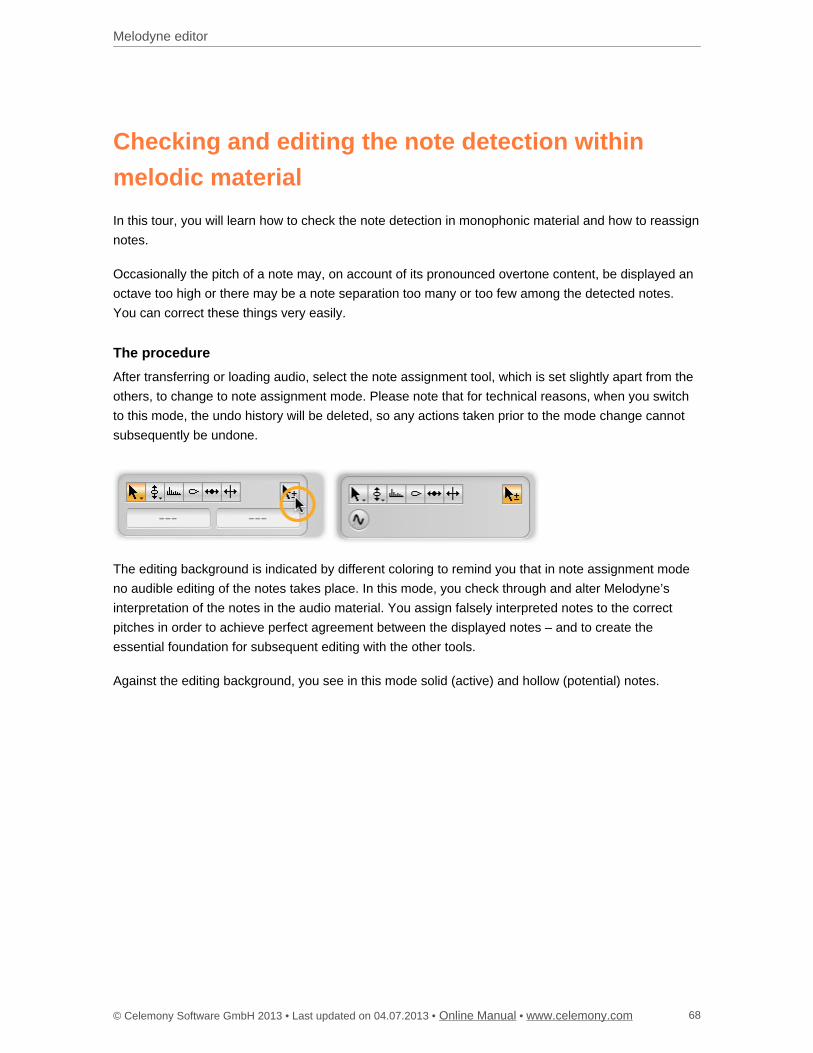
Melodyne editor
© Celemony Software GmbH 2013 • Last updated on 04.07.2013 • • Online Manual www.celemony.com 68
Checking and editing the note detection within
melodic material
In this tour, you will learn how to check the note detection in monophonic material and how to reassign
notes.
Occasionally the pitch of a note may, on account of its pronounced overtone content, be displayed an
octave too high or there may be a note separation too many or too few among the detected notes.
You can correct these things very easily.
The procedure
After transferring or loading audio, select the note assignment tool, which is set slightly apart from the
others, to change to note assignment mode. Please note that for technical reasons, when you switch
to this mode, the undo history will be deleted, so any actions taken prior to the mode change cannot
subsequently be undone.
The editing background is indicated by different coloring to remind you that in note assignment mode
no audible editing of the notes takes place. In this mode, you check through and alter Melodyne’s
interpretation of the notes in the audio material. You assign falsely interpreted notes to the correct
pitches in order to achieve perfect agreement between the displayed notes – and to create the
essential foundation for subsequent editing with the other tools.
Against the editing background, you see in this mode solid (active) and hollow (potential) notes.
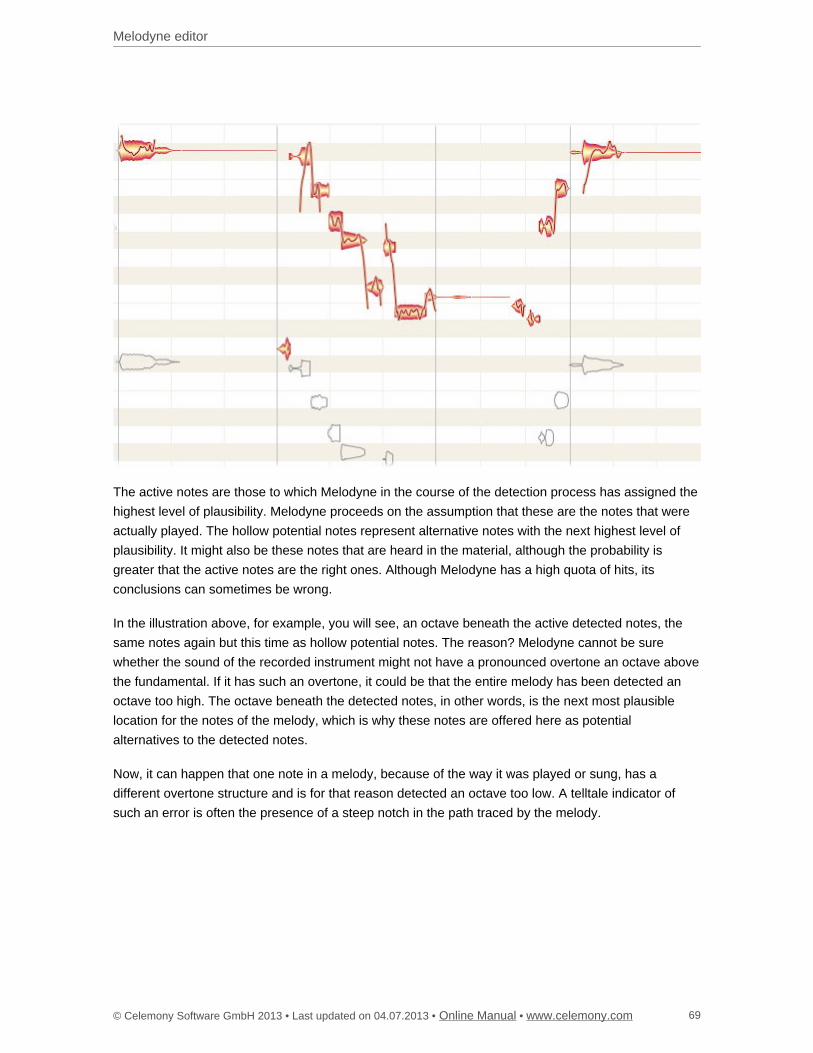
Melodyne editor
© Celemony Software GmbH 2013 • Last updated on 04.07.2013 • • Online Manual www.celemony.com 69
The active notes are those to which Melodyne in the course of the detection process has assigned the
highest level of plausibility. Melodyne proceeds on the assumption that these are the notes that were
actually played. The hollow potential notes represent alternative notes with the next highest level of
plausibility. It might also be these notes that are heard in the material, although the probability is
greater that the active notes are the right ones. Although Melodyne has a high quota of hits, its
conclusions can sometimes be wrong.
In the illustration above, for example, you will see, an octave beneath the active detected notes, the
same notes again but this time as hollow potential notes. The reason? Melodyne cannot be sure
whether the sound of the recorded instrument might not have a pronounced overtone an octave above
the fundamental. If it has such an overtone, it could be that the entire melody has been detected an
octave too high. The octave beneath the detected notes, in other words, is the next most plausible
location for the notes of the melody, which is why these notes are offered here as potential
alternatives to the detected notes.
Now, it can happen that one note in a melody, because of the way it was played or sung, has a
different overtone structure and is for that reason detected an octave too low. A telltale indicator of
such an error is often the presence of a steep notch in the path traced by the melody.
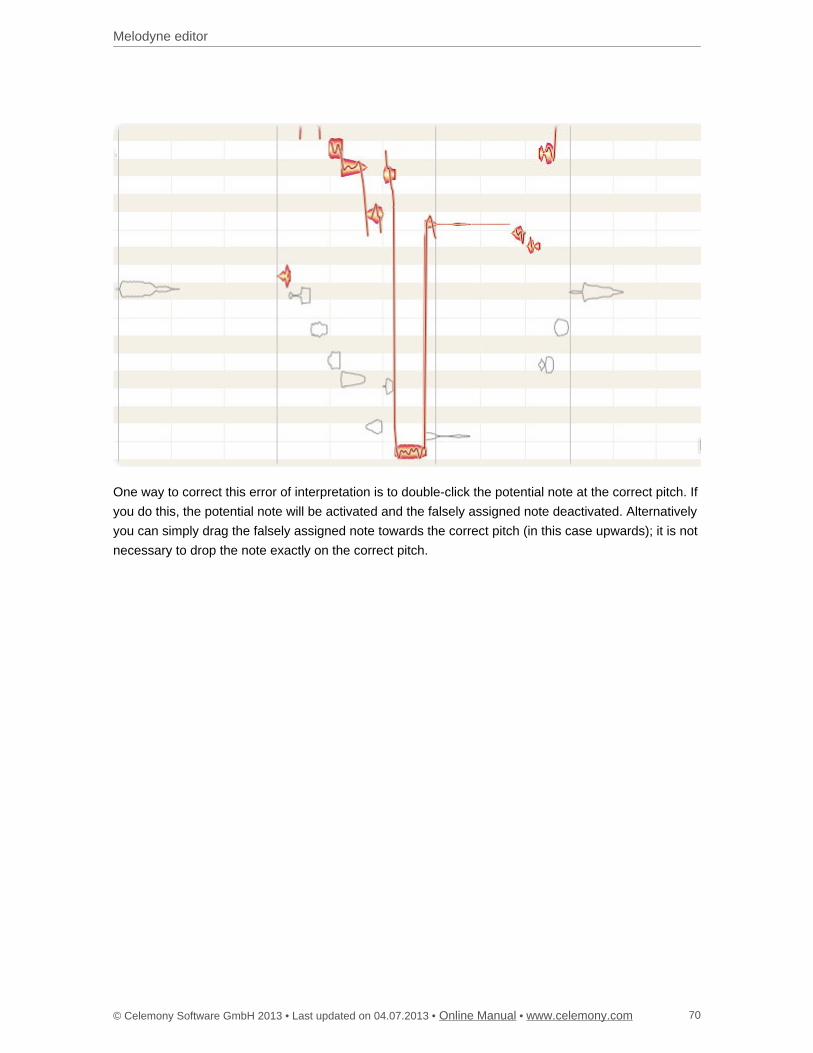
Melodyne editor
© Celemony Software GmbH 2013 • Last updated on 04.07.2013 • • Online Manual www.celemony.com 70
One way to correct this error of interpretation is to double-click the potential note at the correct pitch. If
you do this, the potential note will be activated and the falsely assigned note deactivated. Alternatively
you can simply drag the falsely assigned note towards the correct pitch (in this case upwards); it is not
necessary to drop the note exactly on the correct pitch.
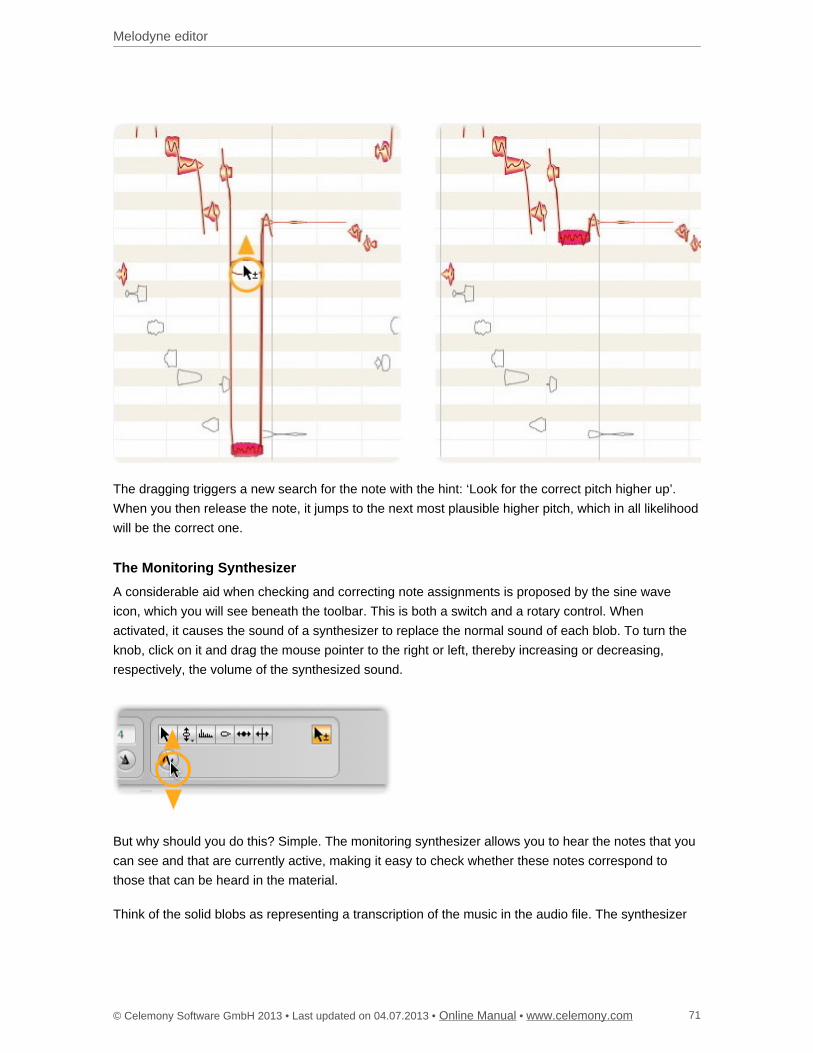
Melodyne editor
© Celemony Software GmbH 2013 • Last updated on 04.07.2013 • • Online Manual www.celemony.com 71
The dragging triggers a new search for the note with the hint: ‘Look for the correct pitch higher up’.
When you then release the note, it jumps to the next most plausible higher pitch, which in all likelihood
will be the correct one.
The Monitoring Synthesizer
A considerable aid when checking and correcting note assignments is proposed by the sine wave
icon, which you will see beneath the toolbar. This is both a switch and a rotary control. When
activated, it causes the sound of a synthesizer to replace the normal sound of each blob. To turn the
knob, click on it and drag the mouse pointer to the right or left, thereby increasing or decreasing,
respectively, the volume of the synthesized sound.
But why should you do this? Simple. The monitoring synthesizer allows you to hear the notes that you
can see and that are currently active, making it easy to check whether these notes correspond to
those that can be heard in the material.
Think of the solid blobs as representing a transcription of the music in the audio file. The synthesizer
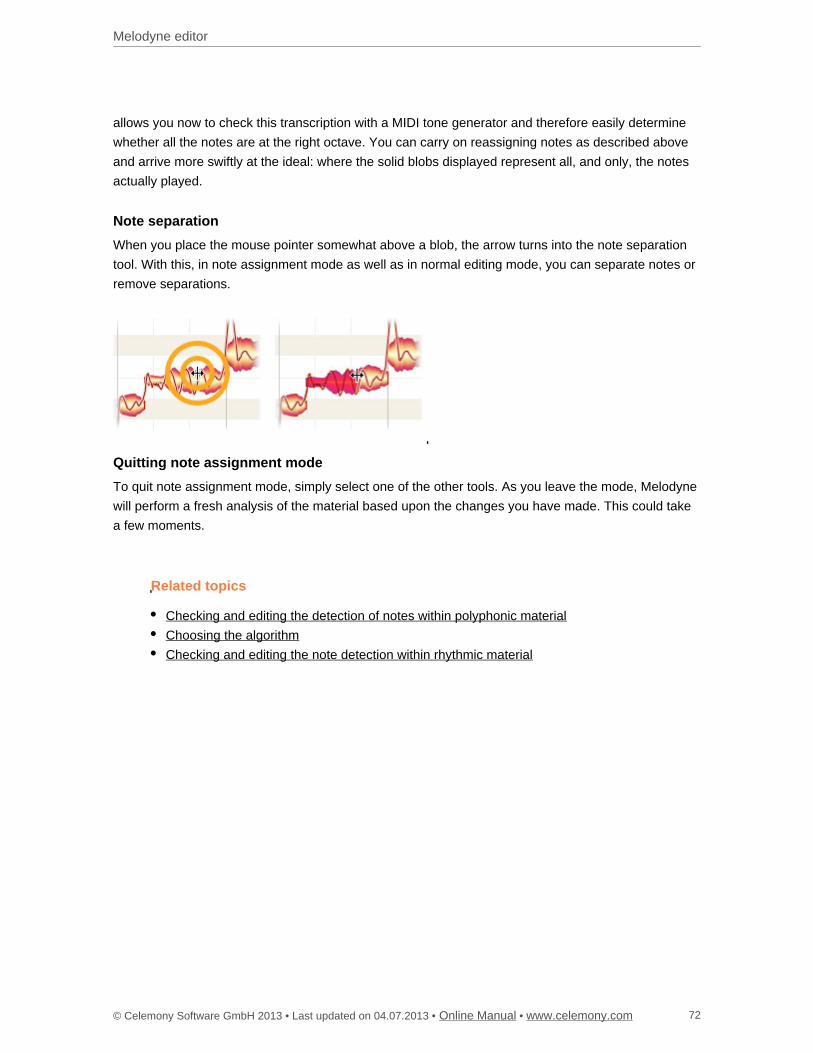
Melodyne editor
© Celemony Software GmbH 2013 • Last updated on 04.07.2013 • • Online Manual www.celemony.com 72
allows you now to check this transcription with a MIDI tone generator and therefore easily determine
whether all the notes are at the right octave. You can carry on reassigning notes as described above
and arrive more swiftly at the ideal: where the solid blobs displayed represent all, and only, the notes
actually played.
Note separation
When you place the mouse pointer somewhat above a blob, the arrow turns into the note separation
tool. With this, in note assignment mode as well as in normal editing mode, you can separate notes or
remove separations.
Quitting note assignment mode
To quit note assignment mode, simply select one of the other tools. As you leave the mode, Melodyne
will perform a fresh analysis of the material based upon the changes you have made. This could take
a few moments.
Related topics
Checking and editing the detection of notes within polyphonic material
Choosing the algorithm
Checking and editing the note detection within rhythmic material
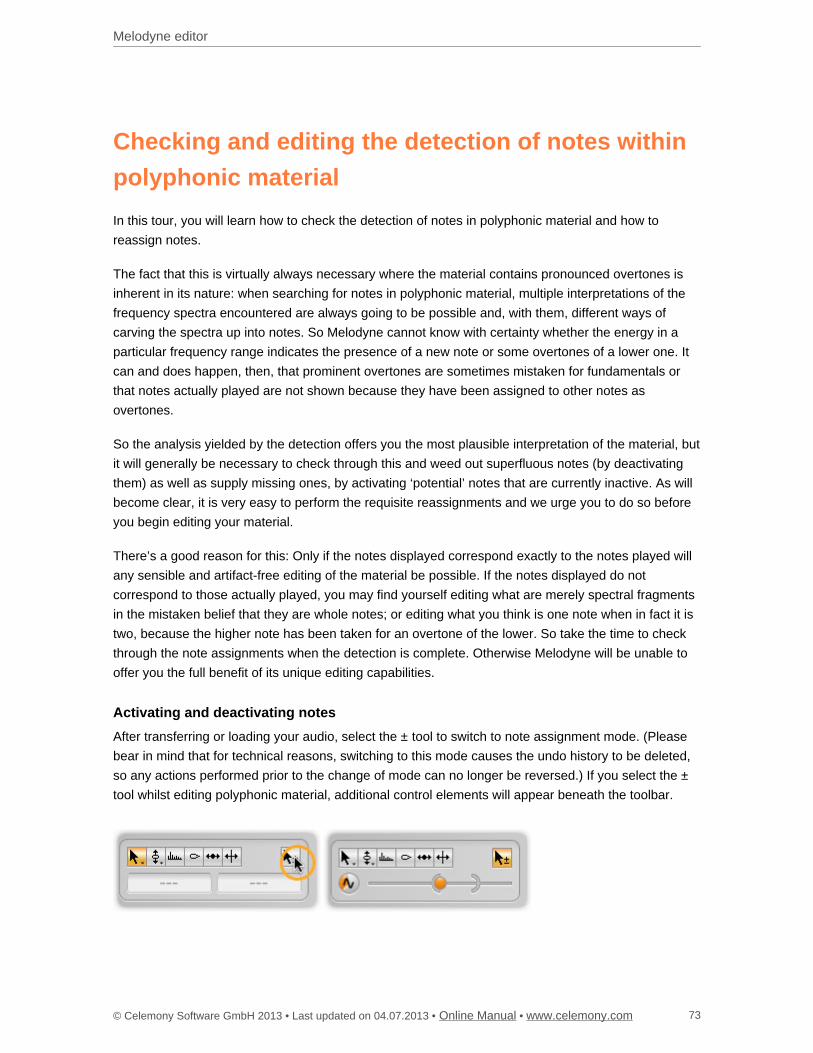
Melodyne editor
© Celemony Software GmbH 2013 • Last updated on 04.07.2013 • • Online Manual www.celemony.com 73
Checking and editing the detection of notes within
polyphonic material
In this tour, you will learn how to check the detection of notes in polyphonic material and how to
reassign notes.
The fact that this is virtually always necessary where the material contains pronounced overtones is
inherent in its nature: when searching for notes in polyphonic material, multiple interpretations of the
frequency spectra encountered are always going to be possible and, with them, different ways of
carving the spectra up into notes. So Melodyne cannot know with certainty whether the energy in a
particular frequency range indicates the presence of a new note or some overtones of a lower one. It
can and does happen, then, that prominent overtones are sometimes mistaken for fundamentals or
that notes actually played are not shown because they have been assigned to other notes as
overtones.
So the analysis yielded by the detection offers you the most plausible interpretation of the material, but
it will generally be necessary to check through this and weed out superfluous notes (by deactivating
them) as well as supply missing ones, by activating ‘potential’ notes that are currently inactive. As will
become clear, it is very easy to perform the requisite reassignments and we urge you to do so before
you begin editing your material.
There’s a good reason for this: Only if the notes displayed correspond exactly to the notes played will
any sensible and artifact-free editing of the material be possible. If the notes displayed do not
correspond to those actually played, you may find yourself editing what are merely spectral fragments
in the mistaken belief that they are whole notes; or editing what you think is one note when in fact it is
two, because the higher note has been taken for an overtone of the lower. So take the time to check
through the note assignments when the detection is complete. Otherwise Melodyne will be unable to
offer you the full benefit of its unique editing capabilities.
Activating and deactivating notes
After transferring or loading your audio, select the ± tool to switch to note assignment mode. (Please
bear in mind that for technical reasons, switching to this mode causes the undo history to be deleted,
so any actions performed prior to the change of mode can no longer be reversed.) If you select the ±
tool whilst editing polyphonic material, additional control elements will appear beneath the toolbar.
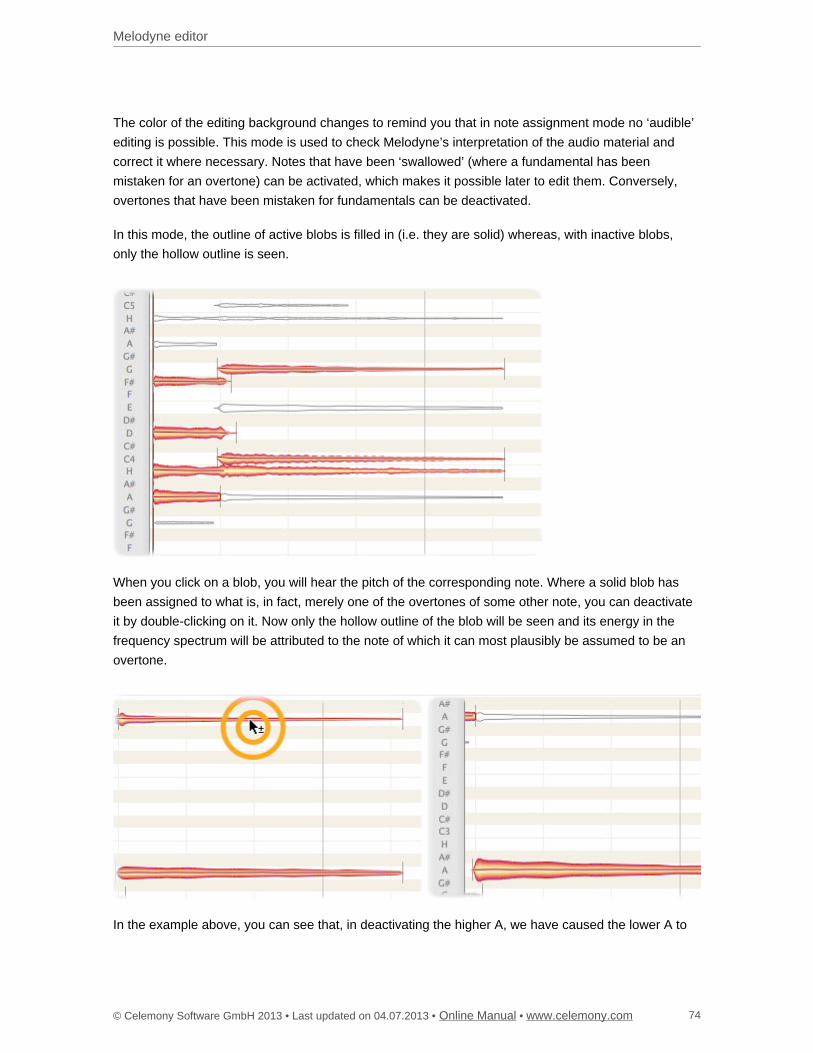
Melodyne editor
© Celemony Software GmbH 2013 • Last updated on 04.07.2013 • • Online Manual www.celemony.com 74
The color of the editing background changes to remind you that in note assignment mode no ‘audible’
editing is possible. This mode is used to check Melodyne’s interpretation of the audio material and
correct it where necessary. Notes that have been ‘swallowed’ (where a fundamental has been
mistaken for an overtone) can be activated, which makes it possible later to edit them. Conversely,
overtones that have been mistaken for fundamentals can be deactivated.
In this mode, the outline of active blobs is filled in (i.e. they are solid) whereas, with inactive blobs,
only the hollow outline is seen.
When you click on a blob, you will hear the pitch of the corresponding note. Where a solid blob has
been assigned to what is, in fact, merely one of the overtones of some other note, you can deactivate
it by double-clicking on it. Now only the hollow outline of the blob will be seen and its energy in the
frequency spectrum will be attributed to the note of which it can most plausibly be assumed to be an
overtone.
In the example above, you can see that, in deactivating the higher A, we have caused the lower A to
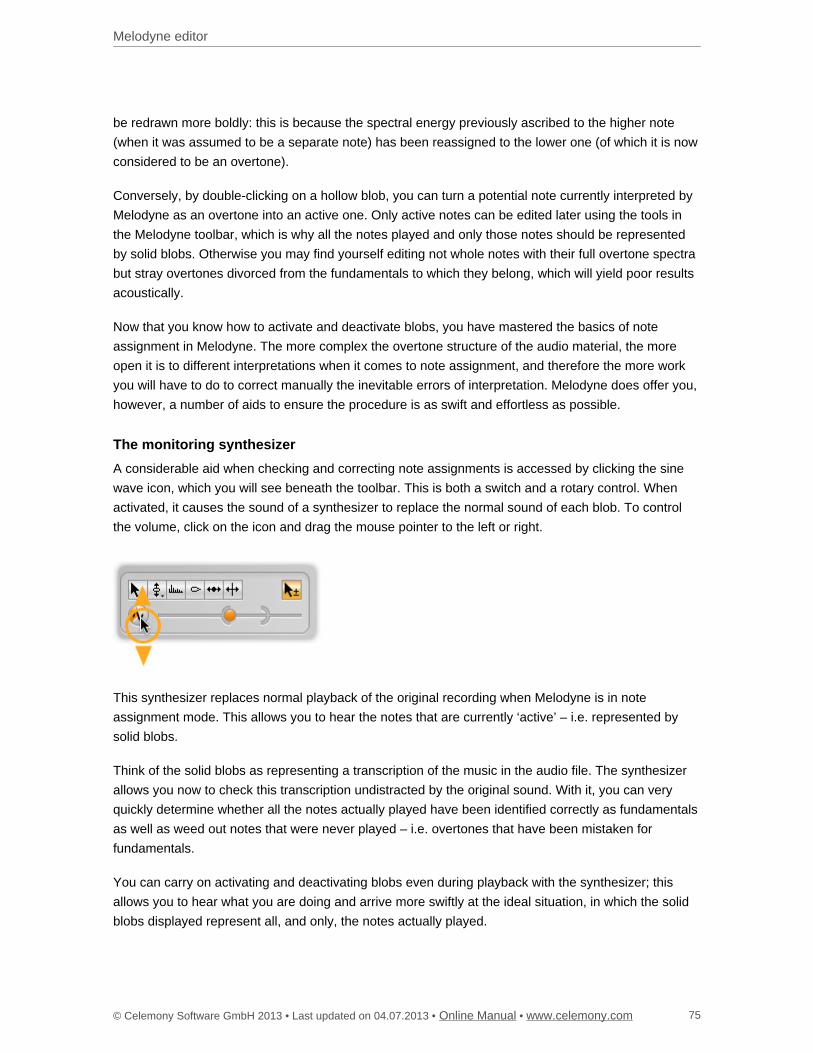
Melodyne editor
© Celemony Software GmbH 2013 • Last updated on 04.07.2013 • • Online Manual www.celemony.com 75
be redrawn more boldly: this is because the spectral energy previously ascribed to the higher note
(when it was assumed to be a separate note) has been reassigned to the lower one (of which it is now
considered to be an overtone).
Conversely, by double-clicking on a hollow blob, you can turn a potential note currently interpreted by
Melodyne as an overtone into an active one. Only active notes can be edited later using the tools in
the Melodyne toolbar, which is why all the notes played and only those notes should be represented
by solid blobs. Otherwise you may find yourself editing not whole notes with their full overtone spectra
but stray overtones divorced from the fundamentals to which they belong, which will yield poor results
acoustically.
Now that you know how to activate and deactivate blobs, you have mastered the basics of note
assignment in Melodyne. The more complex the overtone structure of the audio material, the more
open it is to different interpretations when it comes to note assignment, and therefore the more work
you will have to do to correct manually the inevitable errors of interpretation. Melodyne does offer you,
however, a number of aids to ensure the procedure is as swift and effortless as possible.
The monitoring synthesizer
A considerable aid when checking and correcting note assignments is accessed by clicking the sine
wave icon, which you will see beneath the toolbar. This is both a switch and a rotary control. When
activated, it causes the sound of a synthesizer to replace the normal sound of each blob. To control
the volume, click on the icon and drag the mouse pointer to the left or right.
This synthesizer replaces normal playback of the original recording when Melodyne is in note
assignment mode. This allows you to hear the notes that are currently ‘active’ – i.e. represented by
solid blobs.
Think of the solid blobs as representing a transcription of the music in the audio file. The synthesizer
allows you now to check this transcription undistracted by the original sound. With it, you can very
quickly determine whether all the notes actually played have been identified correctly as fundamentals
as well as weed out notes that were never played – i.e. overtones that have been mistaken for
fundamentals.
You can carry on activating and deactivating blobs even during playback with the synthesizer; this
allows you to hear what you are doing and arrive more swiftly at the ideal situation, in which the solid
blobs displayed represent all, and only, the notes actually played.
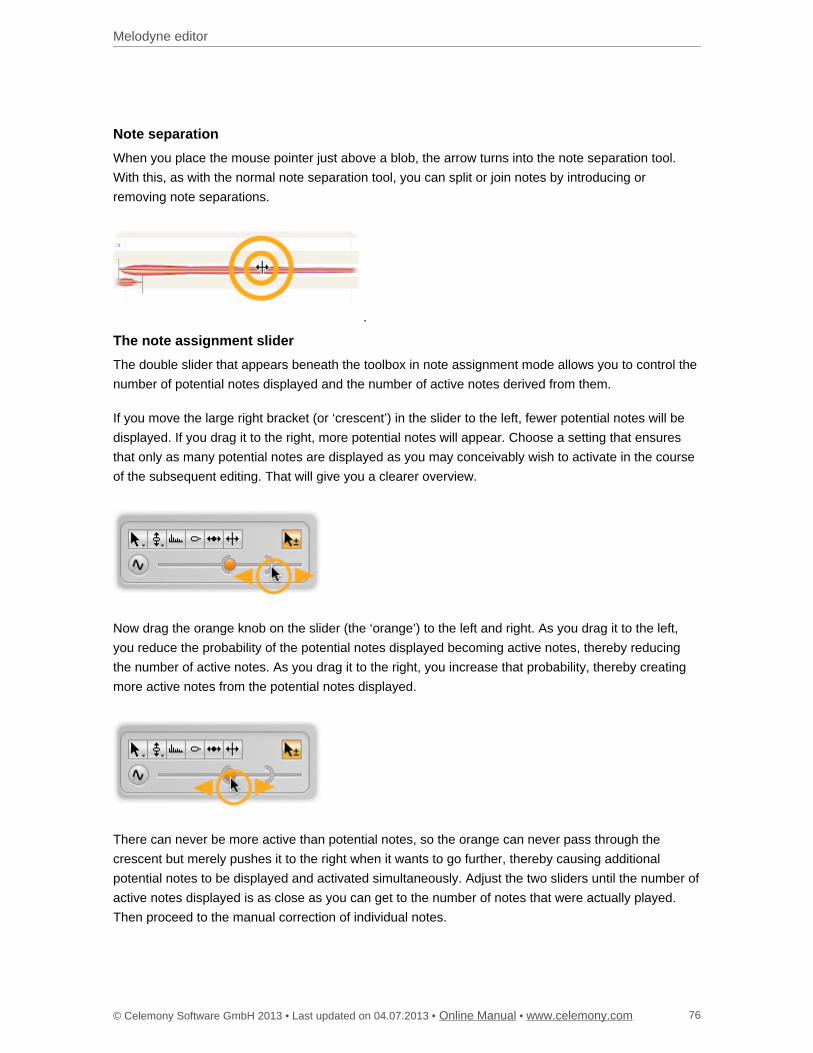
Melodyne editor
© Celemony Software GmbH 2013 • Last updated on 04.07.2013 • • Online Manual www.celemony.com 76
Note separation
When you place the mouse pointer just above a blob, the arrow turns into the note separation tool.
With this, as with the normal note separation tool, you can split or join notes by introducing or
removing note separations.
The note assignment slider
The double slider that appears beneath the toolbox in note assignment mode allows you to control the
number of potential notes displayed and the number of active notes derived from them.
If you move the large right bracket (or ‘crescent’) in the slider to the left, fewer potential notes will be
displayed. If you drag it to the right, more potential notes will appear. Choose a setting that ensures
that only as many potential notes are displayed as you may conceivably wish to activate in the course
of the subsequent editing. That will give you a clearer overview.
Now drag the orange knob on the slider (the ‘orange’) to the left and right. As you drag it to the left,
you reduce the probability of the potential notes displayed becoming active notes, thereby reducing
the number of active notes. As you drag it to the right, you increase that probability, thereby creating
more active notes from the potential notes displayed.
There can never be more active than potential notes, so the orange can never pass through the
crescent but merely pushes it to the right when it wants to go further, thereby causing additional
potential notes to be displayed and activated simultaneously. Adjust the two sliders until the number of
active notes displayed is as close as you can get to the number of notes that were actually played.
Then proceed to the manual correction of individual notes.
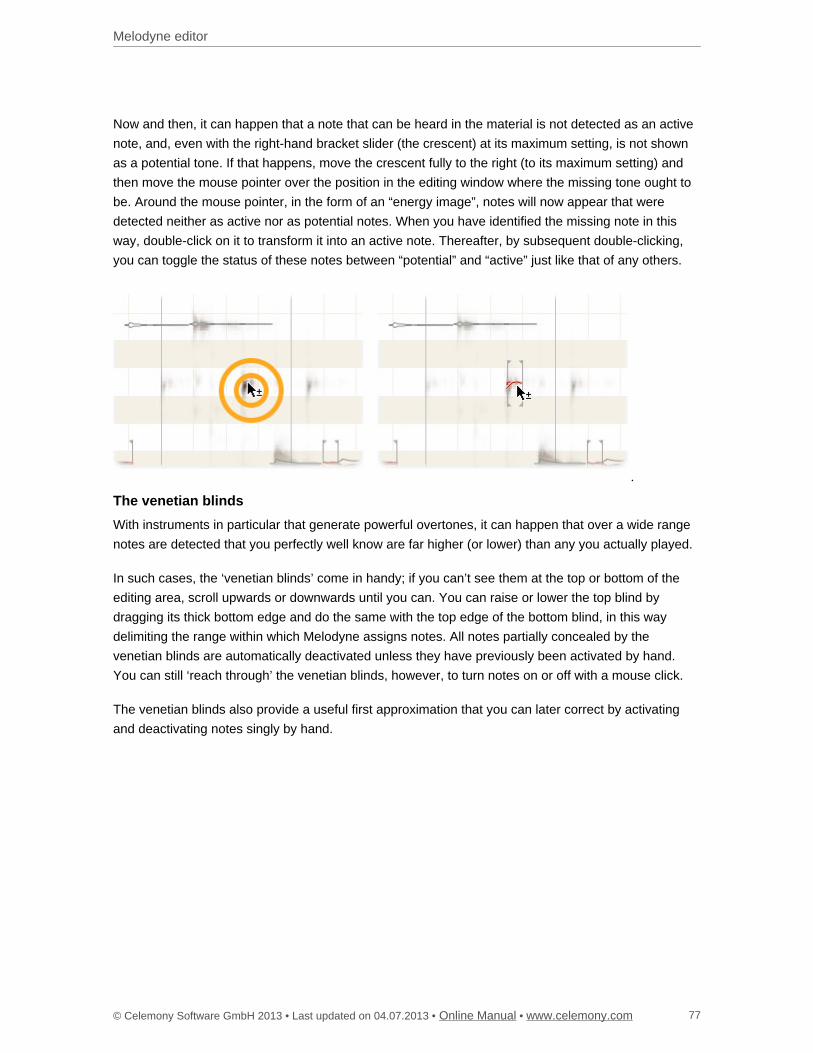
Melodyne editor
© Celemony Software GmbH 2013 • Last updated on 04.07.2013 • • Online Manual www.celemony.com 77
Now and then, it can happen that a note that can be heard in the material is not detected as an active
note, and, even with the right-hand bracket slider (the crescent) at its maximum setting, is not shown
as a potential tone. If that happens, move the crescent fully to the right (to its maximum setting) and
then move the mouse pointer over the position in the editing window where the missing tone ought to
be. Around the mouse pointer, in the form of an “energy image”, notes will now appear that were
detected neither as active nor as potential notes. When you have identified the missing note in this
way, double-click on it to transform it into an active note. Thereafter, by subsequent double-clicking,
you can toggle the status of these notes between “potential” and “active” just like that of any others.
The venetian blinds
With instruments in particular that generate powerful overtones, it can happen that over a wide range
notes are detected that you perfectly well know are far higher (or lower) than any you actually played.
In such cases, the ‘venetian blinds’ come in handy; if you can’t see them at the top or bottom of the
editing area, scroll upwards or downwards until you can. You can raise or lower the top blind by
dragging its thick bottom edge and do the same with the top edge of the bottom blind, in this way
delimiting the range within which Melodyne assigns notes. All notes partially concealed by the
venetian blinds are automatically deactivated unless they have previously been activated by hand.
You can still ‘reach through’ the venetian blinds, however, to turn notes on or off with a mouse click.
The venetian blinds also provide a useful first approximation that you can later correct by activating
and deactivating notes singly by hand.
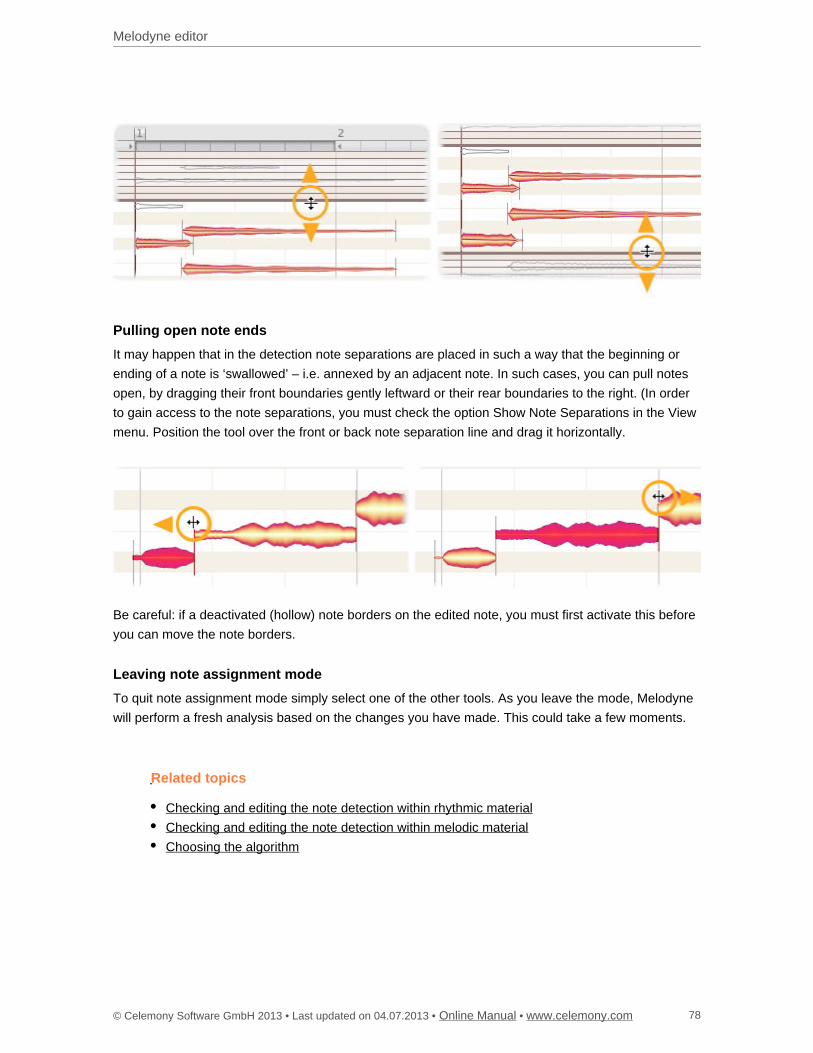
Melodyne editor
© Celemony Software GmbH 2013 • Last updated on 04.07.2013 • • Online Manual www.celemony.com 78
Pulling open note ends
It may happen that in the detection note separations are placed in such a way that the beginning or
ending of a note is ‘swallowed’ – i.e. annexed by an adjacent note. In such cases, you can pull notes
open, by dragging their front boundaries gently leftward or their rear boundaries to the right. (In order
to gain access to the note separations, you must check the option Show Note Separations in the View
menu. Position the tool over the front or back note separation line and drag it horizontally.
Be careful: if a deactivated (hollow) note borders on the edited note, you must first activate this before
you can move the note borders.
Leaving note assignment mode
To quit note assignment mode simply select one of the other tools. As you leave the mode, Melodyne
will perform a fresh analysis based on the changes you have made. This could take a few moments.
Related topics
Checking and editing the note detection within rhythmic material
Checking and editing the note detection within melodic material
Choosing the algorithm
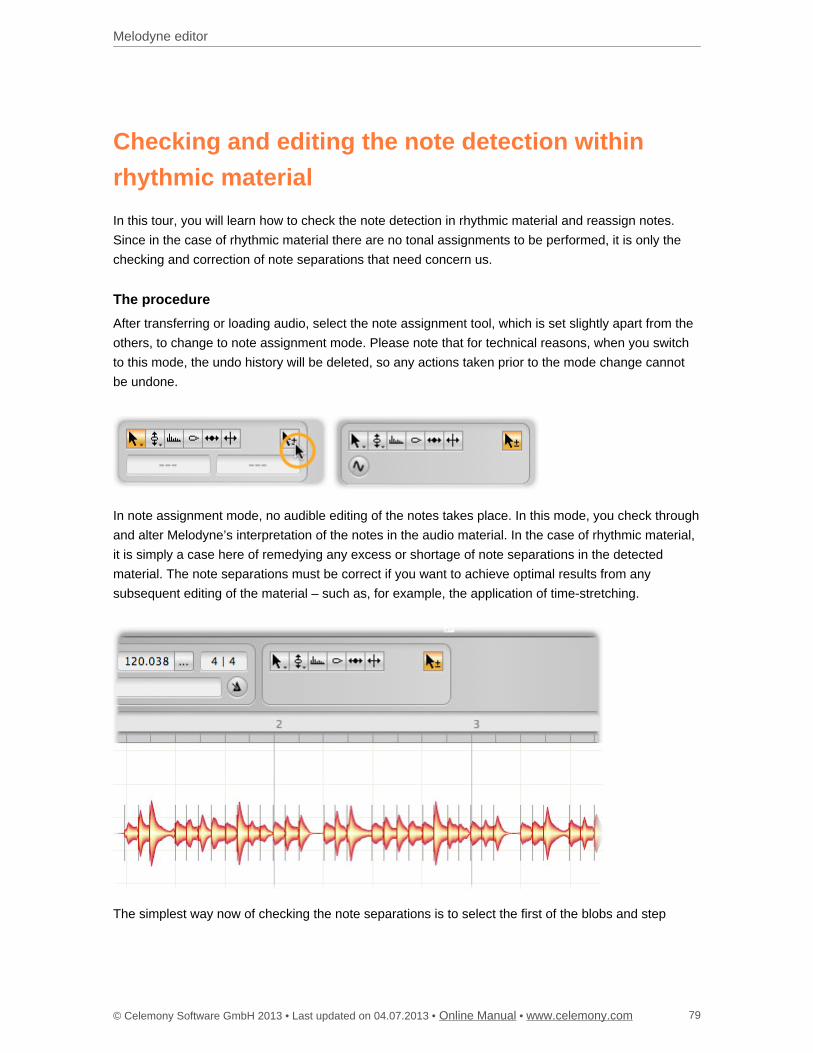
Melodyne editor
© Celemony Software GmbH 2013 • Last updated on 04.07.2013 • • Online Manual www.celemony.com 79
Checking and editing the note detection within
rhythmic material
In this tour, you will learn how to check the note detection in rhythmic material and reassign notes.
Since in the case of rhythmic material there are no tonal assignments to be performed, it is only the
checking and correction of note separations that need concern us.
The procedure
After transferring or loading audio, select the note assignment tool, which is set slightly apart from the
others, to change to note assignment mode. Please note that for technical reasons, when you switch
to this mode, the undo history will be deleted, so any actions taken prior to the mode change cannot
be undone.
In note assignment mode, no audible editing of the notes takes place. In this mode, you check through
and alter Melodyne’s interpretation of the notes in the audio material. In the case of rhythmic material,
it is simply a case here of remedying any excess or shortage of note separations in the detected
material. The note separations must be correct if you want to achieve optimal results from any
subsequent editing of the material – such as, for example, the application of time-stretching.
The simplest way now of checking the note separations is to select the first of the blobs and step
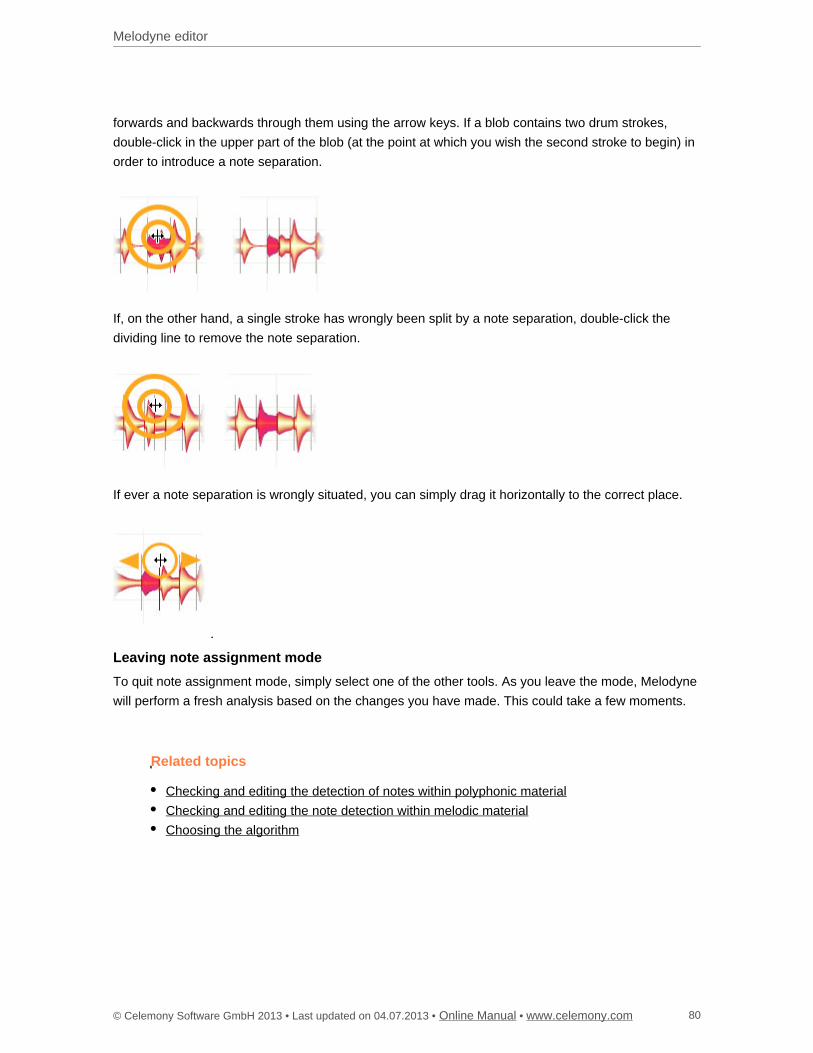
Melodyne editor
© Celemony Software GmbH 2013 • Last updated on 04.07.2013 • • Online Manual www.celemony.com 80
forwards and backwards through them using the arrow keys. If a blob contains two drum strokes,
double-click in the upper part of the blob (at the point at which you wish the second stroke to begin) in
order to introduce a note separation.
If, on the other hand, a single stroke has wrongly been split by a note separation, double-click the
dividing line to remove the note separation.
If ever a note separation is wrongly situated, you can simply drag it horizontally to the correct place.
Leaving note assignment mode
To quit note assignment mode, simply select one of the other tools. As you leave the mode, Melodyne
will perform a fresh analysis based on the changes you have made. This could take a few moments.
Related topics
Checking and editing the detection of notes within polyphonic material
Checking and editing the note detection within melodic material
Choosing the algorithm
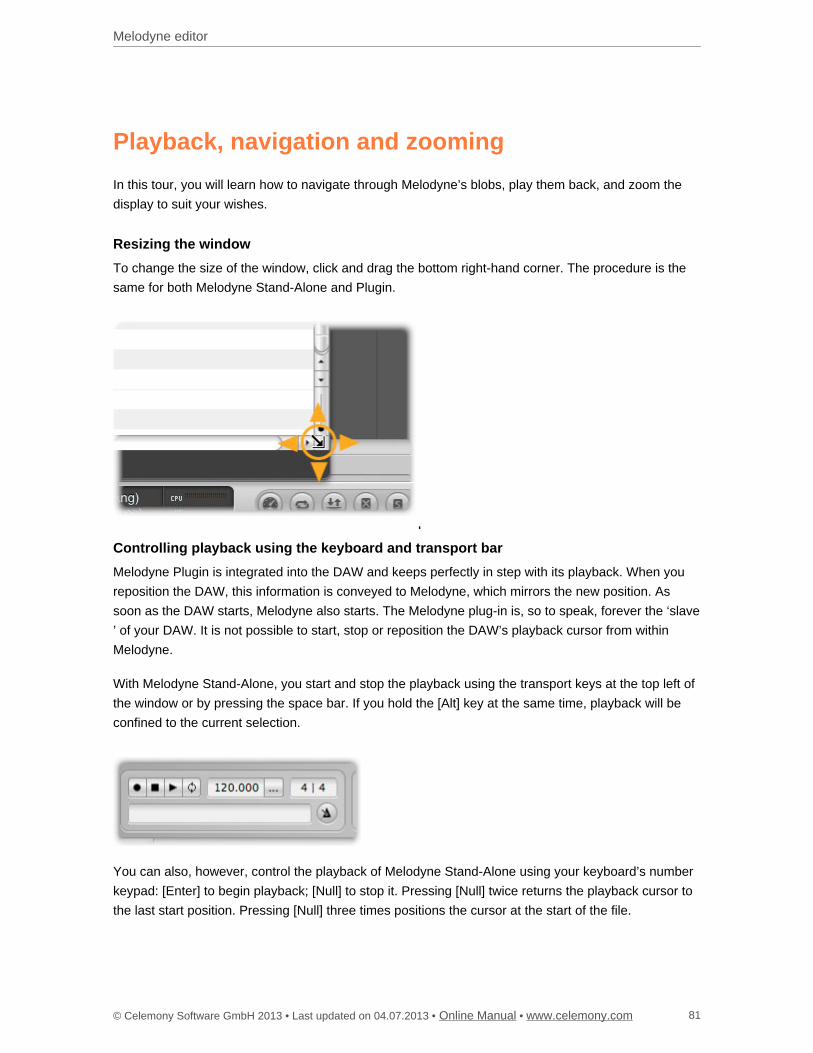
Melodyne editor
© Celemony Software GmbH 2013 • Last updated on 04.07.2013 • • Online Manual www.celemony.com 81
Playback, navigation and zooming
In this tour, you will learn how to navigate through Melodyne’s blobs, play them back, and zoom the
display to suit your wishes.
Resizing the window
To change the size of the window, click and drag the bottom right-hand corner. The procedure is the
same for both Melodyne Stand-Alone and Plugin.
Controlling playback using the keyboard and transport bar
Melodyne Plugin is integrated into the DAW and keeps perfectly in step with its playback. When you
reposition the DAW, this information is conveyed to Melodyne, which mirrors the new position. As
soon as the DAW starts, Melodyne also starts. The Melodyne plug-in is, so to speak, forever the ‘slave
’ of your DAW. It is not possible to start, stop or reposition the DAW’s playback cursor from within
Melodyne.
With Melodyne Stand-Alone, you start and stop the playback using the transport keys at the top left of
the window or by pressing the space bar. If you hold the [Alt] key at the same time, playback will be
confined to the current selection.
You can also, however, control the playback of Melodyne Stand-Alone using your keyboard’s number
keypad: [Enter] to begin playback; [Null] to stop it. Pressing [Null] twice returns the playback cursor to
the last start position. Pressing [Null] three times positions the cursor at the start of the file.
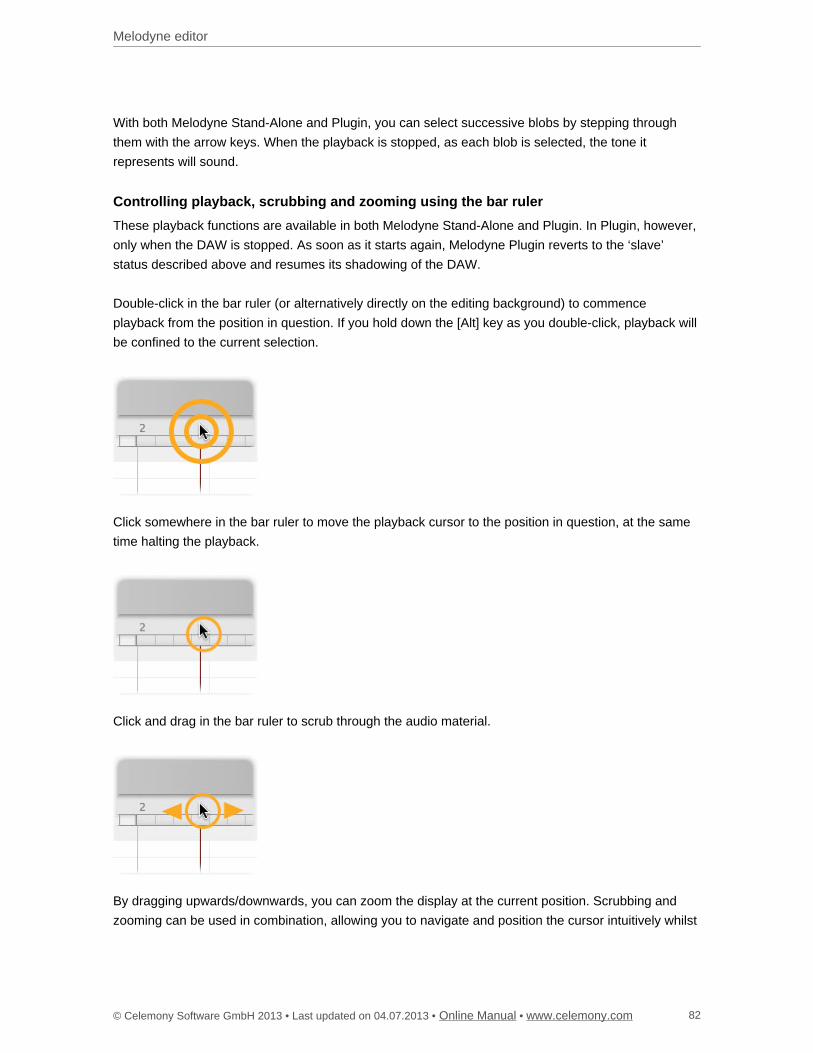
Melodyne editor
© Celemony Software GmbH 2013 • Last updated on 04.07.2013 • • Online Manual www.celemony.com 82
With both Melodyne Stand-Alone and Plugin, you can select successive blobs by stepping through
them with the arrow keys. When the playback is stopped, as each blob is selected, the tone it
represents will sound.
Controlling playback, scrubbing and zooming using the bar ruler
These playback functions are available in both Melodyne Stand-Alone and Plugin. In Plugin, however,
only when the DAW is stopped. As soon as it starts again, Melodyne Plugin reverts to the ‘slave’
status described above and resumes its shadowing of the DAW.
Double-click in the bar ruler (or alternatively directly on the editing background) to commence
playback from the position in question. If you hold down the [Alt] key as you double-click, playback will
be confined to the current selection.
Click somewhere in the bar ruler to move the playback cursor to the position in question, at the same
time halting the playback.
Click and drag in the bar ruler to scrub through the audio material.
By dragging upwards/downwards, you can zoom the display at the current position. Scrubbing and
zooming can be used in combination, allowing you to navigate and position the cursor intuitively whilst
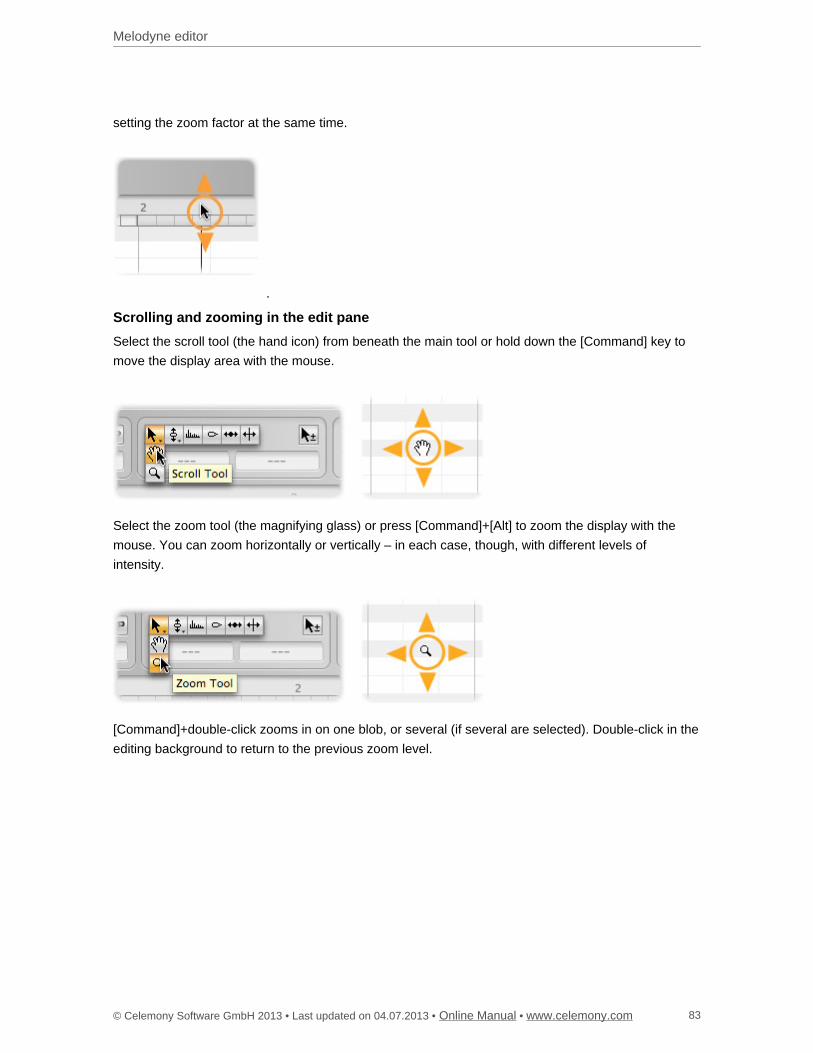
Melodyne editor
© Celemony Software GmbH 2013 • Last updated on 04.07.2013 • • Online Manual www.celemony.com 83
setting the zoom factor at the same time.
Scrolling and zooming in the edit pane
Select the scroll tool (the hand icon) from beneath the main tool or hold down the [Command] key to
move the display area with the mouse.
Select the zoom tool (the magnifying glass) or press [Command]+[Alt] to zoom the display with the
mouse. You can zoom horizontally or vertically – in each case, though, with different levels of
intensity.
[Command]+double-click zooms in on one blob, or several (if several are selected). Double-click in the
editing background to return to the previous zoom level.
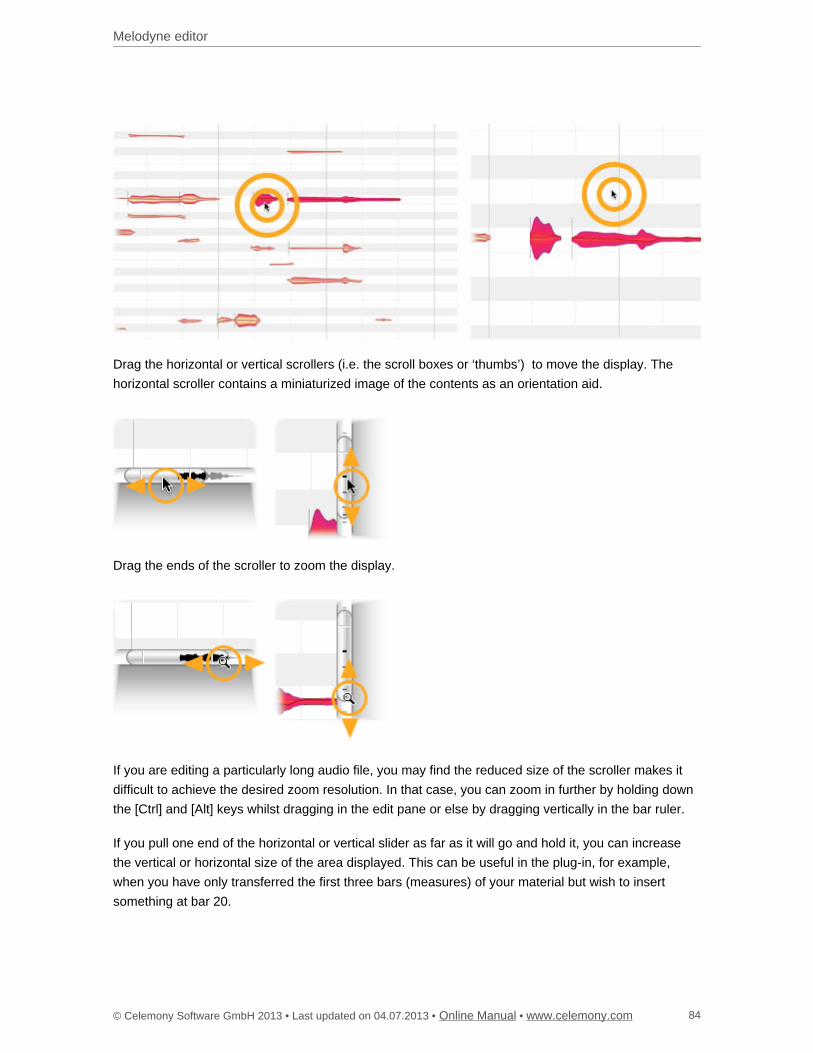
Melodyne editor
© Celemony Software GmbH 2013 • Last updated on 04.07.2013 • • Online Manual www.celemony.com 84
Drag the horizontal or vertical scrollers (i.e. the scroll boxes or ‘thumbs’) to move the display. The
horizontal scroller contains a miniaturized image of the contents as an orientation aid.
Drag the ends of the scroller to zoom the display.
If you are editing a particularly long audio file, you may find the reduced size of the scroller makes it
difficult to achieve the desired zoom resolution. In that case, you can zoom in further by holding down
the [Ctrl] and [Alt] keys whilst dragging in the edit pane or else by dragging vertically in the bar ruler.
If you pull one end of the horizontal or vertical slider as far as it will go and hold it, you can increase
the vertical or horizontal size of the area displayed. This can be useful in the plug-in, for example,
when you have only transferred the first three bars (measures) of your material but wish to insert
something at bar 20.
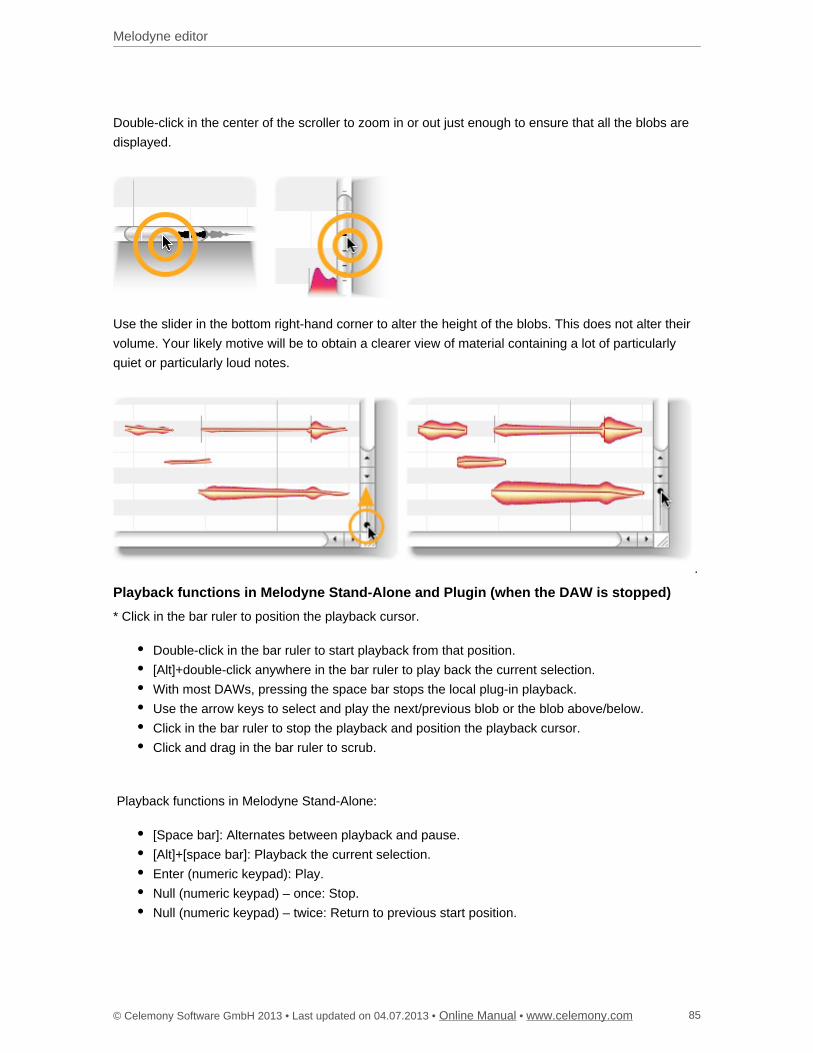
Melodyne editor
© Celemony Software GmbH 2013 • Last updated on 04.07.2013 • • Online Manual www.celemony.com 85
Double-click in the center of the scroller to zoom in or out just enough to ensure that all the blobs are
displayed.
Use the slider in the bottom right-hand corner to alter the height of the blobs. This does not alter their
volume. Your likely motive will be to obtain a clearer view of material containing a lot of particularly
quiet or particularly loud notes.
Playback functions in Melodyne Stand-Alone and Plugin (when the DAW is stopped)
* Click in the bar ruler to position the playback cursor.
Double-click in the bar ruler to start playback from that position.
[Alt]+double-click anywhere in the bar ruler to play back the current selection.
With most DAWs, pressing the space bar stops the local plug-in playback.
Use the arrow keys to select and play the next/previous blob or the blob above/below.
Click in the bar ruler to stop the playback and position the playback cursor.
Click and drag in the bar ruler to scrub.
Playback functions in Melodyne Stand-Alone:
[Space bar]: Alternates between playback and pause.
[Alt]+[space bar]: Playback the current selection.
Enter (numeric keypad): Play.
Null (numeric keypad) – once: Stop.
Null (numeric keypad) – twice: Return to previous start position.
Melodyne editor
© Celemony Software GmbH 2013 • Last updated on 04.07.2013 • • Online Manual www.celemony.com 86
Null (numeric keypad) – three times: Return to the beginning of the file.
Navigation and zoom functions
To resize the window (also in Plugin), drag the bottom right corner
Hold down the [Command] key and drag the editing background to move the area displayed
Use the mouse wheel to scroll up and down or else (holding the [Shift] key) left and right
[Command]+[Alt]+drag in the editing area to zoom the display horizontally and/or vertically
Drag vertically in the bar ruler to zoom in on the area indicated
Press [Command]+[Alt] and use the mouse wheel to zoom both axes simultaneously
Press [Command] and double-click to zoom in on a blob or the current selection of blobs
[Command]+double-click in the editing background to restore the previous zoom setting
Drag the scrollers to move the display horizontally or vertically
Drag the ends of the scroller to zoom the display horizontally or vertically
Pull the left- or right-hand ends of the horizontal slider as far as they will go to increase the
length of the section displayed (important in the plug-in e.g. when you have only transferred the
first four bars and are able to navigate only in this area but wish to insert something at bar 20)
Double-click the scrollers to zoom horizontally or vertically on all notes
The slider in the bottom right-hand corner governs the height of the blobs
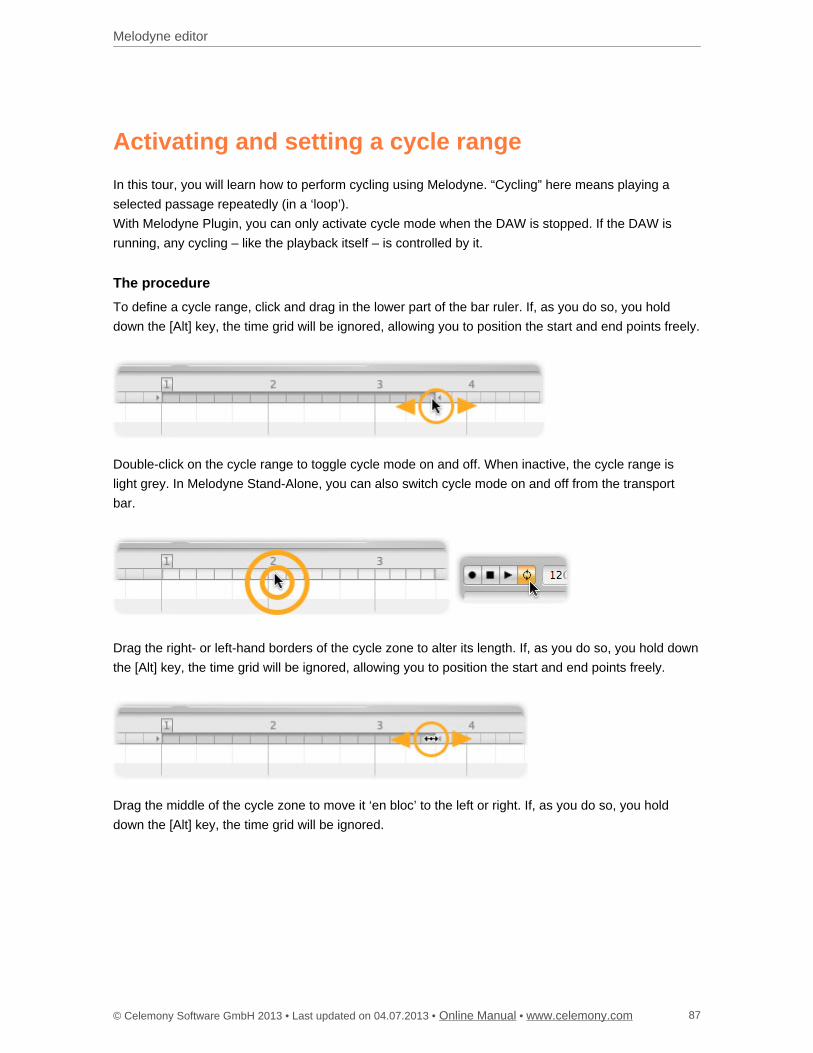
Melodyne editor
© Celemony Software GmbH 2013 • Last updated on 04.07.2013 • • Online Manual www.celemony.com 87
Activating and setting a cycle range
In this tour, you will learn how to perform cycling using Melodyne. “Cycling” here means playing a
selected passage repeatedly (in a ‘loop’).
With Melodyne Plugin, you can only activate cycle mode when the DAW is stopped. If the DAW is
running, any cycling – like the playback itself – is controlled by it.
The procedure
To define a cycle range, click and drag in the lower part of the bar ruler. If, as you do so, you hold
down the [Alt] key, the time grid will be ignored, allowing you to position the start and end points freely.
Double-click on the cycle range to toggle cycle mode on and off. When inactive, the cycle range is
light grey. In Melodyne Stand-Alone, you can also switch cycle mode on and off from the transport
bar.
Drag the right- or left-hand borders of the cycle zone to alter its length. If, as you do so, you hold down
the [Alt] key, the time grid will be ignored, allowing you to position the start and end points freely.
Drag the middle of the cycle zone to move it ‘en bloc’ to the left or right. If, as you do so, you hold
down the [Alt] key, the time grid will be ignored.

Melodyne editor
© Celemony Software GmbH 2013 • Last updated on 04.07.2013 • • Online Manual www.celemony.com 88
If you [Shift]+click near either of the cycle borders, it will move to the designated position. If, as you do
so, you hold down the [Alt] key, the time grid will be ignored.
To move the cycle locators to the beginning and end of the current blob selection (snapping to the
grid) hold the [Shift] key and double-click anywhere in the cycle zone. If you hold the [Alt] key as well
as the [Shift] key as you do this, instead of snapping to the grid, the locators will be placed at the
beginning of the first, and end of the last, blob in the selection.
Related topics
Time grid selection
Matching Melodyne Stand-Alone's time grid to the audio
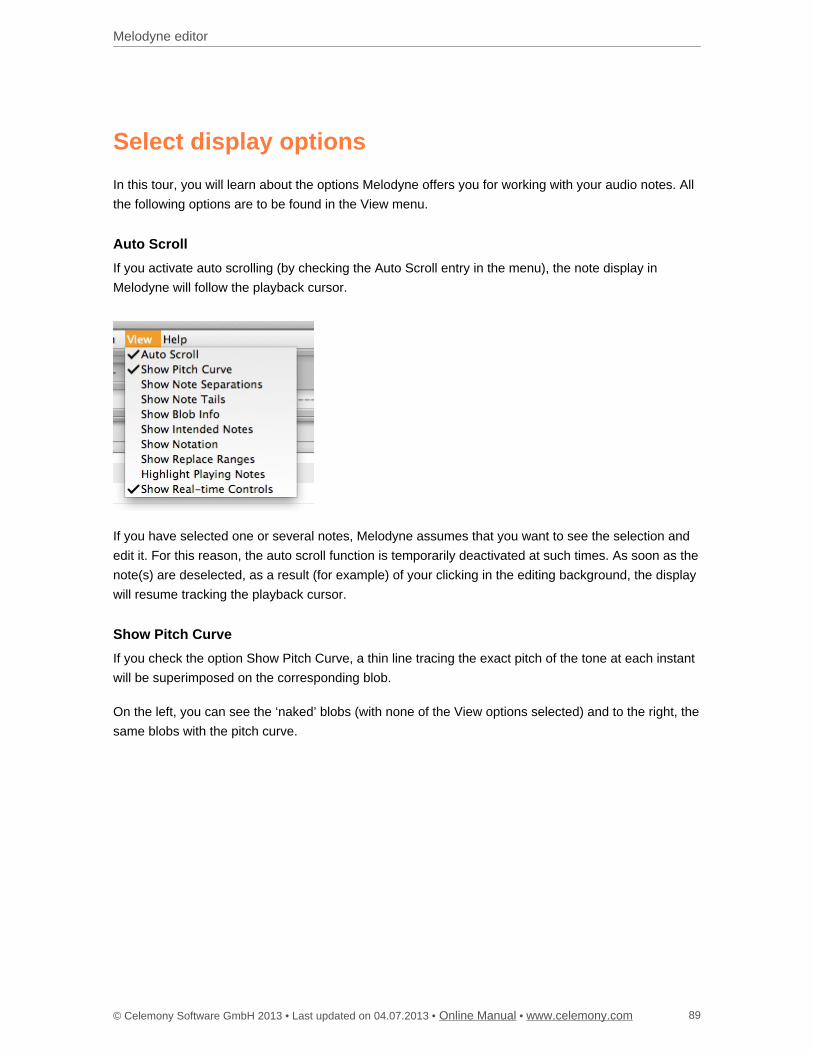
Melodyne editor
© Celemony Software GmbH 2013 • Last updated on 04.07.2013 • • Online Manual www.celemony.com 89
Select display options
In this tour, you will learn about the options Melodyne offers you for working with your audio notes. All
the following options are to be found in the View menu.
Auto Scroll
If you activate auto scrolling (by checking the Auto Scroll entry in the menu), the note display in
Melodyne will follow the playback cursor.
If you have selected one or several notes, Melodyne assumes that you want to see the selection and
edit it. For this reason, the auto scroll function is temporarily deactivated at such times. As soon as the
note(s) are deselected, as a result (for example) of your clicking in the editing background, the display
will resume tracking the playback cursor.
Show Pitch Curve
If you check the option Show Pitch Curve, a thin line tracing the exact pitch of the tone at each instant
will be superimposed on the corresponding blob.
On the left, you can see the ‘naked’ blobs (with none of the View options selected) and to the right, the
same blobs with the pitch curve.
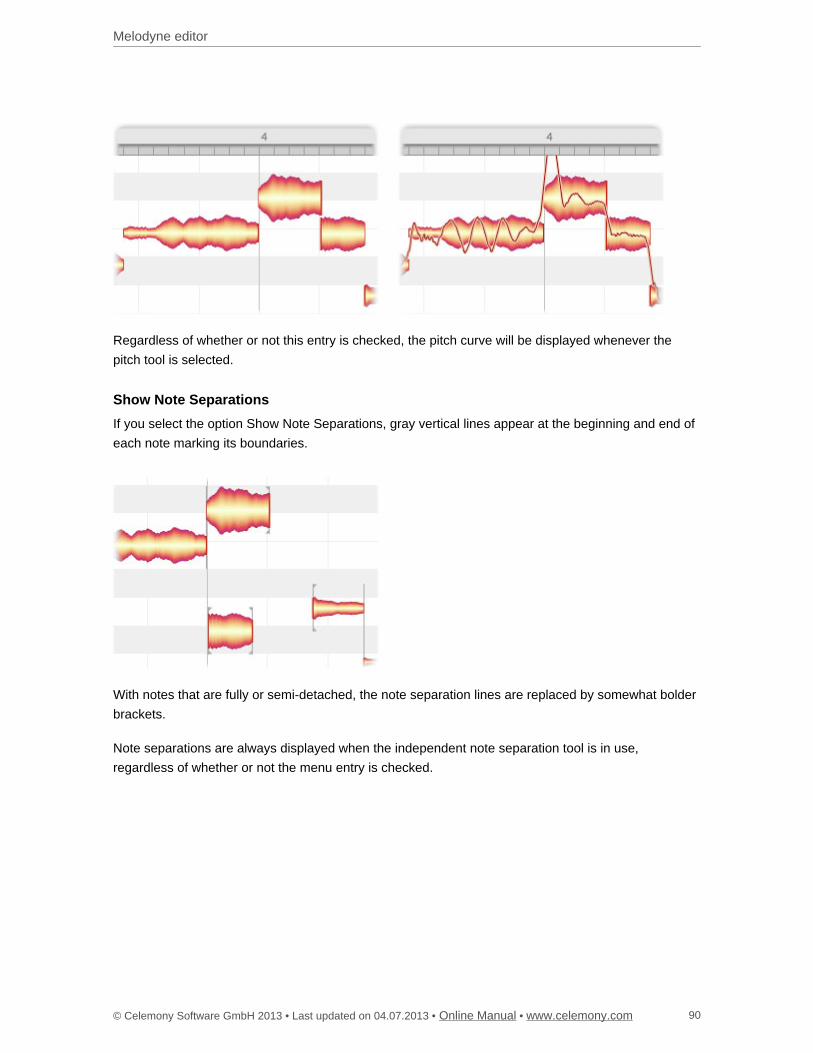
Melodyne editor
© Celemony Software GmbH 2013 • Last updated on 04.07.2013 • • Online Manual www.celemony.com 90
Regardless of whether or not this entry is checked, the pitch curve will be displayed whenever the
pitch tool is selected.
Show Note Separations
If you select the option Show Note Separations, gray vertical lines appear at the beginning and end of
each note marking its boundaries.
With notes that are fully or semi-detached, the note separation lines are replaced by somewhat bolder
brackets.
Note separations are always displayed when the independent note separation tool is in use,
regardless of whether or not the menu entry is checked.

Melodyne editor
© Celemony Software GmbH 2013 • Last updated on 04.07.2013 • • Online Manual www.celemony.com 91
Show Note Tails
In the detection and display of notes, Melodyne editor draws a distinction between the notes
themselves and their tails – notes being the events of musical relevance and tails depicting the
‘non-musically-determined fading-away of the sound’. The share of the reverberation ascribed to a
given tone, for example, is reflected in its tail. The Show Note Tails option allows you to decide
whether the reverberative phase of notes should be displayed or hidden. This is likely to depend upon
whether you prefer to concentrate upon their musical or their acoustic aspects.
If the tail is not displayed, the end of the musically relevant part of the note provides the ‘handle’ you
can drag with the timing tool to make the note longer or shorter. Any reverberation present will in this
case automatically be governed by the changes made. This display option serves, where there is a
great deal of overlapping of notes, to provide a clearer overview of the musical context.
If the note tail is displayed (assuming it has one), it is this that provides the handle for the timing tool.
Show Note Tails is the option most suitable when as authentic a picture as possible of the tones
actually heard – including any temporal overlapping attributable to reverberation or some other cause
– is what is sought.
Show Blob Info
With the option Show Blob Info, you can elect to show or hide a variety of display elements designed
to facilitate working with individual tones.
The most striking of these elements is an additional pitch ruler that appears directly in front of any note
over which you move the mouse pointer. Within the blob itself, thin red lines mark the drag zones of
the context-sensitive tools.
If you drag a blob when the Show Blob Info option is checked, a vertical line also appears in the bar
ruler aligned with the exact start of the note. This makes more precise positioning possible.
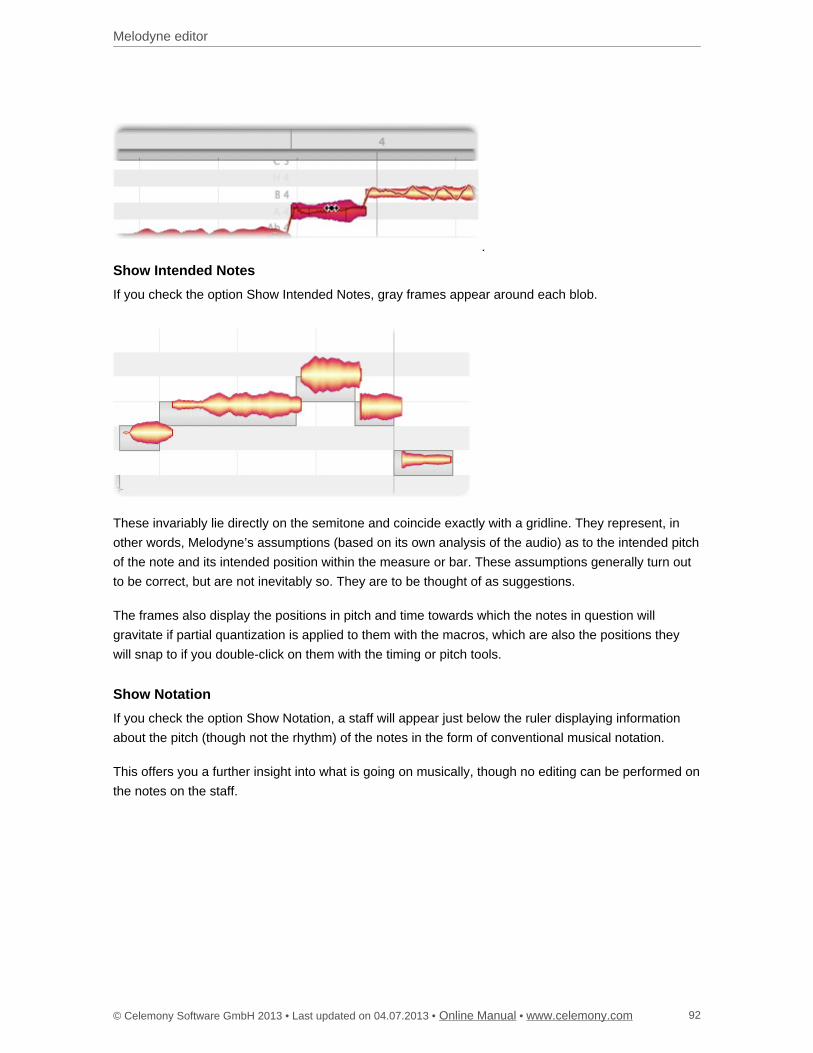
Melodyne editor
© Celemony Software GmbH 2013 • Last updated on 04.07.2013 • • Online Manual www.celemony.com 92
Show Intended Notes
If you check the option Show Intended Notes, gray frames appear around each blob.
These invariably lie directly on the semitone and coincide exactly with a gridline. They represent, in
other words, Melodyne’s assumptions (based on its own analysis of the audio) as to the intended pitch
of the note and its intended position within the measure or bar. These assumptions generally turn out
to be correct, but are not inevitably so. They are to be thought of as suggestions.
The frames also display the positions in pitch and time towards which the notes in question will
gravitate if partial quantization is applied to them with the macros, which are also the positions they
will snap to if you double-click on them with the timing or pitch tools.
Show Notation
If you check the option Show Notation, a staff will appear just below the ruler displaying information
about the pitch (though not the rhythm) of the notes in the form of conventional musical notation.
This offers you a further insight into what is going on musically, though no editing can be performed on
the notes on the staff.
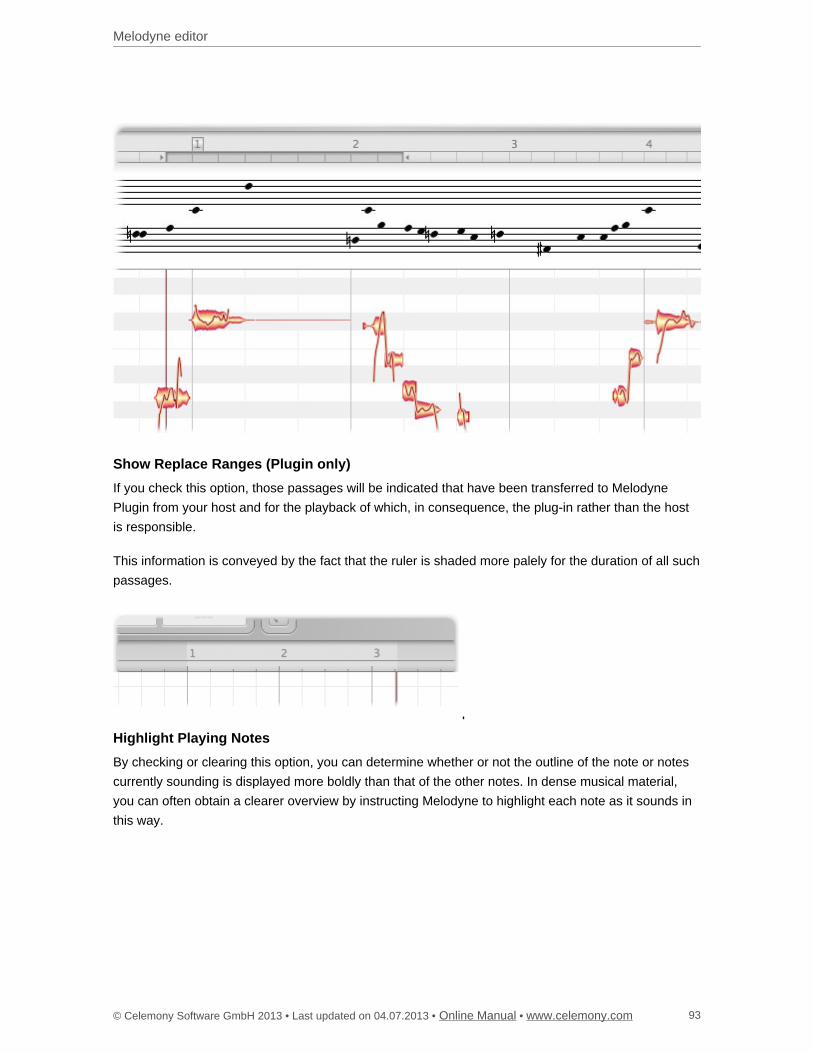
Melodyne editor
© Celemony Software GmbH 2013 • Last updated on 04.07.2013 • • Online Manual www.celemony.com 93
Show Replace Ranges (Plugin only)
If you check this option, those passages will be indicated that have been transferred to Melodyne
Plugin from your host and for the playback of which, in consequence, the plug-in rather than the host
is responsible.
This information is conveyed by the fact that the ruler is shaded more palely for the duration of all such
passages.
Highlight Playing Notes
By checking or clearing this option, you can determine whether or not the outline of the note or notes
currently sounding is displayed more boldly than that of the other notes. In dense musical material,
you can often obtain a clearer overview by instructing Melodyne to highlight each note as it sounds in
this way.
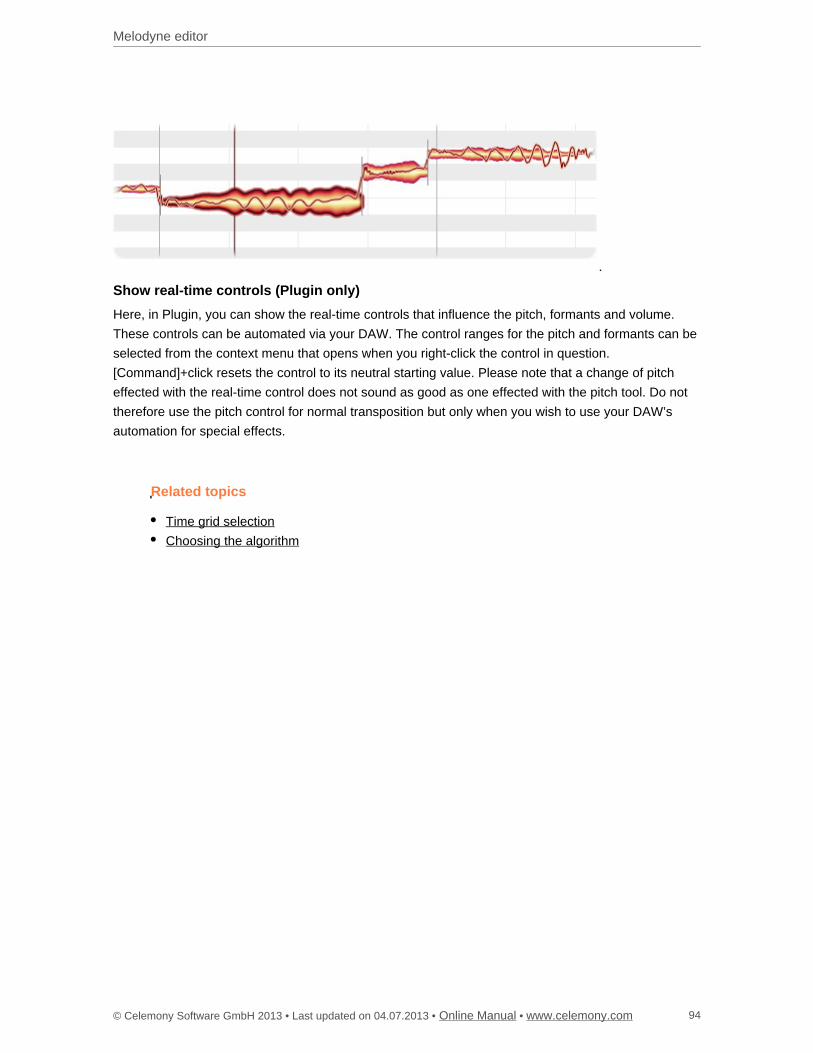
Melodyne editor
© Celemony Software GmbH 2013 • Last updated on 04.07.2013 • • Online Manual www.celemony.com 94
Show real-time controls (Plugin only)
Here, in Plugin, you can show the real-time controls that influence the pitch, formants and volume.
These controls can be automated via your DAW. The control ranges for the pitch and formants can be
selected from the context menu that opens when you right-click the control in question.
[Command]+click resets the control to its neutral starting value. Please note that a change of pitch
effected with the real-time control does not sound as good as one effected with the pitch tool. Do not
therefore use the pitch control for normal transposition but only when you wish to use your DAW’s
automation for special effects.
Related topics
Time grid selection
Choosing the algorithm
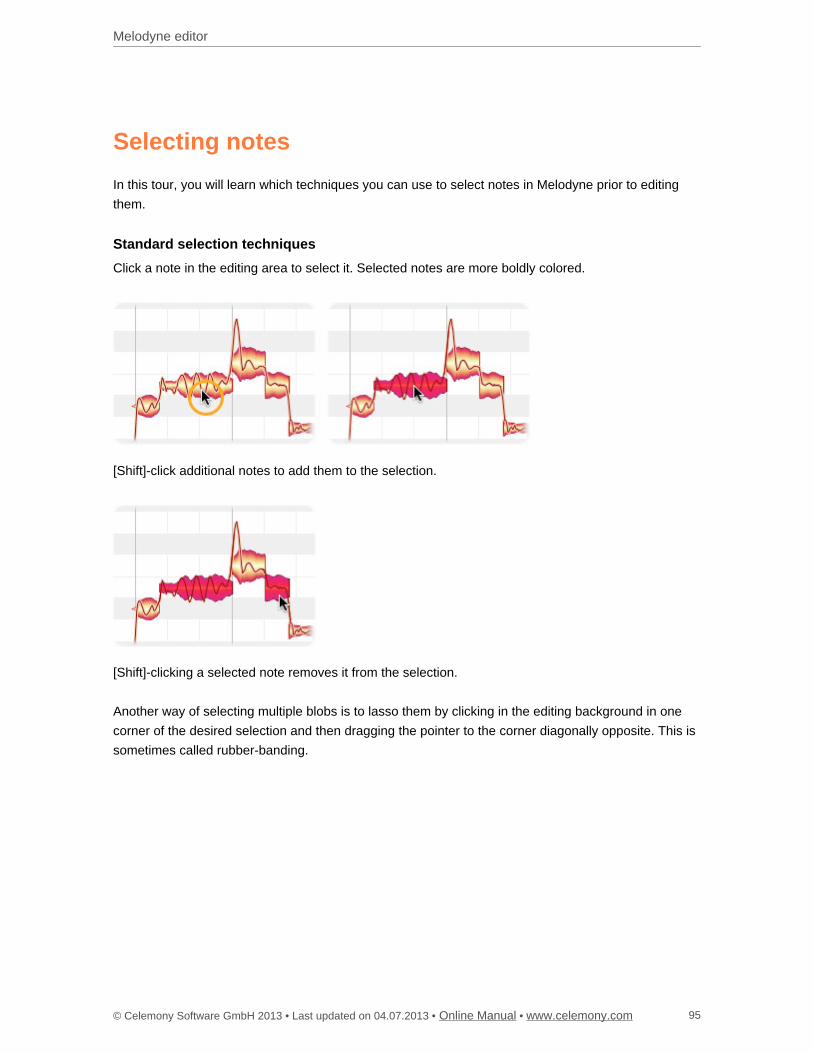
Melodyne editor
© Celemony Software GmbH 2013 • Last updated on 04.07.2013 • • Online Manual www.celemony.com 95
Selecting notes
In this tour, you will learn which techniques you can use to select notes in Melodyne prior to editing
them.
Standard selection techniques
Click a note in the editing area to select it. Selected notes are more boldly colored.
[Shift]-click additional notes to add them to the selection.
[Shift]-clicking a selected note removes it from the selection.
Another way of selecting multiple blobs is to lasso them by clicking in the editing background in one
corner of the desired selection and then dragging the pointer to the corner diagonally opposite. This is
sometimes called rubber-banding.
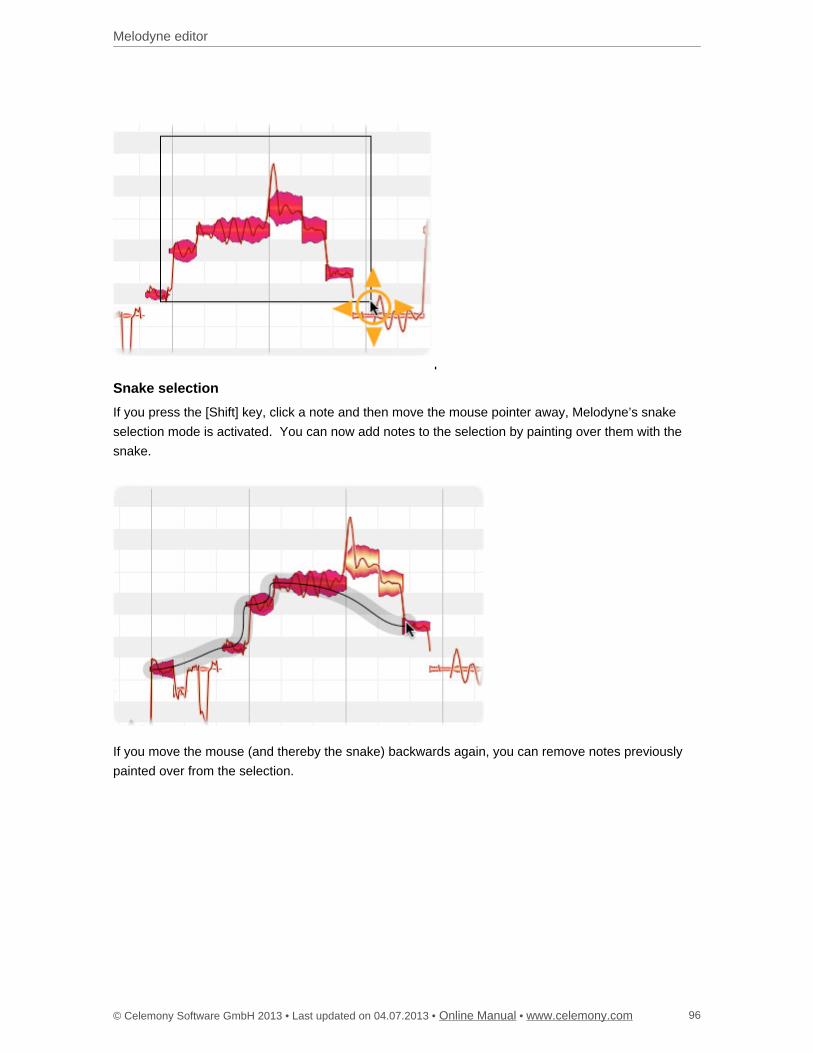
Melodyne editor
© Celemony Software GmbH 2013 • Last updated on 04.07.2013 • • Online Manual www.celemony.com 96
Snake selection
If you press the [Shift] key, click a note and then move the mouse pointer away, Melodyne’s snake
selection mode is activated. You can now add notes to the selection by painting over them with the
snake.
If you move the mouse (and thereby the snake) backwards again, you can remove notes previously
painted over from the selection.
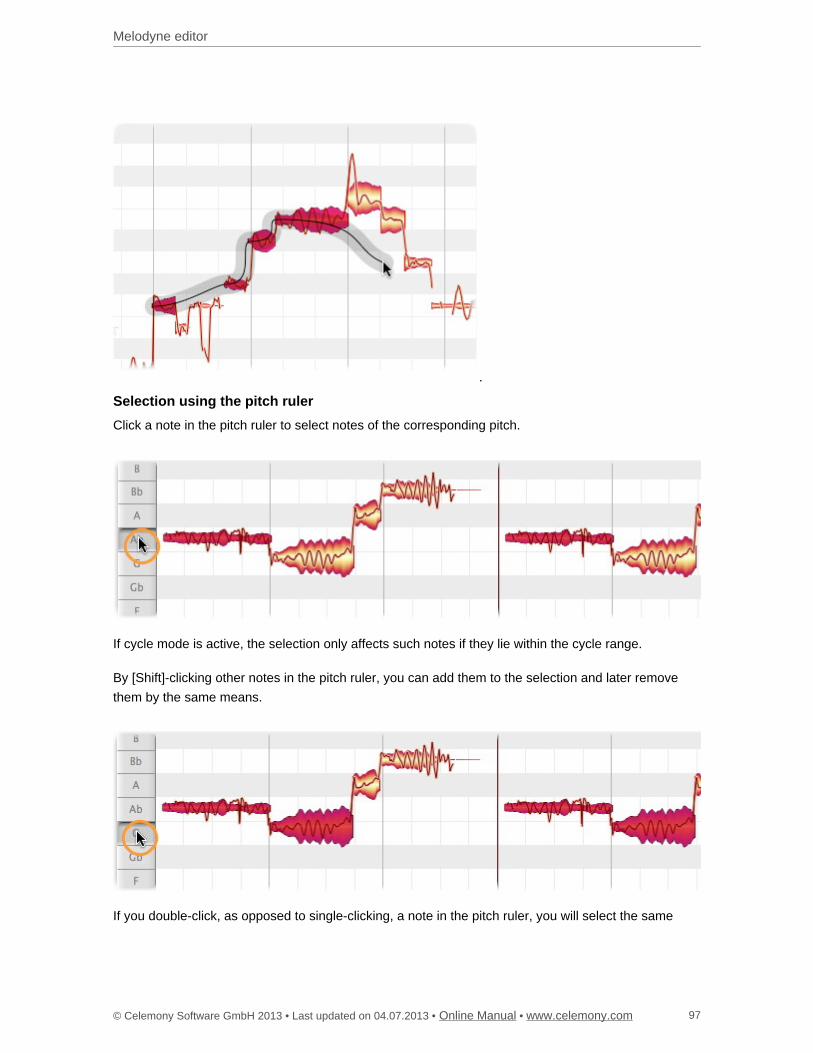
Melodyne editor
© Celemony Software GmbH 2013 • Last updated on 04.07.2013 • • Online Manual www.celemony.com 97
Selection using the pitch ruler
Click a note in the pitch ruler to select notes of the corresponding pitch.
If cycle mode is active, the selection only affects such notes if they lie within the cycle range.
By [Shift]-clicking other notes in the pitch ruler, you can add them to the selection and later remove
them by the same means.
If you double-click, as opposed to single-clicking, a note in the pitch ruler, you will select the same
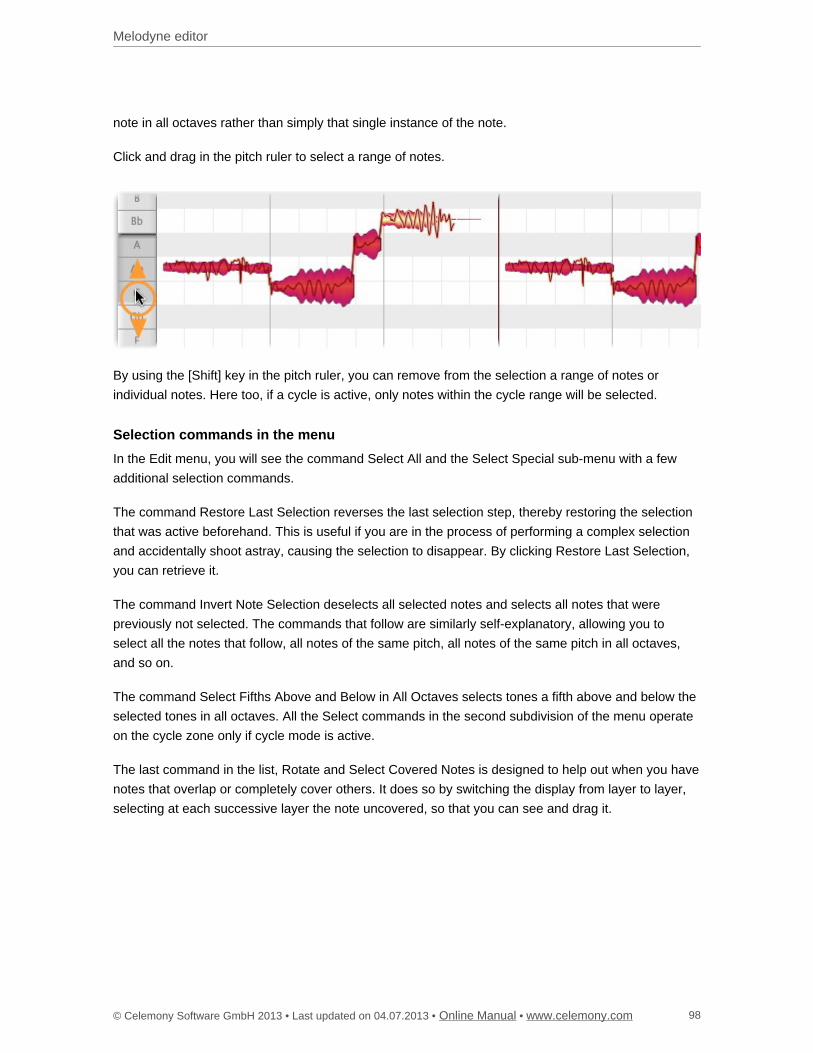
Melodyne editor
© Celemony Software GmbH 2013 • Last updated on 04.07.2013 • • Online Manual www.celemony.com 98
note in all octaves rather than simply that single instance of the note.
Click and drag in the pitch ruler to select a range of notes.
By using the [Shift] key in the pitch ruler, you can remove from the selection a range of notes or
individual notes. Here too, if a cycle is active, only notes within the cycle range will be selected.
Selection commands in the menu
In the Edit menu, you will see the command Select All and the Select Special sub-menu with a few
additional selection commands.
The command Restore Last Selection reverses the last selection step, thereby restoring the selection
that was active beforehand. This is useful if you are in the process of performing a complex selection
and accidentally shoot astray, causing the selection to disappear. By clicking Restore Last Selection,
you can retrieve it.
The command Invert Note Selection deselects all selected notes and selects all notes that were
previously not selected. The commands that follow are similarly self-explanatory, allowing you to
select all the notes that follow, all notes of the same pitch, all notes of the same pitch in all octaves,
and so on.
The command Select Fifths Above and Below in All Octaves selects tones a fifth above and below the
selected tones in all octaves. All the Select commands in the second subdivision of the menu operate
on the cycle zone only if cycle mode is active.
The last command in the list, Rotate and Select Covered Notes is designed to help out when you have
notes that overlap or completely cover others. It does so by switching the display from layer to layer,
selecting at each successive layer the note uncovered, so that you can see and drag it.
Melodyne editor
© Celemony Software GmbH 2013 • Last updated on 04.07.2013 • • Online Manual www.celemony.com 99
Related topics
Copying notes
Time grid selection
Matching Melodyne Stand-Alone's time grid to the audio

Melodyne editor
© Celemony Software GmbH 2013 • Last updated on 04.07.2013 • • Online Manual www.celemony.com 100
Copying notes
In this tour, you will learn how to use Melodyne’s command set for the copying and pasting of notes.
Inserting one note
Let’s begin by copying a single note: select a note followed by Copy from the Edit menu or the context
menu.
Move the playback cursor to the destination by clicking/dragging in the bar ruler.
Select Paste from the Edit menu or the context menu. If the time grid is active, the note is inserted on
the quarter note closest to the playback cursor. If the original note was slightly offset from the nearest
quarter note, the same offset will be preserved. The length of the note will remain unchanged.
If, however, the time grid has been deactivated or set to Seconds, the beginning of the note will be
perfectly aligned with the playback cursor. Again, its length will remain unchanged.
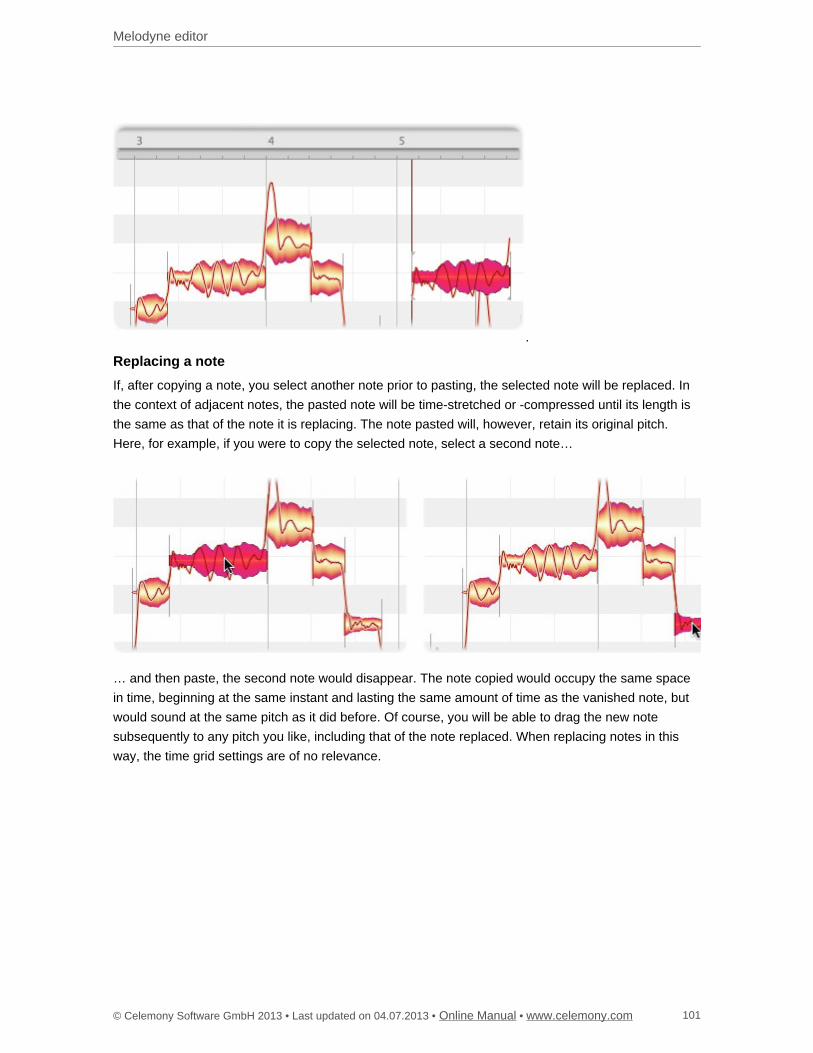
Melodyne editor
© Celemony Software GmbH 2013 • Last updated on 04.07.2013 • • Online Manual www.celemony.com 101
Replacing a note
If, after copying a note, you select another note prior to pasting, the selected note will be replaced. In
the context of adjacent notes, the pasted note will be time-stretched or -compressed until its length is
the same as that of the note it is replacing. The note pasted will, however, retain its original pitch.
Here, for example, if you were to copy the selected note, select a second note…
… and then paste, the second note would disappear. The note copied would occupy the same space
in time, beginning at the same instant and lasting the same amount of time as the vanished note, but
would sound at the same pitch as it did before. Of course, you will be able to drag the new note
subsequently to any pitch you like, including that of the note replaced. When replacing notes in this
way, the time grid settings are of no relevance.
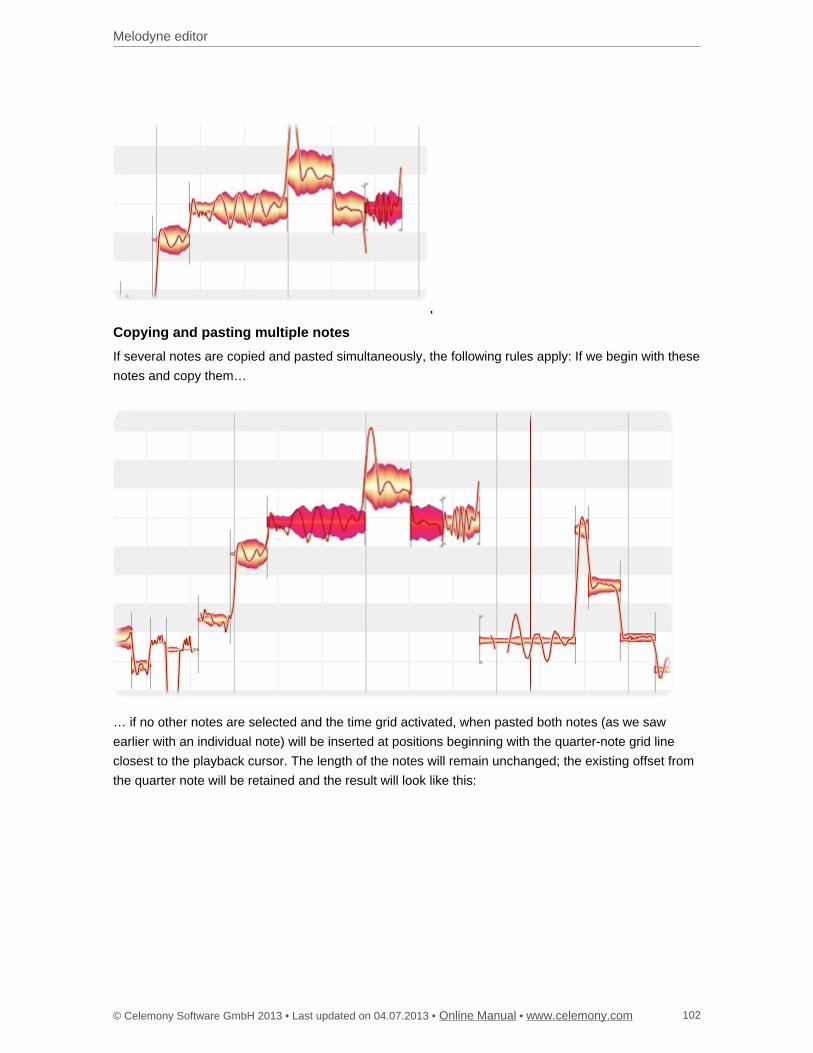
Melodyne editor
© Celemony Software GmbH 2013 • Last updated on 04.07.2013 • • Online Manual www.celemony.com 102
Copying and pasting multiple notes
If several notes are copied and pasted simultaneously, the following rules apply: If we begin with these
notes and copy them…
… if no other notes are selected and the time grid activated, when pasted both notes (as we saw
earlier with an individual note) will be inserted at positions beginning with the quarter-note grid line
closest to the playback cursor. The length of the notes will remain unchanged; the existing offset from
the quarter note will be retained and the result will look like this:
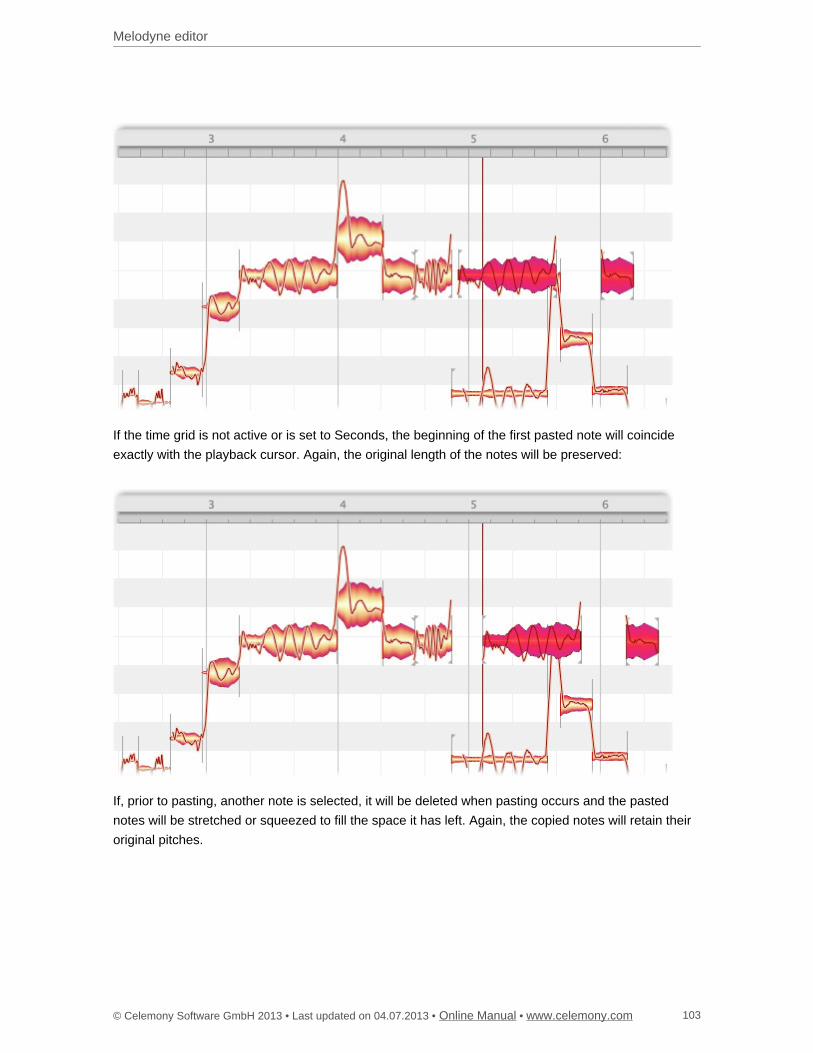
Melodyne editor
© Celemony Software GmbH 2013 • Last updated on 04.07.2013 • • Online Manual www.celemony.com 103
If the time grid is not active or is set to Seconds, the beginning of the first pasted note will coincide
exactly with the playback cursor. Again, the original length of the notes will be preserved:
If, prior to pasting, another note is selected, it will be deleted when pasting occurs and the pasted
notes will be stretched or squeezed to fill the space it has left. Again, the copied notes will retain their
original pitches.

Melodyne editor
© Celemony Software GmbH 2013 • Last updated on 04.07.2013 • • Online Manual www.celemony.com 104
If, prior to pasting, multiple adjacent notes are selected, these will be deleted in the same way, and the
pasted notes stretched or squeezed to occupy the same time interval as the deleted selection. If, for
example, these are the notes selected:

Melodyne editor
© Celemony Software GmbH 2013 • Last updated on 04.07.2013 • • Online Manual www.celemony.com 105
… the result after pasting will look like this:
Related topics
Matching Melodyne Stand-Alone's time grid to the audio
Time grid selection
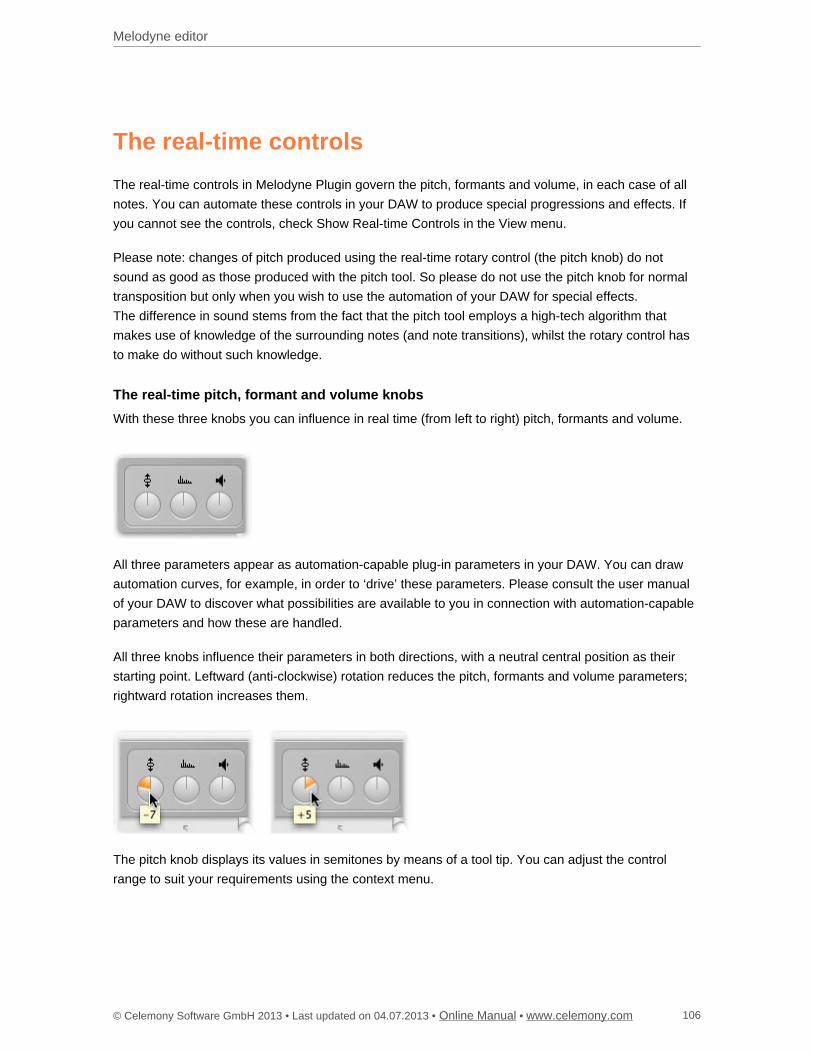
Melodyne editor
© Celemony Software GmbH 2013 • Last updated on 04.07.2013 • • Online Manual www.celemony.com 106
The real-time controls
The real-time controls in Melodyne Plugin govern the pitch, formants and volume, in each case of all
notes. You can automate these controls in your DAW to produce special progressions and effects. If
you cannot see the controls, check Show Real-time Controls in the View menu.
Please note: changes of pitch produced using the real-time rotary control (the pitch knob) do not
sound as good as those produced with the pitch tool. So please do not use the pitch knob for normal
transposition but only when you wish to use the automation of your DAW for special effects.
The difference in sound stems from the fact that the pitch tool employs a high-tech algorithm that
makes use of knowledge of the surrounding notes (and note transitions), whilst the rotary control has
to make do without such knowledge.
The real-time pitch, formant and volume knobs
With these three knobs you can influence in real time (from left to right) pitch, formants and volume.
All three parameters appear as automation-capable plug-in parameters in your DAW. You can draw
automation curves, for example, in order to ‘drive’ these parameters. Please consult the user manual
of your DAW to discover what possibilities are available to you in connection with automation-capable
parameters and how these are handled.
All three knobs influence their parameters in both directions, with a neutral central position as their
starting point. Leftward (anti-clockwise) rotation reduces the pitch, formants and volume parameters;
rightward rotation increases them.
The pitch knob displays its values in semitones by means of a tool tip. You can adjust the control
range to suit your requirements using the context menu.
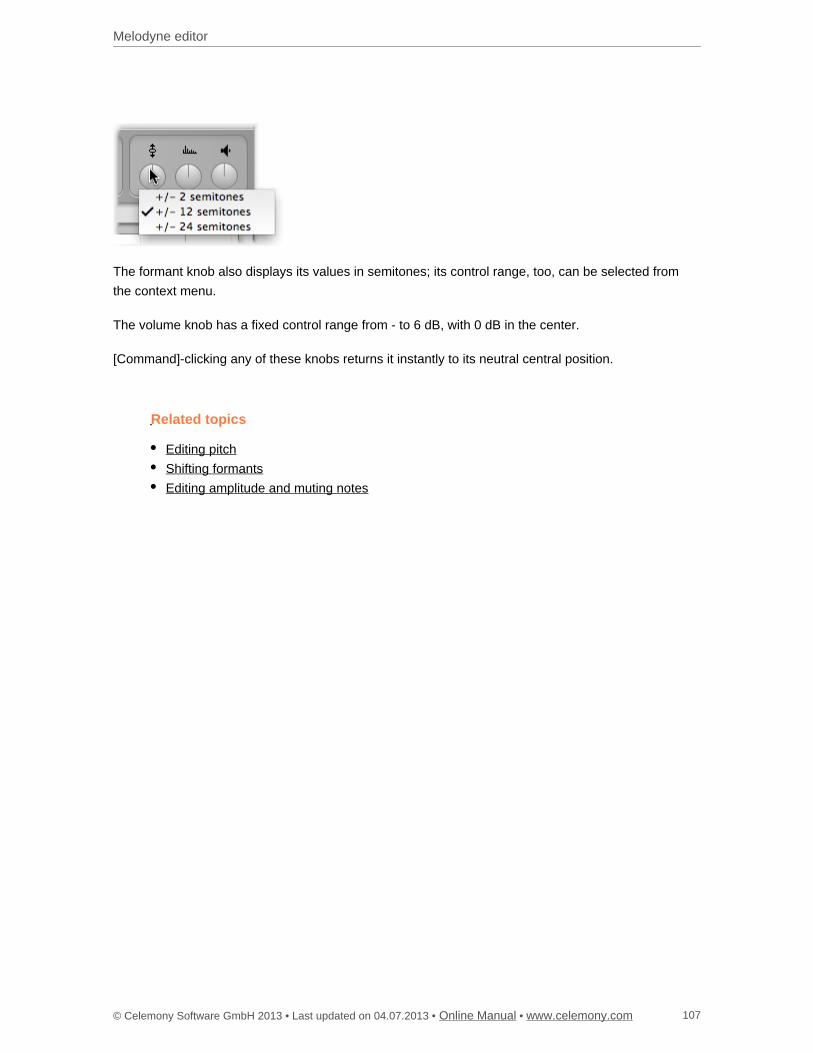
Melodyne editor
© Celemony Software GmbH 2013 • Last updated on 04.07.2013 • • Online Manual www.celemony.com 107
The formant knob also displays its values in semitones; its control range, too, can be selected from
the context menu.
The volume knob has a fixed control range from - to 6 dB, with 0 dB in the center.
[Command]-clicking any of these knobs returns it instantly to its neutral central position.
Related topics
Editing pitch
Shifting formants
Editing amplitude and muting notes
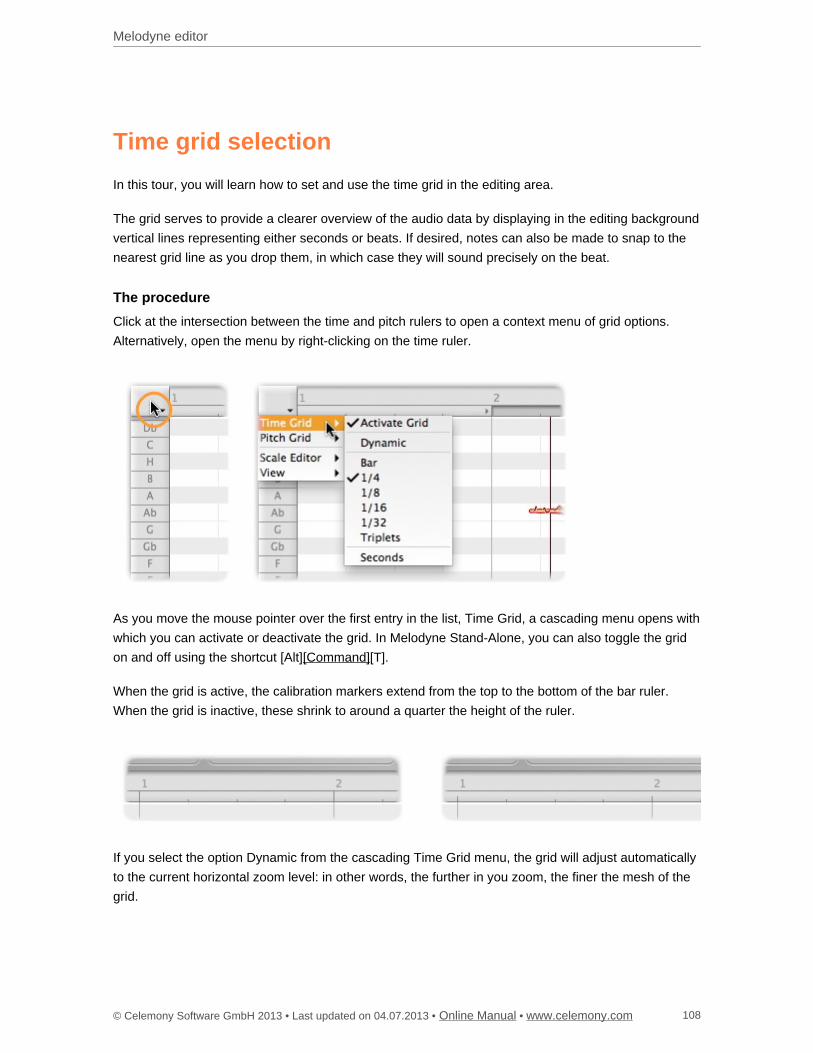
Melodyne editor
© Celemony Software GmbH 2013 • Last updated on 04.07.2013 • • Online Manual www.celemony.com 108
Time grid selection
In this tour, you will learn how to set and use the time grid in the editing area.
The grid serves to provide a clearer overview of the audio data by displaying in the editing background
vertical lines representing either seconds or beats. If desired, notes can also be made to snap to the
nearest grid line as you drop them, in which case they will sound precisely on the beat.
The procedure
Click at the intersection between the time and pitch rulers to open a context menu of grid options.
Alternatively, open the menu by right-clicking on the time ruler.
As you move the mouse pointer over the first entry in the list, Time Grid, a cascading menu opens with
which you can activate or deactivate the grid. In Melodyne Stand-Alone, you can also toggle the grid
on and off using the shortcut [Alt] [T].[Command]
When the grid is active, the calibration markers extend from the top to the bottom of the bar ruler.
When the grid is inactive, these shrink to around a quarter the height of the ruler.
If you select the option Dynamic from the cascading Time Grid menu, the grid will adjust automatically
to the current horizontal zoom level: in other words, the further in you zoom, the finer the mesh of the
grid.
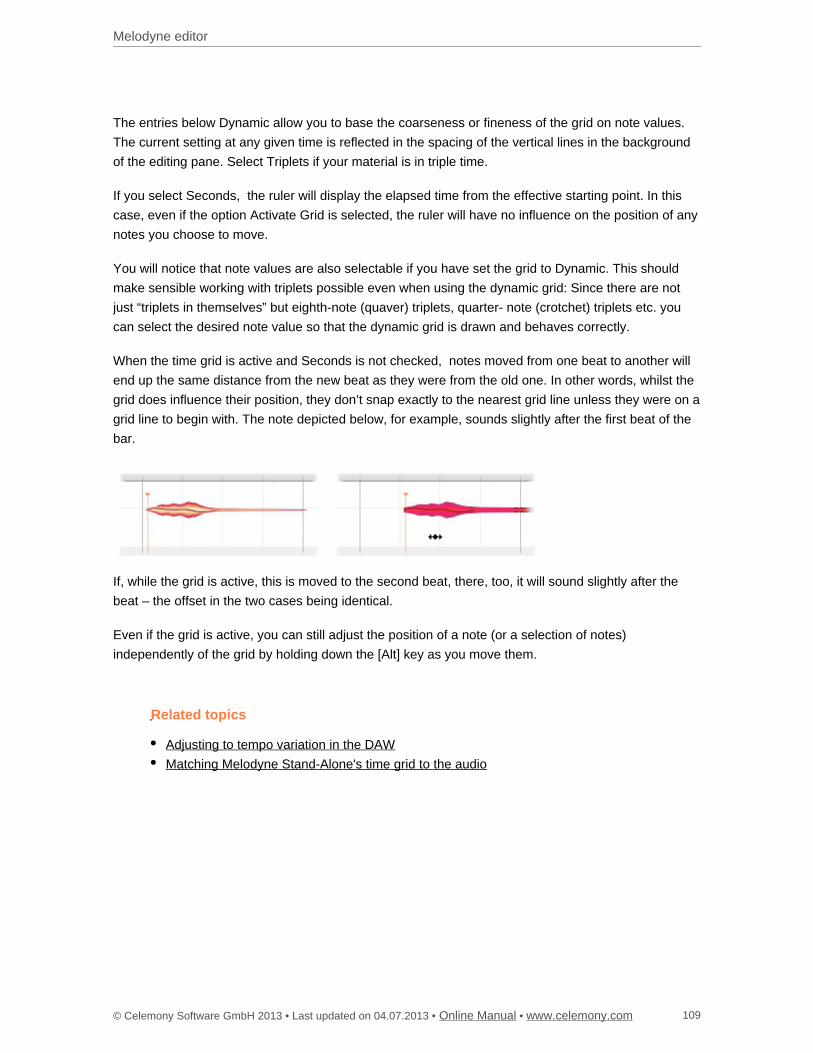
Melodyne editor
© Celemony Software GmbH 2013 • Last updated on 04.07.2013 • • Online Manual www.celemony.com 109
The entries below Dynamic allow you to base the coarseness or fineness of the grid on note values.
The current setting at any given time is reflected in the spacing of the vertical lines in the background
of the editing pane. Select Triplets if your material is in triple time.
If you select Seconds, the ruler will display the elapsed time from the effective starting point. In this
case, even if the option Activate Grid is selected, the ruler will have no influence on the position of any
notes you choose to move.
You will notice that note values are also selectable if you have set the grid to Dynamic. This should
make sensible working with triplets possible even when using the dynamic grid: Since there are not
just “triplets in themselves” but eighth-note (quaver) triplets, quarter- note (crotchet) triplets etc. you
can select the desired note value so that the dynamic grid is drawn and behaves correctly.
When the time grid is active and Seconds is not checked, notes moved from one beat to another will
end up the same distance from the new beat as they were from the old one. In other words, whilst the
grid does influence their position, they don’t snap exactly to the nearest grid line unless they were on a
grid line to begin with. The note depicted below, for example, sounds slightly after the first beat of the
bar.
If, while the grid is active, this is moved to the second beat, there, too, it will sound slightly after the
beat – the offset in the two cases being identical.
Even if the grid is active, you can still adjust the position of a note (or a selection of notes)
independently of the grid by holding down the [Alt] key as you move them.
Related topics
Adjusting to tempo variation in the DAW
Matching Melodyne Stand-Alone's time grid to the audio
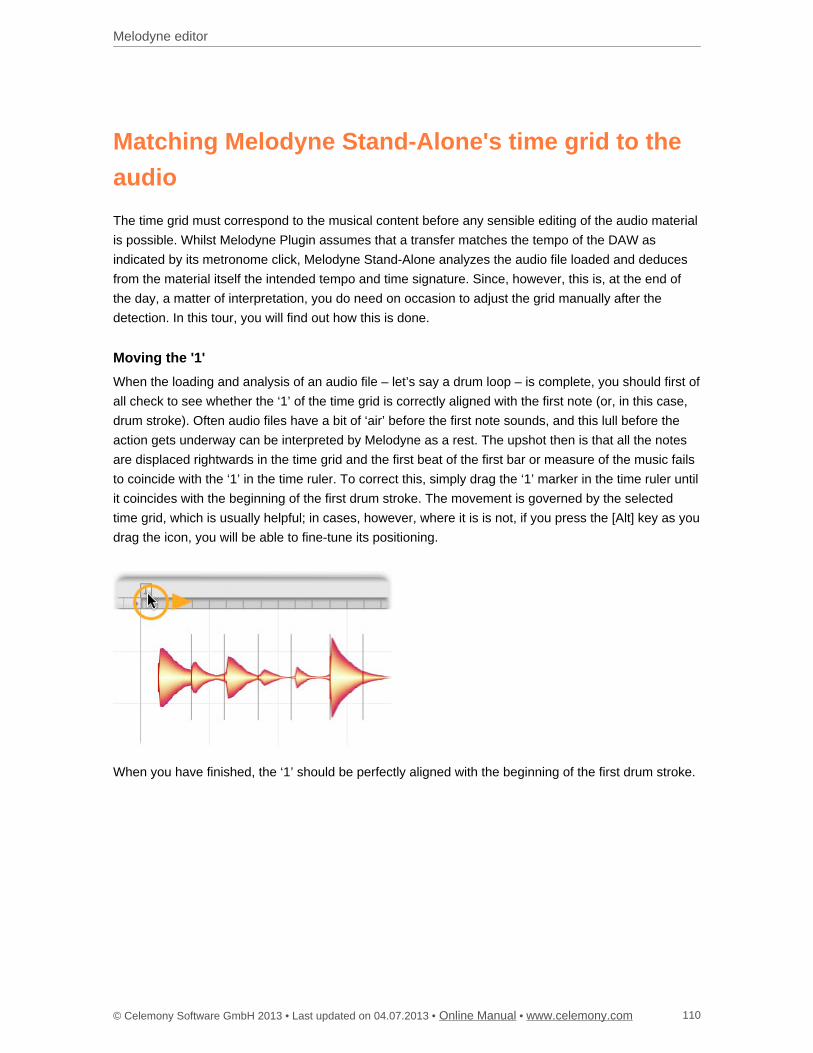
Melodyne editor
© Celemony Software GmbH 2013 • Last updated on 04.07.2013 • • Online Manual www.celemony.com 110
Matching Melodyne Stand-Alone's time grid to the
audio
The time grid must correspond to the musical content before any sensible editing of the audio material
is possible. Whilst Melodyne Plugin assumes that a transfer matches the tempo of the DAW as
indicated by its metronome click, Melodyne Stand-Alone analyzes the audio file loaded and deduces
from the material itself the intended tempo and time signature. Since, however, this is, at the end of
the day, a matter of interpretation, you do need on occasion to adjust the grid manually after the
detection. In this tour, you will find out how this is done.
Moving the '1'
When the loading and analysis of an audio file – let’s say a drum loop – is complete, you should first of
all check to see whether the ‘1’ of the time grid is correctly aligned with the first note (or, in this case,
drum stroke). Often audio files have a bit of ‘air’ before the first note sounds, and this lull before the
action gets underway can be interpreted by Melodyne as a rest. The upshot then is that all the notes
are displaced rightwards in the time grid and the first beat of the first bar or measure of the music fails
to coincide with the ‘1’ in the time ruler. To correct this, simply drag the ‘1’ marker in the time ruler until
it coincides with the beginning of the first drum stroke. The movement is governed by the selected
time grid, which is usually helpful; in cases, however, where it is is not, if you press the [Alt] key as you
drag the icon, you will be able to fine-tune its positioning.
When you have finished, the ‘1’ should be perfectly aligned with the beginning of the first drum stroke.
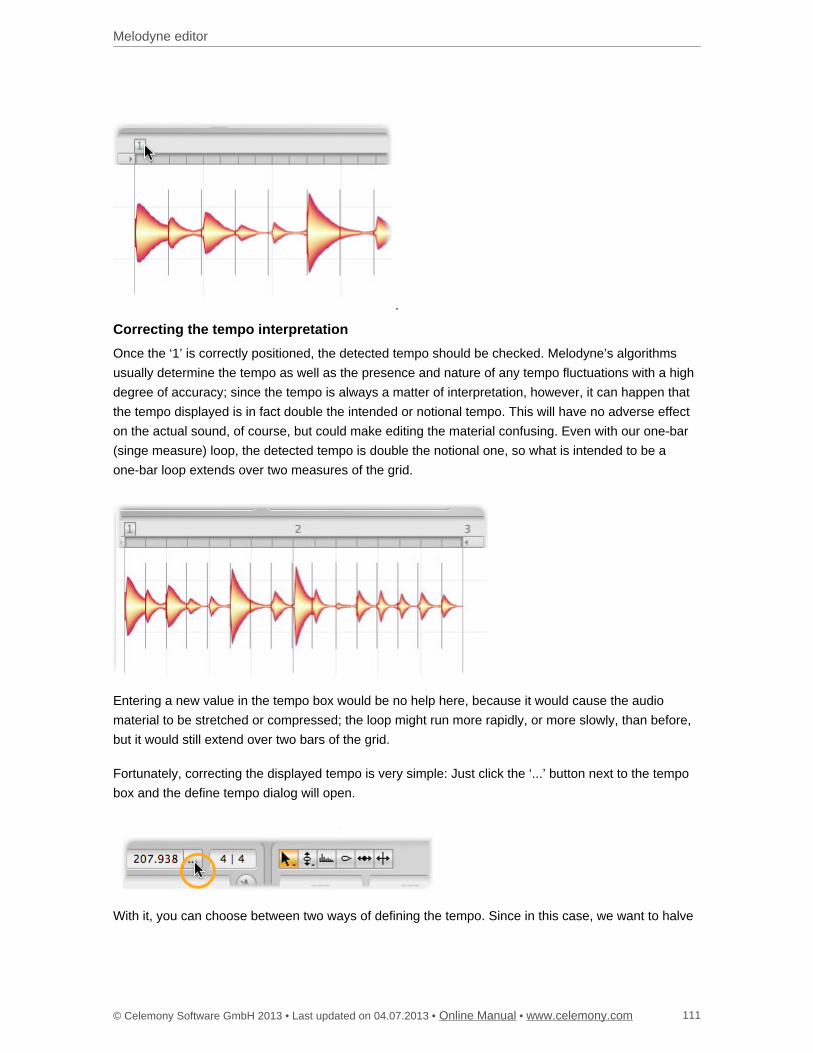
Melodyne editor
© Celemony Software GmbH 2013 • Last updated on 04.07.2013 • • Online Manual www.celemony.com 111
Correcting the tempo interpretation
Once the ‘1’ is correctly positioned, the detected tempo should be checked. Melodyne’s algorithms
usually determine the tempo as well as the presence and nature of any tempo fluctuations with a high
degree of accuracy; since the tempo is always a matter of interpretation, however, it can happen that
the tempo displayed is in fact double the intended or notional tempo. This will have no adverse effect
on the actual sound, of course, but could make editing the material confusing. Even with our one-bar
(singe measure) loop, the detected tempo is double the notional one, so what is intended to be a
one-bar loop extends over two measures of the grid.
Entering a new value in the tempo box would be no help here, because it would cause the audio
material to be stretched or compressed; the loop might run more rapidly, or more slowly, than before,
but it would still extend over two bars of the grid.
Fortunately, correcting the displayed tempo is very simple: Just click the ‘...’ button next to the tempo
box and the define tempo dialog will open.
With it, you can choose between two ways of defining the tempo. Since in this case, we want to halve
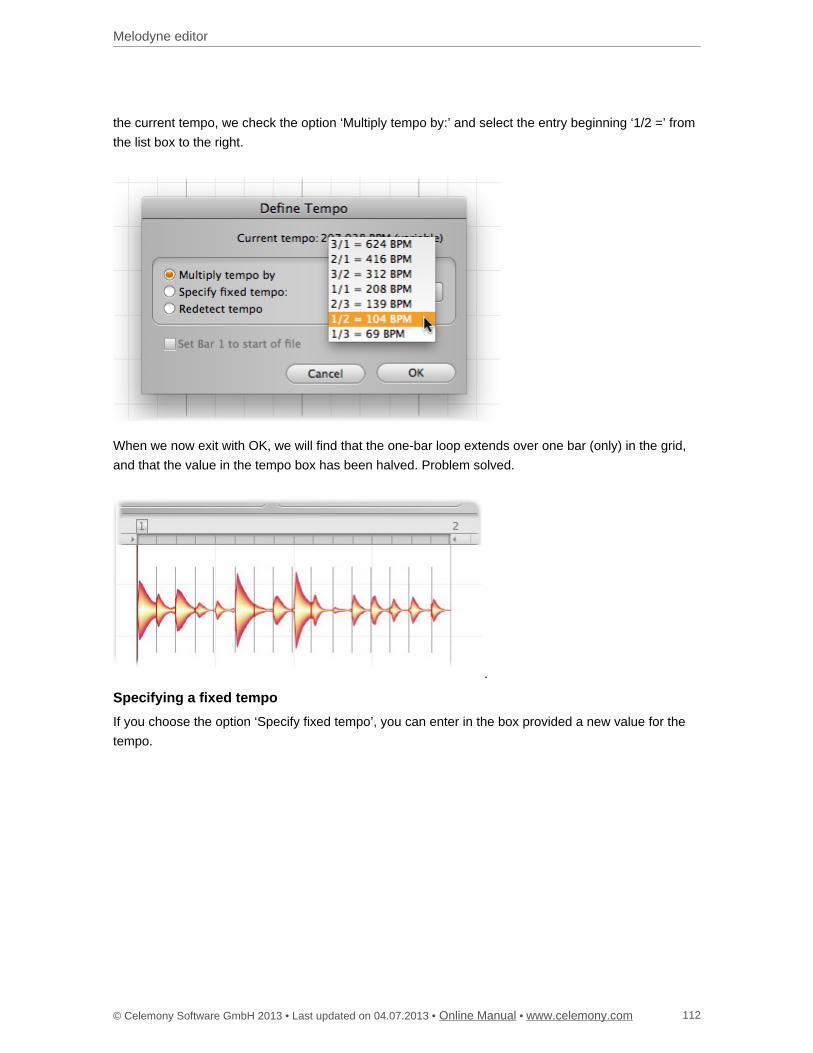
Melodyne editor
© Celemony Software GmbH 2013 • Last updated on 04.07.2013 • • Online Manual www.celemony.com 112
the current tempo, we check the option ‘Multiply tempo by:’ and select the entry beginning ‘1/2 =’ from
the list box to the right.
When we now exit with OK, we will find that the one-bar loop extends over one bar (only) in the grid,
and that the value in the tempo box has been halved. Problem solved.
Specifying a fixed tempo
If you choose the option ‘Specify fixed tempo’, you can enter in the box provided a new value for the
tempo.
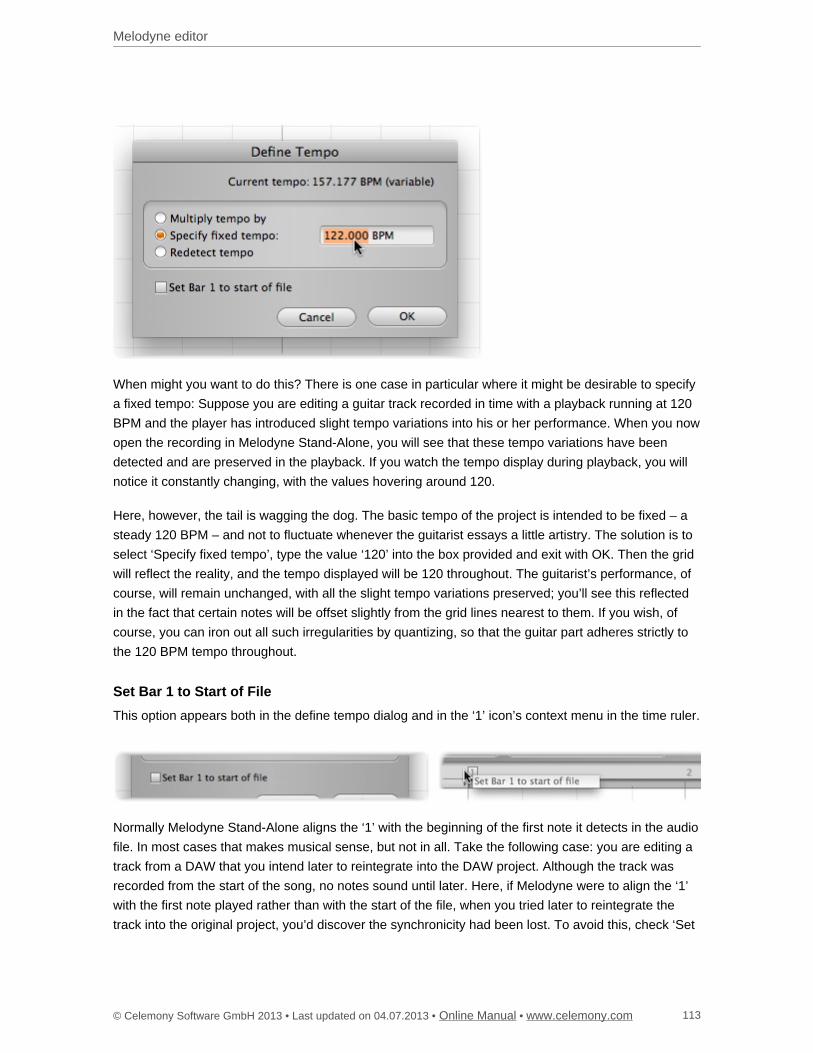
Melodyne editor
© Celemony Software GmbH 2013 • Last updated on 04.07.2013 • • Online Manual www.celemony.com 113
When might you want to do this? There is one case in particular where it might be desirable to specify
a fixed tempo: Suppose you are editing a guitar track recorded in time with a playback running at 120
BPM and the player has introduced slight tempo variations into his or her performance. When you now
open the recording in Melodyne Stand-Alone, you will see that these tempo variations have been
detected and are preserved in the playback. If you watch the tempo display during playback, you will
notice it constantly changing, with the values hovering around 120.
Here, however, the tail is wagging the dog. The basic tempo of the project is intended to be fixed – a
steady 120 BPM – and not to fluctuate whenever the guitarist essays a little artistry. The solution is to
select ‘Specify fixed tempo’, type the value ‘120’ into the box provided and exit with OK. Then the grid
will reflect the reality, and the tempo displayed will be 120 throughout. The guitarist’s performance, of
course, will remain unchanged, with all the slight tempo variations preserved; you’ll see this reflected
in the fact that certain notes will be offset slightly from the grid lines nearest to them. If you wish, of
course, you can iron out all such irregularities by quantizing, so that the guitar part adheres strictly to
the 120 BPM tempo throughout.
Set Bar 1 to Start of File
This option appears both in the define tempo dialog and in the ‘1’ icon’s context menu in the time ruler.
Normally Melodyne Stand-Alone aligns the ‘1’ with the beginning of the first note it detects in the audio
file. In most cases that makes musical sense, but not in all. Take the following case: you are editing a
track from a DAW that you intend later to reintegrate into the DAW project. Although the track was
recorded from the start of the song, no notes sound until later. Here, if Melodyne were to align the ‘1’
with the first note played rather than with the start of the file, when you tried later to reintegrate the
track into the original project, you’d discover the synchronicity had been lost. To avoid this, check ‘Set
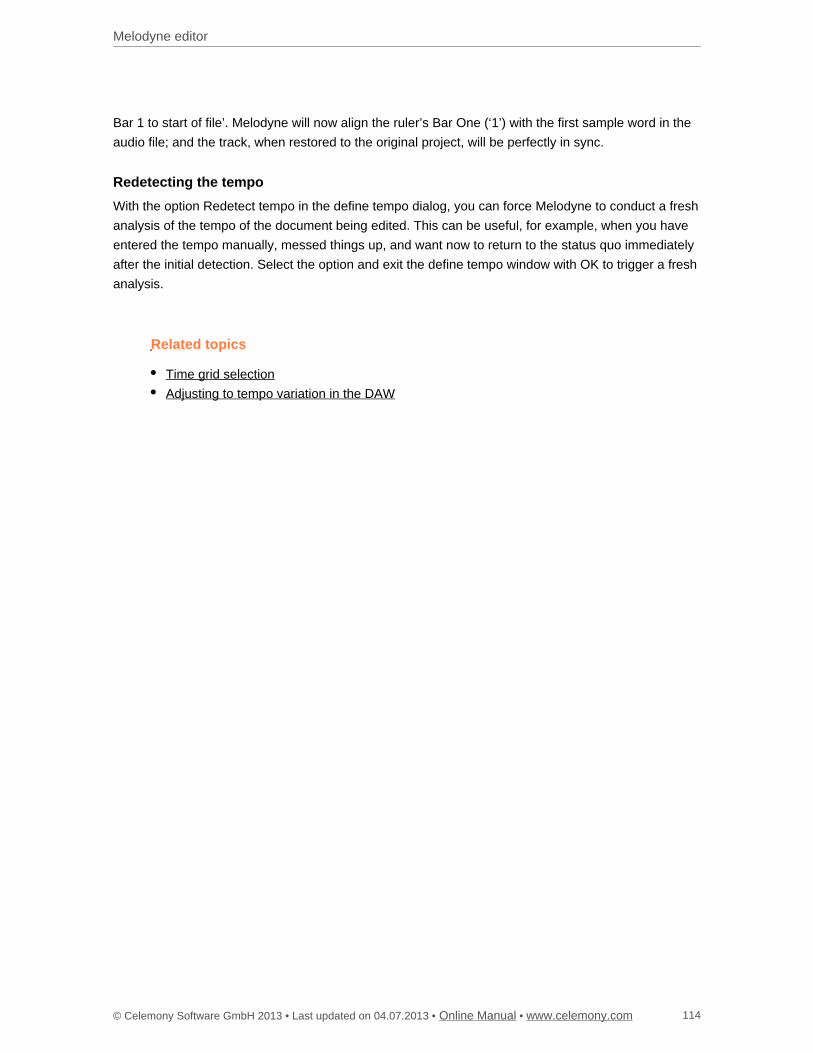
Melodyne editor
© Celemony Software GmbH 2013 • Last updated on 04.07.2013 • • Online Manual www.celemony.com 114
Bar 1 to start of file’. Melodyne will now align the ruler’s Bar One (‘1’) with the first sample word in the
audio file; and the track, when restored to the original project, will be perfectly in sync.
Redetecting the tempo
With the option Redetect tempo in the define tempo dialog, you can force Melodyne to conduct a fresh
analysis of the tempo of the document being edited. This can be useful, for example, when you have
entered the tempo manually, messed things up, and want now to return to the status quo immediately
after the initial detection. Select the option and exit the define tempo window with OK to trigger a fresh
analysis.
Related topics
Time grid selection
Adjusting to tempo variation in the DAW
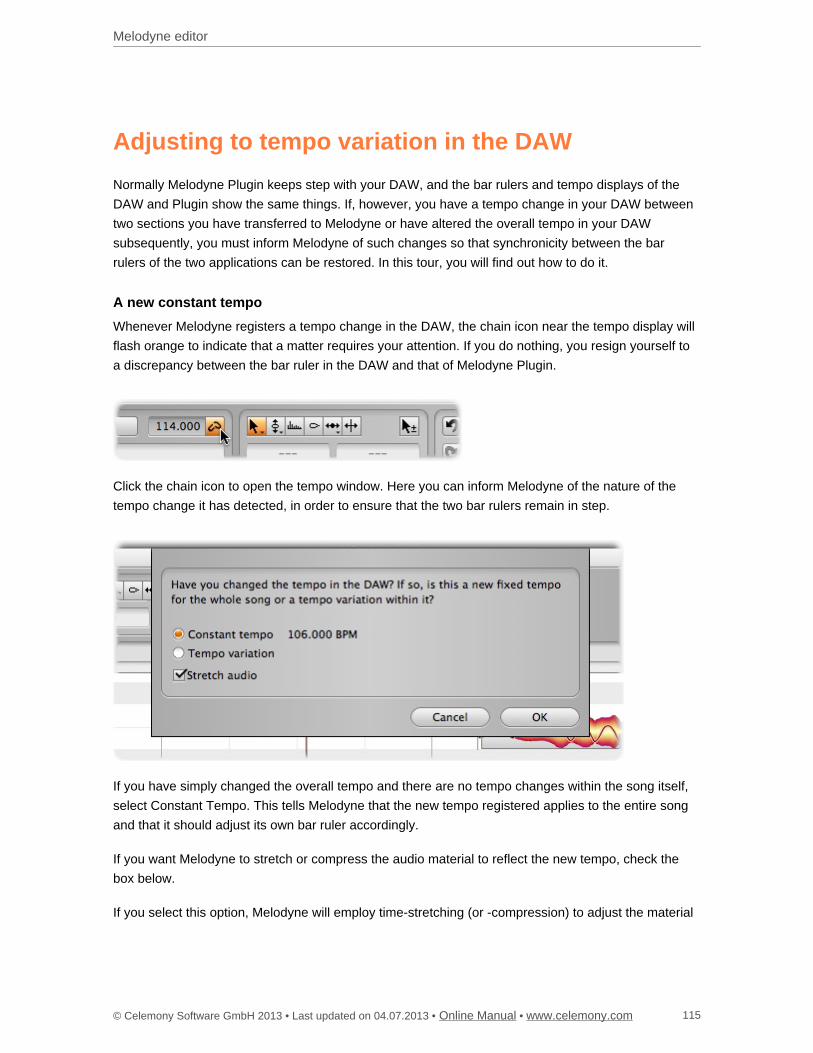
Melodyne editor
© Celemony Software GmbH 2013 • Last updated on 04.07.2013 • • Online Manual www.celemony.com 115
Adjusting to tempo variation in the DAW
Normally Melodyne Plugin keeps step with your DAW, and the bar rulers and tempo displays of the
DAW and Plugin show the same things. If, however, you have a tempo change in your DAW between
two sections you have transferred to Melodyne or have altered the overall tempo in your DAW
subsequently, you must inform Melodyne of such changes so that synchronicity between the bar
rulers of the two applications can be restored. In this tour, you will find out how to do it.
A new constant tempo
Whenever Melodyne registers a tempo change in the DAW, the chain icon near the tempo display will
flash orange to indicate that a matter requires your attention. If you do nothing, you resign yourself to
a discrepancy between the bar ruler in the DAW and that of Melodyne Plugin.
Click the chain icon to open the tempo window. Here you can inform Melodyne of the nature of the
tempo change it has detected, in order to ensure that the two bar rulers remain in step.
If you have simply changed the overall tempo and there are no tempo changes within the song itself,
select Constant Tempo. This tells Melodyne that the new tempo registered applies to the entire song
and that it should adjust its own bar ruler accordingly.
If you want Melodyne to stretch or compress the audio material to reflect the new tempo, check the
box below.
If you select this option, Melodyne will employ time-stretching (or -compression) to adjust the material
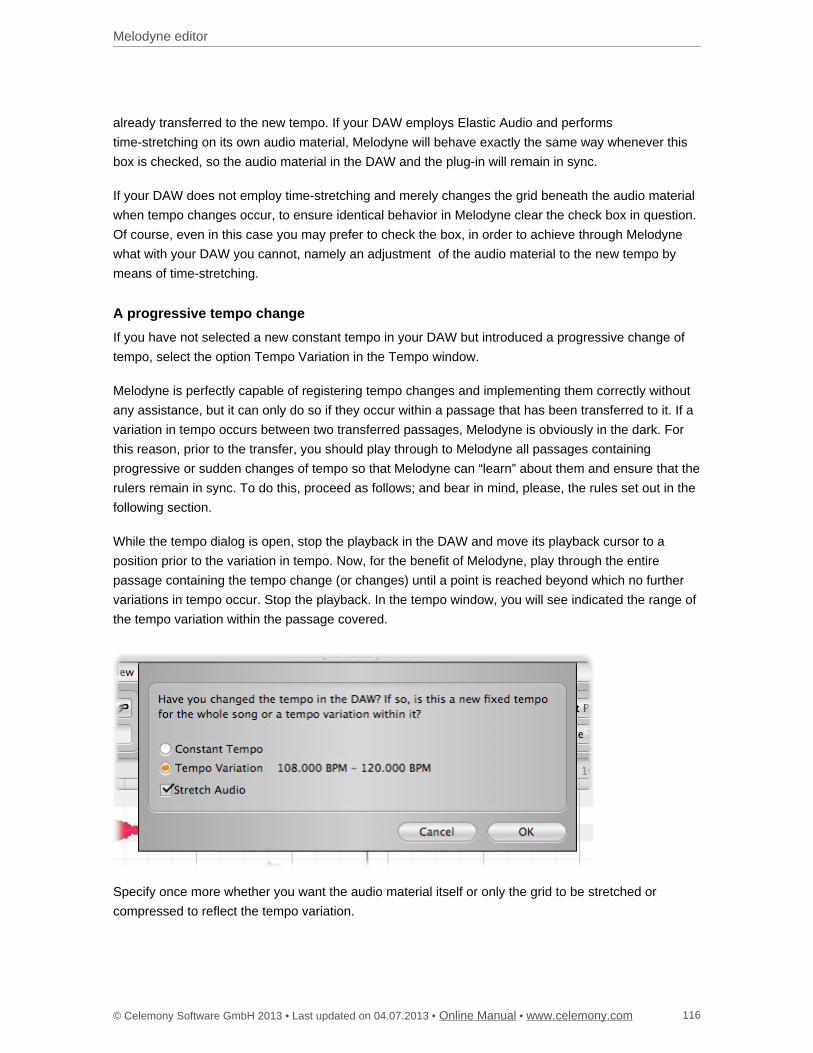
Melodyne editor
© Celemony Software GmbH 2013 • Last updated on 04.07.2013 • • Online Manual www.celemony.com 116
already transferred to the new tempo. If your DAW employs Elastic Audio and performs
time-stretching on its own audio material, Melodyne will behave exactly the same way whenever this
box is checked, so the audio material in the DAW and the plug-in will remain in sync.
If your DAW does not employ time-stretching and merely changes the grid beneath the audio material
when tempo changes occur, to ensure identical behavior in Melodyne clear the check box in question.
Of course, even in this case you may prefer to check the box, in order to achieve through Melodyne
what with your DAW you cannot, namely an adjustment of the audio material to the new tempo by
means of time-stretching.
A progressive tempo change
If you have not selected a new constant tempo in your DAW but introduced a progressive change of
tempo, select the option Tempo Variation in the Tempo window.
Melodyne is perfectly capable of registering tempo changes and implementing them correctly without
any assistance, but it can only do so if they occur within a passage that has been transferred to it. If a
variation in tempo occurs between two transferred passages, Melodyne is obviously in the dark. For
this reason, prior to the transfer, you should play through to Melodyne all passages containing
progressive or sudden changes of tempo so that Melodyne can “learn” about them and ensure that the
rulers remain in sync. To do this, proceed as follows; and bear in mind, please, the rules set out in the
following section.
While the tempo dialog is open, stop the playback in the DAW and move its playback cursor to a
position prior to the variation in tempo. Now, for the benefit of Melodyne, play through the entire
passage containing the tempo change (or changes) until a point is reached beyond which no further
variations in tempo occur. Stop the playback. In the tempo window, you will see indicated the range of
the tempo variation within the passage covered.
Specify once more whether you want the audio material itself or only the grid to be stretched or
compressed to reflect the tempo variation.
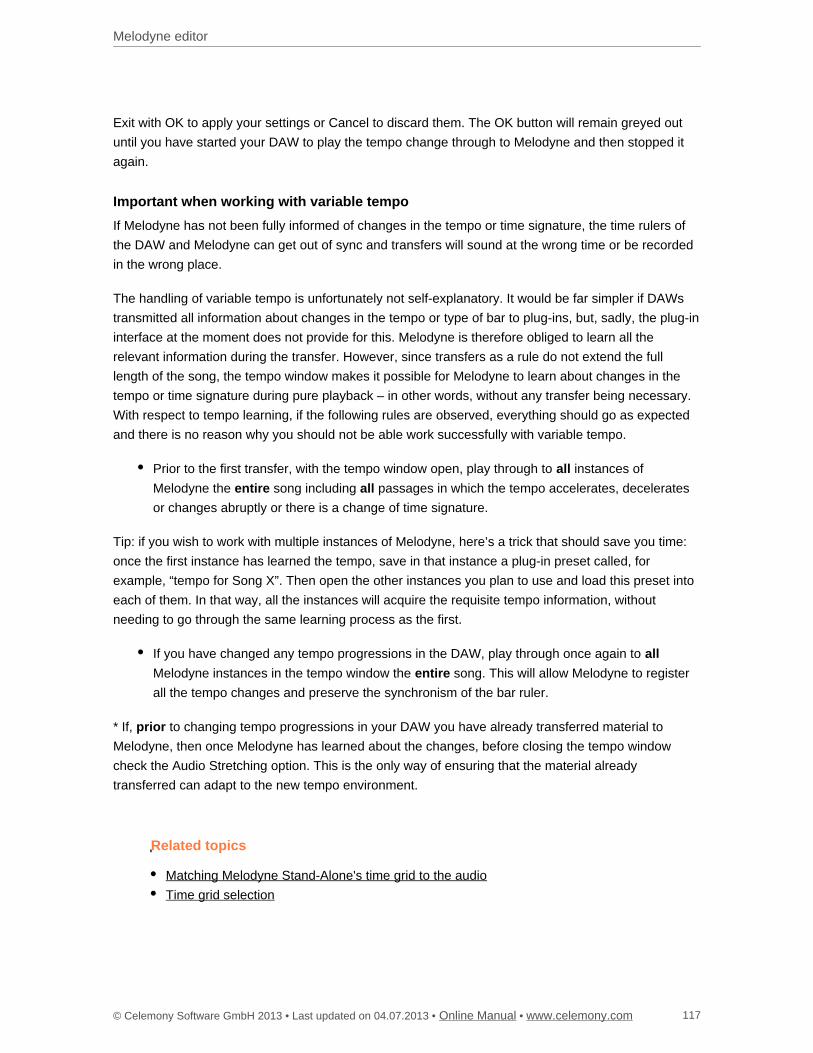
Melodyne editor
© Celemony Software GmbH 2013 • Last updated on 04.07.2013 • • Online Manual www.celemony.com 117
Exit with OK to apply your settings or Cancel to discard them. The OK button will remain greyed out
until you have started your DAW to play the tempo change through to Melodyne and then stopped it
again.
Important when working with variable tempo
If Melodyne has not been fully informed of changes in the tempo or time signature, the time rulers of
the DAW and Melodyne can get out of sync and transfers will sound at the wrong time or be recorded
in the wrong place.
The handling of variable tempo is unfortunately not self-explanatory. It would be far simpler if DAWs
transmitted all information about changes in the tempo or type of bar to plug-ins, but, sadly, the plug-in
interface at the moment does not provide for this. Melodyne is therefore obliged to learn all the
relevant information during the transfer. However, since transfers as a rule do not extend the full
length of the song, the tempo window makes it possible for Melodyne to learn about changes in the
tempo or time signature during pure playback – in other words, without any transfer being necessary.
With respect to tempo learning, if the following rules are observed, everything should go as expected
and there is no reason why you should not be able work successfully with variable tempo.
Prior to the first transfer, with the tempo window open, play through to instances ofall
Melodyne the song including passages in which the tempo accelerates, deceleratesentire all
or changes abruptly or there is a change of time signature.
Tip: if you wish to work with multiple instances of Melodyne, here’s a trick that should save you time:
once the first instance has learned the tempo, save in that instance a plug-in preset called, for
example, “tempo for Song X”. Then open the other instances you plan to use and load this preset into
each of them. In that way, all the instances will acquire the requisite tempo information, without
needing to go through the same learning process as the first.
If you have changed any tempo progressions in the DAW, play through once again to all
Melodyne instances in the tempo window the song. This will allow Melodyne to registerentire
all the tempo changes and preserve the synchronism of the bar ruler.
* If, to changing tempo progressions in your DAW you have already transferred material toprior
Melodyne, then once Melodyne has learned about the changes, before closing the tempo window
check the Audio Stretching option. This is the only way of ensuring that the material already
transferred can adapt to the new tempo environment.
Related topics
Matching Melodyne Stand-Alone's time grid to the audio
Time grid selection
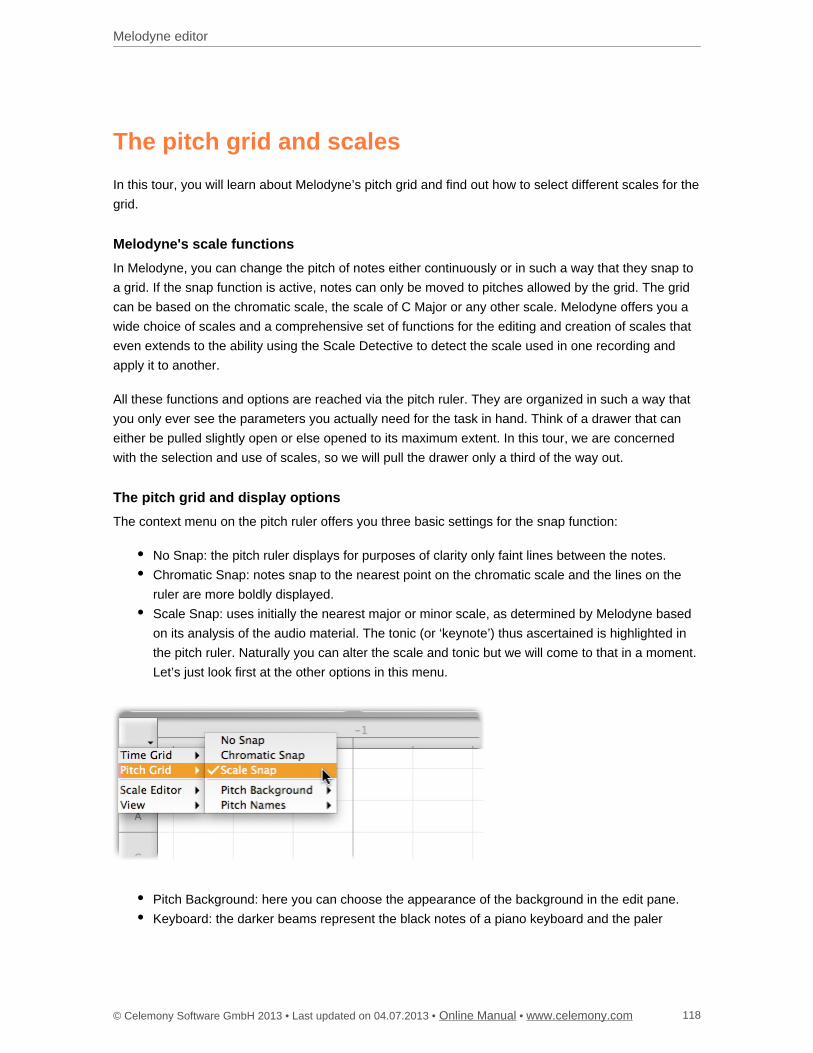
Melodyne editor
© Celemony Software GmbH 2013 • Last updated on 04.07.2013 • • Online Manual www.celemony.com 118
The pitch grid and scales
In this tour, you will learn about Melodyne’s pitch grid and find out how to select different scales for the
grid.
Melodyne's scale functions
In Melodyne, you can change the pitch of notes either continuously or in such a way that they snap to
a grid. If the snap function is active, notes can only be moved to pitches allowed by the grid. The grid
can be based on the chromatic scale, the scale of C Major or any other scale. Melodyne offers you a
wide choice of scales and a comprehensive set of functions for the editing and creation of scales that
even extends to the ability using the Scale Detective to detect the scale used in one recording and
apply it to another.
All these functions and options are reached via the pitch ruler. They are organized in such a way that
you only ever see the parameters you actually need for the task in hand. Think of a drawer that can
either be pulled slightly open or else opened to its maximum extent. In this tour, we are concerned
with the selection and use of scales, so we will pull the drawer only a third of the way out.
The pitch grid and display options
The context menu on the pitch ruler offers you three basic settings for the snap function:
No Snap: the pitch ruler displays for purposes of clarity only faint lines between the notes.
Chromatic Snap: notes snap to the nearest point on the chromatic scale and the lines on the
ruler are more boldly displayed.
Scale Snap: uses initially the nearest major or minor scale, as determined by Melodyne based
on its analysis of the audio material. The tonic (or ‘keynote’) thus ascertained is highlighted in
the pitch ruler. Naturally you can alter the scale and tonic but we will come to that in a moment.
Let’s just look first at the other options in this menu.
Pitch Background: here you can choose the appearance of the background in the edit pane.
Keyboard: the darker beams represent the black notes of a piano keyboard and the paler
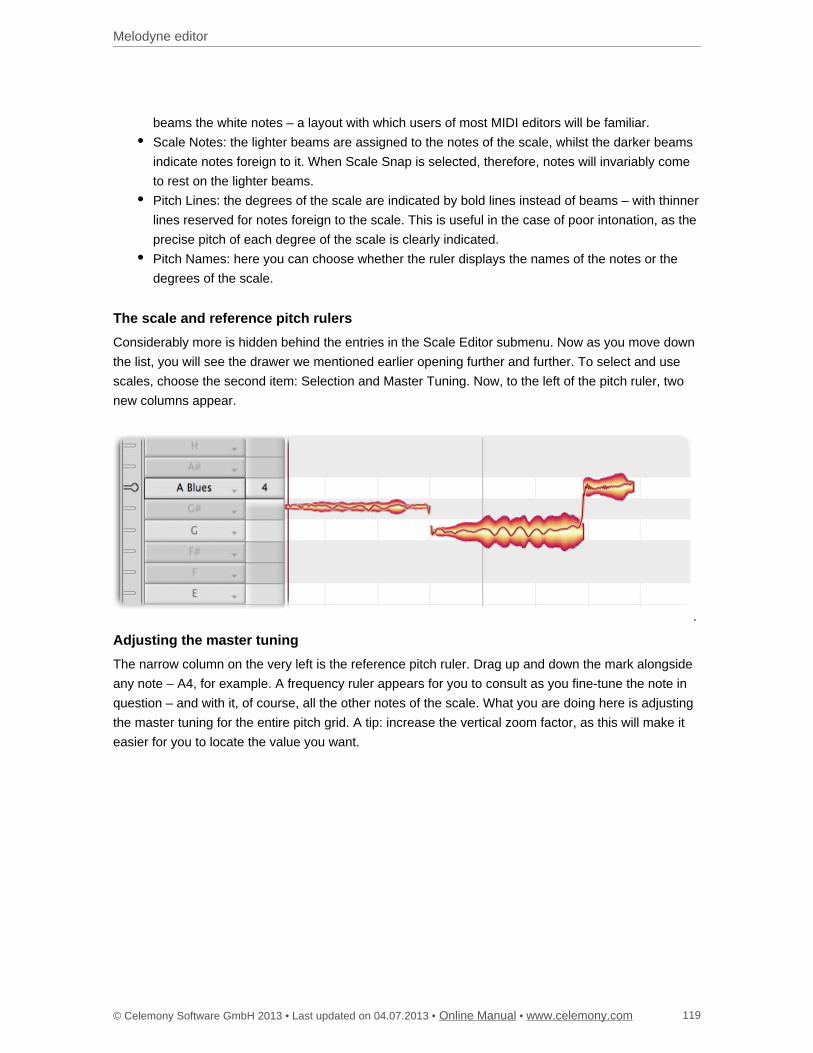
Melodyne editor
© Celemony Software GmbH 2013 • Last updated on 04.07.2013 • • Online Manual www.celemony.com 119
beams the white notes – a layout with which users of most MIDI editors will be familiar.
Scale Notes: the lighter beams are assigned to the notes of the scale, whilst the darker beams
indicate notes foreign to it. When Scale Snap is selected, therefore, notes will invariably come
to rest on the lighter beams.
Pitch Lines: the degrees of the scale are indicated by bold lines instead of beams – with thinner
lines reserved for notes foreign to the scale. This is useful in the case of poor intonation, as the
precise pitch of each degree of the scale is clearly indicated.
Pitch Names: here you can choose whether the ruler displays the names of the notes or the
degrees of the scale.
The scale and reference pitch rulers
Considerably more is hidden behind the entries in the Scale Editor submenu. Now as you move down
the list, you will see the drawer we mentioned earlier opening further and further. To select and use
scales, choose the second item: Selection and Master Tuning. Now, to the left of the pitch ruler, two
new columns appear.
Adjusting the master tuning
The narrow column on the very left is the reference pitch ruler. Drag up and down the mark alongside
any note – A4, for example. A frequency ruler appears for you to consult as you fine-tune the note in
question – and with it, of course, all the other notes of the scale. What you are doing here is adjusting
the master tuning for the entire pitch grid. A tip: increase the vertical zoom factor, as this will make it
easier for you to locate the value you want.
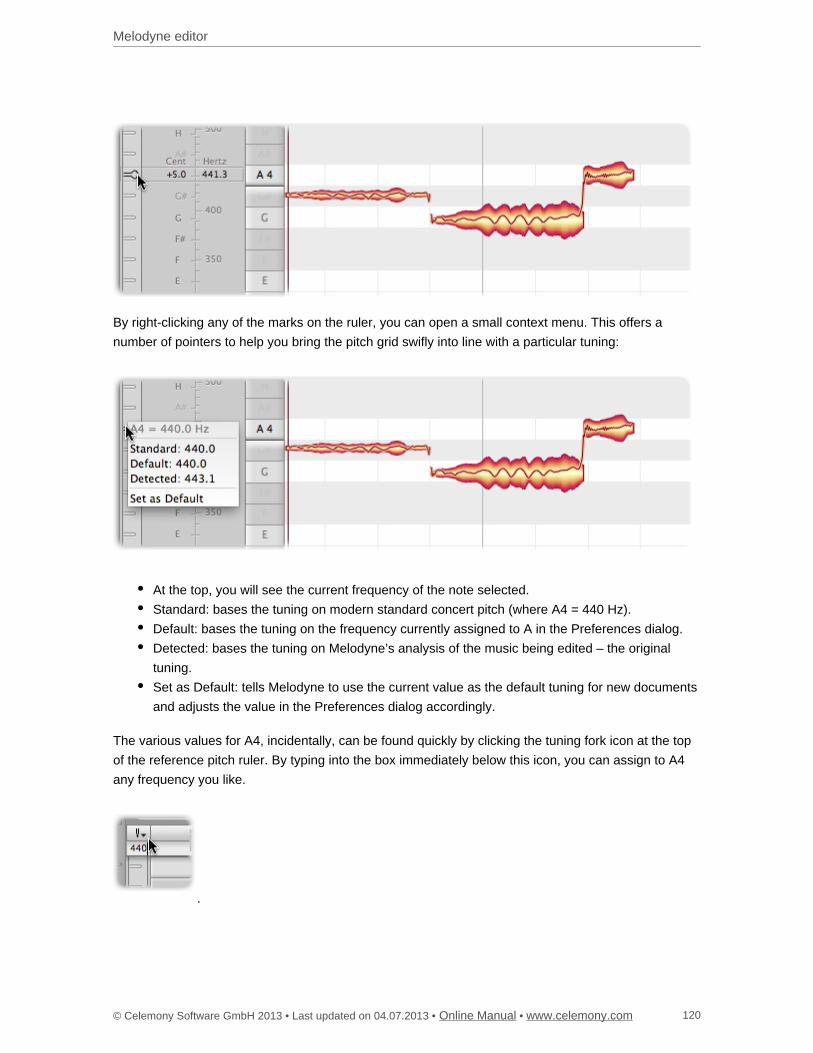
Melodyne editor
© Celemony Software GmbH 2013 • Last updated on 04.07.2013 • • Online Manual www.celemony.com 120
By right-clicking any of the marks on the ruler, you can open a small context menu. This offers a
number of pointers to help you bring the pitch grid swifly into line with a particular tuning:
At the top, you will see the current frequency of the note selected.
Standard: bases the tuning on modern standard concert pitch (where A4 = 440 Hz).
Default: bases the tuning on the frequency currently assigned to A in the Preferences dialog.
Detected: bases the tuning on Melodyne’s analysis of the music being edited – the original
tuning.
Set as Default: tells Melodyne to use the current value as the default tuning for new documents
and adjusts the value in the Preferences dialog accordingly.
The various values for A4, incidentally, can be found quickly by clicking the tuning fork icon at the top
of the reference pitch ruler. By typing into the box immediately below this icon, you can assign to A4
any frequency you like.
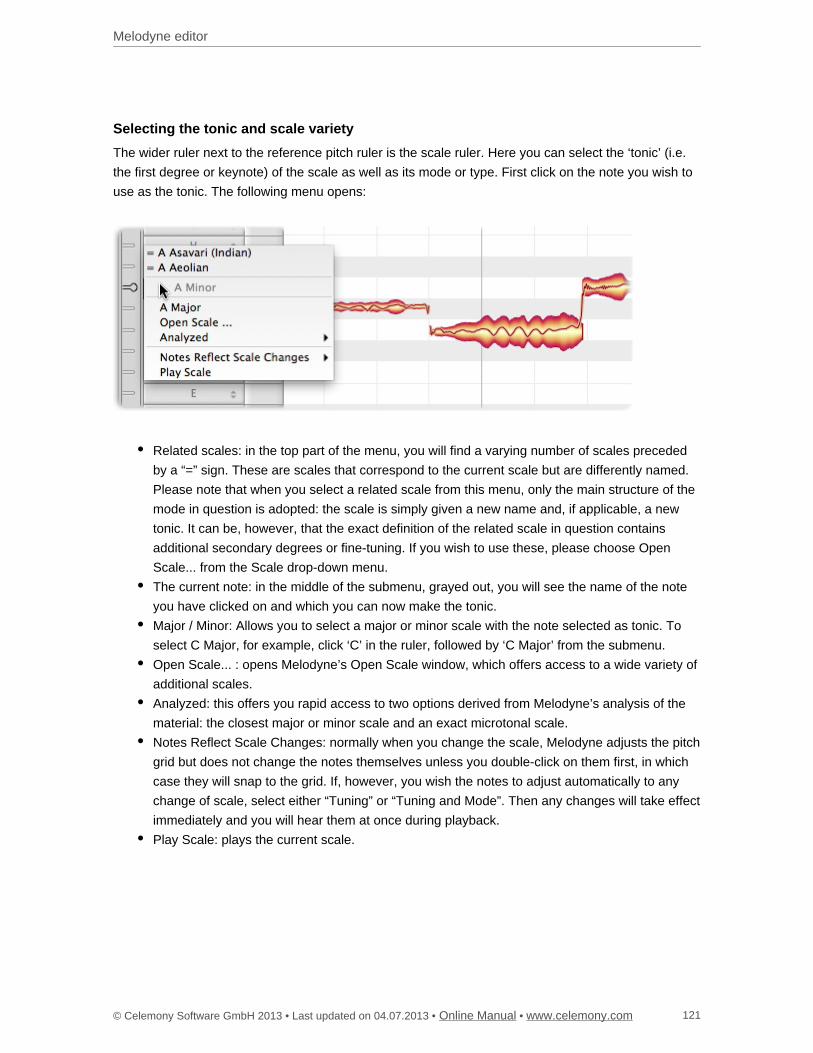
Melodyne editor
© Celemony Software GmbH 2013 • Last updated on 04.07.2013 • • Online Manual www.celemony.com 121
Selecting the tonic and scale variety
The wider ruler next to the reference pitch ruler is the scale ruler. Here you can select the ‘tonic’ (i.e.
the first degree or keynote) of the scale as well as its mode or type. First click on the note you wish to
use as the tonic. The following menu opens:
Related scales: in the top part of the menu, you will find a varying number of scales preceded
by a “=” sign. These are scales that correspond to the current scale but are differently named.
Please note that when you select a related scale from this menu, only the main structure of the
mode in question is adopted: the scale is simply given a new name and, if applicable, a new
tonic. It can be, however, that the exact definition of the related scale in question contains
additional secondary degrees or fine-tuning. If you wish to use these, please choose Open
Scale... from the Scale drop-down menu.
The current note: in the middle of the submenu, grayed out, you will see the name of the note
you have clicked on and which you can now make the tonic.
Major / Minor: Allows you to select a major or minor scale with the note selected as tonic. To
select C Major, for example, click ‘C’ in the ruler, followed by ‘C Major’ from the submenu.
Open Scale... : opens Melodyne’s Open Scale window, which offers access to a wide variety of
additional scales.
Analyzed: this offers you rapid access to two options derived from Melodyne’s analysis of the
material: the closest major or minor scale and an exact microtonal scale.
Notes Reflect Scale Changes: normally when you change the scale, Melodyne adjusts the pitch
grid but does not change the notes themselves unless you double-click on them first, in which
case they will snap to the grid. If, however, you wish the notes to adjust automatically to any
change of scale, select either “Tuning” or “Tuning and Mode”. Then any changes will take effect
immediately and you will hear them at once during playback.
Play Scale: plays the current scale.
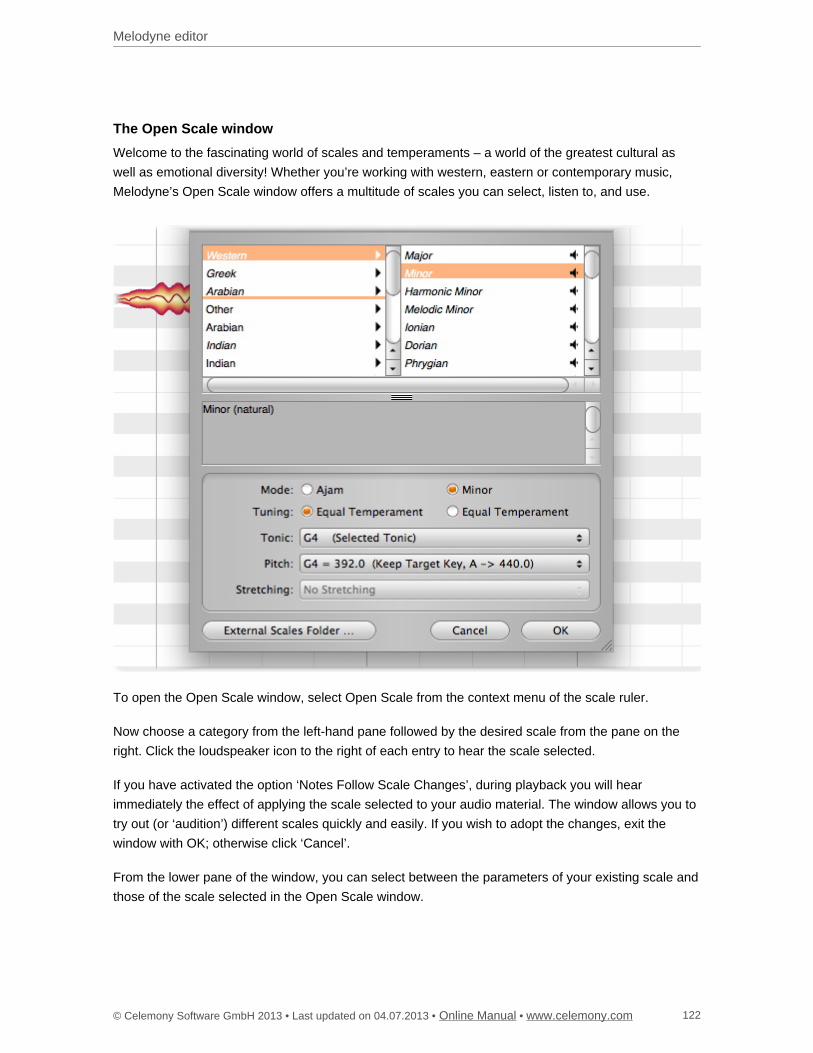
Melodyne editor
© Celemony Software GmbH 2013 • Last updated on 04.07.2013 • • Online Manual www.celemony.com 122
The Open Scale window
Welcome to the fascinating world of scales and temperaments – a world of the greatest cultural as
well as emotional diversity! Whether you’re working with western, eastern or contemporary music,
Melodyne’s Open Scale window offers a multitude of scales you can select, listen to, and use.
To open the Open Scale window, select Open Scale from the context menu of the scale ruler.
Now choose a category from the left-hand pane followed by the desired scale from the pane on the
right. Click the loudspeaker icon to the right of each entry to hear the scale selected.
If you have activated the option ‘Notes Follow Scale Changes’, during playback you will hear
immediately the effect of applying the scale selected to your audio material. The window allows you to
try out (or ‘audition’) different scales quickly and easily. If you wish to adopt the changes, exit the
window with OK; otherwise click ‘Cancel’.
From the lower pane of the window, you can select between the parameters of your existing scale and
those of the scale selected in the Open Scale window.
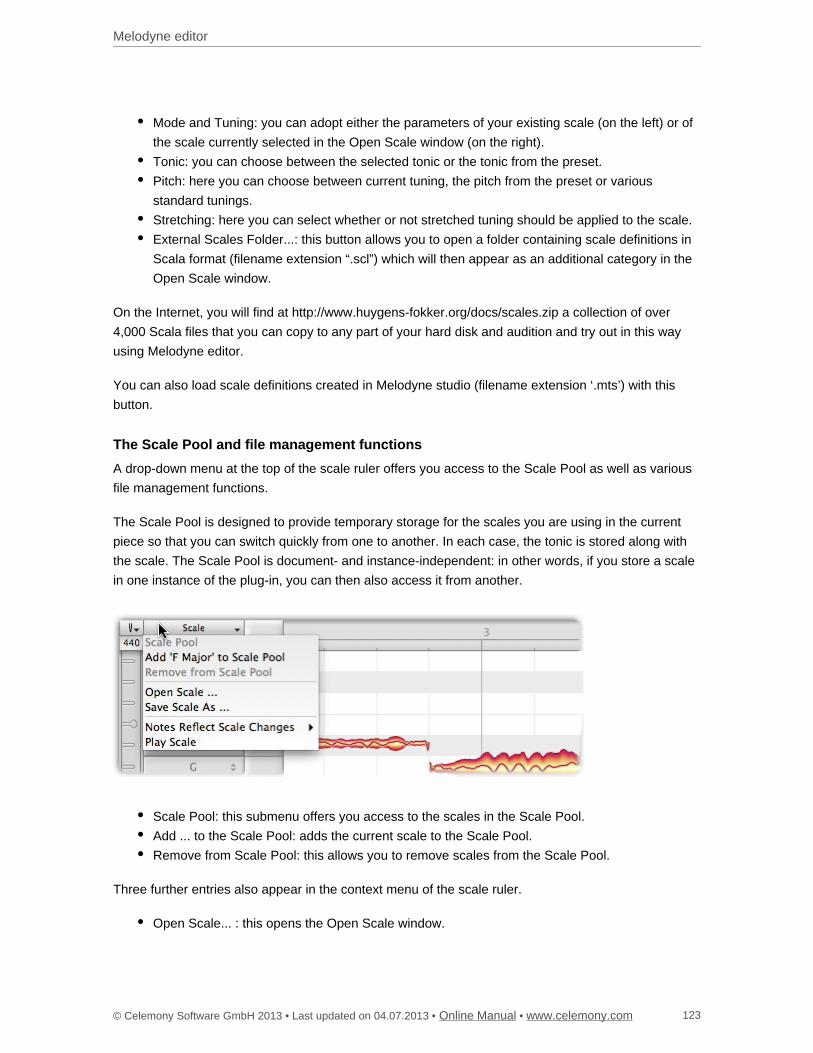
Melodyne editor
© Celemony Software GmbH 2013 • Last updated on 04.07.2013 • • Online Manual www.celemony.com 123
Mode and Tuning: you can adopt either the parameters of your existing scale (on the left) or of
the scale currently selected in the Open Scale window (on the right).
Tonic: you can choose between the selected tonic or the tonic from the preset.
Pitch: here you can choose between current tuning, the pitch from the preset or various
standard tunings.
Stretching: here you can select whether or not stretched tuning should be applied to the scale.
External Scales Folder...: this button allows you to open a folder containing scale definitions in
Scala format (filename extension “.scl”) which will then appear as an additional category in the
Open Scale window.
On the Internet, you will find at http://www.huygens-fokker.org/docs/scales.zip a collection of over
4,000 Scala files that you can copy to any part of your hard disk and audition and try out in this way
using Melodyne editor.
You can also load scale definitions created in Melodyne studio (filename extension ‘.mts’) with this
button.
The Scale Pool and file management functions
A drop-down menu at the top of the scale ruler offers you access to the Scale Pool as well as various
file management functions.
The Scale Pool is designed to provide temporary storage for the scales you are using in the current
piece so that you can switch quickly from one to another. In each case, the tonic is stored along with
the scale. The Scale Pool is document- and instance-independent: in other words, if you store a scale
in one instance of the plug-in, you can then also access it from another.
Scale Pool: this submenu offers you access to the scales in the Scale Pool.
Add ... to the Scale Pool: adds the current scale to the Scale Pool.
Remove from Scale Pool: this allows you to remove scales from the Scale Pool.
Three further entries also appear in the context menu of the scale ruler.
Open Scale... : this opens the Open Scale window.
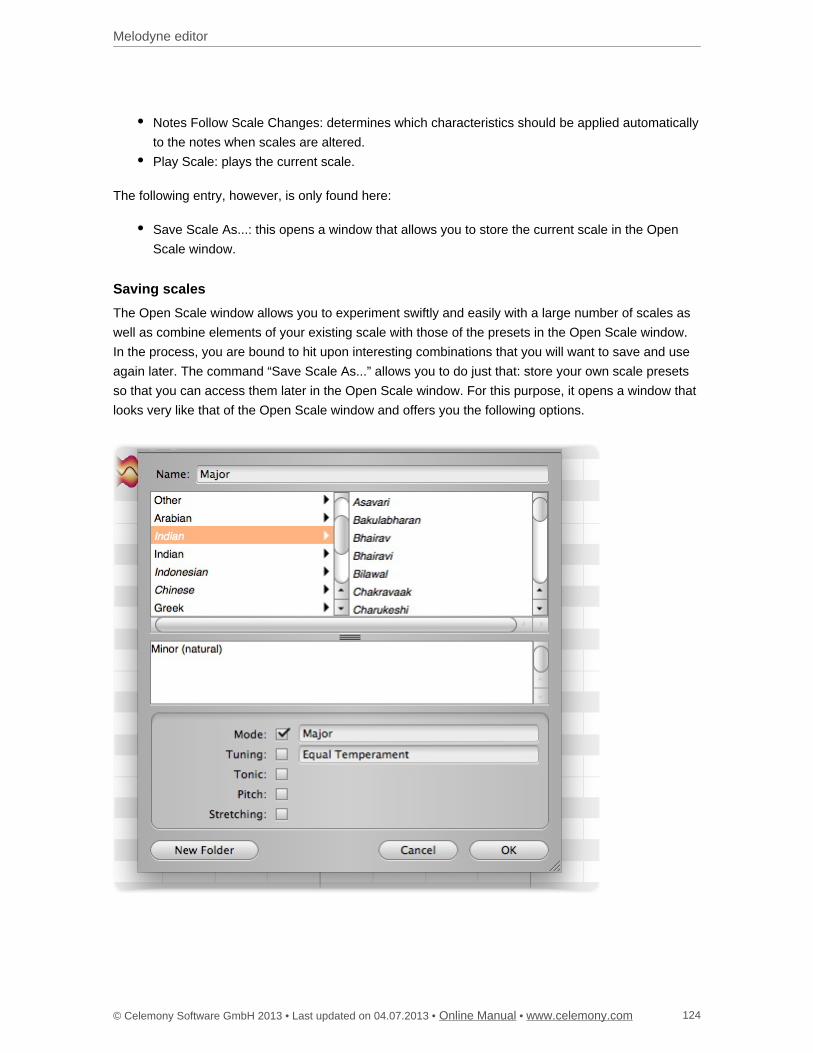
Melodyne editor
© Celemony Software GmbH 2013 • Last updated on 04.07.2013 • • Online Manual www.celemony.com 124
Notes Follow Scale Changes: determines which characteristics should be applied automatically
to the notes when scales are altered.
Play Scale: plays the current scale.
The following entry, however, is only found here:
Save Scale As...: this opens a window that allows you to store the current scale in the Open
Scale window.
Saving scales
The Open Scale window allows you to experiment swiftly and easily with a large number of scales as
well as combine elements of your existing scale with those of the presets in the Open Scale window.
In the process, you are bound to hit upon interesting combinations that you will want to save and use
again later. The command “Save Scale As...” allows you to do just that: store your own scale presets
so that you can access them later in the Open Scale window. For this purpose, it opens a window that
looks very like that of the Open Scale window and offers you the following options.
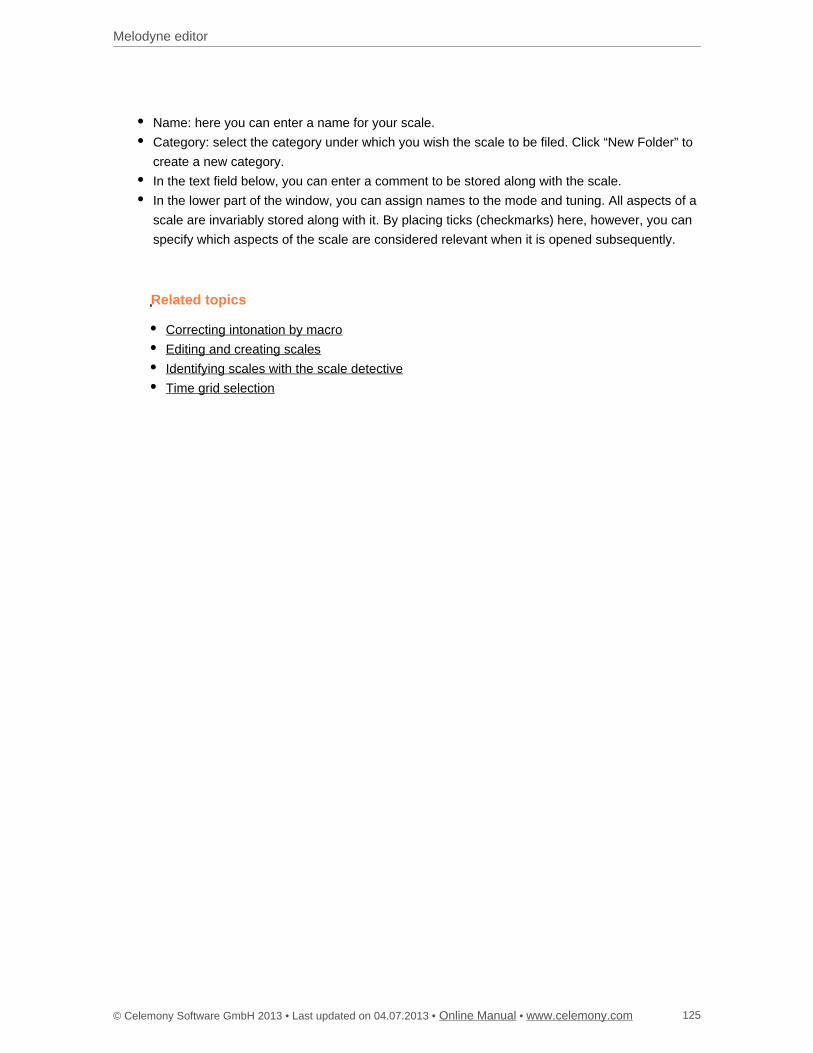
Melodyne editor
© Celemony Software GmbH 2013 • Last updated on 04.07.2013 • • Online Manual www.celemony.com 125
Name: here you can enter a name for your scale.
Category: select the category under which you wish the scale to be filed. Click “New Folder” to
create a new category.
In the text field below, you can enter a comment to be stored along with the scale.
In the lower part of the window, you can assign names to the mode and tuning. All aspects of a
scale are invariably stored along with it. By placing ticks (checkmarks) here, however, you can
specify which aspects of the scale are considered relevant when it is opened subsequently.
Related topics
Correcting intonation by macro
Editing and creating scales
Identifying scales with the scale detective
Time grid selection
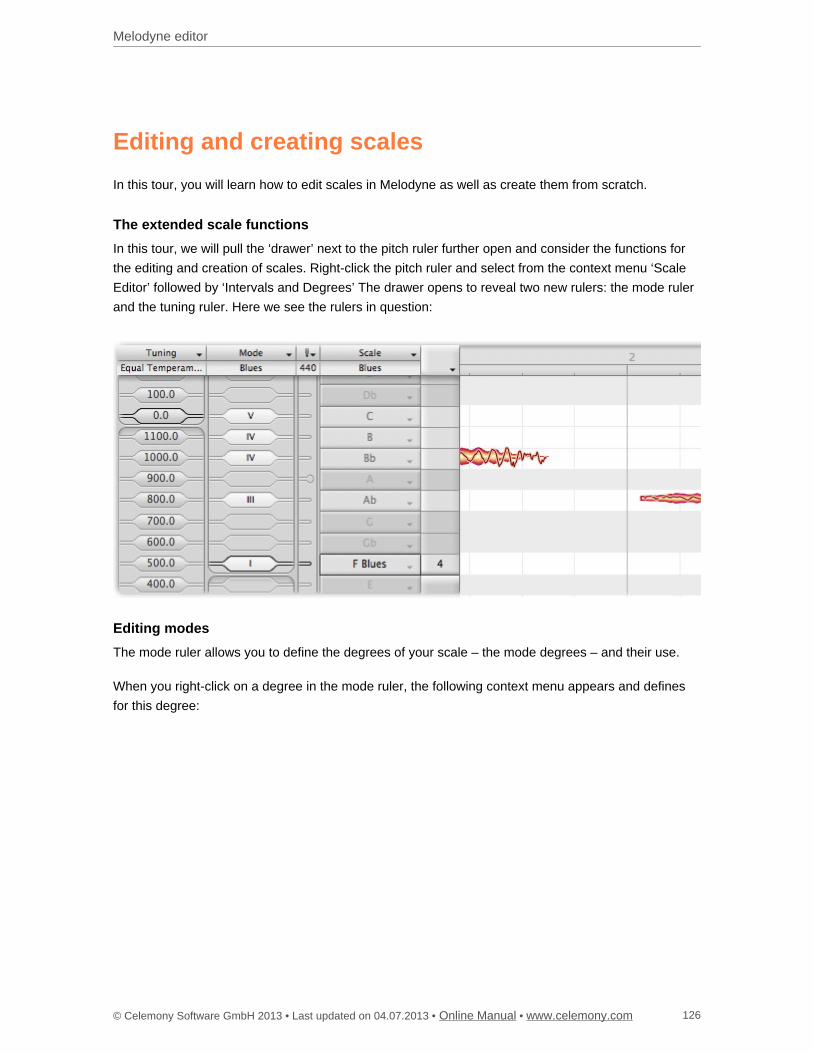
Melodyne editor
© Celemony Software GmbH 2013 • Last updated on 04.07.2013 • • Online Manual www.celemony.com 126
Editing and creating scales
In this tour, you will learn how to edit scales in Melodyne as well as create them from scratch.
The extended scale functions
In this tour, we will pull the ‘drawer’ next to the pitch ruler further open and consider the functions for
the editing and creation of scales. Right-click the pitch ruler and select from the context menu ‘Scale
Editor’ followed by ‘Intervals and Degrees’ The drawer opens to reveal two new rulers: the mode ruler
and the tuning ruler. Here we see the rulers in question:
Editing modes
The mode ruler allows you to define the degrees of your scale – the mode degrees – and their use.
When you right-click on a degree in the mode ruler, the following context menu appears and defines
for this degree:
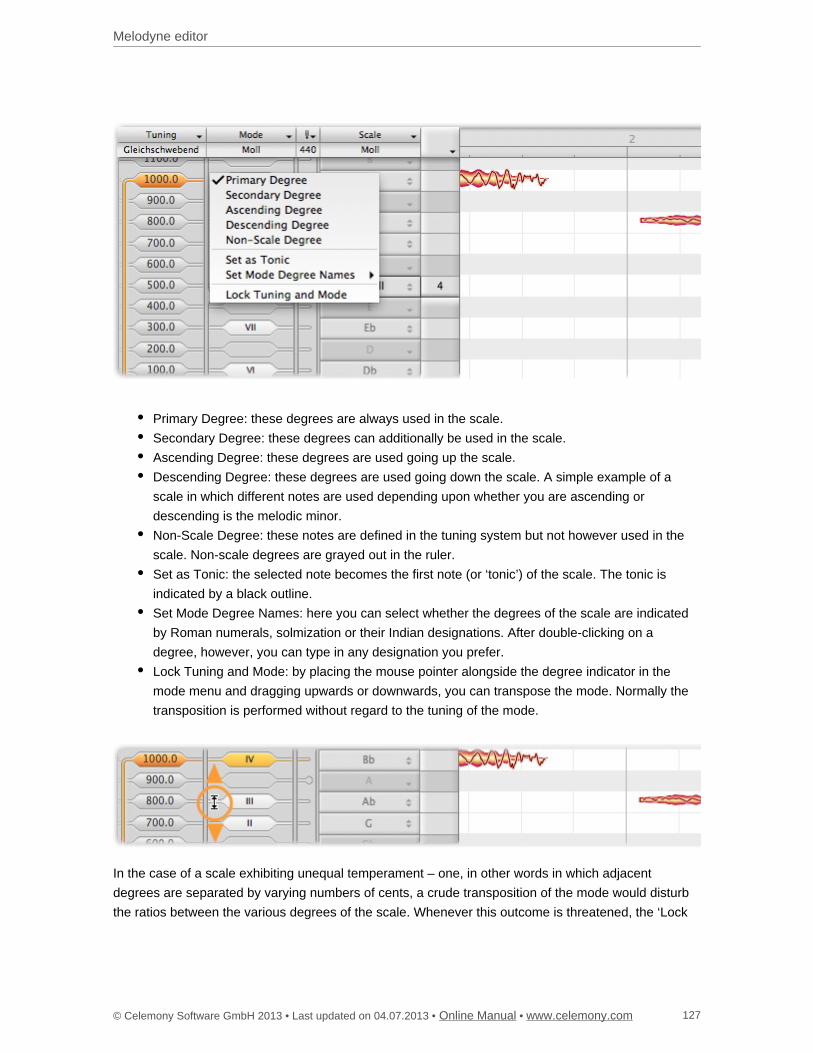
Melodyne editor
© Celemony Software GmbH 2013 • Last updated on 04.07.2013 • • Online Manual www.celemony.com 127
Primary Degree: these degrees are always used in the scale.
Secondary Degree: these degrees can additionally be used in the scale.
Ascending Degree: these degrees are used going up the scale.
Descending Degree: these degrees are used going down the scale. A simple example of a
scale in which different notes are used depending upon whether you are ascending or
descending is the melodic minor.
Non-Scale Degree: these notes are defined in the tuning system but not however used in the
scale. Non-scale degrees are grayed out in the ruler.
Set as Tonic: the selected note becomes the first note (or ‘tonic’) of the scale. The tonic is
indicated by a black outline.
Set Mode Degree Names: here you can select whether the degrees of the scale are indicated
by Roman numerals, solmization or their Indian designations. After double-clicking on a
degree, however, you can type in any designation you prefer.
Lock Tuning and Mode: by placing the mouse pointer alongside the degree indicator in the
mode menu and dragging upwards or downwards, you can transpose the mode. Normally the
transposition is performed without regard to the tuning of the mode.
In the case of a scale exhibiting unequal temperament – one, in other words in which adjacent
degrees are separated by varying numbers of cents, a crude transposition of the mode would disturb
the ratios between the various degrees of the scale. Whenever this outcome is threatened, the ‘Lock
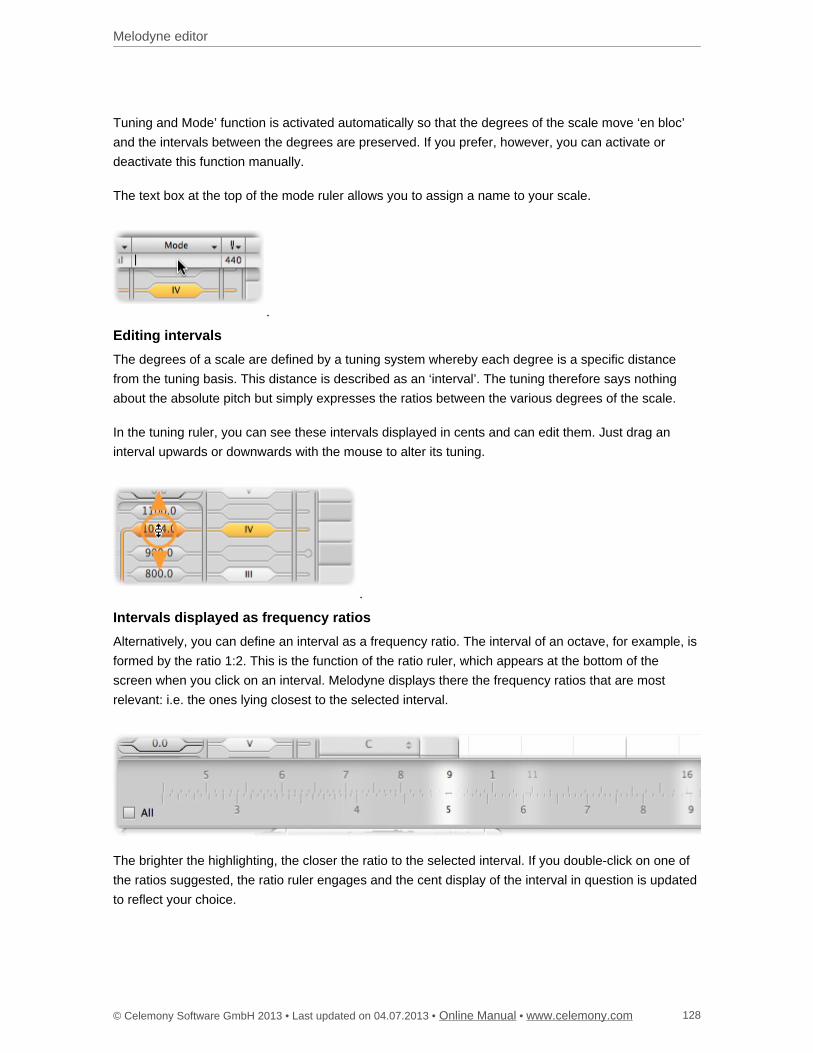
Melodyne editor
© Celemony Software GmbH 2013 • Last updated on 04.07.2013 • • Online Manual www.celemony.com 128
Tuning and Mode’ function is activated automatically so that the degrees of the scale move ‘en bloc’
and the intervals between the degrees are preserved. If you prefer, however, you can activate or
deactivate this function manually.
The text box at the top of the mode ruler allows you to assign a name to your scale.
Editing intervals
The degrees of a scale are defined by a tuning system whereby each degree is a specific distance
from the tuning basis. This distance is described as an ‘interval’. The tuning therefore says nothing
about the absolute pitch but simply expresses the ratios between the various degrees of the scale.
In the tuning ruler, you can see these intervals displayed in cents and can edit them. Just drag an
interval upwards or downwards with the mouse to alter its tuning.
Intervals displayed as frequency ratios
Alternatively, you can define an interval as a frequency ratio. The interval of an octave, for example, is
formed by the ratio 1:2. This is the function of the ratio ruler, which appears at the bottom of the
screen when you click on an interval. Melodyne displays there the frequency ratios that are most
relevant: i.e. the ones lying closest to the selected interval.
The brighter the highlighting, the closer the ratio to the selected interval. If you double-click on one of
the ratios suggested, the ratio ruler engages and the cent display of the interval in question is updated
to reflect your choice.

Melodyne editor
© Celemony Software GmbH 2013 • Last updated on 04.07.2013 • • Online Manual www.celemony.com 129
By dragging the upper half of the ruler, you can set any ratio you want. To move the entire ruler, drag
the lower half. If you check the box marked ‘All’ in the ratio ruler, Melodyne will no longer preselect
ratios for you but simply display all possible ratios that approximate to the current interval.
Defining intervals
Right-clicking on any interval in the tuning ruler opens the following context menu:
Insert Interval Above Selection: inserts an interval above the interval selected.
Remove Interval: removes the selected interval.
Insert Chromatic Intervals: supplements the existing intervals chromatically through the addition
of further intervals.
Remove Non-Scale Intervals: removes all intervals foreign to the scale.
Set as Tuning Root: makes the selected interval the tuning basis of the scale.
Assigned Note Name: any new interval initially takes the name of the nearest note. Musically,
however, it may be preferable to assign the name of the note above or below it, so this entry
allows you to select an alternative name.
Round Tuning to Equal Temperament: rounds all intervals to comply with equal temperament.
Stretch Tuning: opens a window that allows you to apply stretched tuning to your scale (more
on this below).
Create New Scale Based On ...: opens a window that allows you to create from scratch a new
scale (more on this below).
Interval Display: this allows you to make the selected interval the display reference for your
tuning system, deactivate the cyclic interval display, and select between cents, hertz and
Turkish commas (=1/53 octave) as display units. These options only affect the display of the
intervals and have no effect on their tuning.
Interval Monitoring: if this option is checked, as you alter an interval you can hear the results.
The text box at the top of the tuning ruler allows you to enter a name for the tuning system of your
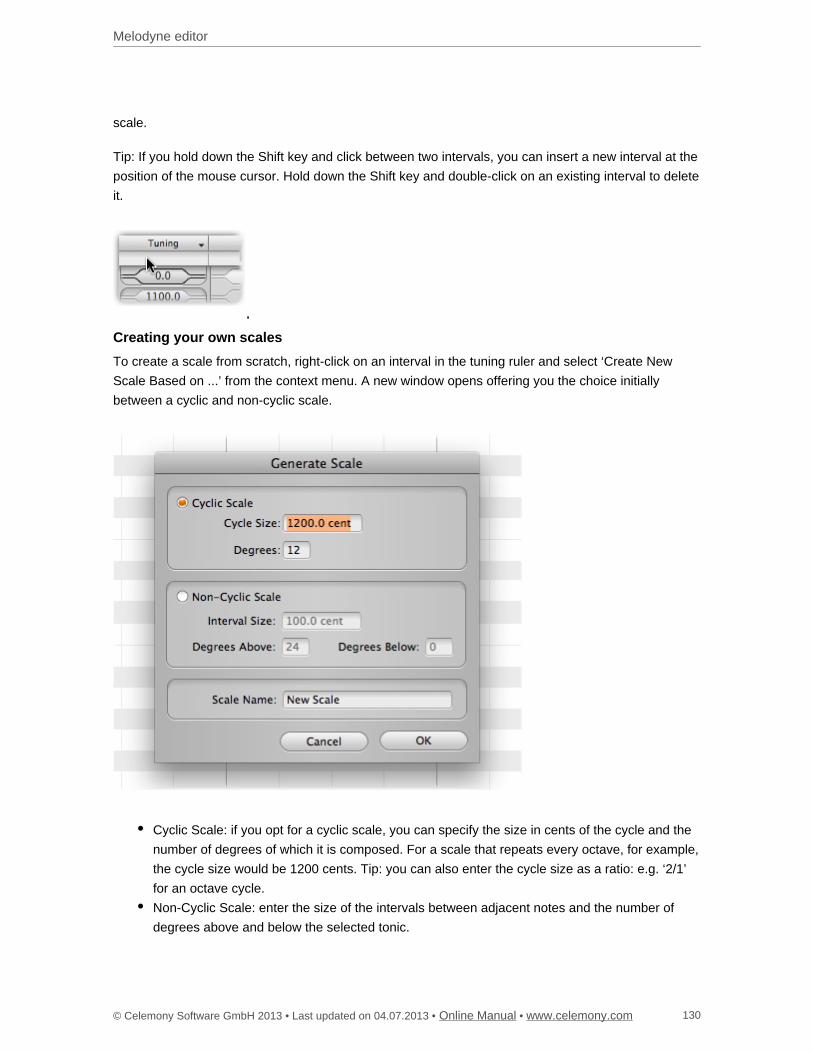
Melodyne editor
© Celemony Software GmbH 2013 • Last updated on 04.07.2013 • • Online Manual www.celemony.com 130
scale.
Tip: If you hold down the Shift key and click between two intervals, you can insert a new interval at the
position of the mouse cursor. Hold down the Shift key and double-click on an existing interval to delete
it.
Creating your own scales
To create a scale from scratch, right-click on an interval in the tuning ruler and select ‘Create New
Scale Based on ...’ from the context menu. A new window opens offering you the choice initially
between a cyclic and non-cyclic scale.
Cyclic Scale: if you opt for a cyclic scale, you can specify the size in cents of the cycle and the
number of degrees of which it is composed. For a scale that repeats every octave, for example,
the cycle size would be 1200 cents. Tip: you can also enter the cycle size as a ratio: e.g. ‘2/1’
for an octave cycle.
Non-Cyclic Scale: enter the size of the intervals between adjacent notes and the number of
degrees above and below the selected tonic.
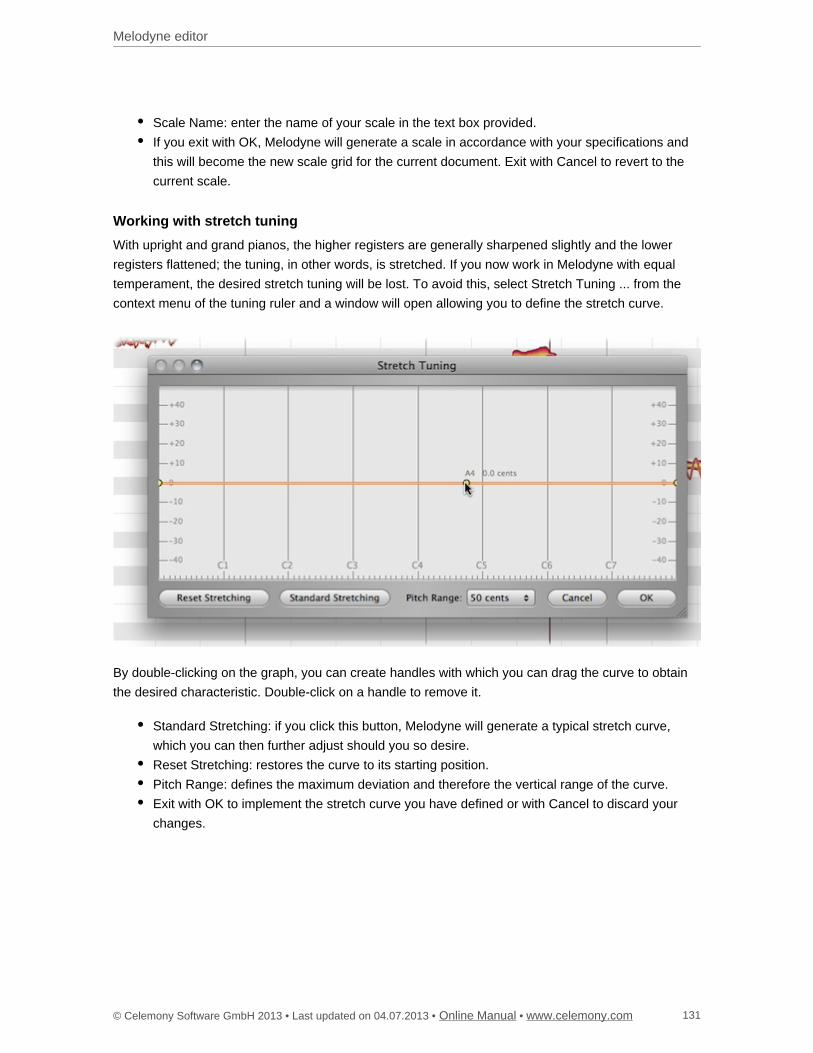
Melodyne editor
© Celemony Software GmbH 2013 • Last updated on 04.07.2013 • • Online Manual www.celemony.com 131
Scale Name: enter the name of your scale in the text box provided.
If you exit with OK, Melodyne will generate a scale in accordance with your specifications and
this will become the new scale grid for the current document. Exit with Cancel to revert to the
current scale.
Working with stretch tuning
With upright and grand pianos, the higher registers are generally sharpened slightly and the lower
registers flattened; the tuning, in other words, is stretched. If you now work in Melodyne with equal
temperament, the desired stretch tuning will be lost. To avoid this, select Stretch Tuning ... from the
context menu of the tuning ruler and a window will open allowing you to define the stretch curve.
By double-clicking on the graph, you can create handles with which you can drag the curve to obtain
the desired characteristic. Double-click on a handle to remove it.
Standard Stretching: if you click this button, Melodyne will generate a typical stretch curve,
which you can then further adjust should you so desire.
Reset Stretching: restores the curve to its starting position.
Pitch Range: defines the maximum deviation and therefore the vertical range of the curve.
Exit with OK to implement the stretch curve you have defined or with Cancel to discard your
changes.
Melodyne editor
© Celemony Software GmbH 2013 • Last updated on 04.07.2013 • • Online Manual www.celemony.com 132
Related topics
Correcting intonation by macro
Identifying scales with the scale detective
Editing pitch
The pitch grid and scales
Melodyne editor
© Celemony Software GmbH 2013 • Last updated on 04.07.2013 • • Online Manual www.celemony.com 133
Identifying scales with the scale detective
In this tour, you will learn how to identify, extract and use the scale of a recording with the help of the
scale detective.
What the scale detective does
The scale detective captures for you the individual character of a scale. To do this, it analyzes the
intervals found in the audio material as well as their implications for the mode of the scale. The result
is a scale grid that represents the music analyzed in an optimal fashion. But, naturally, you are also
free to edit the extracted scale as well as save it and apply it to other material — in this way imbuing a
second recording with the special character of the first.
Showing the scale detective and adjusting its sensitivity
Right-click the pitch ruler and select Scale Editor > Scale Detective from the context menu.
A new column appears at the extreme left of the screen displaying the findings of the scale detective.
The ‘mountains’ there represent the intervals detected: the higher the mountain, the more importance
is attached by Melodyne to the role of the interval in question in the mode of the scale.
The slider at the top of the scale detective column governs the sensitivity of the analysis and with it the
number of intervals detected and displayed. The intervals displayed should correspond as closely as
possible to the intervals actually played. Adjust the sensitivity until only as many intervals are
displayed as the scale in your view contains.
The analysis will take into consideration only the notes selected, unless no notes are selected, in
which case all will be considered.
Melodyne editor
© Celemony Software GmbH 2013 • Last updated on 04.07.2013 • • Online Manual www.celemony.com 134
Scale detection options
A right-click on the scale detective column opens the following context menu:
Reanalyze Scale: this command requires the scale detective to conduct a fresh analysis of the
scale. The analysis will take into consideration only the notes selected, unless no notes are
selected, in which case all will be considered.
Apply Analysis: if this option is selected, the results of the analysis will invariably be applied
directly to the current scale grid.
Analysis Inserts Chromatic Intervals: if this option is selected, the intervals analyzed are
supplemented chromatically by others, which are then regarded as intervals foreign to the scale
(or ‘non-scale degrees’).
Keep ... as Tonic: if you click and drag the scale detective column vertically, you can alter the
tonic upon which the analysis of the audio material is based. When you do so, this option is
selected automatically. The next analysis will then be based upon the tonic you have selected
rather than the one indicated by Melodyne’s current analysis of the material.
Scale Cycle: opens a dialog box that allows you to choose between a cyclic or non-cyclic
analysis.
Melodyne editor
© Celemony Software GmbH 2013 • Last updated on 04.07.2013 • • Online Manual www.celemony.com 135
Cyclic Scale: selects a cyclical scale analysis. You can enter the size of the cycle in cents or as
a ratio: e.g. “2/1” for a scale that repeats every octave.
Non-Cyclic Scale: selects a non-cyclic scale analysis the upper and lower limits of which in
hertz (Hz) you are free to choose. The analysis will then consider only notes lying within the
range specified.
When you exit the scale cycle dialog with OK, a fresh analysis of the material will be conducted
at once based upon your new settings. If, on the other hand, you select Cancel, Melodyne will
revert to the existing analysis.
Applying the detected scale.
To apply the detected scale to the current scale grid, check the option ‘Apply Analysis’ in the context
menu of the scale detective column on the extreme left of the screen. You can then edit, save and
apply to other material your new scale just like any other.
Related topics
Editing pitch
Editing and creating scales
Correcting intonation by macro
The pitch grid and scales
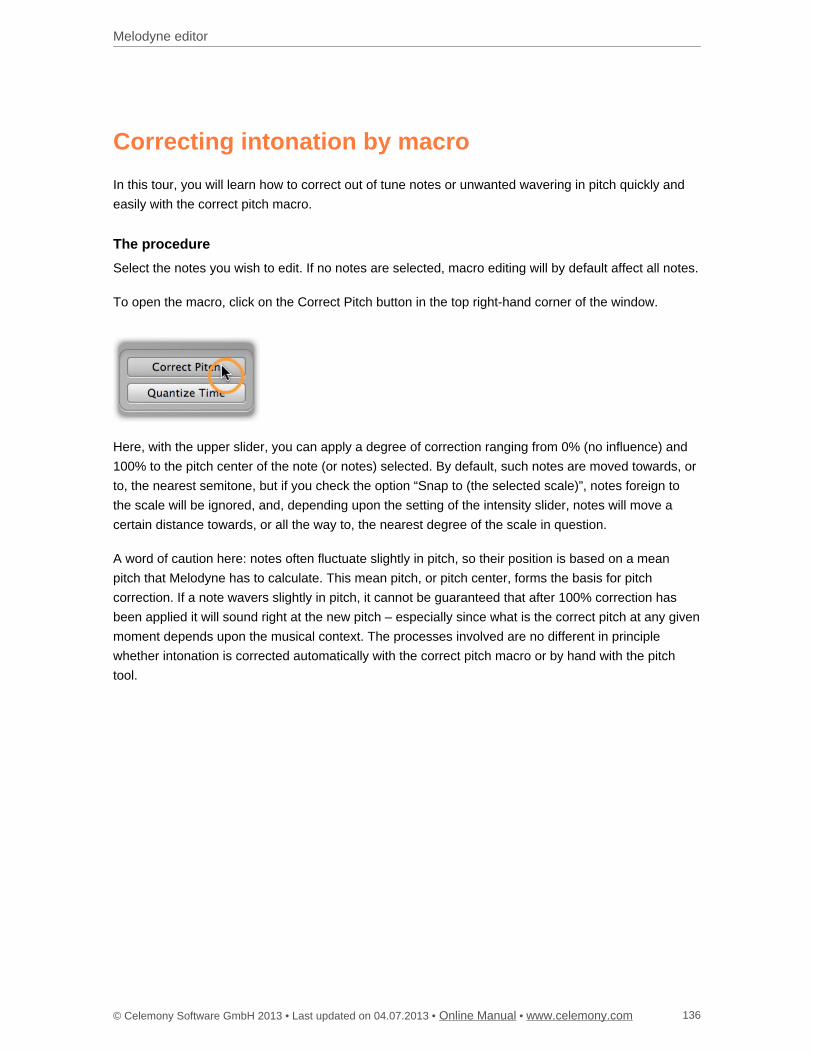
Melodyne editor
© Celemony Software GmbH 2013 • Last updated on 04.07.2013 • • Online Manual www.celemony.com 136
Correcting intonation by macro
In this tour, you will learn how to correct out of tune notes or unwanted wavering in pitch quickly and
easily with the correct pitch macro.
The procedure
Select the notes you wish to edit. If no notes are selected, macro editing will by default affect all notes.
To open the macro, click on the Correct Pitch button in the top right-hand corner of the window.
Here, with the upper slider, you can apply a degree of correction ranging from 0% (no influence) and
100% to the pitch center of the note (or notes) selected. By default, such notes are moved towards, or
to, the nearest semitone, but if you check the option “Snap to (the selected scale)”, notes foreign to
the scale will be ignored, and, depending upon the setting of the intensity slider, notes will move a
certain distance towards, or all the way to, the nearest degree of the scale in question.
A word of caution here: notes often fluctuate slightly in pitch, so their position is based on a mean
pitch that Melodyne has to calculate. This mean pitch, or pitch center, forms the basis for pitch
correction. If a note wavers slightly in pitch, it cannot be guaranteed that after 100% correction has
been applied it will sound right at the new pitch – especially since what is the correct pitch at any given
moment depends upon the musical context. The processes involved are no different in principle
whether intonation is corrected automatically with the correct pitch macro or by hand with the pitch
tool.
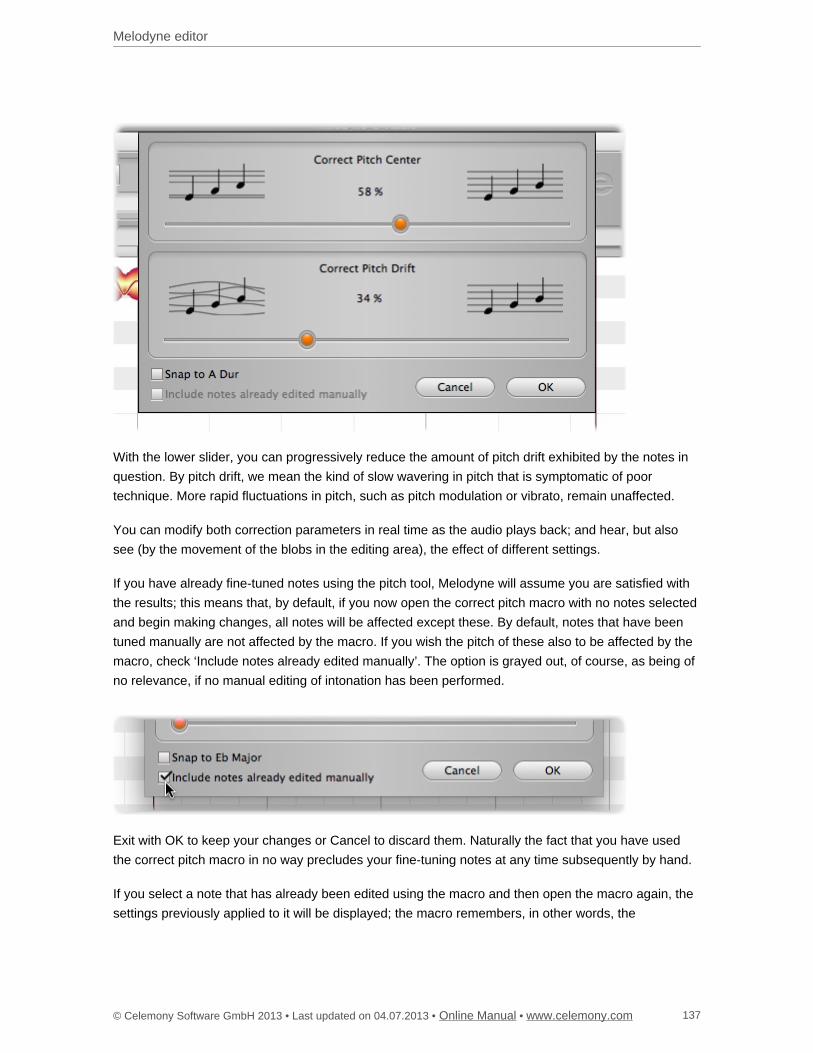
Melodyne editor
© Celemony Software GmbH 2013 • Last updated on 04.07.2013 • • Online Manual www.celemony.com 137
With the lower slider, you can progressively reduce the amount of pitch drift exhibited by the notes in
question. By pitch drift, we mean the kind of slow wavering in pitch that is symptomatic of poor
technique. More rapid fluctuations in pitch, such as pitch modulation or vibrato, remain unaffected.
You can modify both correction parameters in real time as the audio plays back; and hear, but also
see (by the movement of the blobs in the editing area), the effect of different settings.
If you have already fine-tuned notes using the pitch tool, Melodyne will assume you are satisfied with
the results; this means that, by default, if you now open the correct pitch macro with no notes selected
and begin making changes, all notes will be affected except these. By default, notes that have been
tuned manually are not affected by the macro. If you wish the pitch of these also to be affected by the
macro, check ‘Include notes already edited manually’. The option is grayed out, of course, as being of
no relevance, if no manual editing of intonation has been performed.
Exit with OK to keep your changes or Cancel to discard them. Naturally the fact that you have used
the correct pitch macro in no way precludes your fine-tuning notes at any time subsequently by hand.
If you select a note that has already been edited using the macro and then open the macro again, the
settings previously applied to it will be displayed; the macro remembers, in other words, the
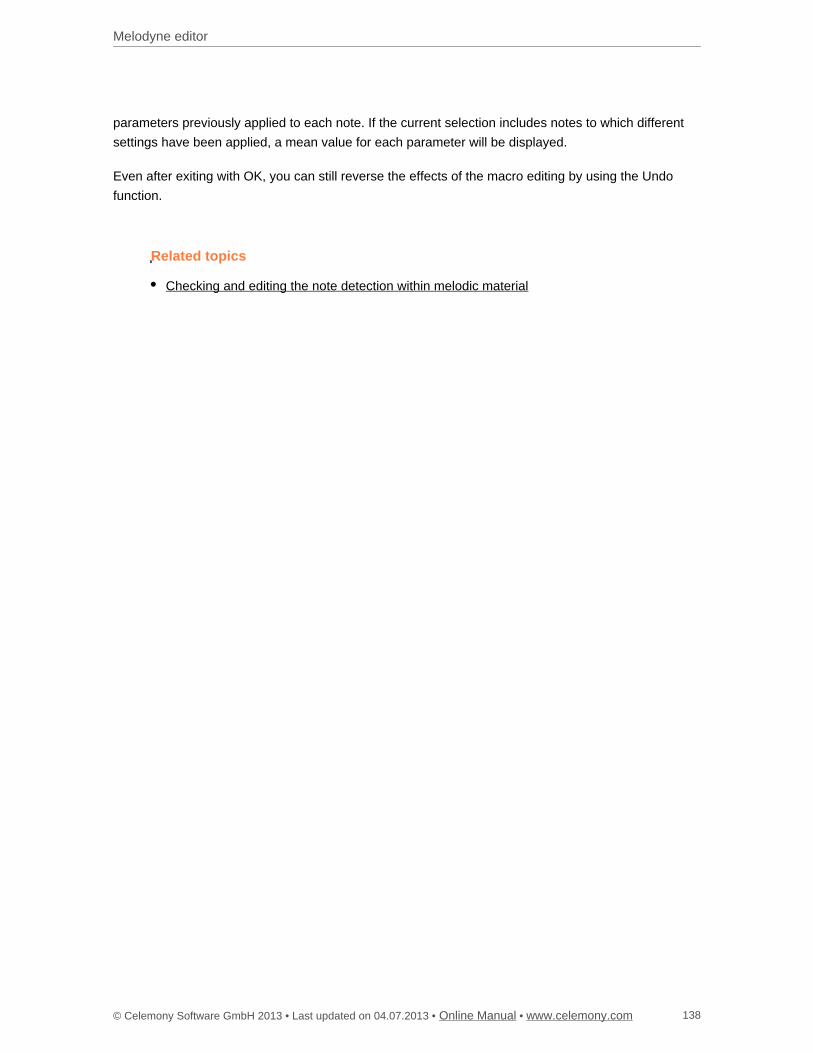
Melodyne editor
© Celemony Software GmbH 2013 • Last updated on 04.07.2013 • • Online Manual www.celemony.com 138
parameters previously applied to each note. If the current selection includes notes to which different
settings have been applied, a mean value for each parameter will be displayed.
Even after exiting with OK, you can still reverse the effects of the macro editing by using the Undo
function.
Related topics
Checking and editing the note detection within melodic material
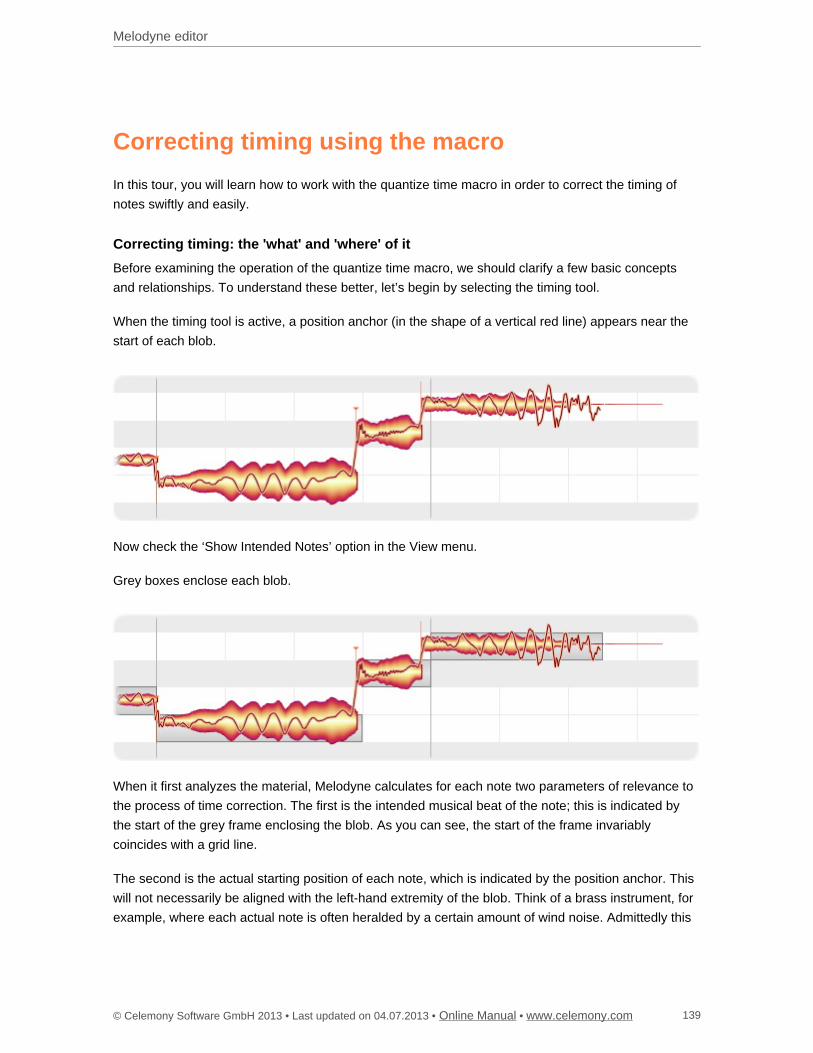
Melodyne editor
© Celemony Software GmbH 2013 • Last updated on 04.07.2013 • • Online Manual www.celemony.com 139
Correcting timing using the macro
In this tour, you will learn how to work with the quantize time macro in order to correct the timing of
notes swiftly and easily.
Correcting timing: the 'what' and 'where' of it
Before examining the operation of the quantize time macro, we should clarify a few basic concepts
and relationships. To understand these better, let’s begin by selecting the timing tool.
When the timing tool is active, a position anchor (in the shape of a vertical red line) appears near the
start of each blob.
Now check the ‘Show Intended Notes’ option in the View menu.
Grey boxes enclose each blob.
When it first analyzes the material, Melodyne calculates for each note two parameters of relevance to
the process of time correction. The first is the intended musical beat of the note; this is indicated by
the start of the grey frame enclosing the blob. As you can see, the start of the frame invariably
coincides with a grid line.
The second is the actual starting position of each note, which is indicated by the position anchor. This
will not necessarily be aligned with the left-hand extremity of the blob. Think of a brass instrument, for
example, where each actual note is often heralded by a certain amount of wind noise. Admittedly this
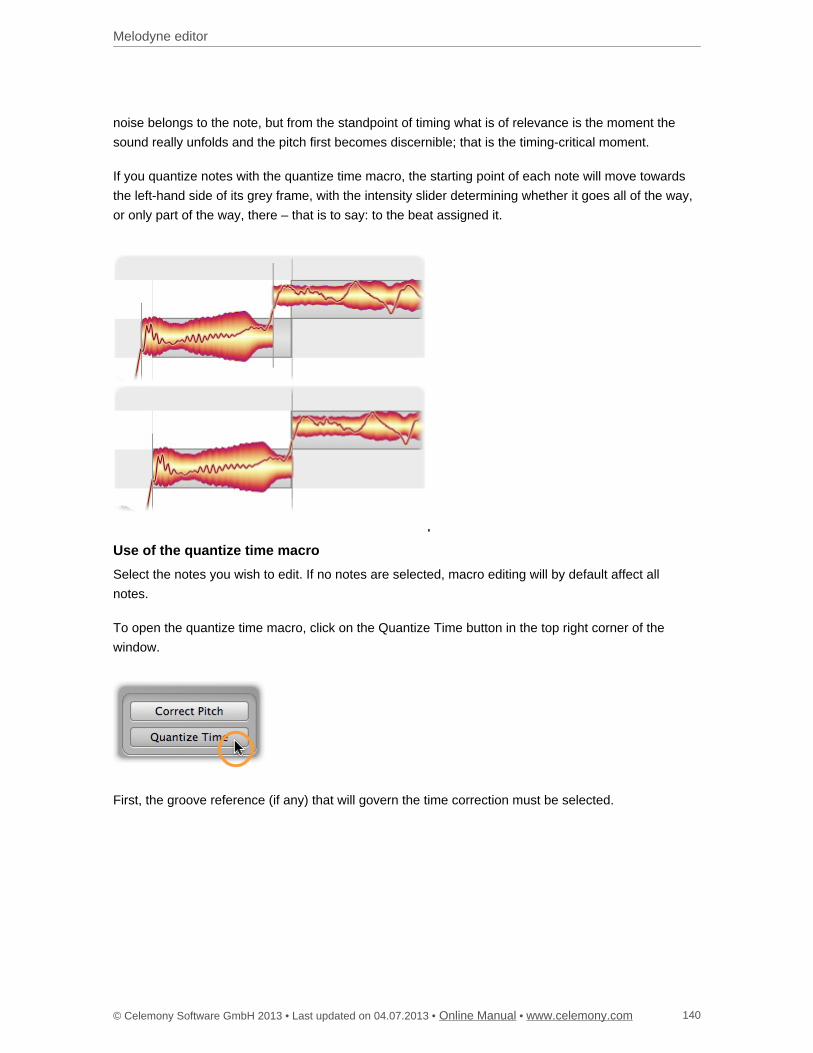
Melodyne editor
© Celemony Software GmbH 2013 • Last updated on 04.07.2013 • • Online Manual www.celemony.com 140
noise belongs to the note, but from the standpoint of timing what is of relevance is the moment the
sound really unfolds and the pitch first becomes discernible; that is the timing-critical moment.
If you quantize notes with the quantize time macro, the starting point of each note will move towards
the left-hand side of its grey frame, with the intensity slider determining whether it goes all of the way,
or only part of the way, there – that is to say: to the beat assigned it.
Use of the quantize time macro
Select the notes you wish to edit. If no notes are selected, macro editing will by default affect all
notes.
To open the quantize time macro, click on the Quantize Time button in the top right corner of the
window.
First, the groove reference (if any) that will govern the time correction must be selected.
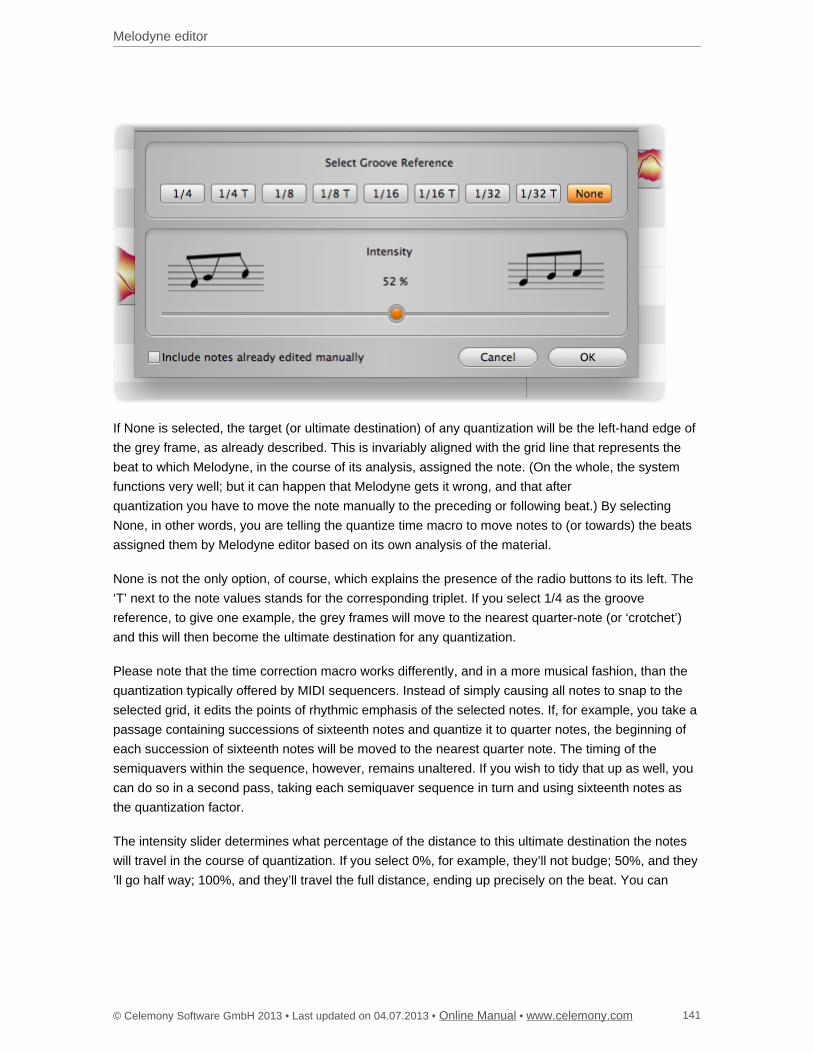
Melodyne editor
© Celemony Software GmbH 2013 • Last updated on 04.07.2013 • • Online Manual www.celemony.com 141
If None is selected, the target (or ultimate destination) of any quantization will be the left-hand edge of
the grey frame, as already described. This is invariably aligned with the grid line that represents the
beat to which Melodyne, in the course of its analysis, assigned the note. (On the whole, the system
functions very well; but it can happen that Melodyne gets it wrong, and that after
quantization you have to move the note manually to the preceding or following beat.) By selecting
None, in other words, you are telling the quantize time macro to move notes to (or towards) the beats
assigned them by Melodyne editor based on its own analysis of the material.
None is not the only option, of course, which explains the presence of the radio buttons to its left. The
‘T’ next to the note values stands for the corresponding triplet. If you select 1/4 as the groove
reference, to give one example, the grey frames will move to the nearest quarter-note (or ‘crotchet’)
and this will then become the ultimate destination for any quantization.
Please note that the time correction macro works differently, and in a more musical fashion, than the
quantization typically offered by MIDI sequencers. Instead of simply causing all notes to snap to the
selected grid, it edits the points of rhythmic emphasis of the selected notes. If, for example, you take a
passage containing successions of sixteenth notes and quantize it to quarter notes, the beginning of
each succession of sixteenth notes will be moved to the nearest quarter note. The timing of the
semiquavers within the sequence, however, remains unaltered. If you wish to tidy that up as well, you
can do so in a second pass, taking each semiquaver sequence in turn and using sixteenth notes as
the quantization factor.
The intensity slider determines what percentage of the distance to this ultimate destination the notes
will travel in the course of quantization. If you select 0%, for example, they’ll not budge; 50%, and they
’ll go half way; 100%, and they’ll travel the full distance, ending up precisely on the beat. You can
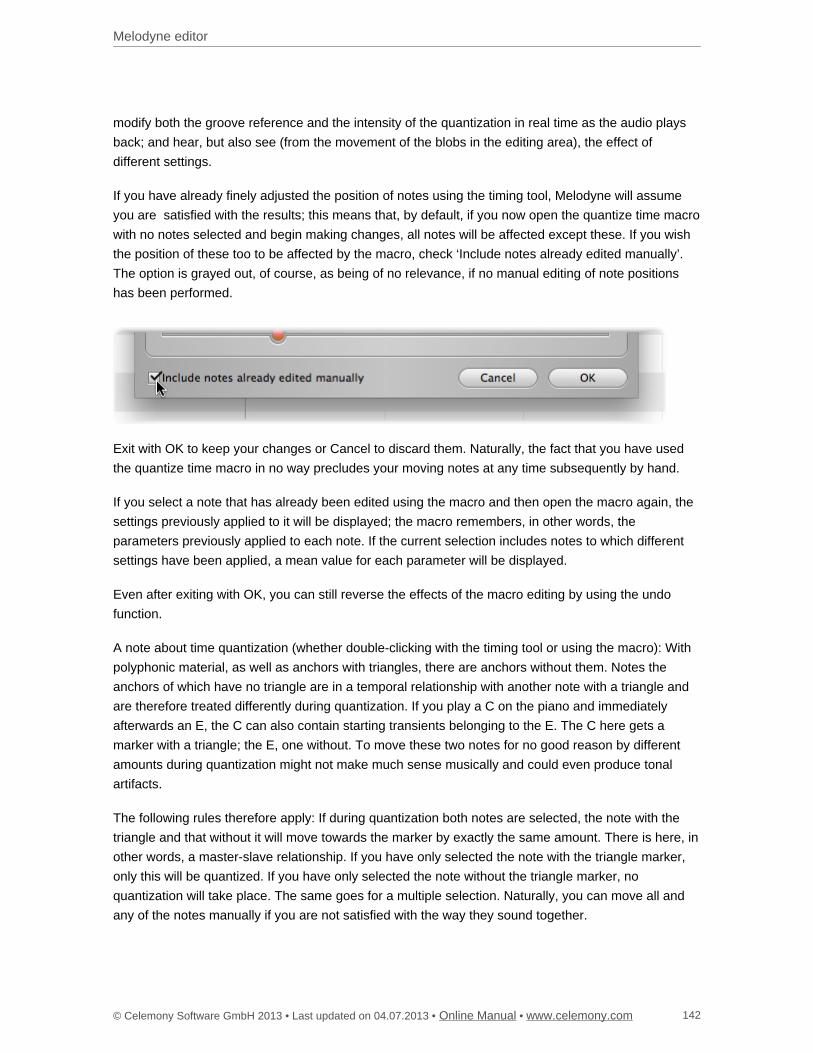
Melodyne editor
© Celemony Software GmbH 2013 • Last updated on 04.07.2013 • • Online Manual www.celemony.com 142
modify both the groove reference and the intensity of the quantization in real time as the audio plays
back; and hear, but also see (from the movement of the blobs in the editing area), the effect of
different settings.
If you have already finely adjusted the position of notes using the timing tool, Melodyne will assume
you are satisfied with the results; this means that, by default, if you now open the quantize time macro
with no notes selected and begin making changes, all notes will be affected except these. If you wish
the position of these too to be affected by the macro, check ‘Include notes already edited manually’.
The option is grayed out, of course, as being of no relevance, if no manual editing of note positions
has been performed.
Exit with OK to keep your changes or Cancel to discard them. Naturally, the fact that you have used
the quantize time macro in no way precludes your moving notes at any time subsequently by hand.
If you select a note that has already been edited using the macro and then open the macro again, the
settings previously applied to it will be displayed; the macro remembers, in other words, the
parameters previously applied to each note. If the current selection includes notes to which different
settings have been applied, a mean value for each parameter will be displayed.
Even after exiting with OK, you can still reverse the effects of the macro editing by using the undo
function.
A note about time quantization (whether double-clicking with the timing tool or using the macro): With
polyphonic material, as well as anchors with triangles, there are anchors without them. Notes the
anchors of which have no triangle are in a temporal relationship with another note with a triangle and
are therefore treated differently during quantization. If you play a C on the piano and immediately
afterwards an E, the C can also contain starting transients belonging to the E. The C here gets a
marker with a triangle; the E, one without. To move these two notes for no good reason by different
amounts during quantization might not make much sense musically and could even produce tonal
artifacts.
The following rules therefore apply: If during quantization both notes are selected, the note with the
triangle and that without it will move towards the marker by exactly the same amount. There is here, in
other words, a master-slave relationship. If you have only selected the note with the triangle marker,
only this will be quantized. If you have only selected the note without the triangle marker, no
quantization will take place. The same goes for a multiple selection. Naturally, you can move all and
any of the notes manually if you are not satisfied with the way they sound together.
Melodyne editor
© Celemony Software GmbH 2013 • Last updated on 04.07.2013 • • Online Manual www.celemony.com 143
Related topics
Matching Melodyne Stand-Alone's time grid to the audio
Time grid selection
Correcting intonation by macro
Editing timing
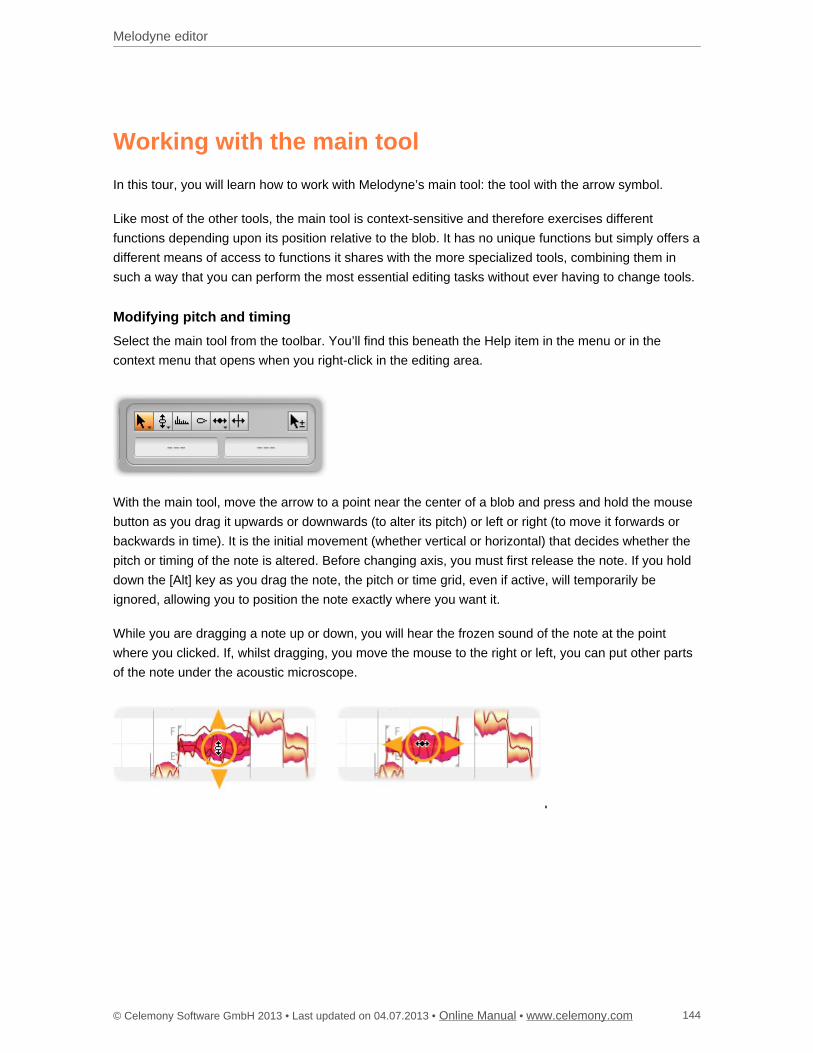
Melodyne editor
© Celemony Software GmbH 2013 • Last updated on 04.07.2013 • • Online Manual www.celemony.com 144
Working with the main tool
In this tour, you will learn how to work with Melodyne’s main tool: the tool with the arrow symbol.
Like most of the other tools, the main tool is context-sensitive and therefore exercises different
functions depending upon its position relative to the blob. It has no unique functions but simply offers a
different means of access to functions it shares with the more specialized tools, combining them in
such a way that you can perform the most essential editing tasks without ever having to change tools.
Modifying pitch and timing
Select the main tool from the toolbar. You’ll find this beneath the Help item in the menu or in the
context menu that opens when you right-click in the editing area.
With the main tool, move the arrow to a point near the center of a blob and press and hold the mouse
button as you drag it upwards or downwards (to alter its pitch) or left or right (to move it forwards or
backwards in time). It is the initial movement (whether vertical or horizontal) that decides whether the
pitch or timing of the note is altered. Before changing axis, you must first release the note. If you hold
down the [Alt] key as you drag the note, the pitch or time grid, even if active, will temporarily be
ignored, allowing you to position the note exactly where you want it.
While you are dragging a note up or down, you will hear the frozen sound of the note at the point
where you clicked. If, whilst dragging, you move the mouse to the right or left, you can put other parts
of the note under the acoustic microscope.
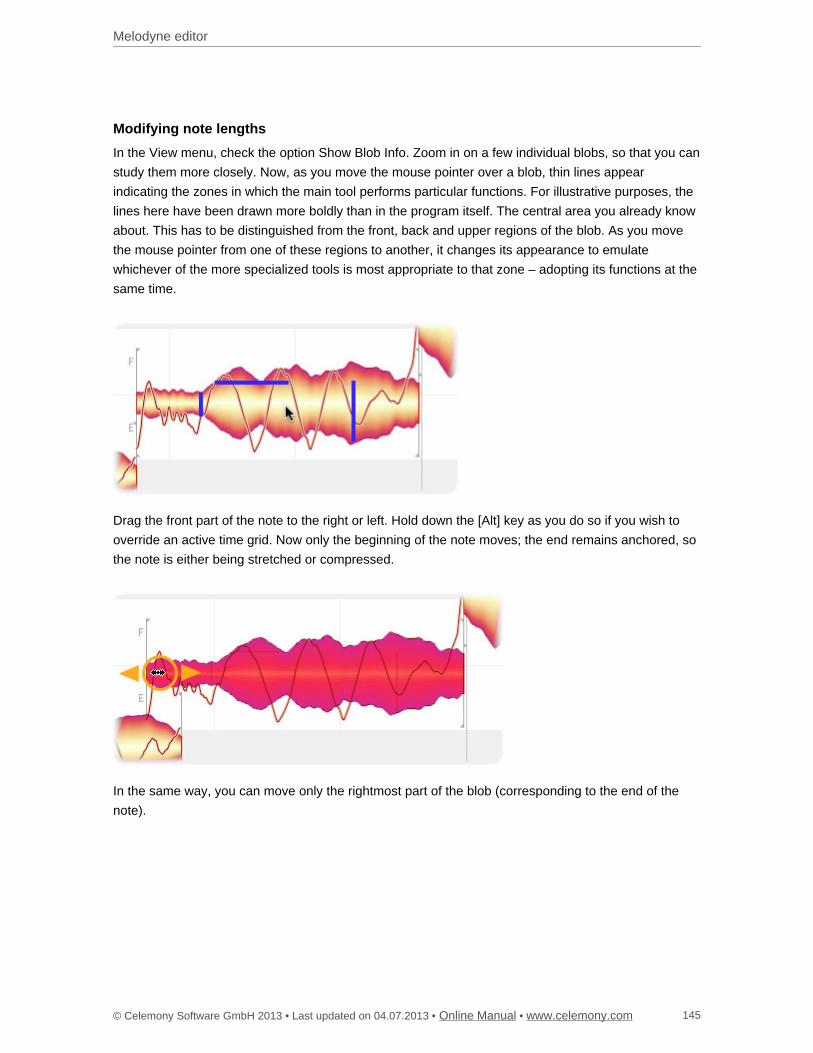
Melodyne editor
© Celemony Software GmbH 2013 • Last updated on 04.07.2013 • • Online Manual www.celemony.com 145
Modifying note lengths
In the View menu, check the option Show Blob Info. Zoom in on a few individual blobs, so that you can
study them more closely. Now, as you move the mouse pointer over a blob, thin lines appear
indicating the zones in which the main tool performs particular functions. For illustrative purposes, the
lines here have been drawn more boldly than in the program itself. The central area you already know
about. This has to be distinguished from the front, back and upper regions of the blob. As you move
the mouse pointer from one of these regions to another, it changes its appearance to emulate
whichever of the more specialized tools is most appropriate to that zone – adopting its functions at the
same time.
Drag the front part of the note to the right or left. Hold down the [Alt] key as you do so if you wish to
override an active time grid. Now only the beginning of the note moves; the end remains anchored, so
the note is either being stretched or compressed.
In the same way, you can move only the rightmost part of the blob (corresponding to the end of the
note).
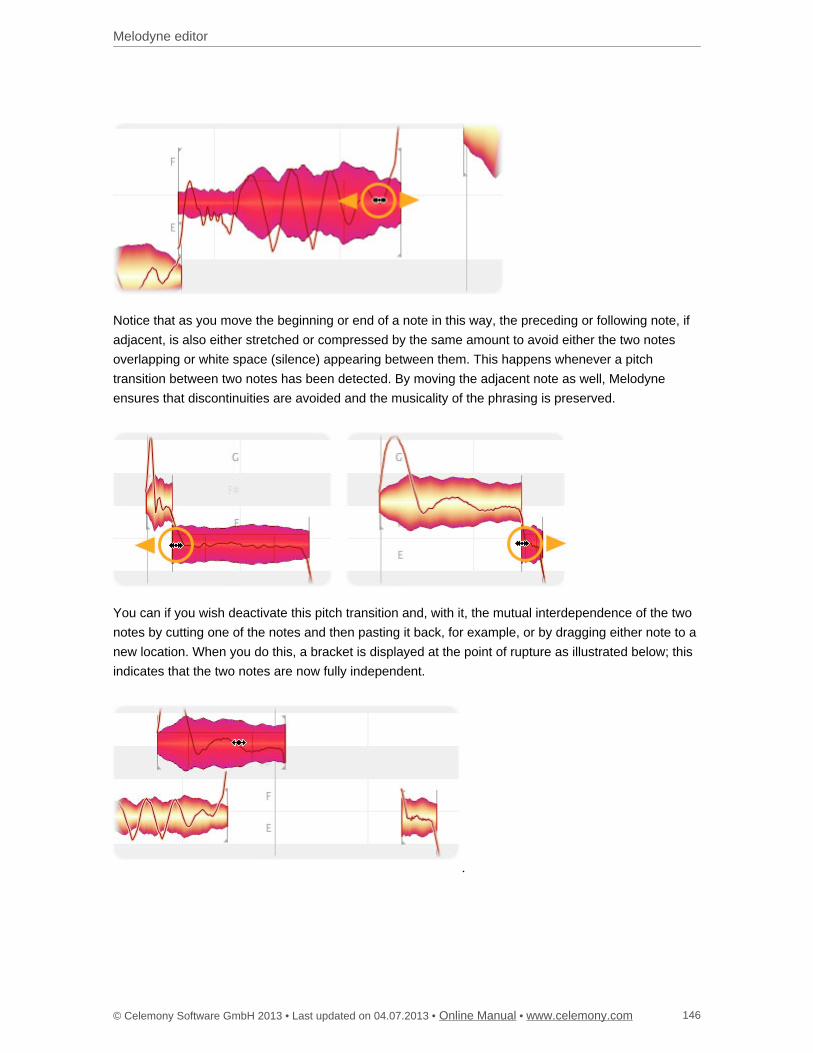
Melodyne editor
© Celemony Software GmbH 2013 • Last updated on 04.07.2013 • • Online Manual www.celemony.com 146
Notice that as you move the beginning or end of a note in this way, the preceding or following note, if
adjacent, is also either stretched or compressed by the same amount to avoid either the two notes
overlapping or white space (silence) appearing between them. This happens whenever a pitch
transition between two notes has been detected. By moving the adjacent note as well, Melodyne
ensures that discontinuities are avoided and the musicality of the phrasing is preserved.
You can if you wish deactivate this pitch transition and, with it, the mutual interdependence of the two
notes by cutting one of the notes and then pasting it back, for example, or by dragging either note to a
new location. When you do this, a bracket is displayed at the point of rupture as illustrated below; this
indicates that the two notes are now fully independent.

Melodyne editor
© Celemony Software GmbH 2013 • Last updated on 04.07.2013 • • Online Manual www.celemony.com 147
Editing note separations
If you move the mouse pointer to the upper part of a note (above the horizontal line), the main tool
adopts the appearance, and emulates the functions, of the note separation tool. If you double-click
now, you can create a note separation – i.e. slice the note in two.
Don’t be surprised if the two notes that result move apart in pitch: this is because a new tonal center is
calculated for each of the newly created notes, and that may differ from the tonal center they shared
when they were one note. In such cases, each therefore moves to a new vertical position based on its
newly calculated pitch center.
You can move an existing note separation horizontally with the note separation tool. For this purpose,
check Show Note Separations in the View menu.
You can double-click a note separation to remove it.
If you select several notes and move a note separation, the note separations of the other selected
notes will also be moved. If you double-click one of the note separations to remove it, those of the
other selected notes will also be removed.
If you have selected several notes that overlap, you can simultaneously insert a note separation at the
same point in all of them, as well as move or remove one.
Melodyne editor
© Celemony Software GmbH 2013 • Last updated on 04.07.2013 • • Online Manual www.celemony.com 148
Related topics
Correcting intonation by macro
Editing pitch
Time grid selection
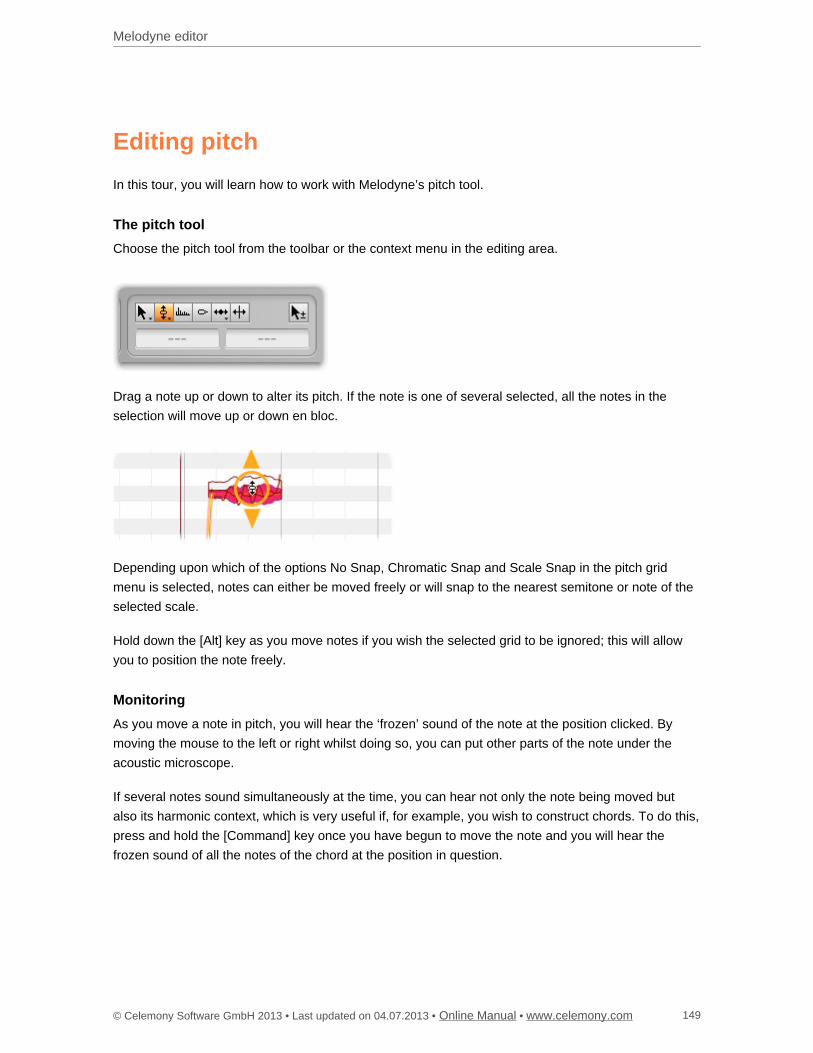
Melodyne editor
© Celemony Software GmbH 2013 • Last updated on 04.07.2013 • • Online Manual www.celemony.com 149
Editing pitch
In this tour, you will learn how to work with Melodyne’s pitch tool.
The pitch tool
Choose the pitch tool from the toolbar or the context menu in the editing area.
Drag a note up or down to alter its pitch. If the note is one of several selected, all the notes in the
selection will move up or down en bloc.
Depending upon which of the options No Snap, Chromatic Snap and Scale Snap in the pitch grid
menu is selected, notes can either be moved freely or will snap to the nearest semitone or note of the
selected scale.
Hold down the [Alt] key as you move notes if you wish the selected grid to be ignored; this will allow
you to position the note freely.
Monitoring
As you move a note in pitch, you will hear the ‘frozen’ sound of the note at the position clicked. By
moving the mouse to the left or right whilst doing so, you can put other parts of the note under the
acoustic microscope.
If several notes sound simultaneously at the time, you can hear not only the note being moved but
also its harmonic context, which is very useful if, for example, you wish to construct chords. To do this,
press and hold the [Command] key once you have begun to move the note and you will hear the
frozen sound of all the notes of the chord at the position in question.
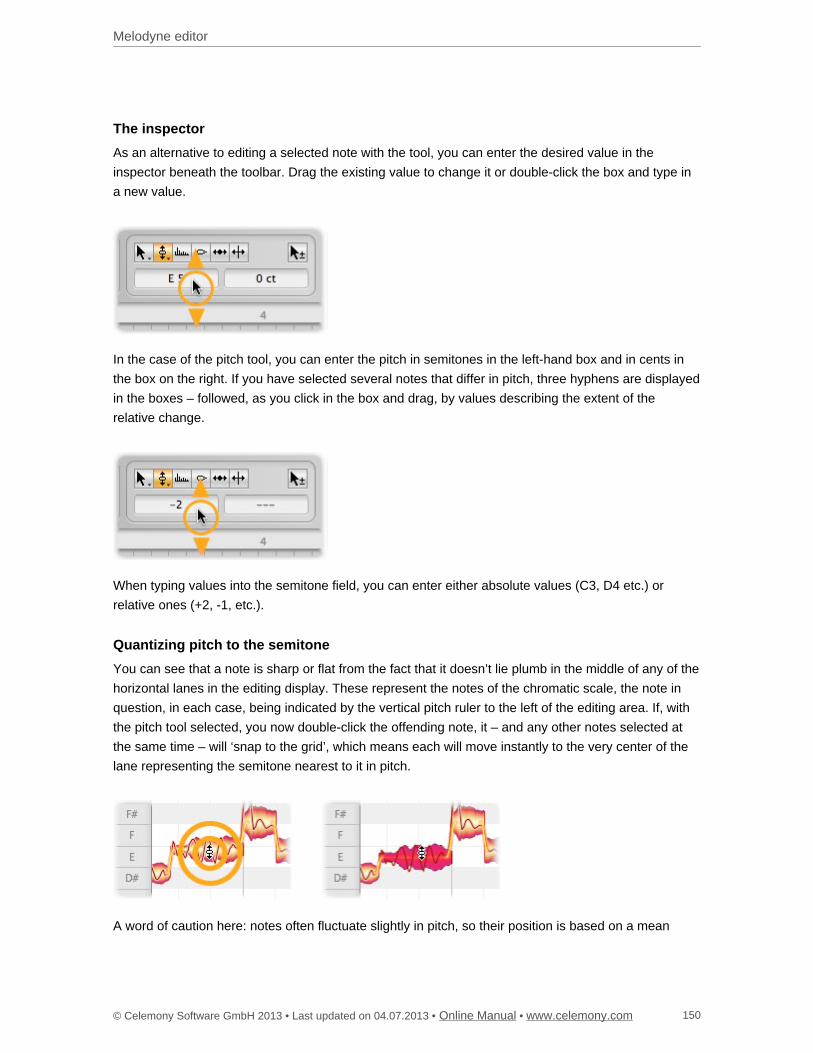
Melodyne editor
© Celemony Software GmbH 2013 • Last updated on 04.07.2013 • • Online Manual www.celemony.com 150
The inspector
As an alternative to editing a selected note with the tool, you can enter the desired value in the
inspector beneath the toolbar. Drag the existing value to change it or double-click the box and type in
a new value.
In the case of the pitch tool, you can enter the pitch in semitones in the left-hand box and in cents in
the box on the right. If you have selected several notes that differ in pitch, three hyphens are displayed
in the boxes – followed, as you click in the box and drag, by values describing the extent of the
relative change.
When typing values into the semitone field, you can enter either absolute values (C3, D4 etc.) or
relative ones (+2, -1, etc.).
Quantizing pitch to the semitone
You can see that a note is sharp or flat from the fact that it doesn’t lie plumb in the middle of any of the
horizontal lanes in the editing display. These represent the notes of the chromatic scale, the note in
question, in each case, being indicated by the vertical pitch ruler to the left of the editing area. If, with
the pitch tool selected, you now double-click the offending note, it – and any other notes selected at
the same time – will ‘snap to the grid’, which means each will move instantly to the very center of the
lane representing the semitone nearest to it in pitch.
A word of caution here: notes often fluctuate slightly in pitch, so their position is based on a mean
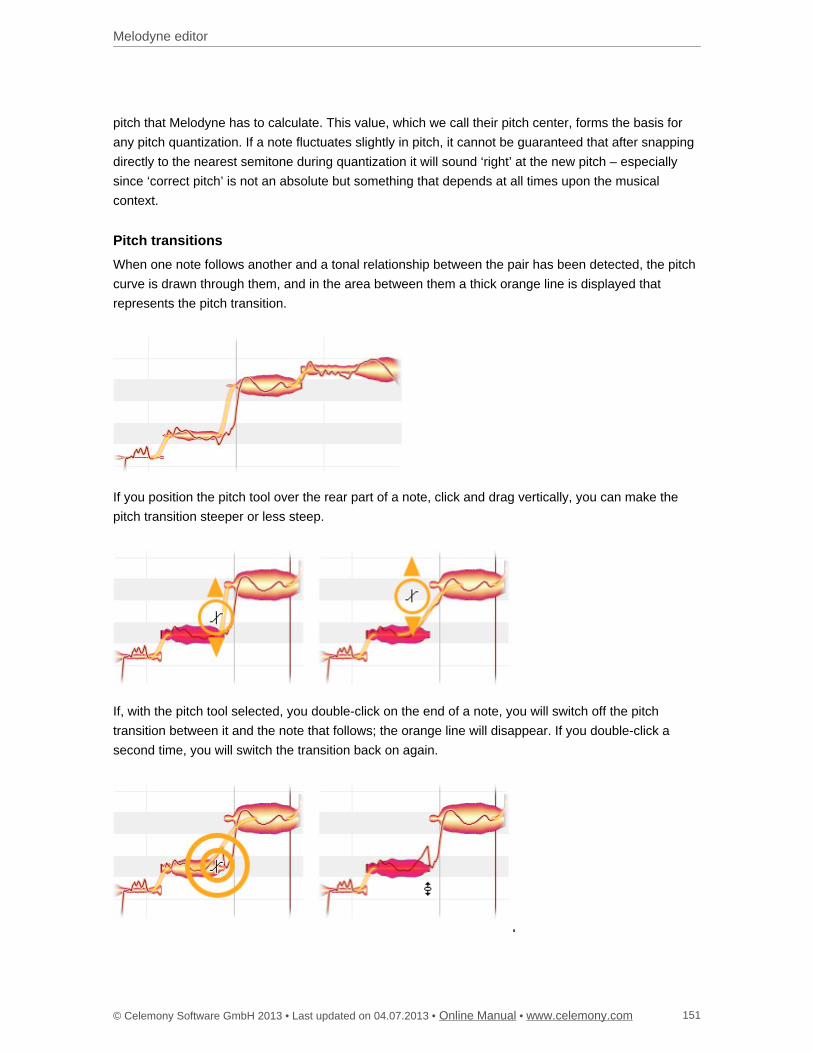
Melodyne editor
© Celemony Software GmbH 2013 • Last updated on 04.07.2013 • • Online Manual www.celemony.com 151
pitch that Melodyne has to calculate. This value, which we call their pitch center, forms the basis for
any pitch quantization. If a note fluctuates slightly in pitch, it cannot be guaranteed that after snapping
directly to the nearest semitone during quantization it will sound ‘right’ at the new pitch – especially
since ‘correct pitch’ is not an absolute but something that depends at all times upon the musical
context.
Pitch transitions
When one note follows another and a tonal relationship between the pair has been detected, the pitch
curve is drawn through them, and in the area between them a thick orange line is displayed that
represents the pitch transition.
If you position the pitch tool over the rear part of a note, click and drag vertically, you can make the
pitch transition steeper or less steep.
If, with the pitch tool selected, you double-click on the end of a note, you will switch off the pitch
transition between it and the note that follows; the orange line will disappear. If you double-click a
second time, you will switch the transition back on again.
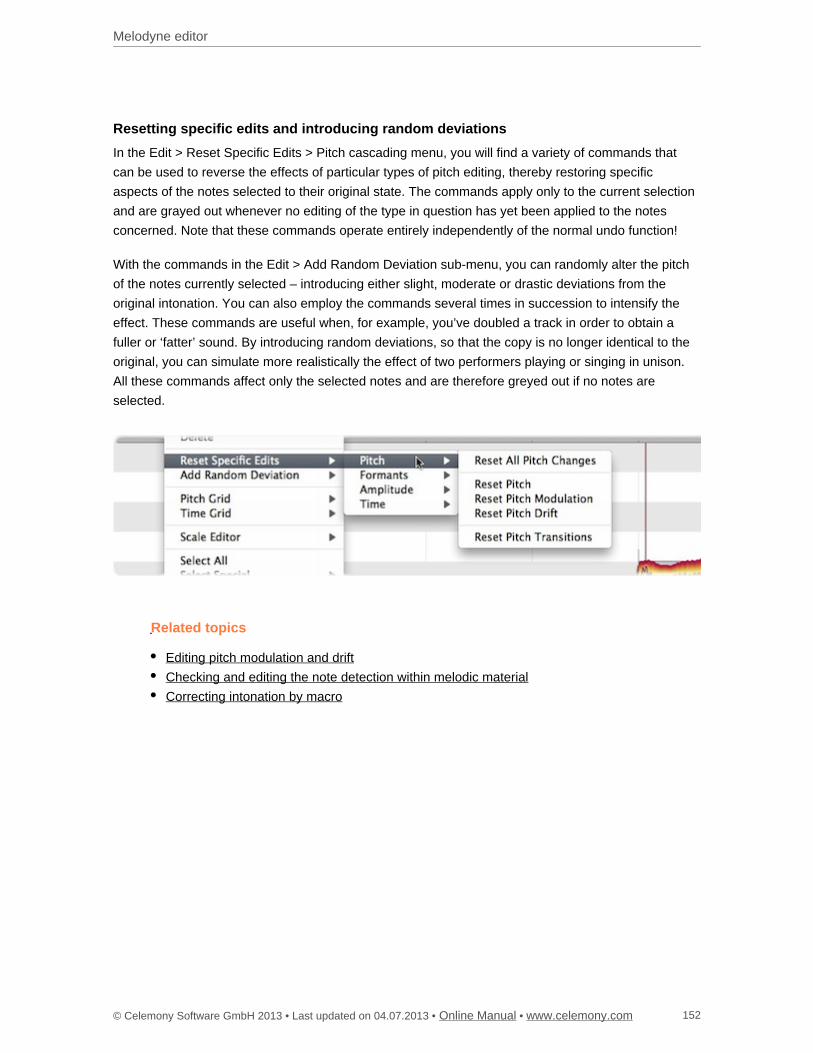
Melodyne editor
© Celemony Software GmbH 2013 • Last updated on 04.07.2013 • • Online Manual www.celemony.com 152
Resetting specific edits and introducing random deviations
In the Edit > Reset Specific Edits > Pitch cascading menu, you will find a variety of commands that
can be used to reverse the effects of particular types of pitch editing, thereby restoring specific
aspects of the notes selected to their original state. The commands apply only to the current selection
and are grayed out whenever no editing of the type in question has yet been applied to the notes
concerned. Note that these commands operate entirely independently of the normal undo function!
With the commands in the Edit > Add Random Deviation sub-menu, you can randomly alter the pitch
of the notes currently selected – introducing either slight, moderate or drastic deviations from the
original intonation. You can also employ the commands several times in succession to intensify the
effect. These commands are useful when, for example, you’ve doubled a track in order to obtain a
fuller or ‘fatter’ sound. By introducing random deviations, so that the copy is no longer identical to the
original, you can simulate more realistically the effect of two performers playing or singing in unison.
All these commands affect only the selected notes and are therefore greyed out if no notes are
selected.
Related topics
Editing pitch modulation and drift
Checking and editing the note detection within melodic material
Correcting intonation by macro
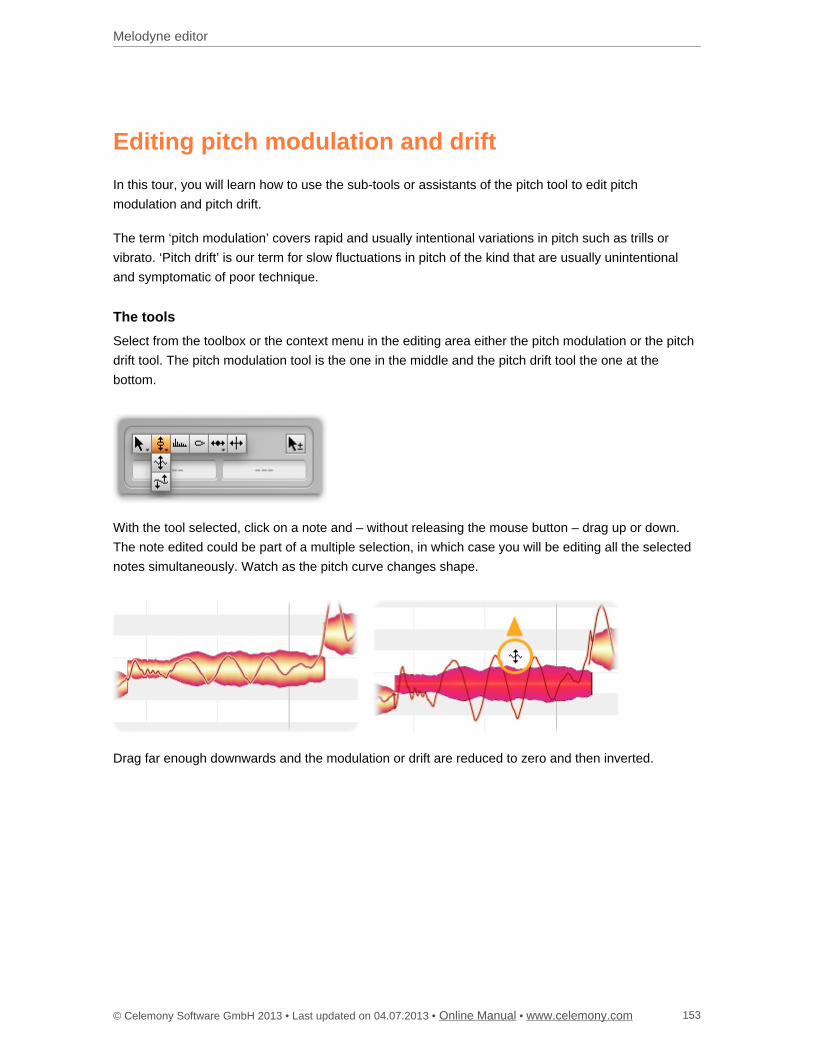
Melodyne editor
© Celemony Software GmbH 2013 • Last updated on 04.07.2013 • • Online Manual www.celemony.com 153
Editing pitch modulation and drift
In this tour, you will learn how to use the sub-tools or assistants of the pitch tool to edit pitch
modulation and pitch drift.
The term ‘pitch modulation’ covers rapid and usually intentional variations in pitch such as trills or
vibrato. ‘Pitch drift’ is our term for slow fluctuations in pitch of the kind that are usually unintentional
and symptomatic of poor technique.
The tools
Select from the toolbox or the context menu in the editing area either the pitch modulation or the pitch
drift tool. The pitch modulation tool is the one in the middle and the pitch drift tool the one at the
bottom.
With the tool selected, click on a note and – without releasing the mouse button – drag up or down.
The note edited could be part of a multiple selection, in which case you will be editing all the selected
notes simultaneously. Watch as the pitch curve changes shape.
Drag far enough downwards and the modulation or drift are reduced to zero and then inverted.
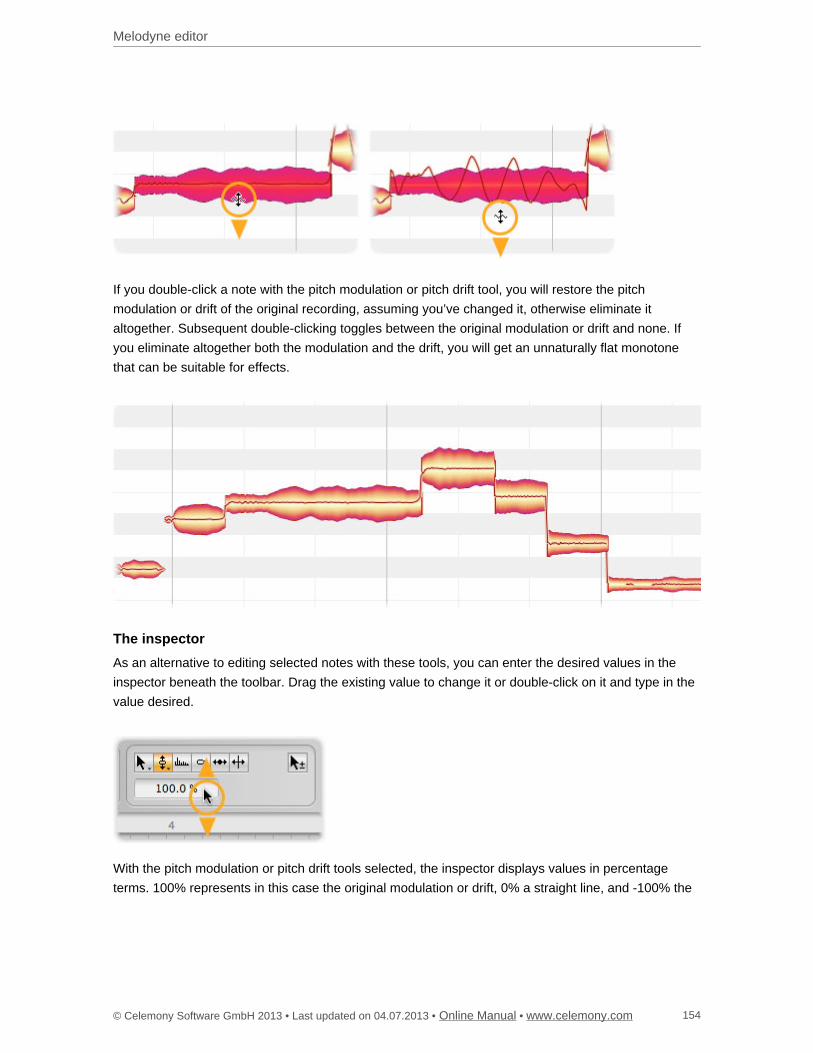
Melodyne editor
© Celemony Software GmbH 2013 • Last updated on 04.07.2013 • • Online Manual www.celemony.com 154
If you double-click a note with the pitch modulation or pitch drift tool, you will restore the pitch
modulation or drift of the original recording, assuming you’ve changed it, otherwise eliminate it
altogether. Subsequent double-clicking toggles between the original modulation or drift and none. If
you eliminate altogether both the modulation and the drift, you will get an unnaturally flat monotone
that can be suitable for effects.
The inspector
As an alternative to editing selected notes with these tools, you can enter the desired values in the
inspector beneath the toolbar. Drag the existing value to change it or double-click on it and type in the
value desired.
With the pitch modulation or pitch drift tools selected, the inspector displays values in percentage
terms. 100% represents in this case the original modulation or drift, 0% a straight line, and -100% the
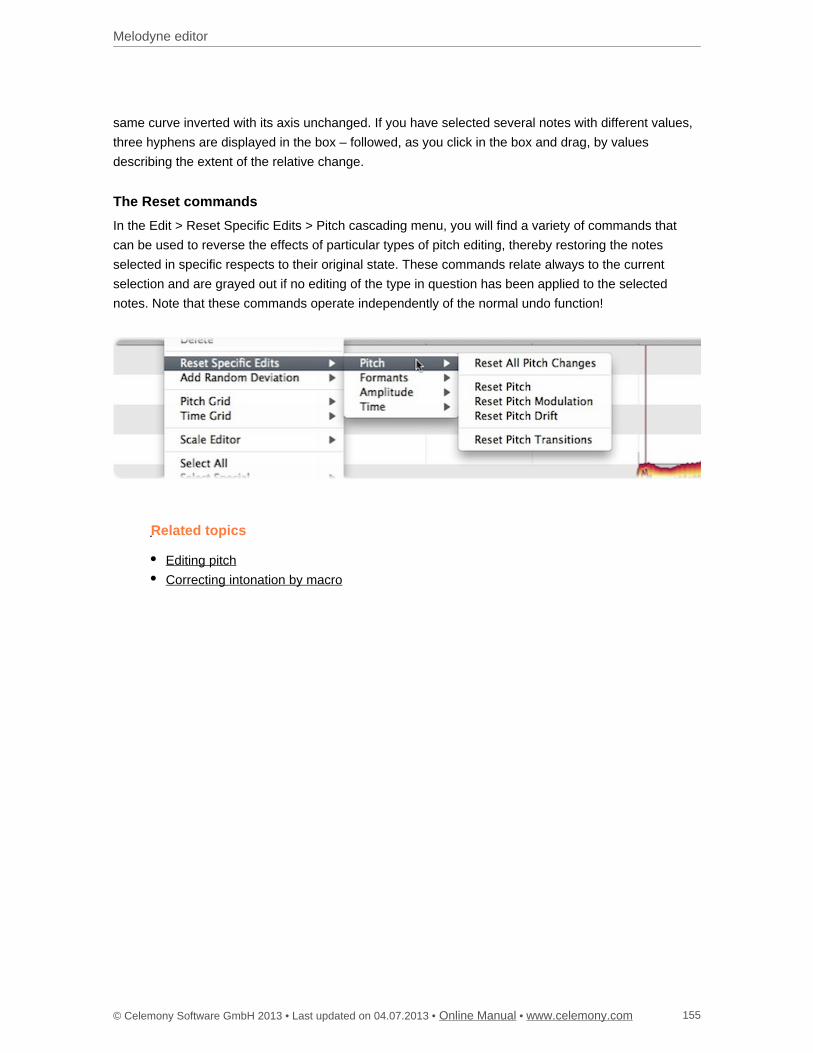
Melodyne editor
© Celemony Software GmbH 2013 • Last updated on 04.07.2013 • • Online Manual www.celemony.com 155
same curve inverted with its axis unchanged. If you have selected several notes with different values,
three hyphens are displayed in the box – followed, as you click in the box and drag, by values
describing the extent of the relative change.
The Reset commands
In the Edit > Reset Specific Edits > Pitch cascading menu, you will find a variety of commands that
can be used to reverse the effects of particular types of pitch editing, thereby restoring the notes
selected in specific respects to their original state. These commands relate always to the current
selection and are grayed out if no editing of the type in question has been applied to the selected
notes. Note that these commands operate independently of the normal undo function!
Related topics
Editing pitch
Correcting intonation by macro
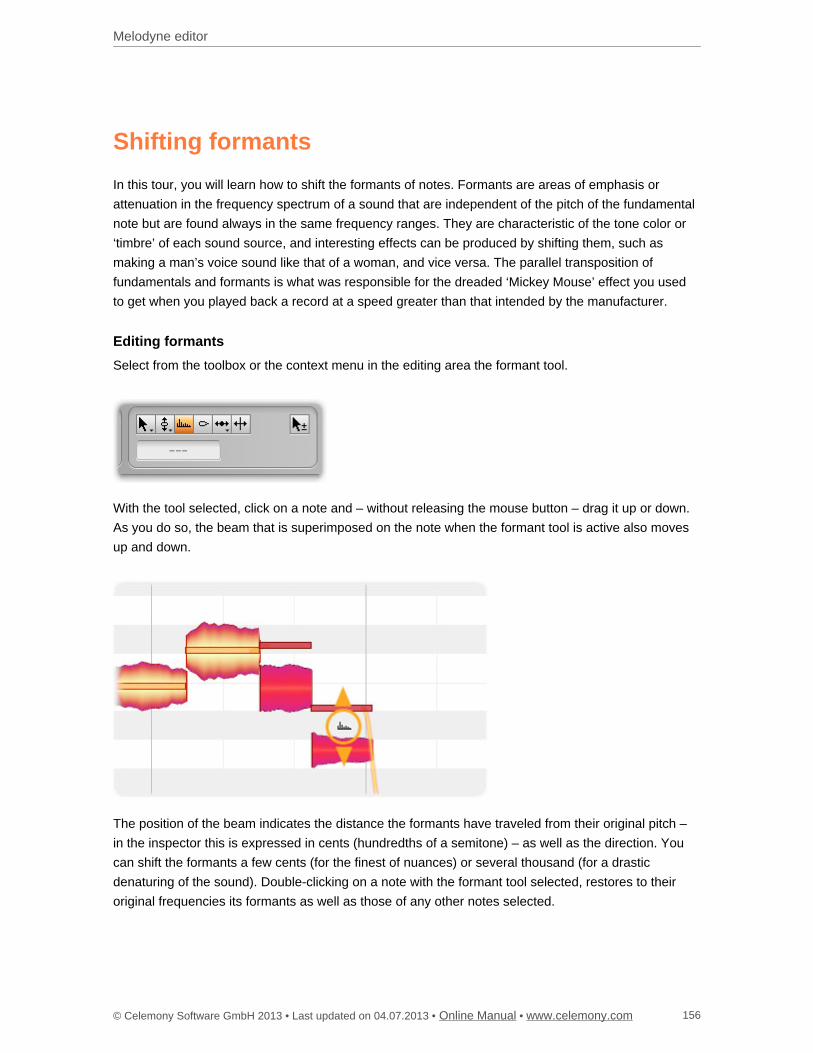
Melodyne editor
© Celemony Software GmbH 2013 • Last updated on 04.07.2013 • • Online Manual www.celemony.com 156
Shifting formants
In this tour, you will learn how to shift the formants of notes. Formants are areas of emphasis or
attenuation in the frequency spectrum of a sound that are independent of the pitch of the fundamental
note but are found always in the same frequency ranges. They are characteristic of the tone color or
‘timbre’ of each sound source, and interesting effects can be produced by shifting them, such as
making a man’s voice sound like that of a woman, and vice versa. The parallel transposition of
fundamentals and formants is what was responsible for the dreaded ‘Mickey Mouse’ effect you used
to get when you played back a record at a speed greater than that intended by the manufacturer.
Editing formants
Select from the toolbox or the context menu in the editing area the formant tool.
With the tool selected, click on a note and – without releasing the mouse button – drag it up or down.
As you do so, the beam that is superimposed on the note when the formant tool is active also moves
up and down.
The position of the beam indicates the distance the formants have traveled from their original pitch –
in the inspector this is expressed in cents (hundredths of a semitone) – as well as the direction. You
can shift the formants a few cents (for the finest of nuances) or several thousand (for a drastic
denaturing of the sound). Double-clicking on a note with the formant tool selected, restores to their
original frequencies its formants as well as those of any other notes selected.

Melodyne editor
© Celemony Software GmbH 2013 • Last updated on 04.07.2013 • • Online Manual www.celemony.com 157
The inspector
As an alternative to editing selected notes with the tool, you can enter the desired values in the
inspector, which you will find beneath the toolbox. Drag the existing value to change it, or double-click
on it and type in the value desired.
If you have selected several notes that differ in the amount of formant shifting that has been applied to
them, three hyphens are displayed in the boxes – followed, as you click in the box and drag, by values
describing the extent of the relative change.
Formant transitions
A thick orange line appears between the formant beams of adjacent notes as soon as you shift the
formants of one note more, or in a different direction, than those of the other. This line represents the
formant transition between the two notes.
If you move the formant tool to the end of the first note, it changes into the formant transitions tool.
Dragging vertically with this tool governs the speed of the formant transition, which is indicated by the
steepness of the connecting line.
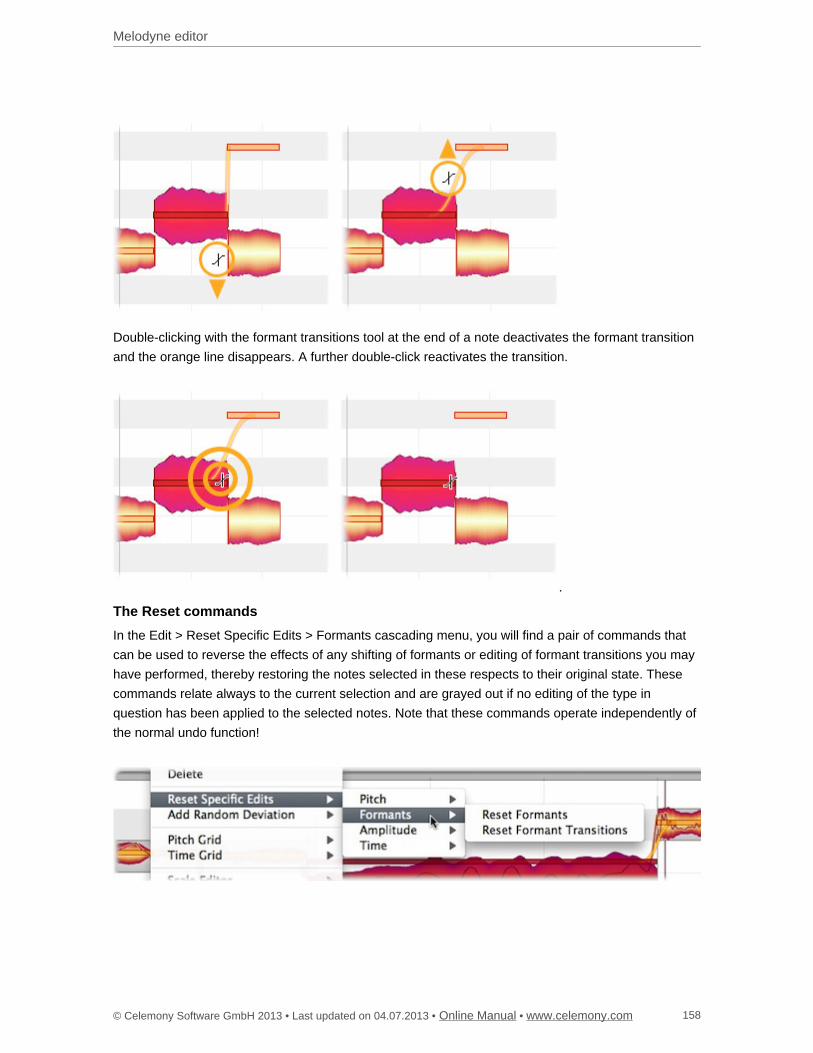
Melodyne editor
© Celemony Software GmbH 2013 • Last updated on 04.07.2013 • • Online Manual www.celemony.com 158
Double-clicking with the formant transitions tool at the end of a note deactivates the formant transition
and the orange line disappears. A further double-click reactivates the transition.
The Reset commands
In the Edit > Reset Specific Edits > Formants cascading menu, you will find a pair of commands that
can be used to reverse the effects of any shifting of formants or editing of formant transitions you may
have performed, thereby restoring the notes selected in these respects to their original state. These
commands relate always to the current selection and are grayed out if no editing of the type in
question has been applied to the selected notes. Note that these commands operate independently of
the normal undo function!

Melodyne editor
© Celemony Software GmbH 2013 • Last updated on 04.07.2013 • • Online Manual www.celemony.com 159
Related topics
The real-time controls
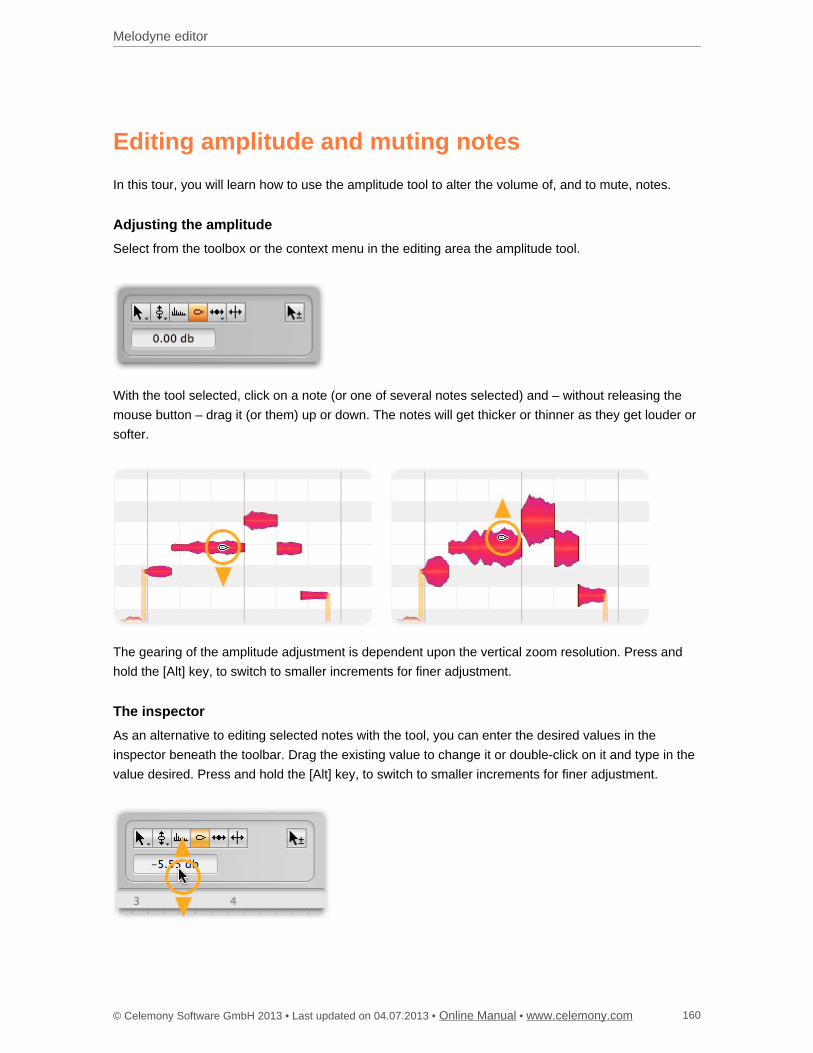
Melodyne editor
© Celemony Software GmbH 2013 • Last updated on 04.07.2013 • • Online Manual www.celemony.com 160
Editing amplitude and muting notes
In this tour, you will learn how to use the amplitude tool to alter the volume of, and to mute, notes.
Adjusting the amplitude
Select from the toolbox or the context menu in the editing area the amplitude tool.
With the tool selected, click on a note (or one of several notes selected) and – without releasing the
mouse button – drag it (or them) up or down. The notes will get thicker or thinner as they get louder or
softer.
The gearing of the amplitude adjustment is dependent upon the vertical zoom resolution. Press and
hold the [Alt] key, to switch to smaller increments for finer adjustment.
The inspector
As an alternative to editing selected notes with the tool, you can enter the desired values in the
inspector beneath the toolbar. Drag the existing value to change it or double-click on it and type in the
value desired. Press and hold the [Alt] key, to switch to smaller increments for finer adjustment.
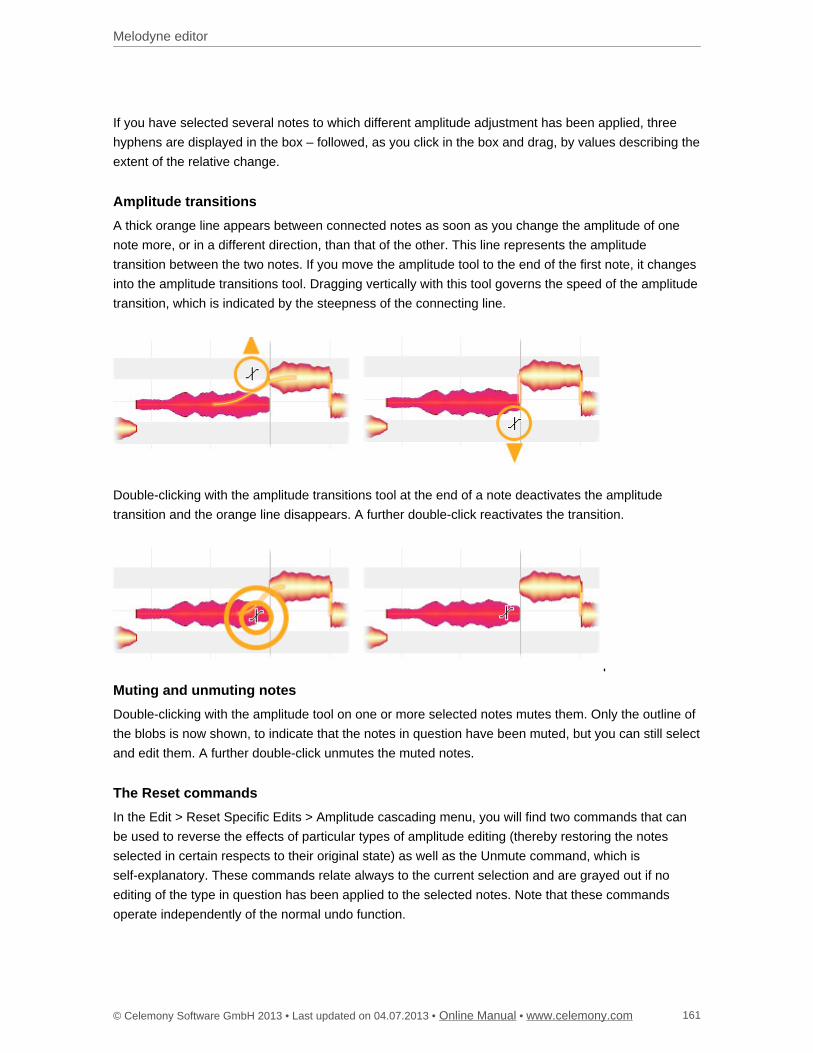
Melodyne editor
© Celemony Software GmbH 2013 • Last updated on 04.07.2013 • • Online Manual www.celemony.com 161
If you have selected several notes to which different amplitude adjustment has been applied, three
hyphens are displayed in the box – followed, as you click in the box and drag, by values describing the
extent of the relative change.
Amplitude transitions
A thick orange line appears between connected notes as soon as you change the amplitude of one
note more, or in a different direction, than that of the other. This line represents the amplitude
transition between the two notes. If you move the amplitude tool to the end of the first note, it changes
into the amplitude transitions tool. Dragging vertically with this tool governs the speed of the amplitude
transition, which is indicated by the steepness of the connecting line.
Double-clicking with the amplitude transitions tool at the end of a note deactivates the amplitude
transition and the orange line disappears. A further double-click reactivates the transition.
Muting and unmuting notes
Double-clicking with the amplitude tool on one or more selected notes mutes them. Only the outline of
the blobs is now shown, to indicate that the notes in question have been muted, but you can still select
and edit them. A further double-click unmutes the muted notes.
The Reset commands
In the Edit > Reset Specific Edits > Amplitude cascading menu, you will find two commands that can
be used to reverse the effects of particular types of amplitude editing (thereby restoring the notes
selected in certain respects to their original state) as well as the Unmute command, which is
self-explanatory. These commands relate always to the current selection and are grayed out if no
editing of the type in question has been applied to the selected notes. Note that these commands
operate independently of the normal undo function.
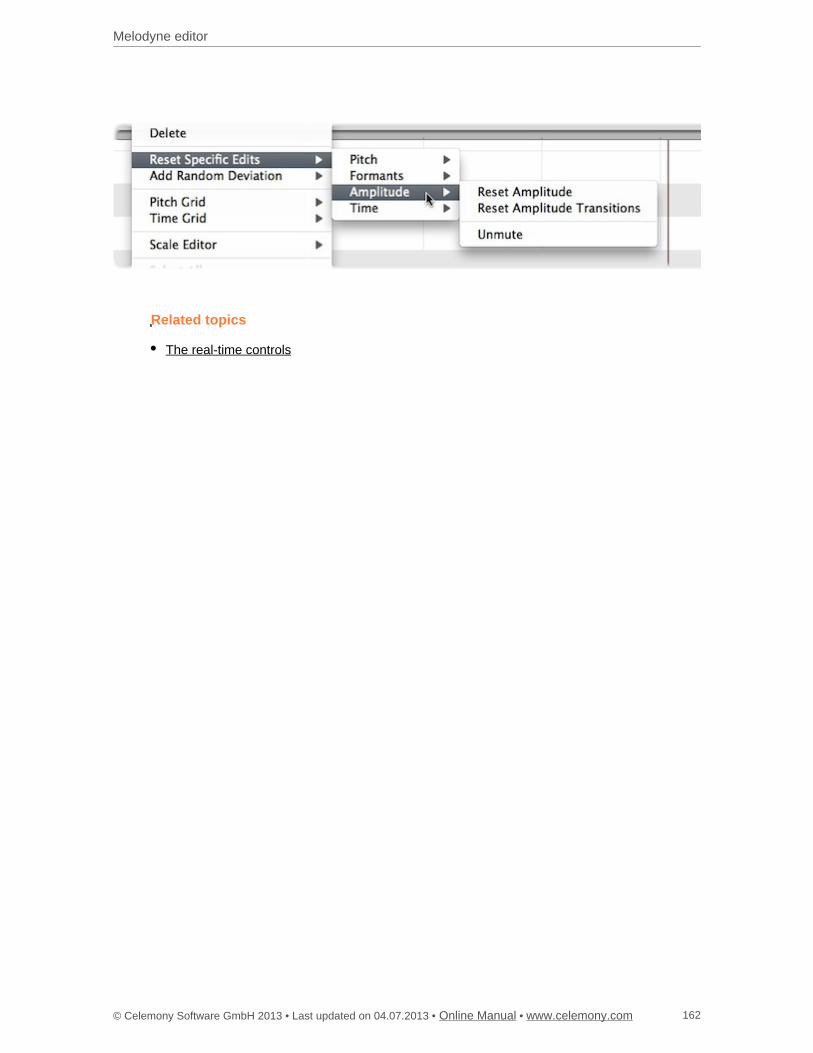
Melodyne editor
© Celemony Software GmbH 2013 • Last updated on 04.07.2013 • • Online Manual www.celemony.com 162
Related topics
The real-time controls
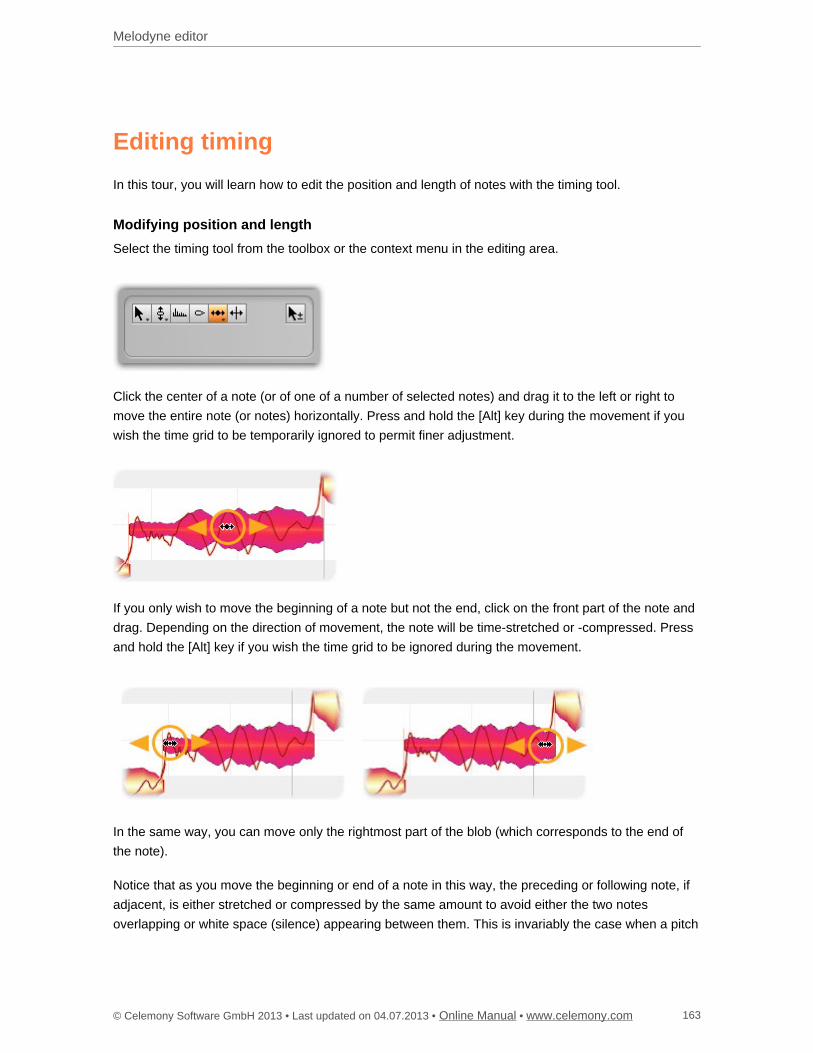
Melodyne editor
© Celemony Software GmbH 2013 • Last updated on 04.07.2013 • • Online Manual www.celemony.com 163
Editing timing
In this tour, you will learn how to edit the position and length of notes with the timing tool.
Modifying position and length
Select the timing tool from the toolbox or the context menu in the editing area.
Click the center of a note (or of one of a number of selected notes) and drag it to the left or right to
move the entire note (or notes) horizontally. Press and hold the [Alt] key during the movement if you
wish the time grid to be temporarily ignored to permit finer adjustment.
If you only wish to move the beginning of a note but not the end, click on the front part of the note and
drag. Depending on the direction of movement, the note will be time-stretched or -compressed. Press
and hold the [Alt] key if you wish the time grid to be ignored during the movement.
In the same way, you can move only the rightmost part of the blob (which corresponds to the end of
the note).
Notice that as you move the beginning or end of a note in this way, the preceding or following note, if
adjacent, is either stretched or compressed by the same amount to avoid either the two notes
overlapping or white space (silence) appearing between them. This is invariably the case when a pitch
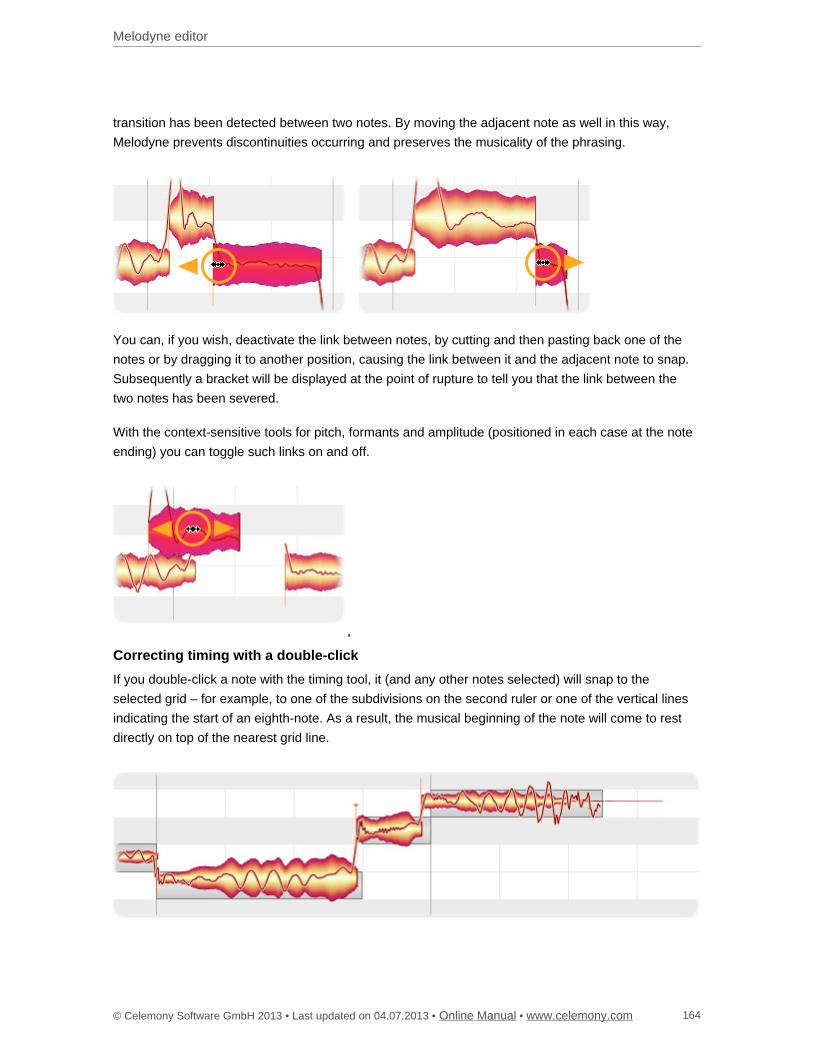
Melodyne editor
© Celemony Software GmbH 2013 • Last updated on 04.07.2013 • • Online Manual www.celemony.com 164
transition has been detected between two notes. By moving the adjacent note as well in this way,
Melodyne prevents discontinuities occurring and preserves the musicality of the phrasing.
You can, if you wish, deactivate the link between notes, by cutting and then pasting back one of the
notes or by dragging it to another position, causing the link between it and the adjacent note to snap.
Subsequently a bracket will be displayed at the point of rupture to tell you that the link between the
two notes has been severed.
With the context-sensitive tools for pitch, formants and amplitude (positioned in each case at the note
ending) you can toggle such links on and off.
Correcting timing with a double-click
If you double-click a note with the timing tool, it (and any other notes selected) will snap to the
selected grid – for example, to one of the subdivisions on the second ruler or one of the vertical lines
indicating the start of an eighth-note. As a result, the musical beginning of the note will come to rest
directly on top of the nearest grid line.

Melodyne editor
© Celemony Software GmbH 2013 • Last updated on 04.07.2013 • • Online Manual www.celemony.com 165
The musical starting point of a note is indicated by an orange anchor somewhere near the start of the
blob but not necessarily at its leftmost extreme. Melodyne places the anchor at the point at which the
sound has unfolded sufficiently for the pitch to become discernible, as it is this moment that is of
relevance for the purpose of quantization. For a note to snap to the nearest grid line, however, there
must be sufficient room; if an adjacent note is in the way and cannot be squeezed enough to create
the requisite space, quantization of the note to the desired grid will be impossible. In such cases, note
are quantized to the next possible value, such as the eighth-note nearest the desired quarter-note.
If no grid is active, a note will be quantized to its ‘intended’ beat – i.e. to that indicated by the left side
of the grey frame enclosing it. This is the beat upon which, according to Melodyne’s analysis, it was
intended to fall.
Note: it is not possible to quantize to entire bars: only to fractions of bars.
A further important point regarding quantization: In the case of polyphonic material, as well as anchors
with triangles there are anchors without them. Notes the anchors of which have no triangle are in a
temporal relationship with another note with a triangle and are therefore treated differently during
quantization. If you play a C on the piano and immediately afterwards an E, the C can also contain
starting transients belonging to the E. The C here gets a marker with a triangle; the E, one without. To
move these two notes for no good reason by different amounts during quantization might not make
much sense musically and could even produce tonal artifacts.
The following rules therefore apply: If during quantization both notes are selected, the note with the
triangle and that without it will move towards the marker by exactly the same amount. There is here, in
other words, a master-slave relationship. If you have only selected the note with the triangle marker,
only this will be quantized. If you have only selected the note without the triangle marker, no
quantization will take place. The same goes for a multiple selection. Naturally, you can move all and
any of the notes manually if you are not satisfied with the way they sound together.
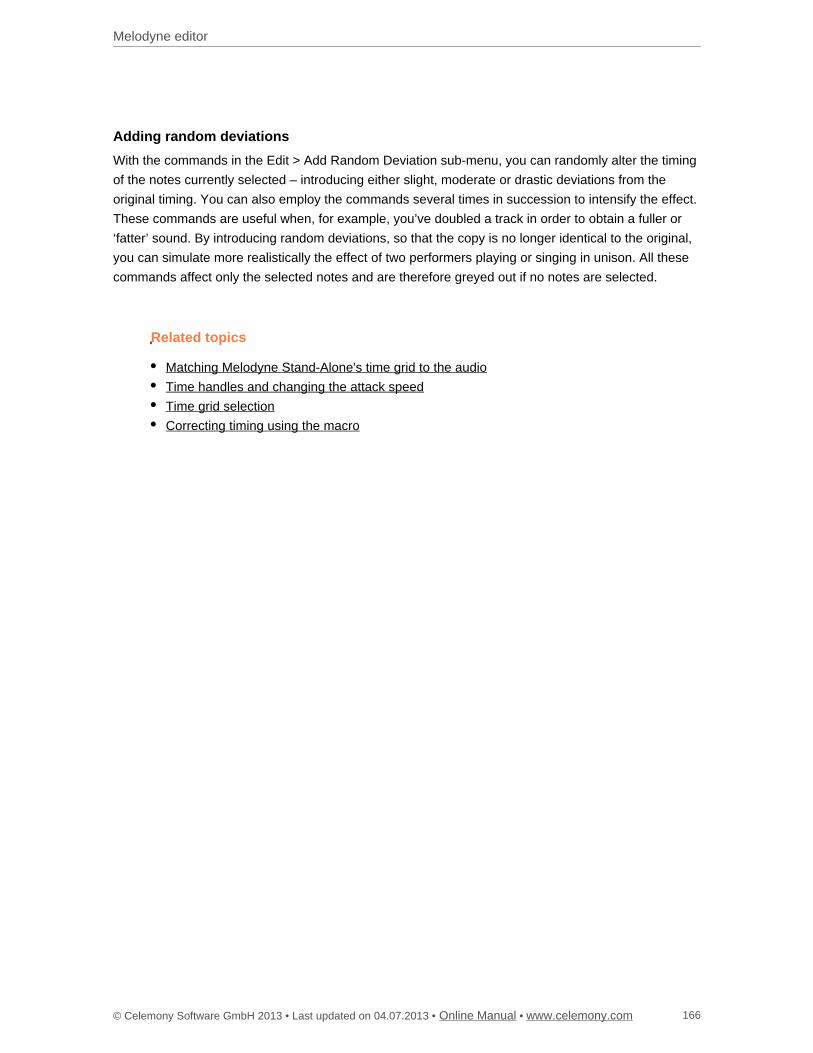
Melodyne editor
© Celemony Software GmbH 2013 • Last updated on 04.07.2013 • • Online Manual www.celemony.com 166
Adding random deviations
With the commands in the Edit > Add Random Deviation sub-menu, you can randomly alter the timing
of the notes currently selected – introducing either slight, moderate or drastic deviations from the
original timing. You can also employ the commands several times in succession to intensify the effect.
These commands are useful when, for example, you’ve doubled a track in order to obtain a fuller or
‘fatter’ sound. By introducing random deviations, so that the copy is no longer identical to the original,
you can simulate more realistically the effect of two performers playing or singing in unison. All these
commands affect only the selected notes and are therefore greyed out if no notes are selected.
Related topics
Matching Melodyne Stand-Alone's time grid to the audio
Time handles and changing the attack speed
Time grid selection
Correcting timing using the macro
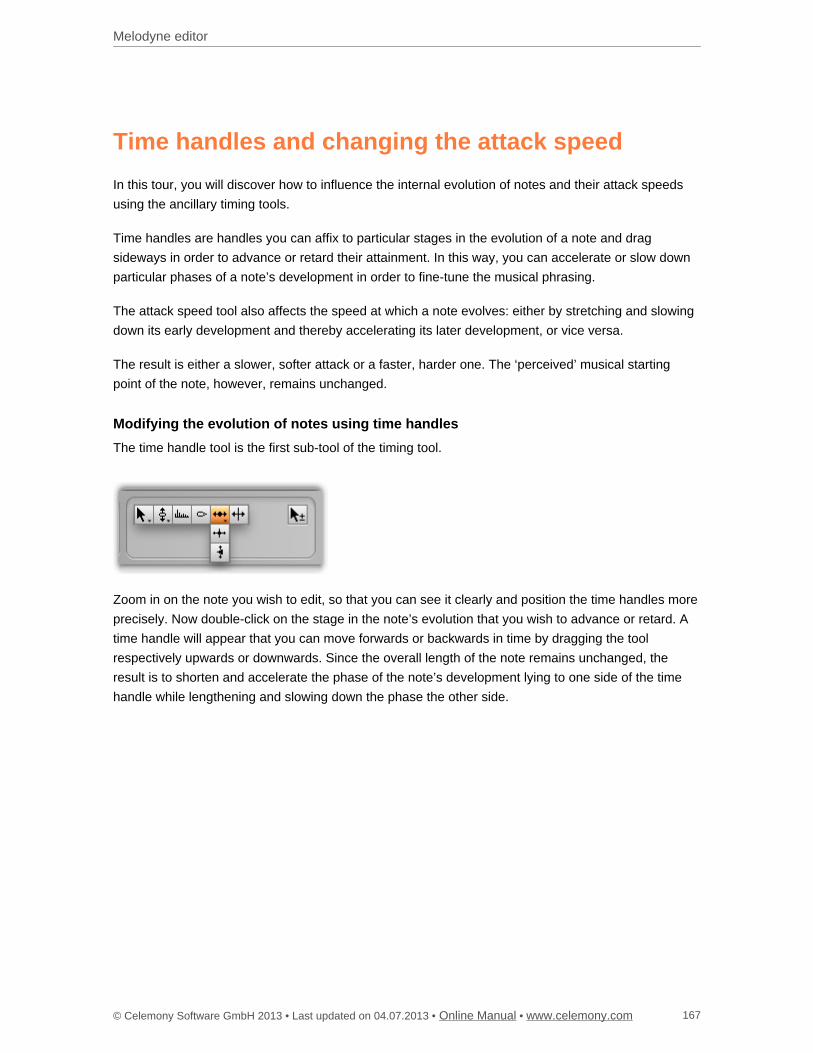
Melodyne editor
© Celemony Software GmbH 2013 • Last updated on 04.07.2013 • • Online Manual www.celemony.com 167
Time handles and changing the attack speed
In this tour, you will discover how to influence the internal evolution of notes and their attack speeds
using the ancillary timing tools.
Time handles are handles you can affix to particular stages in the evolution of a note and drag
sideways in order to advance or retard their attainment. In this way, you can accelerate or slow down
particular phases of a note’s development in order to fine-tune the musical phrasing.
The attack speed tool also affects the speed at which a note evolves: either by stretching and slowing
down its early development and thereby accelerating its later development, or vice versa.
The result is either a slower, softer attack or a faster, harder one. The ‘perceived’ musical starting
point of the note, however, remains unchanged.
Modifying the evolution of notes using time handles
The time handle tool is the first sub-tool of the timing tool.
Zoom in on the note you wish to edit, so that you can see it clearly and position the time handles more
precisely. Now double-click on the stage in the note’s evolution that you wish to advance or retard. A
time handle will appear that you can move forwards or backwards in time by dragging the tool
respectively upwards or downwards. Since the overall length of the note remains unchanged, the
result is to shorten and accelerate the phase of the note’s development lying to one side of the time
handle while lengthening and slowing down the phase the other side.
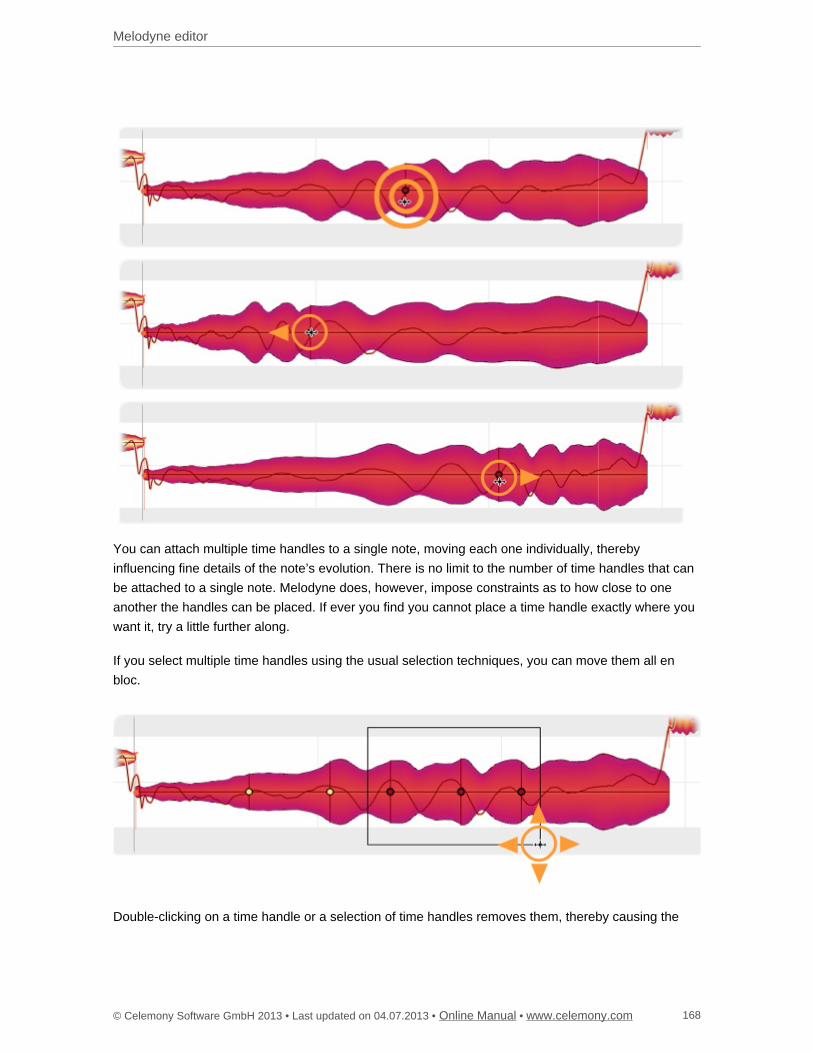
Melodyne editor
© Celemony Software GmbH 2013 • Last updated on 04.07.2013 • • Online Manual www.celemony.com 168
You can attach multiple time handles to a single note, moving each one individually, thereby
influencing fine details of the note’s evolution. There is no limit to the number of time handles that can
be attached to a single note. Melodyne does, however, impose constraints as to how close to one
another the handles can be placed. If ever you find you cannot place a time handle exactly where you
want it, try a little further along.
If you select multiple time handles using the usual selection techniques, you can move them all en
bloc.
Double-clicking on a time handle or a selection of time handles removes them, thereby causing the
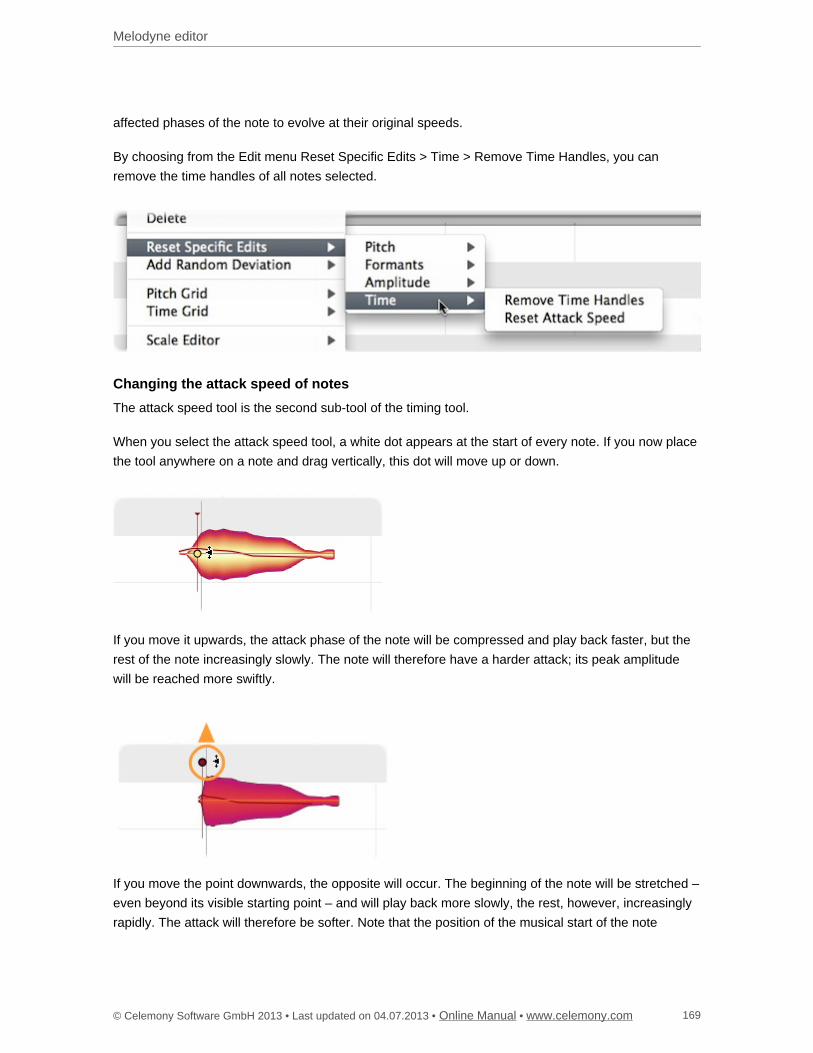
Melodyne editor
© Celemony Software GmbH 2013 • Last updated on 04.07.2013 • • Online Manual www.celemony.com 169
affected phases of the note to evolve at their original speeds.
By choosing from the Edit menu Reset Specific Edits > Time > Remove Time Handles, you can
remove the time handles of all notes selected.
Changing the attack speed of notes
The attack speed tool is the second sub-tool of the timing tool.
When you select the attack speed tool, a white dot appears at the start of every note. If you now place
the tool anywhere on a note and drag vertically, this dot will move up or down.
If you move it upwards, the attack phase of the note will be compressed and play back faster, but the
rest of the note increasingly slowly. The note will therefore have a harder attack; its peak amplitude
will be reached more swiftly.
If you move the point downwards, the opposite will occur. The beginning of the note will be stretched –
even beyond its visible starting point – and will play back more slowly, the rest, however, increasingly
rapidly. The attack will therefore be softer. Note that the position of the musical start of the note
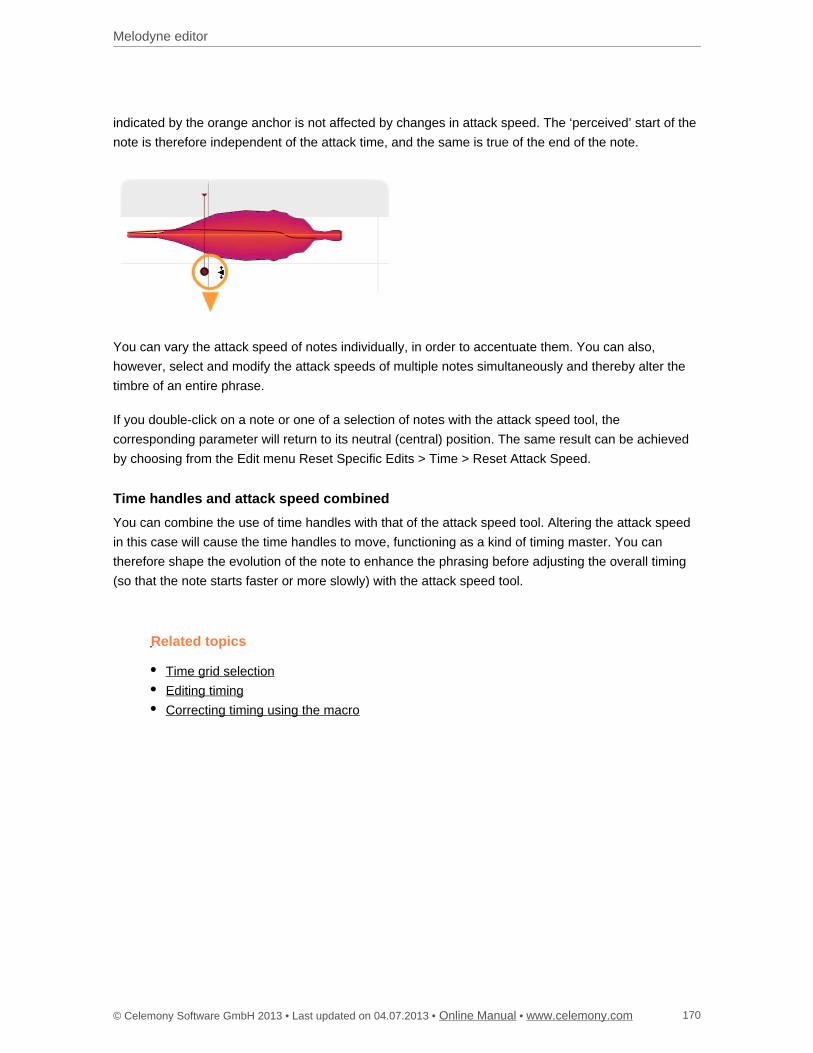
Melodyne editor
© Celemony Software GmbH 2013 • Last updated on 04.07.2013 • • Online Manual www.celemony.com 170
indicated by the orange anchor is not affected by changes in attack speed. The ‘perceived’ start of the
note is therefore independent of the attack time, and the same is true of the end of the note.
You can vary the attack speed of notes individually, in order to accentuate them. You can also,
however, select and modify the attack speeds of multiple notes simultaneously and thereby alter the
timbre of an entire phrase.
If you double-click on a note or one of a selection of notes with the attack speed tool, the
corresponding parameter will return to its neutral (central) position. The same result can be achieved
by choosing from the Edit menu Reset Specific Edits > Time > Reset Attack Speed.
Time handles and attack speed combined
You can combine the use of time handles with that of the attack speed tool. Altering the attack speed
in this case will cause the time handles to move, functioning as a kind of timing master. You can
therefore shape the evolution of the note to enhance the phrasing before adjusting the overall timing
(so that the note starts faster or more slowly) with the attack speed tool.
Related topics
Time grid selection
Editing timing
Correcting timing using the macro
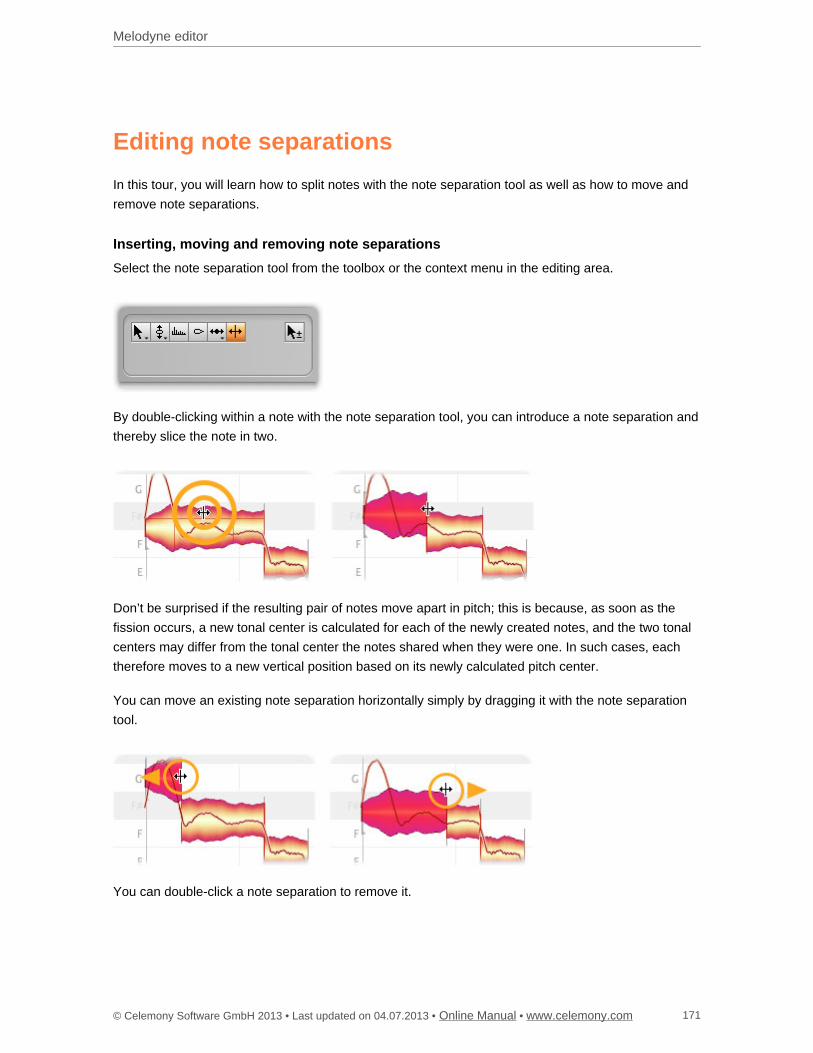
Melodyne editor
© Celemony Software GmbH 2013 • Last updated on 04.07.2013 • • Online Manual www.celemony.com 171
Editing note separations
In this tour, you will learn how to split notes with the note separation tool as well as how to move and
remove note separations.
Inserting, moving and removing note separations
Select the note separation tool from the toolbox or the context menu in the editing area.
By double-clicking within a note with the note separation tool, you can introduce a note separation and
thereby slice the note in two.
Don’t be surprised if the resulting pair of notes move apart in pitch; this is because, as soon as the
fission occurs, a new tonal center is calculated for each of the newly created notes, and the two tonal
centers may differ from the tonal center the notes shared when they were one. In such cases, each
therefore moves to a new vertical position based on its newly calculated pitch center.
You can move an existing note separation horizontally simply by dragging it with the note separation
tool.
You can double-click a note separation to remove it.

Melodyne editor
© Celemony Software GmbH 2013 • Last updated on 04.07.2013 • • Online Manual www.celemony.com 172
If you select several notes and move a note separation, the note separations of the other selected
notes will also be moved. If you double-click one of the note separations to remove it, the note
separations of the other selected notes will also be removed.
If you have selected several notes that overlap, you can insert a note separation in the same place in
all of them simultaneously as well as move or remove one.
Related topics
Working with the main tool