Embed Size (px)
Citation preview

Instructor Guide
For the Landscaping and Horticultural Services Industry

2 – Instructor Guide
Instructor Guide
Contents
Introduction What's Inside? .............................................................................. 3Training Techniques ...................................................................... 4
Tractor Safety Training Guide ...................................................... 10
Motor Vehicle Safety Training Guide ............................................ 49
Chipper/Shredder Safety Training Guide ...................................... 88
Skid Steer Safety Training Guide ............................................... 110
Tree Trimming Safety Training Guide ......................................... 147
Aerial Lift Safety Training Guide ................................................ 171
Mowing and Trimming Safety Training Guide .............................. 201
Written by: Mitch Ricketts, Coordinator, Health, Safety and Environmental Quality, K-State Research and Extension
Sara Lind, Information specialist
Kristy Wieland, Information specialist
DisclaimerThis material was produced under grant number 46G3-HT04 and revised and up-dated under grant number SH-19503-09-60-F-20 from the Occupational Safety and Health Administration, U.S. Department of Labor. It does not necessarily reflect the views or policies of the U.S. Department of Labor, nor does mention of trade names, commercial products, or organizations imply endorsement by the U.S. government.
This booklet was produced by K-State Research and Extension, Kansas State Univer-sity, Manhattan, Kansas.
The information in this publication has been compiled from a variety of sources believed to be reliable and to represent the best current opinion on the subject. How-ever, neither K-State Research and Extension nor its authors guarantee accuracy or completeness of any information contained in this publication, and neither K-State Research and Extension or its authors shall be responsible for any errors, omissions, or damages arising out of the use of this information. Additional safety measures may be required under particular circumstances.

Instructor Guide – 3
What's Inside?Effective safety training requires careful planning and preparation. This Instructor Guide is designed to improve training techniques to better reach adult learners and a diverse workforce. This manual will guide instructors through safety training courses: tractor, motor vehicle, skid steer, chipper/shredder, tree trimming, aerial lift, and mowing and trimming and assist them in planning and preparing learning activities.

4 – Instructor Guide
Training Techniques for Adult LearnersAdults learn best when they are active partners in the learning process. Don’t lecture to adults. Instead, get them involved in discussions, problem solving and hands-on ac-tivities. Give them a chance to share their experiences. Provide lots of encouragement and coaching to help them master the material.
When training adult learners:
Training should be active, not passive.Adults learn better from doing than from listening. Provide experiences that allow for teamwork, problem solving, and practical application of skills. Participants will lose interest in training if they are not being challenged.
Participants must be able to relate to the training.Make sure there is a clear connection between training activities and the work experi-ences of participants. Use realistic examples and problems as teaching tools. Incor-porate familiar equipment and visual aids. Ask participants to describe how they can apply training concepts to their own jobs.
Training must address participants’ immediate needs.Concentrate on the most important safety skills participants need for their jobs. Focus on practical information. Keep training activities short and to the point.
Allow participants to have a say in the learning agenda. Ask participants to help identify important topics for training. Find out what they hope to learn, and take time to discuss safety issues that are important to them.
Encourage participants to share experiences and knowledge during training. Adults take pride in sharing their knowledge with others. Instead of telling them in-formation, ask them questions and let them tell you what they know. Use the knowl-edge they already have as a starting point for more advanced learning.
Get their input before you begin planning.Identify their needs.Have a purpose and state it clearly.Apply training to their work.Involve participants with discussion questions and hands-on exercises.Give them the chance to provide meaningful feedback.Use examples, scenarios, problems and visual aids as teaching tools.Build on the experiences of your participants.

Instructor Guide – 5
Training in the Diverse WorkforceYou must adapt your training techniques to fit the needs of your workforce.
Cultural DifferencesAttitudes about safety vary from culture to culture. Make sure participants understand that safety is just as important as production in your organization. Ask how safety was handled where they worked before:4Did they have safety committees? 4What were the safety rules? 4Was anyone ever injured?4What were the consequences for not following safety rules?
Make sure participants understand any differences in how safety is handled in your organization.New employees learn by watching. Experienced workers must set an example so new employees understand that safety is expected on the job.
Language BarriersParticipants who do not understand instructions given in English may nod in agree-ment or say yes even when they do not fully understand what is being said. As a result, they may begin a job without knowing the safest way to perform the work. Use visual aids and hands-on exercises whenever possible. Demonstrate the tasks and check for comprehension by having participants repeat the tasks correctly.Be aware that even if the material is in the participant’s native language, some work-ers may not have the reading skills to understand. It can be helpful to partner new employees with more experienced bilingual workers. Mentoring is one of the most effective methods for teaching job skills to low-literacy workers. 4Always demonstrate the task — don’t just talk about it. Ask participants to repeat
the same task for you and don’t move on until you feel comfortable they under-stand.
4Identify training topics simply and clearly. 4Make it clear when you finish one topic and begin another. For instance, when
training about personal protective equipment, hold up a pair of safety glasses and say, “Now we are going to discuss safety glasses.” When you move on to hardhats, hold up a hardhat and say, “We have finished talking about safety glasses. Now we are going to discuss hardhats.”
4Break jobs into specific steps and show participants the safe way to perform each step.
4Use props and visual aids whenever possible.4Ask bilingual participants to help plan and assist with training. 4If a participant is observed working in an unsafe manner, immediately explain
and demonstrate how to do the task safely and have the worker repeat the task.

6 – Instructor Guide
Young WorkersYoung workers may not understand dangers that are obvious to older and more ex-perienced workers. They may be less likely to ask questions or bring up problems to persons in positions of authority.4Evaluate every job in advance to determine if young workers can perform it
safely.4Break jobs into specific steps and demonstrate the safe way to perform each step.4Ask the worker to repeat the demonstration until you are comfortable that s/he
understands.4Have young workers complete job-specific safety training before performing any
new duties. Training should be repeated periodically and when there are changes in work procedures and equipment.
4Point out hazards whenever they are encountered.4Always model the appropriate behavior — if long-term employees and supervi-
sors take dangerous shortcuts, so will young workers.
Always make training:aRelevantaPracticalaClear aConciseaActive
Learning ActivitiesParticipants learn best when they have a chance to discover information by applying it to their work. Below are brief explanations of the activities you can use to minimize lecture time and emphasize active participation.
Personal IntroductionsLet participants know you are interested in them. Ask questions:
4How long have you been been working here?4Have you witnessed any accidents on the job?4What kinds of training have you had in the past?4What do you expect to gain from this training?
Keep introduction time brief and informal. Allow enough time for meaningful expression, but keep the introductions moving.
DiscussionAllow participants to relate their experiences, share their knowledge and explore topics of discussion.
Here are a few tips:4Don’t allow a limited number of participants to dominate the discussion. Draw
in hesitant participants by occasionally calling on them by name and asking them if they have anything to add.
4Don’t pressure participants if they appear nervous about speaking up.4Don’t allow participants to be ridiculed for their opinions. Make sure everyone
knows that all points of view are valid topics for discussion.4Keep the discussion rolling. Move on to the next topic or activity if discussion is
getting bogged down.

Instructor Guide – 7
Case StudiesBecause case studies are realistic examples, participants can apply new infor-mation to familiar situations.Case studies present a problem and allow for discussion, development and
evaluation of possible solutions. Discussion of case studies can take any of the follow-ing forms:4The entire class can work through each case study together.4Each individual can work through the case studies and discuss possible solutions
with the group.4The class can broken into groups and each group can work on a different case
study and report back to the class. This option often provides the best opportu-nity to encourage teamwork while still allowing all participants to make a mean-ingful contribution.
Hands-On ExercisesWhenever possible, reinforce every lesson by having participants practice each skill with the same tools and equipment they will be using on the job. Hands-on exercises often take the following form:
1. Instructor or experienced employee demonstrates the correct technique.2. Participants practice while instructor observes and coaches.4Make sure the exercise is conducted safely.4Provide any necessary background information.4Provide appropriate supervision.4Take necessary precautions to avoid injury.4Provide frequent, appropriate feedback.
Visual Aids
Help participants understand by illustrating training material with the use of visual aids:
4If it can be done safely, let participants handle the same tools and equip-ment they will be using on the job.
4Use overheads and slides to reinforce training topics.4Keep visual aids relevant and make sure they serve to increase understanding.
QuestioningKeep participants actively involved and provide an alternative to lecture by asking, rather than telling them about important concepts. For instance, in-stead of lecturing participants about how to prevent tractor rollovers on hills,
you can involve participants by saying, “What precautions do you take so your tractor doesn’t roll over when you are working on a hill?”When using questioning as a learning activity:4Repeat participant responses or record them on a chalkboard, overhead or flip-
chart.4Make sure all important information has been discussed and any incorrect re-
sponses have been addressed tactfully.
1
s

8 – Instructor Guide
Contests and CompetitionsMotivate participants with contest and competitions.Some examples:4Divide the class into groups. In turn, ask each group a multiple choice
or true/false question. Each group gets one point for every correct answer. If a group misses a question, allow the next group to answer it for a point. Keep track of points and recognize the winning group. Use the questions as opportunities to discuss training material.
4Divide the class into groups. Have each group work on a hands-on task (observe safety precautions as noted for hands-on exercises above). Score
each group based on a predetermined checklist.
Evaluation
Throughout the training session, use questions and hands-on exercises to evaluate participant progress and knowledge. Provide constructive feedback and ensure participants are mastering important safety concepts and
procedures.
2

Instructor Guide – 9
Planning and PreparationEffective safety training requires careful planning and preparation. Address the follow-ing before training:
Training ObjectivesDevelop written statements of the desired knowledge or skill to be demonstrated by participants. Identify the objectives as determined by your organization and/or use those listed in the participant manual. Ask participants to share any important issues they want to address in training.
FacilitiesMake sure to provide a safe physical environment, with adequate emergency exits, suitable climate, lighting, restrooms and seating.
MaterialsProvide an adequate supply of all training materials. Visual aids and equipment should be available and in good working order.
RecordkeepingRecord attendance. A sample sign-in sheet is provided on page 44 of the Instructor Guide.
Participant EvaluationUse hands-on performance evaluations and quizes at the end of each lesson to evaluate partipicant knowledge.
Evaluation of TrainingAsk participants how training can be improved. An example of a training evaluation form is provided on pages 47-48 of the Instructor Guide.This Instructor Guide provides learning activities for each lesson in the landscaping and horticultural services industry manuals. Review each lesson and select learning activities most appropriate for your audience, materials, facilities and time.

10 – Instructor Guide
Tractor Safety Training GuideSuggested MaterialscTractor Safety (English, MF2708 and Spanish, MF2708S)cSign-in sheetcPencilscInstructor GuidecTraining overheads/slides/projectorcBlank overheads/flipchart/blackboard/pen for listing participant responses and
outlining important concepts.cTractors and implements for hands-on exercisescEar plugs and other protective equipment for hands-on exercisescToy tractors and implements for visual aidscTemporary traffic control devices for hands-on exercises
Sources of Background InformationTractor and motor vehicle safety manuals available for download:
http://www.ksre.ksu.edu/library/landscaping_equipment_safety.htmOperator’s manuals for tractors (available from dealer)
Length of Time Needed for TrainingReview and select the learning activities that are most appropriate. If all of the discus-sion and hands-on exercises are included in the training it may take up to a full work day. Without the hands-on exercises, the classroom portion will take about two hours.
Welcome and Introduction4Introduce yourself.4Remind participants of the topic of the training. 4Discuss exit locations, emergency procedures, breaks, locations of restrooms, end-
ing time and any tests or evaluations.4Tell participants you expect them to play an active role by relating their experi-
ences and knowledge.
Participant IntroductionsFind out:4Who are they?4What is their experience with tractors?4What do they hope to learn from the training?
Questioning/DiscussionBefore beginning Lesson 1:4What do participants think are the most common types of accidents that happen
with tractors? List ideas on an overhead or flipchart.4Have any participants known someone who has been killed or seriously injured
in a tractor accident? Would anyone care to share what happened?

Instructor Guide – 11
Take Control of Your Own SafetySuggested Objectives
Discuss Accident Reports on pages 4-5 of Tractor Safety.
Discussion Items4How well did participants’ ideas for the most common cause of accidents match
those in the tractor safety manual? (Refer to the overhead or flipchart list made during the introduction.)
4Which of these hazards represents the greatest risk in your workplace?
Discuss the Safety Signs on page 6 of Tractor Safety.
QuestioningCan participants recall any safety signs they have seen on equipment?
Evaluation As a group, answer the quiz items on page 7 of Tractor Safety. Be sure to discuss each item.
QuestioningBefore beginning Lesson 2:4What safety items do participants check before starting their tractor every day?4What are some safety issues participants need to consider when shutting down a
tractor?
=Define the most commonly reported causes of serious injury and death from tractor accidents.
Lesson 1

12 – Instructor Guide
Lesson 2
Discuss the Daily Pre-Operation Checklist and information on pages 8-9 of Tractor Safety.
QuestioningWhat is the company policy for recording pre-operation equipment checks?
Visual AidDisplay the overhead “What’s Wrong with This Picture?” on page 21 of the Instruc-tor Guide. Have participants identify and discuss all safety problems they see. Check participants’ observations from the overhead with the answer key on page 22 of the Instructor Guide.
DiscussionDiscuss the company’s safety belt and hearing protection policy. What are some bar-riers that keep other workers from wear safety belts? Hearing protection?How can these barriers be removed?
Hands-on Exercise
Have participants inspect and wear any personal protective equipment that is required for their work. Discuss the importance of each item.Try on hearing protection: 4follow manufacturer’s procedure or use the general procedure below.4demonstrate technique.4provide feedback as participants practice.
Prepare for Safe OperationSuggested Objectives
=Identify and locate tractor parts to be checked before operation.
=Discuss steps for safe startup and shutdown.
Inserting Ear Plugs
Types of Hearing Protection:Ear Plugs
4Clean hands.
4Roll ear plug between fingers to compress it.
4Grasp ear from behind your head with opposite hand and pull up to straighten ear canal.
4Insert ear plug until it blocks sound, then hold in place while it expands. (Count out loud to 20 while it expands.)
4Ear plug must completely fill ear canal.
4Test fit by cupping hands over ears and then releasing. There should not be much difference in sound.
4Wash reusable plugs in warm soapy water after use/throw away disposable after each use.
Hearing Bands
4Grasp ear from behind your head with opposite hand and pull up to straighten ear canal.
4Use your hands to press the ear pads into the ear canals.
4Test fit in a noisy environment: Lightly press band inward and you should not notice much reduction in noise level.

Instructor Guide – 13
Types of Hearing Protection: cont.
Visual Aid
Display the overhead “Is This a Good Idea?” provided on page 23 of the Instructor Guide. Ask participants to identify all safety problems indicated in the story. Then discuss any items in Safe Entry/Startup/Shutdown on page 9-10 of Tractor Safety that weren’t mentioned.
Discussion Discuss what types of accidents can happen when attachments and implements are not hitched properly.
AnalysisInstruct participants to look at the items for Hitching and Unhitching Attachments and Implements on page 10 of Tractor Safety. Ask them to write “rollover,” “runover,” “moving parts,” or “multiple hazards” beside each item to indicate what type of ac-cident is most likely to result if the recommendation isn’t observed. Briefly discuss the items as a group.
Discussion Items4Discuss why it is important to shut off the tractor and wait 5 minutes for the
engine to cool before fueling. (Note: For tractors with a fuel inlet near the engine or exhaust.)
4Why would operators not follow this rule? 4Why is this rule important?
Questioning4What is your company’s policy and practice for tire maintenance?4Do any of your tractors have split rim wheels?
Evaluation Ask participants to answer quiz items on page 11 of Tractor Safety. Be sure to discuss each item.
Hands-on ExerciseAs a group or individually, inspect a tractor using a checklist such as the Daily Pre-Oper-ation Inspection on page 45 of the Instructor Guide. Safely mount, start, shut down, and dismount a tractor, observing the precautions on pages 9 and 10 of Tractor Safety. Hitch and unhitch the various types of equipment that participants will be expected to use.
Ear Muffs
4Make sure the cushions fully cover the ear and seal tightly against the head.
4Hold the headband at the crown of the head and adjust each cup.
4Test fit in a noisy enivironment: Gently push the cups toward your head and release. There should not be much difference in noise level.

14 – Instructor Guide
Avoiding Rollover AccidentsSuggested Objectives
Discuss Accident Reports on pages 12-13 of the Tractor Safety Manual
Visual AidInform participants that rollovers are the most common cause of death on agricultural tractors. Discuss the overhead on page 24 of the Instructor Guide.
Case StudiesBreak the class into small groups of three to five people. Provide each group with one of the scenarios on pages 25-28 of this Instructor Guide. Ask each group to discuss their scenario, using the information from Lesson 3 of the Tractor Safety Manual. If there are more than four groups, more than one group can work on the same scenario. Monitor the progress of each group. Bring the class back together and ask for a rep-resentative from each group to read their problem and explain their solution. Display case study overheads as each group takes turns. Ask other groups what they think of the proposed solution.
Visual AidDisplay overheads of tractors on slopes provided on pages 29-32 of the Instructor Guide. For each slide, ask the group to identify and explain the proper way to operate a tractor in order to avoid a rollover. Check participant responses with the answer key provided on page 33 of the Instructor Guide.
Visual AidShow participants these concepts with a toy tractor on a sloped surface: 4Demonstrate how rollovers can happen when turning uphill while driving across
a slope.
4Demonstrate how the front end of a tractor will tend to raise if a load is hitched too high.
Lesson 3
=Identify safe work procedures to prevent rollover accidents.
=Evaluate safe operating procedures for hills and slopes.
1. 2. 3. 4.

Instructor Guide – 15
4Demonstrate how the front end of a tractor may raise up if the tractor tires are prevented from rotating while in forward gear.
QuestioningAsk participants why it is important to wear a safety belt when operating a tractor that has ROPS.
DiscussionDiscuss reasons why other workers may not always wear safety belts. What can be done to increase safety belt use?
EvaluationAnswer the quiz items on page 15 of Tractor Safety individually or as a class. Be sure to discuss each item.
2.
4.3.
1.
In normal operation, tractor wheels move clockwise in forward gear.
When pulling a fixed object, the tractor wheels can be prevented from turning.
When the front end raises, a rollover can easily occur.
When tractor wheels can’t rotate, the tractor front end raises in forward gear.

16 – Instructor Guide
Avoiding Run Over and Collision AccidentsSuggested Objectives
Discuss Accident Reports on pages 16-17 of Tractor Safety.
Case Studies Break the class into small groups of three to five participants. Provide each group with one of the scenarios from pages 34-37 of the Instructor Guide. Ask each group to an-swer the question in their scenario, using the information in Lesson 4 of Tractor Safety. If there are more than four groups, have more than one group work on the same scenario. Monitor the progress of the groups. Bring the class back together and ask for a representative from each group to read their problem and explain their solution. Ask other groups what they think of the proposed solution.
EvaluationAnswer the quiz questions on page 19 of Tractor Safety individually or as a class. Be sure to discuss each item.
Hands-on ExerciseTake the class outdoors and point out several distinct areas nearby. (e.g., ditches, fields, wooded areas, embankments, etc.). Break the class into groups of three to five partici-pants. Ask each group to evaluate one of the areas and report back to the class regard-ing whether it is safe to operate a tractor in that particular area and list any precautions that are necessary in order to prevent a rollover, runover or collision accident.
Lesson 4
=Discuss types and causes of runover and collision accidents.
=Identify correct operating procedures for avoiding runover and collision accidents.

Instructor Guide – 17
Moving Parts and Machinery HazardsSuggested Objectives
Discuss the Accident Report on page 20 of Tractor Safety.
Discussion Ask participants to give specific examples of how people get caught in the moving parts of tractors and implements. List participant responses on an overhead or flip-chart.
QuestioningIf your clothing or hair gets caught in a PTO shaft, how long do you have to react before your body gets completely pulled in?
Discuss the PTO information in the box on page 21 of Tractor Safety.
Discussion Have any participants known someone who has been killed or seriously injured in a accident invovling a PTO shaft? Would anyone care to share what happened?
AnalysisHave participants read the Other Mechanical Hazards on pages 21-22 of Tractor Safety. Ask each participant to write an example in the margin next to any hazards they have seen on their own equipment. When finished, ask different participants to briefly describe one of the examples they recorded.
Discussion Items4A tractor or implement comes in contact with a power line. What should be
done?
Discuss the electrical information in the box on page 22 of Tractor Safety.4Is it okay to move a power line out of the way with a two-by-four in order to
drive a tractor with a tall load under the line? 4A power line is in the way of your work. Discuss procedures for contacting the
power company to shut off power.4Discuss the company’s policies and practices regarding checking and repairing
hydraulic fluid leaks.
=Identify mechanical tractor and implement hazards.
=Describe how to avoid injury from moving machine parts.
Lesson 5

18 – Instructor Guide
Hands-on ExerciseHave several tractors available with attached equipment. Break the class into groups of three to five participants. Ask each group to evaluate one of the tractor-attachments and report back to the class regarding whether guards are in place and operating properly and any precautions that are necessary in order to prevent contact with hazardous parts.
Evaluation Answer the quiz items on page 23 of Tractor Safety, either individually or as a class. Be sure to discuss each item.

Instructor Guide – 19
Highway Safety and Other HazardsSuggested Objectives
ContestDivide the class into groups. Display the contest items provided on pages 38-42 of the Instructor Guide. In turn, ask each group a multiple choice or true/false question from the overheads. Each group gets one point for every correct answer. If a group misses a question, allow the next group to answer it for a point. Keep track of points and recognize the winning group. Use the questions as opportunities to discuss the training material. Answer key provided on page 43 of the Instructor Guide.
EvaluationAnswer the quiz items on page 31 of Tractor Safety, either individually or as a class. Be sure to discuss each item.
Hands-on ExerciseIn a safe area such as a private road or parking lot on the organization’s property, have participants set up a roadside work area using traffic cones and flaggers, as appropriate. Make sure all participants wear brightly-colored reflective vests and any other safety equipment that the organization requires for this type of work. Guidelines for road-side work areas are detailed in Motor Vehicle Safety for the Landscape and Horticultural Services Industry (MF2709) at:
http://www.ksre.ksu.edu/library/landscaping_equipment_safety.htm
Lesson 6
=Identify safe operating procedures when driving a tractor on the highway.
=Explain other health and safety risks associated with operating a tractor.

20 – Instructor Guide
Conclusion
ReviewAsk each participant to discuss at least one task they are going to perform differently as a result of the tractor safety training.
DiscussionAsk participants to share any questions or concerns they may still have or want to discuss further.
Evaluation Answer the quiz questions on page 33 of Tractor Safety individually or as a group. Be sure to discuss each item.
Hands-on Performance Evaluation In a safe area with adequate supervision, have each participant complete a hands-on performance evaluation while operating a tractor (including attachments, if appropri-ate). The evaluation may include:aPre-Operation Inspection provided on page 45 of the Instructor GuideaAttaching implements aSafe start-upaDriving the tractor to perform a safe taskaRemoval of implements aSafe shut-down
A scoresheet for the performance evaluation is provided on page 46 of the Instructor Guide.

Inst
ruct
or G
uide
– 2
1
Visu
al A
idTr
acto
r Saf
ety
Less
on 2
What’s Wrong With This Picture?

22 -
Inst
ruct
or G
uide
Visu
al A
idTr
acto
r Saf
ety
Less
on 2
No extra riders.
Fasten Safety Belt.
Block wheels when parked on an incline.
Hitch attachments to the drawbar.Wear appropriate
footwear.
Never drive on a flat tire.
Watch out for obstacles.

Instructor Guide – 23
Is This a Good Idea?A worker was using a tractor with a trailing mower. He saw some rope on the ground and didn’t want it to get caught in the mower. With the engine and PTO running, he put the tractor in neutral and climbed down, stepping on the ground in front of the right rear tractor tire (the parking brake wasn’t working). After picking up the rope, he walked around the back of the tractor, stepped over the spinning PTO shaft, and climbed into the seat, using the PTO master shield as a step.
Visual Aid Tractor Safety Lesson 2

24 - Instructor Guide
Tractor Rollovers
85% are SIDE rollovers
15% are REAR rollovers
Less than 1% are FRONT rollovers
SOURCE: National Institute for Occupational Safety and Health. Trac-Safe: A Community-Based Program for Reducing Injuries and Deaths Due to Tractor Overturns. Cincinnati, Ohio: 1996.
Visual Aid Tractor Safety Lesson 3

Instructor Guide – 25
#1 You will be using a tractor to haul a heavy implement from one job site to another. Part of the route is a gravel country road. The other part is a highway. There are some hills along the roads. What safety issues should you consider before starting in order to reduce the chances of a rollover accident?
Case Study Tractor Safety Lesson 3

26 - Instructor Guide
#2 You have to mow a ditch along a roadside with a tractor and trailing mower. What issues should you consider, and what precautions should you take in order to reduce the risk of a rollover accident?
Case Study Tractor Safety Lesson 3

Instructor Guide – 27
#3 You need to pull out some old stumps with a tractor. What isssues should you consider and what precautions should you take in order to reduce the risk of a rollover accident?
Case Study Tractor Safety Lesson 3

28 - Instructor Guide
#4 You will be using a tractor with a front-end attachment to load dirt onto a truck. You have no choice but to park the truck downhill of the dirt pile. What issues should you consider and what precautions should you take in order to reduce the risk of a rollover accident?
Case Study Tractor Safety Lesson 3

Instructor Guide – 29
Which Picture is Safer?
Visual Aid Tractor Safety Lesson 3
Which is Safer?

30 - Instructor Guide
Visual Aid Tractor Safety Lesson 3
Which Picture is Safer?Which is Safer?

Instructor Guide – 31
Visual Aid Tractor Safety Lesson 3
Which Picture is Safer?Which is Safer?

32 - Instructor Guide
Which Picture is Safer?
Visual Aid Tractor Safety Lesson 3
Which is Safer?

Instructor Guide – 33
Answer KeyAnswer Key Tractor Safety Lesson 3
Safer
Safer
Safer
Safer
34 - Instructor Guide
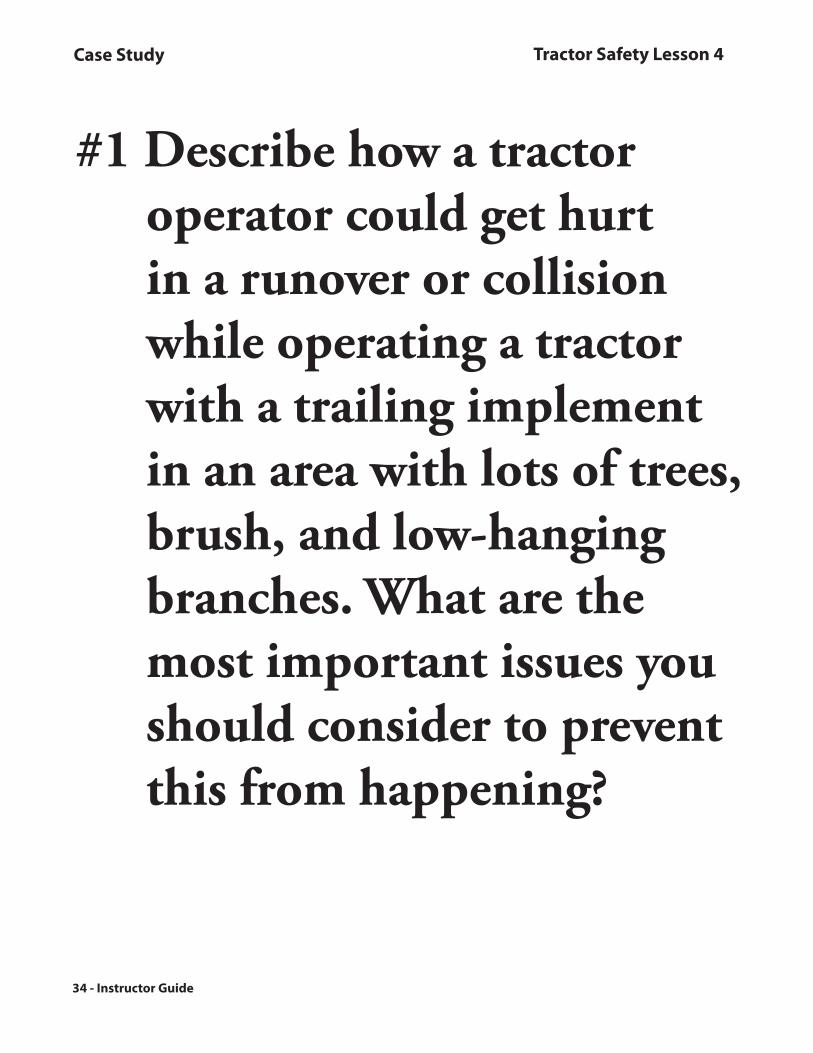
#1 Describe how a tractor operator could get hurt in a runover or collision while operating a tractor with a trailing implement in an area with lots of trees, brush, and low-hanging branches. What are the most important issues you should consider to prevent this from happening?
Case Study Tractor Safety Lesson 4

Instructor Guide – 35
#2 Describe how a worker on foot could be run over while a tractor with a trailing mower is being operated in a landscaping project involving many workers. What are the most important issues you should consider to prevent this from happening?
Case Study Tractor Safety Lesson 4

36 - Instructor Guide
#3 Describe how an operator or a helper could get hurt while hitching an implement to a tractor. What are the most important issues you should consider to prevent this from happening?
Case Study Tractor Safety Lesson 4

Instructor Guide – 37
#4 Describe how an operator or a helper could get hurt when trying to start a tractor that has a battery or starter problems. What are the most important issues you should consider to prevent this from happening?
Case Study Tractor Safety Lesson 4

38 - Instructor Guide
1. Light headedness, dizziness and clammy, moist skin are most likely to be signs of:
a. heat stroke.b. heat exhaustion.c. heat rash.
2. Prolonged exposure to sunlight causes:
a. skin cancer.b. cataracts.c. both A & B.
3. A slow-moving vehicle (SMV) sign is required when driving a tractor or other vehicle on a public road at speeds of:
a. 25 MPH or less.b. 30 MPH or less.c. 35 MPH or less.
Contest Tractor Safety Lesson 6

Instructor Guide – 39
4. Use _____________ to stop bleeding from minor cuts:
a. a tourniquetb. direct pressurec. neither A nor B
5. Disorientation, confusion, and hot, dry, red skin are likely to indicate:
a. heat stroke.b. heat exhaustion.c. neither A nor B.
6. Prevent skin cancer by covering exposed skin with a broad spectrum sunscreen that has a Sun Protection Factor (SPF) of at least:
a. 5.b. 10.c. 15.
Contest Tractor Safety Lesson 6

40 - Instructor Guide
7. When working in the heat, how much water should you drink to avoid heat illness?
a. 1 cup per hourb. 1 quart per hourc. 1 gallon per hour
8. Treat a minor burn by:
a. cooling the burn with cool water.b. warming the burn with warm water.c. breaking any blisters.
9. When operating on a public road, you should use a safety chain strong enough to hold the towed implement if the primary hitch fails.
True/False
Contest Tractor Safety Lesson 6

Instructor Guide – 41
10. The metal cab of an enclosed tractor provides no protection against lightning.
True/False
11. When you can see lightning and hear thunder, lightning is close enough to strike you.
True/False
12. You may die of carbon monoxide posioning if you run a tractor engine indoors with no ventilation.
True/False
Contest Tractor Safety Lesson 6

42 - Instructor Guide
13. If you are bitten by a poisonous snake, use a knife to cut an X on each fang mark, and suck out the poison.
True/False
14. If the tractor is equipped with left and right brake pedals, hitting one brake in road gear may cause the tractor to turn suddenly.
True/False
Contest Tractor Safety Lesson 6

Instructor Guide – 43
Tractor Safety Lesson 6Answer Key
1. b2. c3. a4. b5. a6. c7. b8. a
9. T10. F11. T12. T13. F14. T

44 - Instructor Guide
Training AttendanceTraining Topic: __________________________________________________________
Date: _______________________________ Trainer: ___________________________
Location: _______________________________________________________________
PRINTED Name Signature Job Title_____________________________ ______________________________ ______________________
_____________________________ ______________________________ ______________________
_____________________________ ______________________________ ______________________
_____________________________ ______________________________ ______________________
_____________________________ ______________________________ ______________________
_____________________________ ______________________________ ______________________
_____________________________ ______________________________ ______________________
_____________________________ ______________________________ ______________________
_____________________________ ______________________________ ______________________
_____________________________ ______________________________ ______________________
_____________________________ ______________________________ ______________________
_____________________________ ______________________________ ______________________
_____________________________ ______________________________ ______________________
_____________________________ ______________________________ ______________________
_____________________________ ______________________________ ______________________
_____________________________ ______________________________ ______________________
_____________________________ ______________________________ ______________________
_____________________________ ______________________________ ______________________
_____________________________ ______________________________ ______________________
_____________________________ ______________________________ ______________________
_____________________________ ______________________________ ______________________
_____________________________ ______________________________ ______________________
_____________________________ ______________________________ ______________________
_____________________________ ______________________________ ______________________
_____________________________ ______________________________ ______________________
_____________________________ ______________________________ ______________________
Instructor GuideTraining Record

Instructor Guide – 45
Daily Pre-Operation Inspection: Tractor
Item OK Needs Attention
Comments
Safety Belt
ROPS
Guards/Shields
Tires
Steps/Platform
Fluids Leaks
Fluids Levels
=Oil
=Coolant
=Fuel
=Other
Operator _____________________________ Date ______________________
Tractor ID _______________________ Make/Model ______________________
Location: ________________________________________________________
Pre-Operation Inspection Tractor Safety Lesson 2/Conclusion
46 - Instructor Guide
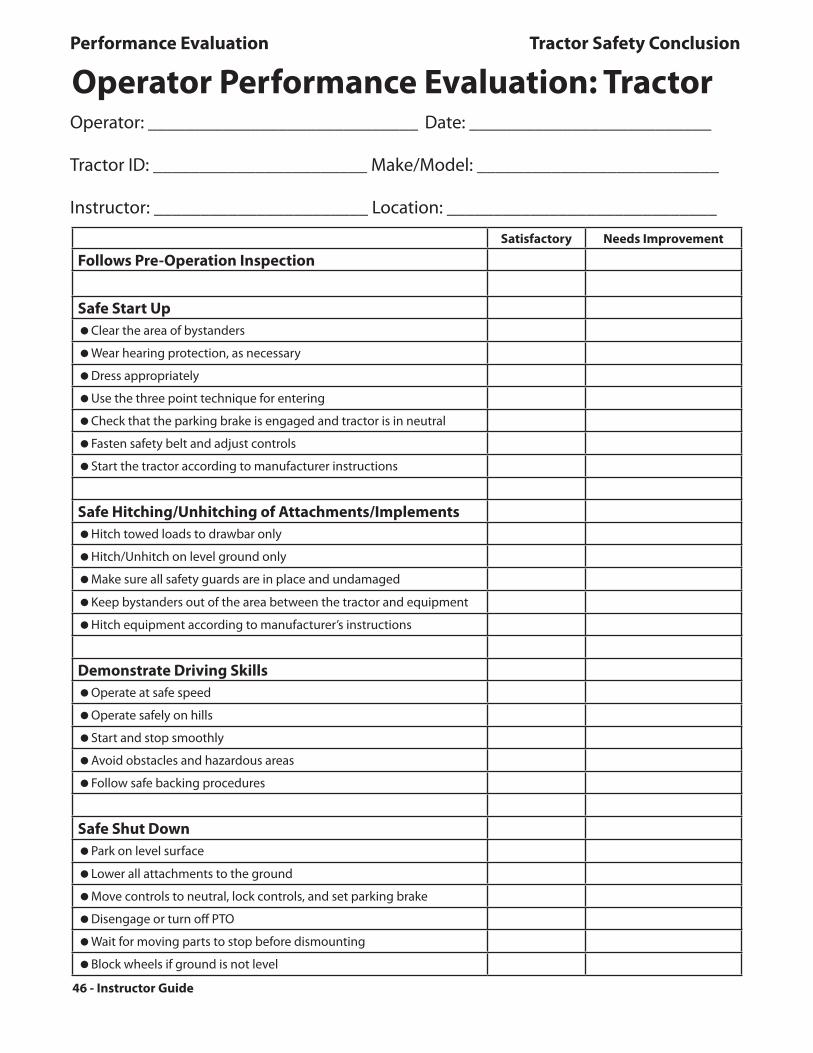
Operator Performance Evaluation: Tractor
Satisfactory Needs Improvement
Follows Pre-Operation Inspection
Safe Start Up =Clear the area of bystanders
=Wear hearing protection, as necessary
=Dress appropriately
=Use the three point technique for entering
=Check that the parking brake is engaged and tractor is in neutral
=Fasten safety belt and adjust controls
=Start the tractor according to manufacturer instructions
Safe Hitching/Unhitching of Attachments/Implements=Hitch towed loads to drawbar only
=Hitch/Unhitch on level ground only
=Make sure all safety guards are in place and undamaged
=Keep bystanders out of the area between the tractor and equipment
=Hitch equipment according to manufacturer’s instructions
Demonstrate Driving Skills=Operate at safe speed
=Operate safely on hills
=Start and stop smoothly
=Avoid obstacles and hazardous areas
=Follow safe backing procedures
Safe Shut Down=Park on level surface
=Lower all attachments to the ground
=Move controls to neutral, lock controls, and set parking brake
=Disengage or turn off PTO
=Wait for moving parts to stop before dismounting
=Block wheels if ground is not level
Operator: _____________________________ Date: __________________________
Tractor ID: _______________________ Make/Model: __________________________
Instructor: _______________________ Location: _____________________________
Performance Evaluation Tractor Safety Conclusion

Instructor Guide – 47
Training Evaluation Form
Training Topic: _____________________________________________________________
Date: _______________________Trainer: _______________________________________
Location: __________________________________________________________________
Instructions: Please use this form to thelp us improve the safety training. For each of the following items, circle the letter next to the answer that best describes your opinion. You may write in additional comments if you wish. Do not put your name on this form.
1. Was the training easy to understand?a. Yes. I understood everything we talked about.b. Mostly. I understood most of the things we talked about.c. No. I did not understand the training.
Use this space to list anything that was hard to understand. If possible, let us know if there is anything we can do to make it easier to understand.________________________________________________________________________________________________________________________________________
2. Did the training address the most important dangers related to the training topic? a. Yes. It definitely included all of the most important dangers. b. Mostly. It included nearly all of the most important dangers. c. No. It left out many important issues. Use this space to list any important dangers that should be added to the training. _______________________________________________________________________________________________________
3. Did the training describe all of the most important safety practices that workers should observe related to the training topic?a. Yes. It definitely included all of the most important safety practices.b. Mostly. It included nearly all of the most important safety practices.c. No. It left out many important safety practices.
Use this space to list any important safety practices that should be added to the training. __________________________________________________________________________________________________
4. Did you learn some important things today that you didn’t know before? a. Yes. I learned a lot of important new information. b. Mostly. I learned some important new things c. No. The information wasn’t very important. d. The information was important, but I already knew most of it. Use this space to list anything you think we should add to the training. _______________________________________________________________________________________________________________
Training Evaluation Instructor Guide

48 - Instructor Guide
5. Will you use the information you learned in today’s training to work more safely in the future? a. Yes. I will definitely use the information to work more safely in the future. b. Maybe. I might use the information to work more safely in the future. c. No. I will not follow the safe work practices that we talked about in the training.
d. I am already following all of the safe work practices we talked about, and I will continue to do so in the future.
Use this space to list any reasons why you might not follow the safe work practices that we talked about. _______________________________________________________________________________________________________________________________________________________________
6. Was the training worthwhile?a. Yes. It was definitely worth my time.b. Mostly. It was somewhat helpful.c. No. It was a waste of my time.
Use this space to list any reasons why you might not follow the safe work practices that we talked about. ________________________________________________________________________________________________________________________________________________________________
7. Would you recommend the training to other landscaping and horticultural services workers? a. Yes. It would definitely be helpful to others. b. Probably. It would probably be helpful to others. c. No. It would not be helpful to others. 8. Use this space for any other comments you have about the training:____________________________ ________________________________________________________________________________ ________________________________________________________________________________ ________________________________________________________________________________
Training Evaluation Instructor Guide

Instructor Guide – 49
Motor Vehicle Safety Training GuideSuggested MaterialscMotor Vehicle Safety (English, 2709; Spanish, 2709S)cSign-in sheetcPencilscInstructor GuidecTraining overheads/slides/projectorcBlank overheads/flipchart/blackboard/pen for listing participant responses and
outlining important conceptscSlow Moving Vehicle sign for visual aidcModel vehicle and trailer blocks/board for demonstrating blocking trailer for
unloading and loading on a slopecTemporary traffic control devices, reflective vests and other equipment
for hands-on exercises and visual aidscVehicle, trailer, and blocks for hands-on exercise
Sources of Background InformationMotor Vehicle Safety available for download:
http://www.ksre.ksu.edu/library/landscaping_equipment_safety.htmOperator’s manuals for motor vehicles (available from dealer)Manual on Uniform Traffic Control Devices (MUTCD) available for download:
http://mutcd.fhwa.dot.gov/
Length of Time Needed for TrainingReview and select the learning activities that are most appropriate. If all of the discus-sion and hands-on exercises are included in the training it may take up to a full work day. Without the hands-on exercises, the classroom portion will take about two hours.
Welcome and Introduction4Introduce yourself.4Remind participants of the topic of the training. 4Discuss exit locations, emergency procedures, breaks, locations of restrooms, end-
ing time and any tests or evaluations.4Tell participants you expect them to play an active role by relating their experi-
ences and knowledge.
Participant IntroductionsFind out:4Who are they?4What is their experience with motor vehicles in the workplace?4What do they hope to learn from the training?
Questioning/Discussion
Before beginning Lesson 1:4Ask participants what types of motor vehicle incidents are most likely to seriously
injure or kill them at their workplace. List ideas on an overhead or flipchart.

50 – Instructor Guide
Take Charge of Your Own SafetySuggested Objectives
Discuss Accident Reports on pages 4-5 of Motor Vehicle Safety.
Discussion Items4Have any participants known someone who has been killed or seriously injured
in a motor vehicle accident while on the job? Would any participant care to share what happened?
4How well did participants’ ideas for the most common cause of accidents match those in the Motor Vehicle Safety Manual? (Refer to the overhead or flipchart list made during the introduction.)
Evaluation As a group, answer the quiz items on page 6 of Motor Vehicle Safety. Be sure to discuss each item.
Questioning/DiscussionBefore beginning Lesson 2:4What steps do participants take to protect themselves, coworkers, motorists and
equipment when working near traffic? List ideas on overhead or flipchart.
Lesson 1
=Identify the leading cause of accidental death on the job.
=Identify safe work habits for operating motor vehicles.

Instructor Guide – 51
Lesson 2
Discuss the Accident Report on page 7 of Motor Vehicle Safety.
Visual Aid4Display temporary traffic control devices, such as highly-reflective, brightly-col-
ored vests and clothing, clean and highly-visible signs and cones. For each device displayed, ask participants when and how the item should be used.
4Discuss company policy for notifying police, distance to park vehicles from trav-eled roads during work and unattended vehicles.
Discussion Ask participants to share their most recent experience when working on or near the shoulder. What traffic control devices were used? Were these controls appropriate based on the information on pages 8-10 of Motor Vehicle Safety?
Review the charts for Work Sign Spacing on pages 9 and 10 of Motor Vehicle Safety.
Problem SolvingDisplay and discuss the overhead “Work Sign Spacing Near the Shoulder” on page 58 of the Instructor Guide. Work out the problem and write the solution on an overhead, chalkboard or flipchart. (When participants are working near the shoulder of an urban road with a speed limit of 50 mph, how many feet should the first road work sign be from the work area? ANSWER: 350 feet)
Problem SolvingDisplay and discuss the overhead “Work Sign Spacing With the Shoulder Closed” on page 59 of the Instructor Guide. Work out the problem and write the solution on an overhead, chalkboard or flipchart. (When participants are working on the shoulder of a highway with 10 foot lanes and a posted speed limit of 50 mph, how any feet should the shoulder taper be? ANSWER: about 167 feet)
Hands-on ExerciseIn a safe area, such as a private road or parking lot on the company’s property, have participants set up a roadside work area using traffic cones and flaggers, as appropri-ate. Ensure all participants wear brightly-colored reflective vests and any other safety equipment that the organization requires for this type of work.
Evaluation
Answer the quiz items on page 11 of Motor Vehicle Safety individually or as a class. Be sure to discuss each item.
Working Safely Near TrafficSuggested Objectives
=Identify safety procedures to use when working on or near the shoulder of the roadway.
=Recall how to use traffic control devices in your work zone.

52 – Instructor Guide
Safety Starts Before the EngineSuggested Objectives
Ask a volunteer to read and discuss the Accident Report on page 12 of Motor Vehicle Safety.
Discussion Items4What is the company policy for daily safety inspection? 4Discuss any problems participants found in the last week while performing daily
start-up inspections. What steps were taken to fix these problems? Could these problems have caused serious injury or death had they not been fixed?
Visual AidDisplay and discuss the overhead “Safety Belts Save Lives” provided on pages 60 of the Instructor Guide. Ask participants to discuss and answer the fill-in the blank items. (ANSWER KEY: half, hips, neck, face)
AnalysisInstruct participants to look at the safe starting and shut-down on pages 13-14 of Motor Vehicle Safety. Ask them to write a (+) sign next to the procedure if they usually do it and a (-) sign if they seldom do it. Discuss the procedures that are hardest to do.
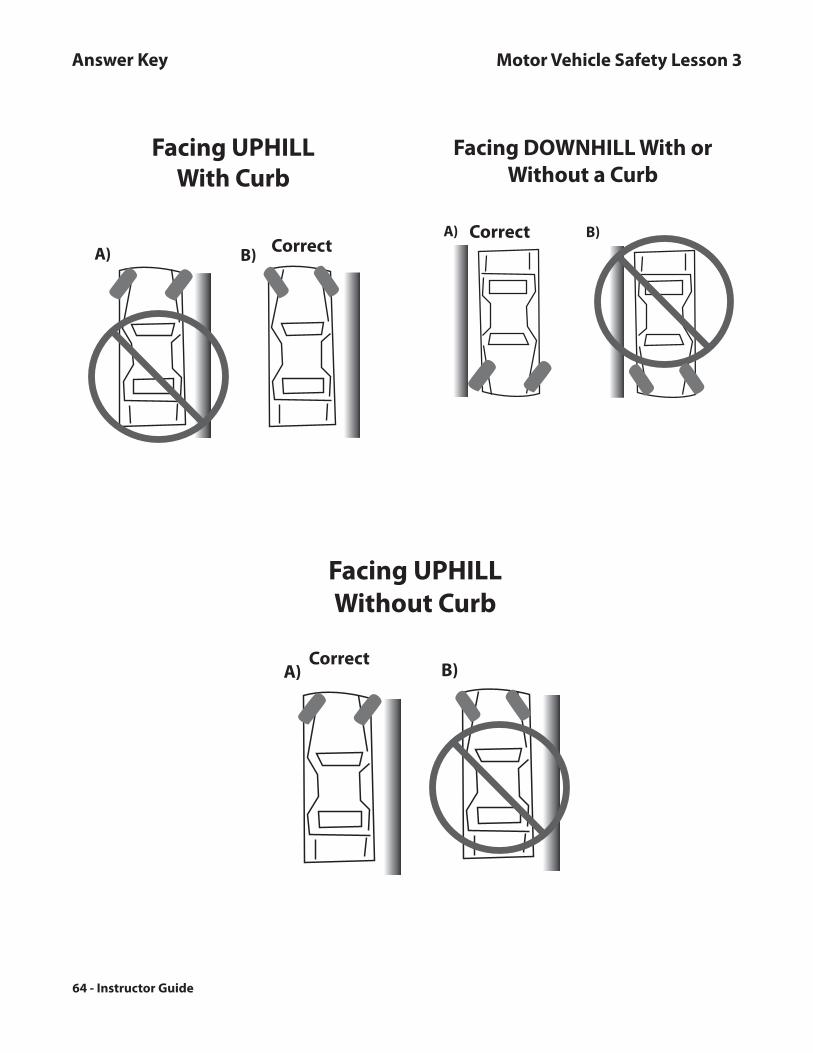
Visual AidDisplay and discuss overheads of “How To Park On Hills” provided on pages 61-63 of this manual. Ask participants to write the numbers 1-3 in the column on the right side of page 13 of Motor Vehicle Safety. For each item, display the overhead and ask participants to write “a” or “b” to identify the correct wheel position. Participants can check their answers with the answer key provided on page 64 of the Instructor Guide. Be sure to discuss each item.
Visual AidDisplay and discuss overhead “What’s Wrong With This Picture?” provided on page 65 of the Instructor Guide. Ask participants to identify and discuss all safety problems in the overhead. Check participants answers with the answer key provided on page 66 of the Instructor Guide.
EvaluationAnswer the quiz items on page 15 of Motor Vehicle Safety individually or as a class. Be sure to discuss each item.
Hands-on ExerciseAs a group or individually, inspect a motor vehicle using a checklist such as the Daily Pre-Operation Inspection on page 70 of the Instructor Guide.
=Recall safe start up and shut down procedures of your vehicle.
=Recognize how to safely park on hills.
Lesson 3

Instructor Guide – 53
Lesson 4Protect Yourself While DrivingSuggested Objectives
Discuss Accident Reports on pages 16-17 of Motor Vehicle Safety.
Discussion Ask participants to look at the protect yourself tips on page 17 of Motor Vehicle Safety. Can participants recall a close call or accident they witnessed that relates to one of these tips?
Discuss the Traffic Signs on page 18 of Motor Vehicle Safety.
ContestDivide the class into groups. Display the contest items provided on pages 67-68 of the Instructor Guide. In turn, ask each group a multiple choice or true/false question from the overheads. Each group gets one point for every correct answer. If a group misses a question, allow the next group to answer it for a point. Keep track of points and recognize the winning group. Use the questions as opportunities to discuss the training material. Answer key provided on page 69 of the Instructor Guide.
Discussion Items4What distractions do participants experience while driving motor vehicles? 4How can they work to minimize and eliminate distractions in motor vehicles?
Discuss pavement markings on page 20 of Motor Vehicle Safety.
Case Studies Break the class into small groups of three to five participants. Provide each group with one of the scenarios from pg 72-74 of the Instructor Guide. Ask each group to answer the question in their scenario, using the information in Lesson 4 of Motor Vehicle Safe-ty. If there are more than three groups, have more than one group work on the same scenario. Monitor the progress of the groups. Bring the class back together and ask for a representative from each group to read their problem and explain their solution. Ask other groups what they think of the proposed solution.
Visual AidDisplay a Slow Moving Vehicle Emblem (SMV). Ask participants to list actual situa-tions when an SMV is needed on their jobs. List ideas on an overhead or flipchart.
EvaluationAnswer the quiz questions on page 21 of Motor Vehicle Safety individually or as a class. Be sure to discuss each item.
=Recognize factors that contribute to motor vehicle crashes.
=Identify ways to prevent crashes.
=Interpret the meaning of traffic signs.

54 – Instructor Guide
Lesson 5 Operating Large TrucksSuggested Objectives
Discuss Accident Reports on page 22-23 of Motor Vehicle Safety.
QuestioningAsk participants: How much longer does it take to stop a heavy truck than it does a passenger vehicle traveling at the same speed?
Discussion Items4Discuss safety issues with the loads participants carry. What types of loads do
they carry? What are the hazards? What precautions do they take?4Divide the class into 3 groups. Assign each group a section from Lesson 5. Ask
each group to discuss an example from their own experience that relates to their section. Have each group report back for a class discussion.
Discuss Accident Reports on page 24-25 of Motor Vehicle Safety.
AnalysisHave each participant circle the items they always follow from the safe dumping checklist on page 25 of Motor Vehicle Safety. As a group, discuss the items that are hardest to do.
EvaluationAnswer the quiz questions on page 26 of Motor Vehicle Safety individually or as a class. Be sure to discuss each item.
Hands-on Exercise In a safe area with adequate supervision, have each participant complete a hands-on exercise with a dump truck by following the safe dumping checklist on page 25 of Motor Vehicle Safety.
Questioning/DiscussionBefore beginning Lesson 6:4Has any participant known someone who has been injured hitching or unhitch-
ing a trailer? Would they care to share what happened?
=Identify safe loading and unloading procedures.
=Recognize safe operating procedures when driving big trucks.

Instructor Guide – 55
Lesson 6Pulling TrailersSuggested Objectives
Discuss the Accident Report on page 27 of Motor Vehicle Safety.
AnalysisHave participants think about the last time they hitched/unhitched a trailer. Using the information under safe hitching and unhitching in Lesson 6 have participants circle the items they followed. As a group discuss any items that were neglected. Ask partici-pants why some items are more difficult to follow and why following them is impor-tant.
Visual Aid4Use a model vehicle and trailer on sloped surface (such as a board or block) and
several small blocks to chock the wheels. 4Demonstrate to participants how to stabilize the trailer before unhitching, hitch-
ing, loading and unloading by blocking the wheels.
Discuss the Accident Report on page 29 of Motor Vehicle Safety.
Case Studies Break the class into small groups of three to five participants. Provide each group with one of the scenarios from pages 75-77 of this manual. Ask each group to answer the question in their scenario, using the information in Lesson 6. If there are more than three groups, have more than one group work on the same scenario. Monitor the prog-ress of the groups. Bring the class back together and ask for a representative from each group to read their problem and explain their solution. Ask other groups what they think of the proposed solution.
Hands-on Exercise In a safe area with adequate supervision, have participants safely hitch, unhitch, load and unload trailers.
EvaluationAnswer the quiz questions on page 31 of Motor Vehicle Safety individually or as a class. Be sure to discuss each item.
=Recall how to safely hitch and unhitch a trailer
=Interpret safe trailer loading procedures.

56 – Instructor Guide
Lesson 7 Environmental HazardsSuggested Objectives
Case Studies Break the class into small groups of three to five participants. Provide each group with one of the scenarios from pages 78-80 of this manual. Ask each group to answer the question in their scenario, using the information in Lesson 7. If there are more than three groups, have more than one group work on the same scenario. Monitor the prog-ress of the groups. Bring the class back together and ask for a representative from each group to read their problem and explain their solution. Ask other groups what they think of the proposed solution.
Discussion Items4What job tasks expose participants to frigid winter weather? During these jobs,
what parts of their body are most affected by the cold? In their experience, what are most effective ways to prevent hypothermia and frostbite on the job?
4Have any participants ever had problems with insects, animals or poisonous plants? Would they care to share what happened? What precautions can they take?
Hands-on Exercise Using your company’s first aid kits, demostrate and have participants practice first aid for cuts, burns, heat exhaustion, cold injury and lightning strike.
EvaluationAnswer the quiz questions on page 38 of Motor Vehicle Safety individually or as a class. Be sure to discuss each item.
=Identify environmental hazards.
=Recognize treatment and first aid for exposure to environmental hazards.

Instructor Guide – 57
ConclusionContestDivide the class into groups. Display the contest items provided on pages 81-86 of the Instructor Guide. In turn, ask each group a multiple choice or true/false question from the overheads. Each group gets one point for every correct answer. If a group misses a question, allow the next group to answer it for a point. Keep track of points and recognize the winning group. Use the questions as opportunities to discuss the training material. Answer key provided on page 87 of the Instructor Guide.
DiscussionAsk participants to share any questions or concerns they may still have or want to discuss further.
Evaluation Answer the quiz questions on page 40 individually or as a group. Be sure to discuss each item.
Hands-on Performance Evaluation In a safe area with adequate supervision, have each participant complete a hands-on performance evaluation while operating a motor vehicle (including a trailer, if appro-priate). The evaluation may include completing:aPre-Operation Inspection provided on page 70 of the Instructor GuideaHitching and UnhitchingaSafe start-upaDriving the vehicle, with trailer, if appropriate, to perform a safe taskaLoading and UnloadingaSafe shut-down
A checklist for the performance evaluation is provided on page 71 of the Instructor Guide.

58 - Instructor Guide
Work Sign SpacingNear the Shoulder
(Urban Road – speed limit 50 mph)
WORK AREA
Road Work Sign
Work Sign Spacing
Shoulder
(___)?
Problem Solving Motor Vehicle Safety Lesson 2

Instructor Guide – 59
Work Sign Spacing with the Shoulder Closed
(Urban Road – speed limit 50 mph – 10 ft lanes)
WORK AREA
Shoulder Closed Sign
End Road Work Sign
End Road Work Sign
ShoulderTaper
Cones or Barricades
Road Work
Shoulder ClosedSign
Road Work
500 ft
500 ft
100 100
100100
Shoulder( (?
Problem Solving Motor Vehicle Safety Lesson 2

60 - Instructor Guide
Safety Belts Save Lives
Wearing your safety belt cuts your risk of being killed in a vehicle
accident by______
To provide protection, the lap portion of the safety belt must be worn low and snug across the _____ , and the shoulder portion must be snug across the chest, away from the ______ and _____. Adjust your seat to ensure your safety belt is
worn properly.
Visual Aid Motor Vehicle Safety Lesson 3

Instructor Guide – 61
Visual Aid Motor Vehicle Safety Lesson 3
FacingUPHILL With Curb
A) B)

62 - Instructor Guide
Visual Aid Motor Vehicle Safety Lesson 3
Facing DOWNHILL With or Without a Curb
A) B)

Instructor Guide – 63
Visual Aid Motor Vehicle Safety Lesson 3
Facing UPHILL Without a Curb
A) B)
64 - Instructor Guide
Answer Key Motor Vehicle Safety Lesson 3
Facing UPHILL With Curb
A) B)
Facing DOWNHILL With or Without a Curb
A) B)
Facing UPHILL Without Curb
A) B)
CorrectCorrect
Correct

Instructor Guide – 65
What’s Wrong With This Picture?

66 - Instructor Guide
Visual Aid Motor Vehicle Safety Lesson 3
What’s Wrong With This Picture?
Do not ride in the back of the truck
Do not ride on the hood
Broken mirror
Wear safety belt
Load not flagged or secured
Broken tail light

Instructor Guide – 67
Contest Motor Vehicle Safety Lesson 4
1. The following traffic sign means:
a. Yieldb. Railroad Crossingc. Pedestrian Crossing
2. Octagon means:a. Stopb. Directional Informationc. Yield
3. The following sign shape could mean:
a. One Wayb. Stopc. No Trucks
68 - Instructor Guide
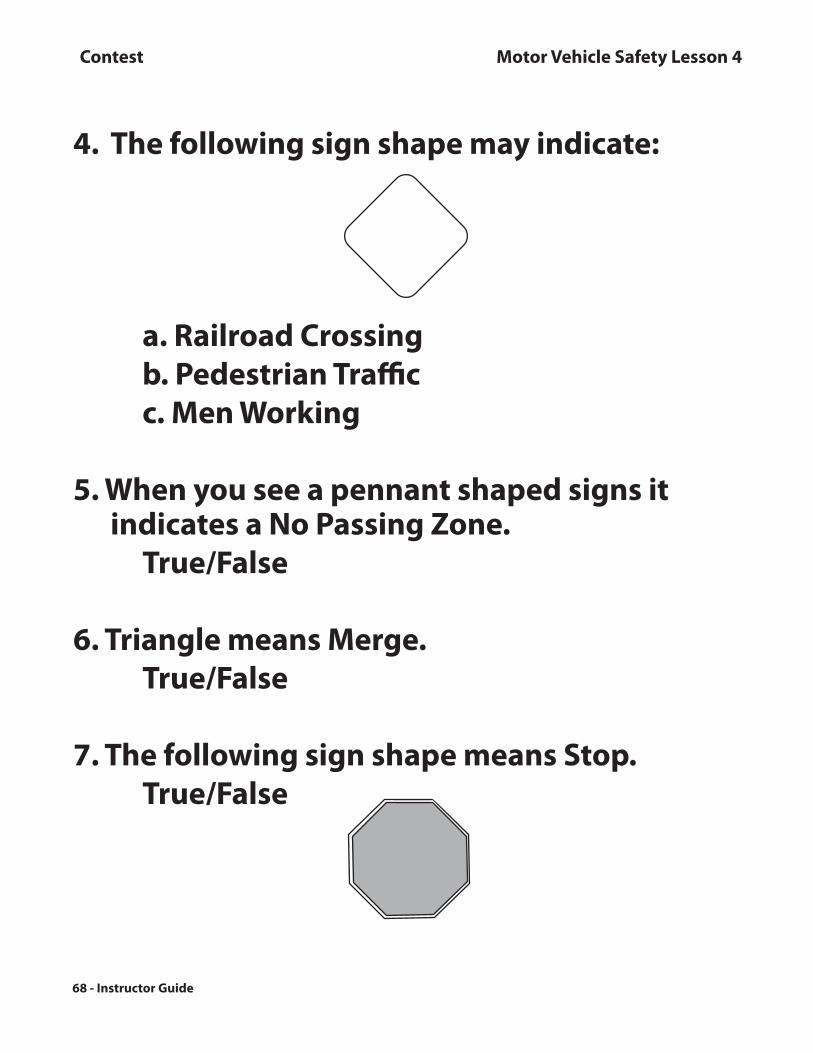
4. The following sign shape may indicate:
a. Railroad Crossing b. Pedestrian Trafficc. Men Working
5. When you see a pennant shaped signs it indicates a No Passing Zone.
True/False
6. Triangle means Merge.True/False
7. The following sign shape means Stop.True/False
Contest Motor Vehicle Safety Lesson 4

Instructor Guide – 69
Motor Vehicle Safety Lesson 4Answer Key
1. b2. a3. a4. c5. T6. F7. T

70 - Instructor Guide
Daily Pre-Operation Inspection: Motor Vehicle
Item OK Needs Attention
Specific Comments
Tires
Fluid Levels
=Oil
=Transmission
=Brake
=Washer
Fuel Level
Driver’s License
Brakes
Windshields and Mirrors
Controls
Safety Belts
Pre-Operation Inspection Motor Vehicle Safety Lesson 3/Conclusion
Operator _____________________________ Date ________________________
Motor Vehicle ID _______________________ Make/Model ___________________
Location: __________________________________________________________
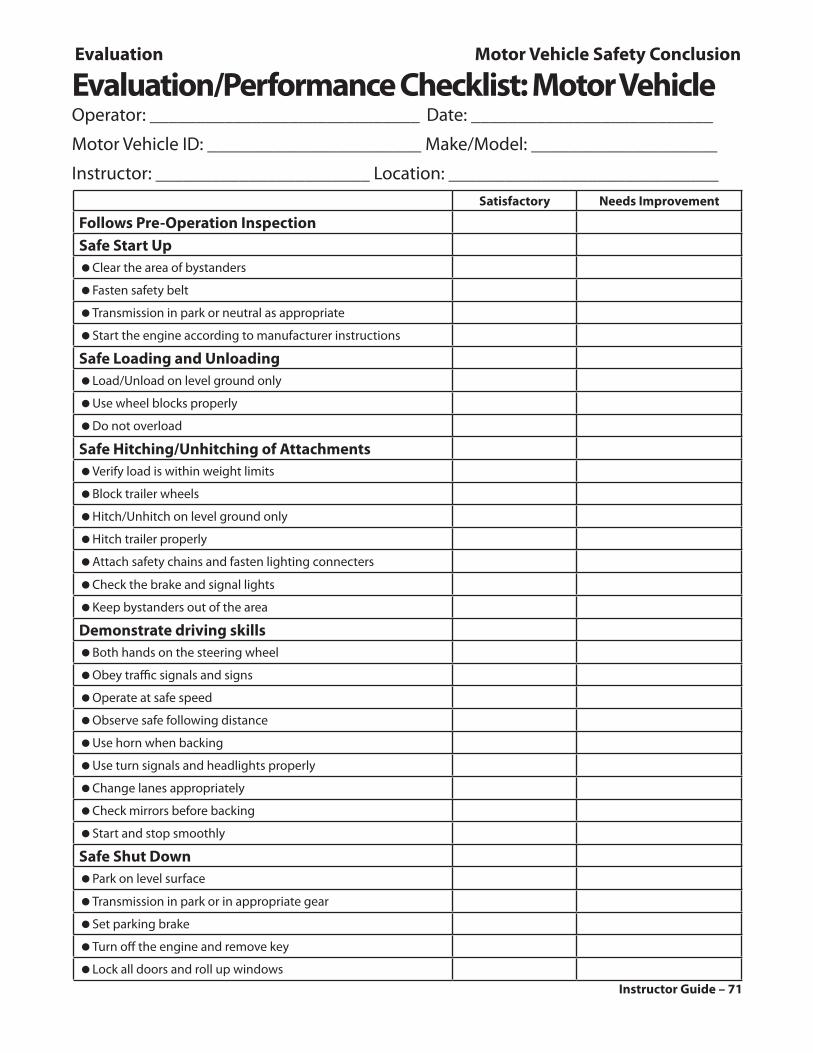
Instructor Guide – 71
Satisfactory Needs Improvement
Follows Pre-Operation InspectionSafe Start Up =Clear the area of bystanders
=Fasten safety belt
=Transmission in park or neutral as appropriate
=Start the engine according to manufacturer instructions
Safe Loading and Unloading=Load/Unload on level ground only
=Use wheel blocks properly
=Do not overload
Safe Hitching/Unhitching of Attachments=Verify load is within weight limits
=Block trailer wheels
=Hitch/Unhitch on level ground only
=Hitch trailer properly
=Attach safety chains and fasten lighting connecters
=Check the brake and signal lights
=Keep bystanders out of the area
Demonstrate driving skills=Both hands on the steering wheel
=Obey traffic signals and signs
=Operate at safe speed
=Observe safe following distance
=Use horn when backing
=Use turn signals and headlights properly
=Change lanes appropriately
=Check mirrors before backing
=Start and stop smoothly
Safe Shut Down=Park on level surface
=Transmission in park or in appropriate gear
=Set parking brake
=Turn off the engine and remove key
=Lock all doors and roll up windows
Operator: _____________________________ Date: __________________________
Motor Vehicle ID: _______________________ Make/Model: ____________________
Instructor: _______________________ Location: _____________________________
Evaluation Motor Vehicle Safety Conclusion
Evaluation/Performance Checklist: Motor Vehicle

72 - Instructor Guide
#1 You are driving an older pickup on a busy highway during rush hour in a very heavy rain storm. What issues should you consider, and what precautions should you take?
Case Study Motor Vehicle Safety Lesson 4

Instructor Guide – 73
#2 You are getting ready to leave for a job site early on a snowy winter morning. The job site is more than 50 miles away in a remote, hilly area. What are some issues to consider, and what precautions should you take?
Case Study Motor Vehicle Safety Lesson 4

74 - Instructor Guide
#3 You are driving a truck pulling an empty trailer. The road is snow packed and the wind has picked up. What are some issues to consider, and what precautions should you take?
Case Study Motor Vehicle Safety Lesson 4

Instructor Guide – 75
#1 You have to load gravel on a trailer that is parked on a hill. You are using a front end loader. What issues should you consider, and what precautions should you take before unloading?
Case Study Motor Vehicle Safety Lesson 6

76 - Instructor Guide
#2 You need to load a farm tractor on a flat-bed trailer attached to your truck. What safety issues should you consider?
Case Study Motor Vehicle Safety Lesson 6

Instructor Guide – 77
#3 You will be driving a truck towing a trailer. There is a large farm tractor on the trailer. The tractor’s wheels extend beyond the sides of the trailer, making it an over-sized load. You will be traveling on a busy highway after dark. What issues should you consider, and what precautions should you take?
Case Study Motor Vehicle Safety Lesson 6

78 - Instructor Guide
#1 You are in charge of a work crew using dump trucks to haul branches and debris from a tree-trimming project. It is hot and humid. The trucks don’t have air conditioning. In the middle of the afternoon, one of the drivers complains of a headache and upset stomach. His face is pale. His skin is moist and clammy. How do you respond? What could have been done to prevent this?
Case Study Motor Vehicle Safety Lesson 7

Instructor Guide – 79
#2 You are in charge of a work crew using trucks to haul sod for a project on the right of way of a busy highway. It is hot and humid. One of your workers has been directing traffic most of the day. You notice he seems agitated and is shouting at passing motorists. When you talk to him he seems very confused. He is not sweating, but his skin is hot and red. How do you respond?
Case Study Motor Vehicle Safety Lesson 7

80 - Instructor Guide
#3 You are using a dump truck to haul trees and branches being cleared from a residential area after a storm. You have an empty truck, and are ready to pick up a new load. The sky is dark and stormy. It begins to rain, and lightning flashes around you. The wind is blowing very hard. You are in the cab of truck. The work crew is outdoors. They have a skid steer loader and a pickup. How do you respond?
Case Study Motor Vehicle Safety Lesson 7

Instructor Guide – 81
1. A vehicle that is not traveling over ____ mph must display a Slow Moving Vehicle (SMV) emblem.
a. 25b. 30c. 35
2. It takes about ______ the distance to stop a heavy truck as it does a passenger vehicle traveling at the same speed.
a. halfb. equalc. twice
3. It is _________ safe to transport passengers in the bed of a pickup.
a. sometimesb. alwaysc. never
Contest Motor Vehicle Safety Conclusion

82 - Instructor Guide
4. You are working beyond the shoulder of the road, but within the right of way. You are working 10 feet from the traveled way. You may use a vehicle with an activated high-intensity rotating light in place of other traffic control devices if your work lasts no more than:
a. 60 minutes.b. 90 minutes. c. 120 minutes
5. Which is the best practice when working along the shoulder of the road?
a. Park your vehicles and equipment as close as possible to the roadway.
b. Notify local police before starting a job that might interfere with traffic flow.
c. Leave warning signs in place and visible when you leave for lunch and when you stop work overnight.
Contest Motor Vehicle Safety Conclusion

Instructor Guide – 83
6. You are working beyond the shoulder of the road, but within the right of way. You will be working more than 60 minutes. You need to use traffic control devices if:
a. you are working 5 feet from the curb.
b. you are working 30 feet from the curb.
c. your vehicle is parked on the shoulder.
7. When driving in fog, turn headlights ________ and use fog lamps, if available.
a. on high beamb. on low beamc. off
8. When loading a trailer:
a. lock the parking brake on the towing vehicle and block the trailer wheels.
b. keep bystanders away.
c. both A and B.
Contest Motor Vehicle Safety Conclusion

84 - Instructor Guide
Contest Motor Vehicle Safety Conclusion
9. Help prevent skin cancer by covering exposed skin with a broad spectrum sunscreen that has a Sun Protection Factor (SPF) of at least:
a. 5b. 10c. 15
10. You are parked on a hill with no curb. Your vehicle is facing downhill. How should you turn the front wheels?
a. Turn front wheels toward the roadside.
b. Turn front wheels away from the roadside.
c. Neither A nor B. Point the wheels straight ahead.

Instructor Guide – 85
11. If the truck bed gets stuck in the raised position and won’t come down, __________________:
a. set the brakesb. turn off the engine and remove the keyc. block the bed d. all of the above
12. Yellow pavement markings:
a. divide same way trafficb. divide two-way trafficc. neither a or b
13. Which is the best practice when driving in rain?
a. Speed up when driving through flood waters.
b. Use your headlights on low beam.
c. Use your headlights on high beam.
Contest Motor Vehicle Safety Conclusion

86 - Instructor Guide
14. Which is the best practice when driving a large truck?
a. Use your horn when backing, unless the truck has an automatic backup alarm.
b. Turn corners sharply when you are hauling water tank trucks.
c. Ask passengers to sit quietly in the cargo area.
15. Lock the parking brake on the towing vehicle before unloading and loading.
True/False
Contest Motor Vehicle Safety Conclusion

Instructor Guide – 87
Answer Key Motor Vehicle Safety Conclusion
1. a2. c3. c4. a5. b6. c7. b8. c
9. c10. a11. d12. b13. b14. a15. T

88 – Instructor Guide
Chipper/Shredder Training GuideSuggested MaterialscChipper/Shredder Safety (English, MF2710; Spanish, MF2710S)cSign-in sheetcPencilscInstructor GuidecTraining overheads/slides/projectorcBlank overheads/flipchart/blackboard/pen for listing participant responses and
outlining important conceptscChipper/shredder and tractor for hands-on exercisescEar plugs and other protective equipment for hands-on exercisescFirst aid kit for hands-on exercises
Sources of Background InformationChipper/Shredder Safety available for download:
http://www.ksre.ksu.edu/library/landscaping_equipment_safety.htmOperator’s manual for chipper/shredders (available from dealer)
Length of Time Needed for TrainingReview and select the learning activities that are most appropriate. If all of the discus-sion and hands-on exercises are included in the training it may take up to a full work day. Without the hands-on exercises, the classroom portion will take about two hours.
Welcome and Introduction4Introduce yourself.4Remind participants of the topic of the training. 4Discuss exit locations, emergency procedures, breaks, locations of restrooms, end-
ing time and any tests or evaluations.4Tell participants you expect them to play an active role by relating their experi-
ences and knowledge.
Participant IntroductionsFind out:4Who are they?4What is their experience with chipper/shredders in the workplace?4What do they hope to learn from the training?
Questioning/DiscussionBefore beginning Lesson 1:4Ask participants what types of accidents can happen while operating a chipper/
shredder. List ideas on an overhead or flipchart.

Instructor Guide – 89
Lesson 1Take Charge of Your Own SafetySuggested Objectives
Discuss Accident Reports on page 4 of Chipper/Shredder Safety.
Discussion Items4How well did participants’ ideas for the most common cause of accidents match
those in Chipper/Shredder Safety? (Refer to the overhead or flipchart list made during the introduction.)
4Which of these hazards represents the greatest risk in your workplace? 4Have any participants known someone who has been seriously injured or killed
while operating a chipper/shredder? Would anyone care to share what happened?
Discuss the Safety Signs on page 6 of Chipper/Shredder Safety.4What signs have participants seen on the equipment in their workplace?
Hands-on ExerciseHave participants inspect and wear any personal protective equipment that is required for their work. Discuss the importance of each item.
Evaluation As a group, answer the quiz items on page 8. Be sure to discuss each item.
Questioning/DiscussionBefore beginning Lesson 2:4Ask participants what safety items they check before starting their chipper/shred-
der every day? List items on an overhead or flipchart.
=Name the most common types of accidents involving wood chipper/shredders.
=Interpret the meaning of common warning signs and labels.
=Identify appropriate protective equipment.

90 – Instructor Guide
Inserting Ear Plugs
Try on hearing protection: 4follow manufacturer’s procedure.4demonstrate technique.4provide feedback as participants practice.
Types of Hearing Protection:
Ear Plugs
4Clean hands.
4Roll ear plug between fingers to compress it.
4Grasp ear from behind your head with opposite hand and pull up to straighten ear canal.
4Insert ear plug until it blocks sound, then hold in place while it expands. (Count out loud to 20 while it expands.)
4Ear plug must completely fill ear canal.
4Test fit by cupping hands over ears and then releasing. There should not be much difference in sound.
4Wash reusable plugs in warm soapy water after use/throw away disposable after each use.
Hearing Bands
4Grasp ear from behind your head with opposite hand and pull up to straighten ear canal.
4Use your hands to press the ear pads into the ear canals.
4Test fit in a noisy environment: Lightly press band inward and you should not notice much reduction in noise level.
Ear Muffs
4Make sure the cushions fully cover the ear and seal tightly against the head.
4Hold the headband at the crown of the head and adjust each cup.
4Test fit in a noisy enivironment: Gently push the cups toward your head and release. There should not be much difference in noise level.

Instructor Guide – 91
Lesson 2Prepare for Safe OperationSuggested Objectives
Discuss the Accident Reports on pages 9-10 of Chipper/Shredder Safety.
Discussion4How do participants’ current pre-operation inspections compare to the one listed
in their manual? (Refer to the overhead or flipchart list made at the end of Lesson 1.)
4Do participants always use a buddy system when working with a chipper/shred-der? Why or why not? Why is it important?
AnalysisAsk participants to read information about Safe Startup and Shutdown on page 11 of Chipper/Shredder Safety. For each numbered or bulleted point, ask participants to write in the margin if the item mainly protects them from being “caught in moving parts” or “struck by the hood.” When everyone has finished have each participant read a point aloud and briefly tell what type of accident it will prevent and why. Be sure to discuss points that participants find surprising or difficult to comply with.
Discuss the Accident Reports on pages 11-12 of Chipper/Shredder Safety.
Hands-on ExerciseHave a chipper/shredder available. After completing a pre-operation inspection:4Have each participant follow safe startup and shutdown procedures. 4Ask a participant to demonstrate safe fueling procedures. 4Ask groups of two or three participants to prepare a chipper/shredder for towing
and hitching.See the Daily Pre-Operation Inspection on page 96 of the Instructor Guide.
Evaluation Answer the quiz items on page 13 either individually or as a class. Be sure to discuss each item.
Visual AidBefore beginning Lesson 3:4Discuss the overhead “What’s Wrong With This Picture?” provided on pages 98
of the Instructor Guide. Ask the group to identify the correct way to feed materi-als into a chipper shredder.
=Indicate features to be inspected before operation.
=Recognize safe operating procedures.
=Identify safe transportation and traffic guidelines.

92 – Instructor Guide
Lesson 3 Avoid Being Caught in Moving PartsSuggested Objectives
Discuss the Accident Reports on page 15 of Chipper/Shredder Safety.Ask participants to describe how a worker should safely attempt to unclog debris or make adjustments to a chipper.
AnalysisAsk participants to look over items under “Safe Feeding Procedures,” “Moving Parts,” and “PTO Safety.” Have participants circle any items that are hard for them to do on the job. Ask participants to discuss the items they circled; why are they difficult to comply with and what can be done to make them easier to follow?
Discuss the recommendation in the Did You Know? box on page 16 of Chipper/Shredder Safety.
Hands-on ExerciseHave a tractor with PTO and chipper. As a group, inspect and discuss the shields and guards. Ensure the shaft is secured. Under careful supervision, have participants prac-tice feeding materials into the chipper/shredder. 4Be sure all participants are wearing proper protective equipment.4Be sure all participants are a safe distance from the chipper/shredder.4Demonstrate the correct procedure.4Have each participant practice one at a time.
Evaluation Answer the quiz items on page 17 either individually or as a class. Be sure to discuss each item.
=Develop safe feeding procedures
=Recognize how to protect yourself from moving parts.

Instructor Guide – 93
Lesson 4Avoid Being Struck by the HoodSuggested Objectives
Discuss the Accident Reports on page 18 of Chipper/Shredder Safety.
Discussion Items4Have participants ever known of a situation like the ones in the accident reports?
Would they care to share what happened?
Discuss the recommendation in “Prevent Injury From The Hood” on page 18 Chipper/Shredder Safety.4What policies does your company have that relate to inspecting hoods and keep-
ing them closed?4What can be done to make compliance easier?
Review the warning labels information on page 19 of the Chipper/Shredder Safety Manual
Hands-on ExerciseBreak the class into small groups. Have each group examine a chipper/shredder and locate and inspect the hood. Have each group report back to the class regarding the condition of the hood and where it might strike a worker if it flew off.
Evaluation Answer the quiz items on page 20 either individually or as a class. Be sure to discuss each item.
=Recognize how to prevent injury from the chippper/shredder hood.
=Identify location of the hood on different chipper/shredder models.
=View different warning labels on chipper/chredder hoods.

94 – Instructor Guide
Lesson 5 Environmental HazardsSuggested Objectives
Discuss the Accident Report on page 21 of Chipper/Shredder Safety.
Discussion Items4Have participants experienced or known any one who has suffered heat related
illness? If so, would they care to share what happened and how the individual was treated?
4What could have been done to prevent the illness?
Discuss the Heat Symptoms in the column on page 22 of Chipper/Shredder Safety.
Visual AidDisplay and discuss the overhead “What Should You Do?” on page 100 of the Instructor Guide. As a group, discuss the proposed solution.
ContestDivide the class into groups. Display the contest items provided on pages 101-105 of the Instructor Guide. In turn, ask each group a multiple choice or true/false question from the overheads. Each group gets one point for every correct answer. If a group misses a question, allow the next group to answer it for a point. Keep track of points and recognize the winning group. Use the questions as opportunities to discuss the training material. Answer key provided on page 106.
Hands-on ExerciseUsing your company’s first aid kits, demonstrate and have participants practice first aid for common injuries such as cuts and burns.
Evaluation Answer the quiz items on page 27 either individually or as a class. Be sure to discuss each item.
=Identify environmental hazards.
=Recognize treatment and first aid for exposure to environmental hazards.

Instructor Guide – 95
ConclusionDiscussionAsk participants to share any questions or concerns they may still have or want to discuss further.
Case Studies Break the class into small groups of three to five participants. Provide each group with one of the scenarios from pages 107-109 of the Instructor Guide. Ask each group to answer the question in their scenario, using the information in the Chipper/Shredder Safety Manual. If there are more than three groups, have more than one group work on the same scenario. Monitor the progress of the groups. Bring the class back togeth-er and ask for a representative from each group to read their problem and explain their solution. Ask other groups what they think of the proposed solution.
Evaluation Answer the quiz questions on page 29 individually or as a group. Be sure to discuss each item.
Hands-on Performance Evaluation In a safe area with adequate supervision, have each participant complete a hands-on performance evaluation while operating a chipper/shredder. The evaluation may in-clude completing:aPre-Operation Inspection provided on page 96 of the Instructor GuideaSafe start-upaProper feeding proceduresaSafe shut-down.
A checklist for the performance evaluation is provided on page 97 of the Instructor Guide.

96 - Instructor Guide
Daily Pre-Operation Inspection: Chipper/Shredder
Item OK Needs Attention
Specific Comments
Machine Placement=On level surface=Not on paved, concrete or gravel surface
Safety Decals=Legible
Guards=All guards in place=No sign of damaged guards
Hoods=Closed=Latched=Pins in place=Hinges not damaged
Cutting Chamber=Free of foreign objects=Free of wood and other debris
Fluid Leaks
PTO=Properly hitched=Shaft fitted with suitable guard=Speed suitable for machine
Pre-Operation Inspection Chipper/Shredder Safety Lesson 2/Conclusion
Operator _____________________________ Date _______________________
Chipper/Shredder ID ___________________ Make/Model __________________
Location: _________________________________________________________

Instructor Guide – 97
Evaluation/Performance Checklist: Chipper/Shredder
Satisfactory Needs ImprovementFollows Pre-Operation Inspection
Safe Start Up =Remove any tripping hazards
=Clear the area of bystanders
=Start the chipper/shredder at the lowest possible speed
=Listen for noise or vibration
=Follow the operator’s manual procedures
PTO Precautions=Properly hitched
=On level ground
=Tractor in neutral, with parking brake set
=Start tractor, engage PTO and then increase to recommended RPM
Safe Feeding Procedures=Feed material at full operating speed
=Feed branches from the side of chute
=Keep hands and feet outside the chute, use a push stick, if necessary
=Let go of material as soon as it begins to be pulled in
=Feed the branches butt end first
=Shorter matrials on top of longer materials
=Collect small materials and put them with chipped material
Safe Shut Down=Disconnet power supply
=Remove key
=Follow the operator’s manual procedures
Performance Evaluation Chipper/Shredder Safety Conclusion
Operator: _____________________________ Date: __________________________
Chipper/Shredder ID: ____________________ Make/Model: ____________________
Instructor: _______________________ Location: _____________________________

98 - Instructor Guide
VIsual Aid Chipper/Shredder Safety Lesson 2
What’s Wrong With This Picture?
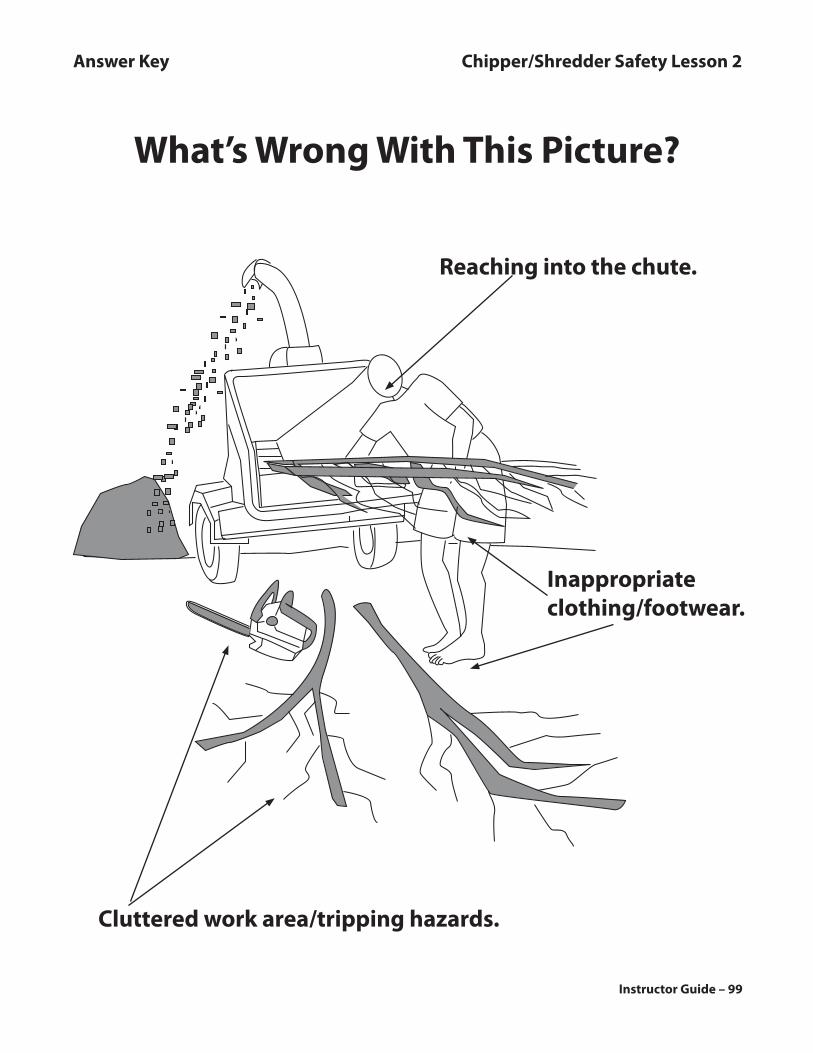
Instructor Guide – 99
What’s Wrong With This Picture?
Answer Key Chipper/Shredder Safety Lesson 2
Reaching into the chute.
Inappropriate clothing/footwear.
Cluttered work area/tripping hazards.

100 - Instructor Guide
What Should You Do?
You and a coworker are operating a chipper on a hot summer afternoon, when your coworker complains of a headache. He is very sweaty and barely has the energy to feed material in the chipper. What should you do?
Visual Aid Chipper/Shredder Safety Lesson 5

Instructor Guide – 101
1. To avoid heat illness: a. drink at least a quart of water per hour.b. plan to do the most strenuous work in
the coolest part of the day. c. both A and B.
2. It is a hot day, and your co-worker becomes light headed, dizzy and has clammy, moist skin. How should you respond?
a. Move the person to a cool area and give fluids to drink.
b. Cover the person with a warm blanket. c. Give the person salt tablets.
3. A broad spectrum sunscreen with a Sun Protection Factor of at least 15 will help protect you from:
a. cataracts.b. skin cancer. c. neither A nor B.
Contest Chipper/Shredder Safety Lesson 5

102 - Instructor Guide
4. Sunglasses and a hat with a visor will help protect you from:
a. cataracts.b. near-sightedness. c. neither A nor B.
5. It is a hot day, and your co-worker becomes disoriented, confused, and has hot, dry, red skin. How should you respond?
a. Give the person a soda and wait for 30 minutes to see if s/he starts feeling better.
b. Call 911 immediately and take steps to cool the person’s body temperature.
c. Keep the person warm until help can arrive.
Contest Chipper/Shredder Safety Lesson 5

Instructor Guide – 103
6. Which of the following is the best practice to avoid being struck by lightning?
a. Crawl under a vehicle.b. Lie flat on the ground under a large
tree. c. Get indoors as soon as your hear
thunder or see lightning.
7. Which of the following is the best practice for working in cold weather?
a. Work alone.b. Dress in layers of warm clothing. c. Vigorously rub any skin that becomes
numb and turns a pale white color.
8. You should consult a physician if: a. you are bitten by a snake.b. you have poison ivy on the face, mouth
or a large portion of the body. c. both A and B.
Contest Chipper/Shredder Safety Lesson 5

104 - Instructor Guide
9. How should you respond if someone working in cold wather becomes drowsy, has bluish-colored skin, and is shivering uncontrollably?
a. Make the person warm and dry, and seek medical attention immediately.
b. Tightly wrap the person in cool, wet towels.
c. Give the person alcoholic beverages to drink.
10. Lightning can strike the same place twice.True/False
11. A person who has been struck by lightning retains an electric charge that can shock you.
True/False
Contest Chipper/Shredder Safety Lesson 5

Instructor Guide – 105
12. You are more vulnerable to heat illness if you have suffered it in the past.
True/False
13. It may take a new worker anywhere from 5 days to 2 weeks to be acclimated to working in the heat.
True/False
14. You are more likely to suffer from a heat-related illness on days with LOW humidity.
True/False
15. Use a cold pack on an insect sting during the first 24 hours to relieve pain and swelling.
True/False
Contest Chipper/Shredder Safety Lesson 5

106 - Instructor Guide
1. c2. a3. b4. a5. b6. c7. b8. c
9. a10.T11. F12. T13. T14. F15. T
Answer Key Chipper/Shredder Safety Lesson 5

Instructor Guide – 107
Case Study Chipper/Shredder Safety Conclusion
#1 You are in charge of a work crew that will be working in a sparsely populated area 20 miles from the nearest town. You will be traveling to this area each day for about two weeks. Your crew will be using a PTO-powered chipper/shredder to grind branches as they are being trimmed away from powerlines. What safety issues should you consider?

108 - Instructor Guide
Case Study Chipper/Shredder Conclusion
#2 You have to operate a chipper near a busy roadway. What issues should you consider and how can you protect yourself, coworkers and motorists?

Instructor Guide – 109
Case Study Chipper/Shredder Conclusion
#3 You will be operating a chipper in a popular public park. What issues should you consider and what precautions should you take?

110 – Instructor Guide
Skid Steer Loader Safety Training GuideSuggested MaterialscSkid Steer Loader Safety (English, MF2711; Spanish, MF2711S)cSign-in sheetcPencilscInstructor GuidecTraining overheads/slides/projectorcBlank overheads/flipchart/blackboard/pen for listing participant responses and
outlining important conceptscSkid steer loader/sttachments for hands-on exercisescEar plugs and other protective equipment for hands-on exercisescFirst aid kit for hands-on exercises
Sources of Background InformationSkid steer and motor vehicle safety training manuals available for download:
http://www.ksre.ksu.edu/library/landscaping_equipment_safety.htmOperator’s manuals for skid steer loaders (available from dealer)
Length of Time Needed for TrainingReview and select the learning activities that are most appropriate. If all of the discus-sion and hands-on exercises are included in the training it may take up to a full work day. Without the hands-on exercises, the classroom portion will take about two hours.
Welcome and Introduction4Introduce yourself.4Remind participants of the topic of the training. 4Discuss exit locations, emergency procedures, breaks, locations of restrooms, end-
ing time and any tests or evaluations.4Tell participants you expect them to play an active role by relating their experi-
ences and knowledge.
Participant IntroductionsFind out:4Who are they?4What is their experience with skid steer loaders?4What do they hope to learn from the training?
Questioning/Discussion
Before beginning Lesson 1:4Ask participants what they believe are the most common types of accidents that
happen with skid steer loaders. List ideas on an overhead or flipchart.4Have any participants known someone who has been killed or seriously injured
in a skid steer accident? Would they care to share what happened?

Instructor Guide – 111
Take Control of Your Own SafetySuggested Objectives
Discuss Accident Reports on pages 4-5 of Skid Steer Loader Safety.
Visual Aid4Display and discuss the overhead “Deaths Involving Skid Steer Loaders” on page
119 of the Instructor Guide. (These percentages represent the combined results of 2 studies of 91 deaths involving skid steer loaders. Studies were conducted by the National Institute for Occupational Safety and Health.)
4Refer to list of participants’ ideas about the most common causes of accidents on skid steer loaders. How well do participant’s ideas match the actual cases of death? Are participants surprised by any of the most common types of accidents?
Discuss the Safety Signs on page 6 of Skid Steer Loader Safety.Can participants recall any safety signs they have seen on equipment?
Evaluation As a group, answer the quiz items on page 7 of Skid Steer Loader Safety. Be sure to discuss each item.
Questioning/DiscussionBefore beginning Lesson 2:4Ask participants what safety items they check before starting the skid steer loader
each day. List their responses on a flipchart or overhead.4What precautions do they take when they shut down the skid steer loader and
leave it unattended?
Lesson 1
=List the two most commonly reported causes of death from skid steer loaders.
=Interpret the meaning of commmonly posted warning signs.

112 – Instructor Guide
Prepare for Safe OperationSuggested Objectives
Discuss the Pre-Start Inspection information and Checklist on page 8-9 of Skid Steer Loader Safety.
Discussion Items4How well did participants’ list of safety items they check before starting the skid
steer loader each day match those in Skid Steer Loader Safety? (Refer to the over-head or flipchart list made at the end of lesson 1.)
4Discuss your company’s policy for recording pre-start equipment checks.4Do all of the company’s skid steer loaders have safety features that keep the lift
arms and attachments from moving when the operator is not in the driver’s seat? Have any of these safety features been disabled?
4Discuss your company’s policy for safety belt use.
AnalysisAsk participants to silently read “Safe Start and Shut Down” on pages 9-11 of Skid Steer Loader Safety. For each numbered or bulleted item, ask participants to write a “C” in the margin if the item mainly protects them from being crushed by moving parts. Write an “R” in the margin if the item mainly addresses being run over. Write a “B” in the margin if the item mainly addresses both of these hazards. Write an “O” in the margin if the item mainly addresses other hazards. When everyone has finished, have each participant read an item and briefly tell what type of accident it will prevent and why. Be sure to discuss items that participants find surprising or difficult to comply with.
Discuss the Accident Reports on pages 10-11 ofSkid Steer Loader Safety.
Evaluation Individually or as a group, answer the quiz items on page 12 of Skid Steer Loader Safety. Be sure to discuss each item.
Hands-on Exercises4As a group or individually inspect a skid steer loader using a checklist such as the
Pre-Operation Inspection on page 120 of the Instructor Guide. 4Have each participant safely mount, start, shut down, and dismount a skid steer
loader, observing the precautions on pages 9-11 of the Skid Steer Safety Manual. (Instruct participants about the operating controls and keep everyone out of the way.)
4Hitch and unhitch equipment that participants will be expected to use.4Discuss other procedures that may be relevant for other types of skid steer loaders.
Lesson 2
=Identify and locate safety related features you must check each day before startup.

Instructor Guide – 113
Lesson 3
Discuss the Accident Reports on pages 13-14 of Skid Steer Loader Safety.
Case StudiesBreak the class into small groups of three to five participants. Provide each group with one of the scenarios on pages 122-125 of this Instructor Guide. Ask each group to dis-cuss their scenario, using the information from Lesson 3 of Skid Steer Loader Safety. If there are more than four groups, more than one group can work on the same scenario. Monitor the progress of each group. Bring the class back together and ask for a rep-resentative from each group to read their problem and explain their solution. Display case study overheads as each group takes turns. Ask other groups what they think of the proposed solution.
Hands-on ExerciseShow the class one or more skid steer loaders (parked and properly shut down). Ask participants to point out locations where they could be crushed by moving parts while operating the loader. Locate data plates and load capacities for the skid steer loader(s). Demonstrate the proper use of the safety belt and bar.
Evaluation Anwer the quiz items on page 16 of Skid Steer Loader Safety. Be sure to discuss each item.
Don’t Get Crushed by Moving PartsSuggested Objectives
=Recognize how moving parts can crush you.
=Identify safe work practces that protect you from being crushed.

114 – Instructor Guide
Prevent Rollover AccidentsSuggested Objectives
Discuss the Accident Reports on pages 17-19 of Skid Steer Loader Safety.
Discussion 4Discuss the load capacities and locations of data plates of the skid steer loaders
used by the company.
Case StudiesBreak the class into small groups of three to five participants. Provide each group with one of the scenarios on pages 126-128 of this Instructor Guide. Ask each group to discuss their scenario, using the information from Lesson 4 of Skid Steer Loader Safety. If there are more than three groups, more than one group can work on the same scenario. Monitor the progress of each group. Bring the class back together and ask for a representative from each group to read their problem and explain their solution. Display case study overheads as each group takes turns. Ask other groups what they think of the proposed solution.
Visual AidDisplay and discuss the overheads of skid steer loaders on pages 129-134. Ask par-ticipants to identify the safer way to operate the skid steer loader to avoid a rollover. Answer key provided on page 135.
Evaluation As a group, answer the quiz items on page 21 of Skid Steer Loader Safety. Be sure to discuss each item.
Lesson 4
=Identify safe work procedures to avoid rollover accidents.
=Describe what could happen when safety procedures are not followed.

Instructor Guide – 115
Lesson 5
Discuss the Accident Report on page 22 of Skid Steer Loader Safety.
Discussion Items4Do any participants know of someone who has been run over by a skid steer
loader or other equipment? Would they care to share what happened?4For the kind of work your company does, what tasks carry the greatest risk of
someone getting run over?4Discuss your company’s practices regarding moving loads that block the driver’s
view.4Discuss any hand signals used by drivers, guides and spotters.4Discuss your company’s policy regarding extra riders on skid steer loaders.4Discuss any recommendations under the heading “Steer Clear of Runover Ac-
cidents” on pages 22-23 that haven’t already been covered.
Discuss the Accident Report on page 23 of Skid Steer Loader Safety.4Do any participants know of someone who has been injured or killed because
they collided with an obstacle while driving a skid steer loader? Would they care to share what happened?
4Where at work are participants at greatest risk of having a collision? What can be done to minimize collisions?
4Discuss undercutting. Do participants remove bulk materials from large piles? If so, what precautions do they take?
4Discuss your company’s policies and practices regarding checking for and repair-ing hydraulic fluid leaks.
Discuss the Accident Report on page 24 ofSkid Steer Loader Safety.4Do participants use skid steer loaders indoors? If so, what precuations do they
take to prevent carbon monoxide poisoning?4Discuss your company’s policy regarding work near power lines and calling the
utility location hotline before digging.4What do you do if your skid steer loader comes in contact with a power line?
Other Operational HazardsSuggested Objectives
=Describe how to avoid collisions with obstacles, traffic and people.
=Identify dangers from electricity, carbon monoxide, fuels and other fluids as well as falling material.

116 – Instructor Guide
EvaluationAnswer the quiz items on page 26 of Skid Steer Loader Safety either individually or as a class. Be sure to discuss each item.
Hands-on Exercise4Take the class outdoors and point out several specific locations (roadside, ware-
house, field, residential area). Break the class into groups of three to five partici-pants. Ask each group to evaluate one of the areas and report back to the class regarding any precautions that are necessary in order to prevent an accident involving a roll over, runover, collision with obstacles, traffic, carbon monoxide or electricity.
4In a safe area such as a private road or parking lot on the company’s property, have participants set up a roadside work area using traffic cones and flaggers, as appropriate. Make sure all participants wear brightly-colored reflective vests and any other safety equipment that the organization requires for this type of work. Guidelines for roadside work areas are detailed in Motor Vehicle Safety for the Landscape and Horticultural Services Industry (MF2709) at http://www.ksre.ksu.edu/library/landscaping_equipment_safety.htm
4With the class observing, ask one of the participants to demonstrate how to safely fuel a skid steer loader. Why is it important to touch the fuel nozzle to the loader before opening the fuel cap?

Instructor Guide – 117
Environmental HazardsSuggested Objectives
Case StudiesBreak the class into small groups of three to five participants. Provide each group with one of the scenarios on pages 136-138 of this Instructor Guide. Ask each group to discuss their scenario, using the information from Lesson 6 of Skid Steer Loader Safety. If there are more than three groups, more than one group can work on the same scenario. Monitor the progress of each group. Bring the class back together and ask for a representative from each group to read their problem and explain their solution. Display case study overheads as each group takes turns. Ask other groups what they think of the proposed solution.
Discussion4When using a skid steer loader in frigid winter weather, what body parts are most
likely to be injured by the cold? Why? In their personal experience, what actions have participants found most effective for preventing cold-induced injury?
Discussion4Have any participants had a bad experience with insects, animals or posionous
plants while working at their jobs? Would they care to share what happened?
EvaluationAnswer the quiz items on page 33 of Skid Steer Loader Safety either individually or as a class. Be sure to discuss each item.
Hands-on ExerciseUsing your company’s first aid kits, demonstrate and have participants practice first aid for common injuries such as cuts and burns.
Lesson 6
=Identify environmental hazards.
=Recognize treatment for first aid for exposure to environmental hazards.

118 – Instructor Guide
ConclusionContestDivide the class into groups. Display the contest items provided on pages 139-145 of the Instructor Guide. In turn, ask each group a multiple choice or true/false question from the overheads. Each group gets one point for every correct answer. If a group misses a question, allow the next group to answer it for a point. Keep track of points and recognize the winning group. Use the questions as opportunities to discuss the training material. Answer key provided on page 146 of the Instructor Guide.
DiscussionAsk participants to share any questions or concerns they may still have or want to discuss further.
Evaluation Answer the quiz questions on page 35 of Skid Steer Loader Safety individually or as a group. Be sure to discuss each item.
Hands-on Performance Evaluation In a safe area with adequate supervision, have each participant complete a hands-on performance evaluation while operating a skid steer loader (including attachments, if appropriate). The evaluation may include completing:aPre-Operation Inspection provided on page 120 of the Instructor GuideaConnecting attachmentsaSafe start-upaDriving the loader, to perform a safe taskaRemoval of attachmentsaSafe shut-down
A checklist for the performance evaluation is provided on page 121 of the Instructor Guide.

Instructor Guide – 119
Deaths Involving Skid Steer Loaders
59% = Pinned/crushed between bucket and frame or between lift arms and frame
19% = Rollover
16% = Crushing incidents with no further information provided
2% = Pinned/crushed between loader and another object
1% = Run over
2% = Other/Unknown
Composite results of two government studies involving a total of 91 deaths reported in National Institute for Occupational Safety and Health Publication Number 98-117
Visual Aid Skid Steer Loader Safety Lesson 1

120 - Instructor Guide
Item OK Needs Attention
Specific Comments
Tires=Properly inflated=No visible damage
Cab and Side Screen=No frame damage=No unauthorized alterations=Side screen attached properly=No damage to side screens
Safety Belt and Bar=Undamaged=Working properly
Grab Handles=Non-slip grip undamaged
Steps=Free from dirt, clutter, snow, ice, etc=Non-slip surface undamaged
Attachments front and/or rear=Attached correctly=Fastened securely
Fluid Leaks=No signs of hydraulic fluid leaks=No signs of fuel leaks=No signs of brake fluid leaks
Daily Pre-Operation Checklist:Skid Steer LoaderOperator: ____________________________ Date: ________________________
Skid Steer ID: _______________________ Make/Model: ____________________
Location: __________________________________________________________
Pre-Operation Inspection Skid Steer Loader Safety Lesson 2/Conclusion

Instructor Guide – 121
Evaluation/Performance Checklist:Skid Steer Loader
Satisfactory Needs Improvement
Follows Pre-Operation Inspection
Safe Entry =Engine off
=Lift arms down and attachments on the ground
=Use the steps made for entering
=Do not use control levers as grab bars
Safe Start Up=Safety belt fastened
=Restraining bar lowered (if so equipped)
=Controls in neutral and parking brake set
=Area is clear of bystanders
=Test all controls
=Check the brakes
=Check the horn and backup alarm (if so equipped)
Demonstrate Driving Skills=Operate at safe speed
=Operate safely on hills
=Start on stop smoothly
=Avoid obstacles and hazardous areas
=Follow safe backing procedures
=Uses attachments appropriately
=Handles load appropriately
Safe Shut Down and Exit=Park on level surface
=Lower the lift arms and attachments to the ground
=Place the controls in neutral
=Set the parking brake
=Turn the engine off
Operator: _____________________________ Date: __________________________
Skid Steer ID: _______________________ Make/Model: _______________________
Instructor: _______________________ Location: _____________________________
Performance Evaluation Skid Steer Loader Safety Conclusion

122 - Instructor Guide
#1 You are using an older skid steer loader with a front bucket attachment. While lifting a load, the lift arms get stuck in the raised position. One of your coworkers sees that you are having a problem and comes to help. What precautions should be taken regarding: Getting safely out of the loader? Keeping your coworker safe? Repairing the loader?
Case Study Skid Steer Loader Safety Lesson 3

Instructor Guide – 123
#2 You are using a loader with a bucket attachment to move dirt around a building foundation. There are lots of trees and shrubs near the foundation, so you are placing the dirt as close as you can, while coworkers on the ground are spreading the dirt with shovels. What issues do you need to consider and what precautions should you take to protect your coworkers?
Case Study Skid Steer Loader Safety Lesson 3

124 - Instructor Guide
#3 Your boss sends you to get the skid steer loader. When you get to the equipment shed, you find that someone has been using the loader and didn’t shut it down properly. The engine is running, the lift arms and bucket are raised, but you don’t see anyone around. What issues do you need to consider and what precautions should you take in order to safely enter and move the loader?
Case Study Skid Steer Loader Safety Lesson 3
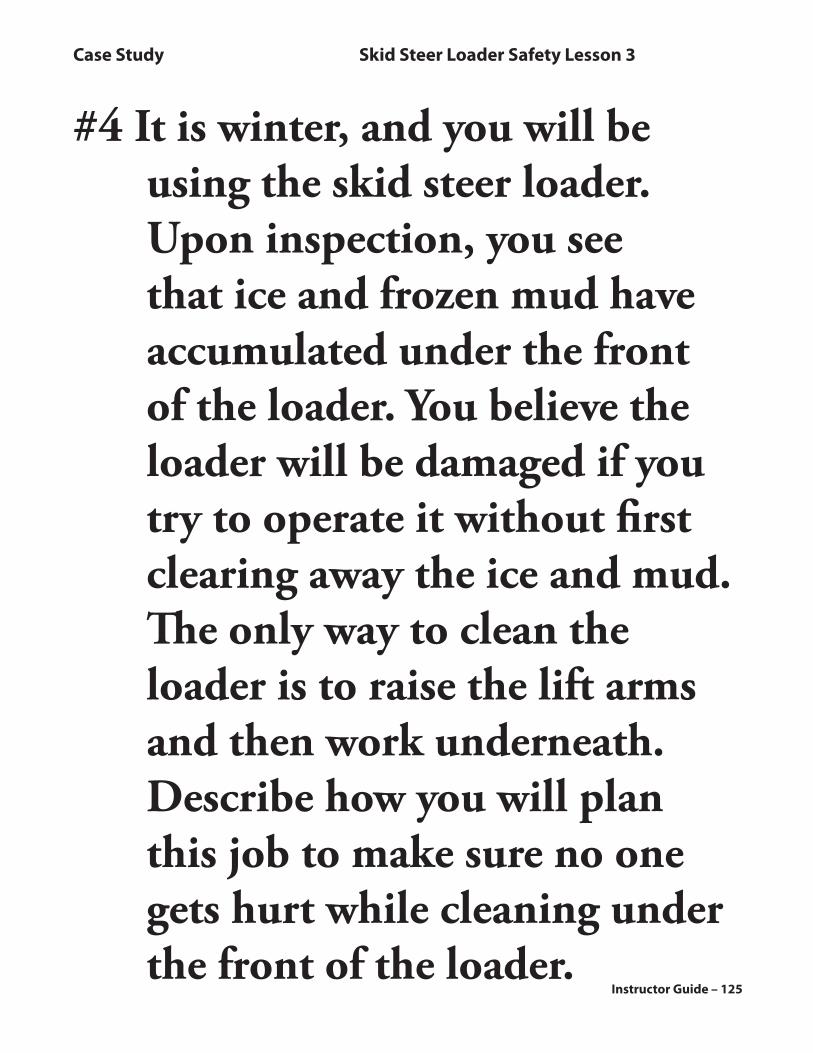
Instructor Guide – 125
Case Study Skid Steer Loader Safety Lesson 3
#4 It is winter, and you will be using the skid steer loader. Upon inspection, you see that ice and frozen mud have accumulated under the front of the loader. You believe the loader will be damaged if you try to operate it without first clearing away the ice and mud. The only way to clean the loader is to raise the lift arms and then work underneath. Describe how you will plan this job to make sure no one gets hurt while cleaning under the front of the loader.

126 - Instructor Guide
#1 You are using a skid steer loader to load trucks with soil and other materials. The soil is stored outside, but some materials are stored in a warehouse. A ramp leads to a raised dock where you will load the trucks. Most of the floor is concrete, but a part is older wood. What issues do you need to consider and what precautions should you take to avoid a rollover accident? What precautions should you take to protect your coworkers?
Case Study Skid Steer Loader Safety Lesson 4

Instructor Guide – 127
#2 You are assigned to use a skid steer loader to move logs and brush where trees were recently felled on a hillside. For the most part, the hill has a very gentle slope, but there are a few steep gullies and some uneven ground. Some of the logs are very small, while others are quite large. What issues do you need do consider and what precautions should you take to avoid rollover accidents while operating here?
Case Study Skid Steer Loader Safety Lesson 4

128 - Instructor Guide
#3 You need to use a skid steer loader with a fork attachment to unload bundles of landscape timbers from a tractor-trailer. You will be moving the timbers to raised storage racks in a crowded warehouse. There is no loading dock, so the tractor trailer has to be unloaded from the ground on the gravel parking lot. What issues do you need to consider and what precautions should you take to avoid rollover accidents while operating here?
Case Study Skid Steer Loader Safety Lesson 4

Instructor Guide – 129
Which Picture is Correct?Driving on a hill with an empty bucket.
Which is Safer?
Visual Aid Skid Steer Loader Safety Lesson 4
Driving on a hill with an empty bucket.

130 - Instructor Guide
Which Picture is Correct?Driving on a hill with a loaded bucket.
Which is Safer?
Visual Aid Skid Steer Loader Safety Lesson 4
Driving on a hill with a heavy load in the bucket.

Instructor Guide – 131
Which Picture is Correct?Transporting a load in the bucket.
Which Picture is Correct?Transporting a load in the bucket.
Which is Safer?
Visual Aid Skid Steer Loader Safety Lesson 4
Driving forward with a heavy load in the bucket.

132 - Instructor Guide
Which Picture is Correct?Driving on a hill.
Which is Safer?
Visual Aid Skid Steer Loader Safety Lesson 4
Driving on a hill.

Instructor Guide – 133
Which Picture is Correct?Driving with a log in the bucket.
Which is Safer?
Visual Aid Skid Steer Loader Safety Lesson 4
Driving with a large log in the bucket.

134 - Instructor Guide
Which Picture is Correct?Carrying a heavy object.
Which is Safer?
Visual Aid Skid Steer Loader Safety Lesson 4
Carrying a heavy object.

Instructor Guide – 135
Answer Key Skid Steer Loader Safety Lesson 4
Which Picture is Correct?Driving on a hill with an empty bucket.
Which Picture is Correct?Driving on a hill with a loaded bucket.
Which Picture is Correct?Transporting a load in the bucket.
Which Picture is Correct?Transporting a load in the bucket.
Safer Safer
Safer
Which Picture is Correct?Driving on a hill.
Which Picture is Correct?Driving with a log in the bucket.
Safer
Safer
Which Picture is Correct?Carrying a heavy object.
Safer

136 - Instructor Guide
Case Study Skid Steer Loader Safety Lesson 6
#1 Your crew will be working in large open area tomorrow (no shade). The weather is expected to be very hot and humid. One of your crew members is new, and it will be his first day on the job. What issues do you need to consider and what precautions should you take to protect the crew from heat illness?

Instructor Guide – 137
#2 You and another worker have been working all day. The weather is hot and sunny. You notice your coworker doesn’t look good. His skin is pale and sweaty and he says he feels sick to his stomach. a) What actions do you take? b) Despite your efforts, your
coworker gets worse and begins acting disoriented. His face is flushed, and his skin feels hot and dry. Now what actions do you take?
c) What could have been done to prevent this from happening?
Case Study Skid Steer Loader Safety Lesson 6

138 - Instructor Guide
#3 You are clearing trees and brush along a powerline in a rural area. There is a severe thunderstom watch in effect, and the sky looks stormy and dark. You think you see a flash of lightning far off on the horizon. You listen for thunder, but you don’t hear anything other than the wind.a) What actions do you take? b) Suddenly lightning begins
to flash around you. You have a work truck and trailer and there is an open metal shed nearby. Now what actions do you take?
Case Study Skid Steer Loader Safety Lesson 6
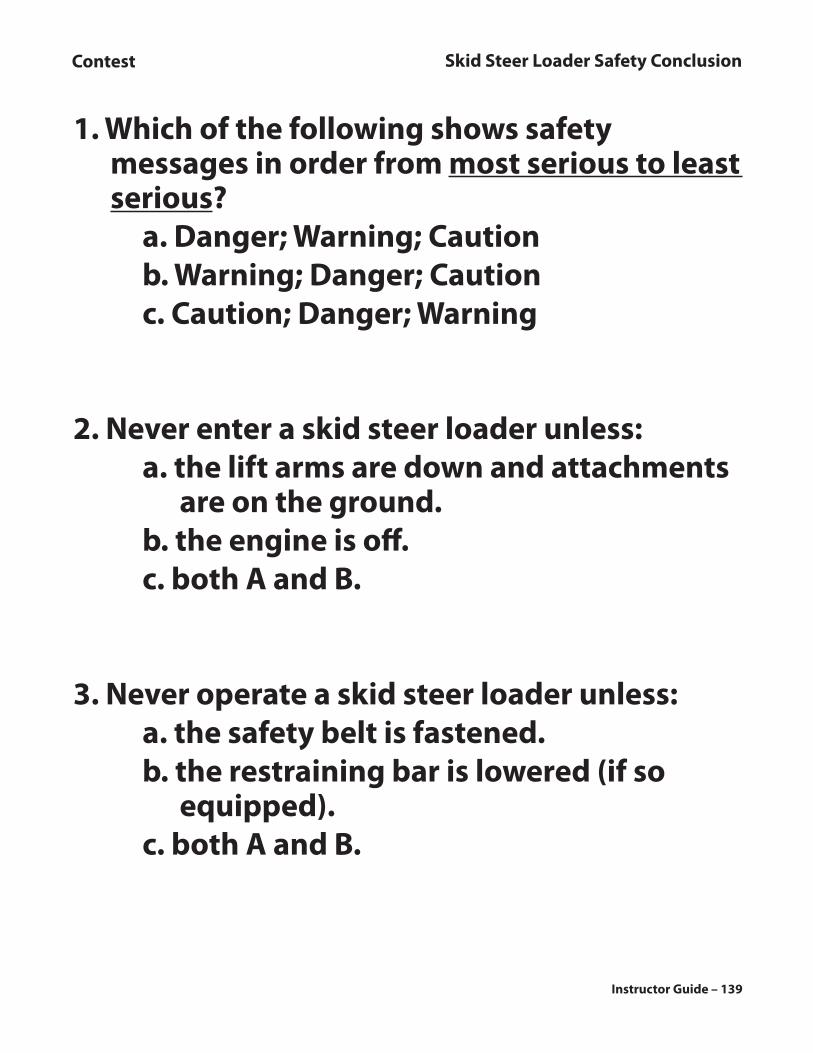
Instructor Guide – 139
1. Which of the following shows safety messages in order from most serious to least serious?
a. Danger; Warning; Cautionb. Warning; Danger; Cautionc. Caution; Danger; Warning
2. Never enter a skid steer loader unless:a. the lift arms are down and attachments
are on the ground.b. the engine is off.c. both A and B.
3. Never operate a skid steer loader unless:a. the safety belt is fastened.b. the restraining bar is lowered (if so
equipped).c. both A and B.
Contest Skid Steer Loader Safety Conclusion

140 - Instructor Guide
4. Do not get any part of your body beneath the raised lift arms and attachments unless they are supported by:
a. a concrete block.b. an approved support device.c. a jack.
5. Which is the best practice for starting a skid steer loader?
a. If the starter isn’t working, start the loader by shorting across the starter terminals.
b. Never start loader from outside the cab.c. If the loader was shut down with the lift
arms and attachment raised, re-start the loader by standing outside the cab and reaching in to turn the key.
Contest Skid Steer Loader Safety Conclusion

Instructor Guide – 141
6. Which is the best practice for shutting down a skid steer loader?
a. Block the wheels if there is a chance the loader will roll.
b. Leave the lift arms and attachment raised about a foot above the ground.
c. Leave the engine running if you will be out of the cab less than 60 seconds.
7. Which of the following is the best practice for avoiding heat illness?
a. Drink plenty of soda, tea or coffee.b. Drink at least a quart of water per hour.c. Eat large meals before working.
Contest Skid Steer Loader Safety Conclusion

142 - Instructor Guide
8. Which is the best practice if you are in a skid steer loader and a coworker approaches to talk with you:
a. Ask him to lean into the cab so you can hear him above the engine noise.
b. Tell him to stay back. Then lean out of the cab so you can hear him above the engine noise.
c. Keep the coworker away until you lower the lift arms and attachments, shut off the engine and set the parking brake.
9. Which of the following will help you avoid a rollover accident?
a. Keep the load high while you turn on hills.
b. Carry loads close to the ground, but high enough to clear obstacles.
c. Operate the lift controls as rapidly as possible.
Contest Skid Steer Loader Safety Conclusion
Instructor Guide – 143
10. Which is the best practice when lifting a load?
a. Check the data plate for lifting capacity.b. Position a worker under the load to give
hand signals to the operator.c. Once the load is in the air, swing it
rapidly into position.
11. Which is the best practice if you have to operate on a hill or ramp?
a. Drive across hills, not up and down.b. Keep the heavy end of the loader uphill.c. Keep the heavy end of the loader
downhill.
Contest Skid Steer Loader Safety Conclusion

144 - Instructor Guide
12. Which is the best practice to avoid running over coworkers?
a. If a load blocks your view, either drive in reverse (if the loader is designed so you can see behind) or have a coworker guide you from a safe distance.
b. Drive past blind corners as quickly as possible.
c. Allow riders only if they hold firmly to the loader.
13. Which is the best practice for digging into piles of materials?
a. Never work with materials that are piled higher than your raised attachment.
b. When working with a tall pile of material, always dig into the bottom of the pile.
c. Ram the attachment into the pile with as much force as possible.
Contest Skid Steer Loader Safety Conclusion

Instructor Guide – 145
14. Which of the following is the best practice when driving a loader onto a trailer?
a. If the loader bucket is empty, drive up the ramp in reverse.
b. If the loader bucket is empty, drive forward up the ramp.
c. Ask a coworker to stand on the trailer and guide you as you drive up the ramp.
15. Seek medical attention if:a. direct pressure will not stop a cut from
bleeding.b. burns occur on the face or genitals.c. all of the above.
Contest Skid Steer Loader Safety Conclusion

146 - Instructor Guide
1. a2. c3. c4. b5. b6. a7. b8. c
9. b10. a11. b12. a13. a14. a15. c
Answer Key Skid Steer Loader Safety Conclusion

Instructor Guide – 147
Tree TrimmingTraining GuideSuggested Materialsc Tree Trimming Safety (English, MF2712; Spanish, MF2712S)c Sign-in sheetc Pencilsc Instructor Guidec Training overheads/slides/projectorc Blank overheads/flipchart/blackboard/pen for listing participant responses and out-
lining important conceptsc Chipper/shredder and tractor for hands-on exercisesc Ear plugs and any other protective equipment for hands-on exercisec First-aid kits for hands-on exercisesc Rope for practing knotsc Tree climbing equipment for hands-on exercisesc Tree trimming equipment for hands-on exercises (chain saws, pole saws,
ladders, aerial lifts, etc.)
Sources of Background InformationTree timming and aerial lift safety manuals available for download:
http://www.ksre.ksu.edu/library/landscaping_equipment_safety.htmOperator’s manuals for chainsaws (available from dealer)Arborists Certification Study Guide, International Society of Aboriculture.
www.isa-arbor.comTree Climber’s Guide, International Society of Aboriculture.
www.isa-arbor.comNational Tree Climbing Guide, United States Department of Agriculture’s National
Tree Climbing Program. www.fs.fed.us/treeclimbing/OSHA Logging Web page, http://www.osha.gov/SLTC/logging/index.htmlOSHA Logging e-Tool, http://www.osha.gov/SLTC/etools/logging/mainpage.htmlNIOSH Logging Web page, http://www.cdc.gov/niosh/injury/traumalog.html
Length of Time Needed for TrainingReview and select the learning activities that are most appropriate. If all of the discus-sion and hands-on exercises are included in the training it may take up to a full work day. Without the hands-on exercises, the classroom portion will take about two hours.
Welcome and Introduction4Introduce yourself.4Remind participants of the topic of the training.4Discuss exit locations, emergency procedures, breaks, locations of restrooms, end-
ing time and any tests or evaluations.4Tell participants you expect them to play an active role by relating their experi-
ences and knowledge.

148 – Instructor Guide
Participant IntroductionsFind out:4Who are they?4What is their experience trimming and felling trees?4What do they hope to learn from the training?
Questioning/DisucssionBefore beginning Lesson 1:4What do participants think are the most common types of accidents that happen
when trimming and feeling trees. List ideas on an overhead or flipchart.4Have any participants known someone who has been killed or seriously injured
in a tree trimming accident? Would anyone care to share what happened?

Instructor Guide – 149
Lesson 1Take Control of Your Own SafetySuggested Objectives
Discuss Accident Reports on page 4 of Tree Trimming Safety.4How well did participants’ ideas for the most common causes of accidents match
those in the tree trimming safety manual? (Refer to the overhead or flipchart list made during the introduction.)
4Are participants surpised by any of the most common types of accidents?
Hands-on ExerciseDivide the class into groups of three to five participants. Have each group look for safety messages and signs on some of the equipment they commonly use (chain saws, pole saws, ladders, aerial lifts, etc.). Bring the class together and ask each group to report on the hazards described in the messages and signs.
Hands-on ExerciseHave participants inspect and wear any protective equipment that is required for their work. Discuss the importance of each item.Try on hearing protection: 4follow manufacturer’s procedure or use the general procedure on the following
page.4demonstrate technique.4provide feedback as participants practice.
=Name the most common types of tree trimming accidents.
=Interpret the meaning of common warning signs and labels.
=Identify appropriate protective equipment.
=Indicate hazards to be assessed before beginning operation.

150 – Instructor Guide
Hands-on ExerciseDivide the class into groups of three to five participants. Have each group evalu-ate equipment and a work area, including trees to be trimmed and felled using the Pre-Operation Inspection on page 169 of the Instructor Guide. Bring the class back together and have each group report regarding hazards they observed and precautions that need to be taken.
EvaluationAnswer the quiz items on page 9 of Tree Trimming Safety individually or as a class. Be sure to discuss each item.
Questioning/DiscussionBefore beginning Lesson 2:4Ask participants if it is possible to get electrocuted from a power line if they don’t
actually touch the line. Ask participants to describe how this can happen. List ideas on an overhead or flipchart.
4Are participants aware that most power lines are not insulated?4Have participants known of anyone who has been electrocuted from a power
line? Would they care to share what happened?
Inserting Ear Plugs
Types of Hearing Protection:
Ear Plugs
4Clean hands.
4Roll ear plug between fingers to compress it.
4Grasp ear from behind your head with opposite hand and pull up to straighten ear canal.
4Insert ear plug until it blocks sound, then hold in place while it expands. (Count out loud to 20 while it expands.)
4Ear plug must completely fill ear canal.
4Test fit by cupping hands over ears and then releasing. There should not be much difference in sound.
4Wash reusable plugs in warm soapy water after use/throw away disposable after each use.
Hearing Bands
4Grasp ear from behind your head with opposite hand and pull up to straighten ear canal.
4Use your hands to press the ear pads into the ear canals.
4Test fit in a noisy environment: Lightly press band inward and you should not notice much reduction in noise level.
Ear Muffs
4Make sure the cushions fully cover the ear and seal tightly against the head.
4Hold the headband at the crown of the head and adjust each cup.
4Test fit in a noisy enivironment: Gently push the cups toward your head and release. There should not be much difference in noise level.

Instructor Guide – 151
Lesson 2Avoid Shock and ElectrocutionSuggested Objectives
Discuss Accident Reports on pages 10-11 of Tree Trimming Safety.4Discuss the ways that workers can be elctrocuted without actually touching a
power line. How well does this information match the list participants made at the end of Lesson 1? Are they surprised by any of the differences?
4Regarding work around power lines, what is the difference between qualified and unqualified employees? Have any of the participants had the additional training needed to become qualified?
4Discuss your organization’s policy regarding work around power lines. What is the procedure for contacting the electric company when power lines need to be shut down or shielded?
EvaluationAnswer the quiz items on page 13 of Tree Trimming Safety.
Hands-on ExerciseAs a group, go outside and evaluate electrical hazards involving nearby trees. For quali-fied and unqualified employees, what precautions need to be taken before trimming/felling specific trees?
=Differentiate between qualified and unqualified line-clearance tree trimmers.
=Recognize electrical hazards.
=Identify minimum distance requirements.

152 – Instructor Guide
Preventing Falls from TreesSuggested Objectives
Discuss Accident Report on page 14 of Tree Trimming Safety.4Ask participants to read key points under “Avoid Injury from Falling” on page 14
of Tree Trimming Safety. What are some reasons other workers might not observe some of these rules? Why are the rules important?
Hands-on Exercises4Demonstrate and have participants practice tying knots that are useful for climb-
ing trees. 4Demonstrate and have participants practice tree climbing techniques, using
appropriate equipment. Participants must be at least 18 years of age, properly supervised, equipped and dressed, and in acceptable health. The climbing loca-tion must be safe, and the climbing tasks must be appropriate for participants’ skills and experience.
ContestBreak the class into small groups. Select several knots that are useful for climbing. For each knot, allow an appropriate amount of time for participants to tie the knot. Group members may coach each other and use the tree trimming safety manual as a guide, but each participant must tie each knot. Check the knots and award points to each group for the number of knots they were able to tie correctly in the allotted time.
EvaluationAnswer the quiz items on page 17 of Tree Trimming Safety.
=Recognize precautions to prevent falling from trees.
=Identify climbing knots.
Lesson 3

Instructor Guide – 153
Lesson 4Avoid Being Struck by Trees or LimbsSuggested Objectives
Discuss Accident Reports on pages 18-22 of Tree Trimming Safety.4Have participants known of workers getting seriously hurt in any other ways
while trimming or felling trees?
ContestDivide the class into groups. Display the contest items provided on pages 156-161 of the Instructor Guide. In turn, ask each group a multiple choice or true/false question from the overheads. Each group gets one point for every correct answer. If a group misses a question, allow the next group to answer it for a point. Keep track of points and recognize the winning group. Use the questions as opportunities to discuss the training material. Answer key provided on page 162 of the Instructor Guide.
DiscussionDiscuss the open face and Humboldt notches on page 24 of Tree Trimming Safety. Par-ticipants may not be familiar with the open face notch. However, it allows for greater felling accuracy and less danger of kickback than the other two notches. Additional felling techniques for difficult trees can be found in OSHA’s Logging e-Tool at: http://wwww.osha.gov/SLTC/etools/logging/mainpage.html.
Hands-on ExercisesPerform the following exercises in a safe location away from power lines and other hazards. Observe all necessary precautions, and keep participants a safe distance from falling limbs and trees. 4Evaluate trees to be trimmed or felled. Discuss trimming and felling techniques
that are appropriate for specific trees and limbs.4Set up a safe work area and practice making cuts, using appropriate equipment.4Practice cutting with chainsaws. Include proper techniques for inspection, fuel-
ing, starting, operating and shutting down safely.
EvaluationAnswer the quiz items on page 25 of Tree Trimming Safety. Be sure to discuss each item.
=Recognize ways to avoid being struck by trees and limbs.
=Develop safe chainsaw operating procedures.
=Identify tree felling danger zones.
=Compare different felling techniques.

154 – Instructor Guide
Lesson 5 Environmental HazardsSuggested Objectives
Discuss Accident Report on page 26 of tTree Trimming Safety.4What precautions do participants alrealy take to protect themselves from heat
and sun exposure while working? List participant responses on an overhead or flipchart.
4Does this list include all of the most important precautions?
Problem SolvingDiscuss the overhead on page 163 of the Instructor Guide. Make sure participants know that more cases of skin cancer are diagnosed each year than breast, lung, pros-tate, colorectal and kidney cancers combined. Ask participants if they are taking adequate precautions.
Visual AidDiscuss the overhead “Is This a Good Idea?” on page 165 of the Instructor Guide. Ask participants to identify all of the safety problems in the story. Then discuss how the worker might have handled the situation in a better manner.
Discussion4What job tasks expose participants to frigid winter weather? During these jobs,
what parts of their body are most affected by the cold? In their experience, what are the most effective ways to prevent hypothermia and frostbite on the job?
4Have any participants ever had problems with insects, animals or poisonous plants while trimming or felling trees? Would they care to share what happened? What precautions can they take?
Hands-on ExerciseUsing the company’s first aid kits, demonstrate and have participants practice first aid for cuts, burns, heat exhaustion, cold injury and lightning strike.
EvaluationAnswer the quiz items on page 32 of Tree Trimming Safety either individually or as a class. Be sure to discuss each item.
=Identify environmental hazards.
=Recognize treatment and first aid for exposure to environmental hazards.

Instructor Guide – 155
ConclusionCase StudiesBreak the class into small groups of three to five participants. Provide each group with one of the scenarios on pages 166-168 of this Instructor Guide. Ask each group to discuss their scenario. If there are more than three groups, more than one group can work on the same scenario. Monitor the progress of each group. Bring the class back together and ask for a representative from each group to read their problem and ex-plain their solution. Display case study overheads as each group takes turns. Ask other groups what they think of the proposed solution.
DiscussionAsk participants to share any questions or concerns they may still have or want to discuss further.
Evaluation
Answer the quiz questions on page 34-35 of Tree Trimming Safety either individually or as a group. Be sure to discuss each item.
Hands-on Performance Evaluation In a safe area with adequate supervision, have each participant complete a hands-on performance evaluation. The evaluation may include:aCompleting Pre-Operation Inspection provided on page 169 of the Instructor
GuideaSelecting and using appropriate equipmentaFollowing power line precautionsaUsing proper trimming and felling procedures
A checklist for the performance evaluation is provided on page 170 of the Instructor Guide.

156 - Instructor Guide
1. On a level surface, no one (other than the feller) should be within ___ tree lengths of the tree being felled.
a. twob. threec. four
2. Never operate a chain saw above your:a. knees.b. belt.c. chest.
3. To refuel a chain saw, shut down the engine and wait at least ______ minute(s) for the engine to cool.
a. 1b. 3c. 5
Contest Tree Trimming Safety Lesson 4

Instructor Guide – 157
4. How many cuts are normally required to prune a large branch from a tree safely and without damaging the bark?
a. 1b. 2c. 3
5. To reduce kickback:a. insert the saw blade fully.b. insert the saw blade about half way.c. cut with the tip of the saw blade.
6. Kickback can occur when:a. the tip of the saw contacts a hard
object.b. the teeth of the saw blade are pinched
in the wood.c. both A and B.
Contest Tree Trimming Safety Lesson 4

158 - Instructor Guide
7. Which of the following is the safest practice when trimming trees?
a. If branches cannot be dropped safely, cut them and leave them in the tree.
b. Never turn your back on a tree where branches are being cut or when a tree is being felled.
c. Workers on the ground should try to catch branches as they fall.
8. When felling a tree on level ground, everyone other than the feller should stay at least two tree lengths away. If the tree is going to fall downhill, this distance should be:
a. decreased.b. increased.c. unchanged.
Contest Tree Trimming Safety Lesson 4

Instructor Guide – 159
9. When a tree is being felled, the direction of the fall will be affected by:
a. wind and any vines or branches that are interlocked with other trees.
b. any pre-existing damage or leaning of the trunk.
c. both A and B.
10. When felling a tree, you first cut a notch in the trunk in the direction you want the tree to fall. This notch is called the:
a. back cut.b. scarf.c. hinge.
11. When felling a tree, the final cut is called the:a. back cut.b. scarf.c. hinge.
Contest Tree Trimming Safety Lesson 4

160 - Instructor Guide
12. When felling a tree, the hinge wood is left between the back cut and scarf. Normally, the hinge wood should be equal to ______ the tree’s diameter.
a. 1/10thb. 1/5thc. 1/3rd
13. When felling a tree, the best escape areas are located:
a. on the side of the tree where you make the back cut.
b. on the side of the tree where you make the scarf.
c. neither A nor B.
Contest Tree Trimming Safety Lesson 4

Instructor Guide – 161
14. For the conventional notch, the scarf should normally penetrate the tree to a distance of about:
a. 1/5 to 1/4 of the tree’s diameter.b. 1/4 to 1/3 of the tree’s diameter.c. 1/3 to 1/2 of the tree’s diameter.
15. For the conventional notch, the back cut should normally start about ______ above the bottom cut.
a. 1 inchb. 6 inchesc. 1 foot
Contest Tree Trimming Safety Lesson 4

162 - Instructor Guide
Answer Key Tree Trimming Safety Lesson 4
1. a2. c3. c4. c5. a6. c7. b8. b
9. c10. b11. a12. a13. c14. b15. a

Instructor Guide – 163
According to the American Cancer Society, what is the most common form of cancer?
a. Lungb. Skinc. Breastc. Prostate
Visual Aid Tree Trimming Safety Lesson 5

164 - Instructor Guide
According to the American Cancer Society, what is the most common form of cancer?
a. Lung
b. Skinc. Breast
c. Prostate
Visual Aid Tree Trimming Safety Lesson 5

Instructor Guide – 165
Is This a Good Idea?A worker was trimming trees near a power line on a rural highway. Storm clouds were on the horizon. He could see far-off lightning flashes. He could also hear distant thunder. He thought, “I’ll keep working until the lightning gets closer.” Just then, a bolt of lightning struck a nearby utility pole. The startled worker ran and took cover under a large tree.
Visual Aid Tree Trimming Safety Lesson 5

166 - Instructor Guide
#1 You are in charge of a three-person crew that will be trimming and felling storm-damaged trees in a hilly residential area. Based on the equipment you normally have available, describe in detail the precautions you will take to protect your workers and residents from falling limbs and trees while you work.
Case Study Tree Trimming Safety Conclusion

Instructor Guide – 167
#2 You are in charge of a crew that will be trimming limbs near a power line. Two of your workers are qualified to work near power lines and one is not. Based on the equipment you normally have available, describe in detail how you will plan and carry out the work to keep all workers safe from electrocution.
Case Study Tree Trimming Safety Conclusion

168 - Instructor Guide
#3 You are in charge of a crew that will be trimming and felling ice-damaged trees. Based on the equipment you normally have available, describe in detail the precautions you will take to ensure none of your crew will fall from trees, ladders or equipment while you work.
Case Study Tree Trimming Safety Conclusion
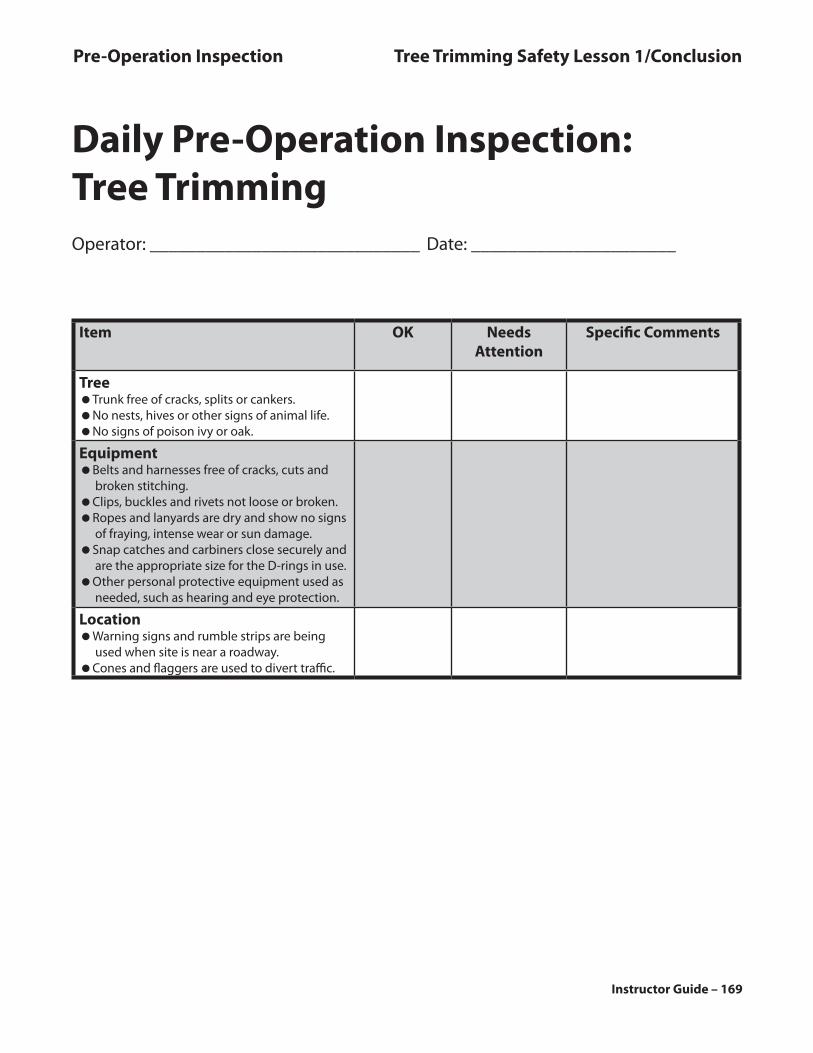
Instructor Guide – 169
Daily Pre-Operation Inspection:Tree Trimming
Item OK Needs Attention
Specific Comments
Tree=Trunk free of cracks, splits or cankers.=No nests, hives or other signs of animal life.=No signs of poison ivy or oak.
Equipment=Belts and harnesses free of cracks, cuts and
broken stitching.=Clips, buckles and rivets not loose or broken.=Ropes and lanyards are dry and show no signs
of fraying, intense wear or sun damage.=Snap catches and carbiners close securely and
are the appropriate size for the D-rings in use.=Other personal protective equipment used as
needed, such as hearing and eye protection.
Location=Warning signs and rumble strips are being
used when site is near a roadway.=Cones and flaggers are used to divert traffic.
Operator: _____________________________ Date: ______________________
Pre-Operation Inspection Tree Trimming Safety Lesson 1/Conclusion

170 - Instructor Guide
Operator Performance Evaluation: TreeTrimming
Satisfactory Needs ImprovementFollows Pre-Operation Inspection
Safe Start Up =Clear the area of bystanders.
=Wear personal protective equipment, including hearing and eye protection, as necessary.
=Dress appropriately.
=Follow powerline precautions.
Safe Operation=Doesn’t endanger people or property.
=Operates equipment according to manufacturer’s instructions.
=Follows two tree rule when felling.
=Does not turn back on tree where others are working.
=Safely climbs trees, if necessary.
=Use appropriate cuts for trimming and felling.
=Avoid danger zone when felling.
Operator: _____________________________ Date: __________________________
Instructor: _______________________ Location: _____________________________
Performance Evaluation Tree Trimming Conclusion

Instructor Guide – 171
Aerial Lift Safety Training GuideSuggested Materialsc Aerial Lift Safety (English, MF2713; Spanish, MF2713S)c Sign-in sheetc Pencilsc Instructor Guidec Training overheads/slides/projectorc Blank overheads/flipchart/blackboard/pen for listing participant responses and out-
lining important concepts.c Ear plugs and other appropriate protective equipment for hands-on exercisesc Fall protection equipment (lanyard, harnesses, etc.)c First aid kits for hands-on exercisesc Aerial lift truck for hands-on exercisesc Temporary traffic control devices for hands-on exercisesc Other equipment appropriate for hands-on exercises (chainsaws, pole saws, etc.)
Sources of Background InformationAerial lift and tree trimming safety manuals available for download:
http://www.ksre.ksu.edu/library/landscaping_equipment_safety.htmOperator’s manuals for aerial lifts (available from dealer)
Length of Time Needed for TrainingReview and select the learning activities that are most appropriate. If all the discussion and hands-on exercises are included in the training it may take up to a full work day. Without the hands-on exercises, the classroom portion will take about two hours.
Welcome and Introduction4Introduce yourself.4Remind participants of the topic of the training. 4Discuss exit locations, emergency procedures, breaks, locations of restrooms, end-
ing time and any tests or evaluations.4Tell participants you expect them to play an active role by relating their experi-
ences and knowledge.
Participant IntroductionsFind out:4Who are they?4What is their experience with aerial lifts?4What do they hope to learn from the training?
Questioning/DiscussionBefore beginning Lesson 1:4What do participants think are the most common types of accidents that involve
aerial lifts? List ideas on an overhead or flipchart.4Have any participants known someone who has been killed or seriously injured
in an aerial lift accident? Would anyone care to share what happened?

172 – Instructor Guide
Inserting Ear Plugs
Take Control of Your Own SafetySuggested Objectives
Discuss Accident Reports on pages 4-5 of Aerial Lift Safety.4Refer to the list of participants’ ideas about the most common causes of acci-
dents. How well do participant’s ideas match the actual causes of death?4Are participants surprised by any of the most common types of accidents?
Hands-on Exercise4Divide the class into groups of three to five participants. Have each group look
for safety messages and signs on equipment they commonly use (aerial lifts, chain saws, pole saws, etc.). Bring the class together and ask each group to report on the hazards described in the messsages and signs they saw.
4Have participants inspect and wear any protective equipment that is required for their work. Discuss the importance of each item.
4Practice wearing hearing protection: 4Follow manufacturer’s procedure or use the general procedure on the next page.4Demonstrate technique.4Provide feedback as participants practice.
=Name the most common types of accidents involving aerial lift devices.
=Interpret the meaning of common warning signs and labels.
=Identify appropriate protective equipment.
Lesson 1

Instructor Guide – 173
EvaluationAnswer the quiz items on page 8 of Aerial Lift Safety individually or as a class. Be sure to discuss each item.
Questioning/DiscussionBefore beginning Lesson 2:4What specific safety items do participants check in regard to their equipment and
worksite before beginning each job? List responses on an overhead or flipchart.4What precautions do they take when they shut down their equipment and leave
it unattended?
Types of Hearing Protection:
Ear Plugs
4Clean hands.
4Roll ear plug between fingers to compress it.
4Grasp ear from behind your head with opposite hand and pull up to straighten ear canal.
4Insert ear plug until it blocks sound, then hold in place while it expands. (Count out loud to 20 while it expands.)
4Ear plug must completely fill ear canal.
4Test fit by cupping hands over ears and then releasing. There should not be much difference in sound.
4Wash reusable plugs in warm soapy water after use/throw away disposable after each use.
Hearing Bands
4Grasp ear from behind your head with opposite hand and pull up to straighten ear canal.
4Use your hands to press the ear pads into the ear canals.
4Test fit in a noisy environment: Lightly press band inward and you should not notice much reduction in noise level.
Ear Muffs
4Make sure the cushions fully cover the ear and seal tightly against the head.
4Hold the headband at the crown of the head and adjust each cup.
4Test fit in a noisy enivironment: Gently push the cups toward your head and release. There should not be much difference in noise level.

174 – Instructor Guide
Lesson 2 Prepare for Safe OperationSuggested Objectives
Discuss the Pre-Start Inspection and Checklist on pages 9-10 of Aerial Lift Safety.4How do the checklist items compare with the list made by participants at the end
of Lesson 1.4Discuss your company’s policy for recording pre-operation equipment checks.4Discuss the safety features that are present on your company’s aerial lift trucks.
Why are these important?4Discuss your company's policy for safety belt use.4Discuss your company’s practices for communication between the person on the
lift and those on the ground.
AnalysisOn pages 10-11 of Aerial Lift Safety, have each participant read one of the following items and briefly give an example of how an accident could occur if the procedure isn’t observed.4Items 1, 2, 3, 4, 5, and 6 under “Start Up Safety Procedures”4Items 1, 2, 3, 4, 6, and 7 of “Safe Shut Down Procedures”4All bullets under “General Operating Procedures”
Visual AidDisplay and discuss the overhead/slide entitled, “Is This a Good Idea?” on page 181 of the Instructor Guide. 4Ask participants to identify all safety problems indicated in the story. 4Discuss how the worker could have handled the situation in a better manner.
Discuss any points from “Maintenance Precautions” and “Driving in Traffic” that haven’t been mentioned.
DiscussionWhat is the company’s policy for ventilating the repair shop while working on equip-ment with the engine running?
=Indicate parts to be inspected before operation.
=Recognize safe start up, shut down and operating procedures.
=Identify guidelines for working near traffic.

Instructor Guide – 175
Hands-on Exercises4Ask participants to inspect an aerial lift using a checklist such as the Pre-Start
Checklist on page 10 ofAerial Lift Safety or the Pre-Operation Inspection pro-vided on page 199 of the Instructor Guide. After the inspection, ask participants to identify crush points and discuss appropriate precautions.
4With the class observing, ask a participant to demonstrate how to safely fuel an aerial lift. Why is it important to touch the fuel nozzle to the lift before opening the fuel cap?
4Have the class set up an aerial lift for operation in safe area. Individually, have participants start the aerial lift, operate the basic controls, and shut it down. Before beginning, instruct partcipants about the operating controls and keep everyone out of the way. Discuss any procedures that may be relevant for other types of aerial lifts. Practice attaching and operating any attachments employees will be expected to use.
4In a safe area such as a private road or parking lot on your company’s property, have participants set up a roadside work area using traffic cones and flaggers, as appropriate. Make sure all participants wear brightly-colored reflective vests and any other safety equipment that your organization requires for this type of work. Guidelines for roadside work areas are detailed in Motor Vehicle Safety Manual for the Landscaping and Horticultural Services Industry: http://www.ksre.ksu.edu/library/landscaping_equipment_safety.htm
Evaluation Answer the quiz items on page 13 of Aerial Lift Safety, either individually or as a class. Be sure to discuss each item.

176 – Instructor Guide
Lesson 3 Prevent Lift OverturnsSuggested Objectives
Discuss the Accident Reports on pages 14-15 of Aerial Lift Safety.
Case StudiesBreak the class into small groups of three to five participants. Provide each group with one of the scenarios on pages 182-184 of this Instructor Guide. Ask each group to dis-cuss their scenario, using the information from Lesson 3 of Aerial Lift Safety. If there are more than three groups, more than one group can work on the same scenario. Monitor the progress of each group. Bring the class back together and ask for a rep-resentative from each group to read their problem and explain their solution. Display case study overheads as each group takes turns. Ask other groups what they think of the proposed solution.
Hands-on ExerciseBreak the class into groups of three to five participants. Identify several distinct tree-trimming areas nearby. Have each group evaluate a work area for hazards that could result in an overturn. Bring the class back together and have each group report about the hazards they observed and precautions that need to be taken.
Evaluation Answer the quiz items on page 16 of Aerial Lift Safety, either individually or as a class. Be sure to discuss each item.
=Identify safe operating procedures to prevent a lift overturn.

Instructor Guide – 177
Lesson 4Prevent Falls from Aerial LiftsSuggested Objectives
Discuss the Accident Reports on pages 17-18 of Aerial Lift Safety.
Case StudiesBreak the class into small groups of three to five participants. Provide each group with one of the scenarios on pages 185-187 of this Instructor Guide. Ask each group to dis-cuss their scenario, using the information from Lesson 4 of Aerial Lift Safety. If there are more than three groups, more than one group can work on the same scenario. Monitor the progress of each group. Bring the class back together and ask for a rep-resentative from each group to read their problem and explain their solution. Display case study overheads as each group takes turns. Ask other groups what they think of the proposed solution.
Hands-on Exercise4Have participants perform an inspection of a lanyard, harness and any other fall
protection equipment they will be using.4Demonstrate and ask participants to practice securing themselves in the lift
bucket with the fall protection equipment they will be using.
Evaluation Answer the quiz items on page 19 of Aerial Lift Safety, either individually or as a class. Be sure to discuss each item.
Question/DiscussionBefore beginning Lesson 5:4Ask participants if it is possible to get electrocuted by a power line if they don’t
actually touch the line. What are some ways this can happen? List responses on an overhead or flipchart.
4Are participants aware that most power lines are not insulated?4Have participants known of anyone who has been electrocuted from a power
line? Would they care to share what happened?
=Identify steps to secure yourself in the bucket of the lift.
=Recognize safe operating procedures to avoid falling from an aerial lift.
=Indicate how to avoid being struck by objects that fall from the lift.

178 – Instructor Guide
Lesson 5 Avoid Contact With Power LinesSuggested Objectives
Discuss the Accident Reports on pages 20-21 of Aerial Lift Safety.4Discuss how participants could be electrocuted without actually touching a
power line. How well does this information match the list they made earlier? Are they surprised by any of the differences?
4Regarding work around power lines, what is the difference between qualified and unqualified employees? Have any of the participants had the additional training needed to become qualified?
4Discuss your company’s policy regarding work around power lines. What is the procedure for contacting the electric company when power lines need to be shut down or shielded?
4Discuss what participants would do if their aerial lift came in contact with a power line.
4Discuss your company’s policy regarding workers on the ground when a lift is be-ing used to trim trees near power lines.
4Discuss insulation features and grounding requirements of the company’s lift trucks. What are the limitations of these features? What are the operator’s re-sponsibilities for checking these features before each job?
Hands-on Exercise4As a group, go outside and evaluate hazards involving nearby trees. For qualified
and unqualified employees, what precautions need to be taken before trimming specific trees?
Evaluation Answer the quiz items on page 23 of Aerial Lift Safety, either individually or as a group. Be sure to discuss each item.
=Differentiate between qualified and unqualified line-clearance tree trimmers.
=Recognize electrical hazards.
=Identify safe working distances from power lines.

Instructor Guide – 179
Lesson 6Environmental HazardsSuggested Objectives
Case StudiesBreak the class into small groups of three to five participants. Provide each group with one of the scenarios on pages 188-190 of this Instructor Guide. Ask each group to dis-cuss their scenario, using the information from Lesson 6 of Aerial Lift Safety. If there are more than three groups, more than one group can work on the same scenario. Monitor the progress of each group. Bring the class back together and ask for a rep-resentative from each group to read their problem and explain their solution. Display case study overheads as each group takes turns. Ask other groups what they think of the proposed solution.
Discuss4When you are using an aerial lift in frigid winter weather, what body parts are
most likely to be injured by the cold? Why?4Ask participants what actions they have found most effective for preventing cold-
induced injury.4Have any participants ever had a bad experience with insects, animals, or poison-
ous plants while working at their jobs? Would they care to share what happened?
Hands-on ExerciseUsing the company’s first aid kits, demonstrate and have participants practice first aid for cuts, burns, heat exhaustion, cold injury and lightning strike.
EvaluationAnswer the quiz items on page 30 of Aerial Lift Safety, either individually or as a class. Be sure to discuss each item.
=Identify environmental hazards.
=Recognize treatment and first aid for exposure to environmental hazards.

180 – Instructor Guide
ConclusionContestDivide the class into groups. Display the contest items provided on pages 191-197 of the Instructor Guide. In turn, ask each group a multiple choice or true/false question from the overheads. Each group gets one point for every correct answer. If a group misses a question, allow the next group to answer it for a point. Keep track of points and recognize the winning group. Use the questions as opportunities to discuss the training material. Answer key provided on page 198 of the Instructor Guide.
DiscussionAsk participants to share any questions or concerns they may still have or want to discuss further.
Evaluation Answer the quiz questions on pages 32-33 of Aerial Lift Safety, either individually or as a group. Be sure to discuss each item.
Hands-on Performance Evaluation In a safe area with adequate supervision, have each participant complete a hands-on performance evaluation while operating an aerial lift in small “work crews.” The evaluation may include:aPre-Operation Inspection provided on page 199 of the Instructor GuideaDetermining if power line precautions are required aSetting up the liftaManueveringaSafe shut-down
A checklist for the performance evaluation is provided on page 200 of the Instructor Guide.

Instructor Guide – 181
Is This a Good Idea?A worker was getting an aerial lift truck ready for work. With the engine running, he raised the boom and then stood underneath it while he greased the lubrication points. He lowered the boom, used a bumper jack to raise the front of the truck, and crawled underneath to change the oil. When he finished, he tossed his tools in the bucket of the boom, hopped in the cab, and headed for the job site.
Visual Aid Aerial Lift Truck Safety Lesson 2

182 - Instructor Guide
#1 You have been asked to use the boom of your aerial lift to pick up some logs and set them in the back of a dump truck. What issues do you need to consider? What precautions should you take to avoid an overturn?
Case Study Aerial Lift Truck Safety Lesson 3

Instructor Guide – 183
#2 A few hours after a severe thunderstorm, your crew is sent to trim damaged trees in a residential area with an aerial lift. You have never been to this area before. In regard to rollovers, what hazards or problems do you anticipate? How will you protect yourself and your crew?
Case Study Aerial Lift Truck Safety Lesson 3

184 - Instructor Guide
#3 You have been assigned to trim trees with an aerial lift along a power line next to a rural two-lane highway. You have never been assigned to this area before. In regard to rollovers, what hazards or problems do you anticipate? How will you protect yourself and your crew?
Case Study Aerial Lift Truck Safety Lesson 3

Instructor Guide – 185
#1 You have been assigned to trim trees in a new area. You have been told the trees are “hard to reach.” In regard to falling from the lift, what problems do you anticipate? How will you protect yourself?
Case Study Aerial Lift Truck Safety Lesson 4

186 - Instructor Guide
#2 You have been assigned to trim trees on a day when there is a chance of gusty winds. In regard to falling from the lift, what problems do you anticipate? How will you protect yourself?
Case Study Aerial Lift Truck Safety Lesson 4

Instructor Guide – 187
#3 You are in charge of a work crew that is trimming storm-damaged trees in a residential area. How will you protect your crew and residents from falling limbs while you work?
Case Study Aerial Lift Truck Safety Lesson 4

188 - Instructor Guide
#1 Your crew is heading out for what you expect to be a long, hard day. The forecast calls for hot and humid weather. One of your crew members is new, and has been working less than a week. What issues do you need to consider and what precaution should you take to protect the crew from the heat and sun?
Case Study Aerial Lift Truck Safety Lesson 6

Instructor Guide – 189
#2 Your crew has been working hard all day. The weather is hot and sunny. A crew member says he feels ill. His skin is pale and sweaty and he is sick to his stomach.
a) What actions do you take?
b) Despite your efforts, your crew member begins acting disoriented. His skin turns red, hot and dry. Now what actions do you take?
Case Study Aerial Lift Truck Safety Lesson 6

190 - Instructor Guide
#3 You are trimming isolated trees next to a power line in a lakeside picnic area. The sky looks stormy and dark. You think you see a flash of lightning on the horizon, but you can’t hear any thunder.
a) What actions do you take?
b) Suddenly, lightning flashes nearby. You have your aerial lift truck. There is also an open shelter house and a dry culvert under the road. Now what actions do you take?
Case Study Aerial Lift Truck Safety Lesson 6

Instructor Guide – 191
1. Which of the following is the most serious safety message?
a. Dangerb. Warningc. Caution
2. You are required to use a lanyard and a body belt or harness when working in the bucket of an aerial lift.
True/False
3. Which is the best practice when setting up an aerial lift at a job site?
a. Use outriggers and make sure the lift is stable.
b. Set up the lift on soft, muddy ground.c. If your lift is insulated, cover the surface
of the boom with a light coating of grease.
Contest Aerial Lift Safety Conclusion

192 - Instructor Guide
4. Do not perform maintenance beneath a raised boom unless it is supported by:
a. a concrete block.b. an approved support device.c. a jack.
5. Which of the following practices is the safest for a worker in the bucket?
a. If the boom acts sluggish, try popping and jerking the controls.
b. The operator on the ground should get permission from the worker in the bucket before using the lower controls.
c. When it is windy, the worker in the bucket should attach one end of the lanyard to the safety belt and the other to a nearby tree or pole.
Contest Aerial Lift Safety Conclusion

Instructor Guide – 193
6. Which of the following will help you avoid overturning the lift?
a. Park away from the work and reach as far as possible with the boom.
b. Operate the lift controls as rapidly as possible.
c. Completely lower and secure the boom before moving the truck.
7. Which is the best practice when lifting a load?a. Check the operator’s manual for lifting
capacity and procedures.b. Position a worker under the load to
give hand signals to the operator.c. Once the load is in the air, swing it
rapidly into position.
Contest Aerial Lift Safety Conclusion

194 - Instructor Guide
8. You need to trim a high branch, but the lift will not reach. Which of the following is safer?
a. Set up a ladder in the bucket.b. Use a pole saw while standing on the
floor of the bucket.c. Attach your lanyard to the tree and
stand on top of the bucket.
9. Which is the best practice when cutting limbs?a. The worker in the bucket should drop
limbs to workers waiting on the ground.b. The worker in the bucket should lower
limbs by hand to workers on the ground. c. Workers on the ground should stay
away while the boom is raised.
Contest Aerial Lift Safety Conclusion

Instructor Guide – 195
10. Workers must keep their distance from energized power lines. How far away must an unqualified worker be at all times?
a. At least 3 feet, depending on voltage.b. At least 7 feet, depending on voltage. c. At least 10 feet, depending on voltage.
11. Which of the following is the best practice when working around power lines?
a. Keep enough distance to allow for sway of the boom and lines.
b. Drill extra holes in the bucket to reduce the wind resistance.
c. Make sure workers on the ground stand close to the lift.
Contest Aerial Lift Safety Conclusion

196 - Instructor Guide
12. Prevent skin cancer by covering exposed skin with a broad spectrum sunscreen that has a Sun Protection Factor (SPF) of at least:
a. 5b. 10c. 15
13. When working in the heat, how much water should you drink to avoid heat illness?
a. 1 cup per hour.b. 1 quart per hour. c. 1 gallon per hour.
14. Use _____________ to stop bleeding from minor cuts.
a. a tourniquetb. direct pressure c. warm water
Contest Aerial Lift Safety Conclusion

Instructor Guide – 197
15. When a worker is elevated in the bucket, the lower controls should only be used with the permission of the elevated worker or in case of an emergency.
True/False
Contest Aerial Lift Safety Conclusion

198 - Instructor Guide
Answer Key Aerial Lift Safety Conclusion
1. a2. T3. a4. b5. b6. c7. a8. b
9. c10. c11. a12. c13. b14. b15. T

Instructor Guide – 199
Daily Pre-Operation Inspection: Aerial Lift
Item OK Needs Attention
Comments
Work Site=Clear of other vehicles=Clear of unauthorized people=Safe distance from ditches, drop offs and
embankments=Safe distance from overhead obstructions
and power lines
Machine Placement=Level surface=Solid surface or outrigger pads used=Surface slope not greater than
manufacturer’s recommendations
Tires=Proper inflation=No visible damage=Lug bolts tight
Outriggers=No damage=No missing parts
Controls=Tested according to manufacturer’s
directions
Boom=No structural damage=No cracks or damaged connectors=Clean and dry
Hydraulic System=Fluid level ok=No leaks
Brakes=Tested according to manufacturer’s
directions
Safety Devices=All guards in place=Lights, alarms and interlocks tested
Operator: _____________________________ Date: _______________________
Aerial Lift ID: ______________________________________________________
Location: _________________________________________________________
Pre-Operation Inspection Aerial Lift Truck Safety Lesson 2/Conclusion

200 - Instructor Guide
Operator Performance Evaluation: Aerial Lift
Satisfactory Needs Improvement
Follows Pre-Operation Inspection
Safe Start Up =Clear the area of bystanders
=Wear hearing protection, as necessary
=Dress appropriately
=Determine if powerline precautions are required
=Vehicle is positioned on level ground
=Set the parking brake
=Chock the wheels
=Engage power supply
=Set the outriggers
=Make sure vehicle is stable before entering bucket/platform and raising and lowering the platform.
=Follow additional procedures in operator’s manual
Safe Manuevering=Doesn’t endanger people or property
=Operates equipment according to manufacturer’s instructions
=Avoid jerking controls
=Avoid obstacles
=Avoid potential crush points
Safe Shut-down=Slowly lower boom to rest on supports
=Secure the boom according to operator’s manual
=Raise the outriggers
=Shut off power supply
=Depress parking brake
=Remove outrigger pads (if applicable) and wheel chocks
=Follow additional procedure in operator’s manual
Operator: _____________________________ Date: __________________________
Instructor: _______________________ Location: _____________________________
Performance Evaluation Aerial Lift Conclusion

Instructor Guide – 201
Mowing and Trimming Safety Training GuideSuggested Materialsc Mowing and Trimming Safety (English, MF2714; Spanish, MF2714S)c Sign-in sheetc Pencilsc Instructor guidec Training overheads/slides/projectorc Blank overheads/flipchart/blackboard/pen for listing participant responses and out-
lining important conceptsc Trailer for loading mower for hands-on exercisesc Mowing and trimming equipment for hands-on exercisesc Power cords and electrical tools appropriate forhands-on exercisesc Traffic control devices for hands-on exercisesc Ear plugs and other protective equipment for hands-on exercisesc First aid kits for hands-on exercises
Sources of Background InformationMowing and trimming, tractor safety and motor vehicle manuals available for download:
http://www.ksre.ksu.edu/library/landscaping_equipment_safety.htmOutdoor Power Equipment Institute safety brochures: http://www.opei.org/Operator’s manuals for mowing and trimming equipment (available from dealer)Length of Time Needed for TrainingReview and select the learning activities that are most appropriate. If all of the discus-sion and hands-on exercises are included in the training it may take up to a full work day. Without the hands-on exercises, the classroom portion will take about two hours.
Welcome and Introduction4Introduce yourself.4Remind participants of the topic of the training. 4Discuss exit locations, emergency procedures, breaks, locations of restrooms, end-
ing time and any tests or evaluations.4Tell participants you expect them to play an active role by relating their experi-
ences and knowledge.
Participant IntroductionsFind out:4Who are they?4What is their experience with mowing and trimming?4What do they hope to learn from the training?
Questioning/DiscussionBefore beginning Lesson 1:4What do participants think are the most common types of accidents that happen
when mowing and trimming? List ideas on an overhead or flipchart.4Have any participants known someone who has been killed or seriously injured
while mowing or trimming? Would anyone care to share what happened?

202 – Instructor Guide
Take Control of Your Own SafetySuggested Objectives
Discuss Accident Reports on page 4 of Mowing and Trimming Safety.4How well did participants’ ideas for the most common cause of accidents match
those in Mowing and Trimming Safety? (Refer to the overhead or flipchart list made during the introduction.)
4Which of these hazards represents the greatest risk in your workplace?
Hands-on Exercise4Break the class into groups of three to five participants. Have each group look for
safety messages and signs on the mowing and trimming equipment they com-monly use. Bring the class together and ask each group to report on what they saw.
4Have participants inspect and wear any protective equipment that is required for their work. Discuss the importance of each item.
Lesson 1
=Name the most common types of serious accidents involving mowers and trimmers.
=Interpret the meaning of common warning signs and labels.
=Identify appropriate protective equipment.

Instructor Guide – 203
Inserting Ear Plugs
Discuss Accident Reports on page 7 of Mowing and Trimming Safety.
Evaluation As a group, answer the quiz items on page 8 of Mowing and Trimming Safety. Be sure to discuss each item.
QuestioningBefore beginning Lesson 2:4What specific safety items do participants check in regard to their equipment and
worksite before beginning each job?4What precautions do they take when they shut down their mowing equipment
and leave it unattended?
Try on hearing protection: 4follow manufacturer’s procedure or use the general procedure below.4demonstrate technique.4provide feedback as participants practice.
Types of Hearing Protection:
Ear Plugs
4Clean hands.
4Roll ear plug between fingers to compress it.
4Grasp ear from behind your head with opposite hand and pull up to straighten ear canal.
4Insert ear plug until it blocks sound, then hold in place while it expands. (Count out loud to 20 while it expands.)
4Ear plug must completely fill ear canal.
4Test fit by cupping hands over ears and then releasing. There should not be much difference in sound.
4Wash reusable plugs in warm soapy water after use/throw away disposable after each use.
Hearing Bands
4Grasp ear from behind your head with opposite hand and pull up to straighten ear canal.
4Use your hands to press the ear pads into the ear canals.
4Test fit in a noisy environment: Lightly press band inward and you should not notice much reduction in noise level.
Ear Muffs
4Make sure the cushions fully cover the ear and seal tightly against the head.
4Hold the headband at the crown of the head and adjust each cup.
4Test fit in a noisy enivironment: Gently push the cups toward your head and release. There should not be much difference in noise level.

204 – Instructor Guide
Lesson 2
Discuss the Pre-Start Inspection and Prepare the Mowing Area on pages 9-11 of Mowing and Trimming Safety.4How do participants’ current pre-operation inspections compare to the one listed in
their manual? (Refer to the overhead or flipchart list made during the Lesson 1.)4What is the company’s policy for recording pre-start equipment checks?4Are appropriate safety guards and interlocks present and functional on all of your
company’s mowing and trimming equipment? What is your company’s proce-dure for reporting and repairing damaged equipment?
4Discuss the company’s policy for using safety belts on riding mowers and tractors.
Discuss the Accident Report on page 12 of Mowing and Trimming Safety.
AnalysisAsk participants to silently read “Safe Start Up and Shut Down” on page 12 of Mowing and Trimming Safety. For each item, ask participants to write in the margin to indicate if the item mainly protects them from “being caught in or struck by moving parts,” “being run over,” or “other hazards.” When everyone has finished, have each participant read an item in turn and briefly tell what type of accident it will prevent and why. Be sure to discuss items that participants find surprising or hard to comply with.
Visual Aid4Discuss the overhead/slide entitled, “Is This a Good Idea?” on page 212 of the
Instructor Guide. Ask participants to identify all safety problems indicated in the story.
4Discuss how the worker could have handled the situation in a better manner. 4Discuss any points from “Safe Fueling Procedures” that haven’t been mentioned.
Prepare for Safe OperationSuggested Objectives
=Indicate mower parts to be inpsected before operation.
=Identify steps to prepare the area for safe mowing.
=Recognize safe start up and shut down procedures.

Instructor Guide – 205
Discuss the Accident Reports on page 13 of Mowing and Trimming Safety.4Discuss the company’s policy for ventilating the repair shop while working on
equipment with the engine running.
Evaluation Ask participants to answer the quiz items on page 13 of Mowing and Trimming Safety. Be sure to discuss each item.
Hands-on ExercisesDemonstrate and have participants practice the following skills:4Inspect mowing/trimming equipment using the Daily Pre-Operation Inspection
on page 225 of the Instructor Guide or other checklist used by the company (can be done as a group or individually).
4Safely start and shut down mowing/trimming equipment observing the precau-tions in Lesson 2 of Mowing and Trimming Safety. Before beginning instruct all participants about important operating controls and keep other participants out of the way.
4Discuss startup and shutdown procedures that are relevant for other types of equipment.

206 – Instructor Guide
Lesson 3 Preventing Rollover AccidentsSuggested Objectives
Discuss Accident Report on page 15 of Mowing and Trimming Safety.
Case StudiesBreak the class into small groups of three to five participants. Provide each group with one of the scenarios on pages 213-215 of this Instructor Guide. Ask each group to discuss their scenario, using the information from Lesson 3 of Mowing and Trimming Safety. If there are more than three groups, more than one group can work on the same scenario. Monitor the progress of each group. Bring the class back together and ask for a representative from each group to read their problem and explain their solution. Display case study overheads as each group takes turns. Ask other groups what they think of the proposed solution.
EvaluationAnswer the quiz items on page 17 of Mowing and Trimming Safety individually or as a class. Be sure to discuss each item.
=Recognize safe operating procedures to prevent a rollover accident.
=Identify issues of concern when mowing on slopes.

Instructor Guide – 207
Lesson 4Avoid Being Caught in Moving PartsSuggested Objectives
Discuss Accident Reports on pages 18-20 of Mowing and Trimming Safety.4Have participants known of workers who have been seriously hurt by moving
parts in any other ways? Would anyone care to share what happened?
AnalysisAsk each participant to silently read the recommendations on pages 18-20 of Mow-ing and Trimming Safety and circle the item that s/he believes would prevent the most injuries in your company given the equipment that is used, the jobs that are performed and any problems that have occurred in the past. Ask a few volunteers to discuss their selections.
DiscussionDiscuss your company’s policies regarding the following:4maintaining guards and shields.4adding blades and chains that are not recommended by the manufacturer.4shutting down equipment before unclogging or making adjustments.
EvaluationAnswer the quiz items on page 21 of Mowing and Trimming Safety individually or as a class. Be sure to discuss each item.
Hands-on ExerciseBreak the class into groups of three to five participants. Ask each group to evaluate one item of mowing or trimming equipment and report back to the class regarding wheth-er guards are in place and operating properly, and any precautions that are necessary in order to prevent contact with hazardous parts.
=Recognize safe operating procedures to avoid being caught in moving parts.
=Identify hazards associated with equipment parts.

208 – Instructor Guide
Lesson 5 Other Common DangersSuggested Objectives
Discuss Accident Reports on pages 23 and 24 of Mowing and Trimming Safety.
AnalysisFor each item listed in “Runovers” on page 22 of Mowing and Trimming Safety, read the item and ask a participant to briefly describe: 4How could someone be killed or injured if they don’t follow the recommenda-
tions? 4Given the kinds of projects participants work on, when is a runover most likely
to occur? 4Ask participants to silently read “Hitching and Unhitching Attachments” on
page 22 of Mowing and Trimming Safety. For each item, ask participants to write “rollover,” “runover,” “moving parts,” or “multiple hazards” in the margin next to each item to identify the type of accident that could happen if they don’t follow the recommendation. When everyone has finished, have each participant read an item, briefly tell what type of accident it will prevent and why. Be sure to discuss items that participants find surprising or hard to comply with.
4Ask participants to silently read “Obstacles” on page 23 of Mowing and Trimming Safety. In the margin next to each item, ask participants to write an example they have recently seen or experienced. When finished, ask volunteers to quickly de-scribe one of the examples they recorded and discuss how they would deal with it.
4As a group, read “Thrown Objects” on page 24 ofMowing and Trimming Safety. For each item, call on a participant to describe a situation when it is a hard to comply with the recommendation. What can be done to make compliance easier?
=Identify steps to avoid being run over.
=Become aware of hitching and unhitching procedures.
=List precautions to avoid hitting obstacles.
=Recognize how to prevent objects from being thrown during equipment operation.
=Evaluate how to safely operate equipment in and around traffic.
=Become aware of electrical hazards.

Instructor Guide – 209
Hands-on Exercises4In a safe area such as a private road or parking lot on your company’s property,
have participants set up a roadside work area using traffic cones and flaggers, as appropriate. Make sure all participants wear brightly-colored reflective vests and any other safety equipment that your company requires for this type of work. Guidelines for roadside work areas are detailed in the Motor Vehicle Safety Manual for Landscaping and Horticultural Services (http://www.ksre.ksu.edu/ag-safe/training/OSHA_training.htm)
4In a safe area with adequate supervision, have participants practice loading mow-ers safely onto a trailer.
4Break the class into groups of three to five participants. Ask each group to inspect familiar power cords and electrical tools. Is there any damage to the item? Is it rated for outdoor use? Is it safe to use in a damp or wet area? Ask each group to report on one or more items. Do other groups agree with their assessment? Should any items be taken out of service?
4Ask participants to look at the electrical outlets on the outside of the building. Are there any GFCIs? If not, how can GFCI protection be obtained? Discuss the benefits and limitations of GFCIs.
4Take the class outdoors and point out several distinct areas for mowing and trim-ming nearby. Break the class into groups of three to five participants. Ask each group to evaluate one of the areas and report back to the class regarding any hazards they observed and precautions that are necessary in order to prevent ac-cidents involving rollovers, runovers, collisions, power lines, thrown objects and traffic.
EvaluationAnswer the quiz items on page 26 of Mowing and Trimming Safety individually or as a class. Be sure to discuss each item.

210 – Instructor Guide
Lesson 6 Environmental HazardsSuggested Objectives
Discuss Accident Reports on pages 29 and 32 of Mowing and Trimming Safety.
ContestDivide the class into groups. Display the contest items provided on pages 216-220 of the Instructor Guide. In turn, ask each group a multiple choice or true/false question. Each group gets one point for every correct answer. If a group misses a question, allow the next group to answer it for a point. Keep track of points and recognize the winning group. Use the questions as opportunities to discuss the training material. If possible, use an overhead or slide projector to display each question as you ask it. Answer key is provided on page 221 of the Instructor Guide.
Hands-on ExerciseUsing the company’s first aid kits, demonstrate and have participants practice first aid for cuts, burns, heat exhaustion, cold injury and lightning strike.
EvaluationAnswer the quiz items on page 33 of Mowing and Trimming Safety either individually or as a class. Be sure to discuss each item.
=Identify environmental hazards.
=Recognize treatment and first aid for exposure to environmental hazards.

Instructor Guide – 211
ConclusionCase StudiesBreak the class into small groups of three to five participants. Provide each group with one of the scenarios on pages 222-224 of this Instructor Guide. Ask each group to discuss their scenario, using the information in the Mowing and Trimming Safety Manual. If there are more than three groups, more than one group can work on the same scenario. Monitor the progress of each group. Bring the class back together and ask for a representative from each group to read their problem and explain their solu-tion. Display case study overheads as each group takes turns. Ask other groups what they think of the proposed solution.
DiscussionAsk participants to share any questions or concerns they may still have or want to discuss further.
Evaluation Answer the quiz questions on page 35 of Mowing and Trimming Safety, individually or as a group. Be sure to discuss each item.
Hands-on Performance Evaluation In a safe area with adequate supervision, have each participant complete a hands-on performance evaluation. The evaluation may include the use of the Pre-Operation Inspection provided on page 225 of the Instructor Guide and proper use of mowing and trimming equipment.A checklist for the performance evaluation is on page 226 of the Instructor Guide.

212 - Instructor Guide
Is This a Good Idea?It was getting late and a worker was hurrying to finish his mowing job. His fuel was low, so he stopped his riding mower and hopped off with the engine still running. With a lit cigar clenched between his teeth, he opened the cap on the mower’s fuel tank. He grabbed the gas can and took off the lid. He didn’t have time to attach the fill spout, so he poured the gasoline “free-hand” into the tank.
Visual Aid Mowing and Trimming Safety Lesson 2

Instructor Guide – 213
#1 You are in charge of a work crew assigned to mow a large park. Your equipment includes riding mowers, push mowers and string trimmers. Your crew consists of two experienced workers and a new 18-year-old employee. This is the first time your crew has been to this park. In regard to rollovers, what hazardous areas do you expect to find when you get there? How will you assign your equipment and crew in light of those hazards?
Case Study Mowing and Trimming Safety Lesson 3

214 - Instructor Guide
#2 You are assigned to mow a large commercial property. The area includes a large grassy area with an artificial pond and fountain. It also includes an asphalt parking lot with many grassy islands. Finally, there is a steep roadside ditch. What issues do you need to consider, what equipment will you use, and what precautions should you take to avoid rollover accidents while operating here?
Case Study Mowing and Trimming Safety Lesson 3

Instructor Guide – 215
#3 You are visiting an old cemetery to prepare a bid for mowing it. As you estimate the time and equipment you will need, what hazards should you look for, and what issues should you consider regarding rollover accidents?
Case Study Mowing and Trimming Safety Lesson 3

216 - Instructor Guide
1. Use direct pressure to:a. stop bleeding from minor cuts.b. treat a burn. c. neither A nor B.
2. Use cool water to treat: a. hypothermia.b. a minor burn. c. neither A nor B.
3. Seek medical attention if: a. direct pressure will not stop a cut from
bleeding.b. burns occur on the face or genitals. c. both A and B.
Contest Mowing and Trimming Safety Lesson 6

Instructor Guide – 217
4. Light headedness, dizziness, and clammy, moist skin are most likely to be signs of:
a. heat stroke.b. heat exhaustion. c. heat rash.
5. Disorientation, confusion, and hot, dry, red skin are likely signs of:
a. heat stroke.b. heat exhaustion. c. neither A nor B.
6. Which of the following is a medical emergency that can quickly result in death:
a. heat stroke.b. heat exhaustion. c. heat rash.
Contest Mowing and Trimming Safety Lesson 6

218 - Instructor Guide
7. Which of the following is the best practice for avoiding heat illness?
a. Drink plenty of soda, tea or coffee.b. Eat large meals before working. c. Drink at least a quart of water per hour.
8. Treat heat exhaustion by: a. covering the person with a warm
blanket.b. moving the person to a cool area and
giving them fluids to drink. c. giving the person salt tablets.
9. Prolonged exposure to sunlight can cause: a. skin cancer.b. cataracts. c. both A and B.
Contest Mowing and Trimming Safety Lesson 6

Instructor Guide – 219
10. You can help prevent skin cancer by using a broad spectrum sunscreen with a Sun Protection Factor (SPF) of at least 15. A broad spectrum sunscreen will help protect you from:
a. UVA rays.b. UVB rays.c. both A and B.
11. Frozen skin and tissue is known as:a. hypothermia.b. frostbite.c. neither A nor B.
12. When a person’s core body temperature drops to 95 degrees F or below, the condition is known as:
a. hypothermia.b. frostbite.c. neither A nor B.
Contest Mowing and Trimming Safety Lesson 6

220 - Instructor Guide
13. Treat a cold-induced injury by: a. making the person warm and dry, and
seeing medical attention immediately.b. rubbing any numb, white skin.c. giving the person alcoholic beverages
to drink.
14. Which of the following is the best practice? a. Treat a poisonous snake bite by cutting
an X on each fang mark and sucking out the poison.
b. Treat a minor insect sting by removing the stinger and applying ice.
c. Treat minor cuts by applying a tourniquet.
15. Which of the following provides the BEST protection against lightning?
a. Crouch in a ditch.b. Get inside an enclosed vehicle.c. Get inside a sturdy building.
Contest Mowing and Trimming Safety Lesson 6

Instructor Guide – 221
1. a2. b3. c4. b5. a6. a7. c8. b
9. c10. c11. b12. a13. a14. b15. c
Answer Key Mowing and Trimming Safety Lesson 6

222 - Instructor Guide
#1 You have been assigned to mow a public playground. Describe all of the hazards you will consider as you plan your work. What precautions will you take to protect yourself and others?
Case Study Mowing and Trimming Safety Conclusion

Instructor Guide – 223
#2 You have been assigned to mow a ditch along a busy road. Describe all of the hazards you will consider as you plan your work. What precautions will you take to protect yourself and others?
Case Study Mowing and Trimming Safety Conclusion

224 - Instructor Guide
#3 You have been assigned to mow a popular camping and picnic area at a lake during the summer. Describe all of the hazards you will consider as you plan your work. What precautions will you take to protect yourself and others?
Case Study Mowing and Trimming Safety Conclusion
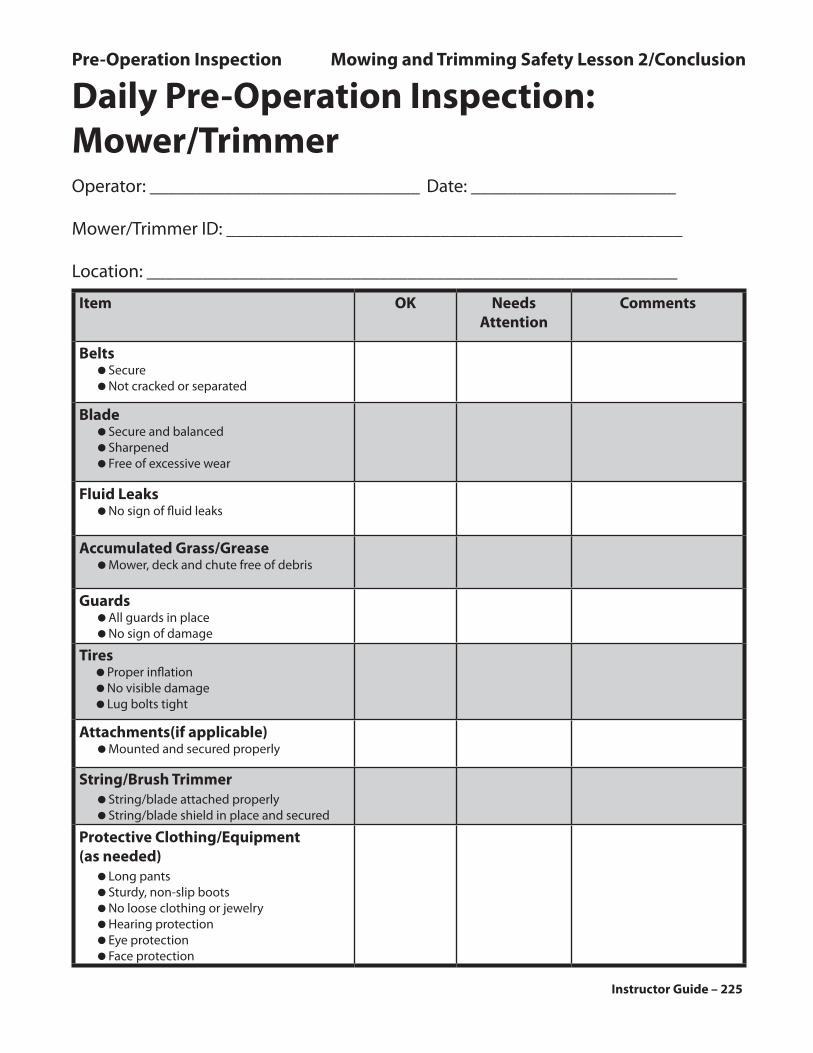
Instructor Guide – 225
Item OK Needs Attention
Comments
Belts=Secure=Not cracked or separated
Blade=Secure and balanced=Sharpened=Free of excessive wear
Fluid Leaks=No sign of fluid leaks
Accumulated Grass/Grease=Mower, deck and chute free of debris
Guards=All guards in place=No sign of damage
Tires=Proper inflation=No visible damage=Lug bolts tight
Attachments(if applicable)=Mounted and secured properly
String/Brush Trimmer=String/blade attached properly=String/blade shield in place and secured
Protective Clothing/Equipment (as needed)=Long pants=Sturdy, non-slip boots=No loose clothing or jewelry=Hearing protection=Eye protection=Face protection
Operator: _____________________________ Date: ______________________
Mower/Trimmer ID: _________________________________________________
Location: _________________________________________________________
Daily Pre-Operation Inspection: Mower/Trimmer
Pre-Operation Inspection Mowing and Trimming Safety Lesson 2/Conclusion

226 - Instructor Guide
Operator Performance Evaluation: Mower/TrimmerOperator: _____________________________ Date: __________________________
Mower/Trimmer ID: ___________________Make/Model: _______________________
Instructor: _______________________ Location: _____________________________
Performance Evaluation Mowing and Trimming Safety Conclusion
Satisfactory Needs Improvement
Follows Pre-Operation Inspection
Prepares Mowing area=Removes debris
=Bystanders out of the way
Safe Start Up=Wears personal protective equipment, including hearing and eye protection, as necessary.
=Attachments are disengaged
=Shifts into neutral before starting the engine
=Controls in neutral and parking brake set
=Always starts string/brush trimmers on the ground
=Starts riding equipment from the operator’s seat only
=Keeps hands and feet away from the blade area when starting walk-behind mowers
Safe Operation=Doesn’t endanger people or property
=Operates equipment according to manufacturer’s instructions
=Operates appropriately on hills
=Avoids hazardous areas
=Turns appropriately
Safe Shut Down and Exit=Disengage the blade and other attachments
=Lower the attachments to the ground
=Shift the controls into neutral
=Set the parking brake
=Turn the engine off
=Remove the key (if applicable)

Instructor Guide – 227

This publication is produced by K-State Research and Extension, Manhattan, Kansas, www.ksre.ksu.edu
Brand names appearing in this publication are for product identification purposes only. No endorsement is intended, nor is criticism implied of similar products not mentioned.
Kansas State University Agricultural Experiment Station and Cooperative Extension Service
MF 2716 rev. October 2009K-State Research and Extension is an equal opportunity provider and employer. Issued in further-ance of Cooperative Extension Work, Acts of May 8 and June 30, 1914, as amended. Kansas State University, County Extension Councils, Extension Districts, and United States Department of Agriculture Cooperating, Fred A. Cholick, Director.