Embed Size (px)
Citation preview
™
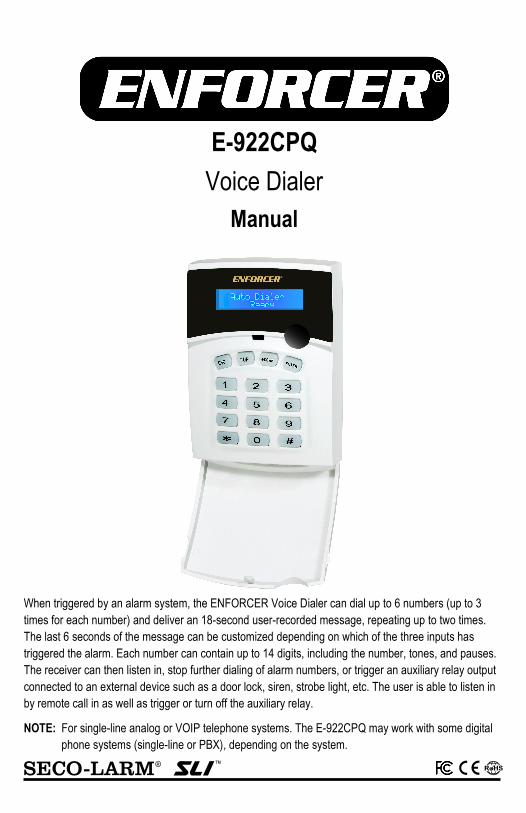
When triggered by an alarm system, the ENFORCER Voice Dialer can dial up to 6 numbers (up to 3
times for each number) and deliver an 18-second user-recorded message, repeating up to two times.
The last 6 seconds of the message can be customized depending on which of the three inputs has
triggered the alarm. Each number can contain up to 14 digits, including the number, tones, and pauses.
The receiver can then listen in, stop further dialing of alarm numbers, or trigger an auxiliary relay output
connected to an external device such as a door lock, siren, strobe light, etc. The user is able to listen in
by remote call in as well as trigger or turn off the auxiliary relay.
NOTE: For single-line analog or VOIP telephone systems. The E-922CPQ may work with some digital
phone systems (single-line or PBX), depending on the system.
E-922CPQ
Voice Dialer
Manual
ENFORCER Voice Dialer
2 SECO-LARM U.S.A., Inc.
1x Voice dialer unit 2x Wall mount screws 2x Plastic wall anchors 1x User manual
Parts List:
Features:
Table of Contents:
• Trigger-activated dialer with user-recorded 18-second alarm message
• The last 6 seconds of the alarm message is individually customizable for each input
• 3 Trigger inputs and 1 inhibit input, each programmable high (input >3.5V) or low (input <1V)
• 1 Auxiliary relay output, NO/NC programmable for 1~255 seconds
• Works as a stand-alone unit or connected to a security system
• LCD display indicates status, either "ready" or "alarm" showing which input and number dialed
• Listen in, stop the dialing process, and/or turn the auxiliary output on or off during dialer call out
• Call in at any time to listen in to room and/or turn the auxiliary output on or off
• 6 Programmable alarm telephone numbers (up to 14 digits each)
• Programmable auto-dialing to call each number three times or call a single number
• Built-in flash memory to protect against system data loss in case of power failure
• Tone or pulse dialing
• Terminal blocks for all external connections
• Wall-mountable
Table of Contents .......................................... 2
Features ........................................................ 2
Parts List ........................................................ 2
Specifications ................................................ 3
Sample Applications and Wiring Diagrams ... 3
Overview ........................................................ 4
Installation ..................................................... 4
Programming the Voice Dialer .................. 5~10
Entering Setup Mode ................................. 5
Setting and Changing the PIN ................... 5
Setting Alarm Phone Numbers .................. 5
Deleting a Stored Phone Number .............. 6
Recording Alarm Messages ...................... 6
Setting the Auto-Dial Mode ........................ 7
Setting the Trigger Level ........................... 7
Setting the Trigger Mode ............................ 8
Setting the Dialer "Beep" Volume ............... 8
Setting the Number of Rings for Remote
Access ...................................................... 9
Setting the Auxiliary Output Relay Time ..... 9
Setting the Number of Times the Alarm
Message Plays ......................................... 9
Making a Test Call .................................... 10
Operating the Voice Dialer ...................... 10~13
Stopping Dialing with the Dialer Keypad ... 10
Remote Control by Telephone ............ 10~11
Viewing the Last Event ............................. 11
Resetting the Dialer .................................. 11
Troubleshooting ............................................ 11
Notices, Warnings, and Warranty ................. 12
ENFORCER Voice Dialer
SECO-LARM U.S.A., Inc. 3
Operating voltage 10~18 VDC
Current draw (max.) Standby 50mA@12VDC
Dialing 200mA@12VDC
Phone system For single-line analog or VOIP phone systems*
Alarm message length (user recorded) 12s site message + 6s individual message for each input
Programmable alarm phone numbers 6
Maximum digits per phone number 14
Programmable dial attempts Up to 3 times per number
Alarm message repeat 1~2 times for each number
Trigger inputs 1~3 Programmable high (input >3.5V, max. 15V) N.O. or N.C.
or low (input <1V) N.O. or N.C. Inhibit
Auxiliary output 2A@24VDC, NO/NC, programmable 1~255s
Operating temperature 32°~140°F (0°~60°C)
Weight 15.9-oz (450g)
Dimensions 41/16"x59/16"x111/16" (104x142x43 mm)
*The E-922CPQ may work with some digital phone systems (single-line or PBX), depending on the system.
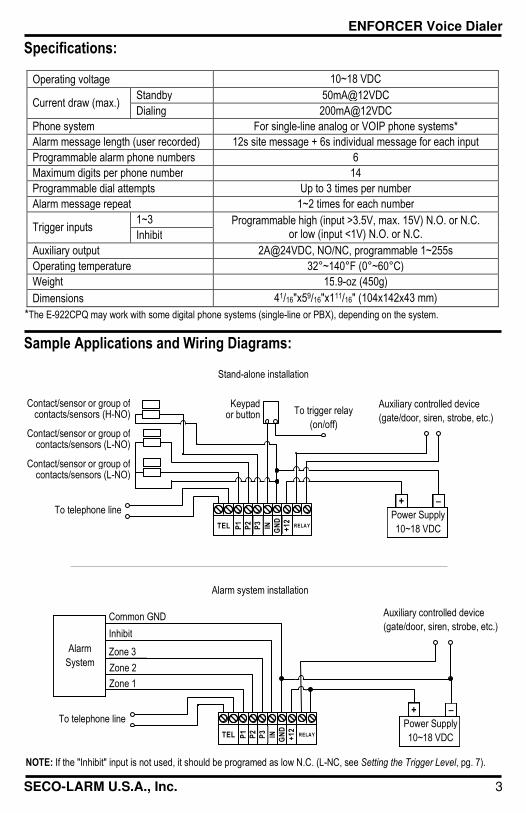
Specifications:
Sample Applications and Wiring Diagrams:
Zone 1
To telephone line
Auxiliary controlled device
(gate/door, siren, strobe, etc.)
Contact/sensor or group of contacts/sensors (L-NO)
Contact/sensor or group of contacts/sensors (H-NO)
Contact/sensor or group of contacts/sensors (L-NO)
Stand-alone installation
Keypad or button
Power Supply
10~18 VDC
+ –
To trigger relay
(on/off)
Auxiliary controlled device
(gate/door, siren, strobe, etc.)
Power Supply
10~18 VDC
+ – To telephone line
Inhibit
Zone 3
Zone 2
Alarm system installation
Common GND
Alarm
System
NOTE: If the "Inhibit" input is not used, it should be programed as low N.C. (L-NC, see Setting the Trigger Level, pg. 7).
GN
D
RELAY
+1
2
IN
P3
P2
P1
TEL
GN
D
RELAY
+1
2
IN
P3
P2
P1
TEL
ENFORCER Voice Dialer
4 SECO-LARM U.S.A., Inc.
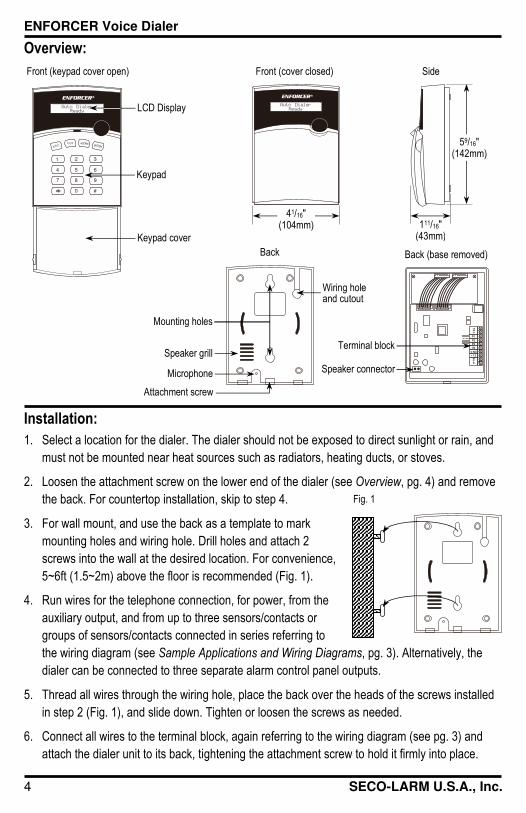
Overview:
1. Select a location for the dialer. The dialer should not be exposed to direct sunlight or rain, and
must not be mounted near heat sources such as radiators, heating ducts, or stoves.
2. Loosen the attachment screw on the lower end of the dialer (see Overview, pg. 4) and remove
the back. For countertop installation, skip to step 4.
3. For wall mount, and use the back as a template to mark
mounting holes and wiring hole. Drill holes and attach 2
screws into the wall at the desired location. For convenience,
5~6ft (1.5~2m) above the floor is recommended (Fig. 1).
4. Run wires for the telephone connection, for power, from the
auxiliary output, and from up to three sensors/contacts or
groups of sensors/contacts connected in series referring to
the wiring diagram (see Sample Applications and Wiring Diagrams, pg. 3). Alternatively, the
dialer can be connected to three separate alarm control panel outputs.
5. Thread all wires through the wiring hole, place the back over the heads of the screws installed
in step 2 (Fig. 1), and slide down. Tighten or loosen the screws as needed.
6. Connect all wires to the terminal block, again referring to the wiring diagram (see pg. 3) and
attach the dialer unit to its back, tightening the attachment screw to hold it firmly into place.
TE
L
P1
P2
P3
IN
C NC
+12
RE
LAY
1 2 3
4 5 6
7 8 9
0 #
ES C ENTER
UP DOWN
Wiring hole and cutout
Keypad cover
Front (keypad cover open) Front (cover closed) Side
Back Back (base removed)
Auto Dialer Ready
Auto Dialer
Ready
Terminal block
Speaker connector
Speaker grill
Mounting holes
Keypad
59/16" (142mm)
111/16" (43mm)
41/16" (104mm)
Attachment screw
Microphone
LCD Display
Installation:
Fig. 1
ENFORCER Voice Dialer
SECO-LARM U.S.A., Inc. 5
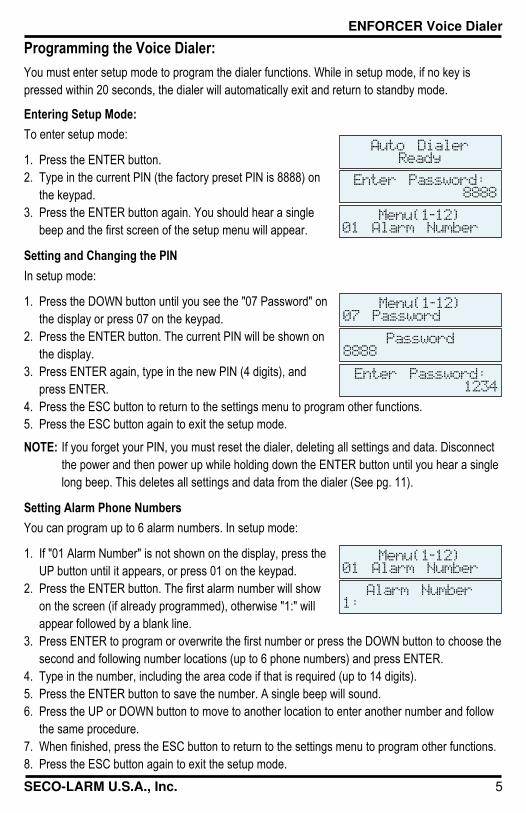
Programming the Voice Dialer:
You must enter setup mode to program the dialer functions. While in setup mode, if no key is
pressed within 20 seconds, the dialer will automatically exit and return to standby mode.
Entering Setup Mode:
To enter setup mode:
1. Press the ENTER button.
2. Type in the current PIN (the factory preset PIN is 8888) on
the keypad.
3. Press the ENTER button again. You should hear a single
beep and the first screen of the setup menu will appear.
Setting and Changing the PIN
In setup mode:
1. Press the DOWN button until you see the "07 Password" on
the display or press 07 on the keypad.
2. Press the ENTER button. The current PIN will be shown on
the display.
3. Press ENTER again, type in the new PIN (4 digits), and
press ENTER.
4. Press the ESC button to return to the settings menu to program other functions.
5. Press the ESC button again to exit the setup mode.
NOTE: If you forget your PIN, you must reset the dialer, deleting all settings and data. Disconnect
the power and then power up while holding down the ENTER button until you hear a single
long beep. This deletes all settings and data from the dialer (See pg. 11).
Setting Alarm Phone Numbers
You can program up to 6 alarm numbers. In setup mode:
1. If "01 Alarm Number" is not shown on the display, press the
UP button until it appears, or press 01 on the keypad.
2. Press the ENTER button. The first alarm number will show
on the screen (if already programmed), otherwise "1:" will
appear followed by a blank line.
3. Press ENTER to program or overwrite the first number or press the DOWN button to choose the
second and following number locations (up to 6 phone numbers) and press ENTER.
4. Type in the number, including the area code if that is required (up to 14 digits).
5. Press the ENTER button to save the number. A single beep will sound.
6. Press the UP or DOWN button to move to another location to enter another number and follow
the same procedure.
7. When finished, press the ESC button to return to the settings menu to program other functions.
8. Press the ESC button again to exit the setup mode.
Enter Password: 8888
Menu(1-12) 07 Password
Menu(1-12) 01 Alarm Number
Password 8888
Enter Password: 1234
Menu(1-12) 01 Alarm Number
Alarm Number 1:
Auto Dialer Ready
ENFORCER Voice Dialer
6 SECO-LARM U.S.A., Inc.
Programming the Voice Dialer (Continued):
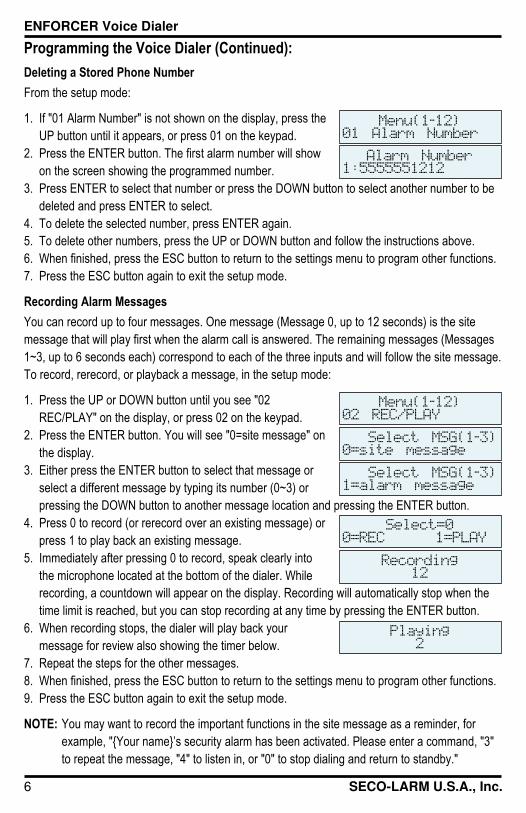
Deleting a Stored Phone Number
From the setup mode:
1. If "01 Alarm Number" is not shown on the display, press the
UP button until it appears, or press 01 on the keypad.
2. Press the ENTER button. The first alarm number will show
on the screen showing the programmed number.
3. Press ENTER to select that number or press the DOWN button to select another number to be
deleted and press ENTER to select.
4. To delete the selected number, press ENTER again.
5. To delete other numbers, press the UP or DOWN button and follow the instructions above.
6. When finished, press the ESC button to return to the settings menu to program other functions.
7. Press the ESC button again to exit the setup mode.
Recording Alarm Messages
You can record up to four messages. One message (Message 0, up to 12 seconds) is the site
message that will play first when the alarm call is answered. The remaining messages (Messages
1~3, up to 6 seconds each) correspond to each of the three inputs and will follow the site message.
To record, rerecord, or playback a message, in the setup mode:
1. Press the UP or DOWN button until you see "02
REC/PLAY" on the display, or press 02 on the keypad.
2. Press the ENTER button. You will see "0=site message" on
the display.
3. Either press the ENTER button to select that message or
select a different message by typing its number (0~3) or
pressing the DOWN button to another message location and pressing the ENTER button.
4. Press 0 to record (or rerecord over an existing message) or
press 1 to play back an existing message.
5. Immediately after pressing 0 to record, speak clearly into
the microphone located at the bottom of the dialer. While
recording, a countdown will appear on the display. Recording will automatically stop when the
time limit is reached, but you can stop recording at any time by pressing the ENTER button.
6. When recording stops, the dialer will play back your
message for review also showing the timer below.
7. Repeat the steps for the other messages.
8. When finished, press the ESC button to return to the settings menu to program other functions.
9. Press the ESC button again to exit the setup mode.
NOTE: You may want to record the important functions in the site message as a reminder, for
example, "{Your name}’s security alarm has been activated. Please enter a command, "3"
to repeat the message, "4" to listen in, or "0" to stop dialing and return to standby."
Menu(1-12) 01 Alarm Number
Alarm Number 1:5555551212
Menu(1-12) 02 REC/PLAY
Select MSG(1-3) 0=site message
Select=0 0=REC 1=PLAY
Select MSG(1-3) 1=alarm message
Recording 12
Playing 2
ENFORCER Voice Dialer
SECO-LARM U.S.A., Inc. 7
Programming the Voice Dialer (Continued):
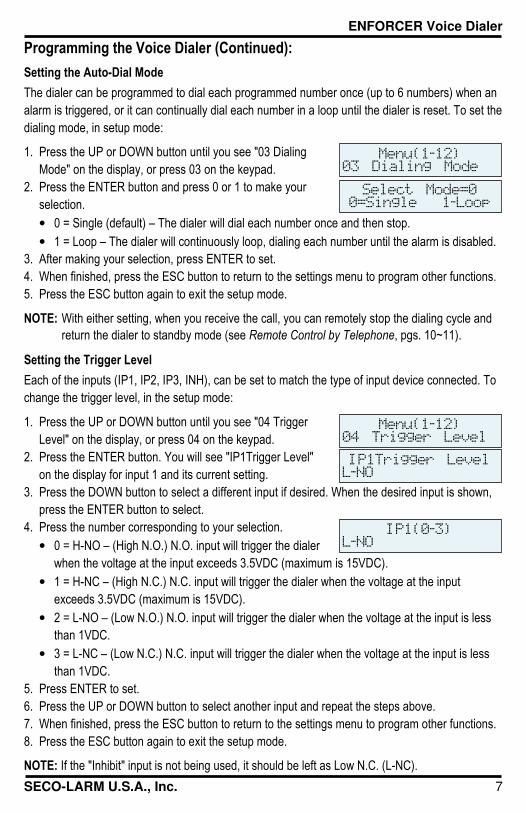
Setting the Auto-Dial Mode
The dialer can be programmed to dial each programmed number once (up to 6 numbers) when an
alarm is triggered, or it can continually dial each number in a loop until the dialer is reset. To set the
dialing mode, in setup mode:
1. Press the UP or DOWN button until you see "03 Dialing
Mode" on the display, or press 03 on the keypad.
2. Press the ENTER button and press 0 or 1 to make your
selection.
• 0 = Single (default) – The dialer will dial each number once and then stop.
• 1 = Loop – The dialer will continuously loop, dialing each number until the alarm is disabled.
3. After making your selection, press ENTER to set.
4. When finished, press the ESC button to return to the settings menu to program other functions.
5. Press the ESC button again to exit the setup mode.
NOTE: With either setting, when you receive the call, you can remotely stop the dialing cycle and
return the dialer to standby mode (see Remote Control by Telephone, pgs. 10~11).
Setting the Trigger Level
Each of the inputs (IP1, IP2, IP3, INH), can be set to match the type of input device connected. To
change the trigger level, in the setup mode:
1. Press the UP or DOWN button until you see "04 Trigger
Level" on the display, or press 04 on the keypad.
2. Press the ENTER button. You will see "IP1Trigger Level"
on the display for input 1 and its current setting.
3. Press the DOWN button to select a different input if desired. When the desired input is shown,
press the ENTER button to select.
4. Press the number corresponding to your selection.
• 0 = H-NO – (High N.O.) N.O. input will trigger the dialer
when the voltage at the input exceeds 3.5VDC (maximum is 15VDC).
• 1 = H-NC – (High N.C.) N.C. input will trigger the dialer when the voltage at the input
exceeds 3.5VDC (maximum is 15VDC).
• 2 = L-NO – (Low N.O.) N.O. input will trigger the dialer when the voltage at the input is less
than 1VDC.
• 3 = L-NC – (Low N.C.) N.C. input will trigger the dialer when the voltage at the input is less
than 1VDC.
5. Press ENTER to set.
6. Press the UP or DOWN button to select another input and repeat the steps above.
7. When finished, press the ESC button to return to the settings menu to program other functions.
8. Press the ESC button again to exit the setup mode.
NOTE: If the "Inhibit" input is not being used, it should be left as Low N.C. (L-NC).
Menu(1-12) 04 Trigger Level
IP1Trigger Level L-NO
Menu(1-12) 03 Dialing Mode
Select Mode=0 0=Single 1-Loop
IP1(0-3) L-NO
ENFORCER Voice Dialer
8 SECO-LARM U.S.A., Inc.
Programming the Voice Dialer (Continued):
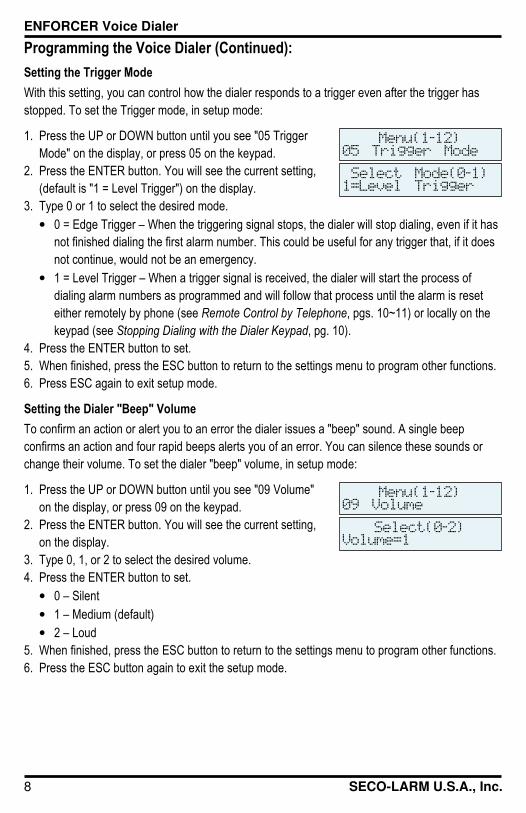
Setting the Trigger Mode
With this setting, you can control how the dialer responds to a trigger even after the trigger has
stopped. To set the Trigger mode, in setup mode:
1. Press the UP or DOWN button until you see "05 Trigger
Mode" on the display, or press 05 on the keypad.
2. Press the ENTER button. You will see the current setting,
(default is "1 = Level Trigger") on the display.
3. Type 0 or 1 to select the desired mode.
• 0 = Edge Trigger – When the triggering signal stops, the dialer will stop dialing, even if it has
not finished dialing the first alarm number. This could be useful for any trigger that, if it does
not continue, would not be an emergency.
• 1 = Level Trigger – When a trigger signal is received, the dialer will start the process of
dialing alarm numbers as programmed and will follow that process until the alarm is reset
either remotely by phone (see Remote Control by Telephone, pgs. 10~11) or locally on the
keypad (see Stopping Dialing with the Dialer Keypad, pg. 10).
4. Press the ENTER button to set.
5. When finished, press the ESC button to return to the settings menu to program other functions.
6. Press ESC again to exit setup mode.
Setting the Dialer "Beep" Volume
To confirm an action or alert you to an error the dialer issues a "beep" sound. A single beep
confirms an action and four rapid beeps alerts you of an error. You can silence these sounds or
change their volume. To set the dialer "beep" volume, in setup mode:
1. Press the UP or DOWN button until you see "09 Volume"
on the display, or press 09 on the keypad.
2. Press the ENTER button. You will see the current setting,
on the display.
3. Type 0, 1, or 2 to select the desired volume.
4. Press the ENTER button to set.
• 0 – Silent
• 1 – Medium (default)
• 2 – Loud
5. When finished, press the ESC button to return to the settings menu to program other functions.
6. Press the ESC button again to exit the setup mode.
Menu(1-12) 05 Trigger Mode
Select Mode(0-1) 1=Level Trigger
Menu(1-12) 09 Volume
Select(0-2) Volume=1
ENFORCER Voice Dialer
SECO-LARM U.S.A., Inc. 9
Programming the Voice Dialer (Continued):
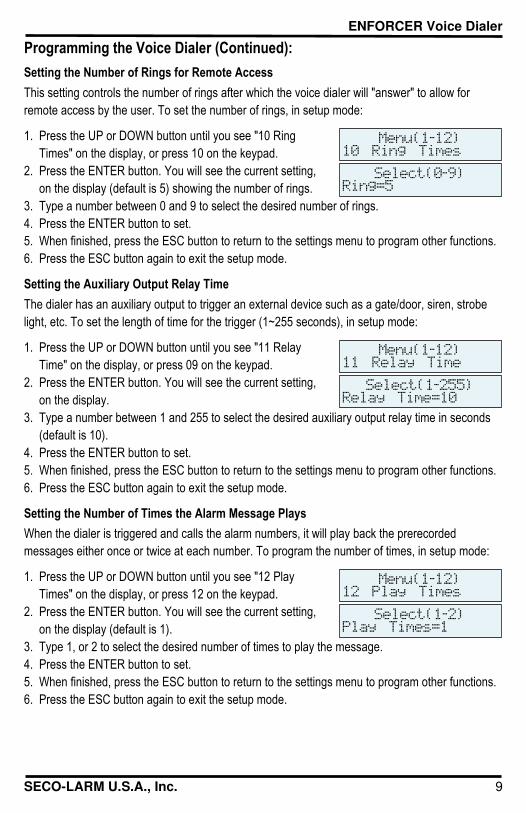
Setting the Number of Rings for Remote Access
This setting controls the number of rings after which the voice dialer will "answer" to allow for
remote access by the user. To set the number of rings, in setup mode:
1. Press the UP or DOWN button until you see "10 Ring
Times" on the display, or press 10 on the keypad.
2. Press the ENTER button. You will see the current setting,
on the display (default is 5) showing the number of rings.
3. Type a number between 0 and 9 to select the desired number of rings.
4. Press the ENTER button to set.
5. When finished, press the ESC button to return to the settings menu to program other functions.
6. Press the ESC button again to exit the setup mode.
Setting the Auxiliary Output Relay Time
The dialer has an auxiliary output to trigger an external device such as a gate/door, siren, strobe
light, etc. To set the length of time for the trigger (1~255 seconds), in setup mode:
1. Press the UP or DOWN button until you see "11 Relay
Time" on the display, or press 09 on the keypad.
2. Press the ENTER button. You will see the current setting,
on the display.
3. Type a number between 1 and 255 to select the desired auxiliary output relay time in seconds
(default is 10).
4. Press the ENTER button to set.
5. When finished, press the ESC button to return to the settings menu to program other functions.
6. Press the ESC button again to exit the setup mode.
Setting the Number of Times the Alarm Message Plays
When the dialer is triggered and calls the alarm numbers, it will play back the prerecorded
messages either once or twice at each number. To program the number of times, in setup mode:
1. Press the UP or DOWN button until you see "12 Play
Times" on the display, or press 12 on the keypad.
2. Press the ENTER button. You will see the current setting,
on the display (default is 1).
3. Type 1, or 2 to select the desired number of times to play the message.
4. Press the ENTER button to set.
5. When finished, press the ESC button to return to the settings menu to program other functions.
6. Press the ESC button again to exit the setup mode.
Menu(1-12) 10 Ring Times
Select(0-9) Ring=5
Menu(1-12) 11 Relay Time
Select(1-255) Relay Time=10
Menu(1-12) 12 Play Times
Select(1-2) Play Times=1
ENFORCER Voice Dialer
10 SECO-LARM U.S.A., Inc.
Programming the Voice Dialer (Continued):
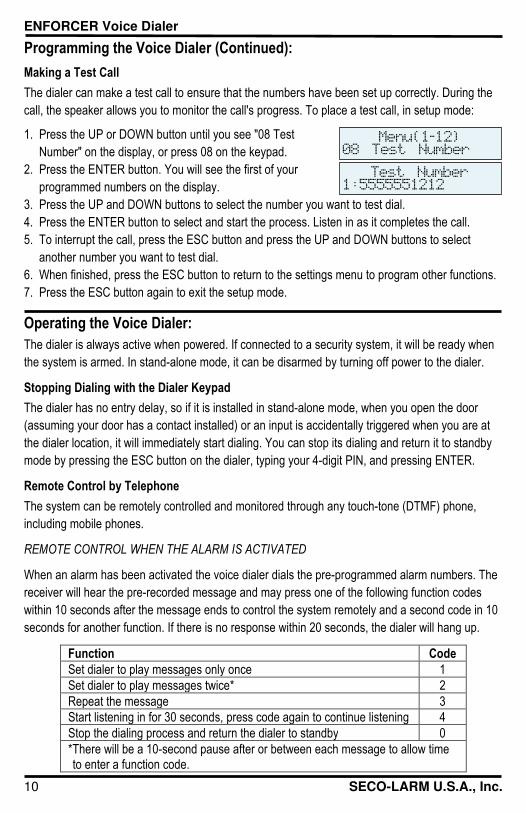
Making a Test Call
The dialer can make a test call to ensure that the numbers have been set up correctly. During the
call, the speaker allows you to monitor the call's progress. To place a test call, in setup mode:
1. Press the UP or DOWN button until you see "08 Test
Number" on the display, or press 08 on the keypad.
2. Press the ENTER button. You will see the first of your
programmed numbers on the display.
3. Press the UP and DOWN buttons to select the number you want to test dial.
4. Press the ENTER button to select and start the process. Listen in as it completes the call.
5. To interrupt the call, press the ESC button and press the UP and DOWN buttons to select
another number you want to test dial.
6. When finished, press the ESC button to return to the settings menu to program other functions.
7. Press the ESC button again to exit the setup mode.
The dialer is always active when powered. If connected to a security system, it will be ready when
the system is armed. In stand-alone mode, it can be disarmed by turning off power to the dialer.
Stopping Dialing with the Dialer Keypad
The dialer has no entry delay, so if it is installed in stand-alone mode, when you open the door
(assuming your door has a contact installed) or an input is accidentally triggered when you are at
the dialer location, it will immediately start dialing. You can stop its dialing and return it to standby
mode by pressing the ESC button on the dialer, typing your 4-digit PIN, and pressing ENTER.
Remote Control by Telephone
The system can be remotely controlled and monitored through any touch-tone (DTMF) phone,
including mobile phones.
REMOTE CONTROL WHEN THE ALARM IS ACTIVATED
When an alarm has been activated the voice dialer dials the pre-programmed alarm numbers. The
receiver will hear the pre-recorded message and may press one of the following function codes
within 10 seconds after the message ends to control the system remotely and a second code in 10
seconds for another function. If there is no response within 20 seconds, the dialer will hang up.
Function Code
Set dialer to play messages only once 1
Set dialer to play messages twice* 2
Repeat the message 3
Start listening in for 30 seconds, press code again to continue listening 4
Stop the dialing process and return the dialer to standby 0
*There will be a 10-second pause after or between each message to allow time to enter a function code.
Operating the Voice Dialer:
Menu(1-12) 08 Test Number
Test Number 1:5555551212
ENFORCER Voice Dialer
SECO-LARM U.S.A., Inc. 11
Dialer will not dial out
• Ensure sure that the telephone line is working and is firmly connected to the correct terminal on the dialer.
• Make sure that you have programmed at least one telephone number into the unit and that the full number has been stored.
Unit doesn’t respond to a call-back
• Check to see if another unit (fax or answering machine) could be answering the call and remove the other unit.
• Adjust the call-in ring detect setting so the dialer will answer.
Difficulty in activating 'listen in' by telephone remote control
• Try pressing the code key again.
• Move to a quieter location as ambient noise may affect the dialer’s ability to detect the tone signal.
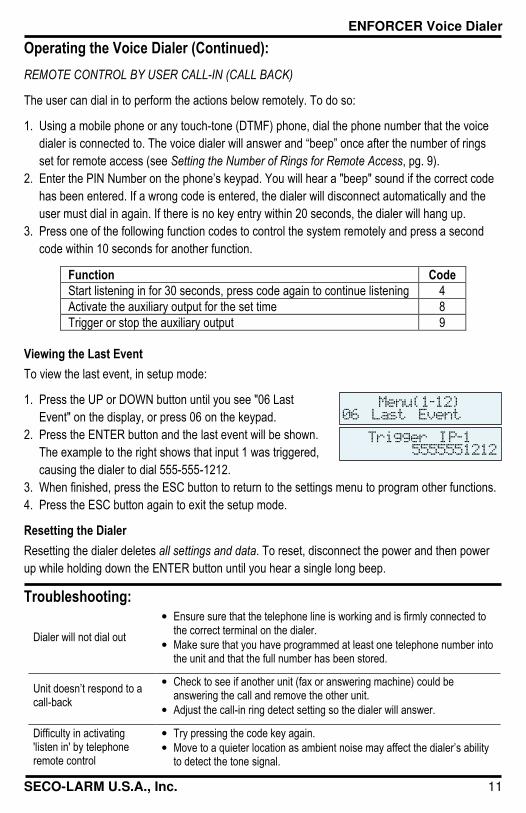
REMOTE CONTROL BY USER CALL-IN (CALL BACK)
The user can dial in to perform the actions below remotely. To do so:
1. Using a mobile phone or any touch-tone (DTMF) phone, dial the phone number that the voice
dialer is connected to. The voice dialer will answer and “beep” once after the number of rings
set for remote access (see Setting the Number of Rings for Remote Access, pg. 9).
2. Enter the PIN Number on the phone’s keypad. You will hear a "beep" sound if the correct code
has been entered. If a wrong code is entered, the dialer will disconnect automatically and the
user must dial in again. If there is no key entry within 20 seconds, the dialer will hang up.
3. Press one of the following function codes to control the system remotely and press a second
code within 10 seconds for another function.
Function Code
Start listening in for 30 seconds, press code again to continue listening 4
Activate the auxiliary output for the set time 8
Trigger or stop the auxiliary output 9
Viewing the Last Event
To view the last event, in setup mode:
1. Press the UP or DOWN button until you see "06 Last
Event" on the display, or press 06 on the keypad.
2. Press the ENTER button and the last event will be shown.
The example to the right shows that input 1 was triggered,
causing the dialer to dial 555-555-1212.
3. When finished, press the ESC button to return to the settings menu to program other functions.
4. Press the ESC button again to exit the setup mode.
Resetting the Dialer
Resetting the dialer deletes all settings and data. To reset, disconnect the power and then power
up while holding down the ENTER button until you hear a single long beep.
Operating the Voice Dialer (Continued):
Menu(1-12) 06 Last Event
Trigger IP-1 5555551212
Troubleshooting:
ENFORCER Voice Dialer
12 SECO-LARM U.S.A., Inc.
Notices, Warnings, and Warranty:
SECO-LARM
® U.S.A., Inc. 16842 Millikan Avenue, Irvine, CA 92606 Website: www.seco-larm.com Phone: (949) 261-2999 | (800) 662-0800 Email: [email protected]
PICZN3
MI_E-922CPQ_210601.docx
NOTICE: The SECO-LARM policy is one of continual development and improvement. For that reason, SECO-LARM reserves the right to change specifications without notice. SECO-LARM is also not responsible for misprints. All trademarks are the property of SECO-LARM U.S.A., Inc. or their respective owners. Copyright © 2021 SECO-LARM U.S.A., Inc. All rights reserved.
WARRANTY: This SECO-LARM product is warranted against defects in material and workmanship while used in normal service for one (1) year from the date of sale to the original customer. SECO-LARM’s obligation is limited to the repair or replacement of any defective part if the unit is returned, transportation prepaid, to SECO-LARM. This Warranty is void if damage is caused by or attributed to acts of God, physical or electrical misuse or abuse, neglect, repair or alteration, improper or abnormal usage, or faulty installation, or if for any other reason SECO-LARM determines that such equipment is not operating properly as a result of causes other than defects in material and workmanship. The sole obligation of SECO-LARM and the purchaser’s exclusive remedy, shall be limited to the replacement or repair only, at SECO-LARM’s option. In no event shall SECO-LARM be liable for any special, collateral, incidental, or consequential personal or property damage of any kind to the purchaser or anyone else.
IMPORTANT: Users and installers of this product are responsible for ensuring this product complies with all national, state, and local laws and statutes related to monitoring and recording audio and video signals. SECO-LARM will not be held responsible for the use of this product in violation of any current laws or statutes.
FCC Part 68
This equipment complies with Part 68 of the FCC rules and the requirements adopted by the ACTA. On the bottom of the device of this equipment is a label that contains, among other information, a product identifier in the format US:7M7AL01AE922CPQ and REN:0.1A for this equipment.
A plug and jack used to connect this equipment to the premises wiring and telephone network must comply with the applicable FCC Part 68 rules and requirements adopted by the ACTA.
REN (RINGER EQUIVALENT NUMBERS) STATEMENT Notice: The Ringer Equivalence Number (REN) assigned to each terminal device provides an indication of the maximum number of terminals allowed to be connected to a telephone interface. The termination on an interface may consist of any combination of devices subject only to the requirement that the sum of the Ringer Equivalence Numbers of all the devices does not exceed 5.
If this equipment US:7M7AL01AE922CPQ causes harm to the telephone network, the telephone company will notify you in advance that temporary discontinuance of service may be required. But if advance notice isn't practical, the telephone company will notify the customer as soon as possible. Also, you will be advised of your right to file a complaint with the FCC if you believe it is necessary.
The telephone company may make changes in its facilities, equipment, operations or procedures that could affect the operation of the equipment. If this happens, the telephone company will provide advance notice in order for you to make necessary modifications to maintain uninterrupted service.
If trouble is experienced with this equipment product Model: E-922CPQ, for repair or warranty information, please contact SECO-LARM U.S.A., Inc. If the equipment is causing harm to the telephone network, the telephone company may request that you disconnect the equipment until the problem is resolved.
Connection to party line service is subject to state tariffs. Contact the state public utility commission, public service commission or corporation commission for information.
If your home has specially wired alarm equipment connected to the telephone line, ensure the installation of this US:7M7AL01AE922CPQ does not disable your alarm equipment. If you have questions about what will disable alarm equipment, consult your telephone company or a qualified installer.
WHEN PROGRAMMING EMERGENCY NUMBERS AND/OR MAKING TEST CALLS TO EMERGENCY NUMBERS:
1. Remain on the line and briefly explain to the dispatcher the reason for the call.
2. Perform such activities in the off-peak hours, such as the early morning or late evening.
NOTE: While the system can provide valuable protection to home and property when properly installed, it cannot guarantee complete protection against intrusion. SECO-LARM is not responsible for any losses or damage which may occur during the use of this product.
California Proposition 65 Warning: These products may contain chemicals which are known to the State of California to cause cancer and birth defects or other reproductive harm. For more information, go to www.P65Warnings.ca.gov.