Embed Size (px)
Citation preview
Software Version: 12.60 & 12.60 Patch 1
ALM
Installation and Upgrade Guide - Windows
Go to HELP CENTER ONLINEhttp://admhelp.microfocus.com/alm
Document Release Date: November 2018 | Software Release Date: November 2018

Legal Notices
DisclaimerCertain versions of software and/or documents (“Material”) accessible here may contain branding from
Hewlett-Packard Company (now HP Inc.) and Hewlett Packard Enterprise Company. As of September 1,
2017, the Material is now offered by Micro Focus, a separately owned and operated company. Any
reference to the HP and Hewlett Packard Enterprise/HPE marks is historical in nature, and the HP and
Hewlett Packard Enterprise/HPE marks are the property of their respective owners.
WarrantyThe only warranties for products and services of Micro Focus and its affiliates and licensors (“Micro Focus”)
are set forth in the express warranty statements accompanying such products and services. Nothing herein
should be construed as constituting an additional warranty. Micro Focus shall not be liable for technical or
editorial errors or omissions contained herein. The information contained herein is subject to change without
notice.
Restricted Rights LegendContains Confidential Information. Except as specifically indicated otherwise, a valid license is required for
possession, use or copying. Consistent with FAR 12.211 and 12.212, Commercial Computer Software,
Computer Software Documentation, and Technical Data for Commercial Items are licensed to the U.S.
Government under vendor's standard commercial license.
Copyright Notice© Copyright 2002 - 2018 Micro Focus or one of its affiliates.
Trademark NoticesAdobe™ is a trademark of Adobe Systems Incorporated.
Microsoft® and Windows® are U.S. registered trademarks of Microsoft Corporation.
UNIX® is a registered trademark of The Open Group.
Oracle and Java are registered trademarks of Oracle and/or its affiliates.
Open Source and Third Party LicensesLicenses used by ALM
ALM (12.60 & 12.60 Patch 1) Page 2 of 206
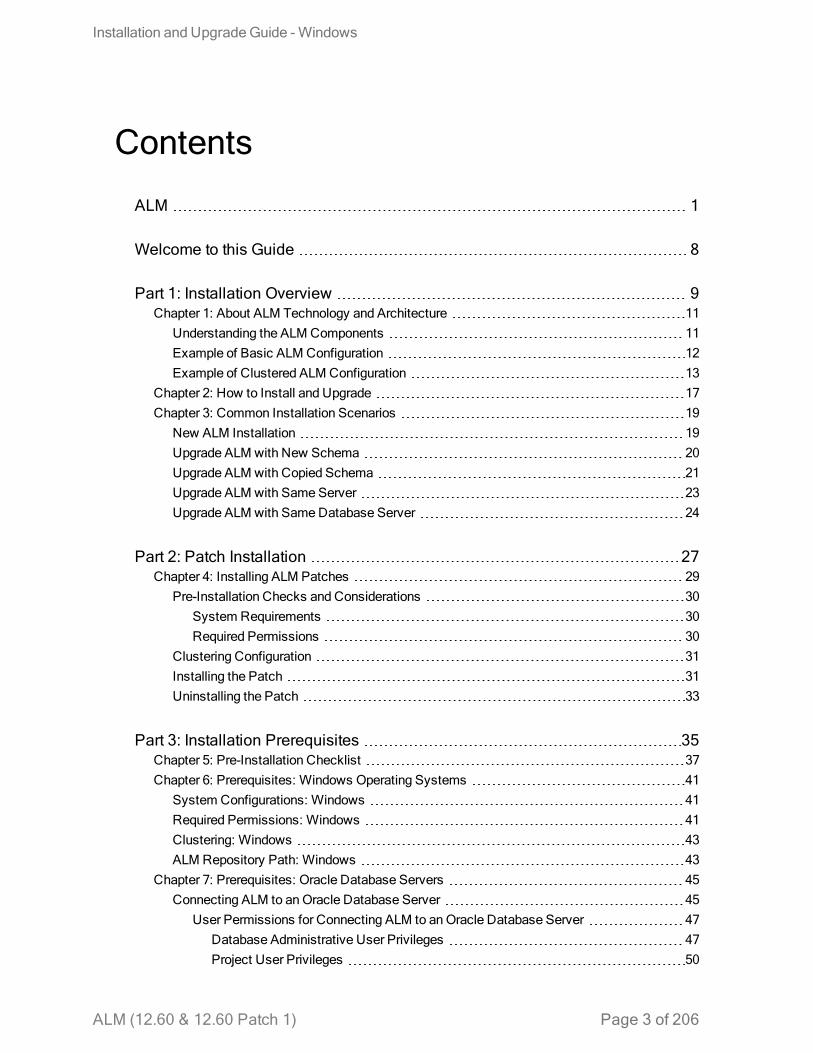
Contents
ALM 1
Welcome to this Guide 8
Part 1: Installation Overview 9Chapter 1: About ALM Technology and Architecture 11
Understanding the ALM Components 11Example of Basic ALM Configuration 12Example of Clustered ALM Configuration 13
Chapter 2: How to Install and Upgrade 17Chapter 3: Common Installation Scenarios 19
New ALM Installation 19Upgrade ALM with New Schema 20Upgrade ALM with Copied Schema 21Upgrade ALM with Same Server 23Upgrade ALM with SameDatabase Server 24
Part 2: Patch Installation 27Chapter 4: Installing ALM Patches 29
Pre-Installation Checks and Considerations 30System Requirements 30Required Permissions 30
Clustering Configuration 31Installing the Patch 31Uninstalling the Patch 33
Part 3: Installation Prerequisites 35Chapter 5: Pre-Installation Checklist 37Chapter 6: Prerequisites: Windows Operating Systems 41
System Configurations: Windows 41Required Permissions: Windows 41Clustering: Windows 43ALM Repository Path: Windows 43
Chapter 7: Prerequisites: Oracle Database Servers 45Connecting ALM to anOracle Database Server 45
User Permissions for Connecting ALM to anOracle Database Server 47Database Administrative User Privileges 47Project User Privileges 50
Installation and UpgradeGuide - Windows
ALM (12.60 & 12.60 Patch 1) Page 3 of 206

Site Administration Database SchemaConsiderations: Oracle 51Oracle RAC Support 51
Chapter 8: Prerequisites: Microsoft SQLDatabase Servers 53Connecting ALM to aMicrosoft SQLDatabase Server 53User Permissions for Connecting ALM to aMicrosoft SQLDatabase Server 54Site Administration Database SchemaConsiderations: SQL 56
Chapter 9: Prerequisites: General 57License File 57Security Passphrases 57Mail Server Information 57Java Installation 58
Oracle Java JDK or JRE 58OpenJDK 8 58
Conflicting Applications 58Chapter 10: Prerequisites: Client-side 59
System Configurations 59Additional Considerations 59
Permissions Required to Download ALM Client Components 59Internet Explorer Configuration 60Enabling User Account Control (UAC) 61
Part 4: Pre-Installation Project Upgrade Steps 63Chapter 11: Project Upgrade Considerations 65
Upgrade Versions 65Suggested ALM System Configuration 65
Chapter 12: Project Upgrade Pre-Installation Activities 69Back Up Projects in Existing ALM Installation 69Verifying Domains and Projects 70
Verification Process Overview 70Define an Exception File 71Verify a Project 72Verify a Domain 74
Repairing Domains and Projects 75Repairing a Project 76Repairing a Domain 77
Restoring Backed Up Projects and Repositories 78Restoring Projects from aMicrosoft SQLDatabase Server 79Restoring Projects from anOracle Database Server 79Restoring a Repository from the File System 80Restoring LAB_PROJECT 80
Verify Projects Again 81
Installation and UpgradeGuide - Windows
ALM (12.60 & 12.60 Patch 1) Page 4 of 206

Copy Site Administration Database Schema to the New Database Server 81Chapter 13: Upgrading the Site Administration Database Schema 83
SchemaUpgradeGuidelines 83Recovering a Lost Confidential Data Passphrase 84Managing SchemaChanges 85
Part 5: ALM Installation and Configuration 89Chapter 14: Installing ALM onMicrosoft Windows Systems 91
Installation Considerations: Windows 91Installing ALM: Windows 93Installing ALM in Silent Mode: Windows 104Configure the IIS Mail Service 105
Chapter 15: LAB_PROJECT Installation Considerations 107Chapter 16: Starting ALM 109
Browsing the ALM Program Folder 109Starting and Stopping ALM Services 109Starting ALM on aClient Machine 109Registering ALM on aClient Machine 112
Chapter 17: Integrating the ALM Application Server with aWeb Server 115Configuring IIS as a reverse proxy 115Configuring IIS as a Secure Reverse Proxy 117Configuring the IIS Web Server for SSL Offloading 118Configuring Apache as a reverse proxy 118Configuring Apache as a Secure Reverse Proxy 120Configuring the ApacheWeb Server for SSL Offloading 121
Chapter 18: Managing the ALM Application Server 123Changing the HeapMemory Size 123Changing the Application Server Port Number 123Configuring Secure Access onWindows Systems 124
Configure trust on the ALM server 124Configure a secure connection to the ALM application server (Jetty) 125Use TLS 1.2 instead TLS 1.1, TLS 1.0 or SSLv3 127Redirect http to https 128Set up encrypted communication with cookies 129
Configuring Secure Database Access 129Application Server Management Tools 134
Chapter 19: Customizing System Files 135Customizing Site Administration 135
Customizing the Site Administration Repository 135Customizing the qcbin Application 136
CustomizingMenus 136
Installation and UpgradeGuide - Windows
ALM (12.60 & 12.60 Patch 1) Page 5 of 206

Customizing the ALM System Tray Icon 138Customizing the ALM LoginWindow 139
Chapter 20: Uninstalling ALM 141Uninstalling ALM fromWindows Systems 141Removing ALM Client Components from aClient Machine 141
Part 6: Project Upgrade 143Chapter 21: Upgrading Projects 145
Deactivate and Remove Projects from Existing ALM/Quality Center Installation 145Copy Project Database Schemas to the New Database Server Machine 146Restore ALM Projects in New Site Administration Database Schema 146Upgrade Projects 149
About Upgrading Domains and Projects 149Upgrading a Project 150Upgrading a Domain 151
Chapter 22: Migrating the Project Repository 155About the Repository Migration 155Repository Migration Status Window 156ConfigureMigration Priority 159
Chapter 23: Performance Center / LAB_PROJECT Post-Upgrade Steps 161
Part 7: Appendix 163Appendix A: Troubleshooting the ALM Installation 165
Disabling Validation Checks for the InstallationWizard 165Checking the Installation and Configuration Log Files 170ALM Installation Already Exists 171Database Validator Fails 171Monitoring ALM Server Fails 172
Appendix B: Upgrade Preparation Troubleshooting 173Overview 173Quick Warning Reference 174
General Issues 174Schema Issues 175Data Issues 177
General Validation 178Supported Database Version 178Valid Database User SchemaName 179Mixed Table Ownership 179Repository over Database Feature 180Version Control Validation 180Database Permissions 180
Installation and UpgradeGuide - Windows
ALM (12.60 & 12.60 Patch 1) Page 6 of 206

Text Search Configuration 180Schema Validation 182
Tables 183Columns 184Indexes and Constraints 187Triggers 190Sequences 191Internal Quality Center Changes 192
Data Validation 194Duplicate Values 195Duplicate IDs 195Tree Inconsistencies 196Views 197Orphaned Entities 197Missing Entities 198Missing Lists and/or List Values 198Encrypted Values 199
Changing the Database User Schema 200Missing DatabaseObjects 200Missing List Warning 200Sequences Warning 201Changed DatabaseObjects 201Extra DatabaseObjects 202
Send Us Feedback 205
Installation and UpgradeGuide - Windows
ALM (12.60 & 12.60 Patch 1) Page 7 of 206
Welcome to this GuideWelcome to Application Lifecycle Management (ALM). ALM empowersorganizations to manage the core application lifecycle, from requirements throughdeployment, granting application teams the crucial visibility and collaborationneeded for predictable, repeatable, and adaptable delivery of modern applications.
This help contains the following information:
l Step-by-step instructions for installing and configuring ALM 12.60.l Step-by-step instructions for upgrading projects from earlier versions ofALM/Quality Center to work in ALM 12.60.
l Generic instructions for installing on ALM 12.60.
Note: To configure ALM to work with external authentication, refer to theMicro Focus Application Lifecycle Management External AuthenticationConfiguration Guide.
Installation and UpgradeGuide - Windows
ALM (12.60 & 12.60 Patch 1) Page 8 of 206

ALM (12.60 & 12.60 Patch 1) Page 9
Part 1: Installation Overview

ALM (12.60 & 12.60 Patch 1) Page 10
Installation and UpgradeGuide - WindowsPart 1: Installation Overview

Chapter 1: About ALM Technology andArchitectureALM is an enterprise-wide application that is based on Java 2 Enterprise Edition(J2EE) technology. J2EE technology provides a component-based approach to thedesign, development, assembly, and deployment of enterprise applications.
This section includes:
• Understanding the ALMComponents 11• Example of Basic ALMConfiguration 12• Example of Clustered ALMConfiguration 13
Understanding the ALM ComponentsAn ALM system contains the following components:
l ALM client components.When you open Application Lifecycle Management orSite Administration on your client machine, client components are downloadedto the machine. ALM client components interact with each other using .NET andCOM technologies. The client communicates with the server over HTTP/S.
l ALM server/Application server. Client requests are dispatched by servlets to thedeployed server. ALM comes with a built-in application server called the ALMApplication Server.The deployed application contains Application Lifecycle Management, SiteAdministration, and associated files which are packaged into a Web ApplicationArchive (WAR) file. Client requests from ALM are dispatched to the deployedapplication.The Java Database Connectivity (JDBC) interface is used to communicatebetween the application server and database server(s).The server can run on a Windows or Linux platform.
l Database server(s). The database server stores three types of schemas:l Site Administration schema. Stores information related to the ALM system, suchas domains, users, and site parameters. A row exists in this schema for eachproject you create.Irrespective of how you configure your system, there is always only one SiteAdministration schema.
l Lab_Project. Stores lab information related to managing functional andperformance testing on remote hosts, Performance Center server data, andlicenses. There is always only one Lab_Project schema.
ALM (12.60 & 12.60 Patch 1) Page 11 of 206

l Project schemas. Stores project information, such as entity data and user data.A separate schema exists for every project you create.By default, the project schemas are created on the same database server asthe Site Administration schema. These default project schemas are useful forsmaller setups. However, if you are working with a large number of projects orwith a small number of huge projects, it may be advisable to define additionaldatabase servers solely for storing project schemas. You define additionalservers in the Site Administration DB Servers tab. For details, refer to theMicro Focus Application Lifecycle Management Administrator Guide.
The schemas can reside on an Oracle or on a Microsoft SQL server. For detailedguidelines on deploying on the database server, refer to the Micro Focus ALMDatabase Best Practices Guide.
Note: To improve system performance, it is advisable that the ALM serverand the Database server be installed on separate machines and beconnected over LAN.
l Project repository. Stores all files to be used by all the projects in the system. Forexample, .xml files, templates, and attachments. By default the repository islocated on the same machine as the application server, which is useful forsmaller setups. For larger organizations however, or when working in a clusteredenvironment, it is advisable to install the repository on a dedicated machine.When working in a clustered environment, the repository must be accessible byall nodes.
l Load balancer.When working with a load balancer, client requests are transmittedto the load balancer and distributed according to server availability within thecluster.
l Tanuki wrapper. A Java service wrapper that allows ALM to be installed andcontrolled like a native Windows Service. It also includes advanced faultdetection software to monitor ALM.
Example of Basic ALM ConfigurationIn the basic ALM configuration, the ALM Jetty application server and the webserver are embedded with the installation and installed on the same machine.
Installation and UpgradeGuide - WindowsChapter 1: About ALM Technology and Architecture
ALM (12.60 & 12.60 Patch 1) Page 12 of 206

The following diagram illustrates a basic ALM system configuration:
To enhance security in this configuration:
l Enable SSL on the ALM Jetty and make it required.Alternatively, install an Apache or IIS web server acting as a reverse proxy infront of the ALM server and configure SSL on the reverse proxy server. Thisprotects the ALM server and uses the IIS or Apache security related features toenhance ALM security.For information on enabling SSL for all interactions with IIS, refer tohttp://www.iis.net/. SSL must be enabled for the entire IIS web server underwhich you install the ALM applications.For information on enabling SSL for all interactions with Apache, refer tohttp://httpd.apache.org/docs/current/ssl/ssl_howto.html.
l Use a firewall and close access to all incoming traffic except for the https/httpport used by ALM.
Example of Clustered ALM ConfigurationWithin the J2EE framework, ALM supports clustering. A cluster is a group ofapplication servers that run as if they were a single system. Each application serverin a cluster is referred to as a node.
Clusters provide mission-critical services to ensure maximum scalability. The loadbalancing technique within the cluster is used to distribute client requests acrossmultiple application servers, making it easy to scale to an infinite number of users.
Take the following into consideration when setting up a clustered environment:
Installation and UpgradeGuide - WindowsChapter 1: About ALM Technology and Architecture
ALM (12.60 & 12.60 Patch 1) Page 13 of 206

l All nodes must have access to the database server on which the SiteAdministration database schema resides.
l All nodes must have access to all database servers.l All nodes must have access to the repository. By default the repository is locatedon the first node in the cluster, and therefore all other nodes must have access tothe first node. If you install the repository on a dedicated machine, each nodemust have access to that machine.
l The load balancer must be configured with the ALM health monitor, using thefollowing KeepAlive uniform resource identifier (URI):
l Send String: GET /qcbin/servlet/tdservlet/
l Receive String: up and running
l The load balancer must be configured with session persistency. Set thepersistency to sticky session enabled or destination address affinity, depending onthe load balancer.
To enhance security in this configuration:
l Require SSL for the ALM virtual IP on the load balancer.l Use a firewall on each ALM server to block access to all incoming traffic exceptfor the http port (8080) or https port (8443) used by ALM.
l If you have external clients connecting to the ALM deployment from outside thecorporate firewall, place an Apache or IIS web server as a reverse proxy in frontof the corporate firewall behind which the ALM servers are deployed, and requireSSL on the reverse proxy.
Installation and UpgradeGuide - WindowsChapter 1: About ALM Technology and Architecture
ALM (12.60 & 12.60 Patch 1) Page 14 of 206

The following diagram illustrates a clustered ALM system configuration:
Installation and UpgradeGuide - WindowsChapter 1: About ALM Technology and Architecture
ALM (12.60 & 12.60 Patch 1) Page 15 of 206

Page 16 of 206ALM (12.60 & 12.60 Patch 1)
Installation and UpgradeGuide - WindowsChapter 1: About ALM Technology and Architecture

Chapter 2: How to Install and UpgradeThis chapter presents an overview of the installation and upgrade processesdescribed in this guide.
Note: For patch installations, refer to "Installing ALM Patches " on page 29.
Installing and upgrading ALM consists of the following steps:
1. Check that you meet all relevant installation prerequisites.
Before beginning the actual installation procedure, check that your ALM servermachine's operating system, your database server, and your client machines,all meet the prerequisite criteria for working with ALM 12.60. For details, see"Installation Prerequisites" on page 35.
2. (Upgrading) Check that you meet all relevant upgrade prerequisites.
If you are upgrading from an earlier version of ALM/Quality Center, it isimportant to carefully consider how to configure your new ALM system. Thisguide provides a suggested system configuration for upgrading projects fromyour existing system. Follow the suggested configuration as much as possible.Before beginning the installation, verify and repair all projects in the existingsystem, and then back up the projects, the database, and the repository.If you plan to upgrade a copy of the Site Administration database schema, youneed the Confidential Data Passphrase that was used in the existinginstallation, and you must manage changes to the existing schema (if any).For details, see "Pre-Installation Project Upgrade Steps" on page 63.
3. Install ALM 12.60.Install ALM 12.60 on your ALM server machine. The installation is guided by astep-by-step wizard. For details, see "ALM Installation and Configuration" onpage 89.
4. (Upgrading) Upgrade projects from your existing ALM system.
Upgrade your existing projects to ALM 12.60 based on your systemconfiguration. Note the project repository migration options. For details, see"Project Upgrade" on page 143.
ALM (12.60 & 12.60 Patch 1) Page 17 of 206

Page 18 of 206ALM (12.60 & 12.60 Patch 1)
Installation and UpgradeGuide - WindowsChapter 2: How to Install and Upgrade

Chapter 3: Common Installation ScenariosThere are many different scenarios in which you may need to install ApplicationLifecycle Management. This chapter lists the most common scenarios and providesyou with links to the specific sections in this guide that you need to follow for yourscenario. This enables you to read only the sections of this guide that are relevantto you, while still having the entire guide available as a reference.
• New ALM Installation 19• Upgrade ALMwith New Schema 20• Upgrade ALMwith Copied Schema 21• Upgrade ALMwith SameServer 23• Upgrade ALMwith SameDatabase Server 24
New ALM InstallationThe table below lists the steps for the following scenario:
l Installing ALM for the first time
l Windowsl SQL database
Installation Step Instructions
Prerequisites l "Prerequisites: Windows Operating Systems" onpage 41
l "Prerequisites: Microsoft SQL Database Servers"on page 53
l "Prerequisites: General" on page 57l "Prerequisites: Client-side" on page 59
Installation "Installing ALM on Microsoft Windows Systems" onpage 91
Start ALM "Starting ALM" on page 109
Manage ALM l "Managing the ALM Application Server" onpage 123
l "Customizing System Files" on page 135
Troubleshoot theInstallation
"Troubleshooting the ALM Installation" on page 165
ALM (12.60 & 12.60 Patch 1) Page 19 of 206

Upgrade ALM with New SchemaThe table below lists the steps for the following scenario:
l Upgrading ALM to a new versionl Windowsl SQL databasel New ALM serverl New database serverl New Site Administration schema
Installation Step Instructions
Prerequisites l "Prerequisites: Windows Operating Systems" on page 41l "Prerequisites: Microsoft SQL Database Servers" onpage 53
l "Prerequisites: General" on page 57l "Prerequisites: Client-side" on page 59
Project UpgradePrerequisites
l "Back Up Projects in Existing ALM Installation" onpage 69
l "Verifying Domains and Projects" on page 70l "Upgrade Preparation Troubleshooting" on page 173l "Repairing Domains and Projects" on page 75l "Restoring Backed Up Projects and Repositories" onpage 78
Installation "Installing ALM on Microsoft Windows Systems" on page 91
Start ALM "Starting ALM" on page 109
Installation and UpgradeGuide - WindowsChapter 3: Common Installation Scenarios
ALM (12.60 & 12.60 Patch 1) Page 20 of 206

Installation Step Instructions
Project Upgrade l "Deactivate and Remove Projects from ExistingALM/Quality Center Installation" on page 145
l "Copy Project Database Schemas to the New DatabaseServer Machine" on page 146
l "Restore ALM Projects in New Site AdministrationDatabase Schema" on page 146
l "Upgrade Projects" on page 149l "Migrating the Project Repository" on page 155l "Performance Center / LAB_PROJECT Post-UpgradeSteps" on page 161
Manage ALM l "Managing the ALM Application Server" on page 123l "Customizing System Files" on page 135
Troubleshoot theInstallation
"Troubleshooting the ALM Installation" on page 165
Upgrade ALM with Copied SchemaThe table below lists the steps for the following scenario:
l Upgrading ALM to a new versionl Windowsl SQL databasel New ALM serverl New database serverl Copying the existing Site Administration schema
Installation Step Instructions
Prerequisites l "Prerequisites: Windows Operating Systems" onpage 41
l "Prerequisites: Microsoft SQL Database Servers" onpage 53
l "Prerequisites: General" on page 57l "Prerequisites: Client-side" on page 59
Installation and UpgradeGuide - WindowsChapter 3: Common Installation Scenarios
ALM (12.60 & 12.60 Patch 1) Page 21 of 206

Installation Step Instructions
Project UpgradePrerequisites
l "Back Up Projects in Existing ALM Installation" onpage 69
l "Verifying Domains and Projects" on page 70l "Upgrade Preparation Troubleshooting" on page 173l "Repairing Domains and Projects" on page 75l "Restoring Backed Up Projects and Repositories" onpage 78
l "Copy Site Administration Database Schema to the NewDatabase Server" on page 81
l "Upgrading the Site Administration Database Schema"on page 83
Installation "Installing ALM on Microsoft Windows Systems" onpage 91
Start ALM "Starting ALM" on page 109
Project Upgrade l "Upgrade Projects" on page 149l "Migrating the Project Repository" on page 155l "Performance Center / LAB_PROJECT Post-UpgradeSteps" on page 161
Manage ALM l "Managing the ALM Application Server" on page 123l "Customizing System Files" on page 135
Troubleshoot theInstallation
"Troubleshooting the ALM Installation" on page 165
Installation and UpgradeGuide - WindowsChapter 3: Common Installation Scenarios
ALM (12.60 & 12.60 Patch 1) Page 22 of 206

Upgrade ALM with Same ServerThe table below lists the steps for the following scenario:
l Upgrading ALM to a new versionl Windowsl SQL databasel Same ALM serverl New database serverl New Site Administration schema
Installation Step Instructions
Prerequisites l "Prerequisites: Windows Operating Systems" on page 41l "Prerequisites: Microsoft SQL Database Servers" onpage 53
l "Prerequisites: General" on page 57l "Prerequisites: Client-side" on page 59
Project UpgradePrerequisites
l "Back Up Projects in Existing ALM Installation" onpage 69
l "Verifying Domains and Projects" on page 70l "Upgrade Preparation Troubleshooting" on page 173l "Repairing Domains and Projects" on page 75l "Restoring Backed Up Projects and Repositories" onpage 78
Installation "Installing ALM on Microsoft Windows Systems" on page 91
Start ALM "Starting ALM" on page 109
Installation and UpgradeGuide - WindowsChapter 3: Common Installation Scenarios
ALM (12.60 & 12.60 Patch 1) Page 23 of 206

Installation Step Instructions
Project Upgrade l "Deactivate and Remove Projects from ExistingALM/Quality Center Installation" on page 145
l "Copy Project Database Schemas to the New DatabaseServer Machine" on page 146
l "Restore ALM Projects in New Site AdministrationDatabase Schema" on page 146
l "Upgrade Projects" on page 149l "Migrating the Project Repository" on page 155l "Performance Center / LAB_PROJECT Post-UpgradeSteps" on page 161
Manage ALM l "Managing the ALM Application Server" on page 123l "Customizing System Files" on page 135
Troubleshoot theInstallation
"Troubleshooting the ALM Installation" on page 165
Upgrade ALM with Same Database ServerThe table below lists the steps for the following scenario:
l Upgrading ALM to a new versionl Windowsl SQL databasel New ALM serverl Same database serverl New Site Administration schema
Installation Step Instructions
Prerequisites l "Prerequisites: Windows Operating Systems" on page 41l "Prerequisites: Microsoft SQL Database Servers" onpage 53
l "Prerequisites: General" on page 57l "Prerequisites: Client-side" on page 59
Installation and UpgradeGuide - WindowsChapter 3: Common Installation Scenarios
ALM (12.60 & 12.60 Patch 1) Page 24 of 206

Installation Step Instructions
Project UpgradePrerequisites
l "Back Up Projects in Existing ALM Installation" onpage 69
l "Verifying Domains and Projects" on page 70l "Upgrade Preparation Troubleshooting" on page 173l "Repairing Domains and Projects" on page 75l "Restoring Backed Up Projects and Repositories" onpage 78
Installation "Installing ALM on Microsoft Windows Systems" on page 91
Start ALM "Starting ALM" on page 109
Project Upgrade l "Deactivate and Remove Projects from ExistingALM/Quality Center Installation" on page 145
l "Restore ALM Projects in New Site AdministrationDatabase Schema" on page 146
l "Upgrade Projects" on page 149l "Performance Center / LAB_PROJECT Post-UpgradeSteps" on page 161
Manage ALM l "Managing the ALM Application Server" on page 123l "Customizing System Files" on page 135
Troubleshoot theInstallation
"Troubleshooting the ALM Installation" on page 165
Installation and UpgradeGuide - WindowsChapter 3: Common Installation Scenarios
ALM (12.60 & 12.60 Patch 1) Page 25 of 206

Page 26 of 206ALM (12.60 & 12.60 Patch 1)
Installation and UpgradeGuide - WindowsChapter 3: Common Installation Scenarios

ALM (12.60 & 12.60 Patch 1) Page 27
Part 2: Patch Installation

ALM (12.60 & 12.60 Patch 1) Page 28
Installation and UpgradeGuide - WindowsPart 2: Patch Installation

Chapter 4: Installing ALM PatchesThis chapter provides general instructions for installing and uninstalling ALMpatches.
l Minor-minor patchesPatches that are new minor-minor versions (for example ALM 12.01) do notnecessarily contain changes to project database schemas. However, theycannot be rolled back once installed. For details about the Micro Focus versionnumbering scheme, refer to the Application Lifecycle ManagementAdministrator Guide.
l Patches with changes to project database schemasPatches that include changes to project database schemas upgrade ALM to anew minor-minor version (for example ALM 11.50 to ALM 11.52.) When installingsuch a patch, ALM automatically upgrades projects to the new minor-minorversion. For details about the Micro Focus version numbering scheme andautomatic upgrade of projects to a new minor-minor version, refer to theApplication Lifecycle Management Administrator Guide.To determine if the patch that you are installing changes project databaseschemas, refer to the Release Notes.
Caution: Uninstalling patches with changes to project database schemas isnot supported. Before installing a patch with changes to project databaseschemas, back up all projects.
Note: Before installing a patch, review the "Installation Considerations:Windows" on page 91 section for important installation information.
For specific instructions for the patch that you are installing, refer to the ReleaseNotes.
This section includes:
• Pre-Installation Checks and Considerations 30• Clustering Configuration 31• Installing the Patch 31• Uninstalling the Patch 33
ALM (12.60 & 12.60 Patch 1) Page 29 of 206

Pre-Installation Checks and ConsiderationsVerify that the patch that you are installing is compatible with your version of ALM.You can verify the installed version of Micro Focus ALM by going to theversions.xml file.
l ALM 12.60 Patch 1 or later: Located under C:\ProgramData\Micro Focus\ALM\conf
l ALM 12.60 or earlier: Located under C:\ProgramData\HP\ALM\conf
Refer to the patch Release Notes for prerequisite and compatibility information.
This section includes:
• SystemRequirements 30• Required Permissions 30
System RequirementsVerify that your ALM server machine meets the ALM system configurations.
Note: For the most up-to-date supported environments, seehttp://admhelp.microfocus.com/alm/specs/alm-qc-system-requirements.htm.
Required PermissionsVerify that you have the required permissions to install ALM on a server machine.
To install an ALM patch on a Windows operating system:
l You must be logged on as a local or domain user with administrator permissions.Your user name cannot include a pound sign (#) or accented characters (suchas, ä, ç, ñ).
Note: The patch installation must be performed by the same user whoperformed the full ALM installation.
l You must have the following file system and registry key permissions:l Full read permissions to all the files and directories under the directory inwhich ALM is installed. The default location for installation files is C:\ProgramFiles\Micro Focus\ALM. The patch automatically identifies the correctinstallation directory path on your server machine. Do not change this path.
l Full read, write, and execute permissions to the directory on which ALM isdeployed. The patch automatically identifies the deployment directory that was
Installation and UpgradeGuide - WindowsChapter 4: Installing ALM Patches
ALM (12.60 & 12.60 Patch 1) Page 30 of 206

specified during the initial installation of ALM.l Full read and write permissions to the repository directory which contains thesa and qc directories. The repository path is specified by the user during thefirst installation of ALM. The patch automatically identifies the correctrepository path on your server machine. For details on the repository, refer tothe Micro Focus Application Lifecycle Management Administrator Guide.
l Full read permissions to the system root (%systemroot%) directory.l Full read and write permissions to the installation and configuration log filesdirectory.o ALM 12.60 Patch 1 or later: Installation and configuration log files are writtento C:\ProgramData\Micro Focus\ALM\log.
o ALM 12.60 or earlier: Installation and configuration log files are written toC:\ProgramData\HP\ALM\log.
l Full read and write permissions to all the keys underHKEY_LOCAL_MACHINE\SOFTWARE.
Tip: The ProgramData folder is hidden by default. Files and folders must bevisible to view permissions. Show the hidden files by performing the relevantsteps for your operating system.
Clustering ConfigurationWhen deploying ALM over a cluster, you must install the patch on each of thecluster nodes.
Install the same version of the patch on all nodes, and insert the same repositoryand database details that you used on the first node.
You must use the same confidential data passphrase on all nodes.
It is important that you enter the repository path using the exact same characters onall nodes. For example, you cannot have the path on the first server node definedas C:\alm\repository and on additional nodes defined as \\server1\alm\repository.Rather the \\server1\alm\repository path must appear on every node.
Installing the PatchBefore installing the patch:
1. To prevent loss of files that were added or changed as a result of hot fixes orcustomization:
Installation and UpgradeGuide - WindowsChapter 4: Installing ALM Patches
ALM (12.60 & 12.60 Patch 1) Page 31 of 206

l All files, except for files with a .class extension, that were added or changedunder the <ALM Deployment folder>\webapps\qcbin folder should be copied tothe <ALM Deployment folder>\application\qcbin.war folder, including the foldertree hierarchy.
Note: Do not copy over .class files from the qcbin folder as these filesuse a different codebase from the patch.
l Any file added or changed under the <ALM File repository folder>\sa foldershould be copied to the <ALM File repository folder>\customerData folder,including the folder tree hierarchy.After installing the patch and updating the deployment with the changes, thedeployment process copies your files back to the qcbin and the sa folders.
Note: If user avatars are lost after a server upgrade, see this KB article.
2. Make sure that all users are logged out of ALM. You can check activeconnections from Site Administration, in the Site Connections tab.
3. Check the Readme or Release Notes for the patch to see if it contains changesto project database schemas. If so:a. Back up all ALM projects.
b. Set project update priorities (optional). For details, refer to the Micro FocusApplication Lifecycle Management Administrator Guide.
4. Stop the ALM server. In the system tray, right-click the ALM icon and chooseStop Application Lifecycle Management. Close the tray icon utility by right-clickingthe ALM icon and selecting Exit.
Note: There may be multiple system tray icon processes running on theALM server machine. After stopping the server, ensure that all systemtray icon processes are terminated before installation. System trayprocesses can also be terminated in Windows Task Manager.
Caution: If the patch includes an automatic upgrade, be aware that theupgraded site administration schema refers to the projects in production.
To install the patch:
On your ALM server machine, run the ALM_Installer EXE file. Alternatively you caninstall the patch from the command line. The installation structure is mandatory for
Installation and UpgradeGuide - WindowsChapter 4: Installing ALM Patches
ALM (12.60 & 12.60 Patch 1) Page 32 of 206

proper execution of the ALM EXE installer. The directory structure must be kept asis. Follow the installation and deployment instructions.
Note: If you quit the installation process while upgrading from ALM 12.60 toan ALM 12.60 patch, the ALM tray icon may disappear. To fix the issue, seethis KB article.
Patch installation automatically identifies the installation, deployment, andrepository paths from the properties file that was created during the first installationof ALM. The file is saved in the following path:
l ALM 12.60 Patch 1 or later: Under C:\ProgramData\MicroFocus\ALM\conf\qcConfigFile.properties.
l ALM 12.60 or earlier: Under C:\ProgramData\HP\ALM\conf\qcConfigFile.properties.If the installation fails, you receive an error message with the cause of the failureand the path to the log file.
Note: If the patch changes the database schema, the ALM ServerDeployment Wizard prompts you to confirm that you have backed up allprojects before proceeding with the deployment. You are not able to selectNext until you confirm that you have backed up your projects.
After the patch is installed, the next time users log in to ALM, new files aredownloaded and installed on the client machines. If file downloads are prohibitedthrough your browser, you can install these files through the ALM Client MSIGenerator add-in, available on Marketplace.
Uninstalling the PatchThere is no need to uninstall any patch before installing a new patch. Forinstructions on uninstalling a patch, refer to "Uninstalling ALM" on page 141.
Note: To uninstall an ALM 12.60 patch and revert to ALM 12.60, see this KBarticle.
Installation and UpgradeGuide - WindowsChapter 4: Installing ALM Patches
ALM (12.60 & 12.60 Patch 1) Page 33 of 206

Page 34 of 206ALM (12.60 & 12.60 Patch 1)
Installation and UpgradeGuide - WindowsChapter 4: Installing ALM Patches

ALM (12.60 & 12.60 Patch 1) Page 35
Part 3: Installation Prerequisites

ALM (12.60 & 12.60 Patch 1) Page 36
Installation and UpgradeGuide - WindowsPart 3: Installation Prerequisites

Chapter 5: Pre-Installation ChecklistReview and verify the following checklist before installing ALM. This checklistoutlines the information that you must supply during the installation process. Fordetailed prerequisite information, see the chapters in this part that are relevant toyour installation.
Check Information Required
InstallationMachine
l Operating system versionl CPU typel Free disk spacel Free memory
Note: For the most up-to-date supported environments,see http://admhelp.microfocus.com/alm/specs/alm-qc-system-requirements.htm.
Setup Paths l Installation pathl Deployment path
Note:
l You can accept the default paths offered by theInstallation and Configuration wizards, or enteralternative paths.
l The installation path must not include folders withaccented characters (for example, ä, ç, ñ).
l The installation path and the deployment pathcannot contain non-English characters.
l You must have full permissions on the installationand deployment directories.
License Key License file
ClusterDescription
l Is clustering used?l Cluster hosts
ALM (12.60 & 12.60 Patch 1) Page 37 of 206

Check Information Required
EncryptionPassphrases
l Communication security passphrasel Confidential data passphrase
Note: In a cluster, use the same passphrase on allnodes.
ApplicationServer
The port number
Mail Server l Server typel Server hostl Server port
Demo Project Do you require the Web-based demo application for workwith the Micro Focus Application Lifecycle ManagementTutorial?
Database Server l Database typel Database versionl Database server namel Database administrator user namel Database administrator user passwordl Database portl Oracle service name (Oracle only)l Default tablespace (Oracle only)l Temp tablespace (Oracle only)
SiteAdministration
l Site administrator user namel Site administrator password
Installation and UpgradeGuide - WindowsChapter 5: Pre-Installation Checklist
ALM (12.60 & 12.60 Patch 1) Page 38 of 206
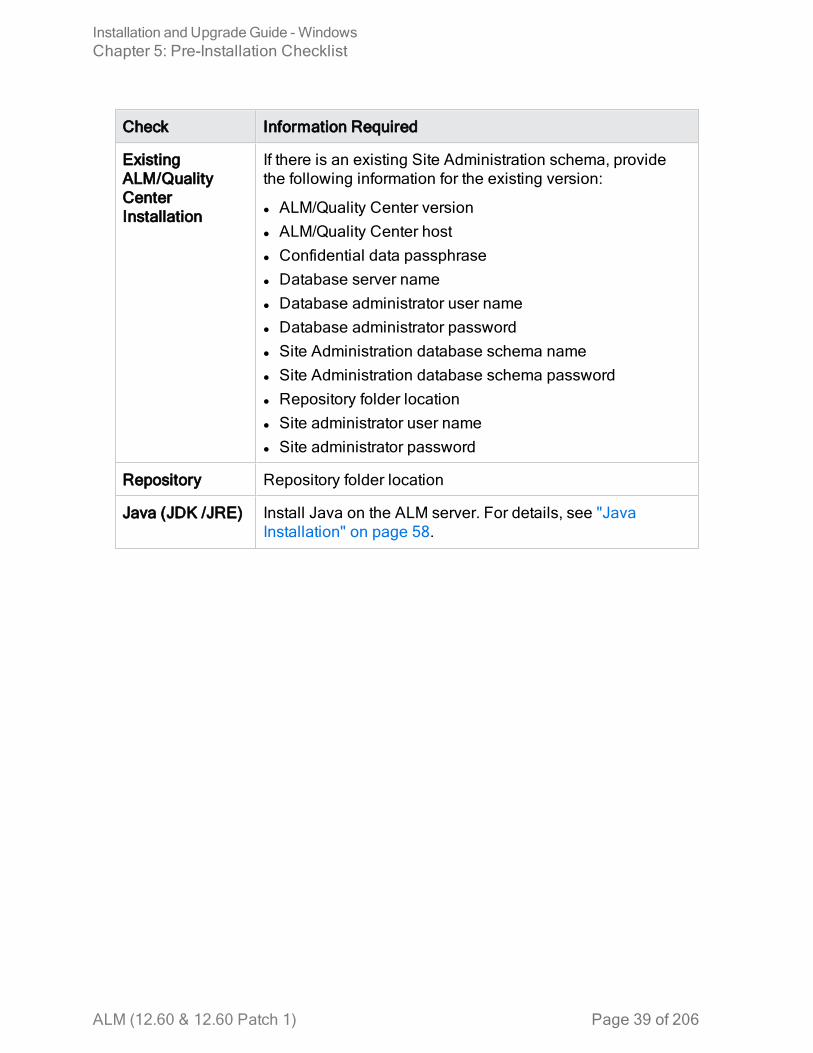
Check Information Required
ExistingALM/QualityCenterInstallation
If there is an existing Site Administration schema, providethe following information for the existing version:
l ALM/Quality Center versionl ALM/Quality Center hostl Confidential data passphrasel Database server namel Database administrator user namel Database administrator passwordl Site Administration database schema namel Site Administration database schema passwordl Repository folder locationl Site administrator user namel Site administrator password
Repository Repository folder location
Java (JDK /JRE) Install Java on the ALM server. For details, see "JavaInstallation" on page 58.
Installation and UpgradeGuide - WindowsChapter 5: Pre-Installation Checklist
ALM (12.60 & 12.60 Patch 1) Page 39 of 206

Page 40 of 206ALM (12.60 & 12.60 Patch 1)
Installation and UpgradeGuide - WindowsChapter 5: Pre-Installation Checklist

Chapter 6: Prerequisites: WindowsOperating SystemsThis chapter provides an overview of the prerequisites for installing ALM onWindows-based operating systems.
This chapter includes:
• SystemConfigurations:Windows 41• Required Permissions:Windows 41• Clustering:Windows 43• ALMRepository Path: Windows 43
System Configurations: WindowsVerify that your server machine meets the ALM system configurations.
Note: For the most up-to-date supported environments, seehttp://admhelp.microfocus.com/alm/specs/alm-qc-system-requirements.htm.
ALM can be deployed on a VMware ESX/ESXi server according to the VMWareguest operating system compatibility matrix.
Required Permissions: WindowsVerify that you have the required permissions to install ALM on a server machine.
Tip: Some permissions require access to the ProgramData folder. This folderis hidden by default. To show hidden files and folders, perform the relevantsteps for your operating system.
l If you are upgrading from a previous version of ALM/Quality Center with a remoterepository, the ALM/Quality Center application server user account must havenetwork access to the remote repository. For details, contact your networkadministrator.
l You must be logged on as a local or domain user with administrator permissions.Your user name cannot include a pound sign (#) or accented characters (suchas, ä, ç, ñ).
ALM (12.60 & 12.60 Patch 1) Page 41 of 206

Note: All related installation operations for the same version, such as patchinstallations or uninstalling ALM, must be performed by the same user.
l You must disable User Account Control (UAC) during the ALM installation andconfiguration.
Note: In Windows 8, UAC cannot be completely disabled. Instead, use theRun as Administrator option during installation and configuration.
l The Distributed Link Tracking Client service must be stopped during the ALMinstallation and configuration.
l We recommend disabling anti-virus software during the ALM installation andconfiguration.
l You must have the following file system and registry key permissions:l Full read permissions to all the files and directories under the directory inwhich ALM is installed. The installation directory path is specified by the userduring installation. By default, ALM writes the installation files to: C:\ProgramFiles\Micro Focus\ALM.
l Full read, write, and execute permissions to the directory on which ALM isdeployed. The deployment directory is specified by the user duringinstallation.
Note: Due to a Windows limitation, the deployment directory cannot beon a mapped drive.
l Full read and write permissions to the repository directory, which contains thesa and qc directories. The repository path is specified by the user duringinstallation. By default, it is located under the ALM deployment directory. Fordetails on the repository, refer to the Micro Focus Application LifecycleManagement Administrator Guide.
Note: Due to a Windows limitation, the repository path cannot be on amapped drive.
l Full read permissions to the system root (%systemroot%) directory. If you donot have these permissions, you can still install ALM, but you cannot installany patches.
l Full read and write permissions to the installation and configuration log filesdirectory.
Installation and UpgradeGuide - WindowsChapter 6: Prerequisites: Windows Operating Systems
ALM (12.60 & 12.60 Patch 1) Page 42 of 206

o ALM 12.60 Patch 1 or later: Installation and configuration log files are writtento C:\ProgramData\Micro Focus\ALM\log.
o ALM 12.60 or earlier: Installation and configuration log files are written toC:\ProgramData\HP\ALM\log.
l Full read and write permissions to all the keys underHKEY_LOCAL_MACHINE\SOFTWARE\Mercury Interactive.
Clustering: WindowsCheck with your system administrator whether you are installing ALM on a singlenode or as a cluster.
If you are installing ALM on cluster nodes, verify which machine to use as the firstnode to start the installation and the number of machines you should use. Thisdepends on the number of users and availability considerations.
When installing on additional nodes:
l ALM version. You must install the same version of ALM on all nodes.l Operating System. You must install the same version of the operating system,including all patches, updates, or hot fixes, on all nodes.
l Site Administration schema. All nodes must point to the Site Administrationschema.
l Database details. Configure all nodes with the same database information.l Confidential Data Passphrase. You must use the same Confidential DataPassphrase on all nodes.
l Repository path. All nodes must point to the repository path that is defined on thefirst node. It is important that you enter the repository path using the exact samecharacters on all nodes. For example, you cannot have the path on the firstserver node defined as c:\alm\repository and on additional nodes defined as\\server1\c$\alm\repository—the \\server1\c$\alm\repository path must appear onevery node.
ALM Repository Path: WindowsThe location of the repository directory is specified by the user during installation.You must have full control permissions to the ALM repository path as described in"Required Permissions: Windows" on page 41.
Note: Due to a Windows limitation, the repository path cannot be on amapped drive.
Installation and UpgradeGuide - WindowsChapter 6: Prerequisites: Windows Operating Systems
ALM (12.60 & 12.60 Patch 1) Page 43 of 206

Page 44 of 206ALM (12.60 & 12.60 Patch 1)
Installation and UpgradeGuide - WindowsChapter 6: Prerequisites: Windows Operating Systems

Chapter 7: Prerequisites: Oracle DatabaseServersThis chapter provides an overview of the prerequisites for connecting ALM to anOracle database server.
This chapter includes:
• Connecting ALM to anOracle Database Server 45• Site Administration Database SchemaConsiderations: Oracle 51• Oracle RAC Support 51
Connecting ALM to an Oracle Database ServerVerify the following:
Database type and version Verify that ALM supports your database typeand version.
Note: For the most up-to-date supportedenvironments, seehttp://admhelp.microfocus.com/alm/specs/alm-qc-system-requirements.htm.
Database server name Verify the name of the database server.
Database user permissions Verify that you have the database permissionsrequired to install ALM on the Oracle databaseserver. For a list of required permissions, see"User Permissions for Connecting ALM to anOracle Database Server" on page 47.
ALM (12.60 & 12.60 Patch 1) Page 45 of 206

Site Administration databaseschema
To install ALM on an existing SiteAdministration database schema (secondnode or upgrade), you must have:
l The existing database schema name andthe database administrator permissionsrequired to connect ALM to the databaseserver.
l Full read/write permissions on the existingrepository.
l ALMmust have access to the previous SiteAdministration schema repository path.
l Full read/write permissions for the ALM userto the previous schema repository path.
l The Confidential Data Passphrase that wasused to create the existing schema.
For schema name and passwordconsiderations, see "Site AdministrationDatabase Schema Considerations: Oracle" onpage 51.
Database tablespace nameand size
l Verify the name of the database server, andcheck the connection to the databaseserver. Ping the database server machinename to test DNS resolution.
l Verify you have the tablespace names(default and temporary) and the minimumtablespace sizes for storing the SiteAdministration database schema.
l Verify that the tablespace is not locked.
Database Column LengthSemantics
For Unicode databases, ensure that columnlength (NLS_LENGTH_SEMANTICS) isdefined according to characters (CHAR), andnot according to bytes (BYTE, the defaultoption).
This section also includes:
• User Permissions for Connecting ALM to anOracle Database Server 47
Installation and UpgradeGuide - WindowsChapter 7: Prerequisites: Oracle Database Servers
ALM (12.60 & 12.60 Patch 1) Page 46 of 206

User Permissions for Connecting ALM to an OracleDatabase ServerTo connect ALM to an Oracle database server, the installing database user musthave sufficient permissions to perform certain administrative tasks in Oracle. Thesetasks include creating the ALM project user schema, copying data betweenprojects, and checking that there is sufficient storage in a specific tablespace.
If you are unable to use the Oracle system user due to security reasons, werecommend that your database administrator create an ALM databaseadministrative user, for example qc_admin_db, with the specific privileges requiredto install ALM.
Your database administrator can create an ALM database administrative userusing the example script, qc_admin_db___oracle.sql, which is located in the\Utilities\Databases_scripts directory on the installation DVD. This script creates theALM database administrative user with the recommended grants required on thedatabase. Your database administrator should run the script and create this user onthe staging database server.
Note:When working with Oracle Database 12c, make sure to create an ALMdatabase administrative user and grant the necessary privileges. For detailson the required privileges, see "Database Administrative User Privileges"below.
This section includes:
• Database Administrative User Privileges 47• Project User Privileges 50
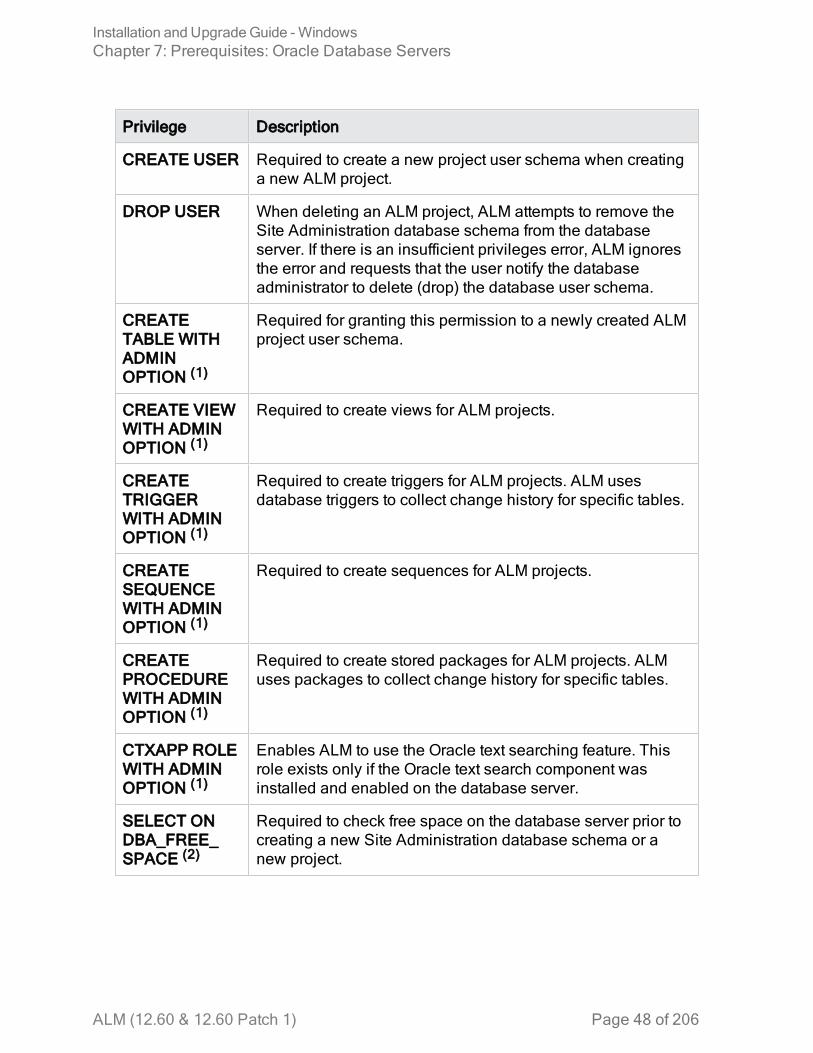
Database Administrative User Privileges
Following are the privileges required by the ALM database administrative user.Additional explanations about these privileges can be found in the notes at the endof the table.
Privilege Description
CREATESESSION WITHADMIN OPTION(1)
ALM uses this privilege to connect to the database as theALM database administrative user.
Installation and UpgradeGuide - WindowsChapter 7: Prerequisites: Oracle Database Servers
ALM (12.60 & 12.60 Patch 1) Page 47 of 206
Privilege Description
CREATE USER Required to create a new project user schema when creatinga new ALM project.
DROP USER When deleting an ALM project, ALM attempts to remove theSite Administration database schema from the databaseserver. If there is an insufficient privileges error, ALM ignoresthe error and requests that the user notify the databaseadministrator to delete (drop) the database user schema.
CREATETABLE WITHADMINOPTION (1)
Required for granting this permission to a newly created ALMproject user schema.
CREATE VIEWWITH ADMINOPTION (1)
Required to create views for ALM projects.
CREATETRIGGERWITH ADMINOPTION (1)
Required to create triggers for ALM projects. ALM usesdatabase triggers to collect change history for specific tables.
CREATESEQUENCEWITH ADMINOPTION (1)
Required to create sequences for ALM projects.
CREATEPROCEDUREWITH ADMINOPTION (1)
Required to create stored packages for ALM projects. ALMuses packages to collect change history for specific tables.
CTXAPP ROLEWITH ADMINOPTION (1)
Enables ALM to use the Oracle text searching feature. Thisrole exists only if the Oracle text search component wasinstalled and enabled on the database server.
SELECT ONDBA_FREE_SPACE (2)
Required to check free space on the database server prior tocreating a new Site Administration database schema or anew project.
Installation and UpgradeGuide - WindowsChapter 7: Prerequisites: Oracle Database Servers
ALM (12.60 & 12.60 Patch 1) Page 48 of 206

Privilege Description
SELECT ONSYS.DBA_TABLESPACES(2)
Required to collect a list of tablespaces that exist on thedatabase server prior to creating a new Site Administrationdatabase schema or a new project.
SELECT ONSYS.DBA_USERS (2)
Required to verify the existence of specific database projectusers. For example, you might want to verify the existence ofan Oracle CTXSYS user before creating a new ALM project.
SELECT ONSYS.DBA_REGISTRY (2)
Required to verify that the text search component is installedon the database server.
SELECT ONSYS.DBA_ROLES (2)
Required to verify that the text search role (CTXAPP) isinstalled on the database server.
SELECT ANYTABLE WITHADMINOPTION (1)
and
INSERT ANYTABLE
Required for various administrative operations whenupgrading the Site Administration database schema duringinstallation using the copy and upgrade method, and forenhancing performance when copying a project that has thesame source and target database server.
Note:
l(1) An ALM database administrative user must have privileges with AdminOption.
l(2) The SELECT ON SYS privileges can be given directly by the tableowner, or through a database application role. To avoid giving theseprivileges each time, you can grant this role to the ALM databaseadministrative user. The recommended name for this role is QC_SELECT_ON_SYS_OBJECTS. You can create this role using the qc_sys_db___oracle.sql example script, which is located in the \Utilities\Databases_scriptsdirectory on the installation DVD. You should run this script before you runthe qc_admin_db___oracle.sql script.
Installation and UpgradeGuide - WindowsChapter 7: Prerequisites: Oracle Database Servers
ALM (12.60 & 12.60 Patch 1) Page 49 of 206

Project User Privileges
When creating a new project, ALM creates a project user schema. This userschema hosts all the tables that are used by the project for storing and retrievingdata. Following are the required privileges for an ALM project user schema:
Project UserSchemaPrivilege Description
QUOTAUNLIMITED ON<defaulttablespace>
Required for creating database objects that are owned by theALM project user schema. This privilege allows users tocreate tables in the default tablespace. It replaces theUNLIMITED TABLESPACE system privilege that gave userssystem privileges to create tables in any tablespace,including the SYSTEM tablespace.
CREATESESSION
ALM uses this privilege to connect to the database userschema to perform required operations. For example creatingdatabase objects such as tables, and using them to insert,retrieve, and delete data.
l CREATETABLE
l CREATEVIEW
l CREATETRIGGER
l CREATESEQUENCE
l CREATEPROCEDURE
l CTXAPP Role
For a description of these privileges, see "DatabaseAdministrative User Privileges" on page 47.
Tip: The installation DVD contains an example script that describes therecommended permissions required for the ALM database project userschema. This script contains information and does not need to be run. It islocated at \Utilities\Databases_scripts\qc_project_db_oracle.sql.
Installation and UpgradeGuide - WindowsChapter 7: Prerequisites: Oracle Database Servers
ALM (12.60 & 12.60 Patch 1) Page 50 of 206

Site Administration Database SchemaConsiderations: OracleBe aware of the following schema name and password considerations:
l The default Site Administration database schema name is qcsiteadmin_db. If youwant to rename the schema, you can change the name when configuring theALM installation.
Note: The Site Administration database schema name can only containEnglish characters or numbers.
l You can create your own ALM user password for accessing the SiteAdministration database schema.
l If there is an existing Site Administration database schema, you can create acopy of the existing schema and upgrade the copy. This enables you to workwith ALM 12.60 and previous versions of ALM/Quality Center simultaneously.
Note: This scenario does not apply to working with Performance Centerprojects. After you upgrade LAB_PROJECT, you must then upgradePerformance Center projects before they can be used.
Oracle RAC SupportOracle RAC is a way to enhance Oracle database availability and scalability,allowing it to interact with more than one database instance.
ALM RAC support includes:
l Load balancing between Oracle instances.l Failover between all specified Oracle RAC nodes at initial connection.ALM RAC support does not include:
l TAF (Transparent Application Failover) support. A user failing to complete arequest upon an Oracle instance crash is required to perform the activity againwith a working Oracle instance.
To enable Oracle RAC support:
1. Verify that a file containing information of Oracle database addresses is savedon your ALM machine. The file is named tnsnames.ora. The file should containinformation similar to the following examples:
Installation and UpgradeGuide - WindowsChapter 7: Prerequisites: Oracle Database Servers
ALM (12.60 & 12.60 Patch 1) Page 51 of 206

a. This first example shows an RAC TNS Alias using all cluster nodes in theADDRESS sub-section and a sample of utilizing the Load balance andFailover features:
Example:OrgRAC =(DESCRIPTION =
(ADDRESS_LIST=(FAILOVER = on)(LOAD_BALANCE = on)(ADDRESS= (PROTOCOL = TCP)(HOST = server1)(PORT = 1521))(ADDRESS= (PROTOCOL = TCP)(HOST = server2)(PORT = 1521))(ADDRESS= (PROTOCOL = TCP)(HOST = server3)(PORT = 1521))
)(CONNECT_DATA=(SERVICE_NAME = myrac.yourcompany.com))
)
b. This second example shows an RAC TNS Alias using Single ClientAccess Name (SCAN). This enables Oracle 11gR2 clients to connect to thedatabase with the ability to resolve multiple IP addresses, reflect multiplelisteners in the cluster and handle public client connections. For details onworking with RAC SCAN, refer to the Oracle documentation.
Example:OrgRAC_Scan =(DESCRIPTION =
(ADDRESS_LIST=(FAILOVER = on)(LOAD_BALANCE = on)(ADDRESS= (PROTOCOL = TCP)(HOST = myrac-cluster-scan)(PORT = 1521))
(CONNECT_DATA=(SERVICE_NAME = myrac.yourcompany.com))
)
2. Verify that you have the address of the TNS server to which ALM should refer,for example, OrgRAC.
Installation and UpgradeGuide - WindowsChapter 7: Prerequisites: Oracle Database Servers
ALM (12.60 & 12.60 Patch 1) Page 52 of 206

Chapter 8: Prerequisites: Microsoft SQLDatabase ServersThis chapter provides an overview of the prerequisites for connecting ALM to aMicrosoft SQL database server.
In addition to the information presented in this chapter, you can find moreinformation on configuring the database server, including information on supportedcharacter sets, in the Micro Focus ALM Database Best Practices Guide.
This chapter includes:
• Connecting ALM to aMicrosoft SQLDatabase Server 53• User Permissions for Connecting ALM to aMicrosoft SQLDatabase Server 54• Site Administration Database SchemaConsiderations: SQL 56
Connecting ALM to a Microsoft SQL DatabaseServerVerify the following:
Database type and version Verify that ALM supports your database typeand version.
Note: For the most up-to-date supportedenvironments, seehttp://admhelp.microfocus.com/alm/specs/alm-qc-system-requirements.htm.
Database server name Verify the name of the database server.
Database user permissions Verify that you have the database permissionsrequired to connect ALM to the Microsoft SQLdatabase server (not applicable for WindowsAuthentication). For a list of requiredpermissions, see "User Permissions forConnecting ALM to a Microsoft SQL DatabaseServer" on the next page.
ALM (12.60 & 12.60 Patch 1) Page 53 of 206

Site Administration databaseschema
To install ALM on an existing SiteAdministration database schema (secondnode or upgrade), you must have:
l The existing database schema name andthe database administrator permissionsrequired to connect ALM to the databaseserver.
l Full read/write permissions on the existingrepository.
l ALMmust have access to the previous SiteAdministration schema repository path.
l Full read/write permissions for the ALM userto the previous schema repository path.
l The Confidential Data Passphrase that wasused to create the existing schema.
For schema name and passwordconsiderations, see "Site AdministrationDatabase Schema Considerations: SQL" onpage 56.
Text Search Verify that the text search component isinstalled on the server, even if you do notintend to use it.
User Permissions for Connecting ALM to aMicrosoft SQL Database ServerTo connect ALM to a Microsoft SQL database server, the installing database usermust have sufficient permissions to perform certain administrative tasks in SQL.
If you have the SQL sa login, you can use it to install ALM. If you are unable to usethe SQL sa login due to security reasons, we recommend that your databaseadministrator create an ALM database administrative login, for example td_db_admin, with the specific privileges required to install ALM.
The td_db_admin login must have the Database Creators role. You must also grantthe td_db_admin login the Security Administrators role. This allows the td_db_adminlogin to create and add the td user with only those privileges required for runningALM, and to run the Maintain Project activities, such as Verify, Repair, and Update.
Installation and UpgradeGuide - WindowsChapter 8: Prerequisites: Microsoft SQL Database Servers
ALM (12.60 & 12.60 Patch 1) Page 54 of 206

To create an ALM database administrative login on a Microsoft SQL Server:
1. Open the SQL Server Management Studio.2. In the Object Explorer pane, under the ALM database server, expand the
Security folder.3. Right-click the Logins folder, and select New Login.4. Type td_db_admin as the login name, and select the authentication type (enter
password if necessary).5. Click the Server Roles tab, and select the dbcreator and securityadmin options.6. Click OK.To test the ALM database administrative login after connecting via this login (SQL ServerAuthentication):
1. Verify the select sysdatabases table permission in the master database:
SELECT name FROM sysdatabases where name=<db_name>
2. Verify the create database permission:
CREATE DATABASE <dbName> -- the database name must not already exist
3. Verify the drop database permission:
DROP DATABASE <database_name> -- the database name must exist
4. Verify the select syslogins permission:
SELECT COUNT(*) FROM master..syslogins WHERE name=<dbOwnerName>
Note: The dbOwnerNamemust be set to td.
To test the ALM database administrative login permissions after connecting via this login(Windows Authentication):
1. Verify the change database context permission:
USE <dbName>
2. Verify the create database permission:
CREATE DATABASE <dbName> -- the database name must not already exist
3. Verify the select on syslogins permission:
Installation and UpgradeGuide - WindowsChapter 8: Prerequisites: Microsoft SQL Database Servers
ALM (12.60 & 12.60 Patch 1) Page 55 of 206

SELECT COUNT(*) FROM master..syslogins WHERE name='<dbOwnerName>'
4. Verify the select on sysusers permission:
SELECT COUNT(*) FROM master..sysusers WHERE name='<dbOwnerName>'
Site Administration Database SchemaConsiderations: SQLBe aware of the following schema name and password considerations:
l The default Site Administration database schema name is qcsiteadmin_db. If youwant to rename the schema, you can change the name when configuring theALM installation.
Note: The Site Administration database schema name can only containEnglish characters or numbers.
l You can create your own ALM user password for accessing the SiteAdministration database schema.
l If there is an existing Site Administration database schema, you can create acopy of the existing schema and upgrade the copy. This enables you to workwith ALM 12.60 and previous versions of ALM/Quality Center simultaneously.
Note: This scenario does not apply to working with Performance Centerprojects. After you upgrade LAB_PROJECT, you must then upgradePerformance Center projects before they can be used.
Installation and UpgradeGuide - WindowsChapter 8: Prerequisites: Microsoft SQL Database Servers
ALM (12.60 & 12.60 Patch 1) Page 56 of 206

Chapter 9: Prerequisites: GeneralThis chapter provides an overview of various prerequisites for installing ALM.
This chapter includes:
• License File 57• Security Passphrases 57• Mail Server Information 57• Java Installation 58• Conflicting Applications 58
License FileVerify that you have the ALM license file.
To activate your license, see http://enterpriselicense.hpe.com/redirector/home) andenter your Entitlement Order Number (EON).
The license file has a .dat file extension by default. Make a note of where you savethe file, as during the ALM configuration process you need to specify a path to it.
If you do not have a license, see http://enterpriselicense.hpe.com/ and click theContact Licensing Support link.
Security PassphrasesVerify that you have passphrases for confidential data and communication securityencryption.
For secondary cluster nodes, verify that you have the confidential data encryptionpassphrase that you used to install the primary cluster.
You must use the same confidential data passphrase as was used for the previousinstallation.
Performance Center: You must use the same communication securitypassphrase for the ALM and Performance Center server configurations.
Mail Server InformationA mail server enables ALM users to send emails to other users in a project. Youselect which server to use as part of the installation configuration process.
ALM (12.60 & 12.60 Patch 1) Page 57 of 206

Before installing ALM, decide which mail server to use. Ask your systemadministrator for assistance. If you are using an SMTP Server, check that you havethe SMTP Server name and port. The installer checks that the specified mail servername and port are valid and that the mail server is running.
Java InstallationALM requires Java Development Kit (JDK) or Java Runtime Environment (JRE) tobe installed prior to installing ALM (only x64 is supported).
Oracle Java JDK or JREDownload and install JDK or JRE from the following URL:http://www.oracle.com/technetwork/java/javase/downloads/jre8-downloads-2133155.html.
OpenJDK 81. Download from the following URL: https://adoptopenjdk.net/releases.html.2. Unzip the OpenJDK file to a folder.3. Open the System Properties dialog box. In the Advanced tab, click Environment
Variables.4. Under System Variables, edit the Path and add the OpenJDK bin path (for
example: C:\OpenJDK8_x64_Win_jdk8u172-b11\jdk8u172-b11\bin).5. To verify that Java was installed correctly, run java -version in the command
prompt.
Conflicting ApplicationsTo work with ALM, you may need to disable conflicting applications that arerunning on the ALMmachine. For a list of these applications, see this KB article.
Installation and UpgradeGuide - WindowsChapter 9: Prerequisites: General
ALM (12.60 & 12.60 Patch 1) Page 58 of 206

Chapter 10: Prerequisites: Client-sideThis chapter provides an overview of the prerequisites for working with ALM on aclient machine. The steps described in this chapter are performed on the clientmachines, and not on the machine on which ALM server is installed.
This chapter includes:
• SystemConfigurations 59• PermissionsRequired to Download ALMClient Components 59• Internet Explorer Configuration 60• Enabling User Account Control (UAC) 61
System ConfigurationsVerify that client machines meet the ALM system configurations seehttp://admhelp.microfocus.com/alm/specs/alm-qc-system-requirements.htm.
Additional ConsiderationsThe following considerations must also be taken into account:
l If you are integrating ALM with other Micro Focus testing tools, you must modifythe DCOM permissions on your client machine. For details, see this KB article.ALM Edition:Modifying DCOM permissions is not required for running Functionaltest sets (server-side test execution).
l You can work with the ALM client using a remote desktop.l For customers using remote or mass distribution mechanisms, ALM clientcomponents can be deployed locally on client machines by running a self-extracting msi file. You build the msi file by running the ALM Client MSIGenerator, available from Marketplace.
Permissions Required to Download ALM ClientComponentsTo enable ALM to work with Micro Focus testing tools as well as various otherintegrations and third-party tools, you need to log in to the client machine withadministrator privileges. These privileges are required to install the ALM ClientRegistration add-in, which you use to register ALM client components and SiteAdministration client components on your client machine.
File System Permissions
ALM (12.60 & 12.60 Patch 1) Page 59 of 206

You must have the following file system permissions:
l Full read and write permissions on the HP\ALM-Client deployment folder. This islocated at %ALLUSERSPROFILE%.
l Full read and write permissions to the Temp (%TEMP% or %TMP%) directory.The installer program writes installation and log files to this directory. This isgenerally located at C:\Users\<username>\AppData\Local\Temp.
Internet Explorer ConfigurationBefore you download Application Lifecycle Management on a client machine, youmust perform the following configurations to the Internet Explorer browser on theclient machine.
l Configure the Custom Level security settings. The Custom Level security settingshould be configured for the specific zone of the ALM server.
l Set Internet Explorer as the default Web browser. This ensures that external linksto ALM entities can open in ALM.
To configure security settings on the client machine:
1. In Internet Explorer, select Tools > Internet Options. The Internet Options dialogbox opens.
2. Click the Security tab. The Web content zone of the ALM server (Internet orLocal intranet) is automatically selected. Click Custom Level.
3. In the Security Settings dialog box, configure the following settings:Under .NET Framework-reliant components:
l Set Run components not signed with Authenticode to Enable.l Set Run components signed with Authenticode to Enable.Under ActiveX controls and plug-ins:
l Set Run ActiveX controls and plug-ins to Enable.l Set Download signed ActiveX controls to Enable or Prompt.
Note: You do not need to enable Download signed ActiveX controls ifyou install the ALM client using the ALM Client MSI Generator Add-in.This allows you to install all ALM modules on a client machine withoutdownloading them through a browser.
4. On Windows 7:l It is suggested that you add the ALM server site to the Trusted Sites securityzone. This is not mandatory.
Installation and UpgradeGuide - WindowsChapter 10: Prerequisites: Client-side
ALM (12.60 & 12.60 Patch 1) Page 60 of 206

l Disable the Protected Mode for the Trusted Sites security zone.5. Click OK.To set Internet Explorer as the default web browser:
1. In Internet Explorer, select Tools > Internet Options. The Internet Options dialogbox opens.
2. Click the Programs tab.3. Under Default web browser, make sure that Internet Explorer is set as the default
browser. If not, click the Make default button.
Enabling User Account Control (UAC)If you enable UAC on a Microsoft Windows 7, 2008R2, or 2012 operating system,be aware of the following considerations:
l To register ALM client components, you must run Internet Explorer as theadministrator.
l To register ALM client components on a shared location of a client machine, youmust run Internet Explorer as the administrator.
l To install and run ALM Client MSI Generator, and to run ALM client MSI files, youmust log in with administrator permissions.
l Administrator permissions are required to run the ALM Tray Icon.
Installation and UpgradeGuide - WindowsChapter 10: Prerequisites: Client-side
ALM (12.60 & 12.60 Patch 1) Page 61 of 206

Page 62 of 206ALM (12.60 & 12.60 Patch 1)
Installation and UpgradeGuide - WindowsChapter 10: Prerequisites: Client-side

ALM (12.60 & 12.60 Patch 1) Page 63
Part 4: Pre-Installation ProjectUpgrade Steps

ALM (12.60 & 12.60 Patch 1) Page 64
Installation and UpgradeGuide - WindowsPart 4: Pre-Installation Project Upgrade Steps

Chapter 11: Project UpgradeConsiderationsIf you are upgrading from an earlier version of ALM/Quality Center, this chapterpresents project upgrade considerations to be taken into account before installingALM 12.60.
Note: For upgrade troubleshooting details, see "Upgrade PreparationTroubleshooting" on page 173.
This section includes:
• Upgrade Versions 65• Suggested ALMSystemConfiguration 65
Upgrade VersionsThe following table describes how to upgrade projects from previous QualityCenter and ALM versions.
Fromversion: To ALM 12.60:
ALM12.00 -12.5x
Upgrade projects directly to ALM 12.60.
ALM11.52
Upgrade to ALM 12.53 or 12.55, then upgrade to ALM 12.60.
ALM11.00
Projects must first be migrated to ALM 12.21. For details, see theALM 12.21 Installation and Upgrade Guide.
Caution: Before performing any upgrade, the current repository must bemoved to the correct location for the new version.
Suggested ALM System ConfigurationThe ALM system includes the following main components: The ALM server, thedatabase server, and the project repository. For details regarding the function of
ALM (12.60 & 12.60 Patch 1) Page 65 of 206

each component within the ALM system, see "About ALM Technology andArchitecture" on page 11.
When planning your installation and upgrade strategy, decide whether to install thenew ALM system on new system components, or to reuse components from theexisting system.
It is strongly recommended that you not use any of the existing components as partof the new system.
l ALM server. To install the new version of the ALM server on the same machinewhere the existing ALM server is installed, first reformat or reinstall the machine'soperating system. You can also uninstall the old version of ALM. For moredetails on uninstalling ALM, see "Uninstalling ALM" on page 141.
l Database server. Install an updated version of the database server on a separatemachine, or create a new instance of the existing server on the machine onwhich it is currently installed.
l Project Repository. Create a copy of the existing repository to be used by the newsystem.
Advantages
Following this best practice produces two functioning ALM systems:
l The original system that can open and work with existing projects.l The new system to which existing projects will be upgraded.Each system is totally separate, and any problem encountered in one does notimpact the other.
This best practice has the distinct advantage of enabling you to incrementallyupgrade your projects. Since there are two functioning ALM systems, there is noneed to deactivate all projects at once. You can deactivate projects individually inthe old system, back them up, and then reactivate them in the new system,upgrading them one-by-one. Without two functioning ALM systems, all projectswould remain inactive until their upgrades are complete, a significant amount ofproject downtime.
Note: Before beginning the upgrade process you must back up the databaseserver and the project repository. Continuing to work in the old ALM systemafter backing up causes the backup to be out of date.
The following are two examples of critical problems that may arise when you do notfollow the suggested upgrade approach:
l Unnecessary project downtime. If a project becomes corrupted before youcomplete its upgrade, there will be no option but to retrieve a backup copy of it.
Installation and UpgradeGuide - WindowsChapter 11: Project Upgrade Considerations
ALM (12.60 & 12.60 Patch 1) Page 66 of 206

Depending on organizational policy this process may take a few days, meaningthat the project is not available at all for this amount of time.If the original ALM system is functioning however, you can go back to a workingversion of the project immediately and not be dependent on waiting for thebackup to arrive, thus avoiding unnecessary project downtime.
l Damaged project repository. If you install the new version of the ALM server on thesame machine, you must first uninstall the existing ALM server. It is possible thatyou may subsequently discover a problem with the project repository thatrequires the original ALM server to repair it.Your only course of action is to:a. Uninstall the new version.b. Reinstall the old version.c. Fix the project repository.d. Uninstall the old version.e. Reinstall the new version.
Installation and UpgradeGuide - WindowsChapter 11: Project Upgrade Considerations
ALM (12.60 & 12.60 Patch 1) Page 67 of 206

Page 68 of 206ALM (12.60 & 12.60 Patch 1)
Installation and UpgradeGuide - WindowsChapter 11: Project Upgrade Considerations

Chapter 12: Project Upgrade Pre-Installation ActivitiesThis chapter describes project upgrade steps that must be performed beforeinstalling ALM 12.60
This section includes:
• BackUp Projects in Existing ALM Installation 69• Verifying Domains and Projects 70• Repairing Domains and Projects 75• Restoring Backed Up Projects and Repositories 78• Verify Projects Again 81• CopySite Administration Database Schema to the New Database Server 81
Back Up Projects in Existing ALM InstallationBack up all your projects in the existing ALM installation. Projects should bebacked up before running the verify and repair tools.
When you run the repair or upgrade process, ALM performs changes on yourprojects to align them with the specifications for the current version of ALM. Youmust back up your projects before you start to repair or upgrade them.
We strongly recommend that you deactivate projects before backing them up. If youmust back up while your project is still active, you must back up the databasebefore the file system. We also recommend backing up the file system as soon aspossible after backing up the database. To back up and restore data from activeprojects, see this KB article.
Note:
l The repair process makes changes to the project database schema only.Before running the repair process, you should back up the projectdatabase schema on the database server, and you should back up theproject data in the file system.
l Before you run the upgrade process, perform a full backup of your projectsthat includes the project database schema and the project repository.
l Version Control: Version control enabled projects cannot be backed upwhile there are checked out entities. All entities must be checked in to the
ALM (12.60 & 12.60 Patch 1) Page 69 of 206

corresponding version of Quality Center or ALM. To determine if there arechecked out entities, see this KB article.
To back up the project database schema on the database server:
l Microsoft SQL database. To back up the project database schema on thedatabase server, see this KB article.
l Oracle database. To back up the project database schema on the databaseserver, see this KB article.
Verifying Domains and ProjectsVerify all projects in the existing ALM installation.
The verify and repair process checks that the project schema structure and dataintegrity are correct for the existing version of ALM. It is important to verify thisbefore proceeding with the new installation, since the projects on the old servershould be aligned prior to upgrade.
You can run the verify tool per individual project, or on the domain level to verify allprojects in the domain.
This section includes:
• Verification ProcessOverview 70• Define an Exception File 71• Verify a Project 72• Verify a Domain 74
Verification Process OverviewThe verification process:
l Checks the correctness of the database user schema and data in a project.l Detects problems in your environment, settings, schema structure, and dataintegrity that could cause the upgrade to fail.
l Generates a verification report which alerts you to problems that can be repairedby ALM and problems that you should manually repair.
By default, the verification report is saved on the ALM server machine. To changethis default location, refer to the Micro Focus Application Lifecycle ManagementAdministrator Guide.
Installation and UpgradeGuide - WindowsChapter 12: Project Upgrade Pre-Installation Activities
ALM (12.60 & 12.60 Patch 1) Page 70 of 206

Define an Exception FileIf you have made changes to a project database user schema such as the additionof tables or columns, the verification, repair, or upgrade processes may fail. Youcan define an exception file for objects that are added manually to the databaseuser schema, and are not defined in the schema configuration file. This instructsALM to ignore these changes.
You can use the exception file to ignore warnings for extra tables, views, columns,and sequences. For any other problem that requires manual repair, consult withyour database administrator.
You must use the same exception file when running the verification, repair, orupgrade processes.
You can set an exception file for a single project or for all projects in SiteAdministration.
Caution: Using the exception file to ignore warnings for objects that areadded manually to the schema may compromise the stability of your projectupgrade and the validity of the database user schema.
To define an exception file:
1. Copy the SchemaExceptions.xml file from the ALM installation directory. Bydefault, the file is located in <ALM installationpath>\ALM\data\sa\DomsInfo\MaintenanceData.
2. Create the exception file, for example,my_exceptions.xml, and define theexceptions as follows:l For an extra table:
<TableMissing><object pattern="MY_Table" type="extra"/>
</TableMissing>
l For an extra view:
<ViewMissing><object pattern="MY_VIEW" type="extra"/>
</ViewMissing>
l For an extra column:
<ColumnMissing>
Installation and UpgradeGuide - WindowsChapter 12: Project Upgrade Pre-Installation Activities
ALM (12.60 & 12.60 Patch 1) Page 71 of 206

<object pattern="MY_COLUMN" type="extra"/></ColumnMissing>
l For an extra sequence:
<SequenceMissing><object pattern="MY_SEQUENCE" type="extra"/>
</SequenceMissing>
3. To set an exception file for a single project:a. In Site Administration, click the Site Projects tab.b. In the Projects list, select a project. In the right pane, select the Project
Details tab. The project's details are displayed.c. Under Project Database, click Exception File. The Edit Exception File dialog
box opens.d. Type the file location. The file is located under <<Repository
path>\sa\DomsInfo\MaintenanceData.4. To set an exception file for all projects:
a. In Site Administration, click the Site Configuration tab.b. Add the UPGRADE_EXCEPTION_FILE parameter to the list of parameters
and define the exception file location. A template example of an empty fileis located under <Repository path>\sa\DomsInfo\MaintenanceData.For details, refer to the Micro Focus Application Lifecycle ManagementAdministrator Guide.
Verify a ProjectThis section describes how to verify a single project.
1. In Site Administration, click the Site Projects tab.2. In the Projects list, select a project.
3. Click the Maintain Project button and choose Verify Project. The VerifyProject dialog box opens.
Installation and UpgradeGuide - WindowsChapter 12: Project Upgrade Pre-Installation Activities
ALM (12.60 & 12.60 Patch 1) Page 72 of 206
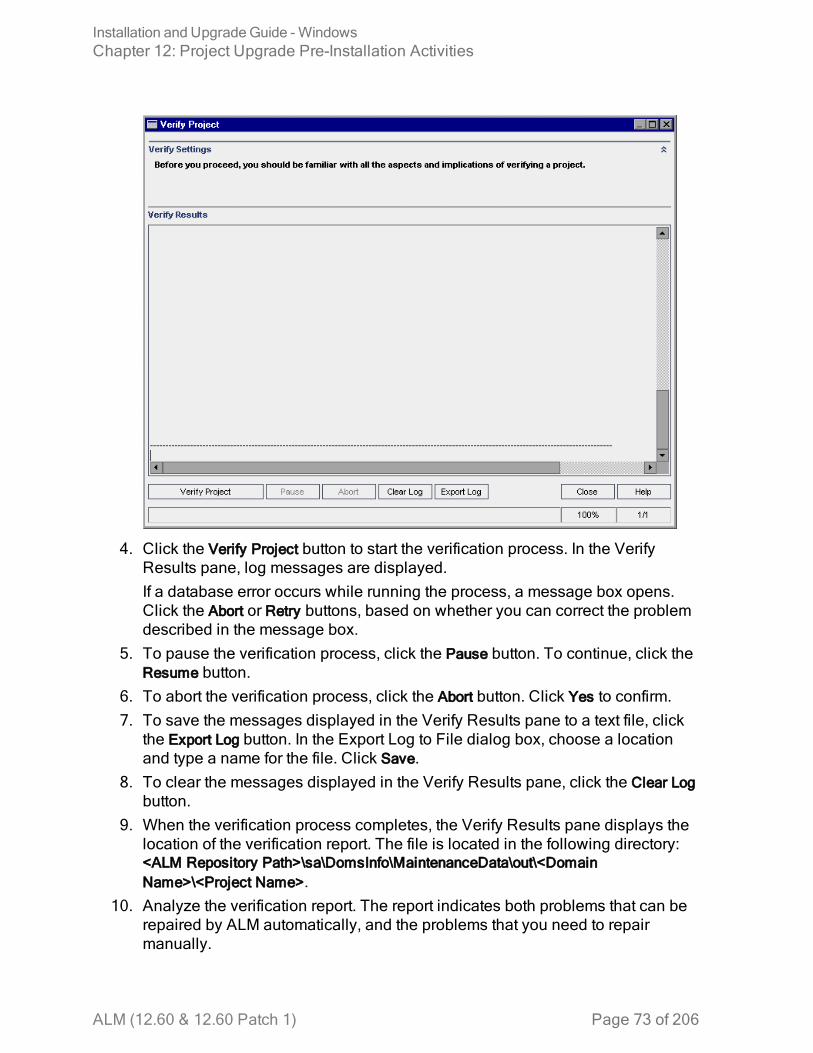
4. Click the Verify Project button to start the verification process. In the VerifyResults pane, log messages are displayed.If a database error occurs while running the process, a message box opens.Click the Abort or Retry buttons, based on whether you can correct the problemdescribed in the message box.
5. To pause the verification process, click the Pause button. To continue, click theResume button.
6. To abort the verification process, click the Abort button. Click Yes to confirm.7. To save the messages displayed in the Verify Results pane to a text file, click
the Export Log button. In the Export Log to File dialog box, choose a locationand type a name for the file. Click Save.
8. To clear the messages displayed in the Verify Results pane, click the Clear Logbutton.
9. When the verification process completes, the Verify Results pane displays thelocation of the verification report. The file is located in the following directory:<ALM Repository Path>\sa\DomsInfo\MaintenanceData\out\<DomainName>\<Project Name>.
10. Analyze the verification report. The report indicates both problems that can berepaired by ALM automatically, and the problems that you need to repairmanually.
Installation and UpgradeGuide - WindowsChapter 12: Project Upgrade Pre-Installation Activities
ALM (12.60 & 12.60 Patch 1) Page 73 of 206

11. Click Close to close the Verify Project dialog box.
Verify a DomainThis section describes how to verify all projects in a domain.
1. In Site Administration, click the Site Projects tab.2. In the Projects list, select a domain.
3. Click the Maintain Domain button and choose Verify Domain. The VerifyDomain dialog box opens.
4. To view the current version numbers of your projects, select the project names,or click Select All to view version numbers for all projects. Click the DisplayVersions button.The project version number is displayed in the Version column.
5. To verify your projects, select the project names, or click Select All to verify allprojects. Click the Verify Projects button.
Installation and UpgradeGuide - WindowsChapter 12: Project Upgrade Pre-Installation Activities
ALM (12.60 & 12.60 Patch 1) Page 74 of 206

If a database error occurs while running the process, a message box opens.Click the Abort or Retry buttons, based on whether you can correct the problemdescribed in the message box.
6. To pause the verification process, click the Pause button. To continue, click theResume button.
7. To abort the verification process, click the Abort button. Click Yes to confirm.8. To save the messages displayed in the Verify Results pane to a text file, click
the Export Log button. In the Export Log to File dialog box, choose the locationand type the name for the file. Click Save.
9. To clear the messages displayed in the Verify Results pane, click the Clear Logbutton.
10. When the verification process completes, the Verify Results pane displays thelocation of each verification report. The files are located in the followingdirectory: <ALM RepositoryPath>\repository\sa\DomsInfo\MaintenanceData\out\<Domain Name>\<ProjectName>.
11. Analyze the verification report. The report indicates problems that can berepaired by ALM and the problems that you need to repair manually.
12. Click Close to close the Verify Domain dialog box.
Repairing Domains and ProjectsThe repair process fixes most data and schema issues found by the verificationprocess. If the verification process finds problems that can cause data loss, therepair process does not fix these automatically. You need to repair these problemsmanually. To find out whether a particular issue is handled automatically ormanually, refer to the verification report.
By default, the repair process runs in non-silent mode. When running the processin non-silent mode, ALM may pause and prompt you for input when an error occurs.Instead, you can choose to run the process in silent mode. When an error occurs,ALM aborts the process without prompting you for input.
For detailed information on the problems fixed by the repair process, and help withrepairing problems that cannot be fixed by ALM, see "Upgrade PreparationTroubleshooting" on page 173.
This section includes:
• Repairing a Project 76• Repairing a Domain 77
Installation and UpgradeGuide - WindowsChapter 12: Project Upgrade Pre-Installation Activities
ALM (12.60 & 12.60 Patch 1) Page 75 of 206

Repairing a ProjectThis section describes how to repair a single project.
To repair a project:
1. In Site Administration, click the Site Projects tab.2. In the Projects list, select a project.
3. Click the Maintain Project button and choose Repair Project. The RepairProject dialog box opens.
4. To run the repair process without any user interaction, select Run in SilentMode.
5. To start the repair process, click the Repair Project button. If the project is active,you are prompted to deactivate it. For details about deactivating projects, referto the Micro Focus Application Lifecycle Management Administrator Guide.If a database error occurs while running the process in non-silent mode, amessage box opens. Click the Abort or Retry buttons, based on whether youcan correct the problem described in the message box.If the repair process fails, see "Restoring Backed Up Projects andRepositories" on page 78.
6. To pause the repair process, click the Pause button. To continue, click theResume button.
7. To abort the repair process, click the Abort button. Click Yes to confirm.
Installation and UpgradeGuide - WindowsChapter 12: Project Upgrade Pre-Installation Activities
ALM (12.60 & 12.60 Patch 1) Page 76 of 206

8. To save the messages displayed in the Repair Results pane to a text file, clickthe Export Log button. In the Export Log to File dialog box, choose a locationand type a name for the file. Click Save.
9. To clear the messages displayed in the Repair Results pane, click the ClearLog button.
10. Click Close to close the Repair Project dialog box.
Repairing a DomainThis section describes how to repair all projects in a domain.
To repair a domain:
1. In Site Administration, click the Site Projects tab.2. In the Projects list, select a domain.
3. Click the Maintain Domain button and choose Repair Domain. The RepairDomain dialog box opens.
4. In the Repair Settings area, under Repair Mode, you can select the followingoptions:l Run in Silent Mode. Runs the process without any user interaction.l Continue to next project if repair failed. Proceeds to the next project if the repairprocess fails. This is the default option.
Installation and UpgradeGuide - WindowsChapter 12: Project Upgrade Pre-Installation Activities
ALM (12.60 & 12.60 Patch 1) Page 77 of 206

5. In the Repair Settings area, under After the Repair, you can select one of thefollowing options:l Leave all projects deactivated. Leaves all projects deactivated after the repairprocess completes.
l Activate only currently active projects. Reactivates previously-activatedprojects after the repair process completes. This is the default option.
l Activate all projects. Activates all projects after the repair process completes.6. To view the current version numbers of your projects, select the project names,
or click Select All to view version numbers for all projects. Click the DisplayVersions button.The project version number is displayed in the Version column.
7. To repair your projects, select the project names, or click Select All to verify allprojects. Click the Repair Projects button.If a database error occurs while running the process in non-silent mode, amessage box opens. Click the Abort or Retry buttons, based on whether youcan correct the problem described in the message box.If the repair process fails, see "Restoring Backed Up Projects andRepositories" below.
8. To pause the repair process, click the Pause button. To continue, click theResume button.
9. To abort the repair process, click the Abort button. Click Yes to confirm.10. To save the messages displayed in the Repair Results pane in a text file, click
the Export Log button. In the Export Log to File dialog box, choose a locationand type a name for the file. Click Save.
11. To clear the messages displayed in the Repair Results pane, click the ClearLog button.
12. Click Close to close the Repair Domain dialog box.
Restoring Backed Up Projects and RepositoriesIf the repair or upgrade process fails, you must restore the backed up projectsbefore trying the process again. You can restore projects that were backed up onan Oracle or Microsoft SQL database server, and you can restore projectrepositories that were backed up in the file system. A project you restore can beused only in the ALM/Quality Center version from which it was backed up. Beforerestoring the backed up project, you must remove the project from SiteAdministration.
If you were previously working with Performance Center 11.00 or later, see"Restoring LAB_PROJECT" on page 80.
This section includes:
Installation and UpgradeGuide - WindowsChapter 12: Project Upgrade Pre-Installation Activities
ALM (12.60 & 12.60 Patch 1) Page 78 of 206

• Restoring Projects from aMicrosoft SQLDatabase Server 79• Restoring Projects from anOracle Database Server 79• Restoring a Repository from the File System 80• Restoring LAB_PROJECT 80
Restoring Projects from a Microsoft SQL Database ServerThis section describes how to restore a project backed up on a Microsoft SQLdatabase server.
For details, see this KB article.
To restore a project from a Microsoft SQL database server:
1. From the SQL Server Enterprise Manager, navigate to the database and selectTools > Restore Database.
2. Navigate to the backup file, and follow the restore procedure to complete thedata restore process.
3. To align the td user on the new database server, run the followingSQL commands on every restored schema (site administration, lab_project andeach project schema):
EXEC sp_change_users_login 'Report'
EXEC sp_change_users_login 'Update_One', 'td', 'td'
EXEC sp_changedbowner 'td_admin'
Note: td_admin is the database administration user with the appropriaterequired database privileges.
4. In Site Administration, restore the project. For details, see "Restore ALMProjects in New Site Administration Database Schema" on page 146.
5. If the backup was performed while the project was active, realign the projectrepository. For details, refer to the Micro Focus Application LifecycleManagement Administrator Guide.
Restoring Projects from an Oracle Database ServerThis section describes how to restore a project backed up on an Oracle databaseserver.
For details, see this KB article.
Installation and UpgradeGuide - WindowsChapter 12: Project Upgrade Pre-Installation Activities
ALM (12.60 & 12.60 Patch 1) Page 79 of 206

To restore a project from an Oracle database server:
1. Copy the backup file to the Oracle server machine.2. Using the SQL*Plus utility, log in to the Oracle server using the system account.3. Create a user for the ALM project. Make sure you create it with the same name
as the project name (or the Oracle user name) when the project was exported.Use these SQL statements:CREATE USER [<project name>] IDENTIFIED BY tdtdtd DEFAULT TABLESPACE TD_dataTEMPORARY TABLESPACE TD_TEMP;
GRANT CONNECT,RESOURCE TO [<project name>];
4. On the ALM installation DVD, locate the \Utilities\Databases\Scripts directory.Open the qc_project_db_oracle.sql file and follow the instructions.
5. Using the command line, type imp to run the import utility.6. Follow the prompt, and log in to the Oracle server using the system account.
After all tables have been successfully imported, a confirmation messagedisplays.
Restoring a Repository from the File SystemThis section describes how to restore a repository backed up in the file system.
To restore a repository from the file system:
1. Copy the backed up repository to the ALM repository.2. In Site Administration, restore the project. For details, see "Restore ALM
Projects in New Site Administration Database Schema" on page 146.3. If the backup was performed while the project was active, you must restore the
database and the file system from a backup that was created after the databasebackup was created, realign the project, and then activate the project. Thisprocedure must always be performed during disaster recovery. For details,refer to the Micro Focus Application Lifecycle Management AdministratorGuide. If this process is done to recover certain files or directories, you can skipthe realignment.
Restoring LAB_PROJECTBefore restoring other Performance Center projects, you must first restore LAB_PROJECT, and then any Performance Center template projects.
You restore LAB_PROJECT from the Lab Management tab in Site Administration.For details, refer to the Micro Focus ALM Lab Management Guide.
You restore Performance Center 11.00 or later projects in Site Administration.
Installation and UpgradeGuide - WindowsChapter 12: Project Upgrade Pre-Installation Activities
ALM (12.60 & 12.60 Patch 1) Page 80 of 206

Verify Projects AgainBefore proceeding, run the verification tool again to make sure that all problemshave been fixed.
Copy Site Administration Database Schema to theNew Database ServerTo upgrade a copy of the Site Administration database schema on a new databaseserver machine, you must copy the schema from the database server that was usedin the previous ALM system to the database server that will be used in the newALM system.
You perform this step before installing ALM 12.60 because the schema upgradeoption is defined as part of the installation configuration.
Perform the required steps for backing up, removing, and restoring databases foryour database type. For assistance contact your database administrator.
Note: The database user must have the same permissions as the userinstalling ALM.
When copying and upgrading the Site Administration database schema, ensurethat the existing project refers to the production project database and sharedrepository, if applicable. When using a staging or side by side upgrade prior tostarting the server update, update the following columns in the PROJECTS table inthe Site Administration database schema to their new values:
l PHYSICAL_DIRECTORYl DBSERVER_NAMEl DB_CONNSTR_FORMATl DB_USER_PASS
Installation and UpgradeGuide - WindowsChapter 12: Project Upgrade Pre-Installation Activities
ALM (12.60 & 12.60 Patch 1) Page 81 of 206

Page 82 of 206ALM (12.60 & 12.60 Patch 1)
Installation and UpgradeGuide - WindowsChapter 12: Project Upgrade Pre-Installation Activities

Chapter 13: Upgrading the SiteAdministration Database SchemaWhen installing ALM 12.60, you can choose to create a new Site Administrationschema on the database server, or you can upgrade a copy of the existing schema.This chapter discusses considerations, guidelines, and prerequisites for upgradinga copy of the existing schema.
This section includes:
• SchemaUpgradeGuidelines 83• Recovering a Lost Confidential Data Passphrase 84• Managing SchemaChanges 85
Schema Upgrade GuidelinesUpgrading a copy of the existing schema is a useful option if you are installingALM 12.60 on a new ALM server machine. Creating a copy of the existing schemaand then upgrading the copy enables you to work with new and upgraded projects.
Example:
If your ALM 12.00 schema contains a project called my_project, by creating acopy of the Site Administration ALM 12.00 schema and then upgrading it toALM 12.60, the my_project project is available in Site Administration in bothALM 12.00 and ALM 12.60.
Oracle database servers: The new database schema is created in the sametablespace as the existing Site Administration database.
When you upgrade a copy of the existing Site Administration database schema, thecopy that is created is independent of the existing schema. Any changessubsequently made to the original schema through updates in your previousversion of Quality Center or ALM are not reflected in the upgraded copy of the SiteAdministration database schema that ALM 12.60 uses.
Therefore, consider the following guidelines:
ALM (12.60 & 12.60 Patch 1) Page 83 of 206

ALM users After you install ALM 12.60, if you add or delete users or updateuser details in your previous version of ALM/Quality Center, youmust make the same changes in ALM12.60.
ALMconfigurationparameters
After you install ALM 12.60, if you modify configurationparameters in your previous version of ALM/Quality Center, youmust make the same changes in ALM 12.60.
Server nodeconfiguration
If you are working with server nodes, in the Servers tab in SiteAdministration for ALM 12.60, you must reconfigure the settingsfor the ALM log file and the maximum number of databaseconnections.
ALMrepositorypath
The repository path in your previous version must be defined asa network path, so that it can be accessed by both the previousALM/Quality Center installations and by ALM 12.60.
Make sure that the project is active on one ALM server but not onboth.
Recovering a Lost Confidential Data PassphraseThe Confidential Data Passphrase encrypts passwords that are used for accessingexternal systems (databases and LDAP).
When configuring the installation, you must enter the same passphrase that wasused in the previous installation. If you do not know the passphrase, perform thefollowing steps.
Note: This procedure can be performed whether you are installing ALM12.60on the same machine as the existing installation, or on a new or separatemachine, for example, if you are adding a node to a cluster. If you are notsure on which server machine to install ALM 12.60, see"Suggested ALMSystem Configuration" on page 65.
1. On the machine where ALM is currently installed:l ALM 12.60 Patch 1 or later: navigate to the C:\ProgramData\MicroFocus\ALM\conf directory.
l ALM 12.60 or earlier: navigate to the C:\ProgramData\HP\ALM\conf directory.
Tip: The ProgramData folder is hidden by default. To show hidden filesand folders, perform the relevant steps for your operating system.
Installation and UpgradeGuide - WindowsChapter 13: Upgrading the Site Administration Database Schema
ALM (12.60 & 12.60 Patch 1) Page 84 of 206

2. Create a copy of the qcConfigFile.properties fileIf you are installing ALM on a new server machine, place the copy on themachine where you plan to run the new installation. Place the file in the samelocation on the new machine.
Tip: If the ...\ALM\conf directory does not exist on the new server machine,manually create it. In such a case, make sure that the new directory hasthe required permissions to be accessed by the configuration tool.
3. Open the file and delete all information except for the line that starts withinitstring.
4. Save the copy. If you are installing ALM on a new machine, skip to step 6.5. If you are upgrading ALM on the same machine as the previous installation:
a. Uninstall the current version of ALM. For information about uninstallingALM, see "Uninstalling ALM" on page 141. Uninstalling ALM does notremove the existing qcConfigFile.properties file.
b. Overwrite the existing qcConfigFile.properties file with the version you editedin step 3.
6. When you run the installation, the wizard detects a previous ALM installationand prompts you to accept the current settings. Accept the current settings.When the wizard reaches the Security page the previous Confidential DataPassphrase appears.
Managing Schema ChangesChanges to the existing Site Administration database schema may cause theupgrade process to fail. Examples of such changes are the deletion of tables orcolumns, or changes to field types.
If you are sure that the schema has been changed manually, perform the stepsbelow to ensure a successful schema upgrade.
If you are unsure if the schema has been changed, proceed with the installation asnormal. If the schema has been changed, the configuration process fails if thechanges cannot be handled automatically. It is important that not all schemaupgrade failures are the result of the schema changes. Check the error logs verycarefully to identify the exact cause of the failure. If it is apparent that the failure wasdue to changes to the schema, proceed with the steps below. You will have to runthe configuration process again.
To prevent the upgrade process from failing, perform one of the following actions:
Installation and UpgradeGuide - WindowsChapter 13: Upgrading the Site Administration Database Schema
ALM (12.60 & 12.60 Patch 1) Page 85 of 206

Note: It is advisable to perform these actions in this order.
1. Manually repair inconsistencies between the old schema and the new schema.For details about manually repairing the old schema, see "Changing theDatabase User Schema" on page 200.
2. If the change is known and you are sure the upgraded ALMserver can workwith it, you can create an exception file that instructs ALM to ignore thesechanges during the upgrade process. After creating the exception file, save it inan accessible location on your system. After installing ALM the SiteAdministration Database Schema page in the wizard prompts you to add thefile to the configuration process. As a result, the changes to the existingschema do not cause the upgrade process to fail.To create an exception file:a. Copy the SchemaExceptions.xml file from the ALM installation directory. By
default, the file is located in: <ALM installationpath>\ALM\data\sa\Admin\MaintenanceData
b. Place the copy of the file in an accessible location on your system.c. Edit the file and define exceptions. For example:
o For an extra table:
<TableMissing><object pattern="MY_Table" type="extra"/></TableMissing>
o For an extra view:
<ViewMissing><object pattern="MY_VIEW" type="extra"/></ViewMissing>
o For an extra column:
<ColumnMissing><object pattern="MY_COLUMN" type="extra"/></ColumnMissing>
o For an extra index:
<IndexMissing><object pattern="MY_INDEX" type="extra"></IndexMissing>
Installation and UpgradeGuide - WindowsChapter 13: Upgrading the Site Administration Database Schema
ALM (12.60 & 12.60 Patch 1) Page 86 of 206

o For an extra constraint:
<ConstraintMissing><object pattern="MY_CONSTRAINT" type="extra"></ConstraintMissing>
o For multiple occurrences of extra elements:For example, multiple extra columns:
<ColumnMissing><object pattern="MY_COLUMN_1" type="extra"/><object pattern="MY_COLUMN_2" type="extra"/></ColumnMissing>
d. Save the SchemaExceptions.xml file.3. If you cannot manually repair the inconsistencies, or create an exception file,
create a new schema and then migrate the projects to the new schema.If ALM is already installed on the server machine, you can rerun the ALMInstallation Wizard.a. In the Site Administration Database Schema page, select Create a New
Schema.b. After the configuration process completes, migrate projects to the new
schema using the Restore Project option in Site Administration. For details,refer to the Micro Focus Application Lifecycle Management AdministratorGuide.
Installation and UpgradeGuide - WindowsChapter 13: Upgrading the Site Administration Database Schema
ALM (12.60 & 12.60 Patch 1) Page 87 of 206

Page 88 of 206ALM (12.60 & 12.60 Patch 1)
Installation and UpgradeGuide - WindowsChapter 13: Upgrading the Site Administration Database Schema

ALM (12.60 & 12.60 Patch 1) Page 89
Part 5: ALM Installation andConfiguration

ALM (12.60 & 12.60 Patch 1) Page 90
Installation and UpgradeGuide - WindowsPart 5: ALM Installation and Configuration

Chapter 14: Installing ALM on MicrosoftWindows SystemsThis chapter describes how to install ALM on Windows operating systems. It alsodescribes how to install ALM silently.
Note: For installation troubleshooting details, see "Troubleshooting the ALMInstallation" on page 165.
This section includes:
• Installation Considerations:Windows 91• Installing ALM:Windows 93• Installing ALM in Silent Mode:Windows 104• Configure the IIS Mail Service 105
Installation Considerations: WindowsBefore installing ALM, consider the following:
Default ALMpaths (12.60Patch 1 andlater)
l Installation path: C:\Program Files\Micro Focus\ALM
l Server deployment path: C:\ProgramData\Micro Focus\ALM
l Repository path: C:\ProgramData\Micro Focus\ALM\repository
Paths andfiles createdautomaticallyby the ALM
l C:\ProgramData\Micro Focus\ALM\conf
l C:\ProgramData\Micro Focus\ALM\log
ALM logs The locations of the ALM Site Administration and client log files aresubject to your settings. You can verify the locations from SiteAdministration.
The installation log file is located in the ALM server installationfolder.
The deployment log file is located in C:\ProgramData\MicroFocus\ALM\log.
ALM (12.60 & 12.60 Patch 1) Page 91 of 206

Installationscenarios
l Upgrading from ALM 12.5x or earlier to ALM 12.60 Patch 1 or later.When upgrading a copy of an existing Site Administrationdatabase schema, consider the following:l If you are using the existing settings as default, the defaultdeployment path will be the same as the path used in theprevious installation. This path can be changed.
l If you are not using the existing settings as default, the defaultdeployment path will be C:\ProgramData\Micro Focus\ALM. Thispath can be changed.
Note: The repository path of the upgraded projects will bethe same as the path used in the previous installation.
After upgrading, the newly created projects will use therepository path that was defined during the currentinstallation.
If you want to use the same repository path as it was before(default: C:\ProgramData\HP\ALM\repository), make sure to setit correctly during installation.
l Installing an ALM 12.60 patch on top of ALM 12.60. Consider thefollowing:l If you uninstall ALM 12.60 before you install ALM 12.60 Patch 1or later, and you are connecting to an existing schema duringthe patch installation:o and you are using the existing settings as default, thedefault deployment path will be the same as the pathused in the previous installation. This path can bechanged.
o or you are not using existing settings as default, the defaultdeployment path will be C:\ProgramData\Micro Focus\ALM.This path can be changed.
Note: The project repository path is set as specified in theexisting Site Administrator database schema. Changingthe path is not recommended.
l Installing an ALM 12.60 patch directly on top of ALM 12.60. Theconfiguration folder will be stored in C:\ProgramData\Micro
Installation and UpgradeGuide - WindowsChapter 14: Installing ALM on Microsoft Windows Systems
ALM (12.60 & 12.60 Patch 1) Page 92 of 206

Focus\ALM\conf, and the deployment log file will be stored inC:\ProgramData\Micro Focus\ALM\log.
Installing ALM:WindowsBefore installing ALM, consider the following:
l Verify that you meet the various installation prerequisites. For prerequisiteinformation, see the relevant chapters in "Installation Prerequisites" on page 35.
l If you are planning to upgrade a copy of the existing Site Administration schema,the database server of the existing Site Administration schema and the databaseserver of the existing Lab Project must be supported. If these database serversare not supported, you can disable the validation check. For details, refer to"Disabling Validation Checks for the Installation Wizard" on page 165.
Note: For the most up-to-date supported environments, seehttp://admhelp.microfocus.com/alm/specs/alm-qc-system-requirements.htm.
l If you encounter problems during the ALM installation process, see"Troubleshooting the ALM Installation" on page 165 for troubleshootingsuggestions.
l If you want to reconfigure ALM after the installation and configuration iscomplete, you must run the installation procedure again.
l If an error occurs during the installation procedure, you must uninstall and restartthe installation procedure.
l If an error occurs during the installation procedure and the installation log file isnot found, ensure that enough disk space is available for installation anddeployment to the selected locations, and that system settings such as the openfile resources limit are set to the maximum allowable value.
To install ALM:
1. Log in to the ALM server machine with the appropriate permissions. For a list ofrequired permissions, see "Required Permissions: Windows" on page 41.
2. If Quality Center or ALM is installed on the machine, uninstall it. For informationon uninstalling, see "Uninstalling ALM fromWindows Systems" on page 141.
Cluster environment: Uninstall ALM from all nodes.
Installation and UpgradeGuide - WindowsChapter 14: Installing ALM on Microsoft Windows Systems
ALM (12.60 & 12.60 Patch 1) Page 93 of 206

3. Make sure the following services are started on the machine:a. Secondary Logonb. Windows Management Instrumentation
4. Insert the ALM 12.60 Software installation DVD into the DVD drive, runsetup.exe, and click ALM Platform (Windows OS).
Note:
l The configuration settings are saved in the qcConfigFile.properties file.o ALM 12.60 Patch 1 or later: The file is created in theC:\ProgramData\Micro Focus\ALM\conf directory. The file is createdin the C:\ProgramData\Micro Focus\ALM\conf directory.
o ALM 12.60 or earlier: The file is created in theC:\ProgramData\HP\ALM\conf directory. The file should not bemoved from this location.
l Also, the repid.txt file is created in the <ALM Repository path>\qc folder.The file should not be moved from this location.
l If you are installing ALM on a secondary node of a cluster, some of thedialog boxes that are needed only for the primary node are notdisplayed.
5. The ALM Installation wizard starts, displaying the Welcome page. Click Next.6. The License Agreement page opens.
Read the license agreement. To accept the terms of the license agreement,select I accept the license terms. Click Next.
7. The JDK/JRE Folder Selection page opens.Browse to or enter the JDK or JRE folder path.
Note: ALM requires Java JDK or JRE to be installed prior to installingALM. For details, see "Java Installation" on page 58.
Click Next.8. The Folder Selection page opens.
Browse to or enter the installation path, or accept the default.Click Next.
9. If the wizard detects settings from a previous ALM installation, the CurrentSettings page opens.
Installation and UpgradeGuide - WindowsChapter 14: Installing ALM on Microsoft Windows Systems
ALM (12.60 & 12.60 Patch 1) Page 94 of 206

Select Use default values of existing configuration to use the current settings asdefault settings for the current installation. You can make changes to any of thedefault settings during the wizard. Select No to clear all settings in theConfiguration wizard.Click Next
10. The Database Server page opens.a. Under Database Type, select the database type to be used in your ALM
system.If you select a Microsoft SQL Server, choose the authentication type:
Microsoft SQL Server(SQL Server Auth.)
Authenticates the user to the database using adatabase user name and password.
Microsoft SQL Server(Windows Auth.)
Windows authentication relies on the user beingauthenticated by the operating system.
Note:When upgrading projects to ALM 12.60, you must use the sametype of SQL authentication that you used when that project wasoriginally created.
For details on database requirements, see "Prerequisites: Oracle DatabaseServers" on page 45 or "Prerequisites: Microsoft SQL Database Servers"on page 53.
b. Select one of the following options:o Database Parameters. Select this option to enter database serverinformation using the following fields:
DB hostname
Type the database server host name or IP address. Forexample, dbsrv01.domain.com.
DB portnumber
Type the database server port number, or accept thedefault port number.
Oracleservicename
If you selected Oracle as the database type, type theOracle service name.
o Connection String. Select this option to type a formulated database serverconnection string.
Installation and UpgradeGuide - WindowsChapter 14: Installing ALM on Microsoft Windows Systems
ALM (12.60 & 12.60 Patch 1) Page 95 of 206

OracleRACdatabase
Select Connection String, and enter a connection string,specifying the location of the tnsnames.ora file, and theTNS server to which ALM should refer. Use the followingexample:
jdbc:mercury:oracle:TNSNamesFile=<tnsnames.oralocation>;TNSServerName=OrgRAC
For details on prerequisites for Oracle RAC support,see"Oracle RAC Support" on page 51
MicrosoftSQLServerdatabase
If your database requires SSL/TLS access, see "Toconfigure a secure database connection for a new ALMinstallation:" on page 133.
c. DB admin user name. Type the name of the user with the administrativepermissions required to install ALM on the database server.
d. DB admin password. Type the database administrator password.
Note: DB admin user name and DB admin password are not applicable forMicrosoft SQL Server Windows Authentication.
Click Next.11. The Site Administration Database Schema page opens.
Installation and UpgradeGuide - WindowsChapter 14: Installing ALM on Microsoft Windows Systems
ALM (12.60 & 12.60 Patch 1) Page 96 of 206

a. In Select Action, choose one of the following:
Create aNewSchema
Creates a new Site Administration database schema and anew Lab_Project.
Note: The installation log and the enable_extensions.txtfile contain error messages stating "Schema differenceswere found". These errors can be ignored, they aregenerated as part of the schema enable extensionmechanism and the upgrade mechanism.
Upgradea copyof theexistingschema
Creates a copy of the existing Site Administration databaseschema, and upgrades the copy. For details, see "SchemaUpgrade Guidelines" on page 83.If you select this option, the Schema Exception File optionappears. If you have defined an exception file for the upgradeprocess, click Browse and navigate to the location where itwas saved before the installation. For details about exceptionfiles, see "Managing Schema Changes" on page 85.When working in a cluster environment, select this option ifyou have an existing primary node and you want to installALM.
Note:When you upgrade a copy of the existing SiteAdministration schema, ALM tries to copy LAB_PROJECT to the database server where the originalLAB_PROJECT exists. If LAB_PROJECT issuccessfully copied, the new upgraded SiteAdministration schema points to the new copy of LAB_PROJECT. If LAB_PROJECT is not copied, a newempty LAB_PROJECT is created in the databaseserver where the new Site Administration databaseschema is created. For details, see "LAB_PROJECTInstallation Considerations" on page 107
Installation and UpgradeGuide - WindowsChapter 14: Installing ALM on Microsoft Windows Systems
ALM (12.60 & 12.60 Patch 1) Page 97 of 206

Connecttoexistingschema /secondnode
This option can be used in two scenarios:o If you are reinstalling ALM and would like to reconnect tothe same Site Administration database schema.
o If you have an existing node and you want to install ALM onanother node to create a cluster. For details on clusterconfiguration, see "Clustering: Windows" on page 43.
Note: This option enables you to connect to anALM12.60 Site Administration database schemaonly. To connect to an earlier version, you must firstupgrade the schema. For details, see"Upgrading theSite Administration Database Schema" on page 83.
b. When creating a new schema, in Database Name, enter the name of thedatabase.
c. When connecting to ALM on an Oracle database server:If you are installing ALM on a secondary node or if the Site Administrationdatabase already exists, the new Site Administration database schema iscreated in the same tablespace as the existing schema. Continue with theSecurity step below.Type the following information:o Default Tablespace. Select a default storage location from the list.o Temporary Tablespace. Select a temporary storage location from the list.
d. Under SA Schema Details, type the following information:o Schema name. Type a Site Administration database schema name, oraccept the default schema name. The Site Administration databaseschema name can contain English characters or numbers only.
Note:When upgrading an existing Site Administration databaseschema to work in ALM 12.60, you must use the same name thatyou used before the upgrade.
o Schema password. Enter the following information, depending on yourdatabase type:
Oracle: The default tdtdtd password is created, which you canaccept or change.
Installation and UpgradeGuide - WindowsChapter 14: Installing ALM on Microsoft Windows Systems
ALM (12.60 & 12.60 Patch 1) Page 98 of 206

MicrosoftSQLServer(SQLAuth.):
ALM uses the td user to create the Site Administrationdatabase schema. For more details on the td user, see"User Permissions for Connecting ALM to a Microsoft SQLDatabase Server" on page 54.Type a password for the td user that complies with yourorganization’s password policy, or keep the default tdtdtdpassword.
MicrosoftSQLServer(WindowsAuth.):
Not applicable.
o New Schema name. If you selected Upgrade a copy of the existing schema,type a name for the upgraded copy of the database schema. The SiteAdministration database schema name can only contain Englishcharacters or numbers.
Click Next.12. The License Key page opens.
Note: If you selected Connect to existing schema / second node in the previousstep, the License Key step is skipped. Continue with the Security step below.Select one of the following options:l Browse to or enter the ALM license file path.l If you do not have a license file, select Use Evaluation Key for a 30-day trialversion of ALM. From the drop-down list, select the edition to install for thetrial period.
Note: If you install Micro Focus Quality Center Community Edition, youmust assign named licenses to your users. Only then can the userssuccessfully log in to ALM and see the appropriate modules. For detailson assigning named licenses, see theMicro Focus Application LifecycleManagement Administrator Guide.
Click Next.13. The Security page opens.
a. Confidential Data EncryptionPasswords for accessing external systems (databases and LDAP) arestored by ALM after encryption. Enter a Confidential Data Passphrase thatALM uses to encrypt the information.
Installation and UpgradeGuide - WindowsChapter 14: Installing ALM on Microsoft Windows Systems
ALM (12.60 & 12.60 Patch 1) Page 99 of 206

Make a note of the passphrase for future support calls. You need thepassphrase if you choose to redeploy ALM and choose to upgrade a copyof the existing Site Administration Database Schema. The passphrase isalso required for the next ALM installation.Select Use default value for Passphrase to use the default Confidential DataEncryption passphrase. By selecting this option, the encrypted informationis more vulnerable to unauthorized access.Confidential Data Passphrase Considerations
o You must enter the same passphrase that was used for the previousinstallation. If you do not have a note of the passphrase, there is aworkaround to recover it. However, you will have to abort theconfiguration process and then begin again once the workaround iscomplete. For details, see "Recovering a Lost Confidential DataPassphrase" on page 84.
o If you are planning to migrate Performance Center and/or LabManagement enabled projects onto the server on which you areperforming the installation, you must use the same Confidential DataPassphrase that was defined on the server on which the projects werecreated.
o If you are installing ALM on a cluster, you must use the same passphrasefor all nodes.
o After completing the server configuration wizard, you cannot change theconfidential data encryption passphrase.
o The passphrase is case-sensitive. Also check that there are no emptyspaces before or after the passphrase. The passphrase must containonly alphanumeric characters.
b. Communication SecurityCommunication between ALM and other applications is enabled afterauthentication by a Single Sign-On (SSO) token. Enter a Communicationsecurity passphrase that ALM uses to encrypt the SSO token.
Note:
o The communication security passphrase is stored as the value ofthe COMMUNICATION_SECURITY_PASSPHRASE siteconfiguration parameter. For details, refer to the Micro FocusApplication Lifecycle Management Administrator Guide.
o The passphrase must contain only alphanumeric characters, andmust contain at least 12 characters .
Installation and UpgradeGuide - WindowsChapter 14: Installing ALM on Microsoft Windows Systems
ALM (12.60 & 12.60 Patch 1) Page 100 of 206
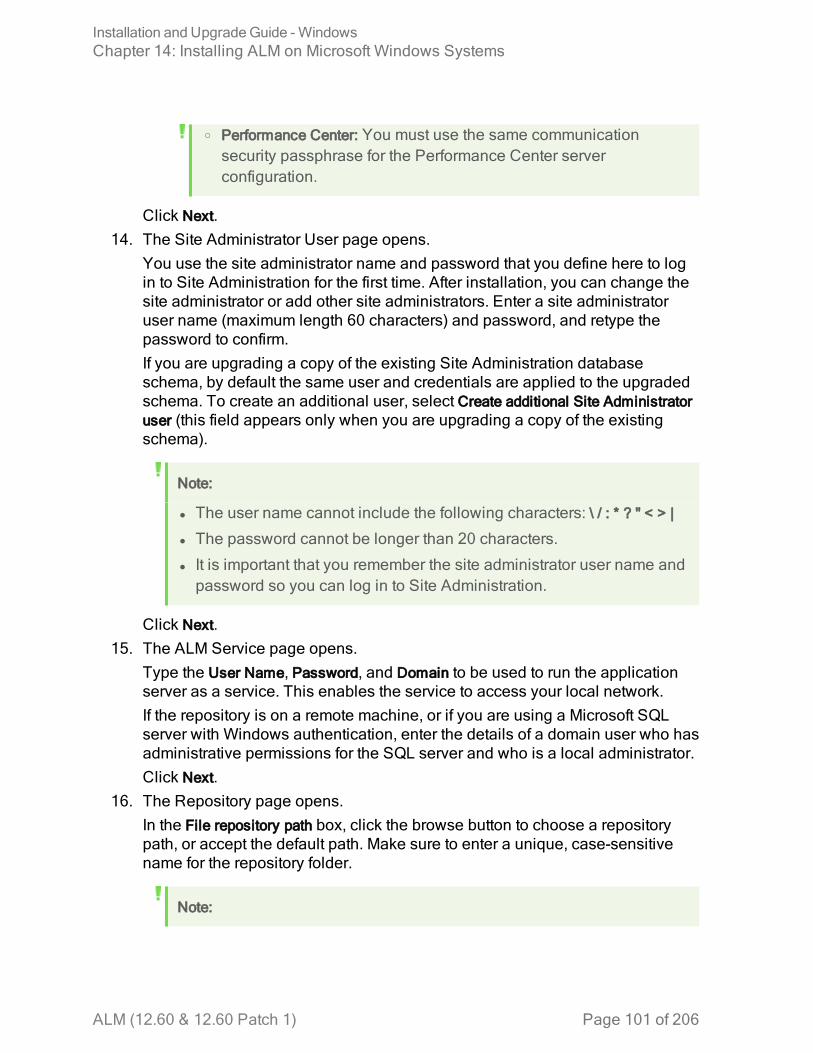
o Performance Center: You must use the same communicationsecurity passphrase for the Performance Center serverconfiguration.
Click Next.14. The Site Administrator User page opens.
You use the site administrator name and password that you define here to login to Site Administration for the first time. After installation, you can change thesite administrator or add other site administrators. Enter a site administratoruser name (maximum length 60 characters) and password, and retype thepassword to confirm.If you are upgrading a copy of the existing Site Administration databaseschema, by default the same user and credentials are applied to the upgradedschema. To create an additional user, select Create additional Site Administratoruser (this field appears only when you are upgrading a copy of the existingschema).
Note:
l The user name cannot include the following characters: \ / : * ? " < > |
l The password cannot be longer than 20 characters.
l It is important that you remember the site administrator user name andpassword so you can log in to Site Administration.
Click Next.15. The ALM Service page opens.
Type the User Name, Password, and Domain to be used to run the applicationserver as a service. This enables the service to access your local network.If the repository is on a remote machine, or if you are using a Microsoft SQLserver with Windows authentication, enter the details of a domain user who hasadministrative permissions for the SQL server and who is a local administrator.Click Next.
16. The Repository page opens.In the File repository path box, click the browse button to choose a repositorypath, or accept the default path. Make sure to enter a unique, case-sensitivename for the repository folder.
Note:
Installation and UpgradeGuide - WindowsChapter 14: Installing ALM on Microsoft Windows Systems
ALM (12.60 & 12.60 Patch 1) Page 101 of 206

l Make sure you select a path where you have full read and writepermissions.
l To work with cluster nodes, make sure that all nodes have access tothe file repository path and that the path is UNC. All nodes in thecluster must have the same string for the repository path.
l The length of the file repository path cannot exceed 200 characters.
l The file repository path cannot reside on the root folder.
l Due to a Windows limitation, the file repository path cannot be on amapped drive.
Using the BASE_REPOSITORY_PATH site configuration parameter, you cancreate a location for a repository path where new projects will be located.Performing this action, therefore, means there will be two repository paths: theprevious path containing older projects, and a second path containing projectscreated subsequently. For details, refer to the Micro Focus ApplicationLifecycle Management Administrator Guide.Click Next.
17. The Application Settings page opens.a. In the Deployment Path box:
Specify the location in which you want to deploy ALM application files.Click the browse button to choose a location, or accept the default location.We recommend that you keep the default.
Note:
o The length of the deployment path cannot exceed 200 characters.o Due to a Windows limitation, the deployment path cannot be on amapped drive.
b. In theWeb Server box:Change or keep the default HTTP port number. The default port is 8080.
Note: If an error message is displayed that the default port isunavailable, the port may be in use by another application running onthe server machine. Either locate the application and stop it, or entera different port number. To enter a different port number, you mustfirst change the port number on the application server. For details,see "Changing the Application Server Port Number" on page 123.
Installation and UpgradeGuide - WindowsChapter 14: Installing ALM on Microsoft Windows Systems
ALM (12.60 & 12.60 Patch 1) Page 102 of 206
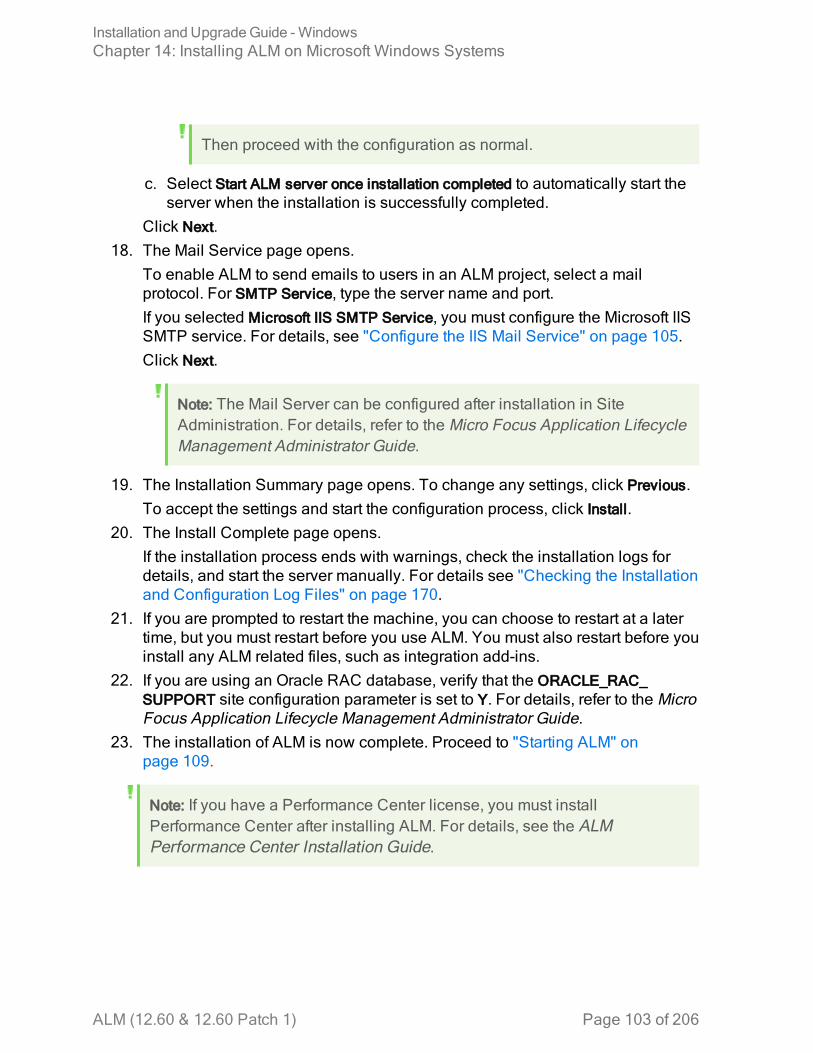
Then proceed with the configuration as normal.
c. Select Start ALM server once installation completed to automatically start theserver when the installation is successfully completed.
Click Next.18. The Mail Service page opens.
To enable ALM to send emails to users in an ALM project, select a mailprotocol. For SMTP Service, type the server name and port.If you selected Microsoft IIS SMTP Service, you must configure the Microsoft IISSMTP service. For details, see "Configure the IIS Mail Service" on page 105.Click Next.
Note: The Mail Server can be configured after installation in SiteAdministration. For details, refer to the Micro Focus Application LifecycleManagement Administrator Guide.
19. The Installation Summary page opens. To change any settings, click Previous.To accept the settings and start the configuration process, click Install.
20. The Install Complete page opens.If the installation process ends with warnings, check the installation logs fordetails, and start the server manually. For details see "Checking the Installationand Configuration Log Files" on page 170.
21. If you are prompted to restart the machine, you can choose to restart at a latertime, but you must restart before you use ALM. You must also restart before youinstall any ALM related files, such as integration add-ins.
22. If you are using an Oracle RAC database, verify that the ORACLE_RAC_SUPPORT site configuration parameter is set to Y. For details, refer to the MicroFocus Application Lifecycle Management Administrator Guide.
23. The installation of ALM is now complete. Proceed to "Starting ALM" onpage 109.
Note: If you have a Performance Center license, you must installPerformance Center after installing ALM. For details, see the ALMPerformance Center Installation Guide.
Installation and UpgradeGuide - WindowsChapter 14: Installing ALM on Microsoft Windows Systems
ALM (12.60 & 12.60 Patch 1) Page 103 of 206

Installing ALM in Silent Mode: WindowsA silent installation runs the entire setup process in the background withoutrequiring you to navigate through setup screens and input selections. Instead, allconfiguration parameters are assigned values that you define in a configuration file(qcConfigFile.properties). When running an installation in silent mode, no messagesare displayed. Instead, you can view installation information in the log file,including information on whether the installation was successful. The installationlog file can be found under the <installation folder>\log directory. The deploymentand configuration log file can be found in the following path:
l ALM 12.60 Patch 1 or later: Under the C:\ProgramData\Micro Focus\ALM\logdirectory.
l ALM 12.60 or earlier: Under the C:\ProgramData\HP\ALM\log directory.To troubleshoot problems you may encounter while running the installation, see"Troubleshooting the ALM Installation" on page 165.
If you want to reconfigure ALM after the installation and configuration is complete,you must run the installation procedure again.
If an error occurs during the installation procedure, you must uninstall and restartthe installation procedure.
If an error occurs during the installation procedure and the installation log file is notfound, ensure that enough disk space is available for installation and deploymentto the selected locations, and that system settings such as the open file resourceslimit are set to the maximum allowable value.
To install ALM in Silent Mode:
Note: To run silent installations for different configurations, you can createmultiple configuration files.
1. Uninstall the existing version of ALM/Quality Center from the machine.2. Create the qcConfigFile.properties file.
The file defines the configuration values that are used during the installation.We recommend that you use an existing file from a prior installation of ALM.If there is no existing file, you can create one manually. However, this can be acomplicated process that is open to errors. We suggest that you create one byrunning a normal installation. During the installation process, the file isautomatically created. The configuration values you define during theinstallation process are recorded in the file. Even if you subsequently uninstallALM, you can keep and edit the file as needed for future installations.
Installation and UpgradeGuide - WindowsChapter 14: Installing ALM on Microsoft Windows Systems
ALM (12.60 & 12.60 Patch 1) Page 104 of 206

The file is automatically saved in the following path:l ALM 12.60 Patch 1 or later: In the C:\ProgramData\Micro Focus\ALM\confdirectory.
l ALM 12.60 or earlier: In the C:\ProgramData\HP\ALM\conf directory.3. Update the installer.properties file with the installation path and the path of the
configuration file, if they are not in their default locations.
Note:
l Neither the length of the file repository path nor the length of thedeployment path can exceed 200 characters.
l Due to a Windows limitation, the deployment directory and therepository path cannot be on a mapped drive.
4. From the command line, run the run_silent.bat file on the installation DVD.If the installation process fails, check the installation logs for details. For detailssee "Checking the Installation and Configuration Log Files" on page 170.If the installation process ends with warnings, the ALM server does notautomatically start. Check the installation logs for details, and start the servermanually. For details see "Checking the Installation and Configuration LogFiles" on page 170.
Note: If you have a Performance Center license, you must installPerformance Center after installing ALM. For details, see the ALMPerformance Center Installation Guide.
Configure the IIS Mail ServiceIf you selectMicrosoft IIS SMTP Service as your mail server, you must configure theMicrosoft IIS SMTP service as follows:
1. Open the Internet Information Services (IIS) Manager window.2. In the Tree pane, right-click Default SMTP Virtual Server and select Properties.
The Default SMTP Virtual Server Properties dialog box opens.3. In the Access tab, click the Connection button. The Connection dialog box
opens. Select All except the list below and click OK.4. Click the Relay button. The Relay Restrictions dialog box opens. Select All
except the list below and click OK.5. Click OK to close the Default SMTP Virtual Server Properties dialog box.
Installation and UpgradeGuide - WindowsChapter 14: Installing ALM on Microsoft Windows Systems
ALM (12.60 & 12.60 Patch 1) Page 105 of 206

Page 106 of 206ALM (12.60 & 12.60 Patch 1)
Installation and UpgradeGuide - WindowsChapter 14: Installing ALM on Microsoft Windows Systems

Chapter 15: LAB_PROJECT InstallationConsiderationsWhen you select Upgrade a copy of the existing schema in the Installation wizard,ALM tries to copy LAB_PROJECT as well. Below is a more detailed explanation ofthe actions performed on LAB_PROJECT when upgrading a copy of the existingSite Administration schema:
1. ALM tries to copy LAB_PROJECT to the database server where the originalLAB_PROJECT exists.If LAB_PROJECT is successfully copied:l The new Site Administration schema points to the new LAB_PROJECT.l The copied LAB_PROJECT has an empty repository. You need to copy therepository from the source LAB_PROJECT.
l The copied LAB_PROJECT must be upgraded.2. If ALM fails to copy LAB_PROJECT to the database server where the original
LAB_PROJECT exists, a new empty LAB_PROJECT is created in thedatabase server where the new Site Administration database schema iscreated.To copy the original LAB_PROJECT data to make it usable for the installation:l Remove the new LAB_PROJECT.l Create a copy of the original LAB_PROJECT database schema andrepository:o Backup the original LAB_PROJECT database schema.o Restore a backup of the original LAB_PROJECT into the new installationdatabase server.
o Copy the source repository from the original LAB_PROJECT into the newinstallation repository.
l Update the dbid.xml file of the new LAB_PROJECT with the new:o Installation database server nameo Connection stringo Passwordo Repository location
l Restore the new LAB_PROJECT.l Upgrade the new LAB_PROJECT.
ALM (12.60 & 12.60 Patch 1) Page 107 of 206

Page 108 of 206ALM (12.60 & 12.60 Patch 1)
Installation and UpgradeGuide - WindowsChapter 15: LAB_PROJECT Installation Considerations

Chapter 16: Starting ALMThis chapter introduces ALM options and resources. It also explains how to startALM.
• Browsing the ALMProgramFolder 109• Starting and Stopping ALMServices 109• Starting ALM on aClient Machine 109• Registering ALM on aClient Machine 112
Browsing the ALM Program FolderIn Windows, after the ALM setup process is complete, the following items areadded to your ALM program folder (Start > Programs > ALM Server):
Option (A-Z) Description
ALM Tray Icon Places the system tray icon in the system tray if it does notappear there.
ApplicationLifecycleManagement
Opens ALM. For details, refer to the Micro FocusApplication Lifecycle Management User Guide.
SiteAdministration
Opens the Site Administration application. For details, referto the Micro Focus Application Lifecycle ManagementAdministrator Guide.
UninstallApplicationLifecycleManagement
Uninstalls ALM. For details, refer to "Uninstalling ALM" onpage 141.
Starting and Stopping ALM ServicesIn the system tray, right-click the ALM icon and select Start Application LifecycleManagement, or Stop Application Lifecycle Management.
Starting ALM on a Client MachineYou launch ALM on your client machine from your Web browser.
ALM (12.60 & 12.60 Patch 1) Page 109 of 206
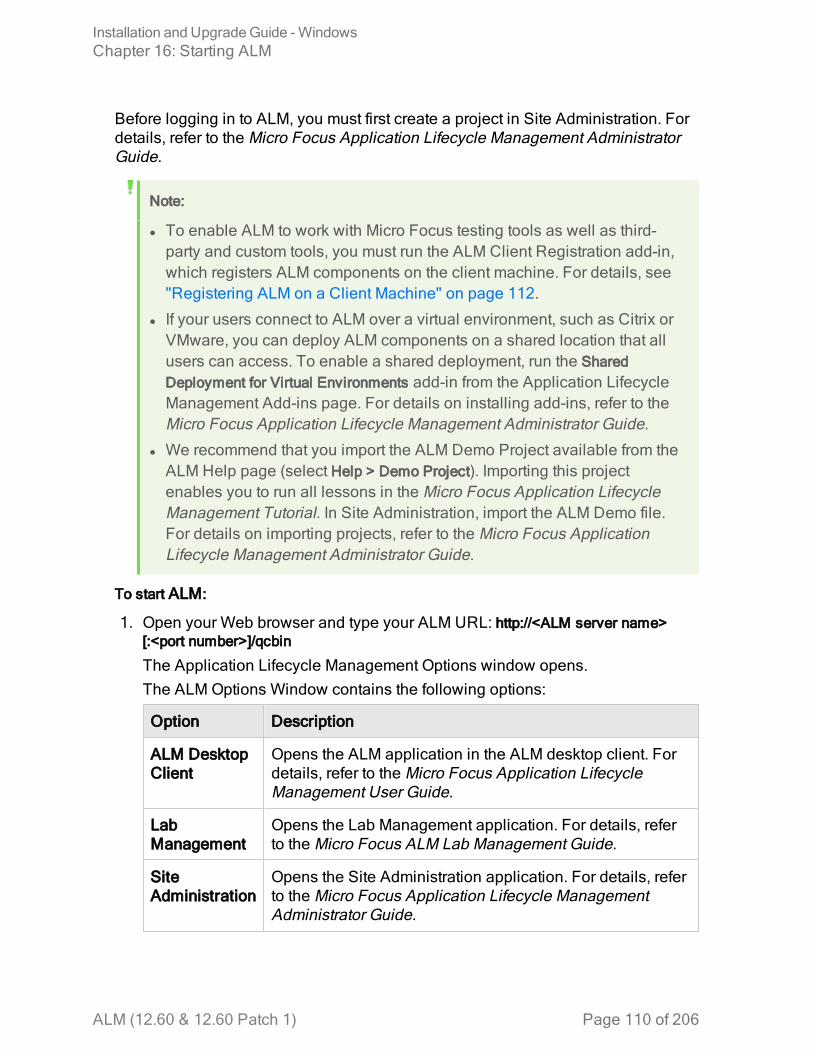
Before logging in to ALM, you must first create a project in Site Administration. Fordetails, refer to the Micro Focus Application Lifecycle Management AdministratorGuide.
Note:
l To enable ALM to work with Micro Focus testing tools as well as third-party and custom tools, you must run the ALM Client Registration add-in,which registers ALM components on the client machine. For details, see"Registering ALM on a Client Machine" on page 112.
l If your users connect to ALM over a virtual environment, such as Citrix orVMware, you can deploy ALM components on a shared location that allusers can access. To enable a shared deployment, run the SharedDeployment for Virtual Environments add-in from the Application LifecycleManagement Add-ins page. For details on installing add-ins, refer to theMicro Focus Application Lifecycle Management Administrator Guide.
l We recommend that you import the ALM Demo Project available from theALM Help page (select Help > Demo Project). Importing this projectenables you to run all lessons in the Micro Focus Application LifecycleManagement Tutorial. In Site Administration, import the ALM Demo file.For details on importing projects, refer to the Micro Focus ApplicationLifecycle Management Administrator Guide.
To start ALM:
1. Open your Web browser and type your ALM URL: http://<ALM server name>[:<port number>]/qcbin
The Application Lifecycle Management Options window opens.The ALM Options Window contains the following options:
Option Description
ALM DesktopClient
Opens the ALM application in the ALM desktop client. Fordetails, refer to the Micro Focus Application LifecycleManagement User Guide.
LabManagement
Opens the Lab Management application. For details, referto the Micro Focus ALM Lab Management Guide.
SiteAdministration
Opens the Site Administration application. For details, referto the Micro Focus Application Lifecycle ManagementAdministrator Guide.
Installation and UpgradeGuide - WindowsChapter 16: Starting ALM
ALM (12.60 & 12.60 Patch 1) Page 110 of 206

Option Description
Tools Opens the Application Lifecycle Management Tools page.
Readme Opens the ALM Readme which provides the latest newsand information about ALM.
2. Click the ALM Desktop Client link. Each time ALM is run, it carries out a versioncheck. If it detects a newer version, it downloads the necessary files to yourmachine.Follow the on-screen instructions.
Note:
l Windows 7/8/2008R2/2012: If you do not have administrator privilegeson your machine and a Security Warning displays, click Don’t Install.You will be redirected to the Install screen.
l If you run ALM over a virtual environment such as Citrix, only thesystem administrator can install a new version.
l If file downloads are prohibited through your browser, you can installthese files by using the ALM Client MSI Generator Add-in, availablefrom the Application Lifecycle Management Add-ins page (Help > Add-ins).
l If files are downloaded but the Login window does not display, youmust install a Microsoft Hotfix on your machine. For details, see thisKB article.
l Click the Open in Full Screen mode icon to open ALM in FullScreen mode. Full Screen mode enables you to take advantage of theentire screen when using ALM.
3. After the ALM version has been checked and files have been updated asnecessary, the Application Lifecycle Management Login window opens.
Note: If you are an external authentication user, you are not required toprovide name and password in this window. Continue with step 8.
4. In the Login Name box, type your user name.5. In the Password box, type the password. If you cannot remember your
password, click the Forgot Password link. For details, refer to the Micro FocusApplication Lifecycle Management User Guide.
Installation and UpgradeGuide - WindowsChapter 16: Starting ALM
ALM (12.60 & 12.60 Patch 1) Page 111 of 206

6. Select the Automatically log in to my last domain and project on this machinecheck box if you want ALM to automatically log in to the last project in whichyou were working.
7. Click Authenticate. ALM verifies your user name and password and determineswhich domains and projects you can access. If you specified automatic login,ALM opens.If authentication fails, check that your user name and password are correct andtry again.
8. In the Domain list, select a domain. By default, the last domain in which youwere working is selected.
9. In the Project list, select a project. By default, the last project in which you wereworking is selected.
10. Click Login. ALM opens and displays the module in which you last workedduring your previous session.
Registering ALM on a Client MachineTo enable you to work with other Micro Focus testing tools as well as third-partyand custom tools, ALM must be registered on the client machine. To register ALM,run ALM Client Registration from the Application Lifecycle Management Tools page.
Note: If you are running previous versions of ALM/Quality Center on yourmachine, before registering ALM 12.60, make sure that all instances ofALM/Quality Center and any integration tools are closed.
Installation and UpgradeGuide - WindowsChapter 16: Starting ALM
ALM (12.60 & 12.60 Patch 1) Page 112 of 206

Tools that Require Registering ALM Client Components
The following tools require that ALM client components be registered on the clientmachine:
ALMAdd-ins
l Unified Functional Testing Add-inMicro Focus Unified Functional Testing (UFT) comprises the productformerly known as Micro Focus QuickTest Professional and theproduct known as Micro Focus Service Test.l Functionality provided by QuickTest is now known as GUI testing inUFT.
l Functionality provided by Service Test is also known as API testingin UFT.
Note: Requires that Data Execution Prevention (DEP) bedisabled in Windows 7.
l Micro Focus Screen Recorder Add-inl Service Test Add-inl ALM Synchronizerl Defects and Requirements Exchange with Micro Focus ServiceManager and ALM
Other Unified Functional Testing tests
Micro Focus Unified Functional Testing (UFT) comprises the productformerly known as Micro Focus QuickTest Professional and the productknown as Micro Focus Service Test.
l Functionality provided by QuickTest is now known as GUI testing inUFT.
l Functionality provided by Service Test is also known as API testing inUFT.
Note:
l Required to run tests.
l Requires that Data Execution Prevention (DEP) be disabled inWindows 7.
Installation and UpgradeGuide - WindowsChapter 16: Starting ALM
ALM (12.60 & 12.60 Patch 1) Page 113 of 206

Page 114 of 206ALM (12.60 & 12.60 Patch 1)
Installation and UpgradeGuide - WindowsChapter 16: Starting ALM

Chapter 17: Integrating the ALMApplication Server with a Web ServerTo enhance the security of your ALM deployment, we recommend placing the ALMserver behind a secure reverse proxy, either an Apache or IIS web server. Suchconfiguration is also required to support external authentication. If you are not usinga secure reverse proxy, we recommend configuring SSL on the ALM server itself.For details on configuring SSL, see "Managing the ALM Application Server" onpage 123.
Configuring IIS as a reverse proxy
To integrate ALM with a web server, you configure the web server to redirectrequests to the ALM Application Server. You configure the web server to work inproxy HTTP mode.
To configure IIS to work as a reverse proxy:
Note: The following instructions apply to IIS 7.0 and later.
1. Using Server Manager, install the IIS server using default settings. You do notneed to enable any other extensions.
2. Install the URL rewrite package from http://www.iis.net/downloads/microsoft/url-rewrite.
3. Install Application Request Routing (ARR) for IIS fromhttp://www.iis.net/downloads/microsoft/application-request-routing.
Note: You may need to disable Internet Explorer ESC and run InternetExplorer as an administrator.
If you have no direct access to the internet from your server, you canobtain the ARR 3.0 standalone version that contains everything youneed, including the URL rewrite package, fromhttp://www.microsoft.com/en-us/download/details.aspx?id=40813.Download ARR 3.0 to your client, copy it to the server, and install it onthe server.
4. Make sure the IIS Web server is stopped.5. Open IIS Manager and ensure you have an element named Server Farms under
the relevant IIS server node.
ALM (12.60 & 12.60 Patch 1) Page 115 of 206

Note:
l If there is no Server Farms element and you are using a Windows2012 server, uninstall Microsoft Web Farm Framework and downloadthe latest version fromhttp://download.microsoft.com/download/5/7/0/57065640-4665-4980-a2f1-4d5940b577b0/webfarm_v1.1_amd64_en_us.msi.
l If you fail to install a Web Farm for IIS 10, see this KB article.
6. Right click Server Farms and click Create Server Farm.7. Enter a name for the farm and click Next.8. Click Advanced settings and change the ports to match your ALM Jetty ports.
The default ALM Jetty ports are 8080 for http and 8443 for https.9. Under Server address, type the name or IP address of the ALM server you want
to add to the farm.10. Click Add to add the server.
Note: Repeat steps 9 - 10 to add more ALM servers to use IIS as a loadbalancer in an ALM cluster.
11. Click Finish.12. Click Yes in the Rewrite Rules dialog box that opens. This adds a URL rewrite
rule that causes IIS to forward all incoming requests to the ALM Server.13. Select the new Server farm element created.14. Double-click Proxy.15. Set Time-out (seconds) to 35.16. Set Response buffer threshold to 0.17. Click Apply.
Note: This change is applied only to the Application Request Routingproxy.
18. Enable the proxy.a. Select the main tree node (the server name), click Application Request
Routing Cache, and then click Server Proxy Settings in the Proxy section.b. Enable Enable proxy.c. Verify that HTTP version is valued with Pass Through.
Installation and UpgradeGuide - WindowsChapter 17: Integrating the ALM Application Server with a Web Server
ALM (12.60 & 12.60 Patch 1) Page 116 of 206

d. Verify that Reverse rewrite host in response headers is enabled.e. Click Apply.
19. Restart the IIS Web server.You can now connect to your ALM site using the following URL: http://<IISserver name>/qcbin.
20. If you are using IIS with multiple servers farms (for example, ALM andPerformance Center):a. Add another server farm for the other server group.b. Modify the URL Rewrite rule for the ALM server farm:
i. Select the main tree node (the server name) and click URL Rewrite.ii. Edit the Inbound Rule.iii. Change Using fromWildcards to Regular Expressions.iv. Change Pattern to (^qcbin(.*)).v. Click Apply.
c. Modify the URL Rewrite rule for the other server farm:i. Select the main tree node (the server name) and click URL Rewrite.ii. Edit the Inbound Rule.iii. Change Using fromWildcards to Regular Expressions.iv. Change Pattern to reflect the other server group (for example, enter
(^loadtest(.*)) for Performance Center).v. Click Apply.
d. Restart the IIS Web server.
Configuring IIS as a Secure Reverse Proxy
To configure IIS to work as a secure reverse proxy:
Note: For detailed instructions, refer to the IIS documentation.
1. Ensure that you configured IIS to work as a reverse proxy.2. Install the server certificate in IIS.
Note: The server certificate must have a password protected private key.
In IIS Manager:l Import your server certificate:Select Server > Certificates > Import.
Installation and UpgradeGuide - WindowsChapter 17: Integrating the ALM Application Server with a Web Server
ALM (12.60 & 12.60 Patch 1) Page 117 of 206

l Add a listener on a secure port:Select Default Website.Edit Bindings.Click Add.Select https and select your certificate.
3. In SSL Settings for your website, configure IIS to require an SSL connection.4. Verify that you can access the ALM server through the IIS virtual IP using the
https protocol.
Configuring the IIS Web Server for SSL OffloadingSSL Offloading means that IIS is configured to connect to ALM over http and nothttps. In this case, perform the following configuration:
1. Edit the qcbin inbound rule and add the following server variable:Set name="HTTP_X_FORWARDED_PROTO" value="https".
2. In Action Properties, change the protocol from https to http.3. Restart IIS so it will read the configuration.
Configuring Apache as a reverse proxy
To configure Apache to work as a reverse proxy:
Note: It is recommended that you use Apache HTTP Server version 2.2.
1. Make sure the Apache Web server is stopped.2. Navigate to the <Apache Home directory>\conf directory.3. Create a backup copy of the httpd.conf file.4. Open the httpd.conf file.5. Uncomment or add the following load module commands:
LoadModule proxy_module modules/mod_proxy.so
LoadModule proxy_http_module modules/mod_proxy_http.so
LoadModule rewrite_module modules/mod_rewrite.so
LoadModule headers_module modules/mod_headers.so
6. Add the following section to the end of the file:
Installation and UpgradeGuide - WindowsChapter 17: Integrating the ALM Application Server with a Web Server
ALM (12.60 & 12.60 Patch 1) Page 118 of 206

# Turn off support for true Proxy behavior as we are acting as# a reverse proxyProxyRequests Off# Turn off VIA header as we know where the requests are proxiedProxyVia Off# Set the permissions for the proxy<Proxy *>AddDefaultCharset offOrder deny,allowAllow from all</Proxy># Turn on Proxy status reporting at /status# This should be better protected than: Allow from allProxyStatus On<Location /status>SetHandler server-statusOrder Deny,AllowAllow from all</Location># Configuring mod_proxy_http# To connect to servlet container with HTTP protocol, the ProxyPass# directive can be# used to send requests received on a particular URL to a Jetty instance.ProxyPreserveHost offProxyPass /qcbin http://<ALM server name>:8080/qcbinProxyPassReverse /qcbin http://<ALM server name>:8080/qcbin# For Performance Center deployments, add the following:ProxyPass /loadtest http://<PC server name>/loadtestProxyPass /LoadTest http://<PC server name>/LoadTestProxyPass /Loadtest http://<PC server name>/LoadtestProxyPassReverse /loadtest http://<PC server name>/loadtestProxyPassReverse /LoadTest http://<PC server name>/LoadTestProxyPassReverse /Loadtest http://<PC server name>/Loadtest# Rewrite rule trailing slash must be used in the VirtualHost sectionRewriteEngine On# Add trailing slash if was not present in the original requestRewriteRule ^/qcbin$ /qcbin/ [R]
7. Save the changes to the file.8. Run httpd -t from the Apache bin folder to check the syntax of the file.9. Restart the Apache Web server.
You can now connect to your ALM site using the following URL: http://<ALMvirtual server name>[:<apache port number>]/qcbin.
Installation and UpgradeGuide - WindowsChapter 17: Integrating the ALM Application Server with a Web Server
ALM (12.60 & 12.60 Patch 1) Page 119 of 206

Configuring Apache as a Secure Reverse Proxy
To configure Apache to work as a secure reverse proxy:
1. Open the httpd.conf file.2. Uncomment ssl_module:
LoadModule ssl_module modules/mod_ssl.so
3. Uncomment the httpd-ssl.conf file:
# Secure (SSL/TLS) connectionsInclude conf/extra/httpd-ssl.conf
4. Close the httpd.conf file and open the httpd-ssl.conf file. By default it is in/<apache-directory>/conf/extra.
5. In the httpd-ssl.conf file, activate the SSL port 443:
Listen 443
6. Add the SSLProtocol parameter:
SSLProtocol -SSLv2 -SSLv3 +TLSv1
7. Change the cache settings:
LoadModule socache_shmcb_module modules/mod_socache_shmcb.soSSLSessionCache "shmcb:<apacheAbsoluteFolder>/logs/ssl_scache(512000)"
8. Modify the VirtualHost and ServerName parameters:
<VirtualHost <fully qualified server name>:443>ServerName <fully qualified server name>:443
9. Add the SSL certificates to the VirtualHost section:
# Server CertificateSSLCertificateFile " /<apache-directory>/conf/WebServerPublicCert.pem"# Server Private Key:SSLCertificateKeyFile " /<apache-directory>/conf/WebServerPrivateCert.pem"
10. Restart Apache so it will read the new configuration.Run <apache-directory>/bin/apachectl -k restart
Installation and UpgradeGuide - WindowsChapter 17: Integrating the ALM Application Server with a Web Server
ALM (12.60 & 12.60 Patch 1) Page 120 of 206

11. Verify that Apache works as a secure proxy server.Go to https://webserver/qcbin. Make sure the ALM home page is displayed.
Note: The web server name must be in FQDN (fully qualified domainname) format when using a secure connection.
12. After verifying that Apache works as a secure proxy server, close the non-secure port.a. Open the httpd.conf file.b. Comment out the Listen parameter:
#Listen 80
Configuring the Apache Web Server forSSL OffloadingSSL Offloading means that Apache is configured to connect to ALM over http andnot https. In this case, perform the following configuration:
1. Navigate to the <Apache Home directory>\conf directory.2. Create a backup copy of the httpd.conf file.3. Open the httpd.conf file.4. Add the following section if encrypted communication terminates on the
Apache server:
################################################################ add the following line if SSL is terminated/offloaded on Apache server###############################################################RequestHeader set X-Forwarded-Proto https
5. Save the httpd.conf file.6. Restart Apache so it will read the configuration.
Installation and UpgradeGuide - WindowsChapter 17: Integrating the ALM Application Server with a Web Server
ALM (12.60 & 12.60 Patch 1) Page 121 of 206

Page 122 of 206ALM (12.60 & 12.60 Patch 1)
Installation and UpgradeGuide - WindowsChapter 17: Integrating the ALM Application Server with a Web Server

Chapter 18: Managing the ALM ApplicationServerThis chapter contains information relating to managing the ALM Application Server,as well as information regarding general Java management tools.
This chapter includes
• Changing the HeapMemory Size 123• Changing the Application Server Port Number 123• Configuring Secure Access onWindowsSystems 124• Configuring Secure Database Access 129• Application Server Management Tools 134
Changing the Heap Memory SizeAfter you install ALM, you may need to change the heap memory values. Forexample, you may want to increase the heap size if there is an increase in thenumber of active projects in ALM, or an increase in the number of concurrent usersessions.
Note:
l The maximum heap value cannot exceed your maximummemory (RAM)size.
l On a machine running on a 32-bit operating system, the heap memory sizeshould not exceed 1024 MB.
To change the heap memory size:
1. Verify that all users have logged out of ALM projects and stop the ALM Service.In the system tray, right click the ALM icon and choose Stop Application LifecycleManagement.
2. In the ALM deployment path, open the wrapper.conf file.3. Change the wrapper.java.maxmemory value as necessary.4. Restart the ALM Service. In the system tray, right click the ALM icon and
choose Start Application Lifecycle Management.
Changing the Application Server Port NumberAfter you install ALM, you may need to change the application server port number.
ALM (12.60 & 12.60 Patch 1) Page 123 of 206

It is possible that the default application server port may be in use by anotherapplication that is running on the same machine. In this case, you can either locatethe application that is using the port and stop it, or you can change the applicationserver port on the machine.
To change the application server port number:
1. Verify that all users have logged out of ALM projects and stop the ALM Service.In the system tray, right click the ALM icon and choose Stop Application LifecycleManagement.
2. Navigate to the <ALM deployment path>/server/conf/jetty.xml file.3. Change the jetty.port value.4. Start the ALM Service. In the system tray, right click the ALM icon and choose
Start Application Lifecycle Management.
Configuring Secure Access on Windows SystemsThis section describes how to configure a secure connection to and from ALMwhen ALM is installed on a Windows system. For the procedure, see "Configure asecure connection to the ALM application server (Jetty)" on the next page.
When the ALM server connects to another server, such as the Performance Centerserver, that requires a secure connection, you must configure trust on the ALMserver to the authority that issued the remote server certificate.
For more secure communication with the ALM server, you can configure Jetty touse TLS 1.2.
When enabling a secure connection, you should also ensure encryptedcommunication with cookies by setting a site configuration parameter.
In this section:
l "Configure trust on the ALM server" belowl "Configure a secure connection to the ALM application server (Jetty)" on the nextpage
l "Use TLS 1.2 instead TLS 1.1, TLS 1.0 or SSLv3" on page 127l "Redirect http to https" on page 128l "Set up encrypted communication with cookies" on page 129
Configure trust on the ALM serverConfigure trust on the ALM server, when ALM connects to another server over asecure connection.
Installation and UpgradeGuide - WindowsChapter 18: Managing the ALM Application Server
ALM (12.60 & 12.60 Patch 1) Page 124 of 206

1. Obtain the certificate of the root and any intermediate Certificate Authority thatissued the remote server certificate.
2. On the ALM server, go to the java bin. For example:
C:\Program Files\Java\jre\bin
3. Import each certificate into the java truststore by using a keytool command. Forexample:
C:\Program Files\Java\jre\bin\keytool -import -trustcacerts -alias myCA -file <path to certificate> -keystore "c:\ProgramFiles\java\jre\lib\security\cacerts"
4. If your access is denied, run CMD as an administrator.
Configure a secure connection to the ALM applicationserver (Jetty)1. Obtain the server certificate issued to the name of this server in java keystore
format. It must contain a private key and the certificate authority that issued it.For details on creating certificates using the Certificate Authority, see this KBarticle.
2. Verify that all users have logged out of ALM projects and stop the ALM Serviceas follows: In the system tray, right click the ALM icon and choose StopApplication Lifecycle Management.
3. Navigate to the <ALM Deployment Folder>\server\conf directory and make abackup of the jetty-ssl.xml file and the keystore file located in this directory.
4. Copy your keystore file to this directory and rename it keystore.5. Open the jetty-ssl.xml file, search for sslContextFactory, and change the
password to your password (mypass):
<Set name="KeyStorePath"><Property name="jetty.base" default="." />/<Propertyname="jetty.keystore" default="conf/keystore"/></Set><Set name="KeyStorePassword"><Property name="jetty.keystore.password"
default="<mypass>"/></Set><Set name="KeyManagerPassword"><Property name="jetty.keymanager.password"
default="<mypass>"/></Set><Set name="TrustStorePath"><Property name="jetty.base" default="." />/<Propertyname="jetty.truststore" default="conf/keystore"/></Set><Set name="TrustStorePassword"><Property name="jetty.truststore.password" default="
<mypass> "/></Set>
Installation and UpgradeGuide - WindowsChapter 18: Managing the ALM Application Server
ALM (12.60 & 12.60 Patch 1) Page 125 of 206

6. (Strongly recommended) To obfuscate the password, perform the followingsteps:a. Determine the version of Jetty that you are using. Locate the <ALM
Deployment Folder>\server\lib\jetty-util-<your-jetty-version>.jar file. <your-jetty-version> is the version of Jetty you are using.
b. Open Command Prompt (cmd) and run the following commands:
$ set JETTY_VERSION=<your-jetty-version><JAVA_HOME>\java -cp <ALM Deployment Folder>\server\lib\jetty-util-$JETTY_VERSION.jar org.eclipse.jetty.util.security.Password <password>
For example, if you run the following command:
"C:\Program Files\java\jre\bin\java.exe" -cp <ALM deploymentfolder>\server\lib\jetty-util-9.1.4.v20140401.jarorg.eclipse.jetty.util.security.Password changeit
The output will appear as follows:
changeitOBF:1vn21ugu1saj1v9i1v941sar1ugw1vo0
c. Replace the plain text password in the jetty-ssl.xml file with the OBF prefix.7. Save the jetty-ssl.xml file.8. Edit the start.ini file and uncomment the following lines:
jetty-ssl.xmljetty-https.xml
9. Save the start.ini file.10. Restart the ALM Service as follows: In the system tray, right click the ALM icon
and choose Start Application Lifecycle Management.11. Check the wrapper.log file. If you do not see the "Server is ready!" message,
correct the errors shown in the log.12. Connect to ALM using the SSL connection, such as
https://<ALM server>:8443/qcbin.13. After ensuring that the SSL connection works, disable non-HTTPS access to
the ALM Application Server. In the jetty.xml file, locate the following section andcomment it out by placing <!-- at the beginning of the section, and --> at theend.
Installation and UpgradeGuide - WindowsChapter 18: Managing the ALM Application Server
ALM (12.60 & 12.60 Patch 1) Page 126 of 206

Note: It is possible that this section in your jetty.xml file is slightlydifferent.
<!--<Call name="addConnector">
<Arg><New class="org.eclipse.jetty.server.ServerConnector"><Arg name="server"><Ref refid="Server" /></Arg><Arg name="factories">
<Array type="org.eclipse.jetty.server.ConnectionFactory"><Item>
<New class="org.eclipse.jetty.server.HttpConnectionFactory"><Arg name="config"><Ref refid="httpConfig" /></Arg>
</New></Item>
</Array></Arg><Set name="host"><Property name="jetty.host" /></Set><Set name="port"><Property name="jetty.port" default="8080"/></Set><Set name="idleTimeout"><Property name="http.timeout" default="30000"/></Set>
</New></Arg>
</Call>-->
14. Save the jetty.xml file.15. Restart the ALM Service and ensure that the non-secure URL (such as
http://<ALM server>:8080/qcbin) does not open.
Use TLS 1.2 instead TLS 1.1, TLS 1.0 or SSLv3To use TLSv1.2, you need to configure the jetty-ssl.xml file, and modify thedatabase connection string.
Configure the jetty-ssl.xml file
1. Verify that all users have logged out of ALM projects and stop the ALM Serviceas follows: In the system tray, right click the ALM icon and choose StopApplication Lifecycle Management.
2. Navigate to the <ALM Deployment Folder>\server\conf directory and make abackup of the jetty-ssl.xml file.
3. Open the jetty-ssl.xml file.4. Uncomment the ExcludeProtocols section in the file:
Installation and UpgradeGuide - WindowsChapter 18: Managing the ALM Application Server
ALM (12.60 & 12.60 Patch 1) Page 127 of 206
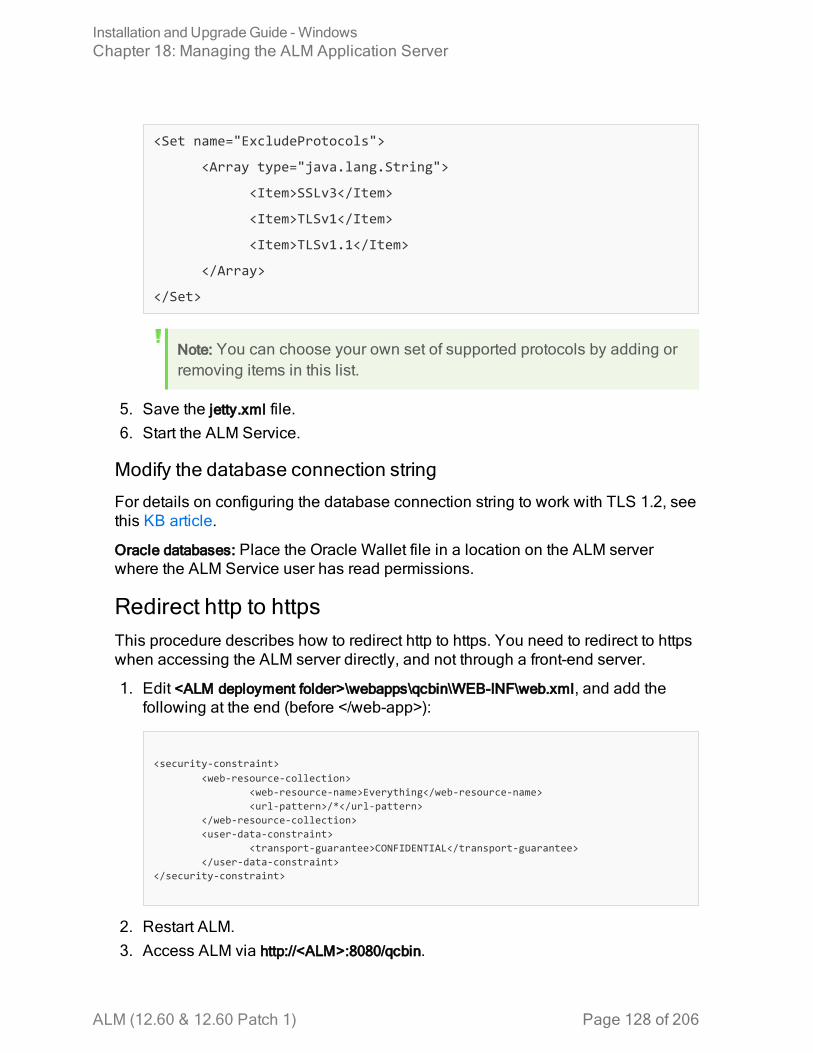
<Set name="ExcludeProtocols">
<Array type="java.lang.String">
<Item>SSLv3</Item>
<Item>TLSv1</Item>
<Item>TLSv1.1</Item>
</Array>
</Set>
Note: You can choose your own set of supported protocols by adding orremoving items in this list.
5. Save the jetty.xml file.6. Start the ALM Service.
Modify the database connection string
For details on configuring the database connection string to work with TLS 1.2, seethis KB article.
Oracle databases: Place the Oracle Wallet file in a location on the ALM serverwhere the ALM Service user has read permissions.
Redirect http to httpsThis procedure describes how to redirect http to https. You need to redirect to httpswhen accessing the ALM server directly, and not through a front-end server.
1. Edit <ALM deployment folder>\webapps\qcbin\WEB-INF\web.xml, and add thefollowing at the end (before </web-app>):
<security-constraint><web-resource-collection>
<web-resource-name>Everything</web-resource-name><url-pattern>/*</url-pattern>
</web-resource-collection><user-data-constraint>
<transport-guarantee>CONFIDENTIAL</transport-guarantee></user-data-constraint>
</security-constraint>
2. Restart ALM.3. Access ALM via http://<ALM>:8080/qcbin.
Installation and UpgradeGuide - WindowsChapter 18: Managing the ALM Application Server
ALM (12.60 & 12.60 Patch 1) Page 128 of 206

You should be redirected to https://<ALM>:8443/qcbin. If not, ensure thatSecurePort in jetty.xml matches your secure port.
Set up encrypted communication with cookies1. In Site Administration, click the Site Configuration tab.2. click the New Parameter button. Enter the following information:
Parameter Value
SSO_SECURE_ONLY_COOKIE Y
Configuring Secure Database AccessThis section describes how to configure a secure connection, such as SecureSocket Layer (SSL), from the ALM server to the database server. If your databaseserver requires an encrypted channel, you must follow these instructions.
Before beginning, determine the following:
l For SQL databases:l Is the certificate signed by a trusted Certificate Authority (CA)? If not, obtainthe certificate chain of authority that issued your SQL server certificate andimport it into the ALM server truststore using the procedure to configure truston the ALM server in "Configuring Secure Access on Windows Systems" onpage 124.
l Is host name validation required? If yes, what is the host name, including thedomain name, in the server certificate?
l For Oracle databases:l Is SSL configured? If yes:
o Place the Oracle Wallet file in a location on the ALM server where the ALMService user has read permissions.
o Is host name validation required? If yes, what is the host name, includingthe domain name, in the server certificate?
o Is the port different than what it was before?l If SSL is not configured:
o Is native Data Integrity configured?o Is native Encryption configured? If yes, what is the algorithm? Is the keylarger than 128 bits?
Installation and UpgradeGuide - WindowsChapter 18: Managing the ALM Application Server
ALM (12.60 & 12.60 Patch 1) Page 129 of 206

To configure a secure database connection for a previously unsecured database:
1. For SQL databases, follow the procedure to configure trust on the ALM serverin "Configuring Secure Access on Windows Systems" on page 124.
2. Configure the Site Administration schema connection.This section is relevant if the database server that was configured for a secureconnection contains your Site Administration schema. If you have a separatedatabase server for your projects and you only want a secure connection to thatdatabase, skip this section.a. Stop the ALM server.b. Run the ALM Server Configuration wizard:
Win > Run > “%ALM_INSTALL_PATH%\run_configuration.bat” gui false
c. In the Database Server step, enter the database administrator passwordand click Next.
d. Select the Connection String option under Database Connection:i. For SSL, add ;EncryptionMethod=SSL to the end of the value. Forexample:
jdbc:mercury:sqlserver://<database server>\SQL2012SSL:1499;EncryptionMethod=SSL.
ii. For Oracle, add ;TrustStore=[path to Oracle Wallet];TrustStorePassword=[password to Oracle wallet] to the end of the value. For example:
jdbc:mercury:oracle://<database server>;servicename=palmssl1210;EncryptionMethod=SSL;TrustStore=c:/ewallet.p12;TrustStorePassword=client12
iii. For Oracle native Data Integrity, add ;DataIntegrityLevel=accepted or;DataIntegrityLevel=required to the end of the value, and replace thejava security policy files in ..\java\jre\lib\security\.
iv. For Oracle native Encryption, add ;EncryptionLevel=accepted or;EncryptionLevel=required to the end of the value, and, for encryptionalgorithms with keys longer than 128 bits, replace the java securitypolicy files in ..\java\jre\lib\security\.
Note: For details on java security policy files, seehttp://www.oracle.com/technetwork/java/javase/downloads/jce-7-download-432124.html.
e. Click Next. In the Site Administration Database Schema step:
Installation and UpgradeGuide - WindowsChapter 18: Managing the ALM Application Server
ALM (12.60 & 12.60 Patch 1) Page 130 of 206

i. Select Connect to existing schema/ second node under Selected Action.ii. Enter your Site Administration schema name and password.
f. Continue until the end of the wizard and start the ALM Service.3. Configure the database servers:
a. Log in to Site Administration.b. In the Database Servers tab, do the following for each database that was
configured for a secure connection:i. Select the database and click Edit.ii. Change the connection string:
A. For SSL, add ;EncryptionMethod=SSL to the end of the value.B. For Oracle, add ;TrustStore=[path to Oracle
Wallet];TrustStorePassword=[password to Oracle wallet] to the end ofthe value.
C. For Oracle native Data Integrity, add ;DataIntegrityLevel=accepted or;DataIntegrityLevel=required to the end of the value, and replace thejava security policy files in ..\java\jre\lib\security\.
D. For Oracle native Encryption, add ;EncryptionLevel=accepted or;EncryptionLevel=required to the end of the value, and, forencryption algorithms with keys longer than 128 bits, replace thejava security policy files in ..\java\jre\lib\security\.
Note: For details on java security policy files, seehttp://www.oracle.com/technetwork/java/javase/downloads/jce-7-download-432124.html.
iii. Click Test Connection to check that the connection works.iv. Click OK.
4. Configure LAB_PROJECT, if LAB_PROJECT is on a secure connectiondatabase:a. Log in to Site Administration.b. Go to the Site Projects tab, select LAB_PROJECT, and click Edit :
i. Click OK for any error messages that appear.ii. The Connection String Editor (MS-SQL/Oracle) dialog box opens.
Change the connection string:A. For SSL, add ;EncryptionMethod=SSL to the end of the value.B. For Oracle, add ;TrustStore=[path to Oracle
Wallet];TrustStorePassword=[password to Oracle wallet] to the end ofthe value.
Installation and UpgradeGuide - WindowsChapter 18: Managing the ALM Application Server
ALM (12.60 & 12.60 Patch 1) Page 131 of 206

C. For Oracle native Data Integrity, add ;DataIntegrityLevel=accepted or;DataIntegrityLevel=required to the end of the value, and replace thejava security policy files in ..\java\jre\lib\security\.
D. For Oracle native Encryption, add ;EncryptionLevel=accepted or;EncryptionLevel=required to the end of the value, and, forencryption algorithms with keys longer than 128 bits, replace thejava security policy files in ..\java\jre\lib\security\.
Note: For details on java security policy files, seehttp://www.oracle.com/technetwork/java/javase/downloads/jce-7-download-432124.html.
iii. Click Test Connection to check that the connection works.iv. Click OK.v. Click Activate Project.
5. Configure all site projects on a secure connection database:a. Log in to Site Administration.b. Go to the Site Projects tab, select the project and click Edit:
i. Click OK for any error messages that appear.ii. The Connection String Editor (MS-SQL/Oracle) dialog box opens.
Change the connection string:A. For SSL, add ;EncryptionMethod=SSL to the end of the value.B. For Oracle, add ;TrustStore=[path to Oracle
Wallet];TrustStorePassword=[password to Oracle wallet] to the end ofthe value.
C. For Oracle native Data Integrity, add ;DataIntegrityLevel=accepted or;DataIntegrityLevel=required to the end of the value, and replace thejava security policy files in ..\java\jre\lib\security\.
D. For Oracle native Encryption, add ;EncryptionLevel=accepted or;EncryptionLevel=required to the end of the value, and, forencryption algorithms with keys longer than 128 bits, replace thejava security policy files in ..\java\jre\lib\security\.
Note: For details on java security policy files, seehttp://www.oracle.com/technetwork/java/javase/downloads/jce-7-download-432124.html.
iii. Click Test Connection to check that the connection works.
Installation and UpgradeGuide - WindowsChapter 18: Managing the ALM Application Server
ALM (12.60 & 12.60 Patch 1) Page 132 of 206

iv. Click OK.v. Click Activate Project.
c. Perform the above step for all projects on a secure connection database.If you have a large number of projects to update, you can run the followingSQL update query on the site administration schema:i. In MS SQL Server: UPDATE td.PROJECTS SET DB_CONNSTR_FORMAT = 'your new connection string'
ii. In Oracle: UPDATE [your sa schema name].PROJECTS SET DB_CONNSTR_FORMAT = 'your new connection string'
iii. To limit the projects you update, add a where clause to the query, suchas WHERE PROJECT_NAME IN ('project1', 'project2') or WHEREDOMAIN_NAME IN ('damain1', 'domain2')
iv. After executing the query, restart the ALM service.To configure a secure database connection for a new ALM installation:
1. For SQL databases, follow the procedure to configure trust on the ALM serverin "Configuring Secure Access on Windows Systems" on page 124.
2. During the installing ALM, in the Database Server step, select the ConnectionString option and value the field as follows:a. For MS SQL server use this format:
jdbc:mercury:sqlserver://sql2014.test.net:1433;EncryptionMethod=SSL.If TLSv1.2 is required use this format:jdbc:mercury:sqlserver://sql2014.test.net:1433;EncryptionMethod=SSL;CryptoProtocolVersion=TLSv1.2.
b. For Oracle, add ;TrustStore=[path to Oracle Wallet];TrustStorePassword=[password to Oracle wallet] to the end of the value.
c. For Oracle native Data Integrity, add ;DataIntegrityLevel=accepted or;DataIntegrityLevel=required to the end of the value, and replace the javasecurity policy files in ..\java\jre\lib\security\.
d. For Oracle native Encryption, add ;EncryptionLevel=accepted or;EncryptionLevel=required to the end of the value, and, for encryptionalgorithms with keys longer than 128 bits, replace the java security policyfiles in ..\java\jre\lib\security\.
Note: For details on java security policy files, seehttp://www.oracle.com/technetwork/java/javase/downloads/jce-7-download-432124.html.
3. Complete the ALM installation.
Installation and UpgradeGuide - WindowsChapter 18: Managing the ALM Application Server
ALM (12.60 & 12.60 Patch 1) Page 133 of 206

Application Server Management ToolsSince the ALM Application Server is Java-based, we recommend the followingJava tools to enable you to effectively manage ALM:
Tool Address
jconsole http://java.sun.com/developer/technicalArticles/J2SE/jconsole.html
jstack http://download.oracle.com/javase/1.5.0/docs/tooldocs/share/jstack.html
jmap http://download.oracle.com/javase/1.5.0/docs/tooldocs/share/jmap.html
jvisualvm
http://download.oracle.com/javase/6/docs/technotes/tools/share/jvisualvm.html
Note: Jvisualvm is an all-in-one tool that was added in Java 1.6. Howeverjvisualvm is very memory and CPU intensive, so you may find that anothertool is more useful.
Installation and UpgradeGuide - WindowsChapter 18: Managing the ALM Application Server
ALM (12.60 & 12.60 Patch 1) Page 134 of 206

Chapter 19: Customizing System FilesYou can customize various aspects of ALM by creating or configuring system files.
This chapter includes
• Customizing Site Administration 135• CustomizingMenus 136• Customizing the ALMSystemTray Icon 138• Customizing the ALM LoginWindow 139
Customizing Site AdministrationCustomization of the Site Administration repository and the qcbin application, suchas editing .xsl mail stylesheets or creating custom test types, must be performed inthe ALM deployment directory. After customizing any of the files in the deploymentdirectory, you must redeploy ALM.
Caution: You must not modify, add, or delete files in the ALM installationdirectory.
This section includes:
• Customizing the Site Administration Repository 135• Customizing the qcbin Application 136
Customizing the Site Administration RepositoryPerform the following procedure to customize the Site Administration repository.
1. On the machine on which ALM is installed, open a file browser, and navigate to<ALM installation path>\ALM\data\sa.
2. Open another file browser, and navigate to <ALM repository path>\customerData.3. In the installation directory, navigate to the file that you want to customize.4. In the repository directory, under customerData, create the same folder structure
that contains the file in the installation directory.5. Copy the file from the installation directory and paste the file in the appropriate
folder in the repository directory.6. Edit the file in the repository directory.
ALM (12.60 & 12.60 Patch 1) Page 135 of 206

7. Run the Server Deployment Wizard from Start > Micro Focus ALM Server >Server Deployment Wizard or <installation path>\bin\run_server_deploy_tool.bat.
Customizing the qcbin ApplicationPerform the following procedure to customize the qcbin application.
1. On the machine on which ALM is installed, open a file browser, and navigate to<ALM installation path>\ALM\application\20qcbin.war.
2. Open another file browser, and navigate to <ALM deploymentpath>\application\20qcbin.war.
3. In the installation directory, navigate to the file that you want to customize.4. In the deployment directory, under 20qcbin.war create the same folder structure
that contains the file in the installation directory.5. Copy the file from the installation directory and paste the file in the appropriate
folder in the deployment directory.6. Edit the file in the deployment directory.7. Run the Server Deployment Wizard from Start > Micro Focus ALM Server >
Server Deployment Wizard or <installation path>\bin\run_server_deploy_tool.bat.8. Repeat the procedure on each cluster node.
Customizing MenusYou can customize the ALM Tools and Help menus by modifying the ALM-Client.exe.config file on the machine on which ALM is installed.
Note: You can only perform .cab related actions on a Windows machine. Tocustomize menus, copy the relevant files to a Windows machine and edit thefiles as necessary. Then copy the files back to the machine on which ALM isinstalled and proceed as instructed.
To customize ALM:
1. On the machine on which ALM is installed, extract the ALM-Client.exe.config filefrom Client.cab. This file is located in: <ALM deploymentpath>\deployment\20qcbin.war\Install.
2. Open the ALM-Client.exe.config file (this is in .xml format).3. In the Tools section of the file, you can add new items to the Tools menu.
The following is the syntax of an entry in the Tools line:
<TDFrame
Installation and UpgradeGuide - WindowsChapter 19: Customizing System Files
ALM (12.60 & 12.60 Patch 1) Page 136 of 206
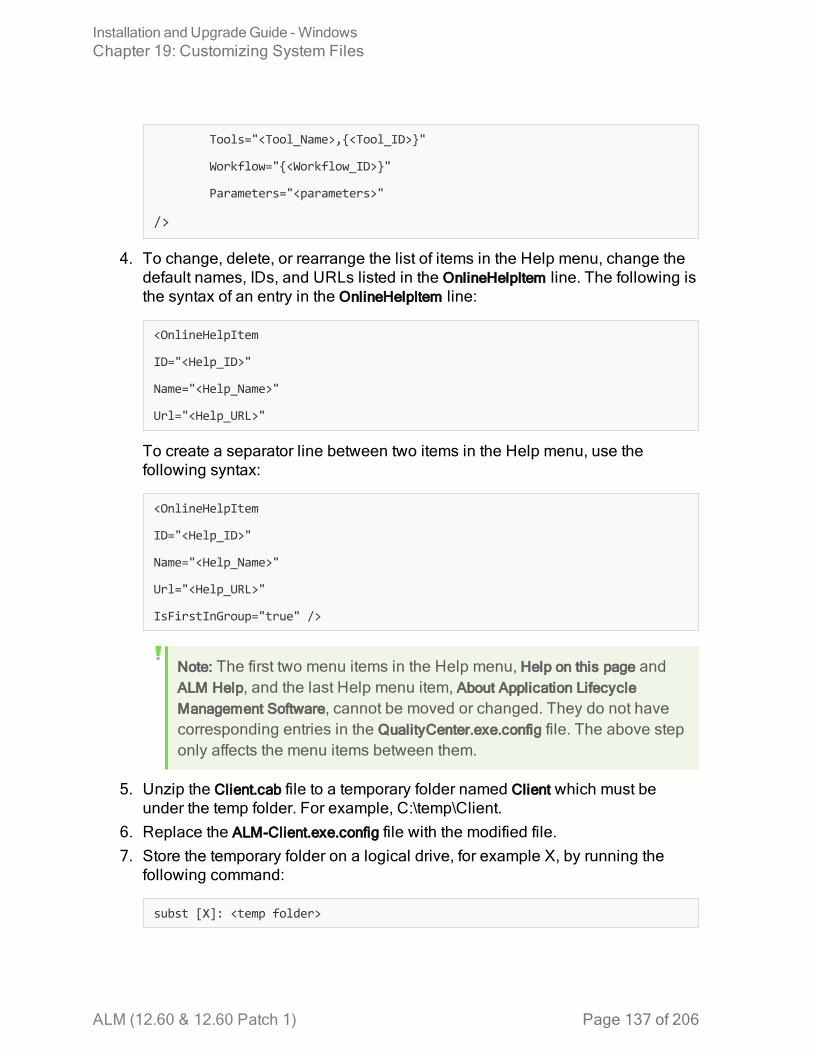
Tools="<Tool_Name>,{<Tool_ID>}"
Workflow="{<Workflow_ID>}"
Parameters="<parameters>"
/>
4. To change, delete, or rearrange the list of items in the Help menu, change thedefault names, IDs, and URLs listed in the OnlineHelpItem line. The following isthe syntax of an entry in the OnlineHelpItem line:
<OnlineHelpItem
ID="<Help_ID>"
Name="<Help_Name>"
Url="<Help_URL>"
To create a separator line between two items in the Help menu, use thefollowing syntax:
<OnlineHelpItem
ID="<Help_ID>"
Name="<Help_Name>"
Url="<Help_URL>"
IsFirstInGroup="true" />
Note: The first two menu items in the Help menu, Help on this page andALM Help, and the last Help menu item, About Application LifecycleManagement Software, cannot be moved or changed. They do not havecorresponding entries in the QualityCenter.exe.config file. The above steponly affects the menu items between them.
5. Unzip the Client.cab file to a temporary folder named Client which must beunder the temp folder. For example, C:\temp\Client.
6. Replace the ALM-Client.exe.config file with the modified file.7. Store the temporary folder on a logical drive, for example X, by running the
following command:
subst [X]: <temp folder>
Installation and UpgradeGuide - WindowsChapter 19: Customizing System Files
ALM (12.60 & 12.60 Patch 1) Page 137 of 206

For example: subst X: C:\temp
8. Create a new Client.cab file with the following command:
cabarc -r -p -P Client\ -s 6144 N <temp folder>\Client.cab X:\Client\*.*
Note: To use this command you must first download cabsdk.exe (theCabinet Software Development Kit) from the Microsoft Download Center.
9. Add a class 3 digital signature to the new Client.cab file.
Note: The digital signature must be a signature of a trusted provider.
10. Under <ALM deployment path>\application\20qcbin.war, create a new Installationfolder, if it does not already exist.
11. Save the new cab file under the Installation folder.12. Run the Server Deployment Wizard from Start > Micro Focus ALM Server >
Server Deployment Wizard or <installation path>\bin\run_server_deploy_tool.bat.13. Repeat the procedure on each cluster node.
Customizing the ALM System Tray IconThe ALM system tray icon indicates the current status of ALM. It also indicates thecurrent action that ALM is performing.
You can customize the behavior of the icon by modifying thetrayConfigFile.properties file.
To customize the system tray icon:
1. Navigate to the following directory: <ALM deployment folder>\server\conf
2. Open the trayConfigFile.properties file.3. Change the following properties as necessary:
l pollingintervalMillis. Defines, in milliseconds, how often the ALM system trayicon checks the status (started or stopped) of ALM. The default value is5,000.
l logDebugMode. Defines whether debugging information is included in thesystem tray log. The default value is false.
l timeoutintervalMillis. Defines, in milliseconds, the maximum amount of timeALM takes to change the status of ALM when you right-click the icon andchoose Start/Stop ALM Server. If ALM is not able to perform the action in theallotted time the status changes to Error. The default value is 180,000.
Installation and UpgradeGuide - WindowsChapter 19: Customizing System Files
ALM (12.60 & 12.60 Patch 1) Page 138 of 206

Note: If the icon does not appear in the system tray, choose Start > Programs> Application Lifecycle Management > ALM Tray icon.
Customizing the ALM Login WindowYou can customize the ALM Login window, so that you can share any specialannouncements or important events with users that are using the same ALMserver. You create a content file and save it on the ALM server. Users can view thiscontent from their ALM Desktop Client machines. For example, you can notify theusers that the ALM server will not be available for use due to an upgrade.
To customize the Login window:
1. On the ALM server, navigate to the following directory:
Windows <Deployment path>\webapps\qcbin\Help\
(By default: C:\ProgramData\Micro Focus\ALM\webapps\qcbin\Help\)
Linux <Deployment path>/webapps/qcbin/Help/
(By default: /var/opt/Micro Focus/ALM/webapps/qcbin/Help/)
2. Create the customization folder.3. In the customization folder, create the following file: customizationInfo.htm. The
file name is case-sensitive.4. Edit the customizationInfo.htm file and add content.5. To view the content, open the ALM Login window from the ALM Desktop Client
machine.
Installation and UpgradeGuide - WindowsChapter 19: Customizing System Files
ALM (12.60 & 12.60 Patch 1) Page 139 of 206

Page 140 of 206ALM (12.60 & 12.60 Patch 1)
Installation and UpgradeGuide - WindowsChapter 19: Customizing System Files

Chapter 20: Uninstalling ALMYou can uninstall ALM from the server machine. When uninstalling ALM, projectsare not deleted. You can also uninstall ALM client components from a clientmachine that has been used to access ALM.
This section includes:
• Uninstalling ALM fromWindowsSystems 141• Removing ALMClient Components from aClient Machine 141
Uninstalling ALM fromWindows SystemsThis section describes how to uninstall ALM from your Windows server machine.
l Select Start > All Programs > Application Lifecycle Management. Run UninstallApplication Lifecycle Management.Alternatively, navigate to the installation directory (the default is C:\ProgramFiles\Micro Focus\ALM\ALM). Run the Uninstall_ALM.exe file.
l (Optional) To remove all traces of ALM from the machine, delete all remainingfiles in the installation directory as well as the deployment path. Also delete the\HP\ALM folders in the c:\ProgramData directory and their files
Note:When you remove the repository directory, all projects' repositories arealso removed. The database remains unless it is specifically deleted.
Removing ALM Client Components from a ClientMachineWhen you run ALM on your client computer, client components are downloaded toyour client machine. You can use the ALM Client Cleanup add-in to remove allALM client components, including files and registry keys. For details and todownload the add-in, see the ALM Client Cleanup Add-in page on Marketplace.
If the client machine is used to access ALM after the cleanup add-in has been run,all necessary components are downloaded again from the ALM server.
ALM (12.60 & 12.60 Patch 1) Page 141 of 206

Page 142 of 206ALM (12.60 & 12.60 Patch 1)
Installation and UpgradeGuide - WindowsChapter 20: Uninstalling ALM

ALM (12.60 & 12.60 Patch 1) Page 143
Part 6: Project Upgrade

ALM (12.60 & 12.60 Patch 1) Page 144
Installation and UpgradeGuide - WindowsPart 6: Project Upgrade

Chapter 21: Upgrading ProjectsUpgrading Projects describes the post-installation steps necessary for upgradingprojects from previous versions of ALM/Quality center to ALM 12.60.
To update multiple projects concurrently, use ALM Robot. For details, refer to theApplication Lifecycle Management Administrator Guide.
This chapter includes:
• Deactivate and Remove Projects fromExisting ALM/Quality Center Installation 145• CopyProject Database Schemas to the New Database Server Machine 146• Restore ALMProjects in New Site Administration Database Schema 146• Upgrade Projects 149
Deactivate and Remove Projects from ExistingALM/Quality Center Installation
Note: Back up the database and repository after deactivating projects.
In the previous ALM/Quality Center installation, deactivate and remove projectsfrom Site Administration. You do not have to deactivate and remove all projects atonce. You can perform this action on a per-project upgrade basis.
To deactivate a project:
1. In Site Administration, click the Site Projects tab.2. In the Projects list, select a project.
3. Click the Deactivate Project or Deactivate Template button . A message boxindicates that all connected users will be disconnected.
4. Click OK to confirm. The project is deactivated and the project icon is changedin the Projects list.
To remove a project from the Projects list:
Note: If the project is currently in use, it cannot be removed. For informationabout how to manually remove a project, see this KB article.
1. In Site Administration, click the Site Projects tab.2. In the Projects list, select a project.
3. Click the Remove Project or Remove Template button .
ALM (12.60 & 12.60 Patch 1) Page 145 of 206

4. Click OK to confirm. If the project is still active, you are prompted to deactivateit.
5. Click OK.
Copy Project Database Schemas to the NewDatabase Server Machine
Note: Perform this step only if your new ALM system uses a new databaseserver or new instance of the previous database server.
To restore removed projects in the new database server machine, copy the projectschemas from the database server that was used in the previous ALM system tothe database server that will be used in the new ALM system.
This enables you to restore the projects in Site Administration in the new ALMinstallation.
Perform the required steps for backing up, removing, and restoring databases foryour database type. For assistance contact your database administrator.
Note: The database user must have the same permissions as the userinstalling ALM.
Restore ALM Projects in New Site AdministrationDatabase SchemaTo view projects in Site Administration, on the machine on which the new versionof ALM has been installed, restore projects you removed above as follows:
Project restore considerations
l Before restoring the project, make sure that the database where the projectresides exists in the DB Servers tab in Site Administration on your ALM server.The ALM server needs to access the contents of the restored project from theproject's database.
l When restoring a project, you should select the dbid.xml file located in the projectrepository. This ensures that the project retains its original ID. If a project doesnot have its original ID, the following cross project features may not functionproperly: cross project customization, importing and synchronizing libraries, andcross project graphs.
l You must first restore and upgrade any template projects before restoring andupgrading other projects. If the template project and its linked projects are in
Installation and UpgradeGuide - WindowsChapter 21: Upgrading Projects
ALM (12.60 & 12.60 Patch 1) Page 146 of 206

different databases, ensure that the template project’s database is accessiblewhen restoring any linked projects.
l If you were previously working with Performance Center 11.00 or later, you mustfirst restore and upgrade LAB_PROJECT, and then any Performance Centertemplate projects, before restoring and upgrading other Performance Centerprojects.
To restore access to an ALM project:
1. Navigate to the project's dbid.xml file. The file is located in the projectrepository's qc sub-directory.For details on the project structure, refer to the Understanding the ProjectStructure section in the Micro Focus Application Lifecycle ManagementAdministrator Guide.
2. Open the file and update the following values:
Note:
l To identify the values of DB_CONNSTR_FORMAT and DB_USER_PASS, it is recommended to create a new, empty project in ALM SiteAdministration, open the project's dbid.xml file, and copy these values.You can later delete the empty project.
l Make sure not to change the original value for PR_SMART_REPOSITORY_ENABLED.
l If you are restoring LAB_PROJECT or Performance Center projects aspart of the upgrade process, make sure not to edit the PROJECT_UIDvalue. You must restore these projects with their original PROJECT_UID value to maintain the links between LAB_PROJECT and itsassociated Performance Center projects. This is important for shareddata, such as timeslots, runs, and so on.
l DB_NAME. Update to the database schema name as it appears in thedatabase server.
l DB_CONNSTR_FORMAT. Update to the value of the empty project created inALM. See the note for details.
l DBSERVER_NAME. This is the name of the database server as defined inthe DB Servers tab in Site Administration.
l DB_USER_PASS. Update if the encrypted passphrase differs between theprevious installation and ALM.
l PHYSICAL_DIRECTORY. Update to the new location of the projectrepository. It must contain a backslash (\) at the end of the path.
Installation and UpgradeGuide - WindowsChapter 21: Upgrading Projects
ALM (12.60 & 12.60 Patch 1) Page 147 of 206

3. Save the file.4. In Site Administration, click the Site Projects tab.
5. Click the Restore Project or Restore Template button . The Restore Projectdialog box opens.
6. To locate the file that includes the project that you want to restore, click thebrowse button to the right of the dbid.xml file location box. The Open File dialogbox opens.
7. Locate the project's dbid.xml file.8. Select the dbid.xml file and click Open. The Restore Project dialog box opens
and displays the database type, name, server, and the directory path of theproject.
9. In the Restore Into Domain box, select the domain in which you want therestored project to be located.
10. Click Restore.11. If your database server does not have the text search feature enabled, a
message box opens. You can enable the text search feature before or after thisprocess completes.l Click Yes to continue this process. After the process completes, you canenable the text search feature.
l Click No to stop this process. Enable the text search feature and then restartthe process.
For details on enabling the text search feature, refer to the Micro FocusApplication Lifecycle Management Administrator Guide.
12. When the restore process completes, click OK.13. Click Close to close the Restore Project dialog box and view the restored
project in the Projects list.
Installation and UpgradeGuide - WindowsChapter 21: Upgrading Projects
ALM (12.60 & 12.60 Patch 1) Page 148 of 206

Upgrade ProjectsOnce a project appears in the ALM 12.60 Site Administration project list, you canproceed with the actual project upgrade. You can upgrade projects individually oron the domain level, which upgrades all projects contained in the domain. Youmust first upgrade any template projects before upgrading other projects.
This section includes:
• About Upgrading Domains and Projects 149• Upgrading a Project 150• Upgrading a Domain 151
About Upgrading Domains and ProjectsBy default, the upgrade process runs in non-silent mode. When running theprocess in non-silent mode, ALM may pause and prompt you for input when anerror occurs. Instead, you can choose to run the process in silent mode. Whenrunning the process in silent mode, ALM aborts the process without prompting youfor input.
After the project has been upgraded, you can no longer use the project with aprevious version of ALM/Quality Center.
Note:
l During the upgrade process, the project directory must be accessible. Forexample, if your project directory is located on a file server, ensure that theserver is running and accessible.
l During the upgrade process, no database maintenance jobs can be run.Running database maintenance jobs can cause the upgrade to fail andcan corrupt projects.
l If a project has extensions enabled, the availability of these extensions onthe new server must be verified before upgrading. If any extension is notavailable on the new server, the upgrade fails.
l You must first upgrade a template project before upgrading any of itslinked projects. If the template project and its linked projects are in differentdatabases, ensure that the template project’s database is accessible whenupdating any linked projects.
l Version Control: Version control enabled projects cannot be upgradedwhile there are checked out entities. All entities must be checked in to thecorresponding version of Quality Center or ALM. To determine if there are
Installation and UpgradeGuide - WindowsChapter 21: Upgrading Projects
ALM (12.60 & 12.60 Patch 1) Page 149 of 206
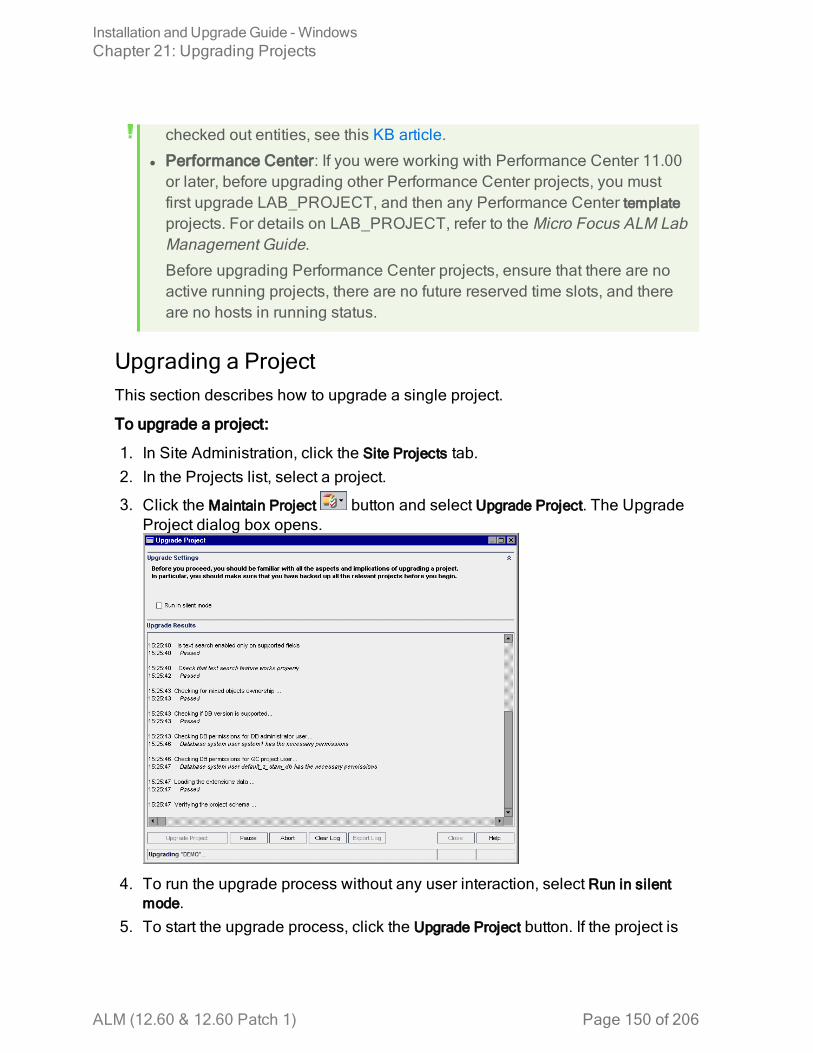
checked out entities, see this KB article.
l Performance Center: If you were working with Performance Center 11.00or later, before upgrading other Performance Center projects, you mustfirst upgrade LAB_PROJECT, and then any Performance Center templateprojects. For details on LAB_PROJECT, refer to the Micro Focus ALM LabManagement Guide.
Before upgrading Performance Center projects, ensure that there are noactive running projects, there are no future reserved time slots, and thereare no hosts in running status.
Upgrading a ProjectThis section describes how to upgrade a single project.
To upgrade a project:
1. In Site Administration, click the Site Projects tab.2. In the Projects list, select a project.
3. Click the Maintain Project button and select Upgrade Project. The UpgradeProject dialog box opens.
4. To run the upgrade process without any user interaction, select Run in silentmode.
5. To start the upgrade process, click the Upgrade Project button. If the project is
Installation and UpgradeGuide - WindowsChapter 21: Upgrading Projects
ALM (12.60 & 12.60 Patch 1) Page 150 of 206

active, you are prompted to deactivate it. For details, refer to the Micro FocusApplication Lifecycle Management Administrator Guide.If a database error occurs while running the process in non-silent mode, amessage box opens. Click the Abort or Retry buttons, based on whether youcan correct the problem described in the message box.If the upgrade fails, ALM displays an error message with reasons for the failureand refers you to the log file. You must restore the backed up project before youtry to upgrade again. For details, see "Restoring Backed Up Projects andRepositories" on page 78.
6. To pause the upgrade process, click the Pause button. To continue, click theResume button.
7. To abort the upgrade process, click the Abort button. Click Yes to confirm.8. To save the messages displayed in the Upgrade Results pane to a text file,
click the Export Log button. In the Export Log to File dialog box, choose alocation and type a name for the file. Click Save.
9. To clear the messages displayed in the Upgrade Results pane, click the ClearLog button.
10. Click Close to close the Upgrade Project dialog box.11. Reactivate the project.
Upgrading a DomainThis section describes how to upgrade all projects in a domain.
To upgrade a domain:
1. In Site Administration, click the Site Projects tab.2. In the Projects list, select a domain.
3. Click the Maintain Domain button and select Upgrade Domain. The UpgradeDomain dialog box opens.
Installation and UpgradeGuide - WindowsChapter 21: Upgrading Projects
ALM (12.60 & 12.60 Patch 1) Page 151 of 206

4. In the Upgrade Settings area, under Upgrade Mode, you can select the followingoptions:l Run in Silent Mode. Runs the process without any user interaction.l Continue to next project if upgrade failed. Proceeds to the next project if theupgrade process fails. This is the default option.
5. In the Upgrade Settings area, under After the Upgrade, you can select one of thefollowing options:l Leave all projects deactivated. Leaves all projects deactivated after theupgrade process completes.
l Activate only currently active projects. Reactivates previously-activatedprojects after the upgrade process completes. This is the default option.
l Activate all projects. Activates all projects after the upgrade processcompletes.
6. To view the current version numbers of your projects, select the project names,or click Select All to view version numbers for all projects. Click the DisplayVersions button.The project version number is displayed in the Version column.
7. To upgrade your projects, select the project names, or click Select All to verifyall projects. Click the Upgrade Projects button.If a database error occurs while running the process in non-silent mode, amessage box opens. Click the Abort or Retry buttons, based on whether youcan correct the problem described in the message box.
Installation and UpgradeGuide - WindowsChapter 21: Upgrading Projects
ALM (12.60 & 12.60 Patch 1) Page 152 of 206

If the upgrade fails, ALM displays an error message with reasons for the failureand refers you to the log file. You must restore the backed up projects beforeyou try to upgrade again. For details, see "Restoring Backed Up Projects andRepositories" on page 78.
8. To pause the upgrade process, click the Pause button. To continue, click theResume button.
9. To abort the upgrade process, click the Abort button. Click Yes to confirm.10. To save the messages displayed in the Upgrade Results pane in a text file,
click the Export Log button. In the Export Log to File dialog box, choose alocation and type a name for the file. Click Save.
11. To clear the messages displayed in the Upgrade Results pane, click the ClearLog button.
12. Click Close to close the Upgrade Domain dialog box.
Installation and UpgradeGuide - WindowsChapter 21: Upgrading Projects
ALM (12.60 & 12.60 Patch 1) Page 153 of 206

Page 154 of 206ALM (12.60 & 12.60 Patch 1)
Installation and UpgradeGuide - WindowsChapter 21: Upgrading Projects

Chapter 22: Migrating the ProjectRepositoryThis chapter describes the process of migrating a Quality Center 10.00 projectrepository to the optimized repository architecture used in ALM. ALM versions11.00 and later use a new project repository architecture, that is optimized to allowmaximum storage space.
When you upgrade from Quality Center 10.00 to ALM, you must migrate the projectrepository. You can perform the migration as part of the upgrade from QualityCenter 10.00 to ALM 11.52, or after upgrading from ALM 11.52 or later to ALM12.60.
For details on ALM Optimized Project Repository, refer to the Micro FocusApplication Lifecycle Management Administrator Guide.
This chapter includes:
• About the RepositoryMigration 155• RepositoryMigration StatusWindow 156• ConfigureMigration Priority 159
About the Repository MigrationWhen upgrading projects from Quality Center 10.00, the project repository isautomatically upgraded to the optimized repository format. This is carried out in twostages:
1. The first stage is performed during the upgrade of the project. In this stage, allfiles in the repository are scanned, and their names are stored in the projectdatabase.
2. After the upgrade is completed, the project is reactivated. The repository filesare gradually migrated to the new system. In this stage, the files are movedfrom their old location to their new location in the optimized repository.Depending on various factors, such as the size of the repository and thenetwork speed, the file migration may take up to several days.This second phase of the repository migration is carried in the background.Users can work in the project even while it is in progress. New files that youadd to a project after upgrade are saved in the new project repository structure.
Note:
ALM (12.60 & 12.60 Patch 1) Page 155 of 206

l Until the migration process for a project is complete, you cannot export orcopy the project.
l To back up a project before its migration is complete, you must suspendthe migration process. For details, see"Configure Migration Priority" onpage 159.
You monitor and troubleshoot the migration progress in the Repository MigrationStatus window.
In Site Administration, you can track the status of file migration for each project, andconfigure the speed of performing the migration.
Repository Migration StatusWindowThis window lists all the site projects and displays the status of their migration tothe optimized project repository.
To access In Site Administration, select Tools > Repository Migration Status.
See also l "Migrating the Project Repository" on the previous pagel "Configure Migration Priority" on page 159
Installation and UpgradeGuide - WindowsChapter 22: Migrating the Project Repository
ALM (12.60 & 12.60 Patch 1) Page 156 of 206

User interface elements are described below:
UI Element Description
Instructs ALM to resume the migration of the selected project.
If an error or warning was detected during the migration of theselected project, fix the problem as described in the AdditionalInformation field, and click Resume.
Downloads a log of the migration events associated with theselected project.
Refresh. Refreshes the display with the most up-to-dateinformation.
Note: The grid updates automatically after the migration ofevery 1000 files.
DomainName
The domain to which the selected project belongs.
ProjectName
The name of the selected project.
ProjectStatus
Indicates the selected project's status in Site Administration. Forexample, Active or Deactivated.
Note: Deactivating a project does not affect its repositorymigration.
Installation and UpgradeGuide - WindowsChapter 22: Migrating the Project Repository
ALM (12.60 & 12.60 Patch 1) Page 157 of 206

UI Element Description
MigrationStatus
The migration status of a project can be one of the following:
l None. Project is not upgraded to ALM 12.60, and will not bemigrated.
l Pending. File migration is pending.l Migrating. File migration is in progress.l Done. File migration is complete.l Error. An error occurred during file migration, and migrationcould not be completed. See the cause of the error in theAdditional Information panel. Fix the error, and click Resume.
l Warning. A warning occurred during file migration.For details of the warning, and the actions you must take toresolve the problem, download the log files listed in theAdditional Information panel. Resolve the problems asnecessary, and click Resume to complete the migration.The reason for a warning is files in the old repository structurethat must be handled manually. Handling these files is the laststep before completing the migration.
MigrationProgress
The number of project files migrated to the new repository, as apercentage of the total number of project files.
AdditionalInformation
If a problem was detected, displays the cause of the problem, andlinks to log files. The log files describe the actions you must taketo resolve the problem.
SiteAdministratorAutomailOptions
ALM sends automail to Site Administrators upon eventsconnected to repository migration. Select the following options:
l Send mail on success. Sends mail when the migration of aproject repository completes successfully.
l Send mail on warning. Sends mail when a warning is detectedduring the migration of a project repository.
l Send mail on error. Sends mail when an error is detected duringthe migration of a project repository.
l Include logs as attachments. Attaches detailed log files toautomail messages.
The default is to send mail when warnings or errors are detected,without attaching logs.
Summary Summary information of the migration status of all site projects.
Installation and UpgradeGuide - WindowsChapter 22: Migrating the Project Repository
ALM (12.60 & 12.60 Patch 1) Page 158 of 206

Configure Migration PriorityWhile the migration process does not interfere with your work on projects, theprocess may affect system performance as a whole. Use the following siteconfiguration parameters to control the amount of system resources used by themigration process.
l REPOSITORY_MIGRATION_JOB_PRIORITY. Determines the speed at which filesare copied from the old to the new project repository. For details, refer to theMicro Focus Application Lifecycle Management Administrator Guide.
l SUSPEND_REPOSITORY_MIGRATION. Stops the repository migration on theentire site. Use this parameter temporarily, and only in special circumstances.For example, if you suspect that the migration process disrupts your system. Fordetails, refer to the Micro Focus Application Lifecycle Management AdministratorGuide.
Additional parameters are available for configuring the resources allocated to themigration process. For details, see this KB article.
Consider the following when configuring the migration priority:
l Allocating more resources to the migration process may slow down otherprocesses.
l Allocating less resources extends the time in which the process is completed.l Projects that are pending migration or in the process of migration cannot beexported or copied.
Installation and UpgradeGuide - WindowsChapter 22: Migrating the Project Repository
ALM (12.60 & 12.60 Patch 1) Page 159 of 206

Page 160 of 206ALM (12.60 & 12.60 Patch 1)
Installation and UpgradeGuide - WindowsChapter 22: Migrating the Project Repository

Chapter 23: Performance Center / LAB_PROJECT Post-Upgrade StepsIf you have upgraded a Performance Center 11.00 or later project, perform thefollowing steps in the staging and production environments:
For details regarding these steps, refer to the Micro Focus ALM Lab ManagementGuide and the Performance Center documentation.
1. Log into Lab Management.2. Configure the external URL:
a. On the Lab Management sidebar, under Servers, select PC Servers.b. On the toolbar, click the ALM Connection button. The ALM Connection
dialog box opens.c. Enter external URL information.
3. Add a Performance Center Server:a. On the PC Servers toolbar, click the New PC Server button. The New PC
Server dialog box opens.b. Define new server information.c. Click OK.
4. Update license details:Define new license information in the Performance Center Administration. Fordetails, see the Performance Center documentation.
5. Add, remove, or reconfigure hosts:a. On the Lab Management sidebar, under Lab Resources, select Hosts.b. Add, remove, or reconfigure hosts as needed.
ALM (12.60 & 12.60 Patch 1) Page 161 of 206

Page 162 of 206ALM (12.60 & 12.60 Patch 1)
Installation and UpgradeGuide - WindowsChapter 23: Performance Center / LAB_PROJECT Post-Upgrade Steps

ALM (12.60 & 12.60 Patch 1) Page 163
Part 7: Appendix

ALM (12.60 & 12.60 Patch 1) Page 164
Installation and UpgradeGuide - WindowsPart 7: Appendix

Appendix A: Troubleshooting the ALMInstallationThis appendix contains troubleshooting suggestions for issues relating to the ALMinstallation.
This appendix includes:
• Disabling Validation Checks for the InstallationWizard 165• Checking the Installation and Configuration Log Files 170• ALM Installation Already Exists 171• Database Validator Fails 171• Monitoring ALMServer Fails 172
Disabling Validation Checks for the InstallationWizardThe ALM Installation Wizard automatically performs validation checks to verify thatparticular system configurations requirements are met. If the ALM configurationdoes not complete due to a failed validation, you can fix the problem or disableselected validation checks, and rerun the installation.
Note:
l You should disable validation checks only if you decide to takeresponsibility for the ALM server installation.
l To resolve failures that occur during the ALM Installation Wizard, see"Checking the Installation and Configuration Log Files" on page 170, or"ALM Installation Already Exists" on page 1.
l For troubleshooting tips on database validations, see "Database ValidatorFails" on page 171.
To disable configuration validators and rerun the ALM Installation Wizard inWindowssilent installation:
Note: These instructions also apply when running the Windows silentinstallation.
1. In the ALM installation directory, locate the validations.xml file, which is near theinstallation executable ( ALM_installer.bin).
Installation and UpgradeGuide - WindowsAppendix A: Troubleshooting the ALM Installation
ALM (12.60 & 12.60 Patch 1) Page 165 of 206

2. Edit the validations.xml file by changing the validation value from true to false asrequired. Following is an example of the file with all configuration validatorsactive.
<validations> <os enabled="true" /> <memory enabled="true" threshold="8" /> <installation_disk_space enabled="true" threshold="8" /> <sa-schema enabled="true" /> <db enabled="true" /> <mail enabled="true" /> <license-key enabled="true" /> <repository enabled="true" /> <sa-user enabled="true" /> <security enabled="true" /> <alm-services enabled="true" /> <web-server enabled="true" /></validations>
3. Save the file and rerun the installation.
Configuration Validators
Validator Checks To Disable
os Checks that the operating system is supported.
Note: For the most up-to-date supportedenvironments, seehttp://admhelp.microfocus.com/alm/specs/alm-qc-system-requirements.htm.
<osenabled="false"/>
memory Checks that the customer machine has at leastx GB of memory (x is defined by the thresholdvalue, the default is 8 GB).
<memoryenabled="false"/>
Installation and UpgradeGuide - WindowsAppendix A: Troubleshooting the ALM Installation
ALM (12.60 & 12.60 Patch 1) Page 166 of 206

Validator Checks To Disable
installation_disk_space
Checks that the installation location has at leastx GB of free disk space (x is defined by thethreshold value, the default is 8 GB).
Note: This validation is related only to theinstallation location. If the installation failsbecause of a lack of free space in thetemporary folder, changing the thresholdvalue or disabling this validation does notaffect the failure.
<installation_disk_spaceenabled="false"/>
sa-schema Checks Site Administration database settings. <sa-schemaenabled="false"/>
db Checks database connectivity. <dbenabled="false"/>
mail Checks that the mail server is valid. <mailenabled="false"/>
license-key Checks the license file key. <license-keyenabled="false"/>
repository Checks that the repository folder is accessible,and has sufficient space.
<repositoryenabled="false"/>
sa-user Checks site administrator user settings. <sa-userenabled="false"/>
security Checks encryption passphrases. <securityenabled="false"/>
alm-services
Checks Windows service settings. <alm-servicesenabled="false"/>
Installation and UpgradeGuide - WindowsAppendix A: Troubleshooting the ALM Installation
ALM (12.60 & 12.60 Patch 1) Page 167 of 206

Validator Checks To Disable
web-server Checks that the HTTP port and web serverdeployment folder is accessible, and hassufficient space
<web-serverenabled="false"/>
To disable configuration validators and rerun the ALM Installation Wizard in Windows:
Note: These instructions do not apply when running the Windows silentinstallation. For Windows silent installation, follow the Linux instructionsabove.
1. In the ALM installation directory, locate the validations.xml file, which is near theinstallation executable ( ALM_installer.exe).
2. Edit the validations.xml file by changing the validation value from true to false asrequired. Following is an example of the file with all configuration validatorsactive.
<validations> <os enabled="true" /> <memory enabled="true" threshold="8" /> <installation_disk_space enabled="true" threshold="8" /> <sa-schema enabled="true" /> <db enabled="true" /> <mail enabled="true" /> <license-key enabled="true" /> <repository enabled="true" /> <sa-user enabled="true" /> <security enabled="true" /> <alm-services enabled="true" /> <web-server enabled="true" /></validations>
3. Only the following configuration validators are used in the Windows installationwizard:
Installation and UpgradeGuide - WindowsAppendix A: Troubleshooting the ALM Installation
ALM (12.60 & 12.60 Patch 1) Page 168 of 206

Validator Checks To Disable
os Checks that the operating system issupported.
Note: For the most up-to-datesupported environments, seehttp://admhelp.microfocus.com/alm/specs/alm-qc-system-requirements.htm.
<osenabled="false" />
memory Checks that the customer machine has atleast x GB of memory (x is defined by thethreshold value, the default is 8 GB).
<memoryenabled="false" />
installation_disk_space
Checks that the installation location has atleast x GB of free disk space (x is defined bythe threshold value, the default is 8 GB).
Note: This validation is related only tothe installation location. If theinstallation fails because of a lack offree space in the temporary folder,changing the threshold value ordisabling this validation does not affectthe failure.
<installation_disk_spaceenabled="false" />
db Checks database connectivity. <dbenabled="false" />
4. Save the file and rerun the installation.5. On the Installation Summary page, before clicking Done, edit the run_
configuration.bat file, located under <installation folder>\ALM, to disablevalidations.
Validator Checks To Disable
Existinginstallation
Checks if an older versionof ALM or Quality Center isinstalled.
-wPreviousInstallationValidator
Installation and UpgradeGuide - WindowsAppendix A: Troubleshooting the ALM Installation
ALM (12.60 & 12.60 Patch 1) Page 169 of 206

Validator Checks To Disable
License file Checks license file key. -wLicenseTypeValidator
Securitypassphrases
Checks encryptionpassphrases.
-wEncryptionStepValidator
Mail server Checks that the mail servername is valid.
wMailServerValidator
Databasesettings
Checks Site Administrationdatabase settings.
-wSaSchemaValidator
Siteadministrator
Checks site administratoruser settings.
-wSiteAdminUserValidator
repositoryfolder
Checks that the repositoryfolder is accessible, andhas sufficient space.
-wRepositoryValidator
6. Save the run_configuration.bat file and click Done to continue the installation.
Checking the Installation and Configuration LogFilesIf you encounter problems installing ALM, check for errors in the following log files:
Windows File Delivery Logs
Log Path
InstallCompleted
<installation folder>\ALM\log
Install Failed on the desktop:
Application_Lifecycle_Management_Install_<mm_dd_yyyy_hh_mm_ss>.log
Installation and UpgradeGuide - WindowsAppendix A: Troubleshooting the ALM Installation
ALM (12.60 & 12.60 Patch 1) Page 170 of 206

Application Logs
Log Path
Configuration logs <ALM deployment folder>\log
l Windows. <ALM deploymentfolder>\log
l Linux. <ALM deploymentfolder>/log
Site Administration database schemacreation logs
<ALM deployment folder>\log\sa
l Windows. <ALM deploymentfolder>\log\sa
l Linux. <ALM deploymentfolder>/log/sa
ALM Installation Already ExistsAfter uninstalling a previous version of ALM, an error message displays whileinstalling a later version, indicating that ALM already exists.
Perform the following steps:
1. Navigate to the C:/ProgramData directory.2. Locate the the InstallAnywhere global registry file (hidden file), search for
.com.zerog.registry.xml. Edit the file and remove the sections related to ALMand its components.
3. Locate the .com.zerog.registry.xml.swp (hidden file). If the file exists, delete it.
Database Validator FailsDuring the ALM Server configuration, the database validator performs the followingchecks:
l Check that the input parameters are correct.l Check that the Site Administration database schema name was provided.l Check whether the same authentication type was used as the one used in theprevious installation.
Installation and UpgradeGuide - WindowsAppendix A: Troubleshooting the ALM Installation
ALM (12.60 & 12.60 Patch 1) Page 171 of 206

Perform the following steps:
1. Check whether the parameters are correct:l Read the error message that displays during installation and try tounderstand and resolve the problem from the root cause.
l For further clarifications, check with your database administrator.l If no error was found and you are sure that the parameters are correct,disable the DB parameters validator. For details, see "Disabling ValidationChecks for the Installation Wizard" on page 165.
2. Check that the Site Administration Database Schema name was provided:a. Open a database query tool.b. Make sure the PROJECTS table exists in the Site Administration Database
Schema. This table does not exist in the project schema.3. To check the authentication type of a previous installation:
a. Navigate to <ALM installation path>\ALM\application\20qcbin.war\WEB-INFand open the siteadmin.xml file in a text editor.
b. Search for the native property. If its value is set to Y, Windows authenticationwas used. Make sure that the new installation uses the same authenticationtype (Microsoft SQL Server authentication or Windows authentication) asthe previous installation.
Monitoring ALM Server FailsWhen running one of the Java-based tools to monitor ALM you receive thefollowing message:
"Not enough storage is available to process this command."
This problem is caused because the JVM running the ALM Server is running with aservice account.
Choose one of the following solutions, depending on which tool you are running:
l jmap and jstack. See the suggestion in the following link:http://stackoverflow.com/questions/906620/jstack-and-not-enough-storage-is-available-to-process-this-commandYou will be required to download the pstools tool from the following address:http://technet.microsoft.com/en-us/sysinternals/bb897553
l jconsole and jvisualvm. Download the following tool from the following address:http://www.iopus.com/guides/srvany.htmAlso refer to the following Microsoft article:http://support.microsoft.com/kb/137890
Installation and UpgradeGuide - WindowsAppendix A: Troubleshooting the ALM Installation
ALM (12.60 & 12.60 Patch 1) Page 172 of 206

Appendix B: Upgrade PreparationTroubleshootingThis appendix describes schema and database inconsistencies that the verificationprocess detects. It indicates which problems the repair process can fixautomatically, and which you should repair manually. Suggested solutions forrepairing each issue are provided.
This appendix includes:
• Overview 173• QuickWarning Reference 174• General Validation 178• SchemaValidation 182• Data Validation 194• Changing the Database User Schema 200
OverviewThe verification process, described in "Verifying Domains and Projects" onpage 70, detects inconsistencies and indicates which problems the repair processcan fix automatically, and which you should repair manually. Suggested solutionsfor repairing each issue are provided in this appendix.
If an error is displayed during the verification or upgrade process, you can see errordescriptions at this KB article.
If a warning is displayed during the verification process, you can use the "QuickWarning Reference" on the next page to locate the corresponding solution for thatwarning.
Some solutions require that you change the database user schema:
l Database User Schema. Database in SQL Server and a user schema in Oracle.This term is used for both cases because ALM can be deployed over SQL Serverand Oracle. Both cases are logical sets of database objects (for example, tables,indexes, and so on) owned by the same logical owner.
l Expected Database User Schema. ALM Database User Schema configurations, asdefined in the configuration file for a new ALM Database User Schema. As apreparation for the current version, each project database user schema shouldbe aligned with the latest configurations, as defined in this schema.
If you need to modify the database user schema, see the additional instructionsunder "Changing the Database User Schema" on page 200.
Installation and UpgradeGuide - WindowsAppendix B: Upgrade Preparation Troubleshooting
ALM (12.60 & 12.60 Patch 1) Page 173 of 206

QuickWarning ReferenceThis section lists schema and data issues found in warnings generated by theverification process.
• General Issues 174• Schema Issues 175• Data Issues 177
General IssuesThe following table lists general issues found in verification process warnings.Some issues are fixed automatically by the repair process. Other issues requirethat you repair them manually.
Type Problem Resolution Details
Database Database serverversion notsupported
manual repair "SupportedDatabaseVersion" onpage 178
Database Schema namecontains invalidcharacters
manual repair "Valid DatabaseUser SchemaName" onpage 179
Database Table owner doesnot match theALM serverconnectionmethod
manual repair "Mixed TableOwnership" onpage 179
Database Repository overdatabase featureno longersupported
manual repair "Repository overDatabaseFeature" onpage 180
Version control Certain versioncontrol projectscannot beupgraded directly
manual repair "Version ControlValidation" onpage 180
Installation and UpgradeGuide - WindowsAppendix B: Upgrade Preparation Troubleshooting
ALM (12.60 & 12.60 Patch 1) Page 174 of 206

Type Problem Resolution Details
Database Permissions manual repair "DatabasePermissions" onpage 180
Database Configure textsearch
manual repair "Text SearchConfiguration" onpage 180
Schema IssuesThe following table lists schema issues found in verification process warnings.Some schema issues are fixed automatically by the repair process. Other schemaissues require that you repair them manually.
Type Problem Element Resolution Details
Table Extra table manualrepair
"Extra Table" onpage 183
Table Missing table repairprocess
"Missing Table"on page 184
Views Extra view manualrepair
"Extra Views" onpage 197
Views Missing view repairprocess
"Views" onpage 197
Column Extra column manualrepair
"Extra Column" onpage 185
Column Missing column repairprocess
"Missing Column"on page 187
Column Size mismatch -column size biggerthan expected
manualrepair
"Column SizeMismatch" onpage 185
Column Size mismatch -column size smallerthan expected
repairprocess
"Column SizeMismatch" onpage 185
Installation and UpgradeGuide - WindowsAppendix B: Upgrade Preparation Troubleshooting
ALM (12.60 & 12.60 Patch 1) Page 175 of 206
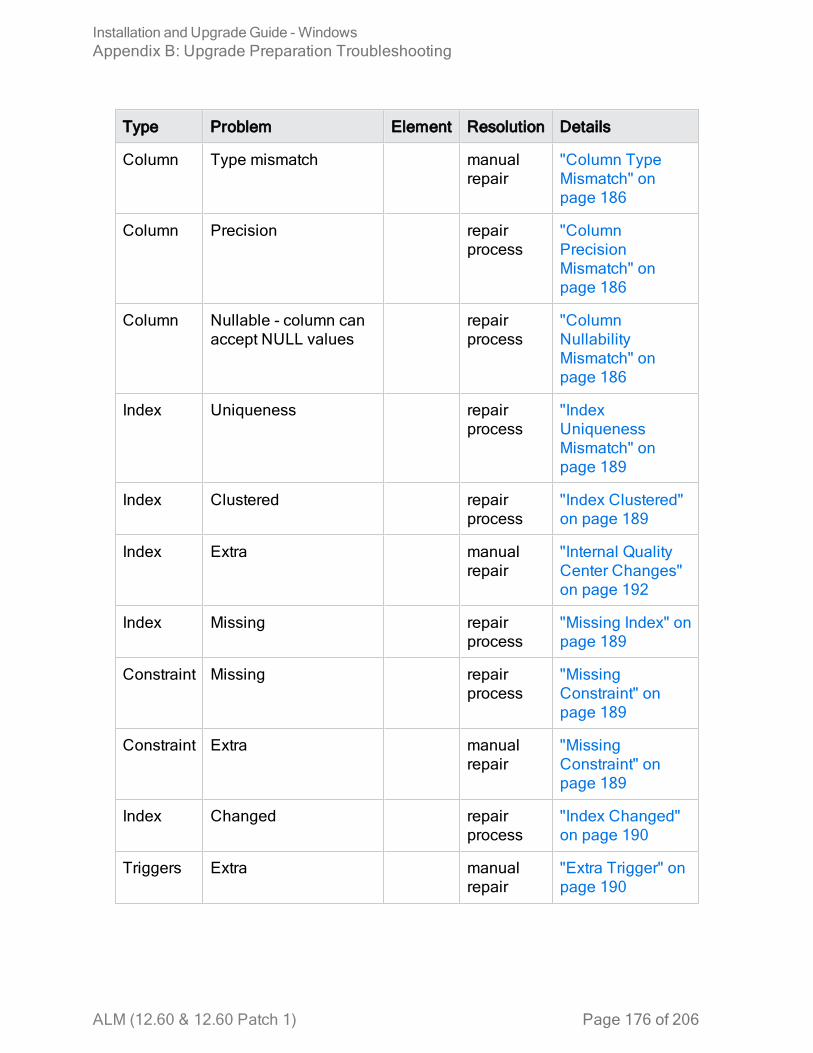
Type Problem Element Resolution Details
Column Type mismatch manualrepair
"Column TypeMismatch" onpage 186
Column Precision repairprocess
"ColumnPrecisionMismatch" onpage 186
Column Nullable - column canaccept NULL values
repairprocess
"ColumnNullabilityMismatch" onpage 186
Index Uniqueness repairprocess
"IndexUniquenessMismatch" onpage 189
Index Clustered repairprocess
"Index Clustered"on page 189
Index Extra manualrepair
"Internal QualityCenter Changes"on page 192
Index Missing repairprocess
"Missing Index" onpage 189
Constraint Missing repairprocess
"MissingConstraint" onpage 189
Constraint Extra manualrepair
"MissingConstraint" onpage 189
Index Changed repairprocess
"Index Changed"on page 190
Triggers Extra manualrepair
"Extra Trigger" onpage 190
Installation and UpgradeGuide - WindowsAppendix B: Upgrade Preparation Troubleshooting
ALM (12.60 & 12.60 Patch 1) Page 176 of 206

Type Problem Element Resolution Details
Sequence Missing repairprocess
"MissingSequence" onpage 191
Sequence Extra manualrepair
"Extra Sequence"on page 191
Sequence Incorrect repairprocess
"IncorrectSequences" onpage 192
Data IssuesThe following table lists data issues found in the verification process warnings.Some data issues are fixed automatically by the repair process. Other data issuesrequire that you repair them manually.
Type Problem ElementResolution Details
Duplicatedata
Duplicatevalues
repairprocess
"DuplicateValues" onpage 195
Duplicatedata
DuplicateIDs
repairprocess
"DuplicateIDs" onpage 195
Trees Wrongnumber ofchildren
Tables REQ/ALL_LISTS/CYCL_FOLD
repairprocess
"TreeInconsistencies" on page 196
Trees Corruptedpath
Tables REQ/ALL_LISTS/CYCL_FOLD
repairprocess
"TreeInconsistencies" on page 196
Trees Orphanrecords
Tables REQ/ALL_LISTS/CYCL_FOLD
repairprocess
"TreeInconsistencies" on page 196
Sequences
Sequencemismatch
Table SEQUENCES repairprocess
"Sequences"on page 191
Installation and UpgradeGuide - WindowsAppendix B: Upgrade Preparation Troubleshooting
ALM (12.60 & 12.60 Patch 1) Page 177 of 206

Type Problem ElementResolution Details
Orphans Missingparententities
repairprocess
"OrphanedEntities" onpage 197
Missingdata
Missingentities
repairprocess
"MissingEntities" onpage 198
Lists Missinglists andvalues
Tables SYSTEM_FIELD /LISTS
repairprocess
"Missing Listsand/or ListValues" onpage 198
Encryption
Mismatchedpassphrases forencryptedvalues
Tables LAB_HOSTS / LAB_AUT_HOSTS / LAB_DIAGNOSTICS_SERVERS
manualrepair
"EncryptedValues" onpage 199
General ValidationThis section describes the general validation checks the verification processperforms.
• Supported Database Version 178• Valid Database User SchemaName 179• Mixed Table Ownership 179• Repository over Database Feature 180• Version Control Validation 180• Database Permissions 180• Text Search Configuration 180
Supported Database VersionThe verification process checks that the project schema is stored in a supporteddatabase server. If the verification process detects that the database server versionis not supported, it displays a warning.
Note: For the most up-to-date supported environments, see
Installation and UpgradeGuide - WindowsAppendix B: Upgrade Preparation Troubleshooting
ALM (12.60 & 12.60 Patch 1) Page 178 of 206

http://admhelp.microfocus.com/alm/specs/alm-qc-system-requirements.htm.
Valid Database User Schema NameThe upgrade mechanism does not support databases that include specialcharacters in the database name. If the verification process finds specialcharacters, you must remove them. For SQL databases, periods are also notsupported in the database user schema name.
To remove special characters from database names:
1. Deactivate the project.2. Ask your database administrator to rename the database user schema to a
name that does not include special characters, or periods for SQL databases.3. Remove the project from Site Administration.4. Update the Dbid.xml file to point to the new database user schema name.5. Restore the project by using the updated Dbid.xml file.6. Run the verification process again to make sure the problem is resolved.
Mixed Table OwnershipALM can connect to Microsoft SQL server by using SQL authentication or Windowsauthentication.
For each of these methods, a different user owns the tables of a project:
l SQL Authentication. Table owner is the user td.l Windows Authentication. Table owner is the user dbo (a user mapped to theoperating system user that runs the ALM server).
If you create a project with one type of authentication (for example, SQL), and thenrestore it with the other type of authentication (for example, Windows), these tablescannot be accessed. In this case, new tables are created with owners that aredifferent from those of the old tables. You will not be able to work with the project. Itis likely that the upgrade will fail.
To prevent this problem, the duplicate ownership validator checks that the owner ofall of the tables in the project database user schema matches the connectionmethod that ALM is using to connect to the server.
To fix table ownership manually, do one of the following:
l SQL Authentication: Run the following query to make td the table owner:
EXEC sp_changeobjectowner '<table name>', 'td'
Installation and UpgradeGuide - WindowsAppendix B: Upgrade Preparation Troubleshooting
ALM (12.60 & 12.60 Patch 1) Page 179 of 206

l Windows Authentication: Run the following query to make dbo the table owner:
EXEC sp_changeobjectowner 'td.<table name>', 'dbo'
Repository over Database FeatureThe Repository over Database feature is not supported in Quality Center 10.00 or inALM versions 11.00 and later.
If you use this feature in Quality Center 9.2, you should migrate the repository fromthe database to the file system (available from Quality Center 9.2 Patch 12) beforeupgrading the project to ALM 11.00.
For details about the tool for migrating the project repository from the database tothe file system, see the ReadMe files for Quality Center 9.2 Patch 12. Theverification process checks whether the project is using the Repository overDatabase feature. If the project is using the feature, the validator displays a warning.
Version Control Validationl Legacy version control projects. Integration with external version control tools isnot supported in ALM12.60. Quality Center version 10.00 and ALM include abuilt-in version control functionality to support your projects. To work withprojects from Quality Center 9.2 that use version control, you must first upgradeto ALM 11.00, migrate legacy version control data, and then upgrade toALM12.60.
l Version control enabled projects. Version control enabled projects cannot beupgraded to ALM12.60 while there are checked out entities. The verificationprocess checks that there are no checked out entities. If there are checked outentities, they must be checked in. To determine if there are checked out entities,see this KB article.
Database PermissionsTo enable an upgrade to the current ALM version, the project schema requires aset of minimum required permissions. The verification process makes sure thatboth the project user and the administrator user have all the privileges needed toperform the upgrade.
Text Search ConfigurationQuality Center versions 9.0 and later support the database text search feature.However, not all databases are configured to support this feature. If your databasedoes support text search, ALM installs the required components when creating anew project database. ALM also activates the text search for the new database.
Installation and UpgradeGuide - WindowsAppendix B: Upgrade Preparation Troubleshooting
ALM (12.60 & 12.60 Patch 1) Page 180 of 206

The verification process checks whether your project has the text search featureenabled, and that it is configured correctly.
The verification process validates the following:
l "Validity of the Text Search Configuration" belowl "Only Valid Fields Configured Under "Text Search"" belowl "Text Search Validation for Oracle Database Server" on the next pagel "Text Search Validation for Microsoft SQL Database Server " on the next page
Validity of the Text Search Configuration
The verification process checks that text search components are installed and arevalid on the database server. If a database server is text search-enabled in the DBServers tab in Site Administration, text search must also be enabled on the Oracleor SQL database server. If the verification process detects that text search is notenabled or configured incorrectly on the Oracle or SQL database server, theupgrade process does not run until you manually repair the problem.
We recommend that you ask your database administrator to reconfigure text searchon the Oracle or SQL database server. Alternatively, as a workaround, you candisable text search for the database server from Site Administration.
To disable the text search for the database server:
1. Run the following query on your Site Administration schema:
update <SA Schema>.dbservers set db_text_search_enabled = null where dbserver_name = '<DB logical name>'
2. Restart the ALM server.3. Run the repair process for your projects.4. When the repair process completes, run the following query:
update <SA Schema>.dbservers set db_text_search_enabled = 'Y' where dbserver_name = '<DB logical name>'
5. Restart the ALM server.
Only Valid Fields Configured Under "Text Search"
The verification process checks that only valid fields are defined as searchable.You can enable the text search only for specific entities, and only on fields of thetype string or memo. The following entities are supported: BUG, COMPONENT,COMPONENT_STEP, DESSTEPS, REQ, TEST, BPTEST_TO_COMPONENT,and CYCLE. Any other configuration could cause functionality problems duringupgrade or customization. This problem is fixed automatically by the repairprocess.
Installation and UpgradeGuide - WindowsAppendix B: Upgrade Preparation Troubleshooting
ALM (12.60 & 12.60 Patch 1) Page 181 of 206

Text Search Validation for Oracle Database Server
For an Oracle Database server, the verification process checks the following:
l Validity of Text Search Indexes. The verification process checks that database textsearch indexes are valid. Invalid text search indexes can cause functionalityproblems and even upgrade failure in ALM. If the verification process detects aninvalid index, try to recreate the index by dropping it from the schema andcreating it again. In Site Administration, click the Site Projects tab. Select therelevant project and click the Enable/Rebuild Text Search button. If this procedurereturns an error, consult your database administrator or contact Micro FocusSupport.
l Validity of Project Database User Permissions. The verification process checks thatthe project database user has the required permissions to work with text search.When text search is installed on the database, the role CTXAPP is createdautomatically. ALM requires that this role be granted to all projects databaseusers that support text search. (ALM grants the CTXAPP role automatically whencreating the project or enabling the text search for a project.) If this role is notgranted to the project database user (configured to support text search), theverification process returns a warning. In these cases, ask your databaseadministrator to grant the required role to the project database user.
Text Search Validation for Microsoft SQL Database Server
The verification process checks that the project database user schema enables thetext search feature. To work with text search on SQL project, you need to enablethe text search on the database.
To enable text search on the database:
1. Select the database from the SQL server Enterprise Manager.2. Right-click the database name.3. Select Properties/Files.4. Select Use Full-Text Indexing.
Schema ValidationThe verification process helps to ensure that the project database user schema iscorrect and configured as expected.
The verification process performs two types of schema verifications:
l Schema Correctness. Checks that the project database schema includes all of therequired schema objects, as defined in the expected database user schema forthe project. This verification ensures that all of the required entities exist and aredefined as expected. It also ensures that there are no extra entities defined on
Installation and UpgradeGuide - WindowsAppendix B: Upgrade Preparation Troubleshooting
ALM (12.60 & 12.60 Patch 1) Page 182 of 206

top of the schema.l Alignment to the current version. Notifies you about differences in the projectdatabase user schema caused by internal changes made in Quality Center orALM. In this way, the verification process aligns the schema with the latestinternal changes to the schema made in preparation for the upgrade.
The verification process displays warnings in the verification report if it finds thefollowing:
l Extra entities defined. For example, Table, Column, Trigger, View, andSequence.
l Differences from the expected definitions. For example, Column Size and IndexAttributes.
l Missing objects.Schema differences found by the verification process can cause upgrade failuresor usage problems. As long as the verification process still finds these differences,an upgrade to the current ALM version will not start.
Note:Many of the schema changes can be fixed automatically by the repairprocess.
The following sections contain possible warnings, grouped by the differentdatabase objects, that the verification process can display in the verification report:
• Tables 183• Columns 184• Indexes and Constraints 187• Triggers 190• Sequences 191• Internal Quality Center Changes 192
TablesDatabase tables can contain the following warnings:
l "Extra Table" belowl "Missing Table" on the next page
Extra Table
The ALM schema should contain only the tables that are defined in the schemaconfiguration file. Adding extra tables on top of the schema is not supported andmight cause future problems with ALM.
Installation and UpgradeGuide - WindowsAppendix B: Upgrade Preparation Troubleshooting
ALM (12.60 & 12.60 Patch 1) Page 183 of 206

Problem: If the verification process finds extra tables that were added manually tothe schema, it generates an Extra Table warning.
Note: This problem requires manual repair. The repair process cannot fix it.
Solution: Do one of the following:
l Change the Schema. If you use the table, copy it to a different schema. If you donot use the table, delete it. Before taking either action, back up the schema andconsult your database administrator. For details, see "Changing the DatabaseUser Schema" on page 200.
l Use the Exception File. For details about the Exception file, see "Define anException File" on page 71.If the project database is case sensitive, the table name must be the same inboth the database and the exception file.
Note: Not recommended: Instruct the upgrade to ignore this problem.
Missing Table
The verification process checks that all of the tables defined for the project schemaactually exist (according to the tables of each Quality Center/ALM version).
Problem: If a table is missing, the verification process generates a Missing Tablewarning.
Solution: Do one of the following:
l See "Changing the Database User Schema" on page 200.l Run the repair process to create the missing table. Although you can use therepair process to add these objects, we recommend that you contact Micro FocusSupport to make sure that the missing objects are not just symptoms of a biggerproblem.
ColumnsDatabase columns can contain the following warnings:
l "Extra Column" on the next pagel "Column Size Mismatch" on the next pagel "Column Precision Mismatch" on page 186l "Column Type Mismatch" on page 186l "Column Nullability Mismatch" on page 186
Installation and UpgradeGuide - WindowsAppendix B: Upgrade Preparation Troubleshooting
ALM (12.60 & 12.60 Patch 1) Page 184 of 206
l "Identity Column" on page 187l "Missing Column" on page 187
Extra Column
The verification process checks that each table includes the required columns, asdefined for the expected database user schema and version. The schema shouldnot include extra columns. Extra columns in a table might cause upgrade failure orfunctionality problems.
Problem: If the verification process detects an extra column (that does not exist inthe database user schema definitions) in one of the tables, it generates an ExtraColumn warning.
Note: This problem requires manual repair. The repair process cannot fix it.
Solution: Do one of the following:
l Change the Schema. If you have an internal implementation that requires extratable columns, move the extra columns to a different table in a different schema.If you do not use a particular column, delete it. Before taking either action, backup your schema and consult your database administrator. For a more detailedexplanation, see "Changing the Database User Schema" on page 200.
l Use the Exception File. For details about the Exception file, see "Define anException File" on page 71.
Note: Not recommended: Instruct the upgrade to ignore this problem.
Column Size Mismatch
The verification process checks that all the table columns are defined as expected.This validation ensures that the column size matches the expected size as definedfor each table column. This verification excludes user-defined fields, whose sizecan be customized through project customization.
Some column mismatch warnings are caused by internal changes made in QualityCenter 10.00 that are fixed by the repair process automatically. For details, see"Internal Quality Center Changes" on page 192.
Problem A: Size is bigger than expected. If the column size is bigger than expected,decrease the column size to the required size manually. Because this operationcan cause data loss, it is not performed automatically by repair process.
Note: This problem requires manual repair. The repair process cannot fix it.
Installation and UpgradeGuide - WindowsAppendix B: Upgrade Preparation Troubleshooting
ALM (12.60 & 12.60 Patch 1) Page 185 of 206

Solution A: Consult your database administrator to resolve this issue. For risksinvolved in changing the database user schema, see "Changing the DatabaseUser Schema" on page 200.
Problem B: Size is smaller than expected. If the column size is smaller thanexpected, the repair process fixes the problem automatically by increasing thecolumn size to the expected size.
Solution B: Run the repair process to increase the current size to the required size.
Column Precision Mismatch
In an Oracle Database, "precision" is the term used to define the size of fields withthe INTEGER type.
Problem: The verification process generates a warning if the precision defined for acertain column is smaller than expected.
Solution: Run the repair process to increase the current precision to the requiredprecision.
Column Type Mismatch
Changing a column type causes the upgrade to fail, and can cause majorfunctionality problems.
Problem: The verification process generates a Column Type warning if the columntype has changed.
Note: This problem requires manual repair. The repair process cannot fix it.
Solution: Consult your database administrator to resolve this issue. For risksinvolved in changing the database user schema, see "Changing the DatabaseUser Schema" on page 200.
Column Nullability Mismatch
One of the attributes that is defined for a column is whether it can accept nullvalues. A null is the absence of a value in a column of a row. Nulls indicatemissing, unknown, or inapplicable data. If you have defined a NOT NULL orPRIMARY KEY integrity constraint for a particular column, you cannot insert rowsinto the column without adding a value.
Problem: The verification process compares the required definitions for eachcolumn in the expected database user schema to the project database userschema. If it encounters differences in the column NULL attribute definition, itgenerates a Column Nullable warning.
Installation and UpgradeGuide - WindowsAppendix B: Upgrade Preparation Troubleshooting
ALM (12.60 & 12.60 Patch 1) Page 186 of 206
Solution: Run the repair process. The repair process runs a query to modify thecolumn attributes to the expected attributes.
If the column includes NULL values, the repair process cannot update the columnattribute to NOT NULL (if this is the required attribute) for the column. Ask yourdatabase administrator how to remove the NULL values from the column. Afterremoving the NULL values, run the repair process again. For details, see"Changing the Database User Schema" on page 200.
Identity Column
The IDENTITY property is one of the attributes defined for columns in MicrosoftSQL server.
Problem: As part of the verification for the columns attributes, the verificationprocess might find a column IDENTITY property that is not configured as expected.
Note: This problem requires manual repair. The repair process cannot fix it.
Solution: Change the IDENTITY property of the column to the expectedconfiguration (according to the output from the verification process report)manually. Consult your database administrator to resolve this issue. For details,see "Changing the Database User Schema" on page 200.
Missing Column
If a column is missing from a table, run the repair process or contact Micro FocusSupport.
Problem: If the verification process finds that a column is missing from one of thetables, it generates a Missing Column warning.
Solution: Do one of the following:
l Run the repair process to fix the problem.l See "Changing the Database User Schema" on page 200.
Indexes and ConstraintsA database index is a data structure that improves the speed of operations in atable. You can create indexes using one or more columns, providing the basis forboth rapid random lookups and efficient ordering of access to records. DatabaseConstraints are constraints on the database that require relations to satisfy certainproperties.
Installation and UpgradeGuide - WindowsAppendix B: Upgrade Preparation Troubleshooting
ALM (12.60 & 12.60 Patch 1) Page 187 of 206

Database indexes and constraints can cause the following validation warnings:
l "Extra Index" belowl "Extra Constraint" belowl "Index Uniqueness Mismatch" on the next pagel "Index Clustered" on the next pagel "Missing Constraint" on the next pagel "Missing Index" on the next pagel "Index Changed" on page 190l "Index Order Changed " on page 190
Extra Index
The ALM schema should include only those indexes defined in the requiredschema configurations.
Problem: If the verification process finds an index that is not defined in the requiredschema configuration, it generates an Extra Index warning.
Note: This problem requires manual repair. The repair process cannot fix it.
Solution: Remove the extra indexes manually. Consult with your databaseadministrator to resolve this issue. For details, see "Changing the Database UserSchema" on page 200.
Some Extra Index warnings are caused by internal changes made in Quality Center10.00. These extra indexes are no longer used by ALM, and are removed by therepair process. For details, see "Internal Quality Center Changes" on page 192.
Extra Constraint
The ALM schema should include only those constraints defined in the requiredschema configurations.
Problem: If the verification process finds a constraint that is not defined in therequired schema configuration, it generates an Extra Constraint warning.
Note: This problem requires manual repair. The repair process cannot fix it.
Solution: Remove the extra constraint manually. Consult with your databaseadministrator to resolve this issue. For details, see "Changing the Database UserSchema" on page 200.
Installation and UpgradeGuide - WindowsAppendix B: Upgrade Preparation Troubleshooting
ALM (12.60 & 12.60 Patch 1) Page 188 of 206

Index Uniqueness Mismatch
A unique index guarantees that the index key contains no duplicate values. As aresult, every row in the table is unique. Specifying unique indexes on ALM datatables ensures data integrity of the defined columns. In addition, it provides helpfulinformation that is used as a query optimizer.
Problem: If the index uniqueness attribute does not have the expected value, theverification process generates an Index Uniqueness Mismatch warning.
You cannot create a unique index, unique constraint, or PRIMARY KEY constraintif duplicate key values exist in the data. The verification process performs thesedata validations. If a table has duplicate values or IDs, based on the indexdefinitions on that table, the verification process also displays the duplication in theverification report. In this case, the repair process automatically fixes theduplication problem before creating the unique index.
Solution: Run the repair process to fix the problem.
Index Clustered
In Microsoft SQL, index type can be classified as clustered or non-clustered. Theverification process compares the required definitions for each index in theexpected database user schema to the project database user schema.
Problem: If the verification process finds differences in the index clustered attributedefinition, it generates an Index Clustered warning.
Solution: Run the repair process to fix the problem.
Missing Constraint
Constraints are rules that the database enforces to improve data integrity.
Problem: If the verification process finds a constraint that should be defined asmissing, it generates a Missing Constraint warning.
Solution: Run the repair process to fix the problem.
Missing Index
The verification process checks that all the required indexes (as defined in theexpected database user schema) exist in the projects database user schema.
Problem: If the verification process does not find all the required indexes in theprojects database user schema, it generates a Missing Index warning.
Solution: Run the repair process to fix the problem.
Installation and UpgradeGuide - WindowsAppendix B: Upgrade Preparation Troubleshooting
ALM (12.60 & 12.60 Patch 1) Page 189 of 206

Index Changed
The verification process checks that the indexes are defined according to theexpected database user schema.
Problem: If the verification process finds an index that is not defined according tothe expected database user schema, it generates an Index Changed warning.
This warning can indicate the following problems:
l Function in a function-based index is different than expected.l Index is not defined on the expected columns.Solution: Run the repair process to fix the problem. The repair process removes theindex, and then recreates it, based on the required definitions for this index.
Index Order Changed
The verification process checks that the order of the columns in the index definitionhas not changed.
Problem: If the order of the columns in the index definition has changed, theverification process generates an Index Order Changed warning.
Solution: Run the repair process to fix the problem. The repair process removes theindex, and then recreates it, based on the required definitions for this index.
TriggersA database trigger is procedural code that is automatically executed in response tocertain events on a particular table in a database.
Database triggers can contain the following warning:
l "Extra Trigger" below
Extra Trigger
Extra triggers can cause upgrade failures and functionality problems.
Problem: If the verification process finds an extra trigger, it generates an ExtraTrigger warning.
Note: This problem requires manual repair. The repair process cannot fix it.
Solution: Before upgrading, back up your database schema and remove the extratriggers manually.
Installation and UpgradeGuide - WindowsAppendix B: Upgrade Preparation Troubleshooting
ALM (12.60 & 12.60 Patch 1) Page 190 of 206
Because extra triggers can cause upgrade failures, the upgrade process cannotignore this warning by using the Exception file. For details, see "Changing theDatabase User Schema" on page 200.
SequencesA sequence is an Oracle object that acts as a generator that provides a sequentialseries of numbers.
Database sequences can contain the following warnings:
l "Extra Sequence" belowl "Missing Sequence" belowl "Incorrect Sequences" on the next page
Extra Sequence
ALM schemas should contain only the sequences that are defined in the schemaconfiguration file.
Problem: If the verification process finds an extra sequence, it generates an ExtraSequence warning.
Note: This problem requires manual repair. The repair process cannot fix it.
Solution: Do one of the following:
l Change the Schema.Move the sequence to a new database user schema. Beforedoing so, consult with your database administrator. For details, see "Changingthe Database User Schema" on page 200.
l Use the Exception File. For details about the Exception file, see "Define anException File" on page 71.
Note: Not recommended: Instruct the upgrade to ignore this problem.
Missing Sequence
Problem: If the verification process finds that one of the sequences that should bedefined on the ALM schema is missing, it generates a Missing Sequence warning.
Solution: Do the following:
l Run the repair process to fix the problem.l See "Changing the Database User Schema" on page 200.
Installation and UpgradeGuide - WindowsAppendix B: Upgrade Preparation Troubleshooting
ALM (12.60 & 12.60 Patch 1) Page 191 of 206

Incorrect Sequences
Problem: Sometimes the Oracle object sequence numbers become incorrect, forexample, if an export of the database is done on a live activated project, in whichusers are still modifying tables. If the verification process finds that Oraclesequences objects are not fully synchronized with ALM schema table IDs, theverification process generates an Incorrect Oracle sequences found warning.
Solution: Run the repair process to fix the problem.
Internal Quality Center ChangesFor upgrade from Quality Center 9.2: As a result of internal changes in Quality Center10.00, a set of updates needs to be applied to the schema as part of thepreparation for the upgrade to ALM.
To apply the updates to the schema, perform the following processes:
l "Verification Process" belowl "Repair Process" on page 194
Verification Process
If the verification process finds any internal differences, it generates warnings in theverification report. The repair process fixes them automatically.
The verification process checks for the following internal changes:
Type Problem Element Comment
Column Sizemismatch
COMMON_SETTINGS.CSET_NAME
Expected column size is240. Actual size is 70.
Column Sizemismatch
REQ.RQ_REQ_PRIORITY
Expected column size is255. Actual size is 70.
Column Sizemismatch
REQ.RQ_REQ_TYPE Expected column size is255. Actual size is 70.
Column Sizemismatch
REQ.RQ_REQ_AUTHOR
Expected column size is255. Actual size is 70.
Column Sizemismatch
REQ.RQ_REQ_PRODUCT
Expected column size is255. Actual size is 70.
Installation and UpgradeGuide - WindowsAppendix B: Upgrade Preparation Troubleshooting
ALM (12.60 & 12.60 Patch 1) Page 192 of 206

Type Problem Element Comment
Column Sizemismatch
REQ.RQ_REQ_REVIEWED
Expected column size is255. Actual size is 70.
Column Sizemismatch
REQ.RQ_REQ_STATUS
Expected column size is255. Actual size is 70.
Index Missing ALL_LISTS.AL_ABS_PATH_COV_IDX
Index Missing BUG.BG_COMPOUND_IDX
Index Missing CYCLE.CY_FOLDER_IDX
Index Missing REQ.RQ_REQ_STATUS_IDX
Index Missing RUN.RN_CYCLE_IDX
Index Missing STEP.ST_RUN_IDX
Index Missing TEST.TS_SUBJECT_IDX
Index Extra BUG.BG_DETECTED_BY_LWR_IDX
Index Extra BUG.BG_STATUS_LWR_IDX
Index Extra BUG.BG_PRIORITY_LWR_IDX
Index Extra BUG.BG_RESPONSIBLE_LWR_IDX
Index Indexchanged
REQ_COVER.RC_ENTITY_ID_IDX
Index Indexchanged
RUN.RN_TEST_ID_IDX
Installation and UpgradeGuide - WindowsAppendix B: Upgrade Preparation Troubleshooting
ALM (12.60 & 12.60 Patch 1) Page 193 of 206

Type Problem Element Comment
Index Indexchanged
RUN.RN_TESTCYCLE_IDX
Function-based indexes -relevant only for SQLserver.
Extraindex
COMMON_SETTINGS.CS_COVER_LWR_IDX
Function-based indexes -relevant only for SQLserver.
Extraindex
HOSTS.HOSTS_LWR_IDX
Function-based indexes -relevant only for SQLserver.
Extraindex
HOSTS_IN_GROUP.HG_COVER_LWR_IDX
Function-based indexes -relevant only for SQLserver.
Extraindex
HOST_GROUP. GH_LWR_IDX
Function-based indexes -relevant only for SQLserver.
Extraindex
USERS.US_USERS_LWR_IDX
Repair Process
The repair process fixes these internal differences in the following way:
l Column Size. Increases the size of columns to the required size.l Index Definition. Removes extra indexes. It also recreates missing indexes andindexes that were defined differently.
l Extra Function-based Indexes.Microsoft SQL Server only. Removes obsoletefunction-based indexes.
Before beginning the upgrade, run the repair process on each project.
Data ValidationOne of the main functions of the verification process is to ensure that the projectdatabase contains valid data.
Installation and UpgradeGuide - WindowsAppendix B: Upgrade Preparation Troubleshooting
ALM (12.60 & 12.60 Patch 1) Page 194 of 206

The verification process helps you find and fix the following problems:
• Duplicate Values 195• Duplicate IDs 195• Tree Inconsistencies 196• Views 197• Orphaned Entities 197• Missing Entities 198• Missing Lists and/or List Values 198• Encrypted Values 199
Duplicate ValuesSome fields (or a combination of fields) must be unique in given tables. Thisconstraint is enforced by the creation of a unique index on these fields. Forexample, the combination of fields TS_SUBJECT and TS_NAME, which representthe ID of the test's parent folder and test name, must be unique. It is not possible tocreate two tests with the same name under the same folder. In rare cases, acorrupted database contains duplicate values in these fields.
Problem: The verification process checks that all unique indexes exist (andtherefore enforce unique values). If the verification process finds duplicate values, itdoes not permit the upgrade to run on the project.
The verification report specifies the fields in which there are duplications andnumber of duplicate values found, as shown below.
Solution: Automatic Repair. Run the repair process to automatically handle theduplicate values. The repair process renames the duplicate values to resolve theproblem.
Duplicate IDsMost tables have a unique primary key, usually a unique single column. If there areduplicate values in this field, the primary key is not created.
For example, in a table called test, the column TS_TEST_ID represents the test ID,which is unique. In rare cases, a corrupted database contains duplicate IDs.
Problem: The verification process checks that all IDs in a table are unique. If it findsduplicate IDs, it does not permit the upgrade to run on the project.
The verification report specifies the fields in which there are duplicate items andvalues, as shown below.
Installation and UpgradeGuide - WindowsAppendix B: Upgrade Preparation Troubleshooting
ALM (12.60 & 12.60 Patch 1) Page 195 of 206

Solution: Automatic Repair. The repair process automatically deletes one of therecords with a duplicate ID.
Caution: This option assumes that the entire record is duplicated, and that theduplicated record is not accessible from the ALM user interface. Becausethere can be exceptions, we recommend that you use this option only afterverifying manually that this record deletion will not cause data loss.
Tree InconsistenciesThe verification process checks four different entity trees (hierarchicalrepresentation of entities):
l Test Plan treel Business Components treel Requirement treel Test Lab treeThe verification process checks that the data in the tree tables is correct.
Caution: Do not manually fix any problems related to tree data. The repairprocess fixes them automatically.
Problem: The verification process checks for the following types of problems:
l Corrupted Path. This is an internal ALM field that contains a string that representsthe order of each node in the tree.
l Wrong Number of Children. This is an internal ALM field that contains the numberof children for each node in the tree.
l Orphan Records in Trees. By definition, orphan records do not have parentrecords. As a result, you cannot access them through the ALM user interface.
Solution: Automatic Repair. Run the repair process to automatically fix anyproblems related to tree data.
Caution: Before beginning the automatic repair, review each orphan recordcarefully. If the verification process finds an orphan record, it deletes it (andall its descendants) from the tree automatically.
Installation and UpgradeGuide - WindowsAppendix B: Upgrade Preparation Troubleshooting
ALM (12.60 & 12.60 Patch 1) Page 196 of 206

ViewsDatabase views can contain the following warning:
l "Extra Views" below
Extra Views
ALM schemas should contain only the views that are defined in the schemaconfiguration file.
Problem: If the verification process detects extra views that were added manually tothe schema, it displays an Extra Views warning. Adding extra views on top of theschema is not supported and could cause problems.
Note: This problem requires manual repair. The repair process cannot fix it.
Solution: Do one of the following:
l Change the Schema. If you use the view, copy it to a different schema. If you donot use the view, delete it. Before taking either action, back up your schema andconsult your database administrator. For details, see "Changing the DatabaseUser Schema" on page 200.
l Use the Exception File. For details about the Exception file, see "Define anException File" on page 71.
Note: Not recommended: Instruct the upgrade to ignore this problem.
Orphaned EntitiesThe verification process checks for entity data that is missing corresponding parentdata. For example, the following entities might be missing corresponding testconfigurations or test criteria:
l Test configuration coveragel Criteria coveragel Run criterial Runsl Test instances
Caution: Do not manually fix any problems related to orphaned entities. Therepair process fixes them automatically.
Installation and UpgradeGuide - WindowsAppendix B: Upgrade Preparation Troubleshooting
ALM (12.60 & 12.60 Patch 1) Page 197 of 206

Problem: In version-controlled projects, deleting a test configuration or test criteriadid not delete corresponding entities after checking in. This caused incorrectcoverage calculation.
Solution: Automatic Repair. Run the repair process to automatically fix anyproblems related to orphaned entities created by this problem.
Missing EntitiesThe verification process checks for data that is missing. For example, the followingentities might be missing:
l Test configurationsl Test criteria
Caution: Do not manually fix any problems related to missing entities. Therepair process fixes them automatically.
Problem: The upgrade process can detect that certain entities are missing based oninformation that exists in related tables.
Solution: Automatic Repair. Run the repair process to automatically fix anyproblems related to missing entities created by this problem.
Missing Lists and/or List ValuesThe verification process checks that all of the fields of List type are associated witha list.
Problem: If a list and/or its values are missing, the verification process generates awarning about missing lists or missing list values.
Solution:
Run the repair process to create the missing list and/or its values.
Missing lists are re-created with the name: AUTO_GENERATED_LIST_NAME_<unique_number>
After running the repair process, do the following in Customization > Project Lists:
l Rename any lists whose names are prefixed by AUTO_GENERATED_LIST_NAME_.
l If necessary, add any list values that are missing.
Tip: Although you can use the repair process to add these objects, werecommend that you contact Micro Focus Support to make sure that the
Installation and UpgradeGuide - WindowsAppendix B: Upgrade Preparation Troubleshooting
ALM (12.60 & 12.60 Patch 1) Page 198 of 206

missing objects are not just symptoms of a bigger problem.
Encrypted ValuesSome fields are saved in the database in an encrypted state. Encryption is doneusing confidential data passphrases.
Note: This is an issue with Performance Center and Lab Managementprojects.
Problem: The verification process checks that all encrypted data can be decryptedwith the current confidential data passphrases. If the verification process findsencrypted values that cannot be decrypted, the project is not upgraded.
The verification report specifies the fields that cannot be decrypted.
Solution: If verifying the LAB_PROJECT fails due to a problem with the ConfidentialData Passphrase, do one of the following:
l Make sure that the same Confidential Data Passphrase is defined on the originalserver on which the LAB_PROJECT was located, as well as on the server towhich it is being restored.
l Perform the following steps:a. In Site Administration: Before attempting to verify the LAB_PROJECT again,
navigate to the Lab Management tab and clear all encrypted field values fromthe project by running the following queries:o For a Microsoft SQL Database
update td.LAB_DIAGNOSTICS_SERVERS set DIAG_SVR_PASSWORD = ''update td.LAB_AUT_HOSTS set AUTHOST_PASSWORD = ''ALTER TABLE td.LAB_HOSTS DISABLE TRIGGER ALLupdate td.LAB_HOSTS set HOST_PASSWORD = ''ALTER TABLE td.LAB_HOSTS ENABLE TRIGGER ALL
o For an Oracle Database
update <schema name>.LAB_DIAGNOSTICS_SERVERS set DIAG_SVR_PASSWORD = ' 'update <schema name>.LAB_AUT_HOSTS set AUTHOST_PASSWORD = ' 'update <schema name>.LAB_HOSTS set HOST_PASSWORD = ' '
b. Proceed with the verify, repair, and upgrade of your LAB_PROJECT.c. Login to Lab Management and update the passwords of the AUT Hosts,
Diagnostics Server and Standalone Unix Load Generators. For information
Installation and UpgradeGuide - WindowsAppendix B: Upgrade Preparation Troubleshooting
ALM (12.60 & 12.60 Patch 1) Page 199 of 206
on working in Lab Management, refer to the Micro Focus ALM LabManagement Guide.
Changing the Database User SchemaThis section describes the problems that require manual repair (cannot be fixedautomatically by the repair process), and recommends solutions for theseproblems. If you encounter any of the problems mentioned below, consult with yourdatabase administrator or contact Micro Focus Support for further guidelines toresolve these problems before upgrading.
The stability of the new database upgrade component depends on the databaseuser schema validity. We recommend that you not use the Exception file to changethe database user schema.
This section includes:
• Missing DatabaseObjects 200• Missing List Warning 200• SequencesWarning 201• Changed DatabaseObjects 201• Extra DatabaseObjects 202
Missing Database ObjectsMissing database objects can be symptoms of a bigger problem.
Problem:Missing database objects (for example, tables and indexes) can yieldunexpected and unwanted behavior.
Solution: Although you can use the repair process to add these objects, werecommend that you contact Micro Focus Support to make sure that the missingobjects are not just symptoms of a bigger problem.
Missing List WarningUser-defined fields of List type must be associated with lists.
Problem: If a list is missing for a user-defined field, the verification processgenerates a Missing List warning.
Solution: Contact Micro Focus Support for instructions on changing the data type ofthe user-defined field from List to String in the SYSTEM_FIELD table.
Caution: Contact Micro Focus Support before attempting to fix the problem
Installation and UpgradeGuide - WindowsAppendix B: Upgrade Preparation Troubleshooting
ALM (12.60 & 12.60 Patch 1) Page 200 of 206

manually.
SequencesWarningAn internal mechanism manages IDs and other system numerators. The tableSEQUENCES holds the name of the table or other entity whose numeration isbeing tracked as well as its highest current value.
Problem: If one of the records is missing in this table, or if one of the values isincorrect, the verification process generates a Sequences warning.
Solution: The repair process fixes the problem automatically.
Caution:We strongly recommend that you not attempt to fix the problemmanually.
Changed Database ObjectsAny of the following cases is defined as a Changed Database Object:
l Data type of a column was changedl Length of a column was changedl Nullability of a column was changedl Column is defined as identity although it should not be defined as such, or viceversa
Problem: A changed column data type can result in incorrect behavior on the serverside.
Solution: To avoid this behavior, make sure that you have resolved all data type andlength concerns before beginning the upgrade.
For every changed database object that is found, do the following:
1. Create a new column with the required attributes as originally defined by theALM server.
2. Move the data from the old column to the new one.If you cannot move the data (for example, move strings to numeric columns, ormove large data to smaller fields), contact Micro Focus Support.
3. Remove the old column.4. Rename the new column to the original column name.
Installation and UpgradeGuide - WindowsAppendix B: Upgrade Preparation Troubleshooting
ALM (12.60 & 12.60 Patch 1) Page 201 of 206

Extra Database ObjectsALM has various customization options. One option is to add user-defined fields(UDFs). You can add a UDF by using either the project customization userinterface or through OTA (Open Test Architecture).
Problem: Any other addition to the database user schema (for example, definingextra objects on top of ALM schema) can result in a failure, such as the following:
l Name Conflict. If the later version happens to include a name that you added for aproprietary database object (for example, a table, view, or column), the twonames will be in conflict.
l Copy and Synchronize Failure. If the database user schema contains extra ormissing database objects, some ALMmechanisms for copying andsynchronizing might fail.
l Extra Triggers. If the database contains extra triggers, some update operationsmight fail.
Solution:
For each extra database object that is found, perform the corresponding solution:
l Move extra columns to newly created tables.
To make sure a new table has a one-to-one relationship with the original table,define the primary key of the new column in the new table with the value of theprimary key of the original column in the original table.
l Move extra tables to a different database user schema.
These extra tables include those tables created above. You might need toamend the proprietary application data access of these tables. You can stillaccess these tables from within the ALM database connection by specifying thefull name.l Oracle
<schema name>.<table name>
l SQL Server
<database name>.td.<table name>
To be able to see these tables, you must grant the necessary permissions for thedatabase user schema.
l Move extra views to a different database user schema.
Installation and UpgradeGuide - WindowsAppendix B: Upgrade Preparation Troubleshooting
ALM (12.60 & 12.60 Patch 1) Page 202 of 206

Like extra tables, these views can be moved to a different database userschema. In addition, you must grant reading permissions to the newly createddatabase user schema on the database user schema objects.
l Remove referential integrity between customer database objects and ALM databaseobjects.
This removal includes no data loss.l Remove extra triggers before the upgrade, and, only if truly necessary, restore themafter the upgrade.
No data loss is involved. The upgrade process includes data upgraders thatperform some data manipulations (for example, removing duplicate values, fixingtree structures, and so on).Your triggers will not be invoked on these update events.As a result, you need to do the following:a. Ask Micro Focus Support for information about the data upgrader activity.b. Review the information about the data upgrader activity.c. Decide on which proprietary updates you need to perform.
l Remove extra indexes.
You can log all indexes before the upgrade, and (only if necessary) restore themafter the upgrade. No data loss is involved.
l Oracle Database only: Move extra sequences to a newly created database userschema.
To access the extra sequences from the database user schema, you must grantALM the required permissions. When moving these sequences, set them to startwith the number they reached at the time of the move.
Installation and UpgradeGuide - WindowsAppendix B: Upgrade Preparation Troubleshooting
ALM (12.60 & 12.60 Patch 1) Page 203 of 206

Page 204 of 206ALM (12.60 & 12.60 Patch 1)
Installation and UpgradeGuide - WindowsAppendix B: Upgrade Preparation Troubleshooting

Send Us FeedbackLet us know how we can improve your experience with the Installation andUpgrade Guide - Windows.Send your email to: [email protected]
ALM (12.60 & 12.60 Patch 1) Page 205 of 206