Embed Size (px)
Citation preview

Microbiology
Bioluminescence: Investigating Glow-in-the-Dark Dinoflagellates
(from http://www.sciencebuddies.com) Objective The objective of this biotechnology science fair project is to investigate how the bioluminescence of the marine dinoflagellate Pyrocystis lunula is affected by changes to its light-dark cycle. Introduction Marine dinoflagellates are the main contributors to a phenomenon commonly known as phosphorescence of the sea. When the concentration of these bioluminescent organisms in the water near shore is high, the wave crests glow with a luminous blue light (see Figure 1, below). Wet sand on the beach even glows blue when you step on it! The reason that the light appears on wave crests and in the sand near your feet is that the bioluminescent organisms glow when they are subjected to mechanical stress. They sense that they are being pushed and pulled in the waves, and in the sand near your feet, and respond by producing the light. It is not clear what sort of adaptive advantage this light might have for the organisms, but it makes for a beautiful show if you are lucky enough to witness it.
Figure 1. Bioluminescent dinoflagellates (a form of algae) caused the blue glow in this wave near Carlsbad, California. (Wikipedia, 2009.)
There are many examples of bioluminescence in nature, with the most familiar being the firefly. Bioluminescence evolved independently in many different organisms. The
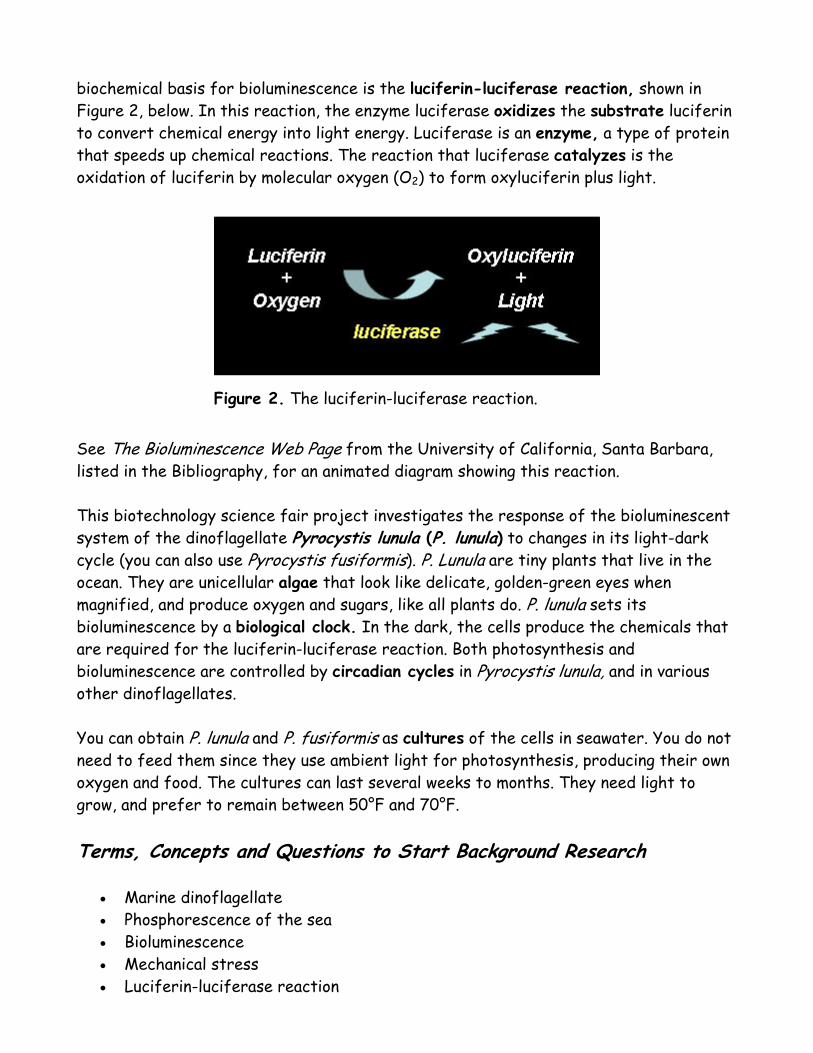
biochemical basis for bioluminescence is the luciferin-luciferase reaction, shown in Figure 2, below. In this reaction, the enzyme luciferase oxidizes the substrate luciferin to convert chemical energy into light energy. Luciferase is an enzyme, a type of protein that speeds up chemical reactions. The reaction that luciferase catalyzes is the oxidation of luciferin by molecular oxygen (O2) to form oxyluciferin plus light.
Figure 2. The luciferin-luciferase reaction. See The Bioluminescence Web Page from the University of California, Santa Barbara, listed in the Bibliography, for an animated diagram showing this reaction. This biotechnology science fair project investigates the response of the bioluminescent system of the dinoflagellate Pyrocystis lunula (P. lunula) to changes in its light-dark cycle (you can also use Pyrocystis fusiformis). P. Lunula are tiny plants that live in the ocean. They are unicellular algae that look like delicate, golden-green eyes when magnified, and produce oxygen and sugars, like all plants do. P. lunula sets its bioluminescence by a biological clock. In the dark, the cells produce the chemicals that are required for the luciferin-luciferase reaction. Both photosynthesis and bioluminescence are controlled by circadian cycles in Pyrocystis lunula, and in various other dinoflagellates. You can obtain P. lunula and P. fusiformis as cultures of the cells in seawater. You do not need to feed them since they use ambient light for photosynthesis, producing their own oxygen and food. The cultures can last several weeks to months. They need light to grow, and prefer to remain between 50°F and 70°F. Terms, Concepts and Questions to Start Background Research
• Marine dinoflagellate • Phosphorescence of the sea • Bioluminescence • Mechanical stress • Luciferin-luciferase reaction
• Oxidize • Substrate • Enzyme • Catalyze • Pyrocystis lunula • Algae • Biological clock • Circadian cycle • Cell culture • Scintillon
Questions
• What other sorts of stress cause P. lunula cells to emit light? • Based on your research, what is the "burglar alarm" hypothesis for why
dinoflagellates glow in turbulent water? • What is the biological classification (kingdom, phylum, class, order, family, etc.)
for Pyrocystis lunula? • How are dinoflagellates related to the algae? • What is the chemical structure for luciferin? • What is the chemical equation for the luciferin-luciferase reaction? • What are some examples of circadian cycles in marine organisms? • What is the definition of an enzyme? • What is the definition of a substrate? • What is the name of the structure in dinoflagellates that produces
bioluminescent light? Bibliography
• University of California, Santa Barbara. (2009). The Bioluminescence Web Page. Retrieved March 3, 2009, from http://www.lifesci.ucsb.edu/~biolum
• Instructables. (2008). Grow your own bioluminescent algae. Retrieved March 3, 2009, from http://www.instructables.com/id/Grow-Your-Own-Bioluminescent-Algae
• University of California, San Diego. (2009). Glow with the Flow. Retrieved March 3, 2009, from http://explorations.ucsd.edu/biolum
• Wilson, T. (2008). How Bioluminescence Works. Retrieved March 3, 2009, from http://animals.howstuffworks.com/animal-facts/bioluminescence.htm
• University of Texas at Austin. (2008). Teaching Kits: Bioluminescence. Retrieved March 3, 2009, from http://www.sbs.utexas.edu/utex/teachingKits-bioluminescence.aspx
• Widder, E.A. (n.d.). Bioluminescent Dinoflagellates, Growing and Experimenting for Advanced Students. Retrieved March 3, 2009, from http://www.usc.edu/org/cosee-west/Apr08/18Growing%20dinos.pdf
• Hoppenrath, M. and Saldarriaga, J.F. (2009). Dinoflagellates. Retrieved March 3, 2009, from http://tolweb.org/Dinoflagellates/2445
Materials and Equipment Note: You can use P. lunula or P. fusiformis for this science fair project. The cells can be obtained from the sources below:
• If you are using: a. Pyrocystis lunula, cells are available from the University of Texas, Austin,
which maintains a culture collection of algae. The website is http://www.sbs.utexas.edu/utex/teachingKits-bioluminescence.aspx. The cultures are delivered in 6 glass test tubes.
b. Pyrocystis fusiformis, cells are available from Sunnyside Sea Farms at http://seafarms.com/html/products.html. Order the cultures in 10-mL tubes. The cultures they offer in plastic bags are also suitable.
• Boxes with lids, opaque (3); each should be tall enough to one cup (with two test tubes inside) upright, with the lid tightly shut. If they are not, use bigger boxes.
• Glue or tape • Plastic cups (3) • Masking tape • Permanent marker • Aluminum foil • Lamp with a fluorescent bulb • Nightlight or a flashlight • Lab notebook • Graph paper
Experimental Procedure Note: You should begin this science fair project in the morning. Setting Up Your Cultures
1. When the cultures arrive, loosen the caps of the tubes. Follow any directions that are sent with the cultures to get them started.
2. Place a clean plastic cup in each box, near the middle. The cups will be used to keep the cultures upright. Glue or tape the cups in the boxes so that they won't fall over. Label the boxes as follows:
a. Dark b. Light c. Light/Dark
3. Label six of the tubes as follows: a. A: Dark b. B: Dark c. C: Light d. D: Light e. E: Light/Dark f. F: Light /Dark
Note: If you've ordered the P. fusiformis cultures, you'll have more than six tubes and should label and add more replicates for each condition.
4. Wrap tubes A and B in aluminum foil. a. These will be kept in constant darkness. b. Place tubes A and B in the plastic cup in the box marked Dark. It's ok if
the test tubes are not completely upright—leaning against the side of the cup is fine.
c. Place the top on the Dark box and set it aside. 5. Place tubes C and D in the plastic cup in the box labeled Light. It's ok if the test
tubes are not completely upright—leaning against the side of the cup is fine. 6. Put the lamp with the fluorescent bulb in an area where it can stay on 24 hours a
day. 7. Place the Light box under the fluorescent lamp. 8. Turn on the lamp.
a. Do not put the top on the Light box. b. These tubes will be kept in constant light. c. The cell cultures will be taken out of the light for brief periods of time,
described later in the procedure, to determine if they will produce bioluminescence in response to mechanical stress.
9. The Dark box should now be placed next to the Light box, also under the lamp. a. Keep the boxes in the same area to minimize variations in temperature, etc. b. The boxes will both get equally heated since they are both under the lamp. c. Do not expose the cultures in the Dark box to any light.
10. Place tubes E and F in the cup in the box labeled Light/Dark, as follows: a. These cultures will be kept in darkness for part of the day, and in light for
part of the day. b. Keep tubes E and F in the dark during the daylight hours. This will allow you
to study their bioluminescence during your normal waking hours.

c. Cover tubes E and F with aluminum foil in the morning. Choose a time that is convenient and wrap them at that time consistently.
d. Place the wrapped tubes in the Light/Dark box and cover the box with the lid.
e. Place the Light/Dark box near the other two boxes, also under the lamp. f. Unwrap tubes E and F in the evening. Unwrap them at the same times each
day. Suggestion: Keep the cultures in the dark from 10:00 AM to 5:00 PM each day.
g. Expose the Light/Dark tubes to the lamp light during the night. h. Re-wrap them in aluminum foil in the morning and place the lid back on the
Light/Dark box. Making Observations Now that you have your Pyrocystis cultures set up, you can determine how the light and dark conditions affect their bioluminescence. The bioluminescence of the cultures can be viewed in a darkened room.
1. Create a scale for how bright the cultures glow. You will rank the brightness on a scale from 1 to 4, with 4 being the brightest.
2. Take the cultures into a dark room at the same times each day. You could have a dim light on, such as a nightlight or a flashlight, to help you work in the room. Keep the light several feet away from the cultures. Keep track of which tubes belong in which boxes.
3. To stimulate bioluminescence, tighten the cap on each tube, one at a time, and turn it upside down. You should see a clear blue light at the region where the bubble in the tube is moving through the culture. This region has the highest mechanical stress. Record your observations and brightness ranking in your lab notebook.
4. Test all of the cultures for bioluminescence. Record all observations and brightness rankings in your lab notebook. Try to treat each tube in the same way so that you can compare the relative amount of light produced.
5. Observe each of the cultures at least four times per day for five days. Keep track of dates, times, and all data in your lab notebook.
6. Make sure you observe the light/dark culture during both its light phase and its dark phase.
7. For example, if the light/dark cultures are in the dark from 10:00 AM to 5:00 PM, check the bioluminescence of the cultures (including the ones in constant darkness or light) at 8:00 AM, Noon, 4:00 PM, and 8:00 PM.

Analyzing Your Data
1. Graph your data. a. Graph the time on the x-axis and the brightness score on the y-axis. b. Suggestion: Divide the x-axis into 24 hours, with noon in the middle. Mark
the period of darkness for the light/dark cycle with a black rectangle under the x-axis. Add bars for the bioluminescent scores to the graph at the appropriate times. Use different colors for the all-light, all-dark, and light/dark cultures.
2. How does the varying light exposure affect the bioluminescence of the cells? 3. Repeat the procedure at least two more times so that you have three sets of
data. Variations
• Switch the cultures that have been in constant light (or constant darkness) to the light/dark cycle. How long does it take for their bioluminescent cycle to become fully adjusted to the new light/dark timing? For example, switch a culture that has been in constant darkness for 3 days to a dark (10:00 AM to 5:00 PM) /light (5:00 PM to 10:00 AM) cycle, and then record its bioluminescence (8:00 AM, Noon, 4:PM and 8:00 PM) for 7 days. Make a new graph for each day.
• Look more carefully at when the cultures become bioluminescent in the light dark cycle. For example, if they are adjusted to a period of darkness from 10:00 AM to 5:00 PM, and light from 5:00 PM to 10:00 AM, check their bioluminescence every half hour between 8:00 AM and Noon, and every half hour between 3:00 PM and 7:PM. Graph your data.
• Try other light/dark cycles and determine how the Pyrocystis cells respond. For example, 4 hours of darkness, followed by 20 hours of light, or 12 hours light/12 hours of darkness. How quickly do the cultures respond to a change in the light/dark cycle?
• Borrow some beakers, a magnetic stir plate, and some stir bars from your school lab and investigate how the rate of rotation of the stir bar affects the amount of light produced. Set up an electronic measuring device to measure the light produced (see the Science Buddies project Measure Luminescence in Glow-in-the-Dark Objects for an example circuit).
• Study the dinoflagellates under a microscope. Can you see any microscopic changes that follow a circadian rhythm? If so, what affect does altering the light/dark cycles have on these changes?
Can Garlic Prevent Crown Gall? (from http://sciencebuddies.com/science-fair-
projects/project_ideas/MicroBio_p024.shtml?fave=no&isb=c2lkOjEsaWE6TWljcm9CaW8scDoxLHJpZDozMjkzNTkx&from=TSW)
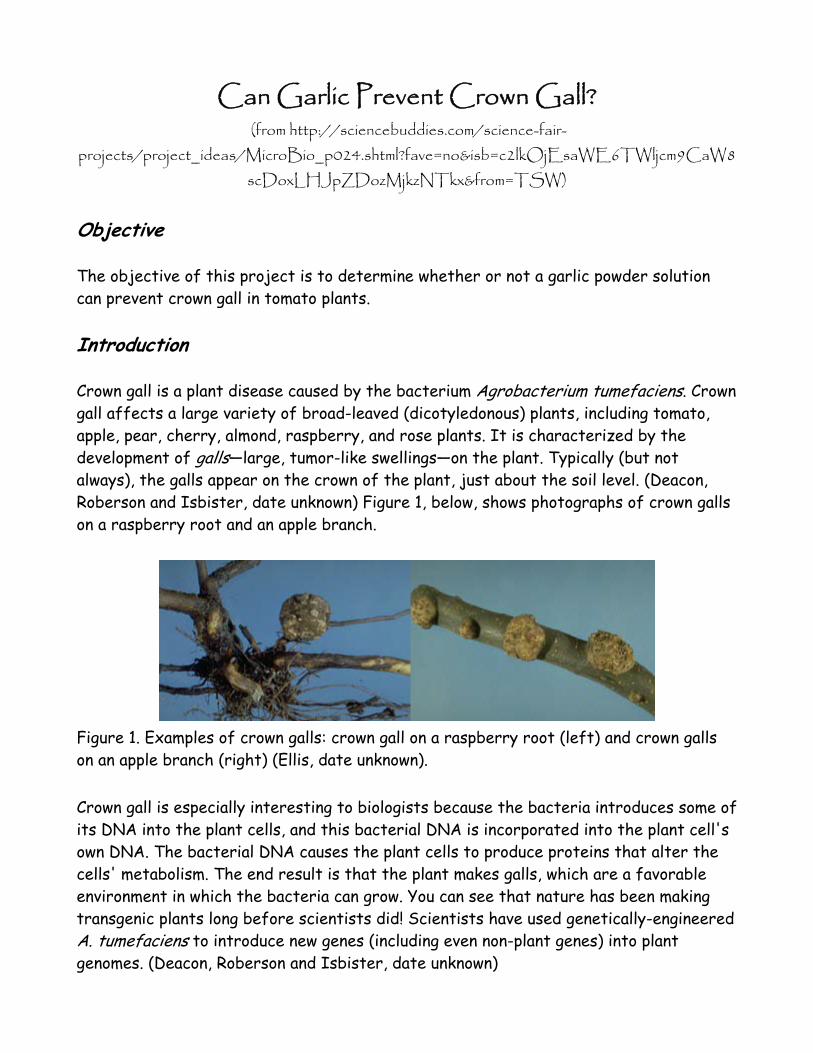
Objective The objective of this project is to determine whether or not a garlic powder solution can prevent crown gall in tomato plants. Introduction Crown gall is a plant disease caused by the bacterium Agrobacterium tumefaciens. Crown gall affects a large variety of broad-leaved (dicotyledonous) plants, including tomato, apple, pear, cherry, almond, raspberry, and rose plants. It is characterized by the development of galls—large, tumor-like swellings—on the plant. Typically (but not always), the galls appear on the crown of the plant, just about the soil level. (Deacon, Roberson and Isbister, date unknown) Figure 1, below, shows photographs of crown galls on a raspberry root and an apple branch.
Figure 1. Examples of crown galls: crown gall on a raspberry root (left) and crown galls on an apple branch (right) (Ellis, date unknown). Crown gall is especially interesting to biologists because the bacteria introduces some of its DNA into the plant cells, and this bacterial DNA is incorporated into the plant cell's own DNA. The bacterial DNA causes the plant cells to produce proteins that alter the cells' metabolism. The end result is that the plant makes galls, which are a favorable environment in which the bacteria can grow. You can see that nature has been making transgenic plants long before scientists did! Scientists have used genetically-engineered A. tumefaciens to introduce new genes (including even non-plant genes) into plant genomes. (Deacon, Roberson and Isbister, date unknown)
A. tumefaciens infects plants through wound sites, e.g., from pruning or transplantation. Cellular components such as sugars leaking from the wound site can serve as chemoattractants for the bacteria. In fact, specific strains of A. tumefaciens can detect a particular compound released from plant wounds, acetosyringone, at 1 part in 10,000,000! The bacteria can direct their movement towards higher concentrations of the compound (this is called chemotaxis) to find the wound site. Crown gall is usually not much of a problem for mature plants, but seedlings and young plants that are infected can be severely stunted. The A. tumefaciens bacteria can remain viable in the soil for long periods of time (up to two years). How can young garden and crop plants be protected from infection in soil that harbors A. tumefaciens? Antibiotics can not be used for agricultural purposes, because resistant bacterial strains will develop with widespread use, resulting eventually in loss of effectiveness of the antibiotic against human disease. How about testing a natural product as an anti-bacterial agent to protect plants? Garlic powder has been shown to have anti-bacterial properties under some conditions (Jonkers et al., 1999). Can it protect tomato plants from A. tumefaciens? In this project you will grind up garlic tablets in order to make solutions with a known amount of garlic powder. You will need a plant infected with crown gall as a source of A. tumefaciens bacteria for this experiment. To infect tomato seedlings, you will use a "stab innoculation" technique, using a pin. Half of the plants will be stabbed with sterile pins that have been scraped on the inside surface of a cut-open crown gall (to innoculate the pin with A. tumefaciens bacteria). The remaining plants will be stabbed with sterile pins (as a negative control). Terms, Concepts and Questions to Start Background Research To do this project, you should do research that enables you to understand the following terms and concepts:
• crown gall, • Agrobacterium tumefaciens.
Bibliography
• Here are several excellent references on crown gall disease and the bacteria that causes it:

o Gleason, M., 1995. "All About Crown Gall," Department of Plant Pathology Iowa State University, [accessed October 4, 2006] http://www.ipm.iastate.edu/ipm/hortnews/1995/5-19-1995/cgall.html.
o Ellis, M.A., date unknown. "Bacterial Crown Gall of Fruit Crops," Ohio State University Extension, Fact Sheet, Plant Pathology [accessed October 4, 2006] http://ohioline.osu.edu/hyg-fact/3000/3301.html.
o Nameth, S. and J. Chatfield, date unknown. "Bacterial Crown Gall on Ornamentals in the Landscape," Ohio State University Extension, Fact Sheet, Plant Pathology [accessed October 4, 2006] http://ohioline.osu.edu/hyg-fact/3000/3054.html.
o Moore, L.W., 2006. "Crown Gall Disease of Nursery Crops," An Online Guide to Plant Disease Control, Oregon State University [accessed October 4, 2006] http://plant-disease.ippc.orst.edu/articles.cfm?article_id=8.
o Deacon, J., A. Robertson, and A. Isbister, date unknown. "The Microbial World: Biology and Control of Crown Gall (Agrobacterium tumefaciens)," Institute of Cell and Molecular Biology, The University of Edinburgh [accessed October 4, 2006] http://helios.bto.ed.ac.uk/bto/microbes/crown.htm.
• Jonkers, D. et al., 1999. "Antibacterial effect of garlic and omeprazole on Helicobacter pylori," Journal of Antimicrobial Chemotherapy 43(6): 837‐839, available online [accessed October 4, 2006]: http://jac.oxfordjournals.org/cgi/content/full/43/6/837.
Materials and Equipment To do this experiment you will need the following materials and equipment:
• plant infected with crown gall as a source of A. tumefaciens bacteria: o a county agricultural extension agent may be able to help with identifying
crown gall infection; o you can also check with experts at local nurseries.
• sharp knife or razor blade for cutting gall open, • at least 24 tomato plant seedlings,
o Note: tomato plant seedlings are usually available for purchase in spring to early summer. If you are doing your project at another time of year, you will have to grow your own plants from seed, which will add several weeks to the project, so be sure to plan ahead!
• potting soil, • 4 large plant pots (big enough to hold 6 tomato seedlings each), • garlic tablets, • clean tools for crushing garlic tablets,
• water, • graduated cylinder (100 mL), • 1 ml disposable pipettes (or eyedropper), • pins.
Experimental Procedure
1. In this project you will have four different sets of tomato plants, with 5 plants each. The table below shows the experimental conditions for the four sets.
# description innoculation treatment
1 control #1 stab with sterile pin plain water
2 control #2 stab with sterile pin garlic solution
3 control #3 stab with crown gall pin plain water
4 test stab with crown gall pin garlic solution
2. Pots 1 and 2 are negative controls. These tomato seedlings will be "sham
innoculated" (stabbed with sterile pins). None of these plants should develop galls (this is why these are called "negative" controls). The stabs on the seedlings in pot #1 will be treated with plain water. The stabs on the seedlings in pot #2 will be treated with garlic solution. Comparing these two pots will show you if the garlic solution has any effects (positive or negative) on uninfected tomato plants.
3. Pot #3 is a positive control. These tomato seedlings will be stab innoculated with bacteria, and the stabs will be treated with plain water. You should expect all of these seedlings to develop galls (that's why it is called a "positive" control.) It is important to include this control condition. These plants must develop galls. If they do not, your experiment cannot show that garlic has a preventive effect.
4. Pot #4 has the test seedlings. These will be stab innoculated with bacteria, and the stabs will be treated with garlic solution. Comparing these seedlings to those in pot #3 will tell you if the garlic treatment has a preventive effect.
5. For plants treated with garlic solution (pots 2 and 4), pipette 1 mL of the garlic solution over the stab wound immediately after innoculation, and then once a day for the next four days (5 treatments total).
6. For plants treated with water (pots 1 and 3), pipette 1 mL of water over the stab wound immediately after innoculation, and then once a day for the next four days (5 treatments total).
7. Allow the plants to grow for 2–3 weeks. Observe the plants daily. Make notes of your observations in your lab notebook.
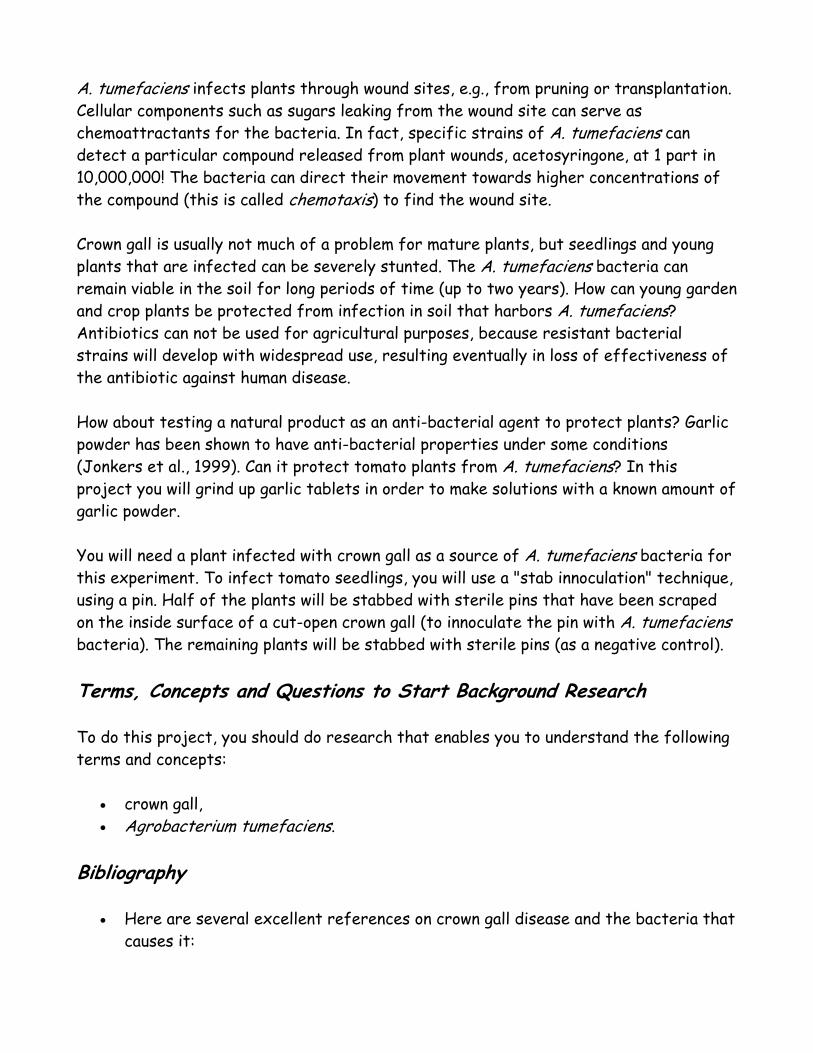
8. Figure 2, below, shows an example of a tomato seedling that has developed a crown gall three weeks after stab innoculation with A. tumefaciens.
Figure 2. Examples of crown galls developing on tomato seedlings three weeks after stab innoculation (arrows) with A. tumefaciens. (Deacon, Roberson and Isbister, date unknown)
9. Compare the number of seedlings with with galls between pots 3 and 4. Is garlic
effective at preventing crown gall at the concentration you tested? 10. Compare the growth of the seedlings between pots 1 and 2. Does the garlic
solution have any effect (positive or negative) on sham innoculated seedlings (pots 1 and 2)?
Making Garlic Powder Solution
1. In this experiment, you will treat each plant once a day with 1 mL of garlic powder solution for a total of 5 days. How much solution will you need?
a. amount per plant per day × number of plants × number of days = amount of solution needed
b. 1 mL/day/plant × 12 plants × 5 days = 60 mL solution needed 2. Prepare garlic solution by grinding up tablets into very fine powder and dissolving
in warm water. a. Choose a single garlic concentration between 1 and 20 g/L. For example,
let's suppose your desired final concentration is 5 g/L, and that each garlic tablet contains 40 mg (0.04 g) of garlic powder.
b. To make 60 mL (0.05 L) of 5 g/L solution, you'll need: 5 g/L / 0.04 g/tablet × 0.06 L = 7.5 tablets.
c. It's good to have a little extra solution, so round up to 8 tablets. 3. How much garlic powder is that?
8 tablets × 0.04 g/tablet = 0.32 g garlic powder. 4. So how much water do I dissolve that in?
0.32 g / 5 g/L = 0.064 L = 64 mL.
Stab Innoculating Tomato Seedlings
1. Sterilize pins by wrapping them in aluminum foil, and then heating them in the oven at 300°F for 30 min.
2. Use a sharp knife or razor blade to cut open the crown gall you will use to innoculate your tomato seedlings.
3. Scrape the point of a sterile pin inside the gall to innoculate it with A. tumefaciens bacteria. You only need a small amount of material. Use the same amount of material for each innoculation.
4. Stab plant near base of stem with tip of the pin. The pin should penetrate to the center of the stem, but no further.
5. For sham innoculations (seedlings in pots 1 and 2), do not innoculate the pin with crown gall material. Instead, stab the seedlings near the base of the stem with the tip of a sterile pin. Again, the pin should penetrate to the center of the stem, but no further.
6. It's a good idea to mark the location of the stab innoculation by drawing a circle around it with permanent marker. You'll be able to tell where you innoculated each plant, even if the wound site heals. Mark the sham innoculated plants first, then mark the plants innoculated with crown gall scrapings (or use separate markers). This way, you won't risk contaminating the sham innoculated plants.
Variations
• The procedure above uses only a single concentration of garlic solution. If the garlic treatment is not effective against crown gall, it might be that garlic just isn't effective against A. tumefaciens. On the other hand, it might be the wrong concentration of garlic solution, or perhaps 5 days of treatment is not enough.
o If your negative controls show that the garlic solution has a negative effect on the tomato seedlings, try again with a lower concentration of garlic than the one suggested above.
o If your negative controls show that the garlic solution has no effect, or a positive effect on the tomato seedlings, try again with a higher concentration of garlic than the one suggested above, or extend the treatment for a longer time period, or both.
• If garlic is effective against crown gall, you could do additional experiments with different concentrations of garlic to find the most effective concentration. Also, as you dilute the garlic solution, the preventive effect should go away, which will add support for the hypothesis that something in the garlic solution is acting as an anti-microbial agent.
• Advanced. There are commercially available preventive treatments for crown gall disease that use a biological control agent, a closely-related bacterial strain

called Agrobacterium radiobacter which competes with A. tumefaciens and prevents it from infecting plants. Galltroll is one of the commercial names for this project. Galltroll is not effective against every strain of A. tumefaciens (see Deacon, Roberson and Isbister, date unknown). Design an experiment using the stab innoculation technique to test the effectiveness of Galltroll against the A. tumefaciens strain(s) from galls in your local area.
How Do Food Preservatives Affect the Growth of Microorganisms?
(from http://sciencebuddies.com/science-fair-projects/project_ideas/MicroBio_p016.shtml?fave=no&isb=c2lkOjEsaWE6TWljcm9CaW8
scDoxLHJpZDozMjkzNTkx&from=TSW) Objective The purpose of this project is to determine the effective concentration for anti-microbial food preservatives. Introduction The problem of protecting food from spoilage has been with us since prehistoric times. The solutions to this problem have changed with advances in technology and knowledge about what causes food to spoil. This project will focus on retarding microbial growth, which is only one of the causes of food spoilage. There are many ways that food can be spoiled. For example, oils in food can become oxidized, releasing free fatty acids that cause a bitter, rancid taste. Additionally, natural enzymes that take part in the ripening process of fruits and vegetables can remain active after harvest, causing spoilage. Different chemical preservatives have been developed to counteract each of these different mechanisms: "Preservatives can be categorized into three general types: antimicrobials that inhibit growth of bacteria, yeasts, or molds; antioxidants that slow air oxidation of fats and lipids, which leads to rancidity; and a third type that blocks the natural ripening and enzymatic processes that continue to occur in foodstuffs after harvest." (Dalton, 2002)In order for an antimicrobial preservative to work, it must be used at the right concentration. Ideally, it will disrupt microbial growth while at the same time preserving most of the nutritional value of the food. To do this project, you should first do background research on methods of food preservation. Then, select an antimicrobial preservation method to test for your experiment. As an example, this project will test one of the oldest preservation methods by adding different concentrations of salt.
Terms, Concepts and Questions to Start Background Research To do this project, you should do research that enables you to understand the following terms and concepts:
• bacteria, • conditions for bacterial growth,
o minimum, maximum, and optimum values for temperature, pH, osmolarity. • preservatives, • food additives, • food preservation.
Questions
• What is meant by "effective concentration" for a chemical compound? • What are the effective concentrations for the additives you intend to test?
Bibliography
• This article provides a general overview for methods of food preservation: Brain, M., date unknown. "How Food Preservation Works," HowStuffWorks.com [accessed September 20, 2006] http://home.howstuffworks.com/food-preservation.htm.
• These articles provide an introduction to the different types of food preservatives, and what each is used for:
o Dalton, L., 2002. "What's That Stuff? Food Preservatives: Antimicrobials, Antioxidants, and Metal Chelators Keep Food Fresh," Chemical & Engineering News, American Chemical Society 80 (45): 40, available online [accessed September 20, 2006] http://pubs.acs.org/cen/science/8045/8045sci2.html.
o Foulke, J.E., 1998. "A Fresh Look at Food Preservatives," FDA Consumer, U.S. Food and Drug Administration [accessed September 20, 2006] http://www.cfsan.fda.gov/~dms/fdpreser.html.
• This webpage has background information on nutritional requirements for bacterial growth. It is from an online textbook of bacteriology, which can be an excellent source of further information on bacteria: Todar, K., 2002. "Nutrition and Growth of Bacteria," Todar's Online Textbook of Bacteriology, Department of Bacteriology, University of Wisconsin, Madison [accessed September 20, 2006] http://textbookofbacteriology.net/nutgro.html.

Materials and Equipment To do this experiment you will need the following materials and equipment:
• 4 low-salt chicken boullion cubes, • 500 mL hot water, • 10 glass jars with lids, • anti-microbial preservative; for example, you could try one of the following:
o salt, o sugar, o vinegar,
• electronic balance, • masking tape, • marking pen, • 40 nutrient agar plates.
Experimental Procedure
1. Dissolve 2 chicken broth cubes in 500 mL of hot water. 2. Divide the solution into 10 glass jars (50 mL/jar). 3. Following the table below, add preservative at 4 different concentrations, and
add nothing for the control condition. Make two replicates of each condition (10 jars total). Be sure that the salt you add is fully dissolved.
Label Amount Broth (mL) Amount Salt (g)
Control 50 0
#1 2.5% 48.75 1.25
#2 5% 47.5 2.5
#3 10% 45 5.0
#4 20% 40 10
4. If you use a preservative other than salt, you should do background research to
come up with an estimate of the effective concentration. Make the effective concentration your #3 test condition. Condition #'s 1, 2, and 4 should be 1/4, 1/2, and 2 times this concentration, respectively.
5. Take samples on 1st, 3rd, 5th and 7th days, and streak onto agar plates. Use the quadrant streaking method (Inoculation: How to Put the Bacteria You Desire on a Petri Dish) when plating samples.
6. Be sure to properly label all plates with the test solution and day number. 7. Tape plates closed, incubate (inverted) overnight, and count bacterial colonies. 8. Does the number of colonies decrease as concentration of the preservative
increases? Safe Disposal of Plates At the conclusion of the experiment, all plates should be disinfected for safe disposal.
1. The best way to dispose of bacterial cultures is to pressure-sterilize (autoclave) them in a heat-stable biohazard bag.
2. If autoclaves or pressure cookers are not available, an alternative is to bleach the plates.
a. Wear proper safety equipment (gloves, lab coat, eye protection) when working with the bleach solution; it is corrosive.
b. Saturate the plates with a 20% household bleach solution (in other words, one part bleach and four parts water).
c. Allow the plates to soak overnight in the bleach solution before disposing of them.
d. Please note that the bleach solution is corrosive and needs to be thoroughly rinsed afterwards.
Variations
• Compare refrigerated and/or frozen vs. room-temperature broth. • Try additional preservatives. What are their effective concentrations? • Try preservatives with solid food, e.g., salt meat or pickled vegetables. See the
Science Buddies project, Minimizing Bacteria in the Thawing and Cooking of Meat for a method of pureeing solid food in order to assess bacterial content. Be sure to establish baseline bacterial content by pureeing samples before treatment with preservatives.
• Compare starting sterile vs. not. If you have a pressure cooker, here is an experiment you can try. Follow canning procedures for three jars. For the other three, use normal conditions for cooking and left-over food storage in three separate jars. Test by plating samples from successive jars from each condition at 1 day, 1 week, 2 weeks.

Rise to the Occasion: Investigating Requirements for Yeast Fermentation
(from http://sciencebuddies.com/science-fair-projects/project_ideas/MicroBio_p008.shtml?fave=no&isb=c2lkOjEsaWE6TWljcm9CaW8
scDoxLHJpZDozMjkzNTkx&from=TSW) Objective The objective of this project is to detect the production of carbon dioxide and alcohol by yeast fermentation and to determine the reaction time and nutrient conditions needed for fermentation. You will learn that yeast is unicellular fungi and fermentation is the process by which yeast breaks down glucose to produce alcohol and carbon dioxide. Introduction Yeasts are unicellular fungi. They are plantlike organisms that do not contain chlorophyll and cannot undergo photosynthesis to make their own food. Instead, yeast must get their food from their surroundings. One such food source is glucose. Complex carbohydrates, like the starch in potatoes or flour, are another food source. Yeast first break these down into simple sugar molecules, like glucose. If oxygen is present in the yeast's environment, glucose will be broken down into carbon dioxide and water, plus energy, which the yeast can use to grow and reproduce. When oxygen is not present, yeast use an alternative pathway, called alcoholic fermentation, to extract energy from sugar. In alcoholic fermentation, glucose is broken down into alcohol, carbon dioxide and water, plus energy—but much less energy than when oxygen is present. The alcohol by-product is important for making wine and beer, while the bubbles of carbon dioxide make yeast-based dough rise. Terms, Concepts and Questions to Start Background Research Before starting your experiments, you should do background research that enables you to understand the following terms, concepts and questions:
• unicellular • alcoholic fermentation • What is limewater? How do you make it? What happens to limewater in the
presence of carbon dioxide?
Bibliography
• This link describes how to make limewater: http://www.hometrainingtools.com/articles/making-limewater-solution-science-teaching-tip.html
• This link has pictures that show how limewater turns cloudy when exposed to carbon dioxide: http://genchem.chem.wisc.edu/demonstrations/Gen_Chem_Pages/15precippage/reactions_between_carbon_d.htm
• This link has interesting information about yeast fermentation in bread dough: http://www.baking911.com/bread/101_fermentation.htm
Materials and Equipment
• 12 tall, slim glasses or clear plastic containers (water bottles are good) • 4 bendable straws • 4 straight straws (stirrers) • Modeling clay or play dough • Limewater (see Bibliography) • 1 box of glucose tablets (available at your local pharmacy; you need 6 5-gram
tablets) • Yeast (12 teaspoons total) • Water • White sugar • Corn syrup • Flour • Vegetable oil • Stove • Oven gloves • Measuring cup and spoons • Small pot
Experimental Procedure Part 1: The Process of Fermentation
1. Make a 10% glucose solution by dissolving 6 5-gram glucose tablets in 300 ml of water (about 1.25 cups). Gentle heating and stirring will help to dissolve the tablets. After the tablets are fully dissolved, boil the solution gently for five minutes to eliminate all oxygen in the glucose. Warning: Be careful with hot stove, pot and liquid!!
2. Use oven gloves to remove the small pot of glucose from the stove. Allow it to cool (feels slightly warm to the touch).
3. Add 2 teaspoon of yeast to glass/plastic container. Pour the boiled glucose solution into the same container. Use a spoon/straw to gently mix.
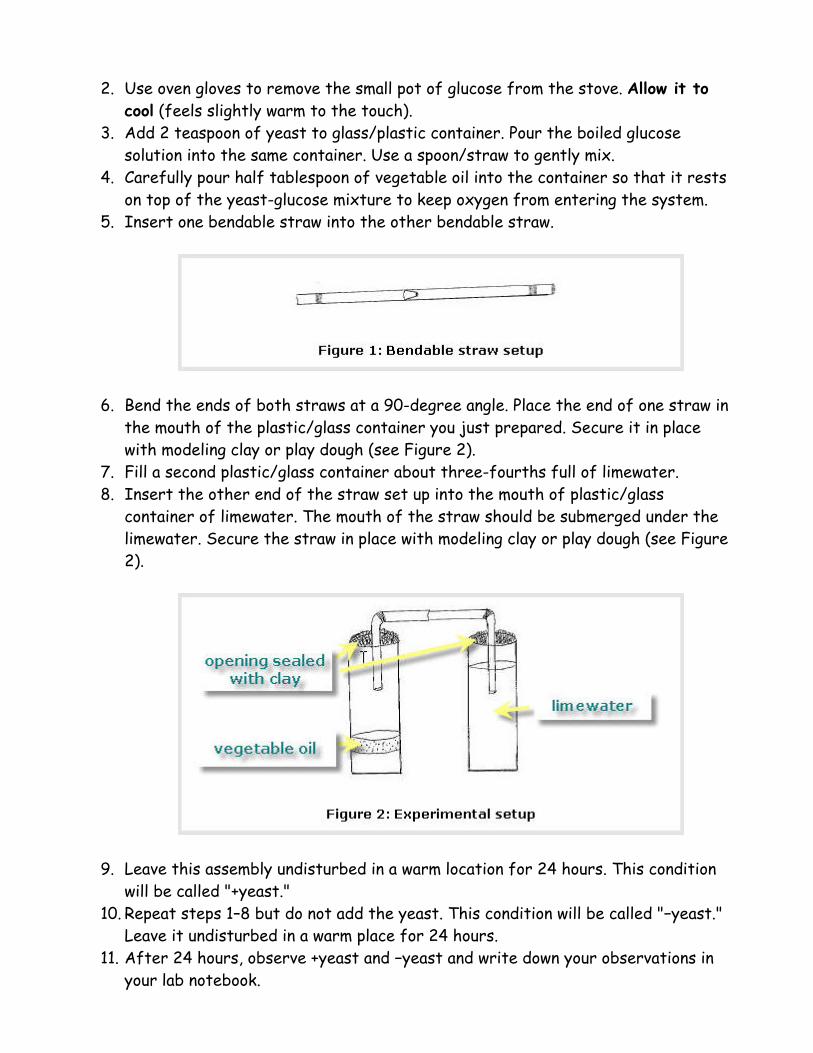
4. Carefully pour half tablespoon of vegetable oil into the container so that it rests on top of the yeast-glucose mixture to keep oxygen from entering the system.
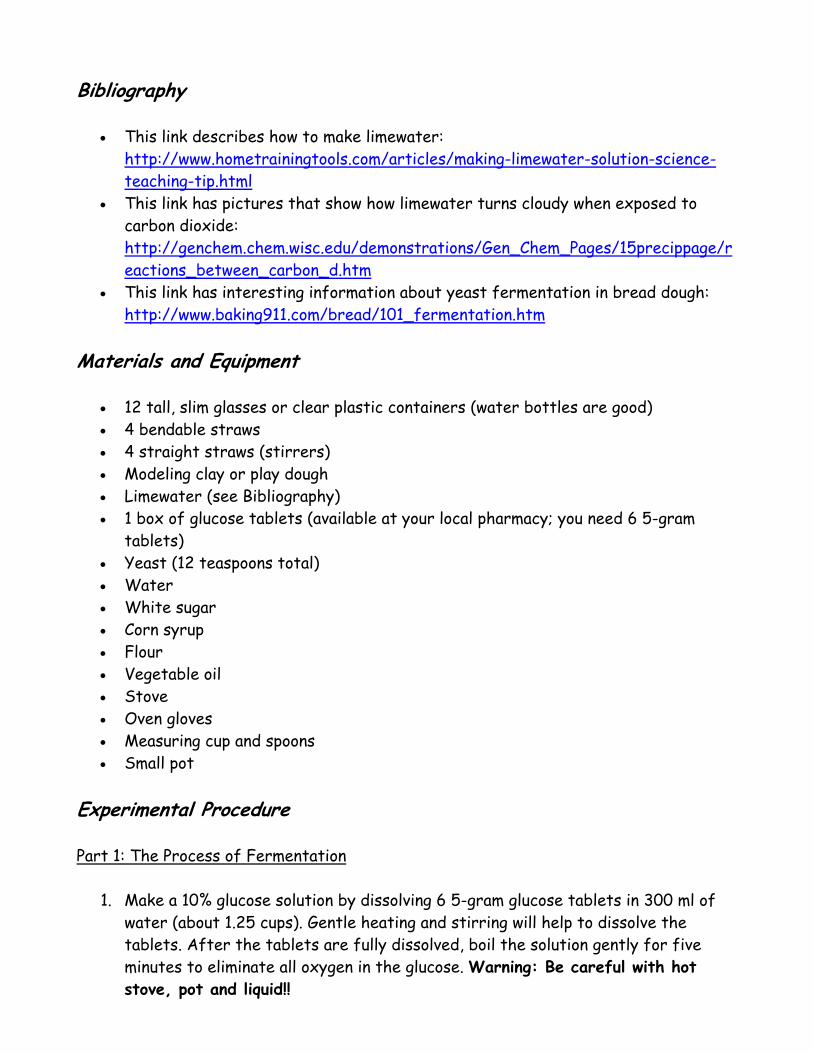
5. Insert one bendable straw into the other bendable straw.
6. Bend the ends of both straws at a 90-degree angle. Place the end of one straw in the mouth of the plastic/glass container you just prepared. Secure it in place with modeling clay or play dough (see Figure 2).
7. Fill a second plastic/glass container about three-fourths full of limewater. 8. Insert the other end of the straw set up into the mouth of plastic/glass
container of limewater. The mouth of the straw should be submerged under the limewater. Secure the straw in place with modeling clay or play dough (see Figure 2).
9. Leave this assembly undisturbed in a warm location for 24 hours. This condition will be called "+yeast."
10. Repeat steps 1–8 but do not add the yeast. This condition will be called "−yeast." Leave it undisturbed in a warm place for 24 hours.
11. After 24 hours, observe +yeast and −yeast and write down your observations in your lab notebook.
12. Here are some questions to consider as you make your observations: a. What happened to the limewater for +yeast and −yeast conditions? b. The change of limewater from clear to cloudy indicates the presence of
carbon dioxide. Which condition(s) produced carbon dioxide? c. Can you detect an alcohol-like odor coming from either condition? d. Production of heat suggests that a chemical reaction has occurred. Does
either one feel warm? e. What is the difference between the +yeast and −yeast conditions? Why do
you think this component is essential for fermentation? Part 2: The Conditions for Fermentation
1. For the second experiment, you will test four different food sources for yeast. For each condition, you will prepare two containers (three per condition is even better). Label 4 pairs of containers as follows: condition #1 water, condition #2 sugar, condition #3 flour, and condition #4 corn syrup.
2. Pour 1 cup of warm water into each container. 3. #1 will serve as the control with plain water. Add 1 tablespoon of sugar to each
#2, 1 tablespoon of flour to each #3 and 1 tablespoon of corn syrup to each #4. 4. Sprinkle 1 teaspoon of active dry yeast into all 8 containers. 5. Use a clean stirrer and thoroughly stir each #1 and record the time. Repeat for
all containers, using a clean stirrer for each. 6. Observe the containers at regular intervals for the next 1 or 2 days. Note your
observations for each container in your lab notebook. Be sure to record the time and date of each observation.
7. Here are some questions to consider as you make your observations: a. Fermentation produces carbon dioxide and alcohol. Did you see evidence of
either of these in each condition? Explain. b. Yeasts are one-celled, plantlike organisms that have the ability to lie
dormant (inactive) if conditions are not favorable for them to grow and reproduce. Did any of the samples remain dormant? If so, which one(s)?
c. What conclusion can you draw about what yeasts need? d. Which variable combined with the yeast and warm water made the yeast
ferment the fastest?
The Effect of Various Treatments on the Mold Growth of D'Anjou Pears
(Project found at http://www.all-science-fair-projects.com/) Purpose Determine the best way to reduce blue mold (Penicillium), and gray mold (Botrytis cinerea) on red D’Anjou pears, in open air Materials
40 D’anjou pears Four pear trays Roll of paper towels Bottle of vegetable oil Screw driver 1.5 Liter container Pitcher Powdered zinc oxide Syringe 12 pipettes Moldy pear
Safety concerns: Chemicals, mold. Students will wear gloves, goggles, mask, and apron when doing this activity. Procedure 1. Pour 950mL of water into the mixing container (the 1.5-liter container). Add 260mL ounces of chlorine (500 parts per million). 2. Take one pear and (using your dominant hand) dip the pear in the solution for 7 seconds. 3. Repeat step 2 (make sure to pick up the next pear with the hand that has not been in the solution, so all the pears do not have that solution), for 9 more pears.
4. Pour out the container, and wash it out with tap water. 5. Pour 950mL of water into the mixing container. 6. Repeat steps 2-4. 7. Repeat step 1. 8. Take 113g of zinc oxide powder, and pour it into the container. Stir the solution. 9. Repeat steps 2-4. 10. Take a paper towel, and saturate it with the vegetable oil. 11. Take one pear and wipe the towel over it (making sure to get the stem and bowl). 12. Repeat step 10 for the remaining pears. 20. Take a disposable pipette and put the tip of it into the mold, and puncture the fruit. 13. Take a screwdriver and enlarge the wound, made by the pipette. 14. Repeat steps 12, and 13 for three pears in each of the groups. 15. Let the pears sit for 14 days. 16. After the 14 days take all the pears and, using the visual guide and safety procedures (in step 1), grade each pear. 17. Repeat steps 2 and 3 and soak one pear group, and dispose of them. 18. Repeat step 17 for the remaining pear groups.

Death Rays: What Duration of Ultraviolet Exposure Kills Bacteria?
(from http://sciencebuddies.com/science-fair-projects/project_ideas/MicroBio_p017.shtml?fave=no&isb=c2lkOjEsaWE6TWljcm9CaW8
scDoxLHJpZDozMjkzNTkx&from=TSW) Objective The purpose of this project is to observe the effects of short-term ultraviolet light exposure on bacteria. Introduction Ultraviolet (UV) light is invisible to our eyes, and has higher energy than visible light. "When considering the effect of UV radiation on human health and the environment, the range of UV wavelengths is often subdivided into UVA (400–315 nm), also called Long Wave or 'blacklight'; UVB (315–280 nm), also called Medium Wave; and UVC (< 280 nm), also called Short Wave or 'germicidal'." (Wikipedia, 2006a) Short-wavelength UV light has enough energy to damage chemical bonds in DNA molecules, which are very stable under most conditions. "Ultraviolet light is absorbed by a double bond in pyrimidine bases (such as thymine and cytosine in DNA), opening the bond and allowing it to react with neighboring molecules. If it is next to a second pyrimidine base, the UV-modified base forms direct covalent bonds with it. The most common reaction forms two new bonds between the neighboring bases, forming a tight four-membered ring (see Figure 1, below). Other times, a single bond forms between two carbon atoms on the rings, forming a '6-4 photoproduct.' These reactions are quite common: each cell in the skin might experience 50-100 reactions during every second of sunlight exposure." (Goodsell, 2001)
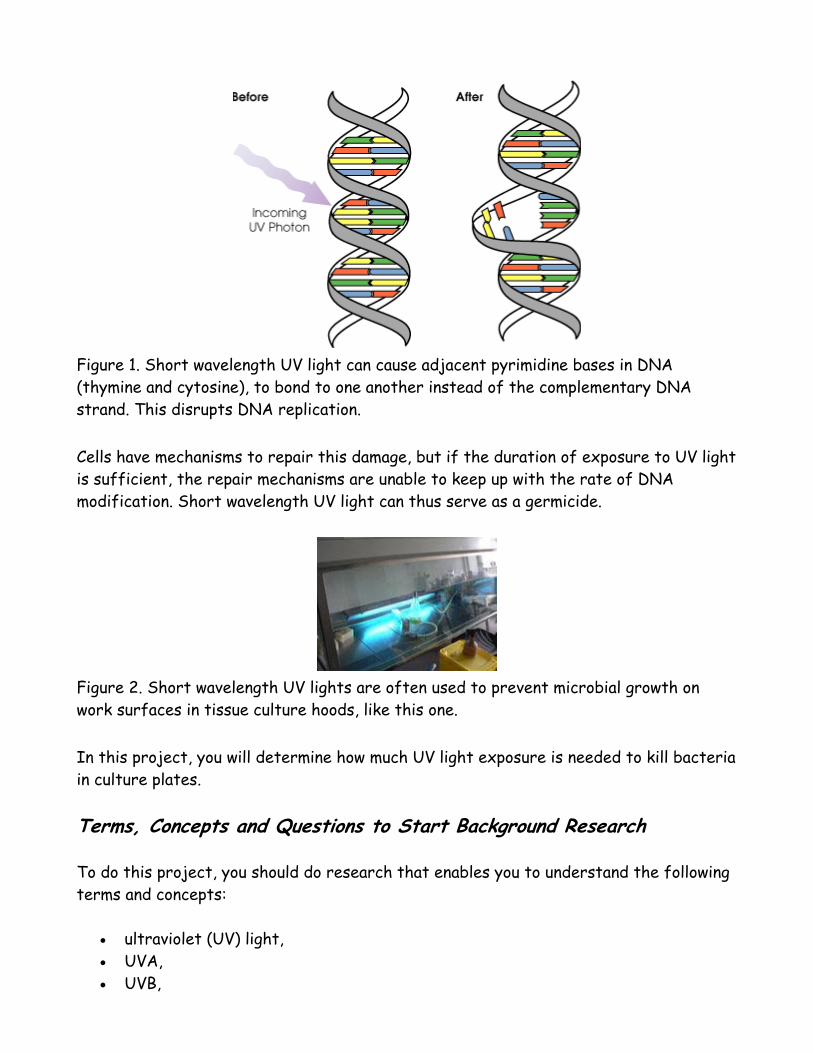
Figure 1. Short wavelength UV light can cause adjacent pyrimidine bases in DNA (thymine and cytosine), to bond to one another instead of the complementary DNA strand. This disrupts DNA replication. Cells have mechanisms to repair this damage, but if the duration of exposure to UV light is sufficient, the repair mechanisms are unable to keep up with the rate of DNA modification. Short wavelength UV light can thus serve as a germicide.
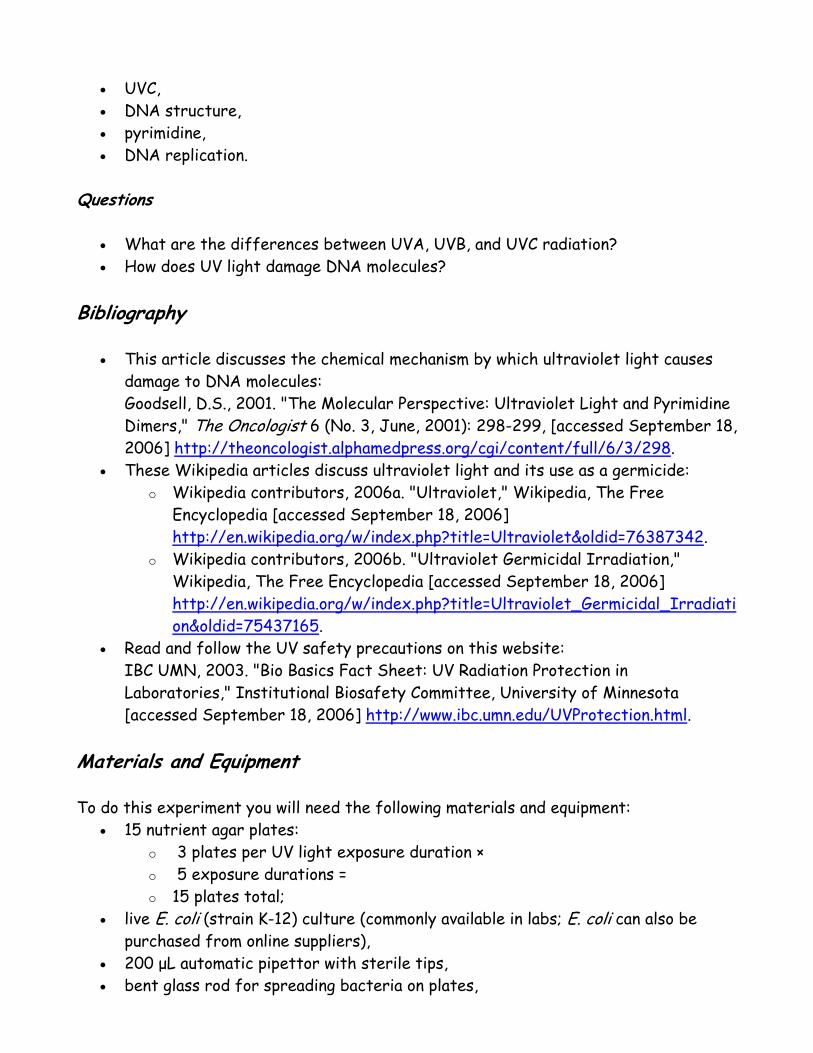
Figure 2. Short wavelength UV lights are often used to prevent microbial growth on work surfaces in tissue culture hoods, like this one. In this project, you will determine how much UV light exposure is needed to kill bacteria in culture plates. Terms, Concepts and Questions to Start Background Research To do this project, you should do research that enables you to understand the following terms and concepts:
• ultraviolet (UV) light, • UVA, • UVB,
• UVC, • DNA structure, • pyrimidine, • DNA replication.
Questions
• What are the differences between UVA, UVB, and UVC radiation? • How does UV light damage DNA molecules?
Bibliography
• This article discusses the chemical mechanism by which ultraviolet light causes damage to DNA molecules: Goodsell, D.S., 2001. "The Molecular Perspective: Ultraviolet Light and Pyrimidine Dimers," The Oncologist 6 (No. 3, June, 2001): 298-299, [accessed September 18, 2006] http://theoncologist.alphamedpress.org/cgi/content/full/6/3/298.
• These Wikipedia articles discuss ultraviolet light and its use as a germicide: o Wikipedia contributors, 2006a. "Ultraviolet," Wikipedia, The Free
Encyclopedia [accessed September 18, 2006] http://en.wikipedia.org/w/index.php?title=Ultraviolet&oldid=76387342.
o Wikipedia contributors, 2006b. "Ultraviolet Germicidal Irradiation," Wikipedia, The Free Encyclopedia [accessed September 18, 2006] http://en.wikipedia.org/w/index.php?title=Ultraviolet_Germicidal_Irradiation&oldid=75437165.
• Read and follow the UV safety precautions on this website: IBC UMN, 2003. "Bio Basics Fact Sheet: UV Radiation Protection in Laboratories," Institutional Biosafety Committee, University of Minnesota [accessed September 18, 2006] http://www.ibc.umn.edu/UVProtection.html.
Materials and Equipment To do this experiment you will need the following materials and equipment:
• 15 nutrient agar plates: o 3 plates per UV light exposure duration × o 5 exposure durations = o 15 plates total;
• live E. coli (strain K-12) culture (commonly available in labs; E. coli can also be purchased from online suppliers),
• 200 μL automatic pipettor with sterile tips, • bent glass rod for spreading bacteria on plates,

• bunsen burner, • ethanol, • aluminum foil, • 37°C incubator for bacterial culture plates, • short wavelength UV light, • UV-blocking face shield, • lab coat, • gloves.
Experimental Procedure
Safety Note: adult supervision is required for this project. Read and follow these Ultraviolet Light Safety Precautions (IBC UMN, 2003):
• The germicidal ultraviolet (UV) light used in this project will also damage unprotected human cells. Your eyes and skin are particularly susceptible to UV damage.
• Exposure to UV light can burn the retina or irritate the cornea and the conjunctiva. This can cause a feeling of "sand in the eye" and heightened sensitivity to light. Symptoms appear from 6 to 24 hours after exposure and usually disappear within 48 hours.
• Persons who have had the lens of an eye removed (e.g. cataract surgery) can receive permanent retinal damage from UV exposure - including blindness.
• Individuals who are exposed to photosensitizing agents (e.g. some oral drugs or topically applied creams) may not be aware of heightened sensitivity to UV radiation.
• UV radiation burns skin promoting skin aging and cancer. • If possible, the UV source for irradiating bacterial cultures should be operated
remotely, so that the Investigator is not exposed to UV light. • If this is not possible, then the UV source should be set up so as to avoid direct
exposure to the Investigator (i.e., placed behind a UV-blocking barrier). • The Investigator should also use the following personal protective equipment:
o All skin should be protected including face, neck, hands, and arms. o Wear gloves and long sleeves covering all skin above the gloves. o Eyes and face should be protected by a face shield designed to block the
UV wavelengths used. Radiation can readily reach the eyes through the open sides of standard eye glasses, so they do not provide sufficient protection.
1. Prepare 15 plates of chosen bacteria: pipette 100 μL from the liquid bacterial suspension, and spread it on the plate. Cover the plate and wait 5 minutes for it to dry.
2. Protect half of each plate from UV light by using aluminum foil to cover half of the lid for each plate.
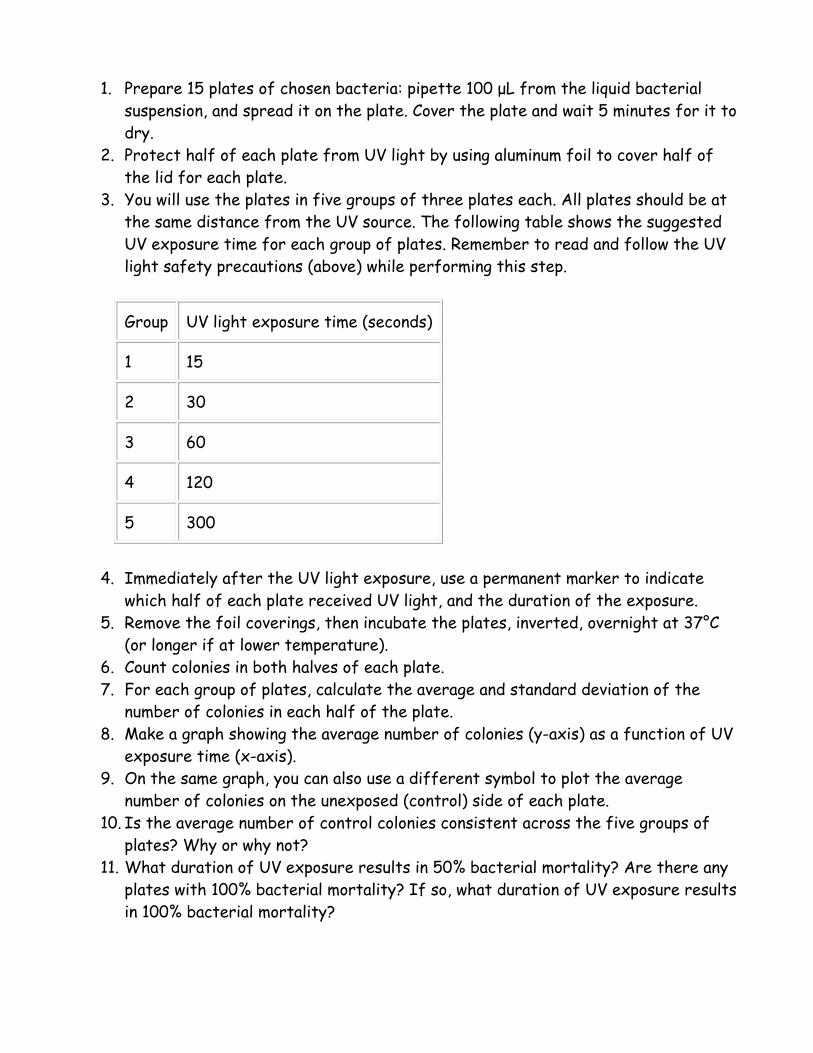
3. You will use the plates in five groups of three plates each. All plates should be at the same distance from the UV source. The following table shows the suggested UV exposure time for each group of plates. Remember to read and follow the UV light safety precautions (above) while performing this step.
Group UV light exposure time (seconds)
1 15
2 30
3 60
4 120
5 300
4. Immediately after the UV light exposure, use a permanent marker to indicate
which half of each plate received UV light, and the duration of the exposure. 5. Remove the foil coverings, then incubate the plates, inverted, overnight at 37°C
(or longer if at lower temperature). 6. Count colonies in both halves of each plate. 7. For each group of plates, calculate the average and standard deviation of the
number of colonies in each half of the plate. 8. Make a graph showing the average number of colonies (y-axis) as a function of UV
exposure time (x-axis). 9. On the same graph, you can also use a different symbol to plot the average
number of colonies on the unexposed (control) side of each plate. 10. Is the average number of control colonies consistent across the five groups of
plates? Why or why not? 11. What duration of UV exposure results in 50% bacterial mortality? Are there any
plates with 100% bacterial mortality? If so, what duration of UV exposure results in 100% bacterial mortality?
Safe Disposal of Plates At the conclusion of the experiment, all plates should be disinfected for safe disposal.
1. The best way to dispose of bacterial cultures is to pressure-sterilize (autoclave) them in a heat-stable biohazard bag.
2. If autoclaves or pressure cookers are not available, an alternative is to bleach the plates.
a. Wear proper safety equipment (gloves, lab coat, eye protection) when working with the bleach solution; it is corrosive.
b. Saturate the plates with a 20% household bleach solution (in other words, one part bleach and four parts water).
c. Allow the plates to soak overnight in the bleach solution before disposing of them.
d. Please note that the bleach solution is corrosive and needs to be thoroughly rinsed afterwards.
Variations Be sure to follow the UV light safety precautions (above) for all of these experiments.
• Are some bacterial strains more susceptible to UV-induced DNA damage? Are some bacterial strains less susceptible to UV-induced DNA damage? Do background research in order to develop a hypothesis, and then design an experiment to test it.
• Is UVB light an effective bactericide? Design an experiment to compare UVB exposure to UVC exposure. Make sure that you verify the range of wavelengths produced by each light source (see manufacturer's specifications).
• How good is sunblock at blocking UVB rays? Can it protect bacteria from germicidal illumination? You can use a protocol similar to the one here, but instead of using foil, spread a uniform layer of sunblock over half of the plate lid.
What is the effect of ultraviolet light on yeast fermentation?
(Project found at http://www.all-science-fair-projects.com/) Purpose Determine the effect of UV light on yeast fermentation. Materials
Flask Graduating cylinder Plastic tubing Plastic wrap Water bath Rubber stopper Clamp and stand Teaspoon Heating pad UV lamp Yeast Apple juice
Procedure 1. Fill the water bath with water. Fill the graduated cylinder with water. 2. Put plastic wrap over graduated cylinder. 3. Flip the water-filled graduated cylinder over in the water bath. 4. Get the plastic tubing and attach one end to the rubber stopper. 5. Put 100mL apple juice into 250ml flask. 6. Heat apple juice in microwave for 25 seconds. 6. Put ¼-teaspoon yeast in flask.
7. Shake flask to mix apple juice with yeast. 8. Plug in heat pad. Put flask on heat pad. Slide the stopper into the top of the flask. 9. Place the rubber tubing into the water bath. Slip the plastic tubing up inside the cylinder. 10. Put a straw on other side of graduated cylinder to balance it. 11. Clamp cylinder to support graduated cylinder in an upright position. 12. Watch for CO2 bubbles in the graduated cylinder. 13. Record volume of captured CO2 in the graduated cylinder every 10 minutes for one hour. 14. Repeat steps 1-9 with the following exception;
Place an UV lamp so it shines directly on the flask and the yeast during fermentation
What Color Can Be Seen Most Clearly Through a Fog? (from All Science Fair Projects/ http://www.all-science-fair-
projects.com/project758_91.html)
Purpose Learn which color light would shine the brightest through fog. Materials 1. Jar with no label 2. Milk 3. Water 4. Flashlight 5. Cellophane wrap colored film, 6. Light meter, an instrument that measures the intensity of light Procedure 1. Buy colored cellophane wrap and rent or buy a light meter. 2. Get a jar and remove the label. 3. Cut different colors of cellophane wrap and fold them into squares. 4. Fill the jar with water. 5. Add two teaspoons of milk to the water. 6. Stir milk and water to form a cloudy liquid. 7. Put the light meter behind the jar and the flashlight in front of the jar. 8. Shine the flashlight through the cloudy liquid into the light meter. The light meter will measure the intensity of the light shining through the clouds formed in the liquid. 9. Put different colors of cellophane wrap film over the flashlight to make different colors of light. 10. Record the brightness or strength of the different colors of light shining through the liquid.

Let’s Glow (from All Science Fair Projects/ http://www.all-science-fair-
projects.com/project907_104.html) Problem How do pollutants affect light bioluminescent bacteria? Materials Bioluminescent bacteria
Metal transferring loop River water Tap water Hair gel 3 in 1 oil Bunsen burner Sparker Rubbing alcohol Napkin Pen/pencil Paper Test tubes Goggles dropper
(Bacteria can be purchased from: http://www.carolina.com) Procedure To transfer the bacteria: First, we clean the area where we were to work in with rubbing alcohol. We turn on the Bunsen burner with a sparker. We sterilize the metal transferring loop with which we are to transfer the bacteria from the dish to the tube. After the loop glows bright red, meaning it is sterilized, we cool it down on agar, nutrient food for bacteria, where there is no bacteria. Afterwards, we scrape off enough bacteria from the dish with the loop and move it over to the test tube. Before placing the bacteria in the tube, we have to sterilize the opening of the tube by placing
it over fire for a couple of seconds. After we transfer the bacteria, we place them in the dark. We have to transfer the bacteria every 2 days or else it will die. To insert pollutants: We go into a dark room to check if the bacteria are glowing. If it is, we observe how many sheets of blank paper it takes to block out the light produced by the bacteria. Next, we insert the pollutant and examine if the pollutant has decreased the amount of light the bacteria gave off by seeing how many blank sheets of paper it takes to block out the light. We tested how many sheets of paper it takes to block out the light of the bioluminescent bacteria before and after the drop of pollutants were placed in the tube. In test tube number one, before the pollutant was arranged in to the tube, it took 4 sheets of blank paper to block out the light. After the bacteria in test tube #1 met the hair gel, it took only one sheet of paper to block out the light. This means that the light decreased by 75%. In test tube number 2, it took 3 sheets of paper to block out the light before the drops were placed in the tube. After the bacteria met the 3 in 1 oil, the number of sheets of paper it took to block out the light stayed the same; meaning that the bacteria’s encounter with the oil did not increase or decrease it light production. In test tube #3, it took 5 sheets of paper to block out the light the bacteria produced. However, after a drop of tap water was placed in the tube, it took 4 sheets of paper to cover up the light. The percent of decrease was 20%. Test tube #4’s percent of decrease was much similar to the percent of decrease of test tube #3. This is so because it took 5 sheets of paper to block out the light the bacteria made. Afterwards, when one drop of Hudson River water was placed in to the tube, it took 4 sheets of paper to cover up the light. The percent of decrease was also 20%.
The Use of Lichens as Bioindicators (from All Science Fair Projects/ http://www.all-science-fair-
projects.com/project936_108.html) Problem The purpose for this experiment is to investigate the effect of acidic solution on fruticose, foliose, and crustose lichens. This experiment is being done to model the effect of acid rain on lichens in the natural environment and to use this information to determine if these lichens can be used as bioindicators. Materials
• Lichen sets that included portions of crustose, foliose, and fruticose lichens • Glass jar for each sample • Two Spray bottles • Bottled water • Vinegar • Plastic wrap
(Can purchase lichens from: http://www.sciencekit.com; http://www.sargentwelch.com/; http://www.carolina.com) Procedure To study the effect of acid rain on different samples of lichens, I first ordered two lichen sets that included portions of crustose, foliose, and fruticose lichens from the Carolina Biological Supply Company. I then took both sets of lichens and placed each individual sample into its own glass jar. I then filled one spray bottle with 10 ounces of Dannon bottled water. I placed a label on the spay bottle and labeled it water. I took a slit of white tape a put it on one of the ditches in the twisting top to the spray bottle. I then turned it around four times. I then filled half of the other spray bottle with 5 ounces of vinegar and the other half with 5 ounces of Dannon bottled water. I did this because acid rain has the same effect on plants and organisms as water and vinegar mixed together; only vinegar and water works slower and is weaker (Wilkes 1991). I then placed a label on the spray bottle and labeled it acid. I took a slit of white tape and put it a ditch of the twisting top of this spray bottle. I then turned it four times so the mist settings of both bottles were the same. I then took a sample of crustose, foliose, and fruticose lichens and used them as a control, misting them daily with water. After I

misted each sample three times with water I placed Saran wrap on the opening in the jars and sealed it with a rubber band. I then took the remaining samples of crustose, foliose, and fruticose lichens and misted them daily with the acid. After I misted each sample with the acid three times I placed Saran wrap over the opening in the jars and secured it with a rubberband. Everyday I took off the Saran wrap and examined the lichen samples with a magnifying glass, took pictures, and wrote down my observations in my logbook. After doing this, I misted the plants again and replaced the Saran wrap. I did this repeatedly for ten days. I then performed the experiment again with new lichen samples keeping all the variables the same. I recorded all my observations in my logbook.

![[PPT]PowerPoint Presentation - Mr. Hill's Science Websitemrscienceut.net/BacPres.pptx · Web viewThe presentation ends here. Author Windows User Created Date 02/13/2015 12:36:18 Title](https://img.pdfslide.net/doc/110x75/5ab32c2b7f8b9aea528e06ea/pptpowerpoint-presentation-mr-hills-science-viewthe-presentation-ends-here.jpg)