Embed Size (px)
DESCRIPTION
Arturia MICROBRUTE Connection Manual v 1.0.3
Citation preview
1
MICROBRUTE CONNECTION
USER'S MANUAL
2
PRODUCT AND PROJECT MANAGEMENT
Glen T. DARCEY
Bruno PILLET
ELECTRONICS
Yves USSON
Bruno PILLET
Laurent BARET
Robert BOCQUIER
DESIGN
Axel HARTMANN (Design Box)
Morgan PERRIER
INDUSTRIALIZATION
Nicolas DUBOIS
MANUAL
Glen DARCEY
Morgan PERRIER
SPECIAL THANKS TO:
Frank Orlich, Jean-Michel Blanchet, Michael Hosker, Sébastian Rochard,
Boele Gerkes, Antonio Rodriquez, Katsunori Ujiie, Howard Jones, Alex
Theakston, Jim Cowgill, Drew Anderson, Ray Barbee, Keith Shocklee, Kevin
Lamb, Jim Norman, Ryan Wood.
1st
edition: November 2013
Information contained in this manual is subject to change without notice and does not represent a commitment on behalf of ARTURIA. The hardware unit and the software product described in this manual are provided under the terms of a license agreement or non-disclosure agreement. The license agreement
specifies the terms and conditions for its lawful use. No part of this manual may be produced or transmitted in any form or by any purpose other than purchaser’s personal use, without the explicit written permission of ARTURIA S.A. All other products, logos or company names quoted in this manual are trademarks or registered trademarks of their respective owners.
© ARTURIA S.A. 1999-2013, all rights reserved.
ARTURIA S.A. 30, chemin du vieux
chêne 38240 Meylan FRANCE
http://www.arturia.com
3
TABLE OF CONTENTS
TABLE OF CONTENTS ....................................................................................................................................3
MicroBrute Connection software..............................................................................................................4
Configuration Page.........................................................................................................................................5 MIDI Settings ................................................................................................................................................................5 Sequencer settings .....................................................................................................................................................5
Play ................................................................................................................................................................................................ 5 Seq Retrig.................................................................................................................................................................................... 5 Next Sequence........................................................................................................................................................................... 6 Sequence Step size .................................................................................................................................................................. 6 Step/Gate .................................................................................................................................................................................... 6
Module Settings ...........................................................................................................................................................7 LFO Retrig................................................................................................................................................................................... 7 Envelope Modes ....................................................................................................................................................................... 7 Pitch Bend Range..................................................................................................................................................................... 7 Gate Length ................................................................................................................................................................................ 7 Sync ............................................................................................................................................................................................... 7
Keyboard Parameters...............................................................................................................................................8 Note Priority .............................................................................................................................................................................. 8 Velocity Response.................................................................................................................................................................... 8
FIRMWARE UPDATE page............................................................................................................................8 Check Update............................................................................................................................................................................. 9 Update Firmware..................................................................................................................................................................... 9
SEQUENCES page.......................................................................................................................................... 10 Save sequences .......................................................................................................................................................................10 Load sequences ......................................................................................................................................................................10
.mbseq file ...................................................................................................................................................... 12
Changing parameters via MIDI CC’s ...................................................................................................... 13

4
MicroBrute Connection software Even though the MicroBrute synthesizer is analog, it comes with a software editor allowing various configuration tasks, such as: MIDI channel selection, Pitch Bend range, LFO and Envelope-triggering, Sequencer
settings, and Firmware updates.
5
Configuration Page
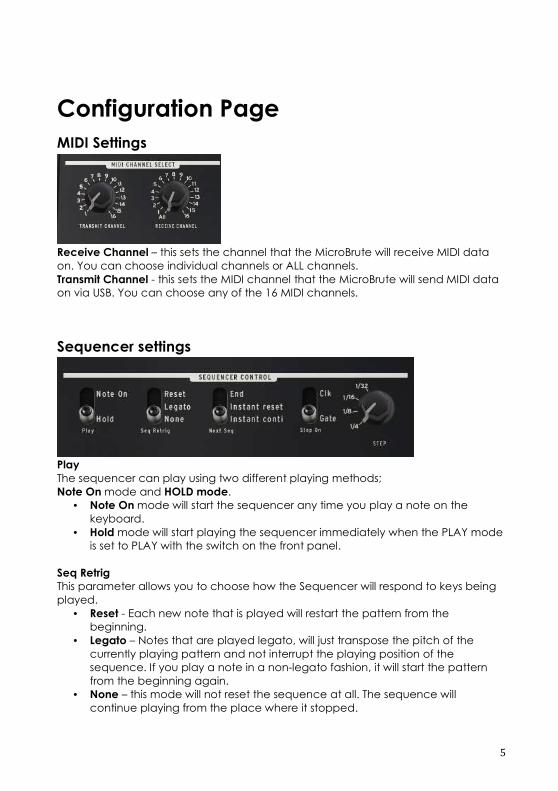
MIDI Settings
Receive Channel – this sets the channel that the MicroBrute will receive MIDI data
on. You can choose individual channels or ALL channels.
Transmit Channel - this sets the MIDI channel that the MicroBrute will send MIDI data on via USB. You can choose any of the 16 MIDI channels.
Sequencer settings
Play
The sequencer can play using two different playing methods;
Note On mode and HOLD mode. • Note On mode will start the sequencer any time you play a note on the
keyboard.
• Hold mode will start playing the sequencer immediately when the PLAY mode is set to PLAY with the switch on the front panel.
Seq Retrig
This parameter allows you to choose how the Sequencer will respond to keys being
played.
• Reset - Each new note that is played will restart the pattern from the beginning.
• Legato – Notes that are played legato, will just transpose the pitch of the
currently playing pattern and not interrupt the playing position of the sequence. If you play a note in a non-legato fashion, it will start the pattern
from the beginning again. • None – this mode will not reset the sequence at all. The sequence will
continue playing from the place where it stopped.
6
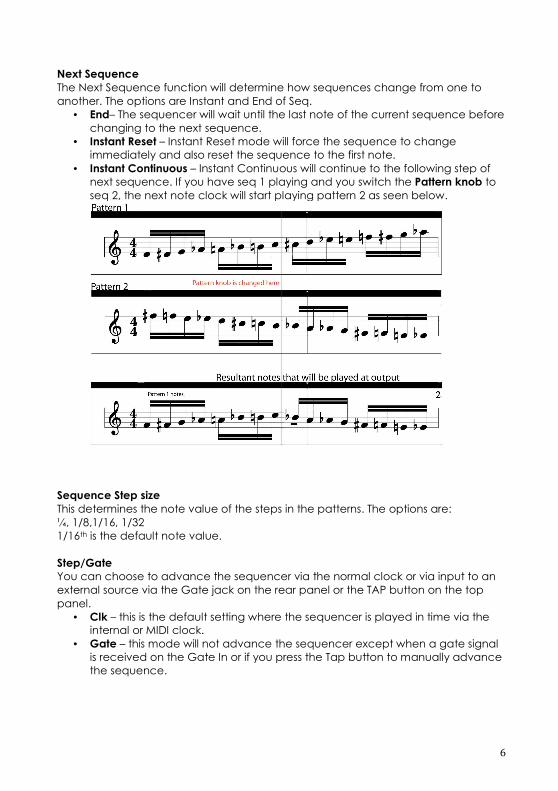
Next Sequence
The Next Sequence function will determine how sequences change from one to
another. The options are Instant and End of Seq. • End– The sequencer will wait until the last note of the current sequence before
changing to the next sequence. • Instant Reset – Instant Reset mode will force the sequence to change
immediately and also reset the sequence to the first note.
• Instant Continuous – Instant Continuous will continue to the following step of next sequence. If you have seq 1 playing and you switch the Pattern knob to
seq 2, the next note clock will start playing pattern 2 as seen below.
Sequence Step size
This determines the note value of the steps in the patterns. The options are:
¼, 1/8,1/16, 1/32 1/16th is the default note value.
Step/Gate
You can choose to advance the sequencer via the normal clock or via input to an
external source via the Gate jack on the rear panel or the TAP button on the top
panel. • Clk – this is the default setting where the sequencer is played in time via the
internal or MIDI clock.
• Gate – this mode will not advance the sequencer except when a gate signal is received on the Gate In or if you press the Tap button to manually advance the sequence.
7
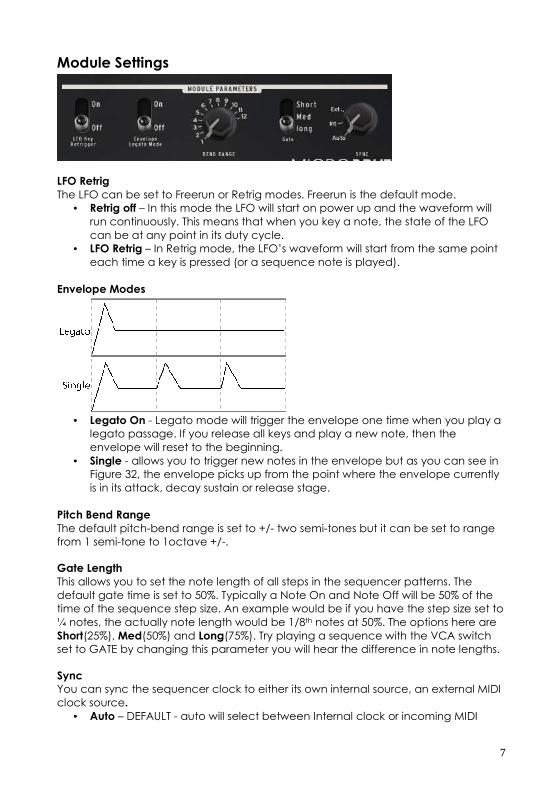
Module Settings
LFO Retrig
The LFO can be set to Freerun or Retrig modes. Freerun is the default mode. • Retrig off – In this mode the LFO will start on power up and the waveform will
run continuously. This means that when you key a note, the state of the LFO
can be at any point in its duty cycle. • LFO Retrig – In Retrig mode, the LFO’s waveform will start from the same point
each time a key is pressed (or a sequence note is played).
Envelope Modes
• Legato On - Legato mode will trigger the envelope one time when you play a
legato passage. If you release all keys and play a new note, then the
envelope will reset to the beginning.
• Single - allows you to trigger new notes in the envelope but as you can see in Figure 32, the envelope picks up from the point where the envelope currently
is in its attack, decay sustain or release stage.
Pitch Bend Range
The default pitch-bend range is set to +/- two semi-tones but it can be set to range from 1 semi-tone to 1octave +/-.
Gate Length
This allows you to set the note length of all steps in the sequencer patterns. The
default gate time is set to 50%. Typically a Note On and Note Off will be 50% of the time of the sequence step size. An example would be if you have the step size set to
¼ notes, the actually note length would be 1/8th notes at 50%. The options here are
Short(25%), Med(50%) and Long(75%). Try playing a sequence with the VCA switch set to GATE by changing this parameter you will hear the difference in note lengths.
Sync
You can sync the sequencer clock to either its own internal source, an external MIDI
clock source.
• Auto – DEFAULT - auto will select between Internal clock or incoming MIDI
8
clocking. If there is no MIDI clock present, the sequencer will play on the
internal clock. If MIDI clock starts, it will change sync to MIDI clock.
• Internal – Internal will select the internal Sequencer clock. In this mode,
external sync is ignored. • MIDI – MIDI will select an external MIDI clock source. If there is no clock, the
sequencer will not play. When Clock is present, the sequencer will play in sync
with the clock.
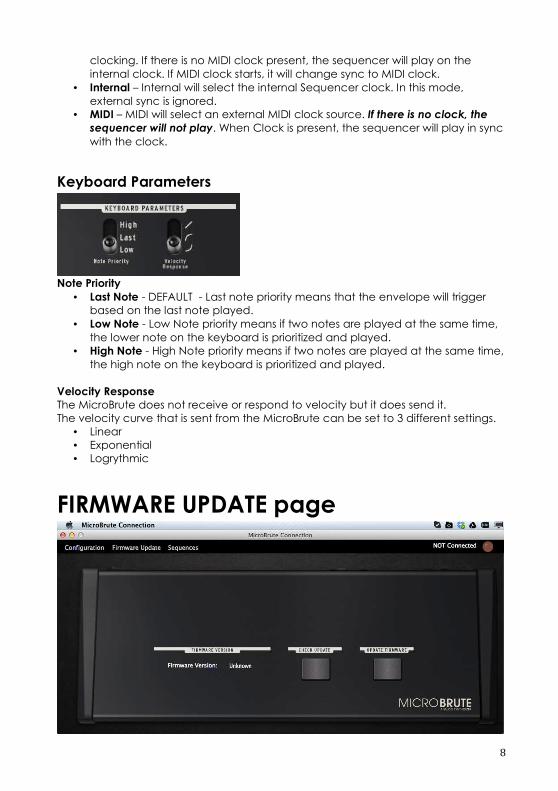
Keyboard Parameters
Note Priority
• Last Note - DEFAULT - Last note priority means that the envelope will trigger based on the last note played.
• Low Note - Low Note priority means if two notes are played at the same time,
the lower note on the keyboard is prioritized and played. • High Note - High Note priority means if two notes are played at the same time,
the high note on the keyboard is prioritized and played.
Velocity Response
The MicroBrute does not receive or respond to velocity but it does send it. The velocity curve that is sent from the MicroBrute can be set to 3 different settings.
• Linear • Exponential • Logrythmic
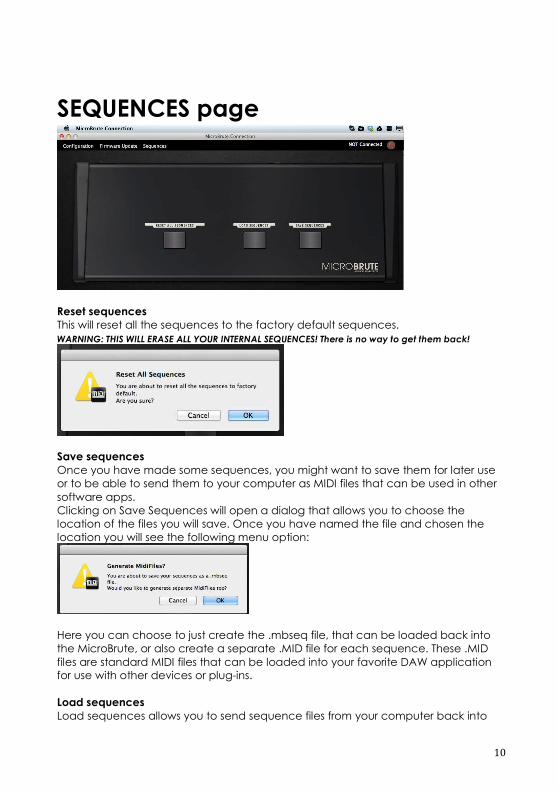
FIRMWARE UPDATE page

9
When you first power up the MicroBrute connection software, it will check the version of
firmware that you have in your machine. The software will display the current version that you
have.
Check Update You can check the latest version that is available by clicking on the CHECK UPDATE button.
Update Firmware The UPDATE FIRMWARE button will allow you to actually update the firmware. Just press the
button and follow the on-screen directions.
10
SEQUENCES page
Reset sequences This will reset all the sequences to the factory default sequences.
WARNING: THIS WILL ERASE ALL YOUR INTERNAL SEQUENCES! There is no way to get them back!
Save sequences
Once you have made some sequences, you might want to save them for later use or to be able to send them to your computer as MIDI files that can be used in other
software apps. Clicking on Save Sequences will open a dialog that allows you to choose the location of the files you will save. Once you have named the file and chosen the location you will see the following menu option:
Here you can choose to just create the .mbseq file, that can be loaded back into the MicroBrute, or also create a separate .MID file for each sequence. These .MID
files are standard MIDI files that can be loaded into your favorite DAW application for use with other devices or plug-ins.
Load sequences
Load sequences allows you to send sequence files from your computer back into

11
the MicroBrute. When you SAVE SEQUENCES it will create a file with the extension
.mbseq You can then load this file and send it to your MicroBrute. This will write over your internal sequences so make sure you save anything you don’t want to lose before
loading a different bank in.
12
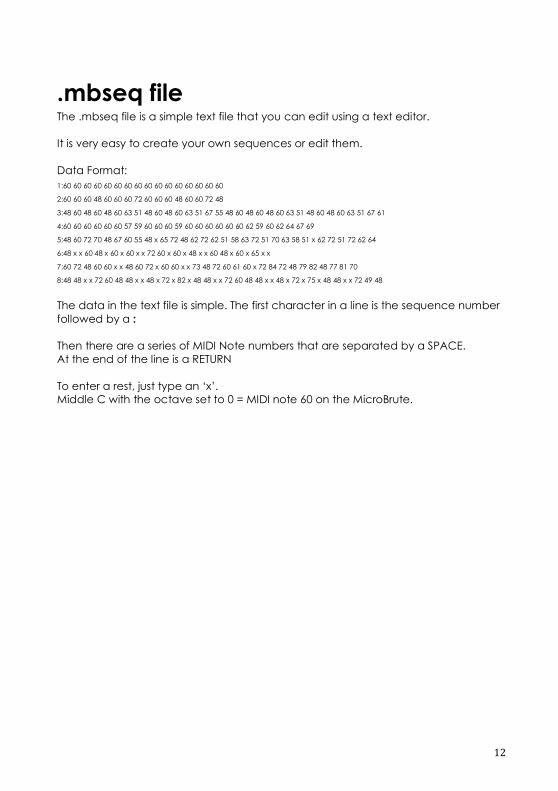
.mbseq file The .mbseq file is a simple text file that you can edit using a text editor.
It is very easy to create your own sequences or edit them.
Data Format:
1:60 60 60 60 60 60 60 60 60 60 60 60 60 60 60 60
2:60 60 60 48 60 60 60 72 60 60 60 48 60 60 72 48
3:48 60 48 60 48 60 63 51 48 60 48 60 63 51 67 55 48 60 48 60 48 60 63 51 48 60 48 60 63 51 67 61
4:60 60 60 60 60 60 57 59 60 60 60 59 60 60 60 60 60 60 62 59 60 62 64 67 69
5:48 60 72 70 48 67 60 55 48 x 65 72 48 62 72 62 51 58 63 72 51 70 63 58 51 x 62 72 51 72 62 64
6:48 x x 60 48 x 60 x 60 x x 72 60 x 60 x 48 x x 60 48 x 60 x 65 x x
7:60 72 48 60 60 x x 48 60 72 x 60 60 x x 73 48 72 60 61 60 x 72 84 72 48 79 82 48 77 81 70
8:48 48 x x 72 60 48 48 x x 48 x 72 x 82 x 48 48 x x 72 60 48 48 x x 48 x 72 x 75 x 48 48 x x 72 49 48
The data in the text file is simple. The first character in a line is the sequence number
followed by a :
Then there are a series of MIDI Note numbers that are separated by a SPACE. At the end of the line is a RETURN
To enter a rest, just type an ‘x’. Middle C with the octave set to 0 = MIDI note 60 on the MicroBrute.
13
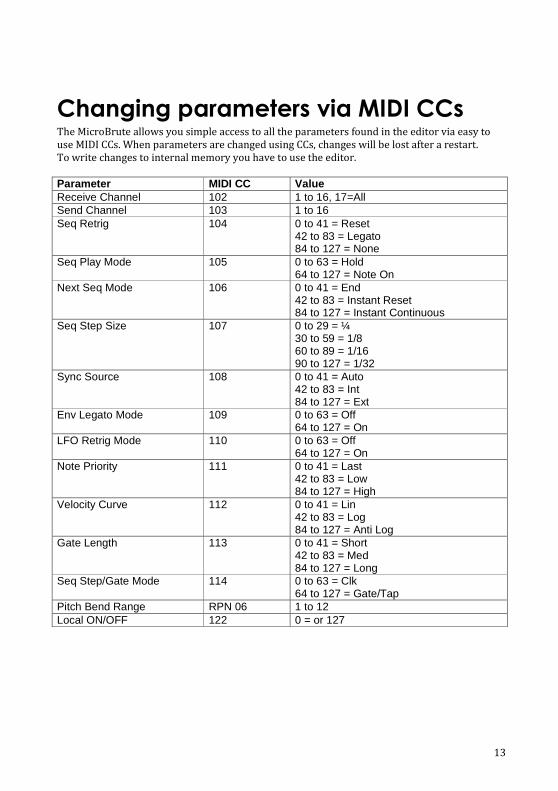
Changing parameters via MIDI CCs The MicroBrute allows you simple access to all the parameters found in the editor via easy to
use MIDI CCs. When parameters are changed using CCs, changes will be lost after a restart.
To write changes to internal memory you have to use the editor.
Parameter MIDI CC Value Receive Channel 102 1 to 16, 17=All Send Channel 103 1 to 16 Seq Retrig 104 0 to 41 = Reset
42 to 83 = Legato 84 to 127 = None
Seq Play Mode 105 0 to 63 = Hold 64 to 127 = Note On
Next Seq Mode 106 0 to 41 = End 42 to 83 = Instant Reset 84 to 127 = Instant Continuous
Seq Step Size 107 0 to 29 = ¼ 30 to 59 = 1/8 60 to 89 = 1/16 90 to 127 = 1/32
Sync Source 108 0 to 41 = Auto 42 to 83 = Int 84 to 127 = Ext
Env Legato Mode 109 0 to 63 = Off 64 to 127 = On
LFO Retrig Mode 110 0 to 63 = Off 64 to 127 = On
Note Priority 111 0 to 41 = Last 42 to 83 = Low 84 to 127 = High
Velocity Curve 112 0 to 41 = Lin 42 to 83 = Log 84 to 127 = Anti Log
Gate Length 113 0 to 41 = Short 42 to 83 = Med 84 to 127 = Long
Seq Step/Gate Mode 114 0 to 63 = Clk 64 to 127 = Gate/Tap
Pitch Bend Range RPN 06 1 to 12 Local ON/OFF 122 0 = or 127
14
6.1 No liability for consequential damages Neither ARTURIA nor anyone else involved in the creation, production, or delivery of this
product shall be liable for any direct, indirect, consequential, or incidental damages
arising out of the use of, or inability to use this product (including without limitation,
damages for loss of business profits, business interruption, loss of business information and
the like) even if ARTURIA was previously advised of the possibility of such damages.
Some states do not allow limitations on the length of an implied warranty or the
exclusion or limitation of incidental or consequential damages, so the above limitation
or exclusions may not apply to you. This warranty gives you specific legal rights, and you
may also have other rights which vary from state to state.
6.2 FCC Information (USA) DO NOT MODIFY THE UNIT! This product, when installed as indicate in the instructions
contained in this manual, meets FCC requirement. Modifications not expressly approved
by ARTURIA may avoid your authority, granted by the FCC, to use the product.
IMPORTANT: When connecting this product to accessories and/or another product, use
only high quality shielded cables. Cable (s) supplied with this product MUST be used.
Follow all installation instructions. Failure to follow instructions could void your FFC
authorization to use this product in the USA.
NOTE: This product has been tested and found to comply with the limit for a Class B
Digital device, pursuant to Part 15 of the FCC rules. These limits are designed to provide
a reasonable protection against harmful interference in a residential environment. This
equipment generate, use and radiate radio frequency energy and, if not installed and
used according to the instructions found in the users manual, may cause interferences
harmful to the operation to other electronic devices. Compliance with FCC regulations
does not guarantee that interferences will not occur in all the installations. If this product
is found to be the source of interferences, which can be determined by turning the unit
“OFF” and “ON”, please try to eliminate the problem by using one of the following
measures:
• Relocate either this product or the device that is affected by the interference
• Use power outlets that are on different branch (circuit breaker or fuse) circuits or
install AC line filter(s).
• In the case of radio or TV interferences, relocate/ reorient the antenna. If the
antenna lead-in is 300 ohm ribbon lead, change the lead-in to coaxial cable.
• If these corrective measures do not bring any satisfied results, please the local
retailer authorized to distribute this type of product. If you cannot locate the
appropriate retailer, please contact ARTURIA.
• The above statements apply ONLY to those products distributed in the USA.
6.3 Canada NOTICE: This class B digital apparatus meets all the requirements of the Canadian
Interference-Causing Equipment Regulation.
AVIS: Cet appareil numérique de la classe B respecte toutes les exigences du
Règlement sur le matériel brouilleur du Canada.

15
6.4 Europe
89/336/EEC.


![HBS Installation Procedures 1.0.3[1]](https://img.pdfslide.net/doc/110x75/577cc41f1a28aba711982daf/hbs-installation-procedures-1031.jpg)