Embed Size (px)
Citation preview

Micronta 22-204A range doubler multimeter instructions,manual, circ... file:///C:/Documents%20and%20Settings/Owner/My%20Documents/aj...
1 of 7 02/05/2010 16:45
MICRONTA 22-204A instrucation manual. Supplied by Radio Shack, manufactured for Tandycorporation50000 Ohms/Volt Multitester with range doubler. Circuit diagram at the bottom of this document.
The Sears 82373 multitester and the Archerkit 28-4014 are reported to be the same thing under a differentname.

Micronta 22-204A range doubler multimeter instructions,manual, circ... file:///C:/Documents%20and%20Settings/Owner/My%20Documents/aj...
2 of 7 02/05/2010 16:45
This high-sensitivity MICRONTA Multitester is designed to measure AC and DC voltages, DC currentand Resistance with accuracy and ease. The large, single-knob Range/Function control is easy to use andread. The Range Doubler switch (V.A/2 —V.Ω.A) effectively doubles the number of AC and DC scalesavailable. This means you can obtain meter readings in the upper half of the scale, resulting in consistentaccuracy.An "OFF" position is provided to insure meter protection during transit.
The sensitive15microamp meter movement with10.8cm face and mirrored scale makes accurate reading asimple matter.The meter scales are in 3 colors for rapid identification.The lowest DC ranges-125 mV and 25 pA — are great for solid-state circuit work.The handle can be flipped around to the back to support the meter at an easy-to-read angle. These features combined with rugged design and quality parts insure you of many years of accuratemeasurements.
The "Range Doubler" name is a little misleading. It should really be "Reading doubler, Range halver".With V. A/2 selected the needle swings twice as far for the smae voltage.
SPECIFICATIONS
RANGES 43
DC Voltage 0-125-250 mV 1.25-2.5-5-10-25-50-125-250-500-1000 volts
AC Voltage 0-5-10-25-50-125-250-500-1000 volts
DC Current 0-25-50microamperes 2.5-5-25-50-250-500mA 5-10Amperes
Resistance 0-2K-20K-200K-2Megaohms-20Megaohms (center scale 10)
Decibels -20 to +62 in 8 ranges
ACCURACY
± 3% DC except as noted.± 3% DC except as noted± 4% AC, and 125 mV to 2.5 volts, and 500 and 1.000 volts DC± 3%of scale length on ResistanceThis model of meter was manufactured in the 1970's. It might or might not stillmeet these accuracy claims.
SENSITIVITY DC : 50,000 ohms/volt (V.A/2) or 25,000 ohms/volt (V.Ω.A)AC : 10,000 ohms/volt (V.A/2) or 5,000 ohms/volt (V.Ω.A)
METER MOVEMENT
10.8cm, 3-color, mirrored scale, 18 microA full scale
BATTERIESRequires one type AA penlight cell and one 9-volt rectangular PP3 type for Ohmsfunction
LEADS 120cm spring-steel, banana plug style. Usual 4mm plugs will probably fit.
Micronta 22-204A range doubler multimeter instructions,manual, circ... file:///C:/Documents%20and%20Settings/Owner/My%20Documents/aj...
3 of 7 02/05/2010 16:45
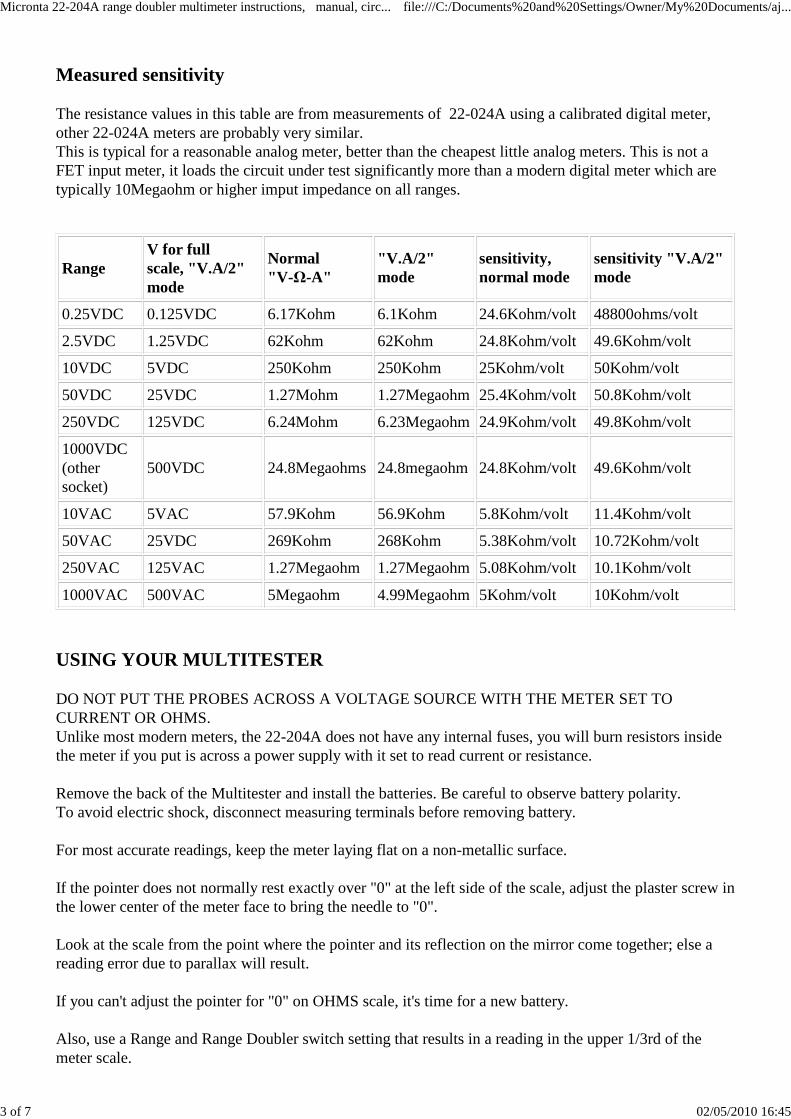
Measured sensitivity
The resistance values in this table are from measurements of 22-024A using a calibrated digital meter,other 22-024A meters are probably very similar.This is typical for a reasonable analog meter, better than the cheapest little analog meters. This is not aFET input meter, it loads the circuit under test significantly more than a modern digital meter which are typically 10Megaohm or higher imput impedance on all ranges.
RangeV for fullscale, "V.A/2"mode
Normal"V-Ω-A"
"V.A/2" mode
sensitivity, normal mode
sensitivity "V.A/2"mode
0.25VDC 0.125VDC 6.17Kohm 6.1Kohm 24.6Kohm/volt 48800ohms/volt
2.5VDC 1.25VDC 62Kohm 62Kohm 24.8Kohm/volt 49.6Kohm/volt
10VDC 5VDC 250Kohm 250Kohm 25Kohm/volt 50Kohm/volt
50VDC 25VDC 1.27Mohm 1.27Megaohm 25.4Kohm/volt 50.8Kohm/volt
250VDC 125VDC 6.24Mohm 6.23Megaohm 24.9Kohm/volt 49.8Kohm/volt
1000VDC (other socket)
500VDC 24.8Megaohms 24.8megaohm 24.8Kohm/volt 49.6Kohm/volt
10VAC 5VAC 57.9Kohm 56.9Kohm 5.8Kohm/volt 11.4Kohm/volt
50VAC 25VDC 269Kohm 268Kohm 5.38Kohm/volt 10.72Kohm/volt
250VAC 125VAC 1.27Megaohm 1.27Megaohm 5.08Kohm/volt 10.1Kohm/volt
1000VAC 500VAC 5Megaohm 4.99Megaohm 5Kohm/volt 10Kohm/volt
USING YOUR MULTITESTER
DO NOT PUT THE PROBES ACROSS A VOLTAGE SOURCE WITH THE METER SET TOCURRENT OR OHMS.Unlike most modern meters, the 22-204A does not have any internal fuses, you will burn resistors insidethe meter if you put is across a power supply with it set to read current or resistance.
Remove the back of the Multitester and install the batteries. Be careful to observe battery polarity.To avoid electric shock, disconnect measuring terminals before removing battery.
For most accurate readings, keep the meter laying flat on a non-metallic surface.
If the pointer does not normally rest exactly over "0" at the left side of the scale, adjust the plaster screw inthe lower center of the meter face to bring the needle to "0".
Look at the scale from the point where the pointer and its reflection on the mirror come together; else areading error due to parallax will result.
If you can't adjust the pointer for "0" on OHMS scale, it's time for a new battery.
Also, use a Range and Range Doubler switch setting that results in a reading in the upper 1/3rd of themeter scale.
Micronta 22-204A range doubler multimeter instructions,manual, circ... file:///C:/Documents%20and%20Settings/Owner/My%20Documents/aj...
4 of 7 02/05/2010 16:45
If the pointer does not normally rest exactly over "0" at the left side of the scale, adjust the plastic screw inthe lower center of the meter face to bring the needle to "0".
Always observe correct test lead polarity when making DC measurements : Black into (COM and Redinto the +V.Ω.A (or 1000VDC or 10A) jacks.
Exercise extreme caution when measuring voltages of 50 and above.
When not in use, always leave the Range switch in the "OFF" position.
Use the Range Doubler switch as followsFor Resistance readings, always use the V-Ω-A position When using the V.A/2 position for all other
functions, divide the Range switch setting by 2 and read on an appropriate scale. For example : Range setto 250 AC V and V.A/2 — the range is 125 volts (250 divided by 2) and you should read the red scale,following the 0 to 125 markings. Another example : leads in COM and 10A with Range set to 10A and
V.A/2— the range is 5 amperes (10 divided by 2) and you should read the black scale, following the 0 to50 markings.
DC VOLTAGE MEASUREMENTS
1. Plug the test leads into the correct jacks (Black into COM and Red into +V-Ω-A). 2. Set Range switchto one of the DC V positions; it is best to start at the top and work down. 3. Connect the test probe tips to the circuit under test; be sure to observe correct polarity. Set Range andRange Doubler switches as required to obtain a meter reading in the upper 1/2 or 1/3rd of the scale. 4. Read the voltage on the black DC scales. If the Range Doubler switch is in the V.A/2 position, be sureto divide the Range switch setting by 2 and read on the appropriate scale. 5. For voltages between 250 and 1000, set Range switch to 250 and 1000 and plug the red test lead intothe 1000 Volt DC Only jack. For voltages between 250 and 500, set the Range Doubler switch to (V.A/2)(full scale is then 500 volts). For voltages between 500 and 1000, set the Range Doubler switch to V.Ω.A(the range is then 1000 volts). NOTE : The 1000 Volt DC Only jack is for use only with DC voltages of 250 to 1000
USE EXTREME CARE WHEN USING THESE HIGH-VOLTAGE RANGES.
AC VOLTAGE MEASUREMENTS
1. Plug the test leads into the correct jacks (black into COM and red into +V.Ω.A).2. Set Range switch to one of the AC V positions; it is best to start at the top and work down.3. Connect the test probe tips to the circuit under test. Set Range and Range Doubler switches as requiredto obtain a meter reading in the upper 1/2 or 1 /3rd of the scale. 4. Read the voltage on the red AC scale, following black numbers printed below the red scale. If theRange Doubler switch is in the V.A/2 position, be sure to divide the Range switch setting by 2 and readthe appropriate scale.
RESISTANCE MEASUREMENTS
Before taking any resistance measurements, disconnect power to the unit under test and dischargecapacitors.It is best to remove batteries and unplug line cords.
1. Plug the test leads into the COM and +V.ohms.A jacks.
Micronta 22-204A range doubler multimeter instructions,manual, circ... file:///C:/Documents%20and%20Settings/Owner/My%20Documents/aj...
5 of 7 02/05/2010 16:45
2. Leave the Range Doubler switch in the V-Ω-A position. Set Range switch to one of the positions; touchthe test probes together and adjust the OHMS ADJ. control to bring the pointer to the "0" on the top(green) OHMS scale. 3. Now, connect the probe tips across the circuit or part under test. 4. Read the resistance on the green OHMS scale, use the proper multiplier to obtain the correct value (R"times" 1, 10, 100, 1000 or 10.000, depending on the position of the Range switch).
NOTES: When you are unable to adjust the pointer to "0" on the OHMS scale in the Rx1, Rx10, Rx100 orRx1K pbsitions, the penlight battery must be replaced. When you are unable to adjust the pointer to "0" onthe OHMS scale when in the Rx10K position, replace the 9-volt battery. When measuring resistance, it isbest to disconnect one side of the part under test (thus the remainder of the circuit will not interfere withthe readings). THE RANGE DOUBLER SWITCH MUST BE LEFT IN THE V-Ω-A POSITION FOR ALLRESISTANCE MEASUREMENTS.
DC CURRENT MEASUREMENTS
1. Plug the test leads into the correct jacks (Black into COM and Red into +V.Ω.A).2. Set the Range switch to the 500m DC A position (500 milliamp). Or, if the current will be greater than500 mA, use the 10A jack (instead of the +V.Ω.A) and set Range to 10A. Always start at the top and workdown. 3. Open up the circuit in which you want to measure current and connect the black lead to the negativeside and the red lead to the positive side of the circuit. 4. Apply power to the circuit under test. Set Range and Range Doubler switches as required to obtain ameter reading in the upper 1/2or 1/3rd of the scale. 5. Read the current on the black DC scales. If the Range Doubler switch is in the V.A/2 position, be sureto divide the Range switch setting by 2 and read on the appropriate scale. NOTES : Do not attempt to read AC current. For currents above 500 milliamps, use the 10A Rangeswitch setting and the 10A jack (instead of the V.Ω.A jack). Use the appropriate setting of the RangeDoubler switch.
DECIBEL MEASUREMENTS
You can probably completely ignore the dB scale, most people will never need it.
1. Plug the test leads into the correct jacks (Black into COM and Red into +V.ohms.A).2. Set the Range and Voltage Doubler switches as required to obtain a meter reading in the upper half ofthe scale.3. Read dB on the dB scale, adding the appropriate number of dB to the dB scale reading as noted on thechart at the lower right on the meter face.
NOTE : For absolute dB measurements, circuit impedance must be 600 ohms.0 dB = 1 milliwatt dissipated in a 600 ohm impedance (equivalent to 0.775 volts across 600 ohms).
The original manual text above about decibel measurements could be a bit confusing. To try to clarify, 1mW into 600ohms is 0dBu not 0decibels. A decibel on it's own is allways a relative measurement, not an absoloute measurement. The dB scale could be used for relative power measurements in decibels, eg if you are measuring the voltage across a resistive load and the needle goes up sothat it reads 6dB higher on the dB scale that means the voltage has doubled so four times more power is being delivered to the load which is a 6dB increase.
Micronta 22-204A range doubler multimeter instructions,manual, circ... file:///C:/Documents%20and%20Settings/Owner/My%20Documents/aj...
6 of 7 02/05/2010 16:45
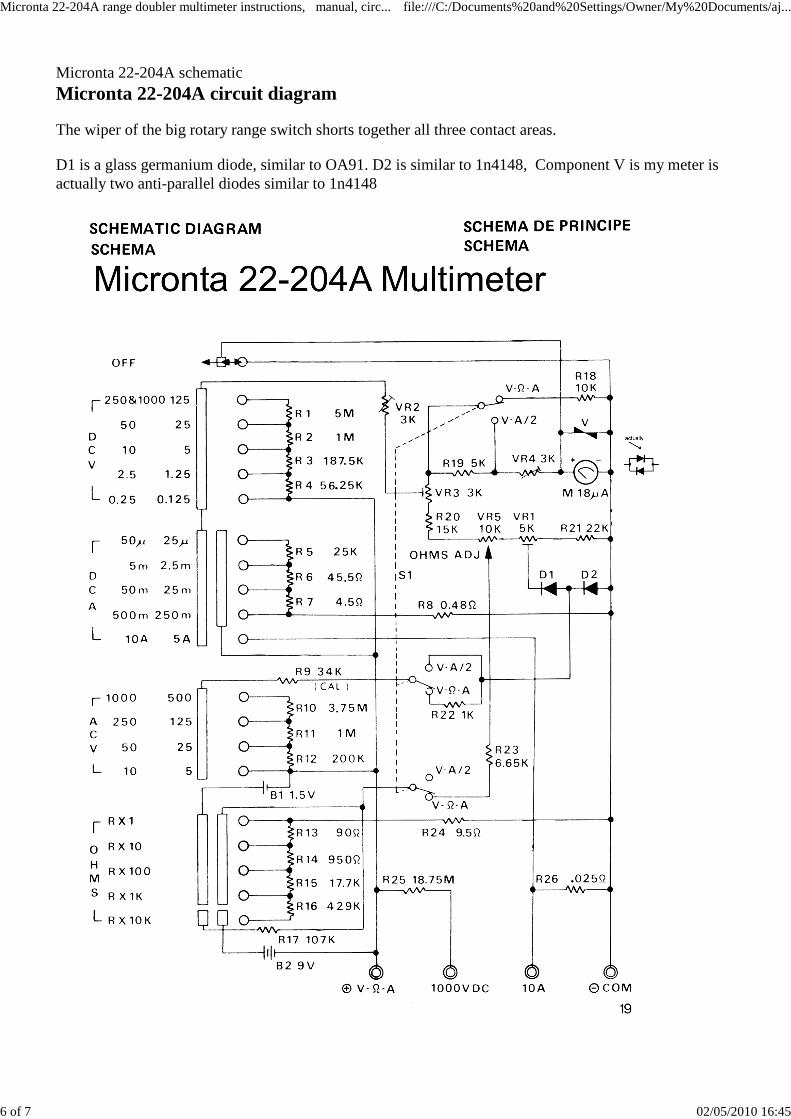
Micronta 22-204A schematicMicronta 22-204A circuit diagram
The wiper of the big rotary range switch shorts together all three contact areas.
D1 is a glass germanium diode, similar to OA91. D2 is similar to 1n4148, Component V is my meter isactually two anti-parallel diodes similar to 1n4148

Micronta 22-204A range doubler multimeter instructions,manual, circ... file:///C:/Documents%20and%20Settings/Owner/My%20Documents/aj...
7 of 7 02/05/2010 16:45