Embed Size (px)
Citation preview

MMiiccrroossoofftt AAcccceessss 22000033
BBYY
AASSIIMM AABBBBAASSII
..::||::.. TTaakkvveeeenn,, IInncc.. SSoouutthh RRiivveerr,, NNJJ
2
Copyright © 2005 Takveen, Inc. P.O. Box 1, South River, NJ 08882. All rights reserved. No part of this publication may be stored in a retrieval system, transmitted, or reproduced in any way, including but not limited to photocopy, photography, magnetic, or other record, without the prior agreement and written permission of the publisher and author. ISBN: 0-9770739-3-9 Takveen and the Takveen logo are either registered trademarks or trademarks of Takveen, Inc. in the United States and/or other countries. The author and publisher have made their best effort to prepare this book, and the content is based upon final release software whenever possible. Portion of the manuscript may be based upon pre-release versions supplied by the software manufacturer(s). The author and the publisher make no representation or warranties of any kind with regard to the completeness or accuracy of the contents herein and accept no liability of ANY KIND including but no limited to performance, merchantability, fitness for any particular purpose, or any losses or damages of ANY KIND caused or alleged to be caused directly or indirectly from this book. Manufactured in the United States of America.

3
TToo FFaatthheerr ((llaattee)),, MMootthheerr,, AArrsshhiiaa aanndd MMaatteeeenn

4

5
About the Author Mr. Abbasi is President and CEO of Takveen, Inc. NJ, which is firm providing information technology related ‘Optimal Solutions’ to industry. He is also attached with three top-notch computer schools of NJ teaching Oracle Database Administration in Unix/Windows Server environments. Before coming to NJ, he used to teach Oracle in heart of NC, Raleigh while working as Chief Technologist with a business solutions development firm. Mr. Abbasi has been attached intensely with the IT field for past 13 years and has written dozens of softwares and tons of code from programming microcontrollers using Assembly language to writing 3-tier multi-language web applications. He did B.Sc. Electrical Engineering from University of Engineering & Technology, Lahore, Pakistan (www.uet.edu.pk). He is Oracle Certified Professional Database Administrator (OCP), Microsoft Certified Professional (VB) and lots of other computer certifications. Besides certifications, he has lots of publications and has filed 1 patent with United States Patent & Trade Mark Office. When asked Mr. Abbasi, he said that it all erupted with a saying of my engineering professor, “Think yourself ….”

6

7
Acknowledgements
First, I am really thankful to God: The Designer of this Universe, everything within and beyond. I always remember Him as “Supreme Progneer” (Programmer & Engineer). The only One who’s every release is a final release and no upgrades, version releases or service packs after words. I salute your sea of computational and engineering skills my Lord and your graciousness for letting me have a droplet from it. I really want to thank my father and mother for their wonderful support. Although my father is no more living but his exceptional sacrifices will never be forgotten … I like to thank my wife Arshia and son Mateen for their encouragement to let me work on this book even during the time which I should had spent with them. Finally, I am thankful to all the wonderful instructors, professors, scholars, students and friends I had for their support and encouragement.

8
9
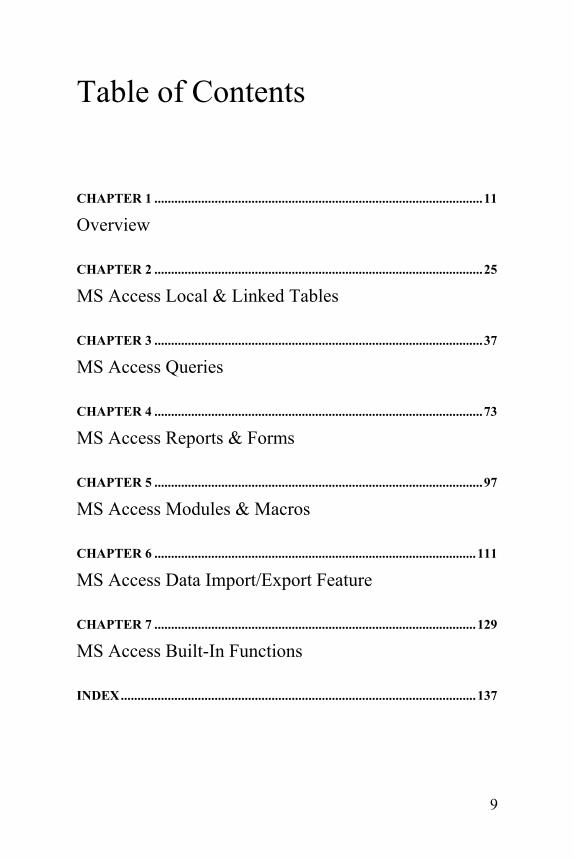
Table of Contents CHAPTER 1 ..................................................................................................11
Overview CHAPTER 2 ..................................................................................................25
MS Access Local & Linked Tables CHAPTER 3 ..................................................................................................37
MS Access Queries CHAPTER 4 ..................................................................................................73
MS Access Reports & Forms CHAPTER 5 ..................................................................................................97
MS Access Modules & Macros CHAPTER 6 ................................................................................................111
MS Access Data Import/Export Feature CHAPTER 7 ................................................................................................129
MS Access Built-In Functions INDEX..........................................................................................................137

10

11
CChhaapptteerr 11
Overview

12
13
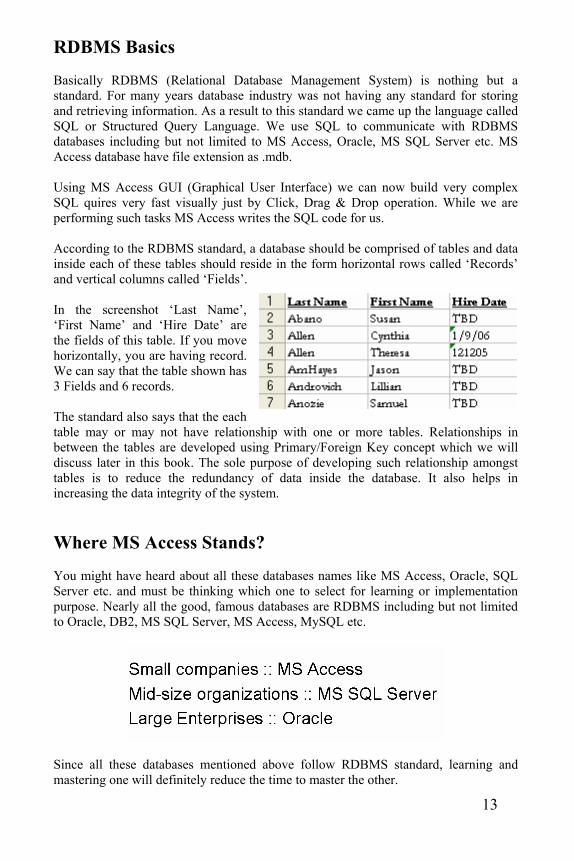
RDBMS Basics Basically RDBMS (Relational Database Management System) is nothing but a standard. For many years database industry was not having any standard for storing and retrieving information. As a result to this standard we came up the language called SQL or Structured Query Language. We use SQL to communicate with RDBMS databases including but not limited to MS Access, Oracle, MS SQL Server etc. MS Access database have file extension as .mdb. Using MS Access GUI (Graphical User Interface) we can now build very complex SQL quires very fast visually just by Click, Drag & Drop operation. While we are performing such tasks MS Access writes the SQL code for us. According to the RDBMS standard, a database should be comprised of tables and data inside each of these tables should reside in the form horizontal rows called ‘Records’ and vertical columns called ‘Fields’. In the screenshot ‘Last Name’, ‘First Name’ and ‘Hire Date’ are the fields of this table. If you move horizontally, you are having record. We can say that the table shown has 3 Fields and 6 records. The standard also says that the each table may or may not have relationship with one or more tables. Relationships in between the tables are developed using Primary/Foreign Key concept which we will discuss later in this book. The sole purpose of developing such relationship amongst tables is to reduce the redundancy of data inside the database. It also helps in increasing the data integrity of the system. Where MS Access Stands? You might have heard about all these databases names like MS Access, Oracle, SQL Server etc. and must be thinking which one to select for learning or implementation purpose. Nearly all the good, famous databases are RDBMS including but not limited to Oracle, DB2, MS SQL Server, MS Access, MySQL etc.
Since all these databases mentioned above follow RDBMS standard, learning and mastering one will definitely reduce the time to master the other.
14
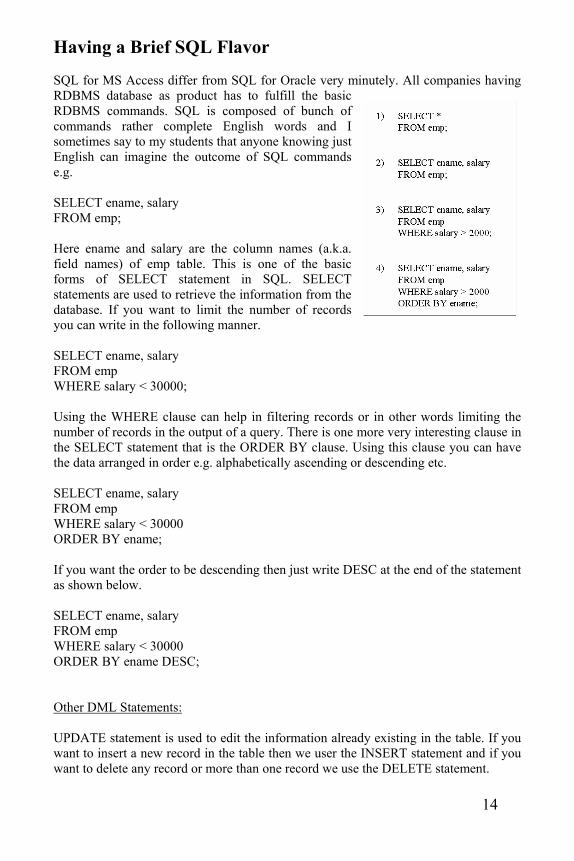
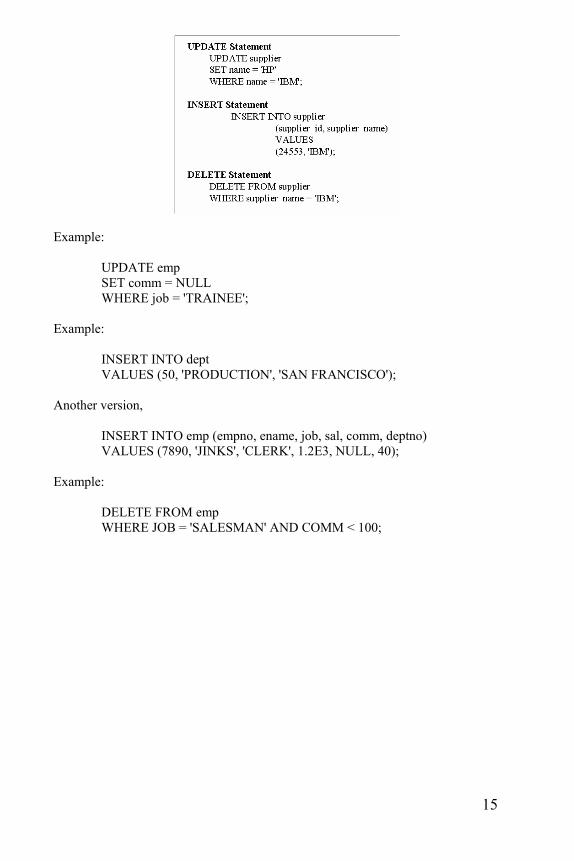
Having a Brief SQL Flavor SQL for MS Access differ from SQL for Oracle very minutely. All companies having RDBMS database as product has to fulfill the basic RDBMS commands. SQL is composed of bunch of commands rather complete English words and I sometimes say to my students that anyone knowing just English can imagine the outcome of SQL commands e.g. SELECT ename, salary FROM emp; Here ename and salary are the column names (a.k.a. field names) of emp table. This is one of the basic forms of SELECT statement in SQL. SELECT statements are used to retrieve the information from the database. If you want to limit the number of records you can write in the following manner. SELECT ename, salary FROM emp WHERE salary < 30000; Using the WHERE clause can help in filtering records or in other words limiting the number of records in the output of a query. There is one more very interesting clause in the SELECT statement that is the ORDER BY clause. Using this clause you can have the data arranged in order e.g. alphabetically ascending or descending etc. SELECT ename, salary FROM emp WHERE salary < 30000 ORDER BY ename; If you want the order to be descending then just write DESC at the end of the statement as shown below. SELECT ename, salary FROM emp WHERE salary < 30000 ORDER BY ename DESC; Other DML Statements: UPDATE statement is used to edit the information already existing in the table. If you want to insert a new record in the table then we user the INSERT statement and if you want to delete any record or more than one record we use the DELETE statement.
15
Example:
UPDATE emp SET comm = NULL WHERE job = 'TRAINEE';
Example:
INSERT INTO dept VALUES (50, 'PRODUCTION', 'SAN FRANCISCO');
Another version,
INSERT INTO emp (empno, ename, job, sal, comm, deptno) VALUES (7890, 'JINKS', 'CLERK', 1.2E3, NULL, 40);
Example:
DELETE FROM emp WHERE JOB = 'SALESMAN' AND COMM < 100;
16
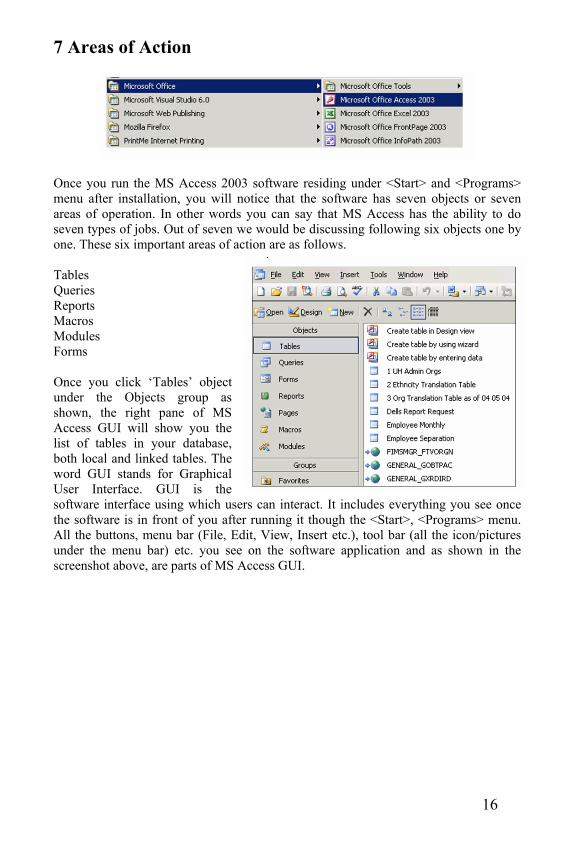
7 Areas of Action
Once you run the MS Access 2003 software residing under <Start> and <Programs> menu after installation, you will notice that the software has seven objects or seven areas of operation. In other words you can say that MS Access has the ability to do seven types of jobs. Out of seven we would be discussing following six objects one by one. These six important areas of action are as follows. Tables Queries Reports Macros Modules Forms Once you click ‘Tables’ object under the Objects group as shown, the right pane of MS Access GUI will show you the list of tables in your database, both local and linked tables. The word GUI stands for Graphical User Interface. GUI is the software interface using which users can interact. It includes everything you see once the software is in front of you after running it though the <Start>, <Programs> menu. All the buttons, menu bar (File, Edit, View, Insert etc.), tool bar (all the icon/pictures under the menu bar) etc. you see on the software application and as shown in the screenshot above, are parts of MS Access GUI.
17
Tables
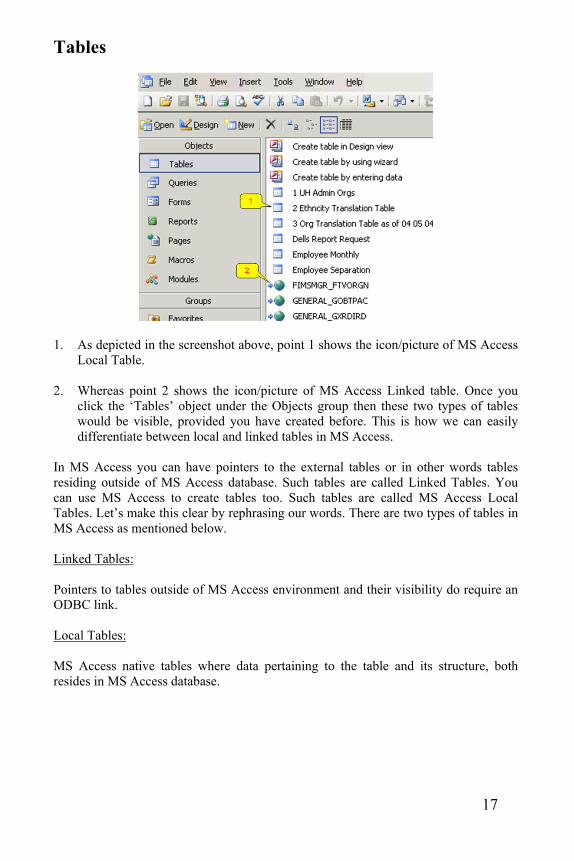
1. As depicted in the screenshot above, point 1 shows the icon/picture of MS Access Local Table.
2. Whereas point 2 shows the icon/picture of MS Access Linked table. Once you click the ‘Tables’ object under the Objects group then these two types of tables would be visible, provided you have created before. This is how we can easily differentiate between local and linked tables in MS Access.
In MS Access you can have pointers to the external tables or in other words tables residing outside of MS Access database. Such tables are called Linked Tables. You can use MS Access to create tables too. Such tables are called MS Access Local Tables. Let’s make this clear by rephrasing our words. There are two types of tables in MS Access as mentioned below. Linked Tables: Pointers to tables outside of MS Access environment and their visibility do require an ODBC link. Local Tables: MS Access native tables where data pertaining to the table and its structure, both resides in MS Access database.

18
Queries MS Access is not only an excellent data analysis tool but a wonderful RDBMS (Relational Database Management System). Once we have all the tables in MS Access both Local and Linked, the next step would be to run queries or in other words to analyze the data residing in those tables.
MS Access treats external linked tables as if those tables are MS Access Local tables when it comes to queries discussion or in other words as if those tables are created locally and the data inside them resides in the MS Access database. So while writing queries always treat linked tables as if the tables residing locally to MS Access database. Whenever you want to do something or rather anything with queries the very first step would be clicking on the “Queries” object under the “Objects” group. If you want to create a brand new query then click the “New” otherwise select the already created query from the right pane of the window and click “Design” command as shown in the above screenshot. If you click “New” then “New Query” window will popup with all different options pertaining to new query development. Most of the time we use the “Design View” option to build new queries visually just by click and drag operations. If you want to find duplicate records information in any table or already existing query then use the option “Find Duplicates Query Wizard”. On the other hand if you want to find unmatched information between two tables or two queries or between the query output and a table then select the “Find Unmatched Query Wizard” option. We will be discussing about queries in great details in the chapters a head.
19
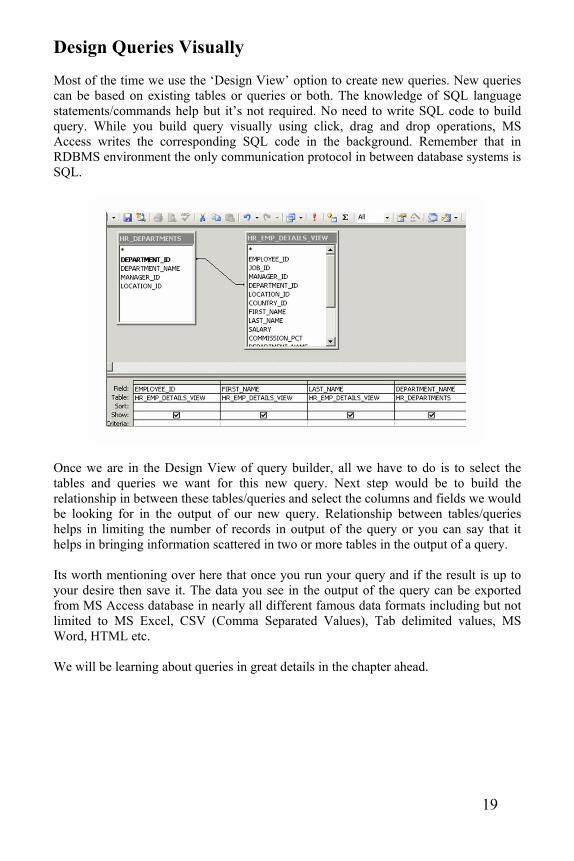
Design Queries Visually Most of the time we use the ‘Design View’ option to create new queries. New queries can be based on existing tables or queries or both. The knowledge of SQL language statements/commands help but it’s not required. No need to write SQL code to build query. While you build query visually using click, drag and drop operations, MS Access writes the corresponding SQL code in the background. Remember that in RDBMS environment the only communication protocol in between database systems is SQL.
Once we are in the Design View of query builder, all we have to do is to select the tables and queries we want for this new query. Next step would be to build the relationship in between these tables/queries and select the columns and fields we would be looking for in the output of our new query. Relationship between tables/queries helps in limiting the number of records in output of the query or you can say that it helps in bringing information scattered in two or more tables in the output of a query. Its worth mentioning over here that once you run your query and if the result is up to your desire then save it. The data you see in the output of the query can be exported from MS Access database in nearly all different famous data formats including but not limited to MS Excel, CSV (Comma Separated Values), Tab delimited values, MS Word, HTML etc. We will be learning about queries in great details in the chapter ahead.
20
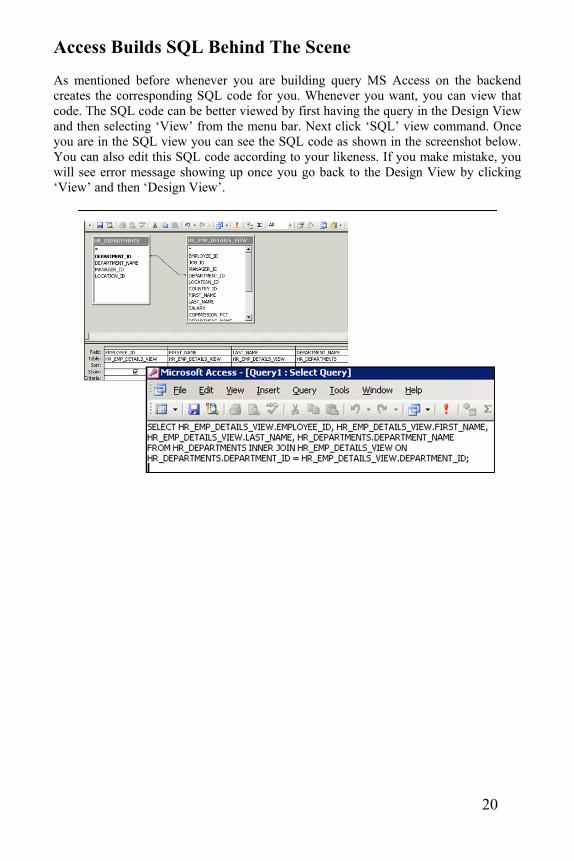
Access Builds SQL Behind The Scene As mentioned before whenever you are building query MS Access on the backend creates the corresponding SQL code for you. Whenever you want, you can view that code. The SQL code can be better viewed by first having the query in the Design View and then selecting ‘View’ from the menu bar. Next click ‘SQL’ view command. Once you are in the SQL view you can see the SQL code as shown in the screenshot below. You can also edit this SQL code according to your likeness. If you make mistake, you will see error message showing up once you go back to the Design View by clicking ‘View’ and then ‘Design View’.
21
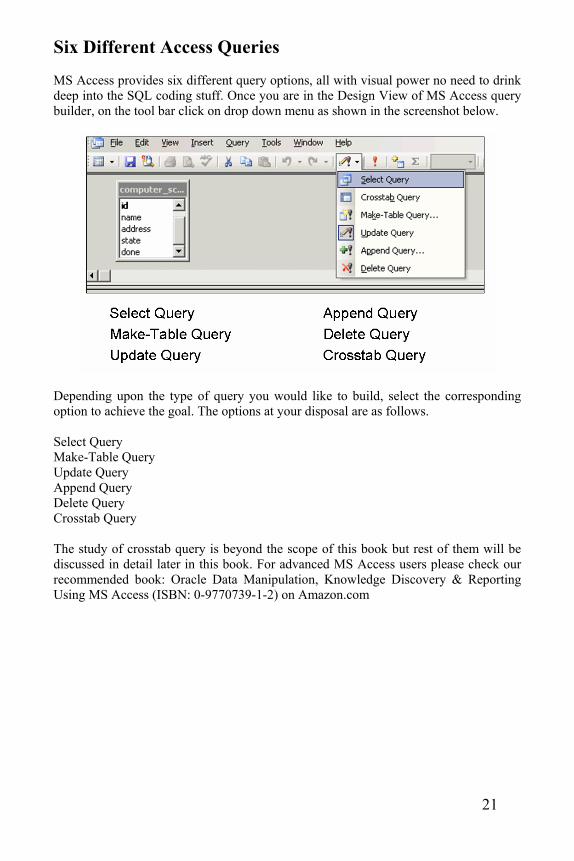
Six Different Access Queries MS Access provides six different query options, all with visual power no need to drink deep into the SQL coding stuff. Once you are in the Design View of MS Access query builder, on the tool bar click on drop down menu as shown in the screenshot below.
Depending upon the type of query you would like to build, select the corresponding option to achieve the goal. The options at your disposal are as follows. Select Query Make-Table Query Update Query Append Query Delete Query Crosstab Query The study of crosstab query is beyond the scope of this book but rest of them will be discussed in detail later in this book. For advanced MS Access users please check our recommended book: Oracle Data Manipulation, Knowledge Discovery & Reporting Using MS Access (ISBN: 0-9770739-1-2) on Amazon.com
22
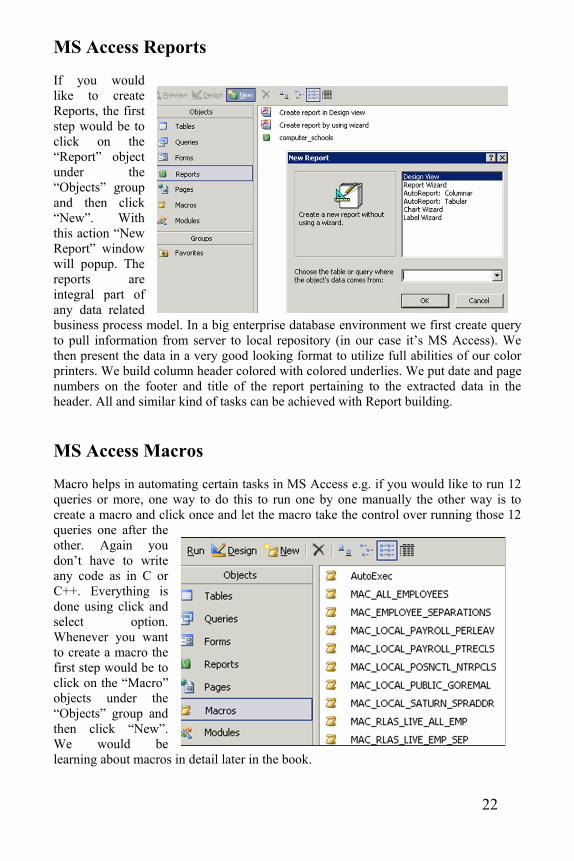
MS Access Reports If you would like to create Reports, the first step would be to click on the “Report” object under the “Objects” group and then click “New”. With this action “New Report” window will popup. The reports are integral part of any data related business process model. In a big enterprise database environment we first create query to pull information from server to local repository (in our case it’s MS Access). We then present the data in a very good looking format to utilize full abilities of our color printers. We build column header colored with colored underlies. We put date and page numbers on the footer and title of the report pertaining to the extracted data in the header. All and similar kind of tasks can be achieved with Report building. MS Access Macros Macro helps in automating certain tasks in MS Access e.g. if you would like to run 12 queries or more, one way to do this to run one by one manually the other way is to create a macro and click once and let the macro take the control over running those 12 queries one after the other. Again you don’t have to write any code as in C or C++. Everything is done using click and select option. Whenever you want to create a macro the first step would be to click on the “Macro” objects under the “Objects” group and then click “New”. We would be learning about macros in detail later in the book.
23
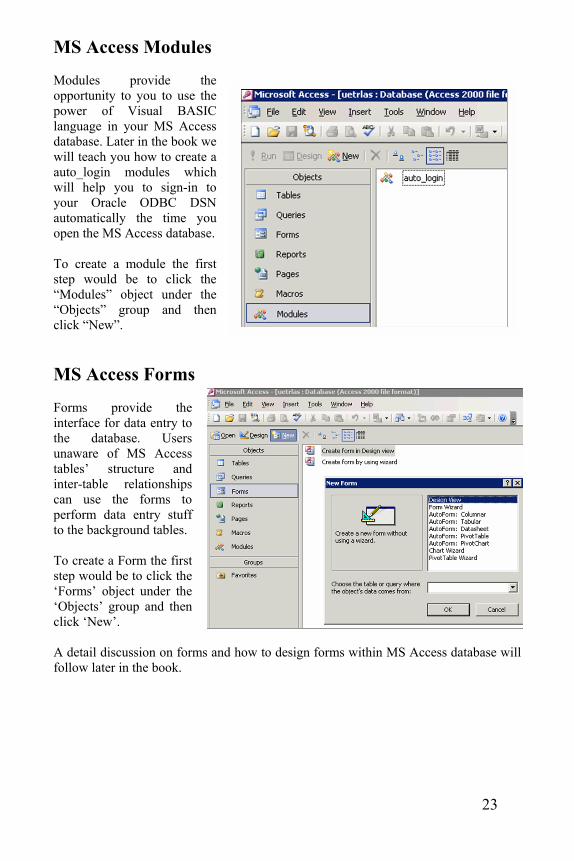
MS Access Modules Modules provide the opportunity to you to use the power of Visual BASIC language in your MS Access database. Later in the book we will teach you how to create a auto_login modules which will help you to sign-in to your Oracle ODBC DSN automatically the time you open the MS Access database. To create a module the first step would be to click the “Modules” object under the “Objects” group and then click “New”. MS Access Forms Forms provide the interface for data entry to the database. Users unaware of MS Access tables’ structure and inter-table relationships can use the forms to perform data entry stuff to the background tables. To create a Form the first step would be to click the ‘Forms’ object under the ‘Objects’ group and then click ‘New’. A detail discussion on forms and how to design forms within MS Access database will follow later in the book.

24

25
CChhaapptteerr 22
MS Access Local & Linked Tables

26
27
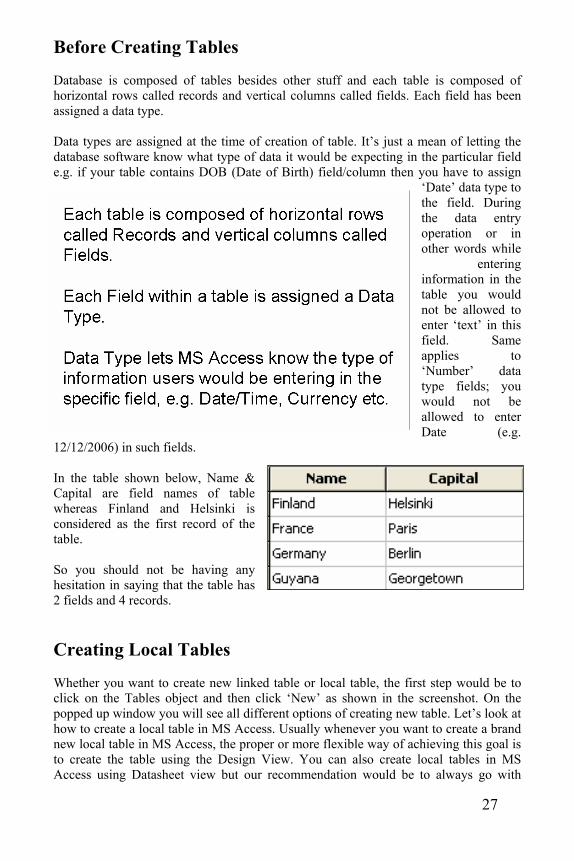
Before Creating Tables Database is composed of tables besides other stuff and each table is composed of horizontal rows called records and vertical columns called fields. Each field has been assigned a data type. Data types are assigned at the time of creation of table. It’s just a mean of letting the database software know what type of data it would be expecting in the particular field e.g. if your table contains DOB (Date of Birth) field/column then you have to assign
‘Date’ data type to the field. During the data entry operation or in other words while
entering information in the table you would not be allowed to enter ‘text’ in this field. Same applies to ‘Number’ data type fields; you would not be allowed to enter Date (e.g.
12/12/2006) in such fields. In the table shown below, Name & Capital are field names of table whereas Finland and Helsinki is considered as the first record of the table. So you should not be having any hesitation in saying that the table has 2 fields and 4 records. Creating Local Tables Whether you want to create new linked table or local table, the first step would be to click on the Tables object and then click ‘New’ as shown in the screenshot. On the popped up window you will see all different options of creating new table. Let’s look at how to create a local table in MS Access. Usually whenever you want to create a brand new local table in MS Access, the proper or more flexible way of achieving this goal is to create the table using the Design View. You can also create local tables in MS Access using Datasheet view but our recommendation would be to always go with
28
‘Design View’ whenever you want to create a Local Table.
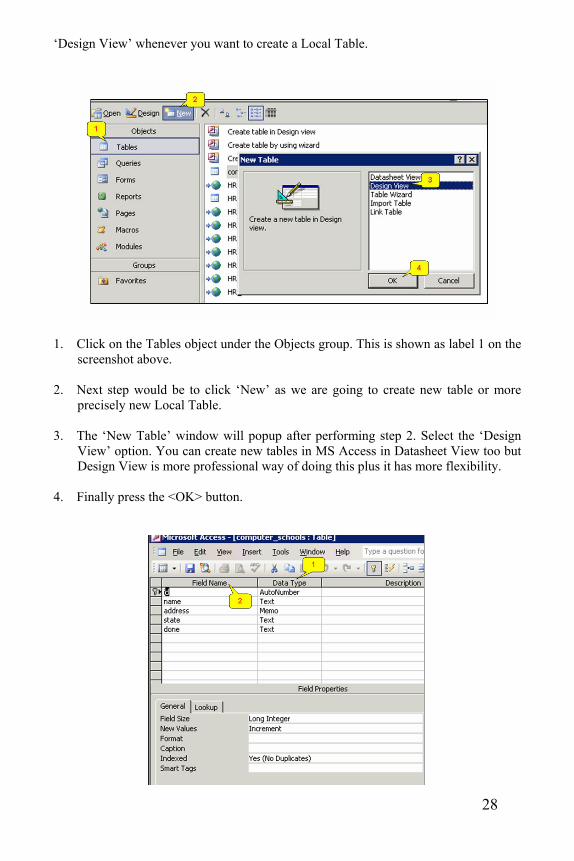
1. Click on the Tables object under the Objects group. This is shown as label 1 on the
screenshot above. 2. Next step would be to click ‘New’ as we are going to create new table or more
precisely new Local Table. 3. The ‘New Table’ window will popup after performing step 2. Select the ‘Design
View’ option. You can create new tables in MS Access in Datasheet View too but Design View is more professional way of doing this plus it has more flexibility.
4. Finally press the <OK> button.
29
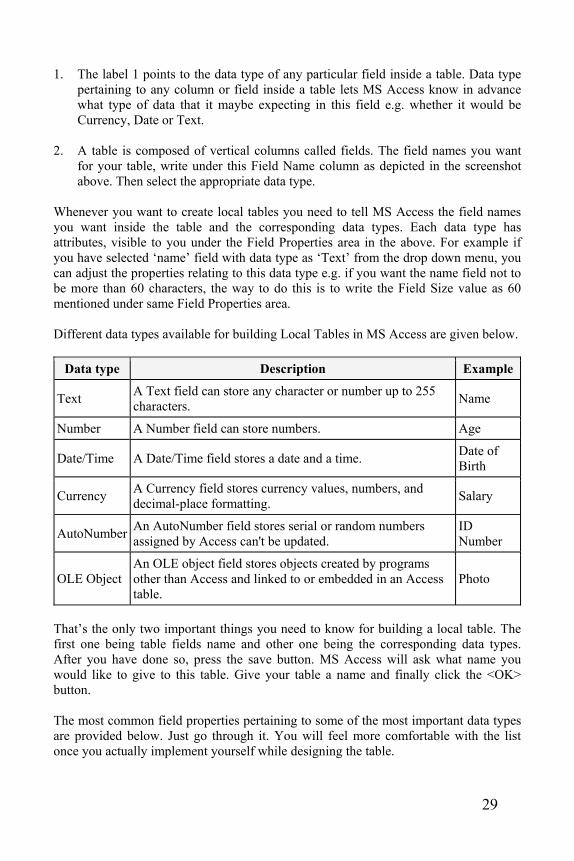
1. The label 1 points to the data type of any particular field inside a table. Data type
pertaining to any column or field inside a table lets MS Access know in advance what type of data that it maybe expecting in this field e.g. whether it would be Currency, Date or Text.
2. A table is composed of vertical columns called fields. The field names you want
for your table, write under this Field Name column as depicted in the screenshot above. Then select the appropriate data type.
Whenever you want to create local tables you need to tell MS Access the field names you want inside the table and the corresponding data types. Each data type has attributes, visible to you under the Field Properties area in the above. For example if you have selected ‘name’ field with data type as ‘Text’ from the drop down menu, you can adjust the properties relating to this data type e.g. if you want the name field not to be more than 60 characters, the way to do this is to write the Field Size value as 60 mentioned under same Field Properties area. Different data types available for building Local Tables in MS Access are given below.
Data type Description Example
Text A Text field can store any character or number up to 255 characters. Name
Number A Number field can store numbers. Age
Date/Time A Date/Time field stores a date and a time. Date of Birth
Currency A Currency field stores currency values, numbers, and decimal-place formatting. Salary
AutoNumber An AutoNumber field stores serial or random numbers assigned by Access can't be updated.
ID Number
OLE Object An OLE object field stores objects created by programs other than Access and linked to or embedded in an Access table.
Photo
That’s the only two important things you need to know for building a local table. The first one being table fields name and other one being the corresponding data types. After you have done so, press the save button. MS Access will ask what name you would like to give to this table. Give your table a name and finally click the <OK> button. The most common field properties pertaining to some of the most important data types are provided below. Just go through it. You will feel more comfortable with the list once you actually implement yourself while designing the table.
30
Field Property Description
Field Size The Field Size property sets the maximum number of characters in a field.
Format The Format property specifies how the field should be displayed and printed.
Input Mask The Input Mask property specifies a pattern for data entry into a field.
Caption The Caption property provides the label for a field used on a form or report.
Default Value The Default Value property provides the default information for all new records.
Validation Rule The Validation Rule property validates data entered by users before saving data.
Validation Text The Validation Text property displays a message when data is rejected as invalid.
Required The Required property defines a field as requiring data for the record to be complete.
Allow Zero Length
The Allow Zero length property allows a record to be complete with a field that contains Null (no data). Only Text, Memo, and Hyperlink fields can accept zero-length strings
Indexed The Indexed property speeds up searching and can ensure that data is unique.
Once all your table structure is complete save the table by clicking File and then Save from the menu bar or clicking on the save button icon on the tool bar as shown in the picture below. Let’s summarize whatever we have said for the design of local tables. Write down the field name and then select the data type then move to the next line, write the field name and then select the data type then move to the next line and so on. Repeat the process unless you would end up having all the fields and corresponding data types required by your table in the systems. Finally click the save icon on the tool bar. MS Access asks for the name of the table you would like to save. Write down whatever name you want to give to that table and finally click <OK> button.
31
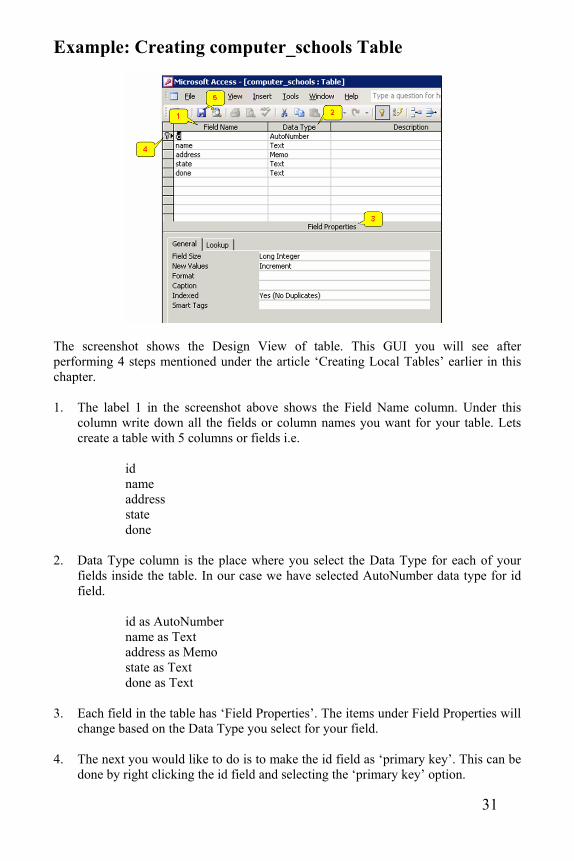
Example: Creating computer_schools Table
The screenshot shows the Design View of table. This GUI you will see after performing 4 steps mentioned under the article ‘Creating Local Tables’ earlier in this chapter. 1. The label 1 in the screenshot above shows the Field Name column. Under this
column write down all the fields or column names you want for your table. Lets create a table with 5 columns or fields i.e.
id name address state done
2. Data Type column is the place where you select the Data Type for each of your
fields inside the table. In our case we have selected AutoNumber data type for id field.
id as AutoNumber name as Text address as Memo state as Text done as Text
3. Each field in the table has ‘Field Properties’. The items under Field Properties will
change based on the Data Type you select for your field.
4. The next you would like to do is to make the id field as ‘primary key’. This can be done by right clicking the id field and selecting the ‘primary key’ option.
32
5. Save the table and assign the table a name e.g. computer_schools. What is Primary & Foreign Key? Primary key is basically a constraint. If defined on any column/field you would not be able to insert anything which is already there in that particular column. To establish a link between two tables or in other words to have Primary-Foreign Key relationship between two or more tables, it is imperative to have primary key defined on at least one of the tables. Primary key of one table acts as the foreign key in other table. A foreign key column can have duplicate values. Once you establish a Primary-Foreign Key relationship between two or more tables its like having a constraint on all the tables in the relationship. Such constraint is called ‘Referential Integrity’ constraint. The table having primary key column is called Parent table all the other tables linked to the Parent table via foreign key are called child tables. Once this Primary-Foreign key relationship is defined in between tables, the following constraints get effective. • You cannot delete any record from the parent table if there are corresponding
record(s) in the child table(s).
• You cannot insert any record in the child table if there is no corresponding record in the parent table.
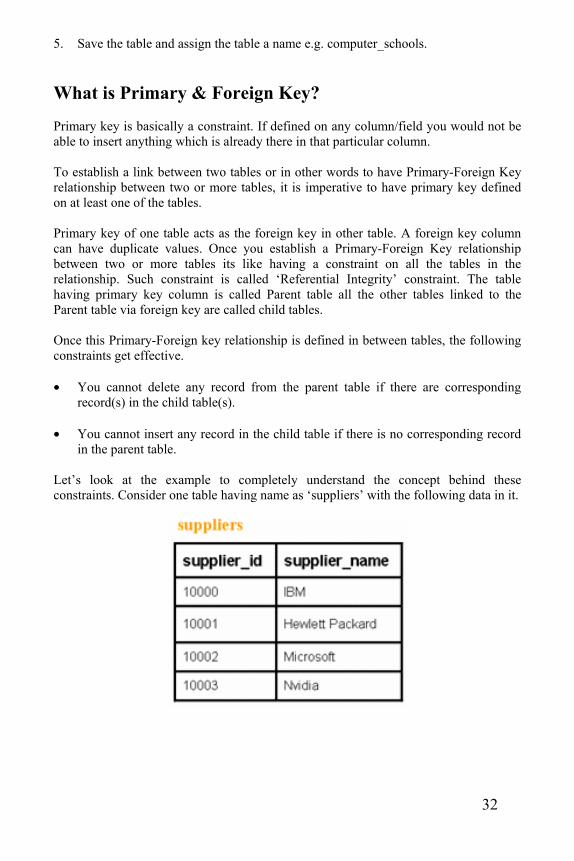
Let’s look at the example to completely understand the concept behind these constraints. Consider one table having name as ‘suppliers’ with the following data in it.
33
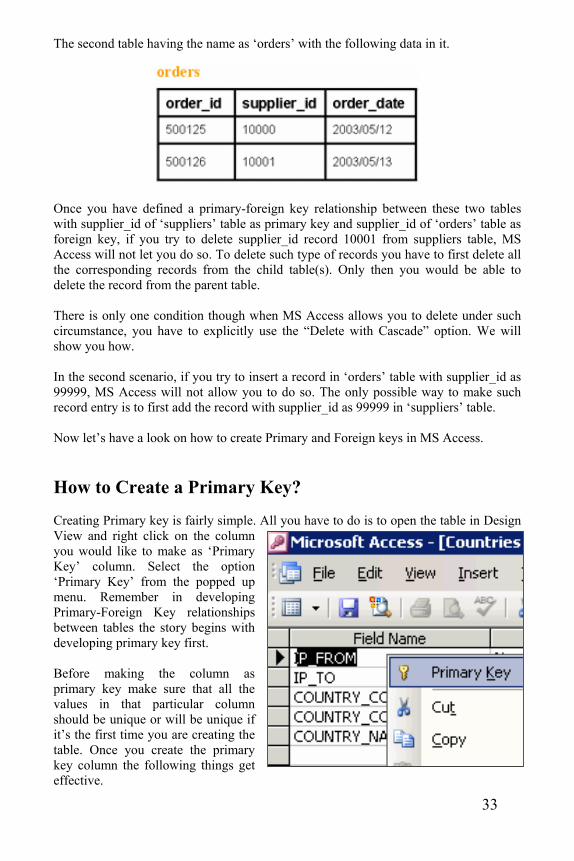
The second table having the name as ‘orders’ with the following data in it.
Once you have defined a primary-foreign key relationship between these two tables with supplier_id of ‘suppliers’ table as primary key and supplier_id of ‘orders’ table as foreign key, if you try to delete supplier_id record 10001 from suppliers table, MS Access will not let you do so. To delete such type of records you have to first delete all the corresponding records from the child table(s). Only then you would be able to delete the record from the parent table. There is only one condition though when MS Access allows you to delete under such circumstance, you have to explicitly use the “Delete with Cascade” option. We will show you how. In the second scenario, if you try to insert a record in ‘orders’ table with supplier_id as 99999, MS Access will not allow you to do so. The only possible way to make such record entry is to first add the record with supplier_id as 99999 in ‘suppliers’ table. Now let’s have a look on how to create Primary and Foreign keys in MS Access. How to Create a Primary Key? Creating Primary key is fairly simple. All you have to do is to open the table in Design View and right click on the column you would like to make as ‘Primary Key’ column. Select the option ‘Primary Key’ from the popped up menu. Remember in developing Primary-Foreign Key relationships between tables the story begins with developing primary key first. Before making the column as primary key make sure that all the values in that particular column should be unique or will be unique if it’s the first time you are creating the table. Once you create the primary key column the following things get effective.
34
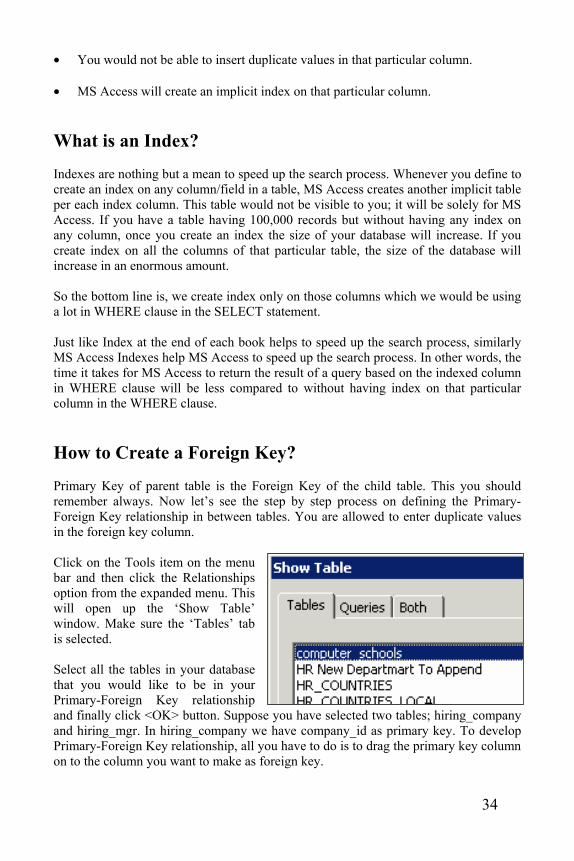
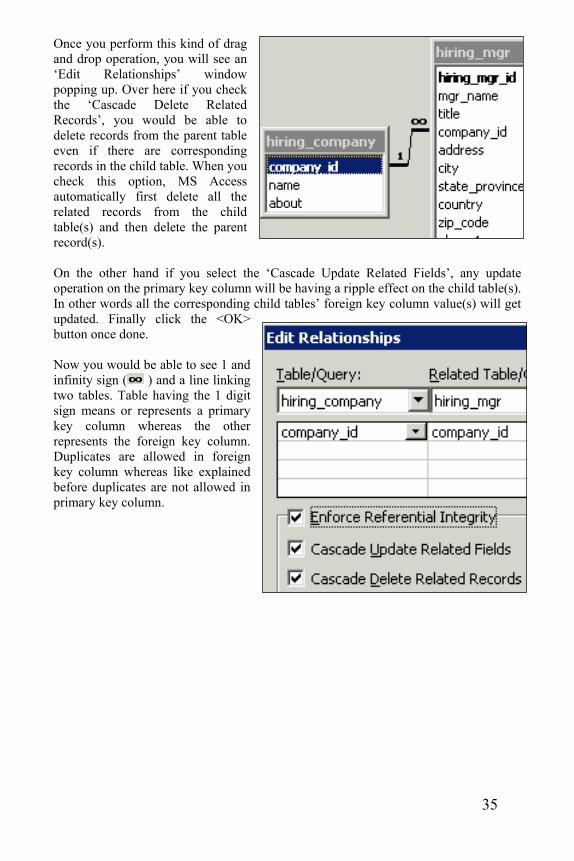
• You would not be able to insert duplicate values in that particular column. • MS Access will create an implicit index on that particular column. What is an Index? Indexes are nothing but a mean to speed up the search process. Whenever you define to create an index on any column/field in a table, MS Access creates another implicit table per each index column. This table would not be visible to you; it will be solely for MS Access. If you have a table having 100,000 records but without having any index on any column, once you create an index the size of your database will increase. If you create index on all the columns of that particular table, the size of the database will increase in an enormous amount. So the bottom line is, we create index only on those columns which we would be using a lot in WHERE clause in the SELECT statement. Just like Index at the end of each book helps to speed up the search process, similarly MS Access Indexes help MS Access to speed up the search process. In other words, the time it takes for MS Access to return the result of a query based on the indexed column in WHERE clause will be less compared to without having index on that particular column in the WHERE clause. How to Create a Foreign Key? Primary Key of parent table is the Foreign Key of the child table. This you should remember always. Now let’s see the step by step process on defining the Primary-Foreign Key relationship in between tables. You are allowed to enter duplicate values in the foreign key column. Click on the Tools item on the menu bar and then click the Relationships option from the expanded menu. This will open up the ‘Show Table’ window. Make sure the ‘Tables’ tab is selected. Select all the tables in your database that you would like to be in your Primary-Foreign Key relationship and finally click <OK> button. Suppose you have selected two tables; hiring_company and hiring_mgr. In hiring_company we have company_id as primary key. To develop Primary-Foreign Key relationship, all you have to do is to drag the primary key column on to the column you want to make as foreign key.
35
Once you perform this kind of drag and drop operation, you will see an ‘Edit Relationships’ window popping up. Over here if you check the ‘Cascade Delete Related Records’, you would be able to delete records from the parent table even if there are corresponding records in the child table. When you check this option, MS Access automatically first delete all the related records from the child table(s) and then delete the parent record(s). On the other hand if you select the ‘Cascade Update Related Fields’, any update operation on the primary key column will be having a ripple effect on the child table(s). In other words all the corresponding child tables’ foreign key column value(s) will get updated. Finally click the <OK> button once done. Now you would be able to see 1 and infinity sign ( ) and a line linking two tables. Table having the 1 digit sign means or represents a primary key column whereas the other represents the foreign key column. Duplicates are allowed in foreign key column whereas like explained before duplicates are not allowed in primary key column.
36
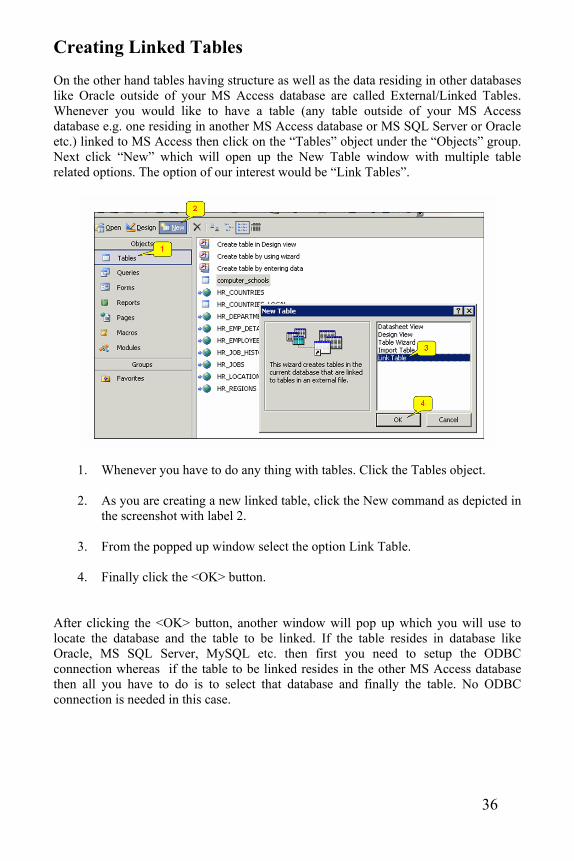
Creating Linked Tables On the other hand tables having structure as well as the data residing in other databases like Oracle outside of your MS Access database are called External/Linked Tables. Whenever you would like to have a table (any table outside of your MS Access database e.g. one residing in another MS Access database or MS SQL Server or Oracle etc.) linked to MS Access then click on the “Tables” object under the “Objects” group. Next click “New” which will open up the New Table window with multiple table related options. The option of our interest would be “Link Tables”.
1. Whenever you have to do any thing with tables. Click the Tables object.
2. As you are creating a new linked table, click the New command as depicted in the screenshot with label 2.
3. From the popped up window select the option Link Table.
4. Finally click the <OK> button.
After clicking the <OK> button, another window will pop up which you will use to locate the database and the table to be linked. If the table resides in database like Oracle, MS SQL Server, MySQL etc. then first you need to setup the ODBC connection whereas if the table to be linked resides in the other MS Access database then all you have to do is to select that database and finally the table. No ODBC connection is needed in this case.

37
CChhaapptteerr 33
MS Access Queries

38

39
Five Different Queries In Focus
In this chapter our sole focus would be on one of very important objects in MS Access i.e. Queries. You can see drop down list of all different kinds of MS Access Queries by first clicking ‘Queries’ object and then clicking ‘New’ as shown in the picture below. As a result of this action a window will popup having the title ‘New’. Select the option of Design View and click the <OK> button. Basically you are commanding MS Access that you would like to create a new query in Design View. MS Access then asks for tables/other existing queries required for this new query, click cancel for now. We can always add tables later. Once done we will be in MS Access query Design View. On the tool bar you will see the icon with the drop down arrow as shown in the picture below. This drop down menu will show you all different types of Query options we have in MS Access. Now lets talk about each of
these different types of queries briefly one by one to comprehend the bigger picture of the whole story. After this, we will be talking about each of these types in much more detail.
40
Select Query: We use Select Query to extract data from table or tables linked together via Joins as discussed before. Like its mentioned before while developing any of the queries, MS Access treats all the tables as if they are MS Access tables. There is no discrimination between Local and Linked tables when you are designing any type of queries. The time you run the query, the resultant data will be displayed. The displayed data will only be in the RAM or in other words the time you close the Run View of the query, the data will get vanished. To extract the data again, you have to run the query again. For query that takes a long time to execute, we usually prefer to have a Make-Table query rather than a Select query under many scenarios. We will discuss about the Make-Table Query in the next article. Make-Table Query: Make-Table query is designed exactly the same manner we design the Select query. The only difference is the Run view. In the Run View of a Make-Table query the resultant data will be saved in the form of MS Access Local Table. If your Make-Table Query is comprised of Local as well as Oracle Linked tables, once you run it, all the data will get transferred from Oracle to MS Access in the form of local table. We will learn in detail in step by step manner, how to design and deal with Make-Table Queries. Update Query: As the name states the Update query is used to update already existing records in the tables. No matter the tables are MS Access Local tables or MS Access Linked Tables (Oracle tables visible via ODBC in MS Access), update operation will get performed upon execution of such query. We used many times Update Queries to perform bulk updates on Oracle tables based on some logic. The process that used to take months to attain the across the board salary increase now can be done within minutes without even writing any SQL code. That’s the power of MS Access. Append Query: Append queries are used to add new records in the table at the end. Whenever you would like to append new records or in other words whenever you would like to insert new records at the end of the table use the append query. This query can be performed on MS Access local as well as linked tables.

41
Delete Query: The purpose of the delete query is to delete any number of records from table, no matter whether its local or linked table. Records are usually deleted based on some logic or criteria. Note that you should be very careful in running such types of queries as if you don’t mention any criteria; you may end up loosing all the records in your table. Now we will be looking at each of these queries one by one starting with Select query in great detail in terms of design and everything.
42
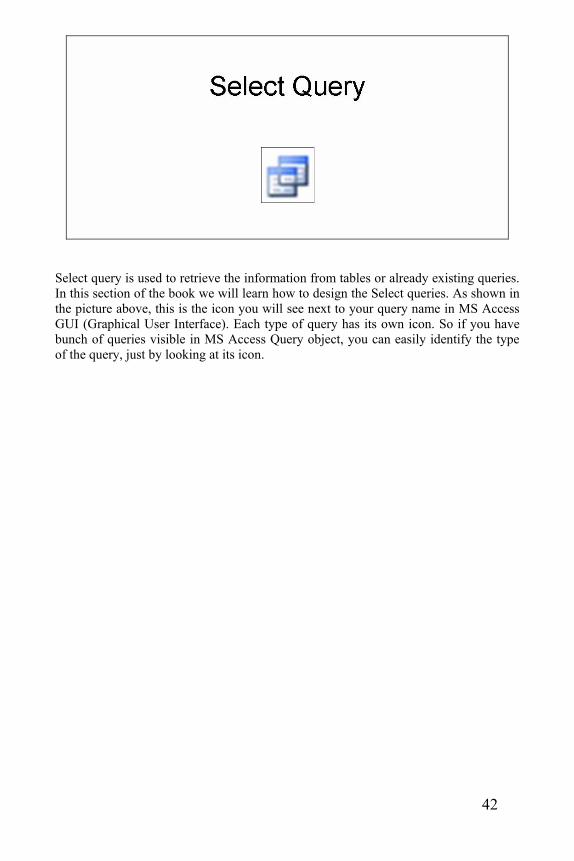
Select query is used to retrieve the information from tables or already existing queries. In this section of the book we will learn how to design the Select queries. As shown in the picture above, this is the icon you will see next to your query name in MS Access GUI (Graphical User Interface). Each type of query has its own icon. So if you have bunch of queries visible in MS Access Query object, you can easily identify the type of the query, just by looking at its icon.
43
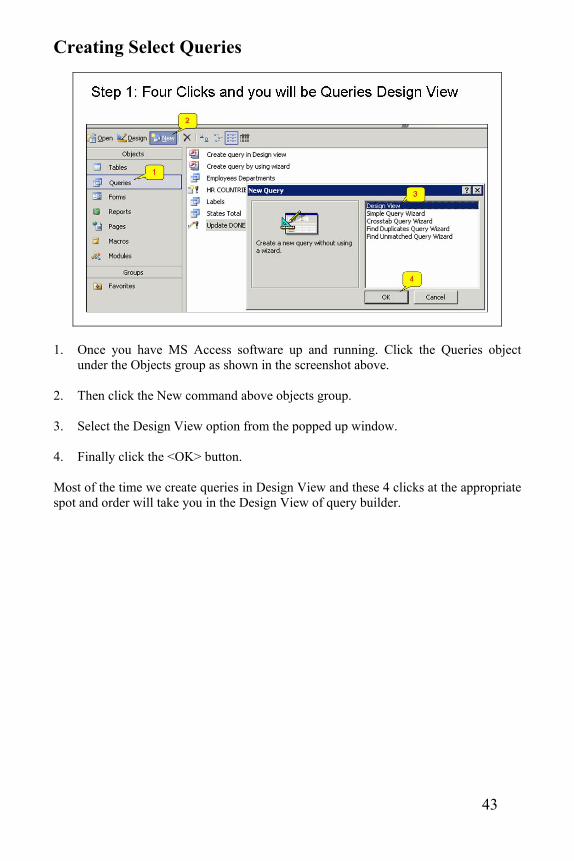
Creating Select Queries
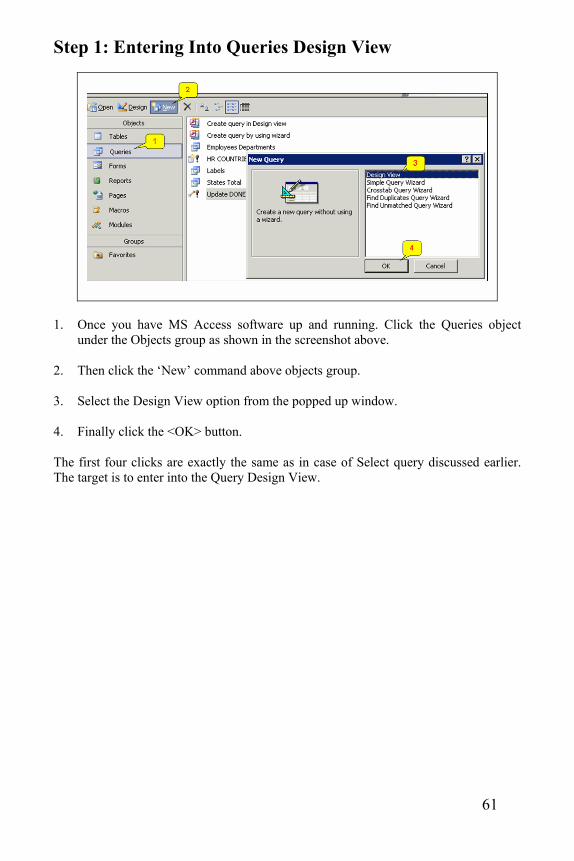
1. Once you have MS Access software up and running. Click the Queries object
under the Objects group as shown in the screenshot above.
2. Then click the New command above objects group. 3. Select the Design View option from the popped up window. 4. Finally click the <OK> button. Most of the time we create queries in Design View and these 4 clicks at the appropriate spot and order will take you in the Design View of query builder.
44
Step 2: Add Tables/Queries Required
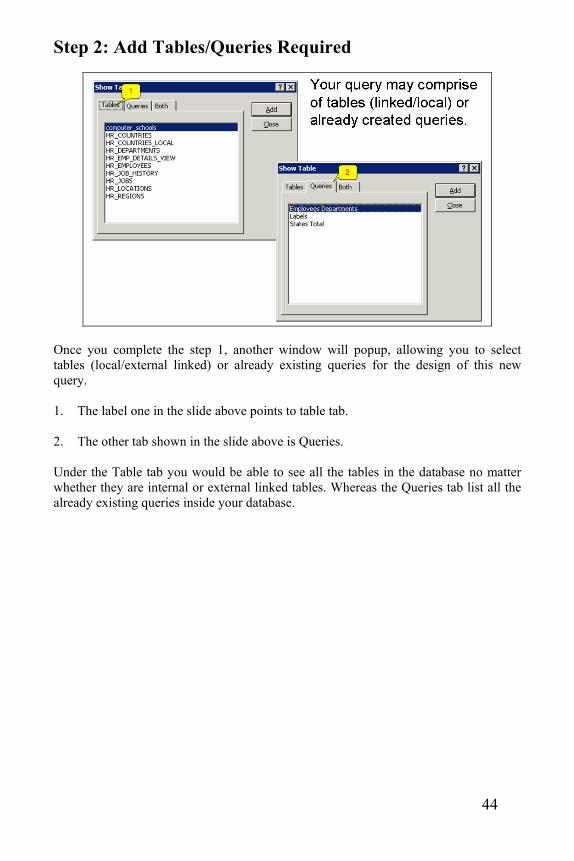
Once you complete the step 1, another window will popup, allowing you to select tables (local/external linked) or already existing queries for the design of this new query. 1. The label one in the slide above points to table tab.
2. The other tab shown in the slide above is Queries. Under the Table tab you would be able to see all the tables in the database no matter whether they are internal or external linked tables. Whereas the Queries tab list all the already existing queries inside your database.
45
Step 3: Build Relationships & Select Fields
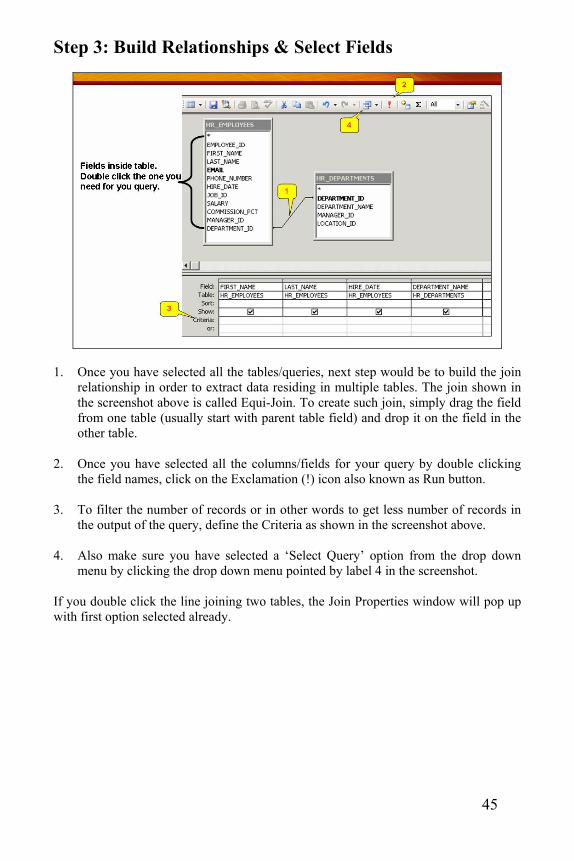
1. Once you have selected all the tables/queries, next step would be to build the join relationship in order to extract data residing in multiple tables. The join shown in the screenshot above is called Equi-Join. To create such join, simply drag the field from one table (usually start with parent table field) and drop it on the field in the other table.
2. Once you have selected all the columns/fields for your query by double clicking the field names, click on the Exclamation (!) icon also known as Run button.
3. To filter the number of records or in other words to get less number of records in
the output of the query, define the Criteria as shown in the screenshot above. 4. Also make sure you have selected a ‘Select Query’ option from the drop down
menu by clicking the drop down menu pointed by label 4 in the screenshot. If you double click the line joining two tables, the Join Properties window will pop up with first option selected already.

46
This first option is for Equi-Join. Once you have equi-join between table(s), the output of the query will contain only those records where joined columns have same values e.g. if there is a department id 33 in the HR_EMPLOYEES table and there is no corresponding record in the HR_DEPARTMENTS table pertaining to the same department, in the output of the equi-join query no record will appear having department id 33. If you select the second option or third option on the Join Properties window then you will see an arrow either pointing to one table or the other depending upon your option selection as shown in the picture below. In Oracle world such type of joins are called Outer Joins whereas in MS Access these are named as Left/Right Joins. The importance lies not in names but in the concept. As depicted in the picture above, the output of such query will be all the records of the left-hand side table and only those records of the right-hand table where there is a join (or same values) e.g. if there is department id 33 in the HR_EMPLOYEES table which is not defined in the HR_DEPARTMENTS table even then you would be able to see the record pertaining to department id 33 but against that particular record you will see DEPARTMENT_NAME column (of HR_DEPARTMENTS table) containing NULL value provided you have selected it as the output field of the query. So a the bottom-line of Outer-Join (Left/Right Join) query is, You will see all the records from the table having no arrow but only those records from the ‘arrow’ table where there is a join. This statement first should be understood and then engraved on the mind.
47
Step 4: Run the Query
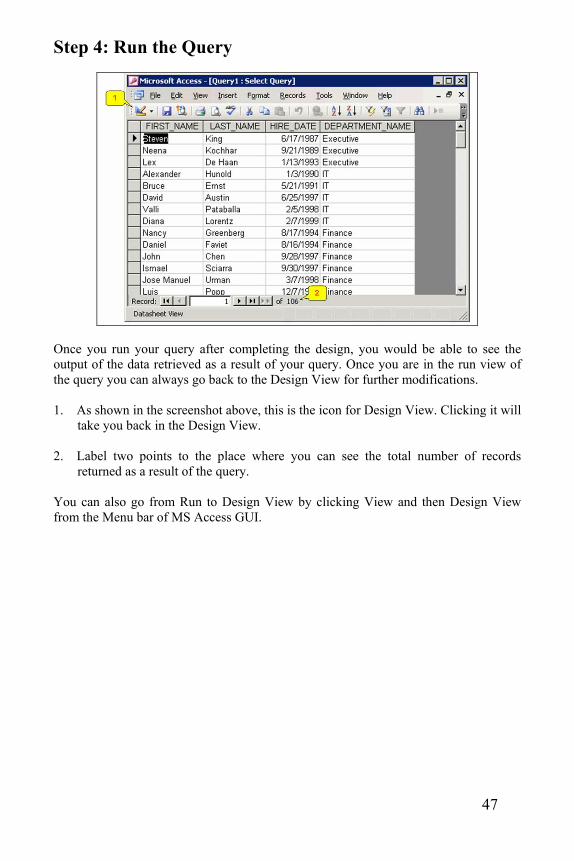
Once you run your query after completing the design, you would be able to see the output of the data retrieved as a result of your query. Once you are in the run view of the query you can always go back to the Design View for further modifications. 1. As shown in the screenshot above, this is the icon for Design View. Clicking it will
take you back in the Design View. 2. Label two points to the place where you can see the total number of records
returned as a result of the query. You can also go from Run to Design View by clicking View and then Design View from the Menu bar of MS Access GUI.
48
Make-Table query is just like Select query the only difference is that the output of the query gets saved in the form of table or more precisely MS Access Local Table. By combining the power of MS Access Macros and Make-Table Query you can automate the process of running long queries. In other words, queries that take long time to execute, the output of those queries can automatically me saved in MS Access using both Macros and Make-Table query technology. We will learn about it in great detail in the chapters ahead. Let’s look at the steps of developing a Make-Table query.
49
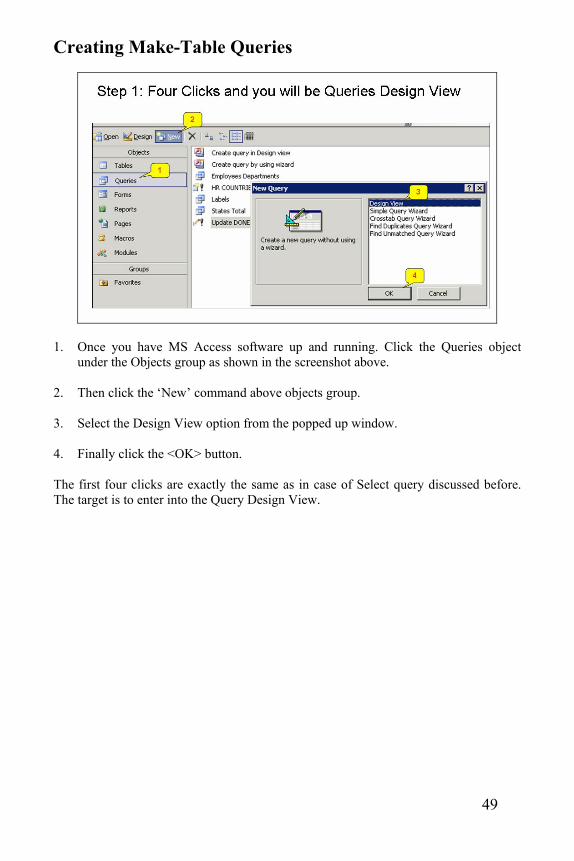
Creating Make-Table Queries
1. Once you have MS Access software up and running. Click the Queries object
under the Objects group as shown in the screenshot above.
2. Then click the ‘New’ command above objects group. 3. Select the Design View option from the popped up window. 4. Finally click the <OK> button. The first four clicks are exactly the same as in case of Select query discussed before. The target is to enter into the Query Design View.
50
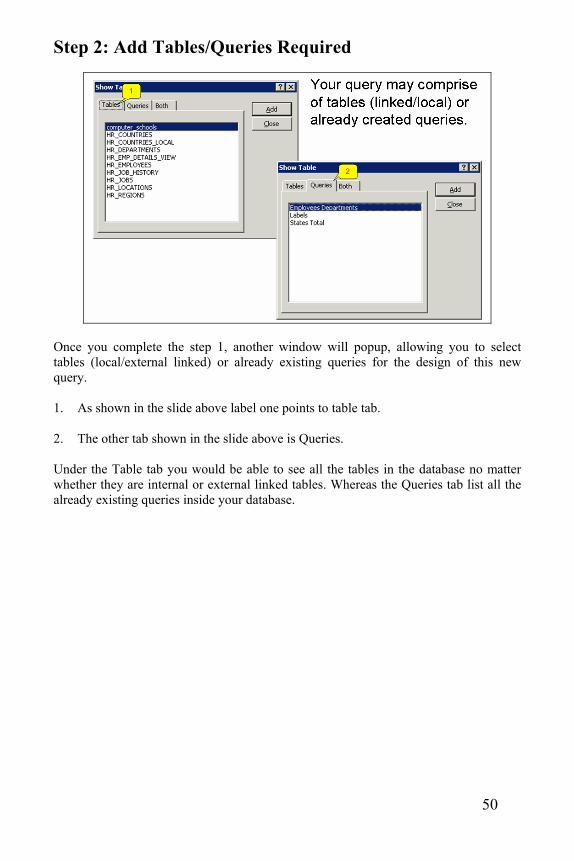
Step 2: Add Tables/Queries Required
Once you complete the step 1, another window will popup, allowing you to select tables (local/external linked) or already existing queries for the design of this new query. 1. As shown in the slide above label one points to table tab.
2. The other tab shown in the slide above is Queries. Under the Table tab you would be able to see all the tables in the database no matter whether they are internal or external linked tables. Whereas the Queries tab list all the already existing queries inside your database.
51
Step 3: Build Relationships & Select Fields
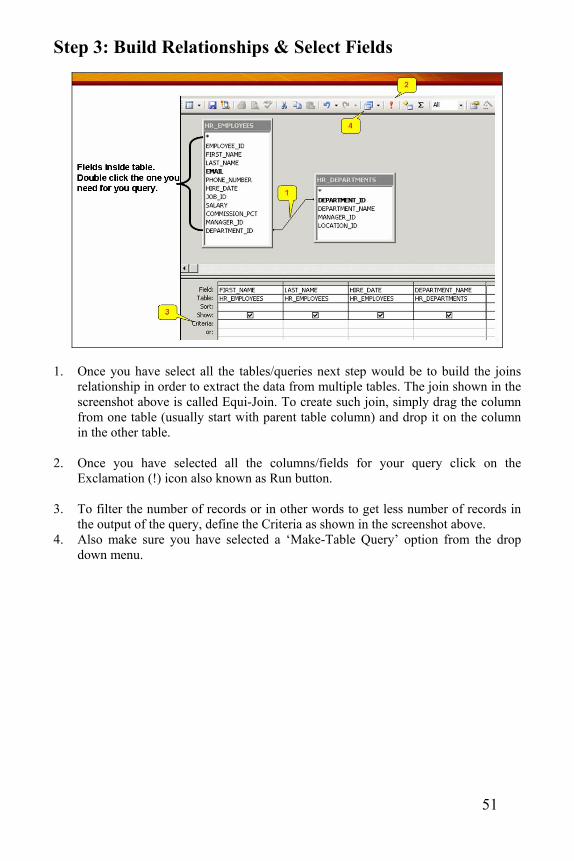
1. Once you have select all the tables/queries next step would be to build the joins
relationship in order to extract the data from multiple tables. The join shown in the screenshot above is called Equi-Join. To create such join, simply drag the column from one table (usually start with parent table column) and drop it on the column in the other table.
2. Once you have selected all the columns/fields for your query click on the Exclamation (!) icon also known as Run button.
3. To filter the number of records or in other words to get less number of records in
the output of the query, define the Criteria as shown in the screenshot above. 4. Also make sure you have selected a ‘Make-Table Query’ option from the drop
down menu.
52
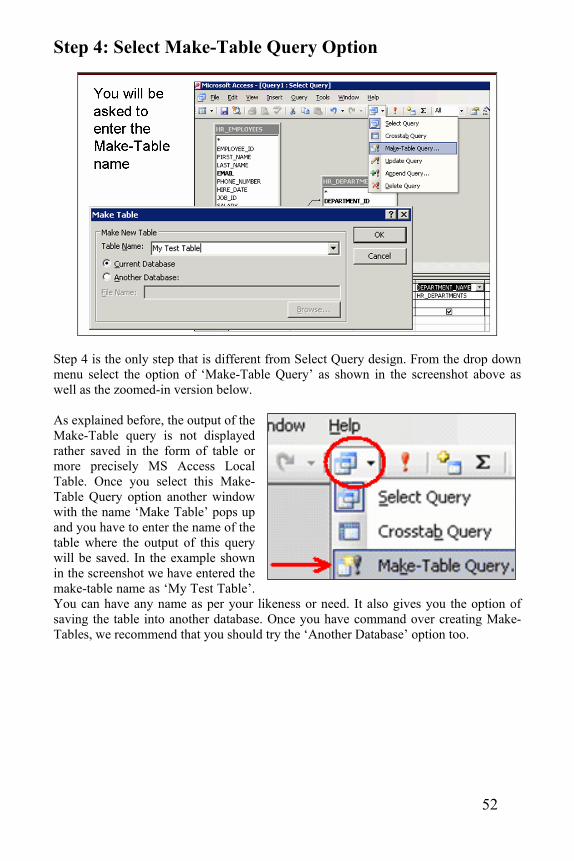
Step 4: Select Make-Table Query Option
Step 4 is the only step that is different from Select Query design. From the drop down menu select the option of ‘Make-Table Query’ as shown in the screenshot above as well as the zoomed-in version below. As explained before, the output of the Make-Table query is not displayed rather saved in the form of table or more precisely MS Access Local Table. Once you select this Make-Table Query option another window with the name ‘Make Table’ pops up and you have to enter the name of the table where the output of this query will be saved. In the example shown in the screenshot we have entered the make-table name as ‘My Test Table’. You can have any name as per your likeness or need. It also gives you the option of saving the table into another database. Once you have command over creating Make-Tables, we recommend that you should try the ‘Another Database’ option too.
53
Step 5: Save & Run Make-Table Query
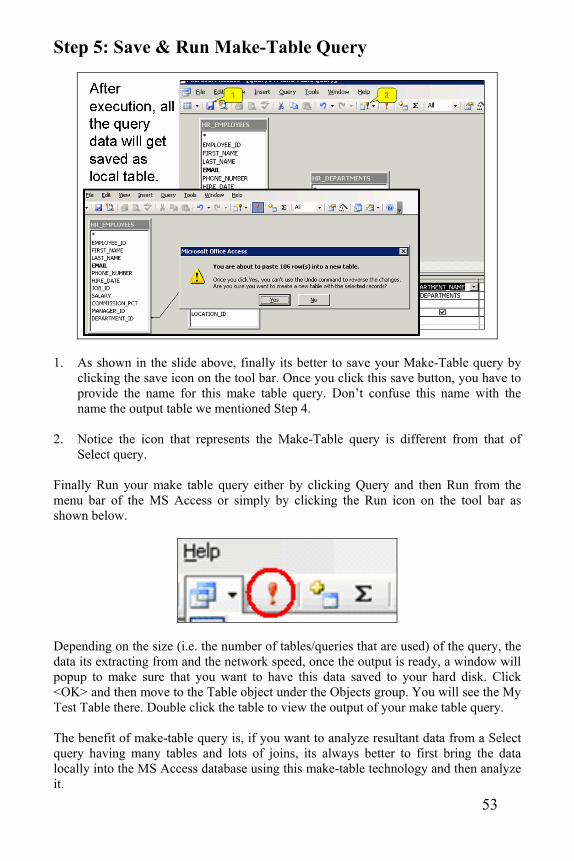
1. As shown in the slide above, finally its better to save your Make-Table query by
clicking the save icon on the tool bar. Once you click this save button, you have to provide the name for this make table query. Don’t confuse this name with the name the output table we mentioned Step 4.
2. Notice the icon that represents the Make-Table query is different from that of
Select query. Finally Run your make table query either by clicking Query and then Run from the menu bar of the MS Access or simply by clicking the Run icon on the tool bar as shown below.
Depending on the size (i.e. the number of tables/queries that are used) of the query, the data its extracting from and the network speed, once the output is ready, a window will popup to make sure that you want to have this data saved to your hard disk. Click <OK> and then move to the Table object under the Objects group. You will see the My Test Table there. Double click the table to view the output of your make table query. The benefit of make-table query is, if you want to analyze resultant data from a Select query having many tables and lots of joins, its always better to first bring the data locally into the MS Access database using this make-table technology and then analyze it.
54
Update query is used to update record(s) inside the table of a MS Access database. The table to be updated could be either Local MS Access table or Linked MS Access table, in either case upon successful execution of Update Query; the information gets updated inside the table. Using this query we can update Oracle table merely with a click and drag operation with little to no knowledge about SQL syntax. We will use update query whenever we want to update/change already existing information in the table.
55
Creating Update Queries
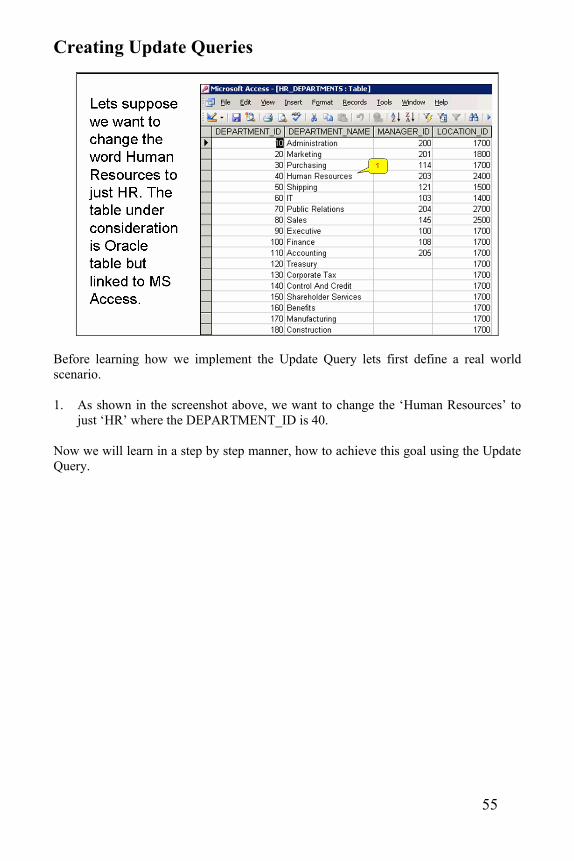
Before learning how we implement the Update Query lets first define a real world scenario. 1. As shown in the screenshot above, we want to change the ‘Human Resources’ to
just ‘HR’ where the DEPARTMENT_ID is 40. Now we will learn in a step by step manner, how to achieve this goal using the Update Query.

56
Step 1: Entering Into Queries Design View
1. Once you have MS Access software up and running. Click the Queries object
under the Objects group as shown in the screenshot above.
2. Then click the ‘New’ command above objects group. 3. Select the Design View option from the popped up window. 4. Finally click the <OK> button. The first four clicks are exactly the same as in case of Select query or any other query as discussed. The target is to enter into the Query Design View.
57
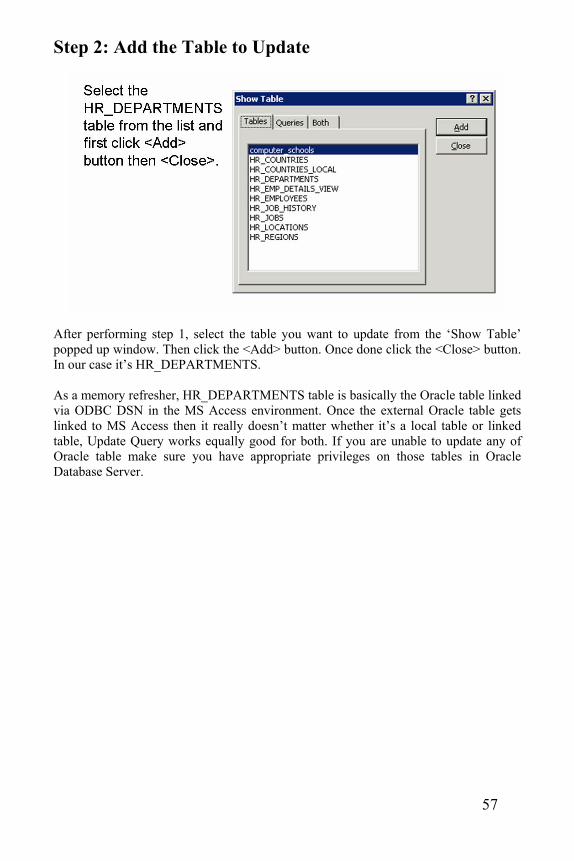
Step 2: Add the Table to Update
After performing step 1, select the table you want to update from the ‘Show Table’ popped up window. Then click the <Add> button. Once done click the <Close> button. In our case it’s HR_DEPARTMENTS. As a memory refresher, HR_DEPARTMENTS table is basically the Oracle table linked via ODBC DSN in the MS Access environment. Once the external Oracle table gets linked to MS Access then it really doesn’t matter whether it’s a local table or linked table, Update Query works equally good for both. If you are unable to update any of Oracle table make sure you have appropriate privileges on those tables in Oracle Database Server.
58
Step 3: Build Query After Selecting Update Query Option
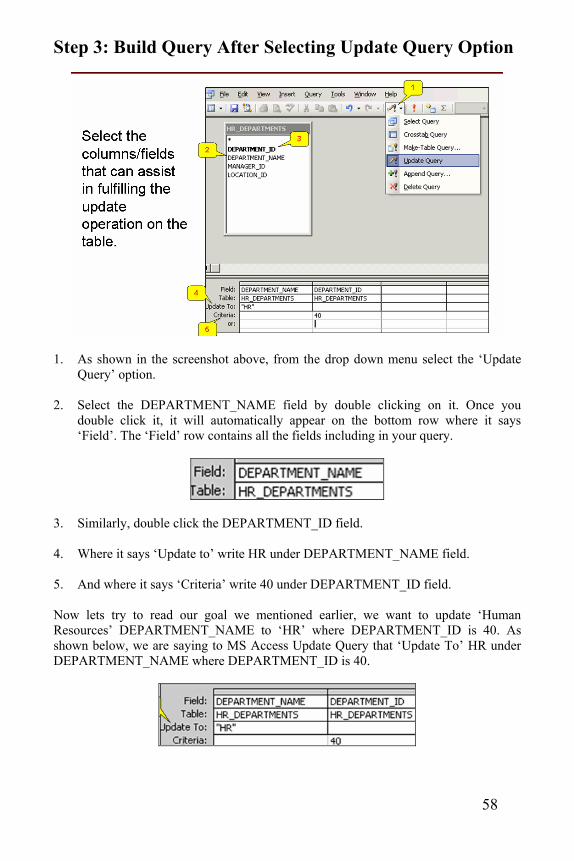
1. As shown in the screenshot above, from the drop down menu select the ‘Update
Query’ option.
2. Select the DEPARTMENT_NAME field by double clicking on it. Once you double click it, it will automatically appear on the bottom row where it says ‘Field’. The ‘Field’ row contains all the fields including in your query.
3. Similarly, double click the DEPARTMENT_ID field. 4. Where it says ‘Update to’ write HR under DEPARTMENT_NAME field. 5. And where it says ‘Criteria’ write 40 under DEPARTMENT_ID field. Now lets try to read our goal we mentioned earlier, we want to update ‘Human Resources’ DEPARTMENT_NAME to ‘HR’ where DEPARTMENT_ID is 40. As shown below, we are saying to MS Access Update Query that ‘Update To’ HR under DEPARTMENT_NAME where DEPARTMENT_ID is 40.
59
Step 4: Run Update Query & Click Yes
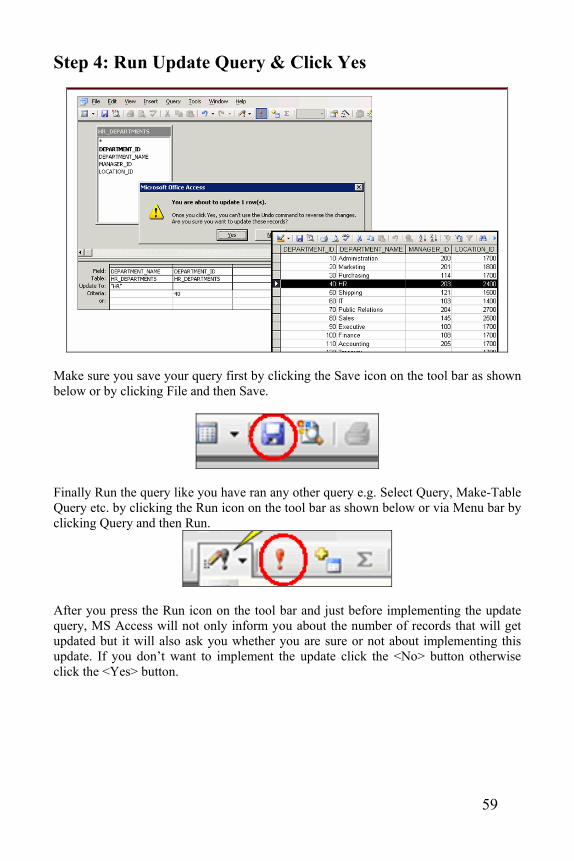
Make sure you save your query first by clicking the Save icon on the tool bar as shown below or by clicking File and then Save.
Finally Run the query like you have ran any other query e.g. Select Query, Make-Table Query etc. by clicking the Run icon on the tool bar as shown below or via Menu bar by clicking Query and then Run.
After you press the Run icon on the tool bar and just before implementing the update query, MS Access will not only inform you about the number of records that will get updated but it will also ask you whether you are sure or not about implementing this update. If you don’t want to implement the update click the <No> button otherwise click the <Yes> button.
60
The Delete Query is used to delete records from the table in the MS Access database. MS Access makes no difference in executing Delete Query against Local Tables or Linked External (Oracle) Tables. If you want to delete records from Oracle table based on some logic, you need to write SQL code to have it done. On the other hand, MS Access provides the complete visual environment and same goal can be achieved via MS Access just by click and drag operation. Let’s have a look on the design and implementation of Delete Query in MS Access.
61
Step 1: Entering Into Queries Design View
1. Once you have MS Access software up and running. Click the Queries object
under the Objects group as shown in the screenshot above.
2. Then click the ‘New’ command above objects group. 3. Select the Design View option from the popped up window. 4. Finally click the <OK> button. The first four clicks are exactly the same as in case of Select query discussed earlier. The target is to enter into the Query Design View.

62
Step 2: Add the Table to Update After performing the step 1, select the table on which you want to perform delete operation from the ‘Show Table’ popped up window. Then click the <Add> button. Once done click the <Close> button. In our case it’s HR_DEPARTMENTS table.
As a memory refresher, HR_DEPARTMENTS table is basically the Oracle table linked via ODBC DSN in the MS Access environment. Once the external table gets linked to MS Access then it really doesn’t matter whether it’s a local table or linked table, Delete Query works equally good for both. If you unable to perform delete operation on any of Oracle tables make sure you have appropriate privileges on those tables in Oracle Database Server.
63
Step 3: Build Query After Selecting Delete Query Option
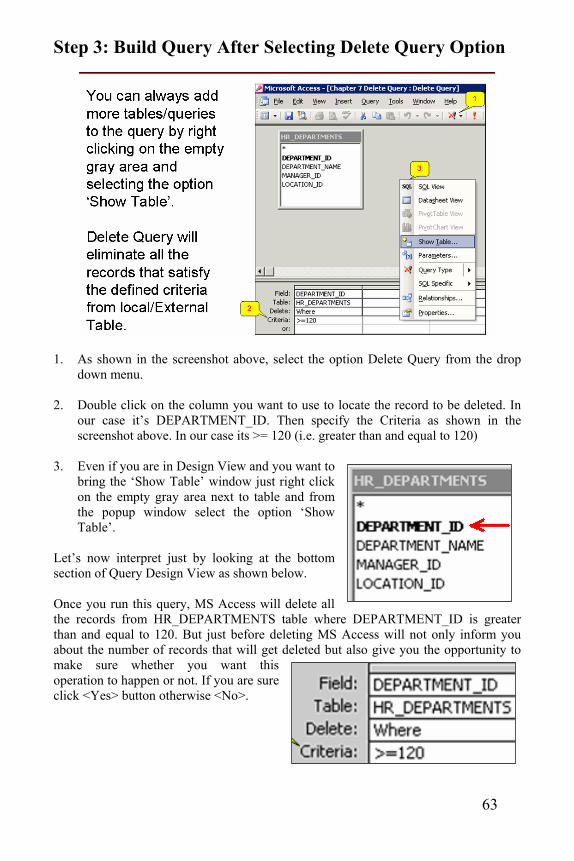
1. As shown in the screenshot above, select the option Delete Query from the drop
down menu.
2. Double click on the column you want to use to locate the record to be deleted. In our case it’s DEPARTMENT_ID. Then specify the Criteria as shown in the screenshot above. In our case its >= 120 (i.e. greater than and equal to 120)
3. Even if you are in Design View and you want to
bring the ‘Show Table’ window just right click on the empty gray area next to table and from the popup window select the option ‘Show Table’.
Let’s now interpret just by looking at the bottom section of Query Design View as shown below. Once you run this query, MS Access will delete all the records from HR_DEPARTMENTS table where DEPARTMENT_ID is greater than and equal to 120. But just before deleting MS Access will not only inform you about the number of records that will get deleted but also give you the opportunity to make sure whether you want this operation to happen or not. If you are sure click <Yes> button otherwise <No>.

64
Step 4: Run Delete Query & Click Yes
The final step would be to run your query. For this purpose, either click the Query and then Run from the menu bar or click the Run icon on the tool bar as shown below as well as on the slide above.
But before deleting MS Access will not only inform you about the number of records that will get deleted but also give you the opportunity to make sure whether you want this operation to happen or not. If you are sure click <Yes> button otherwise <No>.
65
Append Query is used to insert new records at the end the table. Like we mentioned before, the table could be either Local or External (Oracle) Linked table. MS Access treats local and linked tables on the same lines. If you encounter any error running the Append Query against Linked (external Oracle) tables in MS Access, make sure you have appropriate privileges on those tables in Oracle database server. Let’s have a look on the design and implementation of Append Query.
66
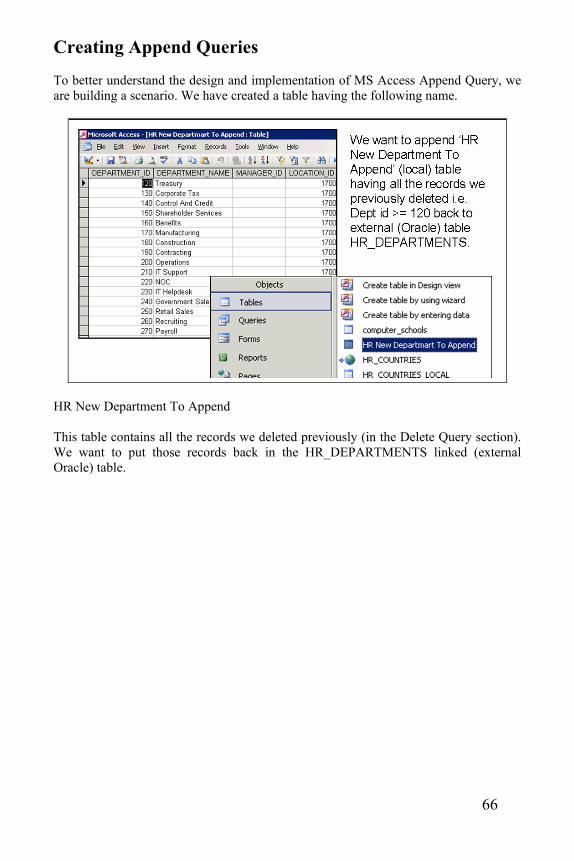
Creating Append Queries To better understand the design and implementation of MS Access Append Query, we are building a scenario. We have created a table having the following name.
HR New Department To Append This table contains all the records we deleted previously (in the Delete Query section). We want to put those records back in the HR_DEPARTMENTS linked (external Oracle) table.
67
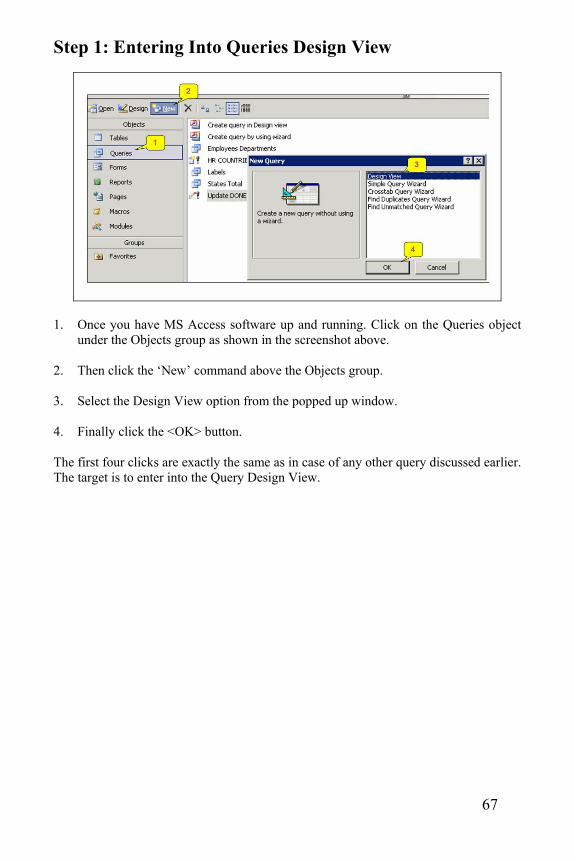
Step 1: Entering Into Queries Design View
1. Once you have MS Access software up and running. Click on the Queries object
under the Objects group as shown in the screenshot above.
2. Then click the ‘New’ command above the Objects group. 3. Select the Design View option from the popped up window. 4. Finally click the <OK> button. The first four clicks are exactly the same as in case of any other query discussed earlier. The target is to enter into the Query Design View.
68
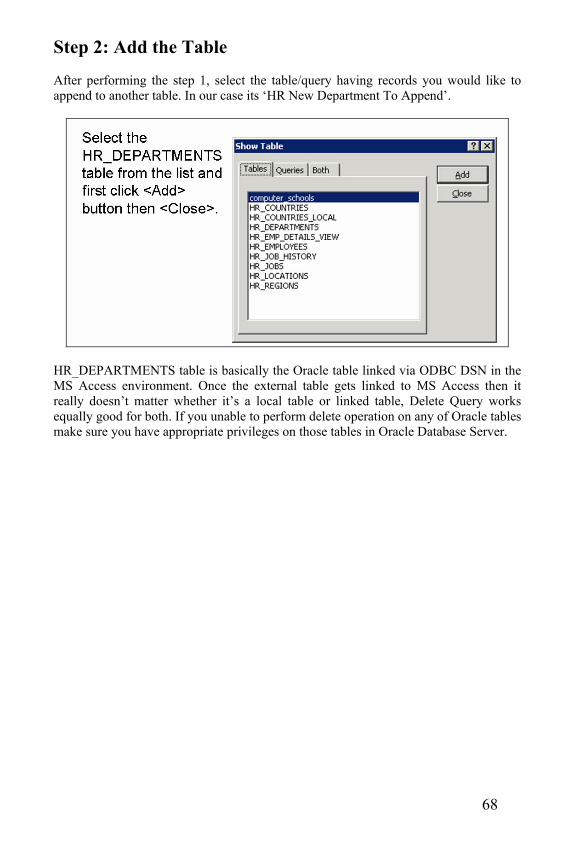
Step 2: Add the Table After performing the step 1, select the table/query having records you would like to append to another table. In our case its ‘HR New Department To Append’.
HR_DEPARTMENTS table is basically the Oracle table linked via ODBC DSN in the MS Access environment. Once the external table gets linked to MS Access then it really doesn’t matter whether it’s a local table or linked table, Delete Query works equally good for both. If you unable to perform delete operation on any of Oracle tables make sure you have appropriate privileges on those tables in Oracle Database Server.
69
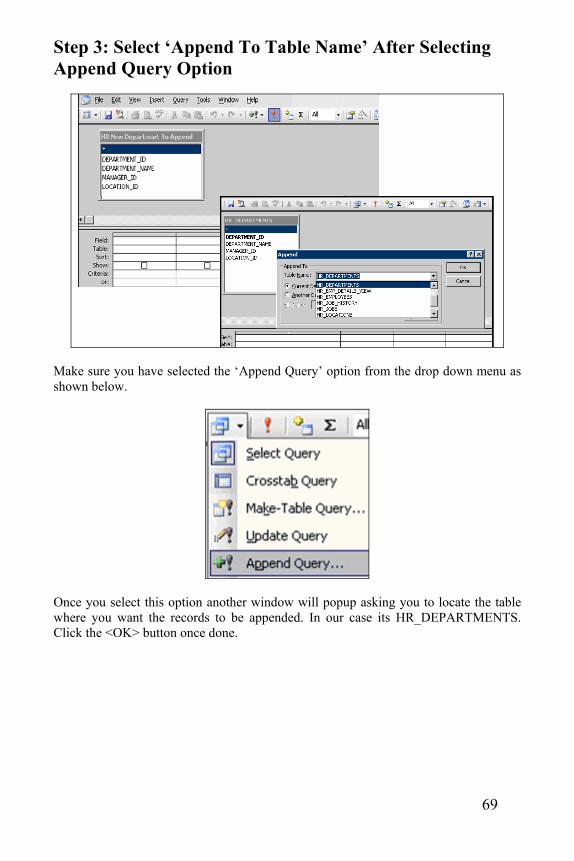
Step 3: Select ‘Append To Table Name’ After Selecting Append Query Option
Make sure you have selected the ‘Append Query’ option from the drop down menu as shown below.
Once you select this option another window will popup asking you to locate the table where you want the records to be appended. In our case its HR_DEPARTMENTS. Click the <OK> button once done.

70
Step 4: Run Update Query & Click Yes
Double click on the fields you would like to include in your append query from ‘HR New Department To Append’. All these fields will appear at the bottom and MS Access will choose the most appropriate corresponding field from the ‘Append To’ table i.e. HR_DEPARTMENTS. You can change the default selection made by MS Access by clicking on the field name in the ‘Append To’ row and it will get converted into drop-down menu with all the field names of the table which will be expecting new records. Remember that data type of corresponding fields has to match otherwise there is a greater probability for your query to end up in an error e.g. you would not be able to append Date data-type column values in Currency data-type column. Before running the query, click the save button on the tool bar to save it first. The final step would be to run your query. For this purpose, either click the Query and then Run from the menu bar or click the Run icon on the tool bar as shown in the adjacent screenshot with Exclamation (!) sign.
But just before appending MS Access will not only inform you about the number of records that will get appended but also give you the opportunity to make sure whether you want this operation to happen or not. If you are sure click <Yes> button otherwise <No>.
71
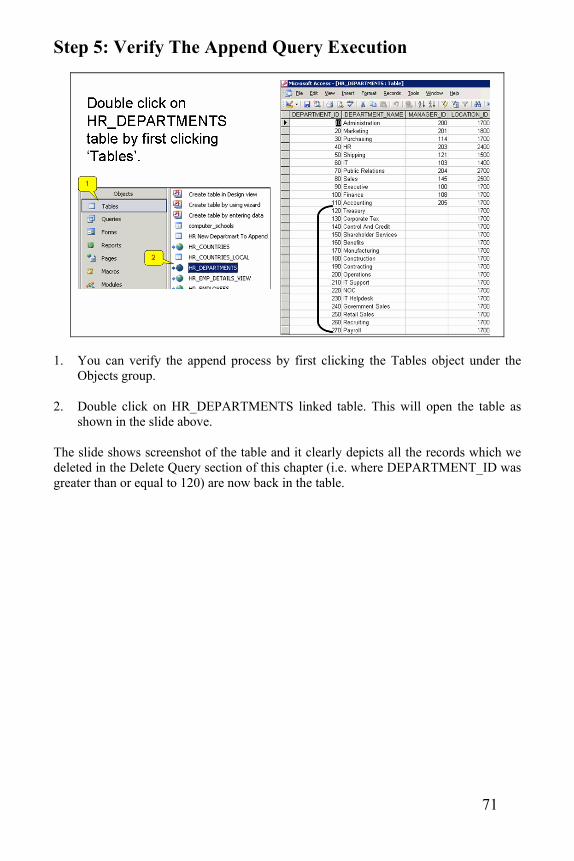
Step 5: Verify The Append Query Execution
1. You can verify the append process by first clicking the Tables object under the
Objects group.
2. Double click on HR_DEPARTMENTS linked table. This will open the table as shown in the slide above.
The slide shows screenshot of the table and it clearly depicts all the records which we deleted in the Delete Query section of this chapter (i.e. where DEPARTMENT_ID was greater than or equal to 120) are now back in the table.

72

73
CChhaapptteerr 44
MS Access Reports & Forms

74
75
The reporting feature in MS Access provides the ability to its users to present the data queried from any data source or residing in MS Access Local table in well-presentable format. We will learn in detail regarding designing and implementation of MS Access reports in this section of the book.
76
Step 1: Creating Reports Using Report Wizard
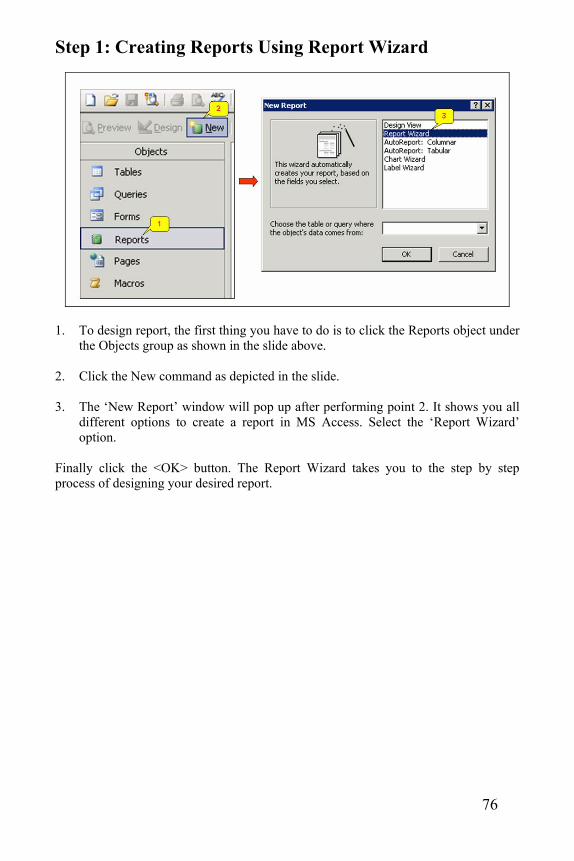
1. To design report, the first thing you have to do is to click the Reports object under
the Objects group as shown in the slide above.
2. Click the New command as depicted in the slide. 3. The ‘New Report’ window will pop up after performing point 2. It shows you all
different options to create a report in MS Access. Select the ‘Report Wizard’ option.
Finally click the <OK> button. The Report Wizard takes you to the step by step process of designing your desired report.
77
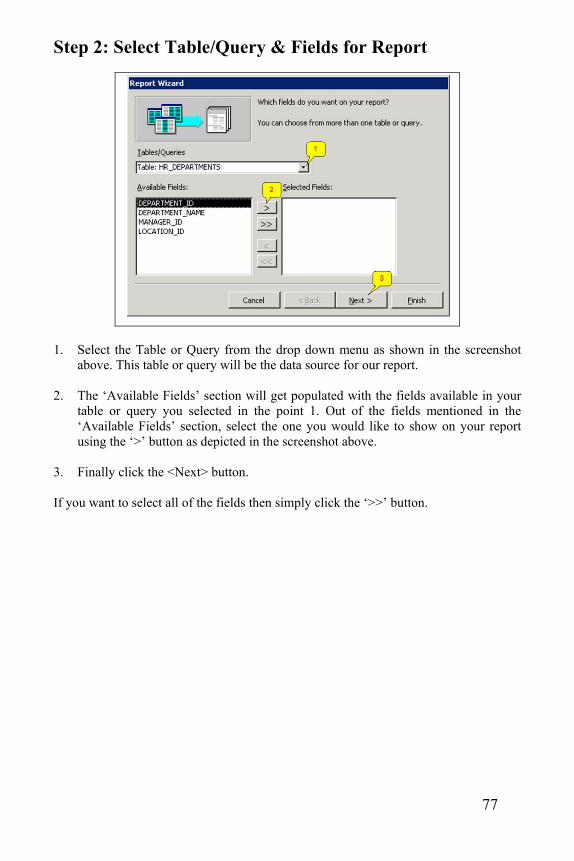
Step 2: Select Table/Query & Fields for Report
1. Select the Table or Query from the drop down menu as shown in the screenshot
above. This table or query will be the data source for our report.
2. The ‘Available Fields’ section will get populated with the fields available in your table or query you selected in the point 1. Out of the fields mentioned in the ‘Available Fields’ section, select the one you would like to show on your report using the ‘>’ button as depicted in the screenshot above.
3. Finally click the <Next> button. If you want to select all of the fields then simply click the ‘>>’ button.
78
Step 3: Add Grouping Levels If Required
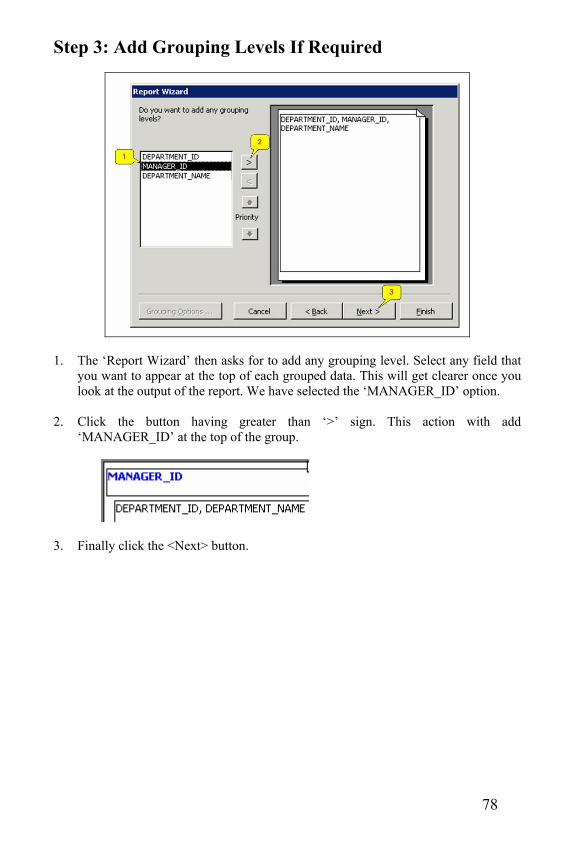
1. The ‘Report Wizard’ then asks for to add any grouping level. Select any field that
you want to appear at the top of each grouped data. This will get clearer once you look at the output of the report. We have selected the ‘MANAGER_ID’ option.
2. Click the button having greater than ‘>’ sign. This action with add ‘MANAGER_ID’ at the top of the group.
3. Finally click the <Next> button.
79
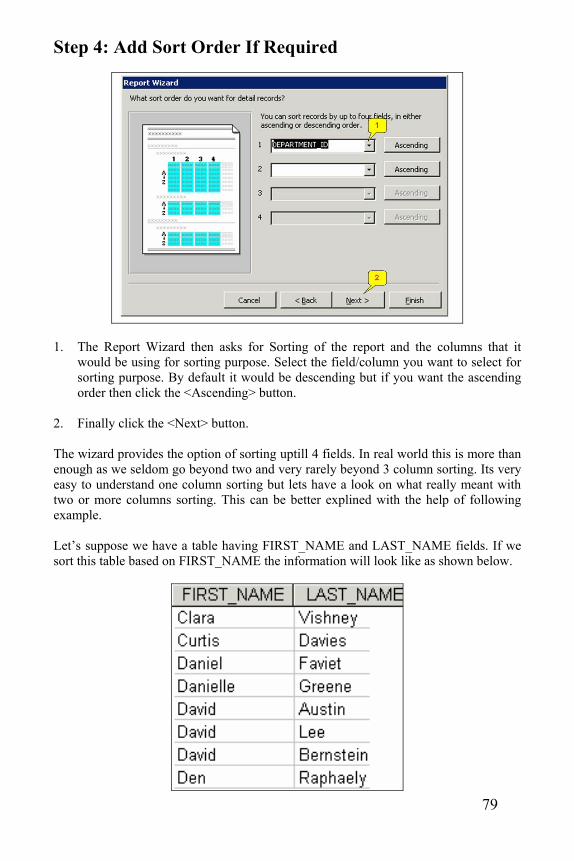
Step 4: Add Sort Order If Required
1. The Report Wizard then asks for Sorting of the report and the columns that it
would be using for sorting purpose. Select the field/column you want to select for sorting purpose. By default it would be descending but if you want the ascending order then click the <Ascending> button.
2. Finally click the <Next> button. The wizard provides the option of sorting uptill 4 fields. In real world this is more than enough as we seldom go beyond two and very rarely beyond 3 column sorting. Its very easy to understand one column sorting but lets have a look on what really meant with two or more columns sorting. This can be better explined with the help of following example. Let’s suppose we have a table having FIRST_NAME and LAST_NAME fields. If we sort this table based on FIRST_NAME the information will look like as shown below.
80
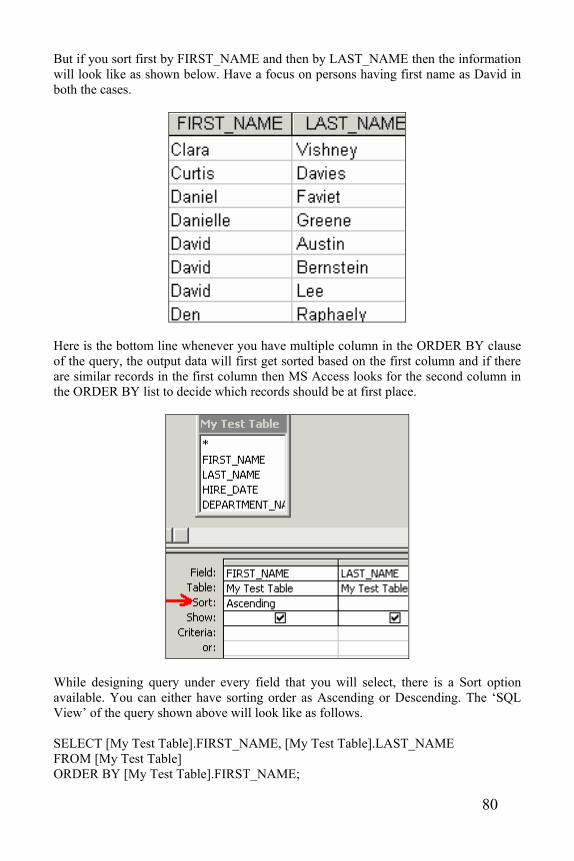
But if you sort first by FIRST_NAME and then by LAST_NAME then the information will look like as shown below. Have a focus on persons having first name as David in both the cases.
Here is the bottom line whenever you have multiple column in the ORDER BY clause of the query, the output data will first get sorted based on the first column and if there are similar records in the first column then MS Access looks for the second column in the ORDER BY list to decide which records should be at first place.
While designing query under every field that you will select, there is a Sort option available. You can either have sorting order as Ascending or Descending. The ‘SQL View’ of the query shown above will look like as follows. SELECT [My Test Table].FIRST_NAME, [My Test Table].LAST_NAME FROM [My Test Table] ORDER BY [My Test Table].FIRST_NAME;
81
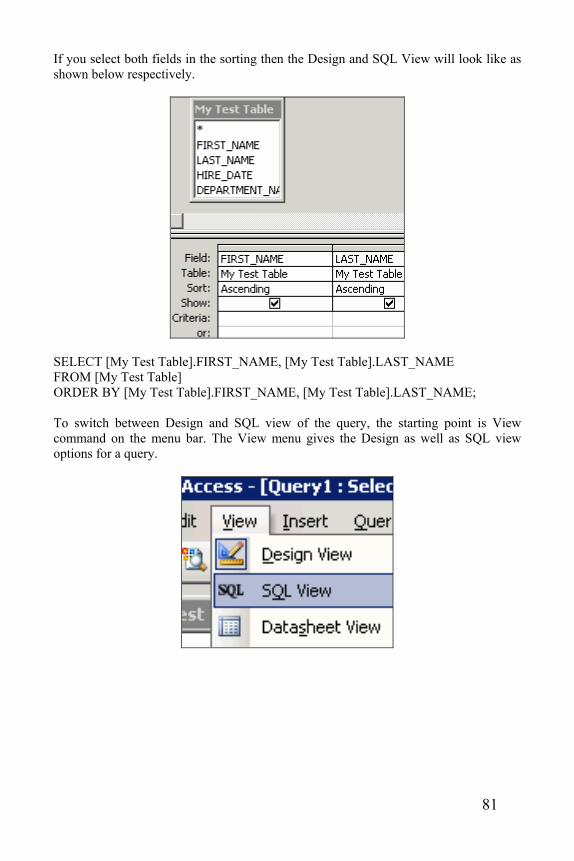
If you select both fields in the sorting then the Design and SQL View will look like as shown below respectively.
SELECT [My Test Table].FIRST_NAME, [My Test Table].LAST_NAME FROM [My Test Table] ORDER BY [My Test Table].FIRST_NAME, [My Test Table].LAST_NAME; To switch between Design and SQL view of the query, the starting point is View command on the menu bar. The View menu gives the Design as well as SQL view options for a query.
82
Step 5: Select Layout of Report
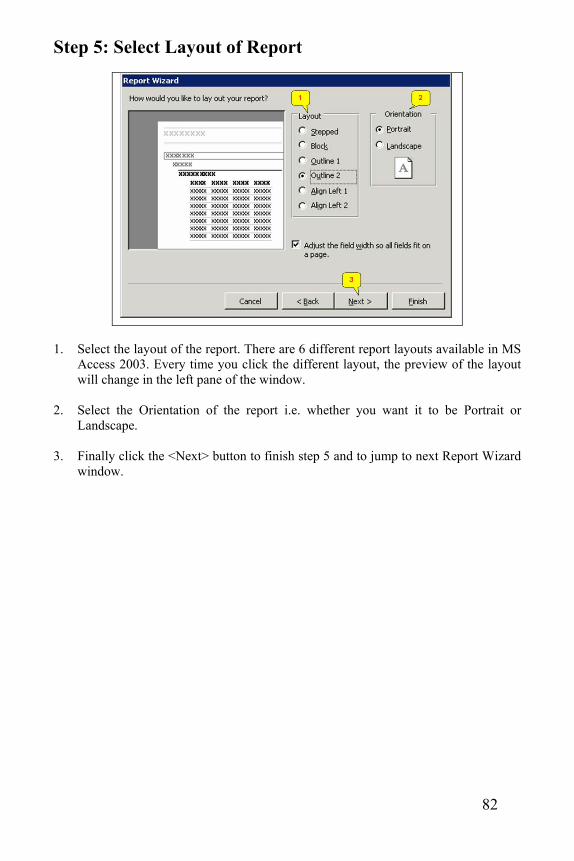
1. Select the layout of the report. There are 6 different report layouts available in MS
Access 2003. Every time you click the different layout, the preview of the layout will change in the left pane of the window.
2. Select the Orientation of the report i.e. whether you want it to be Portrait or Landscape.
3. Finally click the <Next> button to finish step 5 and to jump to next Report Wizard
window.
83
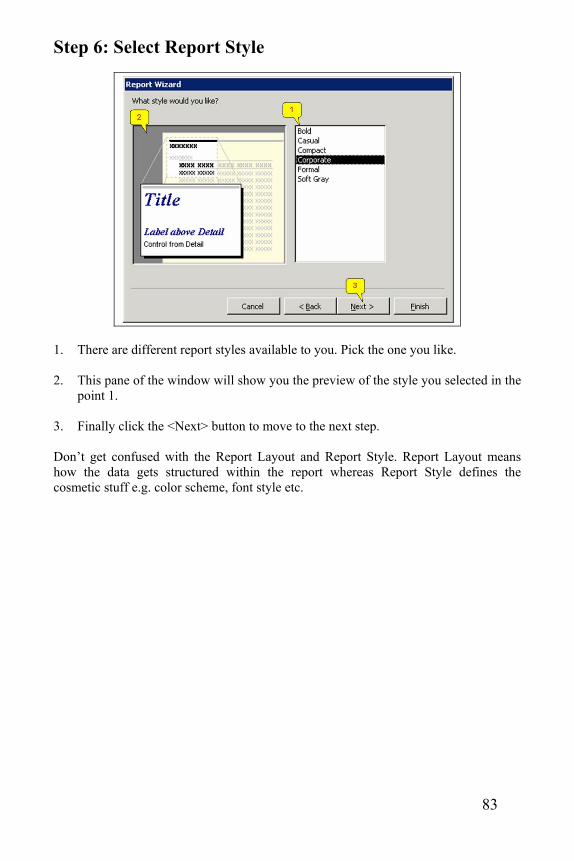
Step 6: Select Report Style
1. There are different report styles available to you. Pick the one you like.
2. This pane of the window will show you the preview of the style you selected in the
point 1. 3. Finally click the <Next> button to move to the next step. Don’t get confused with the Report Layout and Report Style. Report Layout means how the data gets structured within the report whereas Report Style defines the cosmetic stuff e.g. color scheme, font style etc.
84
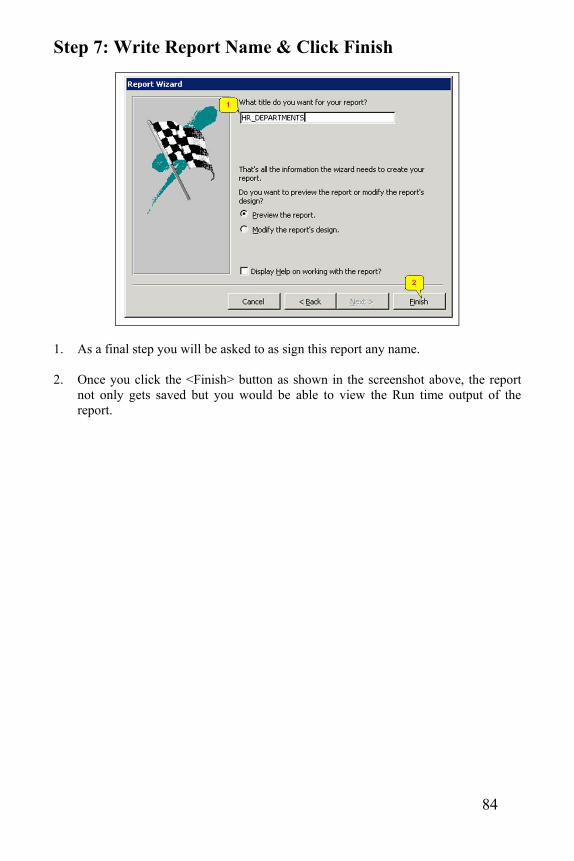
Step 7: Write Report Name & Click Finish
1. As a final step you will be asked to as sign this report any name.
2. Once you click the <Finish> button as shown in the screenshot above, the report
not only gets saved but you would be able to view the Run time output of the report.
85
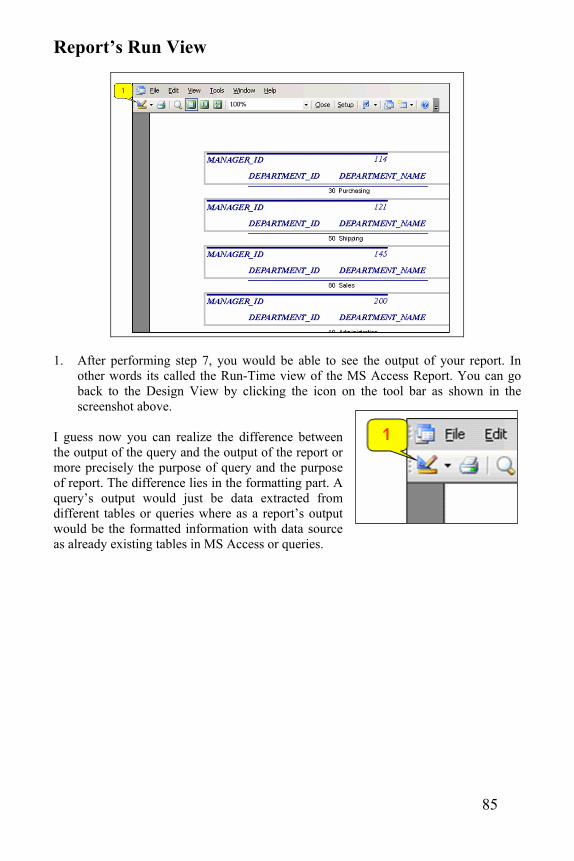
Report’s Run View
1. After performing step 7, you would be able to see the output of your report. In
other words its called the Run-Time view of the MS Access Report. You can go back to the Design View by clicking the icon on the tool bar as shown in the screenshot above.
I guess now you can realize the difference between the output of the query and the output of the report or more precisely the purpose of query and the purpose of report. The difference lies in the formatting part. A query’s output would just be data extracted from different tables or queries where as a report’s output would be the formatted information with data source as already existing tables in MS Access or queries.
86
Report’s Design View
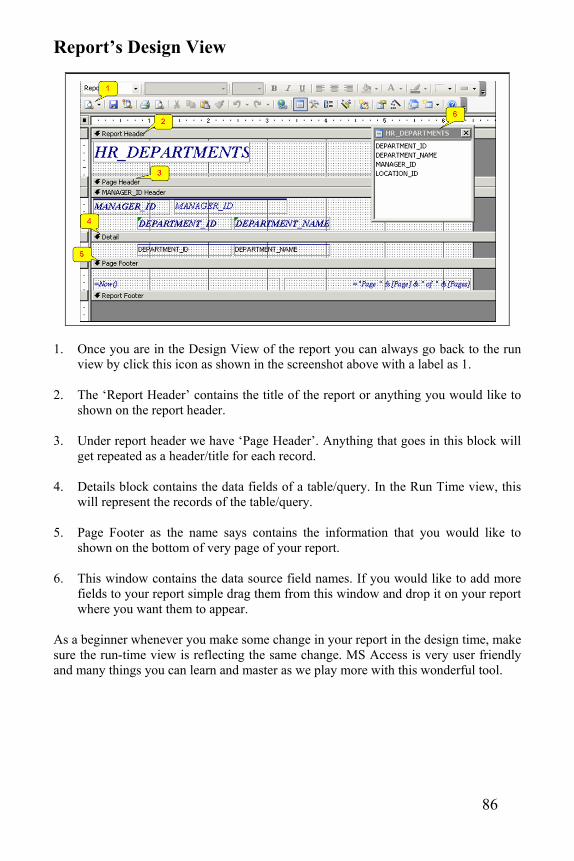
1. Once you are in the Design View of the report you can always go back to the run
view by click this icon as shown in the screenshot above with a label as 1.
2. The ‘Report Header’ contains the title of the report or anything you would like to shown on the report header.
3. Under report header we have ‘Page Header’. Anything that goes in this block will
get repeated as a header/title for each record. 4. Details block contains the data fields of a table/query. In the Run Time view, this
will represent the records of the table/query. 5. Page Footer as the name says contains the information that you would like to
shown on the bottom of very page of your report. 6. This window contains the data source field names. If you would like to add more
fields to your report simple drag them from this window and drop it on your report where you want them to appear.
As a beginner whenever you make some change in your report in the design time, make sure the run-time view is reflecting the same change. MS Access is very user friendly and many things you can learn and master as we play more with this wonderful tool.
87
Forms are used as the source of data entry into the MS Access tables. Forms are basically GUI (Graphical Users Interface) using which users interact with MS Access database. You can also do the data entry to MS Access table directly by double clicking the table and adding the records at the end of the table. Underneath a MS Access form you may have multiple tables attached. You don’t have to switch between tables during massive data entry. Moreover, the end users need not to know about SQL and inter tables’ relationship to perform the data entry operation.
88
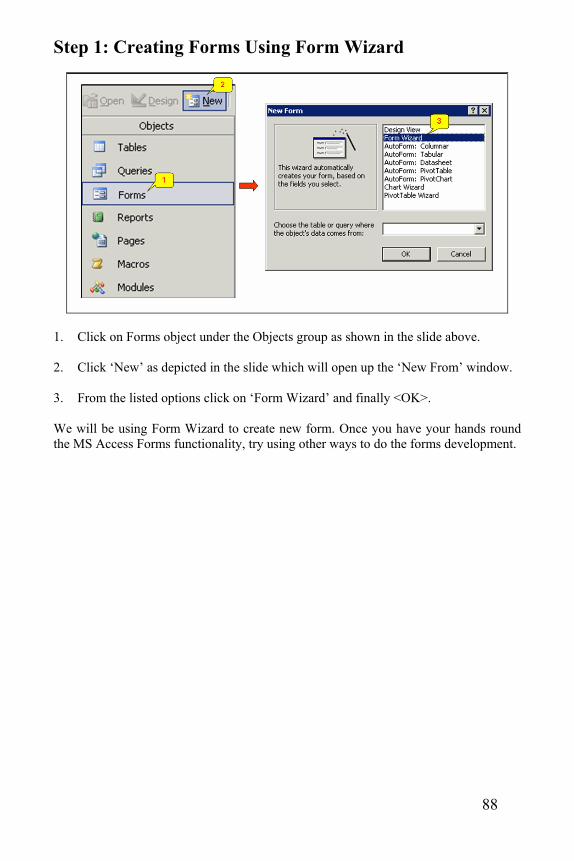
Step 1: Creating Forms Using Form Wizard
1. Click on Forms object under the Objects group as shown in the slide above. 2. Click ‘New’ as depicted in the slide which will open up the ‘New From’ window. 3. From the listed options click on ‘Form Wizard’ and finally <OK>. We will be using Form Wizard to create new form. Once you have your hands round the MS Access Forms functionality, try using other ways to do the forms development.
89
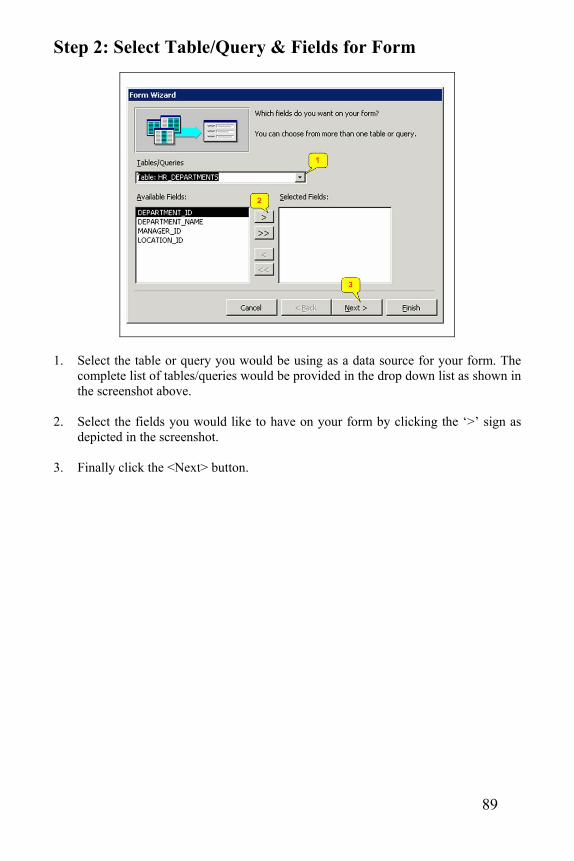
Step 2: Select Table/Query & Fields for Form
1. Select the table or query you would be using as a data source for your form. The
complete list of tables/queries would be provided in the drop down list as shown in the screenshot above.
2. Select the fields you would like to have on your form by clicking the ‘>’ sign as depicted in the screenshot.
3. Finally click the <Next> button.
90
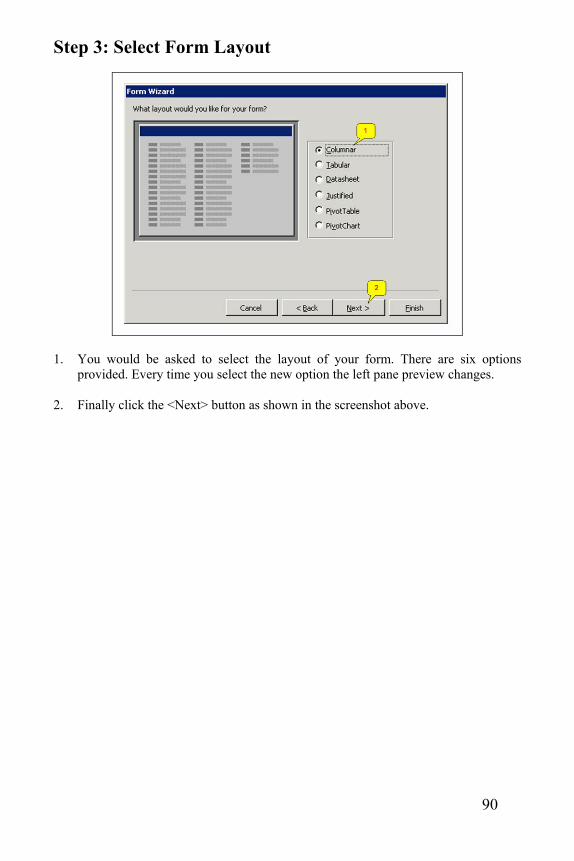
Step 3: Select Form Layout
1. You would be asked to select the layout of your form. There are six options
provided. Every time you select the new option the left pane preview changes. 2. Finally click the <Next> button as shown in the screenshot above.
91
Step 4: Select Form Style
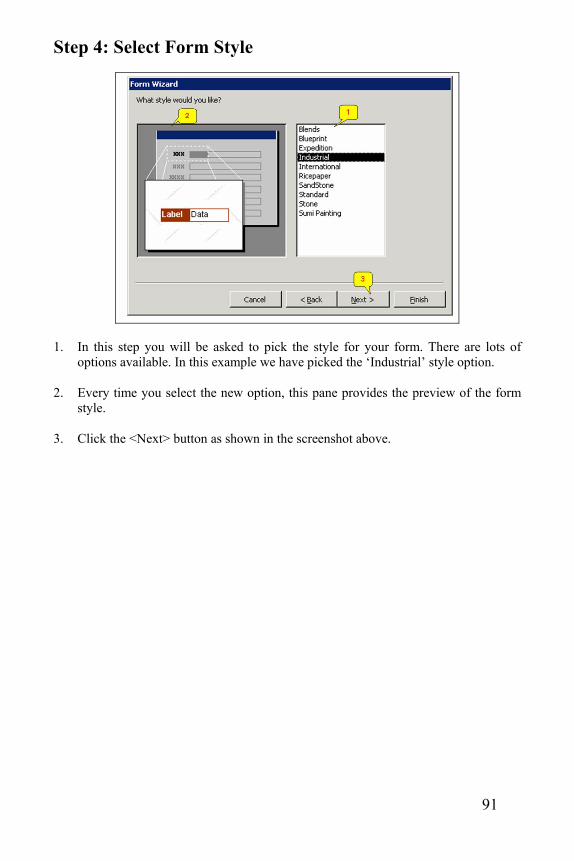
1. In this step you will be asked to pick the style for your form. There are lots of
options available. In this example we have picked the ‘Industrial’ style option. 2. Every time you select the new option, this pane provides the preview of the form
style. 3. Click the <Next> button as shown in the screenshot above.
92
Step 5: Write Form Name and Click Finish
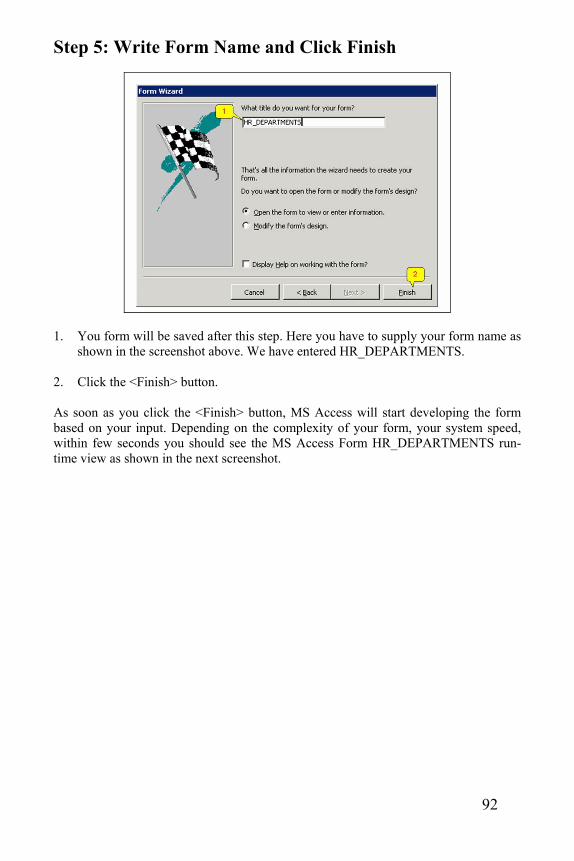
1. You form will be saved after this step. Here you have to supply your form name as
shown in the screenshot above. We have entered HR_DEPARTMENTS.
2. Click the <Finish> button. As soon as you click the <Finish> button, MS Access will start developing the form based on your input. Depending on the complexity of your form, your system speed, within few seconds you should see the MS Access Form HR_DEPARTMENTS run-time view as shown in the next screenshot.
93
Form Run-Time View
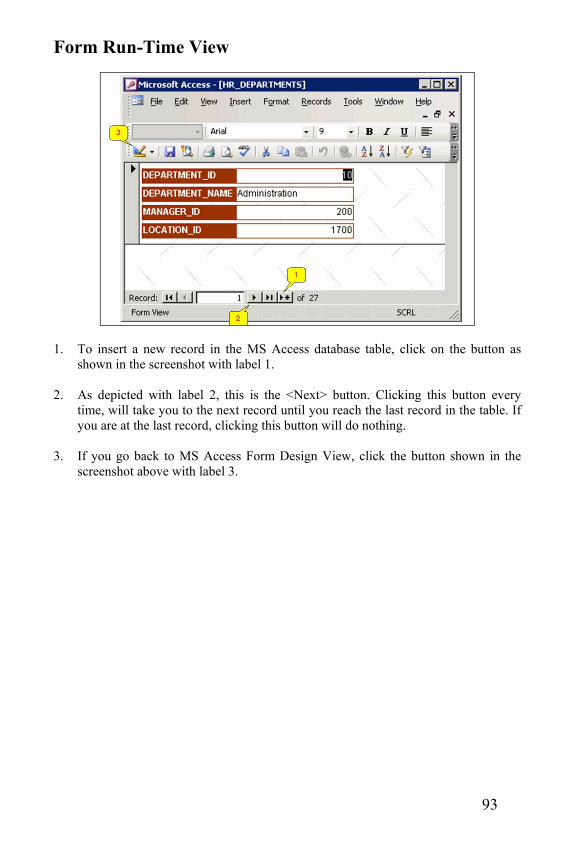
1. To insert a new record in the MS Access database table, click on the button as
shown in the screenshot with label 1.
2. As depicted with label 2, this is the <Next> button. Clicking this button every time, will take you to the next record until you reach the last record in the table. If you are at the last record, clicking this button will do nothing.
3. If you go back to MS Access Form Design View, click the button shown in the
screenshot above with label 3.
94
Form Design View
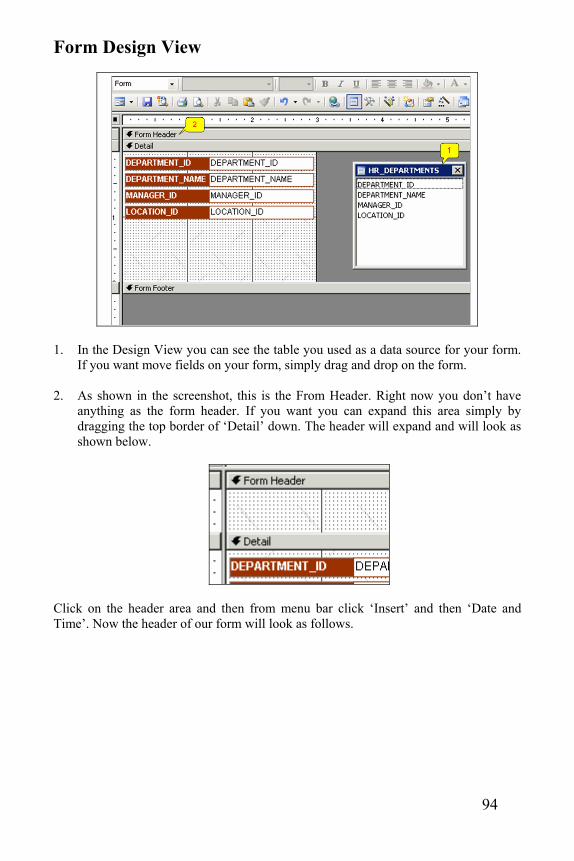
1. In the Design View you can see the table you used as a data source for your form.
If you want move fields on your form, simply drag and drop on the form. 2. As shown in the screenshot, this is the From Header. Right now you don’t have
anything as the form header. If you want you can expand this area simply by dragging the top border of ‘Detail’ down. The header will expand and will look as shown below.
Click on the header area and then from menu bar click ‘Insert’ and then ‘Date and Time’. Now the header of our form will look as follows.
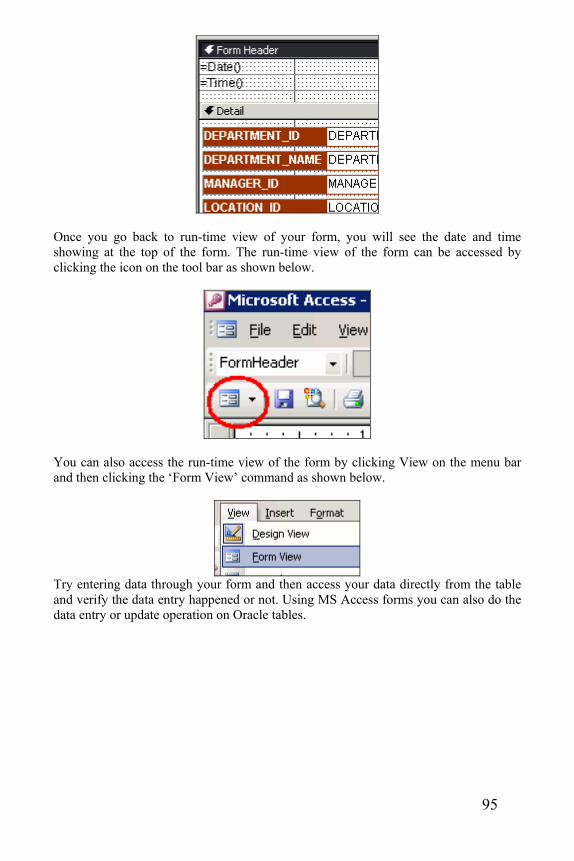
95
Once you go back to run-time view of your form, you will see the date and time showing at the top of the form. The run-time view of the form can be accessed by clicking the icon on the tool bar as shown below.
You can also access the run-time view of the form by clicking View on the menu bar and then clicking the ‘Form View’ command as shown below.
Try entering data through your form and then access your data directly from the table and verify the data entry happened or not. Using MS Access forms you can also do the data entry or update operation on Oracle tables.

96

97
CChhaapptteerr 55
MS Access Modules & Macros

98
99
For Visual Basic programmers, Modules object under the Objects group provides the coding ability. Its because of this Modules you can automate certain tasks that you have to do manually e.g. if you have Linked tables in your MS Access database pointing to Oracle Database, every time you open the database, the login/password screen pops up. Utilizing the Visual Basic coding environment in MS Access, you can automate the login to Oracle Server (or MS SQL Server). We will learn in detail how to do this in the articles ahead. Teaching Visual Basic is beyond the scope of this book. If you are already a MS Visual Basic programmer then this section would just be piece a cake for you.
100
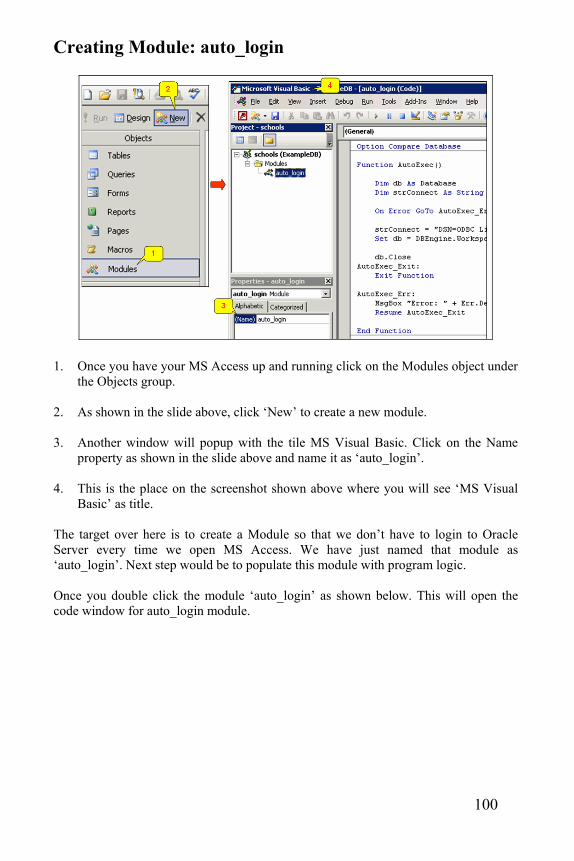
Creating Module: auto_login
1. Once you have your MS Access up and running click on the Modules object under
the Objects group.
2. As shown in the slide above, click ‘New’ to create a new module. 3. Another window will popup with the tile MS Visual Basic. Click on the Name
property as shown in the slide above and name it as ‘auto_login’. 4. This is the place on the screenshot shown above where you will see ‘MS Visual
Basic’ as title. The target over here is to create a Module so that we don’t have to login to Oracle Server every time we open MS Access. We have just named that module as ‘auto_login’. Next step would be to populate this module with program logic. Once you double click the module ‘auto_login’ as shown below. This will open the code window for auto_login module.
101
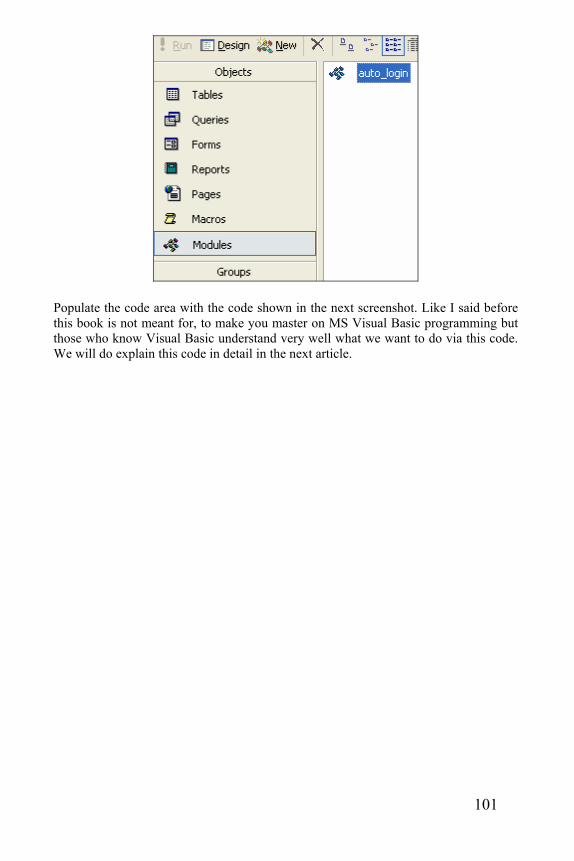
Populate the code area with the code shown in the next screenshot. Like I said before this book is not meant for, to make you master on MS Visual Basic programming but those who know Visual Basic understand very well what we want to do via this code. We will do explain this code in detail in the next article.
102
auto_login Visual Basic Code
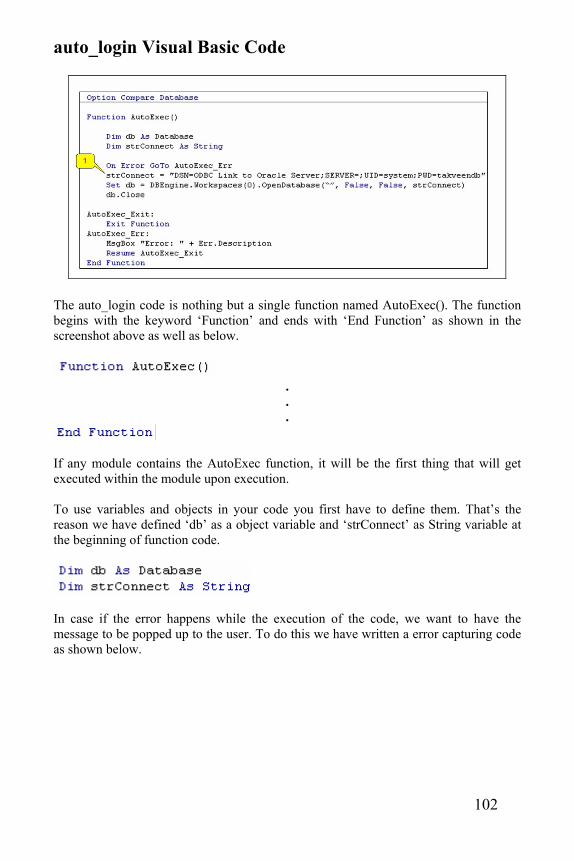
The auto_login code is nothing but a single function named AutoExec(). The function begins with the keyword ‘Function’ and ends with ‘End Function’ as shown in the screenshot above as well as below.
. . .
If any module contains the AutoExec function, it will be the first thing that will get executed within the module upon execution. To use variables and objects in your code you first have to define them. That’s the reason we have defined ‘db’ as a object variable and ‘strConnect’ as String variable at the beginning of function code.
In case if the error happens while the execution of the code, we want to have the message to be popped up to the user. To do this we have written a error capturing code as shown below.
103
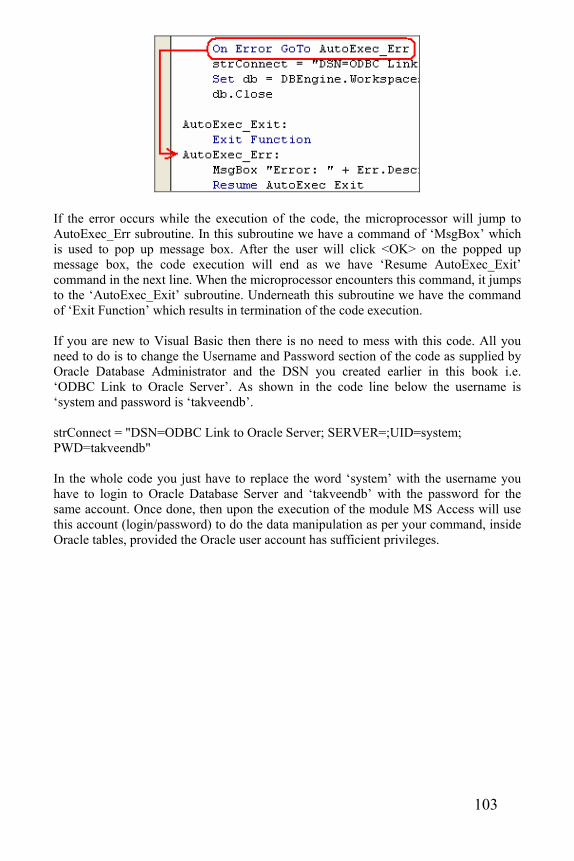
If the error occurs while the execution of the code, the microprocessor will jump to AutoExec_Err subroutine. In this subroutine we have a command of ‘MsgBox’ which is used to pop up message box. After the user will click <OK> on the popped up message box, the code execution will end as we have ‘Resume AutoExec_Exit’ command in the next line. When the microprocessor encounters this command, it jumps to the ‘AutoExec_Exit’ subroutine. Underneath this subroutine we have the command of ‘Exit Function’ which results in termination of the code execution. If you are new to Visual Basic then there is no need to mess with this code. All you need to do is to change the Username and Password section of the code as supplied by Oracle Database Administrator and the DSN you created earlier in this book i.e. ‘ODBC Link to Oracle Server’. As shown in the code line below the username is ‘system and password is ‘takveendb’. strConnect = "DSN=ODBC Link to Oracle Server; SERVER=;UID=system; PWD=takveendb" In the whole code you just have to replace the word ‘system’ with the username you have to login to Oracle Database Server and ‘takveendb’ with the password for the same account. Once done, then upon the execution of the module MS Access will use this account (login/password) to do the data manipulation as per your command, inside Oracle tables, provided the Oracle user account has sufficient privileges.
104
Save & Exit Visual Basic window
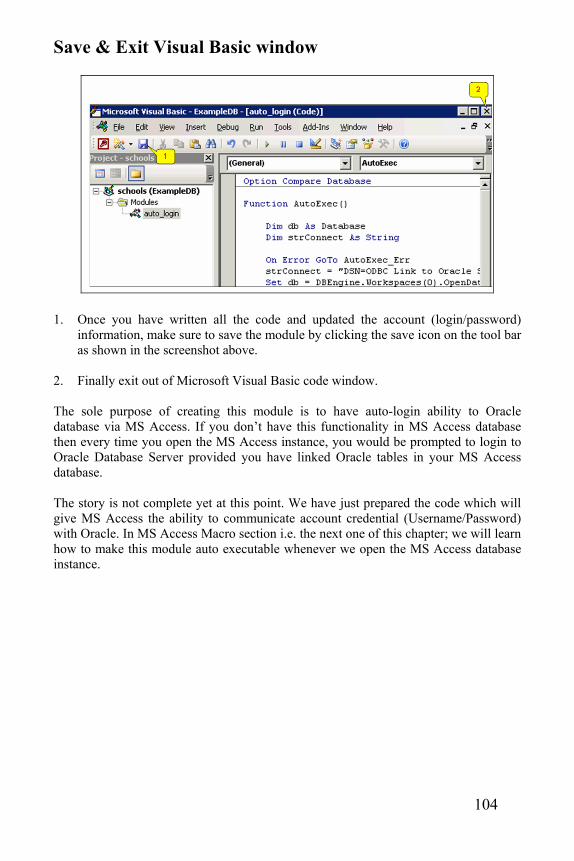
1. Once you have written all the code and updated the account (login/password)
information, make sure to save the module by clicking the save icon on the tool bar as shown in the screenshot above.
2. Finally exit out of Microsoft Visual Basic code window. The sole purpose of creating this module is to have auto-login ability to Oracle database via MS Access. If you don’t have this functionality in MS Access database then every time you open the MS Access instance, you would be prompted to login to Oracle Database Server provided you have linked Oracle tables in your MS Access database. The story is not complete yet at this point. We have just prepared the code which will give MS Access the ability to communicate account credential (Username/Password) with Oracle. In MS Access Macro section i.e. the next one of this chapter; we will learn how to make this module auto executable whenever we open the MS Access database instance.
105
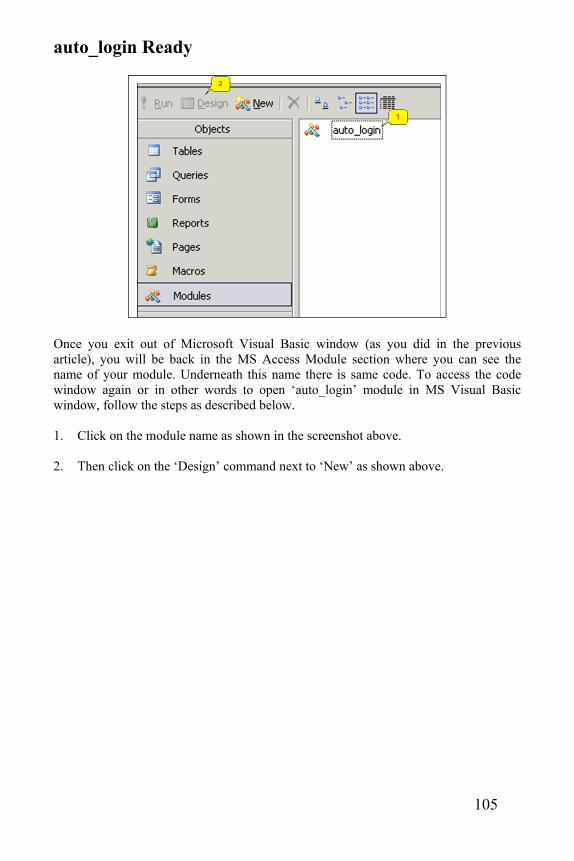
auto_login Ready
Once you exit out of Microsoft Visual Basic window (as you did in the previous article), you will be back in the MS Access Module section where you can see the name of your module. Underneath this name there is same code. To access the code window again or in other words to open ‘auto_login’ module in MS Visual Basic window, follow the steps as described below. 1. Click on the module name as shown in the screenshot above.
2. Then click on the ‘Design’ command next to ‘New’ as shown above.
106
Macros are used to automate tasks in MS Access. If there are 10 make table queries that you have to run one after another in a step by step where the output of one query depends on the output of the other query, such kind of stuff and many similar type can be achieved using Macro with just a single click or the occurrence of certain event. We will look into details about macros and how to use them in MS Access, in this section. Moreover we will complete our auto login ability project too.
107
Creating Macro: AutoExec
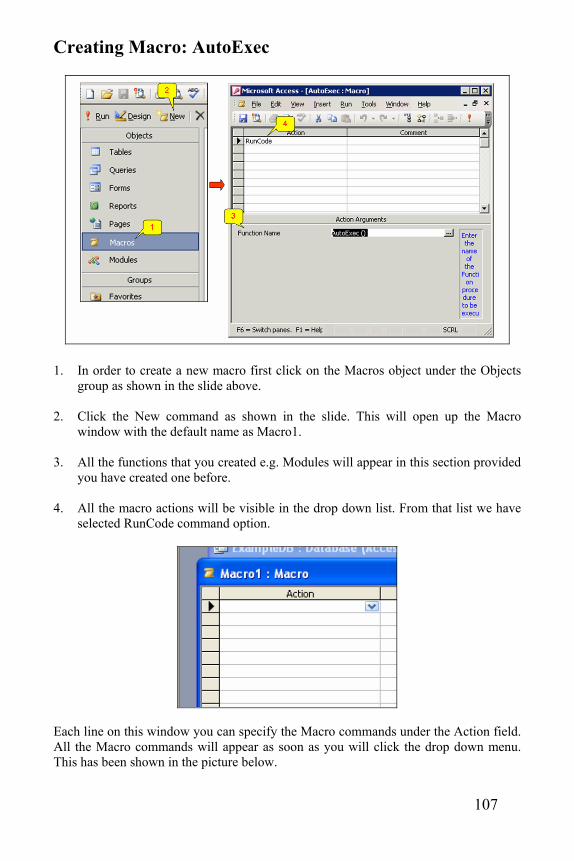
1. In order to create a new macro first click on the Macros object under the Objects
group as shown in the slide above.
2. Click the New command as shown in the slide. This will open up the Macro window with the default name as Macro1.
3. All the functions that you created e.g. Modules will appear in this section provided
you have created one before. 4. All the macro actions will be visible in the drop down list. From that list we have
selected RunCode command option.
Each line on this window you can specify the Macro commands under the Action field. All the Macro commands will appear as soon as you will click the drop down menu. This has been shown in the picture below.
108
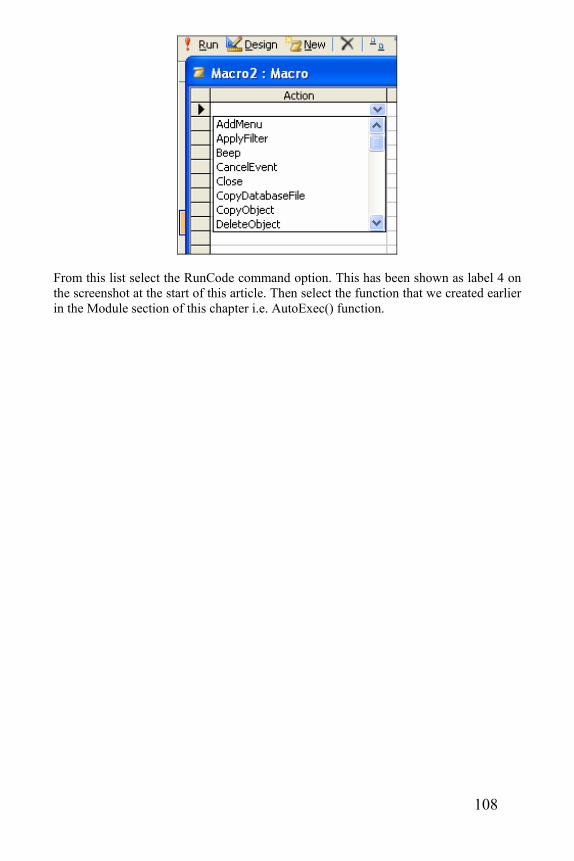
From this list select the RunCode command option. This has been shown as label 4 on the screenshot at the start of this article. Then select the function that we created earlier in the Module section of this chapter i.e. AutoExec() function.

109
Save & Exit Macro Design View
1. Finally click the save button and name your macro as AutoExec. Any macro
having the name AutoExec in MS Access will get executed automatically as soon as MS Access gets alive or in other words when you double click MS Access icon on you desktop.
2. Close out the MS Access database window. After closing out the MS Access environment, turn it back on. You will see that MS Access will no more ask you for the login/password stuff. Why? Because as soon as MS Access gets alive it looks for the macro with the name AutoExec, if it finds then it executes that macro. In our AutoExec macro we have coded to run AutoExec() function. This function is the one we created in the earlier part of this chapter and it in fact contains the login/password information as well as script to logon to Oracle Server.

110
AutoExec Macro Ready
1. Once you are under the Macro object click on the macro that you just created.
2. Click the Run command as shown in the screenshot above. This will execute the
AutoExec macro. 3. If you want to edit your AutoExec macro then click the Design command after
selecting the macro AutoExec. Whenever you execute the AutoExec macro nothing will happen apparently but each time MS Access will supply the credentials (login/password) to Oracle Database Server. You can notice that by looking at the Network Activity icon next to the time in your Window XP system. The icon will blink as soon as you perform this run operation on AutoExec macro.
If you have not supplied proper Oracle Database user’s credential (login/password) while preparing the code for AutoExec() function you will encounter an error.

111
CChhaapptteerr 66
MS Access Data Import/Export Feature

112

113
MS Access has the ability not only to Export data out from its environment to any of the famous data formats but can also bring the outside data into its environment. In this section of the chapter we will be looking deep into the Export functionality of MS Access. We will be looking into all those formats that MS Access can handle as far as Export and Import is concern in the next article.
114
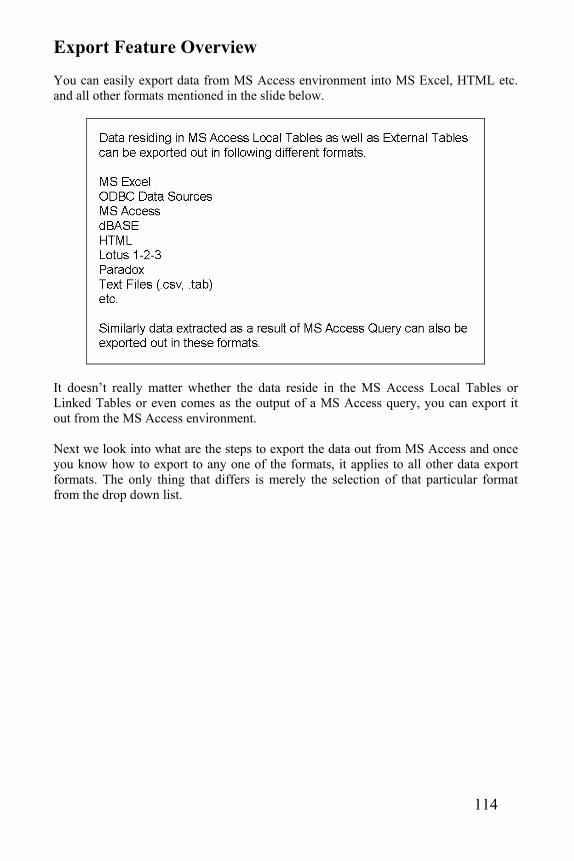
Export Feature Overview You can easily export data from MS Access environment into MS Excel, HTML etc. and all other formats mentioned in the slide below.
It doesn’t really matter whether the data reside in the MS Access Local Tables or Linked Tables or even comes as the output of a MS Access query, you can export it out from the MS Access environment. Next we look into what are the steps to export the data out from MS Access and once you know how to export to any one of the formats, it applies to all other data export formats. The only thing that differs is merely the selection of that particular format from the drop down list.
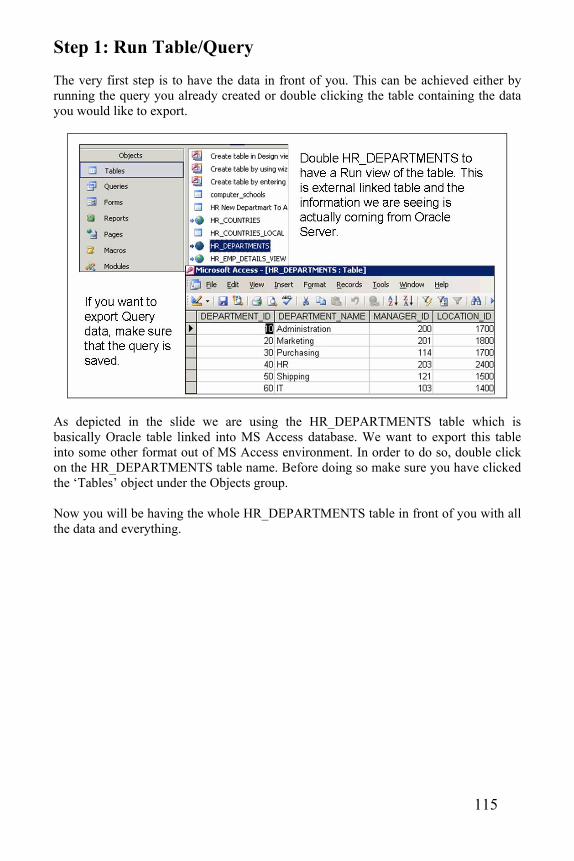
115
Step 1: Run Table/Query The very first step is to have the data in front of you. This can be achieved either by running the query you already created or double clicking the table containing the data you would like to export.
As depicted in the slide we are using the HR_DEPARTMENTS table which is basically Oracle table linked into MS Access database. We want to export this table into some other format out of MS Access environment. In order to do so, double click on the HR_DEPARTMENTS table name. Before doing so make sure you have clicked the ‘Tables’ object under the Objects group. Now you will be having the whole HR_DEPARTMENTS table in front of you with all the data and everything.
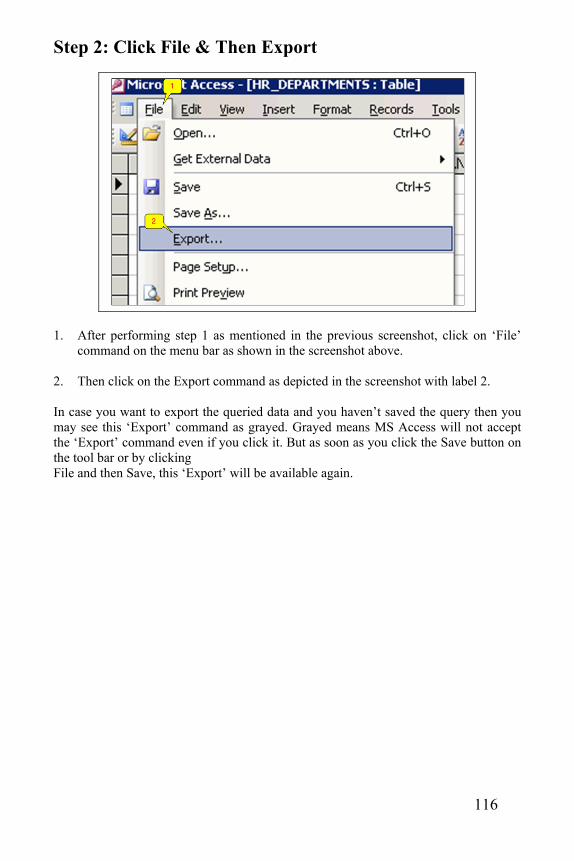
116
Step 2: Click File & Then Export
1. After performing step 1 as mentioned in the previous screenshot, click on ‘File’
command on the menu bar as shown in the screenshot above.
2. Then click on the Export command as depicted in the screenshot with label 2. In case you want to export the queried data and you haven’t saved the query then you may see this ‘Export’ command as grayed. Grayed means MS Access will not accept the ‘Export’ command even if you click it. But as soon as you click the Save button on the tool bar or by clicking File and then Save, this ‘Export’ will be available again.
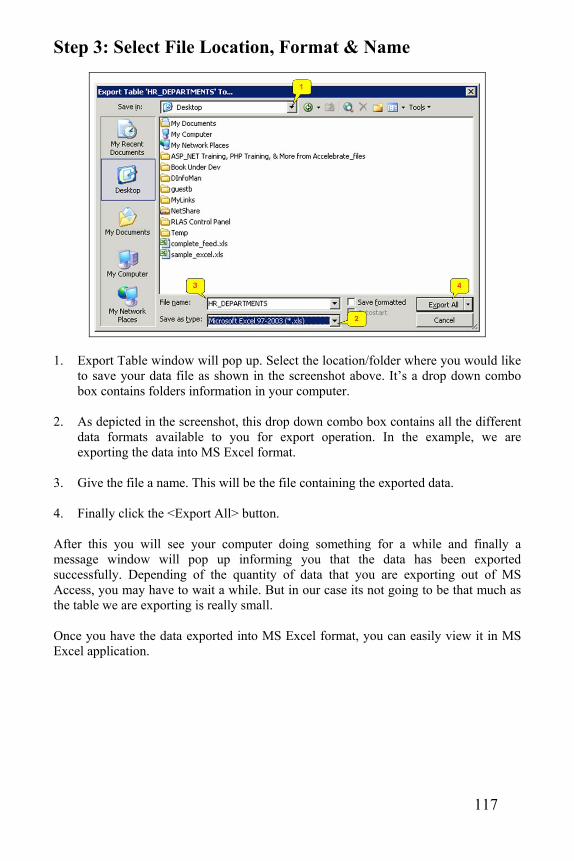
117
Step 3: Select File Location, Format & Name
1. Export Table window will pop up. Select the location/folder where you would like
to save your data file as shown in the screenshot above. It’s a drop down combo box contains folders information in your computer.
2. As depicted in the screenshot, this drop down combo box contains all the different
data formats available to you for export operation. In the example, we are exporting the data into MS Excel format.
3. Give the file a name. This will be the file containing the exported data. 4. Finally click the <Export All> button. After this you will see your computer doing something for a while and finally a message window will pop up informing you that the data has been exported successfully. Depending of the quantity of data that you are exporting out of MS Access, you may have to wait a while. But in our case its not going to be that much as the table we are exporting is really small. Once you have the data exported into MS Excel format, you can easily view it in MS Excel application.
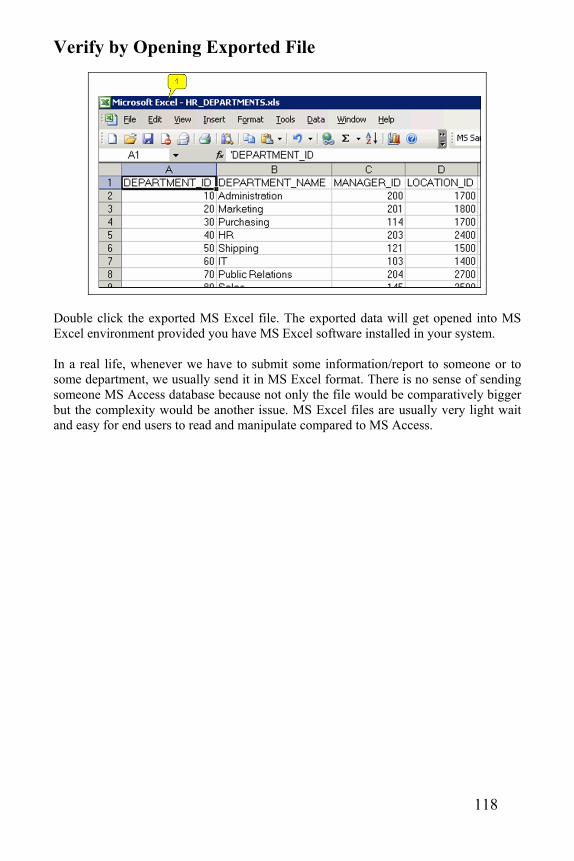
118
Verify by Opening Exported File
Double click the exported MS Excel file. The exported data will get opened into MS Excel environment provided you have MS Excel software installed in your system. In a real life, whenever we have to submit some information/report to someone or to some department, we usually send it in MS Excel format. There is no sense of sending someone MS Access database because not only the file would be comparatively bigger but the complexity would be another issue. MS Excel files are usually very light wait and easy for end users to read and manipulate compared to MS Access.

119
Just like we can export data out from MS Access environment, on the same lines we can import data into MS Access environment from various different sources or in other words many different data formats are accepted by MS Access database for data import. In this section of the chapter we will be learning in detail how to implement the Import functionality in MS Access.
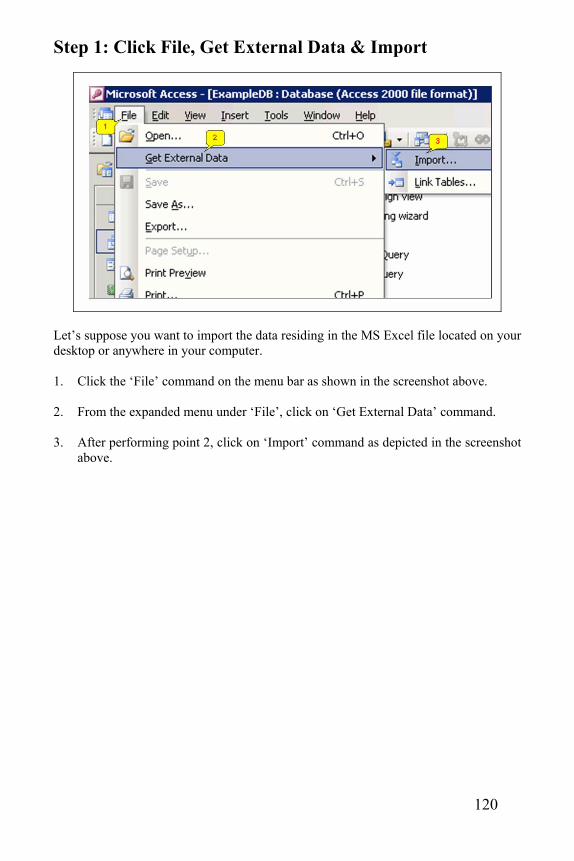
120
Step 1: Click File, Get External Data & Import
Let’s suppose you want to import the data residing in the MS Excel file located on your desktop or anywhere in your computer. 1. Click the ‘File’ command on the menu bar as shown in the screenshot above. 2. From the expanded menu under ‘File’, click on ‘Get External Data’ command. 3. After performing point 2, click on ‘Import’ command as depicted in the screenshot
above.
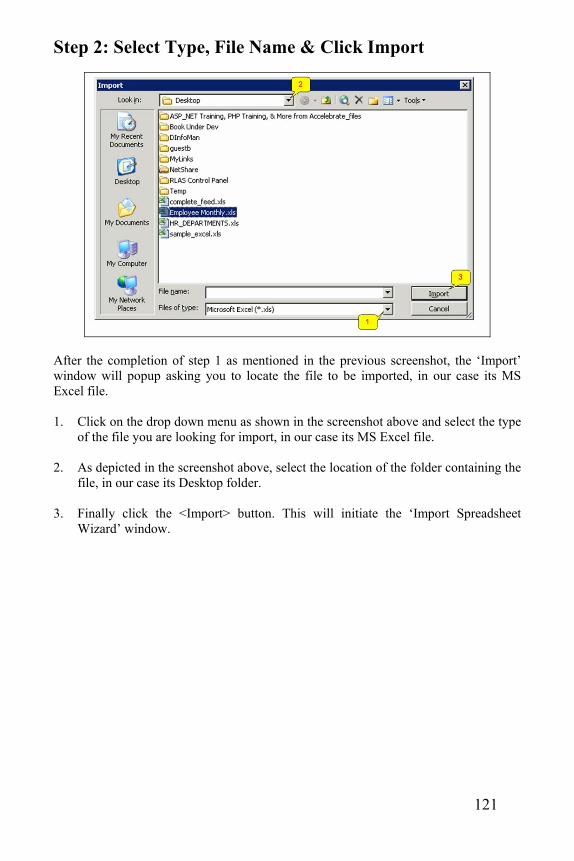
121
Step 2: Select Type, File Name & Click Import
After the completion of step 1 as mentioned in the previous screenshot, the ‘Import’ window will popup asking you to locate the file to be imported, in our case its MS Excel file. 1. Click on the drop down menu as shown in the screenshot above and select the type
of the file you are looking for import, in our case its MS Excel file.
2. As depicted in the screenshot above, select the location of the folder containing the file, in our case its Desktop folder.
3. Finally click the <Import> button. This will initiate the ‘Import Spreadsheet
Wizard’ window.
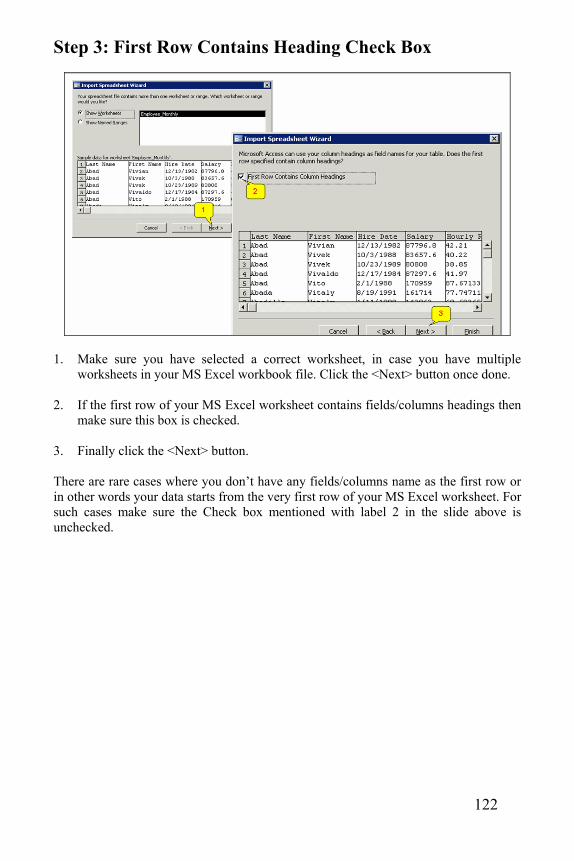
122
Step 3: First Row Contains Heading Check Box
1. Make sure you have selected a correct worksheet, in case you have multiple
worksheets in your MS Excel workbook file. Click the <Next> button once done. 2. If the first row of your MS Excel worksheet contains fields/columns headings then
make sure this box is checked. 3. Finally click the <Next> button. There are rare cases where you don’t have any fields/columns name as the first row or in other words your data starts from the very first row of your MS Excel worksheet. For such cases make sure the Check box mentioned with label 2 in the slide above is unchecked.
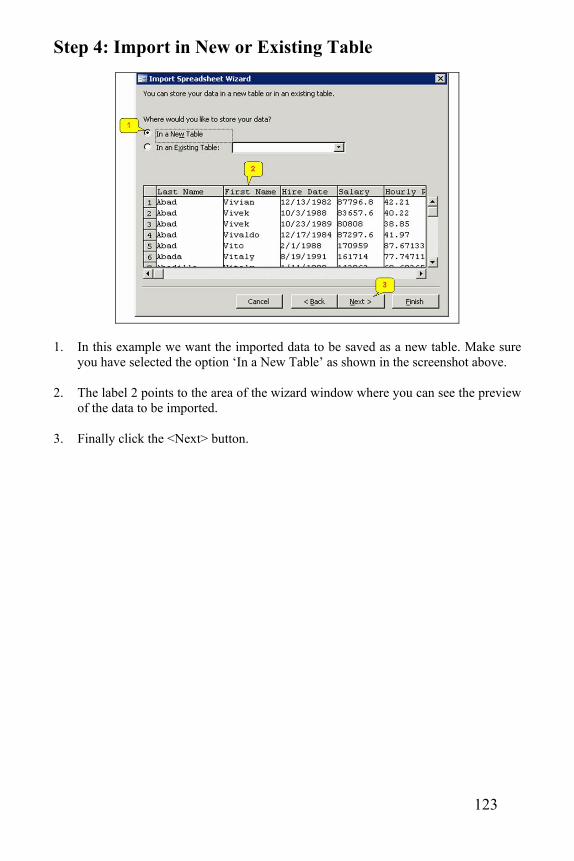
123
Step 4: Import in New or Existing Table
1. In this example we want the imported data to be saved as a new table. Make sure
you have selected the option ‘In a New Table’ as shown in the screenshot above.
2. The label 2 points to the area of the wizard window where you can see the preview of the data to be imported.
3. Finally click the <Next> button.
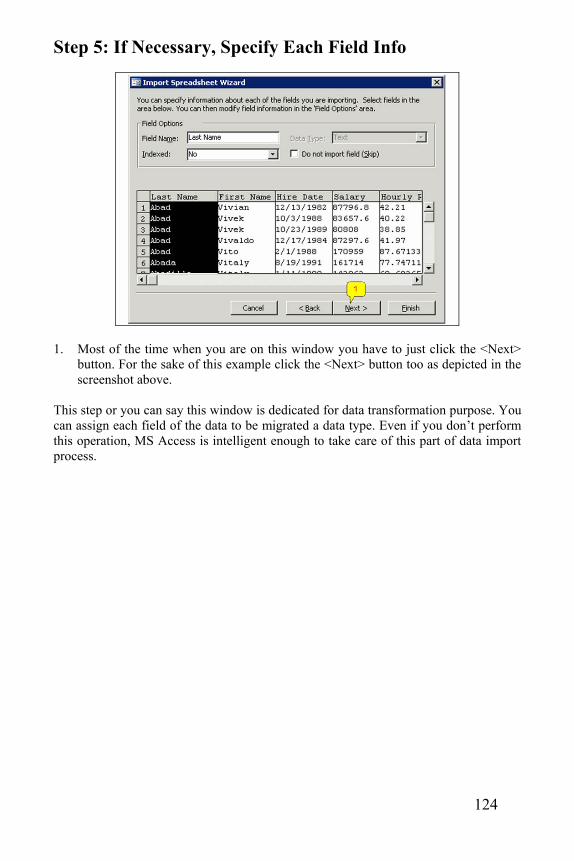
124
Step 5: If Necessary, Specify Each Field Info
1. Most of the time when you are on this window you have to just click the <Next>
button. For the sake of this example click the <Next> button too as depicted in the screenshot above.
This step or you can say this window is dedicated for data transformation purpose. You can assign each field of the data to be migrated a data type. Even if you don’t perform this operation, MS Access is intelligent enough to take care of this part of data import process.
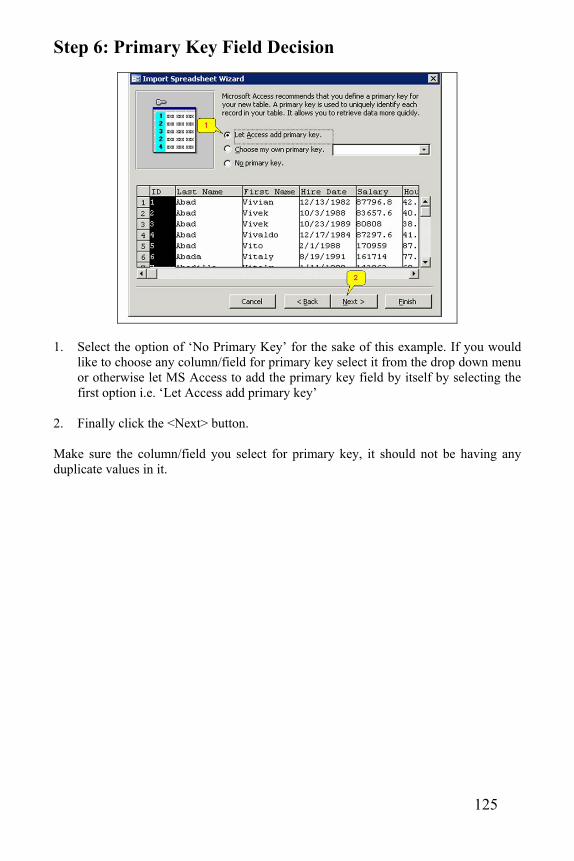
125
Step 6: Primary Key Field Decision
1. Select the option of ‘No Primary Key’ for the sake of this example. If you would
like to choose any column/field for primary key select it from the drop down menu or otherwise let MS Access to add the primary key field by itself by selecting the first option i.e. ‘Let Access add primary key’
2. Finally click the <Next> button. Make sure the column/field you select for primary key, it should not be having any duplicate values in it.
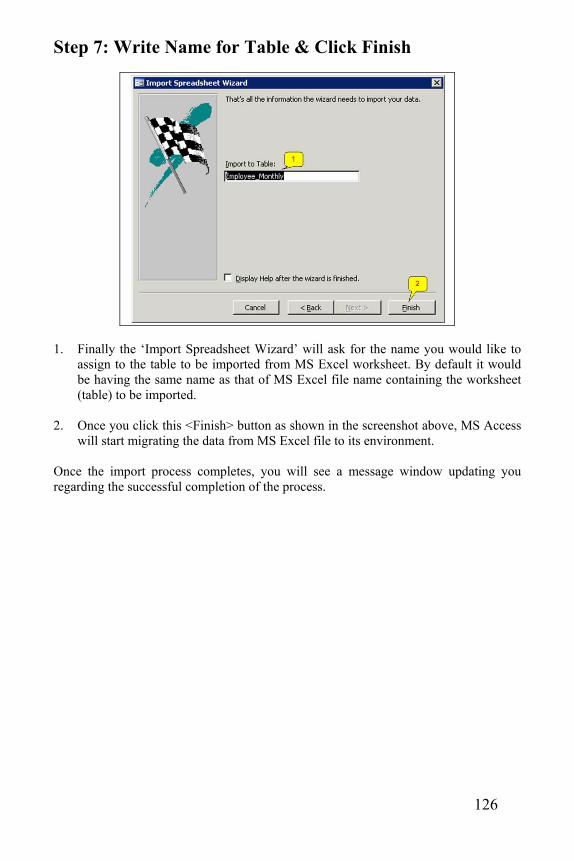
126
Step 7: Write Name for Table & Click Finish
1. Finally the ‘Import Spreadsheet Wizard’ will ask for the name you would like to
assign to the table to be imported from MS Excel worksheet. By default it would be having the same name as that of MS Excel file name containing the worksheet (table) to be imported.
2. Once you click this <Finish> button as shown in the screenshot above, MS Access
will start migrating the data from MS Excel file to its environment.
Once the import process completes, you will see a message window updating you regarding the successful completion of the process.
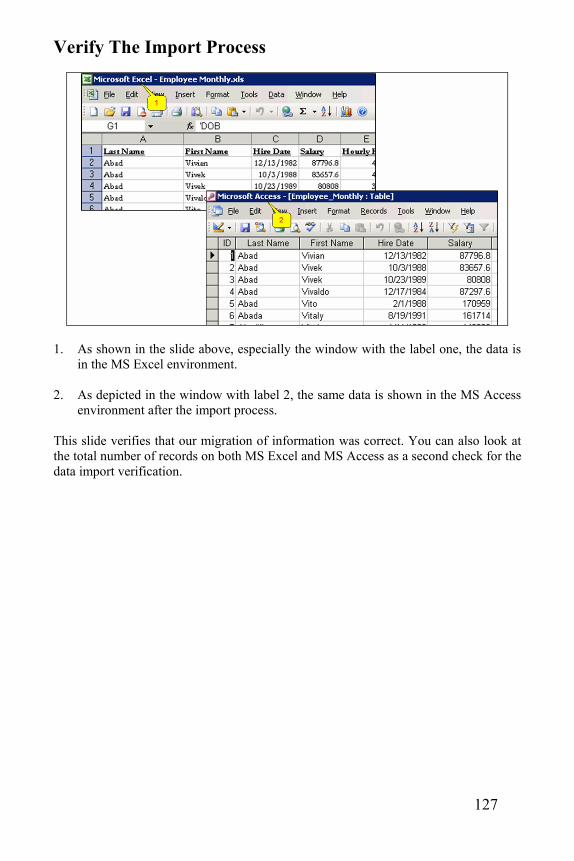
127
Verify The Import Process
1. As shown in the slide above, especially the window with the label one, the data is
in the MS Excel environment.
2. As depicted in the window with label 2, the same data is shown in the MS Access environment after the import process.
This slide verifies that our migration of information was correct. You can also look at the total number of records on both MS Excel and MS Access as a second check for the data import verification.

128

129
CChhaapptteerr 77
MS Access Built-In Functions

130
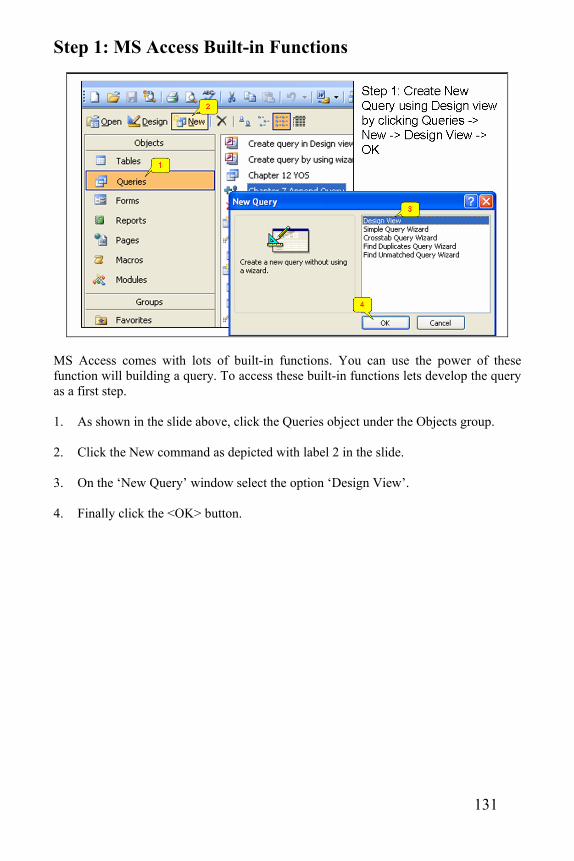
131
Step 1: MS Access Built-in Functions
MS Access comes with lots of built-in functions. You can use the power of these function will building a query. To access these built-in functions lets develop the query as a first step. 1. As shown in the slide above, click the Queries object under the Objects group.
2. Click the New command as depicted with label 2 in the slide. 3. On the ‘New Query’ window select the option ‘Design View’. 4. Finally click the <OK> button.
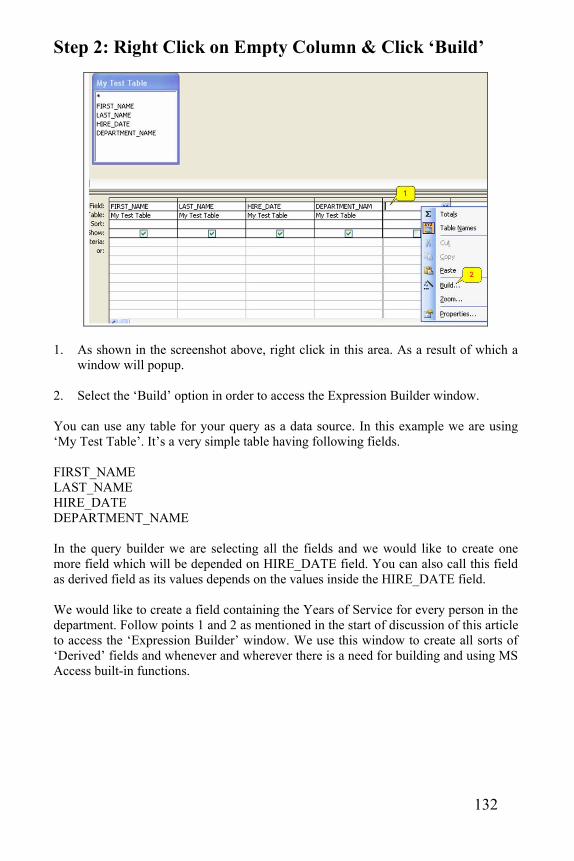
132
Step 2: Right Click on Empty Column & Click ‘Build’
1. As shown in the screenshot above, right click in this area. As a result of which a
window will popup.
2. Select the ‘Build’ option in order to access the Expression Builder window. You can use any table for your query as a data source. In this example we are using ‘My Test Table’. It’s a very simple table having following fields. FIRST_NAME LAST_NAME HIRE_DATE DEPARTMENT_NAME
In the query builder we are selecting all the fields and we would like to create one more field which will be depended on HIRE_DATE field. You can also call this field as derived field as its values depends on the values inside the HIRE_DATE field. We would like to create a field containing the Years of Service for every person in the department. Follow points 1 and 2 as mentioned in the start of discussion of this article to access the ‘Expression Builder’ window. We use this window to create all sorts of ‘Derived’ fields and whenever and wherever there is a need for building and using MS Access built-in functions.
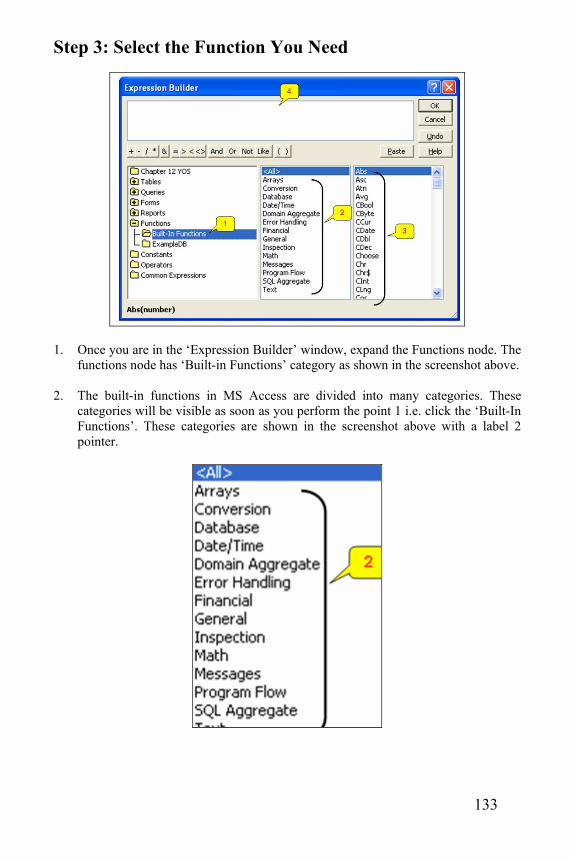
133
Step 3: Select the Function You Need
1. Once you are in the ‘Expression Builder’ window, expand the Functions node. The
functions node has ‘Built-in Functions’ category as shown in the screenshot above. 2. The built-in functions in MS Access are divided into many categories. These
categories will be visible as soon as you perform the point 1 i.e. click the ‘Built-In Functions’. These categories are shown in the screenshot above with a label 2 pointer.
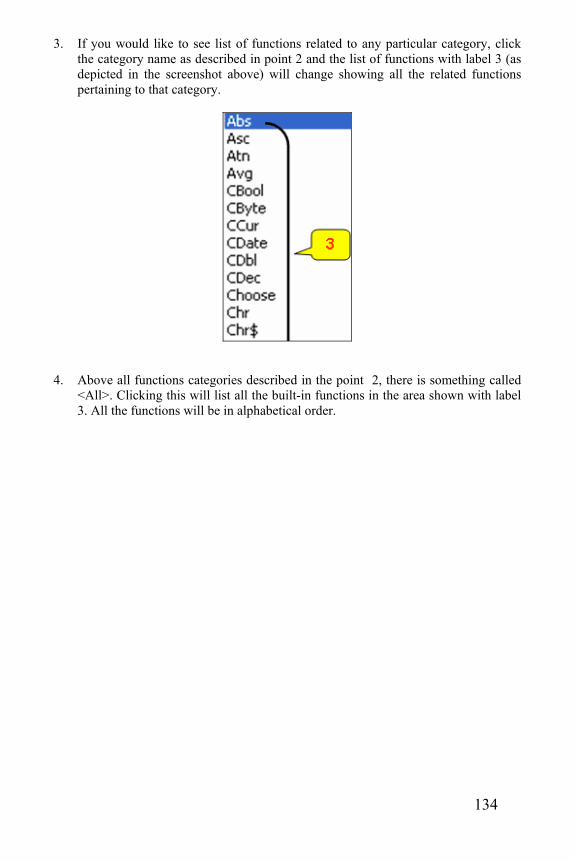
134
3. If you would like to see list of functions related to any particular category, click the category name as described in point 2 and the list of functions with label 3 (as depicted in the screenshot above) will change showing all the related functions pertaining to that category.
4. Above all functions categories described in the point 2, there is something called
<All>. Clicking this will list all the built-in functions in the area shown with label 3. All the functions will be in alphabetical order.
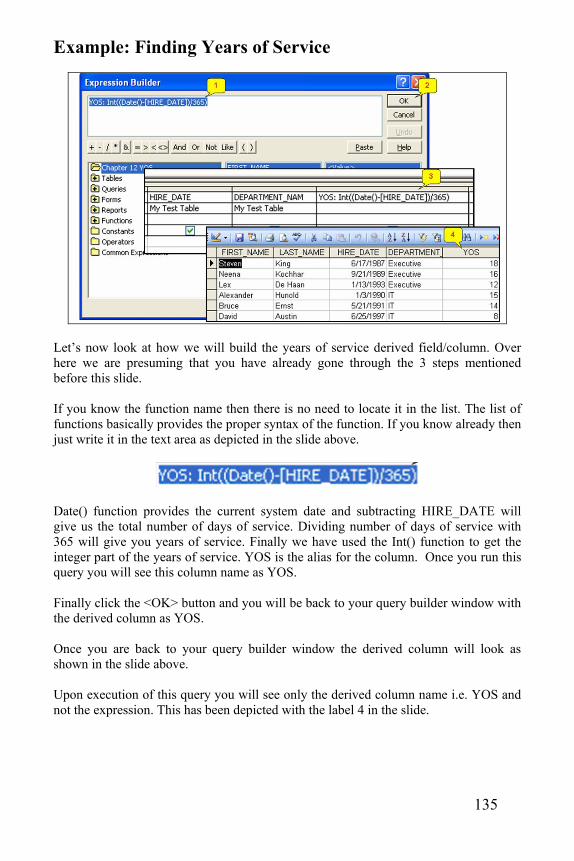
135
Example: Finding Years of Service
Let’s now look at how we will build the years of service derived field/column. Over here we are presuming that you have already gone through the 3 steps mentioned before this slide. If you know the function name then there is no need to locate it in the list. The list of functions basically provides the proper syntax of the function. If you know already then just write it in the text area as depicted in the slide above.
Date() function provides the current system date and subtracting HIRE_DATE will give us the total number of days of service. Dividing number of days of service with 365 will give you years of service. Finally we have used the Int() function to get the integer part of the years of service. YOS is the alias for the column. Once you run this query you will see this column name as YOS.
Finally click the <OK> button and you will be back to your query builder window with the derived column as YOS. Once you are back to your query builder window the derived column will look as shown in the slide above. Upon execution of this query you will see only the derived column name i.e. YOS and not the expression. This has been depicted with the label 4 in the slide.

136

137
IInnddeexx A
Allow Zero Length ..........................................................................................27 Append queries................................................................................................39 Append Query ...........................................................................................21, 65 Append To.......................................................................................................70 Ascending........................................................................................................79 auto_login......................................................................................................100 AutoExec() ............................................................................................ 102, 107 automate ..........................................................................................................48 AutoNumber....................................................................................................27
B
Build..............................................................................................................132
C
Caption ............................................................................................................27 Cascade ...........................................................................................................27 Cascade Update Related Fields .......................................................................27 child tables ......................................................................................................27 Crosstab Query................................................................................................21 Currency..........................................................................................................27
D
data integrity....................................................................................................13 data source.......................................................................................................86 data types.........................................................................................................27 Date of Birth....................................................................................................27 Date().............................................................................................................135 Date/Time........................................................................................................27 Default Value ..................................................................................................27 DELETE..........................................................................................................14 delete query .....................................................................................................39 Delete Query .............................................................................................21, 60 Delete with Cascade ........................................................................................27 DEPARTMENT_NAME ................................................................................45 Design View....................................................................................................27 Design View of table.......................................................................................27 Duplicates........................................................................................................27
138
E
Equi-Join ...................................................................................................45, 51 Export functionality.......................................................................................113 Expression Builder window ..........................................................................132 External Tables................................................................................................27
F
Field Size.........................................................................................................27 fields................................................................................................................27 Fields ...............................................................................................................13 Find Unmatched Query Wizard.......................................................................18 foreign key ......................................................................................................27 Foreign Key.....................................................................................................27 Format .............................................................................................................27 Forms.........................................................................................................16, 87
G
GUI..................................................................................................................16
H
hiring_company...............................................................................................27 hiring_mgr.......................................................................................................27 HR New Department To Append....................................................................66 HR_DEPARTMENTS ..............................................................................45, 62 HR_EMPLOYEES..........................................................................................45 HTML ...........................................................................................................114
I
import data ....................................................................................................119 Import Spreadsheet Wizard ...........................................................................121 Indexed............................................................................................................27 Indexes ............................................................................................................27 Industrial .........................................................................................................91 infinity sign .....................................................................................................27 Input Mask ......................................................................................................27 INSERT...........................................................................................................14 INSERT INTO ................................................................................................14
J
Join Properties .................................................................................................45
L
Left/Right Joins ...............................................................................................45 Link Tables......................................................................................................27 Linked Tables..................................................................................................17 Local Tables ....................................................................................................17

139
M
Macro ..............................................................................................................22 Macros.............................................................................................................16 Make-Table ...............................................................................................21, 39 Make-Table query ...........................................................................................48 MANAGER_ID ..............................................................................................78 Memo ..............................................................................................................27 Modules............................................................................................... 16, 23, 99 MS Excel.......................................................................................................114 MS SQL Server ...............................................................................................13 MsgBox .........................................................................................................102 My Test Table .................................................................................................52 MySQL............................................................................................................13
N
Number............................................................................................................27
O
Objects group ..................................................................................................17 OLE Object .....................................................................................................27 Oracle tables....................................................................................................39 ORDER BY.....................................................................................................14 Orientation of the report ..................................................................................82
P
Page Footer......................................................................................................86 Page Header ....................................................................................................86 Parent table......................................................................................................27 Primary key .....................................................................................................27 Primary/Foreign Key.......................................................................................13 PWD=takveendb ...........................................................................................102
Q
Queries ......................................................................................................16, 39
R
RDBMS...........................................................................................................13 records .............................................................................................................27 Records............................................................................................................13 Report Header .................................................................................................86 Report Layout..................................................................................................83 Report Style.....................................................................................................83 Report Wizard .................................................................................................76 reporting feature ..............................................................................................75 Reports ............................................................................................................16 Required ..........................................................................................................27 Run command ...............................................................................................110 RunCode........................................................................................................107
140
run-time view ..................................................................................................94
S
SELECT ..........................................................................................................14 Select query.....................................................................................................42 Select Query ..............................................................................................21, 39 SERVER .......................................................................................................102 SQL View........................................................................................................79 SQL view command........................................................................................20 supplier_id.......................................................................................................27
T
Tables ..............................................................................................................16 Text .................................................................................................................27
U
UID=system ..................................................................................................102 UPDATE.........................................................................................................14 Update query ...................................................................................................39 Update Query ..................................................................................................21
V
Validation Rule ...............................................................................................27 Validation Text................................................................................................27 Visual Basic ....................................................................................................99 Visual BASIC..................................................................................................23
W
WHERE clause................................................................................................14

141
{Notes}

142
{Notes}

143
{Notes}

144
{Notes}
145
ISBN: 0-9770739-0-4 Buy From: www.Amazon.com or www.LuLu.com
146
Everything in this book is covered in a step by step manner by first building reader’s concept using analogies, real world examples and then taking him/her to the steps of design implementation. The examples are based on MS Access 2003 and Oracle 9i/10g but the concepts are equally good for other versions of MS Access and Oracle. ISBN: 0-9770739-1-2 Buy From: www.Amazon.com or www.LuLu.com