Embed Size (px)
Citation preview

Email: [email protected] Web Page: http://training.health.ufl.edu
Microsoft Access 2010 Importing & Exporting with Excel

Updated: 5/22/2016
Access 2010: Importing & Exporting with Excel 1.5 hour
In this workshop we will create Access tables from Excel Workbooks and other Access database. Topics include 'cleaning' Excel data; linking to Excel; importing from Excel; handling import errors; linking to another Access database; importing from another Access database; and working with Saved Import/Exports. This workshop assumes some prior knowledge of Microsoft Access.
Create Tables from Existing Data .............................................................................................. 1
Importing from Microsoft Excel ................................................................................................ 1
Step 1: Source and Destination ............................................................................................ 1
Step 2: Worksheet or Range ................................................................................................. 2
Step 3: Specify Column Headings ......................................................................................... 2
Step 4: Specify information about fields .............................................................................. 3
Step 5: Set Primary Key field ................................................................................................. 3
Step 6: Name the Table ........................................................................................................ 4
Step 7: Save the Import Steps ............................................................................................... 4
Linking from Microsoft Excel ................................................................................................ 5
Import Errors ............................................................................................................................. 5
Failed Import ......................................................................................................................... 5
Table $_ImportErrors ............................................................................................................ 6
Importing and Linking from Access ........................................................................................... 6
Step 1: Source and Destination ............................................................................................ 6
Step 2: Choose the Objects ................................................................................................... 7
Exporting to Excel ..................................................................................................................... 7
Step 1: Select the Database Object ...................................................................................... 7
Step 2: Specify Destination and File Format ......................................................................... 8
Step 3: Save Export Steps ..................................................................................................... 8
Running Saved Import/Exports ................................................................................................. 9
Automating the Import/Export with a Macro ...................................................................... 9
Pandora Rose Cowart Education/Training Specialist UF Health IT Training
C3‐013 Communicore (352) 273‐5051 PO Box 100152 [email protected] Gainesville, FL 32610‐0152 http://training.health.ufl.edu

Page 1
Create Tables from Existing Data
You can bring existing data into your Access database from another file, such as an Excel Spreadsheet, a character
delimitated (CSV) file, or any other data file that is structured in a database format (including other Access files).
The first group of the External Data tab is Import & Link. Access
will provide you a different wizard depending on the kind of file
you are trying to Import/Link. You can import from: Excel,
Access, ODBC, Text (such as CSV and TXT files), XML,
SharePoint, HTML, Outlook, and dBase.
Importing from Microsoft Excel
From the External Data tab, choose Excel from the Import & Link group.
Step 1: Source and Destination
Choose where the file is located and how you want to store the data. The Browse… button will help you navigate
through your file structure to find the Excel file you want to bring into your database.
There are three options:
Importing a table will place a copy of the data in your database, entirely separate from the original data
source.
Appending data will add the new set of data to an existing table within your database.
Linking will place a copy of the data into your database but the new table will still be connected to the
original data.
If you link to another Access database the data can be changed in the original table or in the linked table. If you
link to any other data source you will only be able to make changes in the original file.
You will not be able to change all of the properties of a linked Excel table (such as field size or setting primary keys)
because Access cannot enforce these rules on data outside of the program. If you need to change these options, or
you would just like a complete copy of the data in your database that is not linked to the original, you should Import
instead of Link.

Page 2
Step 2: Worksheet or Range Choose the worksheet or named range that contains your data within the Excel file. (see Excel Basics II: Math and Functions documentation to find how to name a range of cells).
Step 3: Specify Column Headings Decide if you should use the Excel column headings. If you leave this option unchecked Access will assign field names to each column for you (Field1, Field2…). If any of the field names are invalid Access will label them with a Field number as well. Invalid names would include anything with a period, bracket, or duplicate field names.

Page 3
Step 4: Specify information about fields Here you can change the name and data type of each field; skip columns so they will not be imported; and set indexing.
Step 5: Set Primary Key field Remember a primary key means there will be no blanks and no duplicates within that column. If you let Access add its own key, it will create an AutoNumber ID field.

Page 4
Step 6: Name the Table This window also allows you to choose if you want Access to launch the Table Analyzer (See Access: Tables and Field Properties packet for more information).
Step 7: Save the Import Steps The final step asks if we want to save the steps of this import. This saves time if you have several similar data sets to import that you have customized (i.e. changing DOB into Birth Date). Once it’s saved you can recall it from the Saved Imports button on the External Data tab.

Page 5
Linking from Microsoft Excel If you follow the link wizard instead of the import wizard you will go through the same first three steps.
Step 1 – Specify where the data is coming from and that you want to Link to it. Step 2 – Specify the worksheet or named range you want to Link into your table. Step 3 – Specify if the first row contains the column headings. Final Step – Name your new Table
The linked table will look different on your list of tables. For all linked files you will see an icon representing the original data source and an arrow representing that this table is linked to an outside source. An imported table becomes a true Access table. A linked table which comes from a source outside of Microsoft Access has limitations. For example, you cannot set a primary key or limit the field size of a linked file. You can, however, use the table as the data source for your queries, forms, and reports. You can also make simple relationships (though no data integrity) between your true tables and the linked tables. Import Errors To help reduce import errors you should make sure your Excel file is a consistent dataset. By this I mean the first row of the worksheet (or named range) contains a column heading for every column, and that there are no completely blank columns or rows. It's also important the dataset has a consistent data type (all dates/number/text/no errors). One way to help ensure this is to sort each column ascending then descending, one at a time to bring the "extremes" to the top of your dataset.
Failed Import The main reason that I have seen Access fail to pull in a dataset from Microsoft Excel is a conflict in the field/column headings. Most of the time Access will recognize the name violations and replace them with a generic field name (i.e. Field26). However, its blind spot is a leading space. If the first character of any heading is a space, the Wizard will fail to import the Table. Access will let you go through the entire wizard before it fails:
As you are cleaning up your data, keep in mind Access's limitations. There are only 255 columns per table, and 64 characters per field name. For the field names, each field should have a unique name, the first character cannot be a space, and there should be no periods ( . ), brackets ( [ ] ), or exclamation marks ( ! ). Also any calculations you have in your Excel sheet will be pulled into Access as their true "value" not as the equation.

Page 6
Table $_ImportErrors Microsoft Access determines a field's data type from the first eight rows in Excel. If the first ten rows or so are all listed as numbers in Excel, even if the 11th is a text field, Access will pull this field in as a number. In step four (page 3) you have a chance to change the field types to reflect their true contents. If you miss any, when the data is completely imported, if any of the data points don't match their specified data type, Access will create a $_ImportErrors table. The import error table tells us the reason for the error and which field (column) and row in Excel caused the error. With this information we can return to Excel and look up the issue and determine how to fix the issue.
Importing and Linking from Access To import from another Access datbase choose Access from the Import group of the External Data tab. Step 1: Source and Destination The Browse… button will help you navigate through your file structure to find the Access file you want to bring into your database. This is the same as the Importing from Excel.

Page 7
Step 2: Choose the Objects Access will open the Import Objects (or Link Objects) window. When you are linking you can select the tables, if you are importing you can select the Tables, Queries, Forms, Reports, Macros and Modules from the other database. Again, linking will keep the data 'alive' between both Access databases, importing will place a copy of the objects, not touching the original.
By default the relationships between the tables and queries in the original database will be copied through to the new database. When importing your tables you can change the "options".
Exporting to Excel If your data set is small enough you can copy and paste from Access into an Excel worksheet. "Small enough" is relative, depending on the kind of data and size of your clipboard. Doing this preserves the data formats shown in the datasheet view in Access, but it will not change the column widths. To "export" to Excel we must remember the record (row) limitations. Excel 97‐2003 has 65,536 rows; Excel 2007‐2010 has 1,048,576 rows. If your dataset is larger than these values you will not be able to send it to the Excel sheet. If this is the case, create queries to pull out smaller sets of data.
Step 1: Select the Database Object In Access 2010, we must select an object from our Navigation Pane before we use an automatic function, such as Wizards, AutoForms, AutoReports, and Exporting. Select the object from the navigation pane and then choose Excel from the Export group of the External Data tab.

Page 8
Step 2: Specify Destination and File Format Because we chose "Excel" from our Export group, the File Formats will only be Excel. We can maintain the data formatting like capitalization and input masks if we check the "Export data with Formatting and Layout". (formulas will not be exported)
Step 3: Save Export Steps If you are planning to create this Excel workbook on a regular basis, it's a good idea to save the steps to help you automate your database.
Page 9
Running Saved Import/Exports The External Data tab has buttons for Saved Imports and Saved Exports. Either button opens this window. Choose the import/export you want to use and click Run.
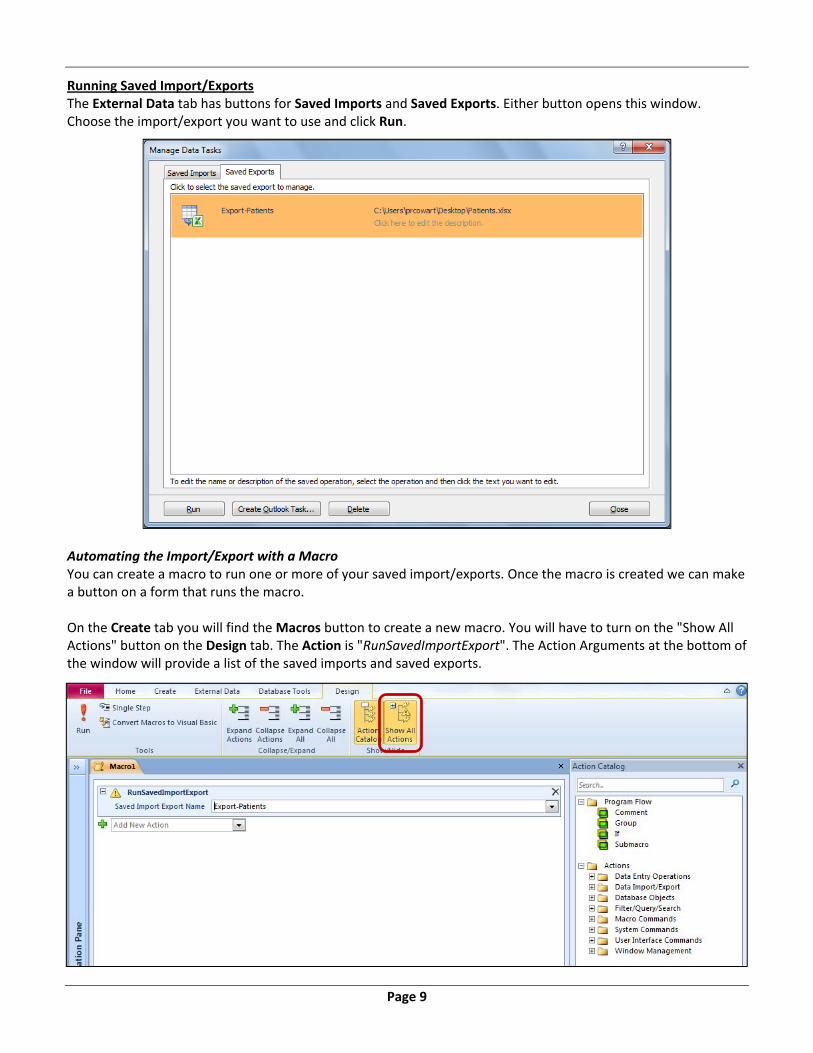
Automating the Import/Export with a Macro You can create a macro to run one or more of your saved import/exports. Once the macro is created we can make a button on a form that runs the macro. On the Create tab you will find the Macros button to create a new macro. You will have to turn on the "Show All Actions" button on the Design tab. The Action is "RunSavedImportExport". The Action Arguments at the bottom of the window will provide a list of the saved imports and saved exports.