Embed Size (px)
Citation preview
MICROSOFT EXCEL VISUAL BASIC FOR APPLICATIONS
INTERMEDIATE

WWP Learning and Development Page 2
NOTE • Unless otherwise stated, screenshots of dialog boxes and screens in this book were
taken using Excel 2003 running on Window XP Professional. There may, therefore, be minor differences if you are using other versions of Excel, or if you are running on Windows 2000, Windows Vista or Windows 7.
• Concepts, discussions, procedures and functionality, however, remain unchanged.
WWP Learning and Development Page 3
Contents NOTE ................................................................................................................................................................................ 2
CONTENTS ..................................................................................................................................................................... 3
REVIEW EXERCISE .......................................................................................................................................................... 5 Automating a Worksheet Using VBA Basics .............................................................................................................. 5
LESSON 1 - USING THE “FOR” LOOP .................................................................................................................... 6
USING A FOR... NEXT LOOP ........................................................................................................................................... 7 USING A FOR EACH... NEXT LOOP .............................................................................................................................. 10 EXERCISE ...................................................................................................................................................................... 15
Create a For Loop Structure. ................................................................................................................................... 15
LESSON 2 - ADDING INTERACTIVITY TO MACROS .................................................................................... 16
THE MSGBOX FUNCTION ............................................................................................................................................. 17 CREATING AN INTERACTIVE MESSAGE BOX ............................................................................................................... 18 CREATING A CUSTOM INPUT BOX ............................................................................................................................... 22 EXERCISE ...................................................................................................................................................................... 26
Using Interactivity ................................................................................................................................................... 26
LESSON 3 - EXPLORING THE RANGE OBJECT ................................................................................................ 27
REFERRING TO A RANGE .............................................................................................................................................. 28 COLLECTIONS .............................................................................................................................................................. 30 THE CURRENTREGION PROPERTY ............................................................................................................................... 32 THE OFFSET & RESIZE PROPERTIES ............................................................................................................................. 34 EXERCISE ...................................................................................................................................................................... 37
Working with the Range Object ............................................................................................................................... 37
LESSON 4 - VARIABLES, CONSTANTS AND ARRAYS .................................................................................. 38
DECLARING VARIABLES .............................................................................................................................................. 39 SCOPE AND VISIBILITY ................................................................................................................................................. 40 CONSTANTS ................................................................................................................................................................. 41 ARRAYS ........................................................................................................................................................................ 42 DECLARING AN ARRAY ................................................................................................................................................ 43 ARRAY TYPES ............................................................................................................................................................... 45 ASSIGNING VALUES TO AN ARRAY .............................................................................................................................. 49 FILLING ARRAYS USING LOOPS................................................................................................................................... 51 DYNAMIC ARRAYS ....................................................................................................................................................... 53 THE ARRAY FUNCTION ............................................................................................................................................... 56 EXERCISE ...................................................................................................................................................................... 58
Task 1: Write a procedure that prompts the user to enter data, using variables and arrays. .................................. 58 Task 2: Use constants for storing data..................................................................................................................... 58
LESSON 5 - USER DEFINED FUNCTIONS .......................................................................................................... 60
USING EXCEL WORKSHEET FUNCTIONS IN VBA ........................................................................................................ 61 VBA FUNCTIONS ......................................................................................................................................................... 63 USER-DEFINED FUNCTIONS ........................................................................................................................................ 65 GETTING HELP WITH USER DEFINED FUNCTIONS ...................................................................................................... 68 DECLARING VARIABLES IN USER DEFINED FUNCTIONS............................................................................................. 70 USING RANGES IN USER DEFINED FUNCTIONS .......................................................................................................... 70 EXERCISES .................................................................................................................................................................... 73
Task 1: Create User Defined Functions. .................................................................................................................. 73 Task 2: Create Complex User Defined Functions.................................................................................................... 73
LESSON 6 - ADD-IN FUNCTIONS ......................................................................................................................... 74
DEFINING AN ADD-IN ................................................................................................................................................. 75
Excel Level 6: - VBA Intermediate Contents
WWP Learning and Development Ltd Page 4
CREATING AN ADD-IN FOR USER DEFINED FUNCTIONS ............................................................................................ 76 INSTALLING AN ADD-IN .............................................................................................................................................. 78 EDITING AN ADD-IN .................................................................................................................................................... 79 REMOVING AN ADD-IN ............................................................................................................................................... 80 EXERCISE ...................................................................................................................................................................... 82
Task: To create and install to Excel, additional VBA functionality. ........................................................................ 82
LESSON 7 – TESTING AND DEBUGGING CODE ............................................................................................. 83
TYPES OF ERROR AND DEBUGGING ............................................................................................................................. 84 STEPPING THROUGH A PROCEDURE ........................................................................................................................... 85 DISPLAYING VARIABLE VALUES.................................................................................................................................. 88 BREAK MODE ............................................................................................................................................................... 90 EXERCISE ...................................................................................................................................................................... 95
Task: To test and identify problems and errors in a sub procedure ........................................................................ 95
APPENDIX I – CREATING AN ADD-IN FOR SUB PROCEDURES (EXCEL 2003) ....................................... 96
APPENDIX II – SOLUTIONS TO EXERCISES ...................................................................................................... 98
INDEX ........................................................................................................................................................................... 105
Excel Level 6: VBA Intermediate Review Exercise
WWP Learning and Development Ltd Page 5
REVIEW EXERCISE
AUTOMATING A WORKSHEET USING VBA BASICS
1. Open the file, Daily Profit and Loss. 2. Launch the VBA Editor and open the module sheet in the Daily Profit and Loss project
containing the CreateTable procedure. 3. Add code to the module that:
a) adds formulas in cells B4 and C4 b) formats cells B1 to C2 with a bold font c) formats cells A2 to A4 with an italic font d) formats cells A4 to C4 with a grey fill (Tip: ColorIndex = 15)
4. Create a button on Sheet1 of the workbook and assign the CreateTable macro to it.
5. Use this button to run the macro and check that it runs correctly. It should result in the
following. 6. Correct any errors. 7. Enter the following data into the newly created table.
USA Europe Sales 35,000 42,000 Costs 25,000 25,000
8. In the same module sheet there is already a procedure named TestProfit that tests cell B4 and makes the font bold if its value is 15000 or over, and formats it red if below 15000. Edit the procedure with a loop so that after it tests cell B4, it also tests cell C4.
9. Assign a keystroke of your choice to this macro and run it to check that it works correctly. The font in cell B4 should be made red and the font in cell C4 bold.
10. Put right any errors and then save and close the file.

WWP Learning and Development Page 6
LESSON 1 - USING THE “FOR” LOOP
In this lesson, you will learn how to:
• Create and use a For To loop
• Create and use a For Next loop
Excel Level 6: VBA Intermediate Lesson 1 – The For Loop
WWP Learning and Development Ltd Page 7
USING A FOR... NEXT LOOP Discussion There are two forms of the For loop – For... Next and For Each... Next. This section looks at the For Next loop.
The For… Next loop allows a series of statements to be repeated a specific number of times. It needs a “container” to do the counting in, hence the use of a variable in its syntax.
For variable = start To end Step step
Statements
Next variable
The structure repeats the statements a number of times depending on the values of start, end and step.
A variable is created to hold a number. The variable is set to equal start, and each time the statements are run, the variable name increments by the value of step. If step is omitted then, the increment will default to one. For example, the following loops through the statement 6 times, creating random numbers between 1 and 49 in a column.
Dim counter as Byte
For counter = 1 To 6
ActiveCell.Value = Rnd * 49 (Rnd is a VBA function that returns a value less than 1 but greater than or equal to zero. It is equivalent to the =RAND() Excel worksheet function.)
ActiveCell.Offset(1,0).Select
Next counter
The following examples uses a variable (numCells) to count the number of cells in a selected range (a column). It then starts with the first cell in the range (ActiveCell) and loops through the statements as many times as there are cells in the range, doubling their value.
Dim numCells as Integer
Dim counter as Integer
numCells = Selection.Cells.Count
For counter = 1 To numCells
ActiveCell.Value = ActiveCell.Value * 2
Next counter
Excel Level 6: VBA Intermediate Lesson 1 – The For Loop
WWP Learning and Development Ltd Page 8
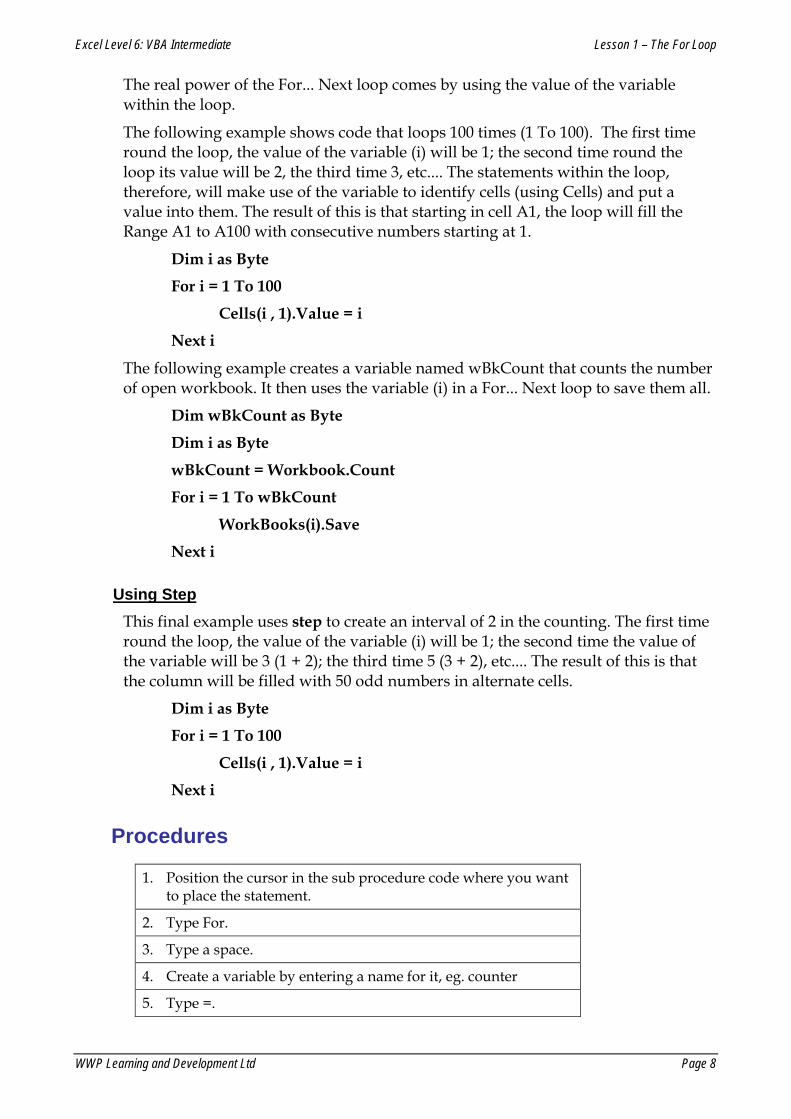
The real power of the For... Next loop comes by using the value of the variable within the loop.
The following example shows code that loops 100 times (1 To 100). The first time round the loop, the value of the variable (i) will be 1; the second time round the loop its value will be 2, the third time 3, etc.... The statements within the loop, therefore, will make use of the variable to identify cells (using Cells) and put a value into them. The result of this is that starting in cell A1, the loop will fill the Range A1 to A100 with consecutive numbers starting at 1.
Dim i as Byte
For i = 1 To 100
Cells(i , 1).Value = i
Next i
The following example creates a variable named wBkCount that counts the number of open workbook. It then uses the variable (i) in a For... Next loop to save them all.
Dim wBkCount as Byte
Dim i as Byte
wBkCount = Workbook.Count
For i = 1 To wBkCount
WorkBooks(i).Save
Next i
Using Step This final example uses step to create an interval of 2 in the counting. The first time round the loop, the value of the variable (i) will be 1; the second time the value of the variable will be 3 (1 + 2); the third time 5 (3 + 2), etc.... The result of this is that the column will be filled with 50 odd numbers in alternate cells.
Dim i as Byte
For i = 1 To 100
Cells(i , 1).Value = i
Next i
Procedures
1. Position the cursor in the sub procedure code where you want to place the statement.
2. Type For.
3. Type a space.
4. Create a variable by entering a name for it, eg. counter
5. Type =.
Excel Level 6: VBA Intermediate Lesson 1 – The For Loop
WWP Learning and Development Ltd Page 9
6. Type a number from where you want the loop to start.
7. Type To.
8. Type a number from where you want the loop to end.
9. If the loop must count between start and end with an interval that is not equal to 1 (the default), type a space.
10. Type Step.
11. Type a space.
12. Type a number for the interval that you want the loop to count.
13. Press Enter.
14. Type the statements that you want the sub procedure to repeat as defined by the For ... To statement.
15. Press Enter.
16. Type Next.
17. Type a space.
18. Type the variable name used in the For... To statement at the beginning of the loop
19. Press Enter.
20. Add additional code as necessary.
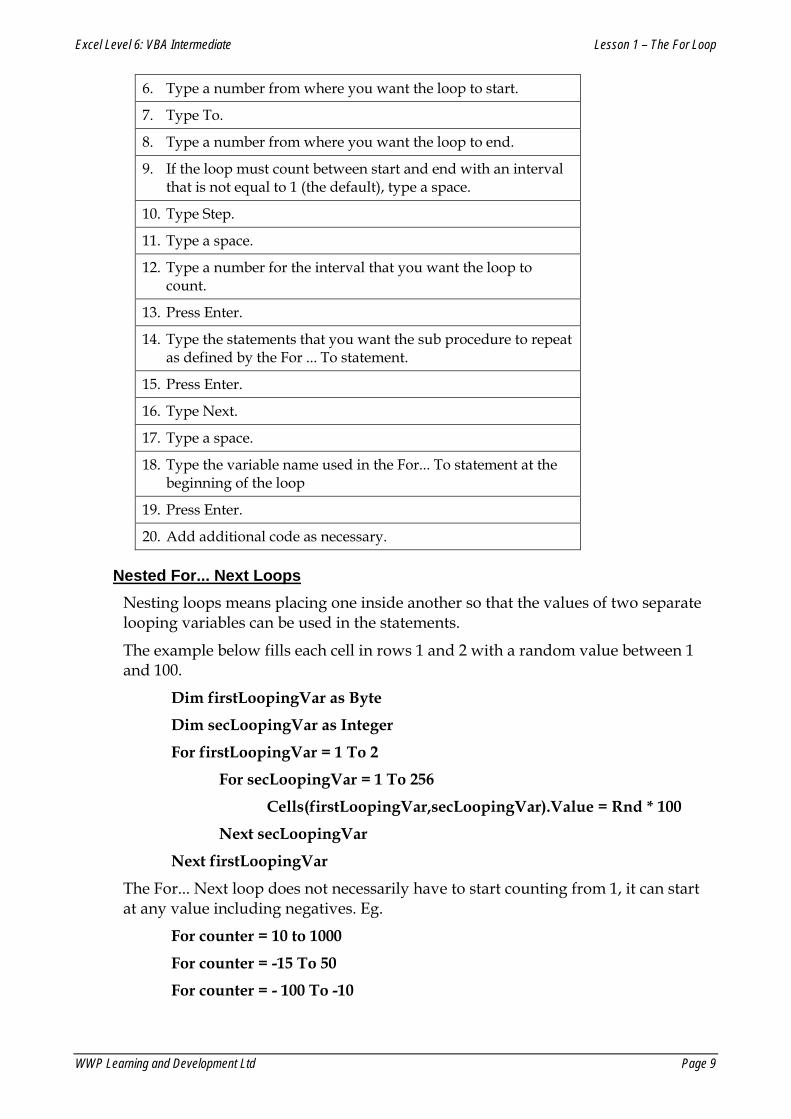
Nested For... Next Loops Nesting loops means placing one inside another so that the values of two separate looping variables can be used in the statements.
The example below fills each cell in rows 1 and 2 with a random value between 1 and 100.
Dim firstLoopingVar as Byte
Dim secLoopingVar as Integer
For firstLoopingVar = 1 To 2
For secLoopingVar = 1 To 256
Cells(firstLoopingVar,secLoopingVar).Value = Rnd * 100
Next secLoopingVar
Next firstLoopingVar
The For... Next loop does not necessarily have to start counting from 1, it can start at any value including negatives. Eg.
For counter = 10 to 1000
For counter = -15 To 50
For counter = - 100 To -10

Excel Level 6: VBA Intermediate Lesson 1 – The For Loop
WWP Learning and Development Ltd Page 10
The For... Next loop, however, will fail if the start number is higher than the end number, eg. For counter = 100 To 1.
USING A FOR EACH... NEXT LOOP Discussion The For Each… Next loop allows a series of statements to be repeated for each item in a group. The syntax is as follows:
For Each element In collection (or array)
statements
Next element
This begs the question: “What is a collection (or array) and how do we define an element in it?”
Well, think of collection (or array) as a container with lots of sections in it, rather like a pigeon hole unit in a post room. Each element is one of the holes in the unit. The For Each ... Next loop repeats the statements for as many pigeon holes as there are in the unit!
So, how do we define the pigeon hole unit in Excel? In many cases it will be a range of cells or another collection of objects. The analogy, therefore, works well because if we take a range of cells, they do, indeed, resemble a pigeon hole unit with each cell representing one of the holes.
Collection, therefore, might be expressed as Range(“A1:A10”). Each element in the collection (each cell) is expressed as a variable. The variable would be declared “as Object”.
Hence, a For Each... Next loop that uses a range as the collection will adopt the following form: .
Dim specificCel as Object
For Each specificCel in Range(“A1:C4”)
The loop works rather like a check sheet, where each cell gets ticked as done once the statement(s) have been executed on it.

Excel Level 6: VBA Intermediate Lesson 1 – The For Loop
WWP Learning and Development Ltd Page 11
The order in which the elements are “ticked” starts with the cell in the top left corner and continues from left-to-right along the top row. It then repeats from left-to-right going down the columns.
The following example uses a For Next...Each loop to enter a zero into any blank cells in the range B2 to D200.
Dim specificCel as Object
For Each specificCel in Range(“B2:D200”)
(For each element in the collection, ie. for every cell in the range B2 to D200)
If specificCel.Value = “” then (If the cell is empty then...)
specificCel.Value = 0 (Enter a value of zero in it)
End if
Next specificCel (Return to For Each and check if all the cells (elements) in the range (collection) have been tested. If TRUE, continue below Next. If FALSE, repeat the statements.)
Note how the variable defined in the first line MUST be used as the object in the repeating statements. If ActiveCell had been used, the statements inside the loop would have been ignored and the If block executed on whichever cell was active when the macro was run.
The For Each ... Loop is more powerful that the Do loops and even (to an extent) the For Next loop.
• It is faster because there is no physical selecting of objects, it is all done in the computer’s memory.
• It is much easier and more convenient to use to carry out looping actions when there is a mixture of columns and rows. Try using a Do loop or a For Next loop in the above example!
• It can be used to loop through other types of object collections in a way that other loops can not.
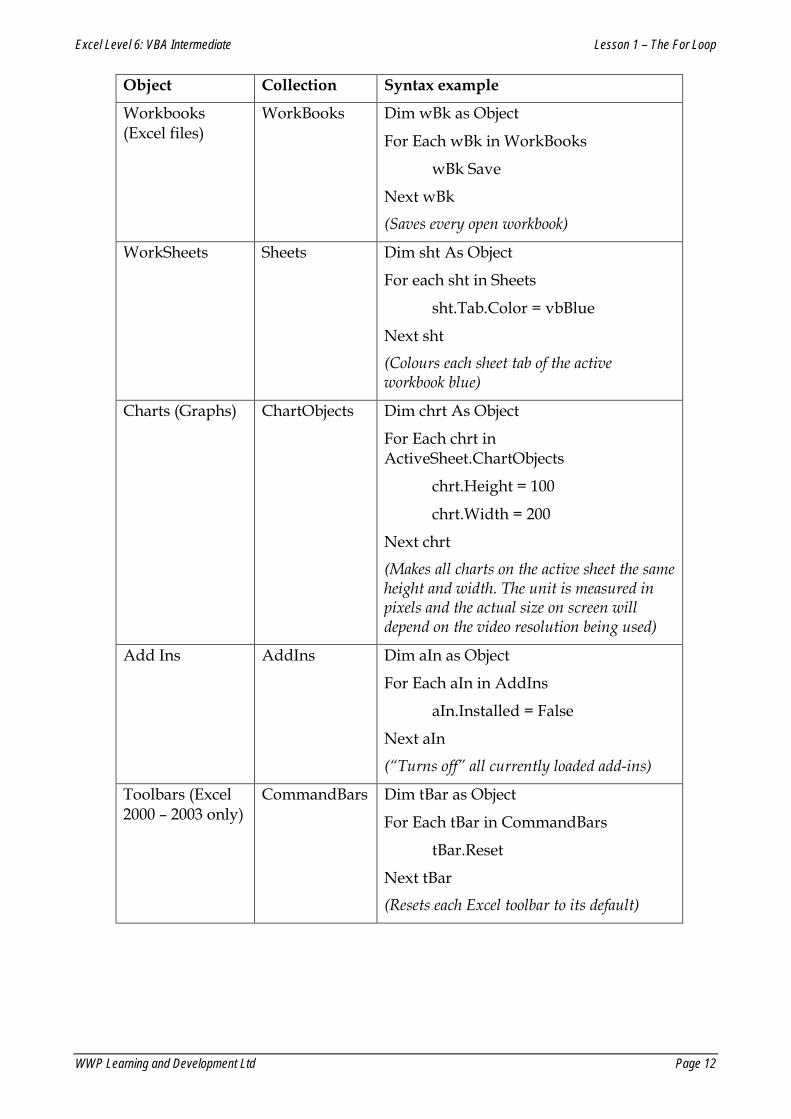
Other Collections We have examined above the use of a range as the collection (or array). Examples of some other collections that can be used is given below.
Excel Level 6: VBA Intermediate Lesson 1 – The For Loop
WWP Learning and Development Ltd Page 12
Object Collection Syntax example
Workbooks (Excel files)
WorkBooks Dim wBk as Object
For Each wBk in WorkBooks
wBk Save
Next wBk
(Saves every open workbook)
WorkSheets Sheets Dim sht As Object
For each sht in Sheets
sht.Tab.Color = vbBlue
Next sht
(Colours each sheet tab of the active workbook blue)
Charts (Graphs) ChartObjects Dim chrt As Object
For Each chrt in ActiveSheet.ChartObjects
chrt.Height = 100
chrt.Width = 200
Next chrt
(Makes all charts on the active sheet the same height and width. The unit is measured in pixels and the actual size on screen will depend on the video resolution being used)
Add Ins AddIns Dim aIn as Object
For Each aIn in AddIns
aIn.Installed = False
Next aIn
(“Turns off” all currently loaded add-ins)
Toolbars (Excel 2000 – 2003 only)
CommandBars Dim tBar as Object
For Each tBar in CommandBars
tBar.Reset
Next tBar
(Resets each Excel toolbar to its default)

Excel Level 6: VBA Intermediate Lesson 1 – The For Loop
WWP Learning and Development Ltd Page 13
Using Selection in a For Each... Next loop The collection in a For Each... Next loop does not need to be specifically given. You can use a “Selection” of valid objects either that has been selected by the sub procedure or that was selected by the user before the macro was run.
In the following example, a range of cells is first selected. The loop then acts on the selection.
Dim specificCel As Object
Range(“B2:C15”).Select
For Each specificCel in Selection
specificCel.Font.Size = 20
Next specificCel
In the following example, the user has already selected several charts on a worksheet (by clicking the first one and then holding down the SHIFT key and clicking all the others). The loop then changes their background colour to cyan and prints them all.
Dim chrt As Object
For Each chrt in Selection
Chrt.Chart.ChartArea.Interior.Color = vbCyan
Chrt.Chart.PrintOut
Next chrt
Procedures
1. Position the cursor in the sub procedure code where you want to place the statement.
2. Type For Each.
3. Type a space.
4. Type a variable name to represent each of the elements that you want the loop to act on.
5. Type a space.
6. Type In.
7. Type the name of a valid object or reference to an object,
8. eg. Range(“A1:C10”) or Selection or Sheets
9. Press Enter.
10. Type the statements that you want the sub procedure to repeat as defined by the For ... Each statement.
11. Press Enter.
12. Type Next.
13. Type a space.
Excel Level 6: VBA Intermediate Lesson 1 – The For Loop
WWP Learning and Development Ltd Page 14
14. Type the variable name used in the For... Each statement at the beginning of the loop
15. Press Enter.
16. Add additional code as necessary.
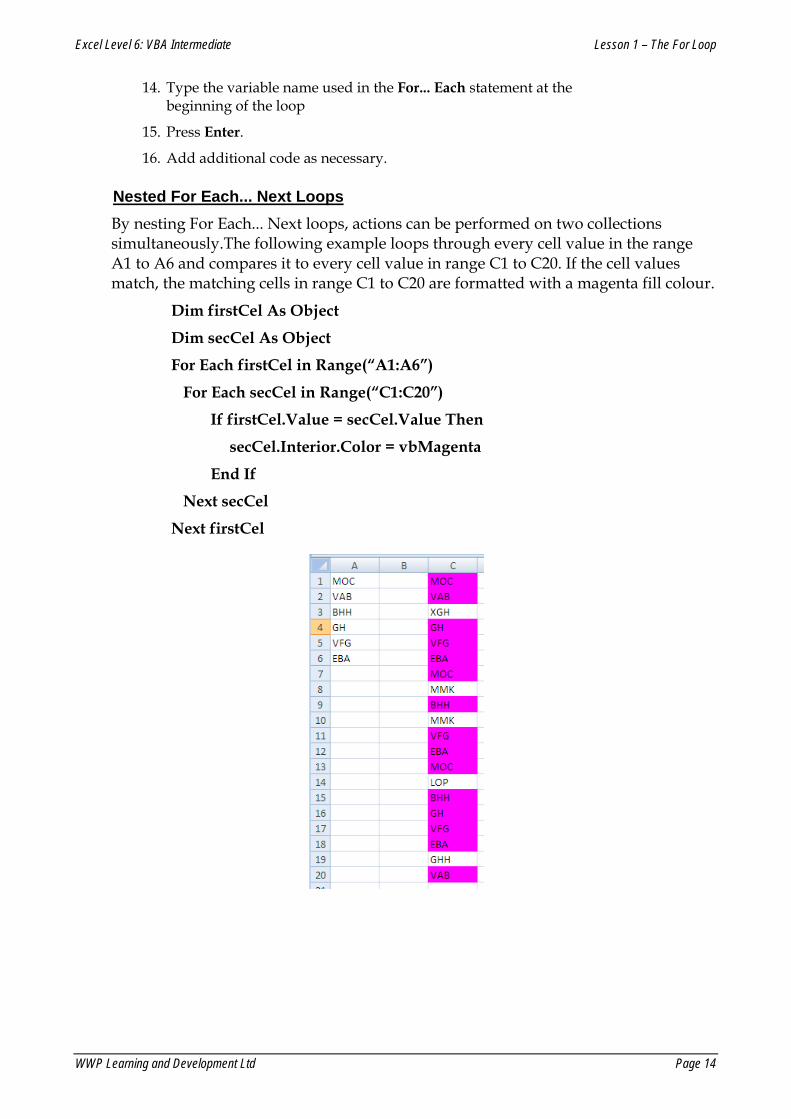
Nested For Each... Next Loops By nesting For Each... Next loops, actions can be performed on two collections simultaneously.The following example loops through every cell value in the range A1 to A6 and compares it to every cell value in range C1 to C20. If the cell values match, the matching cells in range C1 to C20 are formatted with a magenta fill colour.
Dim firstCel As Object
Dim secCel As Object
For Each firstCel in Range(“A1:A6”)
For Each secCel in Range(“C1:C20”)
If firstCel.Value = secCel.Value Then
secCel.Interior.Color = vbMagenta
End If
Next secCel
Next firstCel
Excel Level 6: VBA Intermediate Lesson 1 – The For Loop
WWP Learning and Development Ltd Page 15
EXERCISE
CREATE A FOR LOOP STRUCTURE.
1. Open the file Practice Loops. Enable the macros, if prompted. 2. Test the CheckDept procedure. The macro runs just once, identifies that Davis works in
the Sales department and emboldens the font in cell B5. 3. Edit the procedure as necessary so that it runs 12 times in order to check all the
departments in column C. 4. Test the macro and correct any errors. 5. Save and close the file. 6. Open the file Student Grades. 7. Edit the CollegeIdentify procedure with a FOR EACH NEXT loop so that the macro
runs on all the cells in range C2:C18. 8. Test the macro and correct any errors. 9. Save and close the file.

WWP Learning and Development Page 16
LESSON 2 - ADDING INTERACTIVITY TO MACROS
In this lesson, you will learn how to:
• Create a Sub procedure that displays information on a worksheet by using the MsgBox function.
• Create a Sub procedure that displays a dialog box by using an InputBox function
Excel Level 6: VBA Intermediate Lesson 2 – Adding Interactivity
WWP Learning and Development Ltd Page 17
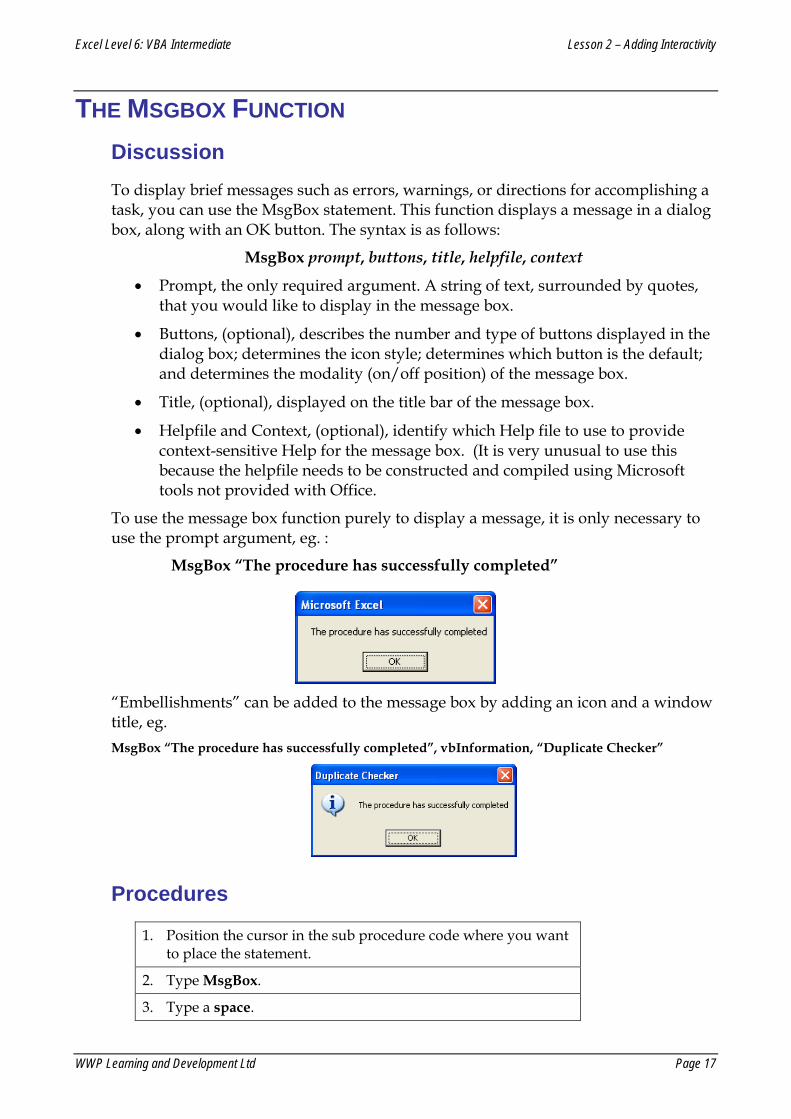
THE MSGBOX FUNCTION Discussion To display brief messages such as errors, warnings, or directions for accomplishing a task, you can use the MsgBox statement. This function displays a message in a dialog box, along with an OK button. The syntax is as follows:
MsgBox prompt, buttons, title, helpfile, context
• Prompt, the only required argument. A string of text, surrounded by quotes, that you would like to display in the message box.
• Buttons, (optional), describes the number and type of buttons displayed in the dialog box; determines the icon style; determines which button is the default; and determines the modality (on/off position) of the message box.
• Title, (optional), displayed on the title bar of the message box.
• Helpfile and Context, (optional), identify which Help file to use to provide context-sensitive Help for the message box. (It is very unusual to use this because the helpfile needs to be constructed and compiled using Microsoft tools not provided with Office.
To use the message box function purely to display a message, it is only necessary to use the prompt argument, eg. :
MsgBox “The procedure has successfully completed”
“Embellishments” can be added to the message box by adding an icon and a window title, eg. MsgBox “The procedure has successfully completed”, vbInformation, “Duplicate Checker”
Procedures
1. Position the cursor in the sub procedure code where you want to place the statement.
2. Type MsgBox.
3. Type a space.
Excel Level 6: VBA Intermediate Lesson 2 – Adding Interactivity
WWP Learning and Development Ltd Page 18
4. Type the text string, variable name or combination of both (separated by - space ampersand space ( & )) that you wish the message box to display.
5. Press Enter.
6. Add additional code as necessary.
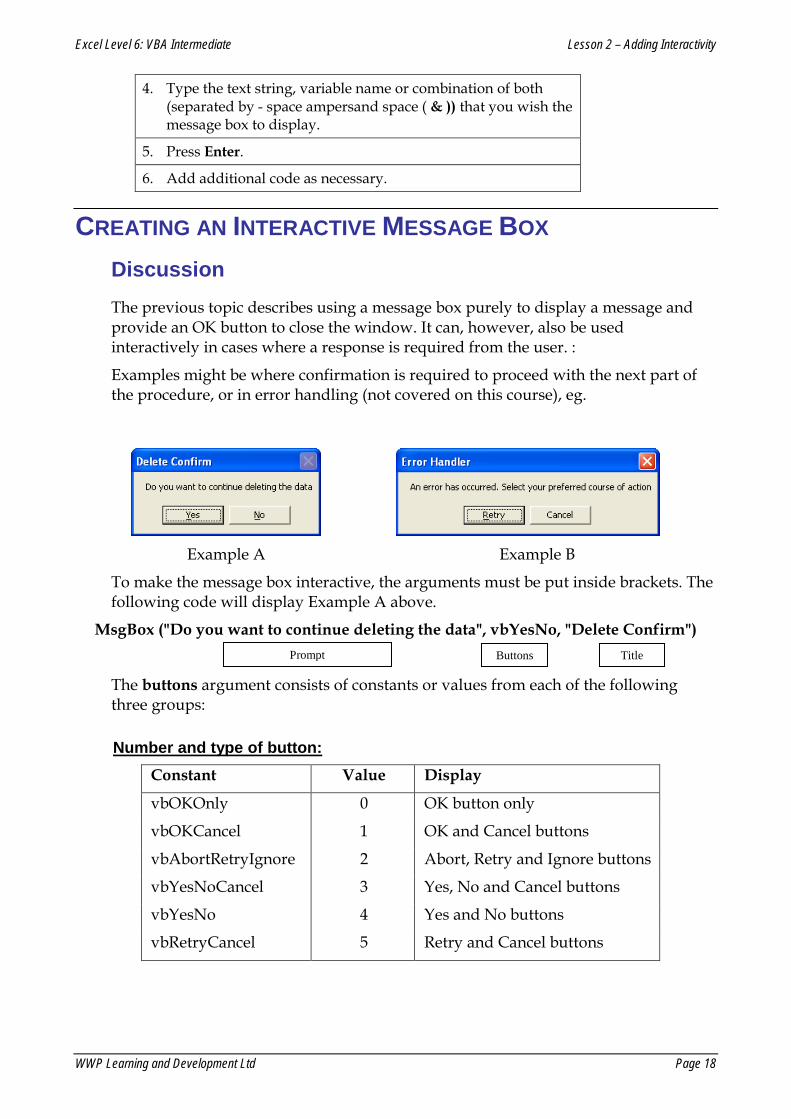
CREATING AN INTERACTIVE MESSAGE BOX Discussion The previous topic describes using a message box purely to display a message and provide an OK button to close the window. It can, however, also be used interactively in cases where a response is required from the user. :
Examples might be where confirmation is required to proceed with the next part of the procedure, or in error handling (not covered on this course), eg.
Example A Example B
To make the message box interactive, the arguments must be put inside brackets. The following code will display Example A above.
MsgBox ("Do you want to continue deleting the data", vbYesNo, "Delete Confirm")
The buttons argument consists of constants or values from each of the following three groups:
Number and type of button: Constant Value Display
vbOKOnly 0 OK button only
vbOKCancel 1 OK and Cancel buttons
vbAbortRetryIgnore 2 Abort, Retry and Ignore buttons
vbYesNoCancel 3 Yes, No and Cancel buttons
vbYesNo 4 Yes and No buttons
vbRetryCancel 5 Retry and Cancel buttons
Prompt Buttons Title
Excel Level 6: VBA Intermediate Lesson 2 – Adding Interactivity
WWP Learning and Development Ltd Page 19
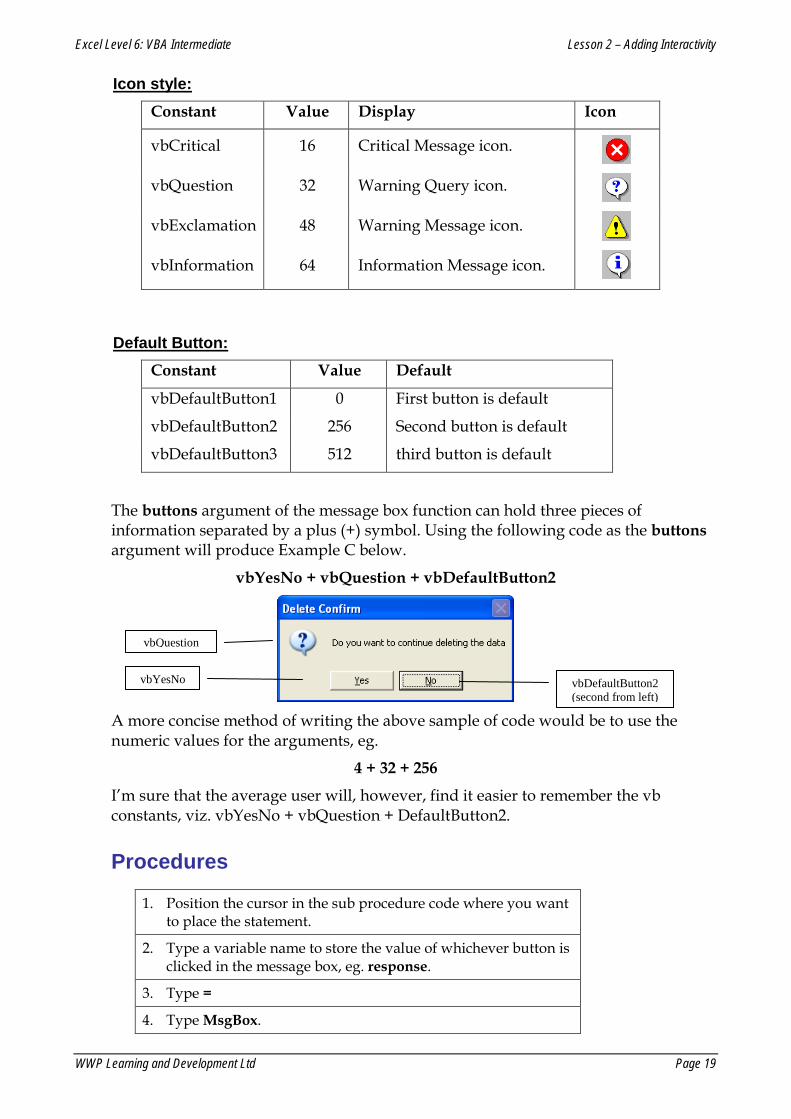
Icon style: Constant Value Display Icon
vbCritical 16 Critical Message icon.
vbQuestion 32 Warning Query icon.
vbExclamation 48 Warning Message icon.
vbInformation 64 Information Message icon.
Default Button: Constant Value Default
vbDefaultButton1 0 First button is default
vbDefaultButton2 256 Second button is default
vbDefaultButton3 512 third button is default
The buttons argument of the message box function can hold three pieces of information separated by a plus (+) symbol. Using the following code as the buttons argument will produce Example C below.
vbYesNo + vbQuestion + vbDefaultButton2
A more concise method of writing the above sample of code would be to use the numeric values for the arguments, eg.
4 + 32 + 256
I’m sure that the average user will, however, find it easier to remember the vb constants, viz. vbYesNo + vbQuestion + DefaultButton2.
Procedures
1. Position the cursor in the sub procedure code where you want to place the statement.
2. Type a variable name to store the value of whichever button is clicked in the message box, eg. response.
3. Type =
4. Type MsgBox.
vbYesNo
vbQuestion
vbDefaultButton2 (second from left)
Excel Level 6: VBA Intermediate Lesson 2 – Adding Interactivity
WWP Learning and Development Ltd Page 20
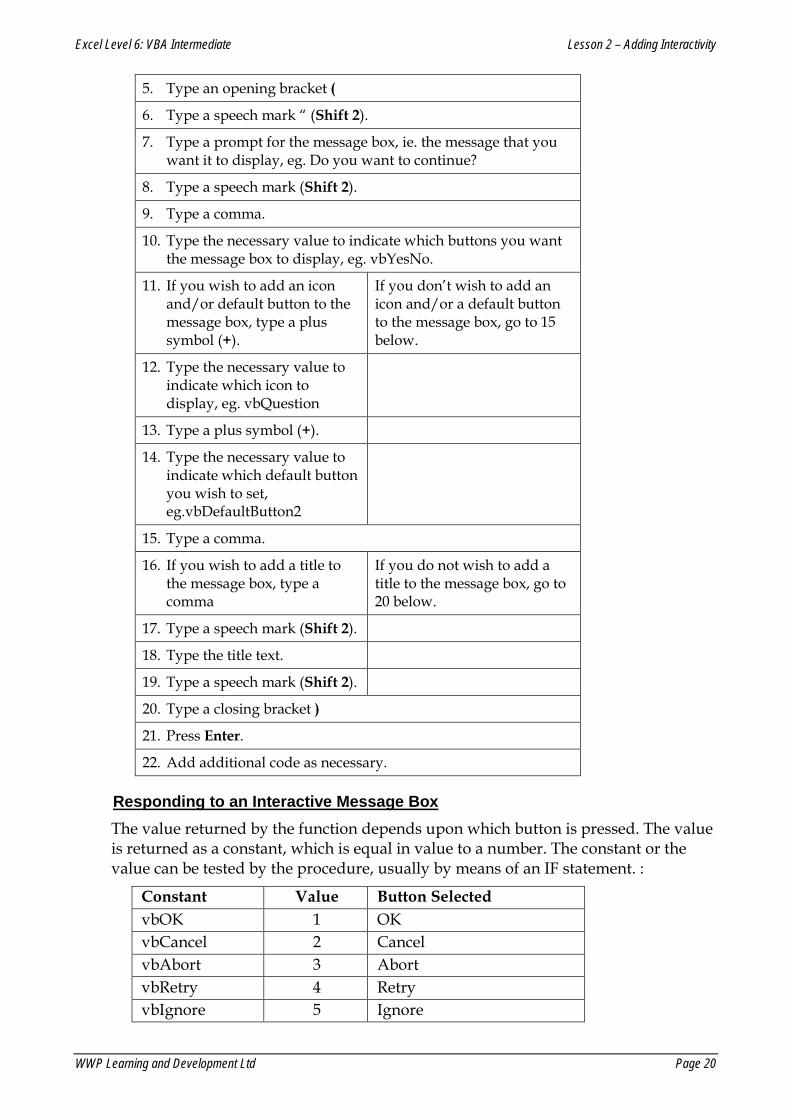
5. Type an opening bracket (
6. Type a speech mark “ (Shift 2).
7. Type a prompt for the message box, ie. the message that you want it to display, eg. Do you want to continue?
8. Type a speech mark (Shift 2).
9. Type a comma.
10. Type the necessary value to indicate which buttons you want the message box to display, eg. vbYesNo.
11. If you wish to add an icon and/or default button to the message box, type a plus symbol (+).
If you don’t wish to add an icon and/or a default button to the message box, go to 15 below.
12. Type the necessary value to indicate which icon to display, eg. vbQuestion
13. Type a plus symbol (+).
14. Type the necessary value to indicate which default button you wish to set, eg.vbDefaultButton2
15. Type a comma.
16. If you wish to add a title to the message box, type a comma
If you do not wish to add a title to the message box, go to 20 below.
17. Type a speech mark (Shift 2).
18. Type the title text.
19. Type a speech mark (Shift 2).
20. Type a closing bracket )
21. Press Enter.
22. Add additional code as necessary.
Responding to an Interactive Message Box The value returned by the function depends upon which button is pressed. The value is returned as a constant, which is equal in value to a number. The constant or the value can be tested by the procedure, usually by means of an IF statement. :
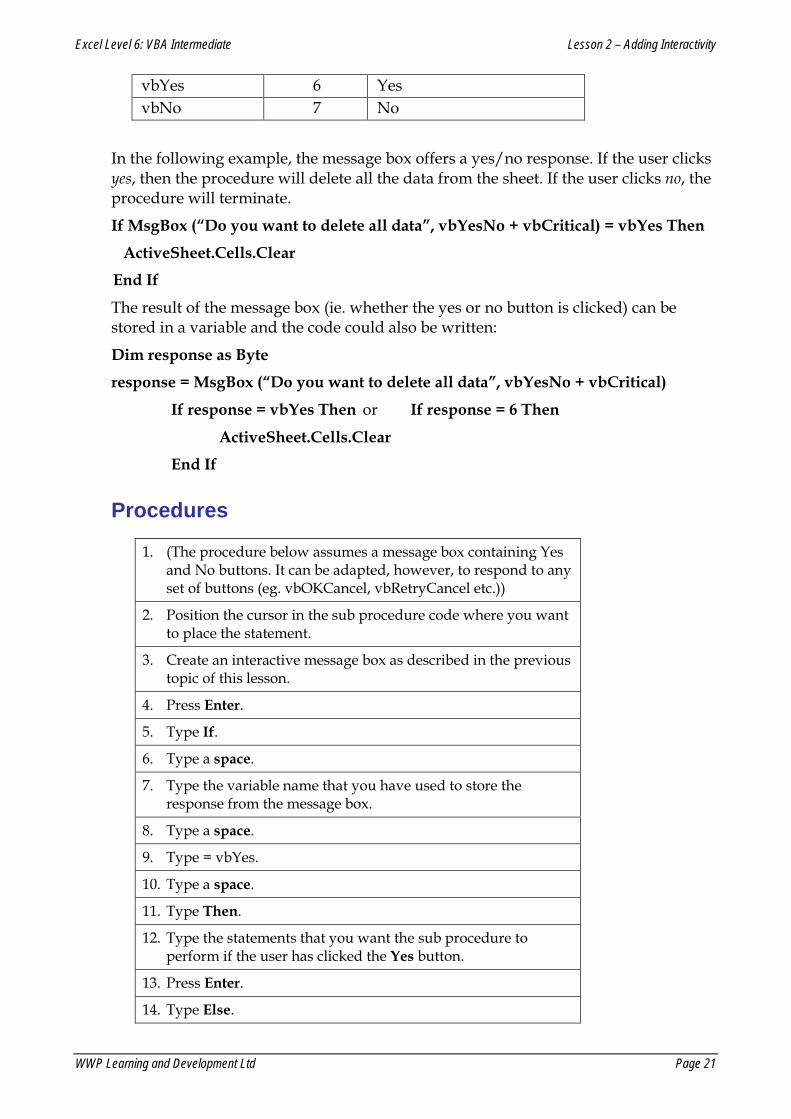
Constant Value Button Selected vbOK 1 OK vbCancel 2 Cancel vbAbort 3 Abort vbRetry 4 Retry vbIgnore 5 Ignore
Excel Level 6: VBA Intermediate Lesson 2 – Adding Interactivity
WWP Learning and Development Ltd Page 21
vbYes 6 Yes vbNo 7 No
In the following example, the message box offers a yes/no response. If the user clicks yes, then the procedure will delete all the data from the sheet. If the user clicks no, the procedure will terminate.
If MsgBox (“Do you want to delete all data”, vbYesNo + vbCritical) = vbYes Then
ActiveSheet.Cells.Clear
End If
The result of the message box (ie. whether the yes or no button is clicked) can be stored in a variable and the code could also be written:
Dim response as Byte
response = MsgBox (“Do you want to delete all data”, vbYesNo + vbCritical)
If response = vbYes Then or If response = 6 Then
ActiveSheet.Cells.Clear
End If
Procedures
1. (The procedure below assumes a message box containing Yes and No buttons. It can be adapted, however, to respond to any set of buttons (eg. vbOKCancel, vbRetryCancel etc.))
2. Position the cursor in the sub procedure code where you want to place the statement.
3. Create an interactive message box as described in the previous topic of this lesson.
4. Press Enter.
5. Type If.
6. Type a space.
7. Type the variable name that you have used to store the response from the message box.
8. Type a space.
9. Type = vbYes.
10. Type a space.
11. Type Then.
12. Type the statements that you want the sub procedure to perform if the user has clicked the Yes button.
13. Press Enter.
14. Type Else.
Excel Level 6: VBA Intermediate Lesson 2 – Adding Interactivity
WWP Learning and Development Ltd Page 22
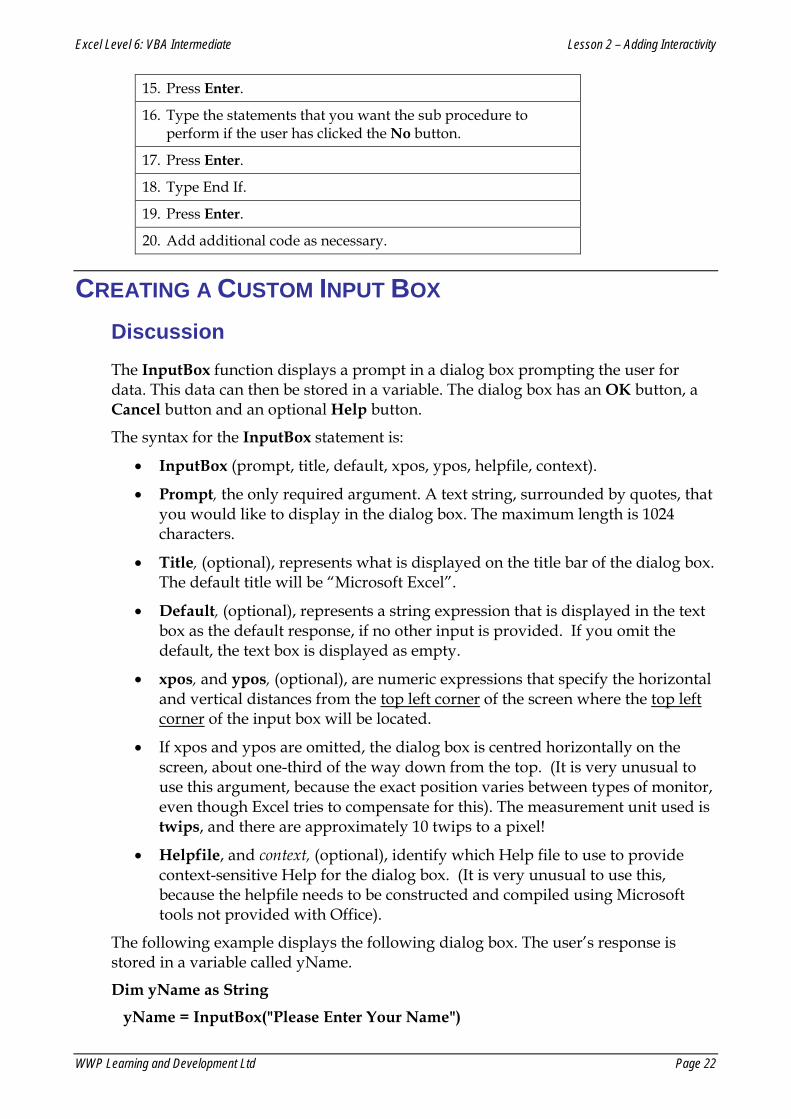
15. Press Enter.
16. Type the statements that you want the sub procedure to perform if the user has clicked the No button.
17. Press Enter.
18. Type End If.
19. Press Enter.
20. Add additional code as necessary.
CREATING A CUSTOM INPUT BOX Discussion The InputBox function displays a prompt in a dialog box prompting the user for data. This data can then be stored in a variable. The dialog box has an OK button, a Cancel button and an optional Help button.
The syntax for the InputBox statement is:
• InputBox (prompt, title, default, xpos, ypos, helpfile, context).
• Prompt, the only required argument. A text string, surrounded by quotes, that you would like to display in the dialog box. The maximum length is 1024 characters.
• Title, (optional), represents what is displayed on the title bar of the dialog box. The default title will be “Microsoft Excel”.
• Default, (optional), represents a string expression that is displayed in the text box as the default response, if no other input is provided. If you omit the default, the text box is displayed as empty.
• xpos, and ypos, (optional), are numeric expressions that specify the horizontal and vertical distances from the top left corner of the screen where the top left corner of the input box will be located.
• If xpos and ypos are omitted, the dialog box is centred horizontally on the screen, about one-third of the way down from the top. (It is very unusual to use this argument, because the exact position varies between types of monitor, even though Excel tries to compensate for this). The measurement unit used is twips, and there are approximately 10 twips to a pixel!
• Helpfile, and context, (optional), identify which Help file to use to provide context-sensitive Help for the dialog box. (It is very unusual to use this, because the helpfile needs to be constructed and compiled using Microsoft tools not provided with Office).
The following example displays the following dialog box. The user’s response is stored in a variable called yName.
Dim yName as String
yName = InputBox("Please Enter Your Name")

Excel Level 6: VBA Intermediate Lesson 2 – Adding Interactivity
WWP Learning and Development Ltd Page 23
If the user clicks OK or presses Enter, the InputBox function returns to the variable yName whatever was typed in the text box. If the user clicks Cancel or presses Esc, the InputBox function returns a zero length (empty) string.
The following example adds a title at the top of the input box window and adds a default text string in the text box.
Dim yName as String yName = InputBox("Type your company name", "Company Name Input", "Key Training")
The input box may be invoked wherever there is a need to prompt the user for information to use in a sub procedure. The sample code below gives two examples of how it might be used.
Sample A – Prompt the user for a name to give the current sheet Dim shtName as String
shtName = InputBox(“What name do you wish to give the current worksheet?”)
ActiveSheet.Name = shtName
Or... Dim shtName as String
ActiveSheet.Name = InputBox(“What name do you wish to give the current worksheet?”)
Sample B – Prompts user for two inputs, carries out a calculation and returns the result in a message box and in cell A1. Dim amount as Single
Dim rate as Single
amount = InputBox (“Enter your sales figure”)
rate = InputBox(“Enter your commission rate as a decimal percentage, eg. 0.15”)
commission = amount * rate
MsgBox “Your commission for this sale is “ & commission
Range(“A1”).Value = commission
Excel Level 6: VBA Intermediate Lesson 2 – Adding Interactivity
WWP Learning and Development Ltd Page 24
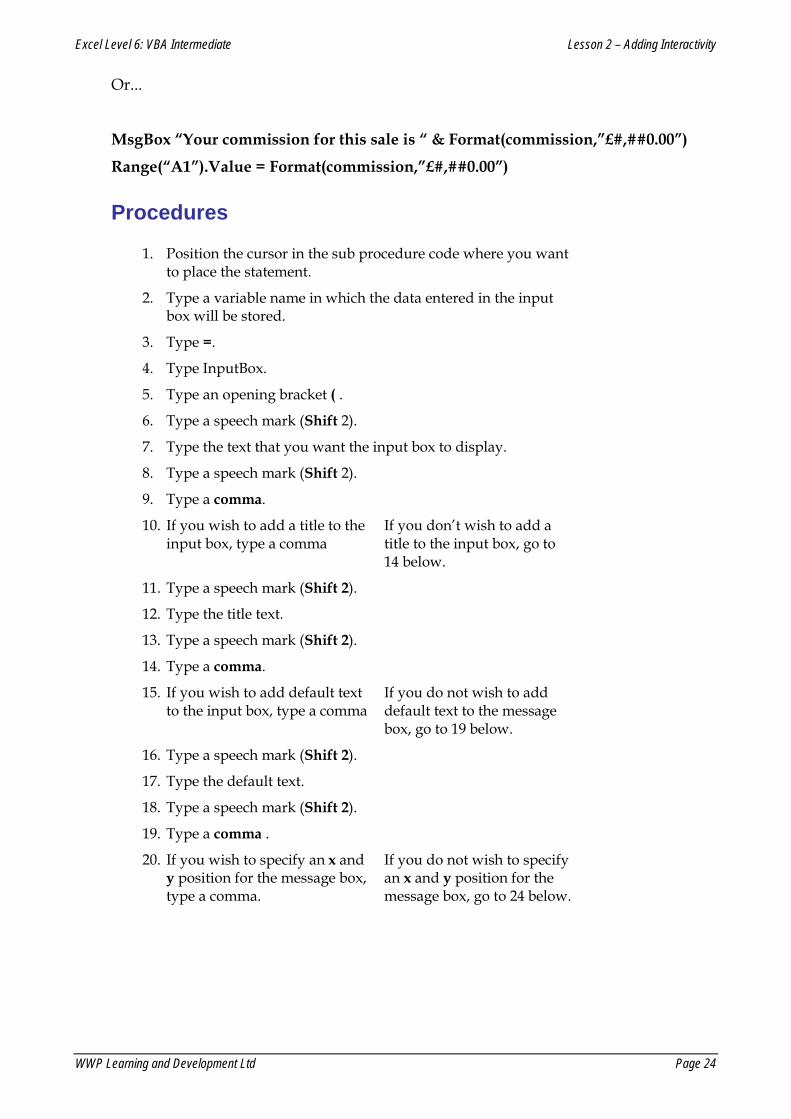
Or...
MsgBox “Your commission for this sale is “ & Format(commission,”£#,##0.00”)
Range(“A1”).Value = Format(commission,”£#,##0.00”)
Procedures
1. Position the cursor in the sub procedure code where you want to place the statement.
2. Type a variable name in which the data entered in the input box will be stored.
3. Type =.
4. Type InputBox.
5. Type an opening bracket ( .
6. Type a speech mark (Shift 2).
7. Type the text that you want the input box to display.
8. Type a speech mark (Shift 2).
9. Type a comma.
10. If you wish to add a title to the input box, type a comma
If you don’t wish to add a title to the input box, go to 14 below.
11. Type a speech mark (Shift 2).
12. Type the title text.
13. Type a speech mark (Shift 2).
14. Type a comma.
15. If you wish to add default text to the input box, type a comma
If you do not wish to add default text to the message box, go to 19 below.
16. Type a speech mark (Shift 2).
17. Type the default text.
18. Type a speech mark (Shift 2).
19. Type a comma .
20. If you wish to specify an x and y position for the message box, type a comma.
If you do not wish to specify an x and y position for the message box, go to 24 below.

Excel Level 6: VBA Intermediate Lesson 2 – Adding Interactivity
WWP Learning and Development Ltd Page 25
21. Type a value for the x position. This is measured in Twips and there approx. 10 Twips to a pixel. The x position is measured down from the top left-hand corner of the Excel window.
22. Type a comma.
23. Type a value for the y position. This is measured in Twips and there approx. 10 Twips to a pixel. The y position is measured to the right from the top left-hand corner of the Excel window.
24. Type a closing bracket )
25. Press Enter.
26. Add additional code as necessary.

Excel Level 6: VBA Intermediate Lesson 2 – Adding Interactivity
WWP Learning and Development Ltd Page 26
EXERCISE
USING INTERACTIVITY
1. Open the file MsgBoxButtons. Enable the macros, if prompted. 2. Click the Add Forecast macro button on the “Buttons” sheet. This copies and pastes data
from the “Forecasts” sheet. 3. Click the Clear Sheet macro button. This deletes out all data from the “Buttons” sheet. 4. Edit the Add_Forecast and Clear_Forecast procedures so that a message box appears,
asking the user if: 5. a) they are sure they want to continue; 6. b) giving them Yes and No buttons to choose from; 7. c) giving a message box title of "Confirm." 8. Run both macros to check that they work. 9. Run the Add_Forecast procedure. 10. Create a new procedure called InputData that: 11. prompts the user with two Input Boxes for values to enter for the projected incomes of the
two countries (Great Britain and United States). 12. have as its title, the name of the country to which it applies. 13. enters the values in the appropriate cells (E7 and E8). 14. Assign the procedure to a worksheet button. 15. Run the macro to check that the procedure works, entering some made up information of
your own into each input box. 16. Save and close the file.

WWP Learning and Development Page 27
LESSON 3 - EXPLORING THE RANGE OBJECT
In this lesson, you will learn how to:
• Refer to ranges
• Use collections
• Manipulate ranges with the Offset and Resize functions
Excel Level 6: VBA Intermediate Lesson 3 - The Range Object
WWP Learning and Development Ltd Page 28
REFERRING TO A RANGE Discussion Procedures will almost certainly need to work with ranges; these ranges will usually differ in size and position in a workbook and hence, there needs to be flexible ways of identifying and selecting them.
The Range Property As a result, there are many ways of referring to a range. The first and most commonly seen after recording a macro is using the Range property:-
Range(reference)
eg. Range(“A1”)
Range(“B2 : D10”)
An alternative way of selecting a range of cells that can provide more flexibility, is to separate the first cell from the last one with a comma, eg.
Range("A1", "A10")
...refers to the range A1 : A10 and gives the same result as using Range(“A1:A10”).
Several (non contiguous) ranges can be referred to by typing them into the Range argument with commas separating them and quote marks (“) at the beginning and end, eg.
Range("A1:A10, C1:C10, E1:E10")
... refers to three ranges.
Another way of using referring to a range is from a currently selected cell to another fixed point in a worksheet, eg.
Range(ActiveCell, ActiveCell.Offset(10, 0))
This provides rather more flexibility because it will always refer to the range from the active cell to the cell 10 rows below it. So, for example, if the active cell is B4, the range B4 : B14 will be selected.
All the above methods refer to and identify a range object that can then have an appropriate method or property applied to it, eg.
Range("A1", "A10").Interior.ColorIndex = 15 (add a light grey fill colour to the range A1 : A10)
Excel Level 6: VBA Intermediate Lesson 3 - The Range Object
WWP Learning and Development Ltd Page 29
The Cells Property The most significant difference between using the Cells property to the Range property, is that the Cells property identifies cells numerically (using what is called an Index) AND it can only identify single cells, not ranges.
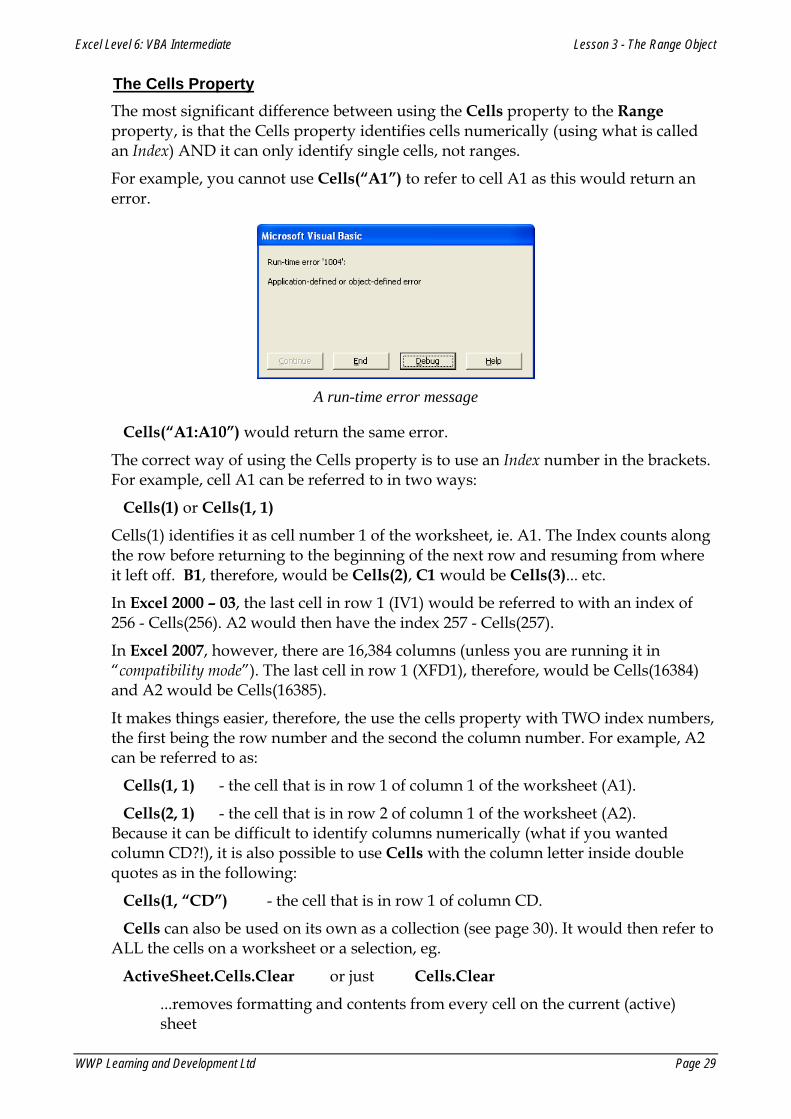
For example, you cannot use Cells(“A1”) to refer to cell A1 as this would return an error.
A run-time error message
Cells(“A1:A10”) would return the same error.
The correct way of using the Cells property is to use an Index number in the brackets. For example, cell A1 can be referred to in two ways:
Cells(1) or Cells(1, 1)
Cells(1) identifies it as cell number 1 of the worksheet, ie. A1. The Index counts along the row before returning to the beginning of the next row and resuming from where it left off. B1, therefore, would be Cells(2), C1 would be Cells(3)... etc.
In Excel 2000 – 03, the last cell in row 1 (IV1) would be referred to with an index of 256 - Cells(256). A2 would then have the index 257 - Cells(257).
In Excel 2007, however, there are 16,384 columns (unless you are running it in “compatibility mode”). The last cell in row 1 (XFD1), therefore, would be Cells(16384) and A2 would be Cells(16385).
It makes things easier, therefore, the use the cells property with TWO index numbers, the first being the row number and the second the column number. For example, A2 can be referred to as:
Cells(1, 1) - the cell that is in row 1 of column 1 of the worksheet (A1).
Cells(2, 1) - the cell that is in row 2 of column 1 of the worksheet (A2). Because it can be difficult to identify columns numerically (what if you wanted column CD?!), it is also possible to use Cells with the column letter inside double quotes as in the following:
Cells(1, “CD”) - the cell that is in row 1 of column CD.
Cells can also be used on its own as a collection (see page 30). It would then refer to ALL the cells on a worksheet or a selection, eg.
ActiveSheet.Cells.Clear or just Cells.Clear
...removes formatting and contents from every cell on the current (active) sheet
Excel Level 6: VBA Intermediate Lesson 3 - The Range Object
WWP Learning and Development Ltd Page 30
Sheets(Sheet2”).Cells.Font.Name = “Calibri”
... formats all cells on Sheet2 to the Calibri font.
numCels = Selection.Cells.Count
... returns to the variable numCels the number of cells in the selected area
The Cells property is generally more powerful and flexible than the Range property, although Range is still best used when referring to specific (absolute) cells or ranges.
The Cells property and the Range property can be used together as follows:
Range(Cells(1, 1),Cells(3, 3))
This refers to the range A1 : C3, Cells(1, 1) being A1 and Cells(3, 3) being C3.
Procedures
1. Launch or switch to the VB Editor.
2. Identify in the Project Explorer pane, the workbook (VBA project) that you want to add code to.
3. Open the module sheet containing the code or, insert a new module.
4. Position the cursor in the procedure where you want to write the code.
5. Type the object that you want to refer to.
6. Type a full stop.
7. Type the method or property that you want to apply to the object.
8. Press Enter.
COLLECTIONS Discussion It was explained in the previous topic that Cells may be used on its own to represent a “collection.” Relevant methods and properties can then be applied to a whole collection (or “type”) of object. For example:
Cells.Select
...select ALL the cells on the active worksheet
Other collections include:
Excel Level 6: VBA Intermediate Lesson 3 - The Range Object
WWP Learning and Development Ltd Page 31
Object Refers to Example
WorkBooks All open Excel files WorkBooks.Close (closes all open Excel files)
WorkBooks.Save (saves all open Excel files)
WorkBooks.Add (creates a new, blank Excel file)
Sheets or WorkSheets
All the sheets of an active workbook
Sheets.PrintOut (prints all the sheets in the current workbook)
Sheets.Select (groups all the sheets in the current workbook)
Sheets.Count (returns the number of sheets in the active workbook)
Columns All the columns of the current worksheet
Columns.Count
Columns.ColumnWidth = 20
Rows All the rows of the current worksheet
Rows.Count
Rows.ColumnWidth = 20
ChartObjects All the charts on the current sheet
ChartObjects.Count
ChartObjects.Delete
ChartObjects.Copy
To identify and refer to a single item in a collection, you normally have to refer to it by its index number, or by its name (as a string). For example:
• WorkBooks(1) is the first workbook opened (assuming that several are open).
• WorkBooks(“Sales Data.xls”) is specifically the open file named Sales Data.
• Sheets(1) is the first sheet from the left of the workbook.
• Sheets(“January”) is specifically the sheet named January.
• Rows(1) refers to row 1 of the active worksheet.
• Columns(1) is the same as Columns(“A”) and refers to column A of the active worksheet.
To select a range of columns, for example from B through G, would require the code Columns(“B : G”).Select. This is the only way to specify a range of columns within a collection, numbers (eg. Columns(2 : 7)) are not allowed.
Procedures
1. Launch or switch to the VB Editor.
Excel Level 6: VBA Intermediate Lesson 3 - The Range Object
WWP Learning and Development Ltd Page 32
2. Identify in the Project Explorer pane, the workbook (VBA project) that you want to add code to.
3. Open the module sheet containing the code or, insert a new module.
4. Position the cursor in the procedure where you want to write the code.
5. Type the object that you want to refer to.
6. Type a full stop.
7. Type the method or property that you want to apply to the object.
8. Press Enter.
THE CURRENTREGION PROPERTY Discussion Referring to a range using CurrentRegion can be very useful when you do not know what the range references are going to be, or how many rows and/or columns it will have.
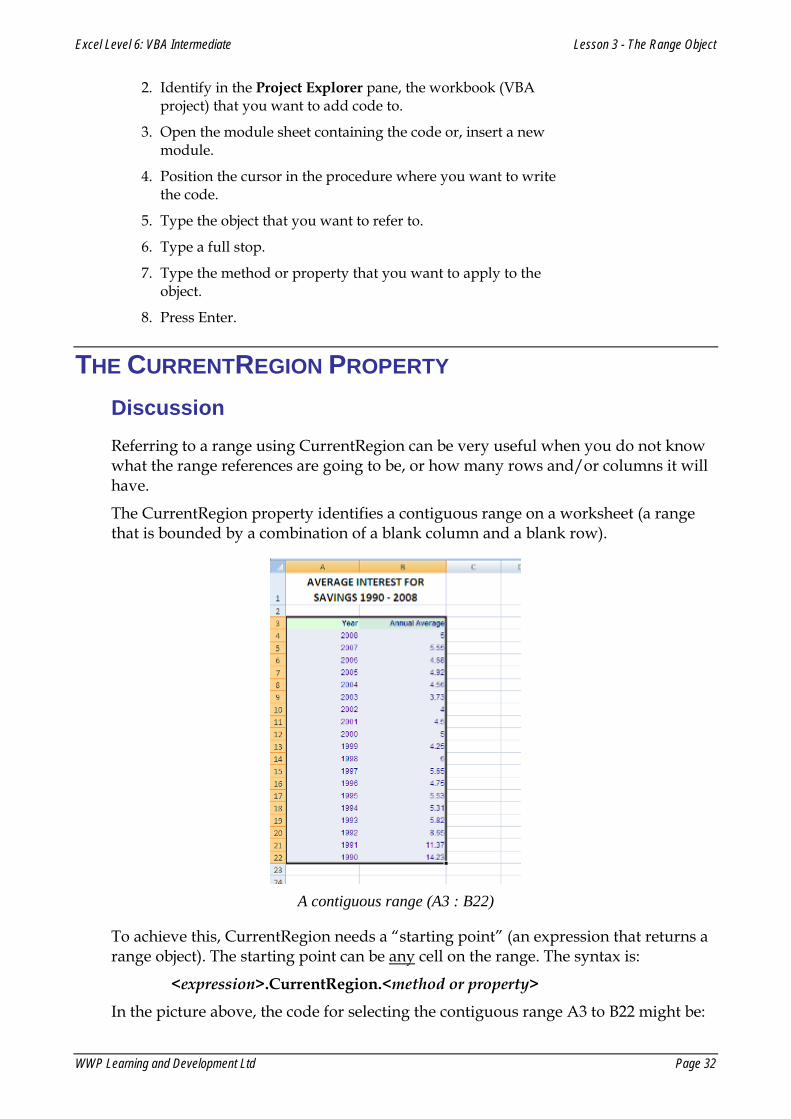
The CurrentRegion property identifies a contiguous range on a worksheet (a range that is bounded by a combination of a blank column and a blank row).
A contiguous range (A3 : B22)
To achieve this, CurrentRegion needs a “starting point” (an expression that returns a range object). The starting point can be any cell on the range. The syntax is:
<expression>.CurrentRegion.<method or property>
In the picture above, the code for selecting the contiguous range A3 to B22 might be:
Excel Level 6: VBA Intermediate Lesson 3 - The Range Object
WWP Learning and Development Ltd Page 33
Range(“A3”).CurrentRegion.Select
If a cell is already active on the range, the code could be written as follows:
ActiveCell.CurrentRegion.Select
For example:
Range(“A1 : G200”).Select
Selection.Copy Destination:= Sheets(2).Range(“A2”)
... will always select the cells from A1 to G200, copy them and paste them into cell A2 on the second sheet of the workbook.
Nevertheless, if you want to run the same procedure on a different table that does not span from cells A1 to G200, then the procedure will not work correctly. Using the CurrentRegion property, however, it would be successful, eg.
ActiveCell.CurrentRegion.Select
Selection.Copy Destination:= Sheets(2).Range(“A2”)
The example above would require a cell to be selected on the table first, but would succeed a table containing any number of rows and columns anywhere on the worksheet.
Another useful way of selecting cells CurrentRegion would be to use arguments for it. The following example would select the cell 2 Rows down and 2 Columns to the right, from the first cell in the current region.
ActiveCell.CurrentRegion(2, 2).Select
An alternative method would be to use the activate method. This would be useful if the current region was selected first and needed to be kept selected. Using activate will make a cell active without removing any cell selection.
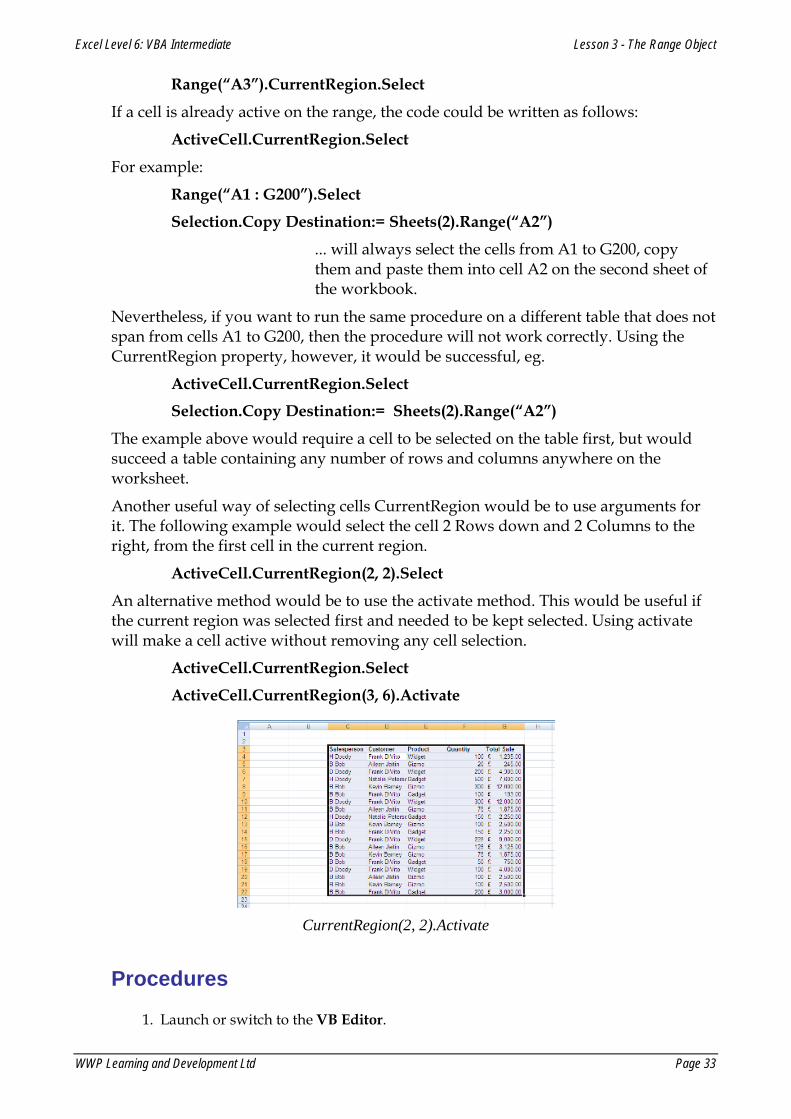
ActiveCell.CurrentRegion.Select
ActiveCell.CurrentRegion(3, 6).Activate
CurrentRegion(2, 2).Activate
Procedures
1. Launch or switch to the VB Editor.

Excel Level 6: VBA Intermediate Lesson 3 - The Range Object
WWP Learning and Development Ltd Page 34
2. Identify in the Project Explorer pane, the workbook (VBA project) that you want to add code to.
3. Open the module sheet containing the code or, insert a new module.
4. Position the cursor in the procedure where you want to write the code.
5. Type the object that you want to refer to.
6. Type a full stop.
7. Type the method or property that you want to apply to the object.
8. Press Enter.
THE OFFSET & RESIZE PROPERTIES Discussion
Offset The Offset property is discussed in the Excel VBA Introduction booklet with respect to it identifying a single cell that is “away” from another one (see Excel VBA Introduction (Student Edition), page 63) . For example:
ActiveCell.Offset(1,0).Select
... would select the cell that is 1 row and 0 columns away from the active cell. If the active cell was B10, therefore, Offset(1,0) would refer to B11 (one row down, same column).
The Offset property can also be used to offset an entire range of cells.
The following example moves a selected range 1 cell down and 1 column to the right:
Range(“A1”).CurrentRegion.Select
Selection.Offset(1,1).Select
Range(“A1”).CurrentRegion.Select
Selection.Offset(1,1).Select
This proves useful where a table has to be selected excluding the top row and left column.
Excel Level 6: VBA Intermediate Lesson 3 - The Range Object
WWP Learning and Development Ltd Page 35
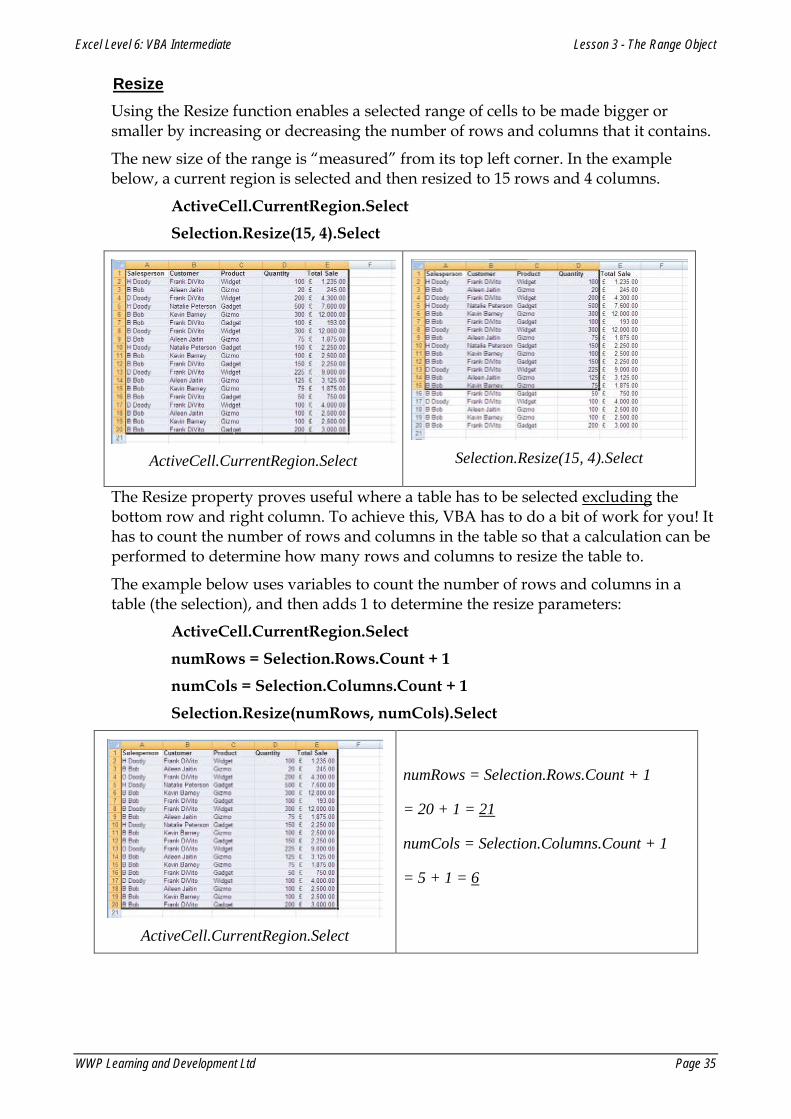
Resize Using the Resize function enables a selected range of cells to be made bigger or smaller by increasing or decreasing the number of rows and columns that it contains.
The new size of the range is “measured” from its top left corner. In the example below, a current region is selected and then resized to 15 rows and 4 columns.
ActiveCell.CurrentRegion.Select
Selection.Resize(15, 4).Select
ActiveCell.CurrentRegion.Select
Selection.Resize(15, 4).Select
The Resize property proves useful where a table has to be selected excluding the bottom row and right column. To achieve this, VBA has to do a bit of work for you! It has to count the number of rows and columns in the table so that a calculation can be performed to determine how many rows and columns to resize the table to.
The example below uses variables to count the number of rows and columns in a table (the selection), and then adds 1 to determine the resize parameters:
ActiveCell.CurrentRegion.Select
numRows = Selection.Rows.Count + 1
numCols = Selection.Columns.Count + 1
Selection.Resize(numRows, numCols).Select
ActiveCell.CurrentRegion.Select
numRows = Selection.Rows.Count + 1
= 20 + 1 = 21
numCols = Selection.Columns.Count + 1
= 5 + 1 = 6
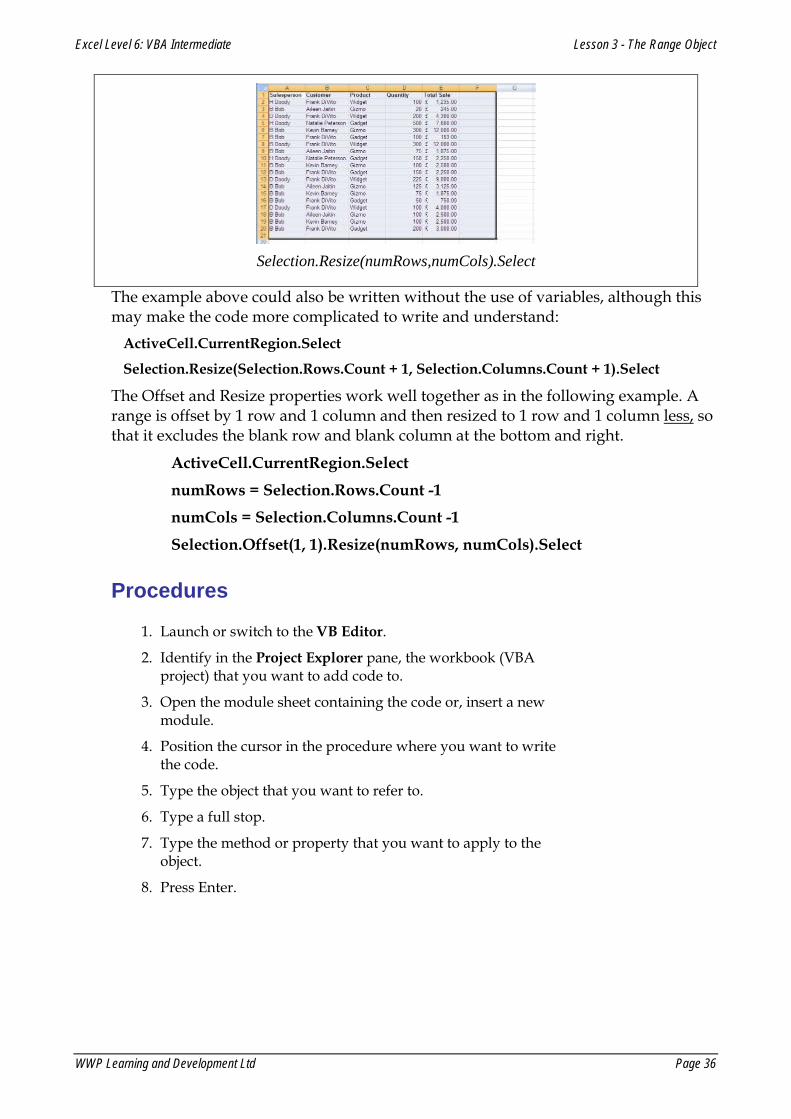
Excel Level 6: VBA Intermediate Lesson 3 - The Range Object
WWP Learning and Development Ltd Page 36
Selection.Resize(numRows,numCols).Select
The example above could also be written without the use of variables, although this may make the code more complicated to write and understand:
ActiveCell.CurrentRegion.Select
Selection.Resize(Selection.Rows.Count + 1, Selection.Columns.Count + 1).Select
The Offset and Resize properties work well together as in the following example. A range is offset by 1 row and 1 column and then resized to 1 row and 1 column less, so that it excludes the blank row and blank column at the bottom and right.
ActiveCell.CurrentRegion.Select
numRows = Selection.Rows.Count -1
numCols = Selection.Columns.Count -1
Selection.Offset(1, 1).Resize(numRows, numCols).Select
Procedures
1. Launch or switch to the VB Editor.
2. Identify in the Project Explorer pane, the workbook (VBA project) that you want to add code to.
3. Open the module sheet containing the code or, insert a new module.
4. Position the cursor in the procedure where you want to write the code.
5. Type the object that you want to refer to.
6. Type a full stop.
7. Type the method or property that you want to apply to the object.
8. Press Enter.
Excel Level 6: VBA Intermediate Lesson 3 - The Range Object
WWP Learning and Development Ltd Page 37
EXERCISE
WORKING WITH THE RANGE OBJECT
1. Insert a new module in your Personal Macro Workbook and write a sub procedure named, LayoutTable that: a) selects a whole table of data; b) adjusts the width of all the columns to 12pts; c) formats the font colour of the first column to blue; d) aligns the text centrally in the first row.
2. Assign this macro to a custom button on your My Macros toolbar. 3. Open the file, Ranges. 4. Run and test LayoutTable on the table in Sheet1 of this workbook. 5. Write another sub procedure in your Personal Macro Workbook named,
FormatNumbers that selects a whole table excluding the top row and the left-most column and formats it to a currency style.
6. Assign this macro to a custom button on your My Macros toolbar. 7. Run and test FormatNumbers on the table in Sheet 1 of this workbook. 8. Create a final sub procedure in your Personal Macro Workbook named, LastCell that
selects the last cell of a table (the one in the bottom right-hand corner) and: a) makes the font size 14pts; b) adds a yellow fill colour; and c) autofit the column.
9. Assign this macro to a custom button on your My Macros toolbar. 10. Run and test LastCell on the table in Sheet 1 of this workbook. 11. Create a new sub procedure in your Personal Macro Workbook named, RunAllMacros. 12. Call into this sub procedure the three macros created above. 13. Assign this macro to a custom button on your My Macros toolbar. 14. Run and test RunAllMacros on the table in Sheet2 of this workbook. 15. Save and close the file. 16. Exit Excel to ensure that the Personal Macro Workbook is saved. 17. Re-launch Excel.
WWP Learning and Development Page 38
LESSON 4 - VARIABLES, CONSTANTS AND ARRAYS
In this lesson, you will learn how to:
• Declare Variables
• Understand Scope and Visibility
• Define Constants
• Declare Arrays

Excel Level 6: VBA Intermediate Lesson 4 - Variable, Constants and Arrays
WWP Learning and Development Ltd Page 39
DECLARING VARIABLES Discussion Variables that are to be used in a procedure are usually declared at the start of that procedure in order to identify them and the type of data that they will hold.
In VBA, it is not necessary to declare variables, but by doing so, it is possible to speed up the procedure, conserve memory and prevent errors from occurring.
Because variables do not have to be declared Visual Basic assumes any variable that has not yet been used to be a new variable. This means a variable spelled incorrectly during code writing would not be recognised by Visual Basic.
This problem can be avoided by choosing to declare explicitly every variable. This tells Visual Basic that every variable will be declared in advance and any others used, misspelt or not, will be incorrect. When Visual Basic encounters an undeclared variable, the following message is displayed:
Error Message – Variable not defined
To explicitly declare variables, the following statement is required at the top of the Visual Basic module:
Option Explicit
Variables are then declared by using the Dim Statement.
Dim variable name
The variable exists until the end of the procedure is met.
The Option Explicit Statement can be set automatically to appear in all modules.
Procedures
1. In the Visual Basic Editor, Select Tools... Options.
2. Select the Editor Tab.
3. Select Require Variable Declaration.
4. Click on the OK button.
The Option Explicit Statement is added to new modules NOT existing modules.
Excel Level 6: VBA Intermediate Lesson 4 - Variable, Constants and Arrays
WWP Learning and Development Ltd Page 40
SCOPE AND VISIBILITY Discussion It is sometimes a necessity to “scope” a variable correctly, when calling procedures from within a module or indeed across several modules. The result of scoping these variables correctly would signify whether or not the variable has maintained its data.
If the data has been lost then, this is known as lost visibility.
A “Local” variable is declared within a procedure and is only available within that procedure.
A “Module-Level” variable is available to all procedures in the module in which it is declared, but not to any other modules. Module-level variables are created by placing their Dim statements at the top of the module before the first procedure.
A “Public” variable is available to every module in the workbook. Public variables are created by using the Public statement instead of the Dim statement, and placing the declarations at the top of a module before the first procedure.
To conserve memory, declare variables at the lowest level possible, e.g. do not declare a variable as public or at module-level if local is sufficient.
Procedures
1. Launch or switch to the VB Editor.
2. Identify the workbook (VBA project) to which you want to add code in the Project Explorer pane.
3. Open the module sheet containing the code or, insert a new module.
4. To declare a variable at “module level,” position the cursor at the very top of the module sheet and type Dim.
5. To declare a “public,” variable, position the cursor at the very top of the module sheet and type Public.
6. Type a space.
7. Type the name for the variable.
8. Type a space.
9. Type As.
10. Type a space.
11. Type or select from the list and appropriate data type for the variable.
12. Press Enter.

Excel Level 6: VBA Intermediate Lesson 4 - Variable, Constants and Arrays
WWP Learning and Development Ltd Page 41
CONSTANTS Discussion A constant is a named item that retains a constant value throughout the execution of a program, as opposed to a variable, whose value may change during execution.
By storing a value as a constant, it indicates to anyone reading or having to edit the procedure, that wherever you see the constant being used, its value will always be as assigned in the Const statement. Like many things in programming, it is an example of good practice and intended to keep the code neat, concise and easily understood.
It is usual to type your constants all UPPER CASE to distinguish them from VBA words (mixture of upper and lowercase) and variables (all lower case).
Constants are defined using the Const statement. Constants can be used anywhere in a procedures in place of actual values. A constant may be a string or numeric literal, another constant, or any combination that includes arithmetic or logical operators except Is. For example:
Sub Font_Colour()
Const RED = 3
Const BLUE = 5
Const YELLOW = 6
Can then be used thus......
Selection.Font.ColorIndex = RED
Selection.Interior.ColorIndex = YELLOW
Selection.BorderAround ColorIndex:= BLUE
End Sub
Like variables, constants should be declared in order to inform, prevent errors and manage computer memory. Constants are not, however, "dimmed" in the same way as variables. They are declared as type immediately after the name of the constant. In the example below, a constant has been created to store the value of pi (π).
Const PI as Single = 3.142
In the example further up the page, the constants would be declared as follows:
Const RED as Byte = 3
Const BLUE as Byte = 5
Const YELLOW as Byte = 6
Or, in the single line form:
Const RED As Byte = 3, YELLOW As Byte = 6, BLUE As Byte = 5

Excel Level 6: VBA Intermediate Lesson 4 - Variable, Constants and Arrays
WWP Learning and Development Ltd Page 42
Procedures
1. Launch or switch to the VB Editor.
2. Identify the workbook (VBA project) to which you want to add code in the Project Explorer pane.
3. Open the module sheet containing the code or, insert a new module.
4. Identify the procedure that you wish to declare the constant in or, start typing a new procedure.
5. Position the cursor immediately below the Sub statement at the top of the procedure.
6. Type Const.
7. Type a space.
8. Type a name for the constant. Tip: constant names are normally written all UPPER CASE.
9. Type a space.
10. Type As.
11. Type or select from the list a data type for the variable.
12. Type a space.
13. Type =.
14. Type a value for the constant.
15. Press Enter.
ARRAYS Discussion An array is a special type of variable that can contain many "elements" of information simultaneously - in essence a large variable. Think of it as a box containing many separate sections, rather like pigeon holes in a post room.
An array stores large numbers of values more efficiently that using an equivalent numbers of individual variables. Not only does an array make better use of computer memory, but it can be "filled" extremely quickly and flexibly with a minimum amount of code. Storing a column of 100 numbers in individual variables would take 100 lines of code. With an array, it can be done with just three!

Excel Level 6: VBA Intermediate Lesson 4 - Variable, Constants and Arrays
WWP Learning and Development Ltd Page 43
DECLARING AN ARRAY Discussion An array must be declared before it can be used. Like a variable, it is declared with a Dim statement, followed by the name of the array. What makes an array different is that after the name, there are brackets containing a number (or numbers). This number (or numbers) denote how many elements the array contains. This is referred to as the dimension of the array. For example, the following example declares an array containing 5 elements:
Dim arrData (4)
You may now be asking the question: "Why 4 when the array must contain 5 elements?"
The number 4 is used because it is the upper bound of the array that is used in the brackets, NOT the number of elements required. Because the lower bound is 0, an upper bound of 4 does, therefore, indicate that the array contains 5 elements.
Also like variables, it is good practice to declare an array as type. If an array is declared with a specific data type (As Single, for example), then every element in the array must be of that type. It is possible, however, to declare an array as a variant, in which case the elements could contain different data types.
Dim variable (dimensions) as Type
Assuming the above array (arrData) will be storing large numbers involving decimals, the array would be declared as follows:
Dim arrData(4) As Single
Earlier, it was explained that all elements in an array must be of the same data type. You can get around this restriction by declaring your array as a variant. A variant array, however, will consume more memory than other types.
The same data types as for variables can be used. These are given in the table below:
Data type Memory size Storage capability
Byte 1 byte 0 to 255
Boolean 2 bytes True or False
Integer 2 bytes -32,768 to 32,767
arrData(0) arrData(1) arrData(2) arrData(3) arrData(4)

Excel Level 6: VBA Intermediate Lesson 4 - Variable, Constants and Arrays
WWP Learning and Development Ltd Page 44
Long 4 bytes -2,147,483,648 to 2,147,483,647
Single 4 bytes -3.402823E38 to -1.401298E-45 for negative values; 1.401298E-45 to 3.402823E38 for positive values
Double 8 bytes -1.79769313486231E308 to -4.94065645841247E-324 for negative values; 4.94065645841247E-324 to 1.79769313486232E308 for positive values
Currency 8 bytes -922,337,203,685,477.5808 to 922,337,203,685,477.5807
Decimal 14 bytes +/-79,228,162,514,264,337,593,543,950,335 with no decimal point; +/-7.9228162514264337593543950335 with 28 places to the right of the decimal; smallest non-zero number is +/-0.0000000000000000000000000001
Date 8 bytes January 1, 100 to December 31, 9999
String (variable-length)
10 bytes + string length
0 to approximately 2 billion
Declaring an array actually reserves memory for the entire array. VBA does not care whether you fill it up or not, so be conservative when defining array elements.
Procedures
1. Launch or switch to the VB Editor.
2. Identify the workbook (VBA project) to which you want to add code in the Project Explorer pane.
3. Open the module sheet containing the code or, insert a new module.
4. Identify the procedure that you wish to declare the array in or, start typing a new procedure.
5. Position the cursor immediately below the Sub statement at the top of the procedure.
6. Type Dim.
7. Type space.
8. Type a name for the array.
9. Type a space.

Excel Level 6: VBA Intermediate Lesson 4 - Variable, Constants and Arrays
WWP Learning and Development Ltd Page 45
10. Type an opening bracket (.
11. Type the upper bound for the array, (this will be a single number).
12. Type a closing bracket ).
13. Type a space.
14. Type As.
15. Type or select from the list an appropriate data type for the array.
16. Press Enter.
ARRAY TYPES Discussion
Changing the lower bound The array described above is referred to as a zero-based array because the lower bound is 0.
An array, however, can have ANY number as its lower bound, most usually a 1. This makes it easier to use the array because it is more natural to the human mind to start counting from 1 rather than 0!
To create an array with a lower bound that is NOT 0 you have to declare it as follows:
Dim arrData (1 To 5) As Type
The array above would contain 5 elements numbered from 1 to 5.
arrData(1) arraData(2) arrData(3) arrData(4) arrData(5)
If you wish ALL arrays on a module sheet to use 1 as the lower index, you can type the words:
Option Base 1
...at the top of the module sheet (a module-level declaration). This makes is more convenient because when it comes to declaring arrays in the module's procedures, you can omit the 1 To part of the declaration. Hence, an array containing 5 elements would be declared as:
Dim arrData (5)
The Option Base 1 statement at the top of the module sheet indicates that the lower bound is 1. The following extract from the VB Editor clarified the code.

Excel Level 6: VBA Intermediate Lesson 4 - Variable, Constants and Arrays
WWP Learning and Development Ltd Page 46
Procedures
1. Launch or switch to the VB Editor.
2. Identify the workbook (VBA project) to which you want to add code in the Project Explorer pane.
3. Open the module sheet containing the code or, insert a new module.
4. Identify the procedure that you wish to declare the array in or, start typing a new procedure.
5. Position the cursor immediately below the Sub statement at the top of the procedure.
6. Type Dim.
7. Type space.
8. Type a name for the array.
9. Type a space.
10. Type an opening bracket (.
11. Type the lower bound (this will be a single number).
12. Type a space.
13. Type To.
14. Type the upper bound (this will be a single number)
15. Type a closing bracket ).
16. Type a space.
17. Type As.
18. Type or select from the list an appropriate data type for the array.
19. Press Enter.
Excel Level 6: VBA Intermediate Lesson 4 - Variable, Constants and Arrays
WWP Learning and Development Ltd Page 47
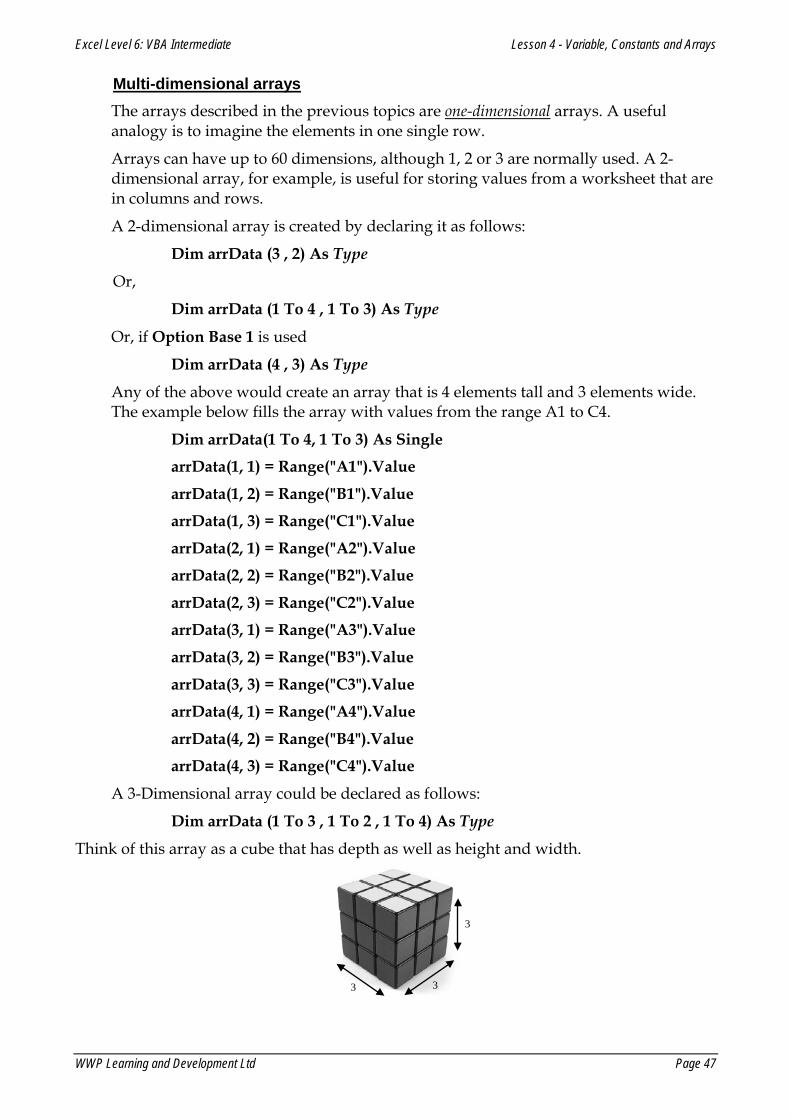
Multi-dimensional arrays The arrays described in the previous topics are one-dimensional arrays. A useful analogy is to imagine the elements in one single row.
Arrays can have up to 60 dimensions, although 1, 2 or 3 are normally used. A 2-dimensional array, for example, is useful for storing values from a worksheet that are in columns and rows.
A 2-dimensional array is created by declaring it as follows:
Dim arrData (3 , 2) As Type
Or,
Dim arrData (1 To 4 , 1 To 3) As Type
Or, if Option Base 1 is used
Dim arrData (4 , 3) As Type
Any of the above would create an array that is 4 elements tall and 3 elements wide. The example below fills the array with values from the range A1 to C4.
Dim arrData(1 To 4, 1 To 3) As Single
arrData(1, 1) = Range("A1").Value
arrData(1, 2) = Range("B1").Value
arrData(1, 3) = Range("C1").Value
arrData(2, 1) = Range("A2").Value
arrData(2, 2) = Range("B2").Value
arrData(2, 3) = Range("C2").Value
arrData(3, 1) = Range("A3").Value
arrData(3, 2) = Range("B3").Value
arrData(3, 3) = Range("C3").Value
arrData(4, 1) = Range("A4").Value
arrData(4, 2) = Range("B4").Value
arrData(4, 3) = Range("C4").Value
A 3-Dimensional array could be declared as follows:
Dim arrData (1 To 3 , 1 To 2 , 1 To 4) As Type
Think of this array as a cube that has depth as well as height and width.
3 3
3
Excel Level 6: VBA Intermediate Lesson 4 - Variable, Constants and Arrays
WWP Learning and Development Ltd Page 48
To use this array to store values, you would need to refer to all three dimensions, for example:
ArrData(1 , 1 , 1) = ...
ArrData(1 , 1 , 2) = ...
ArrData(1 , 1 , 3) = ...
ArrData(1 , 1 , 4) = ...
ArrData(1 , 2 , 1) = ...
ArrData(1 , 2 , 2) = ...
ArrData(1 , 2 , 3) = ...
ArrData(1 , 2 , 4) = ...
ArrData(2, 1 , 1) = ...
ArrData(2, 1 , 2) = ...
........etc.
Procedures
1. Launch or switch to the VB Editor.
2. Identify the workbook (VBA project) to which you want to add code in the Project Explorer pane.
3. Open the module sheet containing the code or, insert a new module.
4. Identify the procedure that you wish to declare the multidimensional array in or, start typing a new procedure.
5. Position the cursor immediately below the Sub statement at the top of the procedure.
6. Type Dim.
7. Type a space.
8. Type a name for the array.
9. Type a space.
10. Type an opening bracket (.
11. Type the upper bound of the first dimension of the array (this will be a single number).
12. Type a comma .
13. Type the upper bound of the second dimension of the array (this will be a single number)
14. Continue typing commas and the upper bound of any additional dimensions that you want your array to have.
15. Type a closing bracket ).
Excel Level 6: VBA Intermediate Lesson 4 - Variable, Constants and Arrays
WWP Learning and Development Ltd Page 49
16. Press Enter.
17. Type a space.
18. Type As.
19. Type a space.
20. Type and appropriate data type for the array.
21. Press Enter.
Keep in mind that an array should simplify a process, not complicate it. Arrays can become very complex, so if the array seems to take on a life of its own, you might want to rethink your strategy before things get too complicated!
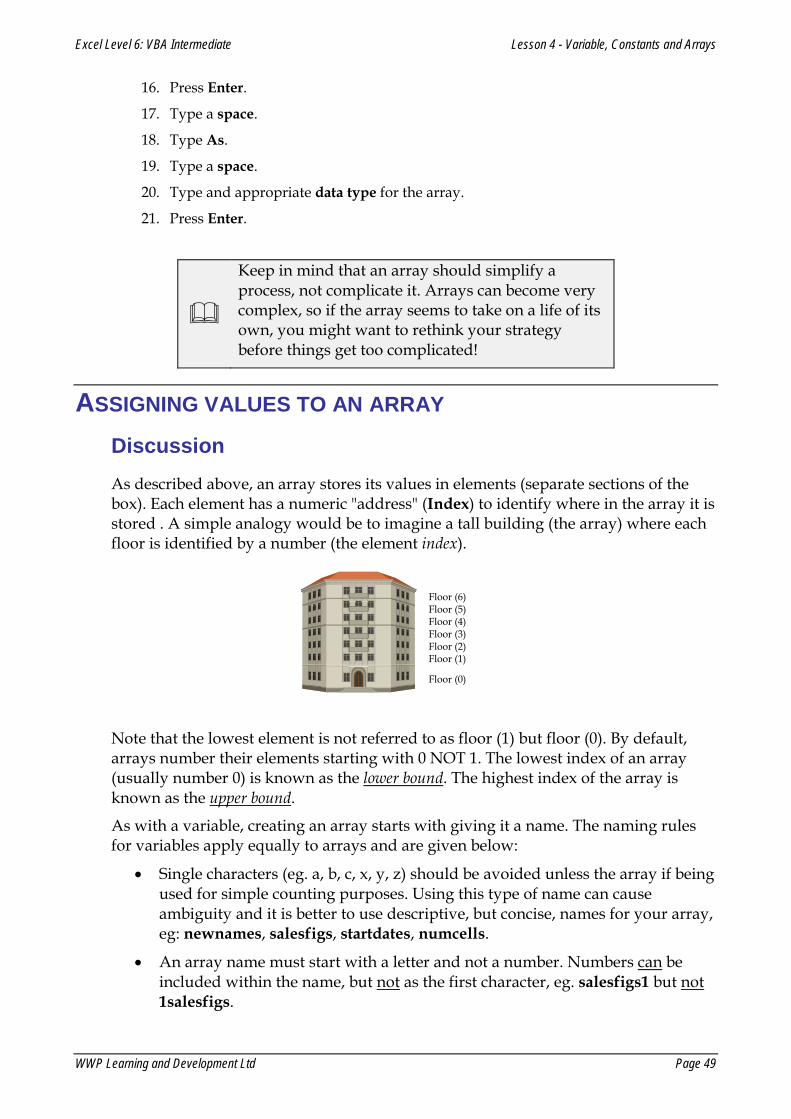
ASSIGNING VALUES TO AN ARRAY Discussion As described above, an array stores its values in elements (separate sections of the box). Each element has a numeric "address" (Index) to identify where in the array it is stored . A simple analogy would be to imagine a tall building (the array) where each floor is identified by a number (the element index).
Floor (6) Floor (5) Floor (4) Floor (3) Floor (2) Floor (1)
Floor (0)
Note that the lowest element is not referred to as floor (1) but floor (0). By default, arrays number their elements starting with 0 NOT 1. The lowest index of an array (usually number 0) is known as the lower bound. The highest index of the array is known as the upper bound.
As with a variable, creating an array starts with giving it a name. The naming rules for variables apply equally to arrays and are given below:
• Single characters (eg. a, b, c, x, y, z) should be avoided unless the array if being used for simple counting purposes. Using this type of name can cause ambiguity and it is better to use descriptive, but concise, names for your array, eg: newnames, salesfigs, startdates, numcells.
• An array name must start with a letter and not a number. Numbers can be included within the name, but not as the first character, eg. salesfigs1 but not 1salesfigs.

Excel Level 6: VBA Intermediate Lesson 4 - Variable, Constants and Arrays
WWP Learning and Development Ltd Page 50
• The first character of an array name should be left lowercase. Because VBA words always start with an uppercase character (eg. ActiveCell, WorkBook, Cells, etc), keeping the first character lowercase helps make your arrays (like variables) stand out more clearly in the sub procedure.
• Avoid using names that conflict with VBA words such as: “activecell”, “sheets”, “font”, “cells”, etc.
• Spaces cannot be used in array names. You can separate words by either capitalisation, eg. newNames, or by using the underscore character, eg. new_names.
• Most punctuation marks (eg. , . : ; ? -) and special characters (eg. $, %, ^, &, #, }) cannot be used.
• An array name can be no longer than 250 characters.
It is common practice to commence a variable name with the prefix – arr.
The example below shows how to create an array named arrData that stores the values in the range B11:B16 in its elements numbered from 0 to 5.
arrData(0) = Range("B11").Value
arrData(1) = Range("B12").Value
arrData(2) = Range("B13").Value
arrData(3) = Range("B14").Value
arrData(4) = Range("B15").Value
arrData(5) = Range("B16").Value
arrData(0) through to arrData(5) can be used like normal variables. The following example returns the contents of the above array into the range(D10:D15) of Sheet2.
Sheets("Sheet2").Range("D10").Value = arrData(0)
Sheets("Sheet2").Range("D11").Value = arrData(1)
Sheets("Sheet2").Range("D12").Value = arrData(2)
Sheets("Sheet2").Range("D13").Value = arrData(3)
Sheets("Sheet2").Range("D14").Value = arrData(4)
Sheets("Sheet2").Range("D15").Value = arrData(5)
Procedures
1. Launch or switch to the VB Editor.
2. Identify the workbook (VBA project) to which you want to add code in the Project Explorer pane.
Excel Level 6: VBA Intermediate Lesson 4 - Variable, Constants and Arrays
WWP Learning and Development Ltd Page 51
3. Open the module sheet containing the code or, insert a new module.
4. Identify the procedure that you wish to declare the constant in or, start typing a new procedure.
5. Position the cursor in the procedure where you want to assign values to the array.
6. Type the name of the array.
7. Type an opening bracket (.
8. Type the index number of the array element where you want to store the value (this will be a single number).
9. Type a closing bracket ).
10. Type a space.
11. Type =.
12. Type a space.
13. Type the value that you want to store.
14. Press Enter.
FILLING ARRAYS USING LOOPS Discussion In the examples above, the elements in the array were filled with values individually (eg. arrData(1) = Range("A1").Value). This would be very time consuming where many values are concerned, and lacking in flexibility.
A common method, therefore, of filling an array is by using a For... Next loop. The example below fills an array with values from the range A1 to A10. By referring to the range with the Cells property, and making use of the For loop variable, the array can be loaded in a fraction of a second.
Dim arrData(1 To 10) As Integer
Dim i as Byte
For i = 1 To 10
arrData(i) = Cells(i, 1).Value
Next i
The value in each element of the array can then be manipulated as necessary.
In the example below, the array, arrData, is filled with values from range A1 to A10 of Sheet1. The values are then returned to range A1 to J1 of Sheet2 with an additional 15% added.
Dim arrData(1 To 10) As Integer
Dim i As Byte
For i = 1 To 10
Excel Level 6: VBA Intermediate Lesson 4 - Variable, Constants and Arrays
WWP Learning and Development Ltd Page 52
arrData(i) = Sheets("Sheet1").Cells(i, 1).Value
Next i
For i = 1 To 10
Sheets("Sheet2").Cells(1, i).Value = arrData(i) * 1.15
Next i
The following example uses a nested For... Next loop to fill a 2-dimensional array with values from the range A1 to C3.
Dim arrData(1 To 3, 1 To 4) As Integer
Dim i As Byte
Dim j As Byte
For i = 1 To 3
For j = 1 To 4
arrData(i, j) = Cells(i, j).Value
Next j
Next i
Procedures
1. Launch or switch to the VB Editor.
2. Identify the workbook (VBA project) to which you want to add code in the Project Explorer pane.
3. Open the module sheet containing the code or, insert a new module.
4. Identify the procedure that you wish to declare the constant in or, start typing a new procedure.
5. Position the cursor in the procedure where you want to assign values to the array.
6. Type For.
7. Type a space.
8. Type a variable name for the For loop (eg. i).
9. Type =.
10. Type the lower bound of the array that you want the loop to fill.
11. Type a space.
12. Type To.
13. Type a space.
14. Type the upper bound of the array that you want the loop to fill.
15. Press Enter.

Excel Level 6: VBA Intermediate Lesson 4 - Variable, Constants and Arrays
WWP Learning and Development Ltd Page 53
16. Type the name of the array.
17. Type an opening bracket (.
18. Type the variable name that you have used for the loop.
19. Type a closing bracket ).
20. Type a space.
21. Type =.
22. Type a space.
23. Type the value that you want to store.
24. Press Enter.
25. Type Next.
26. Type a space.
27. Type the variable name for the loop.
28. Press Enter.
DYNAMIC ARRAYS Discussion In earlier examples, we have known what size to make the array in advance, and hence, been able to create the appropriate number of elements and/or dimensions. This is known as a fixed-size array.
Sometimes, you may not know how many elements you need in an array until it has been calculated out, usually in the form on a variable. In these cases, you declare a dynamic array by creating a name for the array, adding brackets but leaving them empty, eg.
Dim arrData() As Type
Once the number of elements and dimensions for the array have been determined, it can be declared again but using the Redim statement. In the following example, a dynamic array is declared at the beginning of the sub procedure. The number of elements required is then calculated out and the array is redimensioned to the correct size.
Dim arrData() (declares the dynamic array)
numCels = Selection.Cells.Count (counts the number of cells in a selected area of the worksheet)
ReDim arrData (1 To numCels) As Integer (creates an array with the same number of elements as there are cells in the selected area)

Excel Level 6: VBA Intermediate Lesson 4 - Variable, Constants and Arrays
WWP Learning and Development Ltd Page 54
A dynamic array can be redimensioned as many times as necessary, but you cannot change its data type from how you originally declared it. For example, the code below would give an error message:
Dim arrData() As String (declare dynamic array)
var1 = Selection.Cells.Count (calculate size of array)
ReDim arrData(1 To var1) as Integer (redim array as different data type)
Error Message
If all the elements in a dynamic array have been filled with values, and you need to make it bigger, you can redim it again. Beware, however, that you may lose all the original values in it. To avoid this happening you must use the Preserve keyword after ReDim.
In the example below, the dynamic, 1-dimensional array arrData(1 To 4) has been already been filled with values. It is then redimmed to make it bigger by two extra elements (1 To 5). The keyword Preserve is used in the ReDim statement so that the values in (1 To 3) are not lost.
Dim arrData() as String (declare dynamic array)
ReDim arrData (1 To 3) (redimension array to contain 3 elements)
arrData(1) = "Tom"
arrData(2) = "Harry"
arrData(3) = "Joe" (fill array)
Redim Preserve arrData (1 To 5) (redeclare array to make it bigger but retain its existing values)
arrData(4) = "Sally"
arrData(5) = "Jane" (fill additional elements with values)

Excel Level 6: VBA Intermediate Lesson 4 - Variable, Constants and Arrays
WWP Learning and Development Ltd Page 55
If Preserve had not been used, arrData(4) and arrData(5) would have successfully stored Sally and Jane, but Tom, Harry and Joe would have been lost from arrData(1), (2) and (3).
Once you have finished using a dynamic array, you can use a ReDim statement to reclaim the memory your array consumed, eg ReDim arrData(0 , 0) or Erase arrData.
Procedures
1. Launch or switch to the VB Editor.
2. Identify the workbook (VBA project) to which you want to add code in the Project Explorer pane.
3. Open the module sheet containing the code or, insert a new module.
4. Identify the procedure that you wish to declare the constant in or, start typing a new procedure.
5. Position the cursor immediately below the Sub statement at the top of the procedure.
6. Type Dim.
7. Type a space.
8. Type a name for the array.
9. Type a space.
10. Type an opening bracket (.
11. Type a closing bracket ).
12. Press Enter.
13. Position the cursor further down the code where you want to dimension the array.
14. Type ReDim.
15. Type an opening bracket (.
16. Type the dimension(s) for the array
17. Type a closing bracket ).
18. Press Enter.

Excel Level 6: VBA Intermediate Lesson 4 - Variable, Constants and Arrays
WWP Learning and Development Ltd Page 56
THE ARRAY FUNCTION Discussion The Array function is an easy way to create and fill an array with values. Type all the values that you want to store into the function argument separated by commas and it will return a simple, 1-dimensional array that you can use in the same order as the values were typed in.
• The first element of the Array function always has an index of 0, irrespective of any Option Base statement.
• The Array function always returns an array of data type Variant.
Example 1 – Create array from a list text strings
Dim arrWkDays () as Variant
arrWkDays = Array("Mon","Tue","Wed","Thu",Fri")
Example 2 – using numbers as arguments
Dim arrTens as Variant
arrTens = Array(10, 20, 30, 40, 50, 60, 70, 80, 90)
Returning values from the Array function
As for arrays in general, the name of the array followed by the required element index number in brackets, eg.
In example 1, Range("A1").Value = arrWkDays(0) would return Mon.
In example 2, Range("A1").Value = arrTens(4) would return 50.
Procedures
1. Launch or switch to the VB Editor.
2. Identify in the Project Explorer pane, the workbook (VBA project) that you want to add code to.
3. Open the module sheet containing the code or, insert a new module.
4. Position the cursor immediately below the Sub statement at the top of the procedure.
5. Type Dim.
6. Type a space.
7. Type a name for the array.
8. Type a space.
9. Type As.
10. Type a space.
11. Type Variant.

Excel Level 6: VBA Intermediate Lesson 4 - Variable, Constants and Arrays
WWP Learning and Development Ltd Page 57
12. Press Enter.
13. Position the cursor where you want to assign values to the array function.
14. Type the name of the array as previously declared.
15. Type =.
16. Type Array.
17. Type an opening bracket (.
18. Type the value(s) that you want the array to store, separating each one with a comma.
19. Type a closing bracket ).
20. Press Enter.
Excel Level 6: VBA Intermediate Lesson 4 - Variable, Constants and Arrays
WWP Learning and Development Ltd Page 58
EXERCISE
TASK 1: WRITE A PROCEDURE THAT PROMPTS THE USER TO ENTER DATA, USING VARIABLES AND ARRAYS.
1. Open the file Forecast. This workbook already contains a macro named CreateNewForecast that makes a copy of the sheet - Template - at the end of the workbook.
2. Add to this sub procedure, VBA code that: a) prompts the user by means of an Input Box, for a month name to give to the sheet.
This value must be stored in a locally declared variable, and then used to rename the sheet.
b) prompts the user by means of four Input Boxes, for some values to enter into cells B2, C2, D2 and E2. These values should be stored in a locally declared, 1-dimensional array and then entered into the appropriate cells. (Tip: Try using FOR NEXT loops for this purpose)
3. Assign the sub procedure to a worksheet button on the Template sheet and then run and test it using some made-up data of your own. Correct code if necessary.
4. Save and close the file.
TASK 2: USE CONSTANTS FOR STORING DATA.
1. Insert a new module sheet into your Personal Macro Workbook. 2. Declare at module level, a constant named, PURPLE and assign to it the value, 29. 3. Declare at module level, a constant named, ORANGE and assign to it the value, 45. 4. Declare at module level, a constant named, ROSE and assign to it the value, 38. 5. Declare at module level, a constant named, BLUE and assign to it the value, 5. 6. Using the above constants, write a procedure named, ApplyColours that formats: 7. the first row of a table with a purple background and a rose font; 8. the first column of a table with an orange background and blue font. 9. Open the file, Sales Analysis. 10. Assign the macro created above to a custom button on your My Macros Toolbar. 11. Run and test the sub procedure on the first two sheets of this workbook. Correct code if
necessary. 12. Save and close the file.
Task 3: Use a 2-dimensional array for storing data. 1. Open the file, Sales Analysis. 2. Switch to the VB Editor and insert a module sheet into this workbook.

Excel Level 6: VBA Intermediate Lesson 4 - Variable, Constants and Arrays
WWP Learning and Development Ltd Page 59
3. Write a sub procedure named, TransferData that uses a 2-dimensional array to store the data in range B2 to E7 of the sheet named Gross.
4. Add to the procedure additional code that returns the data discounted by 20% to the same range on the sheet named Net.
5. Assign this macro to a worksheet button on the Gross sheet. 6. Run and test the macro again. Correct any errors. 7. Save and close the file.
WWP Learning and Development Page 60
LESSON 5 - USER DEFINED FUNCTIONS
In this lesson, you will learn how to:
• Use built-in Excel functions in a sub procedure
• Use VBA functions in a procedure
• Create and use custom function procedures
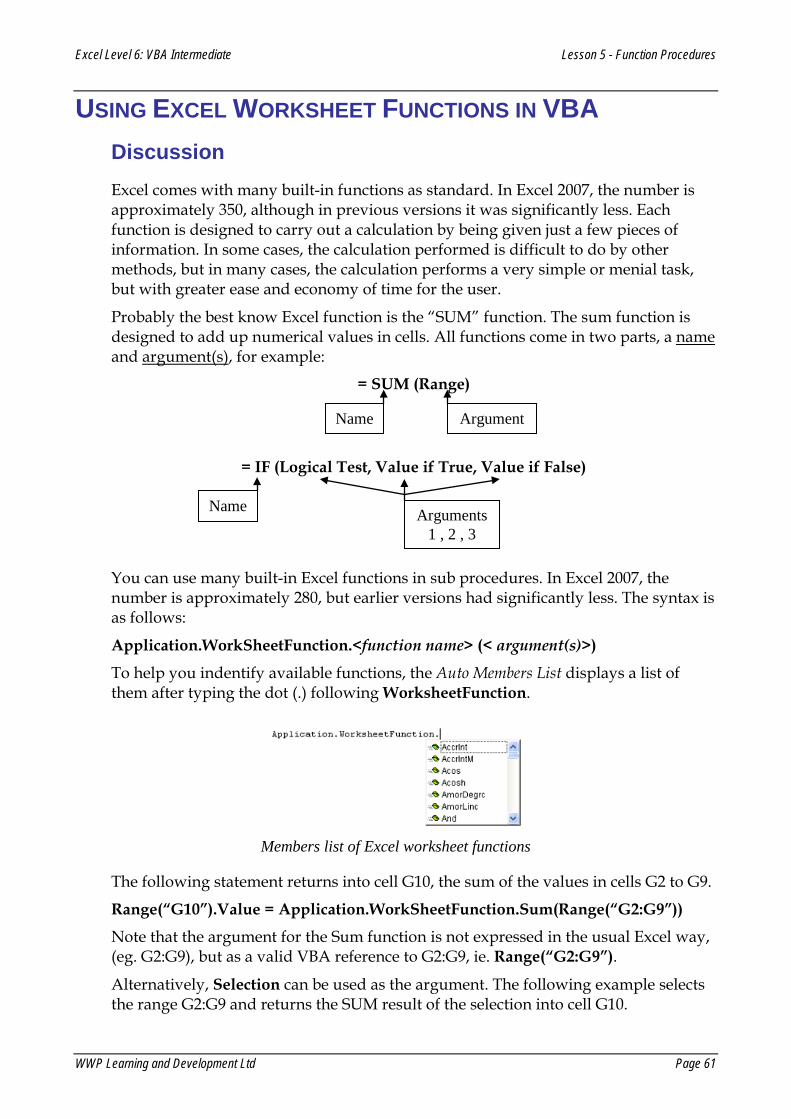
Excel Level 6: VBA Intermediate Lesson 5 - Function Procedures
WWP Learning and Development Ltd Page 61
USING EXCEL WORKSHEET FUNCTIONS IN VBA Discussion Excel comes with many built-in functions as standard. In Excel 2007, the number is approximately 350, although in previous versions it was significantly less. Each function is designed to carry out a calculation by being given just a few pieces of information. In some cases, the calculation performed is difficult to do by other methods, but in many cases, the calculation performs a very simple or menial task, but with greater ease and economy of time for the user.
Probably the best know Excel function is the “SUM” function. The sum function is designed to add up numerical values in cells. All functions come in two parts, a name and argument(s), for example:
= SUM (Range)
= IF (Logical Test, Value if True, Value if False)
You can use many built-in Excel functions in sub procedures. In Excel 2007, the number is approximately 280, but earlier versions had significantly less. The syntax is as follows:
Application.WorkSheetFunction.<function name> (< argument(s)>)
To help you indentify available functions, the Auto Members List displays a list of them after typing the dot (.) following WorksheetFunction.
Members list of Excel worksheet functions
The following statement returns into cell G10, the sum of the values in cells G2 to G9.
Range(“G10”).Value = Application.WorkSheetFunction.Sum(Range(“G2:G9”))
Note that the argument for the Sum function is not expressed in the usual Excel way, (eg. G2:G9), but as a valid VBA reference to G2:G9, ie. Range(“G2:G9”).
Alternatively, Selection can be used as the argument. The following example selects the range G2:G9 and returns the SUM result of the selection into cell G10.
Name Argument
Name Arguments 1 , 2 , 3
Excel Level 6: VBA Intermediate Lesson 5 - Function Procedures
WWP Learning and Development Ltd Page 62
Range(“G2:G9”).Select
Range(“G10”).Value = Application.WorkSheetFunction.Sum(Selection)
The statement can be shortened by omitting WorksheetFunction. This is fine if you know the name of the function that you wish to use, because it will not produce the relevant Auto Members List to help you.
Range(“G10”).Formula = Application.Sum(Range(“G2:G9”))
Note that both examples above do NOT write the actual formula into the cell. The calculation is performed in the sub procedure, and the result only is returned to the cell.
To show the SUM function in the cell, the following code has to be used:
Range(“G10”).Formula = “=Sum(G2:G9)”
This literally writes the formula into the cell as a string. Excel then takes over and carries out the calculation.
For a full list of VBA functions (Excel 2003 but valid for other versions too) can be found at the following Web address:
http://msdn.microsoft.com/en-us/library/aa221655(office.11).aspx
Procedures
1. Launch or switch to the VB Editor.
2. Identify in the Project Explorer pane, the workbook (VBA project) that you want to add code to.
3. Open the module sheet containing the code or, insert a new module.
4. Position the cursor in the procedure where you want to use the workbook function.
5. Type the object to which you want the worksheet function to refer to, eg. ActiveCell
6. Type a full stop.
7. Type Value.
8. Type =.
9. Type Application
10. Type a full stop.
11. Type WorkSheetFunction.
12. Type a full stop.
13. Type the name of the function that you want to use or, select it from the list.
14. Type an opening bracket (.
15. Type the argument(s) for the function (this has to be in a VBA form, eg. Range(“A1:A5”) NOT A1:A5).

Excel Level 6: VBA Intermediate Lesson 5 - Function Procedures
WWP Learning and Development Ltd Page 63
16. Type a closing bracket ).
17. Press Enter.
VBA FUNCTIONS Discussion In addition to the Excel worksheet functions, there are approximately 92 VBA functions (in Excel 2007) that can be used in sub procedures. In many cases, they perform equivalent calculations to the Excel worksheet functions, but in some cases augment them.
In some cases, where there is a VBA function to carry out a calculation, the equivalent Excel worksheet function cannot be used, and will not appear in the Auto Members List following WorksheetFunction..
Examples of VBA functions that have equivalent Excel worksheet functions, but which are not written the same are:
VBA Function Excel Worksheet Equivalent
Description
Date =TODAY() Returns the current system date.
Rnd =RAND() Returns a random number greater than or equal to 0 and less than 1.
UCase(string) =UPPER(text) Converts text to upper case.
LCase(string) =LOWER(text) Converts text to lower case.
IsNumeric(expression) =ISNUMBER(value) Checks whether a value is a number and return TRUE or FALSE
Examples of VBA functions that have equivalent Excel worksheet functions, and which are written the same are:
VBA Function Excel Worksheet Equivalent
Description
Round(expression,digits) =ROUND(number,digits) Rounds a number to the closest number of digits, eg. =ROUND(34.567,1) displays 34.6. =ROUND(34567,-3) displays 35000.
Int(expression) =INT(number) Returns the whole part of a number only, eg. =INT(34.567) displays 34 and discards the decimals.
Abs(number) =ABS(number) Returns a number without its sign (ie. a negative becomes a positive; a positive remains a
Excel Level 6: VBA Intermediate Lesson 5 - Function Procedures
WWP Learning and Development Ltd Page 64
positive).
Day(date) =DAY(serial number) Returns the day that a date falls on.
Month(date) =MONTH(serial number)
Returns the month that a date falls on.
Year (date) =YEAR(serial number) Returns the year that a date falls on.
Now =NOW() Return the current system date AND time.
Pmt(rate,periods,pv) =PMT(rate,nper,pv) Calculates the repayments for a loan.
Fv(rate,periods,payment) =FV(rate,nper,pmt) Calculates the future value of an investment.
There follow some examples of how some of these VBA functions might be used:
Range(“A1”).Value = Date
(Displays the current date in cell A1. The date is linked to the system clock so will be updated automatically.)
ActiveCell.Value = Int(Rnd * 50) (Displays in the currently selected cell a random whole number between 0 and 49 (inclusive)
Cells(2 , 2).Value = UCase(“vba is great fun”)
(Displays VBA IS GREAT FUN in cell B2)
ActiveCell.Offset(0 , 1).Value = Year(ActiveCell.Value)
(Assuming the active cell contains the date 15/05/2009, the cell immediately to its right will display 2009)
If IsNumeric(ActiveCell.Value) Then ActiveCell.Clear
(Deletes the content of an active cell if it is a number)
Note that functions existing in VBA only, can only be used to return a value in the sub procedure that that they are used in. For example, if you type directly into the cell of a worksheet:
Range(“E2”).Value = “=UCASE(D2)” (where cell D2 contains the text, hello world)
...... you would get the #NAME? error. This is because although UCase works in a VBA sub procedure, it is not recognised by Excel as a valid worksheet function. The correct worksheet function to use is: = UPPER(text).
Procedures
1. Launch or switch to the VB Editor.
2. Identify in the Project Explorer pane, the workbook (VBA project) that you want to add code to.

Excel Level 6: VBA Intermediate Lesson 5 - Function Procedures
WWP Learning and Development Ltd Page 65
3. Open the module sheet containing the code or, insert a new module.
4. Position the cursor in the procedure where you want to use the VBA function.
5. Type the object to which you want the function to refer, eg. ActiveCell
6. Type a full stop.
7. Type Value.
8. Type =.
9. Type the VBA function name.
10. Type an opening bracket (.
11. Type the argument(s) for the function.
12. Type a closing bracket ).
13. Press Enter.
USER-DEFINED FUNCTIONS Discussion It was described above how built-in worksheet or VBA functions can be used in sub procedures. There may be times, however, when none these functions meet your needs or meet then just partly. This is when a user-defined function procedure may have to be created.
Unlike a sub procedure, a function procedure only returns a value. It does NOT move around a workbook selecting worksheets and cells, changing their properties and applying methods to objects. Like the dozens of built-in Excel and VBA functions (eg. SUM, COUNT, LOOKUP, IF, PMT, DATE, etc...), they merely carry out a calculation and return the result, either into the cell that they have been typed into or to the sub procedure that they are being used in.
A function procedure is enclosed by, Function and End Function statements.
The function procedure must have a name that is (usually) followed by arguments inside brackets. The arguments are the variables (pieces of information) that the function needs in order to calculate out and return a value.
The following example shows a function procedure that is designed to calculate out Value Added Tax (at the time of writing this was 15%).
Function VAT(amount)
VAT = amount * 0.15
End Function
The function procedure name is VAT and it requires a single piece of information (variable) to calculate out a value: amount.

Excel Level 6: VBA Intermediate Lesson 5 - Function Procedures
WWP Learning and Development Ltd Page 66
The calculation that the function needs to perform to return a value for VAT is expressed in the statement: VAT = amount * 0.15.
This function could be used directly in a cell on a worksheet or it could be used in a sub procedure. The example below shows it being used on a worksheet. By typing in =VAT followed by an opening bracket, the “amount” that you want to carry out the VAT calculation on (in this case, cell D6) and a closing bracket, the result will be returned to the cell that the function is being typed into upon pressing Enter.
The examples below shows it being used in the same way, but in a sub procedure:
Range("E6").Value = VAT(Range("D6")) (This will return the result only of the function into cell E6, not the formula itself)
Range(“E6”).Formula = “=VAT(Range(“D6”))
Or,
ActiveCell.Formula = “=VAT(ActiveCell.Offset(0 , -1).Value) (These will write the actual formula into cell E6)
More examples are given below using multiple arguments and more code that is complex.
The following uses two arguments to calculate the difference in years and decimal fractions of a year, between two dates. The two arguments are separated by a comma:
Function AGE(current_date, date_of_birth)
days = current_date - date_of_birth
AGE = days / 365.25
End Function

Excel Level 6: VBA Intermediate Lesson 5 - Function Procedures
WWP Learning and Development Ltd Page 67
The following function return 10% of sales but only where the sales value is greater than or equal to 30000.
Function COM(sales_value)
If sales_value >= 30000 Then
COM = sales_value * 0.1
Else
COM = 0
End If
End Function
Procedures
1. Launch or switch to the VB Editor.
2. Identify in the Project Explorer pane, the workbook (VBA project) that you want to add code to.
3. Open the module sheet or, insert a new module.
4. Position the cursor in the module where you want to create the function procedure.
5. Type Function.
6. Type a space.
7. Type a name for the function.
8. Type an opening bracket (.
9. Type the variable name(s) for the function argument(s).
10. Type a closing bracket ).
11. Press Enter.
12. Type the necessary calculation(s) to return a value for the function.
13. Type End Function
14. Press Enter.

Excel Level 6: VBA Intermediate Lesson 5 - Function Procedures
WWP Learning and Development Ltd Page 68
GETTING HELP WITH USER DEFINED FUNCTIONS Discussion Excel offers help in two ways when entering your user-defined function into a worksheet.
The first is a Help Tip that appears as you type the function name in a cell. It appears as a list showing functions that match your spelling. This is only available in Excel 2007. There are NO Help Tips for user-defined functions in previous versions of Excel.
Help List in Excel 2007
The second way that you can get help with a user-defined function is by opening the Insert Function window. This is available in all versions of Excel and offers help on all Excel worksheet functions as well as any user defined ones available.
To find the user defined functions, you have to filter the Select a function: list by selecting User Defined from the Or select a category: dropdown list.
The Insert Function window
Excel Level 6: VBA Intermediate Lesson 5 - Function Procedures
WWP Learning and Development Ltd Page 69
Help pages are not available for user-defined functions. These have to be created using Microsoft tools that are not part of VBA or Office.
Procedures
1. Select the cell where you want to use the user-defined function.
2. Press the button.
3. Click the Or select a category: list.
4. Select User Defined.
5. Select the required function.
6. Click OK.
7. Enter the required arguments.
8. Click OK. It is possible, however, to add a description for a user defined function as follows.
Procedures
Excel 2000 - 2003 Excel 2007
1. Click the Tools menu. Click the View tab on the Ribbon.
2. Select Macro Macros... Click the Macros button.
3. Select View Macros....
4. Type the name of the user-defined function in the Macro name: text box.
Type the name of the user-defined function in the Macro name: text box.
5. Click the Options button. Click the Options button
6. Type a description for the macro.
Type a description for the macro.
7. Click OK. Click OK.
8. Click Cancel. Click Cancel. The description for the macro will appear when the macro is selected in the Insert Function window.
Excel Level 6: VBA Intermediate Lesson 5 - Function Procedures
WWP Learning and Development Ltd Page 70
Insert Function window showing description
for a user-defined function
DECLARING VARIABLES IN USER DEFINED FUNCTIONS Discussion As in a sub procedure, it is good practice to declare any variables used in a function procedure. This includes:
• the function name
• the arguments, and
• any additional variables created in the calculation.
The function name variable is declared at the end of the Function statement immediately after the closing brackets of the arguments. The argument variables are declared within the brackets of the argument following each variable. Any additional variable created are declared at the beginning of the function procedure immediately below the Function statement. The following example declares the variables as used in the AGE function above. Underlining is used for clarity only:
Function AGE(current_date As Date , date_of_birth As Date) As Single
Dim days As Single
days = current_date - date_of_birth
AGE = days / 365.25
End Function
USING RANGES IN USER DEFINED FUNCTIONS Discussion There are many Excel worksheet functions that take a range (or ranges) as arguments, eg. SUM, AVERAGE, COUNT, MAX, MIN, to name but a few.
Excel Level 6: VBA Intermediate Lesson 5 - Function Procedures
WWP Learning and Development Ltd Page 71
Ranges can also be used as variables in user defined procedures and are normally handled in the function procedure with a For... Each... Next loop (or loops).
The following example does the same as a simple SUM function:
Function MYSUM(cells_to_sum as Range) As Single
For Each indCel in cells_to_sum
MYSUM = MYSUM + indCel.Value
Next indCel
End Function
The loop repeats for as many cells as there are in the given argument (cells_to_sum). At each iteration of the loop, the value of MYSUM becomes its previous value plus the value of the next cell in cells_to_sum.
In the example shown in the pictures below, the loop iterates through the range C3 to C9.
The value of MYSUM first time round the loop will be 0 (the value in the first cell). The second time round the loop the value of MYSUM will be 3000 (its old value – 0, plus 3000 – the value in the second cell of cells_to_sum); the third time round the loop the value of MYSUM becomes 6200 (its old value – 3000, plus 3200 – the value in the third cell of cells_to_sum). Hence, by the time it has completed the loop, the value of MYSUM has risen to 12300. In essence, the loop carries out a cumulative addition of cells_to_sum.
Procedures
1. Launch or switch to the VB Editor.
2. Identify in the Project Explorer pane, the workbook (VBA project) that you want to add code to.
3. Open the module sheet or, insert a new module.
4. Position the cursor in the module where you want to create the function procedure.
5. Type Function.
6. Type a space.
7. Type a name for the function.
8. Type an opening bracket (.
Excel Level 6: VBA Intermediate Lesson 5 - Function Procedures
WWP Learning and Development Ltd Page 72
9. Type the variable name(s) for the function argument(s).
10. Type a closing bracket ).
11. Press Enter.
12. Type the necessary calculation(s) to return a value for the function.
13. Type End Function
14. Press Enter.

Excel Level 6: VBA Intermediate Lesson 5 - Function Procedures
WWP Learning and Development Ltd Page 73
EXERCISES
TASK 1: CREATE USER DEFINED FUNCTIONS.
1. Open the file Practice Functions. 2. The Temperature sheet gives formulas for converting Fahrenheit into Centigrade and vice
versa. Create two user-defined functions that will do the same. Suggest starting with the lines: Function DegF(TempC) to convert Fahrenheit to Centigrade and, Function DegC(TempF) to convert Centigrade to Fahrenheit .
3. Create a function for calculating the hypotenuse of a right-angle triangle. Use the existing formula in the Pythagoras sheet as a guide but beware that in Visual Basic, the function for square root is SQR not SQRT as in Excel.
4. Save and close the file. 5. The Gas Bill sheet gives a complex series of calculations to arrive at a total charge in
column G. Create a user-defined function that will calculate the total for each quarter. Test it in column H. The results should match those in column G. You will probably need to use some extra variables in your code and a suggestion for the arguments is: Function GasBill (UnitsUsed, LowUnits, HighRate, LowRate)
6. Save and close the file.
TASK 2: CREATE COMPLEX USER DEFINED FUNCTIONS.
1. Open the file Sales Tracking. 2. Create in this workbook, a function procedure named HighSales, which will return the
number of sales in a range that are over 3000 in value. The first line of the function procedure should be:
3. HighSales(RangeToCount) 4. Use the function in cell F22 of the spreadsheet, using the range F2:F20 as the argument.
The result should be 7. 5. Create another function in this workbook named CountText, which will return the
number of cells in a range containing a text value. The first line of the function procedure should be:
6. CountText(RangeToCount) 7. Use the function on cell F23 of the spreadsheet, using the range A2:E20 as the argument.
The result should be 57. 8. Save and close the file.
WWP Learning and Development Page 74
LESSON 6 - ADD-IN FUNCTIONS
In this lesson, you will learn how to:
• Create an Add-In for User Defined Functions
• View and Manage Code in a Function Add-In

Excel Level 6: VBA Intermediate Lesson 8 - Add-Ins
WWP Learning and Development Ltd Page 75
DEFINING AN ADD-IN Discussion An Excel Add-in is a compiled version of a workbook containing procedures, toolbars and menu configurations, user-defined functions and forms and many other VBA features. Add-ins usually provide additional functionality that makes the standard application more powerful. In its simplest form the Add-in may just contain user-defined functions.
An Add-in is saved like other files to a suitable location on your system (it has a .xla extension) and “added in” when/if necessary to the Excel installation on your computer. Like the Personal Macro Workbook, the Add-in file is normally kept hidden in Excel, but can be viewed in the VB Editor.
Add-ins are a convenient way of distributing sub procedures, functions and other VBA functionality to groups of users who can load them into their own Excel application via a simple dialog box.
The Add-in dialog box (Excel all versions)
Excel comes with several built-in Add-ins; the number available varies with the version. These can be accessed and loaded by opening the Add-ins dialog box.
When a workbook is saved as an Add-in, Excel converts its code into a compressed form that cannot be read, altered or converted back into a workbook. This is to make the code in the Add-in work more quickly than in the original workbook.
The workbook’s Title and Comments, set in File Properties, are used as the name and description to help identify Add-ins.
Because a compiled Add-in cannot be converted back to a workbook, it is essential that before saving as an Add-in, the workbook is saved separately as a workbook. If changes are needed, therefore, they can be written into the original workbook and then resaved as another (or the same) Add-in.
When a workbook is made into an add-in, worksheets in the workbook are hidden, and subroutines in the Add-in’s project are hidden from the user (the routines do not appear in the macros dialog box).
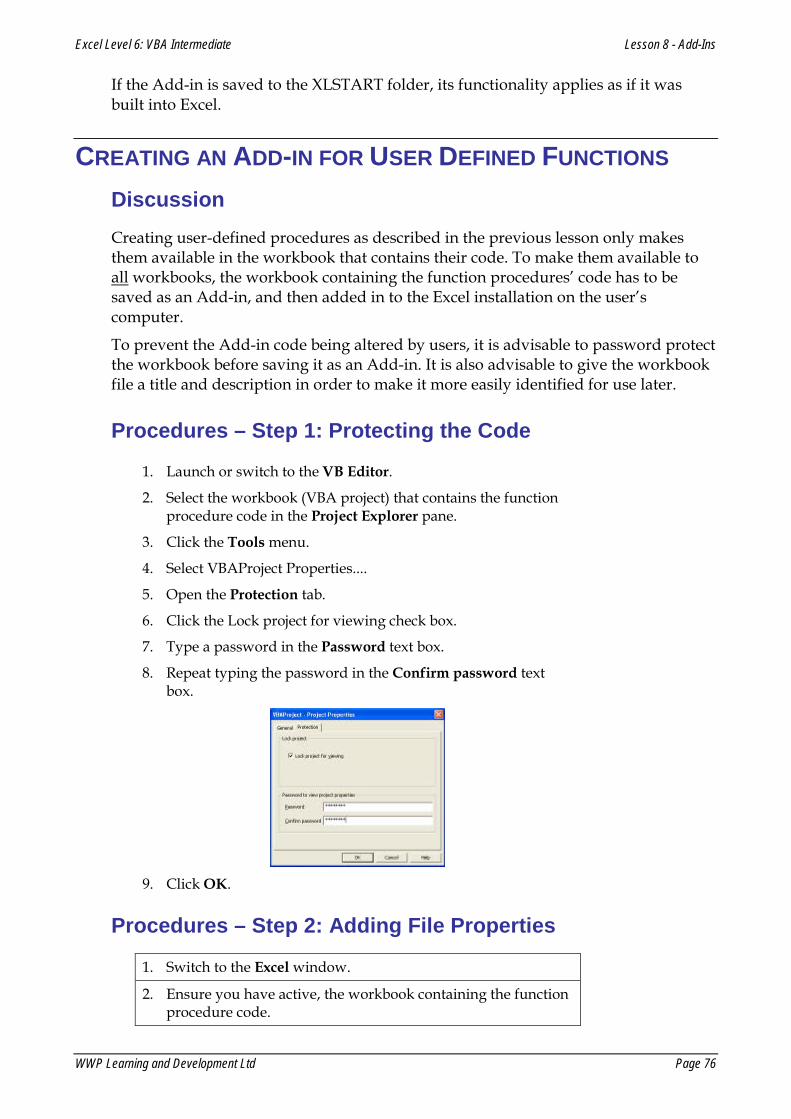
Excel Level 6: VBA Intermediate Lesson 8 - Add-Ins
WWP Learning and Development Ltd Page 76
If the Add-in is saved to the XLSTART folder, its functionality applies as if it was built into Excel.
CREATING AN ADD-IN FOR USER DEFINED FUNCTIONS Discussion Creating user-defined procedures as described in the previous lesson only makes them available in the workbook that contains their code. To make them available to all workbooks, the workbook containing the function procedures’ code has to be saved as an Add-in, and then added in to the Excel installation on the user’s computer.
To prevent the Add-in code being altered by users, it is advisable to password protect the workbook before saving it as an Add-in. It is also advisable to give the workbook file a title and description in order to make it more easily identified for use later.
Procedures – Step 1: Protecting the Code
1. Launch or switch to the VB Editor.
2. Select the workbook (VBA project) that contains the function procedure code in the Project Explorer pane.
3. Click the Tools menu.
4. Select VBAProject Properties....
5. Open the Protection tab.
6. Click the Lock project for viewing check box.
7. Type a password in the Password text box.
8. Repeat typing the password in the Confirm password text box.
9. Click OK.
Procedures – Step 2: Adding File Properties
1. Switch to the Excel window.
2. Ensure you have active, the workbook containing the function procedure code.
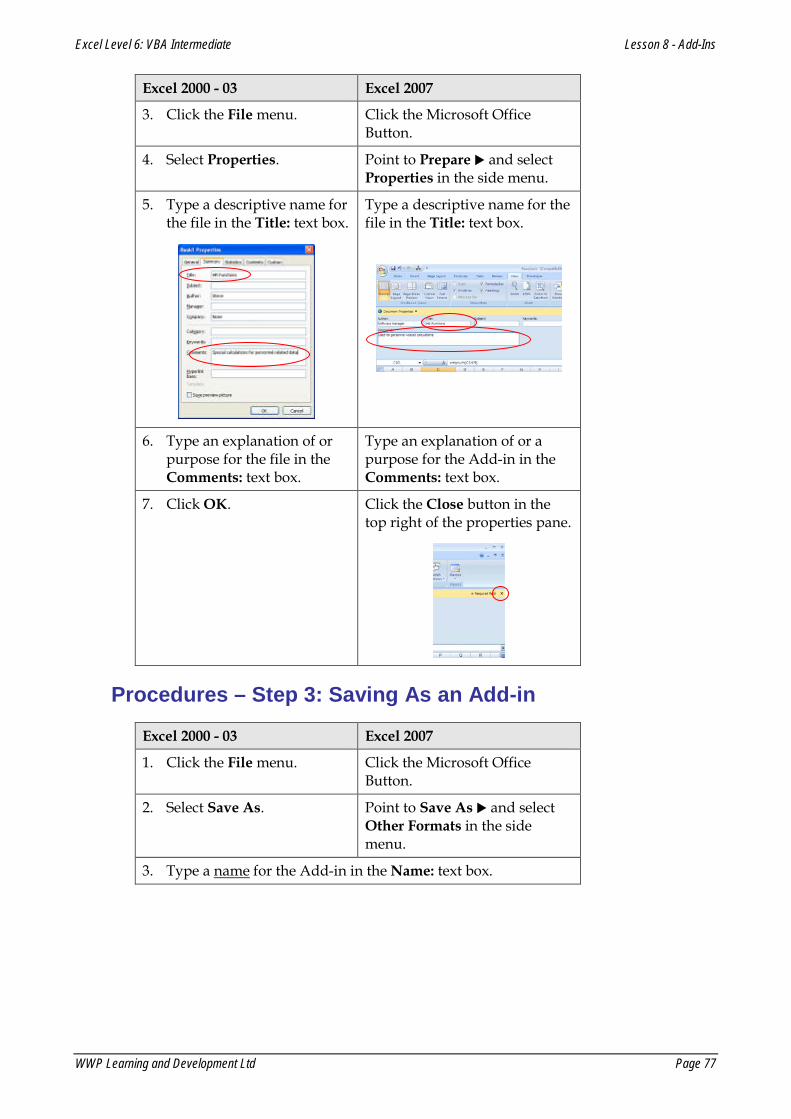
Excel Level 6: VBA Intermediate Lesson 8 - Add-Ins
WWP Learning and Development Ltd Page 77
Excel 2000 - 03 Excel 2007
3. Click the File menu. Click the Microsoft Office Button.
4. Select Properties. Point to Prepare and select Properties in the side menu.
5. Type a descriptive name for the file in the Title: text box.
Type a descriptive name for the file in the Title: text box.
6. Type an explanation of or purpose for the file in the Comments: text box.
Type an explanation of or a purpose for the Add-in in the Comments: text box.
7. Click OK. Click the Close button in the top right of the properties pane.
Procedures – Step 3: Saving As an Add-in
Excel 2000 - 03 Excel 2007
1. Click the File menu. Click the Microsoft Office Button.
2. Select Save As. Point to Save As and select Other Formats in the side menu.
3. Type a name for the Add-in in the Name: text box.

Excel Level 6: VBA Intermediate Lesson 8 - Add-Ins
WWP Learning and Development Ltd Page 78
4. Select Microsoft Office Excel Add-In from the Save as type: dropdown list. (Wording may vary slightly between versions)
The Save As dialog box (Excel 2003 shown). Appearance may vary
slightly between versions but basic functionality is the same.
5. If the Add-in is for your personal use only, leave the location as selected by Excel (the default Add-Ins folder is part of your personal profile). If the Add-in is to be shared with other users, select a suitable shared location in the Save in: dropdown list.
6. Click Save.
INSTALLING AN ADD-IN Discussion Once the Add-in has been created, prepared and saved as described in the topics above, you, and other users, will need to install it on your (their) computer to make the code available for use.
This is achieved by opening the Add-ins dialog box and depending on where it has been saved, either selecting it from the list (if it has been saved in the default location) or browsing to the location that it has been saved in (if you have selected your own location).
If the Add-in file has been saved in the default location, it will appear in the list with the name that you gave it as a Title in File Properties. If the Add-in file has been saved in a different location, it will appear in the list after your browse for it.
After the Add-in has been selected and the dialog box confirmed, the procedure(s) in it will be immediately available for use.
Procedures
Excel 2000 - 03 Excel 2007
1. Click the Tools menu. Click the Microsoft Office Button.
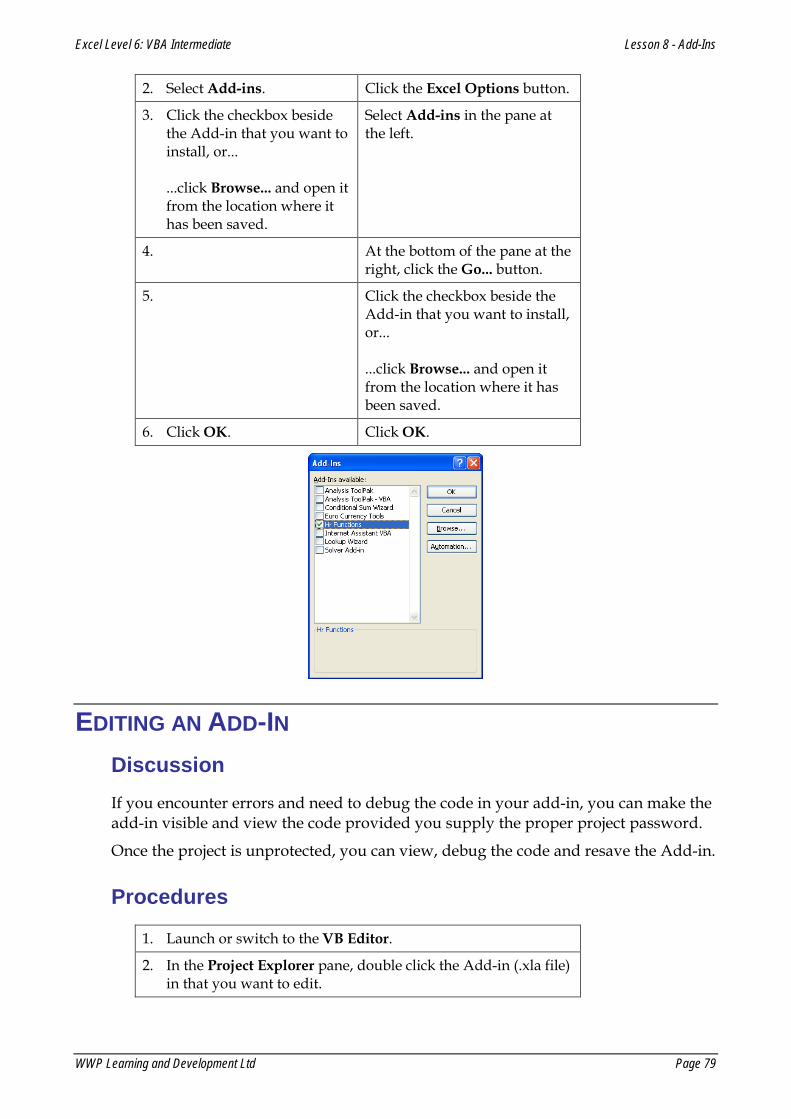
Excel Level 6: VBA Intermediate Lesson 8 - Add-Ins
WWP Learning and Development Ltd Page 79
2. Select Add-ins. Click the Excel Options button.
3. Click the checkbox beside the Add-in that you want to install, or... ...click Browse... and open it from the location where it has been saved.
Select Add-ins in the pane at the left.
4. At the bottom of the pane at the right, click the Go... button.
5. Click the checkbox beside the Add-in that you want to install, or... ...click Browse... and open it from the location where it has been saved.
6. Click OK. Click OK.
EDITING AN ADD-IN Discussion If you encounter errors and need to debug the code in your add-in, you can make the add-in visible and view the code provided you supply the proper project password.
Once the project is unprotected, you can view, debug the code and resave the Add-in.
Procedures
1. Launch or switch to the VB Editor.
2. In the Project Explorer pane, double click the Add-in (.xla file) in that you want to edit.
Excel Level 6: VBA Intermediate Lesson 8 - Add-Ins
WWP Learning and Development Ltd Page 80
3. If password protected, you will be prompted for the password.
4. Open the module containing the function procedure(s) that you want to edit.
5. Make necessary changes to the code.
6. Click the Save button in the VB Editor.
REMOVING AN ADD-IN Discussion If you have many Add-in installed into Excel it can slow down its performance, particularly when starting up and it has to load them all.
It is a good idea, therefore, to uninstall any Add-ins that are no longer required for use. This does not delete the Add-in file (.xla); the file will still be available for re-installing another time.
Procedures
Excel 2000 - 03 Excel 2007
1. Click the Tools menu. Click the Microsoft Office Button.
2. Select Add-ins. Click the Excel Options button.
3. Click the checkbox beside the Add-in that you want to uninstall.
Select Add-ins in the pane at the left.
4. At the bottom of the pane at the right, click the Go... button,
5. Click the checkbox beside the Add-in that you want to uninstall.
6. Click OK. Click OK.

Excel Level 6: VBA Intermediate Lesson 8 - Add-Ins
WWP Learning and Development Ltd Page 81
Excel Level 6: VBA Intermediate Lesson 8 - Add-Ins
WWP Learning and Development Ltd Page 82
EXERCISE
TASK: TO CREATE AND INSTALL TO EXCEL, ADDITIONAL VBA FUNCTIONALITY.
1. Open the file named, Conversions. This file contains several function procedures.
2. Carry out the necessary actions to save this file as an “add-in”, named Conversion Functions.
3. Close the file.
4. Open the file named, Needs Functions.
5. Add into Excel the Conversion Functions saved above.
6. Test a couple of the functions on Sheet1.
7. Save and close Needs Functions.
8. Remove the Conversion Functions add-in from Excel.
WWP Learning and Development Page 83
LESSON 7 – TESTING AND DEBUGGING CODE
In this lesson, you will learn how to:
• Step through code to identify and/or rectify potential problems
• Use the Locals and Watch Windows to observe variable values
• Set a Breakpoint to halt execution of a procedure
• Work with the Immediate Window to test code and variables
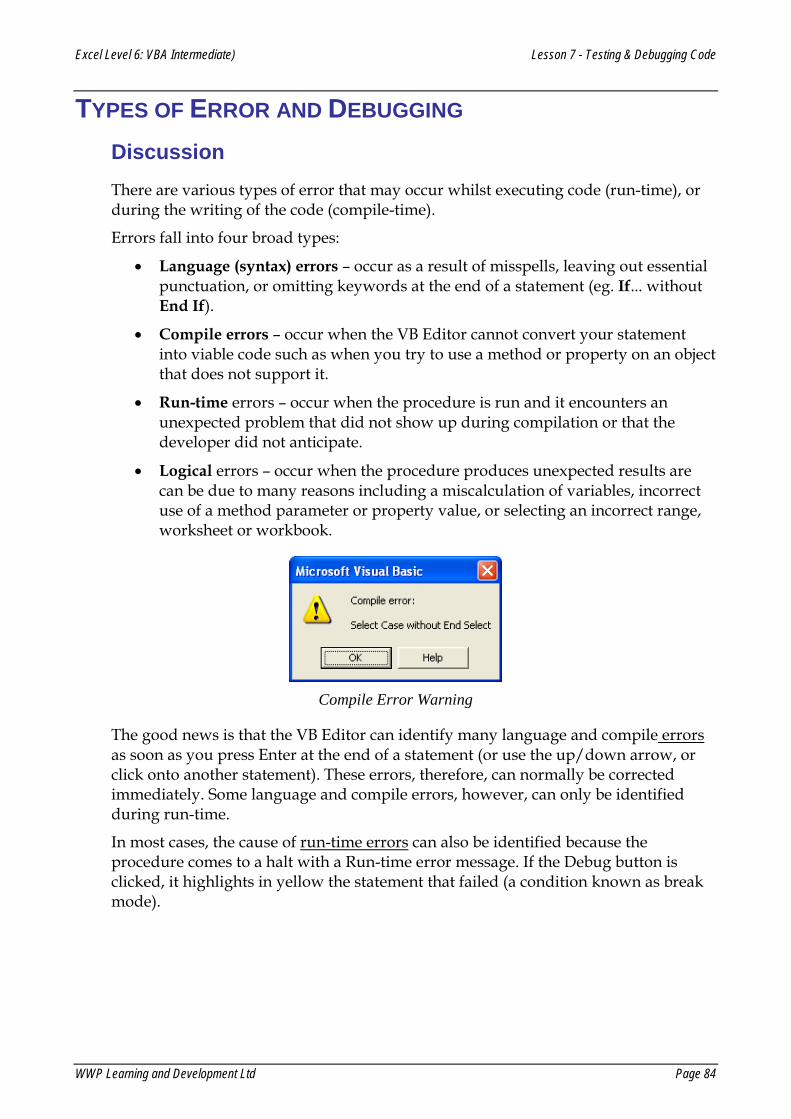
Excel Level 6: VBA Intermediate) Lesson 7 - Testing & Debugging Code
WWP Learning and Development Ltd Page 84
TYPES OF ERROR AND DEBUGGING Discussion There are various types of error that may occur whilst executing code (run-time), or during the writing of the code (compile-time).
Errors fall into four broad types:
• Language (syntax) errors – occur as a result of misspells, leaving out essential punctuation, or omitting keywords at the end of a statement (eg. If... without End If).
• Compile errors – occur when the VB Editor cannot convert your statement into viable code such as when you try to use a method or property on an object that does not support it.
• Run-time errors – occur when the procedure is run and it encounters an unexpected problem that did not show up during compilation or that the developer did not anticipate.
• Logical errors – occur when the procedure produces unexpected results are can be due to many reasons including a miscalculation of variables, incorrect use of a method parameter or property value, or selecting an incorrect range, worksheet or workbook.
Compile Error Warning
The good news is that the VB Editor can identify many language and compile errors as soon as you press Enter at the end of a statement (or use the up/down arrow, or click onto another statement). These errors, therefore, can normally be corrected immediately. Some language and compile errors, however, can only be identified during run-time.
In most cases, the cause of run-time errors can also be identified because the procedure comes to a halt with a Run-time error message. If the Debug button is clicked, it highlights in yellow the statement that failed (a condition known as break mode).
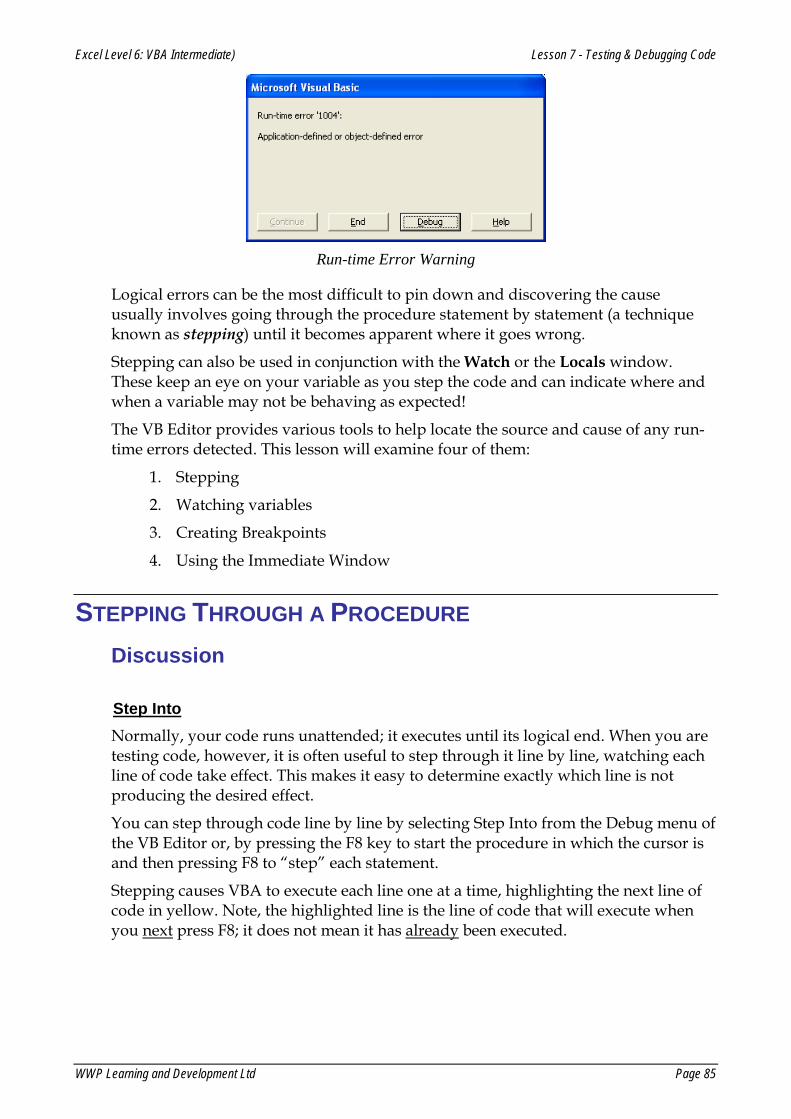
Excel Level 6: VBA Intermediate) Lesson 7 - Testing & Debugging Code
WWP Learning and Development Ltd Page 85
Run-time Error Warning
Logical errors can be the most difficult to pin down and discovering the cause usually involves going through the procedure statement by statement (a technique known as stepping) until it becomes apparent where it goes wrong.
Stepping can also be used in conjunction with the Watch or the Locals window. These keep an eye on your variable as you step the code and can indicate where and when a variable may not be behaving as expected!
The VB Editor provides various tools to help locate the source and cause of any run-time errors detected. This lesson will examine four of them:
1. Stepping
2. Watching variables
3. Creating Breakpoints
4. Using the Immediate Window
STEPPING THROUGH A PROCEDURE Discussion
Step Into Normally, your code runs unattended; it executes until its logical end. When you are testing code, however, it is often useful to step through it line by line, watching each line of code take effect. This makes it easy to determine exactly which line is not producing the desired effect.
You can step through code line by line by selecting Step Into from the Debug menu of the VB Editor or, by pressing the F8 key to start the procedure in which the cursor is and then pressing F8 to “step” each statement.
Stepping causes VBA to execute each line one at a time, highlighting the next line of code in yellow. Note, the highlighted line is the line of code that will execute when you next press F8; it does not mean it has already been executed.
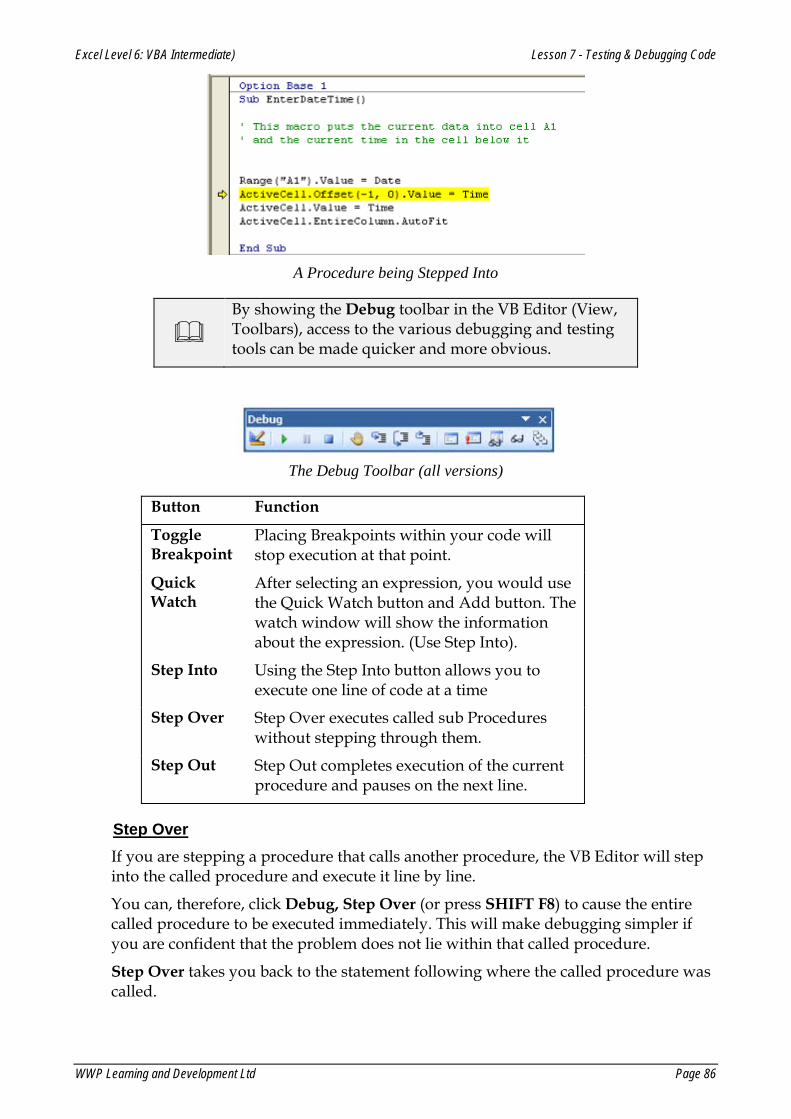
Excel Level 6: VBA Intermediate) Lesson 7 - Testing & Debugging Code
WWP Learning and Development Ltd Page 86
A Procedure being Stepped Into
By showing the Debug toolbar in the VB Editor (View, Toolbars), access to the various debugging and testing tools can be made quicker and more obvious.
The Debug Toolbar (all versions)
Button Function
Toggle Breakpoint
Placing Breakpoints within your code will stop execution at that point.
Quick Watch
After selecting an expression, you would use the Quick Watch button and Add button. The watch window will show the information about the expression. (Use Step Into).
Step Into Using the Step Into button allows you to execute one line of code at a time
Step Over Step Over executes called sub Procedures without stepping through them.
Step Out Step Out completes execution of the current procedure and pauses on the next line.
Step Over If you are stepping a procedure that calls another procedure, the VB Editor will step into the called procedure and execute it line by line.
You can, therefore, click Debug, Step Over (or press SHIFT F8) to cause the entire called procedure to be executed immediately. This will make debugging simpler if you are confident that the problem does not lie within that called procedure.
Step Over takes you back to the statement following where the called procedure was called.
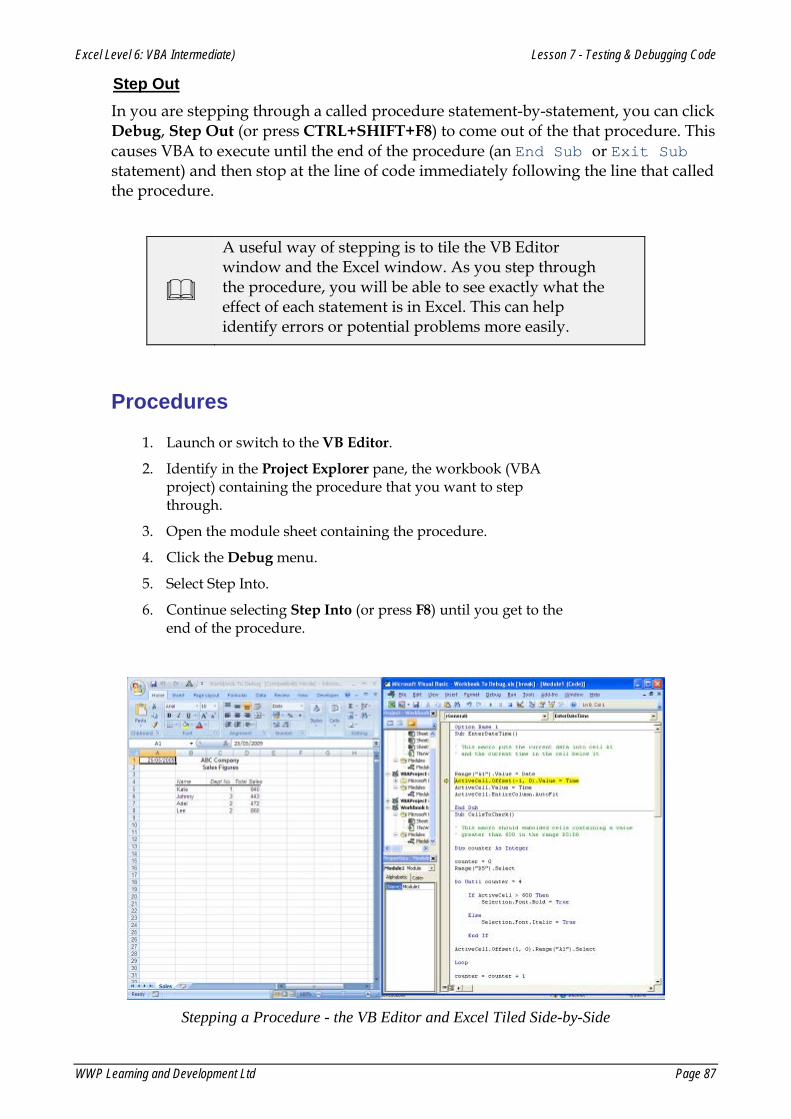
Excel Level 6: VBA Intermediate) Lesson 7 - Testing & Debugging Code
WWP Learning and Development Ltd Page 87
Step Out In you are stepping through a called procedure statement-by-statement, you can click Debug, Step Out (or press CTRL+SHIFT+F8) to come out of the that procedure. This causes VBA to execute until the end of the procedure (an End Sub or Exit Sub statement) and then stop at the line of code immediately following the line that called the procedure.
A useful way of stepping is to tile the VB Editor window and the Excel window. As you step through the procedure, you will be able to see exactly what the effect of each statement is in Excel. This can help identify errors or potential problems more easily.
Procedures
1. Launch or switch to the VB Editor.
2. Identify in the Project Explorer pane, the workbook (VBA project) containing the procedure that you want to step through.
3. Open the module sheet containing the procedure.
4. Click the Debug menu.
5. Select Step Into.
6. Continue selecting Step Into (or press F8) until you get to the end of the procedure.
Stepping a Procedure - the VB Editor and Excel Tiled Side-by-Side
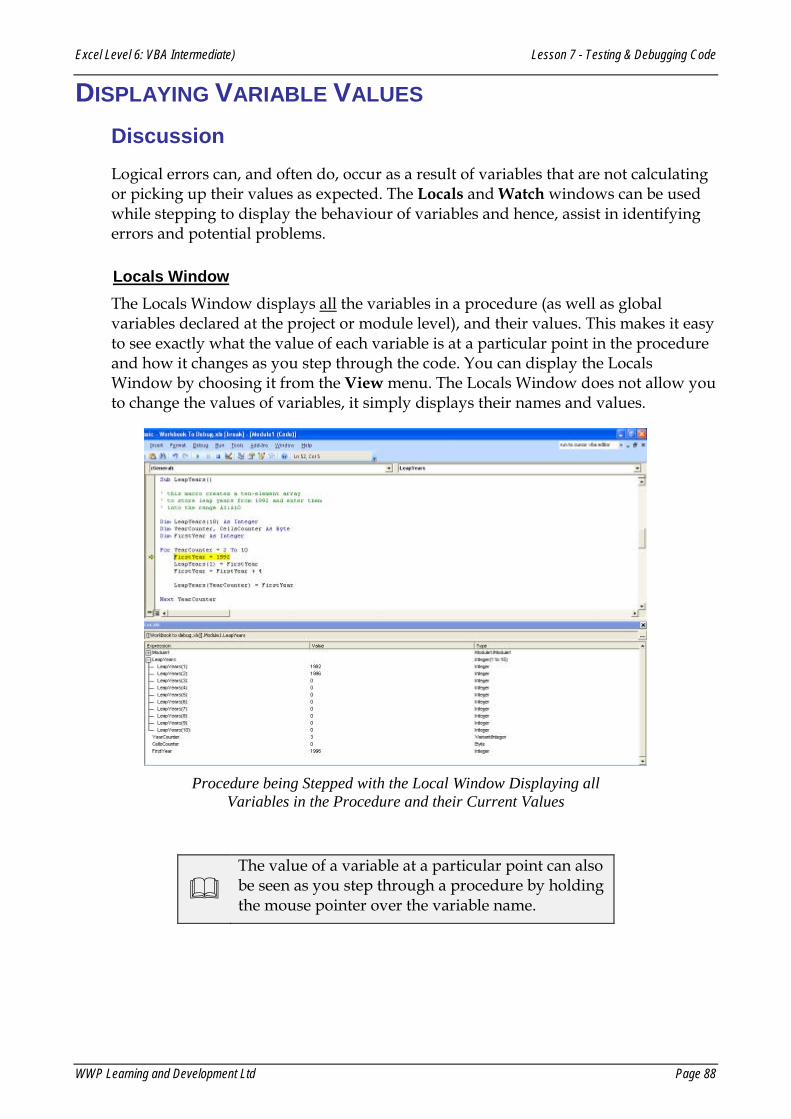
Excel Level 6: VBA Intermediate) Lesson 7 - Testing & Debugging Code
WWP Learning and Development Ltd Page 88
DISPLAYING VARIABLE VALUES Discussion Logical errors can, and often do, occur as a result of variables that are not calculating or picking up their values as expected. The Locals and Watch windows can be used while stepping to display the behaviour of variables and hence, assist in identifying errors and potential problems.
Locals Window The Locals Window displays all the variables in a procedure (as well as global variables declared at the project or module level), and their values. This makes it easy to see exactly what the value of each variable is at a particular point in the procedure and how it changes as you step through the code. You can display the Locals Window by choosing it from the View menu. The Locals Window does not allow you to change the values of variables, it simply displays their names and values.
Procedure being Stepped with the Local Window Displaying all
Variables in the Procedure and their Current Values
The value of a variable at a particular point can also be seen as you step through a procedure by holding the mouse pointer over the variable name.

Excel Level 6: VBA Intermediate) Lesson 7 - Testing & Debugging Code
WWP Learning and Development Ltd Page 89
Displaying the Value of a variable While Stepping
Procedure
1. Launch or switch to the VB Editor.
2. Identify in the Project Explorer pane, the workbook (VBA project) containing the procedure that you want to add a watch to.
3. Open the module sheet containing the procedure.
4. Position the cursor on the procedure containing the variables that you want to watch.
5. Click the View menu.
6. Select Locals Window.
7. Click the Debug menu.
8. Select Step Into. Observe the variable values in the Locals window.
9. Continue selecting Step Into (or press F8) and observing the variable values until you get to the end of the procedure.
Watch Window The Watch Window allows you to be more selective about which variable(s) you "watch." You can set a variable with three watch types:
Watch Type Description
Watch Expression Watches the variable statement-by-statement as you step through the procedure (same as Locals Window).
Break When Value Is True
Halts the procedure and enters break mode when the variable is given a value (value becomes TRUE).
Break When Value Changes
Halts the procedure and enters break mode each time that the value of the variable changes.

Excel Level 6: VBA Intermediate) Lesson 7 - Testing & Debugging Code
WWP Learning and Development Ltd Page 90
The Add Watch Window
Procedure
1. Launch or switch to the VB Editor.
2. Identify in the Project Explorer pane, the workbook (VBA project) containing the procedure that you want to add a watch to.
3. Open the module sheet containing the procedure.
4. Click the View menu.
5. Select Watch Window.
6. Right-click the variable name in the procedure that you want to watch.
7. Select Add Watch....
8. Repeat 6 above for all other variables that you want to watch
9. Click OK.
10. Click the Debug menu.
11. Select Step Into. Observe the variable values in the Watch window.
12. Continue selecting Step Into (or press F8) and observing the variable values until you get to the end of the procedure.
13. Click the close button in the top right of the Watch window.
BREAK MODE Discussion A break point is a setting on a line of code that tells VBA to pause execution immediately before that line of code is executed and code execution is placed in what is called break mode. When the VB Editor is in break mode, you can edit the procedure as normal.

Excel Level 6: VBA Intermediate) Lesson 7 - Testing & Debugging Code
WWP Learning and Development Ltd Page 91
To put a break point on a line of code, place the cursor on that line select Debug, Toggle Breakpoint, press F9, or click in the grey bar at the left of the module next to the line where you want to add the break point.
Removing a break point is the same as applying one (hence, “toggle”).
When a line contains a break point, it is displayed with a brown coloured background and a large dot in the grey band at the left of the module sheet.
Immediately before this line of code is executed, it will appear with a yellow background. When a break point is encountered, code execution is paused but that line of code has not yet executed. You cannot place break points on blank lines, comment lines, or variable declaration lines (lines with Dim statements).
After a break point is encountered, you can resume normal code execution by pressing F5, selecting Run, Continue, clicking the Continue button, or stepping through the code line by line (F8).
Break points are not saved in the workbook file. If you close the file, all break points are removed. Breakpoints are preserved only while the file is open.
Procedure with a Breakpoint Applied
Procedures
1. Launch or switch to the VB Editor.
2. Identify in the Project Explorer pane, the workbook (VBA project) that you want to add code to.
3. Open the module sheet containing the code that you want to add a breakpoint to.
4. Position the cursor in the procedure where you want to add the breakpoint.
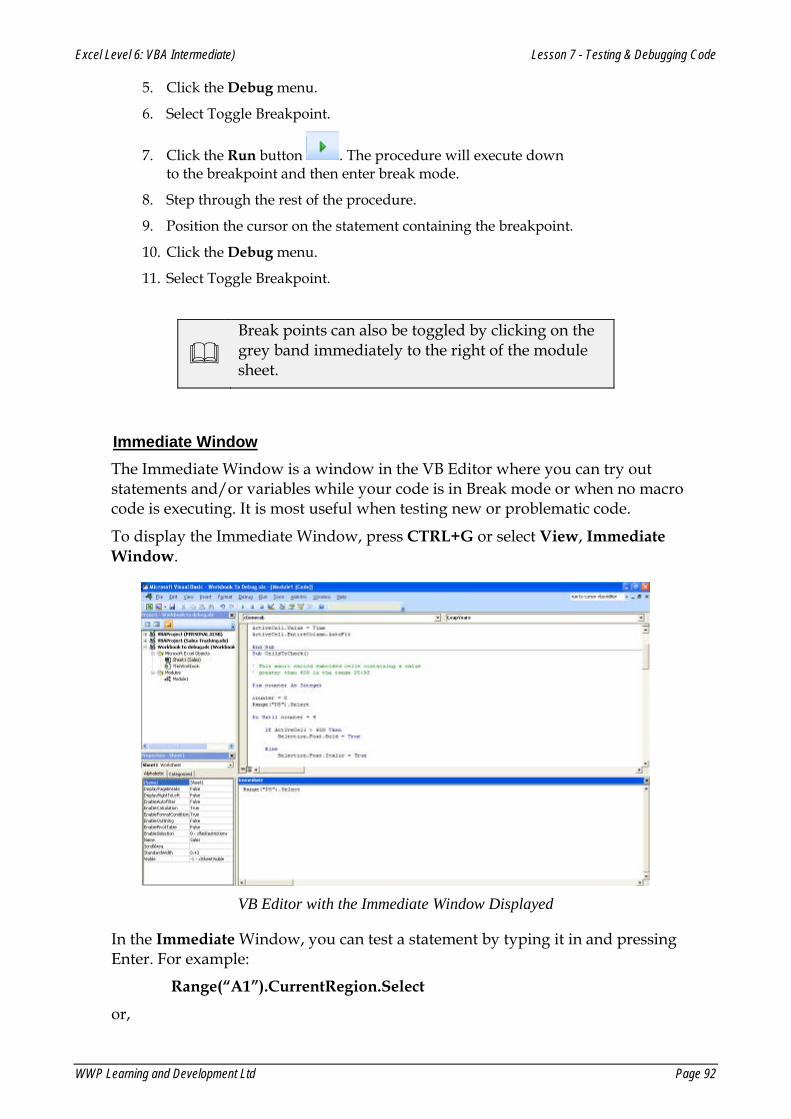
Excel Level 6: VBA Intermediate) Lesson 7 - Testing & Debugging Code
WWP Learning and Development Ltd Page 92
5. Click the Debug menu.
6. Select Toggle Breakpoint.
7. Click the Run button . The procedure will execute down to the breakpoint and then enter break mode.
8. Step through the rest of the procedure.
9. Position the cursor on the statement containing the breakpoint.
10. Click the Debug menu.
11. Select Toggle Breakpoint.
Break points can also be toggled by clicking on the grey band immediately to the right of the module sheet.
Immediate Window The Immediate Window is a window in the VB Editor where you can try out statements and/or variables while your code is in Break mode or when no macro code is executing. It is most useful when testing new or problematic code.
To display the Immediate Window, press CTRL+G or select View, Immediate Window.
VB Editor with the Immediate Window Displayed
In the Immediate Window, you can test a statement by typing it in and pressing Enter. For example:
Range(“A1”).CurrentRegion.Select
or,
Excel Level 6: VBA Intermediate) Lesson 7 - Testing & Debugging Code
WWP Learning and Development Ltd Page 93
Selection.Interior.Color = vbMagenta
A useful way of using the Immediate Window is to tile the VB Editor window and the Excel window. As you press Enter on each statement, you will be able to see exactly what the effect is in Excel.
To test a variable in the Immediate Window, create the variable name and give it a value. Press Enter. Type on the next line: ?variablename and press Enter. The value of the variable will be given on the line below. For example:
numCols = Selection.Columns.Count
?numCols
12
Or,
?ActiveCell.Address $A$10
Because of the way that the Immediate Window is designed to work, it will not allow you to test statement blocks (eg, If..., For... , Select Case... etc.). You can, however, combine several "logical" lines of code in to a single "physical" line of code using the colon (:) and execute this as an entire command. For example:
If ActiveCell.Value < 1000 Then: ActiveCell.Value = 0: Else: ActiveCell.Value = 1
End IF is NOT used when writing the If statement block on one single line.
You can extend a single statement across several lines in the Immediate Window by using the line-continuation character (a space followed by an underscore (_)).
The Immediate Window always behaves as if there is no Option Explicit statement in the active code module (see page 39), namely, you don't have to declare variables that you will be using in the Immediate Window commands. In fact, this is prohibited and you will receive an error message if you attempt to use Dim in the Immediate Window.
There is no programmable way of clearing the Immediate window. You have to select the text and press Delete on the keyboard.

Excel Level 6: VBA Intermediate) Lesson 7 - Testing & Debugging Code
WWP Learning and Development Ltd Page 94
Procedures
1. Launch or switch to the VB Editor.
2. Click the View menu,
3. Select Immediate Window.
4. Position the cursor in the immediate window.
5. Write and test code as necessary.
Debug.Print You can use the Debug.Print statement anywhere in your code to display messages or variable values in the Immediate Window. These statements do not require any confirmation or acknowledgement so will not affect the execution of your code, so it is safe to leave in the code when it is distributed to your users.
They are used purely to explain, clarify, remind or note what is taking place at a particular point of the procedure.
They are much like comments except that they are written for you to see in the Immediate Window. If the Immediate Window is not displayed, Debug.Print has no effect.
For example, you can send a message to the Immediate Window when a particular section of code is executed.
Some code...
Debug.Print "Starting Code Section 1"
More code...
Debug.Print “Procedure is now calling Procedure2”
See also Appendix III, Debug.Assert on page Error! Bookmark not defined..
Excel Level 6: VBA Intermediate) Lesson 7 - Testing & Debugging Code
WWP Learning and Development Ltd Page 95
EXERCISE
TASK: TO TEST AND IDENTIFY PROBLEMS AND ERRORS IN A SUB PROCEDURE
1. Open the file, Workbook to Debug. 2. Tile vertically the Excel and VB Editor windows. 3. Step the macro EnterDateTime and identify any problems. 4. Correct the error(s) and step the macro again to ensure it works correctly. It should enter
the date into cell A1 and the time into the cell below it. 5. Run the sub procedure CellsToCheck. 6. Step the macro to identify the problem (you may also find it useful to “Watch” the
counter variable as you step). 7. Run the LeapYears sub procedure and note the incorrect result. 8. Step the sub procedure together with the Locals window and identify the reason for the
incorrect result. Correct the code so that it runs correctly. 9. Show the Debug toolbar. 10. Step through the procedure named, Main using the Step Into. 11. Repeat 10 above using the Step Over button. Note how it omits stepping the called
procedures. 12. Save and close the file.
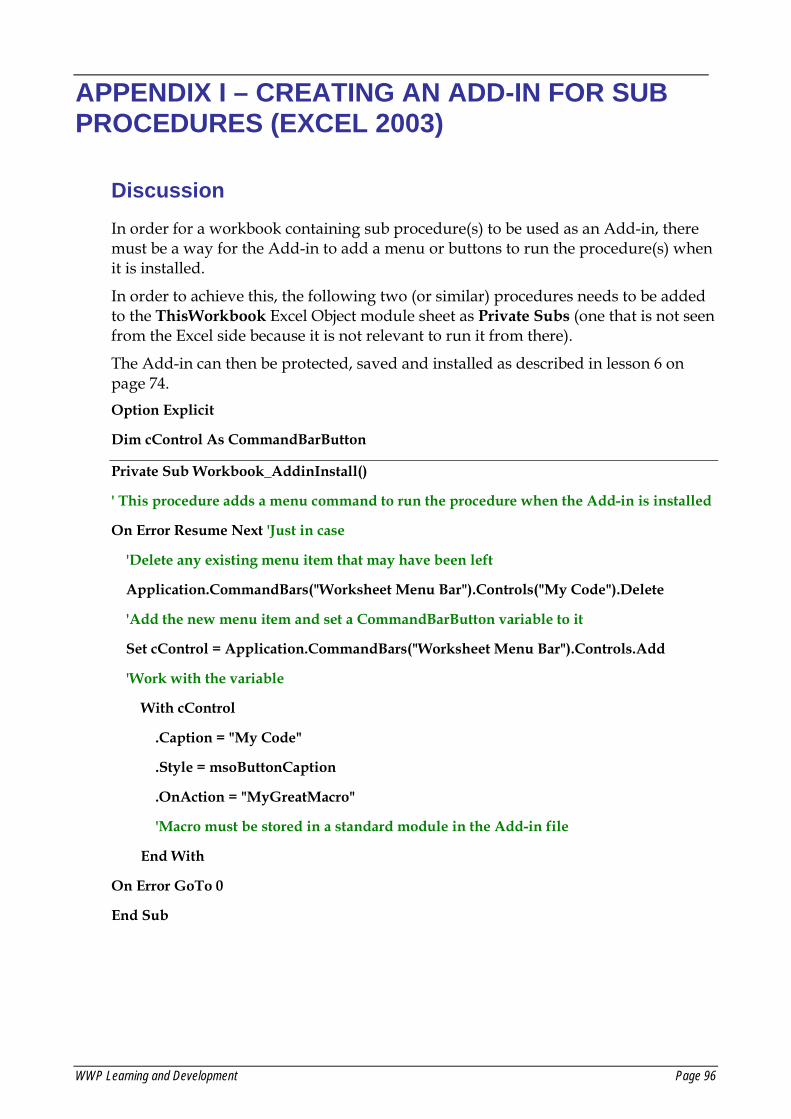
WWP Learning and Development Page 96
APPENDIX I – CREATING AN ADD-IN FOR SUB PROCEDURES (EXCEL 2003)
Discussion In order for a workbook containing sub procedure(s) to be used as an Add-in, there must be a way for the Add-in to add a menu or buttons to run the procedure(s) when it is installed.
In order to achieve this, the following two (or similar) procedures needs to be added to the ThisWorkbook Excel Object module sheet as Private Subs (one that is not seen from the Excel side because it is not relevant to run it from there).
The Add-in can then be protected, saved and installed as described in lesson 6 on page 74. Option Explicit
Dim cControl As CommandBarButton
Private Sub Workbook_AddinInstall()
' This procedure adds a menu command to run the procedure when the Add-in is installed
On Error Resume Next 'Just in case
'Delete any existing menu item that may have been left
Application.CommandBars("Worksheet Menu Bar").Controls("My Code").Delete
'Add the new menu item and set a CommandBarButton variable to it
Set cControl = Application.CommandBars("Worksheet Menu Bar").Controls.Add
'Work with the variable
With cControl
.Caption = "My Code"
.Style = msoButtonCaption
.OnAction = "MyGreatMacro"
'Macro must be stored in a standard module in the Add-in file
End With
On Error GoTo 0
End Sub
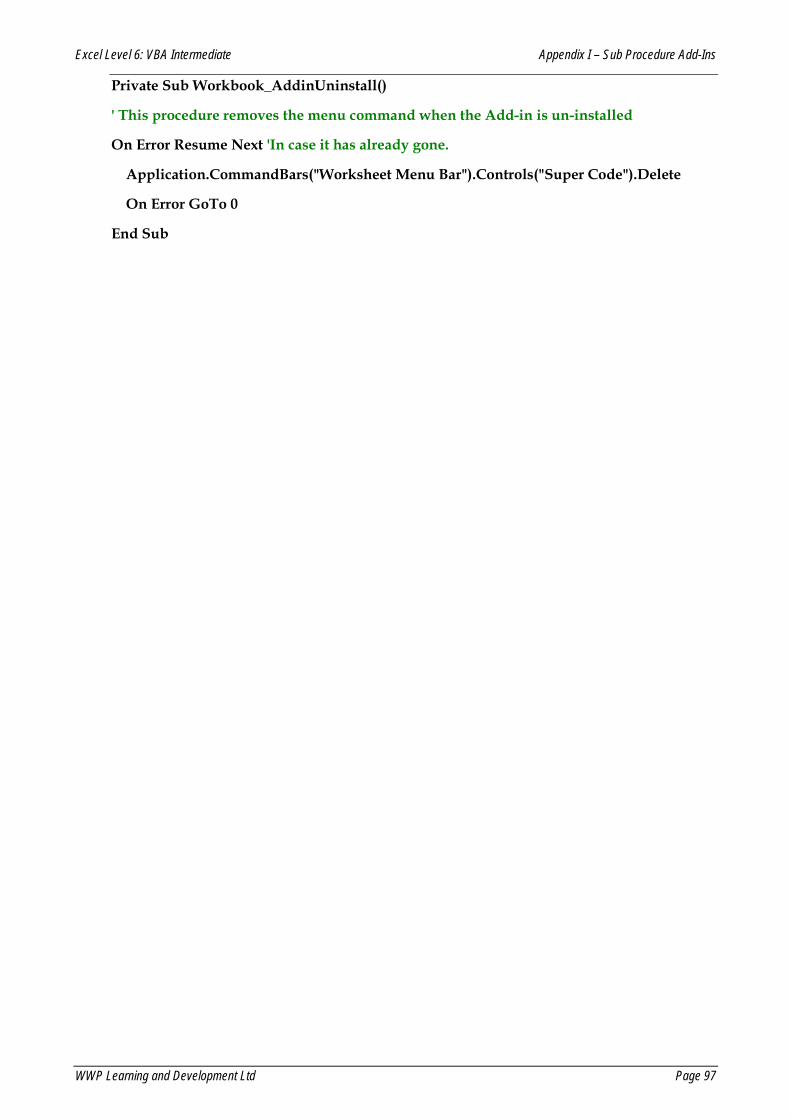
Excel Level 6: VBA Intermediate Appendix I – Sub Procedure Add-Ins
WWP Learning and Development Ltd Page 97
Private Sub Workbook_AddinUninstall()
' This procedure removes the menu command when the Add-in is un-installed
On Error Resume Next 'In case it has already gone.
Application.CommandBars("Worksheet Menu Bar").Controls("Super Code").Delete
On Error GoTo 0
End Sub

WWP Learning and Development Page 98
APPENDIX II – SOLUTIONS TO EXERCISES
REVIEW EXERCISE (PAGE 5)
Sub CreateTable() Sheets.Add ' Add data
Range("B1").Value = "USA" Range("C1").Value = "Europe" Range("A2").Value = "Sales" Range("A3").Value = "Costs" Range("A4").Value = "Profit"
' Add formulas
Range("B4").Formula = "=B2-B3" Range("C4").Formula = "=C2-C3"
' Add formatting
Range("B1:C1").Font.Bold = True Range("A2:A4").Font.Italic = True Range("A4:C4").Interior.ColorIndex = 15
End Sub Sub TestProfit() ' Declare variable Dim cel As Variant ' Start looping through each variable in range For Each cel In Range("B4:C4") ' Test each variable If cel.Value >= 15000 Then cel.Font.Bold = True Else cel.Font.Color = vbRed End If Next cel End Sub
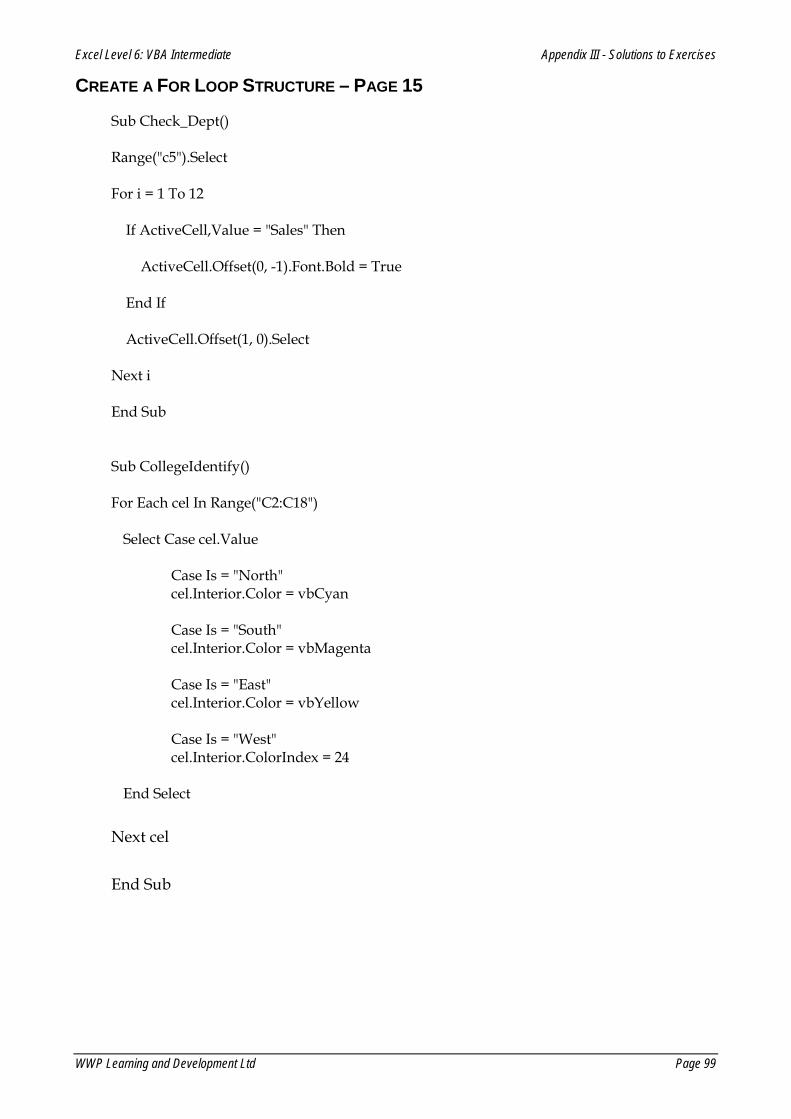
Excel Level 6: VBA Intermediate Appendix III - Solutions to Exercises
WWP Learning and Development Ltd Page 99
CREATE A FOR LOOP STRUCTURE – PAGE 15
Sub Check_Dept() Range("c5").Select For i = 1 To 12 If ActiveCell,Value = "Sales" Then ActiveCell.Offset(0, -1).Font.Bold = True End If ActiveCell.Offset(1, 0).Select Next i End Sub Sub CollegeIdentify() For Each cel In Range("C2:C18")
Select Case cel.Value Case Is = "North" cel.Interior.Color = vbCyan Case Is = "South" cel.Interior.Color = vbMagenta Case Is = "East" cel.Interior.Color = vbYellow Case Is = "West" cel.Interior.ColorIndex = 24
End Select Next cel End Sub
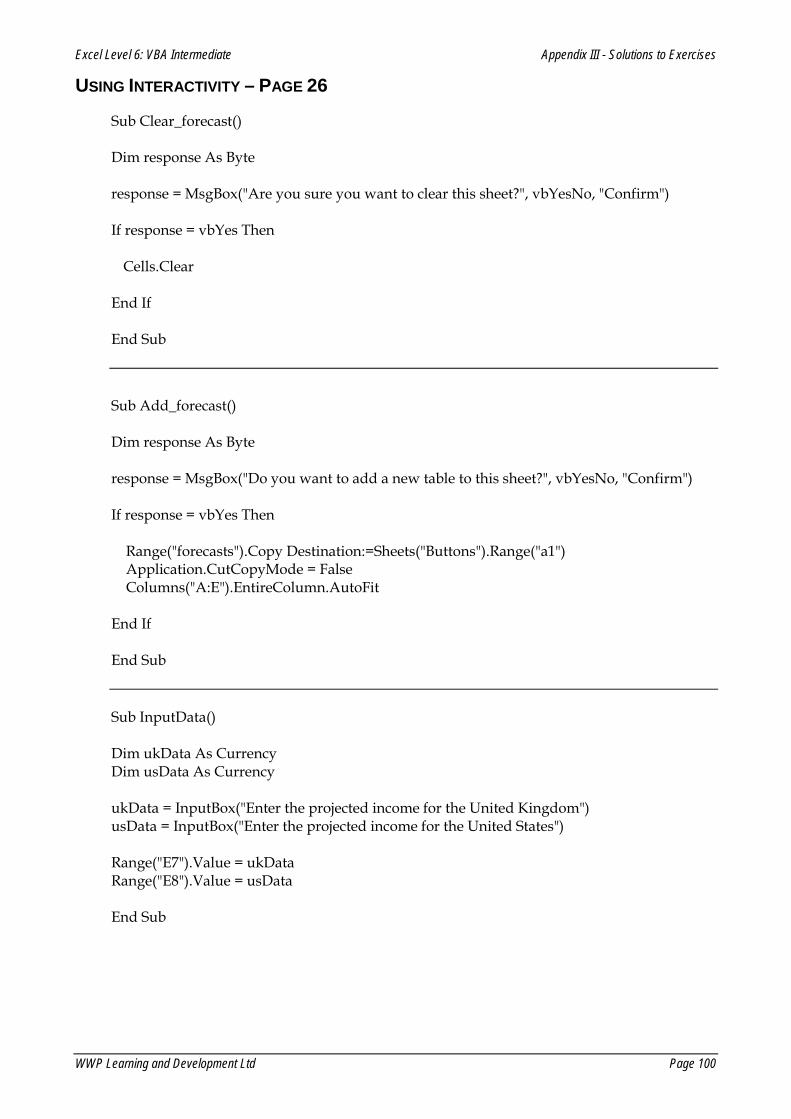
Excel Level 6: VBA Intermediate Appendix III - Solutions to Exercises
WWP Learning and Development Ltd Page 100
USING INTERACTIVITY – PAGE 26
Sub Clear_forecast() Dim response As Byte response = MsgBox("Are you sure you want to clear this sheet?", vbYesNo, "Confirm") If response = vbYes Then
Cells.Clear
End If End Sub Sub Add_forecast() Dim response As Byte response = MsgBox("Do you want to add a new table to this sheet?", vbYesNo, "Confirm") If response = vbYes Then Range("forecasts").Copy Destination:=Sheets("Buttons").Range("a1") Application.CutCopyMode = False Columns("A:E").EntireColumn.AutoFit End If End Sub Sub InputData() Dim ukData As Currency Dim usData As Currency ukData = InputBox("Enter the projected income for the United Kingdom") usData = InputBox("Enter the projected income for the United States") Range("E7").Value = ukData Range("E8").Value = usData End Sub

Excel Level 6: VBA Intermediate Appendix III - Solutions to Exercises
WWP Learning and Development Ltd Page 101
WORKING WITH THE RANGE OBJECT (PAGE 37)
Sub LayoutTable() ' Select a cell on the table before running this macro
ActiveCell.CurrentRegion.Select Selection.ColumnWidth = 12 Selection.Columns(1).Font.Color = vbBlue Selection.Rows(1).HorizontalAlignment = xlCenter
End Sub Sub FormatNumbers() ' Select a cell on the table before running this macro
ActiveCell.CurrentRegion.Select Selection.Offset(1, 1).Select Selection.Resize(Selection.Rows.Count - 1, Selection.Columns.Count - 1).Select Selection.NumberFormat = "£#,##0.00"
End Sub Sub LastCell() ' Select a cell on the table before running this macro
Selection.CurrentRegion.Select Selection.Cells(Selection.Cells.Count).Select ActiveCell.Font.Size = 14 ActiveCell.Interior.Color = vbYellow ActiveCell.EntireColumn.AutoFit
End Sub Sub RunAllMacros() ' Select a cell on the table before running this macro
Call LayoutTable Call FormatNumbers Call LastCell
End Sub
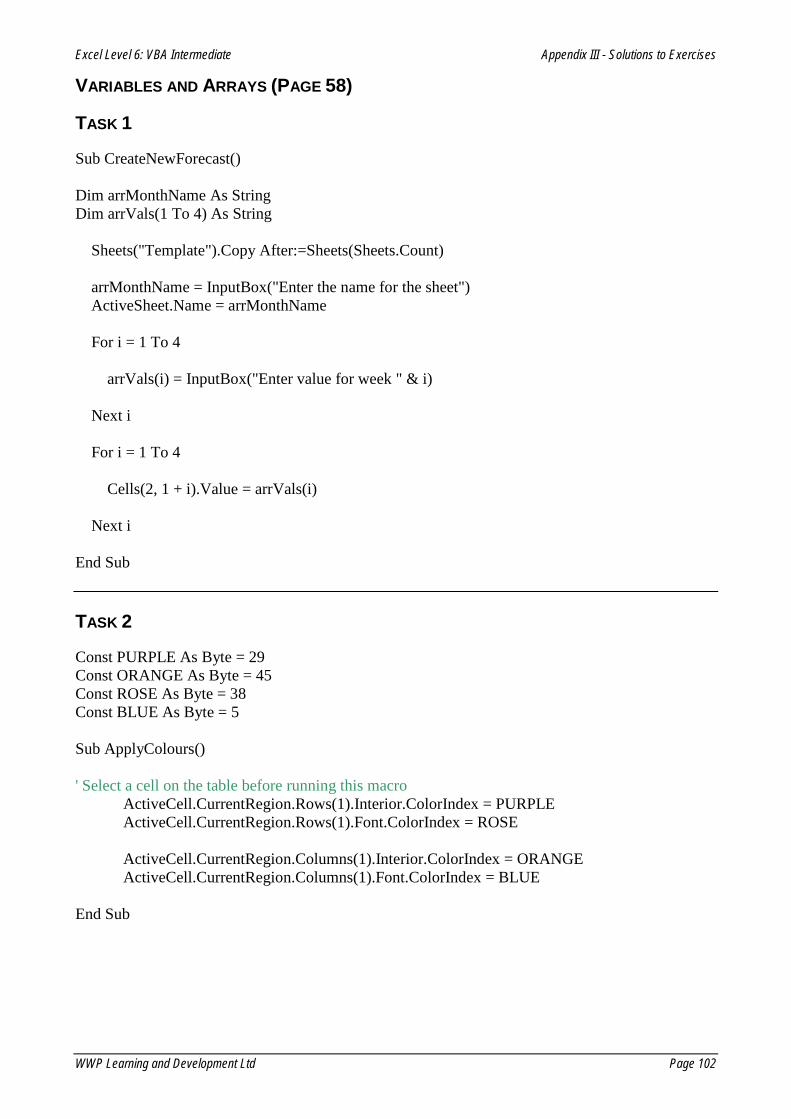
Excel Level 6: VBA Intermediate Appendix III - Solutions to Exercises
WWP Learning and Development Ltd Page 102
VARIABLES AND ARRAYS (PAGE 58)
TASK 1
Sub CreateNewForecast() Dim arrMonthName As String Dim arrVals(1 To 4) As String Sheets("Template").Copy After:=Sheets(Sheets.Count) arrMonthName = InputBox("Enter the name for the sheet") ActiveSheet.Name = arrMonthName For i = 1 To 4 arrVals(i) = InputBox("Enter value for week " & i) Next i For i = 1 To 4 Cells(2, 1 + i).Value = arrVals(i) Next i End Sub TASK 2
Const PURPLE As Byte = 29 Const ORANGE As Byte = 45 Const ROSE As Byte = 38 Const BLUE As Byte = 5 Sub ApplyColours() ' Select a cell on the table before running this macro
ActiveCell.CurrentRegion.Rows(1).Interior.ColorIndex = PURPLE ActiveCell.CurrentRegion.Rows(1).Font.ColorIndex = ROSE
ActiveCell.CurrentRegion.Columns(1).Interior.ColorIndex = ORANGE ActiveCell.CurrentRegion.Columns(1).Font.ColorIndex = BLUE
End Sub

Excel Level 6: VBA Intermediate Appendix III - Solutions to Exercises
WWP Learning and Development Ltd Page 103
TASK 3
Sub TransferData() Dim arrData(1 To 6, 1 To 4) Dim iRows As Byte Dim iCols As Byte For iRows = 1 To 6 For iCols = 1 To 4 arrData(iRows, iCols) = Cells(iRows + 1, iCols + 1).Value Next iCols Next iRows Sheets("Net").Activate For iRows = 1 To 6 For iCols = 1 To 4 Cells(iRows + 1, iCols + 1).Value = arrData(iRows, iCols) * 0.8 Next iCols Next iRows End Sub

Excel Level 6: VBA Intermediate Appendix III - Solutions to Exercises
WWP Learning and Development Ltd Page 104
USER-DEFINED FUNCTIONS (PAGE 73)
TASK 1
Function DegF(TempC) DegF = TempC * 9 / 5 + 32 End Function Function DegC(TempF) DegC = (TempF - 32) * 5 / 9 End Function Function Hypot(x, y) Hypot = Sqr(x ^ 2 + y ^ 2) End Function Function Gasbill(UnitsUsed, LowUnits, HighRate, LowRate) Dim highUnits As Integer highUnits = UnitsUsed - LowUnits Gasbill = (LowUnits * LowRate) + (highUnits * HighRate) End Function TASK 2
Function CountText(RangeToCount) For Each numb In RangeToCount If Not IsNumeric(numb) Then CountText = CountText + 1 End If Next numb End Function
WWP Learning and Development Page 105
INDEX
A
Add-ins code for subprocedures ..................................... 96 creating ................................................................ 76 editing .................................................................. 79 installing to Excel ............................................... 78 overview .............................................................. 75 removing ............................................................. 80
Arrays Array function .................................................... 56 assigning values ................................................. 49 declaring .............................................................. 43 dynamic ............................................................... 53 lower bound ........................................................ 45 multi-dimensional .............................................. 47 Option Base 1 ...................................................... 45 overview .............................................................. 42 ReDim .................................................................. 53 ReDim Preserve .................................................. 54 using loops with ................................................. 51
C
Collections Cells ...................................................................... 30 ChartObjects ....................................................... 31 Columns .............................................................. 31 Rows .................................................................... 31 Sheets ................................................................... 31 WorkBooks .......................................................... 31 WorkSheets ......................................................... 31
Constants declaring .............................................................. 41 using..................................................................... 41
Control Structures For Each examples ....................................... 11, 13 For Each loop ................................................ 10, 13 For Next examples ............................................... 8 For Next loop ................................................ 7, 8, 9 nested For Each examples ................................. 14 nested For Each loops .................................. 13, 14 nested For Next examples ................................... 9 nested For Next loops .......................................... 9 using Step with For Next .................................... 8
D
Debugging Break mode ......................................................... 90 Debug.Print ......................................................... 94 displaying variable values ................................ 88 error types ........................................................... 84
Locals window .................................................... 88 step into ............................................................... 85 step out ................................................................ 87 step over .............................................................. 86 stepping a procedure ......................................... 85 Watch window.................................................... 89
F
Functions declaring variables in ......................................... 70 getting help ......................................................... 68 user-defined ........................................................ 65 using Excel functions in procedures ................ 61 using ranges in arguments ................................ 70 VBA functions ..................................................... 63
I
Input Box definition ............................................................. 22 examples .............................................................. 22
M
Message Box adding interactivity ............................................ 18 buttons ................................................................. 18 default button ..................................................... 19 definition ............................................................. 17 examples .............................................................. 17 icons ..................................................................... 19 interactive use examples ................................... 20
O
Offset ......................................................................... 34
R
Ranges Cells property ..................................................... 29 CurrentRegion property .................................... 32 Offset property ................................................... 34 referring to ........................................................... 28 Resize property ................................................... 35
Resize ........................................................................ 35
V
Variables Dim statement ..................................................... 39 naming ................................................................. 49 Option Explicit .................................................... 39 scope ..................................................................... 40 visibility ............................................................... 40