Embed Size (px)
DESCRIPTION
Tips and Tricks for Microsoft Office 2010
Citation preview


Office 2010: Tips & Tricks
1 | P a g e
© Vasu Jain http:/www.WindowsVJ.com
Office 2010: Tips & Tricks
2 | P a g e
© Vasu Jain http:/www.WindowsVJ.com
Office 2010: Tips & Tricks
3 | P a g e
© Vasu Jain http:/www.WindowsVJ.com

Office 2010: Tips & Tricks
4 | P a g e
© Vasu Jain http:/www.WindowsVJ.com

Office 2010: Tips & Tricks
5 | P a g e
© Vasu Jain http:/www.WindowsVJ.com
Vasu Jain is a Technology enthusiast, and a Technology blogger.
Having worked as a Software Engineer, and being awarded
Microsoft Most Valuable Professional he has close associations in
IT industry and has an idea of expectations & requirements of a
Consumer as well as Enterprise. This book has been written by
him in keeping these things in mind.
He has also authored an eBook on Windows 7, Windows 7: Tips &
Tricks which has crossed over 500,000 downloads in short span of
18 months.
Vasu blogs at the website www.WindowsVJ.com and can be
contacted on Twitter @vasujain.
Office 2010: Tips & Tricks
6 | P a g e
© Vasu Jain http:/www.WindowsVJ.com
The response to my last book ―Windows 7 Tips & tricks‖ was
fabulous one and motivated me to write another eBook. The
Readers at my blog wanted me to go further in this. Finally I
decided to write this book in May 2010.
Microsoft Office is one of the most popular and user friendly
office suites in the market. And this time Microsoft had made it
bigger by integrating features for Office Web Apps and Mobile
Office and significant changes to User Interface and included a lot
of new features in Office Suite.
This book is for the users of Office 2010 who wish to learn and
seek new opportunities via this version of Office. I have included
a list of Tutorials, Basics, Tips and tricks which I have known
during the last one year of trying Office 2010 Suite (Since its Pre-
Beta Build in July 2009) I have tried my level best to make the
language of this book as simple so that a novice can also
understand.
The book is divided into seven sections. Section one would be
covering Office 2010 features as a whole while Section 2 – 5
covers features in Word, Excel, PowerPoint & Outlook respectively.
Chapter Six includes some additional utilities for Office 2010, and
chapter Seven would dive into Office Web apps and Office Mobile
Apps.

Office 2010: Tips & Tricks
7 | P a g e
© Vasu Jain http:/www.WindowsVJ.com
I have personally tried and tested the tips, tricks & tweaks
discussed in this guide. However, I request fellow readers to be
cautious while trying it out with your system. Always take a
backup copy of all important data/registry before attempting to
change the system and registry settings.
Last but not the least- Learn, Share & Grow. Add your knowledge
to what I have and share it unconditionally with the people who
are looking for it.
To increase the ease of access and user readability I have
hyperlinked all articles and table of contents with each other. Click
on any article heading to reach the table of content or click any
content to reach the article.
The offerings in this book would help any user to curtail the time
they spend using ―Office 2010‖ and thus enhance their
productivity as an individual and as a team. This book does not
serve as a complete guide but is a drop in the ocean and
unleashes few new features in Office 2010 Suite as well.
The contents of this book are copyrighted. I have tried my best to
make this book error free but still if you find any error please mail
me and I will correct them. The contents of this book can be
found over my website www.WindowsVJ.com as well.
Vasu Jain
Office 2010: Tips & Tricks
8 | P a g e
© Vasu Jain http:/www.WindowsVJ.com
1. System requirements for Office 2010
2. Price List for Office 2010
3. How to Install Office 2010: Installation Screenshots
4. Take Screenshots from Office 2010 inbuilt Tool
5. Convert Office 2010 docs Formats using inbuilt converter
6. Backstage Concept in Office 2010
7. Enhanced Security using ―Protected View‖ Mode
8. Office Orb replaced by Menu Button
9. Translate Text in Microsoft Office 2010
10. How to Remove Background from a Picture
Office 2010: Tips & Tricks
9 | P a g e
© Vasu Jain http:/www.WindowsVJ.com
1. Special text selection using F8 Key in word 2010
2. Make a Blog Post from Word 2010
3. Save documents to Sky Drive directly from Office 2010
4. Improved Search options in Word 2010
5. Word 2010 Short Cut Keys
6. Sort a list Alphabetically in Word 2010
7. Enable and Add Text to Speech feature in Office 2010
8. Format Painter in Word 2010
9. Autosave a Microsoft Word Document
10. Customize the Default Font in Office Word 2010
1. Analyze data efficiently & quickly using Sparklines
2. Wrap text using Ribbon option in Excel 2010
3. Change Orientation of cell Text in Excel 2010
4. Count the Occurrences of a text in an Excel Sheet
5. Sorting Excel file by column Attribute
6. Excel 2010 Paste Options
7. Handy Shortcuts in Excel 2010
8. Disable Read-Only Protected View in Office 2010
9. Creating a Hyperlink In Excel
10. Data Filtration in Excel 2010 using Slicers
Office 2010: Tips & Tricks
10 | P a g e
© Vasu Jain http:/www.WindowsVJ.com
1. Save PowerPoint 2010 Presentations as Movies
2. Edit Videos inside a Presentation in PowerPoint 2010
3. Broadcast PowerPoint Presentations over the web
4. Copy PowerPoint effects using Animation Painter
5. Preview & Apply PowerPoint Themes to Presentations
6. Show Date and Time on a Slide in PowerPoint 2010
7. Creating a theme in PowerPoint 2010
8. Equation Editor Tool in PowerPoint 2010
9. Compare Two Presentations in PowerPoint 2010
10. Co-Authoring a Presentation in PowerPoint 2010
1. Import Phone Contacts from Excel to Office Outlook 2010
2. Key Tips in Outlook 2010
3. How to create Quicksteps in Outlook 2010
4. Configure Email Account with Microsoft Outlook 2010
5. How to Add email Signatures in Outlook 2010
6. Jumplists in Outlook 2010
7. Outlook Social Connector
8. Send Text Message in Outlook 2010
9. Customize Navigation Pane in Outlook 2010
10. Create a Business Card using Microsoft Publisher 2010
Office 2010: Tips & Tricks
11 | P a g e
© Vasu Jain http:/www.WindowsVJ.com
1. Twitter Add-in for Outlook 2010
2. Facebook add-in for Outlook 2010
3. Enable tabs in Microsoft Office 2010
4. Office 2010 add-in to detect grammar mistakes
5. View Presentations using PowerPoint Viewer
6. Add-in to Compare Worksheets in Excel 2010
7. Office Compatibility Pack for Word, Excel, and PowerPoint
File Formats
8. Forgotten Attachment Detector for Outlook 2010
1. Microsoft Office Web Apps
2. Microsoft Office Mobile 2010
1. Windows 7 EBook : Review

Office 2010: Tips & Tricks
12 | P a g e
© Vasu Jain http:/www.WindowsVJ.com
Office 2010: Tips & Tricks
13 | P a g e
© Vasu Jain http:/www.WindowsVJ.com
Office 2010: Tips & Tricks
14 | P a g e
© Vasu Jain http:/www.WindowsVJ.com
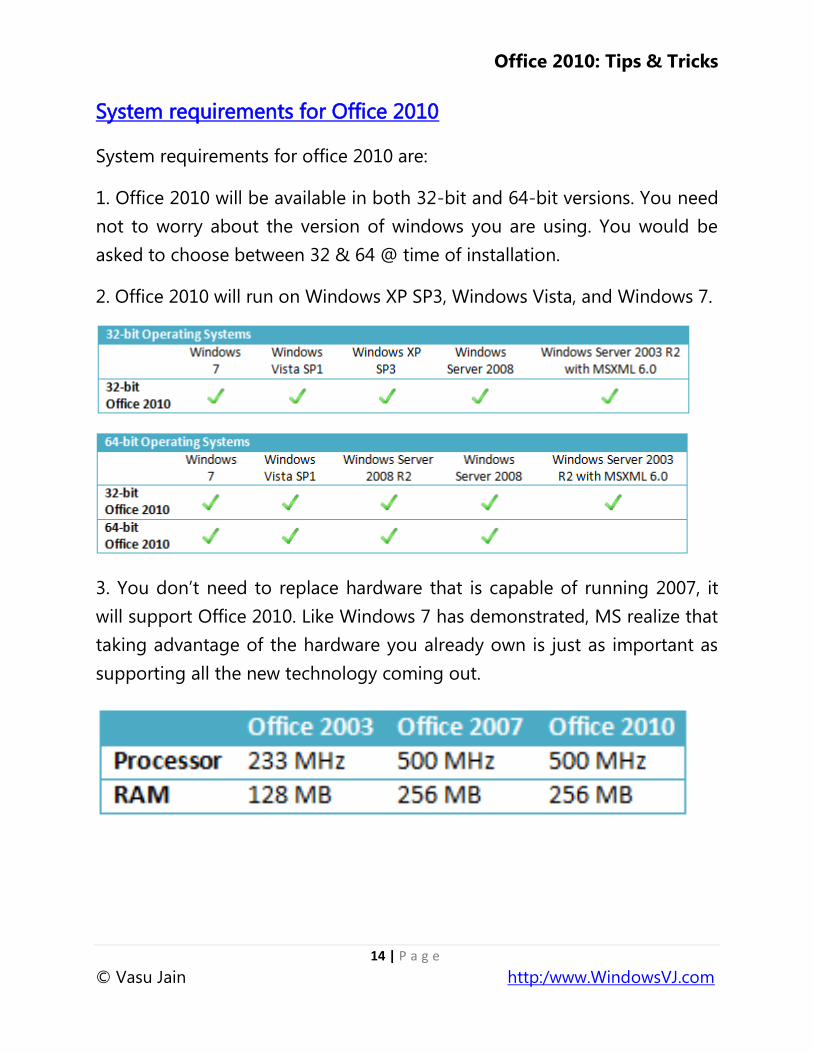
System requirements for Office 2010
System requirements for office 2010 are:
1. Office 2010 will be available in both 32-bit and 64-bit versions. You need
not to worry about the version of windows you are using. You would be
asked to choose between 32 & 64 @ time of installation.
2. Office 2010 will run on Windows XP SP3, Windows Vista, and Windows 7.
3. You don‘t need to replace hardware that is capable of running 2007, it
will support Office 2010. Like Windows 7 has demonstrated, MS realize that
taking advantage of the hardware you already own is just as important as
supporting all the new technology coming out.

Office 2010: Tips & Tricks
15 | P a g e
© Vasu Jain http:/www.WindowsVJ.com
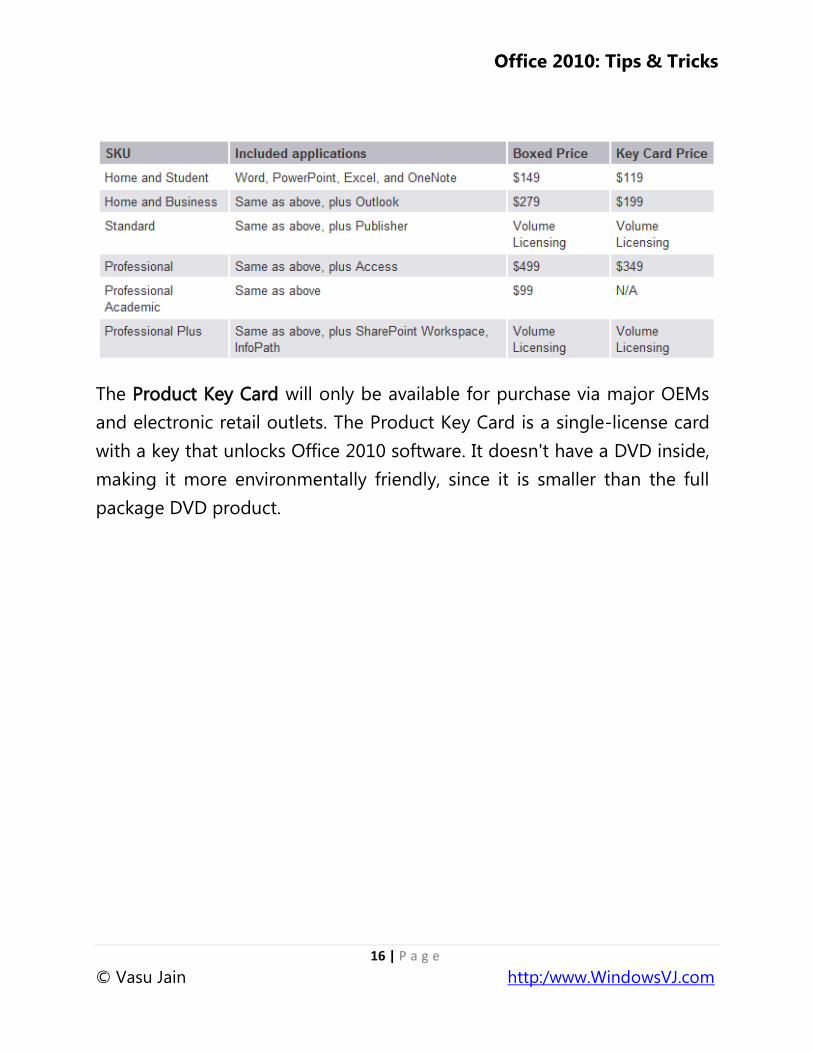
Price List for Office 2010
Microsoft Office Home and Student will cost $149, Office Home and
Business will cost $279, Office Professional will cost $499, and Office
Professional Academic will cost only $99. The prices of Product Key card
differ; refer to the chart below which outlines the cost of each version.
Microsoft has partnered with major retailers & PC manufacturers, as a
result of which new PCs from these partners would be bundled with Office
2010 Suite. However, to unlock the copy of Office 2010 software
preloaded by the PC manufacturers, users need to purchase Product Key
Cards from Microsoft.
Office 2010: Tips & Tricks
16 | P a g e
© Vasu Jain http:/www.WindowsVJ.com
The Product Key Card will only be available for purchase via major OEMs
and electronic retail outlets. The Product Key Card is a single-license card
with a key that unlocks Office 2010 software. It doesn't have a DVD inside,
making it more environmentally friendly, since it is smaller than the full
package DVD product.
Office 2010: Tips & Tricks
17 | P a g e
© Vasu Jain http:/www.WindowsVJ.com
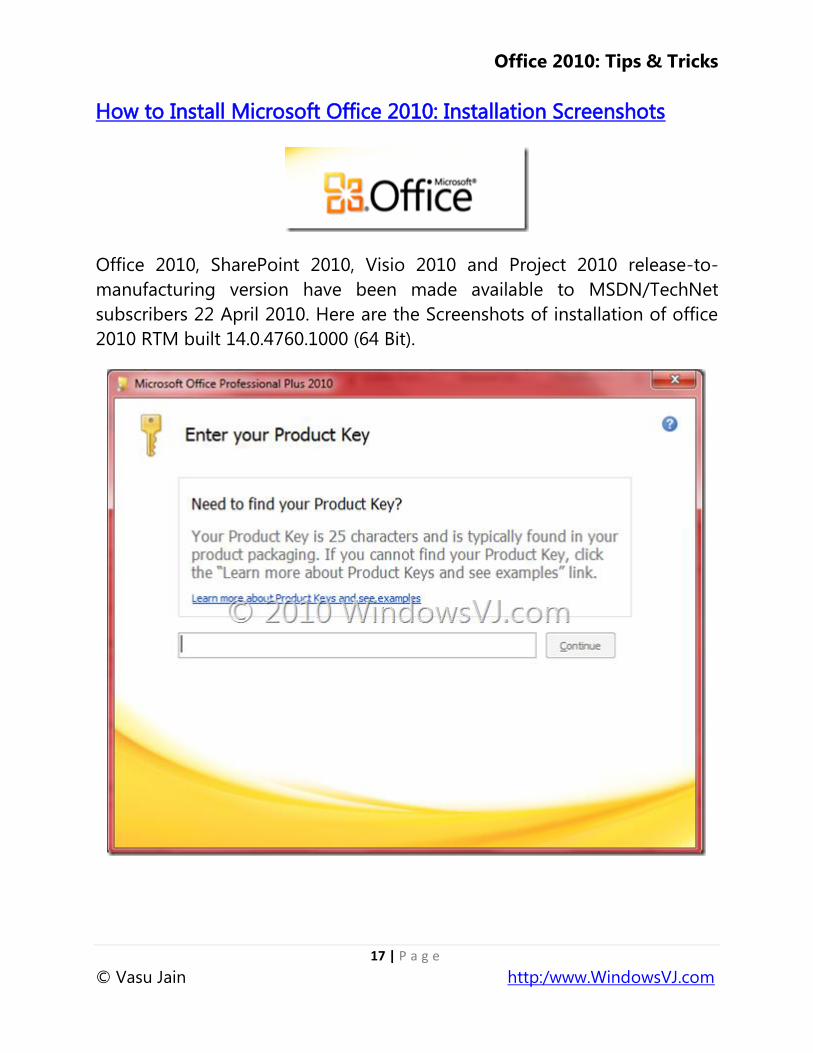
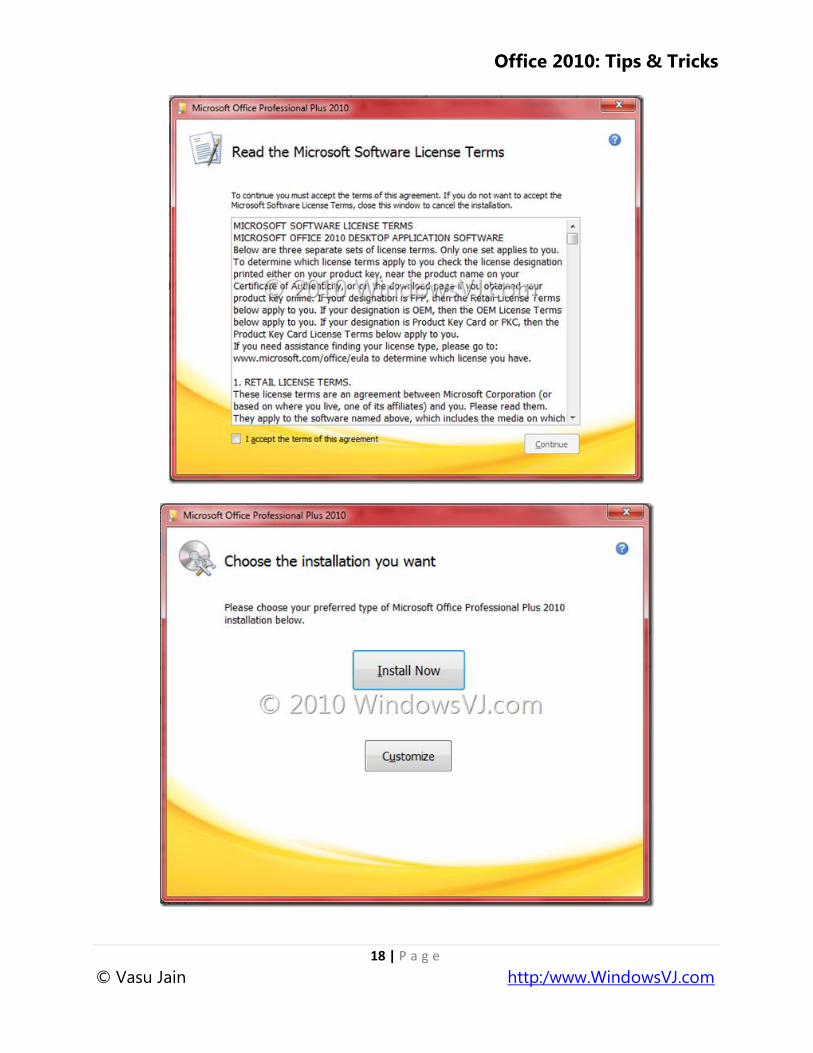
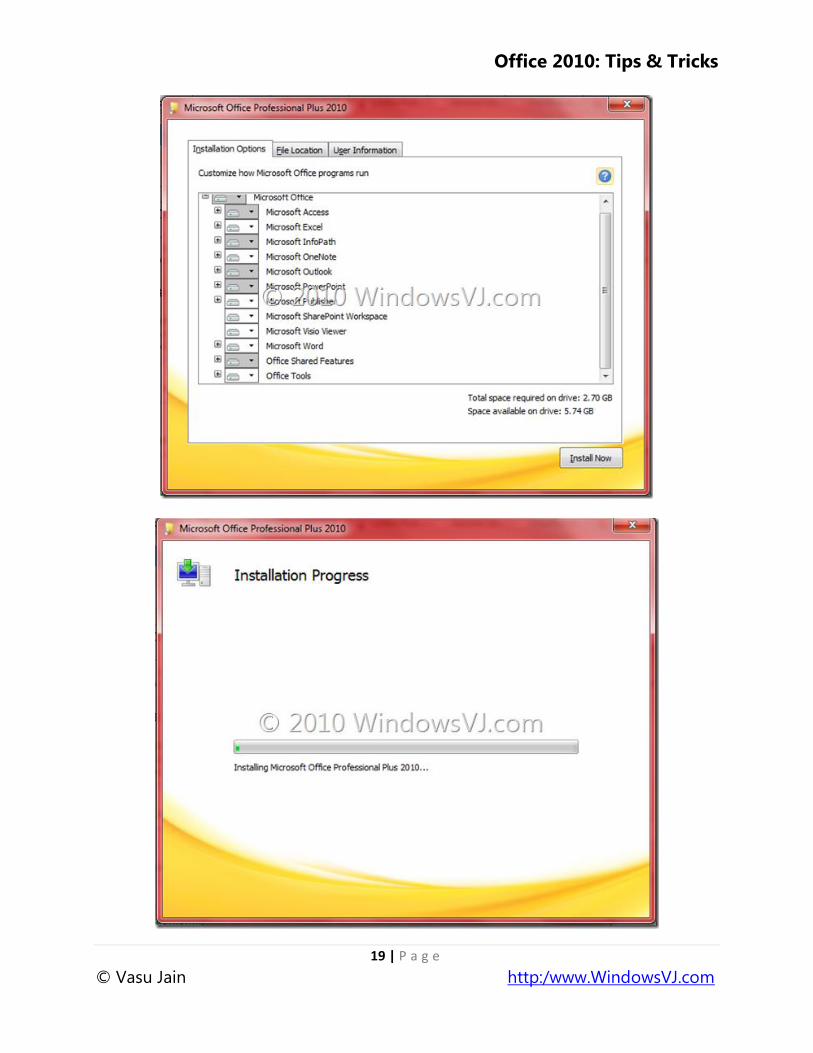
How to Install Microsoft Office 2010: Installation Screenshots
Office 2010, SharePoint 2010, Visio 2010 and Project 2010 release-to-
manufacturing version have been made available to MSDN/TechNet
subscribers 22 April 2010. Here are the Screenshots of installation of office
2010 RTM built 14.0.4760.1000 (64 Bit).
Office 2010: Tips & Tricks
18 | P a g e
© Vasu Jain http:/www.WindowsVJ.com
Office 2010: Tips & Tricks
19 | P a g e
© Vasu Jain http:/www.WindowsVJ.com

Office 2010: Tips & Tricks
20 | P a g e
© Vasu Jain http:/www.WindowsVJ.com
Office 2010: Tips & Tricks
21 | P a g e
© Vasu Jain http:/www.WindowsVJ.com
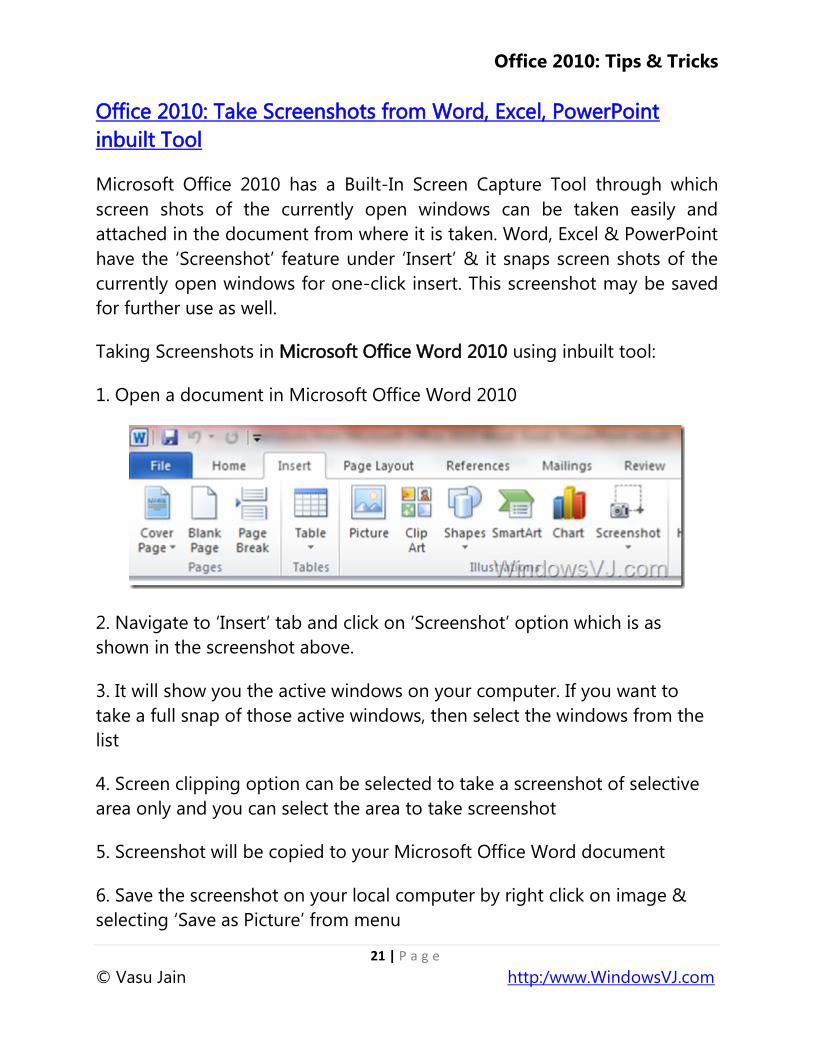
Office 2010: Take Screenshots from Word, Excel, PowerPoint
inbuilt Tool
Microsoft Office 2010 has a Built-In Screen Capture Tool through which
screen shots of the currently open windows can be taken easily and
attached in the document from where it is taken. Word, Excel & PowerPoint
have the ‗Screenshot‘ feature under ‗Insert‘ & it snaps screen shots of the
currently open windows for one-click insert. This screenshot may be saved
for further use as well.
Taking Screenshots in Microsoft Office Word 2010 using inbuilt tool:
1. Open a document in Microsoft Office Word 2010
2. Navigate to ‗Insert‘ tab and click on ‗Screenshot‘ option which is as
shown in the screenshot above.
3. It will show you the active windows on your computer. If you want to
take a full snap of those active windows, then select the windows from the
list
4. Screen clipping option can be selected to take a screenshot of selective
area only and you can select the area to take screenshot
5. Screenshot will be copied to your Microsoft Office Word document
6. Save the screenshot on your local computer by right click on image &
selecting ‗Save as Picture‘ from menu
Office 2010: Tips & Tricks
22 | P a g e
© Vasu Jain http:/www.WindowsVJ.com
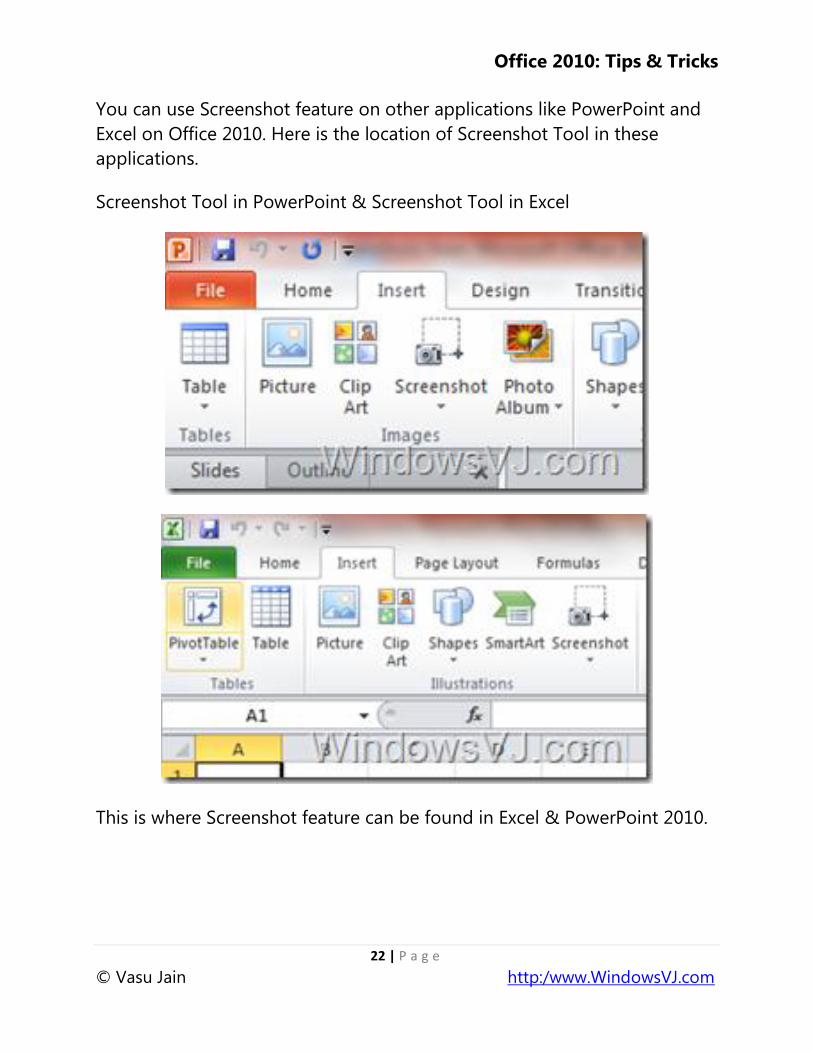
You can use Screenshot feature on other applications like PowerPoint and
Excel on Office 2010. Here is the location of Screenshot Tool in these
applications.
Screenshot Tool in PowerPoint & Screenshot Tool in Excel
This is where Screenshot feature can be found in Excel & PowerPoint 2010.
Office 2010: Tips & Tricks
23 | P a g e
© Vasu Jain http:/www.WindowsVJ.com
Convert your Office 2010 docs into other Formats using inbuilt
converter
Office 2010 has another great feature, conversion of your office document
into the format of your choice from the office application ―save as‖ menu
only. Till Office 2007 third party tools were required to convert Word
documents, Excel spreadsheets, and PowerPoint presentations to other
formats, with Office 2010 a build-in converter is present which eases the
document format conversion.
Here is how you can convert your document to another format in Office
2010:
1. Open a document in Microsoft Office Word 2010
2. Navigate to File Menu and click on ‗Save as‘ option which is as shown in
the screenshot.

Office 2010: Tips & Tricks
24 | P a g e
© Vasu Jain http:/www.WindowsVJ.com
3. It will show you all different formats in which that document can be
converted.
4. Select a format e.g. PDF from the list shown
5. Save the document after selecting the format of the file and filename.
Office 2010: Tips & Tricks
25 | P a g e
© Vasu Jain http:/www.WindowsVJ.com
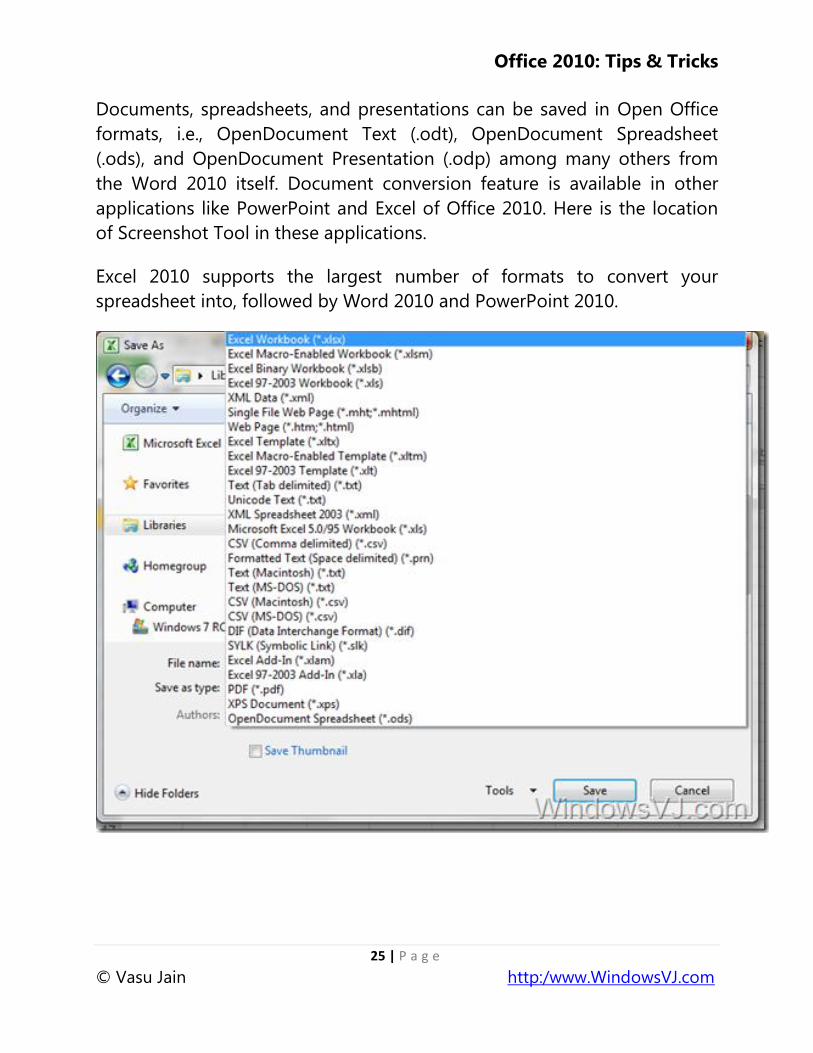
Documents, spreadsheets, and presentations can be saved in Open Office
formats, i.e., OpenDocument Text (.odt), OpenDocument Spreadsheet
(.ods), and OpenDocument Presentation (.odp) among many others from
the Word 2010 itself. Document conversion feature is available in other
applications like PowerPoint and Excel of Office 2010. Here is the location
of Screenshot Tool in these applications.
Excel 2010 supports the largest number of formats to convert your
spreadsheet into, followed by Word 2010 and PowerPoint 2010.
Office 2010: Tips & Tricks
26 | P a g e
© Vasu Jain http:/www.WindowsVJ.com
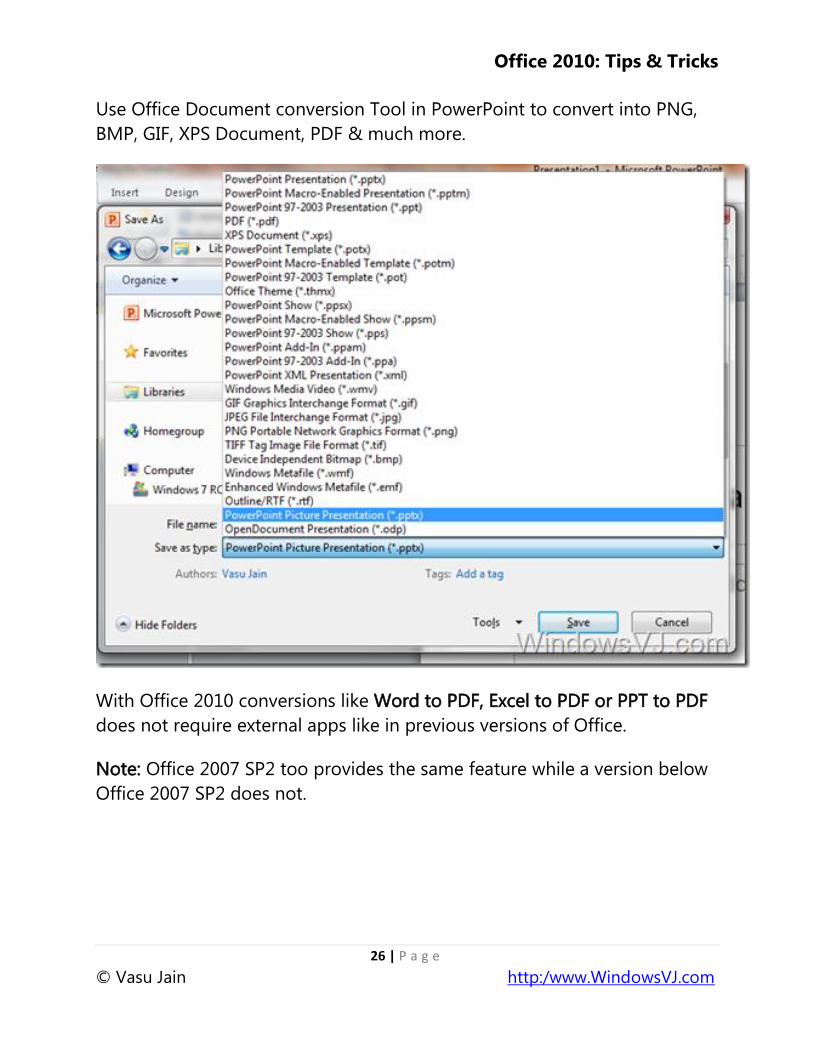
Use Office Document conversion Tool in PowerPoint to convert into PNG,
BMP, GIF, XPS Document, PDF & much more.
With Office 2010 conversions like Word to PDF, Excel to PDF or PPT to PDF
does not require external apps like in previous versions of Office.
Note: Office 2007 SP2 too provides the same feature while a version below
Office 2007 SP2 does not.
Office 2010: Tips & Tricks
27 | P a g e
© Vasu Jain http:/www.WindowsVJ.com
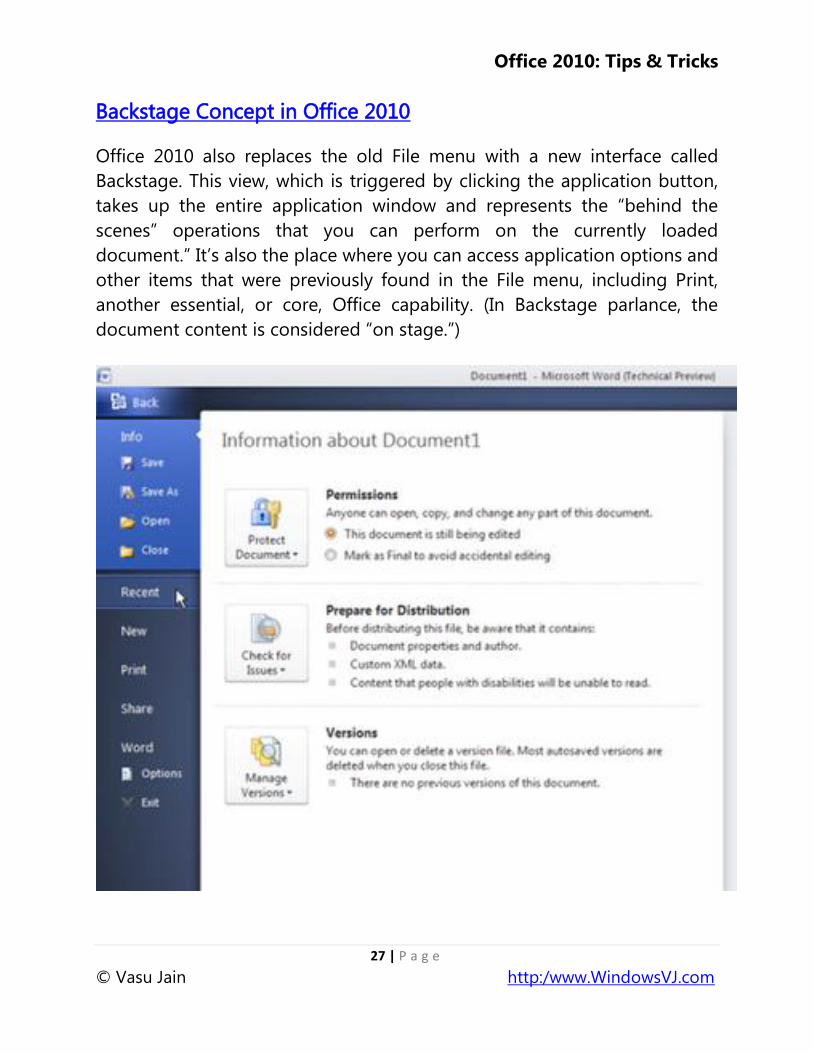
Backstage Concept in Office 2010
Office 2010 also replaces the old File menu with a new interface called
Backstage. This view, which is triggered by clicking the application button,
takes up the entire application window and represents the ―behind the
scenes‖ operations that you can perform on the currently loaded
document.‖ It‘s also the place where you can access application options and
other items that were previously found in the File menu, including Print,
another essential, or core, Office capability. (In Backstage parlance, the
document content is considered ―on stage.‖)

Office 2010: Tips & Tricks
28 | P a g e
© Vasu Jain http:/www.WindowsVJ.com
Backstage in Excel
Backstage in PowerPoint
Office 2010: Tips & Tricks
29 | P a g e
© Vasu Jain http:/www.WindowsVJ.com
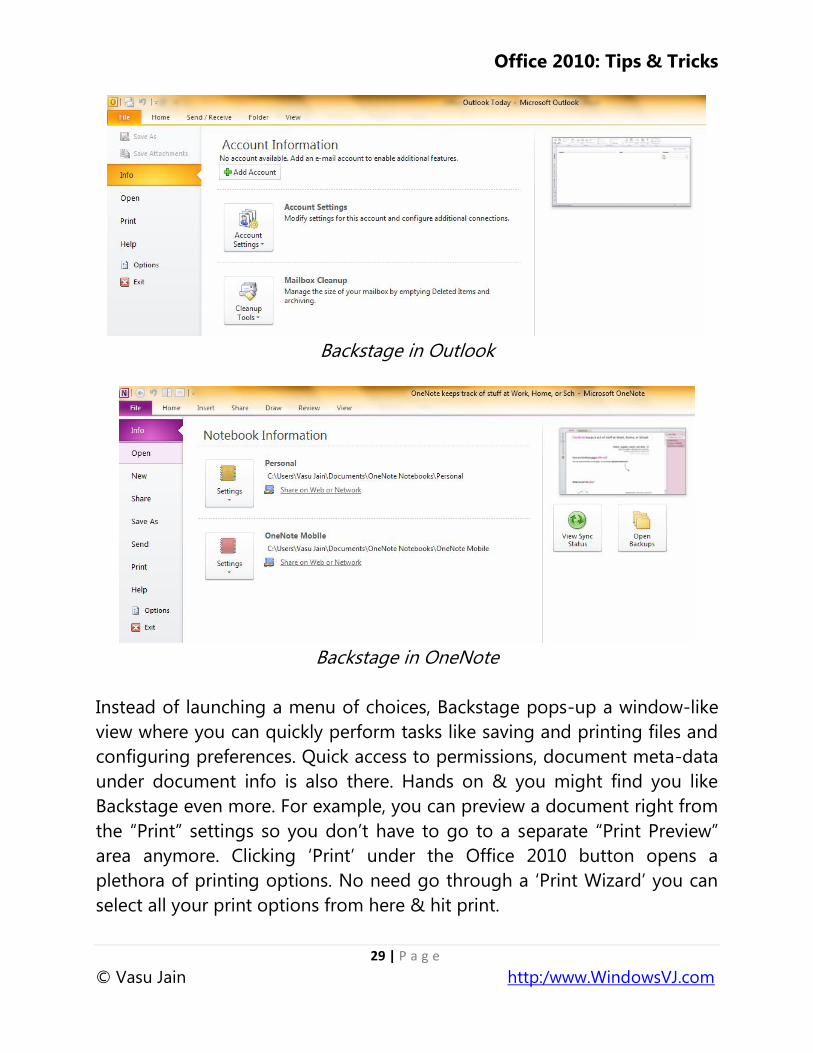
Backstage in Outlook
Backstage in OneNote
Instead of launching a menu of choices, Backstage pops-up a window-like
view where you can quickly perform tasks like saving and printing files and
configuring preferences. Quick access to permissions, document meta-data
under document info is also there. Hands on & you might find you like
Backstage even more. For example, you can preview a document right from
the ―Print‖ settings so you don‘t have to go to a separate ―Print Preview‖
area anymore. Clicking ‗Print‘ under the Office 2010 button opens a
plethora of printing options. No need go through a ‗Print Wizard‘ you can
select all your print options from here & hit print.
Office 2010: Tips & Tricks
30 | P a g e
© Vasu Jain http:/www.WindowsVJ.com
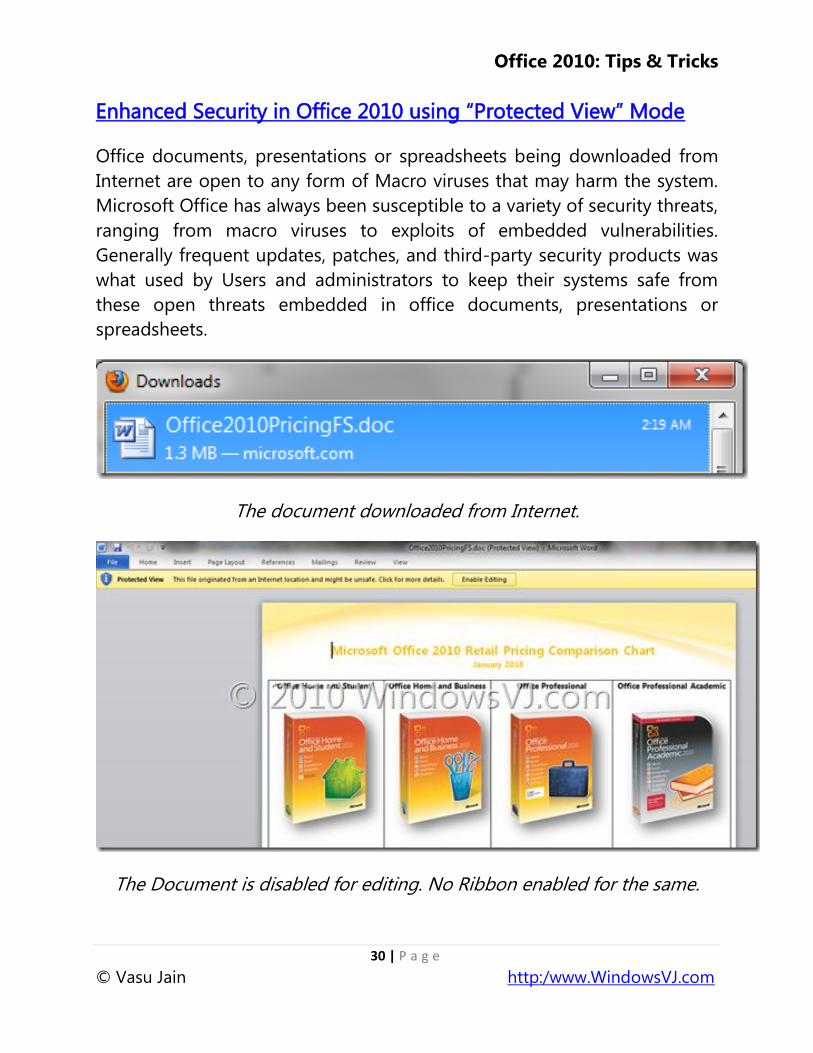
Enhanced Security in Office 2010 using ―Protected View‖ Mode
Office documents, presentations or spreadsheets being downloaded from
Internet are open to any form of Macro viruses that may harm the system.
Microsoft Office has always been susceptible to a variety of security threats,
ranging from macro viruses to exploits of embedded vulnerabilities.
Generally frequent updates, patches, and third-party security products was
what used by Users and administrators to keep their systems safe from
these open threats embedded in office documents, presentations or
spreadsheets.
The document downloaded from Internet.
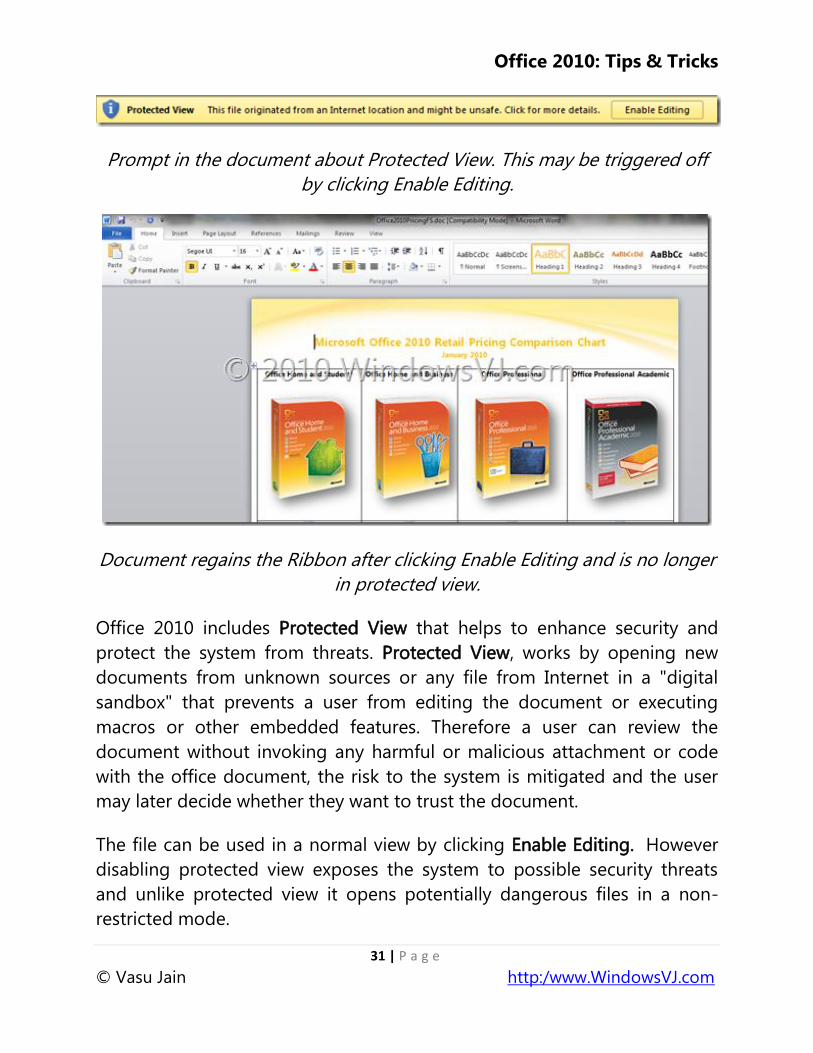
The Document is disabled for editing. No Ribbon enabled for the same.
Office 2010: Tips & Tricks
31 | P a g e
© Vasu Jain http:/www.WindowsVJ.com
Prompt in the document about Protected View. This may be triggered off
by clicking Enable Editing.
Document regains the Ribbon after clicking Enable Editing and is no longer
in protected view.
Office 2010 includes Protected View that helps to enhance security and
protect the system from threats. Protected View, works by opening new
documents from unknown sources or any file from Internet in a "digital
sandbox" that prevents a user from editing the document or executing
macros or other embedded features. Therefore a user can review the
document without invoking any harmful or malicious attachment or code
with the office document, the risk to the system is mitigated and the user
may later decide whether they want to trust the document.
The file can be used in a normal view by clicking Enable Editing. However
disabling protected view exposes the system to possible security threats
and unlike protected view it opens potentially dangerous files in a non-
restricted mode.
Office 2010: Tips & Tricks
32 | P a g e
© Vasu Jain http:/www.WindowsVJ.com
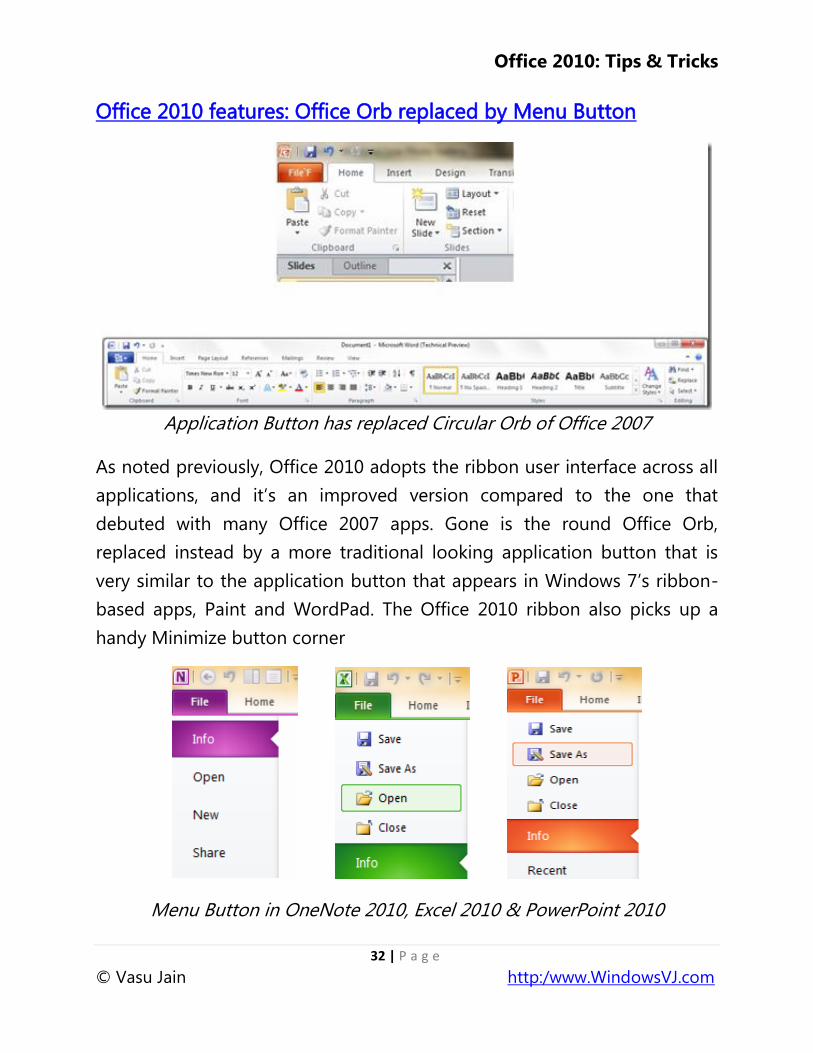
Office 2010 features: Office Orb replaced by Menu Button
Application Button has replaced Circular Orb of Office 2007
As noted previously, Office 2010 adopts the ribbon user interface across all
applications, and it‘s an improved version compared to the one that
debuted with many Office 2007 apps. Gone is the round Office Orb,
replaced instead by a more traditional looking application button that is
very similar to the application button that appears in Windows 7‘s ribbon-
based apps, Paint and WordPad. The Office 2010 ribbon also picks up a
handy Minimize button corner
Menu Button in OneNote 2010, Excel 2010 & PowerPoint 2010
Office 2010: Tips & Tricks
33 | P a g e
© Vasu Jain http:/www.WindowsVJ.com
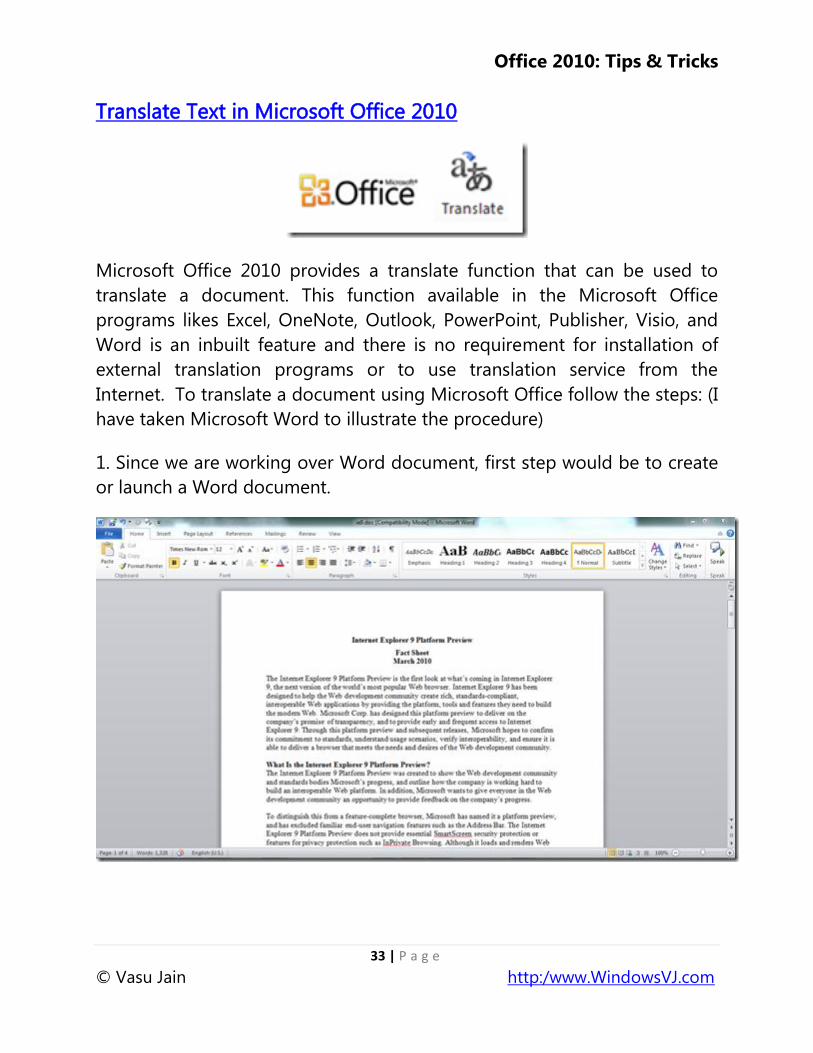
Translate Text in Microsoft Office 2010
Microsoft Office 2010 provides a translate function that can be used to
translate a document. This function available in the Microsoft Office
programs likes Excel, OneNote, Outlook, PowerPoint, Publisher, Visio, and
Word is an inbuilt feature and there is no requirement for installation of
external translation programs or to use translation service from the
Internet. To translate a document using Microsoft Office follow the steps: (I
have taken Microsoft Word to illustrate the procedure)
1. Since we are working over Word document, first step would be to create
or launch a Word document.
Office 2010: Tips & Tricks
34 | P a g e
© Vasu Jain http:/www.WindowsVJ.com
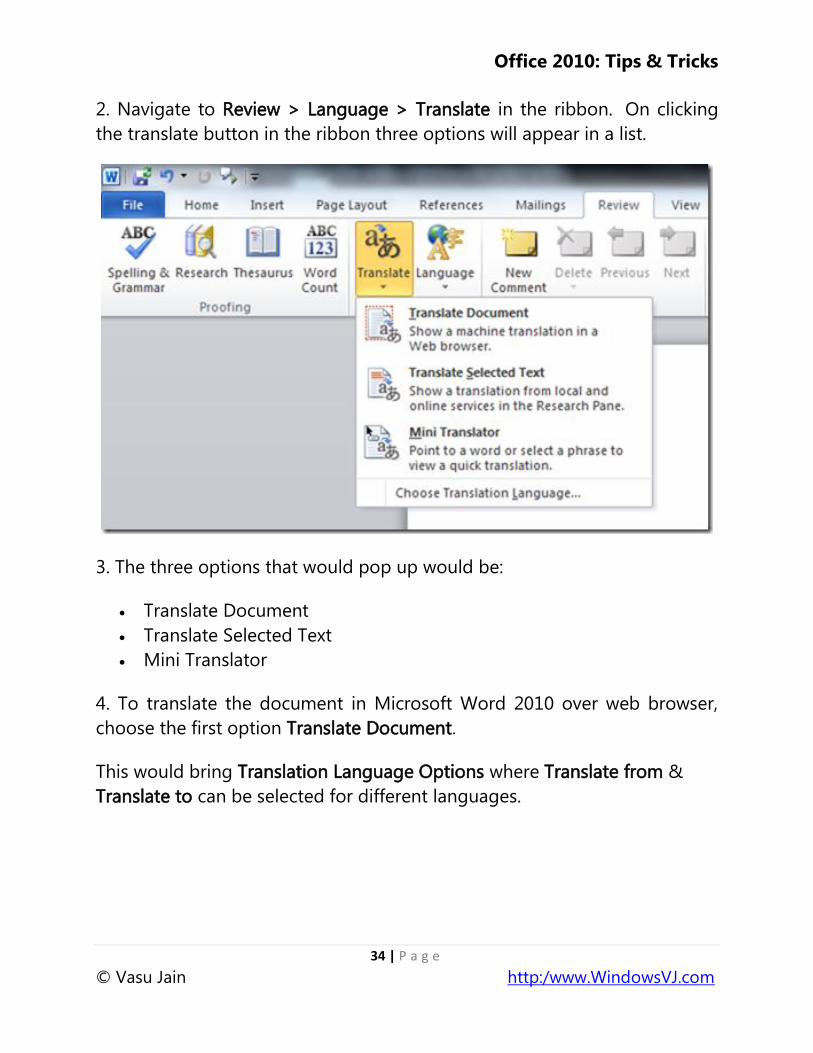
2. Navigate to Review > Language > Translate in the ribbon. On clicking
the translate button in the ribbon three options will appear in a list.
3. The three options that would pop up would be:
Translate Document
Translate Selected Text
Mini Translator
4. To translate the document in Microsoft Word 2010 over web browser,
choose the first option Translate Document.
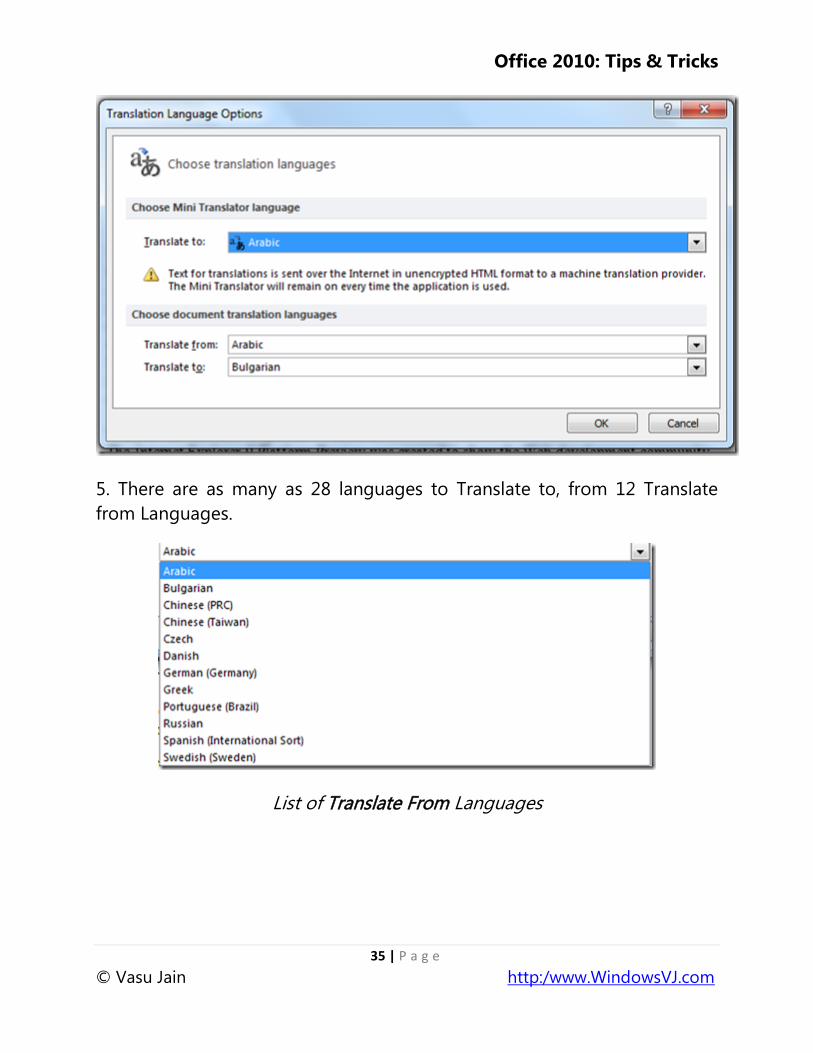
This would bring Translation Language Options where Translate from &
Translate to can be selected for different languages.
Office 2010: Tips & Tricks
35 | P a g e
© Vasu Jain http:/www.WindowsVJ.com
5. There are as many as 28 languages to Translate to, from 12 Translate
from Languages.
List of Translate From Languages
Office 2010: Tips & Tricks
36 | P a g e
© Vasu Jain http:/www.WindowsVJ.com
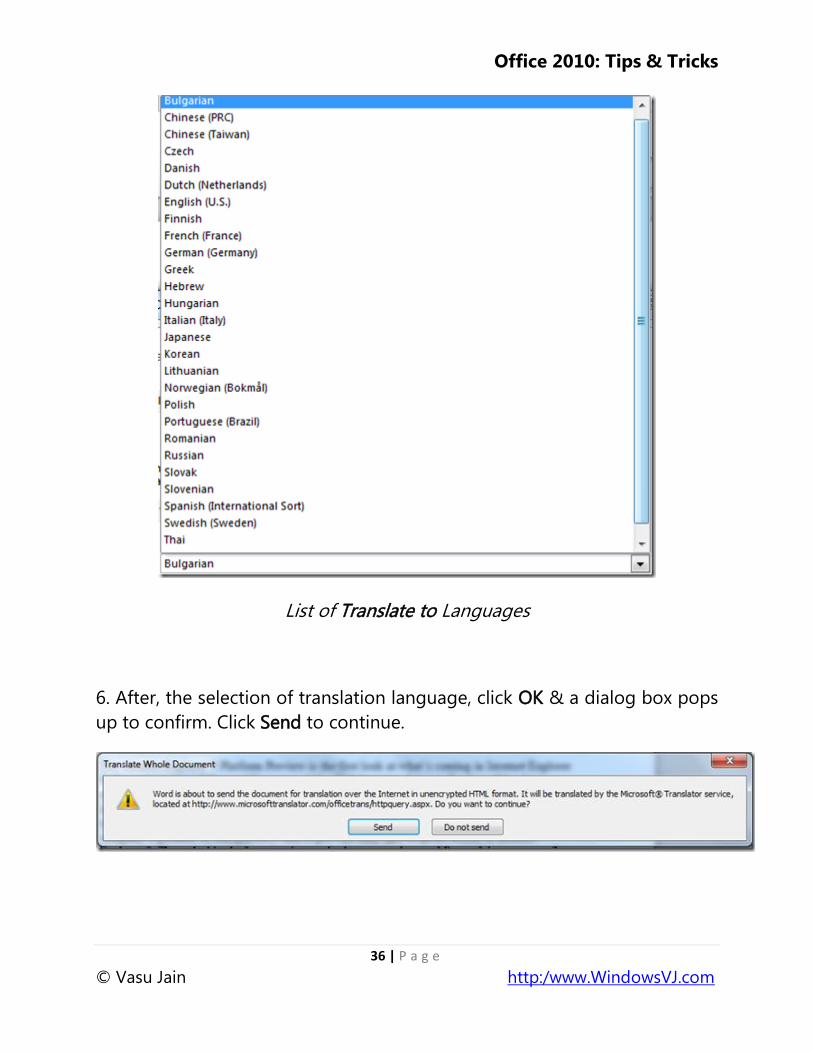
List of Translate to Languages
6. After, the selection of translation language, click OK & a dialog box pops
up to confirm. Click Send to continue.
Office 2010: Tips & Tricks
37 | P a g e
© Vasu Jain http:/www.WindowsVJ.com
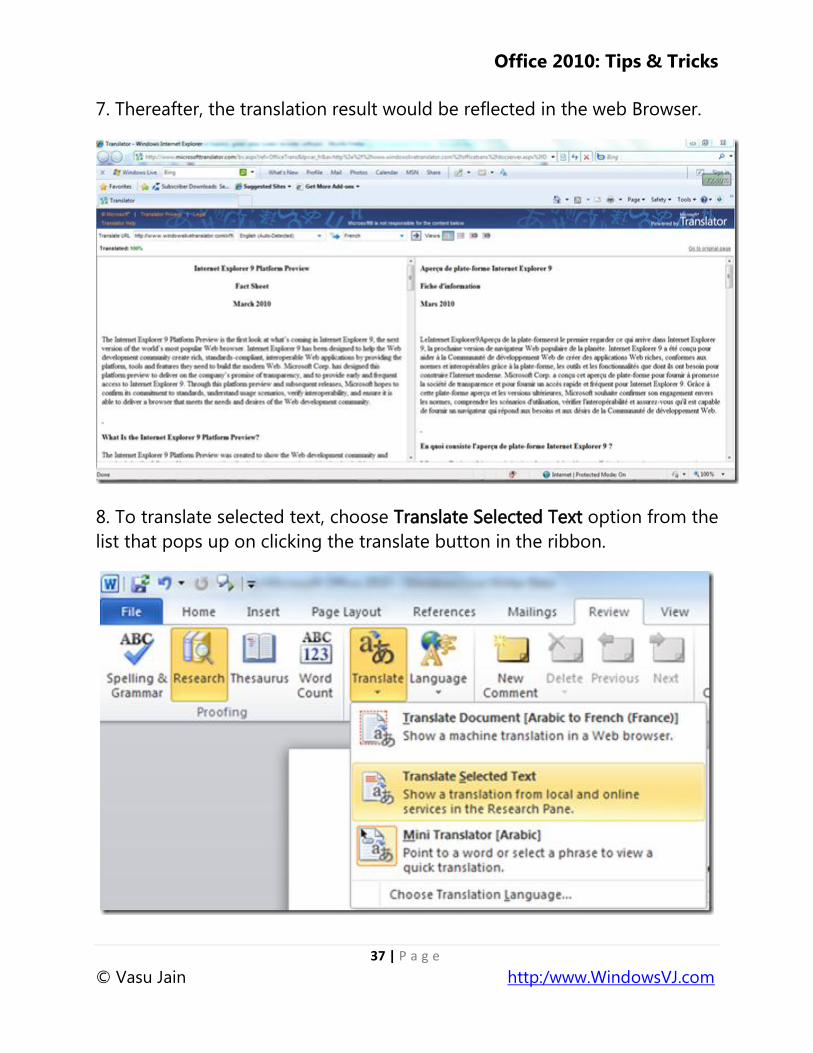
7. Thereafter, the translation result would be reflected in the web Browser.
8. To translate selected text, choose Translate Selected Text option from the
list that pops up on clicking the translate button in the ribbon.
Office 2010: Tips & Tricks
38 | P a g e
© Vasu Jain http:/www.WindowsVJ.com
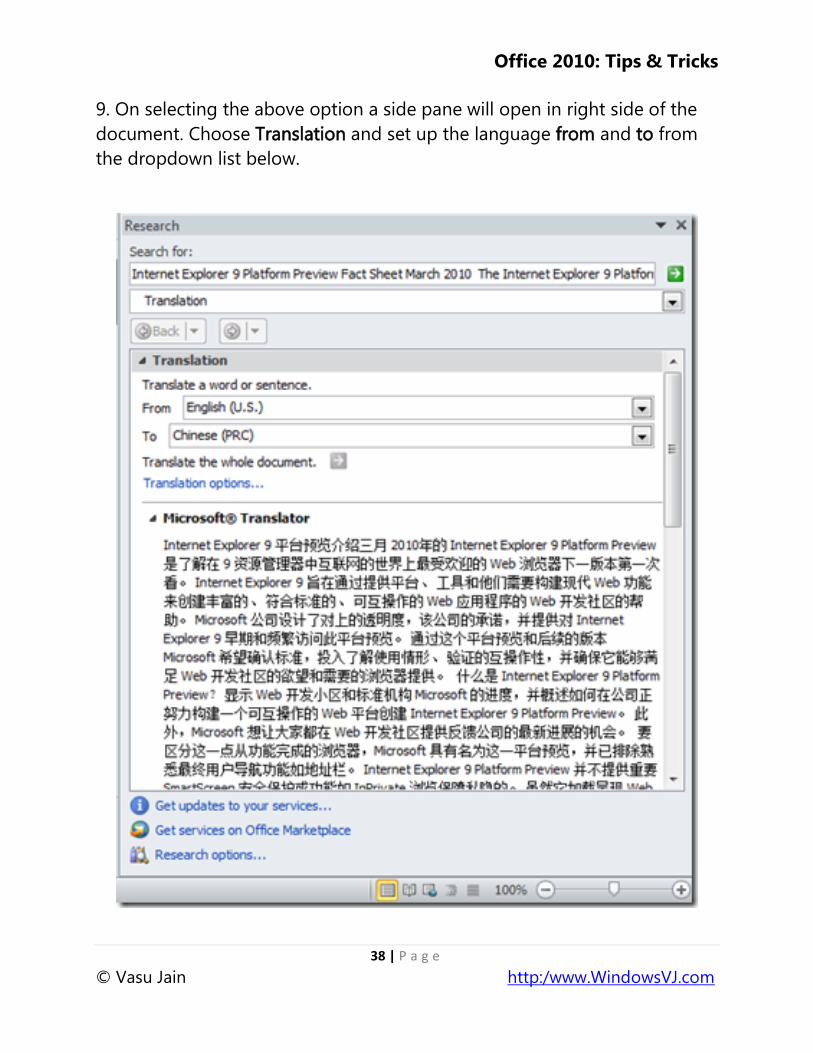
9. On selecting the above option a side pane will open in right side of the
document. Choose Translation and set up the language from and to from
the dropdown list below.
Office 2010: Tips & Tricks
39 | P a g e
© Vasu Jain http:/www.WindowsVJ.com
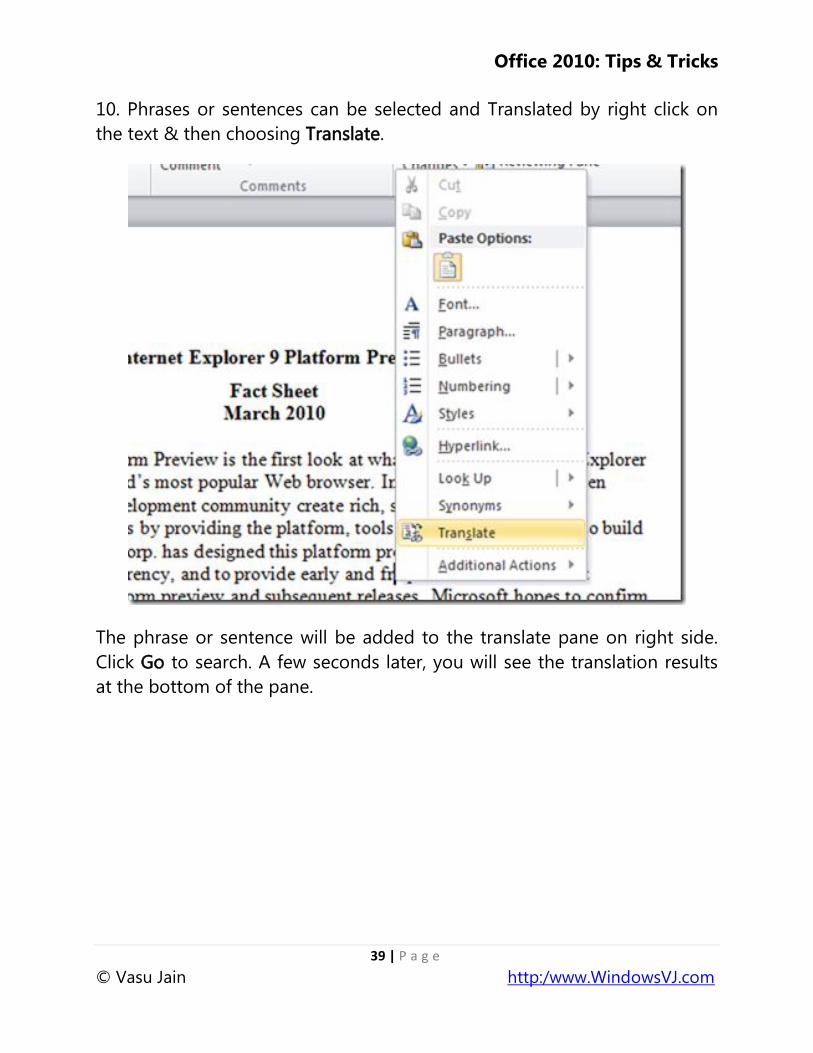
10. Phrases or sentences can be selected and Translated by right click on
the text & then choosing Translate.
The phrase or sentence will be added to the translate pane on right side.
Click Go to search. A few seconds later, you will see the translation results
at the bottom of the pane.
Office 2010: Tips & Tricks
40 | P a g e
© Vasu Jain http:/www.WindowsVJ.com
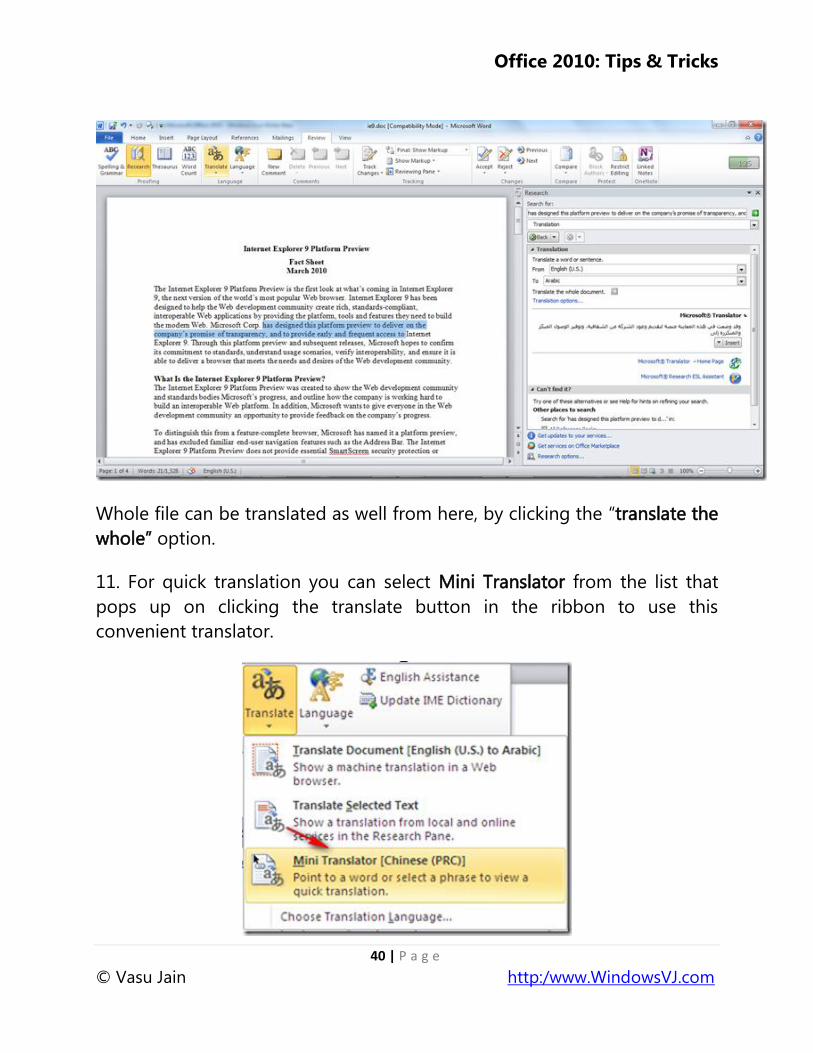
Whole file can be translated as well from here, by clicking the ―translate the
whole‖ option.
11. For quick translation you can select Mini Translator from the list that
pops up on clicking the translate button in the ribbon to use this
convenient translator.

Office 2010: Tips & Tricks
41 | P a g e
© Vasu Jain http:/www.WindowsVJ.com
12. Navigate to the Translation Language Options dialog box & Choose the
to language and click "OK".
Office 2010: Tips & Tricks
42 | P a g e
© Vasu Jain http:/www.WindowsVJ.com
Languages to choose from for Quick Translation
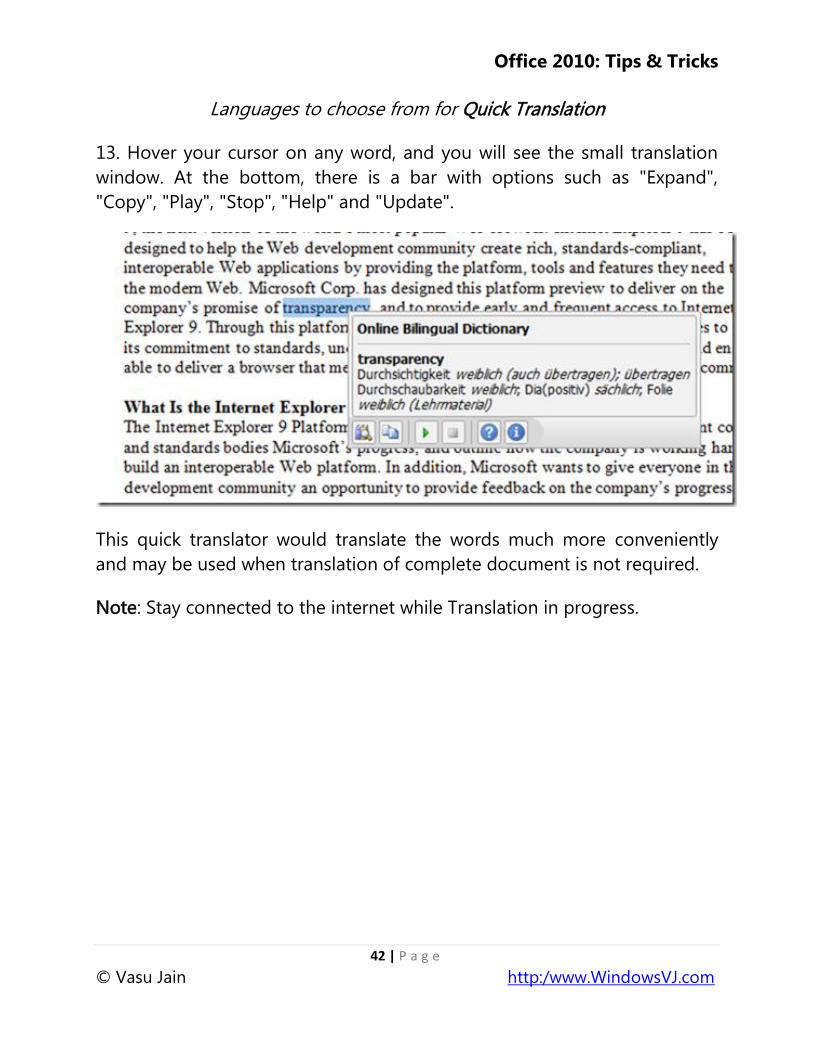
13. Hover your cursor on any word, and you will see the small translation
window. At the bottom, there is a bar with options such as "Expand",
"Copy", "Play", "Stop", "Help" and "Update".
This quick translator would translate the words much more conveniently
and may be used when translation of complete document is not required.
Note: Stay connected to the internet while Translation in progress.
Office 2010: Tips & Tricks
43 | P a g e
© Vasu Jain http:/www.WindowsVJ.com
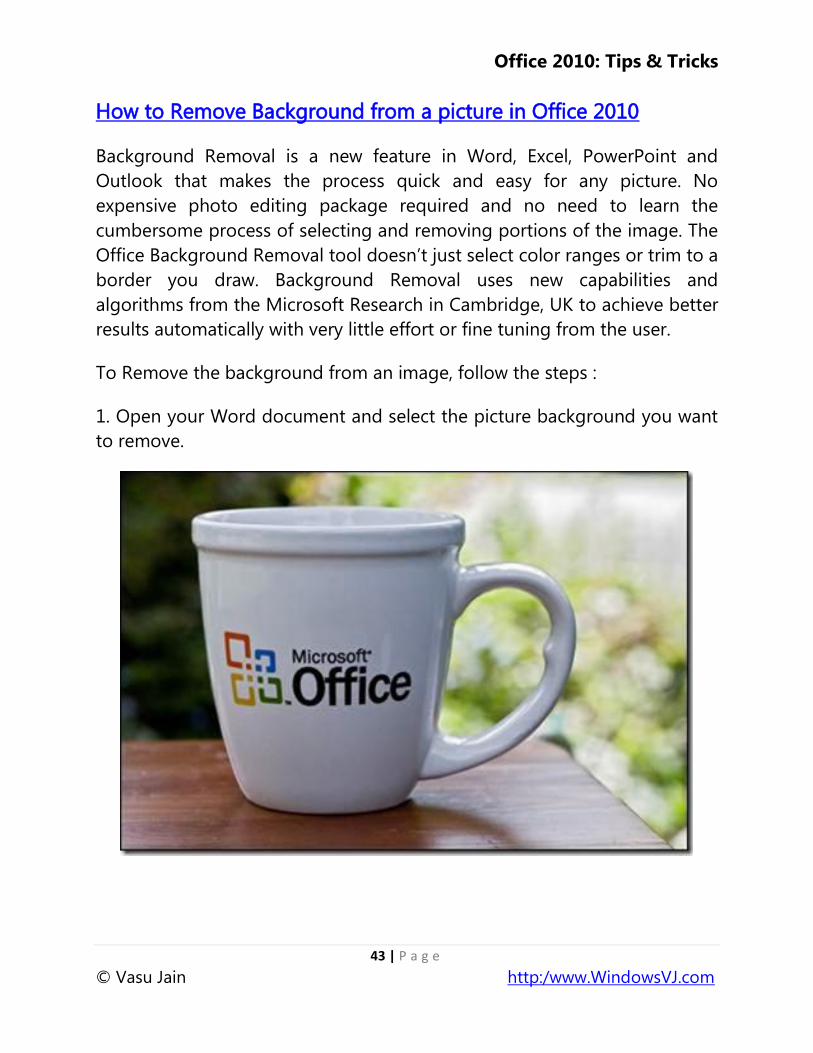
How to Remove Background from a picture in Office 2010
Background Removal is a new feature in Word, Excel, PowerPoint and
Outlook that makes the process quick and easy for any picture. No
expensive photo editing package required and no need to learn the
cumbersome process of selecting and removing portions of the image. The
Office Background Removal tool doesn‘t just select color ranges or trim to a
border you draw. Background Removal uses new capabilities and
algorithms from the Microsoft Research in Cambridge, UK to achieve better
results automatically with very little effort or fine tuning from the user.
To Remove the background from an image, follow the steps :
1. Open your Word document and select the picture background you want
to remove.

Office 2010: Tips & Tricks
44 | P a g e
© Vasu Jain http:/www.WindowsVJ.com
2. Then Navigate to "Picture Tools" tab and click "Format" > "Remove
Background".
3. The moment you click the "Remove Background‖, automatically it trims
the background.
Office 2010: Tips & Tricks
45 | P a g e
© Vasu Jain http:/www.WindowsVJ.com
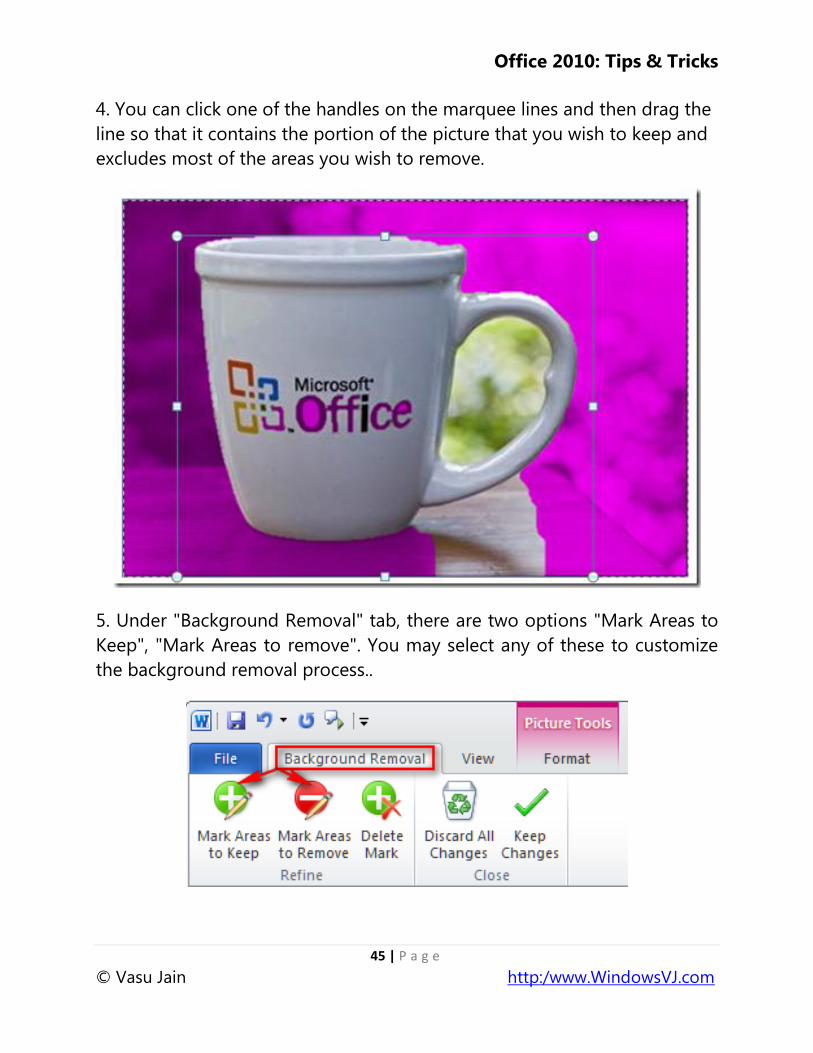
4. You can click one of the handles on the marquee lines and then drag the
line so that it contains the portion of the picture that you wish to keep and
excludes most of the areas you wish to remove.
5. Under "Background Removal" tab, there are two options "Mark Areas to
Keep", "Mark Areas to remove". You may select any of these to customize
the background removal process..
Office 2010: Tips & Tricks
46 | P a g e
© Vasu Jain http:/www.WindowsVJ.com
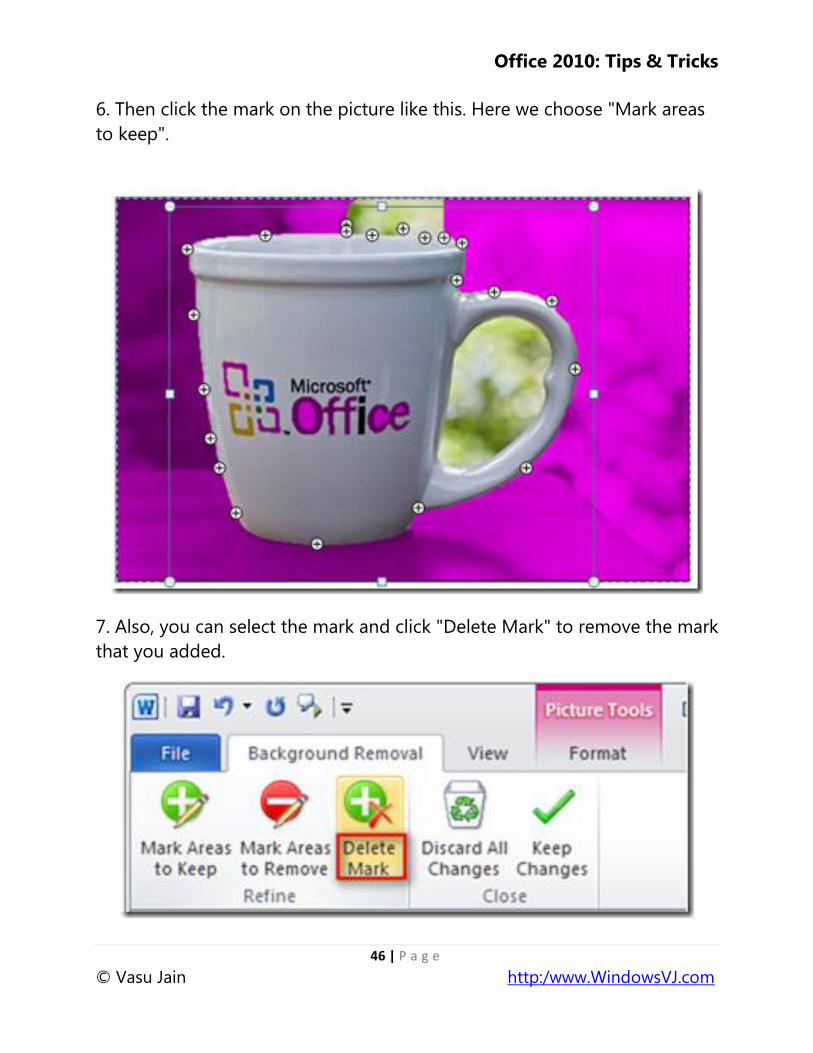
6. Then click the mark on the picture like this. Here we choose "Mark areas
to keep".
7. Also, you can select the mark and click "Delete Mark" to remove the mark
that you added.
Office 2010: Tips & Tricks
47 | P a g e
© Vasu Jain http:/www.WindowsVJ.com
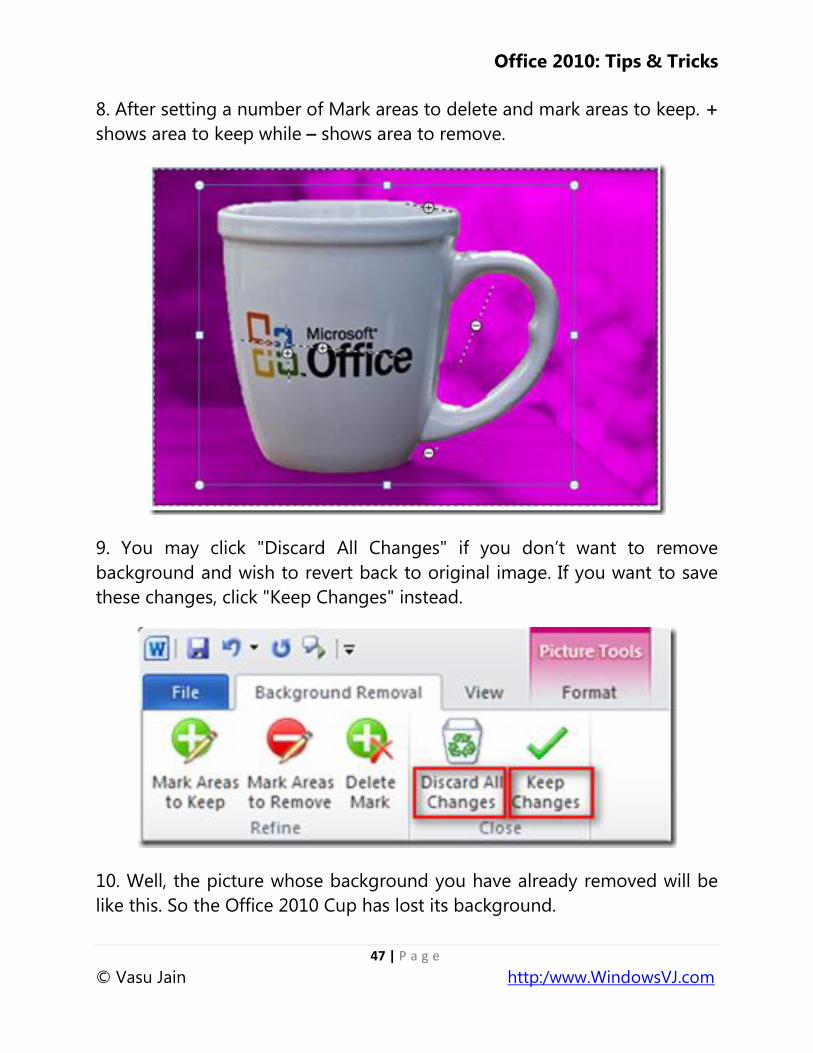
8. After setting a number of Mark areas to delete and mark areas to keep. +
shows area to keep while – shows area to remove.
9. You may click "Discard All Changes" if you don‘t want to remove
background and wish to revert back to original image. If you want to save
these changes, click "Keep Changes" instead.
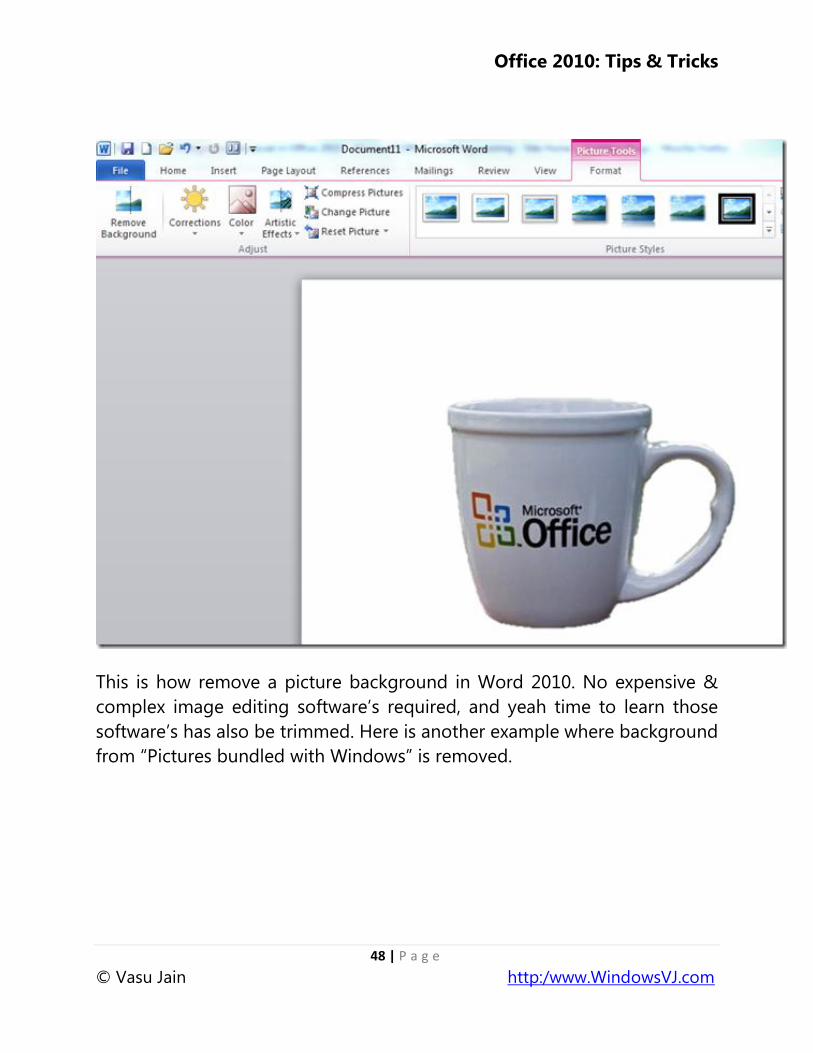
10. Well, the picture whose background you have already removed will be
like this. So the Office 2010 Cup has lost its background.
Office 2010: Tips & Tricks
48 | P a g e
© Vasu Jain http:/www.WindowsVJ.com
This is how remove a picture background in Word 2010. No expensive &
complex image editing software‘s required, and yeah time to learn those
software‘s has also be trimmed. Here is another example where background
from ―Pictures bundled with Windows‖ is removed.
Office 2010: Tips & Tricks
49 | P a g e
© Vasu Jain http:/www.WindowsVJ.com
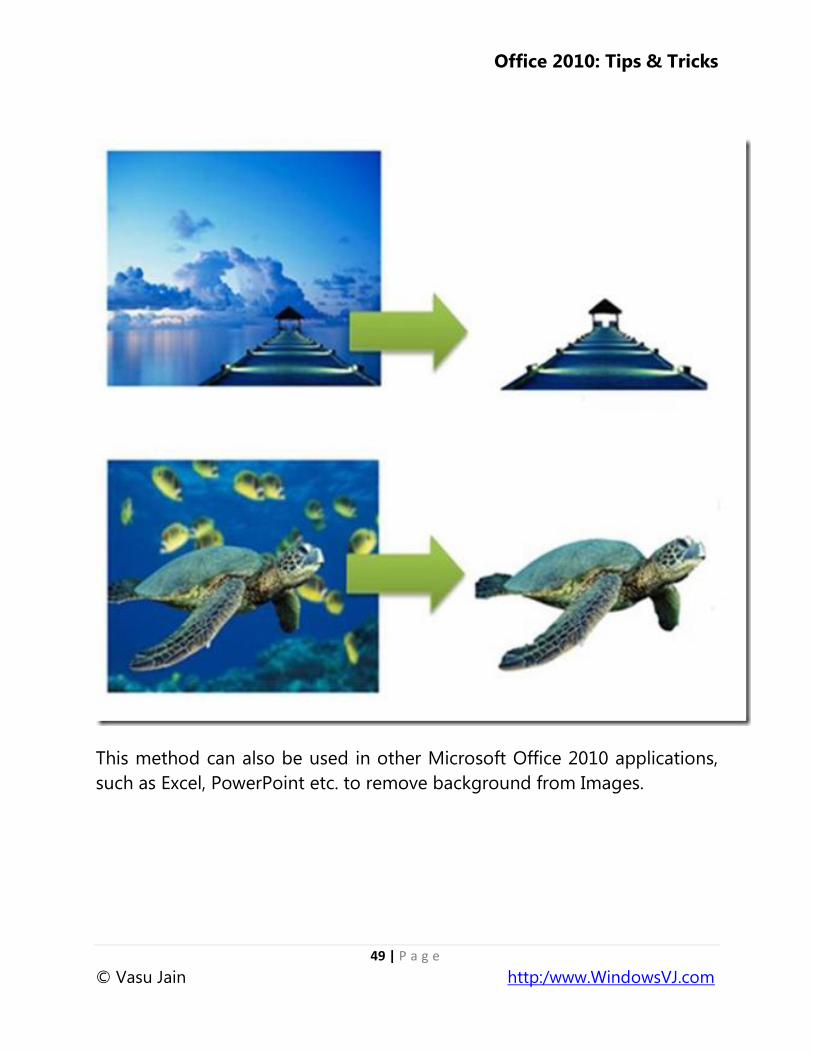
This method can also be used in other Microsoft Office 2010 applications,
such as Excel, PowerPoint etc. to remove background from Images.
Office 2010: Tips & Tricks
50 | P a g e
© Vasu Jain http:/www.WindowsVJ.com

Office 2010: Tips & Tricks
51 | P a g e
© Vasu Jain http:/www.WindowsVJ.com
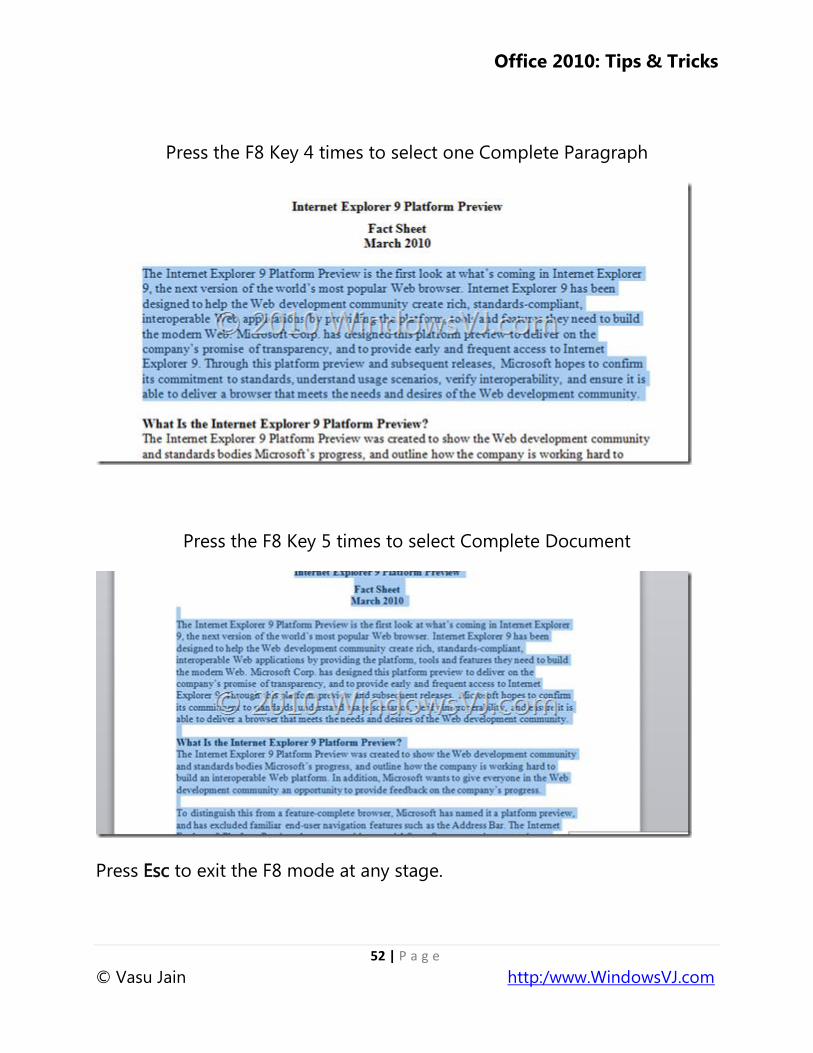
Special text selection using F8 Key in word 2010
Text selection via F8 key gives a different, unique way to select the text in a
data. It encompasses multiple behaviors based on the number of
keystrokes. Pressing it once would take you into this special selection
behavior. Doing it for second time would select one complete word, third
time would select the whole sentence, fourth time, it would select the
whole paragraph, and the fifth time it would select the whole document.
Press the F8 Key 1 time to Initiate Special Copy Mode
Press the F8 Key 2 times to select one Complete Word
Press the F8 Key 3 times to select one Complete Sentence
Office 2010: Tips & Tricks
52 | P a g e
© Vasu Jain http:/www.WindowsVJ.com
Press the F8 Key 4 times to select one Complete Paragraph
Press the F8 Key 5 times to select Complete Document
Press Esc to exit the F8 mode at any stage.
Office 2010: Tips & Tricks
53 | P a g e
© Vasu Jain http:/www.WindowsVJ.com
Make a Blog Post from Word 2010
Bloggers can use Office 2010 to directly make a blog post to their Blog.
Using Word 2010 blogging is as easy as creating a simple document
in Word. To create & publish a blog post via Word 2010 you need to:
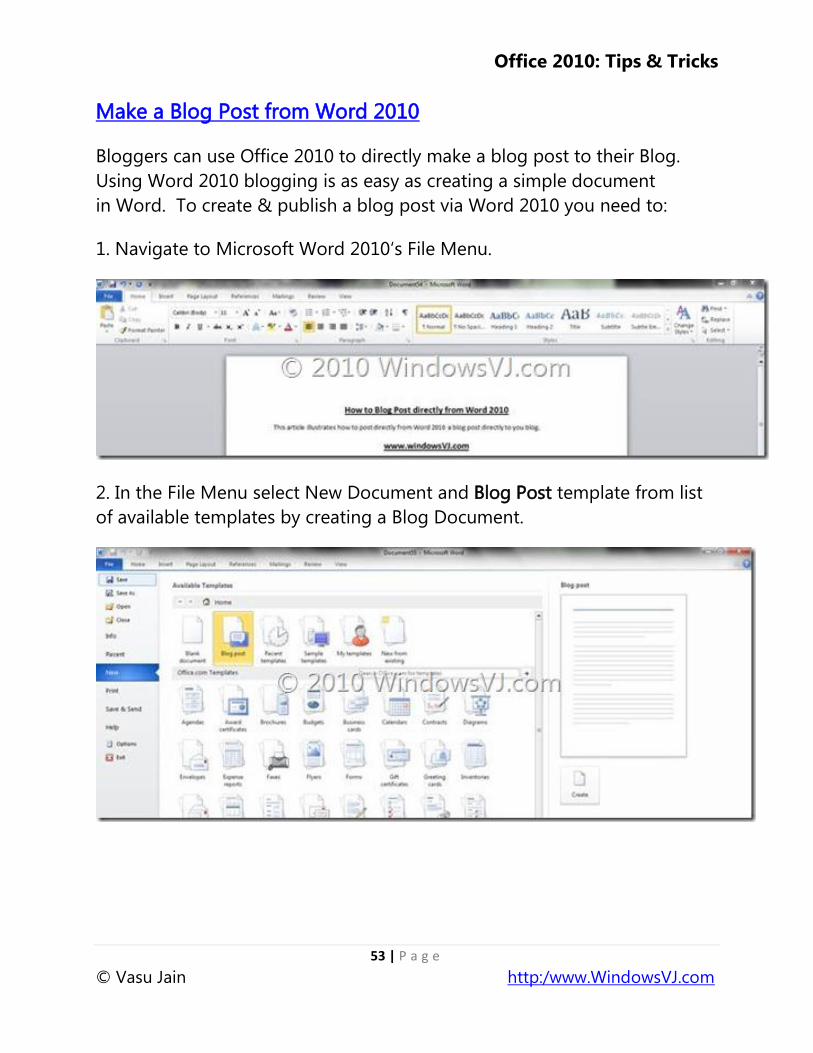
1. Navigate to Microsoft Word 2010‗s File Menu.
2. In the File Menu select New Document and Blog Post template from list
of available templates by creating a Blog Document.
Office 2010: Tips & Tricks
54 | P a g e
© Vasu Jain http:/www.WindowsVJ.com
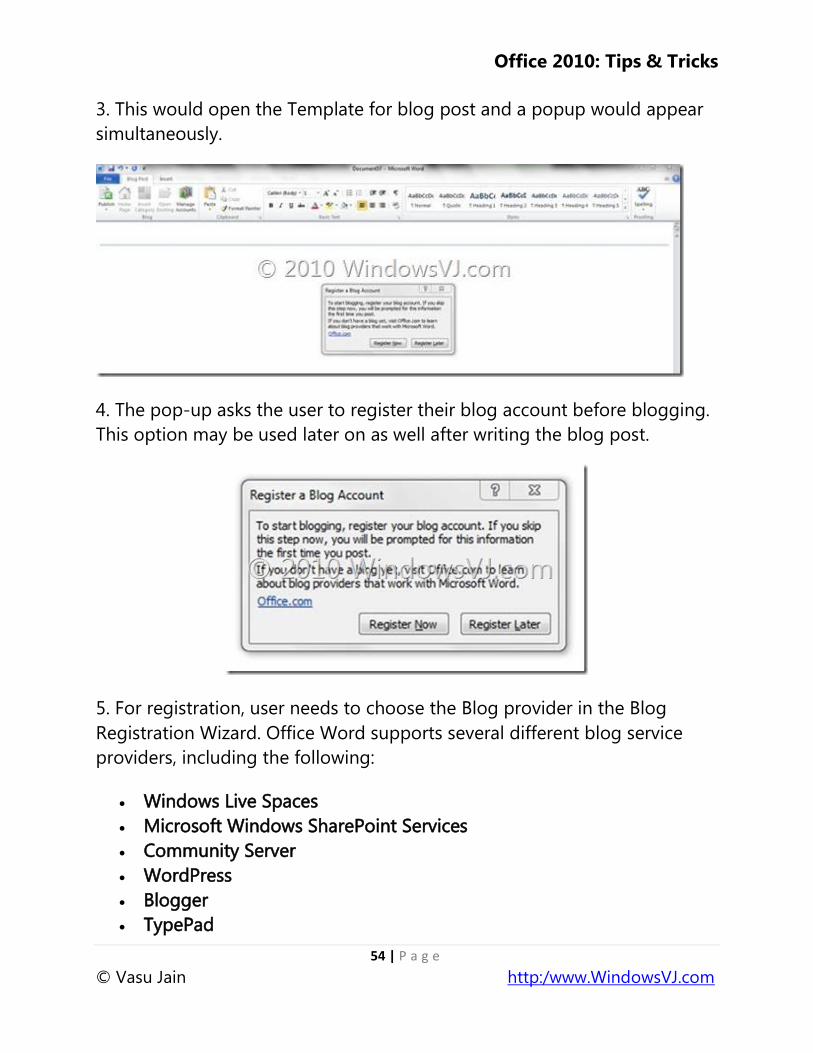
3. This would open the Template for blog post and a popup would appear
simultaneously.
4. The pop-up asks the user to register their blog account before blogging.
This option may be used later on as well after writing the blog post.
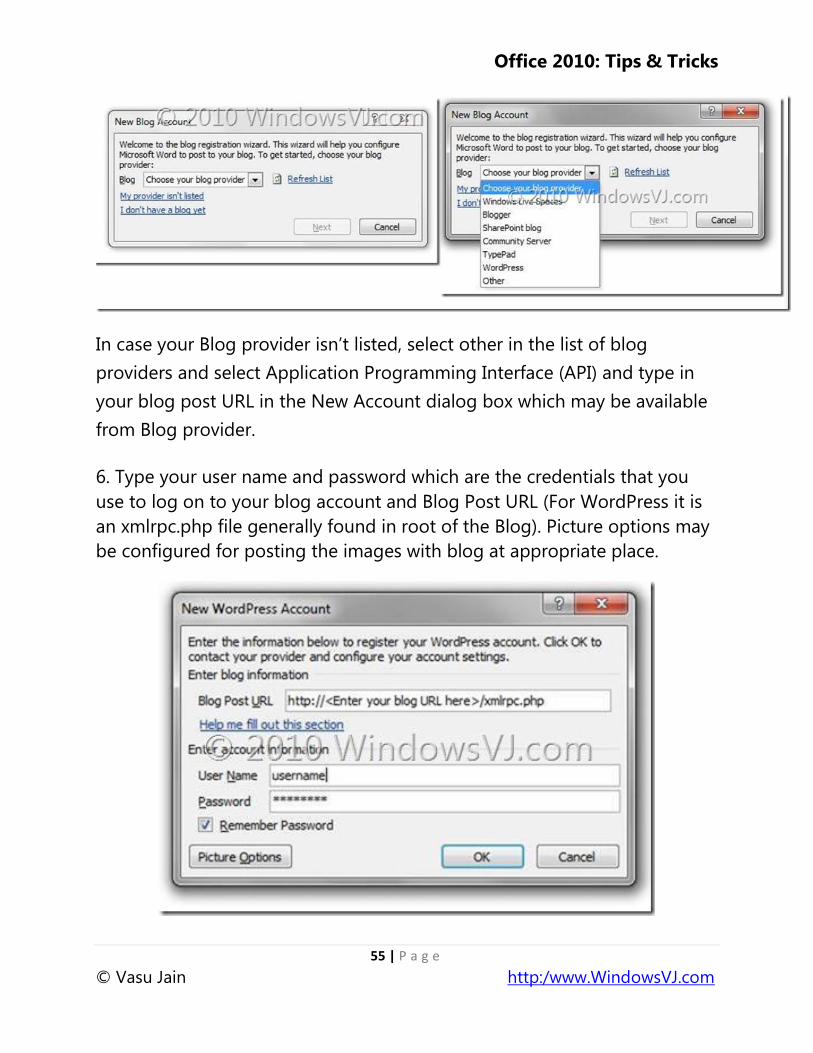
5. For registration, user needs to choose the Blog provider in the Blog
Registration Wizard. Office Word supports several different blog service
providers, including the following:
Windows Live Spaces
Microsoft Windows SharePoint Services
Community Server
WordPress
Blogger
TypePad
Office 2010: Tips & Tricks
55 | P a g e
© Vasu Jain http:/www.WindowsVJ.com
In case your Blog provider isn‘t listed, select other in the list of blog
providers and select Application Programming Interface (API) and type in
your blog post URL in the New Account dialog box which may be available
from Blog provider.
6. Type your user name and password which are the credentials that you
use to log on to your blog account and Blog Post URL (For WordPress it is
an xmlrpc.php file generally found in root of the Blog). Picture options may
be configured for posting the images with blog at appropriate place.
Office 2010: Tips & Tricks
56 | P a g e
© Vasu Jain http:/www.WindowsVJ.com
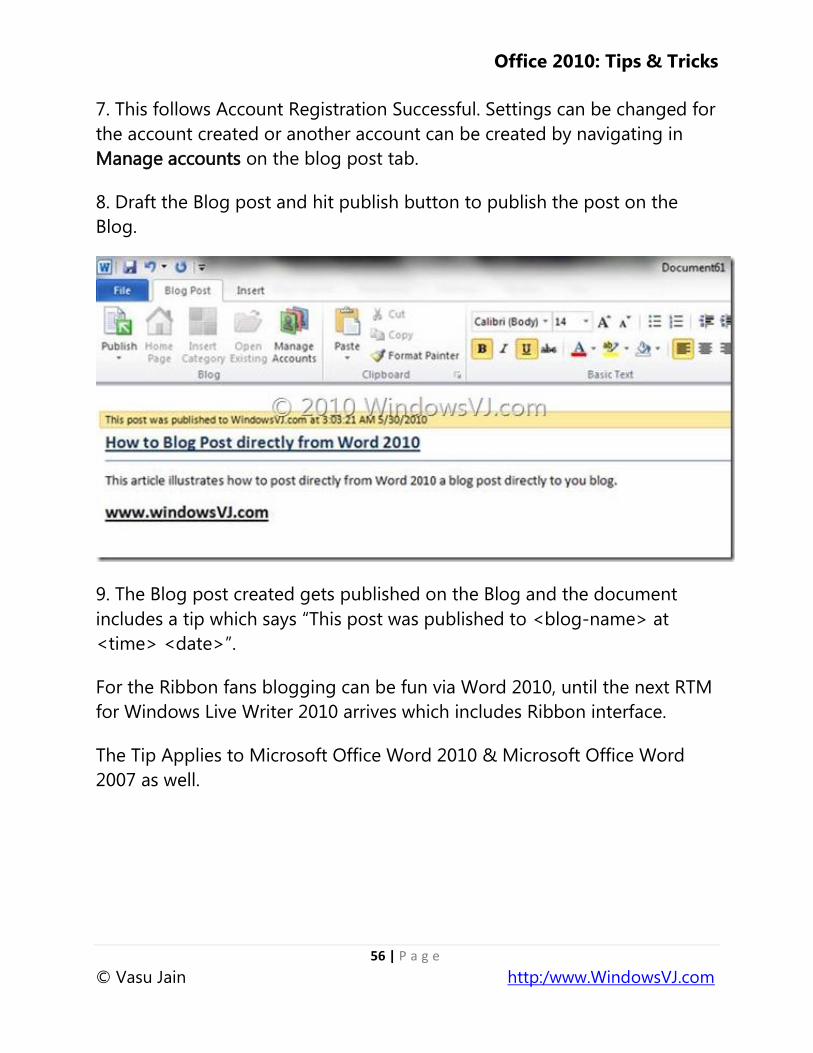
7. This follows Account Registration Successful. Settings can be changed for
the account created or another account can be created by navigating in
Manage accounts on the blog post tab.
8. Draft the Blog post and hit publish button to publish the post on the
Blog.
9. The Blog post created gets published on the Blog and the document
includes a tip which says ―This post was published to <blog-name> at
<time> <date>‖.
For the Ribbon fans blogging can be fun via Word 2010, until the next RTM
for Windows Live Writer 2010 arrives which includes Ribbon interface.
The Tip Applies to Microsoft Office Word 2010 & Microsoft Office Word
2007 as well.
Office 2010: Tips & Tricks
57 | P a g e
© Vasu Jain http:/www.WindowsVJ.com
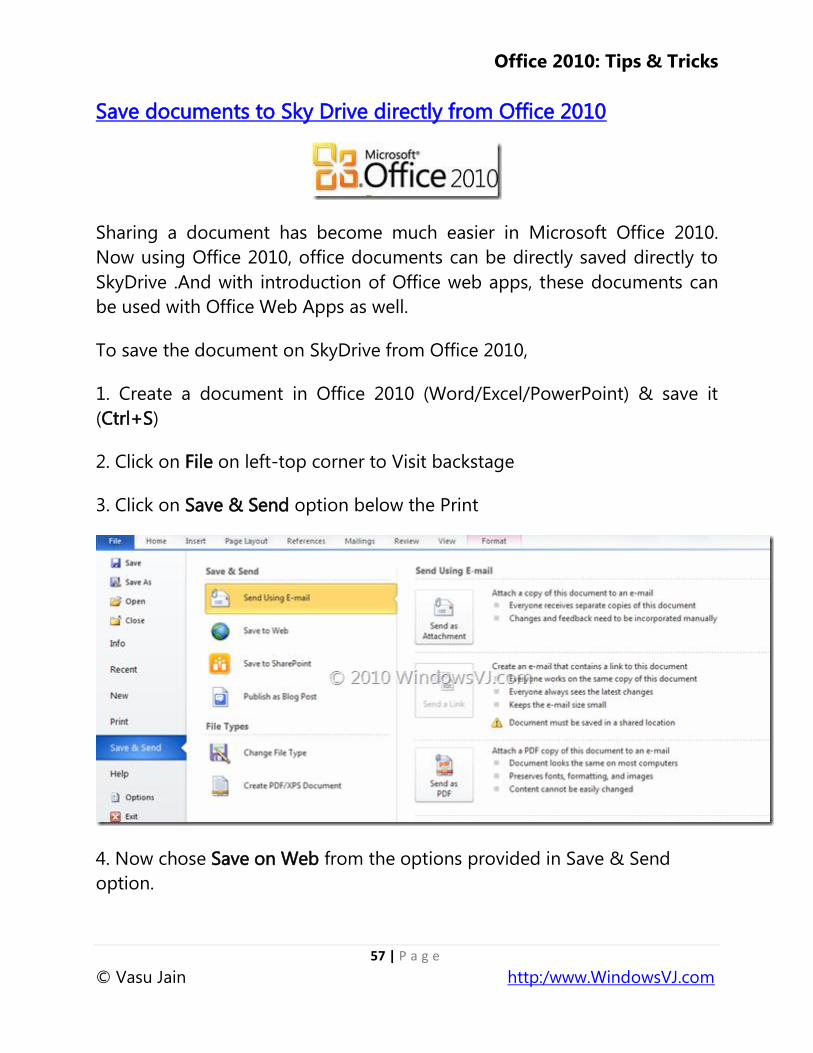
Save documents to Sky Drive directly from Office 2010
Sharing a document has become much easier in Microsoft Office 2010.
Now using Office 2010, office documents can be directly saved directly to
SkyDrive .And with introduction of Office web apps, these documents can
be used with Office Web Apps as well.
To save the document on SkyDrive from Office 2010,
1. Create a document in Office 2010 (Word/Excel/PowerPoint) & save it
(Ctrl+S)
2. Click on File on left-top corner to Visit backstage
3. Click on Save & Send option below the Print
4. Now chose Save on Web from the options provided in Save & Send
option.
Office 2010: Tips & Tricks
58 | P a g e
© Vasu Jain http:/www.WindowsVJ.com
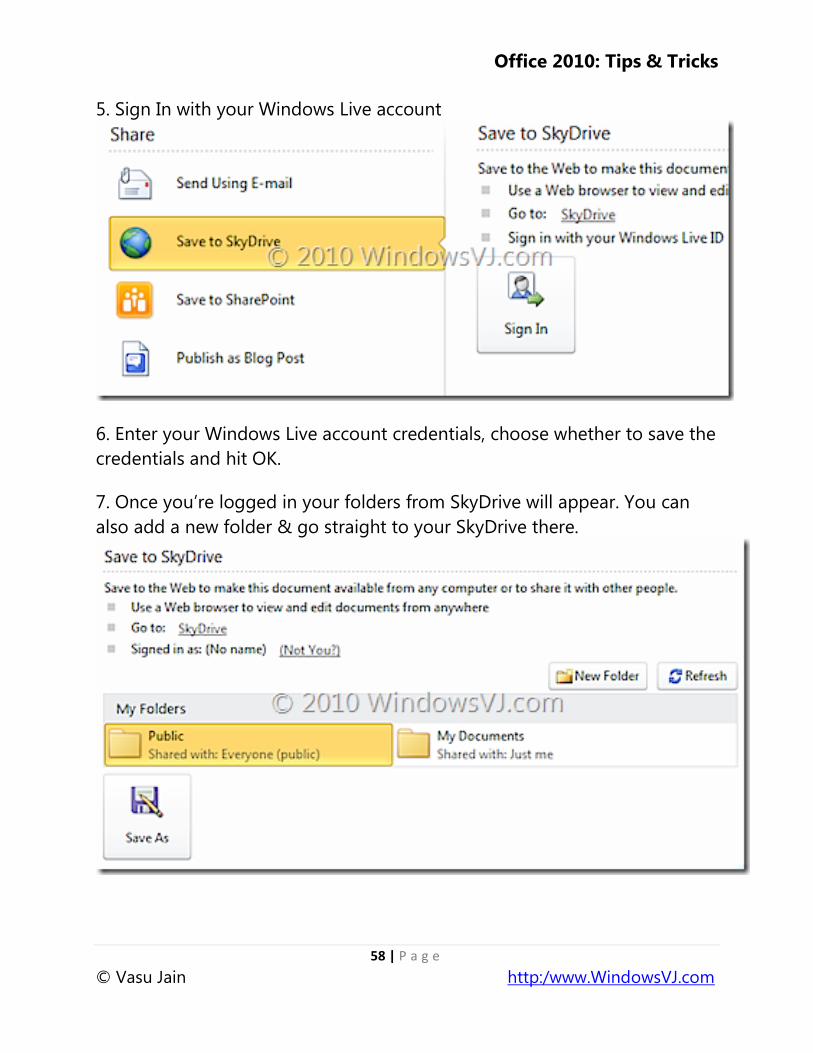
5. Sign In with your Windows Live account
6. Enter your Windows Live account credentials, choose whether to save the
credentials and hit OK.
7. Once you‘re logged in your folders from SkyDrive will appear. You can
also add a new folder & go straight to your SkyDrive there.
Office 2010: Tips & Tricks
59 | P a g e
© Vasu Jain http:/www.WindowsVJ.com
8. Save and upload your document in a folder you wish to save to and click
the Save As button. You can share the document with everyone using
Public Folder or any other folder with that permission.
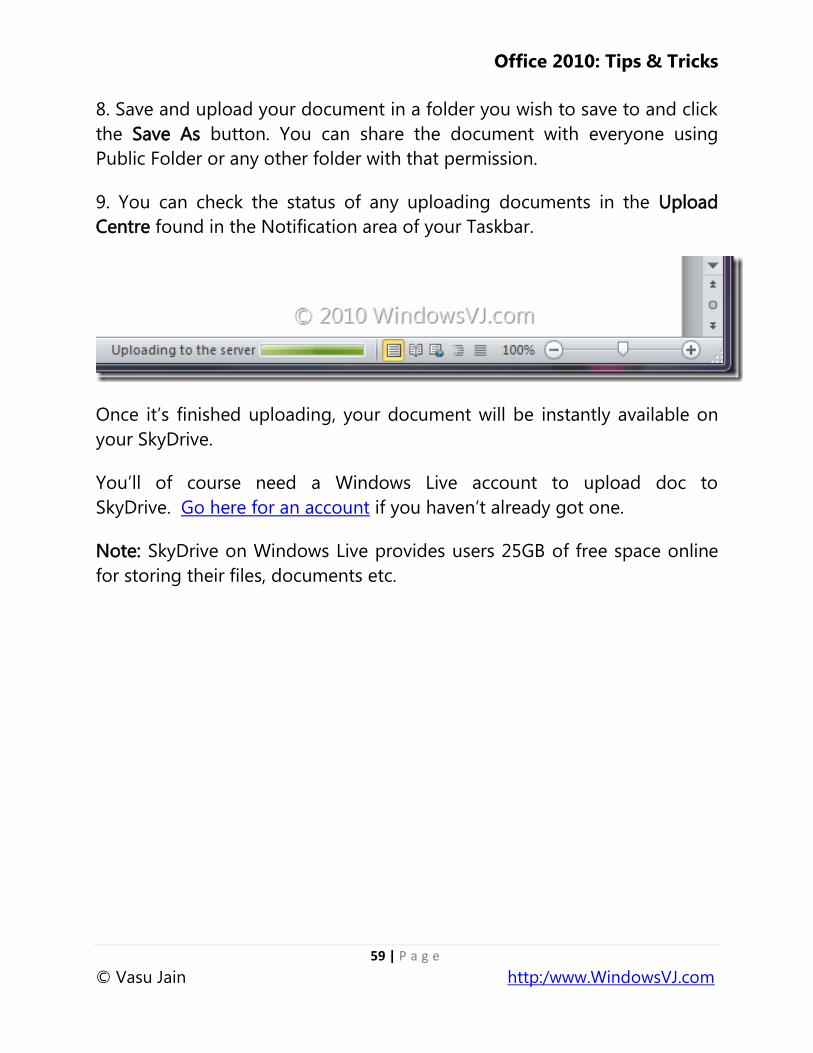
9. You can check the status of any uploading documents in the Upload
Centre found in the Notification area of your Taskbar.
Once it‘s finished uploading, your document will be instantly available on
your SkyDrive.
You‘ll of course need a Windows Live account to upload doc to
SkyDrive. Go here for an account if you haven‘t already got one.
Note: SkyDrive on Windows Live provides users 25GB of free space online
for storing their files, documents etc.
Office 2010: Tips & Tricks
60 | P a g e
© Vasu Jain http:/www.WindowsVJ.com
Improved Search options in Word 2010
Office 2010 users can experience an improved search and navigation
experience in word 2010. Finding information you need is easier and faster
in Word 2010. With the new and improved Find experience, you can now
view a summary of search results in a single pane and click to access any
individual result. The improved Navigation Pane provides you with a visual
outline of your document so you can browse, sort and find what you need
quickly. Just like Inline searching in the Windows file system and in web
browsers, Word and the other Office apps in Office 2010 suite will now
have a next generation document searching instead of a previous-
generation Find dialog.
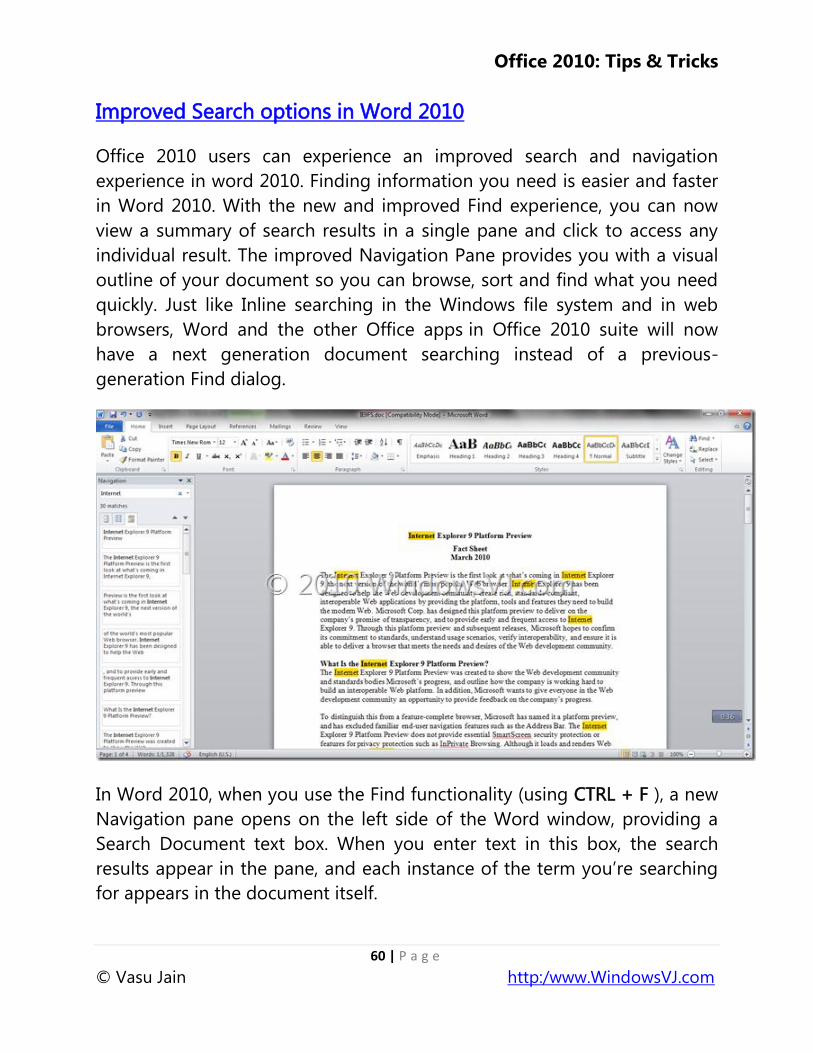
In Word 2010, when you use the Find functionality (using CTRL + F ), a new
Navigation pane opens on the left side of the Word window, providing a
Search Document text box. When you enter text in this box, the search
results appear in the pane, and each instance of the term you‘re searching
for appears in the document itself.
Office 2010: Tips & Tricks
61 | P a g e
© Vasu Jain http:/www.WindowsVJ.com
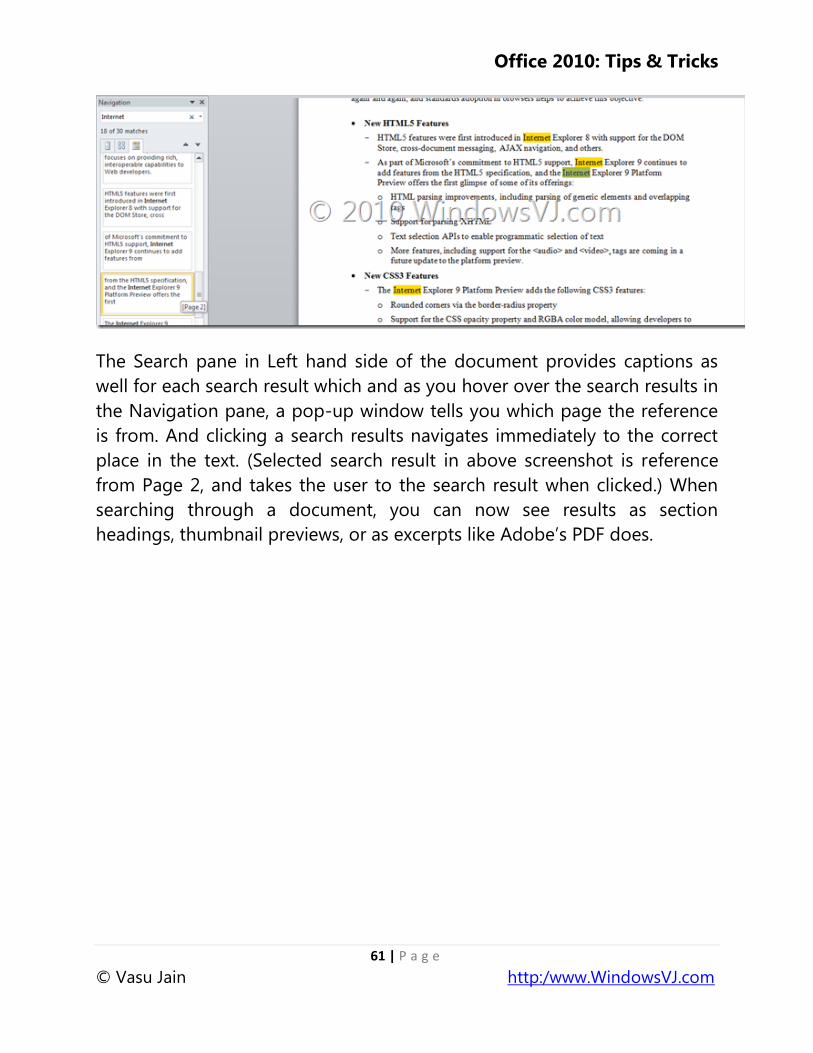
The Search pane in Left hand side of the document provides captions as
well for each search result which and as you hover over the search results in
the Navigation pane, a pop-up window tells you which page the reference
is from. And clicking a search results navigates immediately to the correct
place in the text. (Selected search result in above screenshot is reference
from Page 2, and takes the user to the search result when clicked.) When
searching through a document, you can now see results as section
headings, thumbnail previews, or as excerpts like Adobe‘s PDF does.
Office 2010: Tips & Tricks
62 | P a g e
© Vasu Jain http:/www.WindowsVJ.com
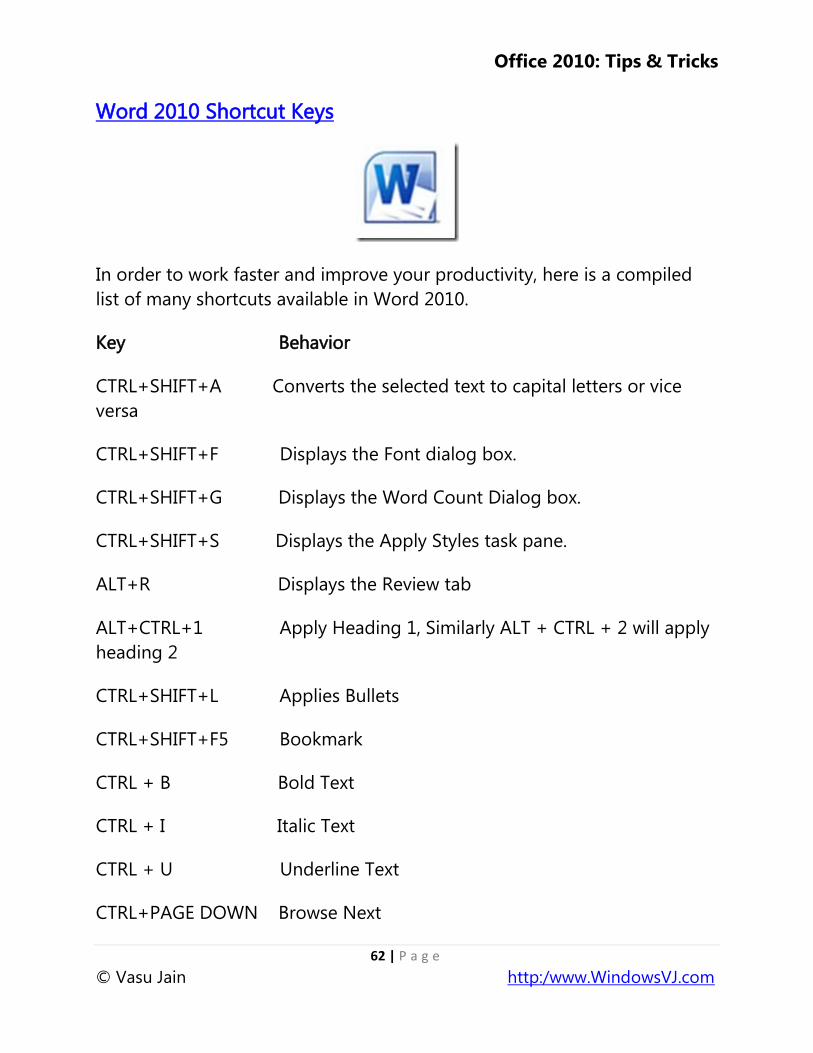
Word 2010 Shortcut Keys
In order to work faster and improve your productivity, here is a compiled
list of many shortcuts available in Word 2010.
Key Behavior
CTRL+SHIFT+A Converts the selected text to capital letters or vice
versa
CTRL+SHIFT+F Displays the Font dialog box.
CTRL+SHIFT+G Displays the Word Count Dialog box.
CTRL+SHIFT+S Displays the Apply Styles task pane.
ALT+R Displays the Review tab
ALT+CTRL+1 Apply Heading 1, Similarly ALT + CTRL + 2 will apply
heading 2
CTRL+SHIFT+L Applies Bullets
CTRL+SHIFT+F5 Bookmark
CTRL + B Bold Text
CTRL + I Italic Text
CTRL + U Underline Text
CTRL+PAGE DOWN Browse Next

Office 2010: Tips & Tricks
63 | P a g e
© Vasu Jain http:/www.WindowsVJ.com
CTRL+E Navigate to the center Paragraph
CTRL+SHIFT+ENTER Column Break
CTRL+SHIFT+C Copy Format
ALT+SHIFT+F7 Dictionary
ALT+CTRL+S Splits the Document
CTRL+SHIFT+D Double Underline
CTRL+END End of Document
END End of line
CTRL+SHIFT+P Font size select
SHIFT+F5 Go Back to previous state
ALT+CTRL+Z Go Back to previous state
CTRL+SHIFT+. Grow Font
CTRL+] Grow Font one point
ALT+SHIFT+R Header Footer Link
CTRL+K Hyperlink
CTRL+M Indentation
CTRL+J Justifies Paragraph
ALT+F8 Inserts Macros
ALT+SHIFT+K Mail Merge Check
Office 2010: Tips & Tricks
64 | P a g e
© Vasu Jain http:/www.WindowsVJ.com
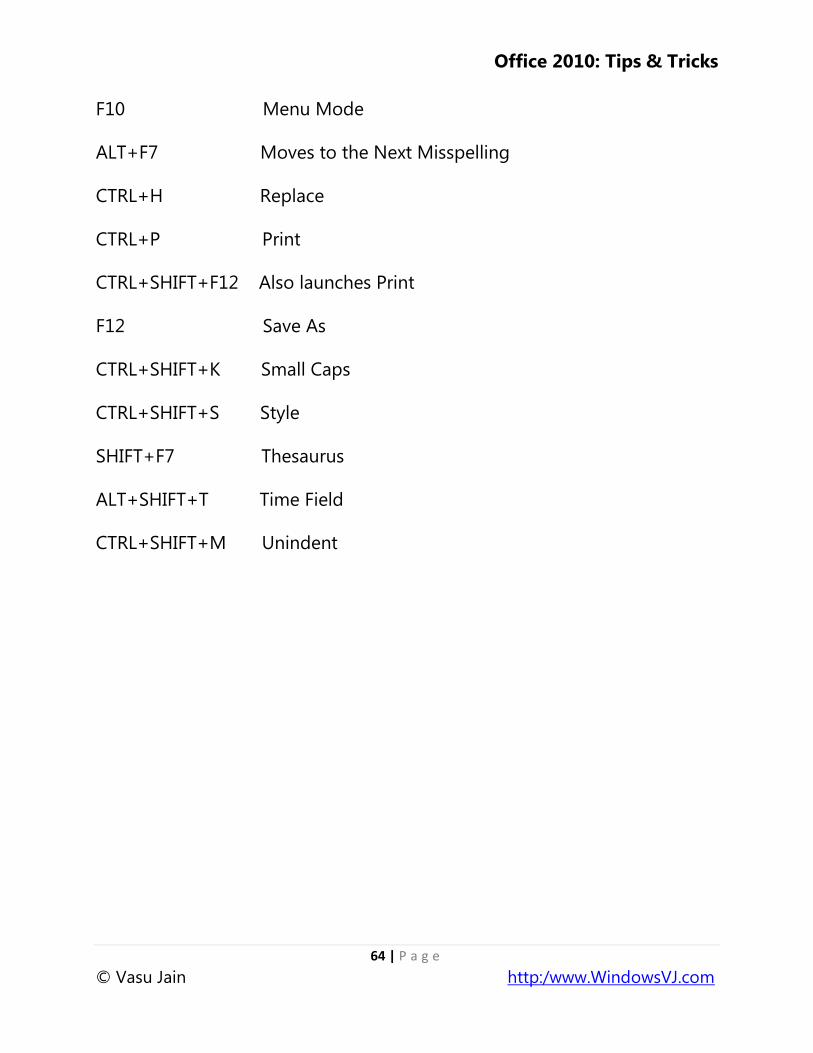
F10 Menu Mode
ALT+F7 Moves to the Next Misspelling
CTRL+H Replace
CTRL+P Print
CTRL+SHIFT+F12 Also launches Print
F12 Save As
CTRL+SHIFT+K Small Caps
CTRL+SHIFT+S Style
SHIFT+F7 Thesaurus
ALT+SHIFT+T Time Field
CTRL+SHIFT+M Unindent
Office 2010: Tips & Tricks
65 | P a g e
© Vasu Jain http:/www.WindowsVJ.com
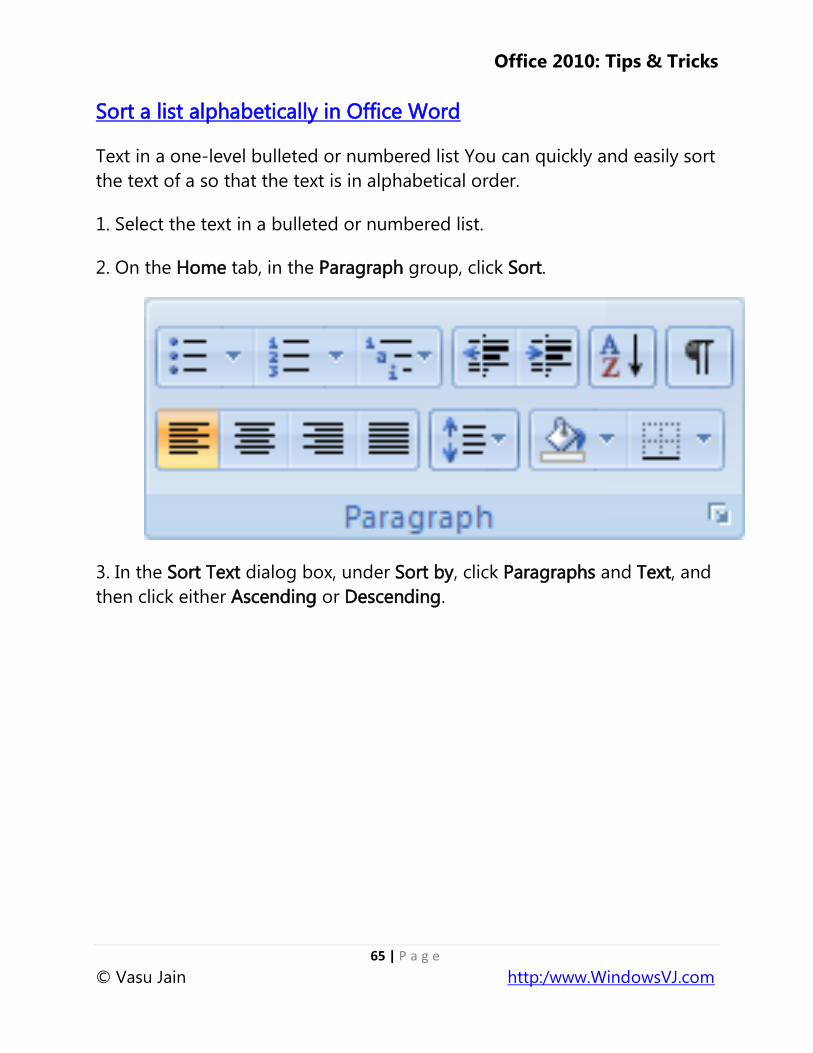
Sort a list alphabetically in Office Word
Text in a one-level bulleted or numbered list You can quickly and easily sort
the text of a so that the text is in alphabetical order.
1. Select the text in a bulleted or numbered list.
2. On the Home tab, in the Paragraph group, click Sort.
3. In the Sort Text dialog box, under Sort by, click Paragraphs and Text, and
then click either Ascending or Descending.
Office 2010: Tips & Tricks
66 | P a g e
© Vasu Jain http:/www.WindowsVJ.com
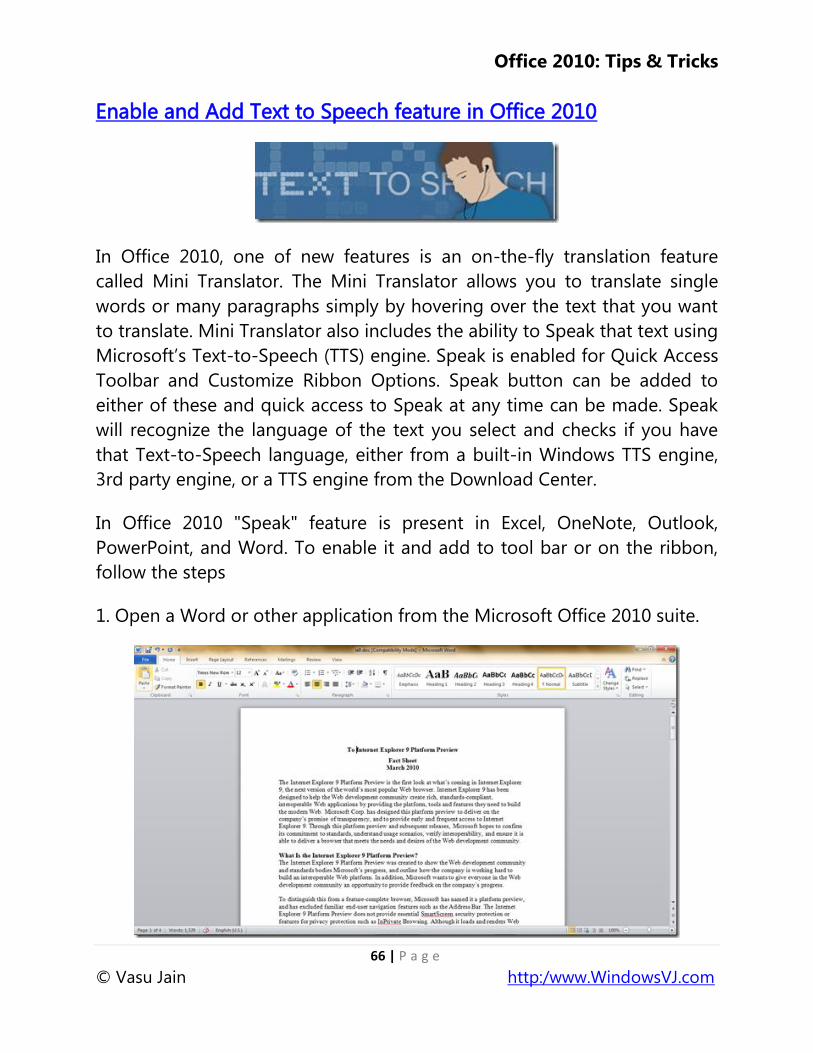
Enable and Add Text to Speech feature in Office 2010
In Office 2010, one of new features is an on-the-fly translation feature
called Mini Translator. The Mini Translator allows you to translate single
words or many paragraphs simply by hovering over the text that you want
to translate. Mini Translator also includes the ability to Speak that text using
Microsoft‘s Text-to-Speech (TTS) engine. Speak is enabled for Quick Access
Toolbar and Customize Ribbon Options. Speak button can be added to
either of these and quick access to Speak at any time can be made. Speak
will recognize the language of the text you select and checks if you have
that Text-to-Speech language, either from a built-in Windows TTS engine,
3rd party engine, or a TTS engine from the Download Center.
In Office 2010 "Speak" feature is present in Excel, OneNote, Outlook,
PowerPoint, and Word. To enable it and add to tool bar or on the ribbon,
follow the steps
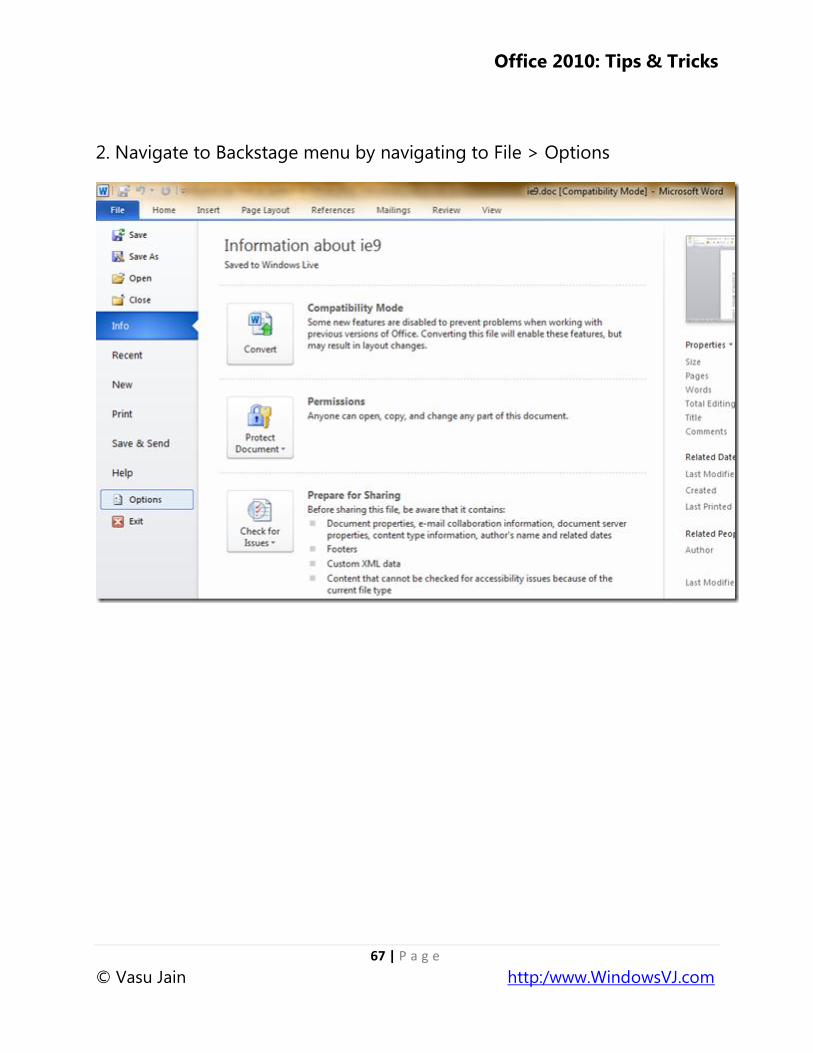
1. Open a Word or other application from the Microsoft Office 2010 suite.
Office 2010: Tips & Tricks
67 | P a g e
© Vasu Jain http:/www.WindowsVJ.com
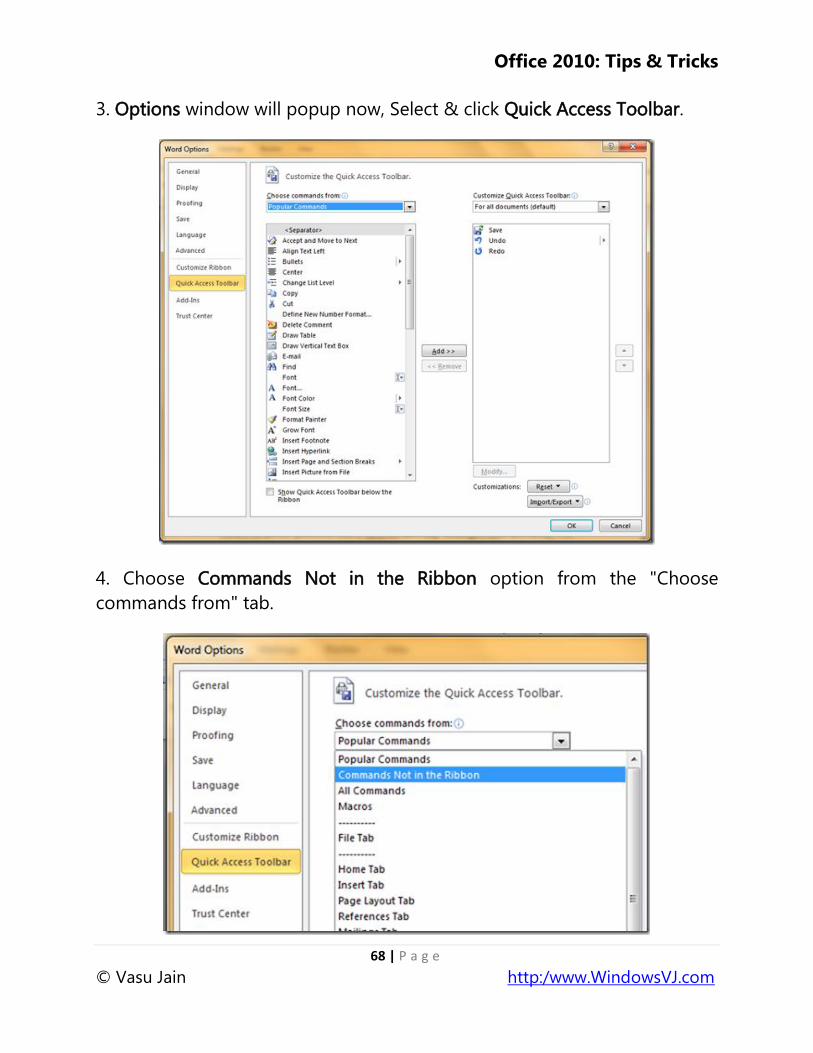
2. Navigate to Backstage menu by navigating to File > Options
Office 2010: Tips & Tricks
68 | P a g e
© Vasu Jain http:/www.WindowsVJ.com
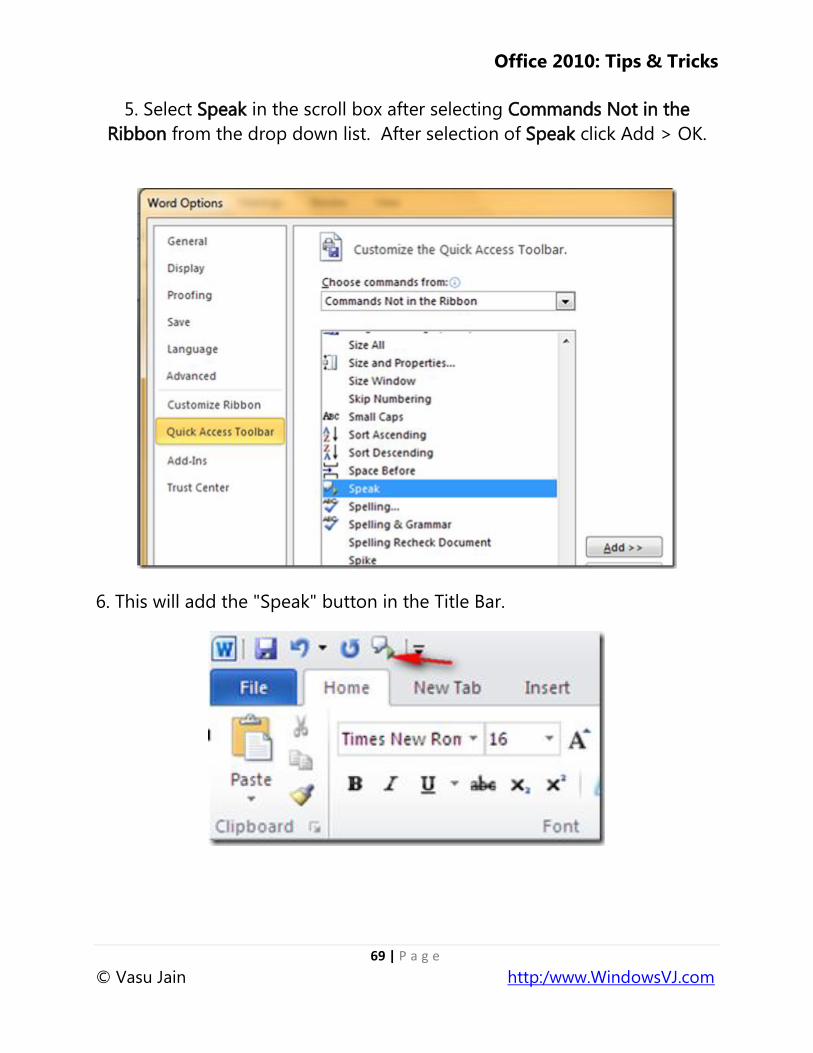
3. Options window will popup now, Select & click Quick Access Toolbar.
4. Choose Commands Not in the Ribbon option from the "Choose
commands from" tab.
Office 2010: Tips & Tricks
69 | P a g e
© Vasu Jain http:/www.WindowsVJ.com
5. Select Speak in the scroll box after selecting Commands Not in the
Ribbon from the drop down list. After selection of Speak click Add > OK.
6. This will add the "Speak" button in the Title Bar.
Office 2010: Tips & Tricks
70 | P a g e
© Vasu Jain http:/www.WindowsVJ.com
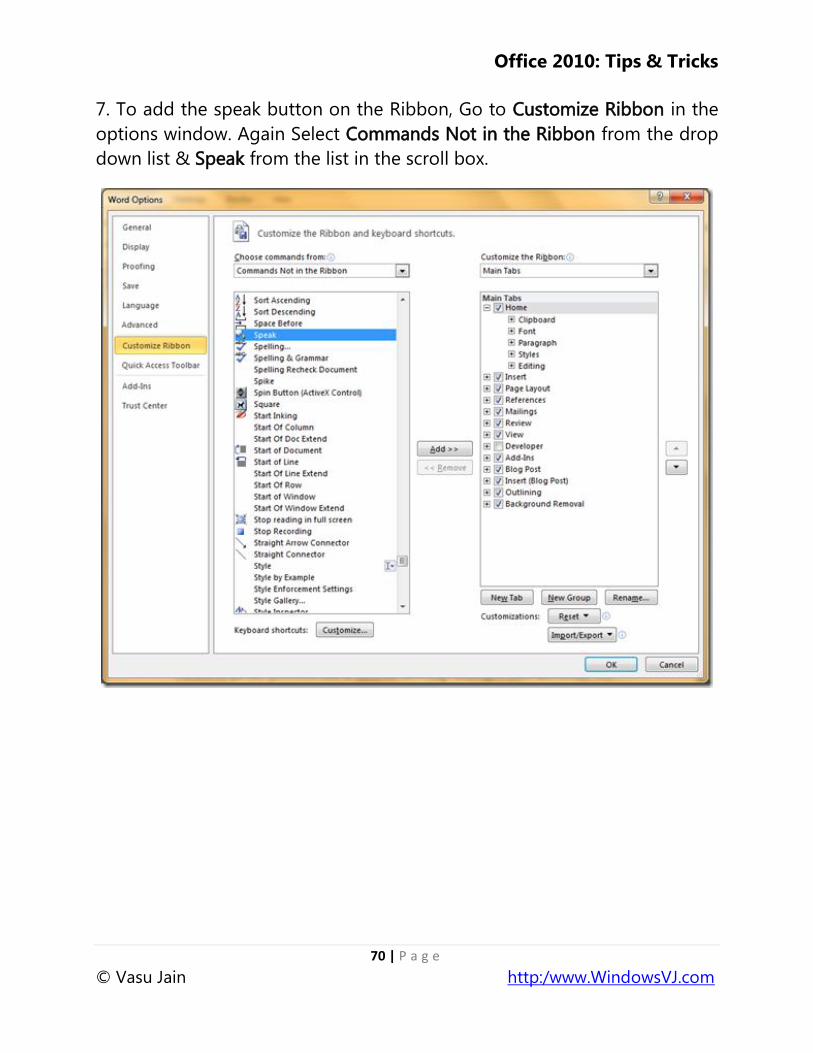
7. To add the speak button on the Ribbon, Go to Customize Ribbon in the
options window. Again Select Commands Not in the Ribbon from the drop
down list & Speak from the list in the scroll box.
Office 2010: Tips & Tricks
71 | P a g e
© Vasu Jain http:/www.WindowsVJ.com
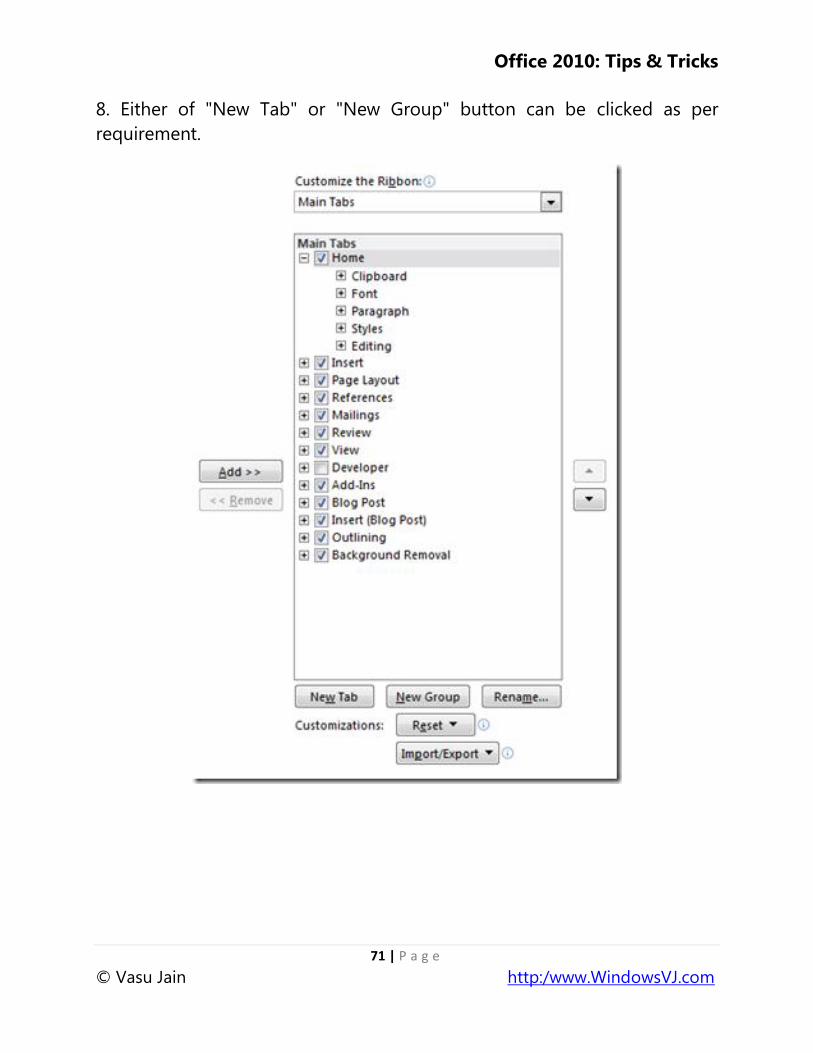
8. Either of "New Tab" or "New Group" button can be clicked as per
requirement.

Office 2010: Tips & Tricks
72 | P a g e
© Vasu Jain http:/www.WindowsVJ.com
9. After selecting the new Tab or new Group (Selected here), the feature
name to be appeared can be renamed and symbolized by an icon which
can be selected from the icon list which pops up when Rename button is
clicked.
Office 2010: Tips & Tricks
73 | P a g e
© Vasu Jain http:/www.WindowsVJ.com
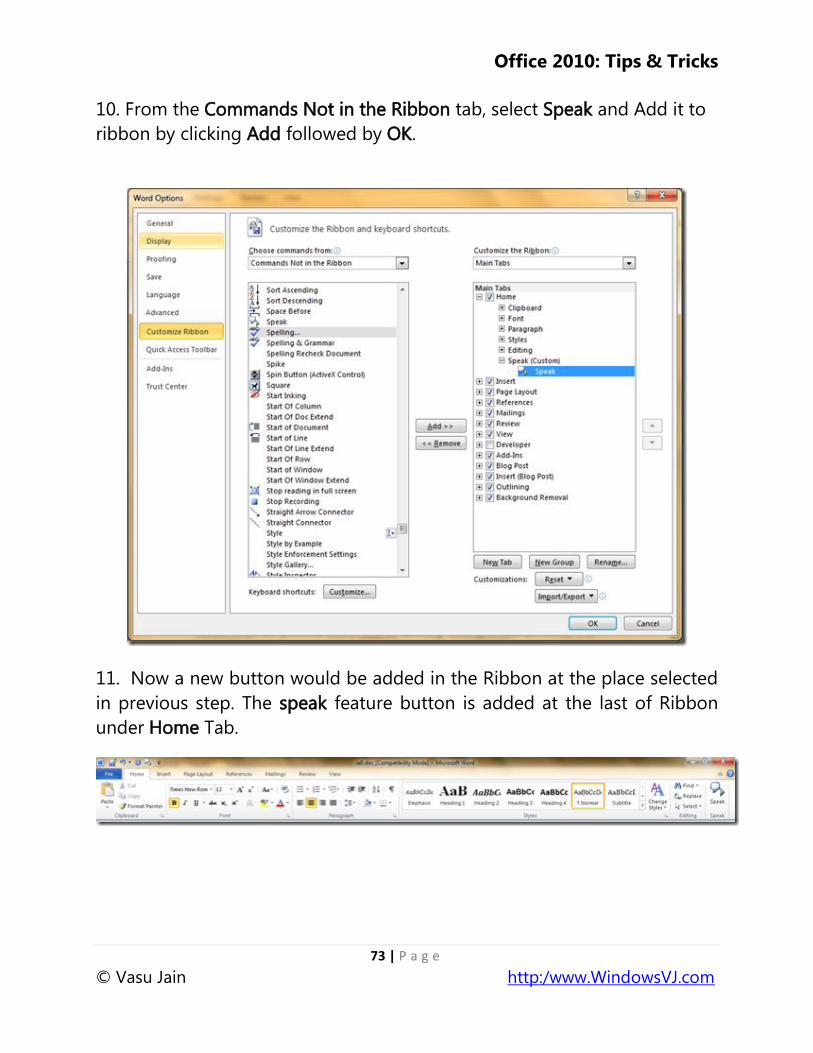
10. From the Commands Not in the Ribbon tab, select Speak and Add it to
ribbon by clicking Add followed by OK.
11. Now a new button would be added in the Ribbon at the place selected
in previous step. The speak feature button is added at the last of Ribbon
under Home Tab.
Office 2010: Tips & Tricks
74 | P a g e
© Vasu Jain http:/www.WindowsVJ.com
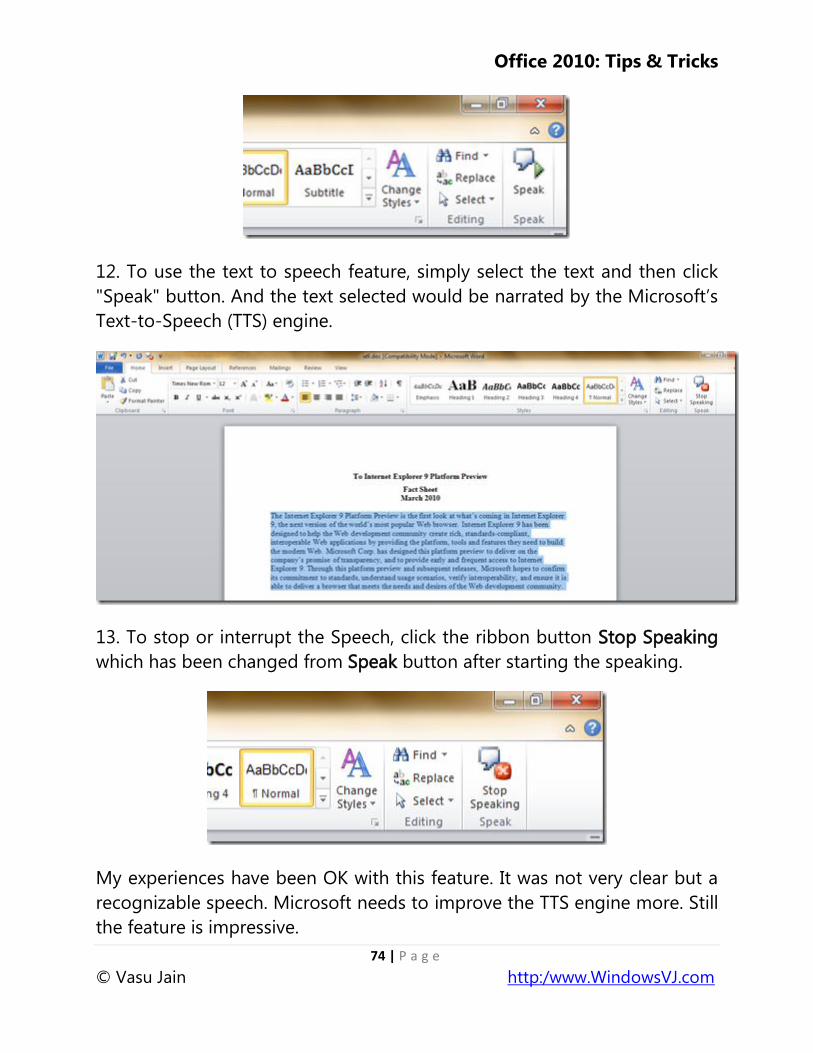
12. To use the text to speech feature, simply select the text and then click
"Speak" button. And the text selected would be narrated by the Microsoft‘s
Text-to-Speech (TTS) engine.
13. To stop or interrupt the Speech, click the ribbon button Stop Speaking
which has been changed from Speak button after starting the speaking.
My experiences have been OK with this feature. It was not very clear but a
recognizable speech. Microsoft needs to improve the TTS engine more. Still
the feature is impressive.
Office 2010: Tips & Tricks
75 | P a g e
© Vasu Jain http:/www.WindowsVJ.com
Format Painter in Word 2010
The format painter feature in Word 2010 allows copying formatting that is
applied to a particular text and applying it to others. It just works like the
way color picker in Microsoft paint do, i.e. to pick up a color applied to a
particular pixel and apply it to others. This features works best when you
spent some time trying different combinations of fonts, sizes and colors to
a particular text until you get just the right combination. Instead of having
to remember the precise formatting you applied, to apply the same to
other text, you can simply copy the formatting using Format Painter.
Let‘s look at the procedure to use Format Painter in Word 2010 using an
example.
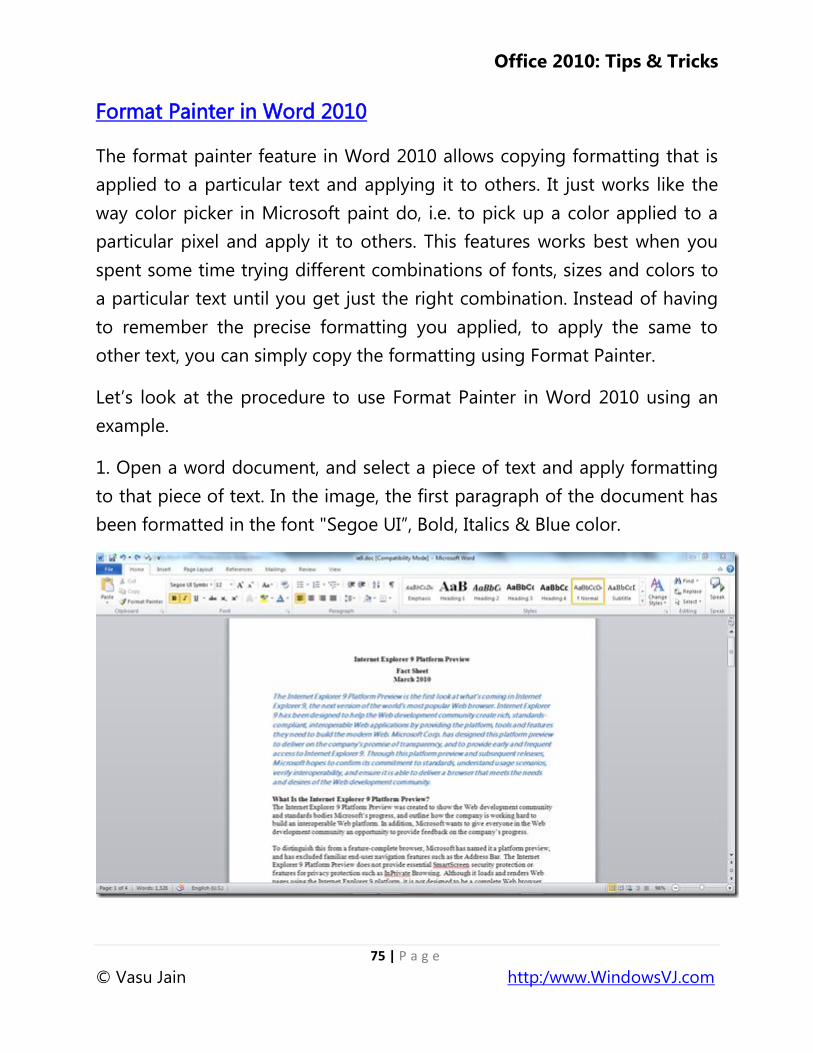
1. Open a word document, and select a piece of text and apply formatting
to that piece of text. In the image, the first paragraph of the document has
been formatted in the font "Segoe UI‖, Bold, Italics & Blue color.
Office 2010: Tips & Tricks
76 | P a g e
© Vasu Jain http:/www.WindowsVJ.com
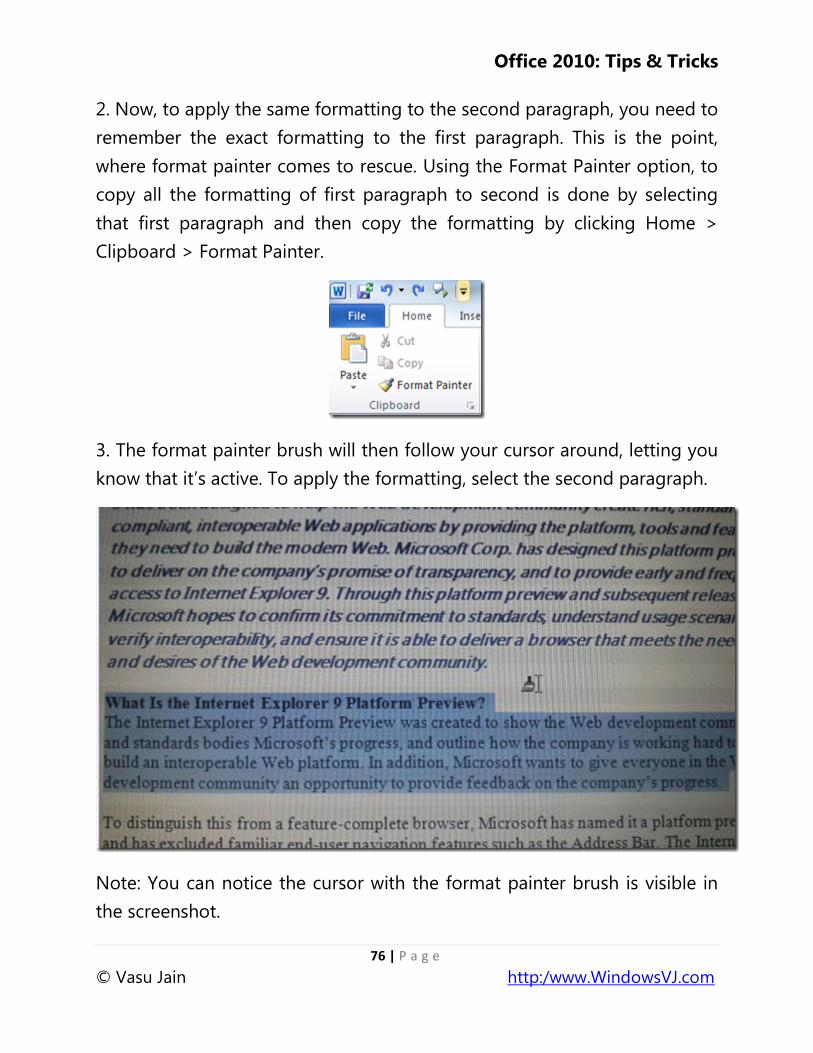
2. Now, to apply the same formatting to the second paragraph, you need to
remember the exact formatting to the first paragraph. This is the point,
where format painter comes to rescue. Using the Format Painter option, to
copy all the formatting of first paragraph to second is done by selecting
that first paragraph and then copy the formatting by clicking Home >
Clipboard > Format Painter.
3. The format painter brush will then follow your cursor around, letting you
know that it‘s active. To apply the formatting, select the second paragraph.
Note: You can notice the cursor with the format painter brush is visible in
the screenshot.
Office 2010: Tips & Tricks
77 | P a g e
© Vasu Jain http:/www.WindowsVJ.com
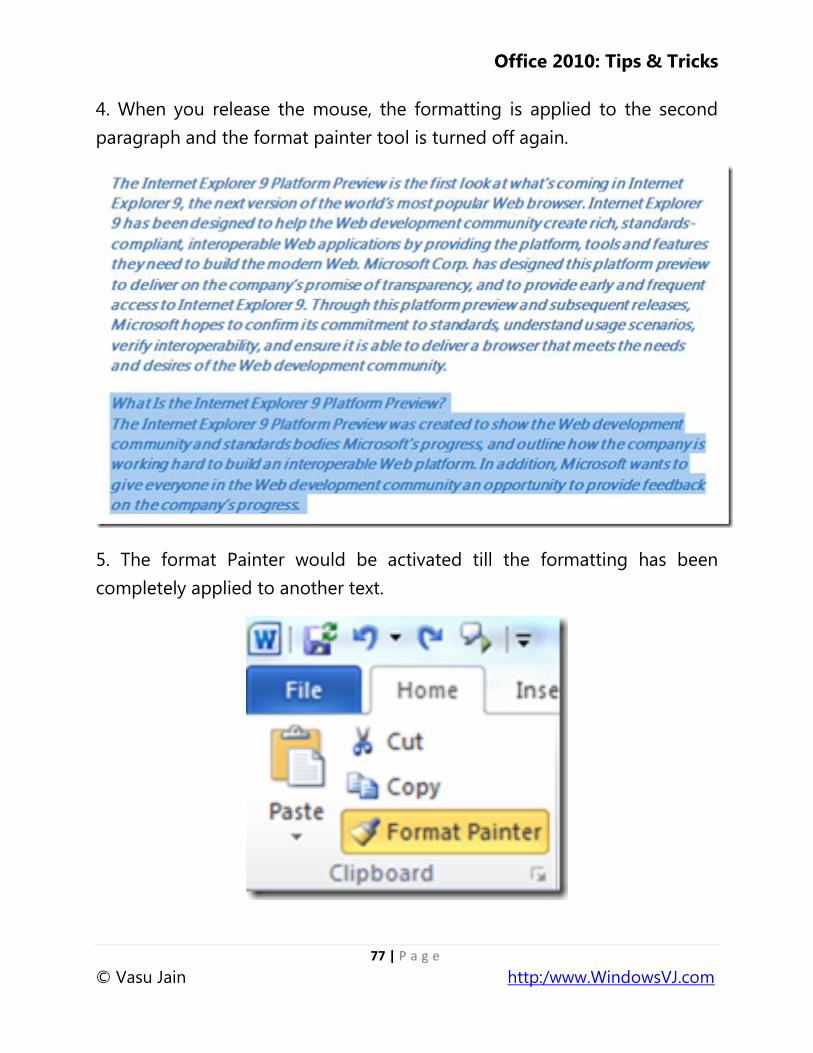
4. When you release the mouse, the formatting is applied to the second
paragraph and the format painter tool is turned off again.
5. The format Painter would be activated till the formatting has been
completely applied to another text.
Office 2010: Tips & Tricks
78 | P a g e
© Vasu Jain http:/www.WindowsVJ.com
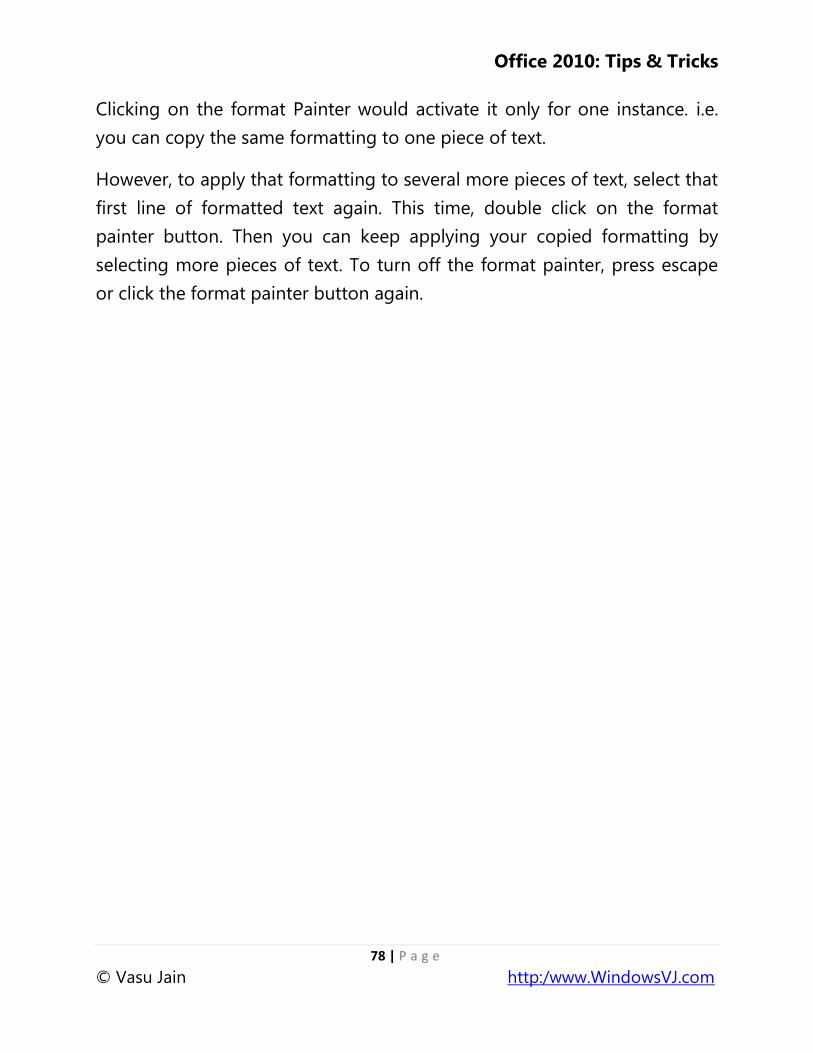
Clicking on the format Painter would activate it only for one instance. i.e.
you can copy the same formatting to one piece of text.
However, to apply that formatting to several more pieces of text, select that
first line of formatted text again. This time, double click on the format
painter button. Then you can keep applying your copied formatting by
selecting more pieces of text. To turn off the format painter, press escape
or click the format painter button again.
Office 2010: Tips & Tricks
79 | P a g e
© Vasu Jain http:/www.WindowsVJ.com
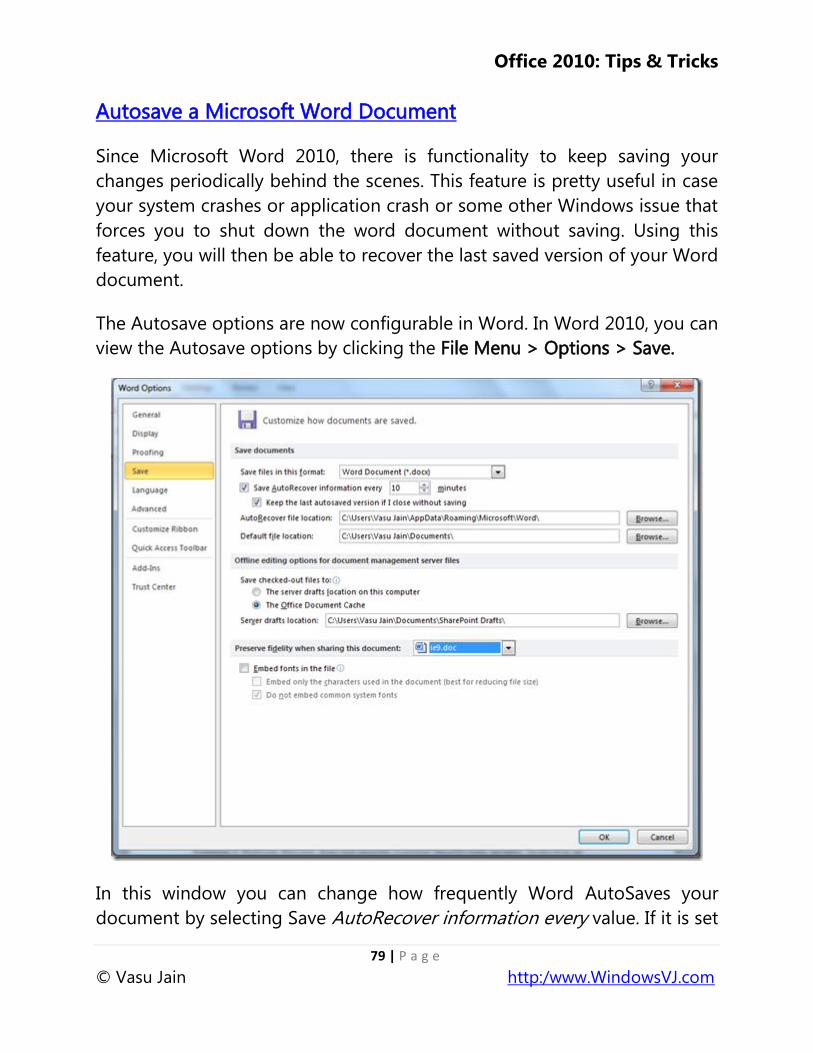
Autosave a Microsoft Word Document
Since Microsoft Word 2010, there is functionality to keep saving your
changes periodically behind the scenes. This feature is pretty useful in case
your system crashes or application crash or some other Windows issue that
forces you to shut down the word document without saving. Using this
feature, you will then be able to recover the last saved version of your Word
document.
The Autosave options are now configurable in Word. In Word 2010, you can
view the Autosave options by clicking the File Menu > Options > Save.
In this window you can change how frequently Word AutoSaves your
document by selecting Save AutoRecover information every value. If it is set
Office 2010: Tips & Tricks
80 | P a g e
© Vasu Jain http:/www.WindowsVJ.com
to 10 minutes, for example, a copy of the current state of the document is
made every 10 minutes. The AutoRecover file location is where copies of
your document are saved to, periodically. This feature pretty much works
like the same way in Windows Live Mail, document gets auto saved as a
draft.
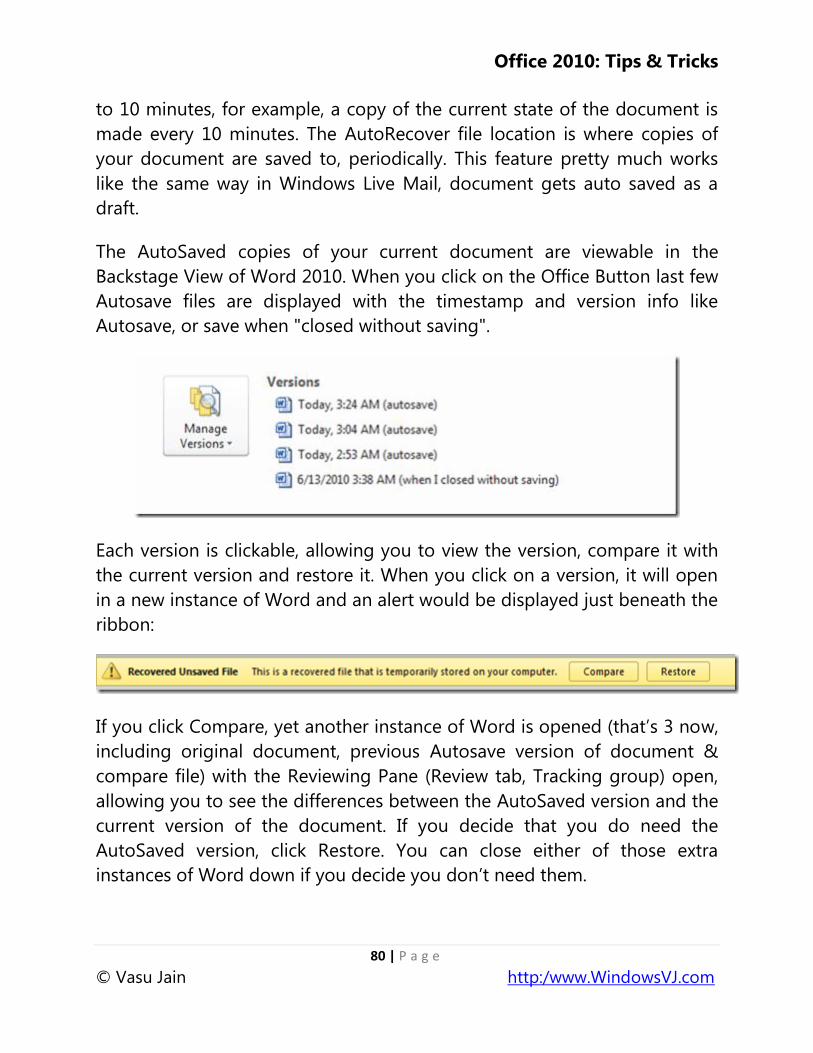
The AutoSaved copies of your current document are viewable in the
Backstage View of Word 2010. When you click on the Office Button last few
Autosave files are displayed with the timestamp and version info like
Autosave, or save when "closed without saving".
Each version is clickable, allowing you to view the version, compare it with
the current version and restore it. When you click on a version, it will open
in a new instance of Word and an alert would be displayed just beneath the
ribbon:
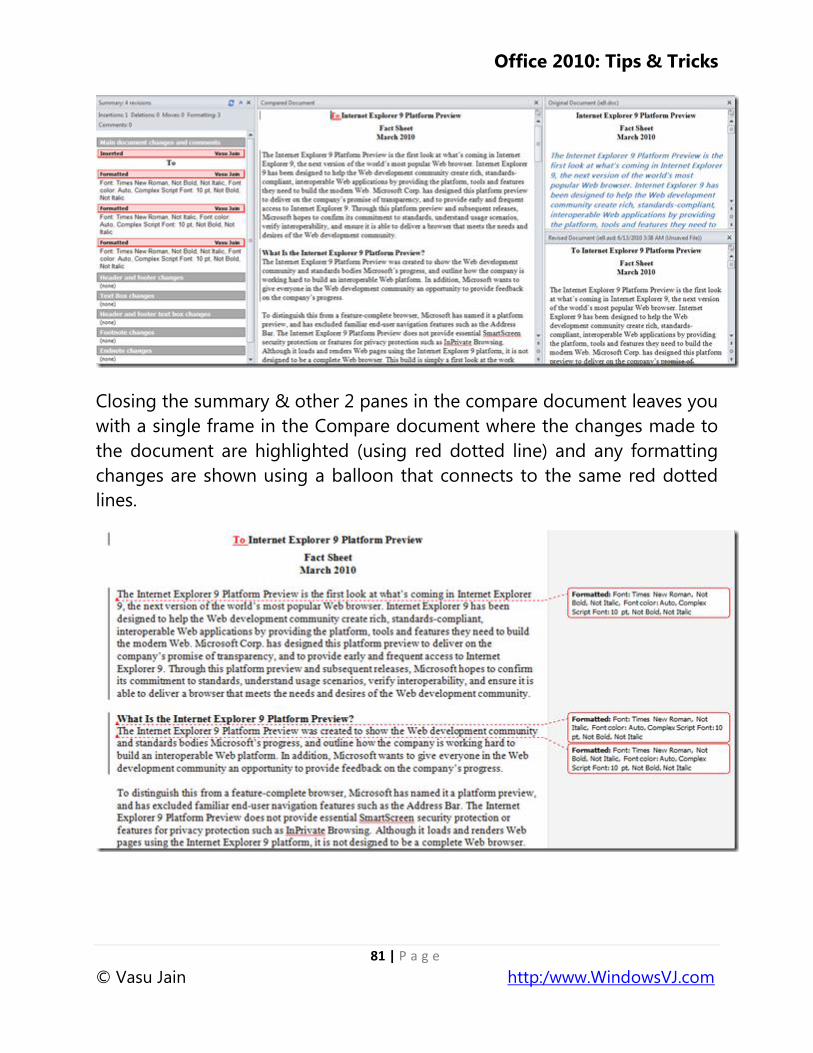
If you click Compare, yet another instance of Word is opened (that‘s 3 now,
including original document, previous Autosave version of document &
compare file) with the Reviewing Pane (Review tab, Tracking group) open,
allowing you to see the differences between the AutoSaved version and the
current version of the document. If you decide that you do need the
AutoSaved version, click Restore. You can close either of those extra
instances of Word down if you decide you don‘t need them.
Office 2010: Tips & Tricks
81 | P a g e
© Vasu Jain http:/www.WindowsVJ.com
Closing the summary & other 2 panes in the compare document leaves you
with a single frame in the Compare document where the changes made to
the document are highlighted (using red dotted line) and any formatting
changes are shown using a balloon that connects to the same red dotted
lines.
Office 2010: Tips & Tricks
82 | P a g e
© Vasu Jain http:/www.WindowsVJ.com
The autosaved versions are deleted automatically when you save and close
your document so that the feature doesn‘t kill space on your hard drive.
The feature is very useful for the people who save their document
infrequently and if there were no auto saves, they would lose a lot of data
in the event of an application crash or in case you‘ve made lots of changes
to a document, and then accidentally clicked ‗No‘ when asked whether you
want to save your changes.

Office 2010: Tips & Tricks
83 | P a g e
© Vasu Jain http:/www.WindowsVJ.com
Customize the Default Font in Office Word 2010
Microsoft Word 2010 comes with a default font Calibri (Body) with Font size
11 and no formatting like Bold, Italics etc. What if you need a different font
of your taste to type every time you open word? Off course you can always
change the font every time you open a Word document, but there is a way
easier for the same. Word 2010 allows user to customize the default font.
When you customize a default font, every new document you open will use
the font settings that you selected and set as the default. The default font
applies to every new Word documents Even, Templates can be created to
use different default font settings.
To customize the default font in Microsoft Word 2010:
1. Click "Home" tab, and then in the "Font" group, click the arrow at right
side bottom corner to open a dialog box.
Office 2010: Tips & Tricks
84 | P a g e
© Vasu Jain http:/www.WindowsVJ.com
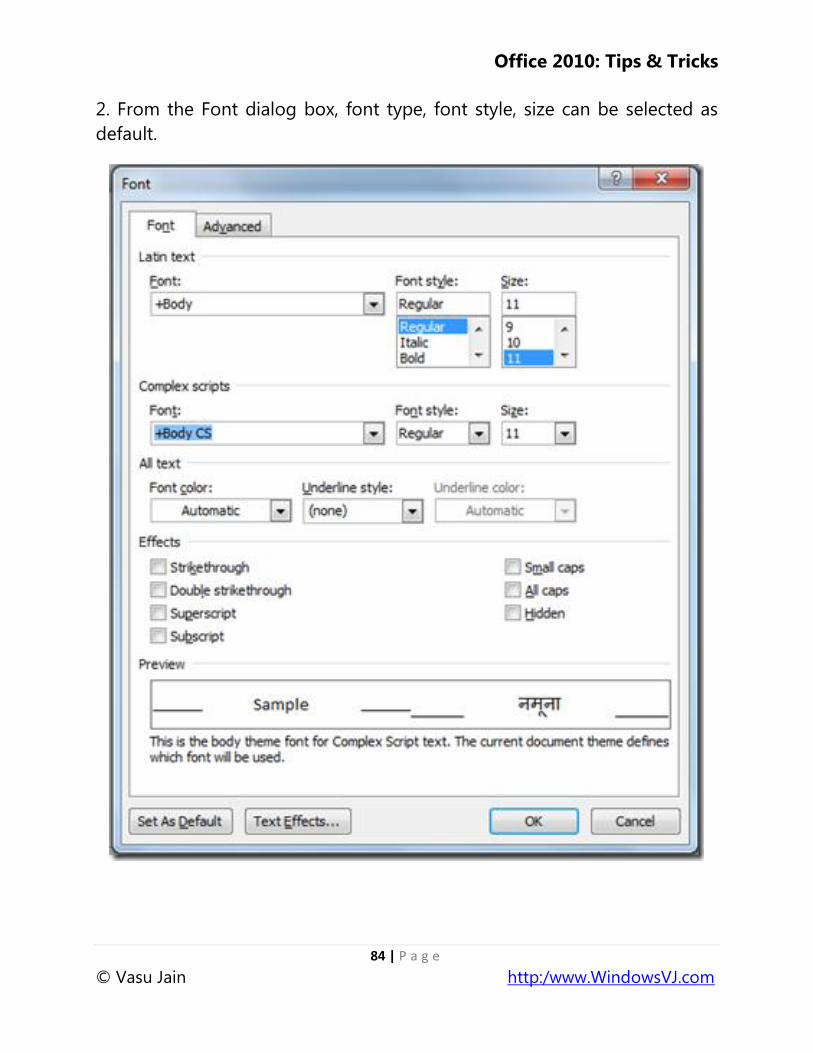
2. From the Font dialog box, font type, font style, size can be selected as
default.
Office 2010: Tips & Tricks
85 | P a g e
© Vasu Jain http:/www.WindowsVJ.com
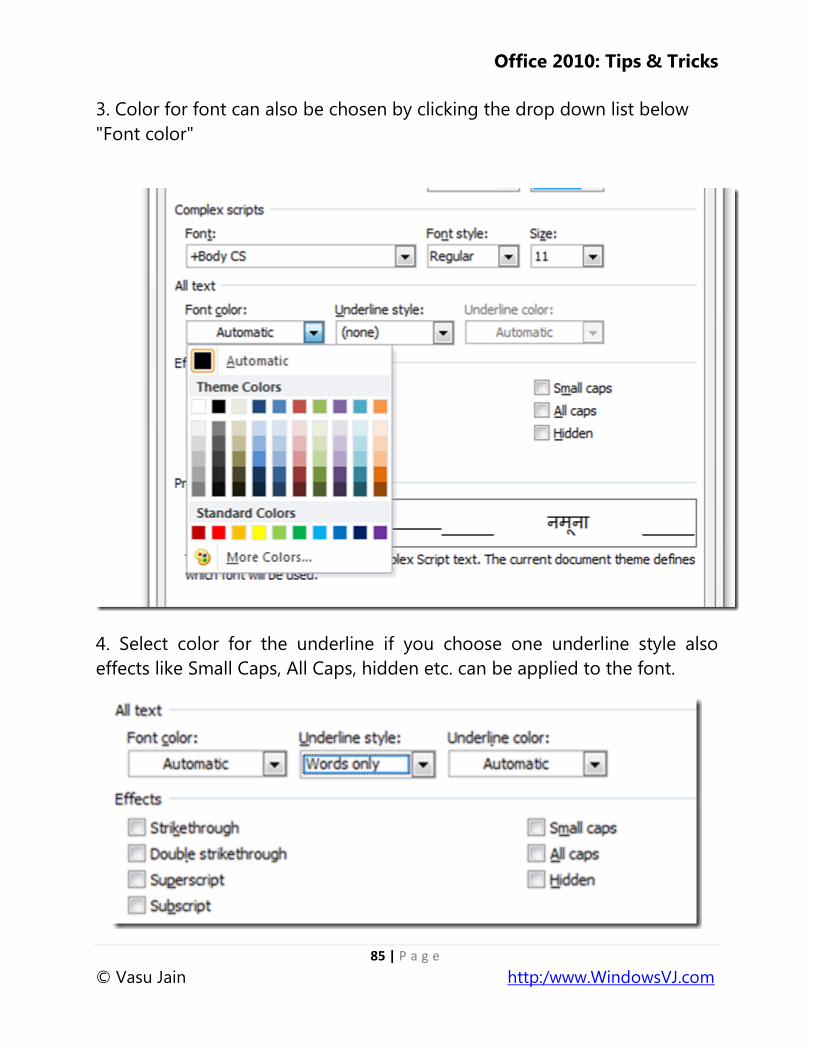
3. Color for font can also be chosen by clicking the drop down list below
"Font color"
4. Select color for the underline if you choose one underline style also
effects like Small Caps, All Caps, hidden etc. can be applied to the font.
Office 2010: Tips & Tricks
86 | P a g e
© Vasu Jain http:/www.WindowsVJ.com
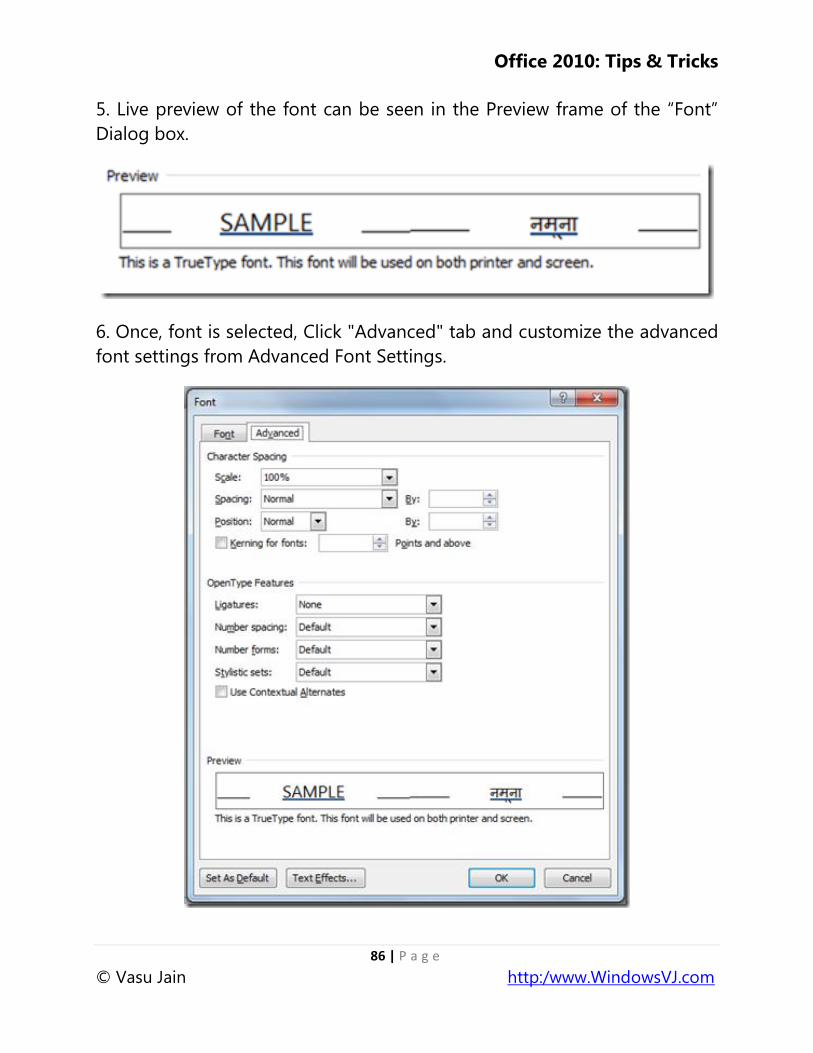
5. Live preview of the font can be seen in the Preview frame of the ―Font‖
Dialog box.
6. Once, font is selected, Click "Advanced" tab and customize the advanced
font settings from Advanced Font Settings.
Office 2010: Tips & Tricks
87 | P a g e
© Vasu Jain http:/www.WindowsVJ.com
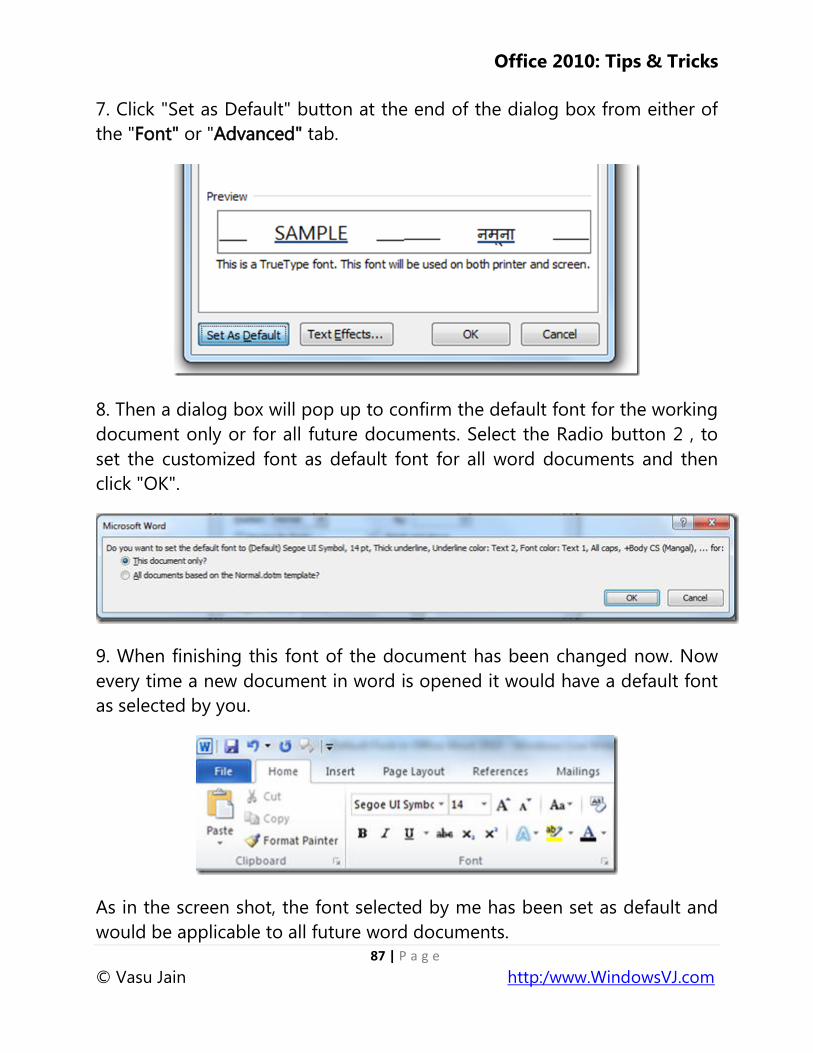
7. Click "Set as Default" button at the end of the dialog box from either of
the "Font" or "Advanced" tab.
8. Then a dialog box will pop up to confirm the default font for the working
document only or for all future documents. Select the Radio button 2 , to
set the customized font as default font for all word documents and then
click "OK".
9. When finishing this font of the document has been changed now. Now
every time a new document in word is opened it would have a default font
as selected by you.
As in the screen shot, the font selected by me has been set as default and
would be applicable to all future word documents.
Office 2010: Tips & Tricks
88 | P a g e
© Vasu Jain http:/www.WindowsVJ.com
Office 2010: Tips & Tricks
89 | P a g e
© Vasu Jain http:/www.WindowsVJ.com
Analyze data efficiently & quickly in Excel 2010 using Sparklines
Sparklines are a new kind of visualization in Excel 2010. They are small cell-
sized graphics used to show trends in series of values by using line, column,
or win/loss charts. Sparklines allow the viewer to see in a single cell
information-dense graphics that greatly increase reader comprehension of
the data. Sparklines display mini-charts that can be placed inside cells in
order to view the data and the chart on the same table. Before office 2010
all versions of Microsoft Excel, used third party add-ins to serve this
purpose, but the Excel 2010 versions have embedded this functionality for
the user‘s convenience.
Creating a Sparkline for data:
1. Populate data in the excel
Office 2010: Tips & Tricks
90 | P a g e
© Vasu Jain http:/www.WindowsVJ.com
2. Go to the Insert option and choose your desired Sparkline from the
Sparklines section. There are 3 types of Sparklines.
• Line
• Column
• Win/Loss
3. Select a type of Sparkline
4. Specify the Data Range (it includes the column which you need to
include into the chart) and Location Range (where you wish to draw the
Sparkline).
Office 2010: Tips & Tricks
91 | P a g e
© Vasu Jain http:/www.WindowsVJ.com
5. Desired Sparkline is created. Notice Line and column Sparklines
respectively in the screenshot below.
Sparklines in this table below are displaying the win / loss record for a
softball league.
Sparklines provide data analysis in a much quicker way and as it is said a
Picture is worth 1000 words this feature would help achieve the same.
Office 2010: Tips & Tricks
92 | P a g e
© Vasu Jain http:/www.WindowsVJ.com
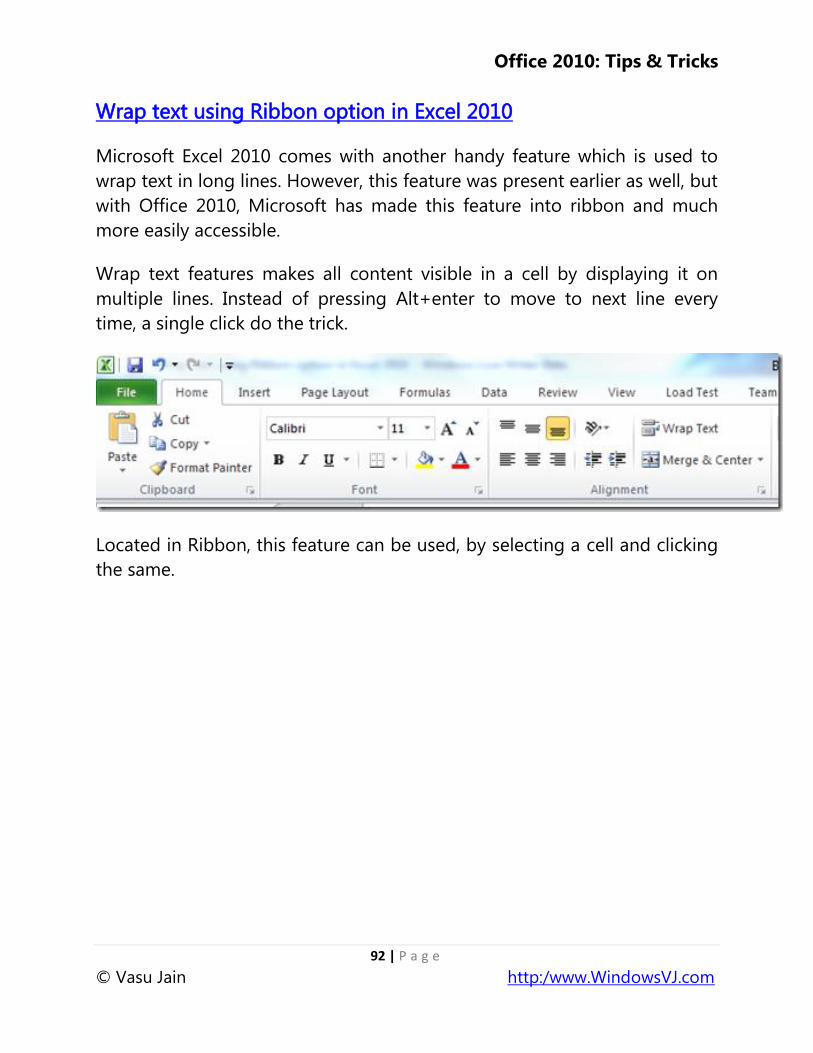
Wrap text using Ribbon option in Excel 2010
Microsoft Excel 2010 comes with another handy feature which is used to
wrap text in long lines. However, this feature was present earlier as well, but
with Office 2010, Microsoft has made this feature into ribbon and much
more easily accessible.
Wrap text features makes all content visible in a cell by displaying it on
multiple lines. Instead of pressing Alt+enter to move to next line every
time, a single click do the trick.
Located in Ribbon, this feature can be used, by selecting a cell and clicking
the same.
Office 2010: Tips & Tricks
93 | P a g e
© Vasu Jain http:/www.WindowsVJ.com
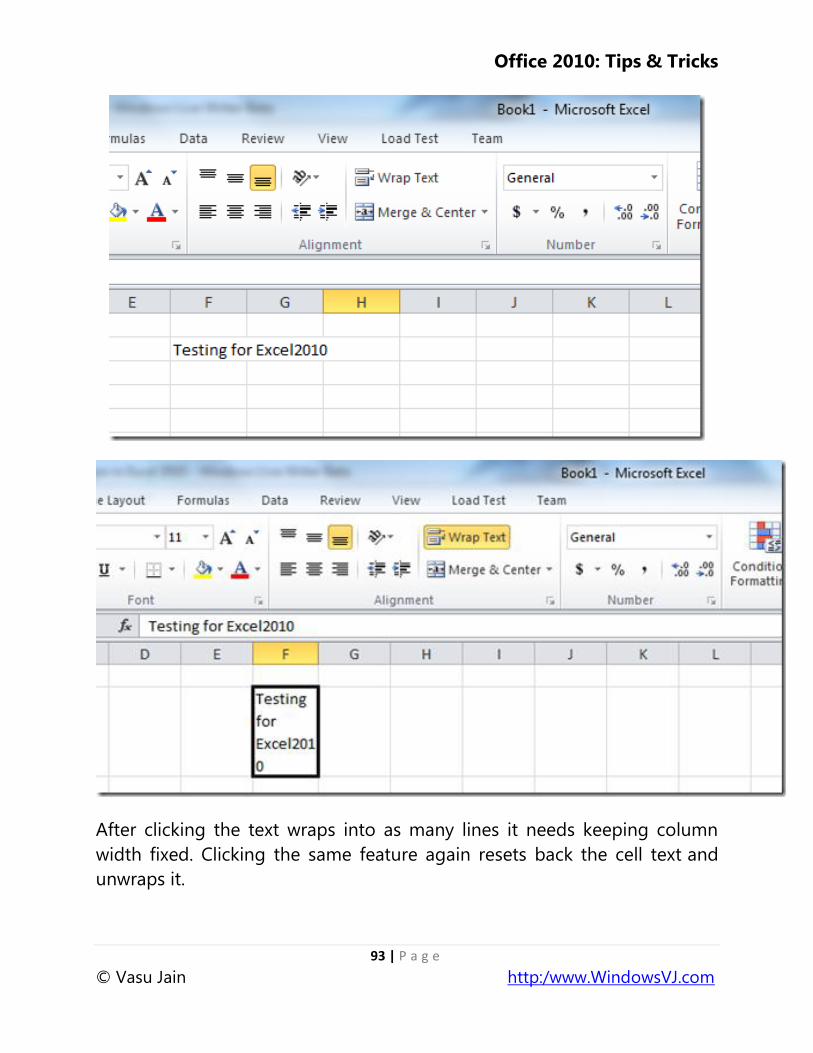
After clicking the text wraps into as many lines it needs keeping column
width fixed. Clicking the same feature again resets back the cell text and
unwraps it.
Office 2010: Tips & Tricks
94 | P a g e
© Vasu Jain http:/www.WindowsVJ.com
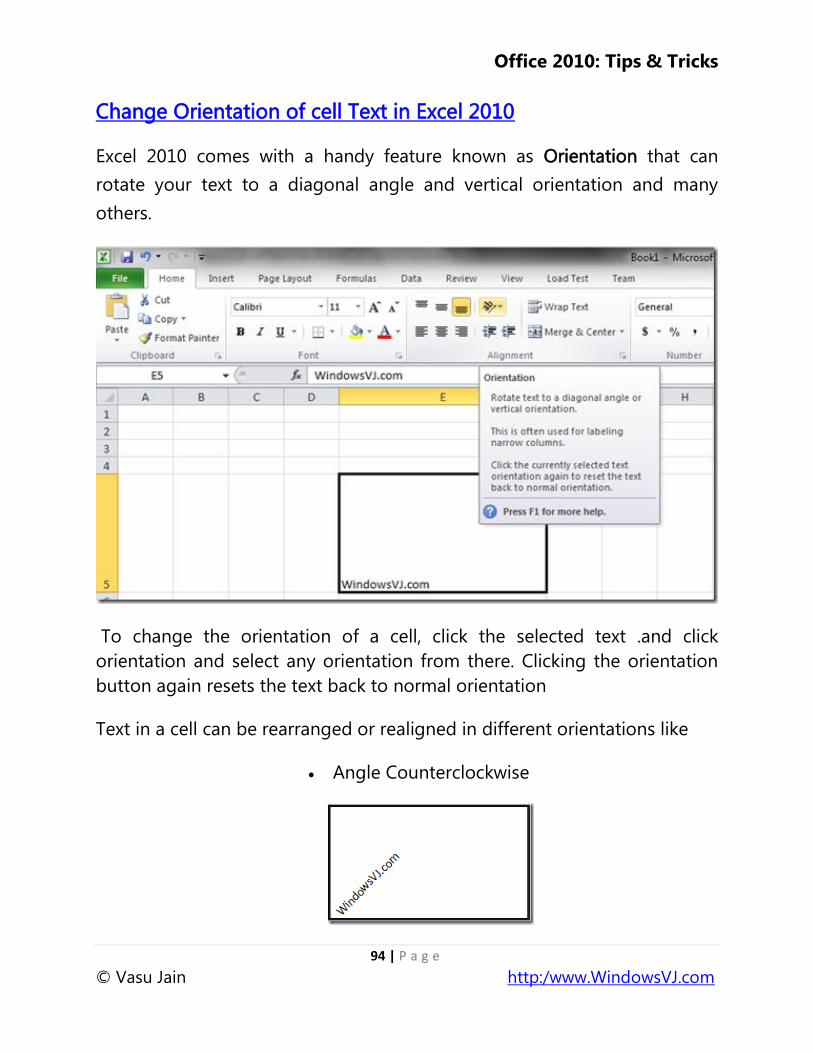
Change Orientation of cell Text in Excel 2010
Excel 2010 comes with a handy feature known as Orientation that can
rotate your text to a diagonal angle and vertical orientation and many
others.
To change the orientation of a cell, click the selected text .and click
orientation and select any orientation from there. Clicking the orientation
button again resets the text back to normal orientation
Text in a cell can be rearranged or realigned in different orientations like
Angle Counterclockwise
Office 2010: Tips & Tricks
95 | P a g e
© Vasu Jain http:/www.WindowsVJ.com
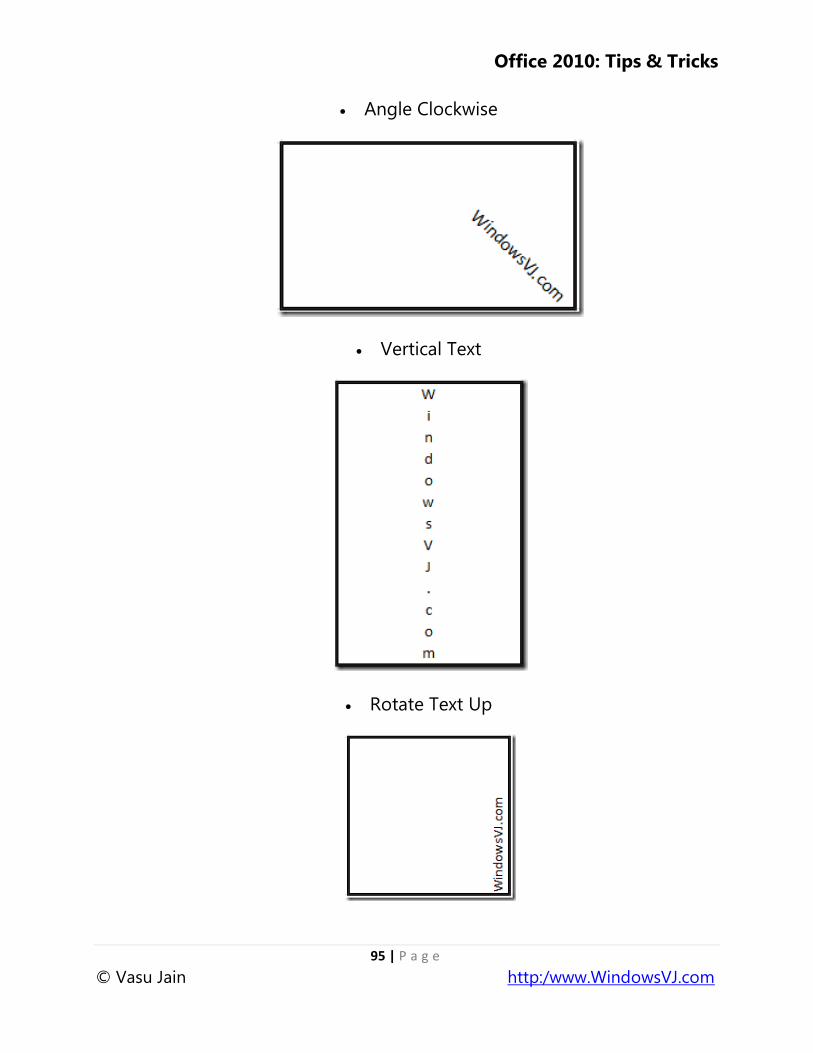
Angle Clockwise
Vertical Text
Rotate Text Up
Office 2010: Tips & Tricks
96 | P a g e
© Vasu Jain http:/www.WindowsVJ.com
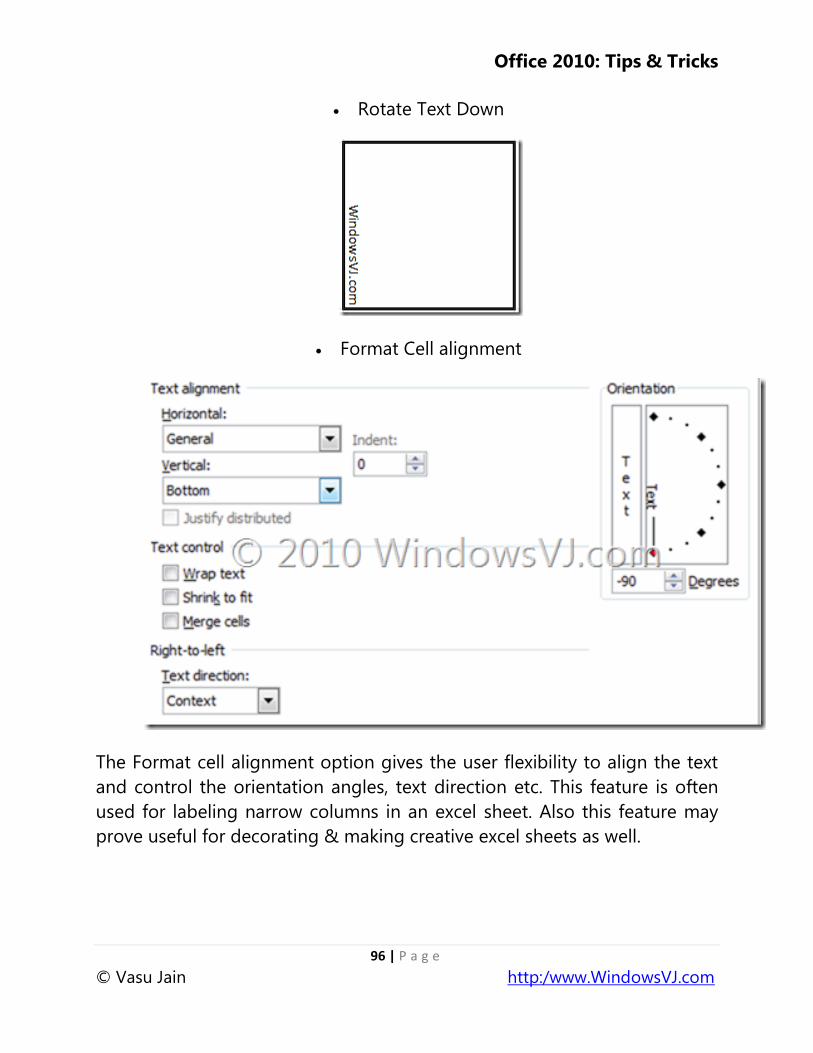
Rotate Text Down
Format Cell alignment
The Format cell alignment option gives the user flexibility to align the text
and control the orientation angles, text direction etc. This feature is often
used for labeling narrow columns in an excel sheet. Also this feature may
prove useful for decorating & making creative excel sheets as well.
Office 2010: Tips & Tricks
97 | P a g e
© Vasu Jain http:/www.WindowsVJ.com
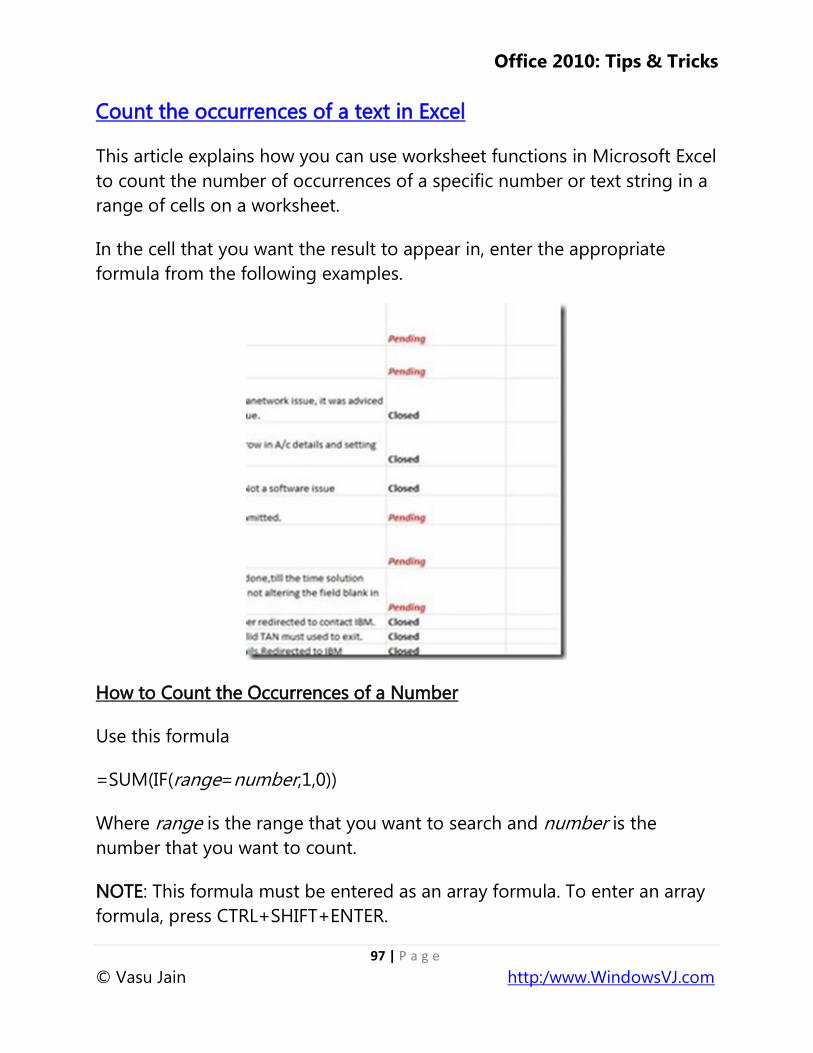
Count the occurrences of a text in Excel
This article explains how you can use worksheet functions in Microsoft Excel
to count the number of occurrences of a specific number or text string in a
range of cells on a worksheet.
In the cell that you want the result to appear in, enter the appropriate
formula from the following examples.
How to Count the Occurrences of a Number
Use this formula
=SUM(IF(range=number,1,0))
Where range is the range that you want to search and number is the
number that you want to count.
NOTE: This formula must be entered as an array formula. To enter an array
formula, press CTRL+SHIFT+ENTER.
Office 2010: Tips & Tricks
98 | P a g e
© Vasu Jain http:/www.WindowsVJ.com
How to Count the Occurrences of a Text String
Method 1
Use this formula
=SUM(IF(range="text",1,0))
where range is the range that you want to search, and text is the text that
you want to find (the text must be enclosed in quotation marks).
NOTE: The above formula must be entered as an array formula. To enter an
array formula, press CTRL+SHIFT+ENTER.
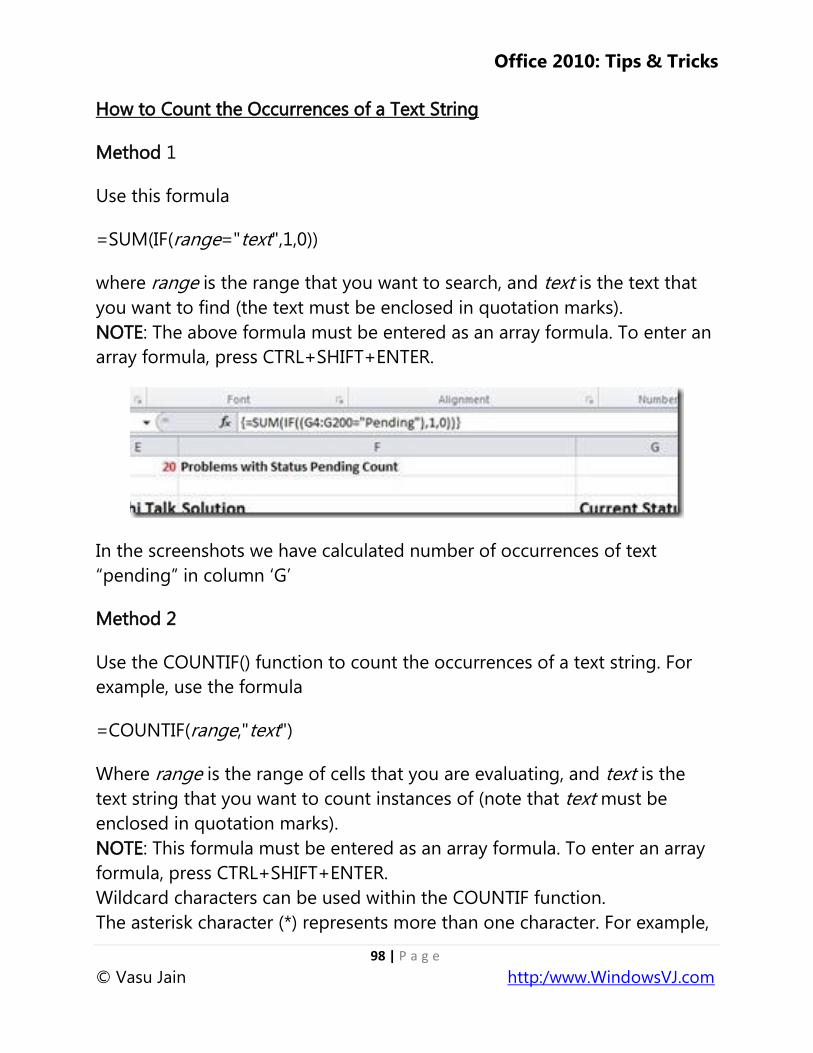
In the screenshots we have calculated number of occurrences of text
―pending‖ in column ‗G‘
Method 2
Use the COUNTIF() function to count the occurrences of a text string. For
example, use the formula
=COUNTIF(range,"text")
Where range is the range of cells that you are evaluating, and text is the
text string that you want to count instances of (note that text must be
enclosed in quotation marks).
NOTE: This formula must be entered as an array formula. To enter an array
formula, press CTRL+SHIFT+ENTER.
Wildcard characters can be used within the COUNTIF function.
The asterisk character (*) represents more than one character. For example,

Office 2010: Tips & Tricks
99 | P a g e
© Vasu Jain http:/www.WindowsVJ.com
to count all the cells in the range a1:a10 that contain an "x," you can use
the following formula:
=COUNTIF(a1:a10,"*x*")
The question mark character (?) can also be used to represent one wildcard
character — for example, to count all cells in the range whose second
character is the letter, such as "ax" or "bx."
=COUNTIF(a1:a10,"?x*")
Office 2010: Tips & Tricks
100 | P a g e
© Vasu Jain http:/www.WindowsVJ.com
Sorting Excel file by Column Attribute
Recently while working on an Excel sheet i required a need to sort a
particular column by an order. At office i was working on Office 2003 and it
made me nuts while figuring out the exact thing. Office 2010 has this thing
in pretty much simple and easy mode.
For Office 2003:
1.Select the cells of a particular column which you want to sort.
2.Go to Menu->Data->Sort
3.Select Sort by ―Column name‖ & ―Order‖ Ascending or Descending
4.Press OK
For Office 2010:
1.Select the cells of a particular column which you want to sort.
2.Go to Menubar->Data->Sort
3.You can either select direct sorting (Ascending or Descending) or you can
select more options
4.For more options you can Sort on ―Cell data,Color,icon‖ Sort by ―Column
name‖ and ―Order‖ Increasing or decreasing.
5. Press OK.
Office 2010: Tips & Tricks
101 | P a g e
© Vasu Jain http:/www.WindowsVJ.com
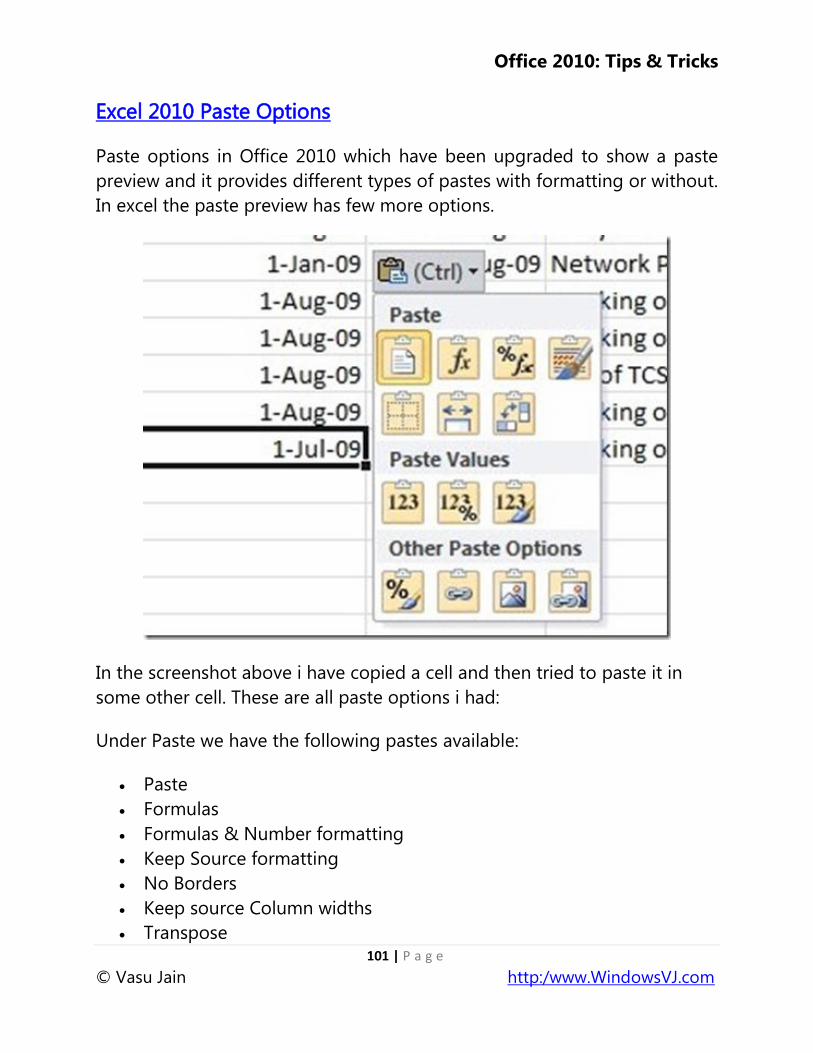
Excel 2010 Paste Options
Paste options in Office 2010 which have been upgraded to show a paste
preview and it provides different types of pastes with formatting or without.
In excel the paste preview has few more options.
In the screenshot above i have copied a cell and then tried to paste it in
some other cell. These are all paste options i had:
Under Paste we have the following pastes available:
Paste
Formulas
Formulas & Number formatting
Keep Source formatting
No Borders
Keep source Column widths
Transpose
Office 2010: Tips & Tricks
102 | P a g e
© Vasu Jain http:/www.WindowsVJ.com
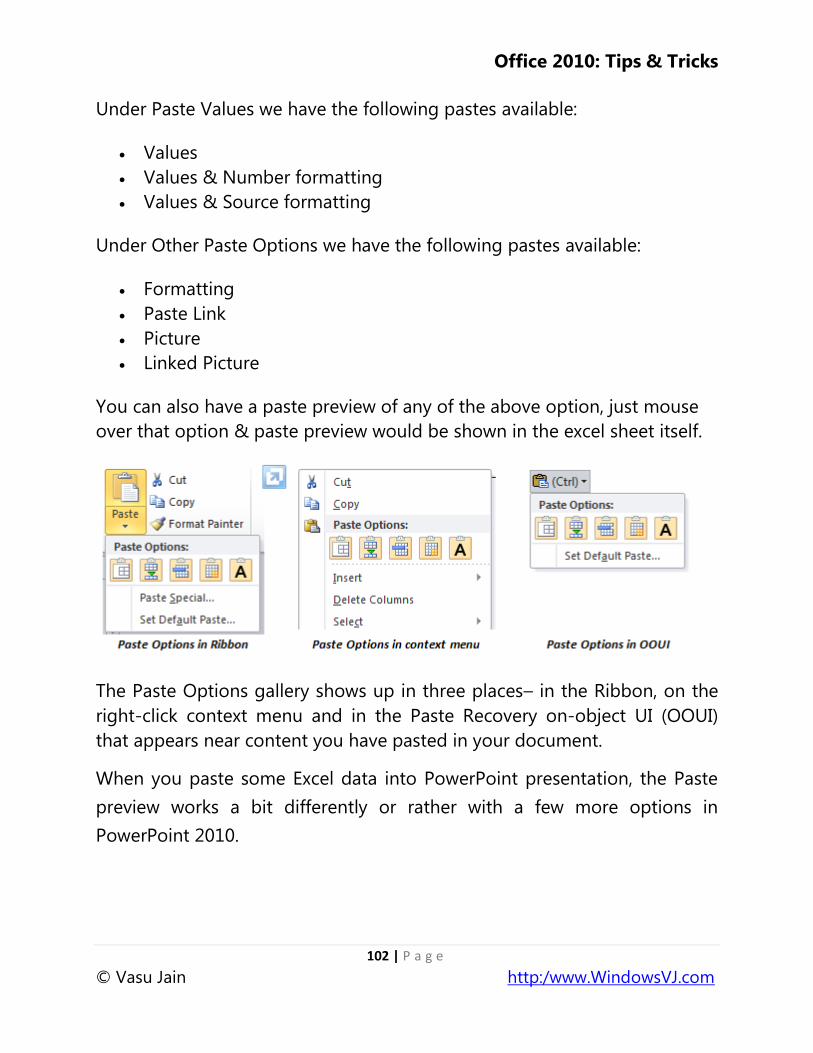
Under Paste Values we have the following pastes available:
Values
Values & Number formatting
Values & Source formatting
Under Other Paste Options we have the following pastes available:
Formatting
Paste Link
Picture
Linked Picture
You can also have a paste preview of any of the above option, just mouse
over that option & paste preview would be shown in the excel sheet itself.
The Paste Options gallery shows up in three places– in the Ribbon, on the
right-click context menu and in the Paste Recovery on-object UI (OOUI)
that appears near content you have pasted in your document.
When you paste some Excel data into PowerPoint presentation, the Paste
preview works a bit differently or rather with a few more options in
PowerPoint 2010.
Office 2010: Tips & Tricks
103 | P a g e
© Vasu Jain http:/www.WindowsVJ.com
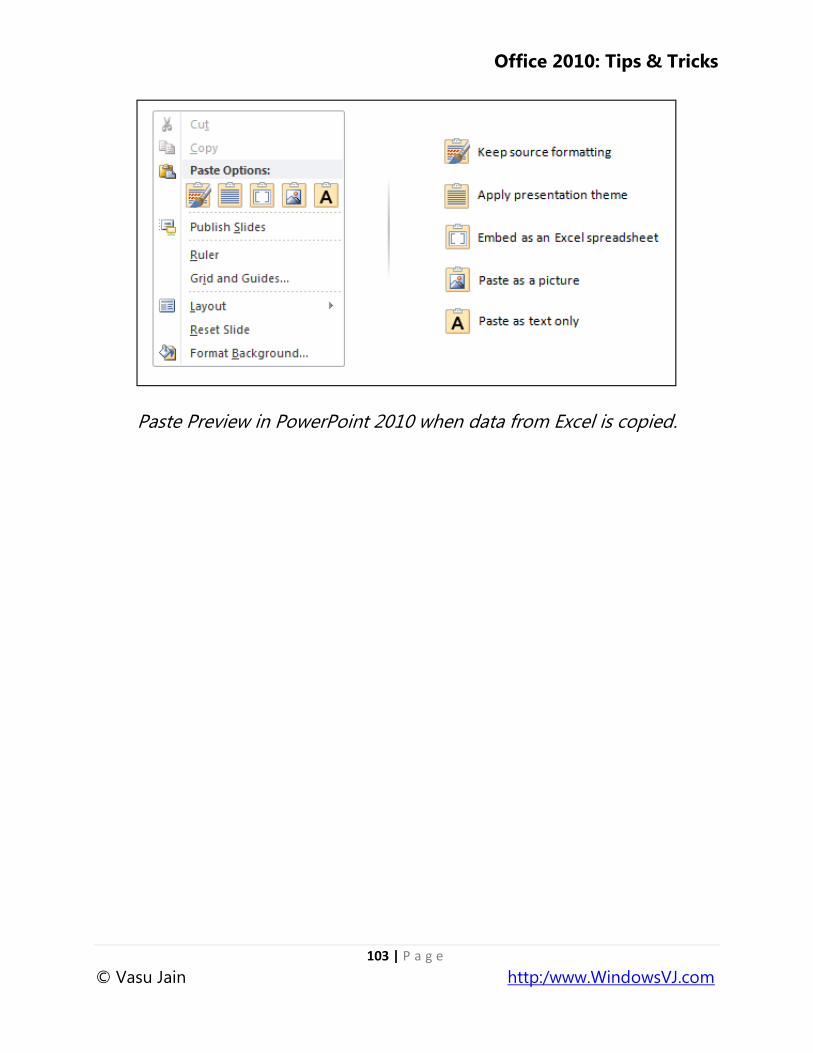
Paste Preview in PowerPoint 2010 when data from Excel is copied.
Office 2010: Tips & Tricks
104 | P a g e
© Vasu Jain http:/www.WindowsVJ.com
Handy Shortcuts in Excel 2010
Covering a few of Excel keyboard shortcuts and a few other little tricks that
helps work faster.
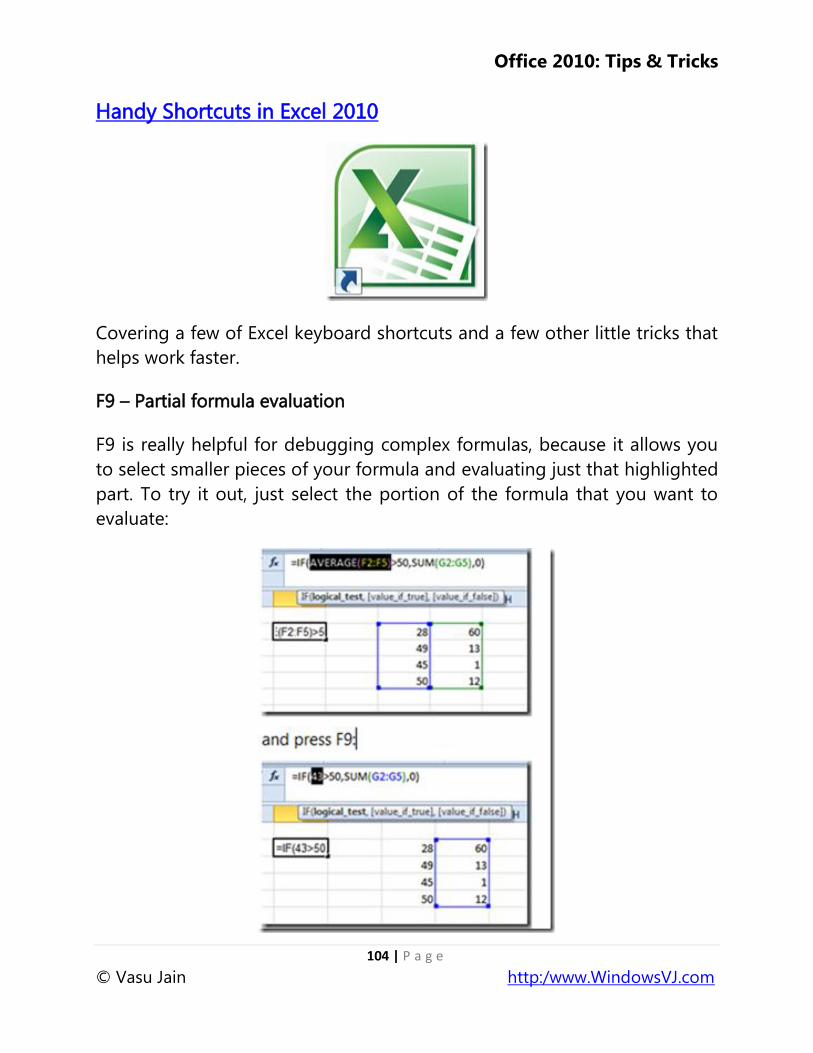
F9 – Partial formula evaluation
F9 is really helpful for debugging complex formulas, because it allows you
to select smaller pieces of your formula and evaluating just that highlighted
part. To try it out, just select the portion of the formula that you want to
evaluate:
Office 2010: Tips & Tricks
105 | P a g e
© Vasu Jain http:/www.WindowsVJ.com
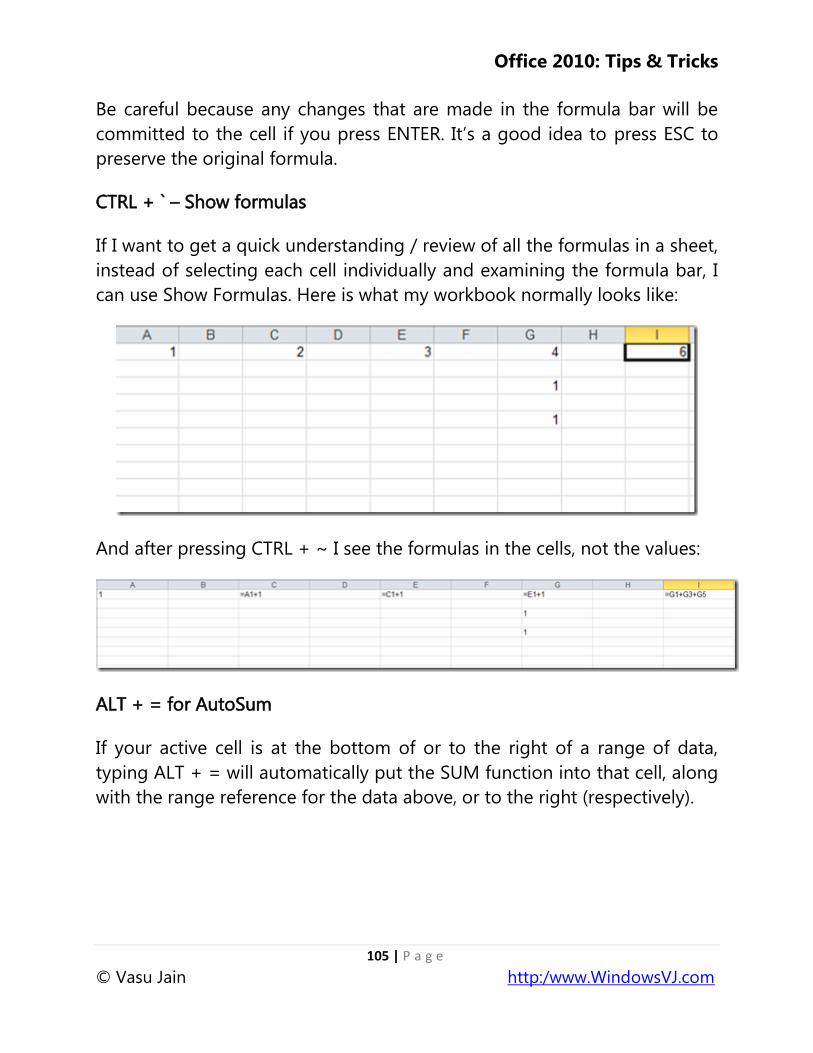
Be careful because any changes that are made in the formula bar will be
committed to the cell if you press ENTER. It‘s a good idea to press ESC to
preserve the original formula.
CTRL + ` – Show formulas
If I want to get a quick understanding / review of all the formulas in a sheet,
instead of selecting each cell individually and examining the formula bar, I
can use Show Formulas. Here is what my workbook normally looks like:
And after pressing CTRL + ~ I see the formulas in the cells, not the values:
ALT + = for AutoSum
If your active cell is at the bottom of or to the right of a range of data,
typing ALT + = will automatically put the SUM function into that cell, along
with the range reference for the data above, or to the right (respectively).

Office 2010: Tips & Tricks
106 | P a g e
© Vasu Jain http:/www.WindowsVJ.com
Before ALT + =
After ALT + =
Incidentally, if Excel doesn‘t know what range to put it, you‘ll just get
=SUM(), which is better than typing it all out, right?
CTRL + [ and CTRL + ] to select direct precedent & dependent cells
In a complex spreadsheet with formulas that build on and reference each
other, you may want to know which cells are precedents of or dependent
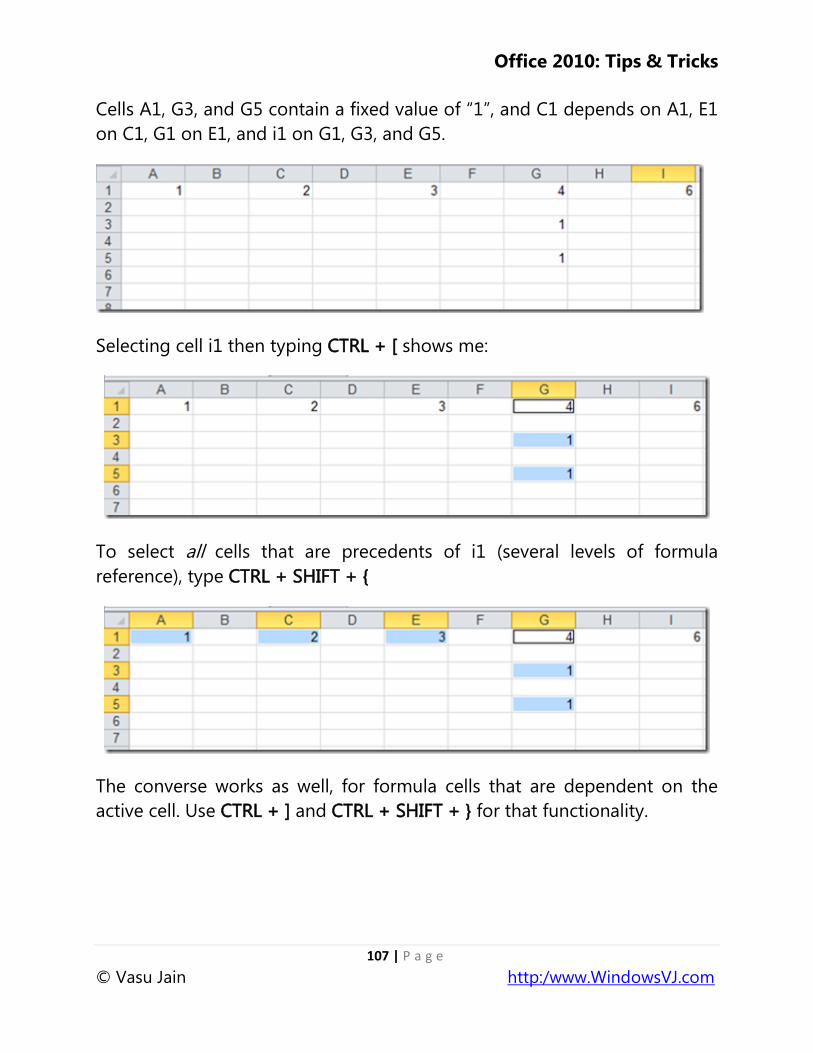
on a particular cell. For example, consider this spreadsheet (in show
formulas mode CTRL + ` ):
Office 2010: Tips & Tricks
107 | P a g e
© Vasu Jain http:/www.WindowsVJ.com
Cells A1, G3, and G5 contain a fixed value of ―1‖, and C1 depends on A1, E1
on C1, G1 on E1, and i1 on G1, G3, and G5.
Selecting cell i1 then typing CTRL + [ shows me:
To select all cells that are precedents of i1 (several levels of formula
reference), type CTRL + SHIFT + {
The converse works as well, for formula cells that are dependent on the
active cell. Use CTRL + ] and CTRL + SHIFT + } for that functionality.
Office 2010: Tips & Tricks
108 | P a g e
© Vasu Jain http:/www.WindowsVJ.com
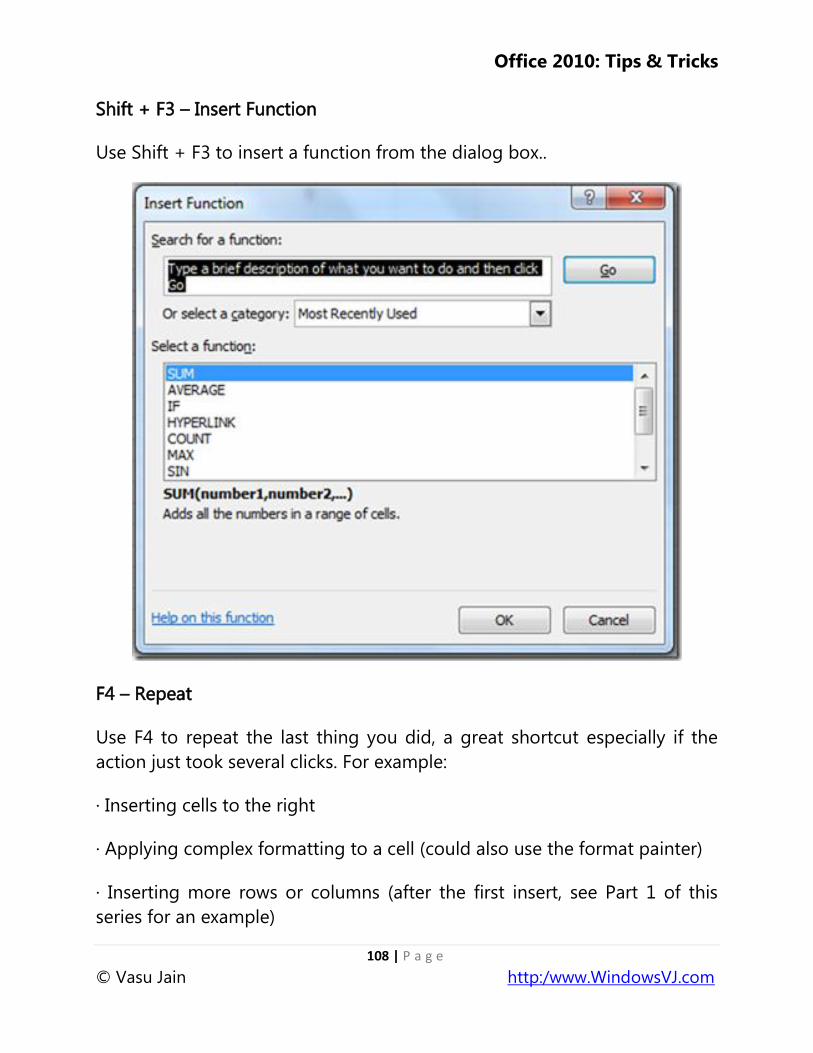
Shift + F3 – Insert Function
Use Shift + F3 to insert a function from the dialog box..
F4 – Repeat
Use F4 to repeat the last thing you did, a great shortcut especially if the
action just took several clicks. For example:
· Inserting cells to the right
· Applying complex formatting to a cell (could also use the format painter)
· Inserting more rows or columns (after the first insert, see Part 1 of this
series for an example)
Office 2010: Tips & Tricks
109 | P a g e
© Vasu Jain http:/www.WindowsVJ.com
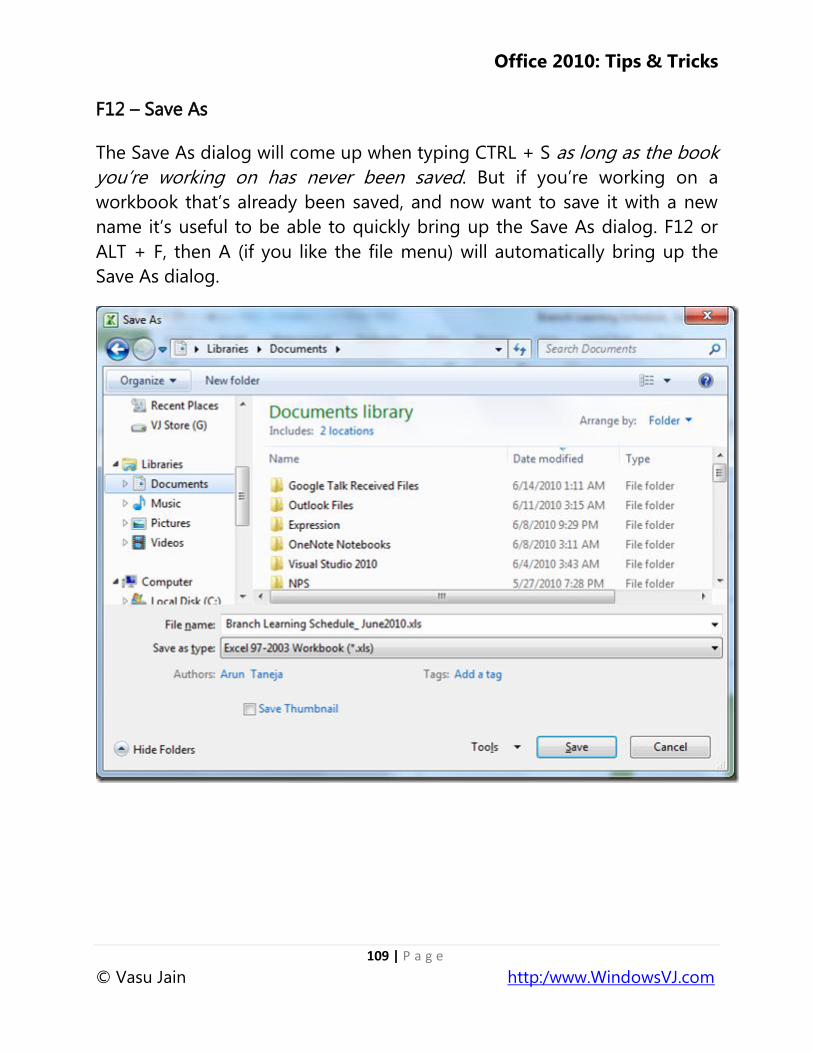
F12 – Save As
The Save As dialog will come up when typing CTRL + S as long as the book
you‘re working on has never been saved. But if you‘re working on a
workbook that‘s already been saved, and now want to save it with a new
name it‘s useful to be able to quickly bring up the Save As dialog. F12 or
ALT + F, then A (if you like the file menu) will automatically bring up the
Save As dialog.
Office 2010: Tips & Tricks
110 | P a g e
© Vasu Jain http:/www.WindowsVJ.com
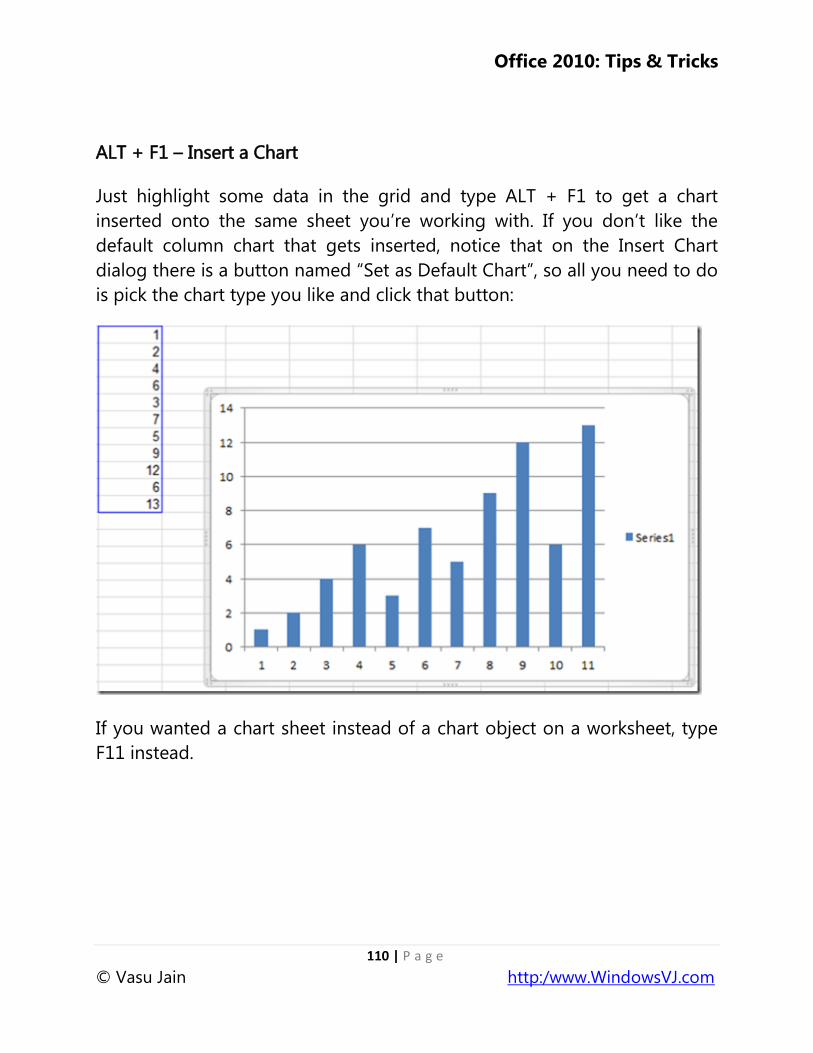
ALT + F1 – Insert a Chart
Just highlight some data in the grid and type ALT + F1 to get a chart
inserted onto the same sheet you‘re working with. If you don‘t like the
default column chart that gets inserted, notice that on the Insert Chart
dialog there is a button named ―Set as Default Chart‖, so all you need to do
is pick the chart type you like and click that button:
If you wanted a chart sheet instead of a chart object on a worksheet, type
F11 instead.
Office 2010: Tips & Tricks
111 | P a g e
© Vasu Jain http:/www.WindowsVJ.com
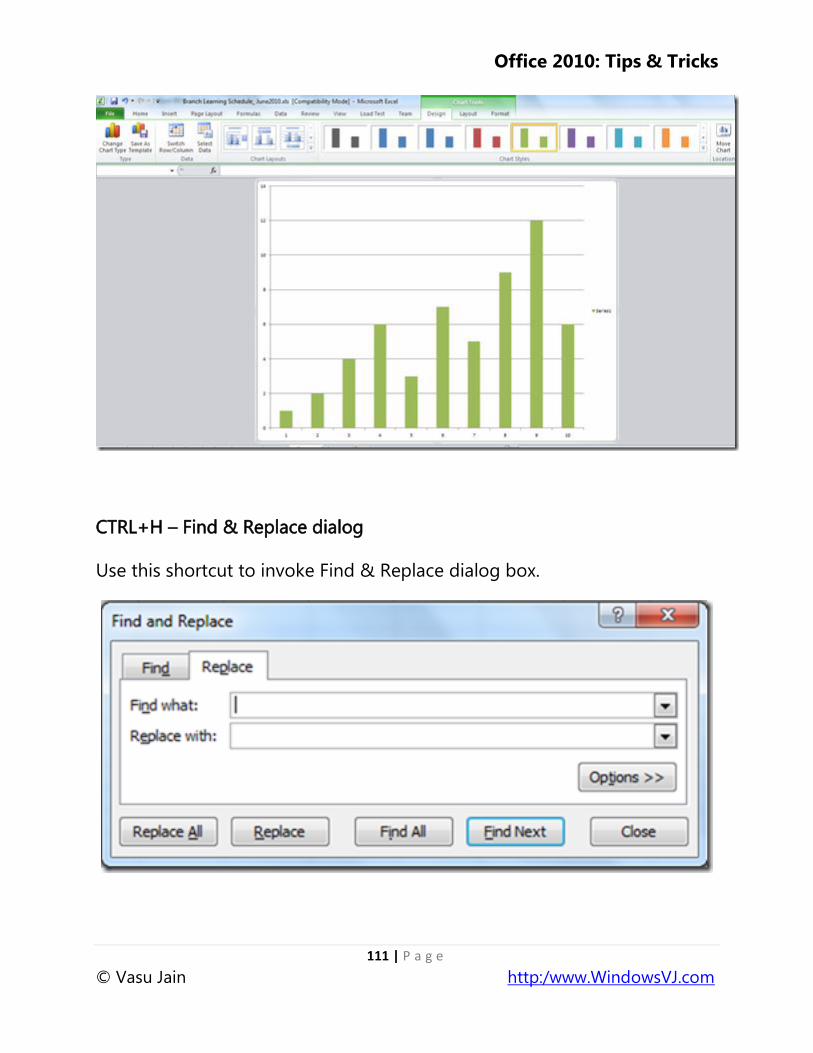
CTRL+H – Find & Replace dialog
Use this shortcut to invoke Find & Replace dialog box.
Office 2010: Tips & Tricks
112 | P a g e
© Vasu Jain http:/www.WindowsVJ.com
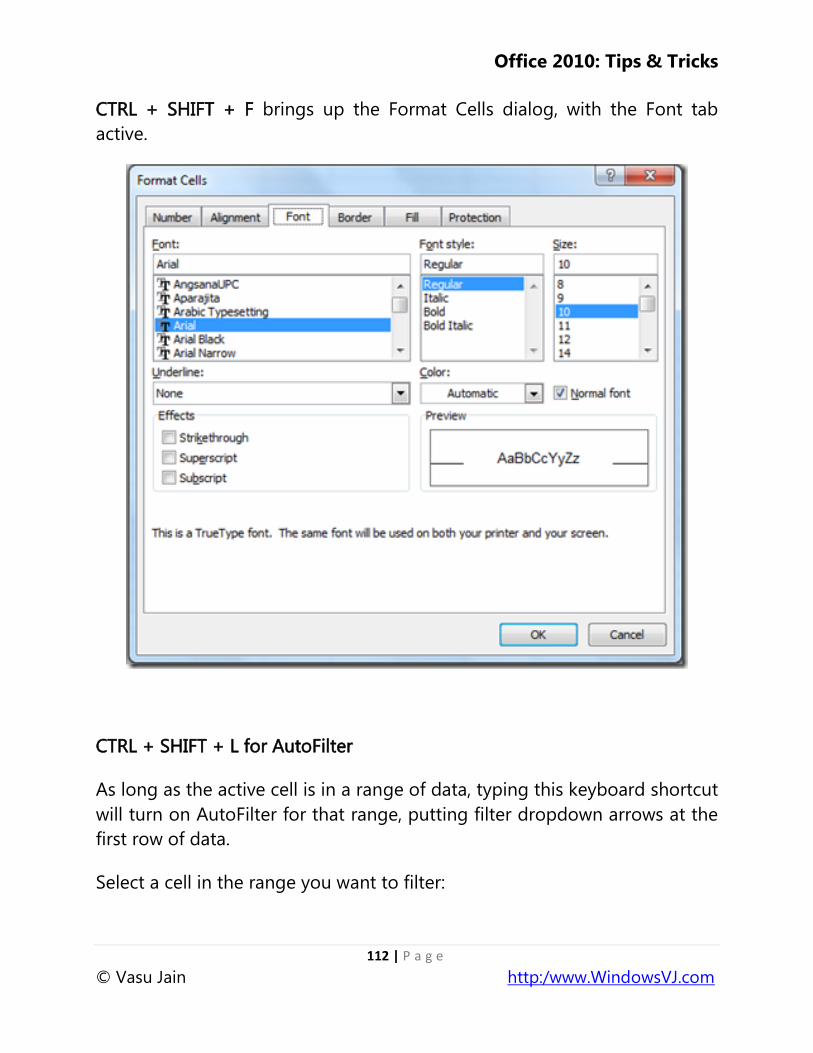
CTRL + SHIFT + F brings up the Format Cells dialog, with the Font tab
active.
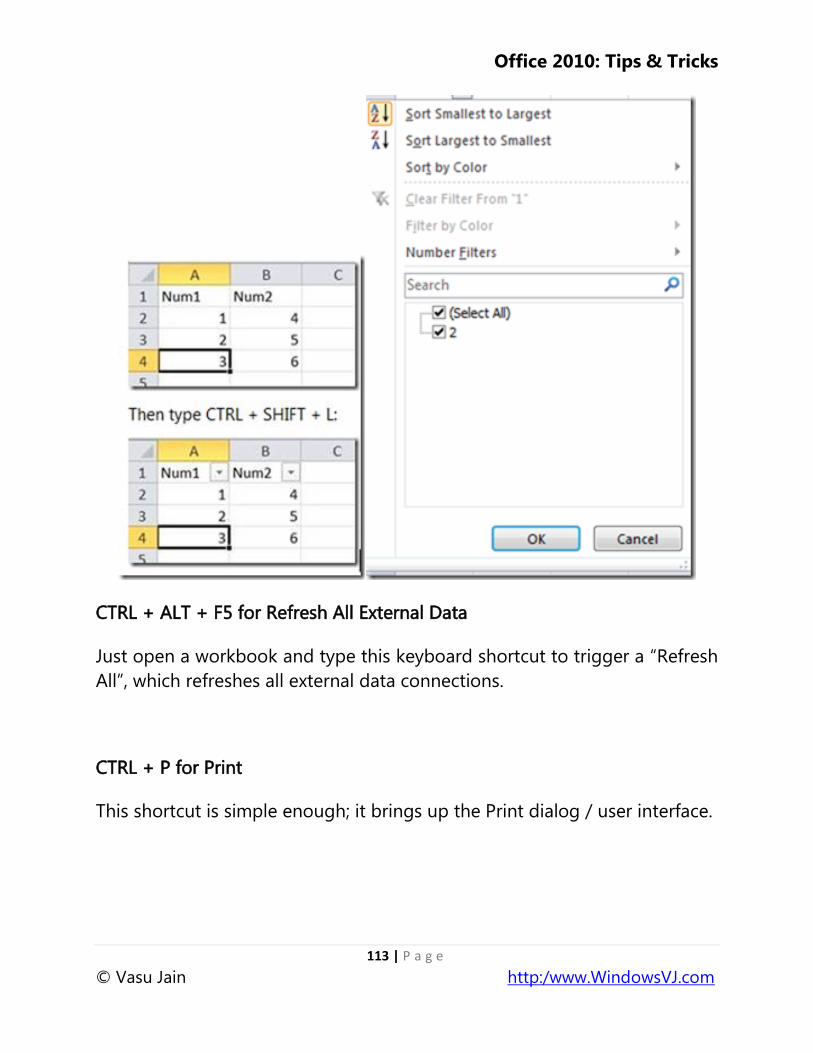
CTRL + SHIFT + L for AutoFilter
As long as the active cell is in a range of data, typing this keyboard shortcut
will turn on AutoFilter for that range, putting filter dropdown arrows at the
first row of data.
Select a cell in the range you want to filter:
Office 2010: Tips & Tricks
113 | P a g e
© Vasu Jain http:/www.WindowsVJ.com
CTRL + ALT + F5 for Refresh All External Data
Just open a workbook and type this keyboard shortcut to trigger a ―Refresh
All‖, which refreshes all external data connections.
CTRL + P for Print
This shortcut is simple enough; it brings up the Print dialog / user interface.
Office 2010: Tips & Tricks
114 | P a g e
© Vasu Jain http:/www.WindowsVJ.com
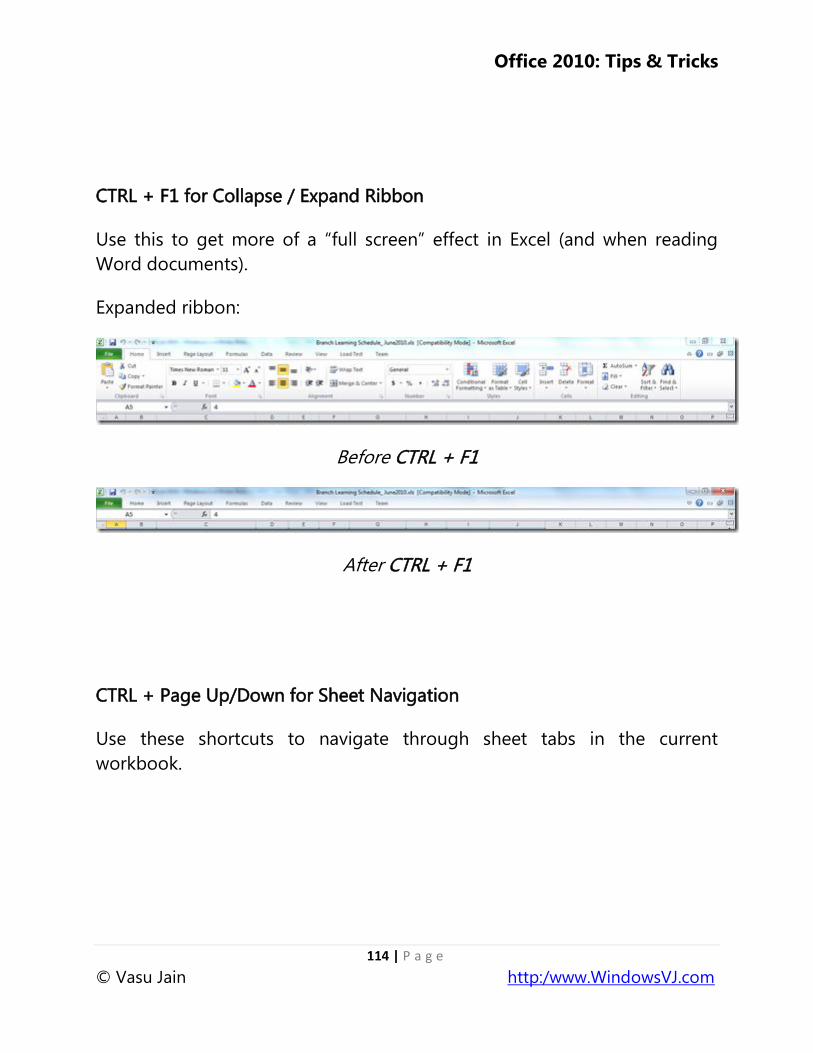
CTRL + F1 for Collapse / Expand Ribbon
Use this to get more of a ―full screen‖ effect in Excel (and when reading
Word documents).
Expanded ribbon:
Before CTRL + F1
After CTRL + F1
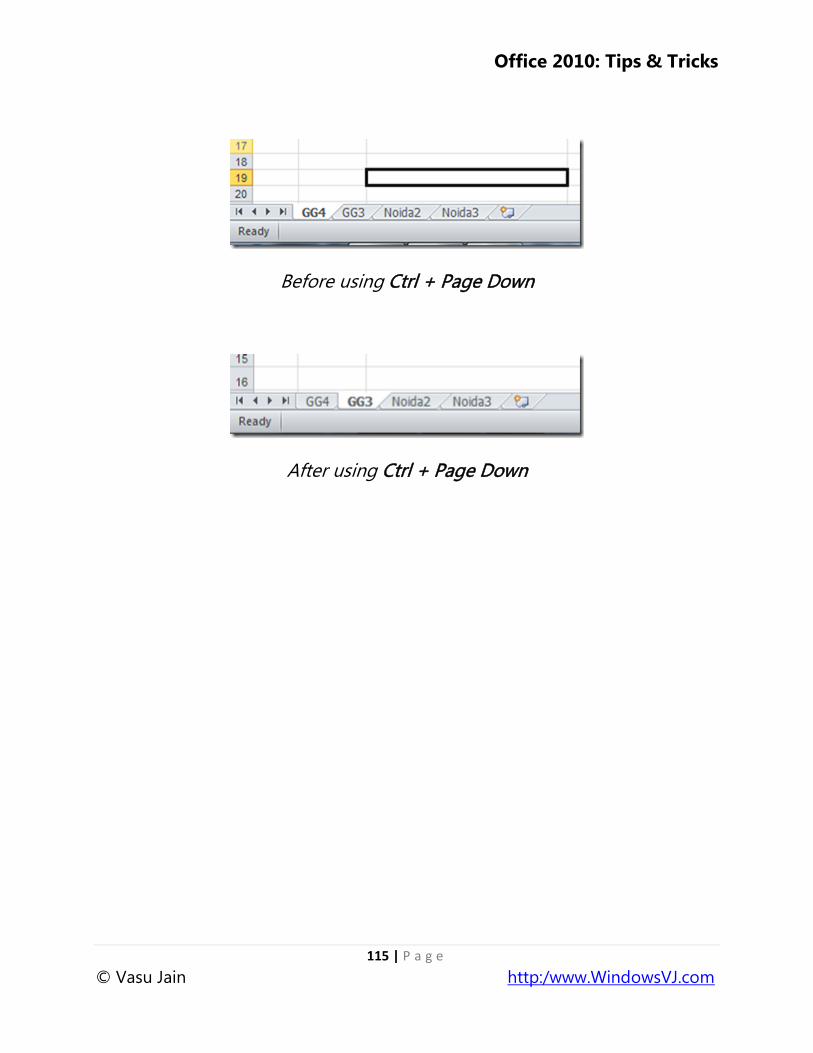
CTRL + Page Up/Down for Sheet Navigation
Use these shortcuts to navigate through sheet tabs in the current
workbook.
Office 2010: Tips & Tricks
115 | P a g e
© Vasu Jain http:/www.WindowsVJ.com
Before using Ctrl + Page Down
After using Ctrl + Page Down
Office 2010: Tips & Tricks
116 | P a g e
© Vasu Jain http:/www.WindowsVJ.com
Disable Read-Only Protected View in Office 2010
Office documents, presentations or spreadsheets being downloaded from
Internet are open to any form of Macro viruses that may harm the system.
Microsoft Office has always been susceptible to a variety of security threats,
ranging from macro viruses to exploits of embedded vulnerabilities.
Generally frequent updates, patches, and third-party security products was
what used by Users and administrators to keep their systems safe from
these open threats embedded in office documents, presentations or
spreadsheets. Thus Microsoft has introduced a security measure ―Protected
View‖ in Office 2010.
Protected View, works by opening new documents from unknown sources
or any file from Internet in a "digital sandbox" that prevents a user from
editing the document or executing macros or other embedded features.
Therefore a user can review the document without invoking any harmful or
malicious attachment or code with the office document, the risk to the
system is mitigated and the user may later decide whether they want to
trust the document.
Protected View is one of the features in Office 2010 that has made the
Office suite much secure. Since in a Protected View, file is a read only view,
no changes can be made over the file. This feature was to only use in high
risk scenarios where macros contain harmful scripts or malicious code. So if
you want to disable read-only protected view in Office 2010, you can do
the same.
Office 2010: Tips & Tricks
117 | P a g e
© Vasu Jain http:/www.WindowsVJ.com
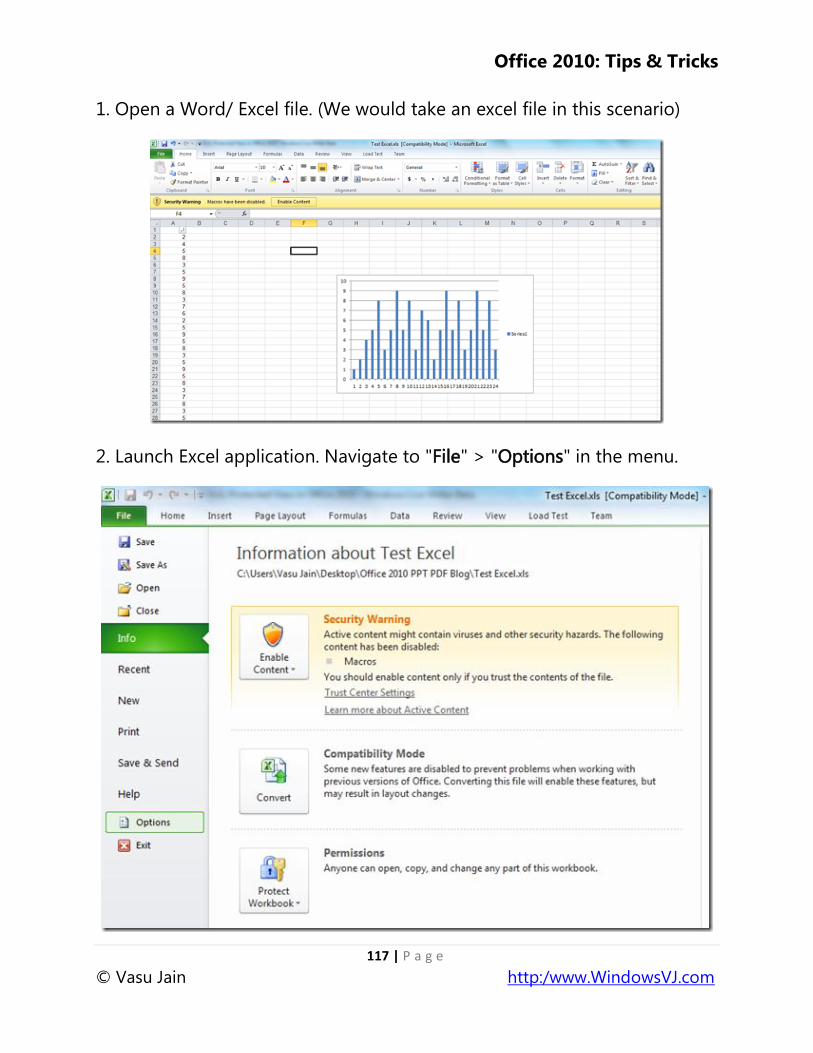
1. Open a Word/ Excel file. (We would take an excel file in this scenario)
2. Launch Excel application. Navigate to "File" > "Options" in the menu.
Office 2010: Tips & Tricks
118 | P a g e
© Vasu Jain http:/www.WindowsVJ.com
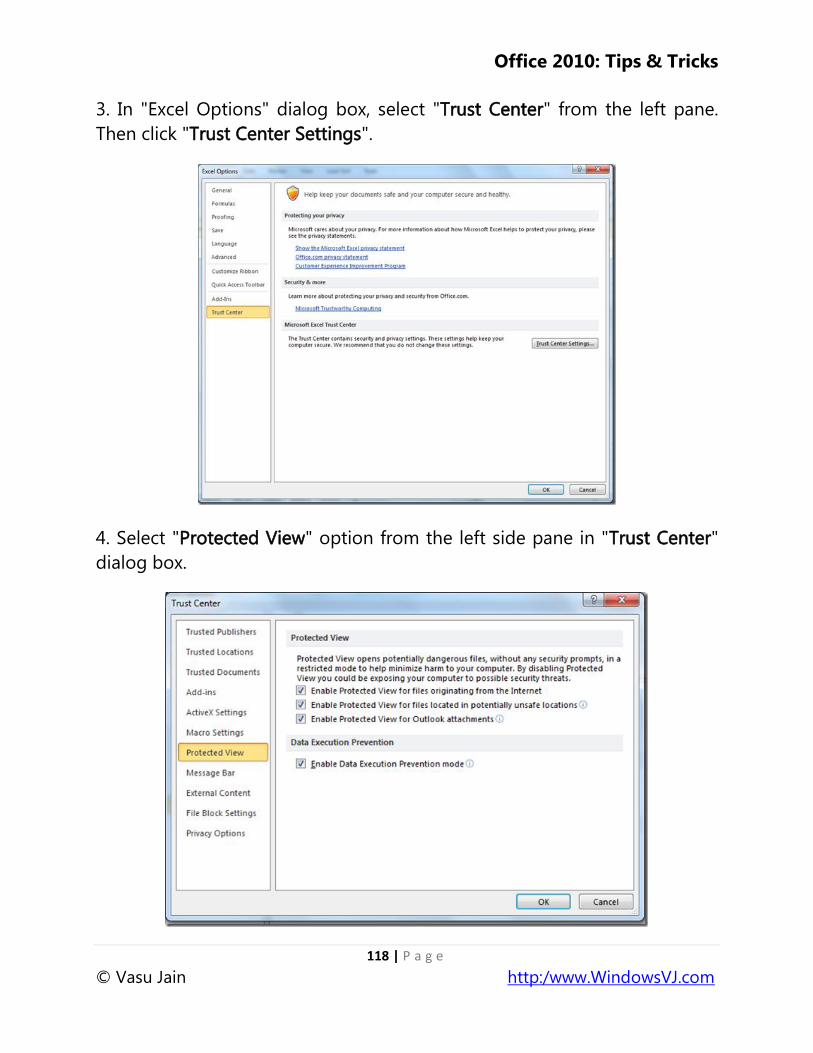
3. In "Excel Options" dialog box, select "Trust Center" from the left pane.
Then click "Trust Center Settings".
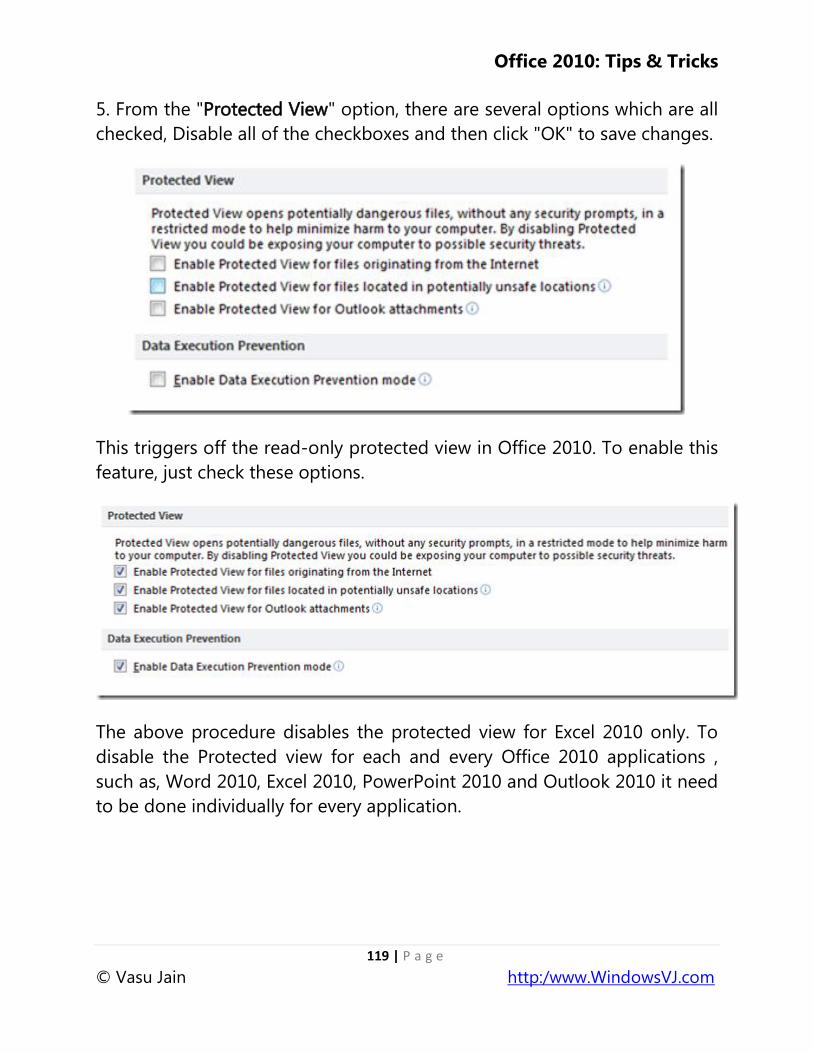
4. Select "Protected View" option from the left side pane in "Trust Center"
dialog box.
Office 2010: Tips & Tricks
119 | P a g e
© Vasu Jain http:/www.WindowsVJ.com
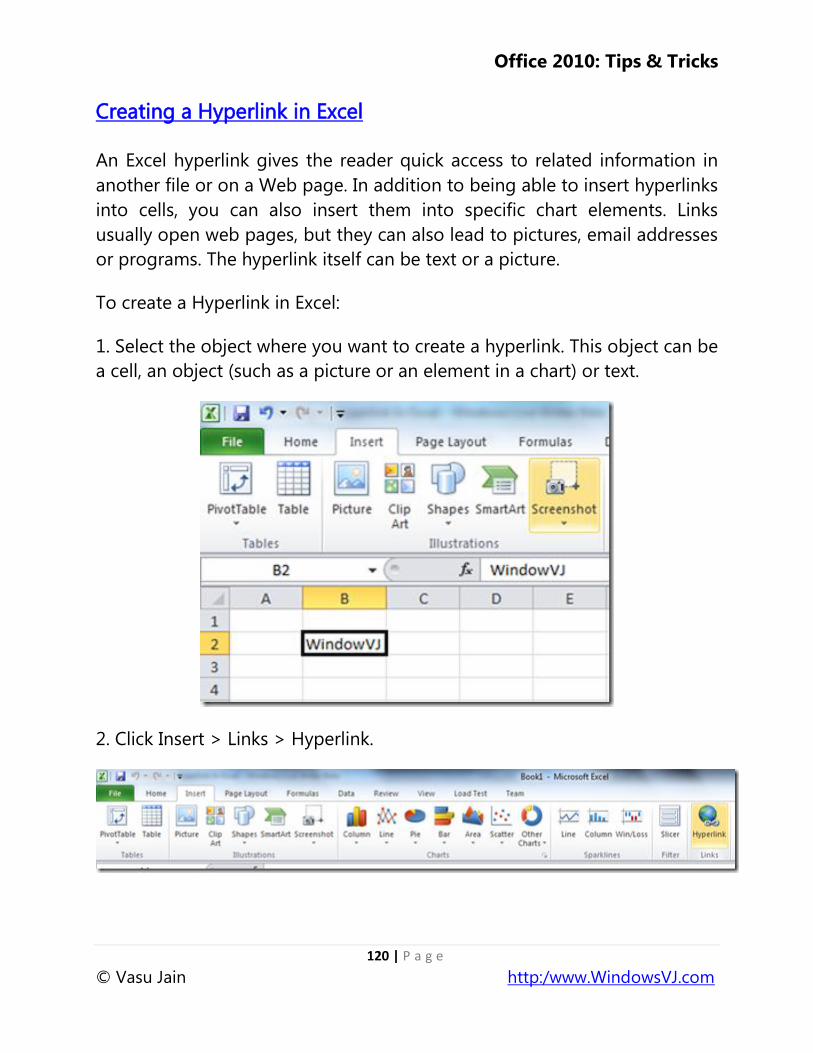
5. From the "Protected View" option, there are several options which are all
checked, Disable all of the checkboxes and then click "OK" to save changes.
This triggers off the read-only protected view in Office 2010. To enable this
feature, just check these options.
The above procedure disables the protected view for Excel 2010 only. To
disable the Protected view for each and every Office 2010 applications ,
such as, Word 2010, Excel 2010, PowerPoint 2010 and Outlook 2010 it need
to be done individually for every application.
Office 2010: Tips & Tricks
120 | P a g e
© Vasu Jain http:/www.WindowsVJ.com
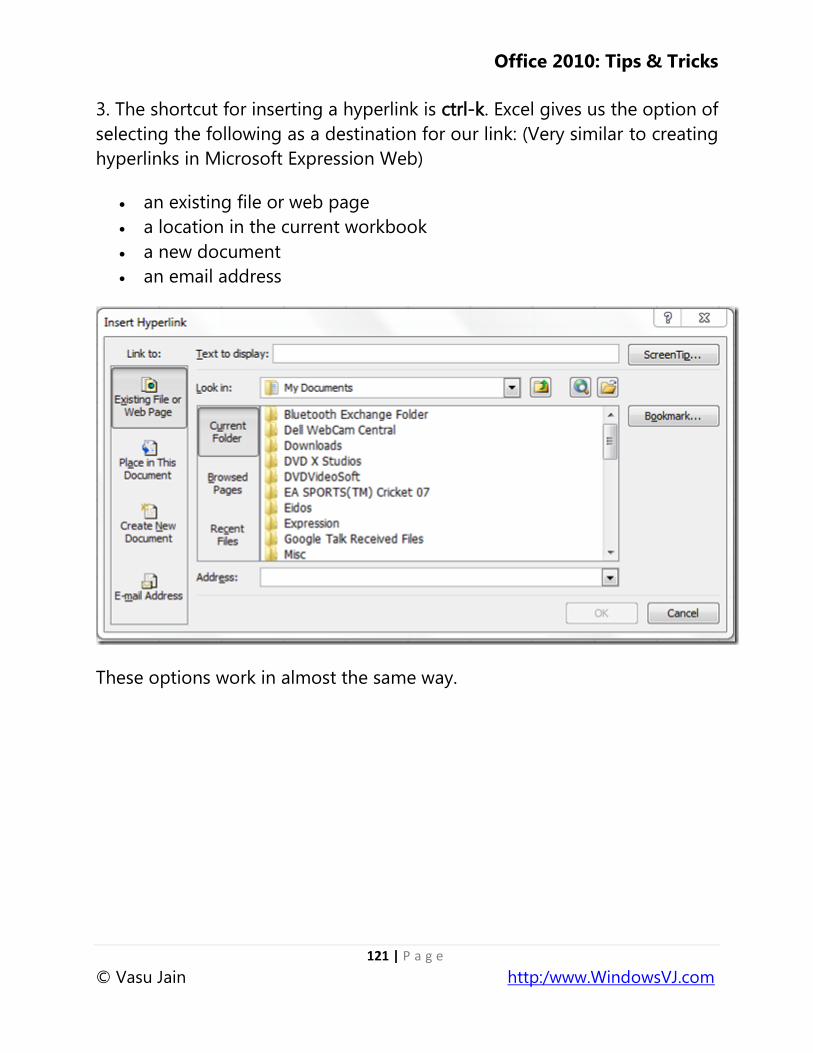
Creating a Hyperlink in Excel
An Excel hyperlink gives the reader quick access to related information in
another file or on a Web page. In addition to being able to insert hyperlinks
into cells, you can also insert them into specific chart elements. Links
usually open web pages, but they can also lead to pictures, email addresses
or programs. The hyperlink itself can be text or a picture.
To create a Hyperlink in Excel:
1. Select the object where you want to create a hyperlink. This object can be
a cell, an object (such as a picture or an element in a chart) or text.
2. Click Insert > Links > Hyperlink.
Office 2010: Tips & Tricks
121 | P a g e
© Vasu Jain http:/www.WindowsVJ.com
3. The shortcut for inserting a hyperlink is ctrl-k. Excel gives us the option of
selecting the following as a destination for our link: (Very similar to creating
hyperlinks in Microsoft Expression Web)
an existing file or web page
a location in the current workbook
a new document
an email address
These options work in almost the same way.
Office 2010: Tips & Tricks
122 | P a g e
© Vasu Jain http:/www.WindowsVJ.com
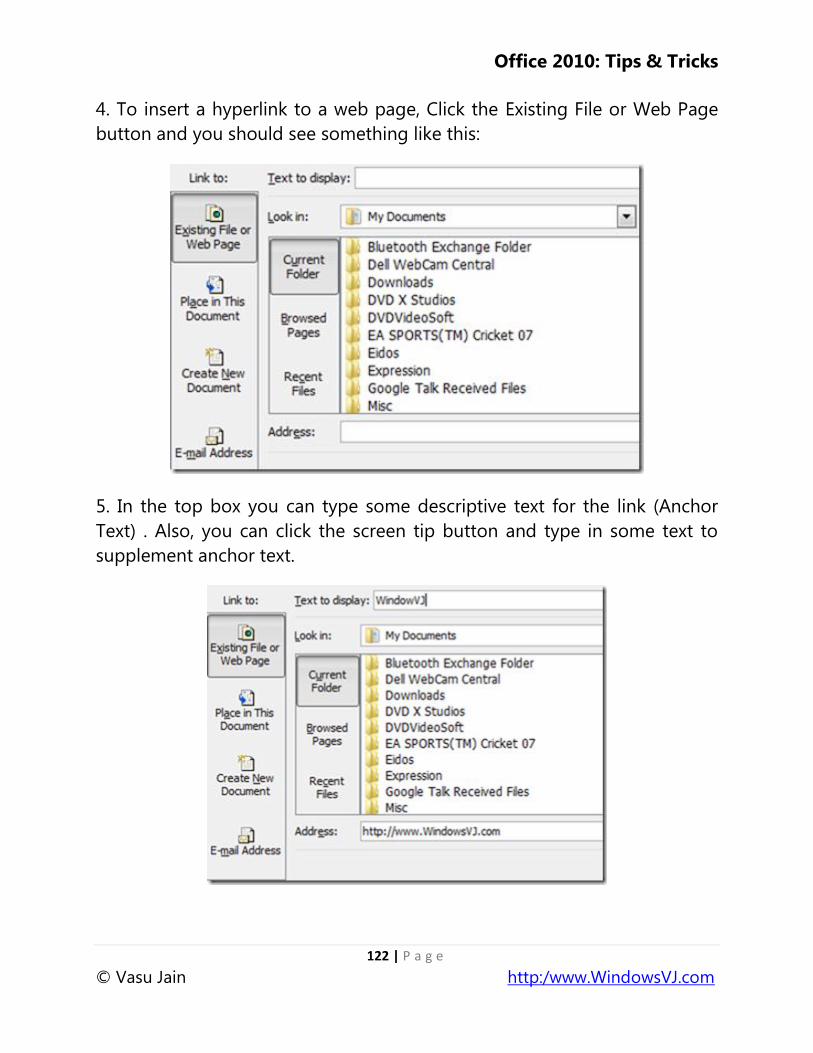
4. To insert a hyperlink to a web page, Click the Existing File or Web Page
button and you should see something like this:
5. In the top box you can type some descriptive text for the link (Anchor
Text) . Also, you can click the screen tip button and type in some text to
supplement anchor text.
Office 2010: Tips & Tricks
123 | P a g e
© Vasu Jain http:/www.WindowsVJ.com
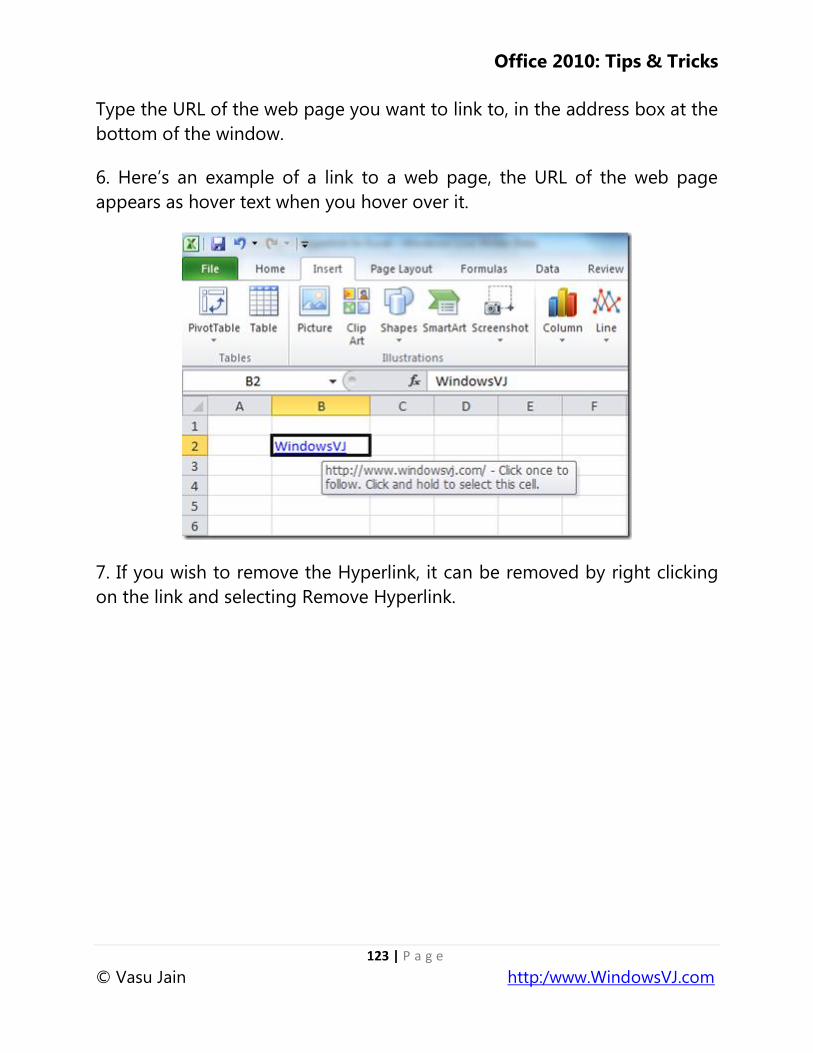
Type the URL of the web page you want to link to, in the address box at the
bottom of the window.
6. Here‘s an example of a link to a web page, the URL of the web page
appears as hover text when you hover over it.
7. If you wish to remove the Hyperlink, it can be removed by right clicking
on the link and selecting Remove Hyperlink.

Office 2010: Tips & Tricks
124 | P a g e
© Vasu Jain http:/www.WindowsVJ.com
8. To place the hyperlinks in the excel document to any cell reference in any
of the Sheet. Press Ok after entering the Cell Reference to hyperlink the
object.
Office 2010: Tips & Tricks
125 | P a g e
© Vasu Jain http:/www.WindowsVJ.com
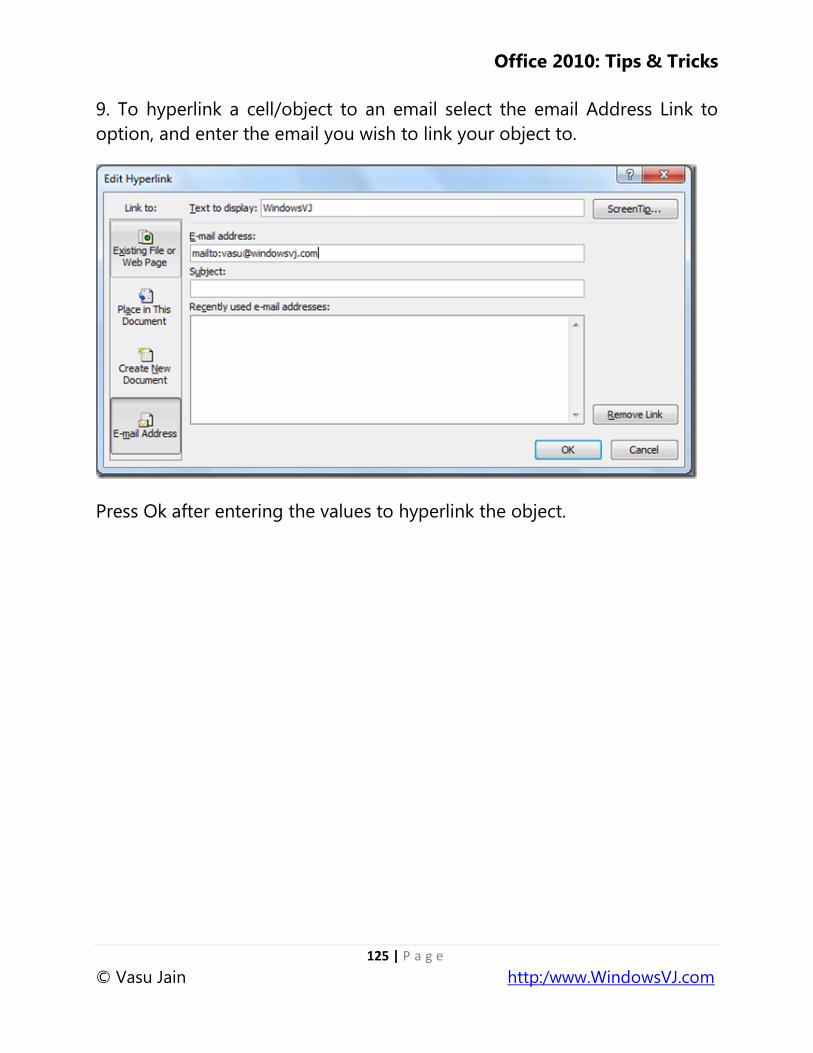
9. To hyperlink a cell/object to an email select the email Address Link to
option, and enter the email you wish to link your object to.
Press Ok after entering the values to hyperlink the object.
Office 2010: Tips & Tricks
126 | P a g e
© Vasu Jain http:/www.WindowsVJ.com
Data Filtration in Excel 2010 using Slicers
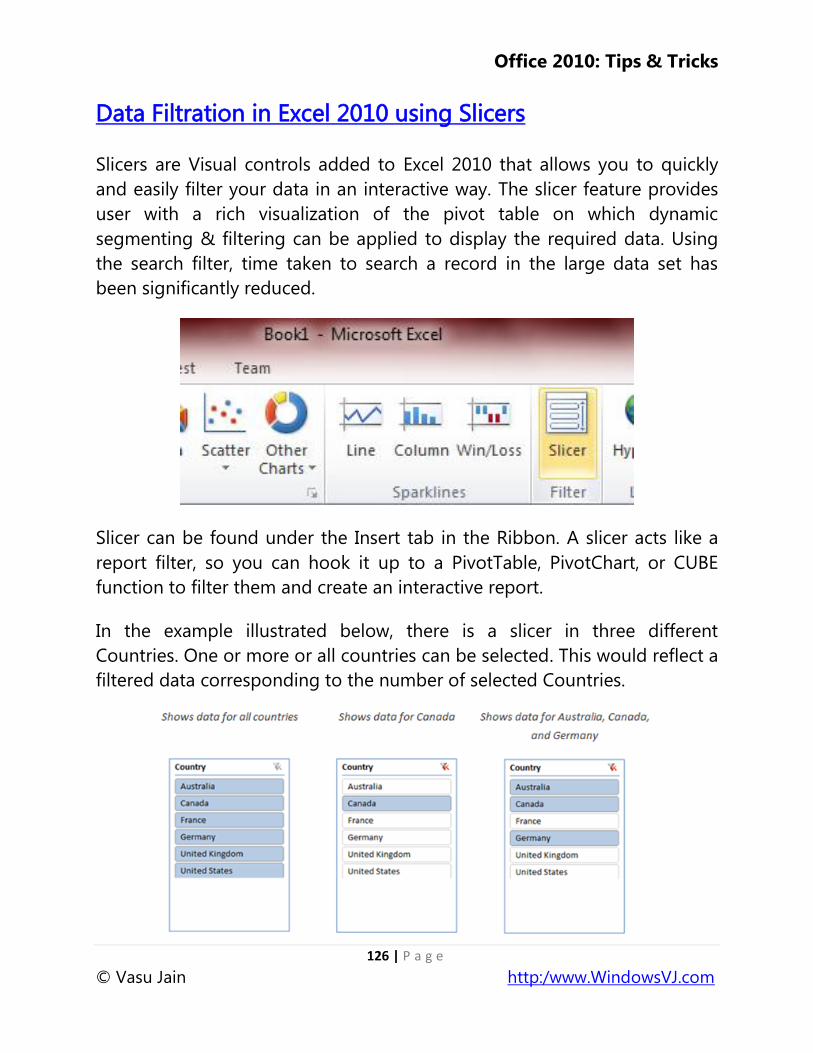
Slicers are Visual controls added to Excel 2010 that allows you to quickly
and easily filter your data in an interactive way. The slicer feature provides
user with a rich visualization of the pivot table on which dynamic
segmenting & filtering can be applied to display the required data. Using
the search filter, time taken to search a record in the large data set has
been significantly reduced.
Slicer can be found under the Insert tab in the Ribbon. A slicer acts like a
report filter, so you can hook it up to a PivotTable, PivotChart, or CUBE
function to filter them and create an interactive report.
In the example illustrated below, there is a slicer in three different
Countries. One or more or all countries can be selected. This would reflect a
filtered data corresponding to the number of selected Countries.
Office 2010: Tips & Tricks
127 | P a g e
© Vasu Jain http:/www.WindowsVJ.com
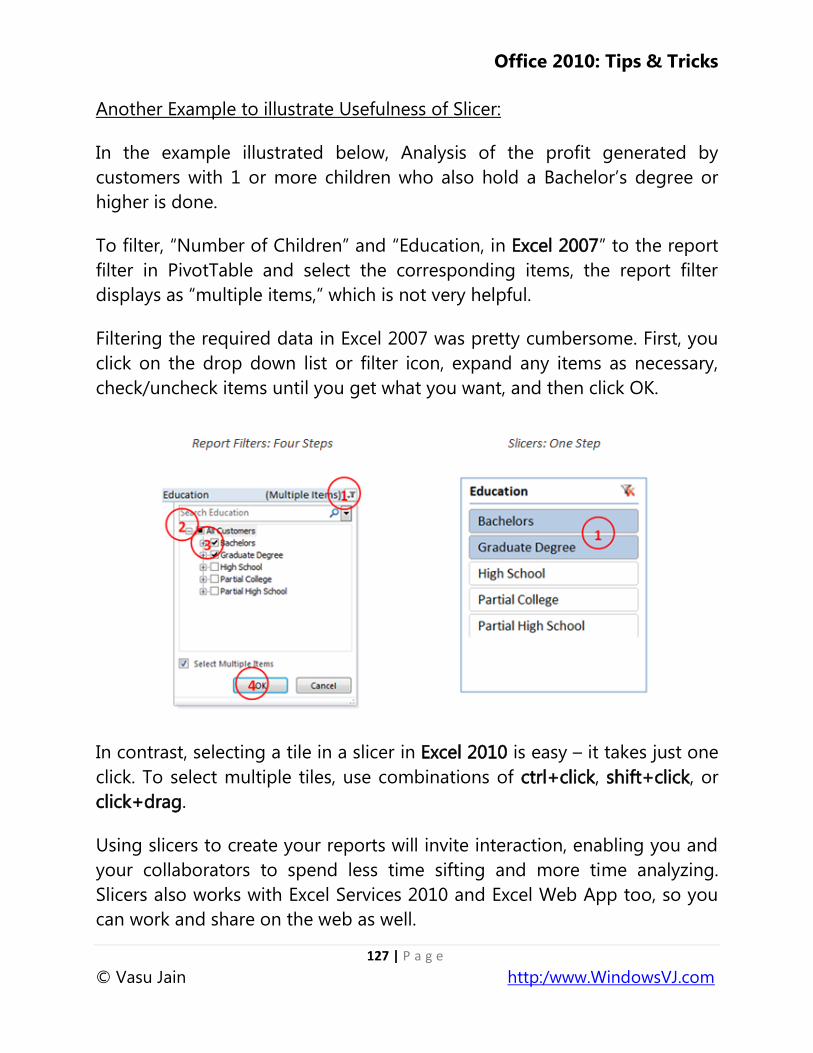
Another Example to illustrate Usefulness of Slicer:
In the example illustrated below, Analysis of the profit generated by
customers with 1 or more children who also hold a Bachelor‘s degree or
higher is done.
To filter, ―Number of Children‖ and ―Education, in Excel 2007‖ to the report
filter in PivotTable and select the corresponding items, the report filter
displays as ―multiple items,‖ which is not very helpful.
Filtering the required data in Excel 2007 was pretty cumbersome. First, you
click on the drop down list or filter icon, expand any items as necessary,
check/uncheck items until you get what you want, and then click OK.
In contrast, selecting a tile in a slicer in Excel 2010 is easy – it takes just one
click. To select multiple tiles, use combinations of ctrl+click, shift+click, or
click+drag.
Using slicers to create your reports will invite interaction, enabling you and
your collaborators to spend less time sifting and more time analyzing.
Slicers also works with Excel Services 2010 and Excel Web App too, so you
can work and share on the web as well.
Office 2010: Tips & Tricks
128 | P a g e
© Vasu Jain http:/www.WindowsVJ.com

Office 2010: Tips & Tricks
129 | P a g e
© Vasu Jain http:/www.WindowsVJ.com
Save PowerPoint Presentations as Movies in PowerPoint 2010
Sometimes a requirement for converting a PowerPoint presentation as a
movie occurs to export the presentation. PowerPoint 2010 comes with a lot
of handy features and one of such feature is export presentations as movies
while maintaining all effects and animations. The videos exported will be in
Microsoft‘s proprietary WMV format. However the videos can be exported
in different resolutions keeping in mind the need to transfer the same over
bandwidth restricted channels or on portable handheld devices. Videos can
be exported in three predefined resolutions:
1. Computers or HD screens (960×720)
2. Internet or DVD (640×480)
3. Portable media devices (320×240)
To convert and save a PowerPoint presentation as a Video:
1. Navigate to Backstage view of PowerPoint.
2. Select Save & Send option from the File menu.
3. Select Create a Video in File Types.
Office 2010: Tips & Tricks
130 | P a g e
© Vasu Jain http:/www.WindowsVJ.com
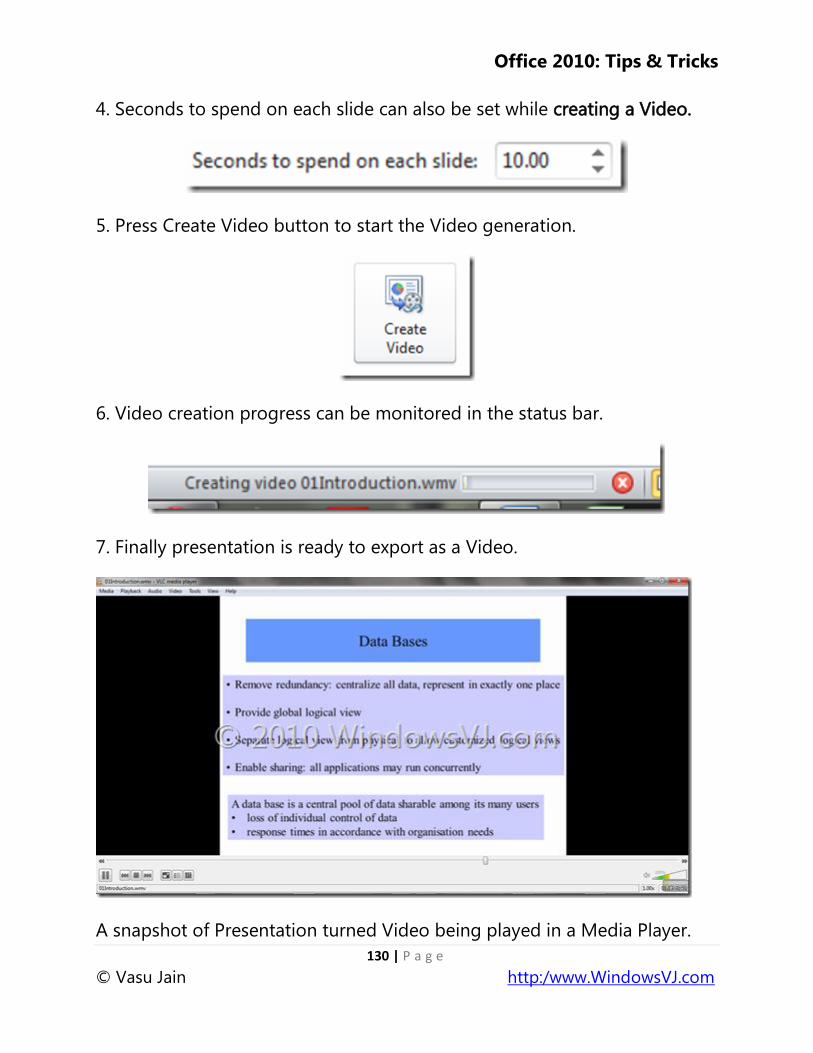
4. Seconds to spend on each slide can also be set while creating a Video.
5. Press Create Video button to start the Video generation.
6. Video creation progress can be monitored in the status bar.
7. Finally presentation is ready to export as a Video.
A snapshot of Presentation turned Video being played in a Media Player.

Office 2010: Tips & Tricks
131 | P a g e
© Vasu Jain http:/www.WindowsVJ.com
This feature is one which was demanded since long time and although a
third party plug-in can always do the needful but doing it from the
PowerPoint menu makes the things much more easier & convenient.
Office 2010: Tips & Tricks
132 | P a g e
© Vasu Jain http:/www.WindowsVJ.com
Edit Videos inside a Presentation in PowerPoint 2010
Microsoft PowerPoint 2010 is the powerful formatting and editing of
embedded videos in slide shows. PowerPoint has long been able to embed
video clips in presentations, but unlike previous versions of the product
where an external application was required to edit a video inside a
presentation, with PowerPoint 2010, you can edit the video right in the
application and then compress it so that the underlying presentation isn‘t
oversized by irrelevant portions of the video. Most of the artistic effects
that can be applied to images in Office 2010 can be applied to the
embedded videos too. You can also embed video from file as well as online
videos. It will automatically compress and optimize the embedded media
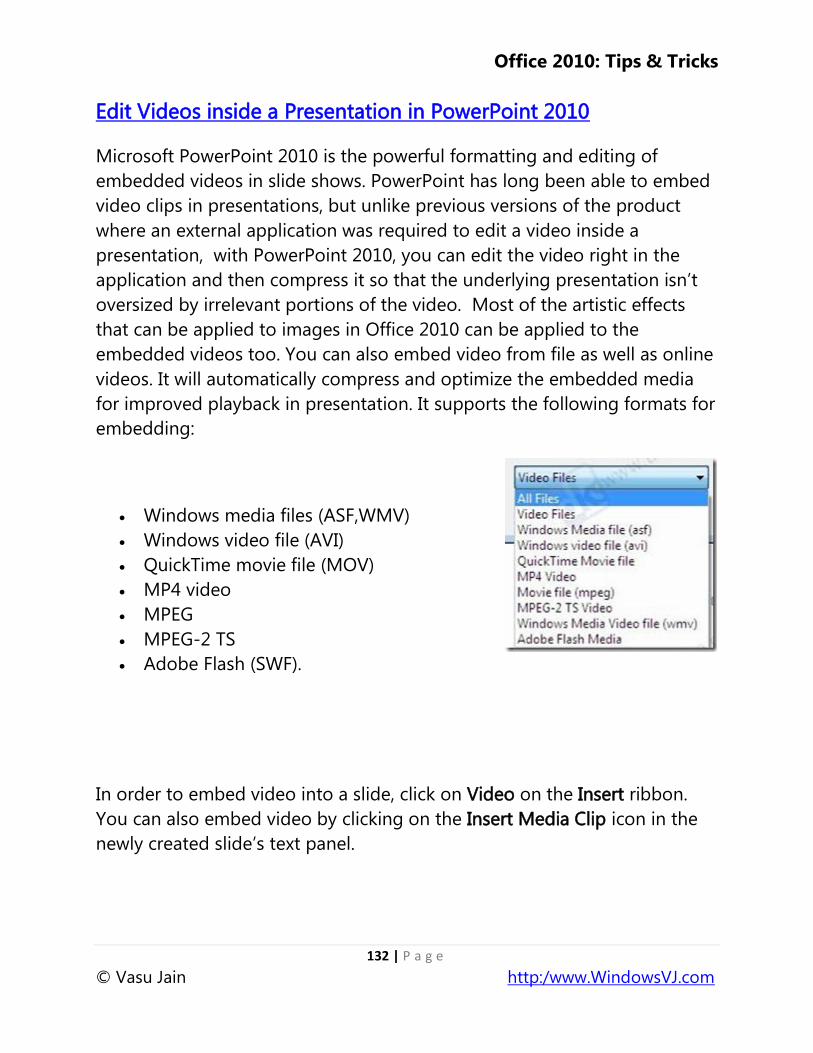
for improved playback in presentation. It supports the following formats for
embedding:
Windows media files (ASF,WMV)
Windows video file (AVI)
QuickTime movie file (MOV)
MP4 video
MPEG
MPEG-2 TS
Adobe Flash (SWF).
In order to embed video into a slide, click on Video on the Insert ribbon.
You can also embed video by clicking on the Insert Media Clip icon in the
newly created slide‘s text panel.
Office 2010: Tips & Tricks
133 | P a g e
© Vasu Jain http:/www.WindowsVJ.com
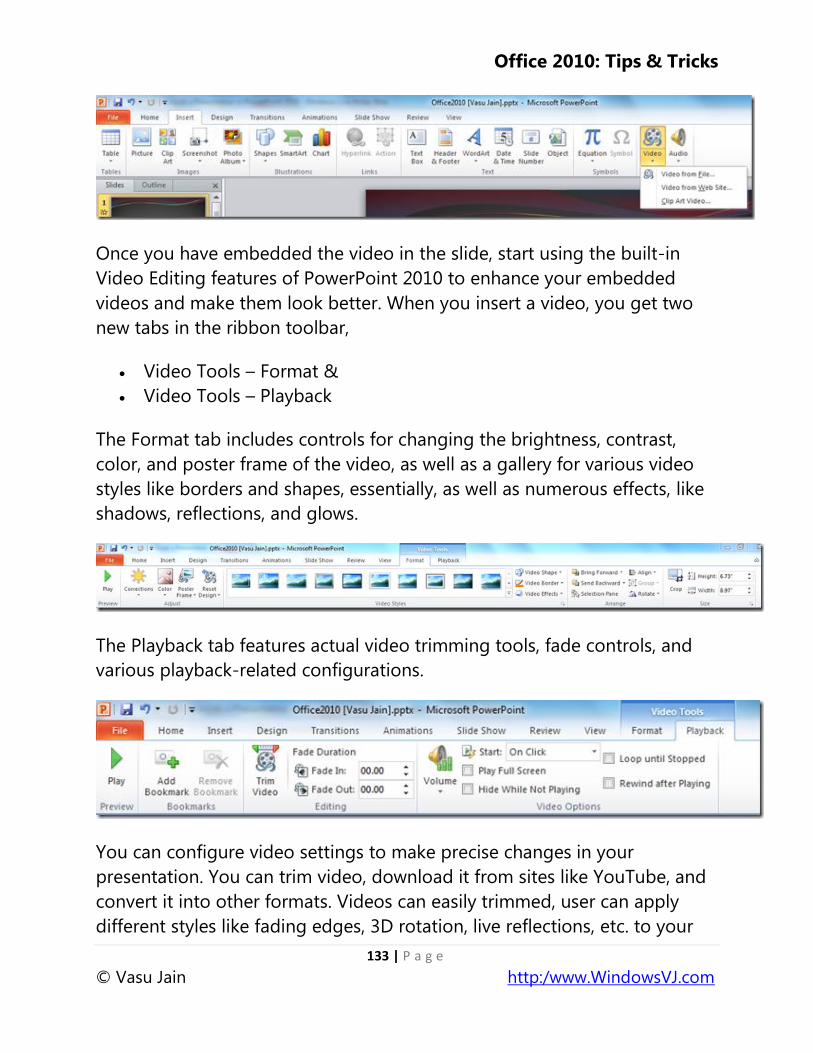
Once you have embedded the video in the slide, start using the built-in
Video Editing features of PowerPoint 2010 to enhance your embedded
videos and make them look better. When you insert a video, you get two
new tabs in the ribbon toolbar,
Video Tools – Format &
Video Tools – Playback
The Format tab includes controls for changing the brightness, contrast,
color, and poster frame of the video, as well as a gallery for various video
styles like borders and shapes, essentially, as well as numerous effects, like
shadows, reflections, and glows.
The Playback tab features actual video trimming tools, fade controls, and
various playback-related configurations.
You can configure video settings to make precise changes in your
presentation. You can trim video, download it from sites like YouTube, and
convert it into other formats. Videos can easily trimmed, user can apply
different styles like fading edges, 3D rotation, live reflections, etc. to your
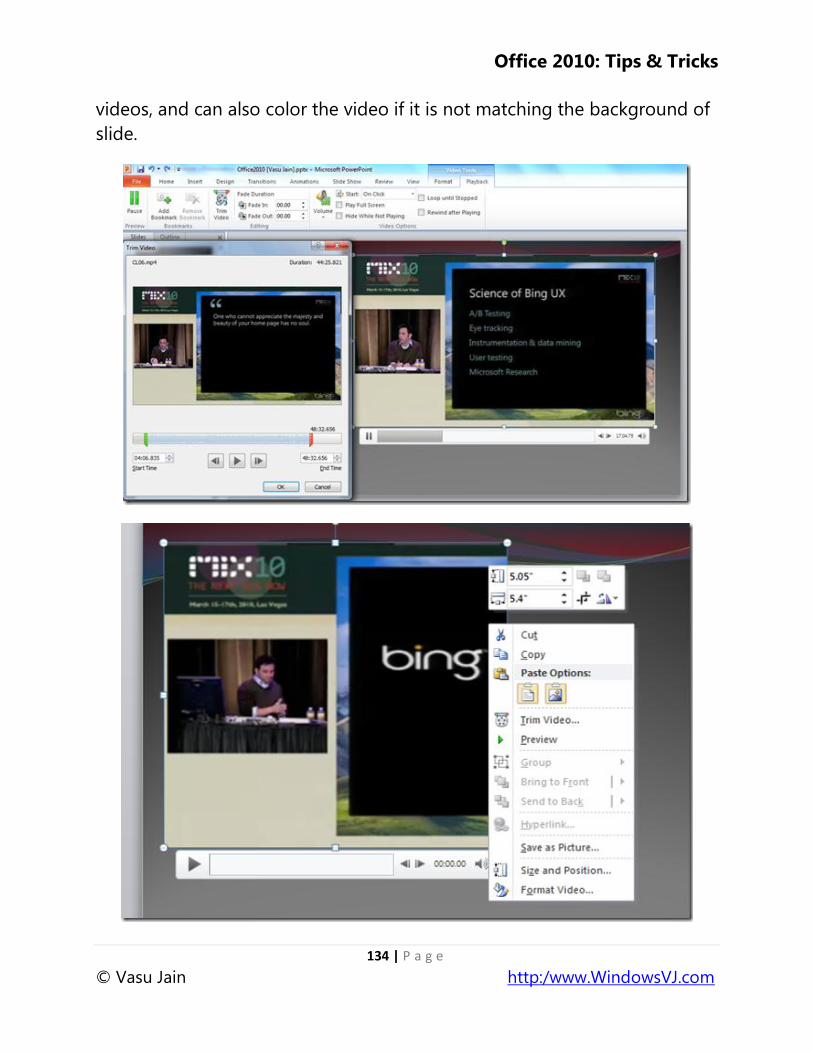
Office 2010: Tips & Tricks
134 | P a g e
© Vasu Jain http:/www.WindowsVJ.com
videos, and can also color the video if it is not matching the background of
slide.
Office 2010: Tips & Tricks
135 | P a g e
© Vasu Jain http:/www.WindowsVJ.com
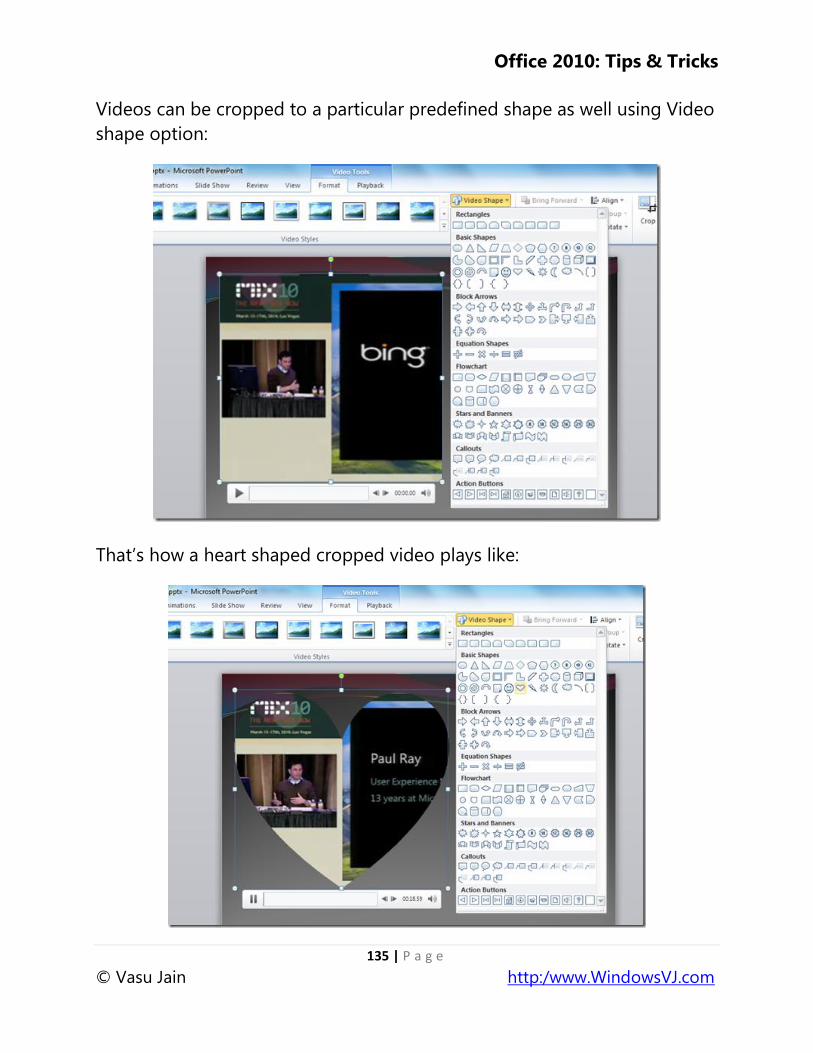
Videos can be cropped to a particular predefined shape as well using Video
shape option:
That‘s how a heart shaped cropped video plays like:
Office 2010: Tips & Tricks
136 | P a g e
© Vasu Jain http:/www.WindowsVJ.com
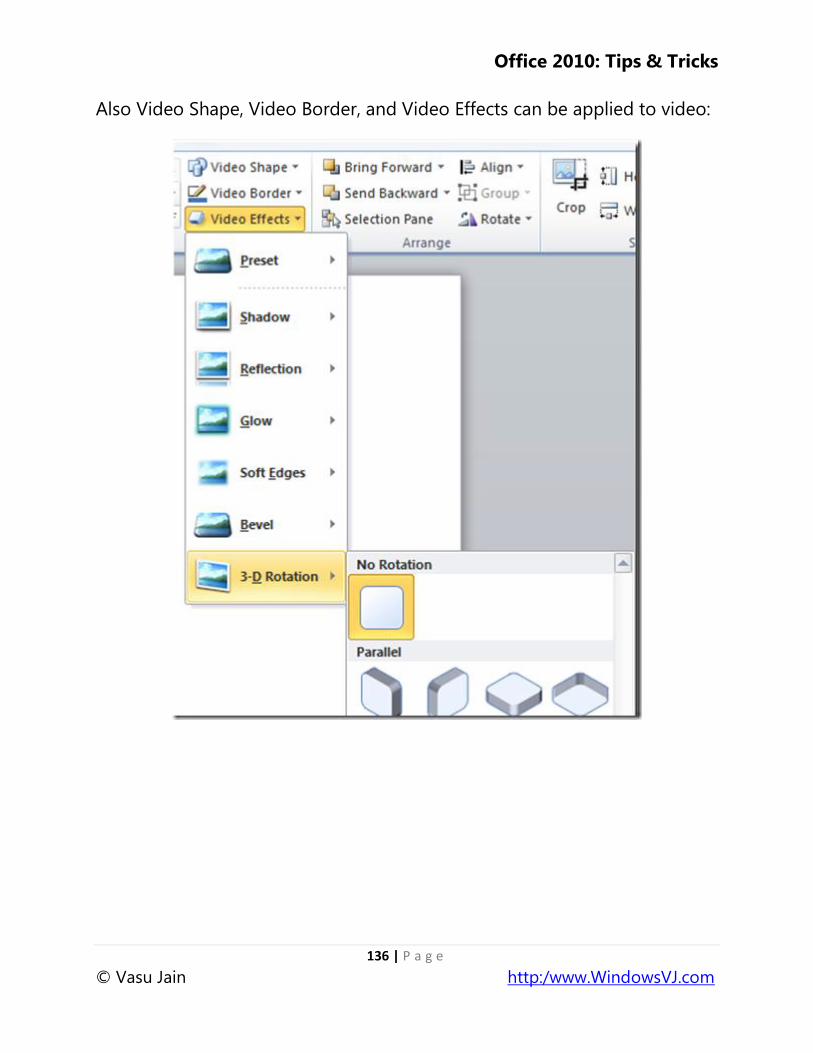
Also Video Shape, Video Border, and Video Effects can be applied to video:
Office 2010: Tips & Tricks
137 | P a g e
© Vasu Jain http:/www.WindowsVJ.com
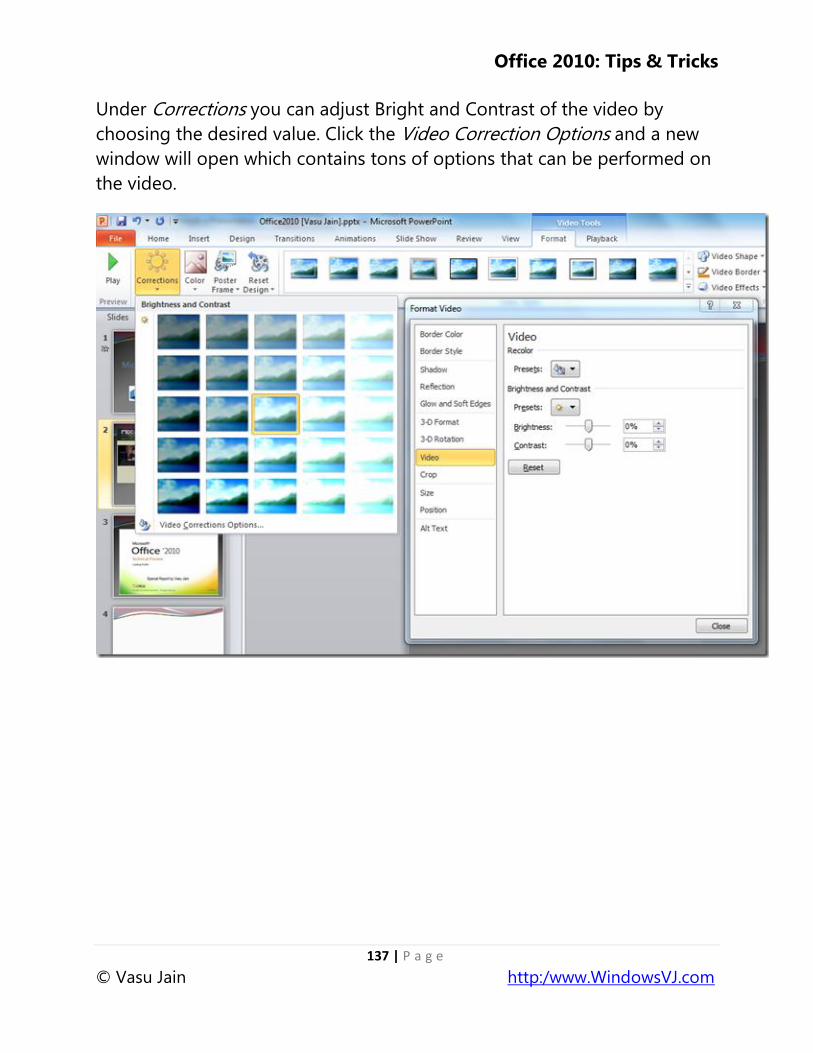
Under Corrections you can adjust Bright and Contrast of the video by
choosing the desired value. Click the Video Correction Options and a new
window will open which contains tons of options that can be performed on
the video.
Office 2010: Tips & Tricks
138 | P a g e
© Vasu Jain http:/www.WindowsVJ.com
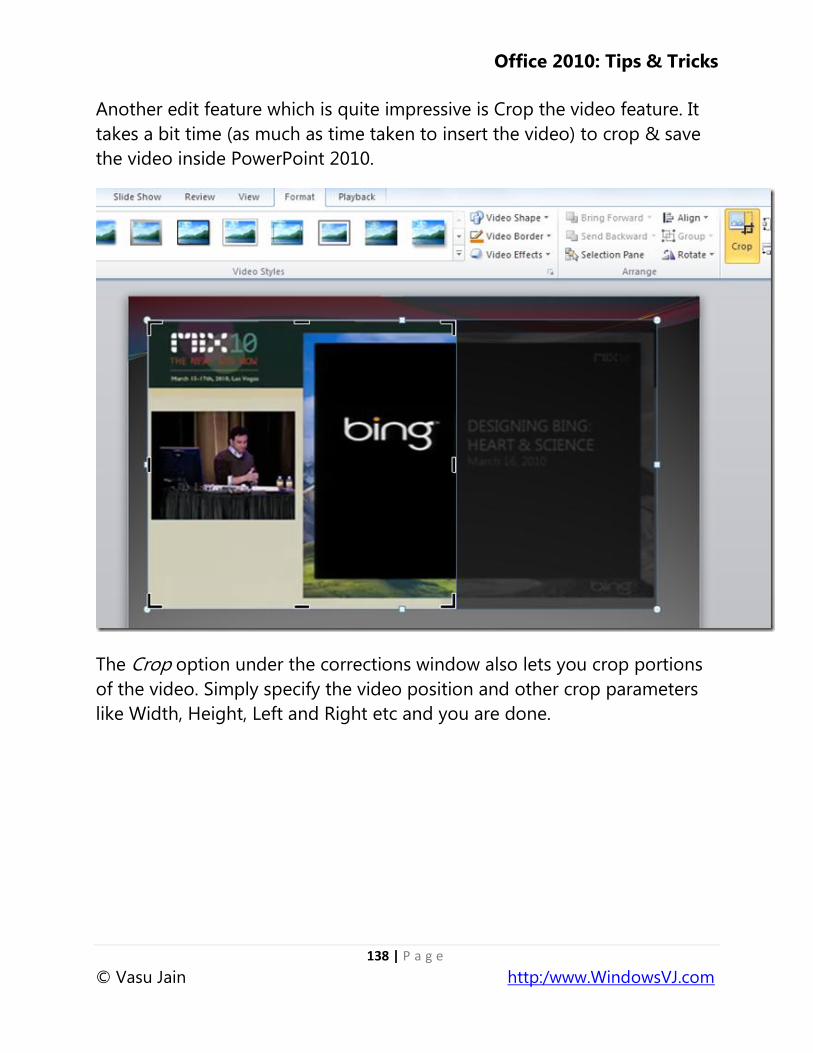
Another edit feature which is quite impressive is Crop the video feature. It
takes a bit time (as much as time taken to insert the video) to crop & save
the video inside PowerPoint 2010.
The Crop option under the corrections window also lets you crop portions
of the video. Simply specify the video position and other crop parameters
like Width, Height, Left and Right etc and you are done.

Office 2010: Tips & Tricks
139 | P a g e
© Vasu Jain http:/www.WindowsVJ.com
The Size and Position options let you adjust the exact size and position of
the video. You can add the Video‘s Title and description from the Alt Text
option.
Office 2010: Tips & Tricks
140 | P a g e
© Vasu Jain http:/www.WindowsVJ.com
Apart from these playback features you can edit the border color and style
of the video, shadow and reflection effects can be added from the Shadow
and Reflection options. You can perform 3-D operations on the video using
the 3-D Format and 3-D Rotation option.
The ton of edit features added to PowerPoint 2010 would surely help you
make rich & much more effective presentations.
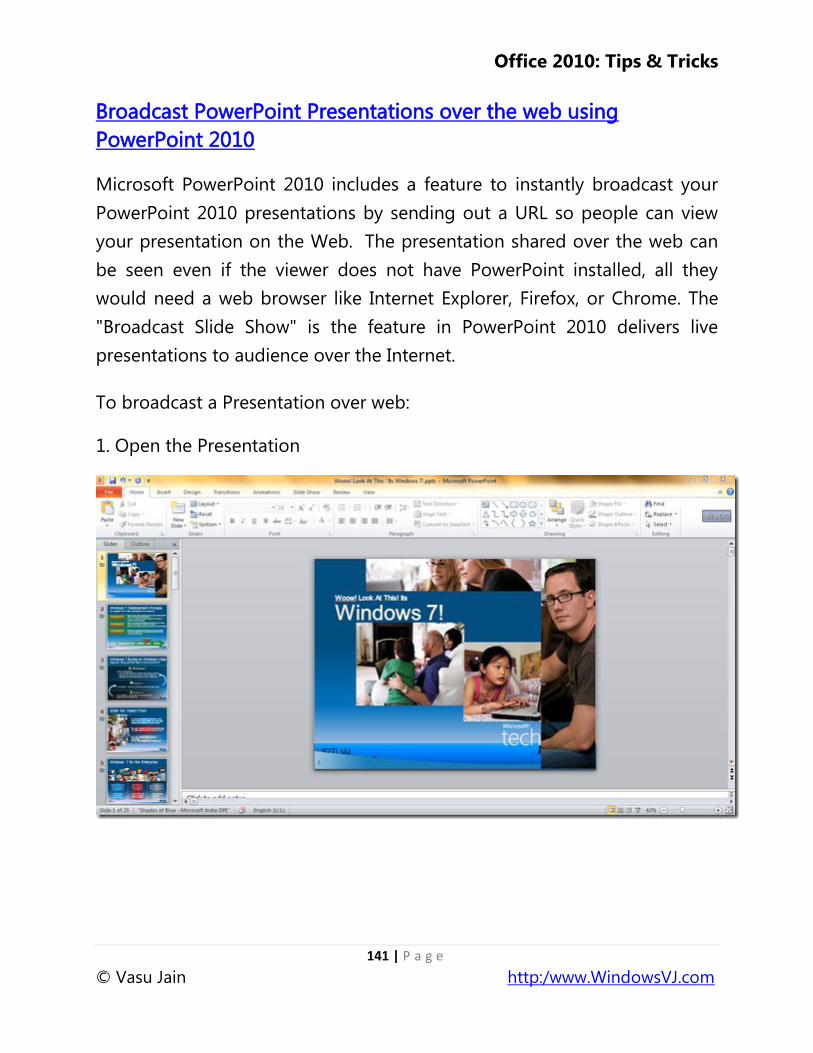
Office 2010: Tips & Tricks
141 | P a g e
© Vasu Jain http:/www.WindowsVJ.com
Broadcast PowerPoint Presentations over the web using
PowerPoint 2010
Microsoft PowerPoint 2010 includes a feature to instantly broadcast your
PowerPoint 2010 presentations by sending out a URL so people can view
your presentation on the Web. The presentation shared over the web can
be seen even if the viewer does not have PowerPoint installed, all they
would need a web browser like Internet Explorer, Firefox, or Chrome. The
"Broadcast Slide Show" is the feature in PowerPoint 2010 delivers live
presentations to audience over the Internet.
To broadcast a Presentation over web:
1. Open the Presentation
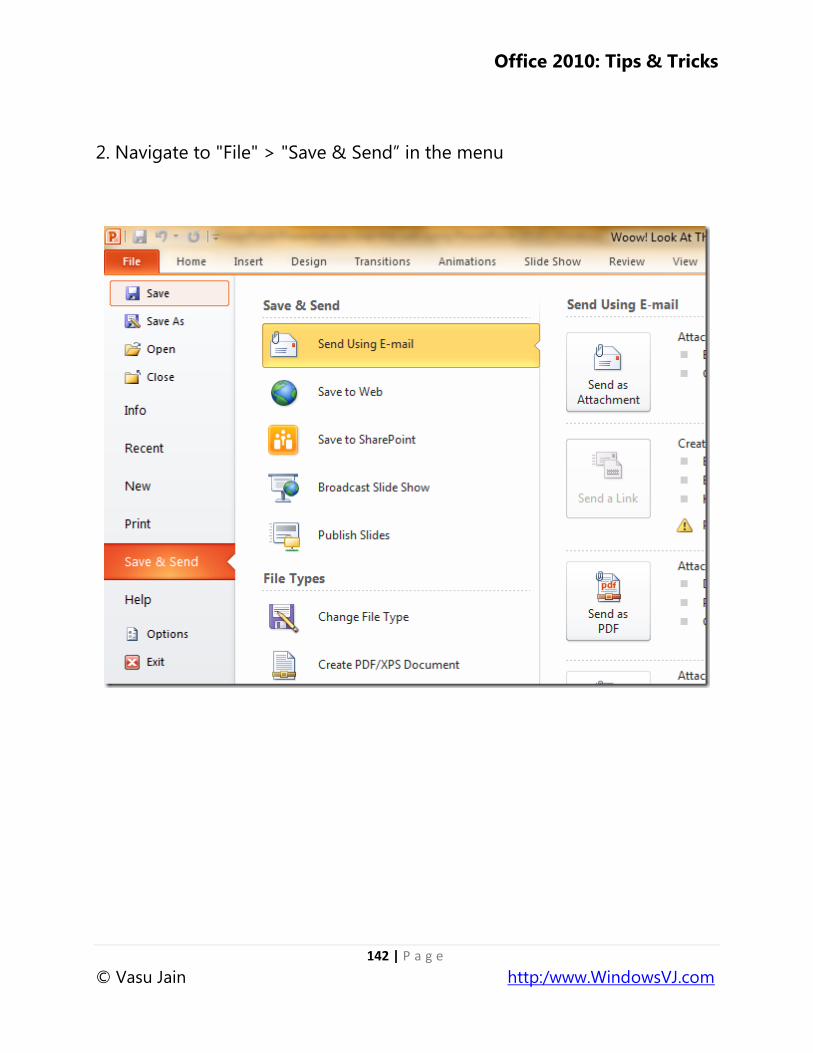
Office 2010: Tips & Tricks
142 | P a g e
© Vasu Jain http:/www.WindowsVJ.com
2. Navigate to "File" > "Save & Send‖ in the menu
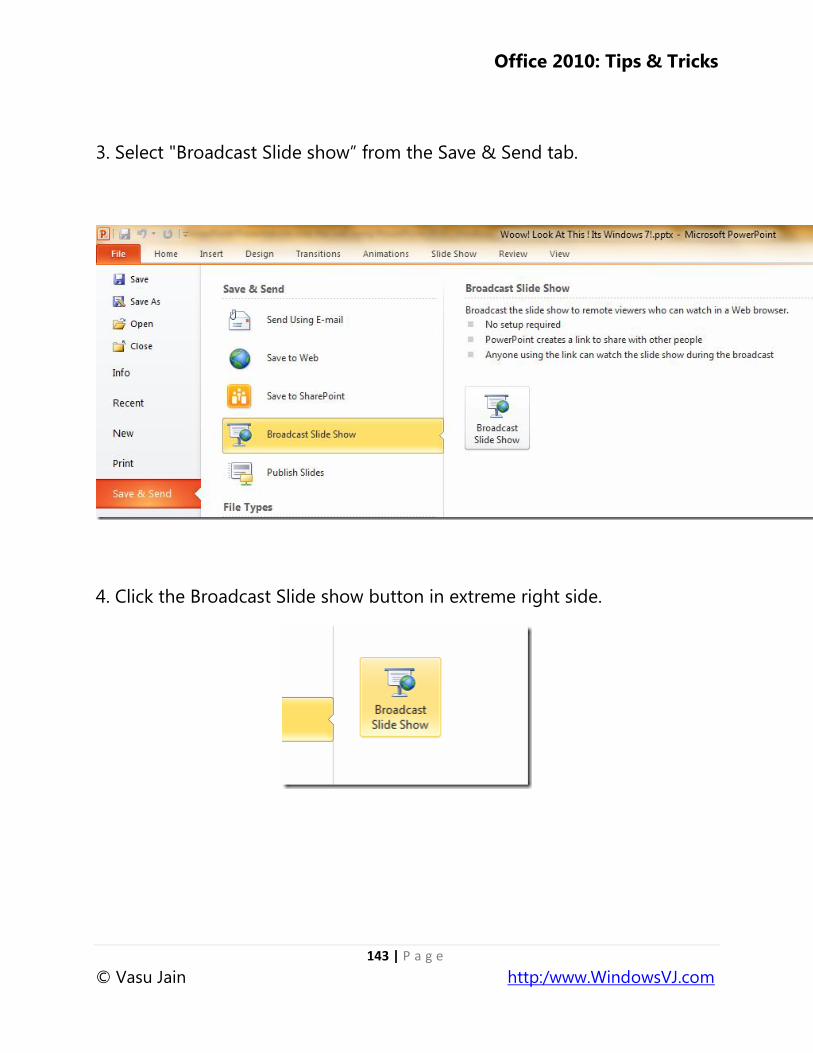
Office 2010: Tips & Tricks
143 | P a g e
© Vasu Jain http:/www.WindowsVJ.com
3. Select "Broadcast Slide show‖ from the Save & Send tab.
4. Click the Broadcast Slide show button in extreme right side.
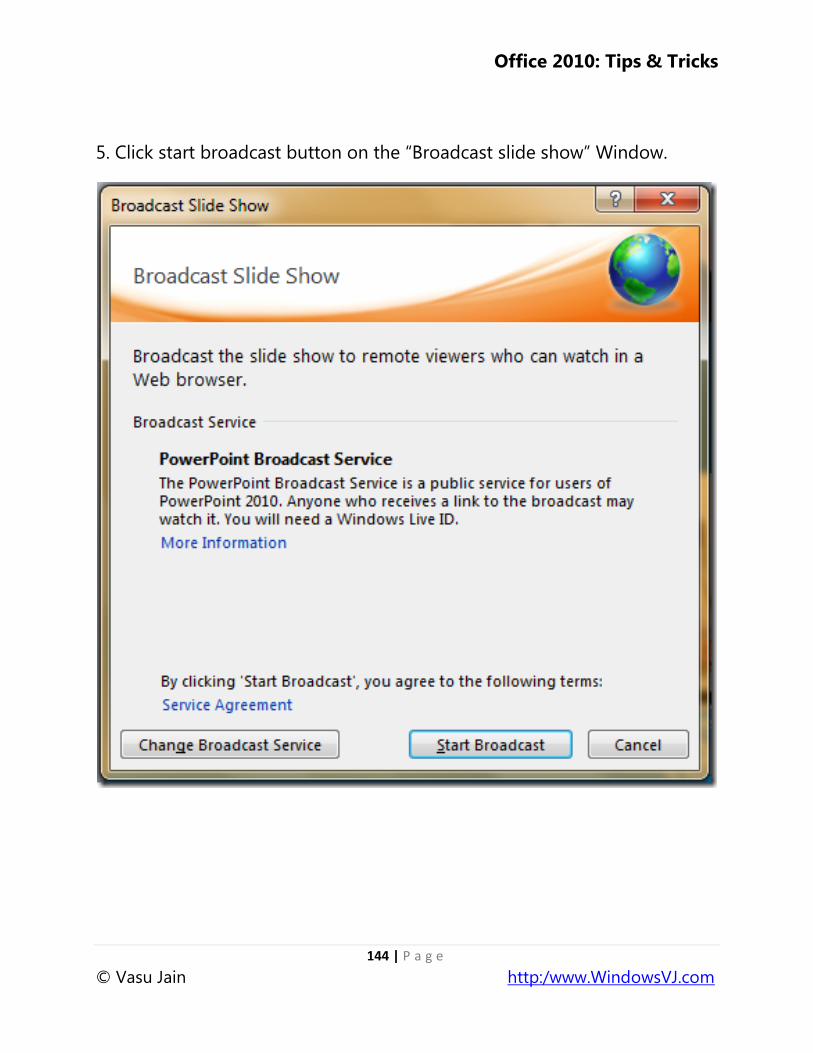
Office 2010: Tips & Tricks
144 | P a g e
© Vasu Jain http:/www.WindowsVJ.com
5. Click start broadcast button on the ―Broadcast slide show‖ Window.
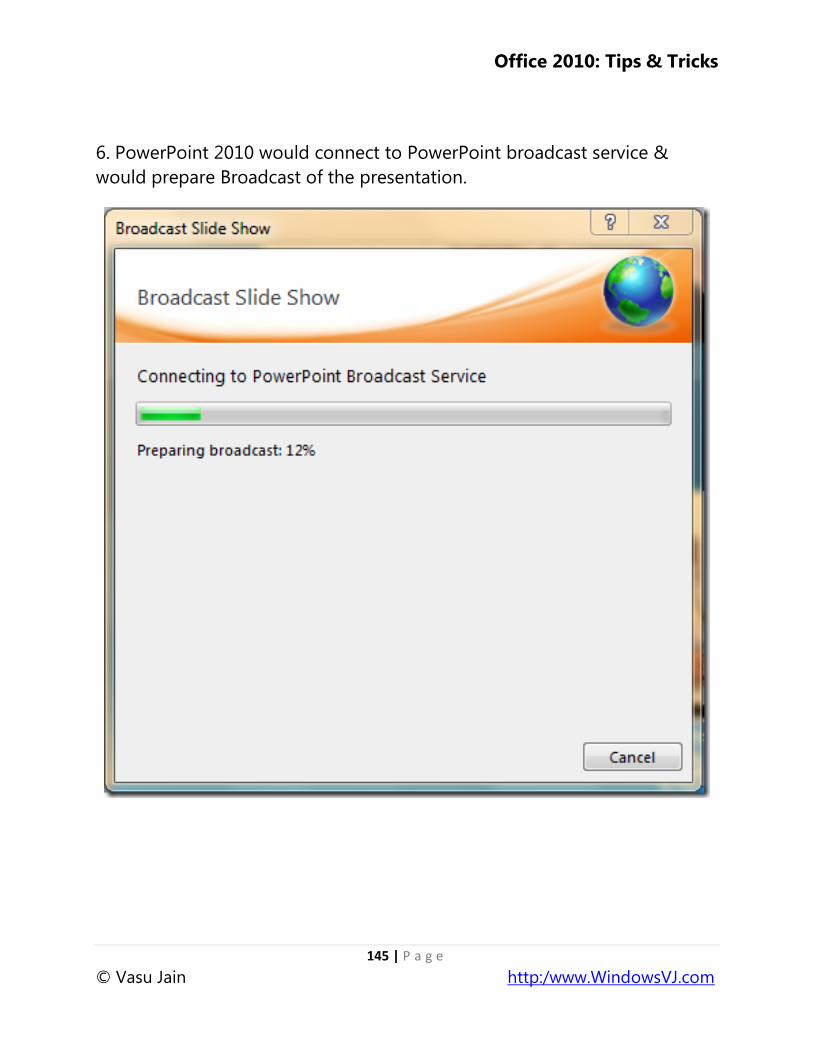
Office 2010: Tips & Tricks
145 | P a g e
© Vasu Jain http:/www.WindowsVJ.com
6. PowerPoint 2010 would connect to PowerPoint broadcast service &
would prepare Broadcast of the presentation.
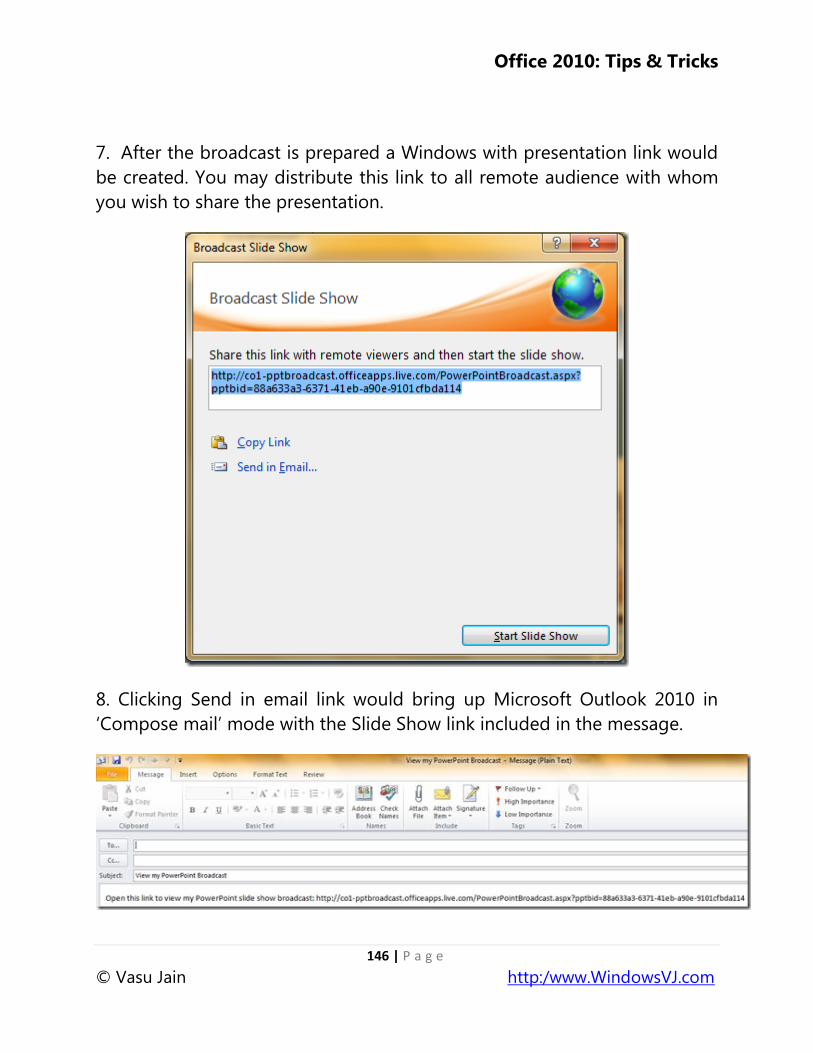
Office 2010: Tips & Tricks
146 | P a g e
© Vasu Jain http:/www.WindowsVJ.com
7. After the broadcast is prepared a Windows with presentation link would
be created. You may distribute this link to all remote audience with whom
you wish to share the presentation.
8. Clicking Send in email link would bring up Microsoft Outlook 2010 in
‗Compose mail‘ mode with the Slide Show link included in the message.
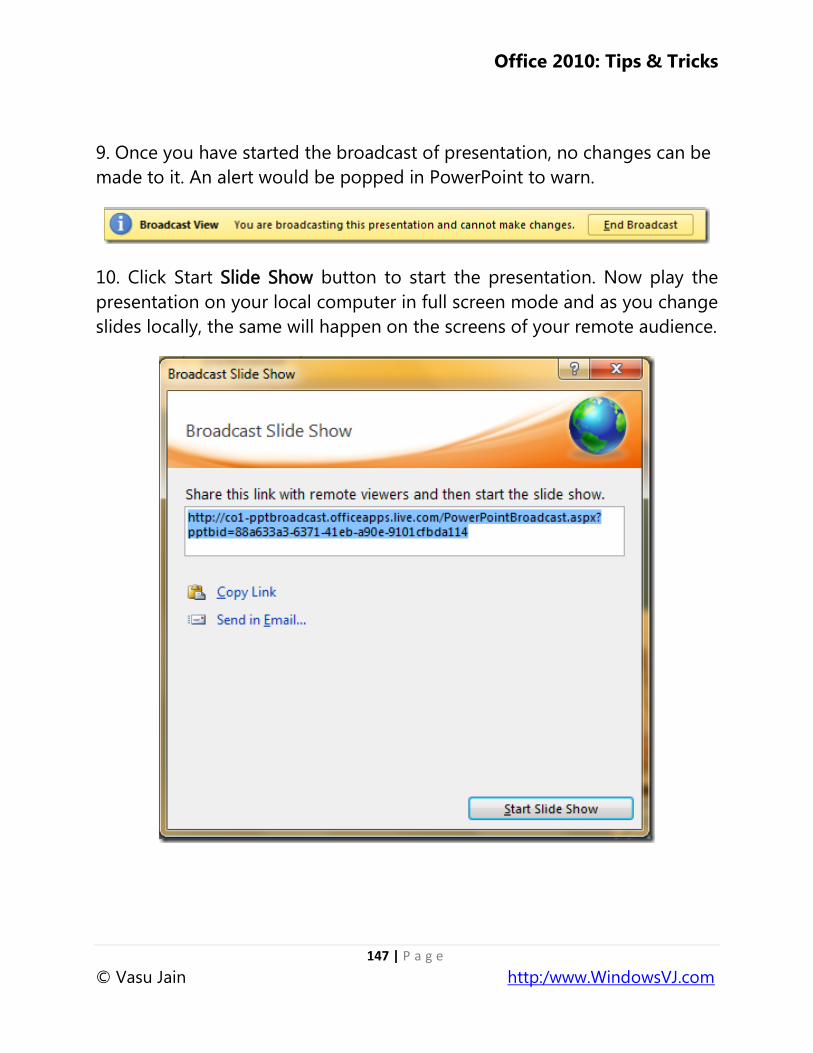
Office 2010: Tips & Tricks
147 | P a g e
© Vasu Jain http:/www.WindowsVJ.com
9. Once you have started the broadcast of presentation, no changes can be
made to it. An alert would be popped in PowerPoint to warn.
10. Click Start Slide Show button to start the presentation. Now play the
presentation on your local computer in full screen mode and as you change
slides locally, the same will happen on the screens of your remote audience.
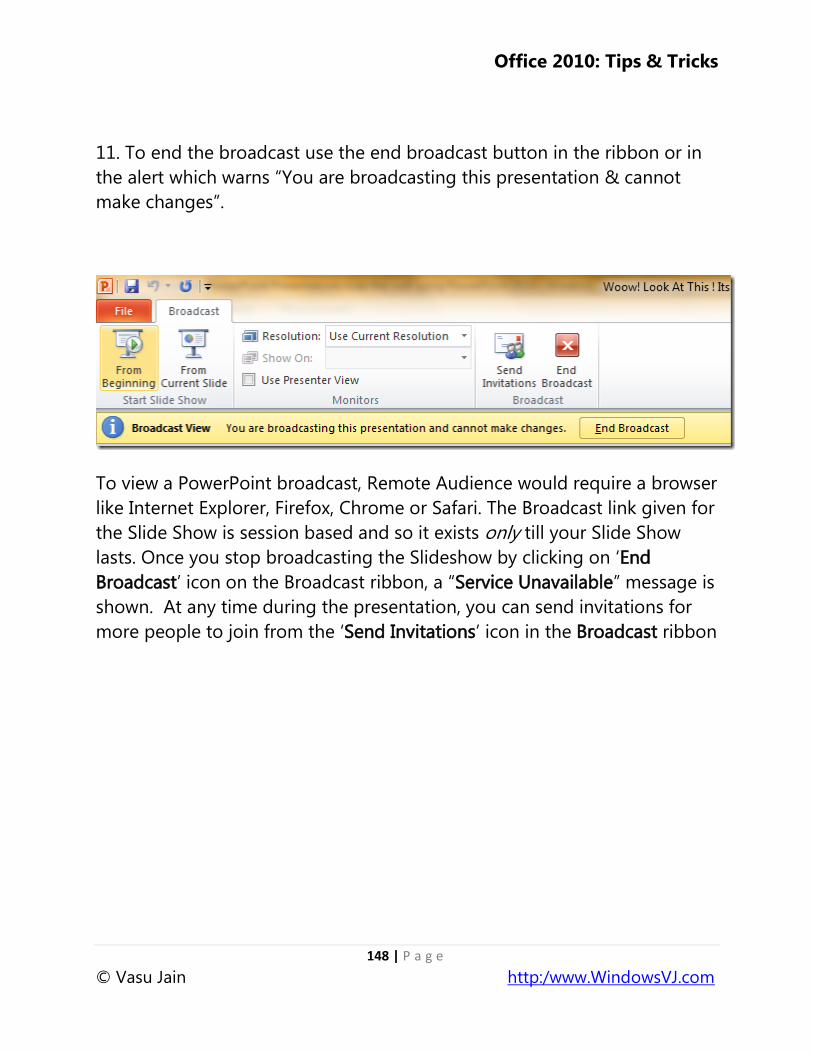
Office 2010: Tips & Tricks
148 | P a g e
© Vasu Jain http:/www.WindowsVJ.com
11. To end the broadcast use the end broadcast button in the ribbon or in
the alert which warns ―You are broadcasting this presentation & cannot
make changes‖.
To view a PowerPoint broadcast, Remote Audience would require a browser
like Internet Explorer, Firefox, Chrome or Safari. The Broadcast link given for
the Slide Show is session based and so it exists only till your Slide Show
lasts. Once you stop broadcasting the Slideshow by clicking on ‗End
Broadcast‘ icon on the Broadcast ribbon, a ―Service Unavailable‖ message is
shown. At any time during the presentation, you can send invitations for
more people to join from the ‗Send Invitations‘ icon in the Broadcast ribbon
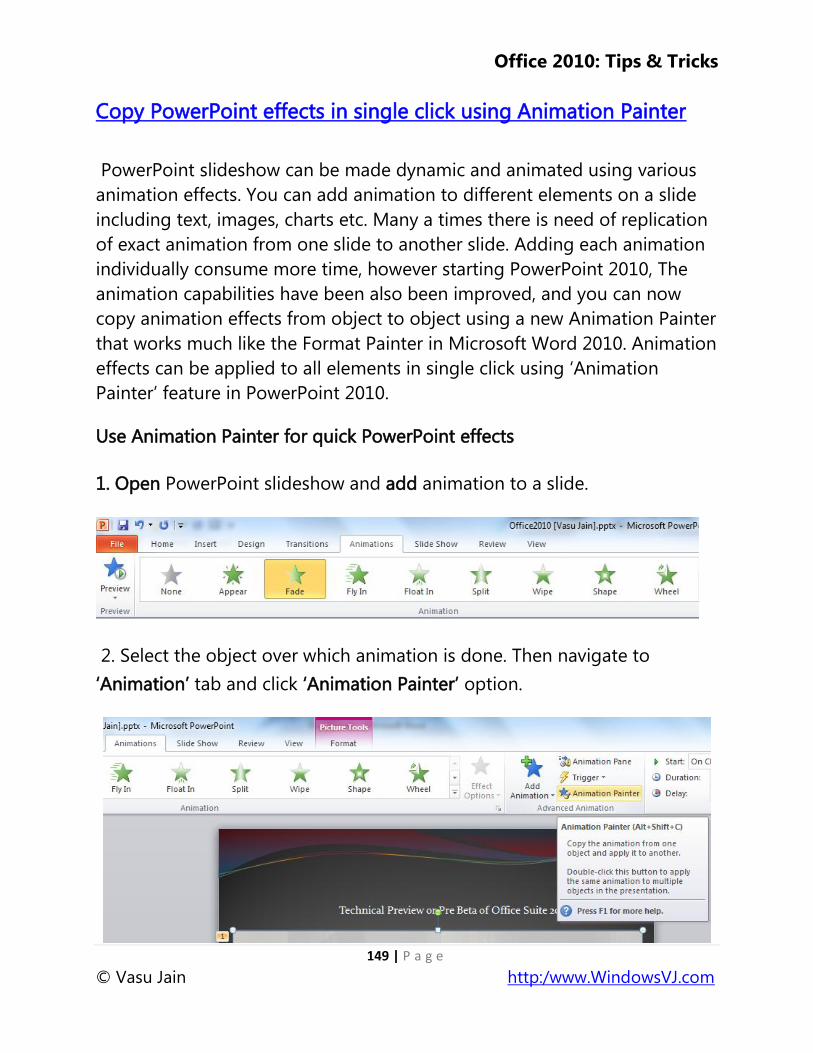
Office 2010: Tips & Tricks
149 | P a g e
© Vasu Jain http:/www.WindowsVJ.com
Copy PowerPoint effects in single click using Animation Painter
PowerPoint slideshow can be made dynamic and animated using various
animation effects. You can add animation to different elements on a slide
including text, images, charts etc. Many a times there is need of replication
of exact animation from one slide to another slide. Adding each animation
individually consume more time, however starting PowerPoint 2010, The
animation capabilities have been also been improved, and you can now
copy animation effects from object to object using a new Animation Painter
that works much like the Format Painter in Microsoft Word 2010. Animation
effects can be applied to all elements in single click using ‗Animation
Painter‘ feature in PowerPoint 2010.
Use Animation Painter for quick PowerPoint effects
1. Open PowerPoint slideshow and add animation to a slide.
2. Select the object over which animation is done. Then navigate to
‗Animation‘ tab and click ‗Animation Painter‘ option.
Office 2010: Tips & Tricks
150 | P a g e
© Vasu Jain http:/www.WindowsVJ.com
3. Clicking the Animation painter would copy the animation from the slide
object and, the animation painter brush will then follow your cursor around,
letting you know that it‘s active.
4. To apply the formatting, Open another slide over which animation is to
be copied down.
5. Click the object in the new slide and the animation is applied to the
second slide and the animation painter tool is turned off again.
Clicking on the animation Painter would activate it only for one instance. i.e.
you can copy the same formatting to one piece of text. However, to apply
that formatting to several more slides, select that first slide again. This time,
double click on the animation painter button. Then you can keep applying
your copied animation by selecting more slides. To turn off the animation
painter, press escape or click the animation painter button again.
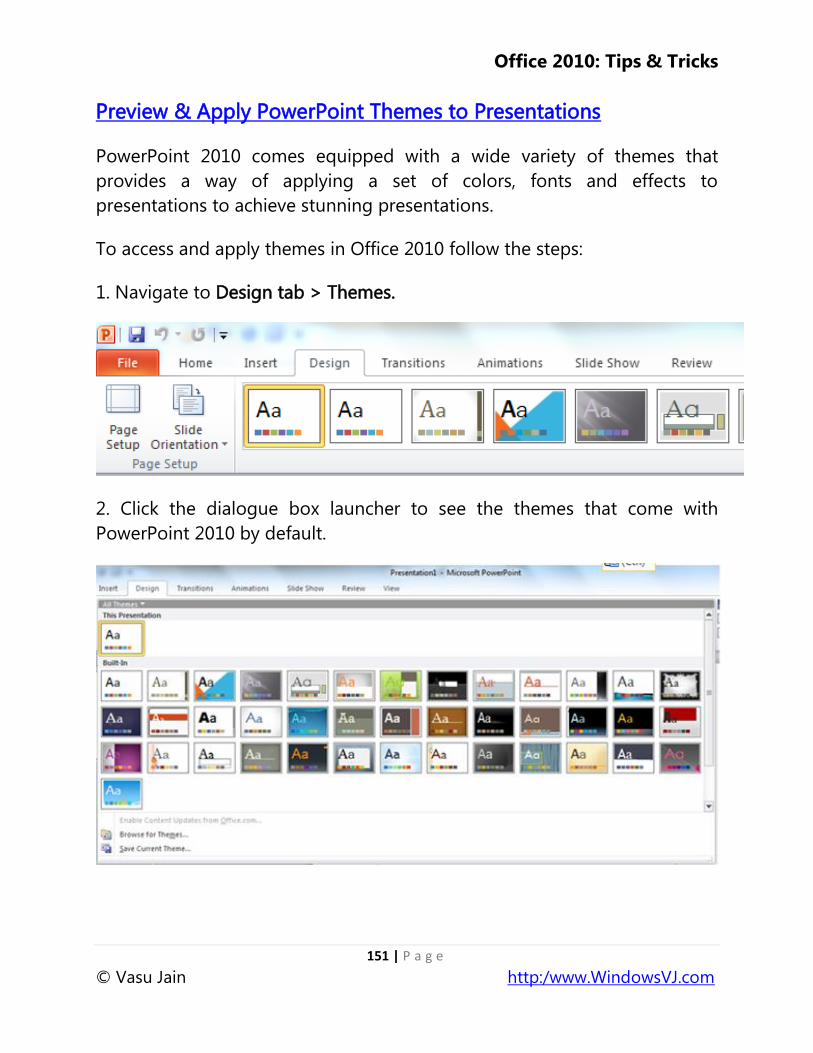
Office 2010: Tips & Tricks
151 | P a g e
© Vasu Jain http:/www.WindowsVJ.com
Preview & Apply PowerPoint Themes to Presentations
PowerPoint 2010 comes equipped with a wide variety of themes that
provides a way of applying a set of colors, fonts and effects to
presentations to achieve stunning presentations.
To access and apply themes in Office 2010 follow the steps:
1. Navigate to Design tab > Themes.
2. Click the dialogue box launcher to see the themes that come with
PowerPoint 2010 by default.
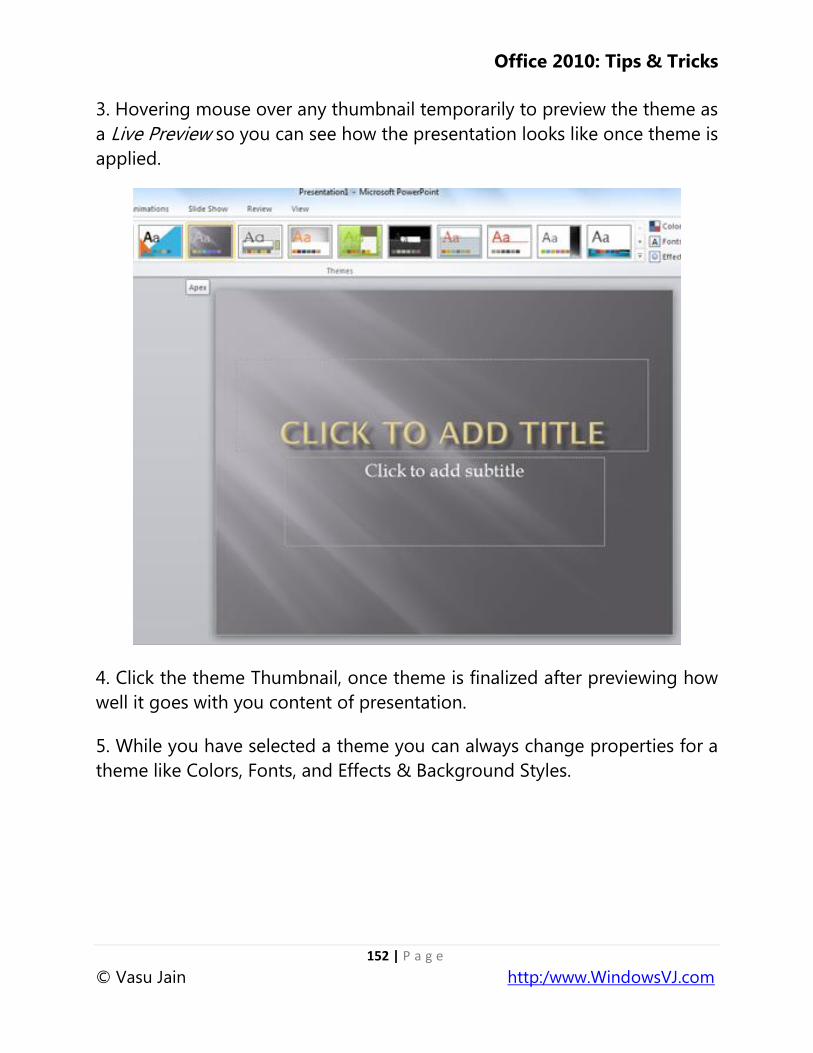
Office 2010: Tips & Tricks
152 | P a g e
© Vasu Jain http:/www.WindowsVJ.com
3. Hovering mouse over any thumbnail temporarily to preview the theme as
a Live Preview so you can see how the presentation looks like once theme is
applied.
4. Click the theme Thumbnail, once theme is finalized after previewing how
well it goes with you content of presentation.
5. While you have selected a theme you can always change properties for a
theme like Colors, Fonts, and Effects & Background Styles.
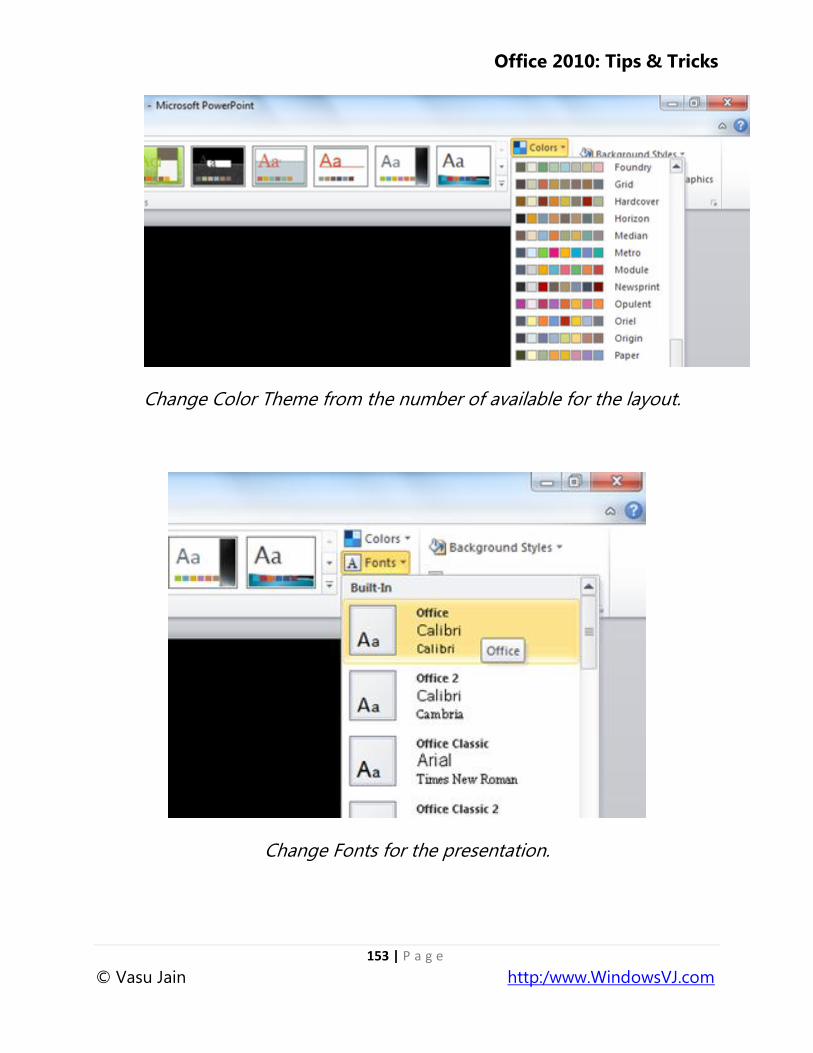
Office 2010: Tips & Tricks
153 | P a g e
© Vasu Jain http:/www.WindowsVJ.com
Change Color Theme from the number of available for the layout.
Change Fonts for the presentation.
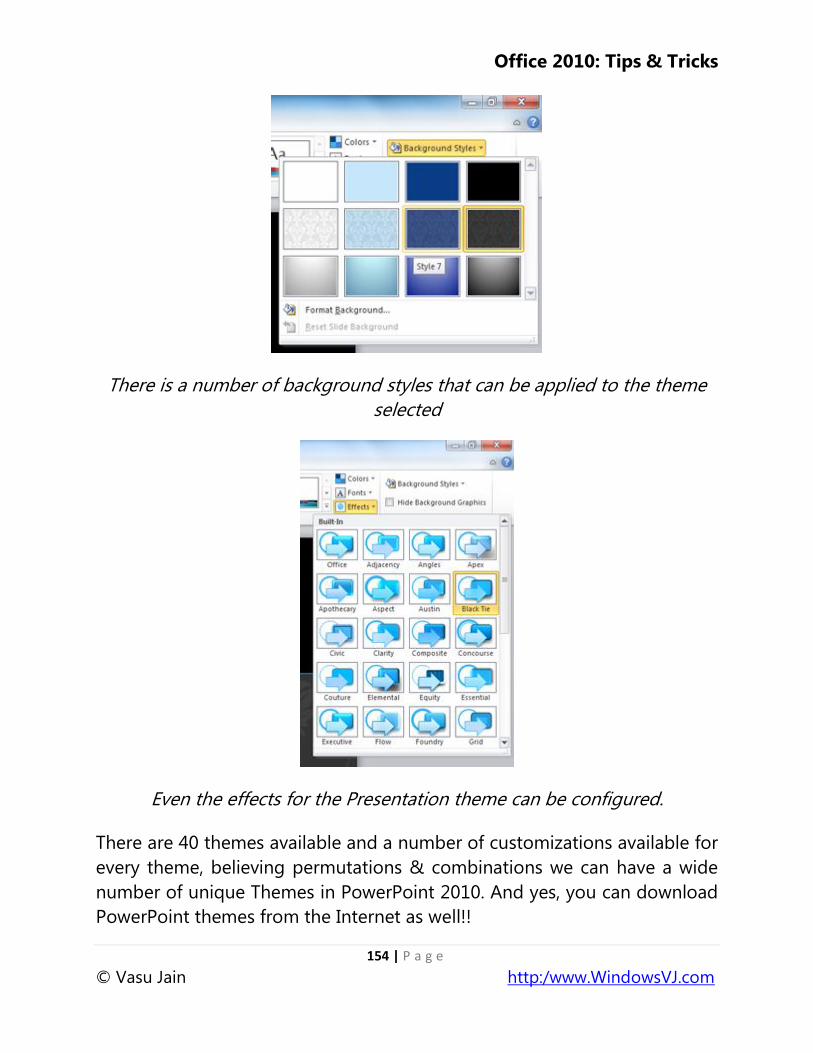
Office 2010: Tips & Tricks
154 | P a g e
© Vasu Jain http:/www.WindowsVJ.com
There is a number of background styles that can be applied to the theme
selected
Even the effects for the Presentation theme can be configured.
There are 40 themes available and a number of customizations available for
every theme, believing permutations & combinations we can have a wide
number of unique Themes in PowerPoint 2010. And yes, you can download
PowerPoint themes from the Internet as well!!

Office 2010: Tips & Tricks
155 | P a g e
© Vasu Jain http:/www.WindowsVJ.com
Show Date and Time on a Slide in PowerPoint 2010
Adding Date & time to PowerPoint slides in your presentation, will make
your presentations more informative for both speaker as well as audience
when the presentation is delivered. There is a simple way to add date and
time to PowerPoint slides.
To Show Date and Time on a Slide in PowerPoint 2010 follow the steps:
1. From the Ribbon, click View tab, and choose Normal Presentation view
from Left Hand side Corner.
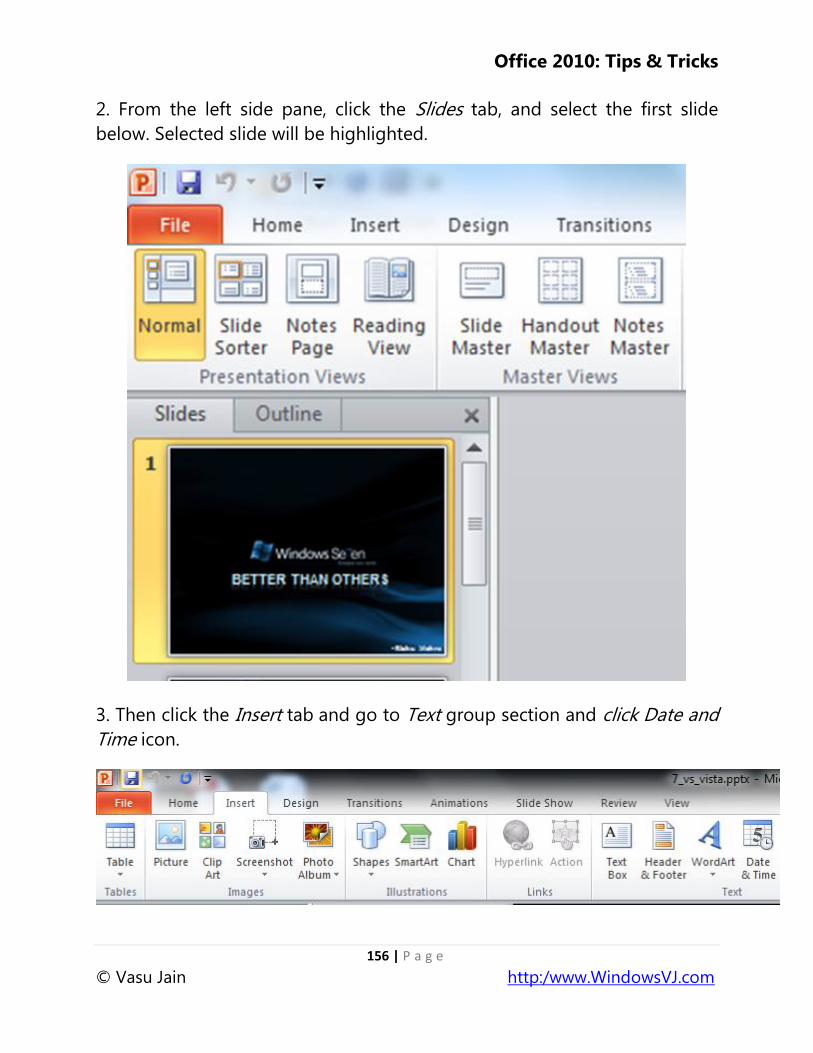
Office 2010: Tips & Tricks
156 | P a g e
© Vasu Jain http:/www.WindowsVJ.com
2. From the left side pane, click the Slides tab, and select the first slide
below. Selected slide will be highlighted.
3. Then click the Insert tab and go to Text group section and click Date and
Time icon.
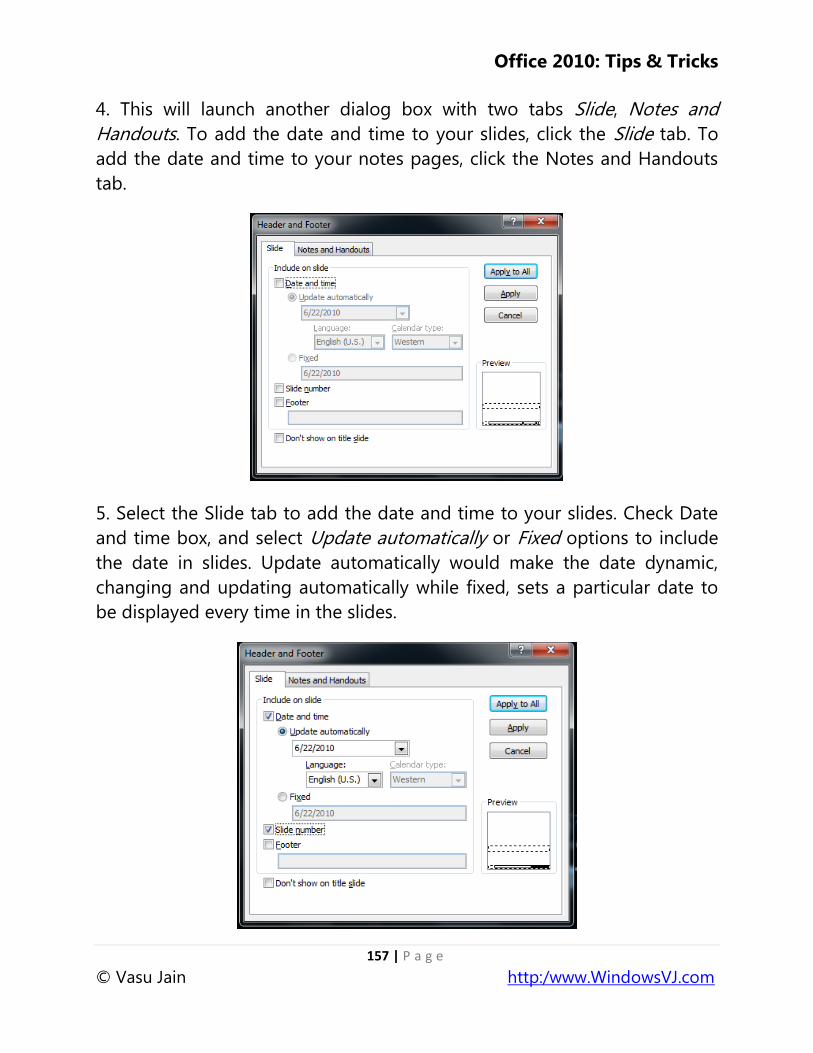
Office 2010: Tips & Tricks
157 | P a g e
© Vasu Jain http:/www.WindowsVJ.com
4. This will launch another dialog box with two tabs Slide, Notes and
Handouts. To add the date and time to your slides, click the Slide tab. To
add the date and time to your notes pages, click the Notes and Handouts
tab.
5. Select the Slide tab to add the date and time to your slides. Check Date
and time box, and select Update automatically or Fixed options to include
the date in slides. Update automatically would make the date dynamic,
changing and updating automatically while fixed, sets a particular date to
be displayed every time in the slides.
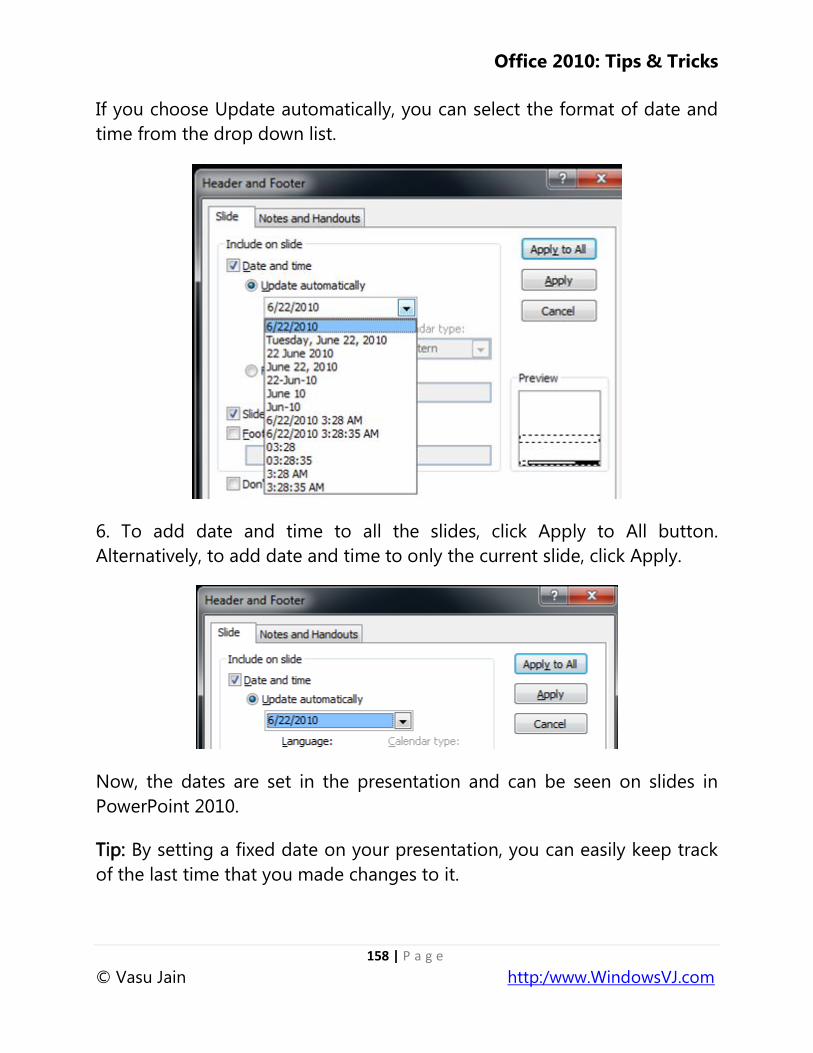
Office 2010: Tips & Tricks
158 | P a g e
© Vasu Jain http:/www.WindowsVJ.com
If you choose Update automatically, you can select the format of date and
time from the drop down list.
6. To add date and time to all the slides, click Apply to All button.
Alternatively, to add date and time to only the current slide, click Apply.
Now, the dates are set in the presentation and can be seen on slides in
PowerPoint 2010.
Tip: By setting a fixed date on your presentation, you can easily keep track
of the last time that you made changes to it.
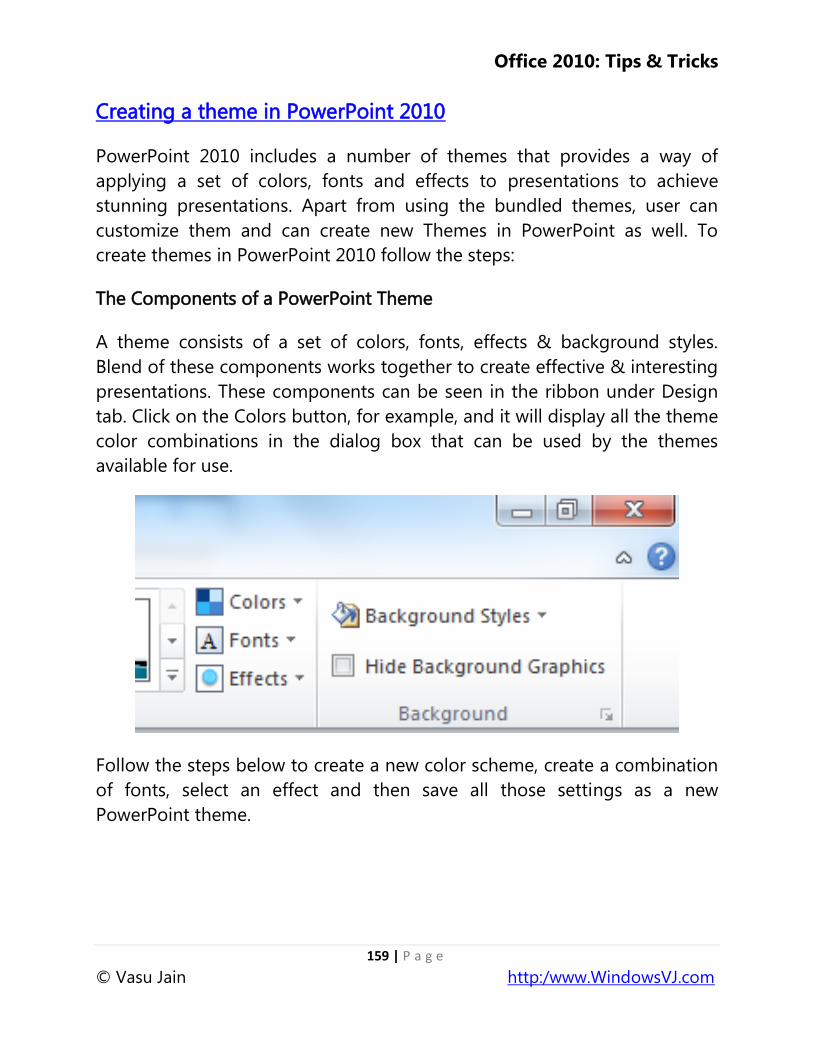
Office 2010: Tips & Tricks
159 | P a g e
© Vasu Jain http:/www.WindowsVJ.com
Creating a theme in PowerPoint 2010
PowerPoint 2010 includes a number of themes that provides a way of
applying a set of colors, fonts and effects to presentations to achieve
stunning presentations. Apart from using the bundled themes, user can
customize them and can create new Themes in PowerPoint as well. To
create themes in PowerPoint 2010 follow the steps:
The Components of a PowerPoint Theme
A theme consists of a set of colors, fonts, effects & background styles.
Blend of these components works together to create effective & interesting
presentations. These components can be seen in the ribbon under Design
tab. Click on the Colors button, for example, and it will display all the theme
color combinations in the dialog box that can be used by the themes
available for use.
Follow the steps below to create a new color scheme, create a combination
of fonts, select an effect and then save all those settings as a new
PowerPoint theme.
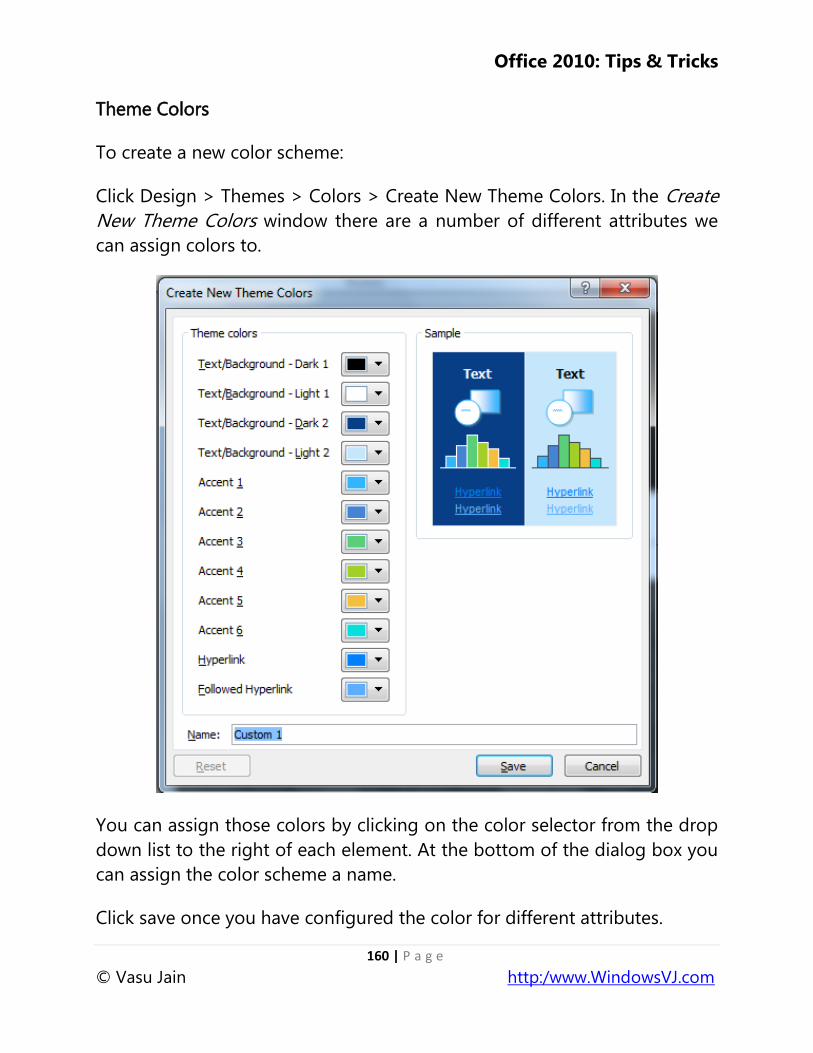
Office 2010: Tips & Tricks
160 | P a g e
© Vasu Jain http:/www.WindowsVJ.com
Theme Colors
To create a new color scheme:
Click Design > Themes > Colors > Create New Theme Colors. In the Create
New Theme Colors window there are a number of different attributes we
can assign colors to.
You can assign those colors by clicking on the color selector from the drop
down list to the right of each element. At the bottom of the dialog box you
can assign the color scheme a name.
Click save once you have configured the color for different attributes.
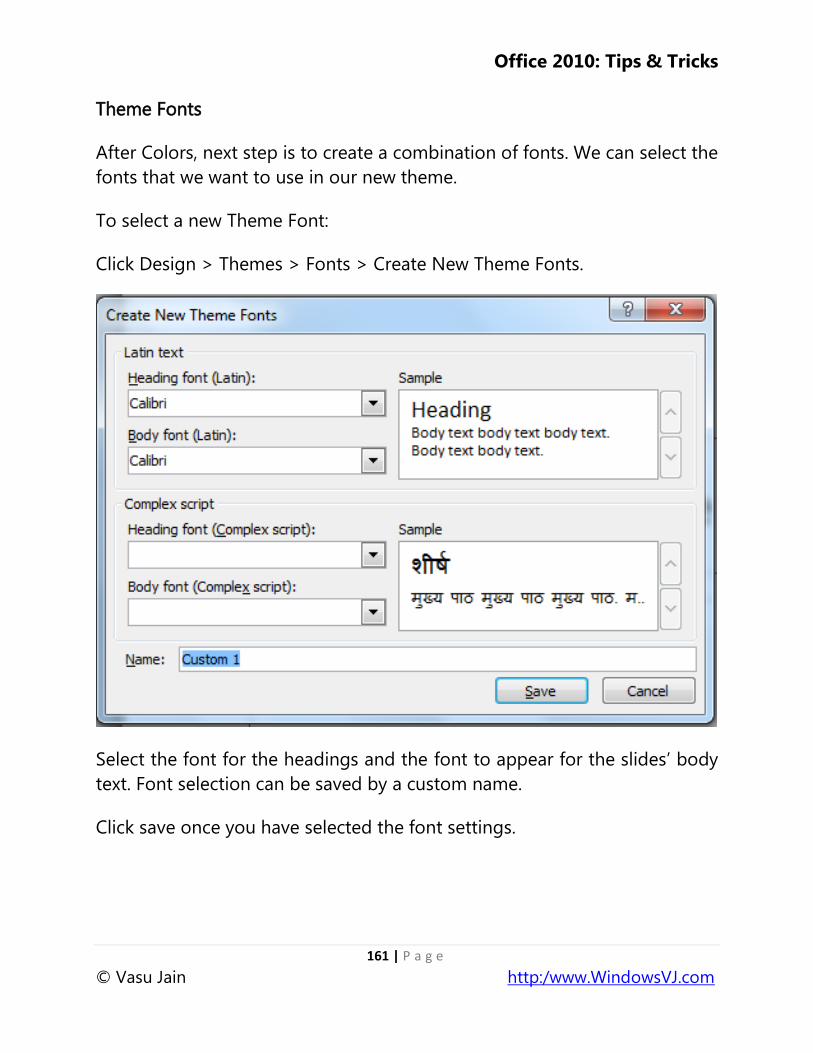
Office 2010: Tips & Tricks
161 | P a g e
© Vasu Jain http:/www.WindowsVJ.com
Theme Fonts
After Colors, next step is to create a combination of fonts. We can select the
fonts that we want to use in our new theme.
To select a new Theme Font:
Click Design > Themes > Fonts > Create New Theme Fonts.
Select the font for the headings and the font to appear for the slides‘ body
text. Font selection can be saved by a custom name.
Click save once you have selected the font settings.
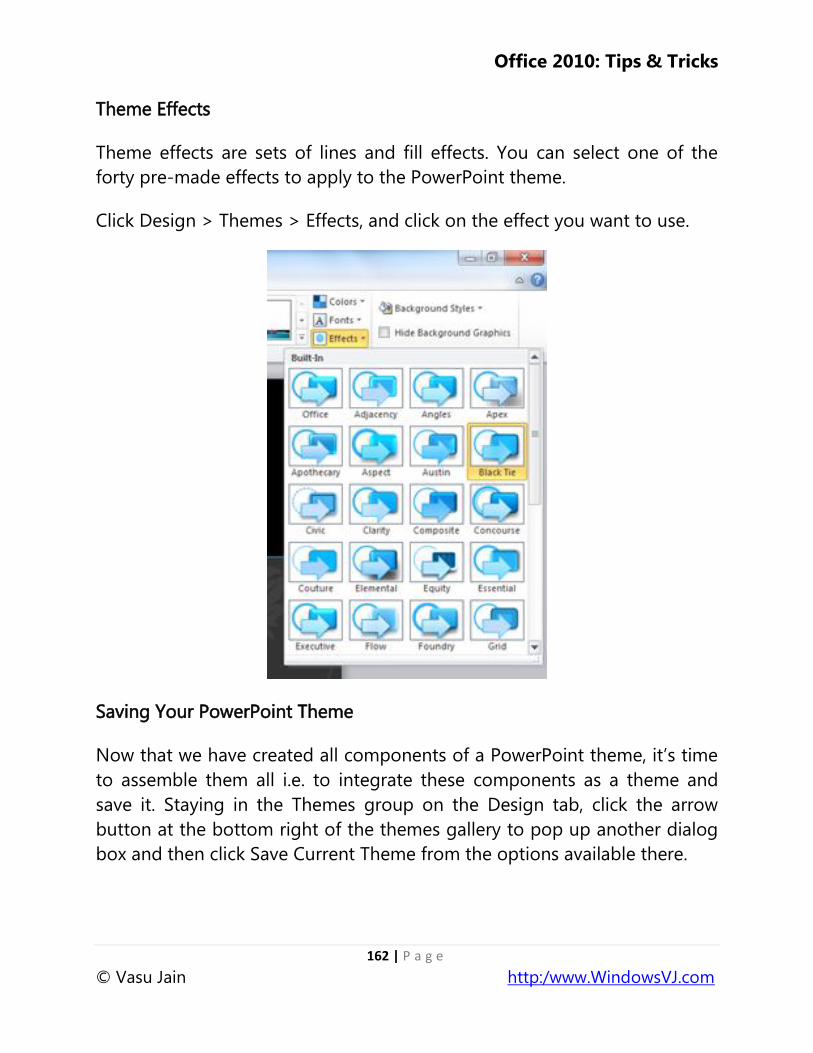
Office 2010: Tips & Tricks
162 | P a g e
© Vasu Jain http:/www.WindowsVJ.com
Theme Effects
Theme effects are sets of lines and fill effects. You can select one of the
forty pre-made effects to apply to the PowerPoint theme.
Click Design > Themes > Effects, and click on the effect you want to use.
Saving Your PowerPoint Theme
Now that we have created all components of a PowerPoint theme, it‘s time
to assemble them all i.e. to integrate these components as a theme and
save it. Staying in the Themes group on the Design tab, click the arrow
button at the bottom right of the themes gallery to pop up another dialog
box and then click Save Current Theme from the options available there.

Office 2010: Tips & Tricks
163 | P a g e
© Vasu Jain http:/www.WindowsVJ.com
Save the theme by a name in the File name box. By default location to save
it is the Document Themes folder. All Theme files are saved in a file
extension .thmx. This is the file extension used for PowerPoint themes.
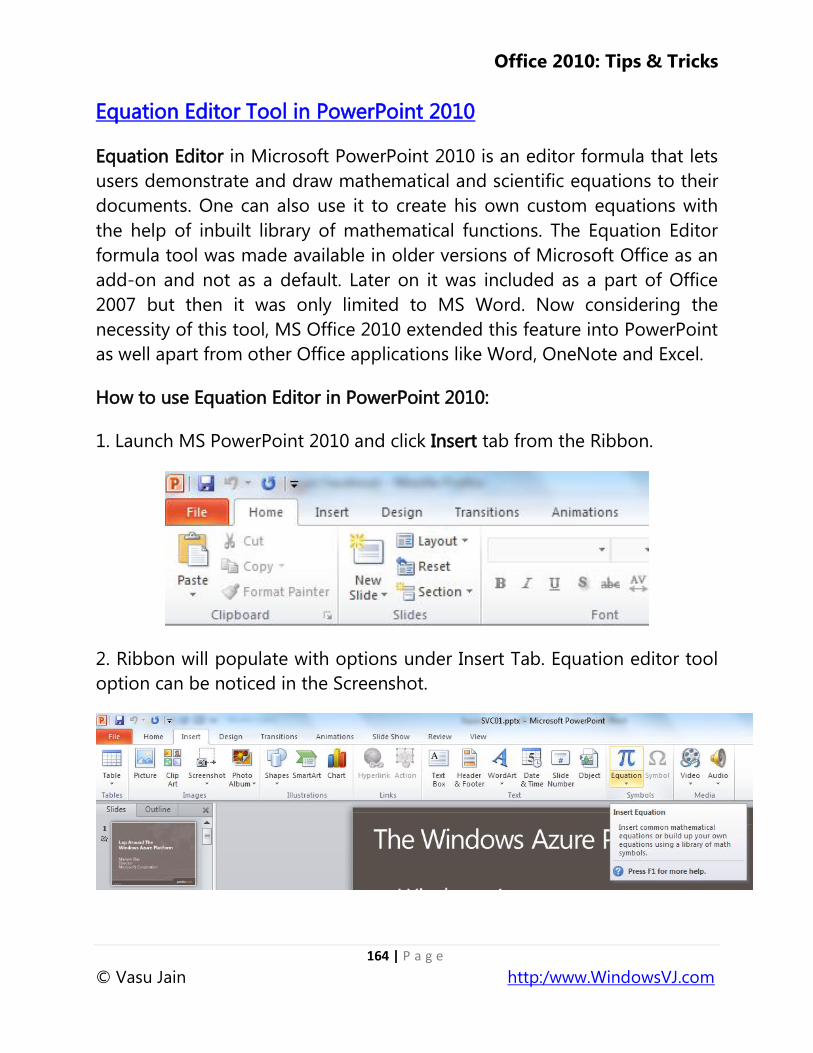
Office 2010: Tips & Tricks
164 | P a g e
© Vasu Jain http:/www.WindowsVJ.com
Equation Editor Tool in PowerPoint 2010
Equation Editor in Microsoft PowerPoint 2010 is an editor formula that lets
users demonstrate and draw mathematical and scientific equations to their
documents. One can also use it to create his own custom equations with
the help of inbuilt library of mathematical functions. The Equation Editor
formula tool was made available in older versions of Microsoft Office as an
add-on and not as a default. Later on it was included as a part of Office
2007 but then it was only limited to MS Word. Now considering the
necessity of this tool, MS Office 2010 extended this feature into PowerPoint
as well apart from other Office applications like Word, OneNote and Excel.
How to use Equation Editor in PowerPoint 2010:
1. Launch MS PowerPoint 2010 and click Insert tab from the Ribbon.
2. Ribbon will populate with options under Insert Tab. Equation editor tool
option can be noticed in the Screenshot.
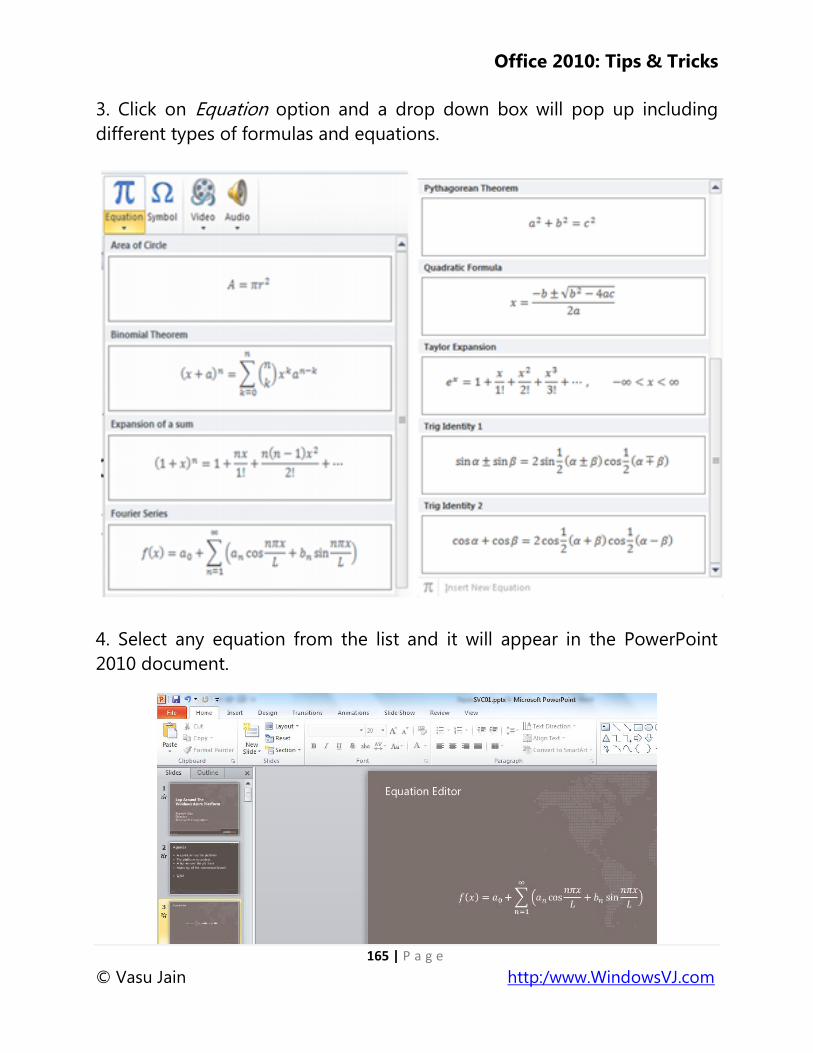
Office 2010: Tips & Tricks
165 | P a g e
© Vasu Jain http:/www.WindowsVJ.com
3. Click on Equation option and a drop down box will pop up including
different types of formulas and equations.
4. Select any equation from the list and it will appear in the PowerPoint
2010 document.
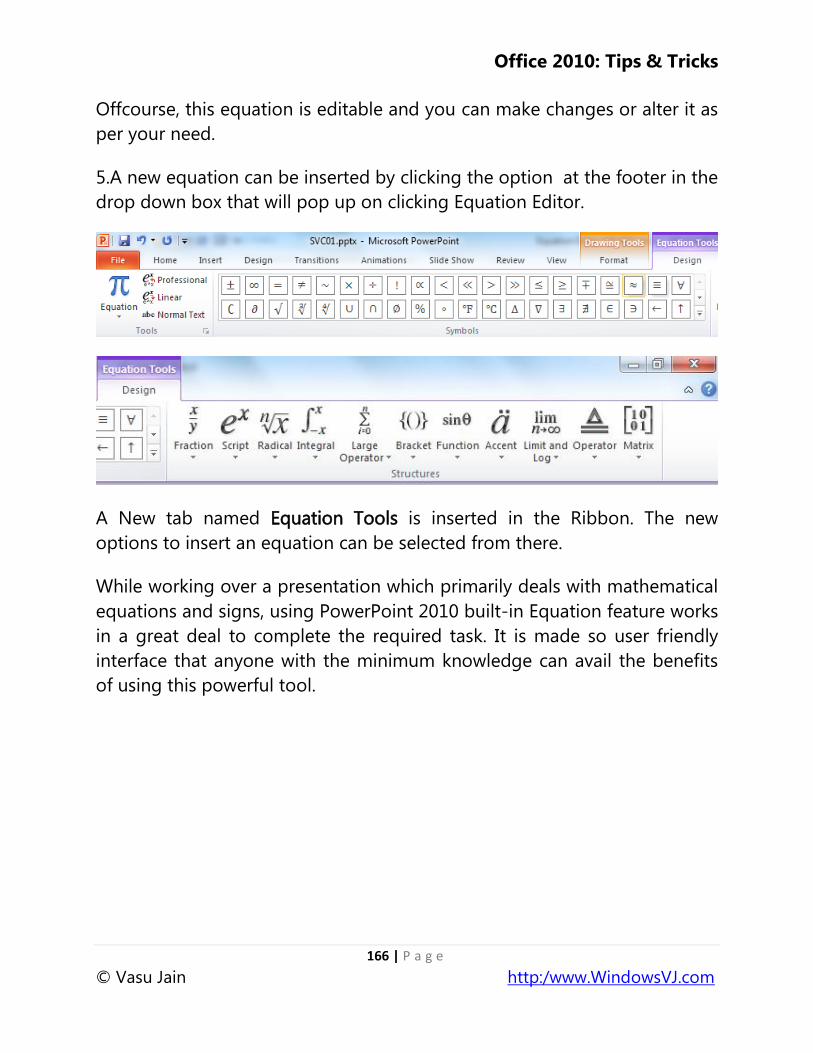
Office 2010: Tips & Tricks
166 | P a g e
© Vasu Jain http:/www.WindowsVJ.com
Offcourse, this equation is editable and you can make changes or alter it as
per your need.
5.A new equation can be inserted by clicking the option at the footer in the
drop down box that will pop up on clicking Equation Editor.
A New tab named Equation Tools is inserted in the Ribbon. The new
options to insert an equation can be selected from there.
While working over a presentation which primarily deals with mathematical
equations and signs, using PowerPoint 2010 built-in Equation feature works
in a great deal to complete the required task. It is made so user friendly
interface that anyone with the minimum knowledge can avail the benefits
of using this powerful tool.
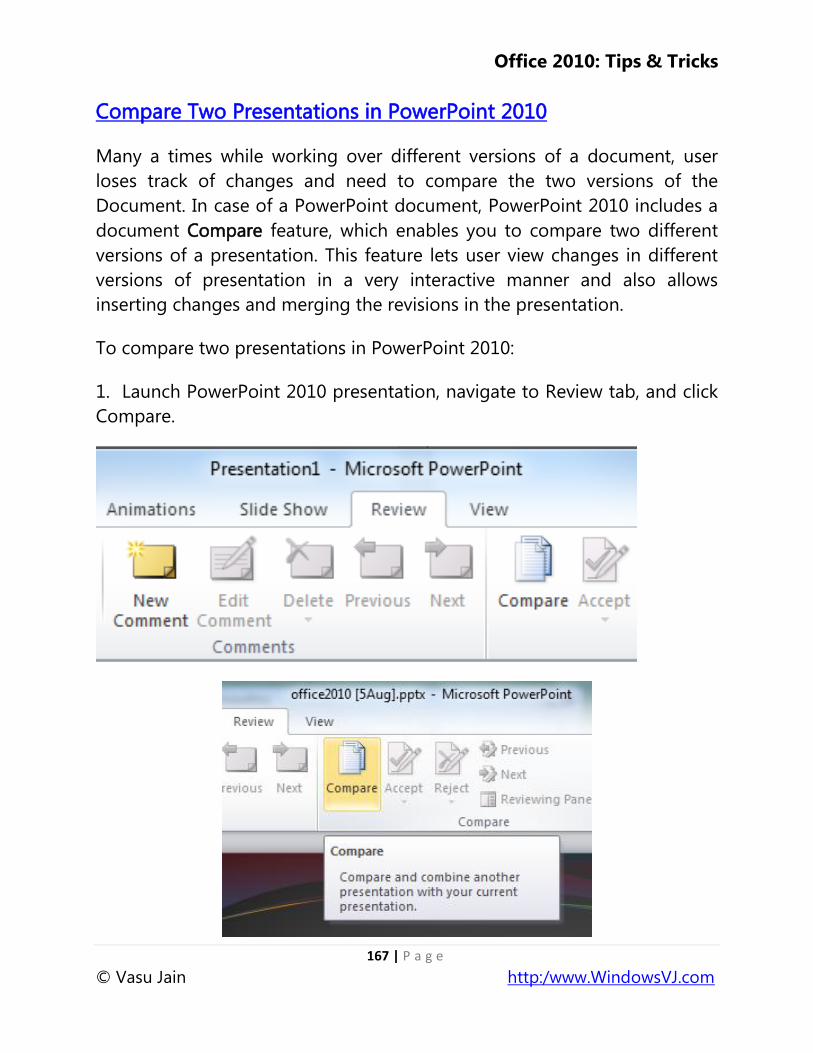
Office 2010: Tips & Tricks
167 | P a g e
© Vasu Jain http:/www.WindowsVJ.com
Compare Two Presentations in PowerPoint 2010
Many a times while working over different versions of a document, user
loses track of changes and need to compare the two versions of the
Document. In case of a PowerPoint document, PowerPoint 2010 includes a
document Compare feature, which enables you to compare two different
versions of a presentation. This feature lets user view changes in different
versions of presentation in a very interactive manner and also allows
inserting changes and merging the revisions in the presentation.
To compare two presentations in PowerPoint 2010:
1. Launch PowerPoint 2010 presentation, navigate to Review tab, and click
Compare.
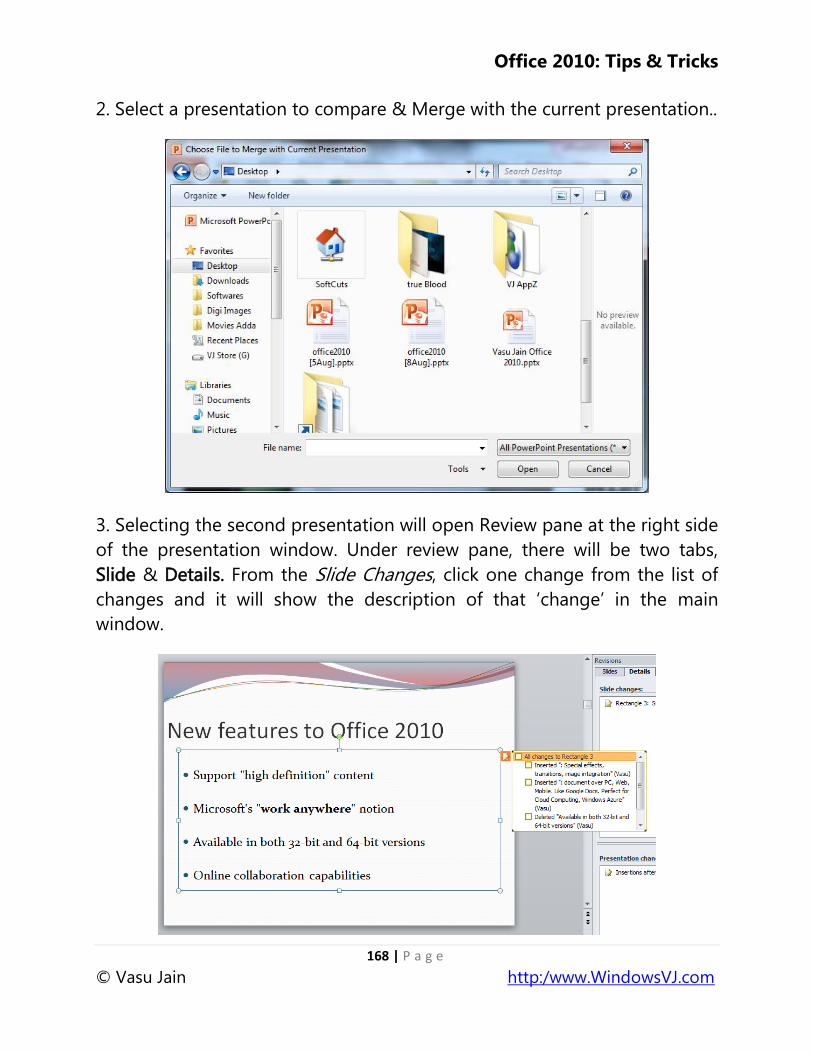
Office 2010: Tips & Tricks
168 | P a g e
© Vasu Jain http:/www.WindowsVJ.com
2. Select a presentation to compare & Merge with the current presentation..
3. Selecting the second presentation will open Review pane at the right side
of the presentation window. Under review pane, there will be two tabs,
Slide & Details. From the Slide Changes, click one change from the list of
changes and it will show the description of that ‗change‘ in the main
window.
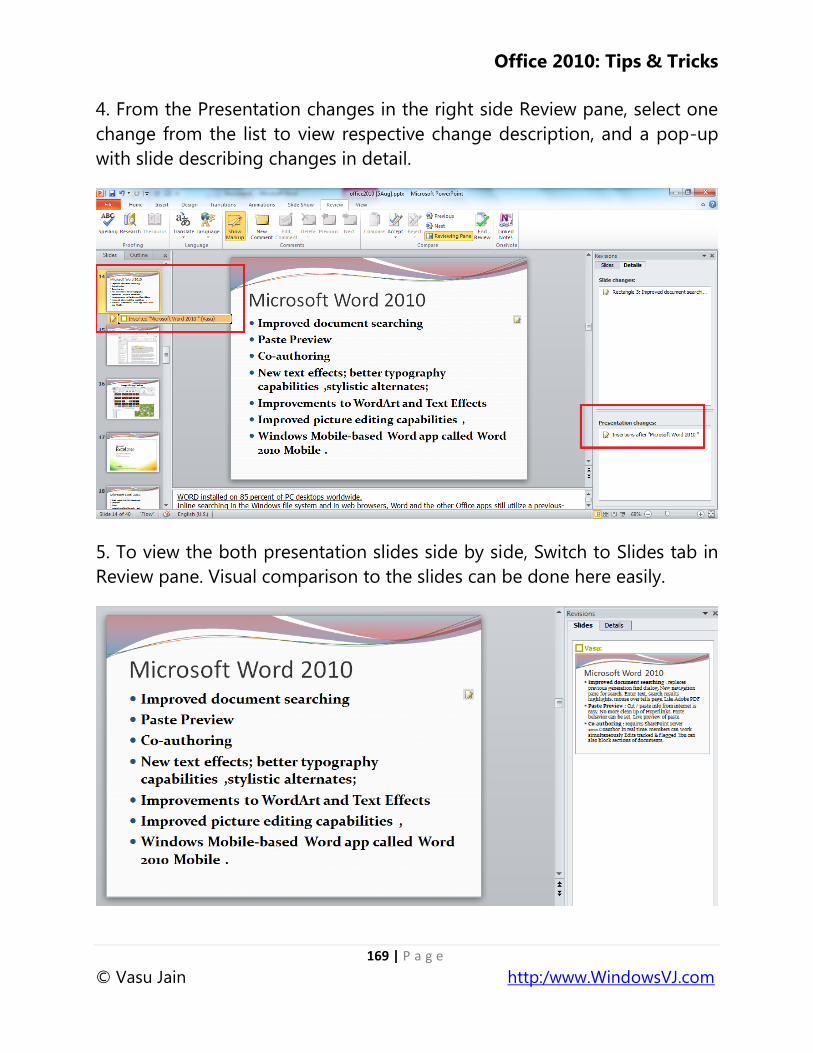
Office 2010: Tips & Tricks
169 | P a g e
© Vasu Jain http:/www.WindowsVJ.com
4. From the Presentation changes in the right side Review pane, select one
change from the list to view respective change description, and a pop-up
with slide describing changes in detail.
5. To view the both presentation slides side by side, Switch to Slides tab in
Review pane. Visual comparison to the slides can be done here easily.

Office 2010: Tips & Tricks
170 | P a g e
© Vasu Jain http:/www.WindowsVJ.com
6. To accept the changes, select a slide from the Review pane and navigate
to Review tab and select Accept button. From Accept options, select either
of:
Accept change
Accept all changes to the current slide
Accept all changes to the presentation.
7. Once you apply any changes to a slide, the Accept option in Review tab
changes to Reject. From Reject options, you can select a few options like:
Reject change
Reject all changes to the current slide
Reject all changes to the presentation.

Office 2010: Tips & Tricks
171 | P a g e
© Vasu Jain http:/www.WindowsVJ.com
7. Click Save to save all changes & close the presentation.
8. To end Review at any time, click End Preview from the Review Options.
Thus, if you miss the track of changes while working over presentation in
PowerPoint 2010, this feature will prove to be very handy.
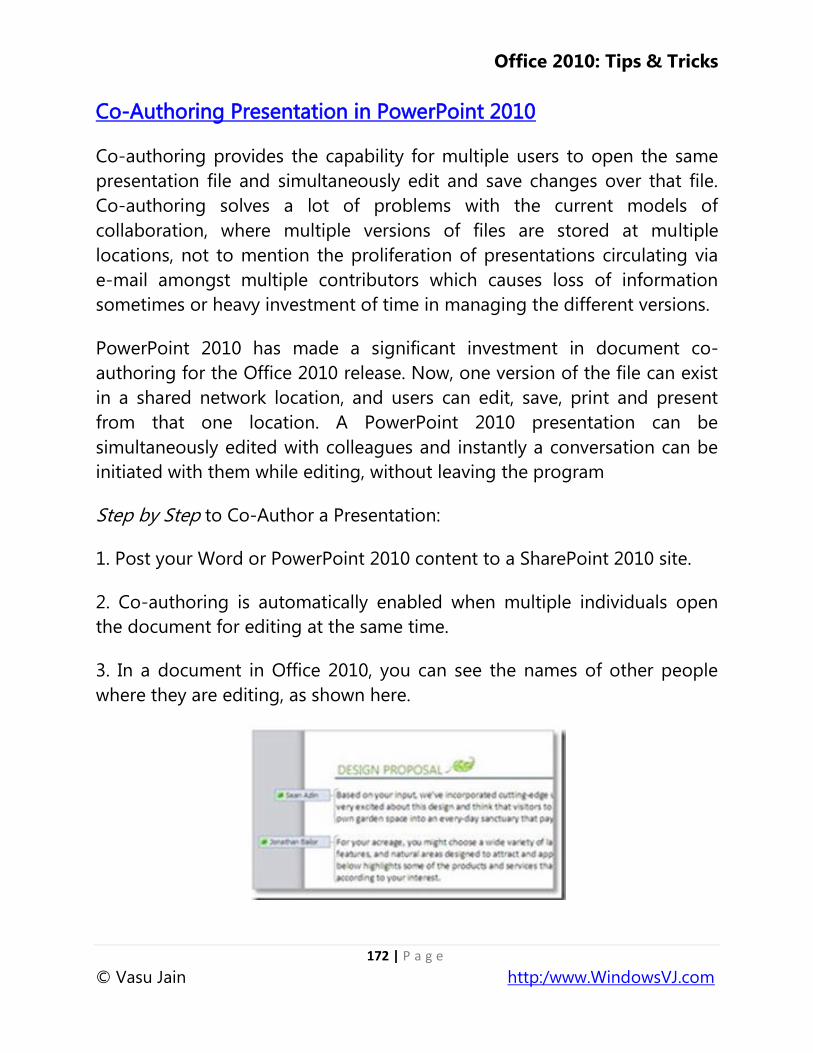
Office 2010: Tips & Tricks
172 | P a g e
© Vasu Jain http:/www.WindowsVJ.com
Co-Authoring Presentation in PowerPoint 2010
Co-authoring provides the capability for multiple users to open the same
presentation file and simultaneously edit and save changes over that file.
Co-authoring solves a lot of problems with the current models of
collaboration, where multiple versions of files are stored at multiple
locations, not to mention the proliferation of presentations circulating via
e-mail amongst multiple contributors which causes loss of information
sometimes or heavy investment of time in managing the different versions.
PowerPoint 2010 has made a significant investment in document co-
authoring for the Office 2010 release. Now, one version of the file can exist
in a shared network location, and users can edit, save, print and present
from that one location. A PowerPoint 2010 presentation can be
simultaneously edited with colleagues and instantly a conversation can be
initiated with them while editing, without leaving the program
Step by Step to Co-Author a Presentation:
1. Post your Word or PowerPoint 2010 content to a SharePoint 2010 site.
2. Co-authoring is automatically enabled when multiple individuals open
the document for editing at the same time.
3. In a document in Office 2010, you can see the names of other people
where they are editing, as shown here.
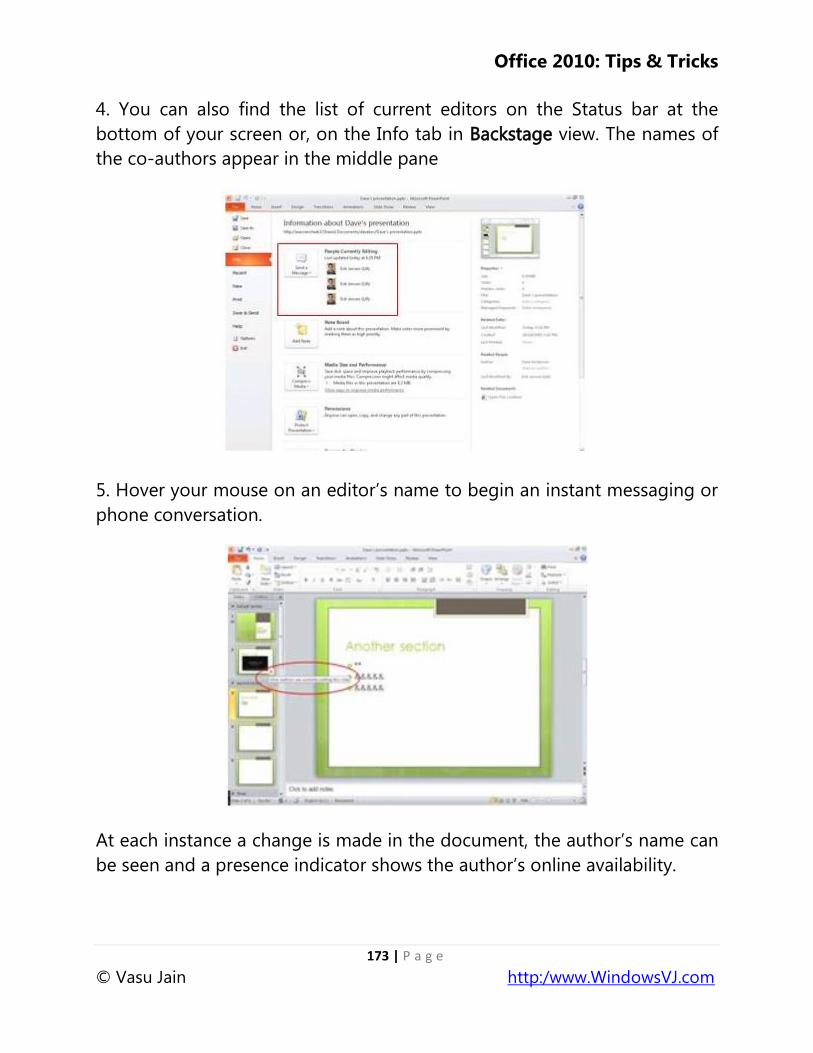
Office 2010: Tips & Tricks
173 | P a g e
© Vasu Jain http:/www.WindowsVJ.com
4. You can also find the list of current editors on the Status bar at the
bottom of your screen or, on the Info tab in Backstage view. The names of
the co-authors appear in the middle pane
5. Hover your mouse on an editor‘s name to begin an instant messaging or
phone conversation.
At each instance a change is made in the document, the author‘s name can
be seen and a presence indicator shows the author‘s online availability.
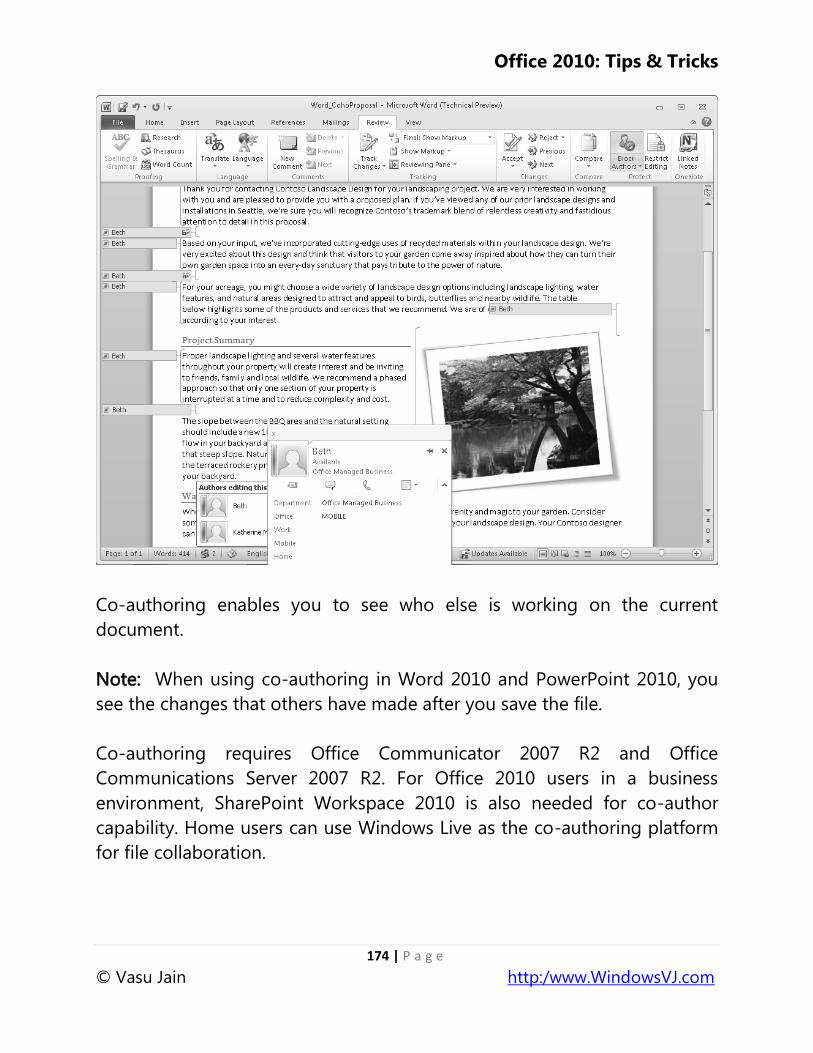
Office 2010: Tips & Tricks
174 | P a g e
© Vasu Jain http:/www.WindowsVJ.com
Co-authoring enables you to see who else is working on the current
document.
Note: When using co-authoring in Word 2010 and PowerPoint 2010, you
see the changes that others have made after you save the file.
Co-authoring requires Office Communicator 2007 R2 and Office
Communications Server 2007 R2. For Office 2010 users in a business
environment, SharePoint Workspace 2010 is also needed for co-author
capability. Home users can use Windows Live as the co-authoring platform
for file collaboration.

Office 2010: Tips & Tricks
175 | P a g e
© Vasu Jain http:/www.WindowsVJ.com
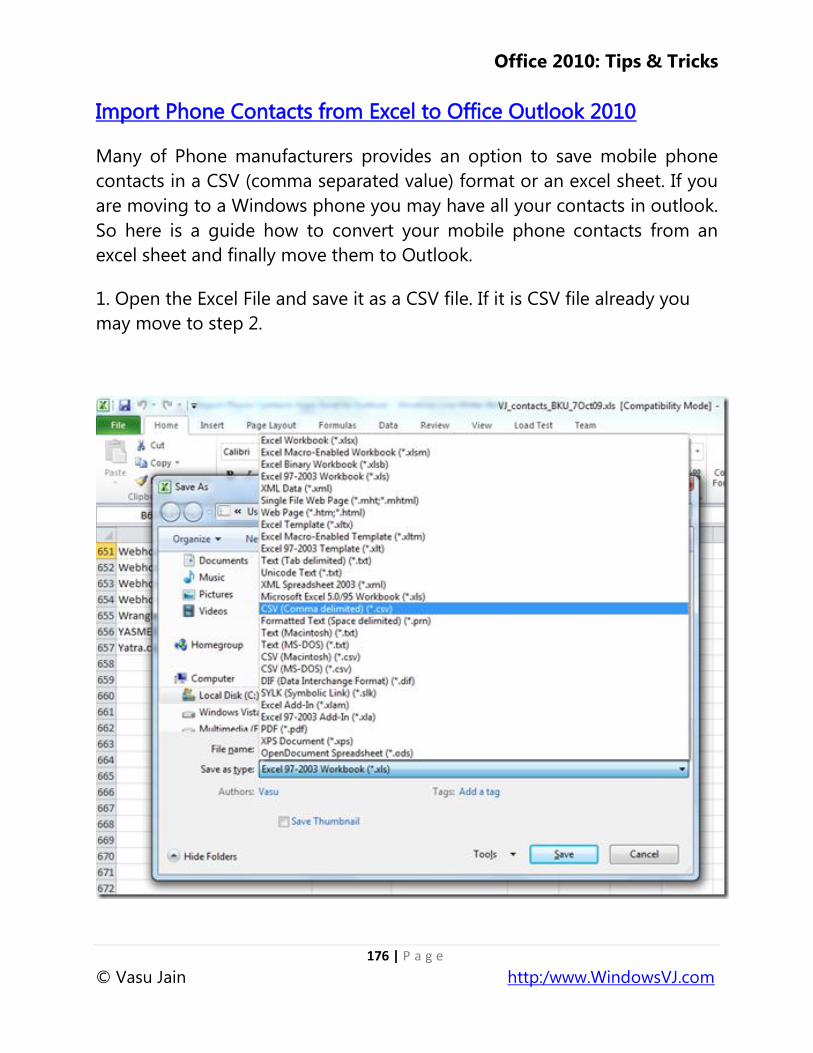
Office 2010: Tips & Tricks
176 | P a g e
© Vasu Jain http:/www.WindowsVJ.com
Import Phone Contacts from Excel to Office Outlook 2010
Many of Phone manufacturers provides an option to save mobile phone
contacts in a CSV (comma separated value) format or an excel sheet. If you
are moving to a Windows phone you may have all your contacts in outlook.
So here is a guide how to convert your mobile phone contacts from an
excel sheet and finally move them to Outlook.
1. Open the Excel File and save it as a CSV file. If it is CSV file already you
may move to step 2.
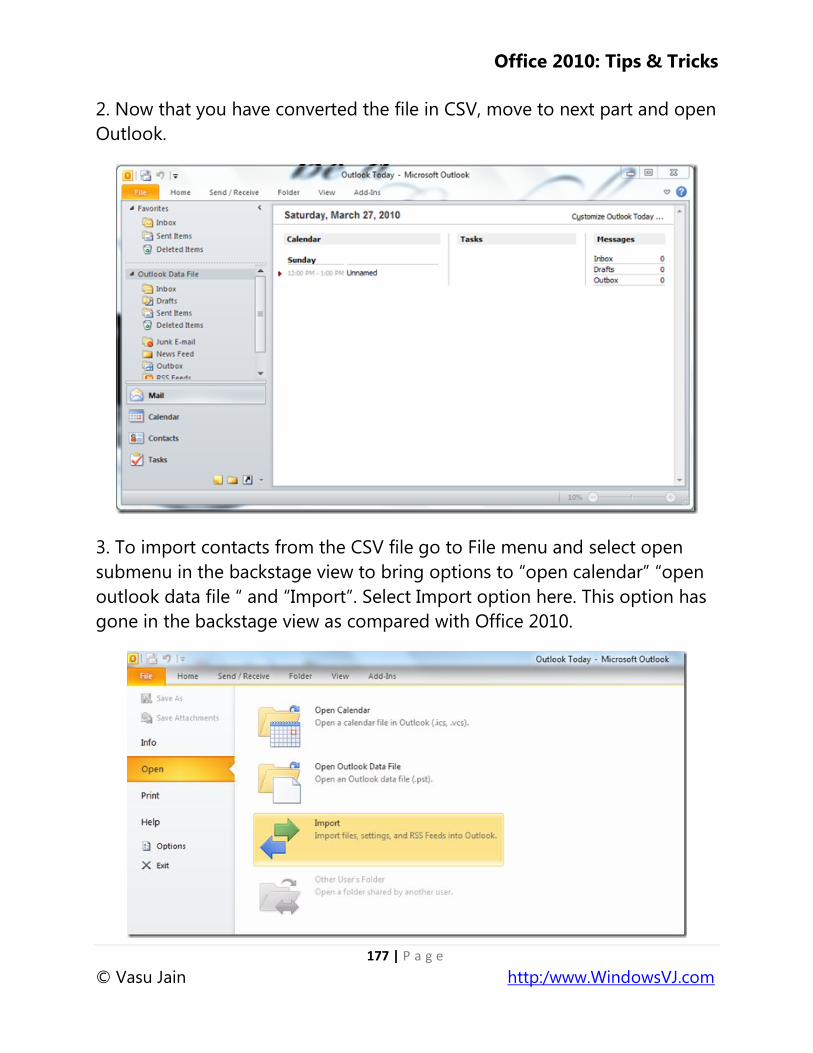
Office 2010: Tips & Tricks
177 | P a g e
© Vasu Jain http:/www.WindowsVJ.com
2. Now that you have converted the file in CSV, move to next part and open
Outlook.
3. To import contacts from the CSV file go to File menu and select open
submenu in the backstage view to bring options to ―open calendar‖ ―open
outlook data file ― and ―Import‖. Select Import option here. This option has
gone in the backstage view as compared with Office 2010.
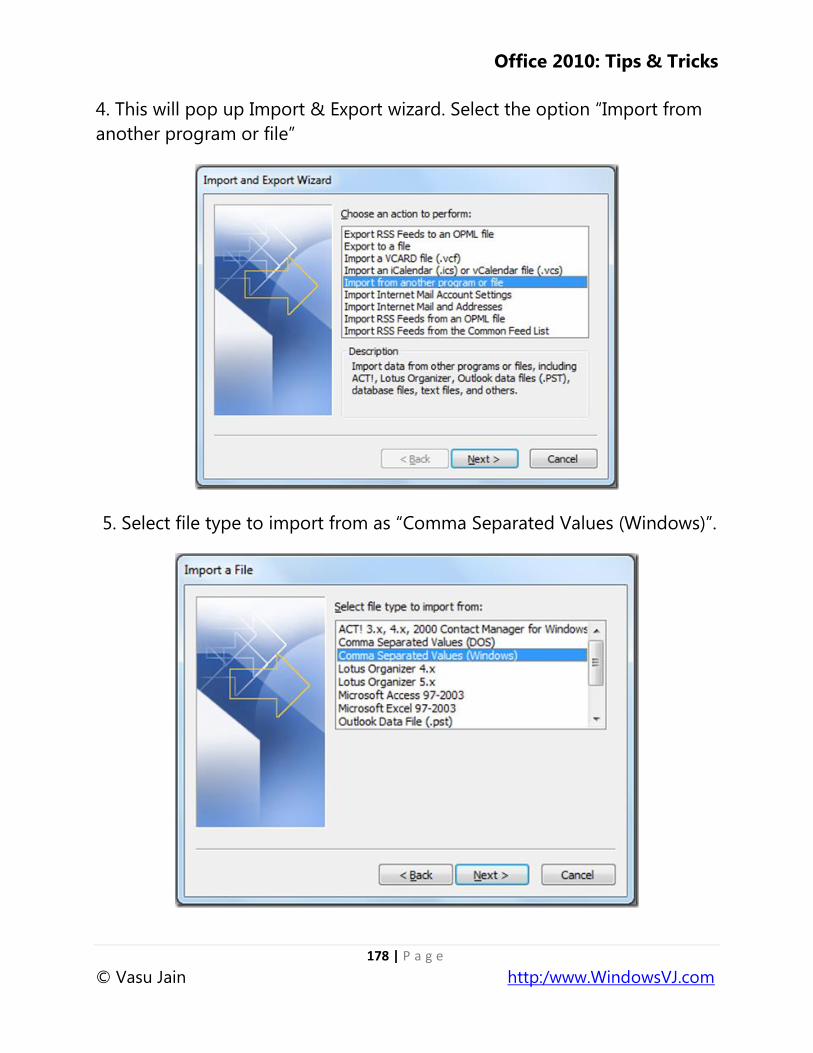
Office 2010: Tips & Tricks
178 | P a g e
© Vasu Jain http:/www.WindowsVJ.com
4. This will pop up Import & Export wizard. Select the option ―Import from
another program or file‖
5. Select file type to import from as ―Comma Separated Values (Windows)‖.
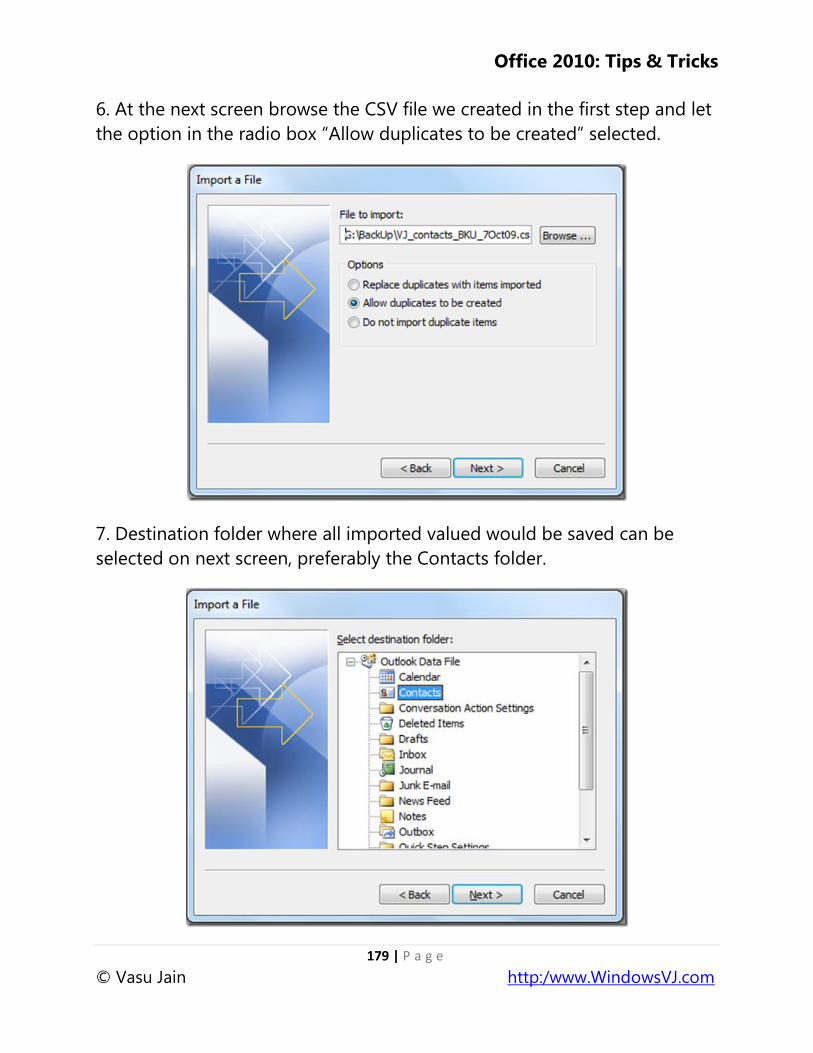
Office 2010: Tips & Tricks
179 | P a g e
© Vasu Jain http:/www.WindowsVJ.com
6. At the next screen browse the CSV file we created in the first step and let
the option in the radio box ―Allow duplicates to be created‖ selected.
7. Destination folder where all imported valued would be saved can be
selected on next screen, preferably the Contacts folder.
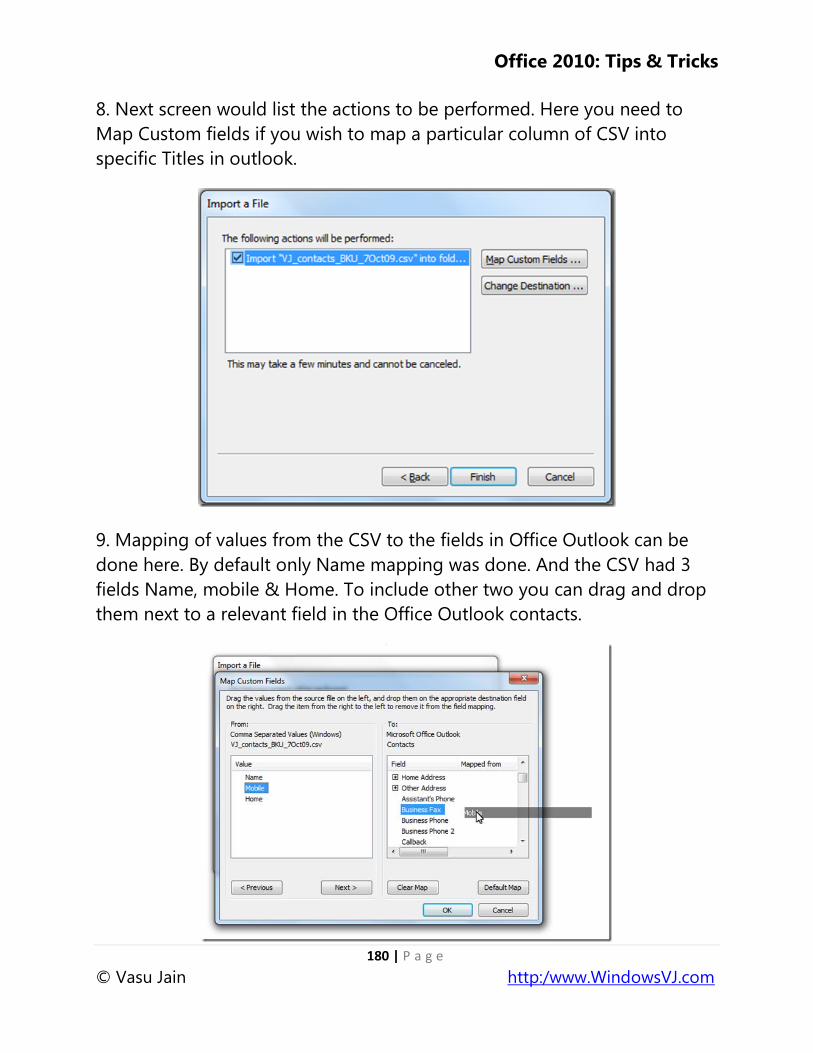
Office 2010: Tips & Tricks
180 | P a g e
© Vasu Jain http:/www.WindowsVJ.com
8. Next screen would list the actions to be performed. Here you need to
Map Custom fields if you wish to map a particular column of CSV into
specific Titles in outlook.
9. Mapping of values from the CSV to the fields in Office Outlook can be
done here. By default only Name mapping was done. And the CSV had 3
fields Name, mobile & Home. To include other two you can drag and drop
them next to a relevant field in the Office Outlook contacts.
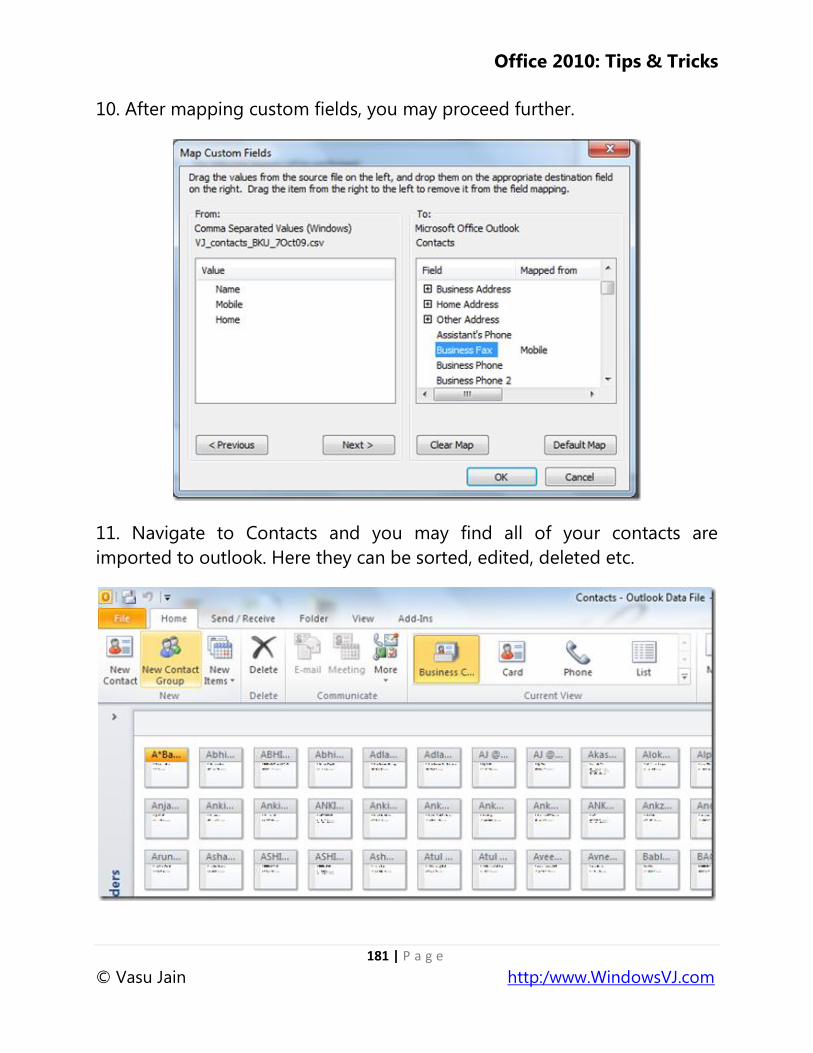
Office 2010: Tips & Tricks
181 | P a g e
© Vasu Jain http:/www.WindowsVJ.com
10. After mapping custom fields, you may proceed further.
11. Navigate to Contacts and you may find all of your contacts are
imported to outlook. Here they can be sorted, edited, deleted etc.
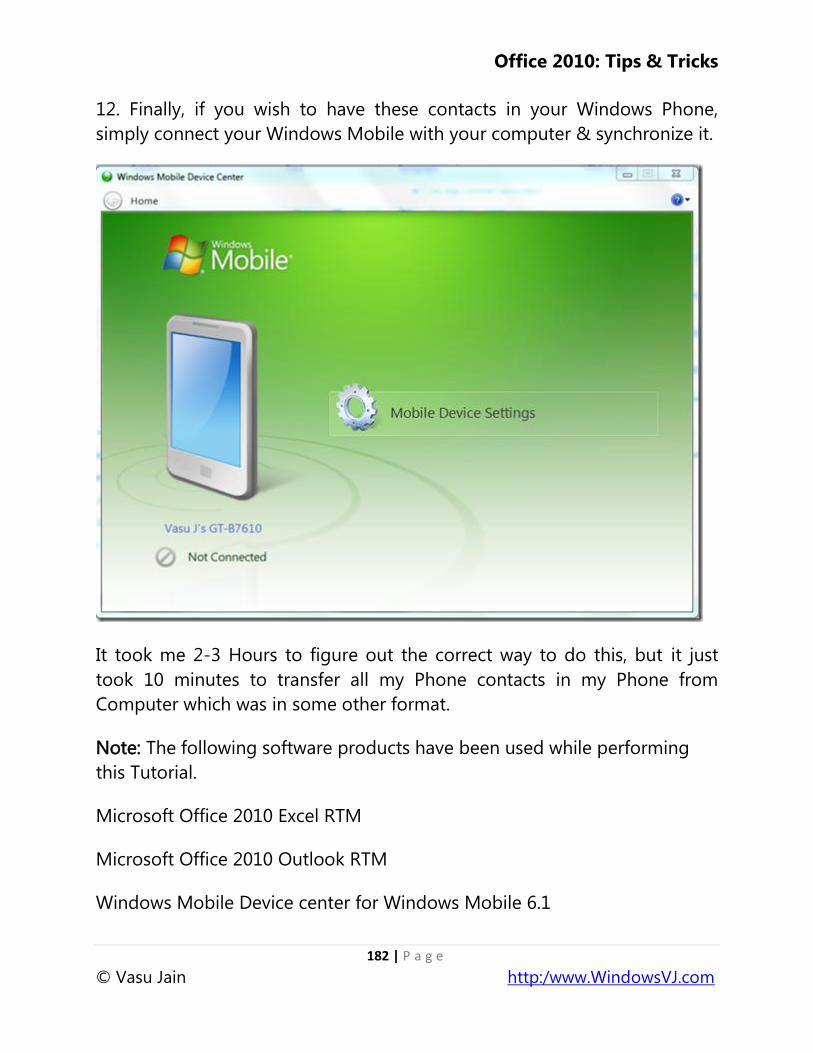
Office 2010: Tips & Tricks
182 | P a g e
© Vasu Jain http:/www.WindowsVJ.com
12. Finally, if you wish to have these contacts in your Windows Phone,
simply connect your Windows Mobile with your computer & synchronize it.
It took me 2-3 Hours to figure out the correct way to do this, but it just
took 10 minutes to transfer all my Phone contacts in my Phone from
Computer which was in some other format.
Note: The following software products have been used while performing
this Tutorial.
Microsoft Office 2010 Excel RTM
Microsoft Office 2010 Outlook RTM
Windows Mobile Device center for Windows Mobile 6.1
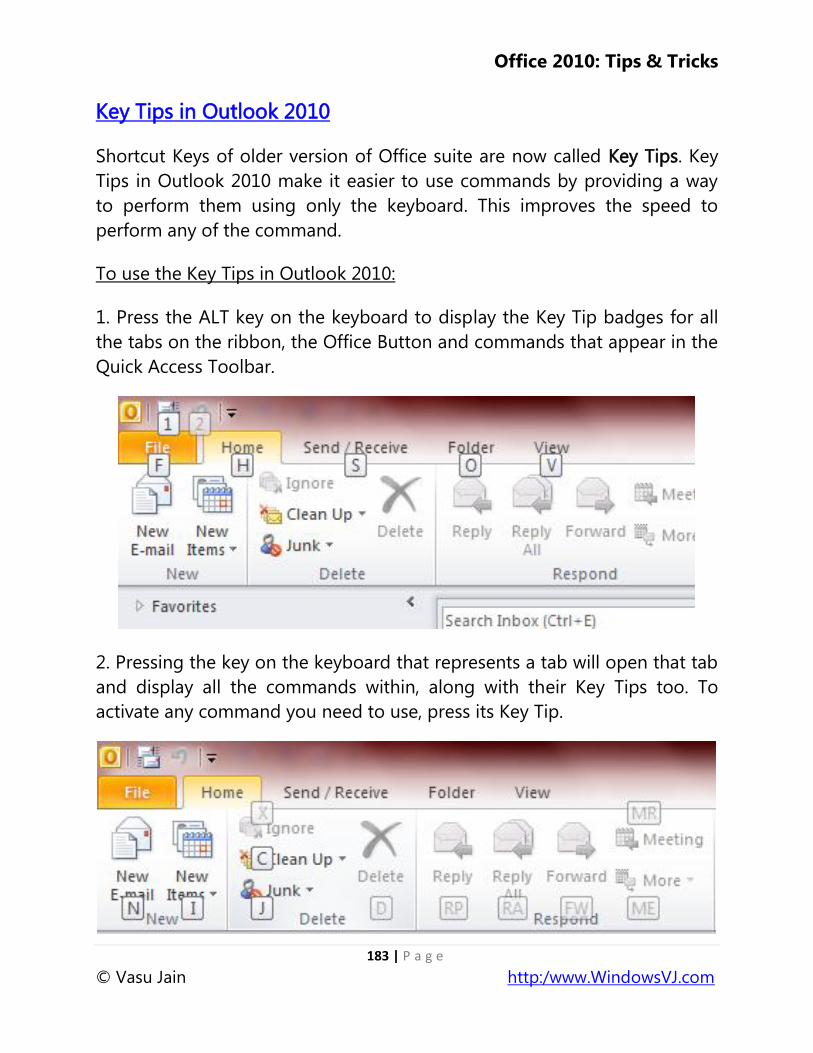
Office 2010: Tips & Tricks
183 | P a g e
© Vasu Jain http:/www.WindowsVJ.com
Key Tips in Outlook 2010
Shortcut Keys of older version of Office suite are now called Key Tips. Key
Tips in Outlook 2010 make it easier to use commands by providing a way
to perform them using only the keyboard. This improves the speed to
perform any of the command.
To use the Key Tips in Outlook 2010:
1. Press the ALT key on the keyboard to display the Key Tip badges for all
the tabs on the ribbon, the Office Button and commands that appear in the
Quick Access Toolbar.
2. Pressing the key on the keyboard that represents a tab will open that tab
and display all the commands within, along with their Key Tips too. To
activate any command you need to use, press its Key Tip.
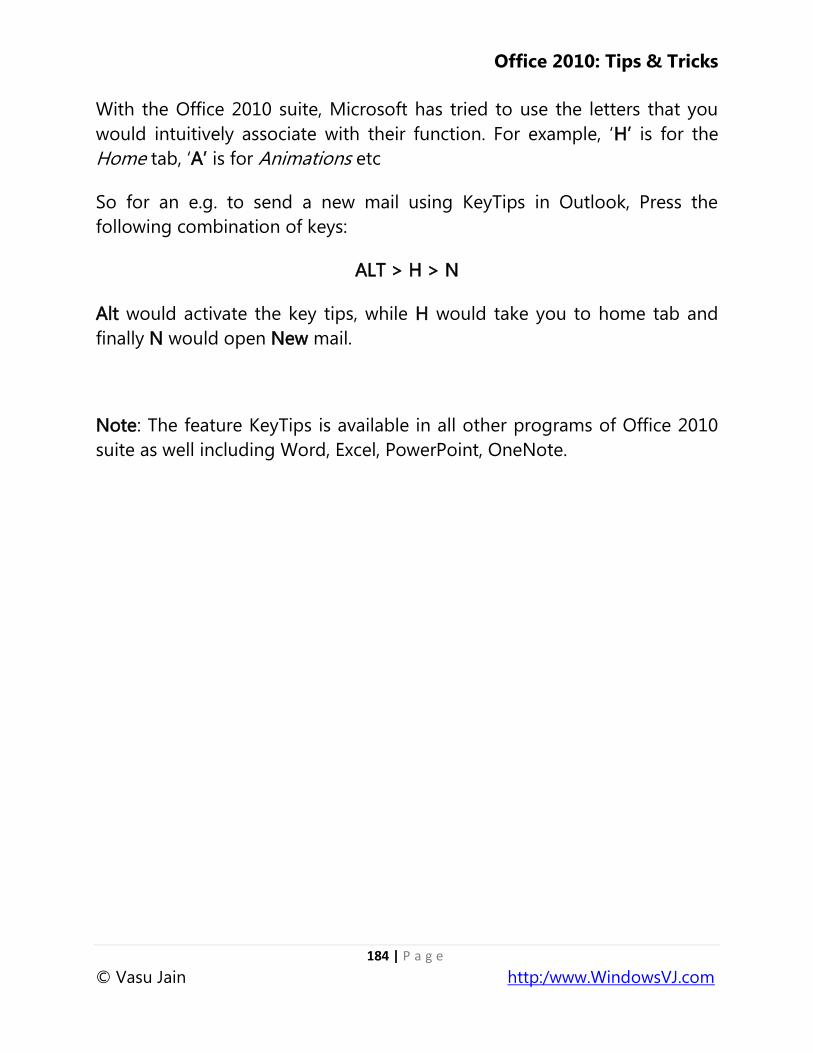
Office 2010: Tips & Tricks
184 | P a g e
© Vasu Jain http:/www.WindowsVJ.com
With the Office 2010 suite, Microsoft has tried to use the letters that you
would intuitively associate with their function. For example, ‗H‘ is for the
Home tab, ‗A‘ is for Animations etc
So for an e.g. to send a new mail using KeyTips in Outlook, Press the
following combination of keys:
ALT > H > N
Alt would activate the key tips, while H would take you to home tab and
finally N would open New mail.
Note: The feature KeyTips is available in all other programs of Office 2010
suite as well including Word, Excel, PowerPoint, OneNote.
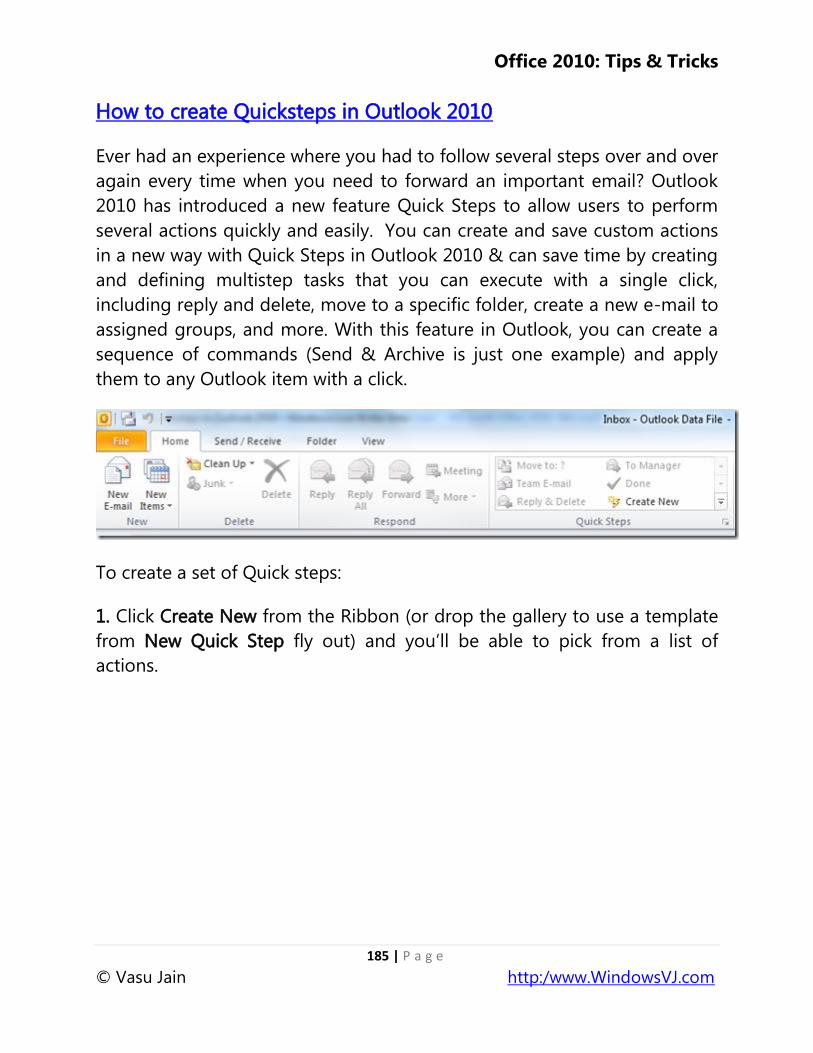
Office 2010: Tips & Tricks
185 | P a g e
© Vasu Jain http:/www.WindowsVJ.com
How to create Quicksteps in Outlook 2010
Ever had an experience where you had to follow several steps over and over
again every time when you need to forward an important email? Outlook
2010 has introduced a new feature Quick Steps to allow users to perform
several actions quickly and easily. You can create and save custom actions
in a new way with Quick Steps in Outlook 2010 & can save time by creating
and defining multistep tasks that you can execute with a single click,
including reply and delete, move to a specific folder, create a new e-mail to
assigned groups, and more. With this feature in Outlook, you can create a
sequence of commands (Send & Archive is just one example) and apply
them to any Outlook item with a click.
To create a set of Quick steps:
1. Click Create New from the Ribbon (or drop the gallery to use a template
from New Quick Step fly out) and you‘ll be able to pick from a list of
actions.
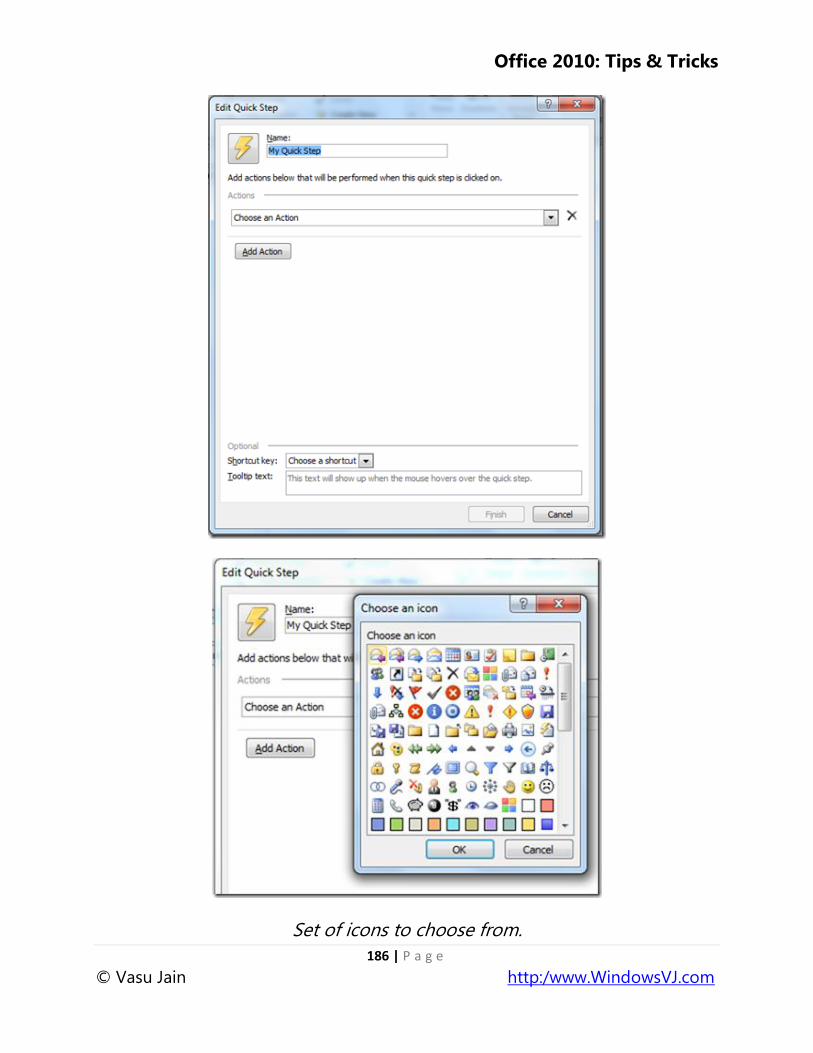
Office 2010: Tips & Tricks
186 | P a g e
© Vasu Jain http:/www.WindowsVJ.com
Set of icons to choose from.
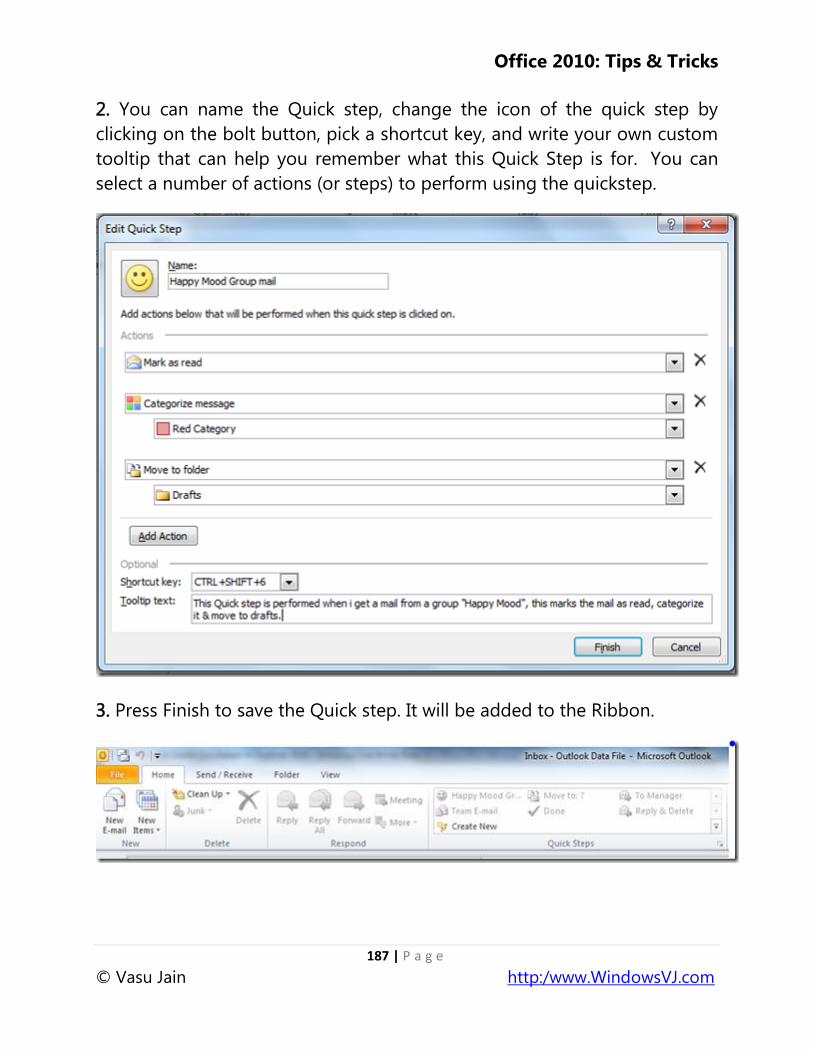
Office 2010: Tips & Tricks
187 | P a g e
© Vasu Jain http:/www.WindowsVJ.com
2. You can name the Quick step, change the icon of the quick step by
clicking on the bolt button, pick a shortcut key, and write your own custom
tooltip that can help you remember what this Quick Step is for. You can
select a number of actions (or steps) to perform using the quickstep.
3. Press Finish to save the Quick step. It will be added to the Ribbon.
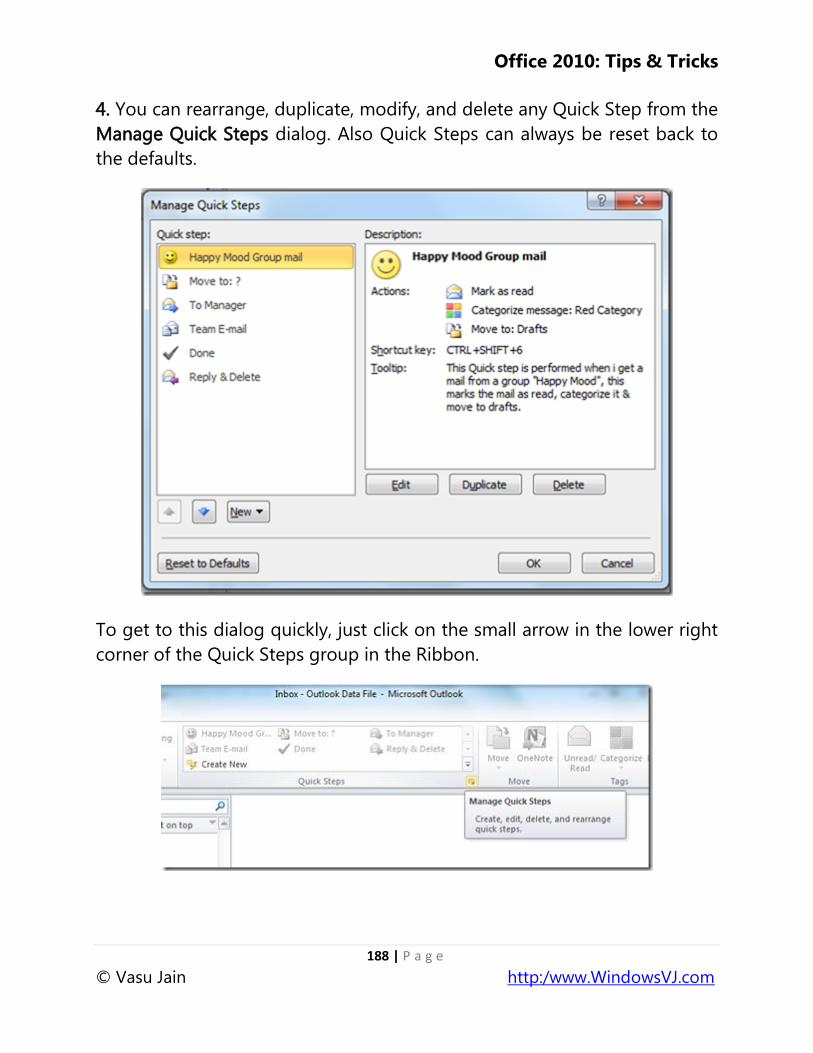
Office 2010: Tips & Tricks
188 | P a g e
© Vasu Jain http:/www.WindowsVJ.com
4. You can rearrange, duplicate, modify, and delete any Quick Step from the
Manage Quick Steps dialog. Also Quick Steps can always be reset back to
the defaults.
To get to this dialog quickly, just click on the small arrow in the lower right
corner of the Quick Steps group in the Ribbon.
Office 2010: Tips & Tricks
189 | P a g e
© Vasu Jain http:/www.WindowsVJ.com
As you already see, if a task on an email requires a lot of steps and actions,
then the Quick Step feature can great simplify the process and make your
life easy. Next time you get a mail from the "Happy Mood" groups as
illustrated above all you need to do is press Ctrl+Shift+6 (shortcut key
assigned to the Quick step) and rest would be taken care by Outlook .
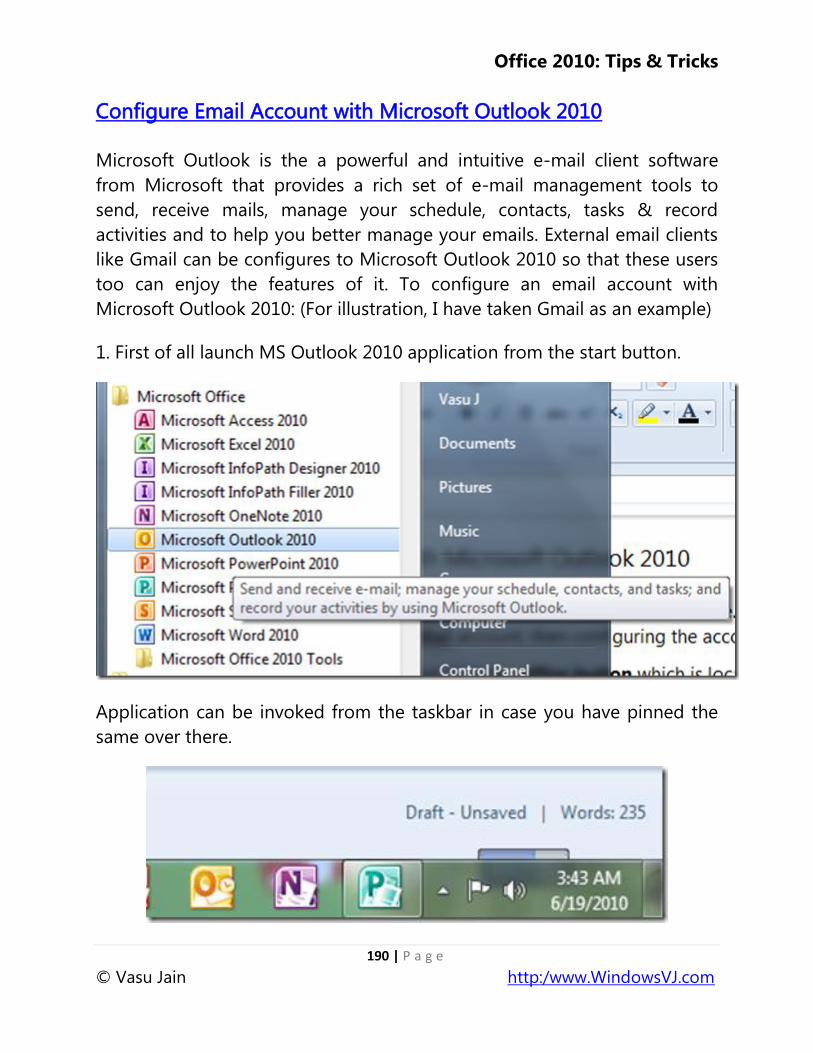
Office 2010: Tips & Tricks
190 | P a g e
© Vasu Jain http:/www.WindowsVJ.com
Configure Email Account with Microsoft Outlook 2010
Microsoft Outlook is the a powerful and intuitive e-mail client software
from Microsoft that provides a rich set of e-mail management tools to
send, receive mails, manage your schedule, contacts, tasks & record
activities and to help you better manage your emails. External email clients
like Gmail can be configures to Microsoft Outlook 2010 so that these users
too can enjoy the features of it. To configure an email account with
Microsoft Outlook 2010: (For illustration, I have taken Gmail as an example)
1. First of all launch MS Outlook 2010 application from the start button.
Application can be invoked from the taskbar in case you have pinned the
same over there.
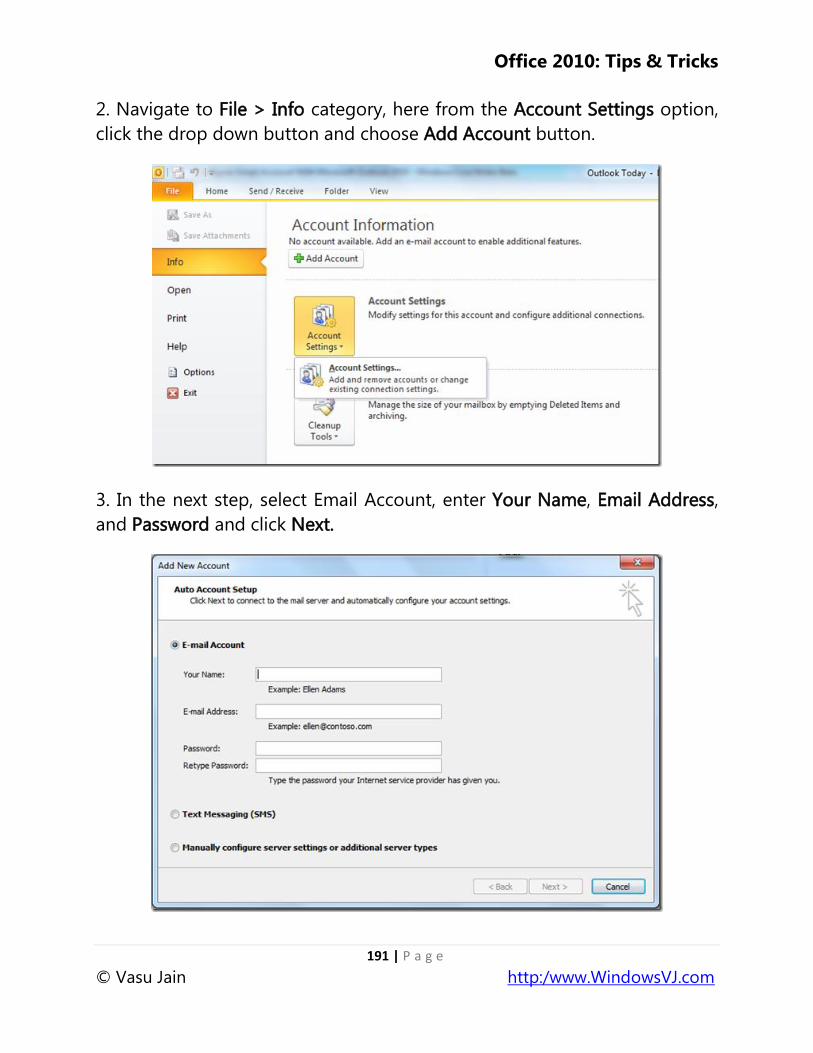
Office 2010: Tips & Tricks
191 | P a g e
© Vasu Jain http:/www.WindowsVJ.com
2. Navigate to File > Info category, here from the Account Settings option,
click the drop down button and choose Add Account button.
3. In the next step, select Email Account, enter Your Name, Email Address,
and Password and click Next.
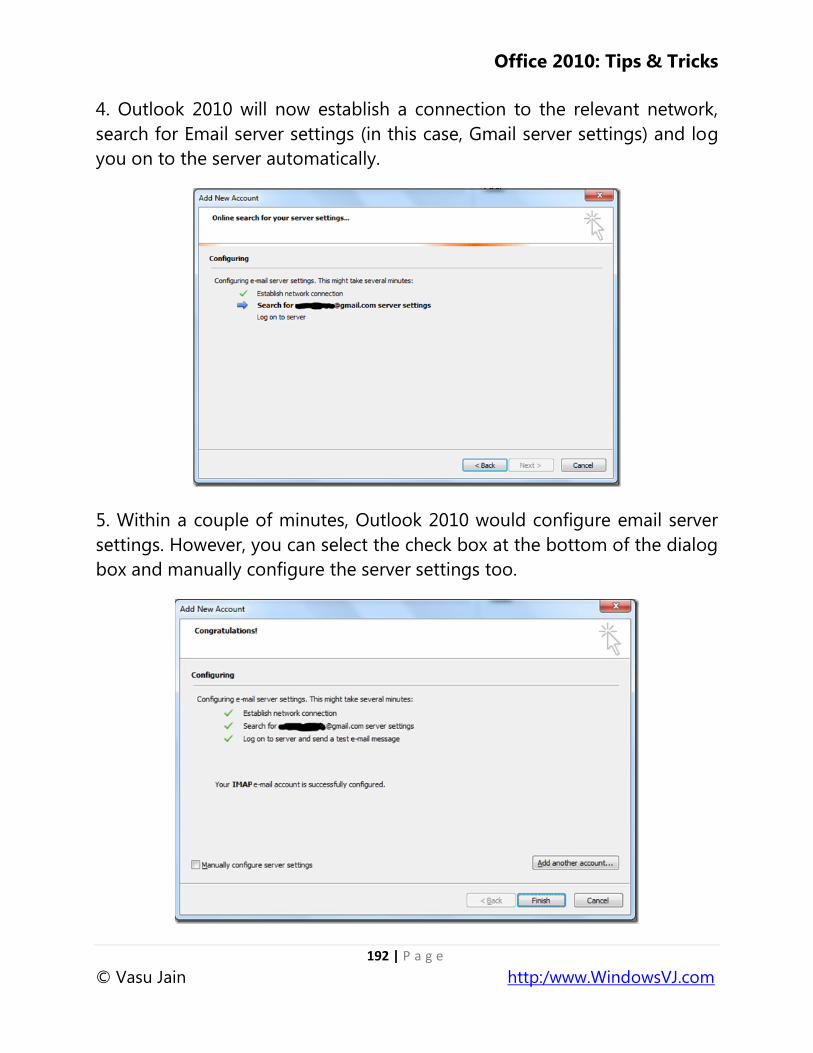
Office 2010: Tips & Tricks
192 | P a g e
© Vasu Jain http:/www.WindowsVJ.com
4. Outlook 2010 will now establish a connection to the relevant network,
search for Email server settings (in this case, Gmail server settings) and log
you on to the server automatically.
5. Within a couple of minutes, Outlook 2010 would configure email server
settings. However, you can select the check box at the bottom of the dialog
box and manually configure the server settings too.
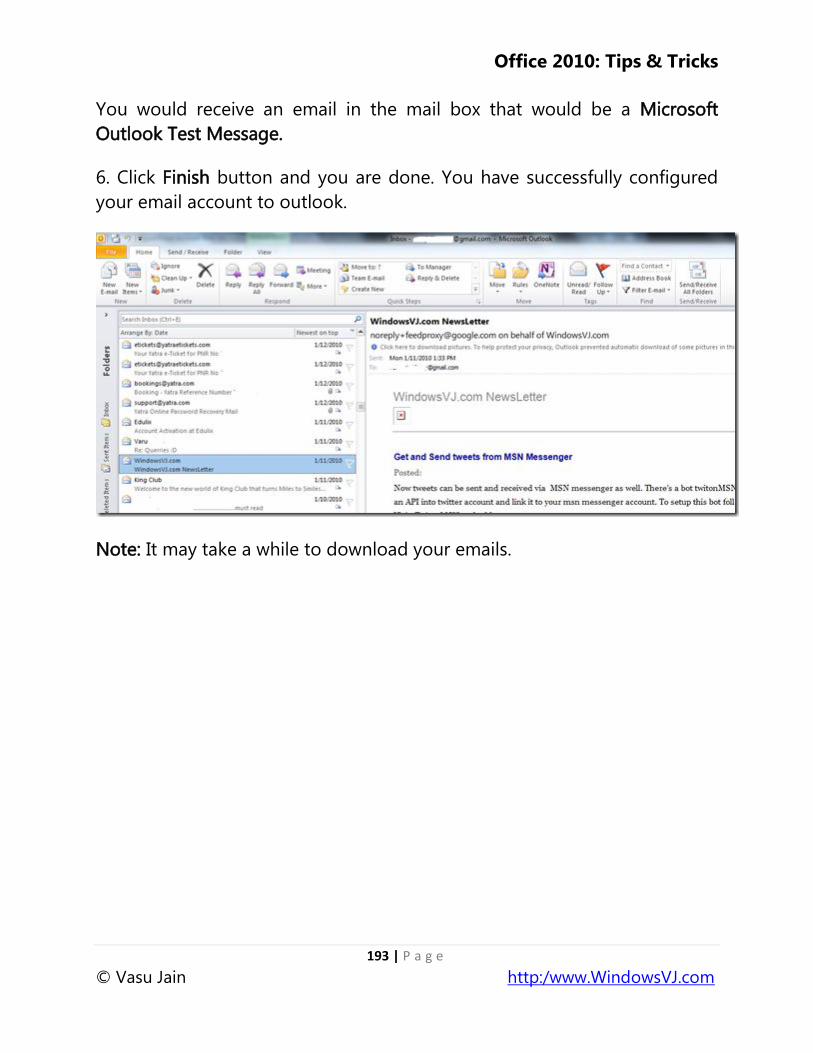
Office 2010: Tips & Tricks
193 | P a g e
© Vasu Jain http:/www.WindowsVJ.com
You would receive an email in the mail box that would be a Microsoft
Outlook Test Message.
6. Click Finish button and you are done. You have successfully configured
your email account to outlook.
Note: It may take a while to download your emails.
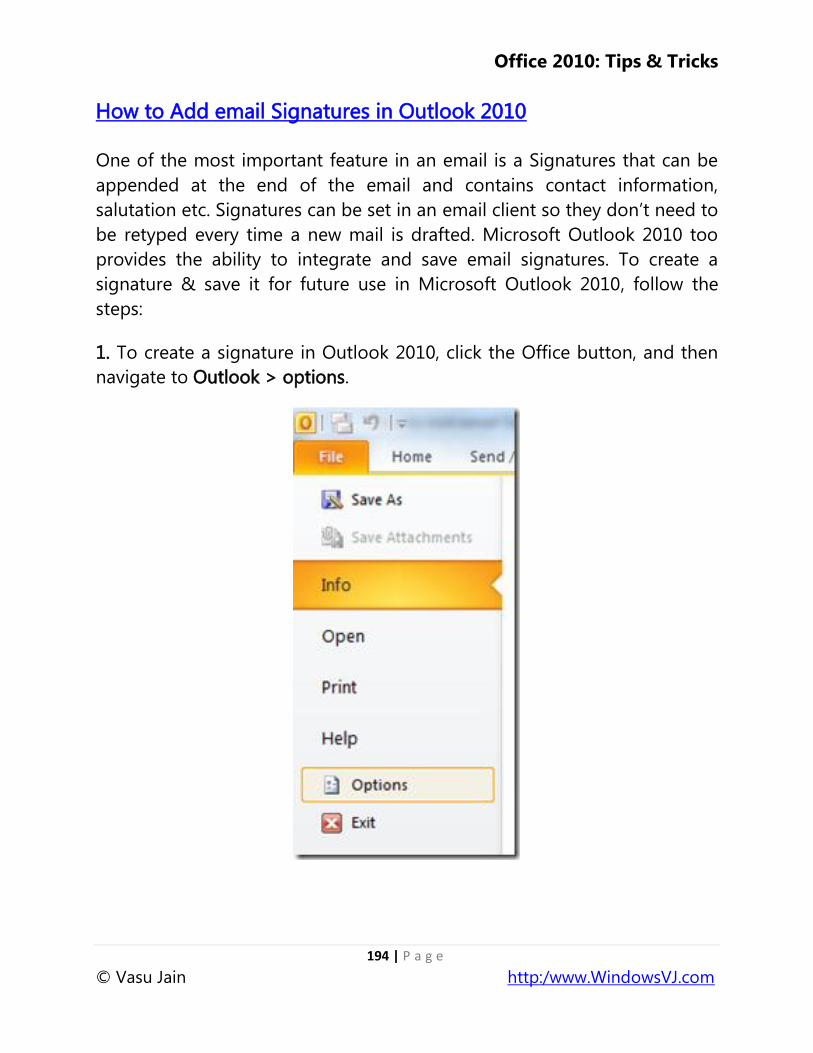
Office 2010: Tips & Tricks
194 | P a g e
© Vasu Jain http:/www.WindowsVJ.com
How to Add email Signatures in Outlook 2010
One of the most important feature in an email is a Signatures that can be
appended at the end of the email and contains contact information,
salutation etc. Signatures can be set in an email client so they don‘t need to
be retyped every time a new mail is drafted. Microsoft Outlook 2010 too
provides the ability to integrate and save email signatures. To create a
signature & save it for future use in Microsoft Outlook 2010, follow the
steps:
1. To create a signature in Outlook 2010, click the Office button, and then
navigate to Outlook > options.
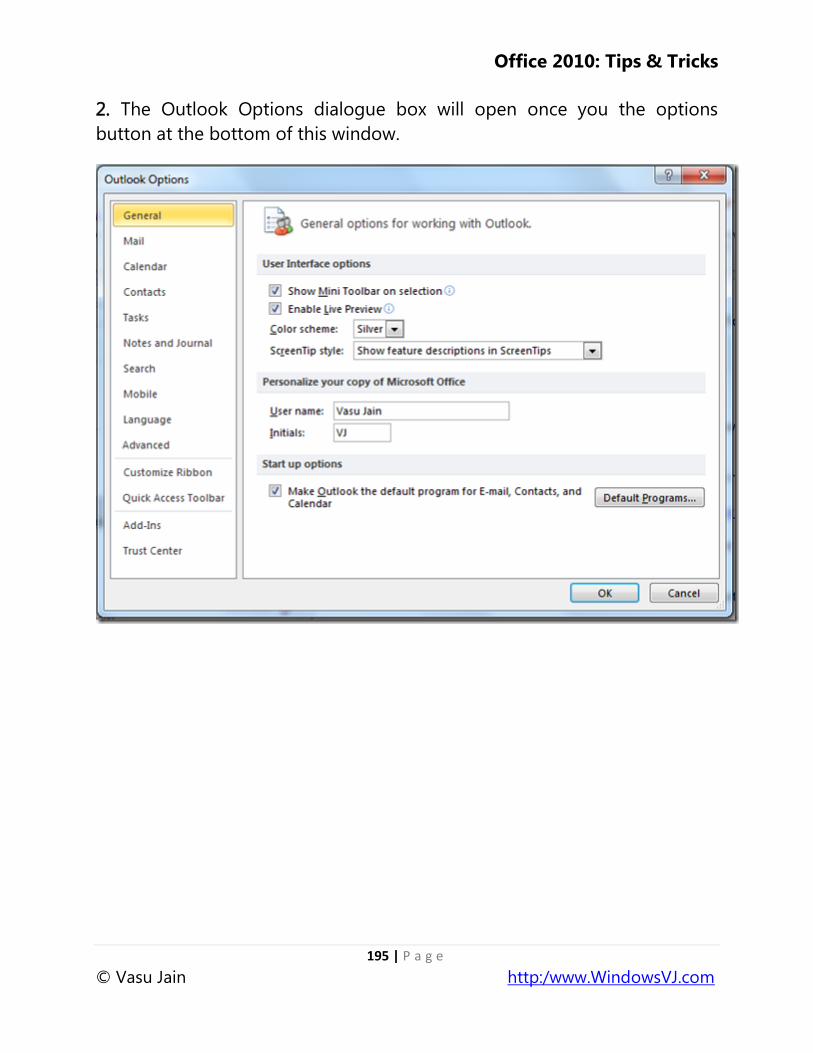
Office 2010: Tips & Tricks
195 | P a g e
© Vasu Jain http:/www.WindowsVJ.com
2. The Outlook Options dialogue box will open once you the options
button at the bottom of this window.

Office 2010: Tips & Tricks
196 | P a g e
© Vasu Jain http:/www.WindowsVJ.com
3. From the Outlook Options window, select the mail option located in the
left side menu and on right side signature options will be available. Click on
the Signatures button here.
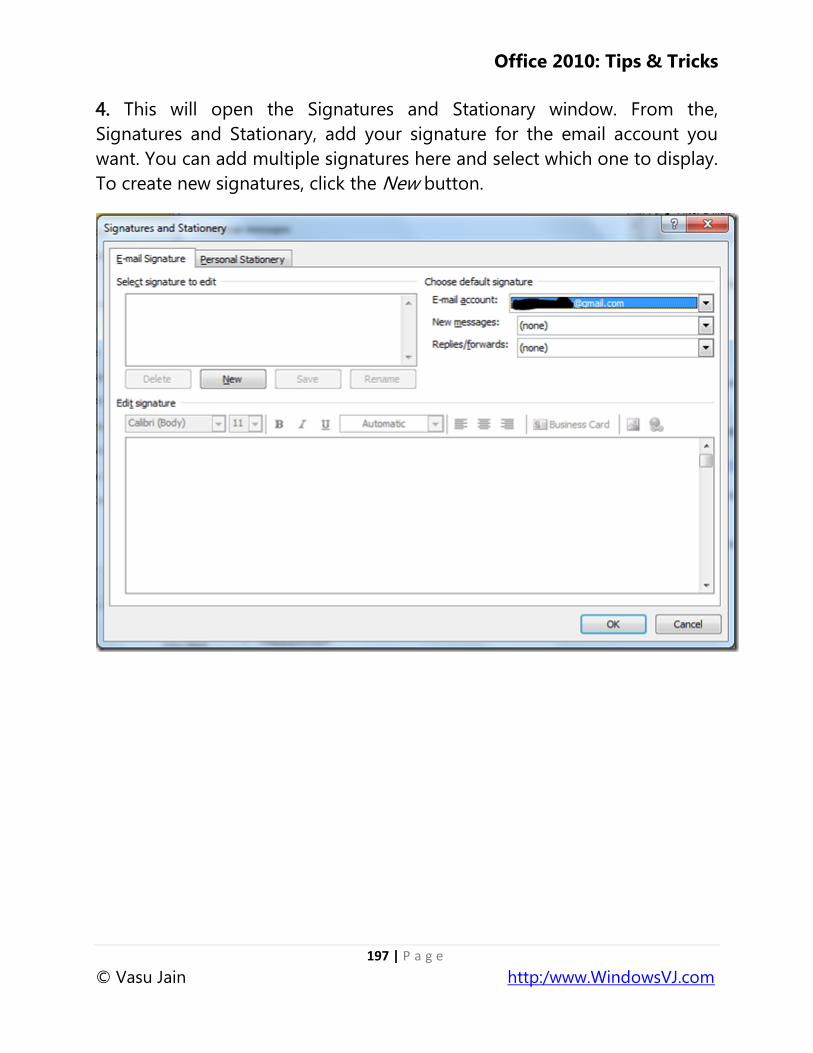
Office 2010: Tips & Tricks
197 | P a g e
© Vasu Jain http:/www.WindowsVJ.com
4. This will open the Signatures and Stationary window. From the,
Signatures and Stationary, add your signature for the email account you
want. You can add multiple signatures here and select which one to display.
To create new signatures, click the New button.
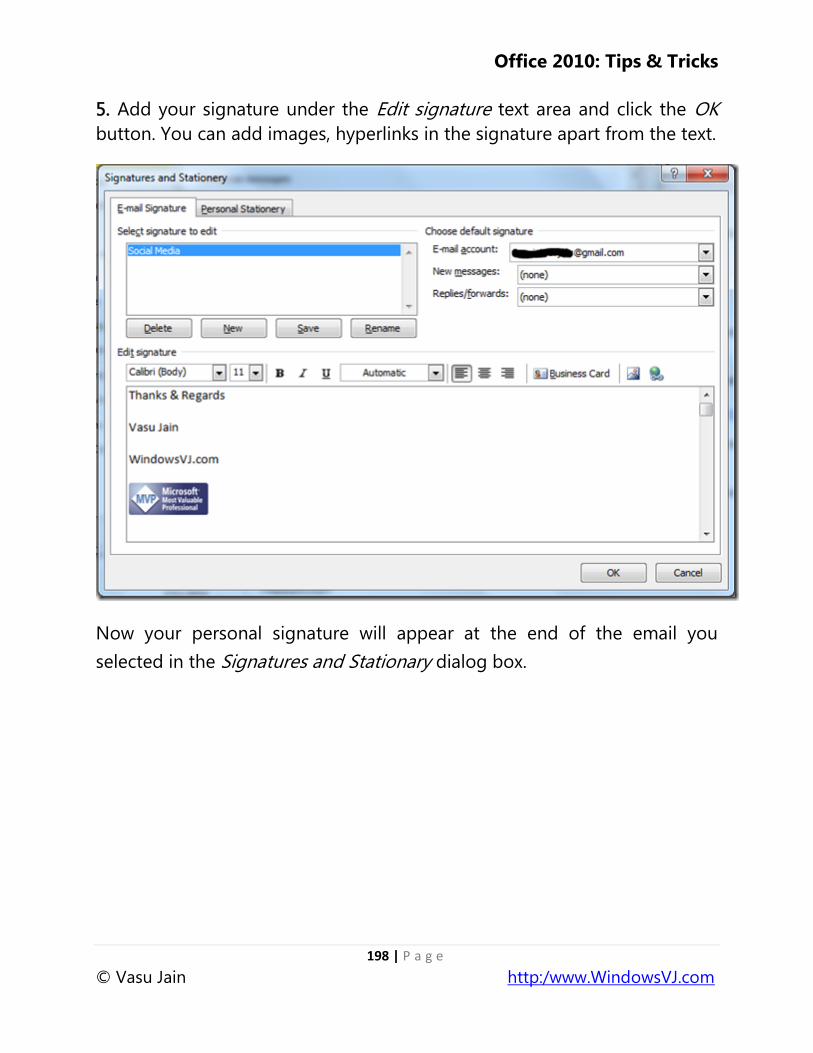
Office 2010: Tips & Tricks
198 | P a g e
© Vasu Jain http:/www.WindowsVJ.com
5. Add your signature under the Edit signature text area and click the OK
button. You can add images, hyperlinks in the signature apart from the text.
Now your personal signature will appear at the end of the email you
selected in the Signatures and Stationary dialog box.
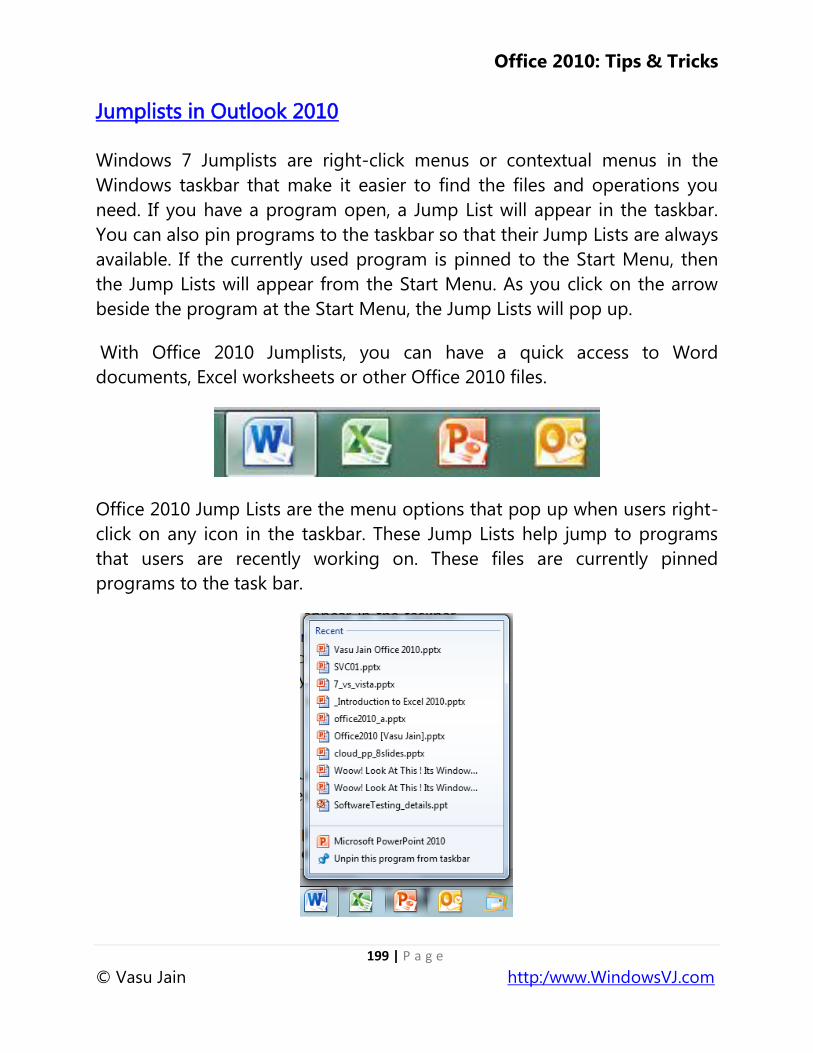
Office 2010: Tips & Tricks
199 | P a g e
© Vasu Jain http:/www.WindowsVJ.com
Jumplists in Outlook 2010
Windows 7 Jumplists are right-click menus or contextual menus in the
Windows taskbar that make it easier to find the files and operations you
need. If you have a program open, a Jump List will appear in the taskbar.
You can also pin programs to the taskbar so that their Jump Lists are always
available. If the currently used program is pinned to the Start Menu, then
the Jump Lists will appear from the Start Menu. As you click on the arrow
beside the program at the Start Menu, the Jump Lists will pop up.
With Office 2010 Jumplists, you can have a quick access to Word
documents, Excel worksheets or other Office 2010 files.
Office 2010 Jump Lists are the menu options that pop up when users right-
click on any icon in the taskbar. These Jump Lists help jump to programs
that users are recently working on. These files are currently pinned
programs to the task bar.

Office 2010: Tips & Tricks
200 | P a g e
© Vasu Jain http:/www.WindowsVJ.com
However, Outlook 2010 makes use of Windows 7‘s Jumplists feature for
quick access to certain processes which include actions to create a new
email, appointment, meeting, contact, or task directly from the Outlook
2010 Jump List.
So, with Outlook 2010 you don't have to open Outlook to perform these
operations and can use a few clicks to perform an operation and for quick
access to certain processes.
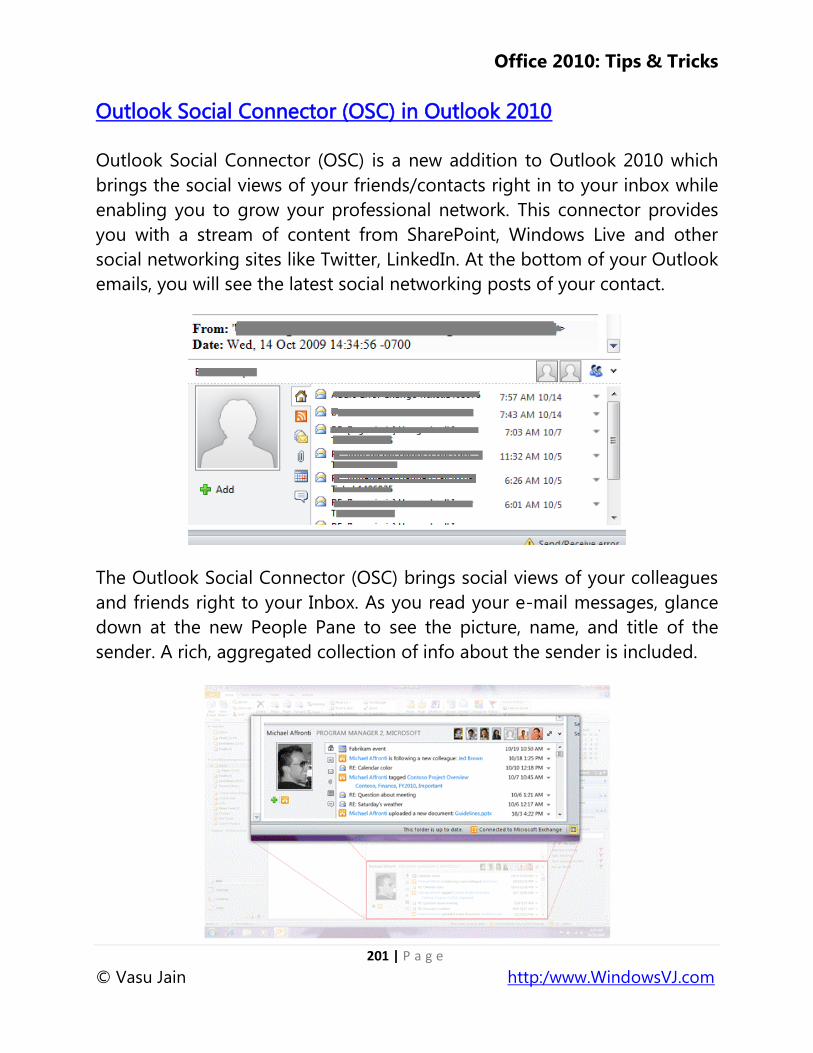
Office 2010: Tips & Tricks
201 | P a g e
© Vasu Jain http:/www.WindowsVJ.com
Outlook Social Connector (OSC) in Outlook 2010
Outlook Social Connector (OSC) is a new addition to Outlook 2010 which
brings the social views of your friends/contacts right in to your inbox while
enabling you to grow your professional network. This connector provides
you with a stream of content from SharePoint, Windows Live and other
social networking sites like Twitter, LinkedIn. At the bottom of your Outlook
emails, you will see the latest social networking posts of your contact.
The Outlook Social Connector (OSC) brings social views of your colleagues
and friends right to your Inbox. As you read your e-mail messages, glance
down at the new People Pane to see the picture, name, and title of the
sender. A rich, aggregated collection of info about the sender is included.
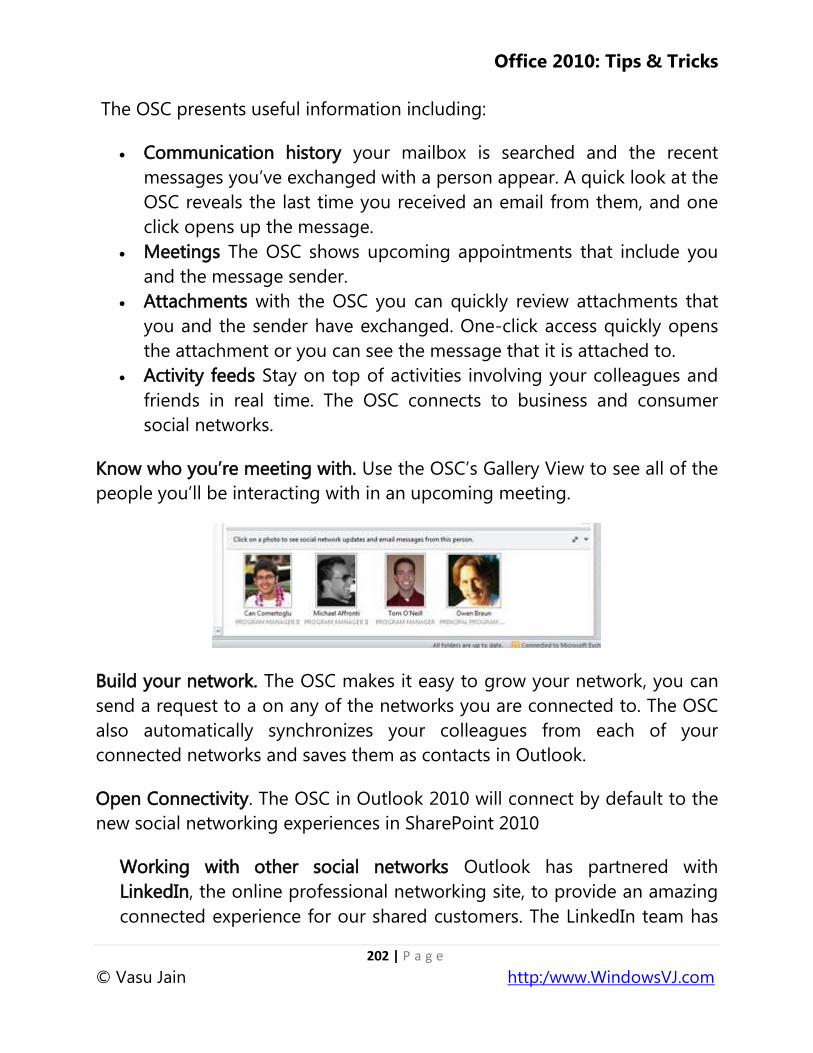
Office 2010: Tips & Tricks
202 | P a g e
© Vasu Jain http:/www.WindowsVJ.com
The OSC presents useful information including:
Communication history your mailbox is searched and the recent
messages you‘ve exchanged with a person appear. A quick look at the
OSC reveals the last time you received an email from them, and one
click opens up the message.
Meetings The OSC shows upcoming appointments that include you
and the message sender.
Attachments with the OSC you can quickly review attachments that
you and the sender have exchanged. One-click access quickly opens
the attachment or you can see the message that it is attached to.
Activity feeds Stay on top of activities involving your colleagues and
friends in real time. The OSC connects to business and consumer
social networks.
Know who you‘re meeting with. Use the OSC‘s Gallery View to see all of the
people you‘ll be interacting with in an upcoming meeting.
Build your network. The OSC makes it easy to grow your network, you can
send a request to a on any of the networks you are connected to. The OSC
also automatically synchronizes your colleagues from each of your
connected networks and saves them as contacts in Outlook.
Open Connectivity. The OSC in Outlook 2010 will connect by default to the
new social networking experiences in SharePoint 2010
Working with other social networks Outlook has partnered with
LinkedIn, the online professional networking site, to provide an amazing
connected experience for our shared customers. The LinkedIn team has
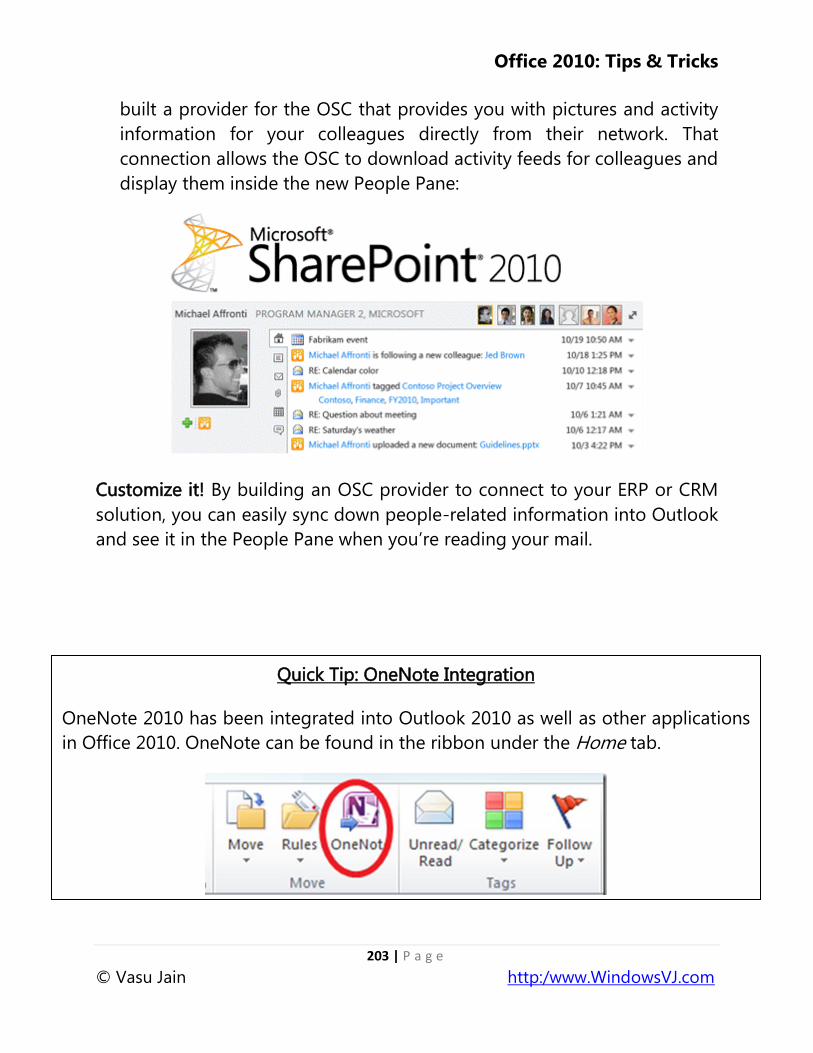
Office 2010: Tips & Tricks
203 | P a g e
© Vasu Jain http:/www.WindowsVJ.com
built a provider for the OSC that provides you with pictures and activity
information for your colleagues directly from their network. That
connection allows the OSC to download activity feeds for colleagues and
display them inside the new People Pane:
Customize it! By building an OSC provider to connect to your ERP or CRM
solution, you can easily sync down people-related information into Outlook
and see it in the People Pane when you‘re reading your mail.
Quick Tip: OneNote Integration
OneNote 2010 has been integrated into Outlook 2010 as well as other applications
in Office 2010. OneNote can be found in the ribbon under the Home tab.
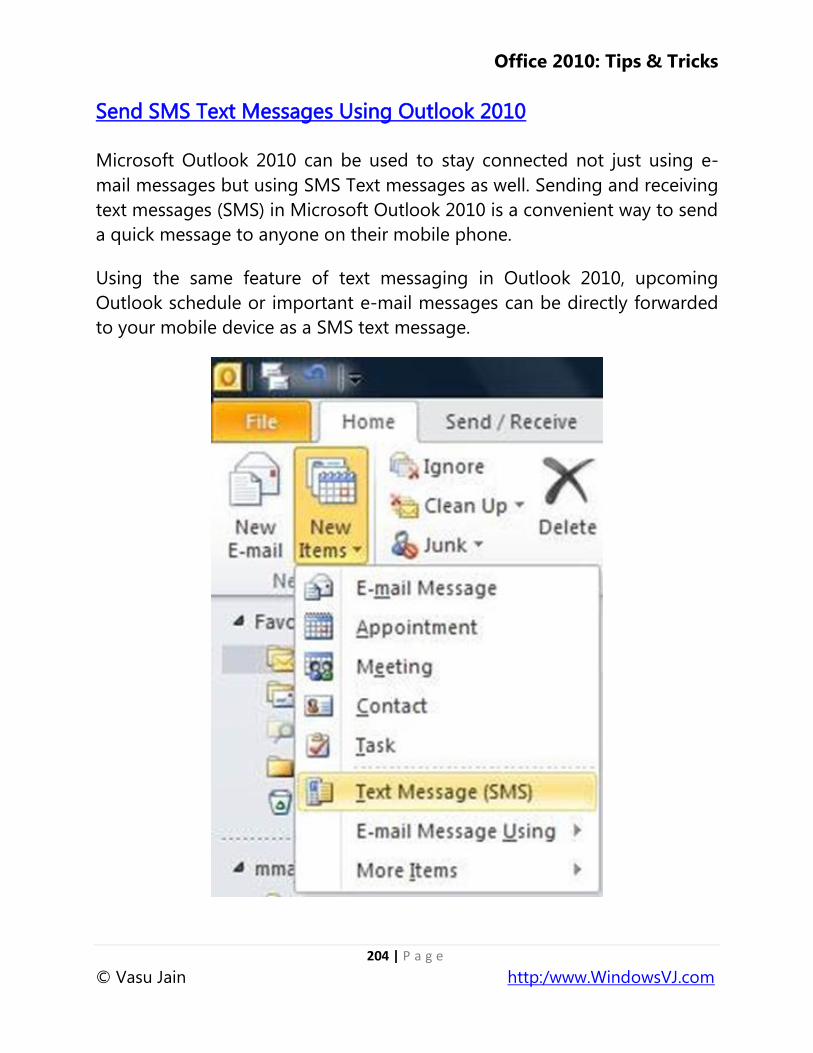
Office 2010: Tips & Tricks
204 | P a g e
© Vasu Jain http:/www.WindowsVJ.com
Send SMS Text Messages Using Outlook 2010
Microsoft Outlook 2010 can be used to stay connected not just using e-
mail messages but using SMS Text messages as well. Sending and receiving
text messages (SMS) in Microsoft Outlook 2010 is a convenient way to send
a quick message to anyone on their mobile phone.
Using the same feature of text messaging in Outlook 2010, upcoming
Outlook schedule or important e-mail messages can be directly forwarded
to your mobile device as a SMS text message.
Office 2010: Tips & Tricks
205 | P a g e
© Vasu Jain http:/www.WindowsVJ.com
To set up text messaging in Outlook 2010 there are two ways:
1. The easiest way is using a Windows phone running 6.1 with an update or
6.5, and connected to a Microsoft Exchange Server 2010 account. With this
setup, your text messages are synchronized from Outlook to your mobile
device for sending. Also, messages that you receive are synchronized back
to Outlook for easy reading in your Inbox.
2. Without a Windows phone or an Exchange 2010 account, text messaging
in Outlook 2010 can be configured by signing up for a third-party service
that sends text messages on your behalf. These services may charge a
nominal fee for message delivery. However the use of a third-party
messaging service requires more initial setup, after connected, you can then
send texts from the convenience of your computer.
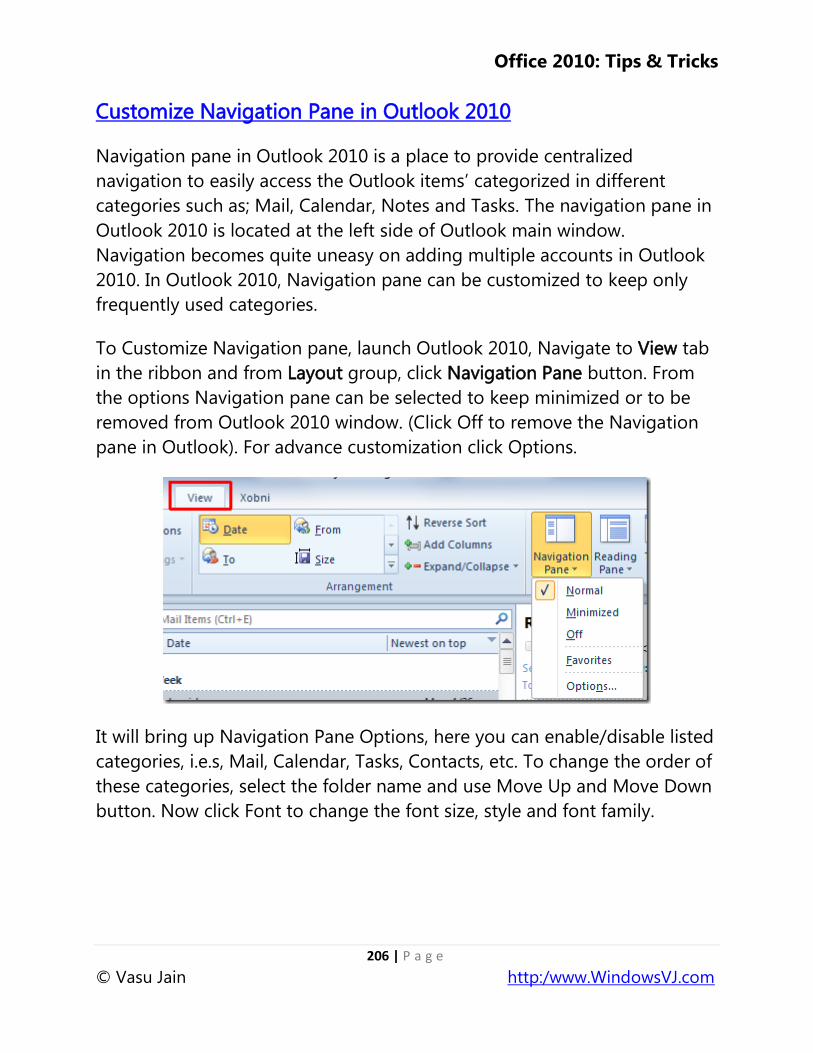
Office 2010: Tips & Tricks
206 | P a g e
© Vasu Jain http:/www.WindowsVJ.com
Customize Navigation Pane in Outlook 2010
Navigation pane in Outlook 2010 is a place to provide centralized
navigation to easily access the Outlook items‘ categorized in different
categories such as; Mail, Calendar, Notes and Tasks. The navigation pane in
Outlook 2010 is located at the left side of Outlook main window.
Navigation becomes quite uneasy on adding multiple accounts in Outlook
2010. In Outlook 2010, Navigation pane can be customized to keep only
frequently used categories.
To Customize Navigation pane, launch Outlook 2010, Navigate to View tab
in the ribbon and from Layout group, click Navigation Pane button. From
the options Navigation pane can be selected to keep minimized or to be
removed from Outlook 2010 window. (Click Off to remove the Navigation
pane in Outlook). For advance customization click Options.
It will bring up Navigation Pane Options, here you can enable/disable listed
categories, i.e.s, Mail, Calendar, Tasks, Contacts, etc. To change the order of
these categories, select the folder name and use Move Up and Move Down
button. Now click Font to change the font size, style and font family.
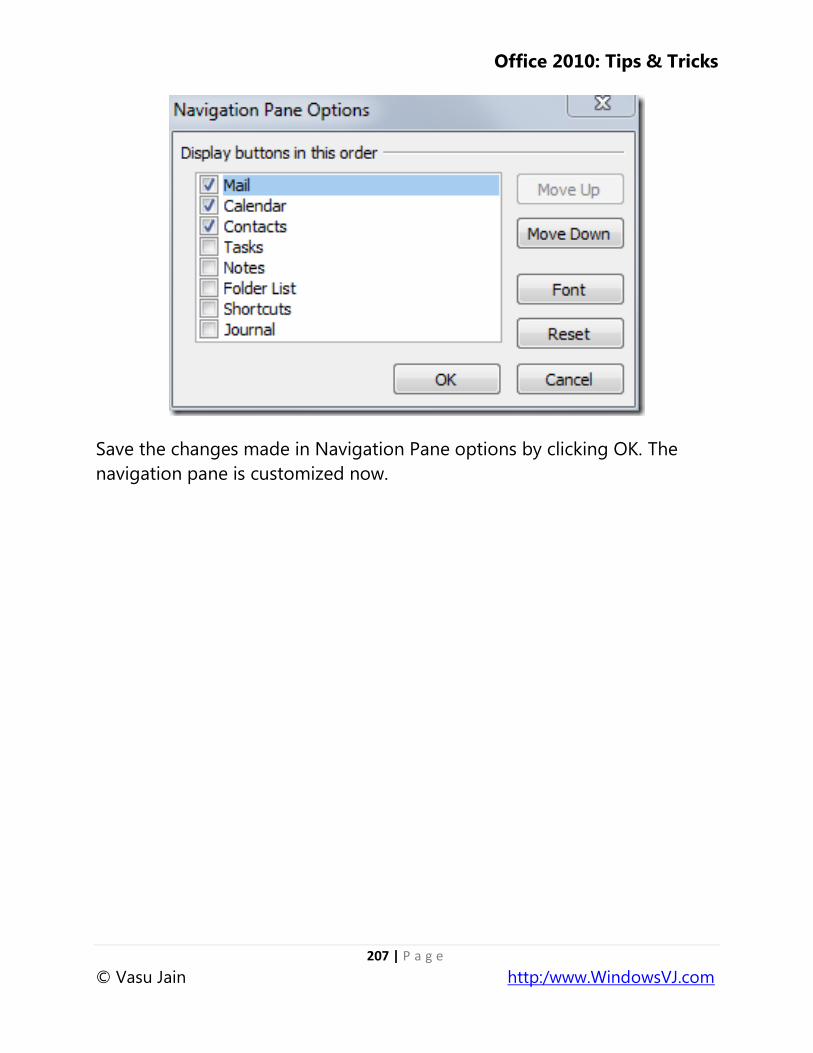
Office 2010: Tips & Tricks
207 | P a g e
© Vasu Jain http:/www.WindowsVJ.com
Save the changes made in Navigation Pane options by clicking OK. The
navigation pane is customized now.
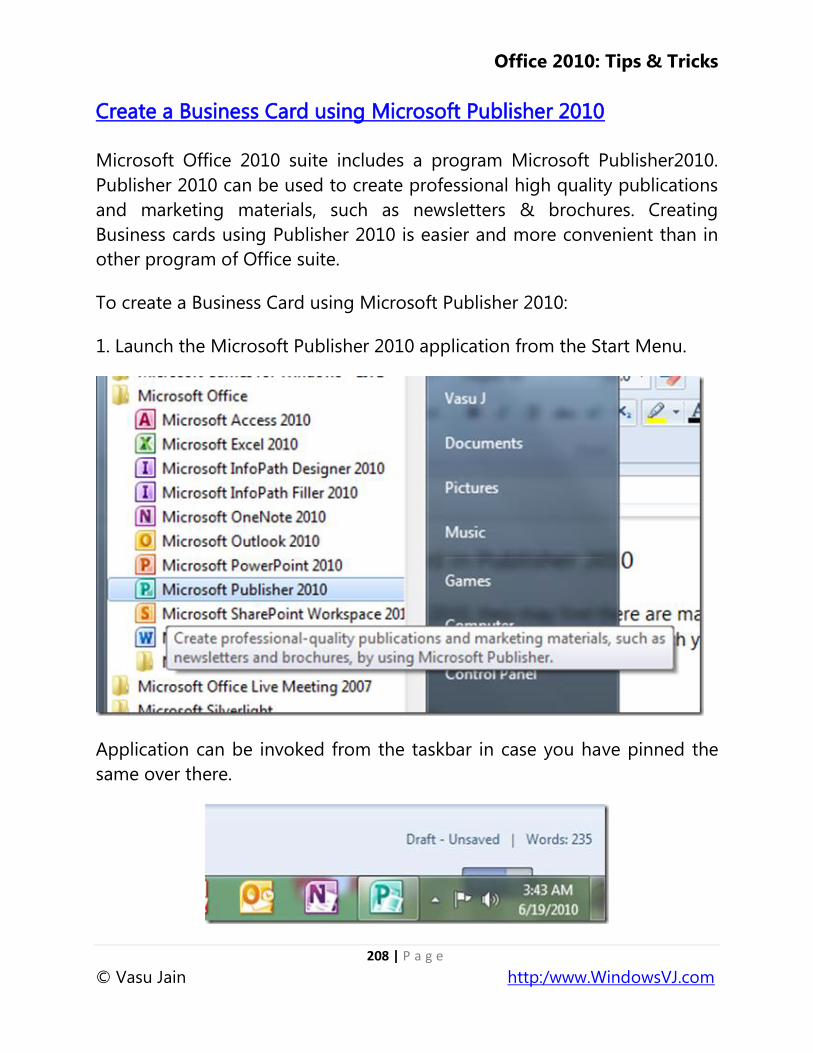
Office 2010: Tips & Tricks
208 | P a g e
© Vasu Jain http:/www.WindowsVJ.com
Create a Business Card using Microsoft Publisher 2010
Microsoft Office 2010 suite includes a program Microsoft Publisher2010.
Publisher 2010 can be used to create professional high quality publications
and marketing materials, such as newsletters & brochures. Creating
Business cards using Publisher 2010 is easier and more convenient than in
other program of Office suite.
To create a Business Card using Microsoft Publisher 2010:
1. Launch the Microsoft Publisher 2010 application from the Start Menu.
Application can be invoked from the taskbar in case you have pinned the
same over there.
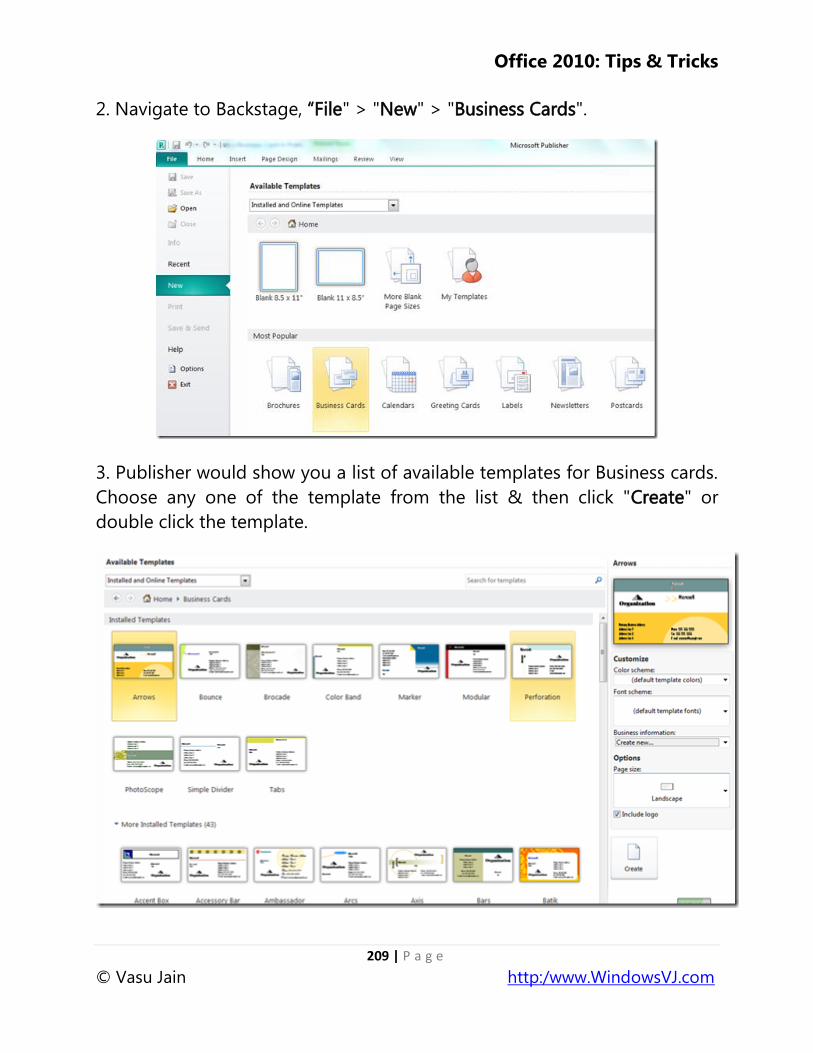
Office 2010: Tips & Tricks
209 | P a g e
© Vasu Jain http:/www.WindowsVJ.com
2. Navigate to Backstage, ―File" > "New" > "Business Cards".
3. Publisher would show you a list of available templates for Business cards.
Choose any one of the template from the list & then click "Create" or
double click the template.
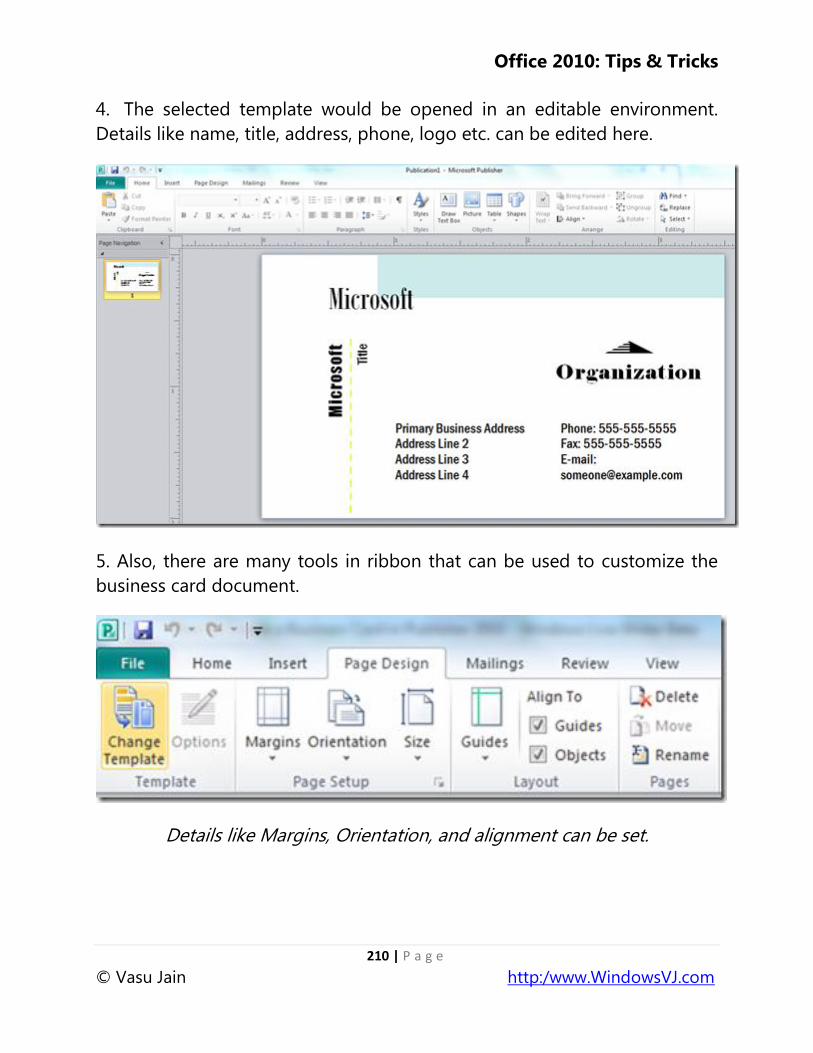
Office 2010: Tips & Tricks
210 | P a g e
© Vasu Jain http:/www.WindowsVJ.com
4. The selected template would be opened in an editable environment.
Details like name, title, address, phone, logo etc. can be edited here.
5. Also, there are many tools in ribbon that can be used to customize the
business card document.
Details like Margins, Orientation, and alignment can be set.
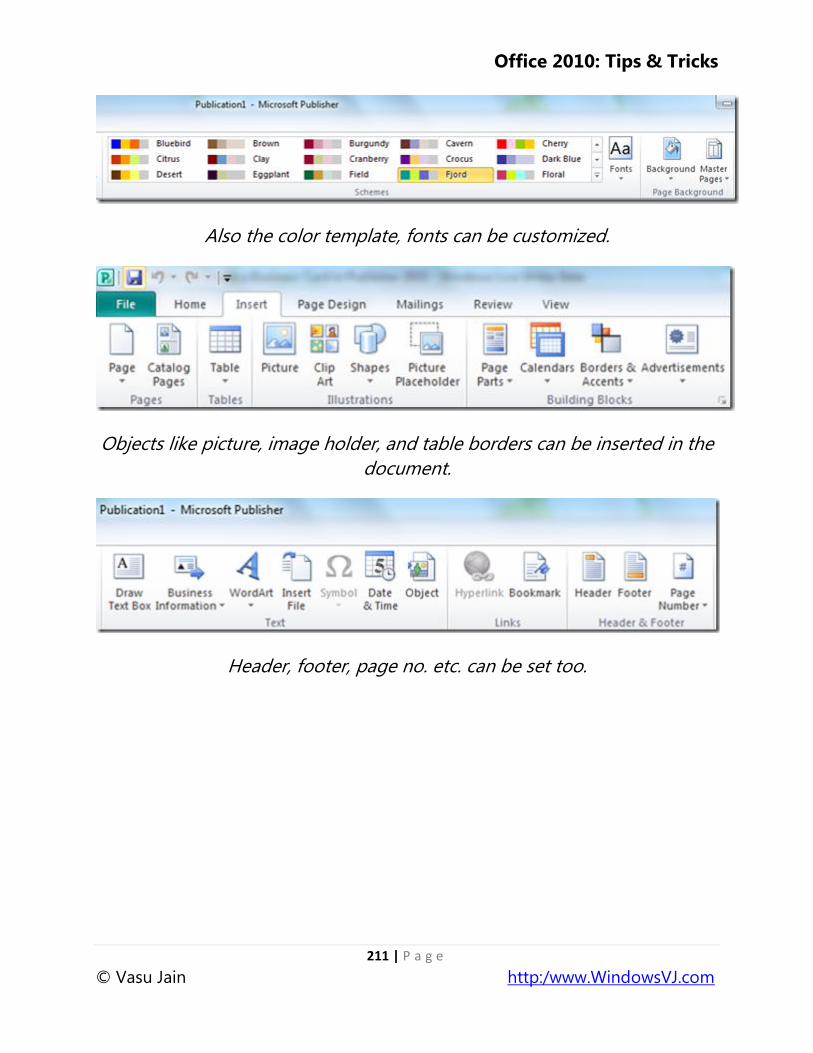
Office 2010: Tips & Tricks
211 | P a g e
© Vasu Jain http:/www.WindowsVJ.com
Also the color template, fonts can be customized.
Objects like picture, image holder, and table borders can be inserted in the
document.
Header, footer, page no. etc. can be set too.
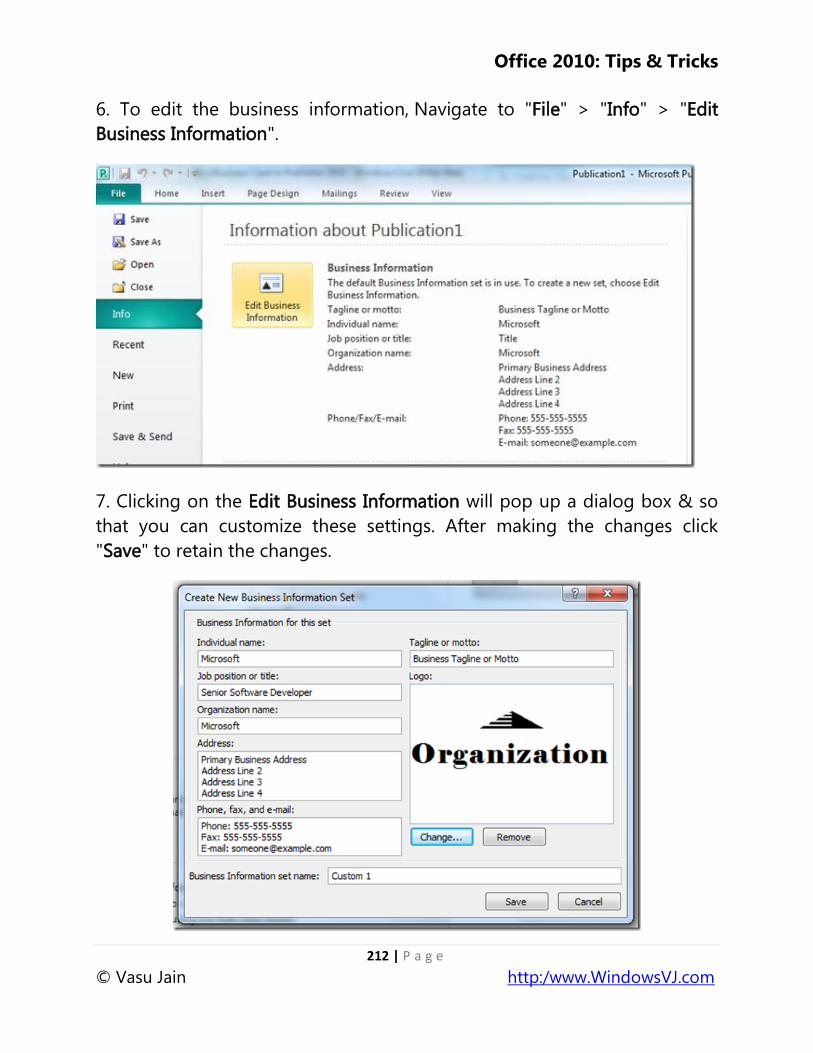
Office 2010: Tips & Tricks
212 | P a g e
© Vasu Jain http:/www.WindowsVJ.com
6. To edit the business information, Navigate to "File" > "Info" > "Edit
Business Information".
7. Clicking on the Edit Business Information will pop up a dialog box & so
that you can customize these settings. After making the changes click
"Save" to retain the changes.
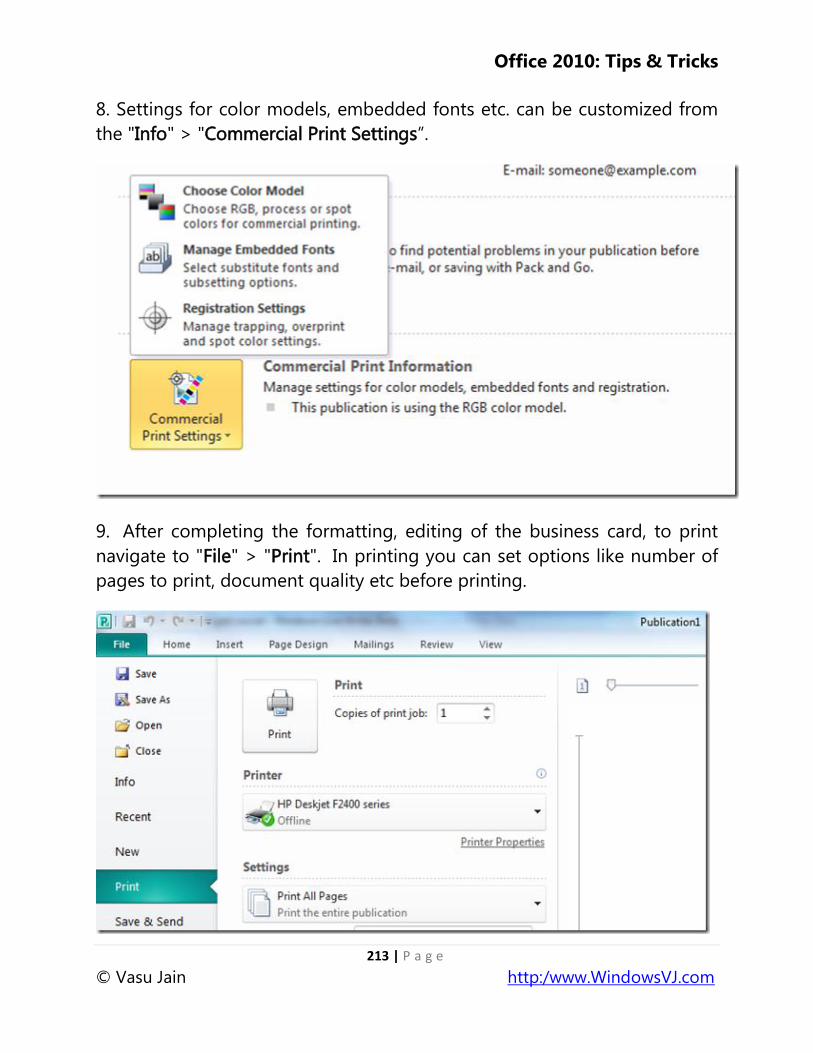
Office 2010: Tips & Tricks
213 | P a g e
© Vasu Jain http:/www.WindowsVJ.com
8. Settings for color models, embedded fonts etc. can be customized from
the "Info" > "Commercial Print Settings‖.
9. After completing the formatting, editing of the business card, to print
navigate to "File" > "Print". In printing you can set options like number of
pages to print, document quality etc before printing.
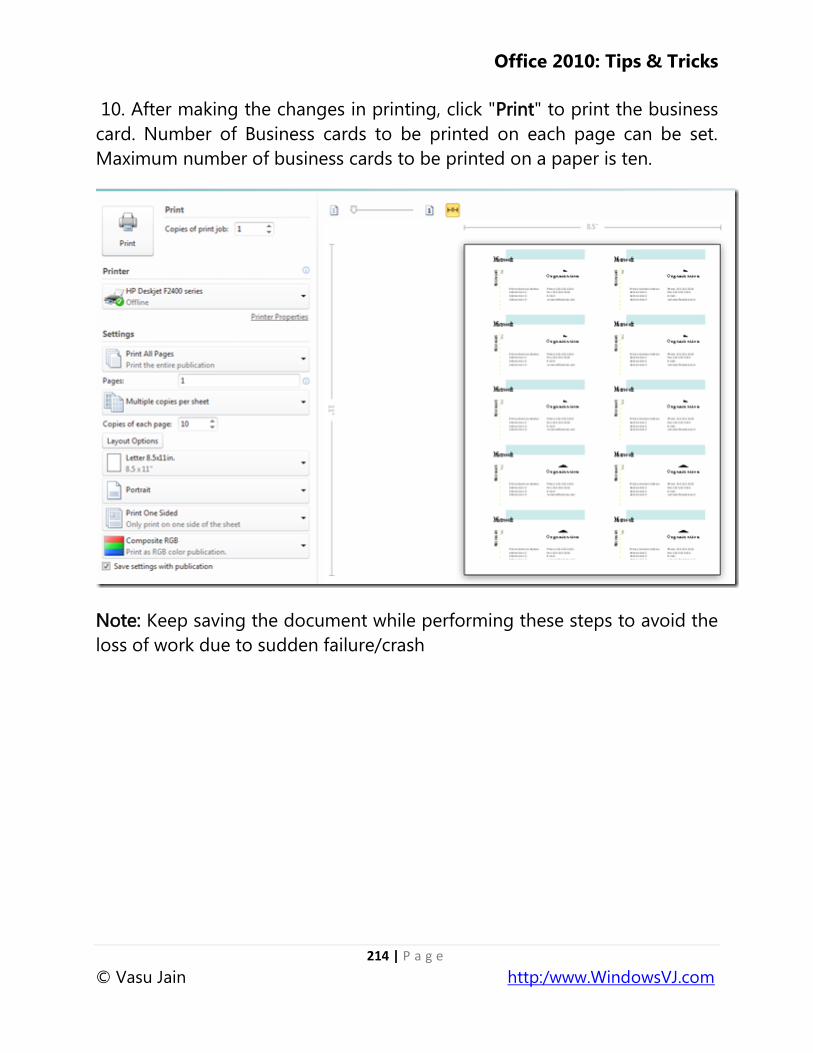
Office 2010: Tips & Tricks
214 | P a g e
© Vasu Jain http:/www.WindowsVJ.com
10. After making the changes in printing, click "Print" to print the business
card. Number of Business cards to be printed on each page can be set.
Maximum number of business cards to be printed on a paper is ten.
Note: Keep saving the document while performing these steps to avoid the
loss of work due to sudden failure/crash

Office 2010: Tips & Tricks
215 | P a g e
© Vasu Jain http:/www.WindowsVJ.com
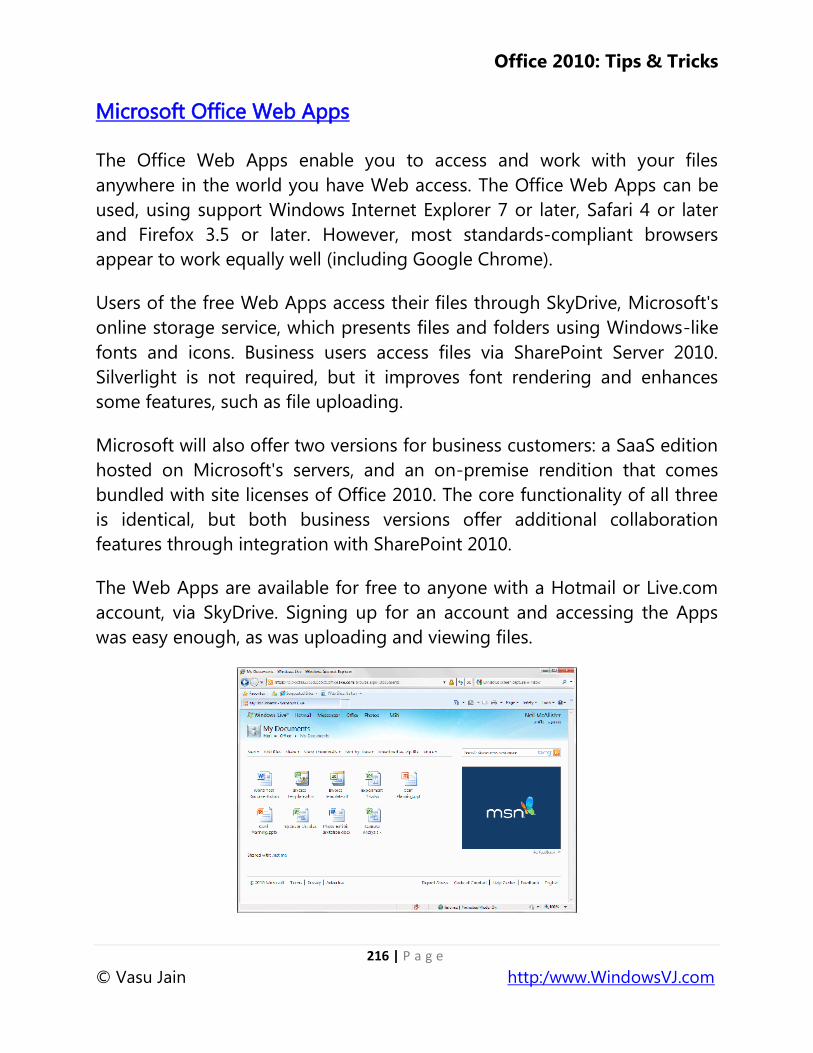
Office 2010: Tips & Tricks
216 | P a g e
© Vasu Jain http:/www.WindowsVJ.com
Microsoft Office Web Apps
The Office Web Apps enable you to access and work with your files
anywhere in the world you have Web access. The Office Web Apps can be
used, using support Windows Internet Explorer 7 or later, Safari 4 or later
and Firefox 3.5 or later. However, most standards-compliant browsers
appear to work equally well (including Google Chrome).
Users of the free Web Apps access their files through SkyDrive, Microsoft's
online storage service, which presents files and folders using Windows-like
fonts and icons. Business users access files via SharePoint Server 2010.
Silverlight is not required, but it improves font rendering and enhances
some features, such as file uploading.
Microsoft will also offer two versions for business customers: a SaaS edition
hosted on Microsoft's servers, and an on-premise rendition that comes
bundled with site licenses of Office 2010. The core functionality of all three
is identical, but both business versions offer additional collaboration
features through integration with SharePoint 2010.
The Web Apps are available for free to anyone with a Hotmail or Live.com
account, via SkyDrive. Signing up for an account and accessing the Apps
was easy enough, as was uploading and viewing files.
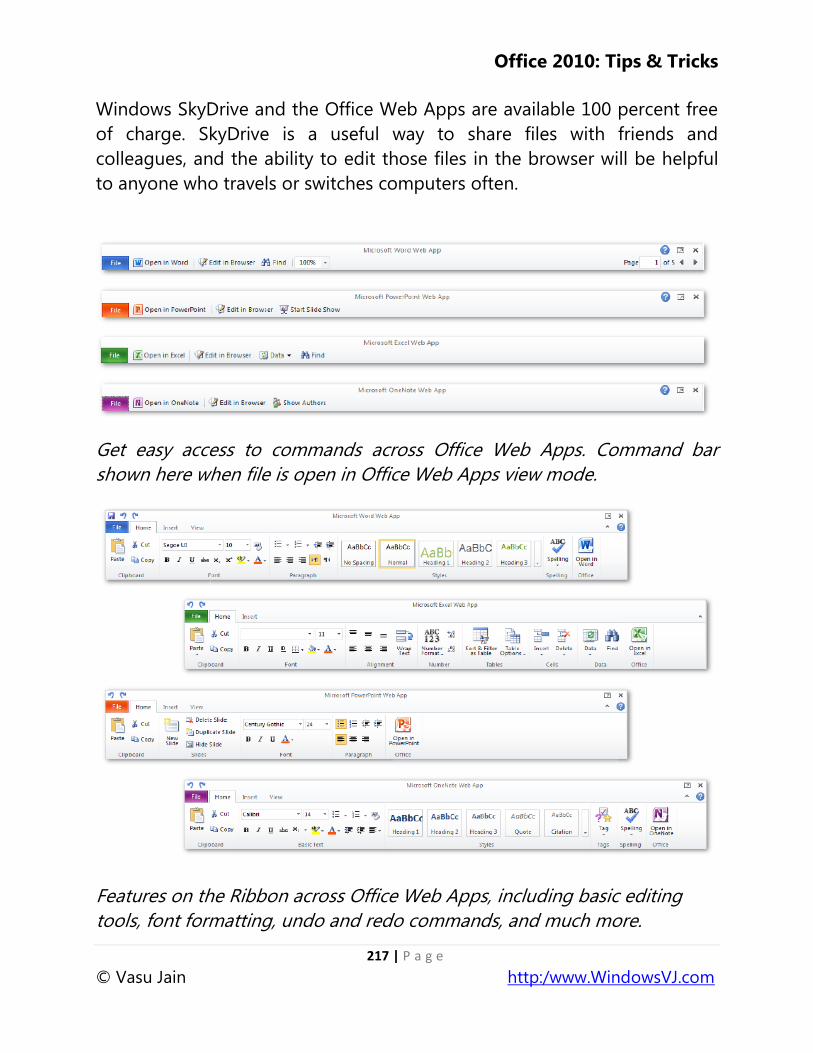
Office 2010: Tips & Tricks
217 | P a g e
© Vasu Jain http:/www.WindowsVJ.com
Windows SkyDrive and the Office Web Apps are available 100 percent free
of charge. SkyDrive is a useful way to share files with friends and
colleagues, and the ability to edit those files in the browser will be helpful
to anyone who travels or switches computers often.
Get easy access to commands across Office Web Apps. Command bar
shown here when file is open in Office Web Apps view mode.
Features on the Ribbon across Office Web Apps, including basic editing
tools, font formatting, undo and redo commands, and much more.
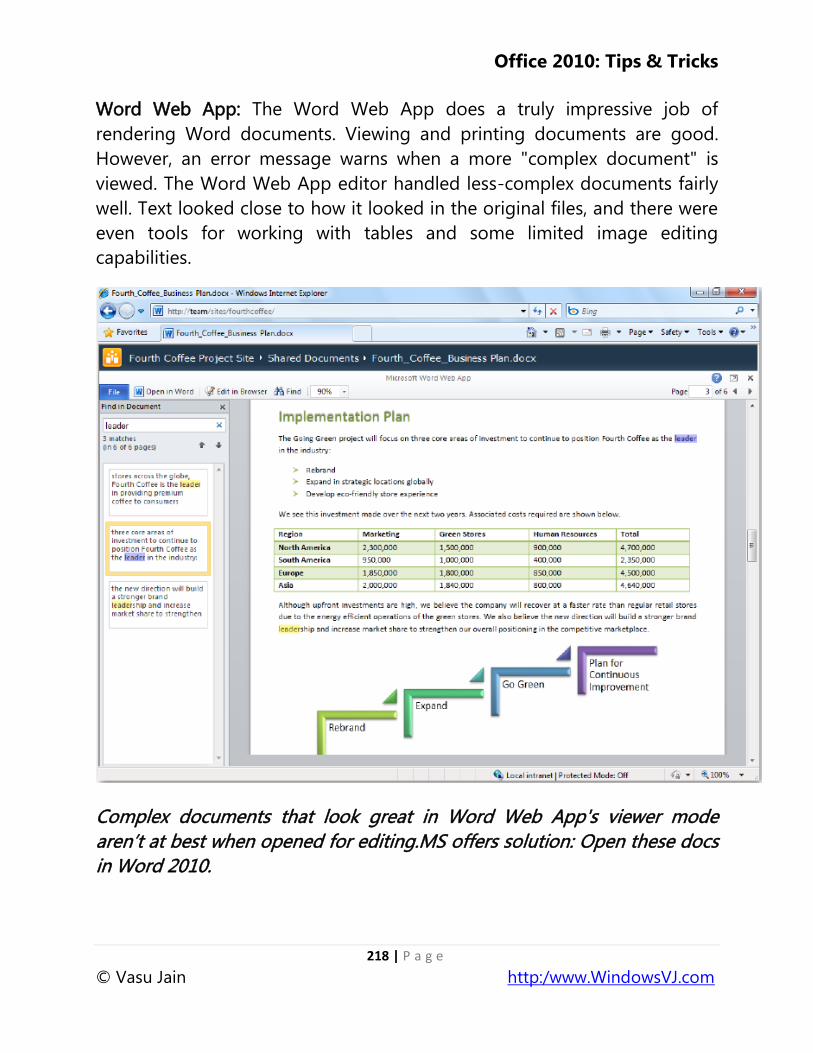
Office 2010: Tips & Tricks
218 | P a g e
© Vasu Jain http:/www.WindowsVJ.com
Word Web App: The Word Web App does a truly impressive job of
rendering Word documents. Viewing and printing documents are good.
However, an error message warns when a more "complex document" is
viewed. The Word Web App editor handled less-complex documents fairly
well. Text looked close to how it looked in the original files, and there were
even tools for working with tables and some limited image editing
capabilities.
Complex documents that look great in Word Web App's viewer mode
aren‘t at best when opened for editing.MS offers solution: Open these docs
in Word 2010.
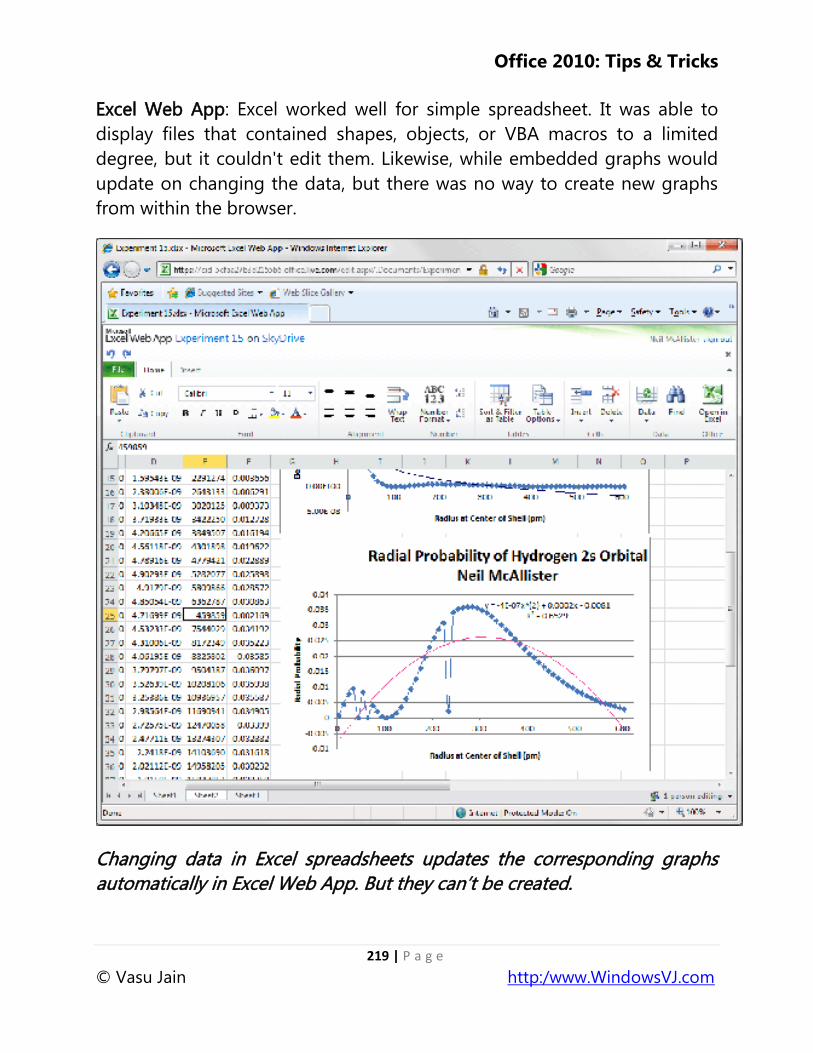
Office 2010: Tips & Tricks
219 | P a g e
© Vasu Jain http:/www.WindowsVJ.com
Excel Web App: Excel worked well for simple spreadsheet. It was able to
display files that contained shapes, objects, or VBA macros to a limited
degree, but it couldn't edit them. Likewise, while embedded graphs would
update on changing the data, but there was no way to create new graphs
from within the browser.
Changing data in Excel spreadsheets updates the corresponding graphs
automatically in Excel Web App. But they can‘t be created.
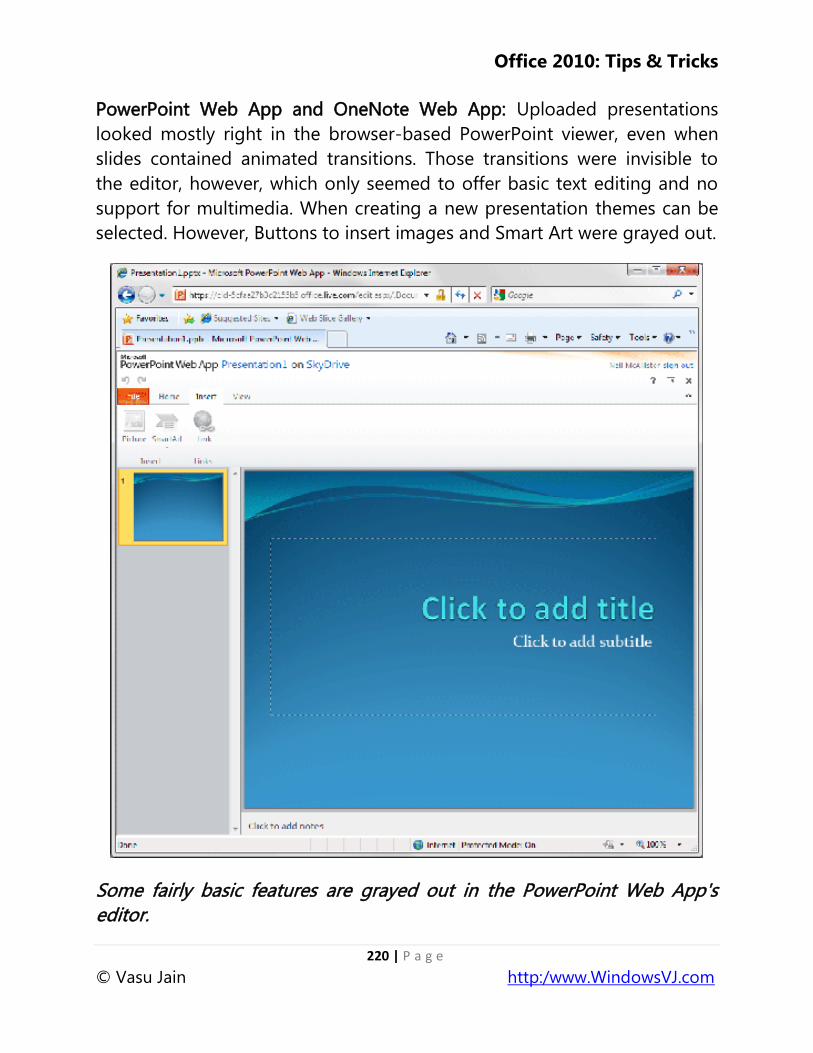
Office 2010: Tips & Tricks
220 | P a g e
© Vasu Jain http:/www.WindowsVJ.com
PowerPoint Web App and OneNote Web App: Uploaded presentations
looked mostly right in the browser-based PowerPoint viewer, even when
slides contained animated transitions. Those transitions were invisible to
the editor, however, which only seemed to offer basic text editing and no
support for multimedia. When creating a new presentation themes can be
selected. However, Buttons to insert images and Smart Art were grayed out.
Some fairly basic features are grayed out in the PowerPoint Web App's
editor.
Office 2010: Tips & Tricks
221 | P a g e
© Vasu Jain http:/www.WindowsVJ.com
Office Mobile 2010 Mobility in Office 2010
Microsoft Office Mobile 2010 on Windows phone can be used to get the
familiar Microsoft look and feel as well as the services that you‘re used to.
Even when you‘re on the road, you can view Microsoft Office Word,
Microsoft Office Excel and Microsoft Office PowerPoint documents sent as
email attachments. By offering more ways to access your files from virtually
anywhere, Office 2010 puts you in control.
Basically, there‘re two major offerings for mobile users to work on their
Office documents which are depending primarily on the type of phone. One
way is with Microsoft Office Mobile 2010 and another is with Microsoft
Office 2010 Mobile Viewers.
Using Windows Phone
To modify Office documents, you can use Office Mobile 2010 applications
providing rich user experience which customers of Microsoft Office client
applications are familiar with. If you just want to quickly view the
documents, you can use Office 2010 Mobile Viewers which display your
documents in mobile IE browser.
Using a phone built on a non-Windows Platform
You get the Office 2010 Mobile Viewers option only. As previously
mentioned, you get to view the Office documents in your mobile browser
whether you have smartphones like iPhone, Blackberry, Android, Symbians
or non-smartphones.
To try the Office 2010 Mobile Viewer, you need to have the Office Web
Apps installed on your company‘s Microsoft SharePoint Server 2010 and
then you can use explorer on your phone to view Office documents on the
server
Office 2010: Tips & Tricks
222 | P a g e
© Vasu Jain http:/www.WindowsVJ.com
Touch-friendly user interface
When using a touch screen on your Windows phone, you can take
advantage of improved support for gestures across the Office Mobile
applications and simplify your touch experience.
Use natural gestures to touch through menus and easily flick your
way through a file for quick navigation with clicks, drags, and taps.
Newly added selection mode for Microsoft Word Mobile 2010,
Microsoft Excel Mobile 2010, and Outlook Mobile 2010 simplifies
touch actions. Now you can more easily convey when you are using
touch to navigate or to select content.
In Outlook Mobile, use selection mode to select multiple messages,
such as for deletion, even if they aren‘t beside each other.
With your mobile device browser, Office 2010 Mobile Viewers will help you
stay organized, get things done, and present information by keeping Office
at your fingertips.
Office 2010 Mobile Viewers enable you to view Microsoft Word,
PowerPoint, and Excel files in an easy to read small-screen format that
maintains high fidelity. Office 2010 Mobile Viewers target a wide range of
devices and micro browsers so that people with or without smartphones
can take the advantage of the cool features without having to upgrade your
mobile phone. Here are a few examples.
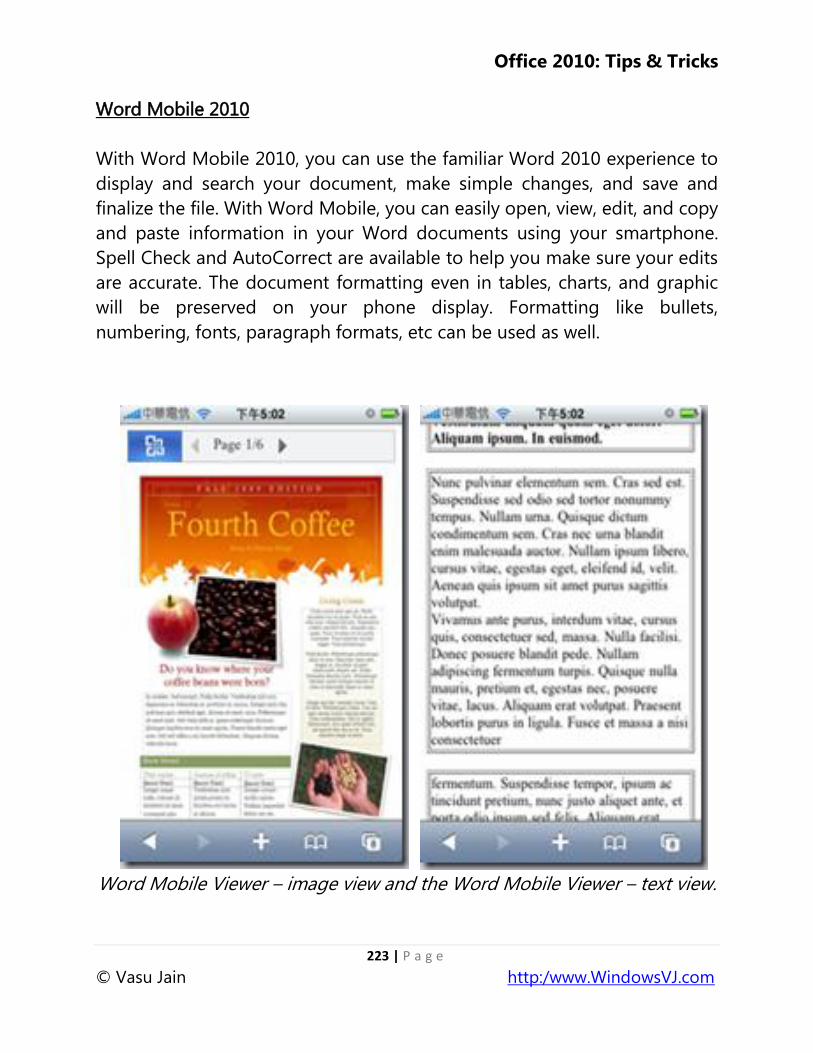
Office 2010: Tips & Tricks
223 | P a g e
© Vasu Jain http:/www.WindowsVJ.com
Word Mobile 2010
With Word Mobile 2010, you can use the familiar Word 2010 experience to
display and search your document, make simple changes, and save and
finalize the file. With Word Mobile, you can easily open, view, edit, and copy
and paste information in your Word documents using your smartphone.
Spell Check and AutoCorrect are available to help you make sure your edits
are accurate. The document formatting even in tables, charts, and graphic
will be preserved on your phone display. Formatting like bullets,
numbering, fonts, paragraph formats, etc can be used as well.
Word Mobile Viewer – image view and the Word Mobile Viewer – text view.
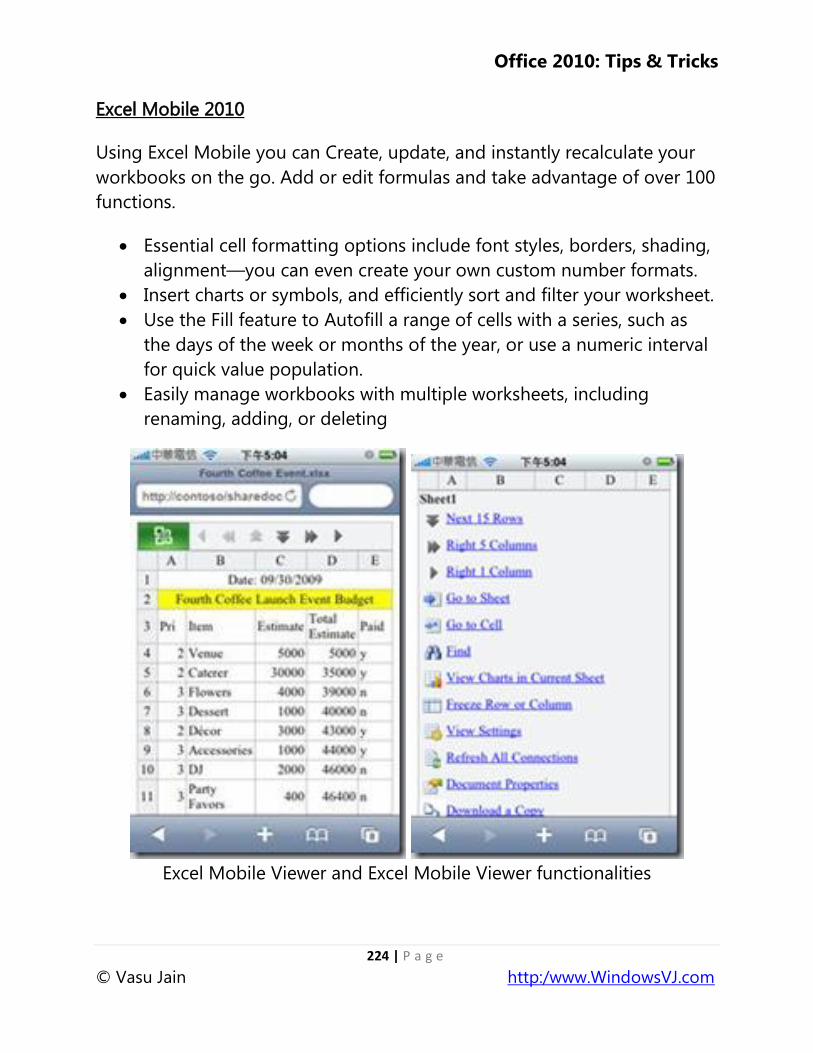
Office 2010: Tips & Tricks
224 | P a g e
© Vasu Jain http:/www.WindowsVJ.com
Excel Mobile 2010
Using Excel Mobile you can Create, update, and instantly recalculate your
workbooks on the go. Add or edit formulas and take advantage of over 100
functions.
Essential cell formatting options include font styles, borders, shading,
alignment—you can even create your own custom number formats.
Insert charts or symbols, and efficiently sort and filter your worksheet.
Use the Fill feature to Autofill a range of cells with a series, such as
the days of the week or months of the year, or use a numeric interval
for quick value population.
Easily manage workbooks with multiple worksheets, including
renaming, adding, or deleting
Excel Mobile Viewer and Excel Mobile Viewer functionalities
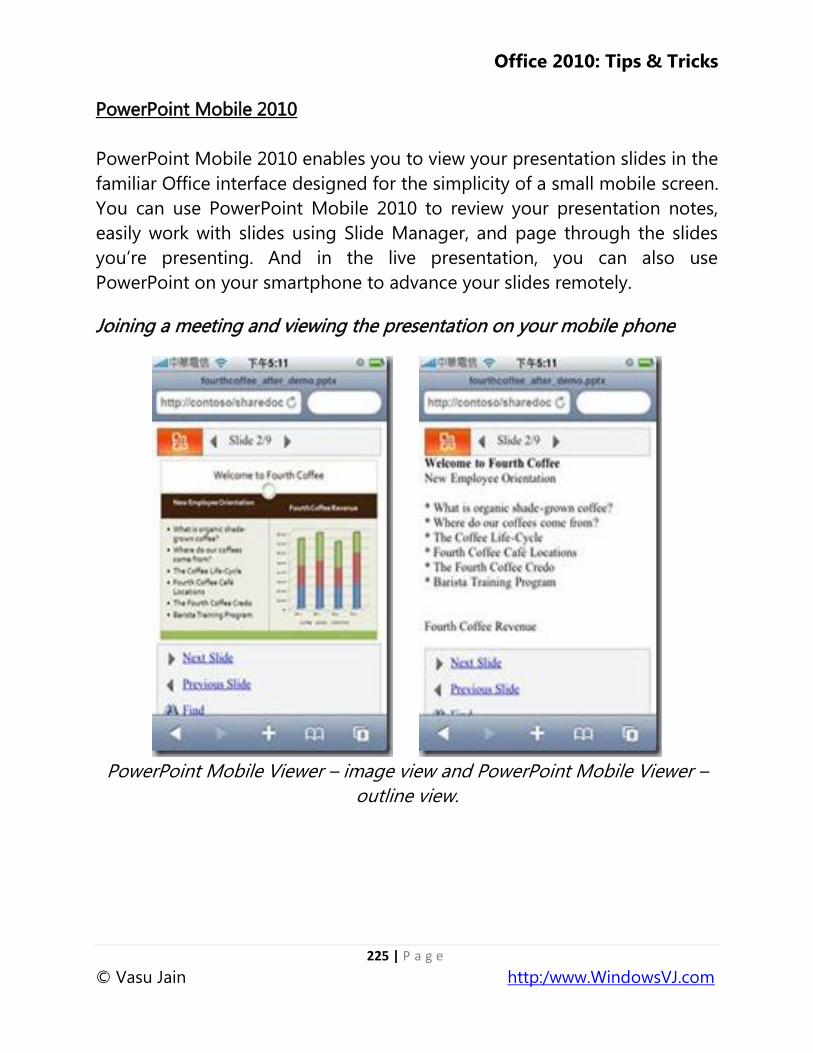
Office 2010: Tips & Tricks
225 | P a g e
© Vasu Jain http:/www.WindowsVJ.com
PowerPoint Mobile 2010
PowerPoint Mobile 2010 enables you to view your presentation slides in the
familiar Office interface designed for the simplicity of a small mobile screen.
You can use PowerPoint Mobile 2010 to review your presentation notes,
easily work with slides using Slide Manager, and page through the slides
you‘re presenting. And in the live presentation, you can also use
PowerPoint on your smartphone to advance your slides remotely.
Joining a meeting and viewing the presentation on your mobile phone
PowerPoint Mobile Viewer – image view and PowerPoint Mobile Viewer –
outline view.
Office 2010: Tips & Tricks
226 | P a g e
© Vasu Jain http:/www.WindowsVJ.com
Outlook Mobile
In today‘s mobile world, many people are accustomed to checking e-mail,
receiving text messages, and updating their calendars online. Now, using
your Windows Mobile smartphone, you can use the high-quality phone
display to view your messages in Conversation view, selecting and moving
messages using touch technology, and get online access to your
calendar, contacts, tasks, and more.
When connected to Exchange Server 2010, newly added Conversation View
helps you manage your e-mail with ease. View only the latest message in a
discussion or move, flag for follow up, or delete entire conversations in just
a few taps.
Use smart filtering and locate messages or contacts by typing a few search
characters and the results will automatically display.
Office 2010: Tips & Tricks
227 | P a g e
© Vasu Jain http:/www.WindowsVJ.com
OneNote Mobile 2010
Using OneNote Mobile, you can take and manage personal notes on your
Windows phone. You can even record voice or take pictures using the
phone and bring them to OneNote Mobile or share your notes with your
PC and refer to them when you are away.
Capture multimedia notes with ease. Take & insert a picture or voice
recording and organize your notes with lists.
Use OneNote mobile application to:
Review or take notes on your phone with ease, Insert voice clips,
pictures, or make a quick list.
Capture pictures in your notes with your camera phone while on the
go.
Use AutoCorrect and essential authoring capabilities, such as bullets,
numbering, and font formatting.
View rich graphics captured in your notes full screen. Easily pan and
zoom or export the image for use in other applications.
Office 2010: Tips & Tricks
228 | P a g e
© Vasu Jain http:/www.WindowsVJ.com
Word Mobile 2010, Excel Mobile 2010 and PowerPoint Mobile 2010
View images and animations. SmartArt graphics are preserved. Easily
manage slides.
Also edited documents can be saved to the phone and synchronized back
to the server in case you lose your mobile connection.

Office 2010: Tips & Tricks
229 | P a g e
© Vasu Jain http:/www.WindowsVJ.com
Office 2010: Tips & Tricks
230 | P a g e
© Vasu Jain http:/www.WindowsVJ.com
Twitter Add-in for Outlook 2010
This section is dedicated to Add-ins to Office 2010 suite that can make
things much easier and time reducing for Office 2010 users.
Outlook Social Connectors to connect Outlook 2010 with Facebook,
MySpace, Windows Live, and more social network support are available but
there is no OSC for Twitter yet
TwInbox is an add-in for Outlook which although looks like a basic add-in
with limited functionality but is actually a complete twitter client with
features to upload images, shorten URLs, and tracking keywords/groups,
among many others.
To start with, create a new PST file (Outlook Data File) named Twitter and
then head over to the Add-Ins tab and click New. This will open up a dialog
window where you can set up Twitter in a few steps.

Office 2010: Tips & Tricks
231 | P a g e
© Vasu Jain http:/www.WindowsVJ.com
To analyze twitter activity, access Display Stats from the TwInbox menu.
Using the Search/Track/Group options you can define groups of tweets to
be tracked by their own Outlook folders. An example would be to create a
group of Microsoft and enter keywords, such as, Xbox, Windows, Live
Expression Web etc. so that they can be tracked easily.
Overall it is one powerful must-have add-in for Outlook power users. Apart
from Outlook 2010, it also works on Outlook 2007 and Outlook 2003.
Download TwInbox http://bit.ly/jG0Ea

Office 2010: Tips & Tricks
232 | P a g e
© Vasu Jain http:/www.WindowsVJ.com
Facebook add-in for Outlook 2010
FBLook is an add-on for Outlook just like Twitter add-in that can be used to
update your Facebook status, check your friend‘s status or provides
functionality to check notifications of new friend requests, messages, etc.
without using a web browser.
Features of FBLook:
1. Update your Facebook status directly from Outlook.
2. Set your status to the name of the song you‘re playing in iTunes or
WMP.
3. Check the status of a friend on Facebook.
4. See notifications of new Friend Requests, Messages, Invites etc.
After installing FBLook, you have to grant permissions to FBLook to access
your Facebook account.
Works with: Outlook 2003 (SP3), Outlook 2007 (SP2) and Outlook 2010
Download FBLook http://bit.ly/uGib
This add-in can be pretty useful to access Facebook at workplaces or offices
where you don‘t want your co-workers or your supervisor to know.

Office 2010: Tips & Tricks
233 | P a g e
© Vasu Jain http:/www.WindowsVJ.com
Enable tabs in Microsoft Office 2010
Tabs in Web browsers provide easy and fast access to multiple instances of
the web browser. Tabs can be enabled in Microsoft Office (for Word, Excel
and PowerPoint) as well for quick access to multiple office documents using
tabs and it may save taskbar space (For Versions below Windows 7 and
having Group similar Taskbar Buttons enabled)
To enable Tabs in Office 2010 Suite, OfficeTab is a plug-in that adds tabs to
Word, Excel and PowerPoint applications.
OfficeTab is a fully customizable tool. Customization options include
changing the color of the tabs, applying any one of the 11 included styles,
placing the tab-bar at top, bottom, left or right of the workspace, change
tab width etc.
Also, you can assign keyboard shortcuts to quickly switch between opened
tabs like the way e.g. Ctrl+T shortcut to open New Tab in Web Browsers.
Works with: Microsoft Office 2010, 2007 and 2003
Download OfficeTab http://bit.ly/2m1YFI
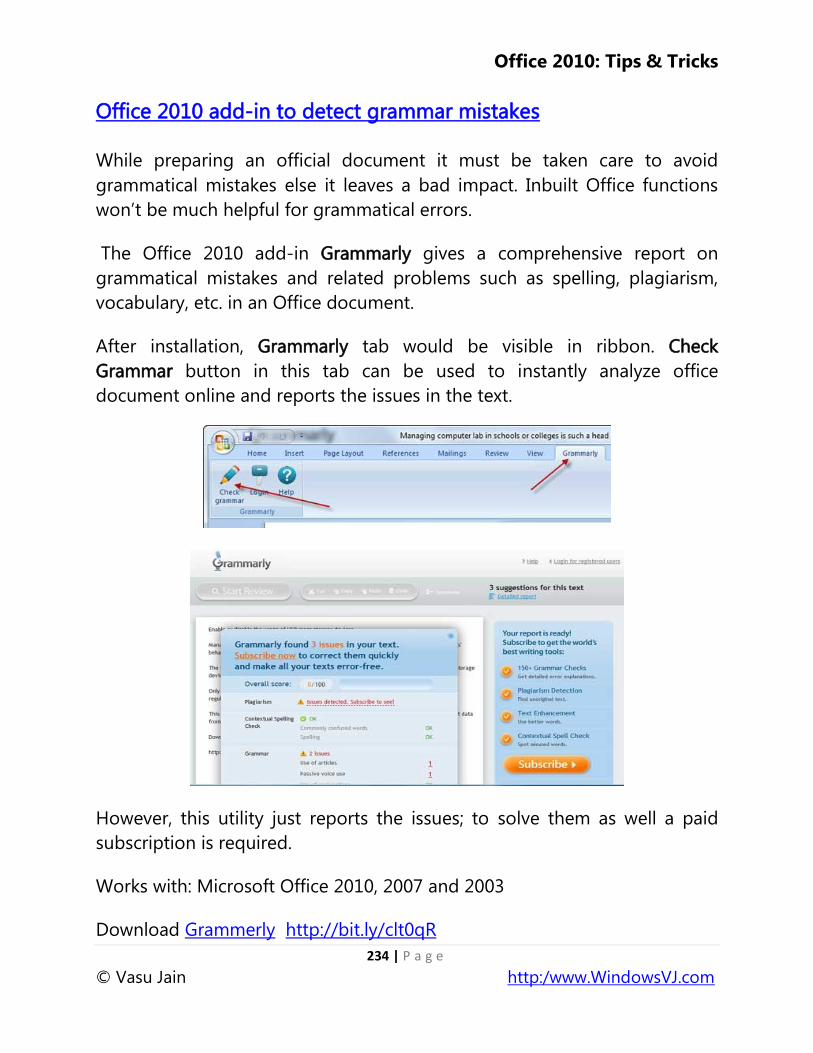
Office 2010: Tips & Tricks
234 | P a g e
© Vasu Jain http:/www.WindowsVJ.com
Office 2010 add-in to detect grammar mistakes
While preparing an official document it must be taken care to avoid
grammatical mistakes else it leaves a bad impact. Inbuilt Office functions
won‘t be much helpful for grammatical errors.
The Office 2010 add-in Grammarly gives a comprehensive report on
grammatical mistakes and related problems such as spelling, plagiarism,
vocabulary, etc. in an Office document.
After installation, Grammarly tab would be visible in ribbon. Check
Grammar button in this tab can be used to instantly analyze office
document online and reports the issues in the text.
However, this utility just reports the issues; to solve them as well a paid
subscription is required.
Works with: Microsoft Office 2010, 2007 and 2003
Download Grammerly http://bit.ly/clt0qR
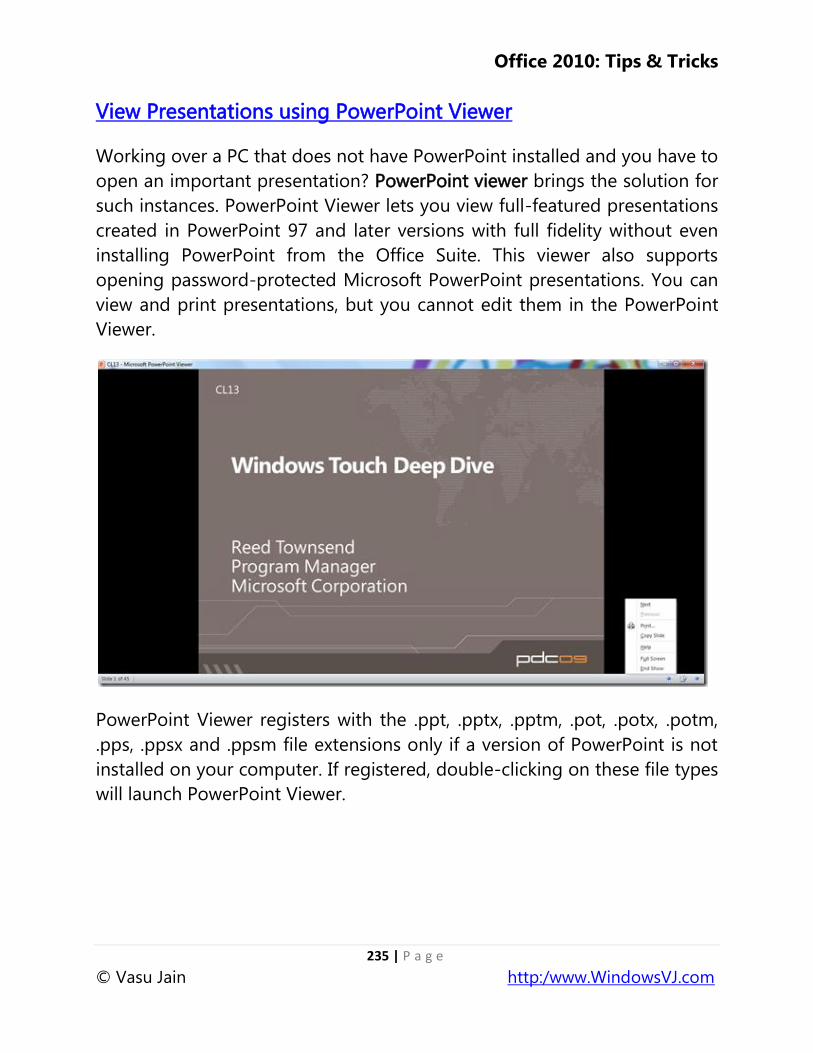
Office 2010: Tips & Tricks
235 | P a g e
© Vasu Jain http:/www.WindowsVJ.com
View Presentations using PowerPoint Viewer
Working over a PC that does not have PowerPoint installed and you have to
open an important presentation? PowerPoint viewer brings the solution for
such instances. PowerPoint Viewer lets you view full-featured presentations
created in PowerPoint 97 and later versions with full fidelity without even
installing PowerPoint from the Office Suite. This viewer also supports
opening password-protected Microsoft PowerPoint presentations. You can
view and print presentations, but you cannot edit them in the PowerPoint
Viewer.
PowerPoint Viewer registers with the .ppt, .pptx, .pptm, .pot, .potx, .potm,
.pps, .ppsx and .ppsm file extensions only if a version of PowerPoint is not
installed on your computer. If registered, double-clicking on these file types
will launch PowerPoint Viewer.
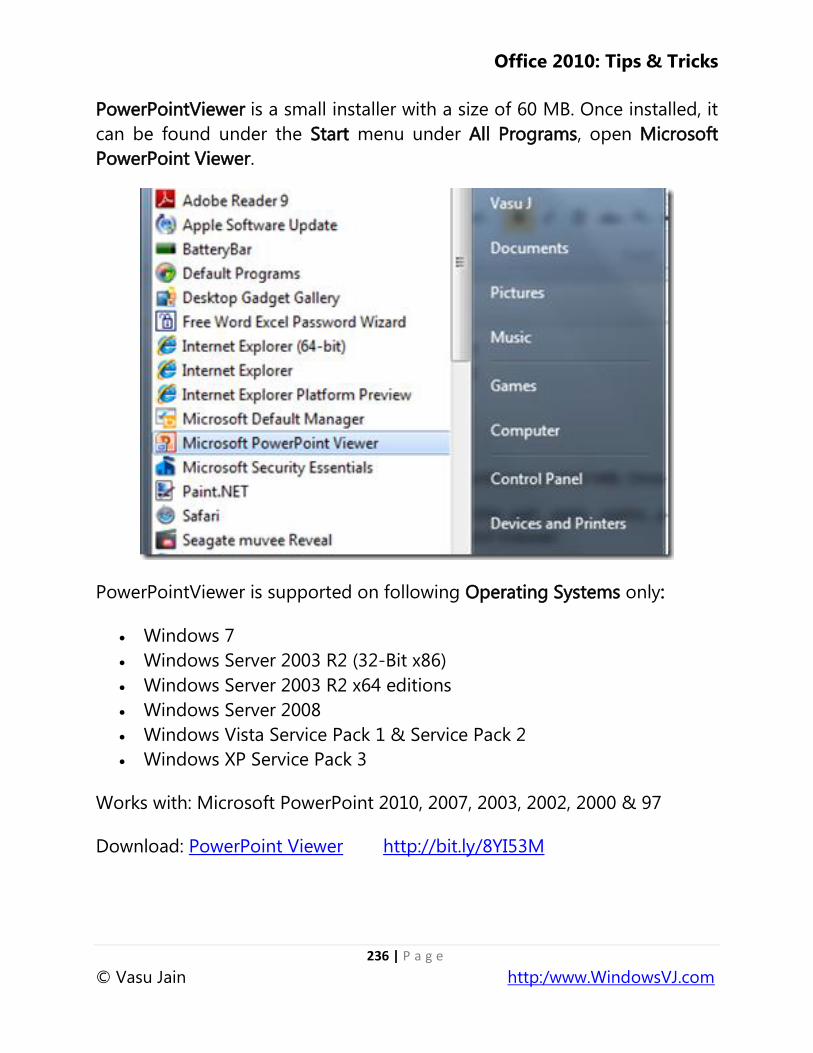
Office 2010: Tips & Tricks
236 | P a g e
© Vasu Jain http:/www.WindowsVJ.com
PowerPointViewer is a small installer with a size of 60 MB. Once installed, it
can be found under the Start menu under All Programs, open Microsoft
PowerPoint Viewer.
PowerPointViewer is supported on following Operating Systems only:
Windows 7
Windows Server 2003 R2 (32-Bit x86)
Windows Server 2003 R2 x64 editions
Windows Server 2008
Windows Vista Service Pack 1 & Service Pack 2
Windows XP Service Pack 3
Works with: Microsoft PowerPoint 2010, 2007, 2003, 2002, 2000 & 97
Download: PowerPoint Viewer http://bit.ly/8YI53M
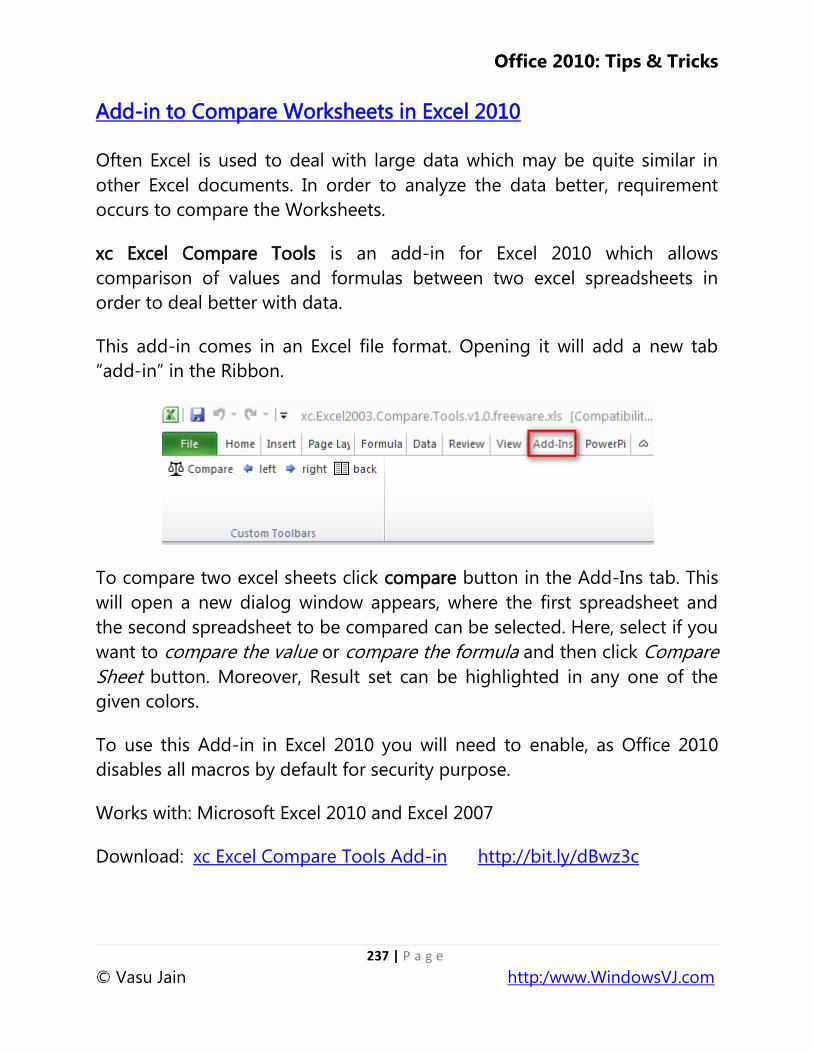
Office 2010: Tips & Tricks
237 | P a g e
© Vasu Jain http:/www.WindowsVJ.com
Add-in to Compare Worksheets in Excel 2010
Often Excel is used to deal with large data which may be quite similar in
other Excel documents. In order to analyze the data better, requirement
occurs to compare the Worksheets.
xc Excel Compare Tools is an add-in for Excel 2010 which allows
comparison of values and formulas between two excel spreadsheets in
order to deal better with data.
This add-in comes in an Excel file format. Opening it will add a new tab
―add-in‖ in the Ribbon.
To compare two excel sheets click compare button in the Add-Ins tab. This
will open a new dialog window appears, where the first spreadsheet and
the second spreadsheet to be compared can be selected. Here, select if you
want to compare the value or compare the formula and then click Compare
Sheet button. Moreover, Result set can be highlighted in any one of the
given colors.
To use this Add-in in Excel 2010 you will need to enable, as Office 2010
disables all macros by default for security purpose.
Works with: Microsoft Excel 2010 and Excel 2007
Download: xc Excel Compare Tools Add-in http://bit.ly/dBwz3c
Office 2010: Tips & Tricks
238 | P a g e
© Vasu Jain http:/www.WindowsVJ.com
Office Compatibility Pack for Word, Excel, and PowerPoint File
Formats
Beginning Office 2007, the Open XML file formats were introduced to
Microsoft Office Word, Excel, and PowerPoint. The file formats for the files
saved in an open XML format are:
.docx (.doc in Word 2003).
.xlsx (.xls in Excel 2003).
.pptx (.ppt in PowerPoint 2003).
By installing the Compatibility Pack in addition to Microsoft Office 2000,
Office XP, or Office 2003, you will be able to open, edit, and save
documents, workbooks, and presentations using these file formats in newer
versions of Word, Excel, and PowerPoint. The Compatibility Pack can also
be used in conjunction with the Microsoft Office Word Viewer 2003, Excel
Viewer 2003, and PowerPoint Viewer 2003 to view files saved in these new
formats.
Works with: Microsoft Office 2003
Download: Office Compatibility Pack http://bit.ly/1Sn5mJ
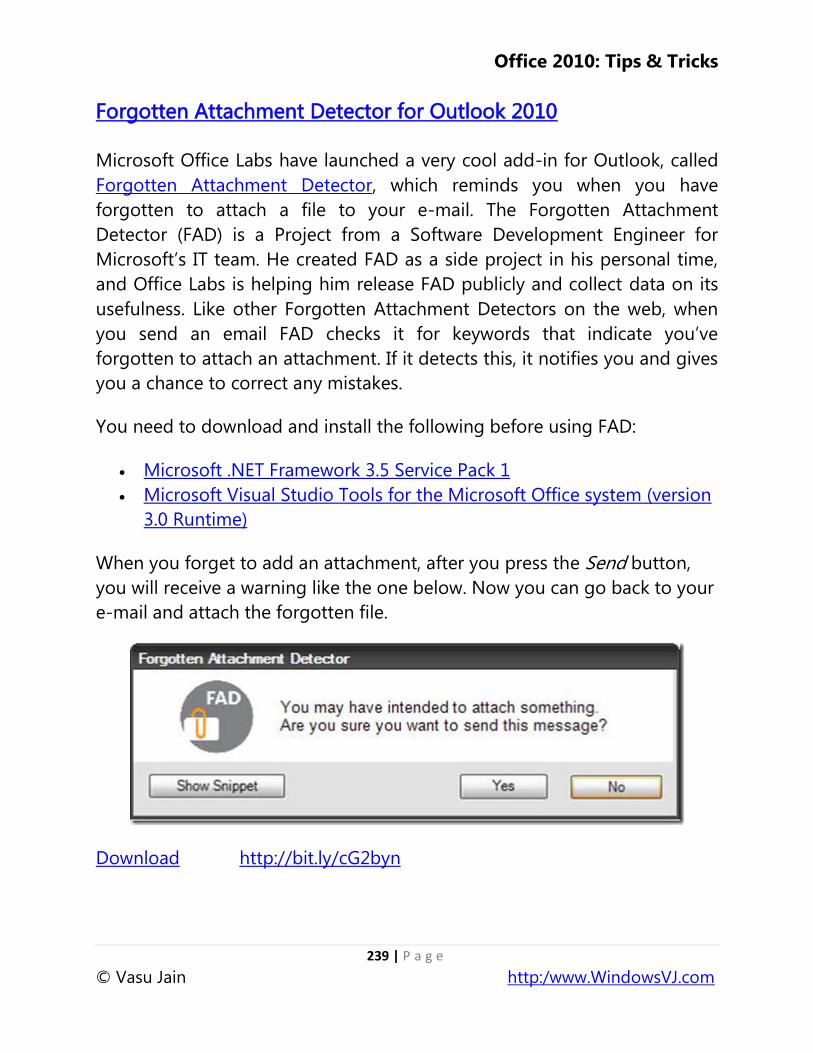
Office 2010: Tips & Tricks
239 | P a g e
© Vasu Jain http:/www.WindowsVJ.com
Forgotten Attachment Detector for Outlook 2010
Microsoft Office Labs have launched a very cool add-in for Outlook, called
Forgotten Attachment Detector, which reminds you when you have
forgotten to attach a file to your e-mail. The Forgotten Attachment
Detector (FAD) is a Project from a Software Development Engineer for
Microsoft‘s IT team. He created FAD as a side project in his personal time,
and Office Labs is helping him release FAD publicly and collect data on its
usefulness. Like other Forgotten Attachment Detectors on the web, when
you send an email FAD checks it for keywords that indicate you‘ve
forgotten to attach an attachment. If it detects this, it notifies you and gives
you a chance to correct any mistakes.
You need to download and install the following before using FAD:
Microsoft .NET Framework 3.5 Service Pack 1
Microsoft Visual Studio Tools for the Microsoft Office system (version
3.0 Runtime)
When you forget to add an attachment, after you press the Send button,
you will receive a warning like the one below. Now you can go back to your
e-mail and attach the forgotten file.
Download http://bit.ly/cG2byn
Office 2010: Tips & Tricks
240 | P a g e
© Vasu Jain http:/www.WindowsVJ.com
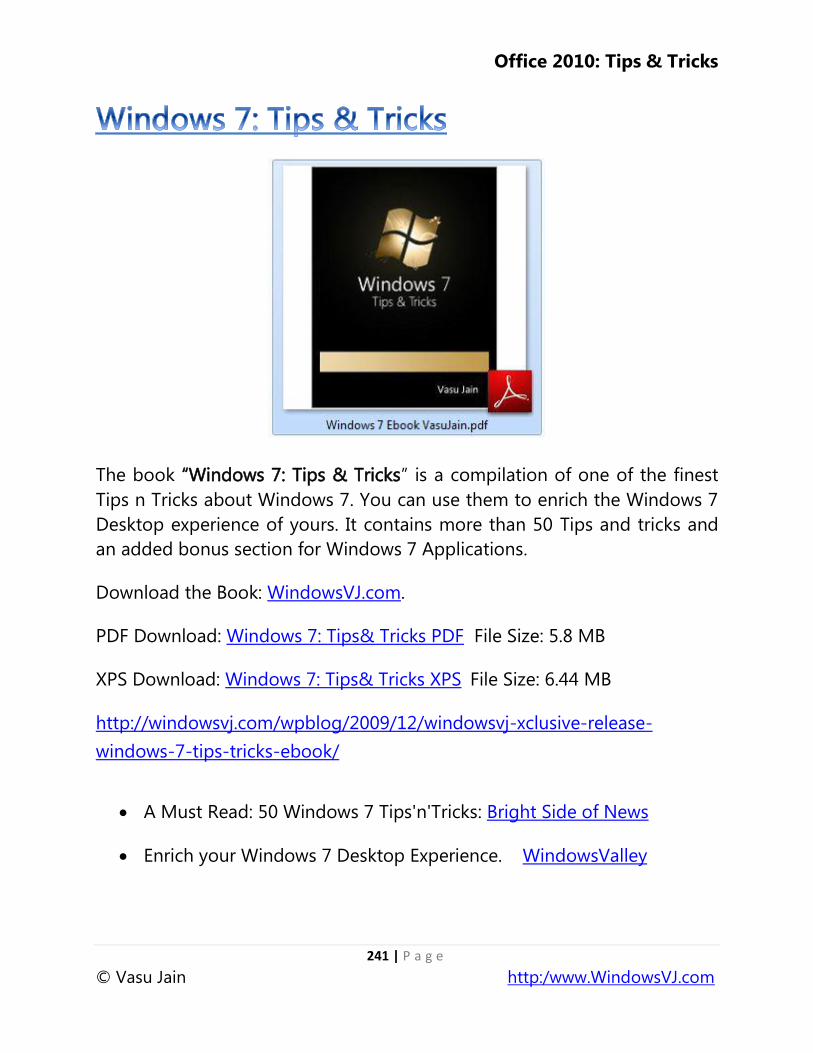
Office 2010: Tips & Tricks
241 | P a g e
© Vasu Jain http:/www.WindowsVJ.com
The book ―Windows 7: Tips & Tricks‖ is a compilation of one of the finest
Tips n Tricks about Windows 7. You can use them to enrich the Windows 7
Desktop experience of yours. It contains more than 50 Tips and tricks and
an added bonus section for Windows 7 Applications.
Download the Book: WindowsVJ.com.
PDF Download: Windows 7: Tips& Tricks PDF File Size: 5.8 MB
XPS Download: Windows 7: Tips& Tricks XPS File Size: 6.44 MB
http://windowsvj.com/wpblog/2009/12/windowsvj-xclusive-release-
windows-7-tips-tricks-ebook/
A Must Read: 50 Windows 7 Tips'n'Tricks: Bright Side of News
Enrich your Windows 7 Desktop Experience. WindowsValley
Office 2010: Tips & Tricks
242 | P a g e
© Vasu Jain http:/www.WindowsVJ.com
Compilation of one of the finest Tips n Tricks about Win7
MsdnCoderBlogs
Helps you get the most out of your Win 7 user experience.
SevenForums
50 Tips + 113 pg + Win 7 + Free + eBook = Cool! Greg's Cool Thing
Office 2010: Tips & Tricks
243 | P a g e
© Vasu Jain http:/www.WindowsVJ.com
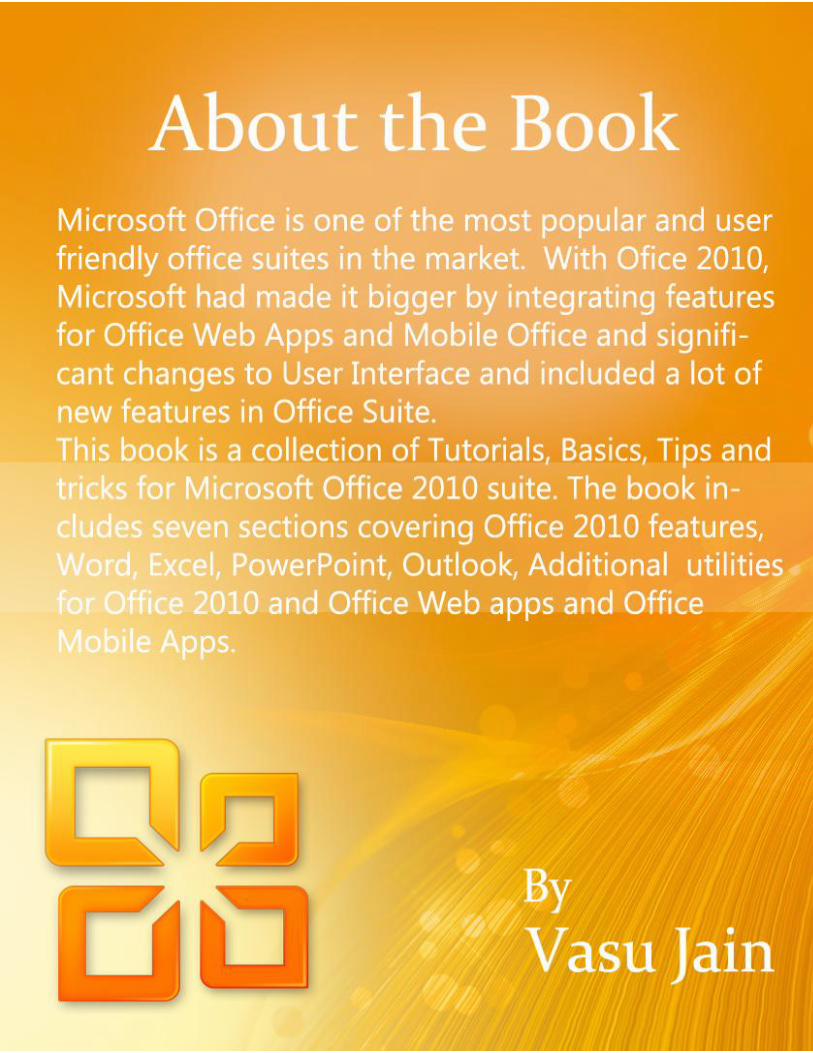
Office 2010: Tips & Tricks
1 | P a g e
© Vasu Jain http:/www.WindowsVJ.com