Embed Size (px)
Citation preview
CHAPTER 3
MICROSOFT® OFFICE ACCESS® 2003
ORGANIZING & RETRIEVING DATA
CHAPTER OUTLINE 3.1 Customizing Datasheet View 3.2 Sorting, Finding, and Maintaining Data 3.3 Using Filters 3.4 Creating a Simple Query Chapter Summary Chapter Quiz Hands-On Exercises Case Study
PREREQUISITES To successfully complete this chapter, you must be comfortable performing basic data entry and editing tasks in the Datasheet window. You will be asked to modify the appearance of a datasheet using toolbar buttons, Menu commands, and right-click shortcut menus. You should also know how to view and print objects from the Database window.
LEARNING OBJECTIVES After completing this chapter, you will be able to: • Enhance the display and printing of a datasheet using
fonts and special effects • Sort the contents of a datasheet into ascending and
descending order • Find a record by entering search criteria and using
wildcard characters • Filter the records displayed in a datasheet using Filter
For Input, Filter By Selection, and Filter By Form • Create a query using the Simple Query Wizard
AC3-2 Microsoft Office Access 2003: Organizing and Retrieving Data
3.1 CUSTOMIZING DATASHEET VIEW
Microsoft Office Access 2003 provides numerous options for customizing the appearance, or layout, of a datasheet. Because a datasheet is only a tool for viewing the data stored in an underlying table, you can manipulate the datasheet's column widths, row heights, and field order without affecting the table structure itself. Exceptions to this rule are when you rename or delete a column. These changes flow through to the structure of the table. Once the table is customized to your satisfaction, remember to save the layout changes by clicking the Save button ( ) on the toolbar. Otherwise, the modifications are discarded when you close the Datasheet window. 3.1.1 FORMATTING A DATASHEET
Feature To enhance the readability of a datasheet, you may select fonts and apply special effects for onscreen display and printing. Any changes that you make affect the entire datasheet but do not affect other database objects such as forms and reports. After formatting the datasheet to suit your needs, save the layout changes for subsequent use.
Method To format a datasheet, choose from the following options: • CHOOSE: Format Font to select font characteristics • CHOOSE: Format Datasheet to apply special visual effects To save the format changes: • CLICK: Save button ( ) on the toolbar
or • CHOOSE: File Save from the menu
Practice In this lesson, you format and then save a datasheet’s layout to appear with a custom font, color, and background. 1. Load Microsoft Access, if it is not already running.
2. Open the database named AC0300, found in your Advantage student data files location.
3. To display the Courses table in Datasheet view: DOUBLE-CLICK: Courses in the list area The Courses Datasheet window appears in the work area, as shown in Figure 3.1.

Chapter 3 AC3-3 Figure 3.1 Displaying the Courses datasheet
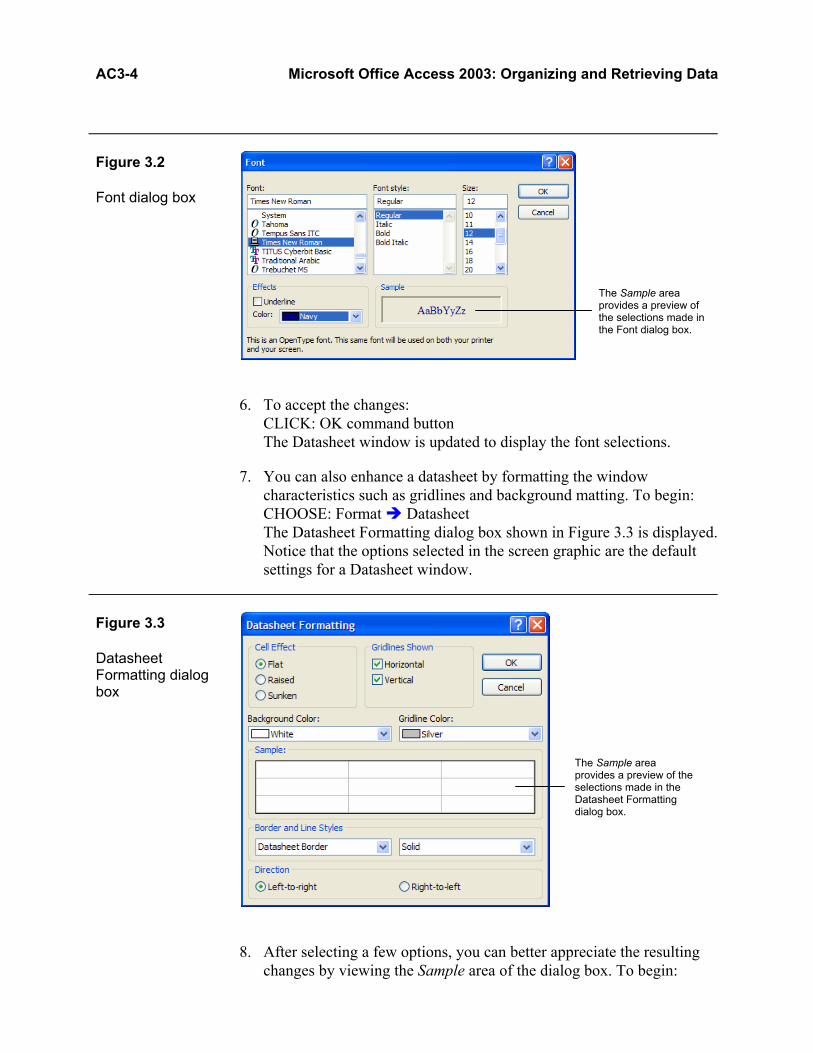
4. You can change the font characteristics of text displayed in a datasheet without affecting any other Datasheet window. To customize the Courses datasheet, do the following: CHOOSE: Format Font The Font dialog box appears, similar but not identical to Figure 3.2. In this one dialog box, you can change the font typeface, style, size, and text color.
5. Make the following selections in the Font dialog box: SELECT: Times New Roman in the Font list box SELECT: Regular in the Font style list box SELECT: 12 in the Size list box SELECT: Navy in the Color drop-down list box Notice that the Sample area, as shown in Figure 3.2, displays an example of the current selections.
AC3-4 Microsoft Office Access 2003: Organizing and Retrieving Data
Figure 3.2 Font dialog box
6. To accept the changes: CLICK: OK command button The Datasheet window is updated to display the font selections.
7. You can also enhance a datasheet by formatting the window characteristics such as gridlines and background matting. To begin: CHOOSE: Format Datasheet The Datasheet Formatting dialog box shown in Figure 3.3 is displayed. Notice that the options selected in the screen graphic are the default settings for a Datasheet window.
Figure 3.3 Datasheet Formatting dialog box
8. After selecting a few options, you can better appreciate the resulting changes by viewing the Sample area of the dialog box. To begin:
The Sample area provides a preview of the selections made in the Font dialog box.
The Sample area provides a preview of the selections made in the Datasheet Formatting dialog box.
Chapter 3 AC3-5
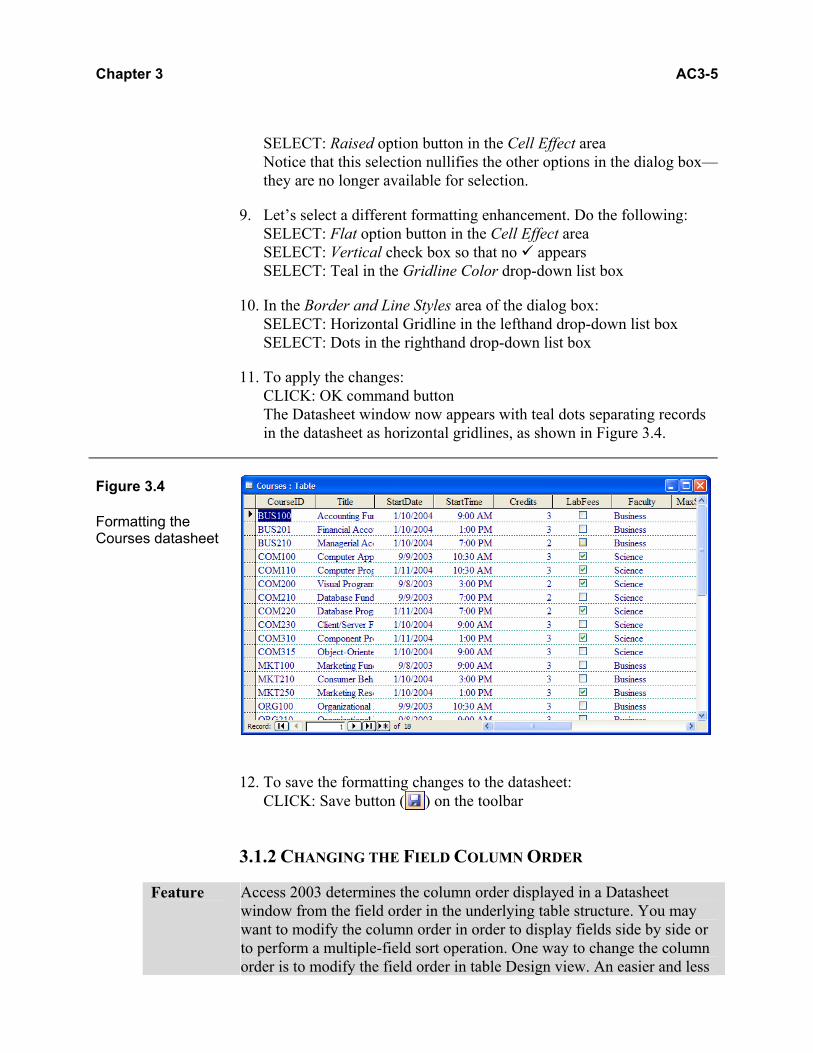
SELECT: Raised option button in the Cell Effect area Notice that this selection nullifies the other options in the dialog box—they are no longer available for selection.
9. Let’s select a different formatting enhancement. Do the following: SELECT: Flat option button in the Cell Effect area SELECT: Vertical check box so that no appears SELECT: Teal in the Gridline Color drop-down list box
10. In the Border and Line Styles area of the dialog box: SELECT: Horizontal Gridline in the lefthand drop-down list box SELECT: Dots in the righthand drop-down list box
11. To apply the changes: CLICK: OK command button The Datasheet window now appears with teal dots separating records in the datasheet as horizontal gridlines, as shown in Figure 3.4.
Figure 3.4 Formatting the Courses datasheet
12. To save the formatting changes to the datasheet:
CLICK: Save button ( ) on the toolbar
3.1.2 CHANGING THE FIELD COLUMN ORDER
Feature Access 2003 determines the column order displayed in a Datasheet window from the field order in the underlying table structure. You may want to modify the column order in order to display fields side by side or to perform a multiple-field sort operation. One way to change the column order is to modify the field order in table Design view. An easier and less
AC3-6 Microsoft Office Access 2003: Organizing and Retrieving Data
drastic method is to move fields by dragging their column headings in Datasheet view. This method does not affect the underlying table structure. Once the columns are positioned, you can save the field column order in the datasheet along with other customizing options.
Method To change the field column order in Datasheet view: 1. SELECT: the desired column in the field header area 2. DRAG: the column heading to its new location
Practice You will now practice selecting and moving columns in a datasheet. Ensure that you’ve completed the previous lesson and that the Courses Datasheet window is displayed. 1. Before moving fields in the datasheet, let’s practice selecting columns
and changing column widths. Do the following: CLICK: CourseID in the field header area Notice that the mouse pointer becomes a downward pointing arrow ( ) when positioned properly on the column heading. The entire column should now appear highlighted.
2. Using the horizontal scroll bar, scroll the window by clicking the right scroll button ( ) so that the last field column, InstructorID, is visible.
3. To select all of the columns in the datasheet at once: PRESS: and hold it down CLICK: InstructorID in the field header area All of the columns should now appear highlighted. (Note: Although it is not explicitly stated, you should release the key after clicking on the InstructorID column heading.)
4. You can now update the columns to their best-fit widths. To do so: CHOOSE: Format Column Width CLICK: Best Fit command button PRESS: to remove the highlighting The datasheet should now appear similar to Figure 3.5.

Chapter 3 AC3-7 Figure 3.5 Adjusting all columns to their best-fit width
5. Let’s practice moving columns in the datasheet. Using the horizontal scroll bar, scroll the window so that both the Faculty and DeptHead field columns are visible.
6. CLICK: DeptHead in the field header area
7. Position the white arrow mouse pointer ( ) over the field name. Then: DRAG: DeptHead to the left so that the bold vertical gridline appears between the Faculty and MaxStudents field columns, as shown in Figure 3.6
Figure 3.6 Moving a field column
8. Release the mouse button to complete the move operation.
9. Now let’s try moving two fields at the same time: CLICK: Faculty in the field header area PRESS: and hold it down CLICK: DeptHead in the field header area Both columns should now appear highlighted.
10. You will now reposition the two field columns. Position the mouse pointer on one of the selected column headings. Then:
AC3-8 Microsoft Office Access 2003: Organizing and Retrieving Data
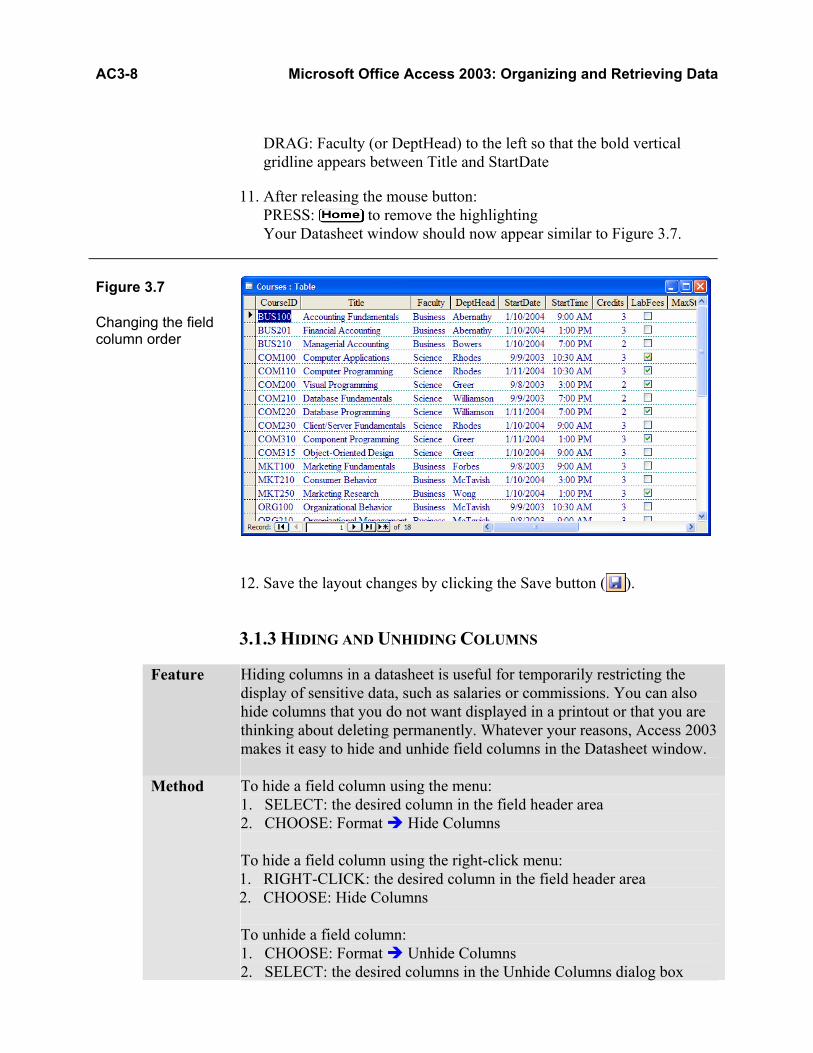
DRAG: Faculty (or DeptHead) to the left so that the bold vertical gridline appears between Title and StartDate
11. After releasing the mouse button: PRESS: to remove the highlighting Your Datasheet window should now appear similar to Figure 3.7.
Figure 3.7 Changing the field column order
12. Save the layout changes by clicking the Save button ( ).
3.1.3 HIDING AND UNHIDING COLUMNS
Feature Hiding columns in a datasheet is useful for temporarily restricting the display of sensitive data, such as salaries or commissions. You can also hide columns that you do not want displayed in a printout or that you are thinking about deleting permanently. Whatever your reasons, Access 2003 makes it easy to hide and unhide field columns in the Datasheet window.
Method To hide a field column using the menu: 1. SELECT: the desired column in the field header area 2. CHOOSE: Format Hide Columns To hide a field column using the right-click menu: 1. RIGHT-CLICK: the desired column in the field header area 2. CHOOSE: Hide Columns To unhide a field column: 1. CHOOSE: Format Unhide Columns 2. SELECT: the desired columns in the Unhide Columns dialog box
Chapter 3 AC3-9
3. CLICK: Close command button
Practice In this lesson, you will hide and unhide columns in the active datasheet. Ensure that you’ve completed the previous lessons and that the Courses Datasheet window is displayed. 1. Let’s assume that you have been asked to print out the Courses
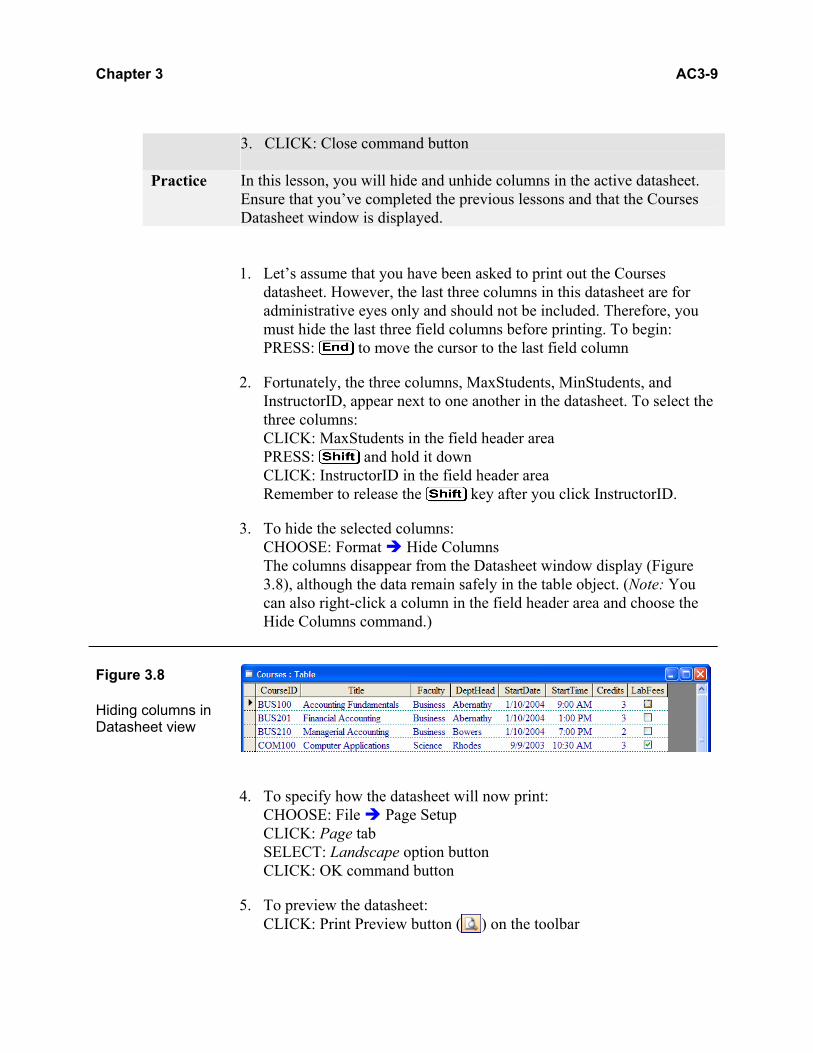
datasheet. However, the last three columns in this datasheet are for administrative eyes only and should not be included. Therefore, you must hide the last three field columns before printing. To begin: PRESS: to move the cursor to the last field column
2. Fortunately, the three columns, MaxStudents, MinStudents, and InstructorID, appear next to one another in the datasheet. To select the three columns: CLICK: MaxStudents in the field header area PRESS: and hold it down CLICK: InstructorID in the field header area Remember to release the key after you click InstructorID.
3. To hide the selected columns: CHOOSE: Format Hide Columns The columns disappear from the Datasheet window display (Figure 3.8), although the data remain safely in the table object. (Note: You can also right-click a column in the field header area and choose the Hide Columns command.)
Figure 3.8 Hiding columns in Datasheet view
4. To specify how the datasheet will now print: CHOOSE: File Page Setup CLICK: Page tab SELECT: Landscape option button CLICK: OK command button
5. To preview the datasheet: CLICK: Print Preview button ( ) on the toolbar

AC3-10 Microsoft Office Access 2003: Organizing and Retrieving Data
6. Using the magnifying glass mouse pointer, zoom in and out on the page. Notice that the hidden columns are not displayed in the Print Preview window, as shown in Figure 3.9.
Figure 3.9 Zooming in the Print Preview window
7. To return to the Datasheet window: CLICK: Close button ( ) on the toolbar
8. To unhide the columns: CHOOSE: Format Unhide Columns The dialog box in Figure 3.10 appears.
Figure 3.10 Unhide Columns dialog box
Field columns that are currently displayed in the datasheet appear in this list area with a selected check box.

Chapter 3 AC3-11
9. In the Unhide Columns dialog box: SELECT: MaxStudents check box SELECT: MinStudents check box SELECT: InstructorID check box CLICK: Close command button Notice that the field columns are displayed once again.
10. Save the layout changes before proceeding.
3.1.4 FREEZING AND UNFREEZING COLUMNS
Feature When you navigate a large table with many columns, the Datasheet window scrolls automatically to accommodate your cursor movements. The farther right you move the cursor, the more the columns scroll away from view at the left. To more easily identify the current record, Access 2003 lets you freeze or lock in place one or more columns, such as a company name or product number, along the left edge of the Datasheet window.
Method To freeze a field column using the menu: 1. SELECT: the desired column(s) in the field header area 2. CHOOSE: Format Freeze Columns To freeze a field column using the right-click menu: 1. RIGHT-CLICK: the desired column in the field header area 2. CHOOSE: Freeze Columns To unfreeze columns in a datasheet: • CHOOSE: Format Unfreeze All Columns
Practice In this lesson, you will freeze and unfreeze columns in the active datasheet. Ensure that you’ve completed the previous lessons and that the Courses Datasheet window is displayed. 1. Let’s use the right-click menu to freeze the CourseID field column
from scrolling off the screen. Do the following: RIGHT-CLICK: CourseID in the field header A shortcut menu appears, as displayed in Figure 3.11.

AC3-12 Microsoft Office Access 2003: Organizing and Retrieving Data
Figure 3.11 Displaying the right-click shortcut menu for a column
2. To freeze the column in the Datasheet window: CHOOSE: Freeze Columns Nothing appears to have happened to the column, but the effects are illustrated in the next few steps.
3. Remove the column highlighting: PRESS: Notice that a vertical gridline appears between the CourseID and Title field columns.
4. To demonstrate the frozen column feature: PRESS: to move to the last field column The CourseID column remains displayed at the left side of the window, as shown in Figure 3.12. This command is especially useful for displaying datasheets that contain many fields.
Figure 3.12 Freezing a column in a datasheet
5. To unfreeze the CourseID column: CHOOSE: Format Unfreeze All Columns
6. PRESS:

Chapter 3 AC3-13
7. Save the layout changes and then close the Datasheet window.
8. To prove that the formatting changes were indeed saved: DOUBLE-CLICK: Courses in the list area The Datasheet window appears with the same text and window formatting and field column order.
9. Close the Datasheet window once again.
Self Check 3.1 Name two reasons for changing the field column order in a
datasheet.
3.2 SORTING, FINDING, AND MAINTAINING DATA
Information is processed data. This processing can take several forms, from analyzing, organizing, and summarizing data to presenting data in charts and reports. In this module, you learn how to sort and arrange records into a precise and logical order. You also find and replace data stored in a table. Finally, you learn how to spell-check the contents of a table as you would a document in Microsoft Word or a worksheet in Microsoft Excel. 3.2.1 SORTING RECORDS IN A DATASHEET
Feature Records are displayed in the order in which they are originally entered into a table, unless a primary key has been assigned. With a primary key, records are arranged and displayed according to the contents of the primary key field. Even so, Access allows you to rearrange the records appearing in a datasheet into ascending (0 to 9; A to Z) or descending (Z to A; 9 to 0) order by the contents of any field. A field chosen to sort by is referred to as a sort key. Sorting is often your first step in extracting information from raw data. It allows you to better organize records and makes it easier to scan a datasheet for specific information.
Method To sort data using the toolbar: 1. SELECT: the desired column(s) in Datasheet view 2. CLICK: Sort Ascending button ( ) to sort in ascending order
or CLICK: Sort Descending button ( ) to sort in descending order
AC3-14 Microsoft Office Access 2003: Organizing and Retrieving Data
To sort data using the right-click menu: 1. RIGHT-CLICK: the desired column in the field header area 2. CHOOSE: Sort Ascending to sort in ascending order
or CHOOSE: Sort Descending to sort in descending order
Practice You will now practice sorting a table into ascending and descending
order. Ensure that the AC0300 Database window is displayed. 1. To open the Students table in Datasheet view:
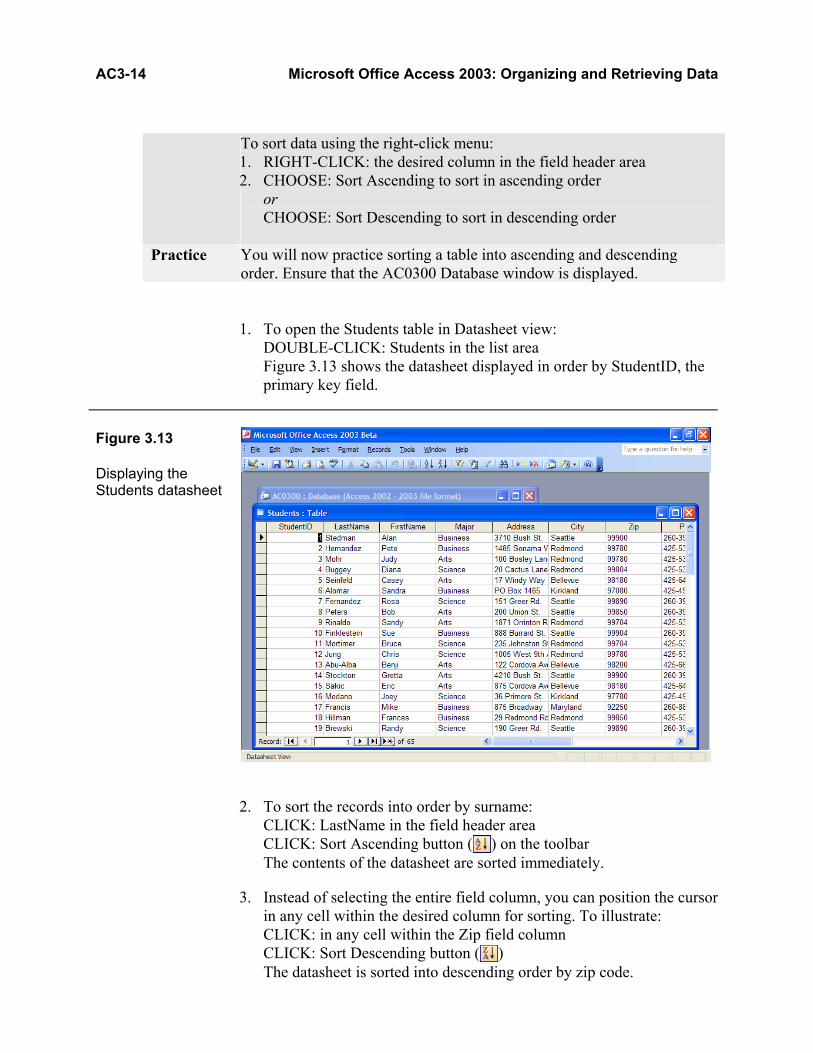
DOUBLE-CLICK: Students in the list area Figure 3.13 shows the datasheet displayed in order by StudentID, the primary key field.
Figure 3.13 Displaying the Students datasheet
2. To sort the records into order by surname: CLICK: LastName in the field header area CLICK: Sort Ascending button ( ) on the toolbar The contents of the datasheet are sorted immediately.
3. Instead of selecting the entire field column, you can position the cursor in any cell within the desired column for sorting. To illustrate: CLICK: in any cell within the Zip field column CLICK: Sort Descending button ( ) The datasheet is sorted into descending order by zip code.
Chapter 3 AC3-15
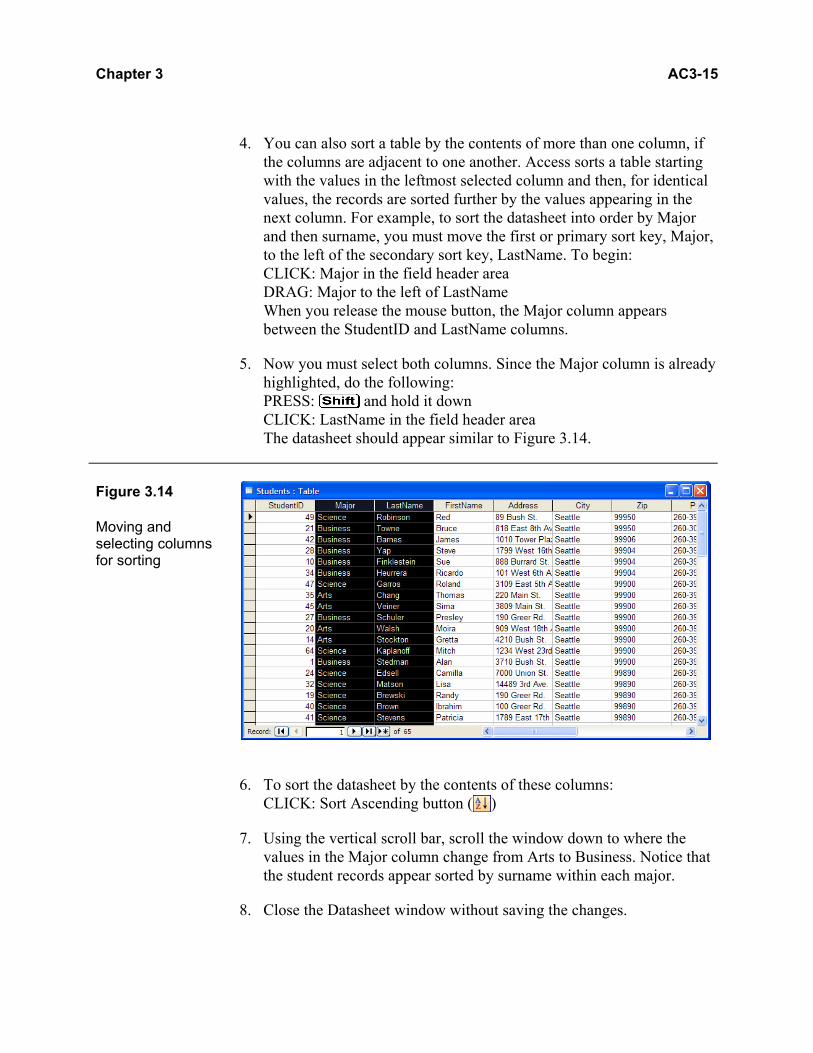
4. You can also sort a table by the contents of more than one column, if the columns are adjacent to one another. Access sorts a table starting with the values in the leftmost selected column and then, for identical values, the records are sorted further by the values appearing in the next column. For example, to sort the datasheet into order by Major and then surname, you must move the first or primary sort key, Major, to the left of the secondary sort key, LastName. To begin: CLICK: Major in the field header area DRAG: Major to the left of LastName When you release the mouse button, the Major column appears between the StudentID and LastName columns.
5. Now you must select both columns. Since the Major column is already highlighted, do the following: PRESS: and hold it down CLICK: LastName in the field header area The datasheet should appear similar to Figure 3.14.
Figure 3.14 Moving and selecting columns for sorting
6. To sort the datasheet by the contents of these columns: CLICK: Sort Ascending button ( )
7. Using the vertical scroll bar, scroll the window down to where the values in the Major column change from Arts to Business. Notice that the student records appear sorted by surname within each major.
8. Close the Datasheet window without saving the changes.

AC3-16 Microsoft Office Access 2003: Organizing and Retrieving Data
3.2.2 PERFORMING A SIMPLE SEARCH
Feature The Find command in Access 2003 lets you search an entire table for the existence of a few characters, a word, or a phrase. With large tables, this command is especially useful for moving the cursor to a particular record for editing. Most commonly, the Find command is used to locate a single record. Filters and query objects, discussed later in this chapter, are best used to locate groups of records matching a specific criteria.
Method 1. SELECT: a cell in the field column you want to search 2. CLICK: Find button ( ) on the toolbar
or CHOOSE: Edit Find
3. SELECT: desired search options
Practice In this lesson, you will attempt to find specific data stored in a table. Ensure that the AC0300 Database window is displayed. 1. Open the Students table in Datasheet view.
2. Finding data is much easier when the datasheet is sorted by the field in which you want to perform a search. To begin: RIGHT-CLICK: LastName in the field header area CHOOSE: Sort Ascending from the menu
3. Let’s find the record for Jimmy Kazo: CLICK: Find button ( ) on the toolbar
4. In the Find and Replace dialog box that appears: TYPE: Kazo in the Find What combo box Notice that the LastName field already appears selected in the Look In drop-down list box, as shown in Figure 3.15.

Chapter 3 AC3-17 Figure 3.15 Find and Replace dialog box: Find tab
5. To proceed with the search: CLICK: Find Next The cursor moves down the column and stops on the first occurrence of “Kazo” in record 31. (Note: The Find and Replace dialog box does not disappear. Therefore, it may be necessary to drag it out of the way by its Title bar in order to view the selected record.)
6. You can continue the search for more entries for Kazo: CLICK: Find Next The following dialog box appears, stating that no more matches were found.
7. To dismiss the message box: CLICK: OK command button You are returned to the Find and Replace dialog box.
8. To end the search: CLICK: Cancel command button

AC3-18 Microsoft Office Access 2003: Organizing and Retrieving Data
Notice that the cursor remains on record 31 (StudentID 56) for “Kazo.”
9. Close the Datasheet window without saving the changes.
3.2.3 SPECIFYING SEARCH PATTERNS
Feature Using the Find command, you can specify several options to control how a search is performed. You can also use wildcard characters to help locate words for which you are unsure of the spelling. These wildcards are also useful in defining search criteria for filters and queries.
Method • Use the question mark (?) in place of a single character. For example, the search pattern “??S?” matches ROSI and DISC.
• Use the number symbol (#) in place of a single number. For example, the search pattern “##9” matches 349 and 109.
• Use the asterisk (*) to represent a group of characters. For example, the search pattern “Sm*” yields entries beginning with the letters “Sm,” such as Smith, Smythe, and Smallwood. You can also use the asterisk in the middle of a search pattern.
Practice You will now practice using wildcards in building search criteria. Ensure
that the AC0300 Database window is displayed. 1. Open the Students table in Datasheet view.
2. Your objective now is to find all the students who live on Shannon Square. To begin, select the Address column: CLICK: Address in the field header area
3. Let’s change the width of the Address field column: CHOOSE: Format Column Width TYPE: 25 PRESS: or CLICK: OK
4. CLICK: Find button ( )
5. In the Find and Replace dialog box: TYPE: *Shannon* Notice that the existing value, Kazo, in the combo box is replaced by the new entry (Figure 3.16). Using asterisks in this search criteria tells Access to find all occurrences of the word “Shannon” anywhere within a cell entry.
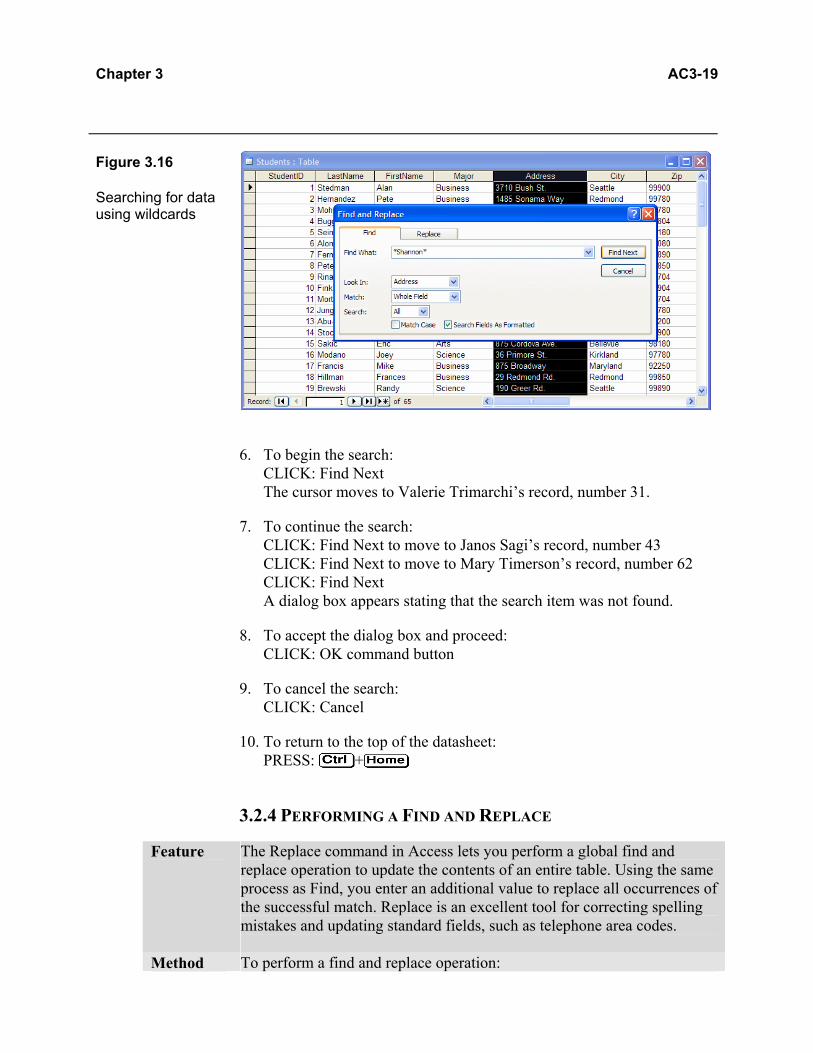
Chapter 3 AC3-19 Figure 3.16 Searching for data using wildcards
6. To begin the search: CLICK: Find Next The cursor moves to Valerie Trimarchi’s record, number 31.
7. To continue the search: CLICK: Find Next to move to Janos Sagi’s record, number 43 CLICK: Find Next to move to Mary Timerson’s record, number 62 CLICK: Find Next A dialog box appears stating that the search item was not found.
8. To accept the dialog box and proceed: CLICK: OK command button
9. To cancel the search: CLICK: Cancel
10. To return to the top of the datasheet: PRESS: +
3.2.4 PERFORMING A FIND AND REPLACE
Feature The Replace command in Access lets you perform a global find and replace operation to update the contents of an entire table. Using the same process as Find, you enter an additional value to replace all occurrences of the successful match. Replace is an excellent tool for correcting spelling mistakes and updating standard fields, such as telephone area codes.
Method To perform a find and replace operation:
AC3-20 Microsoft Office Access 2003: Organizing and Retrieving Data
1. SELECT: a cell in the field column you want to search 2. CHOOSE: Edit Replace 3. SELECT: desired search and replace options
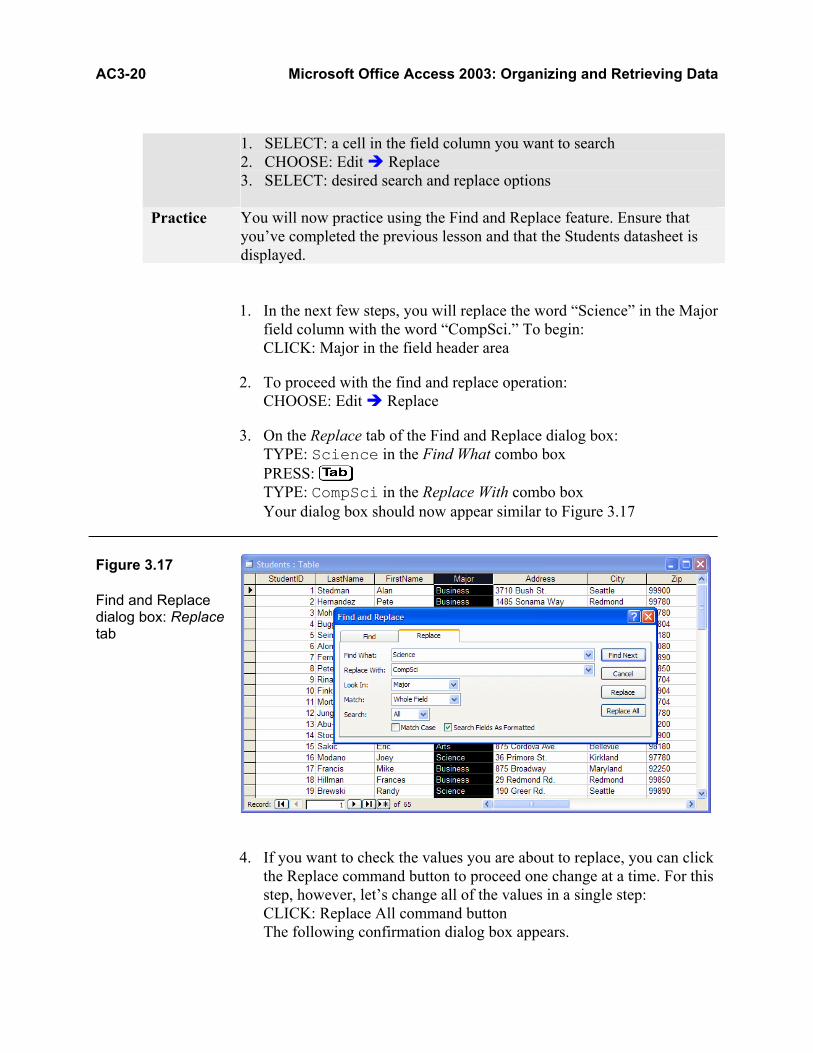
Practice You will now practice using the Find and Replace feature. Ensure that you’ve completed the previous lesson and that the Students datasheet is displayed. 1. In the next few steps, you will replace the word “Science” in the Major
field column with the word “CompSci.” To begin: CLICK: Major in the field header area
2. To proceed with the find and replace operation: CHOOSE: Edit Replace
3. On the Replace tab of the Find and Replace dialog box: TYPE: Science in the Find What combo box PRESS: TYPE: CompSci in the Replace With combo box Your dialog box should now appear similar to Figure 3.17
Figure 3.17 Find and Replace dialog box: Replace tab
4. If you want to check the values you are about to replace, you can click the Replace command button to proceed one change at a time. For this step, however, let’s change all of the values in a single step: CLICK: Replace All command button The following confirmation dialog box appears.
Chapter 3 AC3-21
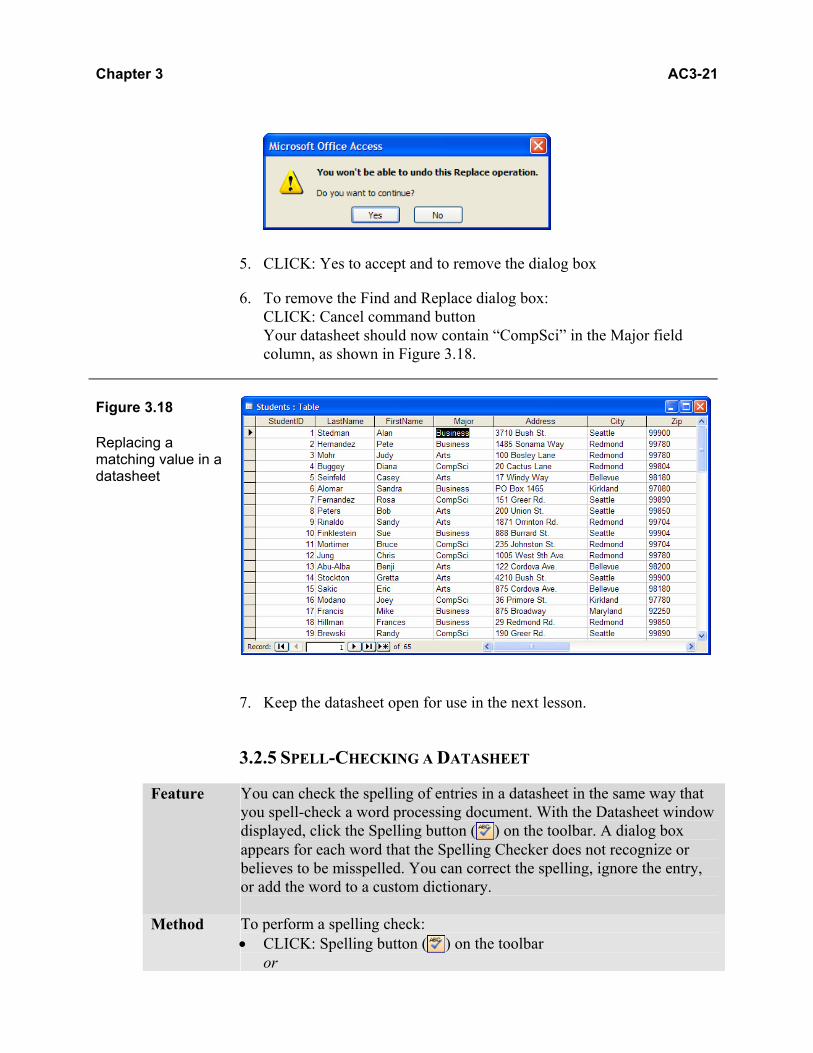
5. CLICK: Yes to accept and to remove the dialog box
6. To remove the Find and Replace dialog box: CLICK: Cancel command button Your datasheet should now contain “CompSci” in the Major field column, as shown in Figure 3.18.
Figure 3.18 Replacing a matching value in a datasheet
7. Keep the datasheet open for use in the next lesson.
3.2.5 SPELL-CHECKING A DATASHEET
Feature You can check the spelling of entries in a datasheet in the same way that you spell-check a word processing document. With the Datasheet window displayed, click the Spelling button ( ) on the toolbar. A dialog box appears for each word that the Spelling Checker does not recognize or believes to be misspelled. You can correct the spelling, ignore the entry, or add the word to a custom dictionary.
Method To perform a spelling check: • CLICK: Spelling button ( ) on the toolbar
or
AC3-22 Microsoft Office Access 2003: Organizing and Retrieving Data
• CHOOSE: Tools Spelling from the menu
Practice You will now practice spell-checking a datasheet. Ensure that you’ve completed the previous lesson and that the Students datasheet is displayed. 1. PRESS: + to move to the top corner of the datasheet
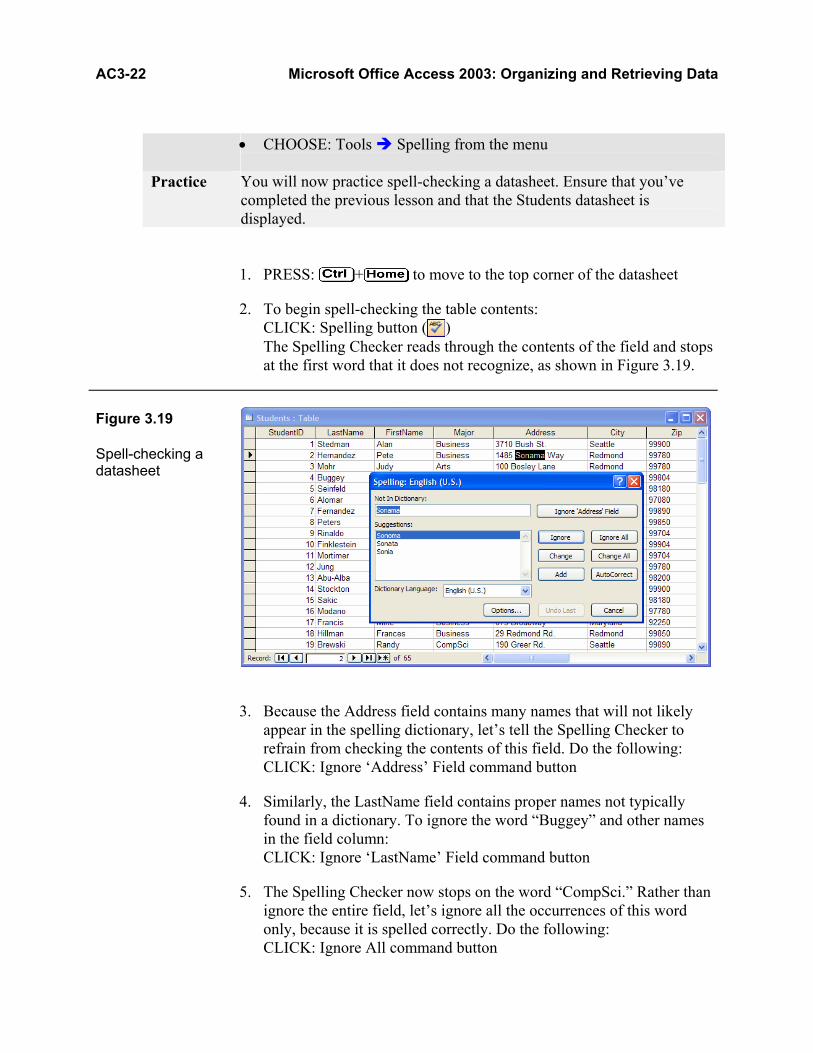
2. To begin spell-checking the table contents: CLICK: Spelling button ( ) The Spelling Checker reads through the contents of the field and stops at the first word that it does not recognize, as shown in Figure 3.19.
Figure 3.19 Spell-checking a datasheet
3. Because the Address field contains many names that will not likely appear in the spelling dictionary, let’s tell the Spelling Checker to refrain from checking the contents of this field. Do the following: CLICK: Ignore ‘Address’ Field command button
4. Similarly, the LastName field contains proper names not typically found in a dictionary. To ignore the word “Buggey” and other names in the field column: CLICK: Ignore ‘LastName’ Field command button
5. The Spelling Checker now stops on the word “CompSci.” Rather than ignore the entire field, let’s ignore all the occurrences of this word only, because it is spelled correctly. Do the following: CLICK: Ignore All command button

Chapter 3 AC3-23
6. Now ignore checking the contents of the FirstName field: CLICK: Ignore ‘FirstName’ Field command button After proceeding through the remaining cells, the Spelling Checker displays the following dialog box.
7. To dismiss the dialog box: CLICK: OK command button
8. Close the Datasheet window and save the layout changes.
Self Check 3.2 How do you perform a sort operation using more than one field
column?
3.3 USING FILTERS
A filter is a tool that limits the display of records in a table using a simple matching criterion. Similar to a pasta strainer that lets water through but not the pasta, a filter allows only some records to pass through for display. Filtering is an excellent way to find a subset of records that match a particular value or range of values. Several methods are available for filtering records in a table: Filter For Input, Filter By Selection, Filter Excluding Selection, and Filter By Form, accessed using the Records, Filter command. In this module, you will learn how to define, apply, and remove filters. 3.3.1 FILTERING FOR INPUT
Feature Filtering displays a subset of records from a table. The Filter For Input method allows you to specify which records are let through. To apply this filter, you display a field's right-click menu and then type a value into the “Filter For:” text box. Finding matches to this value in the current field filters the datasheet. You may return to viewing all of the records by clicking the Apply/Remove Filter button ( ) at any time.

AC3-24 Microsoft Office Access 2003: Organizing and Retrieving Data
Method To apply a filter using Filter For Input: 1. RIGHT-CLICK: any cell in the desired field column 2. CHOOSE: Filter For: 3. TYPE: filter criterion
Practice In this lesson, you will use the Filter For Input method to apply a filter. Ensure that the AC0300 Database window is displayed. 1. Open the Students table in Datasheet view.
2. Let’s apply a filter to the datasheet that displays only those students with a last name beginning with the letter “S.” Do the following: RIGHT-CLICK: Stedman in the LastName field column Your screen should now appear similar to Figure 3.20.
Figure 3.20 Choosing the Filter For Input command
3. CHOOSE: Filter For: A flashing insertion point should appear in the adjacent text box, as shown below.
4. In the Filter For: text box: TYPE: s* PRESS: The datasheet (Figure 3.21) displays 8 of the original 65 records.
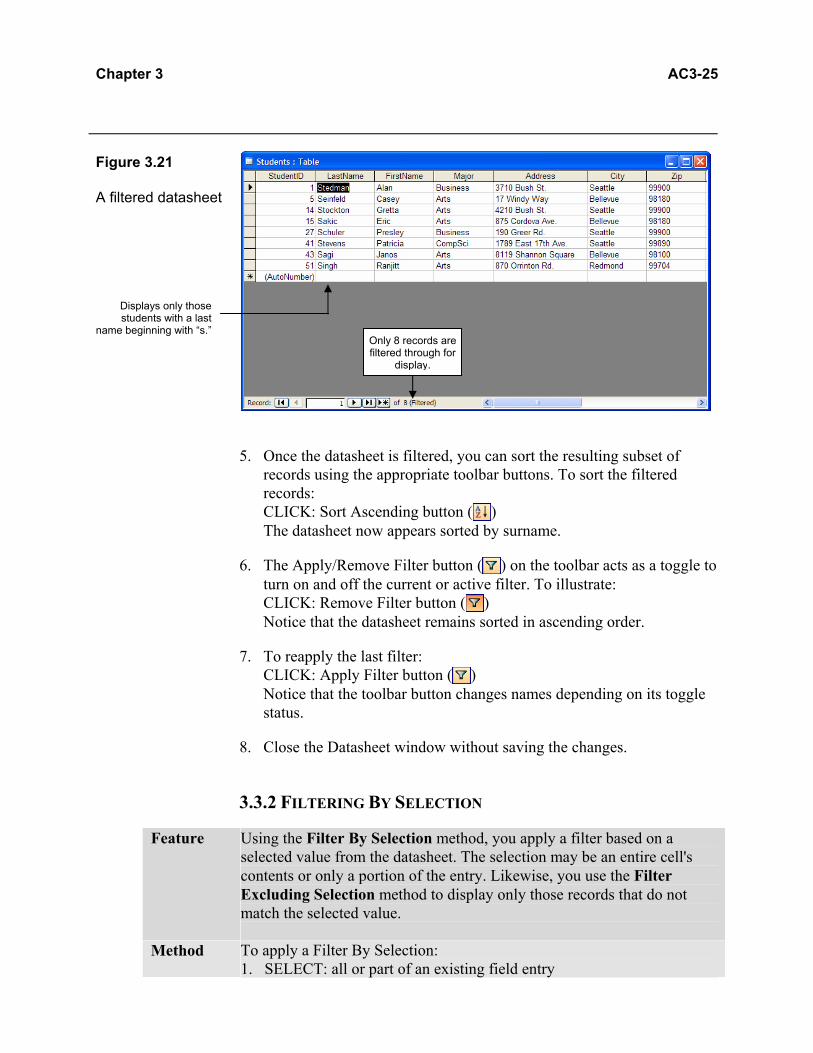
Chapter 3 AC3-25 Figure 3.21 A filtered datasheet
5. Once the datasheet is filtered, you can sort the resulting subset of records using the appropriate toolbar buttons. To sort the filtered records: CLICK: Sort Ascending button ( ) The datasheet now appears sorted by surname.
6. The Apply/Remove Filter button ( ) on the toolbar acts as a toggle to turn on and off the current or active filter. To illustrate: CLICK: Remove Filter button ( ) Notice that the datasheet remains sorted in ascending order.
7. To reapply the last filter: CLICK: Apply Filter button ( ) Notice that the toolbar button changes names depending on its toggle status.
8. Close the Datasheet window without saving the changes.
3.3.2 FILTERING BY SELECTION
Feature Using the Filter By Selection method, you apply a filter based on a selected value from the datasheet. The selection may be an entire cell's contents or only a portion of the entry. Likewise, you use the Filter Excluding Selection method to display only those records that do not match the selected value.
Method To apply a Filter By Selection: 1. SELECT: all or part of an existing field entry
Only 8 records are filtered through for
display.
Displays only those students with a last
name beginning with “s.”
AC3-26 Microsoft Office Access 2003: Organizing and Retrieving Data
2. CLICK: Filter By Selection button ( ) or CHOOSE: Records Filter Filter By Selection
To apply a Filter Excluding Selection: 1. SELECT: all or part of an existing field entry 2. CHOOSE: Records Filter Filter Excluding Selection
Practice In this lesson, you will use the Filter By Selection method to apply a filter. Ensure that the AC0300 Database window is displayed. 1. Open the Students table in Datasheet view.
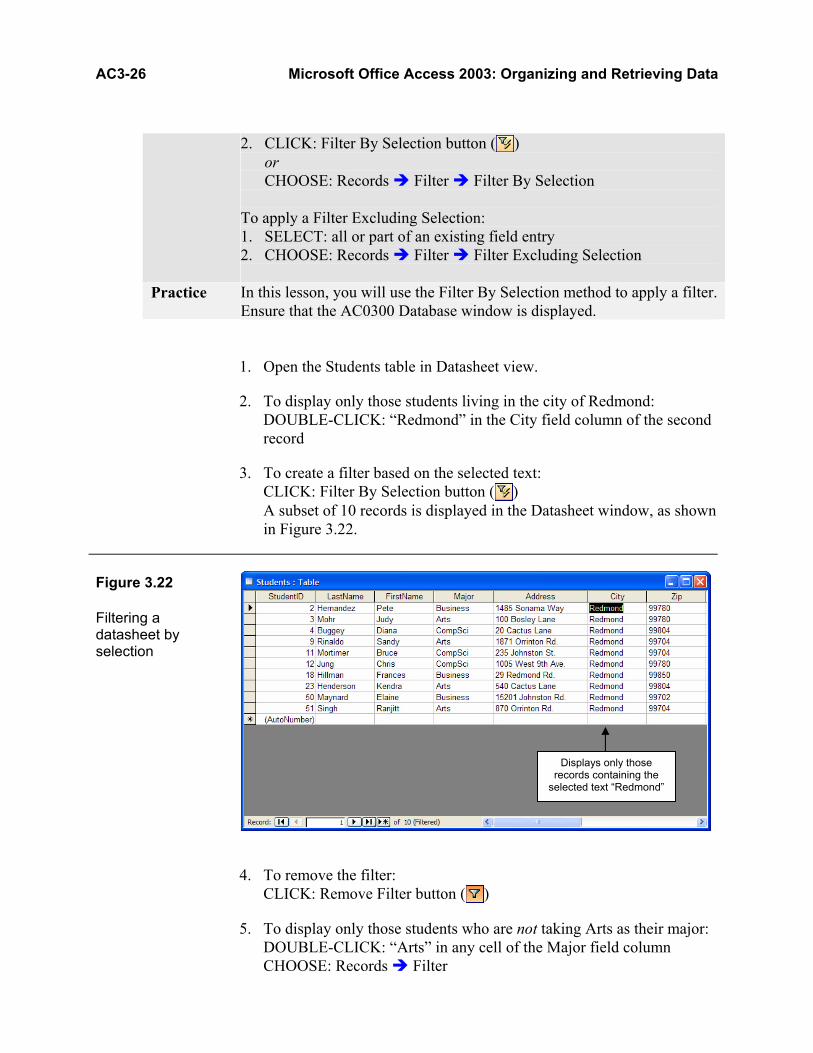
2. To display only those students living in the city of Redmond: DOUBLE-CLICK: “Redmond” in the City field column of the second record
3. To create a filter based on the selected text: CLICK: Filter By Selection button ( ) A subset of 10 records is displayed in the Datasheet window, as shown in Figure 3.22.
Figure 3.22 Filtering a datasheet by selection
4. To remove the filter: CLICK: Remove Filter button ( )
5. To display only those students who are not taking Arts as their major: DOUBLE-CLICK: “Arts” in any cell of the Major field column CHOOSE: Records Filter
Displays only those records containing the
selected text “Redmond”
Chapter 3 AC3-27
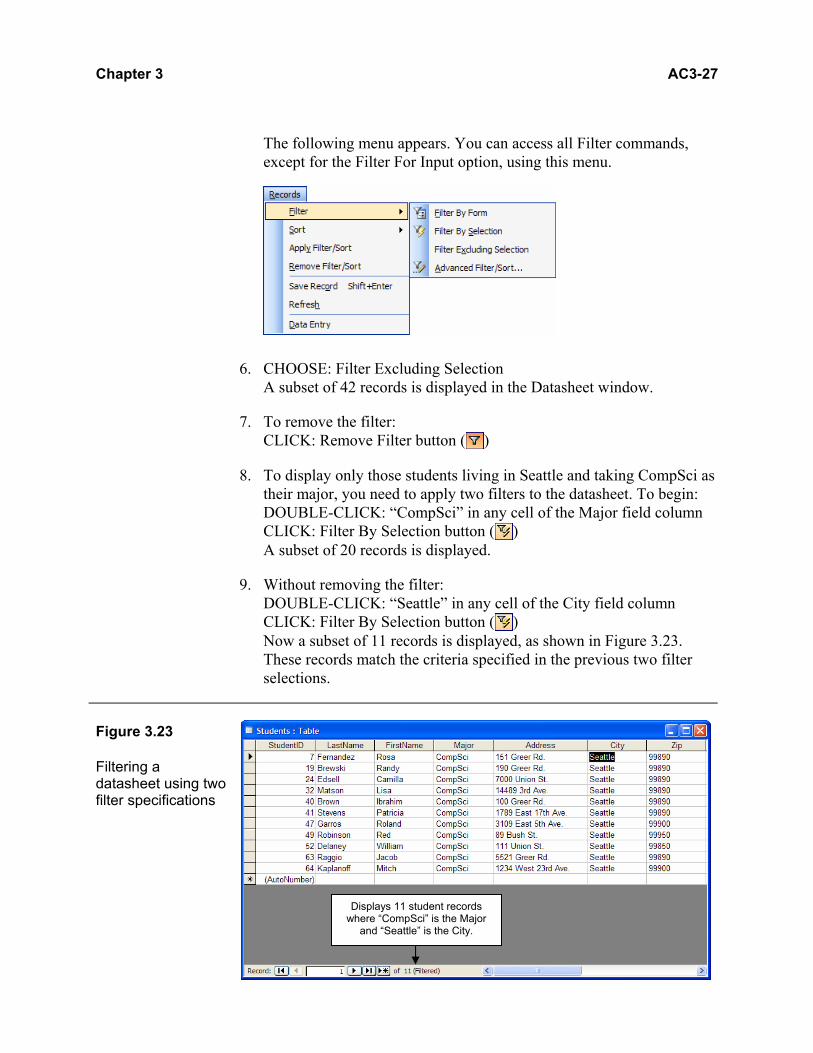
The following menu appears. You can access all Filter commands, except for the Filter For Input option, using this menu.
6. CHOOSE: Filter Excluding Selection A subset of 42 records is displayed in the Datasheet window.
7. To remove the filter: CLICK: Remove Filter button ( )
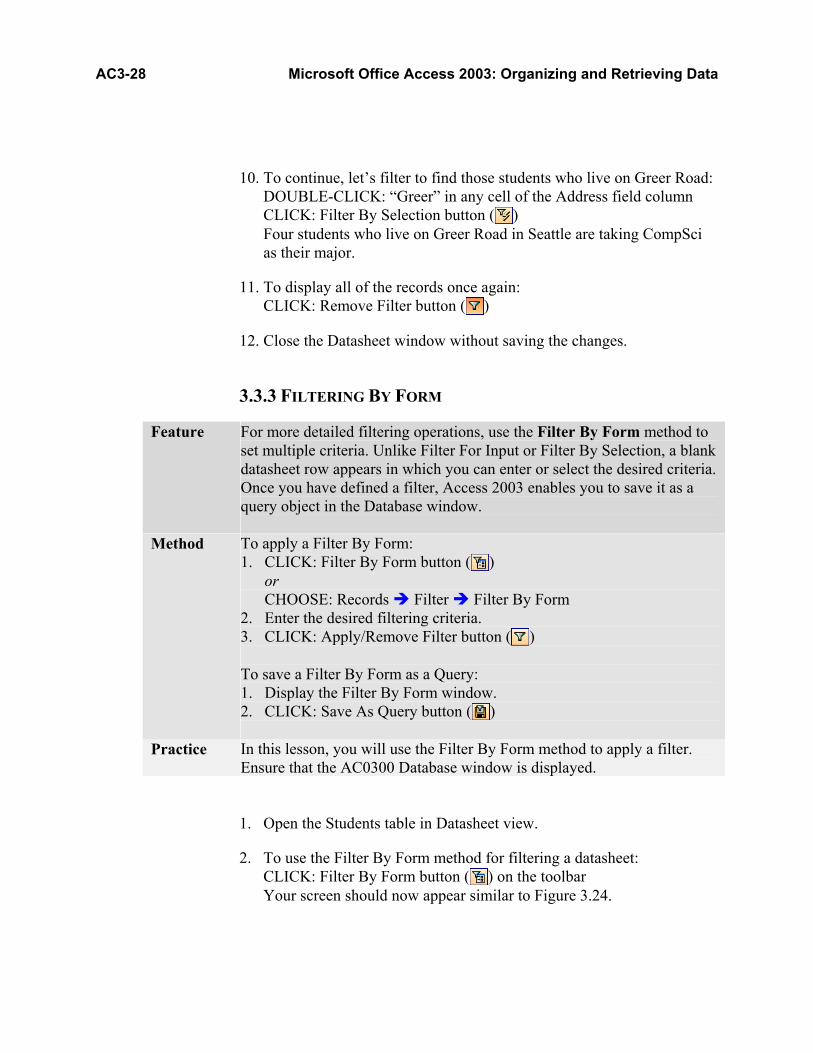
8. To display only those students living in Seattle and taking CompSci as their major, you need to apply two filters to the datasheet. To begin: DOUBLE-CLICK: “CompSci” in any cell of the Major field column CLICK: Filter By Selection button ( ) A subset of 20 records is displayed.
9. Without removing the filter: DOUBLE-CLICK: “Seattle” in any cell of the City field column CLICK: Filter By Selection button ( ) Now a subset of 11 records is displayed, as shown in Figure 3.23. These records match the criteria specified in the previous two filter selections.
Figure 3.23 Filtering a datasheet using two filter specifications
Displays 11 student records where “CompSci” is the Major
and “Seattle” is the City.
AC3-28 Microsoft Office Access 2003: Organizing and Retrieving Data
10. To continue, let’s filter to find those students who live on Greer Road: DOUBLE-CLICK: “Greer” in any cell of the Address field column CLICK: Filter By Selection button ( ) Four students who live on Greer Road in Seattle are taking CompSci as their major.
11. To display all of the records once again: CLICK: Remove Filter button ( )
12. Close the Datasheet window without saving the changes.
3.3.3 FILTERING BY FORM
Feature For more detailed filtering operations, use the Filter By Form method to set multiple criteria. Unlike Filter For Input or Filter By Selection, a blank datasheet row appears in which you can enter or select the desired criteria. Once you have defined a filter, Access 2003 enables you to save it as a query object in the Database window.
Method To apply a Filter By Form: 1. CLICK: Filter By Form button ( )
or CHOOSE: Records Filter Filter By Form
2. Enter the desired filtering criteria. 3. CLICK: Apply/Remove Filter button ( ) To save a Filter By Form as a Query: 1. Display the Filter By Form window. 2. CLICK: Save As Query button ( )
Practice In this lesson, you will use the Filter By Form method to apply a filter. Ensure that the AC0300 Database window is displayed. 1. Open the Students table in Datasheet view.
2. To use the Filter By Form method for filtering a datasheet: CLICK: Filter By Form button ( ) on the toolbar Your screen should now appear similar to Figure 3.24.
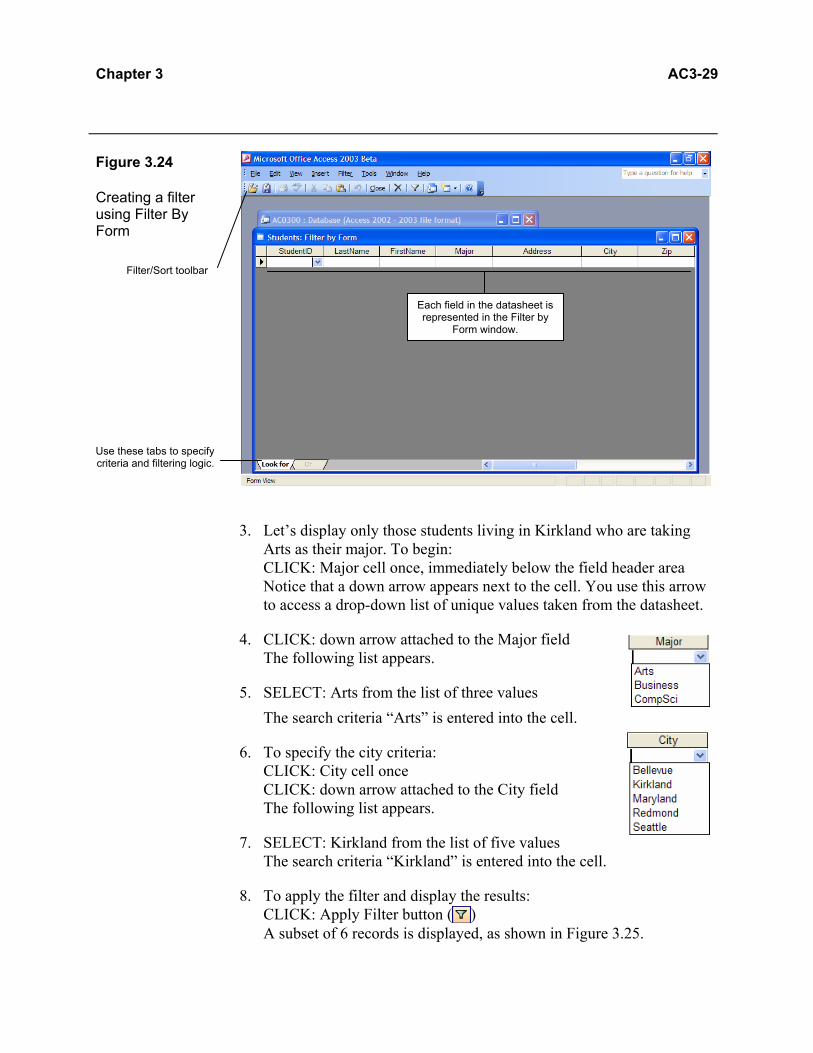
Chapter 3 AC3-29 Figure 3.24 Creating a filter using Filter By Form
3. Let’s display only those students living in Kirkland who are taking Arts as their major. To begin: CLICK: Major cell once, immediately below the field header area Notice that a down arrow appears next to the cell. You use this arrow to access a drop-down list of unique values taken from the datasheet.
4. CLICK: down arrow attached to the Major field The following list appears.
5. SELECT: Arts from the list of three values The search criteria “Arts” is entered into the cell.
6. To specify the city criteria: CLICK: City cell once CLICK: down arrow attached to the City field The following list appears.
7. SELECT: Kirkland from the list of five values The search criteria “Kirkland” is entered into the cell.
8. To apply the filter and display the results: CLICK: Apply Filter button ( ) A subset of 6 records is displayed, as shown in Figure 3.25.
Each field in the datasheet is represented in the Filter by
Form window.
Use these tabs to specify criteria and filtering logic.
Filter/Sort toolbar

AC3-30 Microsoft Office Access 2003: Organizing and Retrieving Data
Figure 3.25 Filtering a datasheet using Filter By Form
9. Let’s return to the Filter By Form window: CLICK: Filter By Form button ( ) Notice that the same criteria appears in the window.
10. To save this filter as a query object: CLICK: Save As Query button ( ) TYPE: Kirkland Arts Students The dialog box should appear as shown here.
11. PRESS: or CLICK: OK
12. To specify a new filter: CLICK: Clear Grid button ( ) The existing filter criteria are removed from the window.
13. In addition to selecting values from the drop-down list, you can type values into the Filter By Form window. To illustrate, let’s display only those students with a last name starting with the letter “m”: CLICK: LastName cell once TYPE: m*
14. CLICK: Apply Filter button ( ) A subset of 7 records is displayed, as shown in Figure 3.26.
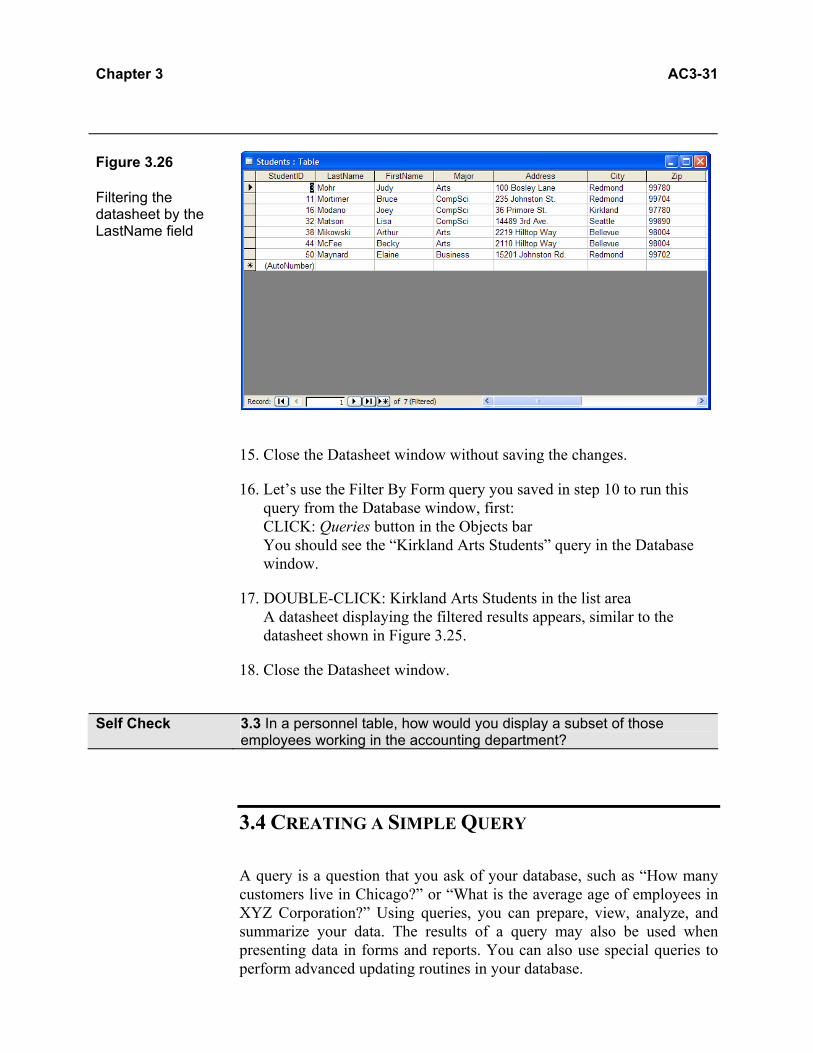
Chapter 3 AC3-31 Figure 3.26 Filtering the datasheet by the LastName field
15. Close the Datasheet window without saving the changes.
16. Let’s use the Filter By Form query you saved in step 10 to run this query from the Database window, first: CLICK: Queries button in the Objects bar You should see the “Kirkland Arts Students” query in the Database window.
17. DOUBLE-CLICK: Kirkland Arts Students in the list area A datasheet displaying the filtered results appears, similar to the datasheet shown in Figure 3.25.
18. Close the Datasheet window.
Self Check 3.3 In a personnel table, how would you display a subset of those
employees working in the accounting department?
3.4 CREATING A SIMPLE QUERY
A query is a question that you ask of your database, such as “How many customers live in Chicago?” or “What is the average age of employees in XYZ Corporation?” Using queries, you can prepare, view, analyze, and summarize your data. The results of a query may also be used when presenting data in forms and reports. You can also use special queries to perform advanced updating routines in your database.
AC3-32 Microsoft Office Access 2003: Organizing and Retrieving Data
Although similar to filters, queries differ in several significant areas. Both filters and queries allow you to retrieve and display a subset of records, but queries also allow you to display data from multiple tables, to control which fields display and in what order they appear, and to perform calculations on selected field values. In addition, whereas filters provide a temporary view of a subset of records, queries are saved as independent database objects. Use the following statement as your guideline: find a record, filter a table, and query a database. 3.4.1 CREATING A QUERY USING THE QUERY WIZARD
Feature The Simple Query Wizard is a step-by-step tool that helps you retrieve data from one or more tables in a database. Unfortunately, the wizard does not allow you to specify search criteria or sort parameters. The type of query object created by the wizard is known as a select query, since you use it to select data for display. The results of the query are listed in a Datasheet window, sometimes referred to as a dynaset. Other types of queries include action queries for updating, adding, and deleting records in a database and parameter queries for accepting input from users.
Method In the Database window, select the Queries button and then: • DOUBLE-CLICK: Create query by using wizard
or • CLICK: New button ( ) on the Database window toolbar • DOUBLE-CLICK: Simple Query Wizard in the New Query dialog box
Practice You will now use the Simple Query Wizard to extract data from two tables for display in a single Datasheet window. Ensure that the AC0300 Database window is displayed. 1. The options for creating a new query object are similar to the options
for creating a new table object. You can start from scratch in query Design view or get helpful guidance from wizards. In the next few steps, you will use the Simple Query Wizard to create a query. To begin: CLICK: Queries button in the Objects bar, if it is not already selected
2. To launch the Simple Query Wizard: DOUBLE-CLICK: Create query by using wizard The dialog box shown in Figure 3.27 appears.
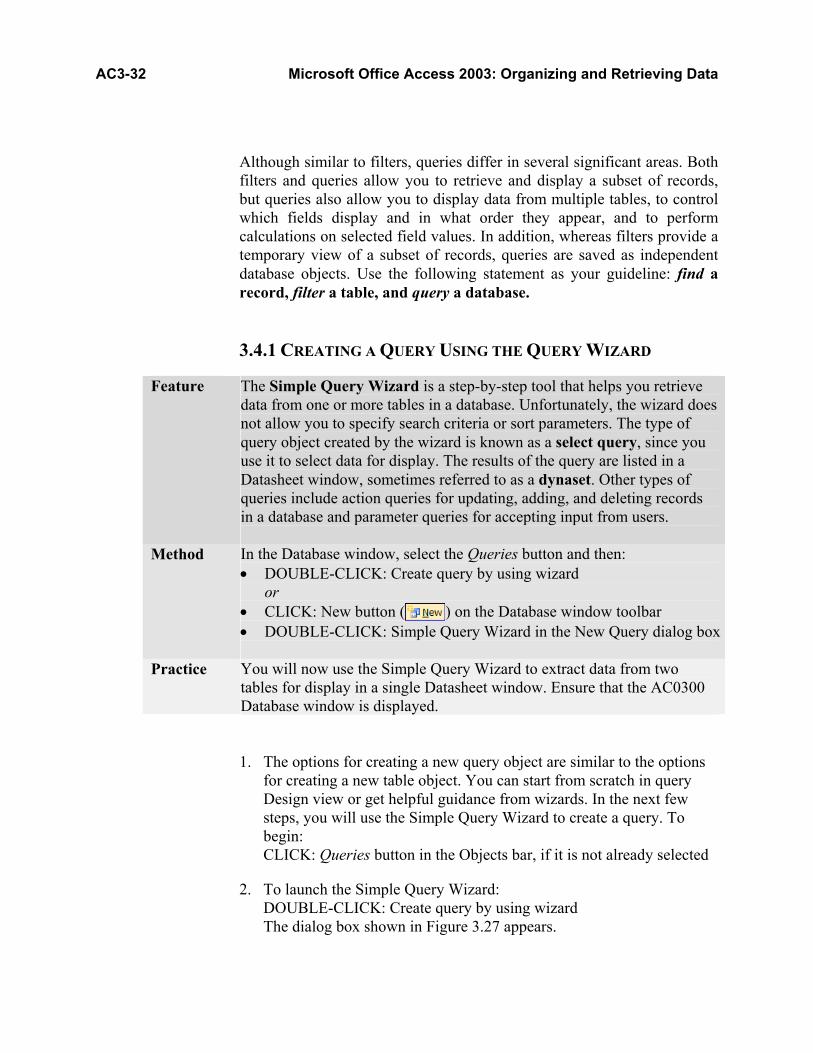
Chapter 3 AC3-33 Figure 3.27 Simple Query Wizard dialog box
3. In order to display a listing of courses along with the instructor’s name, you must select fields from two tables. To begin, ensure that “Table: Courses” is selected in the Tables/Queries drop-down list box.
4. In the Available Fields list box: SELECT: CourseID CLICK: Include button ( ) SELECT: Title CLICK: Include button ( )
5. Now select a new table: SELECT: Table: Instructors in the Tables/Queries drop-down list box Notice that new fields are displayed in the associated list box.
6. In the Available Fields list box: SELECT: LastName CLICK: Include button ( ) SELECT: FirstName CLICK: Include button ( ) Your screen should now appear similar to Figure 3.28.
Selecting a table or query updates the
fields displayed in the list box below.
Select fields for display in the
resulting query.

AC3-34 Microsoft Office Access 2003: Organizing and Retrieving Data
Figure 3.28 Selecting fields for display in the Simple Query Wizard
7. To proceed to the next step in the wizard: CLICK:
8. Now let’s name the query: TYPE: Course Listing Query
9. Ensure that the Open the query to view information option button is selected in the dialog box and then do the following: CLICK: Your screen should appear similar to Figure 3.29. Data in the first two columns is taken from the Courses table, and data in the last two columns is taken from the Instructors table.

Chapter 3 AC3-35 Figure 3.29 Displaying dynaset results for a query
10. Keep the Datasheet window open and proceed to the next lesson.
3.4.2 DISPLAYING THE QUERY DESIGN WINDOW
Feature The Simple Query Wizard makes it easy to get started creating queries. Modifying an existing query, however, requires that you use the query Design window. Discussed in Chapter 6 of our Introductory and Complete editions, the Design view is also used to create complex queries from scratch. In this lesson, you will learn some basic techniques for displaying and editing an existing query.
Method If the query’s Datasheet window is displayed: • CLICK: View – Design button ( ) on the toolbar In the Database window, select the Queries button and then: • SELECT: the query object that you want to modify • CLICK: Design button ( ) on the Database window toolbar or • RIGHT-CLICK: the query object that you want to modify • CHOOSE: Design View
Practice Using the query Design window, you will modify the query created in the last lesson. Ensure that you’ve completed the previous lesson and that the
AC3-36 Microsoft Office Access 2003: Organizing and Retrieving Data
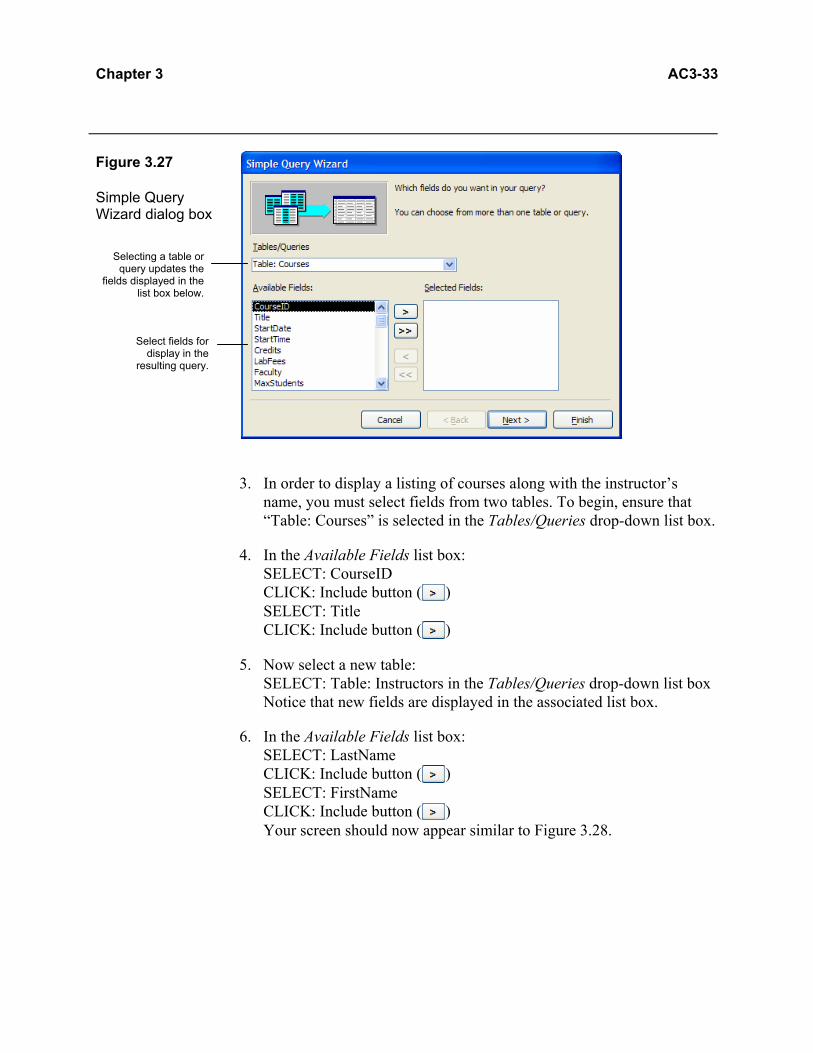
Course Listing Query Datasheet window is displayed. 1. Let’s change the view mode for the Course Listing Query to Design
view. Do the following: CLICK: View – Design button ( ) Your screen should appear similar to Figure 3.30 before proceeding.
Figure 3.30 Query Design window for the Course Listing Query object
2. To add a field to the query: DOUBLE-CLICK: Office in the Instructors table object The field “Office” is added immediately to the next empty column in the query Design grid.
3. To display the resulting dynaset: CLICK: View – Datasheet button ( ) on the toolbar Notice that the Office column is now displayed in the datasheet.
4. To return to Design view: CLICK: View – Design button ( )
5. Let’s limit the display of courses to only those taught by instructors with offices in the “B” wing. To do so: CLICK: in the Criteria text box of the Office column TYPE: B* PRESS: to complete the entry
The Table pane displays the field lists for the Instructors and Courses table objects. Double-click a field to add it to the Field Grid pane.
The query Design grid, in the lower
portion of the Design window, displays the
fields, criteria, and sort specifications for
the query.
Chapter 3 AC3-37
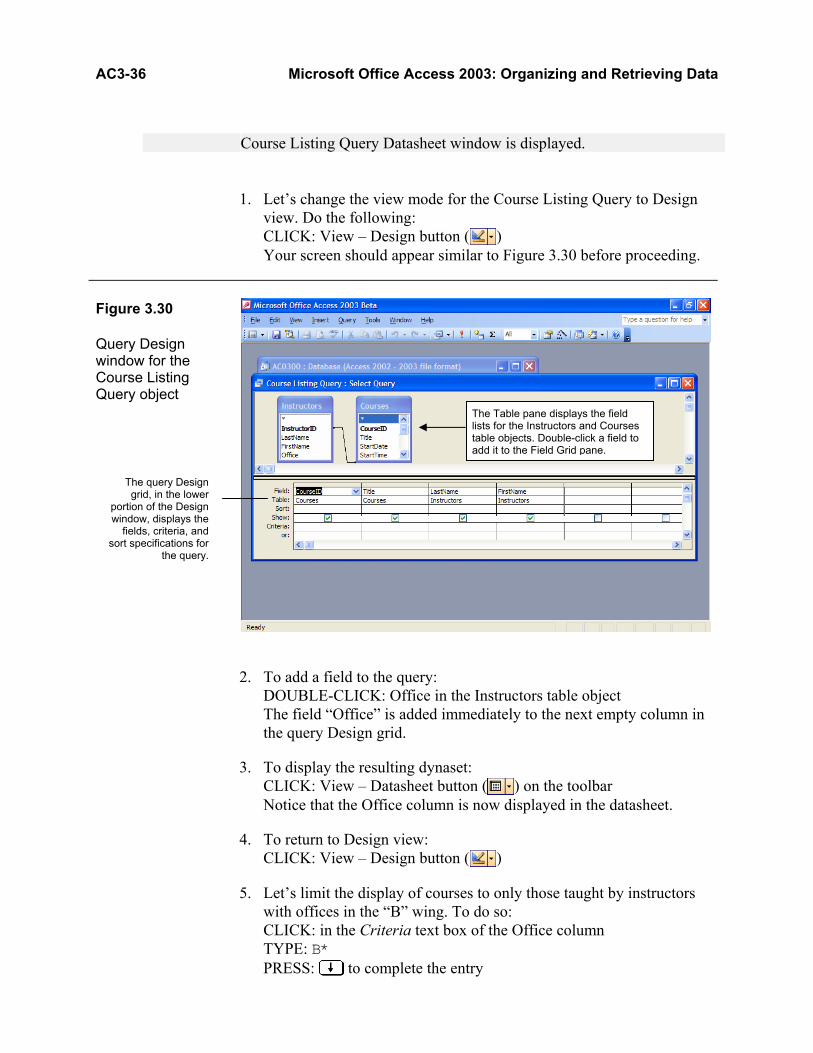
Notice that the criteria specification is automatically changed by Access to Like “B*”. Your screen should now appear similar to Figure 3.31.
Figure 3.31 Entering a criteria specification in the query Design window
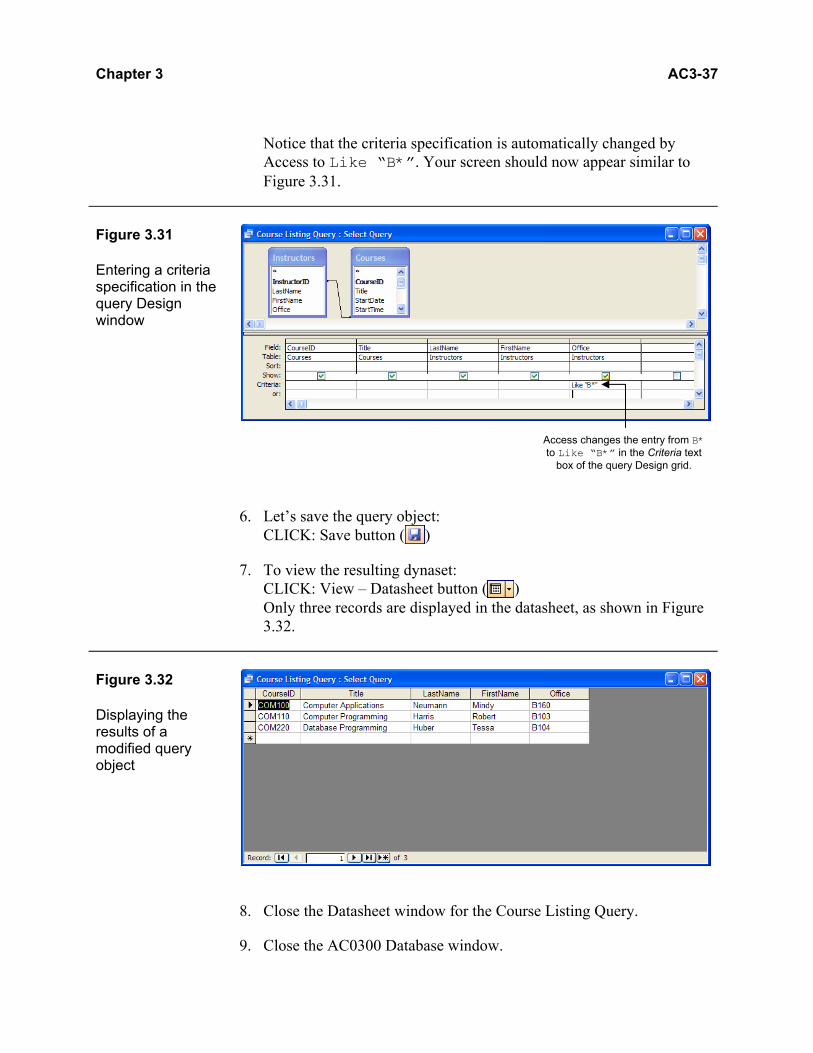
6. Let’s save the query object: CLICK: Save button ( )
7. To view the resulting dynaset: CLICK: View – Datasheet button ( ) Only three records are displayed in the datasheet, as shown in Figure 3.32.
Figure 3.32 Displaying the results of a modified query object
8. Close the Datasheet window for the Course Listing Query.
9. Close the AC0300 Database window.
Access changes the entry from B* to Like “B*” in the Criteria text
box of the query Design grid.
AC3-38 Microsoft Office Access 2003: Organizing and Retrieving Data
In Addition Specifying Search Criteria in Queries
Querying a database involves more than limiting its display to specific fields. Using query Design view, you can create and modify queries to extract records from tables that meet a given criteria. You can also adjust the sorting order and perform calculations.
Self Check 3.4 Name one way that a query’s dynaset may differ from a table’s datasheet.
CHAPTER SUMMARY
One of the primary advantages of using a computerized database is the ability to manipulate, retrieve, and display information quickly and easily. Making your information pleasing to read requires the further ability to format and customize the results. Fortunately, you can spice up your datasheets by applying fonts, styles, and special effects. You can also improve your efficiency in working with a datasheet by moving, hiding, and freezing field columns in Datasheet view. To help you turn raw data into information, the Sort, Find, and Filter commands enable you to organize, locate, and highlight records in a table. You can also use filters to limit the display of records in a table and queries to ask questions of your database. In addition to being able to draw data from multiple tables, queries enable you to specify complex search criteria and sort parameters. Queries are powerful database objects and the sole subject of more advanced chapters. COMMAND SUMMARY
Many of the commands and procedures appearing in this chapter are summarized in the following table.
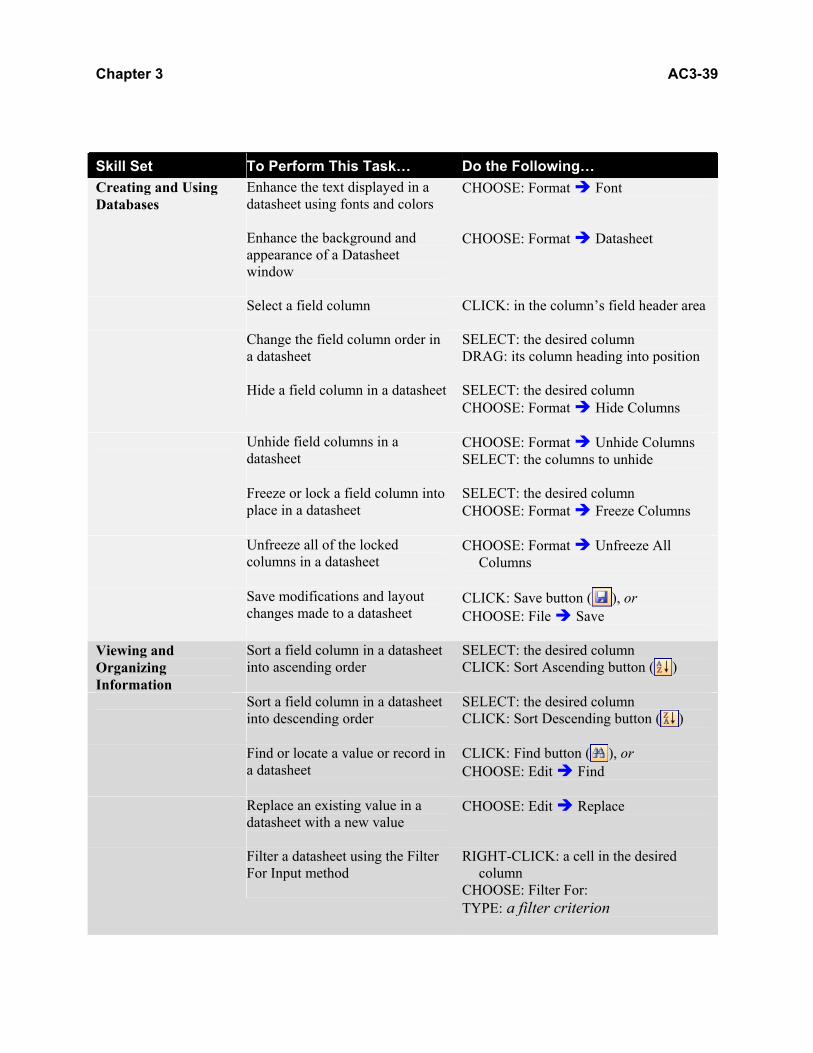
Chapter 3 AC3-39
Skill Set To Perform This Task… Do the Following… Creating and Using Databases
Enhance the text displayed in a datasheet using fonts and colors
CHOOSE: Format Font
Enhance the background and appearance of a Datasheet window
CHOOSE: Format Datasheet
Select a field column
CLICK: in the column’s field header area
Change the field column order in a datasheet
SELECT: the desired column DRAG: its column heading into position
Hide a field column in a datasheet
SELECT: the desired column CHOOSE: Format Hide Columns
Unhide field columns in a datasheet
CHOOSE: Format Unhide Columns SELECT: the columns to unhide
Freeze or lock a field column into place in a datasheet
SELECT: the desired column CHOOSE: Format Freeze Columns
Unfreeze all of the locked columns in a datasheet
CHOOSE: Format Unfreeze All Columns
Save modifications and layout
changes made to a datasheet
CLICK: Save button ( ), or CHOOSE: File Save
Viewing and Organizing Information
Sort a field column in a datasheet into ascending order
SELECT: the desired column CLICK: Sort Ascending button ( )
Sort a field column in a datasheet into descending order
SELECT: the desired column CLICK: Sort Descending button ( )
Find or locate a value or record in a datasheet
CLICK: Find button ( ), or CHOOSE: Edit Find
Replace an existing value in a datasheet with a new value
CHOOSE: Edit Replace
Filter a datasheet using the Filter For Input method
RIGHT-CLICK: a cell in the desired column
CHOOSE: Filter For: TYPE: a filter criterion
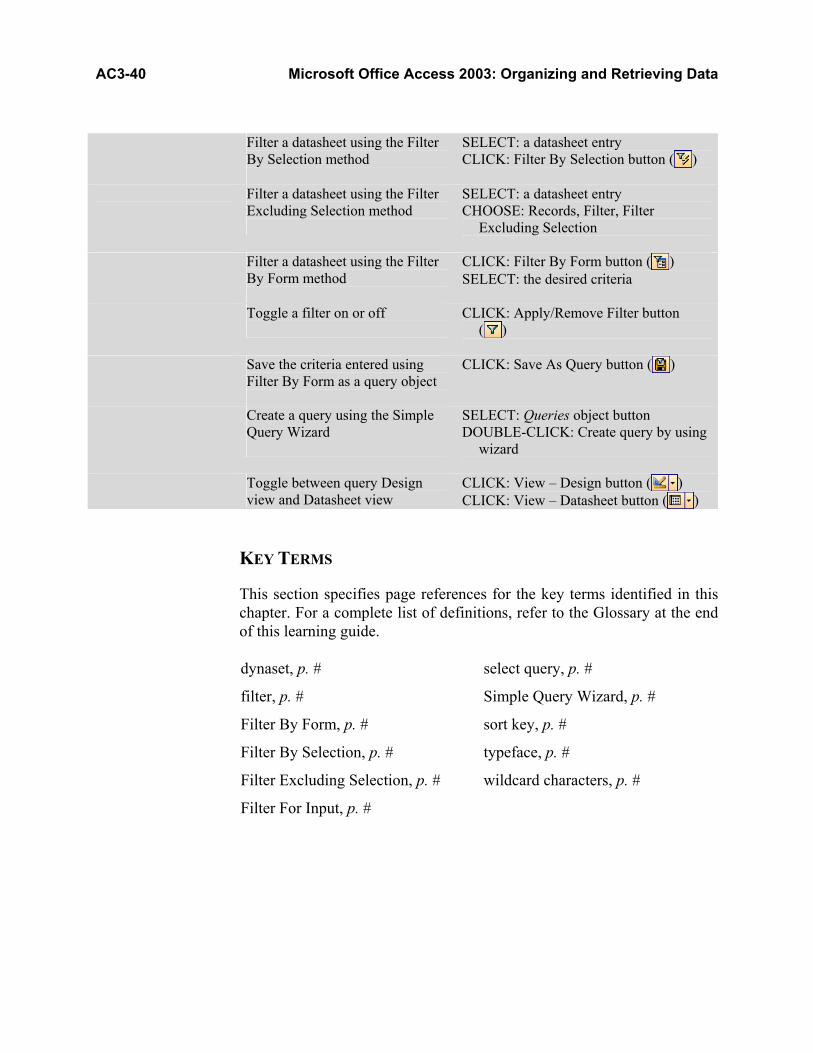
AC3-40 Microsoft Office Access 2003: Organizing and Retrieving Data
Filter a datasheet using the Filter By Selection method
SELECT: a datasheet entry CLICK: Filter By Selection button ( )
Filter a datasheet using the Filter Excluding Selection method
SELECT: a datasheet entry CHOOSE: Records, Filter, Filter
Excluding Selection
Filter a datasheet using the Filter By Form method
CLICK: Filter By Form button ( ) SELECT: the desired criteria
Toggle a filter on or off
CLICK: Apply/Remove Filter button ( )
Save the criteria entered using
Filter By Form as a query object
CLICK: Save As Query button ( )
Create a query using the Simple Query Wizard
SELECT: Queries object button DOUBLE-CLICK: Create query by using
wizard
Toggle between query Design view and Datasheet view
CLICK: View – Design button ( ) CLICK: View – Datasheet button ( )
KEY TERMS
This section specifies page references for the key terms identified in this chapter. For a complete list of definitions, refer to the Glossary at the end of this learning guide. dynaset, p. #
filter, p. #
Filter By Form, p. #
Filter By Selection, p. #
Filter Excluding Selection, p. #
Filter For Input, p. #
select query, p. #
Simple Query Wizard, p. #
sort key, p. #
typeface, p. #
wildcard characters, p. #
Chapter 3 AC3-41
CHAPTER QUIZ
SHORT ANSWER
1. Name the three Cell Effect options for formatting a datasheet. 2. What command allows you to lock one or more columns of a datasheet
in place? Name two ways to execute this command. 3. What are the two primary options for sorting a list? 4. What are wildcards? Provide an example of how they are used. 5. Name four methods for filtering records in a table. 6. When would you use the Find command rather than applying a filter? 7. How do the Filter For Input and Filter By Selection methods differ? 8. When would you apply a filter rather than creating a query? 9. What are two limitations of the Simple Query Wizard?
10. What type of query does the Simple Query Wizard create? What are two additional types of queries?
TRUE/FALSE
1. ___ You can change the color of a datasheet's background. 2. ___ In Datasheet view, click Save ( ) to save your editing changes
and click Save Layout ( ) to save your formatting changes. 3. ___ To sort a datasheet by more than one column, you must first ensure
that the columns are positioned next to one another. 4. ___ Once you have filtered a datasheet, you can then sort the results
using the appropriate toolbar buttons. 5. ___ The search criteria *osf* would match “Microsoft.” 6. ___ The search criteria ?crosof? would match “Microsoft.” 7. ___ You invoke the Filter Excluding Selection method by selecting
text in a datasheet and then clicking a toolbar button. 8. ___ When viewing a table’s data in Datasheet view, you can use a filter
to limit the display of records in the active datasheet. 9. ___ When viewing a table’s data in Datasheet view, you can use a
query to limit the display of records in the active datasheet. 10. ___ You find a record, filter a table, and query a database. MULTIPLE CHOICE
1. In the Datasheet Formatting dialog box, which of the following is not an option in the Border and Line Styles drop-down list box?
a. Datasheet Border b. Datasheet Underline
AC3-42 Microsoft Office Access 2003: Organizing and Retrieving Data
c. Horizontal Gridline d. Vertical Gridline 2. Which of the following is not an option for customizing a Datasheet
window? a. Freeze one column b. Hide one column c. Change one row’s height d. Change one column’s width 3. Which of the following is not a command that is selectable from a
field column’s right-click menu? a. Hide Columns b. Unhide Columns c. Freeze Columns d. Sort Descending 4. The process of restricting the display of records in a table to those
matching a particular criterion is called: a. Filtering b. Restricting c. Sifting d. Sorting 5. Which of the following is not a type of filter method described in this
chapter? a. Filter By Example b. Filter By Form c. Filter By Selection d. Filter For Input 6. What is the name of the Access 2003 tool that simplifies the process of
creating a query object? a. Database Wizard b. Simple Filter Wizard c. Simple Query Wizard d. Table Wizard 7. A collection of records matching the parameters of a query is
sometimes called a: a. Dynaset b. Field c. Table d. Grid
Chapter 3 AC3-43
8. Which of the following criteria returns only those cities beginning with the letter “B”?
a. =B b. B* c. B? d. B# 9. Which of the following criteria returns the name “Jones” as a match? a. *ne* b. J??nes c. J#s d. ?ne*
10. Which of the following statements is false? a. A filter operation limits records displayed in a datasheet. b. A query operation returns a Datasheet window of results. c. A sort operation modifies the natural order of data in a table. d. A find operation that is successful moves the cursor to the record.
HANDS-ON EXERCISES
1. STEP-BY-STEP: FORMATTING A DATASHEET
In this exercise, you will enhance the appearance of a datasheet by applying fonts and specifying background special effects. 1. Load Microsoft Office Access 2003, if it is not already running.
2. Open the database file named AC03HE. Ensure that the Tables button in the Objects bar is selected, as shown in Figure 3.33.

AC3-44 Microsoft Office Access 2003: Organizing and Retrieving Data
Figure 3.33 Opening the AC03HE database
3. Open the 1 Customers table in Datasheet view.
4. Using the Font dialog box, change the display font in the datasheet to Courier New with an 11-point font size. Apply a boldface font style and a maroon text color.
5. Using the Datasheet Formatting dialog box, change the appearance of the datasheet’s background to display using the “raised” cell effect.
6. Modify the field columns in the datasheet to appear using their “best-fit” width.
7. Return to the top of the datasheet using + . Your screen should now appear similar to Figure 3.34.
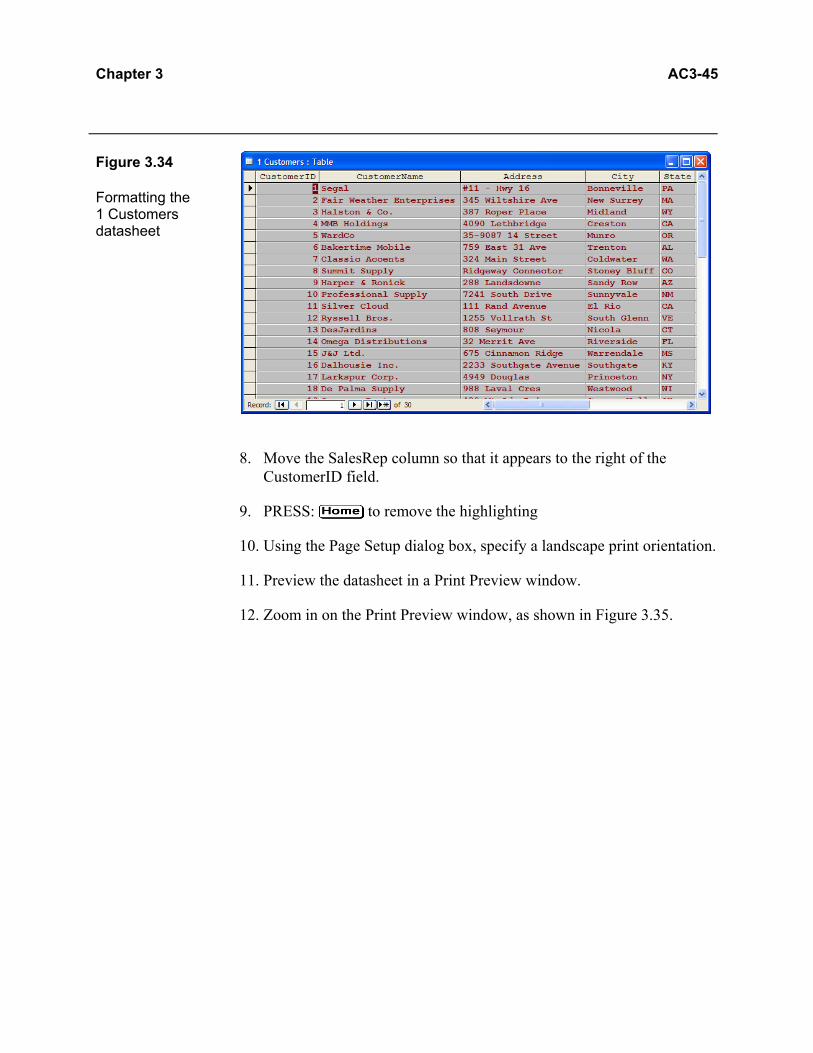
Chapter 3 AC3-45 Figure 3.34 Formatting the 1 Customers datasheet
8. Move the SalesRep column so that it appears to the right of the CustomerID field.
9. PRESS: to remove the highlighting
10. Using the Page Setup dialog box, specify a landscape print orientation.
11. Preview the datasheet in a Print Preview window.
12. Zoom in on the Print Preview window, as shown in Figure 3.35.
AC3-46 Microsoft Office Access 2003: Organizing and Retrieving Data
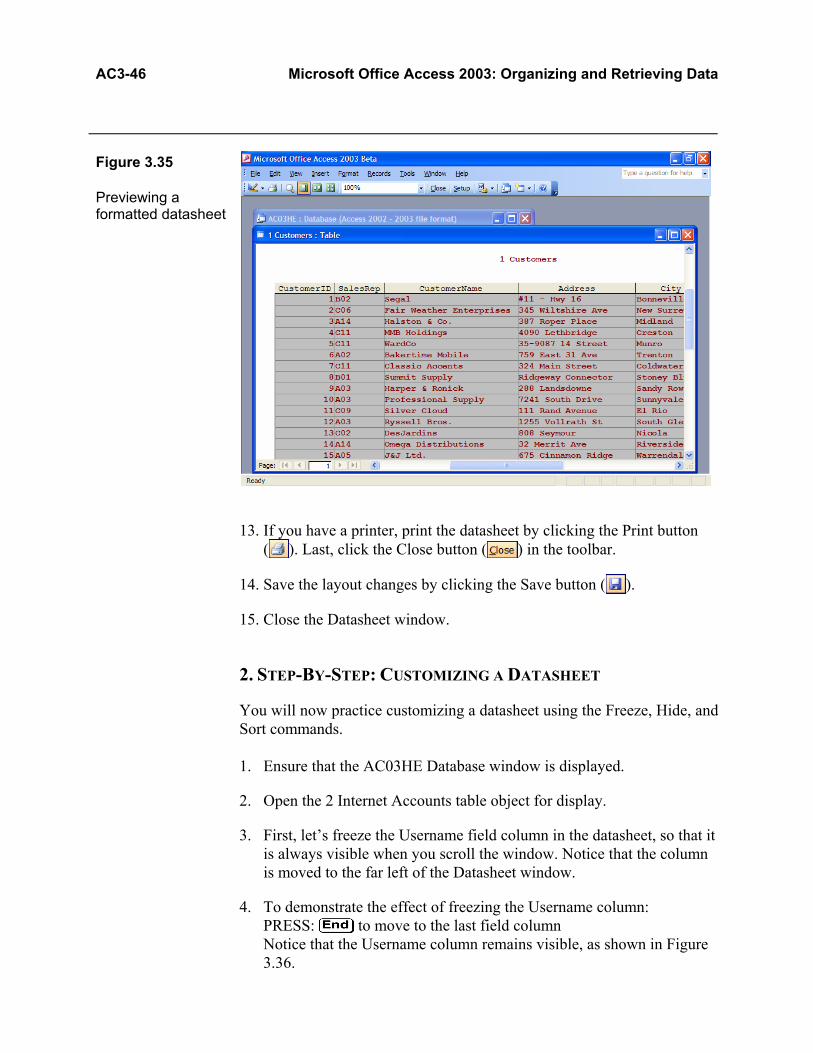
Figure 3.35 Previewing a formatted datasheet
13. If you have a printer, print the datasheet by clicking the Print button ( ). Last, click the Close button ( ) in the toolbar.
14. Save the layout changes by clicking the Save button ( ).
15. Close the Datasheet window.
2. STEP-BY-STEP: CUSTOMIZING A DATASHEET
You will now practice customizing a datasheet using the Freeze, Hide, and Sort commands. 1. Ensure that the AC03HE Database window is displayed.
2. Open the 2 Internet Accounts table object for display.
3. First, let’s freeze the Username field column in the datasheet, so that it is always visible when you scroll the window. Notice that the column is moved to the far left of the Datasheet window.
4. To demonstrate the effect of freezing the Username column: PRESS: to move to the last field column Notice that the Username column remains visible, as shown in Figure 3.36.
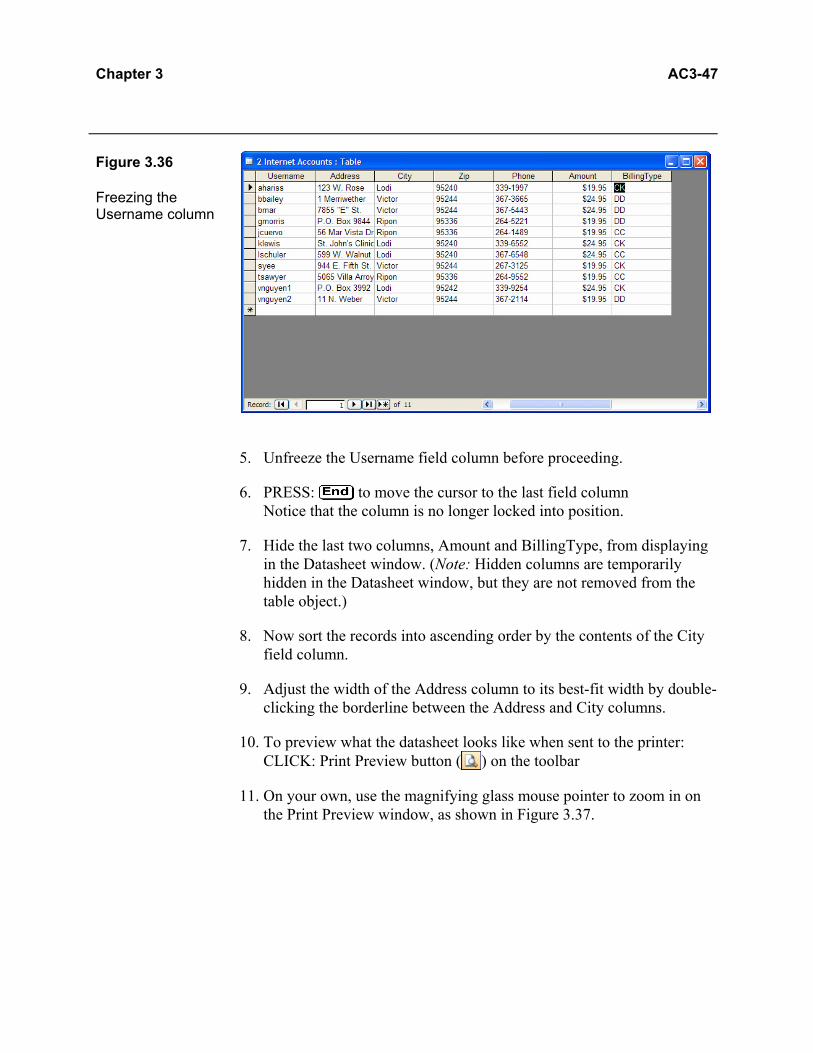
Chapter 3 AC3-47 Figure 3.36 Freezing the Username column
5. Unfreeze the Username field column before proceeding.
6. PRESS: to move the cursor to the last field column Notice that the column is no longer locked into position.
7. Hide the last two columns, Amount and BillingType, from displaying in the Datasheet window. (Note: Hidden columns are temporarily hidden in the Datasheet window, but they are not removed from the table object.)
8. Now sort the records into ascending order by the contents of the City field column.
9. Adjust the width of the Address column to its best-fit width by double-clicking the borderline between the Address and City columns.
10. To preview what the datasheet looks like when sent to the printer: CLICK: Print Preview button ( ) on the toolbar
11. On your own, use the magnifying glass mouse pointer to zoom in on the Print Preview window, as shown in Figure 3.37.
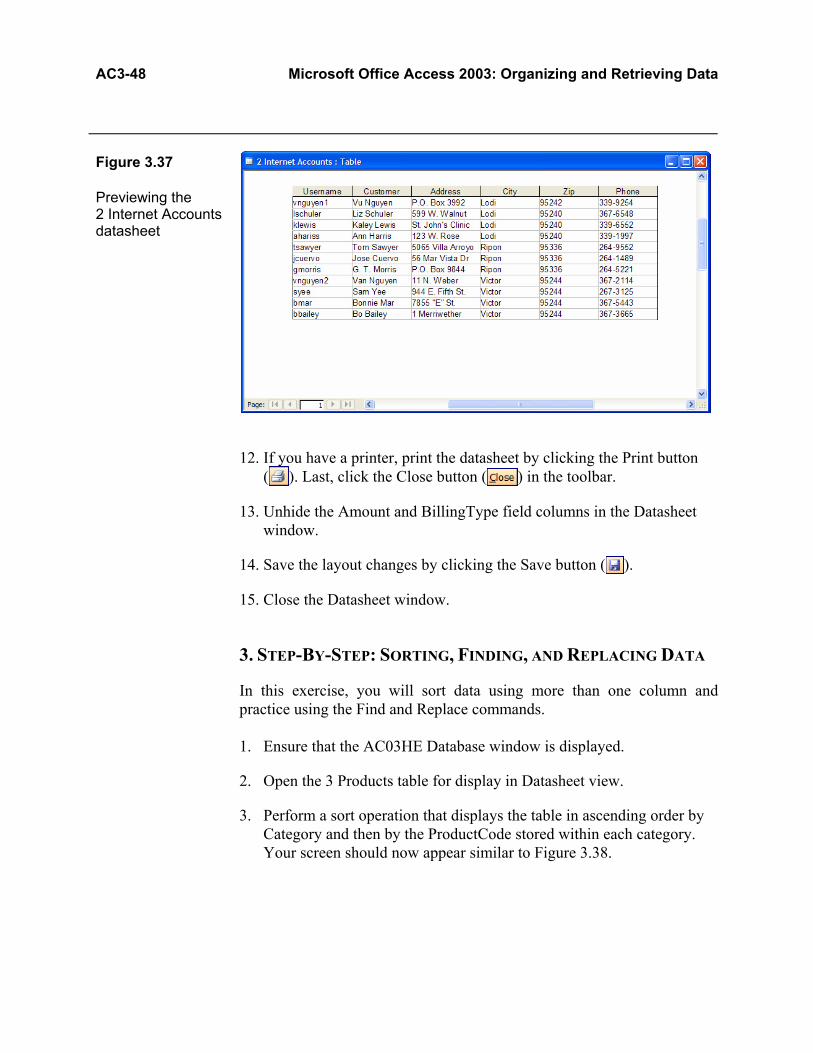
AC3-48 Microsoft Office Access 2003: Organizing and Retrieving Data
Figure 3.37 Previewing the 2 Internet Accounts datasheet
12. If you have a printer, print the datasheet by clicking the Print button ( ). Last, click the Close button ( ) in the toolbar.
13. Unhide the Amount and BillingType field columns in the Datasheet window.
14. Save the layout changes by clicking the Save button ( ).
15. Close the Datasheet window.
3. STEP-BY-STEP: SORTING, FINDING, AND REPLACING DATA
In this exercise, you will sort data using more than one column and practice using the Find and Replace commands. 1. Ensure that the AC03HE Database window is displayed.
2. Open the 3 Products table for display in Datasheet view.
3. Perform a sort operation that displays the table in ascending order by Category and then by the ProductCode stored within each category. Your screen should now appear similar to Figure 3.38.

Chapter 3 AC3-49 Figure 3.38 Sorting a datasheet by two field columns
4. Now let’s find all of the products made from birch wood. Use the Find button and the Find and Replace dialog box to find “birch.” (Note: By default, the Find command is not case sensitive.) What product category does the cursor stop on first?
5. Use the Find Next command button to determine if any of the other products are made from birch. When you are finished, close the Find and Replace dialog box.
6. You will now use the Replace command to replace all occurrences of the code “Dim.” in the Category column with the word “Dimension.” Move to the first field in the table and then open the Find and Replace dialog box.
7. On the Replace tab of the Find and Replace dialog box: TYPE: Dim. in the Find What combo box PRESS: TYPE: Dimension in the Replace With combo box The Find and Replace dialog box appears in Figure 3.39.
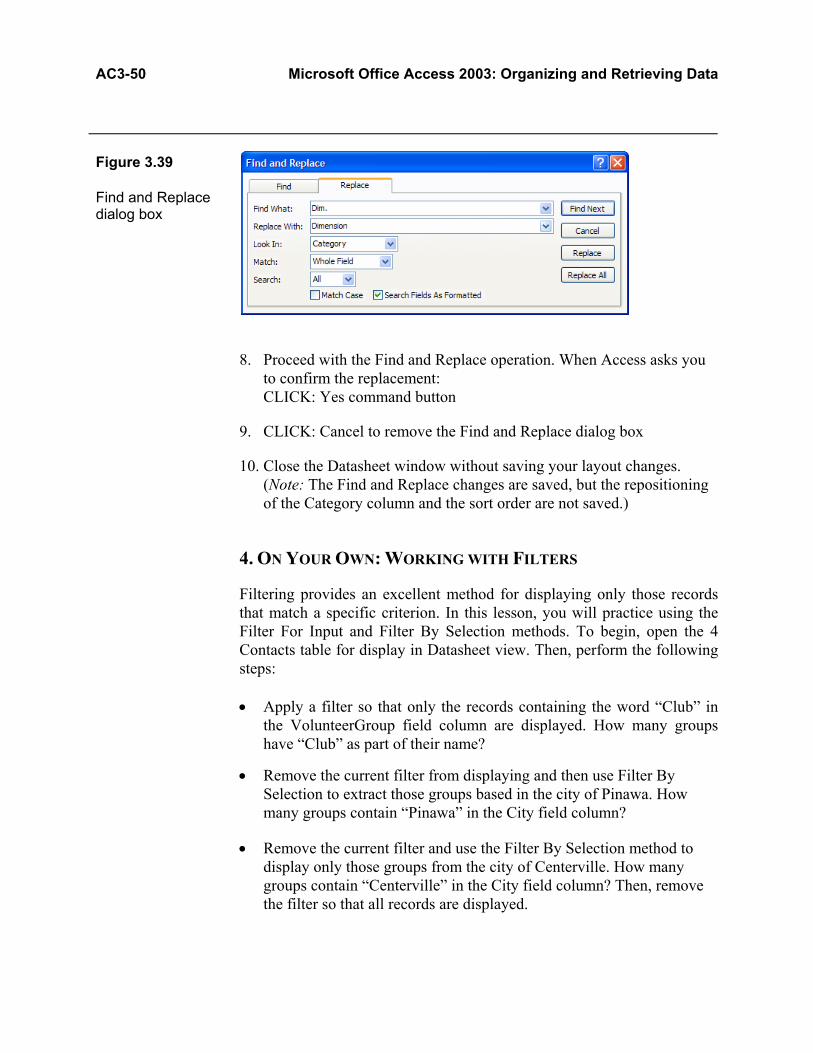
AC3-50 Microsoft Office Access 2003: Organizing and Retrieving Data
Figure 3.39 Find and Replace dialog box
8. Proceed with the Find and Replace operation. When Access asks you to confirm the replacement: CLICK: Yes command button
9. CLICK: Cancel to remove the Find and Replace dialog box
10. Close the Datasheet window without saving your layout changes. (Note: The Find and Replace changes are saved, but the repositioning of the Category column and the sort order are not saved.)
4. ON YOUR OWN: WORKING WITH FILTERS
Filtering provides an excellent method for displaying only those records that match a specific criterion. In this lesson, you will practice using the Filter For Input and Filter By Selection methods. To begin, open the 4 Contacts table for display in Datasheet view. Then, perform the following steps: • Apply a filter so that only the records containing the word “Club” in
the VolunteerGroup field column are displayed. How many groups have “Club” as part of their name?
• Remove the current filter from displaying and then use Filter By Selection to extract those groups based in the city of Pinawa. How many groups contain “Pinawa” in the City field column?
• Remove the current filter and use the Filter By Selection method to display only those groups from the city of Centerville. How many groups contain “Centerville” in the City field column? Then, remove the filter so that all records are displayed.
Chapter 3 AC3-51
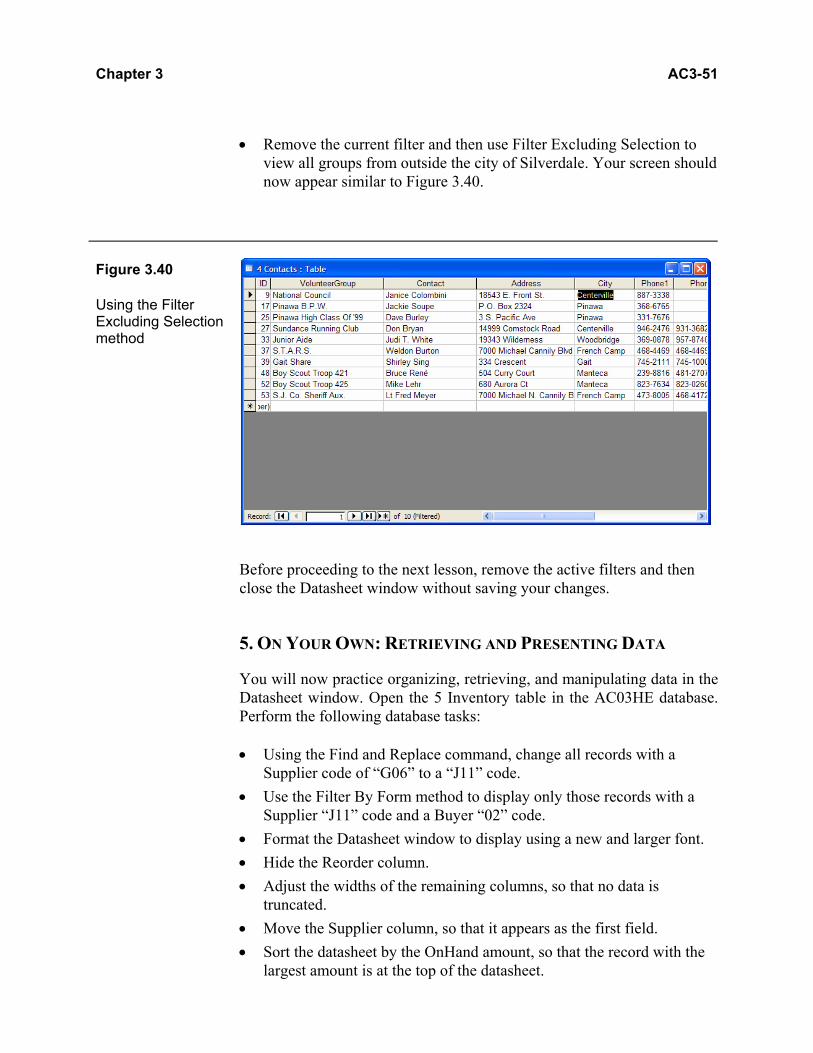
• Remove the current filter and then use Filter Excluding Selection to view all groups from outside the city of Silverdale. Your screen should now appear similar to Figure 3.40.
Figure 3.40 Using the Filter Excluding Selection method
Before proceeding to the next lesson, remove the active filters and then close the Datasheet window without saving your changes.
5. ON YOUR OWN: RETRIEVING AND PRESENTING DATA
You will now practice organizing, retrieving, and manipulating data in the Datasheet window. Open the 5 Inventory table in the AC03HE database. Perform the following database tasks: • Using the Find and Replace command, change all records with a
Supplier code of “G06” to a “J11” code. • Use the Filter By Form method to display only those records with a
Supplier “J11” code and a Buyer “02” code. • Format the Datasheet window to display using a new and larger font. • Hide the Reorder column. • Adjust the widths of the remaining columns, so that no data is
truncated. • Move the Supplier column, so that it appears as the first field. • Sort the datasheet by the OnHand amount, so that the record with the
largest amount is at the top of the datasheet.

AC3-52 Microsoft Office Access 2003: Organizing and Retrieving Data
When you are finished (Figure 3.41), preview and then print a copy of the Datasheet window.
Figure 3.41 Filtering and formatting the 5 Inventory datasheet
Lastly, close the Datasheet window and save your changes. 6. ON YOUR OWN: USING THE SIMPLE QUERY WIZARD
You will now create a query object using the Simple Query Wizard. The objective of using a query in this exercise is to display data from two tables in the database. To begin, select the Queries button in the Objects bar and then launch the Simple Query Wizard. From the 6 Guides table, include the GuideNumber and Guide fields. From the 6 Patrons table, include the Guest, Hometown, and State fields. In the next step of the wizard, save the query as “Guides and Guests Query” and then open the query to view the results (Figure 3.42).
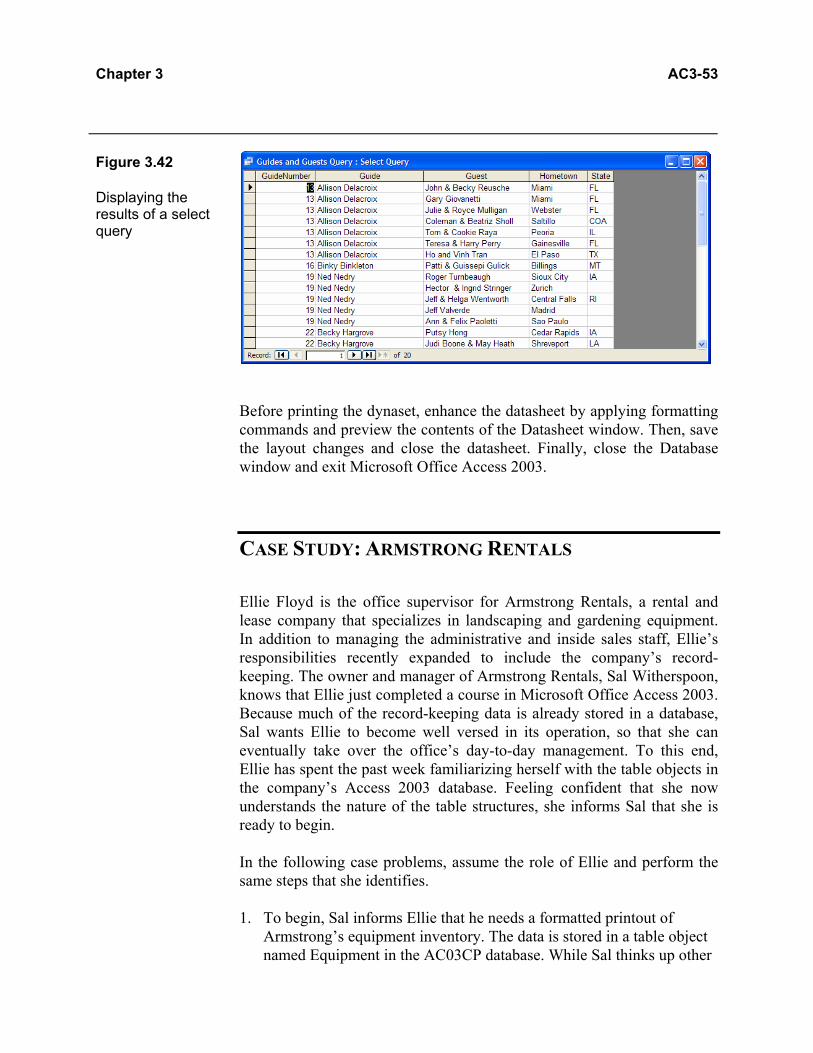
Chapter 3 AC3-53 Figure 3.42 Displaying the results of a select query
Before printing the dynaset, enhance the datasheet by applying formatting commands and preview the contents of the Datasheet window. Then, save the layout changes and close the datasheet. Finally, close the Database window and exit Microsoft Office Access 2003.
CASE STUDY: ARMSTRONG RENTALS
Ellie Floyd is the office supervisor for Armstrong Rentals, a rental and lease company that specializes in landscaping and gardening equipment. In addition to managing the administrative and inside sales staff, Ellie’s responsibilities recently expanded to include the company’s record-keeping. The owner and manager of Armstrong Rentals, Sal Witherspoon, knows that Ellie just completed a course in Microsoft Office Access 2003. Because much of the record-keeping data is already stored in a database, Sal wants Ellie to become well versed in its operation, so that she can eventually take over the office’s day-to-day management. To this end, Ellie has spent the past week familiarizing herself with the table objects in the company’s Access 2003 database. Feeling confident that she now understands the nature of the table structures, she informs Sal that she is ready to begin. In the following case problems, assume the role of Ellie and perform the same steps that she identifies. 1. To begin, Sal informs Ellie that he needs a formatted printout of
Armstrong’s equipment inventory. The data is stored in a table object named Equipment in the AC03CP database. While Sal thinks up other
AC3-54 Microsoft Office Access 2003: Organizing and Retrieving Data
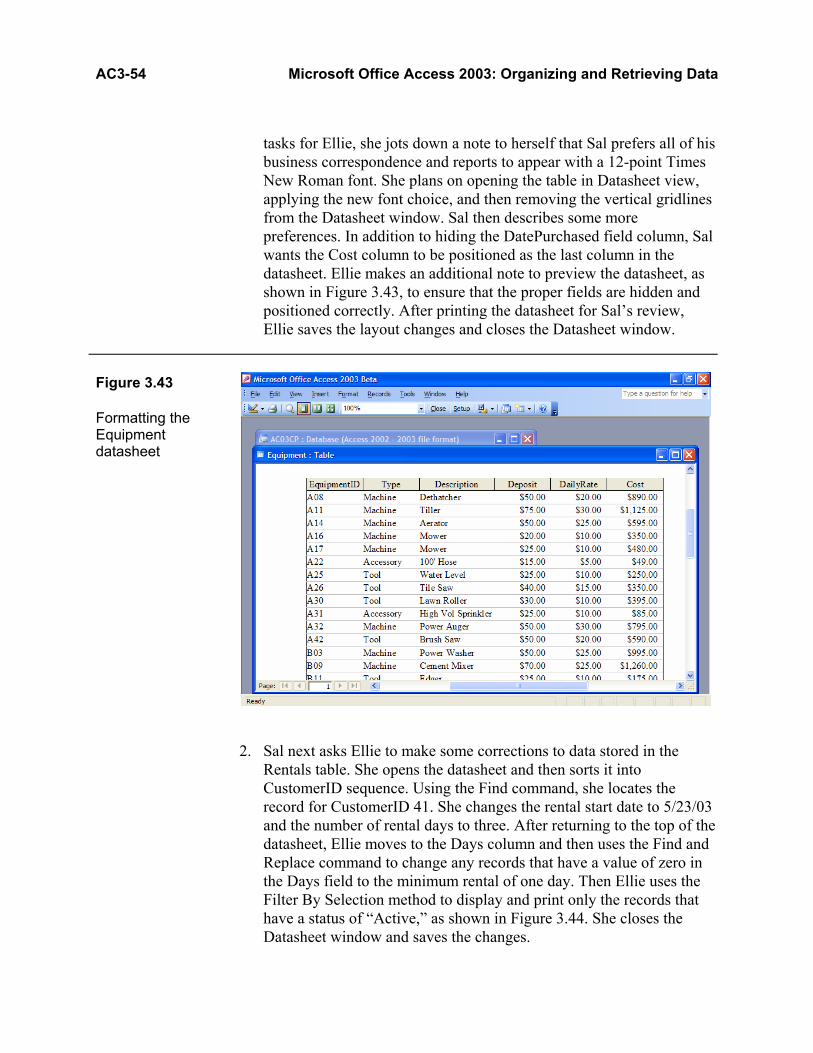
tasks for Ellie, she jots down a note to herself that Sal prefers all of his business correspondence and reports to appear with a 12-point Times New Roman font. She plans on opening the table in Datasheet view, applying the new font choice, and then removing the vertical gridlines from the Datasheet window. Sal then describes some more preferences. In addition to hiding the DatePurchased field column, Sal wants the Cost column to be positioned as the last column in the datasheet. Ellie makes an additional note to preview the datasheet, as shown in Figure 3.43, to ensure that the proper fields are hidden and positioned correctly. After printing the datasheet for Sal’s review, Ellie saves the layout changes and closes the Datasheet window.
Figure 3.43 Formatting the Equipment datasheet
2. Sal next asks Ellie to make some corrections to data stored in the Rentals table. She opens the datasheet and then sorts it into CustomerID sequence. Using the Find command, she locates the record for CustomerID 41. She changes the rental start date to 5/23/03 and the number of rental days to three. After returning to the top of the datasheet, Ellie moves to the Days column and then uses the Find and Replace command to change any records that have a value of zero in the Days field to the minimum rental of one day. Then Ellie uses the Filter By Selection method to display and print only the records that have a status of “Active,” as shown in Figure 3.44. She closes the Datasheet window and saves the changes.

Chapter 3 AC3-55 Figure 3.44 Editing and filtering the Rentals datasheet
3. Before he leaves for the afternoon, Sal provides a list of questions for
Ellie about Armstrong’s customer base. To answer the questions, she must find, filter, and/or query the database. Using these methods, Ellie answers the following questions:
• Which customers are not eligible for a discount, as determined by a zero value in the Discount field?
• How many customers living in Pike Mountain have an account, as denoted by a check mark in the Account field column’s check box?
• Which customer accounts are eligible for a discount of 10% on their rentals?
• How many customers are from outside the city of Kelly?
4. Finally, Ellie uses the Simple Query Wizard to create a “details” query that displays data from all three tables. She includes the following fields in the query and then saves it as “Customer Rentals Query.”
Table Field Customers Name Rentals StartDate Rentals Days Rentals Status Equipment Description

AC3-56 Microsoft Office Access 2003: Organizing and Retrieving Data
After the results are displayed (Figure 3.45), Ellie applies some formatting options, adjusts the column widths, saves the layout, and then prints the Datasheet window.
Figure 3.45 Resulting dynaset from a multitable query
Reflecting on the work she has already completed, Ellie closes all of the open windows, including the AC03CP Database window, and exits Microsoft Office Access 2003.
ANSWERS TO SELF-CHECK QUESTIONS
Self Check 3.1 Name two reasons for changing the field column order in a datasheet. Some reasons for changing the field order include customizing a datasheet's appearance for printing, displaying fields side by side in a datasheet, and arranging columns for performing multiple-field sort operations.
Self Check 3.2 How do you perform a sort operation using more than one field column? You must first ensure that the columns are adjacent to one another. The leftmost column should contain the primary or first sort key. The next column(s) provides the secondary sort level(s). You must then select all of the columns involved in the sort operation and click the appropriate Sort button on the toolbar.
Chapter 3 AC3-57 Self Check 3.3 In a personnel table, how would you display a subset of those
employees working in the Accounting department? Using Filter For Input, you enter “Accounting” as the criterion. Using Filter By Selection, you select “Accounting” from the datasheet. Using Filter By Form, you select “Accounting” from the drop-down list attached to the department field. You then apply and remove the filter by clicking on the Apply/Remove Filter button ( ) on the toolbar.
Self Check 3.4 Name one way that a query’s dynaset may differ from a table’s datasheet. A query’s dynaset may display results from two or more tables in the same Datasheet window.