Embed Size (px)
Citation preview
An Introduction to
Prepared by Computing Services at the Eastman School of Music – March 2010
An Introduction to Microsoft Windows 7
2 © 2010 Eastman Computing Services
Contents Microsoft Windows 7 .................................................................................................................................... 3
Taskbar .......................................................................................................................................................... 4
Open Program (single instance) Indication ............................................................................................... 4
Open Program (multiple instances) Indication ......................................................................................... 4
Identifying Programs ................................................................................................................................. 4
Program Order on the Taskbar ................................................................................................................. 5
Taskbar Preview ........................................................................................................................................ 5
Show Desktop ........................................................................................................................................... 7
Adding Programs ....................................................................................................................................... 7
Removing Programs .................................................................................................................................. 8
Jump Lists .................................................................................................................................................. 9
Start Menu .................................................................................................................................................. 10
Pinned & Frequently Accessed Programs ............................................................................................... 11
Pin Programs to the Start Menu ............................................................................................................. 11
Remove Pinned Programs from the Start Menu .................................................................................... 12
What’s in the right pane? ....................................................................................................................... 12
Power options ......................................................................................................................................... 13
Windows Explorer ....................................................................................................................................... 14
Libraries ................................................................................................................................................... 14
Computer ................................................................................................................................................ 15
Favorites .................................................................................................................................................. 15
Add a Favorite ......................................................................................................................................... 16
Remove a Favorite .................................................................................................................................. 16
An Introduction to Microsoft Windows 7
3 © 2010 Eastman Computing Services
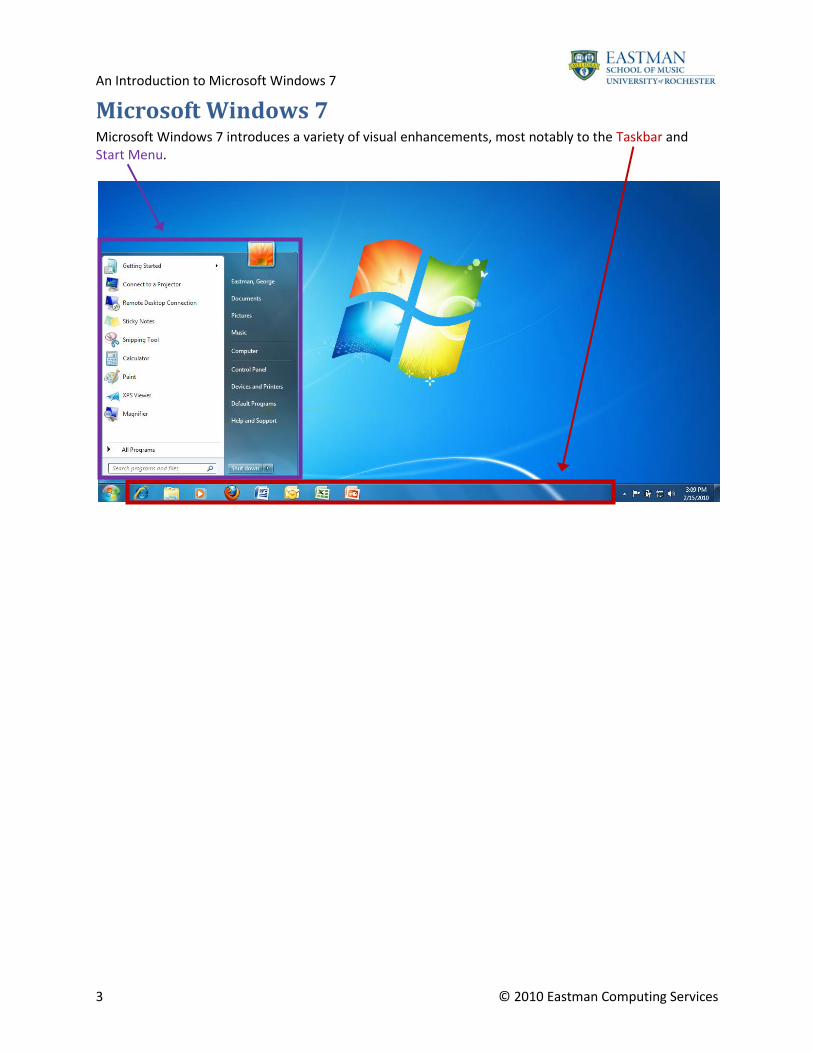
Microsoft Windows 7 Microsoft Windows 7 introduces a variety of visual enhancements, most notably to the Taskbar and Start Menu.
An Introduction to Microsoft Windows 7
4 © 2010 Eastman Computing Services
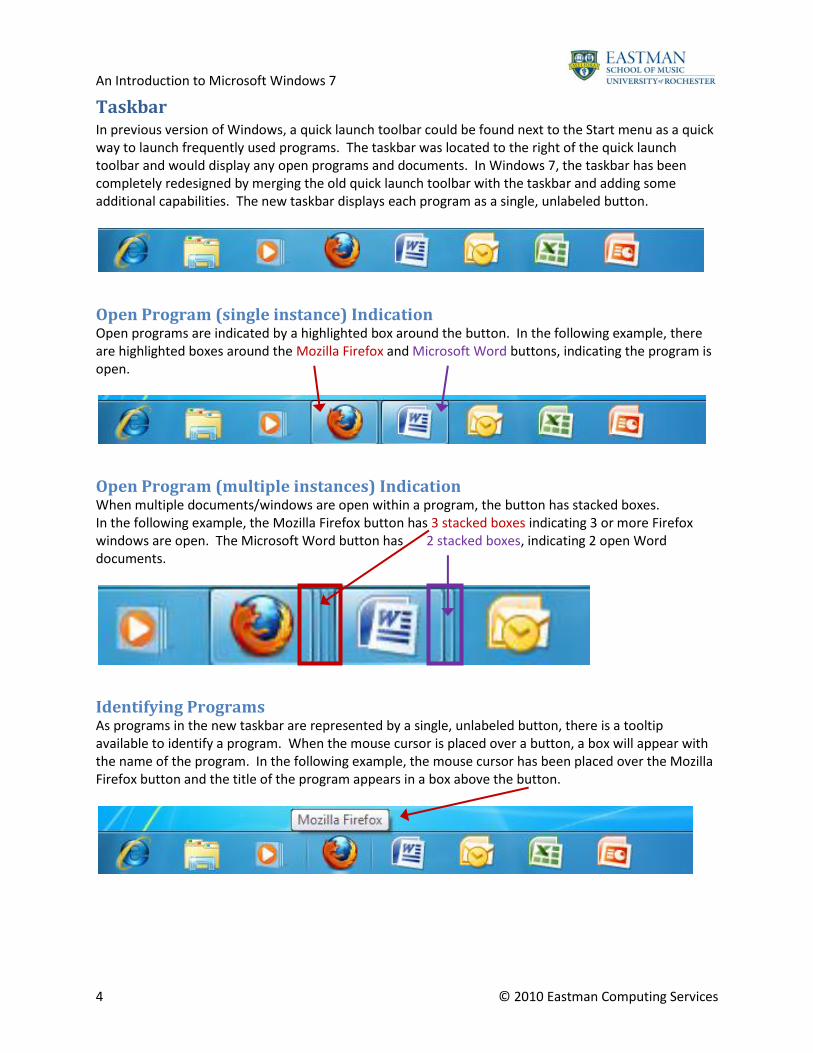
Taskbar In previous version of Windows, a quick launch toolbar could be found next to the Start menu as a quick way to launch frequently used programs. The taskbar was located to the right of the quick launch toolbar and would display any open programs and documents. In Windows 7, the taskbar has been completely redesigned by merging the old quick launch toolbar with the taskbar and adding some additional capabilities. The new taskbar displays each program as a single, unlabeled button.
Open Program (single instance) Indication Open programs are indicated by a highlighted box around the button. In the following example, there are highlighted boxes around the Mozilla Firefox and Microsoft Word buttons, indicating the program is open.
Open Program (multiple instances) Indication When multiple documents/windows are open within a program, the button has stacked boxes. In the following example, the Mozilla Firefox button has 3 stacked boxes indicating 3 or more Firefox windows are open. The Microsoft Word button has 2 stacked boxes, indicating 2 open Word documents.
Identifying Programs As programs in the new taskbar are represented by a single, unlabeled button, there is a tooltip available to identify a program. When the mouse cursor is placed over a button, a box will appear with the name of the program. In the following example, the mouse cursor has been placed over the Mozilla Firefox button and the title of the program appears in a box above the button.
An Introduction to Microsoft Windows 7
5 © 2010 Eastman Computing Services
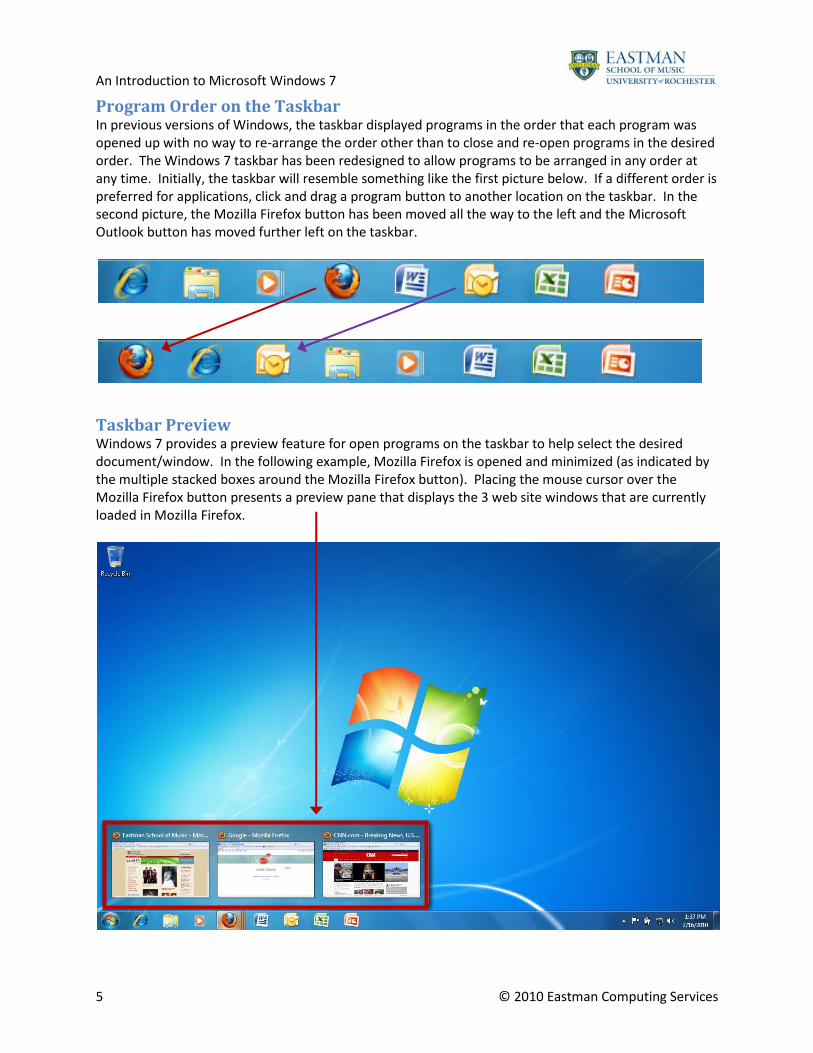
Program Order on the Taskbar In previous versions of Windows, the taskbar displayed programs in the order that each program was opened up with no way to re-arrange the order other than to close and re-open programs in the desired order. The Windows 7 taskbar has been redesigned to allow programs to be arranged in any order at any time. Initially, the taskbar will resemble something like the first picture below. If a different order is preferred for applications, click and drag a program button to another location on the taskbar. In the second picture, the Mozilla Firefox button has been moved all the way to the left and the Microsoft Outlook button has moved further left on the taskbar.
Taskbar Preview Windows 7 provides a preview feature for open programs on the taskbar to help select the desired document/window. In the following example, Mozilla Firefox is opened and minimized (as indicated by the multiple stacked boxes around the Mozilla Firefox button). Placing the mouse cursor over the Mozilla Firefox button presents a preview pane that displays the 3 web site windows that are currently loaded in Mozilla Firefox.
An Introduction to Microsoft Windows 7
6 © 2010 Eastman Computing Services
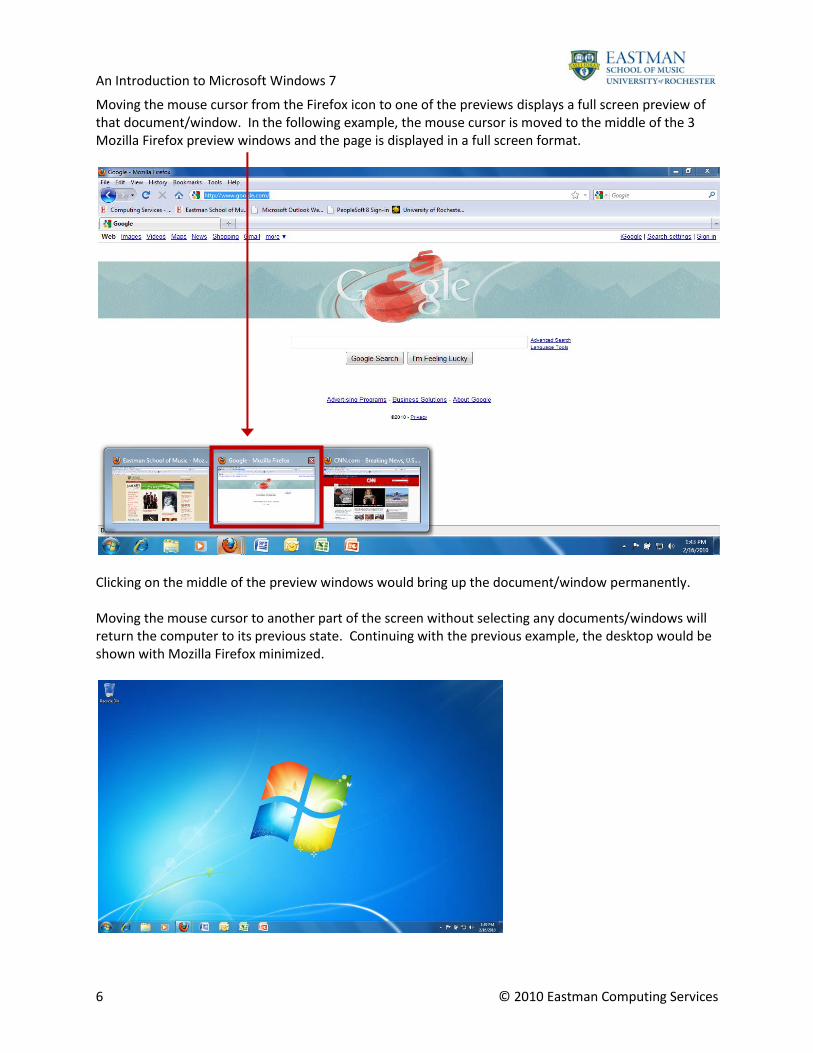
Moving the mouse cursor from the Firefox icon to one of the previews displays a full screen preview of that document/window. In the following example, the mouse cursor is moved to the middle of the 3 Mozilla Firefox preview windows and the page is displayed in a full screen format.
Clicking on the middle of the preview windows would bring up the document/window permanently. Moving the mouse cursor to another part of the screen without selecting any documents/windows will return the computer to its previous state. Continuing with the previous example, the desktop would be shown with Mozilla Firefox minimized.
An Introduction to Microsoft Windows 7
7 © 2010 Eastman Computing Services
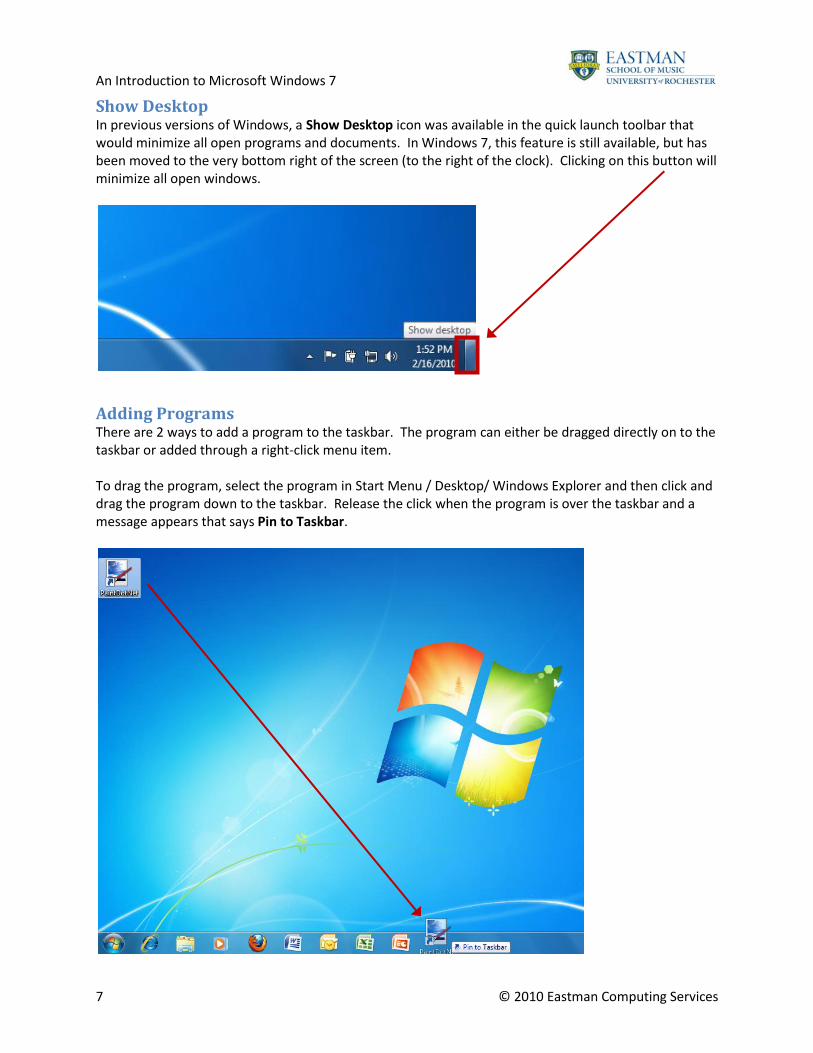
Show Desktop In previous versions of Windows, a Show Desktop icon was available in the quick launch toolbar that would minimize all open programs and documents. In Windows 7, this feature is still available, but has been moved to the very bottom right of the screen (to the right of the clock). Clicking on this button will minimize all open windows.
Adding Programs There are 2 ways to add a program to the taskbar. The program can either be dragged directly on to the taskbar or added through a right-click menu item. To drag the program, select the program in Start Menu / Desktop/ Windows Explorer and then click and drag the program down to the taskbar. Release the click when the program is over the taskbar and a message appears that says Pin to Taskbar.
An Introduction to Microsoft Windows 7
8 © 2010 Eastman Computing Services
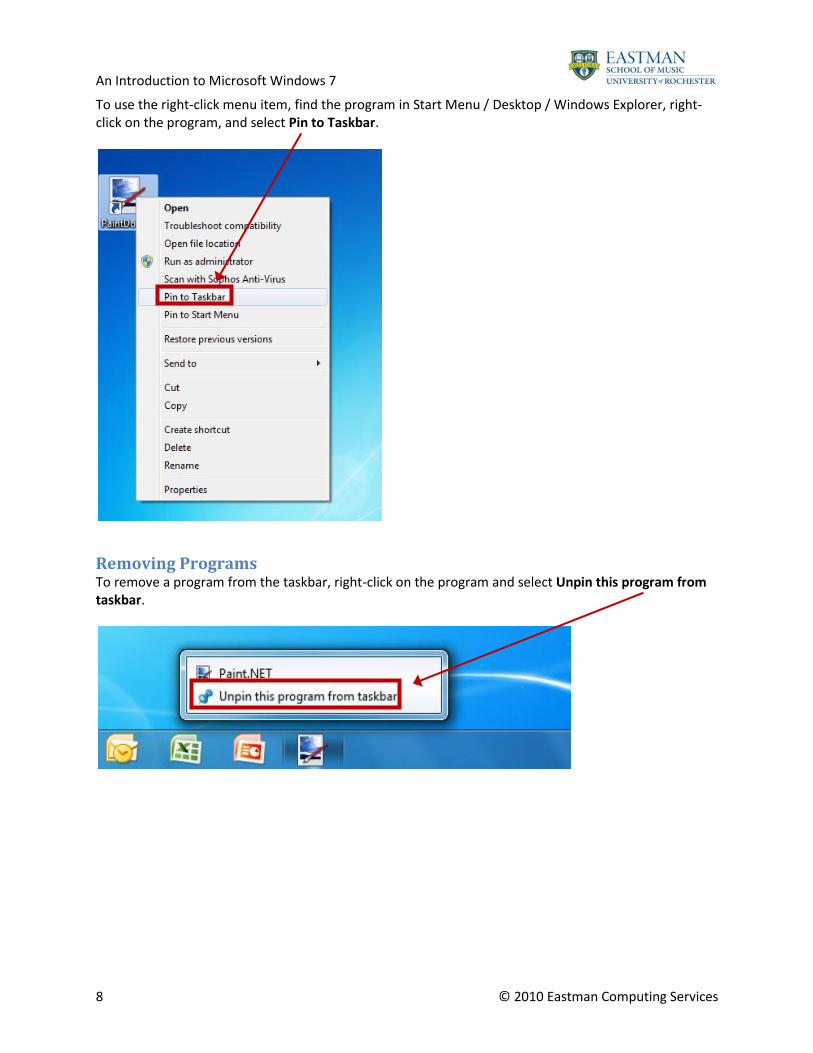
To use the right-click menu item, find the program in Start Menu / Desktop / Windows Explorer, right-click on the program, and select Pin to Taskbar.
Removing Programs To remove a program from the taskbar, right-click on the program and select Unpin this program from taskbar.
An Introduction to Microsoft Windows 7
9 © 2010 Eastman Computing Services
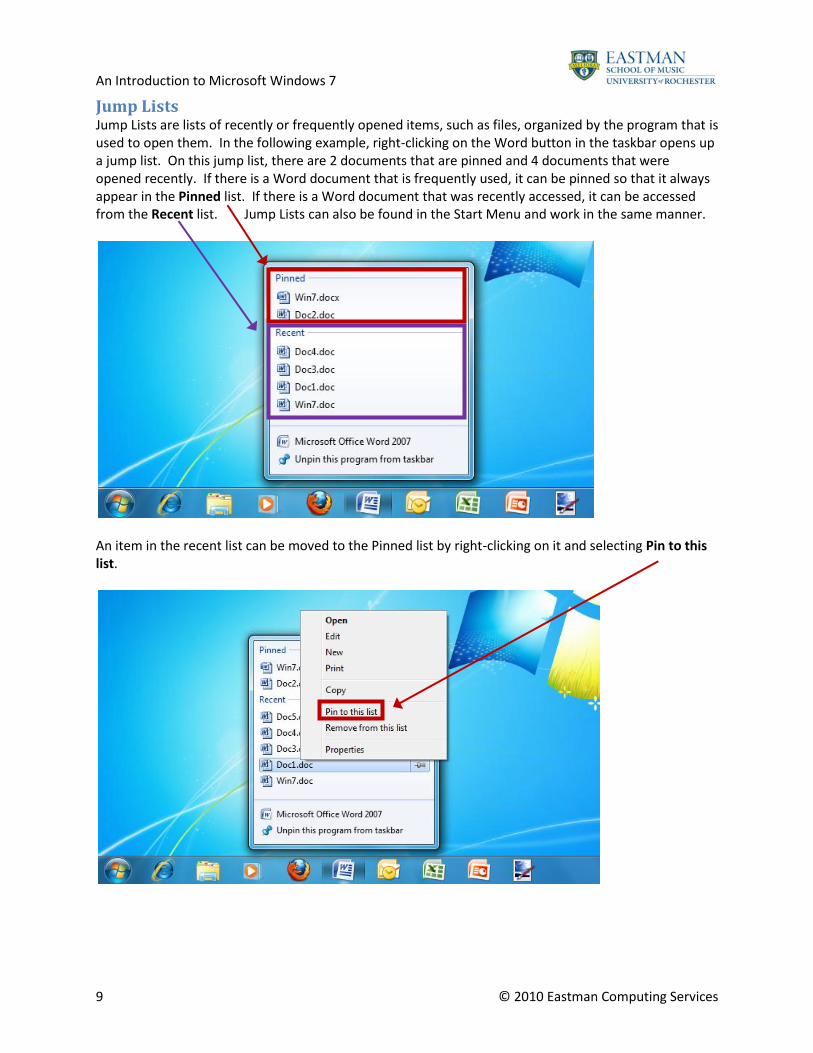
Jump Lists Jump Lists are lists of recently or frequently opened items, such as files, organized by the program that is used to open them. In the following example, right-clicking on the Word button in the taskbar opens up a jump list. On this jump list, there are 2 documents that are pinned and 4 documents that were opened recently. If there is a Word document that is frequently used, it can be pinned so that it always appear in the Pinned list. If there is a Word document that was recently accessed, it can be accessed from the Recent list. Jump Lists can also be found in the Start Menu and work in the same manner.
An item in the recent list can be moved to the Pinned list by right-clicking on it and selecting Pin to this list.
An Introduction to Microsoft Windows 7
10 © 2010 Eastman Computing Services
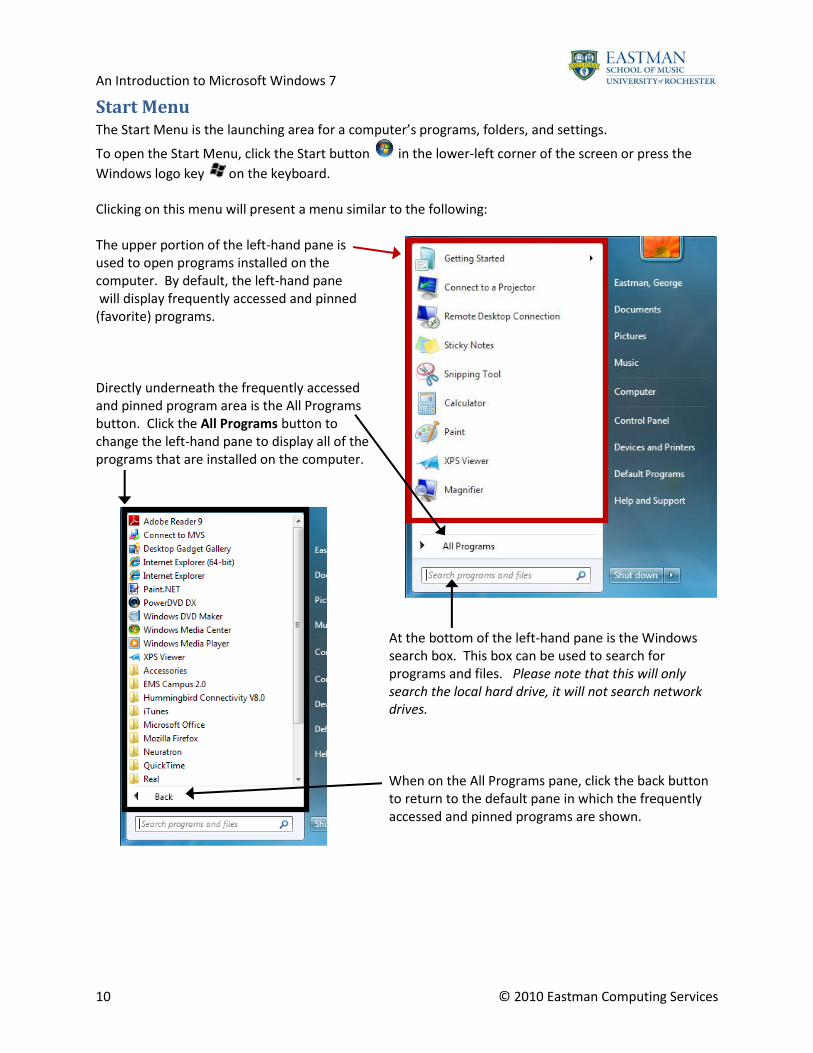
Start Menu The Start Menu is the launching area for a computer’s programs, folders, and settings.
To open the Start Menu, click the Start button in the lower-left corner of the screen or press the
Windows logo key on the keyboard. Clicking on this menu will present a menu similar to the following: The upper portion of the left-hand pane is used to open programs installed on the computer. By default, the left-hand pane will display frequently accessed and pinned (favorite) programs. Directly underneath the frequently accessed and pinned program area is the All Programs button. Click the All Programs button to change the left-hand pane to display all of the programs that are installed on the computer.
At the bottom of the left-hand pane is the Windows search box. This box can be used to search for programs and files. Please note that this will only search the local hard drive, it will not search network drives. When on the All Programs pane, click the back button to return to the default pane in which the frequently accessed and pinned programs are shown.
An Introduction to Microsoft Windows 7
11 © 2010 Eastman Computing Services
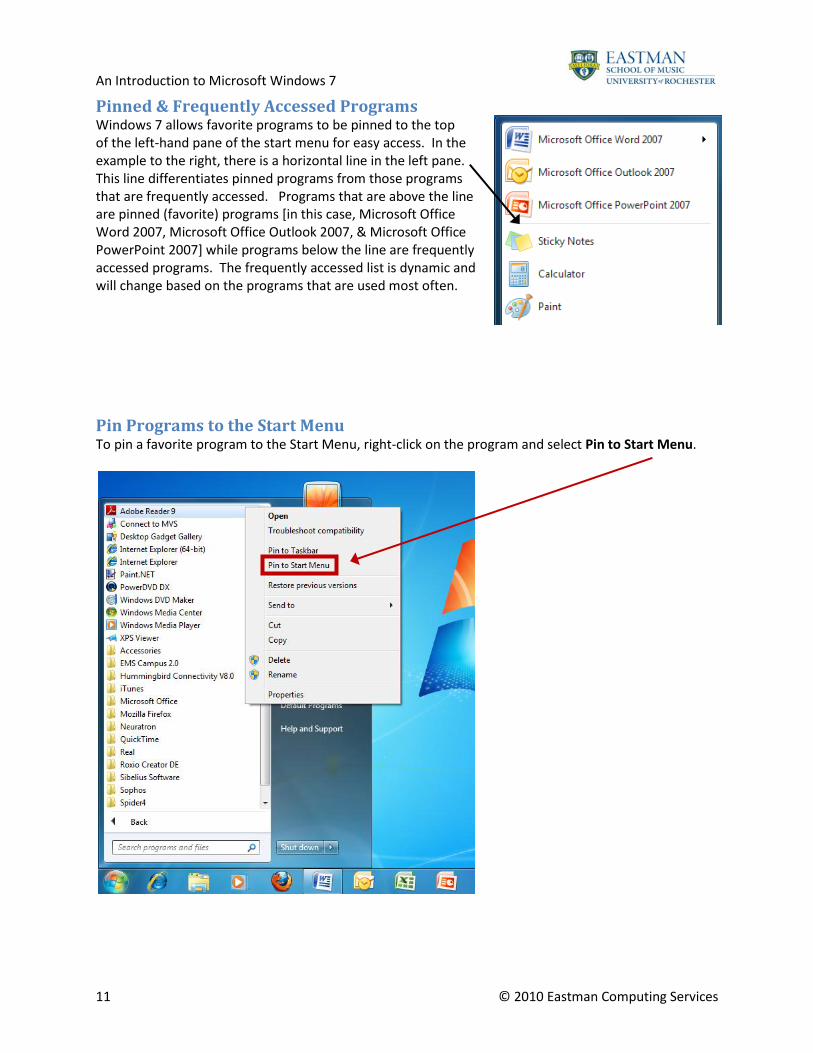
Pinned & Frequently Accessed Programs Windows 7 allows favorite programs to be pinned to the top of the left-hand pane of the start menu for easy access. In the example to the right, there is a horizontal line in the left pane. This line differentiates pinned programs from those programs that are frequently accessed. Programs that are above the line are pinned (favorite) programs [in this case, Microsoft Office Word 2007, Microsoft Office Outlook 2007, & Microsoft Office PowerPoint 2007] while programs below the line are frequently accessed programs. The frequently accessed list is dynamic and will change based on the programs that are used most often.
Pin Programs to the Start Menu To pin a favorite program to the Start Menu, right-click on the program and select Pin to Start Menu.
An Introduction to Microsoft Windows 7
12 © 2010 Eastman Computing Services
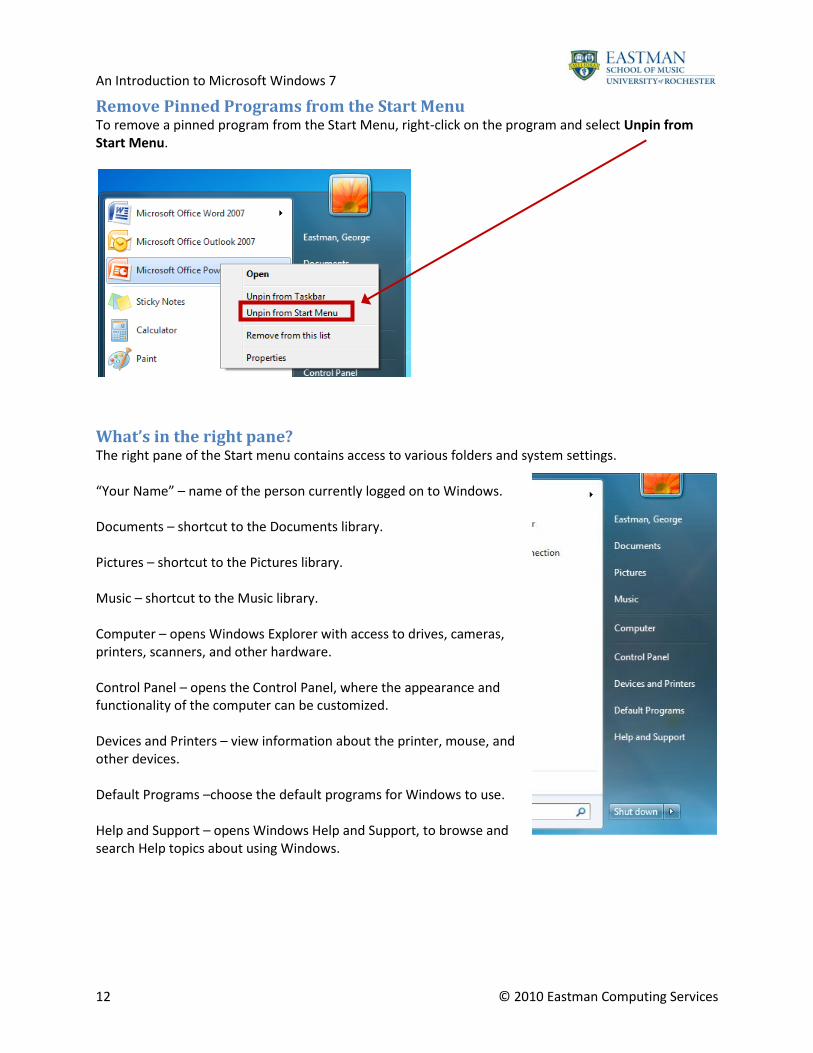
Remove Pinned Programs from the Start Menu To remove a pinned program from the Start Menu, right-click on the program and select Unpin from Start Menu.
What’s in the right pane? The right pane of the Start menu contains access to various folders and system settings. “Your Name” – name of the person currently logged on to Windows. Documents – shortcut to the Documents library. Pictures – shortcut to the Pictures library. Music – shortcut to the Music library. Computer – opens Windows Explorer with access to drives, cameras, printers, scanners, and other hardware. Control Panel – opens the Control Panel, where the appearance and functionality of the computer can be customized. Devices and Printers – view information about the printer, mouse, and other devices. Default Programs –choose the default programs for Windows to use. Help and Support – opens Windows Help and Support, to browse and search Help topics about using Windows.
An Introduction to Microsoft Windows 7
13 © 2010 Eastman Computing Services
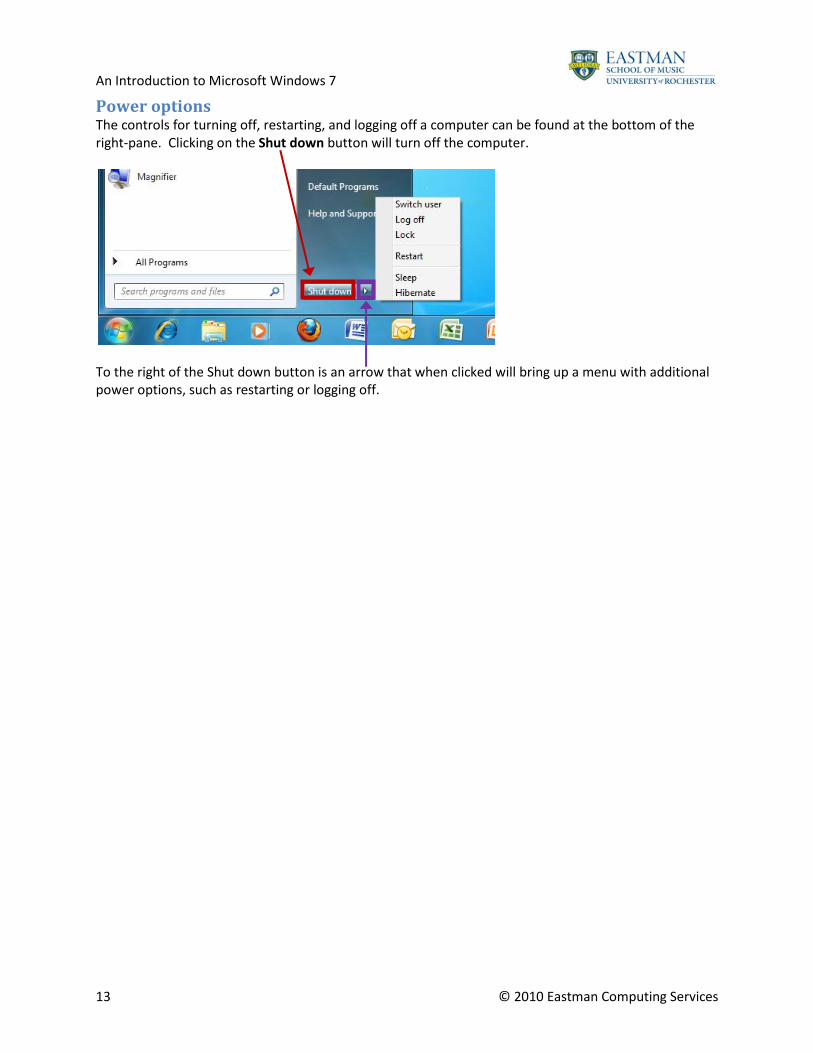
Power options The controls for turning off, restarting, and logging off a computer can be found at the bottom of the right-pane. Clicking on the Shut down button will turn off the computer.
To the right of the Shut down button is an arrow that when clicked will bring up a menu with additional power options, such as restarting or logging off.
An Introduction to Microsoft Windows 7
14 © 2010 Eastman Computing Services
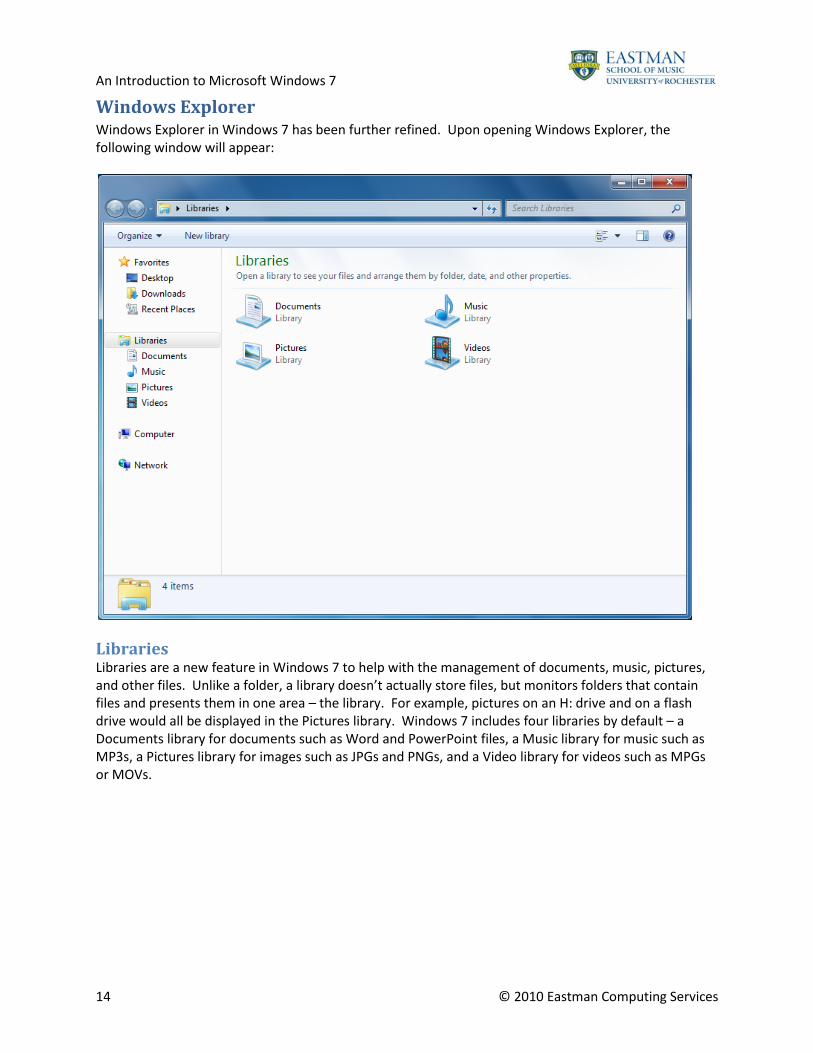
Windows Explorer Windows Explorer in Windows 7 has been further refined. Upon opening Windows Explorer, the following window will appear:
Libraries Libraries are a new feature in Windows 7 to help with the management of documents, music, pictures, and other files. Unlike a folder, a library doesn’t actually store files, but monitors folders that contain files and presents them in one area – the library. For example, pictures on an H: drive and on a flash drive would all be displayed in the Pictures library. Windows 7 includes four libraries by default – a Documents library for documents such as Word and PowerPoint files, a Music library for music such as MP3s, a Pictures library for images such as JPGs and PNGs, and a Video library for videos such as MPGs or MOVs.
An Introduction to Microsoft Windows 7
15 © 2010 Eastman Computing Services
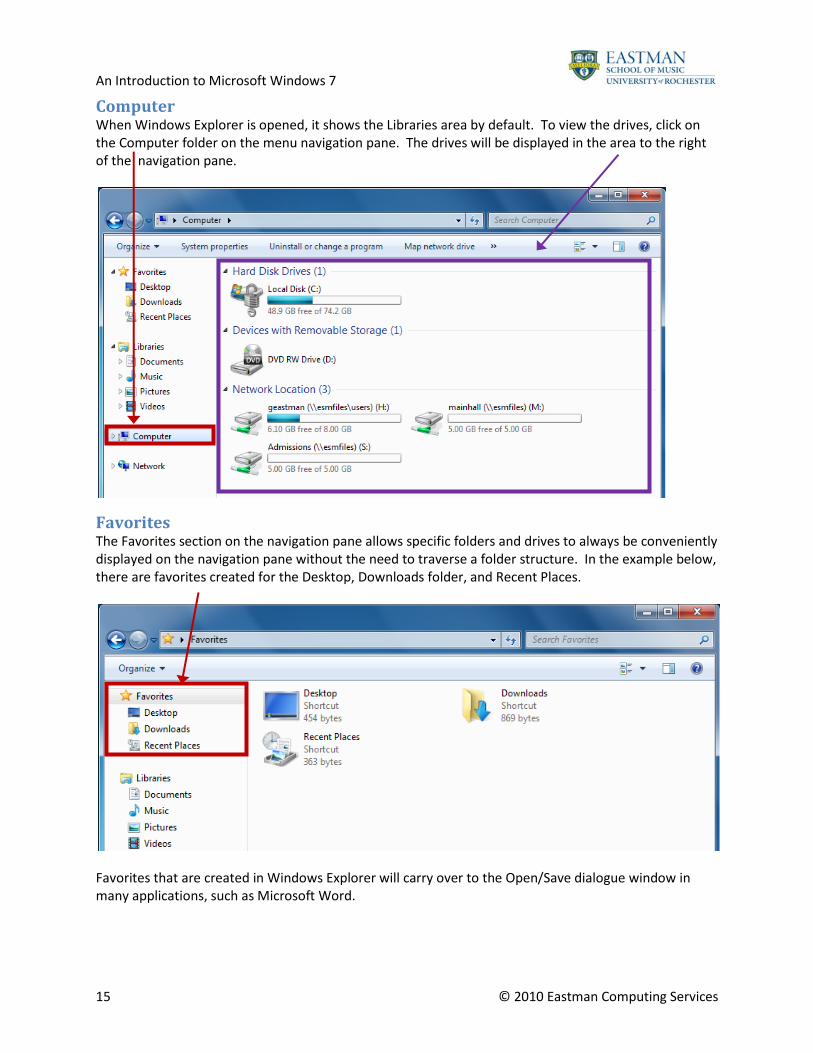
Computer When Windows Explorer is opened, it shows the Libraries area by default. To view the drives, click on the Computer folder on the menu navigation pane. The drives will be displayed in the area to the right of the navigation pane.
Favorites The Favorites section on the navigation pane allows specific folders and drives to always be conveniently displayed on the navigation pane without the need to traverse a folder structure. In the example below, there are favorites created for the Desktop, Downloads folder, and Recent Places.
Favorites that are created in Windows Explorer will carry over to the Open/Save dialogue window in many applications, such as Microsoft Word.
An Introduction to Microsoft Windows 7
16 © 2010 Eastman Computing Services
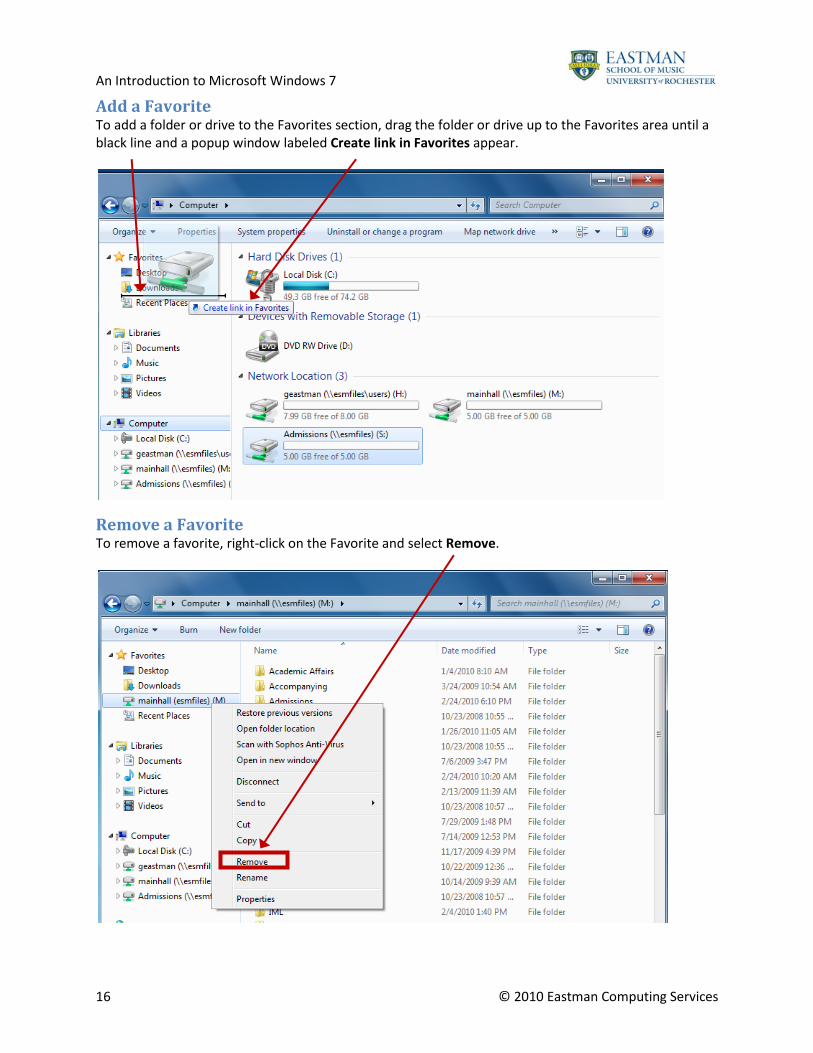
Add a Favorite To add a folder or drive to the Favorites section, drag the folder or drive up to the Favorites area until a black line and a popup window labeled Create link in Favorites appear.
Remove a Favorite To remove a favorite, right-click on the Favorite and select Remove.