Embed Size (px)
Citation preview

MICROWAVE OVEN I NSTRUCTION MANUAL
CLOCK LB DEF MEMOZ
TIMERENTER CODE AMT TIME
Model: 17PX56
Please read this booklet carefully before fixing and using, and save it for future reference.
Zhongshan Donlim Weili Electrical Appliances Co., Ltd. ADDRESS: Fusha Industrial Park, Fusha Town, Zhongshan City, Guangdong Province
OPERAITON THEORY OF MICROWAVE OVEN 1. Microwave is a kind of high frequency electromagnetic wave, which is commonly distributed in the nature. But the existing form of microwave is dispersed so that it cannot be collected together for heating purpose. The key component of magnetron of microwave oven will transform the energy of electricity to microwave and huge energy of microwave field is established under the closed cavity. So the molecule of food is caused to vibrate at very high speed and the friction heat produced will cook the food in a fast way. 2. There is 3 properties of microwave, that is a) Absorbability: the microwave can cause the excess vibration of molecule of various food so as to obtain the heating purpose. But the infiltration ability is largely depending on the size, thickness and properties of the food. b) Penetrability: microwave can penetrate through ceramics, glass, temperature-resistant plastics. It is required to use the containers whose material have good microwave penetrability to achieve best heating result. See the below utensils guide. c) Reflectivity: microwave would be reflected by the metal wall of interior cavity so as to establish an even magnetic field, thus can prevent the overheating of partial area.
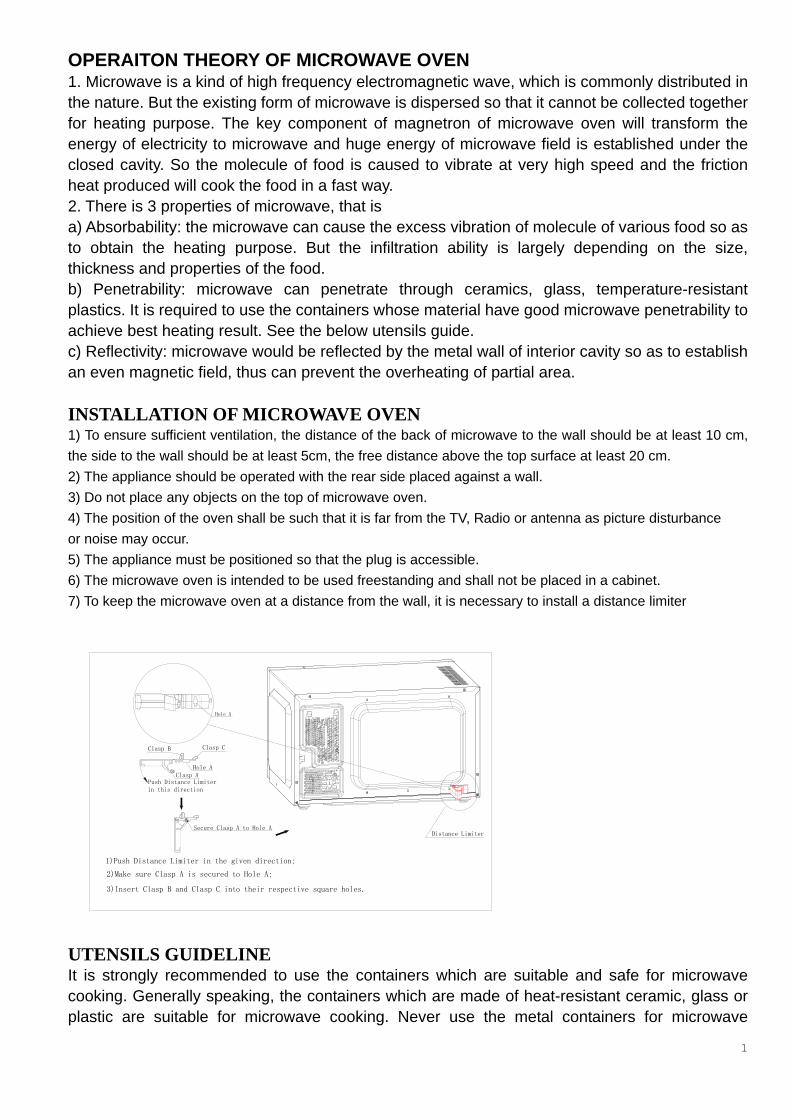
INSTALLATION OF MICROWAVE OVEN 1) To ensure sufficient ventilation, the distance of the back of microwave to the wall should be at least 10 cm, the side to the wall should be at least 5cm, the free distance above the top surface at least 20 cm. 2) The appliance should be operated with the rear side placed against a wall. 3) Do not place any objects on the top of microwave oven. 4) The position of the oven shall be such that it is far from the TV, Radio or antenna as picture disturbance or noise may occur. 5) The appliance must be positioned so that the plug is accessible. 6) The microwave oven is intended to be used freestanding and shall not be placed in a cabinet. 7) To keep the microwave oven at a distance from the wall, it is necessary to install a distance limiter
Push Distance Limiter in this direction
1)Push Distance Limiter in the given direction;
2)Make sure Clasp A is secured to Hole A;
Secure Clasp A to Hole A
Hole AClasp A
Hole A
Distance Limiter
3)Insert Clasp B and Clasp C into their respective square holes.
Clasp CClasp B
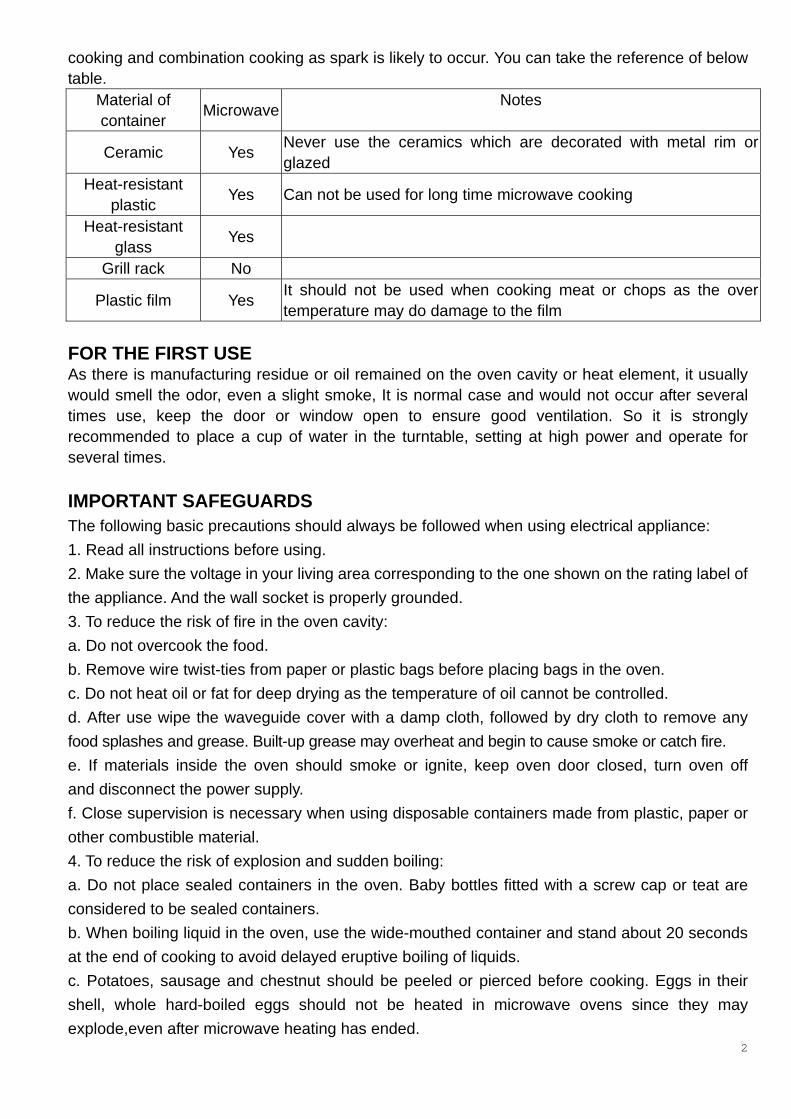
UTENSILS GUIDELINE It is strongly recommended to use the containers which are suitable and safe for microwave cooking. Generally speaking, the containers which are made of heat-resistant ceramic, glass or plastic are suitable for microwave cooking. Never use the metal containers for microwave
1
2
cooking and combination cooking as spark is likely to occur. You can take the reference of below table.
Material of container Microwave Notes
Ceramic Yes Never use the ceramics which are decorated with metal rim or glazed
Heat-resistant plastic Yes Can not be used for long time microwave cooking
Heat-resistant glass Yes
Grill rack No
Plastic film Yes It should not be used when cooking meat or chops as the overtemperature may do damage to the film
FOR THE FIRST USE As there is manufacturing residue or oil remained on the oven cavity or heat element, it usually would smell the odor, even a slight smoke, It is normal case and would not occur after several times use, keep the door or window open to ensure good ventilation. So it is strongly recommended to place a cup of water in the turntable, setting at high power and operate for several times.
IMPORTANT SAFEGUARDS The following basic precautions should always be followed when using electrical appliance: 1. Read all instructions before using. 2. Make sure the voltage in your living area corresponding to the one shown on the rating label of the appliance. And the wall socket is properly grounded. 3. To reduce the risk of fire in the oven cavity: a. Do not overcook the food. b. Remove wire twist-ties from paper or plastic bags before placing bags in the oven. c. Do not heat oil or fat for deep drying as the temperature of oil cannot be controlled. d. After use wipe the waveguide cover with a damp cloth, followed by dry cloth to remove any food splashes and grease. Built-up grease may overheat and begin to cause smoke or catch fire. e. If materials inside the oven should smoke or ignite, keep oven door closed, turn oven off and disconnect the power supply. f. Close supervision is necessary when using disposable containers made from plastic, paper or other combustible material. 4. To reduce the risk of explosion and sudden boiling: a. Do not place sealed containers in the oven. Baby bottles fitted with a screw cap or teat are considered to be sealed containers. b. When boiling liquid in the oven, use the wide-mouthed container and stand about 20 seconds at the end of cooking to avoid delayed eruptive boiling of liquids. c. Potatoes, sausage and chestnut should be peeled or pierced before cooking. Eggs in their shell, whole hard-boiled eggs should not be heated in microwave ovens since they may explode,even after microwave heating has ended.
3
d. The cooked liquid should not be removed out immediately. Several moments should be waited before removing In order to avoid possible hazards caused by delayed eruptive boiling of liquids. e. The contents of feeding bottles and baby food jars are to be stirred or shaken and the temperature is to be checked before consumption, in order to avoid burns. 5. Never operate the oven further if the door or door seals is damaged or the oven is malfunctioned or supply cord is damaged. Return the appliance to the nearest authorised service center for repair and maintenance. Never try to adjust or repair the oven yourself. 6. If the supply cord is damaged it must be replaced by the manufacturer or its service agent or a qualified technician in order to avoid a shock hazard. 7. After cooking, the container is very hot. Using gloves to take out the food and avoid steam burns by directing steam away from the face and hands. 8. Slowly lift the furthest edge of dishes cover and microwave plastic wrap and carefully open popcorn and oven cooking bags away from the face. 9. To prevent the turntable from breaking: a. Let the turntable cool down before cleaning. b. Do not place hot foods or utensils on the cold turntable. c. Do not place frozen foods or utensils on the hot turntable. 10. Make sure the utensils do not touch the interior walls during cooking. 11. Failure to maintain the oven in a clean condition could lead to deterioration of the surface that could adversely affect the life of the appliance and possibly result in a hazardous situation. 12. Only use utensils that are suitable for use in microwave ovens. 13. Do not store food or any other things inside the oven. 14. Do not operate the oven without any liquid or food inside the oven. This would do damage the oven. 15. This appliance is not intended for use by young children or infirm persons without supervision. 16. Any accessories not recommended by the manufacturer may cause injuries to persons. 17. Do not use outdoors. 18. Save these instructions. 19. This appliance is not intended for used by persons (including children) with reduced physical, sensory or mental capabilities, or lack of experience and knowledge, unless they have been given supervision or instruction concerning use of the appliances by a person responsible for their safety. Children should be supervised to ensure that they do not play with the appliance. 20. The appliance is not intended to be controlled by an external timer or separate remote-control system
Household use only
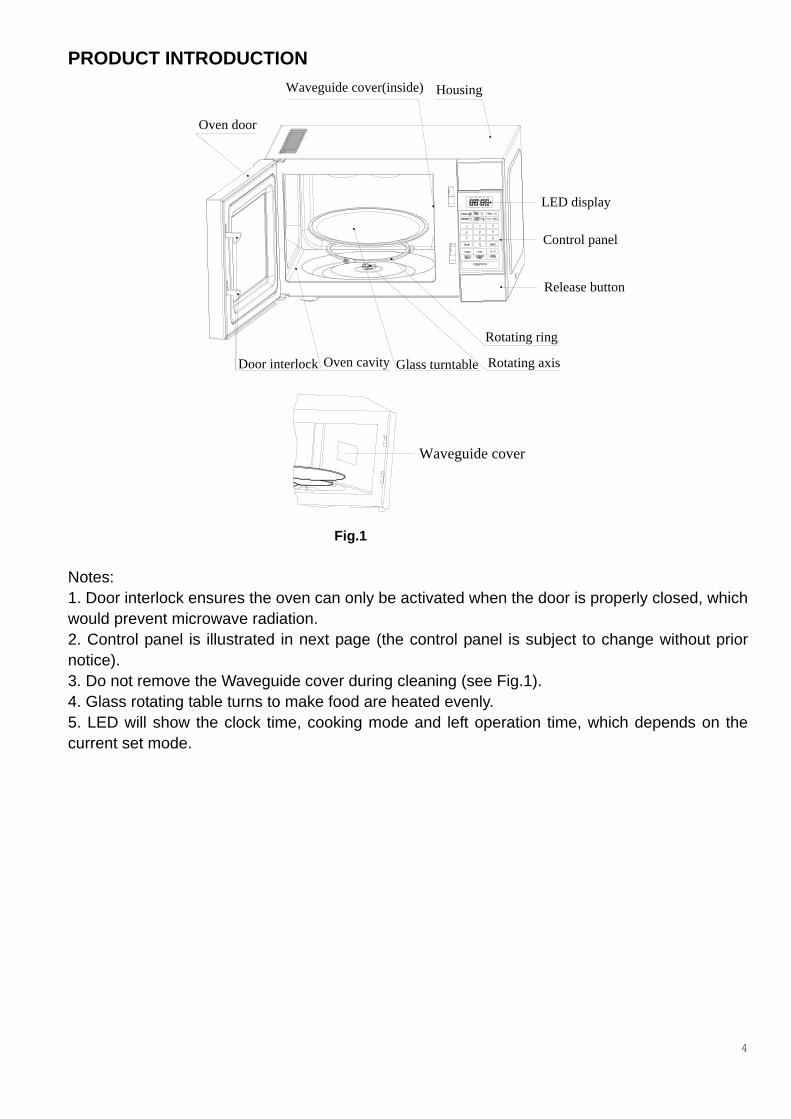
PRODUCT INTRODUCTION
CLOCK LB DEF MEMOZ
TIMERENTER CODE AMT TIME
Rotating axisGlass turntable
Rotating ring
Control panel
LED display
Waveguide cover(inside) Housing
Oven door
Door interlock Oven cavity
Release button
Waveguide cover
Fig.1 Notes: 1. Door interlock ensures the oven can only be activated when the door is properly closed, which would prevent microwave radiation. 2. Control panel is illustrated in next page (the control panel is subject to change without prior notice). 3. Do not remove the Waveguide cover during cleaning (see Fig.1). 4. Glass rotating table turns to make food are heated evenly. 5. LED will show the clock time, cooking mode and left operation time, which depends on the current set mode.
4

CONTROL PANEL
CLOCK LB DEF MEMOZ
TIMERENTER CODE AMT TIME
1. Display Cooking time, power, indicators and present time are displayed. 2. Baked potato, popcorn, pizza, beverage, reheat, frozen dinner Allow you to reheat or cook food automatically without entering power level or time. 3. Power Use to set power level. 4. Timer You can use the timer function independently, even while a cooking program is going on in the oven. 5. Cook Cook at one power level for a period of time, and then the oven automatically switches to another power level for the rest of cooking time. 6. Cook by weight Touch to enter weight of meat accurately. The oven automatically sets the cooking time and power level. 7. Defrost by weight Touch to set the weight of the food to be defrosted; the oven automatically sets the defrosting time and power level. 8. Speed defrost Touch to set defrosting time; the oven automatically divides the defrosting time into periods of alternating defrost and stand times by cycling on and off. 9. Number pads (0-9) Touch to set times or amounts. 10. Clock
5
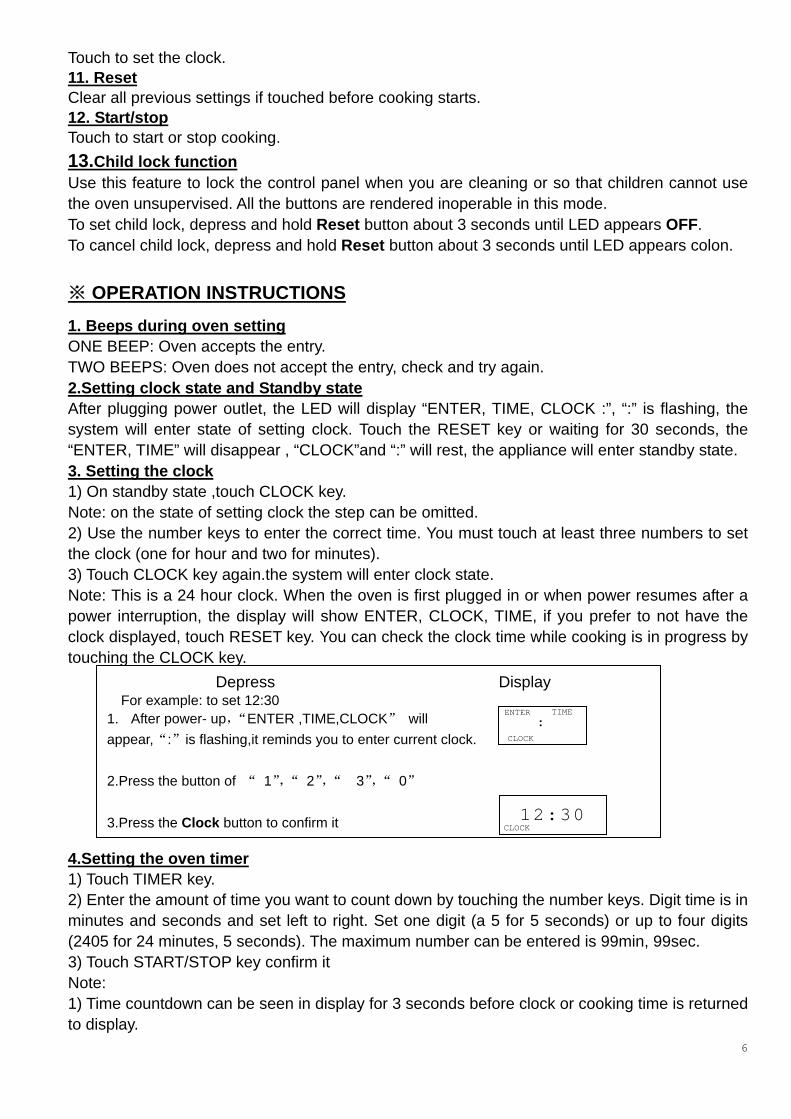
Touch to set the clock. 11. Reset Clear all previous settings if touched before cooking starts. 12. Start/stop Touch to start or stop cooking. 13.Child lock function Use this feature to lock the control panel when you are cleaning or so that children cannot use the oven unsupervised. All the buttons are rendered inoperable in this mode. To set child lock, depress and hold Reset button about 3 seconds until LED appears OFF. To cancel child lock, depress and hold Reset button about 3 seconds until LED appears colon. ※ OPERATION INSTRUCTIONS 1. Beeps during oven setting ONE BEEP: Oven accepts the entry. TWO BEEPS: Oven does not accept the entry, check and try again. 2.Setting clock state and Standby state After plugging power outlet, the LED will display “ENTER, TIME, CLOCK :”, “:” is flashing, the system will enter state of setting clock. Touch the RESET key or waiting for 30 seconds, the “ENTER, TIME” will disappear , “CLOCK”and “:” will rest, the appliance will enter standby state. 3. Setting the clock 1) On standby state ,touch CLOCK key. Note: on the state of setting clock the step can be omitted. 2) Use the number keys to enter the correct time. You must touch at least three numbers to set the clock (one for hour and two for minutes). 3) Touch CLOCK key again.the system will enter clock state. Note: This is a 24 hour clock. When the oven is first plugged in or when power resumes after a power interruption, the display will show ENTER, CLOCK, TIME, if you prefer to not have the clock displayed, touch RESET key. You can check the clock time while cooking is in progress by touching the CLOCK key. Depress Display
For example: to set 12:30 1. After power- up,“ENTER ,TIME,CLOCK” will appear,“:”is flashing,it reminds you to enter current clock. 2.Press the button of “ 1”,“ 2”,“ 3”,“ 0” 3.Press the Clock button to confirm it
: ENTER TIME
CLOCK
12:30
CLOCK
4.Setting the oven timer 1) Touch TIMER key. 2) Enter the amount of time you want to count down by touching the number keys. Digit time is in minutes and seconds and set left to right. Set one digit (a 5 for 5 seconds) or up to four digits (2405 for 24 minutes, 5 seconds). The maximum number can be entered is 99min, 99sec. 3) Touch START/STOP key confirm it Note: 1) Time countdown can be seen in display for 3 seconds before clock or cooking time is returned to display.
6

2) Touch TIMER and then touch RESET to cancel TIMER during timing process.
5. Setting cooking times and power levels
7
A. One-stage Cooking 1) On standby state or clock state, use the number keys to set a cooking time. You can set a cooking time from one second to 99 minutes and 99 seconds. If you are setting a time greater than one minute, you must enter numbers for both minutes and seconds. For example: to set 20 minutes,enter 2, 0, 0, 0. 2) If you want to set a power level other than 100% power,touch POWER, and then use the number keys to enter the power level. You can set the power level from 1 to 9. 3) Touch START/STOP to start cooking.USE THESE SINGLE DIGIT TO REPRESENT POWER LEVELS
Depress Display Example: To cook at 80P for 10 minutes. 1. After power-up, the colon flashes then
Depress Reset button once or wait for 30sec
2.Set cooking time by pressing the number Button of “1 ”,“0”,“ 0”,“0”. 3.Touch Power once then Select the desired microwave power by depressing number “ 8” 4. Press Start/stop button to start, and LED will count down to show left time.
: CLOCK
P 80
10:00 ENTER TIME
10:00
Number key % of power Microwave instruction Tap POWER
once 100%
9 90%
P100 and P90 --- High power, 100% and 90% microwave power. Applicable for quick and thorough cooking
8 80% 7 70%
P80 and P70 --- Medium High power, 80% and 70% microwave power. Applicable for medium express cooking
6 60% 5 50%
P60 and P50 --- Medium power, 60% and 50% microwave power. Applicable for steaming food
4 40% 3 30%
P40 and P30 --- Medium Low power, 40% and 30% microwave power. Applicable for defrosting food
2 20% 1 10%
P20 and P10 --- Low power, 20% and 10% microwave power. Applicable for keeping warm
NOTE: 1) Never use the Grill rack during microwave cooking. 2) Never operate the oven empty. 3) If you turn the food during operation, close the door and then touch the START/STOP key once and the preset cooking procedure will continue. 4) If you intend to remove the food before the preset time, you must touch RESET key once to clear the preset procedure to avoid unintended operation of next time use.
B. Two-stage Cooking Some recipes require different stages of cooking at different temperatures. 1) SET STAGE 1: Follow steps 1 and 2 in “One-stage Cooking”. DO NOT TOUCH START/STOP KEY 2) SET STAGE 2: Touch COOK key then enter proper cooking time and (lower) power level. (Most 2-stage recipes use lower power for second stage.) 3) Touch START/STOP key.

Note: After total time has elapsed, 4 beeps sound and END appears in display. Touch RESET key or open the oven door to clear END before starting another cooking function. For example: You want to cook food with 100P microwave for 3 minutes then 20P microwave for 9 minutes, You may program your personalized menu as follow:
6. Setting “speed defrost” 1) On standby state or clock state , touch SPEED DEFROST key. 2) Enter desired defrosting time by touching correct number keys. Digital timer sets minutes and seconds from left to right so a single digit can be set (5 for 5 seconds) or up to 4 digits (2405 for 24 minutes 5 seconds). 3) Touch START/STOP key. Note: ·After time has elapsed four beeps sound and END appears in display. Touch RESET key or open the door to clear END before starting another cooking function.
example: You want to cook food with 100P microwave for 3 minutes then 20P microwave for 9 minutes. This is two-stage setting Depress Display Depress Display 1. 100P microwave for 3min 2. 20P microwave for 9min 1.1 After power-up,the colon flashes, ,then press Reset once or wait for 30sec 1.2 Press “ 3”,“0”,“0” to set cooking time 1.3 Press Power button once
3. Start cooking by pressing Start/Stop
2.1 Press Cook button 2.1 Press “9”,“0”,“0” to set cooking time 2.2 Press Power button once then Press number key “ 2” to select power level
3:00 ENTER TIME
100 P
9:00 ENTER TIME
20 p
MEN
: ENTER TIME
MEN
Depress Display Example: To speed defrost poultry
: CLOCK
: CLOCK
: ENTER TIME
DEF
2:50 ENTER TIME
DEF
and LED will count down to show running time. 4. Start cooking by pressing Start/Stop,
Number button of “2 ”,“5”.“0” 3. Set defrost time by pressing the
2.Touch Speed Defrost key
For 30sec
Then press Reset button once or wait 1.After power-up, the colon flashes With 2min50sec
·After setting SPEED DEFROST, oven can be programmed to automatically switch to one or two-Stage cooking.
·For speed defrost and one stage cooking, follow steps above. Before touching START/STOP key, touch COOK key, and enter time and power level. Then touch START/STOP key.
·For speed defrost and two stage cooking, follow steps above. Before touching START/STOP key, enter two-stage cooking programs.
7. Setting “cook by weight”
8
9
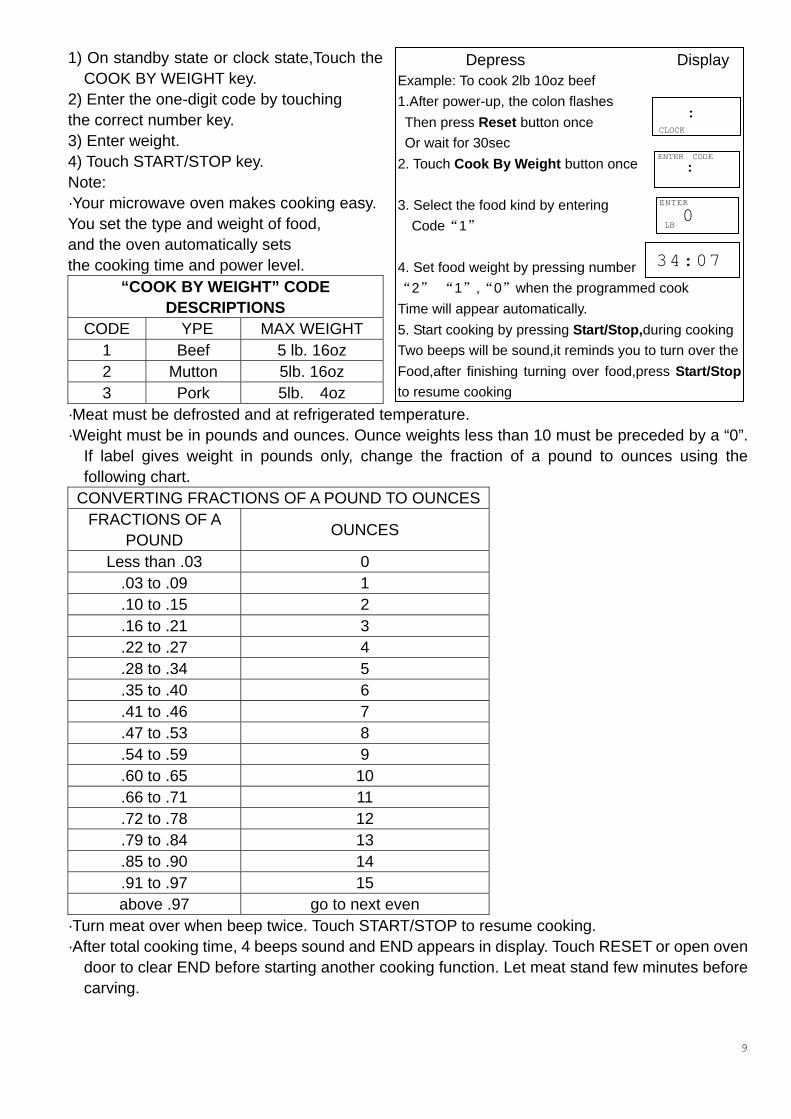
1) On standby state or clock state,Touch the COOK BY WEIGHT key.
2) Enter the one-digit code by touching the correct number key. 3) Enter weight. 4) Touch START/STOP key. Note: ·Your microwave oven makes cooking easy. You set the type and weight of food, and the oven automatically sets the cooking time and power level.
“COOK BY WEIGHT” CODE DESCRIPTIONS
CODE YPE MAX WEIGHT 1 Beef 5 lb. 16oz 2 Mutton 5lb. 16oz 3 Pork 5lb. 4oz
·Meat must be defrosted and at refrigerated temperature.
Depress Display Example: To cook 2lb 10oz beef 1.After power-up, the colon flashes Then press Reset button once
Or wait for 30sec 2. Touch Cook By Weight button once 3. Select the food kind by entering
Code“1” 4. Set food weight by pressing number “2” “1”,“0”when the programmed cook Time will appear automatically. 5. Start cooking by pressing Start/Stop,during cookingTwo beeps will be sound,it reminds you to turn over theFood,after finishing turning over food,press Start/Stopto resume cooking
: CLOCK
: ENTER CODE
0 ENTER
LB
34:07
·Weight must be in pounds and ounces. Ounce weights less than 10 must be preceded by a “0”. If label gives weight in pounds only, change the fraction of a pound to ounces using the following chart.
CONVERTING FRACTIONS OF A POUND TO OUNCESFRACTIONS OF A
POUND OUNCES
Less than .03 0 .03 to .09 1 .10 to .15 2 .16 to .21 3 .22 to .27 4 .28 to .34 5 .35 to .40 6 .41 to .46 7 .47 to .53 8 .54 to .59 9 .60 to .65 10 .66 to .71 11 .72 to .78 12 .79 to .84 13 .85 to .90 14 .91 to .97 15 above .97 go to next even
·Turn meat over when beep twice. Touch START/STOP to resume cooking. ·After total cooking time, 4 beeps sound and END appears in display. Touch RESET or open oven
door to clear END before starting another cooking function. Let meat stand few minutes before carving.
8. Setting “defrost by weight” Depress Display
Example: To defrost 2LB 8OZ beef 1. After power-up, the colon flashes Then press Reset button once
Or wait for 30sec
2. press Defrost By weight button 3. Set defrosting weight by pressing the Number button of “2 ”,“ 0”.“ 8” When the programmed cook time will appear automatically 4. Start cooking by pressing Instant/start, and LED will count down to show running time. 5. during cooking Two beeps will be sound,it reminds you to turn over the Food,after finishing turnning over food,press Start/Stop to resume cooking
: CLOCK
0 ENTER
LB
31:30
31:30 DEF
1) On standby state or clock state,Touch DEFROST BY WEIGHT key.
2) Enter weight. 3) Touch START/STOP key. Note: weight must be in pounds and ounces.Ounce weight less than 10 must be preceded by a 0. If label gives weight inpounds only, change the fraction of apound to ounces using the chart of “CONVERTING FRACTIONS OF A POUND TO OUNCES”. ·Turn food over when oven beep twice. ·Close the door and touch START/STOP key to resume defrosting. ·After total defrosting time, 4 beeps sound and END appears in display. ·Touch RESET or open oven door to clear
END before starting another cooking function.
※ ABOUT “QUICK COOK” SETTINGS “QUICK COOK” allow you to cook or reheat food automatically without entering power level or time. When setting “quick cook”, check visual guide on key for correct setting. Three “quick cook” setting allow you to cook several amounts of the same food. These include the “POPCORN”, “BAKED POTATO”, “PIZZA”, “BEVERAGE”, “FROZEN DINNER”, “REHEAT”. After you touch these keys, ENTER AMT appears in the display. In each “quick cook” category, smaller size food is set by touching key once. The larger size can be set by touching the picture key twice.
1. Setting “popcorn” 1) On standby state or clock state ,touch POPCORN key. POPCORN automatically sets the cooking time for a 3 to 31/2 oz. bag of microwave popcorn. 2) Touch START/STOP key. Note: To reset POPCORN time: tap POPCORN key twice. ENTER TIME appears in display. Touch number keys to enter minutes and seconds. Touch START/STOP key. This new cooking time will remain whenever you touch the POPCORN key until you reset it.
2. Setting “baked potato” For potatoes (4 to 6 oz. per entries): 1) On standby state or clock state ,touch POTATO key once. LED will display 2) Enter number or potatoes by touching number keys from 1 to 4. 3) Touch START/STOP key. For the large potatoes (8 to10 oz. per entries): 1) Tap POTATO key twice. 2) Enter number of potatoes by touching number keys from 1 to 4. 3) Touch START/STOP key.
10

11
3. Setting “pizza” Reheating a slice (or two thin ones) of leftover pizza: 1) On standby state or clock state ,touch PIZZA key once. 2) Touch START/STOP key. Heating a whole frozen pizza: 1) Tap PIZZA key twice. 2) Touch START/STOP key.
4. Setting “beverage” For coffee cups (5 to 7 oz. per share): 1) On standby state or clock state ,touch BEVERAGE pad once. 2) Enter number of cups by touching number pads from 1 to 4. 3) Touch START/STOP key. For the large coffee mugs (9 to 11 oz. per share): 1) Tap BEVERAGE key twice. 2) Enter number of mugs by touching number keys from 1 to 4. 3) Touch START/STOP key.
5. Setting “frozen dinner” Microwaving one or two small (7-9 oz. per share) frozen dinner: 1) On standby state or clock state,touch FROZEN DINNER key once. 2) Touch 1 or 2 key to select 1 entree or 2 entrees. 3) Touch START/STOP key. Microwaving one large (10-12 oz. per share) frozen dinner: 1) Tap FROZEN DINNER key twice. 2) Touch 1 or 2 key to select 1 entree or 2 entrees. 3) Touch START/STOP key.
6. Setting “reheat” 1) On standby state or clock state ,touch REHEAT key. 2) Touch START/STOP key. Note: this setting lets you reheat a dinner plate of chilled leftovers with good results. ※ MICROWAVE COOKING TIPS 1) Arranging food Place thicker areas toward outside of dish and the thinner meat in the center and spread them evenly. Do not overlap if possible. 2) Cooking time Start cooking with the shorter period of time and extend it according to the actual need. Overcooking may result in smoking and burning. 3) Cover foods before cooking refer to the recipe Use paper towels, microwave plastic wrap or a cover to cover food so that prevent spattering and help foods to cook evenly. (Helps keep oven clean). 4) Partial shielding of food Use small pieces of aluminium foil to cover thin areas of meats or poultry to avoid overcooking. 5) Stir foods
12
From outside to center of dish once or twice during cooking, if possible. 6) Turn foods Foods such as chicken, hamburgers or steaks should be turned over once during cooking. 7) Rearrange foods Please change the positions of food in half way during cooking such as: from top to bottom and from the center of the dish to the outside. 8) Allow standing time After cooking ensure adequate standing time. Remove food from oven and stir if possible. Cover for standing time which allows the food to finish cooking without overcooking. 9) Check for doneness Observe the food color and hardness to determine whether the food is cooked. Doneness signs include: -Steams throughout food, not just at edge part. - Joints of Poultry move easily. - Pork and poultry show no evidence of blood. - Fish is opaque and flakes easily with a fork. 10) Condensation It is a normal case of microwave cooking. The humidity and moisture of food will influence the amount of moisture in the oven. Generally, covered foods will not cause as much condensation as uncovered foods. Ensure that the ventilation openings are not blocked. 11) Microwave safe plastic wrap For cooking food with high fat content, do not bring the wrap in contact with the food as it may melt. 12) Microwave safe plastic cookware Some microwave safe plastic cookware are not suitable for cooking foods with high fat and sugar content. ※ CLEANING AND MAINTENANCE The oven should be cleaned regularly and any food deposits removed. Suggest you perform below steps after every time use. Never use hard detergent, gasoline, abrasive powder or metal brush to clean any part of the appliance. Clean the oven at regular intervals Disconnect the power supply cord before cleaning. And if possible leave the door open to inactivate the oven during cleaning. Exterior: The outside may be cleaned wipe with a soft and damp cloth. Avoid the use of harsh abrasive cleaners. Door: Wipe the door and window on both sides, the door seals and adjacent parts frequently with a damp cloth to remove any spills or spatters. Do not use abrasive cleaners. Control panel: Care should be taken in cleaning the control panel. Wipe the panel with a cloth dampened slightly. Do not scrub or use any sort of chemical cleaners.

Interior walls: To clean the interior surfaces, wipe with a soft and damp cloth for hygienic reasons. After use wipe the waveguide cover in the oven with a soft damp cloth to remove any food splashed. Buildup splashes may overheat and begin to smoke or catch fire. Do not remove the waveguide cover. Do not use a commercial oven cleaner, abrasive or harsh cleaners and scouring pads on any part of your microwave oven. Never spray oven cleaners directly onto any part of your oven. Turntable/ Rotating ring/Rotating axis Wash with mild soapy water and dry thoroughly. TIP: When the microwave oven has been used for a long time, there may be some strange odors exist in oven, Following 3 methods can get rid of them: 1. Place several lemon slices in a cup, then heat with high power for 2-3 min. 2. Place a cup of red tea in oven, then heat with high power. 3. Put some orange peel into oven, then heat them with high power for 1 minute. ※ SERVICING Warning: it is hazardous for anyone, other than a qualified service technician, to carry out any service for repairing operation which involves removal of any cover which gives protection against exposure to microwave energy. Caution: MICROWAVE RADIATION Do not become exposed to radiation from the microwave generator or other parts conducting microwave energy. During servicing below listed parts are liable to be removed and give access to potentials above250V to earth. 1. Magnetron 2. High voltage transformer 3. High voltage capacitor 4. High voltage diode 5. High voltage fuse Below listed condition may cause undue microwave exposure during servicing. 1. Unproper fitting of magnetron. 2. Unproper matching of Door interlock, door hinge and door. 3. Unproper fitting of switch support. 4. Door, Door seal or enclosure has been damage. English version:
Correct Disposal of this product
This marking indicates that this product should not be disposed with other household wastes throughout the EU. To prevent possible harm to the environment or human health from uncontrolled waste disposal, recycle it responsibly to promote the sustainable reuse of material resources. To return your used device, please use the return and collection systems or contact the retailer where the product was purchased. They can take this product for environmental safe recycling.
13