Embed Size (px)
Citation preview

Before operating this oven, please read these instructions completely.
MICROWAVE OVENKOR-6L8K*
OPERATING INSTRUCTIONS& COOK BOOK

1
PRECAUTIONS TO AVOID POSSIBLEEXPOSURE TO EXCESSIVE
MICROWAVE ENERGY(a) Do not attempt to operate this oven with the door
open since open-door operation can result in harmfulexposure to microwave energy. It is important not to defeator tamper with the safety interlocks.
(b) Do not place any object between the oven front face andthe door or allow soil or cleaner residue to accumulate onsealing surfaces.
(c) WARNING : If the door or door seals are damaged, theoven must not be operated until it has been repaired by acompetent person : (1) door (bent), (2) hinges andlatches(broken or loosened), (3) door seals and sealingsurfaces.
(d) WARNING : It is hazardous for anyone other than acompetent person to carry out any service or repairoperation that involves the removal of a cover which givesprotection against exposure to microwave energy.
(e) WARNING : Liquids and other foods must not be heatedin sealed containers since they are liable to explode.
(f) WARNING : This appliance can be used by children agedfrom 8 years and above and persons with reducedphysical, sensory or mental capabilities or lack ofexperience and knowledge if they have been givensupervision or instruction concerning use of the appliancein a safe way and understand the hazards involved.Children shall not play with the appliance. Cleaning anduser maintenance shall not be made by children unlessthey are aged from 8 years and above and supervised.

2
• PRECAUTIONS TO AVOID POSSIBLE EXPOSURE TO EXCESSIVE MICROWAVE ENERGY....1
• IMPORTANT SAFETY INSTRUCTIONS .....................................................................................3
• EARTHING INSTRUCTIONS .......................................................................................................5
• INSTALLATION ............................................................................................................................5
• WHAT IS A FUNCTION, STANDBY POWER “0”? .......................................................................6
• FEATURES DIAGRAM .................................................................................................................7
• FEATURES DIAGRAM (CONTINUED) ........................................................................................8
• OPERATION PROCEDURE ........................................................................................................9
• CONTROLS ...............................................................................................................................10
TURNING AC POWER ON & OFF THE OVEN .........................................................................10
WEIGHT DEFROSTING..............................................................................................................11
TIME DEFROSTING ...................................................................................................................11
COOKING IN ONE STAGE ........................................................................................................12
COOKING IN TWO STAGE .......................................................................................................13
+30 sec........................................................................................................................................14
ONE TOUCH COOKING ............................................................................................................14
AUTO COOK ..............................................................................................................................15
HOW TO STOP THE OVEN WHILE THE OVEN IS OPERATING .............................................16
TO SET STANDBY POWER "0" MODE......................................................................................16
• CARE OF YOUR MICROWAVE OVEN ......................................................................................17
• QUESTIONS AND ANSWERs....................................................................................................18
• BEFORE YOU CALL FOR SERVICE .........................................................................................19
• CARE AND CLEANING ..............................................................................................................19
• SPECIFICATIONS ......................................................................................................................20
• COOKING INSTRUCTIONS .......................................................................................................21
• USE YOUR MICROWAVE OVEN SAFELY................................................................................22
• ARCING ......................................................................................................................................22
• MICROWAVING PRINCIPLES ...................................................................................................23
• HOW MICROWAVES COOK FOOD...........................................................................................23
• CONVERSION CHARTS ............................................................................................................23
• COOKING TECHNIQUES...........................................................................................................24
• DEFROSTING GUIDE ................................................................................................................25
• COOKING & REHEATING CHART.............................................................................................26
• VEGETABLE CHART..................................................................................................................28
• RECIPES.....................................................................................................................................29
TABLE OF CONTENTS

3
IMPORTANT SAFETY INSTRUCTIONSREAD CAREFULLY AND KEEP FOR FUTURE REFERENCE
WARNING : To prevent fire, burns, electric shock and otherwarnings:Listed below are, as with all appliances, certain rules to followand safeguards to assure high performance from this oven:
1. Do not use the oven for any reasonother than food preparation, such asfor drying clothes, paper, or any othernonfood items or for sterilizingpurposes.
2. Do not use the oven when empty, thiscould damage the oven.
3. Do not use the oven cavity for any typeof storage, such as papers, cookbook,cookware, etc.
4. Do not operate the oven without theglass tray in place. Be sure it isproperly sitting on the rotating base.
5. Make sure you remove caps or lidsprior to cooking when you cook foodsealed in bottles.
6. Do not put foreign material betweenthe oven surface and door. It couldresult in excessive leakage ofmicrowave energy.
7. Do not use recycled paper products forcooking. They may contain impuritieswhich could cause sparks and/or fireswhen used during cooking.
8. Do not pop popcorn unless popped ina microwave approved popcornpopper or unless it's commercially
packaged and recommendedespecially for microwave ovens.Microwave popped corn produces alower yield than conventional popping;there will be a number of unpoppedkernels. Do not use oil unless specifiedby the manufacturer.
9. Do not cook any food surrounded by amembrane, such as egg yolks,potatoes, chicken livers, etc., withoutfirst piercing them several times with afork.
10. Do not pop popcorn longer than themanufacturer's directions. (poppingtime is generally below 3 minutes).Longer cooking does not yield morepopped corn, it can cause scorchingsand fire.Also, the cooking tray can become toohot to handle or may break.
11. If smoke is observed, switch off orunplug the appliance and keep thedoor closed in order to stifle anyflames.
12. When heating food in plastic or papercontainers, keep an eye on the ovendue to the possibility of ignition.

4
SAVE THESE INSTRUCTIONS
13. The contents of feeding bottles andbaby food jars shall be stirred orshaken and the temperaturechecked before consumption, inorder to avoid burns.
14. Always test the temperature of foodor drink which has been heated in amicrowave oven before you give it tosomebody, especially to children orelderly people. This is importantbecause things which have beenheated in a microwave oven carry ongetting hotter even though themicrowave oven cooking hasstopped.
15. Eggs in their shell and whole hard-boiled eggs should not be heated inmicrowave ovens since they mayexplode, even after microwaveheating has ended;
16. Keep the waveguide cover clean atall times. Wipe the oven interior witha soft damp cloth after each use. Ifyou leave grease or fat anywhere inthe cavity it may overheat, smoke oreven catch fire when next using theoven.
17. Never heat oil or fat for deep fryingas you cannot control thetemperature and doing so may leadto overheating and fire.
18. Liquids, such as water, coffee, or teaare able to be overheated beyondthe boiling point without appearing to
be boiling due to surface tension ofthe liquid. Visible bubbling or boilingwhen the container is removed fromthe microwave oven is not alwayspresent. THIS COULD RESULT INVERY HOT LIQUIDS SUDDENLYBOILING OVER WHEN A SPOONOR OTHER UTENSIL ISINSERTED INTO THE LIQUID. To reduce the risk of injury topersons:a) Do not overheat the liquid.b) Stir the liquid both before and
halfway through heating itc) Do not use straight-sided
containers with narrow necks.d) After heating, allow the container
to stand in the microwave oven fora short time before removing thecontainer.
e) Use extreme care when insertinga spoon or other utensil into thecontainer.
19. Children should be supervised toensure that they do not play with theappliance.
20. Only use utensils that are suitable foruse in microwave ovens.
21. Microwave heating of beverages canresult in delayed eruptive boiling,therefore care must be taken whenhandling the container.
5
EARTHING INSTRUCTIONSThis appliance must be earthed. In the event of anelectrical short circuit, earthing reduces the risk ofelectric shock by providing an escape wire for theelectric current. This appliance is equipped with acord having a earthing wire with a earthing plug. The plug must be plugged into an outlet that isproperly installed and earthed.
WARNING : Improper use of the earthing plug canresult in a risk of electric shock. Consult a qualifiedelectrician or serviceman if the earthing instructionsare not completely understood, or if doubt exists asto whether the appliance is properly earthed. If it is necessary to use an extension cord, use only a3-wire extension cord that has a 3-blade earthingplug, and a 3-slot receptacle that will accept the plugon the appliance. The marked rating of the extensioncord should be equal to or greater than the electricalrating of the appliance.
IMPORTANTThe wires in this mains lead fitted to this applianceare colored in accordance with the following code.Green-and-yellow : EarthBlue : NeutralBrown : LiveAs the colors of the wires in the mains lead of thisappliance may not correspond with the coloredmarkings identifying the terminals in your plug,proceed as follows : the wire which is colored green-and-yellow must be connected to the terminal in theplug which is marked with the letter ‘E’ or by theearth symbol or green-and-yellow. The wire which iscolored blue must be connected to the terminalwhich is marked with the letter ‘N’ or colored white.The wire which is colored brown must be connectedto the terminal which is marked with the letter ‘L’ orcolored red.WARNING : The appliance must be earthed.
INSTALLATION1. Ventilation
Do not block air vents. If they are blocked duringoperation, the oven may overheat and eventuallycause a failure. For proper ventilation, allow above76mm of space between oven sides, rear and theminimum height of free space necessary abovethe top surface of the oven is 100mm.
2. Steady, flat locationThis oven should be set on a steady, flat surface.This oven is designed for counter top use only.The microwave oven shall not be placed in acabinet unless it has been tested in a cabinet.
3. Leave space behind and sideAll air vents should be kept a clearance.If all vents are covered during operation, the ovenmay overheat and, eventually, oven failure.
4. Away from radio and TV setsPoor television reception and radio interferencemay result if the oven is located close to a TV,Radio antenna, feeder and so on. Position theoven as far from them as possible.
5. Away from heating appliance and water tapsKeep the oven away from hot air, steam or Splashwhen choosing a place to position it, or theinsulation might be adversely affected andbreakdowns occur.
6. Power supply• Check your local power source. This oven
requires a current of approximately 6 amperes,230V 50Hz.
• Power supply cord is about 0.8 meters long.• The voltage used must be the same as specified
on this oven. Using a higher voltage may result ina fire or other accident causing oven damage.Using low voltage will cause slow cooking. Weare not responsible for damage resulting fromuse of this oven with a voltage of ampere fuseother than those specified.
• If the supply cord is damaged, it must bereplaced by the manufacturer or its service agentor a similarly qualified person in order to avoid ahazard.
7. Examine the oven after unpacking for anydamage such as:A misaligned door, Broken door, A dent in cavity.If any of the above are visible, DO NOT INSTALL,and notify dealer immediately.
8. Do not operate the oven if it is colder thanroom temperature.(This may occur during delivery in cold weather.)Allow the oven to become room temperaturebefore operating.
6
What is a function, STANDBY POWER “0”?• Standby power is the electric power consumed by electronic appliances without operating on inserting the plug
into a socket.
• STANDBY POWER “0” is a function reducing standby power consumption.
• This product can save energy in a standby mode, by setting the STANDBY POWER "O" mode.To turn on the oven, press and hold ZERO ON button until display is turned on and beep sounds after plugging in.The oven goes to STANDBY POWER “0” mode automatically after 10minutes without using or press and holdSTOP/CLEAR button until display is turned off.Press and hold ZERO ON button again until display is turned on and beep sounds, you can use the oven.
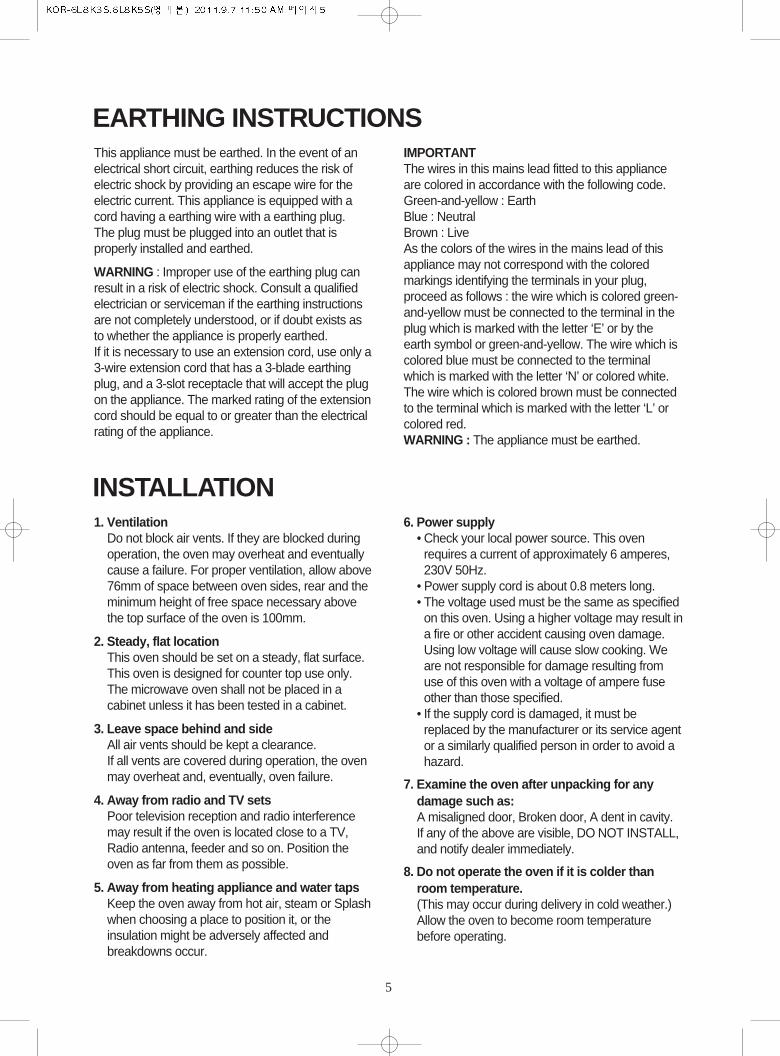
• If you insert plug into a socket, the oven is STANDBY POWER “0” mode. So the display shows nothing.To cancel STANDBY POWER “0” mode, press and hold ZERO ON button until display is turned on andbeep sounds.(Because the oven is turned power off automatically after 10 minutes without using.The display shows nothing.)
To cancel the STANDBY POWER "0" mode.(The oven is turned power on.)

7
11 Door latch - When the door is closed, it willautomatically shut off. If the door is openedwhile the oven is operating, the magnetronwill automatically shut off.
22 Door seal - The door seal surfaces preventmicrowaves escaping from the oven cavity.
33 Oven cavity
44 Oven lamp - Automatically turns on duringoven operating.
55 Safety interlock system
66 Control panel
77Waveguide cover - Protects themicrowave outlet from splashes of cookingfoods.
88 Roller guide - This must always be usedfor cooking together with the glass cookingtray.
99 Coupler- This fits over the shaft in thecenter of the oven cavity floor.This is to remain in the oven for all cooking.
00 Glass cooking tray - Made of special heatresistant glass. The tray must always be inproper position before operating. Do notcook food directly on the tray.
qq Viewing screen - Allows viewing of food.The screen is designed so that light canpass through, but not the microwave.
FEATURES DIAGRAM
1 2 3 4 5
6
7809q

8
11 DISPLAY - Cooking time, power level aredisplayed.
22 AUTO COOK - Used to cook or reheatmany of favorite food.
33WEIGHT DEFROST - Used to defrostfoods for weight.
44 TIME DEFROST - Used to defrost foods fortime.
55 POWER - Used to set power level.
66 ONE TOUCH COOK - Used to cook orreheat specific quantities of food.
77 TIME SET BUTTON - Used to set thecooking time and weight.
88 STOP/CLEAR - Used to stop the ovenoperation or to delete the cooking data.
99 START/+30 SEC - Used to start the ovenand also used to set a reheat time.
00 ZERO ON - Used to turn the AC power onthe oven.
FEATURES DIAGRAM (continued)
1
0
2
34
65
66
7
98

9
Plug power supply cord into 230V AC 50Hzpower outlet.
After placing the food in a suitable container,open the oven door and put it on the glasstray. The glass tray and roller guide mustalways be in place during cooking.
Close the door. Make sure that it is firmlyclosed.
The oven door can be opened at any timeduring operation by pulling the door handle.The oven will automatically shut off. To restartthe oven, close the door and then push theSTART button.
The oven automatically cooks on full powerunless set to a lower power level.
The display will show " : 0" when the oven isplugged in, press and hold ZERO ON buttonuntil display is turned on and beep sounds.
Display will be returned to the " : 0 " when thecooking time ends.
When the STOP/CLEAR button is pushedduring the oven operation, the oven stopscooking and all information retained. To eraseall information, push the STOP/CLEAR buttononce more.If the oven door is opened during the ovenoperation, all information is retained.
If the START button is pushed and the ovendoes not operate, check the area between thedoor and door seal for obstructions and makesure the door is closed securely. The oven willnot start cooking until the door is completelyclosed or the program has been reset.
OPERATION PROCEDUREThis section includes useful information about oven operation.
1
2
3
4
5
6
7
8
9
Make sure the oven is properly installedand plugged into the electrical outlet.
WATTAGE OUTPUT CHART
• The power-level is set by push the Power button. The chart shows the display, the power leveland the percentage of power.
once P-HI 100%
twice P-90 90%
3 times P-80 80%
4 times P-70 70%
5 times P-60 60%
6 times P-50 50%
7 times P-40 40%
8 times P-30 30%
9 times P-20 20%
10 times P-10 10%
11 times P-00 0%
Push the Power button Power level (Display) Approximate Percentage of Power

10
CONTROLSTURNING AC POWER ON & OFF THE OVENWhen the oven is first plugged in , the display will show nothing.
1. Press and hold ZERO ON buttonuntil display is turned on andbeep sounds.The oven is turned AC power on.
2. Press and hold STOP/CLEARbutton until display is turned off.The oven is turned AC power off.
NOTE : If the AC power ever goes off, the display is disappeared until the power comes back on topress and hold ZERO ON button until display is turned on and beep sounds.The oven is turned power off automatically after 10 minutes without using.

The defrosting time is automatically determined by the weight inputed.When you push the START button, the display counts down the time to show you how much defrostingtime is left. The oven beeps during the defrosting cycle to signal that the food needs to be turn over orrearranged. When the defrosting ends, you will hear 3 beeps.
11
WEIGHT DEFROSTINGWhen WEIGHT DEFROST is selected, the automatic cycle divides the defrosting time into periods ofalternating defrost and stand times by cycling on and off.
1. Push the WEIGHT DEFROSTbutton.
2. Push the TIME SET buttons for inputing the desiredweights.
3. Push the START button.
The display will show you " 0" .
The display will show you what you pushed.
NOTE: Your oven can be programmedfor 200g~3000g in Weightdefrosting mode.
When you push the START button, the display counts down the time to show you how much defrostingtime is left. The oven beeps during the defrosting cycle to signal that the food needs to be turn over orrearranged. When the defrosting ends, you will hear 3 beeps.
TIME DEFROSTINGWhen TIME DEFROST is selected, the automatic cycle divides the defrosting time into periods ofalternating defrost and stand times by cycling on and off.
1. Push the TIME DEFROSTbutton.
2. Push the TIME SET buttons for inputing the desiredtime.
3. Push the START button.
The display will show you " : 0" .
The display will show you what you pushed.
NOTE: Your oven can be programmedfor 59minutes 90seconds.(59:90).

12
When you push the START button, the display counts down the time to show how much cookingtime is left.
COOKING IN ONE STAGE
1. Push the POWER button.(Select the desired powerlevel.)
2. Push the TIME SET buttons for the cooking time.
3. Push the START button.
The display will show what you pushed
The display will show what you pushed
NOTE: Your oven can be programmed for 59 minutes 90 seconds. (59 : 90)Using lower power levels increases the cooking time which is recommended for foods such ascheese, milk and slow cooking of meats.
NOTE: If step 1 is omitted, the oven willcook at full power.

13
The display counts down the time remaining in WEIGHT or TIME DEFROST mode. Halfway through defrostingtime, turn over, break apart and/or redistribute the food. At the end of WEIGHT or TIME DEFROST mode, theoven will start M/W cook. The display counts down the time remaining in M/W cook.When the defrost cook is going on, if you push the weight or time defrost button, the display shows you “DEF” in3 seconds.When the defrost or MW COOK is going on, if you push the POWER button, the display shows you the currentpower level in 3 seconds.
COOKING IN TWO STAGEAll recipes require frozen foods to be defrosted fully before cooking. This oven can be programmed toautomatically defrost food before cooking.
1. Push the WEIGHT DEFROSTbutton.
2. Push the TIME SET buttons for the defrosting weightyou want.
3. Push the POWER button.(Select desired power level.)
4. Push the TIME SET buttons for desired cooking time.
5. Push the START button.
The display will show what you pushed
“P-HI” is displayed.The display will show what you pushed.This example shows power level 5.
The display will show what you pushed
X6
1. Push the TIME DEFROSTbutton.
2. Push the TIME SET buttons for the defrosting time youwant.
3. Push the POWER button.(Select desired power level.)
4. Push the TIME SET buttons for desired cooking time.
5. Push the START button.
The display will show what you pushed
“P-HI” is displayed.The display will show what you pushed.This example shows power level 5.
The display will show what you pushed
X6

14
1. Push the BEVERAGE buttononce for 1 cup, twice for 2 cupsor three times for 3 cups.
When you push the BEVERAGE buttononce, “1” is displayed. After 1.5 seconds, thedisplay is changed into cooking time and theoven starts cooking.
* BEVERAGE * (200 ml/cup)• 1 cup (mug) : Push the BEVERAGE button once.• 2 cups (mugs): Push the BEVERAGE button twice within 1.5 seconds.• 3 cups (mugs): Push the BEVERAGE button three times within 1.5 seconds.
NOTE: 1. Use only one frozen pizza at a time2. Use only frozen pizza made for microwave ovens.3. If the cheese of frozen pizza does not melt sufficiently, cook a few seconds longer.4. Some brands of frozen pizza may require more or less cooking time.
1. Push the FROZEN PIZZAbutton once for 200g pizza ortwice for 400g pizza.
When you push the FROZEN PIZZA buttononce, “200” is displayed. After 1.5 seconds,the display is changed into the cooking timeand the oven start cooking
* FROZEN PIZZA *• 200g : Push the FROZEN PIZZA button once.• 400g : Push the FROZEN PIZZA button twice within 1.5 seconds.
+30 sec+30 sec allows you to reheat for 30 seconds at 100% (full power) by simply pushing the +30 sec button.By repeatedly pushing the +30 sec button, you can also extend reheating time to 5 minutes by 30 secondincrements.
ONE TOUCH COOKINGOne touch cooking allows you to cook or reheat many of your favorite foods by pushing just one button.To increase quantity, push the chosen button until the number in the display is same as desired quantityto cook.
1. Push the +30 sec button. When you push the +30 sec button, “:30” isdisplayed, and the oven starts reheating

15
2. Push the AUTO COOK button twice for 350g of SOUP.AC-2 will be displayed.
3. Push the AUTO COOK button three times for 3ea ofBAKED POTATO. AC-3 will be displayed.
4. Push the AUTO COOK button four times for 200g ofFRESH VEGETABLE. AC-4 will be displayed.
5. Push the AUTO COOK button five times for 200g. ofFROZEN VEGETABLE. AC-5 will be displayed.
1. Push the PASTA button oncefor 1 serving of pasta or twicefor 2 servings of pasta
When you push the PASTA once, “1” isdisplayed. After 1.5 seconds, the display ischanged into cooking time and the ovenstarts cooking.
* PASTA *• 1 serving: Push the PASTA button once.• 2 serving: Push the PASTA button twice within 1.5 seconds.
AUTO COOKAUTO COOK allows you to cook or reheat many of your favorite foods by repeatedly pushing the AUTOCOOK button.When you push the AUTO COOK button once, “AC-1” will be displayed. By repeatedly pushing thisbutton, you can select other food category as shown in below.
1. Push the AUTO COOK buttononce for 4PCS of BREAD. AC-1 will be displayed.
Then push the START button. The displaywill be changed into cooking time of quantityand the oven starts cooking.

16
HOW TO STOP THE OVEN WHILE THE OVEN IS OPERATING
1. Push the STOP/CLEAR button.• You can restart the oven by pushing the START button.• Push the STOP/CLEAR once more to erase all instructions.• You must enter in new instructions.
2. Open the door.• You can restart the oven by closing the door and pushing the START button.
NOTE: Oven stops operating when door is opened.
TO SET STANDBY POWER "0" MODE
1. Push the STOP/CLEAR button.“ :0” appears in the display.
2. Press and hold the STOP/CLEAR button until display is turned off.
3. To cancel STANDBY POWER "0" mode, press and hold ZERO ON button until display is turned onand beep sounds.The oven is again available for normal use.
17
CARE OF YOUR MICROWAVE OVEN
Turn the oven off before cleaning.
Keep the inside of the oven clean. When foodspatters or spilled liquids adhere to oven walls,wipe with a damp cloth. Mild detergent may beused if the oven gets very dirty. The use of harsh detergent or abrasives is notrecommended.
The outside oven surface should be cleanedwith soap and water, rinsed and dried with asoft cloth. To prevent damage to the operatingparts inside the oven, water should not beallowed to seep into the ventilation openings.
If the Control Panel becomes wet, clean with asoft, dry cloth. Do not use harsh detergents orabrasives on Control Panel.
If steam accumulates inside or around theoutside of the oven door, wipe with a soft cloth.This may occur when the microwave oven isoperated under high humidity conditions and inno way indicates malfunction of the unit.
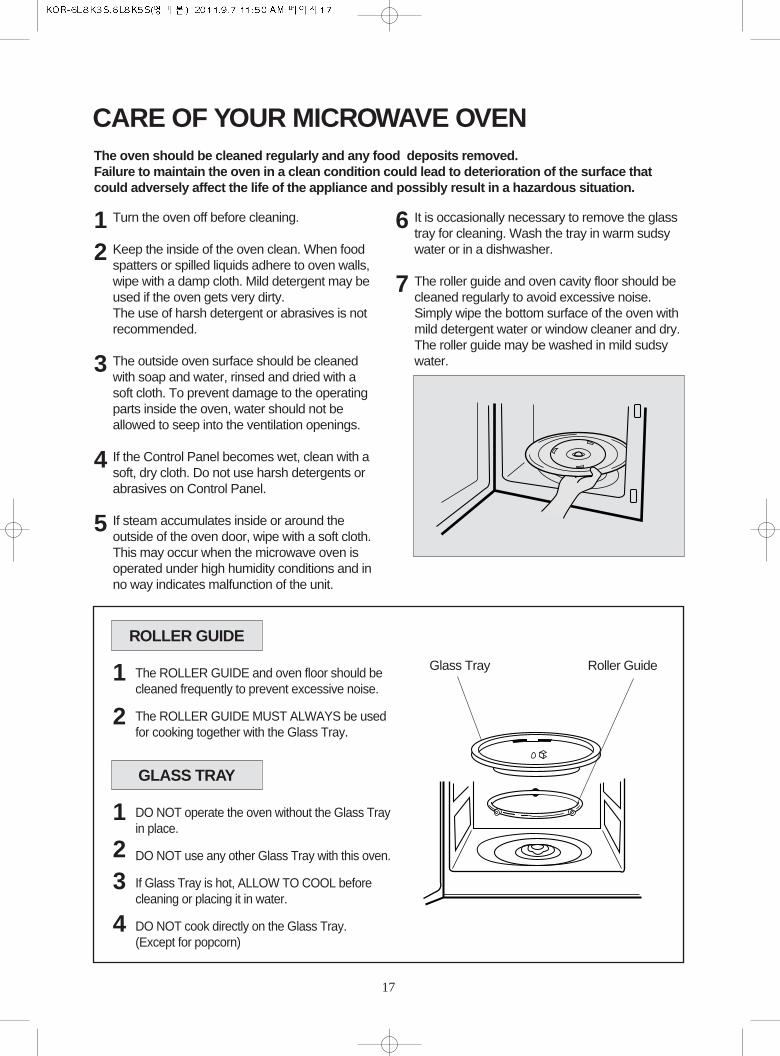
It is occasionally necessary to remove the glasstray for cleaning. Wash the tray in warm sudsywater or in a dishwasher.
The roller guide and oven cavity floor should becleaned regularly to avoid excessive noise. Simply wipe the bottom surface of the oven withmild detergent water or window cleaner and dry.The roller guide may be washed in mild sudsywater.
12
3
4
5
6
7
The oven should be cleaned regularly and any food deposits removed.Failure to maintain the oven in a clean condition could lead to deterioration of the surface thatcould adversely affect the life of the appliance and possibly result in a hazardous situation.
ROLLER GUIDE
Glass Tray Roller GuideThe ROLLER GUIDE and oven floor should becleaned frequently to prevent excessive noise.
The ROLLER GUIDE MUST ALWAYS be usedfor cooking together with the Glass Tray.
1
2
GLASS TRAY
DO NOT operate the oven without the Glass Trayin place.
DO NOT use any other Glass Tray with this oven.
If Glass Tray is hot, ALLOW TO COOL beforecleaning or placing it in water.
DO NOT cook directly on the Glass Tray.(Except for popcorn)
1
23
4
18
QUESTIONS AND ANSWERS* Q : I accidentally ran my microwave oven
without any food in it. Is it damaged?* A : Running the oven empty for a short time will
not damage the oven. However, it is notrecommended.
* Q : Can the oven be used with the glass trayor roller guide removed?
* A : No. Both the glass tray and roller guide mustalways be used in the oven before cooking.
* Q : Can I open the door when the oven isoperating?
* A : The door can be opened anytime during thecooking operation. Then microwave energywill be instantly switched off and the timesetting will maintain until the door is closed.
* Q : Why do I have moisture in my microwaveoven after cooking?
* A : The moisture on the side of your microwaveoven is normal. It is caused by steam fromcooking food hitting the cool oven surface.
* Q : Does microwave energy pass through theviewing screen in the door?
* A : No. The metal screen bounces back theenergy to the oven cavity. The holes aremade to allow light to pass through. They donot let microwave energy pass through.
* Q : Why do eggs sometimes pop?* A : When baking or poaching eggs, the yolk may
pop due to steam build-up inside the yolkmembrane. To prevent this, simply pierce theyolk with a toothpick before cooking. Nevercook eggs without piercing their shells.
* Q : Why this standing time recommendedafter the cooking operation has beencompleted?
* A : Standing time is very important.With microwave cooking, the heat is in thefood, not in the oven. Many foods build upenough internal heat to allow the cookingprocess to continue, even after the food isremoved from the oven. Standing time forjoints of meat, large vegetables and cakes isto allow the inside to cook completely,without overcooking the outside.
* Q : What does “standing time” mean?* A : “Standing time” means that food should be
removed from the oven and covered foradditional time to allow it to finish cooking.This frees the oven for other cooking.
* Q : Why does my oven not always cook asfast as the microwave cooking guidesays?
* A : Check your cooking guide again, to makesure you’ve followed directions exactly ; andto see what might cause variations in cookingtime. Cooking guide times and heat settingsare suggestions, to help prevent over-cooking... the most common problem ingetting used to a microwave oven.Variations in the size, shape and weights anddimensions could require longer cookingtime. Use your own judgement along with thecooking guide suggestions to check whetherthe food has been properly cooked just asyou would do with a conventional cooker.
* Q : Will the microwave oven be damaged if itoperates while empty?
* A : Yes. Never run it empty.
* Q : Can I operate my microwave ovenwithout the turntable or turn the turntableover to hold a large dish?
* A : No. If you remove or turn over the turntable,you will get poor cooking results. Dishesused in your oven must fit on the turntable.
* Q : Is it normal for the turntable to turn ineither direction?
* A : Yes. The turntable rotates clockwise orcounterclockwise, depending on the rotationof the motor when the cooking cycle begins.
* Q : Can I pop popcorn in my microwaveoven? How do I get the best results?
* A : Yes. Pop packaged microwave popcornfollowing manufacture’s guidelines. Do notuse regular paper bags. Use the “listeningtest” by stopping the oven as soon as thepopping slows to a “pop” every 1 or 2seconds. Do not repop unpopped kernels. Donot pop popcorn in glass cookware.
19
CARE AND CLEANINGAlthough your oven is provided with safety features, it is important to observe the following:
1. It is important not to defeat or tamper with safetyinterlocks.
2. Do not place any object between the oven frontface and the door or allow residue to accumulate onsealing surfaces. Wipe the sealing area frequentlywith a mild detergent, rinse and dry. Never useabrasive powders or buttons.
3. When opened, the door must not be subjected tostrain, for example, a child hanging on an openeddoor or any load could cause the oven to fallforward to cause injury and also damage to thedoor. Do not operate the oven if it is damaged, untilit has been repaired by a competent servicetechnician. It is particularly important that the ovencloses properly and that there is no damage to the:
i) Door(bent)ii) Hinges and Hookes(broken or loosened)iii) Door seals and sealing surfaces.
4. The oven should not be adjusted or repaired byanyone except a properly competent servicetechnician.
5. The oven should be cleaned regularly and any fooddeposits removed;
6. Failure to maintain the oven in a clean conditioncould lead to deterioration of the surface that couldadversely affect the life of the appliance andpossibly result in a hazardous situation.
BEFORE YOU CALL FOR SERVICERefer to following checklist, you may prevent an unnecessary service call.
* The oven doesn’t work :1. Check that the power cord is securely plugged
in. and the oven is STANDBY POWER "0"mode.
2. Check that the door is firmly closed.3. Check that the cooking time is set.4. Check for a blown circuit fuse or tripped main
circuit breaker in your house.
* Sparking in the cavity;1. Check utensils. Metal containers or dishes with
metal trim should not be used.2. Check that metal skewers or foil does not push
the interior walls.
If there is still a problem, contact the service station.A list of these stations is included in the oven.

20
446 330
270
SPECIFICATIONS
POWER SUPPLY230V AC, 50Hz SINGLE PHASE WITHEARTHING
INPUT POWERKOR-6L8K3 : 1000W
KOR-6L8K5 : 1200W
MICROWAVEENERGY OUTPUT
KOR-6L8K3 : 700W
KOR-6L8K5 : 800W
FREQUENCY 2,450 MHz
OUTSIDE DIMENSIONS (W x H x D) 446 x 270 x 330 mm
CAVITY DIMENSIONS (W x H x D) 295 x 219 x 303 mm
CAVITY VOLUME 20 L
NET WEIGHTKOR-6L8K3 : APPROX. 10.3 Kg
KOR-6L8K5 : APPROX. 11.0 Kg
TIMER 59 min. 90 sec.
POWER SELECTIONS 10 Levels
* Specifications are subject to change without notice.

21
COOKING INSTRUCTIONSUtensil GuideOnly use utensils that are suitable for use in microwave ovens.To cook food in the microwave oven, the microwaves must be able to penetrate the food, withoutbeing reflected or absorbed by the dish used. Care must therefore be taken choosing the utensil. If theutensil is marked microwave-safe, you do not need to worry. The following table lists various of utensiland indicates whether and how they should be used in a microwave oven.
● : Recommended use▲ : Limited Use✕ : Not Recommended
Aluminium foil
Crust plate
China and earthenware
Disposable polyester cardboard dishes
Fast-food packaging• Polystyrene cups containers
• Paper bags or newspaper• Recycled paper or metal trims
Glassware• Oven-to-table ware• Fine glassware
• Glass jars
Metal• Dishes• Freezer bag twist ties
Paper• Plates, cups, napkins and
Kitchen paper• Recycled paper
Plastic• Containers
• Cling film
• Freezer bags
Wax or grease-proof paper
Utensil Safe Comments
Can be used in small quantities to protect areas againstovercooking. Arcing can occur if the foil is too close tothe oven wall or if too much foil is used.
Do not preheat for more than 8minutes.
Porcelain, pottery, glazed earthenware and bone chinaare usually suitable, unless deco-rated with a metal trim.
Some frozen foods are packaged in these dishes.
Can be used to warm food. Overheating may cause thepolystyrene to melt.May catch fire.May cause arcing.
Can be used, unless decorated with a metal trim.Can be used to warm foods or liquids. Delicate glass may break or crack if heated suddenly.Must remove the lid. Suitable for warming only.
May cause arcing or fire.
For short cooking times and warming. Also to absorbexcess moisture.May cause arcing.
Particularly if heat-resistant thermoplastic. Some otherplastics may warp or discolour at high temperatures. Donot use Melamine plastic.Can be used to retain moisture. Should not touch thefood. Take care when removing the film as hot steam willescape.Only if boilable or oven-proof. Should not be airtight.Prick with a fork, if necessary.
Can be used to retain moisture and prevent spattering.
▲
●
●
●
●
✕
✕
●
●
●
✕
✕
●
✕
●
●
▲
●

22
USE YOUR MICROWAVE OVEN SAFELYGeneral UseDo not attempt to defeat or tamper with safetyinterlocks.Do not place any object between the oven frontframe and the door or allow residue to build up onsealing surfaces. Wipe with a mild detergent, rinseand dry. Never use abrasive powders or buttons.Do not subject the oven door to strain or weight suchas a child hanging on an open door.This could cause the oven to fall forward resulting ininjury to you and damage to the oven.
Do not operate the oven if door seals or sealingsurfaces are damaged; or if door is bent; or if hingesare loose or broken.Do not operate the oven empty. This will damage theoven.Do not attempt to dry clothes, newspapers or othermaterials in the oven. They may catch on fire.Do not use recycled paper products as they maycontain impurities which may cause sparks or fires.Do not hit or strike the control panel with hardobjects. This can damage the oven.
FoodNever use your microwave oven for home canning.The oven is not designed for proper home canning.Improperly canned food may spoil and be dangerousto consume.Always use the minimum recipe cooking time. It isbetter to undercook rather than overcook foods. Undercooked foods can be returned to the oven formore cooking. If food is overcooked, nothing can bedone.Heat small quantities of food or foods with lowmoisture carefully. These can quickly dry out, burn orcatch on fire.Do not heat eggs in the shell. Pressure may build upand eggs can explode.Potatoes, apples, egg yolks and sausages areexamples of food with non-porous skins.These must be pierced before cooking to preventbursting.Do not attempt to deep fat fry in your microwaveoven.Always allow a standing time of at least 20 secondsafter the oven has been switched off to allow the
temperature to even out, stir during heating, ifnecessary, and ALWAYS stir after heating. Toprevent eruptive boiling and possible scalding, youshould put a spoon or glass stick into the beveragesand stir before, during and after heating.Do not leave the oven unattended while poppingcorn.Do not pop corn in a paper bag unless it is thecommercially prepared Microwave Popcorn product.The kernels can overheat and ignite a brown paperbag.Do not put packaged Microwave Popcorn bagsdirectly on the oven tray. Place the package on amicrowave safe glass or ceramic plate to avoidoverheating and cracking the oven tray.Do not exceed the Microwave Popcornmanufacturers suggested popping time. Longer popping does not yield more popcorn but itcan result in scorch, burn of fire. Remember, thePopcorn bag and tray can be too hot to handle.Remove with caution and use pot holders.
ARCINGIf you see arcing, push the STOP/CLEAR button and correct the problem.Arcing is the microwave term for sparks in the oven.
Arcing is caused by:
• Metal or foil pushing the side of the oven.• Foil not molded to food (upturned edges act like
antennas).
• Metal, such as twist-ties, poultry pins, or goldrimmed dishes, in the microwave.
• Recycled paper towels containing small metalpieces being used in the microwave.
23
MICROWAVING PRINCIPLESMicrowave energy has been used in this country to cook and reheat food since early experiments withRADAR in World War ll. Microwaves are present in the atmosphere all the time, both naturally and manmadesources. Manmade sources include radar, radio, television, telecommunication links and car phones.
CONVERSION CHARTSWEIGHT MEASURES15 g 1/2 oz.25 g 1 oz.50 g 2 oz.100 g 4 oz.175 g 6 oz.225 g 8 oz.450 g 1 lb.
HOW MICROWAVES COOK FOODMicrowave oven is a Group 2 ISM equipment in which radio frequency energy is intentionally generated andused in the form of electromagnetic radiation for the treatment of material. This oven is a Class B equipmentsuitable for use in domestic establishments and in establishments directly connected to a low voltage powersupply network which supplies buildings used for domestic purposes.
VOLUME MEASURES30 ml 1 fl.oz.100 ml 3 fl.oz.150 ml 5 fl.oz. (1/4 pt)300 ml 10 fl.oz. (1/2 pt)600 ml 20 fl.oz. (1pt)
SPOON MEASURES1.25 ml 1/4 tsp2.5 ml 1/2 tsp5 ml 1 tsp15 ml 1 tbsp
FLUID MEASUREMENTS1 Cup = 8 fl.oz. = 240 ml1 Pint = 16 fl.oz. (UK 20 fl.oz.) = 480 ml (UK 560 ml)1 Quart = 32 fl.oz. (UK 40 fl.oz.) = 960 ml (UK 1120 ml)1 Gallon = 128 fl.oz. (UK 160 fl.oz.) = 3840 ml (UK 4500 ml)
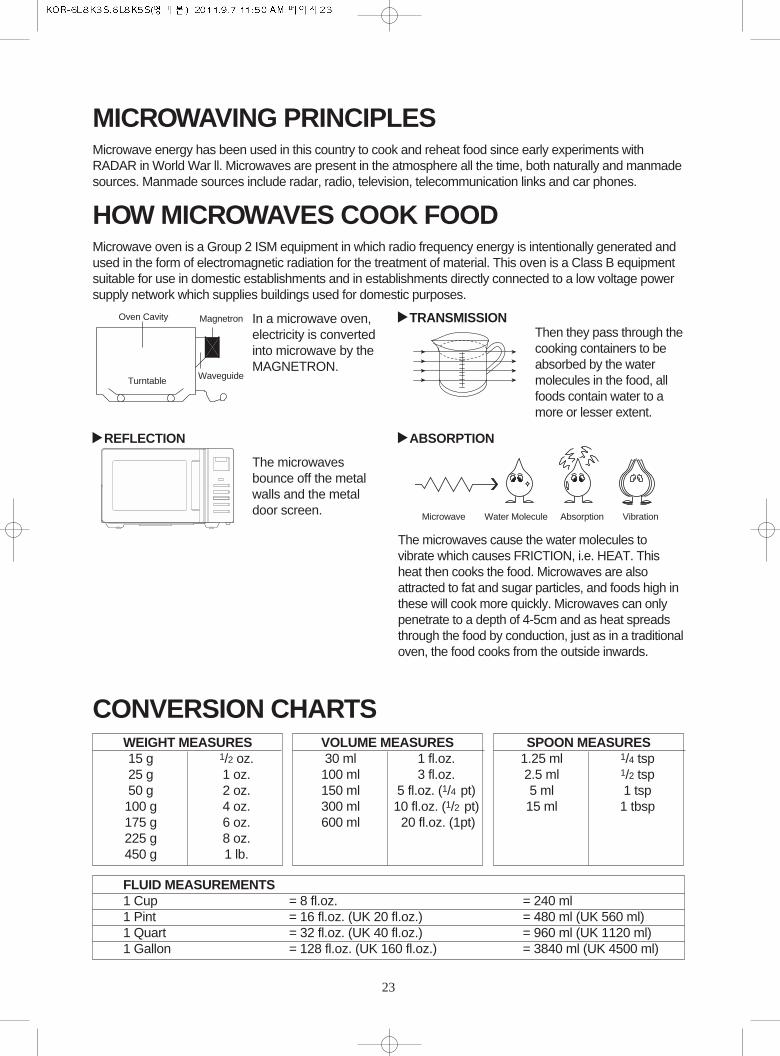
Then they pass through thecooking containers to beabsorbed by the watermolecules in the food, allfoods contain water to amore or lesser extent.
The microwaves cause the water molecules tovibrate which causes FRICTION, i.e. HEAT. Thisheat then cooks the food. Microwaves are alsoattracted to fat and sugar particles, and foods high inthese will cook more quickly. Microwaves can onlypenetrate to a depth of 4-5cm and as heat spreadsthrough the food by conduction, just as in a traditionaloven, the food cooks from the outside inwards.
In a microwave oven,electricity is convertedinto microwave by theMAGNETRON.
The microwavesbounce off the metalwalls and the metaldoor screen.
Oven Cavity Magnetron
WaveguideTurntable
REFLECTION
TRANSMISSION
ABSORPTION
Microwave Water Molecule Absorption Vibration
24
STANDING TIMEDense foods e.g. meat, baked potatoes andcakes, require standing time(inside or outside ofthe oven) after cooking, to allow heat to finishconducting to cook the center completely. Wrapmeat joints and baked potatoes in aluminium foilwhile standing. Meat joints need approx. 10-15minutes, baked potatoes 5 minutes. Other foodssuch as plated meal, vegetables, fish etc require2-5 minutes standing. After defrosting food,standing time should also be allowed. If food is notcooked after standing time, return to the oven andcook for additional time.
MOISTURE CONTENTMany fresh foods e.g. vegetables and fruit, vary intheir moisture content throughout the season,particularly baked potatoes. For this reasoncooking times may have to be adjusted. Dryingredients e.g. rice, pasta, can dry out duringstorage so cooking times may differ.
DENSITYPorous airy foods heat more quickly than denseheavy foods.
CLING FILMCling film helps keep the food moist and thetrapped steam assists in speeding up cookingtimes. Pierce before cooking to allow excesssteam to escape. Always take care whenremoving cling film from a dish as the build-up ofsteam will be very hot.
SHAPEEven shapes cook evenly. Food cooks better bymicrowave when in a round container rather thansquare.
SPACINGFoods cook more quickly and evenly if spacedapart. NEVER pile foods on top of each other.
STARTING TEMPERATUREThe colder the food, the longer it takes to heat up.Food from a fridge takes longer to reheat thanfood at room temperature.
LIQUIDSAll liquids must be stirred before and duringheating. Water especially must be stirred beforeand during heating, to avoid eruption. Do not heatliquids that have previously been boiled. DO NOTOVERHEAT.
TURNING & STIRRINGSome foods require stirring during cooking. Meatand poultry should be turned after half the cookingtime.
ARRANGINGIndividual foods e.g. chicken portions or chops,should be placed on a dish so that the thickerparts are towards the outside.
QUANTITYSmall quantities cook faster than large quantities,also small meals will reheat more quickly thanlarge portions.
PIERCINGThe skin or membrane on some foods will causesteam to build up during cooking. These foodsmust be pierced or a strip of skin should be peeledoff before cooking to allow the steam to escape.Eggs, potatoes, apples, sausages etc, will all needto be pierced before cooking. DO NOT ATTEMPTTO BOIL EGGS IN THEIR SHELLS.
COVERINGCover foods with microwave cling film or a lid.Cover fish, vegetables, casseroles, soups. Do notcover cakes, sauces, baked potatoes or pastryitems.
COOKING TECHNIQUES

25
▶ Do not defrost covered meat. Covering might allowcooking to take place. Always remove outer wrap andtray. Use only containers that are microwave-safe.
▶ Begin defrosting whole poultry breast-side-down.Begin defrosting roasts fat-side-down.
▶ The shape of the package alters the defrosting time.Shallow rectangular shapes defrost more quickly thana deep block.
▶ After 1/3 of the defrost time has elapsed, check thefood. Toy may wish to turn over, break apart,rearrange or remove thawed portions of the food.
▶ During defrost, the oven will prompt you to turn theover. At this point, open oven door and check thefood. Follow the techniques listed below for optimumdefrost results.Then, close oven door, push the START button tocomplete defrosting.
▶ When defrosted, food should be cool, but softened inall areas. If still slightly icy, return to microwave ovenvery briefly, or let stand a few minutes. Afterdefrosting, allow food to stand 5-60 minutes if thereare any icy areas.Poultry and fish may be placed under running coolwater until defrosted
➪ Turn over : Roast, ribs, whole poultry, turkey breasts,hot dogs, sausages, steaks, or chops.
➪ Rearrange : Break apart or separate steaks, chops,hamburger patties, ground meat, chicken or seafoodpieces, chunks of meat such as stew beef.
➪ Shield : Use small strips of aluminum foil to protectthin areas or edges of unevenly shaped foods such aschicken wings. To prevent arching, do not allow foil tocome within 1-inch of oven walls or door.
➪ Remove : To prevent cooking, thawed portions shouldbe removed from the oven at this point. This mayshorten defrost time for food weighing less than 3lbs.(1350g).
DEFROSTING GUIDE
DEFROSTING CHART (by Time Defrost)
* The times are approximate because freezer temperatures vary.
BEEFMinced beef1 lb./450g
Stew Meat1 1/2 lbs./675g
Patties4(4oz./110g)
PORKSpareribs1 lb./450g
Chops4(5oz./125g)
Minced pork1 lb./450g
POULTRYWhole Chicken2 1/2 lbs./1125g
Chicken Breasts1 lbs./450g
Fryer Chicken(cut up)2 lbs./900g
Chicken Thights1 1/2 lbs./675g
FISH & SEAFOODWhole Fish1 lb./450g
Fish Fillets1 1/2 lb./675g
Shrimp1/2 lb./225g
Item & Weight Standing Time Special Techniques
8-10 min.
13-17 min.
8-10 min.
8-10 min.
8-10 min.
8-10 min.
21-25 min.
8-10 min.
17-20 min.
13-17 min.
6-8 min.
10-12 min.
3-5 min.
7-9 min.
11-13 min.
7-9 min.
7-9 min.
8-10 min.
7-9 min.
18-21 min.
7-9 min.
14-17 min.
11-13 min.
6-8 min.
10-12 min.
3-4 min.
15-20 min.
25-30 min.
15-20 min.
25-30 min.
25-30 min.
15-20 min.
45-90 min.
15-30 min.
25-30 min.
15-30 min.
15-20 min.
15-20 min.
15-20 min.
Break apart and remove thawed portionswith fork.
Separate and rearrange once.
Turn over after half the time.
Separate and rearrange once.
Separate and turn over once.
Break apart and remove thawed portionswith fork.
Break side down. Turn over after half thetime. Shield as needed.
Separate and rearrange once.
Separate and rearrange once.
Separate and rearrange once.
Turn over after half the time.Shield as needed.
Separate and turn over once.
Separate and rearrange once.
Defrosting Time700W 800W

26
COOKING & REHEATING CHARTCooking chart
MEAT
Beef joint -Rare P-80 8-10 min.
-Medium P-80 9-11 min.
-well done P-80 11-13 min.
Pork Joint P-HI 12-14 min.
Bacon joint P-HI 8-10 min.
POULTRY
Whole chicken P-HI 6-8 min.
Portions chicken P-80 5-7 min.
Breast (boned) P-80 6-8 min.
FISH
Fish Fillets P-HI 4-6 min.
Whole Mackerel, P-HI 4-6 min.
Cleaned and prepared
Whole Trout, Cleaned P-HI 5-7 min.
& Prepared
Salmon steaks P-HI 4-6 min.
NOTE : The above times should be regarded only as a guide. Allow for difference in individual tastes and
preferences. The times may vary due to the shape, cut, and composition of the food.
Frozen meat, poultry and fish must be thoroughly thawed before cooking.
Cooking TimeItem Per lb./450g Special Instruction
- Chilled meat and poultry should be removed fromthe refrigerator at least 30 minutes beforecooking.
- Always let the meat and poultry stand, coveredafter cooking.
- Brush a little oil or melted butter over the fish, oradd 15~30ml(1-2 tbsp) lemon juice, wine, stock,milk or water.
- Always let the fish stand, covered, after cooking
700W 800W
PowerLevel

27
Reheating chart • Baby food particularly needs to be checked carefully before serving to prevent burns.
• When heating pre-packaged ready-cooked foods, always follow the pack instructions carefully.
• If you freeze foods which were bought from the fresh or chilled counters, remember that they shouldbe thoroughly thawed before following the heating instructions on the packed. It’s worth putting anote on them so that other members of the household will remember too.
• Remember metal ties and transfer food from foil containers before reheating.
• Chilled(refrigerated) food takes longer to reheat than food at room temperature (such as just-cooledfood or food from the store cupboard).
• All foods should be reheated using full microwave power.
Baby food128g jar 30 sec.
Baby milk100ml / 4fl.oz. 20-30 sec.225ml / 8fl.oz. 40-50 sec.
Sandwich roll or bun1 roll 20-30 sec.
Lasagna1 serving 4-6 min.(10 1/2 oz./300g)
Casserole1 cup 1 1/2-3 min.4 cups 5-7 min.
Mashed potatoes1 cup 2-3 min.
4 cups 6-8 min.
Baked beans1 cup 2-3 min.
Ravioli or pasta in sauce1 cup 3-4 min.4 cups 7-10 min.
Item Special Instructions
Empty into a small serving bowl.Stir well once or twice during heating. Before serving, check the temperature carefully.
Stir or shake well and pour into a sterilized bottle.Before serving, shake well and check the temperature carefully.
Wrap in paper towel and place on glass microwaveable rack.*Note : Do not use recycled paper towels.
Place lasagna on microwaveable plate.Cover with plastic wrap and vent.
Cook covered in microwaveable casserole.Stir once halfway through cooking.
Cook covered in microwaveable casserole.Stir once halfway through cooking.
Cook covered in microwaveable casserole.Stir once halfway through cooking.
Cook covered in microwaveable casserole.Stir once halfway through cooking.
Cooking time700W 800W

28
VEGETABLE CHARTUse a suitable glass pyrex bowl with lid. Add 30-45ml cold water(2-3 tbsp.) for every 250g unlessanother water quantity is recommended - see table. Cook covered for the minimum time - see table.Continue cooking to get the result you prefer. Stir once during and once after cooking. Add salt, herbsor butter after cooking. Cover during a standing time of 3 minutes.Hint : cut the fresh vegetables into even sized pieces. The smaller they are cut, the quicker they willcook.All vegetables should be cooked using full microwave power.
Cooking Guide for fresh vegetables
Broccoli 1/2 lb./250g1 lb./500g
Brussels sprouts 1/2 lb./250g
Carrots 1/2 lb./250g
Cauliflower 1/2 lb./250g1 lb./500g
Courgettes 1/2 lb./250g
Egg plants 1/2 lb./250g
Leeks 1/2 lb./250g
Mushrooms 0.3 lb./125g1/2 lb./250g
Onions 1/2 lb./250g
Pepper 1/2 lb./250g
Potatoes 1/2 lb./250g1 lb./500g
Turnip cabbage 1/2 lb./250g
Vegetables Weight Comments
Prepare even sized florets. Arrange the stems to the centre.
Add 60-75ml(5-6tbsp.) water.
Cut carrots into even sized slices.
Prepare even sized florets. Cut big florets intohalves. Arrange stems to the centre.
Cut courgettes into slices. Add 30ml(2tbsp.) water ora knob of butter. Cook until just tender.
Cut egg plants into small slices and sprinkle with 1tablespoon lemon juice.
Cut leeks into thick slices.
Prepare small whole or sliced mushrooms. Do notadd any water. Sprinkle with lemon juice. Spice withsalt and pepper. Drain before serving.
Cut onions into slices or halves. Add only15ml(1tbsp.) water.
Cut pepper into small slices.
Weigh the peeled potatoes and cut them into similarsized halves or quarters.
Cut turnip cabbage into small cubes.
3-4 min.5-7 min.
4-5 min.
3-4 min.
3-4 min.5-7 min.
3-4 min.
3-4 min.
3-4 min.
2-3 min.3-5 min.
3-4 min.
3-5 min.
3-5 min.8-10 min.
5-7 min.
2-3 min.4-6 min.
3-4 min.
2-3 min.
2-3 min.4-6 min.
2-3 min.
2-3 min.
2-3 min.
1-2 min.2-4 min.
2-3 min.
2-4 min.
3-5 min.8-10 min.
4-6 min.
Time700W 800W
Cooking Guide for frozen vegetables
spinach 0.3 lb./125g
broccoli 1/2 lb./250g
Peas 1/2 lb./250g
Green beans 1/2 lb./250g
Mixed vegetables 1/2 lb./250g(carrots/peas/corn)
Mixed vegetables 1/2 lb./250g(Chinese style)
Vegetables Weight Instructions
Add 15ml(1tbsp.) cold water.
Add 30ml(2 tbsp.) cold water.
Add 15ml(1 tbsp.) cold water.
Add 30ml(2t tbsp.) cold water.
Add 15ml(1ttbsp.) cold water.
Add 15ml(1 tbsp.) cold water.
4-5 min.
5-6 min.
5-6 min.
5-6 min.
5-6 min.
6-7 min.
3-4 min.
4-5 min.
4-5 min.
4-5 min.
4-5 min.
5-6 min.
Time700W 800W

29
RECIPESTOMATO & ORANGE SOUP1 oz.(25g) butter1 medium onion, chopped1 large carrot & 1 large potato, chopped13/4lb(800g) canned, chopped tomatoesjuice and grated rind of 1 small orange11/2pints(900ml) hot vegetable stocksalt and pepper to taste
1. Melt the in a large bowl at P-HI for 1 minute.2. Add the onion, carrot and potato and cook at
P-HI for 6 minutes. stir halfway through cooking.3. Add the tomatoes, orange juice, orange rind
and stock. Mix thoroughly. Season with salt andpepper to taste. Cover the bowl and cook at P-HI for 15 minutes. stir 2-3 times during cooking,until the vegetables are tender.
4. Blend and serve immediately.
FRENCH ONION SOUP1 large onions, sliced1 tbsp (15ml) corn oil2 oz.(50g) plain flour2 pints(1.2 liters) hot meat
or vegetable stocksalt and pepper to taste2 tbsp (30ml) parsley, chopped4 thick slices French bread2 oz.(50g) cheese, grated
1. Place the onion and oil a bowl, mix well andcook at P-HI for 2 minutes.
2. Stir in the flour to make a paste and graduallyadd stack. Season and add the parsley.
3. Cover the bowl and cook at P-80 for 16minutes.
4. Pour the soup into serving bowls, submergebread and sprinkle generously with cheese.
5. Cook at P-80 for 2 minutes, until the cheesehas melted.
STIR FRIED VEGETABLES1 tbsp(15ml) sunflower oil2 tbsp (30ml) soy sauce1 tbsp (15ml) sherry1"(2.5cm) root ginger,
peeled and finely grated 2 medium carrots, cut into fine strips4 oz.(100g) button mushrooms,
chopped2 oz.(50g) beansprouts4 oz.(100g) mange-tout1 red pepper, seeded and thinly sliced4 spring onions, chopped4 oz.(100g) canned water chestnuts,
sliced1/4 head of chinese leaves, thinly sliced
1. Place the oil, soy sauce, sherry, ginger, garlicand carrots in a large bowl, mix thoroughly
2. Cover and cook at P-HI for 4-5 minutes, stirringonce.
3. Add the button mushrooms, beansprouts,mange-tout, red pepper, spring onions, waterchestnuts and chinese leaves. Mix thoroughly.
4. Cook at P-HI for 4-5 minutes, until thevegetables are tender. Stir 2-3 times duringcooking.
Stir fried vegetables are ideally served withmeat or fish.
HONEYED CHICKEN4 boneless chicken breasts2 tbsp(30ml) clear honey1 tbsp(15ml) whole grain mustard1/2 tsp(2.5ml) dried tarragon1 tbsp(15ml) tomato puree1/4 pint(150ml) chicken stock
1. Place the chicken breasts in a casserole dish.2. Mix all remaining ingredients together and pour
over the chicken. Salt and pepper to taste.3. Cook at P-HI for 11-12 minutes. Rearrange and
coat the chicken with the sauce twice duringcooking.

30
BLUE CHEESE & CHIVE JACKETS2 baking potatoes, (approx.9 oz.(250g) each)
2 oz.(50g) butter4 oz.(100g) blue cheese, chopped1 tbsp(15ml) fresh chives, chopped2 oz.(50g) mushrooms, slicedsalt and pepper to taste
1. Prick each potato in several places. Cook at P-HI for 10-11 minutes. Halve and scoop the fleshinto a bowl, add the butter, cheese, chives,mushrooms, salt and pepper, mix thoroughly.
2. Pile mixture into the potato skins and place in aflan dish, on the rack.
3. Cook at P-80 for 10 minutes.
WHITE SAUCE1 oz.(25g) butter1 oz.(25g) plain flour1/2 pint(300ml) milksalt and pepper to taste
1. Place the butter in a bowl and cook at P-HI for 1minute, until melted.
2. Stir in the flour and whisk in the milk.Cook at P-HI for 3-4 minutes, stirring every 2minutes until thick and smooth. Season with saltand pepper to taste.
STRAWBERRY JAM11/2 lb.(675g) strawberries, hulled3 tbsp(45ml) lemon juice11/2 lb.(675g) caster sugar
1. Place strawberries and lemon juice in a verylarge bowl, heat at P-HI for 5 minutes, or untilthe fruit has softened. Add sugar, mix well.
2. Cook at P-80 for 25-30 minutes, until settingpoint*is reached, stir every 4-5 minutes.
3. Pour into hot, clean jars. Cover, seal and label.
* setting point : To determine setting point, place1 tsp(5ml)jam onto chilled saucer. Allow to standfor 1 minute. Move surface of jam gently withyour finger, if the surface wrinkles setting pointhas been reached.
PLAIN MICROWAVE CAKE4 oz.(100g) margarine4 oz.(100g) sugar1 eggs4 oz.(100g) self raising flour, sifted2-3 tbsp(30-45ml) milk
1. line the base of 8" (20.4cm) cake dish withgrease-proof paper.
2. Cream the margarine and sugar together untillight and fluffy. Beat in the eggs and fold in thesifted flour alternately with the milk.
3. Pour into prepared container. Cook at P-HI for3-4 minutes, until a skewer comes out cleanly.
4. Leave the cake to stand for 5 minutes beforeturning out.
OMELETTS1/2 oz.(15g) butter4 eggs6 tbsp(90ml) milksalt & pepper
1. Whisk together eggs and milk. Season.2. Place butter in 10"(26cm) flan dish.
Cook at P-HI for 1 minute, until melted.Coat the dish with the melted butter.
3. Pour omelette mixture into flan dish.Cook at P-HI for 2 minutes. whisk mixture andcook again at P-HI for 1 minutes.

31
SCRAMBLED EDD1/2 oz.(15g) butter2 eggs2 tbsp(30ml) milksalt & pepper
1. Melt the butter in a bowl at P-HI for 1 minutes.2. Add the eggs, milk and seasoning and mix well.3. Cook at P-HI for 2 minutes, stirring every 30
seconds.
SAVORY MINCE1 small onion, diced1 clove garlic, crushed1 tsp(5ml) oil7 oz.(200g) can chopped tomatoes1 tbsp(15ml) tomato puree1 tsp(5ml) mixed herbs8 oz.(225g) minced beefsalt and pepper
1. Place onion, garlic and oil in casserole, andcook at P-HI for 2 minutes or until soft.
2. Place all other ingredients in casserole. Stirwell.
3. Cover and cook at P-HI for 4 minutes then P-80for 8-12 minutes or until the meat is cooked.


![Standby Power Systems - UNSJdea.unsj.edu.ar/ihospitalarias/Power Quality in... · assembled into standby power systems for critical loads and systems. They include the following [13.1]:](https://img.pdfslide.net/doc/110x75/5eb7ec6a44b6e07038322bc3/standby-power-systems-quality-in-assembled-into-standby-power-systems-for.jpg)