Embed Size (px)
DESCRIPTION
model magazine
Citation preview

military illustrated modeller
airc
raft
edi
tion
Has
egaw
a Sh
iden
-Kai
• I
tale
ri W
estl
and
Wes
sex•
Acc
urat
e M
inia
ture
s TB
M-3
• F
w 1
90 R
efer
ence
and
mor
e…
www.militaryillustratedmodeller.com
£6.50 - January ‘13 (issue 021)
BIRD OF PREYBuilding and Painting Revell’s New 1:32 He 219 01
9770268
832071
p01 CoverMIM 021.indd 1 28/11/2012 10:16

HOBBYBOSS, VALLEJO, MODEL MASTER, MINIART, MASTER BOX, AK INTERACTIVE, MIG PRODUCTIONS, PLUS MODEL AND MANY MORE...
Unit 6-10, Honeysome Ind Est., Honeysome Road, Chatteris, Cambs. PE16 6TG
www.creativemodels.co.uk Tel: +44(0)1354 760022
Inspirational...
Innovational...
Irresistible...
Get Creative!
www.creativemodels.co.uk
Model by Angus Creighton
p 05 CreativeModels 021.indd 1 29/11/2012 17:09

Aircraft Edition 3
Contents military illustrated modellerISSUE No.021 January 2013
4 NEWS What’s happening in modelling and aviation
6 REFERENCE The Sinking of LST-158 by Morten Jessen & Andrew Arthy
14 PREVIEW Meng 1:72 F-102A by Brett Green
16 BIRD OF PREY Part Two Revell’s 1:32 Heinkel He 219 A by Brett Green & Chris Wauchop
30 OKINAWA AVENGER Gary Edmundson builds Accurate Miniatures’ 1:48 scale TBM-3 Avenger
36 PREVIEW Tarangus 1:48 Lansen by Brett Green
37 PREVIEW Revell 1:32 Sea Lynx by Phil Parsons
38 GEORGE OF THE JUNGLE Hasegawa 1:48 N1K2-J Shiden-Kai by Joaquin Garcia Gazquez
46 THE DUELLISTS Wingnut Wings 1:32 Build Preview by Rob Baumgartner
50 SCALE MODELWORLD 2012 – Show Report
53 PREVIEW Kinetic 1:48 T-45 Goshawk by Brett Green
54 WESSEX WHIRLYBIRD Italeri 1:48 Westland Wessex HU.5 by Brett Green
65 NEXT ISSUE What’s coming up in the next issue of Military Illustrated Modeller
66 TAILPIECE Late breaking news and ramblings from the Editor
38
30
4 NEWS What’s happening in modelling and aviation
6 The Sinking of LST-158 by Morten Jessen & Andrew Arthy
14 PREVIEW Meng 1:72 F-102A by Brett Green
16 BIRD OF PREY Part Two Revell’s 1:32 Heinkel He 219 A by Brett Green & Chris Wauchop
30 OKINAWA AVENGER Gary Edmundson builds Accurate Miniatures’ 1:48 scale TBM-3 Avenger
36 PREVIEW Tarangus 1:48 Lansen by Brett Green
37 PREVIEW Revell 1:32 Sea Lynx by Phil Parsons
16
Aircraft Edition
66 TAILPIECE Late breaking news and ramblings from the Editor
54
p3 Contents 021.indd 3 28/11/2012 10:15

4 Military Illustrated Modeller - January 2013
AIRFIX TEST SHOTS AT SCALEMODELWORLD 2012
News
T he book contains 144 pages including more than 40 pages of technical information, 30 pages of walkaround images and technical diagrams, 5 pages
of camouflage and markings plus sections with model builds and modelling information.
Images comprise 200+ photographs including wartime images; colour side views and four-views by Richard Caruana; 3D isometric views of all variants by Jacek Jackiewicz and a full set of fold-out 1:48 scale plans.
The book may be ordered direct from Valiant Wings website www.valiant-wings.co.uk/airframe--miniature-no4-30-p.asp , or from ADH Books www.adhbooks.com
K itty Hawk has sent the latest images of their future releases in 1:48 scale, an F-35A Lightning II, Mirage F1B/ F1Cand a Sepecat Jaguar A.
The F-35A is out now. More information will be available on the Jaguar and Mirages closer to release.
Thanks to Kitty Hawk for the images and information www.kittyhawkmodel.com
NEW RELEASES FROM KITTY HAWK MODELS
VALIANT WINGS HAWKER TEMPEST BOOK
A irfix surprised visitors to ScaleModelworld 2012 at Telford with test shots and even a built sample of a forthcoming 1:48 scale Spitfire PR.XIX. Detail looked excellent,
and panel lines appear much finer than the latest Airfix releases. In fact, the exterior surface detail was much more reminiscent of the benchmark Spitfire 22/24 from the 1990s than the somewhat chunkier Spitfire XII.
Also on the Airfix stand were test shot sprues, an unpainted build-up and a complete and painted example of their forthcoming 1:48 scale Agusta Westland Merlin helicopter at ScaleModelworld 2012. The Merlin is an all weather multi-role helicopter that can be used in both strategic and operational roles. It is currently serving in Afghanistan where it is proving to be a valuable asset carrying a wide range of cargo, from general stores inside its fuselage to larger under slung loads such as Land Rovers and artillery pieces. This kit will be available in 2013.
More information will be available on the Airfix website www.airfix.com
A2Zee Models has a number of new releases including the first WWI kit by Alley Cat, a 1:32 scale Bristol M1.C. This resin kit has decals for seven
aircraft – three operational and four trainers. Also released recently is a 1:32 scale Gloster Gamecock
This kit contains 148 high quality resin parts plus 6 clear resin parts, and decals two aircraft.
Other new releases inlcude a 1:48 scale de Havilland Sea Vixen FAW.1 (Royal Navy Test Squadron) full resin conversion for the Airfix FAW.2 kit, including new resin booms, canopy parts, masks and decals for XJ488
A2Zee Models has launched a new brand, Rotor Craft, specialising in helicopter accessories. The initial batch of releases are a 1:48 scale Gulf War “Killer” Lynx HAS.3 designed for the Airfix kit with weapons and decals for two aircraft; a Wessex HAR.2 conversion for the Italeri kit (decals available on Xtradecal sheet no. X48111; and a folded tail rotor also for the Italeri 1:48 scale kit.
All these new releases are available now from A2Zee Models’ website www.
Valiant Wings newest release, No.4 in their Airframe & Miniature series, The Hawker Tempest by Richard A. Franks, is available now.
A2ZEE MODELS NEW RELEASES
VALIANT WINGS HAWKER TEMPEST BOOKVALIANT WINGS HAWKER TEMPEST BOOKVALIANT WINGS HAWKER TEMPEST BOOKVALIANT WINGS HAWKER TEMPEST BOOKVALIANT WINGS HAWKER TEMPEST BOOKVALIANT WINGS HAWKER TEMPEST BOOKVALIANT WINGS HAWKER TEMPEST BOOK
p4 News 021.indd 4 28/11/2012 10:14

AeroDetail seriesMaking a scale model?Finding the detail needed to fi nish a scale model can be diffi cult and getting full size images is not always practical. Our range of detail photo collections provides extensive close ups of a wide range of popular aircraft all on CD in J-peg format
Whitman Tailwind CD106Two examples shown of this U.S. homebuilt lightplane, with boxey shape ideal for modellers. Complete close-up detail. (62 images)
Westland Lysander CD105The Shuttleworth Museum’s airworthy example shown in both camoufl age and Special Operations black fi nishes. Full close-up detail. (62 images)
Waco Ymf-5 CD104Beautiful and graceful spatted undercarriage biplane of the 1930s ‘golden aviation era’. Example photographed is an accurate-in-every-detail modern replica. (130 images)
Vickers Supermarine Walrus CD103The famous ‘Shagbag’ biplane seaplane, used during WW2 as an air-sea rescue craft and fl eet gunnery spotter. (80 images)
Tipsy Belfair CD102Highly attractive Belgian low wing light aircraft from the era of simple, open cockpit private fl ying. Machine offers scale modellers pleasant lines and simple shape. (35 images)
Thulin Tummelisa CD101Swedish 1919-era fi ghter trainer that served the Swedish air arm for many years. Example depicted is a faithful reproduction. (55 images)
Supermarine Spitfi re MK.XVI CD100Last of the Merlin-engined Spifi res. This collection depicts the cut-down fuselage, bubble cockpit canopy later version. (116 images)
Supermarine Spitfi re MK.IX CD99The most numerous version of the classic Spitfi re that turned the tables on the Luftwaffe’s Focke Wulf Fw 190. (90 images)
Supermarine Spitfi re MK XIV CD982nd of the Griffon-engined Spits (Mk.XII was fi rst), the bigger engine forced a change of the classic Spifi re shape. (58 images)
Supermarine Spitfi re MK Vc CD97Shuttleworth Museum’s airworthy example presented in it’s latest form with classic rounded wingtip planform. (160 plus images)
Supermarine Seafi re Mk17 CD96The Seafi re 17 was no navalised Spit. A true ground-up naval fi ghter. (64 images)
Stinson 105 CD95Light, private aircraft of the 1940-50s era, with lots of character. (75 images)
Steen Skybolt CD94Attractive U.S. aerobatic biplane, presented in full detail. (89 images)
Sopwith Triplane CD93The last example of the ‘Tripehound’ is the one built (in 1980!) from original Sopwith drawings by Northern Aero Works and given sequential manufacturer’s number by Sir Thomas Sopwith himself in recognition of the out-standing workmanship. Extensive detail. (120 images)
Sopwith Pup CD92The charismatic Sopwith Scout (to give its correct des-ignation) is a great scale modellers’ favourite. Example depicted is the one preserved and regularly fl own at the Shuttleworth Collection, Old Warden. (50 images)
S.E.5A CD91Shuttleworth Museum’s airworthy example presented in full detail. (100 plus images)
Ryan Pt-22 CD90US military primary trainer aircraft that served with both US Army and Navy, thus providing ab-initio fl ight training for the majority of US airmen of the WW2 period. A highly attractive aircraft. 90 images of the preserved, airworthy aircraft, hangared at the Shutleworth Collec-tion, Old Warden.
Republic P-47D CD89Bubble-canopy version of the much loved ‘Jug’, photo-graphed in fi ne detail. (105 images)
Polikarpov Po-2 CD88The world’s most numerously produced aircraft of all time, the P0-2 was a great maid-of-all-work used by both military and civil groups in the old Soviet Union and its satellite states. Example depicted is pristine, and now in storage at Old Warden. (170 images)
Polikarpov I-15 CD87The ultra agile Russian biplane fi ghter aircraft that saw widespread service prior to and in the early years of WW2 and during the Spanish civil war. Example illus-trated is a superbly restored machine. (100 images)
Pitts S.1 CD86Homebuilt example by Bob Millinchip, as seen at 2002 PFA Rally. Complete detail study. (36 images)
Piper Tomahawk CD85Cranfi eld Flying School example of this civil ab-initio trainer aircraft. (54 images)
Piper Super Cub CD84The later, ‘cleaned-up’ version of the famous Piper J-3, with more elegant engine cowl. Two examples shown. (80 images)
Piper L-4 Grasshopper CD83Military version of the famous Piper J-3 Cub used dur-ing WW2 and close reconnaissance and spotter aircraft and for many other tasks. (80 images)
Percival Provost CD82Airworthy, preserved example of the RAF piston engined basic trainer used in the 1950s. Full detail. (30 images)
Percival Mew Gull CD81Famous 1930s racing and record setting aircraft that will forever linked with the achievements of British aviator Alex Henshaw. (35 images)
North American T28 CD80The advanced trainer aircraft that served in many air arms worldwide and also became a counter-insur-gency ground attack aircraft. Examples illustrated are from France, where the type served for many years as the ‘Fenec’. (100 plus images)
North American P51D Mustang CD79The definitive bubble canopy Merlin Mustang. In de-tail, showing several restored examples. This is the Fantasy of Flight Museum’s overpolished example, but the close-up detail is all there. (102 images)
North American P51B/C CD78First of the Rolls Royce Merlin engined Mustangs, this collection depicts the Fantasy of Flight Museum’s re-stored example, with overly polished plain metal surfaces. Much detail. (102 images) Also, 41 images of The Fighter Collection’s P-51C in bare metal restoration, showing much surface and internal airframe detail. A real bumper bundle! (over 140 images)
North American B25 Mitchell CD77Fantasy of Flight Museum’s example. Photographed soon after superb restoration. Full nose to tail detail. (74 images)
North American AT6 Harvard CD76AT-6, SNJ, Texan, Harvard – call it what you will. 55,000 were built – this example is in U.S. Army colours, with comprehensive close-up detail, nose to tail. (76 images)
North American A36 Invader CD75The ground attack variant of the Alison engined P-51A. Photos, in detail, of the world’s only airworthy example. (69 images)
Morane Saulnier MS406 CD74French WW2 fi ghter that fought in the Battle of France, 1940. Swiss restored example (92 images)
Monocoupe CD108The Monocoupes were side-by-side two-seat light-planes of mixed wood and steel-tube basic construction with fabric covering. A braced high-wing monoplane with fi xed tailskid landing gear, and the reverse curve rear fuselage lines that were to become one of the signature identifi er features of the Monocoupes. 55 photos
Miles Magister CD73A fi rm favourite with scale modellers, this extensive collection of images depicts two examples in different Royal Air Force training colour schemes. (100 images)
Messerschmitt ME109G CD72The ‘Gustav’ saw Luftwaffe service from late 1942 on-wards. Subject version of this collection is a tropicalised G-6. (110 images)
Messerschmitt Bf109E CD71The ‘Emil’ was the version of this WW2 fi ghter that was the mainstay of the Luftwaffe fi ghter force during the Battle of Britain in 1940. (150 images)
Me 410A – 1/U2 CD107For those who fancy a twin, but something outside the ‘normal’ favourites, consider the Luftwaffe’s fi nal ‘destroyer’ heavy fi ghter that packed a powerful punch 79 photos
Martin B-26 Marauder CD70The Fantasy of Flight Museum’s example, photo-graphed pre-restoration, soon after it was fl own into the Museum site, thus in original, unrestores condition. (100 images)
LVG C.VI CD69The sole survivor of its type from the WW1 era, photo-graphed in extensive detail. This is the machine house at and fl own from the Shuttleworth Collection airfi eld, Old Warden and now in storage, awaiting display at the RAF Museum. (110 images)
Luton Minor CD68Just one example of this light aircraft, to which the owner has added many mods and variations. (32 images)
Luscombe Silvaire CD67The elegant late 1940s U.S. light aircraft. Several examples provided, with much close-up detail for modellers. (74 images)
Kawasaki Ki100 CD66A study of the late WW2 radial engined ‘emergency’ development of the Japanese Ki 61 Hien (Tony) that provided an unexpectedly superior performance for the squadrons of the Imperial Japanese Air Force during the closing stages of the Pacifi c war. (60 images)
ORDER FORM - Aerodetail CDsPlease send me the following CDs:
Name:
Address:
Postcode:
Daytime Tel No:
I enclose a cheque for £
(Made payable to ADH Publishing)
Please debit my credit card for £
(VISA / Mastercard - please delete non-applicable)
Card No:
Expiry date:
CCV:
SIGNATURE:
DATE:
£12.99 (including p+p)* per CD *UK only
Postage: (Europe); £2.50 (World); £3.50
Send to:
ADH Publishing Ltd,
Doolittle Mill, Doolittle Lane, Totternhoe,
Bedfordshire, LU6 1QX. Great Britain.
Tel: 01525 222573 Fax: 01525 222574
Email: [email protected]
Allow 21 days for delivery
✁
Order on line at www.flyingscalemodels.com or aero-modeller.com
Monocoupe CD108Steen Skybolt CD94 Piper L-4 Grasshopper CD83
See many more online at fl yingscalemodels.com
ONLYONLY£12.99 (INC. P+P)*
Cd advert-Nov12.indd 1 29/11/2012 15:17

On 10 July 1943, the hitherto largest amphibious invasion force in history landed on the southern coast of Sicily. This Anglo-American landing provided a very difficult
challenge for the Luftwaffe’s Focke-Wulf Fw 190 units based in the Mediterranean theatre, but they put up a fight despite facing numerous problems. One of the highlights of their anti-invasion efforts was the sinking of American Landing Ship Tank 158 (LST-158) on the morning of 11 July.
The Fw 190 fighter-bomber force available to counter the Allied invasion of Sicily comprised two units, Schnellkampfgeschwader 10 (SKG 10) and Schlachtgeschwader 2 (Sch.G. 2), which were both exhausted and badly in need of rest, replacement pilots and new aircraft. They had fought hard in the final stages of the North African campaign,
but in the early days of May 1943 had to hastily evacuate their African bases and fly more than 170 km across the Mediterranean to airfields in southern Sicily, often with several ‘passengers’ – mechanics and other members of the unit’s ground personnel – hastily stowed in the fuselages of their Fw 190s. Some pilots bravely flew several of these very risky evacuation flights.
After the conclusion of the North African campaign on 13 May 1943, the few available Fw 190 units were widely distributed to protect potential Allied invasion objectives, including the island of Sardinia, and the southern, eastern and western coasts of Sicily. This dispersal of forces meant that concentrated fighter-bomber attacks could not be carried out during the early hours of the Anglo-American invasion, when the fledgling
beachhead would be at its most vulnerable.There was another factor that seriously
weakened the Fw 190 units. The British and Americans, concerned about the potential threat of the Axis air force during the invasion of Sicily, commenced a concentrated bombing campaign against Axis airfields on Sicily and Sardinia in June 1943. Many German aircraft were destroyed or damaged (including 24 Fw 190s destroyed and 47 damaged), most airfields were rendered unserviceable, and the bombing forced the evacuation of most of SKG 10’s Fw 190s to airfields in Italy just a few days before the invasion took place. The bombing campaign was so effective that the Luftwaffe reported just 79 serviceable Fw 190s in the entire Mediterranean theatre on the morning of 10 July, with only a
The Sinking of LST-158
6 Military Illustrated Modeller - January 2013
REFERENCE: Focke-Wulf Fw 190 in the Battle for Sicily Part One - The Sinking of LST-158
Focke-Wulf Fw 190 in the Battle for Sicily Part One
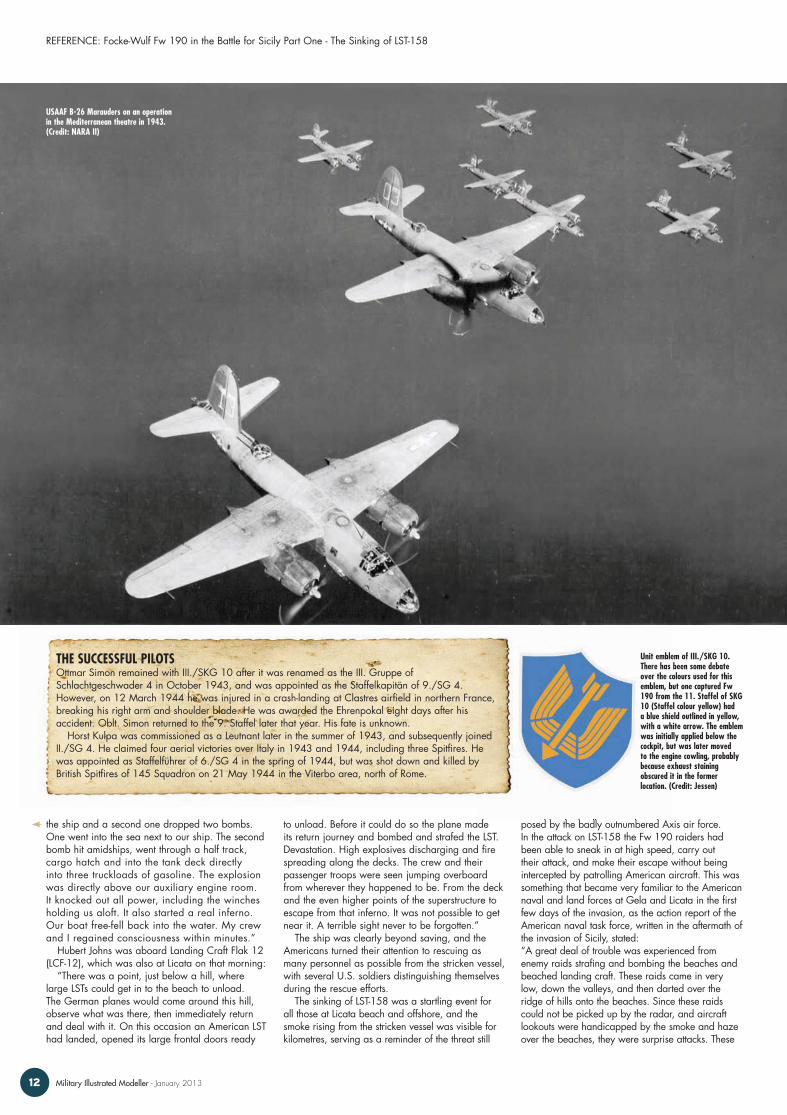
by Morten Jessen & Andrew Arthy LST-158 burning at Blue Beach, east of Licata, on the morning of 11 July 1943. (Credit: NARA II)
p6-13 ref fw 190 articles 021.indd 6 28/11/2012 10:10

Aircraft Edition 7
handful on Sicily itself (ideally, the five Fw 190 Gruppen in the region would have had a total of 200 aircraft serviceable). In comparison, the RAF and USAAF had 2,510 serviceable aircraft at their disposal in the Mediterranean theatre, most of which were assigned to support the invasion.
Despite the Fw 190 units being in such a
difficult position, they were expected by Luftwaffe commanders to be an important anti-invasion force when the Allies made their next move. Generalfeldmarschall Wolfram Freiherr von Richthofen, commander of the Luftwaffe in the central Mediterranean, wanted to stop the invasion on the beaches, and he placed great faith in his fighter-bomber force of Fw 190s and Bf 110s to achieve his ambitious aim.
The British and Americans came ashore in the early hours of 10 July 1943, and firmly established their bridgehead despite the best efforts of the depleted Axis air units based in Sicily, Sardinia and Italy. SKG 10 and Sch.G. 2 flew at least eleven missions and 44 sorties on the opening day of the invasion, sinking one American Landing Ship Tank, and claiming damage to various British and
American targets on land and at sea. Fw 190 unit losses for 10 July amounted to four aircraft destroyed and one damaged, as well as two pilots killed and one lightly wounded. As could be expected given the prevailing situation, fighter-bomber operations were small-scale, the largest being carried out by fourteen Fw 190s of Sch.G. 2
in the afternoon.On 11 July all elements of SKG 10 based
on Sicily were ordered to continue their efforts by attacking Allied shipping from first light, and again the Fw 190s enjoyed success against enemy vessels. This time, American Landing Ship Tank 158 (LST-158) fell victim to a pair of raiding Fw 190 fighter-bombers while it was unloading its cargo on one of the American invasion beaches. This event highlighted the threat posed to the Allied invasion force by high-speed German fighter-bomber aircraft undertaking ‘hit-and-run’ raids.
The successful Luftwaffe unit in the LST-158 attack was the III. Gruppe of Schnellkampfgeschwader 10, which was led by the very capable Knight’s Cross Holder Hauptmann Fritz Schröter. III./SKG 10 was equipped with the Fw 190 A-5/U8, a long-
range fighter-bomber variant with underwing racks to carry a pair of jettisonable 300 litre fuel tanks. However, the underwing racks were removed from many of the unit’s aircraft because the internal fuel capacity was sufficient for most operations flown by the Gruppe in June and early July 1943, and pilots disliked the reduction in performance caused
by the tanks and racks. As one pilot remarked: “It’s true the tanks were jettisonable, but even when they had gone there was still a sort of faired mounting there, which remained underneath. That kind of thing is no damned use. Then in addition there was the 500 kg bomb in the centre, so you can imagine what our speed was - only 320 kph. You can do that with the Ju 88!”
At this time III./SKG 10 suffered from the same problems as the rest of the Fw 190 units: weeks of costly operations, as well as the devastating Allied bombing campaign, had taken their toll. At dawn on 11 July Fritz Schröter’s Gruppe was divided between two Sicilian bases. Hauptmann Schröter and most of his ground personnel were at San Pietro in the south-east of the island with a handful of serviceable Fw 190s, cut off by American
Although more than 250 Fw 190s served in North Africa between November 1942 and the Axis surrender there on 13 May 1943, only a handful of them received ‘desert’ camouflage colours. In fact, most of the Luftwaffe Fw 190s that served in Tunisia wore the standard European ‘grey’ scheme of RLM 74/75/76. The ‘desert’ colour used in Tunisia was RLM 79 Sandgelb, and perhaps the most famous Fw 190 in a desert scheme was Focke-Wulf 190 A-4 Werknummer 748, coded ‘Yellow 1 + -’ and flown by Experte Oberleutnant Erich Rudorffer, who had claimed 222 aerial victories by the end of the war.
Mechanics of III./SKG 10 prepare an Fw 190 A-4 for a mission at La Fauconnerie airfield in central Tunisia. The photo was taken between 26 March and 7 April 1943. Note the Gruppe emblem on the engine cowling, and the standard European grey camouflage scheme. (Credit: PK Photo)
Fw 190 A-4s of III./SKG 10 are prepared for operations at muddy Sidi Ahmed, northern Tunisia, in early January 1943. The aircraft in the foreground is loaded with a 500 kg bomb. As seen here, most III./SKG 10 aircraft had white spinners. Note also the absence of outer wing cannon on these fighter-bombers. (Credit: PK Photo)
Fw 190 A-5 ‘< I + ’ of Sch.G. 2 at Brindisi, Italy, in May 1943. The pilot in these photographs is Lt. ‘Molli’ Eckart of I./Sch.G. 2. The aircraft has a standard RLM 74/75/76 camouflage scheme, with the white fuselage band indicating the aircraft was used in the Mediterranean theatre. (Credit: Petrick)
p6-13 ref fw 190 articles 021.indd 7 28/11/2012 10:10

paratrooper landings from the rest of the Gruppe at the Gerbini airfield complex, further to the north.
It was from one of the Gerbini satellite airfields, known as Marsa del Oro, that the first III./SKG 10 mission of the day began. Leading the pair of Fw 190 A-5s on this hit-and-run raid was Oberleutnant Ottmar Simon, a veteran of the unit who had previously served in Russia, France and Tunisia. Accompanying him was rookie 19-year old Oberfähnrich Horst Kulpa, who had flown his first combat mission barely a month earlier, on 6 June. This same pair had sunk an American ship during a mission to the Allied beachhead on the previous day, and fortune was to favour them again on the eleventh. Oberleutnant Simon and Oberfähnrich Kulpa intended to attack shipping in the vicinity of Gela and Licata, where the American 1st and 3rd Infantry Divisions had landed.
They took off at 08:02 in their Fw 190s, each aircraft carrying a single SC 500 Trialen anti-shipping bomb. Fighter escort was not provided for small-scale anti-invasion operations like this one, so the pair immediately climbed
to an altitude of 3,500 metres and set a direct west-south-west course to their objective, which was only 80 kilometres away. The beaches at Gela and Licata were protected by Spitfires of the 31st Fighter Group, and Curtiss P-40s of the 33rd Fighter Group, but on this occasion the two Germans avoided the patrolling enemy (a common occurrence during the invasion of Sicily, much to the frustration of the U.S. Navy).
Ottmar Simon and Horst Kulpa were met by anti-aircraft fire of all calibres near the coast, and dodged barrage balloons near the beaches, before they commenced their bombing runs. Of the numerous targets available, they picked out two medium-sized ships lying side-by-side east of Licata, unloading on the beach. They carried out a shallow dive-attack, strafing as they neared their objective.
Oberleutnant Simon’s bomb hit one of the 4,000-ton cargo vessels amidships, and he was later officially credited by the Luftwaffe with the sinking of this ship. In contrast, Horst Kulpa’s bomb was reported to have caused no damage. The pair then dashed for home at high speed, and
landed at Marsa del Oro just 25 minutes after taking off. Oberfähnrich Kulpa made it back to base despite slight wounds sustained from a hit by light anti-aircraft fire over the invasion area. Four Lockheed P-38s were spotted over the target, providing additional cover for the newly created beachhead, but the dangerous twin-engined American fighters failed to engage the fast, low-flying Focke-Wulf 190s.
The scene left behind by the two German pilots was chaotic. LST-158 had been busy unloading its cargo on Blue Beach, a few kilometres east of Licata, when the two III./SKG 10 pilots came in to attack without warning. As Oblt. Simon reported, LST-158 received a direct bomb hit amidships and immediately began to burn, before it exploded catastrophically. A crewmember of LST-158, Verdell Jacobsen, recalled the moments before and after the bomb struck his ship:
“My crew was called out to launch our boat and handle a cable from the bow to the pontoon deck so we could get underway. We had just started to be hoisted back aboard when an ME-109 strafed
8 Military Illustrated Modeller - January 2013
REFERENCE: Focke-Wulf Fw 190 in the Battle for Sicily Part One - The Sinking of LST-158
Invasion vessels unloading at Scoglitti, the easternmost American invasion beach. In the background is LST-389, which later participated in the landings at Salerno and Normandy. (Credit: NARA II)
Fw 190 A-5 ‘Yellow B + |’ of the 11. Staffel of SKG 10 at San Pietro airfield. (Credit: Sundin)
p6-13 ref fw 190 articles 021.indd 8 28/11/2012 10:10

AircraftEdition 9
Fw 190 A-5 ‘< I + ’ of Sch.G. 2, Brindisi, May 1943 (Credit: Sundin)
Two Fw 190s of III./SKG 10 in the scrub at San Pietro airfield. The aircraft in the foreground has been loaded with a 500 kg bomb, while the aircraft in the background is in the process of being bombed-up. Note the lack of fuselage markings on the nearest aircraft. (Credit: Leproni)
p6-13 ref fw 190 articles 021.indd 9 28/11/2012 10:11

10 Military Illustrated Modeller - January 2013
REFERENCE: Focke-Wulf Fw 190 in the Battle for Sicily Part One - The Sinking of LST-158
Mission map of the successful 11 July attack on the American landing craft LST-158. (Credit: Jessen)
Portrait of Hauptmann Fritz Schröter, Kommandeur of III./SKG 10 in 1943. (Credit: PK Photo)
Fw 190 A-5 ‘Yellow B + |’ of the 11. Staffel of SKG 10. As can be seen clearly in this photograph, the III. Gruppe of Schnellkampfgeschwader 10 used larger than average fuselage codes on its aircraft, in this case carried on a standard RLM 74/75/76 scheme. (Credit: Sundin)
p6-13 ref fw 190 articles 021.indd 10 28/11/2012 10:11

Aircraft Edition 11
INVASION BEACHES
Map of the invasion beaches and landing zones of the Allied forces in south-eastern Sicily. (Credit: Jessen)
LST-158 burning at Blue Beach, east of Licata, on the morning of 11 July 1943. (Credit: NARA II)
p6-13 ref fw 190 articles 021.indd 11 28/11/2012 10:11
12 Military Illustrated Modeller - January 2013
REFERENCE: Focke-Wulf Fw 190 in the Battle for Sicily Part One - The Sinking of LST-158
the ship and a second one dropped two bombs. One went into the sea next to our ship. The second bomb hit amidships, went through a half track, cargo hatch and into the tank deck directly into three truckloads of gasoline. The explosion was directly above our auxiliary engine room. It knocked out all power, including the winches holding us aloft. It also started a real inferno. Our boat free-fell back into the water. My crew and I regained consciousness within minutes.”
Hubert Johns was aboard Landing Craft Flak 12 (LCF-12), which was also at Licata on that morning:
“There was a point, just below a hill, where large LSTs could get in to the beach to unload. The German planes would come around this hill, observe what was there, then immediately return and deal with it. On this occasion an American LST had landed, opened its large frontal doors ready
to unload. Before it could do so the plane made its return journey and bombed and strafed the LST. Devastation. High explosives discharging and fire spreading along the decks. The crew and their passenger troops were seen jumping overboard from wherever they happened to be. From the deck and the even higher points of the superstructure to escape from that inferno. It was not possible to get near it. A terrible sight never to be forgotten.”
The ship was clearly beyond saving, and the Americans turned their attention to rescuing as many personnel as possible from the stricken vessel, with several U.S. soldiers distinguishing themselves during the rescue efforts.
The sinking of LST-158 was a startling event for all those at Licata beach and offshore, and the smoke rising from the stricken vessel was visible for kilometres, serving as a reminder of the threat still
posed by the badly outnumbered Axis air force. In the attack on LST-158 the Fw 190 raiders had been able to sneak in at high speed, carry out their attack, and make their escape without being intercepted by patrolling American aircraft. This was something that became very familiar to the American naval and land forces at Gela and Licata in the first few days of the invasion, as the action report of the American naval task force, written in the aftermath of the invasion of Sicily, stated:“A great deal of trouble was experienced from enemy raids strafing and bombing the beaches and beached landing craft. These raids came in very low, down the valleys, and then darted over the ridge of hills onto the beaches. Since these raids could not be picked up by the radar, and aircraft lookouts were handicapped by the smoke and haze over the beaches, they were surprise attacks. These
to unload. Before it could do so the plane made posed by the badly outnumbered Axis air force.
THE SUCCESSFUL PILOTSOttmar Simon remained with III./SKG 10 after it was renamed as the III. Gruppe of Schlachtgeschwader 4 in October 1943, and was appointed as the Staffelkapitän of 9./SG 4. However, on 12 March 1944 he was injured in a crash-landing at Clastres airfield in northern France, breaking his right arm and shoulder blade. He was awarded the Ehrenpokal eight days after his accident. Oblt. Simon returned to the 9. Staffel later that year. His fate is unknown.
Horst Kulpa was commissioned as a Leutnant later in the summer of 1943, and subsequently joined II./SG 4. He claimed four aerial victories over Italy in 1943 and 1944, including three Spitfires. He was appointed as Staffelführer of 6./SG 4 in the spring of 1944, but was shot down and killed by British Spitfires of 145 Squadron on 21 May 1944 in the Viterbo area, north of Rome.
USAAF B-26 Marauders on an operation in the Mediterranean theatre in 1943. (Credit: NARA II)
Unit emblem of III./SKG 10. There has been some debate over the colours used for this emblem, but one captured Fw 190 from the 11. Staffel of SKG 10 (Staffel colour yellow) had a blue shield outlined in yellow, with a white arrow. The emblem was initially applied below the cockpit, but was later moved to the engine cowling, probably because exhaust staining obscured it in the former location. (Credit: Jessen)
p6-13 ref fw 190 articles 021.indd 12 28/11/2012 10:11

Aircraft Edition 13
raids were frequent …”These small-scale hit-and-run raids carried out
by the Fw 190s of Sch.G. 2 and SKG 10 caused a great deal of concern for those in command of American naval forces involved in the invasion, who were unhappy with the air support provided by the USAAF and RAF during the initial days of the landings.
Although the Luftwaffe achieved some notable successes, such as the sinking of LST-158, and the U.S. Navy was very concerned about the Axis air threat, the Germans and Italians lacked the air resources to stop the Allied invasion on the beaches, or seriously disrupt the subsequent build-up of British and American forces in the beachhead. The Fw 190 certainly proved its
worth as an anti-invasion weapon, but as one of the participating German pilots remarked after the war: “… our operations enjoyed success, but these were only pin-pricks in view of the enemy’s overwhelming superiority.” The battle for Sicily would continue for another five weeks, and the Fw 190 would continue to play an important part.
The next article in this series about the Fw 190 in the Mediterranean theatre describes the operations by Fw 190 units over the island in the final weeks of the Sicilian campaign, and includes information about the camouflage and markings of II./Sch.G. 2 and II./SKG 10, as well as more information about the special long-range fighter-bomber versions of the Fw 190. •
REMARK FROM THE AUTHORSThis series of articles is extracted from our book ‘Focke-Wulf Fw 190 in the Battle for Sicily’, which is available from the publisher’s website, www.airwarpublications.com. If you have any questions about this article you are welcome to contact the authors via the website.
Also available from the company website are free flight sim skins based on aircraft illustrated in the book, and additional book-related listings and research.
Fw 190 A-5 ‘White K+ |’ was a former 9./SKG 10 machine found at Gela-Ponte Olivo airfield, southern Sicily, when American troops overran the airfield on the morning of 12 July 1943. It wears the standard RLM 74/75/76 scheme, with a very clear demarcation. Note the III. Gruppe vertical bar and code letter in the 9. Staffel colour, white. The aircraft’s four-letter factory code, or Stammkennzeichen, RM + BK, is painted under the wings. (Credit: Crow)
p6-13 ref fw 190 articles 021.indd 13 28/11/2012 10:12

T he Convair F-102 Delta Dagger was a US interceptor aircraft built as part of the backbone of the United States Air Force’s air defences in the late 1950s.
Entering service in 1956, its main purpose was to intercept Soviet bomber fleets. The F-102 was the first operational supersonic interceptor and delta-wing fighter of the USAF. It used an internal weapons bay to carry both guided missiles and rockets. As originally designed, it could not achieve Mach 1 supersonic flight until redesigned with area ruling.
The F-102 replaced subsonic types such as the F-89 Scorpion, and by the 1960s, it saw limited service in Vietnam in bomber escort and ground attack roles. It was supplemented by F-101 Voodoos and, later, by F-4 Phantom IIs.
Many F-102s were transferred to United States Air National Guard duty by the mid-to-late 1960s, and the type was retired from operational service in 1976.
The follow-on replacement was the Mach 2 class F-106 Delta Dart, which was an extensive redesign of the F-102.*
Meng is a new company from China that produces both military vehicles and aircraft models. This is Meng’s third aircraft release, but its first operational subject following its 1:72 scale Kayaba ramjet fighter and Mansyu Ki-98 earlier this year.
Meng’s 1:72 scale F-102 Delta Dagger is fitted with the Case X wing and comprises 95 parts in grey plastic and five parts in clear. Markings for three aircraft are also included.
Plastic parts are very well moulded with no imperfections in places that will be visible on the finished model. Even tricky areas such as the undercarriage doors and the backs of one-piece wheels are free from ejector pin and sink marks.
Panel lines and selected rows of rivets are quite crisp and fine. The photos tend to overemphasise them due to the saturation of light, but they look very good on the surface of the plastic.
Details are also well done. The cockpit features an instrument panel with moulded detail and the option of a decal overlay. The seat is a three-piece affair, although you’ll need to bring your own harness straps. The tub includes integrated side consoles with raised switch detail.
The engine exhaust is appropriately deep and the two-piece nozzle is finely detailed.
The clamshell speed brakes may be posed either open or closed. If they are glued open, a one-piece
actuator will hold the speed brake doors at the correct angle.
Landing gear bays have plenty of structural detail moulded in place.
One of the most impressive options in the kit is the weapons bay. This may be posed open with a loadout of six AIM-4C or AIM-4D missiles. Alternate pylons are provided too - either folded or deployed.
The folded weapons bay door is well detailed on both sides and even on the edges.
Two under-wing 815 litre drop tanks complete the ordnance.
The clear parts are thin and free from distortion. The canopy may be posed open using a fixed actuator - another thoughtful touch.
Engineering and parts breakdown is conventional, with thin sprue attachments and plenty of locating pins. On the major parts such as fuselage halves, the sprue attaches via the mating surface, not the exterior surface of the part. This reduces the risk of scarring the external surface of the plastic during parts removal and cleanup.
There is no mention of nose weight, but I expect that some will be required to keep that front wheel on the ground.
Markings are supplied for three aircraft. The two grey machines are colourful and interesting. The SEA scheme offers even more variety. The decals are well printed and in register. The only potential issue is the USAF and U.S. Air Force markings, which are supplied in black. I understand that these should be Insignia Blue.
Meng’s first two Japanese aircraft releases were technically very nice - well detailed with fine surface features - but their hypothetical nature may have limited their mass-market appeal.
This new 1:72 scale F-102 will find a much broader market. It blows away the old 1:72 scale Hasegawa Delta Dagger in terms of detail, options and surface features. In fact, I think it is the best F-102 kit currently available in any scale.
The model is surprisingly big, even in 1:72 scale, so it will be an eye-catching canvas for some of the striking marking options available.
This is an impressive model of an important Cold War early supersonic jet. I look forward to hearing about Meng’s future release plans!
Thanks to Meng Model for the sample www.meng-model.com •
Background and History courtesy of Wikipedia
SUPERSONIC DAGGER
KIT PREVIEW: Meng Model 1:72 F-102A Delta Dagger (Case X).• Kit No. DS-003
Meng Model releases its first Cold War jet. The Editor takes a look at this all-new 1:72 scale F-102A Delta Dagger.
14 Military Illustrated Modeller - January 2013
The fuselage is a decent size even in this relatively small scale.
actuator will hold the speed brake doors at the
Two under-wing 815 litre drop tanks are included.
Panel line detail is recessed and sharp.
Markings are provided for three interesting options.
p14 preview - meng f-102 021.indd 14 04/12/2012 11:40

Squadron/Signal PublicationsOver 250 books offering a wealth of information
Available from all good model and book shopsFor more details visit www.adhbooks.com or call 01525 222573 • Trade enquiries welcome
SQUADRON/SIGNAL PUBLICATIONS MODELLING REFERENCE BOOKSSquadron Signal Publications is one of the best known and most extensive ranges of modelling reference books ever published, featuring high quality photographs of aircraft, tanks, ships and more in action, as well as an ever-expanding range of ‘walk-around’ volumes which show the subject inside and out in crystal-clear photographs - perfect for superdetailing projects.
The books have been helping modellers to add essential details, find markings and apply paint schemes to aircraft, armour and ship models for many years, and the great news is that Squadron Signal books are now easier to find than ever before, because ADH Publishing, the company that brings you this magazine each month, is importing them from the USA.
You can find Squadron Signal at good model and book shops, and you can also check www.adhbooks.com to see what we have on offer!
Please call us now for full details of prices, availability and range; UK (+44) 01525 222573
Official UK distributor ADH Publishing, Doolittle Mill, Doolittle Lane, Totternhoe, Beds LU6 1QXTel: 01525 222573 • Fax: 01525 222574 • email: [email protected]
Shown here is a selection of some of the most popular titles, many more available
SS25070 - Heinkel He 111 Walk Around (Soft cover)SS65070 - Heinkel He 111 Walk Around (Hard cover)
SS25068 - F9F COUGAR WALK AROUND (Soft Cover)SS65068 - F9F COUGAR WALK AROUND (Hard Cover)
SS25071 - B-25 Mitchell Walk Around (Soft cover)SS65071 - B-25 Mitchell Walk Around (Hard cover)
Soaring into the pages of history with Jimmy Doolittle’s famed Tokyo Raiders, the North American B-25 Mitchell was the most-produced American medium bomber of World War II. Profusely illustrated with 200 stunning color photographs, this 80-page volume examines the nuances of the external features and explores the inner workings of the B-25D model, the scarce hard-hitting, cannon-armed B-25H, and also the most abundantly-produced Mitchell, the B-25J. Enhancing the color photographs, taken both on the ground and in the air, four vintage black-and-white images and 14 line drawings further illustrate details, while five color renderings of aircraft and markings provide a glimpse at the nature of the crews.Illustrated with over 200 photographs. 80 pages.
The Heinkel 111 saw service on all Germany’s military fronts in the European Theater of World War II. The He 111 entered the war as a medium bomber, supporting Wehrmacht ground campaigns. After the tide in the conflict had turned against the Reich, and air superiority had been achieved by the Soviet Union and the Western Allies, the Heinkel 111 was largely relegated to transport functions. This iconic warplane had its origins as a cutting-edge civil airliner in the mid-1930s. But war was looming and before long it was adapted for use as a bomber. The first mass-produced versions, the He 111-E and He 111-F, served in the Condor Legion with Francisco Franco’s Nationalist forces in the Spanish Civil War, paving the way to further military engagement once World War II broke out. Although produced in large numbers and exported to many countries before and during the war, few examples of the He 111 survive today. This walk around features detailed photographic images of the He 111-P1 restored and preserved in Norway, and the He 111-H20 on display in the RAF museum in Britain.Illustrated with 228 photographs, detailed line drawings, and color profiles. 88 pages.
The first swept-wing carrier-based fighter aircraft built for the US Navy, the F9F Cougar marked a major leap forward in the area of naval aircraft design from its predecessor, the straight-wing Grumman F9F Panther. The prototype of the first version of the Cougar, the F9F-6, first took to the air in September of 1951, just six months after contract award. There were several different models of the Cougar, reflecting its varied uses as well as the general development of the aircraft. The F9F-6 was followed by the F9F-7 and F9F-8. In addition there were also two reconnaissance models - the F9F-6P and the F9F-8P - as well as a two-seater trainer version, the F9F-8T. The contemporary photographs in this volume illustrate in detail the differences between the various Cougar models, making use of over a dozen display aircraft located in museums across the United States as well as one Cougar on display in Argentina. Grounded in solid historical research, the book also features historical images from the photo archives of both the U.S. Navy and Grumman, and also includes rare photos of F9F Cougar in its final days, serving as a target drone for later generations of fighters. Illustrated with over 230 photographs; 80 pages.
SS25066 - KC-135 STRATOTANKER Walk Around (Soft cover)SS65066 - KC-135 STRATOTANKER Walk Around (Hard cover)
Many air forces can conduct missions such as air superiority and ground attack, but only the US Air Force has truly global reach. For more than five decades, the essential enabler of this global reach has been the KC-135 Stratotanker. Unarmed and unglamorous, the KC-135 has been one of the most successful and enduring aircraft in US Air Force history. Primarily based on the author’s extensive access to operational KC-135 aircraft on the ground and in flight, this book contains the most detailed photographic documentation of the KC-135 inside and out that has ever been published, as well as color profiles of the KC-135R in the markings of every major USAF command that has operated that variant. Illustrated with 240 photographs, detailed line drawings and color profiles; 88 pages.
ALSO FROM ADH BOOKS...
Airframe & Miniature seriesThe Hawker Tempest– A Complete Guide To The RAF’s Last Piston Engine Fighter by Richard A. Franks
This fourth book in our much acclaimed series contains a massive 128 pages packed with vital information that no active modeller and Tempest enthusiast should be without.The Hawker Tempest will contain:• Over 40 pages of technical information• Over 20 pages of walkaround images and technical diagrams• Over 5 pages of camouflage and markings• Over 25 pages of model builds and modelling information• Over 200 photographs including wartime images• Colour side views and four-views by Richard Caruana• 3D isometric views of all variants by Jacek Jackiewicz• 1/72 and 1/48 scale full kit builds by Libor Jekl and Steve EvansAs with prior titles a full set of fold-out 1/48 scale plans will be included
p 15 Squadron 021.indd 8 29/11/2012 17:10
BIRD OF PREY
16 Military Illustrated Modeller - January 2013
FEATURE ARTICLE: Revell 1:32 scale Heinkel He 219 A • Kit No. 04666
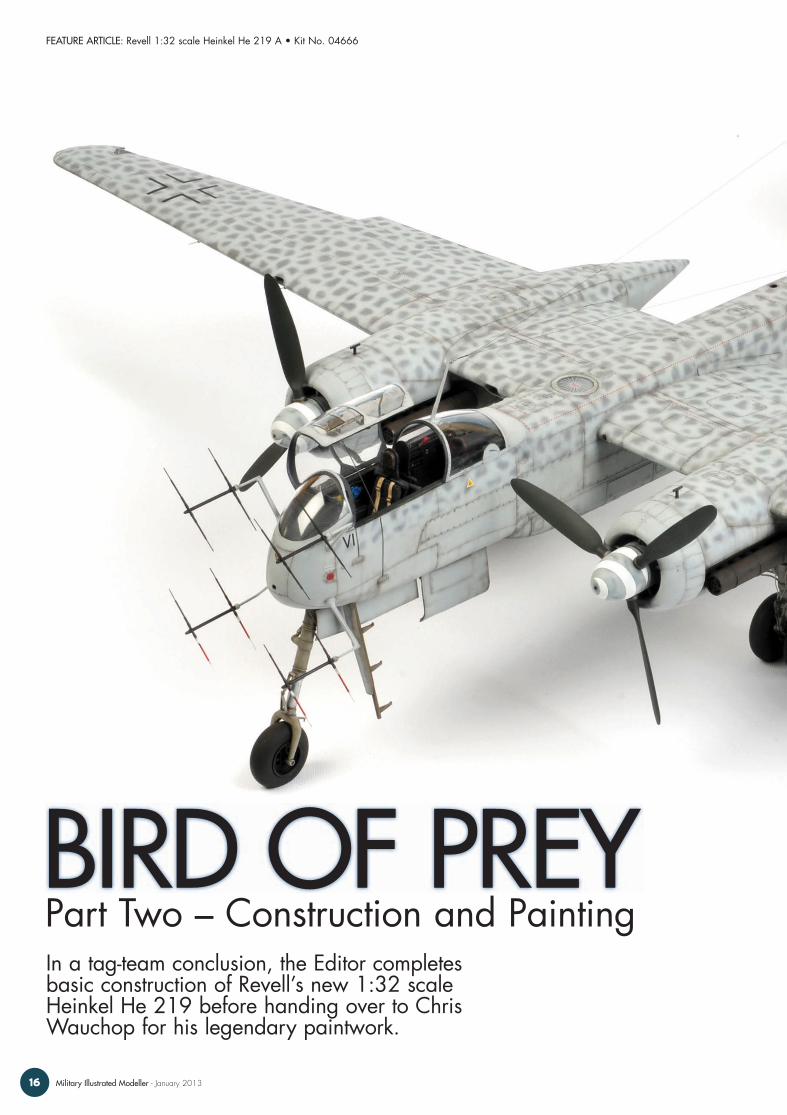
Part Two – Construction and PaintingIn a tag-team conclusion, the Editor completes basic construction of Revell’s new 1:32 scale Heinkel He 219 before handing over to Chris Wauchop for his legendary paintwork.
p16-29 feature article - he 219 pt 2 021.indd 16 28/11/2012 10:01

Aircraft Edition 17
In Issue 19 of Military Illustrated Modeller magazine we left the Revell 1:32 scale Heinkel He 219 with the cockpit complete and the airframe awaiting construction.Compared to the detailing and painting of the
cockpit, the overall build was really quite fast considering the overall size of the model.
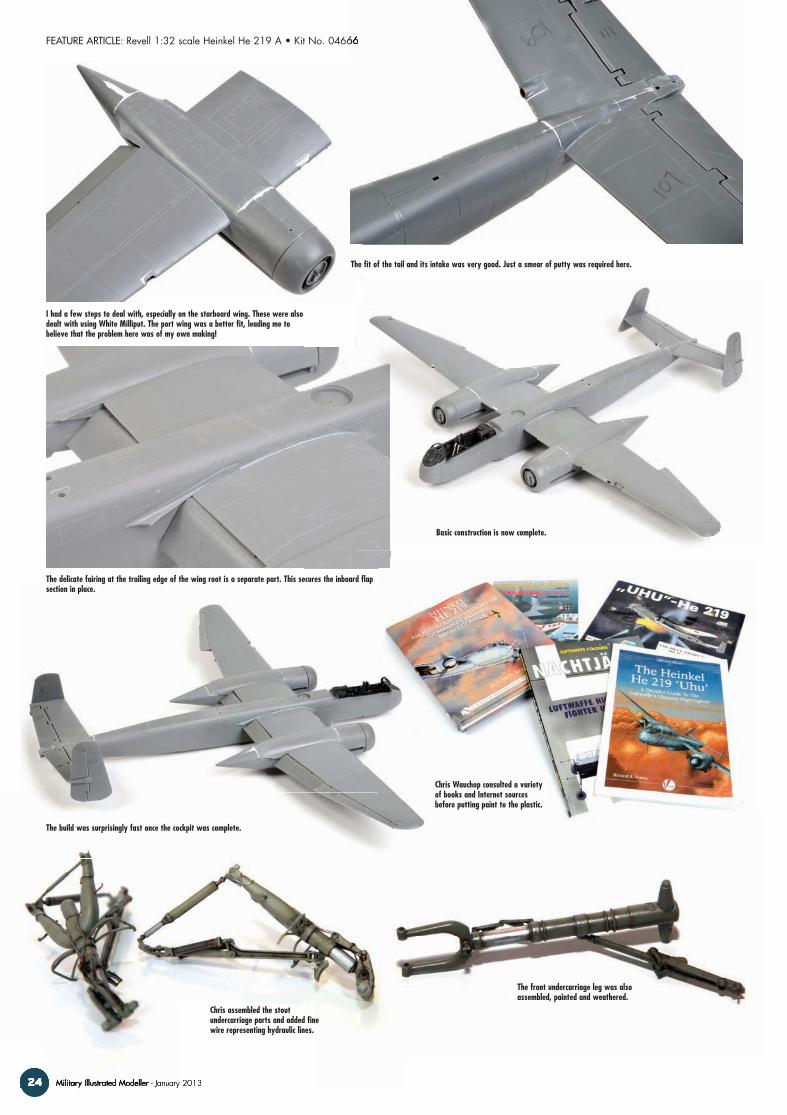
The first job before joining the fuselage halves was to prepare the model for nose weight. With its big twin tail unit and forward-located wings, I knew that the model would need a fair amount of weight to ensure that it sat comfortably on its nose wheel. Unfortunately there is not much room in the extreme tip of the nose where it would be most effective, so I had to squeeze lead sinkers as close behind the cockpit as I could manage. Before sealing up the engine nacelles I also added four lead sinkers as insurance. It is just as well that I did, as the aircraft just balanced on its nose wheel when it was complete.
Any extra work that I needed to do was a result of my own blunders. First of all, I managed to step on a sprue that had fallen to the ground, and I cracked the upper fuselage part. I decided to glue the part in place first then repair the damage.
I also had some problems with the fit of the starboard side engine nacelle and the upper wing. I think I did something wrong when fitting the wheel well parts on this side as I had no problem with the port nacelle.
TREADING CAREFULLYThere were a number of occasions that I questioned the instructions. The first of these was in Step 10, where the instructions show a solid armour plate in front of the pilot (part 24). This appears to be hinged and it would seem likely that such an obstruction would be folded down for most of the time. In the end, we did not fit the part at all.
My next source of confusion was armament. Photos and reference documents are a bit ambiguous, but it would appear that if the obliquely firing Schrage Musik cannon were fitted to the top of the fuselage, then two or all four of the ventral cannon would be removed. Without any definite photographic evidence, I settled on fitting the Schrage Musik and keeping the two outboard cannon in the ventral fairing. The middle guns were blanked off with the individual fingers of part 41 and a generous smearing of Milliput.
In Step 26, I believe the draft instructions may have mislabelled the part numbers for the wing leading edge intakes. I suggest that you carefully test fit these parts before committing to cement.
In Step 45, the mysterious assembly made up from parts 130, 131 and 139 is actually the canopy locking mechanism, and should be attached to the canopy rail.
Revell supplies three different styles of opening canopy section, including one with a prominent blister housing elements of the NAXOS radar. However, it would appear that this style of canopy was rare (to say the least), so I thought the safest bet was to use part 126 as the most commonly seen version.
In Step 75, the tail radar was not fitted to all aircraft and specifically not to the one that we were building. Chris did assemble a tail radar unit but did not actually glue it in place. At least we can see what it would have looked like if the tail radar was fitted!
In Step 77, Revell suggests that chunky extended cannon barrels (parts 132) for the Schrage Musik should be fitted. However, I could find no evidence of their widespread use, and certainly not on this
“In common with its recent large-scale siblings, Revell’s 1:32 scale Heinkel He 219 is well detailed, thoughtfully engineered and
represents excellent value for money.”
p16-29 feature article - he 219 pt 2 021.indd 17 28/11/2012 10:01

18 Military Illustrated Modeller - January 2013
FEATURE ARTICLE: Revell 1:32 scale Heinkel He 219 A • Kit No. 04666
The cockpit tub, as assembled and painted in Issue 19 of Military Illustrated Modeller magazine.
Here the tub has been glued into the starboard side fuselage half. Note that the additional yellow cabling on the sidewall lines up with the side console and the instrument panel – thank goodness!
A medium sized plastic Irwin clamp was used to hold the tub in place while the cement dried. Note the stout wing spars, which also add rigidity to the fuselage.
This model needs lots of nose weight to keep the front wheel on the ground. Lead sinkers of various size were hammered flat before being installed.
The sinkers were fixed immediately behind the cockpit tub using super glue.
p16-29 feature article - he 219 pt 2 021.indd 18 28/11/2012 10:01

Aircraft Edition 19 Aircraft Edition
The long fuselage halves were glued together without incident.
Small plastic clamps ensured that there was no gap between the upper cockpit rail and the top of the fuselage side.
The joins were taped together while the cement set.
The joins were taped together while the cement set.
I clumsily stepped on the upper fuselage deck, cracking it almost side to side.
p16-29 feature article - he 219 pt 2 021.indd 19 28/11/2012 10:02

20 Military Illustrated Modeller - January 2013
FEATURE ARTICLE: Revell 1:32 scale Heinkel He 219 A • Kit No. 04666
particular aircraft, so they were not installed.I somehow managed to lose the tail bumper
(part 48), so I made a replacement from a piece of plastic cut to shape, and filled out with Milliput two-part epoxy putty.
DETAILING AND PAINTINGby Chris WauchopWhen Brett asked whether I would be interested in painting and weathering this model after he had completed the cockpit interior and basic construction, I agreed without a moment’s hesitation.
I have been interested in the Heinkel He 219 as a modelling subject for many years and can remember excitedly assembling the 1:72 Frog kit back in the 1960s. I can also remember being very disappointed with the finished result. At first I thought it was my lack of painting skills but soon realised it was not only my lack of skill but also the grossly inaccurate shape of virtually every part of the kit!
My juvenile quest for an accurate representation of the aircraft was quickly reignited when I discovered the 1:72 Revell offering with its exciting, and pretty accurate box art promising a much more realistic result. Again I was sadly disappointed.
It wasn’t until the late 1990s that, with the release of Tamiya’s 1:48 offering, I was able to build an ‘accurate’ model of this subject. And I built a few! The practice I got at doing the RLM76 Light Blue ‘lattice’ over RLM75 Grey Violet technique held me in good stead to tackle this project, and I couldn’t wait to get my hands on it!
When I did get my hands on the model I was quite surprised at its size and weight. The weight was mainly due to the amount of lead that Brett had installed in its nose and engine compartments and I was a tad concerned that the nose may be a little too heavy for the forward undercarriage leg to cope with, but I needn’t have worried as the completed model is perfectly balanced.
GETTING STARTEDMy first task was to assemble the undercarriage. This was done without any problems and once the glue had set, any seams were cleaned up, the weight holes in the oleo scissors were drilled, then they and anything else that needed a coat of RLM02 were sprayed. The other parts that needed to be painted this colour included the wheel wells, the gear door interiors, the boarding ladder and its housing and the inside of the engine cowls. Once this colour had dried, the oleo legs and any hydrau-lic shafts that needed to be, were painted silver.
The undercarriage wheels were now assembled and flat spotted. Next, the moulded-on pneumatic hoses on the wheel hubs were carefully removed and replaced with more defined ones made out of fine solder. All the wheel hubs were then painted semi-gloss black and the tyres flat blackish, brownish grey. Brake lines were also added to the main gear legs using the same fine solder.
The diagonally marked areas of the wing were thinned to improve the fit of the landing flaps.
Revell supplies a structure for the flap interior.
It is important to get the sequence right for adding the main landing gear and nacelle parts. This sequence is shown on the starboard wing. First, the forward landing gear wall (part 54) is glued to the bottom of the wing.
Now the ceiling of the forward landing gear (part 56) is added.
p16-29 feature article - he 219 pt 2 021.indd 20 04/12/2012 11:43

Aircraft Edition 21
A STORM IN A SPINNER CAPWhen I posted a few photos of the finished model on HyperScale, I was surprised by the immediate and vehement criticism about the shape of the propeller blades.
Neither Chris nor I noticed during construction and painting, but Revell has moulded a prominent step at the front of each propeller blade near its base. The propeller also lacks the subtle twist of the real thing.
A number of people suggested that we had fitted the propeller on backwards, but this was not the case. It just seems that Revell made a mistake with the shape of the propeller base. The profile of the propeller blades is actually very good – it just should not have the step at the base.
Until the inevitable after-market resin propeller blade replacements come along, you could fix this problem by filling the space between the step and the blade with Milliput, then sanding the area until it is a smooth transition.
For those who want an absolutely accurate model, there are a few other points that you might want to investigate too:
1. At least some Heinkel He 219s were fitted with a clear skylight to provide light for a radio technician on a jump seat fitted inside the rear fuselage. Logic would suggest that the technician would only be present for short periods of time, and photos seem to indicate that the skylights were not present on all aircraft. Revell does provide a panel in the right place though, so if you feel like opening up the skylight and detailing the interior of the rear fuselage, you go for it!
2. Apart from the rear fillet, the wing root has no detail or structure. Rather than butting up against the fuselage, there should be a narrow fairing covering this area.
3. There are a few minor errors and misalignments with hatches and panel lines, mainly on the wings and the ventral gun fairing. Check reference photos and drawings to confirm the configuration.Thanks to Damon Whiteman for pointing out some of these issues.
the base.
blade replacements come along, you could fix this problem by filling the space between the step and the blade with Milliput, then sanding the area until it is a smooth transition.
model, there are a few other points that you might want to investigate too:
with a clear skylight to provide light for a radio technician on a jump seat fitted inside the rear fuselage. Logic would suggest that the technician would only be present for short periods of time, and photos seem to indicate that the skylights were not present on all aircraft. Revell does provide a panel in the right place though, so if you feel like opening up the skylight and detailing the interior of the rear fuselage, you go for it!
has no detail or structure. Rather than butting up against the fuselage, there should be a narrow fairing covering this area.
misalignments with hatches and panel lines, mainly on the wings and the ventral gun fairing. Check reference photos and drawings to confirm the configuration.
Aircraft Edition 21
Part 55 comes next. Make sure that the capsule-shaped protrusion is pointing out.
I was not convinced that the fuselage had enough weight to keep the nose wheel grounded, so I added several medium sized sinkers on each side of the engine nacelles.
The rear landing gear wall (part 59) was glued onto one side of the nacelle.
The nacelle haves (parts 58 and 60) were now glued together and allowed to set.
Once thoroughly dry, the nacelle should slip over the landing gear parts and snap into place. Mine, however, did not want to co-operate entirely, so the nacelle was clamped firmly while the glue set.
p16-29 feature article - he 219 pt 2 021.indd 21 28/11/2012 10:02

22 Military Illustrated Modeller - January 2013
FEATURE ARTICLE: Revell 1:32 scale Heinkel He 219 A • Kit No. 04666
A very thin mix of Tamiya X-18 Semi Gloss Black and water was then carefully brush-painted in and around all raised detail on the gear legs, gear doors, wheel wells and the boarding ladder. These areas were then subtly shaded using the airbrush filled with an extremely thin mix of flat black and red brown.
The next job on my list was to replace the plastic radar antenna dipoles with scratch-built items using various sizes of Albion Alloys’ brass tube and wire. These probably won’t need replacing when the kit reaches full production, but on our pre-production example the mould seams and flash were pretty heavy on these very fine parts, and I think it would have been more dangerous and time consuming to clean them up than it was to scratch-build new ones.
At this point I made a new pitot tube out of brass tube and a replacement DF loop by bending a large staple around an appropriate diameter drill handle. The plastic whip aerial on the Morane antenna mast was also replaced with fine brass wire. As goes for all the dangly bits, this mast was not fitted until the model was almost
complete thus avoiding breakages due to any puerile manipulation on my part.
LATTICE PATTERNSI decided early on that I did not want to attempt a scheme that involved solid black undersurfaces, so after studying my reference photos and my decal options I chose (not too surprisingly) an aircraft from I/NJG1 that had RLM76 Light Blue lower surfaces and solid RLM75 Grey Violet with an oversprayed ‘lattice’ of RLM76 on the upper surfaces.
The subject I settled on was G9+DB. The one photo that I could find of this aircraft is not of the highest quality but it does show some pretty dirty panel lines on the rear fuselage and moderate exhaust staining on the lower tail fins. The photo also indicates that the inner part of the fuselage crosses were grey rather than black, and as the kit decals do not provide this option (and in my opinion are dimensionally incorrect) I sourced some alternatives from my aftermarket decal collection. The only correct size crosses I could find were black and white
so while still on the decal sheet I masked and sprayed their black centres RLM75 and set them aside until they were required.
It was now time to apply the main camouflage colours but before this could begin the black panels around the exhaust outlets were sprayed flat black.
Once dry, this area, the wheel wells and the cockpit were carefully masked off and the entire undersurfaces were sprayed RLM76 Light Blue. This colour was carried up to, and just above the top horizontal panel lines on the fuselage sides and over the top of the engine nacelles. This allowed a good overlap of the RLM75 Grey Violet upper surface colour, which was sprayed after the RLM76 had had enough time to dry properly enabling the safe handling of the model during its application.
The rough looking lattice pattern was the next task. This method takes a fair bit of control and patience but I had achieved very satisfactory results on several other subjects over the years although never on such a large scale. I usually start on a wing tip and work towards the fuselage but it had been a while since I had used this
A very thin mix of Tamiya X-18 Semi Gloss Black and water was then carefully brush-painted in and around all raised detail on the gear legs, gear
complete thus avoiding breakages due to any puerile manipulation on my part.
so while still on the decal sheet I masked and sprayed their black centres RLM75 and set them aside until they were required.
The fit to the lower wing was free from gaps and steps.
I was still feeling paranoid about nose weight so I also filled the nose cap with small lead sinkers before gluing it in place.
The flaps and ailerons are supplied in upper and lower halves, trapping the delicate plastic hinges. Take care when applying cement and with subsequent handling to avoid damaging the hinges.
The rudders are also hinged.
The horizontal stabilisers are moulded with structural detail butting up against the elevators, but this will be completely hidden once the elevators are in place.
p16-29 feature article - he 219 pt 2 021.indd 22 04/12/2012 11:43

Aircraft Edition 23 Aircraft Edition
I managed to lose the tail bumper that was supposed to be fitted to the bottom rear of the fuselage so I decided to scratch build a replacement. I started by cutting a profile of the shape from plastic card.
This simple profile was glued onto the bottom of the rear fuselage. The area around the plastic was built up with white Milliput, a two-part epoxy resin.
The bumper was sanded down to a shape suggested by reference photos.
Originally, I installed all four guns to the ventral tray but further investigation revealed that probably only two were fitted when the two obliquely firing Schrage Musik cannon were present in the upper fuselage.
The two middle “fingers” of the cannon blanking rods (part 42) were cut off and put to one side.
I cut off the two centre cannon barrels as far back in their mounts as I could manage, then filled the empty spaces with the plastic fingers. White Milliput two-part epoxy putty was used to seal and smooth the surface.
The annular radiator is correctly depicted. Each side is made up from five paired elements.
This is what the radiator should look like when assembled.
p16-29 feature article - he 219 pt 2 021.indd 23 28/11/2012 10:02
24 Military Illustrated Modeller - January 2013
FEATURE ARTICLE: Revell 1:32 scale Heinkel He 219 A • Kit No. 04666
24 24 Military Illustrated Modeller - January 2013
Revell 1:32 scale Heinkel He 219 A • Kit No. 04666
I had a few steps to deal with, especially on the starboard wing. These were also dealt with using White Milliput. The port wing was a better fit, leading me to believe that the problem here was of my own making!
The fit of the tail and its intake was very good. Just a smear of putty was required here.
The delicate fairing at the trailing edge of the wing root is a separate part. This secures the inboard flap section in place.
Basic construction is now complete.
The build was surprisingly fast once the cockpit was complete.
Chris Wauchop consulted a variety of books and Internet sources before putting paint to the plastic.
Chris assembled the stout undercarriage parts and added fine wire representing hydraulic lines.
The front undercarriage leg was also assembled, painted and weathered.
p16-29 feature article - he 219 pt 2 021.indd 24 28/11/2012 10:03

Aircraft Edition 25
The draft instructions with the test shot erroneously show part 199 as an alternative deep spinner backplate. It is not! Instead, Chris cut a disk from plastic card and used it as a spacer behind the spinner.
The test shot radar dipoles had a bit of flash on them so Chris made up a full new set from Albion Alloys’ telescoping brass rod and tube.
A new pitot tube was also made from Albion Alloys brass tube.
The kit exhausts, painted and ready for fitting. Now all we need is the camouflage!
The nose radar array plus the NAXOS tail radar.
Gunze-Sangyo acrylics were used for the camouflage colours. The fuselage sides and lower surfaces were painted RLM 76 Light Blue followed by the upper surfaces in RLM 75 Grey Violet.
The rough looking lattice pattern takes a fair bit of control and patience. Before tackling the big wings, Chris did some test work around the cockpit and engine cowls.
Full coverage of the RLM 76 Light Blue lattice pattern then continued from the wing tip and across the entire upper surfaces and tail planes.
The black panels around the exhausts had been sprayed and masked prior to the application of the main camouflage colours.
p16-29 feature article - he 219 pt 2 021.indd 25 28/11/2012 10:03

26 Military Illustrated Modeller - January 2013
FEATURE ARTICLE: Revell 1:32 scale Heinkel He 219 A • Kit No. 04666
method, so I did do some test work around the cockpit and engine cowls to make sure I was going to achieve the desired affect. It looked right so my usual method commenced starting from the port wingtip. It is a bit disconcerting when you first start this scheme because the edge of the pattern that you’ve just sprayed looks worryingly like a lace doily, but it always seems to look alright in the end.
With both wings covered, I turned my attention to the horizontal tail surfaces where the pattern was re-started and continued all the way along the fuselage to the nose. It is relatively easy to correct any mistakes by simply respraying the base colour and then carrying on with the pattern.
The propeller spinners received similar treatment except this time the base colour was RLM70 Black Green with a slightly denser application of RLM76.
This scheme is a big job no matter what the scale. It will take at least a couple of hours to complete but the results will be worth it!
WEATHERING AND DECALSBeing a large model, this He 219 has a lot of panel lines and other surface detail that is going to look great if weathered properly.
The first step in my weathering process was to run a very sharp 6B graphite pencil lightly along and around all of this finely engraved detail on any surface that is plain RLM76. The upper surface panel lines received the same treatment but instead of using a pencil to draw them in they were carefully painted with a very thin, watery black wash. This is a bit trickier than using the pencil but looks a lot better over the heavily mottled paint scheme.
The airbrush was then loaded with the extremely thin black/brown mix used earlier and wound down to its finest setting then sprayed as tightly as possible in, along and around all the edges and panel lines. Even rivets and screw heads got a squirt.
The areas affected by exhaust staining were next to receive attention. This required a marginally heavier black/brown mix than that used on the panel lines. I always find that the best exhaust effects are achieved by gradually building up the colour with several passes of the air brush set relatively fine and stopping just before you think it’s dark enough because it probably is! You can always add a little more but it’s a pain in the neck trying to reduce it. In photos of these aircraft this staining extended from the engine nacelles to the tail area where, on this subject the build up was quite visible on the bottom of the vertical fins.
At this point I noticed in my reference photos of this and several other He 219s that the panels on the leading edges of the vertical tail fins had had their paint removed. This also included any part of the swastika that overlapped the panel. In colour photos this panel appears to be a dirty, spotty brown colour. The panels were masked off on both fins and painted appropriately.
Areas where decals were to be applied now received a spray of ‘Future’ gloss floor sealer. While this was drying I went and had my lunch. On returning from my half hour meal break I made sure that the gloss coat had thoroughly dried and decal application began.
I was a bit wary of the kit decals because of their very flat finish but I needn’t have worried as they performed flawlessly. Even the re-painted fuselage crosses conformed perfectly with the help of a few drops of Gunze Sangyo’s Mr Mark Softer. What did not perform flawlessly were the
A small rectangle of plastic was used as an additional spacer for the spinner. Also note that I had
earlier cut off the extended stem of the propeller shaft (part 96)
as indicated in Step 43 of the instructions. Don’t do this! The
extra length will give you a more secure bond with the propeller.
Exhaust stains were added to the sides of the engine nacelles with a gradual build up of the
thinned Tamiya black/red brown mix applied by airbrush.
Chris was a bit wary of the kit decals because of their very
flat finish but he needn’t have worried as they performed
flawlessly.
Reference photos clearly show this unusual arrangement of a white spiral on a mottled spinner. Chris paints the spiral on after the kit spiral decals failed to conform to the sharp compound curves of the spinner.
p16-29 feature article - he 219 pt 2 021.indd 26 04/12/2012 11:44

Aircraft Edition 27
The new metal radar array, painted and fixed to the model at a 45 degree angle.
Some scratch built details were added
around the canopy latch and supporting rod.
The whip at the bottom of the Morane mast was also replaced with fine bent wire. The blue codes were toned down somewhat with an overspray of the ubiquitous thin black/brown mix.
The plastic kit DF loop was replaced with a large staple bent around an appropriate diameter drill handle.
Reference photos show that the leading edges of the fins are darker than the surrounding areas. This may have been dark pinking tape on the leading edges showing through the camouflage paint. Staining from the exhaust was also painted onto the bottom of the fins. Also note that the tail radar is only dry-fitted here. It was not actually installed on this aircraft.
Revell supplies a decal for the suppressed DF antenna in the upper fuselage, as well as a clear plastic cover.
The lower surfaces with post shading and exhaust staining complete.
The clear leading edge landing lights and new pitot tube in place.
p16-29 feature article - he 219 pt 2 021.indd 27 28/11/2012 10:04

28 Military Illustrated Modeller - January 2013
FEATURE ARTICLE: Revell 1:32 scale Heinkel He 219 A • Kit No. 04666
white spiral decals intended for the prop spinners. No matter how hard I tried I could not get them to behave. In the end I decided that they weren’t the right width anyway, so they were discarded and I masked and painted my own. While the rest of the decals were still a bit soft the parts of the swastikas that overlapped the panels on the tail fin leading edges were removed with the help of a scalpel and a toothpick. The model was now left overnight so the decals could set properly. Next morning they were treated to another coat of gloss and while this was drying I began the task of masking and spraying the canopy. This would have been a relatively easy job except for the fact that the inside of the open centre section of canopy needed to be painted dark grey. I always find this task particularly tiresome but it was completed without much fuss, mainly thanks to the slightly flexible nature of Tamiya’s wonderful masking tape.
The exhaust shrouds, which had been painted basically the same colour as the exhaust stains, were now glued in place. The grey fuselage
crosses were dirtied-up and the rather bright blue code letters were toned down using a thinner mix of this black/brown colour. Before the canopy and other clear parts were attached, the model received two or three coats of Polly Scale Flat Clear, which gave the Uhu a very realistic, smooth, slightly satin finish. This product dries very quickly so after only a few minutes the model was safe to handle and I was able to attach the canopy, the undercarriage, the undercarriage doors, the boarding ladder, the pitot tube, the aileron mass balances and the sundry other fragile masts and antennae.
Once the glue had set properly and the model was standing firmly on its feet, the main radar masts and dipoles were attached to the nose.
A brass wire support rod to hold the centre canopy section open was fixed in position. The main radio mast, with a pre-drilled hole at its top, was then firmly glued in position on the rear canopy. Small holes were drilled into the vertical tail fins and a long length of invisible mending
thread was glued into the starboard fin. The thread was then fed through the pre-drilled hole in the radio mast, trimmed to the right length and super glued to the port tail fin. Drops of white glue were then used to ad isolators at the attachment points and when dry these were painted light grey.
Finally the props were pushed onto their shafts and the bird was finished. Hoorah!
CONCLUSIONIn common with its recent large-scale siblings, Revell’s 1:32 scale Heinkel He 219 is well detailed, thoughtfully engineered and represents excellent value for money.
Some of my comments about the draft instructions may have already been addressed in the final version of the kit, and the biggest problem – the step at the base of the propeller blades – can be improved with the application of putty and a bit of modelling skill if the spirit takes you.
This is clearly another big winner from Revell, in every sense of the word! •
FEATURE ARTICLE: Revell 1:32 scale Heinkel He 219 A • Kit No. 04666
The profile of this lethal nocturnal bird of prey is unmistakable.
This is a big model!
p16-29 feature article - he 219 pt 2 021.indd 28 28/11/2012 10:04

Aircraft Edition 29
MODELSPEC
Revell 1:32 scale Heinkel He 219 A. Kit No. 04666
Accessories Used :
HGW Item No. 32001 - Seat Belts Luftwaffe WWIIAirscale Item No. AS32 SCH – WW2 Luftwaffe Cockpit Placards
Tools and Modelling Products Used:
Albion Alloys brass rod and tubeTamiya masking tapeInvisible mending thread0.335mm solder wireEvergreen plastic strip and sheetWaldron Punch and Die SetCopper wireTamiya Extra Thin CementRevell Contacta CementSelley’s Super GlueTamiya SurfacerZip Kicker (super glue accelerator)Tamiya Masking TapeBlu-TackIrwin Clamps
Paints and Finishing Products Used:
Tamiya Acrylics: X-18 Semi-Gloss Black; XF-1 Flat Black; XF-2 Flat White; XF-24 Dark Grey; XF-64 Red Brown; XF-69 NATO Black.Gunze-Sangyo Acrylics: H65 RLM70 Black Green; H69 RLM75 Grey Violet; H70 RLM02 Grey Green; H414 RLM23 Red; H416 RLM66 Black Grey; H417 RLM76 Light BlueVallejo Model Color (acrylic): 70891 Intermediate Green; 919 Foundation White; 70953 Flat Yellow; 70957 Flat Red; 963 Medium BlueVallejo Panzer Aces (acrylic): 312 Leather BeltTestor’s Model Master Flat Clear Lacquer FinishSolvaset decal setting solutionFuture Floor Polish
References:
Model Art - Camouflage And Markings Of The Luftwaffe Aircraft Vol. 2Schiffer Military - “UHU” – He219. Heinz J. NowarraSchiffer Military - Heinkel HE219. Roland KempClassic Colours - Luftwaffe Colours Nachtjager Vol. 2. David P. Williams. Ian Allan PublishingAirframe Album No.1 ‘The Heinkel He219 ‘UHU’ Richard A. Franks. Valiant Wings Publishing…and the internet.
Easily the best kit of this aircraft in any scale; crisp and restrained surface textures; high level of detail; optional parts to build He 219 A-2, A-5 or A-7; positionable control surfaces; solid and straightforward engineering; nice clear and thin transparencies
Inaccurate propeller blade cuffs; some errors and ambiguity found in draft instructions.
RATING: 9 out of 10
Revell model kits are available from all good toy and model retailers. For further information visit www.revell.eu
Revell 1:32 scale Heinkel He 219 A. Kit No. 04666
“I was a bit wary of the kit decals because of their very flat finish but I needn’t have worried as they performed flawlessly.”
Tamiya SurfacerZip Kicker (super glue accelerator)Tamiya Masking TapeBlu-TackIrwin Clamps
Paints and Finishing Products Used:Paints and Finishing Products Used:
Tamiya Acrylics: X-18 Semi-Gloss Black; XF-1 Flat Black; XF-2 Flat White; XF-24 Dark Grey; XF-64 Red Brown; XF-69 NATO Black.Gunze-Sangyo Acrylics: H65 RLM70 Black Green; H69 RLM75 Grey Violet; H70 RLM02 Grey Green; H414 RLM23 Red; H416 RLM66 Black Grey; H417 RLM76 Light BlueVallejo Model Color (acrylic): 70891 Intermediate Green; 919 Foundation White; 70953 Flat Yellow; 70957 Flat Red; 963
Chris’s marvellous paint job conveys the ambiguous nature of the real camouflage. From this distance, it is difficult to determine whether we are looking at a dark mottle or a pale lattice overspray.
Every gram of the lead weight was needed to keep the nose on the ground. The centre of gravity is very finely balanced even with the sinkers in the nose, the fuselage and the fronts of the engine nacelles.
Revell’s 1:32 scale Heinkel He 219 A is a well-detailed kit that looks spectacular when complete.
p16-29 feature article - he 219 pt 2 021.indd 29 28/11/2012 10:04

Designed to replace the obsolete TBD Devastator, the Grumman Avenger entered service with the US Navy in January of 1942. Built by Grumman and designated
“TBF”, these torpedo bombers were later manufactured by the Eastern Aircraft Division of General Motors and designated “TBM”. The company built over 7500 Avengers by the end of the war. These aircraft served well into the 1960’s in a variety of post-war roles.
Accurate Miniatures 1:48 scale kit of the TBM-3 Avenger Kit number 3404 is labelled
“Okinawa”, and can be built from the box to represent one of the attacking invasion forces that took part in the fighting there in April of 1945. The kit features a wealth of detail and is quite a complex project due to the nature of its interior, dorsal turret and detailed ordnance bay.
Fidelity of detail is exquisite throughout the kit, and the instructions are written and illustrated well to assist the modeller through a tricky build. A well-engineered model, the kit was a pleasure to assemble from start to finish.
CONSTRUCTIONThin strips of lead were detailed with photo-etched buckles and glued to the seats using the kit-supplied seatbelt decals as a guide. The interior of the MG turret was detailed using copper wire for added support brackets, and a photo-etched gunsight from the parts box. Test-fitting was essential to have this assembly be properly situated in the glazed dome of the turret. The dome popped open after it had been cemented together during my first pathetic attempt, and had to be re-glued after trimming the gun & chair assembly to fit better.
OKINAWA AVENGER
30 Military Illustrated Modeller - January 2013
FEATURE ARTICLE: Accurate Miniatures 1:48 scale TBM-3. Avenger • Kit No. 3404
Gary Edmundson builds Accurate Miniatures’ benchmark 1:48 scale TBM-3 Avenger.
p30-35 feature article - tbm-3 avenger 021.indd 30 28/11/2012 09:54

AircraftEdition 31
Positioning of the MG turret was the most difficult step in assembling the model. There are two choices; install it before the fuselage halves are glued together, or slide it into place with a bit of effort afterwards. The first choice means the turret will have to be masked from the painting process on the fuselage. The latter choice places the turret in position after painting, but it’s a tight squeeze and could result in the thing popping apart if not sturdily glued together. There’s also the possibility of damaging the joint of the fuselage halves. I chose the latter method after reading several reviews of the kit on the Internet. The retaining lugs on the lower base of the turret were clipped off, since they are unnecessary if you’re not going to play with your model, holding it upside down and shaking it around in imaginative battle scenarios. With a sideways twist and some coaxing, the turret popped into place without too much trouble.
Landing gear, clear canopy parts and some of the smaller attachments were left off the model to be painted separately and added later.
Painting the interiorThe interior components were first airbrushed with Tamiya’s XF-1 Flat Black to give them a pre-shade, and then painted with an interior zinc-chromate green. The interior colour was mixed from XF-5 Green, XF-3 Yellow and a touch of XF-57 Buff to tone it all down. A couple of the bulkhead panels are made from clear styrene since they have an integral window, so these were masked first using Tamiya’s masking tape.
The instrument panel was airbrushed black, and the instruments were added using thinned Vallejo acrylics and a very fine 000 brush. Cockpit details were brush painted also using Vallejo’s acrylics. Each of the dials received a drop of Future floor polish to give the glazed look.
To highlight the details and give everything a worn look, the entire interior was given a wash of thinned oil paint. Varying amounts of Winsor & Newton series 3 black and raw umber was thinned down with mineral spirit, and applied to a pre-soaked area of the model, allowing the pigment to settle into the recesses of the painted surfaces.
Once the oil paint wash had dried, the interior colours were dry-brushed with a lighter shade of the interior green made using a combination of green, yellow and grey Vallejo acrylics. Wiring and other details were treated in the same fashion using lighter shades of the original colours.
The cylinder banks for the engine were assembled and painted XF-1 Black, and the front housing was airbrushed a semi-gloss medium grey. The cooling fins of the cylinder tops were dry-brushed with silver enamel that had a touch of raw umber oil paint to tone it down, and the lower fins were treated similarly, with a touch of gold paint to emulate the different look of the materials of construction.
Spark plug wiring was highlighted with grey, with the distribution tube and fittings picked out in subdued silver enamel.
Painting the exteriorAll exposed interior painting was masked with Tamiya tape, and the model was airbrushed with Tamiya’s grey primer. The primer was decanted from the rattle can into a jar and diluted with lacquer thinner. The panel lines of the kit were pre-shaded using Tamiya’s XF-1 black. This was thinned considerably and sprayed at a higher pressure (40 psi) to get a nice thin line. Although
Seat belts were made from lead strip and photo-etched buckles from aber.
Below: interior components and sub assemblies were pre-shaded in black before applying the zinc chromate green.
Left: the engine was detailed by drybrushing with silver enamel toned down with raw umber oil paint.
above: the completed engine sub-assembly
the seatbelts were painted off-white using Vallejo acrylics, and weathered with thinned oil paints.
p30-35 feature article - tbm-3 avenger 021.indd 31 28/11/2012 09:55

32 Military Illustrated Modeller - January 2013
FEATURE ARTICLE: Accurate Miniatures 1:48 scale TBM-3. Avenger • Kit No. 3404
“The kit features a wealth of detail and is quite a complex project due to the nature of its interior, dorsal turret and
detailed ordnance bay.”
The bomb bay features a wealth of detail, shown here with ordinance installed. The instrument panel was detailed using Vallejo acrylics, which flow smoothly when diluted with water and have a thick pigment.
The various bulkheads and interior components were painted and weathered before assembly.
The turret MG was detailed with copper wire struts and a p.e. gunsight from the parts box.
The rear section of the fuselage featured flare chutes and tailgun assembly The left fuselage half was packed with interior components before being cemented to the right side. The interior was a painting project all by itself.
Tamiya’s masking tape was used to seal off all interior work before commencing the three-colour camouflage scheme.
After priming the surface with Tamiya’s lacquer-based grey primer, the panel lines were painted using XF-1 black.
Beginning with the underside, an off-white mix of Tamiya acrylic was airbrushed over the pre-shaded lines, allowing them to show through.
Intermediate Blue followed using a mix of Tamiya’s XF18 Medium Blue and XF-2 White.
After the application of Non Specular Sea Blue on the upper surfaces, the model was airbrushed with Future Floor Acrylic to give it a gloss surface for weathering and decal application.
Accenting the panel lines with thinned oil paint shows quite a difference from those not yet treated to the right of the picture.
After the application of the oil paint to the panel lines, it is allowed to dry for a few minutes to establish itself in the recesses of the model’s detail.
p30-35 feature article - tbm-3 avenger 021.indd 32 28/11/2012 09:55

AircraftEdition 33
With a paint brush dampened with mineral spirits, the excess wash is wiped away, leaving the fine pigment in the panel line.
Discovering in retrospect that the arrow decals for the tail should really be positioned forward of the rudder hinge, it was scraped off with a sharp X-acto blade
The vertical stabilizer was then repainted and re-glazed.
Masks were made based on photos of the real aircraft The arrows were airbrushed on using an off-white mix of Tamiya acrylic.
The dorsal turret had to be carefully maneuvered into position and popped into place. The instruction sheet described how to do this, emphasising patience and inferring good luck!
Wing walks were airbrushed using a black-grey mix of Tamiya paint rather than using the kit supplied decals.
The silver hub of the propeller was drybrushed over the flat black base using silver enamel with a touch of raw umber oil paint.
To enhance the look of the tyres, pastel chalk powder was rubbed onto the aircraft’s wheels, and then dusted off to leave a realistic residue.
Tamiya’s 1:48 US Navy Pilot figures are nicely sculpted and feature delicate detail.
Right: The figures were mounted on toothpicks for ease of handling. After being airbrushed black, the
uniforms were base coated in a light tan allowing the undercoat to appear as shadow.
p30-35 feature article - tbm-3 avenger 021.indd 33 28/11/2012 09:55

34 Military Illustrated Modeller - January 2013
FEATURE ARTICLE: Accurate Miniatures 1:48 scale TBM-3. Avenger • Kit No. 3404
time consuming, this step accentuates the detail of the model.
The three-colour Navy scheme of this aircraft was painted using Tamiya’s acrylics: Non Specular Sea Blue, Intermediate Blue, and White. To mix these colours using Tamiya’s jars of acrylics went as follows: Non Specular Sea Blue = XF-17 Sea Blue 5 parts, XF-8 Flat Blue 3 parts, XF-2 White 2 Parts. Intermediate Blue = XF18 Medium Blue 5 parts, XF-2 White 2 parts. White = XF-2 White 10 parts, XF-57 Buff 1 part.
The lower sections of the aircraft were painted first, and the paint was thinned to give a subtle, gradual build-up of the colour, allowing the pre-shaded panel lines to show through. Excess thinning of the paint allowed the subsequent colours to be applied with a fine line of demarcation. The actual lines of demarcation had to be studied using wartime photos since the guide on the instruction showed the darker blue on the upper fuselage to go to a lower level than actual. The upper surfaces were painted also to allow the primer to show through in a random fashion, giving a faded, mottled effect overall.
To prepare the surfaces for decal application, Future floor acrylic was airbrushed over the completed three-colour scheme.
DECALSI used the kit decals after failing to find any aftermarket markings for this model. Perhaps it was due to the kit being an older release, but the decals were very susceptible to cracking, and the utmost care was needed to keep them in one piece. Some of the cracked markings had to be repaired later by painting over the damage.
It was noticed after the fact that the wartime photos of the tail marking had the arrow centred forward of the rudder hinge. To repair this error, the marking had to be scraped off, the tail repainted, and the arrow masked and airbrushed in place. The repair looked much better than the original decal, so all worked out well eventually.
Solvaset decal solution was used on the markings, which helped them settle down into the engraved lines on the model’s surface. After decal application, the model again received a coat of Future floor acrylic to seal the markings and
protect the finish from handling.Although decals are provided for the walkways
on each wing, the areas were masked off and airbrushed with a dark grey acrylic.
WEATHERING THE EXTERIORTo tone down the bright appearance of the decals, the base colours were thinned down to a very diluted amount, and lightly misted onto all of the aircraft markings. This technique seems to blend them into the overall look of the paintwork.
To further enhance the appearance of the panel lines, an oil paint wash was applied to the engraved panel lines. A thinned mixture of raw umber and black oil paint was loaded onto a fine brush and touched to the line, allowing it to “wick” along the length. Any surplus blobs of paint were wiped away with a clean brush.
Black oil paint was applied to some of the engraved lines around the engine cowling, and fairly heavily under & behind the lower cowling area and feathered to the rear using a paintbrush dampened with mineral spirits. This gave the look of the oil and other fluid leaks
Accurate Miniatures 1:48 scale TBM-3. Avenger • Kit No. 3404
The clear canopies were glued down using 5-minute epoxy.
The upper and lower surfaces were treated to oil paint washes, airbrushed streaks and pastel chalks to break the monotony of the solid colours.
To give the model a final flat coat, the Avenger was airbrushed with Vallejo Matt Medium thinned with tap water.
The engine exhausts were drilled out deeper and had their walls thinned to look more realistic. Studying wartime photos showed very little if any exhaust stains on the fuselage sides – so none were added.
All smaller delicate parts of the model were attached at the final stages of completion to prevent being broken off and lost.
p30-35 feature article - tbm-3 avenger 021.indd 34 28/11/2012 09:55

Aircraft Edition 35
MODELSPEC
Accurate Miniatures 1:48 scale TBM-3. Avenger Kit No. 3404
Accessories Used :
Just Plane Stuff Item No. JPS 001 - US Navy Flight DeckTamiya Set No. 61107 - 1:48 scale US Navy Pilots
Paints and Finishing Products:
Tamiya Acrylics – XF-1 Flat Black; XF-2 Flat White; XF-3 Yellow; XF-5 Green; XF-8 Flat Blue; XF-15 Flat Flesh; XF-57 Buff; XF-57 Buff; XF-59 Desert Yellow; XF-17 Sea Blue; XF-18 Medium Blue.Vallejo Acrylics – VariousWinsor & Newton Oil Paints – Lamp Black; Raw UmberSolvaset
Accurate; great fit.
Kit decals cracked up on application.
RATING: 9 out of 10
Italeri kits are distributed by The Hobby Company Limited www.hobbyco.net
Accurate Miniatures 1:48 scale TBM-3. Avenger Kit No. 3404
“The overall lines and detail of the real TBM-3 Avenger are well captured by the
finished model.”
typically seen on wartime aircraft.Some patches on the wings and fuselage were
painted over using a slightly different shade of the base colour to vary the appearance and break the monotony of the paint. This also added to the mottled and weathered look of the model. Silver enamel with a touch of raw umber oil paint added was painted in small spots to simulate chipped paint around the service panels and high-traffic areas.
Pastel power of a greyish dirt colour were brushed onto the wheels and wing walks to give a worn appearance, although these areas would probably have been fairly clean of “dirt” with service on an aircraft carrier.
CANOPY AND SMALL DETAILSThe canopy sections were masked painstakingly with small sections of Tamiya tape, and painted separately before adding them to the model using 5-minute epoxy glue. The pitot tube and rudder support for the antenna (long since broken off) were glue in place, and aerial wire added using invisible thread. Aerial insulators were made with blobs of white glue.
FIGURES & DISPLAY BASEThe display base for the model was a large resin casting from “Just Plane Stuff” JPS 001 US Navy Flight Deck. It was airbrushed with a dark blue-grey using Tamiya’s acrylics mixed to match 20-B Deck Blue. The metal portions were masked and the wooden planking portion airbrushed with a light mist of heavily diluted XF-55 Deck Tan. Following the illustration on the JPS website, carrier deck markings were sprayed on after further masking the paintwork. Working on small sections at a time, the base was dampened with mineral spirits and treated to a wash of thinned brown and black oil paint to enhance the engraved detail and give a weathered look. The metal sections of the deck were dry-brushed randomly with silver enamel with a touch of raw umber oil paint.
Tamiya’s US Navy Pilots in 1:48 scale (kit 61107) were added to give some life to the scene. Very crisp sculpting and realistic poses help these 1:48 figures appear quite convincing. The figures were mounted on toothpicks to ease handling, and then airbrushed with XF-1 black.
Using a dilute mixture of XF-55 Deck Tan and XF-57 Buff, the flight uniforms were airbrushed leaving the black as a shadow. Details were painted in with Vallejo acrylics, with the Mae West vests given a more orange shade of yellow. Several thinned washes of dark oil paints were used to accentuate the well-defined detail on these figures.
The faces were primed with Tamiya’s XF-15 Flesh mixed with some XF-59 Desert Yellow. They were then painted with Winsor & Newton artist oil paint white and burnt sienna. Shadows were done in raw umber and black, with white blended in for highlights. Payne’s grey was touched around the lower jaws for the 5-o’clock shadow look.
CONCLUSIONAccurate Miniatures has produced kits that actually look like what they are representing. The overall lines and detail of the real TBM-3 Avenger are well captured by the finished model. The research that went into this particular model shows, and it was a pleasure to construct, paint, and display. •
The kit decals were a major drawback since they cracked on every application and had to be creatively repaired. This could quite possibly due to age since the model was an old one picked up at a swap meet.
The bomb bay doors were opened up to display all of the aircraft’s ordinance.
The model and figures were placed on a carrier deck base from Just Plane Stuff. The resin base was painted overall 20-B Deck Blue, and then weathered with further acrylics and oil paint washes.
p30-35 feature article - tbm-3 avenger 021.indd 35 28/11/2012 09:55
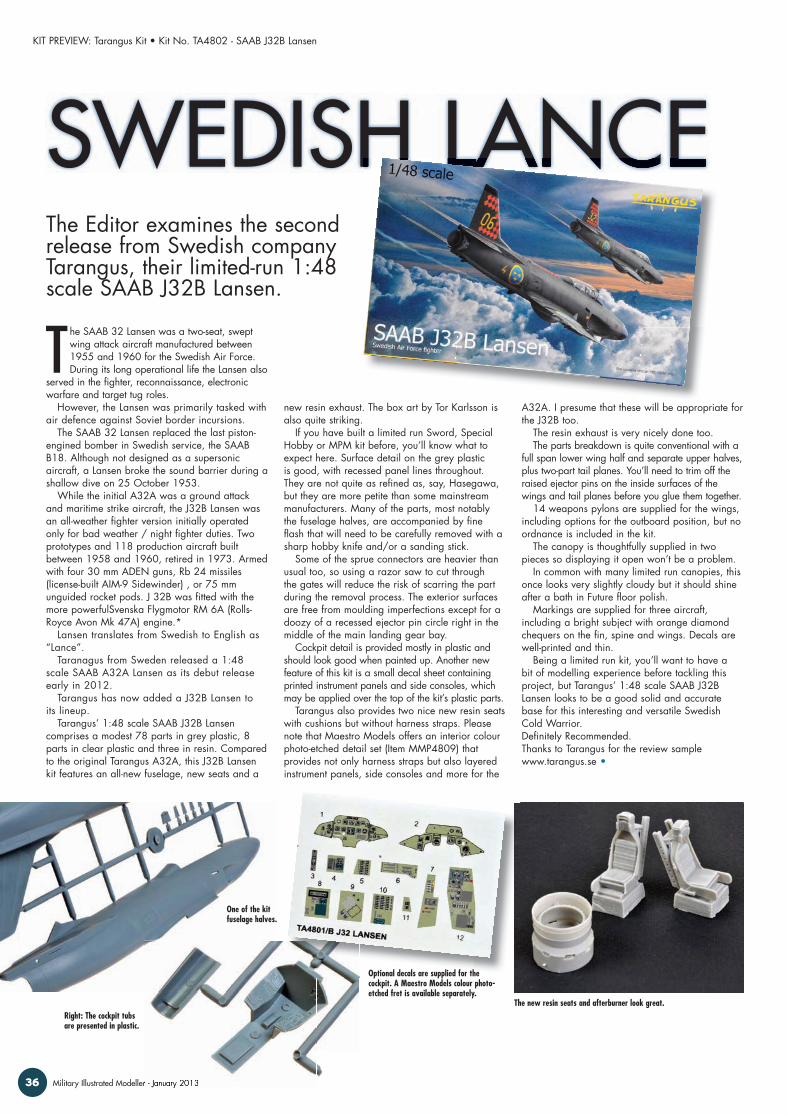
T he SAAB 32 Lansen was a two-seat, swept wing attack aircraft manufactured between 1955 and 1960 for the Swedish Air Force. During its long operational life the Lansen also
served in the fighter, reconnaissance, electronic warfare and target tug roles.
However, the Lansen was primarily tasked with air defence against Soviet border incursions.
The SAAB 32 Lansen replaced the last piston-engined bomber in Swedish service, the SAAB B18. Although not designed as a supersonic aircraft, a Lansen broke the sound barrier during a shallow dive on 25 October 1953.
While the initial A32A was a ground attack and maritime strike aircraft, the J32B Lansen was an all-weather fighter version initially operated only for bad weather / night fighter duties. Two prototypes and 118 production aircraft built between 1958 and 1960, retired in 1973. Armed with four 30 mm ADEN guns, Rb 24 missiles (license-built AIM-9 Sidewinder) , or 75 mm unguided rocket pods. J 32B was fitted with the more powerfulSvenska Flygmotor RM 6A (Rolls-Royce Avon Mk 47A) engine.*
Lansen translates from Swedish to English as “Lance”.
Taranagus from Sweden released a 1:48 scale SAAB A32A Lansen as its debut release early in 2012.
Tarangus has now added a J32B Lansen to its lineup.
Tarangus’ 1:48 scale SAAB J32B Lansen comprises a modest 78 parts in grey plastic, 8 parts in clear plastic and three in resin. Compared to the original Tarangus A32A, this J32B Lansen kit features an all-new fuselage, new seats and a
new resin exhaust. The box art by Tor Karlsson is also quite striking.
If you have built a limited run Sword, Special Hobby or MPM kit before, you’ll know what to expect here. Surface detail on the grey plastic is good, with recessed panel lines throughout. They are not quite as refined as, say, Hasegawa, but they are more petite than some mainstream manufacturers. Many of the parts, most notably the fuselage halves, are accompanied by fine flash that will need to be carefully removed with a sharp hobby knife and/or a sanding stick.
Some of the sprue connectors are heavier than usual too, so using a razor saw to cut through the gates will reduce the risk of scarring the part during the removal process. The exterior surfaces are free from moulding imperfections except for a doozy of a recessed ejector pin circle right in the middle of the main landing gear bay.
Cockpit detail is provided mostly in plastic and should look good when painted up. Another new feature of this kit is a small decal sheet containing printed instrument panels and side consoles, which may be applied over the top of the kit’s plastic parts.
Tarangus also provides two nice new resin seats with cushions but without harness straps. Please note that Maestro Models offers an interior colour photo-etched detail set (Item MMP4809) that provides not only harness straps but also layered instrument panels, side consoles and more for the
A32A. I presume that these will be appropriate for the J32B too.
The resin exhaust is very nicely done too.The parts breakdown is quite conventional with a
full span lower wing half and separate upper halves, plus two-part tail planes. You’ll need to trim off the raised ejector pins on the inside surfaces of the wings and tail planes before you glue them together.
14 weapons pylons are supplied for the wings, including options for the outboard position, but no ordnance is included in the kit.
The canopy is thoughtfully supplied in two pieces so displaying it open won’t be a problem.
In common with many limited run canopies, this once looks very slightly cloudy but it should shine after a bath in Future floor polish.
Markings are supplied for three aircraft, including a bright subject with orange diamond chequers on the fin, spine and wings. Decals are well-printed and thin.
Being a limited run kit, you’ll want to have a bit of modelling experience before tackling this project, but Tarangus’ 1:48 scale SAAB J32B Lansen looks to be a good solid and accurate base for this interesting and versatile Swedish Cold Warrior.Definitely Recommended.Thanks to Tarangus for the review sample www.tarangus.se •
SWEDISH LANCEKIT PREVIEW: Tarangus Kit • Kit No. TA4802 - SAAB J32B Lansen
The Editor examines the second release from Swedish company Tarangus, their limited-run 1:48 scale SAAB J32B Lansen.
36 Military Illustrated Modeller - January 2013
SWEDISH LANCESWEDISH LANCE
Military Illustrated Modeller - January 2013
One of the kit fuselage halves.
Right: The cockpit tubs are presented in plastic.
Optional decals are supplied for the cockpit. A Maestro Models colour photo-etched fret is available separately.
The new resin seats and afterburner look great.
p36 preview - tarangus saab lansen 021.indd 36 28/11/2012 09:48

I guess first impressions should always count, and wow, what a first impression the Revell Westland Sea Lynx Mk.88A leaves you with.
When I saw what Revell has delivered for the price, I was bowled over.
You get five bags containing 18 Sprues, a 19 page instruction booklet and a single large sheet of decals. Apart from the clear plastic, all other plastic is white, possibly not a favourite choice for my old eyes, as looking at the plastic I find it difficult to see the detail and part numbers ( it’s like skiing in a whiteout).
I’ve mentioned the unlisted sprues early on because as I did more research, I discovered that you can and need to use these extras to accurately complete a Sea Lynx Mk.88A. Sprue Q contains parts to complete a Sea Owl thermal imager modified nose (HMA8), Older instrument
panel, rescue hoist, folding tail, ALQ 144 and various antennas and avionics panels. Please note that some of these extra parts may not be included in final production kits though.
Enough of the detective work. Let’s look at the construction sequence. Before you begin you will need to decide if you wish to build an Anti-Submarine Warfare aircraft with AN/AQS-18D dipping sonar and its associated equipment, or an Anti-Piracy aircraft armed with the 12.7mm door gun.
Construction commences with the cockpit where upon your final choice of marking options, determines what holes need to be opened in the flooring. The instrument panel (part 148A) at step 5 is correct if you are building an Mk.88A with
the FLIR on the nose (I have seen images that look to have an unspecified [not the Sea Owl] type of FLIR fitted). For the aircraft on the decal sheet use the instrument panel part 236A of sprue Q. Both instrument panels have some minor indentations within one or two instruments that will need some attention before the decals are applied. I guess the point I’m making is, use your references, as the centre consoles in images I have seen have a single Comm. Nav. Interface (CNI) panel top left. While the instruction show the use of dual CNI. Sprue Q again has the parts required to revert to single CNI. When completed, the cockpit will look great, as the level of detail in the plastic when painted and decaled will certainly stand out.
From the cockpit, construction continues to the AN/AQS-18D dipping Sonar and all its associated equipment. Two whole pages are devoted to the
construction of the sonar equipment. Again the detail is superb and will look spectacular when painted.
From this point on we begin to close up the fuselage and then add all the external equipment, antennas, floatation equipment and electronic counter measure modules. There are no engines to speak of just the inlet and exhaust that are both blanked off far enough back so as not to be an issue. Not in the instructions, but included on a spare clear sprue (H) are the inlet mesh guards.
At this point we move onto attaching the tail boom, and possibly the one area that will create discussion. Sea Lynx are covered with numerous reinforcing plates. These and the main aircraft panels are secure by 1000’s of dome head rivets.
These rivets do not appear on the Revell Sea Lynx exterior. I can only assume that a conscious decision was made to not include this detail. Does this lack of detail detract from the overall kit? Given the price and overall high level of detail, I don’t think so, and if you wish to super detail (as many will) there are options available to replace the rivet detail. I personally feel that under the 25th Anniversary markings you may not notice the lack of rivets.
Various air vents are mould into the kit with no openings. One option will be to cut these vents open and insert fine mesh from behind. Construction now moves onto the door gun and associated weapons prior to beginning the rotor head construction. There is currently no option to build the Sea Lynx with the rotor blades folded, but what is nice is that the head is detachable. With the head done, we are finished.
Revell has certainly come up with a winner here, okay, the lack of raised rivet detail will generate discussion, and so for those that wish to add this, there are options available. Looking at the sprues provided in the kit, this will not be the only Super Sea Lynx that Revell will release. I feel you could come very close to a Royal Navy HMA.8 aircraft and other variants of nationalities that use similar Super Sea Lynx.
For £20 from Hannants this will certainly be a very popular kit with a great level of detail, eye catching markings and priced to suit all budgets.
Revell model kits are available from all good toy and model retailers. For further information visit www.revell.eu •
BIG CAT AT SEAKIT PREVIEW: Revell 1:32 Sea Lynx Mk.88A.• Kit No. 04652
Phil Parsons investigates Revell’s big new 1:32 scale Sea Lynx Mk.88A.
Two colourful options are included on the decal sheet.
Aircraft Edition 37
BIG CAT AT SEA
Cockpit and exterior detail are very well done. The clear parts look fantastic. Revell’s big Lynx is moulded to a very high quality, including smaller and more delicate parts.
One of the large main fuselage halves.
p37 preview - revell sea lynx 021.indd 37 28/11/2012 09:46

A lthough I am probably best known in the modelling world for my AFV projects, I really began in this hobby with my interest in aviation, and building model aircraft.
I think there are a number of notable differences between aircraft and AFV modelling. For a start, it is necessary to be more accurate with the building and detailing an aircraft model. It is also requires continuous alternating between assembly and painting. AFV models have a clearer sequence of building first and painting later. It is certainly very
hard for to me to finish an aircraft model. This one is a good example - 10 years have passed since I started it!
After many stops and starts however, I finally took up this kit again in the summer and was determined to finish it.
HISTORYThe Kawanishi N1K2-J Shiden-Kai was a development of the N1K1 Kyofu floatplane fighter. The heavy floats of the N1K1 meant
that it was never a match against contemporary American fighters. However, the engineers at Kawanishi came to the conclusion that N1K might make a good land-based fighter based so they started a private venture development that took its first flight on December 27, 1942. This prototype was fitted with the Nakajima NK9H Homare radial engine, a recent development, instead of the original and less powerful Mitsubishi MK4D Kasei of the N1K1.
A bigger diameter propeller was fitted to take
GEORGE OF THE JUNGLE
38 Military Illustrated Modeller - January 2013
FEATURE ARTICLE: Hasegawa 1:48 Kawanishi N1K2-J Shiden-Kai (George) Late Version • Kit No. JT74
Joaquin Garcia Gazquex builds and details Hasegawa’s lovely 1:48 scale N1K2-J Shiden-Kai, and provides a step-by-step guide to his weathering methods.
p38-45 feature article - hasegawa shiden-kai 021.indd 38 29/11/2012 10:22
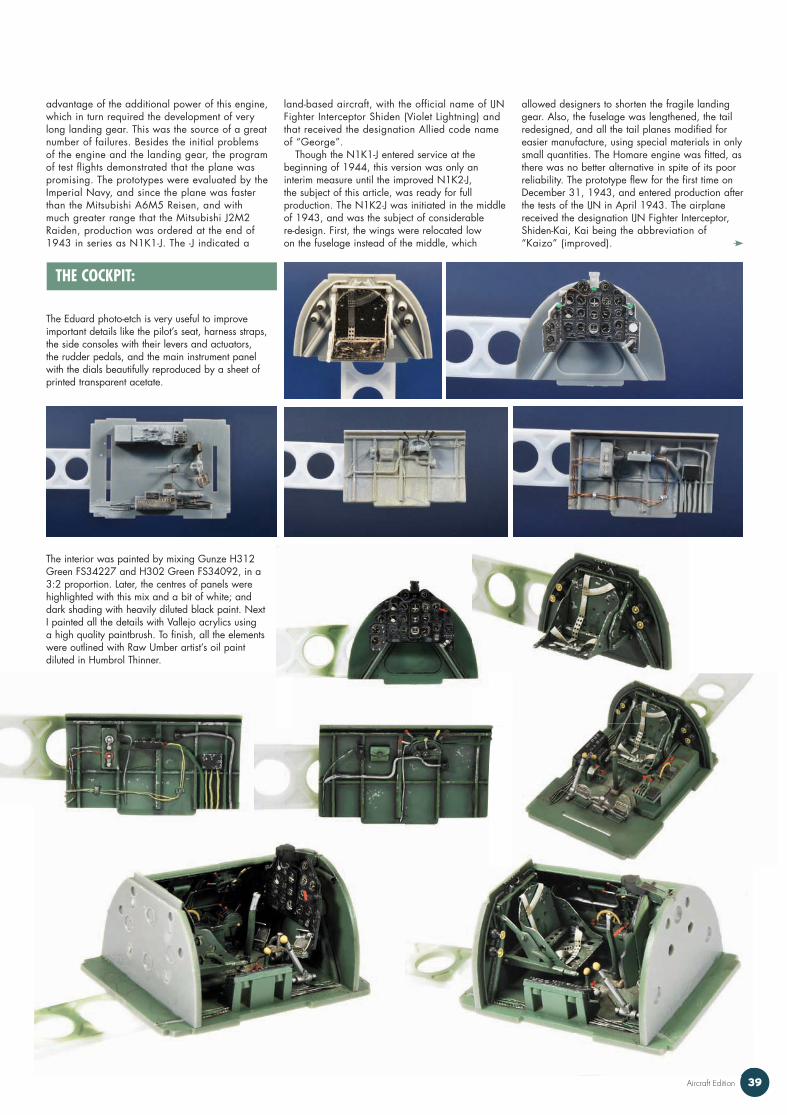
Aircraft Edition 39
advantage of the additional power of this engine, which in turn required the development of very long landing gear. This was the source of a great number of failures. Besides the initial problems of the engine and the landing gear, the program of test flights demonstrated that the plane was promising. The prototypes were evaluated by the Imperial Navy, and since the plane was faster than the Mitsubishi A6M5 Reisen, and with much greater range that the Mitsubishi J2M2 Raiden, production was ordered at the end of 1943 in series as N1K1-J. The -J indicated a
land-based aircraft, with the official name of IJN Fighter Interceptor Shiden (Violet Lightning) and that received the designation Allied code name of “George”.
Though the N1K1-J entered service at the beginning of 1944, this version was only an interim measure until the improved N1K2-J, the subject of this article, was ready for full production. The N1K2-J was initiated in the middle of 1943, and was the subject of considerable re-design. First, the wings were relocated low on the fuselage instead of the middle, which
allowed designers to shorten the fragile landing gear. Also, the fuselage was lengthened, the tail redesigned, and all the tail planes modified for easier manufacture, using special materials in only small quantities. The Homare engine was fitted, as there was no better alternative in spite of its poor reliability. The prototype flew for the first time on December 31, 1943, and entered production after the tests of the IJN in April 1943. The airplane received the designation IJN Fighter Interceptor, Shiden-Kai, Kai being the abbreviation of “Kaizo” (improved).
THE COCKPIT:
The Eduard photo-etch is very useful to improve important details like the pilot’s seat, harness straps, the side consoles with their levers and actuators, the rudder pedals, and the main instrument panel with the dials beautifully reproduced by a sheet of printed transparent acetate.
The interior was painted by mixing Gunze H312 Green FS34227 and H302 Green FS34092, in a 3:2 proportion. Later, the centres of panels were highlighted with this mix and a bit of white; and dark shading with heavily diluted black paint. Next I painted all the details with Vallejo acrylics using a high quality paintbrush. To finish, all the elements were outlined with Raw Umber artist’s oil paint diluted in Humbrol Thinner.
p38-45 feature article - hasegawa shiden-kai 021.indd 39 29/11/2012 10:22

40 Military Illustrated Modeller - January 2013
FEATURE ARTICLE: Hasegawa 1:48 Kawanishi N1K2-J Shiden-Kai (George) Late Version • Kit No. JT74
PAINTING:
Before starting to paint any model, I think it is essential to carefully consult real references of the original subject. On this occasion I used the book “Famous Airplanes Nº124: Kyofu, Shiden, Shiden-Kai” edited by Bunrindo. This book offers a large number of photographs both from the WWII period and of a restored example, plus profiles, sketches, etc.
In the photographs it is possible to see that operational Shiden-Kai’s wore a fantastic aspect (at least for a modeller) of heavily deteriorated paint with large areas of chipping and flaking. Amongst the available profiles, I particularly liked Shiden-Kais of the 343 Kokutai, which featured ID numbers painted inside the fuselage Hinomarus.
After a search on the Internet, I found a decal sheet by Yellowhammer. I chose the aircraft piloted by Lt. Naoshi Kanno. It featured two yellow bands on the fuselage and victory marks. This was an impressively showy scheme!
SILVER COLOUR:
After the fuselage and the wings are joined, it is important to carefully fill and sand very all the join lines, especially where we are going to paint in aluminium colour. These can be tricky areas that will later expose assembly mistakes and imperfections.
Hydraulic lines were added to the landing gear using copper wire.
I built a simple jig from cardboard to minimise handling while painting.
For the aluminium colour I decanted Tamiya TS-17 “Aluminium Silver” from its spray can into a glass bottle, leaving it to rest a few hours to expel the propellant gas. Later I applied this paint in fine coats with my airbrush until the model was completely covered.
Far left and Left: Prior to applying the green colour, I simulated the biggest chipping areas in the wing roots and adjacent zones.with Maskol, slightly diluted with water.
THE ENGINE:
The Homare engine is magnificently reproduced. I only added the ignition harness with copper wire stripped from telephone cable. This was simple but time consuming.
Painting the engine started with a base coat of Tamiya enamel XF-16 Flat Aluminium applied with my airbrush.
Tamiya’s acrylic XF-1 Flat Black was diluted with 90% alcohol, and applied as shading. Vallejo Red Amaranth 829 was painted onto the connectors of the ignition harness. A few washes were done with Citadel “Badab Black” ink lend the necessary depth to engine elements.
To finish the engine, I airbrushed Tamiya acrylic XF-10 Flat Brown heavily diluted to suggest scorching and burning. Some details were outlined with XF-16 applied by brush. Sepia and black ink were applied in different spots to suggest oil stains.
p38-45 feature article - hasegawa shiden-kai 021.indd 40 29/11/2012 10:23

Aircraft Edition 41
KAWANISHI IJN DARK GREEN:Apart from the prototypes, I have not found photos of Shiden-Kai in any camouflage other than the official scheme. The colours are Kawanishi IJN Dark Green on the top and side surfaces, with bare aluminium on the lower surfaces and brown for the propeller.
In my opinion it does not make much sense to talk about the precisely accurate shade because exposure to harsh weather degrades and modifies the colour a great deal. However, I think that a Tamiya’s XF-11 IJN Green or the Gunze-Sangyo’s H-59 IJN Green are good starting points. I used Gunze-Sangyo’s H-59 applied in thin layers, covering the
camouflaged surfaces with this colour completely after the cockpit and the engine cowl were masked off to prevent overspray of these completed areas.
The weathering is intended to lighten the centre of the panels by adding a bit of Tamiya acrylic XF-76 Grey Green (IJN) to the base colour. A soft shading with Tamiya Flat Black XF-1 diluted 90% with 96 º alcohol serves to highlight all the panel lines.
The wings are masked off in preparation for the yellow leading edge markings.
After the Maskol was removed, I added more scratching by carefully chipping the green paint with a brand new sharp X-Acto blade. This way, I obtain different size and shapes of the chipping. Yellowhammer’s decals were applied over Marabou’s acrylic gloss varnish with the aid of Microset and Microsol liquids, and finally sealed with satin varnish.
The canopy was masked with Eduard’s die-cut masking sheet, and painted with same green of the upper surfaces.
Tamiya’s transparent colours (Blue and Smoke) were sprayed over different panels on the lower surfaces, suggesting the variation of colours of the natural metal. Please note that the effect has intentionally applied to excess. Later, the weathering process will tone down the effect.
WEATHERING AND PAINT DETERIORATION:
At this point we have a paint base suitable to continue with the weathering and deterioration process.
The best way to emphasise the structure of the ailerons is to mask them with Tamiya masking tape.
The shading is done with Tamiya acrylic black XF-1, heavily diluted. If we overdo the effect, it is always possible to dial it back by applying an overspray of the green base colour to obtaining the wished result.
Right and far right: The current state of weathering, upper and
lower surfaces.
p38-45 feature article - hasegawa shiden-kai 021.indd 41 29/11/2012 10:23

42 Military Illustrated Modeller - January 2013
FEATURE ARTICLE: Hasegawa 1:48 Kawanishi N1K2-J Shiden-Kai (George) Late Version • Kit No. JT74
The Lower ParTs:
a good way to start weathering the aluminium is with Tamiya X-19 smoke, applied with the airbrush. some of this may be partially removed with a thin paintbrush and alcohol…
…the process is completed by sanding with 3000 grit paper, leaving a realistic dirty patina.
This was repeated for different parts, alternating by zones, to give variety and diversity to the model.
weathering continues on the lower surfaces using oils. a blend of Paynes Grey and raw Umber delivers a perfect patina for the metallic surfaces.
all this work also accentuates the panel lines and other structural details.
“Before starting to paint any model, I think it is essential to carefully
consult real references of the original subject.”
p38-45 feature article - hasegawa shiden-kai 021.indd 42 29/11/2012 10:23
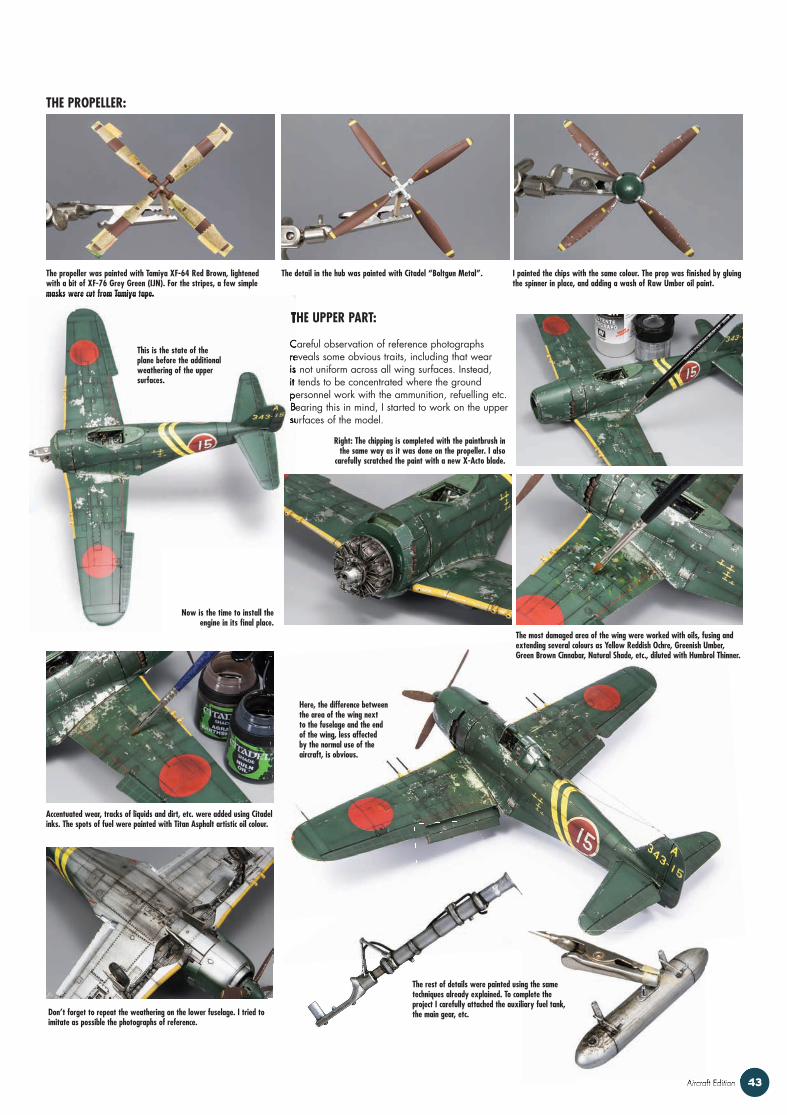
Aircraft Edition 43
THE PROPELLER:
The propeller was painted with Tamiya XF-64 Red Brown, lightened with a bit of XF-76 Grey Green (IJN). For the stripes, a few simple masks were cut from Tamiya tape.
The detail in the hub was painted with Citadel “Boltgun Metal”. I painted the chips with the same colour. The prop was finished by gluing the spinner in place, and adding a wash of Raw Umber oil paint.
THE UPPER PART:
Careful observation of reference photographs reveals some obvious traits, including that wear is not uniform across all wing surfaces. Instead, it tends to be concentrated where the ground personnel work with the ammunition, refuelling etc. Bearing this in mind, I started to work on the upper surfaces of the model.
masks were cut from Tamiya tape.
THE UPPER PART:
Careful observation of reference photographs reveals some obvious traits, including that wear is not uniform across all wing surfaces. Instead, it tends to be concentrated where the ground personnel work with the ammunition, refuelling etc. Bearing this in mind, I started to work on the upper surfaces of the model.
Aircraft Edition 43
This is the state of the plane before the additional weathering of the upper surfaces.
Right: The chipping is completed with the paintbrush in the same way as it was done on the propeller. I also
carefully scratched the paint with a new X-Acto blade.
The most damaged area of the wing were worked with oils, fusing and extending several colours as Yellow Reddish Ochre, Greenish Umber, Green Brown Cinnabar, Natural Shade, etc., diluted with Humbrol Thinner.
Now is the time to install the engine in its final place.
Accentuated wear, tracks of liquids and dirt, etc. were added using Citadel inks. The spots of fuel were painted with Titan Asphalt artistic oil colour.
Here, the difference between the area of the wing next to the fuselage and the end of the wing, less affected by the normal use of the aircraft, is obvious.
Don’t forget to repeat the weathering on the lower fuselage. I tried to imitate as possible the photographs of reference.
The rest of details were painted using the same techniques already explained. To complete the project I carefully attached the auxiliary fuel tank, the main gear, etc.
p38-45 feature article - hasegawa shiden-kai 021.indd 43 29/11/2012 10:24

44 Military Illustrated Modeller - January 2013
FEATURE ARTICLE: Hasegawa 1:48 Kawanishi N1K2-J Shiden-Kai (George) Late Version • Kit No. JT74
Military Illustrated Modeller - January 2013
“Hasegawa 1:48 scale Shiden-Kai is an extraordinarily
good kit.”
Small details are important too. They add up in the final result and it is very important to pay sufficient attention. The antenna was wired up using stretched sprue.
The wing lights are includes in the kit. They were painted with Tamiya’s transparent colours.
The landing gear down indicator is replicated by small lengths of copper wire painted with acrylic red.
p38-45 feature article - hasegawa shiden-kai 021.indd 44 29/11/2012 10:24

Aircraft Edition 45
MODELSPEC
Hasegawa 1:48 Kawanishi N1K2-J Shiden-Kai (George) Late Version. Kit No. JT74
Accessories Used :
Eduard N1K2-J Shinden Kai / George Photo-Etched Detail SetEduard Item No. EDUEX065 - N1K2-J Shinden Kai / George Masking Set (HAS kit)Fine Molds Item No. FNMAC-71 – Shiden-Kai 20mm Gun & Pitot TubeYellowhammer Decals Item No. YHD48030 - N1K2 Shiden-Kai
Paints and Finishing Products:
Tamiya Acrylics – XF-1 Flat Black; XF-2 Flat White; XF-3 Yellow; XF-5 Green; XF-8 Flat Blue; XF-15 Flat Flesh; XF-57 Buff; XF-57 Buff; XF-59 Desert Yellow; XF-17 Sea Blue; XF-18 Medium Blue.Vallejo Acrylics – VariousWinsor & Newton Oil Paints – Lamp Black; Raw UmberSolvaset
Excellent detail; good fit; nicely rendered surface features.
Nothing worth mentioning
RATING: 9 out of 10
References
Ed. Accion Press, Euromodelismo Magazine nº 106, N1K2-J “Shiden-Kai”, por Julio C. Cabos Gómez.Ed. Bunrindo, Famous Airplanes #124: Kyofu, Shiden, Shidenkai.Hasegawa kits are distributed in the UK by The Hobby Company Limited www.hobbyco.net
Hasegawa 1:48 Kawanishi N1K2-J Shiden-Kai (George) Late Version.
THE MODELHasegawa 1:48 scale Shiden-Kai is an extraordinarily good kit. I also used the excellent Eduard photo-etched set, principally to detail the interior of the cockpit. •
Aircraft Edition 45
Details such as the lowered flaps provide even more realism and interest to the model.
Weathering is particularly concentrated under the fuselage, just as seen in reference photographs.
The guns and the pitot tube are turned metal accessories from Fine Molds’ upgrade set for the Shiden-Kai.
Pigments and oil washes were used to provide the typical patina seen on heavily weathered aircraft wheel hubs and tyres.
p38-45 feature article - hasegawa shiden-kai 021.indd 45 29/11/2012 10:24

New kits from Wingnut Wings are always eagerly awaited.
Although the subject matter was not unexpected, the initial packaging
was. Wingnut Wings, in a first for their marketing department, decided to release these two adversaries as a double act. The Fokker Eindecker and Airco DH.2 frequently encountered each other in combat so it is only fitting that they are pitted against each other in the modellers’ display cabinet.
The huge box is split in two so that each subject occupies its own space. A common instruction book is shared between the aircraft, as is a decal sheet and photo-etched fret.
To keep the cost of the overall package down, only a single decal option is allocated to each “Scout”.
FOKKER E.IIIThere are 7 sprues of light grey plastic (plus 1 clear item for the windscreens) and it is obvious from these that many more Eindecker variants will follow. All of the parts are beautifully moulded with fine detail and minimal flash. The only ejection pin visible on the completed model is found at the rear of the cockpit, the rest being conveniently hidden during assembly. The offending beast is easily removed without loss of detail.
There was one small area of concern however, which turned up on one of the sprues. It manifested itself as a significantly stepped seam line thanks to the misalignment of the mould halves during the manufacturing process. This can become problematical when trying to maintain the correct cross section of an item during the clean-up process.
Often not appreciated are the attachment points that each part has to its parent sprue. Great care has been taken with both these releases to ensure that the areas concerned are either easily eradicated or are concealed away from prying eyes.
The obvious place to start the build is in the cockpit. This interior is occupied by a comprehensive arrangement of fittings that include all the usual suspects such as seat, control column, rudder bar, heel guides, ammunition and empty belt bin. Also seen are the tachometer, pulsator, magneto, fuel control switches, “throttle”, air pressure gauge, hand pump, and engine air
THE DUELLISTS
46 Military Illustrated Modeller - January 2013
BUILD REVIEW: Wingnut Wings 1:32 “The Duellists” • Kit No. 32802
Rob Baumgartner examines and starts building the brand new Wingnut Wings 1:32 scale “Duellists” combination of a Fokker E.III and DH.2. Both are now available from Wingnut Wings as separate kits too.
THE DUELLISTS
Photo-etched parts for both kits are supplied on the one fret.
The common decal sheet with one marking option for each aircraft.
One Fokker fuselage half.
The Fokker engine cowling will give you some interesting painting opportunities.
Lovely fine interior detail Fokker clear parts.
p46-49 preview - wnw duellists 021.indd 46 29/11/2012 09:44

Aircraft Edition 47
intake bulb. Purists may wish to add the handle for engaging the gun synchronizing mechanism under the coaming.
The interior framework comes as separate parts which attach to the rear plywood bulkhead and wing attachment aid. The hinged doors for downward viewing are nicely portrayed on the floor, as are the pilot’s sliding hatches on the fuselage sides.
When these fuselage halves are brought together, the fit is perfect. If you do encounter any problems, then check that the previous sub-assemblies are seated correctly.
The photo-etched fret takes care of the seatbelts as well as the aforementioned elevated heel guides.
A rigging diagram is supplied for the internal control cables and bracing. It’s easy to understand and leaves little room for doubt. Just remember that the wires running across the undercarriage bungee purposely cross over at a lower point than usual to allow room for the pilot’s legs.
The underside lacing is treated in the same way that Eduard chose to do it on their Fokker D.VII series. Once again there were no problems with the fit and the results are as near to perfect as you are likely to get.
The upper deck, side cheeks and cowling are trouble free in their placement and the machine gun cleverly hides any mess the modeller may have made with the upper sprue attachment point. Here the modeller can replace the moulded-on blast plate with a better detailed photo-etched part.
The similarity of the 100hp Oberursel U.1 and the 100hp Gnome Monosoupape rotary engine persuaded WNW to use a common set of cylinders. Each version had the spark plugs located in a different area and both positions are represented. The modeller then has to scrape away the spark plugs that don’t apply to the version of engine they are building.
Well… considering the amount of detail and thought that has gone into the rest of these kits, this shortcut seems a bit surprising. With the addition of two extra parts, the result could have been a set of cylinders with each having the correct spark plug layout. After all, the initial design has already been established. The challenge the modeller must now face is to reinstate the delicate fin detail on each cylinder.
Despite appearances, the undercarriage is quite strong. This is helped by having the assembly kept to as few parts as possible. It slips into place easily and remained “square” with no adjustments necessary. The tyres are separate from the wheel covers which paves the way for the addition of photo-etched spokes.
The IMG 08 “Spandau” machine gun comes in 2 flavours. One can go with a full plastic version or if you want more detail, a phoy-etched fretted jacket may be substituted. This also comes with an end plate and incorporated rectangular sight.
A major feature of these monoplanes is the wings. They are big, beautifully moulded, and carry no blemishes whatsoever. The tacked strips of cane are rendered superbly with delicate and consistent detail. Of course they carry quite a bit of weight and those that don’t rig using monofilament for structural integrity may get a little jittery at this stage.
Don’t fear. The wings carry large slots that slide into Part F5 behind the cockpit bulkhead. This secures them firmly into position and automatically aligns them to the correct angle. If yours display any anhedral or dihedral, the tab can be bent
The Oberursal engine of the Fokker.
E.III interior looking forward.
A nice view of the seat from this angle. The undercarriage assembled and ready for installation.
Wings and undercarriage in place. The big wings deliver a positive fit.
Note the subtle wrinkled fabric texture on the nacelle halves. Three styles of nose covers are included.
The four-bladed pusher propeller. Yet more subtle fabric texture.
p46-49 preview - wnw duellists 021.indd 47 29/11/2012 09:45

48 Military Illustrated Modeller - January 2013
BUILD REVIEW: Wingnut Wings 1:32 “The Duellists” • Kit No. 32802
slightly for minor adjustments and reinserted.To test the strength of the wing to fuselage joint, I
dry fitted the flying surfaces to a taped up fuselage that contained the interior structure. The completed assembly sat solidly on the workbench and could be moved around with impunity. So rigging doesn’t have to be structural and you can use any method you like.
FOKKER DECALSA single aircraft is represented on the instruction sheet and this is Fokker E.III 635/15 of Kampfeinsitzerkommando (KeK) Vaux, Somme 1916.
As expected, the decals are well printed with everything in perfect register. Not only do we get the subjects individual markings, there’s stencil data, prop logos and instrument faces to utilise.
They go on easily with or without setting solutions. The carrier film is thin and has been kept to a minimum.
AIRCO DH.2Despite sporting more parts, as well as a complicated looking “lattice tail”, the DH.2 builds just as easily as the Eindecker. This is courtesy of the kit’s clever engineering that allows the positive
location of both individual parts and sub-assemblies.Inside the box’s second partition, we are
greeted by 5 sprues of the familiar grey coloured plastic. A clear sprue is also included that caters for a number of different windscreen arrangements.
The nacelle interior is tackled first and can be treated as a model unto itself. Around 23 items make up this area, including photo-etched parts for the lap belts. Control column, rudder bar, linkages, seat, altimeter, magneto switch, and fuel fine adjustment wheel, are many of the expected adornments, Others are the elevator trim lever and quadrant, rev counter, a couple of oil pulsators, air pressure valves and associated gauge.
A number of different instrument arrangements are present in the kit, the one needed for this boxing is the typical “early” type. Other early and later 1916 layouts whet the appetite for future releases.
Cleaning up the various cockpit parts calls for a bit of care. The separate interior structure is quite delicate, especially with its incorporated pumping. A deft hand will do wonders here.
The engine mounts need to be precisely located so that the shaft of the Gnome rotary is parallel
to the line of flight. Careful dry fitting before the fateful application of glue ensures success.
Instrument faces come in the form of some superbly printed decals.
Bracing and control wires are colour coded in the instruction sheet.
I was a little apprehensive about how the nacelle halves would fit around the comprehensive interior…but I needn’t have worried. The frontal shelf conceals any internal join lines and the complete assembly is detailed with a subtle representation of wrinkled fabric.
There is only one set of ejection pins that will not be concealed on the finished model. These are on each inner face of the nacelle. This necessary manufacturing evil is very shallow and can easily be filled and sanded with a few swipes of wet ‘n dry paper.
The rear upper deck, A19, was the only part that wasn’t a perfect fit. This was more to do with the moulding process than any design fault.
To allow the appropriate clearance above part “A48” I had to whittle away the inside of the cover to allow the sides to not ride”up on the edge of the nacelle.
As mentioned previously, the engine shares its
The wing textures are simply gorgeous. Struts are not identical, so take care when fitting them.
Tail surfaces with lovely stitching.
Two-blade propeller option.
Some of the common engine parts on the sprue.
The DH.2 clear parts.The DH.2’s Gnome engine – look familiar?
p46-49 preview - wnw duellists 021.indd 48 29/11/2012 09:45

AircraftEdition 49
“Without doubt these kits are the best of their breed in
any scale”
cylinder halves with the Oberursel so the latter’s rearward facing spark plugs need to be cut away. Unlike the Oberursel, a wiring guide is not provided.
The one-piece lower wing takes care of any dihedral setting problems. It fits snugly under the nacelle and provides a solid basis for the rest of the assembly. The upper wing on the original was constructed in 3 sections, which are represented by a single part here. That’s good news because setting the angles of the outer segments could otherwise be problematic.
As a result, these flying surfaces are quite complex, but their execution is exemplary. There’s not a blemish or ejection pin anywhere. The ribs are fully rendered and each contains a beautifully subtle representation of the stitching.
The many struts are not all the same; so don’t remove them randomly from the sprue. They are keyed for ease of orientation and the top wing fits effortlessly on top.
As with any “lattice tail”, the booms are the most fragile part of the model. Fortunately WNW has designed the location points for maximum rigidity. To try and ease the painting process, I decided to deviate from the instructions and
assemble the booms and tailplane assembly as a separate unit.
This may then be added towards the end of the build and carefully squared up with the rest of the aircraft.
The rigging on a DH.2 is extremely complex and it will be very easy to distort the booms. This is especially so if using monofilament for structural rigidity. Safer methods involve stretched sprue, metal/carbon fibre rod, or even WNW’s EZ-line elastic thread. A diagram in the instruction booklet helps the modeller determine where these cables go but some additional reference material wouldn’t go amiss.
DH.2 DecalsThe Eindecker’s adversary in this release is DH.2 serial 7851 of C Flight, 32 Sqn.
It was flown by WGS Curphey to score the first of an eventual 6 victories on 22 August 1916. He met his death in a different DH.2 when shot down on 14 May 1917 by Franz Walz of Jasta “Boelcke”.
The same German unit was responsible for the loss of “7851” when Erwin Bohme met WGS Wagner in combat on 7 Janurary 1917. Wagner lost his life after the combat with Bohme’s Albatros
D.II, and died at the age of 23.Once again, there are no registration problems
on the decal sheet.
conclusionThis latest release from the Wingnut Wings stable matches the very high standards set previously.
Both subjects share a common instruction booklet that doubles as handy piece of reference material. Period photos abound of the two aircraft types and the colour profiles are more of Ronny Bar’s exceptional work.
By coincidence, each aircraft has a rigging layout that would scare the average modeller. But it’s not as daunting as it first appears. Thanks to the clever engineering and informative instructions, the builder can tackle the task with confidence.
Accuracy is not a problem when compared with recognised plans. This includes those in the recent Eindecker Compendium by Josef Scott.
Without doubt these kits are the best of their breed in any scale and are a worthy addition to the ever-increasing range of subjects from Wingnut Wings.
Thanks to Wingnut Wings for the sample www.wingnutwings.com •
The nacelle interior is beautifully detailed.
The interior parts installed and ready to be trapped between the nacelle halves.
The nacelle haves joined and attached to the bottom wing.
The Gnome engine fitted to the rear of the nacelle.
Those beautiful booms.
p46-49 preview - wnw duellists 021.indd 49 29/11/2012 09:46

T he IPMS UK Nationals, Scale Model World, is held each November at The International Centre in Telford, west of Birmingham in England’s Midlands. Although the weather is
invariably chilly and the skies are grey, the halls provide a happy sanctuary for modellers.
This year’s show was bigger than ever before. In the three regular halls, the competition tables had been moved out to make way for more traders and Special Interest Group displays spilling over from their traditional homes.
Brand new for this year was a fourth hall. This housed a large dining area and was the new centre for the competition.
During daylight hours, the competition tables were bathed in natural light thanks to tall windows that ran the full width of the room – a nice change from the hard tungsten lights of the main halls. The tables were packed with 999 entries from 21 different countries. The standard was very high and judging by the spectators snaking their way along the aisles, the models in competition were a real drawcard.
Traditionally, the majority of competition entries are aircraft. There was certainly a preponderance of winged models at Telford again this year, but military vehicles made an excellent showing both in quantity and quality.
In addition to the models, the 2012 show also featured a number of full sized exhibits. Meng Model had an AMX-30 tank alongside their stand as part of their product announcement of a 1:35 scale kit of this fast French tank. Airfix organised a Royal Navy Lynx to fly in for the weekend. It was also conveniently located under the show’s roof and commanded plenty of attention until it flew out again on Sunday night.
This is a truly international event. Visitors flock to the show from all over the UK and Europe, and from as far afield as the USA and Australia. There is always a lively dedicated international section set up, and this year was no exception. Food and drink are the order of the day in this quarter. Whether you are thirsting for schnapps or you have a hankering for a slice of reindeer, you’ll find what you want here.
The halls are also packed with traders and display stands. There were more mainstream manufacturers this year than we have seen before, with stands fielded by Airfix, Revell, Meng, Zoukei-Moura and more.
Revell’s impressive display showed their new
A POSTCARD FROM TELFORD
50 Military Illustrated Modeller - January 2013
SHOW REPORT: SCALE MODEL WORLD 2012: IPMS UK NATIONALS
The Editor takes a stroll around the aisles of Scale Model World 2012, the IPMS UK Nationals at Telford.
A POSTCARD FROM TELFORDThe Editor takes a stroll around
The International Centre, Telford UK, the home of the IPMS UK Nationals for two days each November.
Monogram’s 1:48 scale Su-25 Frogfoot in a striking Ukranian camouflage finish.
On the A2Zee Models stand, Alley Cat’s newly released 1:32 scale Bristol M1.C was proving popular over the weekend.
Above and right: A beautiful 1:48 scale scratch built Caudron G.III
Above: Looking like a large malevolent insect with its rotors folded, here is Academy’s 1:48 scale CH-53 Super Stallion.
p50-52 show report - ipms 021.indd 50 29/11/2012 09:54

AircraftEdition 51
The big Vintage Fighter Series 1:24 scale P-47D Thunderbolt. This gorgeous Tornado with everything dropped was also in the S.I.G. area.
The Airfix “Make and take” tables proved popular with kids and parents alike. Tamiya’s Beaufighter in North Atlantic colours.Dave Little from Model Craft Limited, home of Combat Decals. Dave has plans to expand his decal range to 1:48 scale during 2013.
Jamie Haggo’s unusually marked New Zealand Corsair. This is Tamiya’s 1:48 scale kit.
A beautifully superdetailed and modified 1:32 scale Wingnut Wings FE.2b.
One of a new range of beautiful 1:32 scale pilot figures from Wings Cockpit Figures.
The ADH Publishing stand.
p50-52 show report - ipms 021.indd 51 29/11/2012 09:54
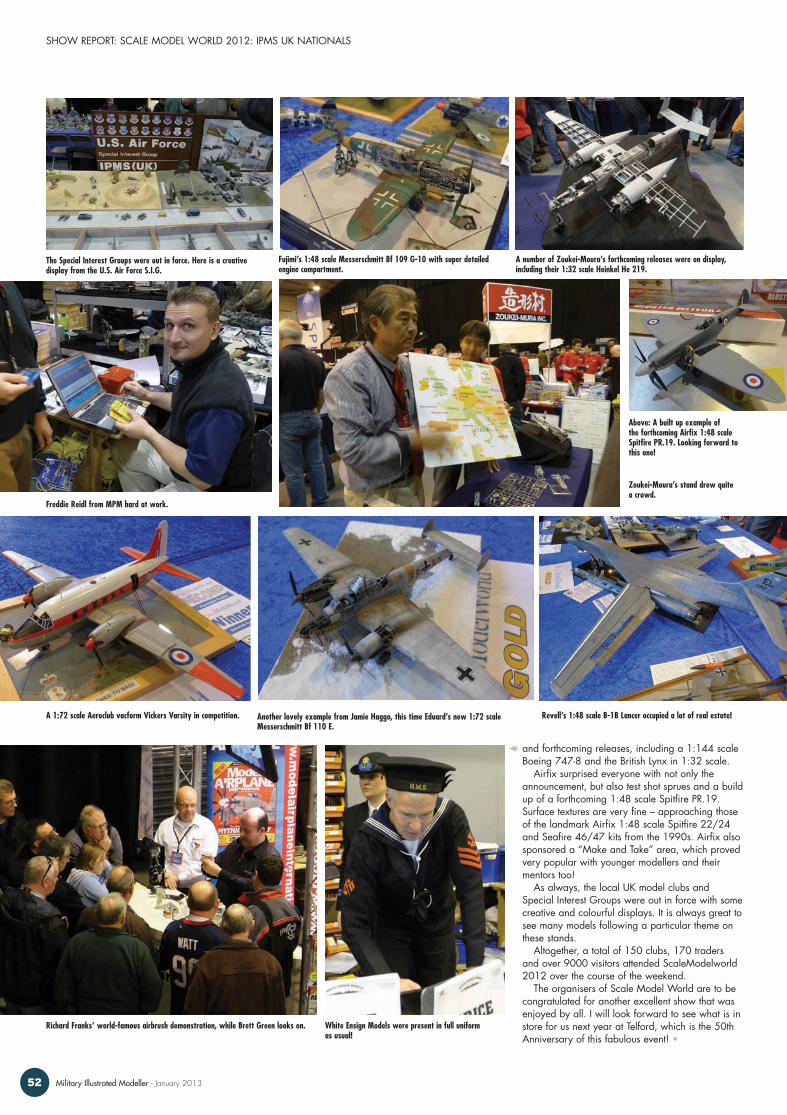
and forthcoming releases, including a 1:144 scale Boeing 747-8 and the British Lynx in 1:32 scale.
Airfix surprised everyone with not only the announcement, but also test shot sprues and a build up of a forthcoming 1:48 scale Spitfire PR.19. Surface textures are very fine – approaching those of the landmark Airfix 1:48 scale Spitfire 22/24 and Seafire 46/47 kits from the 1990s. Airfix also sponsored a “Make and Take” area, which proved very popular with younger modellers and their mentors too!
As always, the local UK model clubs and Special Interest Groups were out in force with some creative and colourful displays. It is always great to see many models following a particular theme on these stands.
Altogether, a total of 150 clubs, 170 traders and over 9000 visitors attended ScaleModelworld 2012 over the course of the weekend.
The organisers of Scale Model World are to be congratulated for another excellent show that was enjoyed by all. I will look forward to see what is in store for us next year at Telford, which is the 50th Anniversary of this fabulous event! •
52 Military Illustrated Modeller - January 2013
SHOW REPORT: SCALE MODEL WORLD 2012: IPMS UK NATIONALS
The Special Interest Groups were out in force. Here is a creative display from the U.S. Air Force S.I.G.
Fujimi’s 1:48 scale Messerschmitt Bf 109 G-10 with super detailed engine compartment.
A number of Zoukei-Moura’s forthcoming releases were on display, including their 1:32 scale Heinkel He 219.
Freddie Reidl from MPM hard at work.
Zoukei-Moura’s stand drew quite a crowd.
A 1:72 scale Aeroclub vacform Vickers Varsity in competition. Another lovely example from Jamie Haggo, this time Eduard’s new 1:72 scale Messerschmitt Bf 110 E.
Revell’s 1:48 scale B-1B Lancer occupied a lot of real estate!
Richard Franks’ world-famous airbrush demonstration, while Brett Green looks on. White Ensign Models were present in full uniform as usual!
Above: A built up example of the forthcoming Airfix 1:48 scale Spitfire PR.19. Looking forward to this one!
p50-52 show report - ipms 021.indd 52 29/11/2012 09:55

T he T-45 Goshawk is a navalised advanced jet trainer designed for the US Navy and Marines. It is based on the airframe of the BAE Systems Hawk Mk.60.
Modifications compared to the original Hawk include strengthened undercarriage and arrestor gear for carrier landings, airframe sealing against water and corrosion, and revised avionics.
The first T-45A flew in 1988, entering service in 1992. The type received an upgrade from the 84th production aircraft with the fitting of a glass digital cockpit. This new variant is the T-45C.
Although the T-45 is not fitted with built-in weapons, it is capable of carrying external training weapons, fuel tanks and an under-fuselage pod.
More than 200 T-45 A and C Goshawks are currently in service with the US Navy and Marines.
Kinetic has expanded its growing range of Cold War and modern US military aircraft with this latest release, the 1:48 scale T-45A/C Goshawk. The kit comprises 146 parts in light grey plastic; nine parts in clear and markings for two aircraft - one Marines and one Navy.
Kinetic’s 1:48 scale T-45 Goshawk features crisp, consistent panel detail and selected rows of rivets, these being raised on the tail area. These are all very subtle and on par with their recent F-5A Freedom Fighter. The sprue attachment pints are also quite fine, so removal and clean-up of parts should not present any problems.
Cockpit detail is good, but no harness straps are supplied for the seat. However, it has been Kinetic’s habit to release colour photo-etched frets shortly after a kit’s release. This will spruce up the front office for super-detailers, and will likely include harness straps, side consoles and a replacement instrument panel. Parts are supplied to depict either the original T-45A or the digital cockpit of the T-45C.
The large clear canopy features detonation cord
moulded into the top of the part.The kit features full-length intakes and exhaust.Parts breakdown is conventional, so construction
should be very straightforward.The wings feature a full span lower wing with
large integrated wheel well ceilings that should assist with correct location and dihedral. The flaps and slats are all separate, and alternative mounts/actuators are supplied depending on whether you plan to pose the flaps either up or down. The rudder is separate too.
Additional useful options include cockpit parts for the T-45A or glass-instrument T-45C, poseable canopy and speed brakes, and the ability to display the undercarriage up or down.
Markings are supplied for one Navy and one Marines T-45 from Training Wing 2, NAS Kingsville. Both are finished in the almost universal white and high visibility red trainer colours.
The decals are perfectly printed by Cartograf. Colours and dimensions look great. The only tiny issue is that the upper and lower wing markings are labelled as Upper Fuselage and Lower Fuselage on the sheet itself.
Artwork was designed by Two Bobs Aviation Graphics.
Stencil markings are included.Kinetic’s new 1:48 scale T-45A/C Goshawk
looks to be an excellent model with surface features on par with their recent F-5A Freedom Fighter. As the first mainstream T-45 in 1:48 scale, the kit will be warmly welcomed by US Navy, Marines and training aircraft fans.
Considering Kinetic is about to release a 1:32 scale 100 series Hawk, I wonder if they also have plans to expand their 1:48 scale Hawk family? That would be interesting!
Thanks to Lucky Model for the sample www.luckymodel.com •
TRANSATLANTIC HAWK
KIT PREVIEW: Kinetic Model Kits 1:48 T-45A/C Goshawk.• Kit No. K48038
The Editor takes a first look at Kinetic’s all-new 1:48 scale T-45A/C Goshawk, the first time this type has been available as a 1:48 scale injection moulded kit.
Markings are provided for two aircraft on the glossy Cartograf decal sheet.
Aircraft Edition 53
1:48 scale injection moulded kit.
Alternate instrument panels are offered for the T-45A or the digital T-45C.
The large canopy has the detonation cord moulded in place.
Surface detail is crisp and fine.
p53 preview - kinetic t-45 021.indd 53 29/11/2012 09:58

WESSEX WHIRLYBIRD
54 Military Illustrated Modeller - January 2013
FEATURE ARTICLE: Italeri 1:48 Westland Wessex HU.5. • Kit No.2720
p54-63 feature article - italeri wessex hu 021.indd 54 28/11/2012 09:42

Aircraft Edition 55
T he Westland Wessex was a British development of the Sikorsky S-58 Chocktaw, licence built and initially fitted with the Napier Gazelle turboshaft engine. This was
the Wessex HAS.1 variant. A later anti-submarine development, the HAS.3, was also fitted with the Napier Gazelle engine.
The Wessex first flew on 20 June 1958 and entered service with the Royal Navy in 1961 in the anti-submarine role.
This long-serving workhorse later equipped the Royal Air Force and Royal Marines too. The Wessex HC.2, HCC.4 and HU.5 were powered by twin Rolls-Royce Gnome engines, and could easily be distinguished by the large single exhaust on each side of the forward fuselage. Across its life, the Wessex undertook troop carrier, air ambulance, ground support and search and rescue duties. A total of 356 across all variants were built.
The Wessex saw action in the Falklands War in 1982, and in counter-insurgency operations against Indonesian infiltrators and the North Kalimantan Liberation Army in the 1960s.
Export customers for the Wessex included Australia, Uruguay, Bangladesh, Brunei, Egypt, Ghana, Iraq and Oman.
The Wessex was retired from British service in 2003, but remains in Uruguayan service today.
ITALERI’S 1:48 SCALE WESSEX HU.5This is not the only Westland Wessex to be released in 1:48 scale, but it is the first Gnome-powered variant.
Italeri’s 1:48 scale Wessex is an HU.5 although it is incorrectly labelled as “UH.5”. The kit comprises 123 parts in grey plastic, seven in clear, 16 photo-etched parts on a single sprue and one sheet of vinyl mesh.
The level of detail is very good indeed considering the kit’s modest parts count. The cockpit includes photo-etched harness straps and instrument panel, with the quilted surfaces at the back of the front office and on the roof of the cabin being very convincing. The textures associated with the webbing seat backs and the intricate floor patterns look great too.
I am also relieved to report that the external surface features are crisp and restrained. I bought Italeri’s 1:72 scale Sunderland around the same time as this kit. Whereas the Sunderland’s panel lines are ludicrously wide and soft, the Wessex surface detail is excellent – the best I have seen on an Italeri kit.
The photo-etched fret also offers some helpful exterior detailing parts such as an optional mesh upper deck (Italeri supplies plastic and vinyl mesh if you’d prefer to go down that path) and several perforated vents for the tail.
Options include poseable crew and cargo doors, a cargo door winch, deployed aircrew steps, a decal for the instrument dial and flotation gear for the main undercarriage.
The colourful decal sheet includes markings for four helicopters.
THE INSIDE JOBItaleri’s 1:48 scale Wessex is a model best tackled in separate sub-assemblies. The first of these is the cockpit. I thought that the kit detail was quite adequate so the parts were assembled per instructions, including the photo-etched harness straps. Although they appeared a bit anaemic on the fret, they actually look fine on the seats. My reference photos showed that the seat sqaubs
WESSEX WHIRLYBIRD
The Editor builds his first helicopter kit in more than a decade – Italeri’s new 1:48 scale Westland Wessex HU.5
Italeri’s attractive box art.
p54-63 feature article - italeri wessex hu 021.indd 55 28/11/2012 09:42

56 Military Illustrated Modeller - January 2013
FEATURE ARTICLE: Italeri 1:48 Westland Wessex HU.5. • Kit No.2720
featured yellow piping along the edges, so this was depicted using Vallejo paints and a fine brush.
Although I have traditionally only applied Vallejo acrylics by brush in previous projects, I experimented with these paints in the airbrush this time. I found that they sprayed quite well using Vallejo’s proprietary thinners.
I particularly wanted to emphasise the quilted texture of the rear cockpit wall. This received a sprayed base coat of Vallejo acrylic 942 Light Green, followed by a generous brushed coat of SIN Industries’ P244 Green for Light Green Filter. This thin enamel filter settled nicely in the low areas, creating the well-defined effect I was hoping for.
The floor received similar treatment. Reference photos suggest that the floor of the cockpit and the cargo area was a distinctly bluish grey shade. Following a base coat of Tamiya acrylic XF-54 Dark Sea Grey, I applied a brushed coat of AK Interactive’s AK-071 Blue for Panzer Grey Filter.
With the floor and the rear wall complete,
these areas were masked off to ensure a crisp demarcation for the black centre console. The top console was sprayed and detail painted at the same time.
The same painting techniques were used in the cargo area, with the main difference being the blue seats. These were sprayed with Vallejo’s Model Colour 963 Medium Blue, followed by the Blue for Panzer Grey Filter.
The cabin windows had been previously dipped in Future floor polish. The borders were now painted Tamiya XF-1 Flat Black and the clear parts secured to the inside of the fuselage using super glue.
The main rotor transmission was sprayed with Vallejo Model Colour 70865 Oily Steel, followed by AK Interactive’s AK-045 Dark Brown enamel wash.
BRINGING IT ALL TOGETHERAt this stage, the three interior sub-assemblies – the cockpit, cargo area and rotor transmission – were brought together. There is some margin for error in this wobbly assembly, so it is advisable to test fit the
interior inside the fuselage halves to make sure that everything lines up where it is supposed to.
Also, don’t forget to drill out the aerial mast holes and the step rectangles from the inside of the fuselage halves before they are joined.
I was delighted to find that the interior pod fitted perfectly between the fuselage halves.
The fit of the nose parts, however, was vague to say the least. The initial fit was very poor, but I found as the glue dried I could tweak the parts, especially the vertical joins with the front sides of the fuselage, to something more acceptable. Some filling and smoothing with Milliput was still required, but it was not as bad as I had first feared.
Another area that I was worried about was the vinyl mesh behind the intake grille. I was not sure if this would be sufficiently flexible to match the contours of the intake grille, and I was also sceptical that it would look convincing. Happily, I was wrong on both counts. I cut the vinyl to shape using the plastic grille as a template, then simply
Small details are very well moulded.The kit includes some nice interior detail.
The rotor blades are moulded with an authentic droop. The clear parts are sparkling and free from distortion. The colourful kit decal sheet includes four interesting marking options.
The photo-etched fret has a number of useful elements, including harness straps and mesh grilles.
Interior parts were tackled as the first sub-assembly.
Parts that were to be sprayed the same colour were grouped together and tacked to small cardboard boxes to make handling easier and cleaner.
p54-63 feature article - italeri wessex hu 021.indd 56 28/11/2012 09:42

Aircraft Edition 57
attached the oval of mesh to the inside of the grille using tiny spots of super glue. It looked great.
The balance of construction went smoothly. My only source of confusion was the conduit / piping on the upper fuselage sides (parts 16B and 24B). I found that these fitted better when switched between sides and installed upside-down compared to the illustrations in the instructions. My advice is to test fit thoroughly before committing to glue!
I replaced the kit’s plastic undercarriage legs with Scale Aircraft Conversions’ white metal parts (item no. 48196). These were really very handy, as the flexible white metal could be adjusted even after the legs were glued to the fuselage.
WESSEX COLOURSAlthough the four kit marking options are very attractive, I was drawn to a two-tone green RAF scheme found on Xtradecal’s 1:48 scale decal sheet no. X48-111.
Xtradecal’s instructions suggest that the paler
shade is Matt Lichen Green (Xtracolor X024), but I was on a tight schedule and did not have access to Xtracolor paints. I therefore mixed up a concoction from Tamiya acrylics, but I was not happy with the final appearance – it looked too cool and too blue compared to reference photos.
I oversprayed this false start with Tamiya XF-81 Dark Green 2 (RAF), to which a few spots of XF-4 Yellow Green had been added. I was much happier with this colour.
For the darker green I used Tamiya acrylic XF-62 Olive Drab straight from the bottle.
The lower surfaces were sprayed “scale black” - a 50/50 mix of Tamiya XF-1 Flat Black and XF-64 Red Brown. This dark mix was also used to spray the squashed-elliptical black area surrounding the steps to the cockpit.
Around this time I managed to pop two of the cabin windows back into the fuselage. This was partly due to my rough handling, but also because of the brittle bond resulting from the super glue. In future, I will make sure that I glue windows with
proper polystyrene cement.Fortunately, I still had access to the inside of the
cabin thanks to the open cargo door. I popped out the remaining window, masked off the inside and continued with the paint job.
The entire model was sprayed with several coats of Future floor polish in preparation for the decals. All the markings – Italeri and Xtradecal alike – performed perfectly and were free from silvering or visible carrier film. The lustreless finish was restored with two coats of Testor’s Model Master Flat Clear Lacquer.
OVERSPRAY ISSUESI thought that I had thoroughly masked off the large cockpit door openings but upon removing the canopy masks I was horrified to see that the clear upper panels were obscured with overspray from the inside.
After giving the problem some thought, I dipped a Q-tip into Windex and carefully scrubbed the inside of the clear panels. This did not seem
Cockpit and cabin parts were carefully masked to ensure crisp lines of demarcation. Note that thin strips of tape laid down first… …followed by wider sections later.
Basic cockpit painting is complete here. The quilted cockpit back wall has been treated to a dark green wash to help emphasise the texture.
Switch and light detail has been hand-painted wit Vallejo acrylics.
The collective levers and the seats have been painted and weathered here.
The completed cockpit sub-assembly.
Elements of the cabin have been painted and await assembly.
The floor of the transmission bay is masked off prior to additional painting.
The main rotor transmission was sprayed using Vallejo acrylic Oily Steel, thinned with Vallejo’s proprietary thinner. A dark brown enamel wash finishes off the weathering of this area.
The wobbly tower – cabin, transmission and cockpit.
p54-63 feature article - italeri wessex hu 021.indd 57 28/11/2012 09:42

58 Military Illustrated Modeller - January 2013
FEATURE ARTICLE: Italeri 1:48 Westland Wessex HU.5. • Kit No.2720
“Italeri’s 1:48 scale Wessex is well-detailed, sensibly engineered,
features fine surface detail and offers a wide range of colourful
finishing options”
The cabin windows were treated to a bath in Future floor polish, and were outlined in black.
The cabin windows were fitted to the painted fuselage interior before the halves were joined.
The interior assembly glued to one side of the fuselage. So far, so good!
The fuselage halves fitted together perfectly. No putty was required on any of the joins once the glue had set.
The nose was assembled before it was offered up to the main fuselage.Below: The fit between the nose and the fuselage was poor. The parts were taped together to minimise the gaps.
Some steps remained, however, especially where the intake insert was installed.
Left: As the cement began to set, the nose could be tweaked to reduce the steps, especially at the long vertical joins with the fuselage sides.
p54-63 feature article - italeri wessex hu 021.indd 58 28/11/2012 09:43

Aircraft Edition 59 Aircraft Edition
The surrounding areas were masked, and Milliput White two-part epoxy putty was applied to smooth the steps.
The plastic intake grille was used as a mask to cut the vinyl mesh to size.
Plastic strips were glued around the inside rim of the transmission compartment roof to help raise the photo-etched grille to the same level as the top of the fuselage.
Scale Aircraft Conversions offer white metal undercarriage legs to replace the kit’s plastic parts.
The white metal legs were primed before they were attached with super glue. It was very useful to be able to bend the white metal legs to the correct alignment even after they had been glued in place.
Masks for the large cockpit opening were cut from Tamiya tape using the clear doors as templates.
The masks were attached to the inside of the door framing before the canopy was fitted.
The centre console was attached to the inside of the canopy using Revell Contacta cement.
Fuselage masking is in place and now we are just waiting for the glue holding the canopy to set.
Here we can see the canopy masks and the extent of putty required to address the remaining steps around the nose area.
Markings were sourced from Xtradecal Sheet No. X48-111.
p54-63 feature article - italeri wessex hu 021.indd 59 28/11/2012 09:43

60 Military Illustrated Modeller - January 2013
FEATURE ARTICLE: Italeri 1:48 Westland Wessex HU.5. • Kit No.2720
Small details are important too. They add up in the final result and it is very important to pay sufficient attention. The antenna was wired up using stretched sprue.
Small details are important too. They add up in the final result and it is very important to pay sufficient attention. The antenna was wired up using stretched sprue.
I tried mixing my own blend of Lichen Green as the base coat, but I was not happy with the result. I wound up overpainting this colour.
The new base colour is Tamiya XF-81 Dark Green 2 (RAF) with a few spots of XF-4 Yellow Green. The disruptive camouflage is XF-62 Olive Drab.
Italeri provides decals for the black surrounds to the cockpit steps, but I decided to paint them instead. The decals were used as templates to cut masks for the fuselage.
The masks were applied to the fuselage sides and several very fine coats of paint were carefully sprayed inside the borders.
Tamiya tape was also used to define the lower surface demarcation. The same shade of “scale black” was used – a 50/50 mix of Tamiya acrylic XF-1 Flat Black and XF-64 Red Brown.
Markings were a combination of Italeri and Xtradecal, applied over two glossy coats of Future floor polish.
Removing the masks revealed that overspray had somewhat obscured the insides of some of the top clear panels. This unwanted paint was carefully removed with Windex on a Q-Tip, with the full shine eventually restored with Future floor polish, also applied with a Q-Tip.
Details parts such as the bulged and flattened wheels, the nicely detailed tail rotor, the big exhausts and the winch were painted and weathered in advance of final assembly.
E Z Line was used for the twinned aerial rigging on each side of the fuselage. The stretchy material was perfect for this job, and it responded instantly to super glue.
p54-63 feature article - italeri wessex hu 021.indd 60 28/11/2012 09:43

Aircraft Edition 61 Aircraft Edition 61 Aircraft Edition Aircraft Edition Aircraft Edition 61
A few extra antennae and avionics were added from plastic card and copper wire.
The rotor fold and support bracket was sourced from Scalewarship Ltd. The rotor and blade heads are 3D printed plastic – quite remarkable.
The blade heads were cleaned up and attached to the base of the rotor blades.
Some photo-etch origami is the order of the day for the rotor blade support bracket.
Here, the blade holders have been attached to the support bracket with fine brass rod, carefully cut to specific lengths in line with the instructions.
The main rotor head and the blade support bracket both glued into place. The support bracket is fixed with Gator’s Grip acrylic glue to allow a little “give” when the blades are eventually inserted.
The metal and 3D printed parts were all sprayed with Tamiya Grey Primer before their final paint jobs. The rotor head and blade heads were painted Tamiya XF-54 Dark Sea Grey, while the blade support bracket was finished in Tamiya’s spray colour TS-49 Bright Red decanted and mixed with around 5% of TS-17 Black.
p54-63 feature article - italeri wessex hu 021.indd 61 04/12/2012 11:47

62 Military Illustrated Modeller - January 2013
FEATURE ARTICLE: Italeri 1:48 Westland Wessex HU.5. • Kit No.2720
62 62 Military Illustrated Modeller - January 2013
“If I was intimidated before, I was terrified now. Everything would have to fit perfectly
and I really had no idea if it would.”
The rotor blades were prepared with Tamiya’s Fine White Primer straight from the spray can, followed by TS-14 Camel Yellow. A strip of TS-49 Bright Red was also sprayed near the top of three blades. Three of the blades were also masked for visibility stripes using thin strips of Tamiya tape.
The three blades received a final coat of TS-82 Rubber black followed by flat varnish. I subsequently discovered that the top surfaces of the blades should be green, not black, and that my visibility markings are far too wide.
The rotor head parts responded very well to a Dark Brown AK-Interactive enamel wash.
The folded blades certainly deliver a unique appearance to the model.
Search and Rescue helicopters sometimes had a single yellow rotor blade fitted.
p54-63 feature article - italeri wessex hu 021.indd 62 28/11/2012 09:43
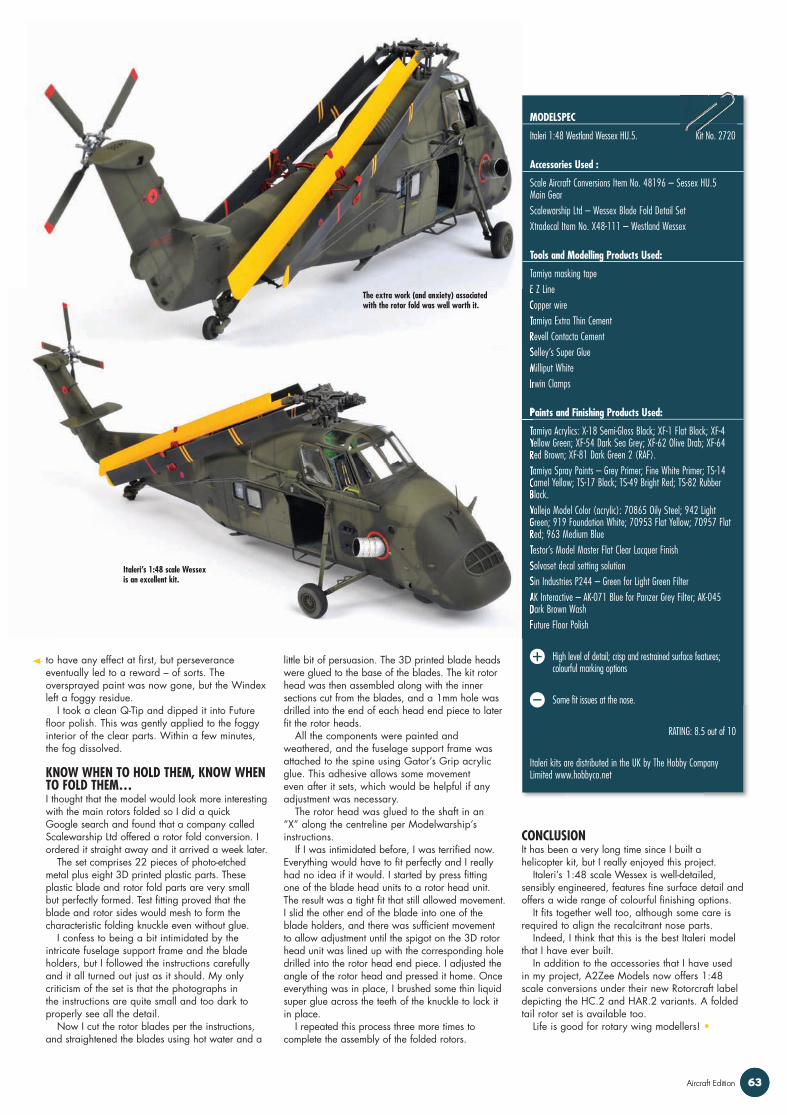
Aircraft Edition 63
MODELSPEC
Italeri 1:48 Westland Wessex HU.5. Kit No. 2720
Accessories Used :
Scale Aircraft Conversions Item No. 48196 – Sessex HU.5 Main GearScalewarship Ltd – Wessex Blade Fold Detail SetXtradecal Item No. X48-111 – Westland Wessex
Tools and Modelling Products Used:
Tamiya masking tapeE Z LineCopper wireTamiya Extra Thin CementRevell Contacta CementSelley’s Super GlueMilliput WhiteIrwin Clamps
Paints and Finishing Products Used:
Tamiya Acrylics: X-18 Semi-Gloss Black; XF-1 Flat Black; XF-4 Yellow Green; XF-54 Dark Sea Grey; XF-62 Olive Drab; XF-64 Red Brown; XF-81 Dark Green 2 (RAF).Tamiya Spray Paints – Grey Primer; Fine White Primer; TS-14 Camel Yellow; TS-17 Black; TS-49 Bright Red; TS-82 Rubber Black.Vallejo Model Color (acrylic): 70865 Oily Steel; 942 Light Green; 919 Foundation White; 70953 Flat Yellow; 70957 Flat Red; 963 Medium BlueTestor’s Model Master Flat Clear Lacquer FinishSolvaset decal setting solutionSin Industries P244 – Green for Light Green FilterAK Interactive – AK-071 Blue for Panzer Grey Filter; AK-045 Dark Brown WashFuture Floor Polish
High level of detail; crisp and restrained surface features; colourful marking options
Some fit issues at the nose.
RATING: 8.5 out of 10
Italeri kits are distributed in the UK by The Hobby Company Limited www.hobbyco.net
Aircraft Edition 63
to have any effect at first, but perseverance eventually led to a reward – of sorts. The oversprayed paint was now gone, but the Windex left a foggy residue.
I took a clean Q-Tip and dipped it into Future floor polish. This was gently applied to the foggy interior of the clear parts. Within a few minutes, the fog dissolved.
KNOW WHEN TO HOLD THEM, KNOW WHEN TO FOLD THEM…I thought that the model would look more interesting with the main rotors folded so I did a quick Google search and found that a company called Scalewarship Ltd offered a rotor fold conversion. I ordered it straight away and it arrived a week later.
The set comprises 22 pieces of photo-etched metal plus eight 3D printed plastic parts. These plastic blade and rotor fold parts are very small but perfectly formed. Test fitting proved that the blade and rotor sides would mesh to form the characteristic folding knuckle even without glue.
I confess to being a bit intimidated by the intricate fuselage support frame and the blade holders, but I followed the instructions carefully and it all turned out just as it should. My only criticism of the set is that the photographs in the instructions are quite small and too dark to properly see all the detail.
Now I cut the rotor blades per the instructions, and straightened the blades using hot water and a
little bit of persuasion. The 3D printed blade heads were glued to the base of the blades. The kit rotor head was then assembled along with the inner sections cut from the blades, and a 1mm hole was drilled into the end of each head end piece to later fit the rotor heads.
All the components were painted and weathered, and the fuselage support frame was attached to the spine using Gator’s Grip acrylic glue. This adhesive allows some movement even after it sets, which would be helpful if any adjustment was necessary.
The rotor head was glued to the shaft in an “X” along the centreline per Modelwarship’s instructions.
If I was intimidated before, I was terrified now. Everything would have to fit perfectly and I really had no idea if it would. I started by press fitting one of the blade head units to a rotor head unit. The result was a tight fit that still allowed movement. I slid the other end of the blade into one of the blade holders, and there was sufficient movement to allow adjustment until the spigot on the 3D rotor head unit was lined up with the corresponding hole drilled into the rotor head end piece. I adjusted the angle of the rotor head and pressed it home. Once everything was in place, I brushed some thin liquid super glue across the teeth of the knuckle to lock it in place.
I repeated this process three more times to complete the assembly of the folded rotors.
CONCLUSIONIt has been a very long time since I built a helicopter kit, but I really enjoyed this project.
Italeri’s 1:48 scale Wessex is well-detailed, sensibly engineered, features fine surface detail and offers a wide range of colourful finishing options.
It fits together well too, although some care is required to align the recalcitrant nose parts.
Indeed, I think that this is the best Italeri model that I have ever built.
In addition to the accessories that I have used in my project, A2Zee Models now offers 1:48 scale conversions under their new Rotorcraft label depicting the HC.2 and HAR.2 variants. A folded tail rotor set is available too.
Life is good for rotary wing modellers! •
E Z LineCopper wireTamiya Extra Thin CementRevell Contacta CementSelley’s Super GlueMilliput WhiteIrwin Clamps
Paints and Finishing Products Used:Paints and Finishing Products Used:
Tamiya Acrylics: X-18 Semi-Gloss Black; XF-1 Flat Black; XF-4 Yellow Green; XF-54 Dark Sea Grey; XF-62 Olive Drab; XF-64 Red Brown; XF-81 Dark Green 2 (RAF).Tamiya Spray Paints – Grey Primer; Fine White Primer; TS-14 Camel Yellow; TS-17 Black; TS-49 Bright Red; TS-82 Rubber Black.Vallejo Model Color (acrylic): 70865 Oily Steel; 942 Light Green; 919 Foundation White; 70953 Flat Yellow; 70957 Flat Red; 963 Medium BlueTestor’s Model Master Flat Clear Lacquer FinishSolvaset decal setting solutionSin Industries P244 – Green for Light Green FilterAK Interactive – AK-071 Blue for Panzer Grey Filter; AK-045 Dark Brown WashFuture Floor Polish
The extra work (and anxiety) associated with the rotor fold was well worth it.
Italeri’s 1:48 scale Wessex is an excellent kit.
p54-63 feature article - italeri wessex hu 021.indd 63 04/12/2012 11:47

afv
editi
on AF
V C
lub
Cent
urio
n - A
ngus
Cre
ight
on’s
siG
.33
– Ca
rl S
tart
in’s
Het
zer
wed
gie
- Dra
gon
Wir
belw
ind
- and
mor
e…
A HARLEQUIN SHERMAN AT METULATwo talented modellers combine their talents to create a fabulously colourful M50 hulk
military illustrated modeller£6.50 - June ’12 (issue 014)
www.militaryillustratedmodeller.com
06
9770268
832071
p01 Cover MIM 014.indd 1 27/04/2012 14:58
For the serious Modeller
First name ..........................................................................................................
Surname ..............................................................................................................
Address ................................................................................................................
...................................................................................................................................
Post/zip code ...................................................................................................
Country ................................................................................................................
Telephone Number .......................................................................................
Email Address ..................................................................................................
Cheques payable to: ADH Publishing Ltd.
Aircraft & AFV editions: UK Euro World
Aircraft editions only: UK Euro World
AFV editions only: UK Euro World
Starting from issue ............................................................
Signature................................................Date .....................Please mail this form to;ADH Publishing, Doolittle Mill, Doolittle Lane, Totternhoe, Bedfordshire, LU6 1QX, United KingdomTel; +44(0)1525 222573 Fax; +44(0)1525 222574 Online; www.militaryillustratedmodeller.com (Photocopies of this form are acceptable)
ORDER FORM - MIMODELLER Please debit my credit/debit card for £ .......................................
Visa /Mastercard /Maestro /other ............................
Card No. ....................................................................................................
Expiry date................................. Start date ........................................
Security Number (last 3 digits on signature strip) ............................
Issue No (if applicable) ...........................................................................
12 issue subscription for all issues (AFV and Aircraft) UK £60, Euro £75, World £8512 issue subscription for AFV issues (2 years) UK £60, Euro £75, World £8512 issue subscription for Aircraft issues (2 years) UK £60, Euro £75, World £85Single issue UK £6.50, Euro £7.95, World £8.95www.militaryillustratedmodeller.com
Issue 20Issue 19
12 issue subscription for all issues (AFV and Aircraft) UK £60, Euro £75, World £8512 issue subscription for AFV issues (2 years) UK £60, Euro £75, World £8512 issue subscription for Aircraft issues (2 years) UK £60, Euro £75, World £85
Subscribe Today
Get it fi rst • Delivered to your door • Save Money
p 64 Subscribe 021.indd 1 29/11/2012 17:10

Aircraft Edition 65
Next IssuesEditors; Aircraft Edition - Brett Green AFV Edition - Marcus NichollsPublisher; Alan Harman Graphic Design; Alex Hall, Colin TrundleAdvertising Manager; Colin Spinner Advertising Sales; Mark PeacockAdvertising Assistant; Joe BrownOffice Manager; Paula GrayAdministration Manager; Hannah McLaurieMIM Website; Alex Hall
Printed by; Symbian Print Intelligence, Hertfordshire, UK
Distributed by; Seymour Distribution2 East Poultry Avenue, London, EC1A 9PTTel; 020 7429 4000
Newstrade;Select Publisher Services3 East Avenue, Bournemouth, BH3 7BWTel; 01202 586848 Email; [email protected]
Military Illustrated Modeller is published on the third Thursday of each month by; ADH Publishing, Doolittle Mill, Doolittle Lane, Totternhoe, Bedfordshire, LU6 1QX UK www.militaryillustratedmodeller.comTel; +44 (0)1525 222573Fax; +44 (0)1525 222574
Editorial enquiries;Aircraft email; [email protected] AFV email; [email protected]
Advertising enquiries;Tel; +44 (0)1525 222573Email; [email protected]
Subscription enquiries;Tel; +44 (0)1525 222573Fax; +44 (0)1525 222574Email; [email protected]
Reproduction in part of any text, photograph, or illustration without written consent from the publisher is strictly prohibited. While due care is taken to ensure the contents of Military Illustrated Modeller is accurate, the publishers and printers can not accept responsibility for errors and omissions.
Advertisements are accepted for publication in Military Illustrated Modeller only on ADH Publishing’s standard terms of acceptance of advertising, copies of which are available from the advertising department. Please write to the address above. All advertising, circulation and subscription enquiries should also be directed to the UK address above.
Subscription rates are; Option 1 - 12 Issues (AFV & Aircraft) - 1 year UK - £60.00 / Europe - £75.00 / World - £85.00 (prices include shipping)Option 2 - 12 Aircraft Editions - 2 years UK - £60.00 / Europe - £75.00 / World - £85.00 (prices include shipping)Option 3 - 12 AFV Editions - 2 years UK - £60.00 / Europe - £75.00 / World - £85.00 (prices include shipping)For all orders, please call; (UK) +44(0)1525 222573 or visit www.miltaryillustratedmodeller.com
military illustrated modeller
www.fsc.orgwww.pefc.org
© ADH Publishing 2012
ISSUE No.021 January 2013
...AND MORE!
Military Illustrated Modeller Issue 23 - Aircraft Edition on sale 28 February 2013
10 AUGUST, 1943Reference by Morten Jessen and Andrew Arthy, with wartime photos and colour profiles.
BABY BOOMERWingnut Wings’ 1:32 scale DH.2 by James Hatch
THE PERFECT STORMSpencer Pollard builds Hasegawa’s brand new 1:72 scale Eurofighter Typhoon.
Military Illustrated Modeller Issue 22 - AFV Edition on sale 17 January 2013
MUDDY MERKAVAHobbyboss 1:35 Merkava IV, heavily weathered!
WINTER WARRIORCarl Startin is back,
with his Waffen SS bust BABY DOZERReference feature on the Clark airborne bulldozer
BABY DOZER
10 AUGUST, 1943advertising, copies of which are available from
subscription enquiries should also be directed to
on sale 28 February 2013
10 AUGUST, 1943Reference by Morten Jessen and Andrew Arthy, with wartime photos and colour profiles.
10 AUGUST, 1943
STEALTH, STRAIGHT UP!Feliks Kamil Sztarbala presents Kitty Hawk’s 1:48 scale F-35 Lightning II.
THE PERFECT STORM
p65 NextIssues 021.indd 65 29/11/2012 10:01

66 Military Illustrated Modeller - January 2013
BRAND NEW MIG-29!
Tailpiece
At last, a state-of-the-art MiG-29 in 1/48 scale! The Editor gets an early look at G.W.H.’s brand new kit.
T he MiG-29 is a fourth-generation Russian air superiority fighter that originally entered service with the Soviet Union in 1983.
It remains in widespread service today with the Russian Air Force, former states of the Soviet Union and a range of export countries,
Monogram released a 1:48 scale MiG-29 not long after the aircraft was first publicly displayed in the West in Finland during 1986. The model was based on photographs and was seriously inaccurate as a result. Academy followed with their kit during the 1990s. Although it featured crisply recessed panel lines, it too was inaccurate in a number of important areas and also suffered from poor fit.
The latest model from the company formerly known as Great Wall Hobby, G.W.H., is also their first modern aircraft subject. G.W.H.’s 1:48 scale MiG-29 Fulcrum 9-12 Late Type comprises 198 parts in medium grey plastic, eight parts in clear plastic, two photo-etched frets and decals for three aircraft.
Surface detail is made up from a combination of fine, crisply recessed panel lines and recessed rivets of various sizes, some of which are almost invisible at certain angles. Hinge lines, intakes, bumps and vents compliment the panel detail to good effect. The surface and structural features are really very impressive. Note that I have intentionally photographed some of the parts into the hard light of my studio flash, which tends to exaggerate the effect - the features really are very fine when viewed under normal light.
The kit is sensibly broken down into upper and lower “pancakes” incorporating the wing and fuselage elements in a single piece each. These large parts are carefully packed to avoid damage during shipping and storage. The upper fuselage requires no inserts for the single-seat configuration, reducing the amount of joins and potential for misalignment. If G.W.H are planning
either a two-seater or a hump-backed MiG-29 9-13 (oh please do a 9-13!), a whole new upper fuselage will be required.
The cockpit is fitted out with an eight part plastic ejection seat supplemented with a further five photo-etched parts, including the harness. Photo-etched parts are also used to detail the rudder pedals, gunsight and pilot’s mirrors. The instrument panel is injection moulded plastic. Individual dials are supplied on the decal sheet. These are clearly marked with numbers, with a corresponding illustration in the instruction sheet.
The canopy parts are impressively thin and sparklingly free from distortion. Even more impressive is the absence of the usual centreline seam down the centre of the main canopy part - no cleanup required here! Of course, the canopy may be posed either open or closed.
The windscreen is moulded with two faint lines down either side. These are not moulding seams, so do not remove them. They represent the structural rods fitted to the inside of the windscreen of the real aircraft. You could try painting these fine lines from the inside, but I think they will look just fine as they are.
Separate parts are supplied for either open or closed auxiliary intake vents on the top of the fuselage - a really nice touch. Alternate cannon vent panels (open or covered) are included too. Speed brakes may be posed open or closed.
The wheel wells are comprehensively detailed with structural features moulded in place.
Two full engines are included. The intake fans, engine bodies and exhausts are some of the best I have seen in a 1/48 scale plastic kit. In fact, I would suggest that they are up to the standard of some after-market resin parts. if you just cannot bear to hide the engines away inside the fuselage, G.W.H. has supplied an engine stand to display
this little masterpiece separately.Undercarriage parts are also very well detailed.
The tyres are injection moulded plastic, which will please modellers who do not like working with vinyl tyres (myself included).
A large centreline fuel tank is supplied along with two slim wing mounted tanks.
Additional ordnance includes two R-27R and four R-73R missiles. These are truly a remarkable achievement in modern moulding technology. They are all presented in one piece each, with their fine fins moulded in place. They really have to be seen to be appreciated.
The decal sheet is well printed, and includes markings for three Fulcrums.
G.W.H. has exceeded their own high standard with their first modern aircraft subject. Their 1/48 scale MiG-29 9-12 Late Type is beautifully detailed and features superb surface textures. Despite the level of detail, parts breakdown is quite conventional and construction should not present any problems to modellers with a few plastic kits already under their belts.
Thanks to G.W.H / Lionroar for the sample www.lionroar.net •
STOP PRESS
The upper and lower mouldings incorporate the fuselage and wing sections.
BRAND NEW MIG-29!
At last, a state-of-the-art MiG-29 in 1/48 scale! The Two full engines are supplied, along with an optional display cart.
Markings are supplied for three Fulcrums.
p66 Tailpiece 021.indd 66 04/12/2012 11:49

OVER 300 TITLES INCLUDING THE
SQUADRON SIGNAL REFERENCE RANGE
THE WORLD’S MOST RESPECTED SCALE MODELLING MAGAZINES
TAMIYA MODEL MAGAZINE INTERNATIONAL
MODEL AIRPLANE INTERNATIONAL
MODEL MILITARY INTERNATIONAL
THE ‘HOW TO BUILD...’ SERIES OF BOOKS
THE MOST COMPREHENSIVE REFERENCE LIBRARY
www.adhpublishing.com all you need to know...
THE WORLD’S LEADING SCALE MODELLING WEBSITESWWW.HYPERSCALE.COM
THE ONLINE RESOURCE FOR AIRCRAFT & ARMOUR MODELLERSWWW.MISSING-LYNX.COMTHE SOURCE FOR AFV MODEL MAKING
p 67 ADH Advert 021.indd 8 29/11/2012 17:11