Embed Size (px)
Citation preview

MILLENNIUM ULTRA Installation Guide, v.1.1 05/15/2015
MILLENNIUM ULTRA Installation Guide

MILLENNIUM ULTRA Installation Guide, v.1.0.1.0. 06/09/2016 2
Table of Contents:
Technical Requirements..................................................................................................3
Package Contents ...........................................................................................................4
1. Checking your OS Version ..........................................................................................5
2. Millennium Ultra Setup algorithm.................................................................................6
3. Running the Millennium Ultra Setup program..............................................................7
4. Millennium Ultra Desktop Client Installation ..............................................................18
5. Running the Millennium Ultra Application..................................................................22
6. .NET Framework 4.5 Installation / Configuration .......................................................23

MILLENNIUM ULTRA Installation Guide, v.1.0.1.0. 06/09/2016 3
Technical Requirements
a) Hardware Requirements:
1 GHz or faster processor
1024 MB RAM
1 GB available hard disk space (x86)
2 GB available hard disk space (x64)
b) Supported Operating Systems:
Windows 7 Service Pack 1, Windows Server 2008 R2 SP1, Windows Server 2008
Service Pack 2, Windows Vista Service Pack 2, Windows 8, Windows 10, Windows
Server 2012.
Windows Vista SP2 (x86 and x64)
Windows 7 SP1 (x86 and x64)
Windows Server 2008 R2 SP1 (x64)
Windows Server 2008 SP2 (x86 and x64)
Windows 8
Windows 8.1
Windows Server 2012
c) .NET Framework 4.5 or higher.
For earlier MS Windows versions .NET 4.5 could be downloaded from
http://go.microsoft.com/fwlink/?LinkId=225702
d) Microsoft® SQL Server® 2008 Express with Advanced Services or higher. For
example, Microsoft® SQL Server® 2014 Express with Advanced Services could be
downloaded from http://www.microsoft.com/en-us/download/details.aspx?id=42299.
e) Microsoft SQL Server Management Studio Express 2005 or higher. It could be
downloaded from http://www.microsoft.com/en-us/download/details.aspx?id=8961.

MILLENNIUM ULTRA Installation Guide, v.1.0.1.0. 06/09/2016 4
Package Contents
The installation package comes with the following 5 files and 1 folder:
SqlExpress folder contains links.txt file where the following links for downloading MS
SQL Server Express and instructions are listed:
Download Microsoft® SQL Server® 2014 Express with Advanced Services
from page http://www.microsoft.com/en-us/download/details.aspx?id=42299
Direct Url:
x86:
http://download.microsoft.com/download/E/A/E/EAE6F7FC-767A-4038-A954-
49B8B05D04EB/ExpressAndTools%2032BIT/SQLEXPRWT_x86_ENU.exe
x64:
http://download.microsoft.com/download/E/A/E/EAE6F7FC-767A-4038-A954-
49B8B05D04EB/ExpressAndTools%2064BIT/SQLEXPRWT_x64_ENU.exe
Unpack installation file by command SQLEXPRWT_x86_ENU.exe /x
(SQLEXPRWT_x64_ENU.exe /x for x64) and place all extracted files in this folder
Note: If any Microsoft® SQL Server® with Advanced Services is not installed on
your system, we recommend you to download installation files of Microsoft® SQL
Server® 2014 Express with Advanced Services and unpack them as described in
links.txt before running the Setup.exe.

MILLENNIUM ULTRA Installation Guide, v.1.0.1.0. 06/09/2016 5
1. Checking your OS Version
To check which OS version is installed on your PC, right-click on My Computer icon
and select Properties. The system information screen will be displayed:
If you have installed Microsoft Windows 8 or higher, then proceed directly to
Paragraph 3. If you have installed Microsoft Windows 7 or earlier, then proceed to
Paragraph 7 and install:
a) Microsoft .NET Framework 4.5
b) Microsoft IIS 8.0 or higher.
After that you may run the Millennium Ultra Setup program which is discussed in
Paragraph 3.
MILLENNIUM ULTRA Installation Guide, v.1.0.1.0. 06/09/2016 6
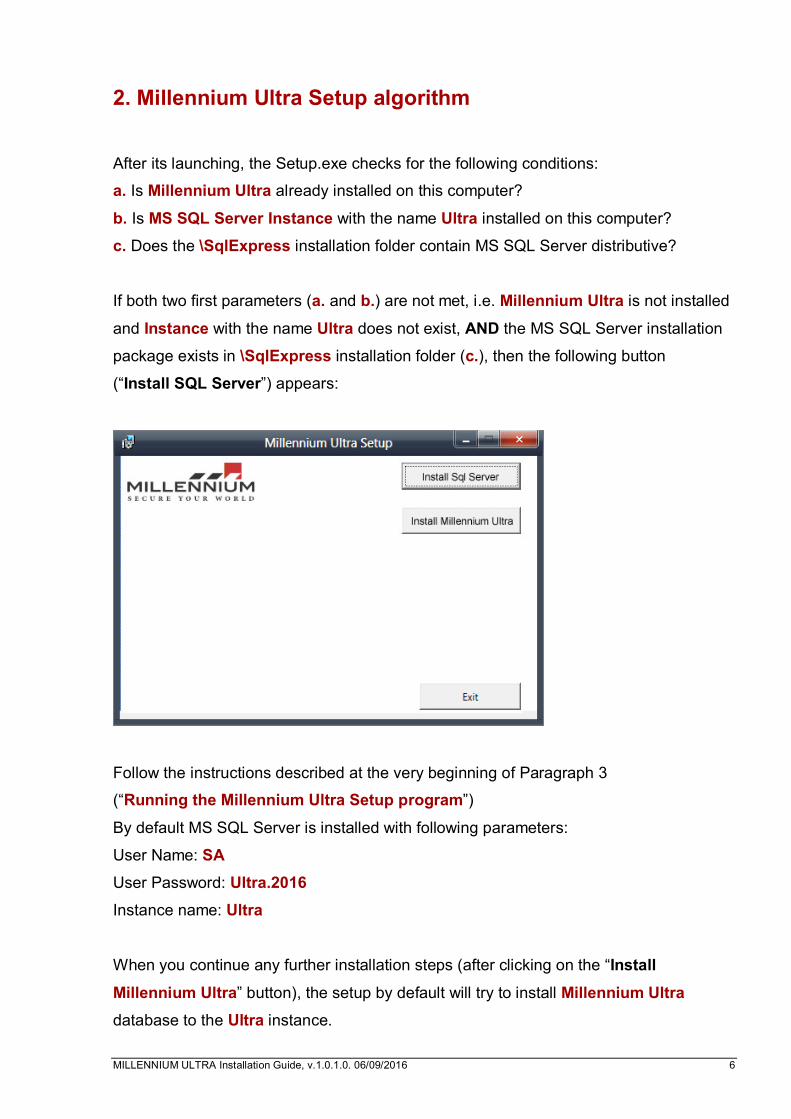
2. Millennium Ultra Setup algorithm
After its launching, the Setup.exe checks for the following conditions:
a. Is Millennium Ultra already installed on this computer?
b. Is MS SQL Server Instance with the name Ultra installed on this computer?
c. Does the \SqlExpress installation folder contain MS SQL Server distributive?
If both two first parameters (a. and b.) are not met, i.e. Millennium Ultra is not installed
and Instance with the name Ultra does not exist, AND the MS SQL Server installation
package exists in \SqlExpress installation folder (c.), then the following button
(“Install SQL Server”) appears:
Follow the instructions described at the very beginning of Paragraph 3
(“Running the Millennium Ultra Setup program”)
By default MS SQL Server is installed with following parameters:
User Name: SA
User Password: Ultra.2016
Instance name: Ultra
When you continue any further installation steps (after clicking on the “Install
Millennium Ultra” button), the setup by default will try to install Millennium Ultra
database to the Ultra instance.

MILLENNIUM ULTRA Installation Guide, v.1.0.1.0. 06/09/2016 7
3. Running the Millennium Ultra Setup program
Run the Setup.exe, which is supplied within your Millennium Ultra installation package:
By clicking the “Install SQL Server” button, the Microsoft SQL Server 2014 will be
installed. The previous MS SQL Server instances will not be affected, as well as all the
existing obsolete databases will remain untouched.
The step-by-step installation screens for Microsoft SQL Server 2014 are shown below:

MILLENNIUM ULTRA Installation Guide, v.1.0.1.0. 06/09/2016 8
Now, the Microsoft SQL Server 2014 is installed.

MILLENNIUM ULTRA Installation Guide, v.1.0.1.0. 06/09/2016 9
Click on the second button, “Install Millennium Ultra”.
After clicking on the “Install Millennium Ultra” button,
the following screen will appear:

MILLENNIUM ULTRA Installation Guide, v.1.0.1.0. 06/09/2016 10
To start the installation process, click the Next button:
Read the License Agreement:

MILLENNIUM ULTRA Installation Guide, v.1.0.1.0. 06/09/2016 11
Check the “I accept…” checkbox and click the Next button:
The screen with Millennium Ultra setup options will appear:
Typical setup is used in most common cases. By selecting this option, the most
common program features will be installed. This option is recommended for most users.

MILLENNIUM ULTRA Installation Guide, v.1.0.1.0. 06/09/2016 12
Custom setup allows users to choose what program features will be installed. Also,
any custom locations for the Millennium Ultra software files may be selected. This
option is recommended for advanced users.
Complete setup is also used in common cases. By selecting this option, all program
features will be installed. This option requires the most disk space.
Below there are available options which could be selected when Custom setup was
chosen:
After choosing all necessary program components, click the “Next” button.
MILLENNIUM ULTRA Installation Guide, v.1.0.1.0. 06/09/2016 13
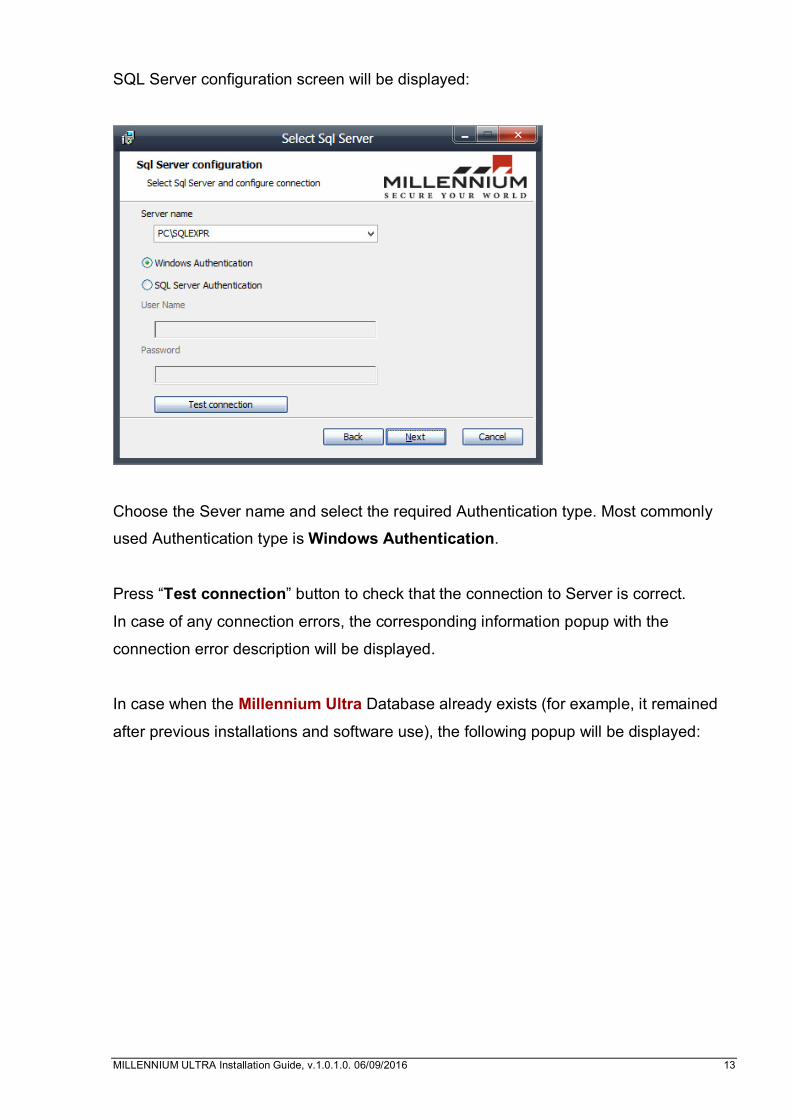
SQL Server configuration screen will be displayed:
Choose the Sever name and select the required Authentication type. Most commonly
used Authentication type is Windows Authentication.
Press “Test connection” button to check that the connection to Server is correct.
In case of any connection errors, the corresponding information popup with the
connection error description will be displayed.
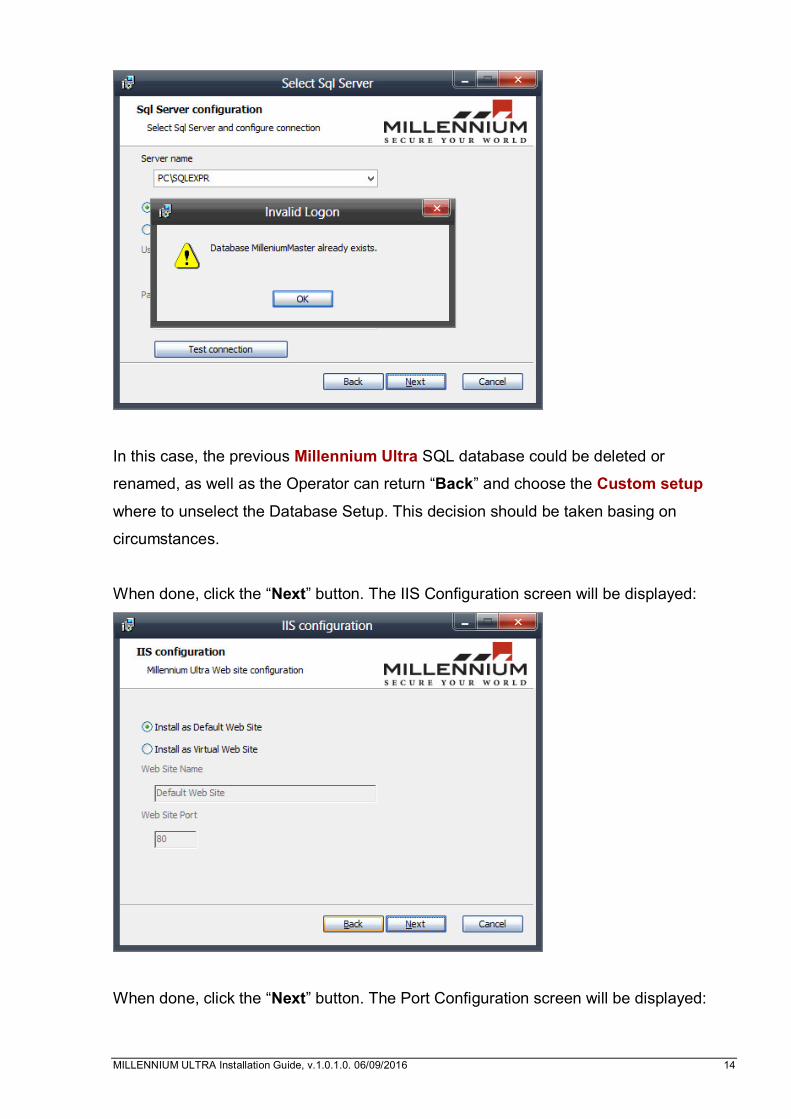
In case when the Millennium Ultra Database already exists (for example, it remained
after previous installations and software use), the following popup will be displayed:
MILLENNIUM ULTRA Installation Guide, v.1.0.1.0. 06/09/2016 14
In this case, the previous Millennium Ultra SQL database could be deleted or
renamed, as well as the Operator can return “Back” and choose the Custom setup
where to unselect the Database Setup. This decision should be taken basing on
circumstances.
When done, click the “Next” button. The IIS Configuration screen will be displayed:
When done, click the “Next” button. The Port Configuration screen will be displayed:

MILLENNIUM ULTRA Installation Guide, v.1.0.1.0. 06/09/2016 15
Choose the required port numbers for Schedule Service, Routing Manger and Controller
Manager. By default they are:
Scheduler Service Port – 8733
Routing Manger Service Port – 8737
Controller Manager Service Port – 8735
ExTask Manager Service Port – 8741
Port numbers should be changed in case when they are already used by other software.
When done, click the “Next” button. The Database Configuration screen will be
displayed:

MILLENNIUM ULTRA Installation Guide, v.1.0.1.0. 06/09/2016 16
Choose the required paths to the Database file and Log file.
The physical location of Millennium Ultra Database file and Millennium Ultra Log file
depend on version of the installed Microsoft SQL Server.
The physical location of Millennium Ultra Database file and Millennium Ultra Log file
could be changed if necessary.
When done, click the “Next” button. “Ready to Install” screen will be displayed:

MILLENNIUM ULTRA Installation Guide, v.1.0.1.0. 06/09/2016 17
Click “Install” Button. The installation process will start since this point:
When the Millennium Ultra Setup will complete, the following screen will appear:
The Setup is completed now. Click the “Finish” button.

MILLENNIUM ULTRA Installation Guide, v.1.0.1.0. 06/09/2016 18
4. Millennium Ultra Desktop Client Installation
To obtain the Desktop Client’s installation, you should type the following string in any of
your browsers:
http://[ultra server name]:[port number]
Ultra server name is the name of your Ultra Server.
Port number is configured during IIS installation (by default - 80).
For example, use this simple string by default: http://localhost
The Ultra server will create a Setup.exe file (1,179,648 bytes).
It will be located in your browser’s folder for Downloads:
This file should be launched in order to obtain your WPF-based Desktop Client
application (Millennium Ultra.exe). So, run the obtained Setup.exe file at first.
MILLENNIUM ULTRA Installation Guide, v.1.0.1.0. 06/09/2016 19
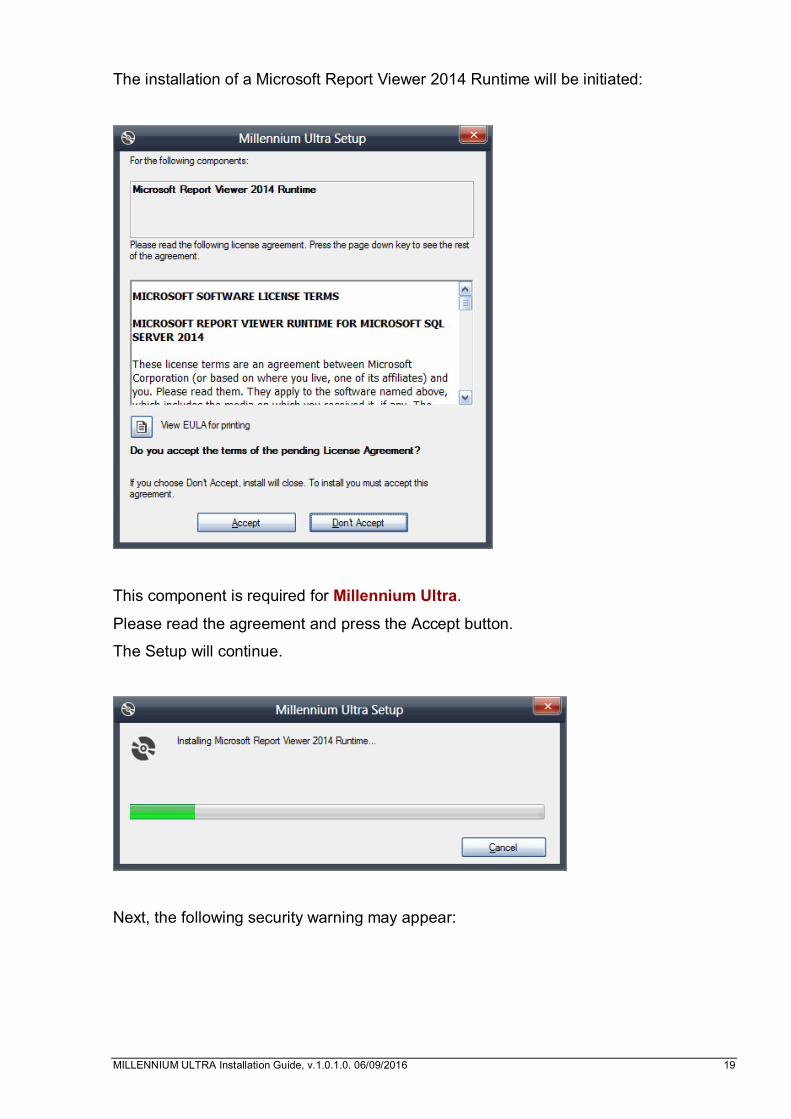
The installation of a Microsoft Report Viewer 2014 Runtime will be initiated:
This component is required for Millennium Ultra.
Please read the agreement and press the Accept button.
The Setup will continue.
Next, the following security warning may appear:

MILLENNIUM ULTRA Installation Guide, v.1.0.1.0. 06/09/2016 20
Click on Install button. The installation process will continue:
At the very end of installation the login window will appear:

MILLENNIUM ULTRA Installation Guide, v.1.0.1.0. 06/09/2016 21
Enter the default Login data as shown above and click OK button to run the WPF-based
Desktop Client application (Millennium Ultra.exe):
Pin this program to your taskbar if necessary.

MILLENNIUM ULTRA Installation Guide, v.1.0.1.0. 06/09/2016 22
5. Running the Millennium Ultra Application
Run the installed application (Millennium Ultra.exe).
The Login window will be opened:
Click on "More Options"
Enter the Server Url - http://127.0.0.1/, http://localhost/, http://MillenniumServer/,
http://myserver.mydomen.com etc.
Note: the Server Url name depends on the Application Name and Path which were
assigned during IIS configuration. By default, try using http://localhost.
Enter the Login Name – admin.
Company Name field should be left without changes.
Password field should be empty.
The default Login window settings look like the following:
MILLENNIUM ULTRA Installation Guide, v.1.0.1.0. 06/09/2016 23
6. .NET Framework 4.5 Installation / Configuration
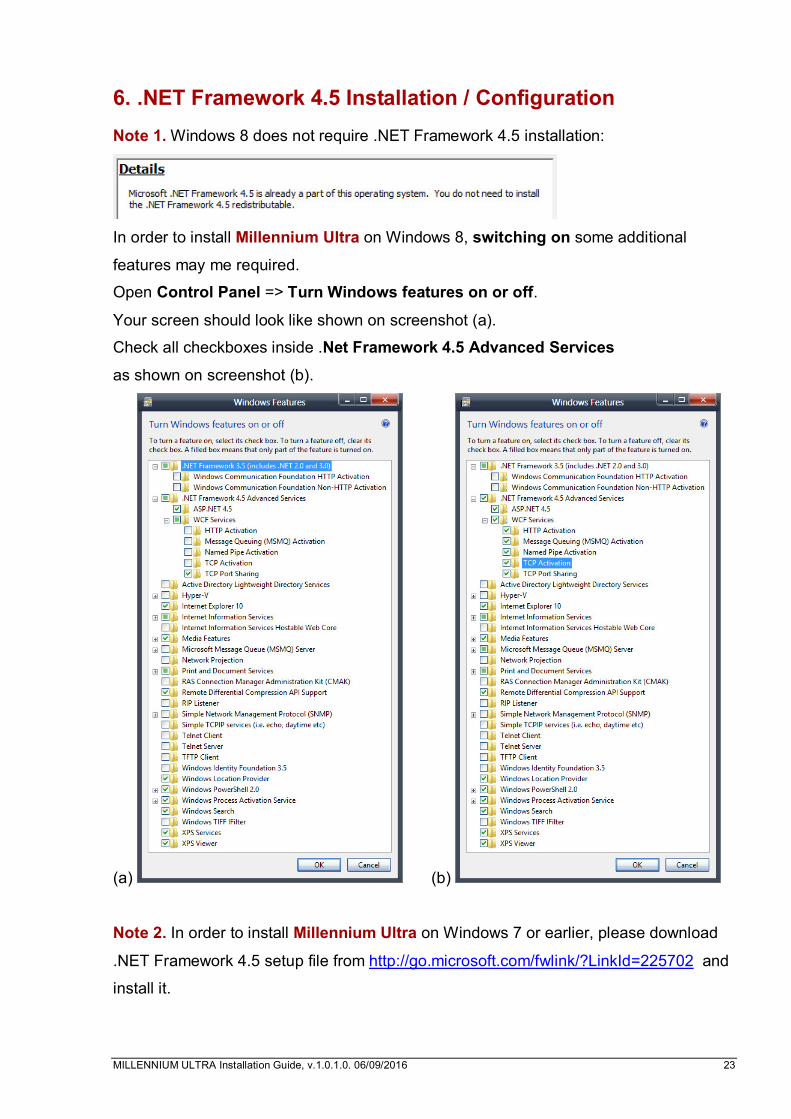
Note 1. Windows 8 does not require .NET Framework 4.5 installation:
In order to install Millennium Ultra on Windows 8, switching on some additional
features may me required.
Open Control Panel => Turn Windows features on or off.
Your screen should look like shown on screenshot (a).
Check all checkboxes inside .Net Framework 4.5 Advanced Services
as shown on screenshot (b).
(a) (b)
Note 2. In order to install Millennium Ultra on Windows 7 or earlier, please download
.NET Framework 4.5 setup file from http://go.microsoft.com/fwlink/?LinkId=225702 and
install it.