Embed Size (px)
Citation preview
Mini Cooper and S Trailer Receiver Hitch
Installation Instructions
Version: 6 1 © 2006 Breon Group Inc
11/5/2008 DBA Mini Do More
Application ………………………………………… Mini Cooper and S 3 Door Hatch or Convertible; M1001 - 02-06 Mini Cooper M1002 - 02-06 Mini Cooper S
Hitch Capacity ………………………………………1400 lbs gross, 200 lb max tongue Notes: This hitch features a removable ball mount. This hitch is not intended for use as a weight distributing hitch. Before towing, the hitch pin and retainer clip MUST be in place securing the ball mount to the receiver. These installation instructions are periodically updated. Prior to installation, please check www.MiniDoMore.com for the latest version of these installation instructions. The tools you will need are:
• #2 Phillips Screwdriver
• 8mm Socket
• 10mm wrench
• Jack & Jack Stands
• 17mm Socket
• Torque Wrench
• Safety Goggles
• 12mm Socket
• Hacksaw or box cutters
Step 1: Take off rear wheels
While the car is on the ground, loosen the lug bolts with the 17mm socket. Jack up the car and secure with jack stands. Remove lug bolts and remove rear wheels.
Step 2: Removing the bumper
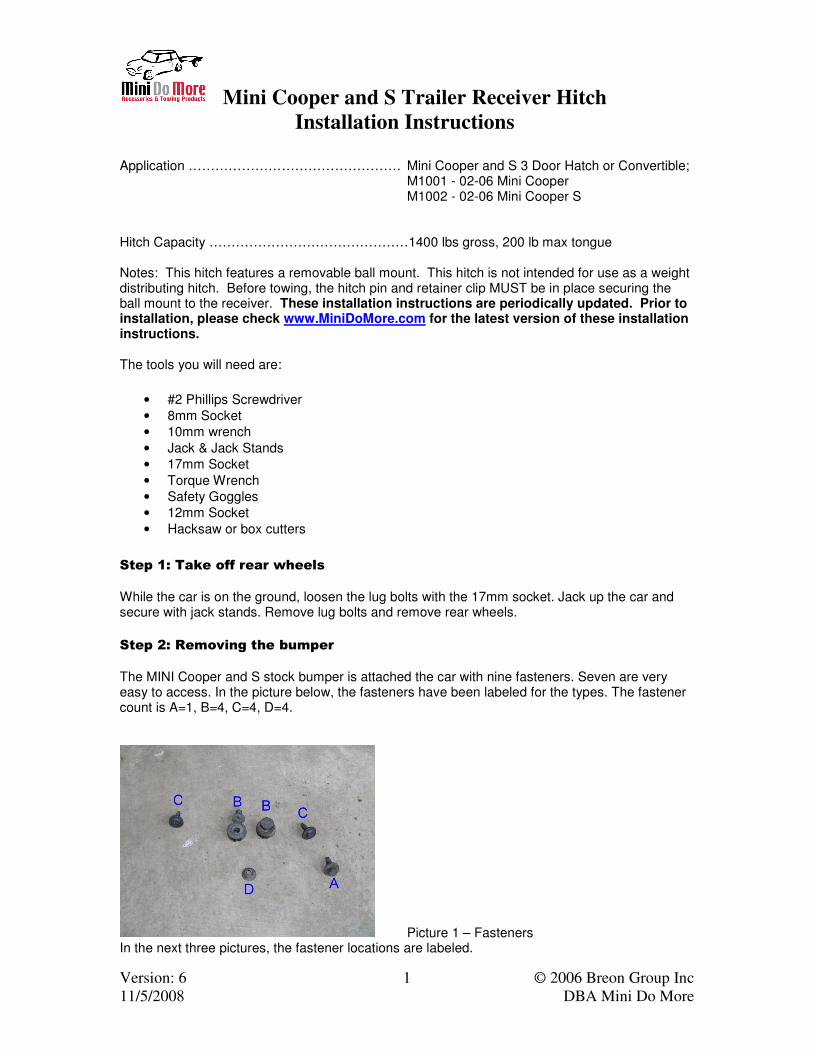
The MINI Cooper and S stock bumper is attached the car with nine fasteners. Seven are very easy to access. In the picture below, the fasteners have been labeled for the types. The fastener count is A=1, B=4, C=4, D=4.
Picture 1 – Fasteners In the next three pictures, the fastener locations are labeled.

Mini Cooper and S Trailer Receiver Hitch
Installation Instructions
Version: 6 2 © 2006 Breon Group Inc
11/5/2008 DBA Mini Do More
Picture 2 – Rear Bumper Off
Picture 3 – Fastener C Under Rear Fender Flair
Picture 4 – Rear Bumper Using the 8mm socket, remove fastener A. Next, with the Phillips Screwdriver, remove fasteners B in four locations, two on each side. These are accessed from inside the rear fender well as shown in Picture 5. Repeat on the other side of the car. Fastener B is a two-piece design. Do not be surprised if one part remains in the fender well. You will need to remove this piece before re-installation.
Mini Cooper and S Trailer Receiver Hitch
Installation Instructions
Version: 6 3 © 2006 Breon Group Inc
11/5/2008 DBA Mini Do More
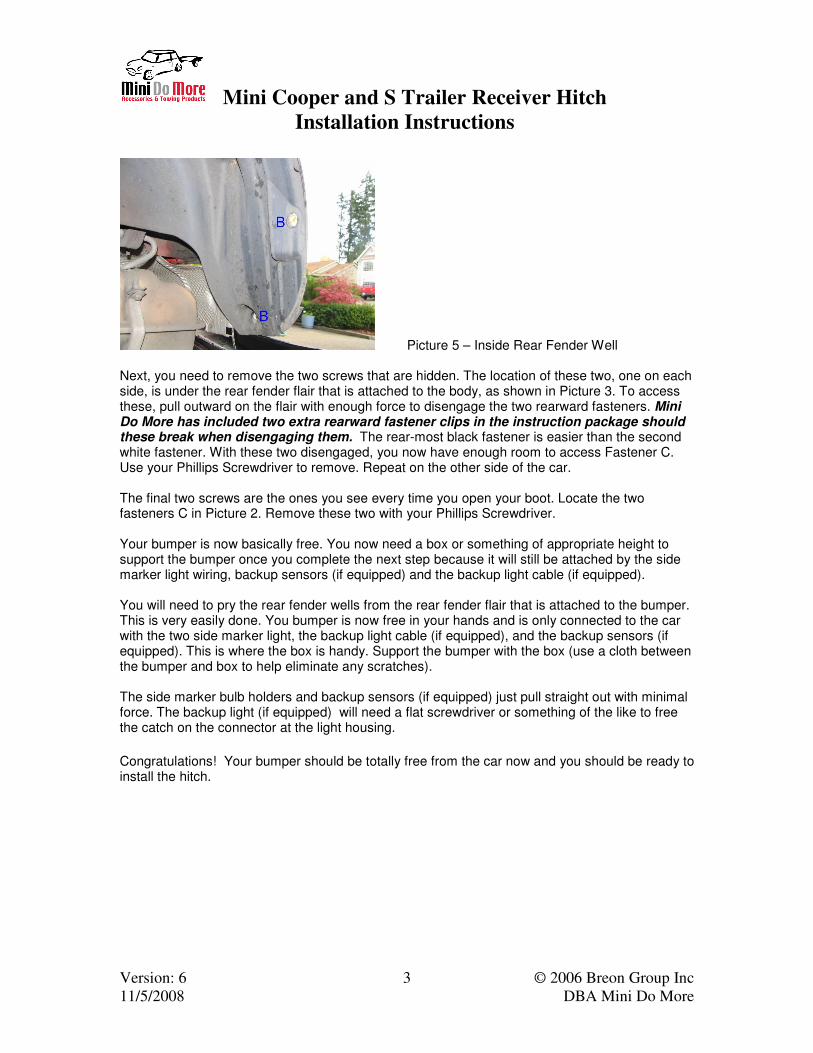
Picture 5 – Inside Rear Fender Well Next, you need to remove the two screws that are hidden. The location of these two, one on each side, is under the rear fender flair that is attached to the body, as shown in Picture 3. To access these, pull outward on the flair with enough force to disengage the two rearward fasteners. Mini Do More has included two extra rearward fastener clips in the instruction package should these break when disengaging them. The rear-most black fastener is easier than the second white fastener. With these two disengaged, you now have enough room to access Fastener C. Use your Phillips Screwdriver to remove. Repeat on the other side of the car. The final two screws are the ones you see every time you open your boot. Locate the two fasteners C in Picture 2. Remove these two with your Phillips Screwdriver. Your bumper is now basically free. You now need a box or something of appropriate height to support the bumper once you complete the next step because it will still be attached by the side marker light wiring, backup sensors (if equipped) and the backup light cable (if equipped). You will need to pry the rear fender wells from the rear fender flair that is attached to the bumper. This is very easily done. You bumper is now free in your hands and is only connected to the car with the two side marker light, the backup light cable (if equipped), and the backup sensors (if equipped). This is where the box is handy. Support the bumper with the box (use a cloth between the bumper and box to help eliminate any scratches). The side marker bulb holders and backup sensors (if equipped) just pull straight out with minimal force. The backup light (if equipped) will need a flat screwdriver or something of the like to free the catch on the connector at the light housing.
Congratulations! Your bumper should be totally free from the car now and you should be ready to install the hitch.

Mini Cooper and S Trailer Receiver Hitch
Installation Instructions
Version: 6 4 © 2006 Breon Group Inc
11/5/2008 DBA Mini Do More
Step 3: Hitch Installation
General Fit: This hitch mounts behind the aluminum substructure behind the bumper cover using the original bumper mounting bolts.
Remove any plastic screws holding the heat shield to the aluminum substructure. The Cooper S has two of these. Remove the eight 12mm bolts holding the aluminum bumper substructure to the car. The aluminum substructure and the steel reinforcement plate will come off the car together. Disconnect the wiring harness from the black steel reinforcement piece and aluminum substructure. Remove the two 10mm plastic nuts holding the aluminum substructure to the black steel reinforcement plate together. Discard the black steel reinforcement piece and the black foam insert. Lift hitch into position. Install the new hitch plate in its place behind the aluminum substructure. Use the eight 12mm bolts to install the hitch and aluminum substructure back to the car. Torque to 17 foot lbs. Use the enclosed wire ties to rerun the wiring harness under the hitch cross member.

Mini Cooper and S Trailer Receiver Hitch
Installation Instructions
Version: 6 5 © 2006 Breon Group Inc
11/5/2008 DBA Mini Do More
If you have a 02 through 04 Mini Cooper or Cooper S with a back up light in the center of the rear bumper cover, there may be a black plastic lip that lays flat under the backup light as shown in the picture below.
This piece will need to be modified to allow room for the receiver portion of the hitch behind the bumper cover. Looking at the picture above, you can see where this one has been cut with a hacksaw to provide clearance.

Mini Cooper and S Trailer Receiver Hitch
Installation Instructions
Version: 6 6 © 2006 Breon Group Inc
11/5/2008 DBA Mini Do More
Following the picture above, make a cut 2” from the back edge using a hacksaw or box cutter. Cut straight across the plastic piece stopping before the vertical tab on the left used to hold the backup light in place. Now make a cut 3” from the right towards the end of the first cut. Discard removed plastic piece.
Step 4: Reinstall the rear bumper
This is really just the reverse of the removal directions with these helpful hints. Attach the backup light (if equipped), marker lights, and backup sensor (if equipped) wiring harness. When hanging the bumper on the car, there are three major height locators for the bumper. These are shown in Pictures 8 & 9.
Picture 8 – Side Alignment Feature
Picture 9 – Center Alignment Feature The bumper rests on the Center Alignment feature F and fits between the body and Side Alignment feature G. Next, screw in the two screws, Fastener C, inside the boot. Only tighten about two-thirds of the way, this will allow some slight adjustment. Maneuver the inner fender wells inside the rear bumper. Assemble Fastener B in four places by inserting the spreading part of Fastener B first into the inner fender well and bumper. Next, by

Mini Cooper and S Trailer Receiver Hitch
Installation Instructions
Version: 6 7 © 2006 Breon Group Inc
11/5/2008 DBA Mini Do More
either pushing or screwing, tighten the other part of the Fastener B. Tighten Fastener C inside the rear body fender flair. Snap this fender flair back in place. Finish tightening the two Fastener C’s inside the boot. Tighten Fastener A. You are now finished with the bumper. Time to reassemble the wheels. Don’t forget to torque your lug bolts to the specification in your manual once you have the car on the ground.
Step 5: Use
Now that your hitch is installed, you are ready to use it. The receiver portion is set in behind the backup light/fog light/black plastic cover. Remove this be depressing the tabs behind the bumper on this light or cover. You will need to reach with two hands under the bumper cover between the aluminum heat shield to gain access to these tabs.

Mini Cooper and S Trailer Receiver Hitch
Installation Instructions
Version: 6 8 © 2006 Breon Group Inc
11/5/2008 DBA Mini Do More
With the light or cover removed you can easily see the receiver. Slide your receiver mounting devices (cargo carrier, bike carrier, drawbar, etc.) into the receiver. Looking under the rear bumper, there is a thin, aluminum heat shield between the rear bumper cover and the muffler. Slightly bend this shield towards the muffler away from the bumper cover creating about 2” or so of access. Do not bend this shield to touch the muffler.
While lying on the ground under the bumper, use one hand to gently pull the plastic bumper away from the back of the car and the other hand to insert the pin through the receiver hitch to lock in the hitch mounting device. Repeat this step for installing the securing cotter pin on the other side of the hitch pin.
Step 6: Legal Stuff
Thanks for choosing www.MiniDoMore.com. It was a pleasure doing business
with you.
WWW.MINIDOMORE.COM LIMITED LIFETIME WARRANTY
Each trailer hitch manufactured by www.MiniDoMore.com is warranted to the
original purchaser to be free from defects in material and workmanship for as
long as original purchaser owns the vehicle on which the trailer hitch was

Mini Cooper and S Trailer Receiver Hitch
Installation Instructions
Version: 6 9 © 2006 Breon Group Inc
11/5/2008 DBA Mini Do More
originally installed. Any defective hitch may be returned freight prepaid with
dated proof of purchase receipt and will become the property of
www.MiniDoMore.com. Finishes are not warranted. This warranty does not
apply to any www.MiniDoMore.com hitch damaged as a result of abuse,
neglect, improper installation, overloading, or alteration. This warranty is
limited to the replacement of the defective hitches only. Installation, removal,
incidental or consequential losses or expenses incurred as a result of using a
www.MiniDoMore.com hitch such as towing, telephone, lodging, rental fees,
fuel, transportation, or time lost are not covered.
Products sold but not manufactured by www.MiniDoMore.com will be subject
to the terms and conditions of the original manufacturers warranty and are not
warranted for any purpose by www.MiniDoMore.com.
This warranty gives specific legal rights and you may have other rights which
vary from state to state. The manufacturer reserves the right to make
changes, additions, or improvements to new product without obligation to
install same on existing product covered by this warranty.
Please be sure to read and follow all assembly and installation instructions.
All www.MiniDoMore.com Trailer Receiver Hitches have a maximum 200 lb
tongue weight rating and a maximum 1400 lb gross weight rating. NEVER
exceed recommended loading ratings for Trailer Receiver Hitch or Miniature
Trailer.