Embed Size (px)
Citation preview

Mixxx User ManualRelease 1.11.0
The Mixxx Development Team
May 08, 2013

Contents
1 Introduction to Mixxx 11.1 Mixxx Features . . . . . . . . . . . . . . . . . . . . . . . . . . . . . . . . . . . . . . . . . . . . . . 11.2 System Requirements . . . . . . . . . . . . . . . . . . . . . . . . . . . . . . . . . . . . . . . . . . 21.3 About the Mixxx Project . . . . . . . . . . . . . . . . . . . . . . . . . . . . . . . . . . . . . . . . . 21.4 About the Mixxx Manual . . . . . . . . . . . . . . . . . . . . . . . . . . . . . . . . . . . . . . . . 21.5 Additional Resources . . . . . . . . . . . . . . . . . . . . . . . . . . . . . . . . . . . . . . . . . . . 3
2 Installing Mixxx 42.1 Installation on Windows . . . . . . . . . . . . . . . . . . . . . . . . . . . . . . . . . . . . . . . . . 42.2 Installation on Mac OS X . . . . . . . . . . . . . . . . . . . . . . . . . . . . . . . . . . . . . . . . 52.3 Installation on GNU/Linux . . . . . . . . . . . . . . . . . . . . . . . . . . . . . . . . . . . . . . . . 62.4 Building Mixxx from Source . . . . . . . . . . . . . . . . . . . . . . . . . . . . . . . . . . . . . . . 72.5 Where to go from here? . . . . . . . . . . . . . . . . . . . . . . . . . . . . . . . . . . . . . . . . . 7
3 Hardware Setup 83.1 Audio Output . . . . . . . . . . . . . . . . . . . . . . . . . . . . . . . . . . . . . . . . . . . . . . . 83.2 Common Configurations . . . . . . . . . . . . . . . . . . . . . . . . . . . . . . . . . . . . . . . . . 8
4 Configuring Mixxx 124.1 Sound Hardware Preferences . . . . . . . . . . . . . . . . . . . . . . . . . . . . . . . . . . . . . . 124.2 Audio Outputs . . . . . . . . . . . . . . . . . . . . . . . . . . . . . . . . . . . . . . . . . . . . . . 134.3 Latency, Sample Rate, and Audio API . . . . . . . . . . . . . . . . . . . . . . . . . . . . . . . . . . 13
5 An Overview of the Mixxx Interface 155.1 The Deck Sections . . . . . . . . . . . . . . . . . . . . . . . . . . . . . . . . . . . . . . . . . . . . 155.2 The Mixer Section . . . . . . . . . . . . . . . . . . . . . . . . . . . . . . . . . . . . . . . . . . . . 225.3 The Sampler Section . . . . . . . . . . . . . . . . . . . . . . . . . . . . . . . . . . . . . . . . . . . 265.4 The Microphone Section . . . . . . . . . . . . . . . . . . . . . . . . . . . . . . . . . . . . . . . . . 275.5 Preview Deck Section . . . . . . . . . . . . . . . . . . . . . . . . . . . . . . . . . . . . . . . . . . 28
6 The Mixxx Library 306.1 Overview of the Library features . . . . . . . . . . . . . . . . . . . . . . . . . . . . . . . . . . . . . 306.2 Search - Find your tracks . . . . . . . . . . . . . . . . . . . . . . . . . . . . . . . . . . . . . . . . . 316.3 Library - View and edit your whole collection . . . . . . . . . . . . . . . . . . . . . . . . . . . . . . 316.4 Auto DJ - Automate your mix . . . . . . . . . . . . . . . . . . . . . . . . . . . . . . . . . . . . . . 336.5 Playlists - Organizing your tracks . . . . . . . . . . . . . . . . . . . . . . . . . . . . . . . . . . . . 336.6 Crates - Working with track collections . . . . . . . . . . . . . . . . . . . . . . . . . . . . . . . . . 346.7 Browse - Loading remote tracks . . . . . . . . . . . . . . . . . . . . . . . . . . . . . . . . . . . . . 356.8 Recordings . . . . . . . . . . . . . . . . . . . . . . . . . . . . . . . . . . . . . . . . . . . . . . . . 35
i

6.9 History - Keep track of your last sessions . . . . . . . . . . . . . . . . . . . . . . . . . . . . . . . . 356.10 Analyze - Preparing your tracks . . . . . . . . . . . . . . . . . . . . . . . . . . . . . . . . . . . . . 366.11 iTunes, Traktor, Rhythmbox - Using external libraries . . . . . . . . . . . . . . . . . . . . . . . . . 36
7 Controlling Mixxx 377.1 Using a Mouse and Trackpad . . . . . . . . . . . . . . . . . . . . . . . . . . . . . . . . . . . . . . 377.2 Using a Keyboard . . . . . . . . . . . . . . . . . . . . . . . . . . . . . . . . . . . . . . . . . . . . 377.3 Using MIDI/HID Controllers . . . . . . . . . . . . . . . . . . . . . . . . . . . . . . . . . . . . . . 387.4 Using Timecode Vinyl Records and CDs . . . . . . . . . . . . . . . . . . . . . . . . . . . . . . . . 40
8 Vinyl Control 418.1 How does it work? . . . . . . . . . . . . . . . . . . . . . . . . . . . . . . . . . . . . . . . . . . . . 418.2 What do I need to use it? . . . . . . . . . . . . . . . . . . . . . . . . . . . . . . . . . . . . . . . . . 418.3 Configuring Input and Output devices . . . . . . . . . . . . . . . . . . . . . . . . . . . . . . . . . . 438.4 Configuring Vinyl Control . . . . . . . . . . . . . . . . . . . . . . . . . . . . . . . . . . . . . . . . 448.5 Enabling Vinyl Control . . . . . . . . . . . . . . . . . . . . . . . . . . . . . . . . . . . . . . . . . . 468.6 Single Deck Control . . . . . . . . . . . . . . . . . . . . . . . . . . . . . . . . . . . . . . . . . . . 478.7 End-Of-Record Mode . . . . . . . . . . . . . . . . . . . . . . . . . . . . . . . . . . . . . . . . . . 478.8 Control Track . . . . . . . . . . . . . . . . . . . . . . . . . . . . . . . . . . . . . . . . . . . . . . . 478.9 Troubleshooting . . . . . . . . . . . . . . . . . . . . . . . . . . . . . . . . . . . . . . . . . . . . . 48
9 Live Broadcasting - Start your own Internet radio 509.1 Streaming Servers . . . . . . . . . . . . . . . . . . . . . . . . . . . . . . . . . . . . . . . . . . . . 509.2 Configuring Mixxx . . . . . . . . . . . . . . . . . . . . . . . . . . . . . . . . . . . . . . . . . . . . 519.3 Live Broadcasting Preferences . . . . . . . . . . . . . . . . . . . . . . . . . . . . . . . . . . . . . . 519.4 Troubleshooting . . . . . . . . . . . . . . . . . . . . . . . . . . . . . . . . . . . . . . . . . . . . . 539.5 Activate MP3 streaming support . . . . . . . . . . . . . . . . . . . . . . . . . . . . . . . . . . . . . 53
10 DJing With Mixxx 5510.1 Opening Mixxx . . . . . . . . . . . . . . . . . . . . . . . . . . . . . . . . . . . . . . . . . . . . . . 5510.2 Importing your audio files . . . . . . . . . . . . . . . . . . . . . . . . . . . . . . . . . . . . . . . . 5510.3 Loading Tracks . . . . . . . . . . . . . . . . . . . . . . . . . . . . . . . . . . . . . . . . . . . . . . 5610.4 Finding Tracks (Search) . . . . . . . . . . . . . . . . . . . . . . . . . . . . . . . . . . . . . . . . . 5710.5 Previewing Tracks . . . . . . . . . . . . . . . . . . . . . . . . . . . . . . . . . . . . . . . . . . . . 5810.6 Waveform displays . . . . . . . . . . . . . . . . . . . . . . . . . . . . . . . . . . . . . . . . . . . . 5810.7 Beatmatching and Mixing . . . . . . . . . . . . . . . . . . . . . . . . . . . . . . . . . . . . . . . . 5910.8 Headphone Cueing . . . . . . . . . . . . . . . . . . . . . . . . . . . . . . . . . . . . . . . . . . . . 5910.9 BPM and Beat Detection . . . . . . . . . . . . . . . . . . . . . . . . . . . . . . . . . . . . . . . . . 5910.10 Recording your Mix . . . . . . . . . . . . . . . . . . . . . . . . . . . . . . . . . . . . . . . . . . . 6110.11 Using Auto DJ for automatic mixing . . . . . . . . . . . . . . . . . . . . . . . . . . . . . . . . . . 62
11 Advanced Topics 6411.1 Adding support for your MIDI/HID Controller . . . . . . . . . . . . . . . . . . . . . . . . . . . . . 6411.2 Making a Custom Keyboard Mapping . . . . . . . . . . . . . . . . . . . . . . . . . . . . . . . . . . 6511.3 Additional Effects via external Mixer Mode . . . . . . . . . . . . . . . . . . . . . . . . . . . . . . . 6611.4 Deleting Your Library . . . . . . . . . . . . . . . . . . . . . . . . . . . . . . . . . . . . . . . . . . 67
12 Contributing to the Project 6912.1 As a non-developer . . . . . . . . . . . . . . . . . . . . . . . . . . . . . . . . . . . . . . . . . . . . 6912.2 As a software developer . . . . . . . . . . . . . . . . . . . . . . . . . . . . . . . . . . . . . . . . . 69
13 Appendix 7113.1 Keyboard mapping table . . . . . . . . . . . . . . . . . . . . . . . . . . . . . . . . . . . . . . . . . 7113.2 Application shortcuts . . . . . . . . . . . . . . . . . . . . . . . . . . . . . . . . . . . . . . . . . . . 7213.3 Command line options . . . . . . . . . . . . . . . . . . . . . . . . . . . . . . . . . . . . . . . . . . 73
ii

14 Glossary of Terms 75
Index 80
iii

CHAPTER 1
Introduction to Mixxx
Mixxx allows you to perform live DJ mixes with your digital music collection. It helps you rock the party with MIDIcontrollers, vinyl turntables, or even just your keyboard.
Mixxx is used by professional DJs and bedroom DJs alike. It is designed by an international team of volunteer DJs whowant to bring the joy of DJing to everyone. The project is non-profit, open-source and community driven. Togetherand with your help we aim to build the best DJ software ever created.
1.1 Mixxx Features
• Dual Decks: A scratchable, scrolling waveform marks beats and cue points of a track, along with a whole-songwaveform overview for quick seeking.
• Advanced Controls: Change playback with time stretching, and loop beat segments.
• Sampler Decks: Perfect for dropping that vocal sample or airhorn.
• iTunes Integration: Use your playlists and songs from iTunes, Traktor and Rhythmbox.
• BPM Detection and Sync: Instantly detect and sync the tempo of your songs.
• DJ Controller Support: Control your DJ mixes with MIDI/HID controllers.
• Timecode Support: Use a real turntable or DJ-CD player as a controller.
• Live Broadcasting: Start a radio station and stream your mixes live over the Internet.
• Powerful Mixing Engine: Supports various file formats, custom EQ shelves, recording, etc.
• Automatic Mixing: Create a quick playlist and let Auto DJ take over.
• Microphone Input: Drop vocals or give shoutouts on the air.
New in version 1.11: This version adds several major new features including completely revamped Waveforms, DirectHID controller support, Point & Click Controller Mapping, Next Generation Beat Detection, a Library History Featureand much more.
• For a full list of features go to: http://mixxx.org/features/
• For an overview of the new features, go to: http://mixxx.org/whats-new-in-mixxx-1-11
• For a full list of new features and bugfixes, go to: https://launchpad.net/mixxx/1.11.0
1

Mixxx User Manual, Release 1.11.0
1.2 System Requirements
Mixxx is available for Windows, Mac OS X and GNU/Linux. Mixxx is designed to use very few system resources,but the Mixxx Development Team suggests these minimum requirements for having a great experience with Mixxx:
• A 2GHz or faster CPU
• At least 1GB of RAM
• A soundcard with 2 stereo audio outputs
1.3 About the Mixxx Project
Mixxx is designed by an international team of volunteer DJs who want to bring the joy of DJing to everyone. Theproject is non-profit, open-source and community driven. Together and with your help we aim to build the best DJsoftware ever created.
Mixxx started as an open-source project because of demand for DJing software on Linux, and discontent with propri-etary DJ software on Windows and Mac OS X. Today, Mixxx development is driven by the simple idea that togetherwe can create a better way to DJ, and that has brought Mixxx to the cutting edge.
Mixxx is the only free cross-platform vinyl control software and has the most advanced MIDI/HID controller supportvia our innovative JavaScript-based scripting engine. We are continuing to pursue new and exciting features that giveDJs more tools to create better live mixes.
1.3.1 Project History
Mixxx was originally created in 2002 as part of a PhD thesis on new interfaces for DJing by Tue Haste Andersen.After releasing the project as open source, dozens of contributors began modifying and improving Mixxx.
In 2006, a new development team lead by Adam Davison and Albert Santoni began reorganizing the project to ensuresmooth growth of both the code-base and the number of contributors. A renewed focus on usability and stability hashelped Mixxx grow to become the most popular free DJ software in the world, receiving over 1,000,000 downloadsannually. Our committed team has worked hard to create great DJ software, and this growth is a sign of our success.
In 2011, RJ Ryan took over as Lead Developer to successfully continue the teams endeavor to make Mixxx a world-class DJ software.
As our user community grows, so does our development team - Over 150 developers, artists, and translators havehelped create Mixxx!
1.4 About the Mixxx Manual
Some effort has been made to present the material in a way that is neither too technical nor too dumbed-down. Takesome time to look through it and you’ll find lots of hints that will enhance both your enjoyment and your productivity.
Through the manual you’ll find text formatted like this:
• Library → Add new Playlist
This is to simplify the business of choosing commands in menus. In this example, the instruction means “Openthe Library menu at the top of the application window and then choose the Add new Playlist command”.
1.2. System Requirements 2

Mixxx User Manual, Release 1.11.0
• Apply
This is used to indicate a certain area of the GUI, including button labels, tabs, checkboxes, field names, valuesin selection lists etc. .
• STRG + G
This is used to mark a keystroke, or a sequence of keystrokes. In this example, you would have to hold downthe STRG key, then to press G.
• http://www.wikipedia.org/
Links to external websites are marked like this.
Important information in this manual are highlighted like this:•
Note: For anything that should receive a bit more attention.
•Hint: For supplementary information that lightens the work load.
• See also:
For references to other documents or websites if they need special attention.
• Warning: For anything that needs to be done with caution.
1.4.1 Improving the Manual
• Send Feedback: If you have comments, corrections or suggestions regarding the manual, write us an email.
• Get the Source Code: To download the source code for the Mixxx manual, go to:https://code.launchpad.net/~mixxxdevelopers/mixxx/manual
1.5 Additional Resources
Got questions? Need more information? Want to contribute ? There are a variety of other resources you can use tofind out more.
• Mixxx Website: For general information and updates, as well as the latest news on Mixxx, go to:http://mixxx.org
• Mixxx Support Websites: To get support from the Mixxx wiki, IRC channel or Developer mailing list, go to:http://mixxx.org/support
• Mixxx Community Forums: To search for answers, post your question or answer other DJ’s questions, go to:http://mixxx.org/forums
• Mixxx Bug Tracker: To report a bug or request a feature, go to: https://bugs.launchpad.net/mixxx
• Mixxx Translations: To translate Mixxx and promote your mother tongue, go to:https://translations.launchpad.net/mixxx
1.5. Additional Resources 3

CHAPTER 2
Installing Mixxx
This part of the manual provides step-by-step directions for installing Mixxx on your computer.
2.1 Installation on Windows
Figure 2.1: Mixxx Installation - Ready to install the application
• Download Mixxx for Windows from http://mixxx.org/download.php .
• Using Windows Explorer browse to the location where the Mixxx download was saved, usually theDesktop or Downloads folder.
• Double-click the Mixxx installer .EXE to open it up.
• Follow the step-by-step instructions in the installer.
• If the installation is complete, a confirmation screen will appear.
• Close the installer screen.
Mixxx is supported on Windows 8, Windows 7, Windows Vista or Windows XP, with native 32 and 64-bit versions.
Note: If you are not sure about 32-bit versus 64-bit, pick the 32-bit version when downloading the Mixxx installer.
4
Mixxx User Manual, Release 1.11.0
Warning: You may encounter a warning message similar to “Security Warning - Publisher could not be verified”.This is because the Mixxx installer is not digitally signed. Ignore the message and continue the installation. It doesnot indicate a security risk, if you can trust the source website such as www.mixxx.org .
2.2 Installation on Mac OS X
2.2.1 Method A: Direct Download
Figure 2.2: Mixxx Installation - Ready to drop the Mixxx icon to the Applications folder
• Download Mixxx for Mac OS X from http://mixxx.org/download.php .
• Using Finder browse to the location where the Mixxx download was saved, usually the Desktop orDownloads folder.
• Double-click the the Mixxx installer .DMG file, a new Finder window appears.
• Locate the Mixxx icon within this new Finder window. Drag-and-drop it into your Applications folder.
• Eject the Mixxx installation volume from the Finder by clicking on the icon right next to Mixxx volume name.
Mixxx requires an Intel Mac running Mac OS X 10.5 or newer.
2.2.2 Method B: The Mac App Store
Figure 2.3: Mixxx Installation from the Mac App Store
The Mac App Store makes getting new apps easier than ever.
• Start the Mac App Store.app on your computer.
• Search for mixxx in the App Store, alternatively click this direct link .
• Select Mixxx and click the Install button.
• Type in your administrator password if asked.
2.2. Installation on Mac OS X 5

Mixxx User Manual, Release 1.11.0
• Mixxx will be installed to your Applications folder.
The App Store version of Mixxx is under some circumstances out of date, therefore using Method A: Direct Downloadis preferable.
Note: Due to licensing restrictions, vinyl control is not available in Mixxx from the Mac App Store.
2.3 Installation on GNU/Linux
Official packages of Mixxx are only offered for Ubuntu Linux. However, Mixxx can build on almost any Linuxdistribution.
2.3.1 Installation on Ubuntu
Method A: Personal Package Archive (ppa)
• Open a terminal and type the following commands. Type in your administrator password if asked for.
sudo apt-add-repository ppa:mixxxsudo apt-get updatesudo apt-get install libportaudio2 mixxx
• Start Mixxx by simply typing mixxx into the terminal, then hit Return .
Method B: The Ubuntu Software Center
Figure 2.4: Mixxx Installation from the Ubuntu Software Center
The Ubuntu Software Center provides the easiest and safest way to install software on Ubuntu.
2.3. Installation on GNU/Linux 6

Mixxx User Manual, Release 1.11.0
• Start the Ubuntu Software Center on your computer.
• Search for mixxx in the Software center.
• Select Mixxx and click the Install button.
• Type in your administrator password if asked for.
• Mixxx will be installed and an icon is added to the frequently-used program icons on the launcher.
The Software Center version of Mixxx is under some circumstances out of date, therefore using Method A: PersonalPackage Archive (ppa) is preferable.
2.3.2 Installation on Other Distributions
Your distribution may maintain a non-official build that you may use. Alternatively, you can build Mixxx from source.This should be a pretty straight forward process, and it’s certainly easiest on GNU/Linux. For more information, goto:
• http://mixxx.org/wiki/doku.php/compiling_on_linux
2.4 Building Mixxx from Source
If your operating system isn’t listed here, then it’s likely you’re going to have to build Mixxx from the source code.For more information, go to:
• http://mixxx.org/wiki/doku.php#build_mixxx
2.5 Where to go from here?
• Set up your audio devices and controllers
• Open Mixxx and start importing your audio files
• Get familiar with the Mixxx user interface
2.4. Building Mixxx from Source 7

CHAPTER 3
Hardware Setup
This chapter describes the most common hardware setups to serve as examples. We will go over the setup of timecoderecords/CDs, MIDI control and keyboard control.
3.1 Audio Output
Headphone cueing, or just cueing, is previewing the next track you would like to mix in your headphones. Theaudience will not hear what you are cueing in your headphones. Being able to cue is a crucial aspect of DJing.
In order to cue with your computer, you will need at least 2 separate audio outputs. Traditionally, a headphone jackon most laptops is not a second audio output. Rather, plugging headphones into the jack simply redirects the laptop’smain output to your headphones. Having a headphone jack alone will not allow you to cue.
3.2 Common Configurations
Unlike some commercial DJ systems, Mixxx can control multiple audio devices simultaneously. Depending on yourbudget and application area your sound setup and requirements may vary. This section provides useful information forclub, hobby and radio DJs alike.
3.2.1 Laptop Only
There is absolutely no need to buy an additional, expensive sound card if you do not require headphone cueing. Thebuilt-in soundcard on most computers and laptops comes with a single line-out and microphone input.
The figure above depicts how the sound configuration might look. The stereo output of your soundcard (channels 1-2)will be connected to the Master out.
1. Open Preferences → Sound Hardware
2. Select the Output tab
3. From the Master drop-down menus, select your built-in soundcard, then Channels 1-2
4. Depending on your soundcard, you can specify a microphone
(a) Use your built-in microphone or connect a microphone to your computer
(b) Check that your microphone is detected by your OS
(c) Open the Input tab
8

Mixxx User Manual, Release 1.11.0
Figure 3.1: Using Mixxx with your built-in sound card
(d) From the Microphone drop-down menu, select the input your microphone is connected to
5. Click Apply to save the changes.
This minimal configuration may be suitable for radio DJs that do not need headphone cueing.
3.2.2 Laptop and an External USB Soundcard
Figure 3.2: Using Mixxx together with an external soundcard
The most common setup for DJing is a laptop and a soundcard with 2 stereo outputs (4 channels). The first stereooutput (channels 1-2) is used as the Master out and supplies the main mix to the room. With the 2nd stereo output(channels 3-4) you can cue and preview the next track in your headphones. If your soundcard does not have 2 stereooutputs, you can use multiple soundcards to achieve the same setup.
The depicted configuration above uses two soundcards. This setup is the bare minimum for serious DJing. Withoutany extra gear, the DJ can control Mixxx via mouse and keyboard. For more information see Controlling Mixxx.
Using an external multi-channel soundcard
1. Open Preferences → Sound Hardware
3.2. Common Configurations 9

Mixxx User Manual, Release 1.11.0
2. Select the Output tab
3. From the Master drop-down menus, select the external soundcard, then Channels 1-2
4. From the Headphones drop-down menus, select the external soundcard, then Channels 3-4
5. Click Apply to save the changes.
Using two soundcards (built-in + external)
1. Open Preferences → Sound Hardware
2. Select the Output tab
3. From the Master drop-down menus, select the external soundcard, then Channels 1-2
4. From the Headphones drop-down menus, select the built-in soundcard, then Channels 1-2
5. Click Apply to save the changes.
3.2.3 Laptop, MIDI Controller, and External USB Soundcard
Mixxx can work with any MIDI controller that has drivers for your OS, as long as there is a MIDI mapping file to tellMixxx how to understand it. Mixxx comes bundled with a number of MIDI mapping presets. To see the full list, seeUsing MIDI/HID Controllers.
Figure 3.3: Using Mixxx together with a MIDI controller and external soundcard
Using a controller without an integrated multi-channel soundcard
1. Open Preferences → Sound Hardware
2. Select the Output tab
3. From the Master drop-down menus, select the external soundcard, then Channels 1-2
4. From the Headphones drop-down menus, select the built-in soundcard, then Channels 1-2
5. Click Apply to save the changes.
Your MIDI controller may have an integrated multi-channel soundcard. If yours does not, your sound setup may looklike the figure above. Otherwise, an alternative sound setup may look like the figure below:
Using a controller with an integrated multi-channel soundcard
3.2. Common Configurations 10
Mixxx User Manual, Release 1.11.0
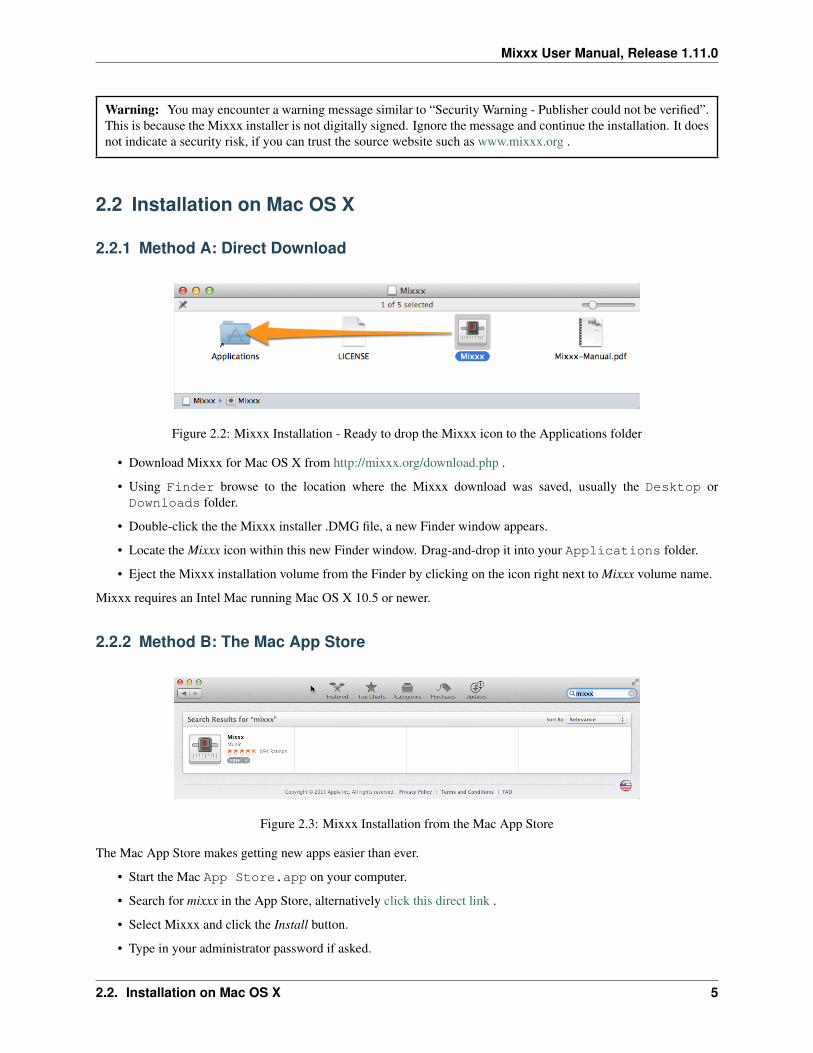
Figure 3.4: Using Mixxx together with a MIDI controller and integrated soundcard
1. Open Preferences → Sound Hardware
2. Select the Output tab
3. From the Master drop-down menus, select your controllers soundcard, then Channels 1-2
4. From the Headphones drop-down menus, select your controllers soundcard, then Channels 3-4
5. Click Apply to save the changes.
Note: You can connect as many MIDI controllers as you have ports on your computer. Just follow the steps in UsingMIDI/HID Controllers for each controller you want to use.
3.2.4 Laptop, External Hardware Mixer and Vinyl Control
This setup is usually preferred by DJs who work in clubs. Instead of carrying large and heavy CD bags or a MIDIcontroller, all you need to have is a professional soundcard together with a pair of timecode records and headphones.
For best results, when using this setup you should ensure your system is capable of latencies under 10ms. Otherwisescratching may sound distorted. For more information about latency and how to improve it, see Latency.
See also:
Go to the chapter Vinyl Control for detailed information.
3.2. Common Configurations 11

CHAPTER 4
Configuring Mixxx
4.1 Sound Hardware Preferences
Figure 4.1: Mixxx Sound Hardware Preferences
Preferences → Sound Hardware allows you to select the audio in- and outputs to be used.
• Sound API: Depending your Operating System, select the API that Mixxx uses to deliver audio to your audiodevice. Your choice can drastically affect how smooth Mixxx performs on your computer.
• Sample Rate: Allows you to manually select the sample rate for the audio input. The sample rate value shouldbe set to the sample rate of your audio interface. By default, Mixxx tries the system default first, which is mostlikely 44.1 kHz. Otherwise, Mixxx will pick a different default.
• Latency: Latency is the lag time in milliseconds that it takes for Mixxx to process your input. Lower latencymeans Mixxx will be more responsive but on slower computers it might cause glitches.
• Buffer Underflow Count: Underflows (no data is available when needed) indicate that some of the subsystemsin Mixxx can’t keep up with real-time deadlines. This is useful to tune the latency settings. If the counterincreases, then increase your latency setting, decrease the sample rate setting or change the sound API setting ifavailable.
12

Mixxx User Manual, Release 1.11.0
4.2 Audio Outputs
Mixxx’s mixing engine can be used two ways:
Internal Mixer Mode In this mode, Mixxx performs the mixing of the decks, microphone, and samplers in softwareand outputs them to a single output. To enable internal mixer mode assign a valid audio output to the Masteroutput in Preferences → Sound Hardware → Output.
Internal mode is used in the following configurations:
• Laptop Only
• Laptop and an External USB Soundcard
• Laptop, MIDI Controller, and External USB Soundcard
External Mixer Mode In this mode, Mixxx outputs the audio from each deck to a separate soundcard output. Thisallows you to route the deck outputs through a hardware mixer. Similarly, to enable external mixer mode, simplyselect a valid audio output for the Deck outputs in Preferences → Sound Hardware → Output.
External mode is used in the following configuration:
• Laptop, External Hardware Mixer and Vinyl Control
4.2.1 Headphone Output
In both internal and external mixer mode, you can choose a headphone output for pre-fader listening or headphonecueing in Preferences → Sound Hardware → Output → Microphone. This allows you to listen and synchronize thetrack you will play next in your headphones before your audience hears the track. See also PFL/Headphone Button.
4.3 Latency, Sample Rate, and Audio API
To achieve the best performance with Mixxx it is essential to configure your latency, samplerate, and audio API. Thesethree factors largely determine Mixxx’s responsiveness and audio quality and the optimal settings will vary based onyour computer and hardware quality.
4.3.1 Latency
Latency is the lag time in milliseconds that it takes for Mixxx to process your input (turning knobs, sliding thecrossfader, etc.). For example, a latency of 36 ms indicates that it will take approximately 36 milliseconds for Mixxx tostop the audio after you toggle the play button. Additionally, latency determines how quickly your Operating Systemexpects Mixxx to react. Lower latency means Mixxx will be more responsive. On the other hand, setting your latencytoo low may be too much for your computer to handle. In this situation, Mixxx playback will be choppy and veryclearly distorted as your computer will not be able to keep up with how frequently Mixxx is processing audio.
A latency between 36-64 ms is acceptable if you are using Mixxx with a keyboard/mouse or a MIDI controller. Alatency below 10 ms is recommended when vinyl control is used because Mixxx will feel unresponsive otherwise.
Keep in mind that lower latencies require better soundcards and faster CPUs and that zero latency DJ software is amyth (although Mixxx is capable of sub-1ms operation).
4.2. Audio Outputs 13

Mixxx User Manual, Release 1.11.0
4.3.2 Sample Rate
New in version 1.11: Mixxx automatically selects a default sample rate for your soundcard, most likely 44100 Hz
The sample rate setting in Mixxx determines how many samples per second are produced by Mixxx. In general, ahigher sample rate means that Mixxx produces more audio data for your soundcard. This takes more CPU time, butin theory produces higher audio quality. On high-wattage club sound systems, it may become apparent if your audiosample rate is too low.
Warning: A sample rate of 96kHz takes Mixxx over twice as long to compute. Keep in mind that increasing thesamplerate will increase CPU usage and likely raise the minimum latency you can achieve.
4.3.3 Audio API
The Audio API that Mixxx uses is the method by which Mixxx talks to your Operating System in order to deliveraudio to your soundcard. Your choice of Audio API can drastically affect Mixxx’s performance on your computer.Therefore it is important to take care to choose the best Audio API available to you. Refer to the following tableof Audio APIs to see what the best choice is for your operating system.
OS / Audio API QualityWindows / WMME PoorWindows / DirectSound PoorWindows / WASAPI GoodWindows / ASIO GoodWindows / WDDKMS GoodMac OS X / CoreAudio GoodGNU Linux / OSS OKGNU Linux / ALSA GoodGNU Linux / JACK (Advanced) Good
On Windows, if an ASIO driver is not available for your operating system, you can try installing ASIO4ALL, alow-latency audio driver for WDM audio devices.
On GNU/Linux using JACK, make sure to start your JACK daemon before running Mixxx. Otherwise JACK will notappear as a Sound API in the preferences.
Warning: On GNU/Linux do not use the pulse device with the ALSA Audio API. This is an emulation layerfor ALSA provided by PulseAudio and results in very poor performance. Make sure to run Mixxx using thepasuspender tool on GNU/Linux distributions that use PulseAudio.
4.3. Latency, Sample Rate, and Audio API 14

CHAPTER 5
An Overview of the Mixxx Interface
Welcome to the Mixxx interface. This is where the magic happens. You are going to want to get very familiar withthis interface because it is the main way to use Mixxx. In this chapter, we present the default interface of Mixxx anddescribe its elements, knobs and faders.
Figure 5.1: The Mixxx interface - Deere skin
This is the Deere skin. It is the default skin supplied with Mixxx. There are a variety of others skins included withMixxx. You should explore them all to figure out which one you prefer. This section will focus on Deere only.
5.1 The Deck Sections
The deck section allows you to control everything relating to a virtual turntable deck. We are going to break this downinto sections.
15

Mixxx User Manual, Release 1.11.0
Figure 5.2: A deck with a track loaded
5.1.1 Track Information Display
Figure 5.3: The track information section of the deck
Track Title The title of the track that was loaded into a deck is displayed on top. This is the same as the titlelisted under the Title column heading in the Mixxx library. This information is initially loaded from the tracksmetadata.
Track Artist The title of the track is listed below. It is the same as listed under the Artist column heading in theMixxx library.
BPM (Tempo) The number at the top right is the effective BPM of the track. This is the detected BPM of the track,adjusted for the playback rate of the track. For example, if the track is normally 100 BPM, and it is playing at+5%, then the effective BPM will read 105 BPM.
Hint: Click directly on the BPM display and tap with the beat to set the BPM to the speed you are tapping.You can also use a keyboard shortcut, go to Using a Keyboard for more information.
Time Elapsed/Remaining By default it displays the total elapsed time in the track up to the millisecond. Clicking onthe display switches to the Time Remaining view, which indicates how much time is left before the track reachesthe end. You can change the default in Preferences → Interface → Position Display.
5.1.2 Waveform Displays
The waveform section of a deck allows you to visualize the audio changes that occur throughout the track, you canbasically “see” your music.
Waveform summary The big waveform summary shows the waveform envelope of the track near the current play-back position and is updated in realtime. The mouse can be used on the waveform to pause, scratch, spin-backor throw the tracks. Right-clicking on the waveforms allows you to drag with the mouse to make temporarypitch adjustments.
Hint: You can select from different types of displays for the waveform, which differ primarily in the level ofdetail shown in the waveform, in Preferences → Interface → Waveform Display → Display type.
5.1. The Deck Sections 16

Mixxx User Manual, Release 1.11.0
Figure 5.4: The waveform summary and waveform overview of the deck
Waveform overview The smaller, zoomed-out version of the waveform shows the various markers within the trackas well as the waveform envelope of the entire track. This is useful because they allow DJs to see breakdownsfar in advance. Clicking somewhere on the waveform allows you to jump to an arbitrary position in the track.
Vinyl Widget The line on the vinyl widget rotates if the track moves. It is similar to the position marker found onscratch records. Use the mouse on the vinyl widget to pause, scratch, spin-back or throw tracks - just like areal record. When performing Loop rolls or right-clicking on the vinyl during playback, a “ghost” marker hintswhere the playback will continue. The Vinyl Widget is hidden by default and can be enabled in the Deck OptionsButton Grid.
If Vinyl control is enabled, it can optionally display the time-coded vinyl signal quality. Activate the option inPreferences → Vinyl Control → Show Signal Quality in Skin.
Waveform Zoom Using the mouse-wheel everywhere in the waveform summary will zoom the waveform in or out.You can choose whether or not to synchronize the zoom level between the decks in Preferences → Interface →Waveform Display → Synchronize.
Waveform Marker While mixing, various additional markers can appear on the waveforms:
• Position marker: The static vertical line in the center of the waveform summary indicates the playback pointof the deck.
• Beat marker: The regular white lines on the waveform summary indicate the locations of beats in the audio,also called the beatgrid.
• Cue marker: Indicates the position of the cue point.
• Hotcue marker: Indicate the position and number of a hotcue point if set.
• Loop-in/Out marker: Indicate the beginning and the end of a loop.
• Loop overlay: Is drawn between the Loop-in/Out markers and changes color depending on whether a loop isactivated or not.
• Track ending notification: If the waveform overview flashes red, only 30 seconds are left before the trackreaches the end.
See also:
To learn how to get most out of the waveforms while mixing, go to the chapter Waveform displays.
Warning: If you have a slower computer and notice performance issues with Mixxx, try to lower the frame rateor change the level of detail shown in the waveform in in Preferences → Interface → Waveform Display.
5.1. The Deck Sections 17

Mixxx User Manual, Release 1.11.0
Figure 5.5: The Options Button Grid of the deck
5.1.3 Deck Options Button Grid
The six buttons at the bottom right below the waveform allow you to configure the deck. Starting from the top-left andmoving counterclockwise the buttons are as follows:
Show/Hide Vinyl Widget Toggles the visibility of the Vinyl Widget in the Waveform Displays.
Repeat Mode Toggle If enabled, the repeat mode will jump back to the beginning and continue playing when thetrack finishes.
Eject Track Button Clicking this button ejects the track from the deck. Alternatively you can use a keyboard shortcut,go to the chapter Using a Keyboard for more information.
Beat-grid Adjust Button Clicking this button adjusts the track beat-grid so that the current position is marked as abeat. This is useful if Mixxx was able to accurately detect the track’s BPM but failed to align the beat markerson the beats. For more information, go to the chapter BPM and Beat Detection.
Quantize Mode Toggle If enabled, all cues, hotcues, loops, and beatloops will be automatically quantized so thatthey begin on a beat.
Keylock Toggle Keylock locks the track’s pitch so that adjustments to its tempo via the rate slider do not affect itspitch. This is useful if you would like to speed up or slow down a track and avoid the “chipmunk” effect thatspeeding up vocals has.
5.1.4 Vinyl Control Mode and Cueing controls
Figure 5.6: The Vinyl Control Mode and Cueing controls of a deck
The control above the waveforms relate to the vinyl control feature in Mixxx and is hidden in the default Mixxx userinterface. Click the VINYL section expansion button in the mixer section, or use the specific Application shortcuts toshow or hide the section.
Abs/Rel/Const button
• Absolute mode: The track position equals needle position and speed.
• Relative mode: The track speed equals needle speed regardless of needle position.
• Constant mode: The track speed equals last known-steady speed regardless of needle input.
Off/One/Hot button
This button determines how cue points are treated in vinyl control relative mode:
• Off: Cue points are ignored.
• One Cue: If the needle is dropped after the cue point, the track will seek to that cue point.
• Hot Cue: The track will seek to nearest previous hotcue point.
5.1. The Deck Sections 18

Mixxx User Manual, Release 1.11.0
See also:
For more information on how to use Vinyl control in your setup, go to the chapter Vinyl Control.
5.1.5 Sync and Rate Controls
Figure 5.7: Rate controls
The rate controls allow you to change the rate at which tracks are played. This is veryuseful for beatmatching two tracks together in a mix. You can control rate changes alsofrom your computer’s keyboard, see the chapter Using a Keyboard for more information.
SYNC button
• Left-Click: Changes the rate of the track so that the BPM and phase of the trackmatches the other deck.
• Right-Click: Only changes the rate of the track to match the other deck but doesnot adjusts the phase.
Changed in version 1.11: Changed Sync mode (Ghetto Sync™)
Decks and samplers now pick which sync target to sync to on the fly. Decks can’t sync tosamplers and samplers can only sync to decks. The sync target is:
• The first (in numerical order) deck that is playing (rate > 0) a track that has a detectedbeatgrid.
• The first (in numerical order) deck that has a track loaded with a detected beatgrid(could be stopped).
So basically, if you sync a sampler and both deck 1 and deck 2 are playing a trackwith a beatgrid then deck 1 will win since numerically it is first. This will changeagain in the future once Mixxx gets a proper master sync feature.
Pitch/Rate slider The slider allows you to change the speed of the song, by default up to10% from the tracks original tempos. The speed will increase as you move the sliderup, opposite to the behavior found on DJ turntables and CDJ. Right-clicking on theslider will reset the tempo to its original value.
Pitch Rate Display The percent that the track’s rate is sped up or slowed down is notedhere. Is the Pitch/Rate slider positioned at the center, the pitch rate display is at+0.0%, which indicates no change.
Pitch/Rate buttons The plus and minus buttons increase or decrease the tempo in stepsat which a song is played, same as pulling the pitch slider slightly. By right-clickingthe buttons you get even finer adjustments.
Temporary Pitch/Rate buttons (Nudge) Pushing the the left and right arrow buttons islike nudging the metal edge of a turntable, or the outer edge of a CD player. It willgive the track a push or pull forwards or backwards. If the buttons are released theprevious tempo is restored. The buttons can act as either a fixed pitch bend or aramping pitch bend.
See also:
To customize the amount by which the buttons alter the pitch of the track, the slider range as well as the direction, goto Preferences → Interface.
Hint: If the tempo of a track changes, you’ll notice that the tone changes based on the pitch used (e.g. playing atfaster pitch gives a chipmunk sound). You can enable the Keylock feature to maintain a constant tone.
5.1. The Deck Sections 19

Mixxx User Manual, Release 1.11.0
5.1.6 Transport Controls
Figure 5.8: The transport controls of the deck
Fast-Rewind button As long as the button is pressed, the track will play in reverse with increased speed. Right-clicking on the button will seek the play position to the beginning of the track.
Fast-Forward button As long as the button is pressed, the track will play with increased speed. Right-clicking onthe button will seek the play position to the end of the track.
Reverse button As the name suggests, this button plays a track backwards.
5.1.7 Loop Controls
Figure 5.9: The beatloop and looping controls of the deck
In this section of the Mixxx interface you can control (beat-)loops and set the loop points of a track.
Beatlooping Buttons
• Instant loop: The numbered buttons represents a different bar length. Clicking on any of that buttons will seta loop of the defined number of beats from the beat immediately following the current playback position. If aloop is set, a loop overlay will be drawn on the waveforms.
• Loop roll:
New in version 1.11.
Right-click on any of the numbered loop buttons to temporarily setup a rolling loop over the defined number ofbeats. Playback will resume where the track would have been if it had not entered the loop.
• Double loop: Clicking on the plus button will double the current loop’s length up to 64 bars. The length of theloop overlay in the waveform will increase accordingly.
• Halve loop: Clicking on the minus button will halve the current loop’s length down to 1/32 bars. The length ofthe loop overlay in the waveform will decrease accordingly.
Loop Buttons
• Loop-In: This button allow you to manually set the start point of a loop. A loop-in marker is placed on thewaveform indicating the position. If clicked when a loop was already set, it moves the start point of a loop to anew position.
• Loop-Out: This button allow you to manually set the end point of a loop. A loop-out marker is placed on thewaveform indicating the position. If clicked when a loop was already set, it moves the end point of a loop to anew position.
5.1. The Deck Sections 20

Mixxx User Manual, Release 1.11.0
• Loop: Also dubbed Reloop, this button toggles whether the loop is active or not. This works for manuallyplaced loops as well as automatic loops set by the beatlooping buttons. Depending on the current status of theloop, the loop overlay on the waveforms changes color.
Hint: If you are playing inside a loop and want to move the end point beyond its current position in the track, clickon the Loop button first and when the play position reaches the desired position, click on the Loop-Out button.
See also:
If the Quantize mode is enabled, the loops will automatically snap to the nearest beat. This is disabled by default, clickon the Quantize Mode Toggle to enable it.
5.1.8 Hotcue Controls
Figure 5.10: The hotcue controls of the deck
To jump in between different parts of a track, you can use these numbered buttons. You can also use keyboardshortcuts, go to Using a Keyboard for more information.
Setting Hotcues
Clicking on a numbered button will set a hotcue at the current play position on the track. A marker with the corre-sponding number will appear in the waveform and the button will lit up to indicate that the hotcue is set.
Playing Hotcues
• While playing: Tap a hotcue button to cause the track to instantly jump to the location of the hotcue and continueplaying. If you are playing inside a loop and tap a hotcue whose position is outside of the loop, then the trackstill instantly jump to the hotcue but the loop will be deactivated.
• While stopped: Tap a hotcue button to cause the track to instantly jump to the location of the hotcue and startplaying as long as the button is pressed. Press the Play keyboard shortcut while the hotcue button is pressed tocontinue playback, then release the hotcue button.
Deleting Hotcues
To delete a hotcue, right-click on the numbered button. The marker in the waveform will be deleted as well.
Note: Mixxx supports up to 36 hotcues per deck. By default, only some of them are visible in the user interface. Youcan customize your keyboard or controller mappings to use all of them.
See also:
Just as with the loops (see above), if the quantize mode is enabled, the hotcues will automatically snap to the nearestbeat. This is disabled by default, click on the Quantize Mode Toggle to enable it.
5.1. The Deck Sections 21

Mixxx User Manual, Release 1.11.0
5.2 The Mixer Section
Figure 5.11: The mixer section
The mixer section of the Mixxx user interface allows you to control how the different decks and samplers are mixedtogether.
5.2.1 Channel Faders and VU Meters
VU meters In the center of the mixer section are 4 VU meters. The two outer-most VU meters are for each deck,while the 2 inner-most VU meters are the left and right VU meters for the master output.
The light at the top of the VU meter indicates when the audio in the selected channel is clipping. If this lightgoes on, reduce the gain or EQs for this deck to eliminate distortion.
Line faders The two large faders on either side of the VU meters are the deck volume faders, also known as Channel-or Line-faders. Adjusting these controls the volume of each deck.
Hint: Some DJ’s prefer to use the line faders over the crossfader for fading between tracks. Try it, you maylike it.
5.2.2 Section Expansion Buttons
Above the VU meters in the mixer are the optional section expansion buttons.
If you click on either MIC, SAMPLER, or VINYL then you will enable control sections for interacting with:
5.2. The Mixer Section 22

Mixxx User Manual, Release 1.11.0
Figure 5.12: The section expansion buttons
• The Microphone Section
• The Sampler Section
• Vinyl Control Mode and Cueing controls
New in version 1.11: You can also use the specific Application shortcuts.
5.2.3 Headphone and Master Mix Controls
Figure 5.13: The headphone and master mix knobs
Head-Mix Knob Allows you to customize how much of the master output you hear in your headphones. It workslike a crossfader between the stereo Master and stereo Cueing signal. If the knob is set to the left, you only hearthe cueing signal which can be useful for prelistening tracks.
Note: Don’t forget to activate the PFL button on the deck you want to listen to in your headphones.
Head volume Knob This button adjusts your headphone volume. You can adjust the volume of a single deck’s signalyou listening to in the headphones with the Gain knob.
Balance Knob This knob allows you to adjust the balance (left/right orientation) of the master output.
Volume Knob The Volume Knob controls the overall volume of of the master output. Adjust this knob so that theMaster VU meters are just at the peak.
Hint: If the Peak indicator on top of the Master VU meter flashes, the master output signal is clipping (tooloud). Lower the volume with using the volume knob.
5.2.4 PFL/Headphone Button
Figure 5.14: The headphone buttons of both decks in the mixer
The headphone button is also known as the pre-fader listen or PFL button. Pressing this button allows you to listenand synchronize the track you will play next in your headphones before your audience hears the track (headphonecueing). You can select more than one PFL button simultaneously.
See also:
Headphone cueing is only available if you have configured a Headphone Output in Preferences → Sound Hardware.
5.2. The Mixer Section 23
Mixxx User Manual, Release 1.11.0
5.2.5 Equalizers and Gain Knobs
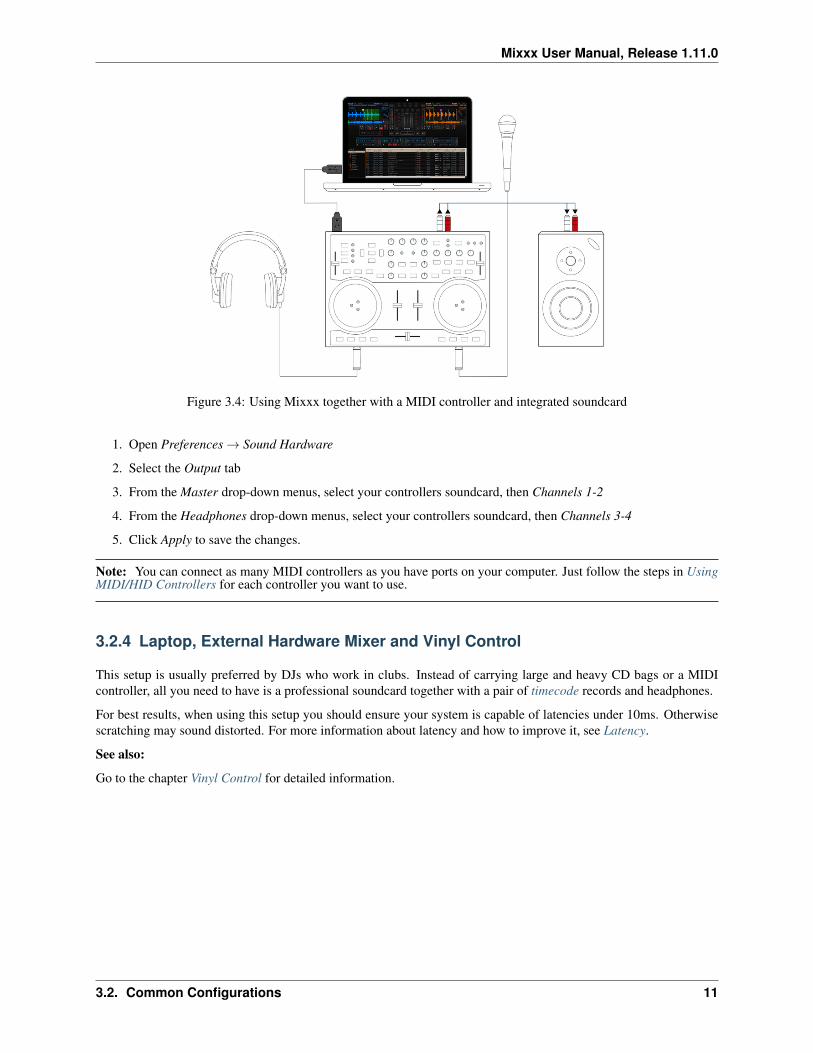
Figure 5.15: EQ Con-trols
New in version 1.11: Latch mode for Kill Switches
Gain Knob Above these knobs, the gain knob allows you to adjust the gain of the deck. Ingeneral, you should adjust this knob so that at full-volume the deck’s audio is just at thepeak of the center VU meters. This is so you can achieve the widest dynamic range foryour track.
EQ Knobs The low, mid, and high knobs allow you to change the filters of the audio. Thisallows you to selectively reduce or boost certain frequency ranges of the audio.
Kill Switches The small boxes next to each EQ knob are called kills. Hold these buttons to fullyremove that frequency range. Short click on the buttons for latching. When in Latch mode,click again to restore the frequency range. If the Kill switches do not work as expected,check the high/low shelf EQ settings in the preferences.
See also:
You can customize the EQ settings in Preferences → Equalizer.
5.2.6 Crossfader
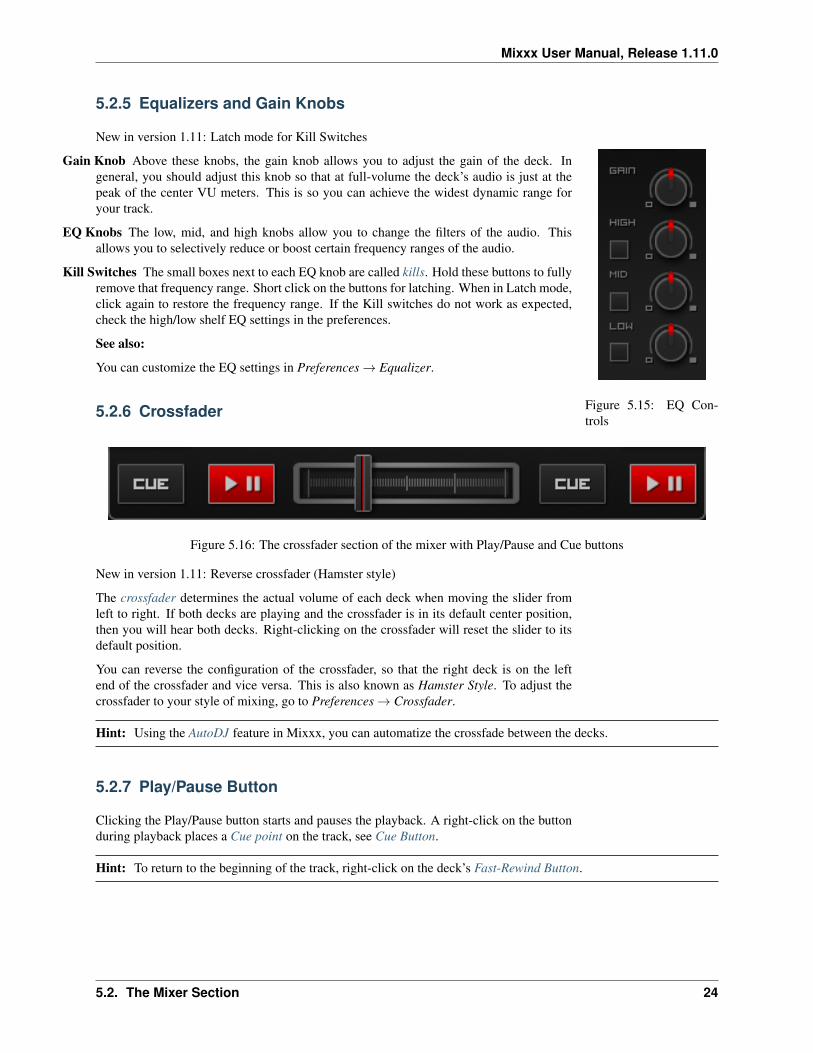
Figure 5.16: The crossfader section of the mixer with Play/Pause and Cue buttons
New in version 1.11: Reverse crossfader (Hamster style)
The crossfader determines the actual volume of each deck when moving the slider fromleft to right. If both decks are playing and the crossfader is in its default center position,then you will hear both decks. Right-clicking on the crossfader will reset the slider to itsdefault position.
You can reverse the configuration of the crossfader, so that the right deck is on the leftend of the crossfader and vice versa. This is also known as Hamster Style. To adjust thecrossfader to your style of mixing, go to Preferences → Crossfader.
Hint: Using the AutoDJ feature in Mixxx, you can automatize the crossfade between the decks.
5.2.7 Play/Pause Button
Clicking the Play/Pause button starts and pauses the playback. A right-click on the buttonduring playback places a Cue point on the track, see Cue Button.
Hint: To return to the beginning of the track, right-click on the deck’s Fast-Rewind Button.
5.2. The Mixer Section 24

Mixxx User Manual, Release 1.11.0
5.2.8 Cue Button
If the button is pressed, the play position jumps to an existing Cue point on the track orsets a new one, depending on whether a track is playing or not. If you have not set anycustom cues yet, the default point is at the track’s beginning.
Setting Cue points
• While playing: The Cue point is set via Play/Pause Button. A right-click on the buttonplaces a Cue point at the current play position on the track, and a Cue marker appears onthe waveforms.
• While stopped: Clicking on the Cue button places a Cue point at the current play positionon the track, and a Cue marker appears on the waveforms. The existing cue point will bereplaced.
Every track has a Cue point, by default on its beginning. Unlike with Hotcues, you can’tdelete, but only move Cue points.
Using Cue Modes
You can switch between the CUE modes in Preferences → Interface.
CDJ cue mode (default)
• While playing: Tapping the Cue button causes the track to instantly jump to the locationof the cue point where it stops the playback.
• While stopped: Holding down the Cue button jumps to the cue point and starts playbackas long as the button is pressed. If the button is released, the play position marker jumpsto the cue point and the playback is paused. Clicking the Play button while the Cue buttonis down continues the playback.
Simple mode
• While playing: Similar to the Hotcues, clicking the Cue button jumps to the cue point andcontinues playback.
• While stopped: No action is performed.
Hint: Use the Hotcue Controls to place more reference points on a track.
See also:
You can also use keyboard shortcuts for Cueing. Go to Using a Keyboard for more infor-mation.
5.2.9 Effects Controls
Currently, the only available internal effect in Mixxx is a flanger. This effect applies a“sweeping” sound to the channel and can add extra depth to a mix when used tactfully.
FX Button The FX (“Effects”) button enables a built-in flanger effect on the selected channel.
Delay/Depth/LFO Knobs Adjusts the phase delay, intensity and the the wavelength of theflange effect.
5.2. The Mixer Section 25

Mixxx User Manual, Release 1.11.0
Figure 5.17: The effect control section of the mixer
Hint: For the most noticeable effect, enable the FX button and turn the Depth knob completely to the right.
See also:
As an advanced user, you can route your audio signal to external software and then applyadditional effects. Go to Additional Effects via external Mixer Mode for more information.
5.3 The Sampler Section
Figure 5.18: A sample deck
Samplers are miniature decks. They allow you to play short samples and jingles but alsoadditional tracks in your mix. They come with a small overview waveform and a limitednumber of controls. All controls work just like on the regular decks, see The Deck Sections.
The Sampler section is hidden in the default Mixxx user interface. Click the SAMPLERbutton in the mixer section, or use the specific Application shortcuts to show or hide thesection.
5.3.1 Waveform Display
Waveform overview The waveform shows the various markers within the track as well as thewaveform envelope of the entire track. Clicking somewhere on the waveform allows youto jump to an arbitrary position in the track.
Waveform Marker While mixing, some additional markers can appear on the waveforms:
• Position marker: A vertical line indicates the playback point of the sample deck.
• Hotcue marker: Indicate the position and number of a hotcue point if set.
5.3. The Sampler Section 26

Mixxx User Manual, Release 1.11.0
5.3.2 Track Information Display
Track Artist/Title The artist and title of the track that was loaded into a sampler deck is dis-played here.
BPM (Tempo) The number at the top right is the effective BPM of the track. Tap the BPM toset the BPM to the speed you are tapping.
5.3.3 Deck Options Button Grid
The buttons grid next to the waveform overview allow you to configure the sampler deck.Starting from the top-left and moving counterclockwise the buttons are as follows:
Repeat Mode Toggle If enabled, the repeat mode will jump back to the beginning and continueplaying when the track finishes.
Eject Track Button Clicking this button ejects the track from the deck.
Mix Orientation Toggle This control determines the microphone input’s mix orientation.
Keylock Toggle Keylock locks the track’s pitch so that adjustments to its tempo via the rateslider do not affect its pitch.
5.3.4 Sample Deck Controls
New in version 1.11: Samplers can sync to decks.
Play/Pause button Clicking the button starts and stops playback. Right-clicking on the buttonwill seek the play position to the beginning of the sample.
Sync Button Syncs the Sampler deck to a regular deck, as described in Sync and Rate Controls.
• Left-Click: Changes the rate of the track so that the BPM and phase of the track matchesthe sync target.
• Right-Click: Only changes the rate of the track to match the sync target but does notadjusts the phase.
Hotcue Controls To jump in between different parts of a sample, you can use these numberedhotcue buttons.
PFL/Headphone Button If active, the pre-fader listen or PFL button allows you to listen to thetrack in your headphones.
Gain Knob Allows you to adjust the volume of the track.
VU Meter Shows the level of the signal and can be adjusted with the Gain knob.
Pitch/Rate slider The slider allows you to change the speed of the sample. Right-clicking onthe slider will reset the tempo to its original value.
5.4 The Microphone Section
The microphone section is hidden in the default Mixxx user interface. Click the MICbutton in the mixer section, or use the specific Application shortcuts to show or hide thesection.
Setup the microphone
5.4. The Microphone Section 27

Mixxx User Manual, Release 1.11.0
Figure 5.19: The Microphone section
• Most computers have built-in microphones, while some are connected through USB. Thesework adequately, but don’t expect them to be high-quality.
• The best solution is to connect a good external microphone to the “Mic” or “Line” inputon your audio device. If available, use the “Gain” knob on the device to adjust the inputsignal.
• Select the microphone input in Preference → Sound Hardware → Input → Microphoneand click Apply.
5.4.1 Microphone Controls
Talk Button
Changed in version 1.11: Latch mode added
Hold this button and talk to mix the microphone input into the Mixxx master output. Shortclick on the button for latching. This is handy for talking for an extended period, forexample when streaming a radio show. When in Latch mode, click again to mute themicrophone input.
Mix Orientation Toggle This control determines the microphone input’s mix orientation. Ei-ther to the left side of crossfader, to the right side or to the center (default). Clicking cyclesthrough all the options.
Microphone Volume Meter This displays the microphone volume input signal strength.
Microphone Gain Knob Use this knob to adjust the gain of the microphone output. Try to keepthe volume at a reasonable level to avoid signal clipping.
5.5 Preview Deck Section
Figure 5.20: The Preview Deck with a track loaded
New in version 1.11.
The Preview Deck is a special deck that allows you to pre-listen to tracks in the head-phones before using them in your mix. Pre-listening a track does not change the tracks’sPlayed state as well as the play counter and is not logged in the History. Press CTRL + 4(Windows/Linux) or CMD + 4 (Mac) to display the Preview Deck.
The features in detail:
5.5. Preview Deck Section 28

Mixxx User Manual, Release 1.11.0
• Track Artist/Title: The artist and title of the track is displayed here. This is the samelisted under the Track and Title column in the Mixxx library. This information is initiallyloaded from the track’s metadata.
• Eject Track: Clicking this button ejects the track from the deck.
• Waveform overview: Shows the various markers (Cues, Hotcues) within the track as wellas the waveform envelope of the entire track. Clicking somewhere on the waveform allowsyou to jump to an arbitrary position in the track.
• Gain: Move the slider to adjust the gain of the track.
• VU-Meter: Shows the current volume of the track. If it’s too loud and distorted, a peakindicator flashes red.
See also:
For more information, go to the chapter Previewing Tracks.
5.5. Preview Deck Section 29

CHAPTER 6
The Mixxx Library
6.1 Overview of the Library features
Figure 6.1: The Mixxx Library
The library manages all of your music files. This is where you can find the tracks you want to play and load them intoa deck or sampler, see Loading Tracks. Mixxx imports your music library automatically when it is run for the firsttime, and automatically detects newly added tracks on each subsequent run, see Importing your audio files.
The sidebar on the left contains different collections of music. The track list view on the right displays the tracks inthose collections.
Sidebar:
• Search: Search for tracks in your Mixxx library.
• Library: View and edit your whole collection.
• Auto DJ: Automatically load and crossfade tracks for unattended mixing.
• Playlists: Organize your tracks in sortable lists.
• Crates: Manage your files in unordered track collections.
• Browse: Browse and load tracks from your filesystem and connected devices.
• Recordings: Record your mix and view previous recordings.
• History: Browse lists of tracks you played in past mixing sessions.
• Analyze: Prepare your tracks for optimal mixing experience.
• External Libraries: Access your existing iTunes, Traktor and Rhythmbox libraries.
Track List:
30

Mixxx User Manual, Release 1.11.0
• Sort: Display and sort track collections by different criteria.
• Load: Drag tracks you want to play to the waveform display.
• Edit: Rate tracks and edit track properties.
6.2 Search - Find your tracks
Figure 6.2: The Search box - Has focus and a search term entered
The Search box above the sidebar filters the current library view for tracks that match your search query. The librarysearch include some nice search features, go to the chapter Finding Tracks (Search) for details.
6.3 Library - View and edit your whole collection
The Library displays a sortable list of all the tracks in your music library.
Customizing the view Move columns by clicking in a column header and dragging it to another position. Right-clickon a column header to show and hide particular columns. Adjust the column width to fit the contents of the rowsby double-clicking on the separator between two column headers.
Sorting Tracks Tracks are automatically sorted by the active column. Click on the active column header to reversethe sort order. Click on another column header to change the active column.
Rating tracks Make sure the Rating column is not hidden. Rate tracks by hovering over the rating field and clickingthe stars.
Track Inline editing Mixxx reads metadata from the tracks to fill the columns of the library. To edit this data, double-click on a field. If the field is editable it will become an editable text box. When you are done, hit Enter. Thedata will be saved to the Mixxx library, but not to the track’s metadata itself.
Loading tracks To load a track into a deck, you can either drag it to the waveform display or use the context menu.Go to the chapter Loading Tracks for detailed information.
Importing tracks Mixxx imports your music library automatically when it is run for the first time, and automaticallydetects newly added tracks on each subsequent run. Go to the chapter Importing your audio files for detailedinformation.
Previewing Tracks To pre-listen to tracks in your headphones without loading them to a regular deck, click theicon in the Preview column. Go to the chapter Previewing Tracks for detailed information.
Rescan Library If you want to manually refresh your library without exiting (for example because you added ormoved files) you can do this with Library → Rescan Library in the menu on top of the application window. Youcan prompt an automatic rescan in Preferences → Library → Rescan on startup.
6.3.1 Track list context menu
Right-clicking on selected tracks in the track list reveals the context menu:
• Add to Auto DJ: Adds the content of the session to the Auto DJ playlist for automatic mixing.
6.2. Search - Find your tracks 31

Mixxx User Manual, Release 1.11.0
• Load to Deck/Sampler: Loads a selected file to a deck, sampler or previewdeck. Alternatively simply drag itto the Waveform Displays. Note that you can’t load multiple files at ones.
• Add to playlist/crate: Add selected tracks to the playlists or crates that you have created before. Alternatively,drag the selection to the playlist or crate in the sidebar.
• Lock/Unlock BPM: Locks/Unlocks the BPM of selected tracks so you can’t edit them in the track properties.If a BPM is locked, a “lock” icon appears next to the track’s BPM.
• Clear BPM and Beatgrid: Removes BPM and beatgrid data of selected tracks from the Mixxx libary. Afterdoing this we recommended you analyze the tracks again.
• Reload Track Metadata: If the track’s metadata changes, e.g. if you used iTunes to edit them, this option letsyou load the new values to the Mixxx library.
• Hide from Library: Temporarily hides selected tracks from the track list. Hidden tracks are listed in the HiddenTracks menu item which is explained below.
• Reset Play Count: Marks selected tracks as not played in the current session and set their play counter to zero.The icon in the Played column changes.
• Open in File Browser: Browse for the selected files in your file manager.
• Properties: Similar to inline editing explained above the properties dialog allows you to view and edit metadatasuch as title, artist, album, and view the full file name and path. Note that you can not edit multiple files at once.
Note: Most of the context menu items are available in file lists of other views like Auto DJ, Playlists, and Crates aswell.
6.3.2 Missing Tracks
New in version 1.11.
The Missing Tracks view is accessible by expanding the Library tree item in the sidebar. Any tracks that were pre-viously loaded into your library, but were later detected to be missing from your hard disk by Mixxx will appearhere. Mixxx does not automatically delete records of missing tracks so that extra metadata Mixxx might have (such ashotcues and the beatgrids) will not be lost if the file is replaced.
The features in detail:
• Select All button: Selects all tracks in the current view.
• Purge button: Purges the selected tracks from the Mixxx library, but does not remove them from your computer.This will delete all metadata Mixxx has for a track.
6.3.3 Hidden Tracks
New in version 1.11.
The Hidden Tracks view is also accessible by expanding the Library tree item in the sidebar. Any tracks that werepreviously loaded into your library, but were later set to be hidden from the library will appear here. Use the Hide fromLibrary context menu item in the library view to temporarily hide selected tracks.
The features in detail:
• Select All button: Selects all tracks in the current view.
• Purge Button: Purges the selected tracks from the Mixxx library, but does not remove them from your computer.This will delete all metadata Mixxx has for a track.
6.3. Library - View and edit your whole collection 32

Mixxx User Manual, Release 1.11.0
• Unhide Button: Removes the selected tracks from the Hidden Tracks view and makes them available in theregular track list again. The tracks appears again in every playlist or crate they were listed before they werehidden.
6.4 Auto DJ - Automate your mix
The Auto DJ queue is a special playlist that contains extra controls for automatic mixing. This is useful for
taking a break from live mixing or for using Mixxx as media player.
New in version 1.11: Shuffle, Skip track, Fade now, Transition time, and Auto DJ Requeue
The Auto DJ features in detail:
• Shuffle button: Shuffles the content of the Auto DJ playlist.
• Skip track button: Skips the next track in the Auto DJ playlist.
• Fade now button: Triggers the transition to the next track.
• Transition time spin-box: Determines the duration of the transition.
• Enable Auto DJ button: Toggles the Auto DJ mode on or off.
The Skip track and Fade now buttons are only accessible if the Auto DJ mode is enabled. The Search field in the upperleft corner is disabled in Auto DJ. By default, Auto DJ removes tracks after playing them but you have the choice oftelling it not to by activating the Auto DJ Requeue option in Preferences → Interface.
Hint: Put a pause between tracks that are automatically mixed by using a negative value in the Transition timespin-box.
See also:
For more information, go to the chapter Using Auto DJ for automatic mixing.
6.5 Playlists - Organizing your tracks
Playlists are ordered lists of tracks that allow you to plan your DJ sets. Some DJs construct playlists before
they perform live, but others prefer to build them on-the-fly.
Playlists are not directly loadable into the decks as Mixxx is primarily intended for live, attended performance use.However, you can use the Auto DJ explained below.
• Create a playlist: Right-click on the Playlists sidebar item and select New playlist. Name the playlist and clickOK.
• Add Tracks: Add tracks to a previously created playlist by drag-and-dropping a selection of tracks from thelibrary or playlists onto the name of a playlist in the sidebar. Alternatively use the right-click context menu inthe library‘s track list.
Right-click on an existing playlist’s name to access the different features in the context menu:
• Add to Auto DJ: Adds the content of the playlist to the Auto DJ queue for automatic mixing.
• Rename: To rename a playlist, just put in a new playlist name and click OK.
6.4. Auto DJ - Automate your mix 33

Mixxx User Manual, Release 1.11.0
• Duplicate: Sometimes you want to build a playlist based on an existing one. Select the playlist you would liketo duplicate, choose Duplicate Playlist, name the new playlist and click OK.
• Lock: This icon indicates a locked playlist. If a playlist is locked, you cannot add tracks, rename or
delete the playlist. Choose Unlock from the context menu to unlock the playlist.
• Remove: Removes an unlocked playlist. Tracks in the playlist are still available in the library for later use.
• Import playlist: Import tracks from external playlists to a playlist in various file formats. For more information,go to iTunes, Traktor, Rhythmbox - Using external libraries.
• Export playlist: Export a playlist in various file formats, such as m3u, pls, or csv. Ideal for processing thedata in other applications.
6.6 Crates - Working with track collections
Crates are unordered collections of tracks, and are similar to playlists. Think of it like a DJ case to organize
your favorite vinyls into.
• Create a crate: Right-click on the Crates sidebar item and select New Crate. Name the crate and click OK.
• Add Tracks: Add tracks to a previously created crate by drag-and-dropping a selection of tracks from the libraryor playlists onto the name of a crate in the sidebar. Alternatively use the context menu in the library’s track list.
Right-click on an existing crate’s name to access the different features in the context menu:
• Rename: To rename a crate, enter the new crate name and click OK.
• Duplicate: Just like playlists you can duplicate an existing crate. Select the crate you would like to duplicate,choose Duplicate Crate, name the new crate and click OK.
• Lock: This icon indicates a locked crate. If a crate is locked, you cannot add tracks, rename or delete the
crate. Choose Unlock from the context menu to unlock the crate.
• Remove: Removes an unlocked crate. Tracks in the crate are still available in the library for later use.
• Import crate: Import tracks from an external playlist to a crate in various file formats.
• Export crate: Export a crate in various file formats, such as m3u, pls, or csv. Ideal for processing the data inother applications.
6.6.1 Crates vs. Playlists
Crates are unordered collections of tracks. Unlike playlists, they cannot contain duplicate entries and do not supportdrack-and-drop within them.
Playlists serve a limited purpose of keeping an ordered list of tracks. You can right-click a playlist to queue it to AutoDJ, so in a sense you can “play” it.
Often DJs keep a playlist of favorites or plan a list of tracks they want to play at a party. In these cases they rarelycare about the order since they will likely choose the order at the party based on the dance floor and mood and theycertainly don’t want duplicates. This is where crates come in. You can think of them like labels in GMail or Web 2.0tags for your music.
6.6. Crates - Working with track collections 34

Mixxx User Manual, Release 1.11.0
On the other hand, if you want to specifically plan out a set and practice the transitions you might want to keep anordering of tracks or repeat them (if you plan to mix a track back in later on) so in that situation you could use aplaylist.
6.7 Browse - Loading remote tracks
Browse mode works like a file-manager and allows you to load tracks that are not necessarily already in your
Mixxx library.
Click the Browse sidebar item to navigate the computer and find your music. Depending on your operating system,
the music will usually be found in the “My Music” or “Music” folder. Drag the files you want to import to the
Library icon or directly to the Waveform Displays.
Note: Currently you can drag only files but not folders to the Mixxx library.
6.7.1 Quick Links - Bookmark your favorite folders
New in version 1.11.
Using the Quick Links sub-menu you can bookmark folders for direct access. Click the Browse sidebar item andnavigate to the folder you would like to bookmark. Right-click and choose Add to Quick Links. The folder is nowpinned below the Quick Links. To un-pin that folder, right-click and choose Remove from Quick Links.
6.8 Recordings
In this section of the library you can start and stop recordings well as view previous recordings and the dates
they were made.
See also:
For more information, go to Recording your Mix.
6.9 History - Keep track of your last sessions
New in version 1.11.
The history section automatically keeps a list of tracks you play in your DJ sets. This is handy for remembering
what worked in your DJ sets, posting set-lists, or reporting your plays to licensing organizations. Every time you startMixxx, a new history section is created. If you don’t play a track during the current session, it will be discarded.
This icon indicates the current session.
Click on the History icon in the sidebar to switch to the History view, then right-click on a sessions name to access thedifferent features:
• Add to Auto DJ: Adds the content of the session to the Auto DJ queue for automatic mixing.
6.7. Browse - Loading remote tracks 35

Mixxx User Manual, Release 1.11.0
• Rename: Rename a session, default is the calendar date (YYYY-MM-DD).
• Remove: Remove a previous session, but not the locked sessions or even the current session.
• Lock: Protect a previous session against accidental merge and deletion. An icon indicates a locked session.
• Join with previous: Join the current history session with a previous one.
• Export playlist: Export a session in various file formats, ideal for processing the data in other applications.
6.10 Analyze - Preparing your tracks
Mixxx automatically analyzes tracks the first time you load them in a deck, nevertheless it is recommended that
you analyze them before playing live with them to ensure the beatgrids are correct. Furthermore, track analysis takesconsiderable CPU power and might cause skips in the audio; things you surely don’t need while performing.
The Analyze view allows you to run BPM and beatgrid detection on tracks in advance. Waveforms are generated aspart of the analysis as well.
Changed in version 1.11: Shows the progress in percentage and total queue length while analyzing.
The Analyze features in detail:
• All / New: Allows you to view a list of either all tracks in the library or tracks added to the library within thelast 7 days.
• Select All: Selects all tracks in the current view.
• Analyze: Starts the detection on the selected tracks.
See also:
For more information, go to BPM and Beat Detection.
6.11 iTunes, Traktor, Rhythmbox - Using external libraries
The iTunes (Windows/Mac OS X), Traktor (Windows/Mac OS X), and Rhythmbox (GNU/Linux)
views allow you to use the music libraries you have created in these applications. You can access music and playlists.If available, Mixxx automatically loads the external libraries from their default locations on your hard drive.
Right-click on the iTunes icon in the Library tree and select Choose Library to load the iTunes MusicLibrary.xml from a different location. Select Use Default Library to reset.
New in version 1.11.
• Right-click on a iTunes/Rhythmbox/Traktor playlist and choose Import Playlist to import it to be a regularMixxx playlist.
• If you have an iTunes configuration file (*.xml) from a Windows or Mac partition mounted in Linux, you canload it and use your iTunes tracks and playlists.
See also:
You can disable external libraries in Prefences → Library.
6.10. Analyze - Preparing your tracks 36

CHAPTER 7
Controlling Mixxx
Mixxx can be controlled with a keyboard, a mouse, MIDI/HID controllers, time-code records/CDs, or a combinationof these. The choice usually depends on your budget or style of DJing.
7.1 Using a Mouse and Trackpad
Use your mouse to interact with the controls in the Mixxx User Interface on your computer screen. You can performactions by pointing and clicking with your mouse.
• Single Left Click: Performing a left mouse click on buttons triggers the default action for that control. Moreoverif you click on a value in the track list of the Mixxx library, you can change the value. For example the year ofa track.
• Single Right Click: On most buttons, performing a right click triggers a different action than a left click. Youcan return any knob or fader to its default value by right-clicking that control.
• Mouse Drag: Click on a knob or fader, hold the left mouse button and move your cursor to change the value ofthe control. Use mouse drag to drop tracks from the file list to the decks, crates, playlists, etc.
• Mouse Wheel: Just like Mouse Drag, you can change knob and fader values by placing the cursor over thecontrol and moving the mouse wheel.
Hint: If you hover with the mouse over a control (e.g the crossfader) in the Mixxx user interface, the tooltip lists theleft- and right-click action respectively.
Hint: On a Macbook or a computer with a touchpad that lacks mouse buttons, a two-finger click gesture is oftentreated as a right click.
See also:
Using the Mouse drag/wheel on the waveforms you can adjust zoom and playback rate of the tracks. For moreinformation, go to Waveform Displays.
7.2 Using a Keyboard
Controlling Mixxx with a keyboard is handy. Unlike mouse control, the keyboard allows you to manage thingssimultaneously. For example, you can start playing a track on deck 1 whilst stopping deck 2 at the same time.
37

Mixxx User Manual, Release 1.11.0
Figure 7.1: Mixxx Keyboard shortcuts (for en-us keyboard layout)Download the image
The default mapping for English keyboards is depicted in the figure above. It is divided into a left-hand side for deck1 and right-hand side for deck 2. Please note that you can also access the functions through Mixxx’s interface.
For some user groups, like those using MIDI/HID controllers or vinyl control, it might be useful to enable/disable thekeyboard mappings at runtime. You can do so by clicking Options → Enable Keyboard Shortcuts.
Hint: If you hover with the mouse over a control (e.g. the crossfader) in the Mixxx user interface, the tooltip lists thekeyboard shortcuts of the control among a description of the control.
See also:
For a list of default shortcuts, go to Keyboard mapping table.
7.2.1 Customizing the keyboard mapping
Mixxx allows you to customize the keyboard control. For more information, go to:
• Making a Custom Keyboard Mapping
7.3 Using MIDI/HID Controllers
Mixxx supports MIDI and HID controller which are external hardware devices used to control audio applications.Many DJs prefer the hands-on feel of a controller with Mixxx because it can feel similar to using a real mixer andturntables or CDJ.
7.3.1 Loading a controller preset
Without loading the correct preset, your controller does not work with Mixxx.
1. Connect your controller(s) to your computer
2. Start Mixxx
3. Go to Preferences → Controllers
4. Select your device from the list of available devices on the left, and the right pane will change
5. Activate the Enabled checkbox
7.3. Using MIDI/HID Controllers 38

Mixxx User Manual, Release 1.11.0
Figure 7.2: Mixxx Preferences - Loading a controller preset
6. Select the mapping for your controller from the Presets drop-down menu
7. Click OK and Mixxx can now be controlled by your controller(s).
8. Repeat step 4-7 for any of the controllers you want to use
Hint: If you do not find a connected device in the list, make sure to install any necessary drivers for that device.
7.3.2 Supported controllers
Mixxx can use any MIDI/HID controller that is recognized by your OS (some may require drivers), as long as there isa MIDI/HID mapping file to tell Mixxx how to understand it. Mixxx comes bundled with a number of mappings forvarious devices. There are two levels of controller mappings:
• Mixxx Certified Mappings: These mappings are verified by the Mixxx Development Team.
• Community Supported Mappings: These mappings are provided and have been verified as working by theMixxx community, but the Mixxx Development Team is unable to verify their quality because we don’t havethe devices ourselves. They might have bugs or rough edges.
If you run into issues with any of these mappings, please file a bug report on our Bug Tracker or tell us about it onour mailing list, forums, or IRC channel. Device support varies for each supported OS, so make sure to consult thedocumentation of the device.
Hint: Additional mappings are available in the Controller presets forum.
See also:
Before purchasing a controller to use with Mixxx, consult our Hardware Compatibility wiki page. It contains the mostup-to-date information about which controllers work with Mixxx and the details of each.
7.3. Using MIDI/HID Controllers 39

Mixxx User Manual, Release 1.11.0
7.3.3 Map your own your controller
There is no mapping available for your controller or you want to change an existing mapping? You can map yourcontroller by using the Controller Wizard or take full control with the MIDI Scripting support in Mixxx.
See also:
Go to Adding support for your MIDI/HID Controller for detailed information.
7.4 Using Timecode Vinyl Records and CDs
Vinyl control allows a user to manipulate the playback of a track in Mixxx using a turntable or CDJ as an interface.In effect, it simulates the sound and feel of having your digital music collection on vinyl. Many DJs prefer the tactilefeel of vinyl, and vinyl control allows that feel to be preserved while retaining the benefits of using digital audio.
See also:
Go to Vinyl Control for detailed information.
7.4. Using Timecode Vinyl Records and CDs 40

CHAPTER 8
Vinyl Control
Vinyl control allows a user to manipulate the playback of a track in Mixxx using a real turntable as a controller. Ineffect, it simulates the sound and feel of having your digital music collection on vinyl. Many DJs prefer the tactile feelof vinyl, and vinyl control allows that feel to be preserved while retaining the benefits of using digital audio.
8.1 How does it work?
Vinyl control uses special timecode records or CD’s which are placed on real turntables or CDJ. The audio output ofthe turntables is plugged into a computer on which Mixxx is running. When a record is played on one of the attachedturntables, Mixxx reads the timecode from the record and uses the information to manipulate whatever track is loaded.
8.2 What do I need to use it?
It is possible to use Mixxx’s vinyl control with several hardware setups, but the basic ones are:
Setup 1: Vinyl DJ
Two timecode vinyls, two turntables with phono pre-amplifiers (or line-level output), and two stereo soundinputs.
Your sound card inputs must match the turntable outputs. Older turntables only have phono-level outputs,and you should find a sound card that has a phono pre-amplifier built in. Some turntables have line-leveloutput, and these can be used with any sound card.
You can try skipping the phono pre-amps if you use the software pre-amp in Mixxx on the Vinyl Controlpreferences pane. This may not work for everyone. Line-level signals are preferred and recommended.
For turntables a typical setup is depicted in the figure below. First, connect the RCA cables from theturntables to the inputs on your sound card. Second, connect the outputs of your sound card to the inputson your mixer.
Note: Many modern turntables have a Line/Phono select switch. If yours does, make sure it matches the input orswitch setting on your sound card.
Setup 2: CDJ
Two timecode CDs, two CD decks, and two stereo sound inputs.
Setting up CDJs for use with timecode CDs is similar to setting up turntables. The figure below outlines atypical configuration. First, connect the RCA cables of the CDJs to an inputs of your sound card. Second,
41

Mixxx User Manual, Release 1.11.0
Figure 8.1: Using Mixxx together with turntables and external mixer
connect the inputs of your mixer to the outputs of your sound card. Make sure the input mode of yoursound card is set to Line.
Sound inputs
• It is recommended to use a proper DJ sound card that has multiple stereo line inputs on it.
• Alternatively you can use two sound cards, each with a single stereo line in, but this is strongly discouraged.
Mixxx supports vinyl control input through a single soundcard with at least 4-channels of input (two stereo line-injacks), or through two separate soundcards which each have 2-channels of input (a single stereo line-in jack). Vinylcontrol requires the use of stereo line-in jacks - Mono or microphone inputs will not work.
It is strongly recommended to use a soundcard that comes with native low latency drivers such as ASIO (Windows) orCoreAudio (Mac). Linux users depend on the quality of the corresponding open source driver.
Note: For best scratch performance with vinyl control, we recommend using a system capable of latencies of 10ms.With higher latencies the scratch sound will start to become distorted.
8.2.1 Supported Timecode media
Changed in version 1.11: Added MixVibes DVS V2 Vinyl support
You can use any of the timecode media supported by Mixxx:
8.2. What do I need to use it? 42
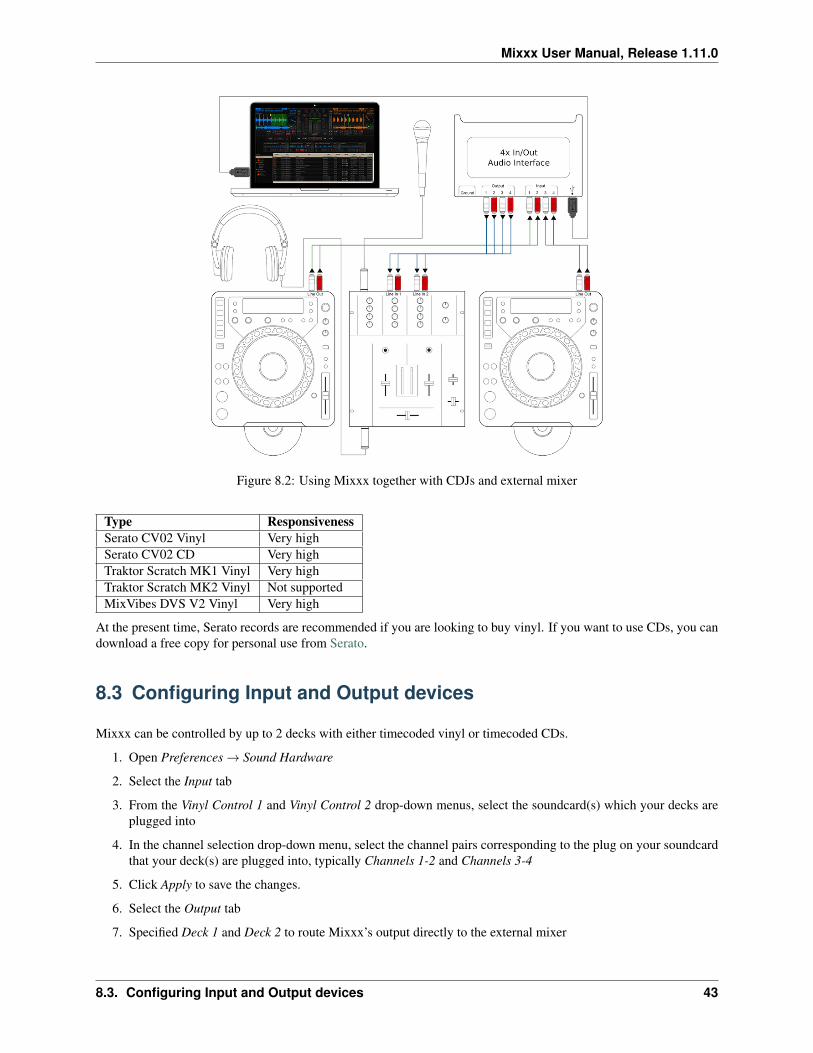
Mixxx User Manual, Release 1.11.0
Figure 8.2: Using Mixxx together with CDJs and external mixer
Type ResponsivenessSerato CV02 Vinyl Very highSerato CV02 CD Very highTraktor Scratch MK1 Vinyl Very highTraktor Scratch MK2 Vinyl Not supportedMixVibes DVS V2 Vinyl Very high
At the present time, Serato records are recommended if you are looking to buy vinyl. If you want to use CDs, you candownload a free copy for personal use from Serato.
8.3 Configuring Input and Output devices
Mixxx can be controlled by up to 2 decks with either timecoded vinyl or timecoded CDs.
1. Open Preferences → Sound Hardware
2. Select the Input tab
3. From the Vinyl Control 1 and Vinyl Control 2 drop-down menus, select the soundcard(s) which your decks areplugged into
4. In the channel selection drop-down menu, select the channel pairs corresponding to the plug on your soundcardthat your deck(s) are plugged into, typically Channels 1-2 and Channels 3-4
5. Click Apply to save the changes.
6. Select the Output tab
7. Specified Deck 1 and Deck 2 to route Mixxx’s output directly to the external mixer
8.3. Configuring Input and Output devices 43

Mixxx User Manual, Release 1.11.0
Figure 8.3: Mixxx preferences - Setting up Input and Output devices for Vinyl Control
8. Click Apply to save the changes.
8.4 Configuring Vinyl Control
You can configure vinyl control in Preferences → Vinyl Control.
8.4.1 Turntable Input Preamp
Many turntables provide unamplified “phono level” output which must be boosted to a “line level” signal. Normally,a mixer or soundcard provides this amplification, but if you’re plugging a turntable’s phono output directly into asoundcard, that doesn’t support phono input, Mixxx can do the amplification. The Turntable Input Preamp sliderallows you to adjust the level of preamplification applied to your decks’ signal. However it is always preferable to usea proper phono preamplifier if you have one.
8.4.2 Vinyl Configuration
• Vinyl Type: Several different types of timecoded media can be used to control Mixxx. Configure the drop-downmenus to match what type of timecoded media you are using on your decks.
• Deck Vinyl Tempo: Change this if you prefer to scratch with your turntable or CDJ set at 45 RPM, default is33 RPM.
• Lead-in Time: Allows you to set a dead-zone at the start of your vinyl or CD, where the time code will beignored. This is useful in situations where the time code begins very close to the edge of a vinyl which canmake back-cueing over the first beat in a track tricky to do without your turntable’s needle falling off the vinyl.Setting a lead-in time of 20 seconds or more helps alleviate this by giving you more room on the vinyl to cuewith. It’s also useful when you’ve worn the grooves at the edge of a control record to the point that it no longer
8.4. Configuring Vinyl Control 44

Mixxx User Manual, Release 1.11.0
Figure 8.4: Mixxx preferences - Setting up vinyl control
works reliably: you simply set the lead-in so that the start of the tracks begin in good groove area. You can keepdoing this until you run out of groove area, thereby decreasing your record replacement frequency.
• Show Signal Quality in Skins: If enabled, a circular representation of the incoming timecode signal is displayedin real-time on the Vinyl Widget in the Mixxx Interface.
Hint: Although not recommended, you can use different kinds of timecode media per deck.
8.4.3 Control Mode
Mixxx has three control modes regardless of which control records you use.
• Absolute Mode: Provides Mixxx with both pitch and position information from the timecode, and allows youto seek by needle dropping on your vinyl or seeking on your CDJ.
• Relative Mode: Takes the position to be relative to your deck’s starting point, and only controls the pitch inMixxx. It is not possible to seek using your deck in relative mode, with one exception. If you drop the needlein the “Lead-in Time” area (see Vinyl Configuration), Mixxx will seek back to the beginning of the track. Oncea track is playing in Relative Mode, Mixxx will not allow you to select Absolute mode. Otherwise, the trackwould suddenly jump to a new position. Make sure the record is stopped and then you’re free to select Absolutemode.
• Constant Mode: This special mode is usually only activated when Mixxx needs to keep playing a track even ifthe vinyl control signal isn’t present. Constant mode is automatically enabled when the needle reaches the endof a vinyl control record, or if “Needle-skip Prevention” is enabled and a needle skip is detected.
8.4.4 Cueing Modes
Mixxx has two optional cueing modes for vinyl control which only apply to Relative Mode. These modes are usefulfor quickly seeking to specific positions in a track without touching the laptop. Turntablists often need to find a breakor a vocal sample, and cueing modes make these easy to find.
8.4. Configuring Vinyl Control 45

Mixxx User Manual, Release 1.11.0
• Cue: In this mode, when you drop the needle on the record after the Cue point, Mixxx will seek to that cuepoint.
• Hot Cue: When the needle is dropped Mixxx will seek to the nearest hotcue point, working backwards. Soif you have a hotcue at the one-minute mark, and another at the two-minute mark, you can drop the needleanywhere between one and two minutes and Mixxx will seek to the one-minute hotcue.
Hint: You can change the Control and Cueing Modes directly in the Mixxx user interface while mixing, go to VinylControl Mode and Cueing controls.
8.4.5 Needle-skip Prevention
Allows Mixxx to detect and ignore small changes in needle position, such as when you’ve accidentally bumped yourturntable. When Mixxx detects a needle skip, it will engage Constant mode and the vinyl indicator (normally a greenrectangle) will become red. Needle-skip prevention can be advantageous in a live performance environment but thedownside is that it can be accidentally enabled during scratching, causing your track to play forward regardless of theturntable’s pitch. Consequently, disabling needle-skip prevention is recommended for scratch performances.
8.4.6 Signal Quality
A successful vinyl control setup hinges on good signal quality. Many factors can affect signal quality, but the mostimportant one is ensuring the volume level of your timecode signal is moderate. A signal that is too loud or too quietwill cause adverse performance, often characterized by a loss of position data causing absolute mode to behave likerelative mode.
Mixxx represents your timecode signal quality as a circular representation of the vinyl control audio signal itself. Thetwo graphs correspond to your Deck 1 and Deck 2 input devices.
If your vinyl signal is working, you should see a round, green circle drawn with two lines. This vinyl “doughnut”should be as circular as possible, and the lines should be clear with a minimum amount of fuzz.
Hint: You can display the signal quality in the Mixxx user interface while mixing, see Configuring Input and Outputdevices .
8.5 Enabling Vinyl Control
For each deck, select Options → Vinyl Control → Enable Vinyl Control or use the Application shortcuts.
8.5.1 Vinyl Control Status Display
A rectangle provides visual feedback with regards to vinyl control status of a deck.
• Off: Vinyl control disabled on the deck.
• Green: Vinyl control is enable on the deck.
• Yellow: The needle has reached End-Of-Record.
• Red: A needle skip was detected.
8.5. Enabling Vinyl Control 46

Mixxx User Manual, Release 1.11.0
Figure 8.5: The vinyl control status, and signal quality display of the deck
8.6 Single Deck Control
If you only have one turntable, you can still use Mixxx to play your sets. In the Preferences → Sound Hardware →Input tab, use the same audio input for both Vinyl Control decks.
When mixing, you’ll have one track playing automatically while the other is controlled by the turntable. Start byenabling vinyl control on the first deck, and start mixing. When you’re ready to cue up the next record, just disablevinyl control on the first deck and enable it on the second deck. Playback will continue on the first deck withoutinterruption. Cue up the second track and mix it in. When you’re ready to cue the first deck again, just toggle thesecond deck off and the first deck on again.
You can bind a key to the [VinylControl],Toggle control to automatically swap from one deck to the other.
• In the Controller Wizard, select Vinyl → Single Deck mode to assign the control to a key on your MIDI device.
• To assign the control to a keyboard shortcut like Shift + T , you just need to add the following lines on top ofyour custom keyboard mapping file.
[VinylControl]Toggle Shift+T
8.7 End-Of-Record Mode
Sometimes the track you are playing is longer than the timecode area on your record. If the needle reaches the end ofthe vinyl timecode, Mixxx will enter a special End-Of-Record Mode. When this happens, the vinyl indicator (usuallya green rectangle) will blink yellow as a warning. At the same time, Mixxx will automatically enable Constant Modeand will ignore the turntable’s pitch. At this point the track will simply continue playing until the end. When you loada new track, End-Of-Record Mode will be automatically disabled and Constant Mode turned off.
When you’re in End-Of-Record Mode and you want to still use the turntable for pitch control, simply lift the needleand place it anywhere in the main timecode area. It’s ok, the track won’t stop playing. As soon as Mixxx detects thatthe needle has settled, it will automatically switch to Relative Mode.
8.8 Control Track
Some vinyl control records have a special portion of grooves near the center of the record for selecting and loadingtracks in the user interface. You can see these grooves because there is a gap between the main timecode area and the
8.6. Single Deck Control 47

Mixxx User Manual, Release 1.11.0
inner circle. Some control records have not been tested with Mixxx, and their control areas are not supported. SeratoCV02 Vinyl and Traktor Vinyl MK1 are known to work. Serato CV02 CDs are known not to work.
Just drop the needle in the control area and let the record play forward or backward. The highlighted row in the libraryshould move up or down. Simply lift the needle and drop it anywhere in the main timecode area to load the track.
8.9 Troubleshooting
Configuration
To complete your setup you must configure Mixxx properly. Make sure you have:
• specified Deck 1 and Deck 2 in Preferences → Sound Hardware to route Mixxx’s output directly to the externalmixer
• specified Vinyl Control 1 and Vinyl Control 2 under Preferences → Sound Hardware → Input
• selected the correct control type under Preferences → Vinyl Control → Vinyl type in the preferences. See UsingTimecode Vinyl Records and CDs for the list of supported control records/CDs.
• enabled vinyl control via the menu under Options -> Vinyl Control → Enable Vinyl Control.
Signal Quality
The graph is displayed in Preferences → Vinyl Control, see Signal Quality.
8.9. Troubleshooting 48

Mixxx User Manual, Release 1.11.0
Signal Meaning Troubleshooting
Vinyl control input channels not correctly set up.Vinyl control will not work.
Open Preferences/ Sound Hardware and set upthe devices you want to use, see ConfiguringInput and Output devices
Vinyl control input channels set up correctly.Waiting for timecode input signal.
Start your turntable or CDJ with the selectedtimecode vinyl or CD.
Nearly perfect green doughnut about about halfthe width of the graph. Rotating radar sweeps inthe direction your record on the turntable isspinning .
Everything is OK, nothing to do. Go spin somebeats.
Incorrect choice of vinyl control source.Doughnut looks good but has a solid red color.
Select the correct vinyl type in the preferences.E.g. maybe you selected side B of the SeratoVinyl but your record is on side A.
Input signal is bad. As the vinyl signal getsworse, you’ll see the color of the doughnutchange from green over orange to red.
Check the wiring / grounding on your turntable /CDJ. You timecode record / CD might be wornout or the needle on your turntable is dirty.
Wrong direction. The green doughnut looks goodbut the radar sweeps in the opposite direction ofthe record on your turntable / CDJ.
You probably have a wiring problem. Tryreversing the left and right inputs on yourturntable. You may also have to rewire theheadshell.
Input signal is no timecode signal. Mixxxreceives a normal audio signal while it expects atimecode signal.
Start your turntable or CDJ with the selectedtimecode vinyl or CD. You may want to check ifthe inputs devices are set up correctly in thepreferences.
Left or right channel is missing. Mixxx recivesonly a mono signal but needs a stereo timecodesignal to operate.
Check the wiring on your turntable / CDJ andalso the headshell and needle on your turntable.
Timecode signal too loud. Mixxx receives asignal which has too much amplification.
Lower the amplification, either on your externalMixer, soundcard or with the Turntable InputPreamp
Timecode signal too quiet. Mixxx receives asignal which has not enough amplification.
Boost the amplification, either on your externalMixer, soundcard or with the Turntable InputPreamp
8.9. Troubleshooting 49
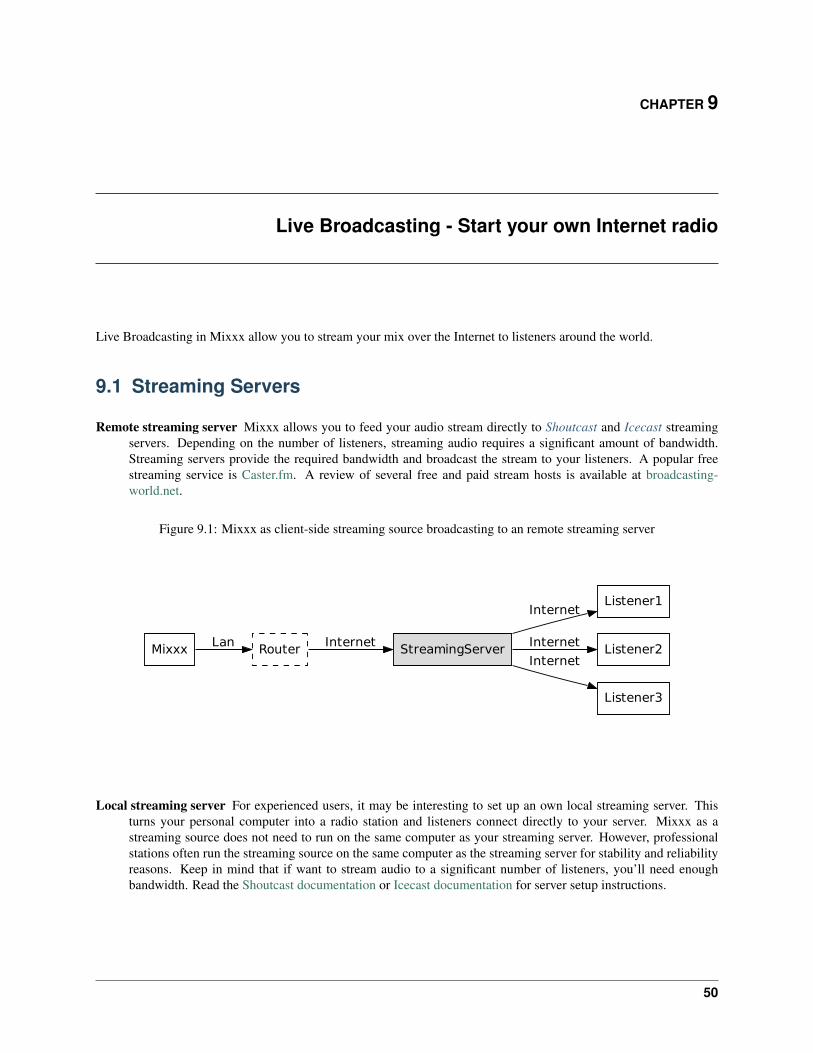
CHAPTER 9
Live Broadcasting - Start your own Internet radio
Live Broadcasting in Mixxx allow you to stream your mix over the Internet to listeners around the world.
9.1 Streaming Servers
Remote streaming server Mixxx allows you to feed your audio stream directly to Shoutcast and Icecast streamingservers. Depending on the number of listeners, streaming audio requires a significant amount of bandwidth.Streaming servers provide the required bandwidth and broadcast the stream to your listeners. A popular freestreaming service is Caster.fm. A review of several free and paid stream hosts is available at broadcasting-world.net.
Figure 9.1: Mixxx as client-side streaming source broadcasting to an remote streaming server
StreamingServer
Listener1Internet
Listener2Internet
Listener3
InternetRouter InternetMixxx Lan
Local streaming server For experienced users, it may be interesting to set up an own local streaming server. Thisturns your personal computer into a radio station and listeners connect directly to your server. Mixxx as astreaming source does not need to run on the same computer as your streaming server. However, professionalstations often run the streaming source on the same computer as the streaming server for stability and reliabilityreasons. Keep in mind that if want to stream audio to a significant number of listeners, you’ll need enoughbandwidth. Read the Shoutcast documentation or Icecast documentation for server setup instructions.
50

Mixxx User Manual, Release 1.11.0
Figure 9.2: Mixxx as client-side streaming source broadcasting to an local streaming server
Router
Listener1Internet
Listener2Internet
Listener3
InternetStreamingServer LanMixxx
9.2 Configuring Mixxx
Start by supplying Mixxx with all information needed to establish a connection to the streaming server:
• Open Preferences → Live Broadcasting.
• Insert the settings following the descriptions in the Live Broadcasting Preferences
• Click OK
• Go to Options → Enable Live Broadcasting or use the Application shortcuts to start broadcasting.
9.3 Live Broadcasting Preferences
Figure 9.3: Mixxx preferences - Setting up live broadcasting
9.2. Configuring Mixxx 51
Mixxx User Manual, Release 1.11.0
Server Connection
• Type: Select the type of streaming server you want to connect with.
• Host: You can enter the host as either a host name or an IP address.
• Login: As provided by your streaming server provider. Without this, you will not connect successfully to theserver. The default password for Icecast is source while the default password for Shoutcast is admin.
• Mount: A mount point is a unique name identifying a particular stream. For Shoutcast it is not necessary tospecify a mount point. The setting must not be blank if you are using Icecast. Try the default /mount or/live. If you haven’t been given a specific mount point you can usually make one up. It always begins with a/ (slash) followed by a text without any special characters in it.
• Port: As provided by your streaming server provider. Most servers use the default port 8000.
• Password: As provided by your streaming server provider, unless you run your own radio server. It is requiredto establish the connection to the server and to start the broadcast.
Warning: Do not enter a URL as the host! http://example.com:8000 does not work. Use example.comin the Host field and 8000 in the Port field instead.
Stream Setting
• Public stream: If enabled, this option adds your radio station to the Shoutcast/Icecast directory.
• Enable UTF-8 metadata: If enabled, this option fixes broken accented and foreign language symbols in meta-data, assuming the streaming provider has configured the server to support UTF-8 metadata.
• Stream name: So, what’s the name of your show?
• Website: The website you would like your listeners to visit.
• Description: Enter your DJ name and a short tagline.
• Genre: List the main genres you play. This attracts search hits on stream directories. Genre must not be blank.
Encoding
• Bitrate: Selecting a bitrate of 128 or 160 kbps is common and provides sufficient quality to your listeners.Higher bitrates will use a larger chunk in your Internet connection bandwidth to stream and for your listeners toreceive the stream.
• Format: Mixxx supports streaming to Icecast servers either in MP3 or Ogg Vorbis format, streaming to Shout-cast servers is supported in MP3 format.
Custom metadata
By default, Mixxx broadcasts artist and title information of the files that you play to your listeners. Youcan disable this feature and use your own custom metadata. For technical reasons, broadcasting artist andtitle information is not supported for OGG streams.
• Enable custom metadata: Toggles custom metadata on and off.
• Artist: Insert your custom artist metadata here, your DJ name for example.
• Title: Insert your custom title metadata here.
Note: Due to licensing restrictions, MP3 streaming is not enabled by default. For information on how to enable MP3streaming, go to the chapter Activate MP3 streaming support.
9.3. Live Broadcasting Preferences 52

Mixxx User Manual, Release 1.11.0
9.3.1 Icecast vs. Shoutcast
Both essentially serve the same purpose. An Icecast server can stream either MP3 or Ogg Vorbis. However, althoughOgg is more efficient and effective (you get higher-fidelity sound than MP3 at lower data rates) not all players canplay Ogg streams. As a result MP3 is probably a safe choice unless you know your listeners can hear an Ogg streamsuccessfully.
9.3.2 Broadcast directories
Generally your streaming server host adds your radio station to the Shoutcast/Icecast directory, if you enable the PublicStream option in Preferences → Live Broadcasting → Stream Settings.
• Shoutcast radio directory: www.shoutcast.com
• Icecast radio directory: dir.xiph.org
Often streaming hosts will run their own directories. Check your host’s FAQ to find out. If you want to promote yourstreaming radio station even more, register at services like streamfinder.com. An overview of different internet radiodirectories is available at shoutcheap.com
9.4 Troubleshooting
• If you have trouble connecting to your streaming server, check the configuration in the Live Broadcasting Pref-erences.
• You may need the LAME libraries to stream in MP3. See Activate MP3 streaming support.
• You may have selected the Ogg Vorbis format that is unsupported by Shoutcast servers.
• You may need to check your firewall settings. Both Icecast and Shoutcast use two ports. If you are streamingon a port (for example, port 8000) then you need to open up the next port (port 8001) as well.
• You may need to configure port forwarding if you are behind a router or your router will block requests to yourstreaming port (for example, port 8000)
9.5 Activate MP3 streaming support
Due to licensing restrictions, MP3 streaming is not enabled by default. In order to enable MP3 streaming you mustinstall the LAME MP3 codec yourself. The following section explains how you can do that.
Hint: If you have activated MP3 streaming support, you’ll be also able to record your mixes in MP3 format. Go tothe chapter Recording your Mix for more information.
9.5.1 Activate MP3 streaming support on Windows
To activate MP3 streaming on Windows, follow these steps:
1. Download LAME 3.98.4 binaries from http://lame.bakerweb.biz/. The download includes versions for 32-bitand 64-bit Windows
2. Unpack the downloaded archive. You need a utility for manipulating archives like the free 7zip.
9.4. Troubleshooting 53

Mixxx User Manual, Release 1.11.0
3. If you have the 32-bit version of Mixxx, copy the file libmp3lame.dll from the x86 folder to the locationyou have installed Mixxx, for example C:\Program Files\Mixxx\
4. Alternatively, if you have the 64-bit version of Mixxx, copy the file libmp3lame.dll from the x64 folderto the location you have installed Mixxx
5. Rename libmp3lame.dll to lame_enc.dll in the folder where you have installed Mixxx
6. Restart Mixxx
Hint: A common mistake when going through the process is not copying only libmp3lame.dll from the LAMEzip file and then renaming that file to lame_enc.dll. It’s deceiving but there is a file named lame_enc.dll inthe LAME zip file. You don’t want that file! Also, make sure the version of LAME you use (x86=32-bit vs. x64=64-bit) matches the version of Mixxx you use. Select Help → About to find out whether you have installed the 32-bit or64-bit version of Mixxx.
Warning: Some websites like Audacity provide lame binaries too. Do not use these versions or Mixxx will showan error when activating live broadcasting and your stream will fail.
9.5.2 Activate MP3 streaming support on Mac OS X
Method A: Download
To activate MP3 streaming on Mac OS X, follow these steps:
1. Download LAME 3.98.4 Intel (Mac OS X 10.5+ 32-bit & 64-bit)
2. Double-click on the downloaded zip file to unpack the file and you’ll get an installer package file
3. Double-click on the installer package file and follow the step-by-step instructions in the installer
4. Restart Mixxx
Method B: Macports
Another easy way to activate MP3 streaming is to use MacPorts which is a repository manager (like apt on De-bian/Ubuntu) for Open Source software. Having installed this piece of software, installing MP3 support is rathersimple.
1. Open a terminal and type the following commands:
sudo port install lame
2. Restart Mixxx
9.5.3 Activate MP3 streaming support on Linux
On Ubuntu and GNU/Linux-based operating systems MP3 streams can be activated by installing the packagelibmp3lame. Dependent on your Linux distribution the package might be slightly named different such as lame.
1. Open a terminal and type the following commands:
sudo apt-get install libmp3lame0
2. Restart Mixxx
9.5. Activate MP3 streaming support 54

CHAPTER 10
DJing With Mixxx
Mixxx was designed to be easy to learn for both novice and experienced DJs.
This part of the manual provides you with directions for importing and managing you music collection and playingyour tracks.
10.1 Opening Mixxx
Once you’ve installed Mixxx, start by opening Mixxx and import your music to the Mixxx library.
Windows Double-click the Mixxx icon on the Desktop. Alternatively, browse your Windows start menu and click theMixxx icon, or perform a search for Mixxx.exe.
Mac OSX Double-click the Mixxx icon in the Applications folder. Alternatively, drag the Mixxx icon to thedock and double-click it there, or perform a search for Mixxx.app.
GNU/Linux Simply type mixxx into the terminal, then hit Return. With some distributions like Ubuntu you canalso double-click the Mixxx icon in the launcher. Alternatively, perform a search for mixxx.
10.2 Importing your audio files
Setup the music library The first time you run Mixxx, you are asked to select a directory where your music is stored.By default, the dialog points to a location where music files are typically held.
Click Select Folder and Mixxx will scan your music library. Depending on the size of your library this couldtake some time. All of the supported music files Mixxx detects will be listed in the Library - View and edit yourwhole collection.
Mixxx automatically detects newly added tracks on each subsequent run. If you want to manually refresh yourlibrary without exiting (for example because you added or moved files), you can do this with Library → RescanLibrary in the menu. If you want to rescan at every launch, select Preferences → Library → Rescan on startup.
Warning: On Windows 7 and 8 the import dialog points to your Windows “Music“ Library, a special-purpose virtual folder. You can not use these virtual folders. Select a regular folder instead, usually “MyMusic“, like pictured above.
55

Mixxx User Manual, Release 1.11.0
Figure 10.1: Mixxx running on Windows 8 - Choose music library directory dialog
Compatible files Mixxx supports a variety of file formats: Wave (wav), Aiff (aiff, aif), MP3 (mp3), Ogg vorbis (ogg),FLAC (flac), and AAC (aac, m4a) if supported by your OS. DRM protected files, such as m4p files purchased inthe iTunes Store, are not supported.
AAC (M4A) is supported on Windows Vista and Mac OSX 10.5 onwards. On Linux, Mixxx does not have AAC(M4A) playback support enabled by default due to licensing restrictions.
See also:
To enable playback of AAC (M4A) files, you can build Mixxx from source.http://www.mixxx.org/wiki/doku.php/compiling_on_linux#build_with_m4a_file_support
Changing the music directory The Mixxx music directory can always be changed at a later time in Preferences →Library. You might want to run a library rescan afterwards, select Library → Rescan Library in the menu.
Import external libraries If you have iTunes, Traktor or Rhythmbox installed, Mixxx allows you to access yourtracks and playlists in the Mixxx library, see iTunes, Traktor, Rhythmbox - Using external libraries.
Import remote files To import audio files which are not in your music library directory, drag them directly from anexternal file manager or from the Browse section to the track list.
Note: You can not drag complete folders to the library because currently Mixxx can not recursively scan foldersfor compatible music files.
Import music from CDs Mixxx can not play music from Audio CDs. Convert the content to compatible files in goodquality and add them to them Mixxx library. See https://en.wikipedia.org/wiki/Ripping
10.3 Loading Tracks
Tracks can be loaded into a deck in several ways:
• Right-click the library track table: Right-clicking on a track in the table will present the options Load in Deck1 and Load in Deck 2, among others. Making either selection will load a track into a deck.
• By Using a Keyboard to load the selected track from library track table.
10.3. Loading Tracks 56

Mixxx User Manual, Release 1.11.0
• Drag-and-drop from library track table: Dragging-and-dropping a track from the track table onto a waveformdisplay will load a track into a deck.
• Drag-and-drop from external file browser: Dragging-and-dropping a track from an external file browser directlyonto a waveform display in Mixxx will load that track. This function also works with some other applications.For example, on Mac OS X, dragging-and-dropping a track from iTunes onto one of Mixxx’s waveform displayswill load that track into a deck.
10.4 Finding Tracks (Search)
The search function searches for a match only in the current selected list (e.g. a playlist, a crate or even the wholelibrary).
• Activate the search input field by pressing CTRL + F (Windows/Linux) or CMD + F (Mac). Alternatively clickinto the search box.
• Type your search term. Mixxx filters the tracks and retains only the ones that match the search term. Searchterms can include an artist’s name, a song title, BPM, etc.
• To clear the search string hit ESC or click the clear button right next to the input field.
• Hit TAB to cycle between the search and the list of results in the library. Use the ARROW UP and ARROW DOWNkeys to scroll in the list of results.
Note: If the search input field has focus, the Mixxx keyboard shortcuts are disabled, see Using a Keyboard.
10.4.1 Using search operators
New in version 1.11.
Search operators allow you to form more complex search queries. They allow you to limit certain search terms toparticular properties of your tracks.
Mixxx supports the following filters:
• Text filtering: For artist, album, genre, title, composer, comment, key
• Numeric filtering: For year, track, bpm, duration, played, rating, bitrate
You can combine operators but there’s no way to do an “OR” search right now. The following example list all tracksby “Danger” that are rated 4 or 5:
artist:Danger rating:>=4
Examples for text filtering Examples for numeric filteringartist: “com truise” bpm:140album:Danger bpm: >140genre: Trance year: <2010title: foo bpm: >=140composer: foo rating: <=4comment: foo bpm: 140-150
played: >10Note it doesn’t matter if you have space between the colonand the argument or not. Quotes must be used formulti-word text arguments.
Note that you can put a space between the colon butcurrently there must be no space between theoperator and the number.
10.4. Finding Tracks (Search) 57

Mixxx User Manual, Release 1.11.0
10.5 Previewing Tracks
New in version 1.11.
To pre-listen to a track, activate the Preview column in a library view. Clicking the icon in the library’s Previewcolumn loads the selected track in a special Preview Deck that will only output sound in the headphones channel.Click the icon to stop the playback.
Alternatively, select a track from the track list of the Mixxx library, drag the track to the waveform view of the PreviewDeck and click the Play button next to the waveform.
To display the Preview deck, press CTRL + 4 (Windows/Linux) or CMD + 4 (Mac).
10.6 Waveform displays
There are two main waveform displays in Mixxx that are used to display the waveform of the tracks you are mixing.These are useful because they allow you to see features in a track (like a breakdown) before you hear them.
Depending on the skin Mixxx displays either separate waveforms (default) or parallel waveforms. Select your pre-ferred appearance in Preferences → Interface → Skin.
Figure 10.2: Mixxx default skin (Deere) - Separate waveforms
With some skins the waveform displays are aligned parallel to each other in order to make beatmatching easier, as itis possible to beatmatch visually by aligning the beats that appear in each waveform.
Figure 10.3: Mixxx alternative skin (Latenight) - Parallel waveforms
The mouse can be used on the waveforms to scratch, spin-back or throw the tracks. Right-clicking and dragging onthe waveforms allows you to nudge the track and make temporary pitch adjustments. Using the mouse-wheel on thewaveform zooms the waveform in or out. You can choose whether or not to synchronize the zoom level between thedecks in Preferences → Interface → Waveform Display → Synchronize. The waveform display is updated in realtimeupon seeking.
10.5. Previewing Tracks 58

Mixxx User Manual, Release 1.11.0
There are two smaller waveform summary displays located adjacent to the main waveform displays. Clicking on awaveform summary allows you to seek through the track. These smaller displays show the waveform envelope of theentire track, and are useful because they allow DJs to see breakdowns far in advance. Vinyl DJs will find this familiarbecause quiet sections of tracks can be visually distinguished when looking at a vinyl record. This is a useful toolwhen planning your mixes on-the-fly.
10.7 Beatmatching and Mixing
Beatmatching is the process of adjusting the playback rate of a track so that it matches the tempo of another track.Beatmatching also involves adjusting the phase of the beats in a track so that they are aligned with the beats in theother track. Matching the tempo and aligning the beats are the two things a DJ must do to beatmatch.
Mixxx can match the tempo and align the beats for you but this requires an accurately detected BPM value and acorrect beat grid for both tracks. To enable this feature, hit the SYNC button. To beatmatch manually, the tempo ofthe two tracks must be synchronized by adjusting the playback rate sliders. You can adjust the phase of the beats byright-clicking and dragging on either waveform display to temporarily speed up or slow down one of the tracks untilthe beats are aligned. The temporary pitch bend buttons can also be used to momentarily adjust the playback rate,allowing you to “shuffle” the beats in a track forwards or backwards, so they can be aligned with another track. Seethe chapter Sync and Rate Controls.
Two tracks are beatmatched once their tempos are matched and their beats beats are aligned. A “perfect” beatmatchis nearly impossible - there will always be a tiny difference in the playback rates. A keen DJ will keep his or her earsopen and listen for the beats drifting out of alignment. This has a distinct “double bass kick” sound which is oftenpreceded by the kick weakening in intensity as the two kicks drift out of phase. When this happens, the beats can berealigned by simply tapping one of the temporary pitch bend buttons a few times in the appropriate direction.
10.8 Headphone Cueing
Headphone cueing is a technique DJs use to listen to the next track they want to play in their headphones beforeplaying it on the main speakers. Headphone cueing is useful because it allows a DJ to beatmatch the next track in theirheadphones before bringing it into their mix by sliding the crossfader.
Mixxx allows a DJ to route audio from either deck to their headphones by toggling either of the Headphone buttons inthe mixer section of Mixxx’s interface. See the chapter The Mixer Section.
10.9 BPM and Beat Detection
Previous versions of Mixxx were able to detect BPM values but unable to determine where the beats are. Consequently,the beat grids often looked unaligned. The DJ had to adjust the beat grid manually in oder to make use of auto-beatmatching via SYNC button.
Changed in version 1.11: Mixxx comes with a new ultra-precise BPM and beat detector.
The beat grid is adjusted after track analysis is finished. Manual adjustments are redundant in many cases becauseMixxx knows where the beats are.
10.9.1 Analyser Settings
BPM and beat detection is a complex operation. Depending on your computer and the track’s bitrate and duration thismay take some time. By default Mixxx analyzes the complete track. To accelerate beat detection on slower computers,a “Fast Analysis” option is available. If enabled, the BPM is computed by analyzing the first minute of the track. In
10.7. Beatmatching and Mixing 59

Mixxx User Manual, Release 1.11.0
most cases this does not affect the beat detection negatively because most of today’s dance music is written in a 4/4signature with a fixed tempo.
Figure 10.4: Mixxx preferences - BPM settings
The table below summarizes the beat detection settings:
Option DescriptionEnable Fast Analysis If enabled, BPM detection results from the first minute of audio.Assume constant tempo If enabled, Mixxx assumes that the distances between the beats are constant.
If disabled, the raw beat grid obtained by the analyzer is presented. The latteris appropriate for tracks with variable tempo.
Enable Offset Correction Prevents beat markers from being placed incorrectly.Re-analyze beats when settingschange or beat detection data isoutdated
If enabled, Mixxx over-writes old beat grids from Mixxx before v1.11.Moreover, it will re-analyze the BPM if your beat detection preferenceschange or BPM data from 3rd party programs are present.
10.9.2 Correcting Beat Grids
There may be situations where BPM and beat detection do not result in a proper beat grid.
Typically, the detected BPM is correct but the analyzer has failed to detect the location of the first beat. Consequently,the beat markers are shifted, i.e. the beat markers are always a fixed distance from the true beat. To adjust the beatgrid, cue the track before a real beat and click the Beat-grid Adjust button in the Deck Options Button Grid.
If the detected BPM is not accurate, the corresponding beat grid will also be inaccurate. A deviation of 0.02 BPMunits from the correct BPM will cause beatgrid alignment issues on long tracks (e.g. a club mix). If this happens, yourbeatgrid may look aligned for the few minutes but you will notice a slight drift as the song goes on. Finding the correctBPM is easy in many cases - just follow the note below.
Note: If the detected BPM value is not sufficiently accurate but very close to an integer value, try to set the BPMvalue manually to the integer.
10.9. BPM and Beat Detection 60

Mixxx User Manual, Release 1.11.0
10.10 Recording your Mix
With the integrated recording feature you can record your mix as an audio file and listen to it later, distribute it asPodcast or burn it to CD. Mixxx records the master output - the audio you hear from the speakers including themicrophone.
Figure 10.5: Mixxx library - Recordings view
New in version 1.11: Allows to specify a custom recordings directory
Mixxx can record your mix in various audio formats and quality settings. You can split your recordings, generate cuefiles, choose a custom recording directory and even set your own metadata. By default, Mixxx saves your recordingsas lossless wav files to a Mixxx/Recordings sub-folder in the Mixxx music directory. Before you start recording,we recommend that you adjust the settings in Preferences → Recording.
If you click on the Recordings icon in the sidebar of the Mixxx library, the track table to the right displays the contentof your recordings directory. New recordings are automatically saved to this directory as well as CUE files if youchoose to create them in the preferences.
10.10.1 Record your mix to disk
• Click on the Recordings icon in the sidebar to switch to the Recordings view
• Click the Start Recording button or click Options → Record Mix in the menu on top of the Mixxx applicationwindow.
• The display above the track table shows how much data has already been recorded.
• Perform your mix
• Click the Stop Recording button to stop the recording when the mix has finished.
Hint: You can instantly play your recording as track in Mixxx. Simply drag-and-drop the track to a deck.
10.10.2 Burn your recorded mix to a CD/DVD
• Select your recording in the Recordings view
• Right-click and select Open in File Browser to locate the file on your disk
• Now burn the recording to a CD/DVD using a 3rd-party program, for example CDBurnerXP for Windows orBurn for Mac OS X.
10.10. Recording your Mix 61

Mixxx User Manual, Release 1.11.0
Note: Due to licensing restrictions, MP3 recording is not enabled per default. In order to enable MP3 streaming youmust install the LAME MP3 codec yourself. Go to the chapter Activate MP3 streaming support for more information.
10.11 Using Auto DJ for automatic mixing
Figure 10.6: Mixxx library - Auto DJ view
Auto DJ allows you to automatically load tracks from the Auto DJ playlist when the current track is nearly finished,and crossfade into it. See Auto DJ - Automate your mix.
10.11.1 Loading tracks into Auto DJ
To play tracks automatically, they must first be loaded into the Auto DJ playlist. The Auto DJ playlist is empty bydefault.
Figure 10.7: Mixxx library - Adding a playlist to Auto DJ
There are several ways to load tracks into the Auto DJ playlist:
• Select single or multiple tracks from the library, a regular playlist or crate and drag them to the Auto DJ icon onthe left.
• Select a regular playlist or crate, right-click with the mouse and select Add to Auto DJ from the mouse menu.This adds all tracks to Auto DJ.
10.11. Using Auto DJ for automatic mixing 62

Mixxx User Manual, Release 1.11.0
• While in the Auto DJ view of the library, drag tracks from external file managers to the Auto DJ icon in thesidebar or to the Auto DJ track table on the right.
10.11.2 Playing tracks in Auto DJ
Now that you have loaded tracks into the Auto DJ playlist, you can activate Auto DJ as follows:
• Click on the Auto DJ icon in the sidebar to switch to the Auto DJ view of the library.
• Click the Enable Auto DJ button.
• The first tracks from your list are loaded into the decks and the playback starts.
• Mixxx will continue to automatically mix until the Auto DJ playlist is empty.
• Click the Disable Auto DJ button to stop the automatic mixing
10.11. Using Auto DJ for automatic mixing 63

CHAPTER 11
Advanced Topics
11.1 Adding support for your MIDI/HID Controller
11.1.1 MIDI Scripting
In order to support the advanced features of many MIDI / HID controllers, Mixxx offers what we call MIDI Scripting.
It enables MIDI controls to be mapped to QtScript (aka Javascript/EMCAScript) functions stored in function libraryfiles, freeing Mixxx from a one-to-one MIDI mapping ideology. These user-created functions can then do anythingdesired with the MIDI event info such as have a single controller button simultaneously affect two or more Mixxxproperties (“controls”,) adjust incoming control values to work better with Mixxx (scratching,) display a complexLED sequence, or even send messages to text displays on the controller.
For more information, go to http://mixxx.org/wiki/doku.php/midi_scripting .
11.1.2 Controller Wizard
Figure 11.1: Mixxx Controller Wizard - Mapping a control
64

Mixxx User Manual, Release 1.11.0
TodoAdd intro and proofread
1. Connect your controller(s) to your computer
2. Start Mixxx
3. Go to Preferences → Controllers
4. Select your device from the list of available devices on the left, and the right pane will change
5. Activate the Enabled checkbox
6. Click on Learning Wizard to open the selection dialog
7. Click any control in the Mixxx GUI
8. Alternatively, click the Choose Control button and choose one from the selection list
9. Move a control on your controller to map it. Repeat this as many times as you wish.
10. When you are finished mapping controls, click Done
The Controller Wizard works only for MIDI devices. Currently you can’t map modifier (shift) keys and platter rota-tions. Use MIDI Scripting instead.
11.2 Making a Custom Keyboard Mapping
The default keyboard mappings are defined in a text file which can be found at the following location:
• Linux: /usr/local/share/mixxx/keyboard/en_US.kbd.cfg
• Mac OS X: /Applications/Mixxx.app/Contents/Resources/keyboard/en_US.kbd.cfg
• Windows: <Mixxx installation directory>\keyboard\en_US.kbd.cfg
Depending on your systems language settings, Mixxx might use a different file as default, e.g. de_DE.kbd.cfg forGerman or es_ES.kbd.cfg for Spanish.
There are two ways to customize the default Mixxx keyboard mapping:
1. Edit your system’s default mapping file directly, e.g. en_US.kbd.cfg.
2. Copy the default mapping file to the following location:
• Linux: ~/.mixxx/Custom.kbd.cfg
• Mac OS X: ~/Library/ApplicationSupport/Mixxx/Custom.kbd.cfg
• Windows: %USERPROFILE%\Local Settings\Application Data\Mixxx\Custom.kbd.cfg
Then edit this file and save the changes. On the next startup, Mixxx will check if Custom.kbd.cfg is present andload that file instead of the default mapping file. This has the advantage, that you can always revert back to the defaultmapping, just by deleting Custom.kbd.cfg.
For a list of controls that can be used in a keyboard mapping, see http://www.mixxx.org/wiki/doku.php/mixxxcontrols.
You can download and share custom keyboard mappings in the Mixxx User customizations forums.
11.2. Making a Custom Keyboard Mapping 65

Mixxx User Manual, Release 1.11.0
11.3 Additional Effects via external Mixer Mode
Mixxx does not have an effects engine yet (work on one is in progress). To hold you over you can use some externaltools. Using the external mixer mode you route each deck directly to 3rd party effect hosts.
The following examples are only intended to encourage experimentation, they are no definitive guidance.
11.3.1 Effects via AU Lab on Mac OS X
Figure 11.2: The Au Lab routing for external effects on Mac OS X
On Mac OS X there is a pretty simple and free way to give Mixxx access to the collection of AU/VST/MAS pluginsthat are installed on your system.
• Install the free Soundflower, a system extension for inter-application audio routing.
• Download AU Lab.app standalone from Apple (you will need an free Apple Developer Login though), go to theDownloads for Developers page and search for “AU Lab” to get it.
In Mixxx
• Go to Preferences → Sound Hardware→ Output
• Select for Deck 1 the Soundflower 16 device with Channel 1-2
• Select for Deck 2 the Soundflower 16 device with Channel 3-4
• Click the Apply button
In AU Lab
• Click on the + button to create a new configuration
• Add 2 stereo inputs tracks in the Audio Input Tab
• Add 2 stereo output tracks in the Audio Output Tab
• Click OK
• Change the audio input device to Soundflower 16
• Changethe audio output device for example to Built-in Output
11.3. Additional Effects via external Mixer Mode 66

Mixxx User Manual, Release 1.11.0
• Click Create document
• In the Output 1 channel, select an effect from the drop-down menu, for example Apple > AUCompressor
The effect should now react if you play a track in Mixxx.
11.3.2 Effects via JACK Rack on GNU/Linux
Figure 11.3: The Jack routing for external effects on GNU/Linux
Use Jack to route each deck directly through JACK Rack effect racks, or for more control you can use Ardour (or otherDAW) using sends for effects. This gives Mixxx access to the extensive collection of LADSPA plugins.
Make sure the correct multichannel sound card has been selected in Jack (Jack settings visible bottom left). Note thatMixxx possibly labels it’s Jack ports as “Portaudio”.
11.4 Deleting Your Library
The library file is stored in the following places depending on your operating system:
Windows The Mixxx library is stored in the %USERPROFILE%\Local Settings\ApplicationData\Mixxx\ folder. To delete your library on Windows, delete the mixxxdb.sqlite file in thisfolder.
Mac OS X The Mixxx library is stored in the Library/Application Support/Mixxx folder in your homedirectory. To delete your library on Mac OS X type the following command into a terminal:
rm ~/Library/Application\ Support/Mixxx/mixxxdb.sqlite
GNU/Linux The Mixxx library is stored in the .mixxx folder in your home directory. To delete your library onGNU/Linux type the following command into a terminal:
11.4. Deleting Your Library 67

Mixxx User Manual, Release 1.11.0
rm ~/.mixxx/mixxxdb.sqlite
Warning: Deleting your library will lose all of your metadata. This includes saved hotcues, loops, comments,ratings, and other library related metadata. Only delete your library if you are fine with losing these.
11.4. Deleting Your Library 68

CHAPTER 12
Contributing to the Project
Mixxx is a community-driven project involving many DJs worldwide. Without the contributions from these DJs,Mixxx would not exist, and we’re constantly looking for more contributors.
We want to make it as easy as possible for people to get involved in Mixxx development. First off, to be clear youdon’t have to be a programmer to contribute.
12.1 As a non-developer
• Donate to Mixxx using Paypal to help support and enhance development.
• Make skins
• Make MIDI mappings for your controller
• Report bugs
• Update our Wiki to make sure the information on it is up to date.
• Translate Mixxx using Launchpad Translations
• Answer questions on the Troubleshooting Forum and the Launchpad Answers page
• Help promote Mixxx: If you’ve got a blog, write an article about Mixxx. Blog about our new releases whenthey come out. Any exposure on the web and in print helps our project grow, and is much appreciated.
• Send us some photos of you using Mixxx at a gig!
12.2 As a software developer
• You don’t have to know C++. There are developers who got into Mixxx development while learning C++ alongthe way.
• Join our mailing list: mixxx-devel
• Join our IRC channel, #mixxx on Freenode
• Tell us your ideas! Email us, talk on IRC, file wishlist bugs, or post on the forums.
• Register an account on our development platform Launchpad and make a branch of our code. See LaunchpadTutorial
• Join the Mixxx Development Team on Launchpad.
69

Mixxx User Manual, Release 1.11.0
• Get familiar with the code. Pick a bug off of the Easy Bug List
• Get help fixing the bug on IRC, talk to us about the best way to do it.
Contributing to Mixxx in 3 Easy Steps:
1. Pick a bug off of the Easy Bug List
2. Talk to us on IRC for help on how to fix it.
3. Fix it! Done! Your name will now be on the Mixxx contributor list.
12.2. As a software developer 70

CHAPTER 13
Appendix
13.1 Keyboard mapping table
Shortcuts let you work more efficiently. This table lists the default keyboard shortcuts for accessing Mixxx with anEnglish keyboard layout. Depending on your language settings the defaults may be different.
New in version 1.11: Auto DJ and Preview Deck shortcuts
Function Deck 1 Deck 2 MasterMixerCrossfade Left GCrossfade Right HSmall Crossfade Left Shift + GSmall Crossfade Right Shift + HActivate/Disable Effects Unit 5 0Headphone Cue (Pre-fader listen) T YBass Kill B NPlaybackLoad selected track to deck Shift + left Shift + rightUnload track from deck Alt + Shift + left Alt + Shift + rightPlayback D LSeek Backwards A JReverse Playback Shift + A Shift + JSeek Forwards S KTempo Adjust Down F1 F5Tempo Adjust Up F2 F6Small Tempo Adjust Down Shift + F1 Shift + F5Small Tempo Adjust Up Shift + F2 Shift + F6Temporary Tempo Adjust Down F3 F7Temporary Tempo Adjust Up F4 F8Small Temporary Tempo Adjust Down Shift + F3 Shift + F7Small Temporary Tempo Adjust Up Shift + F4 Shift + F8Tempo (BPM) Sync 1 6BPM Tap Tempo Adjust Shift + ! Shift + ^Cue and LoopSet Cuepoint Shift + D Shift + LCue F ;Cue Go-to-and-stop Shift + F Shift + :
Continued on next page
71

Mixxx User Manual, Release 1.11.0
Table 13.1 – continued from previous pageFunction Deck 1 Deck 2 MasterActivate 4 Beat Loop Q UHalve Beat Loop Size W IDouble Beat Loop Size E OSet Loop In Point 2 7Set Loop Out Point (Activates Loop) 3 8Toggle Loop On/Off 4 9Set Hot cue 1 Z MSet Hot cue 2 X ,Set Hot cue 3 C .Set Hot cue 4 V /Clear Hot cue 1 Shift + Z Shift + MClear Hot cue 2 Shift + X Shift + <Clear Hot cue 3 Shift + C Shift + >Clear Hot cue 4 Shift + V Shift + ?MicrophoneMicrophone Talkover ‘Auto DJShuffle Auto DJ playlist F9Skip next track in Auto DJ F10Fade to next track in Auto DJ F11Toggle Auto DJ on/Off F12Preview DeckLoad Selected Track And Play Alt+ReturnStart/Stop ReturnSeek Backwards Alt + LeftSeek Forwards Alt + Right
See also:
Mixxx allows you to customize the keyboard shortcuts. For more information, and to download a a keyboard mappingimage, go to Using a Keyboard.
13.2 Application shortcuts
Use these shortcuts to access features available in the menu on top of the application window.
13.2. Application shortcuts 72

Mixxx User Manual, Release 1.11.0
Function KeyFile menuLoad Track to Deck 1 Ctrl + OLoad Track to Deck 2 Ctrl + Shift + OLibrary menuAdd new Playlist Ctrl + NAdd new Crate Ctrl + Shift + NView menuShow Samplers Ctrl + 1Show Microphone Section Ctrl + 2Show Vinyl Control Section Ctrl + 3Show Preview Deck Ctrl + 4Full Screen (Windows & Linux) F11Full Screen (Mac OS X) Ctrl + Shift + FOptions menuEnable Vinyl Control 1 Ctrl + YEnable Vinyl Control 2 Ctrl + ZEnable Live Broadcasting Ctrl + LRecord Mix Ctrl + REnable Keyboard Shortcuts Ctrl + ‘Exit Mixxx Ctrl + QDeveloper menuReload skin Ctrl + Shift + R
Hint: The Ctrl key on Windows & Linux is equivalent to the Command key on Mac OS X. The Alt key onWindows & Linux is equivalent to the Option key on Mac OS X. Application shortcuts are not customizable.
Note: The Developer menu is available if Mixxx is started using the Command line options.
13.3 Command line options
Mixxx is designed to be as user-friendly as possible. As such, its command line options are only useful for developmentor debugging, as they make these tasks easier. Comment line options are case-sensitive.
13.3. Command line options 73
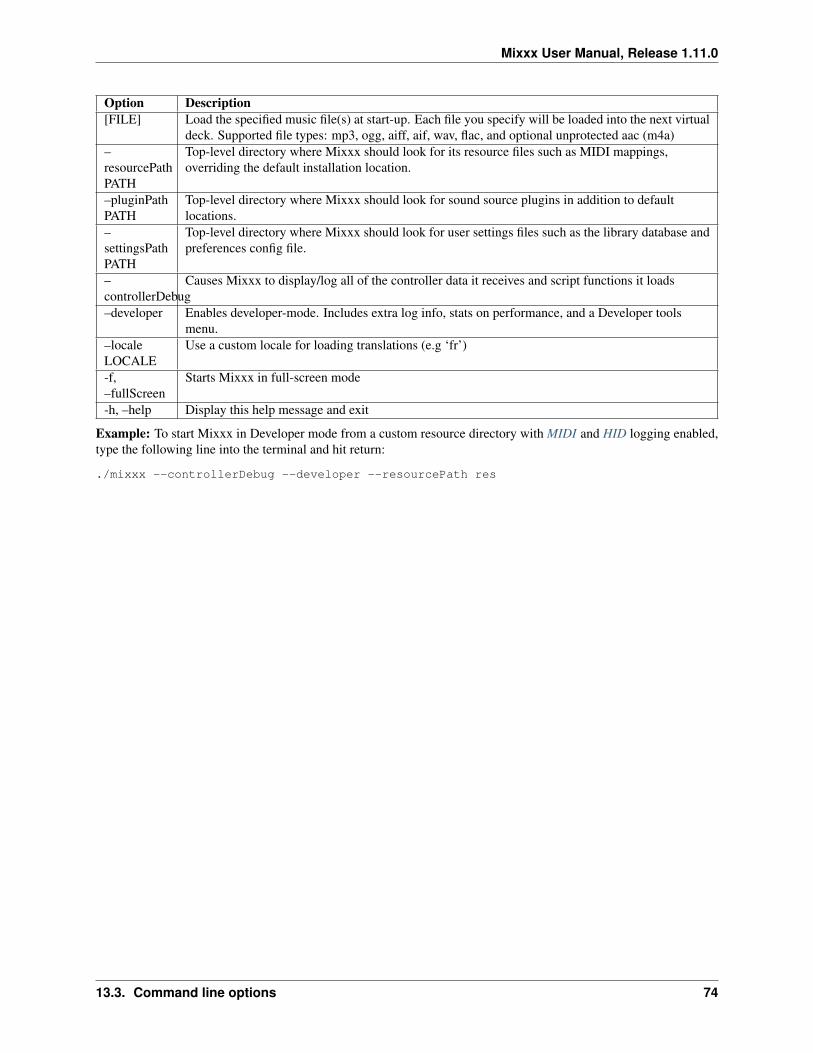
Mixxx User Manual, Release 1.11.0
Option Description[FILE] Load the specified music file(s) at start-up. Each file you specify will be loaded into the next virtual
deck. Supported file types: mp3, ogg, aiff, aif, wav, flac, and optional unprotected aac (m4a)–resourcePathPATH
Top-level directory where Mixxx should look for its resource files such as MIDI mappings,overriding the default installation location.
–pluginPathPATH
Top-level directory where Mixxx should look for sound source plugins in addition to defaultlocations.
–settingsPathPATH
Top-level directory where Mixxx should look for user settings files such as the library database andpreferences config file.
–controllerDebug
Causes Mixxx to display/log all of the controller data it receives and script functions it loads
–developer Enables developer-mode. Includes extra log info, stats on performance, and a Developer toolsmenu.
–localeLOCALE
Use a custom locale for loading translations (e.g ‘fr’)
-f,–fullScreen
Starts Mixxx in full-screen mode
-h, –help Display this help message and exit
Example: To start Mixxx in Developer mode from a custom resource directory with MIDI and HID logging enabled,type the following line into the terminal and hit return:
./mixxx --controllerDebug --developer --resourcePath res
13.3. Command line options 74

CHAPTER 14
Glossary of Terms
AAC Advanced Audio Coding (AAC) is a patented audio compression algorithm which uses a form of lossy datacompression. Designed to be the successor MP3, AAC generally achieves better sound quality at similar bitrates. While the .AAC extension is sometimes used for AAC-encoded files, they are typically saved with an.M4A file extension.
AIFF Short for Audio Interchange File Format. High-quality digital audio file format, similar to .wav files. ContainsCD-quality audio stored in a non-compressed, lossless format. AIFF files generally end with a .AIFF or .AIFextension.
balance A balance control on a mixer allows you to adjust the balance between the left and right channel. Thebalance refers to the relative volume of the corresponding channel in a stereo audio signal.
bar In musical notation, a bar (or measure) is a segment of time defined by a given number of beats. Typically, apiece consists of several bars of the same length.
beatgrid A series of markers that point to the location of beats within the track. Beatgrids are used for advancedmixing functions such as track sync, precise effects synchronization, looping and accurate BPM representation.
beatmatching A mixing technique used to establish a similar tempo with two or more tracks, making them soundlike just one track.
binaries Files that contain compiled computer code, which was compiled from source code. Source code, whichis usually a bunch of text files, is processed with a program called a compiler. The compiler then generates abinary, which is something like an an .exe or a .dll file. By using binaries you are relieved of the task of havingto compile the code by yourself.
bitrate Describe the quality of an audio or video file. For audio data the bitrate is commonly measured Kbps. Forexample, an MP3 audio file that is compressed at 192 Kbps will have a greater dynamic range and may soundslightly more clear than the same audio file compressed at 128 Kbps.
BPM Beats per minute (BPM) is used as a measure of tempo in music. If you tap your foot to music you are followingthe “beat”. If you count how many taps you do in a minute you have calculated the BPM.
bug report Every software has bugs. When you come across a bug in this software, you should submit a report aboutit to the developers. They can use this to identify, replicate and fix the issue.
CDJ CDJ is a term originally used to describe a line of CD players from Pioneer Electronics. Today CDJ generallyrefers to DJ CD players that work like a record player. They allow analog control of music using CDs, usuallyusing a touch sensitive emulated vinyl control surface.
codec Short for compressor/decompressor, a codec is any technology for compressing and decompressing audio andvideo data. Some popular codecs for computer audio include MP3 and Ogg Vorbis.
crossfader The crossfader is a slider that determines how much each deck of audio contributes to the master output.
75

Mixxx User Manual, Release 1.11.0
cue A Cue or Cue point is a reference point in the track usually placed on the position the DJ wants the track to startat by default. This is useful to instantly jump to that point without seeking through the track.
cue sheet A cue sheet (or CUE file, CUE sheet, etc.) is a formatted plain text file which is used to provide indexinformation for a large audio file. For example, it can be used to tell software extra details about the layout of aCD to burn.
cueing Headphone cueing, or just cueing, is listening to the next track you would like to mix in in your headphones.The audience will not hear what you are cueing in your headphones. Being able to cue is a crucial aspect toDJing.
db Short for decibels. A Decibel is a logarithmic measurement of sound level. Whispering is around 25 dB whileunbearable sound such as a jet engine is around 160 db. Rule of thumb: A volume increase of 10 dB is perceivedas twice as loud.
deck A deck is like a virtual vinyl turntable. You can load a track into it and play the track, just like you would put arecord on turntable and play it.
DRM Digital Rights Management (DRM) technologies attempt to control what you can and can’t do with the mediaand hardware you’ve purchased. Typically, a DRM system either encrypts the data so that it can only be accessedin a way authorized by copyright holders or marks content with a digital watermark or similar method so thatthe content can not be freely distributed. For information about how you can get involved in activism againstDRM, see Defective by Design.
fast-forward To cause something to advance at quicker than normal speed. In terms of audio software that means ifyou press the fast-forward button the audio will play with increased speed as long as the button is pressed. Thisis useful to seek trough a track.
fast-rewind The opposite of fast-forward. If you press the fast-rewind button the audio will play in reverse withincreased speed as long as the button is pressed.
file manager Is a computer program that organizes data files into groups and shows you where they are when youneed to find them again. Popular file managers for the operating systems Mixxx supports are Explorer onWindows, Finder on Mac OS X and Nautilus on GNU/Linux.
FLAC Free Lossless Audio Compression (FLAC), a patent-free audio compression similar to MP3 but lossless (i.e.there is no loss in audio quality when used). FLAC files generally end with a .FLAC extension.
flanger A flanger is an effect that mixes the input signal with a delayed copy of itself which leads to interferences inthe signal and creates a comb-filter effect. By routing the output of the effect back into the input (feedback), theeffect is enhanced.
GUI Short for “Graphical User Interface” and is pronounced “gooey”. It refers to a user interface based on graphics(icons, pictures and menus) instead of text. In Mixxx, it uses a mouse, keyboard, or MIDI / HID controllers asinput devices.
head/mix button The head/mix button is used to control how much you mix the master output into your headphoneoutput. This can be very useful when cueing a track, because you can test out how it sounds when mixed withthe main mix in your headphones, before letting the audience hear the track.
headphone button The headphone button is used to indicate whether or not you are pre-listening to a deck or samplerin your headphones.
headphone output The headphone output is what you hear in your headphones.
HID Short for for Human Interface Device, a part of the USB specification. It specifies a device class (a type ofcomputer hardware) for human interface devices such as keyboards, mice and game controllers.
HID controller An external hardware device that generates and transmits HID data to HID-enabled hardware orsoftware (e.g. Mixxx). Connected to your computer via USB, HID controllers allow you to control audio appli-cations among others. Many DJs prefer to control DJ software using physical knobs, faders, and wheels insteadof using a computer keyboard. Besides the known DJ controllers also keyboards, mice and game controllers are
76

Mixxx User Manual, Release 1.11.0
some of the most popular HID devices. Compared to MIDI it also allows use of advanced features such as thosefound on modern CDJs, e.g. display screens and high-resolution jogwheels.
hotcue Similar to the main cue point, a hotcue is a reference point in the track. DJs usually place hotcues at distinctivepositions within a track such as drops, breaks or kicks and snares. Mixxx supports up to 36 hotcues.
HSV HSV stands for hue, saturation, and value, and is also often called HSB (B for brightness). The HSV ColorModel represents color in a way more suited to the human perception of color. For example, the relationships“stronger than”, “darker than”, and “the opposite of” are easily expressed in HSV. In contrast, the representationof the hardware-oriented RGB model is close to what most monitors show.
icecast Icecast is free and open-source software that allows digital audio content to be broadcast to and from mediaplayer software, enabling the creation of Internet radio stations. Unlike Shoutcast, the software provides theability to stream in free file formats like Ogg Vorbis and run your own directory server.
IRC Internet Relay Chat (IRC) is a an online chat network. The Mixxx IRC channel can be found on the FreeNodeIRC Network in the #mixxx channel.
kbps Short for kilobits per second. Here used to measure the quality of audio data. See bitrate
key lock With key lock enabled, the tempo of the track will change but the pitch remains consistent. When unlocked,the pitch slider will speed up (or slow down) the track and the pitch will increase (or decrease) along with it.
kill switch A button to turn on and off individual frequency ranges within a channel, i.e. treble, mid and bass. Usefulfor effects where the DJ drops a track out for a period or creates room for a transition.
LAME LAME is a free software codec used to encode/compress audio into the lossy MP3 file format.
latency Latency refers to a short period of delay (usually measured in milliseconds) between when an audio signalenters and when it emerges from a system. Being able to lower the latency as much as possible makes a hugedifference in responsiveness.
lossless Used when describing audio compression algorithms, a lossless algorithm is one which results in no loss inaudio quality when used.
lossy Used when describing audio compression algorithms, a lossy algorithm is one which results in a loss in audioquality when used.
master output The master output is the main audio output. It is what your audience hears.
metadata In general, any piece of information about a music file that Mixxx uses (e.g. title, artist, album, hotcuelocations, loops, etc.). Various file metadata formats allow information such as the title, artist, album, and tracknumber to be stored in the audio file itself, see https://en.wikipedia.org/wiki/ID3 . Mixxx stores additionalmetadata about music files in its database, like beatgrid, waveform data, hotcues, playlists, crates, number ofplays, etc.
MIDI Short for for Musical Instrument Digital Interface. A digital communications language and hardware specifi-cation enabling compatible electronic instruments, sequencers, computers, etc., to communicate with each otherin a network.
MIDI controller An external hardware device that generates and transmits MIDI data to MIDI-enabled hardware orsoftware (e.g. Mixxx). Usually connected to your computer via USB, MIDI controllers allow you to controlaudio applications among others. Many DJs prefer to control DJ software using physical knobs, faders, andwheels instead of using a computer keyboard.
MP3 A patented audio compression algorithm which uses a form of lossy data compression. It is de-facto standardof digital audio compression for music. MP3 files generally end with a .MP3 extension.
Ogg Vorbis A patent-free audio compression algorithm which uses a form of lossy data compression. It is designedto provide for efficient streaming and manipulation of high quality digital audio. Ogg Vorbis files generally endwith a .OGG or .OGA extension.
77

Mixxx User Manual, Release 1.11.0
open-source Generically, open-source refers to a program for which the source code is available to the public for useand/or modification from its original design free of charge. Open source code is typically created as a collabo-rative effort in which programmers improve upon the code and share the changes within the community. Opensource sprouted in the technological community as a response to proprietary software owned by corporations.For more information, see Wikipedia.
OpenGL An operating system feature used to draw hardware-accelerated graphics. Mixxx uses OpenGL to draw thewaveform displays and spinning vinyl widgets.
operating system Your operating system (OS) is the computing environment on your computer. For example, Win-dows, Mac OS X, or GNU/Linux are the three operating systems that Mixxx supports.
PFL PFL or “pre-fader listen” is a fancy word for whether or not you are “pre-listening” to a deck in your headphones.See also: headphone button.
phase The phase of a track is its position relative to another track. If two tracks are sync’d to the same tempo andin-phase then they should be playing so that their beats are aligned.
pitch bend A technique used by DJs that temporarily bends the rate of a track up or down, usually while a buttonis held. This technique is usually used to make micro-adjustments to the synchronization of tracks while beat-matching. Before digital DJing, this was accomplished by dragging one’s finger alongside the turntable to slowit down or by twisting the record spindle to speed it up.
podcast A podcast is a feed of audio or video files made available for free or for purchase over the Internet. Podcastclients such as iTunes allow listeners to subscribe to the feed and automatically download content to theirportable audio players as it becomes available.
quantization Quantization is the process of aligning notes and other events like loops or cuepoints so that they startor finish exactly on beats or fractions of beats.
ramping pitch bend Basically identical to the regular pitch bend with the difference that the pitch changes gradually,instead of all at once. Often uses for temporary pitch changes. It simulates the effect of touching a turntable totemporarily slow down or speed up a record.
rate The speed at which a track is played back, usually expressed in terms of a percentage of the speed relative to thetracks normal rate. Often while mixing, DJs adjust the rates of tracks so that they can play at the same tempo asother tracks. This allows DJs to beatmix, and is an essential part of DJing.
ReplayGain ReplayGain normalizes audio data in a non-destructive way, so the tracks in your music library dont allplay at different volume. Audio files are scanned by an psychoacoustic algorithm to determine the loudness ofthe audio data. ReplayGain information is stored as metadata in a digital audio file in order for the sound to becorrectly played at the right level of loudness.
reverse Reverse plays a track backwards.
RGB The RGB color model is an additive color model in which red, green, and blue light are added together invarious ways to reproduce a broad array of colors. The name of the model comes from the initials of the threeadditive primary colors, red, green, and blue.
shoutcast Shoutcast is proprietary software that allows digital audio content to be broadcast to and from media playersoftware, enabling the creation of Internet radio stations.
soundcard Also known as an audio card, it is an internal computer expansion card or external expansion devicethat facilitates the input and output of audio signals to and from a computer. Today DJ-soundcards are usuallyconnected via USB and have at least 2 stereo audio outputs to support cueing.
sync Sync allows you to automatically adjust a track’s tempo and phase to be in sync with another deck that isplaying.
tempo The speed of a track measured in bpm.
78

Mixxx User Manual, Release 1.11.0
timecode Used here in conjunction with vinyl control. A special audio signal on a control vinyl or control CD (time-code media) that a computer can listen to in order to determine speed, direction and position of the playback.
track A track is another word for a song.
url Uniform Resource Locator. The address that defines the route to a file on an Internet server. URLs are typed intoa Web browser to access Web pages and files, and URLs are embedded within the pages themselves as hypertextlinks. One example of a URL is http://www.mixxx.org .
vinyl control A method of controlling DJ applications which simulates the traditional DJing paradigm of two turnta-bles. Using special timecode media, the DJ application analyzes the timecode signal and simulates the soundand feel of having your music collection on vinyl.
volume A term that refers to the degree of sound intensity or audibility; loudness. A volume control is used to adjustthe output gain setting.
vu meter The volume unit (VU) meter is used to show the relative levels of audio signals and is subdivided acrosschannels. Basically it represents how ‘loud’ a sound from a channel is.
WAV Standard digital audio file format used for storing waveform data; allows audio recordings to be saved withdifferent sampling rates and bitrates; often saved in a 44.1 KHz, 16-bit, stereo format, which is the standardformat used for CD audio. Wave files are not compressed, and are therefore lossless. Wave files generally endwith a .WAV extension.
waveform overview The waveform overview shows the waveform envelope of the entire track, and is useful becausethey allow DJs to see breakdowns far in advance.
waveform summary The waveform summary shows the waveform envelope of the track near the current playbackpostition.
79

Index
AAAC, 75AIFF, 75
Bbalance, 75bar, 75beatgrid, 75beatmatching, 75binaries, 75bitrate, 75BPM, 75bug report, 75
CCDJ, 75codec, 75crossfader, 75cue, 76cue sheet, 76cueing, 76
Ddb, 76deck, 76DRM, 76
Ffast-forward, 76fast-rewind, 76file manager, 76FLAC, 76flanger, 76
GGUI, 76
Hhead/mix button, 76headphone button, 76
headphone output, 76HID, 76HID controller, 76hotcue, 77HSV, 77
Iicecast, 77IRC, 77
Kkbps, 77key lock, 77kill switch, 77
LLAME, 77latency, 77lossless, 77lossy, 77
Mmaster output, 77metadata, 77MIDI, 77MIDI controller, 77MP3, 77
OOgg Vorbis, 77open-source, 78OpenGL, 78operating system, 78
PPFL, 78phase, 78pitch bend, 78podcast, 78
80

Mixxx User Manual, Release 1.11.0
Qquantization, 78
Rramping pitch bend, 78rate, 78ReplayGain, 78reverse, 78RGB, 78
Sshoutcast, 78soundcard, 78sync, 78
Ttempo, 78timecode, 79track, 79
Uurl, 79
Vvinyl control, 79volume, 79vu meter, 79
WWAV, 79waveform overview, 79waveform summary, 79
Index 81