Embed Size (px)
Citation preview
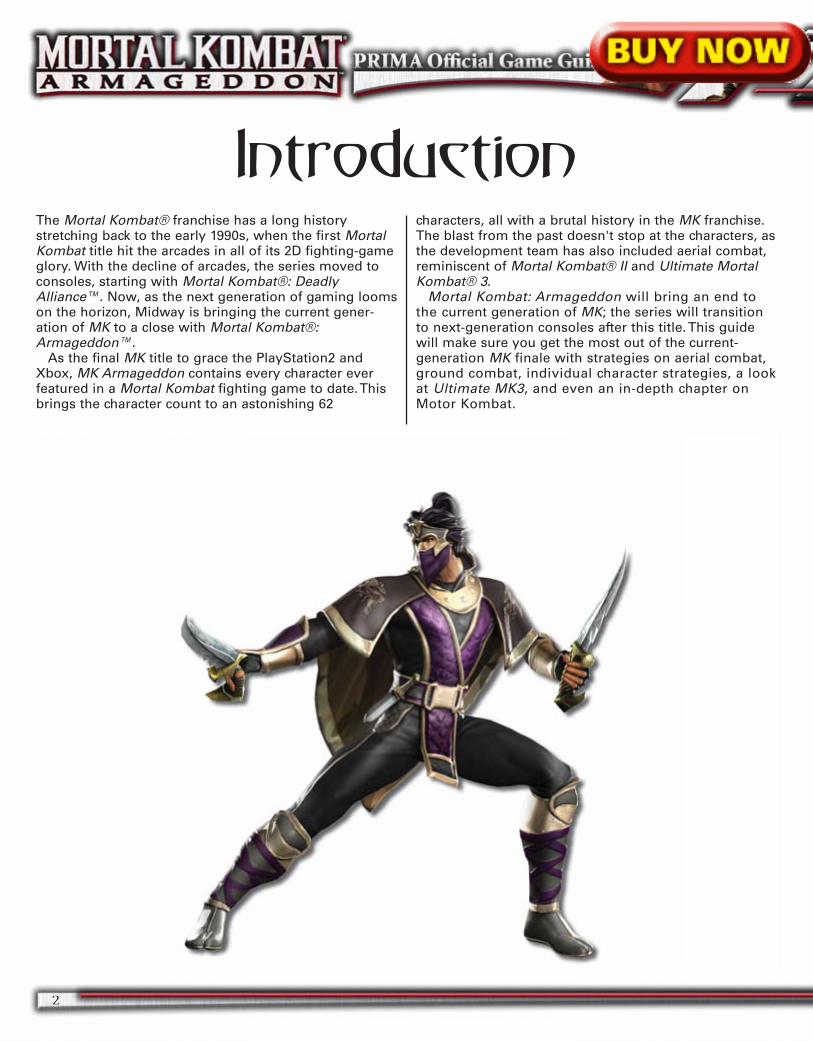
IntroductionThe Mortal Kombat® franchise has a long historystretching back to the early 1990s, when the first MortalKombat title hit the arcades in all of its 2D fighting-gameglory. With the decline of arcades, the series moved toconsoles, starting with Mortal Kombat®: DeadlyAlliance™. Now, as the next generation of gaming loomson the horizon, Midway is bringing the current gener-ation of MK to a close with Mortal Kombat®:Armageddon™.
As the final MK title to grace the PlayStation2 andXbox, MK Armageddon contains every character everfeatured in a Mortal Kombat fighting game to date. Thisbrings the character count to an astonishing 62
characters, all with a brutal history in the MK franchise.The blast from the past doesn't stop at the characters, asthe development team has also included aerial combat,reminiscent of Mortal Kombat® II and Ultimate MortalKombat® 3.
Mortal Kombat: Armageddon will bring an end tothe current generation of MK; the series will transitionto next-generation consoles after this title. This guidewill make sure you get the most out of the current-generation MK finale with strategies on aerial combat,ground combat, individual character strategies, a lookat Ultimate MK3, and even an in-depth chapter onMotor Kombat.
2
Basic Info and Terminology
Basic Info and Terminology
3
To get the most from this guide and become arespectable player, you need to learn the basic termsused in this franchise and fighting games in general, aswell as some basic skills you'll need to take your gameto the next level. This section has everything you need.
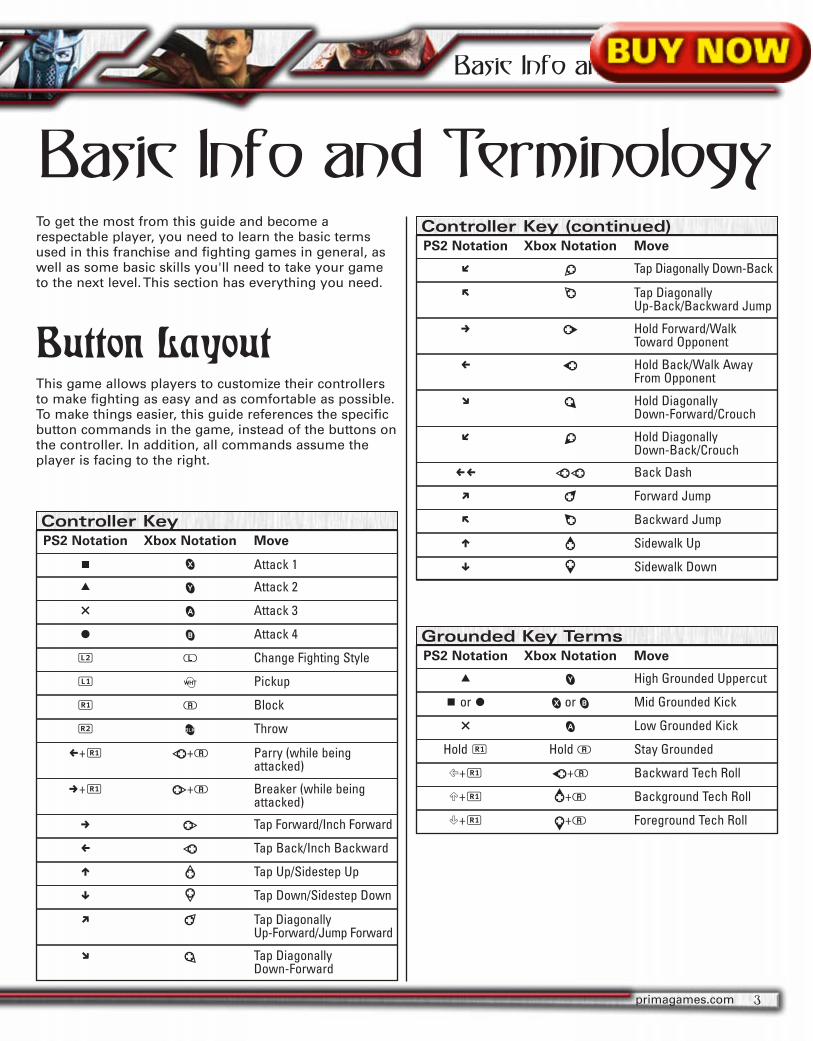
Button LayoutThis game allows players to customize their controllersto make fighting as easy and as comfortable as possible.To make things easier, this guide references the specificbutton commands in the game, instead of the buttons onthe controller. In addition, all commands assume theplayer is facing to the right.
primagames.com
Controller Key
P 3 Attack 1
I 4 Attack 2
U 1 Attack 3
O 2 Attack 4
l 7 Change Fighting Style
L 5 Pickup
R 8 Block
r 6 Throw
4+R A+8 Parry (while being attacked)
6+R D+8 Breaker (while being attacked)
6 D Tap Forward/Inch Forward
4 A Tap Back/Inch Backward
8 W Tap Up/Sidestep Up
2 X Tap Down/Sidestep Down
9 E Tap Diagonally Up-Forward/Jump Forward
3 C Tap Diagonally Down-Forward
PS2 Notation Xbox Notation Move
Controller Key (continued)
1 Z Tap Diagonally Down-Back
44 AA Back Dash
9 e Forward Jump
7 q Backward Jump
8 w Sidewalk Up
2 x Sidewalk Down
7 Q Tap Diagonally Up-Back/Backward Jump
6 d Hold Forward/Walk Toward Opponent
4 a Hold Back/Walk Away From Opponent
3 c Hold Diagonally Down-Forward/Crouch
1 z Hold Diagonally Down-Back/Crouch
PS2 Notation Xbox Notation Move
Grounded Key Terms
I 4 High Grounded Uppercut
P or O 3 or 2 Mid Grounded Kick
U 1 Low Grounded Kick
Hold R Hold 8 Stay Grounded
a+R a+8 Backward Tech Roll
w+R w+8 Background Tech Roll
x+R x+8 Foreground Tech Roll
PS2 Notation Xbox Notation Move

4
Basic InformationAll Mortal Kombat players must know some basic infor-mation to become better players. These are key elementsthat many players either overlook or aren't aware of.Take a moment to familiarize yourself with this infor-mation, as it will be the basis of the advanced strategiescovered later in this guide.
Fighting Stances
During the transition to the PlayStation2 and Xbox, thefranchise was changed to include the addition of multiplefighting stances for each character. These fightingstances allowed players to shift from one fighting styleto another with one button press.
In this game, the number of fighting stances percharacter has been cut down to a hand-to-hand fightingstyle and a weapon-based fighting style. Each fightingstyle offers a different set of attacks. To use yourcharacter to full potential, learn both of your character'sfighting styles.
Canned Combos
Canned combos are strings of attacks that result in anuninterrupted assault on an opponent when executedwith proper timing. If the first attack in a canned comboconnects, your opponent will not be able to block any ofthe following attacks within that combo string. Many ofthe canned combos transition from one fighting stanceto another or to an aerial combo.
Most of your offensive strategies involve connectingwith the first attack in these canned combos, thenexecuting the most damaging moves in your character’sarsenal. To interrupt a canned combo, use a Breaker.
Movement
While this game relies more on combos and specialattacks than anything else, movement is still a decidingfactor in a win or loss. Most players make the mistake ofeither constantly rushing their opponent or standing inone place until they decide to attack. There shouldalways be some sort of movement, no matter what thesituation.
Even moving forward and backward, or sidesteppinginto the foreground or background is effective in the heatof combat. The more you move, the harder it is for anopponent to land an attack.
Frame Data
This game runs at 60 frames per second, and everyattack is composed of a specific number of frames ofanimation. For example, Scorpion's backflip kick takes 30frames of animation to hit an opponent. If the kick isblocked, Scorpion has 10 frames of recovery time. This isreferred to as a 10-frame disadvantage, and meansScorpion cannot block, attack, or move in any way forthe next 10 frames of animation.
If Scorpion's kick connects, however, he may havewhat is referred to as a 10-frame advantage. This meansthat Scorpion's opponent cannot block, attack, or movein any way for the next 10 frames of animation.
Frames are the most basic element of fighting games,but can be hard for beginners to understand. Think offrames as an amount of time. For every second, thereare 60 frames. Therefore a 60-frame attack would takeone second to hit an opponent. Likewise, if an attack hasa 60-frame disadvantage on block, the character will notbe able to block, attack, or move in any way for onesecond if the attack is blocked.
Throughout this guide, the terms frame advantage andframe disadvantage are used to describe specific attacks.While frame data is not as important to Mortal Kombatas it is to other fighting games, it still plays a part inadvanced strategies.
Tech Rolling
When a character rolls off the ground, it is referred to asa tech roll. To tech roll, hold block and press any directionas you're getting up off the ground. Using a tech roll cankeep opponents from attacking your character whileyou're on the ground. It forces your opponents to stoptheir current series of attacks when you hit the ground.
If your opponent is not using tech rolls, you can inflicta significant amount of damage after knocking your foeto the ground by using ranged attacks and other specialmoves. Most skilled players will tech roll every chancethey get, so don't rely on attacks that connect when anopponent is on the ground. The combo information inthe character section of this guide details the bestcombos to use for each character.
Multi-Tiered Areas
Many of the stages have multiple tiers where characterscan fight. These stages have specific areas where acharacter can be knocked into the next tier or into adeath trap. A character who is knocked into the next tiertakes additional damage. The amount of damagedepends on the area they were knocked into. Knowing
Basic Info and Terminology
5
where these areas are can change the flow of a fight. TheStage Strategies section of the guide details the multi-tiered stages and the death traps within.
Death Traps & Stage Hazards
Each stage features multiple areas where you can finishoff the current round by knocking your opponent into adeath trap. These death traps are marked on the groundby a red circular outline. If you stand inside of theoutline, you can knock your opponent into a death trap,effectively ending the round no matter how much healthyour opponent has remaining.
In addition to death traps, many of the stages alsofeature stage hazards. These are marked in the samefashion as death traps, except that the circular outline isyellow instead of red. Stage hazards do not deplete youropponent's health bar, but they inflict additionaldamage.
Fatalities
Fatalities are a staple of the series since the original titlehit arcades back in 1992. Midway has upped the ante byintroducing kustom fatalities to replace the character-specific fatalities of the past. The kustom fatalities allowplayers to create their own mix of violence with a fewwell-timed command inputs. The kustom fatalitiessection of this guide details to the fullest every optionavailable to finish off your opponent.
Weapons
Almost every character uses a weapon in one of thefighting styles. Certain stages also contain powerfulweapons you can pick up and use against youropponent. When using your character's weapon, you canchange back and forth at will between the weapon andyour character's other fighting style. If you changefighting styles while using a stage weapon, however,you drop the weapon and have to pick it up to use itagain. Weapons offer a variety of attack options, fromcanned combos to juggles, and can also be used duringaerial combat.
Breakers
Breakers allow you to interrupt attacks, including cannedcombos and aerial combos. Each player is allowed touse up to three Breakers per match. The number ofBreakers remaining is indicated by the lightning boltemblem under your character's health bar.
Focus on using all three Breakers throughout thecourse of a match to interrupt your opponent's combos.Use them sparingly to ensure that you have a Breakeravailable when you need it, but if you lose a match withBreakers still remaining, you could have prolonged yourdeath or won the match by using a Breaker near the endof the final round.
Parries
New to the series is the ability to parry an opponent'sattack. When you parry an attack, you gain a smallamount of frame advantage. You can use this frameadvantage to stop your opponent's momentum andbegin your offensive strategies. There is no limit to thenumber of parries you can use in a match, but be carefulnot to overuse them. A throw cannot be parried, and ifyou begin to overuse the parry, your opponent will startto use more throws to avoid being parried.
Practice Mode
To become a serious competitor, you will need to spenda good deal of time in the Practice Mode. Here you willbe able to see all of your character's special attacks andcanned combos, and can practice them all you like. Usethe Practice Mode to perfect your execution of yourcharacter's special attacks and all the combos andjuggles listed in the Character Guide section. The moreyou practice these attacks, the easier it will be for you topull them off in the heat of battle.
Fighting the Computer
While fighting against the computer is not recom-mended, it's still a good way to hone your skills in abattle setting. The game features online play and theability to play another person on the same console, butbefore you jump into a real match, make sure you'reready. Playing against the computer allows you to usecanned combos and juggles under the pressure ofcombat, which cannot be duplicated in Practice Mode.After you can execute all of these attacks flawlesslyagainst the computer, you're ready to take on humanopponents.
primagames.com
General StrategiesYou can use certain strategies no matter which characteryou choose to play with. Knowing these strategies willhelp you become a better player by letting you takeadvantage of the depth featured in the fighting engine.You cannot become a top player with any characterwithout first knowing these general strategies.
The Art of FightingThe point of this guide is to make you a better player. Toreach this goal, you must understand how a good playerthinks while playing. This is referred to as the Art ofFighting. Study this section, because it serves as thefoundation for taking your game to the next level.
Offense vs. Defense
Novice players assume that they have to attack all thetime. Offense is important, but defense wins battles. Toomany players rush in, mindlessly attacking theiropponents with no plan or purpose. If you don't knowwhen to block or evade, you'll never have the oppor-tunity to attack. At the same time, if you play too defen-sively, you'll leave yourself open and your opponent willbe able to attack at will.
Finding a good balance between offense and defenseis the key to winning. If an opponent is constantly hittingyou, step back and block or evade until your opponentmakes a mistake or allows you to safely attack.
Bait and Switch
In this game, you can't wait for your opponent to attack,then block and counterattack. This is one big mindgame—the one who plays the smartest wins. Because ofthis, you need bait to lure your opponent into an attack.
Most players react similarly to certain situations. Forexample, after blocking certain attacks, most playersimmediately attempt to counterattack. Use thisknowledge to your advantage by using one attackinstead of a full canned combo string. Your opponent,seeing that you have stopped attacking, will begin acounterattack. At this point, follow up your initial attackwith a low attack that evades high attack, or a parry thatgives you frame advantage and allows you to connect
with a full canned combo. This is referred to as baitingyour opponents—making them do what you want themto do so you can land a successful attack or combo.
Have Patience
Novice players tend to think they always have to be intheir opponent's face and attacking. Mindless attacking isa route to defeat, so take your time and see what worksand what doesn't. If something doesn't work, stop usingthat technique, pay attention to what your opponent didto stop or interrupt your attack, and figure out why itdidn't work. If you can determine why an attack didn'twork, you can use that knowledge to come up withbetter strategies. If you don't understand why your attackfailed, you will never learn better strategies.
Using FrameAdvantageHigh-level play begins and ends with the use of frameadvantage. Because the game is not heavily dependenton frame data, many players use frame advantagewithout realizing it. Under most circumstances, if youblock an attack, you are free to counterattack before youropponent can block again.
Most players commonly know this, but may not knowthat frame data is the basis of this thought process. Youcan attack after blocking an opponent's attack becauseyour opponent is at a frame disadvantage after theirattack is blocked. Knowing how to fully use frameadvantage and avoid frame disadvantage is a criticalfactor in becoming a good player.
Poking
Most of the attacks are not safe when blocked. Almostanytime you block and attack, you are free to counter-attack without fear of interruption from your opponent.At any point during a match, your opponent can use oneof three Breakers, but these inflict no damage and are oflittle concern when dealing with frame data.
Every canned combo in the game leaves you at aframe disadvantage. You can use a few single attacks
6
General Strategies
7
with safety, however. Under most circumstances, theseattacks are the first in a canned combo, so they are notonly safe for you, but your opponent will be expectingthe full canned combo. Instead, use the single attack,then go into a throw or low attack to confuse opponentsand keep them on the defensive. These attacks are listedunder offensive and defensive strategies in the CharacterGuide section.
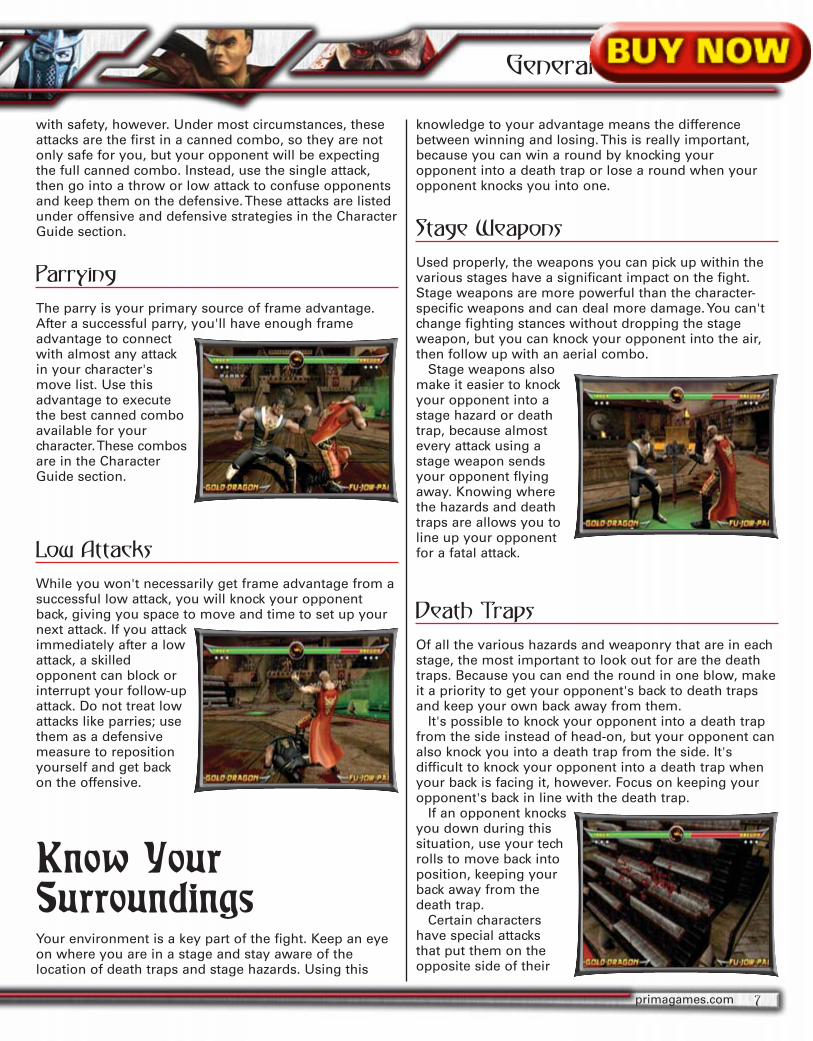
Parrying
The parry is your primary source of frame advantage.After a successful parry, you'll have enough frameadvantage to connectwith almost any attackin your character'smove list. Use thisadvantage to executethe best canned comboavailable for yourcharacter. These combosare in the CharacterGuide section.
Low Attacks
While you won't necessarily get frame advantage from asuccessful low attack, you will knock your opponentback, giving you space to move and time to set up yournext attack. If you attackimmediately after a lowattack, a skilledopponent can block orinterrupt your follow-upattack. Do not treat lowattacks like parries; usethem as a defensivemeasure to repositionyourself and get backon the offensive.
Know YourSurroundingsYour environment is a key part of the fight. Keep an eyeon where you are in a stage and stay aware of thelocation of death traps and stage hazards. Using this
knowledge to your advantage means the differencebetween winning and losing. This is really important,because you can win a round by knocking youropponent into a death trap or lose a round when youropponent knocks you into one.
Stage Weapons
Used properly, the weapons you can pick up within thevarious stages have a significant impact on the fight.Stage weapons are more powerful than the character-specific weapons and can deal more damage. You can'tchange fighting stances without dropping the stageweapon, but you can knock your opponent into the air,then follow up with an aerial combo.
Stage weapons alsomake it easier to knockyour opponent into astage hazard or deathtrap, because almostevery attack using astage weapon sendsyour opponent flyingaway. Knowing wherethe hazards and deathtraps are allows you toline up your opponentfor a fatal attack.
Death Traps
Of all the various hazards and weaponry that are in eachstage, the most important to look out for are the deathtraps. Because you can end the round in one blow, makeit a priority to get your opponent's back to death trapsand keep your own back away from them.
It's possible to knock your opponent into a death trapfrom the side instead of head-on, but your opponent canalso knock you into a death trap from the side. It'sdifficult to knock your opponent into a death trap whenyour back is facing it, however. Focus on keeping youropponent's back in line with the death trap.
If an opponent knocksyou down during thissituation, use your techrolls to move back intoposition, keeping yourback away from thedeath trap.
Certain charactershave special attacksthat put them on theopposite side of their
primagames.com
Stage Strategies
Arena as Arsenal?Several of the arenas employed in the vicious MortalKombat tournaments are as deadly as the weapons eachfighter carries. Instant-kill zones called death traps canend a fight with one punch, no matter who has beendominating the match up to that point. Special weapons,like hammers, can tip the scales in favor of the fightersfast enough to grab them after the round begins. Manystages have multiple areas, each with different deathtrap sites. Knowing where you stand at all times iscritical to victory.
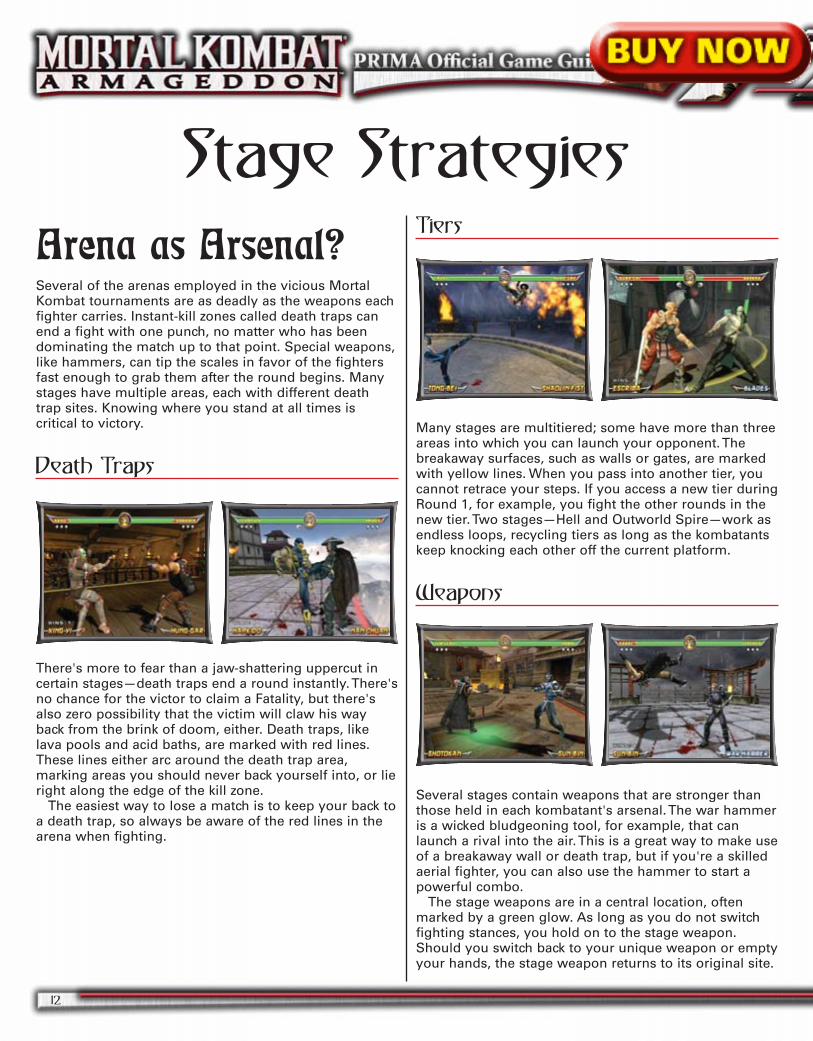
Death Traps
There's more to fear than a jaw-shattering uppercut incertain stages—death traps end a round instantly. There'sno chance for the victor to claim a Fatality, but there'salso zero possibility that the victim will claw his wayback from the brink of doom, either. Death traps, likelava pools and acid baths, are marked with red lines.These lines either arc around the death trap area,marking areas you should never back yourself into, or lieright along the edge of the kill zone.
The easiest way to lose a match is to keep your back toa death trap, so always be aware of the red lines in thearena when fighting.
Tiers
Many stages are multitiered; some have more than threeareas into which you can launch your opponent. Thebreakaway surfaces, such as walls or gates, are markedwith yellow lines. When you pass into another tier, youcannot retrace your steps. If you access a new tier duringRound 1, for example, you fight the other rounds in thenew tier. Two stages—Hell and Outworld Spire—work asendless loops, recycling tiers as long as the kombatantskeep knocking each other off the current platform.
Weapons
Several stages contain weapons that are stronger thanthose held in each kombatant's arsenal. The war hammeris a wicked bludgeoning tool, for example, that canlaunch a rival into the air. This is a great way to make useof a breakaway wall or death trap, but if you're a skilledaerial fighter, you can also use the hammer to start apowerful combo.
The stage weapons are in a central location, oftenmarked by a green glow. As long as you do not switchfighting stances, you hold on to the stage weapon.Should you switch back to your unique weapon or emptyyour hands, the stage weapon returns to its original site.
12
14
Bell Tower
Death Traps: 2Tiers: 2Weapon: —
The Bell Tower returns in with two unmarked deathtraps, so players will have no warning before falling totheir doom. The top tier is safe from harm aside from afew breakable objects that will not add any additionaldamage. There is a series of bells on the stage's bottomtier, accessible by slamming a fighter into the massivebell in the top floor's center.
After blasting opponents against the bell and sendingthem crashing to the floor below, you can jump downand tenderize them further by smashing them againstthe smaller bells that surround the arena. These bells andgongs do extra damage to opponents unlucky enough tobe kicked or punched into them.
If you can launch a rival into the air in the center of thebottom tier, your foe flies up into the central bell and,after rattling around for a moment, drops back to thefloor as a torrent of bats escapes the bell.
On either side of the bottom tier are gold bells that arerung by large wooden logs throughout the match. Theseare where the unmarked death traps are found. If youback your opponents up to one of these two bells andlaunch them into the air, they crash down through theflooring and fall to their deaths on the spikes below. Toadd insult to injury, a rat appears to horde one of theirsevered limbs.
Evil Tower
Death Traps: 1Tiers: 2Weapon: —
The Evil Tower returns, as fighters trade blows under thewatchful eyes of cloaked clerics. The small top-floor areafeatures a few hazards, such as breakable pillars that candisrupt juggles or add damage to successful combos.The second tier is down a long flight of stairs, in front ofthe swirling vortex.
After pushing youropponents down the flightof steps to crash over adebris pile at the bottom,you can back them up tothe edge of the arena'sbottom tier. The red linesignifies a death trap, andindeed, if you can force anenemy over the stage's sideduring a launching attack, the kombatant is sucked intothe vortex and destroyed.
The bottom tier is smaller than the top one, and has nostage hazards to speak of—just the deadly vortex thatsilently waits to be fed a new flesh sacrifice.
Falling Cliffs
Death Traps: 1 Tiers: 1Weapon: —
The Falling Cliffs is a smallcircular arena teetering overa sea of spikes that instantlykills any player launched offthe rapidly shrinking stageedges. As the fight rages,bits and pieces of the arenafall away, shrinking theborders of the stage. Thefirst land loss happens only seconds after the match'sstart, with subsequent breakage every 10 seconds there-after, until the stage becomes the smallest in the game.
Tier 1 Tier 2
Tier 1 Tier 2
Konquest Mode
23
Konquest Mode plays like an adventure game mixedwith combat specific to Konquest Mode, as well as thestandard 3D fighting for which the series is known. InKonquest Mode, you play the role of Taven as heprogresses through the backstory.
Button LayoutKonquest Mode uses a control scheme different fromthat of the standard fighting game. These controls arespecific to Konquest Mode.
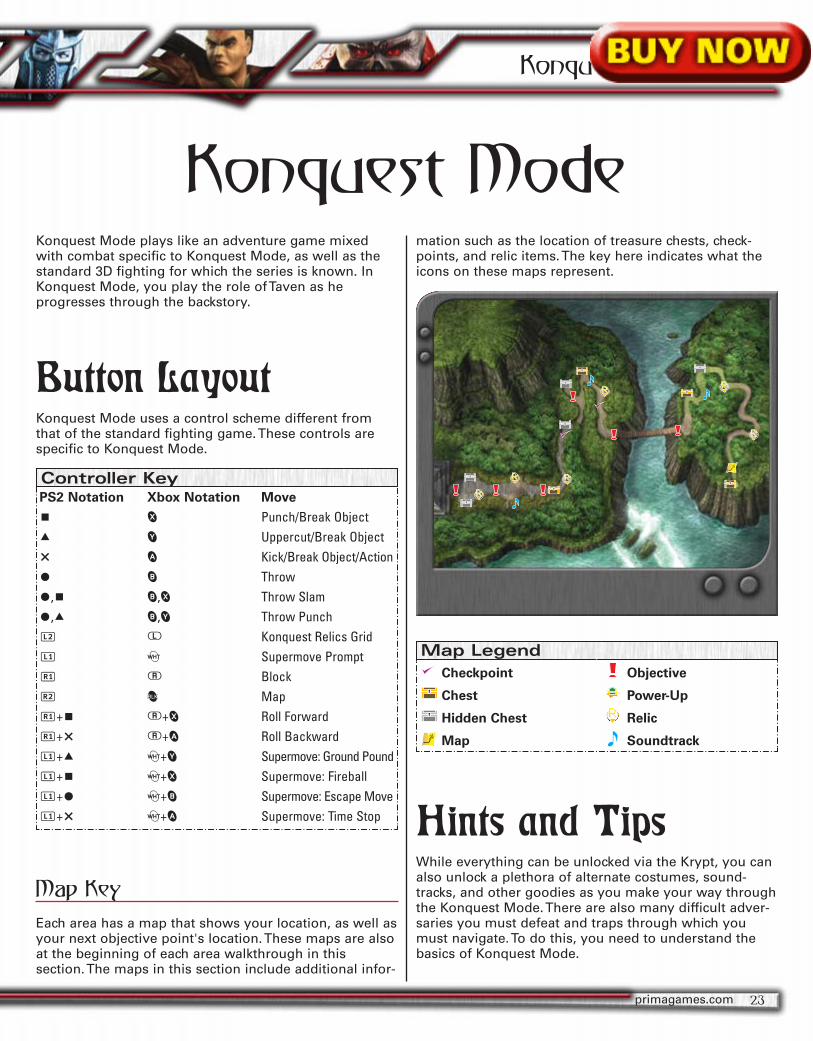
Map Key
Each area has a map that shows your location, as well asyour next objective point's location. These maps are alsoat the beginning of each area walkthrough in thissection. The maps in this section include additional infor-
mation such as the location of treasure chests, check-points, and relic items. The key here indicates what theicons on these maps represent.
Hints and TipsWhile everything can be unlocked via the Krypt, you canalso unlock a plethora of alternate costumes, sound-tracks, and other goodies as you make your way throughthe Konquest Mode. There are also many difficult adver-saries you must defeat and traps through which youmust navigate. To do this, you need to understand thebasics of Konquest Mode.
primagames.com
Konquest Mode
PS2 Notation Xbox Notation Move
P 3 Punch/Break ObjectI 4 Uppercut/Break ObjectU 1 Kick/Break Object/ActionO 2 ThrowO,P 2,3 Throw SlamO,I 2,4 Throw Punchl 7 Konquest Relics GridL 5 Supermove PromptR 8 Blockr 6 MapR+P 8+3 Roll ForwardR+U 8+1 Roll BackwardL+I 5+4 Supermove: Ground PoundL+P 5+3 Supermove: FireballL+O 5+2 Supermove: Escape MoveL+U 5+1 Supermove: Time Stop
Controller Key
Checkpoint
Chest
Hidden Chest
Map
Objective
Power-Up
Relic
Soundtrack
Map Legend
28
Head to the right first andkick open the chest at thewalkway's end. This unlocksHsu Hao's alternate costume.Head to the other side and kickopen the other chest to find300 koins as well as Cryax'sBomb, another relic item.
Head to the exit, wherethere is a green panel on theleft side. Access the panel toopen the door. Head through the door and open thechest to your right. This will unlock the Elder Gods MaleArmor belt for the Kreate a Fighter mode.
Search the bodies on thefloor to find koins, KungLao's Hat (another relic item),the key card needed to getout of the room, and koins.
At the room's end isanother chest that unlocksHotaru's alternate costume.Access the panel to the rightof the door to head out ofthat room.
In the next room, you're instructed to knock theTekunin into the fan to progress. Stand near the room's
middle and use youruppercut attack to clear outthe Tekunin that attack you.After you clear the Tekunin, achest spawns. It holdsCyrax's alternate costume.
In the room's corners,you can find the relic itemNightwolf's Axe and somekoins. Proceed to your nextobjective.
After you enter the nextroom, you're granted yoursecond supermove, theFireball. This triggers anotherKonquest Kombat battle.Defeat the enemies and headto the room's end. Here areSektor's Rocket, another relicitem, and the panel to openthe next door.
Head to the point of yournext objective to find asword. Grab it to initiate the next Konquest Kombatbattle. Clear the enemies to spawn a chest that containsBaraka's alternate costume. Look around the room tofind another relic item, Jade's Bracelet, and some koins.
Proceed to the next room, where there are a smallnumber of enemies. Look around the room to findSonya's I.D., another relic item, and koins. Access thepanel to open the door, and you enter into MortalKombat with Sektor. Defeat Sektor to progress to acutscene and the next area.
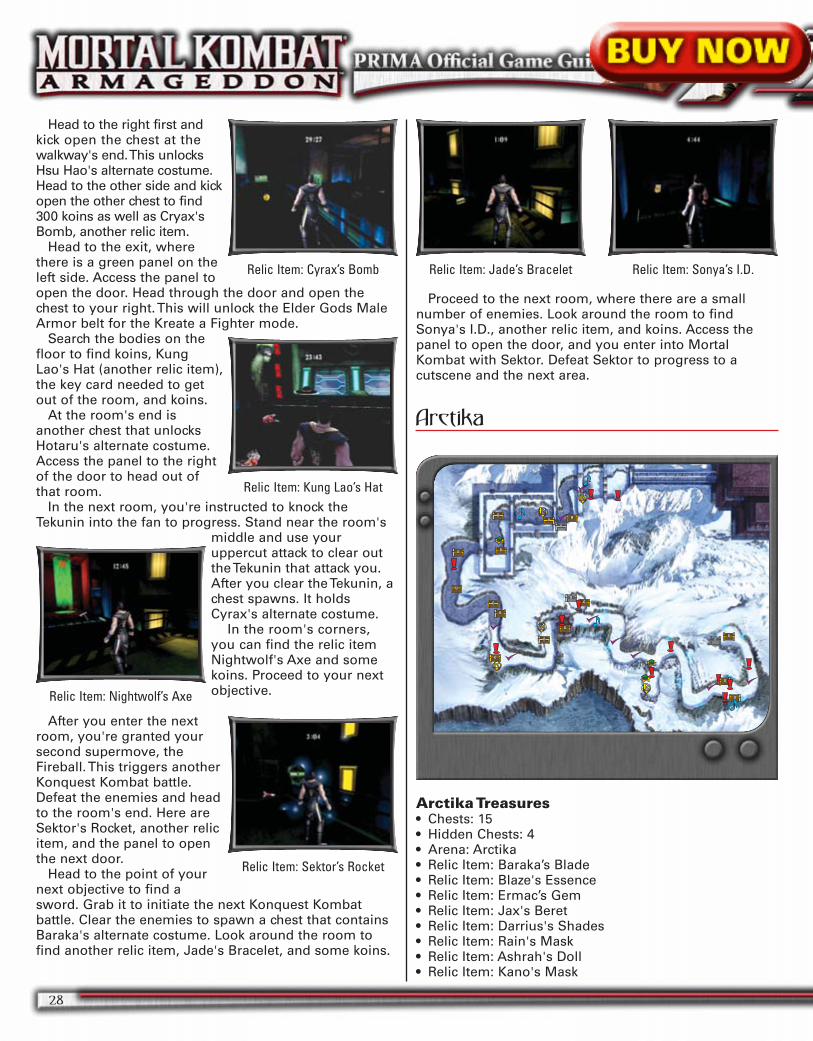
Arctika
Arctika Treasures• Chests: 15• Hidden Chests: 4• Arena: Arctika• Relic Item: Baraka’s Blade• Relic Item: Blaze's Essence• Relic Item: Ermac’s Gem• Relic Item: Jax's Beret• Relic Item: Darrius's Shades • Relic Item: Rain's Mask• Relic Item: Ashrah's Doll• Relic Item: Kano's Mask
Relic Item: Cyrax’s Bomb Relic Item: Jade’s Bracelet Relic Item: Sonya’s I.D.
Relic Item: Kung Lao’s Hat
Relic Item: Nightwolf’s Axe
Relic Item: Sektor’s Rocket
34
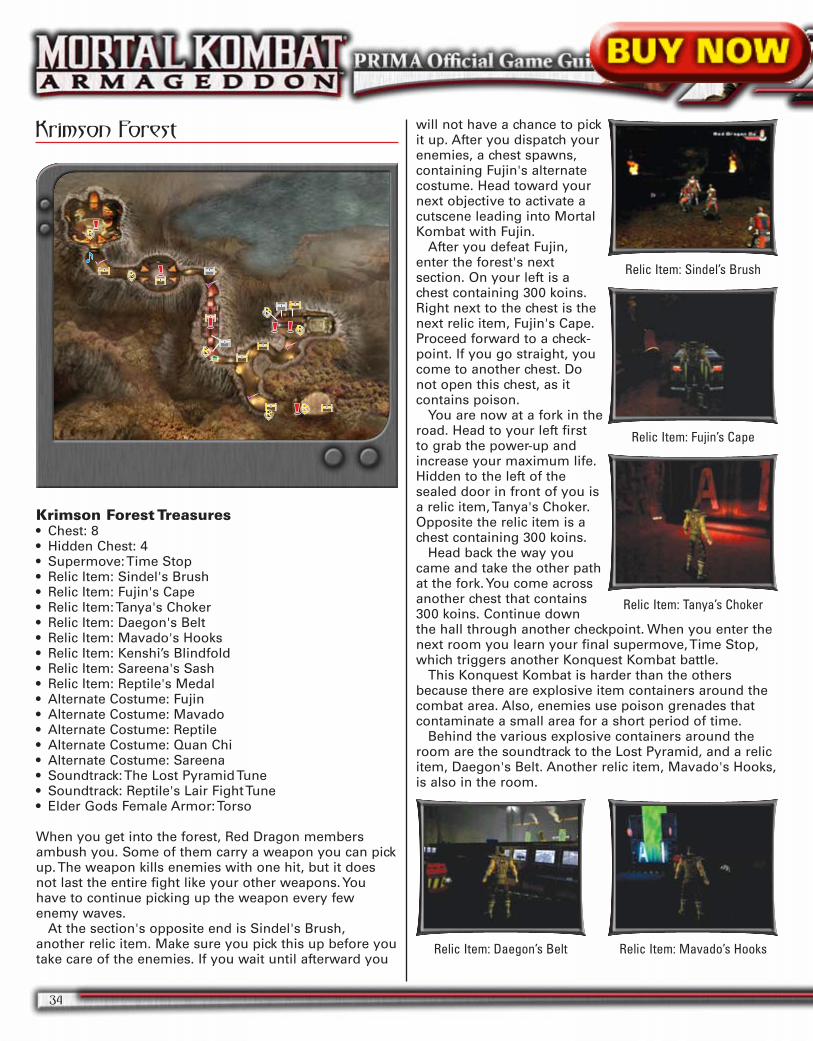
Krimson Forest
Krimson Forest Treasures• Chest: 8• Hidden Chest: 4• Supermove: Time Stop• Relic Item: Sindel's Brush• Relic Item: Fujin's Cape• Relic Item: Tanya's Choker• Relic Item: Daegon's Belt• Relic Item: Mavado's Hooks• Relic Item: Kenshi’s Blindfold• Relic Item: Sareena's Sash• Relic Item: Reptile's Medal• Alternate Costume: Fujin• Alternate Costume: Mavado• Alternate Costume: Reptile• Alternate Costume: Quan Chi• Alternate Costume: Sareena• Soundtrack: The Lost Pyramid Tune• Soundtrack: Reptile's Lair Fight Tune• Elder Gods Female Armor: Torso
When you get into the forest, Red Dragon membersambush you. Some of them carry a weapon you can pickup. The weapon kills enemies with one hit, but it doesnot last the entire fight like your other weapons. Youhave to continue picking up the weapon every fewenemy waves.
At the section's opposite end is Sindel's Brush,another relic item. Make sure you pick this up before youtake care of the enemies. If you wait until afterward you
will not have a chance to pickit up. After you dispatch yourenemies, a chest spawns,containing Fujin's alternatecostume. Head toward yournext objective to activate acutscene leading into MortalKombat with Fujin.
After you defeat Fujin,enter the forest's nextsection. On your left is achest containing 300 koins.Right next to the chest is thenext relic item, Fujin's Cape.Proceed forward to a check-point. If you go straight, youcome to another chest. Donot open this chest, as itcontains poison.
You are now at a fork in theroad. Head to your left firstto grab the power-up andincrease your maximum life.Hidden to the left of thesealed door in front of you isa relic item, Tanya's Choker.Opposite the relic item is achest containing 300 koins.
Head back the way youcame and take the other pathat the fork. You come acrossanother chest that contains300 koins. Continue downthe hall through another checkpoint. When you enter thenext room you learn your final supermove, Time Stop,which triggers another Konquest Kombat battle.
This Konquest Kombat is harder than the othersbecause there are explosive item containers around thecombat area. Also, enemies use poison grenades thatcontaminate a small area for a short period of time.
Behind the various explosive containers around theroom are the soundtrack to the Lost Pyramid, and a relicitem, Daegon's Belt. Another relic item, Mavado's Hooks,is also in the room.
Relic Item: Fujin’s Cape
Relic Item: Sindel’s Brush
Relic Item: Tanya’s Choker
Relic Item: Daegon’s Belt Relic Item: Mavado’s Hooks
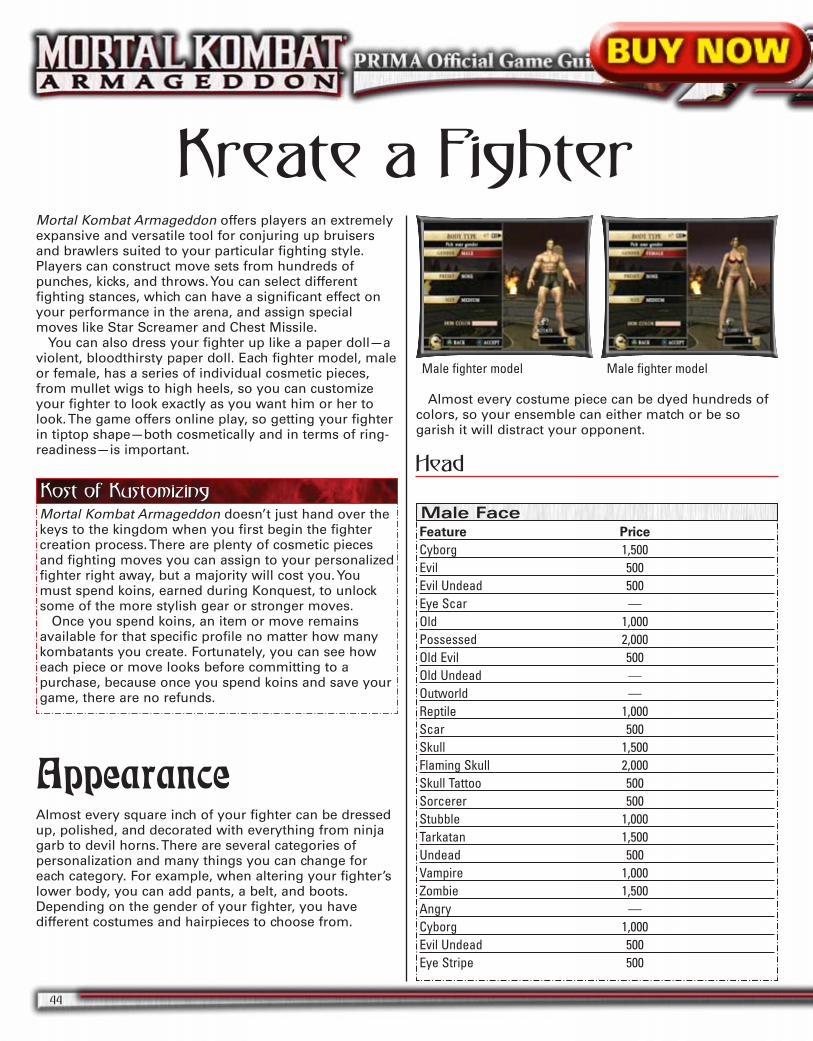
Kreate a FighterMortal Kombat Armageddon offers players an extremelyexpansive and versatile tool for conjuring up bruisersand brawlers suited to your particular fighting style.Players can construct move sets from hundreds ofpunches, kicks, and throws. You can select differentfighting stances, which can have a significant effect onyour performance in the arena, and assign specialmoves like Star Screamer and Chest Missile.
You can also dress your fighter up like a paper doll—aviolent, bloodthirsty paper doll. Each fighter model, maleor female, has a series of individual cosmetic pieces,from mullet wigs to high heels, so you can customizeyour fighter to look exactly as you want him or her tolook. The game offers online play, so getting your fighterin tiptop shape—both cosmetically and in terms of ring-readiness—is important.
AppearanceAlmost every square inch of your fighter can be dressedup, polished, and decorated with everything from ninjagarb to devil horns. There are several categories ofpersonalization and many things you can change foreach category. For example, when altering your fighter’slower body, you can add pants, a belt, and boots.Depending on the gender of your fighter, you havedifferent costumes and hairpieces to choose from.
Almost every costume piece can be dyed hundreds ofcolors, so your ensemble can either match or be sogarish it will distract your opponent.
Head
44
Mortal Kombat Armageddon doesn’t just hand over thekeys to the kingdom when you first begin the fightercreation process. There are plenty of cosmetic piecesand fighting moves you can assign to your personalizedfighter right away, but a majority will cost you. Youmust spend koins, earned during Konquest, to unlocksome of the more stylish gear or stronger moves.
Once you spend koins, an item or move remainsavailable for that specific profile no matter how manykombatants you create. Fortunately, you can see howeach piece or move looks before committing to apurchase, because once you spend koins and save yourgame, there are no refunds.
Kost of KustomizingKost of Kustomizing
Male fighter model Male fighter model
Feature Price
Cyborg 1,500Evil 500Evil Undead 500Eye Scar —Old 1,000Possessed 2,000Old Evil 500Old Undead —Outworld —Reptile 1,000Scar 500Skull 1,500Flaming Skull 2,000Skull Tattoo 500Sorcerer 500Stubble 1,000Tarkatan 1,500Undead 500Vampire 1,000Zombie 1,500Angry —Cyborg 1,000Evil Undead 500Eye Stripe 500
Male Face
46
Examples
Examples
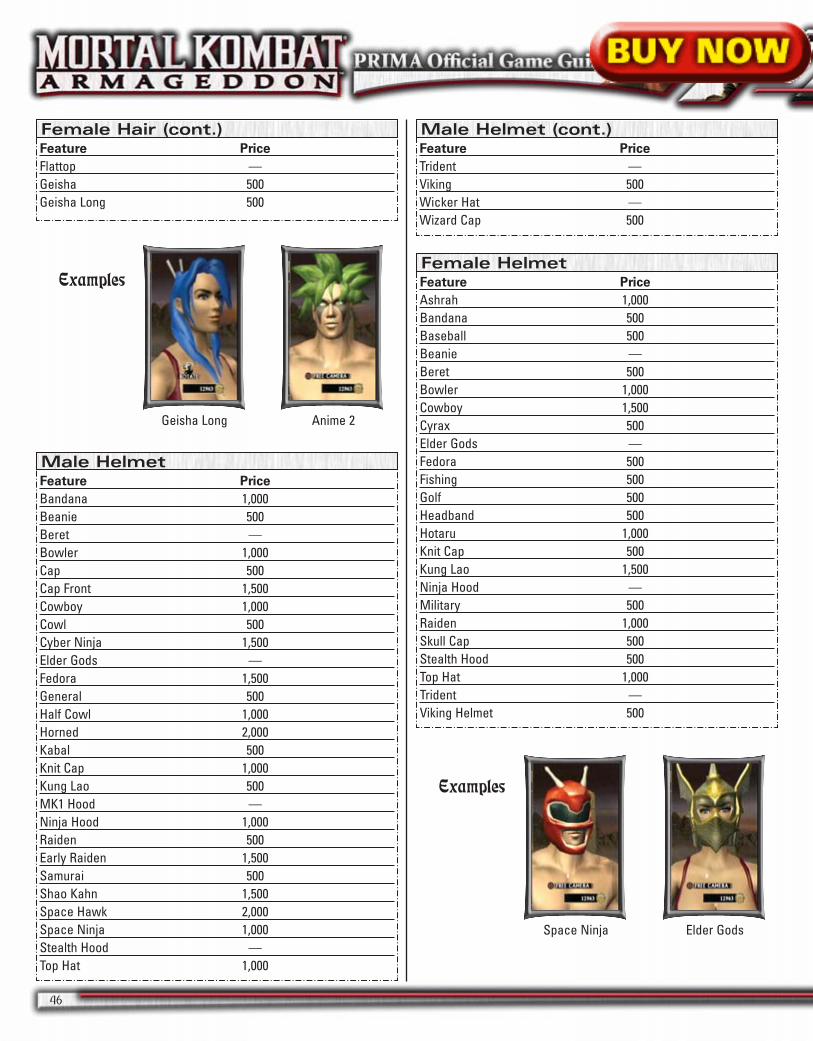
Geisha Long Anime 2
Space Ninja Elder Gods
Feature Price
Bandana 1,000Beanie 500Beret —Bowler 1,000Cap 500Cap Front 1,500Cowboy 1,000Cowl 500Cyber Ninja 1,500Elder Gods —Fedora 1,500General 500Half Cowl 1,000Horned 2,000Kabal 500Knit Cap 1,000Kung Lao 500MK1 Hood —Ninja Hood 1,000Raiden 500Early Raiden 1,500Samurai 500Shao Kahn 1,500Space Hawk 2,000Space Ninja 1,000Stealth Hood —Top Hat 1,000
Male Helmet
Feature Price
Ashrah 1,000Bandana 500Baseball 500Beanie —Beret 500Bowler 1,000Cowboy 1,500Cyrax 500Elder Gods —Fedora 500Fishing 500Golf 500Headband 500Hotaru 1,000Knit Cap 500Kung Lao 1,500Ninja Hood —Military 500Raiden 1,000Skull Cap 500Stealth Hood 500Top Hat 1,000Trident —Viking Helmet 500
Female Helmet
Feature Price
Trident —Viking 500Wicker Hat —Wizard Cap 500
Male Helmet (cont.)Feature Price
Flattop —Geisha 500Geisha Long 500
Female Hair (cont.)
Motor Kombat
75
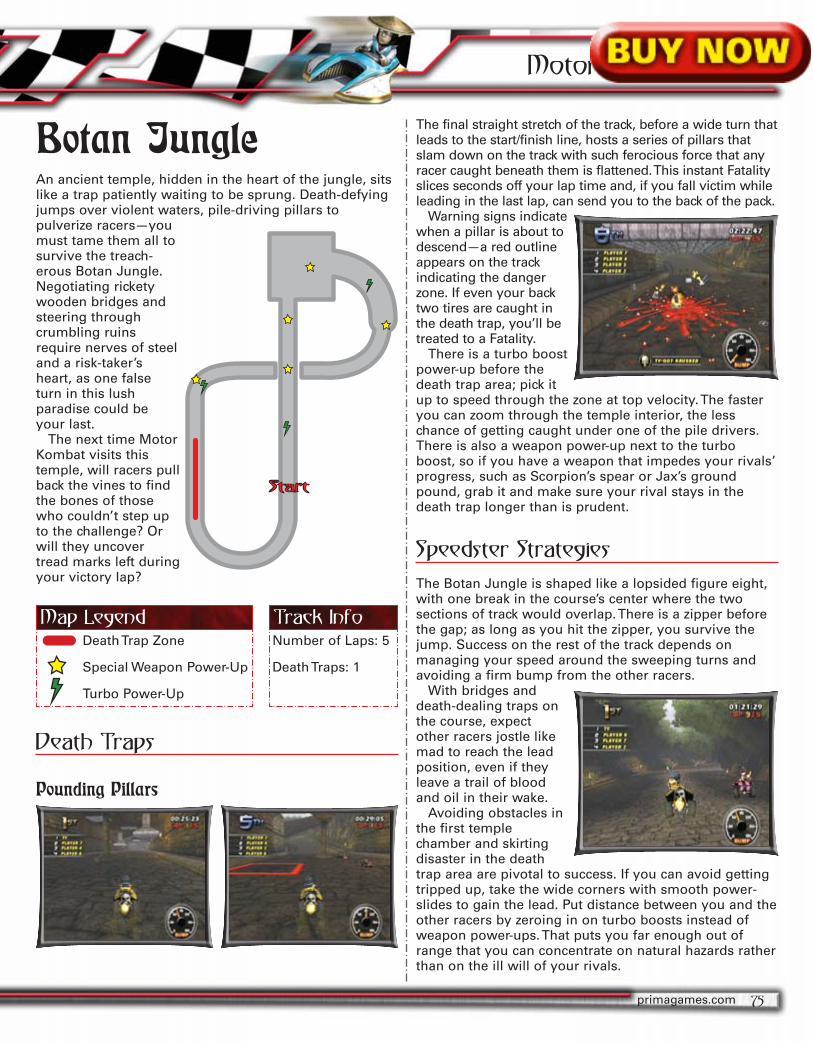
Botan JungleAn ancient temple, hidden in the heart of the jungle, sitslike a trap patiently waiting to be sprung. Death-defyingjumps over violent waters, pile-driving pillars topulverize racers—youmust tame them all tosurvive the treach-erous Botan Jungle.Negotiating ricketywooden bridges andsteering throughcrumbling ruinsrequire nerves of steeland a risk-taker’sheart, as one falseturn in this lushparadise could beyour last.
The next time MotorKombat visits thistemple, will racers pullback the vines to findthe bones of thosewho couldn’t step upto the challenge? Orwill they uncovertread marks left duringyour victory lap?
Death Traps
Pounding Pillars
The final straight stretch of the track, before a wide turn thatleads to the start/finish line, hosts a series of pillars thatslam down on the track with such ferocious force that anyracer caught beneath them is flattened. This instant Fatalityslices seconds off your lap time and, if you fall victim whileleading in the last lap, can send you to the back of the pack.
Warning signs indicatewhen a pillar is about todescend—a red outlineappears on the trackindicating the dangerzone. If even your backtwo tires are caught inthe death trap, you’ll betreated to a Fatality.
There is a turbo boostpower-up before thedeath trap area; pick itup to speed through the zone at top velocity. The fasteryou can zoom through the temple interior, the lesschance of getting caught under one of the pile drivers.There is also a weapon power-up next to the turboboost, so if you have a weapon that impedes your rivals’progress, such as Scorpion’s spear or Jax’s groundpound, grab it and make sure your rival stays in thedeath trap longer than is prudent.
Speedster Strategies
The Botan Jungle is shaped like a lopsided figure eight,with one break in the course’s center where the twosections of track would overlap. There is a zipper beforethe gap; as long as you hit the zipper, you survive thejump. Success on the rest of the track depends onmanaging your speed around the sweeping turns andavoiding a firm bump from the other racers.
With bridges anddeath-dealing traps onthe course, expectother racers jostle likemad to reach the leadposition, even if theyleave a trail of bloodand oil in their wake.
Avoiding obstacles inthe first templechamber and skirtingdisaster in the deathtrap area are pivotal to success. If you can avoid gettingtripped up, take the wide corners with smooth power-slides to gain the lead. Put distance between you and theother racers by zeroing in on turbo boosts instead ofweapon power-ups. That puts you far enough out ofrange that you can concentrate on natural hazards ratherthan on the ill will of your rivals.
primagames.com
Death Trap Zone
Special Weapon Power-Up
Turbo Power-Up
Map LegendNumber of Laps: 5
Death Traps: 1
Track Info
78
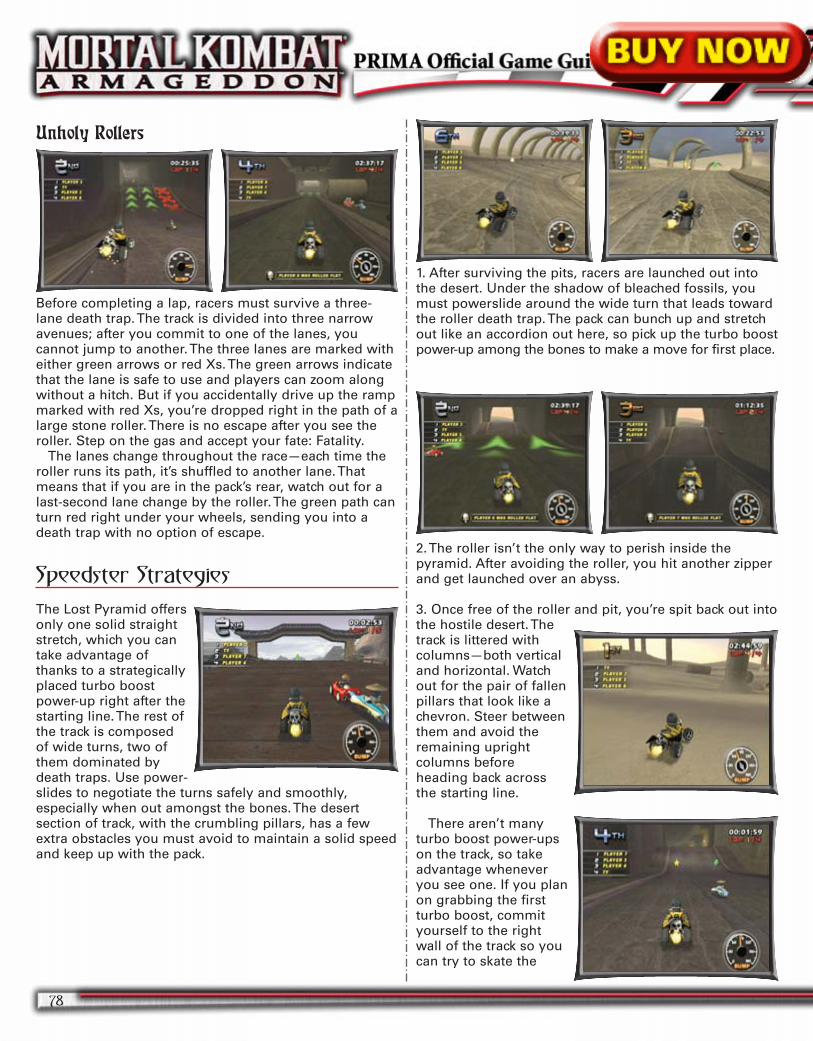
Unholy Rollers
Before completing a lap, racers must survive a three-lane death trap. The track is divided into three narrowavenues; after you commit to one of the lanes, youcannot jump to another. The three lanes are marked witheither green arrows or red Xs. The green arrows indicatethat the lane is safe to use and players can zoom alongwithout a hitch. But if you accidentally drive up the rampmarked with red Xs, you’re dropped right in the path of alarge stone roller. There is no escape after you see theroller. Step on the gas and accept your fate: Fatality.
The lanes change throughout the race—each time theroller runs its path, it’s shuffled to another lane. Thatmeans that if you are in the pack’s rear, watch out for alast-second lane change by the roller. The green path canturn red right under your wheels, sending you into adeath trap with no option of escape.
Speedster Strategies
The Lost Pyramid offersonly one solid straightstretch, which you cantake advantage ofthanks to a strategicallyplaced turbo boostpower-up right after thestarting line. The rest ofthe track is composedof wide turns, two ofthem dominated bydeath traps. Use power-slides to negotiate the turns safely and smoothly,especially when out amongst the bones. The desertsection of track, with the crumbling pillars, has a fewextra obstacles you must avoid to maintain a solid speedand keep up with the pack.
1. After surviving the pits, racers are launched out intothe desert. Under the shadow of bleached fossils, youmust powerslide around the wide turn that leads towardthe roller death trap. The pack can bunch up and stretchout like an accordion out here, so pick up the turbo boostpower-up among the bones to make a move for first place.
2. The roller isn’t the only way to perish inside thepyramid. After avoiding the roller, you hit another zipperand get launched over an abyss.
3. Once free of the roller and pit, you’re spit back out intothe hostile desert. Thetrack is littered withcolumns—both verticaland horizontal. Watchout for the pair of fallenpillars that look like achevron. Steer betweenthem and avoid theremaining uprightcolumns beforeheading back acrossthe starting line.
There aren’t manyturbo boost power-upson the track, so takeadvantage wheneveryou see one. If you planon grabbing the firstturbo boost, commityourself to the rightwall of the track so youcan try to skate the
90
PS2 Notation Xbox Notation Action Number of Uses
4,4+P A,A+3 Punch1 2
Knees Behind Chains
PS2 Notation Xbox Notation Action Number of Uses
6,6+P D,D+3 Kick 2
Boss Knees Behind Chains
PS2 Notation Xbox Notation Action Number of Uses
6,6+P D,D+3 Head Punch 1
Boss Face Down Chains
PS2 Notation Xbox Notation Action Number of Uses
4,4+P A,A+3 Knee Drop 18,8+P W,W+3 Back Stomp 26,6+P D,D+3 Punch 1
Face Down Chains
1 This action will leave the opponent in the forward position.
PS2 Notation Xbox Notation Finisher
4,4+O A,A+2 Head Rip
Knees Behind Finishers
PS2 Notation Xbox Notation Finisher
8,8+O W,W+2 Head Crush
Boss Knees Behind Finishers
PS2 Notation Xbox Notation End Position
2,4+I X,A+4 Forward2,4+P X,A+3 Knees8,2,8+P W,X,W+3 Pull Out Sword
Face Down Transitions
PS2 Notation Xbox Notation End Position
2,8+I X,W+4 Knees
Boss Face Down Transitions
PS2 Notation Xbox Notation Finisher
6,6+O D,D+2 Spine Rip
Face Down Finishers
PS2 Notation Xbox Notation Finisher
6,6+O D,D+2 Head Stab
Face Down Finishers With Sword
PS2 Notation Xbox Notation Finisher
8,8+O W,W+2 Head Pop8,2+O W,X+2 Exploding Torso
Boss Face Down Finishers
Kustom Fatalities
91primagames.com
PS2 Notation Xbox Notation Action Number of Uses
6,6+I D,D+4 Punch 2
Face Up Chains
PS2 Notation Xbox Notation Action Number of Uses
4,4+P A,A+3 Impale1 1
Face Up Chains With Sword
PS2 Notation Xbox Notation Action Number of Uses
6,2+P D,X+3 Knee 2
Boss Face Up Chains
1 You will no longer be able to use sword-based actions after performing this action.In addition, this action will leave the opponent in the knees-behind position.
PS2 Notation Xbox Notation Finisher
6,6+O D,D+2 Head Stomp One2,2+O X,X+2 Head Stomp Two
Face Up Finishers
PS2 Notation Xbox Notation Finisher
8,8+O W,W+2 Decapitation4,4+O A,A+2 Head Stab
Face Up Finishers With Sword
PS2 Notation Xbox Notation Finisher
2,2+O X,X+2 Head Punch4,2+O A,X+2 Arms Off
Boss Face Up Finishers
PS2 Notation Xbox Notation End Position
2,4+P X,A+3 Behind2,6+I X,D+4 Knees Behind8,2,8+P W,X,W+3 Pull Out Sword
Face Up TransitionsPS2 Notation Xbox Notation End Position
2,4+I X,A+4 Behind2,6+I X,D+4 Knees Behind
Boss Face Up Transitions
Ultimate Mortal Kombat 3
93
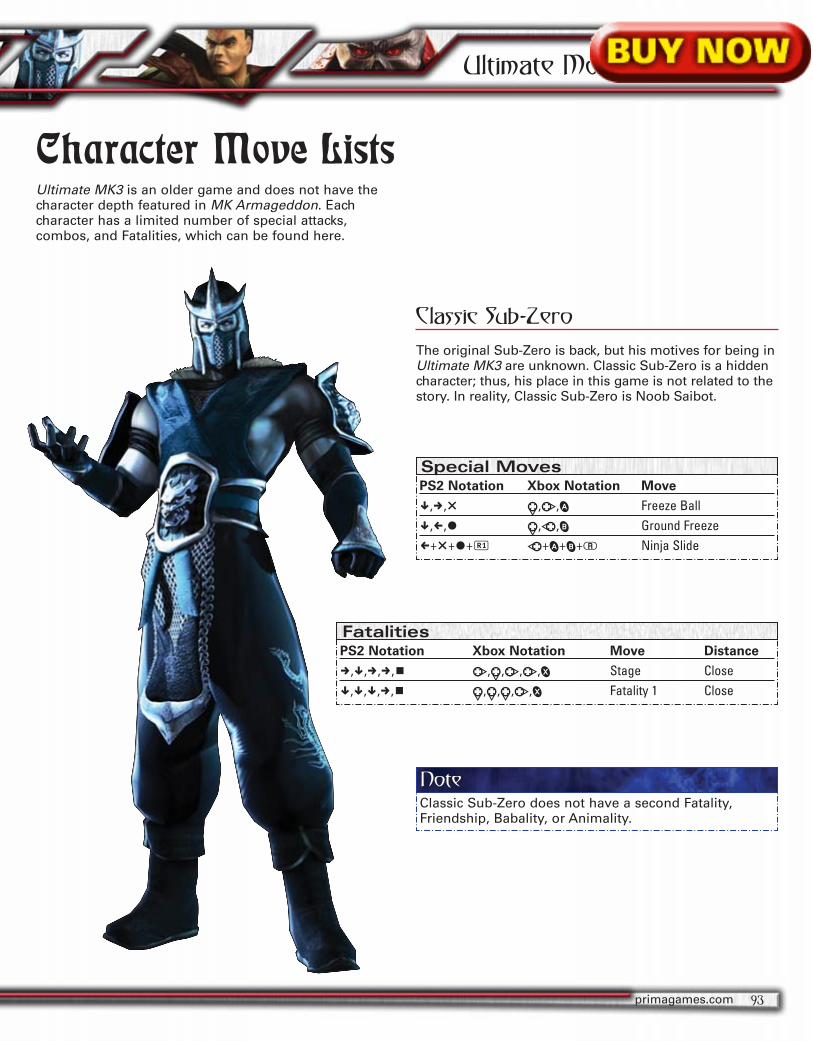
Character Move ListsUltimate MK3 is an older game and does not have thecharacter depth featured in MK Armageddon. Eachcharacter has a limited number of special attacks,combos, and Fatalities, which can be found here.
Classic Sub-Zero
The original Sub-Zero is back, but his motives for being inUltimate MK3 are unknown. Classic Sub-Zero is a hiddencharacter; thus, his place in this game is not related to thestory. In reality, Classic Sub-Zero is Noob Saibot.
primagames.com
Classic Sub-Zero does not have a second Fatality,Friendship, Babality, or Animality.
NoteNote
PS2 Notation Xbox Notation Move
2,6,U X,D,1 Freeze Ball2,4,O X,A,2 Ground Freeze4+U+O+R A+1+2+8 Ninja Slide
Special Moves
PS2 Notation Xbox Notation Move Distance
6,2,6,6,P D,X,D,D,3 Stage Close2,2,2,6,P X,X,X,D,3 Fatality 1 Close
Fatalities
108
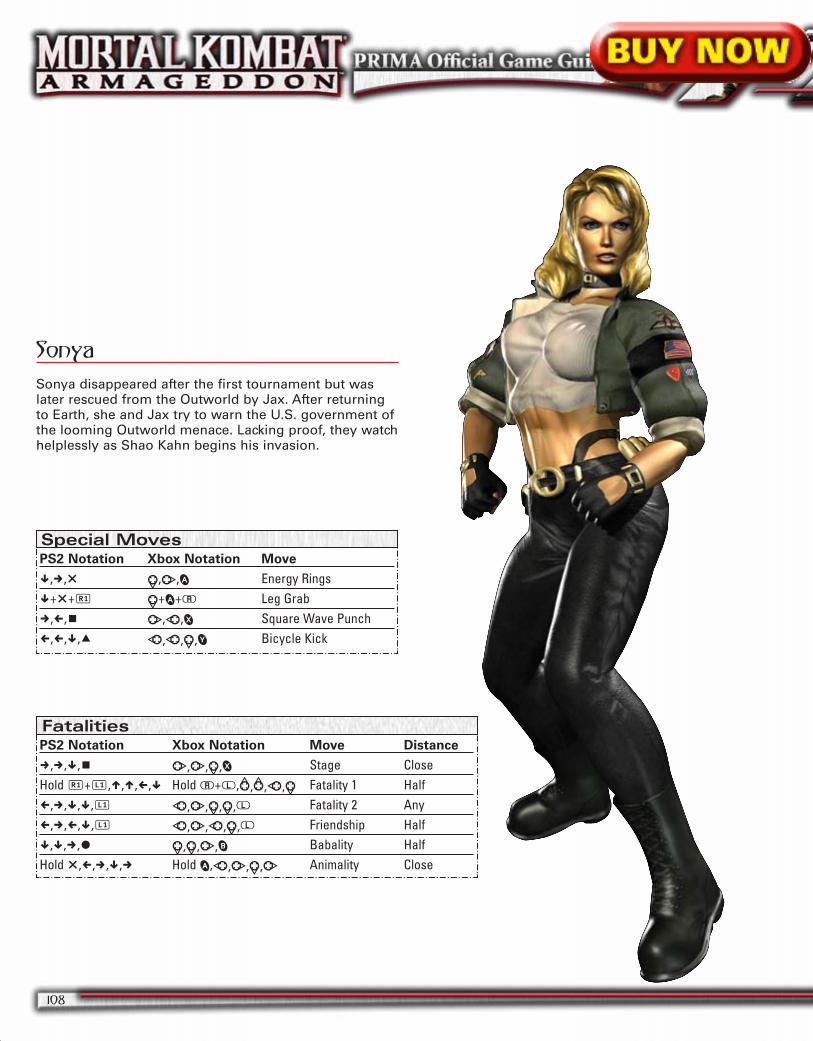
Sonya
Sonya disappeared after the first tournament but waslater rescued from the Outworld by Jax. After returningto Earth, she and Jax try to warn the U.S. government ofthe looming Outworld menace. Lacking proof, they watchhelplessly as Shao Kahn begins his invasion.
PS2 Notation Xbox Notation Move
2,6,U X,D,1 Energy Rings2+U+R X+1+8 Leg Grab6,4,P D,A,3 Square Wave Punch4,4,2,I A,A,X,4 Bicycle Kick
Special Moves
PS2 Notation Xbox Notation Move Distance
6,6,2,P D,D,X,3 Stage CloseHold R+L,8,8,4,2 Hold 8+7,W,W,A,X Fatality 1 Half4,6,2,2,L A,D,X,X,7 Fatality 2 Any4,6,4,2,L A,D,A,X,7 Friendship Half2,2,6,O X,X,D,2 Babality HalfHold U,4,6,2,6 Hold 1,A,D,X,D Animality Close
Fatalities
Best Stages
As a punishing character who excels at close-rangecombat, Ashrah does well on small stages with deathtraps. On these stages, Ashrah typically only needs oneor two mistakes to force an opponent into a death trap.Try to fight on Falling Cliffs, Armory, Battle Arena, EvilTower, Sky Temple, and Wastelands.
Worst Stages
Large stages with no death traps do not give Ashrah anyadvantages. Opponents can distance themselves fromAshrah, making it difficult for her to inflict damage.Without the help of death traps, it takes Ashrah longer todispose of her opponents. Avoid fighting on Pyramid ofArgus, Botan Jungle, Arctika, Lin Kuei Palace,Netherrealm Cliffs, and Edenian Ruins.
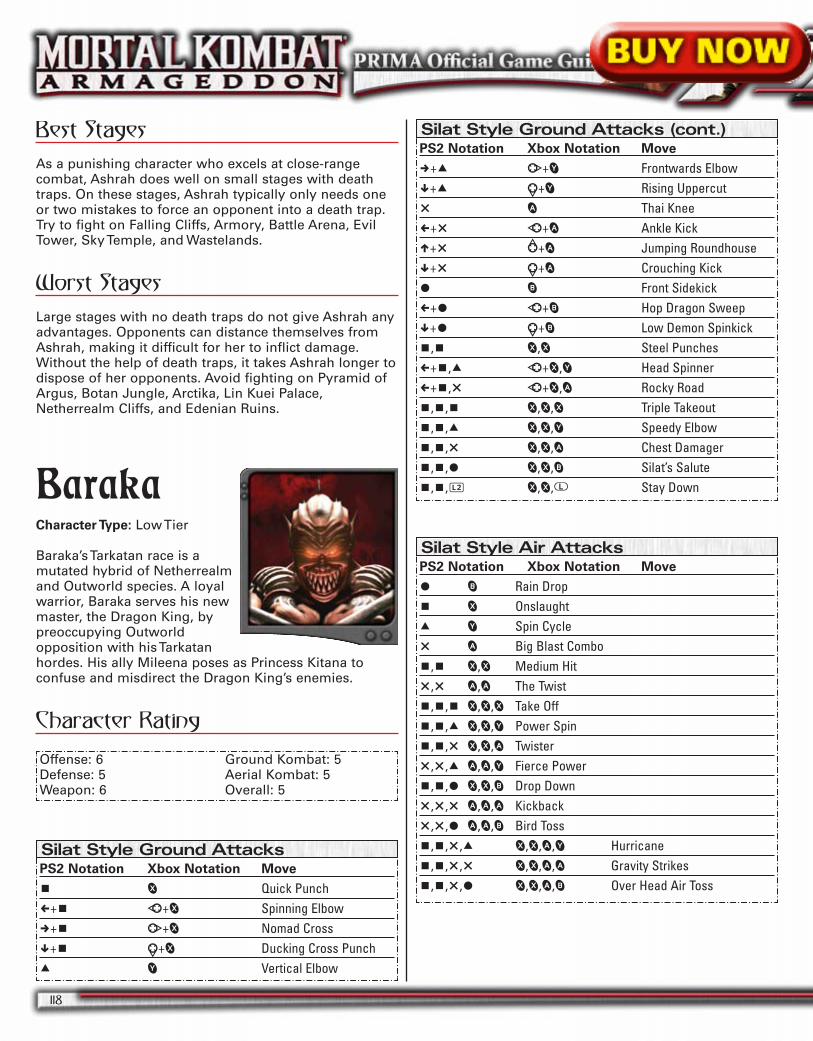
BarakaCharacter Type: Low Tier
Baraka’s Tarkatan race is amutated hybrid of Netherrealmand Outworld species. A loyalwarrior, Baraka serves his newmaster, the Dragon King, bypreoccupying Outworldopposition with his Tarkatanhordes. His ally Mileena poses as Princess Kitana toconfuse and misdirect the Dragon King’s enemies.
Character Rating
118
Offense: 6Defense: 5Weapon: 6
Ground Kombat: 5Aerial Kombat: 5Overall: 5
PS2 Notation Xbox Notation Move
P 3 Quick Punch4+P A+3 Spinning Elbow6+P D+3 Nomad Cross2+P X+3 Ducking Cross PunchI 4 Vertical Elbow
Silat Style Ground Attacks
PS2 Notation Xbox Notation Move
6+I D+4 Frontwards Elbow2+I X+4 Rising UppercutU 1 Thai Knee4+U A+1 Ankle Kick8+U W+1 Jumping Roundhouse2+U X+1 Crouching KickO 2 Front Sidekick4+O A+2 Hop Dragon Sweep2+O X+2 Low Demon SpinkickP,P 3,3 Steel Punches4+P,I A+3,4 Head Spinner4+P,U A+3,1 Rocky RoadP,P,P 3,3,3 Triple TakeoutP,P,I 3,3,4 Speedy ElbowP,P,U 3,3,1 Chest DamagerP,P,O 3,3,2 Silat’s SaluteP,P,l 3,3,7 Stay Down
Silat Style Ground Attacks (cont.)
PS2 Notation Xbox Notation Move
O 2 Rain DropP 3 OnslaughtI 4 Spin CycleU 1 Big Blast ComboP,P 3,3 Medium HitU,U 1,1 The TwistP,P,P 3,3,3 Take OffP,P,I 3,3,4 Power SpinP,P,U 3,3,1 TwisterU,U,I 1,1,4 Fierce PowerP,P,O 3,3,2 Drop DownU,U,U 1,1,1 KickbackU,U,O 1,1,2 Bird TossP,P,U,I 3,3,1,4 HurricaneP,P,U,U 3,3,1,1 Gravity StrikesP,P,U,O 3,3,1,2 Over Head Air Toss
Silat Style Air Attacks
Character Guide
119primagames.com
A-B
C-D
E-F
G-H
I-JK
-LM
-NO
-PQ
-RS
-TU
-VW
-XY-Z
PS2 Notation Xbox Notation Move
P 3 Downwards Slash4+P A+3 Mid-Ripper6+P D+3 Face Impaler2+P X+3 Low ScissorsI 4 Throat Slash8+I W+4 Send Them Flying6+I D+4 Chest Slash2+I X+4 Crouching Dual StabU 1 Scarlet Swing8+U W+1 Up and Beyond6+U D+1 Get the Point2+U X+1 Toe SlashO 2 Spinning Sidekick4+O A+2 Demon Sweep2+O X+2 Shin StabP,P 3,3 Slashing WindI,P 4,3 Long TipsI,I 4,4 Mithril MetalU,U 1,1 CycloneI,P,P 4,3,3 Frenzy SlashesU,U,I 1,1,4 Khan’s Warrior
Blades Style AttacksPS2 Notation Xbox Notation Move
U,U,O 1,1,2 Baraka’s SpecialU,U,I,P 1,1,4,3 Death’s DoorU,U,I,I 1,1,4,4 Mutant SpikesU,U,I,P,P 1,1,4,3,3 Out of Kontral Slashes
Blades Style Attacks (cont.)
PS2 Notation Xbox Notation Move
P 3 Thrash OutI 4 BogieU 1 Long LegsO 2 Spinning Feet GrabP,P 3,3 RebelU,U 1,1 Airborne KickP,P,P 3,3,3 Fresh AirP,P,I 3,3,4 Spinning AttackP,P,U 3,3,1 Lucky WindU,U,I 1,1,4 SomersaultP,P,O 3,3,2 Flip DownU,U,U 1,1,1 Boot To The FaceU,U,O 1,1,2 Pincer ThrowP,P,U,U 3,3,1,1 Guiding LightP,P,U,O 3,3,1,2 Zero Gravity
Blades Style Attacks
Silat: Speedy Elbow, Change Fighting Style, Out of Kontral Slashes(29% Damage)
Blades: Up and Beyond, Out of Kontral Slashes (35% Damage)
Best Combos
Silat: Speedy Elbow, Triple Takeout, Mutant Blades (27% Damage)
The Prima Games logo is a registeredtrademark of Random House, Inc., regis-tered in the United States and othercountries. Primagames.com is a regis-
tered trademark of Random House, Inc., regis-tered in the United States.
© 2006 by Midway Amusement Games LLC. Allrights reserved. No part of this book may bereproduced or transmitted in any form or by anymeans, electronic or mechanical, including photo-copying, recording, or by any information storageor retrieval system without written permissionfrom Midway Amusement Games LLC.
Product Manager: Todd ManningSenior Project Editor: Brooke N. Hall
Mortal Kombat® Armageddon™ © 2006 MidwayAmusement Games, LLC. All rights reserved.MORTAL KOMBAT, MORTAL KOMBATARMAGEDDON, the dragon logo, MIDWAY, andthe Midway logo are trademarks or registeredtrademarks of Midway Amusement Games, LLC.Midway Amusement Games, LLC and its affil-iates do not monitor, endorse or accept respon-sibility for the content of any non-Midwaywebsite. Used by permission.
All products and characters mentioned in thisbook are trademarks of their respectivecompanies.
Please be advised that the ESRB Ratings icons,"EC," "E," “E10+,” "T," "M," "AO," and "RP" aretrademarks owned by the EntertainmentSoftware Association, and may only be usedwith their permission and authority. For infor-mation regarding whether a product has beenrated by the ESRB, please visit www.esrb.org.For permission to use the Ratings icons, pleasecontact the ESA at esrblicenseinfo.com.
Important:Prima Games has made every effort to determine that theinformation contained in this book is accurate. However,the publisher makes no warranty, either expressed or implied,as to the accuracy, effectiveness, or completeness of thematerial in this book; nor does the publisher assumeliability for damages, either incidental or consequential,that may result from using the information in this book.The publisher cannot provide any additional informationor support regarding gameplay, hints and strategies, orproblems with hardware or software. Such questionsshould be directed to the support numbers provided bythe game and/or device manufacturers as set forth intheir documentation. Some game tricks require precisetiming and may require repeated attempts before thedesired result is achieved.
ISBN: 0-7615-5448-3Library of Congress Catalog Card Number:2006931178
ContentsIntroduction . . . . . . . . . . . . . . . . . 2
Basic Info andTerminology . . . . . . . . . . . . . . . . . 3
General Strategies . . . . . . . . . . . 6
Stage Strategies . . . . . . . . . . . . 12
Konquest Mode . . . . . . . . . . . . 23
Kreate a Fighter . . . . . . . . . . . . 44
Motor Kombat . . . . . . . . . . . . . . 69
Kustom Fatalities . . . . . . . . . . . 84
Ultimate Mortal Kombat 3 . . . . 92
Unlocking Guide . . . . . . . . . . . 110
Character Guide . . . . . . . . . . . 114
PRIMA Official Game Guide
Written by Bryan Dawson
Prima GamesA Division of Random House, Inc.
3000 Lava Ridge Court, Suite 100 / Roseville, CA 95661 / 1-800-733-3000 / www.primagames.com
The Prima Games logo is a registered trademark of Random House, Inc., registered in the United States and other countries.Primagames.com is a registered trademark of Random House, Inc., registered in the United States.


![Mortal Kombat [Operations] [English]](https://img.pdfslide.net/doc/110x75/5459e6beb1af9fb66e8b5ae8/mortal-kombat-operations-english.jpg)

![Mortal Kombat II [GamePro]](https://img.pdfslide.net/doc/110x75/553395585503460f068b4862/mortal-kombat-ii-gamepro.jpg)