Embed Size (px)
Citation preview
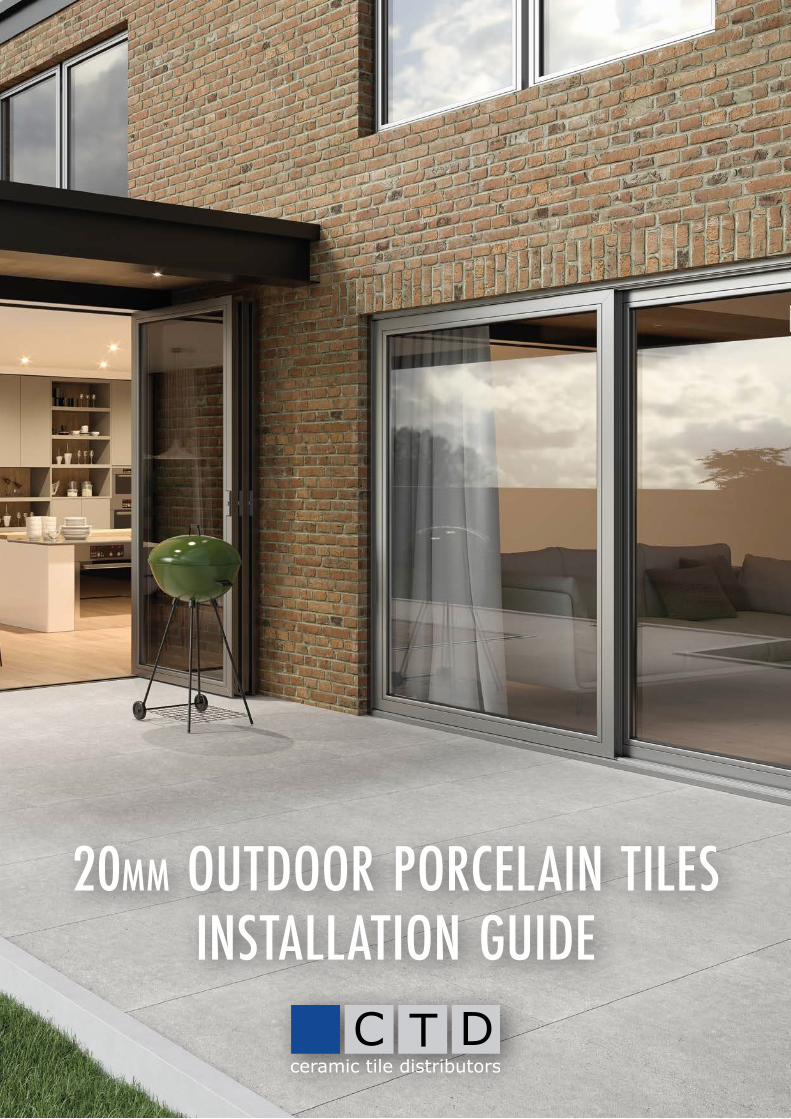
20MM OUTDOOR PORCELAIN TILES INSTALLATION GUIDE

A step up from the usual landscaping paving slabs, outdoor porcelain tiles offer a modern, sleek look that brings interior design to the outdoors. With a thickness of 20mm, outdoor tiles are ideal for patios, terraces and pathways and will transform outdoor living.
Outdoor porcelain tiles offer many features and benefits including a durable, scratch resistant and weatherproof surface requiring very little maintenance. Sealing is not required as the non-porous nature of porcelain tiles makes them resistant to staining, algae and mildew. This also results in them being very easy to clean. Safe even when wet thanks to a high slip resistance, porcelain tiles are an ideal solution to any outdoor living space.
Transform an outdoor space with 20mm outdoor porcelain tiles
Why use outdoor tiles?
Frost resistance
Load resistance
Scratch resistance
Resistance to staining and chemicals
Easy to clean both dry and wet
Slip resistant surface
Resistance to temperature and weather changes
Easy to assemble and disassemble*May differ depending on installation option used
20MM
Installation methodsThere are several installation methods for 20mm outdoor porcelain tiles.
This guide outlines four installation methods:1. Compacted stone sub base2. Raised pedestal system3. Gravel4. Grass
Standard installation
WHY 20MM OUTDOORPORCELAIN TILES?

Compacted MOT Type 1 orGSB (General Sub Base) Material
(100mm minimum)
Bedding mortar (30mm)
Planned patio surface
Total depth150mm
minimum
150mmminimum below
damp course
COMPACTED STONE SUB BASEPREPARATION
1) Mark out the patio area
Allow 150-200mm for kerbing or haunching should the patio not join a solid construction such as a house or garden wall.
2) Dig at least 150mm depth below the proposed height of the patio
This is to allow 100mm minimum compacted MOT Type 1 or GSB (General Sub Base) material, a 30mm minimum bed of bedding mortar and the 20mm porcelain tile.
Building regulations state that the paving must be 150mm below any DPC (damp-proof course) so that it protects the house from damp.
The patio must have suitable water drainage, such as a 15mm fall in the sub base for every 1000mm. This can be achieved by using a tense string line to guide the alignment along the length of the paving. Ensure that the sub base is no less than 100mm depth at any point when incorporating the fall.
Alternatively the installation of a linear drain system would allow for a seamless transition between the internal and external floors.
3) Compact the sub-base
The use of a MOT Type 1 or GSB material is required to give the strength and stability to the patio.
Rake out the aggregate to create an even layer, then use a compacting plate to compact the loose aggregate to a compressed height of 50mm below the string line, ensuring a 100mm depth of material.
4) Mix and apply the bedding mortar
Using a mixer, mix the sharp sand and cement 4-parts sand to 1-part cement. This should be a firm consistency, not sloppy or runny.
Apply the mortar to the sub base levelling it out to a height of 20mm below the string line, ensuring a 30mm minimum depth of mortar.
Ripple or roughen the surface to allow for better coverage of the porcelain tile.
OX Tape Measure5M D110118M D11012
RECOMMENDED TOOLSAvailable in-store at CTD Tile Showrooms and online at ctdtiles.co.uk

Outdoor tiles (20mm)
Slurry(1-2mm)
20kg UltraScape Pro-Prime Slurry Primer C3058
Job Done Multi-Purpose Block Brush D10967
OX Pro Levels600mm D11016 1200mm D110171800mm D11018
500g Rubi White Rubber Mallet D522
1) Prime the paving using slurry
Put 7 litres of water in a suitable container or bucket, add the slurry powder into the container and mix for 3 to 5 minutes so that it creates a smooth and lump free slurry.
Using a brush or roller apply 1–2mm of slurry onto the back of the tile and place immediately onto the bedding mortar ensuring wet on wet contact, lifting if required to check full coverage is achieved.
Allow a 3mm minimum joint, up to 20mm maximum between tiles (if using ProPave grout, other brands may differ).
2) Knock down the paving with a rubber mallet
To aid full coverage and adhesion to the bedding mortar, check that the tiles are level using a spirit level.
Allow the paving to fully cure (approx. 24-48 hours*) before grouting.
Rubi Tile Spacers (100 pack) 3mm D3144 4mm D2760
Rubi Electric Mixer
38L Yellow Gorilla TubD2819
Cutting 20mm Outdoor Porcelain Tiles
Outdoor porcelain tiles should only be cut using a continuous rim diamond blade (bench or handheld cutter) and water-fed for dust suppression and cooling.
Recommended tools include:
Rubi SPT Premium Diamond Blade
*Depending on conditions and products used. Sand/cement mortar may take up to 4 days to fully cure. Check manufacturer recommendations before grouting.
Available in-store at CTD Tile Showrooms and online at ctdtiles.co.uk
Rubi DC-250 Electric Tile Cutter
COMPACTED STONE SUB BASEINSTALLATION
RECOMMENDED TOOLS

Externaltiling grout
Water
The wet method of grouting is recommended when permeable bedding materials have been used in installation. This method makes it easier to apply the grout and allows the product to move deeper into the tile joints. This will also protect the tiles from oils and aid cleaning after application.
1) Ensure that the paving is clean
Remove any dust and bedding mortar that may be sitting proud of the grout joint.
2) Thoroughly soak the tiles using water
This ensures that no oils will penetrate the tiles, eases application, helps get the grout deep into the joint, and aids removal of excess material.
3) Pour the outdoor tile grout over the tile joints evenly
Use a brand new stiff brush and brush the grout into the joints diagonally. Ensure that the paving and grout is kept wet throughout jointing.
4) Repeat until the paving is fully grouted
Make sure to remove any excess material before it hardens on the tiles.
5) Leave for two hours then compact joints with a pointing trowel
To achieve the perfect flush finish, once brushed into place and left for two hours, compact the joints with a pointing trowel or joining iron.
If the joints now need topping-up, pour more grout over the joints, brush in and compact as required.
6) Spray the paving with water and brush away any excess material
ProPave grout is walkable after 24-48 hours (depending on conditions) and will reach its full strength after 28 days.
15kg UltraTileFix ProPave External Tile GroutNatural Cashmere C3132Storm Grey C3131Cosmic Black C3130
Available in-store at CTD Tile Showrooms and online at ctdtiles.co.uk
COMPACTED STONE SUB BASEGROUTING - WET METHOD
RECOMMENDED TOOLS

Externaltiling grout
The dry method of grouting is recommended when impermeable bedding materials have been used in installation, and therefore will not allow drainage of application water. This method may also be used when temperature conditions are below 3°C, and the water application (via the wet method) may freeze and expand in the joint before it has drained away.
1) Pre wet the surface with a mist of water
This will prevent any staining of the paving. Do not over-wet the joints.
2) Pour the outdoor tile grout over the tile joints and brush in as you go
3) Compact joints with a pointing trowel
Using a pointing trowel or joining iron will allow the loose material to be pressed into the joint.
4) Top up the joints after they have been compacted to the suitable level
If the joints need topping-up, pour more grout over the joints, brush in and compact as required.
ProPave grout is walkable after 24-48 hours (depending on conditions) and will reach its full strength after 28 days.
ProPave Grout can be cleaned by use of a domestic pressure washer (130bar max) with a patio head attachment or with the nozzle kept 30cm away from the face of the grout.
Do not use any harsh chemical based cleaners such as brick acid or cement residue removers as this may affect the overall appearance of the grout. For further information please contact the manufacturer.
Suitable Dry Method Applications Driveways, sheds, summerhouses, or heavy trafficked areas.
These areas should only be grouted using the dry method as this allows the grout to cure at a greater rate, avoiding excess moisture within the mortar as well as internal structures.
Dry compressive strength:
After 1 day: 0.80N/mm2 After 7 days: 5.80N/mm2 After 28 days: 6.70N/mm2 Check manufacturer recommendations for tiles and fixing products before installing on driveways or other areas subject to high pressure.
Available in-store at CTD Tile Showrooms and online at ctdtiles.co.uk
15kg UltraTileFix ProPave External Tile GroutNatural Cashmere C3132Storm Grey C3131Cosmic Black C3130
COMPACTED STONE SUB BASEGROUTING - DRY METHOD
RECOMMENDED TOOLS

420mm
155mm
30mm3 Pedestal Prime models®
PR1: from 30 to 65 mm PR2: from 65 to 155 mm PR3: from 155 to 420 mmPR1 PR2
Pedestal Prime®
On terraces, balconies or where under tile access is required, it is possible to build a raised level floor that still allows rainwater drainage. This can also be used to create a flat floor over a sloped surface using our recommended Pedestal Prime® system.
This system is an engineering masterpiece; unique, complex to design but simple to use, with multiple elements that integrate with each other in a single perfect assembly.
With the Pedestal Prime® supports you do not need additional rings, tubes or extensions as you may with other pedestal systems: the extension is already integrated. There are three different sizes of supports which adapt perfectly to the three bases, covering heights from 30mm to 420mm. Its ergonomic shape also makes it easy to adjust.
Advantages of using pedestals
• Significant weight reduction on the structure due to elimination of concrete screed
• Ability to adjust the system to compensate for small differences in height and slope
• Excellent absorption of expansions
• Allows pipes and drainage systems to be hidden
• Speed of installation saves time and costs
• Environmentally friendly - fully recyclable components
• Dry laying means no adhesives or chemicals are needed
• Strong weight resistance, ensuring durability and safety
• Better sound insulation due to anti-slip and anti-noise components
• Better thermal insulation due to interspace between flooring and underlying membrane
PR3
RAISED PEDESTAL SYSTEMINTRODUCTION
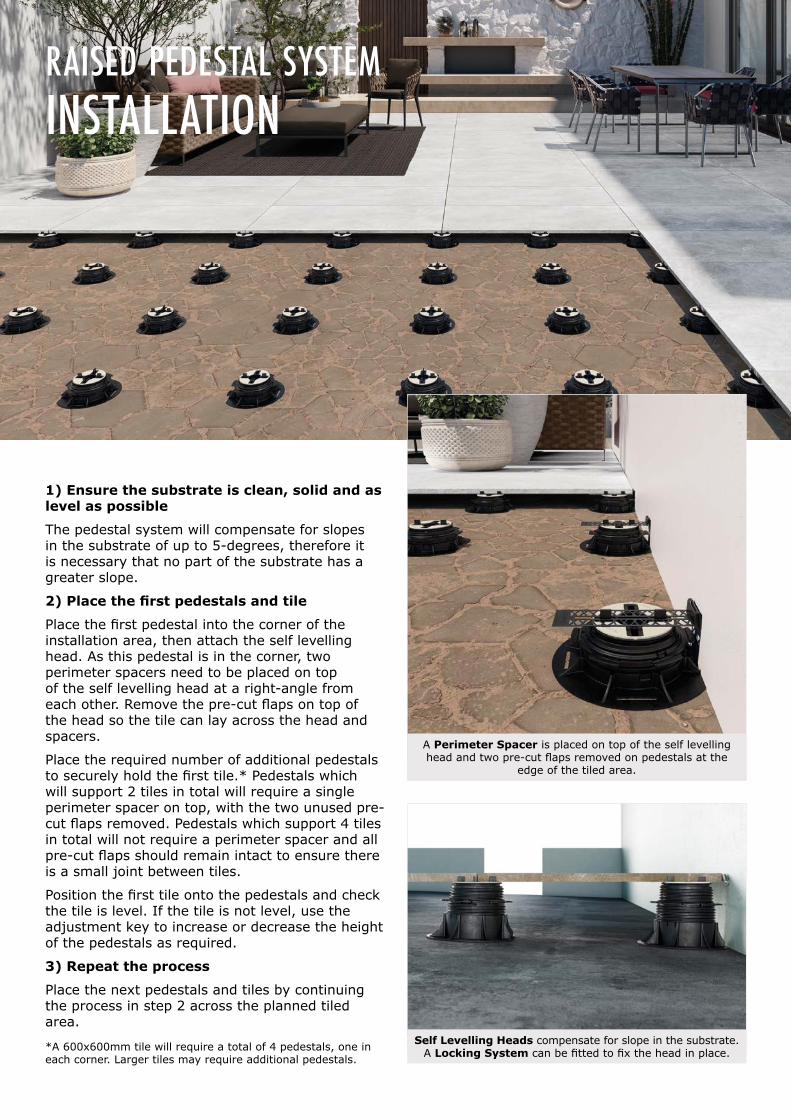
1) Ensure the substrate is clean, solid and as level as possible
The pedestal system will compensate for slopes in the substrate of up to 5-degrees, therefore it is necessary that no part of the substrate has a greater slope.
2) Place the first pedestals and tile
Place the first pedestal into the corner of the installation area, then attach the self levelling head. As this pedestal is in the corner, two perimeter spacers need to be placed on top of the self levelling head at a right-angle from each other. Remove the pre-cut flaps on top of the head so the tile can lay across the head and spacers.
Place the required number of additional pedestals to securely hold the first tile.* Pedestals which will support 2 tiles in total will require a single perimeter spacer on top, with the two unused pre-cut flaps removed. Pedestals which support 4 tiles in total will not require a perimeter spacer and all pre-cut flaps should remain intact to ensure there is a small joint between tiles.
Position the first tile onto the pedestals and check the tile is level. If the tile is not level, use the adjustment key to increase or decrease the height of the pedestals as required.
3) Repeat the process
Place the next pedestals and tiles by continuing the process in step 2 across the planned tiled area.
*A 600x600mm tile will require a total of 4 pedestals, one in each corner. Larger tiles may require additional pedestals.
Self Levelling Heads compensate for slope in the substrate. A Locking System can be fitted to fix the head in place.
A Perimeter Spacer is placed on top of the self levelling head and two pre-cut flaps removed on pedestals at the
edge of the tiled area.
RAISED PEDESTAL SYSTEMINSTALLATION

Creating Steps
If the installation includes a step, treat the last tiles on the lower level as you would other corner or edge tiles, using perimeter spacers to secure the tiles.
Attach a base clip to the bottom of the pedestals which will support the step. Place these pedestals next to the pedestals for the lower level, with the base clips facing the installed tiles.
Ensure the pedestals are level and at the correct height, then measure the height of the pedestals from the base to the head. Cut the tile to fit the vertical portion of the step, making sure that any differences in height are factored into the tile cutting.
Place the cut tile onto the base clips, then attach a head clip to the self levelling heads to fix the vertical tile in place. The head clips will also act in the same way as the perimeter clips, holding the edge and corner tiles of the higher level in place.
Installation of steps requires the vertical tile to be secured by a Head Clip and Base Clip on the pedestal.
Install the remainder of the vertical tiles, then fit the tiles on the higher level in the same way as described in steps 2-3.
Pedestal 30-65mm D1263765-155mm D12638155-420mm D12639
Adjustment Key D12642
Base ClipD12645
Head Clip D12644
Perimeter Spacer D12643
Self Levelling HeadD12640
Locking SystemD12641
RAISED PEDESTAL SYSTEMINSTALLATION (CONTINUED)
RECOMMENDED TOOLSAvailable in-store at CTD Tile Showrooms and online at ctdtiles.co.uk
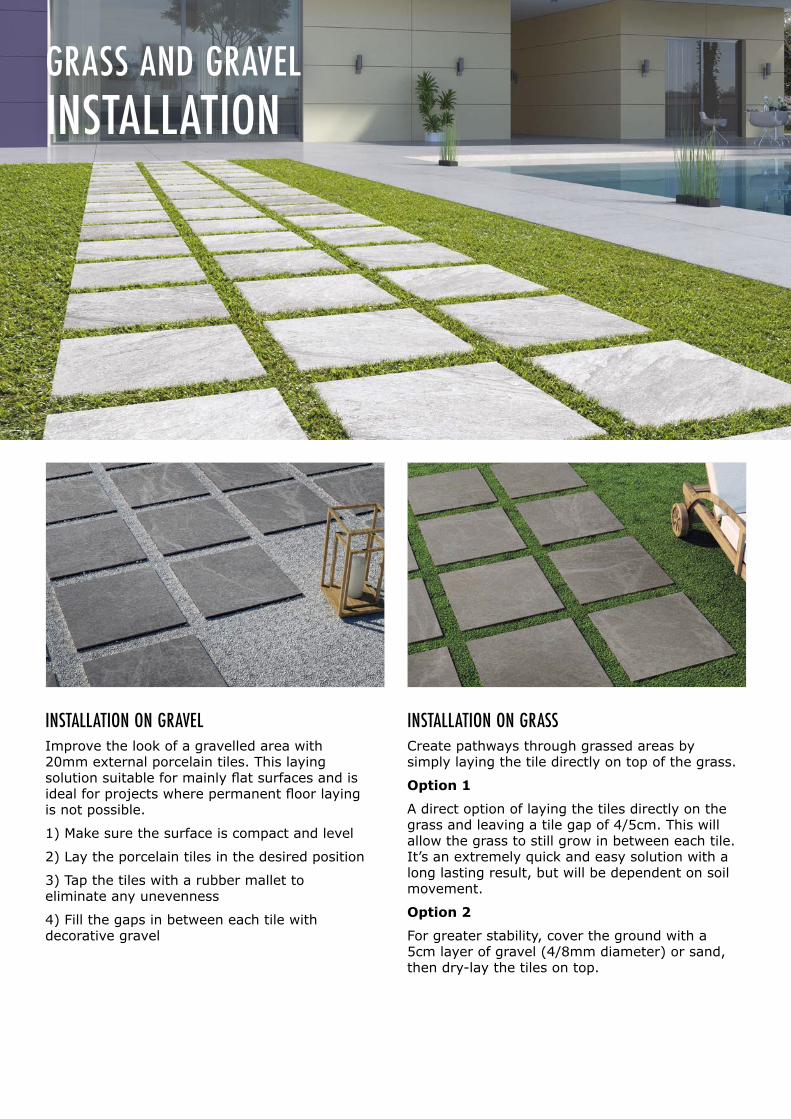
INSTALLATION ON GRAVELImprove the look of a gravelled area with 20mm external porcelain tiles. This laying solution suitable for mainly flat surfaces and is ideal for projects where permanent floor laying is not possible.
1) Make sure the surface is compact and level
2) Lay the porcelain tiles in the desired position
3) Tap the tiles with a rubber mallet to eliminate any unevenness
4) Fill the gaps in between each tile with decorative gravel
INSTALLATION ON GRASSCreate pathways through grassed areas by simply laying the tile directly on top of the grass.
Option 1
A direct option of laying the tiles directly on the grass and leaving a tile gap of 4/5cm. This will allow the grass to still grow in between each tile. It’s an extremely quick and easy solution with a long lasting result, but will be dependent on soil movement.
Option 2
For greater stability, cover the ground with a 5cm layer of gravel (4/8mm diameter) or sand, then dry-lay the tiles on top.
GRASS AND GRAVELINSTALLATION

Please note: Installation requirements may vary depending on the tiles and fixing products used, as well as the external conditions. Check manufacturer recommendations for tiles and fixing products before installing to ensure the products are suitable for their intended use and the required installation standards are achieved. We strongly recommend the use of a professional tiling or lanscaping contractor.