Embed Size (px)
Citation preview

91
Paragraph Formatting 4
KEY TERMS • alignment
• fi rst-line indent
• hanging indent
• horizontal alignment
• indent
• leaders
• line spacing
• negative indent
• vertical alignment
LESSON SKILL MATRIX
Skill Exam Objective Objective Number
Formatting Paragraphs Set indentation. 2.2.7
Setting Line Spacing in Text and Between Paragraphs Set line spacing.
Modify line spacing.
Set paragraph spacing.
2.2.5
3.3.4
2.2.4
Creating and Formatting a Bulleted List Add numbering or bullets.
Create custom bullets.
Modify list indentation.
Increase and decrease list levels.
3.3.1
3.3.2
3.3.3
3.3.5
Creating and Formatting a Numbered List Add numbering or bullets.
Modify numbering.
3.3.1
3.3.6
Creating and Modifying a Multilevel List
Setting and Modifying Tabs
© m
btp
hoto
s/iS
tock
ph
oto
Lisisist AdAdAdd nununumbmbmbering ororor b b bulululleleletststs.
MoModifyfyfy n n numberingngng.
3.3.3.3.3.3.
3.3.3.3.
st

Lesson 492
Y ou are employed at Books and Beyond, an independent used bookstore.
Your job responsibilities include receiving and assessing used books,
issuing trade credit, stocking the bookshelves, and placing special orders.
Because you have good computer skills, you are also responsible for cre-
ating and modifying documents as needed. Currently, you are working
on the store’s employee handbook. In this lesson, you learn how to use
Word’s formatting features to change the appearance of paragraphs. In
particular, you learn to set indents; change alignment and line spacing;
create numbered, bulleted, and multilevel lists; and set tabs.
SOFTWARE ORIENTATION
The Indents and Spacing Tab in the Paragraph Dialog Box
The Paragraph dialog box contains Word’s commands for changing paragraph alignment, indentation, and spacing. The Indents and Spacing tab of the Paragraph dialog box is shown in Figure 4-1. Use this fi gure as a reference throughout this lesson as well as the rest of this book.
Click the arrows to
increase or decrease
Left or Right indent
Preview area
Spacing Before and
After paragraph
Option to change settings in
dialog box and set as DefaultOpens Tabs dialog box
Select Special Indentations: Default
settings (None), First Line, and
Hanging
Default Line spacing setting.
Click arrows to adjust Line
spacing
Click the drop-down arrow to
view Line spacing options
Alignment options
Figure 4-1
Indents and Spacing tab of the Paragraph dialog box
© mbtphotos/iStockphoto
n,n,n, a andndnd spapapacicicing. ThThThe Indents and Spacing tab of the Paragigururure e e 4-1.1.1. U U Usesese thihihis s s fi g g gururure as a a r r refefeferencecece thrhrhrouououghghghououout t t t ththththis lesesessososofi
ok.
Ali ent tio

Paragraph Formatting 93
FORMATTING PARAGRAPHS
Paragraph formatting is an essential part of creating effective, professional-looking documents in Word. When a document is formatted properly and text is spaced and positioned, the reader can focus on the content. Word’s paragraph formatting feature enables you to determine paragraph alignment, indentation, and spacing between paragraphs. Word’s formatting features also enable you to remove paragraph formatting altogether.
Setting Indents
Indents can be used to set paragraphs off from other text in your documents. Word documents can include fi rst-line indents, hanging indents, and negative indents. The commands for indent-ing paragraphs are available in the Paragraph command group on the Home tab, as well as in the Paragraph command group of the Page Layout tab. Both command groups have dialog box launchers that give you access to additional commands. In this exercise, you learn to set indents using the dialog box and the ruler.
An indent is a blank space inserted between text and the left or right margin. A fi rst-line inden t inserts blank space between the left margin and the fi rst line of the paragraph (one-half inch is the default setting for this indent). A hanging indent , common in legal documents and in a bibliogra-phy page, begins the fi rst full line of text in a paragraph at the left margin; all the remaining lines in the paragraph are then indented from the left margin. A negative indent extends paragraph text into the left margin. You can indent paragraphs from the left margin, the right margin, or both, and you can set the sizes of indents using Word’s paragraph-formatting tools. You can also drag the markers on the ruler to set indents. Table 4-1 shows the various indent markers as they appear on the ruler.
The Bottom Line
Table 4-1
Types of indents on the RulerIndent Option Associated Marker on the Ruler
First-line indent
Hanging indent
Left indent
Right indent
Negative indent
STEP BY STEP Set First-Line Indents
GET READY. Before you begin these steps, be sure to launch Microsoft Word.
1. Connect your fl ash drive to one of the USB ports on your computer.
2. Click the File tab, and then click Computer .
3. Click the Browse button. Use the vertical scroll bar to scroll down and locate the data
fi les for this lesson on your fl ash drive. Double-click the lesson folder to open it.
4. Locate and OPEN the fi le named Books Beyond .
5. Click the View tab. Then, in the Show group, click the check box that displays the Ruler.
6. Select the four paragraphs under Acknowledgement .
7. On the Home tab, in the Paragraph group, click the dialog box launcher located in the
bottom right corner of the group. Verify that the Indents and Spacing tab is the active tab.
8. In the Indentation section of this tab, change the Special selection by clicking the drop-
down arrow and selecting First line . The By box lists 0.5 inches by default, as shown in
Figure 4-2.
arararagagagrararaph a a arerere then n n ininindented from the left margin. A ganegativethththe leleleft m m mararargin.n.n. Y Y Yououou c c cananan indndndenenent paragrgrgrapaphshshs f f frororom ththththe e e leftftft m m m
d yoyoyoyou cacacan n n seseseset t thththe e e sizes s s ofof indndndenenents using W W Wororord’d’d’s s s paragrgrgrapapaph-h-h-fofoform markekekersrsrs on ththththe e e ruler toto set i i indndndents. TaTaTaTablble e 4-1 shshows ththe e e varin the rururuler.

Lesson 494
9. Click OK . The fi rst line of each paragraph is indented 0.5 inches from the left margin.
10. Figure 4-3 displays the ruler and the paragraphs with the fi rst-line indent you just set.
Another WayYou can also click
to place the insertion point anywhere within the paragraph to set the indent, and then drag the fi rst-line indent marker on the ruler (see Figure 4-3) to the place where you want the text to be indented.
Preview of paragraph
The open document is set
to Single line spacing
First-line indent
default is .5”
Figure 4-2
Paragraph dialog box
Figure 4-3
Ruler with fi rst-line indent marker on paragraphs
First line indent
marker on ruler
Pre

Paragraph Formatting 95
11. Select the four paragraphs under Introduction .
12. On the horizontal ruler, press and hold the left mouse button and drag the First-line
indent marker to 0.5 inches.
Click the View tab and choose Ruler from the Show command group.
13. Select all the paragraphs under the General Performance Expectation Guidelines .
14. On the Page Layout tab, in the Paragraph group, launch the Paragraph dialog box, and
change the Special selection to First line by clicking the drop-down arrow. Click OK to
accept the default setting of 0.5 inches.
15. Select both paragraphs under the Equal Employment Opportunity and Diversity .
16. Right-click and select Paragraph —this is another way to open the Paragraph dialog box.
17. Change the Special selection to First line . Click OK . Using a shortcut method, you can
also access the Paragraph dialog box.
18. SAVE the document as B&B First Line Indent in the lesson folder on your fl ash drive.
PAUSE. LEAVE the document open to use in the next exercise.
STEP BY STEP Set Hanging Indents
USE the document that is open from the previous exercise.
1. Place the insertion point at the beginning of the fi rst paragraph under the heading
Acknowledgement , and then select the fi rst two paragraphs.
2. On the Home tab, launch the Paragraph dialog box and change the Special selection
from First Line to Hanging . Click OK . The fi rst line of both paragraphs begins at the left
of the margin whereas the remaining paragraphs are indented 0.5 inches from the left
margin.
3. Under the same heading, select the last two paragraphs. On the horizontal ruler, press
and hold the left mouse button and drag the fi rst - line indent marker so that it
aligns with the left margin. You need to reposition the fi rst-line indent marker so that
it doesn’t move when you begin dragging the hanging indent marker. Your markers on
the ruler should match Figure 4-4.
Troubleshooting
How would you set indents?
2.2.7
Another WayTo indent the fi rst
line of a paragraph, click in front of the line and press Tab. To indent an entire paragraph, select the whole paragraph and press Tab.
First line and
Hanging indent
markers are
aligned to the
left margin
The selected
paragraphs are no
longer indented
Figure 4-4
Markers on ruler aligned
ngngngininining Indededents s s s
dododocucucumemementntnt t t thahahat t t isisis opepepen n fromomom the previviviouous exercisesese.
ce thehehe insnsnsertititionononon point at t the bebebeginning ofof the fi rst pararagagagraph fi
knowleleledgdgdgemenenenent , and t t thehehen seseselelelectctct t t thehehe fit r r rststst t t twowowo p p parararagrarararaphphphs. fi

Lesson 496
4. Press and hold the left mouse button and drag the hanging indent marker to 0.5
inches. You have now repositioned the marker using the ruler, and both paragraphs are
indented. Your document should look similar to the one shown in Figure 4-5.
First line indent
marker is positioned
on left margin
Hanging indent marker
is positioned 0.5” from
the left margin
Figure 4-5
Sample document with hanging indent
5. SAVE the document as B&B Hanging Indent in the lesson folder on your fl ash drive.
PAUSE. LEAVE the document open to use in the next exercise.
STEP BY STEP Set Left and Right Indents
USE the document that is open from the previous exercise.
1. Select the paragraphs under Introduction .
2. You will move the fi rst-line indent back to the default settings. Launch the Paragraph
dialog box from the Home tab. Under the Special group, select (none) . Click OK . Notice
the paragraphs are left aligned.
3. Select the fi rst two paragraphs under Introduction .
4. Right-click and click Paragraph to open the dialog box. In the Indentation group, change
the left and right indents to 1 inch by clicking the up arrow. Click OK .
5. Select the last two paragraphs under the same heading.
6. On the Page Layout tab, in the Paragraph group, click the up arrow next to Indent Left
to indent the left side of the paragraph to 1 inch on the ruler.
7. Click the up arrow next to Indent Right to indent the right side of the
paragraph to 1 inch on the ruler. Notice that paragraphs are one inch from the left and
right margins (see Figure 4-6).

Paragraph Formatting 97
8. SAVE the document as B&B Left&Right Indent in the lesson folder on your fl ash drive.
PAUSE. LEAVE the document open to use in the next exercise.
STEP BY STEP Set Negative Indents
USE the document that is open from the previous exercise.
1. Under the Equal Employment Opportunity and Diversity heading, select both paragraphs.
2. Launch the Paragraph dialog box from the Home tab. Under the Special group, select
(none) . Click OK .
3. Select the fi rst paragraph under the heading.
4. Click the Page Layout tab, in the Paragraph group, click the down arrow next to Indent
Left to indent the left side of the paragraph to 20.5 inch on the ruler as shown
in Figure 4-7.
Left indent marker is
one-inch from the
margin
Right indent marker
is one-inch from the
right margin
Figure 4-6
Sample document displaying left and right indents
5. Position your insertion point anywhere in the last paragraph, and then launch the
Paragraph dialog box from the Page Layout tab.
Negative left
indent on ruler
Paragraph
extends into
left margin
Figure 4-7
Sample document with negative left indent
VE t t thehehe docococumumument t t asasas B&B&B&B B B LeLeLeftft&R&R&Right I I Indndndenenenttt ininin thehehehe lesesesson n n fofofottt
LEAEAEAVEVEVE thththe dododocucucumentntnt o open tototo use in thththe e nextxtxt exercrcisisise.e.e.

Lesson 498
7. SAVE the document as B&B Negative Indent in the lesson folder on your fl ash drive,
and then CLOSE the fi le.
PAUSE. LEAVE Word open for the next exercise.
Changing paragraph indents can be completed by using the Ruler or launching the Paragraph dialog box found on the Home or Page Layout tabs.
Changing Alignment
Paragraph alignment refers to how text is positioned between a document’s margins. By default, text is left-aligned at the top of the page. However, as you continue to format a document, you might need to change your text’s horizontal or vertical alignment. In this exercise, you learn to align text left, center, right, and justify and to vertically center text in the document.
Horizontal alignment refers to how text is positioned between the left and right margins. There are four types of horizontal alignments: left align, center align, right align, or justify. Horizontal alignment can be changed in the Paragraph group on the Home tab. Also, when the Paragraph dialog box is open and the Indents and Spacing tab is active, you can change alignment in the General section of the tab. Alternatively, you can use various shortcut keys, as shown in Table 4-2.
Take Note
Another WayTo access the
Paragraph dialog box using the shortcut method, place the insertion point in the paragraph, and then right-click and select Paragraph from the menu that appears.
Negative Right Indent
on ruler
Paragraph extends
beyond right
margin
Figure 4-8
Sample document with negative right indent
Option Button Shortcut Keys Description
Align left Ctrl1L Lines up text fl ush with the left margin, leaving a
ragged right edge
Center Ctrl1E Centers text between the left and right margins,
leaving ragged edges on both sides
Align right Ctrl1R Lines up text fl ush with the right margin, leaving a
ragged left edge
Justify Ctrl1J Lines up text fl ush on both the left and right
margins, adding extra space between words as
necessary for a clean look
Table 4-2
Horizontal alignment options
6. Under the Indentation group, click the down arrow next to Right to indent the right side
of the paragraph to 2 0.5 inch (see Figure 4-8). Click OK. When repositioning the
indentations, you can select or place the insertion point anywhere in the paragraph.
For multiple paragraphs, select them and change the indents.
he docococumumumenenent t t asasas B&B B B NeNeNegagagativeveve I I Indndndenenenttt ininin t t thehehe l l lesesesson n n fofofoldert

Paragraph Formatting 99
Vertical alignment refers to how text is positioned between the top and bottom margins of the page. Text can be aligned vertically at the top margin, at the center of the page, or at the bottom of the page, or it can be justifi ed. Top-of-the-page vertical alignment is the default when launching Word. Centered vertical alignment places the text evenly between the top and bottom margins. Bottom vertical alignment places text next to the bottom margin of the document. Finally, justifi ed vertical alignment aligns text evenly among the top, bottom, left, and right margins (see Table 4-3).
Option Description
Top vertical alignment Aligns text at the top margin
Centered vertical alignment Aligns text between the top and bottom margins
Bottom vertical alignment Aligns text at the bottom margin
Justifi ed vertical alignment Aligns text equally among the top, bottom, left, and right margins
Table 4-3
Vertical alignment options
There are two ways to set vertical alignment.
• From the Page Layout tab, in the Page Setup group, launch the Page Setup dialog box. From the Layout tab, under the Page group, you will find the Vertical Alignment pull-down menu.
• From the File tab, select Print then Page Setup. This launches the Page Setup dialog box also. From the Layout tab, under the Page group, you will fi nd the Vertical Alignment pull-down menu.
STEP BY STEP Change Alignment to Justify
OPEN Books Beyond from the data fi les from this lesson.
1. Select all four paragraphs under Acknowledgement .
2. On the Home tab, in the Paragraph group, click the Justify button . The paragraphs
are justifi ed between the left and right margins. Notice that the Justify button is
highlighted.
3. Select all four paragraphs under Introduction .
4. On the Home tab, in the Paragraph group, click the arrow in the lower-right corner of
the group to launch the Paragraph dialog box. The Indents and Spacing tab should be
selected.
5. In the Alignment list under General, click the drop-down arrow, and then click Justifi ed .
Click OK .
6. Select the fi rst two paragraphs under General Performance Expectation Guidelines .
Avoid selecting the numbered list.
7. Press Ctrl 1 J to justify the paragraphs. Using the keyboard shortcut is a quick way to
change the alignment in a paragraph.
8. Select the two paragraphs under Equal Employment Opportunity and Diversity and
justify the paragraph using one of the methods.
9. SAVE the document as B&B Justify in the lesson folder on your fl ash drive.
PAUSE. LEAVE the document open to use in the next exercise.
thththe e PaPaPage L L Layout t t tatatab, in the Page Setup group, launch thehehehe L L Layayayououout t t tatatab, u u undndndererer thehehe Pagagage e e group, y y yououou w w wililill l l findndndnd t t t the V V Vererertititi
the FiFiFilelele t t tab, seseseselelelect Printntnt then n n PaPaPage Setetetetupupup. This lauauaunchehehes the Pahe Layayayout tab,b,b,b, undererer t t thehehe P P Pagagage e e grgrgrouououp,p,p, y y yououou w w wililill l l fi nd ththththe e e Vertfi

Lesson 4100
STEP BY STEP Change Alignment to Right
USE the document that is open from the previous exercise.
1. Place the insertion point in the fi rst paragraph under Acknowledgement .
2. On the Home tab, in the Paragraph group, click the Align Right button . The right
side of the paragraph is even whereas the left is uneven.
3. Select the second paragraph, right-click and select Paragraph .
4. In the Alignment list under General, click the drop-down arrow, and then click Right .
Review the Preview area, the paragraph is right-aligned. Click OK .
5. Select the last two paragraphs under Acknowledgement, and press Ctrl1R to align the
text on the right. The right side of the paragraphs are even, whereas the left are uneven.
6. SAVE the document as B&B Right Align in the lesson folder on your fl ash drive.
PAUSE. LEAVE the document open to use in the next exercise.
STEP BY STEP Change Alignment to Center
USE the document that is open from the previous exercise.
1. Place the insertion point in the Acknowledgement heading.
2. On the Home tab, in the Paragraph group, click the Center button . The heading is
now centered between the left and right margin.
3. Use the multi-selection and select the headings, Introduction , General Performance
Expectation Guidelines , and Equal Employment Opportunity and Diversity .
In Lesson 2, you learn to select text using different methods. To select multiple text areas, press Ctrl and select the text.
4. Press Ctrl 1 E to center the headings using the shortcut key.
5. SAVE the document as B&B Centered Headings in the lesson folder on your fl ash drive.
PAUSE. LEAVE the document open to use in the next exercise.
STEP BY STEP Change Alignment to Left
USE the document that is open from the previous exercise.
1. Select all four paragraphs under Acknowledgement .
2. On the Home tab, in the Paragraph group, click the Left button. The paragraphs are
now left-aligned, which is the default when you begin a new document.
3. Select all four paragraphs under Introduction .
4. Right-click and select Paragraph to open the Paragraph dialog box.
5. In the Alignment list under General, click the drop-down arrow, and then click Left .
Review the Preview area—the paragraphs are aligned left. Click OK .
6. Select the fi rst two paragraphs under General Performance Expectation Guidelines .
7. On the Page Layout tab, launch the Paragraph dialog box. In the Alignment list under
General, click the drop-down arrow, and then click Left . Click OK .
8. Select the two paragraphs under Equal Employment Opportunity and Diversity .
9. Press Ctrl1L to align the paragraphs to the left using the shortcut key.
10. SAVE the document as B&B Left Align in the lesson folder on your fl ash drive.
PAUSE. LEAVE the document open to use in the next exercise.
Cross Ref
cucucucumemement thahahat is o o opepepen from the previous exercise.
he i i insnsnsertititiononon poioiointntnt in thththe AcAcAcknknknowledgememementtt h h heaeaeadidididingngng. ttt
Homomomome e e tatatab,b,b, in n n thththe Parararagrgraph h h grgrgroup, clililickckck t t thehehe Centererer bu
nterededed b b betweweweweenenen the lefeft and d riright mamamamargrgrginin.
ultititi el titititi nd el t th headin Introd ti Ge

Paragraph Formatting 101
STEP BY STEP Change Alignment to Vertical
USE the document that is open from the previous exercise.
1. Select the text beginning with the heading Introduction… to the end of the document
and press Delete .
2. Press Ctrl1Home to position the insertion point at the beginning of the document.
3. On the Page Layout tab, in the Page Setup group, click the arrow in the lower-right
corner of the group to open the Page Setup dialog box.
4. Select the Layout tab.
5. In the Vertical alignment list under Page, click the drop-down arrow and select Center .
6. In the Apply to list under Preview, Whole document is selected as the default, as shown
in Figure 4-9.
Default setting
Figure 4-9
Page Setup dialog box

Lesson 4102
7. Click OK . The text is centered between the top and bottom margins, as shown in
Figure 4-10.
Figure 4-10
Horizontal and vertical alignments
8. SAVE the document as B&B Vertical Alignment in the lesson folder on your fl ash drive.
PAUSE. LEAVE the document open to use in the next exercise.
Shading a Paragraph
In this exercise, you learn to use Word’s Shading feature to color the background behind selected text or paragraphs.
To apply shading to a paragraph, click the Shading button in the Paragraph group on the Home tab. To choose another color, click the drop-down arrow next to the Shading button, and choose a color in the current theme or a standard color from the Shading menu (place your insertion point over a color to see a ScreenTip with the color’s precise name). To remove shading, click No Color .

Paragraph Formatting 103
Click More Colors to open the Colors dialog box, where additional options are available. You can choose standard colors on the Standard tab, or you can create a custom color from the Custom tab.
STEP BY STEP Shade a Paragraph
USE the document that is open from the previous exercise.
1. Select the fi rst paragraph under the heading.
2. On the Home tab, in the Paragraph group, click the drop-down arrow next to the
Shading button to display the menu shown in Figure 4-11.
Figure 4-11
Shading menu
3. In the Theme Colors palette, locate and select Orange, Accent 6, Lighter 40% as shown
in Figure 4-12.
Figure 4-12
Selecting the color
4. SAVE the document as B&B Shaded Paragraph in the lesson folder on your fl ash drive.
PAUSE. LEAVE the document open to use in the next exercise.

Lesson 4104
Placing a Border around a Paragraph or Text
Like shading, borders can add interest and emphasis to paragraphs or text. Borders can be format-ted with a variety of styles, colors, and widths. In this exercise, you use Word’s Borders options to apply a border to a paragraph in your document.
You can apply a border to a paragraph by clicking the Borders button in the Paragraph group on the Home tab. To change the border style, click the drop-down arrow next to the Borders button.
For additional options, click the Borders and Shading option on the Borders menu to open the Borders tab of the Borders and Shading dialog box. You can choose a number of border colors and styles in this dialog box, or you can remove a border completely. This dialog box also contains tabs for page border options and shading.
STEP BY STEP Place a Border around a Paragraph
USE the document that is open from the previous exercise.
1. Place the insertion point in the second paragraph beginning with “ I also understand…”
2. On the Home tab, in the Paragraph group, click the drop-down arrow next to the Borders
button to display the menu shown in Figure 4-13.
Figure 4-13
Border menu
bububuttttononon to dididisplay y y thththe e e mememenunununu s s shohohown in FiFiFigugugurerere 4 4 4-1-1-13.3.3.

Paragraph Formatting 105
4. Place the insertion point in the third paragraph.
5. On the Design tab, in the Page Background group, click Page Borders to open the
Borders and Shading dialog box, and then click the Borders tab to make it active (see
Figure 4-15). The Design tab on the Ribbon is a new tab for Word 2013 and contains
many additional features to format a document. In Lesson 7, you learn more about the
Design tab.
3. Select Outside Borders on the menu. Your document should look similar to Figure 4-14.
Border around paragraph
Shaded paragraph
Figure 4-14
Shading and border
Border Settings
Options to select a
border style
Based on your selection, the
Apply to will display Paragraph
or Text
Preview area
Width selector
Border color
Figure 4-15
Borders and Shading dialog box
e thehehe insnsnsertititionononon point in n n the thththird papapararararagrgrgrapaph.
he D ig b,b,b,b, i th Pa B kg d lick Pa B

Lesson 4106
6. Select Shadow under the Settings.
7. Select the ninth option under Style. Select Dark Blue, Text 2 for color, and change the
width to 2 ¼ pt.
8. Review the Preview area before you click OK . Note that the border is applied to the
paragraph.
9. SAVE the document as B&B with Borders in the lesson folder on your fl ash drive.
PAUSE. LEAVE the document open to use in the next exercise.
Borders can also be added to pages, sections, tables, cells, graphic objects, and pictures.
STEP BY STEP Place a Border around Text
USE the document that is open from the previous exercise.
1. On the Home tab, enable the Show/Hide to display the nonprinting characters. Select
the title without selecting the paragraph mark (¶).
In Lesson 1, you learn to enable Show/Hide, and in Lesson 2 you learn different ways to select text.
2. On the Home tab, in the Paragraph group, click the drop-down arrow next to the Borders
button to display the menu and select Borders and Shading to open the dialog box.
3. Click the Borders tab to make it active. Notice the title appears in the Preview area and
in the Apply to section, Text is displayed. Not selecting the paragraph mark (¶) allows
you to place a border around text only.
4. Select Box under Setting and change the width to 1 ½ pt. Click OK . Notice that the
border wraps around the text.
5. SAVE the document with the same fi lename in the lesson folder on your fl ash drive.
PAUSE. LEAVE the document open to use in the next exercise.
STEP BY STEP Removing Borders around Text or a Paragraph
USE the document that is open from the previous exercise.
1. Place the insertion point in the second paragraph under the heading.
2. On the Home tab, in the Paragraph group, click the drop-down arrow next to the Borders
button to display the menu and select Borders and Shading . The Borders and
Shading dialog box opens.
3. Select the Borders tab, and then select None under Setting. Click OK .
4. Remove the border on the third paragraph by repeating steps 2 and 3.
5. For the title select only the text before repeating steps 2 and 3.
6. SAVE the document as B&B with No Borders in the lesson folder on your fl ash drive.
PAUSE. LEAVE the document open to use in the next exercise.
Clearing the Formats from a Paragraph
After formatting your document, you might decide that you no longer want any formatting in a paragraph or that you want to begin again. The Clear Formatting command provides an easy way to change a paragraph back to plain text. When you execute this command, all formatting is removed, and the font and font size revert to the original document settings. In this exercise, you use the Clear Formatting command to clear all formats from selected paragraphs in Word.
Take Note
Cross Ref
Another WaySelect text or
paragraph, click the drop-down arrow by Borders in the Para graph group, and then click No Border.
Another WayThe Borders and
Shading dialog box can be accessed by clicking the drop-down arrow next to the Borders
button, and then
selecting Borders and Shading.
Homomome e e tatatab,b,b, in n n thththe e e e Parararagrgraph grgrgroup, clickckck t the d d drop-dododownwnwn a a arrrrrrow
buttononon t t to o o dispspsplalalay y y the memenu a a andndnd select BoBoBordrdrdererers s s and ShShShadadading
he Bordrdrders tabababab to mamamakekeke it acacactititiveveve NoNoNoticecece t t thehehe t t titititlelele appppppeaeaearsrsrs in

Paragraph Formatting 107
STEP BY STEP Clear Paragraph Formats
USE the document that is open from the previous exercise.
1. Select the whole document.
2. On the Home tab, in the Font group, click the Clear Formatting button.
You can also clear formatting in the Styles group by clicking the More button. For more informa-tion, see Lesson 3.
3. SAVE the document as B&B No Formatting in the lesson folder on your fl ash drive, and
then CLOSE the fi le.
PAUSE. LEAVE Word open for the next exercise.
SETTING LINE SPACING IN TEXT AND BETWEEN PARAGRAPHS
In Word, you can determine how much space separates lines of text, and you also can set the spacing between paragraphs. By default, Word sets line spacing (the space between each line of text) to 1.08. Line spacing is paragraph based and can be customized by specifying a point size. Paragraph spacing, which affects the space above and below paragraphs, is set to 8 points after each paragraph by default. The higher the point size is, the greater the space between paragraphs. In this exercise, you learn to set both line and paragraph spacing.
Setting Line Spacing
Line spacing is the amount of space between the lines of text in a paragraph. In this exercise, you learn to set line spacing using a number of Word paragraph formatting tools.
Line spacing options are available in the Home and Page Layout tabs within the Paragraph group by using the Line and Paragraph Spacing button. The line spacing options can also be accessed through the Indents and Spacing tab of the Paragraph dialog box. New in Word 2013 is the Design tab, which includes Paragraph Spacing settings. Table 4-4 provides additional information regarding line spacing options and descriptions.
Cross Ref
The Bottom Line
Option Keyboard Shortcut Description
Single Ctrl11 Accommodates the largest letter in a line, plus a small amount of extra space.
1.5 Ctrl15 One-and-one-half times the amount of space used in single spacing.
Double Ctrl12 Twice the amount of space used in single spacing.
At least Sets the spacing at the minimum amount needed to fi t the largest font on the line.
Exactly Sets the spacing at a fi xed amount that Word does not adjust.
Multiple Sets the spacing at an amount that is increased or decreased from single spacing by a
percentage that you specify. Setting the line spacing to 1.3, for example, increases the
space by 30%.
No Paragraph
Spacing
The Built-in Before and After spacing is set to 0 pt. and the line spacing is set to 1.
Compact The Built-in Before spacing is set to 0 pt., After is set to 4 pt., and the line space is set to 1.
Tight The Built-in Before spacing is set to 0 pt., After to 6 pt., and line spacing 1.15.
Open The Built-in Before spacing is set to 0 pt., After to 10 pt., and line spacing 1.15.
Relaxed The Built-in Before spacing is set to 0 pt., After to 6 pt., and line spacing to 1.5.
Double The Built-in Before spacing is set to 0 pt., After 8 pt., and line spacing 2.
Table 4-4
Line spacing options
h h h spspspacing,g,g, w w whichchch a a a affects the spapace above and below p paragagraagrararaphphph by y y dededefafafaululult.t.t. Thehehe h h higheheher thththe point t sisisizeze i i is, t t thehehe g g g grerereatatater t t thehehe
exercicicicisesese, , , yoyoyou u u lelelearararn n n to setetet both linenene and parararagagagrararaphphph spacicicingngng. . .
Lesson 4108
STEP BY STEP Set Line Spacing in a Paragraph
OPEN the Books Beyond document from the lesson folder.
1. Place the insertion point in the fi rst paragraph under the Acknowledgement heading.
2. On the Home tab, in the Paragraph group, click the Line and Paragraph Spacing
button to display the Line Spacing menu and options to add and remove spacing
before and after paragraphs (see Figure 4-16).
Opens a dialog box
Figure 4-16
Line Spacing menu
3. Select 2.0 to double-space the text.
4. Place the insertion point in the second paragraph.
5. In the Paragraph group, launch the dialog box.
6. In the Spacing group, change the Line spacing by clicking the drop-down arrow and
selecting Double . Click OK . The paragraph is now double-spaced.
7. Place the insertion point in the third paragraph.
8. Press Ctrl 1 2 to double-space the paragraph.
9. Click the Design tab and in the Document Formatting group, click the Paragraph
Spacing button to display the menu as shown in Figure 4-17.

Paragraph Formatting 109
10. Select Double . Notice that the remaining document is double-spaced. This new feature
in Word 2013 changes spacing for the entire document to include new paragraphs.
When using the Document Formatting group to apply paragraph spacing, the document does not need to be selected when using one of the built-in formatting commands.
11. SAVE the document as B&B Double Spacing in the lesson folder on your fl ash drive.
PAUSE. LEAVE the document open to use in the next exercise.
STEP BY STEP Modify Line Spacing in a Paragraph
USE the document that is open from the previous exercise.
1. Select the four paragraphs under Acknowledgement .
2. Return to the Line and Paragraph Spacing drop-down menu in the Paragraph group on
the Home tab. To set more precise spacing measurements, click Line S pacing O ptions
to display the Indents and Spacing tab of the Paragraph dialog box.
3. In the Spacing section, click the drop-down arrow and select Exactly in the Line
spacing list. In the At list, click the up arrow until it reads 22 pt. The line spacing is
increased.
4. Click OK .
5. SAVE the document as B&B Exact Spacing in the lesson folder on your fl ash drive, and
then CLOSE the fi le.
PAUSE. LEAVE Word open for the next exercise.
Setting Paragraph Spacing
Paragraphs are usually separated by a blank line in Word documents. When you press the Enter key at the end of a paragraph, Word adds the designated space above or below the paragraph. By
Take Note
How would you set line spacing in a paragraph?
2.2.5
How would you modify line spacing in a paragraph?
3.3.4
Built-in
paragraph
spacing
Customize
Paragraph
Spacing
Default settings
Figure 4-17
Paragraph Spacing menu
Customtomtomize
Par aph

Lesson 4110
default, the spacing after a paragraph is set to 8 points and the spacing before paragraphs is set to zero, but you can change these settings for a single paragraph or for an entire document. In this exercise, you learn to set paragraph spacing.
To increase or decrease paragraph spacing, click the Before and After up or down arrows in the Indents and Spacing tab of the Paragraph dialog box. The Paragraph spacing can also be changed in the Paragraph group on the Home tab by clicking the Line and Paragraph Spacing button to Add Space Before or After Paragraph or Remove Space Before or After Paragraph.
STEP BY STEP Set Spacing around a Paragraph
OPEN the Books Beyond document from the lesson folder.
1. Select the entire document.
2. On the Home tab, in the Paragraph group, click the arrow in the lower-right corner
of the group to display the Paragraph dialog box. The Indents and Spacing tab is the
active tab.
3. In the Spacing section, click the up arrow next to Before until it reads 24 pt.
4. Click the up arrow next to After until it reads 24 pt. Review the preview area and notice
the increase of spacing in the document.
5. Click OK . Notice the spacing between the paragraphs.
6. With the entire document still selected, click the drop-down arrow next to the Line and
Paragraph Spacing button in the Paragraph group to display the Line Spacing
menu.
7. Click Remove Space Before Paragraph .
8. Repeat step 6, and then click Remove Space After Paragraph . The spacing before and
after have been removed from the document.
9. Place the insertion point in the heading, Acknowledgement .
10. Click the Page Layout tab, and then in the Paragraph group, click the up arrow and
increase the Spacing After to 12 pt.
11. Use the Format Painter and repeat step 10 for each heading, Introduction, General
Performance Expectation Guidelines, and Equal Employment Opportunity and
Diversity.
12. Use multi-selection to select the paragraphs under each heading and change the
Spacing After to 6 pt.
13. SAVE the document as B&B Spacing Before&After in the lesson folder on your fl ash
drive, and then CLOSE the fi le.
PAUSE. LEAVE Word open for the next exercise.
CREATING AND FORMATTING A BULLETED LIST
Bulleted lists are an effective way to format lists of items that don’t have to appear in any specifi c order. (Use numbered lists for items in a set order.) Items in a bulleted list are marked by small icons—dots, diamonds, and so on. In Word, you can create bulleted lists from scratch, change existing lines of text into a bulleted list, choose from a number of bullet styles, create levels within a bulleted list, and insert a symbol or picture as a bullet.
Creating a Bulleted List
By creating and formatting a bulleted list, you can draw attention to major points in a document. In this exercise, you learn to create, format, and modify such a list.
How would you apply paragraph spacing?
2.2.4
The Bottom Line
Another WayYou also can right-
click to open the Paragraph dialog box.
eaeaeasesese of spspspacacacing g g ininin the document.
OK. NoNoNoticecece t t thehehe spapapacingngng b b betweweweenenen the parararagagraphphphs.s.
he entntntiririre e e dododocucucumemement s s stititillll selecececteteted, clickckck thehehe d d drororop-downwnwn a a arrow
aph SpSpSpacacacing g g bububutttttton in n n thththe e PaPaPararararagrgrgrapapaph h grgrgrouououp to disisisplay

Paragraph Formatting 111
STEP BY STEP Create a Bulleted List
OPEN Alarm from the data fi les for this lesson.
1. Select the two paragraphs below the phrase Please keep in mind: .
2. On the Home tab, in the Paragraph group, click the Bullets button. Notice that
solid circles appear before the selected paragraphs.
3. Place the insertion point at the end of the second bulleted paragraph.
4. Press Enter . Word automatically continues the bulleted list by supplying the next
bulleted line.
5. Beside the new bullet, type If you do not know your four-digit code and password,
please get it from the HR department .
6. SAVE the document as B&B Alarm in the lesson folder on your fl ash drive.
PAUSE. LEAVE the document open to use in the next exercise.
STEP BY STEP Change the Bulleted List
USE the document that is open from the previous exercise.
1. Select the entire bulleted list.
2. To change the format of the bulleted list, click the drop-down arrow next to the Bullets
button to display the menu shown in Figure 4-18. The bulleted items might not
match your screen.
How do you apply bullets in a document?
3.3.1
Change List Level
displays different
bullet levels
Bullet Library
Sample Document
Bullets revealed here
Recently Used Bullets are
shown here
Create a new bullet using a
symbol or picture
Figure 4-18
Bullet formatting options
To change a bulleted list to a numbered list (or vice versa), select the list and then click either the Bullets button or the Numbering button. To remove one of the bullets from the Library, open the Bullets drop-down menu; then in the Bullet Library, select the bullet and right-click to remove it.
Take Note
dodododocucucumentntnt that isisis o o open from the previous exercise.
ct t t thehehe entntntiririre e e bububulllllletetetededed lisisist.
hangngngnge e e thththe fofoformrmrmatatat of thththe bulllleteteted list, c c clickckck t t thehehe drop-p-p-dododownwnwn a
butututtototon n n to d d d disisisplplplay thehehe menenenu shown n n n ininin F Figure 4-4-4-18. ThThThe bu
tch yoururur screeeeeeeen.n.n.

Lesson 4112
3. Click the hollow circle in the Bullet Library.
4. SAVE the document as B&B Alarm with Hollow Bullets in the lesson folder on your
fl ash drive.
PAUSE. LEAVE the document open to use in the next exercise.
STEP BY STEP Change the Bullet List Level
Adding an unordered list such as bullets appears with no rank over the others. Changing
the bullet list level can change the appearance of the bullet and indentation.
USE the document that is open from the previous exercise.
1. Place the insertion point in the second bulleted item.
2. Click the drop-down arrow next to the Bullets button, point to Change List Level ,
and note the levels that appear (see Figure 4-19). When you point to the list level, a
ScreenTip appears displaying the level.
Display of nine levels
Figure 4-19
Change List Level
3. Click to select Level 2 . The bullet item is demoted from Level 1 to Level 2. When levels
are increased or decreased, the indentation is changed—see the markers on the rulers.
4. Place the insertion point in the third bulleted item.
5. Click the drop-down arrow next to the Bullets button, and then point to Change List
Level to produce a menu of list-level options.
6. Click to select Level 3 . Your document should look similar to the one shown in
Figure 4-20.

Paragraph Formatting 113
7. SAVE the document as B&B Alarm with Bullet Levels in the lesson folder on your fl ash
drive.
8. Select the second and third bulleted items and click the drop-down arrow next to the
Bullets button. Point to Change List Level and promote the selected bullets to Level 1 .
The two selected items now match the fi rst bulleted item.
9. Click Undo to return the bulleted items to second and third level.
10. SAVE the document with the same fi lename in the lesson folder on your fl ash drive.
PAUSE. LEAVE the document open to use in the next exercise.
STEP BY STEP Insert Special Character Symbols
The Defi ne New Bullet dialog box provides options to change the alignment and add bullet
characters, such as a symbol or a picture. When you click on either option, a new dialog
box opens.
USE the document that is open from the previous exercise.
1. Select the second and third bulleted items and Promote to the fi rst level, and then
select all three bulleted items.
2. Click the drop-down arrow next to the Bullets button, and then click Defi ne New Bullet.
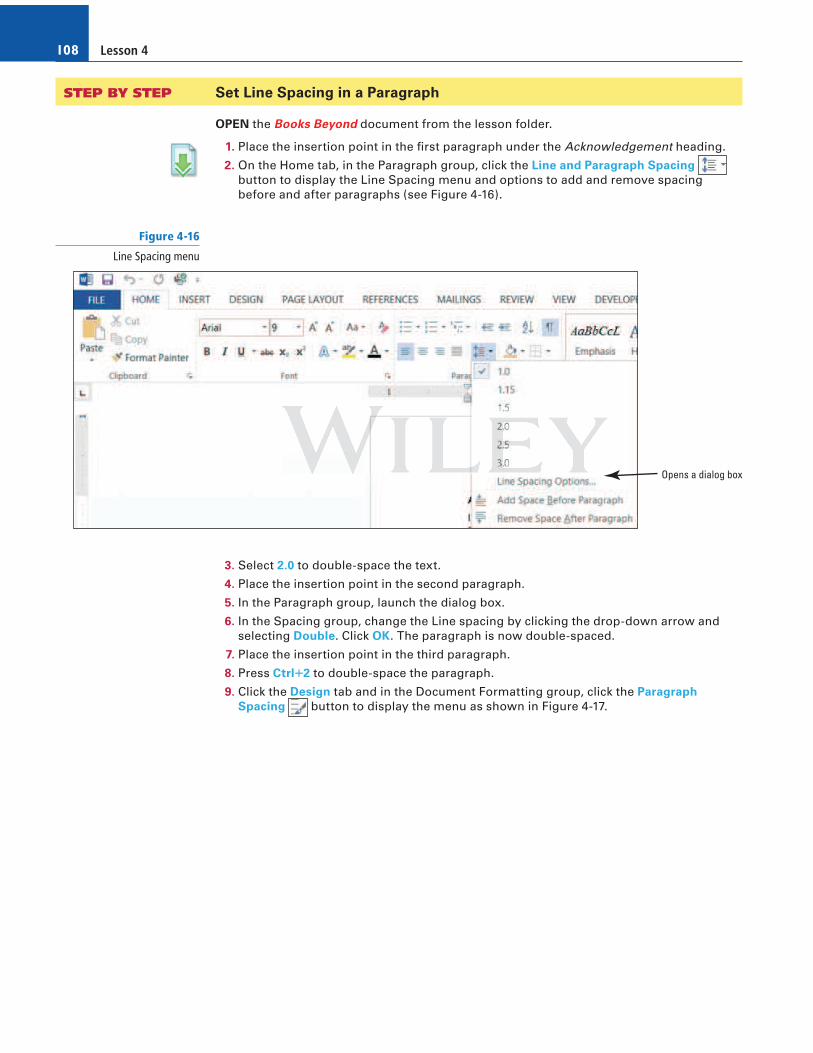
3. Click the Symbol button in the Defi ne New Bullet dialog box. The Symbol dialog box
opens, as shown in Figure 4-21.
The indents automatically
adjust when changing levels
Level 1
Level 2
Level 3
Figure 4-20
Sample document with bullet levels
How do you increase or decrease the list level?
3.3.5
Lesson 4114
4. Change the Font by clicking the drop-down arrow. Scroll down and select Wingdings .
5. Select the bell in the fi rst row, sixth column. Click OK to close the Symbol dialog box.
6. Click OK to close the Defi ne New Bullet dialog box.
7. SAVE the document as B&B Alarm Update in the lesson folder on your fl ash drive.
PAUSE. LEAVE the document open to use in the next exercise.
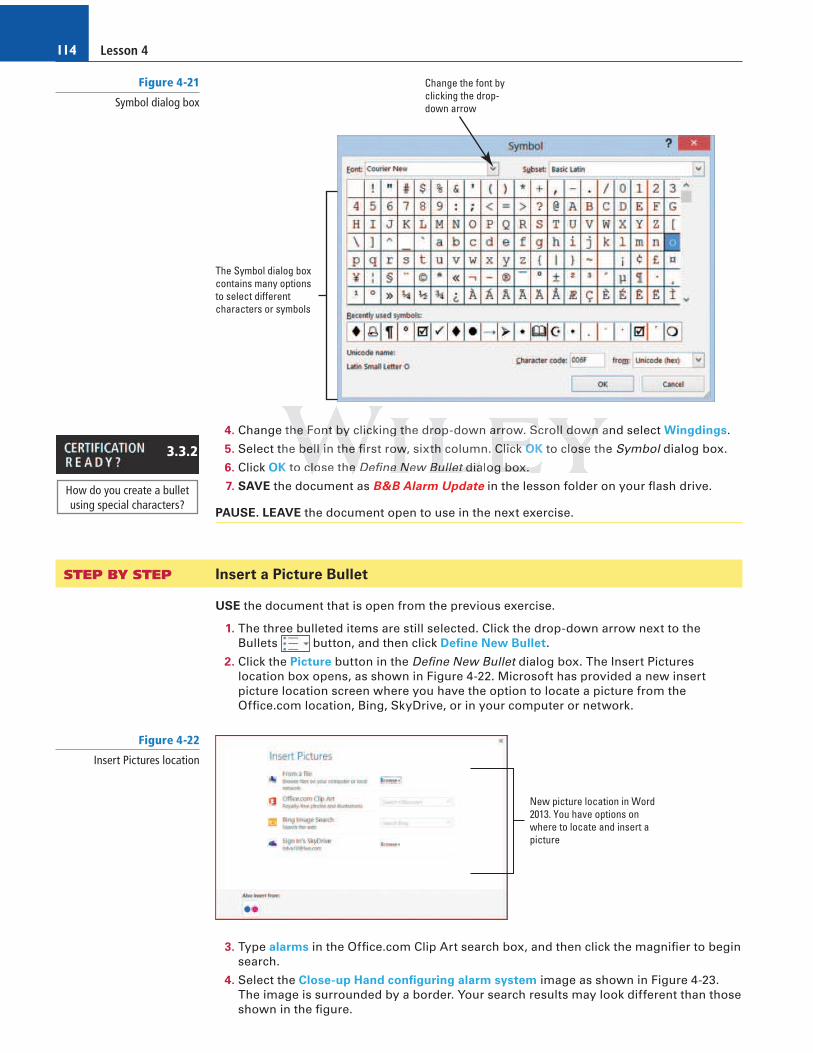
STEP BY STEP Insert a Picture Bullet
USE the document that is open from the previous exercise.
1. The three bulleted items are still selected. Click the drop-down arrow next to the
Bullets button, and then click Defi ne New Bullet .
2. Click the Picture button in the Defi ne New Bullet dialog box. The Insert Pictures
location box opens, as shown in Figure 4-22. Microsoft has provided a new insert
picture location screen where you have the option to locate a picture from the
Offi ce.com location, Bing, SkyDrive, or in your computer or network.
How do you create a bullet using special characters?
3.3.2
The Symbol dialog box
contains many options
to select different
characters or symbols
Change the font by
clicking the drop-
down arrow
Figure 4-21
Symbol dialog box
New picture location in Word
2013. You have options on
where to locate and insert a
picture
Figure 4-22
Insert Pictures location
3. Type alarms in the Offi ce.com Clip Art search box, and then click the magnifi er to begin
search.
4. Select the Close - up Hand confi guring alarm system image as shown in Figure 4-23.
The image is surrounded by a border. Your search results may look different than those
shown in the fi gure.
thththe FoFoFontntnt by y y clicicickikikingngng thehehe drororop-p-p-down a a arrrrow. ScScScrollllll d d dowowown n n an
he b b belelell l l ininin t t thehehe fi fi fi rst rowowow, sixtxtxth column. ClClClicick k k fi fi fi OKOKOK to clololosesese theOK
OK to c c clololose thehehe OK Defi ne e e NeNeNew BuBuBulllllletetetfi dididialalalogogog b b boxoxox. etetet

Paragraph Formatting 115
5. Click Insert to begin downloading the image to your document.
6. Click OK to close the Defi ne New Bullet dialog box.
7. After the image is downloaded, it displays on your document in a small font size. Select the
fi rst image—notice the other two images are also selected. Increase the font size to 28 pt.
8. SAVE the document as B&B Alarm Update1 in the lesson folder on your fl ash drive.
PAUSE. LEAVE the document open to use in the next exercise.
STEP BY STEP Change the Alignment in Bullets
In the previous exercises, you learn to create bullets using the Bullet Library, create a bullet
using symbols, and insert pictures as bullets from the web. You also changed the levels of
the bullets by promoting or demoting the list levels. In this exercise, you learn to adjust the
alignment to any type of bullet.
USE the document that is open from the previous exercise.
1. In the bulleted list, notice the distance between the image and text. Adding a custom
bullet allows you to change the alignment.
2. Select the three bullets items.
3. Click the drop-down arrow next to the Bullets button, and then click Defi ne New Bullet .
4. Under the Alignment group, click the drop-down arrow and select Right . Notice the
space between the image and text in the Preview area.
5. Click OK .
How do you create a picture bullet?
3.3.2
Return to Insert Pictures
main screen
Select image
then click Insert
Location of your search Search box
Figure 4-23
Offi ce.com Clip Art

Lesson 4116
6. SAVE the document with the same fi lename in the lesson folder on your fl ash drive.
PAUSE. LEAVE the document open to use in the next exercise.
CREATING AND FORMATTING A NUMBERED LIST
You can quickly add numbers to existing lines of text to create a list, or Word can automatically create a numbered list as you type.
Creating a Numbered List
In this exercise, you learn how to create and format a numbered list in Word.
STEP BY STEP Create a Numbered List
USE the document that is open from the previous exercise.
1. Select the four paragraphs under the Set Alarm heading.
2. On the Home tab, in the Paragraph group, click the drop-down arrow next to the
Numbering button to display the Numbering Library shown in Figure 4-24.
How do you modify the bulleted list indentation?
3.3.3
The Bottom Line
Figure 4-24
Numbering formatting options appear in the Numbering
Library
3. Select the option, 1., 2., 3 . The paragraphs are now listed as an ordered list.
4. Place the insertion point at the end of item number four and press Enter . Notice that
Word automatically numbers the next line sequentially.
5. In the new numbered line, type Leave the premises immediately .
6. Select the four paragraphs under the Deactivate Alarm heading.
7. On the Home tab, in the Paragraph group, click the drop-down arrow next to the
Numbering button.
8. Select the option, a., b., c., The four paragraphs are numbered and aligned left.
9. SAVE the document as B&B Numbered Alarm List in the lesson folder on your fl ash drive.
PAUSE. LEAVE the document open to use in the next exercise.
How do you create a numbered list?
3.3.1
H H Homomome tab,b,b, in the e e PaPaParagraph group, click the drop-down arr
erinining
b,b,b,
bubububuttononon to dididispspsplay y y thththe Numbmbmbererinining LiLiLibrbrbrarararary y y showowown

Paragraph Formatting 117
STEP BY STEP Modify a Numbered List
USE the document that is open from the previous exercise.
1. Select the numbered list under the Set Alarm heading.
2. To change the format of the numbered list, click the drop-down arrow next to the
Numbering button, and then click Defi ne New Number Format . The Defi ne New
Number Format dialog box appears.
3. Click the Number style drop-down arrow and select uppercase roman numerals (see
Figure 4-25). The format for the selected text changed to uppercase roman numerals.
The default alignment is left and can also be changed
to center or right.
4. Click the Font button and select Arial Black , size 12 pt. Review the preview area to see
how the numbering will appear. Click OK to close the Font dialog box.
5. Click OK to close the Defi ne New Number Format dialog box.
To change the formatting of list numbers, click any number to select the entire list. If you select the text as well, the formatting of both the text and the numbering change.
6. Select the numbered list under the Deactivate Alarm heading.
7. In this next step you renumber an existing list using the lowercase letters. Click the
drop-down arrow next to the Numbering button, and then click Set Numbering Value .
The Set Numbering Value dialog box appears as shown in Figure 4-26.
Take Note
You can reset a
numbering list to begin a
new list or continue from
the previous list
Set Value to begin a
new list or continue
from a previous list
Figure 4-26
Set Numbering Value dialog box
Figure 4-25
Defi ne New Number Format dialog box
Select style
Preview area
Format numbering by
clicking the Font button

Lesson 4118
8. The Start new list option button is already selected. In the Set value to section, click the
up-arrow to f . Click OK. Your document should match Figure 4-27.
9. SAVE the document as B&B Numbered Alarm List 1 in the lesson folder on your
fl ash drive.
PAUSE. LEAVE the document open to use in the next exercise.
STEP BY STEP Change the Alignment of a Numbered List
USE the document that is open from the previous exercise.
1. Select the numbered list under the Set Alarm heading.
2. To change the alignment format of the numbered list, click the drop-down arrow next
to the Numbering button, and then click Defi ne New Number Format . The Defi ne
New Number Format dialog box appears.
3. In the Alignment group, click the drop-down arrow and select Right to change the
alignment of the numbering list.
4. Click OK . Notice how nicely the list is aligned (see Figure 4-28).
How do you modify a numbered list?
3.3.6
Figure 4-27
Sample document with different modifi ed
numbering list
Under Set Alarm, text
is not evenly aligned
Numbering
value reset
beringinging
resetetet

Paragraph Formatting 119
5. SAVE the document as B&B Numbered Alarm List Final in the lesson folder on your
fl ash drive, and then CLOSE the fi le.
PAUSE. LEAVE Word open to use in the next exercise.
The same process used in Backstage for turning automatic bulleting on and off in Word’s Auto-Format feature is applied the same way for the Automatic Numbered List. In Lesson 14, you learn about using the Advanced Options in Word.
CREATING AND MODIFYING A MULTILEVEL LIST
Word provides a multilevel feature that is used for outlines and other documents that require many levels—these levels can be a combination of letters and numbers.
Creating a Multilevel List
M ultilevel lists are typically used in documents where subsets of information are needed within the list, such as preparing an agenda, outline, or exam questions. As an example, you can use the multilevel list for outlining your research paper. In this exercise, you learn how to create and format a multilevel list in Word.
How do you modify the indentation in a
numbered list?
3.3.3
Take Note
The Bottom Line
Changing the alignment
improves the appearance
of the document
Figure 4-28
Sample document with modifi ed alignment

Lesson 4120
STEP BY STEP Create a Multilevel Outline List
OPEN Outline from the data fi les for this lesson.
1. Position the insertion point on the blank line after the Discussion Outline heading.
2. On the Home tab, in the Paragraph group, click the Multilevel List button. A menu
of list formats appears. Notice that when you position the mouse pointer over the
formats, they enlarge and expand.
3. Click the format style in the Current List section, as shown in Figure 4-29. The number 1.
is inserted for you.
Use the Tab key or Shif t 1 Tab to move to different levels.
4. Type Experience , and then press the Enter key. When you press Enter, the number 2. is
inserted.
5. Type Communication with Client and press the Enter key.
6. Press the Tab key and type Initial Meeting . Pressing the Tab key advances to the next
level with a lowercase a . Press the Enter key.
7. Press the Tab key and type Identify Position . Notice that Word inserts a lowercase
roman numeral as the next level. Press the Enter key.
Take Note
Figure 4-29
Multilevel List menu
Multilevel list enlarge
when you position the
mouse over the format
Multileveeveeveevel ll ll lististist en en enlarlarlarlargegege
when you ou ou posposposition on on thethethe
mouse oveoveover tr tr the forforformatmatmat

Paragraph Formatting 121
8. Press the Tab key and type Qualifi cations . Another level is inserted beginning with the
number 1. Press the Enter key.
9. Type Compensation Package and press the Enter key.
10. Type Time Frame and press the Enter key.
11. Press Shift 1 Tab once to move back one level. Type Progress Reporting and press the
Enter key.
12. Press Shift 1 Tab to move back one more level. Type Methods for Finding Candidates
and press the Enter key.
13. Press the Tab key. Type Database and press the Enter key.
14. Type Contacts and press the Enter key.
15. Type Networking . Your document should resemble Figure 4-30.
16. SAVE the document as Discussion Outline in the lesson folder on your fl ash drive.
PAUSE. LEAVE the document open for use in the next exercise.
Sorting a List’s Contents
You can sort a single-level list in much the same way that you sort a column in a table.
STEP BY STEP Sort a List’s Contents
USE the document that is open from the previous exercise.
1. Select the bulleted list under the Philosophy section .
2. On the Home tab, in the Paragraph group, click the Sort button. The Sort Text
dialog box appears as shown in Figure 4-31.
Figure 4-30
Sample document using multilevel list

Lesson 4122
3. Notice the Sort by fi eld is listed by Paragraphs, the Type is listed by Text, and the
Ascending order option is selected. Click OK .
4. The bulleted listed is sorted in alphabetical order.
5. SAVE the document as Discussion Outline Sorted in the lesson folder on your fl ash
drive.
PAUSE. LEAVE the document open to use in the next exercise.
In Lesson 6, you learn about creating tables. In this exercise, you learn to sort a list.
Modifying a Multilevel List
Word provides several options for changing the look of a list. Y ou can change a multilevel list by changing the list level, defi ning a new multilevel list, or defi ning a new list style. The same meth-ods are used from what you have learned in modifying bullets and numbering lists when increas-ing or decreasing the levels. Some formats, such as round bullets, work well for most documents.
STEP BY STEP Modify the Multilevel List Level
USE the document that is open from the previous exercise.
1. Select the bulleted list.
2. On the Home tab, in the Paragraph group, click the drop-down arrow on the Bullets
button. Previously in this lesson, you learned to change bullets—the same process is
used here.
3. Click the square bullet format in the Bullet Library.
4. Select the multilevel list you typed previously.
5. On the Home tab, in the Paragraph group, click the drop-down arrow on the Multilevel
List button. A menu appears.
6. Under List Library, click the third column in the top row. Notice the difference in the
numbering and alignment level.
7. SAVE the document as Discussion Outline Modifi ed in the lesson folder on your fl ash
drive, and then CLOSE the fi le.
PAUSE. LEAVE Word open for the next exercise.
Cross Ref
Figure 4-31
Sort Text dialog box
ththththe e dododocumemement as s s DiDiDiscussion on Outline Sortede in the lesson fod
AVE E E E thehehe d d docococumumument opopopenen to usususe in the nexexext t t exexexercisesese. . .
Paragraph Formatting 123
SOFTWARE ORIENTATION
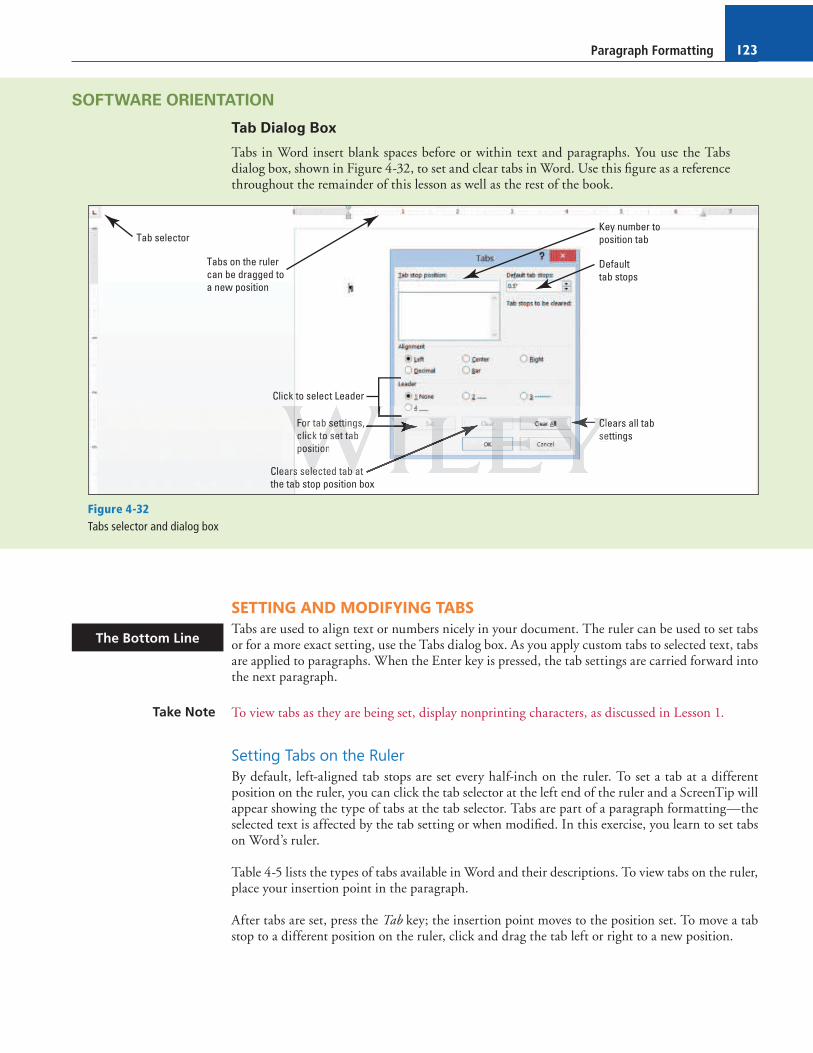
Tab Dialog Box
Tabs in Word insert blank spaces before or within text and paragraphs. You use the Tabs dialog box, shown in Figure 4-32, to set and clear tabs in Word. Use this fi gure as a reference throughout the remainder of this lesson as well as the rest of the book.
Tab selector
Tabs on the ruler
can be dragged to
a new position
Clears selected tab at
the tab stop position box
Click to select Leader
For tab settings,
click to set tab
position
Key number to
position tab
Default
tab stops
Clears all tab
settings
Figure 4-32
Tabs selector and dialog box
SETTING AND MODIFYING TABS
Tabs are used to align text or numbers nicely in your document. The ruler can be used to set tabs or for a more exact setting, use the Tabs dialog box. As you apply custom tabs to selected text, tabs are applied to paragraphs. When the Enter key is pressed, the tab settings are carried forward into the next paragraph.
To view tabs as they are being set, display nonprinting characters, as discussed in Lesson 1.
Setting Tabs on the Ruler
By default, left-aligned tab stops are set every half-inch on the ruler. To set a tab at a different position on the ruler, you can click the tab selector at the left end of the ruler and a ScreenTip will appear showing the type of tabs at the tab selector. Tabs are part of a paragraph formatting—the selected text is affected by the tab setting or when modifi ed. In this exercise, you learn to set tabs on Word’s ruler.
Table 4-5 lists the types of tabs available in Word and their descriptions. To view tabs on the ruler, place your insertion point in the paragraph.
After tabs are set, press the Tab key; the insertion point moves to the position set. To move a tab stop to a different position on the ruler, click and drag the tab left or right to a new position.
The Bottom Line
Take Note
Clears selecleclected tab ab ab ab at
ForForFor tab sb sb settettettingingings,
clicliclick ck ck to to to setsetset ta ta tab
pospospositiitiitiononon
CleCleCle
set

Lesson 4124
If the horizontal ruler is not visible, click the View tab, and then add a check mark by Ruler.
4. Click the ruler at the 2.5-inch mark to set a Center tab. The Center tab appears as
an inverted T .
5. Click the ruler at the 4-inch mark to set a Center tab. The ruler shows two tab settings.
6. Press Tab and type Chicago .
7. Press Tab and type New York .
8. Select the list of words starting with Breakfast and ending with Total s . When setting
tabs, tabs are part of the paragraph formatting—the selected text will be affected by
the tab settings after the Tab key is pressed.
9. Click the tab selector until the Right tab appears—displays as an inverted L .
10. Click the ruler at the 1-inch mark to set a Right tab.
11. Deselect the list, and place the insertion point in front of each word in the list, and then
press Tab to align it at the Right tab. When setting a Right tab, press the Tab key with
existing text or press the Tab key, and then type the new text. The text characters are
aligned at the right and move to the left. Your document should look similar to the one
shown in Figure 4-34.
Troubleshooting
Name Button Description
Left tab Left-aligns text at the tab place indicated on the horizontal ruler
Center tab Centers text at the place indicated on the horizontal ruler
Right tab Right-aligns text at the place indicated on the horizontal ruler
Decimal tab Aligns numbers around a decimal point at the place indicated on the
horizontal ruler
Bar tab Inserts a vertical bar line at the place indicated on the horizontal ruler
Table 4-5
Tab stops on the ruler
STEP BY STEP Set Tabs on the Ruler
OPEN Per Diem from the data fi les for this lesson.
1. On the Home tab in the Paragraph group, click the Show/Hide ( ¶ ) button to show
nonprinting characters.
2. Place the insertion point on the blank line below the Meals & Incidentals Breakdown
heading.
3. Click the tab selector at the left of the ruler until the Center tab appears.
The horizontal ruler is shown in Figure 4-33, displaying the different types
of tabs.
Left tab Right tabCenter tab Decimal tab Bar tab
Figure 4-33
The horizontal ruler with tab sets
Homomome tatatab b b ininin thehehe P P Parararagagagraraphphphph g g grororoup, clicicicick k k thththe e e ShShShowowow/H/H/Hide e ( ( ( ¶ ¶ ¶ ( ( ( (
ntinining g g g chchcharararacacactetetersrsrsrs.
the inininsesesertrtrtion n n popopoint ononon thehe blalalanknknk line bebebelolow the Meals s & & & Inci
g.

Paragraph Formatting 125
Right tab settingFigure 4-34
Right tab formatting
12. SAVE the document as Per Die m First Draft in the lesson folder on your fl ash drive.
PAUSE. LEAVE the document open to use in the next exercise.
Using the Tabs Dialog Box
The Tabs dialog box is useful for setting tabs at precise locations on the ruler, clearing all tabs, and setting tab leaders. Tab leaders are symbols such as dotted, dashed, or solid lines that fi ll the space before a tab (see Figure 4-35). In this exercise, you practice setting tabs and leaders using the Tabs dialog box.
STEP BY STEP Use the Tabs Dialog Box
USE the document that is open from the previous exercise.
1. Select the list of words starting with Breakfast and continuing to the end of the
document.
2. On the Home tab, in the Paragraph group, click the dialog box launcher to launch the
Paragraph dialog box.
3. Click the Tabs button on the bottom left of the Paragraph dialog box to display the Tabs
dialog box. In the Tabs dialog box, you should see the 1" Right tab setting that you set
in the previous exercise.
4. In the Tab stop position box, type 2.6 . In the Alignment section, select Decimal . In the
Leader section, select 2 , and then click Set . After setting individuals tabs, you must
click Set to position the tab setting.
5. In the Tab stop position box, type 4.1 . In the Alignment section, select Decimal . In the
Leader section, select 2 , and then click Set . Setting a leader provides a guide to the
next tab setting. Refer to Figure 4-35 and compare with your screen.
VEVEVE ththe e e docucucumentntnt a a as s s s Per r r Die m First Draft e in the lesson foldeft
LEAEAEAVEVEVE thththe e e dododocucucucumentntnt o open tototo use in thththe e e nenenextxtxt exercrcrcisisisise.e.e.

Lesson 4126
6. OK to close the Tabs dialog box. Notice that nothing happens yet.
7. Place the insertion point after the word Breakfast and press Tab .
8. Type $10 .98 and press Tab .
9. Type $12 .50 . Repeat this process for each line, typing the numbers shown in
Figure 4-36. Notice how the decimals align properly.
Default tab stops at .5”
Clears all tab settings
Leaders
Alignment
Clears one tab setting
Sets tab position
Key tab position here
Figure 4-35
Tabs dialog box
Custom Decimal tab
settings with leaders
Figure 4-36
Tabs and tab leaders formatting
10. SAVE the document with the same fi lename in the lesson folder on your fl ash drive.
PAUSE. LEAVE the document open to use in the next exercise.
lololosesese the TaTaTabsbsbs diaiaialololog g g bobobox. N N N Notototicicice thatatat n n nototothihihingngng hapapappepepepens y y yetetetbs
he i i insnsnsererertititionononon p p poioiointntntnt aftftfterer the w w worord Breaeaeakfkfkfasasastt ananand presesess s s ttt TaTaTabb .
0.9888 ananand prprprpresess s s Tab .
2.50 ReReRepeatatatat this prprprocococesesess fofofor r r eaeaeachch lininine,e,e, t t typypypining g g the nununumbmbmber

Paragraph Formatting 127
In Lesson 1, you created the Welcome Memo and aligned text manually by pressing Tab twice. Open the document from your Lesson 2 folder, delete the tabs, and set a left tab at the one-inch marker using the ruler or dialog box.
Moving Tabs
Tabs can be repositioned using your mouse pointer by dragging to a new position on the ruler or opening the Tabs dialog box.
STEP BY STEP Move Tabs
USE the document that is open from the previous exercise.
1. Select the block of text beginning with Breakfast … and ending with …$63.49 . Include
the non-printing character ( ¶ ) in your selection.
2. Position the mouse pointer at 4.1 " on the ruler until you see the Decimal Tab ScreenTip.
3. Press and hold the left mouse button and drag on the ruler to 5 " . Release the left mouse
button. Notice the Decimal Tab setting for the fi ve lines is positioned at 5" on the ruler.
4. With the text still selected, position the mouse pointer at 2.6" on the ruler until you see
the Decimal Tab ScreenTip.
5. Press and hold the left mouse button and drag on the ruler to 3 " . Release the left mouse
button. Notice the Decimal Tab setting for the fi ve lines is positioned at 3" on the ruler.
6. Select Chicago . Drag the center tab setting and position it at 3" on the ruler. Double-
click the center tab on the ruler to open the Tabs dialog box—check the positioning of
the tab. Chicago should align nicely above the amounts.
7. Select New York . Drag the center tab setting and position it at 5 " on the ruler. Double-
click the center tab on the ruler to open the Tabs dialog box—check the positioning of
the tab. New York should align nicely above the amounts.
8. SAVE the document as Per Diem Final in the lesson folder on your fl ash drive.
PAUSE. LEAVE the document open to use in the next exercise.
Clearing Tabs
Tabs can be removed by dragging them off the ruler, or you can use the Tabs dialog box to clear one or all tabs. To remove a tab stop from the ruler, click and drag it off the ruler. When you release the mouse button, the tab stop disappears. Or, open the Tabs dialog box, where you can choose to clear one tab or all tabs. In this exercise, you practice clearing tabs from your document.
STEP BY STEP Clear Tabs
USE the document that is open from the previous exercise.
1. Place the insertion point on the last line ( Totals ).
2. Move your mouse pointer to the tab stop at 5 " on the ruler. Wait for the ScreenTip to
appear.
3. Press and hold the mouse button and drag it off the ruler. Release the mouse button to
remove the tab stop. The New York amount moves to the left.
4. On the Home tab, in the Paragraph group, click the dialog box launcher to launch the
Paragraph dialog box.
5. Click the Tabs button on the bottom left of the dialog box to display the Tabs dialog box.
6. In the Tab stop position list, click 3 " , and then click Clear to clear that tab.
Cross Ref
Another WayTo open the Tabs
dialog box, double-click any tab stop on the ruler. The Paragraph dialog box can also be accessed in the Page Layout tab. Also, you can right-click on selected text.
t thehehehe text stststill selelelelectctctcted, position the mouse pointer at
DeDeDecicimamamal TaTaTab b b ScrerereenenenTiTiTip.p.p.
s ananand d d hohoholdldld thehehe l l lefefefeft momomoususe bububutttttton and drarag g ononon thehe r r rulululererer t t to o o 3
on. NoNoNotititicecece t t thehehe D D Decimimimalal Tab setetetting fororor thehehe fi fi fi v v ve lines isisis p p posit fi fi fi
ct ChChChicicicago . D D Drararag the e e cececentererer t t tababab s s setetettitititingngng a a andnd p p posososition n n n ititit at 3"

Lesson 4128
7. Click the Clear All button to clear all tabs on that line.
8. Click OK to close the Tabs dialog box.
9. Select all the text on the Totals line and press the Delete button to delete it.
10. SAVE the document with the same fi lename, and then CLOSE the fi le.
PAUSE . LEAVE Word open for the next exercise.
Setting Tab Stops
Tab stops can be reset from the default of 0.5 inch. Each time you press the tab key, the tab moves half an inch on the ruler. Thus, by pressing the tab key twice, for example, the insertion point moves to one inch on the ruler. In this exercise, you practice setting default tab stops.
STEP BY STEP Set Tab Stops
1. OPEN a new blank document.
2. Press the Tab key once.
3. Press the Tab key two more times; the insertion point is now positioned at 1½ inches
on the ruler.
4. Press the Tab key three times; the insertion point moves to the 3-inch mark on the ruler.
Each time you press the Tab key, it advances half an inch on the ruler. By default, the
tab stops are set at half an inch.
5. Press Enter .
6. On the Home tab, in the Paragraph group, click the dialog box launcher.
7. In the Paragraph dialog box, click the Tabs button to open the Tabs dialog box.
8. Click the up arrow below Default Tab Stops until it stops at 1 inch. Click OK .
9. Press the Tab key three times and notice the insertion point on the ruler now stops at
every 1 inch.
STOP. CLOSE Word without saving the changes.
Many of the predesigned document layout options in Word 2013 make it possible to create docu-ments, such as an index or table of contents, without setting any tabs manually.
SKILL SUMMARY
In This Lesson, You Learned To: Exam ObjectiveObjective Number
Format Paragraphs Set indentation. 2.2.7
Set Line Spacing in Text and Between
Paragraphs
Set line spacing.
Modify line spacing.
Set paragraph spacing.
2.2.5
3.3.4
2.2.4
Create and Format a Bulleted List Add numbering or bullets.
Create custom bullets.
Modify list indentation.
Increase and decrease list levels.
3.3.1
3.3.2
3.3.3
3.3.5
Create and Format a Numbered List Add numbering or bullets.
Modify numbering.
3.3.1
3.3.6
Create and Modify a Multilevel List
Set and Modify Tabs
Another WayPress Ctrl1N to
use the shortcut key to open a new, blank document.
Take Note
rulululererer.
he TaTaTabb k k keyeyey t t thrhrhreeeeee timeseses; the inininsertion popopoint momomoves s s tototo thehehehe 3-i
ime yoyoyou u u prprpresesess s s thththe Tab b b kekey, it t t adadadvanceseses h h halalalf f f ananan inch ononon t t thehehe r
ops ararare e e seseset atatatat h h halalalf an i i incncnch.
EnEnte

Paragraph Formatting 129
Knowledge Assessment
Multiple Choice
Select the best response for the following statements.
1. Which of the following is NOT a type of indent?
a. Hanging
b. Negative
c. Positive
d. First-line
2. Which word(s) refers to how text is positioned between the top and bottom margins of
the page?
a. Horizontal alignment
b. Vertical alignment
c. Justifi ed
d. Line spacing
3. Which line spacing command sets the spacing at a fi xed amount that Word does not
adjust?
a. Exactly
b. Double
c. Multiple
d. At least
4. Where is the View Ruler button located?
a. In the Tabs dialog box
b. At the top of the vertical scroll bar
c. In the Paragraph group
d. It does not exist
5. What does dragging a tab off the ruler do?
a. Moves it to another position
b. Turns it into a left-aligned tab
c. Clears it
d. Hides it from view
6. Bullets can be defi ned by adding a:
a. symbol.
b. box.
c. picture.
d. all of the above.
7. Which property of borders can be changed in the Borders tab of the Borders and
Shading dialog box?
a. Color
b. Width
c. Style
d. All of the above
8. The inverted L sets which tab on the ruler?
a. Left
b. Right
c. Center
d. Decimal
9. Which tab setting do you use to align a list of currency values?
a. Decimal
b. Center
c. Right
d. Decimal with leaders
10. You can defi ne a New Number format by selecting which of the following styles?
a. I, II, III
b. 1), 2), 3)
c. 1., 2., 3.
d. All of the above
ExExExacacacactltltly
Doububublelele
Multltltipipiplelele
leasasast
ere is t t thehehe Vieieiew w w Ruler r r bububuttononon locococatatatededed? ?

Lesson 4130
True/False
Circle T if the statement is true or F if the statement is false.
T F 1. Pressing the Enter key indents the fi rst line of a paragraph.
T F 2. An indent is the space between a paragraph and the document’s left and/or
right margin.
T F 3. You can use the ruler to set tabs.
T F 4. A bar tab inserts a vertical bar line at the place indicated on the vertical ruler.
T F 5. Tab leaders are dotted, dashed, or solid lines that fi ll the space before a tab.
T F 6. The Clear Formatting command clears only the fonts applied to the selected
text.
T F 7. Horizontal alignment refers to the position of text with regard to the top and
bottom margins of a document.
T F 8. Centered vertical alignment aligns text between the top and bottom margin.
T F 9. Indents can be changed using the markers on the ruler.
T F 10. The shortcut to double-space a paragraph is Ctrl 1 2.
Competency Assessment
Project 4-1: Creating an Expense Report for Blue Yonder Airlines
You are employed in the fi nancial department at Blue Yonder Airlines and have been asked to create a document to show expenses for fi scal years 2009–2012.
GET READY. LAUNCH Word if it is not already running.
1. OPEN a blank document.
2. SAVE the document as 4-1 Expense Report in the lesson folder on your fl ash drive.
3. Type BLUE YONDER AIRLINES , and press Enter .
4. Type Expense Report , and press Enter .
5. Set a center tab using the ruler at the 2 " , 3 " , 4 " , and 5 " marks. Then at the left margin,
press the Tab key.
6. Type the following text: at the 2", type 2009 , and press Tab ; at the 3", type 2010 , and
press Tab ; at the 4", type 2011 , and press Tab ; and at 5", type 2012 , and press Enter .
7. Remove the center tab settings by dragging them off the ruler.
8. Select the paragraph mark, and then change the tab selector to Decimal . Set decimal
tabs at the 2 " , 3 " , 4 " , and 5 " marks.
9. Type the following text and values:
Corporate Contracts, press Tab $316.00 press Tab $396.00 press Tab $368.00 press Tab $393.00 press Enter
Sky Diving, press Tab $17.00 press Tab $17.00 press Tab $16.00 press Tab $65.00 press Enter
Charter Flights, press Tab $22.00 press Tab $24.00 press Tab $24.00 press Tab $27.00 press Enter
Flight School, press Tab $63.00 press Tab $61.00 press Tab $59.00 press Tab $55.00
-1: Crerereatatating anananan Expenenensesese Repepepororort for r r BlBlBlueue Yondededer Airlrlrlininines
Paragraph Formatting 131
10. Center the title, BLUE YONDER AIRLINES . Change the font size for the title to 26 pt.,
bold , and apply the font color Blue-Gray, Text 2, Darker 50% .
11. Center the subtitle, Expense Report . Change the font size for the subtitle to 18 pt., bold ,
and apply the font color B lack, Text 1 .
12. Select the years beginning with 2009 . . .2012 , bold , and underline only words .
13. Use the multi-selection to select Corporate Contracts, Sky Diving, Charter Flights, and
Flight School , and bold .
14. Select the Page Setup dialog box launcher from the Page Layout tab, and then click the
Layout tab. In the Page group, change the vertical alignment to Center .
15. SAVE the document with the same fi lename in the lesson folder and CLOSE the fi le.
LEAVE Word open for the next project.
Project 4-2: General Performance Expectation Guidelines
In your job at Books and Beyond, you continue to work on documents that will be part of the employee handbook.
GET READY. LAUNCH Word if it is not already running.
1. OPEN Guidelines from the data fi les for this lesson.
2. SAVE the document as 4-2 H andbook Guidelines in the lesson folder on your fl ash drive.
3. In the third paragraph, select the two lines that begin Verbal discussion . . . and Written
warning . . . .
4. On the Home tab, in the Paragraph group, click the drop-down arrow next to the Bullets
button and select the solid circle.
5. Place the insertion point after the second item in the bulleted list and press Enter .
6. Type Termination as the third bulleted item.
7. Select the fi ve double-spaced paragraphs beginning with abuse, misuse . . . and ending
with falsifi cation, misinterpretation . . . .
8. C lick the drop-down arrow next to the Bullets button and click Defi ne New Bullet .
9. Click the Symbol button, and then click the drop-down arrow in the Font box and select
Wingdings .
10. Scroll to the top of the Wingdings menu and select the solid diamond (character
code 116).
11. Click OK to close the Symbol dialog box, and then click OK to close the Defi ne New
Bullet dialog box.
12. Select the remaining paragraphs beginning with insubordination, willful disregard . . .
and ending with engaging in conduct . . . .
13. C lick the drop-down arrow next to the Bullets button and click Defi ne New Bullet .
14. Click the Picture button, and then type handbook in the Search box for Offi ce.com.
15. Select the fi rst picture and then click Insert ; click OK to close the Defi ne New Bullet
dialog box.
16. Select the image and change the font size to 2 0 pt.
17. Select the fi rst, second, third, and last paragraph in the document. Avoid selecting the
bulleted lists.
18. On the Home tab, in the Paragraph group, click the Justify button.
19. With the paragraphs still selected, apply the fi rst-line indent by launching the
Paragraph dialog box.
20. Under Special, select the drop-down arrow and select First Line.
21. Click OK to close the Paragraph dialog box.
22. SAVE the document with the same fi lename in the lesson folder and CLOSE the fi le.
LEAVE Word open for the next project.
VE t t thehehe docococumumument t t asasas 4-4-4-2 2 2 H H H ananandbdbdbooooook H H k k Guidididelelelininineseses i i in n n thththe e e lessononon f f feseses
he thihihihirdrdrd p p parararagagagagrararaphphphph, seseselelect thehehe two lineseses t t thahahat t t bebebegin VeVeVeVerbrbrbalalal d
rning . . . . . . . .
he Homomome tab,b,b,b, in the e e PaPaParararagrgrgrapapaph h h grgrgrouououp,p,p, c c clililickckck t t thehehe drop-p-p-p-dododown

Lesson 4132
Profi ciency Assessment
Project 4-3: Blue Yonder Expense Report
You are now ready to format the expense report that you created in Project 4-1.
GET READY. LAUNCH Word if it is not already running.
1. OPEN 4-1 Expense Report from the data fi les for this lesson.
2. SAVE the document as 4-3 Expense Report Updated in the lesson folder on your
fl ash drive.
3. Select the heading Expense Report , and increase the Spacing After to 24 pt.
4. Select the four lines of text beginning with Corporate Contracts and ending with
$55.00, and sort text in ascending order.
5. With the text still selected, apply the Blue-Gray, Text 2, Lighter 80% shading.
6. SAVE the document with the same fi lename in the lesson folder and CLOSE the fi le.
LEAVE Word open for the next project.
Project 4-4: Phone List
Open a partially completed list of committee members. Your task is to type the phone numbers by the committee members’ names, sort in ascending order, format using tabs, and save as a Word document.
GET READY. LAUNCH Word if it is not already running.
1. OPEN Phone List from the data fi les for this lesson.
2. SAVE the document as 4-4 Committee P hone List in the lesson folder on your fl ash
drive.
3. Select the whole document and create a Right tab setting at 6.5 " with dot leaders ,
and then type the phone number beside each name. The phone numbers should
align evenly between the left and right margins. Maintain a balanced look for your
document.
4. Type the following phone numbers next to each committee member:
Ted Bremer 555-9999
Hao Chen 555-8888
Alice Ciccu 555-7777
Josie Camacho 555-1111
Gioff Grisso 555-4444
Jose Lugo 555-3333
Naomi Solis 555-5555
5. Change the spacing after to 12 pt, font to Times New Roman , and font size to 12 pt to
the whole document.
6. Sort on the fi rst column by text.
7. SAVE the document with the same fi lename in the lesson folder and CLOSE the fi le.
LEAVE Word open for the next project.
-4: P P Phohohonenene L L Lisisist t t
rtially y y cococompleleleteteted d d list o o of cococommmmmmititittetee e mememembmbmbererers.s. Y Y Yououour tasksksk i is s s to tmi bebebebe ’ in di rd fo si

Paragraph Formatting 133
Mastery Assessment
Project 4-5: Developer Job Description
You are a content specialist at a software development company. Your supervisor asks you to for-mat the job description for the developer position.
GET READY. LAUNCH Word if it is not already running.
1. OPEN Developer from the data fi les for this lesson.
2. SAVE the document as 4-5 Developer Description in the lesson folder on your
fl ash drive.
3. Use the skills you learned in this lesson—such as alignment, line spacing, shading,
borders, tabs, and bulleted lists—to format the document as shown in Figure 4-37.
Be sure to follow these guidelines:
a. Display the Show/Hide .
b. Delete all of the paragraph marks (¶) in the document where a blank line appears.
c. For the title, apply the shading: Orange, Accent 6, Lighter 40% and set the paragraph
Spacing After to 24 pts.
d. Select the headings: Position Title , Position Objective , and Reports To and apply the
shading Orange, Accent 6, Lighter 80% .
e. Select the headings, Principle Accountabilities and Essential Duties of the Job and
Qualifi cations and apply a paragraph border with the Shadow setting ; Width: 2¼ " ;
Color: Orange, Accent 6, Darker 50% .
f. Set the paragraph Spacing After to 12 pts. after the paragraph headings: Position
Title and Position Objective .
g. For the Reports To heading, set the paragraph Spacing After to 24 pts. after Director
of Development .
Figure 4-37
Developer job description
SpSpSpacacacinining Afteteter to 242424 pts.
elececect t thththe e e heheheadadadininingsgsgs: PoPoPosisisitiononon T T Title, Posisisitition O O Objbjbjececectititiveveve , a a andndnd
adininining g g OrOrOrananangegege, , , AcAcAccecentnt 6, LiLiLighghghter 80%% .
elect thththe headadadadininings, PrPrPrinininciplplple AcAccounununtatatabibilitieseses a a and E E Essssssenti
Qualifi c c cationsifi a a a and applylyly a paragraphphph b b bordededer wiwiwith thehehe ShShShadow

Lesson 4134
h. Under the headings, Principle Accountabilities and Essential Duties of the Job and
Qualifi cations , apply the solid diamond bullets to the paragraphs.
i. At the beginning of the fi rst bulleted item under Principle Accountabilities and
Essential Duties of the Job and Qualifi cations , set the paragraph Spacing Before to
12 pts.
j. After the last bulleted item under Principle Accountabilities and Essential Duties of
the Job , set the Spacing After to 18 pts.
4. SAVE the document with the same fi lename in the lesson folder and CLOSE the fi le.
LEAVE Word open for the next project.
Project 4-6: Rabbit Show
You are a volunteer at the annual Falls Village Fair, and you have been assigned to work on a document about one of the exhibits. The person who created the document was not as familiar with line spacing, tabs, and lists as you are, so you need to format the document as shown in Figure 4-38.
Figure 4-38
Rabbit Show
GET READY. LAUNCH Word if it is not already running.
1. OPEN Rabbit from the data fi les for this lesson.
2. SAVE the document as 4-6 Rabbit Show in the lesson folder on your fl ash drive.

Paragraph Formatting 135
3. Make any adjustments necessary to format the tabs, line spacing, and lists as shown in
Figure 4-38, following these guidelines:
a. On the title, remove the fi rst-line indent and make sure the alignment is set to center.
b. Select the fi rst six lines under the heading, remove the fi rst-line indent, and then
remove all existing tab settings and reset the tab settings to a right tab at 2 " and 6 "
with leaders.
c. Remove extra paragraph marks before and after Call Pat . . . and center.
d. Apply a bullet using a check mark under the heading Special Rules.
e. Remove the paragraph mark before the heading RABBIT PREMIUMS . Change the
paragraph spacing by setting the Spacing Before/After to 18 pts.
f. Select the items under RABBIT PREMIUMS and clear formatting. Beginning with
Pre-Junior and ending with Senior Class . . . apply the numbering list 1., 2., 3., 4. .
4. SAVE the document with the same fi lename in the lesson folder and CLOSE the fi le.
CLOSE Word.
Circling Back 1136
Circling Back 1
The National Association of Professional Consultants is a professional organization that serves a varied membership of consultants. Each year, the association has a three-day professional develop-ment conference. The association is now planning the upcoming conference. As the association’s membership manager, your job includes a wide variety of tasks related to organizing and commu-nicating information about membership. In addition, you are working with the conference plan-ning committee to help secure speakers for the conference and market the conference to members.
Project 1: Formatting a Letter
GET READY. LAUNCH Word if it is not already running.
1. OPEN the Conference Speaker letter from the Circling Back data fi les folder.
2. Customize the margins to 1" all around.
3. SAVE the document as Conference Speaker Letter in the lesson folder on your fl ash drive.
4. Replace the fi elds in the document by typing the following information:
[Your Name]: Susan Pasha
[Street Address]: 5678 Circle Street
[City, ST ZIP Code]: Kansas City, MO 64163
[Recipient Name]: Daniel Slade
[Title]: President, Strategies and Operations
[Company Name]: Montgomery, Slade and Parker
[Street Address]: 3333 Lakeside Way
[City, ST ZIP Code]: Chicago, IL 60611
[Recipient Name]: Mr. Slade
5. Change the date of the letter to June 15, 20XX.
6. Select the Susan Pasha heading and change the font size to 28 pt, and then change the
font color to Red, Accent 2, Darker 50%.
7. Select the next line and right-align the address and change the font size to 10 pt.
8. In the fi rst sentence of the body of the letter, select travel agents’ and type consultants’.
9. In the second sentence, select Alpine Ski House in Breckenridge, Colorado and type
Lakeview Towers in South Lake Tahoe, California.
10. Select the text you just typed and bold.
11. Change the date of the evening to September 16 and bold.
12. In the last sentence of the letter, select convention and type conference.
13. Type Susan Pasha in the signature line, and then type her title, President, press
Shift1Enter and type National Association of Professional Consultants.
14. Display the documents to view as One Page.
15. SAVE the document in the lesson folder on your fl ash drive, and then CLOSE the fi le.
PAUSE. LEAVE Word open for the next project.
Project 2: Attachment
Create a document that will be sent to the staff and volunteers who are assisting with the Nation-al Association of Professional Consultants Conference. Update them on the upcoming events fees.
GET READY. LAUNCH Word if it is not already running.
1. OPEN a blank document.
2. SAVE the document as Conference Update in the lesson folder on your fl ash drive.
3. Type Update on Fees, and press Enter.
AdAdAddrdrdress]s]s]: 56565678 C C Circlclcle e e StStStrerereetetet
T ZIZIZIP P P CoCoCodedede]]: : : KaKaKansnsnsasas C City, M M MO O O 64163
ient N N Namamame]: : : DaDaDanininiel S Slalade
Presididident, S S Strtrtrategieieies s s ananand OpOpOperereratatatioioionsnsns

Circling Back 1 137
4. Set center tabs on the second line at 3.88" and 4.88".
5. Type the following titles on the second line:
Press Tab, Early Bird, and press Tab.
Regular, and press Enter.
6. Set two tab settings on the third line with a right tab and with dot leaders at 4" and 5".
Remove the previously set tabs.
7. Type the following:
Conference Registration, and press Tab.
$500, and press Tab.
$600, and press Enter.
Hotel Accommodations (per night), and press Tab.
$195, and press Tab.
$250, and press Enter.
Exhibitor’s Fee, and press Tab.
$250, and press Tab.
$350, and press Enter.
8. Adjust the tab stops and move them as follows:
Move the Center tab for the headings from 3.88" to 4.88" and 4.88" to 6.38".
Move the Right tab settings from 4" to 5" and 5" to 6.5".
9. Remove the tab settings in the paragraph below Exhibitor’s Fee.
10. Select the title and apply a Heading 1 style and center.
11. Apply a paragraph border with a 3D setting, Blue-Gray, Text 2, Darker 50%, with a
width of 3 pt.
12. SAVE the document in the lesson folder in your fl ash drive, and then CLOSE the fi le.
PAUSE. LEAVE Word open for the next project.
Project 3: Finding and Replacing Text
You will work on a document and remove all formatting from the whole document, and use the Find and Replace commands. You will apply styles to specifi c text and apply the paragraph spacing after to the heading.
GET READY. LAUNCH Word if it is not already running.
1. OPEN the Group Info document from the lesson folder.
2. SAVE the document as Group Update in the lesson folder on your fl ash drive.
3. Remove all formatting in the document.
4. Select Lakeville.NET User’s Group and paste the phrase into both the Find what and
Replace with boxes of the Find and Replace dialog box.
5. In the Replace with box, replace the formatting with the following changes.
6. Select the Format button, select Font, select Bold, size 14, change the font color to Dark
Blue, Text 2, Darker 50%, and then select All caps. Click OK and then click Replace All.
Three occurrences are replaced.
7. Apply the Heading 2 style to FAQ. Change the font size to 22 pt, and then Bold.
8. Apply the Intense Reference style to How do I join your group?, When is the next
meeting?, How do I sponsor a meeting?, How do I receive the newsletter?, and
Locations and Directions.
9. Set the spacing after on the fi rst line heading to 6 point. Center the heading.
Change the font size to the text About to match the remaining heading.
10. Apply a fi rst line indent to the fi rst paragraph.
11. SAVE the document with the updated changes and close the fi le.
PAUSE. CLOSE Word.
ve t t thehehe Righghghttt tab s s setetettititingngngs s s fromomomom ttt 444" to 5" ananand d d 555" totototo 6.6.6.555".".
moveveve t t thehehe t t tababab s s setetettititings inin the p parararagraph belelow ExExExExhihihibibibibitototor’r’r’r’s s s FeFeFe
ct thehehe t t titititle a a andndnd applylyly a a Headadadinining 1 stylelele a and cececenter.
y a papaparagrapapapaph h h bordrdrdererer w w with h h a a a 3D3D s s setetettingngng, , , BlBlBlueueue-G-G-Gray,y,y, T T Texexext 2,