Embed Size (px)
Citation preview

MOD-t™ & New Matter StoreUser Manual
To download the latest version of this manual, go to support.newmatter.com.Last revised 2/2016.
Introduction ....................................................................................................3Important Info About Your MOD-t................................................................4Technical Customer Support ......................................................................5The New Matter Ecosystem ..........................................................................6The New Matter Store ....................................................................................7What’s in the Box? ..........................................................................................8MOD-t Technical Specifications ...................................................................9MOD-t Diagram .......................................................................................10-11Preparing Your MOD-t
Build Tray Assembly ........................................................................12Loading Filament .............................................................................12Unloading Filament .........................................................................13Preparing a Build Tray to Print a Design ..........................................13
Using the MOD-t 3D PrinterPrinting a Design from The New Matter Store .................................14 Printing a Design from an External Source .......................................14Beginning a Print .............................................................................15Pause/Cancel Printing .....................................................................15Removing a Printed Design from the MOD-t ...................................15
MOD-t MaintenanceMaintaining Your Print Surface Plate ................................................16Updating to the Latest Firmware ....................................................16Cleaning the Acrylic MOD-t Cover ................................................16
Compliance and Safety Warnings FCC Compliance .............................................................................17Safety Warnings ..............................................................................17Electric Shock Hazard ....................................................................17Fire Hazard ......................................................................................17Adult Supervision Required ............................................................17
User AgreementDisclaimers ......................................................................................18Warranty Terms ...............................................................................18Warranty Terms & Conditions .......................................................18
Warranty Information ........................................................................... 19-20Returns and Repairs Policy
Defective on Arrival ........................................................................ 21Defective on Arrival Terms & Conditions ....................................... 21
Intellectual Property .................................................................................... 22
TABLE OF CONTENTS
3
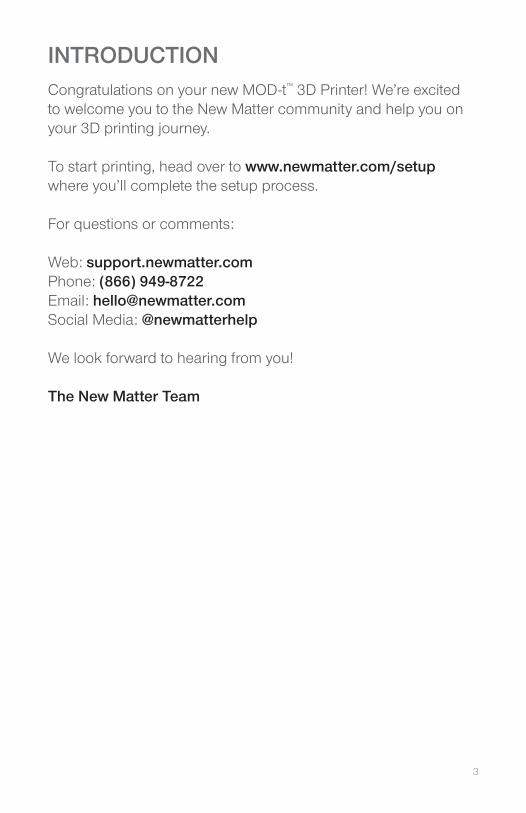
Congratulations on your new MOD-t™ 3D Printer! We’re excited to welcome you to the New Matter community and help you on your 3D printing journey.
To start printing, head over to www.newmatter.com/setup where you’ll complete the setup process.
For questions or comments:
Web: support.newmatter.com Phone: (866) 949-8722 Email: [email protected] Social Media: @newmatterhelp
We look forward to hearing from you!
The New Matter Team
INTRODUCTION
4
• You must visit www.newmatter.com/setup afterreviewing this guide to operate your MOD-t.
• Your primary portal to control your MOD-t via Wi-Fi is:store.newmatter.com.
• Always print with the clear cover on for best resultsand for your safety.
• Always begin printing with a clean build tray properlyinstalled on the X & Y-Axis pinion rods.
• Visit store.newmatter.com to explore our curatedlibrary of 3D designs.
• All information presented in this guide can be foundonline at www.newmatter.com/setup.
• Technical Customer Support is here to help.Visit support.newmatter.com or see next pagefor more information.
IMPORTANT INFO ABOUT YOUR MOD-t
5
Your MOD-t 3D Printer comes with a 90-day limited warranty. In the event you would like to return or replace your MOD-t, please contact New Matter Technical Customer Support. Our online support page includes FAQs, how-to videos, articles, forums, and live chat (Monday – Friday, 9am – 6pm, Pacific).
New Matter Technical Customer Support is available to help you get the most out of your MOD-t and the New Matter Store. We are available through multiple channels:
support.newmatter.com24 hours a day, 7 days a week
1-866-949-8722
@newmatterhelp
Live Chat on support.newmatter.comMonday – Friday, 9am – 6pm PT
Please visit www.newmatter.com/warranty or seePage 19–21 for complete warranty and return information.
TECHNICAL CUSTOMER SUPPORT
6
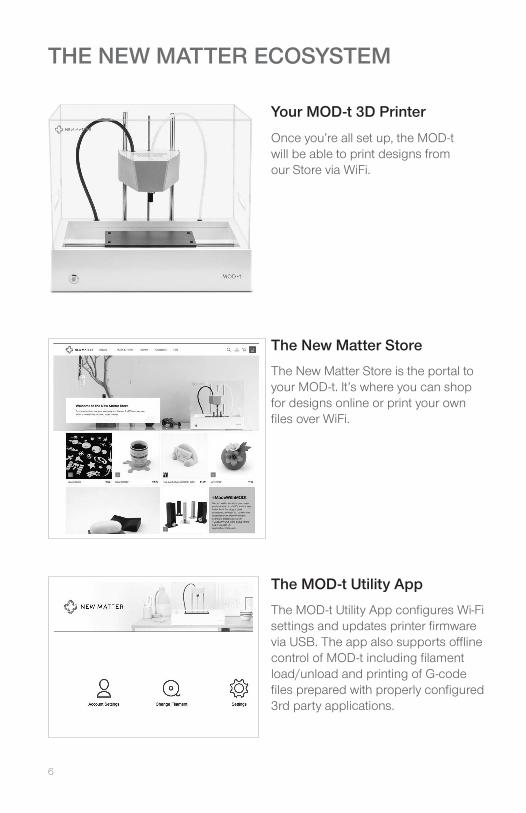
Once you’re all set up, the MOD-twill be able to print designs fromour Store via WiFi.
The New Matter Store is the portal to your MOD-t. It’s where you can shop for designs online or print your own files over WiFi.
The MOD-t Utility App configures Wi-Fi settings and updates printer firmware via USB. The app also supports offline control of MOD-t including filament load/unload and printing of G-code files prepared with properly configured 3rd party applications.
THE NEW MATTER ECOSYSTEM
Your MOD-t 3D Printer
The MOD-t Utility App
The New Matter Store
7
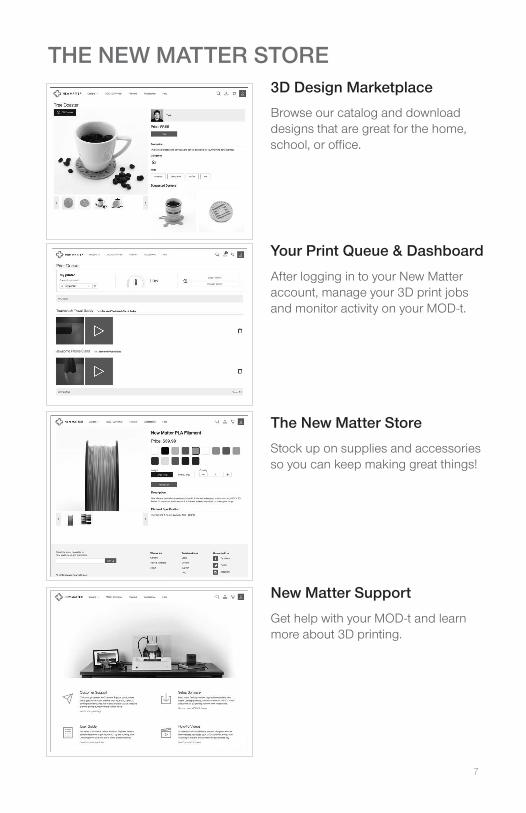
THE NEW MATTER STORE
After logging in to your New Matter account, manage your 3D print jobs and monitor activity on your MOD-t.
Get help with your MOD-t and learn more about 3D printing.
Browse our catalog and download designs that are great for the home, school, or office.
Stock up on supplies and accessories so you can keep making great things!
3D Design Marketplace
Your Print Queue & Dashboard
The New Matter Store
New Matter Support
8
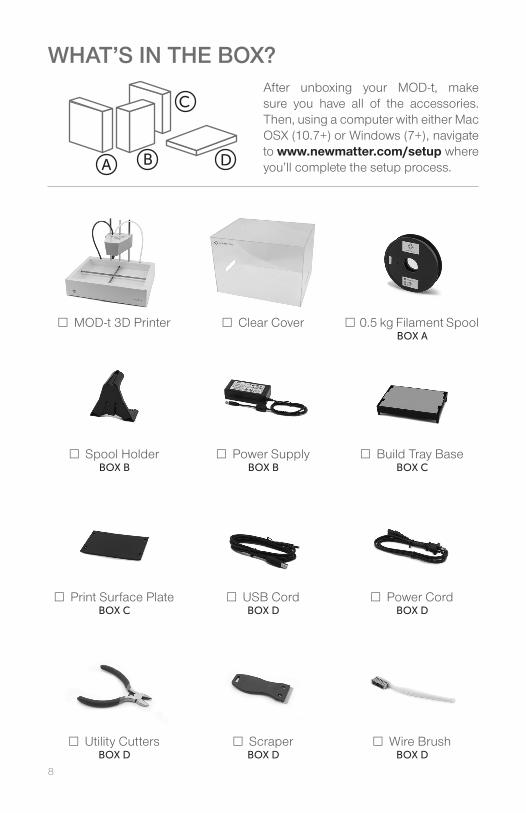
After unboxing your MOD-t, make sure you have all of the accessories.Then, using a computer with either Mac OSX (10.7+) or Windows (7+), navigate to www.newmatter.com/setup where you’ll complete the setup process.
WHAT’S IN THE BOX?
□ MOD-t 3D Printer □ Clear Cover □ 0.5 kg Filament SpoolBOX A
□ USB CordBOX D
□ Spool HolderBOX B
□ Power CordBOX D
□ ScraperBOX D
□ Print Surface PlateBOX C
□ Power SupplyBOX B
□ Utility CuttersBOX D
□ Build Tray BaseBOX C
□ Wire BrushBOX D
9
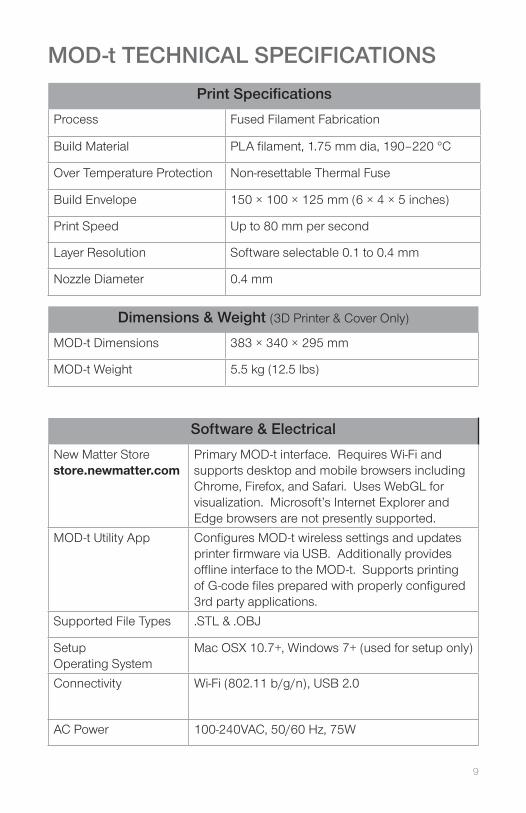
MOD-t TECHNICAL SPECIFICATIONS
Print Specifications
Process Fused Filament Fabrication
Build Material PLA filament, 1.75 mm dia, 190–220 °C
Over Temperature Protection Non-resettable Thermal Fuse
Build Envelope 150 × 100 × 125 mm (6 × 4 × 5 inches)
Print Speed Up to 80 mm per second
Layer Resolution Software selectable 0.1 to 0.4 mm
Nozzle Diameter 0.4 mm
Software & Electrical
New Matter Store store.newmatter.com
Primary MOD-t interface. Requires Wi-Fi and supports desktop and mobile browsers including Chrome, Firefox, and Safari. Uses WebGL for visualization. Microsoft’s Internet Explorer and Edge browsers are not presently supported.
MOD-t Utility App Configures MOD-t wireless settings and updates printer firmware via USB. Additionally provides offline interface to the MOD-t. Supports printing of G-code files prepared with properly configured 3rd party applications.
Supported File Types .STL & .OBJ
Setup Operating System
Mac OSX 10.7+, Windows 7+ (used for setup only)
Connectivity Wi-Fi (802.11 b/g/n), USB 2.0
AC Power 100-240VAC, 50/60 Hz, 75W
Dimensions & Weight (3D Printer & Cover Only)
MOD-t Dimensions 383 × 340 × 295 mm
MOD-t Weight 5.5 kg (12.5 lbs)
10
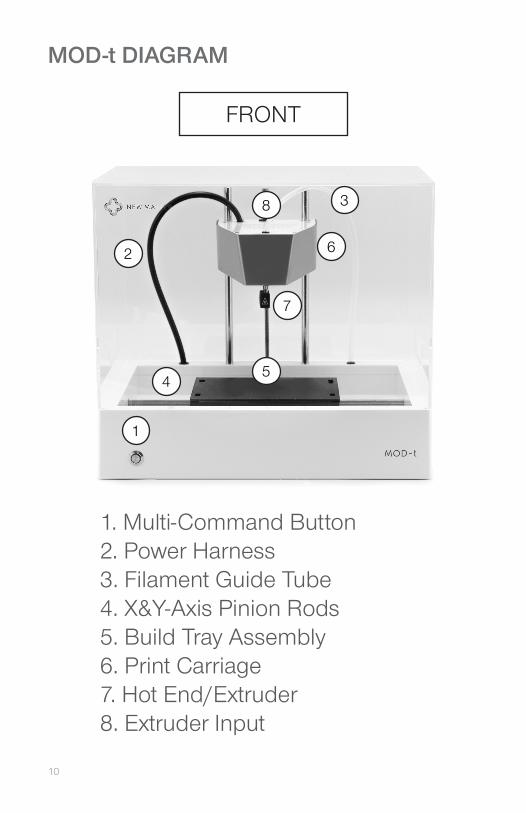
MOD-t DIAGRAM
1. Multi-Command Button2. Power Harness3. Filament Guide Tube4. X&Y-Axis Pinion Rods5. Build Tray Assembly6. Print Carriage7. Hot End/Extruder8. Extruder Input
1
2
3
45
7
6
FRONT
8
11
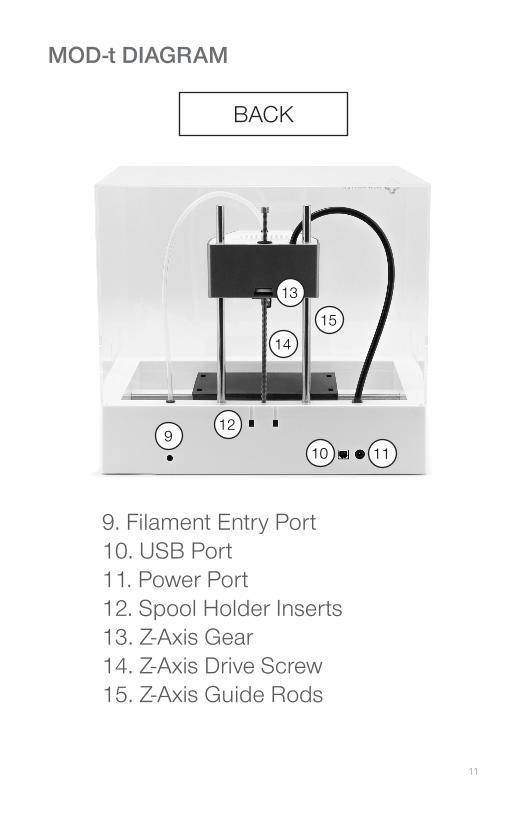
MOD-t DIAGRAM
9. Filament Entry Port10. USB Port11. Power Port12. Spool Holder Inserts13. Z-Axis Gear14. Z-Axis Drive Screw15. Z-Axis Guide Rods
910
12
13
11
14
15
BACK
12
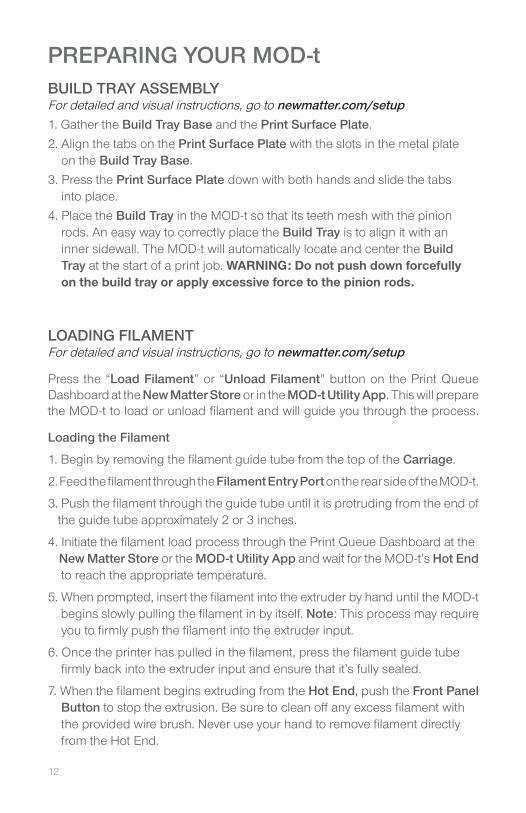
BUILD TRAY ASSEMBLYFor detailed and visual instructions, go to newmatter.com/setup1. Gather the Build Tray Base and the Print Surface Plate.
2. Align the tabs on the Print Surface Plate with the slots in the metal plate on the Build Tray Base.
3. Press the Print Surface Plate down with both hands and slide the tabs into place.
4. Place the Build Tray in the MOD-t so that its teeth mesh with the pinion rods. An easy way to correctly place the Build Tray is to align it with an inner sidewall. The MOD-t will automatically locate and center the Build Tray at the start of a print job. WARNING: Do not push down forcefully on the build tray or apply excessive force to the pinion rods.
LOADING FILAMENTFor detailed and visual instructions, go to newmatter.com/setup
Press the “Load Filament” or “Unload Filament” button on the Print Queue Dashboard at the New Matter Store or in the MOD-t Utility App. This will prepare the MOD-t to load or unload filament and will guide you through the process.
Loading the Filament
1. Begin by removing the filament guide tube from the top of the Carriage.
2. Feed the filament through the Filament Entry Port on the rear side of the MOD-t.
3. Push the filament through the guide tube until it is protruding from the end of the guide tube approximately 2 or 3 inches.
4. Initiate the filament load process through the Print Queue Dashboard at the New Matter Store or the MOD-t Utility App and wait for the MOD-t’s Hot End to reach the appropriate temperature.
5. When prompted, insert the filament into the extruder by hand until the MOD-t begins slowly pulling the filament in by itself. Note: This process may require you to firmly push the filament into the extruder input.
6. Once the printer has pulled in the filament, press the filament guide tube firmly back into the extruder input and ensure that it’s fully sealed.
7. When the filament begins extruding from the Hot End, push the Front Panel Button to stop the extrusion. Be sure to clean off any excess filament with the provided wire brush. Never use your hand to remove filament directly from the Hot End.
PREPARING YOUR MOD-t
13
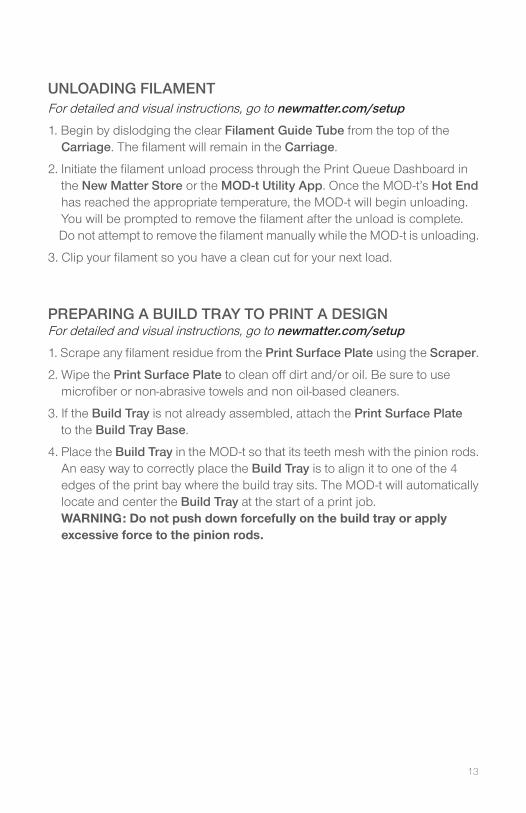
UNLOADING FILAMENTFor detailed and visual instructions, go to newmatter.com/setup
1. Begin by dislodging the clear Filament Guide Tube from the top of the Carriage. The filament will remain in the Carriage.
2. Initiate the filament unload process through the Print Queue Dashboard in the New Matter Store or the MOD-t Utility App. Once the MOD-t’s Hot End has reached the appropriate temperature, the MOD-t will begin unloading. You will be prompted to remove the filament after the unload is complete. Do not attempt to remove the filament manually while the MOD-t is unloading.
3. Clip your filament so you have a clean cut for your next load.
PREPARING A BUILD TRAY TO PRINT A DESIGNFor detailed and visual instructions, go to newmatter.com/setup
1. Scrape any filament residue from the Print Surface Plate using the Scraper.
2. Wipe the Print Surface Plate to clean off dirt and/or oil. Be sure to use microfiber or non-abrasive towels and non oil-based cleaners.
3. If the Build Tray is not already assembled, attach the Print Surface Plate to the Build Tray Base.
4. Place the Build Tray in the MOD-t so that its teeth mesh with the pinion rods. An easy way to correctly place the Build Tray is to align it to one of the 4 edges of the print bay where the build tray sits. The MOD-t will automatically locate and center the Build Tray at the start of a print job. WARNING: Do not push down forcefully on the build tray or apply excessive force to the pinion rods.
14
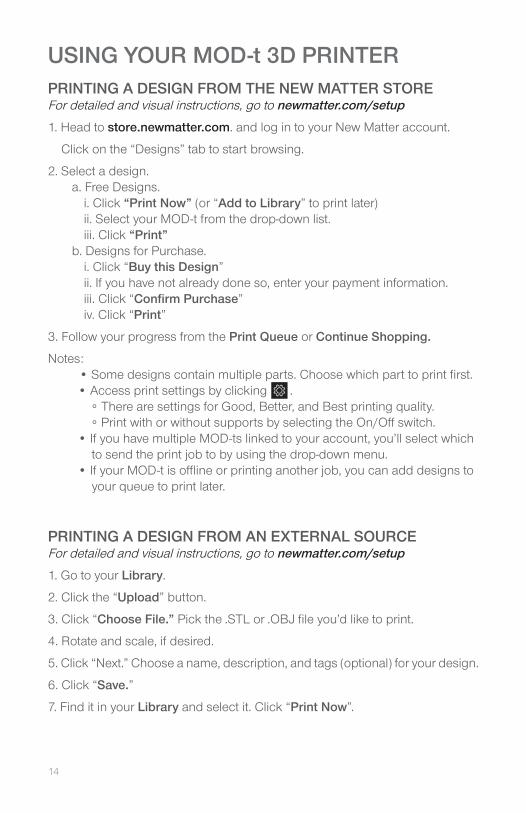
PRINTING A DESIGN FROM THE NEW MATTER STOREFor detailed and visual instructions, go to newmatter.com/setup
1. Head to store.newmatter.com. and log in to your New Matter account.
Click on the “Designs” tab to start browsing.
2. Select a design.a. Free Designs.
i. Click “Print Now” (or “Add to Library” to print later)ii. Select your MOD-t from the drop-down list.iii. Click “Print”
b. Designs for Purchase.i. Click “Buy this Design”ii. If you have not already done so, enter your payment information.iii. Click “Confirm Purchase”iv. Click “Print”
3. Follow your progress from the Print Queue or Continue Shopping.
Notes: • Some designs contain multiple parts. Choose which part to print first. • Access print settings by clicking . ◦ There are settings for Good, Better, and Best printing quality. ◦ Print with or without supports by selecting the On/Off switch. • If you have multiple MOD-ts linked to your account, you’ll select which to send the print job to by using the drop-down menu. • If your MOD-t is offline or printing another job, you can add designs to your queue to print later.
PRINTING A DESIGN FROM AN EXTERNAL SOURCEFor detailed and visual instructions, go to newmatter.com/setup
1. Go to your Library.
2. Click the “Upload” button.
3. Click “Choose File.” Pick the .STL or .OBJ file you’d like to print.
4. Rotate and scale, if desired.
5. Click “Next.” Choose a name, description, and tags (optional) for your design.
6. Click “Save.”
7. Find it in your Library and select it. Click “Print Now”.
USING YOUR MOD-t 3D PRINTER
15
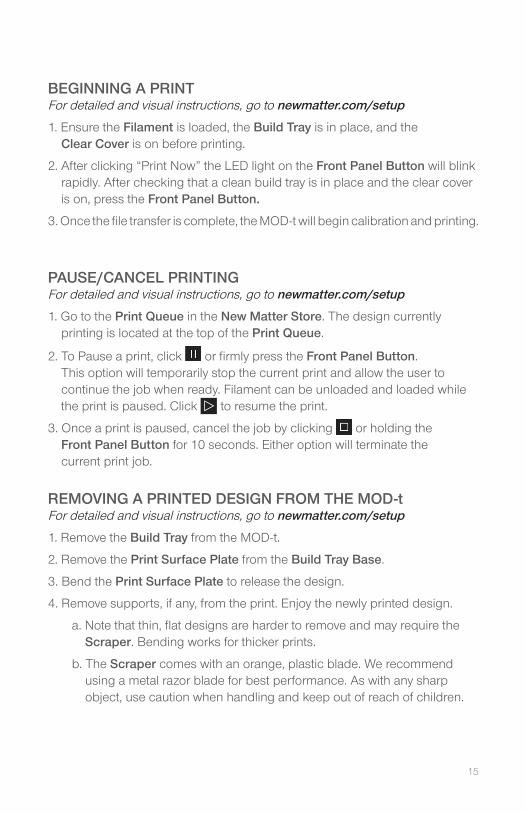
BEGINNING A PRINTFor detailed and visual instructions, go to newmatter.com/setup
1. Ensure the Filament is loaded, the Build Tray is in place, and the Clear Cover is on before printing.
2. After clicking “Print Now” the LED light on the Front Panel Button will blink rapidly. After checking that a clean build tray is in place and the clear cover is on, press the Front Panel Button.
3. Once the file transfer is complete, the MOD-t will begin calibration and printing.
PAUSE/CANCEL PRINTINGFor detailed and visual instructions, go to newmatter.com/setup
1. Go to the Print Queue in the New Matter Store. The design currently printing is located at the top of the Print Queue.
2. To Pause a print, click or firmly press the Front Panel Button. This option will temporarily stop the current print and allow the user to continue the job when ready. Filament can be unloaded and loaded while the print is paused. Click to resume the print.
3. Once a print is paused, cancel the job by clicking or holding the Front Panel Button for 10 seconds. Either option will terminate the current print job.
REMOVING A PRINTED DESIGN FROM THE MOD-tFor detailed and visual instructions, go to newmatter.com/setup
1. Remove the Build Tray from the MOD-t.
2. Remove the Print Surface Plate from the Build Tray Base.
3. Bend the Print Surface Plate to release the design.
4. Remove supports, if any, from the print. Enjoy the newly printed design.
a. Note that thin, flat designs are harder to remove and may require the Scraper. Bending works for thicker prints.
b. The Scraper comes with an orange, plastic blade. We recommend using a metal razor blade for best performance. As with any sharp object, use caution when handling and keep out of reach of children.
16
MAINTAINING YOUR PRINT SURFACE PLATE The Print Surface Plate is a consumable part of your MOD-t and can easily be replaced when required. For best results, always start a print job with a clean Print Surface Plate. Keeping the Print Surface Plate clean and free of oils is important for print adhesion.
It is recommended that the Print Surface Plate is cleaned every 3--5 builds with a no-residue, citrus-based, oil-free cleanser. To remove the print shadow left behind by your previous builds, use the wire brush (enclosed with your MOD-t) to gently abrade the surface finish.
Remember to clean your Print Surface Plate after brushing to remove any debris. We recommend replacing your Print Surface Plate periodically, when builds no longer adhere properly to the surface.
UPDATING TO THE LATEST FIRMWAREFor detailed and visual instructions, go to support.newmatter.com
The New Matter Store will prompt you when it’s time to upgrade the MOD-t’s firmware. Connect the USB to the MOD-t and launch the MOD-t Utility App to update, following its prompts to complete the process.
CLEANING THE ACRYLIC MOD-t COVER
DO NOT use window cleaning fluids with ammonia (such as Windex™ or 409™), gasoline, denatured alcohol, carbon tetrachloride, or acetone. These chemicals will damage the acrylic. Instead use a mild solution of soap or detergent and water. Using a lint-free cotton or microfiber cloth is also recommended instead of paper towels, which may cause fine scratches on the cover.
MOD-t MAINTENANCE
17
FCC COMPLIANCE
This equipment has been tested and found to comply with the limits for a Class B Digital Device, pursuant to Part 15 of the Federal Communications Commission (FCC) rules. These limits are designed to provide reasonable protection against harmful interference in a residential installation. This equipment generates, uses and can radiate radio frequency energy and, if not installed and used in accordance with the instructions, may cause harmful interference to radio communications. However, there is no guarantee that interference will not occur in a particular installation. If this equipment does cause harmful interference to radio or television reception, which can be determined by turning the equipment off and on, the user is encouraged to try to correct the interference by one or more of the following measures:
• Reorient or relocate the receiving antenna.• Increase the separation between the equipment and the receiver.• Connect the equipment to an outlet on a circuit different from that to which the receiver is connected.• Consult the dealer or an experienced radio/TV technician for help.
SAFETY WARNINGS
The MOD-t 3D Printer generates high temperatures at the nozzle when operating. Avoid touching the Hot End nozzle, and ensure that the Clear Cover is in place when printing. Allow the MOD-t to cool down for a few minutes before removing the finished printed object.
ELECTRIC SHOCK HAZARD
Use the Power Supply and the AC Cord that came along with the MOD-t 3D Printer. The use of other power adapters may damage the MOD-t and may cause a risk of fire.
FIRE HAZARD
DO NOT place combustible materials or flammable liquids near the MOD-t when it is turned on or when the MOD-t is printing.
ADULT SUPERVISION REQUIRED
Small MOD-t hardware or printed parts may pose as choking hazards around children. Adult supervision is highly recommended for users under the age of 18.
COMPLIANCE AND SAFETY WARNINGS
CAUTION! HOT SURFACE IN THE VICINITYOF THIS SYMBOL, IEC 60417-5041
18
DISCLAIMERS
Prior to using the MOD-t 3D Printer, you agree to read the MOD-t’s User Guide, which contains (a) Compliance Notice, (b) Safety Warnings, (c) Warranty Terms, Repairs/Returns Policy, and (d) instructions on how to use the MOD-t to ensure understanding of the MOD-t scope of operations. In connection, New Matter will not be held responsible for any injuries that may occur as a result of using the MOD-t. In addition, New Matter will not be liable for any damages, including but not limited to loss of anticipated profits, business, and opportunities due to product performance, repairs, and business interruptions.
WARRANTY TERMS
This section defines the warranty replacement policy for New Matter products that have been determined defective by a New Matter Technical Support Representative within the 90 day warranty period. A like-new replacement will be sent in advance of receiving the customer’s original, defective unit as long as the terms of the New Matter Warranty have been met. Warranty replacement requests must be administered by New Matter Technical Support. In order to receive a warranty replacement, the customer must allow a Technical Customer Support Representative to walk them through a complete diagnostic checklist. Once these conditions are met and the unit is determined to be defective, the Technical Customer Support Representative will initiate the New Matter return process.
WARRANTY TERMS & CONDITIONS
• Warranty replacements will only be issued for a product that has been determined to be defective by New Matter Technical Support, within the 90 day warranty period.• Original copy of the invoice/proof of order/validation of serial number may be required to validate warranty status.• Technical Support will request a credit card number before any replacement unit is shipped. If payment information is already stored in the New Matter Store, we can use your prior payment information. Your card will not be charged as long as the defective unit is returned to New Matter. • A like-new unit will be sent in advance of receiving the original defective unit. The defective unit will be packed properly in the replacement unit’s packaging and returned to New Matter. • If the defective device is not returned to New Matter within 30 days, New Matter reserves the right to both deactivate the serial number of the defective MOD-t and charge the customer’s form of payment collected during the warranty process for the full retail price of a MOD-t unit.• New Matter will pay all freight costs for the shipping of the replacement and the return of the defective unit.• It is the responsibility of the customer to make sure the defective device is packaged as instructed. The customer is responsible for all damages incurred by incorrectly packaged units.• Upon receipt, examination, and testing of the returned unit, if it is found not to be covered by warranty replacement guidelines (i.e. physical damage, issues with the device not originally reported to technical support, misuse, tampering with the device, etc.) New Matter reserves the right to charge the payment form collected by technical support before initiating the warranty process for shipping, repair charges, and/or the retail cost of a new unit.
USER AGREEMENT
19
LIMITED WARRANTY FOR MOD-t 3D PRINTER (NORTH AMERICA)
New Matter, Inc. (“New Matter”) warrants that this MOD-t 3D printer product (the “Product”) will be free from manufacturing defects in materials and workmanship for a period of 90 days (the “Warranty Period”) from the date of purchase by the original end user purchaser.
If your Product is defective in materials or workmanship during the Warranty Period, New Matter will, at its option, repair or replace the Product as provided in this Limited Warranty Statement (the “Warranty”). Please save your original sales receipt to validate the start of the Warranty Period.
When New Matter authorizes an exchange for the defective unit, New Matter will ship a replacement Product to you, freight prepaid, along with packaging to return the defective unit(s). You are responsible for securely packaging the defective unit, using the packaging provided by New Matter and returning it within seven (7) days of receipt. New Matter requires credit card information for all warranty exchanges to secure your obligation to return the defective one. In the event that you fail to securely ship and return the defective unit, You will be charged the retail price of the Product. New Matter can only ship replacement Products to addresses in the U.S. and Canada (excluding Puerto Rico and U.S. Possessions).
This Warranty applies only to Products purchased and used only in North America and operated under normal installation and use conditions. Using this Product for continuous production or similar high duty purposes is not considered normal use and the damage, maintenance or service from such use will not be covered under this Warranty. This Warranty is not transferable, nor applicable to resold products. Warranty coverage will not apply to any damage or failure of the Product which New Matter determines is due to any causes other than manufacturing defects in materials or workmanship, including without limitation: (i) improper assembly, installation, operation or maintenance; (ii) use in environments or for purposes for which the Product was not designed; (iii) negligence, abuse, accidents, or other physical damage; (iv) unauthorized repairs or modifications; (v) use of any parts not provided by New Matter or use with components not intended or recommended for use with the Product, including use of filaments outside the specifications; (vi) wear and tear or cosmetic damage or maintenance work; and (vii) all causes beyond New Matter’s control including electrical surges, fire, floods, wind, freezing, power failure, generalized corrosion, biological infestations, unusual atmospheric conditions, or other unanticipated causes. Warranty claims cannot be made where the serial number on the Product has been altered, removed or cannot be confirmed.
The term “Product” does not include attachments, software, media, applications, programs, or non-branded parts and peripherals. While such are not covered by this Warranty, the suppliers or publishers may provide their own warranty to you. Refurbished or reconditioned Products are not eligible for Warranty service. This Warranty does not cover reimbursement of materials or services required for reprinting. No person or company is authorized to make any warranties other than as provided herein.
If New Matter cannot replicate the claimed defect, You may be responsible for the costs of shipping and replacement. Any replacement product may be either new or like-new, provided that it has functionality at least equal to that of the product being replaced. Products may contain remanufactured parts, components or materials equivalent to new in performance. All returned Products and parts become the property of New Matter.
WARRANTY INFORMATION
20
To the MAXIMUM EXTENT PERMITTED BY LAW, THIS LIMITED WARRANTY STATES YOUR SOLE AND EXCLUSIVE REMEDY IN CONNECTION WITH THE PRODUCT AND IS IN LIEU OF ALL OTHER WARRANTIES, GUARANTEES, REPRESENTATIONS, OBLIGATIONS AND LIABILITIES, EXPRESS OR IMPLIED, STATUTORY OR OTHERWISE. NEW MATTER DISCLAIMS ALL OTHER WARRANTIES, INCLUDING WITHOUT RESTRICTION, ANY IMPLIED WARRANTY OR CONDITION OF QUALITY, MERCHANTABILITY, FITNESS FOR A PARTICULAR PURPOSE OR NON-INFRINGEMENT. SOME LAWS DO NOT ALLOW THE EXCLUSION OF IMPLIED WARRANTIES. IF THESE LAWS APPLY, THEN ALL EXPRESS AND IMPLIED WARRANTIES ARE LIMITED TO THE WARRANTY PERIOD IDENTIFIED ABOVE. IN NO EVENT WILL New Matter BE LIABLE FOR ANY SPECIAL, INDIRECT, INCIDENTAL, PUNITIVE OR CONSEQUENTIAL DAMAGES, LOSSES, OR EXPENSES HOWEVER CAUSED, INCLUDING LOST PROFITS, LOST SAVINGS OR OTHER ECONOMIC DAMAGES. IN THE EVENT THE ABOVE REMEDIES FAIL, OR FOR ANY OTHER CLAIM UNDER ANY OTHER THEORIES OF RECOVERY, New Matter’s AGGREGATE LIABILITY, IF ANY, FOR DAMAGES, LOSS OR OTHERWISE IN CONNECTION WITH THE PRODUCT, SHALL BE LIMITED TO THE AMOUNT YOU PAID FOR THE PRODUCT THAT CAUSED THE DAMAGES.
For Warranty support, You must contact New Matter during the Warranty Period.
See page 5 for Technical Customer Support contact information.
21
DEFECTIVE ON ARRIVAL
This section defines the replacement policy for brand new MOD-t 3D printers that have been determined to be defective on arrival by a New Matter Technical Customer Support Representative. In order to receive a replacement for a defective on arrival device, New Matter Technical Support must be contacted and allowed to walk the customer through a diagnostic checklist. Once these conditions are satisfied and the MOD-t is deemed to be defective a replacement unit will be sent in advance of receiving the customer’s original. All replacement requests must be administered by New Matter Technical Support. If a unit is sent back to New Matter without prior contact with technical support, a return of a replacement unit will not be guaranteed by New Matter.
DEFECTIVE ON ARRIVAL TERMS & CONDITIONS
• Defective on arrival replacements will only be issued for a new product that has been determined to be defective by New Matter Technical Support, out of the box at the time of installation.• Original copy of the invoice/proof of order/validation of serial number may be required to validate warranty status.• Technical Support will request a credit card number before any replacement unit is shipped. If payment information is already stored in the New Matter Store, we can use prior payment information. The customer’s credit card will not be charged as long as the defective unit is returned to New Matter.• A replacement unit will be sent in advance of receiving the original defective unit. The defective unit should be packed properly in the replacement unit’s packaging and returned to New Matter.• If the defective device is not returned to New Matter within 30 days, New Matter reserves the right to both deactivate the serial number of the defective MOD-t and charge the customer’s form of payment collected during the warranty process for the full retail price of a MOD-t unit.• It is the responsibility of the customer to make sure the defective device is packaged as instructed. Customer is responsible for all damages incurred by incorrectly packaged units.• The replacement unit will be given a new full term product warranty.• New Matter will pay all freight costs for the shipping of the replacement and the return of the defective unit.
RETURNS & REPAIRS POLICY
22
INTELLECTUAL PROPERTY
© 2015 by New Matter, Inc. All rights reserved. New Matter and its products and services include proprietary and privileged information protected by the Copyright Law of the United States.
The New Matter Brand Guidelines are property of New Matter, Inc.
New Matter® and MOD-t™ are either registered trademarks or trademarksof New Matter, Inc. in the United States and/or other countries.
© 2016 New Matter, Inc.
Last revised 2/2016
www.newmatter.com


www.newmatter.com


![hQÆRN« Q QM 9N } · 2011. 8. 9. · [1] GB/T 14039 4406: 1999,MOD) GB/T 17484 ISO 3722: 1976) GB/T 18853 18853—2002, ISO 16889 : 1999,MOD) GB/T 18854 11171: 1999, MOD) GB/T 20110—2006](https://img.pdfslide.net/doc/110x75/61486cca2918e2056c22ae2d/hqrn-q-qm-9n-2011-8-9-1-gbt-14039-4406-1999mod-gbt-17484-iso-3722.jpg)