Embed Size (px)
Citation preview
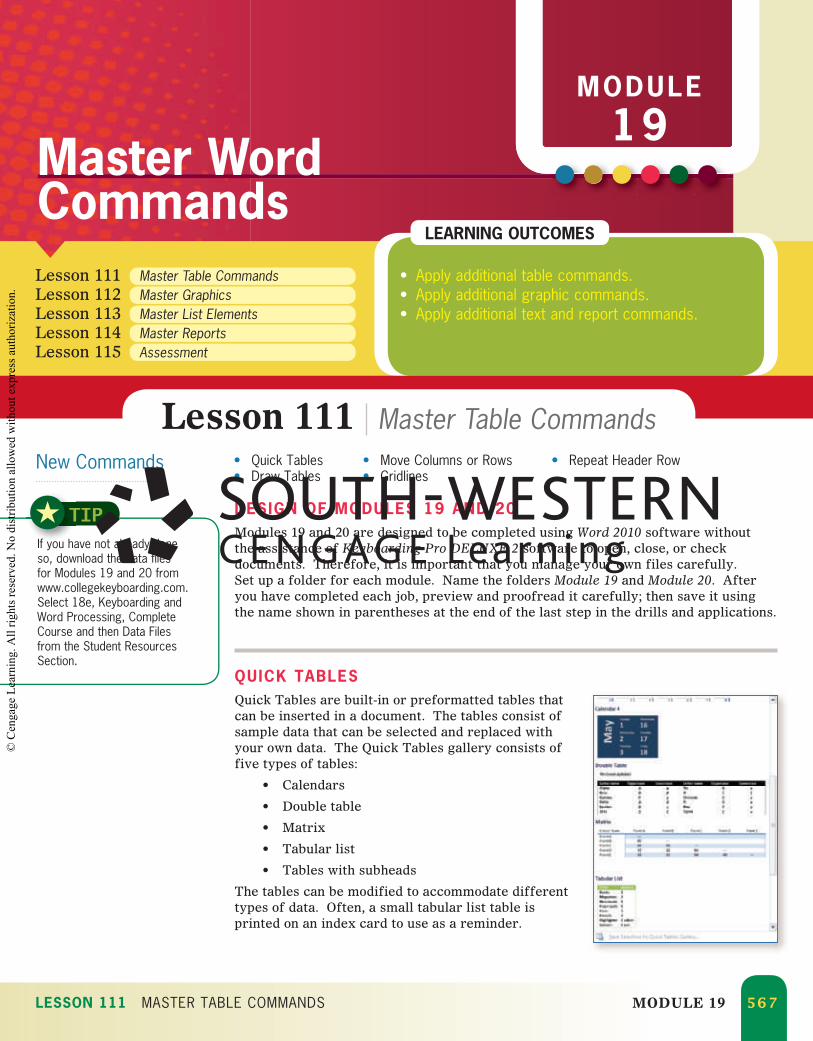
LESSON 111 MASTER TABLE COMMANDS MODULE 19 567
MODULE
19Master Word Commands
• Apply additional table commands.• Apply additional graphic commands.• Apply additional text and report commands.
LEARNING OUTCOMES
Lesson 111 Master Table CommandsLesson 112 Master GraphicsLesson 113 Master List ElementsLesson 114 Master ReportsLesson 115 Assessment
New Commands
Lesson 111 Master Table Commands• Quick Tables• Draw Tables
• Move Columns or Rows• Gridlines
• Repeat Header Row
DESIGN OF MODULES 19 AND 20Modules 19 and 20 are designed to be completed using Word 2010 software without the assistance of Keyboarding Pro DELUXE 2 software to open, close, or check documents. Therefore, it is important that you manage your own files carefully. Set up a folder for each module. Name the folders Module 19 and Module 20. After you have completed each job, preview and proofread it carefully; then save it using the name shown in parentheses at the end of the last step in the drills and applications.
QUICK TABLESQuick Tables are built-in or preformatted tables that can be inserted in a document. The tables consist of sample data that can be selected and replaced with your own data. The Quick Tables gallery consists of five types of tables:
• Calendars
• Double table
• Matrix
• Tabular list
• Tables with subheads
The tables can be modified to accommodate different types of data. Often, a small tabular list table is printed on an index card to use as a reminder.
TIPIf you have not already done so, download the data files for Modules 19 and 20 from www.collegekeyboarding.com. Select 18e, Keyboarding and Word Processing, Complete Course and then Data Files from the Student Resources Section.
0538496479_Mod19.indd 5670538496479_Mod19.indd 567 10/15/10 7:23 PM10/15/10 7:23 PM
© C
enga
ge L
earn
ing.
All
right
s res
erve
d. N
o di
strib
utio
n al
low
ed w
ithou
t exp
ress
aut
horiz
atio
n.
LESSON 111 MASTER TABLE COMMANDS MODULE 19 568
To insert a Quick Table:
Insert/Tables/Table/Quick Tables
1. Follow the path to display the gallery of Quick Tables.
2. Select the desired type of table.
3. Select the data in each cell and key your data in its place.
4. Delete rows or columns not needed.
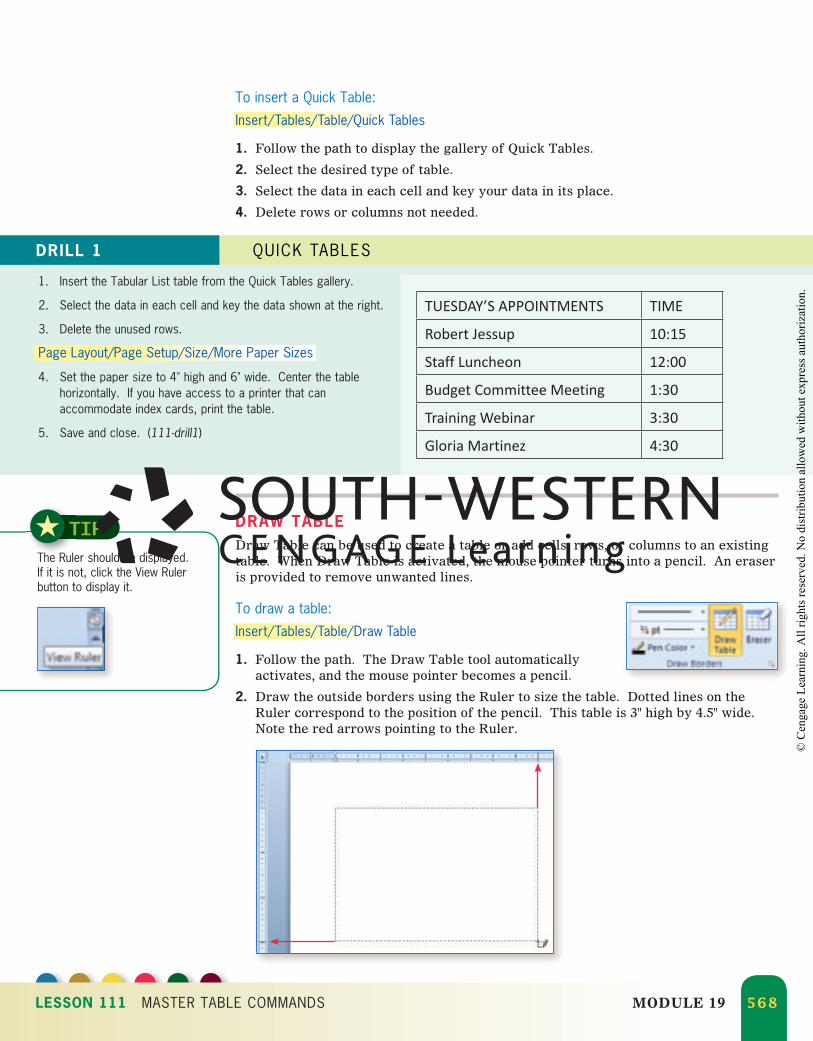
DRILL 1 QUICK TABLES
TUESDAY’S APPOINTMENTS TIME
Robert Jessup 10:15
Staff Luncheon 12:00
Budget Committee Meeting 1:30
Training Webinar 3:30
Gloria Martinez 4:30
DRAW TABLEDraw Table can be used to create a table or add cells, rows, or columns to an existing table. When Draw Table is activated, the mouse pointer turns into a pencil. An eraser is provided to remove unwanted lines.
To draw a table:
Insert/Tables/Table/Draw Table
1. Follow the path. The Draw Table tool automatically activates, and the mouse pointer becomes a pencil.
2. Draw the outside borders using the Ruler to size the table. Dotted lines on the Ruler correspond to the position of the pencil. This table is 3" high by 4.5" wide. Note the red arrows pointing to the Ruler.
TIPThe Ruler should be displayed. If it is not, click the View Ruler button to display it.
1. Insert the Tabular List table from the Quick Tables gallery.
2. Select the data in each cell and key the data shown at the right.
3. Delete the unused rows.
Page Layout/Page Setup/Size/More Paper Sizes
4. Set the paper size to 4" high and 6" wide. Center the table horizontally. If you have access to a printer that can accommodate index cards, print the table.
5. Save and close. (111-drill1)
0538496479_Mod19.indd 5680538496479_Mod19.indd 568 10/15/10 7:23 PM10/15/10 7:23 PM
© C
enga
ge L
earn
ing.
All
right
s res
erve
d. N
o di
strib
utio
n al
low
ed w
ithou
t exp
ress
aut
horiz
atio
n.
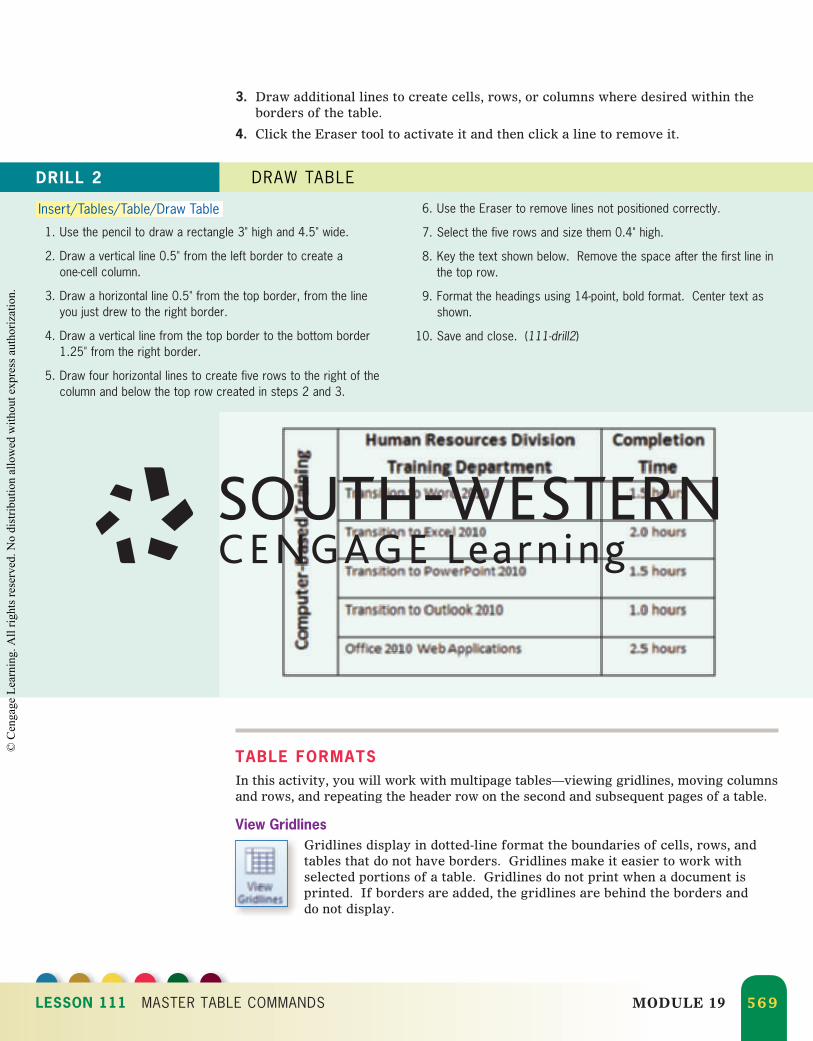
3. Draw additional lines to create cells, rows, or columns where desired within the borders of the table.
4. Click the Eraser tool to activate it and then click a line to remove it.
DRILL 2 DRAW TABLE
Insert/Tables/Table/Draw Table
1. Use the pencil to draw a rectangle 3" high and 4.5" wide.
2. Draw a vertical line 0.5" from the left border to create a one-cell column.
3. Draw a horizontal line 0.5" from the top border, from the line you just drew to the right border.
4. Draw a vertical line from the top border to the bottom border 1.25" from the right border.
5. Draw four horizontal lines to create five rows to the right of the column and below the top row created in steps 2 and 3.
6. Use the Eraser to remove lines not positioned correctly.
7. Select the five rows and size them 0.4" high.
8. Key the text shown below. Remove the space after the first line in the top row.
9. Format the headings using 14-point, bold format. Center text as shown.
10. Save and close. (111-drill2)
TABLE FORMATSIn this activity, you will work with multipage tables—viewing gridlines, moving columns and rows, and repeating the header row on the second and subsequent pages of a table.
View GridlinesGridlines display in dotted-line format the boundaries of cells, rows, and tables that do not have borders. Gridlines make it easier to work with selected portions of a table. Gridlines do not print when a document is printed. If borders are added, the gridlines are behind the borders and do not display.
LESSON 111 MASTER TABLE COMMANDS MODULE 19 569
0538496479_Mod19.indd 5690538496479_Mod19.indd 569 10/15/10 7:23 PM10/15/10 7:23 PM
© C
enga
ge L
earn
ing.
All
right
s res
erve
d. N
o di
strib
utio
n al
low
ed w
ithou
t exp
ress
aut
horiz
atio
n.
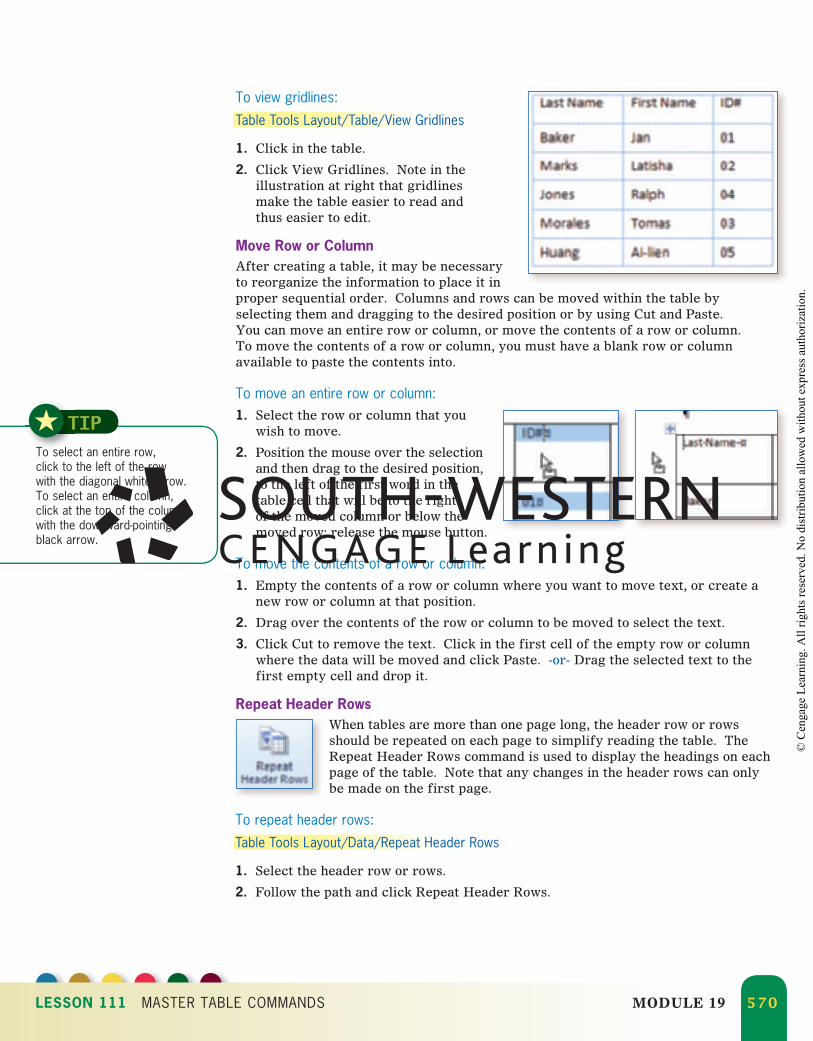
To view gridlines:
Table Tools Layout/Table/View Gridlines
1. Click in the table.
2. Click View Gridlines. Note in the illustration at right that gridlines make the table easier to read and thus easier to edit.
Move Row or ColumnAfter creating a table, it may be necessary to reorganize the information to place it in proper sequential order. Columns and rows can be moved within the table by selecting them and dragging to the desired position or by using Cut and Paste. You can move an entire row or column, or move the contents of a row or column. To move the contents of a row or column, you must have a blank row or column available to paste the contents into.
To move an entire row or column:1. Select the row or column that you
wish to move.
2. Position the mouse over the selection and then drag to the desired position, to the left of the first word in the table cell that will be to the right of the moved column or below the moved row; release the mouse button.
To move the contents of a row or column:1. Empty the contents of a row or column where you want to move text, or create a
new row or column at that position.
2. Drag over the contents of the row or column to be moved to select the text.
3. Click Cut to remove the text. Click in the first cell of the empty row or column where the data will be moved and click Paste. -or- Drag the selected text to the first empty cell and drop it.
Repeat Header RowsWhen tables are more than one page long, the header row or rows should be repeated on each page to simplify reading the table. The Repeat Header Rows command is used to display the headings on each page of the table. Note that any changes in the header rows can only be made on the first page.
TIPTo select an entire row, click to the left of the row with the diagonal white arrow. To select an entire column, click at the top of the column with the downward-pointing black arrow.
LESSON 111 MASTER TABLE COMMANDS MODULE 19 570
To repeat header rows:
Table Tools Layout/Data/Repeat Header Rows
1. Select the header row or rows.
2. Follow the path and click Repeat Header Rows.
0538496479_Mod19.indd 5700538496479_Mod19.indd 570 10/15/10 7:23 PM10/15/10 7:23 PM
© C
enga
ge L
earn
ing.
All
right
s res
erve
d. N
o di
strib
utio
n al
low
ed w
ithou
t exp
ress
aut
horiz
atio
n.
1. Open the data file volunteers and display the gridlines.
2. Select the entire ID# column and drag it to the left of the first column so that it becomes the first column. Adjust the column width to 1".
3. Select the text in row 4, which has the ID# 04, and click Cut to remove the data from that row. The row should now be empty.
4. Select the text in row 5, which has the ID# 03, and drag the selected text to row 4, which has no data in it.
5. Click in the first cell of empty row 5 and click Paste.
6. Insert a row above row 1 and merge cells in the new row. Apply Light Shading – Accent 1 table style.
7. Key the heading Town Hall Meeting Volunteers; apply Cambria 14-point font. Center the heading vertically and horizontally. Size the row 0.5" high.
8. Apply Align Center to columns A, D, E, and F; apply Align Center Left to columns B and C.
9. Select rows 1 and 2 (heading and column heading rows) and click Repeat Header Rows.
10. Insert Plain Page Number 3 at the top of the page and do not show the number on the first page.
11. Preview the second and third pages to view the header rows.
12. Click View Gridlines to turn the gridlines off.
13. Save and close. (111-drill3)
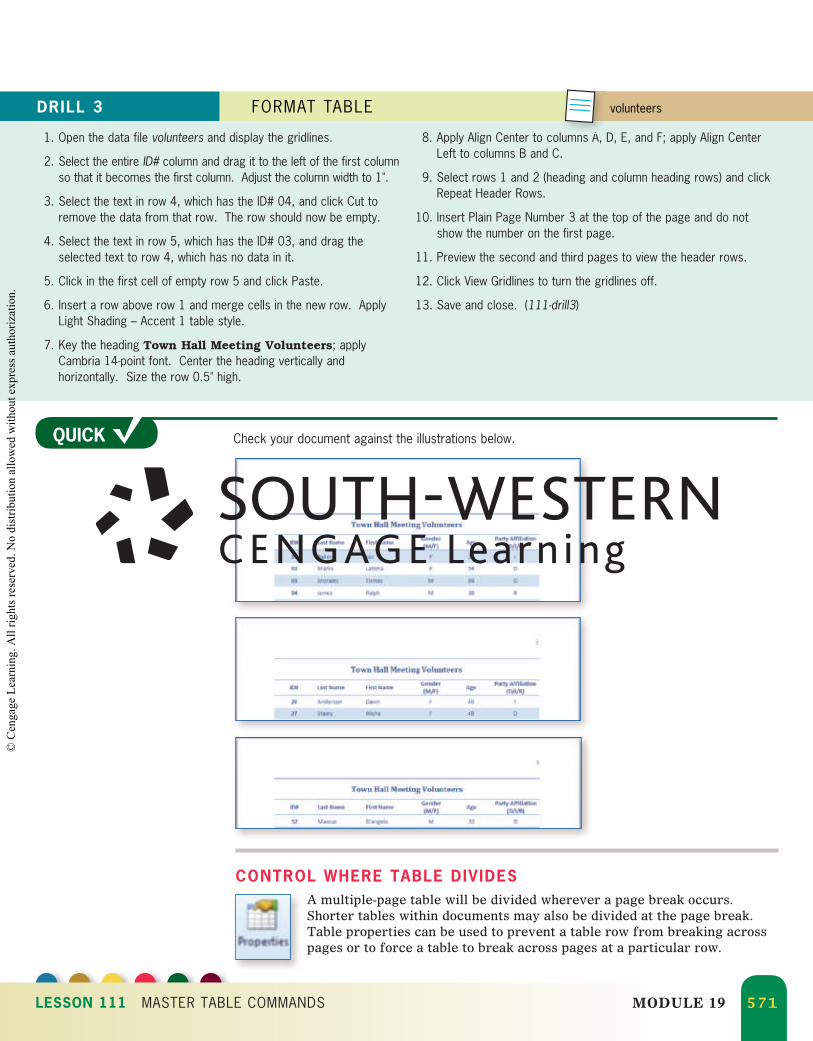
DRILL 3 FORMAT TABLE volunteers
A
QUICK Check your document against the illustrations below.
LESSON 111 MASTER TABLE COMMANDS MODULE 19 571
CONTROL WHERE TABLE DIVIDESA multiple-page table will be divided wherever a page break occurs. Shorter tables within documents may also be divided at the page break. Table properties can be used to prevent a table row from breaking across pages or to force a table to break across pages at a particular row.
0538496479_Mod19.indd 5710538496479_Mod19.indd 571 10/15/10 7:23 PM10/15/10 7:23 PM
© C
enga
ge L
earn
ing.
All
right
s res
erve
d. N
o di
strib
utio
n al
low
ed w
ithou
t exp
ress
aut
horiz
atio
n.
TIPIf you force a page that has header rows repeating to break, you will lose the header row formatting.
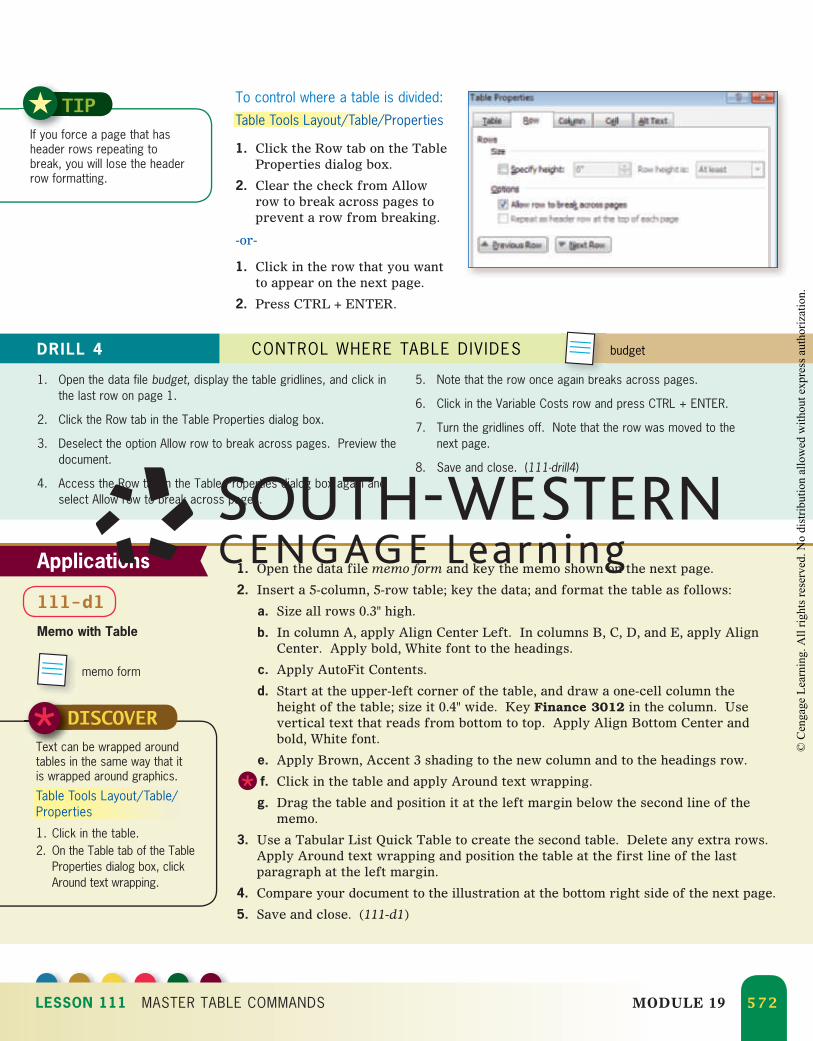
To control where a table is divided:
Table Tools Layout/Table/Properties
1. Click the Row tab on the Table Properties dialog box.
2. Clear the check from Allow row to break across pages to prevent a row from breaking.
-or-
1. Click in the row that you want to appear on the next page.
2. Press CTRL + ENTER.
1. Open the data file budget, display the table gridlines, and click in the last row on page 1.
2. Click the Row tab in the Table Properties dialog box.
3. Deselect the option Allow row to break across pages. Preview the document.
4. Access the Row tab in the Table Properties dialog box again and select Allow row to break across pages.
5. Note that the row once again breaks across pages.
6. Click in the Variable Costs row and press CTRL + ENTER.
7. Turn the gridlines off. Note that the row was moved to the next page.
8. Save and close. (111-drill4)
DRILL 4 CONTROL WHERE TABLE DIV IDES budget
i b
Applications
111-d1
Memo with Table
memo form
1. Open the data file memo form and key the memo shown on the next page.
2. Insert a 5-column, 5-row table; key the data; and format the table as follows:
a. Size all rows 0.3" high.
b. In column A, apply Align Center Left. In columns B, C, D, and E, apply Align Center. Apply bold, White font to the headings.
c. Apply AutoFit Contents.
d. Start at the upper-left corner of the table, and draw a one-cell column the height of the table; size it 0.4" wide. Key Finance 3012 in the column. Use vertical text that reads from bottom to top. Apply Align Bottom Center and bold, White font.
e. Apply Brown, Accent 3 shading to the new column and to the headings row.
f. Click in the table and apply Around text wrapping.
g. Drag the table and position it at the left margin below the second line of the memo.
3. Use a Tabular List Quick Table to create the second table. Delete any extra rows. Apply Around text wrapping and position the table at the first line of the last paragraph at the left margin.
4. Compare your document to the illustration at the bottom right side of the next page.
5. Save and close. (111-d1)
DISCOVERText can be wrapped around tables in the same way that it is wrapped around graphics.
Table Tools Layout/Table/Properties
1. Click in the table.2. On the Table tab of the Table
Properties dialog box, click Around text wrapping.
LESSON 111 MASTER TABLE COMMANDS MODULE 19 572
0538496479_Mod19.indd 5720538496479_Mod19.indd 572 10/15/10 7:23 PM10/15/10 7:23 PM
© C
enga
ge L
earn
ing.
All
right
s res
erve
d. N
o di
strib
utio
n al
low
ed w
ithou
t exp
ress
aut
horiz
atio
n.
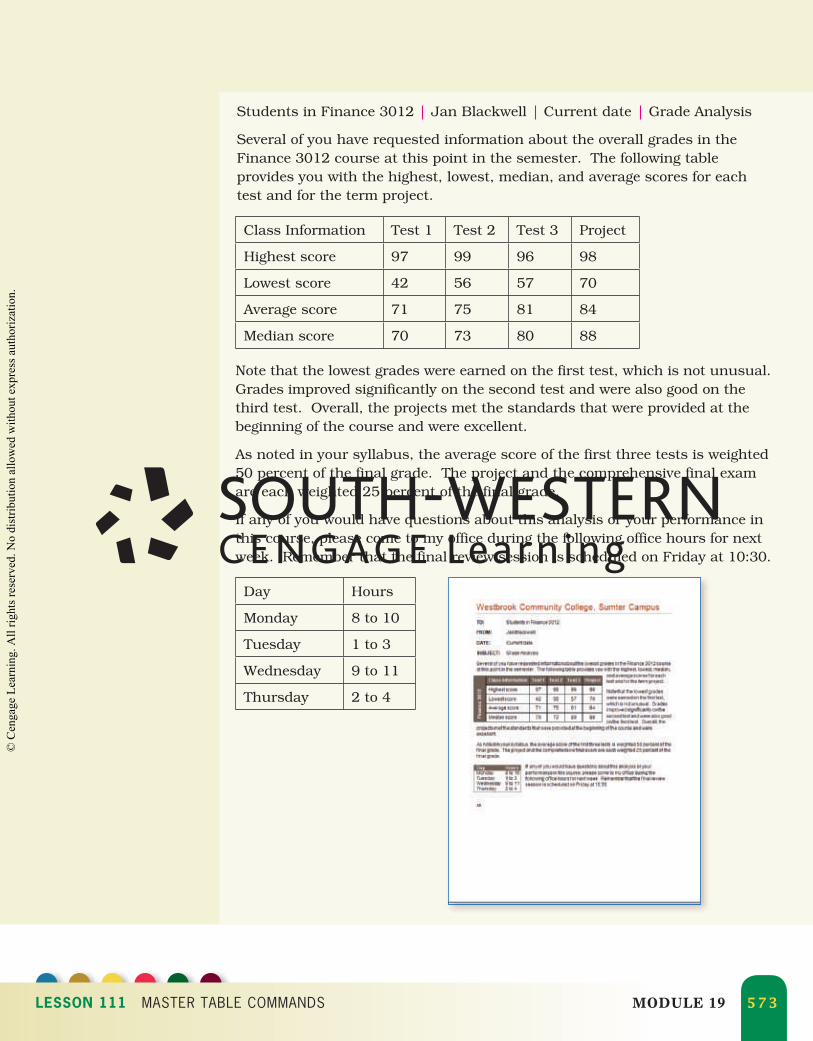
Students in Finance 3012 Jan Blackwell Current date Grade Analysis
Several of you have requested information about the overall grades in the Finance 3012 course at this point in the semester. The following table provides you with the highest, lowest, median, and average scores for each test and for the term project.
Class Information Test 1 Test 2 Test 3 Project
Highest score 97 99 96 98
Lowest score 42 56 57 70
Average score 71 75 81 84
Median score 70 73 80 88
Day Hours
Monday 8 to 10
Tuesday 1 to 3
Wednesday 9 to 11
Thursday 2 to 4
Note that the lowest grades were earned on the first test, which is not unusual. Grades improved significantly on the second test and were also good on the third test. Overall, the projects met the standards that were provided at the beginning of the course and were excellent.
As noted in your syllabus, the average score of the first three tests is weighted 50 percent of the final grade. The project and the comprehensive final exam are each weighted 25 percent of the final grade.
If any of you would have questions about this analysis or your performance in this course, please come to my office during the following office hours for next week. Remember that the final review session is scheduled on Friday at 10:30.
LESSON 111 MASTER TABLE COMMANDS MODULE 19 573
0538496479_Mod19.indd 5730538496479_Mod19.indd 573 10/15/10 7:23 PM10/15/10 7:23 PM
© C
enga
ge L
earn
ing.
All
right
s res
erve
d. N
o di
strib
utio
n al
low
ed w
ithou
t exp
ress
aut
horiz
atio
n.

1. Open the data file itinerary and key the information below to complete the itinerary.
2. Tap ENTER after each entry to make the itinerary more readable.
3. Insert a blank row above each row that contains the day, date, and location. Bold the data in these entries.
4. Repeat the header row (and the blank row below it) on the second page.
5. Check to see if any rows broke at the top of page 2. Deselect Allow row to break across pages to keep the row from breaking.
6. Preview, save, and close. (111-d2)
111-d2
Itinerary with Header Repeated
itinerary
7:00 p.m. Dinner meeting with the Program Planning Committee in Boardroom 2 of the Hankin Hill Hotel. The purpose of the meeting is to begin planning for next year’s Summit scheduled to begin on June 6 in New Orleans, Louisiana. See Travel folder for additional information.
Thursday, Washington, D.C.June 4
9:00 a.m. Conference sessions. See conference program for detailed schedule information.
12:30 p.m. Lunch as guest of Leslie Martin and Lynn Bordelon. Meet in lobby of the Hankin Hill Hotel to walk to the restaurant.
2:00 p.m. Conference sessions. See conference program for detailed schedule information.
No plans made for dinner.
Friday, Washington, D.C.June 5
1:00 p.m. Depart for Ronald Reagan Washington National Airport (Executive Conference Service provides transportation). Bill Smith will return with you. Meet in the lobby of the Hankin Hill Hotel.
2:45 p.m. Leave on Freedom Flight 861 at 2:45 p.m. and arrive in Atlanta at 3:51. Leave Atlanta on Freedom Flight 1683 at 4:45 p.m. and arrive in Mobile at 5:28.
LESSON 111 MASTER TABLE COMMANDS MODULE 19 574
0538496479_Mod19.indd 5740538496479_Mod19.indd 574 10/15/10 7:23 PM10/15/10 7:23 PM
© C
enga
ge L
earn
ing.
All
right
s res
erve
d. N
o di
strib
utio
n al
low
ed w
ithou
t exp
ress
aut
horiz
atio
n.
• Reset Clip Art and Pictures• Screenshot
• Text Box Formats• Grammar and Style Settings
• AutoCorrect Settings• Hyphenation
New Commands
Lesson 112 Master Graphics
RESET CLIP ART AND PICTURESYou can reverse changes to pictures and clip art using the Reset Picture command. In Module 12, you learned how to add captions to pictures and other objects to make them easy to identify.
To reset pictures and clip art:
Picture Tools Format/Adjust/Reset Picture
1. Select the picture that has had adjustments made to it.
2. Click Reset Picture to return it to original settings.
New Commands
112b
1. In a new document, search clip art using the keywords white bunny rabbit; insert the first clip that displays. Size it 3" high and position in Top Center with Square Text Wrapping.
2. Insert andy from the data files and position in Bottom Center with Square Text Wrapping. Crop the picture close to the image of the puppy; size it 3" high.
3. Apply the following adjustments to both images:
a. Compress the picture and apply the correction Sharpen 50%.
b. Apply 300% color saturation and Sepia recolor.
c. Apply the artistic effect Paint Strokes.
4. Preview both images; then reset the pictures to the original settings.
5. Right-click the white bunny rabbit; select Insert Caption.
6. Click New Label and key Bunny. The number 1 will be added automatically.
7. Right-click Andy and insert a caption with the new label Andy. The number 1 will be added automatically.
8. Save and close. (112-drill1)
DRILL 1 RESET CLIP ART AND PICTURES andy
t th
LESSON 112 MASTER GRAPHICS MODULE 19 575
Build Workplace RelationshipsEmployees in effective workplaces develop good working relationships. While many factors are important in creating good relationships, three factors seem to stand out.
1. Being courteous and using good manners. Sensitivity, empathy, and remembering the Golden Rule make a big difference in the workplace.
2. Building trust. Honesty, competence, meeting commitments, and developing credibility are key components of building trust.
3. Resolving workplace conflict. Learn to disagree without being disagreeable. Prevention is often better than resolving conflict.
WORKPLACE SUCCESSW
IMA
GE
CO
PY
RIG
HT
OR
AN
GE
LIN
E M
ED
IA 2
010.
U
SE
D
UN
DE
R L
ICE
NS
E F
RO
M S
HU
TT
ER
STO
CK
.CO
M
0538496479_Mod19.indd 5750538496479_Mod19.indd 575 10/15/10 7:23 PM10/15/10 7:23 PM
© C
enga
ge L
earn
ing.
All
right
s res
erve
d. N
o di
strib
utio
n al
low
ed w
ithou
t exp
ress
aut
horiz
atio
n.
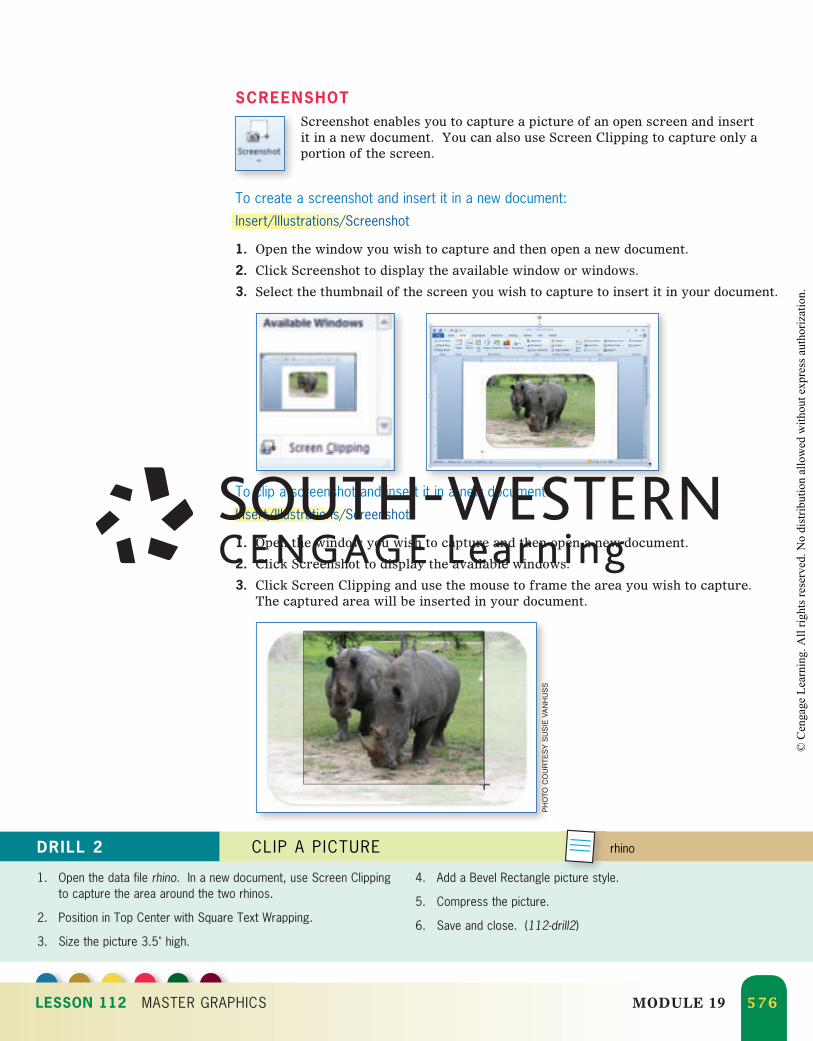
SCREENSHOTScreenshot enables you to capture a picture of an open screen and insert it in a new document. You can also use Screen Clipping to capture only a portion of the screen.
To create a screenshot and insert it in a new document:
Insert/Illustrations/Screenshot
1. Open the window you wish to capture and then open a new document.
2. Click Screenshot to display the available window or windows.
3. Select the thumbnail of the screen you wish to capture to insert it in your document.
To clip a screenshot and insert it in a new document:
Insert/Illustrations/Screenshot
1. Open the window you wish to capture and then open a new document.
2. Click Screenshot to display the available windows.
3. Click Screen Clipping and use the mouse to frame the area you wish to capture. The captured area will be inserted in your document.
1. Open the data file rhino. In a new document, use Screen Clipping to capture the area around the two rhinos.
2. Position in Top Center with Square Text Wrapping.
3. Size the picture 3.5" high.
4. Add a Bevel Rectangle picture style.
5. Compress the picture.
6. Save and close. (112-drill2)
DRILL 2 CLIP A PICTURE rhino
i t t
LESSON 112 MASTER GRAPHICS MODULE 19 576
PH
OTO
CO
UR
TE
SY
SU
SIE
VA
NH
US
S
0538496479_Mod19.indd 5760538496479_Mod19.indd 576 10/15/10 7:24 PM10/15/10 7:24 PM
© C
enga
ge L
earn
ing.
All
right
s res
erve
d. N
o di
strib
utio
n al
low
ed w
ithou
t exp
ress
aut
horiz
atio
n.
LESSON 112 MASTER GRAPHICS MODULE 19 577
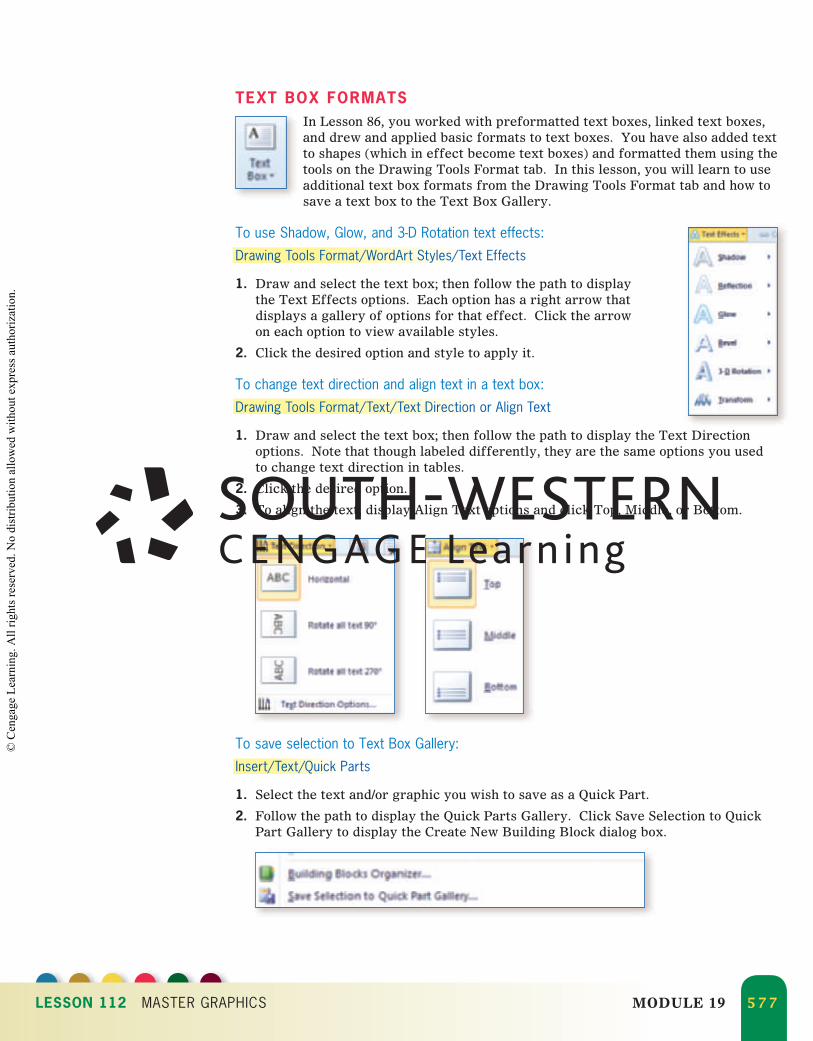
TEXT BOX FORMATS In Lesson 86, you worked with preformatted text boxes, linked text boxes, and drew and applied basic formats to text boxes. You have also added text to shapes (which in effect become text boxes) and formatted them using the tools on the Drawing Tools Format tab. In this lesson, you will learn to use additional text box formats from the Drawing Tools Format tab and how to save a text box to the Text Box Gallery.
To use Shadow, Glow, and 3-D Rotation text effects:
Drawing Tools Format/WordArt Styles/Text Effects
1. Draw and select the text box; then follow the path to display the Text Effects options. Each option has a right arrow that displays a gallery of options for that effect. Click the arrow on each option to view available styles.
2. Click the desired option and style to apply it.
To change text direction and align text in a text box:
Drawing Tools Format/Text/Text Direction or Align Text
1. Draw and select the text box; then follow the path to display the Text Direction options. Note that though labeled differently, they are the same options you used to change text direction in tables.
2. Click the desired option.
3. To align the text, display Align Text options and click Top, Middle, or Bottom.
To save selection to Text Box Gallery:
Insert/Text/Quick Parts
1. Select the text and/or graphic you wish to save as a Quick Part.
2. Follow the path to display the Quick Parts Gallery. Click Save Selection to Quick Part Gallery to display the Create New Building Block dialog box.
0538496479_Mod19.indd 5770538496479_Mod19.indd 577 10/15/10 7:24 PM10/15/10 7:24 PM
© C
enga
ge L
earn
ing.
All
right
s res
erve
d. N
o di
strib
utio
n al
low
ed w
ithou
t exp
ress
aut
horiz
atio
n.
LESSON 112 MASTER GRAPHICS MODULE 19 578
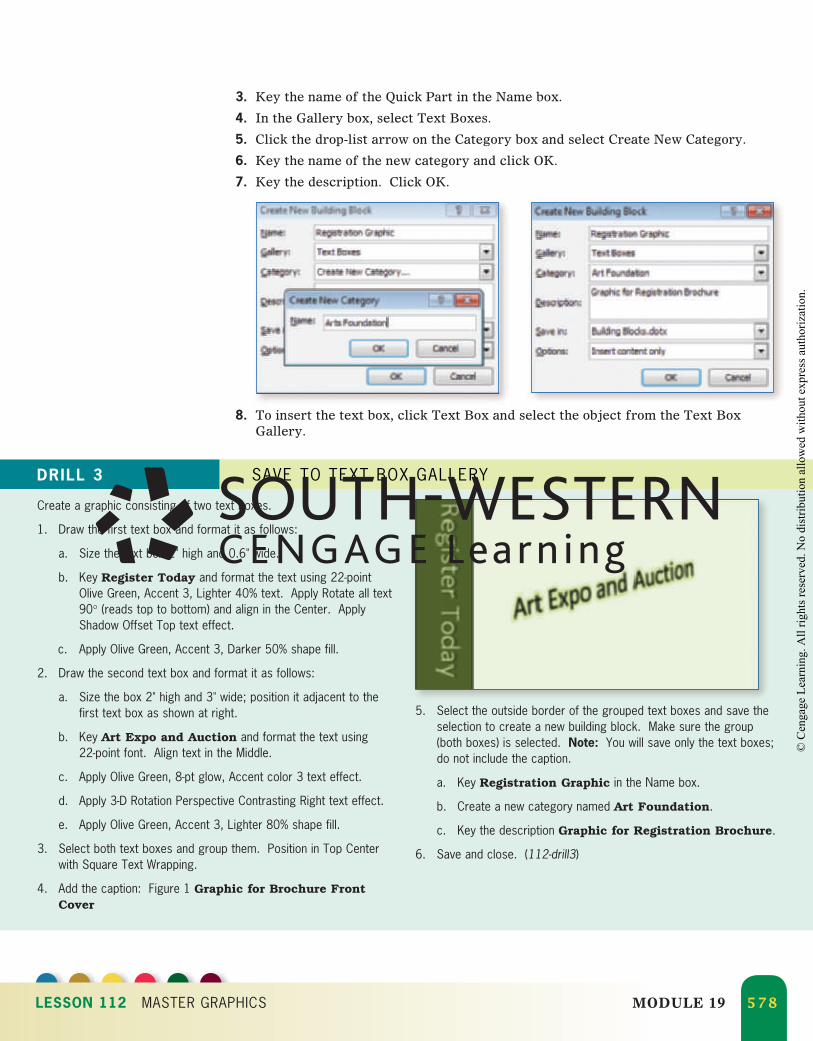
3. Key the name of the Quick Part in the Name box.
4. In the Gallery box, select Text Boxes.
5. Click the drop-list arrow on the Category box and select Create New Category.
6. Key the name of the new category and click OK.
7. Key the description. Click OK.
8. To insert the text box, click Text Box and select the object from the Text Box Gallery.
Create a graphic consisting of two text boxes.
1. Draw the first text box and format it as follows:
a. Size the text box 2" high and 0.6" wide.
b. Key Register Today and format the text using 22-point Olive Green, Accent 3, Lighter 40% text. Apply Rotate all text 90° (reads top to bottom) and align in the Center. Apply Shadow Offset Top text effect.
c. Apply Olive Green, Accent 3, Darker 50% shape fill.
2. Draw the second text box and format it as follows:
a. Size the box 2" high and 3" wide; position it adjacent to the first text box as shown at right.
b. Key Art Expo and Auction and format the text using 22-point font. Align text in the Middle.
c. Apply Olive Green, 8-pt glow, Accent color 3 text effect.
d. Apply 3-D Rotation Perspective Contrasting Right text effect.
e. Apply Olive Green, Accent 3, Lighter 80% shape fill.
3. Select both text boxes and group them. Position in Top Center with Square Text Wrapping.
4. Add the caption: Figure 1 Graphic for Brochure Front Cover
5. Select the outside border of the grouped text boxes and save the selection to create a new building block. Make sure the group (both boxes) is selected. Note: You will save only the text boxes; do not include the caption.
a. Key Registration Graphic in the Name box.
b. Create a new category named Art Foundation.
c. Key the description Graphic for Registration Brochure.
6. Save and close. (112-drill3)
DRILL 3 SAVE TO TEXT BOX GALLERY
0538496479_Mod19.indd 5780538496479_Mod19.indd 578 10/15/10 7:24 PM10/15/10 7:24 PM
© C
enga
ge L
earn
ing.
All
right
s res
erve
d. N
o di
strib
utio
n al
low
ed w
ithou
t exp
ress
aut
horiz
atio
n.

HYPHENATIONGraphics are frequently used in documents with columns or in one-column documents with text wrapped around them or around
tables. Hyphenation can often improve the appearance of text in documents with graphics and tables. Hyphenation can be done manually or automatically.
To hyphenate a document:
Page Layout/Page Setup/Hyphenation
1. Follow the path to display the Hyphenation options.
2. Select either Automatic or Manual.
3. Click Hyphenation Options to change options such as setting the limit on consecutive hyphens or the Hyphenation zone, if desired.
GRAMMAR AND STYLE SETTINGSGrammar and style settings are part of the options that can be set for the Proofing tools. These settings determine the way that grammar and writing style are checked.
To change grammar and style settings:
File/Options
1. Follow the path to display the Word Options dialog box. Then select Proofing.
2. Click the Writing Style drop-list arrow; select Grammar Only or Grammar & Style.
3. Click Settings to display the Grammar Settings dialog box. Deselect Grammar options you do not wish to check. Scroll down and deselect Style options that you do not wish to check.
LESSON 112 MASTER GRAPHICS MODULE 19 579
bl H h i
TIPAfter you have made changes in grammar and style settings, click Recheck Document in the Word Options dialog box to reset the Spelling and Grammar Checkers and recheck the document.
0538496479_Mod19.indd 5790538496479_Mod19.indd 579 10/15/10 7:24 PM10/15/10 7:24 PM
© C
enga
ge L
earn
ing.
All
right
s res
erve
d. N
o di
strib
utio
n al
low
ed w
ithou
t exp
ress
aut
horiz
atio
n.
LESSON 112 MASTER GRAPHICS MODULE 19 580
DRILL 4 HYPHENATION/PROOFING TOOLS hyphenation
Page Layout/Page Setup/Hyphenation
1. Open the data file hyphenation and click Automatic to hyphenate the document.
2. In the Hyphenation dialog box, use the spin arrow in the Limit the consecutive hyphens to box to select 2.
File/Options
3. Change the following grammar and style settings:
a. In the Require section of the Grammar and style options, select always for Comma required before last list item.
b. Scroll down to the Style section and deselect Passive sentences.
c. Click Recheck Document.
4. Check the document to see that hyphenation has been applied and that there are no more than two consecutive hyphens in the document.
5. Check to see if grammar errors are marked where commas are required before the last list item. Add the commas where the errors are marked.
6. Save and close. (112-drill4)
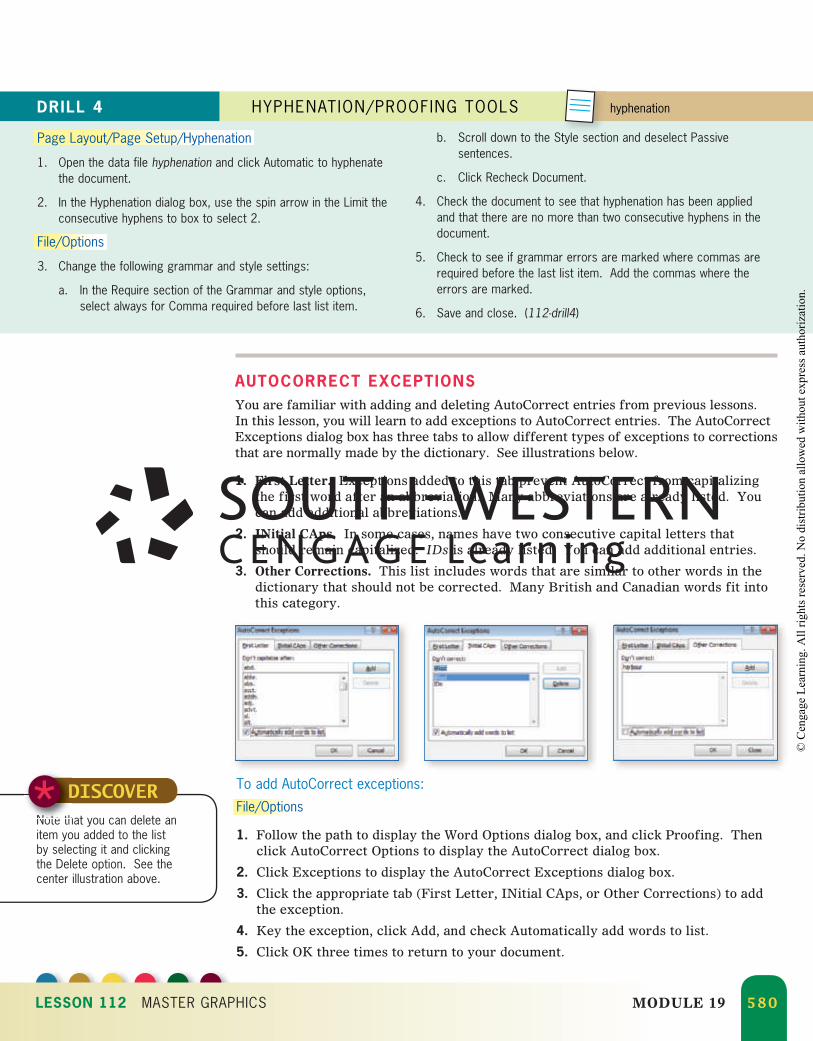
AUTOCORRECT EXCEPTIONSYou are familiar with adding and deleting AutoCorrect entries from previous lessons. In this lesson, you will learn to add exceptions to AutoCorrect entries. The AutoCorrect Exceptions dialog box has three tabs to allow different types of exceptions to corrections that are normally made by the dictionary. See illustrations below.
1. First Letter. Exceptions added to this tab prevent AutoCorrect from capitalizing the first word after an abbreviation. Many abbreviations are already listed. You can add additional abbreviations.
2. INitial CAps. In some cases, names have two consecutive capital letters that should remain capitalized. IDs is already listed. You can add additional entries.
3. Other Corrections. This list includes words that are similar to other words in the dictionary that should not be corrected. Many British and Canadian words fit into this category.
To add AutoCorrect exceptions:
File/Options
1. Follow the path to display the Word Options dialog box, and click Proofing. Then click AutoCorrect Options to display the AutoCorrect dialog box.
2. Click Exceptions to display the AutoCorrect Exceptions dialog box.
3. Click the appropriate tab (First Letter, INitial CAps, or Other Corrections) to add the exception.
4. Key the exception, click Add, and check Automatically add words to list.
5. Click OK three times to return to your document.
DISCOVERNote that you can delete an item you added to the list by selecting it and clicking the Delete option. See the center illustration above.
DDNote th
0538496479_Mod19.indd 5800538496479_Mod19.indd 580 10/15/10 7:24 PM10/15/10 7:24 PM
© C
enga
ge L
earn
ing.
All
right
s res
erve
d. N
o di
strib
utio
n al
low
ed w
ithou
t exp
ress
aut
horiz
atio
n.
LESSON 112 MASTER GRAPHICS MODULE 19 581
DRILL 5 AUTOCORRECT EXCEPTIONS
File/Options
1. In a new document, follow the path; click Proofing; and then click AutoCorrect Options.
2. In the AutoCorrect options, click Exceptions to display the AutoCorrect Exceptions dialog box. Add the following exceptions. Remember to check Automatically add words to list for each one.
a. On the first tab, add the abbreviation abd., which stands for “all but dissertation.”
b. On the second tab, add the name BRod, which is a name used by Benjamin Rodney.
c. On the third tab, add harbour, the Canadian and British spell-ing of harbor.
3. Key the text shown below on the left. Check to see that the excep-tions you added were implemented. Your text should look like the illustration shown below on the right.
4. Save and close. (112-drill5)
Congratulations, BRod, you have reached the abd. milestone in your education. We are sure that everyone at Halifax East Harbour Tour Company is very proud of your accomplishment.
Applications
112-d1
Report with Table and Graphics
trails
1. Open the data file trails and apply automatic hyphenation. Set Hyphenation options: Hyphenation zone: 0.2"; consecutive hyphens: 2.
2. Apply Grammar and Style settings: Do not check for passive sentences.
3. Create a graphic by drawing and formatting two text boxes as follows.
a. Draw the first text box; size it 2" high and 1" wide. Apply Red standard color shape outline.
b. Set text direction to Rotate all text 270° (read bottom to top); key Research Highlights in the box and align text in Center. Apply 22-point heading font and Red, Text 2 color.
c. Apply Shadow Perspective Diagonal Upper Right text effect.
d. Apply 3-D Rotation Off Axis 1 Left shape effect.
e. Draw the second text box; size it 1.9" high by 2.7" wide.
f. Apply Red, Text 2, Lighter 80% shape fill and Red standard color shape outline.
g. Key Controllable Factors in 16-point heading font and Red, Text 2 color.
h. Define a new bullet with a heart from the Symbol font. Key three bulleted items: Exercise, Diet, and Not Smoking. Apply 14-point body font in Red, Text 2 font color.
i. Group the two boxes and apply Tight text wrapping. Position the graphic as shown in the Quick Check. Add the caption: Figure 1 Research Highlights. Align the caption at the left with the slanted box in the graphic.
4. Use boardwalks as the keyword and search for a clip showing a boardwalk. Position it as shown in the Quick Check. Format the clip as follows:
a. Crop the photo attractively; size the clip 1.4" high.
b. Apply the Soften 25% correction and Paint Brush artistic effect.
c. Apply Tight text wrapping, position the graphic as shown in the Quick Check, and add the caption: Figure 2 Boardwalk Construction Proposed.
TIPIt may be easier to format the graphics and table in a separate document and copy and paste them in the report as shown in the Quick Check.
TIPAdjust the position of captions if you see large gaps in line spacing of wrapped text.
0538496479_Mod19.indd 5810538496479_Mod19.indd 581 10/15/10 7:24 PM10/15/10 7:24 PM
© C
enga
ge L
earn
ing.
All
right
s res
erve
d. N
o di
strib
utio
n al
low
ed w
ithou
t exp
ress
aut
horiz
atio
n.
LESSON 112 MASTER GRAPHICS MODULE 19 582
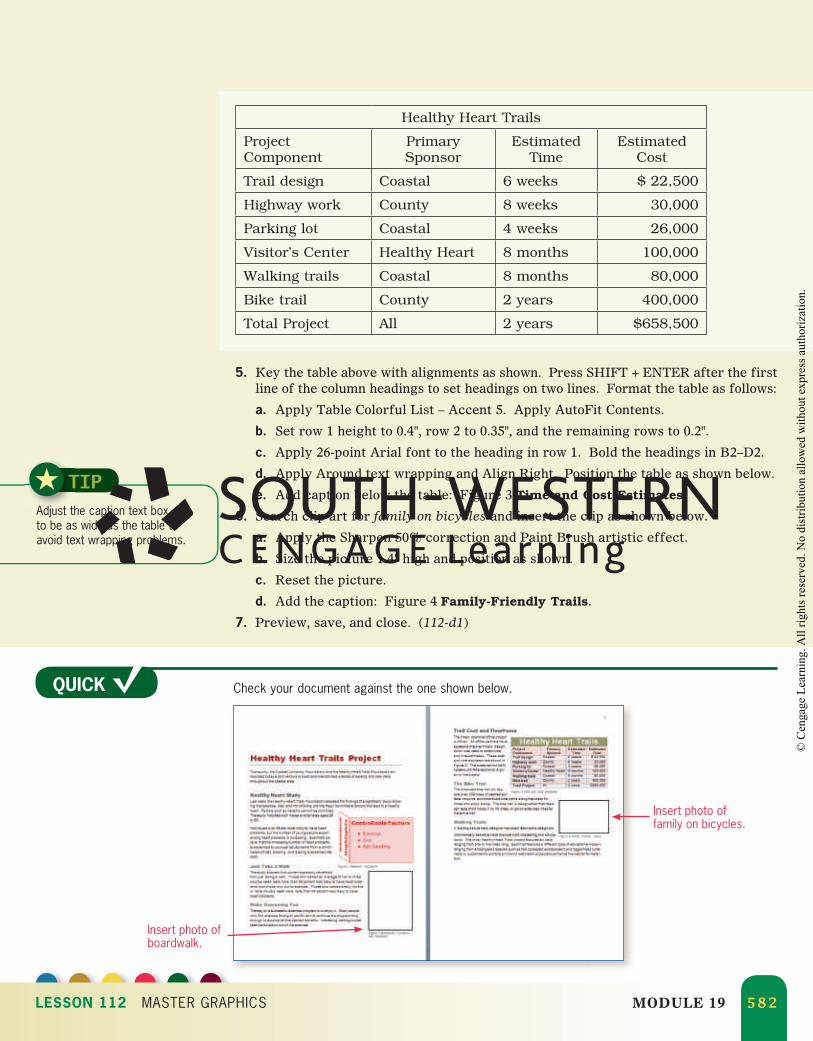
Healthy Heart Trails
ProjectComponent
PrimarySponsor
EstimatedTime
EstimatedCost
Trail design Coastal 6 weeks $ 22,500
Highway work County 8 weeks 30,000
Parking lot Coastal 4 weeks 26,000
Visitor’s Center Healthy Heart 8 months 100,000
Walking trails Coastal 8 months 80,000
Bike trail County 2 years 400,000
Total Project All 2 years $658,500
5. Key the table above with alignments as shown. Press SHIFT + ENTER after the first line of the column headings to set headings on two lines. Format the table as follows:
a. Apply Table Colorful List – Accent 5. Apply AutoFit Contents.
b. Set row 1 height to 0.4", row 2 to 0.35", and the remaining rows to 0.2".
c. Apply 26-point Arial font to the heading in row 1. Bold the headings in B2–D2.
d. Apply Around text wrapping and Align Right. Position the table as shown below.
e. Add caption below the table: Figure 3 Time and Cost Estimates
6. Search clip art for family on bicycles and insert the clip as shown below.
a. Apply the Sharpen 50% correction and Paint Brush artistic effect.
b. Size the picture 1.4" high and position as shown.
c. Reset the picture.
d. Add the caption: Figure 4 Family-Friendly Trails.
7. Preview, save, and close. (112-d1)
TIPAdjust the caption text box to be as wide as the table to avoid text wrapping problems.
QUICK Check your document against the one shown below.
Insert photo of family on bicycles.
Insert photo of boardwalk.
0538496479_Mod19.indd 5820538496479_Mod19.indd 582 10/15/10 7:24 PM10/15/10 7:24 PM
© C
enga
ge L
earn
ing.
All
right
s res
erve
d. N
o di
strib
utio
n al
low
ed w
ithou
t exp
ress
aut
horiz
atio
n.
• AutoFormat for Bullets and Numbering• Stop Automatic Lists• Restart or Continue Numbering• Set Number Value
• Sort a List• Define a New Bullet• Nonbreaking Space
New Commands
Lesson 113 Master List Elements
AUTOFORMAT FOR BULLETS AND NUMBERINGAutoFormat As You Type, one of the AutoCorrect options, allows you to create bulleted and numbered lists automatically.
To view AutoFormat As You Type Options for bulleted and numbered lists:
File/Options/Proofing/AutoCorrect Options
1. Follow the path and click the AutoFormat As You Type tab.
2. In the Apply as you type group, note that the Automatic bulleted lists and Automatic numbered lists checkboxes are selected, verifying that the default settings are “on.”
To turn off the automatic defaults so that bulleted lists or numbered lists are not automatically created, click to deselect the checkbox.
New Commands
LESSON 113 MASTER LIST ELEMENTS MODULE 19 583
STOP AUTOMATIC LIST CREATIONOften as you begin to key a numbered list, you may decide to turn off the automatic numbering for a particular list, or you may decide to turn it off completely.
To stop automatic list creation using the AutoCorrect Options icon:1. After the first number is keyed, the AutoCorrect Options icon displays to the left of
the number.
2. Click the AutoCorrect Options icon, and click Undo Automatic Numbering to turn it off for that particular list. -or-
Click Stop Automatically Creating Numbered Lists to turn off automatic numbering completely.
Note: Clicking Control AutoFormat Options will take you to the AutoFormat As You Type tab in the AutoCorrect dialog box.
TIPPress CTRL + Z to turn off automatic list creation.
TIPSelect a bulleted or numbered list and click the Bullets or Numbering button to remove bullets or numbering.
0538496479_Mod19.indd 5830538496479_Mod19.indd 583 10/15/10 7:24 PM10/15/10 7:24 PM
© C
enga
ge L
earn
ing.
All
right
s res
erve
d. N
o di
strib
utio
n al
low
ed w
ithou
t exp
ress
aut
horiz
atio
n.
LESSON 113 MASTER LIST ELEMENTS MODULE 19 584
DRILL 1 AUTOFORMAT
File/Options/Proofing/AutoCorrect Options
1. In a new document, verify that automatic bulleted and numbered list options are selected as AutoCorrect options.
2. Key 1. and tap the Space Bar. Key the items below on a separate line as a numbered list of Word 2010 commands:
1. Bulleted lists 2. Numbered lists
3. Cover page 4. Document themes
5. Section breaks 6. Table of contents
7. Index 8. Custom margins
9. Citations 10. SmartArt
3. Tap ENTER three times after the list.
4. Turn off automatic numbered lists. Set a decimal tab at 0.25" and a left tab at 0.5". Tap the TAB key, key 1. and tap TAB. Key Bulleted lists.
5. Key the remaining items in the list. Note how the numbers align correctly at the decimal point.
6. Select the first nine lines in the second list and remove space after paragraphs.
7. Save and close. (113-drill1)
RESTART OR CONTINUE NUMBERINGWord generally knows to restart the numbering of a new numbered list at 1. However, when subparagraphs separate items in a numbered list, you may need to make adjustments. The easiest approach is to begin keying the desired number followed by a period and space. The AutoCorrect Options icon then displays to the left of the number. If necessary, click the drop-list arrow and click either Continue Numbering or Restart Numbering as needed.
Occasionally, you may need to set the numbering value.
To set numbering value:
Home/Paragraph/Numbering/Set Numbering Value
1. Click the numbers in the numbered list and follow the path above.
2. In the Set value to box, key the desired number.
TIPClick in the numbered list; right-click, and click either Restart at 1, Continue Numbering, or Set Numbering Value.
DRILL 2 NUMBERING favorites
1. Open the data file favorites and position the insertion point below the last line. Click Numbering to begin a numbered list. Click the AutoCorrect Options icon, and click Continue Numbering.
2. Key the names as follows with each being a separate number: Beagle, Bassett Hound, Yorkshire Terrier, and Dachshund.
3. Tap ENTER twice at the end of the list. Key the sentence: My three favorite dogs are as follows:
4. Tap ENTER. Begin numbering at 1 and key Shih Tzu, Bulldog, and English Cocker Spaniel. If necessary, set the value to begin numbering at 1.
5. Save and close. (113-drill2)
0538496479_Mod19.indd 5840538496479_Mod19.indd 584 10/15/10 7:24 PM10/15/10 7:24 PM
© C
enga
ge L
earn
ing.
All
right
s res
erve
d. N
o di
strib
utio
n al
low
ed w
ithou
t exp
ress
aut
horiz
atio
n.
LESSON 113 MASTER LIST ELEMENTS MODULE 19 585
SORT A LISTAfter a bulleted list is keyed, the user may find it useful to sort the list. Text can be sorted in ascending order (A to Z) or descending order (Z to A).
To sort a list:
Home/Paragraph/Sort
1. Select the list to be sorted and follow the path above.
2. In the Sort by box, select Paragraphs. In the Type box, select Text.
3. Click Ascending or Descending order.
DRILL 3 SORT dogs
1. Open the data file dogs and select the bulleted list.
2. Sort in ascending order.
3. Save and close. (113-drill3)
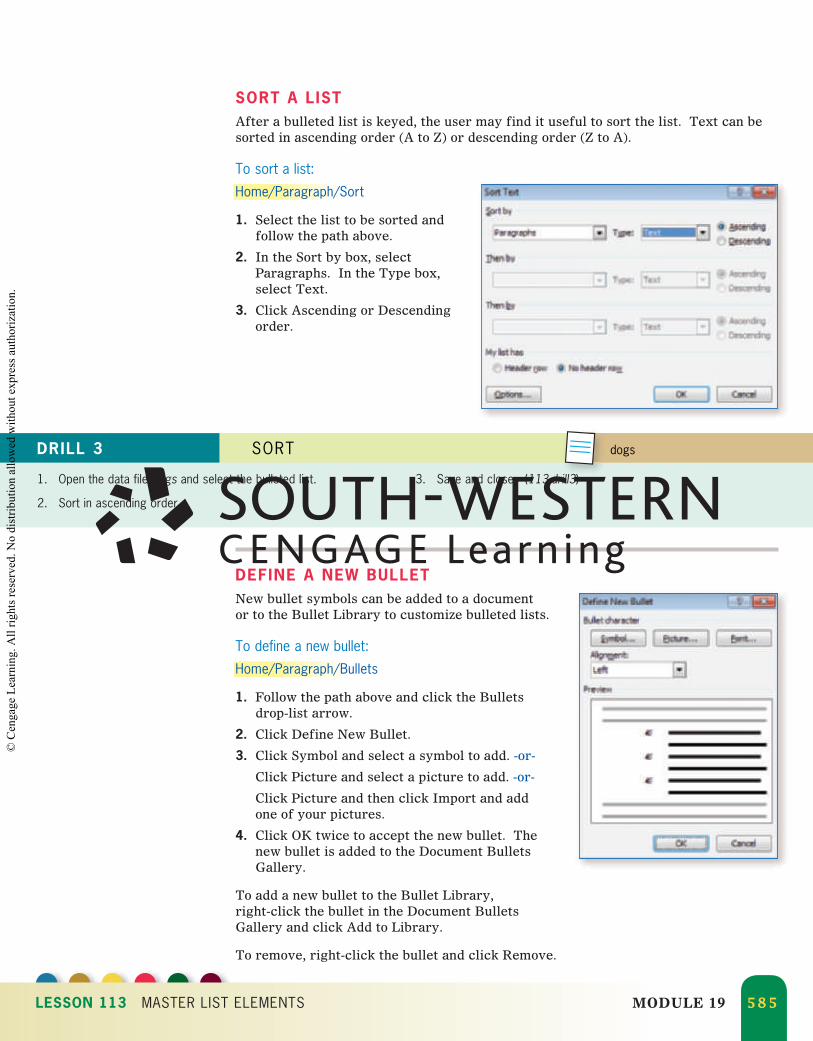
DEFINE A NEW BULLETNew bullet symbols can be added to a document or to the Bullet Library to customize bulleted lists.
To define a new bullet:
Home/Paragraph/Bullets
1. Follow the path above and click the Bullets drop-list arrow.
2. Click Define New Bullet.
3. Click Symbol and select a symbol to add. -or-
Click Picture and select a picture to add. -or-
Click Picture and then click Import and add one of your pictures.
4. Click OK twice to accept the new bullet. The new bullet is added to the Document Bullets Gallery.
To add a new bullet to the Bullet Library, right-click the bullet in the Document Bullets Gallery and click Add to Library.
To remove, right-click the bullet and click Remove.
0538496479_Mod19.indd 5850538496479_Mod19.indd 585 10/15/10 7:24 PM10/15/10 7:24 PM
© C
enga
ge L
earn
ing.
All
right
s res
erve
d. N
o di
strib
utio
n al
low
ed w
ithou
t exp
ress
aut
horiz
atio
n.
LESSON 113 MASTER LIST ELEMENTS MODULE 19 586
DRILL 4 NEW BULLET pet rules
1. Open the data file pet rules and define a new picture bullet for the first list. Click the Picture tab. In the Search text box, key right pointers and click Go. Select the second selection. Click OK two times. Apply the bullet to all items in the first list.
2. Click the Bullets drop-list button and note the new bullet is displayed under Document Bullets. Right-click the new bullet and add it to the Bullet Library.
3. Define a new symbol bullet for the second list. In the Symbol dialog box, select Wingdings from the Font list. Select the hand holding a pencil (Wingding 63). Click OK twice. Add to the Bullet Library.
4. Save and close. (113-drill4)
DRILL 5 IMPORT BULLET fred
1. Open 113-drill4. Select the first list, open the Define New Bullet dialog box, and click Picture. Click Import and select the data file fred as the picture bullet. Click Add and then click OK twice.
2. Click on the picture bullets to select the bullets. Click Grow Font to increase the font size to 14 point to enlarge the picture.
3. Save and close. (113-drill5)
NONBREAKING SPACESA nonbreaking space (sometimes called a hard space) is inserted between words instead of a regular space to prevent wordwrap from breaking word groups inappropriately at the end of the line. Style rules recommend that word groups read as a group should display on the same line. Examples include the following:
December 13 April 2011 Mr. Jones page 203 9:30 a.m.
593 miles Carla Wells, Ph.D. Wayne T. Simpson, II A. W. Smith
Use the following guidelines to assist you in breaking longer word groups.
December 12, 2011 Break after the day of the month.
Avery W. Smith Break after the middle initial.
395 Juniper Street Break after the street name.
Hattiesburg, MS 39401 Break after the city.
the following tips: (1) Memorize Break before the number to keep the your password (2) number with the text.
To insert a nonbreaking space:
Insert/Symbols/Symbol/More Symbols
1. Follow the path above and click the Special Characters tab.
2. Click Nonbreaking Space. The symbol (°) displays where a nonbreaking space is inserted. Hint: Click the Show/Hide button to display formatting marks.
TIP
Use the following shortcut to insert a nonbreaking space: CTRL + SHIFT + Space Bar.
0538496479_Mod19.indd 5860538496479_Mod19.indd 586 10/15/10 7:24 PM10/15/10 7:24 PM
© C
enga
ge L
earn
ing.
All
right
s res
erve
d. N
o di
strib
utio
n al
low
ed w
ithou
t exp
ress
aut
horiz
atio
n.
LESSON 113 MASTER LIST ELEMENTS MODULE 19 587
DRILL 6 NONBREAKING SPACE nonbreaking space
1. Open the data file nonbreaking space and delete the space after 10 in the first sentence. Insert a nonbreaking space to prevent 10 a.m. from breaking. Click Show/Hide to view the symbol for the nonbreaking space.
2. Insert nonbreaking spaces where needed for the remaining sentences.
3. Save and close. (113-drill6)
Applications
113-d1
Edit Report
procedures
1. Open the data file procedures, select the steps for effective proofreading, and apply an automatic numbered list.
2. For the second list, define a new bullet by selecting the Wingdings font and then the eyeglasses (fourth item). Sort the list in alphabetical order. Add the new bullet to the Bullet Library.
3. At the end of the document, key the numbered list below. Apply the Colorful List – Accent 2 table style to the table. Be sure to continue numbering after the table.
4. Go back to the second list of common errors and key the following error at the end of the list: All proofreaders’ marks were not noted, and corrections were not made to the document. Re-sort the list.
5. Proofread the document for word groups that require a nonbreaking space and insert where appropriate.
6. Save and close. (113-d1)
1. Apply the custom theme created for the company.
2. Set a left tab at 3.25". Key the date, writer’s name, and title at the 3.25" tab.
3. Key the salutation Dear + Last Name unless directed differently by the writer.
4. Enclosure notations are listed to ensure that the recipient understands what items have been enclosed. Key each notation on a separate line. Set a tab at 1" to align the multiple items. See example below:
Enclosures: Contract Memo of Agreement
5. Key Sincerely as the standard complimentary closing.
6. Use mixed punctuation by keying a colon after the salutation and a comma after the complimentary closing.
7. If a table is included in the letter, apply the Colorful List – Accent 2 table style as shown below. Adjust the space before the paragraph following the table by adding space before the paragraph (Home/Paragraph/Line and Paragraph Spacing/Add Space Before Paragraph).
Table Title
0538496479_Mod19.indd 5870538496479_Mod19.indd 587 10/15/10 7:24 PM10/15/10 7:24 PM
© C
enga
ge L
earn
ing.
All
right
s res
erve
d. N
o di
strib
utio
n al
low
ed w
ithou
t exp
ress
aut
horiz
atio
n.

8. Align multiple copy notations at the 0.5" default tab.
9. Send blind copies as an exception. Key bcc on the copy that is stored on the company server; do not key on the original letter being mailed to the recipient of the letter.
Dining Etiquette Quiz
Directions: Read each statement carefully. If the statement is true, write True on the answer sheet. If the statement is false, write False.
1. The water and tea goblet are placed to the right side of the dinner plate.
2. The bread plate is placed on the left side of the dinner plate.
3. The napkin fold goes toward your knees.
4. Start with utensils on the outside of the plate first.
5. Dessert utensils are often at the top of the place setting.
6. Sit tall with your elbows off the table.
7. Bring the fork to your mouth without leaning over the plate.
8. Take cues from the host on what to order.
9. Order items that are easy to eat and carry on a conversation.
10. Always watch your host for cues, and only place your napkin in your lap after the host places the napkin in his/her lap.
1. Turn off automatic list numbering.
2. Set a decimal tab at 0.25" and a left tab at 0.5". Key the quiz below. Hint: CTRL + T applies a hanging indent for numbered items requiring more than one line. You will need to press CTRL + T twice to align with the left tab.
3. Preview, save, and close. (113-d2)
113-d2
Test
LESSON 113 MASTER LIST ELEMENTS MODULE 19 588
0538496479_Mod19.indd 5880538496479_Mod19.indd 588 10/15/10 7:24 PM10/15/10 7:24 PM
© C
enga
ge L
earn
ing.
All
right
s res
erve
d. N
o di
strib
utio
n al
low
ed w
ithou
t exp
ress
aut
horiz
atio
n.
• Odd/Even Headers/Footers• Modify Table of Contents
• Edit Table of Contents Options• Hyperlinks
New Commands
Lesson 114 Master Reports
ODD AND EVEN HEADERS/FOOTERSDesigning odd and even headers and footers can add sophistication to a long report. For example, the document title may be displayed on odd-numbered pages and chapter or section titles on even-numbered pages. Number odd pages on the right side of the page and even pages on the left side of the page.
To create odd and even headers or footers:
Insert/Header & Footer/Header or Footer
1. Position the insertion point in the first page of the document (odd page).
2. Follow the path above and select a header or footer labeled (Odd Page); e.g., Puzzle (Odd Page).
3. Click Different Odd & Even Pages to select this option.
4. Click Next to move to the even-numbered header or footer.
5. Click Header or Footer and select a design labeled (Even Page); e.g., Puzzle (Even Page).
New Commands
114b
DISCOVERSelect Browse Object Button
Click the Select Browse Object button at the bottom right of the screen to display 12 options for browsing a document.
Select
DDSelect
h S l B Obj
LESSON 114 MASTER REPORTS MODULE 19 589
DRILL 1 DIFFERENT HEADERS report
DRILL 2 DIFFERENT HEADERS full report
1. Open the data file report and position the insertion point in the header of the first page. Insert the Puzzle (Odd Page) header. Click Different Odd & Even Pages.
2. Click Next to move to the Even Page header. Insert the Puzzle (Even Page) header. The report title displays automatically. Click Different First Page to suppress the header on the first page.
3. Click the Select Browse Object button and browse this report by page. Click the up and down arrows to move between pages.
4. Click the Select Browse Object button and browse by table. Then browse by headings. Then click the Go To button, and go to page 2. Click Close.
5. Click the Select Browse Object button, click Find, and find all occurrences of forms analysis.
6. Save and close. (114-drill1)
1. Open the data file full report and position the insertion point in the footer of page 2 of Section 1. Insert the Plain Number 2 page number style; change format to lowercase Roman numerals.
2. Go to the header of page 1 of Section 2. Click to deselect Different First Page if selected. Click Different Odd & Even pages. Click Link to Previous to break the links between the headers. At the prompt, click No. Begin numbering at 1.
3. Insert the Motion (Odd Page) header.
4. Click Next to go to the Even Page Header. Click Link to Previous to break the link between Sections 1 and 2.
5. Insert the Motion (Even Page) header. Key the document title if necessary. Click to select Different First Page.
6. Go to the Even Page Footer on page 2 of the report. Click Link to Previous to break link.
7. Go to page ii of Section 1 and insert the Plain Number 2 page number style in the footer.
8. Save and close. (114-drill2)
0538496479_Mod19.indd 5890538496479_Mod19.indd 589 10/15/10 7:24 PM10/15/10 7:24 PM
© C
enga
ge L
earn
ing.
All
right
s res
erve
d. N
o di
strib
utio
n al
low
ed w
ithou
t exp
ress
aut
horiz
atio
n.
LESSON 114 MASTER REPORTS MODULE 19 590
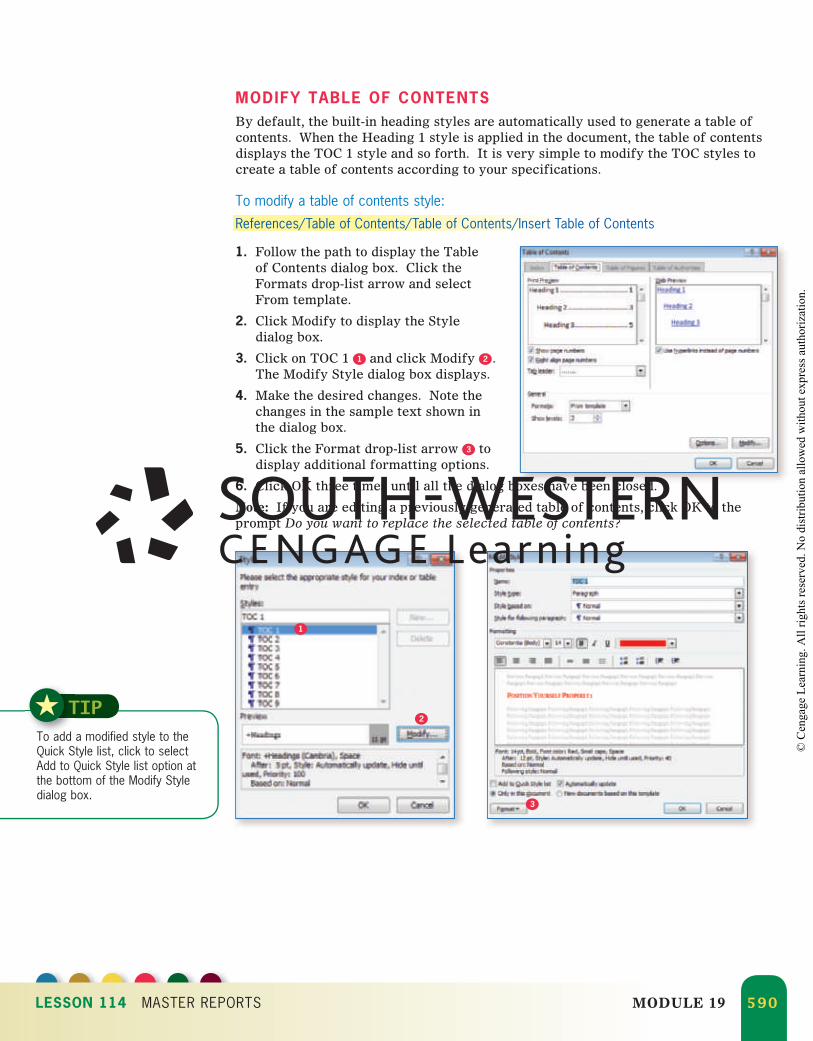
MODIFY TABLE OF CONTENTSBy default, the built-in heading styles are automatically used to generate a table of contents. When the Heading 1 style is applied in the document, the table of contents displays the TOC 1 style and so forth. It is very simple to modify the TOC styles to create a table of contents according to your specifications.
To modify a table of contents style:
References/Table of Contents/Table of Contents/Insert Table of Contents
1. Follow the path to display the Table of Contents dialog box. Click the Formats drop-list arrow and select From template.
2. Click Modify to display the Style dialog box.
3. Click on TOC 1 1 and click Modify 2 . The Modify Style dialog box displays.
4. Make the desired changes. Note the changes in the sample text shown in the dialog box.
5. Click the Format drop-list arrow 3 to display additional formatting options.
6. Click OK three times until all the dialog boxes have been closed.
Note: If you are editing a previously generated table of contents, click OK to the prompt Do you want to replace the selected table of contents?
h b l d
TIPTo add a modified style to the Quick Style list, click to select Add to Quick Style list option at the bottom of the Modify Style dialog box.
1
2
3
0538496479_Mod19.indd 5900538496479_Mod19.indd 590 10/15/10 7:24 PM10/15/10 7:24 PM
© C
enga
ge L
earn
ing.
All
right
s res
erve
d. N
o di
strib
utio
n al
low
ed w
ithou
t exp
ress
aut
horiz
atio
n.
LESSON 114 MASTER REPORTS MODULE 19 591
DRILL 4 TABLE OF CONTENTS
1. Open 114-drill3.
2. In the body of the report, select the first Level 1 heading, Position Yourself Properly, and apply the Heading 2 style. Repeat for the other Level 1 headings. Select each paragraph heading (Level 2) and apply the Heading 4 style. Hint: If you do not see Heading 4, apply Heading 3 and then Heading 4 will display. You can then apply the desired Heading 4.
3. Click in the table of contents and remove it.
4. Generate a new table of contents using the new styles. Click Options and change the TOC levels as follows: Key 1 for Heading 2 and 2 for Heading 4. Note: The format of TOC 1 and TOC 2 remains the same. You have just generated the table of contents using different styles applied in the document.
5. Save and close. (114-drill4)
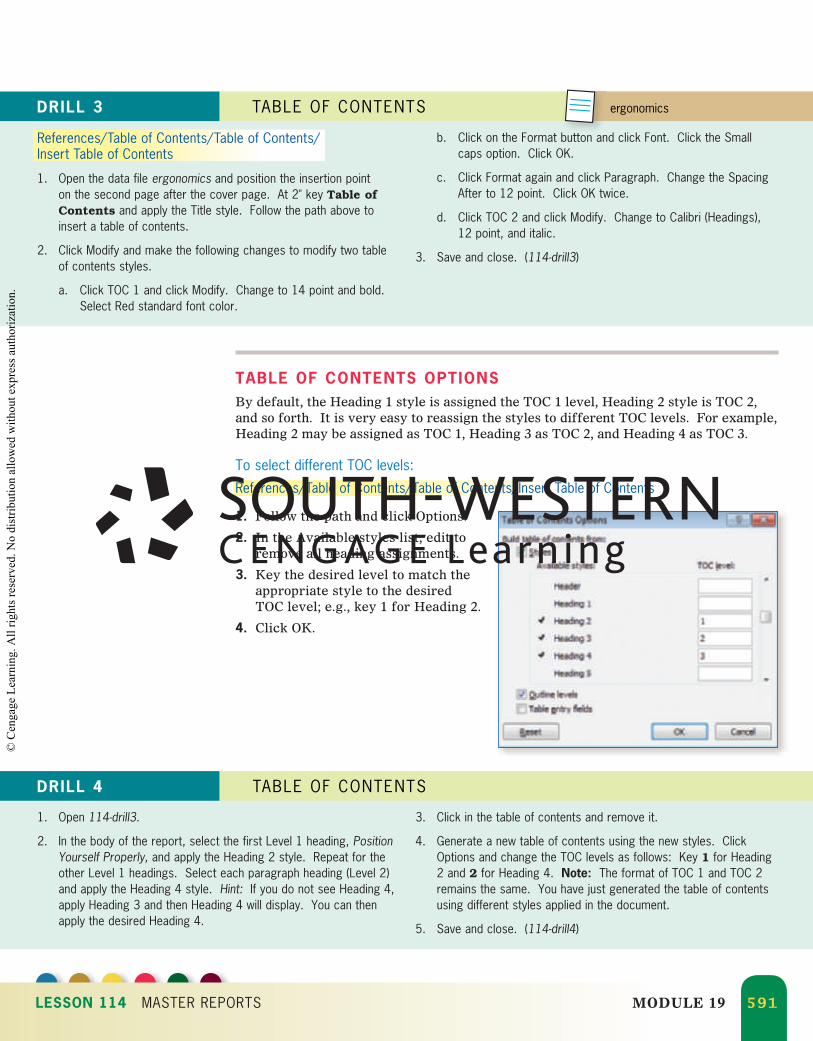
TABLE OF CONTENTS OPTIONSBy default, the Heading 1 style is assigned the TOC 1 level, Heading 2 style is TOC 2, and so forth. It is very easy to reassign the styles to different TOC levels. For example, Heading 2 may be assigned as TOC 1, Heading 3 as TOC 2, and Heading 4 as TOC 3.
To select different TOC levels:
References/Table of Contents/Table of Contents/Insert Table of Contents
1. Follow the path and click Options.
2. In the Available styles list, edit to remove all heading assignments.
3. Key the desired level to match the appropriate style to the desired TOC level; e.g., key 1 for Heading 2.
4. Click OK.
DRILL 3 TABLE OF CONTENTS ergonomics
References/Table of Contents/Table of Contents/Insert Table of Contents
1. Open the data file ergonomics and position the insertion point on the second page after the cover page. At 2" key Table of Contents and apply the Title style. Follow the path above to insert a table of contents.
2. Click Modify and make the following changes to modify two table of contents styles.
a. Click TOC 1 and click Modify. Change to 14 point and bold. Select Red standard font color.
b. Click on the Format button and click Font. Click the Small caps option. Click OK.
c. Click Format again and click Paragraph. Change the Spacing After to 12 point. Click OK twice.
d. Click TOC 2 and click Modify. Change to Calibri (Headings), 12 point, and italic.
3. Save and close. (114-drill3)
0538496479_Mod19.indd 5910538496479_Mod19.indd 591 10/15/10 7:24 PM10/15/10 7:24 PM
© C
enga
ge L
earn
ing.
All
right
s res
erve
d. N
o di
strib
utio
n al
low
ed w
ithou
t exp
ress
aut
horiz
atio
n.
LESSON 114 MASTER REPORTS MODULE 19 592
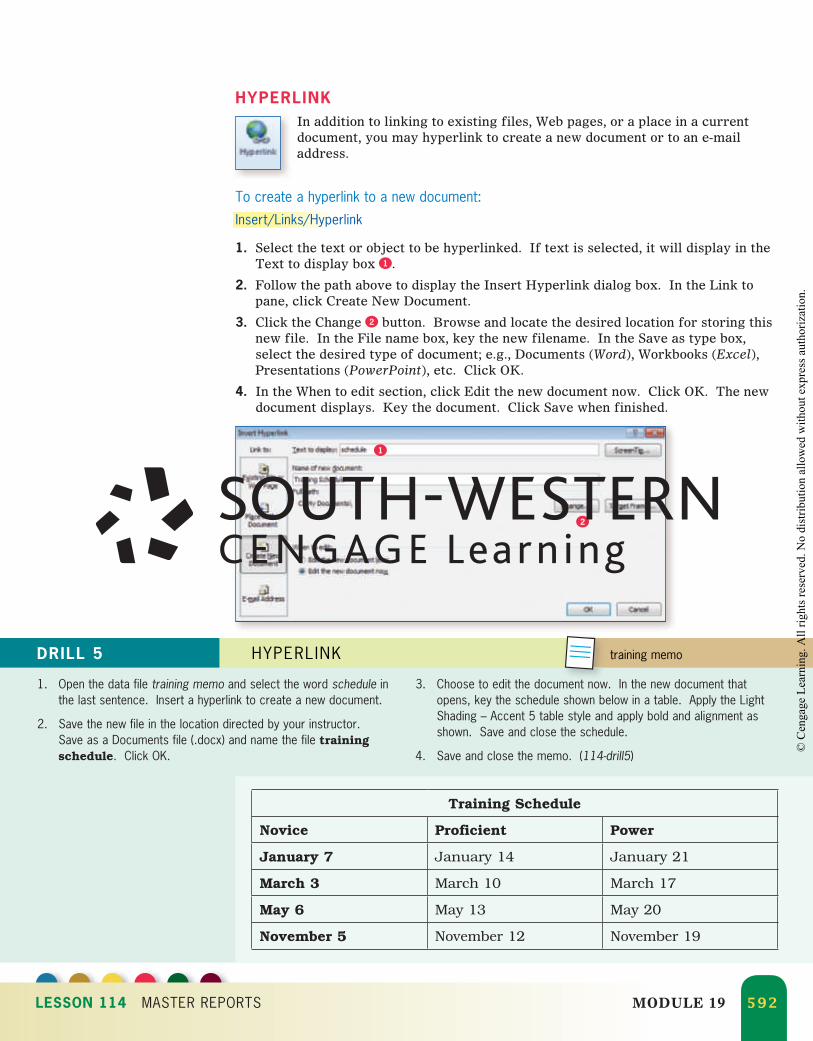
HYPERLINKIn addition to linking to existing files, Web pages, or a place in a current document, you may hyperlink to create a new document or to an e-mail address.
To create a hyperlink to a new document:
Insert/Links/Hyperlink
1. Select the text or object to be hyperlinked. If text is selected, it will display in the Text to display box 1 .
2. Follow the path above to display the Insert Hyperlink dialog box. In the Link to pane, click Create New Document.
3. Click the Change 2 button. Browse and locate the desired location for storing this new file. In the File name box, key the new filename. In the Save as type box, select the desired type of document; e.g., Documents (Word), Workbooks (Excel), Presentations (PowerPoint), etc. Click OK.
4. In the When to edit section, click Edit the new document now. Click OK. The new document displays. Key the document. Click Save when finished.
DRILL 5 HYPERLINK training memo
1. Open the data file training memo and select the word schedule in the last sentence. Insert a hyperlink to create a new document.
2. Save the new file in the location directed by your instructor. Save as a Documents file (.docx) and name the file training schedule. Click OK.
3. Choose to edit the document now. In the new document that opens, key the schedule shown below in a table. Apply the Light Shading – Accent 5 table style and apply bold and alignment as shown. Save and close the schedule.
4. Save and close the memo. (114-drill5)
Training Schedule
Novice Proficient Power
January 7 January 14 January 21
March 3 March 10 March 17
May 6 May 13 May 20
November 5 November 12 November 19
1
2
0538496479_Mod19.indd 5920538496479_Mod19.indd 592 10/15/10 7:24 PM10/15/10 7:24 PM
© C
enga
ge L
earn
ing.
All
right
s res
erve
d. N
o di
strib
utio
n al
low
ed w
ithou
t exp
ress
aut
horiz
atio
n.
LESSON 114 MASTER REPORTS MODULE 19 593
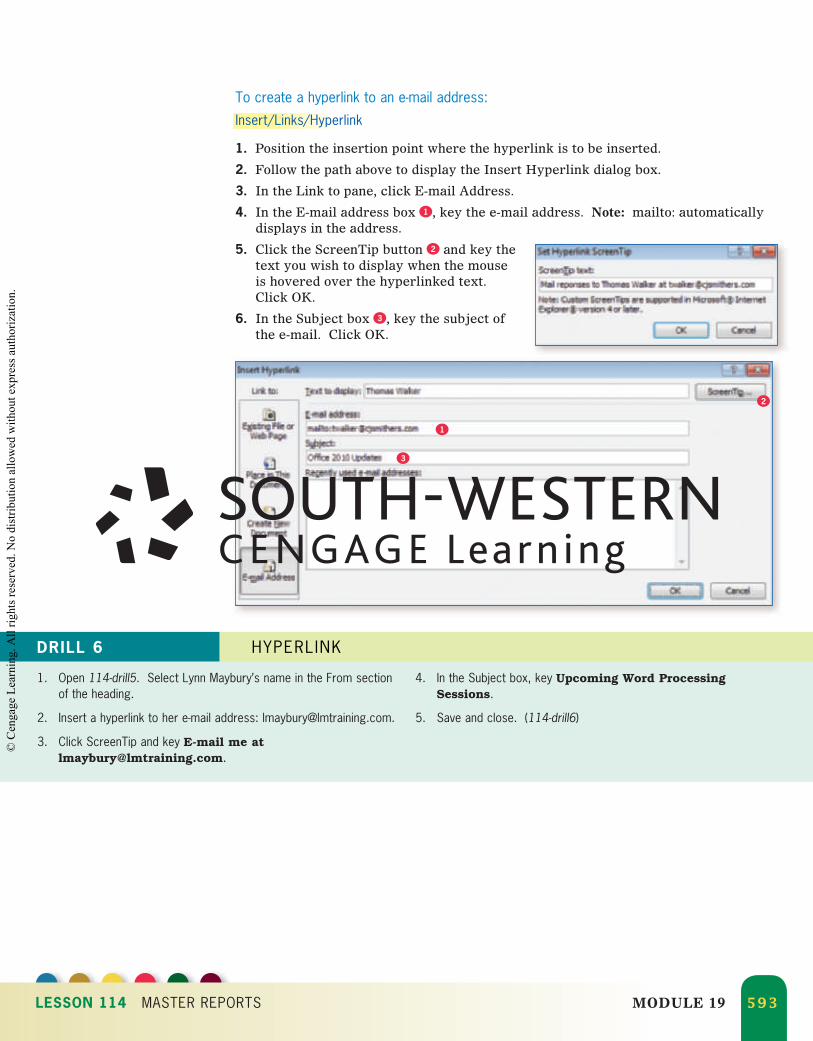
To create a hyperlink to an e-mail address:
Insert/Links/Hyperlink
1. Position the insertion point where the hyperlink is to be inserted.
2. Follow the path above to display the Insert Hyperlink dialog box.
3. In the Link to pane, click E-mail Address.
4. In the E-mail address box 1 , key the e-mail address. Note: mailto: automatically displays in the address.
5. Click the ScreenTip button 2 and key the text you wish to display when the mouse is hovered over the hyperlinked text. Click OK.
6. In the Subject box 3 , key the subject of the e-mail. Click OK.
1
2
3
DRILL 6 HYPERLINK
1. Open 114-drill5. Select Lynn Maybury’s name in the From section of the heading.
2. Insert a hyperlink to her e-mail address: [email protected].
3. Click ScreenTip and key E-mail me at [email protected].
4. In the Subject box, key Upcoming Word Processing Sessions.
5. Save and close. (114-drill6)
0538496479_Mod19.indd 5930538496479_Mod19.indd 593 10/15/10 7:24 PM10/15/10 7:24 PM
© C
enga
ge L
earn
ing.
All
right
s res
erve
d. N
o di
strib
utio
n al
low
ed w
ithou
t exp
ress
aut
horiz
atio
n.
LESSON 114 MASTER REPORTS MODULE 19 594
Applications
114-d1
Edit Report
dress
1. Open the data file dress, select the name Joyce Hodnett in the footnote, and insert a hyperlink to her e-mail address: [email protected]. Key Dress Policy as the subject of the e-mail.
2. Use the Select Browse Object button to find the word here below the table of photos and insert a hyperlink to create a new document. Save the new file as directed. Save as a Documents file (.docx) and name the file dress for success.
3. In the new document, key the title Dress for Success and apply Title style. Insert a 2-column table. Search the Internet for at least two photographs illustrating acceptable dress for casual Friday. Save and close the document.
4. Position the insertion point at the top of the first page of the report. Insert a Continuous page break. Double-click in the header and deselect Different First Page. Click Link to Previous to break the link to the headers in Sections 1 and 2. Go to Footer and click Link to Previous to break the footer link. Click Go to Header.
5. Insert the Motion (Odd Page) header in the first-page header position. Click Different Odd & Even Pages. Click Page Number and click Format Page Numbers. Change page number to start numbering at 1.
6. Click Next to move to the Even Page Header and insert the Motion (Even Page) header. Accept the automatic document text that displays. Click Different First Page.
7. Preview, save, and close. (114-d1)
DISCOVER
Insert Current Date and Time in Header/Footer
Header & Footer Tools Design/Insert/Date & TimeFrom the available formats shown, click on the desired date and time format.
1. Open 114-d2. Select the first Level 1 heading Current Dress Practices and apply the Heading 2 style. Repeat for the other Level 1 heading. Select each paragraph heading (Level 2) and apply the Heading 3 style.
2. Click in the table of contents and remove it. Insert a new table of contents using the new styles. Click Options and change the TOC levels as follows: Key 1 for Heading 2 and 2 for Heading 3.
3. Go to the Odd Page Header, delete the error message, and key the report title.
4. Preview, save, and close. (114-d3)
114-d2
Table of Contents
114-d3
Table of Contents Options
1. Open 114-d1. Position the insertion point in Section 1 and insert a page break.
2. On the new, blank page, create a table of contents for this report. In the General formats, select From template and modify the table of contents headings as follows:
TOC 1: 14 point, standard Dark Blue font color, 1.5 line spacing, and 4 points after the paragraph. Click the Format button and click Tabs. Change the tab leader to None.
3. Key Questions. as a paragraph heading to introduce the paragraph that lists seven questions. Apply the Heading 2 style to the heading; do not include the period in the selection when applying the style.
4. Key Examples. as a paragraph heading to introduce the four pictures. Apply the Heading 2 style; do not include the period. Update the table of contents.
5. Modify the TOC 2 heading as follows: Arial font, 12 point, single spacing, and 4 points after the paragraph.
6. Position the insertion point in the Even Page Footer on page 2. Insert the time using the format 3:31 PM. Do not update automatically.
7. Position the insertion point in the Odd Page Footer on page 3 and click the Align Text Right button. Insert the current date using the format May 31, 2010. Do not update automatically.
8. Preview, save, and close. (114-d2)
0538496479_Mod19.indd 5940538496479_Mod19.indd 594 10/15/10 7:24 PM10/15/10 7:24 PM
© C
enga
ge L
earn
ing.
All
right
s res
erve
d. N
o di
strib
utio
n al
low
ed w
ithou
t exp
ress
aut
horiz
atio
n.
Lesson 115 Assessment
Applications
115a
When you complete a document, proofread it, check the spelling, and preview for placement. When you are completely satisfied, save and close the document. Then move to the next document and repeat the process until you complete all documents.
115-d1
Renovation Plan
1. In a new document, key the renovation plan shown on the next page. Apply Oriel theme.
2. Apply the following settings to the document:
a. Apply Automatic hyphenation; limit to two consecutive hyphens.
b. Apply Grammar & Style settings to require a comma before the last list item and deselect checking passive sentences. Correct any sentences marked.
c. Add moulding as an AutoCorrect Exception on the Other Corrections tab so that the spelling will not be changed to molding.
3. Apply Title style to the title, Subtitle style to the subtitle, and Heading 1 style to all headings.
4. Preview the Quick Check on page 597 to determine the appropriate placement of the tables.
5. Use the following information to draw and format the first table. Key the information shown for Figure 1 following the plan text.
a. Draw a table 3.5" wide and 2" high.
b. Draw a line about 0.4" below the top border for the first row.
c. Draw four lines below the first row. Draw a vertical line in these four rows about 1" from the right border.
d. Size the first row 0.4" high; size the remaining rows 0.3" high.
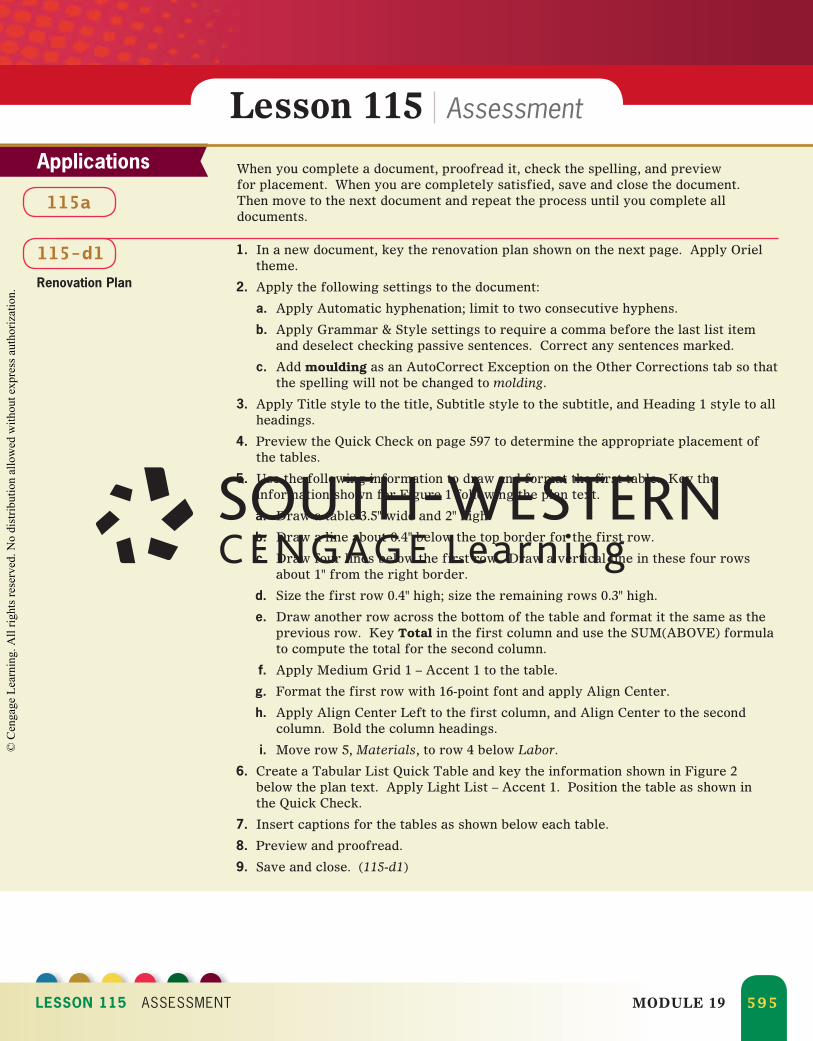
e. Draw another row across the bottom of the table and format it the same as the previous row. Key Total in the first column and use the SUM(ABOVE) formula to compute the total for the second column.
f. Apply Medium Grid 1 – Accent 1 to the table.
g. Format the first row with 16-point font and apply Align Center.
h. Apply Align Center Left to the first column, and Align Center to the second column. Bold the column headings.
i. Move row 5, Materials, to row 4 below Labor.
6. Create a Tabular List Quick Table and key the information shown in Figure 2 below the plan text. Apply Light List – Accent 1. Position the table as shown in the Quick Check.
7. Insert captions for the tables as shown below each table.
8. Preview and proofread.
9. Save and close. (115-d1)
LESSON 115 ASSESSMENT MODULE 19 595
0538496479_Mod19.indd 5950538496479_Mod19.indd 595 10/15/10 7:24 PM10/15/10 7:24 PM
© C
enga
ge L
earn
ing.
All
right
s res
erve
d. N
o di
strib
utio
n al
low
ed w
ithou
t exp
ress
aut
horiz
atio
n.

Renovation Final Plan
Prepared for Patrick Ray by Robert Hart
This plan confirms all of the details and costs involved in converting a closed utility closet in your home to an open beverage center area that adjoins the kitchen and matches the décor. The drawing of the area has already been approved by you, and a copy has been provided to you. The costs are summarized in Figure 1.
Demolition
The initial work involved is to remove the wall closing off the utility closet as well as the moulding and baseboards in the closet area. Then an assessment can be made to determine if hardwood flooring can be added to the area where the wall was removed or whether the entire closet area will need to have new flooring. The flooring quote is based on new flooring in that area.
Electrical Work
The electrical work includes adding appropriate receptacles for the new appliances, moving light switches to the designated places and removing current fluorescent lighting and replacing it with canned spots.
Cabinetry
Cabinetry is being custom designed to match the kitchen cabinets. The cabinets are being built offsite and will be brought in and installed according to the agreed-upon schedule. Cabinets accommodate an under-counter beverage center and a large, full-size beverage center with a cabinet and pullout shelf between the two appliances.
Appliances
The appliances have been the major factor controlling the schedule. A ship date has been confirmed, and the final project schedule is shown in Figure 2. The small under-counter beverage center is due on May 18 and will be installed when the cabinets are installed. The large beverage center is due on May 20 and will be installed on May 21.
Final Inspection
The final painting and inspection is scheduled for May 24. This schedule is approximately two weeks earlier than we originally anticipated. We believe that the schedule is very realistic and will be met.
LESSON 115 ASSESSMENT MODULE 19 596
0538496479_Mod19.indd 5960538496479_Mod19.indd 596 10/15/10 7:24 PM10/15/10 7:24 PM
© C
enga
ge L
earn
ing.
All
right
s res
erve
d. N
o di
strib
utio
n al
low
ed w
ithou
t exp
ress
aut
horiz
atio
n.
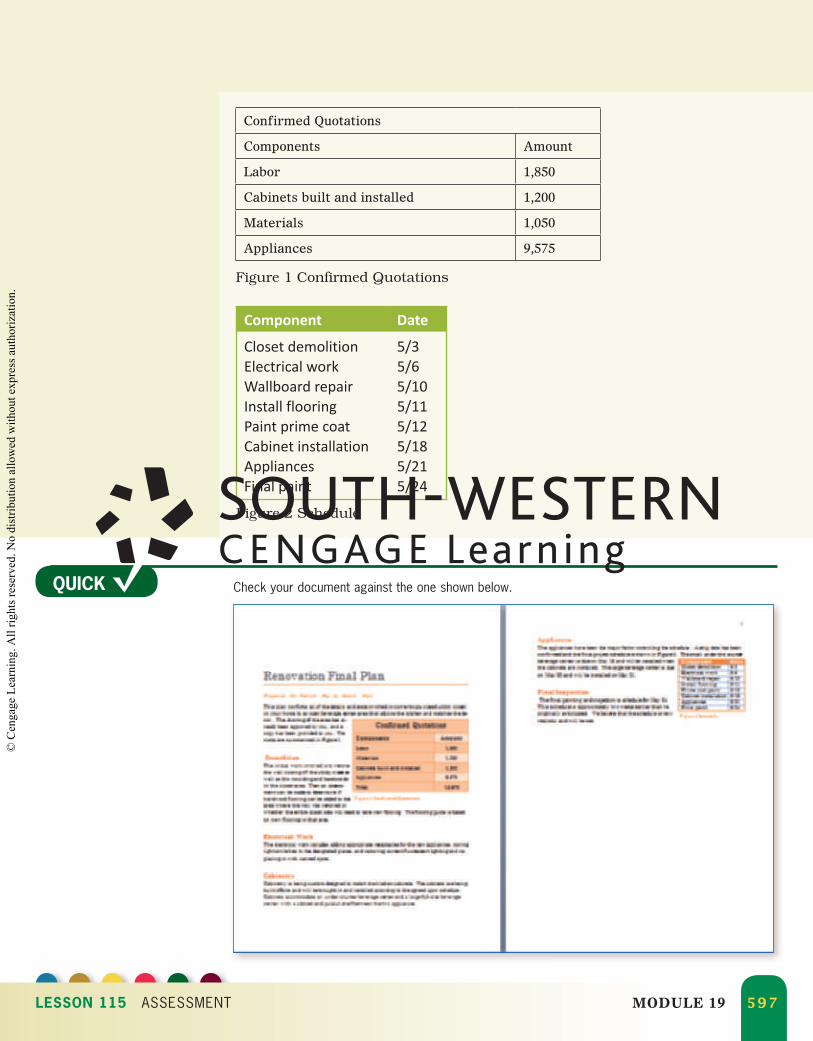
Component Date
Closet demolitionElectrical work Wallboard repairInstall flooringPaint prime coatCabinet installationAppliancesFinal paint
5/35/65/105/115/125/185/215/24
Figure 2 Schedule
Confirmed Quotations
Components Amount
Labor 1,850
Cabinets built and installed 1,200
Materials 1,050
Appliances 9,575
Figure 1 Confirmed Quotations
QUICK Check your document against the one shown below.
LESSON 115 ASSESSMENT MODULE 19 597
0538496479_Mod19.indd 5970538496479_Mod19.indd 597 10/15/10 7:24 PM10/15/10 7:24 PM
© C
enga
ge L
earn
ing.
All
right
s res
erve
d. N
o di
strib
utio
n al
low
ed w
ithou
t exp
ress
aut
horiz
atio
n.

115-d2
Edit Report
meetings
1. Open the data file meetings and insert the Motion (Odd Page) header for odd pages and Motion (Even Page) for even pages. Do not capitalize the word for in the report title in the even page header. Suppress the header on the first page.
2. Insert a blank page at the top of the document. Modify the table of contents headings as indicated below and then create a table of contents. Key the title Table of Contents at 2" and apply Title style.
TOC 1: Change to Arial, 14 point, bold, Green, Accent 6, Darker 50% font color. Change spacing after paragraph to 12 points.
TOC 2: Change to Arial, 12 point, and italic.
3. Select Cameron Maslin’s name in the first footnote and insert a hyperlink to his e-mail address: [email protected]. Key the ScreenTip E-mail Cameron Maslin at [email protected]. Key the subject Productivity Analysis Report.
4. Select the bulleted list and define a new bullet using the Wingdings symbol font. Select Wingding 172. Sort the list in alphabetical order.
5. In the first footnote, insert a nonbreaking space to prevent March and 15 from being separated on two lines.
6. Preview and proofread.
7. Save and close. (115-d2)
BOOKMARKwww.collegekeyboarding.comModule 19 Practice Quiz
Bwww co
LESSON 115 ASSESSMENT MODULE 19 598
0538496479_Mod19.indd 5980538496479_Mod19.indd 598 10/15/10 7:24 PM10/15/10 7:24 PM
© C
enga
ge L
earn
ing.
All
right
s res
erve
d. N
o di
strib
utio
n al
low
ed w
ithou
t exp
ress
aut
horiz
atio
n.


![Module Handbook Master “Wind Engineering” · Module Handbook - Master „Wind Engineering“ 5 Module number [1]: Scientific and Technical Writing Course Master of Science –](https://img.pdfslide.net/doc/110x75/5ec507c74fd2c5513226b65f/module-handbook-master-aoewind-engineeringa-module-handbook-master-awind-engineeringaoe.jpg)