Embed Size (px)
Citation preview

Version History
Version Date Description
1.0 Feb. 10, 2015 Initial draft
1.1 12 Aug. 2015 Added Rotations, Patterns and Pattern Sets from SM3 created new doc. titled SM6a & SM6b
1.2 17 Jan. 2016 Divided SM6 into SM6a & SM6b (new doc.)
Confidentiality
This document contains information which is proprietary and confidential to Fujitsu Consulting (Canada) Inc. (including the information of third parties, including but not limited to, Follett of Canada Inc., submitted with their permission). In consideration of receipt of this document, the recipient agrees to treat this information as confidential and to not use or reproduce this information for any purpose other than its evaluation of this proposal or disclose this information to any other person for any purpose, without the express prior consent of Fujitsu Consulting (Canada) Inc. (and any applicable third party.)
Table of Contents
1.0 ROTATIONS .................................................................................................................... 4
1.1 Create a Rotation: ......................................................................................................... 6
2.0 PATTERNS AND PATTERN SETS ................................................................................. 7
2.1 Pattern Library .............................................................................................................. 8
2.2 Pattern Sets .................................................................................................................12
3.0 APPENDIX A: DETERMINING A SCHOOL’S ROTATION .............................................14
4.0 APPENDIX B: FULL YEAR AND SEMESTER OPTION .................................................18
Module 6a – Rotations, Pattern Library and Pattern Sets v1.2 Page 4
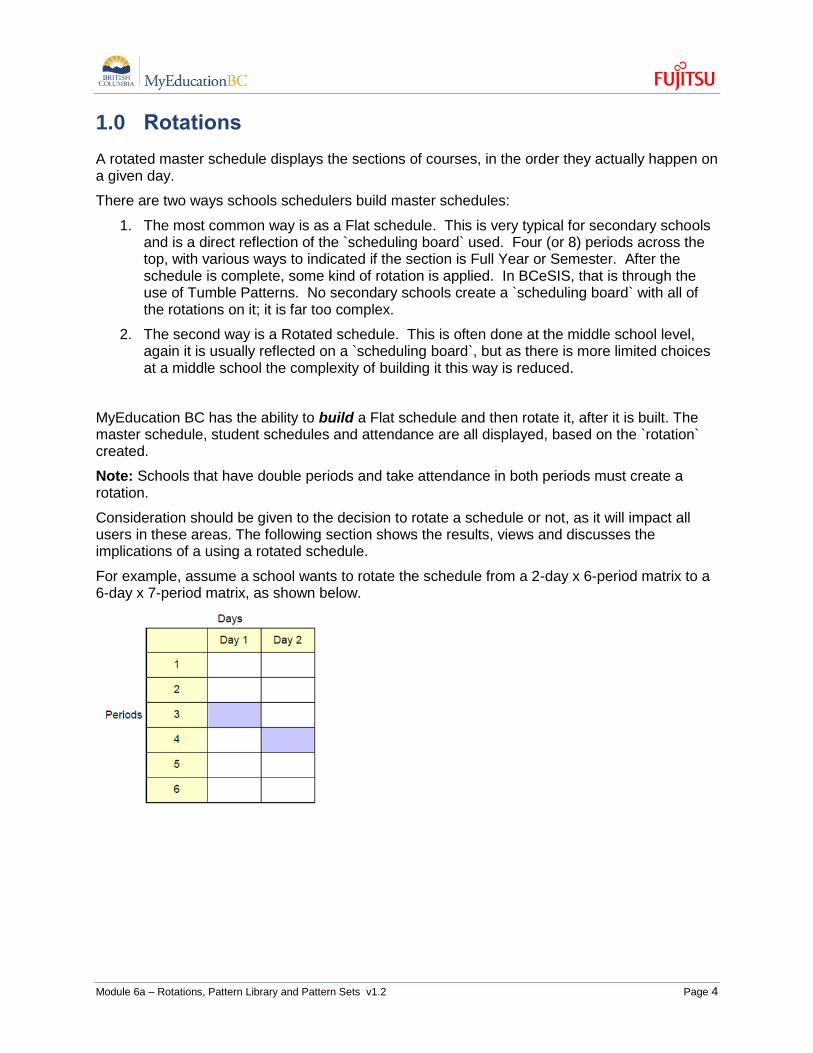
1.0 Rotations
A rotated master schedule displays the sections of courses, in the order they actually happen on a given day.
There are two ways schools schedulers build master schedules:
1. The most common way is as a Flat schedule. This is very typical for secondary schools and is a direct reflection of the `scheduling board` used. Four (or 8) periods across the top, with various ways to indicated if the section is Full Year or Semester. After the schedule is complete, some kind of rotation is applied. In BCeSIS, that is through the use of Tumble Patterns. No secondary schools create a `scheduling board` with all of the rotations on it; it is far too complex.
2. The second way is a Rotated schedule. This is often done at the middle school level, again it is usually reflected on a `scheduling board`, but as there is more limited choices at a middle school the complexity of building it this way is reduced.
MyEducation BC has the ability to build a Flat schedule and then rotate it, after it is built. The master schedule, student schedules and attendance are all displayed, based on the `rotation` created.
Note: Schools that have double periods and take attendance in both periods must create a rotation.
Consideration should be given to the decision to rotate a schedule or not, as it will impact all users in these areas. The following section shows the results, views and discusses the implications of a using a rotated schedule.
For example, assume a school wants to rotate the schedule from a 2-day x 6-period matrix to a 6-day x 7-period matrix, as shown below.

Module 6a – Rotations, Pattern Library and Pattern Sets v1.2 Page 5
Master schedule, showing flat un-rotated and rotated schedule expressions:
Student schedule corresponding to a flat un-rotated schedule:
Student schedule corresponding to a rotated schedule:

Module 6a – Rotations, Pattern Library and Pattern Sets v1.2 Page 6
Class Office:
The periods displayed in this view reflect the time slots of the day in a flat un-rotated schedule. If the schedule had been rotated, the periods displayed reflect the actual order of the rotated blocks on that given date.
1.1 Create a Rotation:
1. Log on to the Build view.
2. Click the Scenario tab.
3. Select the scenario you want to rotate, and click the Rotations side-tab.
4. On the Options menu, click Add. The New Schedule Rotation page appears.
5. Type the rotation ID and a description.
6. Type the rotated dimensions. This creates the proper size matrix for you to identify the rotation map.

Module 6a – Rotations, Pattern Library and Pattern Sets v1.2 Page 7
7. Select the Differs by term checkbox if you want to define a different rotation for each schedule term. If you select the checkbox, the Select Term drop-down appears. Select the first term you want to define a map for.
8. On the original schedule matrix on the left-hand side of the page, select a period and day. Then, on the rotated schedule matrix on the right-hand side of the page, select the periods and days in which you want that period to meet. Repeat this process for all periods and days.
If you select the Differs by term checkbox, define the rotation map for each non-overlapping term that spans the entire school year. For example, you might define rotations for Semester 1, Quarter 3 and Quarter 4. To define rotations that differ by term, select a term at the Select Term field each time you finish a map for a term.
Note: Switching back and forth between terms does not delete the rotations you are creating; you cannot save the rotation until all rotations have been identified for all terms in the Select Terms drop-down.
2.0 Patterns and Pattern Sets
In MyEducation BC, schedule patterns represent all of the different ways course sections meet in your school’s schedule. Schedule patterns consist of a course’s days per cycle and periods per cycle. Patterns are always built based on the Flat schedule.
To create a schedule pattern, you determine the size (days and period), style, and terms of the pattern. Depending on your selections, MyEducation BC provides you with a clickable Days/Period grid in which you click boxes to select the possible meeting times within the pattern:

Module 6a – Rotations, Pattern Library and Pattern Sets v1.2 Page 8
In order to build your schedule, you need to map out all schedule patterns valid for your master schedule. Schedule patterns have different shapes. For example, courses meet on the all days in a period have a different shape, than courses that meet every other day in a period.
Note: To give you a head start, MyEducation BC can initialize your schedule patterns from your current year’s master schedule. But, if you rotated your current schedule, it is better to create your schedule patterns from scratch.
Notes: To copy patterns from another school, click Copy Patterns on the Options menu. Select which school you want to copy from, and either select the Copy all checkbox, or select each pattern you want to copy.
You do not have to delete patterns from the Global tab. If you do not use them, the system will ignore them.
After you create all of your schedule patterns, group your patterns into pattern sets that apply to the different meeting shapes of courses. For example, you might create pattern sets named Full Year and another named Semester.
2.1 Pattern Library
Within the Pattern Library create all schedule patterns that could be assigned to courses in your school:
To create a Simple Schedule Pattern:
1. Log on to the Build view.
2. Click the Global tab.
3. Click the Pattern Library side-tab.
4. On the Options menu, click Add. The New Schedule Pattern page appears:

Module 6a – Rotations, Pattern Library and Pattern Sets v1.2 Page 9
In the area at the top of the page, you define the shape of each pattern:
5. At the Schedule pattern style drop-down, select one of the following:
Simple Use simple patterns to create patterns for courses that meet on a fixed schedule of days and periods during a cycle. For example, courses that meet first period every day.
Recommendation: This is the most common type of pattern that schools in BC will need to create.
Compound Use compound patterns to create patterns for courses that have complicated shapes, such as lab courses, by combining a simple pattern and a list of child patterns. For example, courses that meet second period every day, and an additional consecutive period once per week.
6. Type the number of Days and Periods in this schedule pattern to create a matrix for selecting the possible period/day combinations.
Note: If you have defined days and periods for this scenario, those values default in these fields. Do not change these values unless this scenario has multiple bell schedules.
7. To determine the schedule terms this pattern applies to, click the Terms drop-down to select one of the following:
Do not use: This pattern can be used for any schedule term. You should select this for most patterns. For example, the system can use an everyday pattern to schedule a first semester, second semester, or all-year course.
Same across terms: This pattern applies to a particular schedule term and has the same day and period across terms. Then, type the number of terms in the empty box. For example, assume a course meets every day during the first and third trimester. After you select this checkbox, type 2 in the empty box, and press TAB; two Term boxes appear above the mat- rix. Select the terms for which you want this pattern to apply.
Vary across terms: This pattern only applies to a particular schedule term and has different days and periods for different terms. Then, type the number of terms in the empty box. After you type the number of terms to which this pattern applies, the system displays that number of matrixes, for each of which you paint the appropriate patterns. (This option is not com- mon.)
Module 6a – Rotations, Pattern Library and Pattern Sets v1.2 Page 10
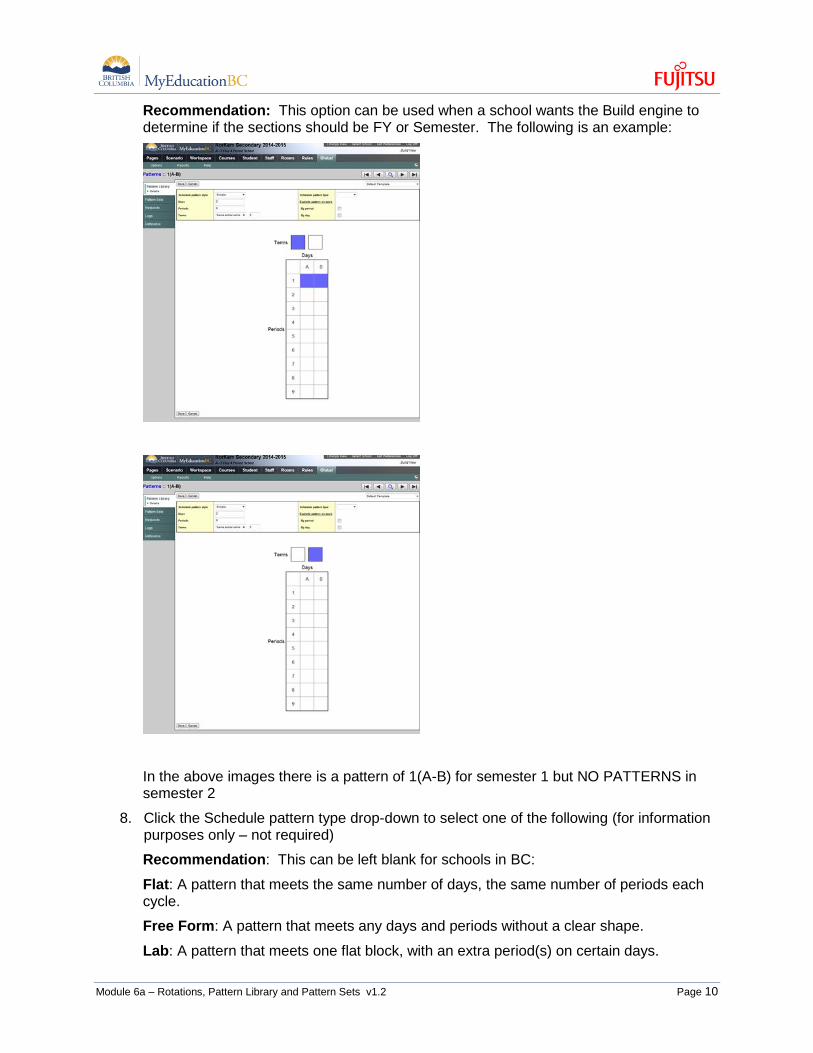
Recommendation: This option can be used when a school wants the Build engine to determine if the sections should be FY or Semester. The following is an example:
In the above images there is a pattern of 1(A-B) for semester 1 but NO PATTERNS in semester 2
8. Click the Schedule pattern type drop-down to select one of the following (for information purposes only – not required)
Recommendation: This can be left blank for schools in BC:
Flat: A pattern that meets the same number of days, the same number of periods each cycle.
Free Form: A pattern that meets any days and periods without a clear shape.
Lab: A pattern that meets one flat block, with an extra period(s) on certain days.

Module 6a – Rotations, Pattern Library and Pattern Sets v1.2 Page 11
9. You can explode Simple and Compound pattern types. Below Explode pattern on save, select the By period and By day checkboxes if you want the system to create every possible pattern based on the pattern you create in the grid after you click Save. Exploding patterns minimizes the number of patterns you actually define. Most schools need to define only a few patterns, and the system creates all versions of that pattern for them. For example, if you explode a simple pattern with two schedule days 1(A-B) by period, the system creates patterns for 2(A-B), 3(A-B), 4(A-B), and 5 (A-B).
Note: By period pushes the pattern down, and By day pushes the pattern across.
10. In the grid, click the boxes that represent the periods and days of this schedule pattern.
Note: To select all unselected or deselect all selected days in a column, click the Days column header. To select all unselected or deselect all selected periods in a row, click the Period row header.
11. Click Save
Create Compound Patterns
Compound Patterns do not need to be used; they help reduce the number of patterns created for courses with complicated shapes, especially lab courses. A compound pattern contains a primary (simple) pattern and a list of its child patterns. Each child pattern is automatically combined with the primary pattern for use by the scheduling engine.
To create compound patterns:
1. When defining a schedule pattern, at the Schedule pattern style field, select Compound. The page displays the Days/Period grid for the Primary pattern, with the Compound patterns list at the bottom.
2. Click the boxes in the Days/Periods grid to define the Primary pattern, such as every day, Period 1.
3. Below the Compound patterns list box, click Add to add the child pattern of the primary pattern. A dialog box with the Days/Period grid for the child pattern appears. For example, this course needs to meet an additional period, two days per cycle:
4. You can explode the pattern By period or By day. For example, if you explode the pattern by day, the system creates a pattern in the Compound patterns list for every possibility of a course meeting two periods per week, with a day in between, such as 2(B-D), 2(C,E), and 2 (D,F).
5. Click OK to add this child pattern to the Compound patterns list at the bottom of the page.
6. Click Combined view for each child pattern to view the grid for that compound pattern:
7. Evaluate the pattern. If you want to delete a pattern, select the pattern in the Compound patterns list box, and click Delete.
8. Continue to click Add to add any additional possibilities for the extra periods for this pattern.

Module 6a – Rotations, Pattern Library and Pattern Sets v1.2 Page 12
9. Click Save.
2.2 Pattern Sets
After you create schedule patterns, you need to group these patterns into pattern sets. Then you attach a pattern set to every course. This is the information that the scheduling engine uses to figure out how to schedule sections of courses.
Create course pattern sets for each of your different shapes of courses. For example, you might create pattern sets named Every day, Alt. days Regular, After School, etc. Then, associate each course with a proper pattern set, based on the shape of the course
Note: Do not delete pattern sets from the Global tab. If you never attach a course to a pattern set and never use it, the scheduling engine ignores it
To create a pattern set:
1. Log on to the Build view.
2. Click the Global tab.
3. Click the Pattern Sets side-tab.
Note: You can also create a pattern set on the Pattern Library side-tab. Select the patterns you want to group into a pattern set. Then, on the Options menu, click Add to Pattern Set.
4. On the Options menu, click Add. The New Schedule Pattern Set page appears.
5. Define the name of the pattern set, such as Alt. days.
6. Click Save.
7. On the Pattern Sets side-tab, click Patterns.
8. On the Options menu, click Add. The Schedule Pattern dialog box appears.
Module 6a – Rotations, Pattern Library and Pattern Sets v1.2 Page 13
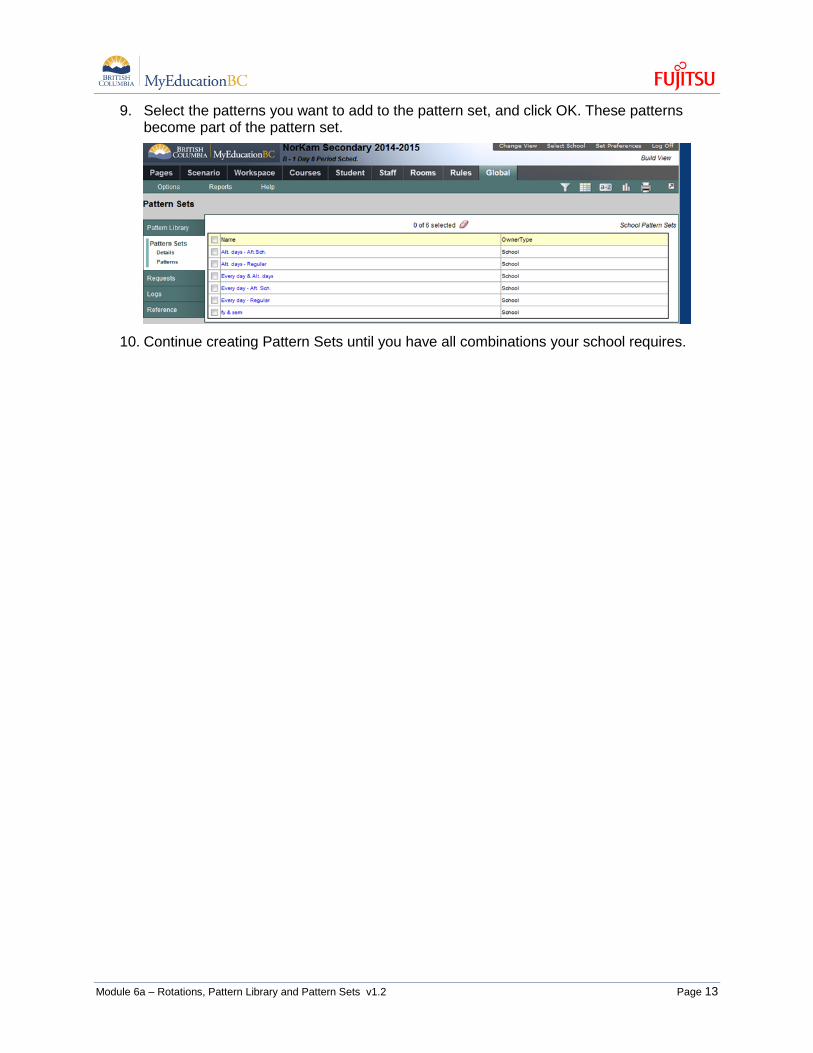
9. Select the patterns you want to add to the pattern set, and click OK. These patterns become part of the pattern set.
10. Continue creating Pattern Sets until you have all combinations your school requires.

Module 6a – Rotations, Pattern Library and Pattern Sets v1.2 Page 14
3.0 Appendix A: Determining a School’s Rotation
The following section outlines a process for determining the number of Rotated Days required for a school. There is no exact “one way to do this,” but the following should be of assistance as you work with individual schools.
1. Write down all the unique tumbles/rotations/bell schedules currently at the school. This information comes from a variety of places (and should be looked at and integrated together):
BCeSIS – Tumble patterns screen, Attendance Calendar;
MyEd – Bell schedules currently in use;
A schools website – Most schools post their ‘block rotation’;
Discussions with the school.
Using all of this information, the following table was created:
Mon1 Mon2 Mon3 Mon4
13 13 13 13
1 2 3 4
2 1 4 3
3 4 1 2
4 3 2 1
Tues1 Tues2 Tues3 Tues4
12 12 12 12
14 14 14 14
1 2 3 4
2 1 4 3
3 4 1 2 4 3 2 1
9 9 9 9
Wed1 Wed2 Wed3 Wed4
13 13 13 13
1 2 3 4
2 1 4 3
3 4 1 2
4 3 2 1
Thurs1 Thurs2 Thurs3 Thurs4
12 12 12 12
1 2 3 4
2 1 4 3
3 4 1 2
4 3 2 1
Fri1 Fri2 Fri3 Fri4
14 14 14 14
1 2 3 4
2 1 4 3
3 4 1 2
4 3 2 1
Module 6a – Rotations, Pattern Library and Pattern Sets v1.2 Page 15
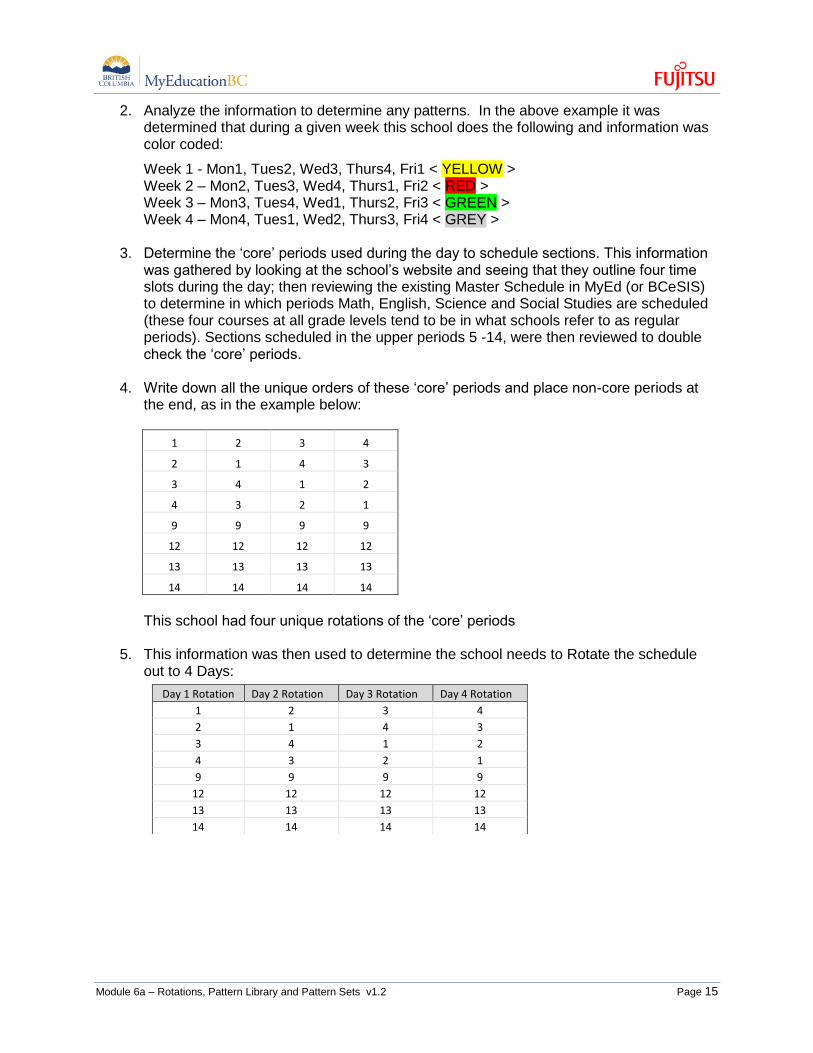
2. Analyze the information to determine any patterns. In the above example it was determined that during a given week this school does the following and information was color coded:
Week 1 - Mon1, Tues2, Wed3, Thurs4, Fri1 < YELLOW > Week 2 – Mon2, Tues3, Wed4, Thurs1, Fri2 < RED > Week 3 – Mon3, Tues4, Wed1, Thurs2, Fri3 < GREEN > Week 4 – Mon4, Tues1, Wed2, Thurs3, Fri4 < GREY >
3. Determine the ‘core’ periods used during the day to schedule sections. This information was gathered by looking at the school’s website and seeing that they outline four time slots during the day; then reviewing the existing Master Schedule in MyEd (or BCeSIS) to determine in which periods Math, English, Science and Social Studies are scheduled (these four courses at all grade levels tend to be in what schools refer to as regular periods). Sections scheduled in the upper periods 5 -14, were then reviewed to double check the ‘core’ periods.
4. Write down all the unique orders of these ‘core’ periods and place non-core periods at the end, as in the example below:
1 2 3 4
2 1 4 3
3 4 1 2
4 3 2 1
9 9 9 9
12 12 12 12
13 13 13 13
14 14 14 14
This school had four unique rotations of the ‘core’ periods
5. This information was then used to determine the school needs to Rotate the schedule out to 4 Days:
Day 1 Rotation Day 2 Rotation Day 3 Rotation Day 4 Rotation
1 2 3 4
2 1 4 3
3 4 1 2
4 3 2 1
9 9 9 9
12 12 12 12
13 13 13 13
14 14 14 14

Module 6a – Rotations, Pattern Library and Pattern Sets v1.2 Page 16
6. In MyEducation BC, Build view> Scenario top tab > Rotations side tab > the following Rotation would be created:
Note: This scenario was created with a Build year context of the current year (due to setup requirements). The dates should in fact be for the coming school year.
7. This school would then require 1 Bell Schedule, which could be created in August:
Bell Period number Bell Period Identifier Period Name Start Time Duration (Minutes)
1 1 1 8:40 AM 80
2 2 2 10:05 AM 80
3 3 3 11:40 AM 75
4 4 4 1:40 PM 80
9 9 9 3:00 PM 60
12 12 12 3:00 PM 60
13 13 13 3:00 PM 60
14 14 14 3:00 PM 60
There would be additional options for the times of Bell Period Numbers 9-14 that could be explored in August.
Module 6a – Rotations, Pattern Library and Pattern Sets v1.2 Page 17
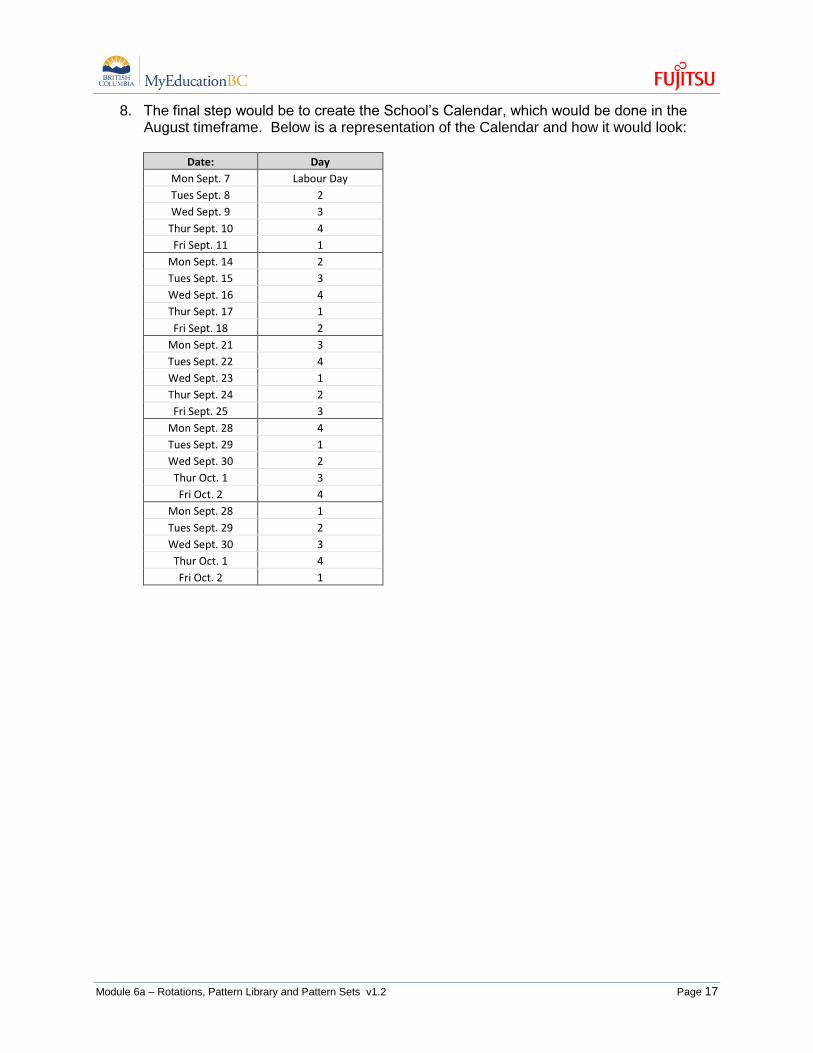
8. The final step would be to create the School’s Calendar, which would be done in the August timeframe. Below is a representation of the Calendar and how it would look:
Date: Day
Mon Sept. 7 Labour Day
Tues Sept. 8 2
Wed Sept. 9 3
Thur Sept. 10 4
Fri Sept. 11 1
Mon Sept. 14 2
Tues Sept. 15 3
Wed Sept. 16 4
Thur Sept. 17 1
Fri Sept. 18 2
Mon Sept. 21 3
Tues Sept. 22 4
Wed Sept. 23 1
Thur Sept. 24 2
Fri Sept. 25 3
Mon Sept. 28 4
Tues Sept. 29 1
Wed Sept. 30 2
Thur Oct. 1 3
Fri Oct. 2 4
Mon Sept. 28 1
Tues Sept. 29 2
Wed Sept. 30 3
Thur Oct. 1 4
Fri Oct. 2 1

Module 6a – Rotations, Pattern Library and Pattern Sets v1.2 Page 18
4.0 Appendix B: Full Year and Semester Option
This section outlines the setup steps required to have the Build engine determine if sections of a course should be Full Year or Semesters. It is not required if you are going to manually do this.
4.1.1 Structure
The structure of a scenario must contain both Full Year terms and Semester terms:
4.1.2 Patterns
Patterns need to be created and added to the Pattern Library that represent the periods Full Year or Semester sections could possible meet.
From the Global > Patterns > Options > Add, create this pattern:
Module 6a – Rotations, Pattern Library and Pattern Sets v1.2 Page 19
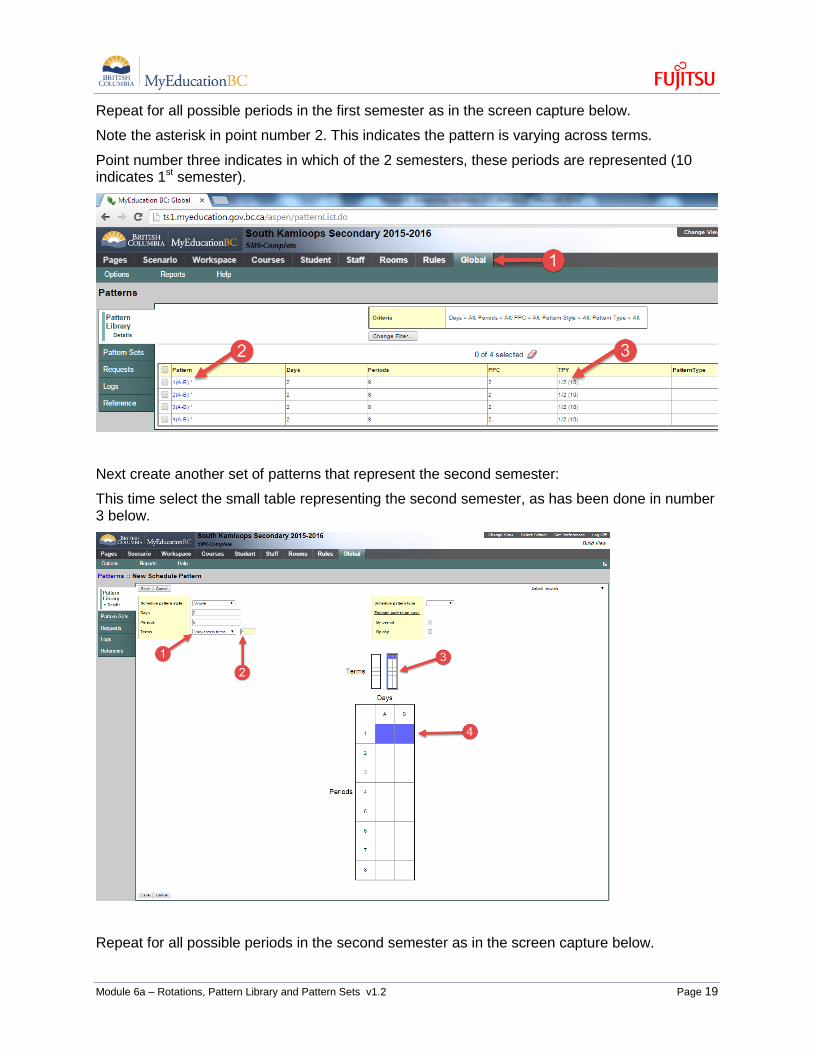
Repeat for all possible periods in the first semester as in the screen capture below.
Note the asterisk in point number 2. This indicates the pattern is varying across terms.
Point number three indicates in which of the 2 semesters, these periods are represented (10 indicates 1st semester).
Next create another set of patterns that represent the second semester:
This time select the small table representing the second semester, as has been done in number 3 below.
Repeat for all possible periods in the second semester as in the screen capture below.
Module 6a – Rotations, Pattern Library and Pattern Sets v1.2 Page 20
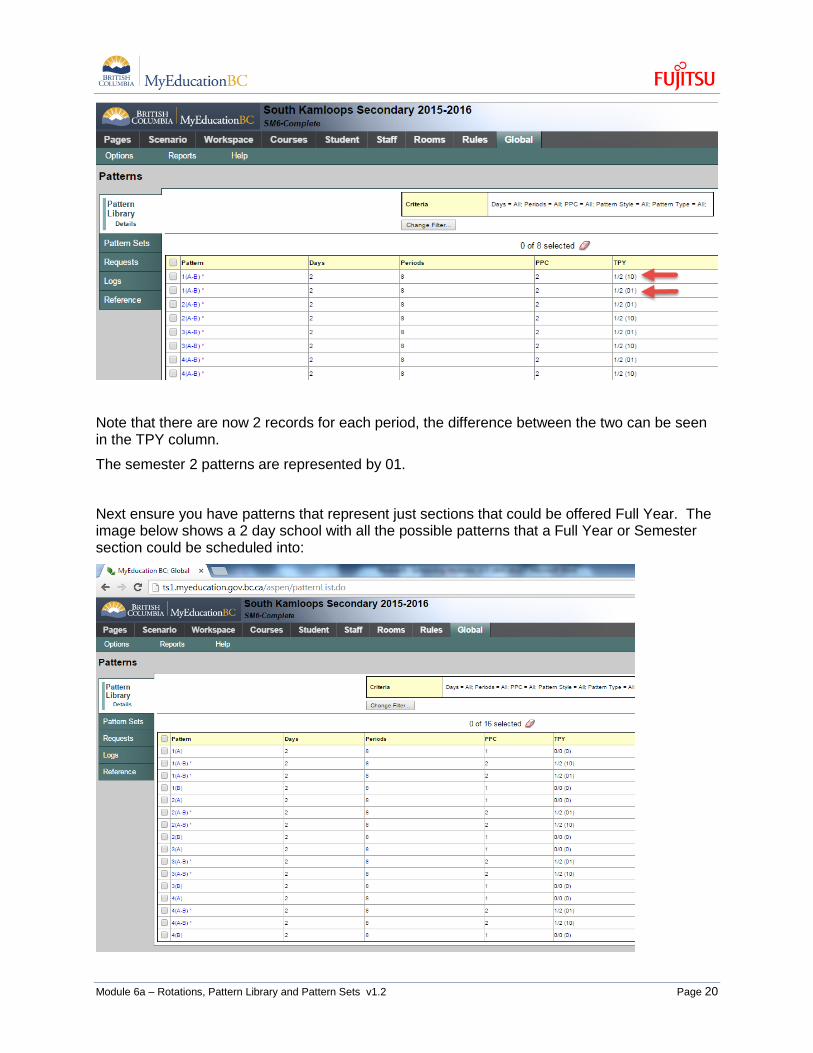
Note that there are now 2 records for each period, the difference between the two can be seen in the TPY column.
The semester 2 patterns are represented by 01.
Next ensure you have patterns that represent just sections that could be offered Full Year. The image below shows a 2 day school with all the possible patterns that a Full Year or Semester section could be scheduled into:

Module 6a – Rotations, Pattern Library and Pattern Sets v1.2 Page 21
4.1.3 Pattern Set
Once created, the patterns need to be grouped into a set with an appropriate name to indicate this set should be used for Full Year and Semester sections.
Global > Pattern Set > Options > Add > Enter the Name > Save
Next click the side leaf Patterns > Options > Add > from the popup window, select all patterns that should be included:
4.1.4 Course setup
In the Course > Detail > Required area > set the course up to represent a Full Year course and choose the special pattern set created in the previous step: The course setup should look like the following image:

Module 6a – Rotations, Pattern Library and Pattern Sets v1.2 Page 22
4.1.5 Build
When the Build is run (covered in Scheduling Module 8) it will choose, based on all parameters entered, which sections will be scheduled as FY and which in S1 or S2: