Embed Size (px)
Citation preview
Page 8-1
National Child Passenger Safety Certification Training Program
Children in Rear-Facing Car Seats
MODULE
8 • Describe why children should travel rear-facing. • Identify types of rear-facing car seats. • Apply 5 steps for rear-facing car seat use. • Explain best practices and caregiver choices about rear-facing car seats. • Identify rear-facing car seat errors and consequences.
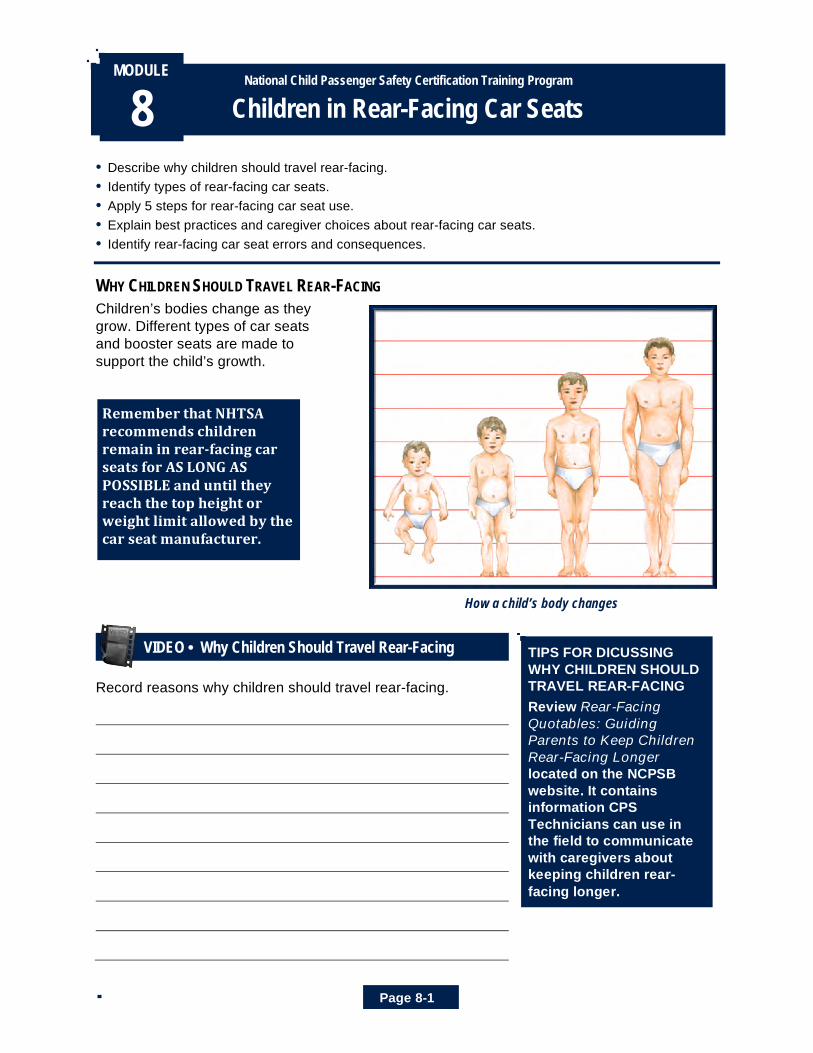
WHY CHILDREN SHOULD TRAVEL REAR-FACING Children’s bodies change as they grow. Different types of car seats and booster seats are made to support the child’s growth.
VIDEO • Why Children Should Travel Rear-Facing Record reasons why children should travel rear-facing.
TIPS FOR DICUSSING WHY CHILDREN SHOULD TRAVEL REAR-FACING Review Rear-Facing Quotables: Guiding Parents to Keep Children Rear-Facing Longer located on the NCPSB website. It contains information CPS Technicians can use in the field to communicate with caregivers about keeping children rear-facing longer.
Remember&that&NHTSA&recommends&children&remain&in&rear6facing&car&seats&for&AS&LONG&AS&POSSIBLE&and&until&they&reach&the&top&height&or&weight&limit&allowed&by&the&car&seat&manufacturer.&
How a child’s body changes

Page 8-2
WHY CHILDREN SHOULD TRAVEL REAR-FACING (CONTINUED) • While great strides have been made in reducing child fatalities and injuries since the 1970s,
over half of children killed are either improperly restrained or unrestrained (FARS: Fatality Analysis Reporting System, NHTSA, 2007).
• Rear-facing-only seats are engineered to distribute the forces of a crash across the entire head and body of an infant and young child. The harnesses are attached snugly to keep the child from sliding up the back of the seat and from flying out of the seat in a crash.
• A rear-facing car seat supports the entire head, neck, and back of a child in a frontal crash. A young child’s head is larger and heavier in proportion to his body than that of an older child. In a frontal crash, the head moves abruptly forward placing increased forces on the neck but when a child is properly restrained rear-facing, the head moves with the seat reducing the risk for a neck and spine injury.
• It’s a common myth that when a child’s feet or legs reach the back of the vehicle seat, he or she is at increased risk for a lower-extremity injury. Lower extremity injuries are rare for children who ride rear-facing. Children can easily sit with their legs crossed or on the back of the seat. Lower extremity injuries heal more easily and completely than injuries to the brain and spinal cord.
• In a frontal crash, the rear-facing car seat cradles and moves with the child. It is the shell of the car seat itself that absorbs the forces.
• Children in the second year of life are five times less likely to die or be seriously injured in a crash if restrained rear-facing compared to forward-facing (Henary B, Sherwood C, Crandall J, et al. Car Safety Seats for Children: Rear-Facing for Best Protection. Injury Prevention, 2007). The forces of the crash are completely distributed throughout the torso and head and the seat appears to provide a cocoon effect for the child.
• Remind parents that they do not watch their child every minute while sleeping, and that, if there is great concern about not being able to see their child when rear-facing, they can arrange for another adult to sit beside the child in the back seat. Drivers should drive and they cannot simultaneously perform child care.
When%working%with%caregivers,%it%is%critical%that%they%understand%the%reasons%why%children%are%safer%when%traveling%rear7facing%in%vehicles.%While%we%can%understand%that%a%caregiver%would%like%to%see%their%child%while%driving,%we%must%emphasize%that%the%statistics%are%compelling%and%risks%are%too%great.%
Keep children rear-facing as long as possible
Page 8-3
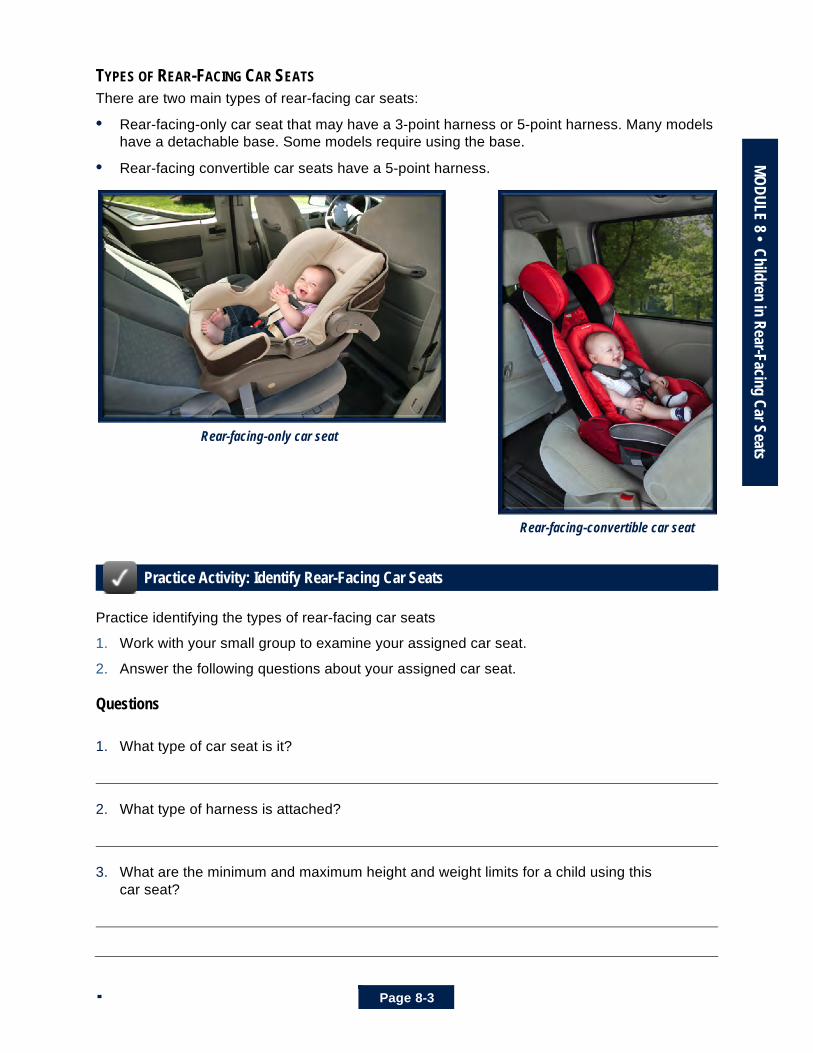
MODULE 8 • Children in Rear-Facing Car Seats TYPES OF REAR-FACING CAR SEATS There are two main types of rear-facing car seats: • Rear-facing-only car seat that may have a 3-point harness or 5-point harness. Many models
have a detachable base. Some models require using the base.
• Rear-facing convertible car seats have a 5-point harness.
Practice Activity: Identify Rear-Facing Car Seats Practice identifying the types of rear-facing car seats 1. Work with your small group to examine your assigned car seat. 2. Answer the following questions about your assigned car seat. Questions
1. What type of car seat is it?
2. What type of harness is attached?
3. What are the minimum and maximum height and weight limits for a child using this
car seat?
Rear-facing-only car seat
Rear-facing-convertible car seat
Page 8-4
Rear-Facing-Only Car Seats • Always check the car seat label for the starting weight. Some car seats are labeled as “birth”
and others are labeled for a specific weight. • In general, the top of the child’s head should be well
contained within the shell and at least 1 inch from top of shell. Some manufacturer instructions state otherwise so be sure to check the car seat manual.
• The harness needs to be snug and hold the child down in the seat so he/she does not slide up in a crash and suffer ejection from the car. Harness straps should emerge from the shell at or below the child’s shoulders unless the manufacturer instructions state otherwise.
• Caregivers should NEVER use the rear-facing seat above the height or weight limits designated by the manufacturer. Once a child outgrows the rear-facing-only car seat, he or she should move to a rear-facing convertible seat with rear-facing height and weight limits. This information may be difficult to determine by simply checking labels. Check the manual for more complete information.
Rear-Facing Convertible Car Seat • Many new convertible car seats are approved for rear-facing
use up to 40+ pound children. Some seats exceed these weights and should be considered for children whose weight and/or height have exceeded the limits of the rear-facing-only car seat.
• Children commonly sit with their legs crossed or resting on the back of the vehicle seat. Risk of injury to legs in a crash is low and injuries to the lower extremities are usually less severe with fewer long-term complications (AAP Technical Report, March 2011).
• Although older children with poor head control and other children with special needs are within height and weight requirements of a car seat, they benefit from staying rear-facing as long as possible. In a crash, all children are safer rear-facing as long as their car seat allows.
5 STEPS FOR REAR-FACING CAR SEAT USE The following is an application of the 5 steps to rear-facing car seats. 1. Selection: Choose the Right Car Seat
• Select the one that is right for the child’s height, weight, developmental levels, AND that a caregiver can use correctly.
• Select a car seat with an adjustable harness height to offer options for a rapidly growing infant.
• Some seats have multiple positions for crotch straps for better fit as a child grows. Caregivers should refer to the manufacturer instructions for proper placement.
TIPS FOR DISCUSSING REAR-FACING CAR SEATS • Encourage caregivers to
use the rear-facing car seat to the highest weight or height allowed by the car seat manufacturer.
• Suggest ways to ease caregivers’ need to see the child during driving. For example, children sleep through the night without being under the parents’ watchful eye. If the car seat is installed correctly, the child should be fine.
• Emphasize that caregivers must check the car seat manufacturer instructions for upper and lower weight and height limits.
• Remind parents that car seats should be used for transportation in the vehicle only and not recommended for use as carriers or long term use at home.
Page 8-5
MODULE 8 • Children in Rear-Facing Car Seats 2. Direction: Face the Car Seat the Right Way
• An infant under the age of 1 should ALWAYS ride in a rear-facing car seat.
• A child should remain in a rear-facing car seat AS LONG AS POSSIBLE. The child should remain in a rear-facing car seat until he or she reaches the top height or weight limit allowed by the car seat manufacturer. Once a child outgrows a rear-facing only seat, they can transfer to a rear-facing convertible until they reach the maximum height or weight for that seat.
3. Location: Install the Car Seat in the Right Spot in the Vehicle
• Although there may be many seating positions in a vehicle, not all may be suitable for installing a car seat. The car seat manufacturer instructions and/or the vehicle owner’s manual may not allow the use of the center rear seating position.
• NEVER place a rear-facing car seat in the front vehicle seat if the passenger frontal air bag is turned on in the vehicle. If it is necessary to place a forward-facing child in the front seat, be sure the air bag is turned off in the vehicle.
Always%ask,%“Who%rides%in%this%vehicle?%%Where%will%each%person%sit?”% 4. Installation: Secure the Car Seat to the Vehicle in the
Right Way • The rear-facing car seat spreads crash forces along the
entire head, neck, and back. The correct angle helps keep the airway open. If the car seat is installed too upright, the child’s head may flop forward and cut off his/her air supply.
• Know the car seat recline angle, use the recline indicator and adjuster, and adjust to accommodate the seat and vehicle slope.
Recline Angle • Caregivers should recline the rear-facing car seat
according to manufacturer instructions. • If permitted by the manufacturer, as the child ages and
gains better head control, he or she may sit more upright.
TIPS FOR DISCUSSING CAR SEATS AND SAFE SLEEPING PRACTICES • CPS Technicians are in
a great position to talk to caregivers about safe sleep practices children.
• Sleeping children should be removed from car seats in the home and at childcare and placed in a crib free from items like pillows, blankets, and stuffed animals.
• Some caregivers may think it is safe to leave the child in the car seat (when inside the home) with a loose harness and/or unsecured crotch strap. Children can: − Slide down on the seat
and be strangled by the chest clip pressing against the throat.
− Also strangle in unsecured harness straps or in loose straps or they can roll over into a prone position, resulting in asphyxia.
• For more information go to http://www.cpsc.gov.

Page 8-6
Recline Angle Indicator The recline angle indicator is part of the car seat and should be used as indicated by the manufacturer. Recline Adjuster • The vehicle must be on a
level surface when checking the car seat angle.
• Many rear-facing car seats have an adjustable base or foot that is used to correct the angle.
• For car seats that do not have an adjustable base, a firm, lightweight object such as a tightly rolled towel or pool noodle can be placed at the vehicle seat crack or bight if permitted by the car seat manufacturer.
• This is helpful when car seats are used on vehicle seats that are not as flat as those used in the testing laboratory. This installation method may be useful when using a carrier without the base.
• Unless the car seat manufacturer indicates otherwise, a rule of thumb is to use either the adjustable base or foot or firm lightweight object – but NOT both. The car seat has most likely NOT been tested this way.
Seat Slope A steep angle may cause the child to ride too upright. Maintain the correct recline angle.
Seat Belt or Lower Anchors • Car seats can be installed with a seat belt or with lower
anchor connectors – usually NOT both. While the systems are different, they are equally safe.
• Most car seats have NOT been tested with both systems used together. Some manufacturers allow this now, so always be sure to read both the vehicle and car seat instructions for help.
Check recline angle
Car seat installed with lower anchor connectors
Rear-facing recline angle
Page 8-7
MODULE 8 • Children in Rear-Facing Car Seats VIDEO • Install a Rear-Facing Car Seat
Record steps you observe to install a rear-facing car seat with a seat belt. 1.
2.
3.
4.
5.
6.
7.
8.
VIDEO • Install a Rear-Facing Car Seat Record the steps that are different when installing a rear-facing car seat with lower connectors instead of a seat belt.
SPECIAL CONSIDERATIONS FOR REAR-FACING CAR SEATS • A rear-facing car seat
can be installed so that it rests against the back of the vehicle seat in front if this is not against the car seat manufacturer instructions.
• CPS Technicians may need to instruct caregivers to switch to an emergency locking retractor and use a locking clip if the tension on the shoulder belt tilts the car seat to 1 side.
• Tilting may be due to over-tightening or pulling up on the shoulder belt. Another option is for the caregiver to try another seating position.
TETHERS AND REAR-FACING CAR SEATS • The use of tethers on a
rear-facing car seat is uncommon in the United States.
• A rear-facing car seat should NEVER be tethered unless recommended and specifically allowed by the car seat manufacturer. Several products have optional tethers in the rear-facing position.
Page 8-8
General Methods to Obtain a Tight Installation Include: 1. Place car seat on vehicle seat in the proper direction and
at the correct recline angle in the back seat of the vehicle.
2. Carefully thread the seat belt or lower connectors through the correct belt path as directed by the manufacturer. Be careful not to have any twists.
3. Buckle and lock the seat belt or connect the lower connectors to the anchors in the vehicle.
4. Press down firmly on the base or car seat and tighten. The base or car seat should NOT move side-to-side or front-to-back more than 1 inch when tested at the belt path.
Space Requirements Check the following to see if the car seat fits in the vehicle.
! Do the contours of the vehicle seat permit the car seat to stay level?
! Is there enough space for the car seat to allow for the correct angle?
! Does at least 80 percent of the car seat base (footprint) fit on the vehicle seat? Many manufacturers say that no more than 20 percent of the car seat can hang over the front edge of the vehicle seat. Some models require that 100 percent of the footprint fit on the vehicle seat. Use the 80/20 as a rule of thumb UNLESS the car seat manufacturer says differently.
! Does the seat belt/lower anchor connector allow for a tight installation?
TIPS FOR DISCUSSING HOW TO INSTALL REAR-FACING CAR SEATS • Tell caregivers that
since not every car seat will fit into every vehicle, they can ask the retail store to allow trying out a car seat in their vehicle in the store parking lot.
• Many caregivers who mistakenly test their rear-facing car seat near the child’s head (instead of near the belt path) think the car seat is not installed properly because it moves more when tested at this point.
• To reduce risk of entanglement from unused seat belts, educate caregivers to evaluate and note unused seat belts that may be within reach of a child.
• If possible, switch the retractor to automatic locking mode to lock the unused seat belt against the back seat. Refer to vehicle and car seat owner’s manuals for guidance.
Page 8-9
MODULE 8 • Children in Rear-Facing Car Seats Common Rear-Facing Installation Errors Caregivers make the following common rear-facing installation errors:
! A seat belt or lower anchor connector that is too loose or not locked
! A rear-facing-only car seat that is facing forward ! Seat belt or lower anchor connectors routed incorrectly ! Incorrect recline angle especially for an infant ! Using two seat belts or using a seat belt and lower
anchor connectors together (must be allowed by BOTH the vehicle and car seat manufacturer)
! Incorrect use of lower anchor connectors and tethers ! Not using the appropriate tether anchor or using a
tether when it should not be used (most convertible car seats do not tether when rear-facing)
! The locking clip installed incorrectly ! The carrying handle not used in the approved position
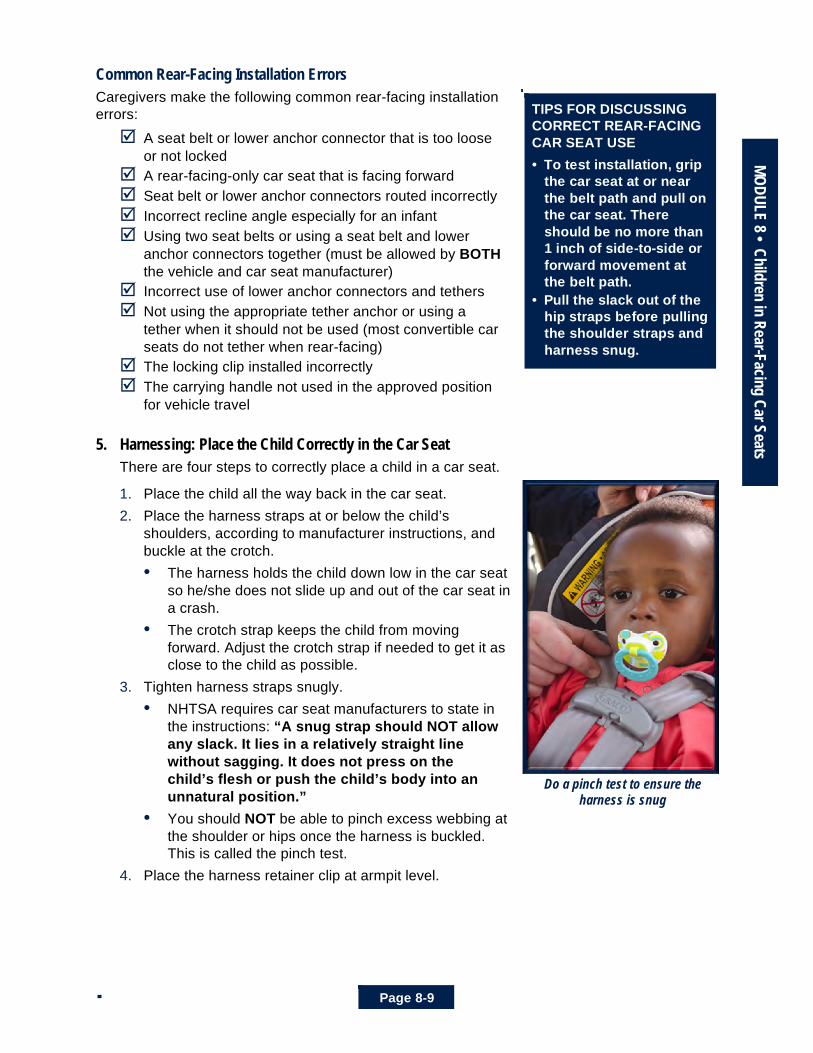
for vehicle travel 5. Harnessing: Place the Child Correctly in the Car Seat
There are four steps to correctly place a child in a car seat.
1. Place the child all the way back in the car seat. 2. Place the harness straps at or below the child’s
shoulders, according to manufacturer instructions, and buckle at the crotch. • The harness holds the child down low in the car seat
so he/she does not slide up and out of the car seat in a crash.
• The crotch strap keeps the child from moving forward. Adjust the crotch strap if needed to get it as close to the child as possible.
3. Tighten harness straps snugly. • NHTSA requires car seat manufacturers to state in
the instructions: “A snug strap should NOT allow any slack. It lies in a relatively straight line without sagging. It does not press on the child’s flesh or push the child’s body into an unnatural position.”
• You should NOT be able to pinch excess webbing at the shoulder or hips once the harness is buckled. This is called the pinch test.
4. Place the harness retainer clip at armpit level.
1
Do a pinch test to ensure the harness is snug
TIPS FOR DISCUSSING CORRECT REAR-FACING CAR SEAT USE • To test installation, grip
the car seat at or near the belt path and pull on the car seat. There should be no more than 1 inch of side-to-side or forward movement at the belt path.
• Pull the slack out of the hip straps before pulling the shoulder straps and harness snug.

Page 8-10
5. Harnessing: Place the Child Correctly in the Car Seat (continued) In addition: • Only place blankets around the child after the harness is snug and secure. Unapproved
padding placed behind or under the child or under harnesses can compress in a crash and create slack in the harness. Only items approved or manufactured by the car seat company for a particular model car seat are acceptable.
• Nothing should be placed under the child or between the child and the harness except for the use of a rolled towel or blanket at the crotch strap, if allowed by the manufacturer.
• Use only harness comfort covers or head padding the manufacturer has included with the car seat or the manufacturer sells separately for the specific car seat.
• Harness hardware can include manual adjusters, “A-locks” (adjuster device on front of many seats), or metal harness adjusters.
• Make sure to follow manufacturer recommendations on approved positions for carry handles on rear-facing-only seats.
!
“JPMA&is&dedicated&to&enhancing&children's&product&safety&and&our&members&work&hard&to&provide&the&latest&information&on&how&to&use&their&products.&If&anyone&has&questions&about&a&product,&they&should&start&by&contacting&the&manufacturer.&Our&members&are&here&to&help&CPS&technicians&and&caregivers&as&they&use&our&products&in&the&field.”&!
Juvenile&Products&Manufacturers&Association&(JPMA)&!
2
Various types of rear-facing harness adjusters

Page 8-11
MODULE 8 • Children in Rear-Facing Car Seats Common Rear-Facing Harnessing Errors Caregivers make the following common rear-facing harnessing errors:
! Harness not used and the child is just sitting in the car seat ! Harness straps that are too loose ! Retainer clip is not at armpit level ! Harness routed through the wrong slots
NOTE: Harness may look as though it is properly routed through the padding, but it may not be routed correctly through the shell. Both areas must be checked.
! Harness that is not doubled-back through buckle type metal adjuster, if it requires the double-back to secure the harness
! Harness that is twisted ! Harness not placed on the child correctly ! Harness that is frayed or damaged ! Metal adjuster not flush with a slot or out of position ! Crotch strap that is adjusted too long ! Harness not at or below shoulder ! Crotch strap that is not through the slot closest to the child ! Harness that is incorrectly routed
Seats for Children With Special Needs The American Academy of Pediatrics (AAP) recommends that all children born before 37 weeks (more than three weeks early) be monitored before they leave the hospital for possible breathing problems or slowing of the heart rate when sitting in a semi-reclined position. The physician will determine if the child can use a rear-facing-only car seat or should ride lying on their stomach or on their back in a car bed.
NOTE: Some very small children do not have respiratory problems, but still may require special consideration.
Car bed
Page 8-12
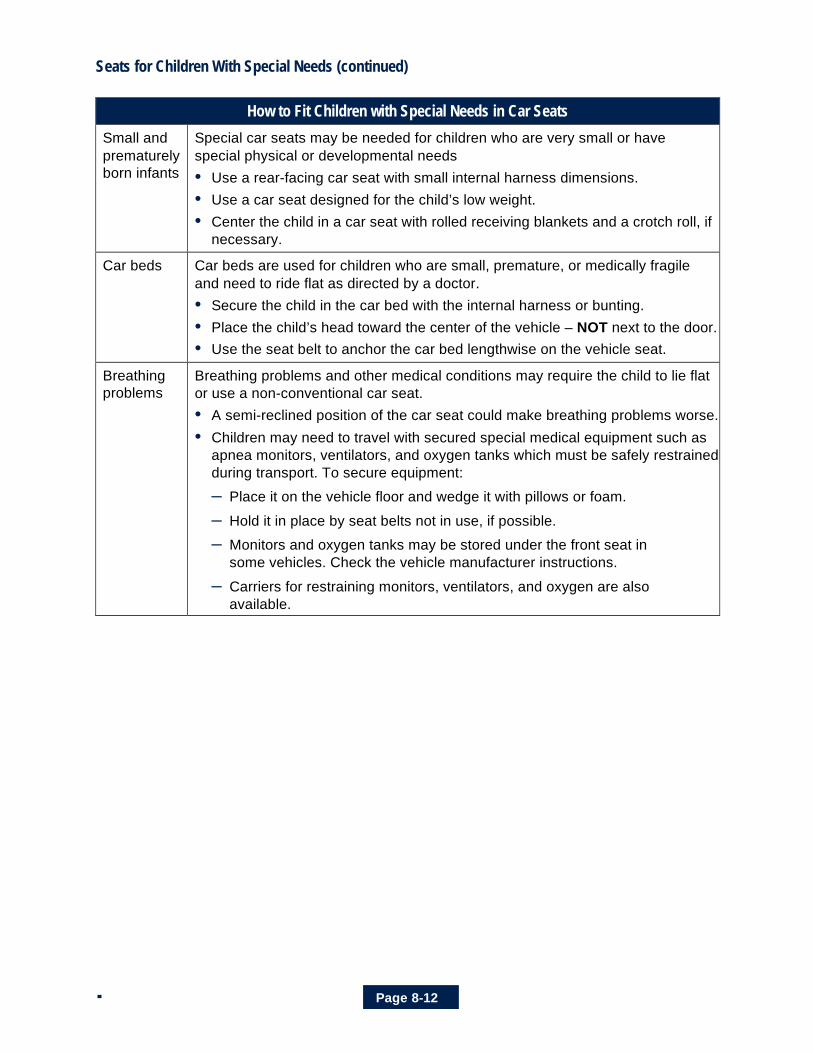
Seats for Children With Special Needs (continued)
How to Fit Children with Special Needs in Car Seats Small and prematurely born infants
Special car seats may be needed for children who are very small or have special physical or developmental needs • Use a rear-facing car seat with small internal harness dimensions. • Use a car seat designed for the child’s low weight. • Center the child in a car seat with rolled receiving blankets and a crotch roll, if
necessary. Car beds Car beds are used for children who are small, premature, or medically fragile
and need to ride flat as directed by a doctor. • Secure the child in the car bed with the internal harness or bunting. • Place the child’s head toward the center of the vehicle – NOT next to the door. • Use the seat belt to anchor the car bed lengthwise on the vehicle seat.
Breathing problems
Breathing problems and other medical conditions may require the child to lie flat or use a non-conventional car seat. • A semi-reclined position of the car seat could make breathing problems worse. • Children may need to travel with secured special medical equipment such as
apnea monitors, ventilators, and oxygen tanks which must be safely restrained during transport. To secure equipment: – Place it on the vehicle floor and wedge it with pillows or foam. – Hold it in place by seat belts not in use, if possible. – Monitors and oxygen tanks may be stored under the front seat in
some vehicles. Check the vehicle manufacturer instructions. – Carriers for restraining monitors, ventilators, and oxygen are also
available.

Page 8-13
MODULE 8 • Children in Rear-Facing Car Seats Practice Activity: Select and Install Rear-Facing Car Seats
In small groups, select and install car seats by a child’s age/height/weight. A child (card with age, height, and weight) will be assigned to your team. 1. Select an appropriate car seat for your child. 2. Using a doll, adjust harness to fit your child. 3. Install a rear-facing-only car seat with and without a base and a rear-facing convertible car
seat in a vehicle using a lap-belt-only, lap-and-shoulder belt, and lower anchors, where applicable. Make your car seat selections based on the child’s age, height, and weight.
4. Repeat the car seat selection, harness adjustment, and three installations for the type of car seat (rear-facing-only or rear-facing convertible) not chosen the first time.
5. Document how the belt locks in the following chart. Seat to Install How Does the Belt Lock? Instructor Initials Rear-facing-only without a base
Retractor:
Latchplate:
How does it lock?
Rear-facing-only with a base
Retractor:
Latchplate:
How does it lock?
Rear-facing convertible
Retractor:
Latchplate:
How does it lock?

Page 8-14
Explain Best Practices About Rear-Facing Car Seats There are key questions to answer related to rear-facing car seats. Explain and demonstrate best practices to caregivers. Key Questions ! What are the age, height, and weight of the child? ! Does the child have any special needs such as being very small, premature, or any physical,
or developmental needs? ! What does the car seat owner’s manual or label say about the minimum and maximum
heights and weights for the child using this car seat? ! Is the car seat a rear-facing-only or convertible type? ! Does the rear-facing-only car seat have a base? Can it be installed without a base? ! Is the car seat facing the correct direction in the vehicle? ! Is the car seat in an appropriate seating position in the vehicle according to the vehicle and
car seat manufacturers? ! Is the car seat installed tightly? ! Is the car seat secured by a seat belt or with lower anchor connectors? ! Is the car seat at the correct recline angle? ! Is the harness being used correctly?
Best Practices Answer the following questions to prepare for conversations you will have with caregivers to educate them about rear-facing car seats.
1. I have two children. Which child should go in the middle of the back seat?
2. Can I leave the carry handle up and dangle toys from the car seat to keep my child happy?
3. Should I use the lower anchors or the seat belt? Which is safer?
4. Should I use a tether on my rear-facing convertible seat?
5. I want to see my child. When can I turn him around?
Page 8-15
MODULE 8 • Children in Rear-Facing Car Seats
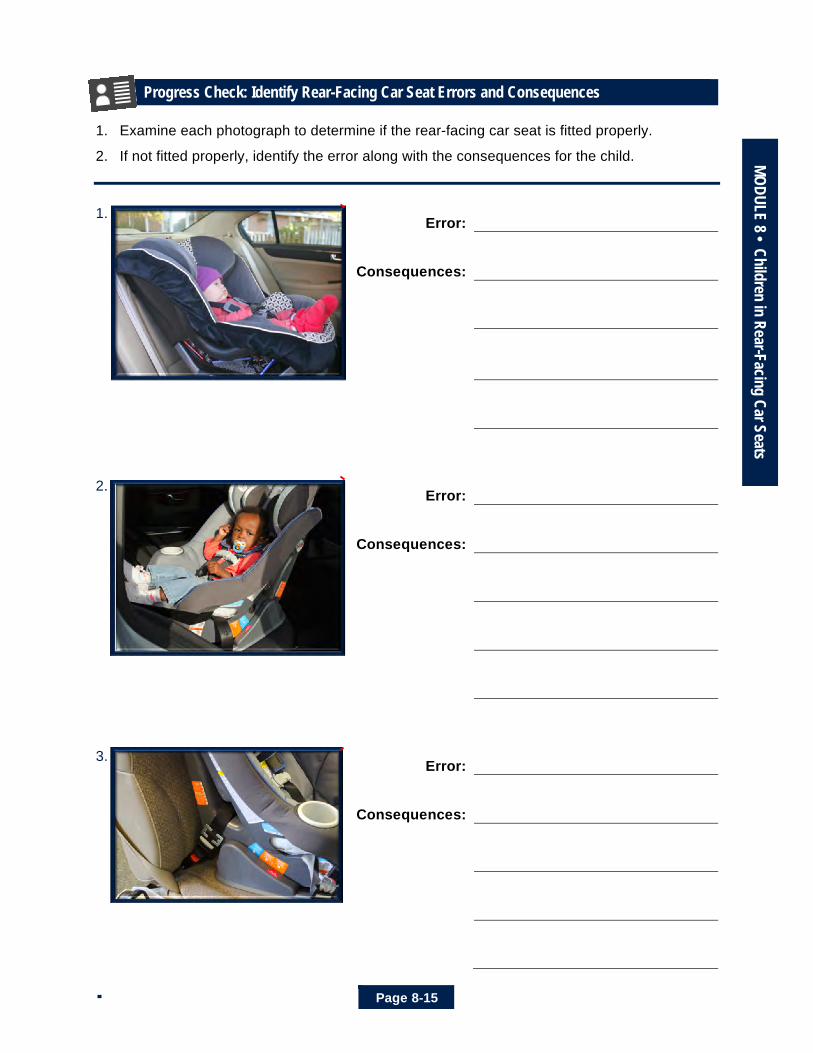
Progress Check: Identify Rear-Facing Car Seat Errors and Consequences
1. Examine each photograph to determine if the rear-facing car seat is fitted properly. 2. If not fitted properly, identify the error along with the consequences for the child. 1.
Error:
Consequences:
2.
Error:
Consequences:
3.
Error:
Consequences:

Page 8-16
Progress Check: Identify Rear-Facing Car Seat Errors and Consequences (continued) 4.
Error:
Consequences:
5.
Error:
Consequences:

Page 8-17
MODULE 8 • Children in Rear-Facing Car Seats Progress Check and Summary
1. How do you determine which harness slot or slots may be used for a rear-facing child?
2. What factors do you check to be sure a child is properly secured with a rear-facing car
seat?
3. What are the two places where you will find accurate information regarding correct seat belt
placement?
4. How do you test the tightness of a rear-facing car seat?

Page 8-18