Embed Size (px)
Citation preview

MENU
INTELLIGENT NOISE CONTROL™ HELMET
MOMENTUM INC

STEREO MUSIC
INTELLIGENT NOISE CONTROL™
CLICK ANY
SECTION TO
BEGIN
MOBILE PHONE USAGE
PAIRING WITH DEVICES
GENERAL SETTINGS
AMBIENT MODE
TROUBLE-SHOOTING
REMOTE CONTROL
ABOUT THE HELMET
VOICE COMMAND
USING THE FM RADIO
MAINTENANCE AND CARE
GETTING STARTED
INTERCOM SETUP

LEGEND:
10sHOLD
1xTAP Tap button/Jog Dial the
specifi ed number of times
Press and Hold button/Jog Dial for the specifi ed amount of time
Audible prompt from the Bluetooth system“Hello”
TABLE OF CONTENTS
1. ABOUT THE MOMENTUM INC INTELLIGENT NOISE CONTROL HELMET 8
1.1 General Information 8
1.2 Product Details 9
1.3 Package Contents 10
1.4 Ventilation 10
1.5 Face Shield 11
1.6 Ear Pad Replacement 13
1.7 Wearing the Helmet 141.7.1 Putting on the Helmet 141.7.2 Removing the Helmet 14
1.8 Pre-Ride Helmet Inspection 151.8.1 Checking the Exterior 151.8.2 Checking the Chinstrap 151.8.3 Checking the Face Shield 16
2. GETTING STARTED: BUILT-IN BLUETOOTH SYSTEM 17
2.1 Button Function 17
2.2 Powering On and Off 18
2.3 Charging 19
2.4 Checking the Battery Level 20
2.5 Volume Adjustment 22
2.6 Downloadable Sena Software 232.6.1 Sena Device Manager 232.6.2 Sena Smartphone App 23
2.7 Configuration Menu 25
3. INTELLIGENT NOISE CONTROL™ (INC) 28

TABLE OF CONTENTS CONTINUED
4. PAIRING THE BLUETOOTH SYSTEM WITH OTHER BLUETOOTH DEVICES 29
4.1 Mobile Phone 30
4.2 Additional Mobile Phone, GPS, MP3 Players or Sena SR10 Two-way Radio Adapter 31
4.3 GPS Pairing 32
4.4 Advanced Selective Pairing: Hands-Free or A2DP Stereo 344.4.1 Phone Selective Pairing- Hands-Free
Profile 344.4.2 Media Selective Pairing- A2DP Profile 35
5. MOBILE PHONE USAGE 37
5.1 Making and Answering Calls 37
5.2 Speed Dialing 385.2.1 Assigning Speed Dial Presets 385.2.2 Using Speed Dial Presets 38
6. STEREO MUSIC 40
6.1 Playing Music with Bluetooth Devices 40
6.2 Music Sharing 41
6.3 Audio Boost (Default: Disable) 42
6.4 Smart Volume Control (Default: Disable) 42
7. INTERCOM SETUP 43
7.1 Intercom Pairing 43
7.2 Two-Way Intercom 46

TABLE OF CONTENTS CONTINUED
7.3 Multi-Way Intercom 477.3.1 Starting a Three-Way Intercom
Conference 487.3.2 Starting a Multi-Way Intercom
Conference 507.3.3 Ending Multi-Way Intercom Conference 51
7.4 Three-Way Conference Phone Call with Intercom Users 52
7.5 Group Intercom 53
7.6 Universal Intercom 55
7.7 Audio Multitasking™ (Default: Enable) 57
7.8 Intercom-Audio Overlay Sensitivity (Default: 6) 58
7.9 Audio Overlay Volume Management (Default: Disable) 58
7.10 HD Intercom (Default: Enable) 59
7.11 Eight-Way Intercom (Default: Disable) 59
7.12 Advanced Noise Control™ (Default: Enable) 59
8. USING THE FM RADIO 60
8.1 FM Radio On/Off 60
8.2 Seek and Save Radio Stations 61
8.3 Scan and Save Radio Stations 63
8.4 Temporary Station Preset 64
8.5 Navigating Preset Stations 65
8.6 Region Selection 65
8.7 Radio Data Systems (RDS) Alternative (AF) Setting (Default: Disable) 66
8.8 FM Station Guide (Default: Enable) 66

TABLE OF CONTENTS CONTINUED
9. VOICE COMMAND 67
9.1 Voice Command Setting (Default: Enable) 69
10. AMBIENT MODE 70
11. GENERAL SETTINGS 71
11.1 Function Priority 71
11.2 Firmware Upgrades 71
11.3 Voice Prompts (Default: Enable) 72
11.4 Sidetone (Default: Disable) 72
11.5 Deleting All Bluetooth Pairing Information 73
12. REMOTE CONTROL 74
12.1 Pairing with the Remote Control 74
13. TROUBLESHOOTING 76
13.1 Fault Reset 76
13.2 Factory Reset 77
14. MAINTENANCE AND CARE 78
14.1 Outer Shell 78
14.2 Inner Lining 78
14.3 Storing the Helmet 78

MOMENTUM INC Intelligent Noise Control™ Helmet | 8
MENU1. ABOUT THE MOMENTUM INC INTELLIGENT NOISE CONTROL HELMET
General Information
Product Details
Package Contents
Ventilation
Face Shield
Ear Pad Replacement
Wearing the Helmet
Pre-Ride Helmet
Inspection
1.1 General Information
This product is a motorcycle helmet.
Do not use it for any other purpose than riding a motorcycle. If you use the helmet for anything else, it may not provide sufficient protection in an accident.
No helmet can protect the wearer against all possible impact scenarios.
For maximum protection, the Sena Momentum INC Helmet must fit properly on the head and its retention strap securely fastened under the chin. With the retention system comfortably but firmly adjusted, the helmet should allow sufficient peripheral vision when secured. If the helmet is too large, it may move on your head while riding. If the helmet can be removed when pulled from the back in an upward and forward direction, it’s not fitted properly. This could cause the helmet to obstruct your vision while riding or come off in an accident, resulting in personal injury or death. Please refer to Section 1.7: “Wearing the Helmet” for more details about properly securing and wearing your helmet.
The contents of this Sena Momentum INC Helmet User’s Guide are subjected to change without notice. Its illustration may differ from the actual product. The copyrights for the User’s Guide belong to Sena Technologies, Inc. Reproduction or copying of the User’s Guide without permission is strictly prohibited.
1. ABOUT THE MOMENTUM INC INTELLIGENT NOISE CONTROL HELMET
CHAPTER1

MOMENTUM INC Intelligent Noise Control™ Helmet | 9
MENU1. ABOUT THE MOMENTUM INC INTELLIGENT NOISE CONTROL HELMET
General Information
Product Details
Package Contents
Ventilation
Face Shield
Ear Pad Replacement
Wearing the Helmet
Pre-Ride Helmet
Inspection
1.2 Product DetailsOuter Shell
Bluetooth System’s
Buttons
Head Ventilation
Chin Ventilation
Face Shield
DC Power Charging & Firmware Upgrade PortINC Button
Ambient Mode Button

MOMENTUM INC Intelligent Noise Control™ Helmet | 10
MENU1. ABOUT THE MOMENTUM INC INTELLIGENT NOISE CONTROL HELMET
General Information
Product Details
Package Contents
Ventilation
Face Shield
Ear Pad Replacement
Wearing the Helmet
Pre-Ride Helmet
Inspection
1.3 Package Contents
• Momentum INC Helmet
• USB Power & Data Cable
• Helmet Pouch
• Helmet Stand
• Optional Ear Pads
• Pinlock®
1.4 Ventilation
Head Ventilation:
Open Closed
Chin Ventilation:
Open Closed

MOMENTUM INC Intelligent Noise Control™ Helmet | 11
MENU1. ABOUT THE MOMENTUM INC INTELLIGENT NOISE CONTROL HELMET
General Information
Product Details
Package Contents
Ventilation
Face Shield
Ear Pad Replacement
Wearing the Helmet
Pre-Ride Helmet
Inspection
1.5 Face Shield
The face shield is coated with an anti-scratch treatment. Removing and installing the shield is quick and easy:
Removal
1. Lift the shield upward so that it is in the most open position.
2. Release the locking mechanism by pulling it in the direction of the arrow towards the front of the helmet.
3. Firmly lift the shield away from the locking mechanism.
4. Repeat on the other side.

MOMENTUM INC Intelligent Noise Control™ Helmet | 12
MENU1. ABOUT THE MOMENTUM INC INTELLIGENT NOISE CONTROL HELMET
General Information
Product Details
Package Contents
Ventilation
Face Shield
Ear Pad Replacement
Wearing the Helmet
Pre-Ride Helmet
Inspection
Installation
1. Keep the locking mechanism open by pushing it in the direction of the arrow.
2. Align and insert the shield guide into the locking mechanism as shown.
3. Release the locking mechanism to lock the shield in place. Make sure that the guide is locked properly into the helmet.
4. Repeat on the other side.

MOMENTUM INC Intelligent Noise Control™ Helmet | 13
MENU1. ABOUT THE MOMENTUM INC INTELLIGENT NOISE CONTROL HELMET
General Information
Product Details
Package Contents
Ventilation
Face Shield
Ear Pad Replacement
Wearing the Helmet
Pre-Ride Helmet
Inspection
1.6 Ear Pad Replacement
The helmet comes pre-installed with two Ear Pads. If the Ear Pads are too tight and uncomfortable while wearing the helmet then you can switch to the optional Ear Pads, which are thinner, included in the package.
To replace the Ear Pads, pull the currently installed Ear Pad away from the speaker with a firm grip. Place the desired Ear Pad over the speaker and push down on the Ear Pad with firm pressure.

MOMENTUM INC Intelligent Noise Control™ Helmet | 14
MENU1. ABOUT THE MOMENTUM INC INTELLIGENT NOISE CONTROL HELMET
General Information
Product Details
Package Contents
Ventilation
Face Shield
Ear Pad Replacement
Wearing the Helmet
Pre-Ride Helmet
Inspection
1.7 Wearing the Helmet
1.7.1 Putting on the Helmet
1. Unfasten the chinstrap.2. Gently pull the chinstrap outward and slide
the helmet onto your head.
Note: A “chinstrap” is the nylon webbing that goes through the D-Rings.
3. Route the chinstrap under your chin, then thread it through both D-Rings.
4. To fasten securely, thread chinstrap back through the D-Ring closest to your neck, and pull.
Chinstrap
Thread chinstrap through the D-Rings
1.7.2 Removing the Helmet
1. Loosen the chinstrap by pulling the red tab attached to the D-Rings.
2. Pull the chinstrap out from within the D-rings.
3. Gently pull the padded chinstrap outward and slide the helmet off your head.
Advice: Fastening the chinstrap after removing the helmet will help avoid scratching surfaces it’s placed upon.

MOMENTUM INC Intelligent Noise Control™ Helmet | 15
MENU1. ABOUT THE MOMENTUM INC INTELLIGENT NOISE CONTROL HELMET
General Information
Product Details
Package Contents
Ventilation
Face Shield
Ear Pad Replacement
Wearing the Helmet
Pre-Ride Helmet
Inspection
1.8 Pre-Ride Helmet Inspection
1.8.1 Checking the Exterior
Check the helmet regularly for damage. Small, superficial scratches will not impair the helmet’s protective qualities. In the case of more serious damage (cracks, dents, flaking and cracking paint, etc.), the helmet should no longer be used.
1.8.2 Checking the Chinstrap
1. Ensure that the chinstrap is properly routed under your chin.
2. To test the chinstrap tension, slip your index finger under the chinstrap and pull. If the chinstrap is loose under the chin, it needs to be tightened. If the chinstrap loosens when you pull on it, the helmet is not properly fitted. Undo the chinstrap completely and try fastening it again, then repeat the test.
3. If you are unable to fasten the chinstrap so that it fits firmly against the chin, check that your helmet is still the right size for you.
Note: Repeat the test after each adjustment.
Caution: : Never ride with the chinstrap unfastened or incorrectly adjusted. The chinstrap should fit correctly and should not become loose when pulled. The fastener is not correctly closed if the chinstrap becomes loose when pulled.
MOMENTUM INC Intelligent Noise Control™ Helmet | 16
MENU1. ABOUT THE MOMENTUM INC INTELLIGENT NOISE CONTROL HELMET
General Information
Product Details
Package Contents
Ventilation
Face Shield
Ear Pad Replacement
Wearing the Helmet
Pre-Ride Helmet
Inspection
1.8.3 Checking the Face Shield
Before every ride, clean the face shield, check that it functions properly and that its surface is scratch- and crack-free. A malfunctioning, badly scratched or dirty shield will considerably impair your vision and should be replaced before riding.
Caution:• A heavily scratched face shield
considerably interferes with visibility and should be replaced if necessary before riding.
• Stop riding if visibility is poor.

MOMENTUM INC Intelligent Noise Control™ Helmet | 17
MENU
2. GETTING STARTED: BUILT-IN BLUETOOTH SYSTEM
Button Function
Powering On and Off
Charging
Checking the Battery Level
Volume Adjustment
Downloadable Sena Software
Configuration Menu
2.1 Button Function
Bluetooth System’s Buttons
Answer/End Phone CallReject an Incoming Phone CallStart/End Intercom ConversationPlay/Pause MusicEnter Voice Confi guration Settings
Decrease Volume Track Back
FM Radio On/Off
Increase Volume Track Forward
Scan Radio Stations Speed Dial
Center Button
Blue/Red/Green LED Lights
(+) Button
(-) Button
Intelligent Noise Control™ On / Off
Ambient Mode On / OffINC Button
Ambient Mode Button
2. GETTING STARTED: BUILT-IN BLUETOOTH SYSTEM
CHAPTER2

MOMENTUM INC Intelligent Noise Control™ Helmet | 18
MENU
2. GETTING STARTED: BUILT-IN BLUETOOTH SYSTEM
Button Function
Powering On and Off
Charging
Checking the Battery Level
Volume Adjustment
Downloadable Sena Software
Configuration Menu
2.2 Powering On and Off
Press and hold the Center Button and the (+) Button at the same time for 1 second to turn the helmet on or off.
Powering On
= 1sHOLD
POWER ON DEVICE
“Preparing headset”
“Hello”
Powering Off
= 1xTAP
POWER OFF DEVICE
Note: If the Voice Command setting is disabled, the “Hello” voice prompt will be heard instantly after powering on the Bluetooth system. Please refer to Section 9: “Voice Command” for more details.

MOMENTUM INC Intelligent Noise Control™ Helmet | 19
MENU
2. GETTING STARTED: BUILT-IN BLUETOOTH SYSTEM
Button Function
Powering On and Off
Charging
Checking the Battery Level
Volume Adjustment
Downloadable Sena Software
Configuration Menu
2.3 Charging
The Bluetooth system can be charged using many common methods via the supplied USB power & data cable:
1. Plugged into a computer’s USB port.
2. With a USB-equipped AC adapter via a wall-outlet charger.
Note: • Please make sure to take off your helmet while
charging. The Bluetooth system automatically turns off during charging.
• Any 3rd party USB charger can be used with Sena products if the charger is approved by either the FCC, CE, IC or other locally approved agencies that Sena accepts.
Charging the Bluetooth System
DC Power Charging & Firmware Upgrade Port
Depending upon the charging method, the Bluetooth system will be fully charged in about 2.5 hours.

MOMENTUM INC Intelligent Noise Control™ Helmet | 20
MENU
2. GETTING STARTED: BUILT-IN BLUETOOTH SYSTEM
Button Function
Powering On and Off
Charging
Checking the Battery Level
Volume Adjustment
Downloadable Sena Software
Configuration Menu
2.4 Checking the Battery Level
There are two ways to check battery level:
1. Visually, with LEDs when powering on.
Battery Level - Visual Method
= 1sHOLD
VISUALMETHOD
=
HIGH
=
MEDIUM
=
LOW
MOMENTUM INC Intelligent Noise Control™ Helmet | 21
MENU
2. GETTING STARTED: BUILT-IN BLUETOOTH SYSTEM
Button Function
Powering On and Off
Charging
Checking the Battery Level
Volume Adjustment
Downloadable Sena Software
Configuration Menu
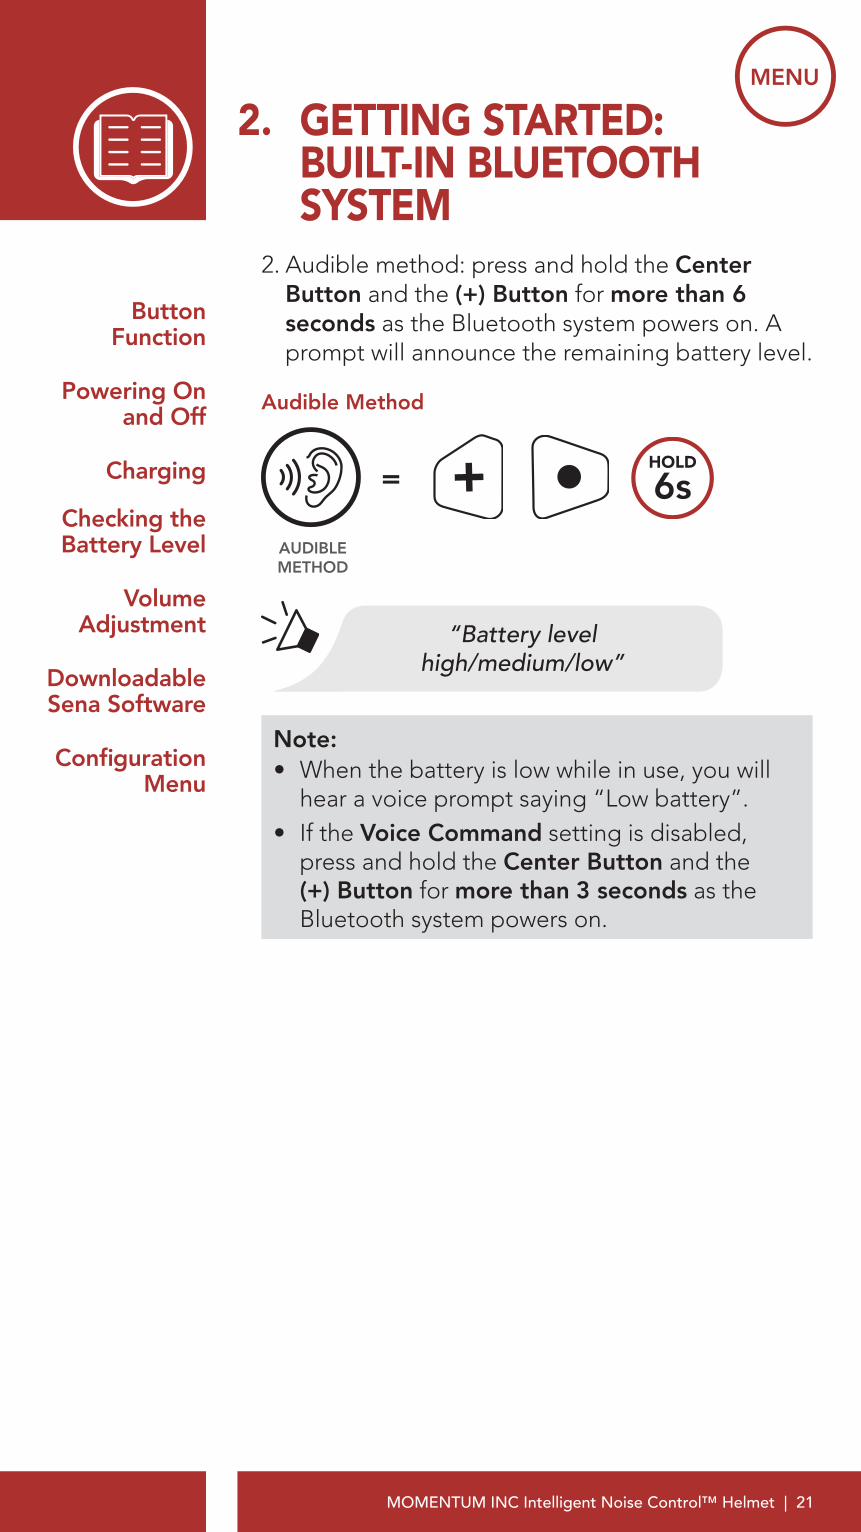
2. Audible method: press and hold the Center Button and the (+) Button for more than 6 seconds as the Bluetooth system powers on. A prompt will announce the remaining battery level.
Audible Method
= 6sHOLD
AUDIBLEMETHOD
“Battery levelhigh/medium/low”
Note: • When the battery is low while in use, you will
hear a voice prompt saying “Low battery”.• If the Voice Command setting is disabled,
press and hold the Center Button and the (+) Button for more than 3 seconds as the Bluetooth system powers on.

MOMENTUM INC Intelligent Noise Control™ Helmet | 22
MENU
2. GETTING STARTED: BUILT-IN BLUETOOTH SYSTEM
Button Function
Powering On and Off
Charging
Checking the Battery Level
Volume Adjustment
Downloadable Sena Software
Configuration Menu
2.5 Volume Adjustment
You can raise or lower the volume by tapping the (+) Button or the (-) Button. Volume is set and maintained independently at different levels for each audio source (i.e. phone, intercom), even when the Bluetooth system is rebooted.
Volume up
= 1xTAP
VOLUME UP
Volume down
= 1xTAP
VOLUME DOWN

MOMENTUM INC Intelligent Noise Control™ Helmet | 23
MENU
2. GETTING STARTED: BUILT-IN BLUETOOTH SYSTEM
Button Function
Powering On and Off
Charging
Checking the Battery Level
Volume Adjustment
Downloadable Sena Software
Configuration Menu
2.6 Downloadable Sena Software
2.6.1 Sena Device Manager
The Sena Device Manager allows you to upgrade the firmware and configure its settings directly from your PC or Apple computer. Using this software, you can assign speed dial presets, FM radio station presets and more. For more information on downloading the Sena Device manager, please visit Sena.com.
Click Here to Visit Sena.com
2.6.2 Sena Smartphone App
The Sena Smartphone App allows you to configure the settings, as well as access the User’s and Quick Start Guides. To do so, pair your mobile phone with your Bluetooth system (please refer to Section 4: “Pairing the Bluetooth System with other Bluetooth Devices” for more details). Run the Sena Smartphone App and configure the settings directly from your smartphone. You can download the Sena Smartphone App for Android and Apple operating systems from Sena.com/headset-app.

MOMENTUM INC Intelligent Noise Control™ Helmet | 24
MENU
2. GETTING STARTED: BUILT-IN BLUETOOTH SYSTEM
Button Function
Powering On and Off
Charging
Checking the Battery Level
Volume Adjustment
Downloadable Sena Software
Configuration Menu
Sena Software Configuration Menu
Configuration Setting Enable/Disable or Execute
Speed Dial Execute
Audio Multitasking Enable/Disable
Intercom-Audio Overlay Sensitivity Execute
Audio Overlay Volume Management Enable/Disable
Audio Boost Enable/Disable
Smart Volume Control Enable/Disable
HD Intercom Enable/Disable
Eight-Way Intercom Enable/Disable
Voice Prompt Enable/Disable
Voice Command Enable/Disable
RDS AF Setting Enable/Disable
FM Station Guide Enable/Disable
Sidetone Enable/Disable
Advanced Noise Control Enable/Disable

MOMENTUM INC Intelligent Noise Control™ Helmet | 25
MENU
2. GETTING STARTED: BUILT-IN BLUETOOTH SYSTEM
Button Function
Powering On and Off
Charging
Checking the Battery Level
Volume Adjustment
Downloadable Sena Software
Configuration Menu
2.7 Configuration Menu
The Bluetooth system can be configured by following a series of voice prompts. Further details about each of these settings will be explained on the following pages.
1. To access the Configuration Menu, press and hold the Center Button for 12 seconds until you hear the voice prompt, “Configuration menu”.
Accessing the Configuration Menu
= 12sHOLD
ACCESSCONFIG.
MENU
“Confi guration menu”
2. Tap the (+) Button or the (-) Button to navigate between the menus, You will hear voice prompts for each menu item. The list of functions is shown in the Bluetooth System Configuration Menu.
Navigating Forward through the Menu
= 1xTAP
NAVIGATE FORWARD
“[Menu prompt]”

MOMENTUM INC Intelligent Noise Control™ Helmet | 26
MENU
2. GETTING STARTED: BUILT-IN BLUETOOTH SYSTEM
Button Function
Powering On and Off
Charging
Checking the Battery Level
Volume Adjustment
Downloadable Sena Software
Configuration Menu
Navigating Backward through the Menu
= 1xTAP
NAVIGATE BACKWARD
“[Menu prompt]”
3. You can execute the command by tapping the Center Button.
Execute a Menu Options
= 1xTAP
EXECUTE

MOMENTUM INC Intelligent Noise Control™ Helmet | 27
MENU
2. GETTING STARTED: BUILT-IN BLUETOOTH SYSTEM
Button Function
Powering On and Off
Charging
Checking the Battery Level
Volume Adjustment
Downloadable Sena Software
Configuration Menu
Bluetooth System Configuration Menu
Tap the (+) Button or (-) Button a specified number of times
Tap the Center Button
1xTAP
Phone Pairing -
2xTAP Second Mobile
Phone Pairing-
3xTAP
GPS Pairing -
4xTAP Phone Selective
Pairing-
5xTAP Media Selective
Pairing-
5xTAP
Delete All Pairings Execute
4xTAP Remote Control
PairingExecute
3xTAP Universal Intercom
PairingExecute
2xTAP
Factory Reset Execute
1xTAP
Exit Configuration Execute

MOMENTUM INC Intelligent Noise Control™ Helmet | 28
MENU
3. INTELLIGENT NOISE CONTROL™ (INC)
Intelligent Noise Control technology will protect your hearing while riding by reducing constant low frequency sounds such as wind noise and high-frequency sounds such as face-to-face conversations, car horns and emergency sirens can be heard more clearly. Press the INC Button for 1 second to turn it on. Press the INC Button for 1 second to turn it off.
INC On
= 1sHOLD
INC ON
“INC on”
INC Off
= 1sHOLD
INC OFF
“INC off”
3. INTELLIGENT NOISE CONTROL™ (INC)
CHAPTER3

MOMENTUM INC Intelligent Noise Control™ Helmet | 29
MENU4. PAIRING THE BLUETOOTH SYSTEM WITH OTHER BLUETOOTH DEVICES
Mobile Phone
Additional Mobile
Phone, GPS, MP3 Players
or Sena SR10 Two-way
Radio Adapter
GPS Pairing
Advanced Selective
Pairing: Hands-Free
or A2DP Stereo
Before using Momentum INC’s Bluetooth system with other Bluetooth devices for the first time, they’ll need to be “paired”. This enables them to recognize and communicate with one another whenever they’re within range.
The Bluetooth system can pair with multiple Bluetooth devices such as mobile phone, MP3 player, GPS or Sena SR10 Two-Way Radio Adapter via Mobile Phone Pairing, Second Mobile Phone Pairing and GPS Pairing. The Bluetooth system can also be paired with up to three other Sena headsets or Bluetooth systems.
Pairs with up to three Sena Headsets
Also pairs with:
MobilePhone
MP3 Player
GPSDevices
SenaSR10
Note: Bluetooth Specifications: Bluetooth 2.4 ~ 2.48 GHz / max. output power 0.1W
4. PAIRING THE BLUETOOTH SYSTEM WITH OTHER BLUETOOTH DEVICES
CHAPTER4

MOMENTUM INC Intelligent Noise Control™ Helmet | 30
MENU4. PAIRING THE BLUETOOTH SYSTEM WITH OTHER BLUETOOTH DEVICES
Mobile Phone
Additional Mobile
Phone, GPS, MP3 Players
or Sena SR10 Two-way
Radio Adapter
GPS Pairing
Advanced Selective
Pairing: Hands-Free
or A2DP Stereo
4.1 Mobile Phone
1. Execute Phone Pairing in the Bluetooth System Configuration Menu.
Access Phone Pairing in the Bluetooth System Configuration Menu
= 12sHOLD
ACCESS CONFIG.
MENU
“Confi guration menu”
= 1xTAP
NAVIGATEFORWARD
1X
“Phone pairing”
=Alternating blue and red fl ashing lights indicate device is now discoverable.
LED STATUS
2. With your mobile phone in Bluetooth-pairing mode, select Momentum INC v1.0 in the list of devices detected.

MOMENTUM INC Intelligent Noise Control™ Helmet | 31
MENU4. PAIRING THE BLUETOOTH SYSTEM WITH OTHER BLUETOOTH DEVICES
Mobile Phone
Additional Mobile
Phone, GPS, MP3 Players
or Sena SR10 Two-way
Radio Adapter
GPS Pairing
Advanced Selective
Pairing: Hands-Free
or A2DP Stereo
3. If your mobile phone asks for a PIN, enter 0000.
=
PIN NUMBER
4.2 Additional Mobile Phone, GPS, MP3 Players or Sena SR10 Two-way Radio Adapter
1. Execute Second Mobile Phone Pairing in the Bluetooth System Configuration Menu.
Access Second Mobile Phone Pairing in the Bluetooth System Configuration Menu
= 12sHOLD
ACCESS CONFIG.
MENU
“Confi guration menu”
= 2xTAP
NAVIGATEFORWARD
2X
“Second mobile phone pairing”
= Blue fl ashing lights indicates device is now discoverable.
BLUETOOTHLED STATUS

MOMENTUM INC Intelligent Noise Control™ Helmet | 32
MENU4. PAIRING THE BLUETOOTH SYSTEM WITH OTHER BLUETOOTH DEVICES
Mobile Phone
Additional Mobile
Phone, GPS, MP3 Players
or Sena SR10 Two-way
Radio Adapter
GPS Pairing
Advanced Selective
Pairing: Hands-Free
or A2DP Stereo
= 12sHOLD
ACCESS CONFIG.
MENU
“Confi guration menu”
= 2xTAP
NAVIGATEFORWARD
2X
“Second mobile phone pairing”
= Blue fl ashing lights indicates device is now discoverable.
BLUETOOTHLED STATUS
2. With your mobile phone in Bluetooth-pairing mode, select Momentum INC v1.0 in the list of devices detected.
3. If your mobile phone asks for a PIN, enter 0000.
=
PIN NUMBER
4.3 GPS Pairing
1. Execute GPS Pairing in the Bluetooth System Configuration Menu.
Access GPS Pairing in the Bluetooth System Configuration Menu
= 12sHOLD
ACCESS CONFIG.
MENU
“Confi guration menu”
= 3xTAP
NAVIGATEFORWARD
“GPS pairing”
=Green fl ashing lights indicates device is now discoverable.
LED STATUS

MOMENTUM INC Intelligent Noise Control™ Helmet | 33
MENU4. PAIRING THE BLUETOOTH SYSTEM WITH OTHER BLUETOOTH DEVICES
Mobile Phone
Additional Mobile
Phone, GPS, MP3 Players
or Sena SR10 Two-way
Radio Adapter
GPS Pairing
Advanced Selective
Pairing: Hands-Free
or A2DP Stereo
= 12sHOLD
ACCESS CONFIG.
MENU
“Confi guration menu”
= 3xTAP
NAVIGATEFORWARD
“GPS pairing”
=Green fl ashing lights indicates device is now discoverable.
LED STATUS
2. With your Bluetooth device on the GPS navigation screen, select Momentum INC v1.0 in the list of devices detected.
3. If your Bluetooth device asks for a PIN, Enter 0000.
=
PIN NUMBER
Note: If you pair your GPS device via GPS Pairing, its instructions will not interrupt your intercom conversations, but overlay with them.

MOMENTUM INC Intelligent Noise Control™ Helmet | 34
MENU4. PAIRING THE BLUETOOTH SYSTEM WITH OTHER BLUETOOTH DEVICES
Mobile Phone
Additional Mobile
Phone, GPS, MP3 Players
or Sena SR10 Two-way
Radio Adapter
GPS Pairing
Advanced Selective
Pairing: Hands-Free
or A2DP Stereo
4.4 Advanced Selective Pairing: Hands-Free or A2DP Stereo
Phone Pairing allows the Bluetooth system to establish two bluetooth profiles: Hands-Free or A2DP Stereo. Advanced Selective Pairing allows the Bluetooth system to separate the profiles to enable connection with two devices.
4.4.1 Phone Selective Pairing- Hands-Free Profile
1. Execute Phone Selective Pairing in the Bluetooth System Configuration Menu.
Access Phone Selective Pairing in the Bluetooth System Configuration Menu
= 12sHOLD
ACCESS CONFIG.
MENU
“Confi guration menu”
= 4xTAP
NAVIGATEFORWARD
4X
“Phone selective pairing”
= Blue fl ashing lights indicate device is now discoverable.
LED STATUS

MOMENTUM INC Intelligent Noise Control™ Helmet | 35
MENU4. PAIRING THE BLUETOOTH SYSTEM WITH OTHER BLUETOOTH DEVICES
Mobile Phone
Additional Mobile
Phone, GPS, MP3 Players
or Sena SR10 Two-way
Radio Adapter
GPS Pairing
Advanced Selective
Pairing: Hands-Free
or A2DP Stereo
= 12sHOLD
ACCESS CONFIG.
MENU
“Confi guration menu”
= 4xTAP
NAVIGATEFORWARD
4X
“Phone selective pairing”
= Blue fl ashing lights indicate device is now discoverable.
LED STATUS
2. With your hands-free device in Bluetooth-Pairing mode, select Momentum INC v1.0 in the list of devices detected.
3. If it asks for a PIN, enter 0000.
=
PIN NUMBER
4.4.2 Media Selective Pairing- A2DP Profile
1. Execute Media Selective Pairing in the Bluetooth System Configuration Menu.
Access Media Selective Pairing in the Bluetooth System Configuration Menu
= 12sHOLD
ACCESS CONFIG.
MENU
“Confi guration menu”
= 5xTAP
NAVIGATEFORWARD
5X
“Media selective pairing”
= Red fl ashing lights indicate device is now discoverable.
LED STATUS

MOMENTUM INC Intelligent Noise Control™ Helmet | 36
MENU4. PAIRING THE BLUETOOTH SYSTEM WITH OTHER BLUETOOTH DEVICES
Mobile Phone
Additional Mobile
Phone, GPS, MP3 Players
or Sena SR10 Two-way
Radio Adapter
GPS Pairing
Advanced Selective
Pairing: Hands-Free
or A2DP Stereo
= 12sHOLD
ACCESS CONFIG.
MENU
“Confi guration menu”
= 5xTAP
NAVIGATEFORWARD
5X
“Media selective pairing”
= Red fl ashing lights indicate device is now discoverable.
LED STATUS
2. With your A2DP device in Bluetooth-pairing mode, select Momentum INC v1.0 in the list of the devices detected.
3. If it asks for a PIN, enter 0000.
=
PIN NUMBER

MOMENTUM INC Intelligent Noise Control™ Helmet | 37
MENU
5. MOBILE PHONE USAGE
Making and Answering
Calls
Speed Dialing
5.1 Making and Answering Calls
Answer a Call
= 1xTAP
ANSWER
END/Reject a Call
= 2sHOLD
END/REJECT
Make a Call with Voice Dialer
= 3sHOLD
VOICE DIAL
Note: If you have a GPS device connected, you will not hear its voice navigation during a phone call.
5. MOBILE PHONE USAGE
CHAPTER5

MOMENTUM INC Intelligent Noise Control™ Helmet | 38
MENU
5. MOBILE PHONE USAGE
Making and Answering
Calls
Speed Dialing
5.2 Speed Dialing
5.2.1 Assigning Speed Dial Presets
Speed Dial Presets could be assigned in the settings menu, accessible through Sena Device Manager or Sena Smartphone App.
5.2.2 Using Speed Dial Presets
1. Press and hold the (+) Button for 3 seconds to enter into the Speed Dial menu.
Enter Speed Dial Mode
= 3sHOLD
SPEED DIAL
“Speed Dial”
2. Tap the (+) Button or the (-) Button to navigate between the Speed Dial Presets.
Navigate Forward through Speed Dial Preset Numbers
= 1xTAP
NAVIGATE FORWARD
Navigate Backward through Speed Dial Preset Numbers
= 1xTAP
NAVIGATE BACKWARD

MOMENTUM INC Intelligent Noise Control™ Helmet | 39
MENU
5. MOBILE PHONE USAGE
Making and Answering
Calls
Speed Dialing
3. To call one of your Speed Dial Presets, tap the Center Button when you hear the prompt, “Speed Dial (#)”.
Call a Speed Dial Preset Number
= 1xTAP
SPEED DIAL
“Speed dial (#)”
4. To redial the last number called, tap the Center Button when you hear the prompt “Last number redial”.
Redial Last Number
= 1xTAP
REDIAL
“Last number redial”

MOMENTUM INC Intelligent Noise Control™ Helmet | 40
MENU
6. STEREO MUSIC
Playing Music with Bluetooth
Devices
Music Sharing
Audio Boost
Smart Volume Control
6.1 Playing Music with Bluetooth Devices
1. To play or pause music, press and hold the Center Button for 1 second until you hear a double beep.
Play/Pause Music
= 1sHOLD
PLAY/PAUSE
“[Beep, Beep]”
2. To adjust the volume, tap the (+) Button or the (-) Button.
Volume Up
= 1xTAP
VOLUME UP
Volume Down
= 1xTAP
VOLUME DOWN
6. STEREO MUSIC
CHAPTER6

MOMENTUM INC Intelligent Noise Control™ Helmet | 41
MENU
6. STEREO MUSIC
Playing Music with Bluetooth
Devices
Music Sharing
Audio Boost
Smart Volume Control
3. To track forward or back, press and hold the (+) Button or the (-) Button for 1 second.
Track Forward
= 1sHOLD
SKIP TRACK FORWARD
Track Backward
= 1sHOLD
SKIP TRACK BACKWARD
6.2 Music Sharing
You can share the music you’re listening to with an Intercom Friend during an intercom conversation. To start or terminate sharing music, press the (-) Button for 3 seconds during an intercom conversation until you hear a double beep. Both you and your Intercom Friend can control music playback.
Sharing Music with an Intercom Friend during Intercom Conversation
= 3sHOLD
SHARE MUSIC
“[Beep, Beep]”

MOMENTUM INC Intelligent Noise Control™ Helmet | 42
MENU
6. STEREO MUSIC
Playing Music with Bluetooth
Devices
Music Sharing
Audio Boost
Smart Volume Control
6.3 Audio Boost (Default: Disable)
An Audio Boost setting can be found in the settings menu, accessible through Sena Device Manager or Sena Smartphone App.
Enabling Audio Boost increases the maximum volume limit. Disabling Audio Boost reduces the maximum volume limit while delivering more balanced sound.
6.4 Smart Volume Control (Default: Disable)
A Smart Volume Control setting can be found in the settings menu, accessible through Sena Device Manager or Sena Smartphone App.
Enabling Smart Volume Control automatically changes the level of the speaker volume based on the level of the environment noise. You can enable it by setting the sensitivity to low, medium or high.

MOMENTUM INC Intelligent Noise Control™ Helmet | 43
MENU
7. INTERCOM SETUP
Intercom Pairing
Two-Way Intercom
Multi-Way Intercom
Three-Way Conference
Phone Call with Intercom Users
Group Intercom
Universal Intercom
Audio Multitasking™
Intercom-Audio Overlay
Sensitivity
Audio Overlay Volume
Management
HD Intercom
Eight-Way Intercom
Advanced Noise Control™
7.1 Intercom Pairing
Up to nine people can communicate via intercom with the helmet simply by pairing their Bluetooth systems.
Pairing with Intercom Friends
1. Press and hold the Center Button of two Bluetooth systems for 8 seconds until you hear the voice prompt “Intercom Pairing”.
Pairing with Intercom B
8sHOLD
YOU
& =
Intercom Friend B
“Intercom Pairing”
= Red fl ashing lights indicate device is now discoverable.
BLUETOOTHLED STATUS
7. INTERCOM SETUP
CHAPTER7

MOMENTUM INC Intelligent Noise Control™ Helmet | 44
MENU
7. INTERCOM SETUP
Intercom Pairing
Two-Way Intercom
Multi-Way Intercom
Three-Way Conference
Phone Call with Intercom Users
Group Intercom
Universal Intercom
Audio Multitasking™
Intercom-Audio Overlay
Sensitivity
Audio Overlay Volume
Management
HD Intercom
Eight-Way Intercom
Advanced Noise Control™
8sHOLD
YOU
& =
Intercom Friend B
“Intercom Pairing”
= Red fl ashing lights indicate device is now discoverable.
BLUETOOTHLED STATUS
2. Tap the Center Button on either Bluetooth system and wait until the LEDs of both turn blue.
On Either One of the Devices
1xTAP
YOU
or =
Intercom Friend B
= Blue fl ashing LED confi rms intercoms are paired.
LED STATUS

MOMENTUM INC Intelligent Noise Control™ Helmet | 45
MENU
7. INTERCOM SETUP
Intercom Pairing
Two-Way Intercom
Multi-Way Intercom
Three-Way Conference
Phone Call with Intercom Users
Group Intercom
Universal Intercom
Audio Multitasking™
Intercom-Audio Overlay
Sensitivity
Audio Overlay Volume
Management
HD Intercom
Eight-Way Intercom
Advanced Noise Control™
3. Repeat steps 1 and 2 to pair with Intercom Friends C, D, … and J.
Last-Come, First-Served
YOU Intercom Friend 1
YOU Intercom Friend 1
Intercom Friend 2
YOU Intercom Friend 1
Intercom Friend 8
Intercom Friend 9

MOMENTUM INC Intelligent Noise Control™ Helmet | 46
MENU
7. INTERCOM SETUP
Intercom Pairing
Two-Way Intercom
Multi-Way Intercom
Three-Way Conference
Phone Call with Intercom Users
Group Intercom
Universal Intercom
Audio Multitasking™
Intercom-Audio Overlay
Sensitivity
Audio Overlay Volume
Management
HD Intercom
Eight-Way Intercom
Advanced Noise Control™
7.2 Two-Way Intercom
You can start or end an intercom conversation with an Intercom Friend by tapping the Center Button.
1. Tap one for Intercom Friend 1.
Start/End Two-Way Intercom with Intercom Friend 1
= 1xTAP
Intercom Friend 1
2. Tap twice for Intercom Friend 2.
Start/End Two-Way Intercom with Intercom Friend 2
= 2xTAP
Intercom Friend 2
3. Tap three times for Intercom Friend 3 through 9 to enter into friend selection mode. Tap the (+) Button or the (-) Button to select a Intercom Friend 3 through 9. Tap the Center Button to initiate an intercom conversation with Intercom Friend 3 through 9.

MOMENTUM INC Intelligent Noise Control™ Helmet | 47
MENU
7. INTERCOM SETUP
Intercom Pairing
Two-Way Intercom
Multi-Way Intercom
Three-Way Conference
Phone Call with Intercom Users
Group Intercom
Universal Intercom
Audio Multitasking™
Intercom-Audio Overlay
Sensitivity
Audio Overlay Volume
Management
HD Intercom
Eight-Way Intercom
Advanced Noise Control™
Start/End Two-Way Intercom with Intercom Friend 3 through 9
= 3xTAP
FRIEND SELECTION
MODE
= 1xTAP
NAVIGATE INTERCOM
FRIENDS 3-9
or
1xTAP
“Intercom (#)”
= 1xTAP
SELECT INTERCOM FRIEND 3-9
7.3 Multi-Way Intercom
Multi-Way Intercom enables conference-call-style conversations with up to seven Intercom Friends at the same time. While Multi-Way Intercom is in progress, mobile phone connection is temporarily disconnected. However, as soon as Multi-Way Intercom terminates, the mobile phone connection will be reestablished.

MOMENTUM INC Intelligent Noise Control™ Helmet | 48
MENU
7. INTERCOM SETUP
Intercom Pairing
Two-Way Intercom
Multi-Way Intercom
Three-Way Conference
Phone Call with Intercom Users
Group Intercom
Universal Intercom
Audio Multitasking™
Intercom-Audio Overlay
Sensitivity
Audio Overlay Volume
Management
HD Intercom
Eight-Way Intercom
Advanced Noise Control™
7.3.1 Starting a Three-Way Intercom Conference
You (A) can have a Three-Way intercom Conference with two other Intercom Friends by establishing two intercom connections simultaneously.1. Pair your Bluetooth system (A) with those
of two other Intercom Friends (B & C). Please refer to Section 7.1: “Intercom Pairing” for pairing instructions.
Pair with Intercom Friends B & C
YOU
Intercom Friend B
Intercom Friend C
2. Start an intercom conversation with one of the two friends in your intercom group. For example, you (A) may start an intercom conversation with the Intercom Friend (B). Or, Intercom Friend (B) may start intercom call with you (A).
Starting an Intercom Conversation with Intercom Friend B
YOU
Intercom Friend B
Intercom Friend C

MOMENTUM INC Intelligent Noise Control™ Helmet | 49
MENU
7. INTERCOM SETUP
Intercom Pairing
Two-Way Intercom
Multi-Way Intercom
Three-Way Conference
Phone Call with Intercom Users
Group Intercom
Universal Intercom
Audio Multitasking™
Intercom-Audio Overlay
Sensitivity
Audio Overlay Volume
Management
HD Intercom
Eight-Way Intercom
Advanced Noise Control™
3. Then, you (A) can call the second Intercom Friend (C), or the second Intercom Friend (C) may join the intercom by making an intercom call to you (A).
Starting an Intercom Conversation with Intercom Friend C
YOU
Intercom Friend B
Intercom Friend C
4. Now you and two Intercom Friends (B&C), are having a Three-Way Intercom Conference.
Three-Way Intercom
YOU
Intercom Friend B
Intercom Friend C

MOMENTUM INC Intelligent Noise Control™ Helmet | 50
MENU
7. INTERCOM SETUP
Intercom Pairing
Two-Way Intercom
Multi-Way Intercom
Three-Way Conference
Phone Call with Intercom Users
Group Intercom
Universal Intercom
Audio Multitasking™
Intercom-Audio Overlay
Sensitivity
Audio Overlay Volume
Management
HD Intercom
Eight-Way Intercom
Advanced Noise Control™
7.3.2 Starting a Multi-Way Intercom Conference
With three Intercom Friends connected, a new participant (D) can be added to either Intercom Friend (B)-the head, or Intercom Friend (C)-the tail. If (D) were added to (C), then (D) becomes the new tail of the chain. If (D) were added to (B), then (D) becomes the new head. In this way, an intercom chain can hold up to eight people.
Starting a Multi-Way Intercom
YOU
First Friend B
Second Friend C
Note: • Each participant’s intercom friends are
the ones adjacent to each other.• To have Multi-Way Intercom with more
than four participants, you must enable Eight-Way Intercom setting. Please refer to Section 7.11: “Eight-Way Intercom (Default: Disable)” for more details.
MOMENTUM INC Intelligent Noise Control™ Helmet | 51
MENU
7. INTERCOM SETUP
Intercom Pairing
Two-Way Intercom
Multi-Way Intercom
Three-Way Conference
Phone Call with Intercom Users
Group Intercom
Universal Intercom
Audio Multitasking™
Intercom-Audio Overlay
Sensitivity
Audio Overlay Volume
Management
HD Intercom
Eight-Way Intercom
Advanced Noise Control™
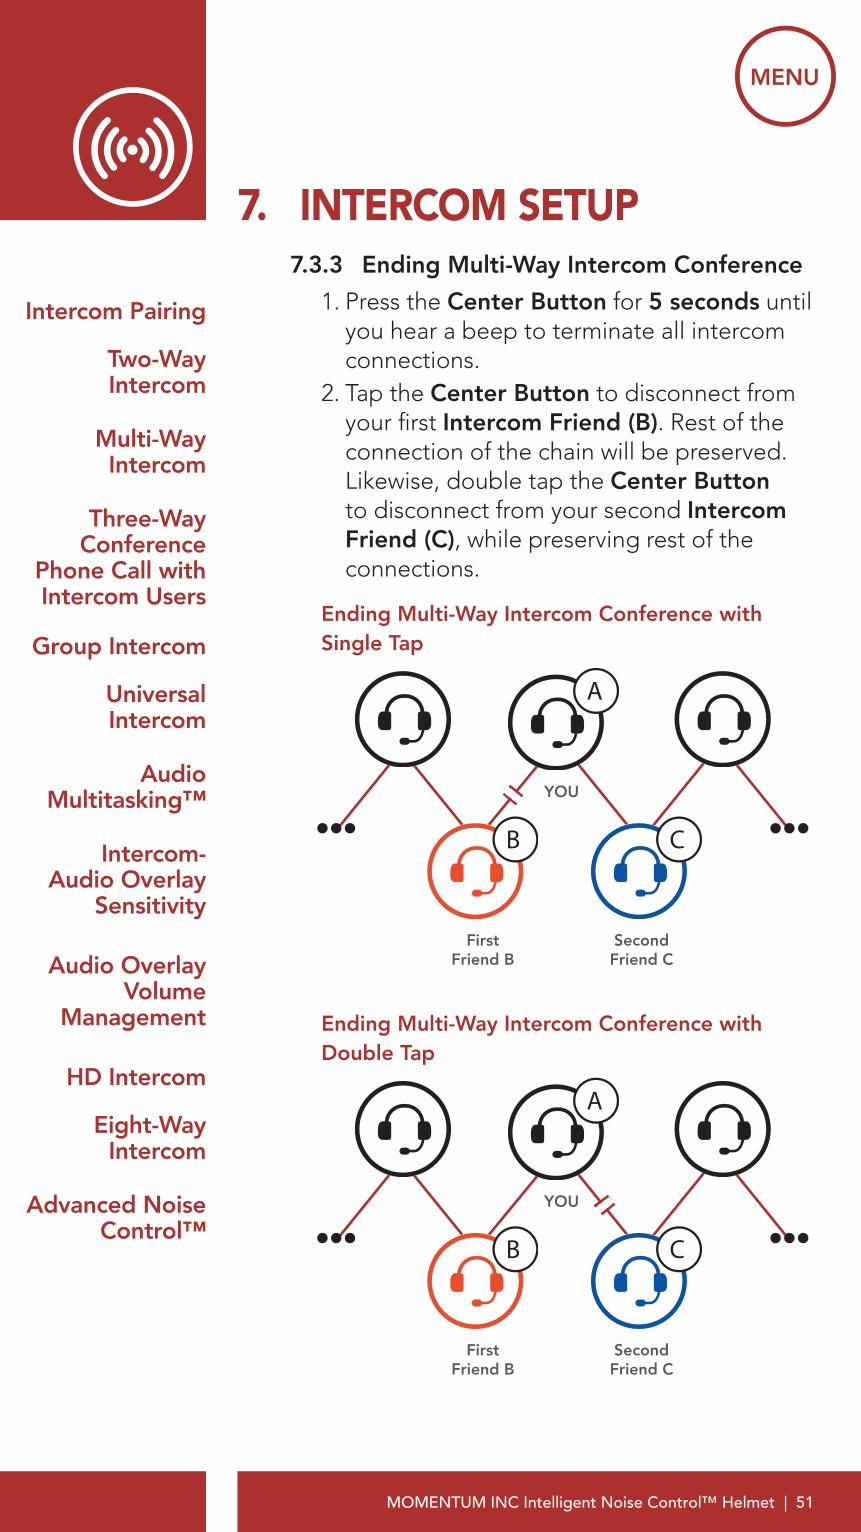
7.3.3 Ending Multi-Way Intercom Conference
1. Press the Center Button for 5 seconds until you hear a beep to terminate all intercom connections.
2. Tap the Center Button to disconnect from your first Intercom Friend (B). Rest of the connection of the chain will be preserved. Likewise, double tap the Center Button to disconnect from your second Intercom Friend (C), while preserving rest of the connections.
Ending Multi-Way Intercom Conference with Single Tap
YOU
First Friend B
Second Friend C
Ending Multi-Way Intercom Conference with Double Tap
YOU
First Friend B
Second Friend C

MOMENTUM INC Intelligent Noise Control™ Helmet | 52
MENU
7. INTERCOM SETUP
Intercom Pairing
Two-Way Intercom
Multi-Way Intercom
Three-Way Conference
Phone Call with Intercom Users
Group Intercom
Universal Intercom
Audio Multitasking™
Intercom-Audio Overlay
Sensitivity
Audio Overlay Volume
Management
HD Intercom
Eight-Way Intercom
Advanced Noise Control™
7.4 Three-Way Conference Phone Call with Intercom Users
You can have a Three-Way Conference Phone Call by adding an Intercom Friend to the mobile phone conversation.
1. During a mobile phone call, tap the Center Button to invite one of your Intercom Friends to the conversation.
Invite an Intercom Friend into Phone Conference
= 1xTAP
ADD AN INTERCOM FRIEND TO
CALL
or
2xTAP
or
3xTAP
2. To disconnect the intercom during a conference phone call, tap the Center Button.
Disconnect Intercom Friend from Conference
= 1xTAP
DISCONNECTINTERCOM
or
2xTAP
or
3xTAP

MOMENTUM INC Intelligent Noise Control™ Helmet | 53
MENU
7. INTERCOM SETUP
Intercom Pairing
Two-Way Intercom
Multi-Way Intercom
Three-Way Conference
Phone Call with Intercom Users
Group Intercom
Universal Intercom
Audio Multitasking™
Intercom-Audio Overlay
Sensitivity
Audio Overlay Volume
Management
HD Intercom
Eight-Way Intercom
Advanced Noise Control™
3. To disconnect the mobile phone call during a conference phone call, press the Center Button for 2 seconds.
End Phone Call
= 2sHOLD
END MOBILE CALL
Note: When you have an incoming intercom call during a mobile phone call, you will hear the voice prompt, “Intercom Requested.”
7.5 Group Intercom
Group Intercom allows you to instantly create a Multi-Way Conference Intercom of up to eight participants. You can create and start Group Intercom through your Smartphone App.
1. Start your Smartphone App and go to “Group Setting” under “Group Intercom”.
2. Browse your friends, and select up to seven other people you want to group with.
3. Check your friends and press “Save to My Momentum INC v1.0” on the screen.
4. Press “Connect” on the screen or tap the (+) and the (-) Button simultaneously to begin Group Intercom.
Note: To use Group Intercom with more than four people, you must enable Eight-Way Intercom. Please refer to Section 7.11: “Eight-Way Intercom (Default: Disable)” for more details.

MOMENTUM INC Intelligent Noise Control™ Helmet | 54
MENU
7. INTERCOM SETUP
Intercom Pairing
Two-Way Intercom
Multi-Way Intercom
Three-Way Conference
Phone Call with Intercom Users
Group Intercom
Universal Intercom
Audio Multitasking™
Intercom-Audio Overlay
Sensitivity
Audio Overlay Volume
Management
HD Intercom
Eight-Way Intercom
Advanced Noise Control™
Start Group Intercom
= 1xTAP
STARTGROUP
INTERCOM
= Green LED Flashing
BLUETOOTH LED STATUS
“Group intercom”
5. When all of the Bluetooth system are connected together, everyone will hear the voice prompt, “Group Intercom connected”.
“Group intercom connected”
6. To terminate Group Intercom, press the Center Button for 5 seconds during Group Intercom. You will hear a voice prompt, “Group intercom terminated.”

MOMENTUM INC Intelligent Noise Control™ Helmet | 55
MENU
7. INTERCOM SETUP
Intercom Pairing
Two-Way Intercom
Multi-Way Intercom
Three-Way Conference
Phone Call with Intercom Users
Group Intercom
Universal Intercom
Audio Multitasking™
Intercom-Audio Overlay
Sensitivity
Audio Overlay Volume
Management
HD Intercom
Eight-Way Intercom
Advanced Noise Control™
End Group Intercom
= 5sHOLD
END GROUP INTERCOM
or
1xTAP
“Group intercom terminated”
7.6 Universal Intercom
Universal Intercom allows you to have intercom conversations with users of non-Sena Bluetooth headsets. You can pair the Bluetooth system with only one non-Sena Bluetooth headset at a time. The intercom distance depends on the performance of the Bluetooth headset to which it’s connected. If another Bluetooth device is paired via Second Mobile Phone Pairing while a non-Sena Bluetooth headset is paired with the Momentum INC Helmet, the another Bluetooth Device will be disconnected.
1. Execute Universal Intercom in the Bluetooth System Configuration Menu.
Access Universal Intercom in the Bluetooth System Configuration Menu
= 12sHOLD
ACCESS CONFIG.
MENU
“Confi guration menu”
= 3xTAP
NAVIGATEBACKWARD
“Universal intercom pairing”
= 1xTAP
EXECUTE

MOMENTUM INC Intelligent Noise Control™ Helmet | 56
MENU
7. INTERCOM SETUP
Intercom Pairing
Two-Way Intercom
Multi-Way Intercom
Three-Way Conference
Phone Call with Intercom Users
Group Intercom
Universal Intercom
Audio Multitasking™
Intercom-Audio Overlay
Sensitivity
Audio Overlay Volume
Management
HD Intercom
Eight-Way Intercom
Advanced Noise Control™
= 12sHOLD
ACCESS CONFIG.
MENU
“Confi guration menu”
= 3xTAP
NAVIGATEBACKWARD
“Universal intercom pairing”
= 1xTAP
EXECUTE
2. Put the non-Sena Bluetooth helmet in Pairing Mode. The Bluetooth system will automatically pair with a non-Sena Bluetooth headset.
3. You can have a Two-Way Intercom or Multi-Way Intercom communication with up to three Intercom Friends using non-Sena helmets as described below.
Example of a Three-Way Universal Intercom
YOU
Non-Sena Headset
Sena Headset

MOMENTUM INC Intelligent Noise Control™ Helmet | 57
MENU
7. INTERCOM SETUP
Intercom Pairing
Two-Way Intercom
Multi-Way Intercom
Three-Way Conference
Phone Call with Intercom Users
Group Intercom
Universal Intercom
Audio Multitasking™
Intercom-Audio Overlay
Sensitivity
Audio Overlay Volume
Management
HD Intercom
Eight-Way Intercom
Advanced Noise Control™
Example of a Four-Way Universal Intercom
Non-Sena Headset
YOU Sena Headset
Non-Sena Headset
7.7 Audio Multitasking™ (Default: Enable)
The Audio Multitasking setting can be found in the settings menu, accessible through Sena Device Manager or Sena Smartphone App.
Audio Multitasking allows you to have an intercom conversation while simultaneously listening to music, FM radio, or GPS instructions. The overlaid audio is played in the background with reduced volume whenever there is an intercom conversation and will return to normal volume once the conversation is finished. If this feature is disabled, any incoming or outgoing intercom will interrupt your audio channel.

MOMENTUM INC Intelligent Noise Control™ Helmet | 58
MENU
7. INTERCOM SETUP
Intercom Pairing
Two-Way Intercom
Multi-Way Intercom
Three-Way Conference
Phone Call with Intercom Users
Group Intercom
Universal Intercom
Audio Multitasking™
Intercom-Audio Overlay
Sensitivity
Audio Overlay Volume
Management
HD Intercom
Eight-Way Intercom
Advanced Noise Control™
7.8 Intercom-Audio Overlay Sensitivity (Default: 6)
The Intercom-Audio Overlay Sensitivity setting can be found in the settings menu, accessible through Sena Device Manager or Sena Smartphone App.
The music, FM radio and GPS volume will be lowered to play in the background if you talk over the intercom while the overlaid audio is playing. You can adjust the intercom sensitivity to activate this background audio mode. Level 1 has the lowest sensitivity and level 10 has the highest sensitivity.
Note: If your voice is not louder than the sensitivity of the selected level, the overlaid audio will not be lowered.
7.9 Audio Overlay Volume Management (Default: Disable)
The Audio Overlay Volume Management setting can be found in the settings menu, accessible through Sena Device Manager or Sena Smartphone App.
The music, FM radio and GPS overlaid audio reduces in volume whenever there is an ongoing intercom conversation. If Audio Overlay Volume Management is enabled, the volume level of the overlaid audio will not be reduced during an intercom conversation.

MOMENTUM INC Intelligent Noise Control™ Helmet | 59
MENU
7. INTERCOM SETUP
Intercom Pairing
Two-Way Intercom
Multi-Way Intercom
Three-Way Conference
Phone Call with Intercom Users
Group Intercom
Universal Intercom
Audio Multitasking™
Intercom-Audio Overlay
Sensitivity
Audio Overlay Volume
Management
HD Intercom
Eight-Way Intercom
Advanced Noise Control™
7.10 HD Intercom (Default: Enable)
The HD Intercom setting can be found in the settings menu, accessible through Sena Device Manager or Sena Smartphone App.
HD Intercom enhances the two-way intercom audio from normal quality to HD quality. HD Intercom will become temporarily disabled when you enter into a multi-way intercom. If this feature is disabled, the two-way intercom audio will change to normal quality.
Note: The intercom distance of HD Intercom is relatively shorter than that of normal intercom.
7.11 Eight-Way Intercom (Default: Disable)
The Eight-Way Intercom setting can be found in the settings menu, accessible through Sena Device Manager or Sena Smartphone App.
Disabling the Eight-Way Intercom optimizes the intercom performance for a small group up to four participants. Enabling the Eight-Way Intercom optimizes the intercom performance for a larger group up to eight participants.
7.12 Advanced Noise Control™ (Default: Enable)
An Advanced Noise Control setting can be found in the settings menu, accessible through Sena Device Manager or Sena Smartphone App.
If Advanced Noise Control is enabled, background noise is reduced during intercom conversations. If Advanced Noise Control is disabled, the background noise is mixed with your voice while using the intercom.

MOMENTUM INC Intelligent Noise Control™ Helmet | 60
MENU
8. USING THE FM RADIO
FM Radio On/Off
Seek and Save Radio
Stations
Scan and Save Radio Stations
Temporary Station Preset
Navigating Preset
Stations
Region Selection
Radio Data Systems (RDS)
Alternative (AF) Setting
FM Station Guide
8.1 FM Radio On/Off
To turn on or shut off the FM Radio, press the (-) Button for 1 second until you hear a double beep.
FM Radio On
= 1sHOLD
FM RADIO ON
“FM on”
FM Radio Off
= 1sHOLD
FM RADIO OFF
“FM off”
8. USING THE FM RADIO
CHAPTER8

MOMENTUM INC Intelligent Noise Control™ Helmet | 61
MENU
8. USING THE FM RADIO
FM Radio On/Off
Seek and Save Radio
Stations
Scan and Save Radio Stations
Temporary Station Preset
Navigating Preset
Stations
Region Selection
Radio Data Systems (RDS)
Alternative (AF) Setting
FM Station Guide
8.2 Seek and Save Radio Stations
The “Seek” feature searches for radio stations.
1. Double tap the (+) Button or the (-) Button to search for radio stations.
Seek Stations Forward
= 2xTAP
SEEKFORWARD
Seek Stations Backward
= 2xTAP
SEEKBACKWARD
2. To save to current station, press and hold the Center Button for 3 seconds until you hear the voice prompt, “Preset (#)”.
Enter Preset Selection Mode
= 3sHOLD
ENTER PRESET MODE
“Preset (#)”

MOMENTUM INC Intelligent Noise Control™ Helmet | 62
MENU
8. USING THE FM RADIO
FM Radio On/Off
Seek and Save Radio
Stations
Scan and Save Radio Stations
Temporary Station Preset
Navigating Preset
Stations
Region Selection
Radio Data Systems (RDS)
Alternative (AF) Setting
FM Station Guide
3. Tap the (+) Button or the (-) Button to navigate through the preset numbers that you want to store.
Navigate Forward through Preset Stations
= 1xTAP
NAVIGATE FORWARD
Navigate Backward through Preset Stations
= 1xTAP
NAVIGATE BACKWARD
4. Press and hold the (+) Button for 1 second to save the station in the preset number you choose. Or, press and hold the (-) Button for 1 second to delete the station from memory.
Save Station to the Preset Number
= 1sHOLD
SAVE TO PRESET #
Delete Station from Memory
= 1sHOLD
DELETE STATION

MOMENTUM INC Intelligent Noise Control™ Helmet | 63
MENU
8. USING THE FM RADIO
FM Radio On/Off
Seek and Save Radio
Stations
Scan and Save Radio Stations
Temporary Station Preset
Navigating Preset
Stations
Region Selection
Radio Data Systems (RDS)
Alternative (AF) Setting
FM Station Guide
8.3 Scan and Save Radio Stations
The “Scan” function automatically searches for radio stations, starting with the current station’s frequency, then up from there.
1. Press and hold the (+) Button for 1 second to scan for stations.
Scan and Save Radio Stations
= 1sHOLD
STARTSCANNING
2. The Sena tuner pauses at each station it finds for 8 seconds before moving to the next.
3. To save the current station, tap the Center Button. The station will be saved as the next preset number.
Save the Current Station
= 1xTAP
SAVE STATION
“Save preset (#)”

MOMENTUM INC Intelligent Noise Control™ Helmet | 64
MENU
8. USING THE FM RADIO
FM Radio On/Off
Seek and Save Radio
Stations
Scan and Save Radio Stations
Temporary Station Preset
Navigating Preset
Stations
Region Selection
Radio Data Systems (RDS)
Alternative (AF) Setting
FM Station Guide
4. To stop scanning, press the (+) Button for 1 second.
Stop Scanning
= 1sHOLD
STOPSCANNING
8.4 Temporary Station Preset
The Temporary Station Preset feature automatically finds and saves the nearest 10 radio stations without changing your existing preset stations.
1. Tap the (+) Button three times to automatically find and save 10 stations.
Temporary Stations
= 3xTAP
TEMPORARY STATIONS
2. The temporary preset stations will be cleared when the Bluetooth system reboots.

MOMENTUM INC Intelligent Noise Control™ Helmet | 65
MENU
8. USING THE FM RADIO
FM Radio On/Off
Seek and Save Radio
Stations
Scan and Save Radio Stations
Temporary Station Preset
Navigating Preset
Stations
Region Selection
Radio Data Systems (RDS)
Alternative (AF) Setting
FM Station Guide
8.5 Navigating Preset Stations
Using the methods above, up to 10 radio stations can be stored. Press and hold the Center Button for 1 second to navigate through the saved stations.
Navigate through Preset Stations
= 1sHOLD
NAVIGATE FORWARD
Note: You can use the Sena Device Manager or the Sena Smartphone App to save the preset stations.
8.6 Region Selection
You can select the proper FM frequency range for your location from the Sena Device Manager or the Sena Smartphone App. Using the region setting, you can optimize the seek function to avoid unnecessary frequency ranges.
Region Frequency range Step
Worldwide 76.0 ~ 108.0 MHz ± 100 kHz
Americas and Australia
87.5 ~ 107.9 MHz ± 200 kHz
Asia and Europe 87.5 ~ 108.0 MHz ± 100 kHz
Japan 76.0 ~ 95.0 MHz ± 100 kHz

MOMENTUM INC Intelligent Noise Control™ Helmet | 66
MENU
8. USING THE FM RADIO
FM Radio On/Off
Seek and Save Radio
Stations
Scan and Save Radio Stations
Temporary Station Preset
Navigating Preset
Stations
Region Selection
Radio Data Systems (RDS)
Alternative (AF) Setting
FM Station Guide
8.7 Radio Data Systems (RDS) Alternative (AF) Setting (Default: Disable)
The RDS AF setting can be found in the settings menu, accessible through Sena Device Manager or Sena Smartphone App.
When Radio station signals get too weak for good reception, with RDS AF enabled, the Sena radio receiver re-tunes to a station with better reception. If RDS AF is disabled, you’ll have to find stronger stations manually.
8.8 FM Station Guide (Default: Enable)
The FM Station Guide setting can be found in the settings menu, accessible through Sena Device Manager or Sena Smartphone App.
When FM Station Guide is enabled, FM station frequencies are given by voice prompts as you select preset stations. When FM Station Guide is disabled, the voice prompts on FM station frequencies will not be given as you select preset stations.

MOMENTUM INC Intelligent Noise Control™ Helmet | 67
MENU
9. VOICE COMMAND
Voice Command
Setting
The Voice Command of the Bluetooth system allows you to operate certain operations by simply using your voice. You can control the Bluetooth system completely handsfree using the voice recognition. The voice command function works only with English commands.
Voice Command
= “Hello Sena”
START VOICE COMMAND or
1xTAP
Speak a voice command from the table below:
Mode Status Function Voice Command
Standby / Intercom
Start/End each Intercom
“Intercom [one, two, … nine]
End all intercoms “End intercom”
Call last intercom “Last intercom”
Group intercom “Group intercom”
Intercom pairing “Pairing intercom”
Cancelling operations
“Cancel”
9. Voice Command
CHAPTER9

MOMENTUM INC Intelligent Noise Control™ Helmet | 68
MENU
9. VOICE COMMAND
Voice Command
Setting
Mode Status Function Voice Command
Standby / Music / FM Radio
Play/Pause music “Music” or “Stereo”
Turn on/off FM radio “FM radio”
Check battery “Check battery”
Speed dialing“Speed dial [one,
two, three]”
Redial the last call “Redial”
Voice command help
“What can I say?”
Check connected devices
“Connected devices”
Configuration menus
“Configuration”
Music / FM Radio
Next track (music) / next preset (FM radio)
“Next”
Previous track (music) / previous preset (FM radio)
“Previous”
Stop music / FM Radio
“Stop”
Note:• Voice Command performance may vary based
on the environmental conditions including riding speed and ambient noise. To improve the performance, minimize wind noise on the microphone by closing the visor.
• To activate the Voice Command during an intercom conversation, tap the Center Button and (-) Button at the same time.

MOMENTUM INC Intelligent Noise Control™ Helmet | 69
MENU
9. VOICE COMMAND
Voice Command
Setting
9.1 Voice Command Setting (Default: Enable)
A Voice Command setting can be found in the settings menu, accessible through Sena Device Manager or Sena Smartphone App.
When Voice Command is enabled, you can use your voice to give a command the Bluetooth system operate certain operations completely handsfree. If Voice Command is disabled, you will need to operate all of the functions using the buttons on the Bluetooth system.

MOMENTUM INC Intelligent Noise Control™ Helmet | 70
MENU
10. AMBIENT MODE You can hear the ambient sound outside of your helmet by activating the Ambient Mode. To activate the Ambient Mode, press the Ambient Mode Button for 1 second to turn it on. To deactivate the Ambient Mode, press the Ambient Mode Button for 1 second.
Ambient On
= 1sHOLD
AMBIENT MODE ON
“Ambient on”
Ambient Off
= 1sHOLD
AMBIENT MODE OFF
“Ambient off”
10. AMBIENT MODE
CHAPTER10

MOMENTUM INC Intelligent Noise Control™ Helmet | 71
MENU
11. GENERAL SETTINGS
Function Priority
Firmware Upgrades
Voice Prompts
Sidetone
Deleting All Bluetooth
Pairing Information
11.1 Function Priority
The Bluetooth system prioritizes connected devices in the following order:
(highest) Mobile phone
Voice command mode
Intercom
Music sharing via Bluetooth stereo
FM radio
(lowest) Bluetooth stereo music
A lower-priority function gets interrupted by a higher-priority function. For example, stereo music will be interrupted by an Intercom Conversation; an Intercom Conversation will be interrupted by an incoming mobile phone call.
11.2 Firmware Upgrades
The Bluetooth system supports firmware upgrades. You can upgrade the firmware using the Sena Device manager. Please visit sena.com to check for the latest software downloads.
Click Here to Visit Sena.com
11. GENERAL SETTINGS
CHAPTER11

MOMENTUM INC Intelligent Noise Control™ Helmet | 72
MENU
11. GENERAL SETTINGS
Function Priority
Firmware Upgrades
Voice Prompts
Sidetone
Deleting All Bluetooth
Pairing Information
11.3 Voice Prompts (Default: Enable)
A Voice prompt setting can be found in the settings menu, accessible through Sena Device Manager or Sena Smartphone App.
If Voice prompt is enabled, you can hear Voice prompts for different kinds of features. If Voice prompt is disabled, Voice prompts are silenced except for those in the Configuration Menu, battery level indication, speed dial, and FM radio functions.
11.4 Sidetone (Default: Disable)
A Sidetone setting can be found in the settings menu, accessible through Sena Device Manager or Sena Smartphone App.
Sidetone is the sound of your own voice as picked up by your Bluetooth system’s microphone and reproduced in your own ear, by your own speaker. It helps you to naturally speak at the correct level according to varying helmet noise conditions. If this feature is enabled, you can hear what you are speaking during an intercom conversation or a phone call.
MOMENTUM INC Intelligent Noise Control™ Helmet | 73
MENU
11. GENERAL SETTINGS
Function Priority
Firmware Upgrades
Voice Prompts
Sidetone
Deleting All Bluetooth
Pairing Information
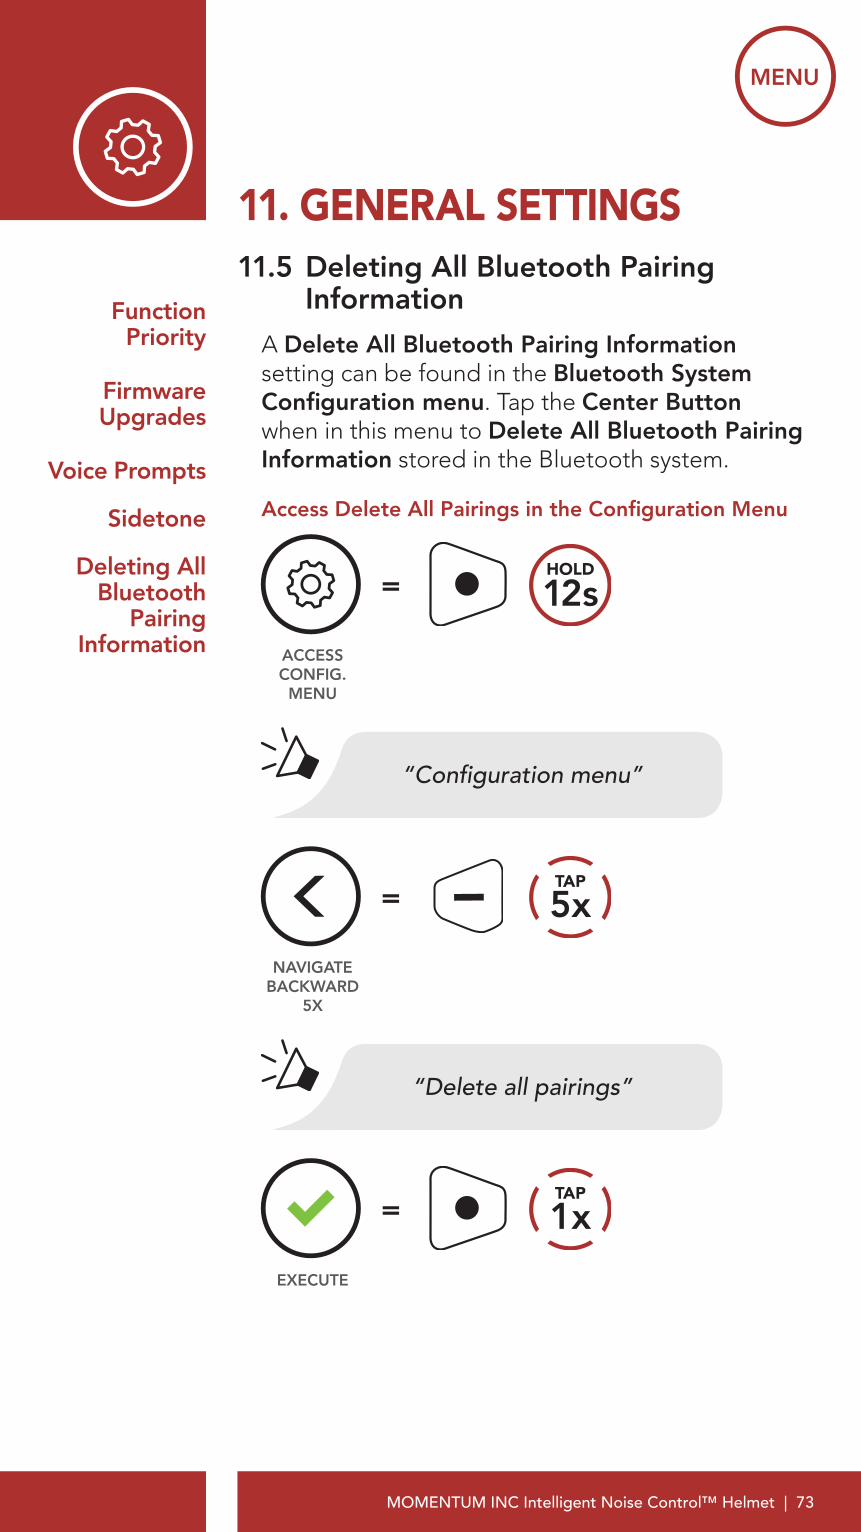
11.5 Deleting All Bluetooth Pairing Information
A Delete All Bluetooth Pairing Information setting can be found in the Bluetooth System Configuration menu. Tap the Center Button when in this menu to Delete All Bluetooth Pairing Information stored in the Bluetooth system.
Access Delete All Pairings in the Configuration Menu
= 12sHOLD
ACCESS CONFIG.
MENU
“Confi guration menu”
= 5xTAP
NAVIGATE BACKWARD
5X
“Delete all pairings”
= 1xTAP
EXECUTE

MOMENTUM INC Intelligent Noise Control™ Helmet | 74
MENU
12. REMOTE CONTROL
Pairing with the Remote
Control
You can remotely control the Bluetooth system using Sena Remote Control devices (sold separately) such as a Handlebar Remote or a Wristband Remote. This eliminates the need to remove your hands from the handlebars for button operations.
12.1 Pairing with the Remote Control
1. Turn on the Bluetooth system and the Remote Control device.
2. Execute Remote Control Pairing in the Bluetooth System Configuration Menu.
Access Remote Control Pairing in the Configuration Menu
= 12sHOLD
ACCESS CONFIG.
MENU
“Confi guration menu”
= 4xTAP
NAVIGATE BACKWARD
4X
“Remote control pairing”
= 1xTAP
EXECUTE
12. REMOTE CONTROL
CHAPTER12
MOMENTUM INC Intelligent Noise Control™ Helmet | 75
MENU
12. REMOTE CONTROL
Pairing with the Remote
Control
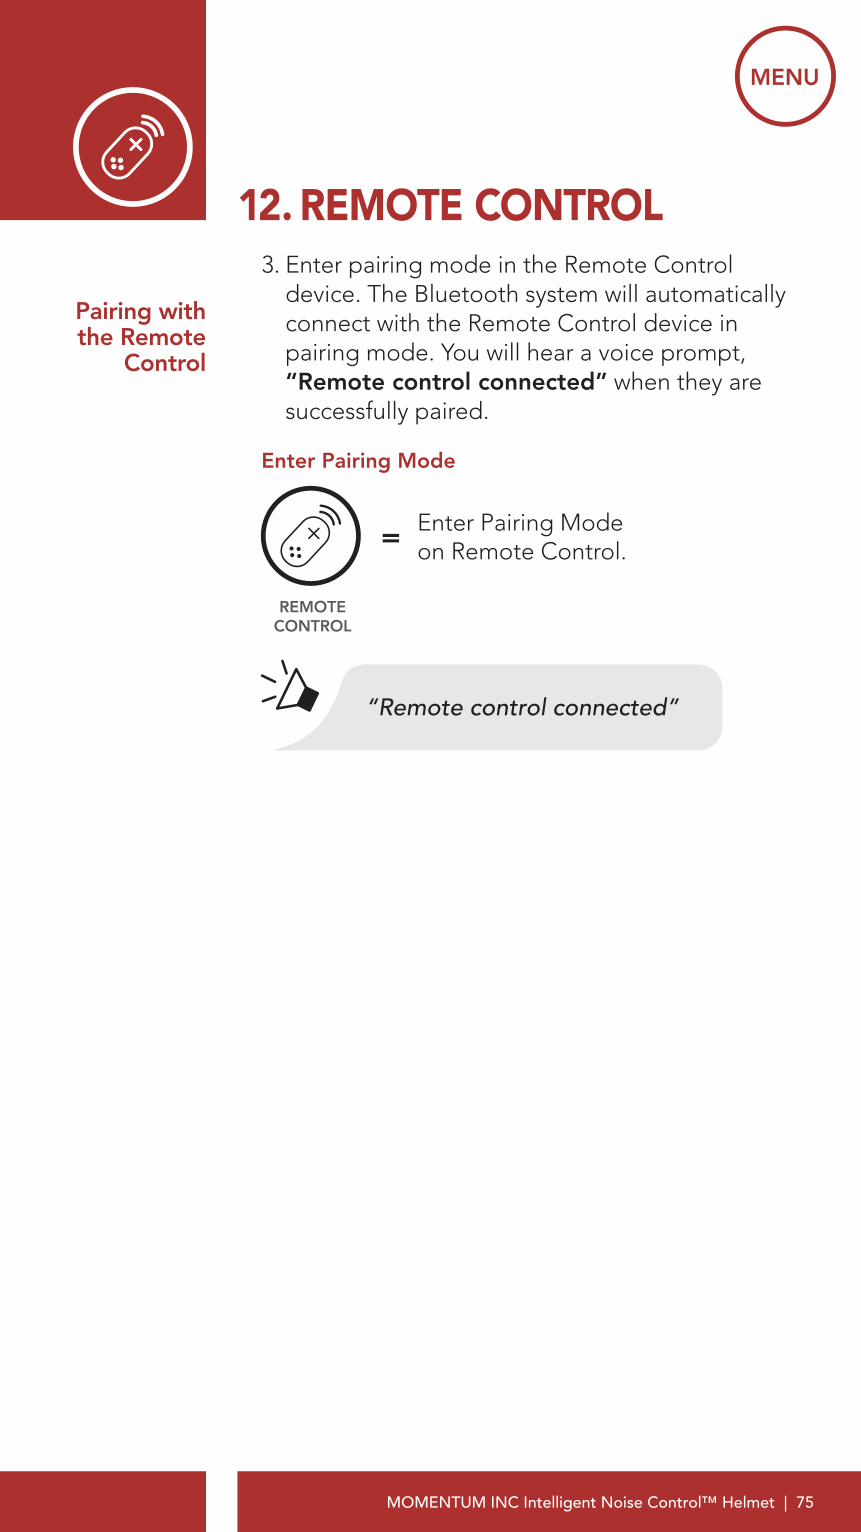
3. Enter pairing mode in the Remote Control device. The Bluetooth system will automatically connect with the Remote Control device in pairing mode. You will hear a voice prompt, “Remote control connected” when they are successfully paired.
Enter Pairing Mode
= Enter Pairing Mode on Remote Control.
REMOTE CONTROL
“Remote control connected”

MOMENTUM INC Intelligent Noise Control™ Helmet | 76
MENU
13. TROUBLESHOOTING
Fault Reset
Factory Reset
Please visit sena.com for answers to frequently asked questions. This detailed online FAQ section deals with troubleshooting, illustrates case studies and contains tips on using the Momentum INC Helmet.
Click Here to Visit Sena.com
13.1 Fault Reset
When the Bluetooth system is not working properly, you can easily reset the unit:
1. Partially pull out the neck roll from the rear side of the helmet.
2. Locate the pinhole reset button as described below.
3. Gently insert a paperclip into the hole and tap the Fault Reset Button with light pressure.
Fault Reset
=
FAULT RESET 1xTAP
13. TROUBLESHOOTING
CHAPTER13

MOMENTUM INC Intelligent Noise Control™ Helmet | 77
MENU
13. TROUBLESHOOTING
Fault Reset
Factory Reset
4. The Bluetooth system will shut down.
Note: Fault Reset will not restore the Bluetooth system to factory default settings.
13.2 Factory Reset
To erase all of your settings and start fresh, the Bluetooth system can be restored to factory default settings using the Factory Reset feature in the Bluetooth System Configuration Menu.
Access Factory Reset in the Configuration Menu
= 12sHOLD
ACCESS CONFIG.
MENU
“Confi guration menu”
= 2xTAP
NAVIGATE BACKWARD
2X
“Factory reset”
= 1xTAP
EXECUTE

MOMENTUM INC Intelligent Noise Control™ Helmet | 78
MENU
14. MAINTENANCE AND CARE
Outer Shell
Inner Lining
Storing the Helmet
14.1 Outer Shell
Use a soft cloth and a small amount of water to remove bugs from the exterior.
Note: Never use gasoline, diesel fuel, thinners or solvents to clean the helmet. These substances can cause serious damage to the helmet, even though the resulting damage may not be visible. The full safety function of the helmet can then no longer be guaranteed.
14.2 Inner Lining
The inner lining of the helmet is completely removable. Its headliner can be washed by hand using mild soap at a maximum temperature of 30°C (86°F). Allow the lining to dry at room temperature.
14.3 Storing the Helmet
Store the helmet in a dry, dark, well-ventilated location, out of the reach of children and animals. Always position the helmet so that it cannot fall to the floor. Damage that occurs in this way is not covered by the warranty.
14. MAINTENANCE AND CARE
CHAPTER14

MOMENTUM INC Intelligent Noise Control™ Helmet | 79
© 1998–2017 Sena Technologies, Inc. All rights reserved.
Sena Technologies, Inc. reserves the right to make any changes and improvements to its product without providing prior notice.
Sena™ is a trademark of Sena Technologies, Inc. or its subsidiaries in the USA and other countries. Prism™, Bluetooth Audio Pack for GoPro®, Cavalry™, X1™, X1 Pro™ FreeWire™, Tufftalk™, 30K™, 20S™, 20S EVO™, 10S™, 10C™, 10U™, 10Upad™ 10R™, 3S™, SMH10™, SMH10R™, SMH5™, SMH5-FM™, SMH5 MultiCom™, SPH10™, SPH10H-FM™, Expand™, Bluetooth Mic & Intercom™, RC1™, RC3™, RC4™, Handlebar Remote™, Wristband Remote™, SM10™, SR10™, SR10i™, FreeWire™ are trademarks of Sena Technologies, Inc. or its subsidiaries. These trademarks may not be used without the express permission of Sena.
GoPro® is a registered trademark of Woodman Labs of San Mateo, California. Sena Technologies, Inc. (“Sena”) is not affiliated with Woodman Labs, Inc. The Sena Bluetooth Pack for GoPro® is an aftermarket accessory specially designed and manufactured by Sena Technologies, Inc. for the GoPro® Hero3 and Hero4 allowing for Bluetooth capabilities.
The Bluetooth® word mark and logos are owned by the Bluetooth SIG, Inc. and any use of such marks by Sena is under license. iPhone® and iPod® touch are registered trademarks of Apple Inc.
Address: 3150 Almaden Expresay, Suite 238 San Jose, CA 95118
Firmware v1.0
Copyright © 2017 Sena Technologies, Inc. All rights reserved.
MENU