Embed Size (px)
Citation preview

Monitor MiniPOS
www.monitorbm.com
Product Manual

The software contains proprietary information of MonitorBusiness Machines Ltd. It is provided under a licenseagreement containing restrictions on use anddisclosure and is also protected by copyright law.Reverse engineering of the software is prohibited.
Information in this document is subject to changewithout notice. Companies, names, and data used inexamples herein are fictitious unless otherwise noted.No part of this document may be reproduced ortransmitted in any form or by any means, electronic ormechanical, for any purpose, without the express writtenpermission of Monitor Business Machines Ltd.
All rights reserved. No part of this work may bereproduced in any form or by any means - graphic,electronic, or mechanical, including photocopying,recording, taping, or information storage and retrievalsystems - without the written permission of thepublisher.
While every precaution has been taken in thepreparation of this document, the publisher and theauthor assume no responsibility for errors oromissions, or for damages resulting from the use ofinformation contained in this document or from the useof programs and source code that may accompany it. Inno event shall the publisher and the author be liable forany loss of profit or any other commercial damagecaused or alleged to have been caused directly orindirectly by this document.
Monitor Business Machines Ltd.31a Normanby RoadAuckland,NEW ZEALAND
Published: 27/03/2014
MiniPOS Manual
© 2014 Monitor Business Machines Ltd
The Monitor Logo and Supervisor™ are registeredtrademarks of Monitor Business Machines Ltd.
Any other products that are referred to in this documentmay be either trademarks and/or registered trademarksof the respective owners. The publisher and the authormake no claim to these trademarks.
iContents
Contents
Introduction 1
................................................................................................................................... 1Features
................................................................................................................................... 1Key Benefits
................................................................................................................................... 2Hardware and Software options
Installation 3
Configuration 4
................................................................................................................................... 4MiniPOS configuration items
......................................................................................................................................................... 4Server Tab
.................................................................................................................................................. 5SOAP Server Address
.................................................................................................................................................. 5Terminal Name
........................................................................................................................................... 5Test
.................................................................................................................................................. 5SQL Server Name
.................................................................................................................................................. 5SQL DB Name
.................................................................................................................................................. 5Authentication
........................................................................................................................................... 5SQL Server Authentication
...................................................................................................................................... 5Login
...................................................................................................................................... 5Passw ord
........................................................................................................................................... 5Window s Authentication
........................................................................................................................................... 6Test
.................................................................................................................................................. 7Used for fees and f ines
.................................................................................................................................................. 7Account Suff ix
.................................................................................................................................................. 7Ignore PIN
......................................................................................................................................................... 7Application Tab
.................................................................................................................................................. 7Setup Passw ord
.................................................................................................................................................. 7MiniPOS Group
.................................................................................................................................................. 8Close After Transaction
.................................................................................................................................................. 8Kiosk Mode
.................................................................................................................................................. 8Show CANCEL Button
.................................................................................................................................................. 9Promag PinPad
.................................................................................................................................................. 9MiFare Reader
.................................................................................................................................................. 9Show Numeric Keypad
.................................................................................................................................................. 10Scramble PIN Entry Keys
.................................................................................................................................................. 11RS232 Port
.................................................................................................................................................. 11PCEFTPOS
.................................................................................................................................................. 11Resolution
.................................................................................................................................................. 11Categories
........................................................................................................................................... 12Use Categories
........................................................................................................................................... 12Drop Shadow Colour
........................................................................................................................................... 12Group Uncatigorized
........................................................................................................................................... 12Auto-category name
......................................................................................................................................................... 13Customisation Tab
.................................................................................................................................................. 13Static Text Colour
.................................................................................................................................................. 14Dynamic Text Colour
.................................................................................................................................................. 14Insuff icient Text Colour
.................................................................................................................................................. 14Dialog Header Text
.................................................................................................................................................. 14Table Background Colour
.................................................................................................................................................. 15Table Header Background Colour
.................................................................................................................................................. 15Table Text Colour
.................................................................................................................................................. 15Table Header Text Colour

Contentsii
.................................................................................................................................................. 15Background Image
.................................................................................................................................................. 15Primary Prompt
.................................................................................................................................................. 16Secondary Prompt
.................................................................................................................................................. 16Show Default Secondary
.................................................................................................................................................. 17End Transaction Msg
......................................................................................................................................................... 18Printer Tab
.................................................................................................................................................. 18Receipt Printer
.................................................................................................................................................. 18Printer
.................................................................................................................................................. 18Initialisation Codes
.................................................................................................................................................. 18Finalisation Codes
.................................................................................................................................................. 18Receipt Width
......................................................................................................................................................... 19Receipt Messages Tab
.................................................................................................................................................. 19Header Line #1 - #3
.................................................................................................................................................. 19Footer Line #1 - #2
.................................................................................................................................................. 19Account # Text
.................................................................................................................................................. 19Primary Name Text
.................................................................................................................................................. 19Secondary Name Text
.................................................................................................................................................. 19To Identify User
........................................................................................................................................... 19Use Primary ID
........................................................................................................................................... 19Use Account Number
...................................................................................................................................... 19Encrypted
.................................................................................................................................................. 20Print Account Name
.................................................................................................................................................. 20Use Product Numbers
................................................................................................................................... 21Loading items into Supervisor Net
......................................................................................................................................................... 23Used in MiniPOS
......................................................................................................................................................... 23MiniPOS groups
......................................................................................................................................................... 23Notif ication email address
......................................................................................................................................................... 24Use a user entered price
......................................................................................................................................................... 25Setting a price per item
................................................................................................................................... 25Payment of Fees and Fines
Application Workflow 26
................................................................................................................................... 26User Authentication
................................................................................................................................... 27Choosing items
................................................................................................................................... 28Checking out
Transactions and Receipts 29
................................................................................................................................... 29Example Scenario
................................................................................................................................... 29Customer Receipt
................................................................................................................................... 30Suppliers' Receipts
................................................................................................................................... 31Database Entries

1Introduction
Introduction
Monitor MiniPOS is a self-service or staff driven point of sale (POS) application that can be runon a standard workstation or touch-screen kiosk. It offers the ability to prepay for goods andservices. Each MiniPOS station is able to have a unique list of products that can bepurchased depending on where the station is installed (e.g. department, library or site) and thepurpose of the station, e.g. a stationery kiosk, a food ordering kiosk, fees and fines paymentfacility in a library.
MiniPOS may also be used in a print room environment for additional charging of binding,folding, special paper types, etc.
Monitor MiniPOS provides greater convenience to customers and eliminates cash handling bystaff. Students, for instance, can pay for specialist printing or copying at a department PC ortouch screen. Receipts can be printed out and emailed to the customer as well as sending apurchase notification to whoever is the supplier of the purchased goods.
There are three different licenses for MiniPOS:
1. MPS - Standard license for the purchase of goods from Supervisor Net
2. MPF - Payment of Library fees and fines only. Goods cannot be purchased from SupervisorNet
3. MPB - Both fees and fines as well as goods purchased from Supervisor Net
Features
MiniPOS features include
· Easy to use interface for the end customer· Automatically emailed customer receipts· Multiple suppliers are supported in the single transaction. Each supplier will receive a
summary of what the customer purchased· Goods and prices are maintained from within Supervisor Net· Support for department/client codes· Support for Library fees and fines payment. This interfaces back through Supervisor Net into
the library management system (LMS) for immediate payment (Available in version 7.2 andabove of Supervisor Net)
· Fully customisable user interface for better integration into customer environments
Key Benefits
Benefits to the user
· Convenient and simple
· Automated system means not having to find and wait for staff to process the purchase andpayment
· Customers are able to pay for goods and services at any time, not just during office hours
· Customers can elect to have the receipt printed, emailed or both
Benefits to you
· Removes cash handling from staff

Introduction2
· Improves payment collection
· Automatically receive notifications of work orders and payment via email
· Runs on a PC or touch screen kiosk
· Reduce paperwork in tracking and reporting payments
· Supports goods being provisioned by multiple suppliers
Hardware and Software options
Hardware
· PC-based POS touchscreen terminal, Standard workstation (If being used by a single user)
· Printer
· ACT812 keypad unit
· MiFare card reader
· PC-EFTPOS terminal
Software
· Integration with Supervisor Net
· Integration with a Library Management System
· On-Screen keypad with option to scramble PIN entry keys
· Kiosk mode (Locked down screen) or standard workstation application
· Customisable user interface - Buttons, Backgrounds, prompts and text colour
· Customisable receipt headers, footers and titles

3Installation
Installation
1. Ensure the Supervisor Net registration includes the correct license for the POS setup:
· MPS - Standard license for the purchase of goods from Supervisor Net
· MPF - Payment of Library fees and fines only. Goods cannot be purchased from SupervisorNet
· MPB - Both fees and fines as well as goods purchased from Supervisor Net
2. Install the MiniPOS application by running the "MBMMiniPOSSetup.exe" installation file
a. Accept the license agreementb. Specify the folder to install the MiniPOS applicationc. Specify the Start Menu application folder to create the MiniPOS application shortcut

Configuration4
Configuration
MiniPOS is installed with the most common parameters already set. At a minimum, youwould want to:
· Set the Supervisor Net SOAP Server address
· Configure the SQL Server connection settings
· Alter the configuration item for Fees and Fines payment, if this feature is being used
· Turn on the receipt printer (if used)
· Customise the receipt messages
· Load items into Supervisor Net
MiniPOS configuration items
To access the MiniPOS configuration, hold down CTRL and ALT and click the OK button atthe main login prompt.
You will be asked for a password.
The password is a default value of "m0nit0r". (Zeros are used instead of letters)
Server Tab
5Configuration
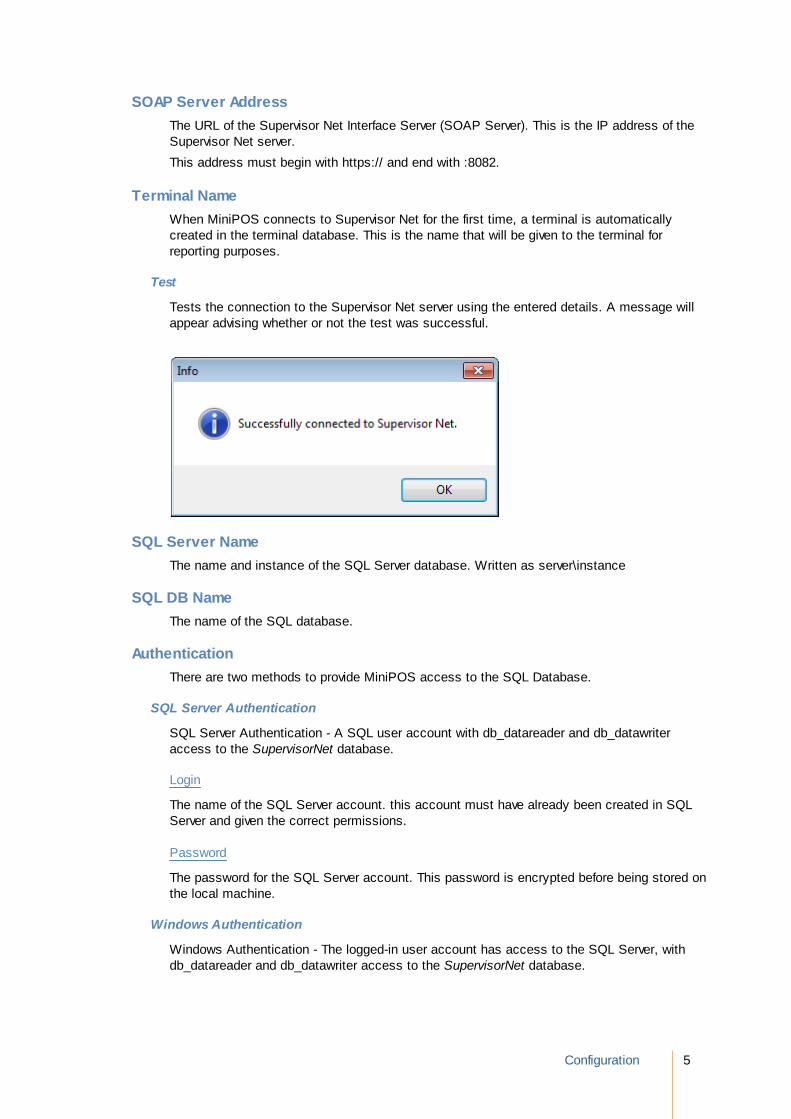
SOAP Server Address
The URL of the Supervisor Net Interface Server (SOAP Server). This is the IP address of theSupervisor Net server.
This address must begin with https:// and end with :8082.
Terminal Name
When MiniPOS connects to Supervisor Net for the first time, a terminal is automaticallycreated in the terminal database. This is the name that will be given to the terminal forreporting purposes.
Test
Tests the connection to the Supervisor Net server using the entered details. A message willappear advising whether or not the test was successful.
SQL Server Name
The name and instance of the SQL Server database. Written as server\instance
SQL DB Name
The name of the SQL database.
Authentication
There are two methods to provide MiniPOS access to the SQL Database.
SQL Server Authentication
SQL Server Authentication - A SQL user account with db_datareader and db_datawriteraccess to the SupervisorNet database.
Login
The name of the SQL Server account. this account must have already been created in SQLServer and given the correct permissions.
Password
The password for the SQL Server account. This password is encrypted before being stored onthe local machine.
Windows Authentication
Windows Authentication - The logged-in user account has access to the SQL Server, withdb_datareader and db_datawriter access to the SupervisorNet database.

Configuration6
Test
Tests the connection to the SQL server using the entered details. A message will appearadvising whether or not the test was successful.

7Configuration
Used for fees and fines
Puts MiniPOS into a mode where it will request a list of fees and fines belonging to the userfrom Supervisor Net. In turn, Supervisor Net is configured to interface to a library managementsystem (LMS), so the payment of these items is real-time.
The chosen options require different connection licenses to Supervisor Net:
Configuration Option License Required
Use for Fees and Fines isdisabled
· MPS - Standard license for the purchase of goods fromSupervisor Net
Fees and Fines only · MPF - Payment of Library fees and fines only. Goodscannot be purchased from Supervisor Net
Use all Sources · MPB - Both fees and fines as well as goods purchased fromSupervisor Net
Account Suffix
If users have multiple accounts, this setting tells MiniPOS which account to use.
Ignore PIN
When enabled, the user will not be prompted for a PIN, even if their account has one set.
Application Tab
Setup Password
The password that must be entered when opening the configuration section of the application.The default value is "m0nit0r", but it is recommended that you change it.
MiniPOS Group
Defines what group(s) the MiniPOS instance is part of.
Grouping is used to only display certain product items at particular MiniPOS stations. This isachieved by assigning one or many group numbers to each item in Supervisor Net and one or

Configuration8
many group numbers to each MiniPOS station.
See the section later in this manual for the configuration of groups in each of the items.
Close After Transaction
MiniPOS will completely exit when the user has completed the purchase. This is used whenMiniPOS is being launched from Supervisor Express. The user will be returned back toExpress once they have completed their transaction.
Kiosk Mode
Puts MiniPOS into a secure, locked-down mode where the user cannot exit the applicationand they can't see the task bar or anything else to do with the machine's operating system.This is used when MiniPOS is being run on a dedicated kiosk.
Show CANCEL Button
Displays the Cancel button on the main login screen. This is used when the application isbeing run on a user's workstation or if it is being launched from Supervisor Express.
Pressing cancel will exit the application.

9Configuration
Promag PinPad
Enables the use of an ACT812 keypad unit for the user to swipe their card and enter their PINon.
MiFare Reader
Enables connection to a serial Mifare reader.
Show Numeric Keypad
Displays the full numeric keypad to the user at the login screen so that they can type theiraccount number in, rather than just swiping a card.

Configuration10
Scramble PIN Entry Keys
Puts the numeric buttons on the keypad in a randomised position to help prevent peopleseeing the PIN number as it is entered.

11Configuration
RS232 Port
The serial port that the ACT812 terminal is connected to.
PCEFTPOS
Enables the connection to a PC-EFTPOS terminal.
Resolution
Enables you to set a specific resolution to fit the device that MiniPOS is running on if the Automode doesn't work correctly. An example of this is MiniPOS running on some tablet devices.
Categories
By using categories, items can be logically grouped which saves room on the user interfaceand makes it look tidier:
Categories are defined in the pricing model record in Supervisor Net Administrator. Either usean existing category when adding a new item, or type in a new category:

Configuration12
Use Categories
Enables the category support in MiniPOS. If this is disabled, items are simply listed inalphabetical order, rather than being grouped.
Drop Shadow Colour
Changes the colour of the drop shadow for the category headings in the user interface. Thisshould only be altered if a different image is used for the category headings.
Group Uncatigorized
If enabled, any items that are found to not already belong to a category are grouped togetherinto a default category with the title defined in the next setting, Auto-category name.
Auto-category name
The customizable name of the default category for any items found to not already be groupedby categories. The default value for this name is 'Other'.

13Configuration
Customisation Tab
Static Text Colour
Changes the colour of the static text in the application. This is things such as the userprompts and the titles of the items such as Balance.

Configuration14
Dynamic Text Colour
The colour of the text on the main form used by the system to indicate a dynamic value, suchas a user's balance.
Insufficient Text Colour
The colour that the user's New Balance changes to if they select more items that they havemoney for.
Dialog Header Text
The colour of the text in the dialog headers.
Table Background Colour
The background colour of the item selection and shopping list tables.

15Configuration
Table Header Background Colour
The colour of the header bar in the product selection and shopping list grids.
Table Text Colour
The colour of the text in the product list tables.
Table Header Text Colour
The colour of the text in the product selection and shopping list grids.
Background Image
The product normally runs over top of a plain blue background. This background can bereplaced by specifying a bitmap image.
Primary Prompt
This is the message that the user is displayed on the first login screen.

Configuration16
Secondary Prompt
This is the message that is displayed to the user on the secondary entry prompt.
Show Default Secondary
Selecting this option will make MiniPOS auto-populate the user's default secondary value intothe secondary selection screen. The user can still change this to another value if desired.

17Configuration
End Transaction Msg
A message displayed to the user at the end of the transaction.
This window will automatically close if the user has walked away.

Configuration18
Printer Tab
Receipt Printer
Enables the printing of receipts.
Printer
Displays a list of available print devices. The printer must be installed before attempting toselect.
Initialisation Codes
The codes required by the printer during initialisation. Please refer to your printer's user guide.
Finalisation Codes
Codes to be sent to the printer after the receipt body has been printed. These codes can makethe printer do things such as feed the paper a bit, cut the paper, etc. Please refer to yourprinter's user guide for more information.
Receipt Width
Set to match the physical size of the receipt paper roll. MiniPOS will only print this manycharacters horizontally. The receipt will automatically be re-formatted to take up the entirewidth of the receipt paper.

19Configuration
Receipt Messages Tab
Header Line #1 - #3
The three optional lines of text at the top of the receipt. Typically the name of the site, phonenumber, etc.
Footer Line #1 - #2
The two lines of optional text at the bottom of the receipt. Typically tax number, etc.
Account # Text
The printed title for 'Primary Number'. I.e. Card Number: or Ticket Number:, etc.
Primary Name Text
The printed title for the user's name. I.e. Patron's Name:, etc.
Secondary Name Text
The printed title for the secondary number. I.e. Department:, etc.
To Identify User
This group of options determines how the user is identified on the receipt.
Use Primary ID
The customer's reference printed on the receipt will be the contents of their Primary ID field.
Use Account Number
The customer's reference printed on the receipt will be the contents of their Primary Numberfield.
Encrypted
The user's Primary Number will be encrypted before being printed on the receipt. This preventsanother person picking up a discarded receipt and typing the number into a device.

Configuration20
The encrypted number can be searched for in Supervisor Administrator by ticking theEncrypted option before typing the encrypted number into the Search field.
Print Account Name
Whether or not to print the user's name on their receipt.
Use Product Numbers
Replaces the product descriptions on the receipt with the Pricing Model Number fromSupervisor Net instead of the normal Pricing Model Name.

21Configuration
Loading items into Supervisor Net
Items are loaded into Supervisor Net by creating a Pricing Model item.
Each item contains the cost to the user, who will be emailed when the item is purchased andwhich MiniPOS terminal the item will appear on.
To create a new item -
1. Open up Supervisor Administrator and create a new Pricing Model.
2. Enter the stock code (Number), name of item (Name). Tick the item Used in MiniPOS andconfigure as required. (Explained in the later sections of this manual).

Configuration22
3. Go to the Variable Rate tab and enter a Count Item Price. This is the price per unit.
The following sections explain the options in more detail.

23Configuration
Used in MiniPOS
Determines that this item should be displayed in MiniPOS. Items without this ticked do notappear at any of the MiniPOS stations.
MiniPOS groups
Determines which MiniPOS station(s) this item is to appear at. There is a matching field ineach of the station's configuration. This grouping system is many to many, making it asflexible as possible.
Notification email address
Each item can have a different email address associated with this. This email address iswhere a notification about the sale of this item is sent to. The notification is in the form of atext file attached to the email.
MiniPOS will automatically group together notifications about multiple items bought in a singlesession. An example of this is, if the user buys:
2 x tins of spaghetti, notification = [email protected]
1 x tin of baked beans, notification = [email protected]

Configuration24
2 x boxes of tissues, notification = [email protected]
[email protected] receives a single email telling them that 2 tins of spaghetti and one tinof baked beans was purchased by the customer:
Account #: 1234
Name: Tom Jones
----------------------------------------
Baked Beans
1 @ $1.00 ....................... $1.00
Spaghetti
2 @ $2.00 ....................... $4.00
[email protected] receives an email telling them that a box of tissues was purchased bythe customer.
Account #: 1234
Name: Tom Jones
----------------------------------------
Tissues
1 @ $3.00 ....................... $3.00
Use a user entered price
If this is enabled, the end-user will be asked how much to charge for this item. This feature isused in a non self-serve application, such a print room operator billing a customer.

25Configuration
Setting a price per item
This is the price per item that the user purchases.
Payment of Fees and Fines
Payment of fees and fines is not yet available in the current version of Supervisor Net. Thisfeature will be available from version 7.2 and onwards of Supervisor Net.

Application Workflow26
Application Workflow
MiniPOS is designed to be simple to use, as customers are not expected to read the manualfirst! The icons are intuitive and there is a very basic workflow for the user from logging in through tochecking out.
User Authentication
Depending on how the application is configured, the user may see just a swipe card prompt, orthey will be presented with a full keypad so that they can type in their account code.
If their account requires PIN authentication, this dialog will then be displayed to them.
If the user is prompted for a department/cost center code, this will now be displayed:
27Application Workflow
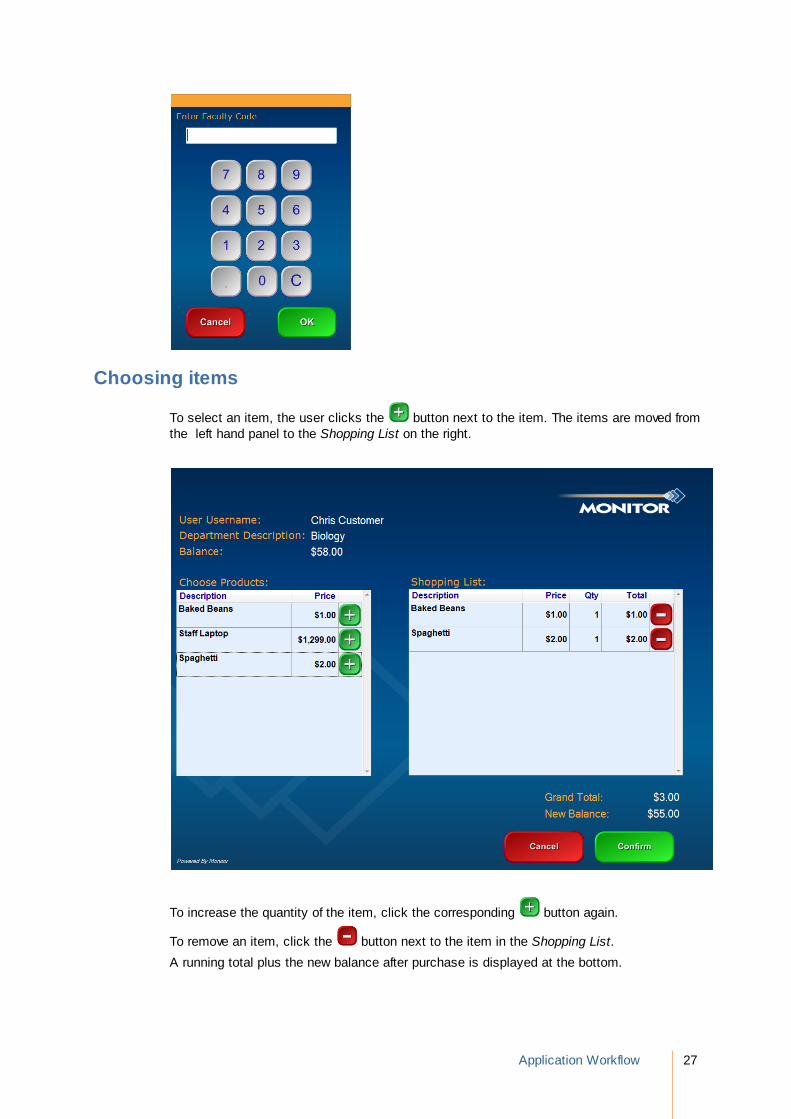
Choosing items
To select an item, the user clicks the button next to the item. The items are moved fromthe left hand panel to the Shopping List on the right.
To increase the quantity of the item, click the corresponding button again.
To remove an item, click the button next to the item in the Shopping List.
A running total plus the new balance after purchase is displayed at the bottom.

Application Workflow28
Checking out
To complete the transaction, click the button. A confirmation screen will bedisplayed which summarises the transaction.
Once the transaction has been committed, the user will be told that the purchase wassuccessful.
Finally, if the End Transaction Msg has been configured, this message will appear.

29Transactions and Receipts
Transactions and Receipts
When a customer purchases goods from a MiniPOS station, there are three receipt options:
1. Print out a receipt for the customer at the station
2. Email a copy of the receipt to the customer
3. Email a copy of the receipt to the suppliers of the goods
Example Scenario
In this scenario, a customer has purchased goods from a MiniPOS station. It's breakfast time,so they buy food items, but they realise that they may also need a ream of paper to makepaper planes and a ballpoint pen to decorate them.
After completing their purchase at the MiniPOS station, they have to go and collect their orderfrom two different places - the canteen and the stationery supplies shop.
MiniPOS has already emailed their order off to these two places so that they can simply walkover and collect their goods upon presentation of the receipt.
Customer Receipt
The receipt printed out at the MiniPOS station and emailed to the customer is in the followingformat:

Transactions and Receipts30
As you can see, it lists all the items that the customer purchased, along with their closingbalance, receipt number and tax number.
The receipt number is generated in the following way:
Terminal ID - B03
Date/Time - 2012 (Year) 07 (Month) 24 (Day) 07 (Hour) 38 (Minute) 50 (Seconds)
There is no possibility of a receipt number being duplicated in the future, unless the MiniPOSstation is set to the wrong time (Sometime in the past). Even in this situation, the chances areextremely slim.
Suppliers' Receipts
As there are two separate suppliers for the goods that the customer has bought (Food itemsfrom the canteen and stationery items from the stationery shop), there are two separateemails generated.
Receipt 1 - Canteen.
Receipt 2 - Stationery Shop.

31Transactions and Receipts
MiniPOS is able to work this out, as each item purchased has a registered email address.MiniPOS will look through all the items purchased and group them together by email addressbefore generating the receipts.
Database Entries
The resulting transaction would make the following entries in the RTETable (Transaction table):
The following entries would also be created in the TransactionID table, which is there to ensurethat the transaction was successful (for in the event of a network outage during a transaction,etc). MiniPOS will check this table against any locally cached transactions to ensure that alltransactions have been successfully unloaded back to Supervisor Net.
The relationship between these two tables is based upon the RTEID field.

Monitor Business Machines31a Nornanby Road
Mt Eden 1024Auckland,
New Zealand.Phone: +64 9 623 5000
Web: www.monitorbm.com


![FedEx Global Home - Select Your Location · áÕ 51] Express Office'Print Services * FedEx Ship Manager 1. *fi-A Jcñn Chm. Beijng, Beiing Express test test ABCD EEG H 23456789 3](https://img.pdfslide.net/doc/110x75/5f5a99f22194fc35ef4c811a/fedex-global-home-select-your-location-51-express-officeprint-services.jpg)