Embed Size (px)
Citation preview

Montageanleitung für Rudergerät „COACH LS”Art.-Nr. 07985-640
P
CZ
PL
I
E
NL
F
GB
D
DK
RO
Auf
100
% A
ltpap
ier g
edru
ckt!
Abb. ähnlich

Handling the equipment■ Before using the equipment for exercise, check carefully to en-
sure that it has been correctly assembled.■ It is not recommended to use or store the apparatus in a damp
room as this may cause it to rust. Please ensure that no part of themachine comes in contact with liquids (drinks, perspiration etc.).This may cause corrosion.
■ The machine is designed for use by adults and children shouldnot be allowed to play with it. Children at play behave unpre-dictably and dangerous situations may occur for which the ma-nufacturer cannot be held liable. If, in spite of this, children areallowed to use the equipment, ensure that they are instructed inits proper use and supervised accordingly.
■ Use for your regular cleaning, maintenance and care our appli-ance maintenance set (Article no. 07921-000) specifically li-censed for KETTLER Sports apparatus and available from theSport specialized trade.
■ Please ensure that liquids or perspiration never enter the machineor the electronics.
■ This Rowing machine is an exercise machine that works inde-pendence from stroke sequence (speed).
■ A slight production of noise at the bearing of the centrifugal mass
is due to the construction and has no negative effect upon ope-ration. Possibly occurring noise during reverse pedalling resultfrom engineering and are absolutely safe.
■ The crosstrainer has a magnetic brake system.■ To operate correctly, the pulse function requires a minimum vol-
tage of 2,7 volts (only for computers working with batteries).■ When choosing a place for the equipment please ensure that the
floor can withstand the additional weight/load.■ The surface on which the unit is placed must be firm and even.
Place rubber or straw mats under it to deaden any noise or im-pacts. Only for appliances with weights. Avoid powerful oscilla-tions of the dumbbells!
■ Basically this equipment does not need any special maintenance.■ The rowing machine must be set up on an even impactresistant
base. To absorb the vibrations, lay a straw or rubber mat underthe machine.
4
Before assembling or using the unit, please read the following instructions carefully. They contain important informationfor use and maintenance of the equipment as well as for your personal safety. Keep these instructions in a safe place formaintenance purposes or for ordering spare parts.
GB Assembly Instructions
For Your Safety■ The crosstrainer should be used only for its intended purpose, i.e.
for physical exercise by adult people.■ Any other use of the equipment is prohibited and may be dan-
gerous. The manufacturer cannot be held liable for damage or in-jury caused by improper use of the equipment.
■ The crosstrainer has been designed in accordance with the lateststandards of safety. Any features which may have been a possi-ble cause of injury have been avoided or made as safe as pos-sible.
■ The training device corresponds with DIN EN 957 -1/-9, classHB.
■ Incorrect repairs and structural modifications (e.g. removal or re-placement of original parts) may endanger the safety of the user.
■ Damaged components may endanger your safety or reduce thelifetime of the equipment. For this reason, worn or damaged partsshould be replaced immediately and the equipment taken out ofuse until this has been done. Use only original KETTLER spareparts.
■ In case of enquiry, please contact your KETTLER dealer.■ If the equipment is in regular use, check all its components tho-
roughly every 1–2 months. Pay particular attention to the tight-ness of bolts and nuts. This is particularly true for the attachmentof grip strap, running plate and fastening of the handlebar andfront tube.
■ Instruct people using the equipment (in particular children) onpossible sources of danger during exercising.
■ Before beginning your program of exercise, consult your doctorto ensure that you are fit enough to use the equipment. Base yourprogram of exercise on the advice given by your doctor. Incorrector excessive exercise may damage your health!
■ Any interference with parts of the product that are not describedwithin the manual may cause damage, or endanger the personusing this machine. Extensive repairs must only be carried out byKETTLER service staff or qualified personnel trained by KETTLER.
■ To ensure that the safety level is kept to the highest possible stan-dard, determined by its construction, this product should be ser-viced regulary (once a year) by specialist retailers.
■ Before use, always check all screws and plug-in connections aswell as respective safety devices fit correctly.
Caution: While assembly of the product keep off children’sreach (Choking hazard - contains small parts).
■ Before beginning your first training session, familiarize yourselfthoroughly with all the functions and settings of the unit.
■ Always wear suitable shoes when using.■ Before beginning your program of training, study the instructions
for training carefully.■ Our products are subject to a constant innovative quality assu-
rance. We reserve the right to perform technical modifications.■ In choosing the location of the apparatus, ensure a sufficient
safety distance from any obstacles. The apparatus must not bemounted in the immediate vicinity of main passageways (paths,doorways, corridors).
■ All electric appliances emit electromagnetic radiation when inoperation. Please do not leave especially radiation-intensive ap-pliances (e.g. mobile telephones) directly next to the cockpit orthe electronic controlsystem as otherwise values displayed mightbe distorted (e.g. pulse measurement.
WARNING! Heart rate monitoring systems may be inaccurate.Over exercise may result in serious injury or death. If you feelfaint stop exercising immediately.
!
!

5
GB Assembly Instructions
Instructions for Assembly■ Ensure that you have received all the parts required (see check
list) and that they are undamaged. Should you have any causefor complaint, please contact your KETTLER dealer.
■ Before assembling the equipment, study the drawings carefullyand carry out the operations in the order shown by the diagrams.The correct sequence is given in capital letters.
■ Please note that there is always a danger of injury when wor-king with tools or doing manual work. Therefore please be ca-reful when assembling this machine.
■ Ensure that your working area is free of possible sources of dan-ger, for example don’t leave any tools lying around. Always dis-pose packaging material in such a way that it may not cause anydanger. There is always a risk of suffocation if children play withplastic bags!
■ The equipment must be assembled with due care by an adult per-
son. If in doubt call upon the help of a second person, if possi-ble technically talented.
■ The fastening material required for each assembly step is shownin the diagram inset. Use the fastening material exactly as in-structed. The required tools are supplied with the equipment.
■ Bolt all the parts together loosely at first, and check that they havebeen assembled correctly. Tighten the locknuts by hand until re-sistance is felt, then use spanner to finally tighten nuts completelyagainst resistance (locking device). Then check that all screw con-nections have been tightened firmly. Attention: once locknutshave been unscrewed they no longer function correctly (the lok-king device is destroyed), and must be replaced.
■ For technical reasons, we reserve the right to carry out prelimi-nary assembly work (e.g. addition of tubing plugs).
List of spare parts page 34-36When ordering spare parts, always state the full article number,spare-partnumber, the quantity required and the S/N of the product(see handling).Example order: Art. no. 07985-640 / spare-part no. 67002000/ 2 pieces / S/N .................... Please keep original packaging of this article, so that it may beused for transport at a later date, if necessary.Goods may only be returned after prior arrangement and in (in-ternal) packaging, which is safe for transportation, in the originalbox if possible.It is important to provide a detailed defect description / damagereport!Important: spare part prices do not include fastening material; if fa-stening material (bolts, nuts, washers etc.) is required, this shouldbe clearly stated on the order by adding the words „with fasteningmaterial“.
Waste DisposalKETTLER products are recyclable. At the end of its useful life pleasedispose of this article correctly and safely (local refuse sites).
KETTLER GB Ltd. · KETTLER House, Merse Road · NorthMoons Moat · Redditch, Worcestershire B98 9HL
http://www.kettler.co.ukKETTLER International Inc. · 1355 London Bridge Road · Vir-ginia Beach, VA 23453
http://www.kettlerusa.com
USA
GB

24
Messhilfe für Verschraubungsmaterial– GB – Measuring help for screw connections – F – Gabarit pour système de serrae
– NL – Meethlp voor schroefmateraal– E – Ayuda para la medición del material de atornilladura
– DK – Hjælp til måling af skruer
– I – Misura per materiale di avvitamento– PL – Wzornik do połączeń śrubowych– CZ – Měřící pomůcka pro materiál k přišroubování– P – Auxiliar de medição para materiais de aparafusamento
– RO – Ajutor pentru măsurarea materialului de înşurubat
0 10 20 30 40 50 60 70 80 90 100 110 120 130 140 150 160 170
M5x40
M8x40
M8
ø22
ø16
ø12
M6
M5
ø3,9x13
M5x40
Beispiel Examples Examples Bij voorbeeldEjemplas Esemp Przykłod PříkladExemplo Eksempel Exemplu

25
Checkliste (Packungsinhalt)– GB – Checklist (contents of packaging) – F – Liste de vérification (contenu de l’emballage) – NL – Checklijst (verpakkingsinhoud)– E – Lista de control (contenido del paquete) – I – Lista di controllo (contenuto del pacco) – PL – Lista kontrolna (zawartość opakowania)
– CZ – Kontrolní seznam (obsah balení) – P – Lista de verificação (conteúdo da embalagem) – DK – Checkliste (pakkens indhold)– RO – Lista de verificare (conţinutul pachetului)
1
1
1
1
1/1
1/1
1/1
1
1/1
1

26
Checkliste (Packungsinhalt)
ø16x122,5 mm 1
ø16x40 mm 2
ø16x9 mm 2
Actual Size
ø13x308 mm 1
ø13x410 mm 1
1M8x140
2M8x45
5M8
3ø16x8,3x2
4ø25x8,4x3
1
1
2ø46 mm
23,9x13
ø16x115 mm 2
2ø24x13,25x2

27
3
21
M8x452x
ø25
– D – Benutzen Sie bei diesem Montageschritt geeignetes Unterlegma-terial (z. B. Verpackung, Styropor, o. ä.) damit das Gehäuse nichtverkratzt oder beschädigt wird.
– GB – Please, use suitable supporting material (such as packing mate-rial, polystyrene or similar material) for this assembly step inorder to avoid a scratching or damaging of the housing.
– F – Lors de cette phase de montage, utilisez du matériel de supportapproprié (p. ex. emballage, styropore ou similaire) pour éviterque la boîte ne soit pas endommagée ou égratignée.
– NL – Gebruik bij deze montagestap geschikt materiaal om onder hetapparaat te leggen (bijv. het verpakkingsmateriaal, piepschuimof iets dergelijks), zodat het omhulset niet door bijvoorbeeld kras-sen beschadigd wordt.
– E – Durante este paso de montaje se recomienda colocar debajo delaparato un material adecuado (p.e. el embalaje, icopor etc.) paraque no se rasguñe o dañe la envoltura.
– I – Per questa sequenza di montaggio utilizzate del materiale d’ap-poggio adatto (per es. imballaggio, polistirolo, o simili) in modoche la carcassa non si graffi o danneggi.
– PL – Podczas tej operacji montażowej stosuj odpowiedni podkład (naprzykład opakowanie, styropian itp.), aby obudowa nie zadra-pała się względnie nie uległa uszkodzeniu.
–CZ – Používejte při tomto montážním kroku vhodný podkládací mate-riál (např. obal, polystyren aj.), aby se nepoškrábalo nebo ne-poškodilo pouzdro.
– P – Para esta etapa de montagem utilize bases adequadas (p. ex.embalagem, esferovite ou semelhante) para que a caixa nãofique riscada ou danificada.
–DK– Brug et egnet underlagsmateriale (f.eks. emballage, styropor ellerlignende), når dette monteringstrin udføres for at undgå, at ka-binettet ridses eller beskadiges.
–RO– În această etapă de montaj utilizaţi material suport adecvat (deexemplu ambalaj, polistiren ş.a.) pentru a evita zgârierea saudeteriorarea carcasei.
3,9x132x
A “klick”
A “klick”
B
B

28
4
1xM8 ø16 115mm M8ø16
ø24ø24115mmø13x310mm
5
1xM8 ø25 40mm M8ø2540mmø13x410mm
6 7
M8x140
B1x
ø16x8,3 M8
ø16x122,5
A1x
ø16x9 ø16x9
A
B

29
B
A
–D – Achtung! Falls der Sitz des Rudergerätes schwergängig ist, bitteSchraube (A) etwas lösen, Sitz etwas nach oben ziehen (B) unddabei Schraube (A) wieder fest anziehen.
– GB – Caution! If the seat of the rowing machine is stiff, please loosenthe screw (A) slightly, pull the seat a little upwards (B) and, whiledoing so, tighten the screw (A) again.
– F – Attention! Si la siège du rameur se déplace difficilement, desser-rez la vis (A) légèrement, tirez la siège un peu verse le haut (B) etresserrez la vis (A).
– NL – Opgelet! Indien de zitting van het roeiapparaat stroef is, draaitu schroef (A) los, trekt de zitting iets naar boven (B) en draait ver-volgens schroef (A) weer stevig vast.
– E – ¡Atención! Si el asiento de la máquina de remar marcha dema-siado duro, suelte levemente el tornillo (A), tire el asiento un pocohacia arriba (B) y al mismo tiempo apriete de nuevo el tornillo (A).
– I – Attenzione! Se la sede del timone è rigida, allentare leggermentela vite (A), sollevare leggermente la sede verso l’alto (B) e poi ser-rare di nuovo la vite (A).
– PL – Uwaga! Jeżeli siedzenie urządzenia do wiosłowania porusza sięzbyt ciężko, proszę poluzować co nieco śrubę (A), pociągnąćsiedzenie trochę do góry (B) i przy tym ponownie mocno dokręcićśrubę (A).
– CZ – Pozor! Jestliže sedadlo veslovacího trenažéru funguje ztuha, pro-sím povolte trošku šroub (A), povytáhněte sedadlo trošku směremnahoru (B) a přitom opět pevně dotáhněte šroub (A).
– P – Atenção! Se o banco da máquina de remar tiver pouca mobili-dade, solte um pouco o parafuso (A), puxe o banco ligeiramentepara cima (B) apertando novamente o parafuso (A).
– DK – OBS! Løsn skruen (A) lidt, hvis romaskinen går trægt, træk sad-len lidt opad (B) og spænd skruen (A) igen.
– RO – Atenţie! Dacă scaunul aparatului de vâslit este greu accesibil, des-faceţi puţin şurubul (A), trageţi scaunul puţin în sus (B) şi strângeţidin nou şurubul (A).
Handhabungshinweise– GB – Handling – F – Utilisation – NL – Handleiding – E – Aplicación– I – Utilizzo – PL – Zastosowanie – CZ – Pokyny k manipulaci – P – Notas sobre o manuseamento
– RO – Indicaţii privind manipularea
30
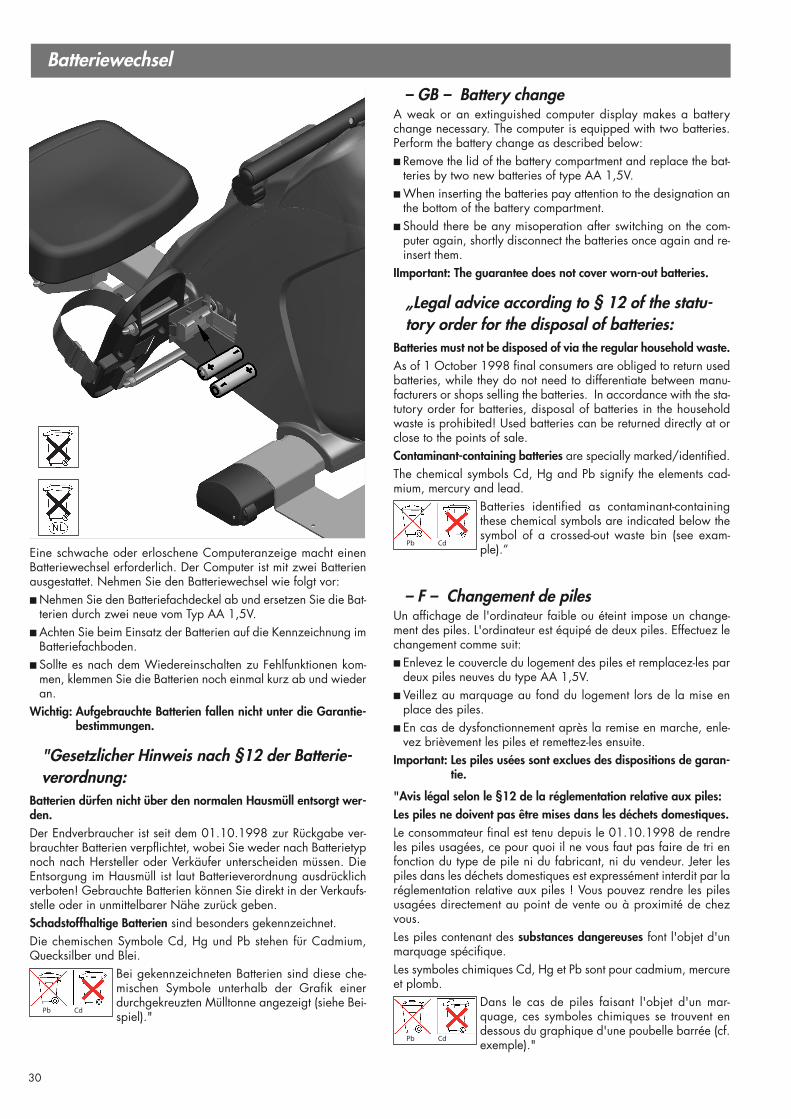
Batteriewechsel
Eine schwache oder erloschene Computeranzeige macht einenBatterie wechsel erforderlich. Der Computer ist mit zwei Batterienausgestattet. Nehmen Sie den Batteriewechsel wie folgt vor:■ Nehmen Sie den Batteriefachdeckel ab und ersetzen Sie die Bat-
terien durch zwei neue vom Typ AA 1,5V.■ Achten Sie beim Einsatz der Batterien auf die Kennzeichnung im
Batteriefachboden.■ Sollte es nach dem Wiedereinschalten zu Fehlfunktionen kom-
men, klem men Sie die Batterien noch einmal kurz ab und wiederan.
Wichtig: Aufgebrauchte Batterien fallen nicht unter die Garantie -bestim mun gen.
"Gesetzlicher Hinweis nach §12 der Batterie-verordnung:
Batterien dürfen nicht über den normalen Hausmüll entsorgt wer-den.Der Endverbraucher ist seit dem 01.10.1998 zur Rückgabe ver-brauchter Batterien verpflichtet, wobei Sie weder nach Batterietypnoch nach Hersteller oder Verkäufer unterscheiden müssen. DieEntsorgung im Hausmüll ist laut Batterieverordnung ausdrücklichverboten! Gebrauchte Batterien können Sie direkt in der Verkaufs-stelle oder in unmittelbarer Nähe zurück geben.Schadstoffhaltige Batterien sind besonders gekennzeichnet.Die chemischen Symbole Cd, Hg und Pb stehen für Cadmium,Quecksilber und Blei.
Bei gekennzeichneten Batterien sind diese che-mischen Symbole unterhalb der Grafik einerdurchgekreuzten Mülltonne angezeigt (siehe Bei-spiel)."
Pb Cd
– GB – Battery changeA weak or an extinguished computer display makes a batterychange necessary. The computer is equipped with two batteries.Perform the battery change as described below:■ Remove the lid of the battery compartment and replace the bat-
teries by two new batteries of type AA 1,5V.■ When inserting the batteries pay attention to the designation an
the bottom of the battery compartment. ■ Should there be any misoperation after switching on the com-
puter again, shortly disconnect the batteries once again and re-insert them.
IImportant: The guarantee does not cover worn-out batteries.
„Legal advice according to § 12 of the statu-tory order for the disposal of batteries:
Batteries must not be disposed of via the regular household waste. As of 1 October 1998 final consumers are obliged to return usedbatteries, while they do not need to differentiate between manu-facturers or shops selling the batteries. In accordance with the sta-tutory order for batteries, disposal of batteries in the householdwaste is prohibited! Used batteries can be returned directly at orclose to the points of sale. Contaminant-containing batteries are specially marked/identified.The chemical symbols Cd, Hg and Pb signify the elements cad-mium, mercury and lead.
Batteries identified as contaminant-containingthese chemical symbols are indicated below thesymbol of a crossed-out waste bin (see exam-ple).”
– F – Changement de pilesUn affichage de l'ordinateur faible ou éteint impose un change-ment des piles. L'ordinateur est équipé de deux piles. Effectuez lechangement comme suit:■ Enlevez le couvercle du logement des piles et remplacez-les par
deux piles neuves du type AA 1,5V.■ Veillez au marquage au fond du logement lors de la mise en
place des piles.■ En cas de dysfonctionnement après la remise en marche, enle-
vez brièvement les piles et remettez-les ensuite.Important: Les piles usées sont exclues des dispositions de garan-
tie.
"Avis légal selon le §12 de la réglementation relative aux piles:Les piles ne doivent pas être mises dans les déchets domestiques.Le consommateur final est tenu depuis le 01.10.1998 de rendreles piles usagées, ce pour quoi il ne vous faut pas faire de tri enfonction du type de pile ni du fabricant, ni du vendeur. Jeter lespiles dans les déchets domestiques est expressément interdit par laréglementation relative aux piles ! Vous pouvez rendre les pilesusagées directement au point de vente ou à proximité de chezvous.Les piles contenant des substances dangereuses font l'objet d'unmarquage spécifique.Les symboles chimiques Cd, Hg et Pb sont pour cadmium, mercureet plomb.
Dans le cas de piles faisant l'objet d'un mar-quage, ces symboles chimiques se trouvent endessous du graphique d'une poubelle barrée (cf.exemple)."
Pb Cd
Pb Cd

33
A
A
B
B
A
B
1 2
3 4
5 6
Demontage des Computers im Reparaturfall– GB – Detaching computer for repairs– F – Démontage de l’ordinateur pour réparation
– NL – Demontage van de computer voor reparatie– E – Desmontaje de la computadora en casa de la reparación– I – Smontaggio del computer nel caso di riparazioni
– PL – Demontaż komputera w przypadku naprawy– CZ – Demontáž počítače v případě poruchy– P – Desmontag em do computador em caso de avaria
– DK – Afmontering af beskadiget computer– RO – Demontarea calculatorului în cazul defectării

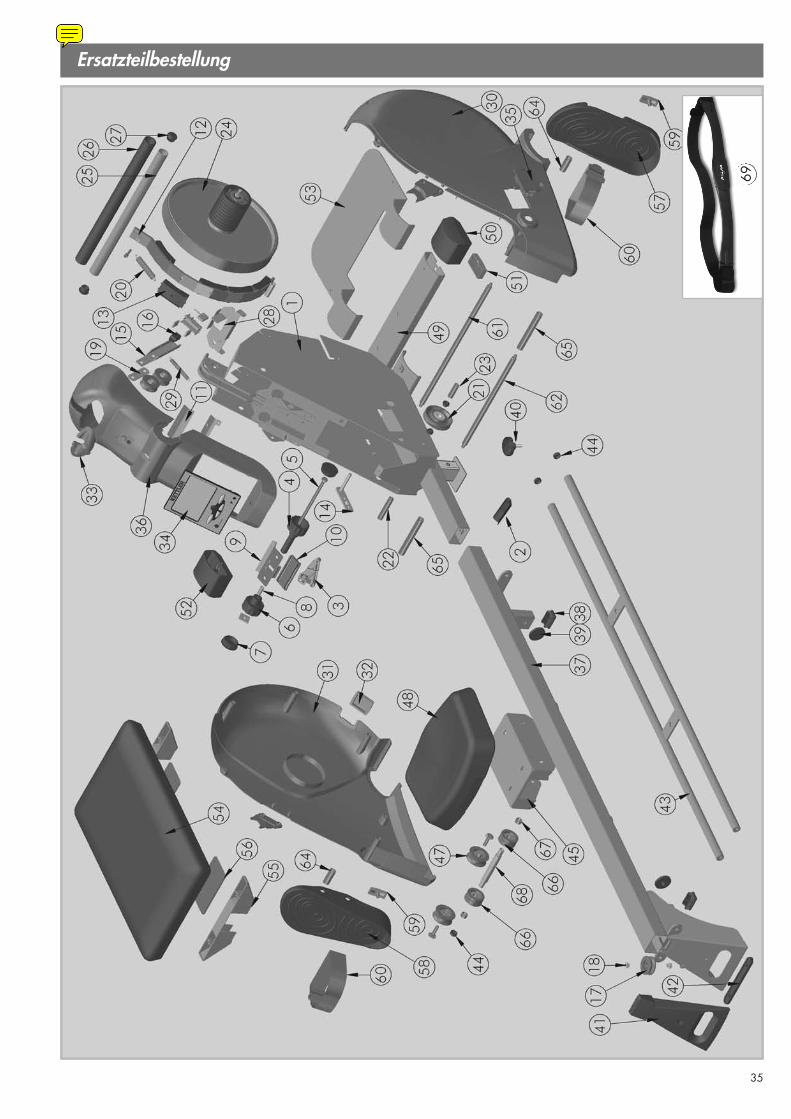
34
Ersatzteilbestellung– GB – Spare parts order – F – Commande de pièces de rechange – NL – Bestelling van reserveonderdelen– E – Pedido de recambios – I – Ordine di pezzi di ricambio – PL – Zamówiene części zamiennych
– CZ – Objednání náhradních dílů – P – Encomenda de peças sobressalentes – DK – Bestilling af reservedele– D – Geben Sie bei Ersatzteilbestellungen bitte die vollständige Arti-
kelnummer, die Ersatzteilnummer, die benötigte Stückzahl und dieSeriennummer des Gerätes an.
– GB – When ordering spare parts, always state the full article number, spare-part number, the quantity required and theS/N of the product.
– F – En cas de commande de pièces de rechange, nous vous prionsde mentionner la référence article, le numéro de pièce de re-change, la quantité demandée et le numéro de série de l’appareil.
– NL – Vermeld bij de onderdelenbestellingen a.u.b. het volledige arti-kelnummer, het onderdeelnummer, het benodigde aantal en hetserienummer van het apparaat.
– E – Indicar con los pedidos de piezas de repuesto el número completodel artículo, el número de la pieza de repuesto, las unidades so-licitadas y el número de serie del aparato.
– I – Per l’ordinazione di parti di ricambio indicate il completo numerodi articolo, della parte di ricambio, il numero di unit necessariononchè il numero di serie dell’apparecchio.
– PL – Przy zamawianiu części zamiennych proszę podawać kompletnynumer artykułu, numer części zamiennej i numer serii urządzenia.
– CZ – Při objednání náhradních dílů prosím udejte úplné číslo zboží,číslo náhradního dílu, potřebný počet kusů a sériové číslo přístroje.
– P – Ao encomendar peças sobressalentes, por favor indique o númerocompleto do artigo, o número da peça sobressalente, o número deunidades necessárias e o número de série do aparelho.
– DK – Ved bestilling af reservedele skal du altid opgive det fuldstændigeartikelnummer, nummeret på reservedelen, det ønskede antal ogmaskinens serienummer.
– RO – La comandarea pieselor de schimb indicaţi numărul complet al ar-ticolului, numărul piesei de schimb, numărul de bucăţi necesare şiseria aparatului.
– D – Beispiel Typenschild - Seriennummer– GB – Example Type label - Serial number– F – Example Plaque signalétique - Nu-
mèro de serie– NL – Bij voorbeeld Typeplaatje - Serien-
nummer– E – Ejemplo Placa identificativa - Número
de serie– I – Esempio Targhetta tecnica - Numero
di serie– PL – Przyklady Tabliczka identyfikacyjna -
Numer serii– CZ – Přiklad typového štítku – sériové číslo– P – Exemplo placa de características -
número de série– DK – Eksempel type label – serienummer– RO – Exemplu plăcuţa de fabricaţie - seria
Rudermaschine 07985-640Pos.- Coach LS qty EuropaNr Bezeichnung description Stück Bestell-Nr.1 Gehäuseeinheit Frame, base 1 943182362 Kantenschutz safety cap 1 701290373 Bowdenzug mit Verstellhebel montiert Tension cable unit 1 943141074 Drehknopf (kpl. mit Schraube + Stopfen) Knob with shaft, right 1 943158765 6-kant Schraube M8x145 Bolt, hex m 8x145 1 102051456 Verstellrad links (2016) Knob, left 1 943158777 Stopfen ø42 mm Plug 42 mm 2 101000798 Distanzrohr A3 Spacer sleeve A3 1 972005379 Trägerblech (BD 1469) Carrier plate 1 9720003610 Zeiger 0-10 (1728) Scale, resistance 1 9117020711 Befestigungswinkel (3-4266) Bearing plate 1 9720182612 Magnethalter kpl. Montiert Flywheel resistance magnet with 5 magnets 1 91170364-4013 Magnetsegment Magnet 5 6700017014 Verstell-Lasche (BD 1329B) Tabaxle, resistance shoe 1 9720004515 Pendelhalter (3-3846) Triparm, stroke count 165 mm long 1 9720182516 Magnet M 3101 Magnet sensor M 3101 1 6700014617 Seilrolle Nr. 4 (2097) Pulley, cord Nr. 4 2 9858501618 Buchse (2098) Bushing 4 7013004519 Lasche (4-5909) Tabbrace, triparm pulley 1 9720024920 Zugfeder (4-5910) Spring 1 2560591021 Seilrolle Nr. 1 (1896) Pulley, cord Nr. 1 1 9858501822 Distanzrohr A983 Spacer sleeve A983 1 9720149423 Distanzrohr A203 Spacer sleeve A203 1 9720045624 Schwungrad kpl. montiert Fly wheel 1 9114029325 Griff 25x2x400 mm kpl. Pullbar, 25x400 mm with grip 1 91210359-4026 Soft-Grip SW Soft-Grip black 1 1011801027 Stopfen ø30 mm Plug, 30 mm 2 1010014928 Lagerblech (BD 1480) montiert Support bracket 1 94315123
35
Ersatzteilbestellung
69

36
HEINZ KETTLER GmbH & Co. KG · Postfach 1020 · D-59463 Ense-Parsitwww.kettler.de
Ersatzteilbestellung
docu
197
5f/0
6.09
Rudermaschine 07985-640Pos.- Coach LS qty EuropaNr Bezeichnung description Stück Bestell-Nr.29 Zugfeder (4-5973-a) Tension spring 1 2560597330 Verkleidung rechts (4745) mit Einschubteil Panel, right 1 7012995631 Verkleidung links (4746) mit Einschubteil Panel, left 1 7012995732 Abdeckung (4195) Covering (4195) 1 7012937433 Ablageeinsatz (3625) Backstop, pullbar 1 7013221334 Computer ST 2500-4 geprüft Computer St 2500-4 1 9431587835 Batteriefachdeckel (3620) Covering for battery pack 1 7013221936 Elektor-Aufsatz (3591) für Verkleidung Housing 1 7013221437 Hinterbau Main tube 1 9431821338 Stopfen 40x25 Plug40x25 mm 2 1010000939 Scheibe mit Zapfen ø40 mm Axle bumper 2 1012207340 Verbindungsschraube screw 1 9431823941 Abdeckung Fuß (4576) Foot covering 1 7013221542 Bodenschoner (0738) Foot 1 7013217543 Sitzführung *2007* Guiding tubes for seat 1 9710060544 Kappe (3876) Endcap (3876) 4 7013229745 Sitzträgerblech Seat carrier plate 1 9431804546 Distanzrohr A948 mit Laufrolle (4313) Spacer sleeve A948 with Roller (4313) 4 9431738947 Laufrolle (4313) Roller (4313) 4 7012879148 Sitz f. Rudergerät 8508/8067 SW Seat 1 7259116049 Bodenrohr 80/33 Crossmember, frame 80/33 1 91111951-4050 Rollenschoner rechts Foot roller right 1 9117073851 Einsteckteil (2389) Plate for foot roller 2 7012756552 Rollenschoner links Foot roller left 1 9117073953 Trittplatte (BD1481) Kickplate, front base 1 9431411054 Polsterplatte (4-2025) Back cushion 1 9431620055 Aufnahme Liegebrett (4744) Brace for seat 2 7013221656 Filzplatte 130x 70 mm Felt plate 130x70 mm 2 1251000657 Fußstütze rechts (4512) Foot plate, right 1 7013221758 Fußstütze links (4513) Foot plate, left 1 7013221859 Bodenschoner (1696) Plug for footplate 2 7012793060 Klettband m. Öse Rudergerät Strap for footplate 2 4210800661 Pedalachse A791 Rod, pedal axle A791 1 9720156062 Pedalanschlag A792 Rod, pedal rest A792 1 9720156163 Kleinteilbeutel o. Abb. Hardware Bag (w/o fig.) 1 9431825064 Distanzrohr A589 Distance tube A589 2 9720055865 Distanzrohr A953 Distance tube A953 2 9720148666 Laufrolle (4715) Roller (4715) 2 9858508367 Hülse A973 Spacer sleeve A973 2 9720148968 Achse für Lauwagen Axle for seat carrier plate 1 1130012169 POLAR Brustgurt T34 ohne Plug POLAR cheast strap (w/o plug) 1 67002000

docu 2618/09.09
no. description qty. part no.
Change of spare parts list „Coach LS 07985-649“USA
34 Computer ST 2500-4 geprüft 1 9431587834 Computer ST 2500-4 (adjusted) 1 94315992
no. description qty. part no.
Change of spare parts list „Coach LS 07985-649“USA
34 Computer ST 2500-4 geprüft 1 9431587834 Computer ST 2500-4 (adjusted) 1 94315992
docu 2618/09.09