Embed Size (px)
Citation preview

In-depth exam prep for MOS Office 365 certification!
Demonstrate your expertise with Microsoft Office 365 by earning a MOS certification. This official Study Guide is designed to help you practice and prepare for MOS Exam 77-891: Microsoft Office 365, and features:
Full objective-by-objective coverage
Procedures and hands-on practice tasks
Exam-discount offer from Certiport
Use the in-depth exam prep, practice, and review to help advance your proficiency with Office 365—and earn the credential that proves it!
ISBN: 978-0-7356-6903-1
U.S.A. $11.99Canada $12.99
[Recommended ]
Certification/Microsoft Office
A Microsoft Office Specialist (MOS) certification validates your proficiency with Microsoft Office 2010 programs and Microsoft Office 365, demonstrating you can meet globally recognized performance standards. Successful candidates have at least six months’ experience with the specific products.
For complete information on Microsoft Certifications, see microsoft.com/learning/certification
Special Offer from CertiportGet 25% off your MOS exam fee. See details on the Certiport offer page inside.
EXAM VERSIONCovers the MOS Exam releasing in Fall 2012
MOS Study Guide for Microsoft® Office 365
microsoft.com/mspress Pierce
MO
S Study Guide for M
icrosoft® O
ffice 365
John Pierce
MOS StudyGuide
for Microsoft®
Includes Exam-Discount OfferSee back
Office 365
spine = .41”
PUBLISHED BYMicrosoft PressA Division of Microsoft CorporationOne Microsoft WayRedmond, Washington 98052-6399
Copyright © 2012 by John Pierce
All rights reserved. No part of the contents of this book may be reproduced or transmitted in any form or by any means without the written permission of the publisher.
Library of Congress Control Number: 2012940331ISBN: 978-0-7356-6903-1
Printed and bound in the United States of America.
First Printing
Microsoft Press books are available through booksellers and distributors worldwide. If you need support related to this book, email Microsoft Press Book Support at [email protected]. Please tell us what you think of this book at http://www.microsoft.com/learning/booksurvey.
Microsoft and the trademarks listed at http://www.microsoft.com/about/legal/en/us/IntellectualProperty/Trademarks/EN-US.aspx are trademarks of the Microsoft group of companies. All other marks are property of their respective owners.
The example companies, organizations, products, domain names, email addresses, logos, people, places, and events depicted herein are fictitious. No association with any real company, organization, product, domain name, email address, logo, person, place, or event is intended or should be inferred.
This book expresses the author’s views and opinions. The information contained in this book is provided without any express, statutory, or implied warranties. Neither the authors, Microsoft Corporation, nor its resellers, or distributors will be held liable for any damages caused or alleged to be caused either directly or indirectly by this book.
Acquisitions and Developmental Editor: Rosemary CapertonEditorial Production: Waypoint Press Technical Reviewer: Jorge Diaz Copyeditor: Roger LeBlanc Indexer: Christina Yeager Cover: Jelvetica
iii
What do you think of this book? We want to hear from you! Microsoft is interested in hearing your feedback so we can continually improve our books and learning resources for you . To participate in a brief online survey, please visit:
microsoft .com/learning/booksurvey
ContentsTaking a Microsoft Office Specialist Exam . . . . . . . . . . . . . . . . . . . . . . . . . . . . . . . . . . . . . .vii
Microsoft Office Specialist Certification . . . . . . . . . . . . . . . . . . . . . . . . . . . . . . . . . . . . . viiSelecting a Certification Path . . . . . . . . . . . . . . . . . . . . . . . . . . . . . . . . . . . . . . . . . . . . . . viiTest-Taking Tips . . . . . . . . . . . . . . . . . . . . . . . . . . . . . . . . . . . . . . . . . . . . . . . . . . . . . . . . . .viiiCertification Benefits . . . . . . . . . . . . . . . . . . . . . . . . . . . . . . . . . . . . . . . . . . . . . . . . . . . . . . .ixFor More Information . . . . . . . . . . . . . . . . . . . . . . . . . . . . . . . . . . . . . . . . . . . . . . . . . . . . . . x
Using This Book to Study for a Certification Exam . . . . . . . . . . . . . . . . . . . . . . . . . . . . . . . . xOffice 365 Releases and This Book . . . . . . . . . . . . . . . . . . . . . . . . . . . . . . . . . . . . . . . . . . .xiFeatures and Conventions of This Book . . . . . . . . . . . . . . . . . . . . . . . . . . . . . . . . . . . . . . .xi
How to Get Support and Provide Feedback . . . . . . . . . . . . . . . . . . . . . . . . . . . . . . . . . . . . xiiErrata & Book Support . . . . . . . . . . . . . . . . . . . . . . . . . . . . . . . . . . . . . . . . . . . . . . . . . . . . xiiGetting Help with Microsoft Office 365 . . . . . . . . . . . . . . . . . . . . . . . . . . . . . . . . . . . . . xiiWe Want to Hear from You . . . . . . . . . . . . . . . . . . . . . . . . . . . . . . . . . . . . . . . . . . . . . . . .xiiiStay in Touch . . . . . . . . . . . . . . . . . . . . . . . . . . . . . . . . . . . . . . . . . . . . . . . . . . . . . . . . . . . .xiii
Exam 77-891 Microsoft Office 365 SpecialistWhat You Need to Know . . . . . . . . . . . . . . . . . . . . . . . . . . . . . . . . . . . . . . . . . . . . . . . . . . . 1
1 Navigating Office 365 31.1 Navigate Office 365 Features . . . . . . . . . . . . . . . . . . . . . . . . . . . . . . . . . . . . . . . . . . . . 3
Understanding Office 365 Authentication . . . . . . . . . . . . . . . . . . . . . . . . . . . . . . . 4Working on the Office 365 Home Page . . . . . . . . . . . . . . . . . . . . . . . . . . . . . . . . . . 4Configuring Office 365 to Work with the Office Desktop Applications . . . . . . . 9Getting Started with Outlook Web App . . . . . . . . . . . . . . . . . . . . . . . . . . . . . . . . 11Viewing Your Team Site . . . . . . . . . . . . . . . . . . . . . . . . . . . . . . . . . . . . . . . . . . . . . .13Updating Your Profile . . . . . . . . . . . . . . . . . . . . . . . . . . . . . . . . . . . . . . . . . . . . . . . . 16Getting Help and Support . . . . . . . . . . . . . . . . . . . . . . . . . . . . . . . . . . . . . . . . . . . . 18
iv Contents
1.2 Navigate Office 365 Applications . . . . . . . . . . . . . . . . . . . . . . . . . . . . . . . . . . . . . . . 26Using the Outlook Navigation Pane . . . . . . . . . . . . . . . . . . . . . . . . . . . . . . . . . . . . 26Navigating on Your Team Site . . . . . . . . . . . . . . . . . . . . . . . . . . . . . . . . . . . . . . . . .30
Objective Review . . . . . . . . . . . . . . . . . . . . . . . . . . . . . . . . . . . . . . . . . . . . . . . . . . . . . . . . . 32
2 Communicating by Using Office 365 Outlook Web App 332.1 Manage E-mail . . . . . . . . . . . . . . . . . . . . . . . . . . . . . . . . . . . . . . . . . . . . . . . . . . . . . . . . 33
Creating and Sending Messages . . . . . . . . . . . . . . . . . . . . . . . . . . . . . . . . . . . . . . .34Reviewing and Replying to Messages . . . . . . . . . . . . . . . . . . . . . . . . . . . . . . . . . . 37Searching and Filtering Your Message Store . . . . . . . . . . . . . . . . . . . . . . . . . . . . . 41Working with Attachments . . . . . . . . . . . . . . . . . . . . . . . . . . . . . . . . . . . . . . . . . . .44Using Inbox Rules . . . . . . . . . . . . . . . . . . . . . . . . . . . . . . . . . . . . . . . . . . . . . . . . . . . 45
2.2 Organize Calendars . . . . . . . . . . . . . . . . . . . . . . . . . . . . . . . . . . . . . . . . . . . . . . . . . . .50Recording Appointments . . . . . . . . . . . . . . . . . . . . . . . . . . . . . . . . . . . . . . . . . . . . .50Working with Meeting Requests . . . . . . . . . . . . . . . . . . . . . . . . . . . . . . . . . . . . . . . 52Using the Scheduling Assistant . . . . . . . . . . . . . . . . . . . . . . . . . . . . . . . . . . . . . . . . 55Setting Up Shared Calendars and Managing Permissions . . . . . . . . . . . . . . . . . 56Publishing Calendars . . . . . . . . . . . . . . . . . . . . . . . . . . . . . . . . . . . . . . . . . . . . . . . . .58Adding Calendars . . . . . . . . . . . . . . . . . . . . . . . . . . . . . . . . . . . . . . . . . . . . . . . . . . .60Using Categories, Flags, and Reminders . . . . . . . . . . . . . . . . . . . . . . . . . . . . . . . .60Switching Calendar Views . . . . . . . . . . . . . . . . . . . . . . . . . . . . . . . . . . . . . . . . . . . . .64
2.3 Manage Contacts . . . . . . . . . . . . . . . . . . . . . . . . . . . . . . . . . . . . . . . . . . . . . . . . . . . . . 65Adding Contacts . . . . . . . . . . . . . . . . . . . . . . . . . . . . . . . . . . . . . . . . . . . . . . . . . . . . 65Editing Contact Information . . . . . . . . . . . . . . . . . . . . . . . . . . . . . . . . . . . . . . . . . .67Deleting a Contact . . . . . . . . . . . . . . . . . . . . . . . . . . . . . . . . . . . . . . . . . . . . . . . . . . .67Forwarding Contact Information . . . . . . . . . . . . . . . . . . . . . . . . . . . . . . . . . . . . . .67Creating Groups and Distribution Lists . . . . . . . . . . . . . . . . . . . . . . . . . . . . . . . . .68Importing Contacts . . . . . . . . . . . . . . . . . . . . . . . . . . . . . . . . . . . . . . . . . . . . . . . . . .71Searching Contacts . . . . . . . . . . . . . . . . . . . . . . . . . . . . . . . . . . . . . . . . . . . . . . . . . .72
2.4 Manage Tasks . . . . . . . . . . . . . . . . . . . . . . . . . . . . . . . . . . . . . . . . . . . . . . . . . . . . . . . .73Creating Tasks . . . . . . . . . . . . . . . . . . . . . . . . . . . . . . . . . . . . . . . . . . . . . . . . . . . . . . .73Updating Task Information . . . . . . . . . . . . . . . . . . . . . . . . . . . . . . . . . . . . . . . . . . . . 76Marking Tasks Complete . . . . . . . . . . . . . . . . . . . . . . . . . . . . . . . . . . . . . . . . . . . . .77
2.5 Configure Outlook Web App Options . . . . . . . . . . . . . . . . . . . . . . . . . . . . . . . . . . . . 78Viewing Account Options . . . . . . . . . . . . . . . . . . . . . . . . . . . . . . . . . . . . . . . . . . . . . 78Organizing E-mail . . . . . . . . . . . . . . . . . . . . . . . . . . . . . . . . . . . . . . . . . . . . . . . . . . .80Using Groups . . . . . . . . . . . . . . . . . . . . . . . . . . . . . . . . . . . . . . . . . . . . . . . . . . . . . . .83
Contents v
Changing Outlook Settings . . . . . . . . . . . . . . . . . . . . . . . . . . . . . . . . . . . . . . . . . . .83Using Your Mobile Phone with Outlook Web App . . . . . . . . . . . . . . . . . . . . . . .86Blocking or Allowing Messages . . . . . . . . . . . . . . . . . . . . . . . . . . . . . . . . . . . . . . . . 88
Objective Review . . . . . . . . . . . . . . . . . . . . . . . . . . . . . . . . . . . . . . . . . . . . . . . . . . . . . . . . .90
3 Collaborating by Using Lync Online 913.1 Configure Lync Options . . . . . . . . . . . . . . . . . . . . . . . . . . . . . . . . . . . . . . . . . . . . . . . . 91
General Page . . . . . . . . . . . . . . . . . . . . . . . . . . . . . . . . . . . . . . . . . . . . . . . . . . . . . . . 92Personal Page . . . . . . . . . . . . . . . . . . . . . . . . . . . . . . . . . . . . . . . . . . . . . . . . . . . . . . . 93Status Page . . . . . . . . . . . . . . . . . . . . . . . . . . . . . . . . . . . . . . . . . . . . . . . . . . . . . . . . .94My Picture Page . . . . . . . . . . . . . . . . . . . . . . . . . . . . . . . . . . . . . . . . . . . . . . . . . . . . .94Phones Page . . . . . . . . . . . . . . . . . . . . . . . . . . . . . . . . . . . . . . . . . . . . . . . . . . . . . . . .95Alerts Page . . . . . . . . . . . . . . . . . . . . . . . . . . . . . . . . . . . . . . . . . . . . . . . . . . . . . . . . .96Ringtones And Sounds Page . . . . . . . . . . . . . . . . . . . . . . . . . . . . . . . . . . . . . . . . . .96Audio Device Page . . . . . . . . . . . . . . . . . . . . . . . . . . . . . . . . . . . . . . . . . . . . . . . . . . 97Video Device Page . . . . . . . . . . . . . . . . . . . . . . . . . . . . . . . . . . . . . . . . . . . . . . . . . . . 97File Saving Page . . . . . . . . . . . . . . . . . . . . . . . . . . . . . . . . . . . . . . . . . . . . . . . . . . . . . 98
3.2 Employ Collaboration Tools and Techniques . . . . . . . . . . . . . . . . . . . . . . . . . . . . .100Holding Group Conversations . . . . . . . . . . . . . . . . . . . . . . . . . . . . . . . . . . . . . . . .100Holding Web Conferences . . . . . . . . . . . . . . . . . . . . . . . . . . . . . . . . . . . . . . . . . .109Sending Instant Messages . . . . . . . . . . . . . . . . . . . . . . . . . . . . . . . . . . . . . . . . . . .112Audio Conferencing . . . . . . . . . . . . . . . . . . . . . . . . . . . . . . . . . . . . . . . . . . . . . . . .115Setting Up a Video Conference . . . . . . . . . . . . . . . . . . . . . . . . . . . . . . . . . . . . . . .115
3.3 Manage Lync Contacts . . . . . . . . . . . . . . . . . . . . . . . . . . . . . . . . . . . . . . . . . . . . . . . .117Using Contact Groups . . . . . . . . . . . . . . . . . . . . . . . . . . . . . . . . . . . . . . . . . . . . . . .117Specifying Contact Relationships . . . . . . . . . . . . . . . . . . . . . . . . . . . . . . . . . . . . .119Managing Status and Presence Settings . . . . . . . . . . . . . . . . . . . . . . . . . . . . . . .121Managing Activity Feeds . . . . . . . . . . . . . . . . . . . . . . . . . . . . . . . . . . . . . . . . . . . .123Viewing Conversation History . . . . . . . . . . . . . . . . . . . . . . . . . . . . . . . . . . . . . . . .123
3.4 Use Lync Tools . . . . . . . . . . . . . . . . . . . . . . . . . . . . . . . . . . . . . . . . . . . . . . . . . . . . . . .126Using Recording Manager . . . . . . . . . . . . . . . . . . . . . . . . . . . . . . . . . . . . . . . . . . .126Using the Always On Top Option . . . . . . . . . . . . . . . . . . . . . . . . . . . . . . . . . . . . .128Taking Notes in OneNote . . . . . . . . . . . . . . . . . . . . . . . . . . . . . . . . . . . . . . . . . . . .128Changing the Conversation Subject . . . . . . . . . . . . . . . . . . . . . . . . . . . . . . . . . . .129
Objective Review . . . . . . . . . . . . . . . . . . . . . . . . . . . . . . . . . . . . . . . . . . . . . . . . . . . . . . . .130
vi Contents
4 Managing Sites in SharePoint Online 1314.1 Search for Site Content . . . . . . . . . . . . . . . . . . . . . . . . . . . . . . . . . . . . . . . . . . . . . . .132
Setting a Search Scope . . . . . . . . . . . . . . . . . . . . . . . . . . . . . . . . . . . . . . . . . . . . . .132Using Advanced Search . . . . . . . . . . . . . . . . . . . . . . . . . . . . . . . . . . . . . . . . . . . . .133Working with Search Results . . . . . . . . . . . . . . . . . . . . . . . . . . . . . . . . . . . . . . . . .135
4.2 Manage Sites . . . . . . . . . . . . . . . . . . . . . . . . . . . . . . . . . . . . . . . . . . . . . . . . . . . . . . . .136Using Tags and Notes . . . . . . . . . . . . . . . . . . . . . . . . . . . . . . . . . . . . . . . . . . . . . . .136Working with Your My Site Profile . . . . . . . . . . . . . . . . . . . . . . . . . . . . . . . . . . . .139Sharing Your Site . . . . . . . . . . . . . . . . . . . . . . . . . . . . . . . . . . . . . . . . . . . . . . . . . . . 141Working with Groups and Permissions . . . . . . . . . . . . . . . . . . . . . . . . . . . . . . . . 141Creating a Site Template . . . . . . . . . . . . . . . . . . . . . . . . . . . . . . . . . . . . . . . . . . . . .146Using List Templates . . . . . . . . . . . . . . . . . . . . . . . . . . . . . . . . . . . . . . . . . . . . . . . .147Applying a Site Theme . . . . . . . . . . . . . . . . . . . . . . . . . . . . . . . . . . . . . . . . . . . . . .148Changing the Appearance of a List . . . . . . . . . . . . . . . . . . . . . . . . . . . . . . . . . . . 149Creating a Site . . . . . . . . . . . . . . . . . . . . . . . . . . . . . . . . . . . . . . . . . . . . . . . . . . . . .150
4.3 Manage Site Content . . . . . . . . . . . . . . . . . . . . . . . . . . . . . . . . . . . . . . . . . . . . . . . . .154Selecting the Library You Need . . . . . . . . . . . . . . . . . . . . . . . . . . . . . . . . . . . . . . .154Managing Library Views . . . . . . . . . . . . . . . . . . . . . . . . . . . . . . . . . . . . . . . . . . . . .156Working with Library Settings . . . . . . . . . . . . . . . . . . . . . . . . . . . . . . . . . . . . . . . .161Using a Document Library . . . . . . . . . . . . . . . . . . . . . . . . . . . . . . . . . . . . . . . . . . .166Using a Wiki Page Library . . . . . . . . . . . . . . . . . . . . . . . . . . . . . . . . . . . . . . . . . . .180Creating Pages . . . . . . . . . . . . . . . . . . . . . . . . . . . . . . . . . . . . . . . . . . . . . . . . . . . . .181Working with Lists . . . . . . . . . . . . . . . . . . . . . . . . . . . . . . . . . . . . . . . . . . . . . . . . . .182Working Offline with Content on Your Team Site . . . . . . . . . . . . . . . . . . . . . . .189
Objective Review . . . . . . . . . . . . . . . . . . . . . . . . . . . . . . . . . . . . . . . . . . . . . . . . . . . . . . . .191
Index 193
What do you think of this book? We want to hear from you! Microsoft is interested in hearing your feedback so we can continually improve our books and learning resources for you . To participate in a brief online survey, please visit:
microsoft .com/learning/booksurvey
vii
Taking a Microsoft Office Specialist Exam
Desktop computing proficiency is increasingly important in today’s business world. As a result, when screening, hiring, and training employees, employers can feel reassured by relying on the objectivity and consistency of technology certification to ensure the competence of their workforce. As an employee or job seeker, you can use technology certification to prove that you already have the skills you need to succeed, saving current and future employers the trouble and expense of training you.
Microsoft Office Specialist CertificationMicrosoft Office Specialist certification is designed to assist employees in validating their skills with Microsoft Office applications, including Word, Excel, PowerPoint, Outlook, Access, and OneNote, as well as SharePoint and Office 365. The following certification paths are available:
● A Microsoft Office Specialist (MOS) is an individual who has demonstrated proficiency by passing a certification exam in one or more Microsoft Office applications, including Word, Excel, PowerPoint, Outlook, Access, and OneNote, as well as SharePoint and Office 365. The exam for Office 365 covers objectives for skills you need to work in Outlook Web App, Microsoft Lync, and SharePoint Online.
● A Microsoft Office Specialist Expert (MOS Expert) is an individual who has taken his or her knowledge of Office 2010 to the next level and has demonstrated by passing a certification exam that he or she has mastered the more advanced features of Word 2010 or Excel 2010.
Selecting a Certification PathWhen deciding which certifications you would like to pursue, you should assess the following:
● The program and program version(s) with which you are familiar● The length of time you have used the program and how frequently you use it● Whether you have had formal or informal training in the use of that program

● Whether you use most or all of the available program features● Whether you are considered a go-to resource by business associates, friends, and
family members who have difficulty with the program
Candidates for MOS-level certification are expected to successfully complete a wide range of standard business tasks, such as formatting a document or worksheet and its content; creating and formatting visual content; locating information in a notebook; communicating with coworkers through Lync; or working with SharePoint lists, libraries, and Web Parts. Successful candidates generally have six or more months of experience with a specific Office application, including either formal, instructor-led training or self-study using MOS-approved books, guides, or interactive computer-based materials.
Candidates for MOS Expert-level certification are expected to successfully complete more complex tasks that involve using the advanced functionality of the program. Successful candidates generally have at least six months, and may have several years, of experience with the programs, including formal, instructor-led training or self-study using MOS-approved materials.
Test-Taking TipsEvery MOS certification exam is developed from a set of exam skill standards (referred to as the objective domain) that are derived from studies of how the Office 2010 programs or SharePoint are used in the workplace. Because these skill standards dictate the scope of each exam, they provide critical information about how to prepare for certification. This book follows the structure of the published exam objectives; see “Using This Book to Study for a Certification Exam” later in this book for more information.
The MOS certification exams for Microsoft Office 2010 applications, as well as SharePoint and Office 365, are performance based and require you to complete business-related tasks in the program for which you are seeking certification. You might be told to adjust program settings or be presented with a file and told to do something specific with it. Your score on the exam reflects how well you perform the requested tasks within the allotted time.
Here is some helpful information about taking the exam:
● Keep track of the time. You have 50 minutes to complete the exam. Your exam time does not officially begin until after you finish reading the instructions provided at the beginning of the exam. During the exam, the amount of time remaining is shown at the bottom of the exam interface. You can’t pause the exam after you start it.
viii Taking a Microsoft Office Specialist Exam
● Pace yourself. At the beginning of the exam, you will be told how many questions are included in the exam. Some questions will require that you complete more than one task. During the exam, the number of completed and remaining questions is shown at the bottom of the exam interface.
● Read the exam instructions carefully before beginning. Follow all the instructions provided in each question completely and accurately.
● Enter requested information as it appears in the instructions, but without duplicating the formatting unless you are specifically instructed to do so. For example, the text and values you are asked to enter might appear in the instructions in bold and under-lined text, but you should enter the information without applying these formats.
● Close all dialog boxes before proceeding to the next exam question unless you are specifically instructed not to do so.
● Don’t close task panes before proceeding to the next exam question unless you are specifically instructed to do so.
● If you are asked to print a document, worksheet, chart, report, or slide, perform the task, but be aware that nothing will actually be printed.
● Don’t worry about extra keystrokes or mouse clicks. Your work is scored based on its result, not on the method you use to achieve that result (unless a specific method is indicated in the instructions).
● If a computer problem occurs during the exam (for example, if the exam does not respond or the mouse no longer functions) or if a power outage occurs, contact a testing center administrator immediately. The administrator will restart the com-puter and return the exam to the point where the interruption occurred, with your score intact.
Certification BenefitsAt the conclusion of the exam, you will receive a score report, indicating whether you passed the exam. You can print with the assistance of the testing center administrator. If your score meets or exceeds the passing standard (the minimum required score), you will be contacted by email by the Microsoft Certification Program team. The email message you receive will include your Microsoft Certification ID and links to online resources, including the Microsoft Certified Professional site. On this site, you can download or order a printed certificate, create a virtual business card, order an ID card, view and share your certification transcript, access the Logo Builder, and access other useful and interesting resources, including special offers from Microsoft and affiliated companies.
Taking a Microsoft Office Specialist Exam ix
Using the Logo Builder, you can create a personalized certification logo that includes the MOS logo and the specific programs in which you have achieved certification. If you achieve MOS certification in multiple programs, you can include up to six of them in one logo.
You can include your personalized logo on business cards and other personal promotional materials. This logo attests to the fact that you are proficient in the applications or cross-application skills necessary to achieve the certification.
For More InformationTo learn more about the Microsoft Office Specialist exams and related courseware, visit:
www.microsoft.com/learning/en/us/certification/mos.aspx
Using This Book to Study for a Certification Exam
The Microsoft Office Specialist (MOS) exams for individual Microsoft Office 2010 applications, as well as SharePoint and Office 365, are practical rather than theoretical. You must demonstrate that you can complete certain tasks rather than simply answering questions about program features. The successful MOS certification candidate will have at least six months of experience using all aspects of an application on a regular basis; for example, using Outlook Web App at work to send messages, track contact information, schedule appointments and meetings, track and assign tasks, and take notes.
Each chapter in this book is divided into sections addressing groups of related skills. Each section includes review information, generic procedures, and practice tasks you can com-plete on your own while studying. You can practice the procedures in this book by using your own files.
As a certification candidate, you probably have a lot of experience with the program you want to become certified in. Many of the procedures we discuss in this book will be
x Taking a Microsoft Office Specialist Exam
familiar to you; others might not be. Read through each study section and ensure that you are familiar with not only the procedures included in the section, but also the con-cepts and tools discussed in the review information. In some cases, graphics depict the tools you will use to perform procedures related to the skill set. Study the graphics and ensure that you are familiar with all the options available for each tool.
Office 365 Releases and This BookMicrosoft updates Office 365 regularly. To learn about exciting new features and improvements to Office 365, see http://community.office365.com/en-us/w/office_365_ service_updates/default.aspx. This study guide was written during the spring of 2012 and is based on the E3 edition of the midsize and enterprise plan. It covers the certification exam scheduled to be released in summer 2012.
Features and Conventions of This BookWhile covering the objectives and skills described in this book, you can use the detailed table of contents to scan a listing of the topics covered in each chapter and locate specific topics.
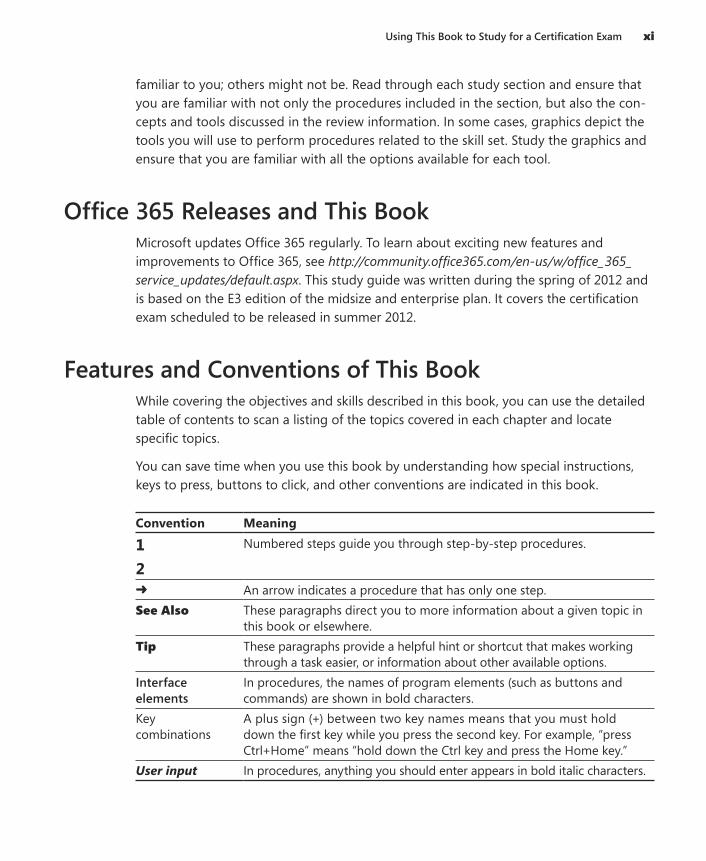
You can save time when you use this book by understanding how special instructions, keys to press, buttons to click, and other conventions are indicated in this book.
Convention Meaning
12
Numbered steps guide you through step-by-step procedures.
➜ An arrow indicates a procedure that has only one step.See Also These paragraphs direct you to more information about a given topic in
this book or elsewhere.Tip These paragraphs provide a helpful hint or shortcut that makes working
through a task easier, or information about other available options.Interface elements
In procedures, the names of program elements (such as buttons and commands) are shown in bold characters.
Key combinations
A plus sign (+) between two key names means that you must hold down the first key while you press the second key. For example, “press Ctrl+Home” means “hold down the Ctrl key and press the Home key.”
User input In procedures, anything you should enter appears in bold italic characters.
Using This Book to Study for a Certification Exam xi
How to Get Support and Provide Feedback
The following sections provide information on errata, book support, feedback, and contact information.
Errata & Book SupportWe’ve made every effort to ensure the accuracy of this book and its companion content. Any errors that have been reported since this book was published are listed on our Microsoft Press site at oreilly.com:
http://go.microsoft.com/FWLink/?Linkid=250941
If you find an error that is not already listed, you can report it to us through the same page.
If you need additional support, please send an email message to Microsoft Press Book Support at [email protected] .
Please note that product support for Microsoft software is not offered through the addresses above.
Getting Help with Microsoft Office 365If your question is about Microsoft Office 365 and not about the content of this Microsoft Press book, your first recourse is the Microsoft Office 365 Help system or community forums. Detailed information about how to access and use the Office 365 Help system and other resources is covered in Chapter 1, “Navigating Office 365.”
If your question is about Office 365 or another Microsoft software product and you cannot find the answer in the product’s Help system, please search the appropriate product solution center or the Microsoft Knowledge Base at:
support.microsoft.com/
xii How to Get Support and Provide Feedback
In the United States, Microsoft software product support issues not covered by the Microsoft Knowledge Base are addressed by Microsoft Product Support Services. Location-specific software support options are available from:
support.microsoft.com/gp/selfoverview/
We Want to Hear from YouAt Microsoft Press, your satisfaction is our top priority, and your feedback our most valuable asset. Please tell us what you think of this book at:
www.microsoft.com/learning/booksurvey/
The survey is short, and we read every one of your comments and ideas. Thanks in advance for your input!
Stay in TouchLet’s keep the conversation going! We’re on Twitter: http://twitter.com/MicrosoftPress .
How to Get Support and Provide Feedback xiii

91
3 Collaborating by Using Lync OnlineThe skills tested in this section of the Microsoft Office exam for Office 365 relate to how you collaborate using Microsoft Lync Online. Specifically, the following objectives are associated with this set of skills:
3.1 Configure Lync options3.2 Employ collaboration tools and techniques3.3 Manage Lync contacts3.4 Use Lync tools
Ease of communication, knowing whether someone is available or in a meeting, and collaborating on content in real time are essential capabilities that Lync provides to users of Office 365. In Lync, you can place calls, send e-mail or instant messages, hold meet-ings and group conversations, annotate a presentation, and sketch on a whiteboard. In the sections that follow, you’ll learn about the skills needed to make use of each of these features and more, how to manage the contacts you communicate with, and about other tools that Lync provides.
3.1 Configure Lync OptionsAs an introduction to Lync, the first section of this chapter describes the options you can specify for how to work with Lync. To open the Lync Options dialog box, click the Options button to the right of your name. You can also open the dialog box from the Tools menu.
Tip To view the Tools menu, click the arrow next to the Options button . To show the menu bar in the Lync window, click the arrow and then choose Show Menu bar.
92 Exam 77-891 Microsoft Office 365 Specialist
General PageAt the top of the General page are options that control the formatting of instant messages. These options control the display of emoticons, the background color in the instant message window, and the font properties of the text you type. Keep the option Show Emoticons In Instant Messages selected if you want to replace specific keyboard combinations—for example, : )—with a graphic. In this case, you would see a small smiling face.
In instant message conversations, Lync by default alternates the background color so that you can distinguish elements of the conversation more easily. Clear the check box that controls this option if you want to keep the background a consistent color.
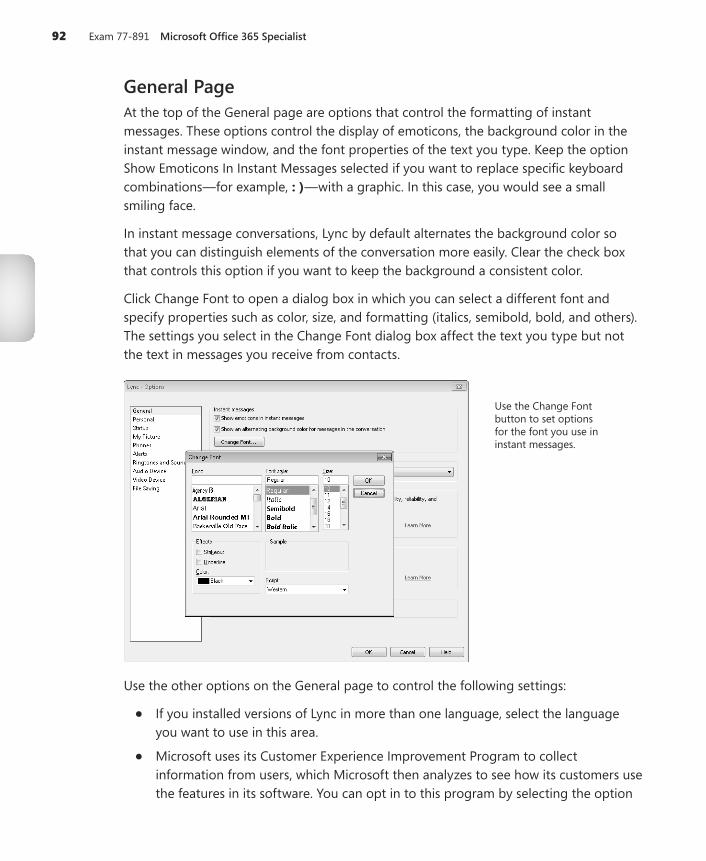
Click Change Font to open a dialog box in which you can select a different font and specify properties such as color, size, and formatting (italics, semibold, bold, and others). The settings you select in the Change Font dialog box affect the text you type but not the text in messages you receive from contacts.
Use the Change Font button to set options for the font you use in instant messages.
Use the other options on the General page to control the following settings:
● If you installed versions of Lync in more than one language, select the language you want to use in this area.
● Microsoft uses its Customer Experience Improvement Program to collect information from users, which Microsoft then analyzes to see how its customers use the features in its software. You can opt in to this program by selecting the option
3 Collaborating by Using Lync Online 93
Allow Microsoft To Collect Information About How I Use Lync. The Learn More link for this option takes you to a page that provides answers to frequently asked ques-tions and tells you more about what Microsoft does with the information it collects and how it protects your privacy.
● Logs are used by system administrators to collect, analyze, and save data. A system administrator might ask you to turn on either of the two logging options to do troubleshooting. Standard users who are not asked to activate these options don’t need to be concerned with them.
● When you minimize the Lync application window, the minimized window appears as an item on the Windows task bar by default. You can select the Minimize To The Notification Area Instead Of The Task Bar option in the Application Window area if you prefer that the minimized window appear in the notification area.
Personal PageUse the Personal page to configure the following options:
● My Account Update the e-mail address you use to sign in to Lync. By default, connection settings for the Lync server that your account is associated with are de-tected automatically. Click the Advanced button to open a dialog box in which you can choose an option to manually configure connection settings. You need to know the name or IP address for the internal server and external server and whether your connection uses the TCP or TLS connection protocol. These are advanced settings.
In the My Account area, you can also select or clear options to start Lync when you log on to Windows and to display Lync in the foreground when it starts.
● Personal Information Manager In this area, you can specify how Lync works together with Microsoft Exchange Server or Microsoft Outlook. By default, all the options in this area are selected. With these options set, Lync uses information from your Outlook calendar to display presence and status information, which alerts your Lync contacts whether you are available, in a meeting, or on a call. For ex-ample, during the time in which your calendar in Outlook shows that you are busy, your presence in Lync is shown the same way.
As you’ll learn more about later in this chapter, you can set privacy relationships in Lync to specify which of your contacts can view details about meetings and your other activities. You should consider privacy relationships in choosing whether to maintain or clear the option that shows an active out-of-office message to contacts who you’ve defined with the privacy relationship Family And Friends, Workgroup, or Colleagues.
94 Exam 77-891 Microsoft Office 365 Specialist
A record of your instant message conversations and call logs is stored in an Outlook folder named Conversation History. Clear either or both of these options to do without this record.
The final option in this area specifies whether Lync contacts are stored as personal contacts in Exchange.
● Location Depending on how your organization has configured Lync, you can use the option in the Location area to share information about your location with other programs.
● Display Photo If you don’t want to see pictures of your contacts, clear this option. If you maintain this option, you’ll see thumbnail photographs of the con-tacts who have posted them.
See Also You’ll learn more about posting your own photograph in the section “My Picture Page .”
● Activity Feed Activities such as changes in your status, notes you add to Lync, and changes to personal information are displayed in the Activities Feed list for your contacts to see. Clear this option if you want only personal notes and out-of-office messages to be displayed.
Status PageAs mentioned earlier, Lync shows your status on the basis of your activities. Lync also uses a colored presence indicator to let contacts know when you are busy or available. You can change your status to Busy, Away, or Do Not Disturb by choosing an option from the menu that appears under your name in the Lync window.
The settings on the Status page control when Lync changes your status automatically. By default, if your computer remains idle for five minutes, Lync switches your status to Inactive. If your status is Inactive for five minutes, Lync switches your status to Away. Use the options on this page to change the timing of these changes.
You can also select an option through which system settings are overridden and every-one can see your presence. If you don’t want to exercise this option, keep the default setting, which leaves this decision to the system administrator.
My Picture PageYou can include a picture that others see as part of your contact information. If your organization has set up a picture directory, you can use an image of yourself stored there. If you don’t want to use your standard organizational picture, you can select the
3 Collaborating by Using Lync Online 95
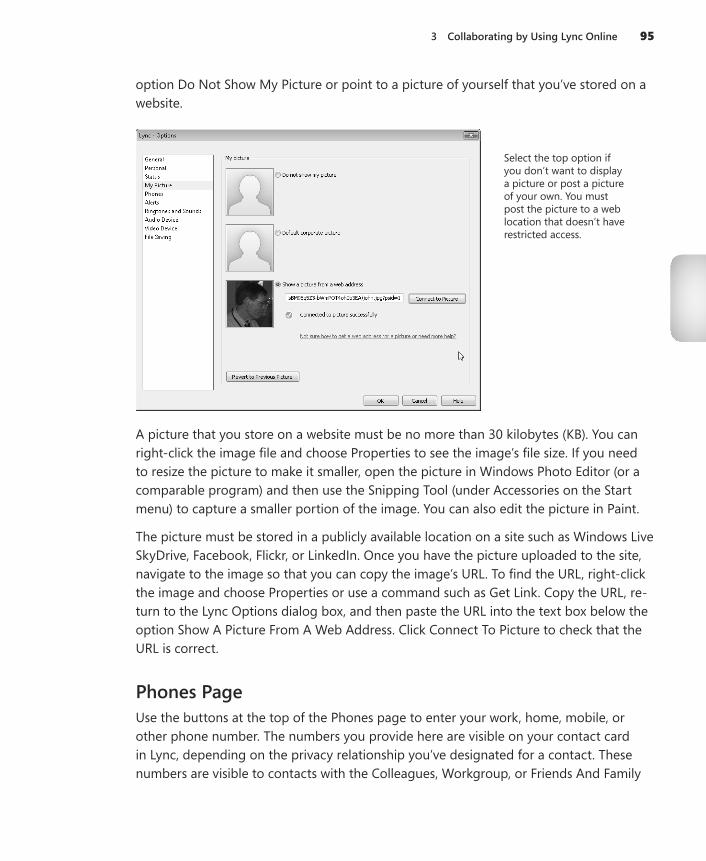
option Do Not Show My Picture or point to a picture of yourself that you’ve stored on a website.
Select the top option if you don’t want to display a picture or post a picture of your own. You must post the picture to a web location that doesn’t have restricted access.
A picture that you store on a website must be no more than 30 kilobytes (KB). You can right-click the image file and choose Properties to see the image’s file size. If you need to resize the picture to make it smaller, open the picture in Windows Photo Editor (or a comparable program) and then use the Snipping Tool (under Accessories on the Start menu) to capture a smaller portion of the image. You can also edit the picture in Paint.
The picture must be stored in a publicly available location on a site such as Windows Live SkyDrive, Facebook, Flickr, or LinkedIn. Once you have the picture uploaded to the site, navigate to the image so that you can copy the image’s URL. To find the URL, right-click the image and choose Properties or use a command such as Get Link. Copy the URL, re-turn to the Lync Options dialog box, and then paste the URL into the text box below the option Show A Picture From A Web Address. Click Connect To Picture to check that the URL is correct.
Phones PageUse the buttons at the top of the Phones page to enter your work, home, mobile, or other phone number. The numbers you provide here are visible on your contact card in Lync, depending on the privacy relationship you’ve designated for a contact. These numbers are visible to contacts with the Colleagues, Workgroup, or Friends And Family
96 Exam 77-891 Microsoft Office 365 Specialist
privacy relationships, but they are not visible to contacts you’ve designated as blocked contacts or external contacts.
Depending on your organization’s configuration of Lync, the Phone Integration option might not be enabled.
If you or a contact use Teletype (TTY) because of a hearing impairment, connect a TTY device to your computer and then select this option.
In the Joining Conference Calls area on the Phones page, you can specify how you want to participate in conference calls. By default, the conference call number is set to use Lync (via the Voice over Internet Protocol, or VoIP). You can list a work number as a phone number on this page and then choose which method you want to use during conference calls or online meetings. If you want to be prompted before joining a call, select that option as well.
Alerts PageThe four options on the Alerts page manage when you receive notifications. By default, Lync alerts you when another user adds you to that user’s contact list and allows you to add that person to your list. Clear the check box for this option if you don’t want to receive this alert.
You can choose one of three options for receiving alerts when your status is set to Do Not Disturb. You can choose not to see any alerts, to see only conversation alerts from people specified as members of your workgroup, or to see all alerts but only conversation alerts from people in your workgroup.
Ringtones And Sounds PageYou can assign one of the built-in ringtones for calls that occur in Lync. Select an entry in the Calls To list and then select the ringtone you want to associate with that item. You’ll hear a preview of the ringtone when you select an item in the Ringtone list. Choose None to turn off ringtones.
By default, Lync plays sounds, which include a ringtone for incoming calls and instant messages. Clear the check box for this option if you prefer to hear no sounds from Lync. If you keep this option selected, use the three related options to fine-tune the condi-tions when Lync plays a sound. For example, Lync mutes sounds for incoming instant messages if you are viewing an instant messaging conversation. Clear this check box if you don’t want Lync to mute sounds in this situation.
3 Collaborating by Using Lync Online 97
Also by default, Lync “keeps sounds to a minimum” when your status is set to Do Not Disturb. You can apply this practice to when your status is Busy as well.
If you want to associate specific sounds with events in Lync, click the Sound Settings button to open the Sound dialog box. On the dialog box’s Sounds tab, scroll down in the Program Events list until you see Microsoft Lync 2010. Under Lync, you’ll see a number of events with which you can associate a sound. The following events are available:
Busy Signal Incoming Private Line Call
Call Ended Incoming Response Group Call
Call Error Income Team Call
Connecting Tone Muting Tone
Data Sharing Invitation New Message
Dial Tone On Hold
Howler Outgoing Call
Incoming Call Redirect Call
Incoming Call in Full Screen Mode Second Incoming Call
Incoming Delegate Call Status Alert
Incoming Instant Message Untag
Select an event in the list to see which sound file is currently associated with it. You can switch to a different .wav file or choose None for a particular event.
Audio Device PageYou can control the volume for your speaker, microphone, and ringer on this page. Select the audio device whose settings you want to test or change. Use the buttons in the Speaker and Ringer areas to test the volume, and use the slider to adjust the volume if you need to. For the microphone setting, speak at the volume you would for a meeting or a call. The volume bar moves as you speak more softly or more loudly.
Use the Also Ring check box under Secondary Ringer if you want to activate that feature. If you select a secondary ringer, you can choose the option to have Lync unmute the ringer when your phone rings.
Video Device PageIf you have a webcam connected to your computer, you can provide a video feed dur-ing calls and online meetings you hold in Lync. You use the Video Device page to con-figure the settings for the webcam. Select a webcam and then click Webcam Settings.
98 Exam 77-891 Microsoft Office 365 Specialist
The Properties dialog box Lync displays depends on the type of webcam you have. As an example, for a Microsoft LifeCam, you see a dialog box with the tabs Camera Control and Video Settings. Options on the Camera Control tab affect focus, zoom, pan, and tilt. You need to clear the Auto check box to make changes to the setting for focus. Click Default to return the settings on this tab to their default values.
The Video Settings tab’s options affect brightness, white balance, and saturation. These options will depend on the webcam you have.
Important Your webcam must be connected to work with the options on this page. Be sure to view the webcam image as you work with these settings so that you can see how your changes are applied to the resolution and the quality of the video.
File Saving PageDuring meetings and calls you hold using Lync, you can exchange files as attachments. Lync also has a built-in feature that lets you record calls and meetings, which you can then play back or publish for others to see.
See Also For more information about recording meetings and managing recordings, see “Holding Web Conferences” and “Using Recording Manager” later in this chapter.
The File Saving page shows the path to where Lync stores files you receive in Lync and the recordings you make of conversations. For file transfers, the default location is C:\Users\username\Documents\My Received Files. For Lync recordings, the default loca-tion is C:\Users\username\Lync Recordings. Use the Browse buttons to open a dialog box in which you can select a different folder for one or both of these settings.
Before Lync changes the path for recordings, it displays a message prompting you to confirm the action. Lync takes this extra step to alert you that choosing not to store recordings in the default location makes the recordings available to people with access to the folder you choose.
➤ To open the Options dialog box
➜ In the Lync window, click the Options button to the right of your name.
Or
➜ Click the arrow to the right of the Options button, point to Tools, and then click Options .
3 Collaborating by Using Lync Online 99
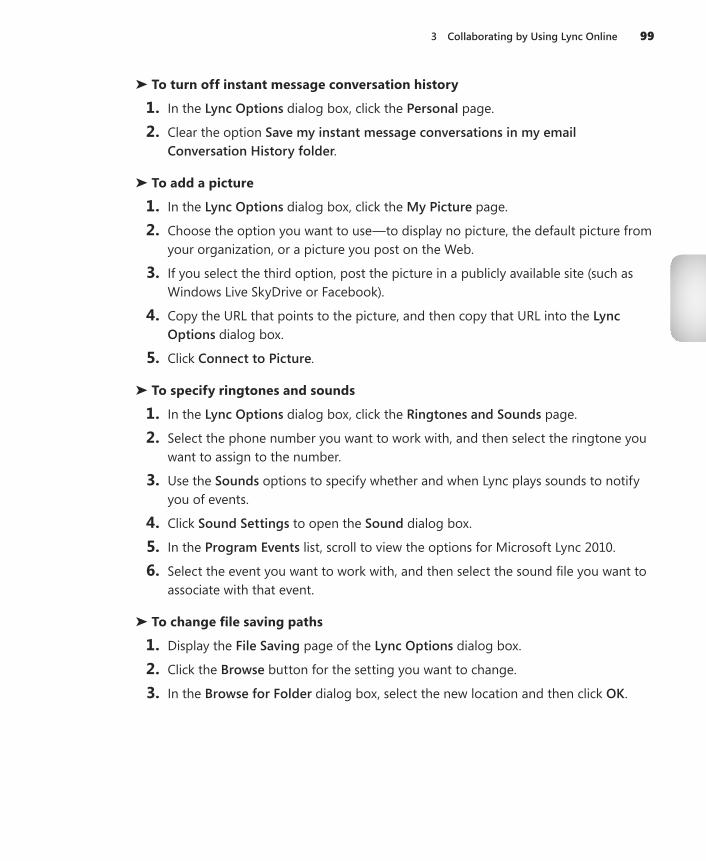
➤ To turn off instant message conversation history
1. In the Lync Options dialog box, click the Personal page.
2. Clear the option Save my instant message conversations in my email Conversation History folder .
➤ To add a picture
1. In the Lync Options dialog box, click the My Picture page.
2. Choose the option you want to use—to display no picture, the default picture from your organization, or a picture you post on the Web.
3. If you select the third option, post the picture in a publicly available site (such as Windows Live SkyDrive or Facebook).
4. Copy the URL that points to the picture, and then copy that URL into the Lync Options dialog box.
5. Click Connect to Picture .
➤ To specify ringtones and sounds
1. In the Lync Options dialog box, click the Ringtones and Sounds page.
2. Select the phone number you want to work with, and then select the ringtone you want to assign to the number.
3. Use the Sounds options to specify whether and when Lync plays sounds to notify you of events.
4. Click Sound Settings to open the Sound dialog box.
5. In the Program Events list, scroll to view the options for Microsoft Lync 2010.
6. Select the event you want to work with, and then select the sound file you want to associate with that event.
➤ To change file saving paths
1. Display the File Saving page of the Lync Options dialog box.
2. Click the Browse button for the setting you want to change.
3. In the Browse for Folder dialog box, select the new location and then click OK .
100 Exam 77-891 Microsoft Office 365 Specialist
Practice Tasks
Practice the skills you learned in this section by performing the following tasks in Lync. If you are just learning how to work with Lync, you might want to return to the Lync Options dialog box after you gain more practice. To start, do the following:
● Sign in to Lync and then open the Options dialog box.
● Enter phone numbers you want to share with appropriate contacts.
● If you have a webcam, go to the Video Device page and update the settings for the webcam.
● Use the Ringtones And Sounds page to experiment with the audio clues Lync can provide.
3.2 Employ Collaboration Tools and TechniquesIn this section, you’ll explore the range of ways in which Lync enables collaboration, including group conversations in which you can review, annotate, or update documents; online meetings; instant messaging; and audio and video conferences.
Holding Group ConversationsDuring an online meeting or a call that you set up with Lync, you can supplement and focus the conversation by using Lync to share information. You can open a Microsoft PowerPoint presentation, for example, and discuss and annotate the presentation’s slides. You can share your entire desktop or the content you are working on in a specific program. You can also use an online whiteboard to gather ideas in a brainstorming session or conduct a quick poll to collect opinions.
Later in this section, you’ll learn more details about conferences and online meetings, but one quick way to initiate a group conversation is to click the arrow next to the Options button, click Meet Now, and then use the People Options button to invite one person or more to join a discussion with you. (You can also drag a contact entry from the Lync window to the conversation window to invite that person to a conversation.) With the group assembled online, you can then use commands on the conversation window’s Share menu to collaborate in a number of ways.
3 Collaborating by Using Lync Online 101
Important The participants in a group conversation that you set up with the Meet Now command are designated as presenters by default . Presenters can share content and per-form other operations during a conversation that participants designated as attendees cannot. When you invite participants by using the People Options button, choose Make Everyone An Attendee if you (as the organizer) want more control of the conversation.
Sharing Your DesktopTo work as a group on a document, to view a web page, or to review other content, you can share your desktop as part of a group conversation. You can grant control of your desktop to another participant (either a presenter or an attendee) and let that partici-pant work with the programs or files on your computer. Participants can also request control, which you can approve or reject.
Tip Sharing your desktop through Lync can be a helpful way to troubleshoot or solve a problem you are having with your system. Start a conversation in Lync with a mem-ber of your help desk staff or a colleague who has experience in the area you’re having trouble with. You can turn over control to that person so that he can check settings and configurations on your computer.
In the conversation window, select Desktop from the Share menu to start this process. If you initiate this action, you can click Preview in the Lync window notification bar to see what participants are looking at.
Across the top of your screen, you’ll see a toolbar that indicates you are currently sharing your desktop. Lync notifies participants in the conversation that you have shared content, and they can then accept (or decline) to view the shared content. Lync loads and displays your desktop in a portion of the Lync window referred to as the stage .
Participants see activity on your desktop in real time. The text you type in a Word document, for example, appears on their screens as you type it. To turn over control to another participant, click Give Control and then select the participant from the list. If a participant clicks Request Control at the top of her screen, you see a notification that lets you accept or decline the request. You can regain control by clicking Give Control and choosing Take Back Control or by pressing Ctrl+Alt+Spacebar.
102 Exam 77-891 Microsoft Office 365 Specialist
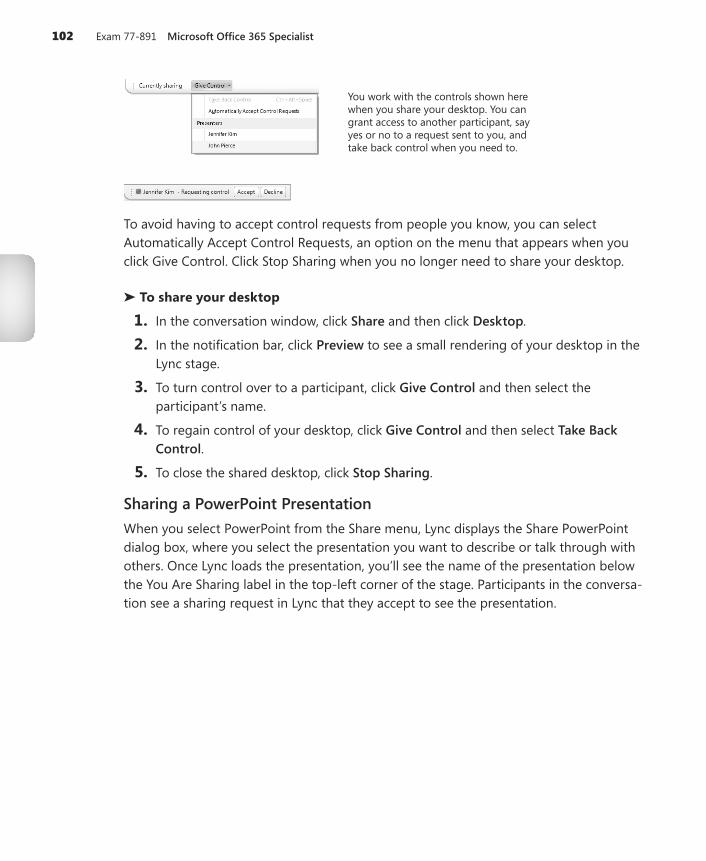
You work with the controls shown here when you share your desktop. You can grant access to another participant, say yes or no to a request sent to you, and take back control when you need to.
To avoid having to accept control requests from people you know, you can select Automatically Accept Control Requests, an option on the menu that appears when you click Give Control. Click Stop Sharing when you no longer need to share your desktop.
➤ To share your desktop
1. In the conversation window, click Share and then click Desktop .
2. In the notification bar, click Preview to see a small rendering of your desktop in the Lync stage.
3. To turn control over to a participant, click Give Control and then select the participant’s name.
4. To regain control of your desktop, click Give Control and then select Take Back Control .
5. To close the shared desktop, click Stop Sharing .
Sharing a PowerPoint PresentationWhen you select PowerPoint from the Share menu, Lync displays the Share PowerPoint dialog box, where you select the presentation you want to describe or talk through with others. Once Lync loads the presentation, you’ll see the name of the presentation below the You Are Sharing label in the top-left corner of the stage. Participants in the conversa-tion see a sharing request in Lync that they accept to see the presentation.
3 Collaborating by Using Lync Online 103
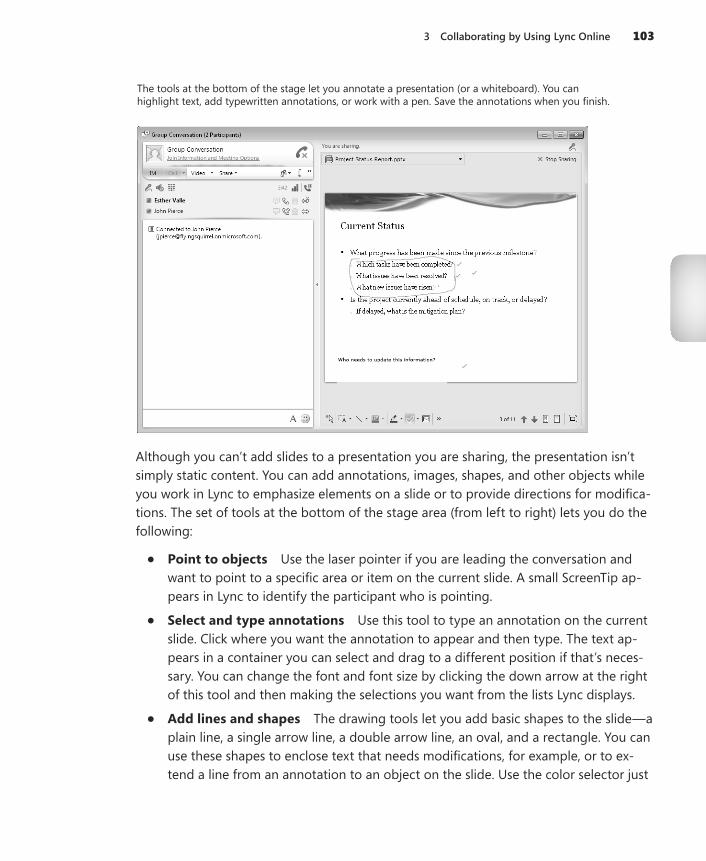
The tools at the bottom of the stage let you annotate a presentation (or a whiteboard). You can highlight text, add typewritten annotations, or work with a pen. Save the annotations when you finish.
Although you can’t add slides to a presentation you are sharing, the presentation isn’t simply static content. You can add annotations, images, shapes, and other objects while you work in Lync to emphasize elements on a slide or to provide directions for modifica-tions. The set of tools at the bottom of the stage area (from left to right) lets you do the following:
● Point to objects Use the laser pointer if you are leading the conversation and want to point to a specific area or item on the current slide. A small ScreenTip ap-pears in Lync to identify the participant who is pointing.
● Select and type annotations Use this tool to type an annotation on the current slide. Click where you want the annotation to appear and then type. The text ap-pears in a container you can select and drag to a different position if that’s neces-sary. You can change the font and font size by clicking the down arrow at the right of this tool and then making the selections you want from the lists Lync displays.
● Add lines and shapes The drawing tools let you add basic shapes to the slide—a plain line, a single arrow line, a double arrow line, an oval, and a rectangle. You can use these shapes to enclose text that needs modifications, for example, or to ex-tend a line from an annotation to an object on the slide. Use the color selector just
104 Exam 77-891 Microsoft Office 365 Specialist
to the right of the drawing tools button to draw in a particular color. Participants can choose specific colors to identify their additions to the slide.
● Write notes on the presentation using a pen or highlighter If you have a pen or stylus attached to your computer (or are adept at writing with a mouse), select a pen or highlighter from the options presented, and then add notes to the slide or highlight content that needs changes, further review, or different formatting, for example. You can choose from four colors for pens or highlighters, but you cannot change the line thickness.
● Add check marks, arrows, and Xs Another way to annotate a slide is by using one of the stamp shapes available. You can add a check mark, an arrow, or an X. Use the arrow at the right of this tool to choose the stamp you want to add.
● Insert images Click Insert Image to choose an image to add to the current slide. Use the handle at the bottom-right corner of the image to resize it. You can drag the image to change its position on the slide.
● Save the presentation with the annotations you’ve added Click this button to create an XPS file of the presentation showing the annotations added during the group conversation.
Tip You can view an XPS file in most web browsers or in a viewer application available from Microsoft .
Attendees as well as presenters can annotate the slides. Only presenters can save an annotated presentation. As the group reviews the presentation, a presenter can use the up and down arrows at the right of the presentation window to navigate back and forth between slides. Presenters (but not attendees) can also click the Thumbnails button to display thumbnail images of the slides along the right side of the stage. If you want to see the notes related to a slide, click Presenter Notes. Both of these buttons toggle on and off the display of these features.
Tip You can display the presentation in full screen by clicking the Full Screen button in the bottom-right corner of the stage. Click Esc to show the presentation within the Lync application window again .
➤ To share and annotate a presentation
1. In the conversation window, click Share and then click PowerPoint Presentation .
2. In the Share PowerPoint dialog box, select the PowerPoint file you want to share.
3. Use the tools at the bottom of the stage to annotate the slides.

3 Collaborating by Using Lync Online 105
4. Click Save with Annotations to save the presentation with your annotations in place.
Sharing Content from the Stage
When you stop sharing content during a conversation, the content remains available if you need to refer to it again. Use the drop-down list at the top-left corner of the stage to view a record of the shared content. Click the arrow related to an item to open a menu that lets you share that content again, save it, rename it, and so on. Choose Share New Content to select a different program, presentation, or sharing option.
You can manage shared content using this menu in the stage.
You can also add attachments to the conversation window during a meeting. Click Add Or View Attachments in the conversation window’s toolbar, and then click Add Attachment. Choose the file or files you want to provide to participants. Participants then click in the notification area of their conversation window to view or save the attachments.
106 Exam 77-891 Microsoft Office 365 Specialist
Tip You can also drag a file into the conversation window to add it to a conversation. If you want to cancel the transfer of an attachment, press Alt+Q.
Sharing a ProgramSharing your desktop lets participants in a group conversation see everything that’s currently running on your computer. If instead of sharing your desktop, you want to share a document in a particular program, start the program and then choose the Program command on the Share menu.
Important The program you want to share must be running on your computer before you share it. In other words, Lync doesn’t give you the option to start a program when you choose the Program command .
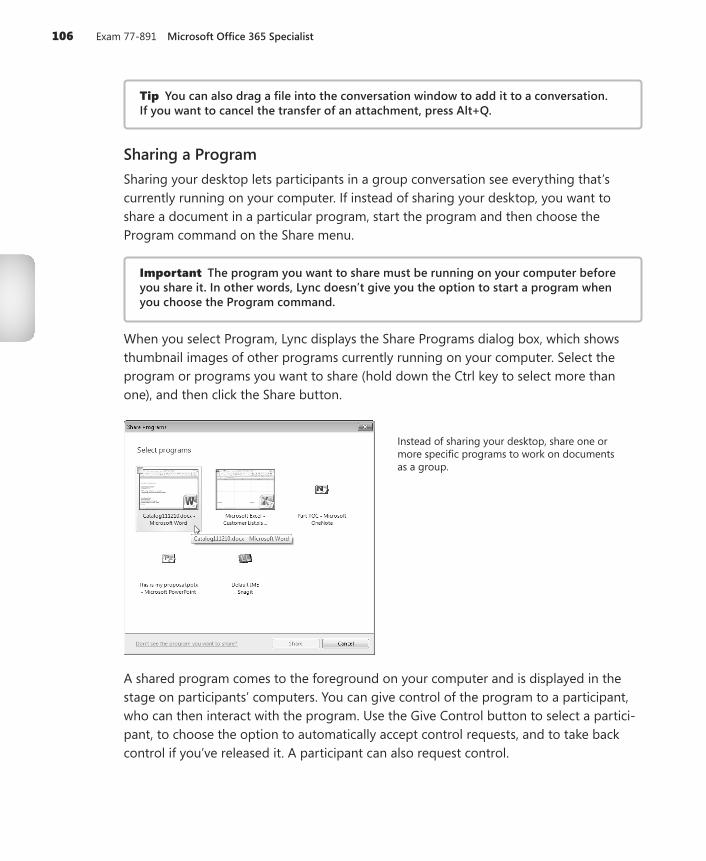
When you select Program, Lync displays the Share Programs dialog box, which shows thumbnail images of other programs currently running on your computer. Select the program or programs you want to share (hold down the Ctrl key to select more than one), and then click the Share button.
Instead of sharing your desktop, share one or more specific programs to work on documents as a group.
A shared program comes to the foreground on your computer and is displayed in the stage on participants’ computers. You can give control of the program to a participant, who can then interact with the program. Use the Give Control button to select a partici-pant, to choose the option to automatically accept control requests, and to take back control if you’ve released it. A participant can also request control.
3 Collaborating by Using Lync Online 107
Important You cannot share the following programs: Lync 2010, Microsoft Lync 2010 Recording Manager, Microsoft Lync 2010 Attendee, Windows Explorer, Sticky Notes, Windows Sidebar, or any program running with user privileges that are higher than the privileges for Lync 2010.
➤ To share a program
1. In the conversation window, click Share and then click Program .
2. In the Share Programs dialog box, select the program or programs you want to share with participants.
3. Click Share .
4. Use the Give Control button to grant control to a participant if necessary.
5. Click Stop Sharing when the session is over.
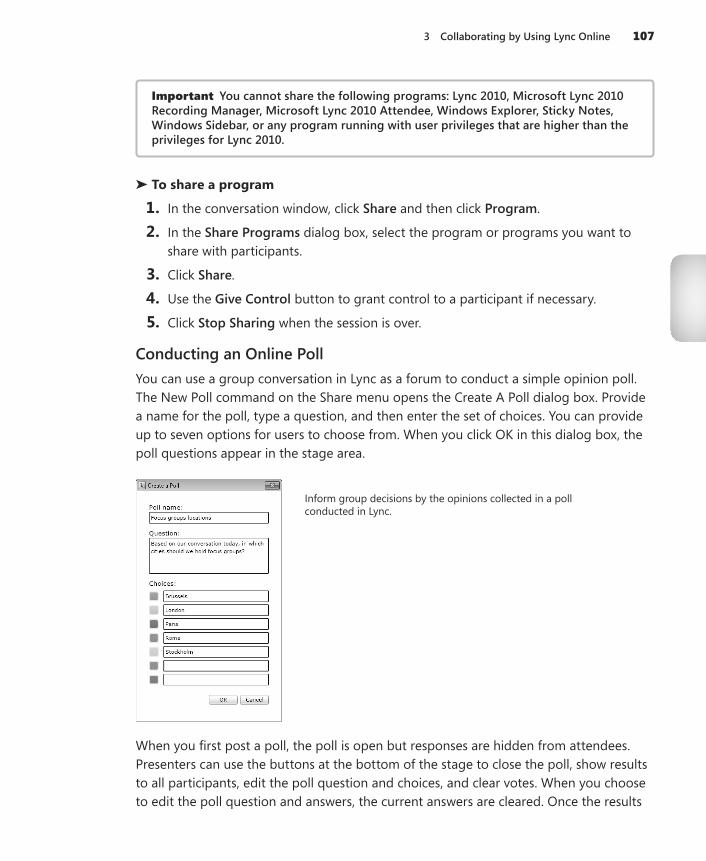
Conducting an Online PollYou can use a group conversation in Lync as a forum to conduct a simple opinion poll. The New Poll command on the Share menu opens the Create A Poll dialog box. Provide a name for the poll, type a question, and then enter the set of choices. You can provide up to seven options for users to choose from. When you click OK in this dialog box, the poll questions appear in the stage area.
Inform group decisions by the opinions collected in a poll conducted in Lync.
When you first post a poll, the poll is open but responses are hidden from attendees. Presenters can use the buttons at the bottom of the stage to close the poll, show results to all participants, edit the poll question and choices, and clear votes. When you choose to edit the poll question and answers, the current answers are cleared. Once the results
108 Exam 77-891 Microsoft Office 365 Specialist
are in, you can save the poll as a PNG image file or as a comma-separated value file (.csv) that you can open in Microsoft Excel.
Tip To conduct a poll with multiple questions, define the first question, collect answers, and then save that poll. Then edit the current poll and define a new question and set of answers .
➤ To create and manage a poll
1. In the conversation window, click Share and then click New Poll .
2. In the Create a Poll dialog box, type a name for the poll, the question, and the array of possible answers.
3. Click OK to display the poll in the stage.
4. After participants have answered the poll question, close the poll, reveal the results to attendees, and edit the poll to provide a new question if needed.
5. Click Save Poll to preserve the results.
6. Click Stop Sharing to clear the stage.
Working Together on a WhiteboardFor a group brainstorming session, share a new whiteboard. Lync displays a blank page in the stage area and provides a set of tools at the bottom of the window that lets you sketch and outline your ideas. The tools available are essentially the same as those you can use to annotate a shared PowerPoint presentation. For a description of these tools, see “Sharing a PowerPoint Presentation” earlier in this chapter.
Take a look at the notification above the top-left corner of the stage that indicates that everyone in the group conversation can contribute to the whiteboard. With a white-board displayed, you won’t see the Give Control or Request Control buttons. To preserve the working session you conduct with a whiteboard, save it. You can save a whiteboard as an XPS file or a PNG file.
➤ To share a whiteboard
1. In the conversation window, click Share and then click New Whiteboard .
2. Use the tools at the bottom of the stage to add ideas and sketches to the whiteboard.
3. Click the Save with Annotations button to preserve the whiteboard as an XPS or a PNG file.
3 Collaborating by Using Lync Online 109
Holding Web Conferences If you set up your Office 365 e-mail account in Outlook 2010, you can schedule a meeting that is held online using Lync.
Tip You can use the Mail option in Control Panel to set up your Office 365 e-mail account in Outlook 2010. In the Mail Setup dialog box, click E-Mail Accounts and then click New. Walk through the Add New Account wizard. After you enter your name, e-mail address, and password, your settings should be configured automatically. Be aware that in some organizations, this operation might be restricted.
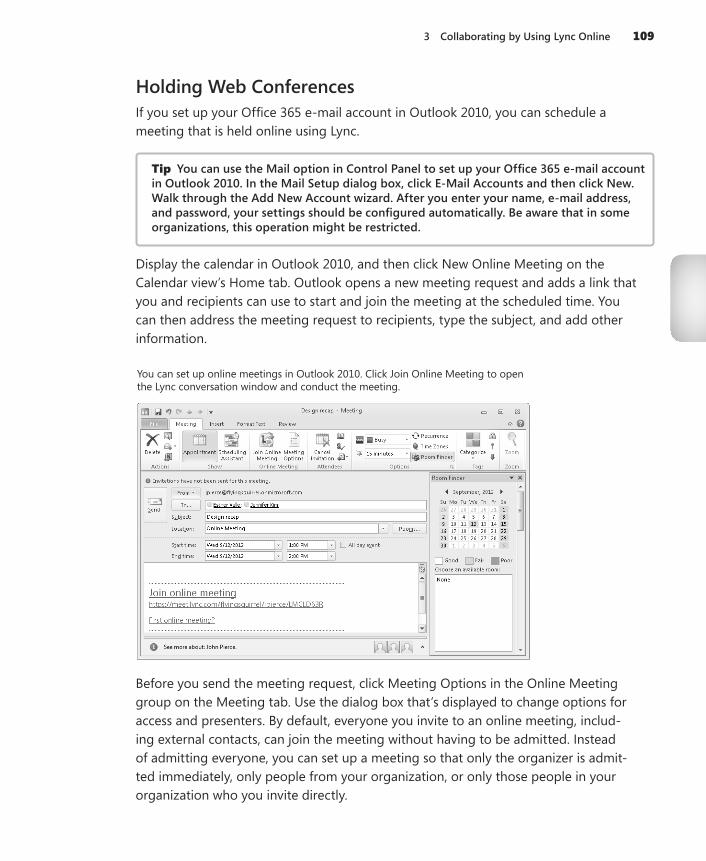
Display the calendar in Outlook 2010, and then click New Online Meeting on the Calendar view’s Home tab. Outlook opens a new meeting request and adds a link that you and recipients can use to start and join the meeting at the scheduled time. You can then address the meeting request to recipients, type the subject, and add other information.
You can set up online meetings in Outlook 2010. Click Join Online Meeting to open the Lync conversation window and conduct the meeting.
Before you send the meeting request, click Meeting Options in the Online Meeting group on the Meeting tab. Use the dialog box that’s displayed to change options for access and presenters. By default, everyone you invite to an online meeting, includ-ing external contacts, can join the meeting without having to be admitted. Instead of admitting everyone, you can set up a meeting so that only the organizer is admit-ted immediately, only people from your organization, or only those people in your organization who you invite directly.
110 Exam 77-891 Microsoft Office 365 Specialist
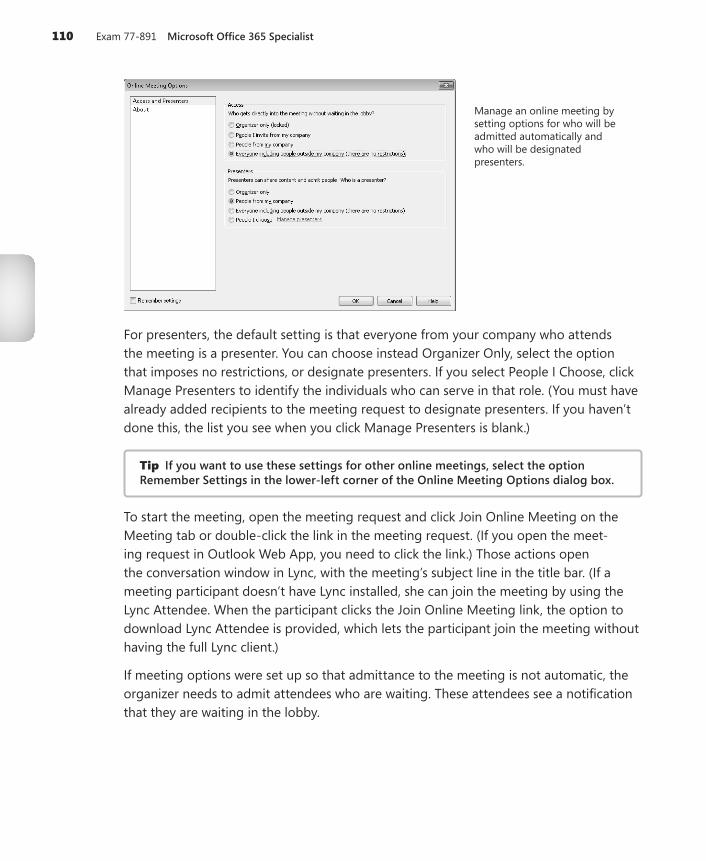
Manage an online meeting by setting options for who will be admitted automatically and who will be designated presenters.
For presenters, the default setting is that everyone from your company who attends the meeting is a presenter. You can choose instead Organizer Only, select the option that imposes no restrictions, or designate presenters. If you select People I Choose, click Manage Presenters to identify the individuals who can serve in that role. (You must have already added recipients to the meeting request to designate presenters. If you haven’t done this, the list you see when you click Manage Presenters is blank.)
Tip If you want to use these settings for other online meetings, select the option Remember Settings in the lower-left corner of the Online Meeting Options dialog box.
To start the meeting, open the meeting request and click Join Online Meeting on the Meeting tab or double-click the link in the meeting request. (If you open the meet-ing request in Outlook Web App, you need to click the link.) Those actions open the conversation window in Lync, with the meeting’s subject line in the title bar. (If a meeting participant doesn’t have Lync installed, she can join the meeting by using the Lync Attendee. When the participant clicks the Join Online Meeting link, the option to download Lync Attendee is provided, which lets the participant join the meeting without having the full Lync client.)
If meeting options were set up so that admittance to the meeting is not automatic, the organizer needs to admit attendees who are waiting. These attendees see a notification that they are waiting in the lobby.

3 Collaborating by Using Lync Online 111
Participants who aren’t admitted to an online meeting automatically wait in the lobby. The organizer must choose to admit them.
During a meeting, presenters can share content, and they can record an online meeting to capture audio and video, including discussions of shared content. To begin recording a meeting, click the More Options arrow at the right side of the conversation window toolbar and choose Start Recording. Use the same menu to pause recording and to stop recording.
When you stop a recording, Lync displays a dialog box in which you can specify a recording title (the meeting subject is used by default) and also choose to create a version of the recording that you can publish for others to see. The path in the Save To box shows the default location or a different location specified in the Lync Options dialog box.
If you want to share a recording with other users, keep the option to create a version that you can publish.
See Also For more information about working with recorded meetings, see ”Using Recording Manager” later in this chapter.

112 Exam 77-891 Microsoft Office 365 Specialist
Participants can leave a meeting by clicking the phone icon at the top right of the conversation window. The meeting’s organizer can end a meeting by clicking the People Options button and then choosing Remove Everyone And End Meeting.
➤ To schedule an online meeting
1. Open Outlook 2010, and switch to Calendar view.
2. On the Home tab, click New Online Meeting .
3. Add the meeting attendees, type a subject, and then add any message to the body of the meeting request.
4. In the meeting request, click Meeting Options if you need to change default settings for meeting access and the designation of presenters.
5. Click Send .
➤ To join an online meeting
1. Open the meeting request.
2. Click the link embedded in the request.
Lync opens the conversation window. You might need to specify how you want to join the audio portion of the meeting.
➤ To record a meeting
1. In the conversation window, click the More Options arrow at the right side of the toolbar.
2. Click Start Recording .
3. Click Pause Recording if necessary during the meeting.
4. Click Stop Recording when you are ready.
Sending Instant MessagesYou will frequently use Lync to exchange instant messages with contacts and coworkers. You only need to double-click the contact’s entry in the Lync window or right-click the entry and choose Send An Instant Message. In the window that Lync displays, type your message and then press Enter. The message’s recipient receives a notification of the mes-sage from Lync and can reply with a return message, redirect the message as a Lync call, ignore the message, or indicate that he doesn’t want to be disturbed.
You can engage in more than one instant message conversation at the same time. After you start the first instant message session, right-click another contact and send an instant message to that person as well. You can also add multiple contacts to a single
3 Collaborating by Using Lync Online 113
instant message session. Select the first contact, press the Ctrl key, and then select the other contacts you want to include.
Tip You can send an instant message to a group of contacts by right-clicking the group’s name in the contact list and choosing Send An Instant Message. You can add a contact to an instant message session by dragging the contact’s entry from the contact list in the Lync window to the conversation window.
In most respects, an instant message session is like other group conversations you hold in Lync. You can share your desktop or a presentation, for example, or set up a poll or a whiteboard. While an instant message session is under way, you can copy and paste text and links to websites or documents into the instant message window. To add another contact to the conversation, click the People Options button and then invite that per-son to join via e-mail, by searching your contact list, or by dragging the contact’s entry into the conversation window. You can use other options on this menu to make all other participants attendees (which means they can’t share content) or to end the session.
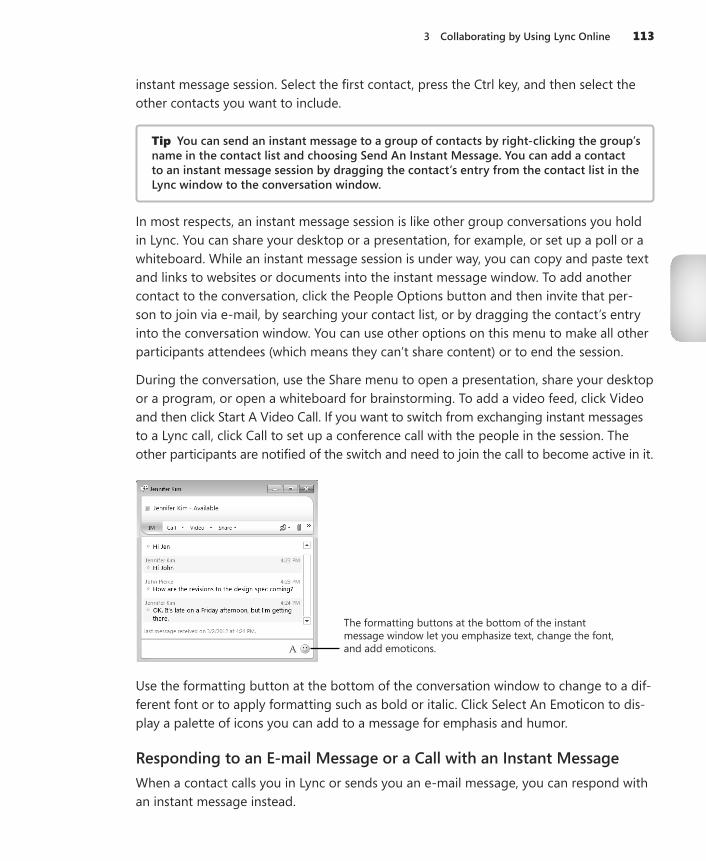
During the conversation, use the Share menu to open a presentation, share your desktop or a program, or open a whiteboard for brainstorming. To add a video feed, click Video and then click Start A Video Call. If you want to switch from exchanging instant messages to a Lync call, click Call to set up a conference call with the people in the session. The other participants are notified of the switch and need to join the call to become active in it.
The formatting buttons at the bottom of the instant message window let you emphasize text, change the font, and add emoticons.
Use the formatting button at the bottom of the conversation window to change to a dif-ferent font or to apply formatting such as bold or italic. Click Select An Emoticon to dis-play a palette of icons you can add to a message for emphasis and humor.
Responding to an E-mail Message or a Call with an Instant MessageWhen a contact calls you in Lync or sends you an e-mail message, you can respond with an instant message instead.
114 Exam 77-891 Microsoft Office 365 Specialist
For a call, click the Redirect button on the notification Lync displays when you receive the call, and then choose Reply With Instant Message. When you choose this command, Lync opens the instant message window and the person who calls is informed that you chose to reply in that way. Lync also informs the caller that you’ve invited her to a conversation. Type your reply in the instant message window and then press Enter to continue.
For an e-mail message you receive in Outlook Web App, you can respond with an instant message by right-clicking the contact’s name in the reading pane and choosing Chat. You can also open the message and then click Chat in the toolbar. In Outlook 2010, you can double-click a contact’s name to display a small contact card. In the toolbar at the top of the contact card, click the Send An Instant Message To button.
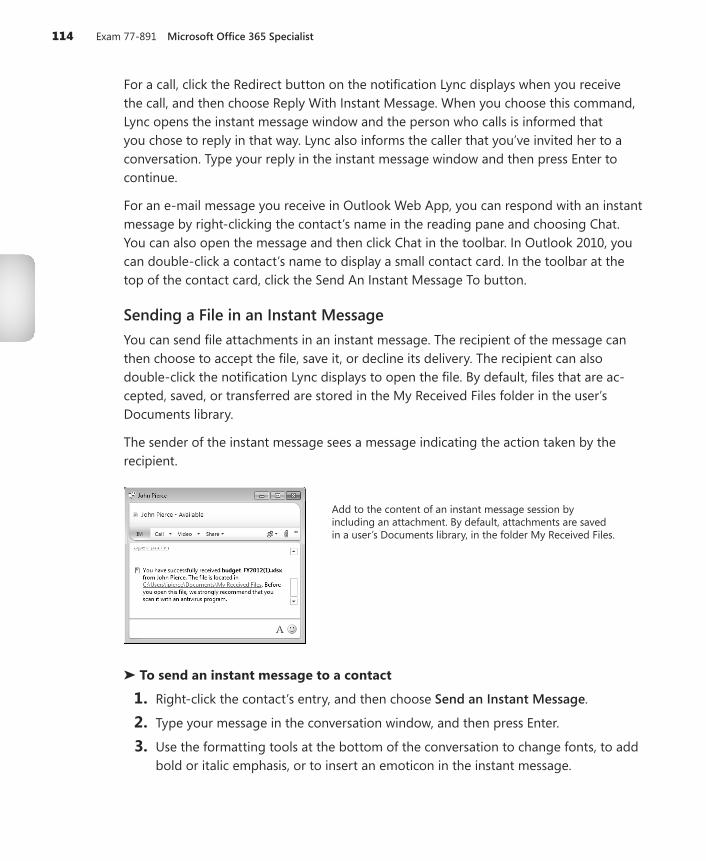
Sending a File in an Instant MessageYou can send file attachments in an instant message. The recipient of the message can then choose to accept the file, save it, or decline its delivery. The recipient can also double-click the notification Lync displays to open the file. By default, files that are ac-cepted, saved, or transferred are stored in the My Received Files folder in the user’s Documents library.
The sender of the instant message sees a message indicating the action taken by the recipient.
Add to the content of an instant message session by including an attachment. By default, attachments are saved in a user’s Documents library, in the folder My Received Files.
➤ To send an instant message to a contact
1. Right-click the contact’s entry, and then choose Send an Instant Message .
2. Type your message in the conversation window, and then press Enter.
3. Use the formatting tools at the bottom of the conversation to change fonts, to add bold or italic emphasis, or to insert an emoticon in the instant message.
3 Collaborating by Using Lync Online 115
➤ To redirect an instant message to a Lync call
➜ In the instant message notification you receive, click Redirect and then choose Respond with Lync Call .
➤ To reply to an e-mail message with an instant message
➜ In Outlook Web App, open the e-mail message and then click Chat .
Audio ConferencingLync calls use Voice over Internet Protocol (VoIP) for communication between computers. When you place a call to a contact, each device that the contact has enabled to receive calls from Lync rings—which might include a desktop computer as well as a laptop. Calls you place via Lync bypass the standard telephone network.
Start a Lync call by pointing at a contact and then clicking Call. During the call, you can add contacts by pointing to the People Options button and then inviting other people to join the conference.
You can start a group call by selecting each contact you want to talk to. (Use the Ctrl key to select more than one entry in the contact list.) Right-click the selection, and then choose Start A Conference Call.
➤ To start a conference call with multiple contacts
1. Select the contacts you want to call.
2. Right-click the selection, and then choose Start a Conference Call .
Setting Up a Video ConferenceIf you have a webcam connected to your computer, you can include a video feed in the group conversations you hold in Lync.
After you connect the webcam, go to the Lync Options dialog box and check the settings for focus, brightness, and other properties. (See “Video Device Page” earlier in this chapter for more details.) You can then select a contact (or a group of contacts), right-click, and choose Start A Video Call.
You see your own video feed in a preview window that is inset at the bottom-right corner of the conversation window. The Video menu includes a command that lets you hide the preview or expand it so that it’s shown in a larger portion of the conversation window. Use the Video menu also to end or pause your video stream, to view the video in full screen, and to display the video feed in its own window. (The standalone video
116 Exam 77-891 Microsoft Office 365 Specialist
window includes a button in its top-right corner that lets you incorporate the video in the conversation window again.)
As you can in conversations that don’t feature video, use the Share menu to display your desktop, a specific program, a whiteboard, and other such items to the participants in the video call. Click the IM button in the conversation window to send a participant an instant message during the call.
When you click End Video, the call itself is not ended. You can carry on via voice or instant messaging.
If you are engaged in a group conversation, open the Video menu and then choose Add Video to start a video feed for the conversation.
➤ To set up a video call
1. Select the contact or contacts you want to include in the video call.
2. Right-click the selection, and then choose Start Video Call .
3. During the call, use the Video menu to do the following:
❍ Hide, show, expand, or shrink your preview
❍ Pause the video
❍ View the video in full screen
❍ View the video in a separate window
❍ End the video
Practice Tasks
Practice the skills you learned in this section by performing the following tasks in Lync:
● Work with colleagues in your organization to hold a group conversation. If you organize the conversation, share your desktop or a presentation with the other participants.
● Exchange instant messages with your colleagues. Redirect an instant message to a Lync call.
● If you and your colleagues have webcams available, set up and conduct a video conference.
3 Collaborating by Using Lync Online 117
3.3 Manage Lync ContactsIn many ways, your contact list is the center of your work in Lync. Using the list, you can initiate calls, send instant messages or e-mail, schedule a meeting, and perform other tasks. You learned how many of these features work in the previous section. In this section, you’ll learn more about organizing and managing your contacts in Lync.
Using Contact GroupsOrganizing Lync contacts into groups helps you find a contact and, more important, lets you communicate with all the members of the group in one step. Lync sets up two groups by default: Frequent Contacts and Other Contacts. You can create your own groups and then add contacts to them.
Tip You can also create a group when you add a contact to your list. You’ll learn how to do this in the next section .
After you add contacts to a group, point to the group’s name in the contact list to display the Call button. Click Call to start a conference call with the group’s members. For more options, right-click a group name to display a menu from which you can do the following:
● Send an instant message to the group
● Start a conference call
● Start a video call
● Share your desktop in a group conversation
● Send an e-mail message to group members
● Schedule a meeting with group members (if your account uses Outlook 2010)
➤ To create a group
1. Above the contacts list, click Groups .
2. In the list, right-click a group name (for example, Other Contacts) and choose Create New Group .
3. Type a name for the group, and then click away from the text box.
➤ To communicate with group members
1. Right-click the group name.
2. On the menu, choose the command for how you want to communicate with the group. For example, choose Send an Instant Message or Start a Video Call .
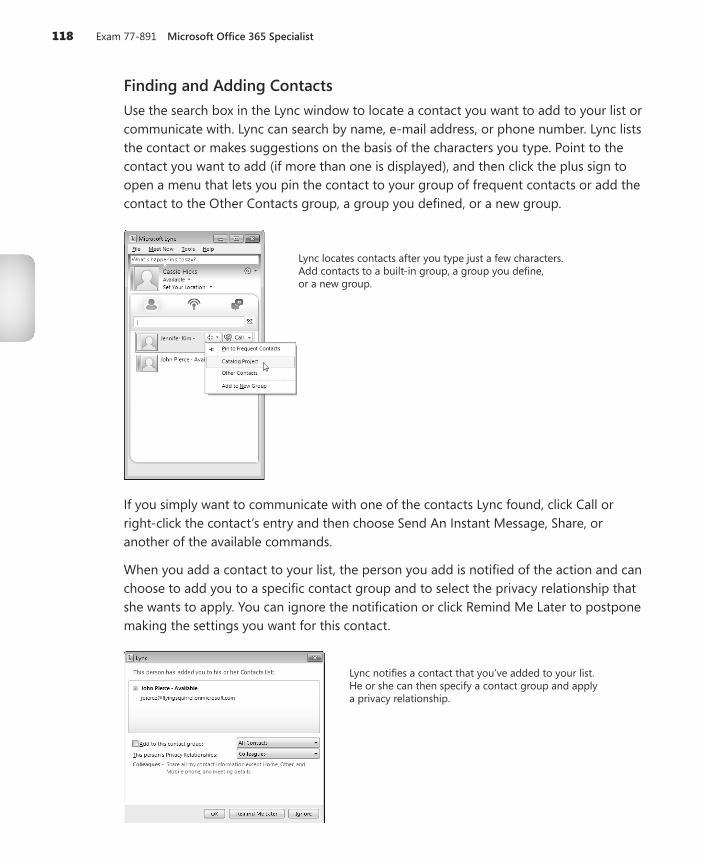
118 Exam 77-891 Microsoft Office 365 Specialist
Finding and Adding ContactsUse the search box in the Lync window to locate a contact you want to add to your list or communicate with. Lync can search by name, e-mail address, or phone number. Lync lists the contact or makes suggestions on the basis of the characters you type. Point to the contact you want to add (if more than one is displayed), and then click the plus sign to open a menu that lets you pin the contact to your group of frequent contacts or add the contact to the Other Contacts group, a group you defined, or a new group.
Lync locates contacts after you type just a few characters. Add contacts to a built-in group, a group you define, or a new group.
If you simply want to communicate with one of the contacts Lync found, click Call or right-click the contact’s entry and then choose Send An Instant Message, Share, or another of the available commands.
When you add a contact to your list, the person you add is notified of the action and can choose to add you to a specific contact group and to select the privacy relationship that she wants to apply. You can ignore the notification or click Remind Me Later to postpone making the settings you want for this contact.
Lync notifies a contact that you’ve added to your list. He or she can then specify a contact group and apply a privacy relationship.
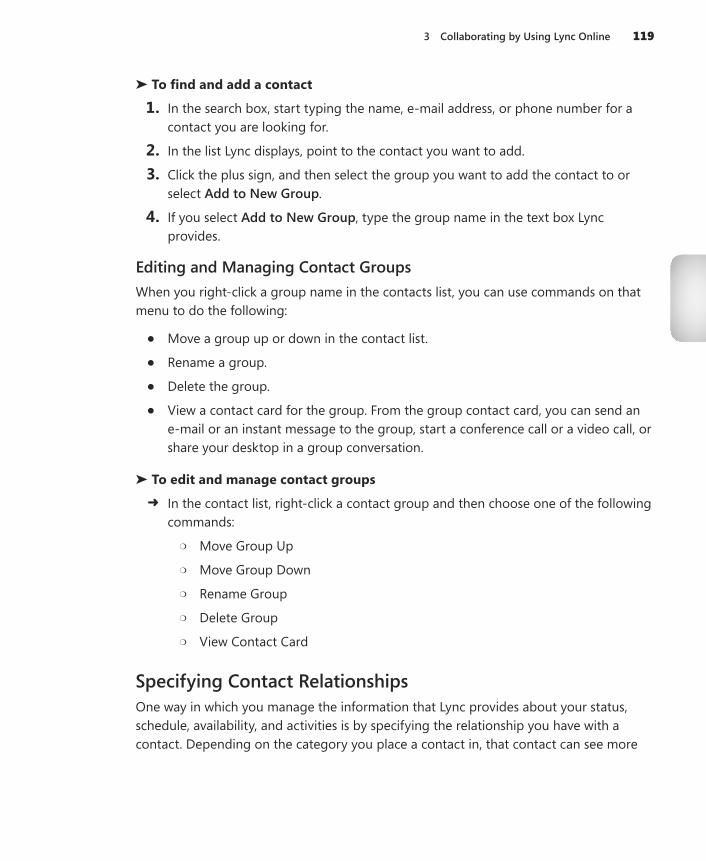
3 Collaborating by Using Lync Online 119
➤ To find and add a contact
1. In the search box, start typing the name, e-mail address, or phone number for a contact you are looking for.
2. In the list Lync displays, point to the contact you want to add.
3. Click the plus sign, and then select the group you want to add the contact to or select Add to New Group .
4. If you select Add to New Group, type the group name in the text box Lync provides.
Editing and Managing Contact GroupsWhen you right-click a group name in the contacts list, you can use commands on that menu to do the following:
● Move a group up or down in the contact list.
● Rename a group.
● Delete the group.
● View a contact card for the group. From the group contact card, you can send an e-mail or an instant message to the group, start a conference call or a video call, or share your desktop in a group conversation.
➤ To edit and manage contact groups
➜ In the contact list, right-click a contact group and then choose one of the following commands:
❍ Move Group Up
❍ Move Group Down
❍ Rename Group
❍ Delete Group
❍ View Contact Card
Specifying Contact RelationshipsOne way in which you manage the information that Lync provides about your status, schedule, availability, and activities is by specifying the relationship you have with a contact. Depending on the category you place a contact in, that contact can see more

120 Exam 77-891 Microsoft Office 365 Specialist
or less of your contact information and activities. You can add a contact to the following categories:
● Friends And Family
● Workgroup
● Colleagues
● External Contacts
● Blocked Contacts
Contacts in your organization are designated as colleagues by default. You can change the relationship for a contact by right-clicking the contact’s entry and choosing Change Privacy Relationship.
Privacy relationships determine what information a contact can see. Coworkers are designated colleagues by default. Choose Blocked Contacts to reveal no information to someone.
The following table, taken from the Lync Help content, lists the information available within each relationship.
Note An asterisk (*) indicates that if this attribute is defined in the company’s directory service, it will be visible to all contacts in your organization, regardless of the privacy re-lationship, and to external contacts (if configured and recognized by your organization’s network). A pound sign (#) indicates that this attribute is visible by default.
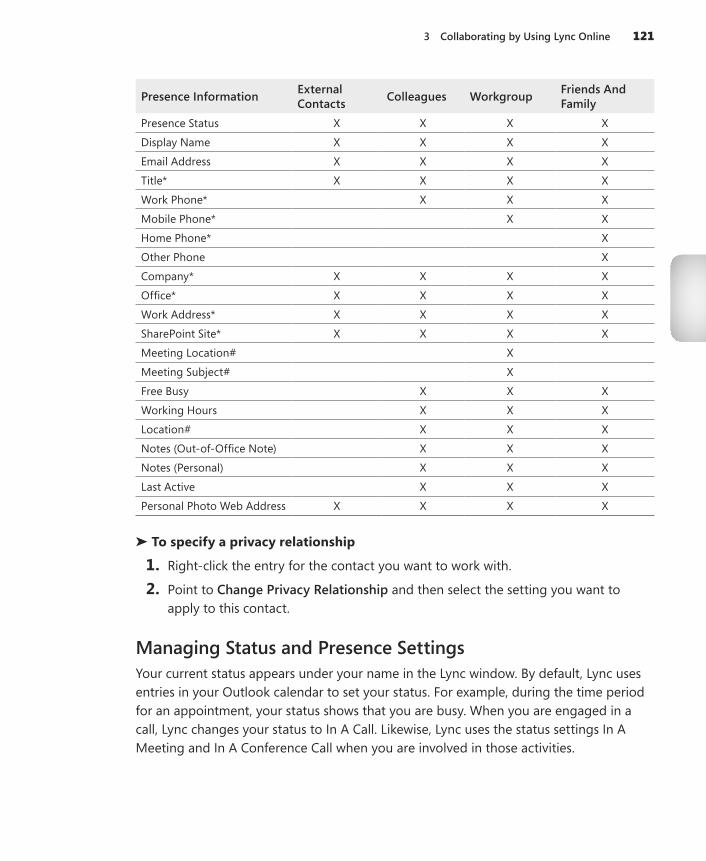
3 Collaborating by Using Lync Online 121
Presence Information External Contacts Colleagues Workgroup Friends And
FamilyPresence Status X X X X
Display Name X X X X
Email Address X X X X
Title* X X X X
Work Phone* X X X
Mobile Phone* X X
Home Phone* X
Other Phone X
Company* X X X X
Office* X X X X
Work Address* X X X X
SharePoint Site* X X X X
Meeting Location# X
Meeting Subject# X
Free Busy X X X
Working Hours X X X
Location# X X X
Notes (Out-of-Office Note) X X X
Notes (Personal) X X X
Last Active X X X
Personal Photo Web Address X X X X
➤ To specify a privacy relationship
1. Right-click the entry for the contact you want to work with.
2. Point to Change Privacy Relationship and then select the setting you want to apply to this contact.
Managing Status and Presence SettingsYour current status appears under your name in the Lync window. By default, Lync uses entries in your Outlook calendar to set your status. For example, during the time period for an appointment, your status shows that you are busy. When you are engaged in a call, Lync changes your status to In A Call. Likewise, Lync uses the status settings In A Meeting and In A Conference Call when you are involved in those activities.
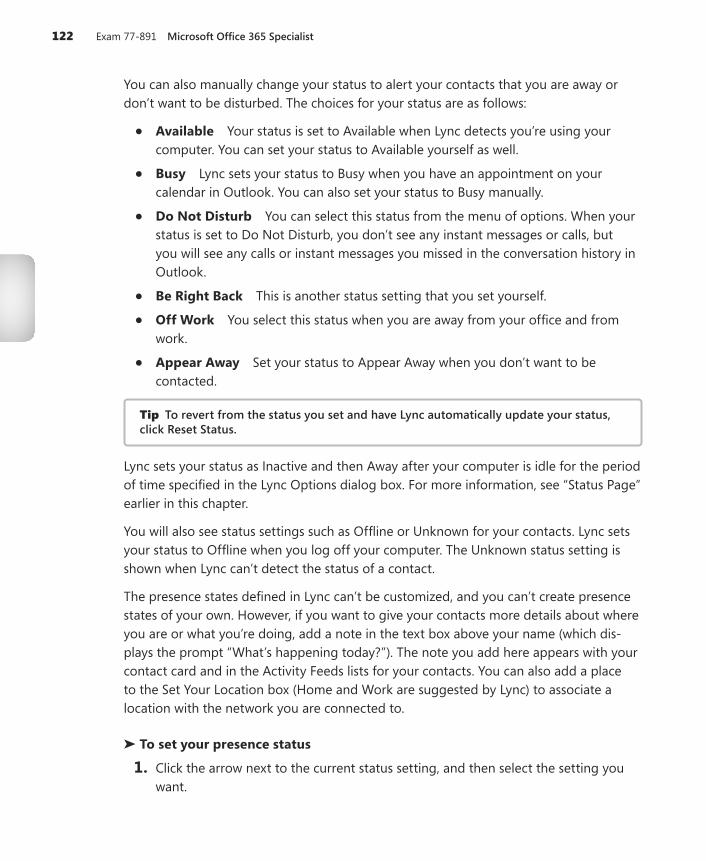
122 Exam 77-891 Microsoft Office 365 Specialist
You can also manually change your status to alert your contacts that you are away or don’t want to be disturbed. The choices for your status are as follows:
● Available Your status is set to Available when Lync detects you’re using your computer. You can set your status to Available yourself as well.
● Busy Lync sets your status to Busy when you have an appointment on your calendar in Outlook. You can also set your status to Busy manually.
● Do Not Disturb You can select this status from the menu of options. When your status is set to Do Not Disturb, you don’t see any instant messages or calls, but you will see any calls or instant messages you missed in the conversation history in Outlook.
● Be Right Back This is another status setting that you set yourself.
● Off Work You select this status when you are away from your office and from work.
● Appear Away Set your status to Appear Away when you don’t want to be contacted.
Tip To revert from the status you set and have Lync automatically update your status, click Reset Status.
Lync sets your status as Inactive and then Away after your computer is idle for the period of time specified in the Lync Options dialog box. For more information, see “Status Page” earlier in this chapter.
You will also see status settings such as Offline or Unknown for your contacts. Lync sets your status to Offline when you log off your computer. The Unknown status setting is shown when Lync can’t detect the status of a contact.
The presence states defined in Lync can’t be customized, and you can’t create presence states of your own. However, if you want to give your contacts more details about where you are or what you’re doing, add a note in the text box above your name (which dis-plays the prompt “What’s happening today?”). The note you add here appears with your contact card and in the Activity Feeds lists for your contacts. You can also add a place to the Set Your Location box (Home and Work are suggested by Lync) to associate a location with the network you are connected to.
➤ To set your presence status
1. Click the arrow next to the current status setting, and then select the setting you want.

3 Collaborating by Using Lync Online 123
2. To reset your status so that Lync sets it automatically based on your activity, choose Reset Status from the options on this menu .
Managing Activity FeedsYou can let your contacts know more about what you’re up to by typing a note in the text box above your name. The notes you add are displayed under your entry in the contacts list as well as in the Activity Feeds list. In addition to the notes you add, the Activity Feeds list shows status changes, changed pictures, and updated contact information.
As you can with conversations and calls, you can view and filter activity feeds. Above the search box, click the Activity Feeds button (the middle one) to display the current list. Use the filters at the top of the list to view all activities for your contacts, the activities of only your frequent contacts, or the activities you entered for yourself. The entries in the Activity Feeds list act like regular contact entries. You can double-click an entry to send that contact an instant message, for example. Right-click the entry to see other options.
Tip By default, updates to your personal note appear in the Activity Feeds list for everyone (except blocked contacts and external contacts) . To not show notes, open the Lync Options dialog box and clear the Show All My Updates In Activity Feed option on the Personal page .
➤ To manage activity feeds
1. Above the contacts list, click the Activities Feed button.
2. Use the filters to see all activity feeds, the activities of your frequent contacts, or your own activities.
Viewing Conversation HistoryLync can maintain a history of the calls and conversations you have with contacts. You can look back on this information to see calls you missed or to pick up a conversation you want to continue. You can also view recent conversations you had with particular contacts.
The View Conversation History command appears on the File menu. (The command might not be available. Its availability depends on how Lync 2010 is set up in your organization.)
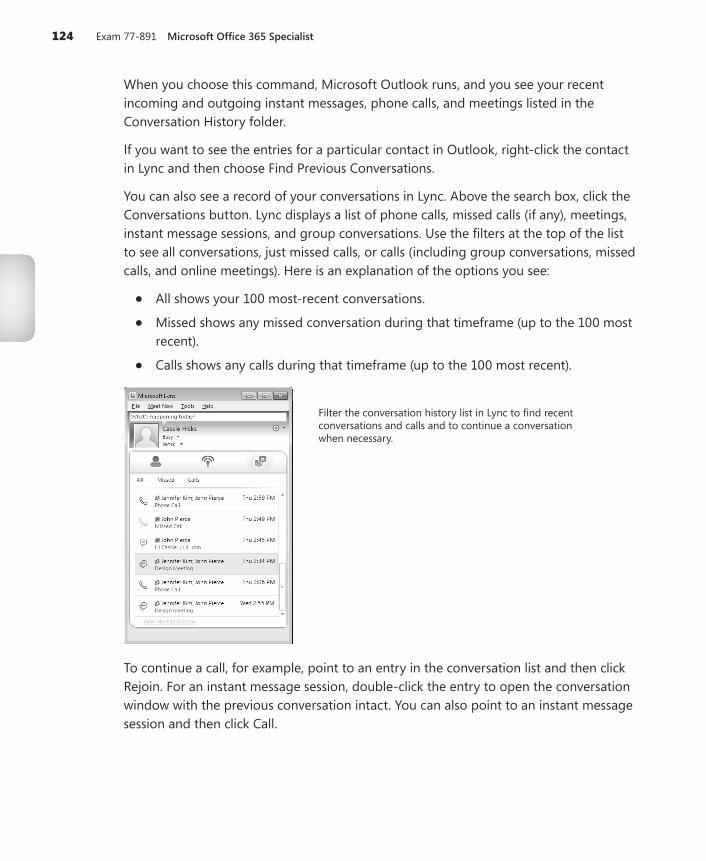
124 Exam 77-891 Microsoft Office 365 Specialist
When you choose this command, Microsoft Outlook runs, and you see your recent incoming and outgoing instant messages, phone calls, and meetings listed in the Conversation History folder.
If you want to see the entries for a particular contact in Outlook, right-click the contact in Lync and then choose Find Previous Conversations.
You can also see a record of your conversations in Lync. Above the search box, click the Conversations button. Lync displays a list of phone calls, missed calls (if any), meetings, instant message sessions, and group conversations. Use the filters at the top of the list to see all conversations, just missed calls, or calls (including group conversations, missed calls, and online meetings). Here is an explanation of the options you see:
● All shows your 100 most-recent conversations.
● Missed shows any missed conversation during that timeframe (up to the 100 most recent).
● Calls shows any calls during that timeframe (up to the 100 most recent).
Filter the conversation history list in Lync to find recent conversations and calls and to continue a conversation when necessary.
To continue a call, for example, point to an entry in the conversation list and then click Rejoin. For an instant message session, double-click the entry to open the conversation window with the previous conversation intact. You can also point to an instant message session and then click Call.

3 Collaborating by Using Lync Online 125
To delete a conversation from the list, right-click the entry and choose Delete Conversation. You can also use this menu to continue a conversation.
➤ To view the Conversation History folder
➜ On the File menu, click View Conversation History .
Microsoft Outlook opens and displays the Conversation History folder. You can then sort conversations or search for a conversation by keyword or contact.
➤ To find a previous conversation with a specific contact
➜ In the contacts list, right-click the contact, and then choose Find Previous Conversations .
Outlook opens and displays that contact’s conversations in the Conversation History folder.
➤ To find and manage a recent or missed conversation
1. Above the search box, click the Conversations icon .
2. Use the filters to see all or a subset of the conversations.
3. Point to an entry for a conversation you want to continue, and then click Rejoin or Call .
4. Right-click the conversation entry you want to remove, and then click Delete Conversation .
5. If the conversation you are looking for is not among your most recent 100 conversations, click View More in Outlook to open the Outlook Conversation History folder.
Practice Tasks
Practice the skills you learned in this section by performing the following tasks in Lync:
● Set up contact groups for projects you are working on currently. Add members of the project teams as contacts.
● Add a personal note and then view the note in the Activity Feeds list.
● Start calls, meetings, and other activities, and observe how Lync automatically changes your status.

126 Exam 77-891 Microsoft Office 365 Specialist
3.4 Use Lync ToolsThis section describes features in Lync that you use to manage recordings, take notes during a conversation, redirect a conversation, and handle a series of incoming calls.
Using Recording ManagerThe Lync Recording Manager is a separate application. You can open it directly from the Start menu (Lync doesn’t need to be running) or from the Tools menu in the Lync application window when you are signed in to Lync.
Tip When you stop recording a conversation or a meeting, you’ll see a notification that the recording is available. You can also open Recording Manager by clicking the notification.
In Recording Manager, you can replay recordings, browse to the location where a recording is stored, and delete a recording. If you are working with Lync recordings (as opposed to Windows Media recordings), you can rename a recording or save all or parts of the recording in Windows Media format and publish it for other people to view.
The Recording Manager lets you replay recordings and publish recordings for other users.
When you use the Recording Manager to replay a recording (select a recording and click Play or double-click the recording to start it), you view the recording in the Lync Recording Player. In this window, you hear the audio and watch the video (if any) of the meeting and can also see what content was being shared. Use the Information And Attachments button at the top of the Recording Player window to see a list of participants and attachments (if any) that were included in the meeting. When you click Content Sharing And People Speaking, you display or hide a pane that shows which content was shared during the meeting and who is speaking. The Recording Player also
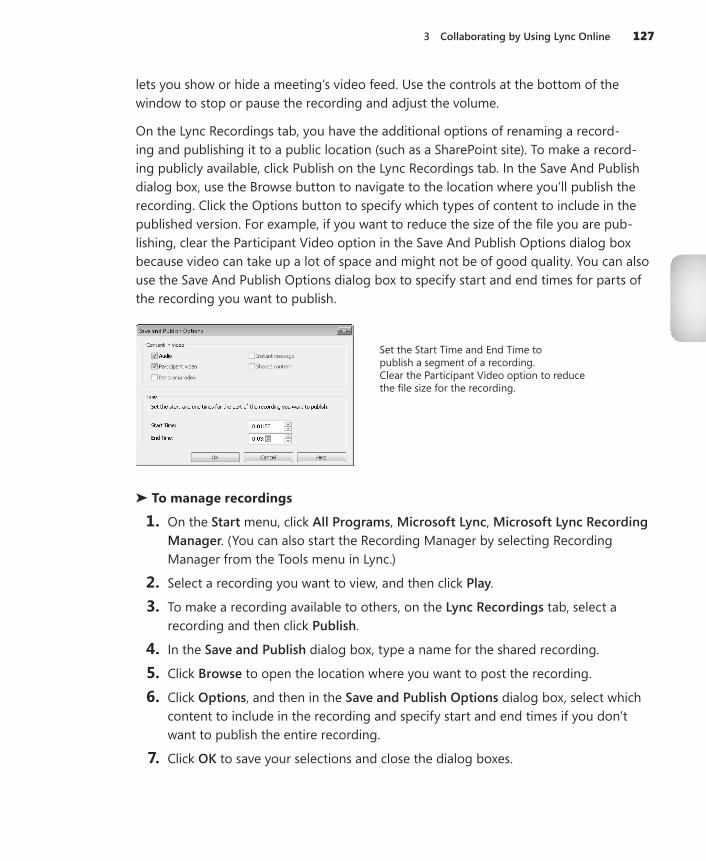
3 Collaborating by Using Lync Online 127
lets you show or hide a meeting’s video feed. Use the controls at the bottom of the window to stop or pause the recording and adjust the volume.
On the Lync Recordings tab, you have the additional options of renaming a record-ing and publishing it to a public location (such as a SharePoint site). To make a record-ing publicly available, click Publish on the Lync Recordings tab. In the Save And Publish dialog box, use the Browse button to navigate to the location where you’ll publish the recording. Click the Options button to specify which types of content to include in the published version. For example, if you want to reduce the size of the file you are pub-lishing, clear the Participant Video option in the Save And Publish Options dialog box because video can take up a lot of space and might not be of good quality. You can also use the Save And Publish Options dialog box to specify start and end times for parts of the recording you want to publish.
Set the Start Time and End Time to publish a segment of a recording. Clear the Participant Video option to reduce the file size for the recording.
➤ To manage recordings
1. On the Start menu, click All Programs, Microsoft Lync, Microsoft Lync Recording Manager. (You can also start the Recording Manager by selecting Recording Manager from the Tools menu in Lync.)
2. Select a recording you want to view, and then click Play .
3. To make a recording available to others, on the Lync Recordings tab, select a recording and then click Publish .
4. In the Save and Publish dialog box, type a name for the shared recording.
5. Click Browse to open the location where you want to post the recording.
6. Click Options, and then in the Save and Publish Options dialog box, select which content to include in the recording and specify start and end times if you don’t want to publish the entire recording.
7. Click OK to save your selections and close the dialog boxes.
128 Exam 77-891 Microsoft Office 365 Specialist
Using the Always On Top OptionTo keep the Lync window visible so that it is on top of other windows, choose Always On Top from the Tools menu. The Lync window is small enough that you can position it in a corner of your screen and continue working in other applications. Clear this setting when you want the Lync window to move to the background when another application is active.
➤ To keep the Lync window on top
1. Click the arrow next to the Options button.
2. Point to Tools, and then choose Always On Top .
Taking Notes in OneNoteIf you don’t want to make a recording of a meeting, you can take notes in Microsoft OneNote while the conversation takes place and then compile and distribute notes to participants.
Start a conversation or an online meeting and then click the More Options arrow at the right end of the conversation window’s toolbar. Then choose Take Notes Using OneNote, which starts OneNote and adds a page to the Unfiled Notes area. In OneNote, you can move this page to a specific notebook (a notebook for a specific project, for example) after you conclude the conversation.
The page OneNote displays is tentatively titled Conversation and includes the date and a time stamp of when the conversation began. The page also lists the participants. To take notes, just start typing on the page, in the note container that OneNote provides. You can add notes to a different area of the page by clicking and then typing the text.
Taking notes in OneNote is not the same as sharing a program through Lync. If you start OneNote, you are the only conversation participant working in that instance of the program.
See Also If you aren’t familiar with Microsoft OneNote, it is a notebook application that comes with some editions of Microsoft Office 2010. You can find out more at www.microsoft.com/office/onenote .
Ending the conversation in Lync doesn’t close OneNote. Keep OneNote open if you want to edit and organize the raw notes, move the page to a notebook, insert images or files to augment the notes you’ve taken, and so on. You don’t need to save your work in OneNote—the program saves new content automatically. Close OneNote when you’re ready.
3 Collaborating by Using Lync Online 129
➤ To take notes in OneNote
1. Start a group conversation, instant message session, or an online meeting.
2. In the conversation window, click the More Options button and then choose Take Notes in OneNote .
3. Add notes (typewritten or handwritten) to the new page in OneNote.
4. When the conversation concludes, edit the notes in OneNote. You can distribute them as an attachment in Lync or post them to a shared location, if necessary.
Changing the Conversation SubjectWhen you initiate a Lync call or an instant message exchange, you can specify a conversation topic so that the person you are contacting knows what you want to talk about. The subject you enter appears in the notification that Lync displays for the contact or contacts you call.
During the conversation, you can change the subject when you need to. For example, you might update the subject when you are working through a meeting agenda. The subject you enter in Lync appears in the title bar in the conversation window.
The Change Conversation Subject command is on the More Options menu. Choose this command and then type the subject you want to use.
➤ To change the conversation subject
1. In the conversation window, click the More Options button at the right end of the toolbar.
2. Choose Change Conversation Subject .
3. Type the subject in the dialog box Lync displays, and then click OK .
Practice Tasks
Practice the skills you learned in this section by performing the following tasks on your site:
● Set up and record a meeting with some of your coworkers.
● Use the Recording Manager to publish an excerpt of the recording.
● During the meeting, open OneNote and take notes about the conversation.
● Ask one or more of your colleagues to change the subject as you talk with each other.
130 Exam 77-891 Microsoft Office 365 Specialist
Objective ReviewBefore finishing this chapter, be sure you have mastered the following skills:
3.1 Configure Lync options3.2 Employ collaboration tools and techniques3.3 Manage Lync contacts3.4 Use Lync tools

193
Index
Symbols[[ ]] (double brackets), 180
Aaccessibility settings, 86Access Services, 153Account page, 78–80
Connected Accounts, 79–80My Account, 79
Actions menu (Outlook Web App), 40–41activity feeds, 123Activity Feeds list, 94, 123
presence information, 122Add A Permission Level command, 143Add A Web Part command, 178, 182Add A Web Part links, 181Add A Workflow page, 162Add Colleagues command, 140Add Filter To Favorites button, 42Add New Account Wizard, 11Add New Item link, 185Add New Task button, 73address books, 34
external contacts, adding, 66global, 65opening, 35public groups in, 69
Add This Calendar link, 57Add To SharePoint Site command, 179administrators
Admin page, 5contact preference settings, 16custom e-mail retention policies, 82external contacts, adding to shared address book,
66external users, allowing, 141Help For Admins, 19profile information, entering, 16public groups, setting up, 69public website, editing, 16SharePoint site permissions, 131
Admin link, 5Admin page, 5advanced searches, 133–135
options for, 134–135
Alert Me command, 170–171alerts
configuration options, 96triggers, 171
Allow Management Of Content Types command, 165
All Site Content link, 31All Sites searches, 133Always On Top option, 128announcements lists, 182Appear Away status, 122applications
accessing, 3navigating, 26–32
appointmentsall-day events, 51controls for, 51fields in, 51recording, 50–52reminders, 51, 62Show Time As list, 51
Approve/Reject dialog box, 177Ask A Question In The Forums link, 22asset libraries, 155Assets Web Database template, 152Attach File command, 44attachments, 35
adding to conversation window, 105adding to e-mail messages, 44–45adding to task items, 74contact information in, 67deleting, 44exchanging in Lync, 98in instant messages, 114opening, 45saving, 45viewing, 44–45working with, 44–45
audience targeting, 184audio conferencing, 115audio devices, configuration options, 97authentication, 4Automatically Filter Junk E-Mail option, 89automatic e-mail replies, 80–81Automatic Replies page, 80

194
available information, 6 . See also presence information
Available status, 122
Bbackground color of instant messages, 92Basic Meeting Workspace template, 152basic pages, adding to team site, 181–182Basic Search Center template, 152Be Right Back status, 122Blank Meeting Workspace template, 152Blank Site template, 151Blocked Contacts, 120blocked senders, 88–90Blocked Senders list, 89Blog template, 151boldface elements in book, xibook conventions, xibreadcrumbs
navigating with, 32root of document library, navigating to, 167
busy information, 6, 51Busy status, 122
Ccalendar lists, 182Calendar Permissions dialog box, 57calendars
access level settings, 59adding, 60appearance options, 85appointments, 50–52categories, 60–61configuration settings, 85–86creating, 56default, 56flagging items, 61–62group calendars, 57meeting requests, 52–54notification settings, 85Other Calendars group, 60People’s Calendars group, 57, 60publishing, 58–60reminders, 62–64, 86Scheduling Assistant, 55–56sharing, 56–58sharing permissions, 57–58time span settings, 59viewing, 57views, 50, 64
Calendar view, 50–64navigating in, 28–29
Call button, 117
call logs in Conversation History folder, 94calls
continuing, 124missed calls, viewing, 124recording, 98responding with instant message, 113–114video, 116VoIP, 115
categories (Outlook), 60–61assigning items to, 61, 63built-in, 60for contacts, 66creating, 63searching by, 72
Category command, 41change alerts on documents, 170–171Change Category Color command, 61Change Conversation Subject command, 129Change Font dialog box, 92Change New Button Order And Default Content
Type command, 165Change Password page, 17Change Privacy Relationship command, 120–121Change Sharing Permissions command, 57–58Charitable Donations Web template, 152Chat command, 66, 114checking files out and in, 172–173Check Out Our Blog link, 23Check Permissions dialog box, 143Clear Filter button, 42, 43Clear Flag command, 62coauthoring documents, 177collaboration, 13 . See also SharePoint Online
desktop, sharing, 101–102group conversations, 100–108meetings, online, 109–112opinion polls, 107–108PowerPoint presentations, sharing, 102–105programs, sharing, 106–107tags and notes for, 136–138whiteboards, sharing, 108
Collaboration templates, 151Colleagues contacts, 120columns, list
creating, 159–161in discussion boards, 189enterprise keywords column, 185in libraries, 154in task lists, 187validation settings, 184in views, 157
community forums, 22–23Community links, 7–8Community page Forums link, 22
available information

195
conference callsconfiguration settings, 96starting, 115with contact groups, 117
connected e-mail accounts, 79–80deleting a connection, 79
Connect & Export group, 179Connect To Office command, 179Connect To Outlook command, 179, 187contact groups, 117–119
adding contacts, 118–119communicating with members, 117creating, 117editing and managing, 119finding contacts, 118
contact list (in Excel), 71contact list (Lync), 117–125contact lists (SharePoint), 182contacts
adding, 65–66adding to distribution lists, 69–70adding to groups, 117Blocked Senders list, 89categories of, 120communicating with, 118conversation history with, 123–125deleting, 67duplicates, 71editing information, 67e-mailing, 66external, 65filtering, 30flagging, 61–62forwarding information on, 67groups, creating, 68–69importing, 71information about, 65, 66instant messages, sending to, 112–115inviting to group conversations, 100–101managing, 29–30, 65–72phone information, 95–96photographs of, 94–95privacy relationships, 93, 118–121Safe Senders And Recipients list, 89searching, 72, 118–119status settings, 122storage settings, 94trust levels for, 89
Contacts folder, 29Contacts view, 65–72
navigating in, 29–30Contacts Web Database template, 153content . See also libraries; lists
adding to wiki pages, 180managing, 154–191
notes and tags, adding, 136–138offline access to, 179, 189–190searching, 132–136versioning settings, 164–165
content approval, 164, 176Content templates, 151content types, defining, 165context-sensitive Help content, 20–21context-sensitive search scope, 132–133Contribute permission, 142conventions of book, xiConversation History folder, 94, 124
viewing, 125Conversations button, 124conversations (Lync), 100–108
changing subject, 129deleting, 125history, turning off, 99history, viewing, 123–126taking notes on, 128–129
conversations (Outlook Web App)configuration options, 85ordering of, 40reviewing, 38–39, 41
conversation windowattachments, adding, 105dragging files to, 106
Create Column dialog box, 159–161Create Document Workspace command, 175Create Group button, 144Create New Category command, 61Create View page, 157–158Ctrl+Alt+Spacebar keyboard combination, 101Ctrl+N keyboard combination, 34Customer Experience Improvement Program, 92custom lists, 182
in datasheet view, 182
Ddata-connection libraries, 155datasheet lists, 182Decision Meeting Workspace template, 152Default Reply Address list, 79Delete All Versions command, 173Delete Category command, 61Delete Draft Versions command, 173delivery reports, 81Delivery Reports page, 81Design permission, 142desktop applications, configuring for Office 365,
9–11desktop, sharing, 101–102Discard Check Out command, 172discussion boards, 183, 188–189
discussion boards
196
distribution listsmembers, 70membership approval options, 70, 83ownership information, 70setting up, 69–71
Document Center template, 151document libraries, 14, 154, 166–179 . See
also librariesconnecting, 178creating, 166–167customizing, 178document properties, managing, 168–170documents, checking out and in, 164, 172–173documents, creating, 167documents, uploading, 168exporting, 178folders, adding, 167My Content page, 140offline access, 179Share & Track group, 170–172sorting, 175–176styles, 158
documentsapproving content, 177change alerts, 170–172checking out and in, 164, 172–173coauthoring, 177copies, downloading, 173–174creating in library, 167draft items security, 164e-mailing link of, 170–171permissions, managing, 169properties, managing, 168–170publishing, 176–177sending to another location, 174–175source document link, 174unpublishing, 177uploading, 168uploading to library, 32versioning settings, 164–165, 169, 173
document workspaces, 151, 175Document Workspace template, 151Do Not Disturb status, 122double brackets ([[ ]]), 180Download A Copy command, 173Downloads page, 7
information on, 9draft items security, 164
EEdit Properties command, 169Edit Rule dialog box, 48Edit View page, 159
e-mailaddresses, verifying, 35attachments, 35, 44–45automatic replies, 80–81Blocked Senders list, 89blocking and allowing messages, 88–90checking names, 86commands for, 41configuration options, 84–85connected accounts, 79–80contact information, attaching, 67conversations, 38–39, 41, 85creating and sending messages, 34–37Default Reply Address list, 79delivery reports, 81filtering messages, 41–42flagging messages, 61–62formatting messages, 36forwarding messages, 40–41forwarding Office 365 messages, 79image attachments, 35importance levels, 35inbox rules, 45–50managing, 33–50marking messages as read, 84message format, 36, 84message options, 36, 84mobile phone, sending and receiving on, 86–87Office 365 account, 79organizing, options for, 80–82reading pane settings, 84–85read receipts, 84replying, 40–41responding with instant message, 113–114, 115retention policies, 82reviewing, 37–41Safe Senders And Recipients list, 89saving drafts, 35searching messages, 42–44signatures, 35, 84sorting messages, 39–40spelling checker, 36, 85To and Cc lines, 34
E-Mail A Link command, 170e-mail message window
formatting toolbar, 34, 36notification bar, 36toolbar, 34–36
emoticons, 92enterprise keywords columns, 185Enterprise Search Center template, 152enterprise version of Office 365, 9
three-state workflows, 14
distribution lists
197
Excelchecking in documents, 172contacts list, 71libraries, exporting to, 179
Excel Web App, coauthoring documents in, 177Exchange ActiveSync, 86–87Export To Excel command, 179, 187Express Team Site template, 151external contacts, 65
adding to address book, 66free and busy information, 55
External Contacts, 120external lists, 183external users, sharing team site with, 141
FFAST Search Center template, 152Favorites list
document library shortcut, 179filtered views, adding, 42managing, 27–28
file plan reports, 185file saving paths, 98–99filtering
activity feeds, 123contacts, 30e-mail messages, 41–42libraries, 158, 175–176task list, 30
Filter menu (Outlook Web App), 41Find Previous Conversations command, 124, 125Flagged Items And Tasks folder, 30flags
duration, 61removing, 62setting, 61–63
foldersin document libraries, 167mailbox, 42
form libraries, 155forms, 184Forward As Attachment command, 40, 67Forward button, 40forwarding Office 365 messages, 79free and busy information
display of, 94for meetings, 55publishing, 59sharing, 56
Frequent Contacts group, 117, 118Friends And Family contacts, 120From command, 41Full Control permission, 142
GGetting Started topics, 21–22Give Control command, 101, 106–107global address book, 65Go To Source command, 174Grant Permissions button, 142Grant Permissions dialog box, 145group calendars, 57group conversations, 100–108
desktop, sharing, 101–102instant message conversations, 112–115online polls, 107–108presentations, sharing, 102–105presenters and attendees, 101programs, sharing, 106–107starting, 100–101subject, changing, 129taking notes on, 128–129video feeds, 115–116whiteboards, sharing, 108
groups, contact, 68–70creating, 70editing and managing, 119joining, 83leaving, 83in Lync, 117–119public groups, 69–71
Groups page, 83groups (SharePoint), 141–146
adding users, 145creating, 144–145site permissions, 142–143
Group Work Site template, 151
Hhelp and support, 18–26
community forums, 22–23context-sensitive help, 20–21how-to procedures and solutions, 24–26team blogs, 23technical support, 24tutorials, 21–22
Help button, 19Help content
context-sensitive, 20–21printing and sharing, 21
Help For Admins, 19home page, 4–9
Ask A Question In The Forums link, 22Community links, 7–8Help button, 19My Profile link, 17navigation bar, 5–6
home page
198
home page (Continued)Outlook link, 11panes, 5Participate In The Community link, 22resource links, 6Resources list, 12search box, 18Shared Documents link, 15small business edition, 15Start Here section, 21Team Site link, 13
Home wiki page, 180How To Import Your Contacts link, 71how-to procedures, 24–26How To Use This Library page, 180Hyperlink dialog box, 84
IID for sign-in, 4Ignore Conversation command, 39, 41I Like It button, 138images
adding to shared presentations, 104attaching to e-mail messages, 35
Import Contacts dialog box, 71importing contacts, 71import spreadsheet lists, 183Import Your Contacts From An Existing E-Mail
Account shortcut, 71inbox rules, 45–50
action words or phrases, 47basis of, 46, 48creating, 45–49managing, 48–50
information management policy settings, list, 185inline editing, 158instant messages, 6, 112–115
attachments in, 114background color, 92calls and e-mail messages, responding with,
113–115continuing conversation, 124conversation history, 99fonts, 92formatting, 92, 113groups, sending to, 113multiple conversations, 112–113redirecting, 115responding to, 112sending, 114sharing content in, 113
Internet Explorer 9 notification bar, 44Issues Web Database template, 153issue-tracking lists, 183item limits, 158
JJunk E-Mail folder, 88junk e-mail, managing, 88–90
KKeep Me Signed In option, 5keywords, 185
LLearn How To Manually Configure Outlook link, 10libraries, 14 . See also document libraries
columns, creating, 159–161connecting, 179content type settings, 165creating, 154–156customizing, 178document libraries, 166–179documents, checking out and in, 164, 172–173documents, copying from, 173–174documents, uploading to, 32exporting, 179filtering, 158inline editing, 158notes and tags, adding, 137offline access, 179settings, managing, 161–165Share & Track group, 170–172shortcuts in Office applications, 179types of, 154–155version management, 164–165, 173views, 156–159wiki page libraries, 180–181workflow settings, 161–164
Library Settings page, 161–191linking wiki pages
, 180links lists, 183lists, 14, 182–189
appearance, changing, 149creating, 183forms, 149–150general settings, 184items, adding, 185–186items, editing, 186notes and tags, adding, 137offline access to, 189permissions and management settings, 185RSS feeds, sending as, 185settings, 184–185surveys, 187–189task lists, 187types of, 182–183views, 149workflows, 185
home page
199
List Settings page, 184–185list templates, 147, 183, 185local senders, 89location setting, 122logging, configuration options, 93Lync Attendee, 110Lync Online, 91–130
32-bit and 64-bit versions, 7Activities Feed list, 123Always On Top option, 128audio conferencing, 115capabilities, 6, 91configuration options, 91–100contacts, managing, 117–125conversations, 123–126, 129file saving information, 98group conversations, 100–108installing, 7–8instant messages, 112–115language settings, 92location information, 94minimizing to notification area, 93My Account area, 93OneNote, taking notes in, 128–129online meetings, 109–112Personal Information Manager settings, 93presence information, 121–123Recording Manager, 126–127sign-in e-mail address, 93signing in to, 7stage, 101, 105–107status information, 121–123Tools menu, 91video conferences, 115–116
Lync Recording Player, 126–127Lync window, 7
Welcome To Lync link, 22
Mmailbox folders, filtering messages in, 42Mail Merge wizard. See mail mergeMail Setup dialog box, 109Mail view, 33–50
navigating in, 27–28Manage Categories dialog box, 61Manage Copies command, 174Manage My Alerts command, 171Manage Permissions command, 169Mark Complete command, 77–78meeting organizers, 53meeting requests, 52–54
attendees, selecting, 55automatic processing, 86busy and free information, 55
date and time information, 55meeting information, 52–53notifications, 85regularly occurring meetings, 53reminders, 62replies, 53responding to, 53–54Scheduling Assistant for, 55–56sending, 52–53, 109
meetings, online . See online meetingsMeetings templates, 152Meet Now command, 100merging documents . See mail mergemessages . See e-mail; instant messages; Outlook
Web Appmetadata navigation settings, 184Microsoft Access, with SharePoint sites, 152Microsoft Certification ID, ixMicrosoft Certified Professional website, ixMicrosoft Customer Experience Improvement
Program, 92Microsoft LifeCam, 98Microsoft Lync. See Lync OnlineMicrosoft Lync Recording Manager, 126–127Microsoft Office. See Office desktop applicationsMicrosoft Office Professional Plus, installing, 9Microsoft Office Specialist Expert (MOS Expert)
Microsoft Office Specialist Expert (MOS Expert)defined , vii
Microsoft Office Specialist Expert (MOS Expert)expectations , viii
Microsoft Office Specialist (MOS)Microsoft Office Specialist (MOS)defined , viiMicrosoft Office Specialist (MOS)expectations , viii
Microsoft Office Specialist programMicrosoft Office Specialist programbenefits of, ixMicrosoft Office Specialist programcertification
path, choosing , viiMicrosoft Office Specialist programcertification
paths, listed, viiMicrosoft Office Specialist programexams,
described, xMicrosoft Office Specialist programexam time
limit, viiiMicrosoft Office Specialist programexam tips, viiiMicrosoft Office Specialist programlogo,
personalizing, xMicrosoft Office Specialist programobjective
domain, viiiMicrosoft OneNote, 128–129Microsoft Online Services ID, 4–5Microsoft Online Services Sign-in Assistant,
installing, 7Microsoft Outlook . See Outlook; Outlook Web AppMicrosoft SharePoint . See SharePoint Online
Microsoft SharePoint
200
Microsoft Support site Office 365 page, 24mobile access to libraries, 159mobile phones
notifications, receiving on, 85, 87, 88Outlook Web App settings, 86–88
Mobile Phone Setup Reference link, 87Modify Form Web Parts button, 149MOS 2010 Study Guide for Microsoft Office
SharePoint e-book, 131Multipage Meeting Workspace template, 152My Calendars, 29My Contacts, 29My Content, 140My Profile, 16–17, 139
colleagues, adding, 140editing, 139
My Site, 139–141My Content page, 140tag cloud, 138tags and notes, 137
My Site profilecategories, 139updating, 141
My Tasks, 30
NNavigate Up icon, 32navigating
applications, 26–32with breadcrumbs, 32in Calendar view, 28–29in Contacts view, 29–30in Mail view, 27–28Office 365 features, 3–26with Quick Launch, 31–32in Tasks view, 30team site, 30–32
navigation pane (Outlook Web App), 26–30New Account Creation Wizard, 79New Alert dialog box, 170New Document command, 166–167New Document Library page, 166New Folder dialog box, 167New Group window, 69New Inbox Rule dialog box, 47
More Options link, 47When The Message Arrives, And option, 48
New Item dialog box, 185–186New Message To Contact command, 66New Page dialog box, 180Newsfeeds area, 139New Task Item window, 73–75note board, 137
notes, 136–138adding, 137in OneNote, 128–129
notification bar in e-mail message window, 36notifications
automatic processing, 86configuration settings, 96on document changes, 170–171mobile phone, receiving on, 85, 87, 88on giving or requesting control over desktop, 101
Oobjective domain
objective domainin MOS exams, viiiOffice 365
accessibility settings, 86help and support, 18–26information about, 8Office desktop applications, configuring for, 9–11quick-start guide, 21small business edition, 15–16Start menu shortcut, 10
Office365.com, 8–9Office 365 community, 22–23Office 365 e-mail account, setting up, 109Office 365 Technical Blog, 23Office desktop applications
coauthoring documents, 177configuring for Office 365, 9–11library shortcuts, adding, 179
offline access to team site content, 179, 189–192Offline status, 122Off Work status, 122OneNote, 128–129online meetings, 6, 109–112
access and presenters options, 109admitting attendees, 110–111joining, 112leaving and ending, 112notes in OneNote, 128–129presenters, 110recording, 98, 111, 112, 126–127saving settings, 110scheduling, 112starting, 110
online polls, 107–108Open In Browser command, 44opinion polls, 107–108Options dialog box (Lync)
Alerts page, 96Audio Device page, 97File Saving page, 98General page, 92–93
Microsoft Support site Office 365 page
201
Options dialog box (Lync) (Continued)My Picture page, 94–95opening, 91, 98Personal page, 93–94Phones page, 95–96Ringtones And Sounds page, 96–97Status page, 94Video Device page, 97–98
Options window (Outlook Web App)calendar settings, 64Create An Inbox Rule option, 45–46Phone page, 87Settings page, 83
Organize E-Mail pageAutomatic Replies page, 80–81Delivery Reports page, 81Retention Policies page, 82
Other Calendars group, 60Other Contacts group, 117, 118Outlook
compatibility with Outlook Web App, 6configuring to work with Office 365, 10–11exporting contacts to Outlook Web App, 71libraries, connecting to, 179Office 365 e-mail account in, 109and Outlook Web App, connecting, 6SharePoint task list, connecting, 187
Outlook Options page Account view, 12Outlook Web App, 11–13, 33–90
Accessibility settings, 86account options, 78–80Actions menu, 40–41Calendar link, 11–12Calendar view, 28–29, 50–64categories, 60–61configuring, 11, 78–90connected accounts, 79–80contacts, importing, 71Contacts view, 29–30, 65–72and desktop version, connecting, 6e-mail, blocking and allowing messages, 88–90e-mail folders, managing, 27–28e-mail, managing, 33–50Favorites list, 27–28Filter menu, 41flags, 61–62groups options, 83Help pages, 21–22Inbox link, 11–12language and time zone, 12Mail view, 27–28message list, 37–38mobile phones, working with, 86–88navigation pane, 26–30Options link, 11–12Organize E-Mail, 80–82
Outlook settings, 83–86reading pane, 37–38Regional Settings, 86reminders, 62–63search box, 42–44starting, 12–13Tasks view, 30, 73views, 11, 26
PPage History button, 180pages, adding to team site, 181–182Participate In The Community link, 22passwords
changing, 17–18for sign-in, 4strong, 4
People Options button, 100, 113People’s Calendars group, 57, 60People searches, 133per-location view settings, list, 184permissions
defining, 143list, 185for SharePoint features, 14on SharePoint sites, 131, 142–144on subsites, 150
personal address books, 65Personal Information Manager, 93Personalization Site template, 151personal SharePoint sites, 139–141phones
secondary ringer, 97synchronizing with Outlook, 87
photographsof contacts, 94–95My Picture, displaying, 94–95, 99in profile, 17–18
picture libraries, 155polls, online, 107–108portal .microsoftonline .com, 4–5portal page, 3 . See also home page
accessing, 4–5displaying, 7Office365.com, signing in with, 8–9opening, 4–9
PowerPoint presentationsannotating, 103, 104drawing in, 103full screen viewing, 104images, adding, 104pointing to objects, 103saving with annotations, 104sharing, 102–105thumbnail images, 104
PowerPoint presentations
202
presence information, 51configuration settings, 94displaying, 6managing, 121–123of privacy relationships, 121
privacy relationships, 93, 119–121for contacts, 118phone information and, 95presence information, 121
private views, 157–158procedures, help and support, 24–26profile
Information area, 16My Site profile, 139–141password, changing, 17–18photographs in, 17–18updating, 16–18
programs, sharing, 106–107Projects Web Database template, 153project tasks lists, 183public groups (contacts), 69–71
joining, 83public views, 157–158publishing
calendars, 58–60documents, 176–177recordings, 127
Publish Major Version dialog box, 176Publish This Calendar To Internet command, 58
QQuick Launch, 31–32
document workspaces, 175Site Pages link, 31wiki pages in, 180
quick-start guide, 21
Rrating settings, 184reading pane (Outlook Web App), 37
attachments, viewing, 44configurations options, 84–85positioning, 38
Read permission, 142read receipts, 84real-time communications . See Lync Onlinerecorded meetings, 111Recording Manager, 126–127
opening, 126recordings
managing, 126–127publishing, 127save location, 98
Recycle Bin link, 31Redirect button, 114Regional Settings (Outlook), 86relationships with contacts, 119–121 . See
also privacy relationshipsreminders
for appointments, 51configuration settings, 86responding to, 62–63setting, 62–64turning off, 62
repeating tasks, 75–76marking as complete, 77
Repetition dialog box, 75, 76Reply All button, 40Reply button, 40Reply With Instant Message command, 114report libraries, 155Request Control command, 101resource links, 6retention policies, 82Retention Policies page, 82ringtones, configuration options, 96–97, 99RSS feeds, sending lists as, 185
SSafe Senders And Recipients list, 89Save And Publish Options dialog box, 127Save List As Template command, 147Save Site As Template command, 146Scheduling Assistant, 55–56scroll bars (Word), 2search box
for help and support, 7, 18Outlook Web App, 42–44
searchingadvanced searches, 43–44, 133–135by category, 60contacts, 72, 118–119e-mail messages, 42–44query syntax, 132scope, changing, 43–44scope, setting, 132–133search results, refining, 135–136for site content, 132–136tags and, 138
search results page, 18–19Search templates, 152search terms, 138secondary ringers, 97See Also paragraphs, xiSelect Members dialog box, 70Select Owner dialog box, 70Send An Instant Message command, 112
presence information
203
Send An Instant Message To button, 114Send To command, 175Set Alert On This Document command, 172Set Your Location box, 122shared address book, 65shared content, managing, 105–106Shared Documents library, 175Shared Documents link, 15, 32SharePoint Online, 131–192
groups, 141–146Help pages, 21–22libraries, 154–156managing site content, 154–191managing sites, 136–153My Site profile, 139–141searching for content, 132–136site permissions, 131team site, 13
SharePoint Online Administration Center, 184SharePoint sites . See also team sites
adding users, 145list templates, 147managing, 136–153note board, 137permissions on, 142–144personal sites, 139–141tags and notes, 136–138
SharePoint team sites, 131 . See also team sitesSharePoint Workspace 2010, 189–190Share PowerPoint dialog box, 102–103Share Programs dialog box, 106Share Site command, 141Share This Calendar command, 56Share & Track group, 170–172Share Your SharePoint Site dialog box, 141sharing
calendars, 56–58content from stage, 105desktop, 101–102permissions on, 57–58PowerPoint presentations, 102–105programs, 106–107team sites, 141whiteboards, 108
signatures, e-mail, 35adding, 84
signing in, authentication credentials for, 4Sign In link, 8sign-in page, 4Site Actions menu
Edit Page page, 149, 178More Options command, 180New Document Library page, 166
New Site page, 150Share Site command, 141Site Settings page, 132, 142, 146Sync To SharePoint Workspace command, 189
site contentmanaging, 154–191searching for, 132–136working with offline, 189–190
Site Pages library, 182Site Pages link, 31site permissions, 131Site Settings page, 132, 142, 146site templates
creating, 146–147for subsites, 150
Site Theme page, 148site themes, 148–149slide libraries, 155small business edition of Office 365, 15–16
team site and website, 15–16three-state workflows, 14
Snipping Tool, 95Social Meeting Workspace template, 152Solutions gallery, site templates in, 146solutions, step-by-step, 24–26sorting
document libraries, 175–176library views, 158
sounds, configuration options, 96–97, 99source documents, links to, 174spelling checker, for e-mail messages, 36, 85stage (Lync), 101
shared content record, 105sharing content from, 105–107tools in, 103
Start A Conference Call command, 115Start A Video Call command, 115Start menu, Office 365 shortcut on, 10status lists, 183status settings
configuration of, 94managing, 121–123manually changing, 122
strong passwords, 4subsites, 14
creating, 150–154permissions on, 150site templates for, 150
support, technical, 18–26surveys, 183, 187–188Sync To SharePoint Workspace command, 179, 189
Sync to SharePoint Workspace command
204
Ttabular views, 158tag cloud, 138, 140tags, 136–138
adding, 137–138Tags & Notes button, 137Take Back Control command, 101Take Notes Using OneNote command, 128task list (Outlook Web App), 73, 75–76task lists (SharePoint), 183, 187tasks
attachments to, 74categories, 61completed, 77–78% Complete value, 76creating, 73–76Deferred status, 74due dates, 73flagging items, 61–62managing, 73priority of, 74private, 77reminders for, 63, 77repeating, 75–76status information, 74, 76updating, 76–77
Tasks folder, 30Tasks list, 187Tasks view, 73
navigating in, 30team blogs, 23Team Discussion list, 188Team Site Members group, 141–142
adding users, 145Team Site Owners group, 141–142team sites, 131–192 . See also SharePoint sites
advanced searches, 133–135basic pages, 181–182content, managing, 154–191creating, 150–153discussion boards, 188–189document libraries, 14Getting Started topics, 22groups and permissions, 141–146lists, 14managing, 136–153navigating, 30–32opening in new window, 13pages, adding, 31, 181–182searching for content, 132–136search scope settings, 132–133sharing, 141site owners, 142site templates, creating, 146–147small business edition, 15–16
subsites, 14, 150–154syncing to SharePoint Workspace, 189–190themes, applying, 148–149three-state workflows, 14users, adding, 13viewing, 13–16wiki page libraries, 180–181working offline with content, 189–192
Team Site template, 151Team Site Visitors group, 141technical support, 24technology certification, benefits of, viitemplates
list, 147, 183, 185site, 146–147, 151–153workflow, 162
terms, search, 138text
textselecting (Word). See also selecting (Word)text message notifications, 85, 87, 88themes, site, 148–149three-state workflows, 14, 162Tip paragraphs, xiTo and Cc lines, 34to-do lists, managing, 73–78troubleshooting tool, 25–26tutorials, 21–22
UUnknown status, 122Unpublish command, 177updates, installing, 10Upload Document command, 168uploading documents, 168Upload Multiple Documents dialog box, 168Use Conversations command, 39, 41users
external, sharing team site with, 141site permissions, 142–144
Use The Blind And Low Vision Experience option, 86
Vvalidation settings, column, 184Version History dialog box, 169, 173versioning settings, 164–165, 176, 184versions, managing, 173video conferences, 115–116video devices, configuration options, 97–98View All Pages command, 180View Conversation History command, 123, 125View Only permission, 142View Properties command, 169
tabular views
205
viewscolumns in, 157creating, 159custom columns in, 161editing, 159folderless, 158grouping items, 158inline editing, 158item limits, 158library views, 156–159mobile settings, 159personal or public, 157–158sort columns, 158summary information, 158tabular, 158
Visio Process Repository template, 151Voice over Internet Protocol (VoIP), 115volume, configuration options, 97
Wwebcams, configuration settings, 97–98, 115web conferences, 109–112Web Databases templates, 152web pages, adding notes and tags, 137web part pages
adding to team site, 181–182editing, 149layout, 181
web partsadding to pages, 178appearance, changing, 149
web part zones, 181Welcome To Lync link, 22whiteboards, sharing, 108wiki page libraries, 155, 180–181
linking to pages, 180wiki pages
editing, 180version history, 180viewing all, 180
Windows Media recordings, 126Windows Photo Editor, 95Word
checking in documents, 172coauthoring documents, 177
workflowsactions, 163defining, 162settings, 161–164, 185starting, 163three-state, 14
Workflow Settings page, 162–164Workgroup contacts, 120working offline with team site content, 189–192worksheets
coauthoring, 177from task lists, 187
XXPS files, 104
XPS files