Embed Size (px)
Citation preview

Mosaico E-Business - User Guide
Contents 1. Log In ............................................................................................................................................................................... 2
1.1. Modifying the on-line password ................................................................................................................................. 4
2. APP Product Configurator ............................................................................................................................................... 6
2.1. On-line Help functions .............................................................................................................................................. 10
2.2. Download Technical Drawing function ..................................................................................................................... 12
3. APP Order Entry ............................................................................................................................................................ 14
3.1. Enter an order or a Template .................................................................................................................................... 14
3.1.1. Search for an existing code ................................................................................................................................... 18
3.2. Create order from a template ................................................................................................................................... 20
3.3. Creating orders from XML ......................................................................................................................................... 22
4. My Bonfiglioli Product APP ........................................................................................................................................... 30
4.1. Finding a customer product ...................................................................................................................................... 32
4.2. Entering a new record ............................................................................................................................................... 32
4.3. Editing an existing record .......................................................................................................................................... 33
4.4. Adding a product to the cart ..................................................................................................................................... 35
5. Order Tracking APP ....................................................................................................................................................... 36
5.1. Filter management .................................................................................................................................................... 39
5.2. Position detail management ..................................................................................................................................... 40
5.3. Order confirmation management ............................................................................................................................. 41
6. On Line Support ............................................................................................................................................................ 42

User Guide Mosaico
27th March, 2018
2
1. Log In There are two ways of accessing the new Mosaico portal
1. Click on the Bonfiglioli website and go to the session Business Area Industrial Customer Support:
http://www.bonfiglioli.com/en/industrial/customer-support/mosaico-e-business/
2. Use the link https://mosaico2.bonfiglioli.com
Note: To avoid any mistake during the navigation, Bonfiglioli suggests using Google Chrome.
To access the new portal, you should have
Password
provided by Bonfiglioli Customer Support via e-mail or obtained during on-line registration.
The portal access procedure is as follows:
1. Click on the Mosaico link to open the Log In page
2. Enter the e-mail and password in the provided fields
3. Click on the Login button
2
3

User Guide Mosaico
27th March, 2018
3
When you will access for the first time, Mosaico will ask you to set your desired password
If the username or password are incorrect, the following message will displays
When you have completed the log in procedure, you will access to the Mosaico Launchpad on which you will display all
the Apps that you can use:

User Guide Mosaico
27th March, 2018
4
1.1. Modifying the on-line password If you forgot your password or just wants to reset it
1. Click on “Forgot your password?”
2. Enter the e-mail to which the password recovery procedure will be sent
3. Click on Confirm to receive the password reset e-mail
If the procedure terminates successfully, the following message appears:
1

User Guide Mosaico
27th March, 2018
5
The user will receive in 5 minutes, the following message at the e-mail address indicated in step 2
From: “[email protected]”
Re: “Mosaico: Reset password”
Text:
Hi “username”
You recently requested to reset your password for your Mosaico app.
The new password is: aiNasUBO.
Thanks
Bonfiglioli Team
If the e-mail is not registered in the Mosaico database, the following error message will display:

User Guide Mosaico
27th March, 2018
6
2. APP Product Configurator
With the App Product Configurator Bonfiglioli makes available the PTS and MDS products catalogue and gives the
opportunity to download drawings to all the person interested on it.
To access to the app, click on the icon “Product Configurator”
To configure a product, you must first:
1. Select a product technology
2. Select a product type
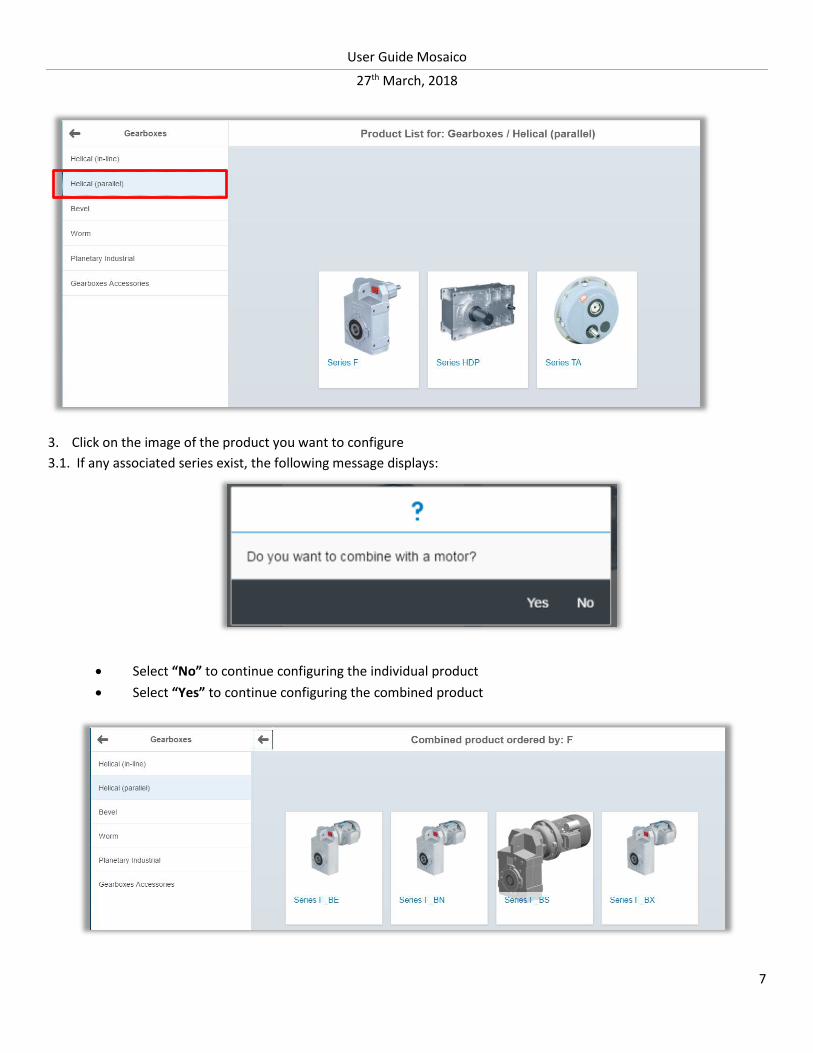
The APP will then display all the configurable series belonging to the selected product technology and type.
User Guide Mosaico
27th March, 2018
7
3. Click on the image of the product you want to configure
3.1. If any associated series exist, the following message displays:
Select “No” to continue configuring the individual product
Select “Yes” to continue configuring the combined product
User Guide Mosaico
27th March, 2018
8
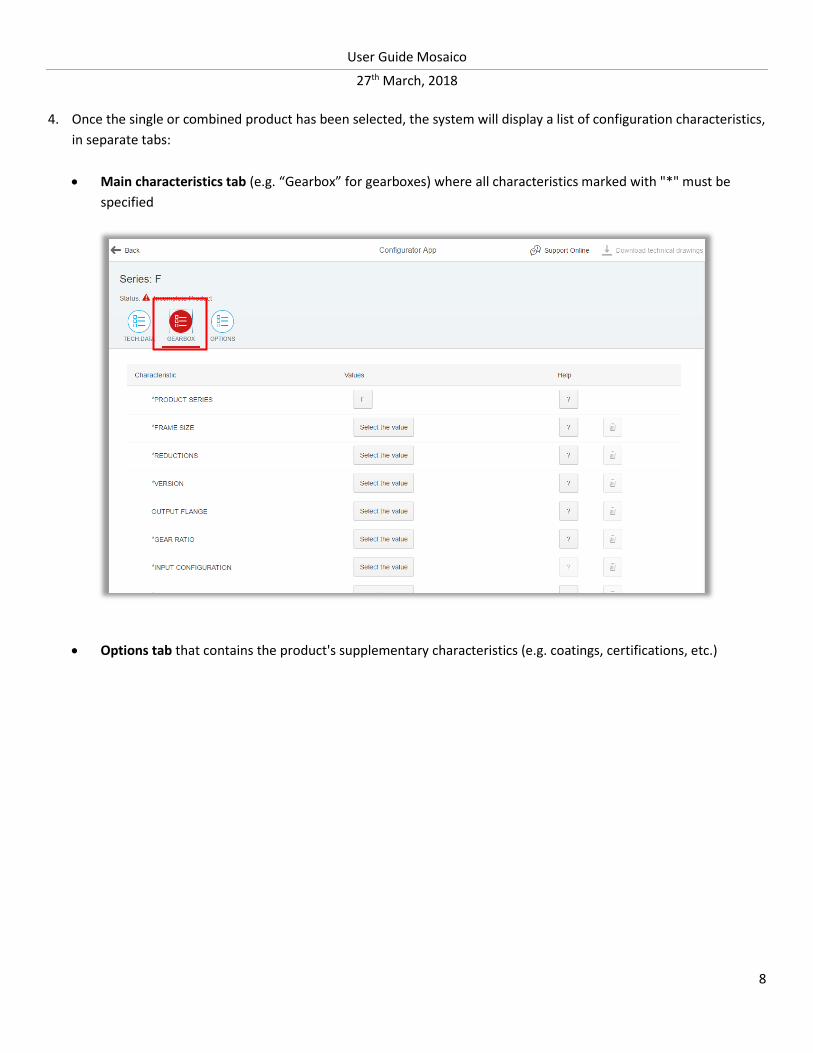
4. Once the single or combined product has been selected, the system will display a list of configuration characteristics,
in separate tabs:
Main characteristics tab (e.g. “Gearbox” for gearboxes) where all characteristics marked with "*" must be
specified
Options tab that contains the product's supplementary characteristics (e.g. coatings, certifications, etc.)

User Guide Mosaico
27th March, 2018
9
Technical data tab where if you choose the “Measurement International System” and the “n1” characteristics ,
the system will calculate all the other technical data

User Guide Mosaico
27th March, 2018
10
When you have specified all mandatory characteristics, the configuration status changes from “incomplete
configuration” (red) to “Validated product” (green).
In “Validated product” status, the “Download Technical Drawings” function become available
2.1. On-line Help functions Two levels of help with product characteristics are available during the configuration process:
1. The Help button for individual characteristics:

User Guide Mosaico
27th March, 2018
11
2. The Help button for the values of the characteristics:

User Guide Mosaico
27th March, 2018
12
The Help on line corresponds to information available in Bonfiglioli Product catalogues.
2.2. Download Technical Drawing function The “Download Technical Drawings” function is available to all users, but is only enabled when the configuration is
complete - i.e. when the status displays as “valid configuration” in green.
1. Click on Download Technical Drawing to generate the drawing
2. The system calls the Teamcenter (Bonfiglioli technical drawing tool) to
1

User Guide Mosaico
27th March, 2018
13
a. provide the drawing of the configuration in JT format
b. provide a list of file formats in which the drawing can be downloaded
3. From the drop down menu, select the desired file format and click on OK: the system will convert the JT file (step 2)
into the new format and will save a .zip version on your PC.
N.B. If an error occur during the download of the drawings (because drawings is not available or because systems
are taking too much time) will be displayed the following message
For more details, please refer to the Bonfiglioli catalogue.
2
b
2 b
2 a

User Guide Mosaico
27th March, 2018
14
3. APP Order Entry The APP Order Entry provides the following functionalities:
Enter an Order
Enter a Template
Enter an Order from Template
Enter an Order from an XML
3.1. Enter an order or a Template To enter your Purchase Order
Click on the APP “Order Entry” on your Launchpad.
If your userid is assigned to more than one Customer code, the window “Customer” will open and you can select
or search the customer for which you would like to enter the order
Then, if for the selected Customer you have authorization to work with multiple Bonfiglioli Sales Organization
(e.g. IT03 and B001), the window “Bonfiglioli Sales Organization” will appear and you can select the sales org
for which enter the order.

User Guide Mosaico
27th March, 2018
15
After the selection of the Customer and the Bonfiglioli Sales Org., the “Order Entry” window will appear.
This windows is organized in two areas
1. Header data
2. Position data
The Header area includes the following information:
Code and description of the Customer (Sold To)
Customer address
Code and description of the Bonfiglioli Sales area
Net total for the order (it appears on the right corner of the windows when the order is saved)
Info that should be entered by you
• PO Number
1
2

User Guide Mosaico
27th March, 2018
16
• PO Date • Ship - to : the address of the plant where you want receive the goods • Req. Delivery Date : the date in which you desire to receive the goods or you want the goods is shipped
(depends from INCOTERMS agreement) • Urgency Procedure: for urgent shipment. In use only from Bonfiglioli IT03
N.B.:
- the Req. Delivery Date by default is blank and should be filled with date higher of the current date.
- Urgency Procedure only displays to users authorised to manage it.
The Position area allows to enter the goods you want to purchase.
To add a product code to the sales order, click on the “+” button at the bottom right of the header data
Per each position, the user can enter:
Material is the Bonfiglioli product code. If you do not know this information, you can:
o Launch a configuration by entering the series of the configurable (e.g. C, C_BN, A, etc.) directly from
this field
o Select an existing material with match code
Customer Material Code is your product code that can be already linked to a Bonfiglioli product (i.e. you
can display it in the APP “My Bonfiglioli Product”)
Quantity
Group This field is used only from IT03 and IT05 Sales Org. It is a numerical field. If more than one row
contains the same “Group” value, then the shipment of these rows will performed together.
Req. Delivery Date the date in which you desire to receive the goods or you want the goods is shipped (depends from INCOTERMS agreement)
If you select one of the above fields and click on enter, the APP will update the data with the corresponding SAP data:
Descriptions of the material
Net Tot
N.B.: the Net Tot. column displays only if Bonfiglioli decided that prices can be displayed for the Bonfiglioli Sales
Org. in question
Once the positions are completed, you can update the data and save the order using the options at the top right
corner of the APP.
User Guide Mosaico
27th March, 2018
17
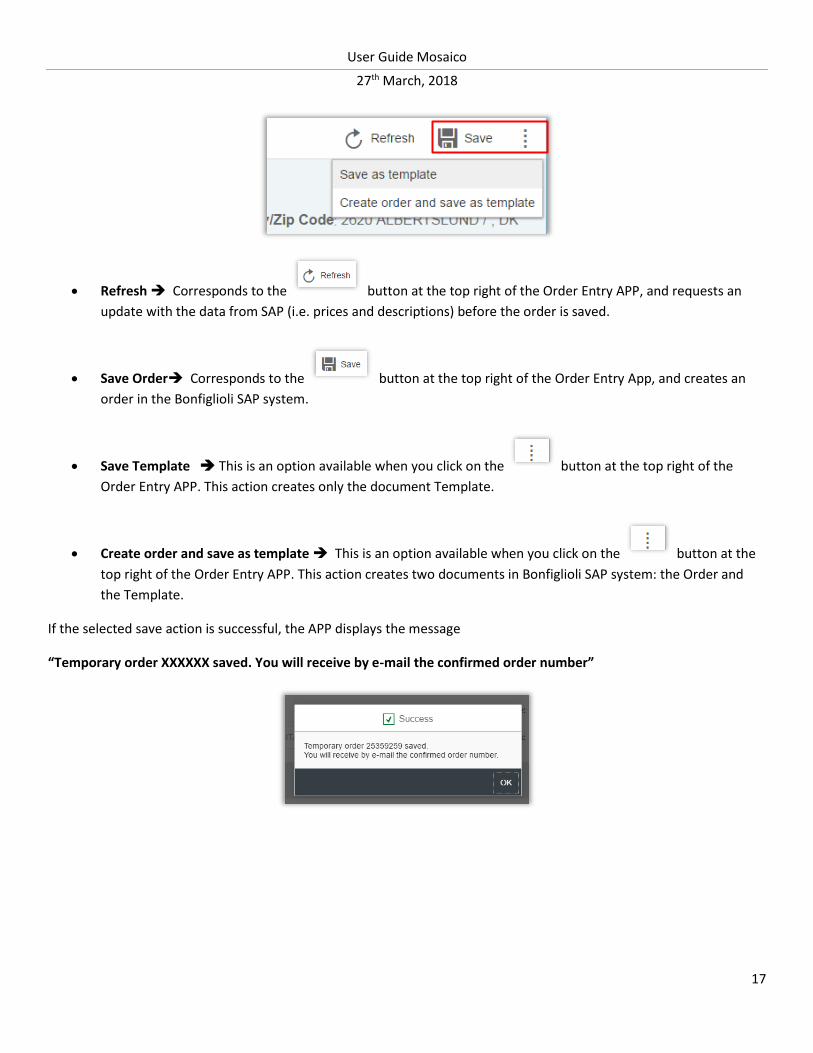
Refresh Corresponds to the button at the top right of the Order Entry APP, and requests an
update with the data from SAP (i.e. prices and descriptions) before the order is saved.
Save Order Corresponds to the button at the top right of the Order Entry App, and creates an
order in the Bonfiglioli SAP system.
Save Template This is an option available when you click on the button at the top right of the
Order Entry APP. This action creates only the document Template.
Create order and save as template This is an option available when you click on the button at the
top right of the Order Entry APP. This action creates two documents in Bonfiglioli SAP system: the Order and
the Template.
If the selected save action is successful, the APP displays the message
“Temporary order XXXXXX saved. You will receive by e-mail the confirmed order number”

User Guide Mosaico
27th March, 2018
18
If you click “OK” on the right corner, system displays the temporary order number created.
If you would like to enter a new order, you can click on the icon on the top left of the window or you can go on
the Home page and click again on the Icon App Order Entry.
N.B. Bonfiglioli will send you an e-mail in both case: successful or unsuccessful temporary order processing.
3.1.1. Search for an existing code
If you do not know the material code you want to enter on the order, you can
1. Search for an existing code
2. Configure a product
You should take into account that Bonfiglioli Products are classified in:
1. Standard finished products (configurable)
2. Special finished products
3. Kits
4. Subassemblies
5. Components
The material search menu in the Order Entry APP, is based on this classification.
To access to “Material Search” click on the icon on the right of field “Material”

User Guide Mosaico
27th March, 2018
19
A new page will open where clicking on “Categories” field, you will display 6 possible choice:
1. Standard finished products (configurable)
2. Special finished products
3. Kits
4. Subassemblies
5. Components
6. All materials
Select the product category you are interested, then refine the search by entering
o Series if you want to search all the finish product codes that belong to the series selected
o full or partial Material code (do not use the wildcard “*”)
o full or partial Description (do not use the wildcard “*”)
o The flag “Configurable search” on the bottom right if you want the list of the configurable product to
start the configurator.
Launch the search by clicking on “Search”

User Guide Mosaico
27th March, 2018
20
N.B.
For category 2. Special finished products, the search will return only “Special Product” assigned from Bonfiglioli
to your APP “My Bonfiglioli Products”.
For category 6. All Materials, the search filters all the types of material in the table. Here pay attention to the
“Max. results” number because could be not enough to receive the desired product.
The search returns one or more codes:
o To select the code you can
Double click on the code itself
Click on the code and select button “Apply”
After the selection, the system will load the code into the Material field in the Order Entry APP.
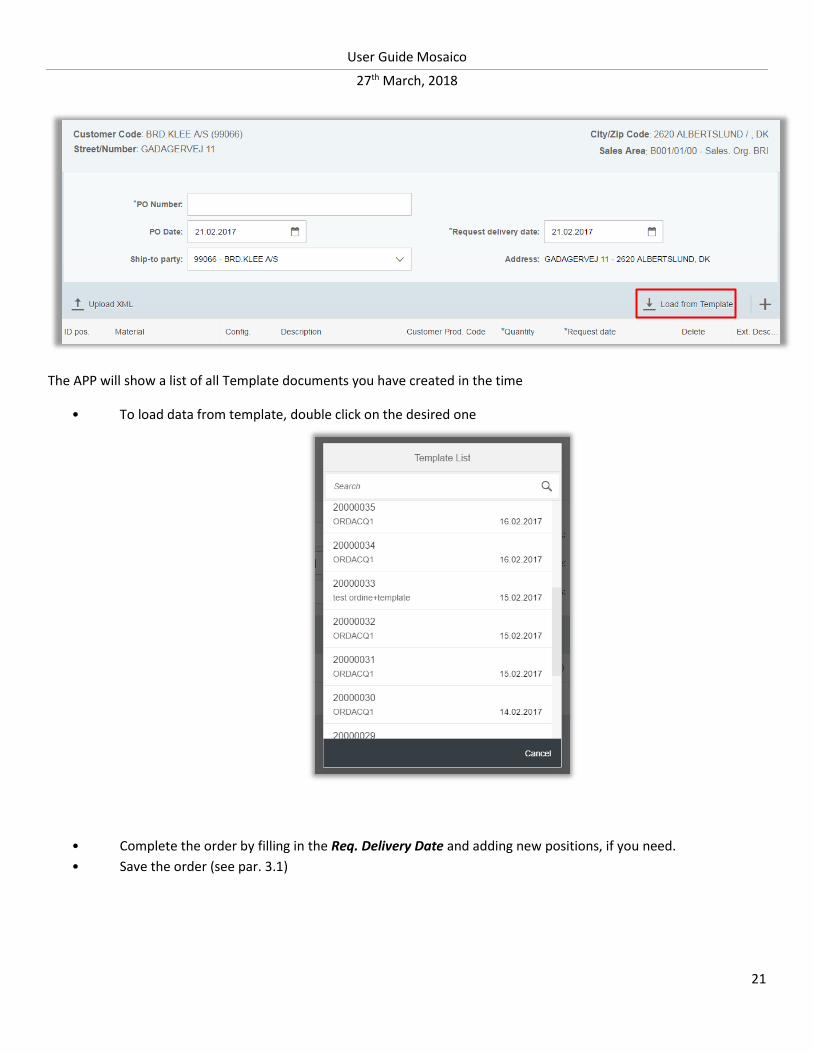
3.2. Create order from a template
To create an order from a template, access the Order Entry APP, fill in the header data as shown in par. 2.1, then call up
the template by clicking on “Load from Template”
User Guide Mosaico
27th March, 2018
21
The APP will show a list of all Template documents you have created in the time
• To load data from template, double click on the desired one
• Complete the order by filling in the Req. Delivery Date and adding new positions, if you need.
• Save the order (see par. 3.1)

User Guide Mosaico
27th March, 2018
22
3.3. Creating orders from XML
Target
The target is to give the possibility to the customer to enter the sales order in Mosaico through an automatic procedure
avoiding to enter the same order twice (both in the customer’s system and into Mosaico)
To create an order from an .XML file proceed as follows
1. Create an XML file on your PC according to the template Bonfiglioli provided (if you do not have it, please ask to your Bonfiglioli referent person). The file should contain the purchase order for import into Mosaico.
2. Access Order Entry APP with the customer code and sales organization 3. Click on button “Upload xml” to select the XML file created in step 1 on your PC. 4. Mosaico systems load the file into the Order Entry APP and update the data (this step can take time if the xml
contains a lot of configured products) 5. If there are errors on some positions, correct them before saving 6. Save the order after checking that the data are correct 7. Display the Temporary order number in the APP
1

User Guide Mosaico
27th March, 2018
23
Search on the PC the XML file before created
Upload the XML file
2

User Guide Mosaico
27th March, 2018
24
Precondition
A necessary precondition for the use of XML file is that the material codes that the User want to order through the XML
file, are already loaded in the App “My Bonfiglioli Product” . This is because the XML procedure is usually used by the
Customer who transcode the Bonfiglioli codes (4) and in this way the system is able to find out the correspondence
between B. material code and Customer material code.
Bonfiglioli code 410063
Customer code 1087989
The XML also works if the Customer identify its own codes with the Bonfiglioli material codes. (5)
Bonfiglioli material code 580219
Customer material code 580219
3
4

User Guide Mosaico
27th March, 2018
25
MISSING CODE IN THE APP “MY BONFIGLIOLI PRODCUTS” PREVENT THE UPLOADING OF THE XML FILE.
To avoid errors in XML uploading, all the product codes listed in the XML file must be first loaded in the APP “My
Bonfiglioli products”.
In case of one of the codes loaded in the XML file is missing from the APP “MY BONFIGLIOLI PRODUCTS”, the system will
open a window showing the message text “invalid material”. Closing the text message (6) the line containing the invalid
material will be highlighted. (7)
5
6

User Guide Mosaico
27th March, 2018
26
How the User can go ahead with order uploading without the need to get out from the App “Order entry”?
It is important to distinguish the case where the customer material code is the same as Bonfiglioli code, from the one
where the Customer usually transcode the Bonfiglioli material code, with its own code.
In the first case, the User can copy and paste it in the field “MATERIAL” (8)
(Otherwise the User ask the Mosaico Supervisor to enter the inforecord into Bonfiglioli database – through the trx
VD51)
7

User Guide Mosaico
27th March, 2018
27
Note: to update the description for pos. 10 and 20 click on “REFRESH”.
8

User Guide Mosaico
27th March, 2018
28
In the second case, the User can directly enter the Bonfiglioli code in the field “Material” if well known. (9)
Saving the order the inforecord will move in the App “My Bonfiglioli products” (10)
9

User Guide Mosaico
27th March, 2018
29
Technical specifications for the compilation of the exchange file.
The file xml must be an ordinary ASCII file named as the customer prefer (no issue on the file name). The file must have the extension XML.
The file can be located on the PC of the customer. The XML file can contain only one order. The words in bold are the tags to compile the XML file and must be entered in the same format as they are
written, digits '<' and '>' included. For each information must be present an initial tag (ex. <ORDERBLOCK>) and the corresponding final tag (ex.
</ORDERBLOCK>), containing the bound information. The tags containing other tags (ORDERBLOCK, ORDER, ORDLINES, and LINE) must be inserted in a different
record, therefore after every initial or end tag a 'carriage return' must be entered. The tags not containing other tags but having data inside, must have a record with an initial tag, the variable
data and the final tag and then the 'carriage return' (NEW_ORDER_NUM, DATE, TIME, ITEMNUM, QTY, GETDATE, GROUP, DETAILREFCUT, NUMLINES).
It is not necessary to indent the tags, each information can also start at the beginning of the record. The words in italic are the points where the variable data of the XML must be inserted.
10
10

User Guide Mosaico
27th March, 2018
30
4. My Bonfiglioli Product APP
The My Bonfiglioli Product APP enables to maintain the correspondence between Bonfiglioli codes and your product
codes.
Note that
It is mandatory to enter these products relations only if you work with the xml. Otherwise, you can work directly
on the APP Order Entry and if the system finds relations not existing will add them in your My Bonfiglioli APP.
Each product relation is assigned to a Customer Code and a Sales Organization (e.g. IT03, B001 etc.). Pay
attention if you work with more customers and more Bonfiglioli Sales Org.
To launch the My Bonfiglioli Product APP on your Launchpad click on the icon:
If you are authorised to work with multiple customer codes, the APP will display a Customer pop-up window with a list
of customers:
Search for the customer code using the “Search” field or by scrolling with the grey bar on the right of the
window
Double click on the customer to select it

User Guide Mosaico
27th March, 2018
31
If you are authorised for multiple Sales Org., the system will display a pop-up list of the sales org. in question:
Double click on the Sales Org. you wish to use
Once you have selected the customer and sales org., the APP will display the list of your codes already linked to
Bonfiglioli Products:
On this APP the following functions are now available:
Find products
Enter new records
Edit existing records
Add to cart

User Guide Mosaico
27th March, 2018
32
4.1. Finding a customer product
To find a product, use the field “Find my product”
You can search by
Product it is the Bonfiglioli Product code. In this case you can enter a partial or complete product code and
system will return all your codes associated to Bonfiglioli products that contains your selection.
Description it is the Bonfiglioli Product Description. In this case you can enter a partial or complete
description and system will return all your codes associated to Bonfiglioli descriptions that contains your
selection.
Customer Product code it is your code used in your PO.
Example: to search for Bonfiglioli Product code “BRAKE305”
Choose “Product”
Enter “BRAKE” on the search field and click enter
4.2. Entering a new record
To enter a new record
a. Click on the "+" button
b. in the Material field, search for the Bonfiglioli code with which you want to associate your product
c. in the Customer Material Code field, enter your product code
d. save

User Guide Mosaico
27th March, 2018
33
After saving, the new record will display immediately in the list:
If the new entry fails because there is already a record for the material code entered, the APP will display the
message "An entry with same material already exists".
In this case, click on “Close” and delete the record you were entering with the button.
4.3. Editing an existing record
To edit an existing record
a. Click on the pencil icon next to the record to be edited
b. Edit the customer Material Code
c. Save
a.
b. c. d.

User Guide Mosaico
27th March, 2018
34
The system will immediately display the change done
a.
b. c.

User Guide Mosaico
27th March, 2018
35
4.4. Adding a product to the cart
The My Bonfiglioli Product APP facilitate the creation of an order because allow you to select products and add
them in the cart.
a. To select products, check the box on the left of each product line
b. To add them to the cart, click on the cart icon at the top right of the APP
Mosiaco will open the APP Order Entry and you can complete the purchase as described in paragraph 3.1.

User Guide Mosaico
27th March, 2018
36
5. Order Tracking APP
The Order Tracking APP allow you to monitor the status of your orders.
To launch the Order Tracking APP click on the following icon in the Mosaico Launchpad.
If your user profile has more than one Customer code, the Customer window will open for you to select the
customer for whom you want to enter the order.
If, for the selected Customer, you are authorised to work with multiple Sales Org. (e.g. IT03 and B001) the
Sales Org. window will display for you to select the Customer for whom you wish to enter the order.

User Guide Mosaico
27th March, 2018
37
The APP will now display the list of orders (entered from Mosaico or from Bonfiglioli customer service) for the
last 3 months;
The APP window is organized in 4 areas:
AREA 1 contains
o Customer code
o Customer description
o Filters
o Search order
AREA 2 contains the list of sales orders which match the selection (by default it shows the list of orders for the
last month). For each order in this area, the following fields display
o Sales order number
o Purchase order
o Order net value
o Currency
o Order status
o Creation date
AREA 3 contains the header data for the selected order. Mosaico displays here the following information
o Sales order number
o Purchase order
o Order net value
AREA 1
AREA 2
AREA 3
AREA 4

User Guide Mosaico
27th March, 2018
38
o Currency
o Sales area
o Description of sales area
o Ship to code
o Ship to description and address
o Order status
o Creation date
AREA 4 contains the positions data for the selected order and shows the following information
o Material position
o Customer material code
o Material code
o Material description
o Quantity
o Quantity unit
o Order net value
o Currency
o Req. delivery date
o Order status
The position data area starts with a bar of icons that represents the possible status of a position.
At the top right of the icon, Mosaico counts the number of positions in the orders that belong to that status.
Possible status are:
R - Requested/Ordered if the position is not completely dated (confirmed)
F - Confirmed if the position is completely dated (including multiple schedules)
P - Partially shipped if the position has been partially shipped
S - Shipped if the position has been completely shipped
I - Invoiced if a completely shipped position has also been invoiced
D - Deleted/Revoked if a reason for rejecting has been applied to the position

User Guide Mosaico
27th March, 2018
39
5.1. Filter management
To modify the filters for the order monitor, click on the filter icon next to the Customer's name:
The APP will display the Order Tracking- Filters window, in which you can refine the search with the following
fields:
a. Creation data From – To
b. PO number
c. Customer material code
d. Order status
Closed (i.e. completely shipped)
Open
N.B.: “Creation Date” is always a mandatory field.
In addition to the filters, if you wish to find a specific order you can use the “Search” bar under the filter icon.
The Search bar allows searching by Bonfiglioli order numbers (partially or complete) or Purchase Order (partially or
complete).

User Guide Mosaico
27th March, 2018
40
5.2. Position detail management
For each order position displayed, you can open a detailed view by clicking on the arrow to the right of the line in
question.
The detailed view displays 4 areas:
1. Information contains the principal data about the position
2. Delivery date for firmed positions, Mosaico will display the schedule line.
3. Shipping data for shipped positions, Mosaico will display the shipment information
4. Invoicing data for invoiced positions, Mosaico will display the invoice number, date and value
1.
2.
3.
4.

User Guide Mosaico
27th March, 2018
41
5.3. Order confirmation management
The Order Tracking APP can also allow displaying order confirmation in .pdf format.
To obtain it, you can click on the bottom “Download order confirmation” on the top right of the APP window.
It is the same document that usually Bonfiglioli sent by e-mail to his customers.
If changes to the first confirmation will be applied, then a second or a third confirmation will be available.

User Guide Mosaico
27th March, 2018
42
6. On Line Support
If an error occurs during the use of the new Mosaico APPs, you can ask support to the Mosaico team using the function
“Support Online” that you will find on the top bar of the following APPs:
Product Configurator
Order Entry
My Bonfiglioli Product
This button will open a ticket to the Mosaico team.
When you click on the button “Support Online” the following window will open:
1. Enter the text to ask support. Please give as more details you can in order to allow to reproduce the mistake
2. Click on Save to send the ticket to Bonfiglioli team
A ticket mail will be sent
to you, in order to allow you to know the progress of the issue resolution
To the team dedicated to support you on that problem in order to solve it ASAP.
End of document