Embed Size (px)
Citation preview

Motherboards
The foundation of the Personal Computer

Physical Construction
• Fiberglass layers
• Copper foil – etched to make “traces” or connection “wires”
• Can be up to five layers
• “Plated through holes” to connect traces from one layer to another

Classification Characteristics
• Layout – or form factor. Defines what type of case is required
• Chipset – Defines the type of processor, memory and expansion bus.
• Components – determine the functionality and the rest of the expandability of system

Form Factor
• The particular way components are positioned on a motherboard
• Three basic form factors: AT, ATX and BTX and a handful of variations
• Cases are designed to work with just one form factor as are power supplies

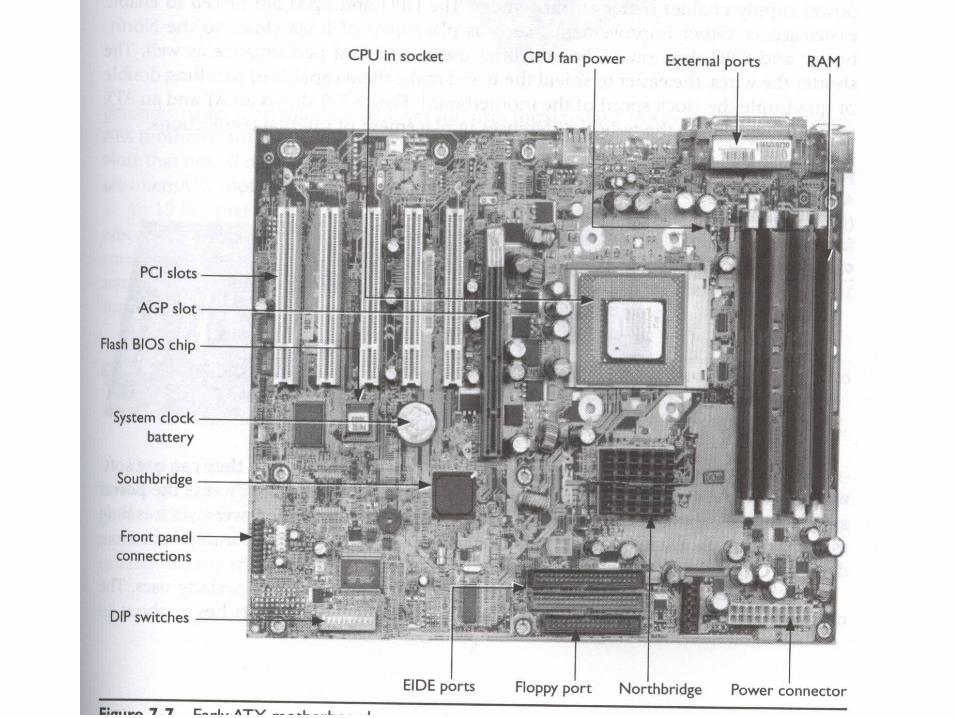
AT Form Factor
• Just one connector – for keyboard. Large (1/2”), five-pin connector
• Processor socket at opposite end of board
• P8 and P9 style power supply sockets
• Later AT’s had pin connectors for serial and parallel ports – used “dongles” to get ports to back of case
• Used ISA slots; limited System Resources


Baby AT
• Smaller than AT, but same basic layout
• For smaller cases

LPX and NLX
• Slim-line or Low Profile motherboards for “desktop” or “pancake” systems
• Use a “riser slot” to allow expansion cards to be parallel to motherboard


ATX form factor
• About 1995 for introduction, 1998 for mainstream
• Utilizes PCI slots• Better power control – read software can
turn off system or components (hard disk drive and/or video). Called Soft Power.
• Shift to PS/2-style keyboard and mouse ports
• P1 style power connector

MicroATX
• Smaller than ATX
• Fits in standard ATX case or smaller microATX case (E-Machines, Compaq)
• Fewer expansion slots; usually more built in connectors


Proprietary Motherboards
• HP, Compaq, Sony, Gateway
• Non-standard power supplies, power connectors and front panel connectors
• Sends you to them for parts – read $$$

Chipset Varieties
• Defines processor, RAM, expansion• Northbridge now gets its own heat sink• NB handles CPU and RAM• Southbridge handles hard disk drive, floppy
drive, expansion slots, serial and parallel ports• Needs BIOS support, only some of which is in
System ROM; remainder in drivers specific to chipset and OS
• CD ships with motherboard in box• Intel uses Memory Controller Hub (MCH) and
I/O Controller Hub (ICH)

Ode to Mike
• No, you do NOT have to know chipsets by number…
• He just got through saying that 100 sets are produced each year (that’s a bit optimistic)
• And no, techs don’t love to talk about chipsets – rather talk about clients.

845 Chipset
15

925 Chipset

Where for the Dollars?
• Newer chipset makes the motherboard more expensive because it is more expansive
• Older chipset might work just fine for the application(s) at hand
• You can “read” the chipset by looking at what the motherboard supports (the specs)


The Expansion Bus
Three Tasks
• A card needs to be built specifically for the expansion slot – the right signals at the right place. Connectivity
• Card needs some way to communicate with the CPU – in and out. Communication
• Operating System needs some way to allow user to control the device/card. Drivers

Structure
• Expansion bus(es) connect to the chipset
And PCIe


Speed
• CPU (and Northbridge) tied to System Crystal
• Almost all chips/devices have clock wire for timing
• This could lead to lots of devices at each specific speed (66, 100, 133, etc.)
• Solution is to add an Expansion Crystal for consistent timing on the bus

Expansion Crystal

Enter PCI
• Intel gets credit for this one (1993)• Peripheral Component Interconnect• 32-bit, 33 MHz; “mezzanine” bus as it sits
between FSB and rest of expansion bus (ISA)• Self-configuring (PnP), allows Ultra-DMA (bus
mastering)• Uses sharable Interrupt Channels (INTA, INTB,
C and D)• Supports I/O addresses above 3F8 to FFFF

Honorable Mention to AGP
• Video demands keep pushing bus improvements
• Accelerated Graphics Port
• PCI slot with its own connection to Northbridge
• This, and more, when we do Video chapter


PCI - X
• PCI Extended
• 64-bit slot for servers, Mac G5
• Four speeds: 66, 133, 266 and 533. 266 is double-pumped 133; 533 is quad-pumped.
• Not going to see this on the desktop.

PCI Express
• PCIe –xN. PCI express by “N” (some number of lanes wide). About 2004-5
• Serial connection (differential signals)
• Not a shared bus like all before it; each connection direct to Northbridge chip

PCIe Speed
• PCIe 1.0 at 2.5 Gbps; 2.0 at 5Gbps
• 1,2,4,8 or 16 lanes
• Total 16Gbps for x16 slot

Installing Expansion Cards
• Need to know that the card works with OS and motherboard
• Insert card properly – don’t break things and beware of ESD
• Provide drivers – specific to card and OS
• Verify proper operation

Will it work?
• Will it work with your motherboard?– Can’t install PCIe-x16 video card in AGP slot– Can’t install ISA sound card in PCI-only m/b
• Will it work with your OS? - This will be an issue for Windows 7 (?)- Always an issue with new OS
• Is device on the Hardware Compatibility List (HCL) or Windows Marketplace?

Drivers
• Expansion cards WILL have a floppy/CD with driver(s) in the box.
• Read the directions to determine what’s first: device install or driver install
• Video cards usually need old (card) drivers removed first; usually in Add/Remove Programs
• Remove All-In-One printer controls from Add or Remove Programs too.

More Drivers
• A lot of drivers are “unsigned” – usually means they did not pay Microsoft to test the driver. It’s not as scary as it looks.
• If you have to force the Add Hardware Wizard you probably did something wrong
• 64-bit Vista and 7 require driver signing
• Usually have to have Administrator permissions to install card


Verify Operation
• Don’t leave until you have verified operation of the expansion card.
• Device Manager is a good place to check after install and driver install
• Have the device do its something just to make sure all is well (and client is happy)

Physical Installation• Do you have an available slot?• Beware ESD• Beware the 5v on the motherboard – pull
the plug during installation• Handle the card carefully – don’t get “wet”
fingerprints on connector.• Insert, and remove, card at a slight angle• Install the attachment screw before you
power up the system

Handle card

Installation Order
• Most video cards today require that you– uninstall current video drivers (revert back to
generic Microsoft driver) – install new driver software – Remove old card and install new card– Finish (driver) installation
• Always read installation instructions first

Preventative Maintenance
• Don’t use pencil eraser to “clean” contacts, rather, use canned contact cleaner – but only if card has had a long shelf life.
• Sometimes removing and reseating a card a time or two will bring the card back to life.
• The attachment screw WILL line up with hole if you have installed card correctly

Trouble - Visable
• Device Manager error indicators:– Yellow circle with black exclamation point
usually means driver is damaged– Red “X” symbol means device is disabled and
not working– Yellow question mark is found device but
lacking correct driver(s).

1

Trouble – Not Visible• Windows should recognize new card on
bootup and ask for driver(s). If it does not ask, you (or card) failed some step.
• USB devices should be recognized on connection.
• Drivers, drivers, drivers
• Get an account at DriverGuide.com (old advice) – get a new card
• Could be that device is turned off in CMOS
Upgrade/Replace Motherboard
• Was a straight forward process with Win 98. It would complain, but after a few restarts and driver installs would be happy with a new motherboard.
• XP to 7, by contrast, often locks up at new motherboard – you may need to reinstall OS and applications. Factor that into upgrade plans. And re-activate, too.

Get the right case
• AT motherboards required AT case (and power supply).
• Desktop cases require smaller board (NLX).
• Mini-Tower is going to need microATX board.

Just do it
• Label stuff as you go along.• Unplug all connectors (ribbon cables, power
cables and front panel cables).• Remove all expansion cards.• Remove all the board screws.• CPU, heat sink and RAM best handled outside
of the case. Remove once board is out, replace before board goes into case.
• Watch out for ESD.• Replace in reverse order.
10

Front Panel LEDs
• Not light bulbs – have a positive (color) wire and negative (white) wire. Backwards won’t harm board, just won’t light the LED.
• System will work without LEDs, but is more pretty with them working.
• Use the motherboard book or go to the web if in doubt.


Mike’s suggestions
• Removable front panel is dated (AT) stuff
• So is side panel motherboard mounting
• Rare today is the case that does not have front panel USB ports.
• Even more rare is the case where you have to remove the power supply to get motherboard out (Dell, etc.)

Troubleshooting
• Catastrophic – system won’t boot even with all but video card removed.
• Component – ESD or power failure can cause it. Spill that drink on your keyboard.
• Mike’s ethereal – random reboots and blue screens. Major headache to trace down.
• Don’t take random approach: replace one component at a time, write down what you did and watch where the problem goes (i.e. is it still there?).
• Flashing the BIOS is almost never the cure.


And then there is
• The Shuttle PC

BTX
• The BTX form factor in a desktop case
4