Embed Size (px)
Citation preview
MOTION CONTROL QUICK START GUIDE
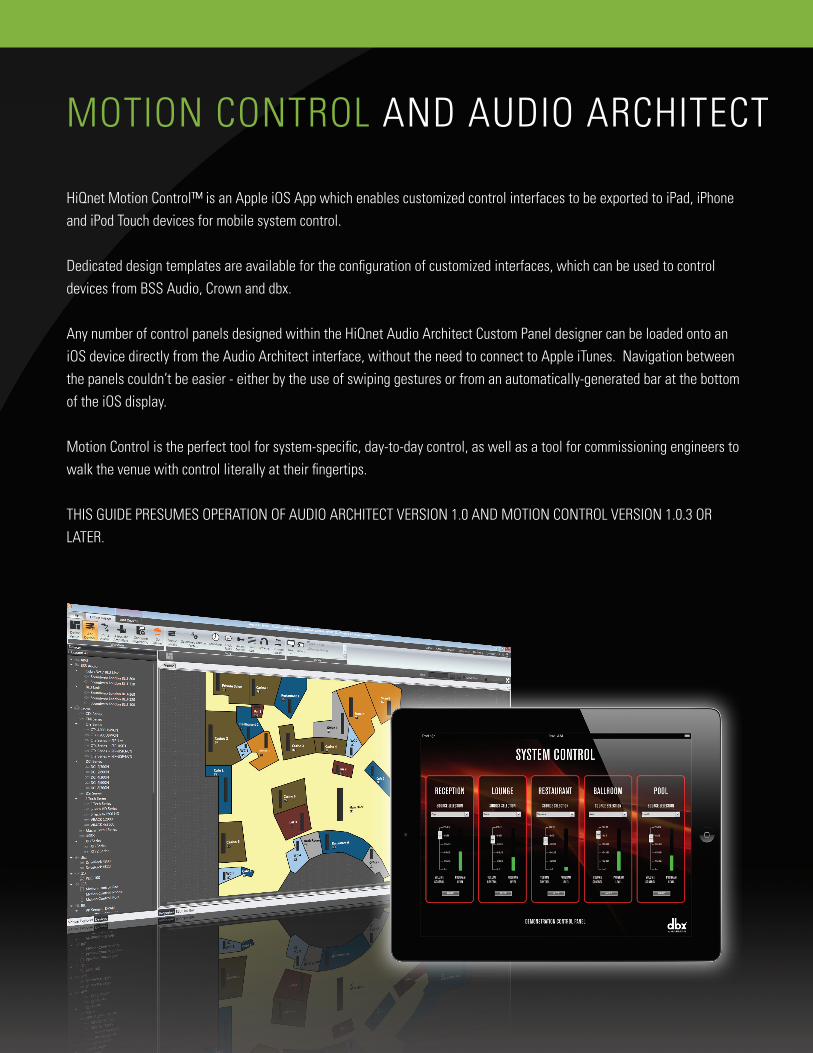
HiQnet Motion Control™ is an Apple iOS App which enables customized control interfaces to be exported to iPad, iPhone and iPod Touch devices for mobile system control.
Dedicated design templates are available for the configuration of customized interfaces, which can be used to control devices from BSS Audio, Crown and dbx.
Any number of control panels designed within the HiQnet Audio Architect Custom Panel designer can be loaded onto an iOS device directly from the Audio Architect interface, without the need to connect to Apple iTunes. Navigation between the panels couldn’t be easier - either by the use of swiping gestures or from an automatically-generated bar at the bottom of the iOS display.
Motion Control is the perfect tool for system-specific, day-to-day control, as well as a tool for commissioning engineers to walk the venue with control literally at their fingertips.
THIS GUIDE PRESUMES OPERATION OF AUDIO ARCHITECT VERSION 1.0 AND MOTION CONTROL VERSION 1.0.3 OR LATER.
MOTION CONTROL AND AUDIO ARCHITECT
NETWORK SETUP
In order for HiQnet Audio Architect to communicate with your HiQnet devices as well as your iOS device, your network must be set up properly. Your Windows computer must have a network adapter connected to a wireless router, they must be on the same subnet, and you must be connected to at least one HiQnet device.
1. Make sure your computer, wireless router, and HiQnet devices are powered ON. 2. Start Audio Architect.3. Verify that Audio Architect is communicating with the router and your device(s) by going online and ensuring that all devices connected to the network are correctly discovered. Consult the Audio Architect Help File for more information
NOTE: If you have difficulty connecting Audio Architect to your network, you may need to adjust your Windows firewall settings. If you are working on a company computer, and are having trouble connecting to an iOS device with Audio Architect, consult your IT manager.
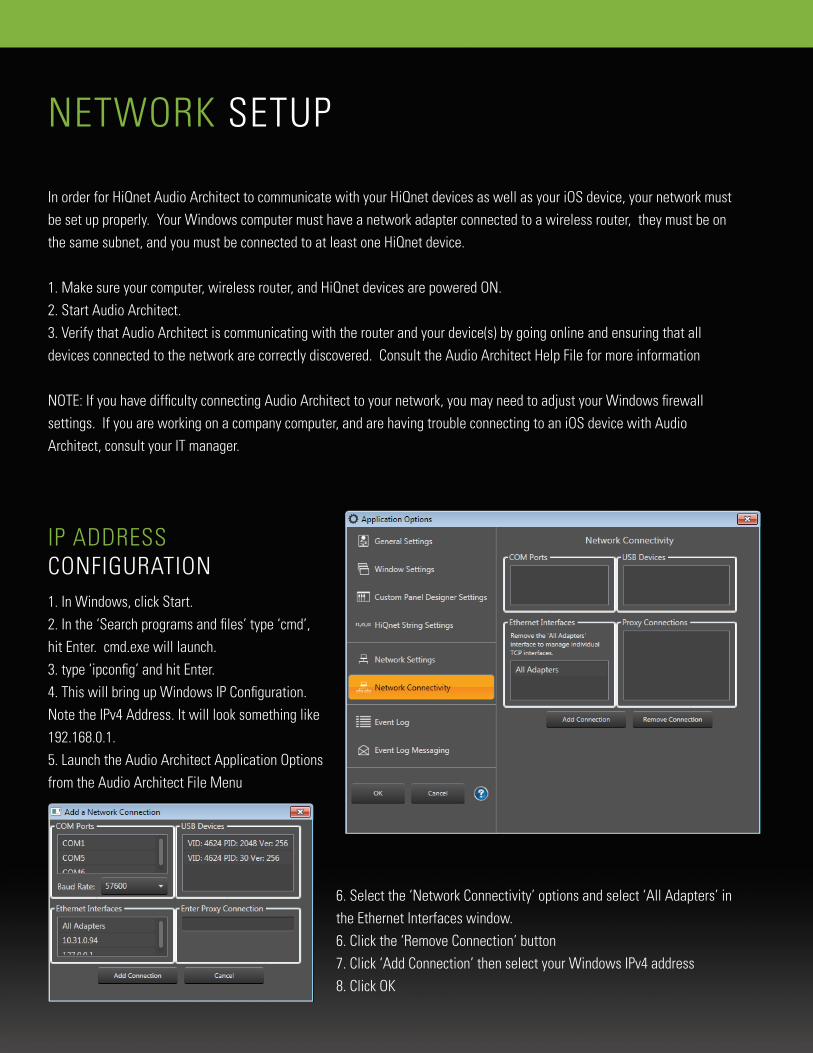
1. In Windows, click Start.2. In the ‘Search programs and files’ type ‘cmd’, hit Enter. cmd.exe will launch.3. type ‘ipconfig’ and hit Enter.4. This will bring up Windows IP Configuration. Note the IPv4 Address. It will look something like 192.168.0.1.5. Launch the Audio Architect Application Options from the Audio Architect File Menu
6. Select the ‘Network Connectivity’ options and select ‘All Adapters’ in the Ethernet Interfaces window.6. Click the ‘Remove Connection’ button7. Click ‘Add Connection’ then select your Windows IPv4 address8. Click OK
IP ADDRESS CONFIGURATION
CREATING CUSTOM PANELS
The following is an example of how to create a Custom Panel in Audio Architect for your iOS device. It is assumed that you know the basics of Audio Architect, and how to add devices to the Venue. In this example a BSS Audio Soundweb London BLU-806 and a Crown DriveCore Install Series DCi 2|600N amplifier are included.
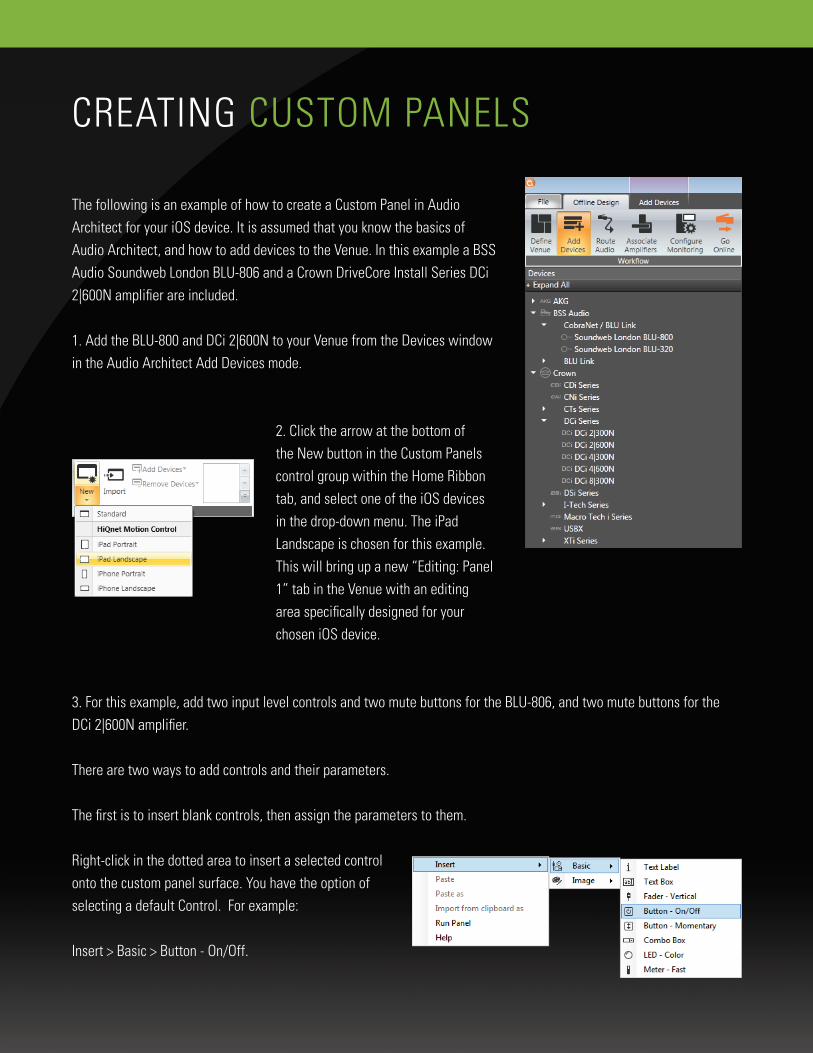
1. Add the BLU-800 and DCi 2|600N to your Venue from the Devices window in the Audio Architect Add Devices mode.
2. Click the arrow at the bottom of the New button in the Custom Panels control group within the Home Ribbon tab, and select one of the iOS devices in the drop-down menu. The iPad Landscape is chosen for this example. This will bring up a new “Editing: Panel 1” tab in the Venue with an editing area specifically designed for your chosen iOS device.
3. For this example, add two input level controls and two mute buttons for the BLU-806, and two mute buttons for the DCi 2|600N amplifier.
There are two ways to add controls and their parameters.
The first is to insert blank controls, then assign the parameters to them.
Right-click in the dotted area to insert a selected control onto the custom panel surface. You have the option of selecting a default Control. For example:
Insert > Basic > Button - On/Off.

After you have created the panel, go to the System Explorer on the left, open the available devices to the parameter level and drag an appropriate parameter onto the control. For example, select a mute and assign it to a Button - On / Off control, or assign a level parameter to a fader.
The second way to add controls and parameters is to drag the actual parameter from the device onto the custom panel.
In the Venue Explorer window, expand the DCi 2|600 to the parameter level. Expand the Ch1 Analog Input parameters and drag the Fader parameter direcly onto the blank Custom Panel background to add that control.
Select Fader - Vertical.
Notice in the Parameters Tab of the Properties window, you’ll see that the DCi 2|600: Ch1 Analog Input: Fader is assigned to the panel control.
The process is repeated to add additional parameter controls.
For more information on adding devices to the Venue or controls and parameters to Custom Panels, consult the Audio Architect Help file, or visit archimedia.harman.com and view the online tutorials.
iOS DEVICE SETUP
At this point you should be ready to connect your iOS device to Audio Architect. Power on your iOS device and make sure it is connected to the same network to which Audio Architect and your HiQnet devices are connected.
1. Start HiQnet Motion Control.
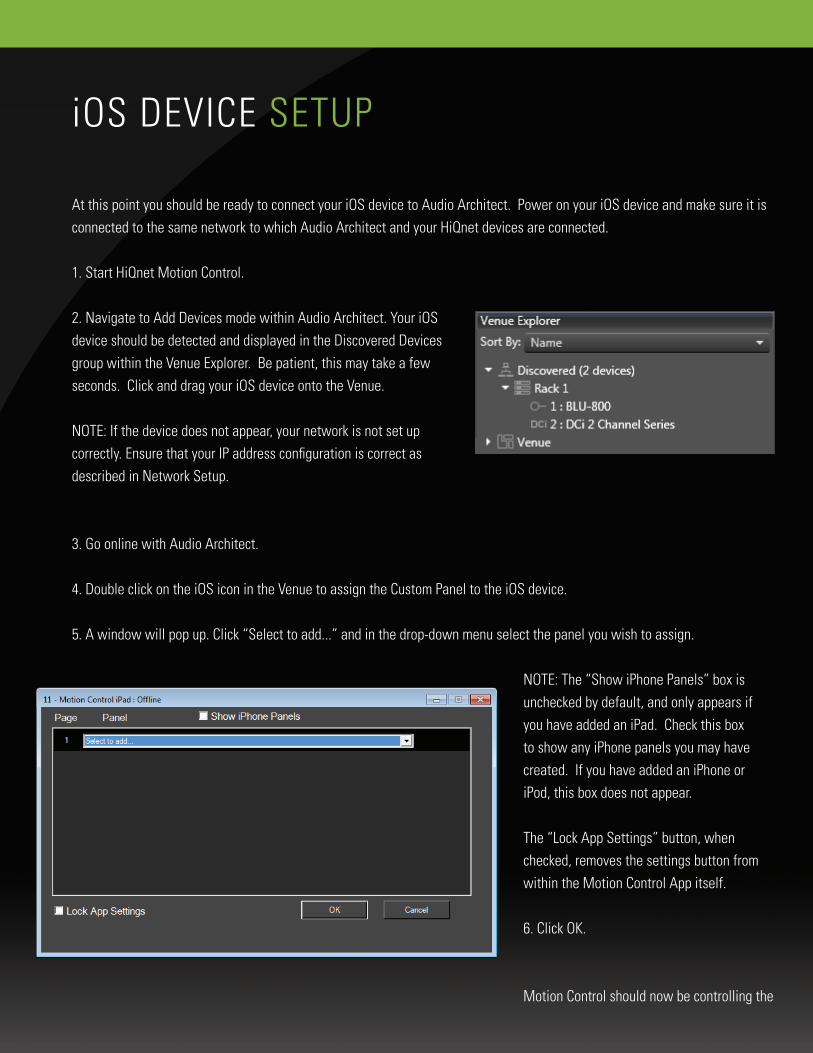
2. Navigate to Add Devices mode within Audio Architect. Your iOS device should be detected and displayed in the Discovered Devices group within the Venue Explorer. Be patient, this may take a few seconds. Click and drag your iOS device onto the Venue.
NOTE: If the device does not appear, your network is not set up correctly. Ensure that your IP address configuration is correct as described in Network Setup.
3. Go online with Audio Architect.
4. Double click on the iOS icon in the Venue to assign the Custom Panel to the iOS device.
5. A window will pop up. Click “Select to add...” and in the drop-down menu select the panel you wish to assign.
NOTE: The “Show iPhone Panels” box is unchecked by default, and only appears if you have added an iPad. Check this box to show any iPhone panels you may have created. If you have added an iPhone or iPod, this box does not appear.
The “Lock App Settings” button, when checked, removes the settings button from within the Motion Control App itself.
6. Click OK.
Motion Control should now be controlling the
HiQnet ADDRESS SETUP
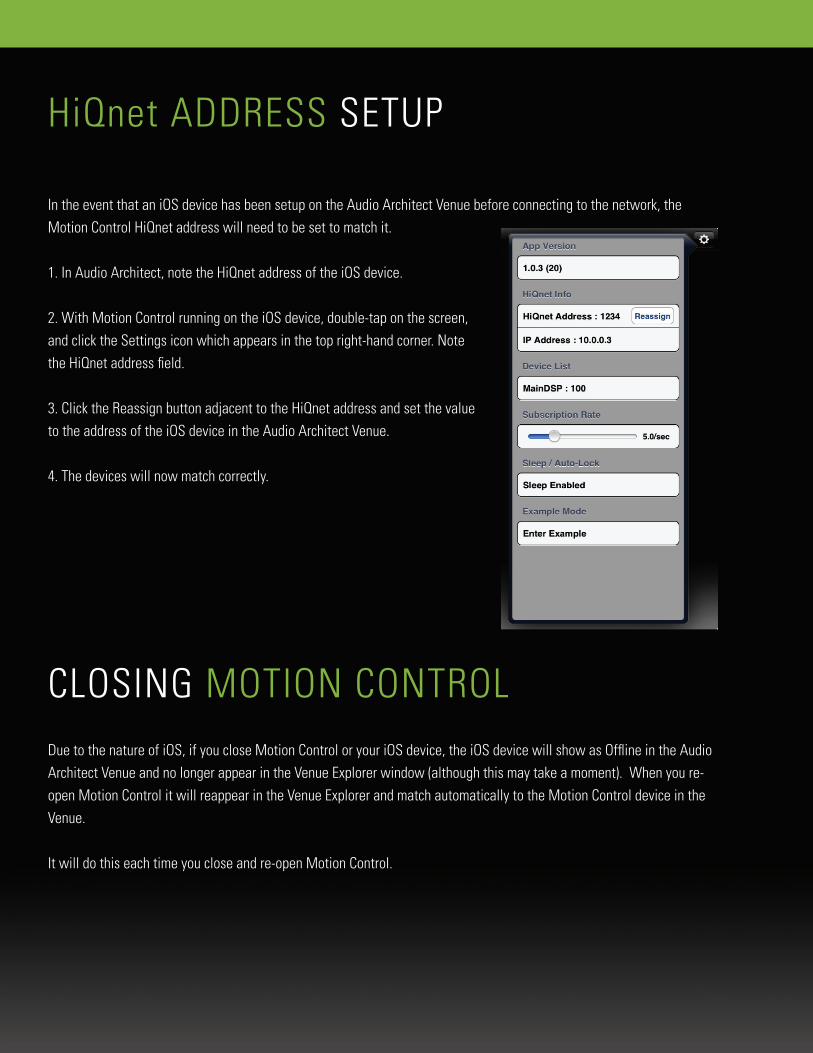
In the event that an iOS device has been setup on the Audio Architect Venue before connecting to the network, the Motion Control HiQnet address will need to be set to match it.
1. In Audio Architect, note the HiQnet address of the iOS device.
2. With Motion Control running on the iOS device, double-tap on the screen, and click the Settings icon which appears in the top right-hand corner. Note the HiQnet address field.
3. Click the Reassign button adjacent to the HiQnet address and set the value to the address of the iOS device in the Audio Architect Venue.
4. The devices will now match correctly.
CLOSING MOTION CONTROLDue to the nature of iOS, if you close Motion Control or your iOS device, the iOS device will show as Offline in the Audio Architect Venue and no longer appear in the Venue Explorer window (although this may take a moment). When you re-open Motion Control it will reappear in the Venue Explorer and match automatically to the Motion Control device in the Venue.
It will do this each time you close and re-open Motion Control.
MOTION CONTROL AND LONDON ARCHITECT
Should it be necessary still to employ HiQnet London Architect to configure the Soundweb London system, it is still possible to use Motion Control as a control device, even though Motion Control is not supported directly within London Architect.
In addition to London Architect, HiQnet System Architect will be required. System Architect offers the ability to import Soundweb London parameters or entire device designs from London Architect. System Architect can be downloaded from archimedia.harman.com.
This section of the guide will illustrate the steps required to create a Motion Control custom panel for the purposes of controlling Soundweb London devices designed within London Architect.
Familiarity with both London Architect and System Architect is presumed.
How it works: • Custom Panels are created in System Architect awaiting the assignment of Soundweb London device parameters. • Soundweb London device parameters are exported from the London Architect Configuration and imported into System Architect individually or as a whole. • Imported parameters from the London Architect Configuration are assigned to the controls on the Custom Panel created in System Architect. • Custom Panels are loaded onto the iOS device and immediately assumes control of the Soundweb London device parameters.
CUSTOM PANELS IN SYSTEM ARCHITECT
The mechanism of creating and editing Custom Panels in System Architect is very similar to that of Audio Architect. Click the Custom Panels tab, click the Create button in the Creation control group, and select one of the iOS devices in the drop-down menu. Refer to the System Architect Help File for more information.
PARAMETER EXPORT AND IMPORT
There are two methods for exporting parameters from a London Architect device Configuration and importing them into System Architect.
The first method provides a quick way to export and import single parameters including controls, meters and indicators. London Architect and System Architect must be running on the same computer.
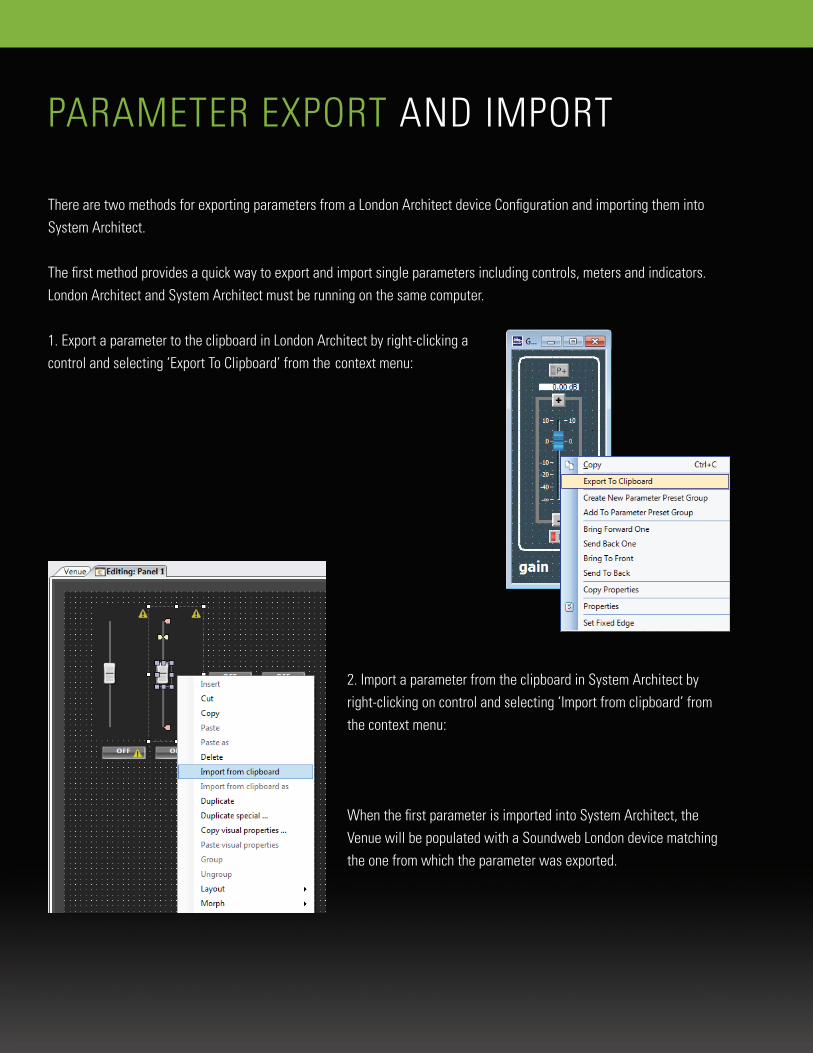
1. Export a parameter to the clipboard in London Architect by right-clicking a control and selecting ‘Export To Clipboard’ from the context menu:
2. Import a parameter from the clipboard in System Architect by right-clicking on control and selecting ‘Import from clipboard’ from the context menu:
When the first parameter is imported into System Architect, the Venue will be populated with a Soundweb London device matching the one from which the parameter was exported.
DEVICE EXPORT AND IMPORT
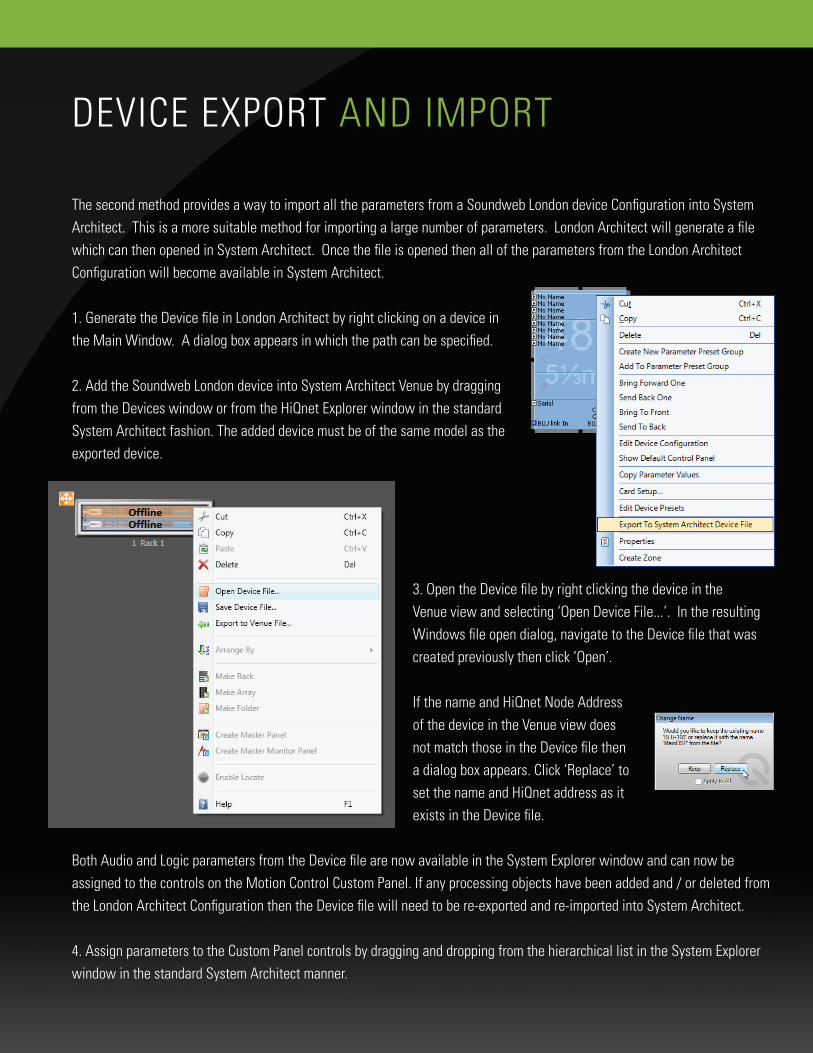
The second method provides a way to import all the parameters from a Soundweb London device Configuration into System Architect. This is a more suitable method for importing a large number of parameters. London Architect will generate a file which can then opened in System Architect. Once the file is opened then all of the parameters from the London Architect Configuration will become available in System Architect.
1. Generate the Device file in London Architect by right clicking on a device in the Main Window. A dialog box appears in which the path can be specified.
2. Add the Soundweb London device into System Architect Venue by dragging from the Devices window or from the HiQnet Explorer window in the standard System Architect fashion. The added device must be of the same model as the exported device.
3. Open the Device file by right clicking the device in the Venue view and selecting ‘Open Device File...’. In the resulting Windows file open dialog, navigate to the Device file that was created previously then click ‘Open’.
If the name and HiQnet Node Address of the device in the Venue view does not match those in the Device file then a dialog box appears. Click ‘Replace’ to set the name and HiQnet address as it exists in the Device file.
Both Audio and Logic parameters from the Device file are now available in the System Explorer window and can now be assigned to the controls on the Motion Control Custom Panel. If any processing objects have been added and / or deleted from the London Architect Configuration then the Device file will need to be re-exported and re-imported into System Architect.
4. Assign parameters to the Custom Panel controls by dragging and dropping from the hierarchical list in the System Explorer window in the standard System Architect manner.
PARAMETER PRESETS
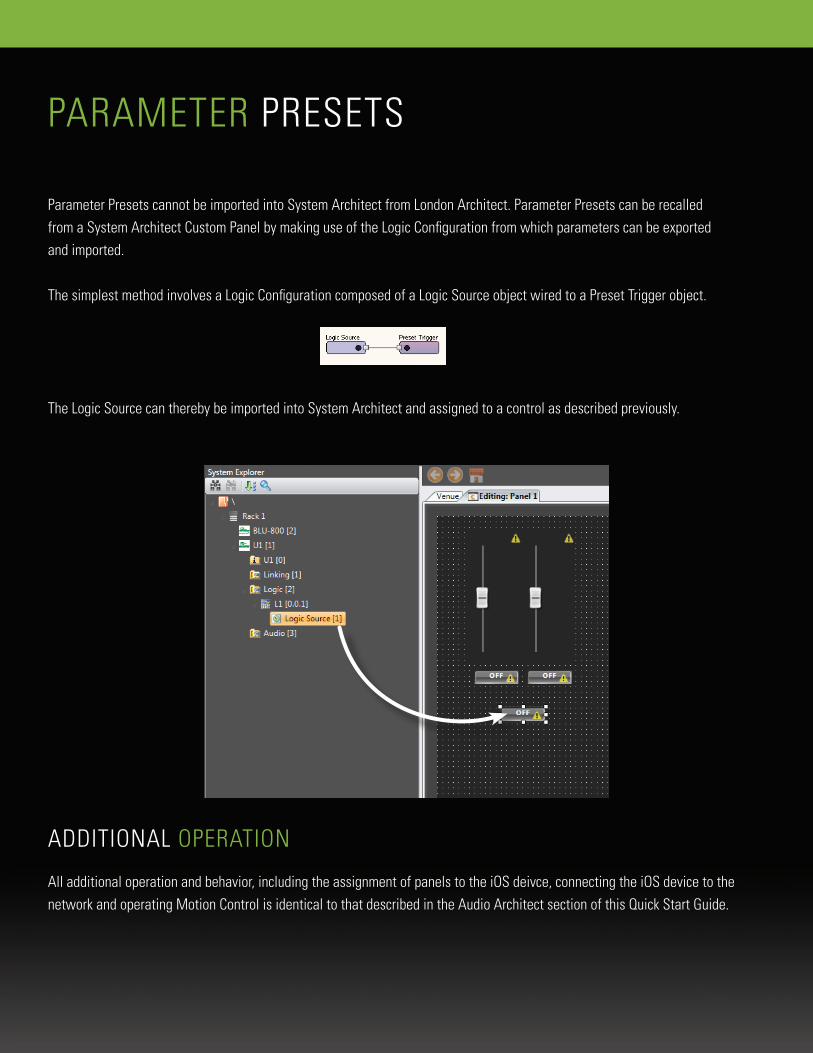
Parameter Presets cannot be imported into System Architect from London Architect. Parameter Presets can be recalled from a System Architect Custom Panel by making use of the Logic Configuration from which parameters can be exported and imported.
The simplest method involves a Logic Configuration composed of a Logic Source object wired to a Preset Trigger object.
The Logic Source can thereby be imported into System Architect and assigned to a control as described previously.
ADDITIONAL OPERATION
All additional operation and behavior, including the assignment of panels to the iOS deivce, connecting the iOS device to the network and operating Motion Control is identical to that described in the Audio Architect section of this Quick Start Guide.
archimedia.harman.com
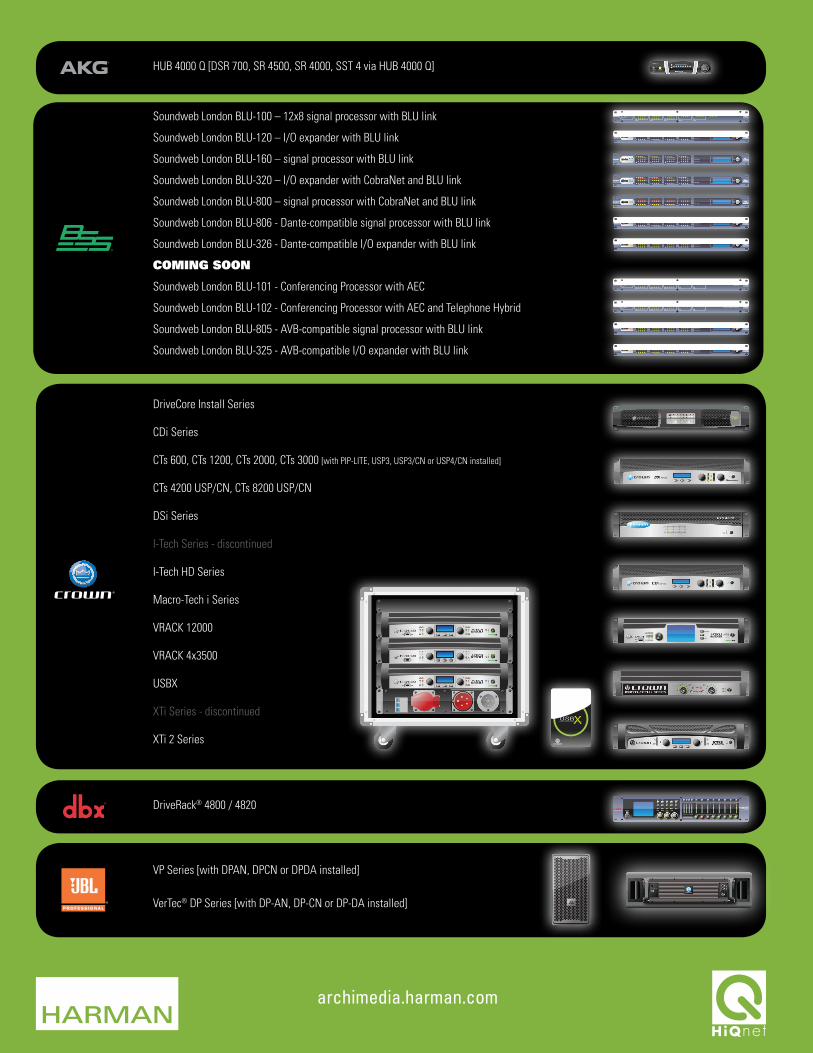
Soundweb London BLU-100 – 12x8 signal processor with BLU link
Soundweb London BLU-120 – I/O expander with BLU link
Soundweb London BLU-160 – signal processor with BLU link
Soundweb London BLU-320 – I/O expander with CobraNet and BLU link
Soundweb London BLU-800 – signal processor with CobraNet and BLU link
Soundweb London BLU-806 - Dante-compatible signal processor with BLU link
Soundweb London BLU-326 - Dante-compatible I/O expander with BLU link
COMING SOON
Soundweb London BLU-101 - Conferencing Processor with AEC
Soundweb London BLU-102 - Conferencing Processor with AEC and Telephone Hybrid
Soundweb London BLU-805 - AVB-compatible signal processor with BLU link
Soundweb London BLU-325 - AVB-compatible I/O expander with BLU link
HUB 4000 Q [DSR 700, SR 4500, SR 4000, SST 4 via HUB 4000 Q]
DriveCore Install Series
CDi Series
CTs 600, CTs 1200, CTs 2000, CTs 3000 [with PIP-LITE, USP3, USP3/CN or USP4/CN installed]
CTs 4200 USP/CN, CTs 8200 USP/CN
DSi Series
I-Tech Series - discontinued
I-Tech HD Series
Macro-Tech i Series
VRACK 12000
VRACK 4x3500
USBX
XTi Series - discontinued
XTi 2 Series
DriveRack® 4800 / 4820
VP Series [with DPAN, DPCN or DPDA installed]
VerTec® DP Series [with DP-AN, DP-CN or DP-DA installed]
BLU-806signal processor
SoundwebTM
A B C D
Clip Clip Clip ClipIN IN IN INAEC AEC AEC AECDIG DIG DIG DIGOUT OUT OUT OUT
Signal Signal Signal Signal
48V 48V 48V 48V
1 1 1 12 2 2 23 3 3 34 4 4 4Data activity
LOCATENetwork linkConductor
BLU-805signal processor
SoundwebTM
A B C D
Clip Clip Clip ClipIN IN IN INAEC AEC AEC AECDIG DIG DIG DIGOUT OUT OUT OUT
Signal Signal Signal Signal
48V 48V 48V 48V
1 1 1 12 2 2 23 3 3 34 4 4 4Data activity
LOCATENetwork linkConductor
BLU-326signal processor
SoundwebTM
A B C D
Clip Clip Clip ClipIN IN IN INAEC AEC AEC AECDIG DIG DIG DIGOUT OUT OUT OUT
Signal Signal Signal Signal
48V 48V 48V 48V
1 1 1 12 2 2 23 3 3 34 4 4 4Data activity
LOCATENetwork linkConductor
BLU-325signal processor
SoundwebTM
A B C D
Clip Clip Clip ClipIN IN IN INAEC AEC AEC AECDIG DIG DIG DIGOUT OUT OUT OUT
Signal Signal Signal Signal
48V 48V 48V 48V
1 1 1 12 2 2 23 3 3 34 4 4 4Data activity
LOCATENetwork linkConductor
BLU-120signal processor
SoundwebTM
A B C D
Clip Clip Clip ClipIN IN IN INAEC AEC AEC AECDIG DIG DIG DIGOUT OUT OUT OUT
Signal Signal Signal Signal
48V 48V 48V 48V
1 1 1 12 2 2 23 3 3 34 4 4 4Data activity
LOCATE