Embed Size (px)
Citation preview
1
MS Invoice
Electronic Submission of Invoices
Last Update: July 2011
2
Contents 1. MS Invoice: Submitting Multiple Invoices at Once via EI Upload ................................................................................... 3
OBTAINING THE EI TEMPLATE ..................................................................................................................................................................................... 3
PREPARING THE EI FILE ................................................................................................................................................................................................ 4
ENTERING DATA IN THE EI FILE .................................................................................................................................................................................... 5
HEADER field ................................................................................................................................................................... 5
DETAIL Line(s) .................................................................................................................................................................. 7
Statutory Field Header .................................................................................................................................................... 8
Statutory Field Value ....................................................................................................................................................... 9
Statutory Tax Details in National Currency ................................................................................................................... 10
End File .......................................................................................................................................................................... 10
UPLOADING THE EI FILE ............................................................................................................................................................................................. 11
Errors with Your EI File .................................................................................................................................................. 12
CONFIRMATION EMAIL OF THE EI UPLOAD ............................................................................................................................................................... 13
3
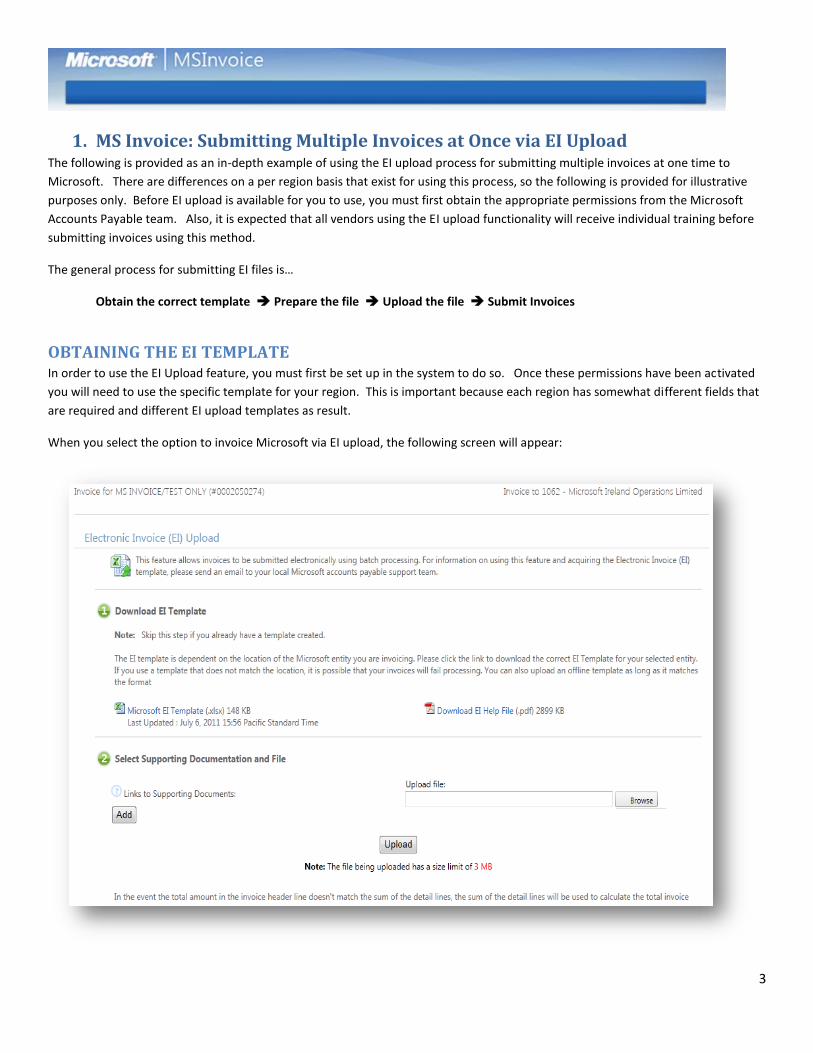
1. MS Invoice: Submitting Multiple Invoices at Once via EI Upload The following is provided as an in-depth example of using the EI upload process for submitting multiple invoices at one time to
Microsoft. There are differences on a per region basis that exist for using this process, so the following is provided for illustrative
purposes only. Before EI upload is available for you to use, you must first obtain the appropriate permissions from the Microsoft
Accounts Payable team. Also, it is expected that all vendors using the EI upload functionality will receive individual training before
submitting invoices using this method.
The general process for submitting EI files is…
Obtain the correct template Prepare the file Upload the file Submit Invoices
OBTAINING THE EI TEMPLATE In order to use the EI Upload feature, you must first be set up in the system to do so. Once these permissions have been activated
you will need to use the specific template for your region. This is important because each region has somewhat different fields that
are required and different EI upload templates as result.
When you select the option to invoice Microsoft via EI upload, the following screen will appear:
4
Select the option to Download EI Template and then save the appropriate template (based on your region) to your computer. Once
you have the right template, open up the copy you saved.
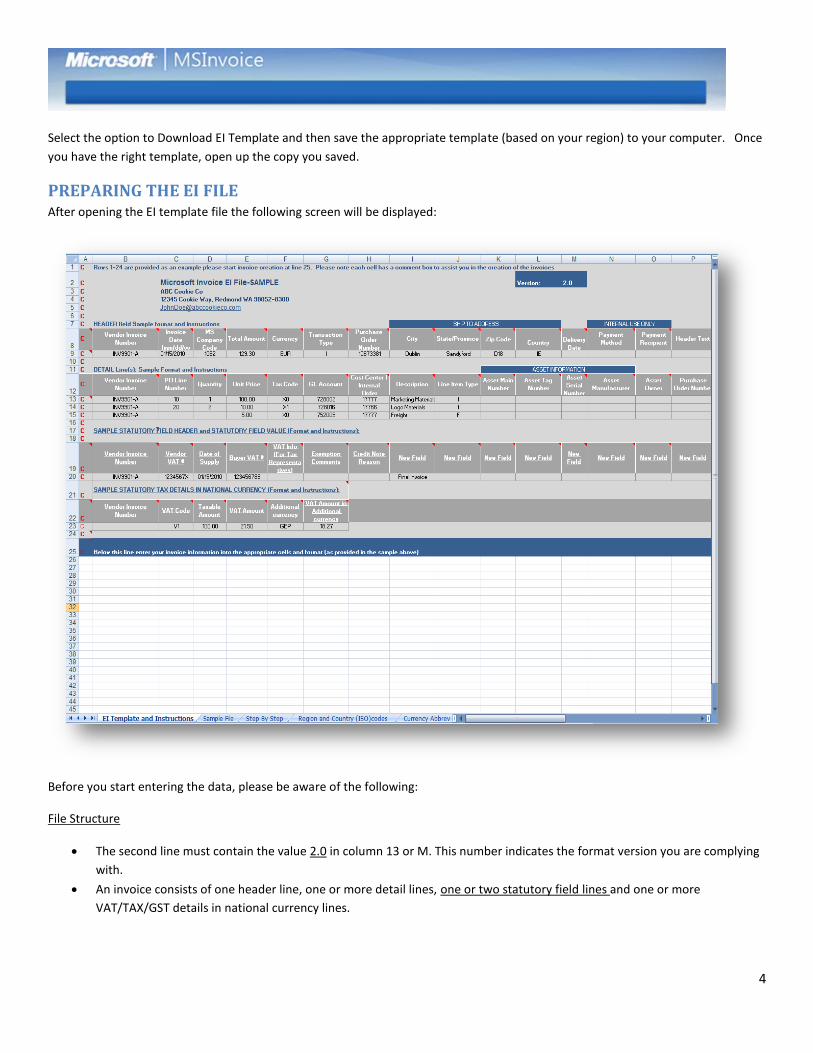
PREPARING THE EI FILE After opening the EI template file the following screen will be displayed:
Before you start entering the data, please be aware of the following:
File Structure
The second line must contain the value 2.0 in column 13 or M. This number indicates the format version you are complying
with.
An invoice consists of one header line, one or more detail lines, one or two statutory field lines and one or more
VAT/TAX/GST details in national currency lines.

5
Each line must indicate a "Record Type" in column 1 or A using one of the following values: "C" - Comments, "H" - Header,
"D" - Details, "S" - Statutory field header, "V" - Statutory field value, "X" – VAT/TAX/GST details in National Currency, "E" -
End File.
Rows which contain the value "C" in column 1 are ignored and used only for reference.
Rows which contain the value "S" in column 1 may have fixed headers for first 6 fields between columns B-G. User may
enter the header name there or can ignore it. From column H onwards, a custom 'field name' can be entered.
Rows which contain the value "V" in column 1 may have fixed values for first 6 fields between columns B-G. From column H
onwards, value corresponding to the entered custom 'field name' can be entered.
A blank row or a value of "E" in column 1 designates the end of the file.
Each cell in the example has a comment box to assist you in the creation of the invoices.
File Format
The file provided for processing can either be an Excel file or Tab-Delimited file. Regardless of the file type, you must
ensure the file extension is .xls or .xlsx.
o There are a series of “pre-checks” built into the EI upload process. These pre-checks will provide you with on-
screen notification of common errors.
Please Note: Only Excel files associated with Office 2007 or later (.xlsx files) will undergo the pre-checks. You can
use early versions of Excel, but the pre-checks will not apply and you will be notified of any errors when the file is
sent back to you.
If using an Excel file format, the first worksheet in the workbook must contain the invoice information you want to process.
Always use the approved EI upload template.
Do not enable macro’s or link data from other sources on the EI upload template.
Limitations
A maximum of 999 invoice Detail lines can be provided for each invoice Header line.
There are no set limits for the number of invoices a file can contain.
ENTERING DATA IN THE EI FILE
HEADER field
Enter the following data in the correct column:
Required
Column Data to be entered
A Enter "H" – Header.
B Provide the Invoice Number.
C Provide the Invoice Date (mm/dd/yyyy).
D Provide the MS Company Code.
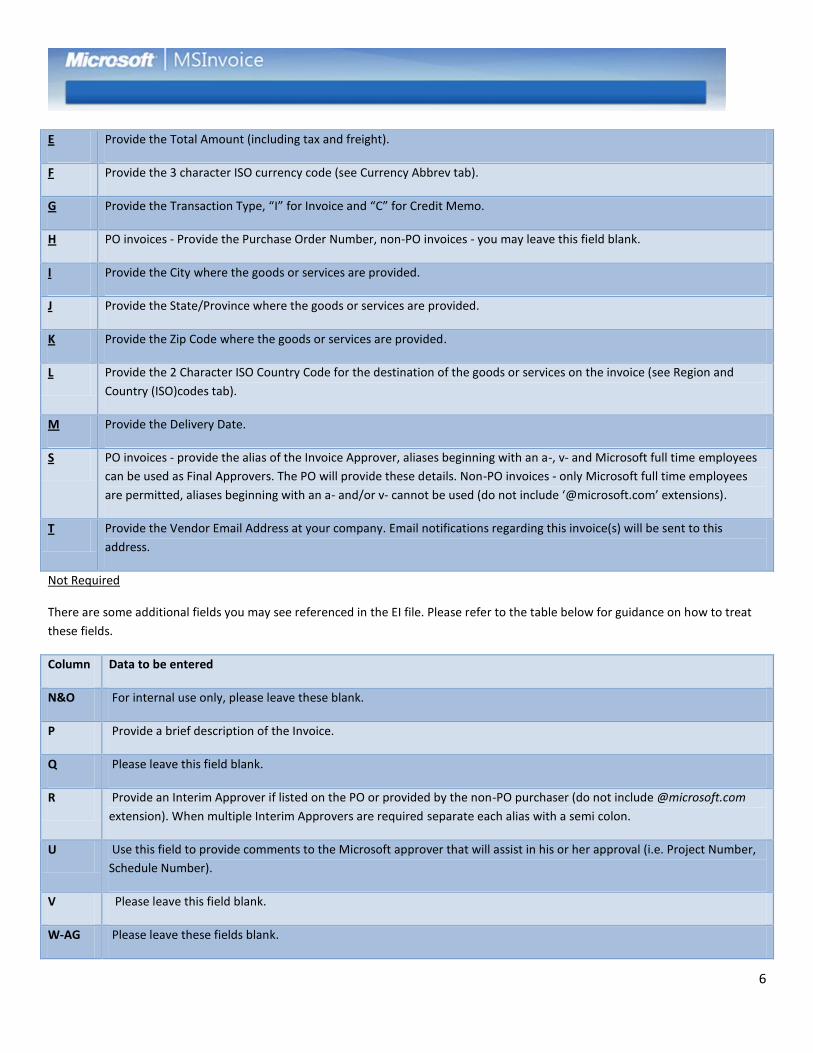
6
E Provide the Total Amount (including tax and freight).
F Provide the 3 character ISO currency code (see Currency Abbrev tab).
G Provide the Transaction Type, “I” for Invoice and “C” for Credit Memo.
H PO invoices - Provide the Purchase Order Number, non-PO invoices - you may leave this field blank.
I Provide the City where the goods or services are provided.
J Provide the State/Province where the goods or services are provided.
K Provide the Zip Code where the goods or services are provided.
L Provide the 2 Character ISO Country Code for the destination of the goods or services on the invoice (see Region and
Country (ISO)codes tab).
M Provide the Delivery Date.
S PO invoices - provide the alias of the Invoice Approver, aliases beginning with an a-, v- and Microsoft full time employees
can be used as Final Approvers. The PO will provide these details. Non-PO invoices - only Microsoft full time employees
are permitted, aliases beginning with an a- and/or v- cannot be used (do not include ‘@microsoft.com’ extensions).
T Provide the Vendor Email Address at your company. Email notifications regarding this invoice(s) will be sent to this
address.
Not Required
There are some additional fields you may see referenced in the EI file. Please refer to the table below for guidance on how to treat
these fields.
Column Data to be entered
N&O For internal use only, please leave these blank.
P Provide a brief description of the Invoice.
Q Please leave this field blank.
R Provide an Interim Approver if listed on the PO or provided by the non-PO purchaser (do not include @microsoft.com
extension). When multiple Interim Approvers are required separate each alias with a semi colon.
U Use this field to provide comments to the Microsoft approver that will assist in his or her approval (i.e. Project Number,
Schedule Number).
V Please leave this field blank.
W-AG Please leave these fields blank.
7
DETAIL Line(s)
Enter the following data in the correct column:
Required
Column Data to be entered
A Enter "D" – Details.
B Provide the Invoice Number. (this has to be the same number as provided in the header line).
C PO invoices - Enter the corresponding line number on the purchase order you are invoicing against, non-PO Invoices,
Tax or Freight lines - you may leave this field blank.
D PO invoices - Provide the Quantity (Qty), the invoicing format should always mirror the Purchase Order accept when a
partial shipment has been sent. If a PO line is created for i.e. $1000 USD and you enter a Qty 1 at a unit price of $500
USD, another invoice can submitted with the same quantity until the amount has been exhausted. For Tax or Freight
lines you may leave this field blank.
E Provide the Unit Price. The Invoicing format should always mirror the PO. However, you can invoice with a lower Unit
Price (use Qty 1) until the Unit Price for that line item as mentioned on the PO is exhausted.
F Provide the Tax Code. Tax Codes identify if a line is taxable or non-taxable. For a complete list of Tax codes, please
select the Tax Code tab. If a line is taxable, the system will use this code to automatically calculate the applicable tax
amount.
G Enter the General Ledger (GL) account number the line item amount will be charged to. The PO will indicate the GL
account that should be utilized, for non-PO invoices the GL must be provided by the purchaser.
H Enter a Cost Center (CC) or Internal Order (IO) number. The PO will indicate the CC or IO from the PO Line, for non-PO
invoices it will be provided by the person placing the order. (Asset Invoices do not require a CC or IO).
I Provide a Description. PO invoices - this should utilize the description provided on the PO, non-PO invoices - this field
should briefly indicate the goods or service being invoiced, Freight Lines - provide ‘Freight’ as the description, Tax Lines
- provide ’Tax’ as the description.
J Indicates the type of line being provided. Permitted entries are: I - for invoice and Credits, F - for Freight/Shipping, T -
for Tax Modification (There are no limits on the number of I, M, F lines each invoice can have but you are limited to
only one T line per invoice), M - for Manual Tax (Canadian Company codes only).
K (only
required
for Asset
invoices)
Computer hardware assets require the Microsoft assigned Asset number provided on the PO.
8
L (only
required
for Asset
invoices)
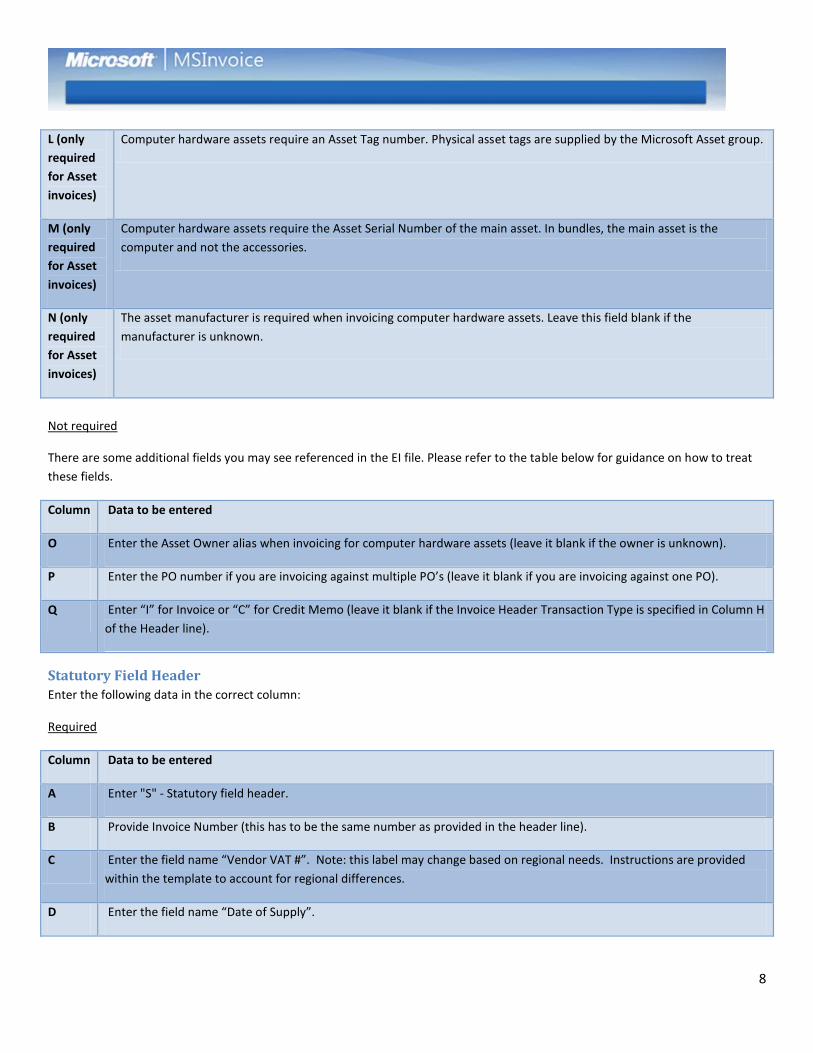
Computer hardware assets require an Asset Tag number. Physical asset tags are supplied by the Microsoft Asset group.
M (only
required
for Asset
invoices)
Computer hardware assets require the Asset Serial Number of the main asset. In bundles, the main asset is the
computer and not the accessories.
N (only
required
for Asset
invoices)
The asset manufacturer is required when invoicing computer hardware assets. Leave this field blank if the
manufacturer is unknown.
Not required
There are some additional fields you may see referenced in the EI file. Please refer to the table below for guidance on how to treat
these fields.
Column Data to be entered
O Enter the Asset Owner alias when invoicing for computer hardware assets (leave it blank if the owner is unknown).
P Enter the PO number if you are invoicing against multiple PO’s (leave it blank if you are invoicing against one PO).
Q Enter “I” for Invoice or “C” for Credit Memo (leave it blank if the Invoice Header Transaction Type is specified in Column H
of the Header line).
Statutory Field Header
Enter the following data in the correct column:
Required
Column Data to be entered
A Enter "S" - Statutory field header.
B Provide Invoice Number (this has to be the same number as provided in the header line).
C Enter the field name “Vendor VAT #”. Note: this label may change based on regional needs. Instructions are provided
within the template to account for regional differences.
D Enter the field name “Date of Supply”.
9
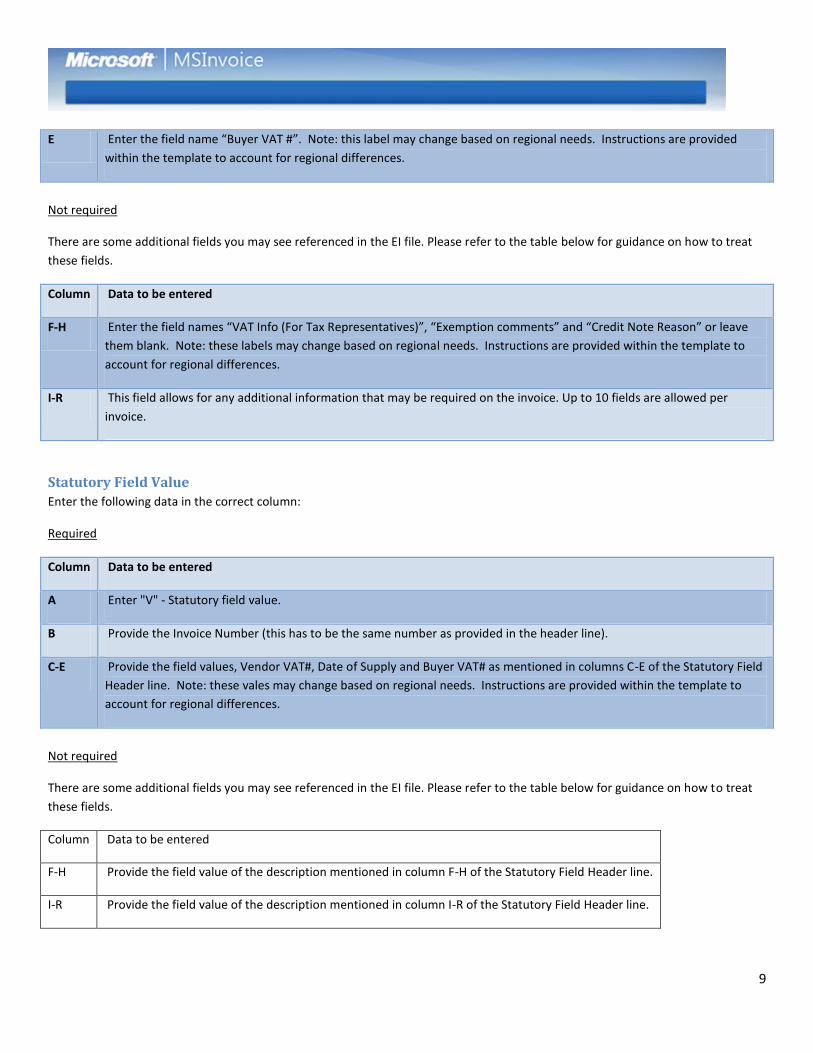
E Enter the field name “Buyer VAT #”. Note: this label may change based on regional needs. Instructions are provided
within the template to account for regional differences.
Not required
There are some additional fields you may see referenced in the EI file. Please refer to the table below for guidance on how to treat
these fields.
Column Data to be entered
F-H Enter the field names “VAT Info (For Tax Representatives)”, “Exemption comments” and “Credit Note Reason” or leave
them blank. Note: these labels may change based on regional needs. Instructions are provided within the template to
account for regional differences.
I-R This field allows for any additional information that may be required on the invoice. Up to 10 fields are allowed per
invoice.
Statutory Field Value
Enter the following data in the correct column:
Required
Column Data to be entered
A Enter "V" - Statutory field value.
B Provide the Invoice Number (this has to be the same number as provided in the header line).
C-E Provide the field values, Vendor VAT#, Date of Supply and Buyer VAT# as mentioned in columns C-E of the Statutory Field
Header line. Note: these vales may change based on regional needs. Instructions are provided within the template to
account for regional differences.
Not required
There are some additional fields you may see referenced in the EI file. Please refer to the table below for guidance on how to treat
these fields.
Column Data to be entered
F-H Provide the field value of the description mentioned in column F-H of the Statutory Field Header line.
I-R Provide the field value of the description mentioned in column I-R of the Statutory Field Header line.

10
Statutory Tax Details in National Currency Enter the following data in the correct column. Please not that this line is not required if the relevant tax code(s) has/have been
provided in column F on the “D” - details line(s):
Not required
Column Data to be entered
A Enter “X” – VAT details in National Currency.
B Provide the Invoice Number (this has to be the same number as provided in the header line).
C Provide the VAT/TAX/GST Details using a Tax code. For a complete list of Tax codes, please select the Tax Code tab.
D Provide the Taxable Amount of the invoice.
E Provide the VAT/TAX/GST Amount.
F Provide the National Currency using the 3 character ISO Currency Code.
G Provide the VAT/TAX/GST Amount in the National Currency.
End File
Required
Column Data to be entered
A Enter “E” - End File. This designates the end of the file
11
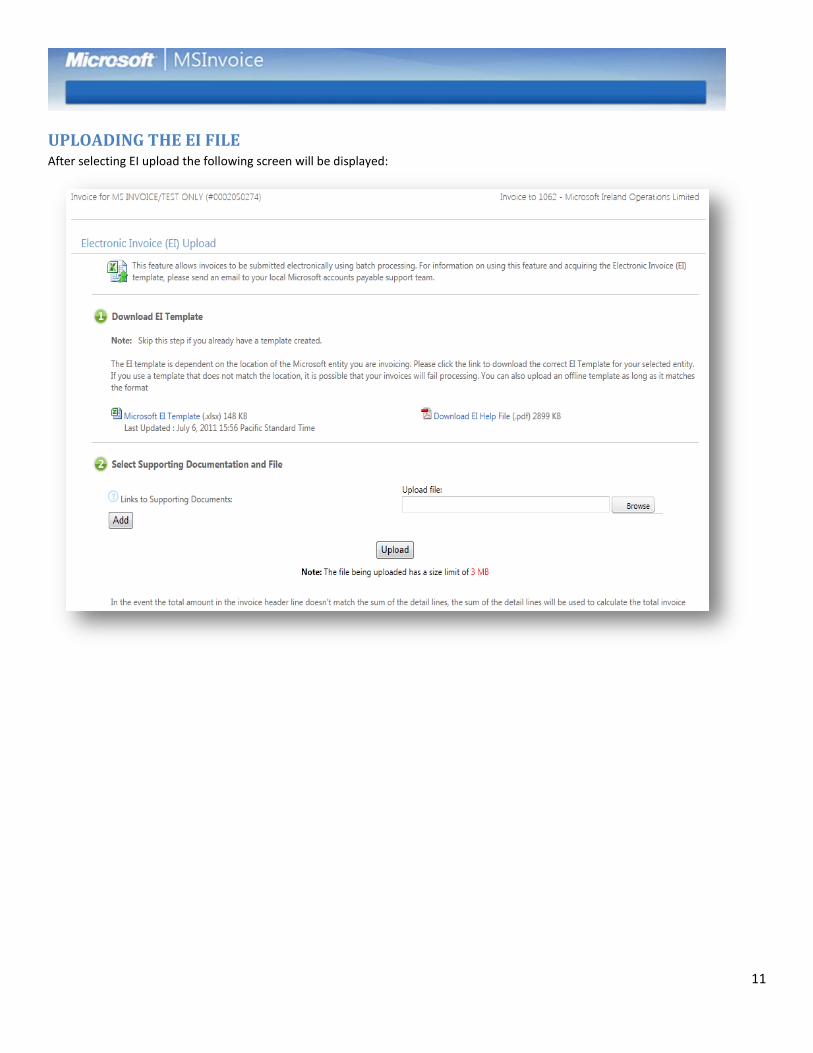
UPLOADING THE EI FILE After selecting EI upload the following screen will be displayed:
12
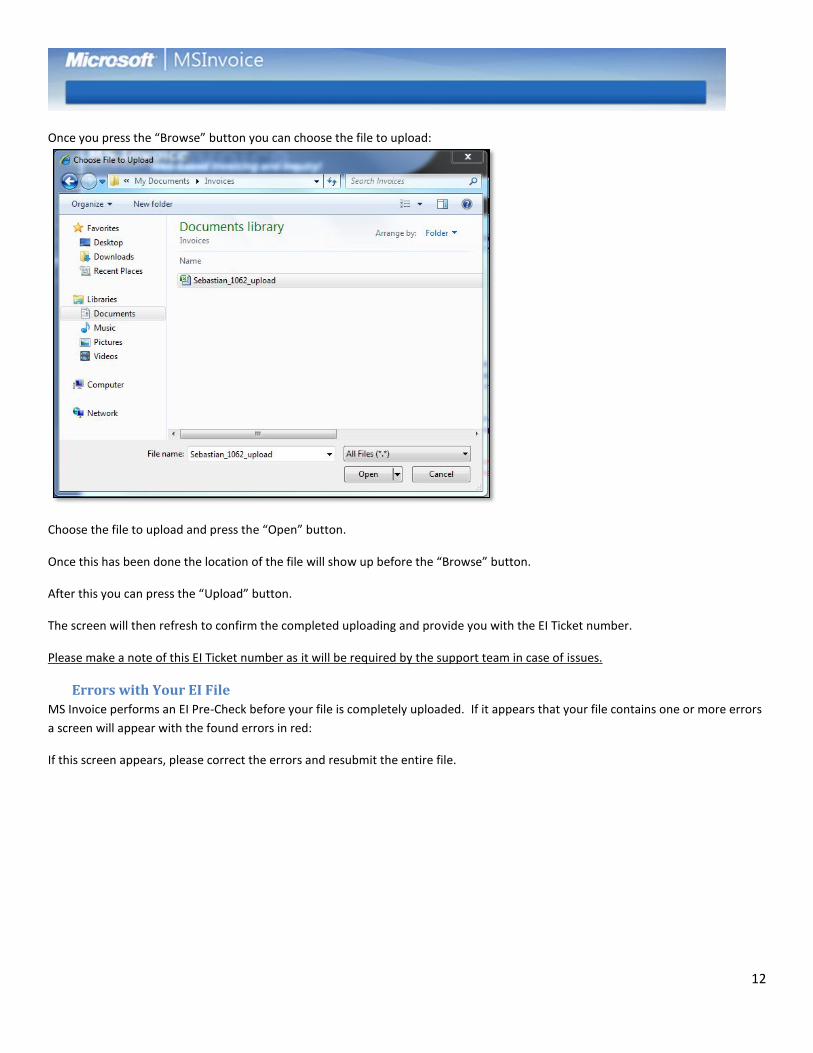
Once you press the “Browse” button you can choose the file to upload:
Choose the file to upload and press the “Open” button.
Once this has been done the location of the file will show up before the “Browse” button.
After this you can press the “Upload” button.
The screen will then refresh to confirm the completed uploading and provide you with the EI Ticket number.
Please make a note of this EI Ticket number as it will be required by the support team in case of issues.
Errors with Your EI File
MS Invoice performs an EI Pre-Check before your file is completely uploaded. If it appears that your file contains one or more errors
a screen will appear with the found errors in red:
If this screen appears, please correct the errors and resubmit the entire file.
13
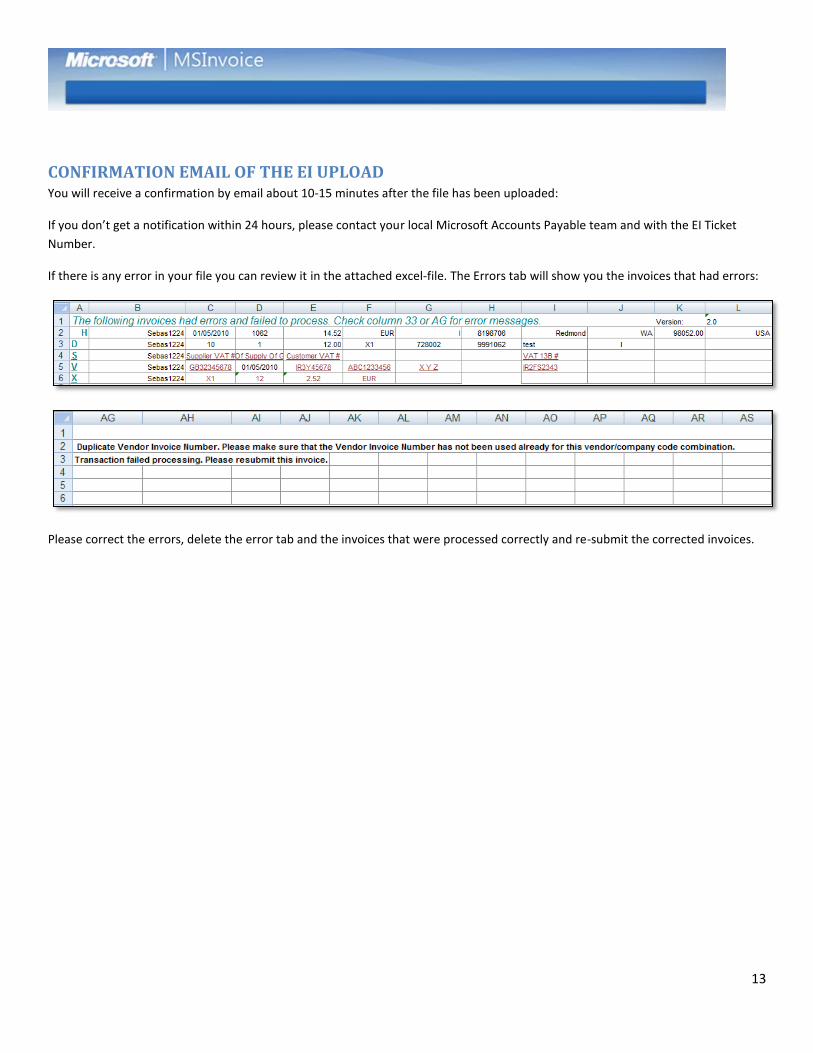
CONFIRMATION EMAIL OF THE EI UPLOAD You will receive a confirmation by email about 10-15 minutes after the file has been uploaded:
If you don’t get a notification within 24 hours, please contact your local Microsoft Accounts Payable team and with the EI Ticket
Number.
If there is any error in your file you can review it in the attached excel-file. The Errors tab will show you the invoices that had errors:
Please correct the errors, delete the error tab and the invoices that were processed correctly and re-submit the corrected invoices.